
© Copyright 2021, LS Retail ehf. All rights reserved. All trademarks belong to their respective holders
Extending Analytics for LS Central
Analytics 2023.4 and later versions
LS Central 23 and later versions
LS Retail ehf.
Hagasmari 3, 201 Kopavogur, Iceland
Phone +354 414 5700
Contents
1 Introduction ................................................................................................................................ 4
2 Initial setup ................................................................................................................................. 4
3 Add Company .............................................................................................................................. 4
4 Staging ........................................................................................................................................... 5
Add new affix ............................................................................................................................................. 6
Add to prestaging tables – LS Central SaaS only ......................................................................... 6
Update existing prestaging table 6
Add new prestaging table 6
Update existing staging table .............................................................................................................. 7
Adding new staging table ...................................................................................................................... 7
5 Dimensions ............................................................................................................................... 10
Add new column to existing dimension ....................................................................................... 10
Add column to dimension 11
Add new dimension .............................................................................................................................. 13
6 Facts ............................................................................................................................................ 15
Add new column from staging table to existing fact table ................................................... 15
Add column to fact table 15
Modify stored procedure 15
Add new fact table ................................................................................................................................ 17
7 Third-party data ..................................................................................................................... 18
Open the Azure Data Factory studio ............................................................................................. 18
Staging data ............................................................................................................................................. 18
Create a copy pipeline 18
Add Pipeline variables 19
Copy Activity 20
Create a new source connection 20
Connect to your data 22
Set the pre-copy script 22
Add Write to audit table action 23
LS Retail ehf.
Hagasmari 3, 201 Kopavogur, Iceland
Phone +354 414 5700
Update LSInsightAudit on success 24
Update LSInsightAudit on failure 25
Large data source 25
Add staging pipeline to scheduled run 26
Add fact table to star schema ........................................................................................................... 28
Create a connected fact table 28
Create a Stored Procedure 28
Add a fact table Stored Procedure to ADF pipeline 30
Add data directly in Power BI .......................................................................................................... 34
Get a new source 34
Merge to get surrogate keys 34
Expand merged tables 35
Remove unnecessary columns 36
M query 36
Define relationships in PowerBI 37
Use the new data in a report page .................................................................................................. 38

Extending Analytics for LS Central
Chapter 1 - Introduction 4
1 Introduction
This document describes how to extend the Analytics data warehouse and reports.
Analytics has always been thought of as a product that provides a BI base for our customers that
currently have no BI solution in place.
With Analytics we provide a basic extendable data warehouse in SQL server database and Power BI
reports and measures that work with the data structure of the warehouse.
We have therefore always encouraged extending Analytics in any way that suites the customer and
have now decided to provide more detailed guidelines and examples of how to extend Analytics with
data from LS Central base or extensions and third-party data.
2 Initial setup
The initial setup of Analytics is described in detail in the onboarding documentation in the Analytics
section the LS Central online help and will not be explained here.
3 Add Company
In the initial setup you select which companies you want to load to Analytics.
If you want to add a new company to your Analytics setup at a later stage, that is easy to do .
You can add to the LSInsight$PublisherAffixReg table using the Add or Delete App Affix pipeline
in the Analytics ADF.
When you add the trigger for the pipeline you are prompted with several fields:
• Companies (Company name as it is on the Companies page in LS Central).
o You can add/delete several companies simultaneously by separating them with a
comma.
• Delete Companies (default setting is false, but if set to true the entered companies will be
deleted).
Once you have added/deleted the companies you want to include/remove from Analytics, you need
to manually run the Generate Analytics Query Base pipeline. To update the query base, you run the
Scheduled Run or wait for the next scheduled run. Data from the companies you added/removed
will be added or removed from the staging, dimension, and fact tables when the Scheduled Run
pipeline runs.
Extending Analytics for LS Central
Chapter 4 - Staging 5
4 Staging
Staging tables in Analytics are each based on one table from LS Central plus columns from the $ext
companion table. The base table can have its origin in Business Central or be created by an app like
LS Central. From BC version 23 if a table is extended, that is additional columns are added by an app,
a companion table is created, and all subsequent extension columns are added to the same table. The
column names are prefixed with the extension prefix and suffixed with the extension GUID.
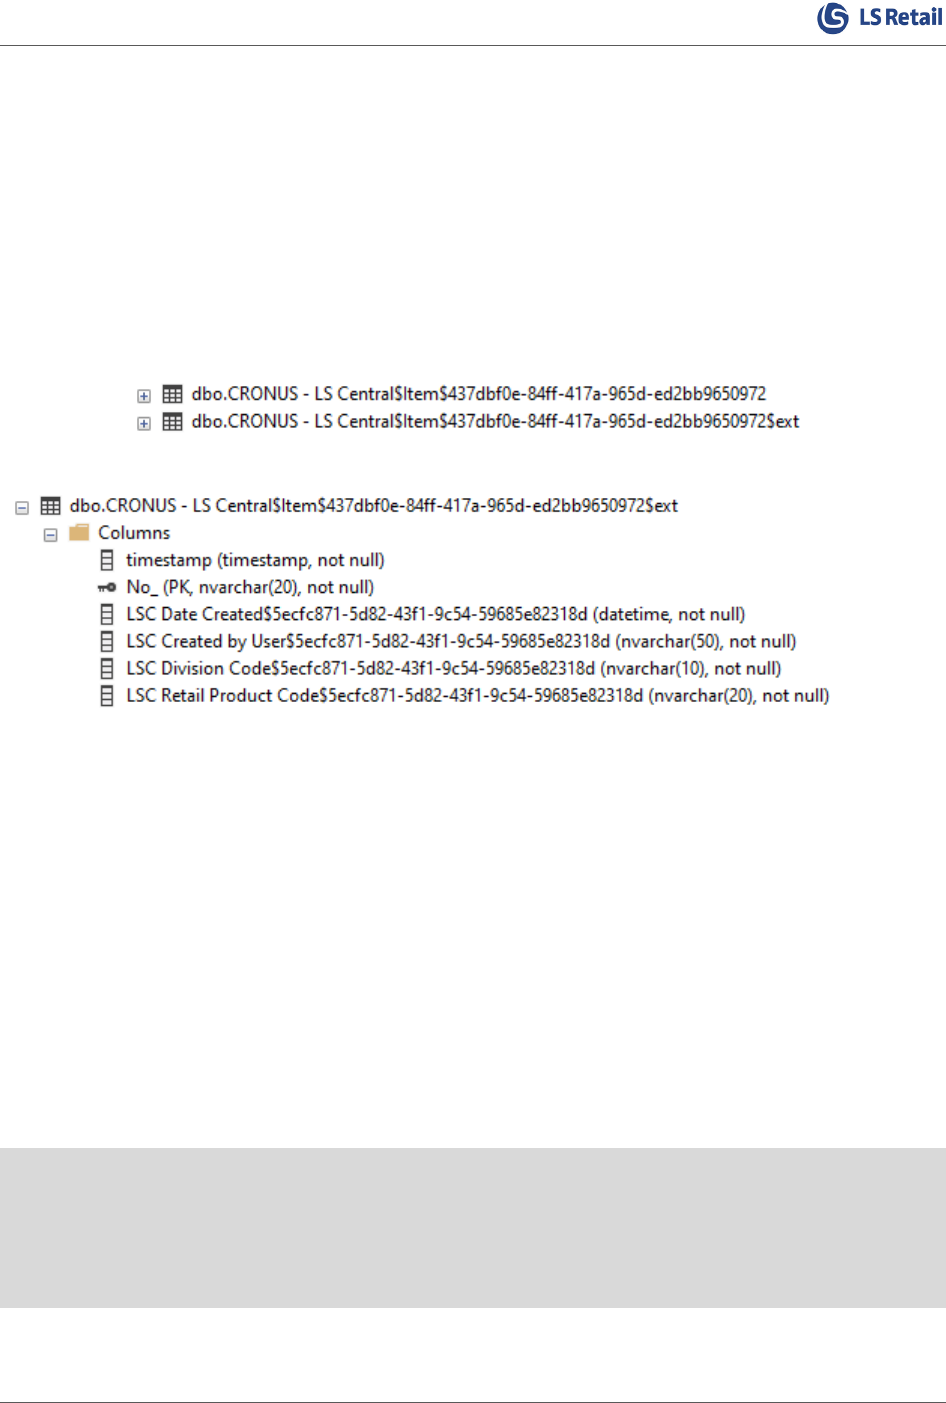
An example of such a table with companion table in LS Central is the Item table. The LS Central
extension adds several columns to the item table that are stored in the companion table. In the LS
Central database they look like this:
Examples of columns from the companion table:
In Analytics we then join the base and companion tables for all company tables together to form one
large table with all columns from both base and extensions and we also add an additional column for
the Company name.
When the staging table is created, we also remove the extension GUID from the column names to make
the staging table readable. If there are duplicate column names when the extension GUID has been
removed the column names are suffixed with a number. For example, if a second column with name
Description is added then the name would become ‘Description 2’. For LS Central and LS Central for
Hotels extensions we also remove the prefixes (LSC and LSCHT) from the column names.
Stand-alone extension tables, that do not extend an existing table but are added by an extension have
a name that is affixed with a partner prefix or suffix. For LS Central this prefix is LSC. These tables can
also serve as base tables. If an extension adds a new table and you want to include this table and its
companion table in Analytics you need to add the extension GUID and affix to the
LSInsight$PublisherAffixReg table.
Between LS Central versions 17.4 and 17.5, when the table names were prefixed along with the AL
objects, some of the table names became too long and were changed. So, to not have to change the
name of the staging tables in Analytics we created a mapping from the original table names to the
prefixed ones. This mapping is stored in the LSInsight$SourceTablesMap table.
In NAV versions older than 14.2 tables were not extended in this manner.

Extending Analytics for LS Central
Chapter 4 - Staging 6
Add new affix
If you want to extend Analytics with staging tables from an extension that you have added to your LS
Central instance, you need to start by adding the affix to the LSInsight$PublisherAffixReg table.
You can add to the LSInsight$PublisherAffixReg table using the Add or Delete App Affix pipeline
in the Analytics ADF.
When you add the trigger for the pipeline you are prompted with several fields:
• AppID (extension GUID from LS Central table)
• AppName (name of installed extension)
• Publisher (name of publisher of Extension)
• Prefix (the three-letter prefix used, if used. Not required)
• Suffix (the three-letter suffix used, if used. Not required)
These are the fields you need to populate to add a record to the table.
In addition, there is the DeleteApp field that decides whether a record is added or deleted from the
table. It is set to FALSE by default, but if it is changed to TRUE it deletes a matching record from the
table. When deleting, all you need to do is enter the Extension GUID in the AppID field and change the
DeleteApp value to TRUE. You can only add or delete one App record at a time.
Add to prestaging tables – LS Central SaaS only
Update existing prestaging table
Analytics already includes prestaging table creation scripts for all BC, LS Central and LS Central for
Hotel tables used in Analytics.
If you have an extension that extends one of those tables you will need to add the columns from the
extension to the appropriate prestaging tables. The prestaing tables are exactly the same as the LS
Central tables so if you need to add columns from a new extension you need to add them to the table
prefixed with $ext and include the column prefix and GUID suffix. Make sure that the column is of the
same data type as in the LS Central database. You can add a new columun by creating an alter table
script.
The format of such a script would look like this:
ALTER TABLE [dbo].[<Company>$<TableName>$<BaseTableGUID>$ext]
ADD [<Prefix> <Column Name>$<Extension GUID>] <datatype> NULL
If we for example had an extension with prefix = ITR and GUID = 383d7016-f0b9-4296-8de3-
cbd429b7b066 that added a column called ‘Activity Type’ to the LSC Trans_ Sales Entry table the
script would look like this:
ALTER TABLE [dbo].[My Company$LSC Trans_ Sales Entry$5ecfc871-5d82-43f1-9c54-59685e82318d$ext]
ADD [ITR Activity Type$383d7016-f0b9-4296-8de3-cbd429b7b066] NVARCHAR(20) NULL
Add new prestaging table
If you are running Analytics against LS Central SaaS, you need to add the new prestaging tables
manually to the Analytics database.
Extending Analytics for LS Central
Chapter 4 - Staging 7
This can be done by accessing the Scheduler server database, that you are using to schedule the
replication jobs, and saving a creation script for the tables you want to add. If the table is extended,
you need to save scripts for the base and companion tables.
You can then either modify the creation script like we have done for the prestaging scripts included
in the product package (so it queries the LSInsight$Companies table to create a table for each
company), or you can have a script per company. If you only have one company, there is no need to
create a script for multiple companies.
The prestaging scripts are included in the product package under the
.. \Modules\LSInsight\Resources\Prestaging tables folder
Once you have created the prestaging script and run them on the Analytics database, you need to add
the table as sub job to the appropriate scheduler jobs to replicate the data from the LS Central SaaS
source table to the Analytics prestaging table.
Update existing staging table
If you added a new column to LS Central on-prem or to pre-staging table and you want to add this
column to an existing staging table, you simply run Factory reset on the data warehouse and the new
column will be added to staging table and data loaded to it from LS Central with the Initial load.
There should not really be any reason why you do not want to run Factory reset pipeline on the data
warehouse except if you have a very large dataset. In Azure you can always scale up the database for
the time it takes to run the Factory reset so time should not really be a constraint.
If you do not want to run Factory reset you can drop the staging table in question, run populate query
base with both parameters set as TRUE and then run Scheduled run. The All staging pipeline should
then recreate the staging table and fully load it.
Now that you have added the new column into a staging table you need to figure out where to add in
into the data warehouse. If you were only adding a new column you usually just add the column to
the fact or dimension that the staging table is currently used in and then modify the stored procedure
that populates that DW table. How to do this is explained in more detail later in this document.
Adding new staging table

Extending Analytics for LS Central
Chapter 4 - Staging 8
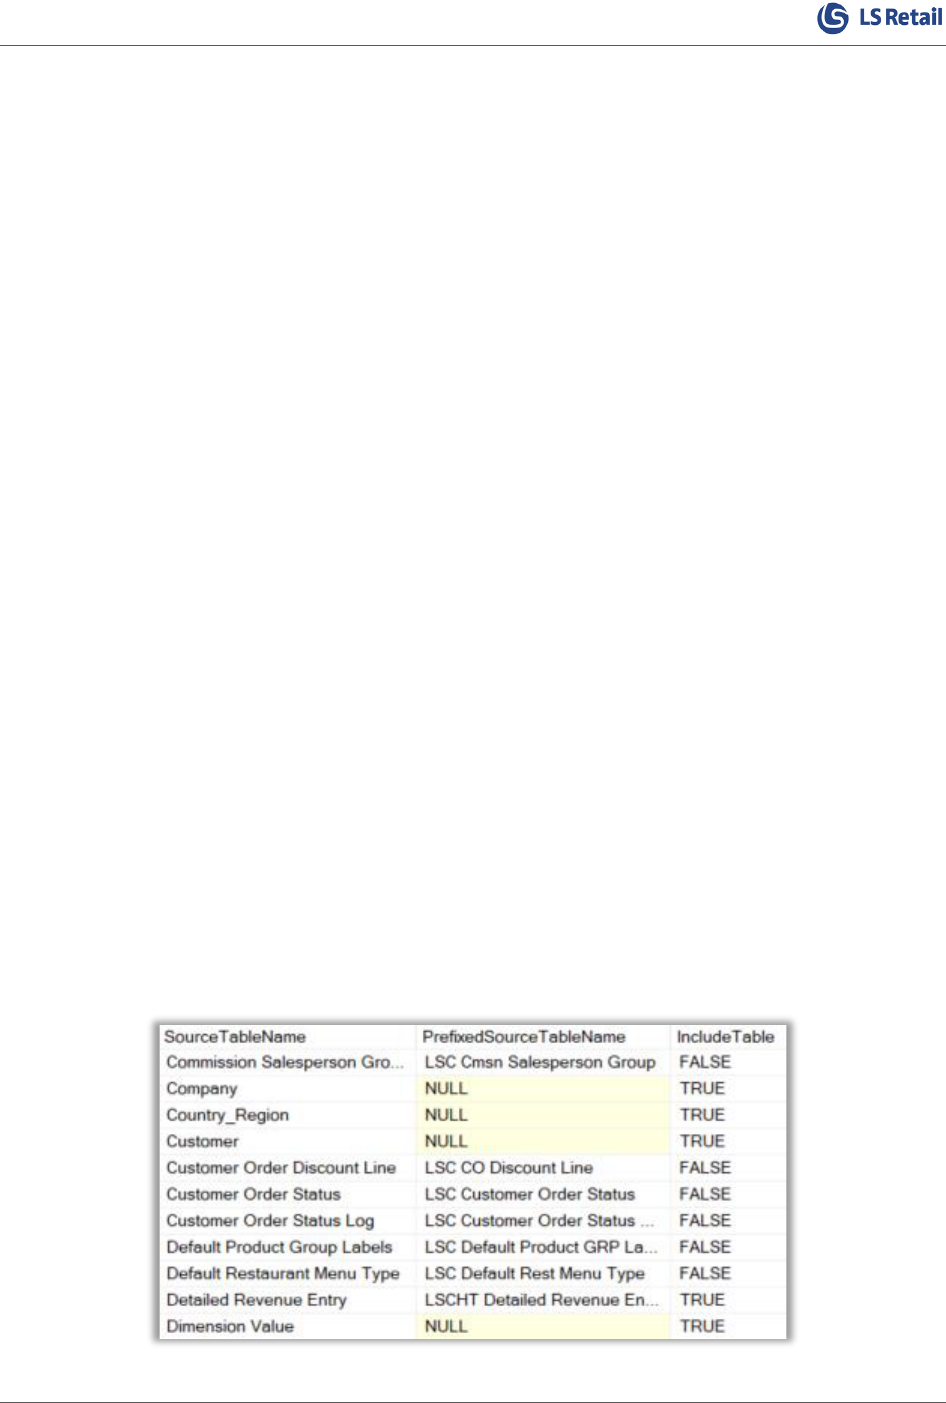
To add a new staging table to Analytics you simply add it to the LSInsight$SourceTablesMap table.
You need to add the table name you want to use for the staging table in SoureTableName column
and the actual name of the table in LS Central, without any GUID or Company name, in
PrefixedSourceTableName column and set the Include field to TRUE. If the actual name of the table
in LS Central is the same as the name you want use for the staging table then the value in
PrefixedSourceTableName column can be NULL.
If the Include Table field is set to false, the table will not be included in Analytics staging.
Currently, all the base tables used in Analytics have been added to this table in the template database,
so you only need to add to it if you want to add tables that are currently not used in Analytics.
We have also added all the table names that were shortened in version 17.5 when the prefix was
added so if you are adding a new source table you should always check whether it exists in the list
and if it does you only need to change the IncludeTable column value from FALSE to TRUE.
You can add to the LSInsight$SourceTablesMap table using the Add or Delete Source Tables
pipeline in the Analytics ADF.
In the example below we will show how you would add a staging table to Analytics for one table
CRONUS - LS Central$LSC Activity Label Script Line$5ecfc871-5d82-43f1-9c54-59685e82318d
When you trigger the pipeline you are prompted to add a value to the SourceTableName and
PrefixedSourceTableName fields, you can only add or delete one table at a time. If you add the value
TRUE to the DeleteRow field, the source table name you specify will be deleted from the table if it
exists. If you are adding a source table that is a BC standard table or you want the name of the new
staging table to include the prefix, you can leave the PrefixedSourceTableName value empty.
When the pipeline has run and entry for the table has been added to LSInsight$SourceTablesMap
table.

Extending Analytics for LS Central
Chapter 4 - Staging 9
You can then move on and run the Initial load pipeline.
This pipeline will fetch all the information about the tables from LS Central, create the query for the
new table and write this information to the LSInsight$QUERY BASE table, in addition to updating
the queries for the other staging tables, if anything has changed in the LS Central database since this
was run initially.

Extending Analytics for LS Central
Chapter 5 - Dimensions 10
The initial load pipeline also triggers a run of the Scheduled Run pipeline that creates and populates
the new or updated staging table.
Once the pipeline has run the staging table should be populated. This does, however, not have any
impact on the dimension or fact tables since those are populated using stored procedures that need
to be created in the database according to the star schema design rules.
In the next sections we will explain in more detail how you can add a column to a dimension, add a
new dimension and connect it to a fact table. And then how you can update the reports to include the
new information.
5 Dimensions
The dimension tables are populated and updated by a stored procedure. The dimension stored
procedures often combine more than one staging table into a single dimension.
All dimensions included in the DW have been created by the Analytics team and are included in the
Analytics database.
Add new column to existing dimension
If you want to add new columns from new or existing staging tables that is a very straight forward
process.
Let's imagine that you want to add information about whether an item is a scale item or not so you
can see whether that is impacting sales in any way and so you can compare sales between stores for
scale items only, since you have a feeling that some stores sell more scale items than others, but you
want to confirm that suspicion.

Extending Analytics for LS Central
Chapter 5 - Dimensions 11
The stg$Item table has a field called “Scale Item” that you can use to distinguish between scale items
and non-scale items.
Add column to dimension
The first thing you do is add a new column to the dItem dimension table.
The best way to edit a table in an existing Analytics database is to connect to the database using SQL
Server Management Studio (SSMS).
We recommend connecting to the Azure database from SSMS (the connection information for the
Analytics database was provided in the deployment summary) and then following these steps:
1) In the Analytics database expand Tables.
2) Select the dItem table
3) Right-click and select Script Table as > DROP and CREATE To > New query editor window.
4) The script will open in a new window.
5) In the CREATE TABLE part of the script, add the new column. Here you can use the same
datatype as in the staging table if you are using the value as is, or you can change it if you want
to transform the value in any way.
6) Then add an ALTER TABLE section to set the default value of the new column. In this example
we have set the default value to zero. But the default selected depends on the datatype.
7) Now run the script
8) The message “Commands completed successfully” is displayed, and the table will be dropped
and recreated including the new column. The table will be empty and to populate it again you
need to edit the dimMergedItem stored procedure.
To modify the stored procedure that loads data into the dItem table, do the following in SSMS:
1) In the Analytics database expand Programmability.
2) Select the dbo.dimMergedItem (or vX.XdimMergedItem) stored procedure for the LS Central
version you are using.
3) Right-click and select Modify.
4) A modification script for the procedure is opened.
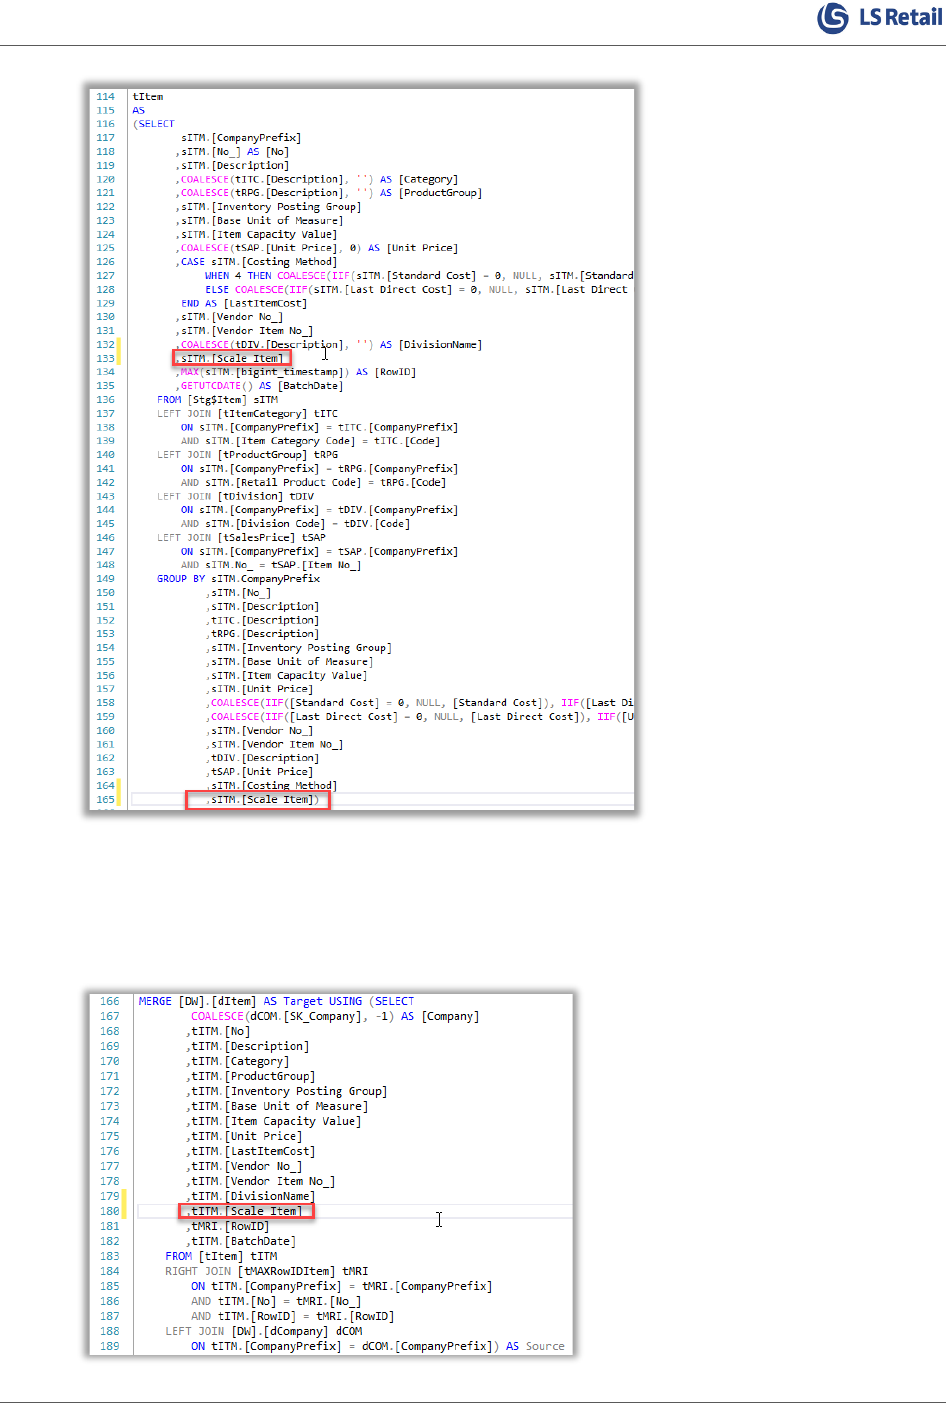
5) Since you are already selecting from the stg$Item table in the procedure, you just need to add
the column where needed, and since this is tiny int value there is no need to check for NULL
values. So, what you do is select from the Scale item column into the temp table and add it to
the GROUP BY aggregation as well.
Extending Analytics for LS Central
Chapter 5 - Dimensions 12
If the column you wanted to add to the dimension was from a new staging table, you would
need to create a temp table for that staging table as you did for ItemCategory and
ProductGroup and do the join here. As you can see from the other join statements, we do a
LEFT JOIN on the ID and the CompanyPrefix.
6) Then select the column from tItem in the MERGE section.
Extending Analytics for LS Central
Chapter 5 - Dimensions 13
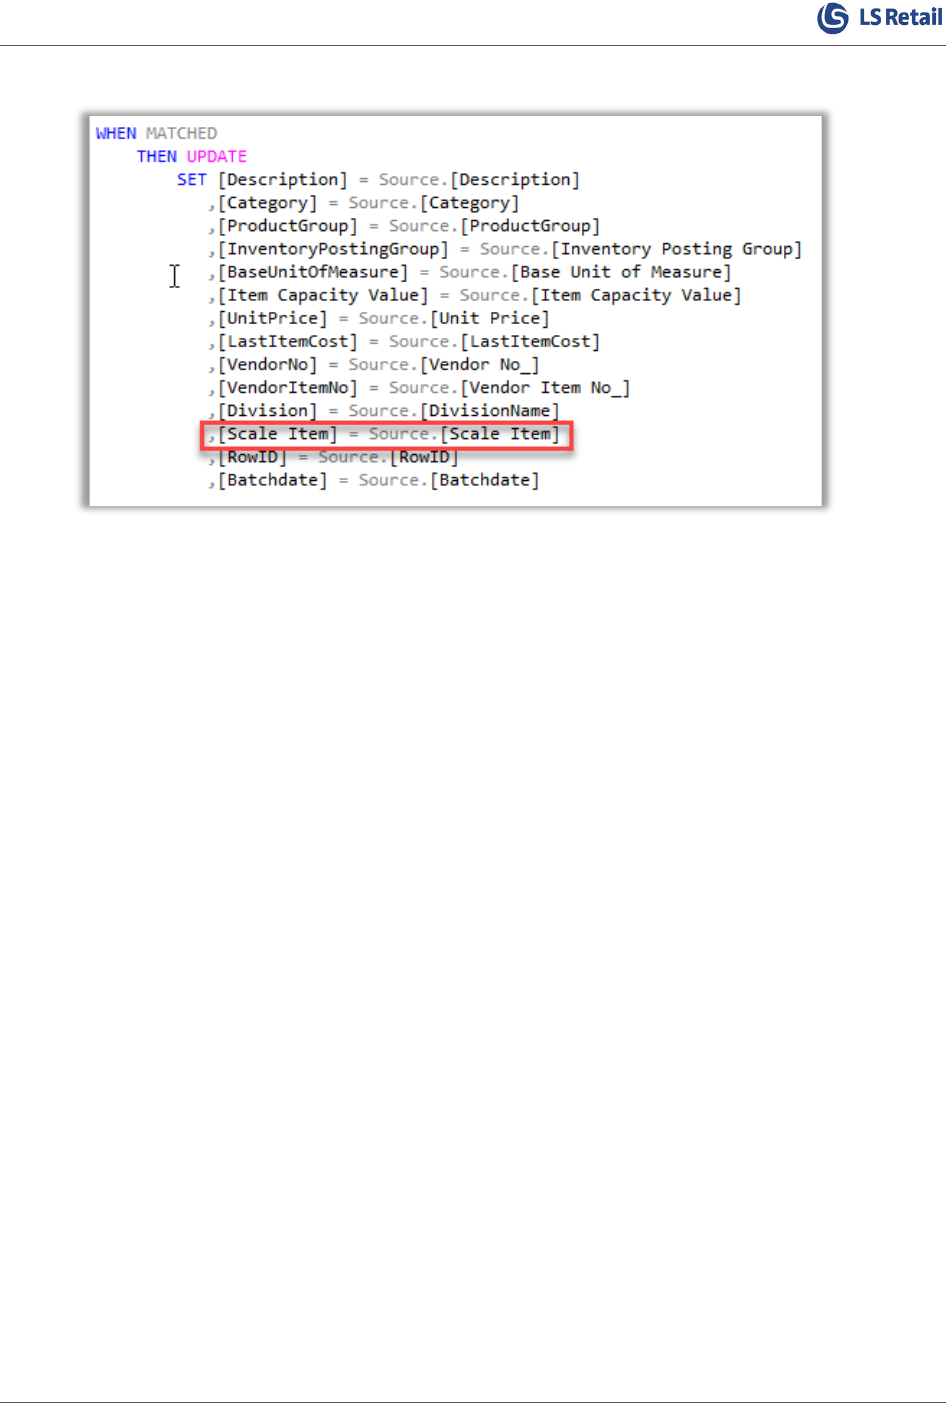
7) Add the column to the UPDATE statement.
8) And lastly, add the column to the INSERT statement.
WHEN NOT MATCHED BY TARGET
THEN INSERT ([Company], [No], [Description], [Category], [ProductGroup],
[InventoryPostingGroup], [BaseUnitOfMeasure], [Item Capacity Value],
[UnitPrice], [LastItemCost], [VendorNo], [VendorItemNo], [Division], [Scale
Item], [RowID], [BatchDate])
VALUES (Source.[Company], source.[No], Source.[Description],
Source.[Category], Source.[ProductGroup], Source.[Inventory Posting Group],
Source.[Base Unit of Measure], Source.[Item Capacity Value], Source.[Unit
Price], Source.[LastItemCost], Source.[Vendor No_], Source.[Vendor Item
No_], Source.[DivisionName], Source.[Scale Item], Source.[RowID],
Source.[BatchDate])
9) Now run the ALTER procedure script.
10) A “Commands completed successfully” message is displayed.
Now that the procedure has been modified, you can either execute it from SSMS or you can trigger the
Scheduled Run pipeline from Azure Data Factory.
When the procedure has been executed, the data in the new column has been populated with the
correct data from the staging table.
Add new dimension
If you would like to add a new dimension to the Analytics data warehouse from LS Central, the process
is straight forward.
Here are the steps you need to follow:
1. The first thing you do is add the table name to the LSInsight$SourceTablesMap table. Using
the Add or Delete Source Tables pipeline in the Azure data factory.

Extending Analytics for LS Central
Chapter 5 - Dimensions 14
2. If you are running LS Central SaaS you then need to follow the process of adding one or more
prestaging tables in the chapters above.
3. Re-run the Populate Query Base pipeline in the Azure data factory.
4. Run the Scheduled Run pipeline to retrieve the data from the new tables.
5. Create a new dimension table with the columns you want to include.
6. Create a new stored procedure to populate the dimension table with data from one or more
staging tables. For the stored procedure to be run automatically you must keep to the naming
convention and prefix SP name with ‘dim’.
7. Add connections from this new dimension table to the appropriate fact tables.
There are several dimension tables in the DW schema that you can use as examples for this, and you
can view the stored procedure used to populate them from the staging tables under Programmability.
All the dimension stored procedures are prefixed with ‘dim’.

Extending Analytics for LS Central
Chapter 6 - Facts 15
6 Facts
Add new column from staging table to existing fact table
To add a new column from staging table to fact table you would go through a similar process as was
used for new column to a dimension table. But since the stored procedures that update fact and
dimension tables are different, we will go through an example.
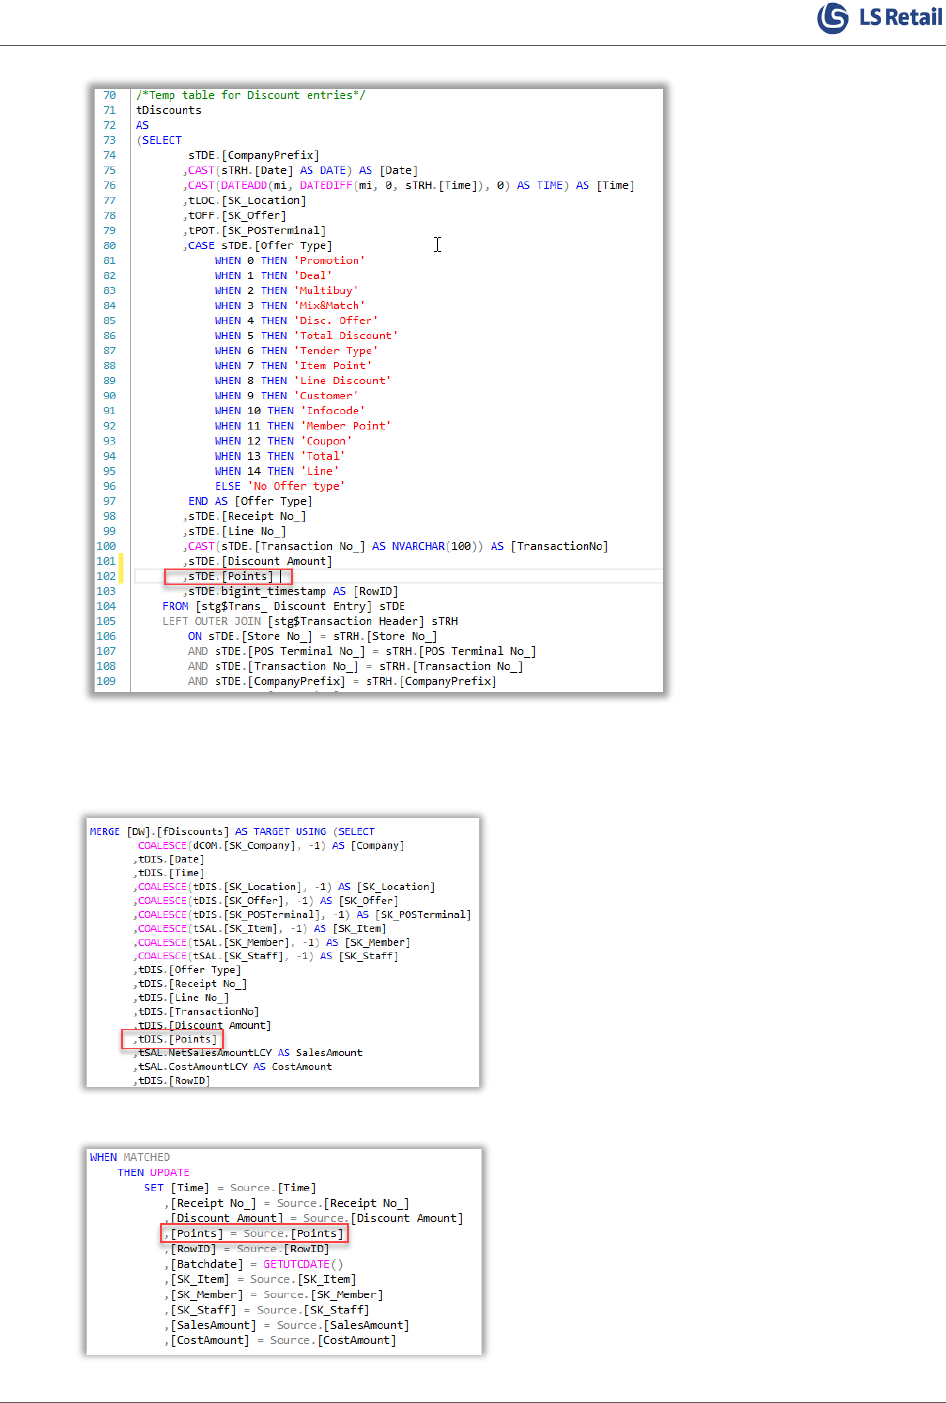
In the following example we will show how to add the points column from the stg$xxx table to the
fDiscount table and how to modify the stored procedure that loads the fDiscount table, so it includes
inserts and updates to the newly added column.
Add column to fact table
The first thing you do is add a new column to the fDiscount fact table.
The best way to edit a table in an existing database is to connect to the database using SQL Server
Management Studio (SSMS).
We recommend connecting to the Azure database from SSMS (the connection information for the
Analytics database was provided in the deployment summary) and then following these steps:
1) In the Analytics database, open a new query.
2) Enter the following ALTER script for the fDiscount table:
3) If you want, you can add a default value constraint of the new column. In this example we have
not set a default value.
4) Now run the script.
5) A Commands completed successfully message is displayed, the table will be altered, and the
new column added but containing only NULL values. To populate the new column with values,
you need to modify the stored procedure that loads the fDiscount table.
Modify stored procedure
To modify the stored procedure that loads data into the dItem table, do the following in SSMS:
1) In the Analytics database, expand Programmability.
2) Select the dbo.factDiscount.
3) Right-click and select Modify.
4) A modification script for the procedure opens.
Since you are already selecting from the stg$ table in the procedure, you just need to add the
column reference where needed, and since this is decimal value there is no need to check for
NULL values. So, what you do in the tDiscount temp table creation selection, is select from the
[Points] column in the stg$Trans_ Discount Entry staging table.
Extending Analytics for LS Central
Chapter 6 - Facts 16
If the column you wanted to add to the fact table was from a new staging table, you would
need to add this new staging table to the left outer join below.
5) Select the column from tDiscoutns in the MERGE section:
6) Add the column to the UPDATE statement:

Extending Analytics for LS Central
Chapter 6 - Facts 17
7) And lastly, add the column to the INSERT statement.
WHEN NOT MATCHED BY TARGET
THEN INSERT ([Company]
, [Date]
, [Time]
, [SK_Location]
, [SK_Offer]
, [SK_POSTerminal]
, [Offer Type]
, [Receipt No_]
, [Line No_]
, [TransactionNo]
, [Discount Amount]
, [Points]
, [RowID]
, [Batchdate]
, [SK_Item]
, [SK_Member]
, [SK_Staff]
, [SalesAmount]
, [CostAmount])
VALUES (Source.[Company], Source.[Date], Source.[Time],
Source.[SK_Location], Source.[SK_Offer],
Source.[SK_POSTerminal], Source.[Offer Type], Source.[Receipt
No_], Source.[Line No_], Source.[TransactionNo],
Source.[Discount Amount],Source.[Points], Source.[RowID],
GETUTCDATE(), Source.[SK_Item], Source.[SK_Member],
Source.[SK_Staff], Source.[SalesAmount], Source.[CostAmount]);
1) Run the ALTER procedure script.
2) A Comands completed successfully message is displayed.
Now that the procedure has been modified, you need to execute it from SSMS with these parameter
values:
@CurrentRowID = 0
@NewRowID = 999999999999999
This will ensure that all the rows of the factDiscount table will be updated with the points value from
the staging table.
Add new fact table
The steps needed to add a new fact table to the Analytics data warehouse are described in chapter
7.4 Adding fact table to star schema in the section about third-party data. The process of creating
a new fact table from LS Central data is exactly the same, but in that case the staging tables hold data
from LS Central instead of third-party data.
Extending Analytics for LS Central
Chapter 7 - Third-party data 18
7 Third-party data
Here are the recommended steps you need to take to add third-party data to Analytics. In this example
you will be adding customer counter data from file. We will first describe how to add the data to the
Analytics data warehouse, and then how the data could be added directly to the Power BI report, if
you want to bypass the data warehouse.
Open the Azure Data Factory studio
Log into your Azure environment (https://portal.azure.com/), and open the Analytics Azure Data
Factory. You will find all resources in “All resources”.
Staging data
The first step is to get the source data in a staging table in the data warehouse (DW). In some scenarios
this is not needed, but it is good practice to stage the source data before cleaning and writing to the
star schema tables. There are many methods available to ingest the data and create the staging table
– in this example we are using Azure data factory (ADF).
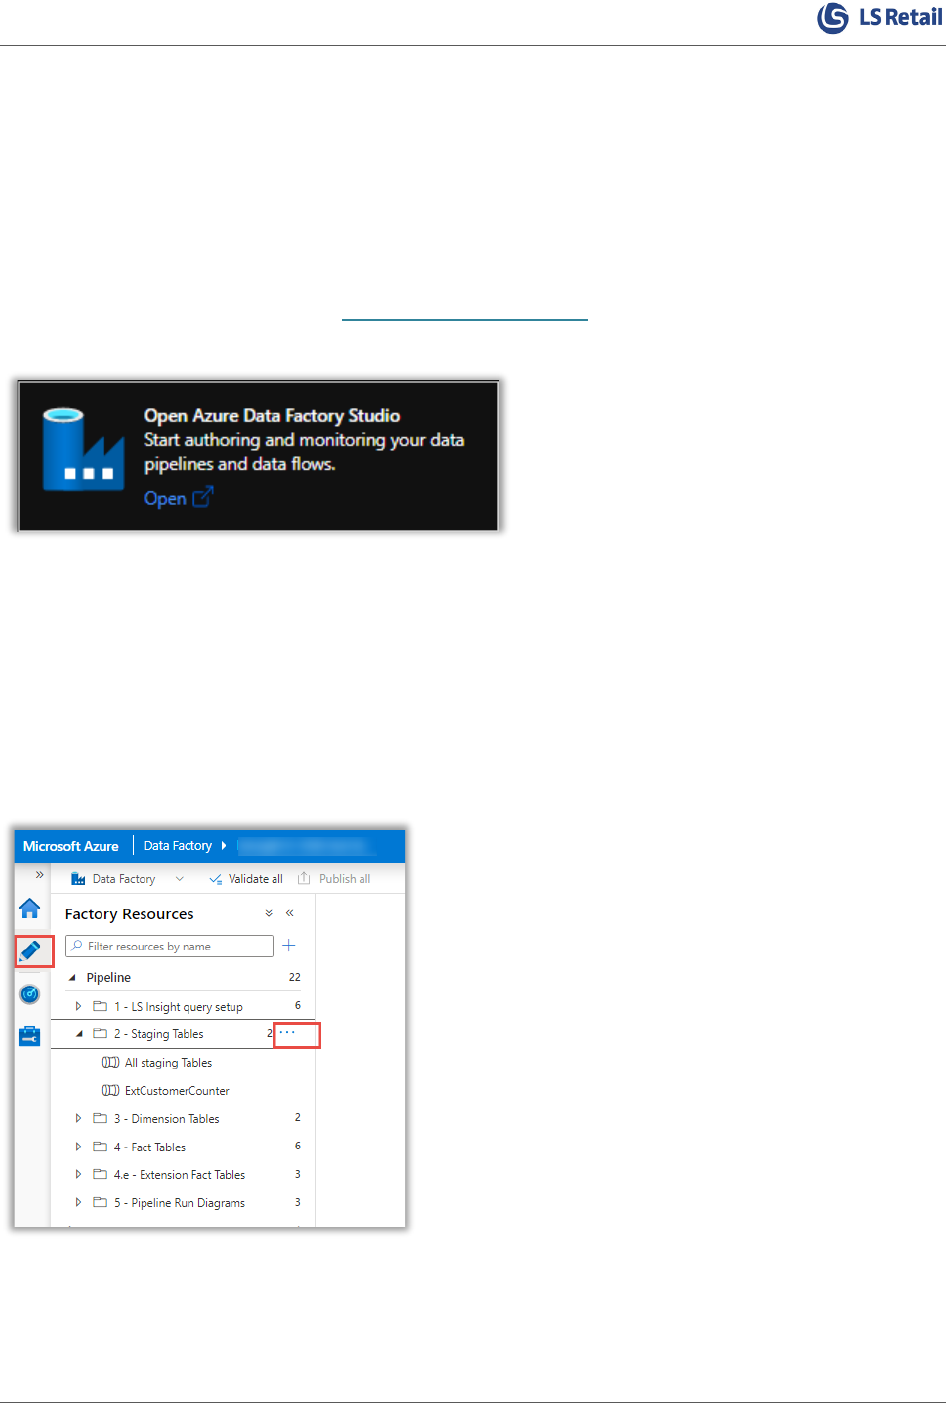
Create a copy pipeline
Open the editor option, and click the three dots next to “2 – Staging Tables”:
Select to create a new pipeline in the selected folder by clicking New pipeline. And give it a
descriptive name. It is a good idea to add an affix to the name to distinguish it from Analytics pipelines.
Extending Analytics for LS Central
Chapter 7 - Third-party data 19
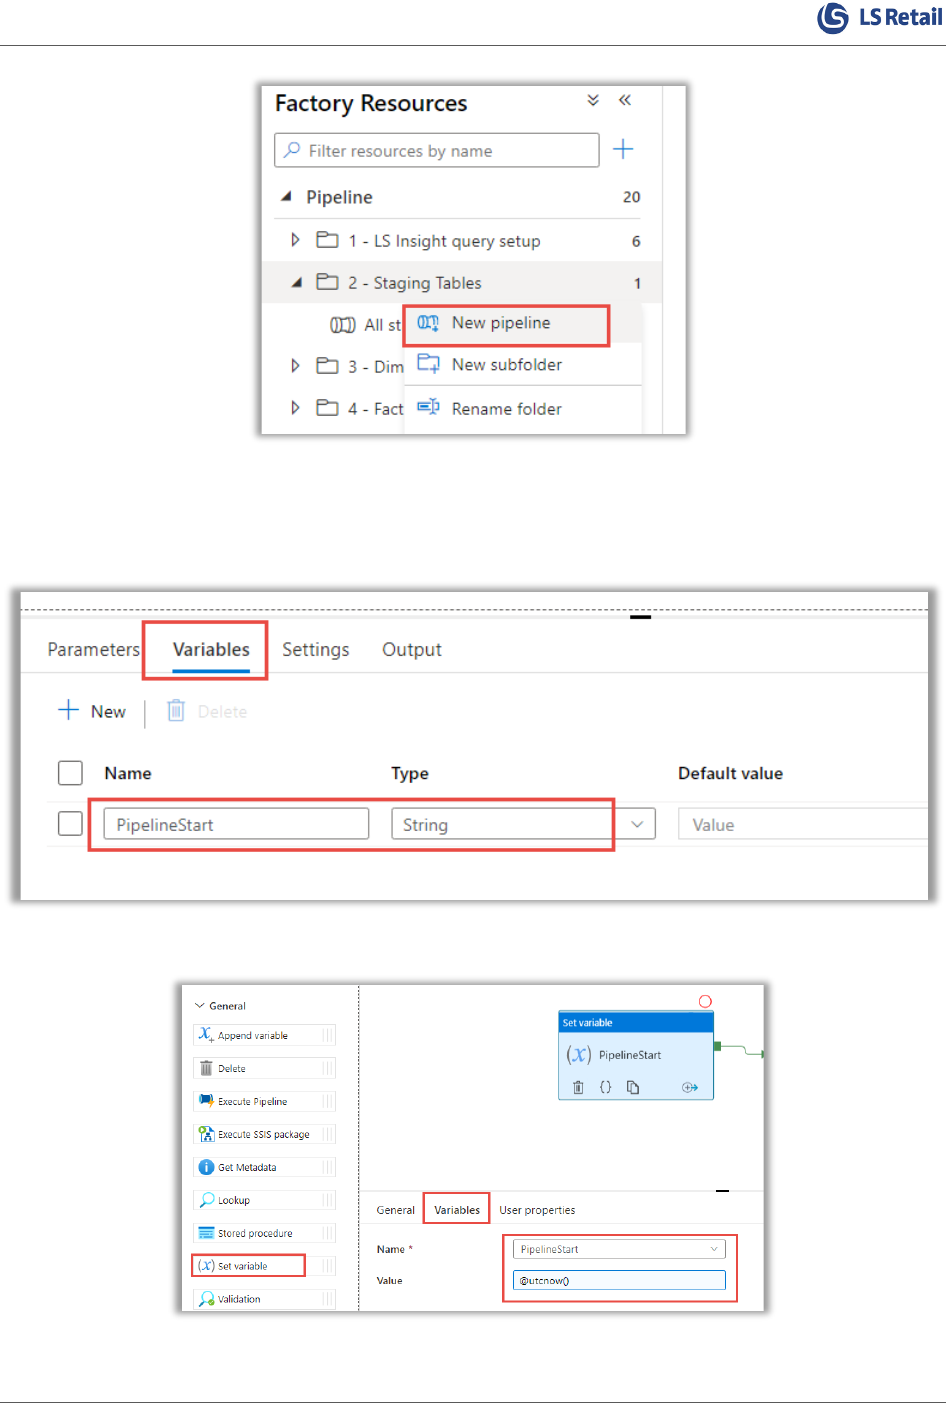
Add Pipeline variables
Add a pipeline variable name “PipelineStart” to hold value of utcnow() to be able to log the pipeline
start in the LSInsightAudit table in the Analytics database.
Set the current timestamp using the “Set variable” activity using “Add dynamic content”

Extending Analytics for LS Central
Chapter 7 - Third-party data 20
Copy Activity
Add a copy activity to copy the data from the source and write to a staging table in your DW.
Create a new source connection
The source connection needs to be set. If this connection does not exist in your ADF, a new connection
is created in the copy activity.
For this example, you will be using a flat file connection – you can choose from over 200 connectors,
depending on your data.

Extending Analytics for LS Central
Chapter 7 - Third-party data 21
Create a connection to the host.
Extending Analytics for LS Central
Chapter 7 - Third-party data 22
Connect to your data
Using the connection, select the data source. In this example the source is a text file in your local file
system.
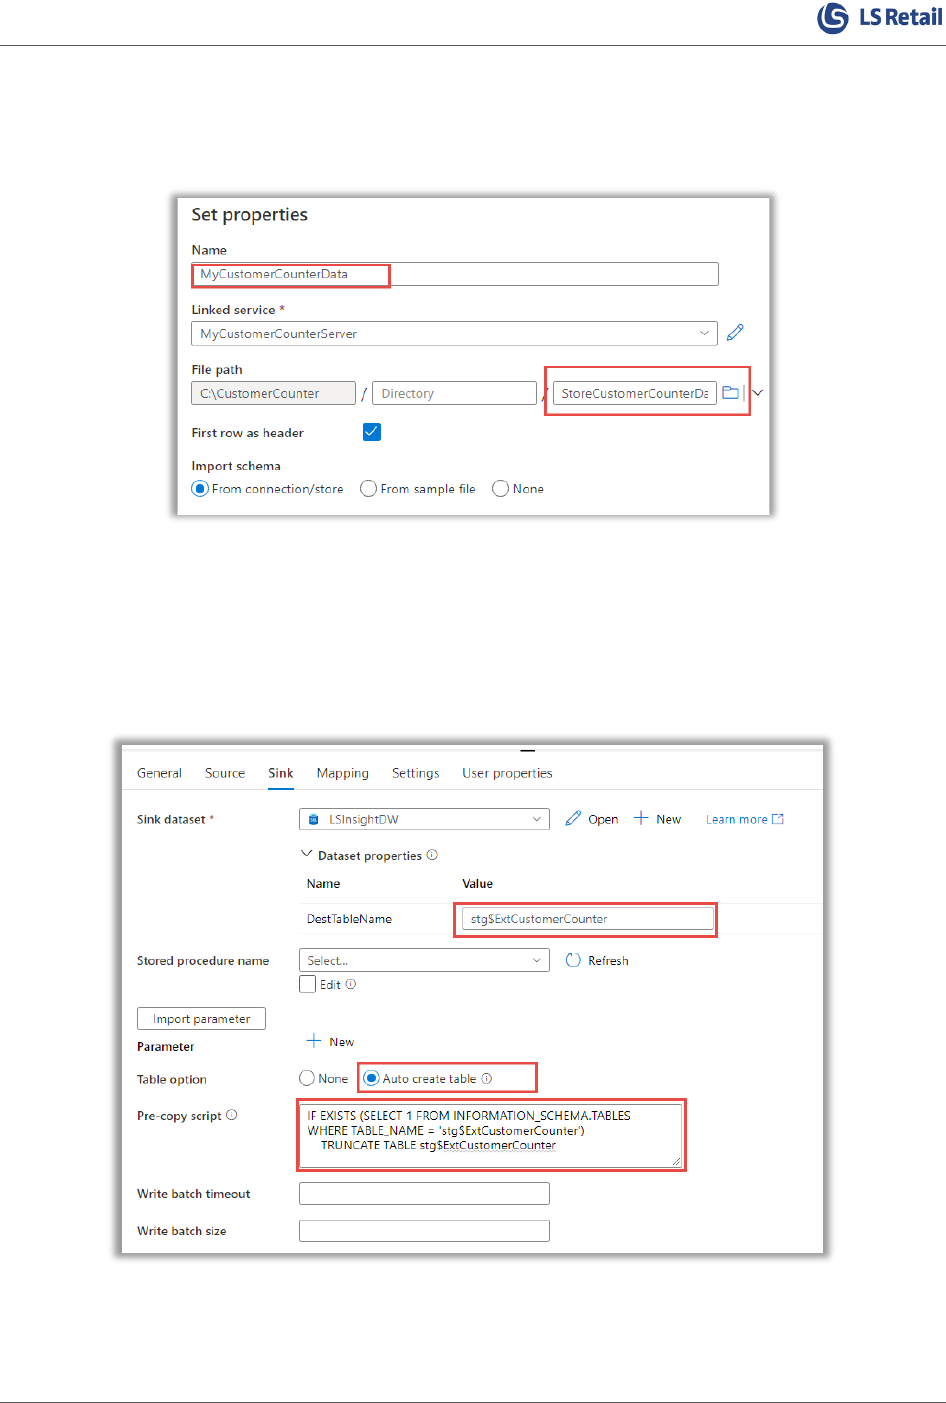
Set the pre-copy script
In this example the full dataset is written to the staging table. The pre-copy script truncates the
staging table before writing the data from the source again on a schedule.
If there is not a separate method to ensure the staging table exists, there is an option to auto create
the table based on the source data.
Import the schemas and verify the mapping.

Extending Analytics for LS Central
Chapter 7 - Third-party data 23
Add Write to audit table action
Add a failure activity to the copy action to be able to trigger an activity when the copy activity has a
failure.
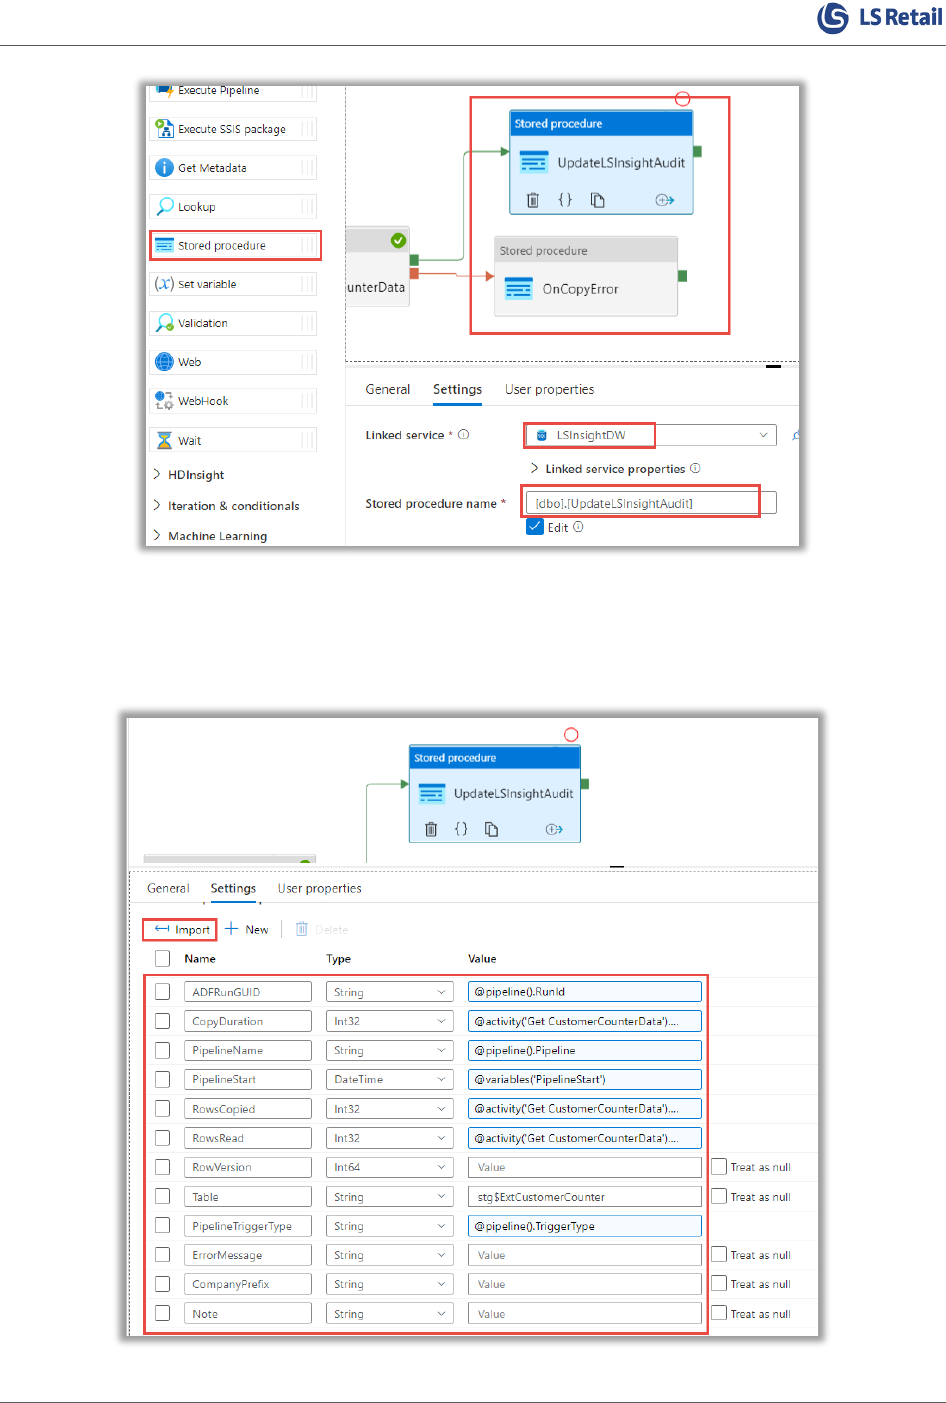
Add two “Stored procedure” activities that will both execute [dbo].[UpdateLSInsightAudit] and
connect Success to UpdateLSInsightAudit and failure to OnCopyError
Extending Analytics for LS Central
Chapter 7 - Third-party data 24
Update LSInsightAudit on success
Set the SP variables as follows for the success activity – UpdateLSInsightAudit:

Extending Analytics for LS Central
Chapter 7 - Third-party data 25
ADFRunGUID = @pipeline().RunId
CopyDuration = @activity('Get CustomerCounterData').output.copyDuration
PipelineName = @pipeline().Pipeline
PipelineStart = @variables('PipelineStart')
RowsCopied = @activity('Get CustomerCounterData').output.rowsCopied
RowsRead = @activity('Get CustomerCounterData').output.rowsRead
RowVersion is only used when you need to set up Incremental loading
Table = stg$ExtCustomerCounter (the name of the staging table you are writing to)
PipelineTriggerType = @pipeline().TriggerType
ErrorMessage is not used here
CompanyPrefix used if you have multiple company setup in your data
Note – free space to add additional information
Update LSInsightAudit on failure
On the failure activity, OnCopyError, the following settings apply for the same stored procedure:
ADFRunGUID = @pipeline().RunId
CopyDuration = 0
PipelineName = @concat('Failed Run - ', pipeline().Pipeline)
PipelineStart = @variables('PipelineStart')
RowsCopied = 0
RowsRead = 0
RowVersion = 0
Table = stg$ExtCustomerCounter (the name of the staging table you are writing to)
PipelineTriggerType = @pipeline().TriggerType
ErrorMessage = @activity('Get CustomerCounterData').Error.Message
CompanyPrefix used if you have multiple company setup in your data
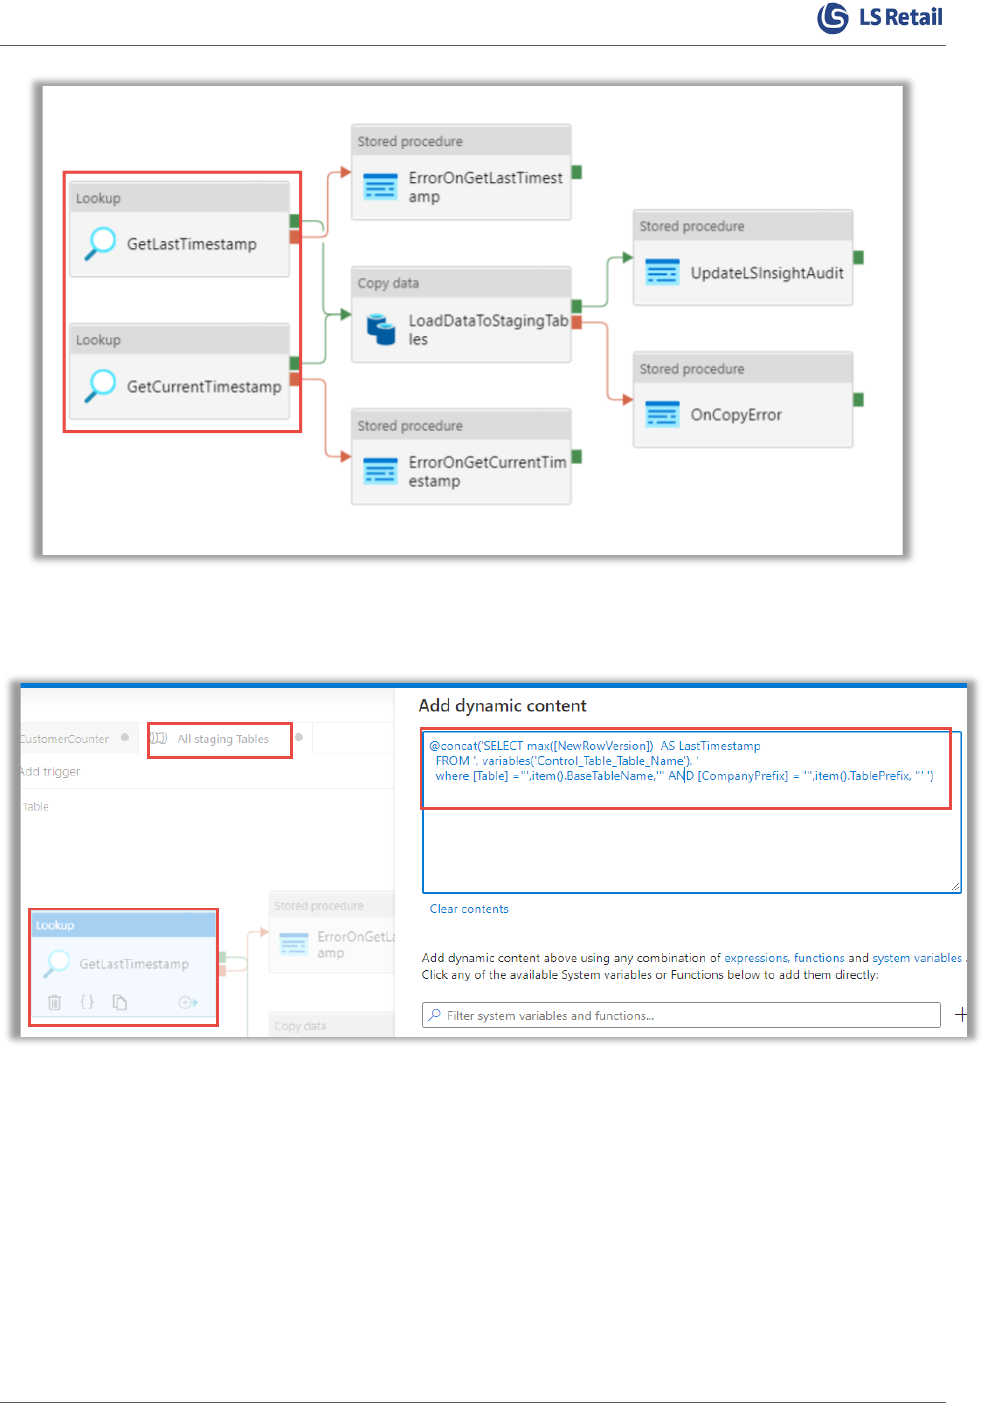
Large data source
For large datasets where daily full load is not an option you will need incremental load. For this you
will need to get the Current timestamp (or the column used in your case to determine the incremental
load) and the last timestamp from the audit table.
Here is an example from the All staging Tables pipeline:
Extending Analytics for LS Central
Chapter 7 - Third-party data 26
The last timestamp is extracted from the table LSInsightAudit
(variables('Control_Table_Table_Name'))
A similar method is used to get the maximum timestamp from the source data and then this
information is used in the source query to only load new data to the DW.
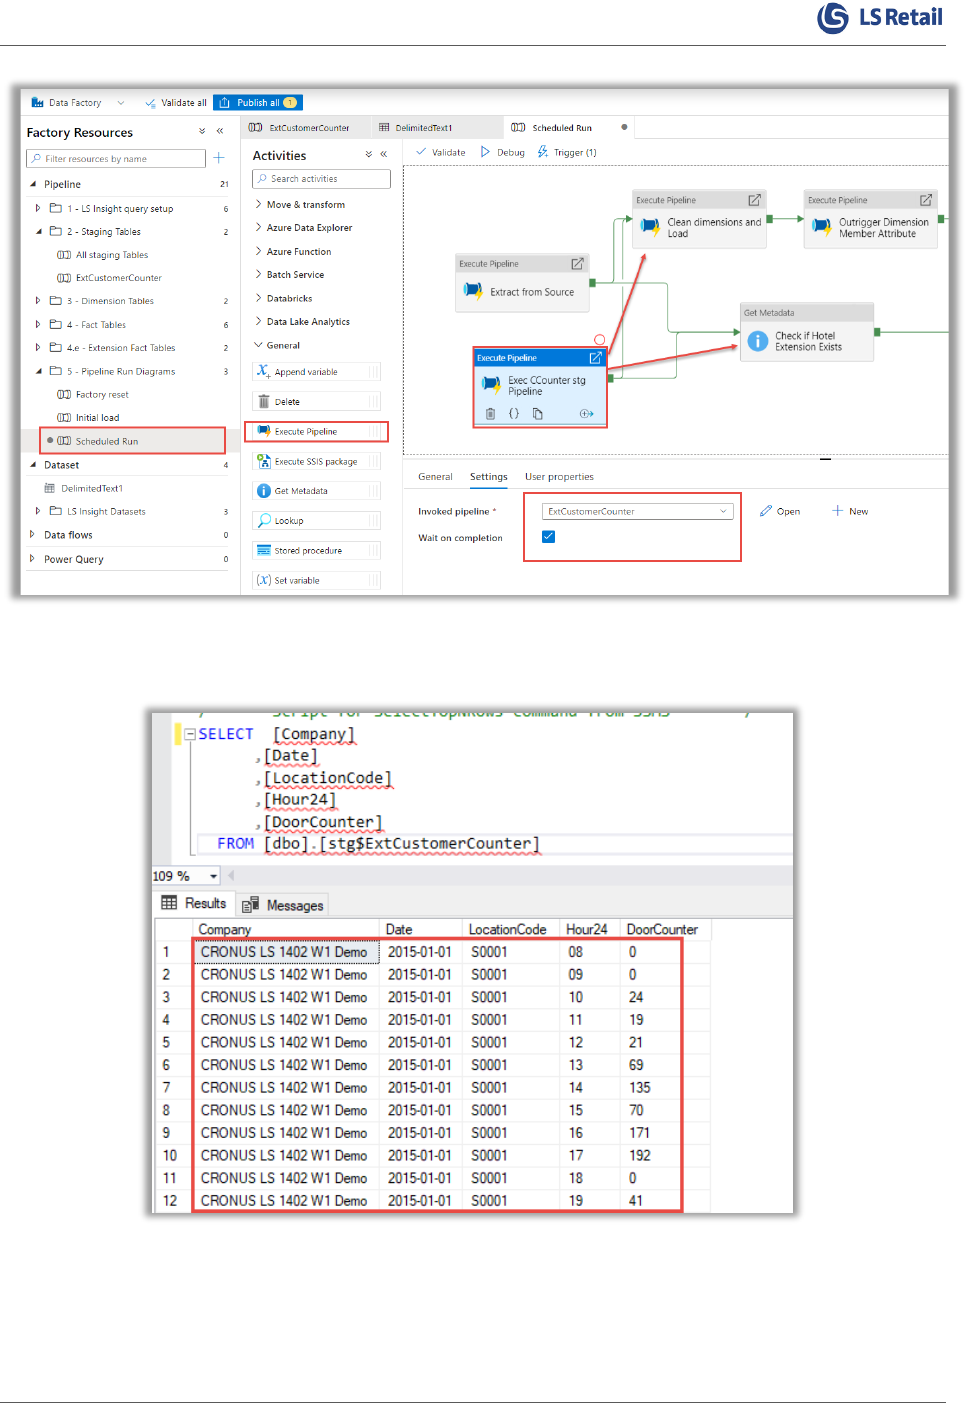
Add staging pipeline to scheduled run
Add the staging pipeline to the Scheduled run pipeline to have the data loaded on the selected
schedule with the Analytics schedule:
Extending Analytics for LS Central
Chapter 7 - Third-party data 27
Now when the scheduled run is triggered, the source data will be written to the Analytics database as
a staging table:

Extending Analytics for LS Central
Chapter 7 - Third-party data 28
Add fact table to star schema
Create a connected fact table
First create the destination table with the correct surrogate keys (SK_*) for the connected dimensions.
Name the schema “DW” and the first letter in the table name “f” to distinguish it from staging and
dimension tables.
Here is the create script for this example:
CREATE TABLE [DW].[fCustomerCounter](
[Company] [int] NULL,
[SK_Location] [int] NULL,
[LocationCode] [nvarchar](100) NULL,
[Date] [date] NULL,
[Hour24] [nvarchar](2) NULL,
[DoorCounter] [int] NULL
) ON [PRIMARY]
Create a Stored Procedure
Create a Stored Procedure that meets your requirements for populating data in the fact table. Make
sure to add the surrogate keys (SK_*) for the connected dimensions. The surrogate keys are used in
the Power BI reports to determine the table relationships.
Here is an example of the stored procedure for the customer counter data used in this documentation.
It is a good idea to have a naming convention for any extra items in the Analytics database – in this
example the affix “Ext” is used.
CREATE PROCEDURE [dbo].[ExtfactCustomerCounter]
AS
/* Ensure the stored procedure does not execute unless the source staging table exist */
IF EXISTS (SELECT
*
FROM INFORMATION_SCHEMA.TABLES
WHERE TABLE_NAME = 'stg$ExtCustomerCounter')
BEGIN
SET NOCOUNT ON;
WITH
/* Get the list of companies used */
tCompanies
AS
(SELECT
dCOM.[SK_Company] AS [Company]
,dCOM.[CompanyPrefix]
FROM [DW].[dCompany] dCOM
WHERE dCOM.[SK_Company] <> -1),
/* Get the dimension(s) needed to connect to the fact table */

Extending Analytics for LS Central
Chapter 7 - Third-party data 29
tLocation
AS
(SELECT
dLOC.[SK_location]
,tCOM.[CompanyPrefix]
,dLOC.[LocationCode]
FROM DW.[dLocation] dLOC
LEFT OUTER JOIN [tCompanies] tCOM
ON dLOC.[Company] = tCOM.[Company]),
/* Get the data from the staging table and connect to the dimensions used */
tCustomerCounter
AS
(SELECT
COALESCE(dCOM.[SK_Company], -1) AS [Company]
,COALESCE(tLOC.SK_Location, -1) AS [SK_Location]
,sECC.[LocationCode]
,[Date]
,[Hour24]
,[DoorCounter]
FROM [dbo].[stg$ExtCustomerCounter] sECC
LEFT JOIN [tLocation] tLOC
ON sECC.[Company] = tLOC.[CompanyPrefix]
AND sECC.[LocationCode] = tLOC.[LocationCode]
LEFT JOIN [DW].[dCompany] dCOM
ON dCOM.[CompanyPrefix] = sECC.[Company])
/* Use merge to update the fact table */
MERGE [DW].[fCustomerCounter] AS Target USING (SELECT
[Company]
,[SK_Location]
,[LocationCode]
,[Date]
,[Hour24]
,[DoorCounter]
FROM tCustomerCounter) AS Source
ON Target.[Company] = Source.[Company]
AND Target.[LocationCode] = Source.[LocationCode]
AND Target.[Date] = Source.[Date]
AND Target.[Hour24] = Source.[Hour24]
WHEN MATCHED
THEN UPDATE
SET [SK_Location] = Source.[SK_Location]
,[DoorCounter] = Source.[DoorCounter]
WHEN NOT MATCHED BY TARGET
THEN INSERT ([Company]
, [SK_Location]
, [LocationCode]
, [Date]
, [Hour24]
, [DoorCounter])
VALUES (Source.[Company], Source.[SK_Location],Source.[LocationCode],
Source.[Date], Source.[Hour24], Source.[DoorCounter])
/* OPTIONAL if records should be deleted in the DW is they are removed from the source data
Usually records are not deleted from DW
WHEN NOT MATCHED BY SOURCE

Extending Analytics for LS Central
Chapter 7 - Third-party data 30
THEN DELETE
*/
;
/* SELECT Rowcount is needed for the Azure Data Factory pipeline so the activity has results to determine
successful execution*/
SELECT
'RowCount' = @@rowcount
;
END
Add a fact table Stored Procedure to ADF pipeline
Create Pipeline to execute SP
Create a new pipeline and place it in the folder “4.e - Extension Fact Tables”. Give the pipeline a
descriptive name, for example “PL-SP-ExtCustomerCounter”, and create a variable named
“PipelineStart”.
Add the following activities: Set variable, Lookup, and 2 instances of Stored procedure. Connect as
shown in the image:
Set the Variable to utcnow() using “Add dynamic content”:
Extending Analytics for LS Central
Chapter 7 - Third-party data 31
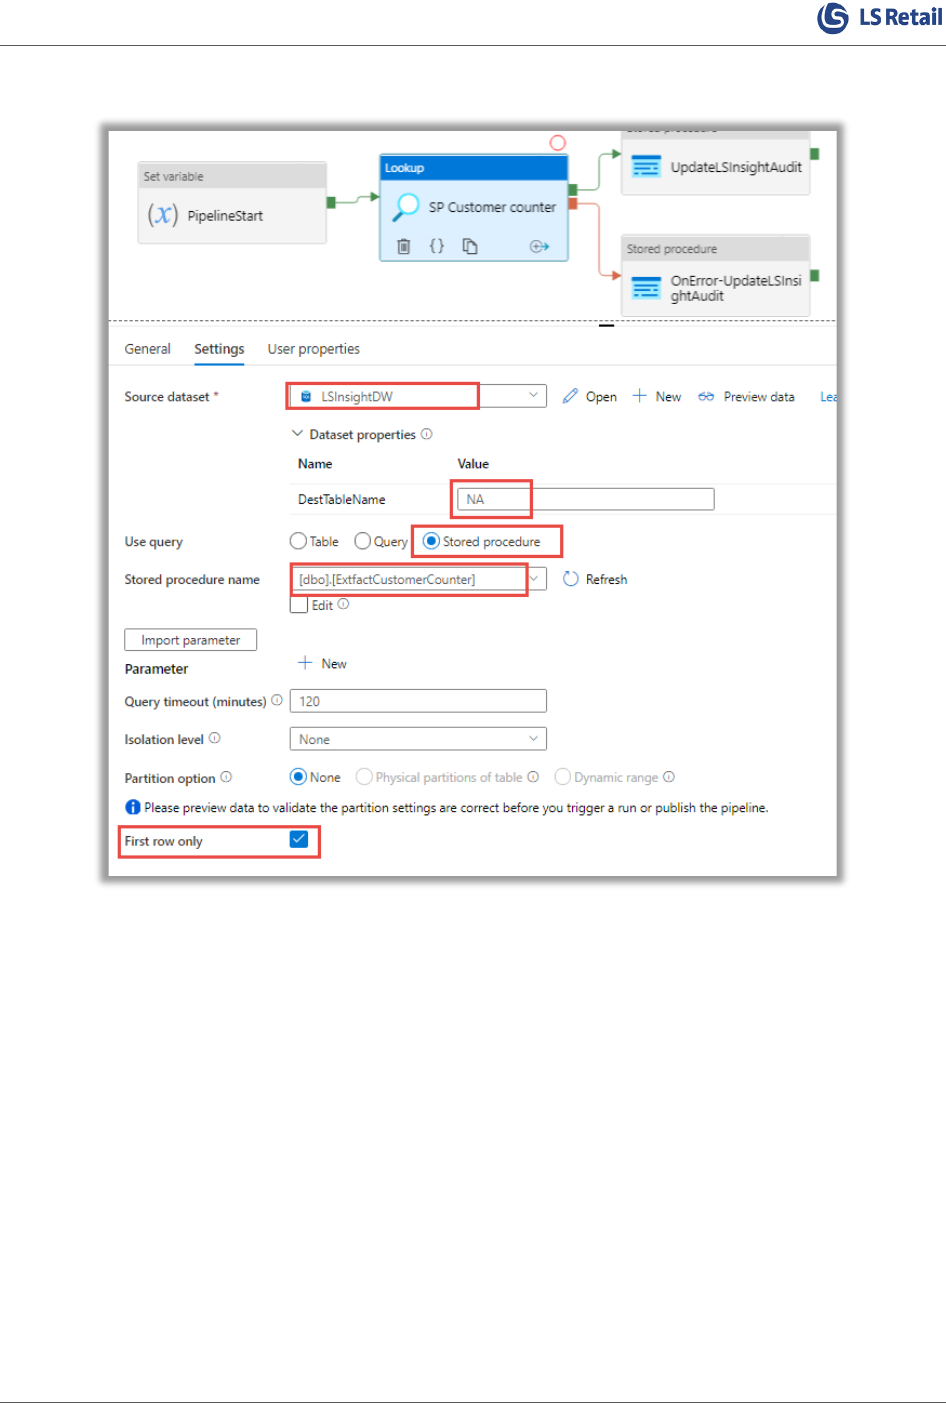
Set the Lookup activity to execute the stored procedure “[dbo].[ExtfactCustomerCounter]”:
Extending Analytics for LS Central
Chapter 7 - Third-party data 32
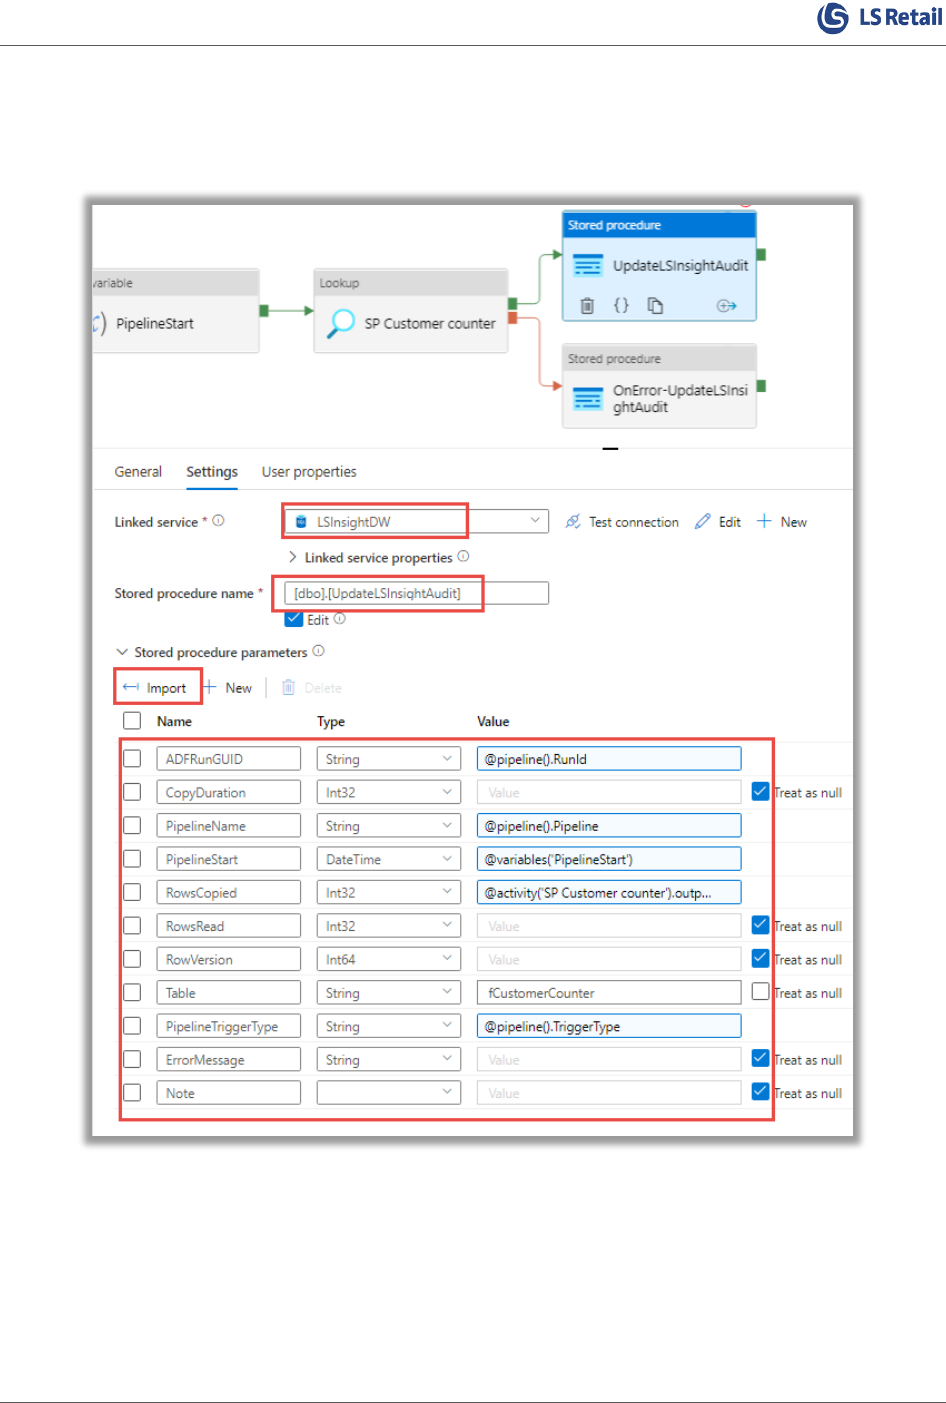
Update Analytics Audit
Set the properties for UpdateLSInsightAudit and OnError-UpdateLSInsightAudit to write correct
information in the LSInsightAudit table.
ADFRunGUID = @pipeline().RunId
CopyDuration = Treat AS null
PipelineName = @pipeline().Pipeline
PipelineStart = @variables('PipelineStart')
RowsCopied = @activity('SP Customer counter').output.firstRow.RowCount

Extending Analytics for LS Central
Chapter 7 - Third-party data 33
RowsRead = Treat AS null
RowVersion is only used when you need to set up Incramental loading - Treat AS null in this scenario
Table = fCustomerCounter (the name of the fact table you are writing to)
PipelineTriggerType = @pipeline().TriggerType
ErrorMessage is not used here
Note – free space to add additional information
Update LSInsightAudit on failure
On the failure activity the following settings apply for the same stored procedure
ADFRunGUID = @pipeline().RunId
CopyDuration = 0
PipelineName = @concat('Failed Run - ', pipeline().Pipeline)
PipelineStart = @variables('PipelineStart')
RowsCopied = 0
RowsRead = 0
RowVersion = 0
Table = fCustomerCounter (the name of the fact table you are trying to write to)
PipelineTriggerType = @pipeline().TriggerType
ErrorMessage = @activity('SP Customer counter').error.message
Add Facttable pipeline to scheduled run
Add an “Execute pipeline” activity to the Scheduled Run pipeline. Depending on your requirements
set the depend linage – In this demo the customer counter fact table will start populating after all
dimension activities have completed.

Extending Analytics for LS Central
Chapter 7 - Third-party data 34
On your next scheduled run the new table will be available in the Analytics DW and you can add to
new data to your reports.
Add data directly in Power BI
There is also an option to add data tables directly in the data model in Power BI. In this demo the
same data source is added to the model and used in a report page. Same or similar steps apply when
using the data from the fact table created above. The difference is the source type and with the fact
table there is no need to look up the correct surrogate key from the relevant dimensions.
Get a new source
In Power BI desktop, open Home – Transform data – Transform data:
Select New Source and in this case Text/csv:
Select the source data and verify columns before loading to the data model.
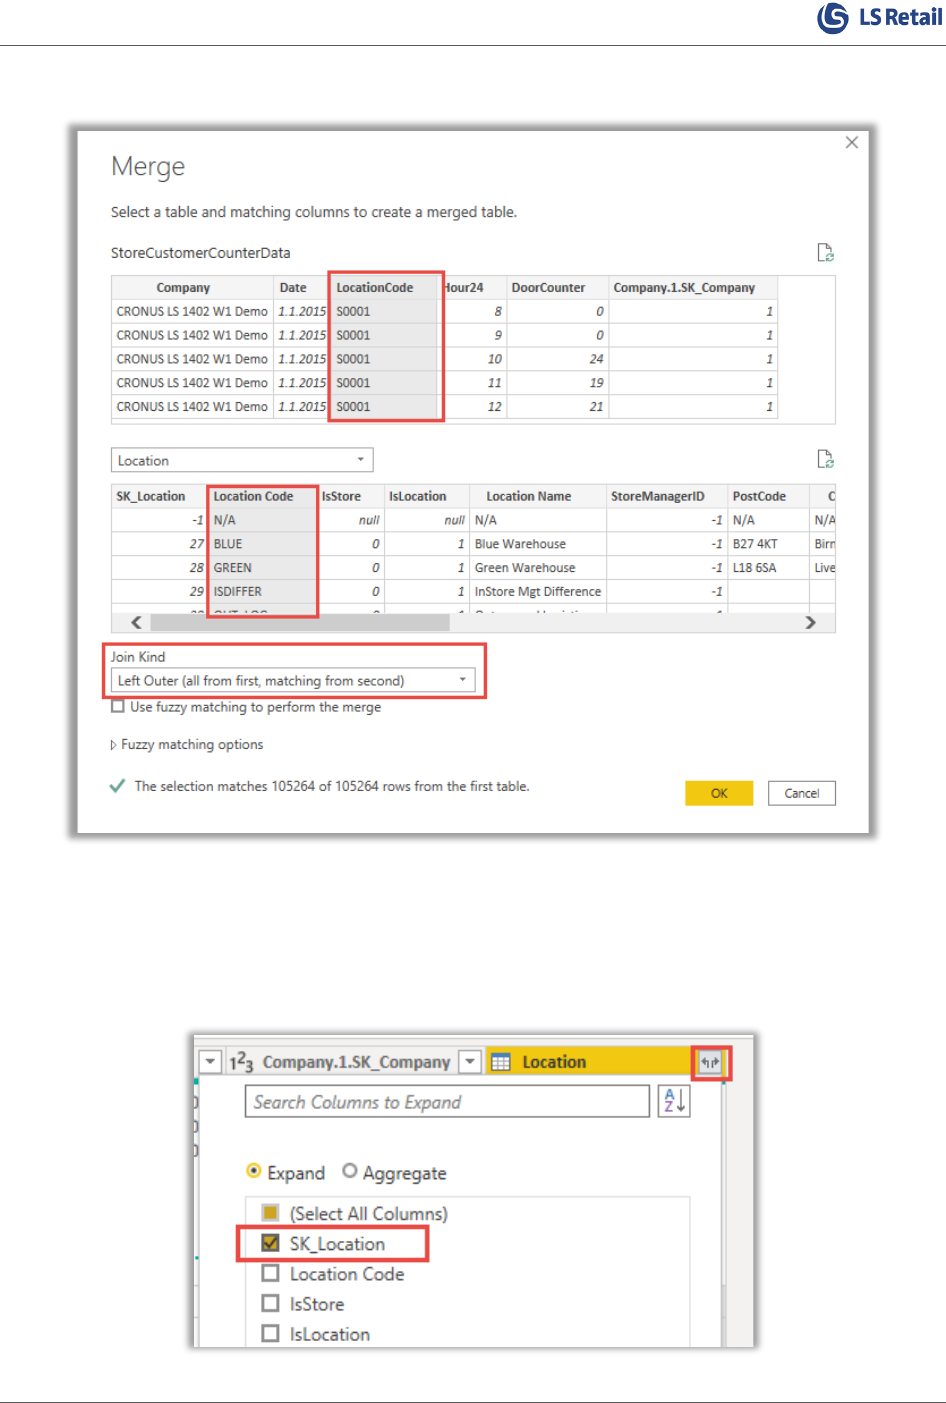
Merge to get surrogate keys
Fact tables are linked to dimensions through surrogate keys. Merge queries is a simple method to add
the correct keys from the dimensions.
Extending Analytics for LS Central
Chapter 7 - Third-party data 35
Select the keys that match and click “OK”:
This needs to be done for the Location and Company dimensions (in this example).
Expand merged tables
You only need to add the surrogate key from the linked tables. This is done by expanding the linked
table and selecting the desired columns:

Extending Analytics for LS Central
Chapter 7 - Third-party data 36
Remove unnecessary columns
After the surrogate keys have been added to the new fact table, the business keys in the fact table can
be removed as they will never be used.
M query
The final M query looks like this:
let
Source = Csv.Document(File.Contents("C:\CustomerCounter\StoreCustomerCounterData.txt"),[Delimiter="
", Columns=5, Encoding=1252, QuoteStyle=QuoteStyle.None]),
#"Promoted Headers" = Table.PromoteHeaders(Source, [PromoteAllScalars=true]),
#"Changed Type" = Table.TransformColumnTypes(#"Promoted Headers",{{"Company", type text}, {"Date",
type date}, {"LocationCode", type text}, {"Hour24", Int64.Type}, {"DoorCounter", Int64.Type}}),
#"Merged Queries" = Table.NestedJoin(#"Changed Type", {"Company"}, Company, {"Company Name"},
"Company.1", JoinKind.LeftOuter),
#"Expanded Company.1" = Table.ExpandTableColumn(#"Merged Queries", "Company.1", {"SK_Company"},
{"Company.1.SK_Company"}),
#"Merged Queries1" = Table.NestedJoin(#"Expanded Company.1", {"LocationCode"}, Location, {"Location
Code"}, "Location", JoinKind.LeftOuter),

Extending Analytics for LS Central
Chapter 7 - Third-party data 37
#"Expanded Location" = Table.ExpandTableColumn(#"Merged Queries1", "Location", {"SK_Location"},
{"Location.SK_Location"}),
#"Removed Columns" = Table.RemoveColumns(#"Expanded Location",{"Company", "LocationCode"}),
#"Renamed Columns" = Table.RenameColumns(#"Removed Columns",{{"Company.1.SK_Company",
"SK_Company"}, {"Location.SK_Location", "SK_Location"}})
in
#"Renamed Columns"
Define relationships in PowerBI
The steps from this point apply both for using a custom fact table in the Analytics DW or for using the
steps above to add data directly to the data model in Power BI.
Define the relationships from the new fact table to the related dimensions. In this example, the
connected dimensions are: Date, Time, Company, and Location.
Extending Analytics for LS Central
Chapter 7 - Third-party data 38
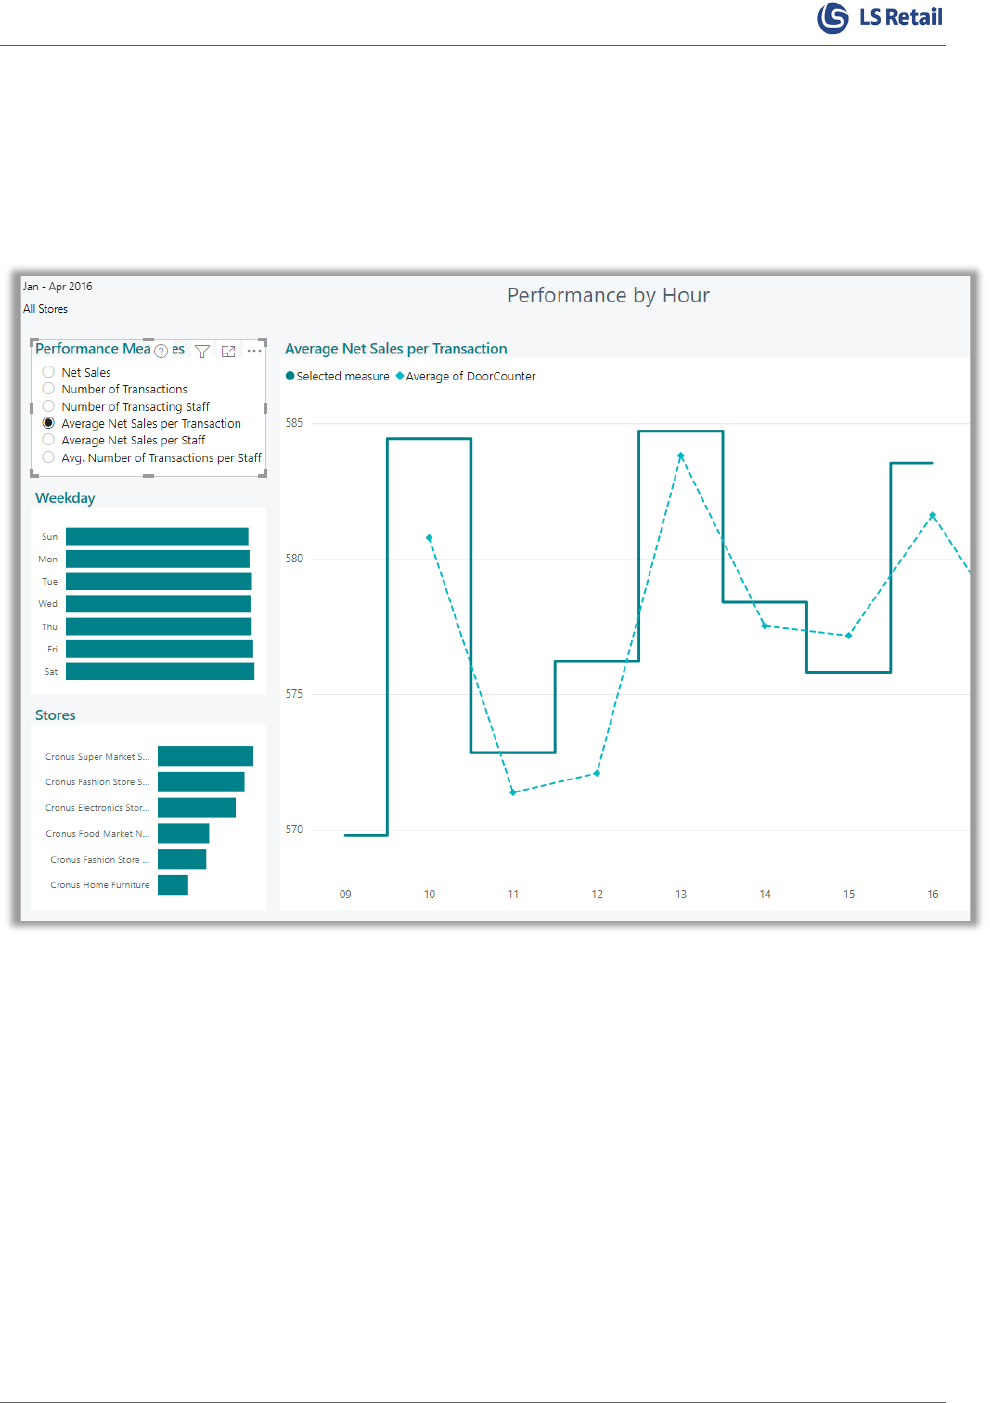
Use the new data in a report page
With the new data it is possible to create custom DAX calculations or, depending on the data, use the
data directly in a current or new visual.
Here is an example where the average number of customers entering the locations is compared with
the average net sale per transaction:
