
Base Handbook
Chapter 3
Tables

Copyright
This document is Copyright © 2013–2015 by the LibreOffice Documentation Team. Contributors
are listed below. You may distribute or modify it under the terms of either the GNU General Public
License (http://www.gnu.org/licenses/gpl.html), version 3 or later, or the Creative Commons
Attribution License (http://creativecommons.org/licenses/by/4.0/), version 4.0 or later.
All trademarks within this guide belong to their legitimate owners.
Contributors
Robert Großkopf
Hazel Russman
Steve Schwettman
Jost Lange
Jean Hollis Weber
Jochen Schiffers
Dan Lewis
Acknowledgments
This chapter is based on an original German document and was translated by Hazel Russman.
Feedback
Please direct any comments or suggestions about this document to the Documentation Team’s
mailing list: [email protected]
Note: Everything you send to a mailing list, including your email address and any other personal
information that is written in the message, is publicly archived and cannot be deleted.
Publication date and software version
Published 24 December 2015. Based on LibreOffice 5.0.
Note for Mac users
Some keystrokes and menu items are different on a Mac from those used in Windows and Linux.
The table below gives some common substitutions for the instructions in this chapter. For a more
detailed list, see the application Help.
Windows or Linux Mac equivalent Effect
Tools > Options
menu selection
LibreOffice > Preferences Access setup options
Right-click Control+click and/or right-click
depending on computer system
Open a context menu
Ctrl (Control) ⌘ (Command) Used with other keys
F5 Shift+⌘+F5 Open the Navigator
F11 ⌘+T Open the Styles and Formatting window
Documentation for LibreOffice is available at http://www.libreoffice.org/get-help/documentation

Contents
Copyright ............................................................................................................................ 2
Contributors ............................................................................................................................... 2
Acknowledgments ...................................................................................................................... 2
Feedback ................................................................................................................................... 2
Publication date and software version ....................................................................................... 2
Note for Mac users ............................................................................................................. 2
General information on tables .......................................................................................... 4
Relationships between tables ........................................................................................... 4
Relationships for tables in databases ........................................................................................ 4
One-to-many relationships .................................................................................................... 5
Many-to-many relationships .................................................................................................. 5
One-to-one relationships ....................................................................................................... 6
Tables and relationships for the example database ................................................................... 7
Media addition table .............................................................................................................. 7
Loan table ............................................................................................................................. 8
User administration table ....................................................................................................... 9
Creating tables ................................................................................................................. 10
Creation using the graphical user interface .............................................................................. 11
Primary keys ....................................................................................................................... 15
Formatting fields .................................................................................................................. 15
Creating an index ................................................................................................................ 18
Problems when modifying tables ......................................................................................... 19
Limitations of graphical table design ................................................................................... 21
Direct entry of SQL commands ................................................................................................ 21
Table creation ...................................................................................................................... 23
Table modification ............................................................................................................... 25
Deleting tables .................................................................................................................... 28
Linking tables ................................................................................................................... 28
Entering data into tables ................................................................................................. 32
Entry using the Base GUI ........................................................................................................ 32
Sorting tables ...................................................................................................................... 34
Searching tables ................................................................................................................. 35
Filtering tables ..................................................................................................................... 36
Direct entry using SQL ............................................................................................................. 38
Entering new records .......................................................................................................... 38
Editing existing records ....................................................................................................... 38
Deleting existing records ..................................................................................................... 39
Importing data from other sources ........................................................................................... 39
Adding Imported Records to an Existing Table .................................................................... 40
Creating a new table for imported data ................................................................................ 41
Splitting data on import ........................................................................................................ 44
Problems with these data entry methods ................................................................................. 44
Tables 3

General information on tables
Databases store data in tables. The main difference from the tables in a simple spreadsheet is that
the fields into which the data is written must be clearly defined beforehand. For example, a
database does not allow a text field to contain numbers for use in calculations. Such numbers are
displayed, but only as strings, whose actual numerical value is zero. Similarly, images cannot be
included in all types of fields.
Details of which data types are available can be obtained from the Table Design window in Base.
They are shown in the Appendix to this handbook.
Simple databases are based on only one table. All data elements are entered independently, which
can lead to multiple entry of the same data. A simple address book for private use can be created
in this way. However, the address book of a school or a sports association could contain so much
repetition of postcodes and locations that these fields are better placed in one or even two
separate tables.
Storing data in separate tables helps:
• Reduce repeated input of the same content
• Prevent spelling errors due to repeated input
• Improve filtering of data in the displayed tables
When creating a table, you should always consider whether multiple repetitions, especially of text
or images (which consume a lot of storage) may occur in the table. If so, you need to export them
into another table. How to do this in principle is described in Chapter 1, Introduction to Base, in the
section “A Simple Database – Test Example in Detail”.
Note
A relational database is a grouping of several tables which are linked to one another
through common attributes. The purpose of a relational database is to prevent
duplicate entry of data elements as much as possible. Redundancies are to be
avoided.
This can be achieved by:
• Separating content into as many unique fields as practical (e.g. instead of
using one field for a complete address, use separate fields for house number,
street, city and postcode).
• Preventing duplicate data for one field in multiple records (for example by
importing the postcode and city from another table).
These procedures are known as “Database Normalization”.
Relationships between tables
This chapter explains many of these steps in detail, using an example database for a library:
media_without_macros. Constructing the tables for this database is an extensive job, as it
covers not only the addition of items into a media library but also the subsequent loan of them.
Relationships for tables in databases
Tables in the internal database HSQLDB always have a distinctive, unique field, the primary key.
This field must be defined before any data can be written into the table. On the basis of this field
certain records in a table can be found.
In certain cases, a primary key is formed from several fields together. These fields must be unique
together. This is known as a “composite primary key”.
4 Tables

Table 2 may have a field that indicates a record in Table 1. Here, the primary key of Table 1 is
written as a value in the Table 2 field. Table 2 now has a field that points to another table's key
field, known as a foreign key. This foreign key exists in Table 2 in addition to the primary key.
The more relationships there are between tables, the more complex is the design task. Figure 1
shows the overall table structure of this example database as an overview, scaled to fit the page
size of this document. To read the content, zoom the page to 200%.
Figure 1: Relationship diagram for the example database media_without_macros
One-to-many relationships
The media_without_macros database lists the titles of the media in one table. Because titles
can have multiple subtitles or sometimes none at all, the subtitles are stored in a separate table.
This relationship is known as one-to-many (1:n). Many subtitles may be assigned to one medium,
for example the many track titles for a music CD. The primary key for the Media table is stored as a
foreign key in the Subtitle table. The majority of relationships between tables in a database are
one-to-many relationships.
Many-to-many relationships
A database for a library might contain a table for authors’ names and a table for the media. The
connection between an author and, for example, books that author has written, is obvious. The
library might contain more than one book by one author. It might also contain books with multiple
authors. This relationship is known as many-to-many (n:m). Such relationships require a table that
acts as an intermediary between the two tables concerned. This is represented in Figure 2 by the
rel_Media_Author table.
Thus, in practice, the n:m relationship is solved by treating it as two 1:n relationships. In the
intermediate table, the Media_ID can occur more than once, as can the Author_ID. But when using
them as a pair, there is no duplication: no two pairs are identical. So this pair meets the
requirements for the primary key for the intermediate table.
Relationships between tables 5

Figure 2: Example 1:n relationship; n:m relationship
Note
For a given value for Media_ID, there is only one title of the media and one ISBN.
For a given value for Author_ID, there is only one Author's first and last name. So,
for a given pair of these values, there is only one ISBN and only one Author. This
makes the pair unique.
One-to-one relationships
Figure 3: Example 1:1 relationship
The library database described above requires a table for readers. In this table only the fields that
are directly necessary were planned in advance. But for a school database, the school class is also
required. From the school class records, you can find borrowers’ addresses where necessary.
Therefore it is not necessary to include these addresses in the database. The school class
relationship of pupils is separated from the reader table, because mapping to classes is not
appropriate in all areas. From this arises a 1:1 relationship between the reader and the individual
school class assignment.
In a database for a public library, the addresses of readers are required. For each reader there is a
single address. If there are multiple readers at the same address, this structure would require the
address to be entered again, since the primary key of the Reader table is entered directly as the
6 Tables

primary key in the Address table. Primary key and foreign key are one and the same in the
Address table. This is therefore a 1:1 relationship.
A 1:1 relationship does not signify that for every record in a table, there will be a corresponding
record in another table. But at most there will be only one corresponding record. A 1:1 relationship
therefore leads to fields being exported which will be filled with content for only some of the
records.
Tables and relationships for the example database
The example database (media_without_macros) must satisfy three requirements: media
additions and removals, loans, and user administration.
Media addition table
First, media must be added into the database so that a library can work with them. However, for a
simple summary of a media collection at home, you could create easier databases with the wizard;
that might be sufficient for home use.
The central table for media addition is the Media table (see Figure 4).
In this table all fields that are directly entered are assumed not to be also in use for other media
with the same content. Duplication should therefore be avoided.
For this reason, planned fields in the table include the title, the ISBN, an image of the cover, and
the year of publication. The list of fields can be extended if required. So, for instance, librarians
might want to include fields for the size (number of pages), the series title, and so on.
The Subtitle table contains the detailed content of CDs. As a CD can contain several pieces of
music, a record of the individual pieces in the main table would require a lot of additional fields
(Subtitle 1, Subtitle 2, etc.) or the same item would have to be entered many times. The Subtitle
table therefore stands in a n:1 relationship to the Media table.
The fields of the Subtitle table are (in addition to the subtitle itself) the sequence number of the
subtitle and the duration of the track. The Length field must first be defined as a time field. In this
way, the total duration of the CD can be calculated and displayed in a summary if necessary.
The authors have a n:m relationship to the media. One item can have several authors, and one
author might have created several items. This relationship is controlled by the rel_Media_Author
table. The primary key of this linking table is the foreign key, formed from the Author and Media
tables. The rel_Media_Author table includes an additional sorting (Author_Sort) of authors, for
example by the sequence in which they are named in the book. In addition, a supplementary label
such as Producer, Photographer and so on is added to the author where necessary.
Category, Mediastyle, Town and Publisher have a 1:n relationship.
For the Category, a small library can use something like Art or Biology. For larger libraries,
general systems for libraries are available. These systems provide both abbreviations and
complete descriptions. Hence both fields appear under Category.
The Mediastyle is linked to the loan period Loantime. For example, video DVDs might on principle
have a loan period of 7 days, but books might be loaned for 21 days. If the loan period is linked to
any other criteria, there will be corresponding changes in your methodology.
The Town table serves not only to store location data from the media but also to store the locations
used in the addresses of users.
Since Publishers also recur frequently, a separate table is provided for them.
The Media table has in total four foreign keys and one primary key, which is used as a foreign key
in two tables, as shown in Figure 4.
Relationships between tables 7
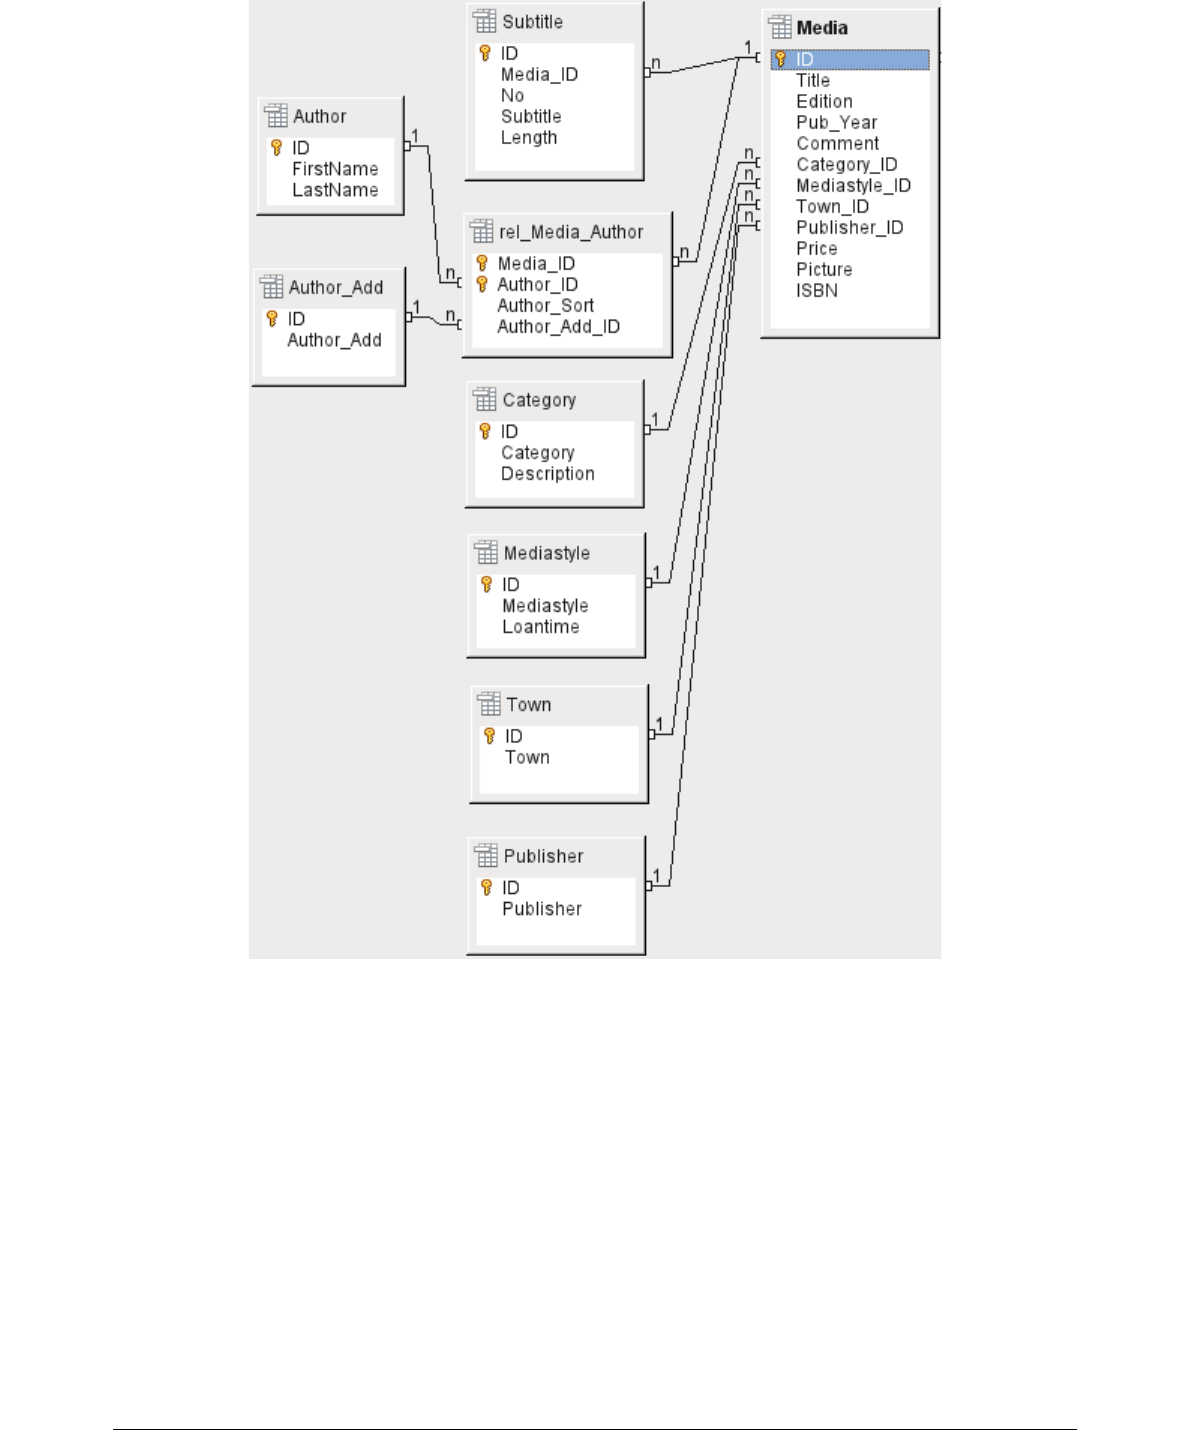
Figure 4: Media addition
Loan table
The central table is Loan (see Figure 5). It is the link between the Media and Reader tables. In
case you need to find out retrospectively who has taken out a book (for example, if someone
notices during the loan process that the book is damaged, or if you wish to make a list of the most
popular media), the Loan_Date in the loan record is not simply deleted during the return process.
Instead a Return_Date is recorded.
Similarly, Reminders are integrated into the loan procedure. Each reminder is separately entered
into the Recall table so that the total number of reminders can be determined.
As well as an extension period in weeks, there is an extra field in the loan record that enables
media to be loaned using a barcode scanner (Media_ID_BC). Barcodes contain, in addition to the
individual Media_ID, a check digit which the scanner can use to determine if the value scanned in
is correct. This barcode field is included here only for test purposes. It would be better if the
8 Tables

primary key of the Media table could be directly entered in barcode form, or if a macro were used
to remove the check digit from the entered barcode number before storage.
Finally we need to connect the Reader to the loan. In the actual reader table, only the name, an
optional lock, and a foreign key linking to the Gender table are included in the plan.
Figure 5: Loan
User administration table
For this table design, two scenarios are envisaged. The chain of tables shown in Figure 6 is
designed for school libraries. Here there is no need for addresses, as the pupils can be contacted
through the school. Reminders do not need to be sent out by post but can be distributed internally.
The Address chain is necessary in the case of public libraries. Here you need to enter data that will
be needed for the creation of reminder letters. See Figure 6.
Figure 6: Readers - a School class chain and an Address chain
Relationships between tables 9

The Gender table ensures that the correct Salutation is used in reminders. The writing of
reminders can then be automated as far as possible. In addition, some given names can be
equally masculine or feminine. Therefore the separate listing of gender is required even when
reminders are written out by hand.
The rel_Reader_Schoolclass table, like the Address table, has a 1:1 relationship with the
Reader table. This was chosen because either the school class or the address might be required.
Otherwise the Schoolclass_ID could be put directly into the pupil table; the same would be true of
the complete content of the address table in a public library system.
A School class usually consists of a year designation and a stream suffix. In a 4-stream school,
this suffix might run from a to d. The suffix is entered in the Class table. The year is in a separate
Grade table. That way, if readers move up a class at the end of each school year, you can simply
change the year entry for everyone.
The Address is also divided. Street is stored separately because street names within an area are
often repeated. Post code and town are separated because there are often several post codes for
a single area and therefore more post codes than towns. So compared with the Address table, the
Postcode table contains significantly fewer records and the Town table even fewer.
How this table structure is put to use is explained further in the Chapter 4, Forms, in this handbook.
Creating tables
Most LibreOffice users will generally use the graphical user interface (GUI) exclusively to create
tables. Direct entry of SQL commands becomes necessary when, for example, a field must
subsequently be inserted at a particular position, or a standard value must be set after the table
has been saved.
Table terminology: The picture below shows the standard division of tables into columns and rows.
Data records are stored in a single row of the table. Individual columns are largely defined by the
field, the type, and the rules that determine if the field can be empty. According to the type, the size
of the field in characters can also be determined. In addition, a default value can be specified to be
used when nothing was entered into the field.
In the Base GUI, the terms for a column are described somewhat differently, as shown below.
Field becomes Field Name, Type becomes Field Type. Field Name and Field Type are entered into
the upper area of the Table Design window. In the lower area you have the opportunity to set,
under the Field properties the other column properties, in so far as they can be set using the GUI.
Limitations include setting the default value of a date field to the actual date of entry. This is
possible only by using the appropriate SQL command (see “Direct entry of SQL commands” on
page 21).
10 Tables

Note
Default values: The term "Default value" in the GUI does not mean what the
database user generally understands as a default value. The GUI displays a certain
value visibly, which is saved with the data.
The default value in a database is stored in the table definition. It is then written into
the field whenever this is empty in a new data record. SQL default values do not
appear when editing table properties.
Creation using the graphical user interface
Database creation using the graphical user interface is explained step by step, using the Media
table as an example.
Launch the table editor by clicking on Create Table in Design View.
1. ID field:
a) In the first column, enter the Field Name ID. Then press the Tab key to move to the
Field Type column. Alternatively you can click with the mouse on the next column to
select it.
b) Integer [INTEGER] should be selected from the list as the field type. The default is
Text [VARCHAR]. Integers can store a number with up to 10 digits. In addition, Integer
is the only type available in the graphical user interface which can be given an
automatically incrementing value.
Creating tables 11

Tip
To rapidly make a selection from the Field Type list using the keyboard, press the
key corresponding to the first letter of your choice. Repeated pressing of this key can
be used to change the selection. For example, pressing D can change your selection
from Date to Date/Time or to Decimal.
c) ID is set as the primary key by clicking with the right mouse button on the green
triangle to the left of the ID row and choosing Primary Key from the context menu. A
key symbol appears before ID.
Note
The primary key serves one purpose only – to uniquely identify the record. Therefore
you can use an arbitrary name for this field. In the example, we have used the
commonly used name ID (identification).
d) Under Field properties for the ID field, AutoValue should be changed from No to Yes.
This causes the primary key to be automatically incremented. In the internal database,
the count begins at 0.
AutoValue can be set for only one field in a table. Choosing AutoValue > Yes
automatically sets this field to be the primary key if a primary key has not been set
already.
12 Tables

2. The next field is Title.
a) The field name Title is entered in the Field Name column.
b) The field type need not be altered here as it is already set to Text [VARCHAR].
c) In the Field properties, the field length must be adjusted. The default length is 100 in
recent LO versions, but should be increased to 250 for media titles.
d) In Field properties, you should change Entry required from No to Yes. A medium
without a title would make no sense.
3. Description could be anything. This column can also be left empty. The description serves
only to explain the field content for people who want later on to view the table definition.
4. For the field Pub_Year, the Small Integer [SMALLINT] type has been chosen. This
can contain an integer with a maximum size of 5 digits. The publication date is not used in
calculations but making it an integer ensures that it will not contain any alphabetic
characters.
5. For the Category_ID field, we have chosen the Integer type. In the Category table, the
primary key should have this field type, so what is entered here as a foreign key must have
the same type. This also applies to the following foreign keys Mediastyle_ID, Town_ID and
Publisher_ID.
Creating tables 13

6. For the Price field, we use the [NUMERIC] or [DECIMAL] type. Both these field types
can contain values with a decimal point. Under Field Properties, we set a length of 6
characters. This should be sufficient for the prices of our media.
a) The number of decimal places is set to 2. This provides a maximum price of 9999.99
since the decimal point itself is not included in the count.
b) It is not necessary to specify the $ character in the format, as a formula will handle
this.
7. For the ISBN field, we use the [NUMERIC] type. This can be set exactly to the correct field
length for an ISBN. ISBNs are 10 or 13 characters long. They will be stored as numbers
without a separator. The length is set to a maximum of 13 characters. The number of
decimal places is set to zero.
8. Save the table with the name Media.
We have now created the main table for the example database. All the other tables can be created
in a similar way. Be careful that the field types and field properties match what is going to be stored
in those fields. This is different from a spreadsheet, in which a column can contain a mixture of
properties.
14 Tables

Note
The order of fields in the table can be changed only until the table is first saved in
the graphical user interface. When data is subsequently entered directly into the
table, the field order is fixed.
However, the order can still be freely changed in queries, forms and reports.
Primary keys
If no primary key is set when the table is designed, you will be asked when saving the table
whether a primary key should be created. This indicates that a significant field is lacking in the
table. Without a primary key, the HSQLDB database cannot access the table. This field is usually
named «ID» and given the type INTEGER with AutoValue > Yes to automatically increment the
value. Clicking Yes in the primary key dialog will automatically create a primary key field. Clicking
No or Cancel in the primary key dialog will allow you to designate an existing field as the primary
key, by right-clicking on the green arrow at the left of the corresponding field.
You can also use a combination of fields as your primary key. The fields must be declared as
primary key together (hold the control or shift key down). Then a right click makes the combination
of all highlighted fields the primary key.
Note
If you do not set a primary key when saving the table in the graphical user interface,
you cannot do so later using this interface (Bug 61547). This bug has been fixed for
versions later than 4.0.5.
Instead you must create the primary key using Tools > SQL:
ALTER TABLE "Table_name" ADD PRIMARY KEY ("Field_name")
If information is imported into this table from others (for example an address database with
externally stored postcodes and towns) a field with the same data type as the primary key of the
other table must be included. Suppose the Postcode table has as its primary key a field called ID
with the type ‘Tiny Integer’. The Addresses table must then have a field Postcode_ID with the ‘tiny
Integer’ type. What is entered into the Addresses table is always the number which serves as the
primary key for the given location in the Postcode table. This means that the Addresses table now
has a foreign key in addition to its own primary key.
A fundamental rule for naming fields in a table is that no two fields can have the same name.
Therefore you cannot have a second field called “ID” occurring as a foreign key in the Address
table.
The field type can be altered only to a limited extent. Increasing a property (length of a text field,
greater size in a number) is always allowed, as all values already entered will match the new
conditions. Decreasing a property is more likely to cause problems and can lead to a loss of data.
Time fields in tables cannot be created to contain fractions of a second. For that, you need a
Timestamp field. However the graphical user interface only allows you to create a Timestamp field
with date, hour, minute and second. You will need to modify this field afterward using Tools->SQL.
ALTER TABLE "Table_name" ALTER COLUMN "Field_name" TIMESTAMP(6)
The parameter “6” makes the Timestamp field capable of storing fractions of a second.
Formatting fields
Formatting presents the values in the database to the user and allows the input of values
depending on the input conventions normal in that country. Without formatting, decimal places are
marked off with a dot where most European countries use a comma (4.21 instead of 4,21). Date
values are presented in the form 2014-12-22. In setting up formatting, you must have regard for
local standards.
Creating tables 15

Formatting only provides a representation of the contents. A date represented by a two-character
year number is still stored with a four-character year. If a field is created for a number with two
decimal places, like the overdue charge (called overdraft) in the following example, the number is
stored with two decimal places, even if the formatting has mistakenly been set not to show them. A
number with two decimal places can even be entered into a field formatted without decimal places.
The decimal part appears to disappear at input but becomes visible if the formatting is bypassed.
To display just a time, not a date, forms can be formatted to show only the necessary information,
hiding the rest of the Timestamp field. In the case of storing time from a stopwatch for example, the
minutes, seconds and fractions of a second in a Timestamp can be displayed by using MM:SS.00
in the display format. A format without the date can be set later in “Forms” using the formatted field,
but not directly into the Timestamp field.
The formatting of fields when the table is created or subsequently, via the field properties, uses a
separate dialog:
The button next to Field Properties > Format example opens the dialog for changing the format.
16 Tables

When creating currency fields, take care that the numeric field has two decimal places set.
Formatting can be carried out when creating the table in the graphical user interface so as to use
the appropriate currency during input. This only affects input into the table and into queries that use
the input value without recalculation. In forms, the currency designation must be separately
formatted.
Note
Base saves the formatting of tables when the fields are created or during data entry
if the column formats are modified by right-clicking on the column headings. Column
widths on the input screen are also saved when modified during data entry.
In queries, forms, or reports, the display formatting can be modified as needed.
In the case of fields that are to contain a percentage, take note that 1% must be stored as 0.01.
Writing percentages thus requires at least two decimal places. If fractional percentages such as
3.45 need to be stored, the stored numeric value requires four decimal places.
Note
A form with a table control may display within it text fields that contain only a ‘0’ and
not the expected content. It is useful in such cases to examine the formatting of the
table. If the format example for a text field has “0” instead of “@”, the format is
wrong. If it is impossible to change the formatting of the field using a dialog, it can be
helpful to check the language. You can set different languages. Changing the
language to another one and then back to Default – English(UK) will change “0”
back into “@” in the formatting. This will result in text being shown again in the table
control on the form.
This bug is cleared in versions of LibreOffice from 4.3.2.
Creating tables 17

Creating an index
Sometimes it is useful to index other fields or a combination of other fields in addition to the
primary key. An index speeds up searching and can also be used to prevent duplicate entries.
Each index has a defined sort order. If a table is displayed without sorting, the sort order will be
according to the content of the fields specified in the index.
Figure 7: Access to Index Design
Open the table for editing by right-clicking and using the context menu. Then you can access index
creation with Tools > Index Design.
Figure 8: Creating a new Index
On the Indexes dialog (Figure 8), click New Index to create an index in addition to the primary key.
The new index is automatically given the name index1. The Index field specifies which field or
fields are to be used for this index. At the same time you can choose the Sort order.
18 Tables
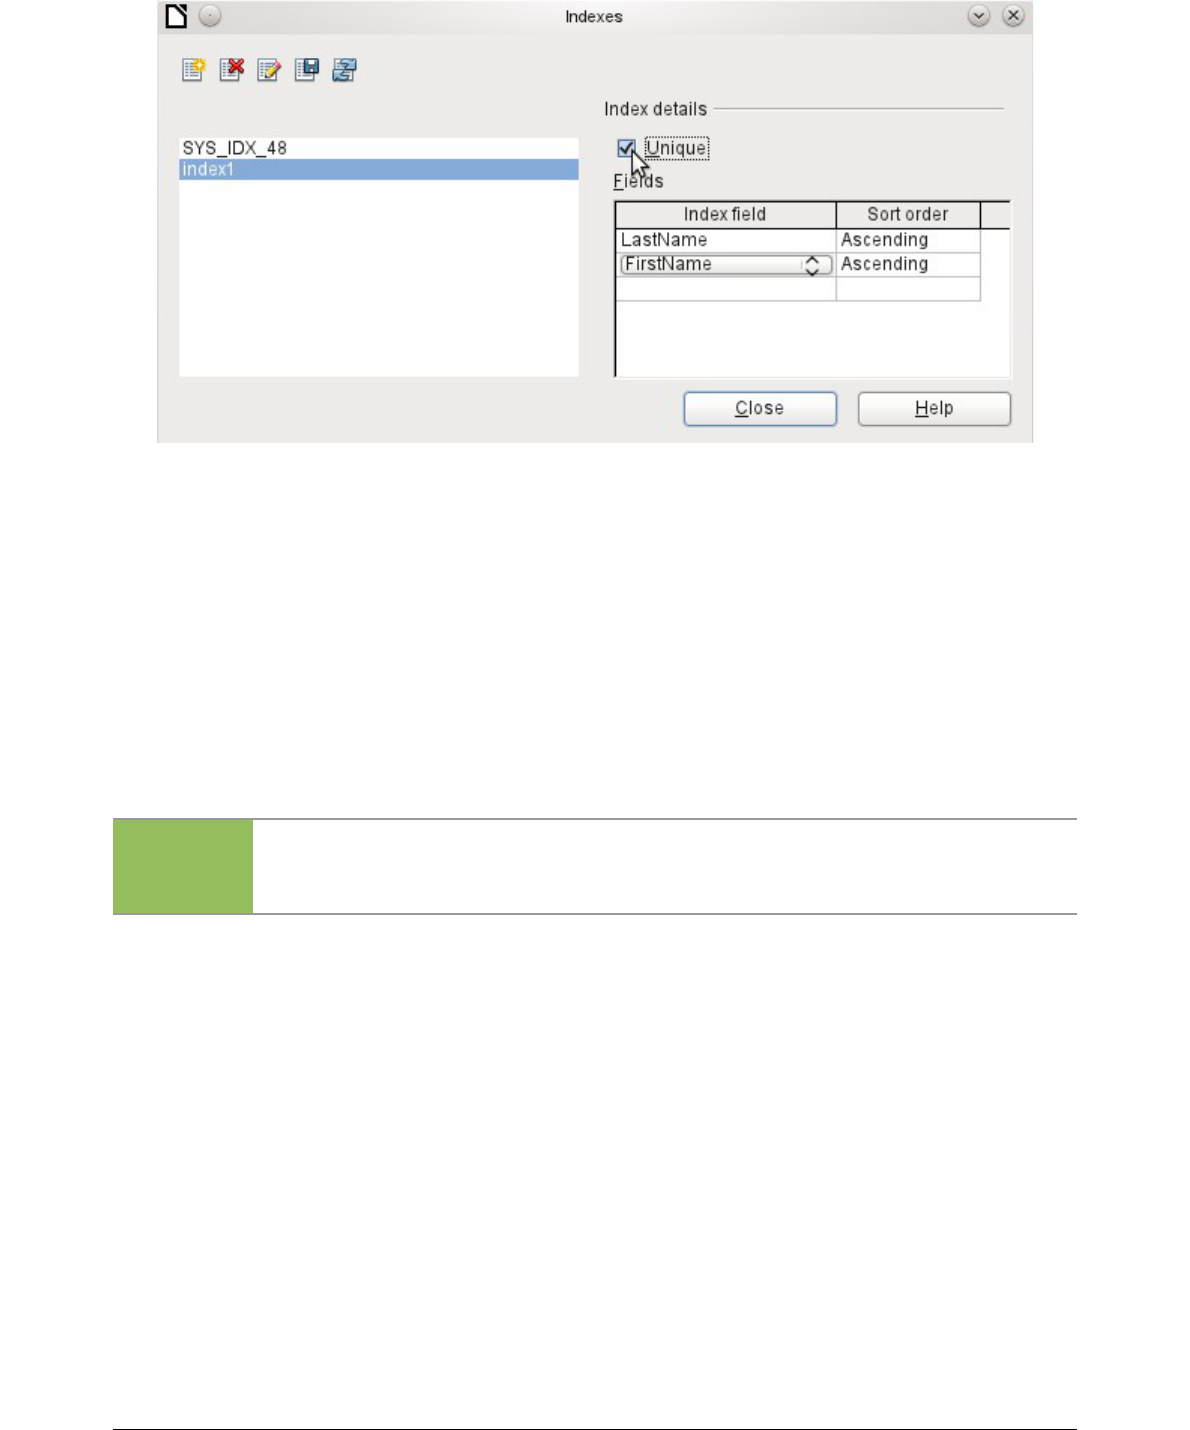
Figure 9: The Index is defined as Unique.
In principle, an index can also be created from table fields that do not contain unique values.
However in Figure 9, the Index detail Unique has been checked, so that the LastName field
together with the FirstName field can only have entries that do not already occur in that
combination. So, for example, Robert Miller and Robert Maier are possible, and likewise Robert
Miller and Eva Miller.
If an index is created for one field only, the uniqueness applies to that field. Such an index is
usually the primary key. In this field each value may occur only once. Additionally, in the case of
primary keys, the field cannot be NULL under any circumstances.
An exceptional circumstance for a unique index is when there is no entry into a field (the field is
NULL). Since NULL can have any arbitrary value, an index using two fields is always allowed to
have the same entry repeatedly in one of the fields as long as there is no entry in the other.
Note
NULL is used in databases to designate an empty cell, one that contains nothing.
No calculation is possible using a NULL field. This contrasts with spreadsheets, in
which empty fields automatically contain the value 0 (zero).
Example: In a media database, the media number and the loan date are entered when the item is
loaned out. When the item is returned, a return date is entered. In theory, an index using the fields
Media_ID and ReturnDate could easily prevent the same item from being loaned out repeatedly
without the return date being noted. Unfortunately this will not work because the return date initially
has no value. The index will prevent an item from being marked as returned twice with the same
date but it will do nothing else.
Problems when modifying tables
It is best to create tables complete with all their required settings, so that changes in table
configuration are not needed at a later time. When properties of fields (field name, mandatory
entry, etc.) are changed later, this can lead to error messages which are not due to the GUI but to
an attempt to modify the underlying database in an undesirable way.
Creating tables 19

In this case the Amount field is to be reset to “Entry required=yes”. The warning symbol notifies us
that this change can lead to loss of data. A simple change is not possible because there may
already be records that have no entry in this field.
Clicking “Yes” leads to a further error notice, as the structure of the database does not allow this
field to be deleted. Clicking on “No” cancels the entire operation. The “More” option is provided
whenever possible in order to give the user additional information on solving the problem:
20 Tables

The error notice Column is referenced in constraint or view means:
The column with the field name “Amount” is referred to in another part of the database. This could
be a constraining definition or a table view which was created by some user after the table itself
was created. The above illustration shows that the name of the constraint or view is
“View_Checkout_with_Transfers”. This makes it clear to the user whereabouts in the database
changes need to be made. For example the SQL code for the view could first be saved as a query,
and then the view could be destroyed and a new attempt made to recreate the field.
In this case, the name of the constraint “Account not equal to Transferaccount” leads us to the
definition for that constraint. The condition is that the value in the field named “Account_ID” is not
allowed to be the same as the value in the field “TransferAccount_ID”. The column can only be
altered if this condition is removed.
Now if a further error occurs, this is most likely to be caused by the corresponding field being linked
to a field in another table by a defined relationship. In this case, the link must be broken by using
Tools > Relationships before the change can be carried out.
Limitations of graphical table design
The sequence of fields in a table cannot be changed after the database has been saved. To
display a different sequence requires a query.
Only the entry of direct SQL commands can insert a field into a specific position in the table.
However, fields already created cannot be moved by this method.
The properties of the tables must be set at the beginning: for example which fields must not be
NULL and which must contain a standard value (Default). These properties cannot subsequently
be changed using the GUI.
The default values you are able to set in the GUI are not as powerful as the possible default values
within the database itself. For example, you cannot define the default for a date field as being the
date of entry. That is only possible with directly entered SQL commands.
Direct entry of SQL commands
To enter SQL commands directly, go to Tools > SQL.
Creating tables 21

Commands are entered in the upper area of the window; in the lower (Status) area, the success or
the reason for failure is shown. The results from queries can be displayed in the Output box if the
checkbox is selected.
Figure 10: Dialog for direct entry of SQL commands
A summary of the possible commands for the built-in HSQLDB engine can be found at
http://www.hsqldb.org/doc/1.8/guide/ch09.html. The contents are described in the following
sections. Some commands only make sense when dealing with an external HSQLDB database
(Specify User, etc.). Where necessary, these are dealt with in the section “Working with external
HSQLDB” in the Appendix to this handbook.
22 Tables

Note
LibreOffice is based on Version 1.8.0 of HSQLDB. The currently available server
version is 2.3. The functions of the new version are more extensive. They can be
reached at http://hsqldb.org/web/hsqlDocsFrame.html. The description of Version
1.8 is now at http://www.hsqldb.org/doc/1.8/guide/ . A further description is given in
the installation packages for HSQLDB, which can be downloaded from
http://sourceforge.net/projects/hsqldb/files/hsqldb/.
Table creation
A simple command to create a usable table is:
CREATE TABLE "Test" ("ID" INT PRIMARY KEY, "Text" VARCHAR(50));
Breakdown of this command:
CREATE TABLE "Test": Creates a table with the name "Test".
( ): the specified field names, field types and options are inserted between parenthesis.
"ID" INT PRIMARY KEY, "Text" VARCHAR(50): Field name "ID" with the numeric type
integer as the primary key, field name "Text" with the text type variable text length and the text size
limited to 50 characters.
Parameters for the CREATE command:
CREATE [MEMORY | CACHED | [GLOBAL] TEMPORARY | TEMP | TEXT] TABLE
"Table name" ( <Field definition> [, ...] [,
<Constraint Definition>...] ) [ON COMMIT {DELETE | PRESERVE} ROWS];
[MEMORY | CACHED | [GLOBAL] TEMPORARY | TEMP | TEXT]:
Specifies the location of the newly created table. The default setting is MEMORY: HSQLDB
creates all tables in core memory. This setting also applies to the tables that are written into the
embedded database by LibreOffice Base. Another possibility would be to write the tables to the
hard drive and use memory only to buffer access to the hard drive (CACHED).
Note
CREATE TEXT TABLE "Text" ("ID" INT PRIMARY KEY, "Text" VARCHAR(50));
Creates a text table in HSQLDB. Now it must be linked to an external text file (for
example a *.csv file):
SET TABLE "Text" SOURCE "Text.csv";
Naturally the Text.csv file must have corresponding fields in the correct order. When
creating the link, various additional options can be selected. For details see
http://hsqldb.org/doc/guide/ch09.html#set_table_source-section
Text tables are not write-protected against other programs. It can therefore happen
that another program or user alters the table just as Base is accessing it. Text tables
are used mainly for data exchange between different programs.
Tables in TEXT format (such as CSV) are not writable in internal databases that are set up
purely in MEMORY, while Base cannot access TEMPORARY or TEMP tables. The SQL commands
are carried out in this case but the tables are not displayed (and therefore cannot be deleted)
using the GUI, and data entered via SQL is likewise not visible to the query module of the GUI,
unless the automatic deletion of the contents after the final commit is prevented (with ON
COMMIT PRESERVE ROWS). Any request in this case shows a table without any contents.
Tables built directly with SQL are not immediately displayed. You must either use View >
Refresh Tables or simply close the database and then reopen it.
<Field definition>:
"Field name" Data type [(Number of characters[,Decimal places])]
[{DEFAULT "Default value" | GENERATED BY DEFAULT AS IDENTITY (START
Creating tables 23

WITH <n>[, INCREMENT BY <m>])}] | [[NOT] NULL] [IDENTITY] [PRIMARY
KEY]
Allows default values to be included in the field definition.
For text fields, you can enter text in single quotes or NULL. The only SQL function allowed is
CURRENT_USER. This only makes sense if HSQLDB is being used as an external Server
database with several users.
For date and time fields, a date, a time, or a combination of the two can be entered in single
quotes or else NULL. You must ensure that the date follows the American conventions (yyyy-
mm-dd), that time has the format hh:mm:ss, and that a combined date/time value has the
format yyyy-mm-dd hh:mm:ss.
Allowed SQL functions:
for the current date CURRENT_DATE, TODAY, CURDATE()
for the current time CURRENT_TIME, NOW, CURTIME()
for the current data time stamp CURRENT_TIMESTAMP, NOW.
For boolean Fields (yes/no) the expressions FALSE, TRUE, NULL can be entered. These
must be entered without single quotes.
For numeric fields, any valid number in the range, or NULL is possible. Here too, if you enter
NULL, do not use quotes. When entering decimals, make sure that the decimal point is a dot
(period) and not a comma.
For binary fields (images, etc.) any valid hexadecimal string in single quotes or NULL is
possible. A hexadecimal example string is: '0004ff', which represents 3 bytes, first 0, then 4 and
finally 255 (0xff). As binary fields in practice need only be entered for images, you need to know
the binary code of the image that is to serve as a default.
Note
Hexadecimal system: Numbers are based on 16. A mixed system consisting of the
numbers 0 to 9 and the letters a to f provides 16 possible digits for each column.
With two columns, you can have 16*16=256 possible values. This corresponds to 1
Byte (2
8
).
NOT NULL: The field value cannot be NULL. This condition can only be given in the field
definition.
Example:
CREATE TABLE "Test" ("ID" INT GENERATED BY DEFAULT AS IDENTITY (START WITH 10),
"Name" VARCHAR(50) NOT NULL, "Date" DATE DEFAULT TODAY);
A table called “Test” is created. The key field “ID” is defined as AutoValue, with values starting
at 10. The input field “Name” is a text field with a maximum size of 50 characters. It must not be
empty. Finally we have the date field “Date” which by default stores the current date, if no other
date is entered. This default value only becomes effective when a new record is created.
Deleting a date in an existing record leaves the field empty.
<Constraint definition>:
[CONSTRAINT "Name"]
UNIQUE ( "Field_name 1" [,"Field_name 2"...] ) |
PRIMARY KEY ( "Field_name 1" [,"Field_name 2"...] ) |
FOREIGN KEY ( "Field_name 1" [,"Field_name 2"...] )
REFERENCES "other_table_name" ( "Field_name_1" [,"Field_name 2"...])
[ON {DELETE | UPDATE}
{CASCADE | SET DEFAULT | SET NULL}] |
CHECK(<Search_condition>)
24 Tables

Constraints define conditions that must be fulfilled when data is entered. Constraints can be
given a name.
UNIQUE ("Field_name"): the field value must be unique within that field
PRIMARY KEY ("Field_name"): the field value must be unique and cannot be NULL
(primary key)
FOREIGN KEY ("Field_name") REFERENCES <"other_table_name">
("Field_name"): The specified fields of this table are linked to the fields of another table.
The field value must be tested for referential integrity as foreign keys; that is, there must be a
corresponding primary key in the other table, if a value is entered here.
[ON {DELETE | UPDATE} {CASCADE | SET DEFAULT | SET NULL}]: In the case of a
foreign key, this specifies what is to happen if, for example, the foreign record is deleted. It
makes no sense, in a loan table for a library, to have a user number for which the user no
longer exists. The corresponding record must be modified so that the relationship between the
tables remains valid. Usually the record is simply deleted. This happens if you select ON
DELETE CASCADE.
CHECK(<Search_condition>): Formulated as a WHERE condition, but only for the current
record.
CREATE TABLE "Time_measurement" ("ID" INT PRIMARY KEY, "Start_time" TIME,
"End_time" TIME, CHECK ("Start_time" <= "End_time"));
The CHECK condition excludes the input of an end time value earlier than the start time. An
attempt to do this produces an error message similar to:
Check constraint violation SYS_CT_357 table: Time_measurement …
The search constraint is assigned a name that is not very informative. Instead, the name could
be defined in the table definition:
CREATE TABLE "Time_measurement" ("ID" INT PRIMARY KEY, "Start_time" TIME,
"End_time" TIME, CONSTRAINT "Start_time<=End_time" CHECK ("Start_time" <=
"End_time"));
This gives a somewhat clearer error message in that the name of the constraint involved then
appears.
Constraints must be honored when establishing relationships between tables or the indexing
for particular fields. The constraints are established using the «CHECK» condition, in the GUI
using Tools > Relationships, and also in indexes created in Table design under Tools >
Index design.
[ON COMMIT {DELETE | PRESERVE} ROWS]:
The content of tables of the type TEMPORARY or TEMP are erased by default when you have
finished working with a particular record (ON COMMIT DELETE ROWS). This allows you to
create temporary records, which contain information for other actions to be carried out at the
same time.
If you want a table of this type to contain data available for a whole session (from opening a
database to closing it), choose ON COMMIT PRESERVE ROWS.
Table modification
Sometimes you might wish to insert an additional field into a particular position in the table.
Suppose you have a table called Addresses with fields ID, Name, Street, and so on. You realize
that perhaps it would be sensible to distinguish first names and last names.
ALTER TABLE "Addresses" ADD "FirstName" VARCHAR(25) BEFORE "Name";
Creating tables 25

ALTER TABLE "Addresses": Alter the table with the name "Addresses".
ADD "FirstName" VARCHAR(25): insert the field "FirstName" with a length of 25 characters.
BEFORE "Name": before the field "Name".
The possibility of specifying the position of additional fields after the creation of the table is not
available in the GUI.
ALTER TABLE "Table_name" ADD [COLUMN] <Field_definition> [BEFORE
"already_existing_field_name"];
The additional designation COLUMN is not necessary in cases where no alternative choices are
available.
ALTER TABLE "Table_name" DROP [COLUMN] "Field_name";
The field "Field name" is erased from the table Table_name. However this does not take place if
the field is involved in a view or as a foreign key in another table.
ALTER TABLE "Table_name" ALTER COLUMN "Field_name" RENAME TO
"New_field_name"
Changes the name of a field.
ALTER TABLE "Table_name" ALTER COLUMN "Field_name" SET DEFAULT
<Standard value>};
Sets a specific default value for the field. NULL removes an existing default value.
ALTER TABLE "Table_name" ALTER COLUMN "Field_name" SET [NOT] NULL
Sets or removes a NOT NULL condition for a field.
ALTER TABLE "Table_name" ALTER COLUMN <Field definition>;
The field definition corresponds to the one from the Table creation with the following restrictions:
• The field must already be a primary key field to accept the property IDENTITY.
IDENTITY means, that the field has the property AutoValue. This is possible only for
INTEGER or BIGINT fields. For these field type descriptions, see the Appendix to this
handbook.
• If the field already has the property IDENTITY but it is not repeated in the field definition,
the existing IDENTITY property is removed.
• The default value will become that specified in the new field definition. If the definition of the
default value is left blank, any default already defined is removed.
• The property NOT NULL continues into the new definition, if not otherwise defined. This is
in contrast to the default value.
• In some cases, depending on the type of modification, the table must be empty in order for
the change to occur. In all cases the change will have effect only if it is possible in principle
(for example a change from NOT NULL to NULL) and the existing values can all be
translated (for example a change from TINYINT to INTEGER).
ALTER TABLE "Table_name" ALTER COLUMN "Field_name" RESTART WITH
<New_field_value>
This command is used exclusively for an IDENTITY field. It determines the next value for a field
with the Autovalue function set. It can be used, for example, when a database is initially used with
test data, and subsequently provided with real data. This requires the contents of the tables to be
deleted and a new value such as "1" to be set for the field.
ALTER TABLE "Table_name"
ADD [CONSTRAINT "Condition_name"] CHECK (<Search_condition>);
This adds a search condition introduced by the word CHECK. Such a condition will not apply
retrospectively to existing records, but it will apply to all subsequent changes and newly entered
records. If a constraint name is not defined, one will be assigned automatically.
26 Tables

Example:
ALTER TABLE "Loan" ADD CHECK
(IFNULL("Return_Date","Loan_Date")>="Loan_Date")
The Loan table needs to be protected from input errors. For example, you must prevent a return
date being given that is earlier than the loan date. Now if this error occurs during the return
process, you will get an error message Check constraint violation …
ALTER TABLE "Table_name"
ADD [CONSTRAINT "Constraint_name"] UNIQUE ("Field_name1",
"Field_name2" ...);
Here a condition is added that forces the named fields to have different values in each record. If
several fields are named, this condition applies to the combination rather than the individual fields.
NULL does not count here. A field can therefore have the same value repeatedly without causing
any problems, if the other field in each of the records is NULL.
This command will not work if there is already a UNIQUE condition for the same field combination.
ALTER TABLE "Table_name"
ADD [CONSTRAINT "Constraint_name"] PRIMARY KEY ("Field_name1",
"Field_name2" ...);
Adds a primary key, optionally with a constraint, to a table. The syntax of the constraint is the same
as when a table is created.
ALTER TABLE "Table_name"
ADD [CONSTRAINT "Constraint_name"] FOREIGN KEY ("Field_name1",
"Field_name2" ...)
REFERENCES "Table_name_of_another_table" ("Field_name1_other_table",
"Field_name2_other_table" ...)
[ON {DELETE | UPDATE} {CASCADE | SET DEFAULT | SET NULL}];
This adds a foreign key (FOREIGN KEY) to the table. The syntax is the same as when a table is
created.
The operation will terminate with an error message, if any value in the table does not have a
corresponding value in the table containing that primary key.
Example: The Name and Address tables are to be linked. The Name table contains a field with
the name Address_ID. The value of this should be linked to the field ID in the Address table. If the
value "1" is found in Address_ID but not in the ID field of the Address table, the link will not work. It
will not work either if the two fields are of different types.
ALTER TABLE "Table_name" DROP CONSTRAINT "Constraint_name";
This command removes the named constraint (UNIQUE, CHECK, FOREIGN KEY) from a table.
ALTER TABLE "Table_name" RENAME TO "new_table_name";
Finally this command changes only the name of a table.
Note
When you change a table using SQL, the change affects the database but is not
necessarily apparent or effective in the GUI. When the database is closed and
reopened, the changes appear in the GUI too.
Changes are also displayed if you choose View > Refresh Tables in the table
container.
Deleting tables
DROP TABLE "Table name" [IF EXISTS] [RESTRICT | CASCADE];
Deletes the table "Table name".
Creating tables 27

IF EXISTS prevents an error occurring if this table does not exist.
RESTRICT is the default arrangement and need not be explicitly chosen; it means that deletion
does not occur if the table is linked to another table by the use of a foreign key or there is an active
view of this table. Queries are not affected as they are not stored within HSQLDB.
If instead you choose CASCADE, all links to the table "Table_name" are deleted. In the linked
tables, all foreign keys are set to NULL. All views referring to the named table are also completely
deleted.
Linking tables
In principle you can have a database without links between tables. The user must then ensure
during data entry, that the relationships between the tables remain correct. This usually occurs
through the use of suitable input forms that manage this.
Deleting records in linked tables is not a simple matter. Suppose you wish to delete a particular
street from the Street table in Figure 6, where this field is linked with the Address table as a foreign
key in that table. The references in the Address table would disappear. The database does not
allow this, once the relationship has been created. In order to delete the Street, the precondition
must be fulfilled, that it is no longer referenced in the Address table.
Basic links are made using Tools > Relationships. This creates a connection line from the primary
key in one table to the defined foreign key in the other.
You may receive the following error message when creating such a link:
This message shows the error that occurred and the internal SQL command that caused the error.
Column types do not match in statement—As the SQL command is displayed as well, the
reference is clearly to the columns Address.str_ID and Street.ID. For test purposes one of these
fields was defined as an Integer, the other as Tiny Integer. Therefore no link could be created since
the one field cannot have the same value as the other.
28 Tables

In this case the column types match. The SQL statement is the same as in the first example. But
again there is an error:
Integrity constraint violation – no parent 1, table: Address... —The integrity of the relationship
could not be established. In field “str_ID” of the Address table, there is a number 1, which is not
present in the field “ID” of the Street table. The parent table here is Street, since its primary key is
the one that must exist. This error is very common, when two tables are to be linked and some
fields in the table with the prospective foreign key already contain data. If the foreign key field
contains an entry that is not present in the parent table (the table containing the primary key), this
is an invalid entry.
If the linking is carried out successfully and subsequently there is an attempt to enter a similarly
invalid record into the table, you get the following error message:
Again this is an integrity violation. Base refuses to accept the value 1 for the field str_ID after the
link has been made because the Street table contains no such value in the ID field.
Figure 11: Links can be edited with a right-click
The properties of a link can be edited so that the deletion of a record from the Street table will
simultaneously set to NULL the corresponding entries in the Address table.
The properties shown in Figure 11 always relate to an action linked to the change in a record from
the table containing the corresponding primary key. In our case this is the Street table. If the
primary key of a record in this table is altered (Update), the following actions might take place.
Linking tables 29

No action
Changing the primary key Street.ID is not allowed in this case, as it would break the
relationship between the tables.
Update cascade
If the primary key Street.ID is changed, the foreign key is automatically changed to its new
value. This ensures that the linkage is not damaged. For example, if a value is changed from 3
to 4, all records from the Address table that contain the foreign key Address.Street_ID with the
value 3, have it changed to 4.
Figure 12: Editing the properties of a relationship
Set null
All records which contain this particular primary key will now have no entry in the foreign key
field Address.Street_ID; the field will be NULL.
Set default
If the primary key Street_ID is changed, the value of Address.Street_ID originally linked to it is
set to the previously defined default value. For this purpose we need an unambiguous
definition of a default value. The LibreOffice Base GUI up to Version 3.5 does not seem to
provide this. If the default is set using the SQL statement:
ALTER TABLE "Address" ALTER COLUMN "Street_ID" SET DEFAULT 1;
the link definition ensures that the field will return to this value in the case of an Update. So if
the primary key in the Street table is changed, the corresponding foreign key in the Address
table will be set to 1. This is useful when a record is required to have a street field, in other
words this field cannot be NULL. But be careful! If 1 is not in use, you will have created a link to
a non-existent value. In this case HSQLDB seems to have been designed without due thought.
It is therefore possible to destroy the integrity of the relationship.
30 Tables

Attention
If the default value in a foreign key field is not linked to a primary key of the foreign
table, a link to a value would be created that isn't possible. The referential integrity of
the database would be destroyed.
It would be better not to use the possibility to set the value to default.
If a record is deleted from the Street table, the following options are available.
No Action
No action takes place. If the requested deletion affects a record in the Address table, the
request will be refused.
Cascading Delete
If a record is deleted from the Street table and this affects a record in the Address table, that
record will also be deleted.
That might seem strange in this context but there are other table structures in which it makes a
lot of sense. Suppose you have a table of CDs and a table which stores the titles on these
CDs. Now if a record in the CD table is deleted, many titles in the other table have no meaning
as they are no longer available to you. In such cases, a cascading deletion makes sense. It
means that the user does not need to delete all these titles before deleting the CD from the
database.
Set to Null
This is the same as for the update option.
Set to Default
This is the same as for the update option and requires the same precautions.
Tip
The No Action option should be avoided in most cases in order to avoid displaying
error messages from the database to the user, since these may not always be
comprehensible to the user.
In Tools > Relationships, dragging with the mouse creates foreign keys that refer to a single field
in another table. To link to a table that has a composite primary key, go to Tools > Relationships,
then Insert > New Relation, or use the corresponding button. A dialog appears for editing the
properties of a relationship with a free choice of available tables.
Entering data into tables
Databases that consist of only a single table usually do not require an input form unless they
contain a field for images. However as soon as a table contains foreign keys from other tables,
users must either remember which key numbers to enter or they must be able to look at the other
tables simultaneously. In such cases, a form is useful.
Entry using the Base GUI
Tables in the table container are opened by double-clicking them. If the primary key is an
automatically incrementing field, one of the visible fields will contain the text AutoValue. No entry is
possible into the AutoValue field. Its assigned value can be altered if required, but only after the
record has been committed.
Entering data into tables 31

Figure 13: Entry into tables – Hiding columns
Figure 14: Entry into tables – Unhiding columns
Individual columns in the Table Data View can be hidden. For example, if the primary key field
does not need to be visible, this can be specified in the table in data entry view by right-clicking on
the column header. This setting is stored with the GUI. The column continues to exist in the table
and can always be made visible again.
Entry into the table usually takes place from left to right using the keyboard with the Tab or Enter
keys. You can also use the mouse.
When you reach the last field of a record, the cursor automatically jumps to the next record. The
previous entry is committed to storage. Additional storage using File > Save is not necessary and
indeed not possible. The data is already in the database.
Caution
For the HSQLDB, data is in working memory. It will only be transferred to the hard
drive when Base is closed (unfortunately from the viewpoint of data security). If Base
for some reason does not close down in an orderly fashion, this can lead to loss of
data.
If no data is entered into a field that has been previously defined during table design as mandatory
(NOT NULL), the appropriate error message is displayed:
Attempt to insert null into a non-nullable column …
The corresponding column, the table and the SQL command (as translated by the GUI) are also
displayed.
Changing a record is easy: find the field, enter a different value, and leave the row again.
To delete a record, select the row by clicking its header (the grey area to the left), right-click and
choose Delete Rows.
There is a method, rather well hidden, to copy complete rows. For this to work, the primary key of
the table must be defined as AutoValue.
32 Tables

First, the row header is highlighted with the left mouse button. Next, hold down the button and drag
the mouse. The cursor will change to a symbol with a + sign. This means that the record is to be
copied. As soon as this symbol appears, the mouse button can be released.
The record with the primary key ‘1’ is inserted as a new record with the new primary key ‘9’.
If the control or shift key is used to highlight a group of records, these will be copied as a group.
Tip
The column headers can be dragged to a suitable width for input. If this is done in a
table, Base automatically saves the new column width in the table.
The column widths in tables affect those in queries. If the columns in a query are too
narrow, widening them will have only a temporary effect. The new width will not be
saved. It is better to widen the column in the table so that it will appear properly in
queries without the need to resize.
The Sort, Search, and Filter functions are very useful for retrieving particular records.
Entering data into tables 33

Sorting tables
Figure 15: Quick Sort
The A→Z and Z→A buttons allow for quick sorting. First, select a field. Then, click on the button
corresponding to ascending or descending sort, and the data is sorted by that column. The figure
shows a descending sort by the Title field.
Quick sort will only sort by one column. To sort by several columns simultaneously, a more
advanced sort function is provided to the left of the quick sort buttons:
Figure 16: Sorting by more than one column
The field name of the column and the current sort order are selected. If a previous quick sort has
been carried out, the first row will already contain the corresponding field name and sort order.
Searching tables
The “Find Record” button is a simple method to locate records in a large table. However, the
search function is very slow for large databases, as the search does not use a SQL command
within the database. For a quicker search, instead of using “Find Record”, use a query. To
eliminate frequent modification of the query, it can be designed to run using parameters. See
Chapter 6, Queries, in the section “Using Parameters in Queries”.
34 Tables

Tip
Before you search, make sure the columns you will be searching are wide enough to
show correctly the records that you will find. The search window remains in the
foreground and you will not be able to correct the settings for column width in the
underlying table. To reach the table, you must break off the search.
The “Find Record” button automatically populates the search term with the contents of the field
from which it was invoked.
To make the search effective, the search area should be limited as far as possible. It would be
pointless to search for the above text from the Title field in the Author field. Instead, the field name
Title is already suggested as the single Field name.
Further settings for the search can make things easier through specific combinations. You can use
the normal SQL placeholders ("_" for a variable character, "%" for an arbitrary number of variable
characters, or "\" as an escape character to enable these special characters themselves to be
searched for).
Regular expressions are described in detail in LibreOffice Help. Apart from that, the Help available
for this module is rather sparse.
Figure 17: Entry mask for a Record search
Entering data into tables 35

Figure 18: Limiting the similarity search
The similarity search function is useful when you need to exclude spelling mistakes. The higher the
values that you set, the more records will be shown in the final list.
This search module is most suitable for people who know, from regular use, exactly how to achieve
a given result. Most users are more likely to succeed in finding records by using a filter.
Chapter 4 of this handbook describes the use of forms for searching, and how the use of SQL and
macros can accomplish a keyword search.
Filtering tables
You can filter a table quickly by using the AutoFilter. Place the cursor in a field, and one click on
the icon causes the filter to take over the content of this field. Only those records are shown for
which the chosen field has the same content. The figure below shows filtering according to an
entry in the Pub_Year column.
The filter is active, as shown by the filter icon with a green check mark. The filter symbol is shown
pressed in. This button is a toggle, so if it is clicked again, the filter continues to exist, but all
records are now shown. So, if you want, you can always return to the filtered state.
Clicking on the Remove Filter/Sort icon at the extreme right causes all existing filters and sorts to
be removed. The filters become inactive and can no longer be recovered with their old values.
Tip
You can still enter records normally into a filtered table or one that has been
restricted by a search. They remain visible in the table view until the table is updated
by pressing the Refresh button.
36 Tables

The Standard Filter icon opens a dialog in which you can filter using several simultaneous criteria,
similar to doing a sort. If AutoFilter is in use, the first line of the Standard Filter will already show
this existing filter criterion.
Figure 19: Multiple Data Filtering using the Standard Filter
The Standard Filter provides many of the functions of SQL data filtering. The following SQL
commands are available.
GUI Condition Description
= Exact equality; corresponds to like, but without any additional placeholders
<> Unequal
< Less than
<= Less than or equal
> Greater than
>= Greater than or equal
like For text, written in quotation marks (' '); "_" for a variable character, "%"
for an arbitrary number of variable characters
not like Opposite of like, in SQL NOT LIKE
empty No entry, not even a space character. In SQL this is expressed by the term
NULL
Not empty Opposite of empty, in SQL NOT NULL
Before one filter criterion can be combined with another, the following row must have at least one
field name selected. In Figure 19, the word – none – is shown instead of a field name, so the
combination is not active. The combination operators available are AND and OR.
The field name can be a new field name or a previously selected one.
Even for large data collections, the number of retrieved records can be reduced to a manageable
set with skillful filtering using these three possible conditions.
In the case of filtering forms too, there are some further possibilities (described in the following
chapter) which are not provided by the GUI.
Entering data into tables 37

Direct entry using SQL
Direct data entry using SQL is useful for entering, changing or removing multiple records with one
command.
Entering new records
INSERT INTO "Table_name" [( "Field_name" [,...] )]
{ VALUES("Field value" [,...]) | <Select-Formula>};
If no "Field_name" is specified, all fields must be completed and in the right order (as laid down in
the table). That includes the automatically incremented primary key field, where present. The
values entered can also be the result of a query (<Select-Formula>). More exact information is
given below.
INSERT INTO "Table_name" ("Field_name") VALUES ('Test');
CALL IDENTITY();
In the table, in the column "Field_name", the value 'Test' is inserted. The automatically incremented
primary key field "ID" is not touched. The corresponding value for the "ID" needs to be created
separately by using CALL IDENTITY(). This is important when you are using macros, so that the
value of this key field can be used later on.
INSERT INTO "Table_name" ("Field_name") SELECT "Other_fieldname" FROM
"Name_of_other_table";
In the first table, as many new records are inserted into "Field_name", as are present in the column
"Other_fieldname" in the second table. Naturally a Select-Formula can be used here to limit the
number of entries.
Editing existing records
UPDATE "Table_name" SET "Field_name" = <Expression> [, ...] [WHERE
<Expression>];
When you are modifying many records at once, it is very important to check carefully the SQL
command you are entering. Suppose that all students in a class are to be moved up one year:
UPDATE "Table_name" SET "Year" = "Year"+1
Nothing could be faster: All data records are altered with a single command. But imagine that you
must now determine which students should not have been affected by this change. It would have
been simpler to check a Yes/No field for the repetition of a year and then to move up only those
students for which this field was not checked:
UPDATE "Table_name" SET "Year" = "Year"+1 WHERE "Repetition" = FALSE
These conditions only function when the field in question can only take the values FALSE and
TRUE; it may not be NULL. It would be safer if the condition were formulated as WHERE
"Repetition" <> TRUE.
If you should subsequently want a default value to be entered in a particular field wherever this is
empty, you can do this with the command:
UPDATE "Table" SET "Field" = 1 WHERE "Field" IS NULL
You can alter several fields at once by directly assigning values to them. Suppose that a table for
books includes the names of their authors. It is discovered that Erich Kästner has frequently been
entered as “Eric Käschtner”.
UPDATE "Books" SET "Author_first_name" = 'Erich', "Author_surname" =
'Kästner' WHERE "Author_first_name" = 'Eric' AND "Author_surname" =
'Käschtner'
38 Tables

Other calculation steps are also possible with Update. If, for example, wares costing more than
$150.00 are to be included in a special offer and the price reduced by 10%, this can be carried out
as follows:
UPDATE "Table_name" SET "Price" = "Price"*0.9 WHERE "Price" >= 150
When you choose the data type CHAR, the field has a fixed width. Where necessary, text is
padded with null characters. If you convert this to VARCHAR, these null characters remain. To
remove them use the right-trim function:
UPDATE "Table_name" SET "Field_name" = RTRIM("Field_name")
Deleting existing records
DELETE FROM "Table_name" [WHERE <Expression>];
Without the conditional expression the command
DELETE FROM "Table_name"
deletes the entire content of the table.
For this reason it is preferable for the command to be more specific. For example, if the value of
the primary key is given, only this precise record will be deleted.
DELETE FROM "Table_name" WHERE "ID" = 5;
If, in the case of a loan, the media record is to be deleted when the item is returned, this can be
done using
DELETE FROM "Table_name" WHERE NOT "Return_date" IS NULL;
or alternatively with
DELETE FROM "Table_name" WHERE "Return_date" IS NOT NULL;
Importing data from other sources
Sometimes there are complete data sets in another program which need to be imported into Base
via the clipboard. This may involve creating a new table or adding records to an existing one.
Note
To import data using the clipboard, the data format must be readable by Base. This
will always be the case for data files opened in LibreOffice.
For example, if tables from an external database are to be read into an *.odb file,
that database must first be opened via LibreOffice or registered with LibreOffice as a
data source. See the section on “Access to external databases” in Chapter 2,
“Creating a database”.
Here a small example table has been copied from the spreadsheet program Calc onto the
clipboard. Then it is pasted into Base’s Table container. Of course this could also have been done
by selecting it with the left mouse button and then dragging it across.
Entering data into tables 39

In the Table container, right-click to call up the context menu for the table to which the records are
to be added.
Adding Imported Records to an Existing Table
The name of the table appears in the Import wizard. At the same time Append data is selected.
Use first line as column names may or may not be required, depending on your version of
LibreOffice. If the records are to be appended, then no data definition is required. A primary key
must also be available for use.
40 Tables

The columns of the Calc source table and the destination table in Base do not have to agree in
their sequence, names, or overall number. Only the elements selected from the left hand side are
transferred. The correspondence between source and destination tables must be adjusted using
the arrow buttons to either side.
This completes the import.
The import can lead to problems if:
• Fields in the destination table require a mandatory entry, but the source table provides no
data for them.
• Field definitions in the destination table are inconsistent with those in the source table (for
instance a name is to be entered into a numeric field, or the destination field has too few
characters for the data).
• The source table provides data inconsistent with those of the destination table, for example
non-unique values for primary keys or other fields defined as unique.
Creating a new table for imported data
When the Import wizard is launched, the previously selected table name appears automatically.
This table name must be changed if you are creating a new table, as it is forbidden to have a table
with the same name as an existing one. The name of this table is Names. “Definition and data” are
to be transferred. The first row is to be used as column headers.
At this point you can create a new, additional field for a primary key. The name of this field must not
exist as a column header in the Calc table. Otherwise you get the error message:
The following fields are already set as primary keys: ID
Unfortunately this message does not explain the situation quite correctly.
If you want an existing field to serve as your primary key, do not select “Create primary key”. In this
case you will establish your primary key field on the third page of the Wizard dialog.
On import, the table definition and data are transferred.
Entering data into tables 41

All available columns are transferred.
The formatting of table types often requires adjustment. Usually the fields have been predefined as
text fields with a very large size. Numeric and date fields should therefore be reset using Type
formating > Column information > Field type. In the case of decimal numbers, you will need to
check the number of decimal places.
42 Tables

The option to choose a primary key is present, somewhat obscurely, in the context menu of the
field that is to contain it. In this example, the ID field has been formatted in a way that will allow it's
use as a primary key. This must now be set explicitly using the context menu of the field name, if a
primary key was not created as an additional field in the Copy table window of the wizard.
When you press the Create button, the table is created and filled with the copied data.
The new primary key is not an AutoValue key. To create one of these, the table must be opened for
editing. You can then carry out further formatting operations.
Entering data into tables 43

Splitting data on import
Sometimes source data are not available in the desired form. Addresses, for example, are often
entered into spreadsheets as a single field, including the town and postcode. When importing
these, you might wish to place those elements in a separate table, which can then be linked to the
main table.
The following is a possible way to create this relationship directly:
1. The complete table with all address information is imported into Base as a table called
“Addresses”. See the previous chapters for details.
2. The Postcode and Town fields are read with a query, copied and stored as a separate
“Postcode_Town” table. For this, an ID field is added and specified as a primary key with
AutoValue.
Here is the query:
SELECT DISTINCT "Postcode", "Town" FROM "Addresses"
3. A new field called “Postcode_ID” is added to the “Address” table.
4. Using Tools > SQL, an update is carried out for this table:
UPDATE "Addresses" AS "a" SET "a"."Postcode_ID" = (SELECT "ID" FROM
"Postcode_Town" WHERE "Postcode"||"Town" =
"a"."Postcode"||"a"."Town")
5. The “Addresses” table is opened for editing and the “Postcode” and “Town” fields deleted.
This change is saved and the table closed again.
This separates the tables so that a 1:n relationship can be created between the Postcode_Town
table and the Addresses table. This relationship is defined using Tools > Relationships.
For details on SQL code, see also Chapter 5, Queries.
Problems with these data entry methods
Entry using a table alone takes no account of links to other tables. This is clear from an example of
a media loan.
The Loan table consists of foreign keys for the item being lent (Media_ID) and the corresponding
reader (Reader_ID) as well as a loan date (Loan_Date). In the table, therefore, we need to enter at
the time of the loan two numeric values (Media number and Reader number) and a date. The
primary key is automatically entered in the ID field. Whether the reader actually corresponds to the
number is not apparent unless a second table for the readers is open at the same time. Whether
the item was loaned out with the correct number is also not apparent. Here the loan must rely on
the label on the item or on another open table.
All this is much easier to accomplish using forms. Here the users and the media can be looked up
using list box controls. In forms, the names of user and item are visible and their numeric identifiers
44 Tables

are hidden. In addition, a form can be so designed that a user can be selected first, then a loan
date, and each set of media are assigned this one date by number. Elsewhere these numbers can
be made visible with the exactly corresponding media descriptions.
Direct entry into tables is useful only for databases with simple tables. As soon as you have
relationships between tables, a specially designed form is better. In forms, these relationships can
be better handled by using sub-forms or list fields.
Entering data into tables 45
