
Page 1
This job aid will focus on building a report for mailing labels using filters and expressions:
Step 1 Log into MiSiS with the following url: https://misis.lausd.net/start using your single
sign-on (SSO) id and password.
Step 2 Click the tab and select .
There are three (3) steps to extracting report data. Step 1: Data to View, Step 2:
Students to View and Step 3: Export Data.
MiSiS – My Student Information System
Generating Mailing Labels using MiSiS Explorer
(Ad Hoc Reporting) 7/26/2014

Generating Mailing Labels using MiSiS Explorer (Ad Hoc Reporting)
Page 2
Step 1: -Data to View
There are multiple ways to view MiSiS Explorer Ad Hoc Report data.
Step 1a To search for a specific data combination, click in the
field and type the desired text. (For this example, name was used).
** As text is typed in the Search: field, occurrences of the data
combination will display within all categories, highlighted in
gray.
Step 1b To search through the categories and sub-categories
manually, click the expand button to the left of a
data category to view the available options.

Generating Mailing Labels using MiSiS Explorer (Ad Hoc Reporting)
Page 3
Step 1c If there are data sub-categories for the selected category, click the expand button to
the left of the data sub-category to view the available options.
Step 2 To select data categories that will appear on the
mailing label, click the desired checkbox(es) . (For
this example, First Name, Middle Name, Last Name
and further down on the list, Parent1 Full Name was
selected.)
** As data categories and/or sub-categories are selected, the Step 3:
Export Data area will display sample data.

Generating Mailing Labels using MiSiS Explorer (Ad Hoc Reporting)
Page 4
Step 3 To collapse the data category and/or sub-category, click the collapse
button to the left of the desired option.
Step 4 Click the expand button to the left of the Address data sub-
category to view the list of available options.
** The list options will display.
Step 6 Click the desired checkbox(es) from the list to select. (For this example Street1, Street2,
Street3, City, State and Zip were selected.)
** Continue the category and/or sub-category data selection process until all desired options are
selected.
Saving Attribute Clusters
Once all data categories and/or sub-categories have been selected, they can be saved for future use.
Step 1 At the Save Current Attribute Cluster area,
click in the Name: field and type the desired name
of the report.
Step 2 Click the button.

Generating Mailing Labels using MiSiS Explorer (Ad Hoc Reporting)
Page 5
** A My Attribute Clusters option is now available in the Step 1:
Data to View window.
To view and/or select the attribute cluster…
Step 1 Click the expand button to the left of My Attribute
Clusters.
** A list of saved attribute clusters will display. This
list will grow as more attribute clusters are saved.
Step 2 Click the checkbox
to select a saved cluster.
** The data selections will display as selected
and, the Step 3: Export Data area will display
sample data for each selected category/sub-category.

Generating Mailing Labels using MiSiS Explorer (Ad Hoc Reporting)
Page 6
Step 2: - Students to View
Step 1 To view student data within a
particular date range, click
the calendar icon at the
Date: field(s)
Step 2 Click the desired date. (The
selection shown is for
training purposes only.)
Step 3 Repeat Steps 1 and 2 at the
to: date field.
There are three (3) ways to select student data, Existing, Static and Dynamic Groups.
Option 1 – Existing Group (used when a group was previously created through the Manage Groups
area.)
Step 1 Click the drop down list arrow at the Select a
Group field.
Step 2 Click an option from the available list. (For this
example, No Shows was selected.)
1

Generating Mailing Labels using MiSiS Explorer (Ad Hoc Reporting)
Page 7
** The selected group will display in the Select a Group field.
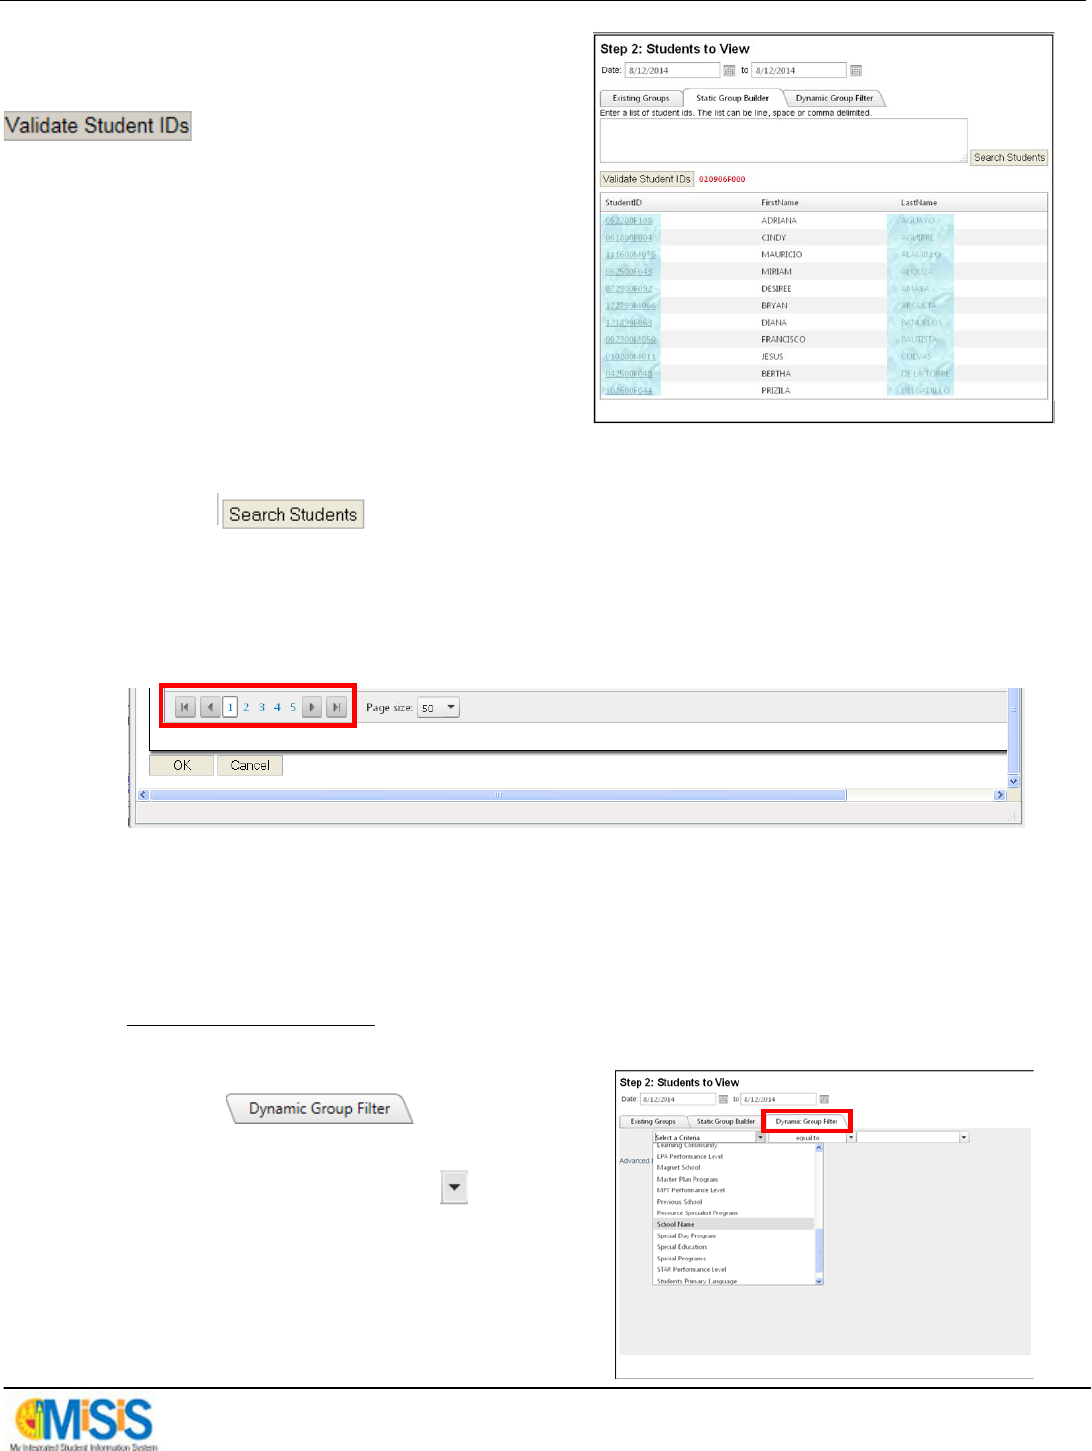
Option 2 – Static Group Builder (used when individual group members will be manually added and
removed from a group. Members’ data can be filtered [i.e., age, grade level, language classification.)
Step 1 Click the tab.
Step 2 Click the button.
** The Search Students window will display.
Step 3 Click the link to
apply filters.

Generating Mailing Labels using MiSiS Explorer (Ad Hoc Reporting)
Page 8
** The Enrolled as of date will default to the current date. To change the date, follow the steps 1
and 2 above under Step 2: - Students to View.
Step 4 Click the drop down list arrow for the
desired filter(s). (For this example
Grade Level was selected).
Step 5 Click the checkbox(es) for the desired
grade level options. (For this example,
Ninth Grade was selected.)
** If the list of options does not automatically
retract, click any open space in the window.
Step 6 Use the vertical scroll bar and scroll
down until the button is
visible.
Step 7 Click the Search button to select.
** The student search results will display below the
filter input area. Use the vertical scroll bar to
view page 1 of the results.
Open Space
Open Space
ANY LAUSD SCHOOL

Generating Mailing Labels using MiSiS Explorer (Ad Hoc Reporting)
Page 9
Step 8 Click the to the left of the
student(s) names to be included in
the group.
Step 9a Use the vertical scroll bar to the right to scroll to the bottom of the page.
Step 9b Click the button.
** The system will return to the MiSiS Explorer page.
Step 10 Click the button to
verify the selected student Id’s are
correct.
Generating Mailing Labels using MiSiS Explorer (Ad Hoc Reporting)
Page 10
** Once the student id’s are validated, data for the
students who passed validation will display. If any
are incorrect, it/they will display in red next to the
button.
To select more students from the filtered list…
Step 11 Click the button.
Step 12 Use the vertical scroll bar to the right to scroll to the bottom of the page.
Step 13 Click the page number button (in this example 2) to turn the page and view more student
results.
** A new page of student results will display.
Step 14 Repeat steps 8 thru 13 until all desired students have been selected.
Option 3 – Dynamic Group Builder (used when a group is built using expressions, meaning the
members must meet the specified criteria.)
Step 1 Click the tab.
Step 2 Click the drop down list arrow at the
Select a Criteria field.
Step 3 Scroll down until the desired option is
available and click to select (For this
example, School Name was selected.)

Generating Mailing Labels using MiSiS Explorer (Ad Hoc Reporting)
Page 11
Step 4 Click the conditions drop down list
arrow to view the available list.
Leave the selection at equal to.
Step 5 Click the drop down list arrow at the
Value field.
Step 6 Click the desired option from the list.
(For this example Any LAUSD School
was selected.)
** The created expression will display.
Other expressions can be applied by
repeating steps 1 thru 6.

Generating Mailing Labels using MiSiS Explorer (Ad Hoc Reporting)
Page 12
Export Data
Prior to exporting data to Microsoft Excel, the order of the data columns can be changed.
Step 1: To do this, click the drop down list arrow for the column to be moved.
Step 2 Click an available option from the list to select. (For this example, position 1 was selected.)
The data column that was previously in the 9
th
position is now in the 6
th
.
Step 3 To remove a data column, click the to the left of the data column number. (For this
example, column 7 Street3 was selected).

Generating Mailing Labels using MiSiS Explorer (Ad Hoc Reporting)
Page 13
** The data column is no longer visible.
** Data categories and/or sub-categories can always be added by either deselecting and then,
reselecting the attribute cluster checkbox or, by selecting the desired option individually
from the Step 1: Data to View area.
Step 4 To export the data to Microsoft
Excel, click the
button.
** A dialog box may display depending on the browser used. If it does display asking “do you want to
Open or Save the file”….
Step 5 Click the button.
Step 6 An button may display at the top of the excel file. If so, click to proceed.

Generating Mailing Labels using MiSiS Explorer (Ad Hoc Reporting)
Page 14
The Microsoft Excel spreadsheet displays.
To save the file…
Step 1 Click the Office button
at the upper left
of the window.
Step 2 Trace to Save and click.

Generating Mailing Labels using MiSiS Explorer (Ad Hoc Reporting)
Page 15
** A Save As dialog box will display.
Step 3 Type the name of the
spreadsheet in the File
name: field.
Step 4 Click the Save button.
** At this point, the saved spreadsheet can be used in a Microsoft Word mail merge where the labels
will be created and printed.
** If assistance with this process is needed, please refer to the Creating a Mail Merge and Printing
Labels job aid.
