
PiRATeMC: A highly flexible, scalable, and affordable system for obtaining high quality video
recordings for behavioral neuroscience.
Authors: Samuel W. Centanni, PhD
1
, Alexander C.W. Smith, PhD
2
*
1
Department of Molecular Physiology & Biophysics, Vanderbilt University, Nashville, TN
2
Nash Family Department of Neuroscience, Icahn School of Medicine at Mount Sinai, New York, NY
*Corresponding Author:
Alexander C.W. Smith, PhD
Icahn School of Medicine at Mount Sinai
1470 Madison Ave
Hess CSM S10-202
New York, NY, 10029
alexander.smith@mssm.edu
Abstract
With the recent development and rapidly accelerating adoption of machine-learning based
rodent behavioral tracking tools such as DeepLabCut, there is an unmet need for a method of acquiring
video data that is scalable, flexible, and affordable. Many experimenters use webcams, GoPros, or
other commercially available cameras that are not only relatively expensive, but offer very little flexibility
over recording parameters. These cameras are not ideal for recording many types of behavioral
experiments, and can lead to suboptimal video quality. Furthermore when using relatively affordable
commercially available products, it is a challenge, if not impossible, to synchronize multiple cameras
with each other, or to interface with third-party equipment (for example, receiving a simple trigger to
simultaneously start recording, or acting as a microcontroller for closed-loop experiments). We have
developed an affordable ecosystem of behavioral recording equipment, PiRATeMC (Pi-based Remote
Acquisition Technology for Motion Capture), that relies on Raspberry Pi Camera Boards that are able
to acquire high quality recordings in bright light, low light, or dark conditions under infrared light.
PiRATeMC offers users control over nearly every recording parameter, and can be fine-tuned to
produce optimal video data in any behavioral arena. This setup can easily be scaled up and
synchronously controlled in clusters via a self-contained network to record a large number of
simultaneous behavioral sessions without burdening institutional network infrastructure. Furthermore,
the Raspberry Pi is an excellent platform for novice and inexperienced programmers interested in using
an open-source recording system, with a large online community that is very active in developing novel
open-source tools. It easily interfaces with Arduinos and other microcontrollers, allowing simple
synchronization and interfacing of video recording with nearly any behavioral equipment using GPIO
pins to send or receive 3.3V or 5V (TTL) signals, I2C, or serial communication.
.CC-BY-NC-ND 4.0 International licenseavailable under a
was not certified by peer review) is the author/funder, who has granted bioRxiv a license to display the preprint in perpetuity. It is made
The copyright holder for this preprint (whichthis version posted July 30, 2021. ; https://doi.org/10.1101/2021.07.23.453577doi: bioRxiv preprint

INTRODUCTION
Preclinical studies have long relied on traditional predetermined activity patterns to assess
behaviors such as affect, motivation, cognitive function, memory, motor coordination, etc. While these
historical approaches have led to countless discoveries, the evolution of behavioral paradigms has
yielded increasingly complex interpretations of the outcomes. Biased behavioral scoring (i.e. the need
for a priori knowledge of behaviors to score) overlooks potentially unique behaviors that may occur in
specific groups or subgroups within experiments. Moreover, manual behavioral scoring is highly
vulnerable to human error, biases, and low inter-rater reliability. Using unbiased pose estimation
techniques with open-source machine learning-based software such as DeepLabCut
1, 2
, and behavioral
mapping or clustering analysis with packages such as B-SOID
3
or VAME
4
have begun to shift
behavioral neuroscience into a new era of behavioral analysis and categorization. These techniques
are able to segment behaviors in an unbiased way, and eliminate inconsistencies due to human error
and inter-rater variability. To maximize the potential for these and other programs, experimenters must
be able to capture high resolution videos. Moreover, the ability to interface recording equipment with
real-time controllers for third-party data collection equipment, such as in vivo measurement of brain
activity (e.g. fiber photometry/miniscopes), optogenetic LED drivers, or MedAssociatesÒ chambers
unlocks the potential for closed-loop experiments, and very easy time-locking of video recordings with
data from these systems.
Here we introduce PiRATeMC (Pi-based Remote Acquisition Technology for Motion Capture),
an affordable, user-friendly, modular, open-source camera system that runs off a Raspberry Pi (RPi)
single-board computer and an accompanying 8-megapixel (MP) Camera Board (Sony IMX219 CMOS
sensor). These cameras can record high quality video under either infrared (IR) or white light. Moreover,
they offer far more flexibility in recording parameters than most commercially available camera
systems. The user can manually set recording parameters like frame size, frame rate (up to 120FPS),
white-balance (crucial for high-quality IR videos), brightness/contrast, ISO, saturation, bitrate, and
many more (details in Table 2 and Supplemental Table 2). Finally, the PiRATeMC system can easily
be controlled remotely via ssh (remote secure shell) over a local area network (LAN), and clusters of
cameras can be controlled synchronously with millisecond precision using ClusterSSH (easily installed
via the advanced packaging tools (apt) in Linux or Homebrew in MacOS), allowing either multi-angle
recording of single subjects (e.g. for 3D-DeepLabCut
5
), or an easy method of recording a large number
of behavioral sessions simultaneously. We provide step-by-step instructions to physically assemble the
camera and Raspberry Pi, as well as a cloned operating system (PiCamOS) that can be uploaded to
an SSD card (source code for building PiCamOS is also available). Lastly, we describe a simple data
management pipeline, whereby with minimal user modification of PiCamOS, a large number of
RPiCams can be controlled simultaneously, and deposit all recorded videos in the same ‘sink’ directory
.CC-BY-NC-ND 4.0 International licenseavailable under a
was not certified by peer review) is the author/funder, who has granted bioRxiv a license to display the preprint in perpetuity. It is made
The copyright holder for this preprint (whichthis version posted July 30, 2021. ; https://doi.org/10.1101/2021.07.23.453577doi: bioRxiv preprint

on a remote local network (LAN) host. The goal of this paper is to provide an easily obtainable recording
system that is highly flexible in recording parameters, can interface with numerous real-time equipment
controllers and other open-source analysis software, and can easily be scaled up to record a large
number of videos simultaneously. Increasing accessibility and usability of acquisition and analysis
programs for assessing rodent behavior has the potential to provide a wealth of new behavioral data
that may have been overlooked using traditional approaches.
METHODS
Note that any text highlighted in grey below represents inputs or outputs from the Linux terminal, and is case-sensitive.
Camera Assembly
Raspberry Pis (RPis) are single-board computers that run a full Linux operating system
(Raspbian), and thus offer greater computational capabilities than other single-board computing
devices such as Arduinos. For a simple recording setup, we recommend using the RPi 3 Model B+, as
this model is the last to have a standard HDMI output port and micro-USB charger. RPi 4 and newer
can certainly be used, however newer models only have micro-HDMI output, and a USB-C power input,
which likely necessitates purchase of additional adapters. There are two options for 8MP camera
boards that connect to the RPi camera interface: a NoIR Camera Board, and a standard Camera Board
v2. The naming of these cameras is not intuitive, the NoIR camera is the camera that is sensitive to
infrared light, (i.e., does not have an IR filter), but may produce lower quality videos under white light.
If you only plan to record experiments under white light, the standard Camera Board v2 is
recommended, as an IR filter will enhance video quality under white light. In order to set up a single
camera, the minimal parts required are listed in Table 1. Note that only one of the two camera options
(NoIR or standard) is necessary, and these cameras come with a Flex Cable, however the stock cable
is only 6” long, so while a longer Flex Cable is not absolutely necessary, we consider a longer flex cable
necessary equipment, and the price is very low.
Basic Camera Necessities:
Part:
Vendor (suggested):
Product #:
Price:
Raspberry Pi 3 Model B+ (or newer)
Adafruit Industries, Newark
Electronics
3775 (Adafruit),
49AC7637
(Newark),
$35.00
Raspberry Pi NoIR Camera Board v2
- 8MP
Adafruit Industries
3100
$29.95
Raspberry Pi Camera Board v2 - 8MP
Adafruit Industries
3099
5V 2.5A Switching Power Supply
Adafruit Industries
1995
$7.50
Kingston 32GB microSD card
CDW
5849358
$4.99
Flex Cable for Camera (various
lengths available)
Adafruit Industries
1730
$2.50
Total:
$79.94
.CC-BY-NC-ND 4.0 International licenseavailable under a
was not certified by peer review) is the author/funder, who has granted bioRxiv a license to display the preprint in perpetuity. It is made
The copyright holder for this preprint (whichthis version posted July 30, 2021. ; https://doi.org/10.1101/2021.07.23.453577doi: bioRxiv preprint

Table 1. Parts List. This table contains the minimum essential parts to get started with one camera.
Only one camera (either NoIR or standard camera board) is needed. For mixed dark/white light use,
we recommend the NoIR camera. For a full list of optional parts/accessories, as well as notes about
each component, see Supplemental Table 1.
Figure 1. Attached the Camera to the Raspberry Pi.
Panel 1 shows the minimum parts needed for assembly.
Panel 2 shows the unpackaged parts, as well as the optional
24” camera cable, and PiTFT touch screen (see Supp. Table
1 for details). The camera cable is attached at both ends by
black clamps. Remove the plastic covering from the Pi
(Panel 3), and gently lift the edges as shown in Panel 4. If
you are replacing the stock camera cable with a longer cable
(recommended), optionally do the same to the clamp on the
camera, and remove the cable as shown in Panel 5. To
attach a new camera cable, the silver leads on the cable
face the same direction as the lens (Panel 6). Insert the
cable all the way into the camera, then gently press the
clamps back down (Panel 7). Follow the same procedure to
insert the new cable into the camera port on the Pi, with the
silver leads facing away from the clamp (towards the HDMI
port on Pi 3), then gently press down on the edges to secure
the cable in place. Panel 9 shows an assembled Pi with a
24” camera cable.
Once the required parts have been gathered, assembly
is very easy. First, replace the stock 6” camera cable
with a longer one with a length of your choice (we use 24” for recording inside operant chambers).
When inserting flex cables, the silver leads of the cable always face away from the slider clamp that
secures the cable in place, on both the camera and the RPi. Instructions and example photos for
attaching the camera to the RPi shown in Figure 1.
Remote Controller Hardware Configuration
While RPis can be connected to a keyboard and monitor and operated as standalone computers,
the most convenient way to control the cameras is via a remote secure shell (SSH) connection. This
allows the RPi to be controlled from a remote computer (referred to here as the ‘remote controller’)
connected to the same network as the RPi, and the remote controller can also serve as a data sink
where videos are automatically transferred after recording. Because the RPi operating system is a
Linux distribution (Raspbian), it is most convenient if the remote controller is also running a UNIX-based
operating system (Mac OSX, Ubuntu, or any Linux Distribution). Users that only have Windows PCs
available should use a Bash emulator such as Git Bash (https://gitforwindows.org/), which will allow
use of all terminal commands described for UNIX based operating systems below (see Supplemental
Material - Notes for Windows Users for details). If you plan to scale up the number of RPis and cameras
for larger experiments, we recommend using a mini-PC such as the AWOW MiniPC running Ubuntu
18.04 or later (see Supplemental Table 1 for product details). Because many institutional IT
.CC-BY-NC-ND 4.0 International licenseavailable under a
was not certified by peer review) is the author/funder, who has granted bioRxiv a license to display the preprint in perpetuity. It is made
The copyright holder for this preprint (whichthis version posted July 30, 2021. ; https://doi.org/10.1101/2021.07.23.453577doi: bioRxiv preprint

departments prohibit use of network switches, the remote controller should have at least a dual-port
network adapter card, as transmitting video data over WiFi is orders of magnitude slower. This will allow
the user to maintain connectivity to the internet and backbone institutional LAN on the remote controller
using one network port, and also to configure the remote controller to act as a DHCP server, which
creates its own LAN to manage the RPis. Detailed instructions for this process are at
https://github.com/alexcwsmith/PiRATeMC/tree/master/docs/networking, and a schematic of this
architecture is shown in Figure 2. A network switch can then be connected to the second port, allowing
the remote controller to assign and manage IP addresses to any RPis connected to the switch, without
the RPis having access to the main institutional network. Thus, PiRATeMC does not pose any security
risk at hospitals/university medical centers
and other institutions where security is a
significant concern. Detailed instructions
for configuring this network are provided in
supplemental materials, and an
instructional walk-through video can be
found in the documentation in the GitHub
repo linked above. The packages that need
to be installed (via sudo apt install) on the
remote controller are: openssh-server,
clusterssh, isc-dhcp-server, bind9. Before
beginning any reconfiguration, users
should connect the remote controller to the
institutional backbone network, and enter
ip a s into a terminal, and record the
information there (or write to a plain text file
with echo $(ip a s) > ~/Desktop/ipas.txt), and also create backup copies of the files at:
/etc/netplan/*.yaml and /etc/dhcp/dhcpclient.conf, and record the institutional network’s default network
settings such as domain name servers (cat /run/resolve/resolv.conf > ~/Desktop/DefaultDNS.conf) and
gateway (echo $(ip -a route) > ~/Desktop/ipRoute.conf). Users planning to record videos with only one
camera should not have an issue connecting to the institutional network without an intermediate
network switch, or in the simplest use case, can connect a PiTFT Touch Screen (add on accessory,
see Supplemental Table 1) or monitor and a keyboard directly to the RPi and record videos locally
without any network connectivity.
Figure 2. Schematic showing infrastructure for creating
isolated LAN separate from main institutional network to
allow using an affordable unmanaged network switch to
manage clusters of PiRATeMC Cameras. Many institutions
(every single one we personally have dealt with, though
these have all been hospitals/medical centers) prohibit these
network switches on their networks, though you may try
plugging a network switch directly into your institutional
network, and if it is allowed to connect you do not need to
configure your own isolated LAN.
.CC-BY-NC-ND 4.0 International licenseavailable under a
was not certified by peer review) is the author/funder, who has granted bioRxiv a license to display the preprint in perpetuity. It is made
The copyright holder for this preprint (whichthis version posted July 30, 2021. ; https://doi.org/10.1101/2021.07.23.453577doi: bioRxiv preprint

Software Configuration
Two versions of pre-configured and fully functional cloned disk images of the PiRATeMC
operating system are available to download from Google Drive (along with other resources) at:
https://tinyurl.com/jaaeu8s2. The ‘standalone’ version is optimally suited for users who want to use a
single camera and are able to directly connect the RPi to their institutional LAN, or who will use an RPi
without a remote connection. The ‘cluster’ version is optimized for users who want to build clusters of
cameras to record a large number of behavioral sessions simultaneously using a network switch and
an isolated LAN. The source code for these operating systems, and documentation is available on
GitHub at https://github.com/alexcwsmith/PiRATeMC. To flash the operating system onto the SD card
that will be used as the storage drive of the RPi, use rpi-imager, available for download at
https://www.raspberrypi.org/software/, or by typing: sudo apt install rpi-imager into a Linux terminal. We
have created a video showing detailed steps for writing PiCamOS to the SD card and for editing system
variables described below. On our system this process takes ~3 minutes, you can find this video here:
https://youtu.be/Ier37fRuUos. PiCamOS is a modified version of Raspbian Buster, and comes pre-
installed with drivers for the PiTFT Resistive Touch Screen, the UV4L video streaming service, and
WebRTC. PiCamOS also has pre-installed shell scripts for logging IP addresses to the remote controller
at startup (sendIP.sh), and for recording videos with highly flexible parameters (recordVideo.sh).
After flashing PiCamOS to the SD card, it will be automatically unmounted/ejected. Before
placing the SD card into the RPi, there are 4 variables to change in a file called .bashrc that will allow
the RPi to communicate with the remote controller the first time it is powered on. To edit this .bashrc
rile, re-mount the SD card to the remote controller, and navigate (cd) to the folder /rootfs/home/pi/ on
the SD card (on Ubuntu/Debian Linux this is likely mounted at /media/<YourComputerName>/rootfs/.
If you don’t know the nickname of your computer, simply cd /media/ then type ls, which will likely only
display one folder (the the name of your computer), and cd into that folder, where ls will show rootfs
mounted). On Raspbian (and all UNIX-based operating systems), any file names that start with ‘.’ are
hidden files, and can be viewed with ls -a, or if using a GUI, make sure that hidden files are viewable
(Ctrl+h on Linux, Cmd+Shift+. on Mac). Open the file ‘.bashrc’ with either a GUI text editor (gedit or
TextEdit), or with a terminal text editor like nano or vim by typing into the terminal: nano .bashrc. This
.bashrc file is a type of configuration script (equivalent to .bash_profile on Mac OSX) that is run every
time a new terminal is opened, and defines system variables, runs startup scripts, or performs other
tasks to initialize a user session. Near the top of this file you will see four lines beginning with ‘export’
that define system variables to edit to be valid with your system:
1) export REMOTEPATH=rpicam@10.1.1.243
a) This is the username & IP address to an account on your remote controller computer that
also serves as a ‘data sink’. This information will be used for automatically transferring
.CC-BY-NC-ND 4.0 International licenseavailable under a
was not certified by peer review) is the author/funder, who has granted bioRxiv a license to display the preprint in perpetuity. It is made
The copyright holder for this preprint (whichthis version posted July 30, 2021. ; https://doi.org/10.1101/2021.07.23.453577doi: bioRxiv preprint

recorded videos from the source (RPi) to the sink (remote controller). If you are setting
up a network for a cluster and using the provided network files, this IP address is the
default IP address for the remote controller, so you only need to change the username.
2) export REMOTEPASS=$(cat .pass_file)
a) This variable reads the password to the REMOTEPATH account from another hidden file
in the /home/pi/ directory, called .pass_file. Note in a graphical interface the .pass_file
command will appear locked, and is only viewable by the file owner or the system root. In
order to edit the contents of this file, open it with sudo nano .pass_file in a terminal while
in the /home/pi/ directory.
3) export REMOTELOGPATH=$HOME/RPi_Sessions/
a) Path to a directory on the remote controller to write log files upon RPi startup. Make sure
this folder exists on the remote controller.
4) export REMOTEVIDPATH=/d1/studies/Raspicam/
a) Path to a directory on remote computer to store recorded video files. Again, make sure
this folder exists on the remote controller.
Finally, you (optionally) can change the RPi hostname to something unique and recognizable at
this point (the default is raspberrypi; we use the room and box # of the chamber each RPi is recording
from), or you can change the hostname after you have established a connection over ssh. You can
change the hostname in the rootfs directory before starting up the RPi for the first time with sudo nano
/media/<YourComputerName>/rootfs/etc/hostname, which contains only the hostname, and sudo nano
/media/<YourComputerName>/rootfs/etc/hosts, where you will find the hostname after the string
127.0.1.1, likely at the bottom of the file. Caution: The hostname must be identical in these two places,
if it is not, you will see the warning “sudo: temporarily unable to resolve hostname” when the Pi is
booted. If you see this warning after connecting to the Pi, check that the hostname is identical in those
two files directly on the RPi via sudo nano /etc/hostname and sudo nano /etc/hosts.
After the system variables and optionally the hostname have been set, plug the RPi into an
ethernet port, either on a network switch if running in a cluster, or directly if running on a main
institutional backbone network. If everything is configured correctly, shortly after powering on, the RPi
will transmit a log file to the directory set in $REMOTELOGPATH above. If running in a cluster, typing
dhcp-lease-list on the remote controller will output a list of connected RPis and their IP addresses. You
can then access the RPi from a terminal on the remote controller via ssh [email protected] (the default
password is raspberry). Note if the RPi does not have internet connectivity, it may record the wrong
date/time. Once connected via ssh, the date/time can be set from the terminal with sudo date --set
“YYYY-MM-DD HH:MM:SS”. Note that once you are able to connect to the RPi via ssh, you can also
.CC-BY-NC-ND 4.0 International licenseavailable under a
was not certified by peer review) is the author/funder, who has granted bioRxiv a license to display the preprint in perpetuity. It is made
The copyright holder for this preprint (whichthis version posted July 30, 2021. ; https://doi.org/10.1101/2021.07.23.453577doi: bioRxiv preprint

move files to/from the RPi and any computer connected to the same network with the scp command,
for details input man scp into the terminal.
Interfacing with third-party equipment
The RPi has 40 general purpose input/output
(GPIO) pins that are capable of sending and
receiving 3.3V and 5V (TTL) signals, inter-
integrated circuits (I2C), and serial communication.
These offer a simple method of interfacing with
Arduinos or other microcontrollers, or for using the
RPi as a microcontroller itself. There is a large
online community dedicated to discussing novel
methods of using both RPis and Arduinos as
microcontrollers for hundreds of applications across
scientific disciplines, as well as hobbyists using
these devices for at-home DIY engineering projects.
Thus, there are several pre-made chips and ‘HATs’
(Hardware Attached on Top) so that users do not need any experience with electrical engineering to
accomplish relatively simple tasks like using the RPi to control an LED driver, a light/tone generator for
fear conditioning, an ultrasonic vocalization microphone, or even a motorized peristaltic pump. Though
we have not included detailed instructions for these uses in this version of the manuscript, we hope
that the neuroscience community will build upon this system and continue to make novel applications
open-source, and we will elaborate further on these capabilities in future versions. See the “Optional
Microcontroller Interfacing Equipment” section of Supplemental Table 1 for a small list of parts we
believe may be of particular interest. Figure 3 shows a pin map of the RPi 3B+ GPIO pins to give a
better idea of the types of interfacing and communication that are possible.
RESULTS
Recording or Streaming Video:
After the PiRATeMC hardware and software have been configured, and you are able to access
the RPi through an SSH connection, you are nearly ready to begin recording or streaming videos. The
first time you power on each RPi, the first command entered should be sudo raspi-config. This will bring
you to a GUI configuration manager, where it is advised to change the password, the hostname (if you
did not change it in the rootfs while flashing the SD card), and the location/time zone settings. If you
are based outside of the USA, it may be necessary to change the keyboard layout as well. There are
several methods for recording or streaming videos.
Figure 3. GPIO Pin Diagram for Raspberry Pi 3
Model B+.
.CC-BY-NC-ND 4.0 International licenseavailable under a
was not certified by peer review) is the author/funder, who has granted bioRxiv a license to display the preprint in perpetuity. It is made
The copyright holder for this preprint (whichthis version posted July 30, 2021. ; https://doi.org/10.1101/2021.07.23.453577doi: bioRxiv preprint

Recording via recordVideo.sh script:
The recordVideo.sh script is the most powerful method for recording high-quality videos, as it
offers the most flexibility of recording parameters. The usage for running this script is:
• ./recordVideo.sh <VideoName> <DurationInMinutes> <FramesPerSecond>
For example, ./recordVideo.sh TestVideo1 0.25 30 will record a 15-second video with 30 frames per
second, and will be saved with filename TestVideo with the hostname and date appended to the
filename, in a .mp4 format. This video
will be stored locally on the Pi, and will
also be automatically transferred to the
location set in the $REMOTEVIDPATH
variable above. Please note that videos
will also be saved locally on the RPi,
and should therefore be deleted
regularly to avoid running out of
storage. This is critical, as full storage
will not prevent the recording from
starting, only from saving at the end of
the recording. To clear all videos from
the RPi, enter the command rm *mp4
while in the home folder. Warning: use caution when combining the rm command with the wildcard *,
as an accidental space between the * and mp4 can delete the entire OS, forcing you to reinstall. A
safer, but more time-consuming way is to use the rm command with the exact filename (e.g., rm
TestVideo1.mp4), or to use a shared string within video names (e.g. rm Test*.mp4). To confirm the files
are removed, use the command ls *.mp4. No files with an .mp4 extension should be present.
Table 2 shows some of the most useful recording parameters that can be manually set. To
change these parameters, edit the recordVideo.sh script with nano recordVideo.sh, and parameters
can be inserted in line 3 after the raspivid command. The impact of some of these recording parameters
on video quality is shown in Figure 4. A caveat of the minimal setup we have described here is that the
recordVideo.sh script does not easily allow simultaneous viewing of the video while it is being recorded.
This can be remedied by attaching a 2.8” touchscreen to the RPi and running the command: sudo
python3 ~/setupScripts/adafruit-pitft.py, and following the prompts. The final prompt of the setup
process will ask “Would you like the console to appear on the screen?”, and answering “No” to this will
result on the video being displayed on the screen while it is recorded. Alternatively, a 7” display can be
purchased and attached via a flex cable to the Display Port of the RPi, and this will display the stream
while recording is ongoing. Part numbers for both options are provided in Supplemental Table 1. As
Figure 4. Demonstration of the effect of different recording
parameters on video quality under infrared light. Most obviously,
setting the auto-white-balance (--awb option) to ‘greyworld’ is
necessary for correcting for the red-shifted light from the infrared
light source. Tuning brightness, saturation, sharpness, and contrast
also have obvious effects on video quality. See Table 2 for the
parameters we find most helpful, and Supplemental Table 2 for all
available options.
.CC-BY-NC-ND 4.0 International licenseavailable under a
was not certified by peer review) is the author/funder, who has granted bioRxiv a license to display the preprint in perpetuity. It is made
The copyright holder for this preprint (whichthis version posted July 30, 2021. ; https://doi.org/10.1101/2021.07.23.453577doi: bioRxiv preprint

a third option, the RPi can be plugged directly into a monitor via the HDMI port, and the monitor will
display video while it is being recorded. We do not consider these options necessary, and they increase
the price of each PiRATeMC unit by 2-3 fold, and in our experience while recording many videos
simultaneously inside of operant boxes, there is no real need to be view the streams live, as videos are
analyzed with DeepLabCut immediately following acquisition (potentially automatically in future
versions, see discussion). A fourth option to view videos while recording is via online streaming with
WebRTC (described in detail below). While this adds no additional cost, WebRTC offers far fewer
parameters to change, and can cause inconsistent recordings (i.e., dropped frames).
Table 2. Abbreviated list of Raspivid commands that can be used in recordVideo.sh line 3.
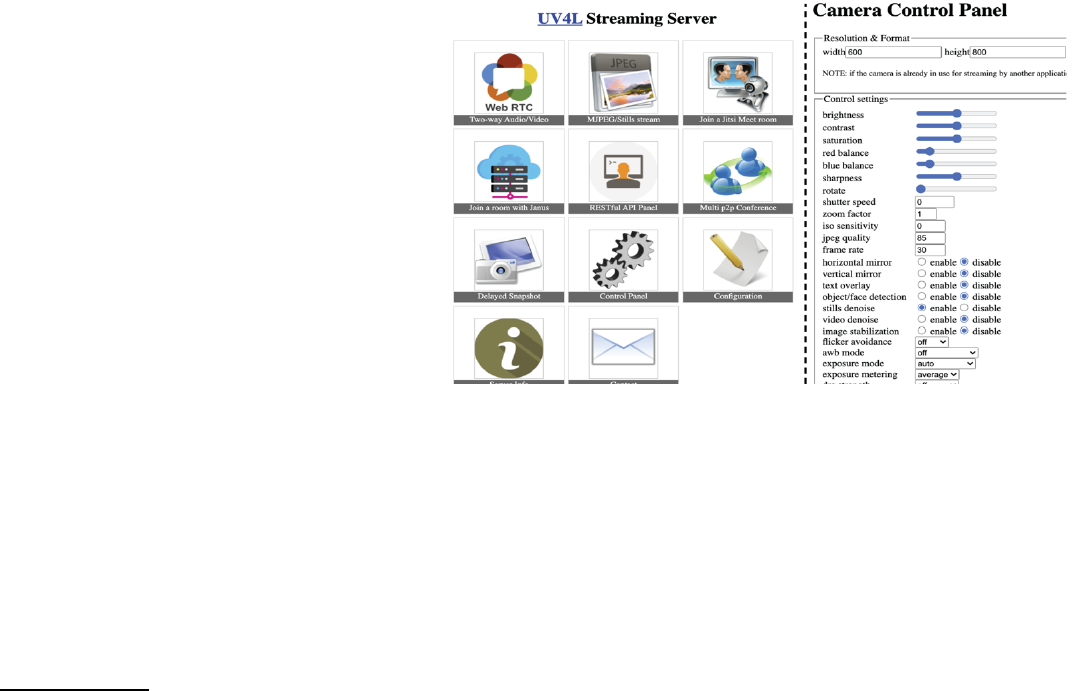
Streaming via UV4L:
You can also stream videos over the network from the remote controller (or any computer
connected to the same network as the RPi) through port 8080 by opening your internet browser of
choice, and entering the RPi IP address followed by :8080 into the address bar, e.g. 10.1.1.50:8080.
This will take you to a UV4L Streaming Service configuration page shown in Figure 5.
The UV4L streaming service is ideal for optimizing recording parameters to use in the
recordVideo.sh script, and for viewing the live stream while fixing cameras in place to optimally capture
the field of view for behavioral equipment. However, the UV4L service does not offer a way to both view
the live stream and record simultaneously, and it does not offer a way to synchronize multiple cameras.
The UV4L driver also does not offer a ‘greyworld’ mode for the AWB setting, so video quality in these
streams will not be as good as can be accomplished via the recordVideo.sh script. However, this does
Short form
Long form
Explanation
-?
--help
Help
-w
--width
Width of image (default 1920)
-h
--height
Height of image (default 1080)
-o
--output
Output filename
-fps
--framerate
Number of frames to record per second
-sh
--sharpness
Image sharpness (-100 to 100)
-co
--contrast
Image contrast (-100 to 100)
-br
--brightness
Image brightness (0 to 100)
-sa
--saturation
Image saturation (-100 to 100)
-awb
--awb
Set auto white balance (options= off, auto, sun, cloud, shade, tungsten,
fluorescent, incandescent, flash, horizon, greyworld)
.CC-BY-NC-ND 4.0 International licenseavailable under a
was not certified by peer review) is the author/funder, who has granted bioRxiv a license to display the preprint in perpetuity. It is made
The copyright holder for this preprint (whichthis version posted July 30, 2021. ; https://doi.org/10.1101/2021.07.23.453577doi: bioRxiv preprint
offer a powerful way to optimize camera
position, and to test the effect of
manipulating parameters such as
brightness/contrast/saturation on video
quality.
Streaming via WebRTC:
Similar to streaming via UV4L,
you can also stream through an internet
browser by entering an IP address
followed by :8080/stream/webRTC/.
This method does allow simultaneous
recording and streaming, however it
does not offer flexibility or tuning of recording parameters (though there are several presets to choose
from for frame size/rate), and is more prone to dropped frames. Using this method, videos will be
recorded and saved locally on whatever computer is running the web browser, not necessarily to the
path saved as the data sink.
DISCUSSION
A major confound in behavioral neuroscience is the rigidity and inflexibility of many commercially
available behavioral tracking software, in addition to the high costs of implementing these systems.
Many programs require a specific type of camera, offer limited options for adjusting the image, and lack
the adaptability to sync across other acquisition programs. Moreover, specific video file outputs require
time consuming conversion software to analyze videos with external programs. Here we present an
affordable, scalable, customizable, open source video recording configuration, PiRATeMC, that can be
optimized for recording animal behavior in any setting. Setting up PiRATeMC requires very little
programming/coding knowledge. Simply upload the software onto a microSD card, set four environment
variables on the microSD card while inserted into a PC, insert it into the RPi and power on, and record
videos. Video recording settings can then be modified to get very high quality videos of large behavioral
arenas illuminated by either infrared light or white light. Unbiased behavioral mapping is becoming
increasingly important and informative in neuroscience, and the output videos from PiRATeMC can be
easily incorporated into widely used open-source analysis pipelines such as DeepLabCut, B-SOID,
VAME, etc.
Setting up PiRATeMC requires very little programming and coding knowledge, though
experience with the Linux operating system and using the command line interface is a plus. Simply
upload the software onto a microSD card, set system variables to detect the remote controller, turn on
Figure 5. UV4L Streaming Server Control Pages. The left side is the UV4L
home page. On the right is the destination of the ‘Control Panel’ link. Clicking
‘MJPEG/Stills stream’ on the UV4L home page results in a live stream (not
shown).
.CC-BY-NC-ND 4.0 International licenseavailable under a
was not certified by peer review) is the author/funder, who has granted bioRxiv a license to display the preprint in perpetuity. It is made
The copyright holder for this preprint (whichthis version posted July 30, 2021. ; https://doi.org/10.1101/2021.07.23.453577doi: bioRxiv preprint
the Raspberry Pi, adjust settings, and record videos. All of the steps can be completed using simple
commands in the terminal, and we attempt to clearly state which parts of the pipeline require specifying
the user’s computer/network information. To provide support beyond this paper, we include links to a
GitHub, YouTube tutorials, and webpages relevant to PiRATeMC. Accordingly, we present a ground
level version of PiRATeMC, and encourage those with experience in Linux coding and Raspberry Pi
computing to build more code into this pipeline as needed such as adding TTL outputs to the Raspberry
Pi GPIO to trigger the start of an external optogenetics or photometry program, allowing for precise
time locked videos. In addition, a logical next step for streamlining PiRATeMC is to convert the
command line code into a unified Python code and/or a local graphical user interface (GUI) for an even
more user friendly protocol.
Being able to easily record video of a large number of behavioral sessions simultaneously may
usher in a new era of behavioral neuroscience analysis. In the field of drug addiction, we have been
studying self-administration for decades using lever-pressing or nose-poking as the only proxy of
‘addictive-like behaviors’. By recording full behavioral sessions and analyzing the data with
DeepLabCut and VAME, we have already begun to discover behavioral phenotypes that are highly
predictive of an ‘addiction score’ that are not able to be detected by these standard behavioral metrics
alone. Furthermore, behavioral neuroscience has long relied on human scoring and classification of
behaviors, which suffers from serious confounding issues with inter-rater variability, the need for a priori
knowledge of relevant behaviors to score, and capture of video data of high enough quality for accurate
scoring. By using PiRATeMC in combination with machine-learning behavioral analysis, we address all
three of these issues, and provide a method for unbiased, high-throughput behavioral analysis and
classification.
We acknowledge that the use of this pipeline is still in its infancy and confounds still exist. First,
PiRATeMC has only been validated using Linux and Mac operating systems and has not been tested
using Windows. Another caveat is the difficulty in viewing the videos in real time while recording as
alluded to above, although if this is required for behaviors without a predetermined timeline, either the
2.8” PiTFT touchscreen or 7” display (see Supplemental Table 2) can be used to view during recording
with additional monetary cost, or the WebRTC platform can be used to view and record videos
simultaneously at the cost of flexibility of recording parameters and synchronization of recording
parameters. We hope the open-source nature of this pipeline will encourage users to expand this
pipeline into many more interfaces beyond those outlined here, and further refine PiRATeMC to be
optimized for each lab’s needs. Future editions of PiRATeMC will incorporate microcontrollers for
closed-loop experiments (for example with optogenetic or MedAssociates equipment), and a
streamlined data analysis pipeline whereby new video data is automatically detected and analyzed with
a pre-set DeepLabCut model as soon as it finishes recording.
.CC-BY-NC-ND 4.0 International licenseavailable under a
was not certified by peer review) is the author/funder, who has granted bioRxiv a license to display the preprint in perpetuity. It is made
The copyright holder for this preprint (whichthis version posted July 30, 2021. ; https://doi.org/10.1101/2021.07.23.453577doi: bioRxiv preprint
REFERENCES CITED
1. Mathis A, et al. DeepLabCut: markerless pose estimation of user-defined body parts with deep
learning. Nat Neurosci 21, 1281-1289 (2018).
2. Sehara K, Zimmer-Harwood P, Larkum ME, Sachdev RNS. Real-Time Closed-Loop Feedback
in Behavioral Time Scales Using DeepLabCut. eNeuro 8, (2021).
3. Hsu AI, EA Y. An Open Source Unsupervised Algorithm for Identification and Fast Prediction of
Behaviors. bioRxiv, (2021).
4. Luxem K, Fuhrmann F, Kürsch J, Remy S, P B. Identifying Behavioral Structure from Deep
Variational Embeddings of Animal Motion. bioRxiv, (2020).
5. Nath T, Mathis A, Chen AC, Patel A, Bethge M, Mathis MW. Using DeepLabCut for 3D
markerless pose estimation across species and behaviors. Nat Protoc 14, 2152-2176 (2019).
.CC-BY-NC-ND 4.0 International licenseavailable under a
was not certified by peer review) is the author/funder, who has granted bioRxiv a license to display the preprint in perpetuity. It is made
The copyright holder for this preprint (whichthis version posted July 30, 2021. ; https://doi.org/10.1101/2021.07.23.453577doi: bioRxiv preprint
