
Alumni Magnet Tr
aining Manual
wellesley college alumnae association

Getting Started 2
A Note about Privacy 3
Home Page Overview 4
Getting Started Managing Your Site 5
Logging In 5
Article Editor Overview 6
Creating a New Article 8
Making Changes to an Existing Article 9
Linking a Document 10
Making a Web Page Private 11
Creating an Event 12
Setting Up a Paid Event Ticket 12
Setting Up an RSVP List for a Free Event 15
Accessing an Attendee List for an Event 16
Creating a Waitlist for an Event 16
Downloading an Event Order Report 16
Files and Images 17
Adding an Image or File to Your Site 17
Creating a Photo Album 18
ENewsletters (Emails) 19
Creating an eNewsletter 19
Saving and Sending a Test eNewsletter 21
Scheduling Your eNewsletter 22
Editing, Rescheduling, or Canceling Your eNewsletter 23
Viewing Email Statistics 24
Our New eNewsletter Archive Feature 25
Selling Merchandise 26
Adding a Store Item 26
Downloading an Order Report 28
Membership/Class Dues 29
Forums 31
Creating a New Forum 31
Tips for Your Constituents 32
Manual last updated October 2017
Contents
2
Getting Started
Beginning from the top to the bottom, the page banner consists of your logo (left), the
title of your website (center), the WCAA logo (right), the main navigation, and your
banner image.
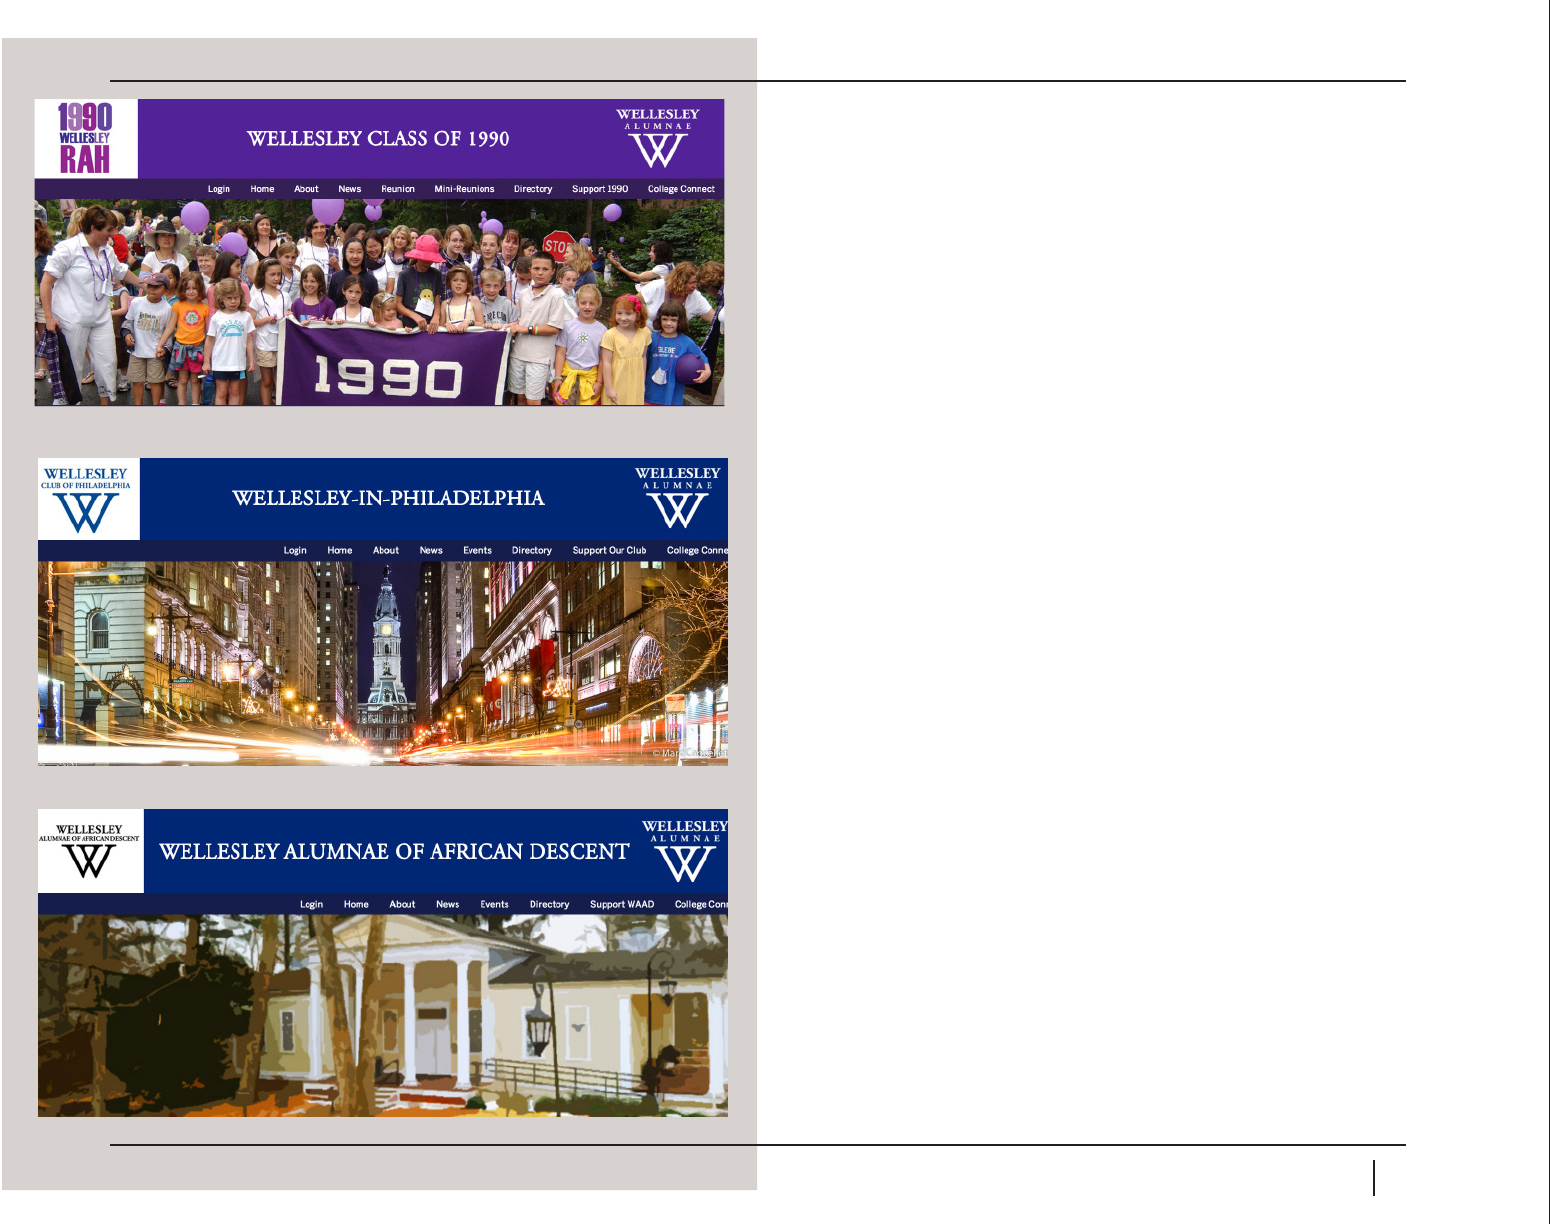
e WCAA oers 3 types of websites:
1. Class Website: class websites are geared toward the events classes care most about:
Reunion and mini-reunions, and classes can collect class dues through the site (if
they so choose).
2. Club Website: through club websites, club ocers can easily manage membership
and plan events.
3. Shared Interest Group (SIG) Website: through SIG websites, SIG ocers can
easily manage membership and plan events.
Each alumna has a personalized homepage that shows which sites you belong to.
Changing photos, adding news items, sending email blasts, renewing memberships, and
collecting revenue will all be in your control.
3
A Note about Privacy
e privacy of your condential Class, Club, or SIG information is a priority of the
WCAA. Privacy is dened as the ability to limit access to content based on some
criteria. On your website, dierent areas and features can be restricted. By default, most
of the items on your website are public. However, as an administrator, you can turn
privacy settings on.
Privacy Settings
e two main privacy settings included in the Wellesley Community are:
1. Public: Anyone can see all the information.
2. Public/Private: Anyone can see the headline, but would need to log in and be
of the appropriate group/membership level to see the detail.
• Alumnae Directory: Defaults to private. is cannot be changed.
• Generic Articles: Defaults to public. Can be changed to public/private at the
article level.*
• Event Articles: Defaults to public. Can be changed to public/private at the
article level.*
• News Articles: Defaults to public. Can be changed to public/private at the
article level.*
• Photo Albums: Defaults to private. is cannot be changed. However, on the
homepage Photo Album pod and Photo Albums page, the photo album title
and the last photo in the album will always be seen publicly.
• Store Items/Event Tickets: e privacy settings are set by the user when the
store item/event ticket is set up.
*See the section on “Making a Web Page Private” on page 11 for how to restrict your
generic, event, or news article.
TIP: For news or event articles,
when you add restriction to the
article it will not prevent the article
thumbnail, headline, or subhead
from appearing on your homepage.
So if you have information you
want to keep private in any of those
elds, make sure to not include it
there.
4
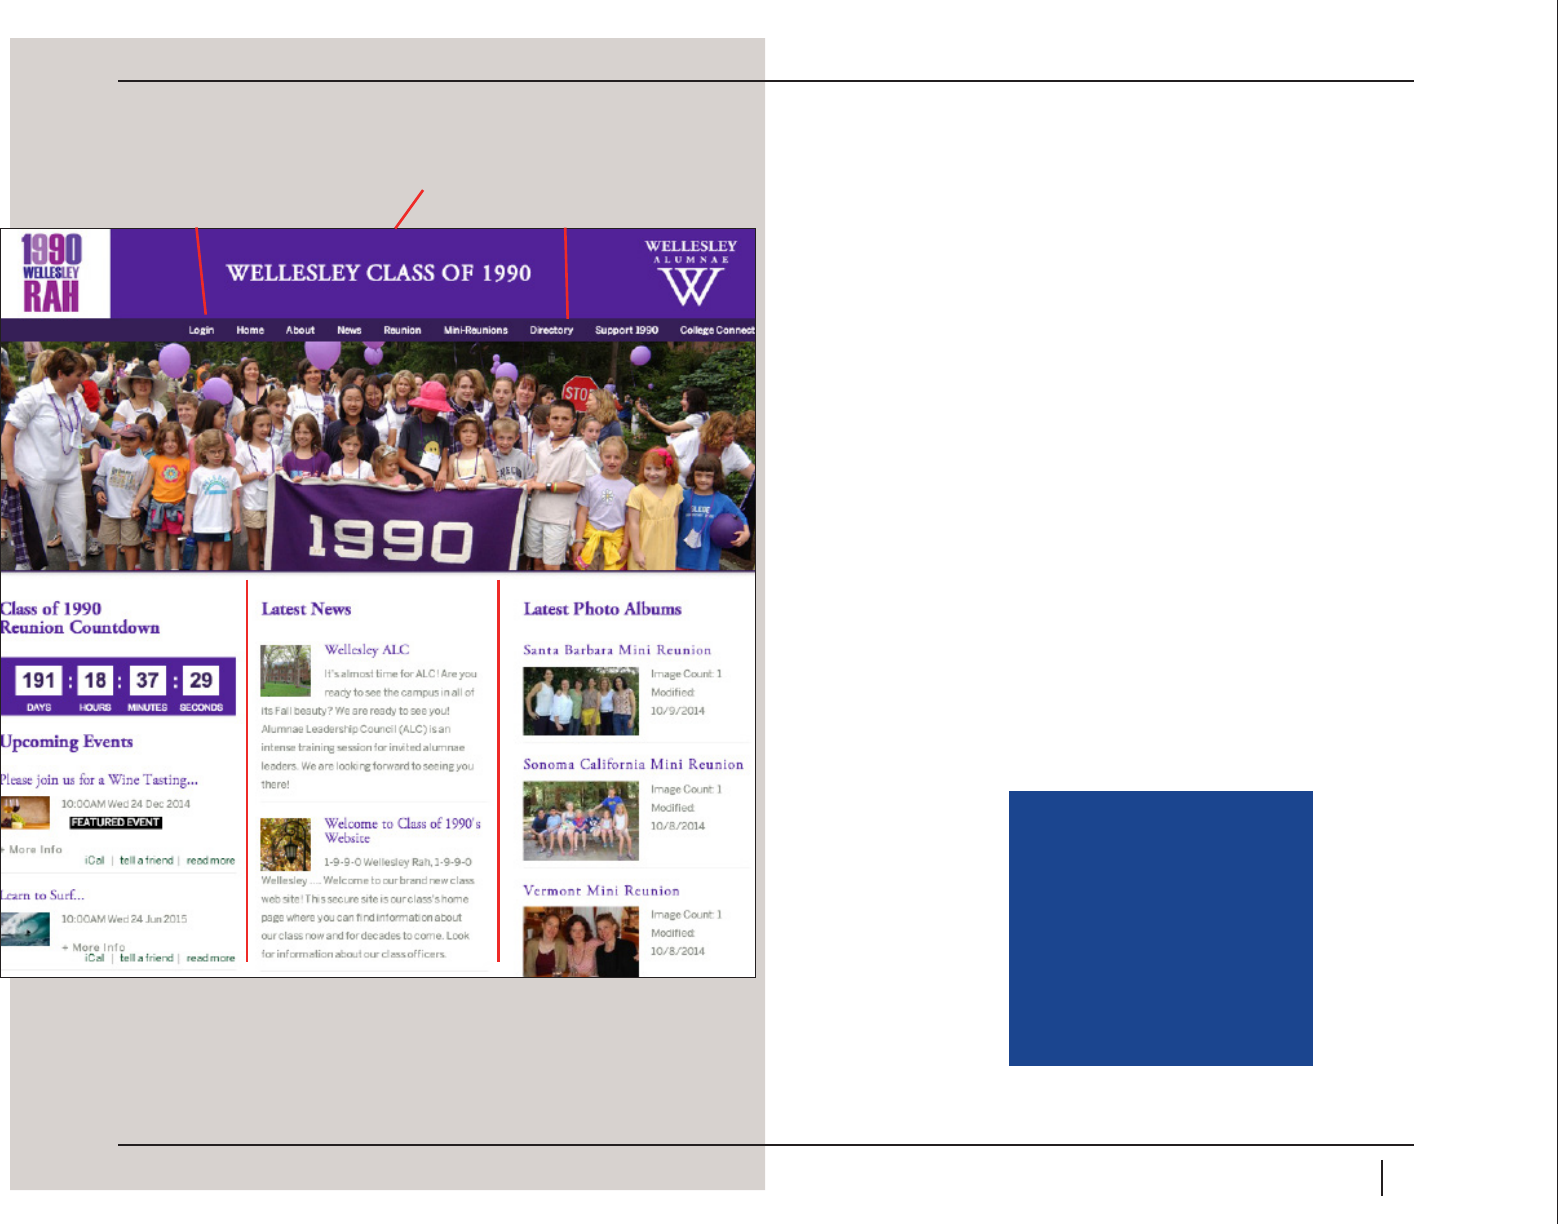
Home Page Overview
To the left is an example of a Class’s main homepage layout. Whether you are
managing a Class, Club or SIG, the organization, format and administration of the
website is very similar. e key elements have been called out in red.
Beginning from the top to the bottom, the page banner consists of your logo (left), the
title of your website (center), the WCAA logo (right), the main navigation, and your
banner image.
Below the page banner is the homepage content:
• Column 1: For classes with reunions scheduled within the next two years, a
Reunion Countdown, followed by a list of upcoming events. For Clubs and SIGs,
a list of your upcoming events. To view additional events, visit the Events page.
• Column 2: Lists brief descriptions of any news items you’ve published recently. To
view additional news, visit the Latest News page.
• Column 3: Shows your latest photo albums, listed in the order in which they were
created (from newest to oldest). To view additional photo albums, visit the Photo
Albums page. Also includes the directory search function (specic to your group),
and links to your social media. You can edit which social media are linked in that
area.
IMPORTANT: If you want to
change your banner image or
add/delete a main navigation
item, you can request it by
sending an email to Robin
Marshall at rmarshal@wellesley.
edu. It needs to be an image that
can be cropped to 1200 x 335
pixels.
Column 1 Column 3Column 2
Main Navigation
Page Banner
Your Login
5
Getting Started Managing Your Site
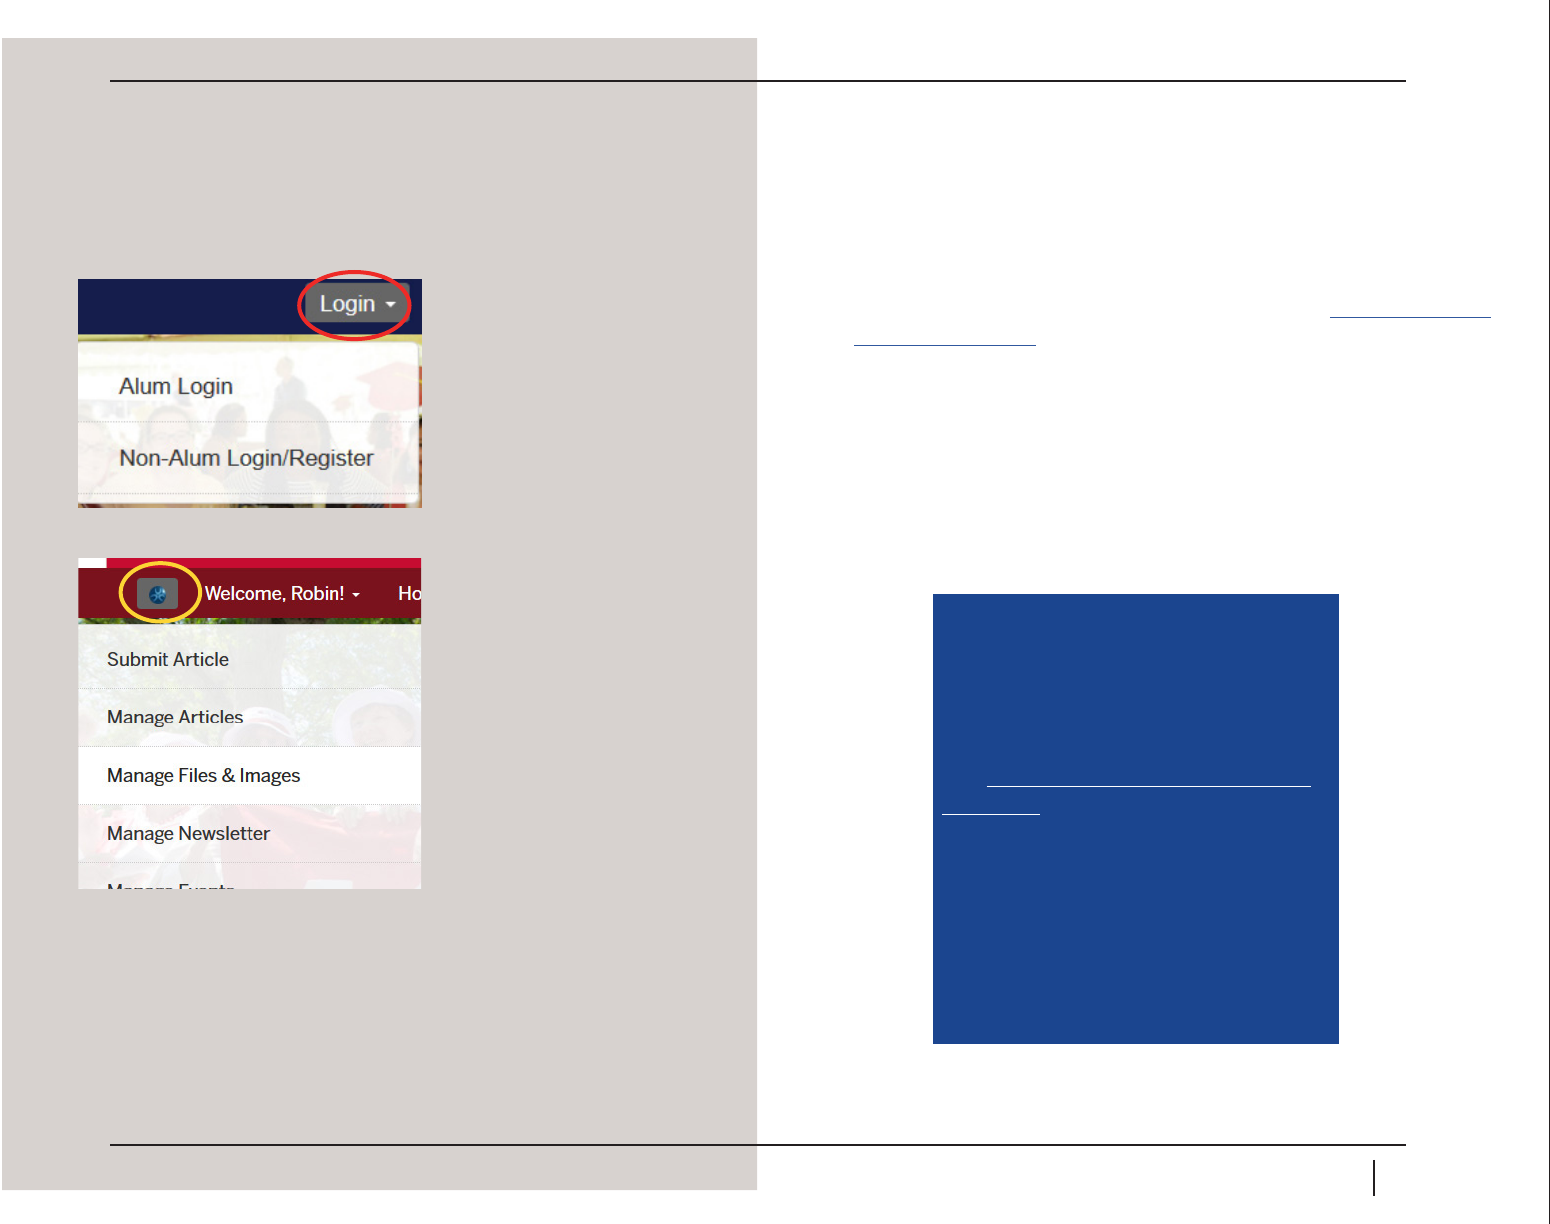
Logging In
1. It is strongly recommended that you access your site using the Mozilla Firefox web
browser. While you may access your site in other browsers, certain functions of your
site only work in Firefox. To download this free browser, visit https://www.mozilla.
org/en-US/refox/new/.
2. e URLs for the websites all have the same naming convention. It is https://
(name of class, club or sig).alum.wellesley.edu. On the homepage of your website
hover over Login in the main navigation and a drop down of options will appear. As
an alumna, you should click the Alum Login option.
3. Enter your Wellesley Login username and password.
TIP: If you have forgotten your Wellesley
Login username or password you can
request your username and a temporary
password online using Wellesley College’s
Library & Technology Services’ new,
automatic password reset feature. Please
click https://webapps.wellesley.edu/alum_
pwd_reset/ to access the reset app. If you
do not receive a temporary password email
from us or you have trouble resetting your
password using the link above, please check
in with the Wellesley College Help Desk at
781.283.7777 or helpdesk@wellesley.edu.
They are open Monday through Friday from
8:30 am to 4:30 pm.

6
Article Basics (News, Events, or Mini Reunions)
Article Editor Overview
e article editor is used whenever you want to create a new article or simply edit an
existing one. is is the most frequently used component because it is also the basis for
your e-newsletter.
1. To begin, click on the blue dot in the home page main navigation. A drop
down menu will appear. From the drop down menu, click Manage Articles and
then go to the upper right and choose Create Article.
2. e article editor is split into four distinct sections: the vault, the collection
information (this is what you will see on the home page for News and Events), the
content section, and the article details section. Let’s look at the vault rst.
3. e vault contains everything you need to create visually appealing content. When
you are in the article editor, the vault is accessed by clicking the little black semi-
circle in the top left-hand corner of your page. From top to bottom, the
three you will be using are: your keyboard tools, your photo vault, the photo
uploader. You can drag and drop any text element from the keyboard tools into
your article. is is also where the Magnet Widget is for the Event map feature. If
you click the little image icon in the black bar, the vault refreshes and you can now
see all the pictures you have in your vault—which you can also drag and drop into
your article. Using the photo uploader, you can upload a photo to your photo vault
directly from your computer.
4. e second of the four sections in the article editor is the collection information. It
is at the very top of the article editor, directly under the main navigation bar. ink
of the collection information as a preview or teaser about your News or Event
article on the homepage.
5. e third of the four sections is the content section. is is where the text and
images you want to include in your article will be entered. You can drag and drop
text blocks, headlines, other content types, and images directly from the toolbar
(discussed in Step 3) into the area between the two gray bars labeled “Begin
Content” and “End Content.”
3
4
1
2
5

7
6. If you click anywhere between the two gray bars, a text formatting box will appear.
is box gives you many of the traditional text editing tools you will be familiar
with: bold, italics, underline, font size, font color, justication, hyperlinks, insert
table, and many more.
7. Two of the most important areas of the text formatting box are the paste tools and
the template tool. e three paste tools are called “Paste,” “Paste as Plain Text,”
and “Paste from Word.” We recommend using Paste from Word if you’re copying
content from a Microsoft Word document, and using Paste as Plain Text for all
other instances. (Otherwise, you may get strange formatting that Microsoft Word
embeds in documents.) e template tool is located to the right of “Source” on the
toolbar.
8. Choosing a topic from the drop-down list determines where on the site your article
will appear. For example, if you want the item to appear in home page column 2
under Latest News, choose News.
9. Event Parameters are only applicable to event articles (so, you don’t need to add an
event start and end date to your news articles).
10. Add a location so the Google map of your event will appear in your event article.
You will need the Event Dashboard widget. e dashboard will include a summary
of your event date, time, and location, plus an interactive Google map for your
readers to access directions. To add the Event Dashboard widget, open the
toolbar, choose the keyboard tools, and scroll all the way down until you see
the Event Dashboard widget. Click and drag the widget into your article where
you want it to appear.
6
7
Important!
If you click the blue box with the
camera icon to the far left of the
Begin Content bar, you can view
a helpful video tutorial on how to
create an article.
8
12
Important!
If you leave the article topic as
the default, Generic, your article
will not show up anywhere on
your site when published. You
must designate a location such as
News or Events.
TIP: To create a break between two
paragraphs, hit Shift + Return/Enter on your
keyboard. Only hitting Return/Enter does not
create a paragraph break in the text editor.
TIP: Always start with a template. This will
give your page visually appealing margins
and make it easy to set up.

8
Creating a New Article
Before you create a new article for the rst time, familiarize yourself with the article
editor interface, discussed in detail in the previous section of this guide.
1. To begin, click on the blue dot in the home page main navigation. In the drop
down menu, click Manage Articles and then choose Create Article in the top
right corner.
2. Have your photo(s) ready to upload. Click on the black half moon in the top left
hand corner and open your vault. You will see an upward pointing arrow. Select the
arrow to open the Photo Uploader. Simply drag the photos from your desktop into
the photo uploader. ey will now reside in the Photo Vault.
3. If you click anywhere between the two grey bars that Begin Content, End Content,
your toolbar will pop up. To enter your content, start with one of the predesigned
templates, found in the text formatting box (located next to “Source” on the
toolbar). Replace the dummy text in the template with the text you want to include
in your article. Drag and drop your new image from your vault next to the template
image, then simply delete the template image. You can resize your image by
moving the corners in or out.
4. If your article is a News or Event article, enter a headline, sub-head, and thumbnail
image. is is the information that will show up on the home page. You can drag
and drop your image into the article thumbnail area directly from your Photo
Vault.
5. If creating an Event, one of the elements in the toolbar that you will need is the
Event Dashboard widget. e dashboard will include a summary of your event
date, time, and location, plus an interactive Google map for your readers to access
directions. To add the Event Dashboard widget, open the toolbar, choose the
keyboard tools, and scroll all the way down until you see the Event Dashboard
widget. Click and drag the widget into your article where you want it to appear.
1
3
4
5
2

9
6. Fill out the additional details section, including your topic (usually News or
Events), visibility (if you would like to add an expiration date), and event
parameters (if your article is an event), which include date, time, and location.
Note: If you leave the topic as Generic, when published, it won’t appear anywhere
on your site. It will be visible only if someone is given the direct URL of the article.
Location is required for the Event Dashboard widget to function properly.
7. Once you’ve entered all information, click “Publish!” Publishing your article means
it can be seen on your website, in accordance with the privacy settings.
Making Changes to an Existing Article
To make changes to an existing (already published) article, you can open the article
editor in two dierent ways. You either click the blue Admin button, choose Manage
Articles, then nd the article you wish to change, or you can open it straight from the
article (if you know where it is on your site). ere is a small green pencil icon in the
bottom right corner of every page. If you click that, the article editor opens for that
article.
Once you are in the article editor, make your changes, and the scroll down to the
bottom of the page. Click Publish.
6
7

10
Linking a Document
Documents can be linked directly to articles. For example, for a club board meeting,
you might want to link an agenda to the Event that attendees can review and print out
in advance.
1. To begin, upload the document from your computer by going to the blue button
and choosing Mange Files and Images. Click on the Upload Files tab and then
simply drag your document from your desktop or le manager.
2. Click on the Manage Files tab and list of the les and images stored in your vault
displays. Find the le you wish to link, and click the blue information box.
3. On the next page, there will be a “File Info” section at the bottom, which includes
an “Absolute URL” and a coinciding hyperlink. You will need to copy the hyperlink
into your article so the article knows where to nd the linked le. is is a two-step
process. Step one is to copy the hyperlink, and step two is to paste the link into the
article. To begin, highlight the one under “Direct Link” and copy the URL.
4. Next, open the article editor for the article in which you wish to add the link.
5. In the content section, highlight the text you want to use as the hyperlink. While
the text is still highlighted, in the text formatting box click the “Link” button.
6. A dialog box will appear. Paste the document URL you copied earlier into the URL
eld. In the Target tab eld, our preference is for you to change it to “New Window
(_blank).” Click “OK.” Note: You can also choose Email from the Link Type drop
down and put in an email address instead of a URL.
3
5
6
2
11
Making a Web Page Private
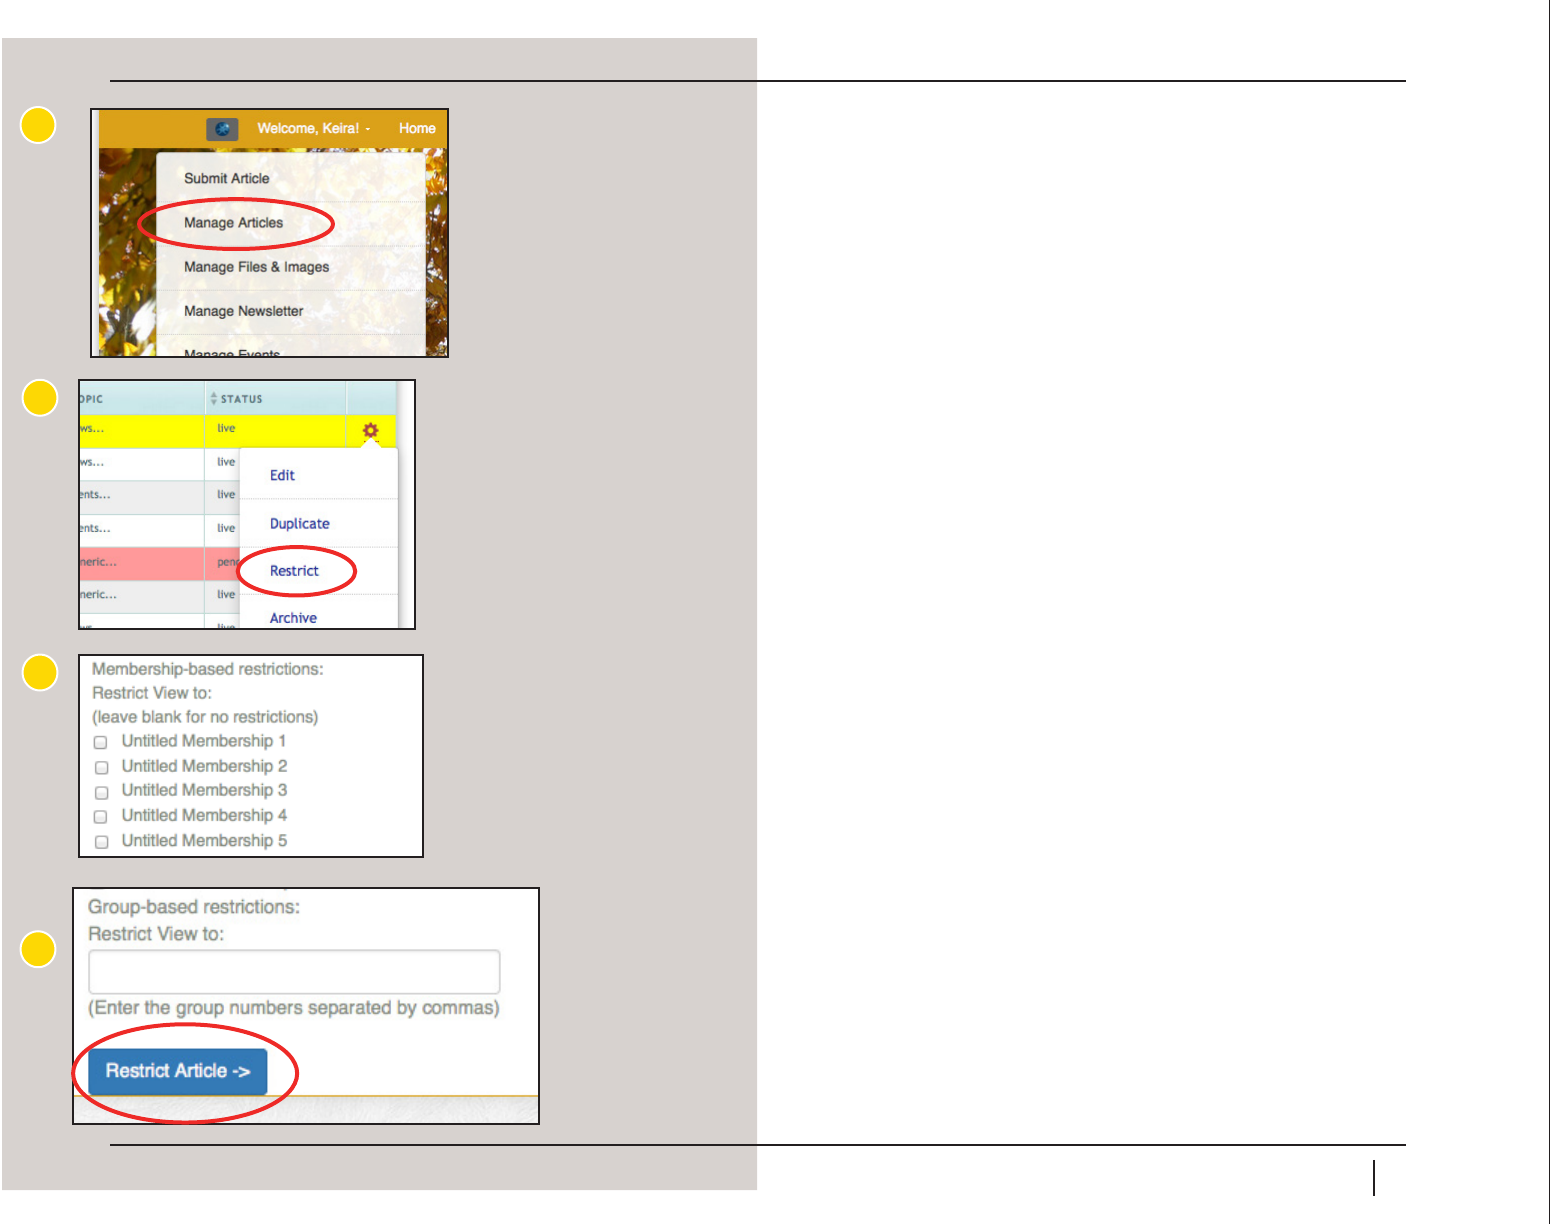
1. To begin, after you create your article, go to the blue admin button in the top left
hand corner of your main navigation, and choose Manage Articles.
2. You are then brought to your Article Repository. Find the article you already
created, and click the gear icon on the far right. Choose “Restrict.”
3. On the Restrict Article page, you can restrict access to your article in two ways: by
membership or by group. Membership restriction will likely be most useful for
Clubs (for example, you can restrict the article so that only paid members can read
it—if you are hosting a member-only event, that might be something you would
like to do).
4. All Classes, Clubs, and SIGs can use the following group restriction:
• All alumnae: Group code 1001
If you want to restrict your article to only alumnae, type 1001 in the box under
group-based restrictions.
1
2
3
5
12
Creating an Event
To create an Event, you should follow the same instructions for creating a new article in
“Creating a New Article” on page 9 of this guide.
Setting Up a Paid Event Ticket
An event ticket is used for ticketed, not free events you host for your Class, Club, or
SIG. (For example, if you are hosting a faculty speaker event for your club, and you
want to sell tickets to the event.)
Once you have created your event article, you can then create the event ticket that
corresponds to that event. Your event ticket can then be purchased. It’s necessary to
create the event article rst, then the event ticket, because you will need to link the
ticket to the event using the event article ID #. Your article ID # can be found in the
Manage Articles tool.
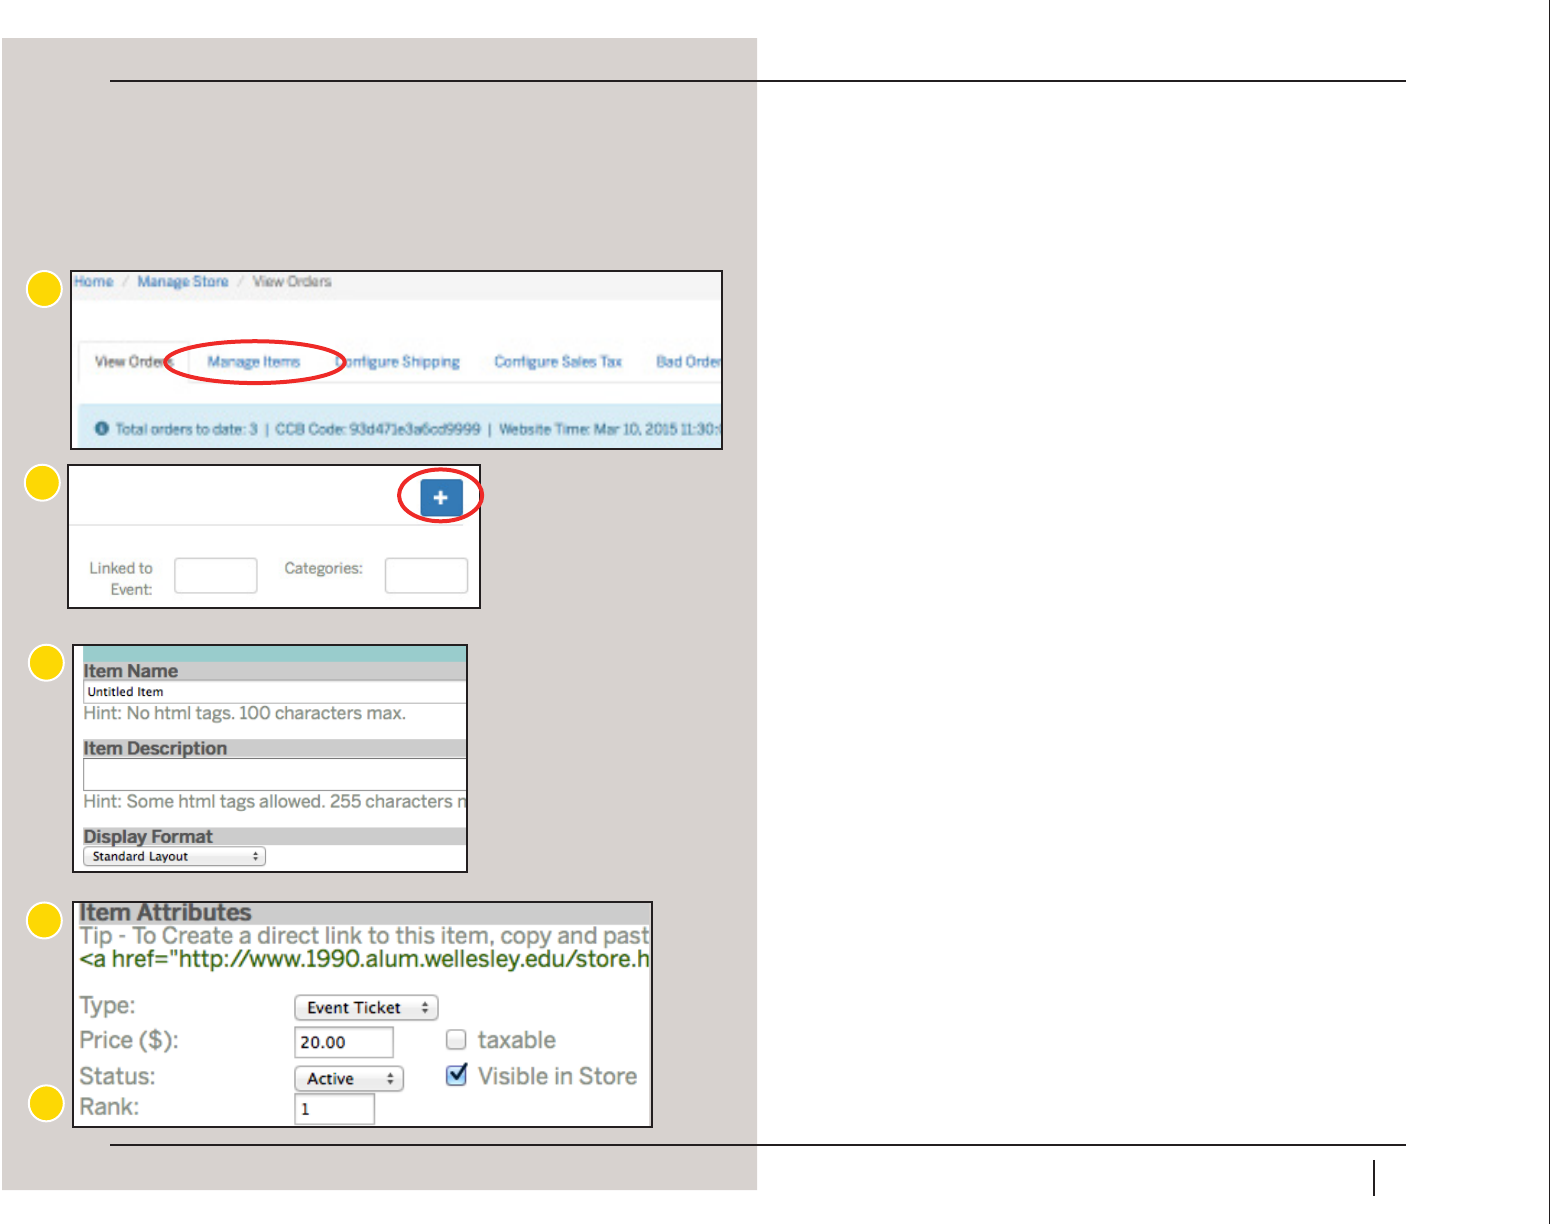
1. Start by clicking the blue dot in the main navigation, then choose Manage Store.
On the next page, click the Manage Items tab.
2. From the Manage Items tab, click the blue + icon in the top right corner.
3. Each time you add a new store item, it is given a unique Sku#. e Sku# acts as a
unique identier for the item on your website. On this screen you should give your
item a name and brief description. Leave display format as “Standard Layout.”
4. Next, you will ll in the item attributes section. For type, you will want to choose
Event Ticket. at will make it so that RSVP information is automatically
requested from the purchaser. en enter your price (you must include two places
after the decimal, e.g. 20.00), and change the status to Active. (If it were inactive, it
wouldn’t be available on the site for purchase.) Leave “Visible in Store” checked if
you want the ticket to be sold in your store.
5. e rank eld is needed if you are selling dierent types of tickets for a single event,
such as a member ticket and a non-member ticket. e rank puts the dierent
tickets in order. If it is the only ticket for your event, leave the rank as 1.
1
2
3
4
5

13
6. Next, in the Linked Event eld, enter the event article ID that corresponds to this
event. In the Qty limit eld, you can add a total number of tickets that can be sold
for this event. You can also dene the maximum number of tickets each user can
purchase in the Max per user eld.
7. In the Availability Date section, enter the date you want tickets to go on sale along
with the date you want tickets to no longer be available for purchase. You can also
enter a time that the ticket purchasing period opens and expires.
8. For the “In Categories” section, choose “Event Tickets”.
9. e last attribute in this section has to do with purchase restrictions. You can
restrict purchase to only people who have purchased certain membership levels
through your site. (is will come in handy if you are selling member and non-
member tickets.) Leave them all unchecked if there are no restrictions on your
ticket, and anyone can purchase them.
10. e next optional step is to assign an image (up to 4) for the ticket. Note that the
recommended size for store item images is 800 x 800 pixels. If you do a smaller size,
it may not t well on your home page store.
11. Click Save Changes.
12. If you checked “Visible in Store” in Step 4, your ticket will show up automatically
on your store page under the category “Event Tickets.” (If you were creating a
“comp” ticket that is only available for certain people, you would have unchecked
“Visible in Store,” and it wouldn’t appear there.)
13. To create another ticket based on the ticket you just created, you can simply
duplicate it.
IMPORTANT: Go to “Manage
Articles” under the blue dot in the
main navigation to locate your
event article and its ID. Note: Once
1 ticket has been sold, your linked
event is locked and this eld cannot
be changed.
8
9
10
6
7

14
Adding a Buy Button to Your Event Article
1. To have your ticket appear with your Event article, there is one last step. Go to the
blue button in your homepage navigation, and choose Manage Events. You will see
a list of all your events. Find the event that corresponds to your ticket, and click the
gear icon in the Action column.
2. Choose “Add ‘Buy Tickets Here’ Link to Article.” You will be asked to conrm if
you want to add the link; click “Do it!”
3. You will now be brought to your updated event article, where you can see the link
that was added for your ticket. You can copy or move this link to another location
in your article if you open the article editor.
1
2
3

15
Setting Up an RSVP List for a Free Event
For free events, you do not have to create a $0.00 event ticket. Instead, there’s a handy
widget that you can drop directly into your article which allows your guests to RSVP
without going through a purchasing process. In order for this feature to work, you must
already have included the MagnetWidget: Event Dashboard to your event article. See
“Creating a New Article on page 9, steps 4 through 6, for instructions on how to add
the Event Dashboard.
1. Click the blue admin button from the main navigation bar, then choose Manage
Events.
2. Choose your event from the list and click the blue gear icon to the right, then
“View.”
3. Next, go to QuickRSVP/Waitlist Control: Disabled [ edit ], and choose “Edit.”
4. is brings you to Additional Event Settings. ere are three options to choose
from: You can set the maximum capacity for your event, activate a “Look Who’s
Coming” list after a certain number of people have RSVP’d, and activate the Quick
RSVP/Waitlist feature. Please note that you need to set up the waitlist feature once
the number of attendees has been met. It will not automatically come on when the
maximum capacity is reached.
5. Choose QuickRSVP “Enabled” to have the RSVP widget added to your event. e
other two settings (maximum capacity and “look who’s coming list”) are optional.
6. Click Save.
7. If you then visit your published event article, you will see that an RSVP widget is
now available to be lled out.
2
3
5

16
Viewing an Attendee List for an Event
Whether your event is a paid event or a free event, you can download an Excel
spreadsheet of your attendees. (With a free event, you must add the “Quick RSVP”
widget to your event in order to collect attendee names. See the previous section of this
guide for instructions.)
1. Click the blue admin button from the main navigation bar, then choose Manage
Events.
2. Choose your event from the list and click the blue gear icon to the right, then
“View.”
3. On the next page, there will be a section titled “RSVP List.” ere, click the link
in the sentence “Click here to download the Extended List of Attendees directly to
Excel.”
Creating a Waitlist for an Event
1. Click the blue admin button from the main navigation bar, then choose Manage
Events.
2. Choose your event from the list and click the blue gear icon to the right, then
“View.”
3. At the top of the next page, there is a feature that says “QuickRSVP/Waitlist
Control.” Click edit.
4. In the Additional Event Settings page, rst set the maximum capacity of tickets for
the event. Once the number you enter here has been reached, you can turn on the
Waitlist Control.
5. Next, toggle the QuickRSVP/Waitlist feature to “Waitlist Enabled.” en click
“Save New Settings.”
Now you will be able to view and download an Excel report of any waitlisted guests.
Follow steps 1 - 2 above, and scroll down to the Waitlist section to download the report.
3
3
5

17
1
2
4
5
6
Files and Images
In your website, you have the ability to upload and save images or les (such as PDFs) to
be used in other parts of your website, such as events, news, or photo albums. Follow the
steps below to add a new image or le to your site. Files and images are stored in your
“vault”.
Adding an Image or File to Your Site
1. Click the blue dot in the home page main navigation. A drop down menu will
appear. In the menu, click Manage Files and Images.
2. From the Manage Files and Images dashboard, click “Upload Files”.
3. As you’ll see on the Upload Files tab, you can upload most le types. e maximum
le size is 2 MB. If your photo or le is too large, the le should be saved as a
smaller size using an image editing program like PhotoShop. If you don’t have
PhotoShop, you could also use a free online photo editing tool located here: http://
pixlr.com/express/.
4. Drag and drop your photo or le directly onto the Upload Files area. You can add
multiple les or images at once.
5. When you are done uploading your les, click “Manage Files” to view your
uploaded les. e new le(s) will appear in the top left of your list of les.
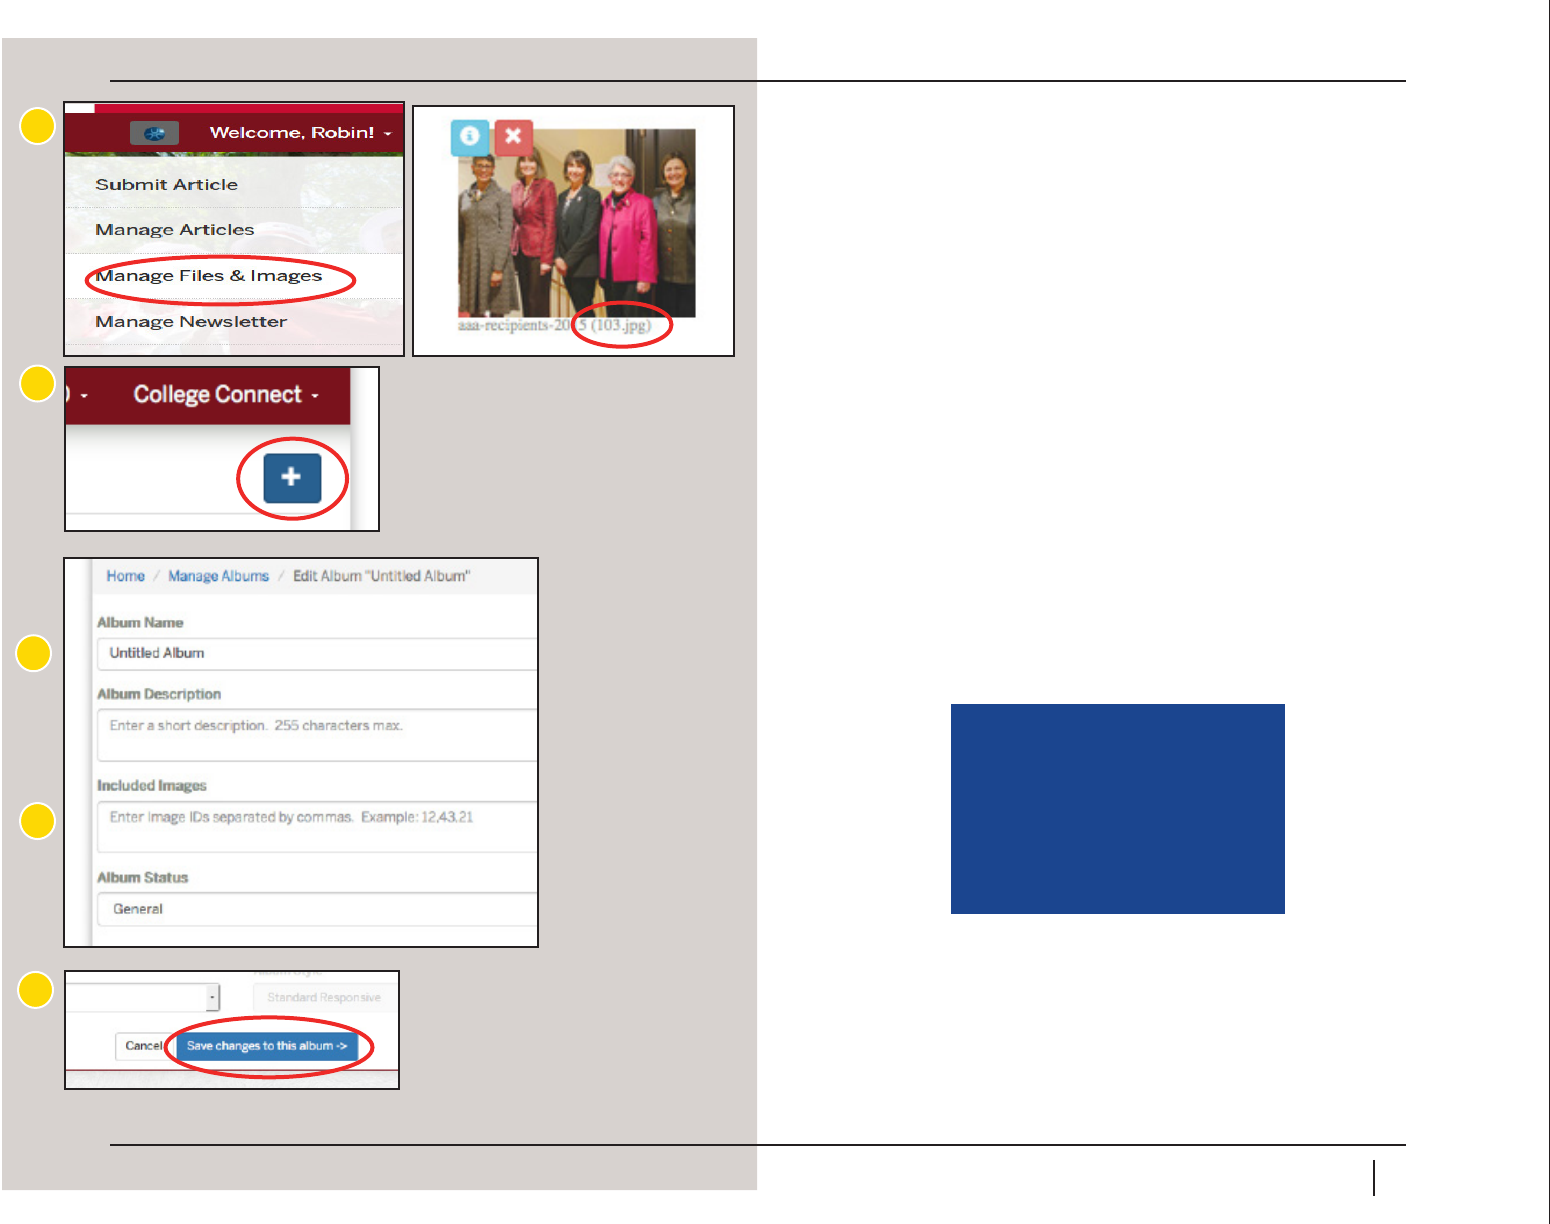
6. Each image le that you upload is assigned an image ID #. (In the example to the
left, the image ID is located directly under the picture, #103.) e image IDs are
later used when creating photo albums. Each non-image le (Word doc, PDF, etc.)
is assigned a unique URL that can later be used if you want to link to a document
from within an article.
18
IMPORTANT: The last image in
your list of Image IDs is considered
your “cover” image, and will appear
as the thumbnail for your album on
the homepage and on your Photo
Albums page.
2
3
4
5
6
Creating a Photo Album
1. To begin, the photos you want to include in your album should already be
uploaded to your site. See “Adding an Image or File to Your Site” the previous page.
2. From the blue Admin button, click Manage Files and Images. Your screen should
then show all the les and images you have uploaded to your site. Write down the
Image IDs of each image you plan to add to your album.
3. Next, click the Manage Image Albums tab, then click blue box with the + sign in
the upper right hand corner of the tab (under College Connect).
4. Give your album a name, and a brief description (optional).
5. In the “Included Images” box, enter each Image ID that you wrote down earlier,
separated by commas (no spaces). ere’s no limit to the number of images you can
include in an album.
6. Lastly, click “save changes to this album.” at’s it! Your album will now appear on
the “Latest Albums” section of your home page.

19
2
3
4
ENewsletters (Emails)
In the new Wellesley Community, emails are referred to as “eNewsletters.” e WCAA
has set up eNewsletter templates for each Class, Club, and SIG. In this section, we
will discuss how to access your eNewsletter template, edit the content, create a test
email, and send out an email to your constituents. We’ll also discuss how to view email
statistics.
Creating an eNewsletter
1. Click the blue admin button and choose Manage Newsletter.
2. is brings you to your eNewsletter Repository. Click the Templates tab to view
your Class, Club, or SIG template we have preloaded for you.
3. In the Templates tab, you will see your default preloaded template. To start your
email click the gear icon on the far right and choose “Create campaign from
template.”
4. e page will refresh, and you will see the pending tab, where a new copy of your
template has been added to your list of email drafts. Click the gear icon on the far
right and choose “Edit” to begin editing this document.
5. e eNewsletter editor is very much like the article editor. You can simply replace
the default text with the text of your email. For more information about using the
content editor, review “Creating a New Article” on page 9.
6. Note that your email template includes “Dear [rst name],” by default. at tag
enclosed by brackets will automatically populate your recipient’s rst name in
the copy of the email he or she receives. If you want to change the greeting to
something more generic, such as Dear Classmate or Dear Member, you can delete
the tag and type what you prefer.
5
6
20
7
8
9
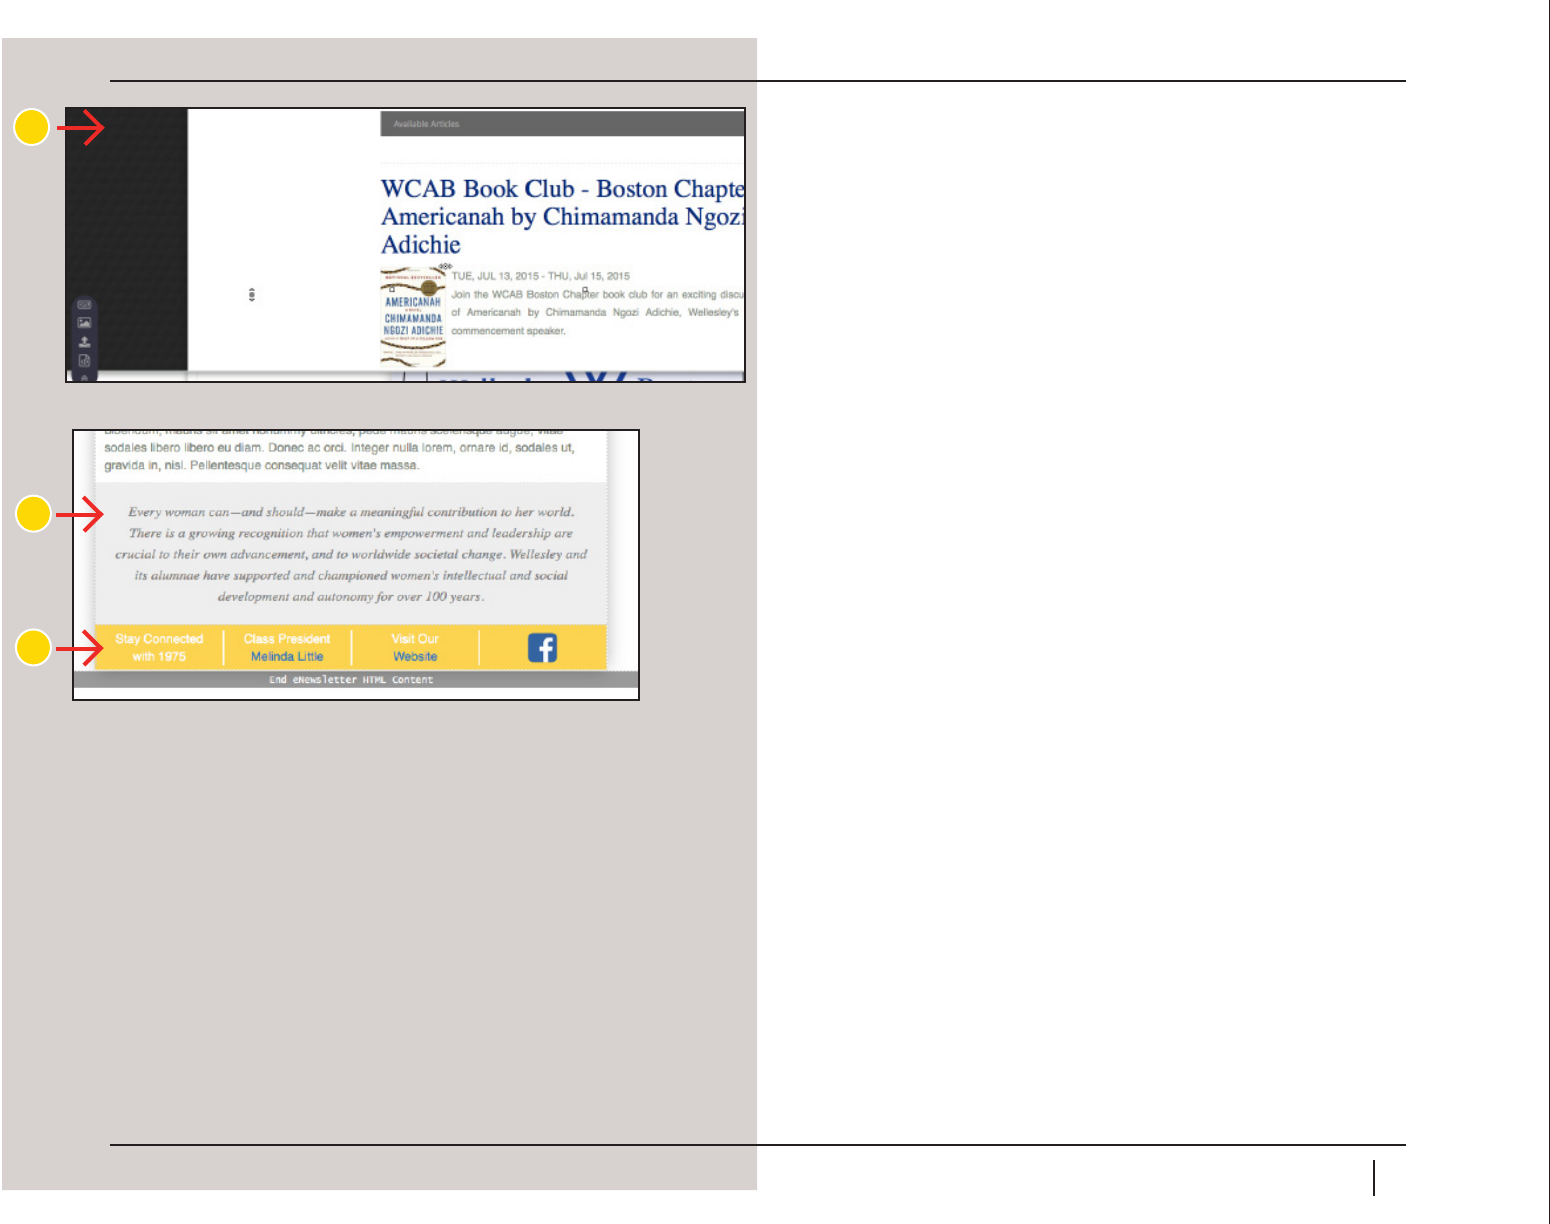
7. You can easily drop links to your news or events articles using the Vault (black
semi-circle dropdown menu on the top left-hand corner of the eNewsletter
editor screen). First, in the content section, put your cursor where you want the
news or event link to appear. Next, click the black semi-circle, and you will see
a list of “Available Articles.” You can drag and drop the news or event article
you wish to highlight in your eNewsletter into the content section where your
cursor was placed. To add another news or event article, repeat these steps.
8. What follows includes a banner with your Class, Club, or SIG president’s name
and contact information, your website link, and social media links.
9. Below your banner, the system will attach a banner with the WCAA’s social
media links and contact information along with a default footer (which includes
a privacy disclaimer and unsubscribe link). is piece is attached automatically
each time an eNewsletter is sent. You will not see it in the eNewsletter editor
and cannot make changes.

21
1
2
3
1
2
3
4
Saving and Sending a Test eNewsletter
ere are two ways to send a test eNewsletter: the rst method sends the test to all
administrators on your site; the second method sends the test to only your president.
Method 1: sends the test to all administrators on your site
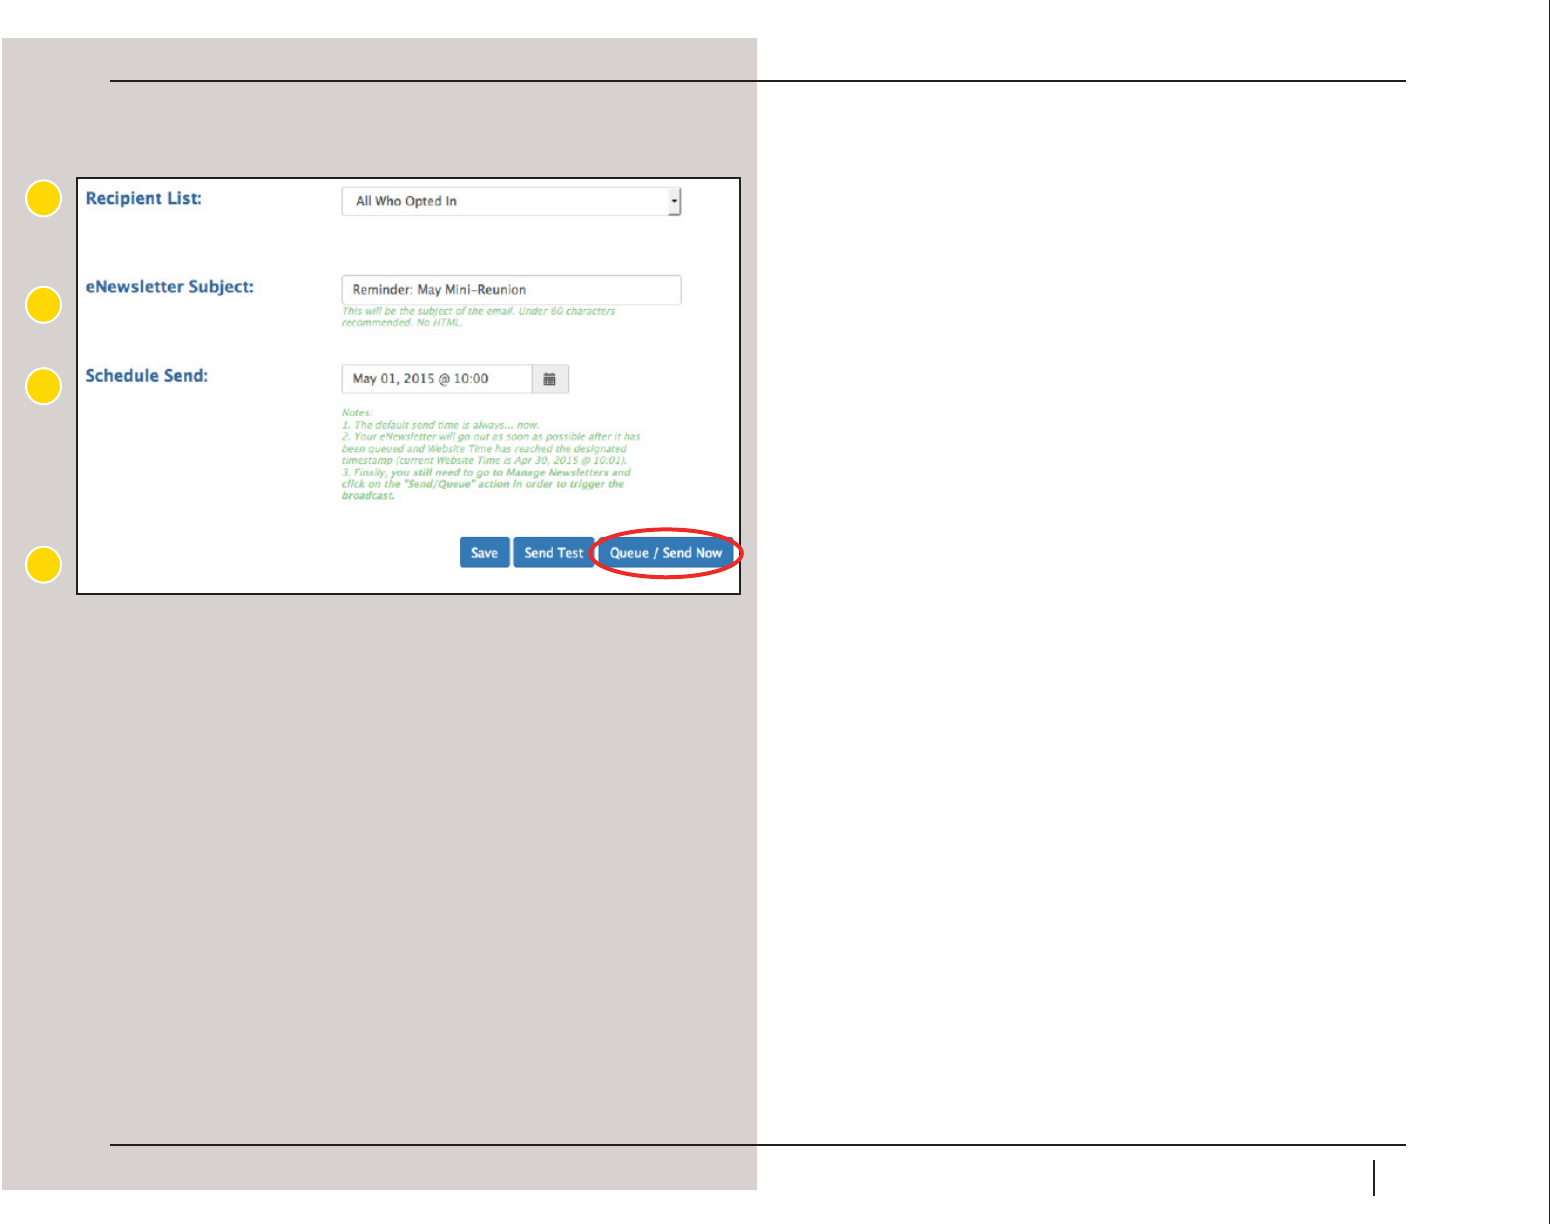
1. When you are in the eNewsletter editor, you will see three elds: Recipient List,
eNewsletter Subject, and Schedule Send. To send a test to all administrators, the
only eld you need to update is the eNewsletter Subject. Note: e Recipient List
defaults to “All Who Opted In,” but with this test method it is OK to leave that as
is.
2. Enter your email subject line. We recommend adding the word “TEST” before
your actual subject line so it’s obvious that the email is a test once it is sent.
3. First click “Save,” then the blue “Send Test” button at the bottom of the page.
Your email content is saved and will remain in the pending tab under Manage
Newsletters, and a test email will immediately send. e test will be sent to anyone
whois listed as a head administrator on your site.
Method 2: sends the test to only your president
1. When you are in the eNewsletter editor, scroll down to just below the content
section. Instead of ignoring the Recipient List eld, you should change it to “Test
Group.” By default, the test group includes your president’s email address only,
though some will have been modied to include others who want to receive test
emails. To have your test group modied by adding or deleting an email address,
contact Robin Marshall at rmarshal@wellesley.edu.
2. Enter your email subject line. We recommend adding the word “TEST” before your
actual subject line so it’s obvious that the email is a test once it is sent.
3. For the Schedule Send eld, if you leave it blank, your test eNewsletter will be sent
out immediately once you complete step 4. If you want your test to go out at a
specic time, you can specify a date and time in this eld.
4. Don’t forget to save! After you click “Save,” click “Queue/Send Now.” Your test email
will go out at the time and date you designated (or immediately, if you left Schedule/
Send blank).
22
1
2
3
4
Scheduling Your eNewsletter
1. Once you are satised with the text of your email, you will need to specify who will
get your email, the subject line, and the date and time the email will go out. For
most emails, choosing “All Who Opted In” should be the default. at list includes
everyone who belongs to your Class, Club, or SIG website. For now, you may only
send to alumnae. Contact alumgroupsrequests@wellesley.edu if you need to email
additional groups or wish to make a custom group of certain alumnae.
2. Enter your eNewsletter subject line.
3. For the Schedule Send eld, if you leave it blank, your eNewsletter will be sent out
immediately once you complete step 4. If you want your eNewsletter to go out at a
specic time, you can specify a date and time in this eld.
4. Click “Save,” then “Queue/Send Now.”
at’s it! Your eNewsletter will go out at the time and date you designated (or
immediately, if you left Schedule/Send blank). If you set a time, you will nd your
eNewsletter in the “Queued” tab under Manage Newsletters. If you left Schedule Send
blank, it will immediately appear under the “Sent” tab instead.

23
Editing, Rescheduling, or Canceling Your eNewsletter
After scheduling your eNewsletter, there may be an instance where you want to make a
change to the email content, change the send time, or cancel the email altogether. Follow the
instructions below to make those kinds of changes. You will start with Manage Newsletters
again.
1. First, click the Queued tab. Next, click the red “Cancel” button next to the eNewsletter
you wish to change.
2. You will then be asked to conrm whether you are sure you want to “de-queue” the
eNewsletter. Click “Yes, please de-queue.”
3. Your de-queued eNewsletter will now appear back in the “Pending” tab. If you don’t
know when you plan to reschedule it and want to save the email content for future use,
your job is done. If you are canceling your email and wish to delete the email content,
click the gear icon on the far right, and choose “Delete.” If you want to make a change
to the content or change the scheduled send time, choose “Edit.”
4. Back in the eNewsletter editor, make your content change or update the Schedule
Send time. If you are not ready to set the Schedule Send time, click “Save” and your
eNewsletter will be updated and returned to the Pending tab. If you are ready to
Schedule the eNewsletter after you change, click “Queue/Send Now.” Your eNewsletter
will now be updated with your changes.
IMPORTANT: Once the
eNewsletter is sent, you cannot
un-send or make changes.
3
4

24
IMPORTANT: raw opens count
every time the message is opened,
including multiple opens by the
same person; unique opens are
counted only the FIRST TIME the
message is opened by each user.
2
3
1
2
Viewing Email Statistics
After your eNewsletter has been sent, you can easily check to see how many
of your recipients have opened it.
1. To begin, click the blue admin button in the main navigation and
choose Manage Newsletter. Click the “Sent” tab. en choose the blue
In Depth button for more information.
2. ere you will nd any email you’ve successfully sent, along with a high-
level overview of your email statistics, which includes how many people
received the email, opened it, clicked a link in it, agged it as spam, and
how many people used the unsubscribe link.
3. For a more in-depth report, click the blue “In Depth” button.
4. An expanded email statistics report will open below. ere you can see
how many “opens” and “clicks”, and you can also see what links were
clicked and by whom, as well as who opened your email.
25
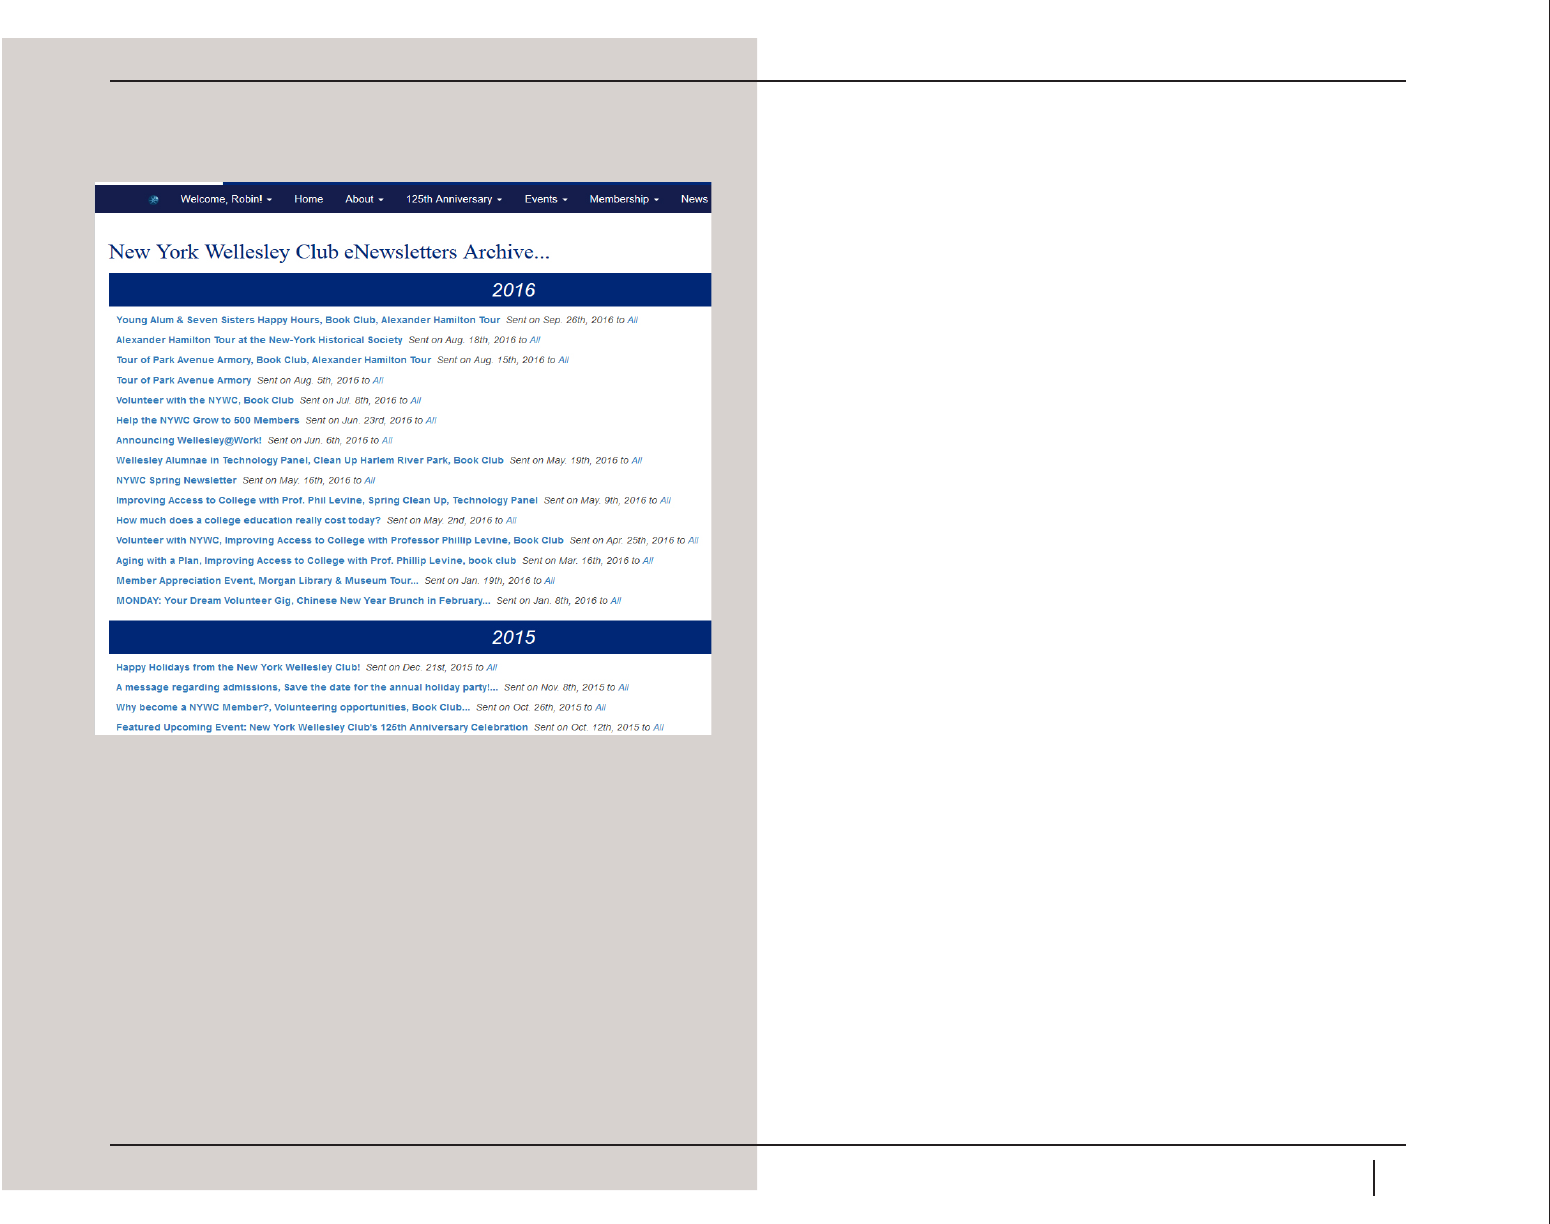
Our New eNewsletter Archive Feature
We now have a new feature available to display your sent e-newsletters. Once an
enewsletter is sent a link to it will be generated on the Past Newsletters (newsletters.
html) page which can be found under the News tab. Any newsletter with the word
“test” in it or only a few recipients will not be displayed in this list. e list is only
accessible if you are logged in to ensure security. You can also choose which emails
you would like displayed by going to Manage Newsletters and then to your Sent
folder. Find the email that you would not like displayed and go to the blue “gear” on
the right. De-select Show in Archive and it will no longer appear in the list.

26
Selling Merchandise
In addition to selling event tickets, you are able to sell general merchandise on your
class, club, or SIG website. Your merchandise is visible to site visitors on the main
page of your site. If you have at least one item for sale, a new section of your website
automatically appears, titled “[Class/Club/SIG Name] Store.” An example of an active
club store is shown at the left.
Adding a Store Item
To add a tangible/physical item to your store (as opposed to an event ticket), follow the
steps below.
1. To begin, click the blue admin button in the main navigation, and choose Manage
Store.”
2. Click the Manage Items tab, then click the blue + symbol on the right hand side of
that tab.
3. On the next screen you will enter details about the item you’re selling. Give it a
title, a brief description (color, size, features, etc.) For item attributes, assign it as
“general.” Assign your price, and leave the “Visible in Store” box checked.
2
3

27
4. “Linked event” is only used for ticket sales, so leave that eld blank. You can enter
a quantity limit if there is a nite amount of the items you’re selling, and/or set a
maximum quantity each user can purchase. Otherwise, leave those elds blank.
5. You can also enter a start and end date for when your item goes on sale. If you want
it to be available now and don’t plan to stop selling it anytime soon, leave these date
elds blank.
6. In the next section, add shipping charges (if you are accounting for them separately
from the item cost) by checking the “Requires shipping” box and adding an amount
in the “Surcharge” box.
7. In the Categories box, click “Featured Items” to ensure the item appears in your
homepage store. Important: Categorizing the item as “General Merchandise” will
not put the item in your store.
8. Also enter the item size and color information in the next boxes, if it has any. e
auxiliary Sku information is not required (if your item has an identifying number
you want to include, you may include it here).
9. Next, you may choose to restrict the purchase of this item to a certain membership
group. If you want purchase to be unlimited, do not check any of the restrict
purchase boxes.
10. Lastly, upload one or more images for your item by clicking the “Browse” buttons
and searching for your image in your les. e rst image you upload will the
“cover” image, and is what will appear on your site’s homepage. Note that the
recommended size for store item images is 800 x 800 pixels. If you do a smaller size,
it may not t well on your home page store.
11. Click “save changes to this item.” Your page will refresh, and your item will be
saved. If you now return to your home page, the store item should appear at the
bottom of the middle column (under News).
4
5
6
7
8
10
9
28
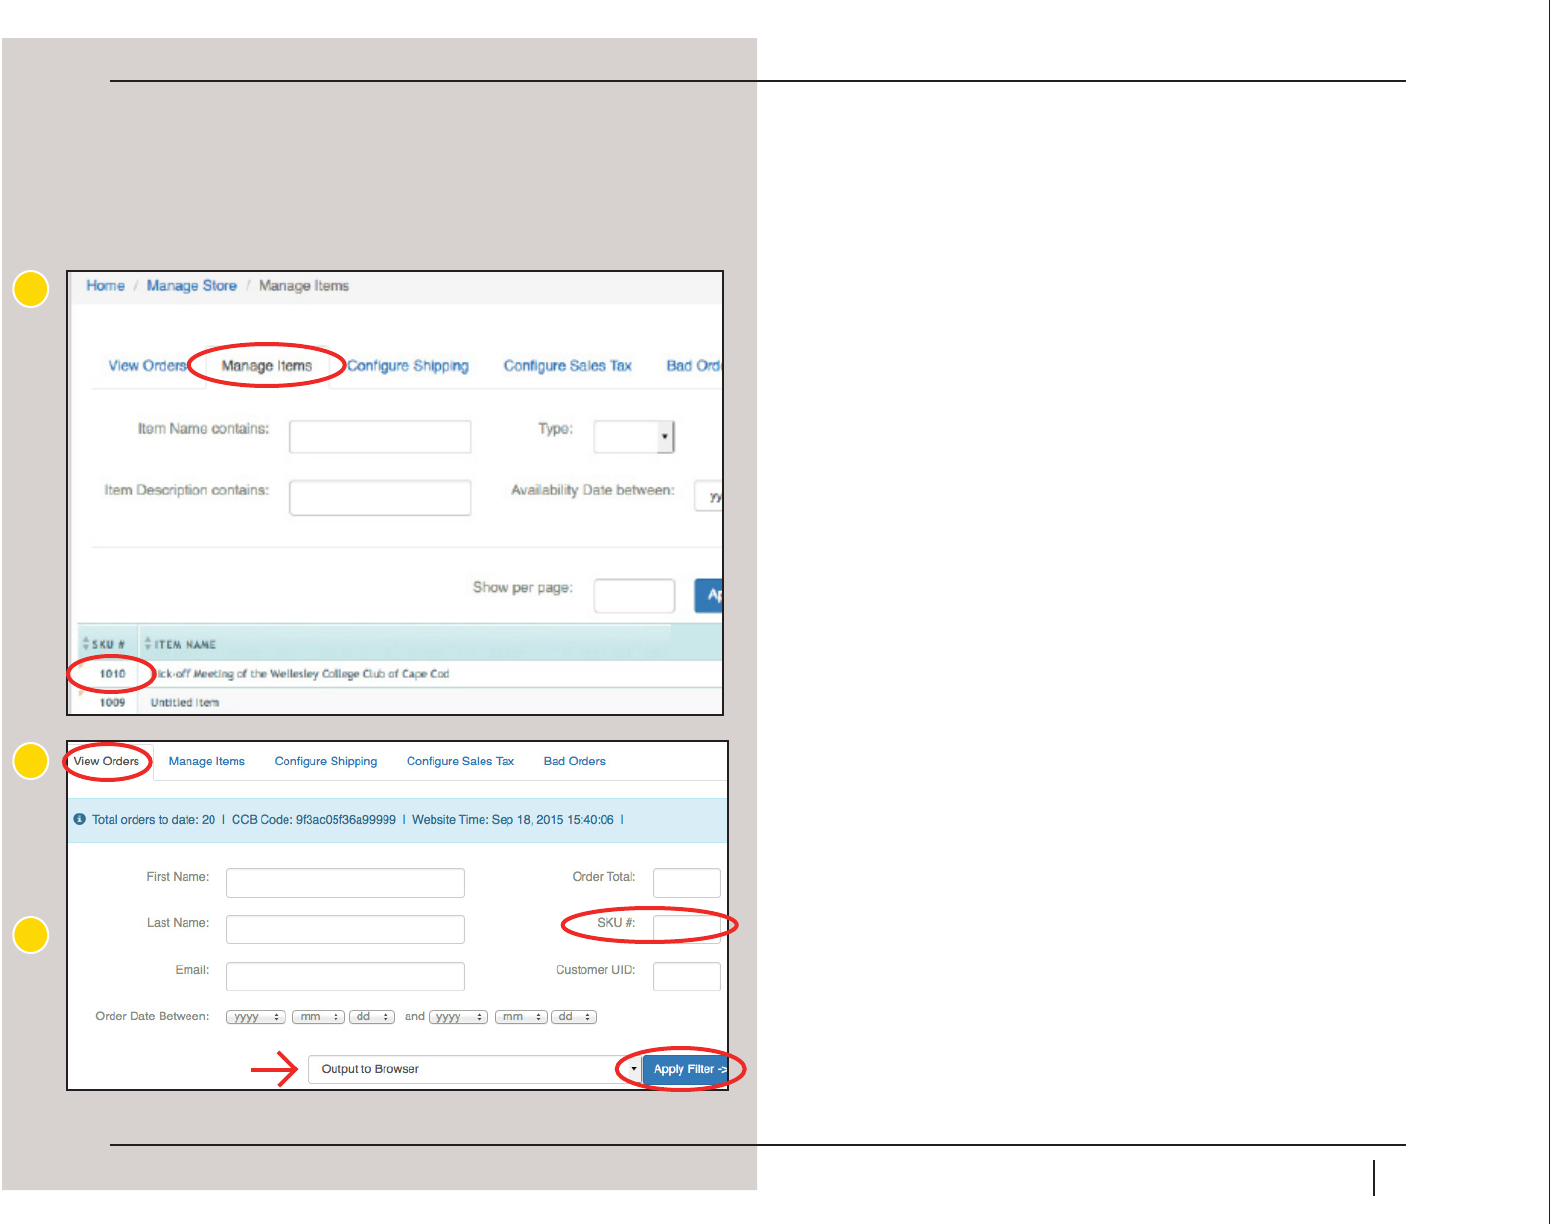
Downloading an Order Report
To view all the orders that have been placed for a specic item or event ticket, you can
download an order report using the Manage Store function.
1. To begin, click the blue admin button in the main navigation, and choose Manage
Store.
2. Click the Manage Items tab, then nd your item or ticket’s SKU # at the bottom
of that screen.
3. Copy your SKU #, then click the “View Orders” tab.
4. Enter your SKU # in the SKU # eld. Choose the report type (we recommend
“Generate Extended Excel Report”), and click Apply Filter.
5. Your report will immediately begin downloading.
2
3
4

29
Membership/Class Dues
Setting Up Membership Structure
It’s fast and easy to set up a page for collecting your club or SIG membership fees.
1. To begin, click the blue dot in the home page main navigation. From the drop
down menu that appears, click Manage Memberships.
2. is opens the Membership Levels Conguration Tool. You can have up to 20
dierent membership levels for your members to choose from. (So, for example,
you can set up Annual, Two-Year, ree-Year, Young Alumna, or other types of
custom membership.) As a default, these levels are set to inactive.
3. Next, open the rst level you want to edit and activate by clicking the gear icon.
4. On the next screen you can name your membership level and write a brief
description about it. It’s also very important at this stage to set the Status and
Life options. If you want the membership level to be available to your members
for purchase, it must be set to active. (Later, if you decide to temporarily or
permanently take down the level, you can edit again and set it to inactive.)
1
2
3
4
30
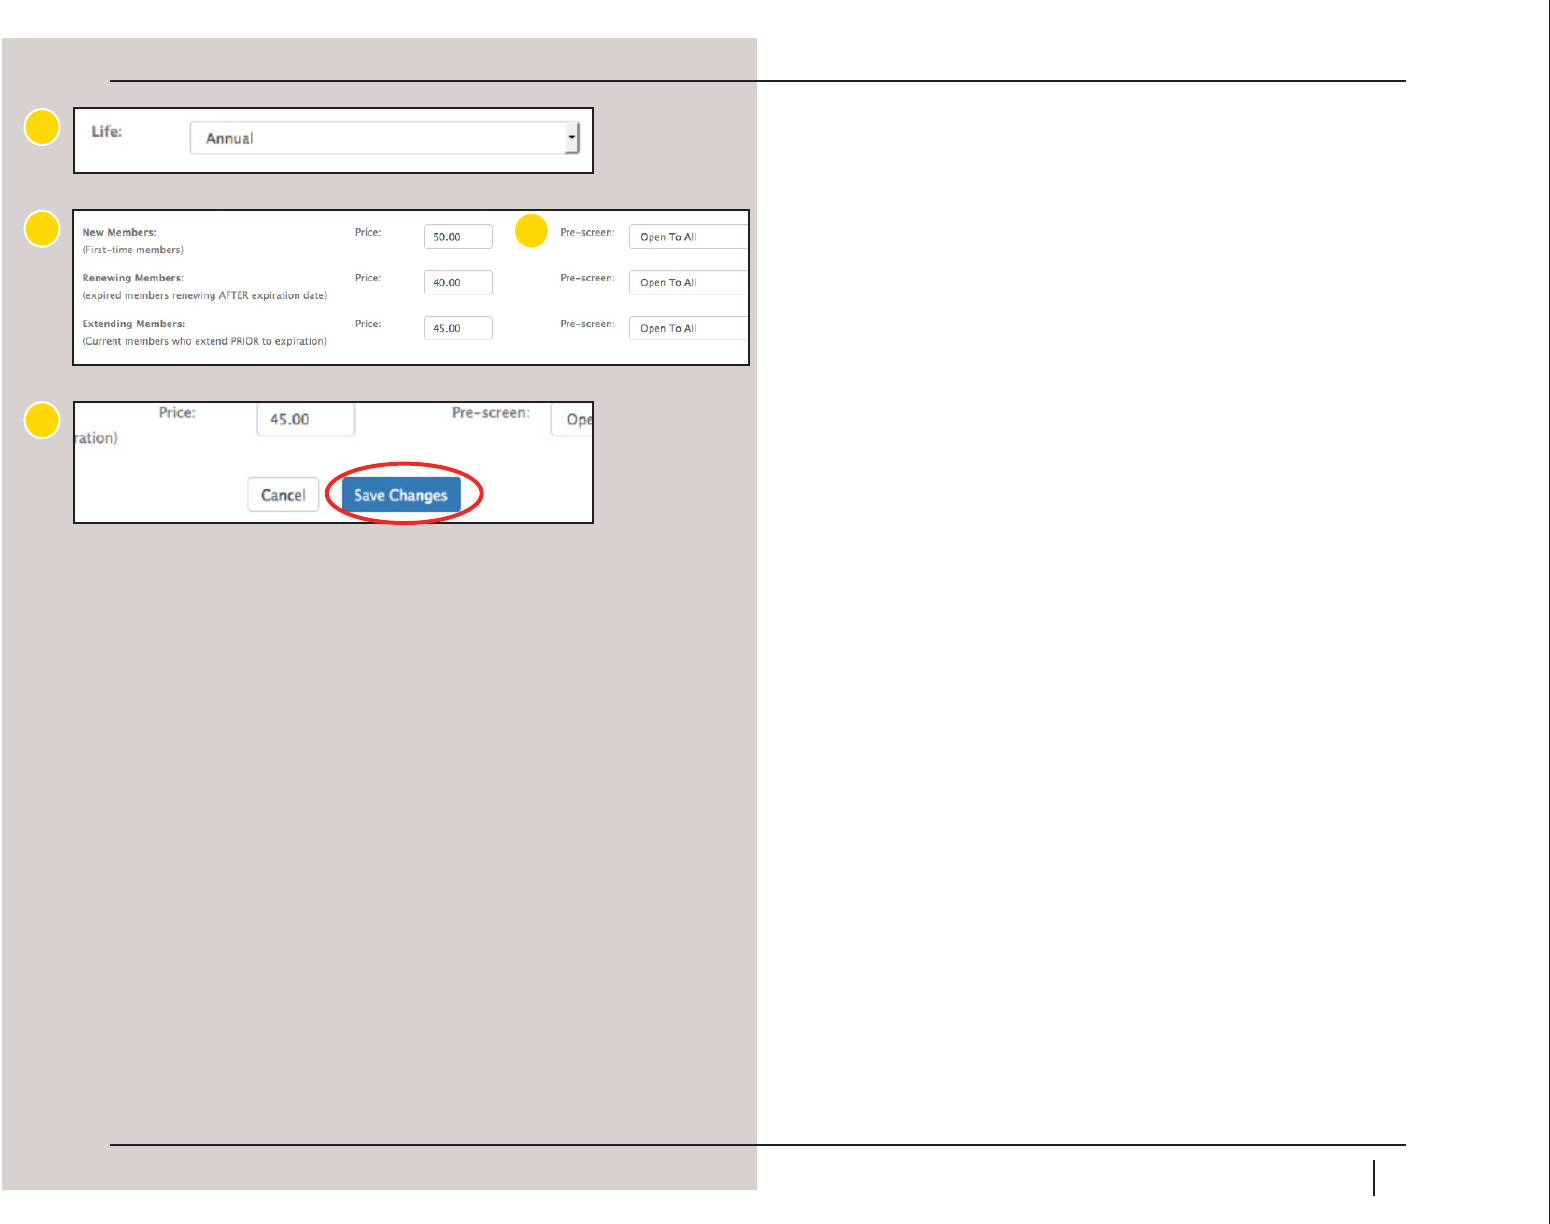
5. e Life option sets the term of the membership. In our example, this is an annual
(one year) membership so we set it to annual. e term is specic to the member
who purchases it. If Member A purchases the annual membership on July 1, 2014,
it is valid through June 30, 2015; if Member B purchases the annual membership
on December 1, 2014, it is valid through November 30, 2015.
6. You’ll then want to set your pricing structure for the membership level. You can
have three dierent prices if you so choose: a new member price (for anyone
purchasing this level for the rst time); a renewing member price (if the member is
renewing this level after the membership has expired); and an extending member
price (for any current member who is renewing before her current membership has
expired). You might set these levels at dierent prices to encourage participation, or
the prices can be the same.
7. Next, set the pre-screen option for each membership level price. e options
include:
• Open to all – anyone can purchase this type of membership. (most commonly
used)
• Auto screen – uses a set of criteria/questions to determine whether the user is
eligible to purchase the membership.
• Manual review – the prospective member lls out an application form, which is
then sent to the membership review board group (whose members are dened
by you, the administrator). If approved, the prospective member gets an email
from the site saying it is now okay to purchase the membership.
8. When you are satised with your pricing, click “Save Changes.”
Any membership level you make “active” automatically feeds to two pages under the
“Support Our Club/SIG” tab in the main navigation.
5
6
7
8
31
Forums
Forums, or discussion groups, are a great way to start conversations among your
members. Only site administrators can create a new forum, but any member of your
Class, Club, or SIG can create a topic within a forum. By default, a user must be logged
in to your site in order to view any of the forums.
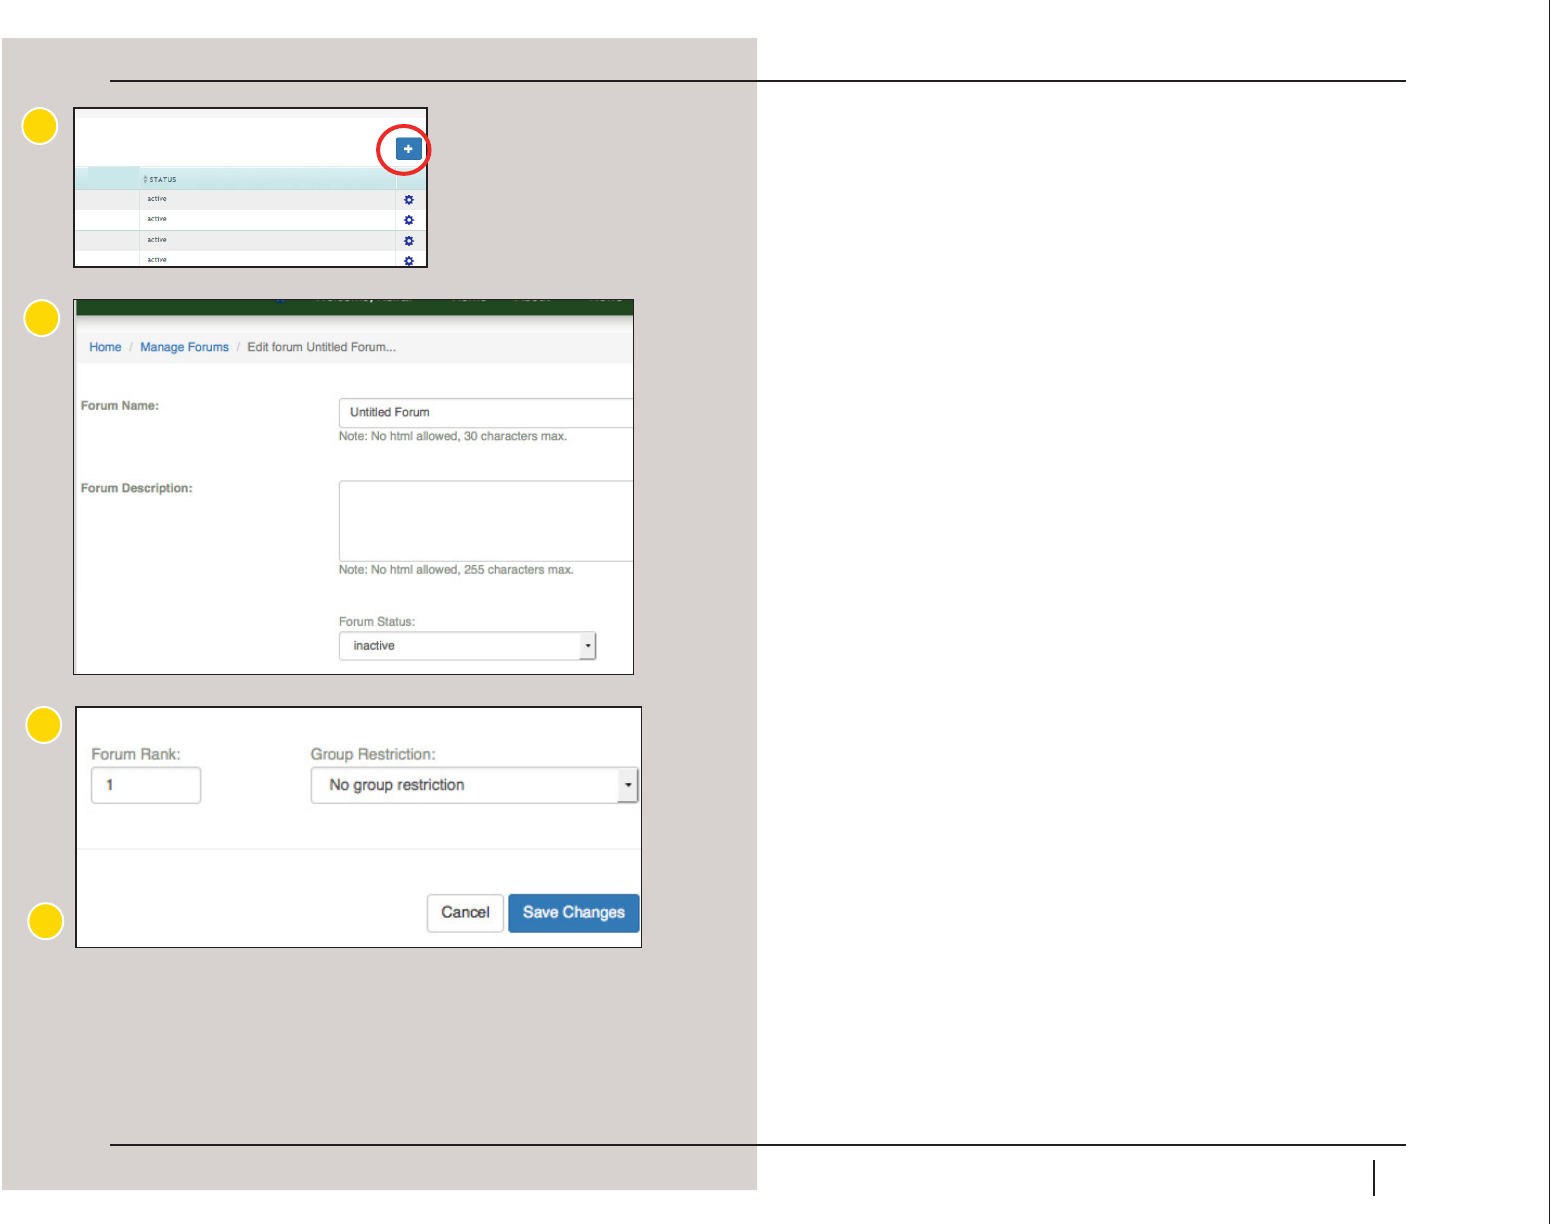
Creating a New Forum
1. To begin, click the blue dot in the main navigation, then Manage Forums. is
will open the Manage Forums Tool.
2. You will see a list of your existing forums, which you can edit as needed. To add a
new forum, click the blue + icon in the top right-hand corner of the page.
3. A new page will open where you can enter information about your forum. Give the
forum a name and description. For status, make the forum active if you want it to
appear on your site’s discussion groups page immediately. Later, if you want to take
down a forum, you can mark it as inactive.
4. Forum rank controls where it will appear in the list of active forums on your site’s
Discussion Groups page. Lastly, enter a group restriction. Leave this as “no group
restriction” unless you only want a certain portion of your members to access it.
5. You can always return to this screen and make changes by choosing Edit in the
Manage Forums Tool.
2
3
4
5
32
Tips for Your Constituents
Password Reset: If you have forgotten your MyWellesley Login username or password you can request
your username and a temporary password online using Wellesley College’s Library & Technology Services’
new, automatic password reset feature. Please click https://webapps.wellesley.edu/alum_pwd_reset/ to access
the reset app. If you do not receive a temporary password email from us or you have trouble resetting your
password using the link above, please check in with the Wellesley College Help Desk at 781.283.7777 or
helpdesk@wellesley.edu. ey are open Monday through Friday from 8:30 am to 4:30 pm.
2. Newsletters:
• Newsletters that link to the News and Event articles will bring alums back to your website.
1. Logging on:
• It’s important for your fellow alums to have their user ID and password available when using the
website.
• Encourage Logging in when making ticket/item/membership purchases to reduce administrative errors.
• Remind your classmates that they need to be logged in to see photo albums, use the directory, see
restricted articles and make purchases.

Wellesley College Alumnae Association
www.wellesley.edu/alumnae
alumnae@wellesley.edu
