
ServiceNow CMDB Synchronization
PowerPack
Version 3.4.0

Table of Contents
Introduction to the ServiceNow CMDB Synchronization PowerPack 9
Architecture Overview for ServiceNow Synchronization PowerPacks SL1 10
SL1 and ServiceNow Terminology 11
Dependency Map for ServiceNow Synchronization PowerPacks 11
Prerequisites for the ServiceNow CMDB Synchronization PowerPack 12
Administrator Access 12
PortAccess 12
Upgrading from Older Versions 12
Contents of the ServiceNow CMDBSynchronization PowerPack 13
PowerFlow Applications 13
PowerFlow Applications (Internal) 15
Installing and Configuring the CMDB Synchronization PowerPack 16
Downloading, Importing, and Installing the ServiceNow CMDBSynchronization PowerPack 17
Using the OptionalIdentification Update Sets 17
Downloading theSynchronization PowerPack 17
Importing theSynchronization PowerPack 18
Installing theSynchronization PowerPack 18
Allowing Cross-Scoped Access in ServiceNow 19
Installing the "ScienceLogic SL1: CMDB & Incident Automation" Application in ServiceNow 21
Creating a ServiceNow Group 22
Creating a ServiceNow User 25
Installing and Activating the CMDBPlugin in ServiceNow 26
Enabling the ServiceNow Identification and Reconciliation Module 27
Configuring Service Rules forDevice Sync 28
Containment Rules 28
Hosting Rules 30
Creating aServiceNowUpdate Set 30
AddingServiceRules to an Update Set 32
Exporting anUpdate Set 33
Configuring CustomerCIRelation Overrides 34
Installing the ScienceLogic Domain Separation (Global) Update Set in ServiceNow 38
Overview of the Update Set 38
Limitations of the Identification Engine 39
Installing the UpdateSet 40
Configuring Domain Separation without Using the Update Set 41
Creating the Configuration Objects for the ServiceNow Domains 41
Example JSONCode for a Configuration Object 42
Aligning a Schedule with a ServiceNow Domain 44
Using ServiceNow DomainSeparation with PowerFlow 45
User Setup 45
Example 1 46
Example 2 47
Workflow 48
Configuring Applications for the CMDB Synchronization PowerPack 49
Creating and Aligning a Configuration Object 50
Creating a Configuration Object 50
Aligning a Configuration Object 53
Syncing Organizations 54
For Domain-separated ServiceNow EnvironmentsOnly 54
For Case Integration ServiceNow Environments Only 54

Configuring Organization Sync 55
Syncing Devices from SL1 to ServiceNow 58
Merged Devices in SL1 59
Using OtherData Sources with Merged Devices 59
Common Fields Used by Device Sync 60
Running a Device Sync 60
Using a Jinja2 Template 68
Example:ABasic Template for Device Attributes 68
Example: An Advanced Template for Device Sync 69
Example: Another Advanced Template for Device Sync 69
Example: Advanced Template for Device Class, Sub Category, andModel 70
Filtering Device Sync by Device Group 70
Using GraphQL to Create the Custom Filter 70
JSON Code Template 71
Adding Device Mappings 73
Persistently Saving DeviceMappings with the API 74
Checking for Missing Device Mappings 75
Device Attribute Mappings 78
Default DeviceAttribute Mappings 79
SL1 Device Attributes Available for Syncing 80
Adding New Device Attributes to ServiceNow 82
Viewing Reports for DeviceSync 83
Syncing CI Attributes from ServiceNow to SL1 84
Creating a Link in an SL1 Device to a ServiceNow CI 88
Syncing Advanced Topology Data from SL1 to ServiceNow 89
Adding Related Items and Lists to the CI Record in ServiceNow 91
SyncingNetwork Interfaces from SL1 to ServiceNow 93
SyncingFileSystems from SL1 to ServiceNow 97
SyncingBusiness Services 99
SyncingBusinessServices from SL1 to ServiceNow 100
SyncingBusiness Services from ServiceNow to SL1 103
Aspects ofSyncing BusinessServices from ServiceNow to SL1 103
SyncingInstalled Software between SL1 and ServiceNow 106
Discovery Sync 108
Configuring a ServiceNow Service Request for Discovery Sync 109
Discovery Sync Workflow 110
Running a Discovery Sync in ServiceNow 113
Discovering One or More Devices from ServiceNow to SL1 118
Decommissioning Devices 120
Activating the ServiceNow ServiceRequest for Monitoring Removal 121
Removing Devices from Monitoring 121
Deleting Devices 123
Scheduling PowerFlow Applications 124
Log Messages for the "Generate Required CI Relations for ServiceNow" Application 128
Troubleshooting the CMDB Synchronization PowerPack 130
Initial Troubleshooting Steps 131
SL1PowerFlow 131
ServiceNow 131
Resources for Troubleshooting 131
Useful PowerFlow Ports 131
Helpful Docker Commands 132
Viewing Container Versions and Status 132

Restarting a Service 132
Stopping all PowerFlowServices 132
Restarting Docker 132
Viewing Logs for a SpecificService 133
Clearing RabbitMQ Volume 133
Viewing the Process Status of All Services 134
Deploying Services from a Defined Docker Compose File 134
Dynamically Scaling for More Workers 134
Completely Removing Services from Running 134
Diagnosis Tools 134
Retrieving Additional Debug Information (Debug Mode) 135
Troubleshooting CMDB Sync 136
Issues Creating CIs in ServiceNow 137
Enabling Debugging of the CI Payload 138
Checklists for Deployment 140
CMDB-Only ServiceNow Integration with Single SL1, no Domain Separation in ServiceNow 141
Sync Devices from SL1 to ServiceNow 141
Discover Devices from ServiceNow in SL1 142
Sync Business Services from SL1 to ServiceNow 142
Sync File Systems from SL1 to ServiceNow 142
Sync Network Interfaces from SL1 to ServiceNow 142
Sync Installed Software from SL1 to ServiceNow 143
Sync Maintenance Schedules from ServiceNow to SL1 143
Sync Advanced Topology from SL1 to ServiceNow 143
CMDB-Only ServiceNow Integration with Single SL1 and Domain-Separated ServiceNow 145
Sync Devices from SL1 to ServiceNow 145
Discover Devices from ServiceNow in SL1 146
Sync Business Services from SL1 to ServiceNow 146
Sync File Systems from SL1 to ServiceNow 147
Sync Network Interfaces from SL1 to ServiceNow 147
Sync Installed Software from SL1 to ServiceNow 147
Sync Maintenance Schedules from ServiceNow to SL1 147
Sync Advanced Topology from SL1 to ServiceNow 148
CMDB-Only ServiceNow Integration with Multiple SL1 Systems, no Domain-Separated ServiceNow 149
Sync Devices from SL1 to ServiceNow 150
Discover Devices from ServiceNow in SL1 150
Sync Business Services from SL1 to ServiceNow 151
Sync File Systems from SL1 to ServiceNow 151
Sync Network Interfaces from SL1 to ServiceNow 151
Sync Installed Software from SL1 to ServiceNow 152
Sync Maintenance Schedules from ServiceNow to SL1 152
Sync Advanced Topology from SL1 to ServiceNow 152
Incident-Only ServiceNow Integration with Single SL1, no Domain Separation in ServiceNow 153
Certified Application Objects 154
Roles 155
Tables 156
Table Columns (cmdb_ci) 156
Table Columns (core_company) 157
Table Columns (cmdb_group) 157
Script Includes 157
Event Registry 157
Scripted Actions 158

Data Lookup Definitions 158
System Properties 158
Catalog Item 159
Catalog UI Policies 159
Variable Sets 159
Catalog Client Scripts 160
Workflows 160
Scripted REST Resources 161
Transform Maps 163
Transform Scripts 163
Mappings between SL1, ServiceNow, and Other Applications 164
Overview 165
VMware Discovery 165
Conflicts 165
vCenter 165
Conflicts 165
Working Solution 166
Datacenter 166
Conflicts 167
Working Solution 167
Folders 167
Conflict 167
ServiceNow Discovery 167
Default 168
Working Solution 168
Cluster 168
Conflicts 168
Working Solution 168
Network 169
Conflicts 170
Working Solution 170
Switch 171
Conflicts 171
Working Solution 172
Virtual Port Group 172
Conflicts 173
Working Solution 173
ESX Server 174
Conflicts 174
Working Solution 174
ESX Resource Pool 174
Conflicts 175
Working Solution 175
Datastore 175
Conflicts 176
Working Solution 176
Virtual Machine Instance 177
Conflicts 177
Working Solution 177
ServiceNow API Endpoints 179
BusinessServices 181
HTTP Method 181

Pagination 181
Resource Path 181
Default Resource Path 181
Example (Request URL) 181
Example (Response) 182
ChangeRequests 183
HTTP Method 183
Resource Path 183
Default Resource Path 183
Fixed Internal Query 184
Example 184
Example (Response) 184
Classification version 1 185
HTTP Method 185
Pagination 185
Resource Path 185
Default Resource Path 185
Fixed Internal Query 186
Example 186
Example (Response) 186
Classification version 2 188
HTTP Method 188
Pagination 188
Resource Path 188
Default Resource Path 188
Fixed Internal Query 189
Example 189
Example (Response) 189
CMDBGroup 191
HTTP Method 191
Pagination 191
Resource Path 191
Default Resource Path 191
Example (Request URL 191
Example (Body) 191
Example (Response) 192
Companies 193
HTTP Method 193
Pagination 193
Resource Path 193
Default Resource Path 193
Fixed Internal Query 194
Example 194
Example (Response) 194
Device Identification Engine 195
HTTP Method 195
Pagination 195
Resource Path 195
Default Resource Path 195
Example(Request URL) 195
Example (Body) 195
Example Business Service (Body) 196

Example (Response) 197
Discovery Dependents 198
HTTP Method 198
Pagination 198
Resource Path 198
Default Resource Path 198
FixedInternalQuery 199
Example 199
Example (Response) 199
File Systems 200
HTTP Method 200
Pagination 200
Resource Path 200
Default Resource Path 200
Fixed Internal Query 201
Example 201
Example (Response) 201
Import Set 202
HTTP Method 202
Resource Path 202
Default Resource Path 202
Example (RequestURL) 202
Example (Body) 202
Incidents 204
HTTP Method 204
Pagination 204
Resource Path 204
Default Resource Path 204
Fixed Internal Query 205
Example 205
Example (Response) 205
Installed Software 206
HTTP Method 206
Pagination 206
Resource Path 206
Default Resource Path 206
Fixed InternalQuery 207
Example (Request URL) 207
ManufactureAndModel 209
HTTP Method 209
Pagination 209
Resource Path 209
Default Resource Path 209
Example (RequestURL) 209
Example (Body) 209
Example (Response) 210
Manufacture (deprecated) 211
HTTP Method 211
Pagination 211
Resource Path 211
Default Resource Path 211
Example (RequestURL) 211

Example (Body) 212
Example (Response) 212
Model (deprecated) 213
HTTP Method 213
Resource Path 213
Default Resource Path 213
Example (Request URL) 213
Example (Body) 213
Example (Response) 214
NetworkAdapters 215
HTTP Method 215
Pagination 215
Resource Path 215
Default Resource Path 215
Fixed Internal Query 216
Example (Request URL) 216
Example (Response) 216
ServiceRequests 217
HTTP Method 217
Pagination 217
Resource Path 217
Default Resource Path 217
Fixed Internal Query 218
Example 218
Example (Response) 218
ServiceNow Registered Events 220
Catalog Item Events 221
x_sclo_scilogic.device_monitoring 221
Trigger 221
Command 221
Event Fields 221
Example 221
x_sclo_scilogic.remove_monitoring 222
Trigger 222
Command 222
Event Fields 222
Example 222

Chapter
1
Introduction to the ServiceNow CMDB
Synchronization PowerPack
Overview
This chapter describes the ServiceNow CMDB Synchronization PowerPack, which lets you integrate SL1 with the
ServiceNow Configuration Management Database (CMDB).
This Synchronization PowerPack maintains and enhances the ServiceNow CMDB by sharing discovered device
information, importing and exporting data bi-directionally between SL1 and ServiceNow, and by automatically
maintaining ServiceNow Configuration Item (CI) relationships.
This section covers the following topics:
Architecture Overview for ServiceNow Synchronization PowerPacks SL1 10
SL1 and ServiceNow Terminology 11
Dependency Map for ServiceNow Synchronization PowerPacks 11
Prerequisites for the ServiceNow CMDB Synchronization PowerPack 12
Contents of the ServiceNow CMDBSynchronization PowerPack 13
9

10
Architecture Overview for ServiceNow Synchronization
PowerPacks SL1
The following diagram details the various elements that are contained in SL1 and the PowerFlow system, and how
PowerFlow sits between the core SL1 platform and an external data platform:
The following diagram provides an example of the high-level architecture of a PowerFlow system with High
Availability, Disaster Recovery, and a proxy configured:
Architecture Overview for ServiceNow Synchronization PowerPacks SL1

SL1 and ServiceNow Terminology
SL1 and ServiceNow Terminology
The following table lists the different names for the shared elements in SL1 and ServiceNow:
SL1 ServiceNow
Asset, CustomAttribute Asset (ITAM)
Device CI(Configuration Item)
Discovery Session Service Request, Catalog Request
Event Incident, Event, or Case(depending on the
Synchronization PowerPack you are using)
Alert Event
Organization Company, Domain
Schedule, Maintenance Schedule ChangeRequest, Change Schedule
Topology, Relationships, Dynamic
Component Mapping and Relationships
(DCM+R)
Dependency View, Affected CIs
Dependency Map for ServiceNow Synchronization PowerPacks
The following graphic describes which Synchronization PowerPacks depend on other Synchronization
PowerPacks:
TIP: For more information about the StandardBase StepsSynchronization PowerPack, see the
SL1 PowerFlowPlatformmanual.
11

12
Prerequisites for the ServiceNow CMDB Synchronization
PowerPack
This section describes the prerequisites for the ServiceNow Synchronization PowerPacks. For more information
about the specific software versions required by a ServiceNow Synchronization PowerPack, see the release notes
for that Synchronization PowerPack.
Administrator Access
To install this Synchronization PowerPack, you must have administrator access to both SL1 and ServiceNow.
Specifically, you will need:
l
ScienceLogic root SSHaccess
l
ScienceLogic administrator access to the Administration Portal
l
ServiceNow administrator access
NOTE: If you want to upload and install multiple ServiceNow Synchronization PowerPacks at the same time,
you should upload all of the Synchronization PowerPacks first, and then install them to address any
dependencies between the Synchronization PowerPacks.
PortAccess
The following table lists the port access required by PowerFlow and this Synchronization PowerPack:
Source IP PowerFlow
Destination
PowerFlow
SourcePort
Destination Port Requirement
PowerFlow SL1 API Any TCP 443 SL1 API Access
PowerFlow ServiceNow API Any TCP 443 ServiceNow
APIAccess
PowerFlow SL1 Database Any TCP 7706 SL1DatabaseAccess
NOTE: ScienceLogic highly recommends that you disable all firewall session-limiting policies. Firewalls will
drop HTTPS requests, which results in data loss.
Upgrading from Older Versions
The following information is related to uploading, installing, and upgrading from older versions of the
ServiceNow Synchronization PowerPacks:
Prerequisites for the ServiceNow CMDB Synchronization PowerPack

Contents of the ServiceNow CMDBSynchronization PowerPack
l
If you are upgrading from version 1.8.4 of PowerFlow (formerly called the "Integration Service"), you can
first move to version 2.5.0 of the ServiceNow Synchronization PowerPack, then upgrade to version 2.x.x of
the PowerFlow platform, and finally move to version 3.0.0 or later of the relevant ServiceNow
Synchronization PowerPacks.
l
If you made customizations to version 2.5.0 or earlier of the ServiceNow Synchronization PowerPack, you
must make a copy of that Synchronization PowerPack and save it as a new Synchronization PowerPack to
keep your customizations. For more information, see the SL1 PowerFlow for Developers manual.
l
If you are starting out withversion 2.x.x of the PowerFlow platform, you should skip version 2.5.0 of the
ServiceNow Synchronization PowerPack and instead install version 3.0.0 or later of the relevant ServiceNow
Synchronization PowerPacks.
l
There is no backwards compatibility after you upgrade a ServiceNow Synchronization PowerPack from
version 2.5.0 to 3.0.0.
Contents of the ServiceNow CMDBSynchronization
PowerPack
This section lists the PowerFlow applications that are in the ServiceNowCMDB Synchronization PowerPack.
PowerFlow Applications
The following applications are included with the ServiceNow Synchronization PowerPack:
l
Cache ServiceNow CIs and SL1 Device Classes. Reads all existing SL1 Organizations, SL1 Device
Classes, ServiceNow Companies, and ServiceNow CIs and writes them to a cache. To perform a Device
Sync, you must run this application before you run the "Sync Devices from SL1 to ServiceNow" application.
Before version 3.5.0 of this Synchronization PowerPack, this application was named "Cache ServiceNow CIs
and SL1 Device Classes". For more information, see Syncing Devices from SL1 to ServiceNow.
l
Create Custom Attributes and ServiceNow Custom Link in SL1. Creates custom device attributes in SL1,
which SL1 uses to create a custom link in SL1 that redirects to the ServiceNow CI. In SL1 the link appears as
a ServiceNow link in the Tools menu on the Device Investigator window for the corresponding device. For
more information, see Syncing CI Attributes from ServiceNow to SL1.
l
Delete Devices from SL1. Lets you delete devices in a specific SL1 Virtual Collector Group (VCUG) if those
devices have not been modified in SL1 for a specified amount of time that is set in the application. For more
information, see Deleting Devices.
l
GenerateRequired CIRelations for ServiceNow. Pulls device class mappings from the "Sync Devices
from SL1 to ServiceNow" and the "Sync CI Attributes from ServiceNow to SL1" applications to prevent you
from having to add a separate set of class mappings. The application also lists any missing relationships in
the Step Log in the PowerFlow user interface. For more information about the log messages, see Log
Messages for the "Generate Required CI Relations for ServiceNow" Application.
l
Report:Identify Unmapped DevicesClasses. Pulls the class mappings from Device Sync and Attribute
Sync and compares the mappings with the full list of device classes of discovered devices in SL1. The
application generates a report on the Reports page that lists missing mappings, and if any device classes
are unmapped, the application generates an event in the target SL1 system. For more information, see
Checking for Missing Device Mappings.
13
14
l
Sync Advanced Topology from SL1 to ServiceNow. Reads Dynamic Component Mapping relationships
from SL1 and syncs those relationships with ServiceNow. This application also syncs CDP, L2, L3, LLDP and
DCM+R relationships. You must run both the "Sync Devices from SL1 to ServiceNow" application and the
"Sync Interfaces from SL1 to ServiceNow" application at least twice on new PowerFlow systems to populate
the cache for this application. For more information, see Syncing Advanced Topologies from SL1 to
ServiceNow.
l
Sync Business Services from SL1 to ServiceNow. Reads BusinessServices, IT Services, and Device
Services in SL1 and syncs them with business services in ServiceNow. This application creates and updates
services, but it does not delete services. For more information, see Syncing Business Services from SL1 to
ServiceNow.
l
Sync Business Services from ServiceNow to SL1. Syncs services that were defined in ServiceNow with
Business Services in SL1. By syncing services from Service Now to SL1, you can see the relationships
between the service components, the application components, and the infrastructure components in SL1.
For more information, see Syncing Business Services from ServiceNow to SL1.
l
Sync CI Attributes from ServiceNow to SL1. Reads CI attributes from ServiceNow and maps those
attributes to asset and attribute fields in SL1. This application uses the mappings and additional attributes
options from the "Sync Devices from SL1 to ServiceNow" application. This application can also sync the
location and production state attributes from ServiceNow to SL1. For more information, see Syncing CI
Attributes from ServiceNow to SL1.
l
Sync Device Groups from SL1 to ServiceNow. Collects all device groups and group IDs from SL1 and
posts device group data to ServiceNow. To prevent errors when running this application or a device sync,
make sure that the device group names are not already being used by existing groups in ServiceNow. For
more information about DeviceSync, see Syncing Devices from SL1 to ServiceNow.
l
Sync Devices from SL1 to ServiceNow. Syncs devices and their properties and relationships from SL1 to
ServiceNow. For more information, see Syncing Devices from SL1 to ServiceNow.
l
Sync Discovery Requirements. Processes credentials from SL1, processes collector groups, device
templates, virtual device classes, and collectors, and then syncs organizations and device groups. For more
information, see Discovery Sync.
l
SyncDiscovery SessionStatus from SL1 to ServiceNow. Collects and processes Discovery sessions from
SL1, and collects Discovery session logs. For more information, see Discovery Sync.
l
SyncDiscovery Templates from SL1 to ServiceNow. Syncs SL1 discovery sessions that contain a
configured string to ServiceNow and creates Service Catalog templates in ServiceNow. You can use those
templates for discovering or monitoring CIs. For more information, see Discovery Sync.
l
Sync File Systems from SL1 to ServiceNow. Reads file systems discovered inSL1 and then maps them to a
parent CI record in ServiceNow. For more information, see Syncing FileSystems from SL1 to
ServiceNow.
l
Sync Installed Software from SL1 to ServiceNow. Reads all available software packages from
ServiceNow and the devices aligned to that software by region and syncs them with SL1. Run this application
after running the "Sync Software Packages from SL1 to ServiceNow" application. For more information, see
Syncing Installed Software between SL1 and ServiceNow.
l
SyncInterfaces from SL1 to ServiceNow. Collects network interface data from ServiceNow andSL1, and
then runs multiple CI syncs for each interface to be synced. For more information, see Syncing Network
Interfaces from SL1 to ServiceNow.
Contents of the ServiceNow CMDBSynchronization PowerPack

Contents of the ServiceNow CMDBSynchronization PowerPack
l
Sync Organizations from SL1 to ServiceNow. Pulls organizations from SL1 and syncs to ServiceNow. For
more information, see Syncing Organizations from SL1 to ServiceNow.
l
Sync Service Requests from ServiceNow to SL1. Processes Discovery sessions and posts Discovery
sessions and new virtual devices to SL1. Also enables device decommissioning for devices you no longer
want to monitor. This application was formerly named "Sync Discovery Session Requests from ServiceNow to
SL1". For more information, see Configuring a ServiceNow Service Request for Discovery Sync.
l
Sync Software Packages from SL1 to ServiceNow. Reads all software packages from and creates new
CIs in ServiceNow. Run this application before running the "SyncInstalled Software" application. For more
information, see Syncing Installed Software between SL1 and ServiceNow.
PowerFlow Applications (Internal)
To view the internal PowerFlow applications, click the Filter icon( ) on the Applications page and select
ShowHidden Applications. Internal applications are hidden by default.The following applications are "internal"
applications that should not be run directly, but are automatically run by applications from the previous list:
l
Bulk Delete Devices. Deletes devices from SL1.
l
CreateDiscoverySession in SL1. Creates and starts a Discovery session in SL1 and updates the
ServiceNow service request.
l
Create ServiceNow CI. Creates a new ServiceNow CI with a mappings dictionary, but does not attempt to
look up new CIs.
l
Create Virtual Device in SL1. Creates a virtual device in SL1 and updates the Requested Item (RITM) value.
l
PostAttribute DBCalls to SL1. Posts attribute database calls to SL1.
l
PostAttribute Rest Calls to SL1. Posts attribute REST calls to SL1.
l
PostCompany and OrganizationUpdates. Posts company and organization updates to ServiceNow or
SL1.
l
Post Discovery-dependent Data to ServiceNow. Posts data used by a Discovery session to ServiceNow.
l
Post Installed Software to ServiceNow. Posts installed software data to ServiceNow.
l
Post New Companies to ServiceNow. Posts new companies to ServiceNow.
l
Post New Organization to SL1. Posts a new organization to SL1.
l
Process Remove Device Requests from ServiceNow to SL1. Pulls requested device information form SL1
and validates the requests to remove a device from monitoring. Removed devices are placed in an SL1
Virtual Collector Group.
l
Pull and PostDiscoveryLogs. Pulls Discovery session logs from SL1 and posts updates to ServiceNow.
15

Chapter
2
Installing and Configuring the CMDB
Synchronization PowerPack
Overview
The following workflow covers how to install and configure this Synchronization PowerPack:
1. In PowerFlow, download, import, and install the ServiceNow CMDB Synchronization PowerPack.
2. In ServiceNow, enable cross-scoped access and install the "ScienceLogic SL1: CMDB & Incident
Automation" application (also called the "ScopedApplication").
3. In ServiceNow, install and activate the "ServiceNow Configuration Management for Scoped Apps (CMDB)"
Plugin.
4. In ServiceNow, enable the "ServiceNow Identification and Reconciliation Module".
5. For domain-separated ServiceNow instances only, install the "ScienceLogic Domain Separation (Global)"
update set in ServiceNow.
6. In ServiceNow, create an update set with containment rules and hosting rules for Device Sync.
This section covers the following topics:
Downloading, Importing, and Installing the ServiceNow CMDBSynchronization PowerPack 17
Allowing Cross-Scoped Access in ServiceNow 19
Installing the "ScienceLogic SL1: CMDB & Incident Automation" Application in ServiceNow 21
Creating a ServiceNow Group 22
Creating a ServiceNow User 25
Installing and Activating the CMDBPlugin in ServiceNow 26
Enabling the ServiceNow Identification and Reconciliation Module 27
Configuring CustomerCIRelation Overrides 34
16
17
Installing the ScienceLogic Domain Separation (Global) Update Set in ServiceNow 38
Using ServiceNow DomainSeparation with PowerFlow 45
Downloading, Importing, and Installing the ServiceNow
CMDBSynchronization PowerPack
A Synchronization PowerPack file has the .whl file extension type. You can download the Synchronization
PowerPack file from the ScienceLogic Support site.
WARNING: If you are upgrading to this version of the Synchronization PowerPack from a previous version,
make a note of any settings you made onthe Configuration pane of the various PowerFlow
applications in this Synchronization PowerPack, as these settings are not retained when you
upgrade. However, any mappings you added to the attribute_mappings section for
the"SyncDevices from SL1 to ServiceNow" application are retained when you upgrade.
Using the OptionalIdentification Update Sets
ScienceLogic provides optional identification update sets that include identification rules for syncing certain
technologies. You can access these update sets from the additional_materials.zip file included in the main .zip
file for the Synchronization PowerPack, which you can find on the Synchronization PowerPack page on the
ScienceLogic Support Site.
If version 3.2.0 is the first version of the ServiceNow CMDB Synchronization PowerPack you are installing on your
PowerFlow system, you should use the new "ScienceLogic IdentificationEngine (pre-set (VMWare 3.2.0))" update
set.
If you are upgrading to version 3.2.0 ServiceNow CMDB Synchronization PowerPack from a previous version of
the Synchronization PowerPack, you should continue to use the VMware update set that was previously provided.
If you are upgrading from a previous version of this Synchronization PowerPack and you install the latest
Identification Update Set, you will encounter errors in ServiceNow because of the change in how version 3.2.0 of
this Synchronization PowerPack overrides relationships. These errors will continue until the identification rules are
fixed in ServiceNow. For this reason, ScienceLogic recommends not installing the latest identification update set if
you are upgrading from an existing Synchronization PowerPack version.
Downloading theSynchronization PowerPack
To locate and download the Synchronization PowerPack:
1. Go to the ScienceLogic Support Site.
2. Click the [ProductDownloads] tab and select PowerPack.
3. In the SearchPowerPacks field, search for the Synchronization PowerPack and select it from the search
results. The Release Version page appears.
Downloading, Importing, and Installing the ServiceNow CMDBSynchronization

Downloading, Importing, and Installing the ServiceNow CMDBSynchronization
4. On the [PowerPack Versions] tab, click the name of the Synchronization PowerPack version that you want
to install. The Release File Details page appears.
5. Click the [Download File] button or click the name of the .zip file containing the .whl file for this
Synchronization PowerPack to start downloading the file.
NOTE: Synchronization PowerPacks do not require a specific license. After you download a Synchronization
PowerPack, you can import it to your PowerFlow system using the PowerFlow user interface.
NOTE: If you are installing or upgrading to the latest version of this Synchronization PowerPack in an offline
deployment, see"Installing or Upgrading in an Offline Environment" in the Synchronization
PowerPack release notes to ensure you install any external dependencies.
Importing theSynchronization PowerPack
To import a Synchronization PowerPack in the PowerFlow user interface:
1. On the SyncPacks page of the PowerFlow user interface, click [Import SyncPack]. TheImport SyncPack
page appears.
2. Click [Browse] and select the .whl file for the Synchronization PowerPack you want to install.
TIP: You can also drag and drop a .whl file to the Import SyncPack page.
3. Click[Import]. PowerFlow registers and uploads the Synchronization PowerPack.The Synchronization
PowerPack is added to the SyncPacks page.
NOTE: You cannot edit the content package in a Synchronization PowerPack published by ScienceLogic.
You must make a copy of aScienceLogic Synchronization PowerPack and save your changes to the
new Synchronization PowerPack to prevent overwriting any information in the original
Synchronization PowerPack when upgrading.
Installing theSynchronization PowerPack
NOTE: You must import and install the ServiceNow Base Synchronization PowerPack before uploading and
installing any of the other ServiceNow Synchronization PowerPacks.
18

19
To activate and install a Synchronization PowerPack in the PowerFlow user interface:
1.
On the SyncPacks page of the PowerFlow user interface, click the [Actions] button ( )for the
Synchronization PowerPack you want to install and select Activate &Install. The Activate &Install
SyncPack modal appears.
NOTE: If you try to activate and install a Synchronization PowerPack that is already activated and
installed, you can choose to "force" installation across all the nodes in the PowerFlow system.
TIP: If you do not see the PowerPack that you want to install, click the Filter icon ( ) on the
SyncPacks page and select Toggle Inactive SyncPacks to see a list of the imported PowerPacks.
2. Click [Yes] to confirm the activation and installation. When the Synchronization PowerPack is activated, the
SyncPacks page displays a green check mark icon ( ) for that Synchronization PowerPack.If the
activation or installation failed, then a red exclamation mark icon ( ) appears.
3. For more information about the activation and installation process, click the check mark icon ( ) or the
exclamation mark icon ( ) in the Activated column for that Synchronization PowerPack. For a successful
installation, the "Activate&Install SyncPack" application appears, and you can view the Step Log for the
steps. For a failed installation, the Error Logs window appears.
4. If you have other versions of the same Synchronization PowerPack on your PowerFlow system, you can click
the [Actions] button ( ) for that Synchronization PowerPack and select Change active version to activate a
different version other than the version that is currently running.
Allowing Cross-Scoped Access in ServiceNow
When using custom tables, you might need to configure cross-scope access for the ScienceLogic plugin. The
following examples contain errors that might occur when cross-scope access is required.
Example of an API response:
{"results":[{"error":
{"message":"com.glide.script.fencing.access.ScopeAccessNotGrantedException: read
access to ui_test_hardware not granted","detail":""},"status":"failure"}
Allowing Cross-Scoped Access in ServiceNow

Allowing Cross-Scoped Access in ServiceNow
Example of navigating to a URL directly from a web browser when cross-scope access is required:
In this example, the table requires that you grant access to the ScienceLogic Scope to allow the API call to run
correctly. In the above example, the target table is u_test_hardware.
NOTE: A ServiceNow account with System Administrator is required.
To grant access to the ScienceLogic Scope in ServiceNow:
1. Log in to your ServiceNow instance.
2. Click the Settings icon ( ) and select the Developer tab. The Developer System Settings window
appears:
3. From the Application drop-down list, select ScienceLogic ServiceNow Integration.
20

21
4. Close the Developer System Settings window and navigate to the Cross scope privileges page (System
Applications > Application Cross-Scope Access).
NOTE: Make sure you are in the "ScienceLogic ServiceNow Application" scope and track these
updates in an update set.
5. Click the [New] button to create a new record on the Cross scope privileges page:
6. Verify that the Source Scope and Application fields are set to ScienceLogic ServiceNow Integration.If they
are not, repeats steps 2-3.
7. Complete the following fields:
l
Target Scope. Specify the scope of the target table, such as Global. Be sure to verify the application
to which the table belongs, and use that value as the target scope in this field.
l
Operation. Select Read.
l
Target Name.Specify the name of the target table.
l
Status. Select Allowed.
l
Target Type. Select Table.
8. Click the[Submit] button.
For more information, see the Cross-scope privilege record topic in the ServiceNow documentation.
Installing the "ScienceLogic SL1: CMDB & Incident
Automation" Application in ServiceNow
You must install the "ScienceLogic SL1: CMDB & Incident Automation" application on the ServiceNow instance to
enable this Synchronization PowerPack. The "ScienceLogic SL1: CMDB & Incident Automation" application is also
known as the "Certified" or "Scoped" application.
Installing the "ScienceLogic SL1: CMDB & Incident Automation" Application in

Creating a ServiceNow Group
NOTE: You must have a ServiceNow HI ServiceAccount to request this application and download it onto
your ServiceNow instance.
You must first request the "ScienceLogic SL1: CMDB & Incident Automation" application from the ServiceNow
Store, and then you can install it.
To request and install the Certified Application:
1. Go to the ServiceNow Store at https://store.servicenow.com and search for "ScienceLogicSL1".
2. Select the "ScienceLogic SL1: CMDB & Incident Automation" application. The detail page for the application
appears.
3. Click the [Get] button and log in with your HI credentials.
4. After the request is approved, log in to ServiceNow as an administrator and navigate toApplication
Manager (System Applications > Applications orMy Company Applications).
5. Click [Downloads] in the menu header or search for "ScienceLogic".
6. Click the version drop-down for the "ScienceLogic SL1: CMDB & Incident Automation" application listing to
make sure you are using the correct version of the application that is compatible with your version of this
Synchronization PowerPack.
7. Click the [Install] button for the application.The installation is complete when the button changes to
[Installed].
8. In the filter navigator, search for "ScienceLogic" and locate the application in the left-hand navigation menu
to verify that the application was installed.
NOTE: You might need to log out of ServiceNow and log in again to see the updated left-hand
navigation menu.
Creating a ServiceNow Group
For best practice and security, create a dedicated ServiceNow account that has restricted access to only the
groups, access control lists (ACLs), and roles needed for ScienceLogic incident management.
To create a ServiceNow Account for ScienceLogic Incident management:
1. In ServiceNow, search in the filter navigator for "groups".
2. On the Groups page (System Security >Groups), click [New]. A New record page appears.
22

23
3. In the New record page, type the group name and any additional information. Name is the only required
field:
4. Right-click the gray header and click Save to save the record.
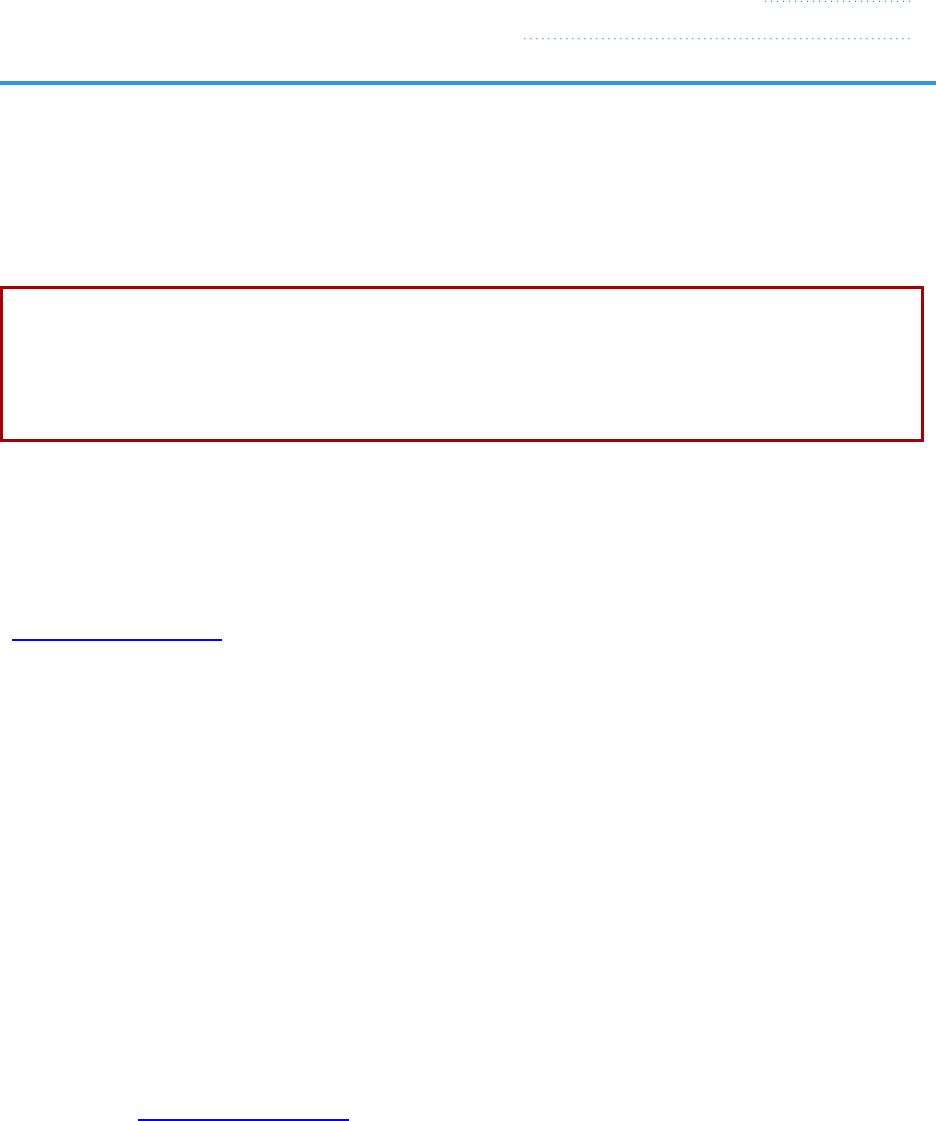
5. At the bottom of the Group form, select the [Roles] tab and click [Edit:]
Creating a ServiceNow Group
Creating a ServiceNow Group
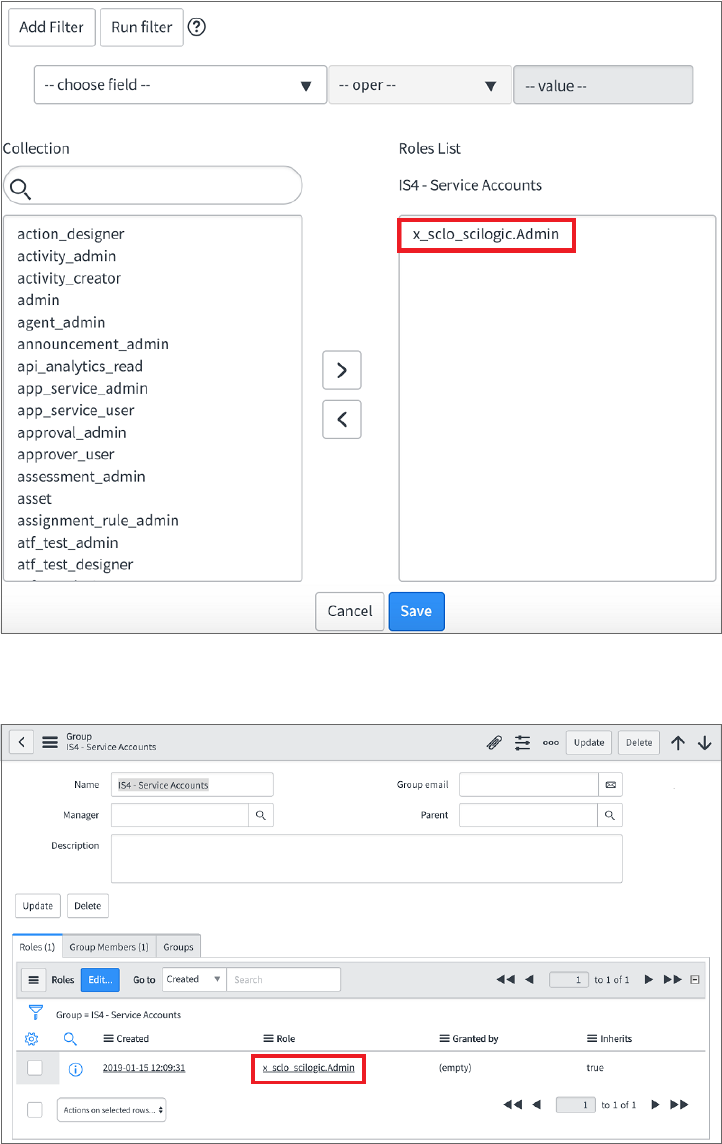
6. Search for x_sclo_scilogic.Admin and move it to the RolesList column using the arrow buttons:
7. Click [Save]. Your ServiceNow Group now has an assigned Role:
8. Next, create a ServiceNow user to use with this Group. See the following procedure for the details.
24

25
Creating a ServiceNow User
NOTE:The ServiceNow user you create in this procedure will not be able to log into the ServiceNow user
interface with the username and password you give this user.However, you will use the username
and password in the relevant configuration objects in the PowerFlow user interface to run
applications. For more information about configuration objects, see Creating and Aligning a
Configuration Object.
To create a ServiceNow Account for ScienceLogic Incident management:
1. In ServiceNow, search in the filter navigator for "users".
2. On the Users page (SystemSecurity >Users), click [New]. A New record page appears.
3. Complete the following fields:
l
User ID. Type a user ID. Required.
l
First Name. Type the user's first name.
l
Last Name. Type the user's last name.
l
Password. Type a password. Required.
l
Active. Select this checkbox. Required.
l
Web Service Access Only. Select this checkbox. Required.
l
Time Zone. Select GMT. Required.
l
Date Format. Select System (yyyy-MM-dd).
4. Right-click the gray header and click Save to save the user.
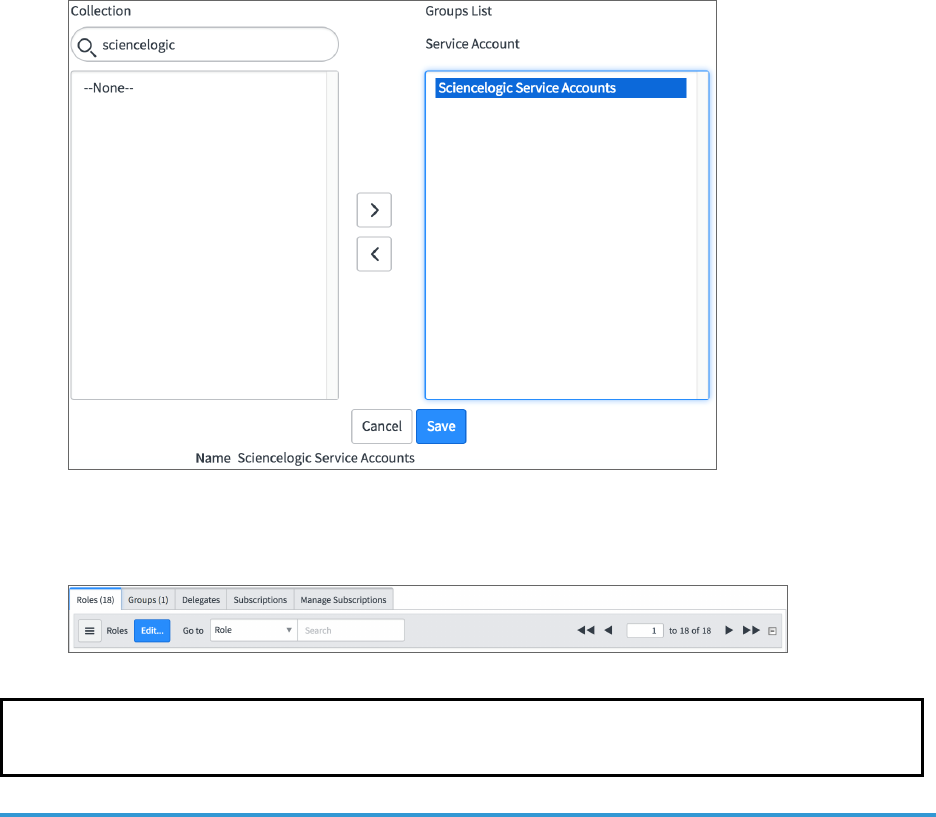
5. Select the [Groups] tab at the bottom of the record and click the [Edit] button:
Creating a ServiceNow User
Installing and Activating the CMDBPlugin in ServiceNow
6. Find the group you created previously and move the group to the right-hand column using the arrow
buttons:
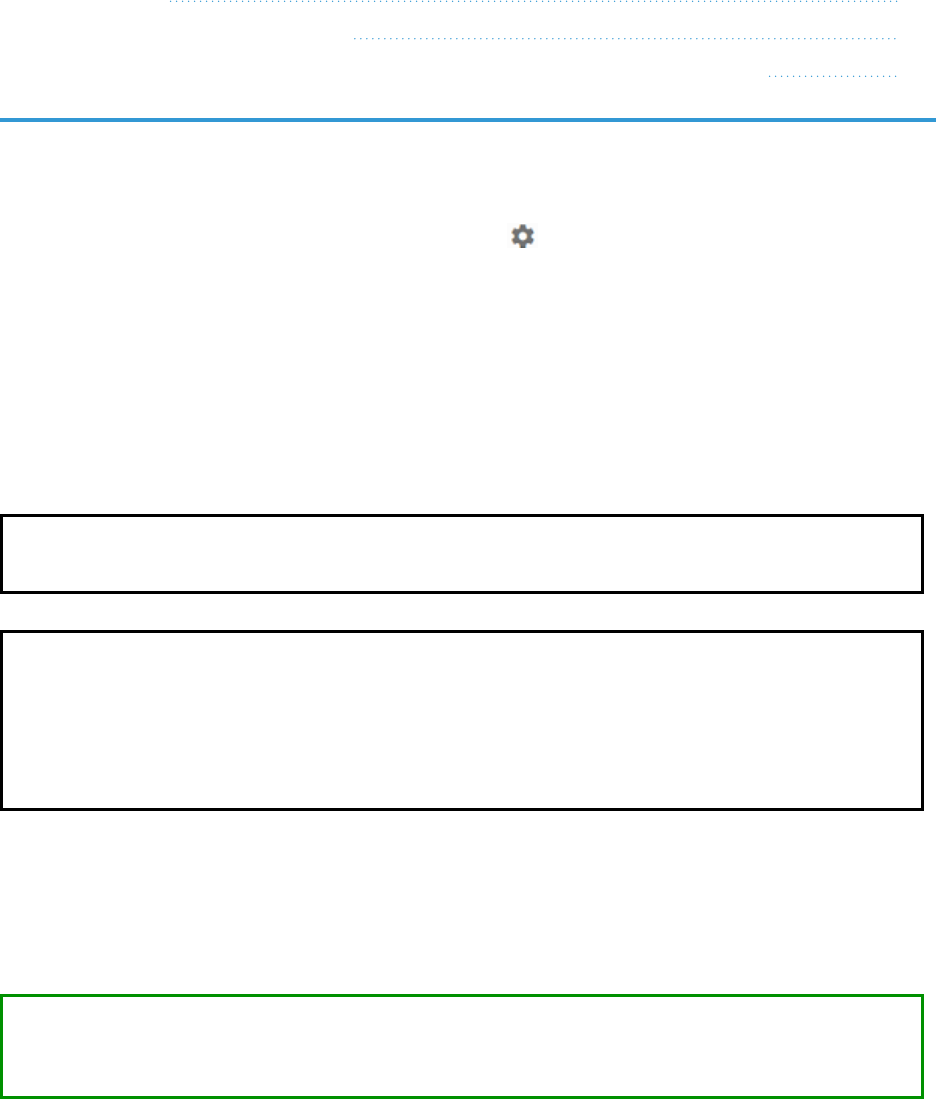
7. Click [Save]. After the user has been added to the group, you can see their Roles and Groups at bottom of
the record:
NOTE: As a best practice, you should use a non-administrator ServiceNow user for the PowerFlow
configuration object.
Installing and Activating the CMDBPlugin in ServiceNow
Installing the "ServiceNow Configuration Management for Scoped Apps (CMDB) Plugin" is required to manage
your Configuration Items. This involves activating the "Configuration Management For Scoped Apps (CMDB)
Plugin" on your ServiceNow instance.
26

27
To activate the "Configuration Management for Scoped Apps (CMDB) Plugin":
1. In ServiceNow, log in as an administrator and navigate to Plugins (System Definition > Plugins).
2. Search for Configuration Management For Scoped Apps (CMDB) and select it.
3. Click Activate/Upgrade in the Related Links section.
4. In the Activate Plugin notification, click [Activate].
Enabling the ServiceNow Identification and Reconciliation
Module
This Synchronization PowerPack uses the "ServiceNow Identification and Reconciliation" module to create and
de-duplicate CI records. PowerFlow builds a JSON-formatted string that is sent to the "ServiceNow Identification
and Reconciliation" module. The following link provides additional detail about the formatting of the JSON-
formatted string: IdentificationEngineScriptableApi.
The JSON-formatted string is sent directly to a custom-scripted API endpoint and run through the
IdentificationEngineScriptable API. Identification (Insert or Update) of Configuration Items (CIs) is handled by the
ServiceNow Identification and Reconciliation module.
For more information about how SL1 andServiceNow work with the ServiceNow Identification and Reconciliation
module to discover and module other applications, such as VMware, see Mappings between SL1,
ServiceNow, and Other Applications.
For more information about the "ServiceNow Identification and Reconciliation" module, see CMDB Identify and
Reconcile. See also Reconciliation Rules, CMDB Identification Rules, and Identification engine error messages.
Enabling the ServiceNow Identification and Reconciliation Module

Enabling the ServiceNow Identification and Reconciliation Module
Configuring Service Rules forDevice Sync
The ServiceNow CMDB Synchronization PowerPack utilizes class hierarchies to build relationships in ServiceNow.
This requires building service rules (containment rules and hosting rules) in ServiceNow to correctly identify
dependent CIs during the business discovery process and service mapping. Containment rules describe which
CIs are contained by a given CI. Hosting rules describe the environment on which a CI runs.
ScienceLogic recommends packaging all of the service rules into a ServiceNow update set so that you can be
easily package and deploy these changes across environments. For more information, see Creating
aServiceNowUpdate Set.
These rules or "mappings" are defined in the "Sync Devices from SL1 to ServiceNow" application in the PowerFlow
user interface. These mappings connect an SL1 device class to a ServiceNow CI class, which determines the
CI class that ServiceNow uses when creating the CI in ServiceNow.
For more information about the "ServiceNow Identification and Reconciliation" module, see CMDB dependent
relationship rules and CMDB Identification Rules at the ServiceNow website.
For example, if you experience error messages about missing relationships in ServiceNow when you run the "Sync
Devices from SL1 to ServiceNow" application in the PowerFlow user interface, you might be missing certain
containment rules or mappings that are needed to complete the export process:
Containment Rules
Containment rules are chained to each other in a group, with a CI type that is the top-level (root) parent of the
group.
28

29
To create containment rules:
1. In ServiceNow, type "cmdb_metadata_containment.list" in the filter navigator to access the CMDB
Metadata Containment Rules page:
2. Click [New]. A newCMDB Metadata Containment Rules record appears:
3. Complete the following fields:
l
Configuration item class.Specify the child CI class.
l
Parent.Specify the parent CI class.
l
Relation type. Specify the relationship type. The common relationship types used by the ServiceNow
integration are "contained" or "contained by", depending on your CMDB. Click the magnifying glass
icon to select the correct value.
4. Click [Submit].
5. In the PowerFlow user interface, go to the Applications page and manually run the "Cache ServiceNow CIs
and SL1 Device Classes" application.
6. Run the "Sync Devices from SL1 to ServiceNow" application and make sure that no errors exist due to
missing CI relationships.
Enabling the ServiceNow Identification and Reconciliation Module

Enabling the ServiceNow Identification and Reconciliation Module
Hosting Rules
Hosting rules can only be one level, and they always involve resources such as physical or virtual hardware.
1. In the ServiceNow filter navigator, type "cmdb_metadata_hosting.list" to view the CMDB Metadata
Hosting Rules page.
2. Click [New]. A newCMDB Metadata Hosting Rules record appears:
3. In the New MetadataHosting Rules record, complete the following fields:
l
Child type.Specify the child CI class.
l
Parent type.Specify the parent CI class.
l
Relation type. Specify the relationship type. The common relationship types used by the ServiceNow
integration are "Hosts" or "Hosted on", depending on your CMDB. Click the magnifying glass icon to
select the correct value.
4. Click [Submit].
5. Add any additional containment and hosting rules that are needed to build the CI relationships in
ServiceNow.
6. In the PowerFlow user interface, go to the Applications page and manually run the "Cache ServiceNow CIs
and SL1 Device Classes" application.
7. Run the "Sync Devices from SL1 to ServiceNow" application and make sure that no errors exist due to
missing CI relationships.
Creating aServiceNowUpdate Set
ScienceLogic recommends packaging the service rules into a standalone ServiceNow update set that you can
export if needed. An update set is an XML file containing a group of customizations that can be moved from one
ServiceNow instance to another. This update set should include any changes or configurations to the service rules
for the ServiceNow Identification and Reconciliation Module.
To create a standalone update set in ServiceNow:
1.
In ServiceNow, enable the Developer Update set picker by clicking the Settings icon ( ) and selecting the
Developer tab.
30

31
2. Select the Show update set picker in header toggle to enable it, and then close the SystemSettings
page.
3. In the filter navigator, search for local update sets.
4. Under System Update Sets, select Local Update Sets and click [New]. A new Update Set record
appears:
5. Complete the following fields:
l
Name. Specify a name that describes the rules of this update set.
l
Application. Set the application scope to Global.
l
State. Set to In Progress.
l
Complete the remaining fields as needed.
6. Click [Submit] or [Submit and Make Current]. If you selected [Submit and Make Current], go to step
8.
7. If you clicked [Submit], you can select the update set in the picker in the header or navigate to the update
set and select Make This My Current Set in the Related links section. You are now ready to make changes
in your ServiceNow Instances.
8. When you are done with all updates in the update set, change the update set State field to Complete.
Enabling the ServiceNow Identification and Reconciliation Module

Enabling the ServiceNow Identification and Reconciliation Module
AddingServiceRules to an Update Set
If you submitted your new update set and made it "Current" in Creating aServiceNowUpdate Set, skip this step
and go to Exporting anUpdate Set.
If you did not make your update set current, you will need to identify your current update set and move all of the
service rules you need into your update set. You can find this information in a drop-down located in the
ServiceNow navigation bar:
All of the service rules that you defined are tracked in the update set record under the [Customer Updates] tab.
To add all created service rules to your update set:
1. In the ServiceNow filter navigator, type "local update sets" to view a list of update sets on the ServiceNow
instance.
2. Identify your current update set, which should have all of the created service rules tracked.
3. Identify the self-created update set that you want to contain all the service rules.This is the update set that
you want to export.
4. Select the current update set that has all of the already-created service rules.
5. On the [Customer Updates] tab, identify all of the records with a Type of either CMDB Metadata
Containment Rules or CMDB Metadata Hosting Rules:
32

33
6. Select each of the relevant service rule records and set the Update set field to match the update set you
want to export. Click the magnifying glass icon to select the correct value:
7. Click [Update].
8. Repeat steps 6-7 until all relevant containment and hosting rules are in the new update set, and then go to
Exporting anUpdate Set.
Exporting anUpdate Set
After you have created your update set and defined the service rules, mark your update set as Complete and
export it to an XML file.
To export an update set:
1. In the ServiceNow filter navigator, type "Local Update Sets" to view a list of update sets in ServiceNow:
2. Select your update set from the list.
3. Set the State to Complete and click [Update].
4. From the Update Sets page, select your completed update set from the list.
Enabling the ServiceNow Identification and Reconciliation Module

Configuring CustomerCIRelation Overrides
5. Under the Related Links section, click Export to XML:
6. Save the downloaded XML file.
Configuring CustomerCIRelation Overrides
When you are mapping Device Classes and attributes, you might find that SL1 creates relationship mappings very
differently than the way that ServiceNow creates relationships. As a result, ScienceLogic strongly recommends that
you use the customer_ci_relation_overrides field instead of using ServiceNow to set up those relationships.
In the "Sync Devices from SL1 to ServiceNow" PowerFlow application, you can use the customer_ci_relation_
overrides field to override the existing relationship linking and directly control the link between Device Classes
and attributes. The customer_ci_relation_overrides field lets you build dynamic relationships rather than
statically setting up relationships within ServiceNow.
WARNING: ScienceLogic does not support using ServiceNow to control and set up your device
relationships.
In addition, ScienceLogic strongly recommends that you use the default relationship overrides for VMware, which
you can view by clicking [Show JSON Configs] from the Configuration pane for the "Sync Devices from SL1 to
ServiceNow" PowerFlow application.
CAUTION: This mapping process is intended for advanced users that are familiar with how SL1 and
ServiceNow construct device relationships.
34

35
In the following example, the relationship structure in SL1 is linear :
In ServiceNow, however, the structure is not as linear, and it requires an override (a manual link) between classes
to make the relationship link required:
Configuring CustomerCIRelation Overrides

Configuring CustomerCIRelation Overrides
The following image shows the JSON structure formatting that is required for the customer_ci_relation_
overrides field:
36

37
The values in the customer_ci_relation_overrides field supersede any of the values configured in the mappings
section in the Configuration pane for the "Sync Device Classes from SL1 to ServiceNow" PowerFlow application.
WARNING: You must ensure that all classes in the relationship chain in SL1 are mapped to classes in
ServiceNow, or else the chain will break, and PowerFlow will not correctly apply the overrides.
In the customer_ci_relation_overrides field, you can string together multiple relationships as in the following
example:
{
"cmdb_ci_db_mssql_instance": {
"relations": [
{
"parent": "cmdb_ci_win_server",
"rel_type": "Runs on::Runs",
"reverse": true
}
],
"values": {"sys_class_name": "snow_ci_class", "instance_name": "name"}
},
"cmdb_ci_db_mssql_database": {
"relations": [
{
"parent": "cmdb_ci_db_mssql_instance",
"rel_type": "Contains::Contained by",
"reverse": false
}
],
"values": {"sys_class_name": "snow_ci_class", "database": "name"}
},
"cmdb_ci_db_mssql_server": {
"relations": [
{
"parent": "cmdb_ci_win_server",
"rel_type": "Runs on::Runs",
"reverse": true
}
],
"values": {"sys_class_name": "snow_ci_class", "instance_name": "name"}
}
}
Configuring CustomerCIRelation Overrides

Installing the ScienceLogic Domain Separation (Global) Update Set in ServiceNow
Installing the ScienceLogic Domain Separation (Global)
Update Set in ServiceNow
If your ServiceNow environment is domain-separated, where the data, processes, and administrative tasks have
been organized into logical groupings called domains, you will need to install the latest version of the
"ScienceLogic Domain Separation (Global)" update set in ServiceNow. This update set is not included in the
"ScienceLogic SL1: CMDB & Incident Automation" application (also called the Certified application).
NOTE: You can get the latest version of the update set from the additional_materials.zip file included in
the main .zip file for the Synchronization PowerPack, which you can find on the ServiceNow
CMDB Synchronization PowerPack page on the ScienceLogic Support Site.
If your ServiceNow environment does not use domain separation, you can skip this topic.
TIP: For more information about ServiceNow domain separation, see Using ServiceNow
DomainSeparation with PowerFlow.
Overview of the Update Set
The "ScienceLogic Domain Separation (Global)" update set contains the following items:
l
Scripted REST API
l
Scripted REST Resource
l
Scripted REST Query Parameter
l
Scripted REST Query Parameter Association
l
Script Include
This update set completely separates the ServiceNow Identification Engine REST resource that is used in the
"ScienceLogic ServiceNow Integration" application and all of the required resources and duplicates it in the
Global scope.
A Scripted REST Service in the Global application is a direct copy of the application endpoint with a new name:
api/10693/sciencelogic_domain_separation. This REST Service includes only one Resource: Device
IdentificationEngine POST. This resource works exactly like the application version, but it points to the
new Script Include "SciLoDomainSepUtil". This version of the REST resource takes the same formatted JSON as
the Certified application.
The Script Include "SciLoDomainSepUtil" includes all of the functionality needed to run the ServiceNow
Identification Engine API.
38

39
Additional resources for the ServiceNow API:
l
CMDB Identification and Reconciliation
l
identifyCI(String jsonString)
l
createOrUpdateCI(String source, String input)
l
Identification engine error messages
NOTE: The only resource shared with this update set and the Certified application is the Device Properties
page. These properties are located in the Certified application at ScienceLogic > Device > Device
Properties.
Limitations of the Identification Engine
For more information about how the Identification Engine handles incoming payloads in domain-separated
systems, see the following ServiceNow KnowledgeBase article: KB0695949.
The payload and the user domain must match, or the ServiceNow Identification Engine(IDE)will by default insert
the CMDB record. Safeguards within the PowerFlow Device Sync application were put in place for payloads that
have relationships. The application will drop the payload if all Configuration Items do not share the same
domain.
Installing the ScienceLogic Domain Separation (Global) Update Set in ServiceNow

Installing the ScienceLogic Domain Separation (Global) Update Set in ServiceNow
Installing the UpdateSet
To install the "ScienceLogic Domain Separation (Global)" update set:
1. Retrieve the latest version of the update set from the additional_materials.zip file included in the main .zip
file for the Synchronization PowerPack, which you can find on the ServiceNow CMDB Synchronization
PowerPack page on the ScienceLogic Support Site.
2. In ServiceNow, navigate to the Retrieved Update Sets page (System Update Sets > Retrieved Update
Sets).
3. Click the Import Update Set from XML link under Related Links.
4. Click [Browse]and navigate to the update set XML file you downloaded. Select the XML file and click
[Upload].
5. After the file is uploaded, the Retrieved Update Sets page appears. Click the link for the "ScienceLogic
Domain Separation (Global)" update set. The Retrieved Update Set page appears.
6. Click [Preview Update Set] . After the preview set runs, a status page appears.
7. Ensure that "Success" appears in the Completion code field.
WARNING: If "Success" does not appear in the Completion code field, contact ScienceLogic Support
to assist with reviewing any conflicts that might exist. Do not proceed until those conflicts
are resolved and "Success" appears in the Completion code field.
8. Click [Commit] to commit the fix script after running the preview set.
9. Before you start to sync devices, you must select the Domain Separation option on the Configuration
pane in the "Sync Devices from SL1 to ServiceNow" application. This option ensures that PowerFlow gets re-
pointed to the API endpoint after you install the "ScienceLogic Domain Separation (Global)" update set. For
more information, see Running a Device Sync.
40

41
Configuring Domain Separation without Using the Update Set
You can sync to a domain-separated ServiceNow CMDB without installing "ScienceLogic Domain Separation
(Global)" update set, but you will need to manage multiple configuration objects and schedules in PowerFlow.
You will need to create multiple schedules, and each schedule will reference a unique configuration object that is
specific to a specific domain in ServiceNow.
Creating the Configuration Objects for the ServiceNow Domains
To create a configuration object for each ServiceNow domain:
1. In the PowerFlow user interface, go to the Configurations page and click [Create Configuration]:
2. Click [Toggle JSON Editor] to open the JSON viewer.
3. In the Configuration Data section, make sure that this object is configured with a ServiceNow domain-
specific user. For example:
{
"encrypted": false,
"name": "snow_user",
"value": "domainA_user"
},
{
"encrypted": false,
"name": "snow_password",
"value": "domainA_password"
},
Installing the ScienceLogic Domain Separation (Global) Update Set in ServiceNow
Installing the ScienceLogic Domain Separation (Global) Update Set in ServiceNow
4. Update the include_orgs value with a list of organizations that map to the domain to which you are syncing.
{
"encrypted": false,
"name": "include_orgs",
"value": [1,2,3]
},
5. Define the class mapping for the configuration object. For example:
{
"encrypted": false,
"name": "mapping",
"value": {
"cmdb_ci_computer": [
"IBM | IBM OS/400 V5R1M0",
"IBM | Main Frame",
"IBM | AIX RS/6000"
],
"cmdb_ci_esx_resource_pool": [
"VMware | Resource Pool"
]
}
},
6. The region value should be unique to SL1 stack that is being synced. For example:
{
"encrypted": false,
"name": "region",
"value": "StackA"
}
7. Repeat steps 1-6 for each ServiceNow domain you want to use.
Example JSONCode for a Configuration Object
The following JSONcode is for an example configuration object:
[
{
"encrypted": false,
"name": "sl1_host",
"value": "SL1_StackA"
},
{
"encrypted": false,
"name": "sl1_db_host",
"value": "${config.sl1_host}"
},
{
"encrypted": false,
"name": "sl1_password",
"value": "password"
},
{
"encrypted": false,
"name": "sl1_user",
42
43
"value": "StackA_user"
},
{
"encrypted": false,
"name": "sl1_db_user",
"value": "root"
},
{
"encrypted": false,
"name": "sl1_db_password",
"value": "StackA_password"
},
{
"encrypted": false,
"name": "snow_host",
"value": "example.service-now.com"
},
{
"encrypted": false,
"name": "snow_user",
"value": "domainA_user"
},
{
"encrypted": false,
"name": "snow_password",
"value": "domainA_password"
},
{
"encrypted": false,
"name": "include_orgs",
"value": [1,2,3]
},
{
"encrypted": false,
"name": "mapping",
"value": {
"cmdb_ci_computer": [
"IBM | IBM OS/400 V5R1M0",
"IBM | Main Frame",
"IBM | AIX RS/6000"
],
"cmdb_ci_esx_resource_pool": [
"VMware | Resource Pool"
]
}
},
{
"encrypted": false,
"name": "region",
"value": "StackA"
}
]
Installing the ScienceLogic Domain Separation (Global) Update Set in ServiceNow

Installing the ScienceLogic Domain Separation (Global) Update Set in ServiceNow
Aligning a Schedule with a ServiceNow Domain
After you have created the configuration objects, you can define multiple schedules, one schedule for each
domain. When scheduling the application, you will need to create multiple schedules, where each schedule uses a
domain-specific configuration object.
NOTE: When specifying a configuration object to use in the custom parameters, use the ID of the
configuration object.
The following image shows how you can create a schedule that uses a specific configuration object using the
Custom Parameters field in the PowerFlow Scheduler:
The following image shows how you could schedule Device Syncs for multiple ServiceNow domains:
44

45
Using ServiceNow DomainSeparation with PowerFlow
The following topics provide more information about ServiceNow domain separation and how it relates to
PowerFlow. For more information, see Domain separation in the ServiceNow Documentation.
NOTE: When either multiple SL1 stacks or multiple ServiceNow systems are involved with PowerFlow, you
should create an individual configuration object for each SL1 stack or ServiceNow system. Next,
create an individual schedule for each configuration object. Each schedule should use a
configuration object that is specific to that single SL1 stack or ServiceNow system. Creating copies of
a PowerFlow application from a Synchronization PowerPack for the purpose of distinguishing
between domains is not supported, and will result in issues on upgrades.
User Setup
Company and domain setup is critical for the domain separation integration to work using the Identification
Engine provided by ServiceNow. This solution requires only one user and will require proper setup depending on
where the user is located within the domain tree.
Using ServiceNow DomainSeparation with PowerFlow

Using ServiceNow DomainSeparation with PowerFlow
Example 1
In the following example, ScienceLogic (1) is both the domain and the company. The ScienceLogic user service
account is associated with ScienceLogic (2) company, and it will have access to all child domains. You do not
need to set visibility to any domain. This is the best way to set up this user, because placing it in the top domain
ensures that it always has access to all children:
46

47
Example 2
In the following example, Delos Inc. (1) is the company within the Delos Inc. domain. The PowerFlow service
account is associated with the Delos Inc. (1) company. The Delos Inc. domain has no children domains, and if
domain visibility is not assigned, PowerFlow will not properly update the CMDB. This setup works, but it requires
that proper domain visibility is set up for the service account to work correctly.
NOTE: Assigning visibility to MSP (3) will grant the service account access to all child domains. Assigning
visibility to Weyland Corporation (4) will only allow access to the Delos Inc. domain and the
Weyland domain; all other domains will not work.
Using ServiceNow DomainSeparation with PowerFlow

Using ServiceNow DomainSeparation with PowerFlow
Workflow
The API endpoint is based on the API query parameter “test” being true or not, which determines which
Identification Engine API resource should be used. There are two primary avenues supplied with this REST
resource: "createOrUpdateCI" or "identifyCI", and the only difference is that "identifyCI" does not commit the
results:
The "getCreateOrUpdateCI" function uses the following workflow:
1. Retrieves the current session Domain ID (sys_id).
2. Sets the user Domain ID by creating an array of domain sys_id values and returning only the unique
domains, or setting the domain if the array has only one unique domain.
3. Submits the JSON formatted string to "createOrUpdateCI()" or "identifyCI()" API.
4. Sets the user's Domain ID back to the original session ID.
The following image shows this workflow:
48

Chapter
3
Configuring Applications for the CMDB
Synchronization PowerPack
Overview
This chapter describes the how to configure and run the various PowerFlow applications contained in the
ServiceNow CMDB Synchronization PowerPack.
A PowerFlow application is a JSONobject that includes all the information required for executing an
integration on the PowerFlow platform. A PowerFlow application combines a set of steps that execute a workflow.
You can configure the parameters in the application to customize the sync process.
TIP: While a PowerFlow application is running on the Applications page, you will see a dark green,
horizontal line moving across the top of the page until the process completes.
This section covers the following topics:
Creating and Aligning a Configuration Object 50
Syncing Organizations 54
Syncing Devices from SL1 to ServiceNow 58
Syncing CI Attributes from ServiceNow to SL1 84
Syncing Advanced Topology Data from SL1 to ServiceNow 89
SyncingNetwork Interfaces from SL1 to ServiceNow 93
SyncingFileSystems from SL1 to ServiceNow 97
SyncingBusiness Services 99
SyncingInstalled Software between SL1 and ServiceNow 106
49
50
Discovery Sync 108
Scheduling PowerFlow Applications 124
Log Messages for the "Generate Required CI Relations for ServiceNow" Application 128
Creating and Aligning a Configuration Object
A configuration object supplies the login credentials and other required information needed to execute the steps
for an application in PowerFlow. The Configurations page ( ) of the PowerFlow user interface lists all
available configuration objects for that system.
You can create as many configuration objects as you need. A PowerFlow application can only use one
configuration object at a time, but you can use (or "align") the same configuration object with multiple
applications.
To use this Synchronization PowerPack, you will need to create one or more configuration objects in the
PowerFlow user interface and align that configuration object to the applications that let you sync data between
SL1 and ServiceNow.
NOTE: Depending on your SL1 and ServiceNow environments, you might be able to use the same
configuration object with other ServiceNow Synchronization PowerPacks.
NOTE: When either multiple SL1 stacks or multiple ServiceNow systems are involved with PowerFlow, you
should create an individual configuration object for each SL1 stack or ServiceNow system. Next,
create an individual schedule for each configuration object. Each schedule should use a
configuration object that is specific to that single SL1 stack or ServiceNow system. Creating copies of
a PowerFlow application from a Synchronization PowerPack for the purpose of distinguishing
between domains is not supported, and will result in issues on upgrades.
Creating a Configuration Object
For this Synchronization PowerPack, you can make a copy of the "ServiceNow SyncPack" configuration object,
which is the sample configuration file that was installed with the ServiceNow Base Synchronization PowerPack.
TIP: The "ServiceNow SyncPack" configuration object contains all of the required variables. Make a copy of
the configuration object and update the variables from that object to match yourSL1 and ServiceNow
settings.
Creating and Aligning a Configuration Object

Creating and Aligning a Configuration Object
To create a configuration object based on the "ServiceNow SyncPack" configuration object:
1. In the PowerFlow user interface, go to the Configurations page ( ).
2. Click the [Actions] button ( ) for the "ServiceNow SyncPack" configuration object and select Edit.
TheConfiguration pane appears:
TIP: Click [Toggle JSON Editor] to show the JSON code. Click the button again to see the fields.
3. Click [Copy as]. The Create Configuration pane appears.
TIP: This step is required. Do not use the original configuration object to run PowerFlow applications.
4. Complete the following fields:
l
Friendly Name. Name of the configuration object that will display on the Configurations page.
l
Description. A brief description of the configuration object.
l
Author. User or organization that created the configuration object.
l
Version. Version of the configuration object.
51

52
5. In the Configuration Data field, include the required block of code to ensure that the applications aligned
to this configuration object do not fail:
{
"encrypted": false,
"name": "<sl1_db_host?",
"value": "${<config.sl1_host>}"
}
For example:
{
"encrypted": false,
"name": "sl1_db_host",
"value": "10.2.11.42"
}
TIP: If you are using IPv6 for IP addresses, wrap the IP string in brackets, such as https://
[2001:db8:3333:4444:5555:6666:7777:8888]
TIP: Click [Toggle JSON Editor] to show the JSON code. Click the button again to see the fields. You
can also click [AddValue] and add a new name-value pair in the Configuration Data Values
section.
NOTE: If you are using SL1 with an External Database (SL1 Extended architecture or a cloud-based
architecture), update the "value" of that block of code to be the host of your database. This
field accepts IP addresses. For example: "value": "db.sciencelogic.com". If you are
not using the SL1 Extended architecture or a cloud-based architecture, you do not need to
make any changes to the block of code other than pasting the code into the configuration
object.
6. In the Configuration Data Values field, update the default variable definitions to match your PowerFlow
configuration.
NOTE: The region value is a user-defined variable that identifies yourSL1 instance
withinServiceNow.
7. To create a configuration variable in the JSON Editor, define the following keys:
l
encrypted. Specifies whether the value will appear in plain text or encrypted in this JSON file. If you
set this to "true", when the value is uploaded, PowerFlow encrypts the value of the variable. The plain
text value cannot be retrieved again by an end user. The encryption key is unique to each PowerFlow
system. The value is followed by a comma.
l
name. Specifies the name of the configuration file, without the JSON suffix. This value appears in the
user interface. The value is surrounded by double-quotes and followed by a comma.
Creating and Aligning a Configuration Object

Creating and Aligning a Configuration Object
l
value. Specifies the value to assign to the variable. The value is surrounded by double-quotes and
followed by a comma.
8. Click [Save]. You can now align this configuration object with one or more applications.
Aligning a Configuration Object
Before you can run the applications in this Synchronization PowerPack, you must first "align" a configuration
object with the application you want to use.
To align a configuration object with an application:
1. From the Applications page of the PowerFlow user interface, open the relevant application and click
[Configure] ( ). The Configurations pane for that application appears:
2. From the Configurations drop-down, select the configuration object you want to use.
3. Click [Save] to align that configuration with the application.
4. Repeat this process for every other application you want to use.
53

54
NOTE: The values for eventDetails and the other parameters that appear in the Configuration pane with a
padlock icon ( ) are populated by the configuration object. Do not modify these values.
Syncing Organizations
If your ServiceNow configuration uses domain separation, the first sync you should run on a newPowerFlow
system is an Organization Sync. This sync uses the "Sync Organizations from SL1 to ServiceNow" application to
sync organizations from SL1 with ServiceNow companies. Be sure to select the Domain Separation option on the
Configuration pane in the "Sync Organizations from SL1 to ServiceNow" application.You must also select
ServiceNow from the Source of Truth field on the Configuration pane for this application.
If your ServiceNow configuration does not use domain separation, ScienceLogic recommends that your first sync
on a new PowerFlow system is an Organization Sync as well, but you should not select the Domain Separation
option on the Configuration pane in the "Sync Organizations from SL1 to ServiceNow" application.
For Domain-separated ServiceNow EnvironmentsOnly
If your ServiceNow environment is domain-separated, where the data, processes, and administrative tasks have
been organized into logical groupings called domains, then the first sync you should run on a newPowerFlow
system is an Organization Sync.
For a domain-separated ServiceNow environment, you must update three fields in ServiceNow for the companies
you want to sync. Because these fields do not display by default on theCompanies page in ServiceNow,
navigate to the Companies page, click the Update Personalized List icon ( ), and add the SL1 Monitored
and SL1 Region columns to that page.
In ServiceNow, update the following fields:
l
SL1 Monitored. Set to true.
l
SL1 Region. Set to match the region value in the configuration object aligned with the "Sync Organizations
from SL1 to ServiceNow"application in the PowerFlow user interface. See step 3, below.
l
SL1 ID. Set to match the Organization ID in SL1.
You must also configure and successfully run the "Sync Organizations from SL1 to ServiceNow" application
before you can sync any additional CI items or devices.
For Case Integration ServiceNow Environments Only
Add the following roles to the Integration user so that user can interact with the "ScienceLogic SL1: Customer
Service Management Integration" Application in ServiceNow.
l
x_sclo_case_mgmt.admin. Provides user rights to interact with the scoped application tables and modules
in ServiceNow.
Syncing Organizations
Syncing Organizations
l
import_transformer. Provides user rights to manage import set transform maps, run transforms, and
access responses.
If your ServiceNow environment is using theCase Integration module and you intend to use customer_account
records, you will need to add additional rights to the Integration user.These rights allow the Integration user to
read the table fields:
l
sn_customerservice.customer_data_viewer
You will need to add cross-scoped access for read-only to the customer_account table as well. ScienceLogic
recommends that you use ServiceNow as the source of truth for Organizations (Companies). For more
information, see the "Allowing Cross-Scoped Access in ServiceNow" topic in the ServiceNow CMDB
Synchronization PowerPack manual.
Configuring Organization Sync
Organization Sync uses the "Sync Organizations from SL1 to ServiceNow" application to pull organizations from
SL1 and sync them with ServiceNow companies.
If your ServiceNow configuration does not use domain separation, ScienceLogic recommends that your first sync
on a new PowerFlow system is an Organization Sync as well, but you should not select the Domain Separation
option on the Configuration pane in the "Sync Organizations from SL1 to ServiceNow" application.
55

56
To sync SL1 organizations with ServiceNow companies:
1. In the PowerFlow user interface, go to the Applications page and select the "Sync Organizations from SL1
to ServiceNow"application. The application page for that application appears.
2. Click [Configure] ( ). The Configuration pane appears:
Syncing Organizations

Syncing Organizations
3. Complete the following fields, as needed:
l
Configuration. Select the configuration object with the relevant SL1 and ServiceNow credentials to
align with this application. You cannot edit fields that are populated by the configuration object.
Required.
NOTE: The region field is populated by the configuration object you aligned with this
application. The region value must match the value in the SL1 Region field in
ServiceNow. If you need to update this value, you will need to define the region
variable in the configuration object that is aligned with this application, or align a
different configuration object that has the correct region value.
l
read_timeout. Specify the maximum amount of time in seconds that the application should wait for a
response before timing out. The default is 20 seconds.
l
snow_chunk_size. Specify the number of organizations to include in each chunk sent to ServiceNow
when you run this application. The default is 500.
l
Domain_Separation. Select this option only if your ServiceNow environment is domain-separated,
where the data, processes, and administrative tasks have been organized into logical groupings
called domains. If your ServiceNow instance is domain-separated, the user listed in the snow_user
field must be a member of the top domain and have access to all of the domains you intend to
integrate. Also, ServiceNow should be the "source of truth" for organizations if your environment is
domain-separated. By default, this option is not selected.
l
Create_Missing. Select this option if you want PowerFlow to create a new organization or company
if that record is missing, based on your selection in the Source_of_Truth field. By default, this option is
not selected.
l
Update_Name. This option addresses the situation where PowerFlow finds a match with an
organization and a company, but the names do not match. This option updates a company or
organization name based on your selection in the Source_of_Truth field, below. For example, if you
selected ScienceLogic as the source of truth, PowerFlow uses the company name from ScienceLogic
as the updated name. By default, this option is not selected.
NOTE: Starting with version 3.5.0 of this Synchronization PowerPack, the Domain Separation
parameter was removed from the Configuration pane. Domain separation is still
supported, but this parameter no longer needs to be selected.
l
Source_of_Truth. Select whether you want to use data from ServiceNow or ScienceLogic as the
"source of truth" when this application encounters duplicate data or data collisions.
o
If you select ServiceNow, you must specify the values in the SL1 Monitored and SL1 Region
fields in ServiceNow. Because these fields do not display by default on theCompanies page
in ServiceNow, navigate to the Companies page, click the Update Personalized List icon (
), and add the SL1 Monitored and SL1 Region columns to that page. If your ServiceNow
57

58
configuration uses domain separation, you must select ServiceNow as the source of truth.
o
If you select ScienceLogic, you do not need to do anything else related to this field.
4. In the attribute_mappings section, you can edit or create a mapping for any other company attributes,
such as address and contact information, that you want to sync between SL1 (the first column) and
ServiceNow(the second column).A set of company attributes are already mapped by default.
NOTE: You can use Jinja2 Templates in fields that are aligned with the "Source of Truth" you selected
(the left column is for SL1, and the right column is for ServiceNow). For more information, see
Using a Jinja2Template.
5. To edit an existing company attribute in the attribute_mappings section, click the attribute name and
either select an attribute from the list or type a new name for the attribute. Press [Enter] after editing the
attribute to make sure your changes are saved.
TIP: Use the [Tab] button to move down through the list of options in a drop-down list, press[Shift]+
[Tab] to move up, and press [Enter] to select a highlighted option.
6. To create a company attribute in the attribute_mappings section, click the [Add Mapping] button at the
bottom of the section, type a name for the attribute in the first field, and select one or more ServiceNow
attributes to which the SL1 attribute should sync in the maps to field. Press [Enter] after editing the attribute
to make sure your changes are saved.
NOTE: When an attribute value is "0" in SL1, the corresponding field in ServiceNow might display as
empty.
7. Click [Save].The Configuration pane automatically closes after this message appears.
8. Click [Run] ( ) to run theapplication.
9. When the application completes, open the Step Log and review the log messages for the "Process
Organizations" step to see if any Company or Organization records were created.As needed, select the
other steps to review the logs on the Step Log for those steps.
TIP: SL1 Organizations that are synced to a ServiceNow Company will have the crm_id field on the
[Properties] tab for that organization populated with the ServiceNow Company sys_id variable.
Syncing Devices from SL1 to ServiceNow
The "Sync Devices from SL1 to ServiceNow" application syncs devices and virtual device relationships from SL1 to
ServiceNow. You can also sync devices based on organization and collector group.
Syncing Devices from SL1 to ServiceNow

Syncing Devices from SL1 to ServiceNow
The DeviceSync process use rules or "mappings" that you can define in the "Sync Devices from SL1 to
ServiceNow" application. These mappings connect an SL1 device class to a ServiceNow CI class, which
determines the CIclass that ServiceNow uses when creating the CI in ServiceNow.
NOTE: For more information about building service rules (containment rules and hosting rules) for devices
and CIs, see Configuring Service Rules for Device Sync.
The "Sync Devices from SL1 to ServiceNow" application can also collect manufacturer and model attributes from
asset records aligned with devices in SL1 and sync that information with ServiceNow. PowerFlow only populates
the manufacturer and model attributes if the values exist in ServiceNow CIs; PowerFlow does not create new
manufacturer values in ServiceNow. The "Sync Devices from SL1 to ServiceNow" application uses the sys_id field
as a reference when syncing manufacturer and model information between SL1 andServiceNow. For more
information, see Device Attribute Mappings.
Merged Devices in SL1
When the "Sync Devices from SL1 to ServiceNow" application encounters a merged device in SL1, it splits the
record into two objects to allow for correct default relationships in ServiceNow.
Starting with version 3.2.0 of this Synchronization PowerPack, the "Sync Devices from SL1 to ServiceNow"
application syncs both the physical and the component device in SL1 to ServiceNow. When a merged device is
encountered in SL1, the "Sync Devices" application splits the device in PowerFlow and creates two CIs in
ServiceNow. This action does not impact the source device record in SL1.
In ServiceNow, the physical CI includes the relevant asset information. A relationship also exists between the
physical CI and the virtual CI. The asset information is directly copied between both CIs, so the data will
essentially be duplicated across both devices, and the data will be submitted to two separate tables. The sl1_url
will also be the same on both devices, so that both CIs will point to the same device in SL1.
Using OtherData Sources with Merged Devices
If you have other data sources syncing into the ServiceNow CMDB and you have merged devices in SL1,
ScienceLogic recommends caution when integrating to the CMDB.
Also, ScienceLogic recommends that you ensure that configuration of the Identification and Reconciliation (IRE)
within ServiceNow affects all data sources that are integrating into it. In the case of ScienceLogic, this is most
apparent when syncing merged devices. Modifications to the IRE to handle merged devices affects all other data
sources that sync to those specific class tables. It is your responsibility to understand each data source, how that
data source integrates with the ServiceNow CMDB, and how to leverage that knowledge to understand the
impact IRE changes may have.
WARNING: ScienceLogic cannot be held responsible for any duplicate, lost, or incorrect CI information as a
result of merged devices when multiple data sources are involved. This scenario will also affect
your Support SLAs, as this practice deviates from recommended best practices.
59

60
For more information about the ServiceNow Identification and Reconciliation module, see the ServiceNow
documentation: https://docs.servicenow.com/bundle/orlando-servicenow-
platform/page/product/configuration-management/concept/c_CompsandProcessIDandReconcil.html.
Common Fields Used by Device Sync
The "Sync Devices from SL1 to ServiceNow" application uses the following ServiceNow fields to determine which
devices to sync from SL1 to ServiceNow:
l
SL1 Monitored. This field displays a Boolean (true or false) value that is impacted by whether the device is
in SL1 or not. The device being found in ServiceNow depends on the SL1 Monitored field. The device being
found in SL1 depends on the class mappings defined in the "Sync Devices from SL1 to ServiceNow"
application.
o
If the CI is in ServiceNow and the device is in SL1 , the SL1 Monitored flag is set to true.
o
If the CI is in ServiceNow but the device is not in SL1, the SL1 Monitored field is set to false. Anything
pulled from ServiceNow (everything that is monitored: true and matches the region) that does not
have a matching device pulled from SL1 gets marked as monitored: false.
l
SL1 Region. This field represents an ID for the SL1 instance or instances being synced to the ServiceNow
instance. The SL1 Region field is determined by the user when configuring the IS applications. In a multi-
SL1 environment, ScienceLogic recommends that you make the SL1 Region field descriptive so the
ServiceNow user knows from which SL1 stack the CI originated.
o
If the SL1 Region field is defined as an identifier by the CI class, ServiceNow will create new CI
records with the new SL1 Region value, and the user must manually delete the duplicate CIs in the
old SL1 Region field.
o
If the SL1 Region field is not defined as an identifier by the CI class, ServiceNow will not treat these
devices as new CIs, and the SL1 Region field will be automatically updated.
NOTE: Changing the SL1 Region value after an initial run of the "Sync Devices from SL1 to ServiceNow"
application will have differing results depending on the service rules defined in ServiceNow that
dictate reconciliation of the CI. If you change the SL1 Region value, you will ll need to run "Sync
Devices from SL1 to ServiceNow" twice: once to align the CIs with the new region, and a second time
to enable PowerFlow to re-cache the newly updated CIs in the region.
Running a Device Sync
To perform a Device Sync between SL1 and ServiceNow, run the following applications in the PowerFlow user
interface, in the specified order:
l
Cache ServiceNow CIs and SL1 Device Classes. Reads all existing SL1 Organizations, SL1 Device
Classes, ServiceNow Companies, and ServiceNow CIs and writes them to a cache. To perform a Device
Sync, you must run this application before you run the "Sync Devices from SL1 to ServiceNow" application.
Before version 3.5.0 of this Synchronization PowerPack, this application was named "Cache ServiceNow CIs
and SL1 Device Classes". For more information, see Syncing Devices from SL1 to ServiceNow.
Syncing Devices from SL1 to ServiceNow

Syncing Devices from SL1 to ServiceNow
l
Generate Required CI Relations for ServiceNow. Determines if you are missing any class mappings or
service rules that might be required in ServiceNow.
l
Sync Devices from SL1 to ServiceNow. Syncs devices and virtual device relationships from SL1 to
ServiceNow. In previous versions, this application was named "ScienceLogic To ServiceNow Device Sync
using GraphQL".
To sync SL1 devices with ServiceNow:
1. In the PowerFlow user interface, select the "Cache ServiceNow CIs and SL1 Device Classes" application
from the Applications page, click [Configure] ( ), align a configuration object, and then click [Run] (
).
NOTE: If you change any of the containment rules or hosting rules in ServiceNow, you will need to
run "Cache ServiceNow CIs and SL1 Device Classes" again. For more information, see
Configuring Service Rules for Device Sync.
2. Select the "Generate Required CI Relations for ServiceNow" application from the Applications page, click
[Configure] ( ), align a configuration object, and then click [Run] ( ).
NOTE: PowerFlow uses the Device Class mappings you are going to configure in step 6, so you do
not need to set up any mappings on the Configuration pane for the "Generate Required CI
Relations for ServiceNow" application. Any mappings you add to this application will
overwrite mappings in the "Sync Devices from SL1 to ServiceNow" application.
3. When the "Generate Required CI Relations for ServiceNow" application completes, review the log
information in the Step Log for the "Pull and Process Relations" step. You should see a log message stating
that no missing relations were found. For more information, see Log Messages for the "Generate
Required CI Relations for ServiceNow" Application.
NOTE: If needed, address any missing class mappings or service rules . For more information on
service rules, see Creating aServiceNowUpdate Set.
61

62
4. Select the "Sync Devices from SL1 to ServiceNow" application from the Applications page and click
[Configure] ( ). The Configuration pane appears:
5. Complete the following fields, as needed:
l
Configuration. Select the configuration object with the relevant SL1 and ServiceNow credentials to
align with this application. You cannot edit fields that are populated by the configuration object.
Required.
NOTE: The region field (along with other fields related to user names and passwords) is
populated by the configuration object you aligned with this application, using the
Configuration field. The region value on this pane must match the value in the SL1
Region field in ServiceNow. If you need to update this value, you will need to define
the region variable in the configuration object aligned with this application, or align a
different configuration object that has the correct region value.
Syncing Devices from SL1 to ServiceNow

Syncing Devices from SL1 to ServiceNow
l
read_timeout. Specify the maximum amount of time in seconds that the application should wait for a
HTTP Read response before timing out. The default is 200 seconds.
l
Include_Orgs. If you want to include a specific set of SL1 Organizations in the device sync, add
theOrganization IDs from the SL1 Organizations page (Registry > Accounts > Organizations) in
this field, separated by commas. If this field is enabled, PowerFlow will pull only the Organizations
listed in this field; PowerFlow does not pull all Organizations and then drop those not on the list.
Leave this field empty to sync all SL1 Organizations. Optional.
l
Include_CUGs. If you want to include SL1 Collector Groups (CUGs) in the device sync, add
theCollector Group IDs from SL1 in this field, separated by commas. Leave this field empty to sync all
SL1 Collector Groups. Optional.
CAUTION: A misconfiguration in the Include Orgs field or the Include_CUGs fields might
change the monitoring flag for one or more devices. In other words, a
misconfiguration in this field could switch the SL1 Monitored flag from "true" to
"false", removing that device or devices from the device sync.
l
chunk_size. Specify the number of devices to pull from SL1 in each chunk. The default is 500 devices
per chunk.
l
selected_devices. If you want to sync a sub-set of all discovered devices, type a comma-separated
list of the Device IDs from SL1 for only the devices that you want to sync.Leave this field empty to sync
all SL1 devices.
l
sl1_url_override. Update this field if you want to use an URL that is different from the standard SL1
URL that gets sent to the ServiceNow CI record.Optional.
l
excluded_devices. Type a list of comma-separated device names or device IDs for any devices that
you want to exclude from the device sync. A device on the excluded list will still be queried, but it will
be dropped during the PowerFlow sync process. Optional.
l
cache_lookup_chunk_size. Specify the number of CIcorrelation documents to pull from the
PowerFlow cache in a chunk. The default is 1000 documents per chunk.
l
discovery_source. Specify the ServiceNow Discovery source. The default is "Other Automated".
l
snow_chunk_size. Specify the number of CI objects to send in each chunk. The default is 500
devices per chunk.
l
retry_max. The maximum number of times PowerFlow will retry to execute the step before it stops
retrying and logs a step failure. For example, if retry_max is 3, PowerFlow will retry after 1 second,
then 2 seconds, then 4 seconds, and stop if the last retry fails. The default is 0.
l
retry_backoff_max.The maximum time interval for the retry_backoff option, in seconds. For
example, if you have retry_max set to 15, the delays will be 1, 2, 4, 8, 16, 32, 64, 120, 240, 480,
600, 600, 600, 600, and 600. The default is 600.
l
exclude_inactive. Select this option to prevent syncing devices to ServiceNow that are disabled,
unavailable, or in maintenance. By default, this option is not selected.
63

64
l
enable_device_active. Select this option to enable the DeviceActive block in the device GraphQL
query, which contains information about the active state of the SL1 device. By default, this option is
not selected. Accessing this data in the attribute mappings requires a Jinja2 Template. For more
information, see Using a Jinja2Template.
l
enable_asset_networks. Select this option to enable the assetNetworks block in the device
GraphQL query, which returns a list of asset networks. By default, this option is not selected.
Accessing this data in the attribute mappings requires a Jinja2 Template. For more information, see
Using a Jinja2Template.
WARNING: Please note that enabling this option might cause performance issues on the SL1
side.
l
unmerge_devices. De-select this option if you want to disable the "unmerge" behavior added in
version 3.2.0 of this Synchronization PowerPack, where PowerFlow splits a merged device record into
two objects to allow for correct default relationships in ServiceNow. This option is enabled by default.
l
Domain_Separation. Select this option if your ServiceNow environment is domain-separated, where
the data, processes, and administrative tasks have been organized into logical groupings called
domains. If your ServiceNow instance is domain-separated, the user listed in the snow_user field
must be a member of the top domain and have access to all of the domains you intend to integrate.
Also, ServiceNow should be the "source of truth" for organizations if your environment is domain-
separated. If this option is selected, PowerFlow syncs the ServiceNow Company sys_id to with the
corresponding SL1 Organization.
l
drop_sys_id. Select this option if you want to remove the sys_id in existing CIs from the sync. If you
set drop_sys_id to true, make sure that ServiceNow can correctly identify and correlate your existing
CIs with the properties that are available. By default, this option is not selected.
l
drop_company. Select this option if you want to remove the sys_id in existing Companies from the
sync. Selecting this option has no effect if you selected the Domain_Separation option for this
application. By default, this option is not selected.
l
change_device_organizations. When enabled, this parameter allows devices to change
companies with a Device Sync if the companies are within the same domain in ServiceNow. If you
change the Organization/Company and another field or fields, but do not enable this parameter,
PowerFlow will not apply any changes to the device. By default, this option is not selected.
l
generate_report. Select this option to create a report about the devices that you sync with
ServiceNow. PowerFlow generates a report every time you run the device sync application, and the
reports are available on the Reports page of the PowerFlow user interface.
l
Simulation_Mode. Select this option if you want to perform a simulated run of this application to
show you the potential results of that run. By default, this option is not selected.
l
retry_jitter. When selected, instead of using a defined interval between retries, the PowerFlow system
will retry the step execution at random intervals. By default, this option is not selected.
l
retry_backoff. When selected, instead of using a defined interval between retries, PowerFlow will
incrementally increase the interval between retries. By default, this option is not selected.
Syncing Devices from SL1 to ServiceNow

Syncing Devices from SL1 to ServiceNow
l
gql_filter. Using JSON, you can optionally define a custom GraphQL filter to apply to the devices in
the sync. To test out a GraphQL filter, go to the GraphiQL interface in SL1 by typing the URL or IP
address for SL1 in a browser, add /gql to the end of the URL or IP address, and press [Enter]. Search
the built in GraphQL docs for DeviceSearch and determine how to set up your custom filter. An
example of a Device Search query using JSON: {"name": {"doesNotBeginWith": "jc-is-
ma"}}
NOTE: You can use this field to filter devices by Device Group. For more information, see
Filtering Device Sync by Device Group.
CAUTION: A misconfiguration in this field might change the monitoring flag for one or more
devices. For example, a misconfiguration in this field could switch the SL1
Monitored flag from "true" to "false", removing that device or devices from the
device sync. This field is an advanced feature that requires a basic knowledge of
the SL1 GraphQL implementation. For more information, see the Using the
ScienceLogic GraphQL API manual.
l
customer_ci_relation_overrides. To override existing relationship linking and directly control the
link between Device Classes and attributes, addJSON code to this field.The JSON for this field
includes default relationship overrides for VMware instead of direct parent/child relations. For more
information, see Configuring CustomerCIRelation Overrides and Mappings between SL1,
ServiceNow, and Other Applications.
NOTE: You can also install the "ScienceLogic IdentificationEngine (pre-set (VMWare)" update
set for ServiceNow to get access to additional relationships and overrides that you
might need to be able to sync VMware trees. Depending on the plug-ins and custom
configurations in your environment, you might need additional relationships. These
mapping do not handle making classes independent, as that is based on the specific
user environment. Identifier rules are not defined in this update set because they
depend on the data in the SL1 environment. For more information about VMware
relationships in ServiceNow, see https://docs.servicenow.com/bundle/orlando-it-
operations-management/page/product/discovery/reference/r_
VCenterDataCollected.html.
65

66
6. In the mappings section, click the expand button ( ) to view the mappings between SL1 Device Classes
and ServiceNow CI classes. This section is pre-loaded with a large number of default device mappings. For
a complete list of the default mappings and a list of available mappings, see Device Attribute Mappings.
NOTE: The "Sync Devices from SL1 to ServiceNow" application will only sync a device from SL1 if the
Device Class for that device is mapped to a ServiceNow CI class in mappings section. The
default mappings in this section do not cover all technologies, however, and syncing
additional technologies from SL1 to ServiceNow might require additional research to
understand the class structure.
7. To create a custom mapping for the device sync, click [Add Mapping] at the bottom of the section.
ServiceNow CI classes display on the left, and SL1 device classes display on the right. You can map a single
ServiceNow CI class with multiple SL1 devices classes.
Syncing Devices from SL1 to ServiceNow

Syncing Devices from SL1 to ServiceNow
8. In the attribute_mappings section, click the expand button ( ) to view the mappings. In this section, you
can create a mapping for any other custom device attributes you want to sync between SL1 (the first column)
and ServiceNow(the second column):
NOTE: All custom attributes for each SL1 device are automatically synced.
TIP: You can use a Jinja2 Template for device attribute fields on the SL1 side(the left column). For
more information, see Using a Jinja2Template.
9. To edit an existing device attribute in the attribute_mappings section, click the attribute name and either
select an attribute from the list or type a new name for the attribute. Press [Enter] after editing the attribute to
make sure your changes are saved.
67

68
10. To create a custom device attribute in the attribute_mappings section, click the [Add Mapping] button at
the bottom of the section, type a name for the attribute in the first field, and select one or more ServiceNow
attributes to which the SL1 attribute should sync in the maps to field. Press [Enter] after editing the attribute
to make sure your changes are saved.
NOTE: When an attribute value is "0" in SL1, the corresponding field in ServiceNow might display as
empty.
TIP: To sync DeviceNotes between SL1 and ServiceNow, create a custom attribute for the device note
in this section.
11. Click [Save].The Configuration pane closes.
12. Run the "Sync Devices from SL1 to ServiceNow" application. If this is the first time you are running this
application, run it a second time to build the internal cache.
13. When the application completes, open the Step Log and review the log messages for the "Compare
SL1Devices and ServiceNow CIs" step to see if any Device orCIrecords were added, updated, or
disconnected from the sync.As needed, select the other steps to review the logs on the Step Log for those
steps.
NOTE: Depending on the number of devices you are syncing to ServiceNow, it might take a few minutes for
all devices to get fully synced to the CMDB. You might notice after running device sync that the
number of SL1 Monitored CIs continues to increase after each refresh. This is expected behavior due
to payload chunking in ServiceNow. ServiceNow processes each payload as an individual chunk.
Using a Jinja2 Template
The attribute mappings in Device Sync applications now support Jinja2 Templates, which let you sync complex,
concatenated (linked) fields from SL1 to ServiceNow. For example, you can add these complex values in the SL1
side of the attribute_mappings section of the Configuration pane for the "SyncDevices from SL1 to
ServiceNow"application, and that value is mapped to one or many fields in ServiceNow. For more information
about Jinja2Templates, see the TemplateDesigner Documentation.
In the "SyncDevices from SL1 to ServiceNow" application, the SL1 side can be a Template. In the "Sync CI
Attributes from ServiceNow to SL1" application, the ServiceNow side can be a Template.
Example:ABasic Template for Device Attributes
This example is included in the "SyncDevices from SL1 to ServiceNow" application as the first default value in the
attribute_mappings section of the Configuration pane:
Syncing Devices from SL1 to ServiceNow

Syncing Devices from SL1 to ServiceNow
Thistemplate, when used on the SL1 side of the attribute_mappings section, populates the short_description
field in ServiceNow:
"Description: {{device.device_category}}, Device Class: {{device.device_class}}": [
"short_description" ]
In the above example, for a device with a category: Testing and a Device Class of Testing | Testing, the end
result would be Description: Testing, Device Class: Testing | Testing, which will be posted to the short_
description field in ServiceNow.
The Jinja2 Templates will have access to all properties on the Device.
NOTE: Any item that is generated by a template is always a string.
Example: An Advanced Template for Device Sync
The following example lets you get the active status of SL1 Devices:
{%- set output = [] -%}
{%- if device.active.unavailable == True -%}{%- set output = output + ['Unavailable']
-%}{%- endif -%}
{%- if device.active.userDisabled == True -%}{%- set output = output + ['User Dis-
abled'] -%}{%- endif -%}
{%- if device.active.userInitiatedMaintenance == True -%}{%- set output = output +
['User Initiated Maintenance'] -%}{%- endif -%}
{%- if device.active.userMaintenance == True -%}{%- set output = output + ['User Ini-
tiated Maintenance'] -%}{%- endif -%}
{%- if output|length > 0 -%}
{{ ", ".join(output) }}
{%- else -%}
{{ "Active" }}
{%- endif -%}
Example: Another Advanced Template for Device Sync
The following example shows another way to get the active status of SL1 Devices:
69

70
{%- set prettify = {"userInitiatedMaintenance": "User Initiated Maintenance", "sys-
temDisabled": "System Disabled", "maintenance": "System Maintenance", "unavailable":
"Unavailable", "userDisabled": "User Disabled"} -%}
{%- set ns = namespace(maint=[]) -%}
{%- for k,v in device.active.items() -%}
{%- if v -%}
{%- set ns.maint = ns.maint + [prettify[k]] -%}
{%- endif -%}
{%- endfor -%}
{{", ".join(ns.maint) if ns.maint else "Active"}}
Example: Advanced Template for Device Class, Sub Category, andModel
The following example shows how to gather device data based on Device Class and SubCategory if available, or
Model if Device Class and Sub Category are not available:
{%- set output = [] -%}
{%- set output = device.device_class.split('|') -%}
{%- if (output[0]|trim) in ['Checkpoint', 'ScienceLogic', 'Microsoft'] -%}
{%- set output = output[1]|trim -%}
{% else %}
{%- set output = device.model -%}
{%- endif -%}
{{output}}
Filtering Device Sync by Device Group
You can use the gql_filter field on the Configuration pane of the "Sync Devices from SL1 to ServiceNow"
application to add a block of JSON code that lets you define a custom filter to apply to the devices in the sync.
NOTE: You cannot enter GraphQL code in the gql_filter field in PowerFlow. The field only accepts JSON.
Using GraphQL to Create the Custom Filter
In this example, you will create a custom GraphQL filter in SL1 based on Device Groups. This filter will prevent
Devices that belong to specific Device Groups from creating CIs in the ServiceNow CMDB.
To create a JSON filter for the gql_filter field:
1. Go to the GraphiQL interface in SL1 by typing the URL or IP address for SL1 in a browser, adding /gql to the
end of the URL or IP address, and pressing [Enter].
Syncing Devices from SL1 to ServiceNow

Syncing Devices from SL1 to ServiceNow
2. Create a GQL query that uses a search variable, such as the following example:
query DeviceFetch($search: DeviceSearch, $order: [ConnectionOrder], $first: Int)
{
devices(first: $first, search: $search, after: "", order: $order) {
pageInfo {
hasNextPage
matchCount
}
edges {
cursor
device: node {
...
}
}
}
}
3. After the query gives you the results you want, copy the resulting JSON variable definitions from the Query
Variables section:
4. Paste that JSON code into the gql_filter portion of PowerFlow and save the PowerFlow application.
JSON Code Template
Instead of using the GraphiQL user interface in SL1, you can use the following JSON code as a template for
filtering based on Device Group; simply paste the code into the gql_filter field on the Configuration pane and
edit the search criteria and group names as needed:
{
"deviceGroup": {
"has": {
"or": [
{
"name": {
"contains": "group1"
}
},
{
"name": {
"contains": "group2"
}
71
72
}
]
}
}
}
Tips for customizing the JSON code:
l
To add or remove additional Device Groups, copy or delete the following block of code and edit the
group name as needed:
{
"name": {
"contains": "group2"
}
}
l
If you add additional name blocks, add a comma after each name block except for the last name block. If
you delete a block, delete the preceding comma.
l
You can change the "or" to an "and" if you want to block syncing for devices that are in more than one
Device Group.
l
The "contains" can be changed to "eq" to make the name an exact match. For example, "contains": "office"
would match "The Office," "HQ Office," and "Office235."
Syncing Devices from SL1 to ServiceNow

Syncing Devices from SL1 to ServiceNow
Adding Device Mappings
You can dynamically set the device mappings on a per-run basis using the API. You can also persistently save
devicemappings with the API. You can find these mappings in the mappings section of the Configuration
pane for the "Sync Devices from SL1 to ServiceNow" application.
The following image displays an example ofusing Postman to send the mapping data to PowerFlow:
NOTE: This example only maps device classes to ServiceNow for VMware, SL1 devices, and a few Cisco
devices. If the your environment contains other device classes, you must manually create the
mappings.
To add device mappings using Postman, POST the following JSON file to trigger the required applications in
thePowerFlow user interface to model SL1 devices to ServiceNow:
{
"name": "device_sync_sciencelogic_to_servicenow",
"params": {
"mappings": {
"cmdb_ci_ip_switch":[
"Cisco Systems | Catalyst 3850-48P",
"Cisco Systems | Nexus 9372PX"
],
"cmdb_ci_linux_server": [
"ScienceLogic, Inc. | EM7 Message Collector",
"ScienceLogic, Inc. | EM7 Customer Portal",
"ScienceLogic, Inc. | EM7 All-In-One",
"ScienceLogic, Inc. | EM7 Integration Server",
"ScienceLogic, Inc. | EM7 Admin Portal",
"ScienceLogic, Inc. | EM7 Database",
"ScienceLogic, Inc. | OEM",
"ScienceLogic, Inc. | EM7 Data Collector",
"NET-SNMP | Linux",
"RHEL | Redhat 5.5"
],
73

74
"cmdb_ci_esx_resource_pool": ["VMware | Resource Pool"],
"cmdb_ci_esx_server": [
"VMware | ESXi 5.1 w/HR",
"VMware | Host Server",
"VMware | ESX(i) 4.0",
"VMware | ESX(i) w/HR",
"VMware | ESX(i) 4.0 w/HR",
"VMware | ESX(i)",
"VMware | ESX(i) 4.1 w/HR",
"VMware | ESXi 5.1 w/HR",
"VMware | ESXi 5.0 w/HR",
"VMware | ESX(i) 4.1",
"VMware | ESXi 5.1",
"VMware | ESXi 5.0"
],
"cmdb_ci_vcenter_datacenter": ["VMware | Datacenter"],
"cmdb_ci_vcenter_datastore": ["VMware | Datastore", "VMware | Datastore
Cluser"],
"cmdb_ci_vcenter_dv_port_group": ["VMware | Distributed Virtual Portgroup"],
"cmdb_ci_vcenter_dvs": ["VMware | Distributed Virtual Switch"],
"cmdb_ci_vcenter_folder": ["VMware | Folder"],
"cmdb_ci_vcenter_network": ["VMware | Network"],
"cmdb_ci_vmware_instance": ["VMware | Virtual Machine"],
"cmdb_ci_vcenter": ["VMware | vCenter", "Virtual Device | Windows Services"],
"cmdb_ci_vcenter_cluster": ["VMware | Cluster"]
},
"configuration": "template_snow_integration" #name your configuration file
}
}
Persistently Saving DeviceMappings with the API
You can persistently save device mappings using the API.
1. Use Postman or cURL to do a GET to load the "SyncDevices fromSL1 to ServiceNow" application:
GET PowerFlow_hostname/api/v1/applications/device_sync_sciencelogic_to_
servicenow
where PowerFlow_hostname is the IP address or URL for your PowerFlow system.
NOTE: The response should contain the entire JSON output for the application.
2. Copy the entire JSON code and save it to a file named: "device_sync_sciencelogic_to_servicenow".
Syncing Devices from SL1 to ServiceNow

Syncing Devices from SL1 to ServiceNow
3. Open the file you created and locate the object with the "name":"mappings" property in the "app_
variables" list. The "value" property in this object specifies the mappings to use throughout the
PowerFlow applications:
4. Modify the "value" property of the object to use the mappings you want to use.
5. Ensure that the mappings follow the same JSONdata structure, or else the sync will not work:
{
"cmdb_ci_class": [
"ScienceLogic Dev Class| ScienceLogic subclass",
"Another Silo Dev Class | Another Silo subclass"
]
}
6. After you update the mappings, use the iscli tool to upload the updated application with your new settings.
Type the following command at the command line:
iscli –uaf device_sync_sciencelogic_to_servicenow –H PowerFlow_hostname -p
password
where:
l
PowerFlow_hostname is the hostname or IP address of the PowerFlow system.
l
password is password you use to log in to the PowerFlow system.
Checking for Missing Device Mappings
You can use the "Report:Identify Unmapped DevicesClasses" PowerFlow application to check whether any
device mappings are missing in your PowerFlow server.
75

76
This application pulls the class mappings from Device Sync and Attribute Sync and compares the mappings with
the full list of device classes of discovered devices in SL1. The application generates a report on the Reports page
that lists missing mappings, and if any device classes are unmapped, the application generates an event in the
target SL1 system.
To configure the "Report:Identify Unmapped DevicesClasses" application:
1. If you do not have the ServiceNow Base PowerPack version 104 or later on your SL1 system, search for and
download the PowerPack from thePowerPacks page on the ScienceLogic Support Site.
2. In SL1, enable the "ServiceNow CMDB: Un-Mapped Device Classes" Event Policy from the ServiceNow Base
PowerPack version 104 or later to trap the alert generated by this application.
3. In the PowerFlow user interface, go to the Configurations page.
4. Click the [Actions] button ( ) for the configuration object you want to use with this application and select
Edit. The Configuration pane for the object appears.
5. In theConfiguration DataValues section, click[AddValue]. A new name-value line appears.
6. Add a configuration variable named pf_host that has a value of the externally addressable IP or fully
qualified domain name (FQDN) of the PowerFlow cluster or instance.
7. Click [Save].
8. Go to the Applications page and select the "Report:Identify Unmapped DevicesClasses" application.
9. Click [Configure] ( ) to open the Configuration pane:
10. Complete the following fields, as needed:
l
Configuration. Select the configuration object you updated in steps 1-5 to align with this
application. Make sure that the pf_host value that is updated on the Configuration pane is
accurate. You cannot edit fields that are populated by the configuration object. Required.
l
read_timeout. Specify the maximum amount of time in seconds the application should wait for a
response before timing out. The default is 20 seconds.
l
query_retries. Specify the number of times to retry this query if needed. The default chunk size is 0.
11. Click [Save] and wait for the "App & Config modifications saved" pop-up message to appear.The
Configuration pane automatically closes after this message appears.
12. Click [Run] ( ) to run theapplication.
Syncing Devices from SL1 to ServiceNow

Syncing Devices from SL1 to ServiceNow
13. After the application runs, click the [Reports] button ( ) and select the relevant report-missing-classes
report from the Reports page. The "missing_classes" report appears:
Also, if any device classes are unmapped and you enabled the "ServiceNow CMDB: Un-Mapped Device
Classes" Event Policy in step 2, SL1 generates an event on the Events page in SL1:
77

78
Device Attribute Mappings
The "Sync Devices from SL1 to ServiceNow" application can also collect manufacturer and model attributes from
asset records aligned with devices in SL1 and sync that information with ServiceNow. You can find these
mappings in the attribute_mappings section of the Configuration pane for that application.
NOTE: These manufacturer and model attributes are different from custom attributes inSL1.
PowerFlow only populates the manufacturer and model attributes if the values exist in ServiceNow CIs;
PowerFlow does not create new manufacturer values in ServiceNow. "Sync Devices from SL1 to ServiceNow"
application uses the sys_id field as a reference when syncing manufacturer and model information between SL1
andServiceNow.
WARNING: Integer fields in ServiceNow have a maximum value of 2147483647. If a value exceeds that
value, ServiceNow stores it as 2147483647. This is a MySQL limitation on the maximum value
that can be stored in a signed integer variable.
Syncing Devices from SL1 to ServiceNow

Syncing Devices from SL1 to ServiceNow
NOTE: The "Sync Devices from SL1 to ServiceNow" application only syncs assets that have a value
populated in SL1. SL1 automatically populates fields in an asset record when the record is properly
configured. For more information on configuring assets in SL1, see the Asset Management
manual.
Default DeviceAttribute Mappings
The "SyncDevices from SL1 to ServiceNow" application contains a set of default device attribute mappings
between SL1 andServiceNow.You can find these mappings in the attribute_mappings section of the
Configuration pane for that application.
The following table describes the default device attribute mappings:
SL1 Device Attribute ServiceNow CIAttribute
Description
"Description: {{device.device_category}}, Device Class:
{{device.device_class}}": [ "short_description"
NOTE: This field requires a Jinja2 Template. For more information, see Using a
Jinja2Template.
assetTag asset_tag
cpuCount> cpu_count
cpuMake cpu_type
cpuSpeed cpu_speed
dateAdded first_discovered
diskSize disk_space
dnsDomain dns_domain
function justification
hostname fqdn, host_name
instance_uuid account_id
ip ip_address
manufacturer_sys_id manufacturer
memory ram
model_sys_id model_id
name name
operatingSystem os
purchaseDate order_date
79

80
SL1 Device Attribute ServiceNow CIAttribute
serial serial_number
status hardware_substatus
warrantyExpirationDate warranty_expiration
SL1 Device Attributes Available for Syncing
In the attribute_mappings section of the Configuration pane for the "SyncDevices from SL1 to ServiceNow"
application, you can also use the following SL1 device attributes from SL1 when syncing attributes with
ServiceNow:
l
arraySize
l
assetTag
l
asset_id
l
company_sys_id
l
component_unique_id
l
cpuCount
l
cpuMake
l
cpuSpeed
l
dateAdded
l
depreciationMethod
l
depreciationSchedule
l
device_category
l
device_class
l
diskCount
l
diskSize
l
dnsDomain
l
dnsName
l
domain_sys_id
l
firmwareVersion
l
floor
l
function
l
hostId
l
hostname
l
ip
l
location
l
make
Syncing Devices from SL1 to ServiceNow
Syncing Devices from SL1 to ServiceNow
l
manufacturer_sys_id
l
memory
l
model
l
model_sys_id
l
name
l
operatingSystem
l
org_id
l
org_name
l
owner
l
panel
l
parent_device
l
parent_did
l
plate
l
punch
l
purchaseCheck
l
purchaseCost
l
purchaseDate
l
purchaseOrderNumber
l
rack
l
region
l
rfid
l
room
l
serial
l
serviceCheck
l
serviceCost
l
serviceDate
l
serviceDescription
l
serviceExpirationDate
l
serviceOrderNumber
l
servicePolicyNumber
l
shelf
l
sl1_id
l
sl1_url
l
snow_ci_class
l
snow_sys_id
81

82
l
status
l
vitalAssetInformation
l
vitalServiceInformation
l
warrantyCheck
l
warrantyCost
l
warrantyDate
l
warrantyDescription
l
warrantyExpirationDate
l
warrantyOrderNumber
l
warrantyPolicyNumber
l
zone
Adding New Device Attributes to ServiceNow
You can also add one or more new attributes to ServiceNow that you can then sync with SL1.
To add an attribute in ServiceNow:
1. In ServiceNow, search for "Tables" in the filter navigator and select System Definition > Tables.
2. From the Tables page, search for and select the table to which you want to add a field for a new attribute.
3. From the Table page, click the [New] button to add a new field on the table. A new record appears:
Syncing Devices from SL1 to ServiceNow

Syncing Devices from SL1 to ServiceNow
4. From the Type drop-down list, select the data type you want to store, such as String. Depending on your
selection, additional required fields display:
NOTE: In the String example, above, Column label contains the text you want to display in
ServiceNow, and Column name is the exact column name used by PowerFlow or the API.
5. Complete the required fields and any other fields as needed, and then click theSubmit button. The field is
added toServiceNow.
Viewing Reports for DeviceSync
The "Sync Devices from SL1 to ServiceNow" application lets you create a report about the devices that you sync
with ServiceNow:
83
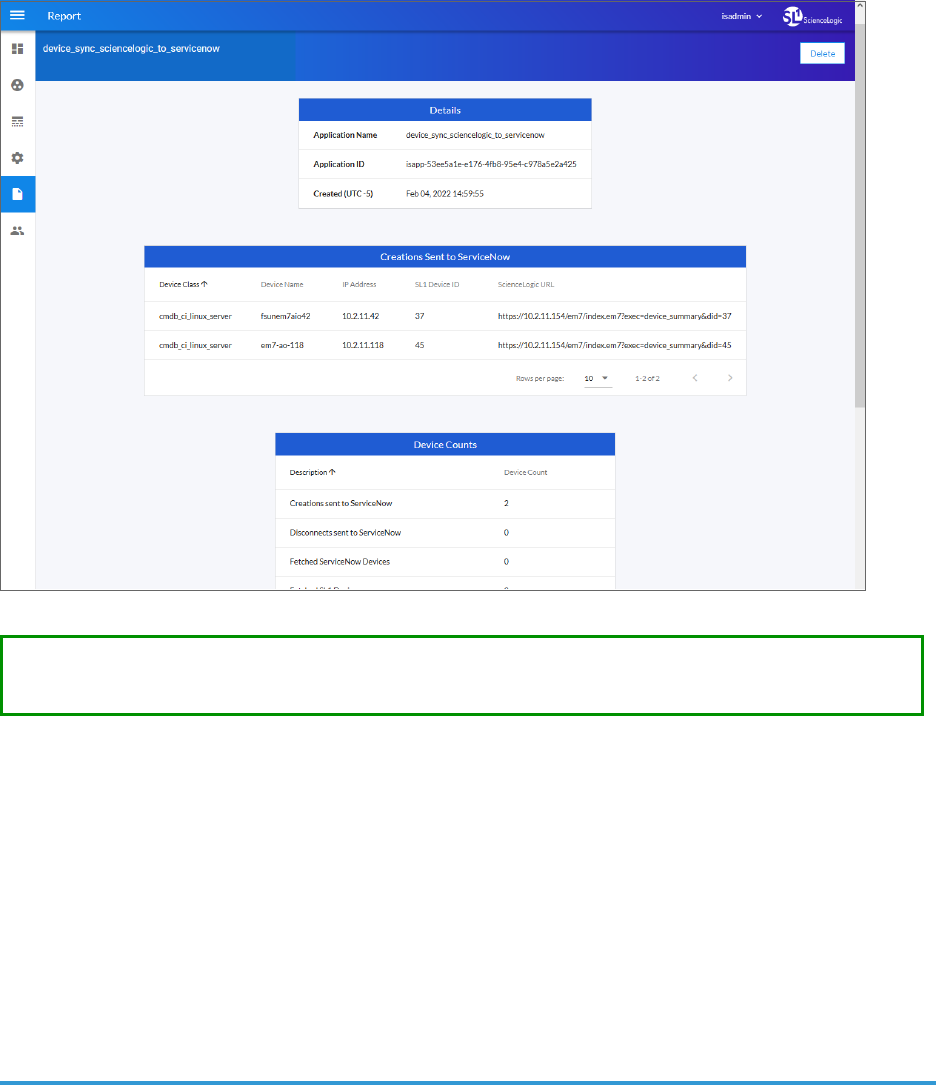
84
TIP: Enable the report by selecting the generate_report option on the Configuration pane for the
application.
When the relevant data is present in a device sync, the report displays the following data under the Details pane:
l
Creations Sent to ServiceNow. Device information for devices in SL1 that will be created in ServiceNow.
l
Device Counts. Lists the number of created, disconnected, and updated devices, as well as the number of
devices pulled from SL1 and ServiceNow during the sync. If domain separation is on and there are devices
removed due to domain separation errors, that count will be added to the table.
l
Deletions Sent to ServiceNow. Device information for devices in SL1 that will be deleted in ServiceNow.
l
Post CIs to ServiceNow. Each instance of the "Post CIs to ServiceNow" application, listing creations,
disconnects, errors, skips, and updates made in ServiceNow.
l
Updates Sent to ServiceNow. Device information for devices in SL1 to be updated in ServiceNow.
Syncing CI Attributes from ServiceNow to SL1
The "Sync CI Attributes from ServiceNow to SL1" application imports CI attributes from ServiceNow to the relevant
asset and attribute fields in SL1. The CISync supports assets, asset configuration, asset maintenance, location,
production statuses, and custom attributes.
Syncing CI Attributes from ServiceNow to SL1

Syncing CI Attributes from ServiceNow to SL1
The "Sync CI Attributes from ServiceNow to SL1" application can sync the display value and sys_id of Reference
fields, such as location, as well as the value and label of Choice List fields, such as operational_status. These
values can be accessed by appending _label to the desired field name.
Reference Example:
"location": "240f6630db993300dc44f00fbf96196f"
"location_label": "Corporate Headquarters"
Choice List Example:
"operational_status": "1",
"operational_status_label": "Operational",
The following image shows the Location table, and the Display column shows the Name marked as true. Only
one field on the table can be marked as true, and that is the field that will be returned to PowerFlow :
NOTE: When this application runs, if no mappings are provided, PowerFlow queries the "Sync Devices from
SL1 to ServiceNow" application and uses the mappings from that application.
To sync CI attributes from ServiceNow to SL1:
1. Because this application uses the mappings and additional attribute options from Device Sync, go to the
Applications page of the PowerFlow user interface and run the "Sync Devices from SL1 to ServiceNow"
application.
2. When that application completes, select the "Sync CI Attributes from ServiceNow to SL1"application from
the Applications page.
85

86
3. Click [Configure] ( ). The Configuration pane appears:
Syncing CI Attributes from ServiceNow to SL1

Syncing CI Attributes from ServiceNow to SL1
4. Complete the following fields, as needed:
l
Configuration. Select the configuration object with the relevant SL1 and ServiceNow credentials to
align with this application. You cannot edit fields that are populated by the configuration object.
Required.
NOTE: The region field (along with other fields related to user names and passwords) is
populated by the configuration object you aligned with this application. The region
value must match the value in the SL1 Region field in ServiceNow. If you need to
update this value, you will need to define the region variable in the configuration
object that is aligned with this application, or align a different configuration object that
has the correct region value.
l
read_timeout. Specify the maximum amount of time in seconds that the application should wait for a
response before timing out. The default is 20 seconds
l
chunk_size. Specify the number of devices to include in each chunk sent to ServiceNow when you
run this application. The default chunk size is 500 devices.
l
Include_Orgs. If you want to include SL1 Organizations in the sync, add theOrganization IDs from
SL1 in this field, separated by commas. Leave this field empty to sync all SL1 Organizations.
l
Include_CUGs. If you want to include SL1 Collector Groups (CUGs) in the sync, add theCollector
Group IDs from SL1 in this field, separated by commas. Leave this field empty to sync all SL1
Collector Groups.
l
snow_attributes_created. Select this option to show that custom attributes for ServiceNow sys_id
and ci_class already existing in SL1.
l
gql_filter. Specify a custom GraphQL filter to apply to the devices in the sync. An example of a
Device Search GraphQL query is: {"name": {"doesNotBeginWith": "jc-is-ma"}}
l
mappings. This section lets you view and add mappings between SL1 Device Classes and
ServiceNow CI classes.
5. Scroll down to the attribute_mappings section, which in previous versions was named the additional_
attributes section. In this section you can edit an existing attribute, or you can click the [Add Mapping]
button at the bottom of the section to create a new attribute. Press [Enter] after editing the attribute to make
sure your changes are saved.
TIP: You can use a Jinja2 Template for attribute fields on the ServiceNow side(the right column). For
more information, see Using a Jinja2Template.
TIP: To sync a user-defined field on the ServiceNow CI record to the device notes table in SL1, create
a custom attribute mapping for that field in this section.
87

88
6. Click [Save].The Configuration pane automatically closes.
7. Click [Run] ( ) to run the "Sync CI Attributes from ServiceNow to SL1"application.
Creating a Link in an SL1 Device to a ServiceNow CI
To help you mange your SL1 devices and their corresponding ServiceNow CIs, you can create a link in an SL1
Device that goes directly to the synced CIin ServiceNow.
The "Create Custom Attributes and ServiceNow Custom Link in SL1" PowerFlow application creates servicenow_
sys_id and servicenow_ci_class custom device attributes in SL1, and then SL1 uses those two attributes to create
a custom link in SL1 titled ServiceNow that redirects to the ServiceNow CI.
In SL1, the link appears as a custom link on the Tools menu for the corresponding device:
NOTE: The application only creates the custom attributes if the attributes do not already exist. Additionally, if
the custom link functionality is disabled by default on SL1, the application will enable the feature
before creating the necessary attributes and link.
To create a link for the SL1 device:
1. In the PowerFlow user interface, go to the Applications page and open the "Create Custom Attributes and
ServiceNow Custom Link in SL1" application.
2. Click the [Configure] button. The Configuration pane appears.
3. Enable the snow_attributes_created toggle and click[Save].
4. Click [Run] ( ) to run theapplication.
5. On the Applications page, open the "Sync CI Attributes from ServiceNow to SL1 to ServiceNow"
application.
6. Click the [Configure] button. The Configuration pane appears.
Syncing CI Attributes from ServiceNow to SL1

Syncing Advanced Topology Data from SL1 to ServiceNow
7. Enable the snow_attributes_created toggle and click[Save].
8. Click [Run] ( ) to run theapplication.
NOTE: You only need to run the "Create Custom Attributes and ServiceNow Custom Link in SL1"
application once.
Syncing Advanced Topology Data from SL1 to ServiceNow
The "Sync Advanced Topology from SL1 to ServiceNow" application reads Dynamic Component Mapping
relationships from SL1 and syncs those relationships with ServiceNow. This application also syncs CDP, L2, L3,
LLDP and DCM+R relationships.
If this is a new PowerFlow system, you must run both the "Sync Devices from SL1 to ServiceNow" application and
the "Sync Interfaces from SL1 to ServiceNow" application at least twice on new PowerFlow systems to populate the
cache for this application.
WARNING: PowerFlow only syncs topology data for devices and network interfaces that have already been
synced with ServiceNow. Before setting up advanced topology sync, you must first sync devices
or sync network interfaces, depending on your environment.
To sync advanced topology data and relationships from SL1 to ServiceNow:
1. On the Applications page of the PowerFlow user interface, click [Run] ( ) for the "Sync Devices from SL1
to ServiceNow" application. Run the application a second time if this is a new PowerFlow system.
2. Click [Run] ( ) for the "Sync Interfaces from SL1 to ServiceNow" application. Run the application a second
time if this is a new PowerFlow system.
89

90
3. Select the "Sync Advanced Topology from SL1 to ServiceNow" application and click [Configure] ( ). The
Configuration page appears:
4. Complete the following fields, as needed:
l
Configuration. Select the configuration object with the relevant SL1 and ServiceNow credentials to
align with this application. You cannot edit fields that are populated by the configuration object.
Required.
NOTE: The region field is populated by the configuration object you aligned with this
application. The region value must match the value in the SL1 Region field in
ServiceNow. If you need to update this value, you will need to define the region
variable in the configuration object that is aligned with this application, or align a
different configuration object that has the correct region value.
l
chunk_size. Specify the number of topologies to include in each chunk sent to ServiceNow when you
run this application. The default chunk size is 500.
l
read_timeout. Specify the maximum amount of time in seconds the application should wait for a
response before timing out. The default is 20 seconds.
Syncing Advanced Topology Data from SL1 to ServiceNow

Syncing Advanced Topology Data from SL1 to ServiceNow
l
retry_max. The maximum number of times PowerFlow will retry to execute the step before it stops
retrying and logs a step failure. For example, if retry_max is 3, PowerFlow will retry after 1 second,
then 2 seconds, then 4 seconds, and stop if the last retry fails. The default is 0.
l
retry_backoff_max.The maximum time interval for the retry_backoff option, in seconds. For
example, if you have retry_max set to 15, the delays will be 1, 2, 4, 8, 16, 32, 64, 120, 240, 480,
600, 600, 600, 600, and 600. The default is 600.
l
Domain_Separation. Select this option if your ServiceNow environment is domain-separated, where
the data, processes, and administrative tasks have been organized into logical groupings called
domains. If your ServiceNow instance is domain-separated, the user listed in the snow_user field
must be a member of the top domain and have access to all of the domains you intend to integrate.
Also, ServiceNow should be the "source of truth" for organizations if your environment is domain-
separated. This application does not support relationships for devices across domains; all devices in
a relation payload must be in the same domain.
l
Simulation_Mode. Select this option if you want to perform a simulated run of this application to
show you the potential results of that run.
l
retry_jitter. When selected, instead of using a defined interval between retries, PowerFlow will retry
the step execution at random intervals. The default is unselected.
l
retry_backoff. When selected, instead of using a defined interval between retries, PowerFlow will
incrementally increase the interval between retries. The default is unselected.
l
customer_ci_relation_overrides. To set a Dynamic Component Mapping + Relationships
(DCM+R) relationship type other than "Connects to" and "Connected By", addJSON code to this
field.Example relationships include VM to Datastore or VM to Network. For more information, see
Configuring CustomerCIRelation Overrides and Mappings between SL1, ServiceNow, and
Other Applications.
5. Click [Save].The Configuration pane automatically closes.
6. Click [Run] ( ) to run theapplication.
Adding Related Items and Lists to the CI Record in ServiceNow
In ServiceNow you can add RelatedItems and RelatedLists to CI records so you can see all related records in
ServiceNow. The following image shows the Related Items pane on a CI record for a VMware
VirtualMachineInstance:
91

92
The following image shows how to add Related Items for a VMware Virtual Machine instance by selecting the CI
relations option.
The following image shows the related lists for network adapters and files systems:
The items highlighted by the red boxes below are the most commonly used items:
Syncing Advanced Topology Data from SL1 to ServiceNow

SyncingNetwork Interfaces from SL1 to ServiceNow
For more information, see the ServiceNow Documentation at https://docs.servicenow.com/bundle/paris-
platform-user-interface/page/use/using-forms/concept/c_RelatedLists.html.
SyncingNetwork Interfaces from SL1 to ServiceNow
You can map and sync network interfaces in much the same way you sync devices between SL1 and ServiceNow.
The "Sync Interfaces from SL1 to ServiceNow" application collects interface data from ServiceNow and SL1 and
runs multiple CI syncs for each interface to be synced.
Version 3.5.0 and later of this Synchronization PowerPack requires SL1 version 11.1.3 or later.
WARNING: PowerFlow only syncs network interfaces that are aligned with devices that are already synced
with ServiceNow. Before setting up network interface sync, you must first sync devices between
SL1 and ServiceNow.
To sync SL1 network interfaces with ServiceNow:
1. In the PowerFlow user interface, go to the Applications page and select the "Sync Interfaces from SL1 to
ServiceNow" application.
93

94
2. Click [Configure] ( ) to open the Configuration pane:
3. Complete the following fields, as needed:
l
Configuration. Select the relevant configuration object to align with this application. You cannot edit
fields that are populated by the configuration object. Required.
NOTE: The region field (along with other fields related to user names and passwords) is
populated by the configuration object you aligned with this application, using the
Configuration field. The region value on this pane must match the value in the SL1
Region field in ServiceNow. If you need to update this value, you will need to define
the region variable in the configuration object aligned with this application, or align a
different configuration object that has the correct region value.
l
read_timeout. Specify the maximum amount of time in seconds the application should wait for a
response before timing out. The default is 120 seconds.
SyncingNetwork Interfaces from SL1 to ServiceNow

SyncingNetwork Interfaces from SL1 to ServiceNow
l
chunk_size. Specify the number of interfaces to pull from SL1 in each chunk. The default is 500.
l
retry_max. The maximum number of times PowerFlow will retry to execute the step before it stops
retrying and logs a step failure. For example, if retry_max is 3, PowerFlow will retry after 1 second,
then 2 seconds, then 4 seconds, and stop if the last retry fails. The default is 0.
l
retry_backoff_max.The maximum time interval for the retry_backoff option, in seconds. For
example, if you have retry_max set to 15, the delays will be 1, 2, 4, 8, 16, 32, 64, 120, 240, 480,
600, 600, 600, 600, and 600. The default is 600.
l
Domain_Separation. Select this option if your ServiceNow environment is domain-separated, where
the data, processes, and administrative tasks have been organized into logical groupings called
domains. If your ServiceNow instance is domain-separated, the user listed in the snow_user field
must be a member of the top domain and have access to all of the domains you intend to integrate.
Also, ServiceNow should be the "source of truth" for organizations if your environment is domain-
separated. By default, this option is not selected.
l
Simulation_Mode. Select this option if you want to perform a simulated run of this application to
show you the potential results of that run. This option is not selected by default.
l
retry_jitter. When selected, instead of using a defined interval between retries, the PowerFlow system
will retry the step execution at random intervals. By default, this option is not selected.
l
retry_backoff. When selected, instead of using a defined interval between retries, PowerFlow will
incrementally increase the interval between retries. By default, this option is not selected.
l
adapter_sync. Select one of the following settings:
o
off. Disables interface sync.
o
all. Syncs every interface, regardless of its state.
o
enabled. Syncs only the interfaces that have a state of "admin up". This is the default setting.
4. Click [Save].The Configuration pane closes.
5. Click [Run] ( ) to run the application.
95

96
6. When the application completes, go to ServiceNow and type "cmdb_ci_network_adapter.list". The Network
Adapters page appears, with a list of synced interfaces:
6. Select a network interface from the list and scroll down to the Network Adapters tab to see more
information about the interface, such as the Operational status value, which is synced from SL1.
NOTE: The Operational status value is different from the [SL1 Monitored] value, but PowerFlow tracks
both values.
SyncingNetwork Interfaces from SL1 to ServiceNow

SyncingFileSystems from SL1 to ServiceNow
SyncingFileSystems from SL1 to ServiceNow
You can map and sync file systems in much the same way you sync devices between SL1 and ServiceNow. The
"Sync File Systems from SL1 to ServiceNow" application reads file systems discovered inSL1 and then maps them
to a parent CI record in ServiceNow.
For a file system to be synced from SL1 to ServiceNow, the class of the file system's parent device must be
included in the mappings parameters for the "Sync Devices from SL1 to ServiceNow" application. Interfaces with
parent CIs with className values of cmdb_ci_ip_switch" or cmdb_ci_ip_router" will be sent to ServiceNow,
but by default they will not be created in ServiceNow due to missing relationship information.
WARNING: PowerFlow only syncs file systems that are aligned with devices that are already synced with
ServiceNow. Before setting up file system sync, you must first sync devices between SL1 and
ServiceNow.
To sync SL1 file systems with ServiceNow:
1. In the PowerFlow user interface, go to the Applications page and select the "Sync FileSystems from SL1 to
ServiceNow" application.
97

98
2. Click [Configure] ( ) to open the Configuration pane:
3. Complete the following fields, as needed:
l
Configuration. Select the relevant configuration object to align with this application. You cannot edit
fields that are populated by the configuration object. Required.
NOTE: The region field (along with other fields related to user names and passwords) is
populated by the configuration object you aligned with this application, using the
Configuration field. The region value on this pane must match the value in the SL1
Region field in ServiceNow. If you need to update this value, you will need to define
the region variable in the configuration object aligned with this application, or align a
different configuration object that has the correct region value.
l
read_timeout. Specify the maximum amount of time in seconds the application should wait for a
response before timing out. The default is 20 seconds.
SyncingFileSystems from SL1 to ServiceNow

SyncingBusiness Services
l
chunk_size. Specify the number of objects to send in each chunk. The default is 500 objects per
chunk.
l
retry_max. The maximum number of times PowerFlow will retry to execute the step before it stops
retrying and logs a step failure. For example, if retry_max is 3, PowerFlow will retry after 1 second,
then 2 seconds, then 4 seconds, and stop if the last retry fails. The default is 0.
l
retry_backoff_max.The maximum time interval for the retry_backoff option, in seconds. For
example, if you have retry_max set to 15, the delays will be 1, 2, 4, 8, 16, 32, 64, 120, 240, 480,
600, 600, 600, 600, and 600. The default is 600.
l
Domain_Separation. Select this option if your ServiceNow environment is domain-separated, where
the data, processes, and administrative tasks have been organized into logical groupings called
domains. If your ServiceNow instance is domain-separated, the user listed in the snow_user field
must be a member of the top domain and have access to all of the domains you intend to integrate.
Also, ServiceNow should be the "source of truth" for organizations if your environment is domain-
separated.
l
Simulation_Mode. Select this option if you want to perform a simulated run of this application to
show you the potential results of that run.
l
retry_jitter. When selected, instead of using a defined interval between retries, the PowerFlow system
will retry the step execution at random intervals. By default, this option is not selected.
l
retry_backoff. When selected, instead of using a defined interval between retries, PowerFlow will
incrementally increase the interval between retries. By default, this option is not selected.
4. Click [Save].The Configuration pane closes.
5. Click [Run] ( ) to run theapplication.
SyncingBusiness Services
Depending on where you have your business services configured initially, you can use one of the two following
methods to sync business services between SL1 and ServiceNow:
l
SyncingBusinessServices from SL1 to ServiceNow
l
SyncingBusiness Services from ServiceNow to SL1
To avoid duplicate services, you should only use one of the above processes in the PowerFlow user interface. The
PowerFlow application you use depends on in which application (SL1 or ServiceNow) you initially configured your
services, before syncing.
For example, if you have BusinessServices, ITServices, andDevicesServices set up in SL1, you would use the
"Sync Business Services from SL1 to ServiceNow" application, and SL1 would be the "source of truth" after the
sync.
99
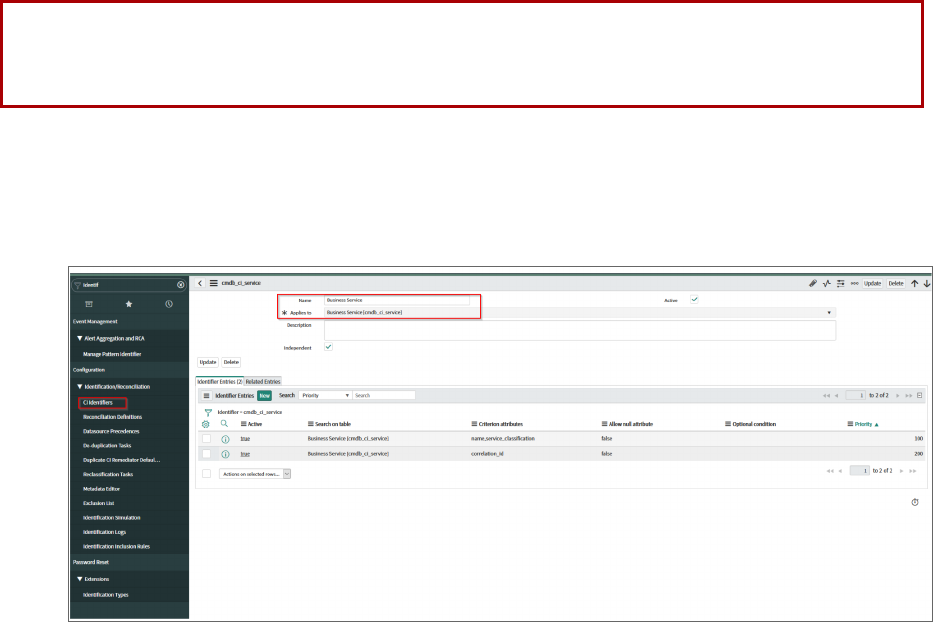
100
SyncingBusinessServices from SL1 to ServiceNow
The Sync Business Services from SL1 to ServiceNow application reads BusinessServices,IT Services, and
Device Services from SL1 and syncs them with business services in ServiceNow. This application creates and
updates services, but it does not delete services.
The "Sync Business Services from SL1 to ServiceNow" application does not currently support deleting or
disconnecting services within ServiceNow. The application logs for the "Post to ServiceNow" step might contain
information regarding disconnects, but you can ignore that information.
If a Device Service does not have a parent IT Service, the CMDB Group will be created, but the CI will not be
created because of the way PowerFlow pulls each of those items. At the time of the Group creation, PowerFlow
does not know if a service has a parent or not. At the time of the CI creation, PowerFlow does not directly pull
Device Services; it only pulls Business Services and IT Services and their children.
WARNING: PowerFlow only syncs business services that are aligned with devices that are already synced
with ServiceNow. Before setting up business service sync, you must first sync devices between
SL1 and ServiceNow.
To sync SL1 business services with ServiceNow:
1. In ServiceNow, create an identifier rule for syncing services by typing "CIIdentifiers"in the filter navigator
and clicking [New] on the Identifiers page:
2. Complete the following fields:
l
Name. Type a relevant name for this rule, such as "Business Service".
l
Applies to. Select cmdb_ci_service.
l
Independent. Select this option.
SyncingBusiness Services

SyncingBusiness Services
3. Right-click the gray header and click Save to save the record.
4. On the [Identifier Entries] tab, click [New] and add the relevant values from the Criterion attributes field
for this business service, such as name, service_classification and correlation_id.
5. Click [Submit].
6. Repeat steps 4-5 for each identifier you want to add.
7. In the PowerFlow user interface, go to the Applications page and run the "Cache ServiceNow CIs and SL1
Device Classes" application to read all existing SL1 Device Classes and ServiceNow CIs and write them to a
cache.
8. Run the "Sync Devices from SL1 to ServiceNow" application to sync devices and their properties and
relationships from SL1 to ServiceNow.
9. On the Applications page, select the "Sync BusinessServices from SL1 to ServiceNow" application.
10. Click [Configure] ( ) to open the Configuration pane:
11. Complete the following fields, as needed:
101

102
l
Configuration. Select the relevant configuration object to align with this application. You cannot edit
fields that are populated by the configuration object. Required.
NOTE: The region field is populated by the configuration object you aligned with this
application. The region value must match the value in the SL1 Region field in
ServiceNow. If you need to update this value, you will need to define the region
variable in the configuration object that is aligned with this application, or align a
different configuration object that has the correct region value.
l
read_timeout. Specify the maximum amount of time in seconds the application should wait for a
response before timing out. The default is 20 seconds.
l
chunk_size. Specify the number of services to include in each chunk sent to ServiceNow when you
run this application. The default chunk size is 500.
l
sl1_url_override. Specify a URL that is different from the standard SL1 URL that gets sent to the
ServiceNow CI record.Optional.
l
business_service_ci_class. Specify the ServiceNow CIClass for Business Services. The default is
cmdb_ci_service.
l
it_service_ci_class. Specify the ServiceNow CIClass for IT Services. The default is cmdb_ci_
service_technical.
l
business_service_classification, it_service_classification, and device_service_classification. Use
these fields to update the default service classifications. Optional.
l
relationship_type. Specify the relationship type string to use between services. The default is
Depends on::Used by.
l
discovery_source. Specify the ServiceNow Discovery source. The default is "Other Automated".
l
retry_max. The maximum number of times PowerFlow will retry to execute the step before it stops
retrying and logs a step failure. For example, if retry_max is 3, PowerFlow will retry after 1 second,
then 2 seconds, then 4 seconds, and stop if the last retry fails. The default is 0.
l
retry_backoff_max.The maximum time interval for the retry_backoff option, in seconds. For
example, if you have retry_max set to 15, the delays will be 1, 2, 4, 8, 16, 32, 64, 120, 240, 480,
600, 600, 600, 600, and 600. The default is 600.
l
Domain_Separation. Select this option if your ServiceNow environment is domain-separated, where
the data, processes, and administrative tasks have been organized into logical groupings called
domains. If your ServiceNow instance is domain-separated, the user listed in the snow_user field
must be a member of the top domain and have access to all of the domains you intend to integrate.
Also, ServiceNow should be the "source of truth" for organizations if your environment is domain-
separated.
l
Simulation_Mode. Select this option if you want to perform a simulated run of this application to
show you the potential results of that run.
l
retry_jitter. Instead of using a defined interval between retries, the PowerFlow system will retry the
step execution at random intervals. The default is unselected.
SyncingBusiness Services

SyncingBusiness Services
l
retry_backoff. Instead of using a defined interval between retries, PowerFlow will incrementally
increase the interval between retries. The default is unselected.
12. Click [Save].The Configuration pane automatically closes.
13. Click [Run] ( ) to run the"Sync BusinessServices from SL1 to ServiceNow" application.
SyncingBusiness Services from ServiceNow to SL1
The Sync Business Services from ServiceNow to SL1 application syncs services that were defined in
ServiceNow with Business Services in SL1. When you sync services from Service Now to SL1, PowerFlow recreates
the service structure in SL1, where you can see the relationships between the service components, the application
components, and the infrastructure components. You can also sync any asset fields on the service using an
attribute mapping on the Configuration pane.
Aspects ofSyncing BusinessServices from ServiceNow to SL1
l
This process syncs the business service structure or map from ServiceNow; however, because ServiceNow
only allows one device service for each device, the process will not dynamically create rules and services in
SL1.
l
This process groups all devices into a single device service. If there are other services at the same level as
the devices, that service will be modeled as a separate aggregate service in SL1.
l
An aggregate service in SL1 will only be created with services as children and a device service in SL1 will
only be created with devices as children.
l
Depending on the actions taken in ServiceNow, an aggregate service can be inserted above or a device
service may be inserted below certain services when the aggregate service is created in SL1.
l
This process creates device services in SL1, but it does not create devices in SL1.
l
Services are not merged in this process, so when you use the "Sync Business Services from ServiceNow to
SL1"application, the "source of truth" will be set to ServiceNow, not SL1.
l
If a ServiceNow service has no child services or child devices, that service will not be created in SL1.
l
If aServiceNow service was previously synced to SL1 when it was not empty, but it is now an empty service
ServiceNow, the service is deleted in SL1.
The following tables in ServiceNow are treated as services in a sync to SL1:
l
cmdb_ci_service
l
cmdb_ci_service_technical
l
cmdb_ci_query_based_service
l
cmdb_ci_service_discovered
l
cmdb_ci_service_auto
l
cmdb_ci_service_group
l
service_offering
l
cmdb_ci_service_manual
l
cmdb_ci_service_calculated
103

104
All other tables will be treated as devices.
NOTE: The cmdb_ci_query_based_service table contains the device services within ServiceNow. For any
other service with a CI as a direct child, a device service will be inserted in between this service and
the child CI in SL1.
WARNING: Syncing services from ServiceNow to SL1 requires SL1 10.2.0 or later.
To sync ServiceNow services with SL1 BusinessServices:
1. In ServiceNow, configure your business service structure or map so it is ready to by synced to SL1:
2. For each service that you want to sync with SL1:
l
Ensure that the SL1 Region field in ServiceNow matches the region field in PowerFlow.
l
Set the SL1 Monitored flag to True.
3. In the PowerFlow user interface, go to the Applications page and run the "Cache ServiceNow CIs and SL1
Device Classes" application to read all existing SL1 Device Classes and ServiceNow CIs and write them to a
cache.
4. Run the "Sync Devices from SL1 to ServiceNow" application to sync devices and their properties and
relationships from SL1 to ServiceNow.
5. On the Applications page, select the "Sync BusinessServices from ServiceNow to SL1" application.
SyncingBusiness Services
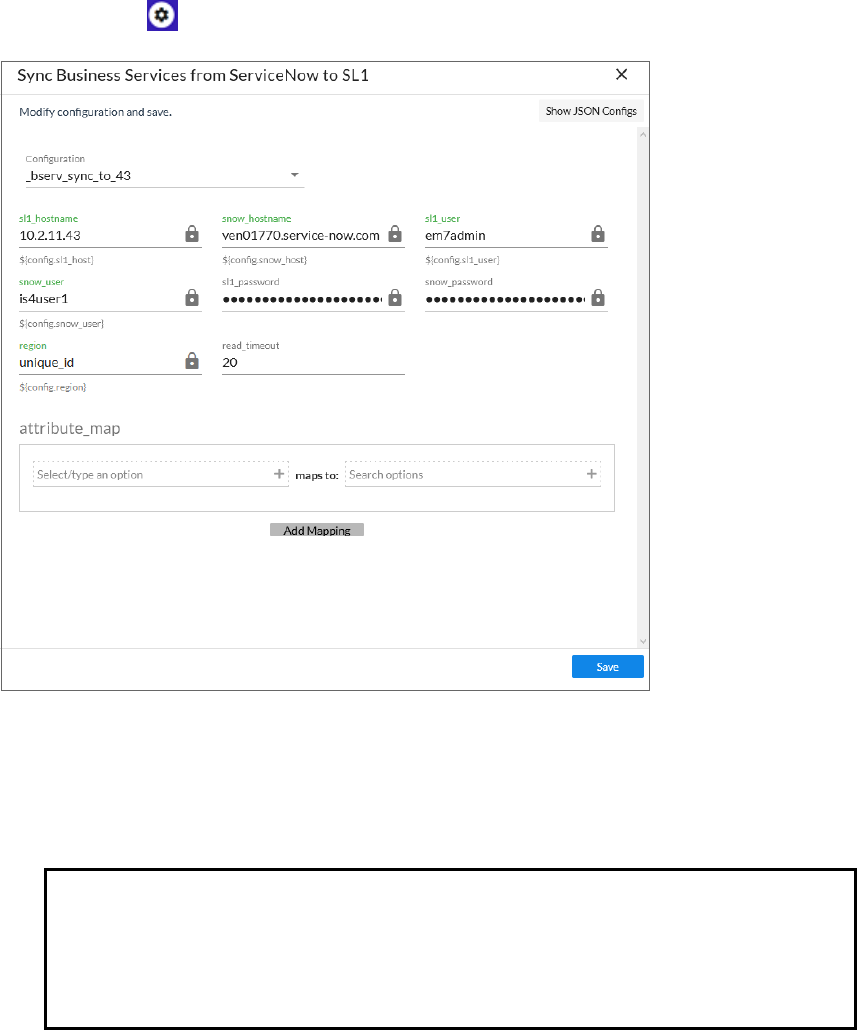
SyncingBusiness Services
6. Click [Configure] ( ) to open the Configuration pane:
7. Complete the following fields, as needed:
l
Configuration. Select the relevant configuration object to align with this application. You cannot edit
fields that are populated by the configuration object. Required.
NOTE: The region field is populated by the configuration object you aligned with this
application. The region value must match the value in the SL1 Region field in
ServiceNow. If you need to update this value, you will need to define the region
variable in the configuration object that is aligned with this application, or align a
different configuration object that has the correct region value.
l
read_timeout. Specify the maximum amount of time in seconds the application should wait for a
response before timing out. The default is 20 seconds.
8. In the attribute_map section, click [AddMapping] if you want to create a mapping for any other asset
fields that you want to sync between SL1 (the first column) and ServiceNow (the second column).
9. Click [Save].The Configuration pane automatically closes.
105

106
10. Click [Run] ( ) to run theapplication. When the application completes, the ServiceNow business services
will be available on the Business Services page of SL1:
SyncingInstalled Software between SL1 and ServiceNow
You can use the following applications to sync your installed software assets between and ServiceNow:
l
"Sync Software Packages from SL1 to ServiceNow". Reads all software packages from SL1 and creates new
CIs in ServiceNow. Run this application before running the "Sync Installed Software" application.
l
"Sync Installed Software from SL1 to ServiceNow". Reads all available software packages from SL1 and the
devices aligned to that software by region and syncs them with ServiceNow.
The applications do not currently support domain separation.
NOTE: The Software Asset Management (SAM) application in ServiceNow is not supported with the current
level of installed software data acquired with SL1. As a result, syncing installed software data with
ServiceNow Discovery and other Software Asset Management software is not currently supported.
To sync installed software between SL1 and ServiceNow:
1. Make sure that you have recently run the "Sync Devices from SL1 to ServiceNow" application to populate the
device cache.
2. In the PowerFlow user interface, go to the Applications page and select the "Sync Software Packages from
SL1 to ServiceNow" application.
SyncingInstalled Software between SL1 and ServiceNow

SyncingInstalled Software between SL1 and ServiceNow
3. Click [Configure] ( ) to open the Configuration pane:
4. Complete the following fields, as needed:
l
Configuration. Select the relevant configuration object to align with this application. You cannot edit
fields that are populated by the configuration object. Required.
NOTE: The region field is populated by the configuration object you aligned with this
application. The region value must match the value in the SL1 Region field in
ServiceNow. If you need to update this value, you will need to define the region
variable in the configuration object that is aligned with this application, or align a
different configuration object that has the correct region value.
l
chunk_size. Specify the number of services to include in each chunk sent to ServiceNow when you
run this application. The default chunk size is 500.
l
read_timeout. Specify the maximum amount of time in seconds the application should wait for a
response before timing out. The default is 20 seconds.
107

108
5. Click [Save] and wait for the "App & Config modifications saved" pop-up message to appear.The
Configuration pane automatically closes after this message appears.
6. Click [Run] ( ) to run theapplication.
7. After the "Sync Software Packages from SL1 to ServiceNow" application finishes running, go to the
Applications page and select the "Sync Installed Software from SL1 to ServiceNow" application.
8. Click [Configure] ( ) to open the Configuration pane:
9. Complete the following fields, as needed:
l
Configuration. Select the relevant configuration object to align with this application. You cannot edit
fields that are populated by the configuration object. Required.
l
region. The region value is populated by the configuration object you selected. The region value
must match the value in the SL_Region field in ServiceNow. If you need to update this value, you will
need to define the region variable in the configuration that is aligned with this application, or align a
different configuration that has the correct region value.
l
chunk_size. Specify the number of services to include in each chunk sent to ServiceNow when you
run this application. The default chunk size is 500.
l
read_timeout. Specify the maximum amount of time in seconds the application should wait for a
response before timing out. The default is 20 seconds.
10. Click [Save] and wait for the "App & Config modifications saved" pop-up message to appear.The
Configuration pane automatically closes after this message appears.
11. Click [Run] ( ) to run theapplication.
Discovery Sync
The Discovery Sync integration lets you use SL1 for discovering and syncing ServiceNow devices. With
DiscoverySync, you start an SL1 discovery session from ServiceNow and then sync the newly discovered SL1
devices or virtual devices and their data with ServiceNow.
Discovery Sync

Discovery Sync
Before running a Discovery Sync session, you must complete the following steps first:
1. For domain-separated ServiceNow instances, perform a company sync by running the "Sync Organizations
from SL1 to ServiceNow"application in the PowerFlow user interface. For more information, see Syncing
Organizations from SL1 to ServiceNow.
2. In ServiceNow, configure a service request for Discovery Sync. For more information, see Configuring a
ServiceNow Service Request for Discovery Sync.
3. In the PowerFlow user interface, run the applications listed in the Discovery Sync Workflow.
Configuring a ServiceNow Service Request for Discovery Sync
Before you can run a Discovery Sync, you need to configure the catalog and category values in the ServiceNow
servicerequest forms. You also need to activate the "DeviceDiscovery" service request in ServiceNow.
NOTE:Because some of the fields in the service request form will only populate if you have completed the
previous fields in the form, you need to complete the fields in the service request form in sequential
order.
To configure the ServiceNow service requests for Discovery Sync:
1. In ServiceNow, search for "Maintain Items" in the filter navigator.
2. Go to Service Catalog > Catalog Definitions > Maintain Items and type "ScienceLogic" in the
Category field. The DeviceDiscovery and Monitoring Removal servicerequests appear:
109

110
3. Open the Device Discovery service request and ensure that the Catalogs and Category fields are
accurate. For example:
NOTE:Do not set the Category to a Change Request.
4. If you need to update these fields, click the "To edit this record click here" link at the top of the detail page.
5. Update the fields and click the [Update] button to save your changes.
6. From the Catalog Items page, click the check box for the DeviceDiscovery service request and click
[Activate].
NOTE:This service request is instance-specific, which means that the service request will appear in the same
location as the catalogs you specified for that request.In the example, above, the Catalog was set
to Service Catalog.
7. Navigate to the relevant catalog for the service request. For example, if you selected Service Catalog for
one or both requests, then type "Service Catalog" in the filter navigator, or select Self-Service>Service
Catalog to view the new service requests. Type "device discovery" in the Search catalog field to quickly
locate the request.
8. Run the applications listed in the Discovery Sync Workflow before creating the Device Discovery service
request in ServiceNow.
Discovery Sync Workflow
To prepare SL1 andServiceNow for a Discovery Sync, run the following applications in the PowerFlow user
interface, in the following order:
Discovery Sync

Discovery Sync
1. Sync Discovery Requirements. This application exports information from SL1 to populate the information
in the ServiceNow request form. You must run this application before you can create the discovery sync
session in ServiceNow. This application uses one or more of the following options from the Configuration
pane:
l
Configuration. Select the relevant configuration object to align with this application. You cannot edit
fields that are populated by the configuration object. Required.
NOTE: The region field is populated by the configuration object you aligned with this
application. The region value must match the value in the SL1 Region field in
ServiceNow. If you need to update this value, you will need to define the region
variable in the configuration object that is aligned with this application, or align a
different configuration object that has the correct region value.
l
read_timeout. Specify the maximum amount of time in seconds the application should wait for a
response before timing out. The default is 20 seconds.
l
chunk_size. Specify the number of objects to send in each chunk fromServiceNow. The default is
500 devices per chunk.
l
Domain_Separation. Select this option if your ServiceNow environment is domain-separated, where
the data, processes, and administrative tasks have been organized into logical groupings called
domains. If your ServiceNow instance is domain-separated, the user listed in the snow_user field
must be a member of the top domain and have access to all of the domains you intend to integrate.
Also, ServiceNow should be the "source of truth" for organizations if your environment is domain-
separated.
l
Create_Missing. Select this option if you want PowerFlow to create a new device or CI if that record
is missing, based on your selection in the Source_of_Truth field.
l
Update_Name. This option addresses the situation where PowerFlow finds a match with a device or
CI, but the names do not match. This option updates a device or CI name based on your selection in
the Source_of_Truth field, below. For example, if you selected ScienceLogic as the source of truth,
PowerFlow uses the device name from ScienceLogic as the updated name.
l
Sync_Empty_Groups. Select this option if you want to sync device groups that have no devices, or
device groups that have devices but no matching CIs.
l
Source_of_Truth. Select whether you want to use data from ServiceNow or ScienceLogic as the
"source of truth" when this application encounters duplicate data or data collisions.
l
attribute_mappings. In this section, you can create a mapping for any other custom attributes you
want to sync between SL1 (the first column) and ServiceNow(the second column).
2. Sync Service Requests from ServiceNow to SL1. This application sends the request forms to SL1. This
application was called "Sync Discovery Session Requests from ServiceNow to SL1" in previous versions of the
Synchronization PowerPack. This application uses one or more of the following options from the
Configuration pane:
l
Configuration. Select the relevant configuration object to align with this application. You cannot edit
fields that are populated by the configuration object. Required.
111

112
l
Open_State. The State IDfrom ServiceNow that specifies which Requested Items (RITMs) to pull and
process. The default is 1.
l
read_timeout. Specify the maximum amount of time in seconds the application should wait for a
response before timing out. The default is 20 seconds.
l
Closed_Success_State. The State ID for a successfully created virtual device. TheState ID for a
successful run changes from 1 to 2 and then ends with 4. The default is 3.
l
Closed_Failed_State. The State ID for failed discoveries or failed virtual device creation, usually
caused by invalid payloads. TheState ID for a failed run changes from 1 to 2 and then ends with 4.
The default is 4.
l
In_Progress_State. The State IDfor RITMs for a running discovery. The default is 2.
l
recursively_disable_children. Leave this field blank.
l
target_vcug. Leave this field blank.
3. Sync Discovery Session Status from SL1 to ServiceNow. This application populates the discovery session
logs back to ServiceNow. This application uses the following options from the Configuration pane:
l
Configuration. Select the relevant configuration object to align with this application. You cannot edit
fields that are populated by the configuration object. Required.
l
read_timeout. Specify the maximum amount of time in seconds the application should wait for a
response before timing out. The default is 20 seconds.
l
Closed_Success_State. The State ID for a successfully created discovery. TheState ID for a
successful run changes from 1 to 2 and then ends with 4. The default is 3.
l
sys_id_target. Takes the sys_id value from the CI in the ServiceNow Service Request and populates it
in the relevant field in SL1, such as c-sys_id.
l
ci_class_target. Takes the ci_class value from the CI in the ServiceNow Service Request and
populates it in the relevant field in SL1, such as c-ci_class.
NOTE: If the sys_id_target field and the ci_class_target field are not populated, PowerFlow
will skip the process of consuming cached data and populating custom attribute fields
in SL1 with the sys_id and ci_class values of newly discovered devices.
4. SyncDiscovery Templates from SL1 to ServiceNow. This application creates Service Catalog templates
in ServiceNow based on Discovery Sessions that were created in SL1. This option lets you use any existing
SL1 Discovery Sessions as a template for discovering or monitoring a CI with SL1. This application uses the
following options from the Configuration pane:
l
Configuration. Select the relevant configuration object to align with this application. You cannot edit
fields that are populated by the configuration object. Required.
l
chunk_size. Specify the number of devices to include in each chunk sent to ServiceNow when you
run this application. The default is 500.
Discovery Sync

Discovery Sync
l
template_prefix. Specify the prefix string that PowerFlow will search for in SL1.Any Discovery
Sessions that contain that string will be used in ServiceNow to create a service catalog template. The
default string is ServiceNow Template:, but you can configure this as needed.
l
read_timeout. Specify the maximum amount of time in seconds the application should wait for a
response before timing out. The default is 20 seconds.
In SL1, go to the Discovery Control Panel page(Manage >Classic Discovery) and search for the
Discovery Session or Sessions that you want to use as a template.The start of the name in the
Name field should match the value in the template_prefix field, above:
5. Sync Devices from SL1 to ServiceNow. Running this application ensures that the devices discovered by
SL1 get synced to ServiceNow.
6. When the applications finish running,PowerFlow sends the status of those applications to ServiceNow, and
you can run a Discovery Sync in ServiceNow.
Running a Discovery Sync in ServiceNow
The Discovery Sync process starts an SL1 discovery session from ServiceNow and syncs the newly discovered SL1
devices and their data with ServiceNow. You can choose to discover standard devices or virtual devices.
113

114
To run a Discovery Sync from the ServiceCatalog page:
1. In ServiceNow, search for "service catalog" in the filter navigator.
2. Navigate to the Service Catalog page (Self-Service > Service Catalog), type "device discovery" in the
Search catalog field at the top right, and press [Enter]. The Device Discovery catalog entry appears:
NOTE:Previous versions of the "ScienceLogic SL1: CMDB & Incident Automation Application" (also called
the Certified or Scoped Application) created two separate service requests: Create Virtual Device
and Device Discovery.Both features have been combined into the DeviceDiscovery service
request.
Discovery Sync

Discovery Sync
3. Click DeviceDiscovery. The Device Discovery service request appears:
4. In the What company is this for? field, specify the company. The Region field updates automatically based
on the company you select.
5. In the Request Type field, select Discover Device(s) or Create Virtual Device, depending on the type of
device you want to discover.
o
If you selected Discover Device(s), go to step 6.
o
If you selectedCreate Virtual Device, go to step 7.
6. If you selected Discover Device(s) in the Request Type field, complete the following fields:
l
LogAll. Select this option if you want the discovery session to use verbose logging. When you select
this option, SL1 logs details about each IP address or hostname specified in the IP
Address/Hostname Discovery List field, even if the results are "No device found at this address."
l
Select Template. To use a template that contains your device discovery information, select the
template from the drop-down.
TIP: You can save the current device discovery as a template by checking Save as Template. A template
saves all of the discovery settings except for the IP addresses. You can access existing templates on the
Catalog Template page in ServiceNow (ScienceLogic > Automations > Catalog Templates).
115
116
l
IP Address/Hostname Discovery List.Provide a list of IP addresses, hostnames, or fully-qualified
domain names for SL1 to scan during discovery:
n
One or more single IPv4 addresses separated by commas and a new line. Each IPaddress
must be in standard IP notation and cannot exceed 15 characters. For example, "10.20.30.1,
10.20.30.2, 10.20."
n
One or more ranges of IPv4 addresses with "-" (dash) characters between the beginning of the
range and the end of the range. Separate each range with a comma. For example,
"10.20.30.1 – 10.20.30.254".
n
One or more IP address ranges in IPv4 CIDR notation. Separate each item in the list with a
comma. For example, "192.168.168.0/24".
n
One or more hostnames (fully-qualified domain names). Separate each item in the list with a
comma.
l
Credentials. Select one or more SNMP credentials to allow SL1 to access a device's SNMP data.
l
Discover Non-SNMP. Specifies whether or not SL1 should discover devices that don't respond to
SNMP requests.
l
Model Devices. Determines whether or not the devices that are discovered with this discovery
session can be managed through SL1.
l
DHCP. Specifies whether or not the specified range of IPs and hostnames use DHCP. If you select this
option, SL1 performs a DNS lookup for the device during discovery and each time SL1 retrieves
information from the device.
l
Device Model Cache TTL (h). Amount of time, in hours, that SL1 stores information about devices
that are discovered but not modeled, either because the Model Devices option is not enabled or
because SL1 cannot determine whether a duplicate device already exists. The cached data can be
used to manually model the device from the Discovery Session window.
l
Collection Server. Select an existing collector to monitor the discovered devices. Required.
l
What company is this for?. Specify the company that will use this discovery data. Click the
magnifying glass icon to locate a company.
l
Add Devices to Device Groups. Select one or more existing device groups to which you want to add
the discovered devices.
l
Apply Device Template . Select an existing device template if needed. As SL1 discovers a device in
the IP discovery list, that device is configured with the selected device template.
l
Initial Scan Level. For this discovery session only, specifies the data to be gathered during the initial
discovery session.
l
Scan Throttle. Specifies the amount of time a discovery process should pause between each
specified IP address (specified in the IPAddress/Hostname Discovery List field). Pausing discovery
processes between IPaddresses spreads the amount of network traffic generated by discovery over a
longer period of time.
l
Scan Default Ports. Select this option to scan the default ports: 21,22,23,25,80.If you de-select this
option, you can specify a different list of ports in the Custom Port Scan field that appears.
Discovery Sync

Discovery Sync
l
Port Scan All IPs. For the initial discovery session only, specifies whether SL1 should scan all IP
addresses on a device for open ports.
l
Port Scan Timeout. For the initial discovery session only, specifies the length of time, in milliseconds,
after which SL1 should stop trying to scan an IP address for open ports and begin scanning the next IP
address (if applicable).
l
Interface Inventory Timeout (ms). Specifies the maximum amount of time that the discovery
processes will spend polling a device for the list of interfaces. After the specified time, SL1 will stop
polling the device, will not model the device, and will continue with discovery. The default value is
600,000 ms (10 minutes).
l
Maximum Allowed Interfaces. Specifies the maximum number of interfaces per devices. If a device
exceeds this number of interfaces, SL1 stops scanning the device, will not model the device, and will
continue with discovery. The default value is 10,000.
l
Bypass Interface Inventory. Select this option if you do not want SL1 to attempt to discover
interfaces for each device in the discovery session.
7. If you selected Create Virtual Device in the Request Type field, complete the following fields:
o
Name. Type a name for the virtual device.
o
Virtual DeviceClass. Specify the device class of the virtual device. Click the magnifying glass icon to
locate any classes aligned with your organization.
o
Collector Group. Specify the SL1 collector group to use for the Discovery Sync. Click the magnifying
glass icon to locate any collector groups aligned with your organization.
8. Click [Order Now]. On the Order Status page that appears, make a note of value in the Request
Number field:
9. In the PowerFlow user interface, go to the Applications page and run the "Sync Service Requests from
ServiceNow to SL1" application.
10. When the application completes, go to Self-Service >My Requests in ServiceNow.
11. Click the RITM record link to go to the Requested Item page. The State field should update to Closed
Complete and the request should be assigned to itself.
117

118
12. In the PowerFlow user interface, go to the Applications page and run the "Sync Devices from SL1 to
ServiceNow" application to make sure that the device or devices were discovered.
13. For a standard device discovery, go to ServiceNow and perform the following:
l
Scroll down to the Activities pane to verify that you have a comment stating the discovery completed.
l
In SL1, navigate to the Discovery Control Panel page (Registry > Manage > Discovery) and verify
that SL1 created a new discovery session with that ID.
14. For a virtual device discovery, go to ServiceNow and perform the following:
l
Scroll down to the Activities pane to verify that you have a comment stating "Virtual Device <name>
Created with SLID: <new id>"
l
In SL1, navigate to the Device Manager page (Registry > DeviceManager) and verify that SL1
created a new device with that device ID.
Discovering One or More Devices from ServiceNow to SL1
If you want to quickly select one or more CIs in ServiceNow for monitoring in SL1, you can use the Monitor Device
List option from the Configuration Items list view, or the MonitorDevice option from the Configuration Item
detail view.
This feature uses registered events in ServiceNow that are queued to ServiceNow Event Management to trigger
actions in PowerFlow.Also, this method is just an example of one of many ways to trigger a registered event. For
more information about registered events, including examples of other triggering events you can define in
ServiceNow, see the ServiceNow Registered Events appendix.
You will need to create a discovery template for a discovery process created on the ServiceCatalog page before
you can discover devices using that template on the Configuration Items page. A template saves all of the
discovery settings except for the IP addresses. You can access existing templates on the Catalog Template page
in ServiceNow (ScienceLogic > Automations > Catalog Templates).
To discover one or more devices from ServiceNow:
Discovery Sync

Discovery Sync
1. In ServiceNow, navigate to the Configuration Items page.
2. From the list view, select the CI or CIs (devices) that you want to discover.
NOTE: A CI inServiceNow must be aligned with a company in ServiceNow, or the service request will
be canceled. Also, that company must be associated with a ScienceLogic Region.
3. Right-click anywhere in the window and select Monitor Device List from the pop-up menu. A Select
Discovery Template dialog box appears.
TIP: You can also select a specific CI from the list view and click the MonitorDevice option from the
Configuration Item detail view. You will also need to use an existing template for this process.
4. Select a discovery template to use for the current discovery.
5. Click [OK] to use the template. ServiceNow generates a new service request for Device Discovery for each
CI.
6. In the PowerFlow user interface, select the "Sync Service Requests from ServiceNow to SL1" application from
the Applications page and click [Configure] ( ). The Configuration pane appears:
7. Complete the following fields, as needed:
l
Configuration. Select the relevant configuration object to align with this application. You cannot edit
fields that are populated by the configuration object. Required.
119

120
l
read_timeout. Specify the maximum amount of time in seconds the application should wait for a
response before timing out. The default is 20 seconds.
l
Open_State. The State IDfrom ServiceNow that specifies which Requested Items (RITMs) to pull and
process. The default is 1.
l
Closed_Success_State. The State ID for a successfully created virtual device. TheState ID for a
successful run changes from 1 to 2 and then ends with 4. The default is 3.
l
Closed_Failed_State The State ID for failed discoveries or failed virtual device creation, usually
caused by invalid payloads. TheState ID for a failed run changes from 1 to 2 and then ends with 4.
The default is 4.
l
In_Progress_State. The State IDfor RITMs for a running discovery. The default is 2.
l
target_vcug. Leave this field blank.
l
recursively_disable_children. Leave this field blank.
8. Click [Save].The Configuration pane automatically closes.
9. Click [Run] ( ) to run theapplication.
10. Go to the Applications page and run the "Sync Devices from SL1 to ServiceNow" application to make sure
that the device or devices were discovered.
Decommissioning Devices
If you want to quickly select one or more CIs in ServiceNow for to remove from monitoring (or "decommission") in
SL1, you can use the Device Monitoring Removal list option from the Configuration Items list view, or the
Monitoring Removal option from the Configuration Item detail view.
You then use the "Sync Service Requests from ServiceNow to SL1" application to decommission the devices that
you no longer want to monitor. Running this application takes the list of synced devices in the service request and
moves them to an SL1 Virtual Collector Group (VCUG). The "Sync Service Requests from ServiceNow to SL1"
application was formerly named "Sync Discovery Session Requests from ServiceNow to SL1".
WARNING: If you move a parent device to a new VCUG, then all of its children move as well. If you move a
child directly, only the child moves.
This feature uses registered events in ServiceNow that are queued to ServiceNow Event Management to trigger
actions in PowerFlow. Also, this method is just an example of one of many ways to trigger a registered event. For
more information about registered events, including examples of other triggering events you can define in
ServiceNow, see the ServiceNow Registered Events appendix.
Discovery Sync

Discovery Sync
Activating the ServiceNow ServiceRequest for Monitoring Removal
To activate the ServiceNow service request for Device Decommission:
1. In ServiceNow, search for "Maintain Items" in the filter navigator.
2. Go to Service Catalog > Catalog Definitions > Maintain Items and type "ScienceLogic" in the
Category field.
3. Open the "Monitoring Removal" service request and ensure that the Catalogs and Category fields are
complete.Add the relevant information if the fields are blank. For example:
NOTE:Do not set the Category to a Change Request.
4. If you need to update these fields, click the "To edit this record click here" link at the top of the detail page.
5. Update the fields and click the [Update] button to save your changes.
6. From the Catalog Items page, click the check box for the Monitoring Removal service request and click
the [Activate] button at the bottom of the Catalog Items window.
7. Navigate to the relevant catalog for the service request. For example, if you selected Service Catalog, then
type "Service Catalog" in the filter navigator, or select Self-Service>Service Catalog to view the new
service requests.
Removing Devices from Monitoring
To decommission ConfigurationItems (devices) in ServiceNow that you no longer want to monitor:
121

122
1. In ServiceNow, navigate to the Configuration Items window.
2. From the list view, select the CI or CIs (devices) that you want to decommission.
NOTE: A CI inServiceNow must be aligned with a company in ServiceNow, or the service request will
be canceled. Also, a company must be associated with a ScienceLogic Region.
3. Right-click anywhere on the window and select Device Monitoring Removal list from the pop-up menu. A
dialog box appears.
4. Click [OK] to remove the CI or CIs from monitoring. ServiceNow generates a new service request for
Monitoring Removal for each CI.
TIP: You can also select a specific CI from the list view and click the Monitoring Removal option from
the Configuration Item detail view.
5. In the PowerFlow user interface, select the "Sync Service Requests from ServiceNow to SL1" application from
the Applications page and click [Configure] ( ) on the application detail page. The Configuration
pane appears:
Discovery Sync
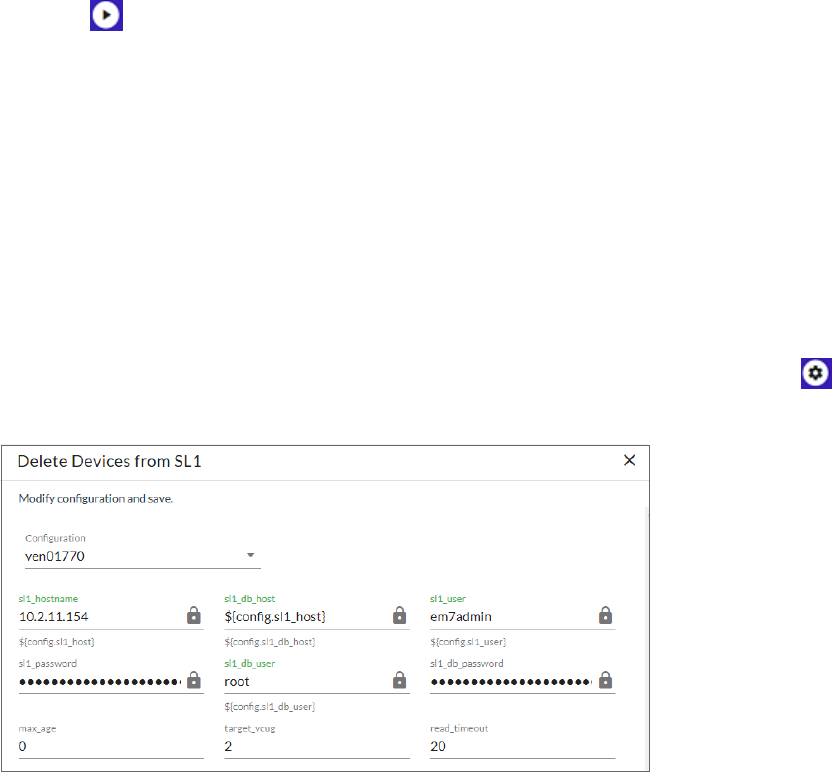
Discovery Sync
6. Complete the following field:
l
Configuration. Select the relevant configuration object to align with this application. You cannot edit
fields that are populated by the configuration object. Required.
l
read_timeout. Specify the maximum amount of time in seconds the application should wait for a
response before timing out. The default is 20 seconds.
l
recursively_disable_children. Check this option to move all child devices of the devices you are
decommissioning to the VCUG. If this option is not checked and a parent device is in the disable
request, the parent device will be skipped with a warning message.
l
target_vcug. Specify the ID of the SL1 Virtual Collection Group(VCUG) you created to hold the
devices on the Collector Group Settings page (System > Settings > Collector Groups). If this value
is null, the application will attempt to pull the value from the target_vcug field in the "Delete Devices
from SL1" application.
7. Click [Save] and wait for the "App & Config modifications saved" pop-up message to appear.The
Configuration pane automatically closes after this message appears.
8. Click [Run] ( ) to run theapplication.
Deleting Devices
The "Delete Devices from SL1" application lets you delete devices in a specific VirtualCollector Group (VCUG) if
those devices have not been modified in SL1 for a specified time, such as one day or five days. You can update
this time in the max_age configuration value, which is described below.
To delete devices from an SL1 VirtualCollector Group:
1. In the PowerFlow user interface, run the "Sync Service Requests from ServiceNow to SL1" application to pull
a list of decommissioned devices that you no longer want to monitor. For more information, see
Decommissioning Devices.
2. On the Applications page, select the "Delete Devices from SL1" application and click [Configure] ( ) on
the application detail page. The Configuration page appears:
123

124
3. Complete the following fields, as needed:
l
Configuration. Select the relevant configuration object to align with this application. You cannot edit
fields that are populated by the configuration object. Required.
l
read_timeout. Specify the maximum amount of time in seconds the application should wait for a
response before timing out. The default is 20 seconds.
l
max_age. Specify how long (in days) that you want to keep the devices in the VCUGbefore deleting
the devices.The default is 0 days. If this setting is 0, all devices in the VCUG will be deleted as soon
as this application runs. If this setting is null, the application will fail. If all device children are in the
same VCUG, the application will delete the target device and all of its children.
l
target_vcug. Specify the ID of the SL1 Virtual Collection Group(VCUG) you created to hold the
devices on the Collector Group Settings page (System > Settings > Collector Groups). Set this
value to -1 if you want this applications to use the target_vcug value from the "Sync Service Requests
from ServiceNow to SL1" application.
WARNING: If you specify a value to target_vcug here, the "Delete Devices from SL1"
application will use that value instead of the target_vcug value from the "Sync
Service Requests from ServiceNow to SL1" application.
4. Click [Save].The Configuration pane automatically closes.
5. Click [Run] ( ) to run theapplication.
Scheduling PowerFlow Applications
Using the PowerFlow user interface, you can configure PowerFlow applications to run on a schedule instead of
manually running the applications. As a best practice,if you use any of these applications, ScienceLogic
recommends that you schedule those applications, in the following order:
l
"Cache ServiceNow CIs and SL1 Device Classes"
l
"Sync Devices from SL1 to ServiceNow"
l
"Sync Interfaces from SL1 to ServiceNow"
TIP: ScienceLogic recommends that you schedule these applications to run at least every 23 hours. You can
also schedule additional applications as needed.
You can create one or more schedules for a single application in the PowerFlow user interface. When creating
each schedule, you can specify the queue and the configuration file for that application.
Scheduling PowerFlow Applications

Scheduling PowerFlow Applications
To schedule an application:
1. On the Applications page ( ), click the [Schedule] button for the application you want to schedule. The
Schedule window appears, displaying any existing schedules for that application:
NOTE: If you set up a schedule using a cron expression, the details of that schedule display in a more
readable format in this list. For example, if you set up a cron expression of */4 * * * *, the
schedule on this window includes the cron expression along with an explanation of that
expression:"Every 0, 4, 8, 12, 16, 20, 24, 28, 32, 36, 40, 44, 48, 52, and 56th minute past
every hour".
125

126
2. Select a schedule from the list to view the details for that schedule.
3. Click the + icon to create a schedule. A blank Schedule window appears:
4. In the Schedule window, complete the following fields:
l
Schedule Name. Type a name for the schedule.
l
Switch to. Use this toggle to switch between a cron expression and setting the frequency in seconds.
o
Cron expression. Select this option to schedule the application using a cron expression.If you
select this option, you can create complicated schedules based on minutes, hours, the day of the
month, the month, and the day of the week.As you update the cron expression, the Schedule
window displays the results of the expression in more readable language, such as Expression:
"Every 0 and 30th minute past every hour on the 1 and 31st of every month", based on */30 * *
/30 * *.
o
Frequency in seconds. Type the number of seconds per interval that you want to run the
application.
l
Custom Parameters. Type any JSON parameters you want to use for this schedule, such as
information about a configuration file or mappings.
5. Click [Save Schedule]. The schedule is added to the list of schedules on the initial Schedule window. Also,
on the Applications page, the word "Scheduled" appears in the Scheduled column for this application,
and the [Schedule] button contains a check mark:
Scheduling PowerFlow Applications

Scheduling PowerFlow Applications
NOTE: After you create a schedule, it continues to run until you delete it.Also, you cannot edit an existing
schedule, but you can delete it and create a similar schedule if needed.
To view or delete an existing schedule:
1. On the Applications page, click the [Schedule] button for the application that contains a schedule you
want to delete. The Schedule window appears.
2. Click the down arrow icon ( ) to view the details of an existing schedule:
3. To delete the selected schedule, click [Delete].
NOTE: When either multiple SL1 stacks or multiple ServiceNow systems are involved with PowerFlow, you
should create an individual configuration object for each SL1 stack or ServiceNow system. Next,
create an individual schedule for each configuration object. Each schedule should use a
configuration object that is specific to that single SL1 stack or ServiceNow system. Creating copies of
a PowerFlow application from a Synchronization PowerPack for the purpose of distinguishing
between domains is not supported, and will result in issues on upgrades.
The following image shows how you can schedule PowerFlow applications for multiple ServiceNow domains:
127

128
Log Messages for the "Generate Required CI Relations for
ServiceNow" Application
This section describes the different types of log messages you might see in the Step Log when you run the
"Generate Required CI Relations for ServiceNow" application.
The following message displays if there are devices in a device tree that do not currently have a CI class mapping
assigned.
Warning: 2751 Relations with missing mappings detected. Please re-run app with
log level 10 to troubleshoot.
Log Messages for the "Generate Required CI Relations for ServiceNow" Application

Log Messages for the "Generate Required CI Relations for ServiceNow" Application
In this situation, the device tree cannot be built in ServiceNow. To address this issue, make sure that you have
your entire technology tree mapped out in the mappings section of the "Sync Devices from SL1 to ServiceNow"
application or in the mappings section of the "Generate Required CI Relations for ServiceNow" application.
If you run the "Generate Required CI Relations for ServiceNow" application in Debug mode (log level 10), the
application will create a log that displays the parent and child class, CI, and device ID. For example:
Debug: Missing Mapping for Device. Parent: {"class": "VMware | Cluster", "ci":
None, "id": 76}, Child: {"class": "VMware | Host Server", ci: "cmdb_ci_
esx_server", id: 363 }
The following message appears if the GQL payloads had bad data for parent and or child devices:
Warning: 10 bad payloads received from SL1. Re-run app in debug to
troubleshoot.
If you run the application in Debug mode, the application will create a log that displays these payloads.
The following message appears if all relations are mapped:
Flow: No missing relations found!
The following message appears if there is a parent/child relation between ServiceNow CI classes that does not
currently exist in ServiceNow and is required to sync those devices:
Flow: Missing Relations: [{"parent": "cmdb_ci_vcenter_folder", "child": "cmdb_
ci_esx_server"}, {"parent": "cmdb_ci_vcenter", "child": "cmdb_ci_vcenter_
datacenter"}]
Refer to the labels in the log(above) to determine which CI class is the parent type and which is the child type. To
address this issue, navigate to your ServiceNow instance and create the required service rules based on the
recommendations in the Step Log.
The following message appears if the application encounters a list of relations that are required, but were
successfully found in ServiceNow:
Info: Found Relations: [{"parent": "cmdb_ci_vcenter_folder", "child": "cmdb_
ci_esx_server"}, {"parent": "cmdb_ci_vcenter", "child": "cmdb_ci_vcenter_
datacenter"}]
This message lets you verify that your mappings and relations are configured correctly.
129

Chapter
4
Troubleshooting the CMDB Synchronization
PowerPack
Overview
This chapter includes troubleshooting resources and procedures to use with the ServiceNow CMDB
Synchronization PowerPack.
This section covers the following topics:
Initial Troubleshooting Steps 131
Resources for Troubleshooting 131
Troubleshooting CMDB Sync 136
130

131
Initial Troubleshooting Steps
PowerFlow acts as a middle server between data platforms. For this reason, the first steps should always be to
ensure that there are no issues with the data platforms with which PowerFlow is talking. There might be additional
configurations or actions enabled on ServiceNow or SL1 that result in unexpected behavior. For detailed
information about how to perform the steps below, see Resources for Troubleshooting.
SL1 PowerFlow
1. Run docker service ls on the PowerFlow server.
2. Note the Docker container version, and verify that the Docker services are running.
3. If a certain service is failing, make a note the service name and version.
4. If a certain service is failing, run docker service ps <service_name> to see the historical state of
the service and make a note of this information. For example: docker service ps iservices_
contentapi.
5. Make a note of any logs impacting the service by running docker service logs <service_name>.
For example: docker service logs iservices_couchbase.
ServiceNow
1. Make a note of the ServiceNow version and Synchronization PowerPack version, if applicable.
2. Make a note of the Synchronization PowerPack application that is failing on PowerFlow.
3. Make a note of what step is failing in the application, try running the application in debug mode, and
capture any traceback or error messages that occur in the step log.
Resources for Troubleshooting
This section contains port information for PowerFlow and troubleshooting commands for Docker, Couchbase,
and the PowerFlow API.
Useful PowerFlow Ports
l
https://<IP ofPowerFlow>:8091. Provides access to Couchbase, a NoSQL database for storage and
data retrieval.
l
https://<IP ofPowerFlow>:15672. Provides access to the RabbitMQ Dashboard, which you can use to
monitor the service that distributes tasks to be executed by PowerFlow workers. Use guest/guest for the
login.
l
https://<IP ofPowerFlow>/flower/dashboard. Provides access to Flower, a tool for monitoring and
administrating Celery clusters.
Initial Troubleshooting Steps

Resources for Troubleshooting
NOTE: For version 2.0.0 and later of PowerFlow, port 5556 must be open for both PowerFlow and the
client.
Helpful Docker Commands
PowerFlow is a set of services that are containerized using Docker. For more information about Docker, see the
Docker tutorial.
Use the following Docker commands for troubleshooting and diagnosing issues with PowerFlow:
Viewing Container Versions and Status
To view the PowerFlow version, SSH to your PowerFlow instance and run the following command:
docker service ls
In the results, you can see the container ID, name, mode, status (see the replicas column), and version (see the
image column) for all the services that make up PowerFlow:
Restarting a Service
Run the following command to restart a single service:
docker service update --force <service_name>
Stopping all PowerFlowServices
Run the following command to stop all PowerFlow services:
docker stack rm iservices
Restarting Docker
Run the following command to restart Docker:
systemctl restart docker
NOTE: Restarting Docker does not clear the queue.
132

133
Viewing Logs for a SpecificService
You can use the Docker command line to view the logs of any current running service in the PowerFlow cluster.
To view the logs of any service, run the following command:
docker service logs -f iservices_<service_name>
Some common examples include the following:
docker service logs –f iservices_couchbase
docker service logs –f iservices_steprunner
docker service logs –f iservices_contentapi
NOTE: Application logs are stored on the central database as well as on all of the Docker hosts in a
clustered environment. These logs are stored at /var/log/iservices for both single-node or clustered
environments. However, the logs on each Docker host only relate to the services running on that
host. For this reason, using the Docker service logs is the best way to get logs from all hosts at once.
Clearing RabbitMQ Volume
RabbitMQ is a service that distributes tasks to be executed by PowerFlow workers. This section covers how to
handle potential issues with RabbitMQ.
The following error message might appear if you try to run a PowerFlow application via the API:
Internal error occurred: Traceback (most recent call last):\n File \"./content_
api.py\", line 199, in kickoff_application\n task_status = ... line 623, in _on_
close\n (class_id, method_id), ConnectionError)\nInternalError: Connection.open:
(541) INTERNAL_ERROR - access to vhost '/' refused for user 'guest': vhost '/' is
down
First, verify that your services are up. If there is an issue with your RabbitMQ volume, you can clear the volume
with the following commands:
docker service rm iservices_rabbitmq
docker volume rm iservices_rabbitdb
If you get a message stating that the volume is in use, run the following command:
docker rm <id of container using volume>
Re-deploy PowerFlow by running the following command:
docker stack deploy -c /opt/iservices/scripts/docker-compose.yml iservices
NOTE: Restarting Docker does not clear the queue, because the queue is persistent. However, clearing the
queue with the commands above might result in data loss due to the tasks being removed from the
queue.
Resources for Troubleshooting
Resources for Troubleshooting
Viewing the Process Status of All Services
Run the following command:
docker ps
Deploying Services from a Defined Docker Compose File
Run the following command:
docker stack deploy -c <compose-file> iservices
Dynamically Scaling for More Workers
Run the following command:
docker service scale iservices_steprunner=10
Completely Removing Services from Running
Run the following command:
docker stack rm iservices
Diagnosis Tools
Multiple diagnosis tools exist to assist in troubleshooting issues with the PowerFlow platform:
l
Docker PowerPack. This PowerPack monitors your Linux-basedPowerFlow server with SSH(the
PowerFlow ISO is built on top of an Oracle Linux Operating System). This PowerPack provides key
performance indicators about how your PowerFlow server is performing. For more information on the
Docker PowerPack and other PowerPacks that you can use to monitor PowerFlow, see the "Using SL1 to
Monitor SL1 PowerFlow" chapter in the SL1 PowerFlow Platform manual.
l
Flower. This web interface tool can be found at the /flower endpoint. It provides a dashboard displaying
the number of tasks in various states as well as an overview of the state of each worker. This tool shows the
current number of active, processed, failed, succeeded, and retried tasks on the PowerFlow platform. This
tool also shows detailed information about each of the tasks that have been executed on the platform. This
data includes the UUID, the state, the arguments that were passed to it, as well as the worker and the time
of execution. Flower also provides a performance chart that shows the number of tasks running on each
individual worker.
l
Debug Mode. All applications can be run in "debug" mode via the PowerFlow API. Running applications
in debug mode may slow down the platform, but they will result in much more detailed logging
information that is helpful for troubleshooting issues. For more information on running applications in
Debug Mode, see Retrieving Additional Debug Information.
134

135
l
Application Logs. All applications generate a log file specific to that application. These log files can be
found at /var/log/iservices and each log file will match the ID of the application. These log files combine
all the log messages of all previous runs of an application up to a certain point. These log files roll over
and will get auto-cleared after a certain point.
l
Step Logs. Step logs display the log output for a specific step in the application. These step logs can be
accessed via the PowerFlow user interface by clicking on a step in an application and bringing up the Step
Log tab. These step logs display just the log output for the latest run of that step.
l
Service Logs. Each Docker service has its own log. These can be accessed via SSH by running the
following command:
docker service logs -f <service_name>
Retrieving Additional Debug Information (Debug Mode)
The logs in PowerFlow use the following loglevel settings, from most verbose to least verbose:
l
10. DebugMode.
l
20. Informational.
l
30. Warning. This is the default settings if you do not specify a loglevel.
l
40. Error.
WARNING: If you run applications with "loglevel": 10, those applications will take longer to run because of
increased I/O requirements. Enabling debug logging using the following process is the only
recommended method. ScienceLogic does not recommend setting "loglevel": 10 for the whole
stack with the docker-compose file.
To run an application in Debug Mode using the PowerFlow user interface:
1. Select the PowerFlow application from the Applications page.
2. Hover over the [Run] ( ) from and selectDebug Run from the pop-up menu. PowerFlow executes the
application in Debug Mode with a log level of 10.
To run an application in Debug Mode using the API:
1. POST the following to the API endpoint:
https://<PowerFlow>/api/v1/applications/run
Resources for Troubleshooting
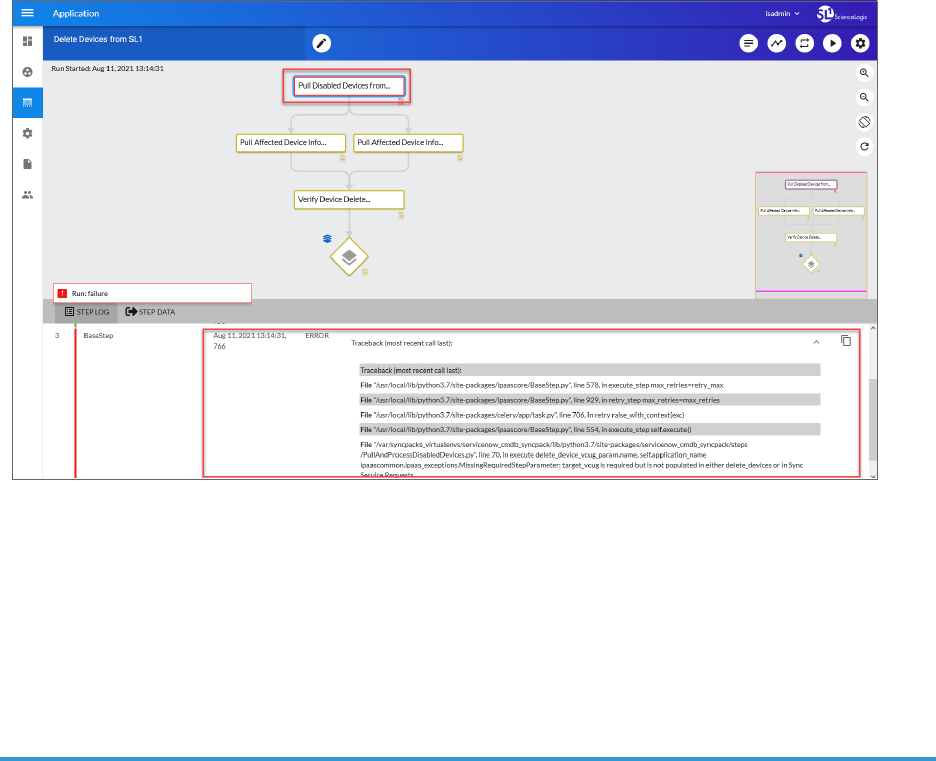
Troubleshooting CMDB Sync
2. Include the following in the request body:
{
"name": "<application_name>",
"params": {
"loglevel": 10
}
}
After running the application in Debug Mode, review the step logs in the PowerFlow user interface to see detailed
debug output for each step in the application. This information is especially helpful when trying to understand
why an application or step failed:
You can also run an application in debug using curl via SSH:
1. SSH to the PowerFlow instance.
2. Run the following command:
curl -v -k -u isadmin:em7admin -X POST "https://<your_
hostname>/api/v1/applications/run" -H 'Content-Type: application/json' -H
'cache-control: no-cache' -d '{"name": "interface_sync_sciencelogic_to_
servicenow","params": {"loglevel": 10}}'
Troubleshooting CMDB Sync
This section contains specific troubleshooting steps for the CMDBSynchronization PowerPack.
136

137
Issues Creating CIs in ServiceNow
If you can successfully send data to your ServiceNow system, but you encounter issues with creating CIs in the
ServiceNow CMDB, this section provides troubleshooting steps to help you test the payload and identify possible
issues. These steps might be helpful if you have set up datasource precedence rules.
1. In ServiceNow, search for "import" in the filter navigator.
2. Select ScienceLogic > Device > Imports. The Device Import window appears.
3. From the list, select the Device Import log entry you want to view.
4. Copy the data from the Payload field in the log entry and decode the data from its Base64 encoding.
5. In the decoded string of data, remove the square brackets from the first and last line: ("[", "]")
6. Copy this modified JSON payload, and then use the filter navigator to search for "Identification Simulation"
or select Configuration > Identification Simulation:
Troubleshooting CMDB Sync

Troubleshooting CMDB Sync
7. On the Identification Simulation page, click the [Start] button in the Start with Existing Payload
section. The Insert JSON Payload page appears:
8. In the Source field, select ScienceLogic as the data source.
9. In the Please insert payload below field, paste the JSON payload you edited in step 5.
10. Click the [Execute] button and review the payload to identify any potential issues.
Enabling Debugging of the CI Payload
You must have administrator-level permissions in ServiceNow to access the system properties and enable
debugging of the Configuration Item (CI) payload in the ServiceNow Identification and Reconciliation
module.
To enable debugging of the CI payload in ServiceNow:
1. On the ServiceNow system, check to see if the glide.cmdb.logger.source.identification_
engine record exists in sys_properties.list.
l
If the record exists, set this value to (* or debugVerbose)
l
If the record does not exist, you will need to create the record.
2. To create the record, complete the following fields:
l
Name. glide.cmdb.logger.source.identification_engine
l
Description. Enable and configure the type of details the system logs when using the Identification
and Reconciliation module outside the scope of identification simulation, such as when using an API,
an ECC queue, or scheduled jobs (info, warn, error, debug, or debugVerbose).
l
Type. String.
138

139
l
Value: * or debugVerbose
NOTE: Set the system property of Value back to error when troubleshooting is complete.
3. Run the "Sync Devices from SL1 to ServiceNow" application. The system logs will have “identfication_
engine” as the source, and the log messages will contain identification_engine : Input.
4. Copy the payload beginning from {“items” to the end of the message. For example:
Message: {"items":[{"className":"","values":{"discovery_
source":"ScienceLogic","mac_address":"9E:0F:04:0A:12:C7","name":"Postman Test
Server 1","x_sclo_scilogic_id":"1","serial_number":"gJ3Bwkzc8r","model_
id":"","ip_address":"10.10.10.102","manufacturer":"ScienceLogic,
Inc.","ram":"16000","x_sclo_scilogic_region":"Postman"},"lookup":[],"related":
[]}],"relations":[]}
5. You can run this message through the ScienceLogic endpoint by putting the {“items”} bracket within [].
For example, send the following message to the endpoint
/api/x_sclo_scilogic/v1/sciencelogic/IdentificationEngine:
Message: [{"items":[{"className":"","values":{"discovery_
source":"ScienceLogic","mac_address":"9E:0F:04:0A:12:C7","name":"Postman Test
Server 1","x_sclo_scilogic_id":"1","serial_number":"gJ3Bwkzc8r","model_
id":"","ip_address":"10.10.10.102","manufacturer":"ScienceLogic,
Inc.","ram":"16000","x_sclo_scilogic_region":"Postman"},"lookup":[],"related":
[]}],"relations":[]}]
NOTE: The endpoint is different in a domain-separated environment.
After the identification run is complete, the ServiceNow logs contain additional data about the run.
Troubleshooting CMDB Sync

Appendix
A
Checklists for Deployment
Overview
This appendix describes the checklists for deploying PowerFlow and the ServiceNow Synchronization PowerPacks,
based on your environment and configuration.
This section covers the following topics:
CMDB-Only ServiceNow Integration with Single SL1, no Domain Separation in ServiceNow 141
CMDB-Only ServiceNow Integration with Single SL1 and Domain-Separated ServiceNow 145
CMDB-Only ServiceNow Integration with Multiple SL1 Systems, no Domain-Separated
ServiceNow 149
Incident-Only ServiceNow Integration with Single SL1, no Domain Separation in ServiceNow 153
140

141
CMDB-Only ServiceNow Integration with Single SL1, no
Domain Separation in ServiceNow
1. Deploy the PowerFlow ISO:
o
IP address, Netmask, Gateway, DNS, Hostname provided
o
Root password provided (this is the root user for the OS)
o
Start Docker services after installation:
/opt/iservices/scripts/pull_start_iservices.sh
o
Validate that iservices are running:
docker service ls
2. Activate the Configuration Management For Scoped Apps (CMDB) Plugin.
3. Install the ScienceLogic Certified Application and create a ServiceNow group and user account:
o
Username
o
Password
o
Web Service Access Only
o
GMT Time Zone
o
x_sclo_scilogic.Admin role assigned
4. Install the ServiceNow Synchronization PowerPacks on PowerFlow.
5. Create the PowerFlow configuration object using the "ServiceNow SyncPack" configuration object as a
template.
Sync Devices from SL1 to ServiceNow
1. Align the configuration object to the following applications:
o
Cache ServiceNow CIs and SL1 Device Classes
o
Sync Devices from SL1 to ServiceNow
2. Run "Cache ServiceNow CIs and SL1 Device Classes" to retrieve all device class information from SL1 and
ServiceNow. This will populate the device class mapping in the following step. This integration should be
run at least every 23 hours.
3. Configure class and attribute mappings in "Sync Devices from SL1 to ServiceNow".
4. Run "Generate Required CI Relations for ServiceNow" to see if you are missing any service rules or class
mappings and create any required maps, containment rules, and hosting rules.
5. Run "Sync Devices from SL1 to ServiceNow" either manually or on a schedule. This integration should be run
at least every 23 hours. See documentation for more information.
CMDB-Only ServiceNow Integration with Single SL1, no Domain Separation in

CMDB-Only ServiceNow Integration with Single SL1, no Domain Separation in
Discover Devices from ServiceNow in SL1
1. Align the configuration object to the following applications:
o
Sync Discovery Requirements
o
Sync Discovery Session Requests from ServiceNow to SL1
o
Sync Discovery Session Status from SL1 to ServiceNow
2. Set additional configuration variables for each of the integrations applications above in the respective
Configuration pane.
3. Run "Sync Discovery Requirements" to sync all discovery-dependent information from SL1 to ServiceNow.
4. Make sure that the Discovery request RITM is successfully created and approved in ServiceNow using the
provided Service Catalogs.
5. Run "Sync Discovery Session Requests from ServiceNow to SL1" either manually or on a schedule to create
and execute the discovery session in SL1.
6. After the discovery session has completed in SL1, run "Sync Discovery Session Status from SL1 to
ServiceNow" either manually or on a schedule to update the status of the RITM in ServiceNow.
NOTE: The following applications only sync CIs that are aligned with the devices that are already synced
with ServiceNow. Before syncing any of the CIs below, you must first sync devices between SL1 and
ServiceNow.
Sync Business Services from SL1 to ServiceNow
1. Align the configuration object to the following application:
o
Sync Business Services from SL1 to ServiceNow
2. Configure the service classification mappings in "Sync Business Services from SL1 to ServiceNow". These are
defined in the Configuration pane.
3. Run "Sync Business Services from SL1 to ServiceNow" either manually or on a schedule.
Sync File Systems from SL1 to ServiceNow
1. Align the configuration object to the following application:
o
Sync File Systems from SL1 to ServiceNow
2. The parent CI must be synced in order to see these related CIs.
3. Run "Sync File Systems from SL1 to ServiceNow" either manually or on a schedule.
Sync Network Interfaces from SL1 to ServiceNow
1. Align the configuration object to the following application:
142

143
o
Sync Network Interfaces from SL1 to ServiceNow
2. Determine additional filters for syncing network interfaces using the adapter_sync variable defined in the
Configuration pane.
3. The parent CI must be synced in order to see these related CIs.
4. Run "Sync Network Interfaces from SL1 to ServiceNow" either manually or on a schedule. This application
should be run at least every 23 hours if you would like to sync interface-level relationships with "Sync
Advanced Topology from SL1 to ServiceNow".
Sync Installed Software from SL1 to ServiceNow
1. Align the configuration object to the following application:
o
Sync Software Packages from SL1 to ServiceNow
o
Sync Installed Software from SL1 to ServiceNow
2. The parent CI must be synced in order to see these related CIs.
3. First, run "Sync Software Packages from SL1 to ServiceNow". Verify that the integration has run successfully.
4. Run "Sync Installed Software from SL1 to ServiceNow" either manually or on a schedule.
Sync Maintenance Schedules from ServiceNow to SL1
1. Align the configuration object to the following application:
o
Sync Maintenance Schedules from ServiceNow to SL1
2. The parent CI must be synced in order to see these related CIs. The affected CI must have SL1 Monitored
set to True.
3. If needed, configure the Request and Task state IDs in the Configuration pane. This is needed if the
customer has custom IDs for certain change request or change task states.
4. Run "Sync Maintenance Schedules from ServiceNow to SL1" either manually or on a schedule.
NOTE: The maintenance schedule does not support changing the planned start date and planned end date
after a linked Maintenance Schedule has been created in SL1.
Sync Advanced Topology from SL1 to ServiceNow
1. Align the configuration object to the following application:
o
Sync Advanced Topology from SL1 to ServiceNow
2. The parent CI must be synced in order to see these related CIs. Syncing Interface-level relationships (Layer
2, LLDP, and CDP) will require that "Sync Network Interfaces from SL1 to ServiceNow" is set to run at least
CMDB-Only ServiceNow Integration with Single SL1, no Domain Separation in
CMDB-Only ServiceNow Integration with Single SL1, no Domain Separation in
every 23 hours.
3. Run "Sync Advanced Topology from SL1 to ServiceNow" either manually or on a schedule.
144

145
CMDB-Only ServiceNow Integration with Single SL1 and
Domain-Separated ServiceNow
1. Deploy the PowerFlow ISO:
o
IP address, Netmask, Gateway, DNS, Hostname provided
o
Root password provided (this is the root user for the OS)
o
Start Docker services after installation:
/opt/iservices/scripts/pull_start_iservices.sh
o
Validate that iservices are running:
docker service ls
2. Activate the Configuration Management For Scoped Apps (CMDB) Plugin.
3. Install the ScienceLogic Certified Application and create a ServiceNow group and user account:
o
Username
o
Password
o
Web Service Access Only
o
GMT Time Zone
o
x_sclo_scilogic.Admin role assigned
4. Install the ServiceNow Synchronization PowerPacks on PowerFlow.
5. Create the PowerFlow configuration object using the "ServiceNow SyncPack" configuration object as a
template.
Sync Devices from SL1 to ServiceNow
1. Align the configuration object to following applications:
o
Sync Organizations from SL1 to ServiceNow Companies
o
Cache ServiceNow CIs and SL1 Device Classes
o
Sync Devices from SL1 to ServiceNow
2. In "Sync Organizations from SL1 to ServiceNow Companies" Configuration pane, set the Source_of_Truth
to ServiceNow and set the Domain_Separation flag to True.
3. Run "Sync Organizations from SL1 to ServiceNow Companies".
4. Run "Cache ServiceNow CIs and SL1 Device Classes" to retrieve all device class information from SL1 and
ServiceNow. This will populate the device class mapping in the following step. This application should be
run at least every 23 hours.
5. Configure class and attribute mappings in "Sync Devices from SL1 to ServiceNow". Set Domain_
Separation to True.
CMDB-Only ServiceNow Integration with Single SL1 and Domain-Separated

CMDB-Only ServiceNow Integration with Single SL1 and Domain-Separated
6. Run "Generate Required CI Relations for ServiceNow" to see if you are missing any service rules or class
mappings, and then create any required maps, containment rules, and hosting rules.
7. Run "Sync Devices from SL1 to ServiceNow" either manually or on a schedule. This application should be
run at least every 23 hours.
Discover Devices from ServiceNow in SL1
1. Align Configuration Object to following applications:
o
Sync Discovery Requirements
o
Sync Discovery Session Requests from ServiceNow to SL1
o
Sync Discovery Session Status from SL1 to ServiceNow
2. In "Sync Discovery Requirements" Configuration pane, set the Source_of_Truth to ServiceNow. Set
Domain_Separation to True.
3. Run "Sync Discovery Requirements" to sync all discovery-dependent information from SL1 to ServiceNow
and back to SL1.
4. Set additional configuration variables for each of the other applications above in the respective
Configuration pane.
5. Discovery request RITM is successfully created and approved in ServiceNow using the provided Service
Catalogs.
6. Run "Sync Discovery Session Requests from ServiceNow to SL1" either manually or on a schedule to create
and execute the discovery session in SL1.
7. After the discovery session completes in SL1, run "Sync Discovery Session Status from SL1 to ServiceNow"
either manually or on a schedule to update the status of the RITM in ServiceNow.
NOTE: Domain separation requires that "Sync Organizations from SL1 to ServiceNow Companies" is
configured with Domain_Separation enabled and Source_of_Truth set to ServiceNow. In a
domain-separated ServiceNow environment, this application must be properly configured and run
successfully before syncing any additional CI items. SL1 organizations that are linked to a
ServiceNow company will have the crm_id populated with the ServiceNow Company sys_id.
NOTE: The following integrations only sync CIs that are aligned with the devices that are already synced with
ServiceNow. Before syncing any of the CIs below, you must first sync devices between SL1 and
ServiceNow.
Sync Business Services from SL1 to ServiceNow
1. Align the configuration object to the following application:
o
Sync Business Services from SL1 to ServiceNow
146
147
2. Configure the service classification mappings in "Sync Business Services from SL1 to ServiceNow". These are
defined in the Configuration pane.
3. Ensure that Domain_Separation is set to True in the Configuration pane.
4. Run "Sync Business Services from SL1 to ServiceNow" either manually or on a schedule.
Sync File Systems from SL1 to ServiceNow
1. Align the configuration object to the following application:
o
Sync File Systems from SL1 to ServiceNow
2. Ensure that Domain_Separation is set to True in the Configuration pane.
3. The parent CI must be synced in order to see these related CIs.
4. Run "Sync File Systems from SL1 to ServiceNow" either manually or on a schedule.
Sync Network Interfaces from SL1 to ServiceNow
1. Align the configuration object to the following application:
o
Sync Network Interfaces from SL1 to ServiceNow
2. Determine additional filters for syncing network interfaces using the adapter_sync variable defined in the
Configuration pane.
3. Ensure that Domain_Separation is set to True in the Configuration pane.
4. The parent CI must be synced in order to see these related CIs.
5. Run "Sync Network Interfaces from SL1 to ServiceNow" either manually or on a schedule. This application
should be run at least every 23 hours if you would like to sync interface-level relationships with "Sync
Advanced Topology from SL1 to ServiceNow".
Sync Installed Software from SL1 to ServiceNow
1. Align the configuration object to the following application:
o
Sync Software Packages from SL1 to ServiceNow
o
Sync Installed Software from SL1 to ServiceNow
2. The parent CI must be synced in order to see these related CIs.
3. First, run "Sync Software Packages from SL1 to ServiceNow". Verify that the integration has run successfully.
4. Run "Sync Installed Software from SL1 to ServiceNow" either manually or on a schedule.
Sync Maintenance Schedules from ServiceNow to SL1
1. Align the configuration object to the following application:
o
Sync Maintenance Schedules from ServiceNow to SL1
CMDB-Only ServiceNow Integration with Single SL1 and Domain-Separated
CMDB-Only ServiceNow Integration with Single SL1 and Domain-Separated
2. The parent CI must be synced in order to see these related CIs. The affected CI must have SL1 Monitored
set to True.
3. If needed, configure the Request and Task state IDs in the Configuration pane. This is needed if the
customer has custom IDs for certain change request or change task states.
4. Run "Sync Maintenance Schedules from ServiceNow to SL1" either manually or on a schedule.
Sync Advanced Topology from SL1 to ServiceNow
1. Align the configuration object to the following application:
o
Sync Advanced Topology from SL1 to ServiceNow
2. Ensure that Domain_Separation is set to True in the Configuration pane.
3. The parent CI must be synced in order to see these related CIs. Syncing Interface-level relationships (Layer
2, LLDP, and CDP) will require that "Sync Network Interfaces from SL1 to ServiceNow" is set to run at least
every 23 hours.
4. Run "Sync Advanced Topology from SL1 to ServiceNow" either manually or on a schedule.
148

149
CMDB-Only ServiceNow Integration with Multiple SL1
Systems, no Domain-Separated ServiceNow
NOTE: Depending on the size of your SL1 stacks and the number of SL1 stacks you have, you may need to
consider a “multi-tenant” configured IS. This is a more advanced deployment model. Please contact
a ScienceLogic representative for more information.
1. Deploy the PowerFlow ISO:
o
IP address, Netmask, Gateway, DNS, Hostname provided
o
Root password provided (this is the root user for the OS)
o
Start Docker services after installation:
/opt/iservices/scripts/pull_start_iservices.sh
o
Validate that iservices are running:
docker service ls
2. Activate the Configuration Management For Scoped Apps (CMDB) Plugin.
3. Install the ScienceLogic Certified Application and create a ServiceNow group and user account:
o
Username
o
Password
o
Web Service Access Only
o
GMT Time Zone
o
x_sclo_scilogic.Admin role assigned
4. Install the ServiceNow Synchronization PowerPacks on PowerFlow.
5. Create the PowerFlow configuration object using the "ServiceNow SyncPack" configuration object as a
template.
NOTE: The key difference between integrating a single SL1 stack on PowerFlow and integrating multiple SL1
stacks on PowerFlow is how you run the application. Running the application with multiple SL1 stacks
involves creating an individual configuration object for each SL1 stack. Then, create an individual
schedule for each configuration object. Each schedule should use a configuration object that is
specific to a single SL1 stack.
CMDB-Only ServiceNow Integration with Multiple SL1 Systems, no Domain-

CMDB-Only ServiceNow Integration with Multiple SL1 Systems, no Domain-
When creating the schedule, populate the custom parameters with the configuration object ID. For
example:
Sync Devices from SL1 to ServiceNow
1. Create a schedule for each SL1 stack for the following Applications following the note above:
o
Cache ServiceNow CIs and SL1 Device Classes
o
Sync Devices from SL1 to ServiceNow
2. Wait for the "Cache ServiceNow CIs and SL1 Device Classes" to retrieve all device class information from
SL1 and ServiceNow. This will populate the device class mapping in the following step. This integration
should be run at least every 23 hours.
3. Configure class and attribute mappings in "Sync Devices from SL1 to ServiceNow". If each SL1 stack has
different class and attribute mapping requirements, you will need to specify the mappings in each schedule’s
custom parameters for this application.
4. Run "Generate Required CI Relations for ServiceNow" to see if you are missing any service rules or class
mappings and create any required maps, containment rules, and hosting rules. By default, these will pull
from the mappings set in "Sync Devices from SL1 to ServiceNow". If you have defined different mappings for
each SL1 stack, you will need to also specify these mappings in each schedule’s custom parameters for this
application.
5. Run "Sync Devices from SL1 to ServiceNow" with a schedule where each schedule uses the configuration
object for a SL1 stack. This application should be run at least every 23 hours.
Discover Devices from ServiceNow in SL1
1. Create a schedule for each SL1 stack for the following applications:
o
Sync Discovery Requirements
o
Sync Discovery Session Requests from ServiceNow to SL1
150

151
o
Sync Discovery Session Status from SL1 to ServiceNow
2. If any additional configuration variables are needed, these will need to be set in the custom parameters
section for each schedule
3. Run "Sync Discovery Requirements" on a schedule to sync all discovery-dependent information from SL1 to
ServiceNow.
4. Verify that the discovery request RITM is successfully created and approved in ServiceNow using the
provided Service Catalogs.
5. Run "Sync Discovery Session Requests from ServiceNow to SL1"on a schedule where each schedule uses the
configuration object for a SL1 stack to create and execute the discovery session in SL1.
6. Once the discovery session has completed in SL1, run "Sync Discovery Session Status from SL1 to
ServiceNow" via schedule where each schedule uses the configuration object for a SL1 stack to update the
status of the RITM in ServiceNow.
The following applications only sync CIs that are aligned with the devices that are already synced with
ServiceNow. Before syncing any of the CIs below, you must first sync devices between SL1 and
ServiceNow.
Sync Business Services from SL1 to ServiceNow
1. Create a schedule for each SL1 stack for the following application:
o
Sync Business Services from SL1 to ServiceNow
2. Configure service classification mappings in "Sync Business Services from SL1 to ServiceNow" application.
These are defined in the Configuration pane.
3. Run "Sync Business Services from SL1 to ServiceNow" on a schedule where each schedule uses the
configuration object for a SL1 stack.
Sync File Systems from SL1 to ServiceNow
1. Create a schedule for each SL1 stack for the following application:
o
Sync File Systems from SL1 to ServiceNow
2. The parent CI must be synced in order to see these related CIs.
3. Run "Sync File Systems from SL1 to ServiceNow" on a schedule where each schedule uses the configuration
object for a SL1 stack.
Sync Network Interfaces from SL1 to ServiceNow
1. Create a schedule for each SL1 stack for the following application:
o
Sync Network Interfaces from SL1 to ServiceNow
CMDB-Only ServiceNow Integration with Multiple SL1 Systems, no Domain-
CMDB-Only ServiceNow Integration with Multiple SL1 Systems, no Domain-
2. Determine additional filters for syncing network interfaces using the adapter_sync variable defined in the
Configuration pane.
3. The parent CI must be synced in order to see these related CIs.
4. Run "Sync Network Interfaces from SL1 to ServiceNow" on a schedule where each schedule uses the
configuration object for a SL1 stack. This application should be run at least every 23 hours if you would like
to sync interface-level relationships with "Sync Advanced Topology from SL1 to ServiceNow".
Sync Installed Software from SL1 to ServiceNow
1. Create a schedule for each SL1 stack for the following application:
o
Sync Software Packages from SL1 to ServiceNow
o
Sync Installed Software from SL1 to ServiceNow
2. The parent CI must be synced in order to see these related CIs.
3. "Sync Software Packages from SL1 to ServiceNow" must run on a schedule before "Sync Installed Software
from SL1 to ServiceNow". Verify that the software packages have been synced before continuing.
4. After the software packages have been synced, run "Sync Installed Software from SL1 to ServiceNow" on a
schedule where each schedule uses the configuration object for a SL1 stack.
Sync Maintenance Schedules from ServiceNow to SL1
1. Create a schedule for each SL1 stack for the following application:
o
Sync Maintenance Schedules from ServiceNow to SL1
2. The parent CI must be synced in order to see these related CIs. The affected CI must have the SL1
Monitored field set to True.
3. If needed, configure the Request and Task state IDs in the Configuration pane. This is needed if the
customer has custom IDs for certain change request or change task states.
4. Run "Sync Maintenance Schedules from ServiceNow to SL1" on a schedule where each schedule uses the
configuration object for a SL1 stack.
Sync Advanced Topology from SL1 to ServiceNow
1. Create a schedule for each SL1 stack for the following application:
o
Sync Advanced Topology from SL1 to ServiceNow
2. The parent CI must be synced in order to see these related CIs. Syncing Interface-level relationships (Layer
2, LLDP, and CDP) will require that you set "Sync Network Interfaces from SL1 to ServiceNow" to run at least
every 23 hours.
3. Run "Sync Advanced Topology from SL1 to ServiceNow" on a schedule where each schedule uses the
configuration object for a SL1 stack.
152

153
Incident-Only ServiceNow Integration with Single SL1, no
Domain Separation in ServiceNow
1. Deploy the PowerFlow ISO:
o
IP address, Netmask, Gateway, DNS, Hostname provided
o
Root password provided (this is the root user for the OS)
o
Start Docker services after installation:
/opt/iservices/scripts/pull_start_iservices.sh
o
Validate that iservices are running:
docker service ls
2. Install the ScienceLogic Certified Application and create a ServiceNow group and user account:
o
Username
o
Password
o
Web Service Access Only
o
GMT Time Zone
3. Install the ServiceNow Synchronization PowerPacks on PowerFlow.
4. Create the PowerFlow configuration object using the "ServiceNow SyncPack" configuration object as a
template:
o
Align the configuration object to the following applications:
o
Create or Update ServiceNow Incident from SL1 Event
o
Update ServiceNow Incident when SL1 Event is Acknowledged
o
Update ServiceNow Incident when SL1 Event is Cleared
o
Sync Incident State from ServiceNow to SL1 Event
o
Only the following Integration should be run manually or scheduled:
o
Sync Incident State from ServiceNow to SL1 Event
5. Install the ServiceNow Base PowerPack and configure SL1:
o
Use the "ServiceNow RBA – Example" credential as a template to create a new credential that points
to the PowerFlow instance.
o
Align the newly-created credential to the "ServiceNow – Add/Update/Clear Incident" Run Book
Action.
o
Ensure that all Run Book Actions and Run Book Policies are enabled.
Incident-Only ServiceNow Integration with Single SL1, no Domain Separation in

Appendix
B
Certified Application Objects
Overview
This appendix describes the tables, endpoints, and roles that were created in ServiceNow as part of the
"ScienceLogic SL1: CMDB & Incident Automation" application. This application is also known as the "Certified
Application" or the "Scoped Application".
This section covers the following topics:
Roles 155
Tables 156
Table Columns (cmdb_ci) 156
Table Columns (core_company) 157
Table Columns (cmdb_group) 157
Script Includes 157
Event Registry 157
Scripted Actions 158
Data Lookup Definitions 158
System Properties 158
Catalog Item 159
Catalog UI Policies 159
Variable Sets 159
Catalog Client Scripts 160
Workflows 160
Scripted REST Resources 161
154

155
Transform Maps 163
Transform Scripts 163
Roles
Two Roles were added with the ScienceLogic update set, Admin (x_sclo_scilogic.Admin) and User (x_sclo_
scilogic.User). Both give access to SL1.
Role InheritedRoles Other Inherited Roles Role Definition
x_sclo_scilogic.Admin
Role for ScienceLogic Service Accounts.
itil Can perform standard actions for an ITIL
help desk technician. This is the default
''Technician'' role.
Can open, update, close incidents,
problems, changes, config management
items. By default, only users with the itil
role can have tasks assigned to them
Dependency_view
A special role to be applied both on
the $ngbsm UI page and on the
BSMProcessor. This role is required to
access the dependency views module.
By default, ITIL includes this role to
avoid regressions.
cmdb_query_builder
Can access the CMDB Query Builder
application to create, run, and save
queries on the CMDB.
template_editor
view_changer
Can switch active views.
app_service_user
Can view and retrieve information
using API from application service
maps (cmdb_ci_service_discovered).
certification
Can work on Certification tasks.
import_
transformer
Can manage Import Set Transform Maps
and run transforms.
x_sclo_scilogic.User
General user account that allows read-
only access to SL1.
Roles

Tables
Tables
Name Label Extends Comments
x_sclo_scilogic_event Event (empty) Event information
x_sclo_scilogic_event_
severity
Event Severity
Look Rules
Data Lookup
Matcher Rules
Look up table for event Severity
x_sclo_scilogic_incident Import Incident Import Set Row Import / staging events before transform to
Event and Incident
x_sclo_scilogic_import_
installed_software
Import Installed
Software
Import Set Row Import / staging events before transform to
Software Instance
x_sclo_scilogic_org_ven_
mfg
Import ORG
VEN MFG
Import Set Row Import / staging events before transform to
core_company
x_sclo_scilogic_import_
discovery_dependent
Import Discovery
Dependent
Import Set Row Import / staging events before transform to
Discovery Dependent table
x_sclo_scilogic_discovery_
dependent
Discovery
Dependent
(empty) Discovery Dependent Information
x_sclo_scilogic_catalog_
item_templates
Catalog item
Templates
(empty) Templates use to fill out catalog items
x_sclo_scilogic_import_
service_request
Import Service
Request
Import Set Row Import / staging events before transform to
Service Requests
Table Columns (cmdb_ci)
Name Label Type Comments
x_sclo_scilogic_id SL1 ID Integer Unique ID
x_sclo_scilogic_region SL1 Region String Unique String of SL1 Platform
x_sclo_scilogic_url SL1 URL URL URL to SL1 Platform
x_sclo_scilogic_monitored SL1 Monitored True/False Device currently synced with SL1 Platform
156

157
Table Columns (core_company)
Name Label Type Comments
x_sclo_scilogic_id SL1 ID String Unique ID
x_sclo_scilogic_region SL1 Region String Unique String of SL1 Platform
x_sclo_scilogic_monitored SL1 Monitored True/False Organization currently synced with SL1 Platform
Table Columns (cmdb_group)
Name Label Type Comments
x_sclo_scilogic_id SL1 ID String Unique ID
x_sclo_scilogic_region SL1 Region String Unique String of SL1 Platform
Script Includes
Name API Name Comments
CatalogUtils x_sclo_scilogic.catalogUtils Catalog Script include scripts
ChangeUtils x_sclo_scilogic.changeUtils Change Script include scripts
DeviceUtils x_sclo_scilogic.DeviceUtils Device Script include scripts
EventUtils x_sclo_scilogic.EventUtils Event Script include scripts
GeneralUtils x_sclo_scilogic.GeneralUtils General Script include scripts
Event Registry
Suffix Event name Table Comments
device_monitoring x_sclo_scilogic.device_
monitoring
Configuration Item [cmdb_
ci]
Event for Device
Monitoring
Remove_
monitoring
x_sclo_scilogic.remove_
monitoring
Configuration Item [cmdb_
ci]
Event for Remove
Monitoring
Table Columns (core_company)

Scripted Actions
Scripted Actions
Name Event name Comments
Device Monitoring Catalog
item
x_sclo_scilogic.device_
monitoring
Action used to submit Catalog item via
Event.
Device Removal Catalog item x_sclo_scilogic.remove_
monitoring
Action used to submit Catalog item via
Event.
Data Lookup Definitions
Name Source Table Matcher Table Comments
Event
Severity
Import Incident [x_sclo_
scilogic_incident]
Event Severity Lookup Rules [x_sclo_
scilogic_event_severity]
Lookup for ScienceLogic Severity
to Impact and Urgency
System Properties
Suffix Name Comments
CatalogItemDiscovery x_sclo_
scilogic.CatalogItemDiscovery
Unique value (sys_id)
CatalogItemRemove x_sclo_
scilogic.CatalogItemRemove
Unique value (sys_id)
closeCode x_sclo_scilogic.closeCode Value to use for Close Code for Incident
Transform
Contact type x_sclo_scilogic.Contact Type Value to use for Contact type for Incident
Transform
deviceLogging x_sclo_scilogic.deviceLogging Turn on Logging
deviceLoggingParam x_sclo_
scilogic.deviceLoggingParm
Add additional parameters beyond the default
errors
discoverySource x_sclo_scilogic.discoverySource Discovery Source to be used by PowerFlow
notResolved x_sclo_scilogic.notResolved Value of Reopened Incident
stateNew x_sclo_scilogic.stateNew Value of New Incident
StateResolved x_sclo_scilogic.stateResolved Value of Resolved Incident
158

159
Catalog Item
Name Comments
Device Discovery Role for ScienceLogic Service Accounts.
Monitoring Removal General user account that allows read only access to ScienceLogic Application.
Catalog UI Policies
Catalog item Short description Comments
Device Discovery Catalog Template Updates form based on Select template
Device Discovery Create Virtual Device Updates form based on Request type
Device Discovery Create Virtual Device (Retired)
Device Discovery Device Discovery Updates form based on Request type
Device Discovery Device Discovery (Retired)
Monitoring
Removal
Hide Overview variables not
required
Hide variables not required for the Monitoring Removal
request
Device Discovery Port Scan Hide scan ports that are not default
Device Discovery Port Scan (Retired)
Device Discovery Region Updates form based on Organization
Device Discovery Region (Retired)
Monitoring
Removal
Region via Organization Updates form based on Organization
Device Discovery Save as Template Updates form based on Save as template
Variable Sets
Title Internal name Comments
Create_virtual_device create_virtual_device
Discovery Overview discovery_overview
Catalog Item

Catalog Client Scripts
Title Internal name Comments
Discovery Sesion - Basic Settings discovery_sesion_basic_settings
Discovery Session - Detection and Scanning discovery_session_detection_and_scanning
Discovery Session - IP & Credentials discovery_session_ip_credentials
Monitoring Removal monitoring _removal
Service Catalog item Template service_catalog_item_template
Catalog Client Scripts
Name Catalog item Type Comments
Hide Request Type
Options
Monitoring
Removal
onLoad Shared variable hide options that don’t apply
Hide Request Type
Options
Device Discovery onLoad Shared variable hide options that don’t apply
Region Monitoring
Removal
onChange Update Region field based on Company
Region
Region Monitoring
Removal
onChange Update Region field based on Company
Region
Workflows
Name Table Comments
SL1 Monitoring Removal Requested Item [sc_req_item] Workflow for Removal of devices from SL1 process
SL1 Discovery Session Requested Item [sc_req_item] Workflow for Discovery session process
160

161
Scripted REST Resources
Name Comments
Business Services /api/x_sclo_
scilogic/v1/sciencelogic/business_service
GET This GET api will pull all
ScienceLogic monitored
Configuration items specific
to Business Services class
from the CMDB.It will be
ordered via the sys_id field to
ensure the same order every
time.
CMDB Group /api/x_sclo_scilogic/v1/sciencelogic/cmdb_
group
POST Use this API to create cmdb_
groups & add a CI to them.
Change Requests /api/x_sclo_scilogic/v1/sciencelogic/change_
requests
GET This GET api will pull Active
Change Requests or Change
Tasks based on the record_
type supplied that have
ScienceLogic monitored CI
attached.It will be ordered
via the sys_id field to ensure
the same order every time.
Classification /api/x_sclo_
scilogic/v1/sciencelogic/classification
GET This GET api will pull all
required CMDB information
to build JSON payloads.
Companies /api/x_sclo_
scilogic/v1/sciencelogic/companies
GET This GET api will pull all
Active Companies that are
ScienceLogic monitored.It
will be ordered via the sys_id
field to ensure the same order
every time.
Configuration Items /api/x_sclo_
scilogic/v1/sciencelogic/configuration_Items
GET This GET api will pull all
ScienceLogic monitored
Configuration items from the
CMDB.It will be ordered via
the sys_id field to ensure the
same order every time.
Device
IdentificationEngine
/api/x_sclo_
scilogic/v1/sciencelogic/IdentificationEngine
POST Use this API to create or
update configuration items
within the CMDB via
ScienceLogic.
Scripted REST Resources

Scripted REST Resources
Name Comments
File Systems /api/x_sclo_scilogic/v1/sciencelogic/file_
systems
GET This GET api will pull all
ScienceLogic monitored
Configuration items specific
to File systems class from the
CMDB.It will be ordered via
the sys_id field to ensure the
same order every time.
Import Set /api/x_sclo_scilogic/v1/sciencelogic/import_
set
POST This POST API will post to the
target import set table and
create a record for each
cmdb_ci.
Incidents /api/x_sclo_scilogic/v1/sciencelogic/incidents GET This GET api will pull all
incidents.It will be ordered
via the sys_id field to ensure
the same order every time.
Installed Software /api/x_sclo_
scilogic/v1/sciencelogic/installed_software
GET This GET api will pull all
Servicenow Software
packages and installed
instances from the CMDB.It
will be ordered via the sys_id
field to ensure the same order
every time.
Manufacture /api/x_sclo_
scilogic/v1/sciencelogic/manufactures
POST This POST API will pull all
Manufactures.
Model /api/x_sclo_scilogic/v1/sciencelogic/models POST This POST API will pull all
Model.
Network Adapters /api/x_sclo_scilogic/v1/sciencelogic/network_
adapters
GET This GET api will pull all
ScienceLogic monitored
Configuration items specific
to Network Adapter class
from the CMDB.It will be
ordered via the sys_id field to
ensure the same order every
time.
Service Request /api/x_sclo_scilogic/v1/sciencelogic/service_
request
GET This GET api will pull all
ServiceRequest items from the
CMDB associated with
Device Discovery Catalog
item.It will be ordered via
the sys_id field to ensure the
same order every time.
162

163
Name Comments
Classification /api/x_sclo_
scilogic/v2/sciencelogic/classification
GET This GET api will pull all
required CMDB information
to build JSON payloads.
Transform Maps
Name Source Table Target Table Comments
ScienceLogic Discovery
Dependent
Import Discovery
Dependent
Discovery
Dependent
Import / staging table for Catalog
Dependents
ScienceLogic Event Import Incident Event Import / staging table for Events.
ScienceLogic Incident Import Incident Incident [incident] Import / staging table for Incident
ScienceLogic Organization Import ORG VEN
MFG []
Company [core_
company]
Import / staging table for
Organization
ScienceLogic Service
Request
Import Service
Request []
Request Item [sc_
req_item]
Import / staging table for Request
item
Transform Scripts
Name Transform Map Order Comments
onBefore ScienceLogic Event 100 Check Action
onAfter ScienceLogic Event 100 Check Action; Get Resolved Validation script include
onBefore ScienceLogic Incident 100 Check Action, event workflow script include
onAfter ScienceLogic Incident 100 Check Action, Affected CI script include
Transform Maps

Appendix
C
Mappings between SL1, ServiceNow, and
Other Applications
Overview
This appendix contains information about how SL1 and ServiceNow discover and model out different
technologies, using VMware as an example. The VMware example explains how the differences between the
systems requires rules be configured to bridge the gap between SL1 and ServiceNow.
This section covers the following topics:
Overview 165
VMware Discovery 165
vCenter 165
Datacenter 166
Folders 167
Cluster 168
Network 169
Switch 171
Virtual Port Group 172
ESX Server 174
ESX Resource Pool 174
Datastore 175
Virtual Machine Instance 177
164

165
Overview
In certain cases, SL1 and ServiceNow will not discover model other technologies and applications in the same
way. As a result, you might need to configure the class rules to satisfy the Identification and Reconciliation Engine
inServiceNow.
One such example of where SL1 and ServiceNow differ in how they model other devices is when PowerFlow
attempts to sync VMware devices from SL1 to ServiceNow. Because of these differences, the required
configurations for VMware and a number of other technologies are packaged into an update set provided by
SL1.This update set removes any manual effort for users.
However, there are many technologies where SL1 has not yet created an update set. For those situations, the
following topics will cover how SL1 and ServiceNow differ, and what configuration steps are required in
ServiceNow.
VMware Discovery
For more information about how the Identification and Reconciliation Engine works within ServiceNow, see this
ServiceNowKnowledgeBase article.
Conflicts
The vCenter Discovery process in ServiceNow creates Configuration Items, but does not send the payload data
through Identification Engine. The sensors or probes process the payload and use scripts to insert records.
For more information about this situation, see this ServiceNowKnowledgeBase article.
vCenter
The vCenter (cmdb_ci_vcenter) default relationship is to a hardware class table, and by default this relationship is
a dependent class. The Identification Rule is derived using the Application Rule.
Conflicts
1. The instance UUID, which is a more unique field, is not collected.As a result, identification falls to the
Name field alone, which is an unreliable source. You can perform the following edits to the name to
match what ServiceNow does, although this practice leads to duplicates:
l
Set the name of the vCenter to the "vcenter@ip_address" of the device instead of the hostname. You
can edit a modification of the name value being sent from SL1 through PowerFlow.
Overview

Datacenter
l
You can use the following Jinja2 template for name mapping:
"{{ 'vcenter@{}'.format(device.ip) if device.snow_ci_class == 'cmdb_ci_
vcenter' else device.name }}": [
"name"
],
WARNING: This name setup has a high chance of causing multiple Device IDs to sync to one
ServiceNow Configuration Item.
For more information about Jinja2 templates, see Using a Jinja2 Template.
2. The order in which SL1 loads data fails to make the specific relationships that ServiceNow populates,
because Discovery does not appear to follow rules of the Identification Engine.
Working Solution
To address this situation, complete the following steps:
1. Replace the identification rule with a rule that applies specifically to a VMware vCenter Instance (cmdb_ci_
vcenter):
2. Add an identifier to the Name field:
Datacenter
DataCenter (cmdb_ci_vcenter_datacenter) is a dependent class, and the identification is derived from the logical
Datacenter table (cmdb_ci_logical_datacenter). The Identification rules are listed under Local Datacenter Rule.
166

167
Conflicts
The instance UUID (account ID) is not available to be pulled from SL1, and the unique_id field is not a reliable
source for identification. As a result, you cannot generate the default relationship to the cloud service account
with the values collected.
Working Solution
To address this situation, complete the following steps:
1. To enable SL1 to sync VMware vCenter Data Centers, an override dependency is required.
2. Relationship for vCenter > Datacenter is required:
HostingRule
Child type cmdb_ci_vcenter
Is reverse true
Parent type cmdb_ci_vcenter_datacenter
Relation type (Parent::Child) Managed by::Manages
Folders
VMware Folders (cmdb_ci_vcenter_folder) is a dependent class, with no mapped dependency by default.
Conflict
The ServiceNow Discovery Expected Relationship is different from the default identification of Hosted On.
ServiceNow Discovery
HostingRule
Child type cmdb_ci_vcenter_folder
Is reverse true
Parent type cmdb_ci_logical_datacenter
Relation type (Parent::Child) Contains::Contained by
Folders

Cluster
Default
HostingRule
Child type cmdb_ci_logical_datacenter
Is reverse false
Parent type cmdb_ci_vcenter_folder
Relation type (Parent::Child) Hosted on::Hosts
Working Solution
To address this situation, use the following override set in PowerFlow to handle the default relationship:
"cmdb_ci_vcenter_folder": {
"relations": [
{
"parent": "cmdb_ci_vcenter_datacenter",
"rel_type": "Hosted on::Hosts",
"reverse": true
}
],
"values": {
}
}
For more information about setting overrides, see Configuring CustomerCIRelation Overrides.
Cluster
VMware vCenter Cluster (cmdb_ci_vcenter_cluster) is a dependent class, and the identification is derived from the
Host Cluster (cmdb_ci_host_cluster). The Identification rules are listed under Host Cluster Rule.
Conflicts
The order in which PowerFlow loads data is not compatible with making the specific relationships that ServiceNow
populates.This issue occurs because Discovery does not appear to follow the rules of the Identification Engine.
Working Solution
To address this situation, use the following override set in PowerFlow to handle the default relationship:
NOTE: Additional relationships are also listed but not shown below. This data is specific to the identification
of the device.
168

169
"cmdb_ci_vcenter_cluster": {
"relations": [
{
"parent": "cmdb_ci_vcenter_datacenter",
"rel_type": "Contains::Contained by",
"reverse": false
}
],
"values": {
}
}
For more information about setting overrides, see Configuring CustomerCIRelation Overrides.
Network
VMware vCenter Network (cmdb_ci_vcenter_network) is a dependent class, and the identification is derived from
the Network Rule (cmdb_ci_network). The Identification rules are listed under the Host Cluster Rule.
The derived relationship is a Hosted On relationship type, and the expected relationship would be Contains. You
will need to create a new metadata rule to get the expected relationship, if the rule does not already exist.
Network

Network
Conflicts
1. The default relationship in ServiceNow is Hosted On, and ServiceNow Discovery is expecting a
relationship of Contains instead of Hosted. This situation requires a change to the Dependent
Relationships:
The relationship for VMware vCenter Network > VMware vCenter Datacenter is required.
HostingRule
Child type cmdb_ci_vcenter_network
Is reverse true
Parent type cmdb_ci_vcenter_datacenter
Relation type (Parent::Child) Contains::Contained by
2. The order in which PowerFlow loads data is not compatible with making the specific relationships that
ServiceNow populates.This issue occurs because Discovery does not appear to follow the rules of the
Identification Engine.
Working Solution
To address this situation, use the following override set in PowerFlow to handle the default relationship:
NOTE: Additional relationships are also listed but not shown below. This data is specific to the identification
of the device.
"cmdb_ci_vcenter_network": {
"relations": [
{
"parent": "cmdb_ci_vcenter_datacenter",
170

171
"rel_type": "Hosted on::Hosts",
"reverse": true
}
],
"values": {
}
}
For more information about setting overrides, see Configuring CustomerCIRelation Overrides.
Switch
VMware Distributed Virtual Switch (cmdb_ci_vcenter_dvs) is a dependent class, and the identification is derived
from the Cloud Network (cmdb_ci_network). The Identification rules are listed under Network Rule.
Conflicts
1. The derived relationship is a Hosted On relationship type, and the expected relationship would be
Contains for ServiceNow Discovery. You will need to create a new metadata rule to get the expected
relationship, if the rule does not already exist.
The relationship for VMware vCenter Network > VMware vCenter Datacenter is required.
HostingRule
Child type cmdb_ci_vcenter_dvs
Is reverse true
Parent type cmdb_ci_vcenter_datacenter
Relation type (Parent::Child) Contains::Contained by
Switch

Virtual Port Group
2. The order in which PowerFlow loads data is not compatible with making the specific relationships that
ServiceNow populates.This issue occurs because Discovery does not appear to follow the rules of the
Identification Engine.
Working Solution
To address this situation, use the following override set in PowerFlow to handle the default relationship:
NOTE: Additional relationships are also listed but not shown below. This data is specific to the identification
of the device.
"cmdb_ci_vcenter_dvs": {
"relations": [
{
"parent": "cmdb_ci_vcenter_datacenter",
"rel_type": "Hosted on::Hosts",
"reverse": true
}
],
"values": {
}
}
For more information about setting overrides, see Configuring CustomerCIRelation Overrides.
Virtual Port Group
VMware Distributed Virtual Port Group (cmdb_ci_vcenter_dv_port_group) is a dependent class and the
identification is derived from the Port Group (cmdb_ci_port_group). The Identification rules are listed under Port
Group Rule.
172

173
Conflicts
1. The derived relationship is a Hosted On relationship type, and the expected relationship would be
Contains for ServiceNow Discovery. You will need to create a new metadata rule to get the expected
relationship, if the rule does not already exist.
The relationship for VVMware Distributed Virtual Port Group > VMware vCenter Datacenter is required.
HostingRule
Child type cmdb_ci_vcenter_dv_port_group
Is reverse true
Parent type cmdb_ci_vcenter_datacenter
Relation type (Parent::Child) Contains::Contained by
2. The order in which PowerFlow loads data is not compatible with making the specific relationships that
ServiceNow populates.This issue occurs because Discovery does not appear to follow the rules of the
Identification Engine.
Working Solution
To address this situation, use the following override set in PowerFlow to handle the default relationship:
NOTE: Additional relationships are also listed but not shown below. This data is specific to the identification
of the device.
"cmdb_ci_vcenter_dv_port_group": {
"relations": [
{
Virtual Port Group

ESX Server
"parent": "cmdb_ci_vcenter_datacenter",
"rel_type": "Hosted on::Hosts",
"reverse": true
}
],
"values": {
}
}
For more information about setting overrides, see Configuring CustomerCIRelation Overrides.
ESX Server
VMware vCenter Network (cmdb_ci_esx_server) is an independent class, and the Identification rules are listed
under ESX Server Rule.
Conflicts
Because no GUID is being collected, the Identification attributes need to be updated. The ability to correlate
values in both systems to identify might case issues with some integrations.
Working Solution
Add an Identifier Entry to the ESX Server rule in addition to the current Correlation ID entry:
ESX Resource Pool
ESX Resource Pool (cmdb_ci_esx_server) is a dependent class, and the identification is derived from the VM
Object (cmdb_ci_vcenter_object). The Identification rules are listed under Port Group Rule.
174

175
Conflicts
1. No derived relationship or any relationship type is defined within ServiceNow by default (ServiceNow Base
+ Discovery). You will need to create a new metadata rule to get the expected relationship, if the rule does
not already exist.
2. The order in which PowerFlow loads data is not compatible with making the specific relationships that
ServiceNow populates.This issue occurs because Discovery does not appear to follow the rules of the
Identification Engine.
3. No DCM+R relationships exist on vCenter Resource Pools, which causes issues when trying to create
matching relations from that ServiceNow Discovery.
Working Solution
To address this situation, use the following override set in PowerFlow to handle the default relationship:
NOTE: Additional relationships are also listed but not shown below. This data is specific to the identification
of the device.
"cmdb_ci_esx_resource_pool": {
"relations": [
{
"parent": "cmdb_ci_esx_server",
"rel_type": "Defines resources for::Gets resources from",
"reverse": true
}
],
"values": {
}
}
For more information about setting overrides, see Configuring CustomerCIRelation Overrides.
Datastore
VMware vCenter Datastore (cmdb_ci_vcenter_datastore) is a dependent class, and the identification is derived
from the VM Object (cmdb_ci_vm_object). The Identification rules are listed under VM Object.
Default Identification:
1. Object ID
2. Name
3. Correlation ID
Datastore

Datastore
Conflicts
1. Identification by defaulting to name does not appear to be unique enough, and it results in false matching.
You will need to change the priority identification.
2. The relationship that ServiceNow Discovery sends does not line up with the defined dependent relationships.
3. The order in which PowerFlow loads data is not compatible with making the specific relationships that
ServiceNow populates.This issue occurs because Discovery does not appear to follow the rules of the
Identification Engine.
4. No derived relationship or any relationship type is defined within ServiceNow by default (ServiceNow Base
+ Discovery). You will need to create a new metadata rule to get the expected relationship, if the rule does
not already exist.
Working Solution
To address this situation:
1. Use the following override set in PowerFlow to handle the default relationship:
NOTE: Additional relationships are also listed but not shown below. This data is specific to the
identification of the device.
"cmdb_ci_vcenter_datastore": {
"relations": [
{
"parent": "cmdb_ci_vcenter_datacenter",
"rel_type": "Contains::Contained by",
"reverse": false
}
],
"values": {
}
}
For more information about setting overrides, see Configuring CustomerCIRelation Overrides.
176

177
2. Add an Identifier Entry to the VM Object Rule in addition to the current entries:
l
Object ID
l
Name
l
Correlation ID
Virtual Machine Instance
VMware Virtual Machine Instance (cmdb_ci_vmware_instance) is a dependent class, and the identification is
derived from the Virtual Machine Instance (cmdb_ci_vm_instance). The Identification rules are listed under VM
Instance.
Conflicts
1. The VC-VMIinstance UUID, which is a more unique field, is not collected.As a result, identification falls to
the Name field alone, which is an unreliable source.
2. The relationship that ServiceNow Discovery sends does not line up with the defined dependent relationships.
The default relationship Hosted On or Runs for dependency, but the relationships that Discovery updates
do not line up.
3. The order in which PowerFlow loads data is not compatible with making the specific relationships that
ServiceNow populates.This issue occurs because Discovery does not appear to follow the rules of the
Identification Engine.
Working Solution
To address this situation, use the following override set in PowerFlow to handle the default relationship:
NOTE: Additional relationships are also listed but not shown below. This data is specific to the identification
of the device.
Virtual Machine Instance

Appendix
D
ServiceNow API Endpoints
Overview
This appendix describes the customized ServiceNow API Endpoints that were created for the ServiceNow
Synchronization PowerPacks. These scripted endpoints reduce the amount of REST calls that PowerFlow makes to
ServiceNow.
Please note that for pagination, the following Query parameters are not required: sysparm_offset and
sysparm_limit. The default settings are:
l
sysparm_offset=0
l
sysparm_limit = ServiceNow defines the default upper limits for data export. It will check the following
properties at System Properties > Import Export: glide.json.export.limit,
glide.ui.export.limit, and then glide.ui.export.war.threshold.
For example, if you have 200 total records and you want to pull the records in 100-record chunks, then the first
pull would be sysparm_offset=0 & sysparm_limit=100 and the second pull would be sysparm_
offset=100 & sysparm_limit=100. For more information, see the ServiceNow documentation for Export
Limits.
This section covers the following topics:
BusinessServices 181
ChangeRequests 183
Classification version 1 185
Classification version 2 188
CMDBGroup 191
Companies 193
Device Identification Engine 195
179


BusinessServices
BusinessServices
HTTP Method
GET
Pagination
Enabled
Resource Path
/api/x_sclo_scilogic/v1/sciencelogic/business_service
Default Resource Path
/api/x_sclo_scilogic/sciencelogic/business_service
This operation pulls all the fields from just the Business Service (cmdb_ci_service) table. The return is ordered by
sys_id, so the results display in the same order every time. The results are filtered by the SL1 monitored and SL1
ID field on the ServiceNow side. This operation requires the region to be supplied by the requester, and it will only
return region-supplied configuration items.
Headers
Key Value
Content-Type application/json
Accept application/json
Parameters
Key Value
region (required) ScienceLogic
sysparm_offset 0
sysparm_limit
glide.json.export.limit, glide.ui.export.limit,
glide.ui.export.war.threshold
Example (Request URL)
https://<your Instance>.service-now.com/api/x_sclo_scilogic/v1/
sciencelogic/business_service
181
182
Example (Response)
{
"results": [
{
"operational_status": "1",
"sys_updated_on": "2019-02-06 19:32:34",
"discovery_source": "Other Automated",
"first_discovered": "2019-02-06 19:31:19",
"sys_updated_by": "admin",
"sys_created_on": "2019-02-06 19:31:19",
"sys_domain": "global",
"used_for": "Production",
"sys_created_by": "is4user1",
"sys_domain_path": "/",
"install_status": "1",
"name": "One Service to rule them",
"subcategory": "Service",
"busines_criticality": "1 - most critical",
"last_discovered": "2019-02-06 19:31:19",
"sys_class_name": "cmdb_ci_service",
"sys_id": "52da95dcdb6323009f7dd7a0cf961918",
"sys_class_path": "/!!/#C",
"comments": "Postman",
"sys_mod_count": "1",
"x_sclo_scilogic_id": "1570",
"model_id": "e8aaeb3f3763100044e0bfc8bcbe5d20",
"cost_cc": "USD",
"x_sclo_scilogic_monitored": "true",
"category": "Business Service",
"service_classification": "Technical Service",
"x_sclo_scilogic_region": "ScienceLogic"
}
],
"sysparm_offset": 0,
"sysparm_limit": 100,
"return_count": 1,
"total_count": 1
}
BusinessServices

ChangeRequests
ChangeRequests
HTTP Method
GET
Resource Path
/api/x_sclo_scilogic/v1/sciencelogic/change_requests?record_type=change_
request&state=1®ion=ScienceLogic
Default Resource Path
/api/x_sclo_scilogic/v1/sciencelogic/change_requests?record_type=change_
request&state=1®ion=ScienceLogic
This scripted API was built for pulling Change Requests or Change Tasks and formatting a JSON object response
with the required information to create a maintenance schedule in SL1. The GET queries the task_ci table to find
configuration items that are monitored by SL1 and are the correct record type. The GET operation returns all
records with their configuration items in formatted JSON strings that include planned start and end time.
Headers
Key Value
Content-Type application/json
Accept application/json
Parameters
Key Value
record_type (required) change_request
state -5
region (required) ScienceLogic
sysparm_offset 0
sysparm_limit
glide.json.export.limit, glide.ui.export.limit,
glide.ui.export.war.threshold
HTTP Status
Code Value
183

184
200 OK
400 Query parameter \'region\' is not defined and is required.
Fixed Internal Query
State:
‘task.sys_class_name=’ + recordType + ‘task.state=’ + state + ‘^ci_item.x_sclo_
scilogic_monitored=true^ci_item.x_sclo_scilogic_region=’ + region
Non-State:
‘task.active=true^task.sys_class_name=’ + recordType + ‘ci_item.x_sclo_scilogic_
monitored=true^ci_item.x_sclo_scilogic_region=’ + region
Example
https://<your Instance>.service-now.com/api/x_sclo_scilogic/v1/sciencelogic/change_
requests?record_type=change_request&state=-5®ion=ScienceLogic
Example (Response)
{
"results": [
{
"sys_id": "48ebaba0db962f00dc44f00fbf961961",
"number": "CHG0030001",
"state_value": "-5",
"state": "New",
"short_description": "Test Change",
"planned_start_date": "2019-01-01 06:00:01",
"planned_end_date": "2019-01-01 18:00:01",
"device": [
{
"sys_id": "d83dac0adb4dab00dc44f00fbf961919",
"name": "Postman Test Server 11",
"id": "11",
"region": "ScienceLogic"
}
]
}
]
}
ChangeRequests

Classification version 1
Classification version 1
NOTE: This APIEndpoint has been deprecated. The last version of the "ScienceLogic SL1: CMDB & Incident
Automation" application"(also called the Certified or Scoped application), that used this endpoint
was version 1.0.18.
HTTP Method
GET
Pagination
Enabled
Resource Path
/api/x_sclo_scilogic/v1/sciencelogic/classification
Default Resource Path
/api/x_sclo_scilogic/sciencelogic/classification
To support the identification and reconciliation framework, SL1 requires a large amount of information to know
how to correctly fill out the JSON formatted string defined by the Identification Engine documentation.This
operation uses the getTableExtension() function to find all the tables extended from the cmdb_ci table and then
goes through each table one by one. This operation collects information about each class, such as which fields
are required to identify and if it is considers another class to help find uniqueness.This operation then finds all the
associated metadata.Finally, the operation pulls a list of all field names from the table.By default the criterion_
attributes and attributes are not included and require "action=attributes" as a parameter in the API call to be
passed.
Headers
Key Value
Content-Type application/json
Accept application/json
Parameters
Key Value
action attributes
185
186
Attributes require x_sclo_scilogic.Admin be added to sys_dictionary.* (read) ACL to allow the API to access field
names on each class table.
Fixed Internal Query
Example
https://<your Instance>.service-now.com/api/x_sclo_scilogic/sciencelogic/
classification
Example (Response)
{
"results": [
{
"class_label": "Storage Area Network",
"class_table": "cmdb_ci_san",
"criterion_attributes": [
""
],
"independent": "false",
"containment_rule": [
],
"hosting_rule": [
],
"reference_rule": [
],
"attributes": [
"asset",
"asset_tag",
"assigned",
"assigned_to",
"assignment_group",
"attributes",
"can_print",
"category",
"change_control",
"checked_in",
"checked_out",
"comments",
"company",
"correlation_id",
"cost",
"cost_cc",
"cost_center",
"delivery_date",
"department",
"discovery_source",
"dns_domain",
"due",
"due_in",
"fault_count",
Classification version 1
Classification version 1
"first_discovered",
"fqdn",
"gl_account",
"install_date",
"install_status",
"invoice_number",
"ip_address",
"justification",
"last_discovered",
"lease_id",
"location",
"mac_address",
"maintenance_schedule",
"managed_by",
"manufacturer",
"model_id",
"model_number",
"monitor",
"name",
"operational_status",
"order_date",
"owned_by",
"po_number",
"purchase_date",
"san_id",
"schedule",
"serial_number",
"short_description",
"skip_sync",
"start_date",
"subcategory",
"supported_by",
"support_group",
"sys_class_name",
"sys_class_path",
"sys_created_by",
"sys_created_on",
"sys_domain",
"sys_domain_path",
"sys_id",
"sys_mod_count",
"sys_updated_by",
"sys_updated_on",
"unverified",
"vendor",
"warranty_expiration",
"x_sclo_scilogic_id",
"x_sclo_scilogic_monitored",
"x_sclo_scilogic_region",
"x_sclo_scilogic_url"
]
}
]
}
187

188
Classification version 2
HTTP Method
GET
Pagination
Enabled
Resource Path
/api/x_sclo_scilogic/v2/sciencelogic/classification
Default Resource Path
/api/x_sclo_scilogic/sciencelogic/classification
To support the identification and reconciliation framework, SL1 requires a large amount of information to know
how to correctly fill out the JSON formatted string defined by the Identification Engine documentation.This
operation uses the getTableExtension() function to find all the tables extended from the cmdb_ci table and then
goes through each table one by one. This operation collects information about each class, such as which fields
are required to identify and if it is considers another class to help find uniqueness.This operation then finds all the
associated metadata.Finally, the operation pulls a list of all field names from the table.By default the criterion_
attributes and attributes are not included and require "action=attributes" as a parameter in the API call to be
passed.
Headers
Key Value
Content-Type application/json
Accept application/json
Parameters
Key Value
action attributes
sysparm_offset 0
sysparm_limit
glide.json.export.limit, glide.ui.export.limit,
glide.ui.export.war.threshold
Attributes require x_sclo_scilogic.Admin be added to sys_dictionary.* (read) ACL to allow the API to access field
names on each class table.
Classification version 2
Classification version 2
Fixed Internal Query
Example
https://<your Instance>.service-now.com/api/x_sclo_scilogic/v2/sciencelogic/
classification
Example (Response)
{
"results": [
{
"class_label": "Storage Area Network",
"class_table": "cmdb_ci_san",
"criterion_attributes": [
""
],
"independent": "false",
"containment_rule": [
],
"hosting_rule": [
],
"reference_rule": [
],
"attributes": [
"asset",
"asset_tag",
"assigned",
"assigned_to",
"assignment_group",
"attributes",
"can_print",
"category",
"change_control",
"checked_in",
"checked_out",
"comments",
"company",
"correlation_id",
"cost",
"cost_cc",
"cost_center",
"delivery_date",
"department",
"discovery_source",
"dns_domain",
"due",
"due_in",
"fault_count",
"first_discovered",
"fqdn",
"gl_account",
189
190
"install_date",
"install_status",
"invoice_number",
"ip_address",
"justification",
"last_discovered",
"lease_id",
"location",
"mac_address",
"maintenance_schedule",
"managed_by",
"manufacturer",
"model_id",
"model_number",
"monitor",
"name",
"operational_status",
"order_date",
"owned_by",
"po_number",
"purchase_date",
"san_id",
"schedule",
"serial_number",
"short_description",
"skip_sync",
"start_date",
"subcategory",
"supported_by",
"support_group",
"sys_class_name",
"sys_class_path",
"sys_created_by",
"sys_created_on",
"sys_domain",
"sys_domain_path",
"sys_id",
"sys_mod_count",
"sys_updated_by",
"sys_updated_on",
"unverified",
"vendor",
"warranty_expiration",
"x_sclo_scilogic_id",
"x_sclo_scilogic_monitored",
"x_sclo_scilogic_region",
"x_sclo_scilogic_url"
]
}
]
}
Classification version 2

CMDBGroup
CMDBGroup
HTTP Method
POST
Pagination
Enabled
Resource Path
/api/x_sclo_scilogic/v1/sciencelogic/cmdb_group
Default Resource Path
/api/x_sclo_scilogic/sciencelogic/cmdb_group
This operation handles the intake of groups of devices from SL1 and converts the device groups to CMDB
groups. This operation uses a standard formatted JSON string, and it checks for a sys_id of the group first by
searching for a matching group. This process creates a group if a group is not supplied or found, and then it
passes the JSON object to the ServiceNow CMDBGroupAPI, which sets the manual CI list of the group.
Headers
Key Value
Content-Type application/json
Accept application/json
Example (Request URL
https://<your Instance>.service-now.com/api/x_sclo_scilogic/v1/sciencelogic/cmdb_
group
Example (Body)
[
{
"items": [
{
"name": "test",
"description": "",
"group": "",
"manualCIList": "d83dac0adb4dab00dc44f00fbf961919,2e6b7046db8dab00dc44f00fbf
961929,7fb39667dba12380dc44f00fbf961901,77b39667dba12380dc44f00fbf961917,7bb
39667dba12380dc44f00fbf96191c",
"region": "Cisco",
"id": "1"
191
192
}
]
}
]
Example (Response)
{
"result": [
{
"idList": [
],
"partialCIListDueToACLFlag": false,
"nextBatchStart": 0,
"result": true
},
{
"idList": [
],
"partialCIListDueToACLFlag": false,
"nextBatchStart": 0,
"result": true
}
]
}
CMDBGroup

Companies
Companies
HTTP Method
GET
Pagination
Enabled
Resource Path
/api/x_sclo_scilogic/v1/sciencelogic/companies
Default Resource Path
/api/x_sclo_scilogic/sciencelogic/companies
This operation supports Domain Separation enabled or not enabled. This operation pulls all the fields for from
the company table that are not NULL values. The return is ordered by sys_id, so the results display in the same
order every time. The results are filtered by the SL1 Monitored and region values. The region mus be supplied by
the requester, and it will only return region-specific companies.
Headers
Key Value
Content-Type application/json
Accept application/json
Parameters
Key Value
region (required) ScienceLogic
domainSep false
sysparm_offset 0
sysparm_limit
glide.json.export.limit, glide.ui.export.limit,
glide.ui.export.war.threshold
HTTP Status
Code Value
193

194
200 OK
400 Query parameter \'region\' is not defined and is required.
Fixed Internal Query
Domain:
'x_sclo_scilogic_region=’ + region + ‘^x_sclo_scilogic_monitored=true^sys_
domain!=global'
Non-Domain:
'x'_sclo_scilogic_monitored=true^x_sclo_scilogic_idISNOTEMPTY^x_sclo_scilogic_
region'’ + region
Example
https://<your instance>.service-now.com/api/x_sclo_scilogic/v1/sciencelogic/
companies?region=ScienceLogic&sysparm_offset=0&sysparm_limit=100
Example (Response)
{
"results": [
{
"country": "USA",
"notes": "What's on your digital horizon?",
"city": "San Jose",
"sys_updated_on": "2018-11-30 16:03:45",
"sys_class_name": "core_company",
"sys_id": "1ac84f95dbce2700dc44f00fbf9619c8",
"sys_updated_by": "is4user1",
"market_cap": "0",
"street": "170 West Tasman Dr.",
"sys_created_on": "2018-11-27 16:32:33",
"state": "CA",
"sys_created_by": "admin",
"zip": "95134",
"profits": "0",
"revenue_per_year": "0",
"sys_mod_count": "4",
"x_sclo_scilogic_id": "1",
"x_sclo_scilogic_monitored": "true",
"phone": "18005532447",
"name": "Cisco Systems, Inc.",
"x_sclo_scilogic_region": "Cisco"
}
],
"sysparm_offset": 0,
"sysparm_limit": 1,
"return_count": 1,
"total_count": 1
}
Companies

Device Identification Engine
Device Identification Engine
HTTP Method
POST
Pagination
Enabled
Resource Path
/api/x_sclo_scilogic/v1/sciencelogic/IdentificationEngine
Default Resource Path
/api/x_sclo_scilogic/sciencelogic/IdentificationEngine
This operation handles all creates and updates to the CMDB.This operation incorporates Identification Engine
and uses the Identification and Reconciliation framework to properly import devices into the CMDB as a
configurable discovery source.SL1 uses the classification GET to populate the JSON object.
Headers
Key Value
Content-Type application/json
Accept application/json
Parameters
Key Value
test true
Example(Request URL)
https://<your Instance>.service-now.com/api/x_sclo_scilogic/v1/sciencelogic/
IdentificationEngine?test=true
Example (Body)
[
{
"items": [
{
"className": "cmdb_ci_linux_server",
"values": {
195
196
"name": "Postman Test Server 1",
"serial_number": "9876EFGH",
"mac_address": "BF:D4:D6:6E:56:F1",
"ip_address": "10.10.10.4",
"ram": "16000",
"x_sclo_scilogic_region": "ScienceLogic",
"x_sclo_scilogic_id": "1"
}
}
]
},
{
"items": [
{
"className": "cmdb_ci_linux_server",
"values": {
"name": "Postman Test Server 2",
"serial_number": "HGFE6789",
"mac_address": "87:54:3C:8C:2A:A3",
"ip_address": "10.10.10.5",
"ram": "16000",
"x_sclo_scilogic_region": "ScienceLogic",
"x_sclo_scilogic_id": "2"
}
}
]
}
]
Example Business Service (Body)
[
{
"items": [
{
"className": "cmdb_ci_service",
"values": {
"name": "Integration Service",
"busines_criticality": "1 - most critical",
"used_for": "Production",
"operational_status": "1",
"service_classification": "Technical Service",
"comments": "Postman",
"x_sclo_scilogic_region": "ScienceLogic",
"x_sclo_scilogic_id": "1570"
}
},
{
"className": "cmdb_ci_linux_server",
"values": {
"name": "Postman Test Server",
"serial_number": "7MDvqrSNyd",
"manufacturer": "ScienceLogic, Inc.",
"model_id": "",
"mac_address": "EE:D6:0B:79:32:C7",
"ip_address": "10.10.10.224",
Device Identification Engine
Device Identification Engine
"ram": "16000",
"x_sclo_scilogic_region": "ScienceLogic",
"x_sclo_scilogic_id": "10"
}
}
],
"relations": [
{
"type": "Depends on::Used by",
"parent": 0,
"child": 1
}
]
}
]
Example (Response)
{
"result": [
{
"items": [
{
"className": "cmdb_ci_linux_server",
"operation": "NO_CHANGE",
"sysId": "7fb39667dba12380dc44f00fbf961936",
"identifierEntrySysId": "fb27f69cc3000200d8d4bea192d3ae67",
"identificationAttempts": [
{
"identifierName": "Hardware Rule",
"attemptResult": "SKIPPED",
"attributes": [
"serial_number",
"serial_number_type"
],
"searchOnTable": "cmdb_serial_number"
},
{
"identifierName": "Hardware Rule",
"attemptResult": "MATCHED",
"attributes": [
"serial_number"
],
"searchOnTable": "cmdb_ci_hardware"
}
]
}
],
"relations": [
]
}
]
}
197

198
Discovery Dependents
HTTP Method
GET
Pagination
Enabled
Resource Path
/api/x_sclo_scilogic/v1/sciencelogic/discovery_dependent
Default Resource Path
/api/x_sclo_scilogic/sciencelogic/discovery_dependent
This operation pulls all Discovery-dependent records that are tied to the region value, which is used for the
catalog request process. Based on the request type, this operation returns a formatted JSON object. This
operation pulls all the required information for both SL1 processes: Discovery Session and Create Virtual Device.
Both requests require different information and are formatted accordingly.
The basic catalog item Device Discovery is set up as information collection to support the process within SL1. The
Service Catalog has been simplified to its most basic form. The Service Catalog moves the request into the
correct state to be picked up by the GET Request and then waits for its return before completing the workflow.
Headers
Key Value
Content-Type application/json
Accept application/json
Parameters
Key Value
region (required) ScienceLogic
sysparm_offset 0
sysparm_limit
glide.json.export.limit, glide.ui.export.limit,
glide.ui.export.war.threshold
HTTP Status
Discovery Dependents

Discovery Dependents
Code Value
200 OK
400 Query parameter \'region\' is not defined and is required.
FixedInternalQuery
Region Specific: 'region=' + region
Example
https://<your instance>.service-now.com/api/x_sclo_
scilogic/v1/sciencelogic/discovery_dependent?region=del_test&sysparm_
offset=0&sysparm_limit=100
Example (Response)
{
"results": [
{
"sys_updated_on": "2019-08-28 18:03:50",
"type": "credential",
"type_label": "Credentials",
"sys_id": "0491aae51b273f0045c8db1dcd4bcbc2",
"hostname": "example.com",
"sys_updated_by": "is4user1",
"sys_created_on": "2019-08-28 18:03:50",
"name": "AppDynamics Example",
"id": "93",
"category": "soapCredentials",
"region": "del_test",
"sys_created_by": "is4user1"
}
],
"sysparm_offset": 0,
"sysparm_limit": 1,
"return_count": 1,
"total_count": 150
}
199

200
File Systems
HTTP Method
GET
Pagination
Enabled
Resource Path
/api/x_sclo_scilogic/v1/sciencelogic/file_systems
Default Resource Path
/api/x_sclo_scilogic/sciencelogic/file_systems
This operation pulls all the fields from the File System table. The return is ordered by sys_id, so the results display
in the same order every time. The results are filtered by the SL1 monitored and SL1 ID field on the ServiceNow
side.This operation requires the region to be supplied by the requester, it returns only region-supplied
configuration items.
Headers
Key Value
Content-Type application/json
Accept application/json
Parameters
Key Value
region (required) ScienceLogic
sysparm_offset 0
sysparm_limit
glide.json.export.limit, glide.ui.export.limit,
glide.ui.export.war.threshold
HTTP Status
Code Value
200 OK
400 Query Parameter \'region\' is not defined and is required.
File Systems
File Systems
Fixed Internal Query
‘x_sclo_scilogic_monitored=true^x_sclo_scilogic_idISNOTEMPTY^x_sclo_scilogic_
region=’ + region
Example
https://<your Instance>.service-now.com/api/x_sclo_scilogic/v1/sciencelogic/file_
systems?region=ScienceLogic&sysparm_offset=0&sysparm_limit=100
Example (Response)
{
"results": [
{
"operational_status": "1",
"sys_updated_on": "2018-11-12 21:59:52",
"media_type": "fixed",
"sys_created_by": "admin",
"sys_domain_path": "/",
"sys_class_name": "cmdb_ci_file_system",
"computer": "d83dac0adb4dab00dc44f00fbf961919",
"x_sclo_scilogic_monitored": "true",
"x_sclo_scilogic_region": "ScienceLogic",
"sys_updated_by": "admin",
"sys_created_on": "2018-11-12 21:59:06",
"sys_domain": "global",
"install_status": "1",
"name": "/root",
"subcategory": "File Share",
"sys_id": "afd30ba0dbf5a380dc44f00fbf961951",
"file_system": "ntfs",
"sys_class_path": "/!!/!K/!!",
"mount_point": "/root",
"sys_mod_count": "3",
"x_sclo_scilogic_id": "31",
"label": "/root",
"cost_cc": "USD",
"category": "Resource"
}
],
"sysparm_offset": 0,
"sysparm_limit": 100,
"return_count": 1,
"total_count": 1
}
201
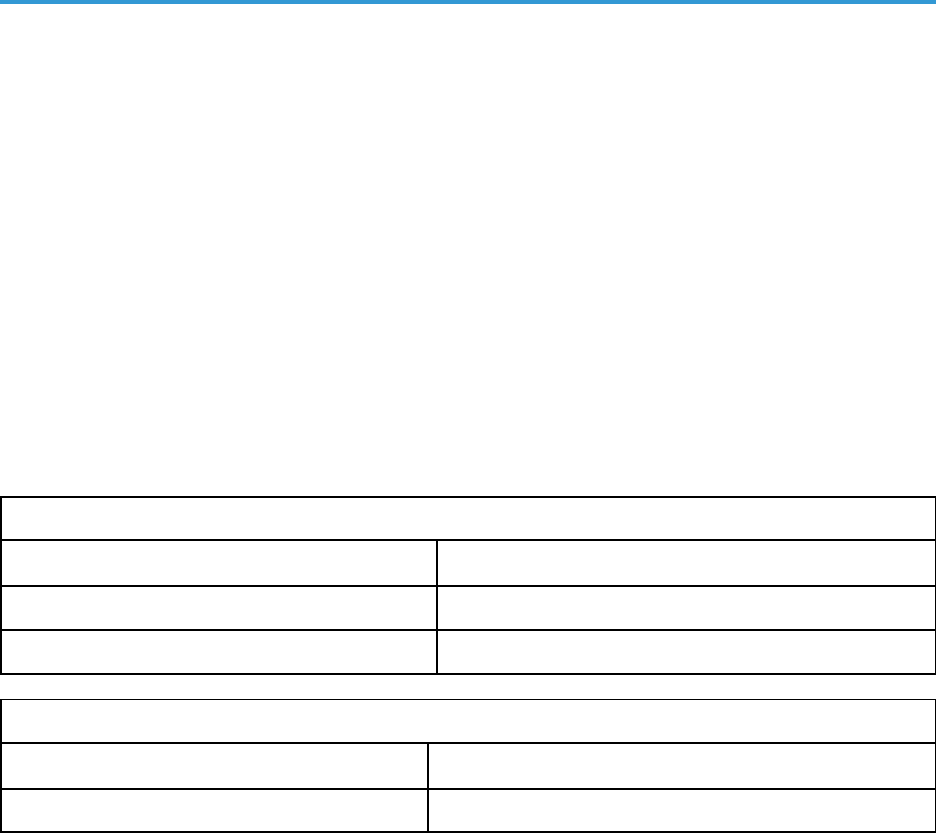
202
Import Set
HTTP Method
POST
Resource Path
/api/x_sclo_scilogic/v1/sciencelogic/import_set
Default Resource Path
/api/x_sclo_scilogic/sciencelogic/import_set
This operation handles the custom intake of import sets before it reaches the transform map staging table, such
as x_sclo_scilogic_import_installed_software. This operations is currently only used for importing installed
software (x_sclo_scilogic_import_installed_software).
Headers
Key Value
Accept application/json
Content-Type application/json
Parameters
Key Value
record_type (required) x_sclo_scilogic_import_installed_software
Example (RequestURL)
https://<your Instance>.service-now.com/api/x_sclo_scilogic/v1/sciencelogic/import_
set
Example (Body)
[
{
"records": [
{
"name": "acl-2.2.51-12.el7",
"software": "671bafd8dba13700dc44f00fbf961953",
"cmdb_ci": [
"ff01a81edb1df300dc44f00fbf961947",
"4011a81edb1df300dc44f00fbf961958",
"f301a81edb1df300dc44f00fbf96193d",
Import Set
Import Set
"7b01a81edb1df300dc44f00fbf961942",
"c411a81edb1df300dc44f00fbf96195d",
"7701a81edb1df300dc44f00fbf961922",
"7b01681edb1df300dc44f00fbf9619e7",
"fb01a81edb1df300dc44f00fbf961927"
],
"active": true
}
]
}
]
203

204
Incidents
HTTP Method
GET
Pagination
Enabled
Resource Path
/api/x_sclo_scilogic/v1/sciencelogic/incidents
Default Resource Path
/api/x_sclo_scilogic/sciencelogic/incidents
This operation pulls all records from the incident table that are created by a specific user_id and its related
events. The results are ordered by the sys_id of the incident, so the results display in the same order every time.
This operation is also based on the incident being in an active state. This operation returns a pre-set of data and
does not return everything on the Incident and Event (x_sclo_scilogic_event) tables.
Headers
Key Value
Content-Type application/json
Accept application/json
Parameters
Key Value
user_id (required) is4user1
sysparm_offset 0
sysparm_limit
glide.json.export.limit, glide.ui.export.limit,
glide.ui.export.war.threshold
HTTP Status
Code Value
200 OK
400 Query Parameter \'user_id\' is not defined and is required.
Incidents
Incidents
Fixed Internal Query
‘sys_created_by=’ + user_id + ‘active=true’
Example
https://<your Instance>.service-now.com/api/x_sclo_
scilogic/v1/sciencelogic/incidents?user_id=is4user1&sysparm_offset=0&sysparm_
limit=100
Example (Response)
{
"results": [
{
"sys_id": "0141807bdbb16300dc44f00fbf9619fc",
"number": "INC0010135",
"state": "2",
"state_label": "In Progress",
"events": [
{
"event_id": "16908",
"device": {
"sys_id": {
}
}
},
{
"event_id": "16874",
"device": {
"sys_id": {
}
}
},
{
"event_id": "16865",
"device": {
"sys_id": {
}
}
}
]
}
],
"sysparm_offset": 0,
"sysparm_limit": 1,
"return_count": 1,
"total_count": 44
}
205

206
Installed Software
HTTP Method
GET
Pagination
Enabled
Resource Path
/api/x_sclo_scilogic/v1/sciencelogic/installed_software
Default Resource Path
/api/x_sclo_scilogic/sciencelogic/installed_software
This operation pulls all the fields from the software (cmdb_ci_spkg) table. The return is ordered by sys_id, so the
results display in the same order every time. The results are filtered by the SL1 monitored field on the ServiceNow
side. This operation requires the region to filter the installed software on devices.
Headers
Key Value
Content-Type application/json
Accept application/json
Parameters
Key Value
region ScienceLogic
sysparm_offset 0
sysparm_limit
glide.json.export.limit, glide.ui.export.limit,
glide.ui.export.war.threshold
HTTPStatus
Code Value
200 OK
400
Query parameter \'region\' is not defined and are
required.
Installed Software
Installed Software
Fixed InternalQuery
'x_sclo_scilogic_monitored=true'
Example (Request URL)
https://<your Instance>.service-now.com/api/x_sclo_
scilogic/v1/sciencelogic/installed_software?sysparm_offset=0&sysparm_
limit=100®ion=ScienceLogic
Example (Response){
"results": [
{
"operational_status": "1",
"operational_status_label": "Operational",
"sys_updated_on": "2019-05-01 06:00:09",
"install_count": "2",
"sys_updated_by": "system",
"sys_created_on": "2019-03-29 19:42:58",
"sys_domain": "global",
"sys_created_by": "admin",
"sys_domain_path": "/",
"install_status": "1",
"install_status_label": "Installed",
"name": "Test_31",
"subcategory": "Package",
"sys_class_name": "cmdb_ci_spkg",
"sys_class_name_label": "Software",
"sys_id": "1e9608fcdb2cb740dc44f00fbf961949",
"sys_class_path": "/!!/#$",
"key": "Test_31_:::_NULL",
"license_available": "-2",
"sys_mod_count": "1",
"x_sclo_scilogic_id": "31",
"model_id": "2c146728dbe8b740dc44f00fbf9619c6",
"model_id_label": "Unknown",
"cost_cc": "USD",
"cost_cc_label": "USD",
"x_sclo_scilogic_monitored": "true",
"package_name": "Test_31",
"category": "Software",
"x_sclo_scilogic_region": "AutoGenerateClass",
"installed_on": [
{
"sys_id": "5a271407dbfe6300dc44f00fbf96190f",
"id": "10",
"region": "ScienceLogic",
"monitored": "true"
},
{
"sys_id": "5a271407dbfe6300dc44f00fbf96190f",
"id": "10",
"region": "ScienceLogic",
"monitored": "true"
}
]
207
208
}
],
"sysparm_offset": 0,
"sysparm_limit": 100,
"return_count": 4,
"total_count": 4
}
Installed Software

ManufactureAndModel
ManufactureAndModel
HTTP Method
POST
Pagination
Enabled
Resource Path
/api/x_sclo_scilogic/v1/sciencelogic/ManufactureAndModel
/api/x_sclo_scilogic/sciencelogic/ManufactureAndModel
Default Resource Path
/api/x_sclo_scilogic/sciencelogic/ManufactureAndModel
This operation does not populate any data into ServiceNow. Instead, this operation takes an array of model
names and attempts to line them up with models already in ServiceNow. The operation then returns the sys_id
value of models that match by name.
Headers
Key Value
Content-Type application/json
Accept application/json
Parameters
Key Value
ModelCategory (required) hardware
Example (RequestURL)
https://<your Instance>.service-now.com/api/x_sclo_
scilogic/v1/sciencelogic/ManufactureAndModel
Example (Body)
{
"Cisco Systems": [
"1803 ISR G1",
"1861 ISR G1",
209
210
"2821 ISR G1",
"826 Quad V",
"888SRST ISR G2",
"Catalyst 1912C",
"Catalyst2912XL",
"Catalyst2960S-48FPD-L",
"TelePresenceEX60",
"UCSC460M4RackServer",
"WS-C2960S-24PS-L",
"VG202XM"
],
"OpenStack": [
"Cloud Physical Service"
],
"VMware, Inc.": [
"VMware Virtual Platform"
]
}
Example (Response)
{
"result": {
"Cisco Systems": {
"models": {
"1803 ISR G1": "ef1f4f3b1b66e490fdfc98e32a4bcb1d",
"1861 ISR G1": "0a0f8bf71b66e490fdfc98e32a4bcb82",
"2821 ISR G1": "342f0b331be260906af3dac4bd4bcb8f",
"826 Quad V": "782f0b331be260906af3dac4bd4bcb0f",
"888SRST ISR G2": "052f4b331be260906af3dac4bd4bcb48",
"Catalyst 1912C": "d30f03ff1ba260906af3dac4bd4bcbba",
"Catalyst2912XL": "e776fe1b1b8bb8906af3dac4bd4bcb7e",
"Catalyst2960S-48FPD-L": "2b76fe1b1b8bb8906af3dac4bd4bcb7f",
"TelePresenceEX60": "e376fe1b1b8bb8906af3dac4bd4bcb80",
"UCSC460M4RackServer": "bf76fe1b1b8bb8906af3dac4bd4bcb80",
"WS-C2960S-24PS-L": "3c36d92d1bfea4906af3dac4bd4bcbbb",
"VG202XM": "37767e5b1b8bb8906af3dac4bd4bcb73"
},
"sys_id": "229697491b769890fdfc98e32a4bcb1f"
},
"OpenStack": {
"models": {
"Cloud Physical Service": "3d6baf011bba64906af3dac4bd4bcbc4"
},
"sys_id": "356baf011bba64906af3dac4bd4bcbc2"
},
"VMware, Inc.": {
"models": {
"VMware Virtual Platform": "3cd7a6ca1b571c10fdfc98e32a4bcb15"
},
"sys_id": "318717891b769890fdfc98e32a4bcb08"
}
}
}
ManufactureAndModel

Manufacture (deprecated)
Manufacture (deprecated)
HTTP Method
POST
Pagination
Enabled
Resource Path
/api/x_sclo_scilogic/v1/sciencelogic/manufacture
Default Resource Path
/api/x_sclo_scilogic/sciencelogic/manufactures
This operation does not populate any data into ServiceNow. Instead, this operation takes an array of
manufacturer names and attempts to line them up with manufacturers already in ServiceNow. Then the operation
returns the sys_id of manufacturers it was able find based on matching name. If the Normalization Data Services
Client is active on the target instance, this operation uses those tables to find a matching company record;
otherwise the operation will match on whether name and manufacturer is true on the core_company table.
NOTE: As of version 3.4.0 of the ServiceNowCMDB SynchronizationPowerPack, this operation has been
deprecated and replaced by the "ManufactureAndModel " operation.
Headers
Key Value
Content-Type application/json
Accept application/json
Parameters
Key Value
region (required) ScienceLogic
Example (RequestURL)
https://<your Instance>.service-now.com/api/x_sclo_
scilogic/v1/sciencelogic/manufacture
211
212
Example (Body)
{
"manufactures": [
"Cisco Systems Inc",
"Cisco Systems, Incorporated",
"CiscoSystems",
"American Power Conversion Inc.",
"APC Corp",
"Apc",
"IBM",
"IBM CORP",
"International Business Machines",
"Juniper Systems",
"Juniper Networks,Inc",
"Juniper Solutions"
]
}
Example (Response)
{
"result": {
"Cisco Systems Inc": "",
"Cisco Systems, Incorporated": "",
"CiscoSystems": "",
"American Power Conversion Inc.": "",
"APC Corp": "",
"Apc": "",
"IBM": "",
"IBM CORP": "",
"International Business Machines": "",
"Juniper Systems": "",
"Juniper Networks,Inc": "",
"Juniper Solutions": ""
}
}
Manufacture (deprecated)

Model (deprecated)
Model (deprecated)
HTTP Method
POST
Resource Path
/api/x_sclo_scilogic/v1/sciencelogic/model
Default Resource Path
/api/x_sclo_scilogic/sciencelogic/models
This operation does not populate any data into ServiceNow. Instead, this operation takes an array of model
names and attempts to line them up with models already in ServiceNow and returns the sys_id of models it was
able to find based on matching name.
NOTE: As of version 3.4.0 of the ServiceNowCMDB SynchronizationPowerPack, this operation has been
deprecated and replaced by the "ManufactureAndModel " operation.
Headers
Key Value
Content-Type application/json
Accept application/json
Parameters
Key Value
region (required) ScienceLogic
Example (Request URL)
https://<your Instance>.service-now.com/api/x_sclo_scilogic/v1/sciencelogic/models
Example (Body)
{
"models": [
"4331 ISR",
"7206VXR",
"7609S",
"AS5300",
213
214
"ASR5000",
"Catalyst 3560G-24TS",
"Catalyst 4948",
"Catalyst 6509-CatOS",
"BIG-IP Viprion B4300",
"F5 BIG-IP DNS",
"BIG-IP Wide IP Container",
"BIG-IP Data Center Container"
]
}
Example (Response)
{
"result": {
"4331 ISR": "",
"7206VXR": "",
"7609S": "",
"AS5300": "",
"ASR5000": "",
"Catalyst 3560G-24TS": "",
"Catalyst 4948": "",
"Catalyst 6509-CatOS": "",
"BIG-IP Viprion B4300": "",
"F5 BIG-IP DNS": "",
"BIG-IP Wide IP Container": "",
"BIG-IP Data Center Container": ""
}
}
Model (deprecated)

NetworkAdapters
NetworkAdapters
HTTP Method
GET
Pagination
Enabled
Resource Path
/api/x_sclo_scilogic/v1/sciencelogic/network_adapters
Default Resource Path
/api/x_sclo_scilogic/sciencelogic/network_adapters
This operation pulls all the fields from the network adapter table. The return is ordered by sys_id, so the results
display in the same order every time. The results are filtered by the SL1 monitored and SL1 ID field on the
ServiceNow side.This operation requires the region to be supplied by the requester, and it only returns region-
supplied configuration items.
Headers
Key Value
Content-Type application/json
Accept application/json
Parameters
Key Value
region (required) ScienceLogic
sysparm_offset 0
sysparm_limit
glide.json.export.limit, glide.ui.export.limit,
glide.ui.export.war.threshold
HTTP Status
Code Value
200 OK
400 Query Parameter \'region\' is not defined and is required.
215
216
Fixed Internal Query
‘x_sclo_scilogic_monitored=true^x_sclo_scilogic_idISNOTEMPTY^x_sclo_scilogic_
region=’ + region
Example (Request URL)
https://<your Instance>.service-now.com/api/x_sclo_scilogic/v1/sciencelogic/network_
adapters?region=ScienceLogic&sysparm_offset=0&sysparm_limit=100
Example (Response)
{
"results": [
{
"operational_status": "1",
"sys_updated_on": "2018-11-12 21:29:23",
"sys_updated_by": "admin",
"sys_created_on": "2018-11-12 21:27:48",
"sys_domain": "global",
"sys_created_by": "admin",
"cmdb_ci": "d83dac0adb4dab00dc44f00fbf961919",
"sys_domain_path": "/",
"install_status": "1",
"name": "eth0",
"subcategory": "Network",
"sys_class_name": "cmdb_ci_network_adapter",
"sys_id": "33ac36acdbb5a380dc44f00fbf961963",
"netmask": "255.255.255.0",
"sys_class_path": "/!!/!8",
"mac_address": "BF:D4:D6:6E:56:F1",
"sys_mod_count": "3",
"x_sclo_scilogic_id": "20",
"ip_address": "10.10.10.4",
"cost_cc": "USD",
"x_sclo_scilogic_monitored": "true",
"category": "Hardware",
"x_sclo_scilogic_region": "ScienceLogic"
}
],
"sysparm_offset": 0,
"sysparm_limit": 1,
"return_count": 1,
"total_count": 5
}
NetworkAdapters

ServiceRequests
ServiceRequests
HTTP Method
GET
Pagination
Enabled
Resource Path
/api/x_sclo_scilogic/v1/sciencelogic/service_request
Default Resource Path
/api/x_sclo_scilogic/sciencelogic/service_request
This operation pulls all service requests that are tied to specific catalog item.Based on the request type it returns
a formatted JSON object.It pulls all the required information for an SL1 Discovery session and creating a virtual
device in SL1.Both requests require different information and are formatted accordingly.
The basic catalog item Device Discovery is set up as information collection to support the process within SL1.The
Service Catalog has been simplified to its most basic form. The workflow moves the request into the correct state
to be picked up by the GET request and then waits for its return before completing the workflow.
Headers
Key Value
Content-Type application/json
Accept application/json
Parameters
Key Value
region (required) ScienceLogic
state 2
sysparm_offset 0
sysparm_limit
glide.json.export.limit, glide.ui.export.limit,
glide.ui.export.war.threshold
217

218
HTTP Status
Code Value
200 OK
400 Query Parameter \'region\' is not defined and is required.
Fixed Internal Query
State:
‘request_item.active=true^request_item.cat_item=’ + catalog + ‘^sc_item_option.item_
option_new.name=Region^sc_item_option.value=’ + region
Non-State:
‘request_item.active=true^request_item.cat_item=’ + catalog + ‘^sc_item_option.item_
option_new.name=Region^sc_item_option.value=’ + region + ‘^request_item.state=’ +
state
Example
https://<your Instance>.service-now.com/api/x_sclo_scilogic/v1/sciencelogic/
service_request?region=Cisco
Example (Response)
{
"results": [
{
"number": "RITM0010018",
"sysid": "00365de2db1a2340dc44f00fbf961941",
"state": "2",
"request_type": "Discover Device",
"region": "Cisco",
"log_all": "false",
"ip_hostname_list": "167.132.14.15",
"credentials": [
{
"Category": "Linux",
"ID": "1"
}
],
"discover_non_snmp": "false",
"model_devices": "true",
"dhcp": "false",
"device_model_cache_ttl_h": "2",
"collection_server": "1",
"organization": "1",
"add_devices_to_device_groups": [
"test"
],
"device_template": "1",
"initial_scan_level": "System Default (Recommended)",
ServiceRequests
ServiceRequests
"scan_throttle": "System Default (Recommended)",
"scan_ports": "21,22,23,25,80",
"port_scan_all": "System Default (Recommended)",
"port_scan_timeout": "System Default (Recommended)",
"interface_inventory_timeout": "600000",
"maximum_allowed_interfaces": "10000",
"bypass_interface_inventory": "false"
},
{
"number": "RITM0010016",
"sysid": "194447e8db162f00dc44f00fbf96195b",
"state": "2",
"request_type": "Discover Device",
"region": "Cisco",
"log_all": "false",
"ip_hostname_list": "192.168.1.1",
"credentials": [
{
"Category": "Linux",
"ID": "1"
}
],
"discover_non_snmp": "false",
"model_devices": "false",
"dhcp": "false",
"device_model_cache_ttl_h": "2",
"collection_server": "1",
"organization": "1",
"add_devices_to_device_groups": [
],
"device_template": "1",
"initial_scan_level": "System Default (Recommended)",
"scan_throttle": "System Default (Recommended)",
"scan_ports": "21,22,23,25,80",
"port_scan_all": "System Default (Recommended)",
"port_scan_timeout": "System Default (Recommended)",
"interface_inventory_timeout": "600000",
"maximum_allowed_interfaces": "10000",
"bypass_interface_inventory": "false"
},
{
"number": "RITM0010014",
"sysid": "250dae2cdbd22f00dc44f00fbf961954",
"state": "2",
"request_type": "create_virtual_device",
"region": "Cisco",
"collection_server": "1",
"virtual_device_class": "1"
}
]
}
219
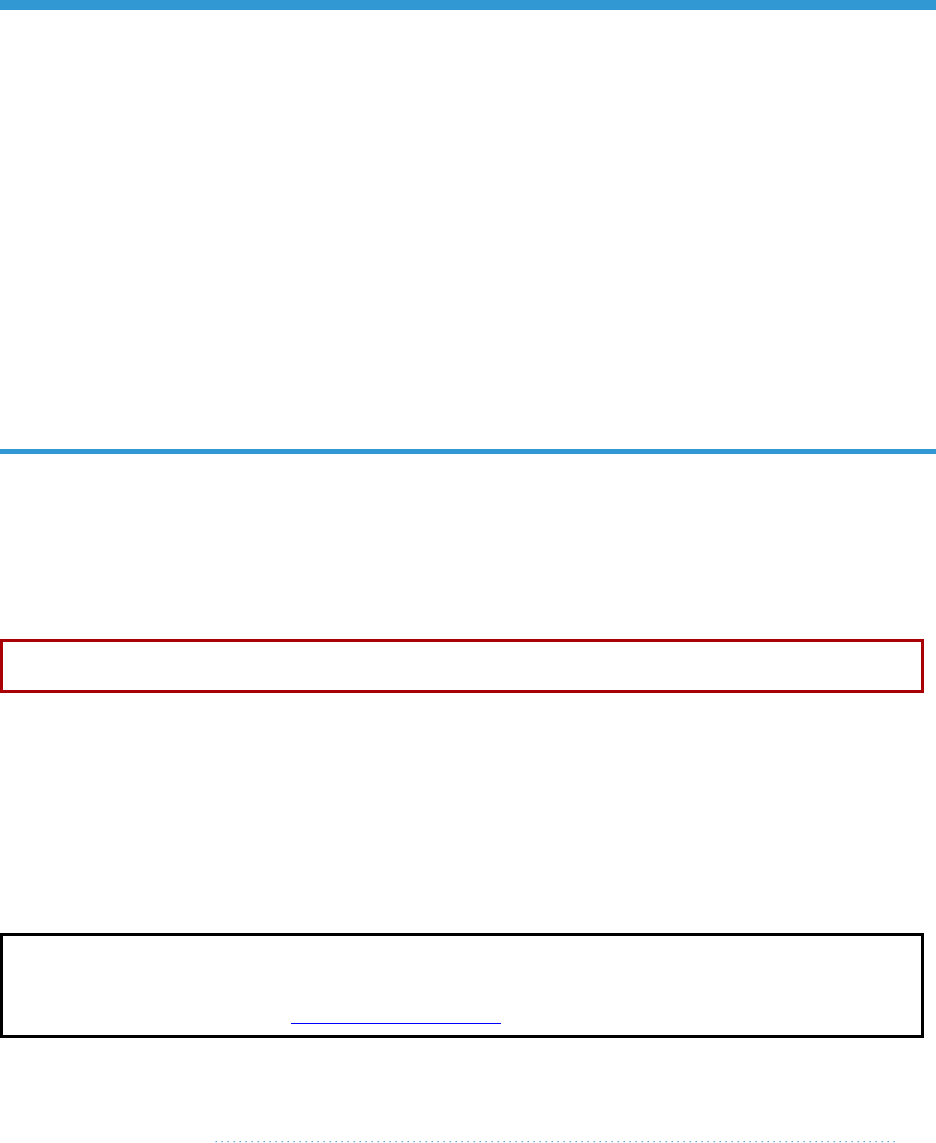
Appendix
E
ServiceNow Registered Events
Overview
This appendix describes the commands and data you can use to generate registered events in ServiceNow that
are queued to ServiceNow Event Management. These events can trigger actions in PowerFlow, such as specifying
one or more CIs for monitoring, or putting a CI into maintenance.
WARNING: This appendix is recommended for advanced ServiceNow administrators.
These events use the gs.eventQueue command, using the following format:
eventQueue(String name, Object instance, String parm1, String parm2)
You can use examples found in the "ScienceLogic ServiceNow Integration (Catalog UI)" update set in ServiceNow
to help you customize the gs.eventQueue command to specify which ServiceNow events can trigger
PowerFlow actions. You will need to install this update set in ServiceNow.
NOTE: You can access the update set from the additional_materials.zip file included in the main .zip file
for the ServiceNow CMDBSynchronization PowerPack, which you can find on the Synchronization
PowerPack page at the ScienceLogic Support Site.
This section covers the following topics:
Catalog Item Events 221
220

221
Catalog Item Events
The following events are available through the "ScienceLogic ServiceNow Integration (Catalog UI)" update set in
ServiceNow.
x_sclo_scilogic.device_monitoring
This event takes the selected Configuration Items in ServiceNow, files a catalog request using the template
selected by the user, and submits the catalog request.
Trigger
Custom requirement supplied by ScienceLogic implementation or the Customer directly.
Command
gs.eventQueue('x_sclo_scilogic.device_monitoring', region, ip_list.toString(),
region.getUniqueValue() + "," + region.x_sclo_scilogic_region + "," + silo_
template);
Event Fields
Field Description
x_sclo_scilogic.device_monitoring
Unique name of the event.
region
The table to which the event applies.
ip_list.toString()
Parm1: The IP, or a comma-separated list of IP
addresses, that is pulled from the ip_address field on
the cmdb_ci table.
getCompany.getUniqueValue(), silo_
template
Parm2: List of three requirements that the sys_id of
the company associated with the Configuration Item
and the catalog template selected through the user
interface action.
Example
The UI action / UI page is available through the "ScienceLogic ServiceNow Integration (Catalog UI Action)"
update set.
Catalog Item Events

Catalog Item Events
x_sclo_scilogic.remove_monitoring
This action takes the selected Configuration Item or Items and submits a request through the ServiceNow service
catalog for each Configuration Item.
Trigger
Custom requirement supplied by ScienceLogic implementation or the Customer directly.
Command
gs.eventQueue('x_sclo_scilogic.remove_monitoring',current, current.getUniqueValue(),
current.company);
Event Fields
Field Description
x_sclo_scilogic.remove_monitoring
Unique name of the event.
current
The table to which the event applies.
current.getUniqueValue()
Parm1: The sys_id of the Configuration Item that
needs to be removed
current.company);
Parm2: The sys_id of the company that is associated
with the Configuration Item.
Example
The UI action / UI page is available through the "ScienceLogic ServiceNow Integration (Catalog UI Action)"
update set.
222
223 Catalog Item Events
© 2003 - 2022, ScienceLogic, Inc.
All rights reserved.
LIMITATION OF LIABILITY AND GENERAL DISCLAIMER
ALL INFORMATION AVAILABLE IN THIS GUIDE IS PROVIDED "AS IS," WITHOUT WARRANTY OF ANY
KIND, EITHER EXPRESS OR IMPLIED. SCIENCELOGIC™ AND ITS SUPPLIERS DISCLAIM ALL WARRANTIES,
EXPRESS OR IMPLIED, INCLUDING, BUT NOT LIMITED TO, THE IMPLIED WARRANTIES OF
MERCHANTABILITY, FITNESS FOR A PARTICULAR PURPOSE OR NON-INFRINGEMENT.
Although ScienceLogic™ has attempted to provide accurate information on this Site, information on this Site
may contain inadvertent technical inaccuracies or typographical errors, and ScienceLogic™ assumes no
responsibility for the accuracy of the information. Information may be changed or updated without notice.
ScienceLogic™ may also make improvements and / or changes in the products or services described in this
Site at any time without notice.
Copyrights and Trademarks
ScienceLogic, the ScienceLogic logo, and EM7 are trademarks of ScienceLogic, Inc. in the United States,
other countries, or both.
Below is a list of trademarks and service marks that should be credited to ScienceLogic, Inc. The ® and ™
symbols reflect the trademark registration status in the U.S. Patent and Trademark Office and may not be
appropriate for materials to be distributed outside the United States.
l
ScienceLogic™
l
EM7™ and em7™
l
Simplify IT™
l
Dynamic Application™
l
Relational Infrastructure Management™
The absence of a product or service name, slogan or logo from this list does not constitute a waiver of
ScienceLogic’s trademark or other intellectual property rights concerning that name, slogan, or logo.
Please note that laws concerning use of trademarks or product names vary by country. Always consult a
local attorney for additional guidance.
Other
If any provision of this agreement shall be unlawful, void, or for any reason unenforceable, then that
provision shall be deemed severable from this agreement and shall not affect the validity and enforceability
of any remaining provisions. This is the entire agreement between the parties relating to the matters
contained herein.
In the U.S. and other jurisdictions, trademark owners have a duty to police the use of their marks. Therefore,
if you become aware of any improper use of ScienceLogic Trademarks, including infringement or
counterfeiting by third parties, report them to Science Logic’s legal department immediately. Report as much
detail as possible about the misuse, including the name of the party, contact information, and copies or

800-SCI-LOGIC (1-800-724-5644)
International: +1-703-354-1010
