
Tenable and ServiceNow 5.x.x Integration Guide
Last Revised: July 16, 2024
Copyright © 2024 Tenable, Inc. All rights reserved. Tenable, Tenable Nessus, Tenable Lumin, Assure, and the Tenable logo are registered trademarks of Tenable, Inc. or its affiliates. All other
products or services are trademarks of their respective owners.

Table of Contents
Welcome to Tenable for ServiceNow 5.x.x 4
Before You Begin 4
Application Dependencies 7
Get Started with Tenable for ServiceNow 8
Install 10
TenableApplications Upgrade Overview 11
Upgrade the Tenable Applications 12
How to Verify a Successful Upgrade 16
Unsuccessful Upgrades 20
Common Reasons for Failed Upgrade 20
Deleting Tenable Applications and Data 21
Tenable Applications 23
Service Graph Connector for Tenable for Assets 23
Service Graph Connector for Tenable for Assets for ServiceNow 23
Tenable for ITSM 25
Tenable for ITSM for ServiceNow 26
OTSecurity for Vulnerability Response (VR) 28
OTSecurity for VR 28
ServiceNow Data Maps 30
Available Data OTSecurity 30
Available Data Tenable Security Center 36
Available Data Tenable Vulnerability Management 41
Configure 48
- 2 -

Configure the Tenable Connector 48
Disable or Enable Connectors 52
Assets Configuration and Schedule Import 55
Configure Assets to Sync from ServiceNow to Tenable Security Center 60
Configure Assets to Sync from ServiceNow to Tenable Vulnerability Management 61
VR Configuration and Schedule Import 64
ITSM Configuration and Schedule Import 67
Settings 76
General Settings 76
Assets Settings 77
VR Settings 78
ITSMSettings 80
System Properties 82
Add Fields to Tables 83
Support 87
Troubleshooting 88
- 3 -

Welcome to Tenable for ServiceNow 5.x.x
Tenable applications are designed to help customers who use ServiceNow with Tenable
Vulnerability Management, Tenable Security Center, or OTSecurity.
In the Tenable for ServiceNow 5.x.x and later, the Tenable Connectors handle all configuration and
import scheduling. Therefore, you must properly configure your Tenable Connectors for the Assets,
Vulnerability Response (VR) for OTSecurity, or Information Technology Service Management
(ITSM) applications to function properly.
The Service Graph Connector for Tenable for Assets application integrates Tenable assets with the
ServiceNow Configuration Management Database (CMDB). Assets are imported into the CMDB
through ServiceNow's Identification Reconciliation Engine (IRE). This application, once configured,
allows you to bring Tenable asset data into ServiceNow as CIs and to push ServiceNow CIs to
Tenable as assets.
The OTSecurity for Vulnerability Response application integrates Tenable vulnerability findings with
the ServiceNow Security Operations Vulnerability Response module. This application, once
configured, syncs all of OTSecurity vulnerability findings into ServiceNow Vulnerable Items (VI) and
Tenable Plugin details into ServiceNow Third-Party Vulnerabilities.
The Tenable for ITSM application integrates Tenable vulnerability findings into a custom table used
to create incidents from the vulnerabilities. This application, once configured, syncs all of Tenable
vulnerability findings into a custom vulnerabilities table and Tenable Plugin details into a second
custom table.
This guide covers ServiceNow integration with:
l
Tenable Connector
l
Assets Configuration and Schedule Import
l
VR Configuration and Schedule Import
l
ITSM Configuration and Schedule Import
Tip: The
Tenable for ServiceNow User Guide
is available in English and Japanese.
Before You Begin
Complete the following steps before you can use the Tenable for ServiceNow application.
- 4 -

Configure ServiceNow Applications
Tenable recommends that you work with your internal ServiceNow Administrator or ServiceNow
Consultant to help setup the applications and follow ServiceNow’s process for development which
uses a development > test > production model:
l
Install your development instance and tune as necessary.
l
Create any modifications using update sets.
l
Install the applications on a test environment and promote those update set changes for
quality assurance in your test environment.
l
Once approved in your test environment, install the Tenable applications on a production
environment and apply the update sets.
Note: You need unique credentials for each ServiceNow environment.
Configure ServiceNow MID Server
The ServiceNow MID Server application facilitates communication and movement of data between
the platform and external applications, data sources, and services. There can be several MID
servers in an environment with some dedicated to development or testing, and others dedicated to
production. If your Tenable Security Center or OTSecurity resides behind a firewall on your internal
network, you must use the MID server to access its data.
l
Review the MID server section in the ServiceNow documentation.
l
Ensure your system meets the MID server system requirements, as described in the MID
Server System requirements in the ServiceNow documentation.
l
Ensure your system meets the MID Server memory requirements, as described in the Set the
MID Server JVM memory size section in the ServiceNow documentation.
ServiceNow Scoped Application
Application scoping protects applications by identifying and restricting access to application files and
data. For more information, see the Application Scope section in the ServiceNow documentation.
Enabling the Application picker under the developer tab in the ServiceNow user interface
configuration menu simplifies the Tenable for ServiceNow application configuration.
- 5 -

Tenable requires creating individual ServiceNow users in Tenable Vulnerability
Management/Tenable Security Center/OTSecurity for each of your ServiceNow instances. This
helps prevent rate limiting, data collision, etc.
Examples:
l
sn_dev
l
sn_test
l
sn_prod
By segmenting the users, you can also limit the amount of data used in your development and test
environments.
In Tenable Vulnerability Management, you can set up an Access Group and limit the data to specific
assets to simplify the import and testing of data.
Note: Tenable is converting all access groups into permission configurations. For more information, see
Access Groups and Permissions in the Tenable Vulnerability Management User Guide.
In Tenable Security Center, you can create a query that limits the data presented to the development
and test users. To determine the best dataset to use for your development and test environments,
speak with your Tenable administrator. They can also help you ensure ServiceNow displays the best
data by setting up appropriate scan cadences.
In OTSecurity, you can create users by navigating to Local Settings > Users and Roles > Local
Users > Add User.
Generate Tenable Vulnerability Management API Keys
To generate unique API keys to integrate ServiceNow with Tenable Vulnerability Management:
1. Log in to Tenable Vulnerability Management.
2. Create administrator accounts (For example, development, test, production) dedicated for use
with ServiceNow. ServiceNow uses these accounts to connect to Tenable Vulnerability
Management to retrieve asset data.
3. Generate APIkeys and save them for use with ServiceNow.
- 6 -

Note: For your Tenable Vulnerability Management integration:
l
Generate an API key in Tenable Vulnerability Management to complete the configuration. See
the Tenable Vulnerability Management user guide for instructions on how to generate an
API key. (Do not use this APIkey for any other third party or custom-built application or
integration. It must be unique for each installed instance of the integration.)
4. Navigate to Settings >Access Groups.
5. Click the All Assets group.
6. Do one of the following:
l
If the All Users toggle is enabled, do nothing.
l
If the All Users toggle is disabled:
a. Click the + button.
b. Add the ServiceNow users you created in step 2.
Generate Tenable Security Center API Keys
Create unique API keys to integrate Tenable Security Center with ServiceNow:
1. Log in to Tenable Security Center.
2. Create security manager accounts or Create security analyst accounts (e.g., development,
test, production) with full access dedicated for use with ServiceNow. ServiceNow uses these
accounts to connect to Tenable Security Center to retrieve data and kick off remediation
scans.
3. Generate API keys and save them for use with ServiceNow.
In OTSecurity, you can create API keys by navigating to Local Settings > System Configuration >
API Keys > Generate Key.
Application Dependencies
The Tenable apps for ServiceNow have the following application dependencies:
l
Tenable Vulnerability Management, Tenable Security Center 5.7+, or OTSecurity
l
ServiceNow Washington D.C., Vancouver, or Utah
- 7 -

Applications
Note: Each application name is linked to its ServiceNow store listing. Click the link to see more detailed
dependency information.
Tenable Connector: This application is a prerequisite for all of the following Tenable applications in
the ServiceNow store.
Service Graph Connector for Tenable for Assets:
l
Tenable Connector
l
ServiceNow Configuration Management Database (CMDB)
l
Integration Commons for CMDB
l
CMDBCI Class Models
l
ITOM Licensing (com.snc.itom.license)
l
ITOM Discovery License (com.snc.itom.discovery.license)
Note: Service Graph Certified apps are required to have the following dependencies: ITOM Licensing
(com.snc.itom.license) and ITOM Discovery License (com.snc.itom.discovery.license). You may request to
have the com.snc.itom.license plugin installed on your instance from the ServiceNow Support Portal.
Contact your ServiceNow representative for more information.
OTSecurity for Vulnerability Response:
l
Tenable Connector
l
Service Graph Connector for Tenable for Assets
l
ServiceNow Vulnerability Response
Tenable for ITSM:
l
Tenable Connector
l
Service Graph Connector for Tenable for Assets
l
ServiceNow Incident (ITSM)
Get Started with Tenable for ServiceNow
- 8 -

To configure your Tenable for ServiceNow integration:
Note: It is important to configure Tenable ServiceNow applications in the following order. Install and
configure connectors before any other application. If the connectors are not properly installed, those errors
can impact all subsequent application installations and configurations.
Tip: Tenable recommends using the tabbed view in ServiceNow to navigate the Tenable applications. To
use this setting, go to Settings > Forms. Enable the Tabbed forms toggle.
1. Install the Tenable applications you want to use in ServiceNow.
Note: Tenable Connector and Service Graph Connector for Tenable for Assets are required.
2. Configure the Tenable Connector.
3. Configure the Service Graph Connector for Tenable for Assets application. You can schedule
imports in this step.
Note: It is important to configure the Service Graph Connector for Tenable for Assets application
with accurate parameters. Otherwise, the integration may not work as designed.
4. (Optional) Configure the OTSecurity for VRapplication. You can schedule imports in this
step.
5. (Optional) Configure the Tenable for ITSM application. You can schedule imports in this step.
- 9 -

Install
To download the Tenable applications, go to the ServiceNow App Store. For more information on
how to download applications from the App Store, see the ServiceNow documentation.
The following Tenable applications are available in the ServiceNow App Store:
l
Tenable Connector (Required)
l
Service Graph Connector for Tenable for Assets (Required)
l
OTSecurity for Vulnerability Response (VR) (Optional)
l
Tenable for ITSM (Optional)
- 10 -

TenableApplications Upgrade Overview
Tenable's ServiceNow applications get upgrades periodically. Tenable recommends that you
upgrade the platform to ensure your system remains up to date.
Supported Upgrade Paths
Version 3.1 and earlier
Tenable does not support direct upgrades to the current version of the application for customers
currently using Tenable apps version 3.1 and earlier. To upgrade to the newest version of the
Tenable applications, delete your current Tenable applications and data and then reinstall the
newest version of the applications.
For more information, see Deleting Tenable Applications and Data.
Version 4.0 and later
Tenable supports direct upgrades to the current version of the application for customers using
Tenable apps version 4.0 and later. For more information, see Upgrade Tenable Applications.
To upgrade the ServiceNow Tenable Applications:
1. Disable the Tenable connectors.
2. Upgrade the platform.
For more information, see the ServiceNow documentation.
3. For each of the Tenable Applications you installed, complete the Upgrade the Tenable
Applications steps.
l
Upgrade the Tenable Connector
l
Upgrade Service Graph Connector for Tenable for Assets
l
Upgrade OTSecurity for VR (if using)
l
Upgrade Tenable for ITSM (if using)
4. Enable the Tenable connectors.
- 11 -

Upgrade the Tenable Applications
To update the Tenable application version:
1. In the ServiceNow filter search bar, type
system applications
.
The system applications results appear.
2. Under System Applications, select Installed.
The All Applications page appears.
3. Type
Tenable
in the search filter box.
- 12 -

A list of installed Tenable applications appears.
4. Next to the installed application, click the version drop-down.
A list of available version updates appears.
5. For each Tenable app (Tenable Connector, Service Graph Connector for Tenable for Assets,
OTSecurity for VR, or Tenable for ITSM), select the latest version.
6. Click Update.
The application updates to the version you selected.
Review and Resolve All Upgrade Skipped Changes
1. Navigate to System Diagnostics > Upgrade History.
2. Search for “x_tsirm” in the To field.
- 13 -

3. For each updated Tenable app, open the upgrade record and look at the Skipped Changes to
Review tab.
4. For each skipped change in this list, complete the following steps:
- 14 -

a. Open the skipped change and select Resolve Conflicts.
b. Select the option to Revert to Base System, if present. The app automatically marks the
skipped change record as Reviewed and Reverted.
c. If you see a blank screen without an option to Revert to Base System, then there is no
action to take on the skipped change. Mark the skipped change record as Reviewed.
After you review all skipped changes in all Tenable apps, the upgrade is complete.
Delete Leftover Artifacts
- 15 -

Occasionally, older application files, or artifacts, may not get deleted even after performing the tasks
in Review and Resolve All Upgrade Skipped Changes. If you encounter this problem, view this
knowledge base article to delete any leftover artifacts.
How to Verify a Successful Upgrade
Tenable supports the most recent version of Tenable applications within ServiceNow, and
unsuccessful upgrades cause most support issues. If requesting support, perform the following
steps to provide proof that you have successfully updated Tenable applications within ServiceNow
to the newest available version.
Caution: To complete a successful upgrade, it is important to review manually each of the skipped changes
and follow the instructions. If you batch update the resolution field of these records instead of manually
reviewing and resolving each one, then the upgrade fails and you must perform the upgrade again. To redo
an upgrade, you need to repair each of the Tenable apps and complete the skip log process again.
Method 1: Support Collection Script
Tenable support provides a script on our support page to gather upgrade information without the
need for you to provide any screenshots as verification:
Tenable Service Now App Support Collection Script
Method 2: Provide Verification Screenshots
If you are unable to run the support collection script, you can provide screenshots to show
completed the successful upgrade.
- 16 -

1. Provide a screenshot of the current version of the Tenable plugins.
Note: This screenshot shows the user has not updated all of their plugins to the latest version. They
need to update to the newest version to receive support.
- 17 -

Note: This screenshot shows the user has updated all of their plugins to the latest version.
2. Provide screenshots of the Upgrade History and Reviewed Skip Logs for each plugin.
Note: This screenshot shows that the user has not reviewed the skipped changes.
- 18 -

Note: This screenshot shows the user has not manually reviewed all skipped changes. They need to
complete this step to upgrade successfully and receive support.
- 19 -

Note: This screenshot shows the user has reviewed all skipped changes.
Unsuccessful Upgrades
If you are unsuccessful with your Tenable App for ServiceNow upgrade, you can complete
it again:
1. Navigate to System Definition > Plugins and search for the Tenable apps.
2. For each Tenable app (Tenable Connector, Service Graph Connector for Tenable for Assets,
OTSecurity for VR, or Tenable for ITSM), click the Menu icon on the application tile.
3. Click Repair.
4. In the Activate Plugin dialog box, click Repair.
5. After you repair the apps, they are back to a newly installed state, and you can review the
skipped changes again. See
Review and Resolve Skipped Changes
in the Upgrade the
Tenable Applications documentation.
Common Reasons for Failed Upgrade
- 20 -

Not reviewing skipped changes:
If you do not review the Skipped Changes after an upgrade, the apps will not work properly and the
upgrade will be unsuccessful.
Incorrectly reviewing skipped changes:
The Tenable application does not apply changes, function properly, and the upgrade fails, when you
do not manually open, review, and resolve each individual skipped change, and/or only update the
Resolution field of the Skipped Changes list to Reviewed and Reverted (or to another resolved
value).
For more information, see Upgrade the Tenable Applications.
Deleting Tenable Applications and Data
You may need to delete your Tenable applications and data when upgrading ServiceNow from
versions 3.0 and earlier to versions 4.0 and later.
To delete current Tenable applications and data:
1. Disable all Tenable connectors and their associated or scheduled jobs.
2. Run the following commands in Scripts > Background to delete records:
a. Delete all Assets Pending Approval (Tenable-specific legacy asset class).
//Assets Pending Approval cleanup x_tsirm_tio_cmdb_tio_disc_ci
var apa = new GlideMultipleDelete('x_tsirm_tio_cmdb_tio_disc_ci');
apa.execute();
b. Delete all Tenable Asset Attribute records.
//Asset Attributes cleanup x_tsirm_tio_cmdb_asset_attributes
var assetInfo = new GlideMultipleDelete('x_tsirm_tio_cmdb_asset_
attributes');
assetInfo.execute();
c. Delete all Tenable-specific IRE records.
- 21 -

//Clean up source uniqueness. This will force IRE matching
var assetSysSource = new GlideMultipleDelete(“sys_object_source”);
assetSysSource.addQuery(“name”, “STARTSWITH”, “Tenable”);
assetSysSource.execute();
d. Delete all Tenable vulnerability items.
var vi = new GlideMultipleDelete('sn_vul_vulnerable_item');
vi.addQuery(“source”, “STARTSWITH”, “Tenable”);
vi.execute();
3. Uninstall the Tenable applications.
This process provides a cleaner starting point and removes any corrupted data, if present. From
here, you can either reinstall the Tenable applications, or install the ServiceNow-built Vulnerability
Response (VR) app.
Reinstall Tenable-built Applications
Choose this option if you are not using ServiceNow’s VR application. For more information, see the
Install page.
- 22 -

Tenable Applications
Service Graph Connector for Tenable for Assets
Tenable for ITSM
OTSecurity for Vulnerability Response (VR)
Service Graph Connector for Tenable for Assets
Service Graph Connector for Tenable for Assets syncs and reconciles assets between Tenable
Vulnerability Management, Tenable Security Center, OTSecurity, and the ServiceNow
Configuration Management Database (CMDB). With Tenable's sophisticated discovery and
scanning technology and ServiceNow's extensive CMDB you can accurately track all of your assets.
With Service Graph Connector for Tenable for Assets, you can:
l
Customize how Tenable assets are matched to ServiceNow CIs
l
Define which ServiceNow CIs are sent to Tenable as assets
Note:Service Graph Connector for Tenable for Assets only supports Tenable Security Center versions 5.7
and later.
Note: The Tenable ServiceNow Application for Assets push job to Tenable Vulnerability Management only
creates assets and does not assign tags to assets.
For more information, see Assets Configuration and Schedule Import.
Service Graph Connector for Tenable for Assets for ServiceNow
Tenable Vulnerability Management offers monitoring and vulnerability management that protects
critical applications, devices, and infrastructures. The Service Graph Connector for Tenable for
Assets application is purpose-built for ServiceNow's Vulnerability Response offering, allowing you to
import your Tenable Vulnerability Management vulnerability data and manage it within ServiceNow.
Note: The Service Graph Connector for Tenable for Assets ServiceNow app asset push job uses the POST
/import/assets API endpoint to create new assets in Tenable Vulnerability Management. This endpoint
creates an asset import job that is managed by Tenable Vulnerability Management and is referred to as an
async request in several rule descriptions.
- 23 -

Application Menu
l
Service Graph Connector for Tenable for Assets: Primary Role Required: x_tsirm_tio_
cmdb.user
Title Required Role
Documentation x_tsirm_tio_cmdb.user
ContactSupport x_tsirm_tio_cmdb.user
Dashboard x_tsirm_tio_cmdb.user
Assets Pending Approval x_tsirm_tio_cmdb.user
All Synchronized Items x_tsirm_tio_cmdb.user
Configuration x_tsirm_tio_cmdb.admin
General Settings x_tsirm_tio_cmdb.admin
Connectors x_tsirm_tio_cmdb.admin
API Data Mappings x_tsirm_tio_cmdb.user
Diagnostics x_tsirm_tio_cmdb.admin
Asset Outbound Jobs x_tsirm_tio_cmdb.admin
Asset Inbound Jobs x_tsirm_tio_cmdb.admin
Queued Actions x_tsirm_tio_cmdb.admin
Primary Roles
l
x_tsirm_tio_cmdb.admin: An administrative user of the application.
l
x_tsirm_tio_cmdb.user: A basic user of the application.
Business Rules
- 24 -

l
Update Job and Chunk Status: Business rule that sets the status of jobs and chunks.
l
Push Asset Update to Tenable.io: Sends asset update information to Tenable Vulnerability
Management by creating an async request queue action entry.
l
Set Name: Sets the name of the asset attribute record of the connector or Asset UUID change.
l
Set Tenable Values when Done Processing: On complete outbound jobs, this sets values on
the asset attribute record.
l
Update Job Percent Complete: Updates the job percent complete as records get processed.
l
Create Settings if None exist: Automatically creates a general settings record with default
values if one does not exist.
l
Calc Job State: Calculates the job state based on happenings with chunks.
l
On Job State Change: Inbound job total records and percent complete, when the state of the
job changes.
l
Notify About Limitations on Out of Box Rules: Shows user interface message explaining that
out of box CI rules are not editable.
l
Push Asset Update to Tenable.io (Update): Sends asset update information to Tenable
Vulnerability Management by creating an async request queue action entry.
Tenable for ITSM
Tenable for ITService Management (ITSM) provides you with the ability to import Tenable
vulnerability findings and transform them into ServiceNow incidents without the need for
ServiceNow Vulnerability Response. This helps you move from manual email and spreadsheet
processes to a repeatable workflow in ServiceNow.
The Tenable ITSM Process
Tenable for ITSM uses Service Graph Connector for Tenable for Assets to find the correct asset/CI
to link a vulnerability to. It is important that you completely test and tune Service Graph Connector
for Tenable for Assets before configuring Tenable for ITSM. Tenable for ITSM uses the connector
you specify to download vulnerabilities and create them in a custom ServiceNow table. The
application uses configurable incident rules to create ServiceNow incidents for each vulnerability to
be used by IT administrators to assign remediation work to their teams.
- 25 -

The application creates vulnerabilities as follows:
l
The Tenable ITSM app uses the Service Graph Connector for Tenable for Assets app to match
vulnerable assets to ServiceNow CI’s.
l
For every vulnerability finding, it creates a unique vulnerability entry in the Tenable ITSM app.
l
Coalescing on ServiceNow CI, plugin id, port, and protocols determine unique vulnerability
entries.
l
If a vulnerability is fixed in Tenable, both the vulnerability and incident close in ServiceNow.
l
If a vulnerability is closed manually, but found in the future, Tenable reopens the vulnerability
and incident in ServiceNow.
The application can create incidents as follows:
l
You can manually create a ServiceNow incident from the vulnerability form.
l
You can create incident rules to automatically spawn incidents:
o
Use the selector form for simple rule creation using asset fields and values.
o
Use advanced scripting to manipulate data for more granular selection.
Tenable for ITSM for ServiceNow
Tenable Vulnerability Management offers monitoring and vulnerability management that protects
critical applications, devices, and infrastructures. The Tenable for ITSM application is purpose built
for ServiceNow's Vulnerability Response offering, allowing you to import your Tenable Vulnerability
Management vulnerability data and manage it within ServiceNow.
Application Menu
l
Tenable for ITSM: Primary Role Required: x_tsirm_tio_itsm.user
Title Required Role
Documentation x_tsirm_tio_itsm.user
ContactSupport x_tsirm_tio_itsm.user
Plugins x_tsirm_tio_itsm.user
- 26 -

Title Required Role
Vulnerabilities x_tsirm_tio_itsm.user
Incidents x_tsirm_tio_itsm.user
Configuration x_tsirm_tio_itsm.user
General Settings x_tsirm_tio_itsm.admin
Connectors x_tsirm_tio_itsm.admin
Scheduled Imports x_tsirm_tio_itsm.user
Incident Rules x_tsirm_tio_itsm.admin
Diagnostics x_tsirm_tio_itsm.admin
Queued Actions x_tsirm_tio_itsm.admin
Documentation x_tsirm_tio_itsm.user
Contact Support x_tsirm_tio_itsm.user
Plugins x_tsirm_tio_itsm.user
Vulnerabilities x_tsirm_tio_itsm.user
Incidents x_tsirm_tio_itsm.user
Primary Roles
l
x_tsirm_tio_itsm.admin: An administrative user of the application.
l
x_tsirm_tio_itsm.user: A basic user of the application.
Business Rules
l
Cali Job State: Calculates the job state based on happenings with chunks.
l
On Job State: Change Inbound job total records and percent complete, when the state of the
job changes.
- 27 -

l
Create Settings if None Exist: Automatically creates a general settings record with default
values if one doesn’t exist.
OTSecurity for Vulnerability Response (VR)
The integration of OTSecurity for VR with ServiceNow’s Vulnerability Response module takes your
Tenable platform findings and syncs them into ServiceNow Vulnerability Response tables and data
structures. This integration allows you to reduce your cyber risk by allowing you to prioritize rapidly
and automate the remediation of critical vulnerabilities across your most important assets.
Note: The OTSecurity for VR application only supports OTSecurity.
With OTSecurity for Vulnerability Response, you can:
l
Leverage the Service Graph Connector for Tenable for Assets application to link vulnerabilities
to ServiceNow CIs
l
Create ServiceNow third-party vulnerabilities from Tenable Plugins
l
Create Vulnerable Items from Tenable findings
l
Customize data mapping while keeping app upgradability
l
Configure vulnerabilities to sync from your Tenable platform
l
Automatically close vulnerable items once Tenable finds them to be resolved
l
Reopen previously closed vulnerable items if they are found again later.
OTSecurity for VR
OTSecurity for VR allows you to integrate your Tenable data with ServiceNow creating closed loop
remediation. This application has grouping functionality and risk calculators. In addition, it creates
tickets for IT staff according to specified machines, allows reallocation, closing, and reopening.
Application Menu
OTSecurity for VR: Primary Role Required: x_tsirm_tio_vr.user
Title Required Role
Documentation x_tsirm_tio_vr.user
- 28 -
Title Required Role
ContactSupport x_tsirm_tio_vr.user
Configuration x_tsirm_tio_vr.user
General Settings x_tsirm_tio_vr.admin
Connectors x_tsirm_tio_vr.admin
Scheduled Imports x_tsirm_tio_vr.user
API Data Mappings x_tsirm_tio_vr.admin
Default VR Data Source x_tsirm_tio_vr.admin
Transform Maps x_tsirm_tio_vr.admin
Diagnostics x_tsirm_tio_vr.admin
Queued Actions x_tsirm_tio_vr.admin
Documentation x_tsirm_tio_vr.user
Contact Support x_tsirm_tio_vr.user
Configuration x_tsirm_tio_vr.user
General Settings x_tsirm_tio_vr.admin
Connectors x_tsirm_tio_vr.admin
Scheduled Imports x_tsirm_tio_vr.user
Primary Roles
x_tsirm_tio_vr.admin: An administrative user of the application.
x_tsirm_tio_vr.user: A basic user of the application.
Business Rules
Calc Job State: Calculates the job state based on happenings with chunks.
- 29 -

Run Plugin Families Populate on Activate: Runs the script to run the API call to get plugin families
from Tenable when a connector is activated.
On Job State Change: Inbound job total records and percent complete, when the state of the job
changes.
Create Settings if None Exist: Automatically creates a general settings record with default values if
one doesn’t exist.
ServiceNow Data Maps
The logic for mapping Assets to ServiceNow Configuration Items is available in the following pages:
l
OTSecurity available data
l
Tenable Security Center available data
l
Tenable Vulnerability Management available data
Available Data OTSecurity
OTSecurity Asset Import Data Map
Logic for mapping OTSecurity Assets to ServiceNow Configuration Items.
Asset import sequence:
1. ServiceNow queries OTSecurity for assets.
2. Data is attached to ServiceNow Job Chunk.
3. Data is transformed into a format useable for ServiceNow Identification and Reconciliation
Engine (IRE).
4. Data is submitted to IRE which creates CIs in CMDB.
5. OT Assets are created for certain CIs.
Data Transformation in ServiceNow
For each Asset imported from OTSecurity into ServiceNow, multiple records are created.
Main CI
- 30 -

A main CI record (cmdb_ci_incomplete_ip, cmdb_ci_unclassed_hardware, or cmdb_ci_computer) is
created for every OTSecurity Asset imported into ServiceNow.
ServiceNow Field Details (OTSecurity fields in bold)
CMDB
Class
Class 1. “Operational Technology (OT)”
2. Specific OT Class
l
If there is a known ServiceNow CI class map
for that OTSecurity type
All classes
Name details.name All classes
Serial Number details.serial All classes
Description details.description All classes
Operating System details.os All classes
Backplane ID details.backplane.id All classes
Backplane Name details.backplane.name All classes
Firmware version details.firmwareVersion All classes
Model number details.modelName All classes
Discovery Source “SG-TenableForAssets” All classes
IP Address details.ips[0] All classes
Most recent
discovery
details.lastSeen All classes
First discovered details.firstSeen All classes
Vendor details.vendor All classes
Manufacturer details.vendor All classes
Tenable Asset
Attributes
Reference to Tio CMDB Asset Attributes table with
OTSecurity specific fields
All classes
Child Network Adapter CIs
- 31 -

Related Network Adapter CI records (cmdb_ci_network_adapter) are created for OTSecurity
Assets since there is no network interface information pulled from Tenable.
ServiceNow field Details (OTSecurity fields in bold)
Class “Network Adapter”
Name details.macs
MAC Address details.macs
Configuration Item Reference to Main CI
Discovery Source “SG-TenableForAssets”
Child IP Address CIs
Related IP Address CI records (cmdb_ci_ip_address) are created for each IP address associated
with a Main CI.
ServiceNow field Details (OTSecurity fields in bold)
Class “IP Address”
Name details.ips
IP Address details.ips
IP Version “4”
Network Partition Identifier details.extendedSegments.nodes[0].id
Discovery Source “SG-TenableForAssets”
Tenable Asset Attributes Records
A Tenable Asset Attributes record (x_tsirm_tio_cmdb_asset_attributes) is created for every Main CI.
ServiceNow filed Details (OTSecurity fields in bold)
Hostname Main CIname
Connector Reference to connector record
- 32 -

ServiceNow filed Details (OTSecurity fields in bold)
Tenable Uniqueness id
Asset UUID id
Raw Data Raw JSON Data
Sources “OT for” + Tenable App Name
Source Native Key id
Attributes Raw JSON Data in ServiceNow format
Name Connector.Name + ". " + id
Related CI Reference to Main CI
OT Asset Records
An OT Asset record (cmdb_ot_entity) is created for every Main CI.
ServiceNow field Details (OTSecurity fields in bold)
OT asset Reference to Main CI
OT asset type Specific asset type
l
If there is a known ServiceNow OT asset type map for that
OTSecurity type.
OT discovery source ID id
Purdue level details.purdueLevel
Asset criticality details.criticality
OT discovery source
name
“SG-TenableForAssets”
CMDB Relationship Records
A CMDB Relationship record (cmdb_rel_ci) is created for every parent/child relationship between
the Main CI and a Network Adapter CI or an IP Address CI.
- 33 -

ServiceNow field Details
Parent Reference to Main CI
Child Reference to Network Adapter or IP Address CI
Type “Owns::Owned by”
Discovery Source Records
A Discovery Source record (sys_object_source) is created for every new CI created in ServiceNow
with information about the source and the unique identifier of the CI.
ServiceNow field Details
ID id
Last Scan Date/time of last OTSecurity import
Target Sys ID Reference to Main CI
Target Table Table of Main CI
Name “SG-TenableForAssets”
Source Feed “Tenable”
Importing Backplane Information
PLC CIs display ownership information, as shown in the following image:
- 34 -

Backplane CIs display information about the asset that owns them, as shown in the following image:
- 35 -

Note: If importing a Tenable asset with backplane information, but no parent is found on that same
backplane, create a fake OT Control System CI using the backplane ID as the unique identifier. The name
should be based off of the backplane. The generic parent is created so the integration can create the OT
Control Module children successfully.
Note: If importing a Communication Module asset and there is no backplane information, create it as a
Network Gear CI. If importing an I/O Module asset and there is no backplane information, create it as an
Industrial Sensor CI.
API Calls to OTSecurity
Query Assets
Input: first, after
l
Example: {"operationName": "getAssets", "variables": {"first": chunkSize,
"after": afterCursor, "sort": [ { "direction": "AscNullFirst", "field":
"lastSeen" } ] }, "query": "query getAssets($filter:
AssetExpressionsParams, $search: String, $sort: [AssetSortParams!],
$slowCount: Boolean, $after: String, $first: Int) { assets(filter: $filter
sort: $sort search: $search slowCount: $slowCount after: $after first:
$first) { pageInfo { ...pageInfo __typename } nodes { ...inventoryAsset __
typename } count: totalCount __typename } } fragment pageInfo on PageInfo {
startCursor endCursor hasNextPage hasPreviousPage __typename } fragment
inventoryAsset on Asset { id superType type details segments { nodes {
...segmentName __typename } __typename } __typename } fragment segmentName
on SegmentGroup { id name type assetType subnet systemName system
isPredefinedName __typename}" }
Output: Use GraphiQL Playground or review Asset object documentation for possible asset values.
Available Data Tenable Security Center
Tenable Security Center Asset Import Data Map
Logic for mapping Tenable Security Center Assets to ServiceNow Configuration Items.
Asset import sequence:
- 36 -

1. ServiceNow queries Tenable Security Center for assets.
2. Data is attached to ServiceNow Job Chunk.
3. Data is transformed into a format useable for ServiceNow Identification and Reconciliation
Engine (IRE).
4. Data is submitted to IRE which creates CIs in CMDB.
Data Transformation in ServiceNow
For each Asset imported from Tenable Security Center into ServiceNow, multiple records are
created.
Main CI
A main CI record (cmdb_ci_incomplete_ip, cmdb_ci_unclassed_hardware, or cmdb_ci_computer) is
created for every Tenable Security Center Asset imported into ServiceNow.
ServiceNow
Field
Details (Tenable Security Center fields in
bold)
CMDB Class
Class
l
Incomplete IP Identified Device
If ip is received from Tenable Security
Center.
l
Unclassed Hardware
If 1, plus dnsName or netbiosNames are
received from Tenable Security Center.
l
Computer
If 2, plus osCPE are received from
Tenable Security Center.
All classes
Name 1. netbiosName
2. fqdn
3. dnsName
4. ip
All classes
- 37 -

5. macAddress
Description Information about how name was identified All classes
Discovery
Source
“SG-TenableForAssets” All classes
Tenable Asset
Attributes
Reference to Tio CMDB Asset Attributes table
with Tenable Security Center specific fields
Computer and
Unclassed Hardware
classes only
Mac Address macAddress Computer and
Unclassed Hardware
classes only
Operating
System
osCPE Computer class only
Name ip Incomplete IP class only
Network
Partition
Identifier
repository_name Incomplete IP class only
Fully Qualified
Domain Name
dnsName Computer class
Child Network Adapter CIs
Related Network Adapter CI records (cmdb_ci_network_adapter) are NOT created for Tenable
Security Center Assets since there is no network interface information pulled from Tenable.
Child IP Address CIs
Related IP Address CI records (cmdb_ci_ip_address) are created for each IP address associated
with a Main CI.
ServiceNow field Details (Tenable Security Center fields in bold)
Class “IP Address”
Name ip
- 38 -

IP Address ip
IP Version “4”
Network Partition Identifier repository.name
Discovery Source “SG-TenableForAssets”
Tenable Asset Attributes Records
A Tenable Asset Attributes record (x_tsirm_tio_cmdb_asset_attributes) is created for every Main CI.
ServiceNow filed Details (Tenable Security Center fields in bold)
Hostname Main CIname
Connector Reference to connector record
SC Uniqueness 1. uniqueness
2. hostUniqueness
OS CPE osCPE
Repository Data Format repository.dataFormat
Sources “SC for” + Tenable App Name
Source Native Key 1. uniqueness
2. hostUniqueness
Attributes Raw JSON Data in ServiceNow format
Name Connector.Name ": " + SC Uniqueness
Related CI Reference to Main CI
CMDB Relationship Records
A CMDB Relationship record (cmdb_rel_ci) is created for every parent/child relationship between
the Main CI and a Network Adapter CI or an IP Address CI.
ServiceNow field Details
- 39 -

Parent Reference to Main CI
Child Reference to Network Adapter or IP Address CI
Type “Owns::Owned by”
Discovery Source Records
A Discovery Source record (sys_object_source) is created for every new CI created in ServiceNow
with information about the source and the unique identifier of the CI.
ServiceNow field Details
ID id
Last Scan Date/time of last Tenable Security Center import
Target Sys ID Reference to Main CI
Target Table Table of Main CI
Name “SG-TenableForAssets”
Source Feed “Tenable”
API Calls to Tenable Security Center
Request Analyst Results
Input: type, query, sortDir, sortField, sourceType, startOffset, endOffset
l
Example: {"type":"vuln","query":
{"name":"","type":"vuln","tool":"sumip","description":"","context":"","gro
ups":[],"startOffset":0,"endOffset":1500,"filters":
[{"filterName":"repository","operator":"=","value":
[{"id":"3","name":"Staged-
Small","description":"","type":"Local","uuid":"5AEA0478-0F1A-4B02-87D6-
1F6131443F9C"},
{"id":"1","name":"Live","description":"","type":"Local","uuid":"504D0D4E-
7A95-4AA8-BFC2-98009FE702E1"},{"id":"4","name":"Staged-
- 40 -

Agents","description":"","type":"Local","uuid":"9F68370D-1EC9-4005-8555-
23B1DF2FCF5B"}]},
{"filterName":"lastSeen","operator":"=","id":"lastSeen","value":"167036434
3-
1670450742"}]},"sortField":"score","sortDir":"asc","sourceType":"cumulativ
e"}
Output: Open link and review Example Response for possible asset values.
Available Data Tenable Vulnerability Management
Tenable Vulnerability Management Asset Import Data Map
Logic for mapping Tenable Vulnerability Management Assets to ServiceNow Configuration Items.
Asset import sequence:
1. ServiceNow queries Tenable Vulnerability Management for assets.
2. Data is attached to ServiceNow Job Chunk.
3. Data is transformed into a format useable for ServiceNow Identification and Reconciliation
Engine (IRE).
4. Data is submitted to IRE which creates CIs in CMDB.
Data Transformation in ServiceNow
For each Asset imported from Tenable Vulnerability Management into ServiceNow, multiple records
are created.
Main CI
A main CI record (cmdb_ci_incomplete_ip, cmdb_ci_unclassed_hardware, or cmdb_ci_computer) is
created for every Tenable Vulnerability Management Asset imported into ServiceNow.
ServiceNow
Field
Details (Tenable Vulnerability Management fields in
bold)
CMDB Class
Class
l
Incomplete IP Identified Device
If ipv4s or ipv6s are received from Tenable
All classes
- 41 -

Vulnerability Management.
l
Unclassed Hardware
If 1., plus hostnames, netbios_names, or fqdns
are received from Tenable Vulnerability
Management.
l
Computer
If 2., plus aws_ec2_instance_id, gcp_instance_id,
azure_resource_id, or operating_systems are
received from Tenable Vulnerability Management.
Name 1. netbios_names
2. hostnames
3. fqdns
4. ipv4s
5. ipv6s
6. mac_addressses
All classes
Description Information about how name was identified All classes
Discovery
Source
“SG-TenableForAssets” All classes
Tenable Asset
Attributes
Reference to Tio CMDB Asset Attributes table with
Tenable Vulnerability Management specific fields
All classes
Is Virtual If aws_ec2_instance_id, gcp_instance_id, azure_
resource_id is received from Tenable Vulnerability
Management
Computer
class only
Operating
System
operating_systems
Computer
class only
IP Address ipv4s Incomplete IP
class only
- 42 -

IP Version “4” Incomplete IP
class only
Network
Partition
Identifier
network_name Incomplete IP
class only
Fully Qualified
Domain Name
fqdns Computer
class
Child Network Adapter CIs
Related Network Adapter CI records (cmdb_ci_network_adapter) are created for each MAC address
associated with a Main CI.
ServiceNow field Details (Tenable Vulnerability Management fields in bold)
Class “Network Adapter”
Name network_interfaces.name
MAC Address network_interfaces.mac_addresses
Fully Qualified Domain Name network_interfaces.fqdns
Configuration Item Reference to Main CI
Discovery Source “SG-TenableForAssets”
Child IP Address CIs
Related IP Address CI records (cmdb_ci_ip_address) are created for each IP address associated
with a Main CI.
ServiceNow field Details (Tenable Vulnerability Management fields in bold)
Class “Network Adapter”
Name 1. network_interfaces.ipv4s or network_interfaces.ipv6s
2. ipv4s or ipv6s
IP Address 1. network_interfaces.ipv4s or network_interfaces.ipv6s
- 43 -

2. ipv4s or ipv6s
IP Version “4” or “6”
Network Partition Identifier network_name
Nic Reference to Network Adapter (if exists)
Discovery Source “SG-TenableForAssets”
Tenable Asset Attributes Records
A Tenable Asset Attributes record (x_tsirm_tio_cmdb_asset_attributes) is created for every Main CI.
ServiceNow filed
Details (Tenable Vulnerability Management fields in
bold)
Hostname Main CIname
Connector Reference to connector record
Tenable Uniqueness id
Asset UUID id
Raw Data Raw JSON data
Sources “IO for ” + Tenable App Name
Source Native Key id
Has Agent has_agent
Has Plugin Results has_plugin_results
Created At created_at
Terminated At terminated_at
Terminated By terminated_by
Updated At updated_at
Deleted At deleted_at
- 44 -

ServiceNow filed
Details (Tenable Vulnerability Management fields in
bold)
Deleted By deleted_by
First Seen first_seen
Last Seen last_seen
First Scan Time first_scan_time
Last Scan Time last_scan_time
Last Authenticated Scan Date last_auhenticated_scan_date
Last Licensed Scan Date last_licensed_scan_date
Last Scan ID last_scan_id
Last Schedule ID last_schedule_id
Azure Instance ID azure_vm_id
GCP Project ID gcp_project_id
GCP Zone gcp_zone
GCP Instance ID gcp_instance_id
AWS EC2 Instance ID aws_ec2_instance_id
Agent UUID agent_uuid
BIOS UUID bios_uuid
Network ID network_id
AWS Owner ID aws_owner_id
McAfee EPO GUID mcafee_epo_guid
McAfee EPO Agent GUID mcafee_epo_agent_guid
Bigfix Asset ID bigfix_asset_id
Agent Names agent_names
- 45 -

ServiceNow filed
Details (Tenable Vulnerability Management fields in
bold)
Netbios Name netbios_names
Operating Systems operating_systems
System Type system_types
SSH Fingerprints ssh_fingerprints
Qualys Asset ID qualys_asset_ids
Qualys Host IDs qualys_host_ids
Manufacturer TPM ID manufacturer_tpm_ids
Symantec EP Hardware Key symantec_ep_hardware_keys
Sources sources
Tags tags
ACR Score acr_score
Exposure Score exposure_score
Attributes Raw JSON data in ServiceNow format
Name Connector.Name + ": " + id
Related CI Reference to Main CI
CMDB Relationship Records
A CMDB Relationship record (cmdb_rel_ci) is created for every parent/child relationship between
the Main CI and a Network Adapter CI or an IP Address CI.
ServiceNow field Details
Parent Reference to Main CI
Child Reference to Network Adapter or IP Address CI
Type “Owns::Owned by”
- 46 -
Discovery Source Records
A Discovery Source record (sys_object_source) is created for every new CI created in ServiceNow
with information about the source and the unique identifier of the CI.
ServiceNow field Details
ID id
Last Scan Date/time of last Tenable Vulnerability Management import
Target Sys ID Reference to Main CI
Target Table Table of Main CI
Name “SG-TenableForAssets”
Source Feed “Tenable”
API Calls to Tenable Vulnerability Management
Generate Tenable Assets Export
Input: chunk_size, filters
l
Example: {"chunk_size":1500,"filters":{"updated_at":1657660668,"is_
deleted":false,"is_licensed":true}}
Output: export_uuid
Query for Asset Export Status
Input: export_uuid
Output: status, chunks_available
Download Tenable Assets Export Chunk
Input: export_uuid, chunk_id
Output: Open link and select the 200 response for all possible asset values.
- 47 -

Configure
Configure your Tenable application.
1. Configure the Tenable Connector
2. Configure Service Graph Connector for Tenable for Assets
3. (Optional) Configure OTSecurity for VR
4. (Optional) Configure Tenable for ITSM
Configure the Tenable Connector
The Tenable Connector provides all API interactions between your Tenable applications
(OTSecurity, Tenable Vulnerability Management, or Tenable Security Center) and ServiceNow
instance.
Note: In ServiceNow, you must have the x_tsirm_api_access admin role to perform the basic connector
setup process.
Note: The ServiceNow configuration only supports Tenable Security Center versions 5.7 and later.
Before you begin:
For Tenable Vulnerability Management:
Minimum Required User Role: Scan Manager
Note: The Tenable ServiceNow integration requires a user with the Scan Manager role for asset
push jobs to import assets into Tenable Vulnerability Management. Alternatively, if asset push
jobs are not required, you can use a Basic User role. Regardless of role, a non-administrator
user must have Can View permissions for the assets they export and Can Use permissions for
the tags assigned to those assets. Without the Can Use tag permissions, the assets return
undefined or the integration fails to export vulnerabilities if a tag filter is used. For more
information on Tenable Vulnerability Management permissions and user roles, refer to
Permissions in the
Tenable Developer Portal
.
- 48 -

l
You must have your Tenable Vulnerability Management API keys.
Note: For your Tenable Vulnerability Management integration:
l
Generate an API key in Tenable Vulnerability Management to complete the
configuration. See the Tenable Vulnerability Management user guide for instructions
on how to generate an API key. (Do not use this APIkey for any other third party or
custom-built application or integration. A unique API key is a requirement for each
installed instance of the integration.)
For Tenable Security Center:
Required User Role: Security Analyst
For OTSecurity:
Required User Role: Read Only
To configure the Tenable connector for Tenable Vulnerability Management, Tenable
Security Center, or OTSecurity:
1. Log in to ServiceNow.
2. In the left navigation pane, click Tenable Connector > Connectors.
The Tenable Connectors page appears.
3. Click New.
4. From the Tenable Product drop-down box, select Tenable.ot, Tenable.io, or Tenable
Security Center.
5. If you are in a domain-separated environment, in the Domain box, type the domain into which
to bring connector data.
6. Select the Active checkbox.
7. In the Scheduled Job Run As box, type the username of the user with which you want to
import data.
Note: If you are in a domain-separated environment, this field is a requirement. The user must be
part of the domain specified in step 5.
- 49 -

8. In the Name text box, type a name for the connector.
9. Complete the configurations for your selected Tenable application.
For OTSecurity:
a. In the Address text box, type an IPaddress or DNS name for the connector.
Note: Type
https://
before the IP or DNS name.
b. In the Secret Key text box, type the secret key provided by your Tenable administrator.
c. In the MID Server text box, search for and select a MID server that can access your
OTSecurity server.
For Tenable Vulnerability Management:
a. In the Address text box, type an IPaddress or DNS name for the connector.
ServiceNow populates this with the Tenable Vulnerability Management IP address.
- 50 -

Note: Type
https://
before the IP or DNS name.
b. In the Access Key text box, type the access key provided by your Tenable administrator.
c. In the Secret Key text box, type the secret key provided by your Tenable administrator.
For Tenable Security Center:
a. Next to Address, click the lock button.
b. In the Address text box, type an IPaddress or DNS name for the connector.
Note: Type
https://
before the IP or DNS name.
c. Click the lock button to lock the address.
d. In the MIDServer text box, search for and select a MID server that can access your
Tenable Security Center server.
e. Do one of the following:
l
If you check the Use User/Password checkbox:
i. In the API Username text box, type the API username provided by your
Tenable administrator.
ii. In the API Password text box, type the API password provided by your
Tenable administrator.
- 51 -

l
If you do not check the Use User/Password checkbox:
i. In the Access Key text box, type the API access key provided by your
Tenable administrator.
ii. In the Secret Key text box, type the API secret key provided by your Tenable
administrator.
Tip: To save your selected configuration options without navigating away from the page:
1.
Right click in the top menu that contains the Tenable Connector heading and menu.
A list of options appears.
2. Click Save.
10. (Optional) In the General Settings section, you can specify your Max ECC Wait Time (in
seconds) and Request Timeout (in seconds) for each of your configured connectors.
11. In the Asset Settings section, you can set the Asset Logging Level, Asset Max Cumulative
Log Entries, and Asset Max Cumulative Log Sizes. The default setting for the logging levels
is Errors Only.
12. In the Additional Asset Settings section, you can set New Record Sync Frequency (in
minutes), Record Update Sync Frequency (in minutes), Asset Max Job Log (in days), and
Asset Max Job Wait (in days).
Note: You may have more settings options on your connector page depending on the Tenable applications
you have installed (For example, Service Graph Connector for Tenable for Assets [Assets Settings],
OTSecurity for VR [VRSettings], and Tenable ITSM [ITSM Settings]).
Note: For more information about ServiceNow settings, see the ServiceNow documentation.
13. Click Update.
14. Click Test the Connector.
Note: If the connector test fails, check your username, password, and APIKeys and retest the
connector.
Disable or Enable Connectors
You can enable or disable your Tenable connectors.
- 52 -

Disable Connector
Enable Connector
To disable your Tenable Connector:
1. In the ServiceNow filter search bar, type
Tenable
.
The Tenable applications appear.
2. In the left-hand menu, click Tenable Connector.
3. In the sub-menu, click Connectors.
Your configured Tenable connectors appear.
4. Select your Tenable connector.
The selected connector page appears.
5. At the top of the page, deselect the Active checkbox.
6. Click Update.
The Tenable Connector deactivates.
- 53 -

7. Repeat this to deactivate all your connectors.
To enable your Tenable Connector:
1. In the ServiceNow filter search bar, type
Tenable
.
The Tenable applications appear.
2. In the left-hand menu, click Tenable Connector.
3. In the sub-menu, click Connectors.
Your configured Tenable connectors appear.
4. Select your Tenable connector.
The selected connector page appears.
5. At the top of the screen, select the Active checkbox.
6. Click Update.
The Tenable Connector activates.
- 54 -

7. Repeat this to activate all your connectors.
Assets Configuration and Schedule Import
Note: Tenable for Assets only supports Tenable Security Center versions 5.7 and later.
The asset integration allows ServiceNow to retrieve and accurately match Tenable assets to your
existing CIs. OTSecurity for VR and ITSM both rely on this app for finding the correct asset related
to vulnerabilities from Tenable.
Note: It is important that you completely set up and tune this integration to match Tenable Assets to
ServiceNow CIs before moving on to OTSecurity for VR or Tenable for ITSM.
To set up the asset integration configuration, you must:
l
Configure the Tenable Connector
l
Configure Assets to Sync from Tenable to ServiceNow
l
Configure IRE Rules
l
Import Operational Technology (OT) Devices
l
(Optional) Configure Assets to Sync from ServiceNow to Tenable Vulnerability Management
l
(Optional) Configure Assets to Sync from ServiceNow to Tenable Security Center
Configure Assets to Sync from Tenable to ServiceNow
1. Log in to ServiceNow.
2. Go to the Tenable Connector Application.
3. In the left-hand menu, click Tenable Connector.
4. In the sub-menu, click Connectors.
The Tenable Connectors page appears.
5. Click the Tenable connector you want to use: Tenable Vulnerability Management, Tenable
Security Center, or Tenable.ot.
The Tenable Connector page appears.
- 55 -

6. In the Scheduled Jobs section, click New.
The Tenable Scheduled Import page appears. By default, the Tenable Product and
Connector fields populate with the Tenable application/connector you selected in step 5.
7. From the Tenable Application drop-down box, select Service Graph Connector for Tenable
for Assets.
Tenable Vulnerability Management
Tenable Security Center
Tenable.ot
- 56 -

8. From theTenable Job Type drop-down box, select the Asset job type.
Note: If you are in a domain-separated environment, the Domain is set to the same value that is on
the Connector record. If this is not correct, create a new Connector record in the correct Domain.
9. From the Import Export drop-down box, select Import. Import is selected by default.
10. In the Name text box, type a unique name for this scheduled job.
11. Configure the options for your import.
Option Description
T.scQuery (Only for Tenable Security Center) Select the query
to use for the import.
Note: If no queries are available, see Queries in the
Tenable Security Center documentation to add a new
query. Then, execute the Queries Scheduled Import to
pull it into ServiceNow. Once that is complete, then
you can select the new query here
Initial Run - Historical Data The amount of time (in days) of historical data you
would like to pull for your first import.
Last Run The date and time that the import was last run.
- 57 -

Active If selected, the scheduled job runs on the configured
schedule. If Run Type = Periodically and Active =
true, then an asset sync is automatically executed
when you submit the import or export. By default,
this setting is selected.
Schedule
Edit Run Schedule Select this box if you want to edit the Run Type and
Repeat Interval / Time.
Run Type The frequency that you want the import to run.
Repeat Interval / Time The set time (hh/mm/ss) to run the import.
12. Click Submit.
Note: Ensure that you accurately configure the assets. Asset configuration is key in making the integration
work properly. Errors in these configuration steps affect all future configurations.
Configure IRE Rules
The Identification and Reconciliation Engine (IRE) is ServiceNow’s system for identifying matches in
the CMDB and determining if CIs can be created and what CI fields can be updated by different
sources. Refer to ServiceNow’s documentation to ensure IRE is configured correctly for your
environment before importing assets from Tenable.
Note: By default, Tenable data updates CI fields on each import. If you are using ServiceNow Paris or later
you can use reconciliation rules to control what asset data updates. You can use data source rules to prevent
Tenable from creating new CIs.
Note: ServiceNow provides some general Identification Rules out-of-the-box. However, you may need to
customize these rules for your specific environment. By default, CI fields are updated with Tenable data on
each import. You can use reconciliation rules to control what CI fields can be updated by Tenable. By default,
Tenable is able to create new CIs in your CMDB. You can use Data Source Rules to prevent Tenable from
creating new CIs. By default, your CIs will not be automatically reclassified if a match is found in a different
CI class. Read more about CI reclassification here. To change this behavior, modify the x_tsirm_tio_
cmdb.updateWithoutDowngrade and x_tsirm_tio_cmdb.updateWithoutSwitch system properties.
- 58 -

1. Log in to ServiceNow.
2. In the left panel, in the Filter navigator, type "CIClass Manager."
3. Click CIClass Manager.
The CI Class Manager page opens.
4. Click Open Hierarchy.
The CI Classes panel opens.
5. In the CIClasses panel, click Hardware (2032).
The Hardware page appears.
6. In the Class Info section, click Identification Rule.
The Identification Rule page appears.
7. Clone or edit the Serial Number rule.
The Edit Identifier Entry window appears.
8. Click Advanced Options.
9. In the Advanced Options section, deselect the Enforce exact count match check box.
10. Click Save.
You return to the Identification Rule page.
11. Clone or edit the Network Adapter rule.
The Edit Identifier Entry window appears.
12. Repeat steps 8-10 for the Network Adapter rule.
What to do next:
Ensure IRE rule changes are applied on the next import and clean the correlation data.
The following background scripts are examples that you can run to clean direct correlations between
Tenable data, the CMDB, and IRE data. When you change the IRE rules to improve the match with
third-party data to your existing ServiceNow CIs, you must apply the updated rules and clean up old
relationships.
- 59 -

//Asset Attributes cleanup x_tsirm_tio_cmdb_asset_attributes
var assetInfo = new GlideMultipleDelete('x_tsirm_tio_cmdb_asset_
attributes');
assetInfo.execute();
// Cleanup source uniqueness This will force IRE matching
var assetSysSource = new GlideMultipleDelete(“sys_object_source”);
assetSysSource.addQuery(“name”, “STARTSWITH”, “Tenable”);
assetSysSource.execute();
Import Operational Technology (OT) Devices
Note: You must have a license from ServiceNow to import OT devices from OTSecurity. Refer to the
OT
Subscription Unit Overview
in the ServiceNow documentation and contact your ServiceNow account team for
details.
Before you begin:
1. Submit a request to ServiceNow support to install the
com.snc.itom.license
plugin on your
production instance. This allows ServiceNow to report on your OT assets.
2. Run the fix script included in Tenable assets to register Tenable as an asset source with
ServiceNow.
To run the fix script for OT devices in the ServiceNow user interface:
1. In the Filter navigator, type
Fix Scripts
.
2. In the left-side navigation pane, click Fix Scripts.
The page populates with available fix scripts.
3. In the search box, search by name for Add Tenable.ot to ITOM License.
4. In the search results, click Add Tenable.ot to ITOM License.
5. In the upper-right, click Run Fix Script.
The fix script runs.
Configure Assets to Sync from ServiceNow to Tenable Security Center
- 60 -

You can configure CIs to Sync from ServiceNow to Tenable Security Center static IP list assets, or to
DNS name list assets. For more information, see Tenable Security Center Assets documentation.
Note: Work with your ServiceNow administrator to perform the following task. Use the following information
as a guideline. Your administrator can help with tuning the export to achieve your desired results.
To configure ServiceNow to Tenable Security Center:
1. Log in to ServiceNow.
2. In the left-hand menu, click Tenable Connector.
3. In the sub-menu, click Connectors.
The Tenable Connectors page appears.
4. Click the Tenable connector you want to use: Tenable Security Center.
The Tenable Connector page appears.
5. In the Scheduled Jobs section, click New.
The Tenable Scheduled Import page appears. By default, the Tenable Product and
Connector fields populate with the Tenable application/connector you selected in step 4.
6. From the Tenable Application drop-down, select Service Graph Connector for Tenable for
Assets.
7. From the Tenable Job Type drop-down, select Push Assets.
8. In the Name text box, type a name for the export.
9. In the Group Name box, type a name for the asset group.
10. From the Group Type drop-down, select the type of asset group to create.
11. In the Conditions section, filter the records you want to export.
12. Click Submit.
Configure Assets to Sync from ServiceNow to Tenable Vulnerability
Management
You can configure CIs to Sync from ServiceNow to Tenable Vulnerability Management.
- 61 -

Note: Work with your ServiceNow administrator to perform the following tasks. Use the information
provided in the following process as a guideline. Your administrator can help with tuning the export to
achieve your desired results.
Note: To sync assets from ServiceNow to Tenable Security Center, see Configure CI to SC Asset Group.
1. Log in to ServiceNow.
2. In the left-hand menu, click Tenable Connector.
3. In the sub-menu, click Connectors.
The Tenable Connectors page appears.
4. Click the Tenable connector you want to use: Tenable.io.
The Tenable Connector page appears.
5. In the Scheduled Jobs section, click New.
The Tenable Scheduled Import page appears. By default, the Tenable Product and
Connector fields populate with the Tenable application/connector you selected in step 3.
6. From the Tenable Application drop-down box, select Service Graph Connector for Tenable
for Assets.
7. From theTenable Job Type drop-down box, select the Push Asset job type.
Note: If you are in a domain-separated environment, the Domain is set to the same value that is on
the Connector record. If this is not correct, create a new Connector record in the correct Domain.
8. From the Import Export drop-down box, select Import. Import is selected by default.
9. In the Name text box, type a name for the export.
10. Configure the options for your export.
Option Description
Last Run The date and time that the import was last run.
Active If selected, the scheduled job runs on the configured
schedule. If Run Type = Periodically and Active =
- 62 -

true, then an asset sync is automatically executed
when you submit the import or export. By default,
this setting is selected.
Schedule
Edit Run Schedule Select this box if you want to edit the Run Type and
Repeat Interval / Time.
Run Type The frequency that you want the import to run.
Repeat Interval / Time The set time (hh/mm/ss) to run the import.
Conditions
Configuration Item Source Table The table to search to query the CIs you want
exported to Tenable. By default, this is set to cmdb_
ci
Conditions Filter conditions for the CIs you want exported to
Tenable. By default, this is set to Any Computer
CIs that have not already been imported
into ServiceNow from Tenable
11. Click Submit.
Verification
1. Launch your Tenable user interface.
2.
In the upper-left corner, click the button.
The left navigation plane appears.
3. In the left navigation plane, in the Asset View section, click Assets.
- 63 -

4. Filter your assets by Source contains ServiceNow.
The ServiceNow option only shows up in the filter box if the integration was successful.
For more information on filtering assets, see View Assets in the Tenable Vulnerability Management
documentation.
VR Configuration and Schedule Import
This section describes how to configure OTSecurity for VR.
Note: The OTSecurity for VR application supports only OTSecurity.
The VR integration configuration allows ServiceNow to poll and retrieve vulnerability data from
Tenable.
Before you begin:
l
In ServiceNow, you must have an account that has the
x_tsirm_tio_vr.admin
role to complete
the setup.
l
Configure the Tenable Connector
Note: Completely configure and tune Service Graph Connector for Tenable for Assets to match
Tenable Assets with ServiceNow CIs. If you do not do this first, issues may occur with VR.
Configure the ServiceNow and OTSecurity for VR Connector
1. Log in to ServiceNow.
2. In the left-hand menu, click Tenable Connector.
3. In the sub-menu, click Connectors.
The Tenable Connectors page appears.
- 64 -

4. Click the Tenable connector you want to use:Tenable.ot.
The Tenable Connector page appears.
5. In the Scheduled Jobs section, click New.
The Tenable Scheduled Import page appears. By default, the Tenable Product and
Connector fields populate with the Tenable application/connector you selected in step 4.
6. From the Tenable Application drop-down box, select Tenable.ot for Vulnerability
Response.
7. From theTenable Job Type drop-down box, select the Vulnerabilities job type.
Note: If you are in a domain-separated environment, the Domain is set to the same value that is on
the Connector record. If this is not correct, create a new Connector record in the correct Domain.
8. If you are in a domain-separated environment, in the Domain box, type the domain into which
to bring connector data.
9. (For Tenable Vulnerability Management) From the Import Export drop-down box, select
Import. Import is selected by default.
10. In the Name text box, type a name for the VR.
11. Configure the options for your import.
- 65 -

Option Description
Initial Run Historical
Data
Specifies how far back (in days) to import when run for the
first time. For example, if you select the Within 30 days
option, observed vulnerabilities within 15 or 25 days ago are
imported into ServiceNow. After the first import, Tenable only
requests as many days as needed to catch up with Tenable.
Last Run -
Opened/Reopened
The date and time that the Open/Reopened import was last
run.
Last run - Fixed The date and time that the fixed import was last run.
Run Fixed Query on
Initial Run
Pulls fixed vulnerabilities from the past on the first import.
This allows for more complete reporting in ServiceNow for
prior fixed vulnerabilities. By default, this setting is not
selected.
Active If selected, the scheduled job runs on the configured
schedule. If Run Type = Periodically and Active =
true, then an asset sync is automatically executed when you
submit the import or export. By default, this setting is
selected.
Included Severities Specify the severities you want to be imported. By default,
this is set to High, Critical
Schedule
Edit Run Schedule Select this box if you want to edit the Run Type and Repeat
Interval / Time.
Run Type The frequency that you want the import to run.
Repeat Interval / Time The set time (hh/mm/ss) to run the import.
12. Click Update.
By default, connector starts syncing vulnerabilities from Tenable to ServiceNow.
Third-Party Vulnerabilities
- 66 -

To view third-party vulnerabilities:
l
Navigate to Vulnerability Response > Libraries > Third-Party.
Vulnerabilities that include TEN- were imported from OTSecurity. Click a vulnerability to view
the details.
Note: The bottom of the page includes vulnerability items and lists of CVE information linked during
the import.
Vulnerable Items (Linked Vulnerability and Configuration Items)
To view vulnerable items:
l
Navigate to Vulnerability Response > Vulnerable Items.
Vulnerabilities that include TEN- were imported from OTSecurity. Click a vulnerability to view
the details.
Note: Text boxes are disabled for closed vulnerable items. In the Notes section, you can view
information about why the item is closed.
ITSM Configuration and Schedule Import
This section describes how to configure Tenable for ITSM.
Note: The ServiceNow configuration only supports Tenable Security Center versions 5.7 and later.
- 67 -

The ITSM integration configuration allows ServiceNow to poll and retrieve vulnerability data from
Tenable Vulnerability Management/Tenable Security Center.
Before you begin:
In ServiceNow, you must have the
x_tsirm_tio_itsm.admin
role to complete the setup.
Note: Configure and tune Service Graph Connector for Tenable for Assets to match Tenable Assets with
ServiceNow CIs. If you do not do this first, you may have issues with ITSM.
To set up the ITSM integration configuration, you must:
l
Configure the Tenable Connector
l
Create the ServiceNow and Tenable for ITSM Connector
l
Create an Incident Rule
Create the ServiceNow and Tenable for ITSM Connector
1. Log in to ServiceNow.
2. In the left-hand menu, click Tenable Connector.
3. In the sub-menu, click Connectors.
The Tenable Connectors page appears.
4. Click the Tenable connector you want to use: Tenable.io or Tenable Security Center.
The Tenable Connector page appears.
5. In the Scheduled Jobs section, click New.
The Tenable Scheduled Import page appears. By default, the Tenable Product and
Connector fields populate with the Tenable application/connector you selected in step 4.
6. From the Tenable Application drop-down box, select Tenable for ITSM.
Tenable Vulnerability Management
- 68 -

Tenable Security Center
7. If you are in a domain-separated environment, the Domain is set to the same value that is on
the Connector record. If this value is not correct, create a new connector record in the correct
domain.
8. In the Name text box, type a name for the import.
9. Configure the options for your import.
- 69 -

Option Description
T.sc Query (Only for Tenable Security Center) The Tenable Security
Center query used for the import or export.
Initial Run - Historical
Data
The amount of time (in days) of how far back you want to pull
data.
Last Run The date and time that the open/reopened import was last
run.
Last Run - Fixed The date and time that the fixed import was last run.
Run Fixed Query on
Initial Run
Pulls fixed vulnerabilities on the first import. By default, this is
set to deselected.
Active If selected, an asset sync is automatically queued when you
submit the import or export. Default setting: selected.
Included Severities Specify the severities you want to be imported. By default,
this is set to High, Critical
Schedule
Edit Run Schedule Select this to edit the Run Type and Repeat Interval / Time
Run Type The frequency with which you want the import to run.
Repeat Interval / Time The set time (hh/mm/ss) to run the import.
10. Click Update.
Create an Incident Rule
Create and enable Incident Rules so that the integration can create incidents. By default, a disabled
example rule comes with the application.
1. From the left navigation pane, navigate to Tenable for ITSM >Configuration > Incident
Rules.
The Incident Rules page appears.
- 70 -
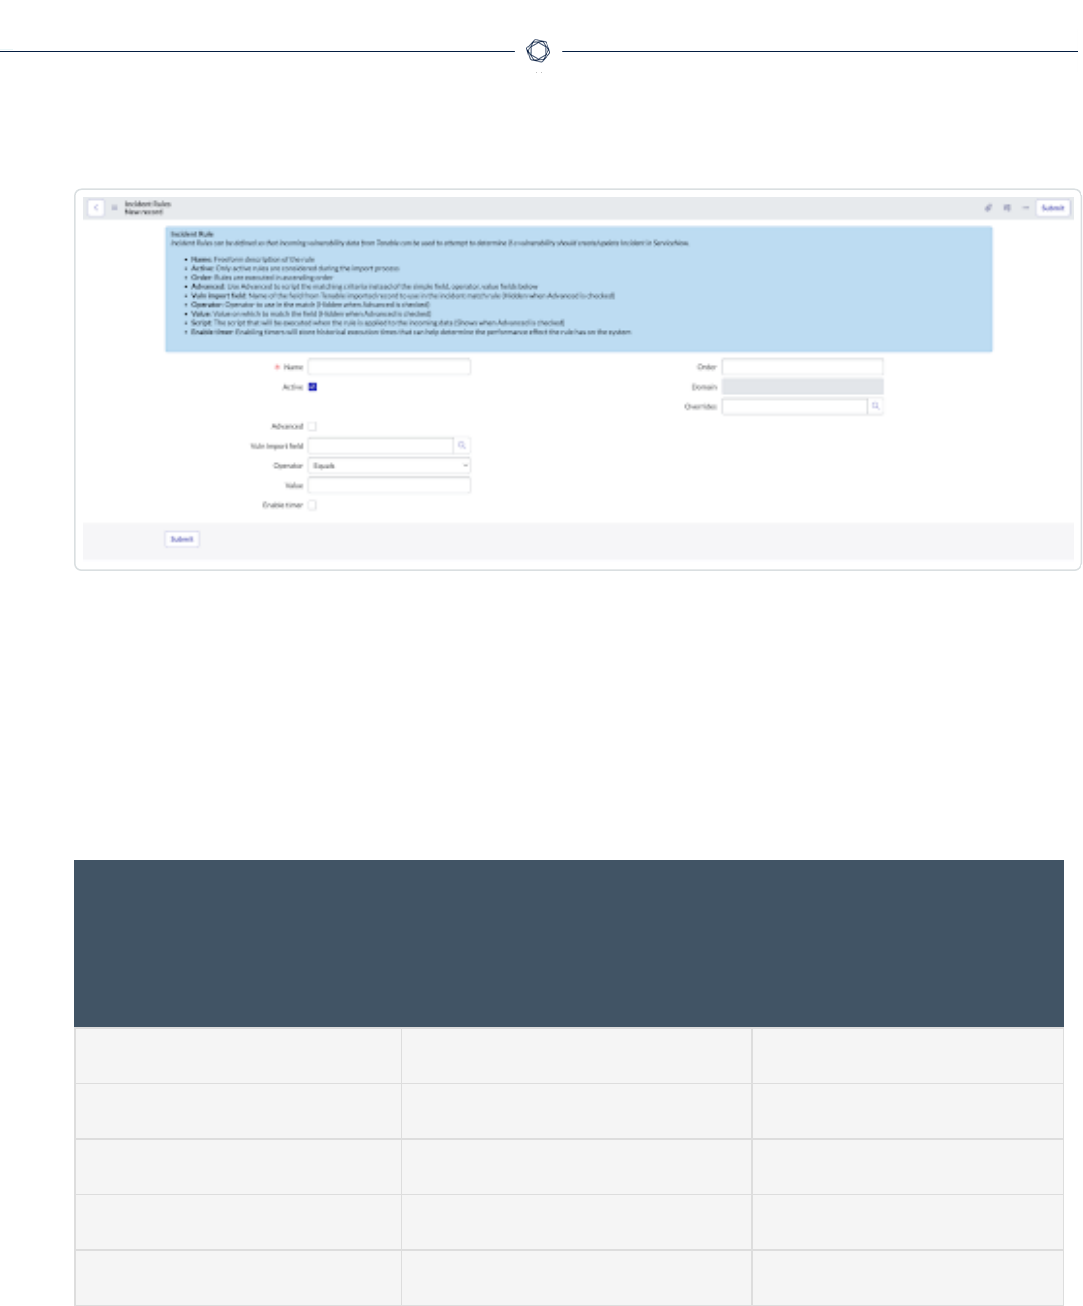
2. Click New.
The New record page appears.
3. In the Name text box, type a name for the matching rule.
4. Select the Active check box.
5. (Option 1) If you want to use scripting to create this rule, click the Advanced check box, and
type the desired script. Refer to the default rule provided for an example script.
Incident rule field options
ServiceNow ITSM
Vulnerability Import Set
Field
Tenable Security Center
Vulnerability Analysis Field
Tenable Vulnerability
Management
Vulnerability Export
Field
u_acceptriskrulecomment acceptRiskRuleComment
u_acrscore acrScore
u_agent_uuid uuid asset.agent_uuid
u_asset_hostname Script - dnsName OR ip
*
asset.hostname
u_assetexposurescore assetExposureScore
- 71 -

u_bios_uuid asset.bios_uuid
u_ci CI SysID
*
CI SysID
*
u_connector Connector SysID
*
Connector SysID
*
u_description description description
u_device_type asset.device_type
u_first_found firstSeen first_found
u_first_found_date firstSeen first_found
u_fqdn dnsName asset.fqdn
u_hasbeenmitigated hasBeenMitigated
u_hostname Script - dnsName OR ip
*
u_hostuniqueness hostUniqueness
u_hostuuid hostUUID
u_indexed indexed
u_ip ip asset.ipv4
u_ips ip
u_job_type “vuln_data”
*
“vuln_data”
*
u_keydrivers keyDrivers
u_last_fixed last_fixed
u_last_found lastSeen last_found
u_last_found_date lastSeen last_found
u_mac_address macAddress asset.mac_address
u_netbios_name netbiosName asset.netbios_name
- 72 -

u_operating_system operatingSystem asset.operating_system
u_operatingsystem operatingSystem
u_output pluginText output
u_plugin_cve cve plugin.cve
u_plugin_description description plugin.description
u_plugin_family family.name plugin.family
u_plugin_family_type family.type
u_plugin_id pluginID plugin.id
u_plugin_modification_
date
pluginModDate plugin.modification_date
u_plugin_name pluginName plugin.name
u_plugin_publication_date vulnPubDate plugin.publication_date
u_plugin_solution solution plugin.solution
u_plugin_synopsis synopsis plugin.synopsis
u_pluginname pluginName
u_port port
u_port_port port port.port
u_port_protocol protocol port.protocol
u_priority Script - 1-4
*
Script - 1-4
*
u_product_type “tsc”
*
“tio”
*
u_recastriskrulecomment recastRiskRuleComment
u_reopened Script - true/false
*
Script - true/false
*
- 73 -

u_repository_data_format repository.dataFormat
u_repository_id repository.id
u_repository_name repository.name
u_risk_accepted acceptRisk
u_risk_recasted recastRisk
u_scan scan
u_scan_completed_at scan.completed_at
u_scan_started_at scan.started_at
u_scan_uuid scan.uuid
u_scunique Calculated Uniqueness
*
u_severity severity.name severity
u_severity_default_id severity_default_id
u_severity_id severity.id severity_id
u_severity_modification_
type
severity_modification_
type
u_source_name “Tenable.sc”
*
“Tenable.io”
*
u_state Script - OPEN/FIXED
*
state
u_substate Script
*
Script
*
u_tenable_plugin Generated Plugin SysID
*
Generated Plugin SysID
*
u_uniqueness uniqueness
u_vpr_score vprScore vpr.score
u_vprcontext vprContext
- 74 -

u_xref xref
6. (Option 2) In the Vuln Import field text box, select the appropriate asset field for the rule.
7. (Option 2) In the Operator text box, select the appropriate operator for the rule.
8. (Option 2) In the Value text box, type the value for the rule.
9. To reorder the incident rule, update the value in the Order text box. Incident rules run in
ascending order (lowest to highest).
If you are in a domain-separated environment, the incident rule is created in the current
domain.
10. Click Submit.
Plugins
To view plugins:
l
Navigate to Tenable for ITSM >Plugins.
Vulnerabilities
To view vulnerabilities:
l
Navigate to Tenable for ITSM >Vulnerabilities.
Incidents
To view incidents:
l
Navigate to Tenable for ITSM >Incidents.
- 75 -

Settings
General Settings
Assets Settings
VR Settings
ITSMSettings
System Properties
Add Fields to Tables
General Settings
Use the settings options to maximize control and troubleshoot.
To access the General Settings:
1. Log in to ServiceNow.
2. In the left-hand menu, click Tenable Connector.
3. In the sub-menu, click Connectors.
The Tenable Connectors page appears.
4. Click the Tenable connector you want to use: Tenable.io, Tenable Security Center, or
Tenable.ot.
The Tenable Connector page appears.
5. In the General Settings section, you can view/edit:
Name Purpose Default value
Connector Logging
Level
Used to set Logging Level for Connector
files.
Note:Change this value to Debug when
troubleshooting
Errors Only
(Recommended)
- 76 -

Assets Settings
Use the settings options to maximize control and troubleshoot.
To access the Asset Settings:
1. Log in to ServiceNow.
2. In the left-hand menu, click Tenable Connector.
3. In the sub-menu, click Connectors.
The Tenable Connectors page appears.
4. Click the Tenable connector you want to use: Tenable.io, Tenable Security Center, or
Tenable.ot.
The Tenable Connector page appears.
5. In the Asset Settings section, you can view/edit:
Name Purpose Default Value
CMDB
Logging Level
Used to set Logging Level for asset files.
Note:Change this value to Debug when
troubleshooting.
Errors Only
(Recommended)
CMDB Max
Cumulative
Log Entries
Used to set the max entries allowed per
system log.
200
CMDB Max
Cumulative
Log Size
Used to set the max string length allowed per
system log.
20000
CMDB Asset
Chunk Size
Used to set the limit of imported assets per Job
Chunk.
Note:If your import is failing due to a size limit
error, reduce this number by 100 and retest.
Tenable.io: 1500
Tenable.sc: 1500
Tenable.ot: 500
- 77 -

Repeat until you do not experience any size
limit errors.
CMDB Asset
Import Thread
Limit
Used to set the limit of asset Job Chunks that
can be importing at the same time.
4
CMDB
Outbound Map
Used to determine Tenable.io Push Asset field
map.
Default Outbound
Map
CMDB Push
Asset Record
Limit
Used to set the limit of exported Push Assets
per Job Chunk.
Note:If your import is failing due to a size limit
error, reduce this number by 1000 and retest.
Repeat until you do not experience any size
limit errors.
Tenable.io: 10000
Tenable.sc: 10000
6. In the left-hand menu, you can configure the following settings:
l
Advanced
l
Default Outbound Map: Defines the field map when using the Tenable
Vulnerability Management Push Asset scheduled export job to send ServiceNow
CI data to Tenable Vulnerability Management.
VR Settings
Use the settings options to maximize control and troubleshoot.
To access the VR Settings:
1. Log in to ServiceNow.
2. In the left-hand menu, click Tenable Connector.
3. In the sub-menu, click Connectors.
The Tenable Connectors page appears.
4. Click the Tenable connector you want to use: Tenable.ot.
- 78 -

The Tenable Connector page appears.
5. In the VR Settings section, you can view/edit:
Name Purpose Default Value
VR Logging
Level
Used to set Logging Level for VR files. Errors Only
(Recommended)
VR Max
Cumulative Log
Entries
Used to set the max entries allowed per
system log.
200
VR Max
Cumulative Log
Size
Used to set the max string length allowed per
system log.
20000
VR Plugin
Chunk Size
Used to set the limit of imported VR plugins
per Job Chunk
Note:If your import is failing due to a size limit
error, reduce this number by 25 and retest.
Repeat until you do not experience any size
limit errors
Tenable.ot: 200
VR Plugin
Import Thread
Limit
Used to set the limit of VR plugin Job Chunks
that can be importing at the same time.
4
VR Vulnerability
Chunk Size
Used to set the limit of imported VR
vulnerabilities per Job Chunk.
Note:If your import is failing due to a size limit
error, reduce this number by 25 and retest.
Repeat until you do not experience any size
limit errors.
Tenable.ot: 200
VR Vulnerability
Import Thread
Used to set the limit of VR vulnerability Job
Chunks that can be importing at the same
8
- 79 -

Limit time.
6. In the left-hand menu, you can configure the following settings:
l
Advanced
o
Transform Maps: Defines how VR and Plugin data imports from Tenable are
mapped to ServiceNow tables.
Caution: We do not support changes made to Transform Maps. If you want to
customize your Transform Maps options, we recommend you contact your ServiceNow
Administrator.
ITSMSettings
Use the settings options to maximize control and troubleshoot.
To access the ITSM Settings:
1. Log in to ServiceNow.
2. In the left-hand menu, click Tenable Connector.
3. In the sub-menu, click Connectors.
The Tenable Connectors page appears.
4. Click the Tenable connector you want to use: Tenable.io or Tenable Security Center.
The Tenable Connector page appears.
5. In the ITSM Settings section, you can view/edit:
Name Purpose Default Value
ITSM Logging
Level
Used to set the Logging Level for ITSM files Errors Only
(Recommended)
ITSM Max
Cumulative Log
Entries
Used to set the max entries allowed per
system log
200
- 80 -

ITSM Max
Cumulative Log
Size
Used to set the max string length allowed per
system log
20000
ITSM
Vulnerability
Chunk Size
Used to set the limit of imported Tenable.sc
ITSM vulnerabilities per Job Chunk
Note:If your import is failing due to a size limit
error, reduce this number by 100 and retest.
Repeat until you do not experience any size
limit errors.
Tenable.sc: 1500
ITSM
Vulnerability
Import Thread
Limit
Used to set the limit of imported Tenable.io
ITSM vulnerabilities per Job Chunk.
Note:Tenable.io vulnerability export range is
50-5000.
Tenable.io: 50
ITSM
Vulnerability
Chunk Size
Used to set the limit of imported VR
vulnerabilities per Job Chunk.
Note:If your import is failing due to a size limit
error, reduce this number by 25 and retest.
Repeat until you do not experience any size
limit errors.
1
ITSM
Vulnerability
Import Thread
Limit
Used to set the limit of ITSM vulnerability Job
Chunks that can be importing at the same
time.
8
6. In the left-hand menu, you can configure the following settings:
l
Advanced
o
Transform Maps: Defines how VR and Plugin data imports from Tenable are
mapped to ServiceNow tables.
- 81 -

Caution: We do not support changes made to Transform Maps. If you want to
customize your Transform Maps options, we recommend you contact your ServiceNow
Administrator.
System Properties
Name Purpose
Default
Value
x_tsirm_tio_cmdb.create_assign_
ot_manufacture
If true, a vendor is created/assigned
when an OT CI is imported
true
x_tsirm_tio_cmdb.create_assign_
ot_vendor
If true, a manufacturer is
created/assigned when an OT CI is
imported.
true
x_tsirm_tio_cmdb.tenable_sc_
asset_group.dns_type.field_name
The name of the CI field used for
capturing DNS information and sending
it to Tenable Security Center when
running a DNS Push Asset scheduled
export.
Note:The default “domain” value is a
placeholder and not a valid field name on
the cmdb_ci table. Modify this to the field
name you want to use. (Example: dns_
domain or fqdn)
domain
x_tsirm_tio_cmdb.tenable_sc_ci_
name_preference
The naming preference used when a CI
is imported from Tenable Security
Center and the NetBIOS name does not
exist. Options: dns or hostname
Note:Changing this value can cause the
creation of duplicate CIs in your CMDB.
Review the System Property description
carefully before changing this value.
dns
x_tsirm_tio_ If true, IRE cannot downgrade CI true
- 82 -

cmdb.updateWithoutDowngrade classes when a match is found and
updated during a CI import.
x_tsirm_tio_
cmdb.updateWithoutSwitch
If true, IRE cannot switch CI classes
when a match is found and updated
during a CI import.
true
x_tsirm_tio_itsm.age_out_period The age (in days) ITSM Vulnerabilities
auto-close when they are in the New or
Review state, and they do not have any
associated Incidents.
30
Note:For any properties/values not listed on this page, you may need to reach out to your ServiceNow
representative.
Add Fields to Tables
You can add more fields to your data tables in Service NOW to broaden the scope of information
available. In the following example, the VPR Score and Patch publication date are added to the
Vulnerability Items table. This can also be done on the Third-Party Table or any table that you
choose.
To add more fields to tables:
1. In your Vulnerability Items table, select a Vulnerable Item entry, right-click on the header and
go to Configure > Form Layout.
- 83 -

The Configuring Vulnerable item form page appears.
2. In the Available box, find Vulnerability [+] and expand it.
- 84 -

3. Find Tenable Plugin Additional Info [+] and expand it.
4. Select Vulnerability.TenablePluginAdditionalInfo.VPR Score and Vulnerability.Tenable
Plugin Additional Info.Patch publication date, then move those over to the Selected box with
the > button.
- 85 -

- 86 -

Support
The Tenable for ServiceNow applications are highly customizable as every ServiceNow
environment tends to be unique. However, Tenable cannot provide ServiceNow specific
customization support. This guide provides information for basic customization scenarios. Tenable
cannot troubleshoot or support items such as custom CI rules, custom transform maps, and custom
field mapping.
Many customers utilize a deployment partner to help set up their instance appropriately for their
customer needs. If you are interested, contact your Tenable representative to get information on
other companies that have extensive experience with the Tenable for ServiceNow applications.
Contacting Tenable Support
l
Support Hours of Operation: 24 hours a day
l
Support Days of Operation: 7 days a week
l
Contact Method: Phone, Support Portal, Email, Chat
l
Contact Details: 1-855- 267-7044 (Toll Free) 1-443- 545-2104 (Direct), Tenable Community
Site
l
Follow the Contact Tenable Support link in the application to go directly to the Tenable
Community Site
- 87 -

Troubleshooting
How can Iview the progress of my scheduled import?
1. Navigate to Tenable Connector > Connector > Job Logs
The status of these jobs updates throughout the progress of the import:
a. Initially, the status is set to New.
b. When the export job finishes, and ServiceNow begins receiving chunk data from Tenable, the
status changes to Receiving Chunk Data.
a. For each chunk of data queried from Tenable, a related Job Chunk record is created with
a New status. The raw imported payload is attached as a .json file titled JOB000XXXX-
native-0.json in the Job Chunk record.
b. The raw data is then transformed into a usable format that can be ingested by
ServiceNow. This transformed payload is then attached to the Job Chunk record as a
.json file titled JOB000XXXX-full-x.json.
c. The Job Chunk record status is then set to Data Received.
d. This process repeats until there are no more data chunks to pull from Tenable.
c. Once all the chunk data is retrieved, the Job status changes to Importing. Each Job Chunk
import into ServiceNow one at a time. As it is importing, the Job Chunk status is set to
Importing and then is set to Complete or Error once finished.
d. Once all of the Job Chunks have completed importing, the job is marked as Complete or
Complete with Errors.
Note: If a job is marked Complete with Errors, the job is attempted again on the next
schedule.
How can Iadjust the Log Level?
1. In ServiceNow, navigate to Tenable Connector > Connector > Asset/VR/ITSM Settings.
2. From the Logging Level drop-down, select the logging level you wish to employ.
*
The value is generated from scripted logic and not directly from the Tenable Export field.
- 88 -
