
Treatment Manual
Some processes, equipment, and materials described in this manual may be patented. Inclusion in this
manual does not constitute permission for use from the patent owner. The use of any patented invention in
the performance of the processes described in this manual is solely the responsibility of the user. APHIS
does not indemnify the user against liability for patent infringement and will not be liable to the user or to any
third party for patent infringement.
The U.S. Department of Agriculture (USDA) prohibits discrimination in all its programs and activities on the
basis of race, color, national origin, age, disability, and where applicable, sex, marital status, familial status,
parental status, religion, sexual orientation, genetic information, political beliefs, reprisal, or because all or
part of any individual’s income is derived from any public assistance program. (Not all prohibited bases
apply to all programs). Persons with disabilities who require alternative means for communication of
program information (Braille, large print, audiotape, etc.) should contact USDA’s TARGET Center at (202)
720-2600 (voice and TDD). To file a complaint of discrimination, write to USDA, Director, Office of Civil
Rights, 1400 Independence Avenue, SW., Washington, DC 20250-9410, or call (800) 795-3272 (voice) or
(202) 720-6382 (TDD). USDA is an equal opportunity provider and employer.
When using pesticides, read and follow all label instructions.
Interim Edition Issued 2023

02/2024-01 Treatment Manual TOC-1
Treatment
Manual
Contents
TOC-1-1
Figures LOF-1-1
LOF-1-1
Tables LOT-1-1
LOT-1-1
Introduction 1-1-1
1-1-1
Chemical Treatments 2-1-1
Fumigants 2-2-1
Fumigants—Methyl Bromide 2-3-1
Fumigants—Methyl Bromide—Tarpaulin Fumigation 2-4-1
Fumigants—Methyl Bromide—Chamber Fumigation 2-5-1
Fumigants—Methyl Bromide—Ship Fumigation for Emergency
Situations 2-6-1
Fumigants—Methyl Bromide—Structure Fumigation 2-7-1
Fumigants—Methyl Bromide—Special Procedures for Container Fumiga-
tions Without a Tarpaulin 2-8-1
Fumigants—Methyl Bromide—Closed-door Container Fumigation 2-9-1
Fumigants—Sulfuryl Fluoride 2-10-1
Fumigants—Phosphine 2-11-1
Aerosols 2-12-1
Dips 2-13-1
Dusts 2-14-1
Sprays 2-15-1
Nonchemical Treatments 3-1-1
Overview 3-1-1
Heat 3-2-1
Heat – Hot Water Immersion 3-3-1
Heat – Steam Treatments 3-4-1
Heat – Vapor Heat and Forced Hot Air 3-5-1
Heat – Forced Hot Air – Niger Seed 3-6-1
Cold Treatment (CT) 3-7-1
Irradiation 3-8-1
Residue Monitoring 4-1-1
Collecting, Packaging, and Shipping 4-1-1
Treatment Schedules 5-1-1
Index 5-1-1

TOC-2 Treatment Manual 02/2024-01
T100 - Schedules for Fruits, Nuts, and Vegetables 5-2-1
T200 - Schedules for Propagative Plant Material 5-3-1
T300 - Schedules for Miscellaneous Plant Products 5-4-1
T400 - Schedules for Miscellaneous Products 5-5-1
T500 - Schedules for Plant Pests or Pathogens 5-6-1
T600 - Controlled Atmosphere Temperature Treatment System 5-7-1
D301 - Schedules for Domestic Movement of Regulated Articles 5-8-1
Certifying Facilities 6-1-1
Overview 6-1-1
Certification of Vacuum Fumigation Chambers 6-2-1
Certifying Normal Atmospheric Fumigation Chambers 6-3-1
Certification of Cold Treatment 6-4-1
Certification of Hot Water Immersion Facilities 6-5-1
Certification of Niger seed Treatment Facilities 6-6-1
Certification of Forced Hot Air and Vapor Heat Treatment Facilities 6-7-
1
Certifying Irradiation Treatment Facilities 6-8-1
Certifying Facilities for the Heat Treatment of Firewood 6-9-1
Hazard Communication Standard 7-1-1
Safety Data Sheets 7-1-1
Emergency Aid and Safety 7-2-1
Guidelines for Managing Pesticide Spills 7-2-1
Equipment 8-1-1
8-1-1
Glossary Glossary-1-1
Glossary-1-1
Appendix A A-1-1
Forms A-1-1
Appendix B B-1-1
Coast Guard Regulations B-1-1
Appendix C C-1-1
Conversion Tables C-1-1
Appendix D D-1-1
APHIS Certified Treatment Facilities and Conveyances D-1-1
Appendix E E-1-1
Reference Guide to Commercial Suppliers of Treatment and Related Safety
Equipment E-1-1
Appendix F F-1-1
EPA Crop Groups F-1-1
Appendix G G-1-1
Respirator Protection Information G-1-1
Index G-1-1
G-1-1

02/2024-01 Treatment Manual LOF-1
Treatment
Manual
Figures
Figure 2-4-1 Container Arrangement in Two Rows with Both Doors
Open 2-4-14
Figure 2-4-2 Container Arrangement in Two Rows With One Door Open 2-
4-14
Figure 2-4-3 Example of the Position
of Gas Sampling Tubes (Side
View) 2-4-18
Figure 2-4-4 Typical Break Bulk Arrang
ement with Fans, Leads, Introduction
Line, Padding, and Sand Snakes 2-4-21
Figure 2-4-5 Formula for Calculating MB Dosage for Tarpaulin
Fumiga
tions 2
-4-25
Figure 2-4-6 Formula for Determining the Amount of Gas to Add to Sched-
ules Not
Equivalent to T101-a-1 2-4-33
Figure 2-4-7 Formula for Determining the Amount of Gas to Add to Sched-
ules Equ
ivalent to T101-a-1 2
-4-34
Figure 2-4-8 Formula to Calculate Air Exchange Rate (AER) 2
-4-40
Figure 2-5-1 Formula for Calculating MB Dosage for Chamber
Fumiga
tions 2-5
-9
Figure 2-6-1 Formula for Calculating MB Dosage for Vessel
Fumiga
tions 2
-6-10
Figure 2-6-2 Formula for Determining the Amount of Gas to Add for Vessel
Fumiga
tion 2-6-13
Figure 2-8-1 Formula for MB Calculating Dosage for
Container Fumigations
Without a Tarpaulin 2-8-1
4
Figure 2-8-2 Formula for Determining the Amount of Gas to Add for Sched-
ules Not
T101-a-1 Equivalent and Conducted in a Container
Without a Tarpaulin 2-8-2
1
Figure 2-8-3 Formula for Determining the Amount of Gas to Add For T101-a-
1 Equ
ivalent Schedules for Container Fumigations Without a
Tarpaulin 2
-8-22
Figure 2-8-4 Ductwork configuration for aeration of untarped containers: full
lo
ads (top) and partial loads (bottom) 2
-8-28
Figure 2-9-1 Diagram of placement of tempe
rature sensors, represented by
a star 2-9-8
Figure 2-9-2 Formula for Calculating MB Dosage for
Closed-Door Container
Fumigations 2
-9-15
Figure 2-9-3 Formula for Determining the Amount of Gas to Add to Closed-
Door Con
tainerized Cargo 2-9-20
Figure 2-9-4 Duct work configuration for a
eration of closed-door containers:
full loads (top) and partial loads (bottom) 2-9-24
Figure 2-11-1 Diagram of ECO
2
FUME
®
Gas Cylinder 2-11-9

Figures
LOF-2 Treatment Manual 02/2024-01
Figure 2-11-2 Diagram of One Type of Dispensing Equipment for
ECO2FUME 2-1
1-11
Figure 2-11-3 Diagram of One Type of Blending Equipment for
VAPORPH3OS 2-11-1
5
Figure 2-11-4 Diagram of VAPORPH
3
OS
®
and Forced Air Blending
Equipment 2-1
1-17
Figure 2-12-1 Formula for Calculating Aerosol Spray Time in Specific Areas of
Aircraft 2-12-2
Figure 2-12-2 Preparing to Dispense a Partial Can of 2% d-phenothrin + 2%
permethrin 2
-12-7
Figure 2-12-3 Preparing to Dispense a Full Can of 2% d-phenothrin + 2%
permethrin 2
-12-7
Figure 2-13-1 Example of % Concentrate From Puma® Label (EPA #5813-
100
) 2-1
3-5
Figure 2-13-2 Formula to Determine Total Parts of Water to Prepare a Bleach
Disinfectant 2-13
-5
Figure 3-7-1 Proper Placement of Pulp Sensor within Larger Fruit 3-7-7
Figure 3-7-2 Proper Placement of Pulp Sensor within Smaller Fruit 3-7-7
Figure 3-7-3 Fruit Stack with Middle Row Temperature Probe
Placement 3-7-9
Figure 3-7-4 40-foot Refrigerated Container with
18 Pallets of Fruit (not
drawn to scale) 3-7-1
0
Figure 3-7-5 Proper Placement of Cardboard Between the Last Pallet Row of
Fruit and
the Back Doors of the Container 3-7-10
Figure 6-3-1 Formula to Calculate Air Exchange Rate (AER) 6-3
-7
Figure 6-8-1 Flow Diagram for Plan Approva
l Application for Irradiation Facil-
ities in Countries Other Than the United States 6-8-3
Figure 7-2-1 Abbreviated Spill Plan, Personal Re
ference Card (Wallet-
size) 7-2-2
Figure 7-2-2 Emergency Contacts for Pesticide Spills 7-2
-3
Figure 7-2-3 Poison Control Center 7-2
-4
Figure 7-2-4 Medical Emergency Facility 7-2
-4
Figure 7-2-5 Federal Aviation Administration (FFA)
Office 7-2-5
Figure 7-2-6 Community-Right-To-Know or Emergency Planning Coordina-
tor (
Fire Marshall) 7-2-5
Figure 7-2-7 Fish and Game Department 7-2
-6
Figure 7-2-8 Regional Veterinary Services (VS) Office 7-2
-6
Figure 7-2-9 Regional Safety
and Health Coordinator 7-2-6
Figure 7-2-10 Local Police 7-2
-7
Figure 7-2-11 Local Hazardous Waste Official 7-2
-7
Figure 8-1-1 Fumiscope
®
Models D, 4.0, and 5.1 8-1-2
Figure 8-1-2 Fumiscope® Model 5.1 8-1
-3
Figure 8-1-3 Spectros Methyl Bromide Monitor 8-1-9
Figure 8-1-4 Methyl Bromide Volatilizer Coil 8-1-1
5
Figure 8-1-5 Tubing Specifications 8-1
-16
Figure 8-1-6 Auxiliary Pump 8-1-19
Figure 8-1-7 Example of Pressure Measurement in an Open-arm
Manometer 8-1-20

Figures
02/2024-01 Treatment Manual LOF-3
Figure 8-1-8 Example of U Tube Manometer 8-1-22
Figure 8-1-9 Example of a Water Trap 8-1
-26
Figure 8-1-10 Example of an Approved Fan 8-1-2
8
Figure A-1 APHIS Form 205-R, Instructions a
nd Worksheet for Calibrating
Portable Temperature Sensors A-1-3
Figure A-2 APHIS Form 206-R, Test of the Accuracy of the Permanent
RTD Sensors In
stalled in Hot Water Tanks A-1-4
Figure A-3 APHIS Form 207-R, Sensor Location Diag
ram Fruit Weights
and Pulp Temperatures A-1-5
Figure A-4 APHIS Form 208, Performance Test for Mango Hot Water Im-
mersion Tan
k A-1-6
Figure A-5 Calibration of Temperature Probes (Cold Treatment) A-1-7
Figure A-6 Location of Temperature Sensors in Containerized Cargo (Cold
Trea
tment) A-1-8
Figure A-7 Example of PPQ Form 429A, Fumigation Record, With Tarpau-
lin (front) A-1-10
Figure A-8 Example of PPQ Form 429A, Fumigation Record, With Tarpau-
lin (back) A-1-11
Figure A-9 Example of PPQ Form 429B, Fumigation Record, Without Tar-
pau
lin (front) A-1-13
Figure A-10 Example of PPQ Form 429B, Fumigation Record, Without Tar-
pau
lin (back) A-1-
14
Figure A-11 Example of PPQ Form 519, Compliance Agreement A-1
-17
Figure A-12 Example of PPQ Form 52
3, Emergency Action Notification A-
1-20
Figure A-13 Example of PPQ Form 449-R, Temperature Recording Calibra-
tion Report A-1-30
Figure A-14 Example of PPQ Form 203, Foreign
Site Certificate of Inspec-
tion and/or Treatment A-1-32
Figure A-15 Example of PPQ Form 556, In
Transit Cold Treatment Clear-
ance Report A-1-35
Figure A-16 Worksite Specific Respira
tory Protection Plan—Template (page
1 of 8) A-1-36
Figure A-17 Worksite Specific Respira
tory Protection Plan—Template (page
2 of 8) A-1-37
Figure A-18 Worksite Specific Respira
tory Protection Plan—Template (page
3 of 8) A-1-38
Figure A-19 Worksite Specific Respira
tory Protection Plan—Template (page
4 of 8) A-1-39
Figure A-20 Worksite Specific Respira
tory Protection Plan—Template (page
5 of 8) A-1-40
Figure A-21 Worksite Specific Respira
tory Protection Plan—Template (page
6 of 8) A-1-41
Figure A-22 Worksite Specific Respira
tory Protection Plan—Template (page
7 of 8) A-1-42
Figure A-23 Worksite Specific Respira
tory Protection Plan—Template (page
8 of 8) A-1-43
Figure G-1 Approved Half Face Respirators G-1-2


02/2024-01 Treatment Manual LOT-1
Treatment
Manual
Tables
Table 1-1-1 How to Use Decision Tables 1-1-6
Table 1-1-2 Example of a FIFRA Section 18 Exemption Treatment
Sch
edule 1-1
-9
Table 1-1-3 Reporting Issues with or Suggestions for the T
reatment
Manual 1-1
-9
Table 2-2-1 Properties of Gaseous Phases of Fumigants 2-2-5
Table 2-3-1 List of Commodities Covered by FIFRA Section 18
Exemption 2-3-3
Table 2-4-1 Determine Reporting Requirements 2-4-7
Table 2-4-2 Determine the Number of Temperature Sensors 2-4
-9
Table 2-4-3 Determining Number and Placement of Circulation Fans for
Tarp
ed Break Bulk Cargo 2-4-16
Table 2-4-4 Determine Whether to Use Commodity or Air Temperature for
Determining Dosage Rate
for Nonpulpy Commodities 2-4-22
Table 2-4-5 Determine the Need to Add Gas and Adjust Exposure 2-4-3
2
Table 2-4-6 Determine the Extended Exposure Period for
Non-equivalent
Schedules 2-4-33
Table 2-4-7 Determine Gas Concentration Values a
nd Corrections for Fruits
and Vegetables at the 30-minute Reading of T101-a-1 or Equiv-
alent Schedules 2-4-36
Table 2-4-8 Determine Gas Concentration Values a
nd Corrections for Fruits
and Vegetables at the 2-Hour Reading of T101-a-1 or Equiva-
lent Schedules 2-4-37
Table 2-4-9 Determine Responsibility for Aerating the Commodity 2-4
-39
Table 2-4-10 Determine the Aeration Procedure 2-4
-39
Table 2-4-11 Determine When to Release the Commodity for Nonsorptive,
Conta
inerized Cargo 2
-4-41
Table 2-4-12 Determine When to Release the Commodity for Nonsorptive,
Noncontainerized Carg
o—Outdoors 2-4-4
2
Table 2-4-13 Determine When to Release the Commodity for Nonsorptive,
Noncontainerized Carg
o—Indoors 2
-4-43
Table 2-4-14 Determine Number of Fans for Aeration of Fresh Fruits, Vege-
tab
les, and Cut Flowers 2-4
-44
Table 2-4-15 Determine When to Release the Commodity After Aeration of
Fresh Fruits,
Vegetables, and Cut Flowers—Indoors or
Outdoors 2
-4-45
Table 2-4-16 Determine when to Release the Commodity for Sorptive, Non-
containerized Cargo
—Outdoors 2-4-46
Table 2-4-17 Determine When to Release the Commodity for Sorptive, Non-
containerized Cargo
—Indoors 2-4
-46

Tables
LOT-2 Treatment Manual 02/2024-01
Table 2-4-18 Determine When to Release the Commodity for Sorptive Com-
modities in Containers—Indoors 2
-4-48
Table 2-4-19 Determine when to Release the Commodity for Sorptive Com-
modities in Conta
iners—Outdoors 2-4-4
9
Table 2-5-1 Determine Whether to Use Commodity or Air Temperature for
Determining Dosage Rate 2-5-9
Table 2-5-2 Determine the Responsibility for Aerating the Commodity
Durin
g Chamber Fumigations 2-
5-11
Table 2-5-3 Determine the Aeration Procedure for Chamber
Fumiga
tions 2
-5-11
Table 2-5-4 Determine When to Release the Commodity After NAP
Fumiga
tion 2-5-1
2
Table 2-5-5 Determine When to Release the Commodity After Vacuum
Fumiga
tion 2-5-1
3
Table 2-6-1 Determine Time for Extended Exposure 2-6-14
Table 2-8-1 Responsibilities for Approving Tarpless Container
Fumiga
tions 2-8
-3
Table 2-8-2 Determine Whether to Use Commodity or Air Temperature for
Determining Dosa
ge Rate For Nonpulpy Commodities 2-8-
13
Table 2-8-3 Determine the Need to Add Gas and Adjust Exposure 2-8-
20
Table 2-8-4 Determine the Extended Exposure Period to Commodities that
are
Not T101-a-1 Equivalent 2
-8-21
Table 2-8-5 Determine Gas Concentration Values a
nd Corrections for Fruits
and Vegetables at the 30-Minute Reading 2-8
-24
Table 2-8-6 Determine Gas Concentration Values a
nd Corrections for Fruits
and Vegetables at the 2-Hour Reading 2-8-25
Table 2-8-7 Determine Responsibility for Aerating the Commodity for Tarp-
le
ss Container Fumigation 2-8-26
Table 2-9-1 Determine the Extended Exposure Period for Closed-Door Con-
tainerized Carg
o 2-9
-20
Table 2-10-1 Effect of Hose Inside Diameter on Rate of Gas Introduction
thro
ugh a 25-Foot Hose (approximates, depending on cylinder
pressure) 2-1
0-4
Table 2-10-2 Effect of Hose Length on Rate of Gas Introduction Through a 1/
8-In
ch Inside Diameter Hose 2
-10-4
Table 2-11-1 NIOSH Recommended Respiratory Protection When Applying
Phosphine 2
-11-7
Table 2-11-2 Amount of Phosphine Liberated by Various Products 2-1
1-8
Table 2-11-3 Phosphine Residue Tolerances 2-1
1-31
Table 2-13-1 Common Products Dilution Ratio to Add to 1 Part Bleach 2-
13-6
Table 3-4-1 Pressure Temperature Relationships 3-4-2
Table 3-5-1 Example of a Treatment Schedule 3-5
-4
Table 3-7-1 Number of Sensors in a Warehouse 3-7-1
7
Table 5-2-1 Pest-Specific Minimum Absorbed Dose (Gy) For Any Approved
Imported
Fruits, Vegetables, and Cut Flowers, and Fruits, Veg-
etables, and Cut Flowers Moved Interstate from Hawaii, Puerto
Rico, and the U.S. Virgin Islands 5-2-25

Tables
02/2024-01 Treatment Manual LOT-3
Table 5-4-1 Fumigation Treatment Options for Khapra Beetle Infested
Material 5
-4-12
Table 6-2-1 Vacuum Chamber Classification Table 6-2-4
Table 6-2-2 Chamber Checklist 6-2-6
Table 6-3-1 Chamber Checklist 6-3-1
3
Table 6-4-1 Number of Temperature Sensors per Compartment 6-4-6
Table 6-4-2 Number of Temperature Sensors in a Warehouse 6-4-1
1
Table 6-5-1 Hypothetical Certification Results: Treatment Tank with Multiple
Set Points 6-5-3
Table A-1 Instructions for Completing PPQ Form 429A and PPQ Form
429
B A-1-15
Table A-2 Instructions for Completing PPQ Form 519, Compliance
Agree
ment A-1-18
Table A-3 Distribution of PPQ Form 519, Compliance Agreement A-1-
19
Table A-4 Instructions for Initiating an EAN A-1-22
Table A-5 Instructions for Completing PPQ Form 449-R A-1
-31
Table A-6 Determine Paperwork to Be Presented upon Arrival of a Pre-
cleared
Commodity A-1-
33
Table A-7 Distribution of PPQ Form 203, Foreign Site Certificate of Inspec-
tion and
/or Treatment A-1-34
Table C-1 Conversion Tables C-1-1
Table D-1 Hyperlinks to Lists of Certif
ied Treatment Facilities, Vessels,
and Containers D-1-1
Table E-1 Cylinder Tare, Net, and Gross Weights E-1-25
Table E-2 DC Scientific Glass - Approved Thermometers E-1-45
Table E-3 Fisher Scientific - Approved Thermometers E-1-46
Table E-4 VWR - Approved Thermometers E-1
-46
Table E-5 Cole-Parmer - Approved Thermometers E-1-47
Table F-1 Crop Group 1: Root and Tuber F-1
-2
Table F-2 Crop Group 2: Leaves of Root and Tuber Vegetables F-1
-3
Table F-3 Crop Group 3: Bulb Vegetable (Allium spp.) F-1
-4
Table F-4 Crop Group 4: Leafy Vegetables (except Brassica
vegetab
les) F-1-5
Table F-5 Crop Group 5: Brassica (Cole) Leafy Vegetables F-1
-6
Table F-6 Crop Group 6: Legume Vegetables (succulent or dried) F-1
-7
Table F-7 Crop Group 7: Leaves of Legume Vegetables F-1-8
Table F-8 Crop Group 8: Fruiting Vegetables F-1-9
Table F-9 Crop Group 9: Cucurbit Vegetables F-1-10
Table F-10 Crop Group 10: Citrus Fruit F
-1-11
Table F-11 Crop Group 11: Pome Fruit F-1
-12
Table F-12 Crop Group 12: Stone Fruit F-1-1
3
Table F-13 Crop Group 13: Berries and Small Fruit F-1-14
Table F-14 Crop Group 14: Tree Nuts F-1-16
Table F-15 Crop Group 15: Cereal Grains F-1
-17
Table F-16 Crop Group 16: Forage, Fodder,and Straw of Cereal
Grains F-1
-18
Table F-17 Crop Group 17: Grass, Forage, Fodder, and Hay F-1-19

Tables
LOT-4 Treatment Manual 02/2024-01
Table F-18 Crop Group 18: Nongrass Animal Feeds (Forage, Fodder,
Straw, and Hay) F-1-20
Table F-19 Crop Group 19: Herbs and Spices F-1-21
Table F-20 Crop Group 20: Oilseed F-1-23
Table F-21 Crop Group 21: Edible Fungi F-1-24
Table F-22 Crop Group 22: Stalk, Stem, and Leaf Petiole Vegetables F-
1-25
Table F-23 Crop Group 23: Tropical and Subtropical Fruit, Edible
Peels F-1-26
Table F-24 Crop Group 23: Tropical and Subtropical Fruit, Edible
Peels F-1-27
Table F-25 Crop Group 23: Tropical and Subtropical Fruit, Edible
Peels F-1-28
Table F-26 Crop Group 23: Tropical and Subtropical Fruit, Edible
Peels F-1-29
Table F-27 Crop Group 24: Tropical and Subtropical Fruit, Inedible
Peels F-1-30
Table F-28 Crop Group 24: Tropical and Subtropical Fruit, Inedible
Peels F-1-31
Table F-29 Crop Group 24: Tropical and Subtropical Fruit, Inedible
Peels F-1-32

02/2024-01 Treatment Manual 1-1-1
Chapter
1
Introduction
Contents
Purpose 1-1-2
Restrictions 1-1-2
Scope 1-1-2
What the Manual Does Not Cover 1-1-3
Users 1-1-4
Related Documents 1-1-4
Conventions 1-1-4
Advisories 1-1-5
Boldface 1-1-5
Bullets 1-1-5
Change Bar 1-1-6
Chapters 1-1-6
Contents 1-1-6
Control Data 1-1-6
Decision Tables 1-1-6
Examples 1-1-6
Footnotes 1-1-7
Heading Levels 1-1-7
Hypertext Links (Highlighting) to Tables, Figures, and Headings 1-1-7
Indentions 1-1-7
Italics 1-1-7
Numbering Scheme 1-1-8
Transmittal Number 1-1-8
FIFRA Section 18 Treatment Schedules 1-1-9
Using the Manual 1-1-9
Reporting Issues with or Suggestions for the Treatment Manual 1-1-9
Manual Updates 1-1-10
Ordering Additional Manuals and Revisions 1-1-10

Introduction
Purpose
1-1-2 Treatment Manual 02/2024-01
Purpose
The procedures and treatment schedules listed in this manual are
administratively authorized for use in the U.S. Department of Agriculture,
Animal and Plant Health Inspection Service, Plant Protection and Quarantine
(USDA-APHIS-PPQ). The treatment of listed commodities prevents the
movement of agricultural pests into or within the United States. An officer may
determine that other commodities require treatment to prevent similar pest
movement.
Restrictions
Treatment recommendations listed in this manual are based on uses authorized
under provisions of the Federal Insecticide, Fungicide, and Rodenticide Act
(FIFRA), as amended. Directions appearing on the label, Section 18
Emergency Exemptions, and manual instructions must be followed.
Nevertheless, some treatments may damage commodities.
PPQ personnel may not make any warranty or representations, expressed or
implied, concerning the use of these pesticides.
The occasional use of registered trade names in this manual does not imply an
endorsement of those products or of the manufacturers by the USDA-APHIS.
Scope
This manual covers treatments for quarantine significant plant pests for
imported and domestic commodities.
This manual is broadly divided into ten sections:
NOTICE
Do not treat unlisted commodities until consulting and receiving approval from the
USDA-APHIS-PPQ Science and Technology, Treatment Mitigation Technology
(S&T-TMT) in Miami, Florida.
Approval from S&T-TMT must be obtained any time a treatment schedule is used
that is not an approved schedule from this manual.
NOTICE
Do not treat unlisted commodities until consulting and receiving approval from
USDA-APHIS-PPQ-S&T-TMT.
Obtain approval from S&T-TMT each time a treatment is used that is not an
approved schedule from this manual.

Introduction
What the Manual Does Not Cover
02/2024-01 Treatment Manual 1-1-3
Chemical Treatments
Nonchemical Treatments
Residue Monitoring
Treatment Schedules
Certifying Facilities
Emergency Aid and Safety
Equipment
Glossary
Appendixes
Index
Each section contains a Table of Contents, an Overview, and where
appropriate, a Methods and Procedures section. The Overview is a broad,
general description of what is covered in the section. Methods and Procedures
cover the “how to” of that particular activity, as well as procedural and
reference material for performing tasks associated with each activity. The
Appendixes contain information directly associated with treatment activities,
but are placed in the back so they do not interfere with the flow of procedural
instructions.
What the Manual Does Not Cover
This manual does not cover treatments conducted in the United States for
export to a foreign country. Export treatments are based on the importing
countries’ requirements and may be obtained from the Phytosanitary Export
Database (PExD) or official communication from the importing country.
With exports, PPQ does not have the authority to require more restrictive
measures than the importing country requires. When certifying an export
treatment has occurred, ensure that the mandatory components of the treatment
are met, and all safety guidelines are followed. Importing countries treatment
requirements are provided through published regulations, import permits, and
other official communication. Maintain quality assurance at the local level to
ensure that all treatments are conducted according to the importing country’s
requirements.
Mandatory components to consider related to an export treatment:
1. Follow the current pesticide label.
2. Ensure the safety of the employee.
3. Base the treatment on the foreign country’s import requirements.

Introduction
Users
1-1-4 Treatment Manual 02/2024-01
For more information, contact the PPQ Export Certification Specialist in your
state or state of export. You can also visit the Export Services Program website
or email the general Export Services mailbox.
Users
This manual is used primarily by PPQ officers, PPQ headquarters personnel,
and State cooperators involved in conducting treatments. The secondary users
of this manual are other government agencies, fumigators, pest control
operators, foreign governments, and other interested parties.
Related Documents
The following documents are related to this manual:
Agricultural Commodity Import Requirements (ACIR) database
APHIS Safety and Health Manual (internal document only)
Code of Federal Regulations (CFR)
Title 7 (Agriculture)
Title 46 (Shipping) Chapter 1, Part 147—Interim Regulations for
Shipboard Fumigation
Federal Insecticide, Fungicide, Rodenticide Act, as amended
Pesticide labels and labeling
Plant Import Manuals
Safety Data Sheets (SDS)
Occupational Safety and Health Administration (OSHA) Technical
Manual
Application
This manual serves both as a field manual for employees conducting
treatments and as a reference for PPQ officers, program managers, and staff
officers. Under APHIS policy, only certified pesticide applicators may conduct
or monitor treatments. This manual will also serve as a reference for
researching the types of treatments available for imports and to answer
questions from importers, industry, and foreign countries.
Conventions
Conventions are established by custom and are widely recognized and
accepted. Conventions used in this manual are listed below.

Introduction
Conventions
02/2024-01 Treatment Manual 1-1-5
Advisories
Advisories are used throughout this manual to bring important information to
your attention. Please carefully review each advisory. The definitions have
been updated as to coincide with the American National Standards Institute
(ANSI) with the goal of making the warnings easy to recognize and
understand, thus limiting the human and dollar cost of foreseeable errors and
accidents.
1
Boldface
Boldface type is used to emphasize important words throughout this manual.
These words include, but are not limited to: cannot, do not, does not, except,
lacks, must, neither, never, nor, not, only, other than.
Bullets
Bulleted lists indicate that there is no order of priority to the information being
listed.
1 TCIF Guideline, Admonishments (Safety-Related Warning Message), TCIF-99-021 Issue 1, p.4.
DANGER
!
Danger box is used in the event of imminent risk of death or serious injury.
!
WARNING
Warning box is used in the event of possible risk of serious injury.
!
CAUTION
Caution box is used for tasks involving minor to moderate risk of injury.
NOTICE
Notice box is used to alert a reader of important information or Agency policy.
SAFETY
Safety box is used for general instructions or reminders related to safety.

Introduction
Conventions
1-1-6 Treatment Manual 02/2024-01
Change Bar
A black change bar in the left margin is used to indicate a change appearing on
a revised page.
Chapters
This manual contains the following chapters: Introduction, Chemical
Treatments, Nonchemical Treatments, Residue Monitoring, Treatment
Schedules, Certifying Facilities, Emergency Aid and Safety, Equipment,
Glossary, Appendixes, and Index.
Contents
Every chapter has a table of contents listing only the first- and second-level
headings within the chapter.
Control Data
Control data is located at the top and bottom of each page to help users keep
track of where they are in the manual and be aware of updates to specific
chapters, sections, appendixes, etc., in the manual. At the top of the page is the
chapter title and first-level heading for that page. At the bottom of the page is
the transmittal number (month, year, number), manual title, page number, and
unit responsible for content. To track revisions, use the control data.
Decision Tables
Decision tables are used throughout the manual. The first and middle columns
in each table represent conditions, and the last column represents the action to
be taken after all conditions listed for that row are considered. Begin with the
column headings and move left to right, and if the condition does not apply,
then continue one row at a time until you find the condition that does apply.
Examples
Examples are used to clarify a point by applying it to a real-world situation.
Examples always appear in boxes as a means of visually separating them from
the other information contained on a page.
Table 1-1-1 How to Use Decision Tables
If you:
And if the condition
applies:
Then:
Read this column cell and
row first
Continue in this cell TAKE the action listed in this
cell
Find the previous condition
did not apply, then read this
column cell
Continue in this cell TAKE the action listed in this
cell

Introduction
Conventions
02/2024-01 Treatment Manual 1-1-7
Footnotes
Footnotes comment on or cite a reference to text and are referenced by number.
The footnotes used in this manual include general text footnotes, figure
footnotes, and table footnotes.
General text footnotes are located at the bottom of the page.
When space allows, figure and table footnotes are located directly below the
associated figure or table. However, for multi-page tables or tables that cover
the length of a page, footnote numbers and footnote text cannot be listed on
the same page. If a table or figure continues beyond one page, the associated
footnotes will appear on the page following the end of the figure or table.
Heading Levels
Within each chapter and section there are four heading levels. The first-level
heading is indicated by a horizontal line across both left and right columns
with the heading language across the left and right columns directly
underneath. The body text after a first-level heading is located inside the
margined text area, one line after the heading language. The second- and third-
level headings are inside the margined text area with the body text following
underneath. The fourth-level heading is inside the margined text area followed
by a period and leading into the text.
Hypertext Links (Highlighting) to Tables, Figures, and
Headings
Figures, headings, and tables are cross-referenced in the body of the manual
and are highlighted in boldface type. These appear in blue hypertext in the
online manual.
Indentions
Entry requirements which are summarized from CFR’s, import permits, or
policies are indented on the page.
Italics
The following items are italicized throughout the Treatment Manual:
EXAMPLE
Examples are graphically placed boxes within the text as a means of
visually separating information from other information contained on
the page. Examples will always appear in a box.
EXAMPLE
Refer to Reporting Issues with or Suggestions for the Treatment
Manual on page 1-1-9 to determine where to report problems with
this manual.

Introduction
Conventions
1-1-8 Treatment Manual 02/2024-01
Cross-references to headings
Publication names
Scientific names of commodities
Numbering Scheme
A three-level numbering scheme is used in this manual for pages, tables, and
figures. The first number represents the section. The second number represents
the chapter. The third number represents the page, table, or figure. This
numbering scheme allows for easier updating and adding pages without having
to reprint an entire chapter. Dashes are used in page numbering to differentiate
page numbers from decimal points.
Transmittal Number
The transmittal number contains the month, year, and a consecutively-issued
number (beginning with -01 for the first edition and increasing consecutively
for each update to the edition). The transmittal number is only changed when
the specific chapter sections, appendixes, glossary, tables, or index is updated.
If no changes are made, then the transmittal number remains unchanged. The
transmittal number only changes for the entire manual when a new edition is
issued or changes are made to the entire manual.
EXAMPLE
12/2018-14 is the transmittal number for this update and is located in
the control data on the pages in this chapter
12 is the month the update was issued
2018 is the year the update was issued
14 is the number (the original new edition was 01, plus 13 updates)

Introduction
Using the Manual
02/2024-01 Treatment Manual 1-1-9
FIFRA Section 18 Treatment Schedules
Treatment schedules which are FIFRA Section 18 Exemptions (such as the
example below) are followed by a “Notice” box to help you determine the
current exemption status.
Using the Manual
Review the contents of this manual to get a feel for the scope of material
covered. Glance through the section you will be using, and familiarize yourself
with the information organization. Use the table of contents to find the
information you need. If the table of contents is not specific enough, use the
index to find the topic and corresponding page number.
Reporting Issues with or Suggestions for the Treatment
Manual
Use Table 1-1-3 to determine where to report issues with the Treatment
Manual.
Table 1-1-2 Example of a FIFRA Section 18 Exemption Treatment Schedule
Minimum Concentration Readings (ounces) At:
Temperature
(°F)
Dosage Rage
(lb/1000 ft
3
)
0.5 hrs 2 hrs 3 hrs 3.5 hrs
90 or above 2 26 19 19 —
80-89 2.5 32 24 24 —
70-79 3 38 29 24 —
60-69 3 38 29 — 24
NOTICE
Do not use this treatment schedule if its FIFRA Section 18 Exemption has expired.
For the current exemption status, call your local State Plant Health Director (SPHD).
Table 1-1-3 Reporting Issues with or Suggestions for the Treatment Manual
If you: Then:
Are unable to access the
online manual
Have a suggestion for improv-
ing the format (layout, spelling,
etc.)
CONTACT the PPQ Manuals Unit at 240-529-0350 or
email [email protected]
Disagree with policy, procedures,
or th
e admissibility of a commodity
CONTACT PPQ Import Services Customer Support at
301-851-2046 or 1-877-770-5990 with the reason for
the disagreement and a recommendation
Have a urgent situation requiring
an immediate response
CONTACT a PPQ treatment specialist by e-mail

Introduction
Using the Manual
1-1-10 Treatment Manual 02/2024-01
Manual Updates
The PPQ Manuals Unit issues and maintains manuals electronically on the
Manuals Unit website. The online manuals contain the most up-to-date
information. Immediate update revisions are distributed via the APHIS
Stakeholder Registry to anyone who has subscribed to receive Treatment
Manual updates. To subscribe to the Stakeholder Registry, register at this
website.
Ordering Additional Manuals and Revisions
Although using the online manuals is the preferred method, APHIS employees
may order hard copies of manuals from the APHIS-MRP Business Services,
Acquisition & Asset Management, Printing, Distribution, Mail, Copier
Solutions (PDMCS). Visit the PDMCS website for detailed information and
printing costs. The Manuals Unit is not responsible for printing costs.

02/2024-01 Treatment Manual 2-1-1
Chapter
2
Chemical Treatments
Overview
Contents
Overview 2-1-1
Fumigants 2-2-1
Aerosols 2-12-1
Dips 2-13-1
Dusts 2-14-1
Sprays 2-15-1
Introduction
The Chemical Treatments section of this manual is organized by chemicals as
follows:
Fumigants
Aerosols and Micronized Dust
Use the Contents in this section to quickly find the information you need. If the
Contents is not specific enough, then turn to the Index to find the topic and its
page number.

Chemical Treatments Overview
Introduction
2-1-2 Treatment Manual 02/2024-01

02/2024-01 Treatment Manual 2-2-1
Chapter
2
Chemical Treatments
Fumigants
Contents
Fumigants—Methyl Bromide 2-3-1
Fumigants—Sulfuryl Fluoride 2-10-1
Fumigants—Phosphine 2-11-1
Introduction
Fumigation is the act of releasing and dispersing a toxic chemical so it reaches
the target organism in a gaseous state. Chemicals applied as aerosols, smokes,
mists, and fogs are suspensions of particulate matter in air and are not
fumigants.
The ideal fumigant would have the following characteristics:
Easily and cheaply generated
Easily detected by human senses
Easily diffuses and rapidly penetrates commodity
Harmless to foods and commodities
Highly toxic to the target pest
Inexpensive
Insoluble in water
Nonexplosive
Nonflammable
Nonpersistent
Nontoxic to plants and vertebrates (including humans)
Stable in the gaseous state (will not condense to a liquid)
Unfortunately, no one fumigant has all the above properties, but those used by
APHIS and PPQ have many of these characteristics.
The toxicity of a fumigant depends on the respiration rate of the target
organism. Generally, the lower the temperature, the lower the respiration rate
of the organism which tends to make the pest less susceptible. Fumigation at
lower temperatures requires a higher dosage rate for a longer exposure period
than fumigation at higher temperatures.

Chemical Treatments Fumigants
Monitoring of Quarantine Treatments
2-2-2 Treatment Manual 02/2024-01
Fumigants vary greatly in their mode of action. Some kill rapidly while others
kill slowly. In sublethal dosages, some fumigants may have a paralyzing effect
on the pest while others will not allow the pest to recover. Some fumigants
have no effect on commodities, while others are detrimental even at low
concentrations. Commodities vary in their sorption of fumigants and in the
effort required to aerate the commodities after fumigation.
Due to the reduction in number of labeled fumigants, there is seldom a choice
in selecting fumigants. When there is a choice, factors such as the commodity
to be treated, pest and stages present, type of structure, and cost should be
considered in selecting a fumigant.
The only authorized fumigants are:
Methyl bromide (MB)
Phosphine (PH) (There are two chemicals used for phosphine: AP–
aluminum phosphide; and MP–magnesium phosphide)
Sulfuryl fluoride (SF) (Vikane)
Much of the information on fumigants is based on MB, with modifications as
needed for the other fumigants.
Monitoring of Quarantine Treatments
Monitoring of program fumigations is performed to ensure that effective
fumigant concentration levels are maintained throughout the treatment to
prevent the introduction of quarantine pests. Quarantine fumigations
employing restricted use pesticides require careful monitoring to assure
efficacy and personal safety, to maintain pesticide residues within acceptable
limits, and to preserve commodity quality. These requirements are included in
the fumigant label, and it is a violation of Federal law to use fumigants and
pesticides in a manner inconsistent with their labeling.
Nonperishable Commodities in Commodities Temporary
Enclosures
PPQ officers will provide onsite monitoring from introduction of the fumigant
through completion of the 2 hour gas concentration readings. Half hour and 2
hour readings are required for these treatments. These readings and general
observations permit the officer to determine how a particular treatment is
progressing and to make necessary corrections to the enclosure or fumigant
concentration level.

Chemical Treatments Fumigants
Monitoring of Quarantine Treatments
02/2024-01 Treatment Manual 2-2-3
Perishable Commodities in Temporary Enclosures
The monitoring officer will remain on the site through the entire fumigation of
perishable commodities. Continuous monitoring allows the officer to alert the
pest control operator at any time to implement necessary corrective measures.
Due to the nature of the commodity and the length of treatment, onsite
monitoring of yam and chestnut fumigations may be interrupted after the 2
hour reading when efficacy and safety considerations warrant.
These instructions do not prevent the officer from leaving the immediate
fumigation site for brief periods when it is necessary and safe to do so. The
pest control operator must be notified of the PPQ officer’s intended absence.
These absences would ordinarily be limited to 20 minutes (e.g., restroom
breaks or a medical condition) and do not constitute a break in service. These
practices are in place in many locations and will require only minor
modifications in other areas.
Fumigation Guidelines
The following fumigation guidelines are commonly used throughout this
manual:
Blowers or fans should be operated as follows:
For all bulk material, forced recirculation is required, check for
uniform gas distribution by taking gas readings at four or five
locations, including at least three from the commodity
For propagative material (T200-series schedules), the entire period of
exposure, whether NAP or vacuum
Under tarpaulin (and vacuum fumigation for other than propagative
material), fans should operate for 30 minutes after gas introduction or
until an APHIS-approved gas detection device indicates uniform gas
distribution
Dosages are listed by weight in the treatment schedules. If liquid measures
are needed, convert from weight to volume using the conversion figures.
Dosage rate is based on 1,000 cubic feet of enclosure space, whether
chamber, tarpaulin, van, freight car, ship hold, etc. Calculate dosage from
the volume of the tarped fumigation enclosure.
All chamber fumigations should be conducted in USDA-approved
chambers. (Refer to Certification of Vacuum Fumigation Chambers on
page 6-2-1 or Certifying Normal Atmospheric Fumigation Chambers on
page 6-3-1.)
NOTICE
Phosphine fumigations do not require fans.

Chemical Treatments Fumigants
Monitoring of Quarantine Treatments
2-2-4 Treatment Manual 02/2024-01
Methyl bromide treatment schedules are indicated as “MB.” MB generally
refers to any methyl bromide label. Specific MB label restrictions are
noted in this manual for the “Q” label. Always check the label of the
fumigant to be sure the commodity is listed on the label. Commodities
that are not listed on the fumigant’s label are not authorized for
fumigation with the manufacturer’s gas.
Ounces per 1,000 cubic feet (oz/1,000 ft
3
) is equal to milligrams per liter
(mg/liter) and is equal to grams per cubic meter (g/m
3
).
Specified vacuum should be held throughout the exposure period
Volume of commodity being treated should not exceed two-thirds of
enclosure volume unless otherwise specified in the treatment schedule

Chemical Treatments Fumigants
Physical Properties of Fumigants
02/2024-01 Treatment Manual 2-2-5
Physical Properties of Fumigants
Table 2-2-1 summarizes the properties of fumigants:
Table 2-2-1 Properties of Gaseous Phases of Fumigants
Properties Methyl bromide Phosphine Sulfuryl fluoride
Chemical Formula CH
3
Br PH
3
SO
2
F
2
Boiling Point 3.6 °C (38.5 °F) -87.7 °C (-125.9 °F) -55.2 °C (-67 °F)
Vapor Density
1
1 Vapor density is the weight of gas in air, with ‘1’ as the weight of air.
3.3 1.17 3.7
Flammability
Limits in Air (v/v%)
10-15 percent by
volume
>1.79 percent by
volume
Nonflammable
Odor Odorless Garlic-like Odorless
Effects on Metals Reacts with aluminum,
may damage electronic
equipment
Copper, brass, gold,
and silver severely
damaged; electronic
equipment damaged,
other metals slightly
affected in high
humidity.
Non-corrosive

Chemical Treatments Fumigants
Physical Properties of Fumigants
2-2-6 Treatment Manual 02/2024-01

02/2024-01 Treatment Manual 2-3-1
Chapter
2
Chemical Treatments
Fumigants—Methyl Bromide
Contents
Properties and Use 2-3-1
Section 18 Exemption Treatment Schedules 2-3-2
Leak Detection and Gas Analysis 2-3-5
Effects of Temperature and Humidity 2-3-8
Packaging Materials Approved for Fumigation 2-3-8
Sorption 2-3-10
Residual Effect 2-3-11
Properties and Use
Methyl bromide (MB) (CH
3
Br) is a colorless, odorless, nonflammable
fumigant. MB boils at 38.5 °F and has a very low solubility in water. As a gas,
MB is three times heavier than air. As a liquid at 32 °F, 1 pound of MB is
equivalent to 262 ml. For ease in transportation and handling, MB is
compressed and stored in metal cylinders as a liquid.
MB is an effective fumigant for treating a wide variety of plant pests associated
with a wide variety of commodities. MB is the most frequently used fumigant
in quarantine fumigations. MB may also be used to devitalize plant material.
MB is effective in treating the following pests:
Fungi (such as oak wilt fungus)
Insects (all life stages)
Mites and ticks (all life stages)
Nematodes (including cysts)
Snails and slugs
MB is effective over a wide range of temperatures (40 °F and above). In
general, living plant material tolerates the dosage rate specified, although the
degree of tolerance varies with species, variety, stage of growth, and condition
of the plant material. MB accelerates the decomposition of plants in poor
condition.
Since MB is three times heavier than air, it diffuses outward and downward
readily, but requires fans to ensure upward movement and equal gas
distribution. Fan circulation also enhances penetration of MB into the
commodity. A volatilizer is used to heat the liquid MB in order to speed up its
Chapter
2

Chemical Treatments Fumigants—Methyl Bromide
Section 18 Exemption Treatment Schedules
2-3-2 Treatment Manual 02/2024-01
conversion to a gas. Once the gas is evenly distributed, it maintains that
condition for the duration of the treatment unless an outside event such as
excessive leakage occurs.
Section 18 Exemption Treatment Schedules
Methyl bromide fumigants, except those with “Q” labels, may be subject to
requirements of the FIFRA Section 18 Quarantine Exemption. When
commodities intended for food or feed are fumigated with methyl bromide
under the FIFRA Section 18 Quarantine Exemption, one additional EPA
requirement must be met: PPQ must monitor aeration by sampling the gas
concentration to determine when a commodity may be released.
The EPA defines a Federal quarantine exemption (40 CFR 166.2(b)) as “A
quarantine exemption may be authorized in an emergency condition to control
the introduction or spread of any pest new to or not theretofore known to be
widely prevalent or distributed within and throughout the United States and its
territories.”
The Section 18 Exemption has been amended to permit treatment of
commodities that are at risk for carrying Federal quarantine pests. This means
that treatments are permitted not only for imported commodities, but also for
domestic commodities growing in areas under quarantine for a regulated pest.
This exemption does not authorize treatments of domestically grown
commodities for export certification unless the treatment is necessary to move
the commodity out of quarantine, i.e. the target pests must be Federally
regulated pests.
In the Agriculture Commodity Import Requirements (ACIR) Treatment Tile
treatment schedules, fumigation schedules under the FIFRA Section 18
Quarantine Exemption are preempted by a “NOTICE” box to help determine
the current exemption status.

Chemical Treatments Fumigants—Methyl Bromide
Section 18 Exemption Treatment Schedules
02/2024-01 Treatment Manual 2-3-3
Table 2-3-1 is a list of commodities covered by the FIFRA Section 18
exemption. This list will expire on March 03, 2026.
Table 2-3-1 List of Commodities Covered by FIFRA Section 18 Exemption
Commodity
Minimum
Temperature
(°F)
Maximum
Dosage
Range
(lb/1000 ft3)
Exposure
Period
(hours)
Avocado 70 4 4
Banana and Plantain 40 4 2
Banana leaf 40 4 2
Blueberry and unlabeled commodities from the berry and small fruit
crop group 13-07
40 4 4
Cacti, edible (includes Opuntia)4043.5
Citrus fruit (crop group 10) 40 3 2
Coffee bean (green, unroasted) 40 9 12
Coconut (unprocessed, whole coconut without husk) 60 2.5 2
Cottonseed (for animal feed) 40 7 24
40 5 48
Cucurbit seed (unprocessed) 40 9 12
Dasheen (root and tuber) 40 4 4
Dragon fruit, Yellow dragon fruit (pitaya or pitahaya)
1
40 4 2
Flowers, squash and loroco 40 4 2
Genip (Spanish lime) 40 4 4
Herbs and spices, fresh (crop group 19) 40 4 4
Ivy gourd 40 4 2
Kaffir lime leaves 40 4 2
Kola nut (cola) 40 6 6
Longan 40 4 2
Lychee fruit 40 4 2
Mango 40 4 2
Mint, dried 40 3 24
Mint, fresh 40 4 2
Oilseed (crop group 20) 40 9 12
Persimmon 40 4 2
Pomegranate, fresh 40 4 3
Pointed gourd 40 4 2
Rambutan 60 4 2
Seeds in the family Malvaceae for food use, including hibiscus and
kenaf seed
40 3.5 2
Unlabeled commodities in the leaves of legume vegetable crop
group 7
2
40 4 2.5
Unlabeled commodities in the root and tuber crop group 1
2
50 3 3.5

Chemical Treatments Fumigants—Methyl Bromide
Section 18 Exemption Treatment Schedules
2-3-4 Treatment Manual 02/2024-01
The EPA only authorizes fumigation of commodities if they are listed on the
label of the gas being used for the fumigation. The fumigator is responsible for
ensuring that the commodity, its dosage, and the treatment duration is listed
either on the product label or within the Section 18 authorization letter, which
the PPQ officer should have readily available for any fumigator who requests
it. The methyl bromide products that fumigators are authorized to use for
Section 18 treatments are identified within the Section 18 authorization letter.
To comply with State requirements, the fumigator is responsible for ensuring
that the fumigant is registered in the State where it is being used.
Fumigation schedules in this publication are more detailed than what is
provided in commercial labels in order to ensure that the phytosanitary
treatments of imported commodities are efficacious.
When the treatment schedule is marked "MB", any methyl bromide fumigant
may be used for the fumigation as long as the commodity, its dosage, and
treatment duration are on the fumigant label.
Unlabeled commodities in the stone fruit crop group (12-12)
2
(i.e.,
pluot, plumcot, aprium, cherrycot, peachcot)
40 4 3
Unlabeled commodities from the Bulb Vegetable Crop Group (3-07)
2
40 4 4
Unlabeled commodities in the stalk, stem, and leaf petiole crop
group (22)
2
40 4 3.5
Unlabeled commodities in the following crop groups:
2
Brassica leafy vegetables (crop group 5)
Cucurbit vegetables (crop group 9)
Edible podded legume vegetables (crop group 6A)
Fruiting vegetable (crop group 8-10)
Leafy vegetables (except Brassica) (crop group 4)
Leaves of roots and tubers (i.e., chicory) (crop group 2)
Tropical and subtropical fruit, edible peel (crop group 23)
Tropical and subtropical fruit, inedible peel (crop group 24)
40 4 2
1 Refer to the document Ecuador Dragon Fruit, Yellow Dragon Fruit, Pitahaya, Pitaya Fruit Admissible into Continental United
States for more information.
2
The EPA crop groups are listed in Appendix F on page F-1-1 for quick reference. Refer to 40 CFR 180.41 Crop Group Tables
for the official list of commodities within
each crop group. All commodities included in the EPA sub-groups of each EPA crop
group are also eligible for the FIFRA Section 18 exemption fumigation.
Table 2-3-1 List of Commodities Covered by FIFRA Section 18 Exemption (continued)
Commodity
Minimum
Temperature
(°F)
Maximum
Dosage
Range
(lb/1000 ft3)
Exposure
Period
(hours)

Chemical Treatments Fumigants—Methyl Bromide
Leak Detection and Gas Analysis
02/2024-01 Treatment Manual 2-3-5
Leak Detection and Gas Analysis
Require the fumigator to use an APHIS-approved gas detection device to
measure gas concentration levels in tarpaulins. Require the fumigator to use an
APHIS-approved leak detection device primarily to check for leaks around
tarpaulins, chambers, application equipment, and as a safety device around the
fumigation site. For a partial list of manufacturers of detection devices, refer to
Reference Guide to Commercial Suppliers of Treatment and Related Safety
Equipment on page E-1-1. Colorimetric tubes, which are supplied by the
fumigator, are used to measure gas concentration levels during aeration.
2016 Methyl Bromide Label Information
In 2015, the Environmental Protection Agency (EPA) directed all methyl
bromide (MB) registrants to amend the use directions on the labels of all 100%
MB products. EPA required the changes in order to reflect recommendations in
an EPA report.
1
These amendments modify the use directions for fumigation and aeration
procedures, modify respiratory requirements and equipment and update gas
monitoring equipment. EPA requires all labels on newly manufactured MB to
reflect these recommendations effective October 01, 2016; however, EPA is
allowing existing stocks of MB to be used in accordance with the use
directions on the existing stock’s (older) labels.
PPQ officials and fumigators must closely examine gas cylinder labels in order
to validate that the dosage, exposure, and commodity are either on the cylinder
label or covered by a FIFRA Section 18 exemption. If a label is not affixed to
the cylinder, DO NOT allow the fumigator to use that cylinder.
1 “Report of Food Quality Protection Act (FQPA) Tolerance Reassessment and Risk Management
Decision (TRED) for methyl bromide, and Reregistration Eligibility Decision (RED) for Methyl
Bromide’s Commodity Uses”, archive dated August 2006.

Chemical Treatments Fumigants—Methyl Bromide
2016 Methyl Bromide Label Information
2-3-6 Treatment Manual 02/2024-01
New Buffer Zone Requirements
All 2016 MB labels now require both a treatment and an aeration buffer zone.
Both the treatment and aeration buffer zones are specific to the enclosure being
fumigated and must be determined by tables in the Environmental Protection
Agency (EPA) Methyl Bromide Commodity Fumigation Buffer Zone Lookup
Tables. The fumigators are responsible for using this website to determine the
buffer zones and reporting both buffer zones to the PPQ official. If the
treatment buffer zone is determined to be less than 30 feet, the PPQ official
will maintain PPQ’s standard 30 foot treatment buffer zone; otherwise, the new
treatment buffer zone must be observed. If the aeration buffer zone is
determined to be less than 200 feet, then PPQ’s standard “200 feet for 10
minutes” aeration buffer zone still applies for the first 10 minutes of aeration.
The fumigator must refer to EPA’s website to determine the minimum aeration
buffer zone to be maintained until the aeration period is complete and the
fumigator has verified that gas concentration levels meet the conditions in the
MB label.
Transiting through buffer zones
The label permits vehicles to transit through both treatment and aeration buffer
zones under specific conditions found in the label; it is up to the fumigator
determine how or whether vehicles may transit in accordance with the label.
When using the newer 2016 MB label, changes to certain procedures and
equipment in this chapter are displayed in a NOTICE box with a heading titled
“MB 2016 Label”.
MB 2016 Label (example)
When using existing stocks, follow the equipment and procedural guidance
that is displayed in the body of the text (outside of the NOTICE box).
If there is no “MB 2016 Label” NOTICE box, then the instructions apply to all
MB labels, 2016 and older.
NOTICE
Use this information when the fumigator is using the 2016 MB label.

Chemical Treatments Fumigants—Methyl Bromide
2016 Methyl Bromide Label Information
02/2024-01 Treatment Manual 2-3-7
MB 2016 Label
NOTICE
The PPQ official and the fumigator must use the following leak detection and
gas analysis equipment:
An air purifying NIOSH certified half-mask or full face piece respirator
when gas concentrations are between 1 and 5 ppm
A self contained breathing apparatus (SCBA) NIOSH approved prefix
TC-13F when gas concentrations are 5 ppm or above
An APHIS-approved continuous real time gas monitoring device that is
permanently mounted in PPQ owned facilities or a portable
photoionization detector to monitor gas concentrations in the breathing
space
An APHIS-approved direct read gas detection device, such as colorimetric
tubes, to determine gas concentrations when aerating and releasing the
commodity
For a list of manufacturers and approved models refer to Reference Guide to
Commercial Suppliers of Treatment and Related Safety Equipment.
PPQ policy is to wear appropriate respiratory protection when air
concentrations are above 1 ppm. However, the new MB labels allow workers to
be present without respiratory protection for specific time limits over a 24-
hour period when air concentrations are:>3 to 5 ppm (90 minutes),
>2 to 3 ppm (160 minutes),
>1 to 2 ppm (4 hours), and
>0 to 1 ppm (8 hours).
These permissible work-time allowances will give the PPQ official sufficient
time to calmly locate and don the appropriate respiratory protection should
their PID (alarm set to go off at 1 ppm) indicate the presence of MB in the air.

Chemical Treatments Fumigants—Methyl Bromide
Effects of Temperature and Humidity
2-3-8 Treatment Manual 02/2024-01
Effects of Temperature and Humidity
MB is effective at the same temperatures plants are generally handled (usually
40 °F and above). In general, increases in temperature give a corresponding
increase in the effectiveness of MB. All treatment schedule temperatures are
listed with the corresponding dosage rate. Follow the dosage rates listed. A
Federal Insecticide, Fungicide, and Rodenticide Act (FIFRA) Section 3
registration (the labeled rate of MB provided), or a Section 18 Exemption must
be in effect at the time of treatment.
For live plant material which is actively growing or with leaves, maintain a
high percentage of humidity (above 75 percent) in the chamber by placing wet
sphagnum or excelsior in the chamber or by wetting the chamber walls and
floor. Protect actively growing or delicate plants from the direct air flow of
fans. Do not add any moisture to the chamber when fumigating seeds. Too
much moisture on the material to be fumigated may prevent the fumigant from
reaching some of the pests.
Packaging Materials Approved for Fumigation
Plastic wrappings such as cellophane, films, and shrink wrap, and papers that
are waxed, laminated, or waterproofed are not readily permeable and must be
perforated, removed, or opened before fumigation. Approved packaging
materials may be layered as long as perforations allow adequate MB
penetration.
Packaging is considered either “routine” or “non-routine”. Routine packaging
does not require S&T approval. Routine packaging is packaging that can be
visually confirmed that it meets one of the following criteria:
Dry cloth
Dry, non-waxed or non-painted cardboard
Dry, non-waxed or non-painted, non-glossy paper
Dry, woven fabrics and plastics
Woven polypropylene bags that are not laminated with plastic or paper
inside or out (these bags are typically used for holding seeds or grains)
Bags containing large quantity of seeds or grains (>2,000 lbs.) are
referred to as “super sacks” or “totes” and must have the top of the bag
opened to aid in fumigant dispersal and aeration
NOTICE
PPQ is not responsible for opening or perforating the wrapping.

Chemical Treatments Fumigants—Methyl Bromide
Packaging Materials Approved for Fumigation
02/2024-01 Treatment Manual 2-3-9
Perforated plastics with evenly distributed holes on all sides and 0.93
percent open area of surface, for example:
Holes that are 3/16-inch in diameter every 3 square inches
Holes that are 1/4-inch in diameter every 4 square inches
49+ pinholes per square inch
Plastic clamshells
Evenly distributed holes on all sides and 0.93 percent open area of
surface
Holes on top and bottom must not be blocked when clamshells are
stacked (i.e., clamshells must have recesses or ridges to prevent
blockage)
Wooden boxes (lids removed if tightly sealed)
Non-routine packaging must be approved by S&T. Contact [email protected]
for specifications for approval. Refer to Packaging—Non-Routine USDA-
Approved For Fumigation on page E-28 for a list of approved non-routine
packaging manufacturers.
If the commodity is undergoing fumigation, the consignment can be rejected
because of packaging.
NOTICE
Inform prospective importers that the wrappings on their shipments may have to be
perforated according to PPQ specifications, removed, or opened if PPQ requires
fumigation.
To expedite commodity movement, importers should send a complete bag/wrap
sample to S&T-TMT for approval.
USDA-APHIS-PPQ-S&T-TMT
13601 Old Cutler Road, Bldg. 63
Miami, FL 33158 USA
Phone: 305-278-4877
Email: [email protected]

Chemical Treatments Fumigants—Methyl Bromide
Sorption
2-3-10 Treatment Manual 02/2024-01
Sorption
Sorption is the process of chemically or physically binding free MB on or
within the fumigated commodity. Sorption makes the fumigant unavailable to
kill the plant pest. There are three types of sorption—absorption, adsorption,
and chemisorption. Sorption rate is high at first, then gradually reduces to a
slow rate. Sorption increases the time required for aeration.
Commodities known or believed to be highly sorptive should not be fumigated
in chambers unless concentration readings can be taken to ensure the required
minimum concentration is met. Additional readings may be necessary in order
to properly monitor gas concentration sorptive commodities in chambers.
For tarpaulin fumigation, additional gas readings are necessary to monitor
concentration of gas to determine the rate of sorption. The following is a partial
list of commodities known to be highly sorptive:
Burlap bales
Carpet backing
Cinnamon quills
Cocoa mats
Cotton
Flour and finely milled products
Gall nuts
Hardboard (Masonite™)
Incense
Myrobalan
Pistachio nuts
Polyamide waste
Polystyrene foam (Styrofoam)
Potato starch
Rubber (crepe or crude)
Vermiculite
Wood products (unfinished)
Wool (raw, except pulled)
Contact S&T-TMT if you are concerned about the sorptive properties of other
commodities.

Chemical Treatments Fumigants—Methyl Bromide
Residual Effect
02/2024-01 Treatment Manual 2-3-11
Residual Effect
MB may adversely affect the shelf life of fresh fruits and vegetables, the
viability of dormant and actively growing plants, and the germination of seed.
Although MB may adversely affect some commodities, it is a necessary risk in
order to control pests. Some dosage rates are near the maximum tolerance of
the commodity, so care must be exercised in choosing the proper treatment
schedule and applying the treatment.
MB may also adversely affect nonplant products. In general, articles with a
high sulfur content may develop “off-odors” on contact with MB. In some
commodities the odors are difficult or impossible to remove by aeration. If
possible or practical, remove from the area to be fumigated any items that are
likely to develop an undesirable odor.
The following items should not be fumigated:
Any commodity not listed on the label or lacking a FIFRA Section 18
exemption
Any commodity lacking a treatment schedule
Automobiles
Baking powder
Blueprints
Bone meal
Butter, lard, or fats, unless in airtight containers
Charcoal (highly sorptive)
Cinder blocks or mixed concrete and cinder blocks
CO
2
scrubbers
2
(calcium hydroxide and calcium carbonate; MAXtend
®
)
EPDM rubber (ethylene propylene diene M-class; a type of synthetic
rubber)
Electronic equipment
3
Ethylene absorbers (potassium permanganate sachets used to remove
ethylene from an enclosure, usually a container loaded with fruit)
Feather pillows
2 If the scrubbers are removed prior to fumigation, the consignment may be fumigated.
3 Electronic equipment may be fumigated, as long as it is properly sealed to protect against internal
fluid contamination by the MB gas. Ensure that the liquid MB is completely volatilized before it is
introduced into the area to be fumigated. Obtain a waiver from the importer agreeing to release the
USDA from any damages.

Chemical Treatments Fumigants—Methyl Bromide
Residual Effect
2-3-12 Treatment Manual 02/2024-01
Felt
Furs
High-protein flours (soybean, whole wheat, peanut)
Horsehair articles
Leather goods
Machinery with milled surfaces
Magazines and newspapers (made of wood pulp)
Magnesium articles (subject to corrosion)
Paper with high rag or sulfur content
Photographic chemicals and prints (not camera film or X-rays)
Polyurethane foam
Natural rubber goods, particularly sponge rubber, foam rubber, and
reclaimed rubber including pillows, mattresses, rubber stamps, and
upholstered furniture
Neoprene
Rug pads
Silver polishing papers
Woolens (especially angora), soft yarns, and sweaters; viscose rayon
fabrics
Yak rugs

02/2024-01 Treatment Manual 2-4-1
Chapter
2
Chemical Treatments
Fumigants—Methyl Bromide—Tarpaulin
Fumigation
Contents
Methods and Procedures 2-4-1
2016 Methyl Bromide Label Information 2-4-2
Materials Needed 2-4-3
PPQ Official Provides 2-4-3
Fumigator Provides 2-4-4
Preparing to Fumigate 2-4-6
Conducting the Fumigation 2-4-27
Special Procedures for Adding Gas and Extending Exposure Period 2-4-33
Adding Gas and Extending Exposure Period to Commodities that are
Fumigated Using Treatment Schedules Other Than T101-a-1 or Equivalent
(may include perishables) 2-4-33
Adding Gas to Fruits, Vegetables, or Perishable Commodities Using
Schedule T101-a-1 or Equivalent 2-4-34
Aeration 2-4-38
Responsibility for Aerating the Commodity 2-4-38
Aeration Buffer Zones 2-4-39
Wearing Respiratory Protection 2-4-39
Aerating Nonsorptive, Containerized Cargo—Indoors and Outdoors 2-4-40
Aerating Nonsorptive, Noncontainerized Cargo—Indoors and Outdoors
2-4-41
Aeration Procedures for Fresh Fruits, Vegetables, and Cut Flowers—Indoors
or Outdoors 2-4-43
Aerating Sorptive, Noncontainerized Cargo—Indoors and Outdoors 2-4-45
Aerating Sorptive Commodities in Containers—Indoors and Outdoors
2-4-47
Methods and Procedures
The procedures in this section provide PPQ officials and commercial
fumigators with the methods, responsibilities, and precautions for tarpaulin
fumigations.

Chemical Treatments Fumigants—Methyl Bromide—Tarpaulin Fumigation
2016 Methyl Bromide Label Information
2-4-2 Treatment Manual 02/2024-01
2016 Methyl Bromide Label Information
In 2015, the Environmental Protection Agency (EPA) directed all methyl
bromide (MB) registrants to amend the use directions on the labels of all 100%
MB products. EPA required the changes in order to reflect recommendations in
an EPA report.
1
These amendments modify the use directions for fumigation and aeration
procedures, modify respiratory requirements and equipment and update gas
monitoring equipment. EPA requires all labels on newly manufactured MB to
reflect these recommendations effective October 01, 2016; however, EPA is
allowing existing stocks of MB to be used in accordance with the use
directions on the existing stock’s (older) labels.
PPQ officials and fumigators must closely examine gas cylinder labels in order
to validate that the dosage, exposure, and commodity are either on the cylinder
label or covered by a FIFRA Section 18 exemption. If a label is not affixed to
the cylinder, DO NOT allow the fumigator to use that cylinder.
New Buffer Zone Requirements
All 2016 MB labels now require both a treatment and an aeration buffer zone.
Both the treatment and aeration buffer zones are specific to the enclosure being
fumigated and must be determined by tables in the Environmental Protection
Agency (EPA) Methyl Bromide Commodity Fumigation Buffer Zone Lookup
Tables. The fumigators are responsible for using this website to determine the
buffer zones and reporting both buffer zones to the PPQ official. If the
treatment buffer zone is determined to be less than 30 feet, the PPQ official
will maintain PPQ’s standard 30 foot treatment buffer zone; otherwise, the new
treatment buffer zone must be observed. If the aeration buffer zone is
determined to be less than 200 feet, then PPQ’s standard “200 feet for 10
minutes” aeration buffer zone still applies for the first 10 minutes of aeration.
The fumigator must refer to EPA’s website to determine the minimum aeration
buffer zone to be maintained until the aeration period is complete and the
fumigator has verified that gas concentration levels meet the conditions in the
MB label.
Transiting through buffer zones
The label permits vehicles to transit through both treatment and aeration buffer
zones under specific conditions found in the label; it is up to the fumigator
determine how or whether vehicles may transit in accordance with the label.
1 “Report of Food Quality Protection Act (FQPA) Tolerance Reassessment and Risk Management
Decision (TRED) for methyl bromide, and Reregistration Eligibility Decision (RED) for Methyl
Bromide’s Commodity Uses”, archive dated August 2006.

Chemical Treatments Fumigants—Methyl Bromide—Tarpaulin Fumigation
Materials Needed
02/2024-01 Treatment Manual 2-4-3
When using the newer 2016 MB label, changes to certain procedures and
equipment in this chapter are displayed in a NOTICE box with a heading titled
“MB 2016 Label”.
MB 2016 Label (example)
When using existing stocks, follow the equipment and procedural guidance
that is displayed in the body of the text (outside of the NOTICE box).
If there is no “MB 2016 Label” NOTICE box, then the instructions apply to all
MB labels, 2016 and older.
Materials Needed
PPQ Official Provides
APHIS-approved leak detection device
Calculator (optional)
Forms (PPQ Form 429A and APHIS Form 2061, if necessary)
Self-contained breathing apparatus (SCBA) or supplied air respirator
NOTICE
Use this information when the fumigator is using the 2016 MB label.

Chemical Treatments Fumigants—Methyl Bromide—Tarpaulin Fumigation
Materials Needed
2-4-4 Treatment Manual 02/2024-01
MB 2016 Label
Fumigator Provides
APHIS-approved gas detection device
2
(e.g. thermal conductivity (TC)
analyzer, infrared device, etc.)
Auxiliary pump for purging long gas sample tubes
Carbon dioxide filter (e.g., Ascarite
®
)
Colorimetric tubes (Refer to Appendix E for a list of APHIS-approved
product ranges)
Desiccant (Drierite
®
)
Electrical wiring (grounded, permanent type), three prong extension cords
Exhaust blower and ducts
Fans (circulation, exhaust, and introduction)
Framework and supports
Gas introduction line
NOTICE
In addition to the bulleted equipment list required from PPQ, PPQ must also
provide:
Air purifying respirator NIOSH certified half-mask or full face piece with
a cartridge for concentrations between 1 and 4 ppm
APHIS-approved continuous real time gas monitoring device
Permanently mounted in PPQ owned facilities only, PureAire
Monitoring Systems, Inc., model Air Check Advantage. The Air
Check Advantage can be calibrated either by the manufacturer or by
the PPQ official. Calibrate according to the manufacturer’s User
Guide. Refer to Chapter 8: Equipment for more information.
Portable Photoionization Detector (PID), RAE Systems, Inc. model
MiniRAE 3000. The MiniRAE 3000 must be calibrated by the PPQ
official according to the manufacturer’s User Guide. Refer to Chapter
8: Equipment for more information.
Self contained breathing apparatus (SCBA) NIOSH approval prefix TC-
13F or supplied air respirator NIOSH approval prefix TC-19C
2 The MB monitor must be calibrated annually. Refer to Chapter 8: Equipment for calibration
information. If using a TC analyzer, Drierite and Ascarite must be used.

Chemical Treatments Fumigants—Methyl Bromide—Tarpaulin Fumigation
Materials Needed
02/2024-01 Treatment Manual 2-4-5
Gas sampling tubes
Heat supply
Insecticides and spray equipment
Loose, wet sand
Methyl bromide
Padding
Sand or water snakes or adhesive sealer
Scales or dispensers
3
Self-contained breathing apparatus (SCBA) or supplied air respirator
Tape
Tape measure
Tarpaulin
Temperature recorder and temperature sensors
4
Thermometer
5
Volatilizer (filled with water or antifreeze)
Warning signs/Placarding
3 All scales must be calibrated by the State, a company that is certified to conduct scale calibrations,
or by the fumigator under the supervision of PPQ. The source and date of calibration must be posted
in a visible location on or with the scale at all times. The scale must be calibrated following every
repair or a minimum of every year.
4 Temperature sensors must be calibrated annually by the manufacturer or National Institute of
Standards and Technology (NIST) within the range of 40 °F to 80 °F (4.4 °C to 26.7 °C).
5 The thermometer must be calibrated or replaced annually.

Chemical Treatments Fumigants—Methyl Bromide—Tarpaulin Fumigation
Preparing to Fumigate
2-4-6 Treatment Manual 02/2024-01
MB 2016 Label
Preparing to Fumigate
Step 1: Selecting a Treatment Schedule
The PPQ official will select a treatment schedule to effectively eliminate the
plant pest.
Turn to the Treatment Schedule Index and look up the available treatment
schedule(s) by commodity (example—apples, pears, or citrus) or by pest (e.g.,
Mediterranean fruit fly). Some commodities may have several treatment
schedules. Refer to Residual Effect on page 2-3-11 for a list of those
commodities which may be damaged by MB. Each treatment schedule lists the
target pest or pest group (e.g., Ceratitis capitata, surface feeders, wood borers),
commodity, or both pest and commodity. If there is no schedule, the
commodity may not be fumigated. Refer to Table 2-3-1 on page 2-3-3 to
determine if a schedule is available under a FIFRA Section 18 Exemption. If a
treatment is required, go to Table 2-4-1.
NOTICE
In addition to the bulleted equipment list required from the fumigator, the
fumigator must also provide:
Air purifying respirator NIOSH certified half-mask or full face piece with
a cartridge for concentrations between 1 and 4 ppm
APHIS-approved direct read gas detection device
Colorimetric tubes (e.g. Draeger, Sensidyne)
APHIS-approved continuous real time gas monitoring device
Permanently mounted in PPQ owned facilities only, PureAire
Monitoring Systems, Inc., model Air Check Advantage
Portable Photoionization Detector (PID), RAE Systems, Inc. model
MiniRAE 3000
Devices must be calibrated according to the manufacturer’s User
Guide. Refer to Chapter 8: Equipment for more information.
Self contained breathing apparatus (SCBA) NIOSH approval prefix TC-
13F or supplied air respirator NIOSH approval prefix TC-19C

Chemical Treatments Fumigants—Methyl Bromide—Tarpaulin Fumigation
Preparing to Fumigate
02/2024-01 Treatment Manual 2-4-7
Step 2: Issuing a PPQ Form 523 (Emergency Action Notification)
When an intercepted pest is identified and confirmed by a PPQ Area Identifier
as requiring action, the CBP or PPQ official will issue a PPQ Form 523
(Emergency Action Notification - EAN) to the owner, broker, or
representative. The EAN will list all treatment options. Follow instructions in
Appendix A for completing and distributing the PPQ Form 523.
Step 3: Determining Section 18 Exemptions and Sampling Requirements
After selecting the treatment schedule, the PPQ official will be able to
determine which treatment schedules are FIFRA Section 18 Exemptions. The
schedule will be followed by a “NOTICE” box to help identify the current
exemption status. Some treatment schedules are only FIFRA Section 18
Exemptions at specific temperature ranges. Check the treatment schedule and
temperature to determine if the fumigation will be a FIFRA Section 18
Exemption. Refer to Table 2-3-1 on page 2-3-3 to determine if a schedule is
available under a FIFRA Section 18 Exemption.
Step 4: Selecting a Fumigation Site
The PPQ official and the fumigator must consider the following factors in
selecting a fumigation site:
Ability to heat (in colder areas)
Aeration requirements
Electrical power supply
Impervious surface
Multiple fumigation buffer zone overlap
Nonwork area that can be effectively marked and safeguarded or isolated
Water supply
Well-lighted area
Well-ventilated, sheltered area
Table 2-4-1 Determine Reporting Requirements
If a Treatment is Required: Then:
As a result of a pest interception GO to Step 2
As a condition of entry GO to Step 3

Chemical Treatments Fumigants—Methyl Bromide—Tarpaulin Fumigation
Preparing to Fumigate
2-4-8 Treatment Manual 02/2024-01
Well-Ventilated, Sheltered Area
The PPQ official and the fumigator must select sites that are well-ventilated
and sheltered. A well-ventilated site is required for exhausting gas before and
when the tarpaulin is removed from the stack. Most warehouses have high
ceilings and a number of windows/doors which can be used for ventilation.
Some gas will escape from the tarpaulin even in the best conditions. Avoid
areas where strong drafts are likely to occur.
In warehouses, the fumigator must provide an exhaust system to exhaust MB
to the outside of the building. The fumigator must ensure that the exhausted
gas does not reenter the building nor endanger people working outdoors.
When treatments are conducted in a particular location on a regular basis, the
PPQ official must ensure that the fumigator designates a permanent site. At
such sites, the fan used to remove the fumigant from the enclosure during
aeration must be connected to a permanent stack extending above the roof
level.
If fumigations are conducted outside, ensure that the fumigator selects a site
that is semi-sheltered such as the leeward side of a warehouse, pier, or building
that offers some protection from severe winds. Severe winds are defined as
sustained winds or gusts of 30 m.p.h. or higher for any time period. Do not
allow the fumigator to proceed if there is a forecast from the National Weather
Service of severe winds and/or thunderstorms at the beginning of, or for the
entire length of, the fumigation.
Ability to Heat
When cooler temperatures (below 40 °F) are expected, the fumigator must
ensure that the commodity temperatures are maintained above 40 °F. The PPQ
official will take the ambient (air) temperature 12 inches above the floor.
For treatments lasting 6 hours or longer, temperatures must be maintained at or
above the starting treatment temperature for the entire duration of the
treatment. Additionally, the PPQ official must monitor the temperature of the
enclosure using temperature sensors and a temperature recorder. The
temperature recording system for treatments lasting 6 hours or longer must
meet the following specifications:
Accurate to within ±0.6 °C or ±1.0 °F in the treatment temperature range
of 4.4 °C to 26.7 °C (40 °F to 80 °F)
Calibrated annually by the National Institute of Standards and Technology
(NIST) or by the manufacturer
The calibration certificate will list a correction factor, if needed, and
the correction factor would be applied to the actual temperature
reading to obtain the true temperature.

Chemical Treatments Fumigants—Methyl Bromide—Tarpaulin Fumigation
Preparing to Fumigate
02/2024-01 Treatment Manual 2-4-9
Capable of printing all temperature readings or downloading data to a
secure source once per hour throughout the entire treatment (all
temperature data must be accessible at a safe distance during the
fumigation)
Tamper-proof
If one or more of the temperature readings go below the minimum temperature
specified in the treatment schedule, the fumigation will be considered a failed
treatment. The commodity must be re-treated, returned to the country of origin,
reexported, or destroyed.
The PPQ official ensures that the fumigator places thermocouples evenly
throughout the enclosure or container. The placement of the temperature
sensors will vary depending on the item fumigated and the configuration of the
fumigation site. Contact the USDA-APHIS-PPQ-S&T-TMT (305) 278-4877
for instructions regarding exact placement of the temperature sensors. Use
Table 2-4-2 to determine the number of temperature sensors needed based on
size of the enclosure.
!
CAUTION
Commodities used for food or feed may not be re-treated. If commodities fall into this
category, the only options are the following:
Return to the country of origin
Reexported to another country if they will accept the shipment
Destroy by incineration
Table 2-4-2 Determine the Number of Temperature Sensors
Size of Enclosure (ft
3
)
Number of Temperature Sensors
Up to 10,000 3
10,001-25,000 6
25,001-55,000 9
Larger than 55,000 12
NOTICE
Do not use flame or exposed electrical element heaters under the tarpaulin during
treatment because MB may cause the formation of hydrogen bromide. Hydrogen
bromide (hydrobromic acid) is a highly corrosive chemical which can cause damage
to the heater and to surrounding materials, including the commodity. Hot air or
radiator type heaters can be used for heating under tarpaulins. When using space
heaters to heat warehouses, there must be adequate ventilation.

Chemical Treatments Fumigants—Methyl Bromide—Tarpaulin Fumigation
Preparing to Fumigate
2-4-10 Treatment Manual 02/2024-01
Impervious Surface
Select an asphalt, concrete, or tight wooden surface—not soil, gravel, or other
porous material. If you must fumigate on a porous surface, require the
fumigator to cover the surface with plastic tarpaulins. For large fumigations,
covering the surface is not usually practical because pallets must be
rearranged and heavy equipment used to move the commodity. On docks,
wharfs, and piers, require the fumigator to seal cracks, holes, and manhole
covers which will allow the MB to escape through the floor.
Nonwork Area
MB 2016 Label
NOTICE
The fumigator will determine the treatment buffer zone in accordance with the
Environmental Protection Agency (EPA) Methyl Bromide Commodity
Fumigation Buffer Zone Lookup Tables.
The treatment buffer zone surrounds the area where access is limited during
treatment. If the fumigator determines that the buffer zone is less than 30’, then
PPQ requires a 30’ buffer zone. If the fumigator determines that the buffer zone
is greater than 30’, then PPQ must observe the prescribed buffer zone.
The treatment buffer zone extends from the perimeter of the enclosure to a
distance determined by the fumigator in accordance with the label. Entry by
any person except the PPQ official and the fumigator is prohibited except as
provided in the “Exceptions to Buffer Zone Entry Restrictions” section of the
label.
The treatment buffer zone begins when the fumigant is introduced into the
enclosure and ends when aeration begins, at which point the aeration buffer
zone requirements apply.
The fumigator must define treatment and aeration buffer zone perimeters using
physical barriers (such as walls, ropes, etc.) and placards to limit access to the
buffer zone. Placards must meet all label requirements regarding specific
warnings, information, and language.
The fumigator will permit transiting through buffer zones in accordance with
the “Transit Exception” section of the label.
Buffer Zone Overlap for Multiple Enclosures
For multiple enclosures where buffer zones overlap, the fumigator must
recalculate both the treatment and aeration buffer zones in accordance with the
label and supply them to the PPQ official.

Chemical Treatments Fumigants—Methyl Bromide—Tarpaulin Fumigation
Preparing to Fumigate
02/2024-01 Treatment Manual 2-4-11
Nonwork Area
The PPQ official and the fumigator must select a secure area where traffic and
people are restricted from entering and which is isolated from people working.
A nonwork area is preferred to help prevent accidents, such as a forklift
piercing a tarpaulin. The fumigation area is the area 30 feet surrounding the
tarpaulin and is separated from the non-fumigation area by a physical barrier
such as ropes, barricades, or walls. If a wall of gas-impervious material is less
than 30 feet from the tarpaulin, the wall may serve as the edge of the secured
area. The fumigator must placard within the perimeter of the secured area.
Placards must meet label requirements regarding specific warnings,
information, and language. Placards generally include the name of the
fumigant, the fumigation date, time, and the name of the company conducting
the fumigation. The fumigator must restrict access to the fumigation area to the
fumigator’s employees and PPQ employees monitoring the treatment. Use
rope or marker tape to limit access within 30 feet of the enclosure. Unless you
(PPQ) authorize their use, do not allow motor vehicles (includes forklifts) to
operate within 30 feet of the enclosure and aeration area during the fumigation
and aeration periods. The area outside the 30-foot perimeter is usually regarded
as a safe distance from the tarpaulin. Gas concentrations exceeding 5.0 ppm
(TLV for MB) are seldom recorded by gas monitoring, except during aeration.
The 30-foot perimeter is not specifically mentioned on the MB label, but is
required for PPQ supervised fumigations. When space is tight, it is permissible
to overlap two adjoining 30-foot perimeters. When multiple fumigations are
occurring simultaneously, there must be sufficient space for a person wearing
SCBA to walk between the tarpaulins.
Electrical Power Supply
An adequate electrical source must be available to run the circulation fans and
the gas detection device. A separate line should be available for the gas
detection device. Electrical outlets must be grounded and conveniently located
in relation to the fumigation area. PPQ does not allow generators as a power
source except under emergency conditions.
Water Supply
A water supply is necessary for safety purposes. Water is necessary for
washing off MB if the liquid form is spilled on someone. If no permanent
water is present on site, the fumigator must provide a 5-gallon supply of
potable, unfrozen water.
Well-Lighted Areas
The fumigator will ensure that the area has adequate lighting for safety
purposes and for reading gas detection devices, thermometers, and determining
whether the tarpaulin has holes or tears.

Chemical Treatments Fumigants—Methyl Bromide—Tarpaulin Fumigation
Preparing to Fumigate
2-4-12 Treatment Manual 02/2024-01
Aeration Requirements
The fumigator is responsible for all aspects of aeration. When the fumigation is
a Section 18 exemption fumigation, the PPQ official is required to verify the
final gas concentration reading(s). Refer to Aeration on page 2-4-38 for more
information.
Step 5: Arranging the Stack
Break Bulk Cargo
Ensure that the fumigator arranges the cargo in a square or rectangular shape, if
possible, to make it easy to cover and to calculate the volume of the stack. An
even shaped stack is easy to tarp. The height of the stack should be uniform so
dosage can be calculated accurately. For loose cargo, the tarpaulin should be 2
feet above the load and 1 foot from the sides and ends. Unless specified in the
treatment schedule, cargo should not exceed two-thirds of the volume of the
area to be fumigated. Contact S&T-TMT for approval for any enclosure larger
than 25,000 ft
3
. For large enclosures, it may be necessary to:
Add more sampling tubes
Install extra circulation fans
Introduce the fumigant at several sites, using multiple volatilizers
Run the circulation fans longer than the first 30 minutes if the difference
between the highest and lowest gas concentration readings exceeds four
ounces
Once S&T-TMT has approved the site and enclosure, it does not require
additional approvals for subsequent fumigations. The PPQ official must
ensure that the commodity is on pallets to permit air movement along the floor
and between the cargo. Allow an inch or more of space between pallets. By
arranging the stack evenly and with space between pallets or cartons, the
fumigant will be effectively distributed and dosage calculation should be easier
and more accurate. Dosages are easier to calculate when the dimensions are
uniform.
When the fumigation involves multiple stacks, PPQ will ensure that the
fumigator allows 10 feet of space between each uncovered stack. After the
stack is tarped, there should be approximately 5 feet between enclosures.

Chemical Treatments Fumigants—Methyl Bromide—Tarpaulin Fumigation
Preparing to Fumigate
02/2024-01 Treatment Manual 2-4-13
Containerized Cargo
Ensure that the fumigator places no more than eight containers that are 20 to
40 feet in length under a single tarpaulin. APHIS does not allow containers to
be stacked. Stacking may create too great a safety risk to the person placing the
tarp, fans, and gas monitoring leads. If fumigating multiple containers in a
single row, ensure that the fumigator has all the doors opening on a center aisle
toward each other (see Figure 2-4-1 on page 2-4-14). The aisle must be at least
3 feet wide. Open all doors completely, if possible.
However, APHIS will allow fumigation of containerized cargo with one door
open on each container using a configuration such as the one shown in Figure
2-4-2 on page 2-4-14, or in a single row of eight containers. Require the
fumigator to introduce gas at both ends of this long row configuration, either at
the same time or half at one end and half at the other end. In any case, the
single open door on each container must be kept from closing during the
fumigation, either taped or blocked open.
!
CAUTION
APHIS recommends that perishable commodities be fumigated outside their
containers, but does allow fumigation inside the container. Because it is difficult to
aerate the container, the commodity may be damaged by the fumigant if left in the
container. When a commodity is removed from the container, spray the empty
container according to T402-d Pests: Miscellaneous Hitc
hhiking Insects (E.g.,
Crickets, Scarab Beetles, Ants, Africanized Honeybee Swarms, Spotted Lanternfly)
a
s a precaution against hitchhiking pests.

Chemical Treatments Fumigants—Methyl Bromide—Tarpaulin Fumigation
Preparing to Fumigate
2-4-14 Treatment Manual 02/2024-01
To conserve MB use, S&T-TMT recommends that containers be removed from
their chassis prior to fumigation. If this is not done, then the space beneath the
container must be calculated as part of the total volume being fumigated.
.
Figure 2-4-1 Container Arrangement in Two Rows with Both Doors Open
Figure 2-4-2 Container Arrangement in Two Rows With One Door Open

Chemical Treatments Fumigants—Methyl Bromide—Tarpaulin Fumigation
Preparing to Fumigate
02/2024-01 Treatment Manual 2-4-15
If fumigating multiple containers in a single row, require the fumigator to open
the rear doors on the same side of the stack. If containers are parked parallel to
one another and close together, it is permissible to open only the door on the
right side of each container, overlapping and taped to the closed left door of the
container adjacent to it. If containers are not parked closely together, all doors
must be completely open.
Ensure that containers are not loaded beyond 80 percent of their capacity.
Ensure that bulk commodities are placed in boxes or containers on pallets. The
pallets must be loaded in the container so that there is at least 2 inches of space
under the commodity and between each pallet. There must be a minimum of 18
inches above the commodity. This facilitates uniform gas distribution and
allows a crawl space for placing the gas sampling tubes and fans. (Some
restacking of cargo may be necessary to meet this requirement.) If the
container is tarped, no additional head space is required between the roof of the
container and the tarp, unless the pest is found on the outside of the container.
Gas Penetration and Distribution
MB will penetrate most cargo easily. Penetration is enhanced by the
availability of free MB.
All packaging used in USDA quarantine fumigations must comply with the
standards in Packaging Materials Approved for Fumigation on page 2-3-8.
Some of the more common types of impermeable materials are cellophane,
plastic, wax coated materials, laminated, and waterproofed papers. Tight
wooden packing cases are also relatively gas tight. Impermeable materials will
allow some gas to penetrate, but make it difficult to aerate and evacuate the
gas. Require the fumigator to remove, perforate, or open all impermeable
materials.

Chemical Treatments Fumigants—Methyl Bromide—Tarpaulin Fumigation
Preparing to Fumigate
2-4-16 Treatment Manual 02/2024-01
Step 6: Arranging and Operating Fans
Break Bulk Cargo
Require the fumigator to use fans which have the capacity to move a volume in
cubic feet per minute equivalent to the total volume of the enclosure. Refer to
Table 2-4-3 to determine the number and placement of fans.
Require the fumigator to turn on all fans to make sure they work. The fans
must be operated during gas introduction and for 30 minutes after the gas is
introduced. If after taking gas concentration readings the fumigant is not
evenly distributed (as indicated by concentration readings within 4 oz. of each
other), require the fumigator to run the fans until the gas is evenly distributed.
Require the fumigator to run fans when adding gas, but only long enough to
obtain even gas distribution.
Table 2-4-3 Determining Number and Placement of Circulation Fans for Tarped
Break Bulk Cargo
Volume of
Enclosure (ft
3
)
Number of
2,500 CFM
Fans (2 axial-
type blade)
Require the fumigator to place the fans:
5,000 2 1. On the floor at the rear of the stack facing the front
2. At the top front (MB introduction site) facing the
rear
5,001-7,500 3 1. On the floor at the rear of the stack facing the front
2. At the top front (MB introduction site) facing the
rear
3. Upper middle facing the rear
7,501-10,000 4 1. On the floor at the rear of the stack facing the front
2. At the top front (MB introduction site) facing the
rear
3. Upper middle facing the rear
4. On the floor near the middle facing the front
10,001-25,000 5-7 1. On the floor at the rear of the stack facing the front
2. At the top front (MB introduction site) facing the
rear
3. Upper middle facing the rear
4. On the floor near the middle facing the front
5. Various locations
> 25,000 Consult S&T-TMT

Chemical Treatments Fumigants—Methyl Bromide—Tarpaulin Fumigation
Preparing to Fumigate
02/2024-01 Treatment Manual 2-4-17
Containerized Cargo
Require the fumigator to use an appropriate number of fans which have the
capacity to move the equivalent cubic feet per minute of the total volume of the
enclosure. Use two fans in the container to circulate the gas. Place one fan of at
least 2,500 cfm at the top of the load (near door) of each container facing the
opposite end of the container. Place the second fan on top of the load facing the
door.
Require the fumigator to place air introduction ducts for aeration into the far
ends of each container opposite the doors and to place exhaust ducts on the
ground in front of the doors of the containers. The fumigator must place the
end of the ducts near the edge of the tarpaulin so they can be pulled under the
tarpaulin when aeration begins.
Step 7: Placing the Gas Introduction Lines
MB is converted from a liquid into a gas by a volatilizer. Ensure that the line
that runs from the MB cylinder into the volatilizer is 3,000 PSI hydraulic high
pressure hose with a 3/8 inch interior diameter (I.D.) or larger. From the
volatilizer, MB gas is introduced into the structure by means of a gas
introduction line. The gas introduction line must be a minimum of 350 PSI
with a 1/2 inch I.D. or larger.
Break Bulk Cargo
Ensure that the fumigator places the gas introduction line directly above the
upper front fan and attaches the line to the top of the fan to prevent movement.
An unsecured introduction line could tear the tarpaulin, move the line, or direct
it out of the airflow. Require the fumigator to attach the fan firmly to the cargo
or have a base that prevents it from toppling (not a pedestal type). Require the
fumigator to place a piece of impermeable sheeting over the commodity and to
the front of each gas supply line. The sheet will prevent any liquid MB from
coming in contact with the cargo.
Containerized Cargo
The number and placement of gas introduction lines depend on the number and
arrangement of containers to be fumigated.
For single containers, ensure that the fumigator installs the introduction line
directly above the fan near the door of the container.
For multiple containers, ensure that the fumigator places the appropriate
number of introduction lines to ensure even gas distribution.

Chemical Treatments Fumigants—Methyl Bromide—Tarpaulin Fumigation
Preparing to Fumigate
2-4-18 Treatment Manual 02/2024-01
If you are fumigating five or more containers under one tarpaulin, then require
the fumigator to use a minimum of two gas introduction lines to ensure even
gas distribution.
Step 8: Placing the Gas Sampling Tubes
Break Bulk Cargo
Ensure that the fumigator installs a minimum of three gas sampling tubes for
fumigations up to 10,000 ft
3
positioned in the following locations (refer to
Figure 2-4-3):
Front low—front of the load, 3 inches above the floor
Middle center—center of the load, midway from bottom to top of the load
Rear high—rear of the load, at the extreme top of the load
For fumigations from 10,001 to 25,000 ft
3
, require the fumigator to use six gas
sampling tubes, positioned in the following locations:
Front low—front of the load, 3 inches above the floor
Upper front quarter section
Middle center—center of the stack, midway from bottom to top
Upper rear quarter section
Lower rear quarter section
Rear high—rear of the stack, at the extreme top
The PPQ official must contact S&T-TMT for approval of fumigations larger
than 25,000 ft
3
, for instructions for number of gas sampling tubes, and for
other technical information.
Figure 2-4-3 Example of the Position of Gas Sampling Tubes (Side View)

Chemical Treatments Fumigants—Methyl Bromide—Tarpaulin Fumigation
Preparing to Fumigate
02/2024-01 Treatment Manual 2-4-19
.
Containerized Cargo
For all containers (either 20 or 40 feet in length) under the same tarpaulin,
require the fumigator to use at least three tubes per container, positioned as
follows:
Front low—near the floor at the door end of the container
Middle center—rear of the load at the high end opposite the fan
Rear high—midway from front to back, at mid-depth
If treating commodities for khapra beetle, require the fumigator to install the
following additional gas sampling tubes:
High (in the commodity)
Low (in the commodity)
Require the fumigator to cover the end of the gas sampling tube with burlap
taped to the tube before inserting into the commodity.
NOTICE
For Khapra beetle cargo containing baled, packaged, finely milled, or closely packed
commodities, require the fumigator to place two additional gas sampling tubes in the
center of the bags, packages, or bales. Before placing gas sampling tubes in com-
modities, require the fumigator to place burlap over the end of the tube and secure
the burlap to the tube with tape.

Chemical Treatments Fumigants—Methyl Bromide—Tarpaulin Fumigation
Preparing to Fumigate
2-4-20 Treatment Manual 02/2024-01
Break Bulk and Containerized Cargo
Require the fumigator to use gas sampling tubes of sufficient length to extend
from the sampling position inside the enclosure to at least 30 feet beyond the
tarpaulin. Ensure that all the gas sampling tubes meet in one area for ease and
safety in taking gas concentration readings. Do not permit gas sampling tubes
to be spliced. Before starting the fumigation, check for gas sampling tube
blockage or pinching by connecting each tube to a MityVac hand pump or to
the gas detection device for a short time. If the tube is blocked, the flow to the
device will drop sharply. Require the fumigator to replace any defective gas
sampling tubes.
Require the fumigator to secure all gas sampling tubes in place under the
tarpaulin and label each one at the end where the gas concentration readings
will be taken. By labeling each gas sampling tube, you will be able to record
concentration readings easily.
Step 9: Padding Corners
Ensure that the fumigator looks for corners and sharp angles which could tear
the tarpaulin. Do not allow the fumigator to use commodity to support the
tarpaulin. If the sharp angles or corners cannot be eliminated, the fumigator
must cover them with burlap or other suitable padding (e.g., old tires or cloth)
(see Figure 2-4-4).

Chemical Treatments Fumigants—Methyl Bromide—Tarpaulin Fumigation
Preparing to Fumigate
02/2024-01 Treatment Manual 2-4-21
Step 10: Measuring the Temperatures
The PPQ official must determine the temperature of the commodity in order to
select the proper dosage rate. Depending on whether or not you are fumigating
a pulpy fruit or vegetable, either the commodity temperature or an average of
the commodity and air temperatures will be used. A pulpy fruit or vegetable
can support internal feeding insects, is fleshy and moist, and can be probed
with a temperature measuring device. Examples include, but are not limited to
peppers, onions, and grapes.
For pulpy fruits and pulpy vegetables, insert the thermometer into the pulp and
use only the commodity temperature to determine the dosage rate. For
Figure 2-4-4 Typical Break Bulk Arrangement with Fans, Leads, Introduction
Line, Padding, and Sand Snakes
NOTICE
Commodity and space temperatures must be 40 °F or above.
Temperature recordings should be rounded to the nearest tenth of a degree (°C or
°F).

Chemical Treatments Fumigants—Methyl Bromide—Tarpaulin Fumigation
Preparing to Fumigate
2-4-22 Treatment Manual 02/2024-01
commodities that have been refrigerated, probe the fruit that have the lowest
pulp temperature. Again, fumigate only when the fruit pulp is 40 °F or higher.
If the commodity has no pulp (for example, peas, beans, grains, herbs, spices,
etc.) take the temperature of the air space immediately surrounding the
commodity as well as the commodity temperature and use Table 2-4-4 to
determine the correct temperature for use when selecting the proper dosage
rate.
To take temperature readings, use a calibrated bimetallic, mercury, or digital
long-stem thermometer.
NOTICE
Fresh fruits and vegetables that require fumigation treatment as a condition of entry,
must meet the minimum temperature requirement of 40 °F (4.4 °C), at the time of
discharge. This may require the gradual warming of the shipment over the later
course of the voyage to ensure that the commodity achieves the proper minimum
temperature of 40 °F (4.4 °C).
This process will facilitate whether or not the fumigation treatment of the cargo takes
place on the same day of arrival.
NOTICE
The presence of ice indicates temperatures below 40 °F. If ice is present anywhere
in the box, pallet, or fumigation enclosure, do not fumigate the commodity.
Table 2-4-4 Determine Whether to Use Commodity or Air Temperature for
Determining Dosage Rate for Nonpulpy Commodities
If the air temperature is: And:
Then, for commodities other than
pulpy fruits, pulpy vegetables, or
logs and lumber:
Higher than the commodity
temperature
Use the single lowest commodity
temperature for determining the
dosage rate (Do not use the average
commodity temperature.)
Lower than the commodity
temperature
By less than 10
degrees
By 10 degrees or
more
Use the average of the single lowest
air and commodity temperatures for
determining the dosage rate. (Never
initiate a fumigation if any commodity
temperature reads lower than 40 °F.)

Chemical Treatments Fumigants—Methyl Bromide—Tarpaulin Fumigation
Preparing to Fumigate
02/2024-01 Treatment Manual 2-4-23
Logs and Lumber
The PPQ official will select several representative locations within the stack at
the ends of the logs or pieces of lumber. Require the fumigator to drill holes in
them to accommodate a thermometer. After drilling, wait at least 10 minutes to
allow the wood around the holes to cool. Insert the thermometer into the drilled
holes. Record the temperature from each hole.
Base the dosage calculation on the lowest reading obtained. Do not average
temperatures. All readings must be above 40 °F to initiate the fumigation. If
not, the fumigation must be postponed.
The PPQ official must record the temperatures in Block 22 of the PPQ Form
429A.
In the electronic 429 database, record the temperatures in the space and
commodity fields in the Treatment form.
Step 11: Covering the Stack
The fumigator must cover the stack, check the tarpaulin for rips, tears, and
holes, look at the spots that have been taped, and verify they are properly
sealed. If needed, the fumigator must repair all holes, rips, and tears.
The tarpaulin should be made of a material such as vinyl, polyethylene plastic,
or coated nylon.
4 mil vinyl or polyethylene plastic tarpaulins are only approved for one
usage
6 mil vinyl or polyethylene plastic tarpaulins may be used up to four
times with the PPQ official’s approval for each usage
EXAMPLE
You are about to fumigate a shipment of fresh herbs. The commodity
temperature is 82 °F and the air temperature is 55 °F. Average the air
and commodity temperatures to determine the dosage rate because
the air is 27 degrees lower than the commodity temperature and the
commodity is not pulpy. The average of the two temperatures is 68.5
°F. Use 68.5°F to determine the dosage rate. (T101-n-2: use 2.5 lbs.
for 2 hours)
NOTICE
When the commodity and air temperature drastically differ, moisture may condense
inside the gas sampling tubes or inside the gas detection device and cause
inaccurate gas concentration readings. The fumigator is responsible for ensuring
that the gas sampling tubes are free from water as described in the instrument
instruction manual. The PPQ official must check the Drierite and Ascarite frequently,
and change it as soon as it becomes saturated with water (turns pink) to obtain true
gas concentration readings. Never fumigate commodities that are frozen.

Chemical Treatments Fumigants—Methyl Bromide—Tarpaulin Fumigation
Preparing to Fumigate
2-4-24 Treatment Manual 02/2024-01
10 to 12 mil vinyl or plastic coated nylon tarpaulins may be approved for
multiple uses with the PPQ official’s approval for each usage
The fumigator should cover all corners and sharp ends with burlap or other
padding to prevent the tarpaulin from ripping. Have the fumigator pull the
tarpaulin over the stack, being careful not to catch or tear the tarpaulin. Make
sure there is sufficient structural support to raise the tarpaulin 2 feet above and
1 foot beyond the sides of the commodity.
The tarpaulin must be large enough to provide a floor overlap of at least 18
inches around all sides of the stack. The fumigator must carefully lay the
tarpaulin out to prevent excess folds or wrinkles along the floor, especially
around corners.
Step 12: Sealing the Tarpaulin
The fumigator must seal the tarpaulin with loose, wet sand, sand snakes, water
snakes, adhesives, or a combination. If there is danger of crushing or crimping
the gas sampling or introduction tubes, use the loose, wet sand. If using snakes,
use two rows of snakes along the sides and three rows on the corners. The
snakes should overlap each other by approximately 1 foot. The goal in sealing
the tarpaulin is to get the tarpaulin to lie flat against the floor to prevent gas
from leaking out. When wind is not a factor, plastic tape may be used for
sealing the tarp. The tape must be at least 2 inches in width, and applied (only
to a smooth surface) with the aid of high-tack spray adhesive.
The fumigator must seal the corners by laying two sand snakes around the
corner and working the tarpaulin until it is flat. Place a third snake on top of the
two other snakes to provide additional weight to force the tarpaulin against the
NOTICE
Sealed containers and vans cannot be considered “fumigation chambers” and
therefore must be covered by a tarpaulin unless they can pass the pressure-leakage
test. (Refer to Chapter 2-8.)

Chemical Treatments Fumigants—Methyl Bromide—Tarpaulin Fumigation
Preparing to Fumigate
02/2024-01 Treatment Manual 2-4-25
floor. Loose, wet sand can be used in the area where the gas introduction line,
electrical cords, and gas sampling tubes extend from under the tarpaulin.
Step 13: Measuring the Volume
Using a 100-foot tape measure, the PPQ official and the fumigator must
carefully measure the length, width, and height of the enclosure. Never
estimate the measurements. An error in measurement of as little as 12 inches
can result in miscalculation of the dosage by as much as 15 percent. When
measuring, round off to the nearest quarter foot (example: 3 inches =.25 feet).
In the case of fumigations of edible commodities, an error can result in an
unacceptable level of residue on the commodity. If the sides of the enclosure
slope outward from top to bottom, measure both the top and bottom and
average the two to determine the dimension. Enclosure height should always
be uniform and not require adjustment.
Formula for determining volume:
Length x Width x Height = volume in cubic feet
The PPQ official must record the volume in Block 26 of the PPQ Form 429A.
In the electronic 429 database, record the length, width, and height in the
corresponding fields under the “AMT of Gas Introduced” heading on the
Treatment form. The total volume of the enclosure will be calculated.
Step 14: Calculating the Dosage
The PPQ official must calculate the dosage using the following steps:
1. Refer to the treatment schedule for the correct dosage rate (lbs/1000 ft
3
)
based on temperature. See Measuring the Temperatures on page 2-4-21.
2. Multiply the dosage rate (lbs/1000 ft
3
) by the volume (ft
3
) to get the dosage
in pounds.
3. Round to the nearest 1/4 pound.
EXAMPLE
A stack with measurements H=10’6”, L=42’3”, W=10’9”
10.50 x 42.25 x 10.75 = 4,768.9 ft
3
round to 4,769 ft
3
Figure 2-4-5 Formula for Calculating MB Dosage for Tarpaulin Fumigations
Dosage (lbs.)
Volume (ft3) Dosage Rate (lbs.)
1,000 ft3
----------------------------------------------------------------------------------=

Chemical Treatments Fumigants—Methyl Bromide—Tarpaulin Fumigation
Preparing to Fumigate
2-4-26 Treatment Manual 02/2024-01
In the electronic 429 database, the PPQ official must enter the dosage rate in
the “dosage” field and the total amount of gas required for the fumigation will
be displayed in the “GAS REQUIRED” field.
Step 15: Making a Final Check
Before introducing the gas, the PPQ official and the fumigator must ensure
that the following activities are performed:
1. Turn on all fans and APHIS-approved gas detection devices to make sure
they work.
2. Warm up and zero APHIS-approved gas detection devices (if required) as
described in Equipment on page 8-1-1.
3. Start volatilizer and heat water to 200 °F or above. A minimum
temperature of 150 °F is required at all times during the introduction
process. Refer to Volatilizer on page 8-1-14 for temperature monitoring
procedures.
4. Place fumigant cylinder with gas introduction line on scale and take the
initial weight.
A. Ensure the gas introduction hose is attached to the cylinder.
B. After obtaining the correct weight, subtract the dosage to be introduced
into the enclosure.
C. After introducing the proper amount of gas, the scale will be balanced.
5. Ensure that the tarpaulin is placarded and the area secured; only people
working on the fumigation are allowed in the area.
6. Ensure that the tarpaulin is free from rips, holes, and tears.
7. Ensure that all gas sampling tubes are labeled and are not crimped or
crushed.
Visually inspect sampling tubes or use a gas detection device, an
electric or Mityvac
®
hand pump to test for unrestricted gas flow.
EXAMPLE
You need to determine the dosage rate for a stack with a volume of
3,000 ft
3
. For 72 °F (air and commodity temperatures), the treatment
schedule lists the dosage rate at 2 pounds per 1,000 ft
3
. Determine
the dosage using the following calculation:
3,000 ft
3
x 2 lbs./1000 ft
3 =
6 lbs. methyl bromide

Chemical Treatments Fumigants—Methyl Bromide—Tarpaulin Fumigation
Conducting the Fumigation
02/2024-01 Treatment Manual 2-4-27
8. Verify that there is enough gas in the cylinder and if necessary, that other
cylinders are available.
9. Check the gas introduction line connections to ensure they are tight and
free of leaks (wearing the SCBA.)
10. Verify that all safety equipment, especially SCBA, is available and in
working order.
11. If using a T/C analyzer, install Drierite® and Ascarite® filters as required
in Thermal Conductivity Gas Analyzers on page 8-1-2
Conducting the Fumigation
Step 1: Introducing the Gas
MB 2016 Label
NOTICE
Erroneous gas readings may occur if the sampling tubes become blocked or
crimped. It would be impossible to install new sampling tubes during the fumigation.
To avoid an unsuccessful fumigation, test sampling tubes before the treatment
begins.
Refer to the following steps to test the sampling tubes using a MityVac pump: (See
Mityvac Hand-Held Vacuum Pump on page 8-1-23)
1
. Prior to gas introduction, connect a MityVac hand-held vacuum pump to a sam-
pling tube.
2. Squeeze the handle on the MityVac unit. If the line is blocked, a vacuum will be
indicated on the MityVac gauge. For sampling tubes longer than 25 feet, squeeze
the handle two or three times. The MityVac pump has the capacity to attain and hold
25 inches of Hg vacuum and a minimum of 7 psig pressure.
3. Disconnect the MityVac pump from the sampling tube and repeat this procedure
for each sampling tube.
NOTICE
Other gas detection devices may not require the use of Drierite
®
or Ascarite
®
.
!
CAUTION
The acceptable air concentration level for methyl bromide (MB) is 5 ppm. A respira-
tor (approved SCBA) is required if the MB concentration level in the air is unknown
or greater than 5 ppm at any time. The PPQ official and the fumigator must use
SCBA while introducing the gas, checking for leaks, when taking aeration readings,
and inside the buffer zone.
NOTICE
If MB concentration levels are between 1-4 ppm, the PPQ official and the fumigator
may wear an air purifying respirator NIOSH certified half-mask or full face piece with
a cartridge.

Chemical Treatments Fumigants—Methyl Bromide—Tarpaulin Fumigation
Conducting the Fumigation
2-4-28 Treatment Manual 02/2024-01
Require the fumigator and PPQ official to use SCBA while introducing and
adding gas. The PPQ official is not required to be in the treatment buffer zone
during the fumigation except as required for monitoring activity. The PPQ
official must ensure that the fumigator turns on all fans before introducing the
gas. When using large cylinders of MB, the fumigator should slightly open the
cylinder valve, then close the valve.
With an APHIS-approved continuous real time gas detection device, the
fumigator must check all connections on the gas introduction hose (between
the MB cylinder and the volatilizer) for leaks. If leaks are found the fumigator
must tighten the connections and repeat the test.
When no leaks are found, require the fumigator to open the valve to the point
where 3 to 4 pounds of MB are being introduced per minute. The water
temperature in the volatilizer should never go below 150 °F at any time during
gas introduction. The water in the volatilizer may include an antifreeze and
should be handled with the appropriate safeguards.
The fumigation time begins once all the gas has been introduced. The PPQ
official must record the time gas introduction was started and completed in
Block 32 on the PPQ Form 429A.
In the electronic 429 database, record the fumigation date, gas introduction
start and finish time in the corresponding fields under the “GAS
INTRODUCTION” heading on the Treatment form.
DANGER
!
If the PPQ official or fumigator notices a cloud, plume, vapor, or mist coming from
the introduction equipment during gas introduction, the fumigator must TURN OFF
the valve on the gas cylinder, EVACUATE the area immediately, and ABORT the
fumigation.
No person should place any part of their body into the cloud, plume, vapor, or mist.
After the cloud plume has dissipated, measure gas concentration levels at the gas
cylinder using any APHIS-approved continuous real time gas detection device.
When gas concentration levels at the cylinder reach 5 ppm or less, the fumigator
must identify the source of the leak and correct it before restarting the fumigation.
Any person within the treatment buffer zone must wear and use SCBA equipment
during gas introduction and gas addition.
!
CAUTION
Do not touch the gas introduction line with your bare hands—you could get burned!
Close the cylinder valve once the proper dosage has been introduced.

Chemical Treatments Fumigants—Methyl Bromide—Tarpaulin Fumigation
Conducting the Fumigation
02/2024-01 Treatment Manual 2-4-29
Require the fumigator to run the fans for 30 minutes to achieve even gas
distribution. The PPQ official must take the initial concentration reading 30
minutes after all the gas has been introduced.
Step 2: Testing for Leaks
Require the fumigator to wear the SCBA to test for leaks using an APHIS-
approved leak detection device before the 30 minute reading or anytime when
the concentration level is unknown or above 5 ppm.
MB 2016 Label
The fumigator must test around the perimeter of the tarpaulin on the floor,
corners, and especially where electric cords, gas sampling tubes, or gas
introduction lines are present. When the fumigator detects leaks, ensure that
they are sealed using more sand or sand snakes for floor leaks and tape for
sealing small holes in the tarpaulin. Loose, wet sand may be used to reduce
leakage from electric cords, gas sampling tubes, gas introduction lines, or
uneven flooring.
If the fumigator detects excessive leakage (concentration readings of 50
percent or less of the minimum concentration), do not attempt to correct the
problem by adding more gas. For non-food, non-feed commodities, require the
fumigator to quickly evacuate the remaining gas from the enclosure, eliminate
the problem, and construct a new enclosure. Aerate as usual following
procedures outlined in Aeration on page 2-4-38. If the commodity is non-food
or feed, restart the fumigation in the new enclosure.
NOTICE
Do not begin counting the fumigation time until all the gas has been introduced and
the valve on the MB tank is closed.
NOTICE
If MB concentration levels are between 1-4 ppm, the PPQ official and the fumigator
may wear an air purifying respirator NIOSH certified half-mask or full face piece with
a cartridge.
NOTICE
If a PPQ employee encounters unsafe conditions (such as holes in the tarpaulin or a
breach in safety protocol) and the condition(s) cannot be corrected in a timely
manner, the employee may CANCEL the fumigation. Consult with a PPQ Supervisor
prior to cancellation.

Chemical Treatments Fumigants—Methyl Bromide—Tarpaulin Fumigation
Conducting the Fumigation
2-4-30 Treatment Manual 02/2024-01
Step 3: Taking Concentration Readings
Before taking concentration readings, require the fumigator to purge the gas
sampling tubes with a mechanical or hand pump. If using a T/C analyzer,
connect it to the gas sampling tube, adjust the gas flow rate to 1.0, and wait
until the meter registering “ounces per thousand cubic feet” stabilizes. This
may take a minute or more, depending on the length of the gas sampling tube
and whether or not an auxiliary pump is used.
The PPQ official must take concentration readings 30 minutes after gas
introduction. Use an APHIS-approved gas detection device to determine the
gas concentration and distribution within the enclosure. Allow gas
concentration readings to stabilize; do not disconnect the sampling line from
the gas detection device when the minimum concentration reading has been
met. If the gas distribution is even (all readings within 4 ounces of each other)
and meet the minimum concentration required by the treatment schedule,
advise the fumigator to turn off the fans. Running the fans longer can
contribute to gas leakage. If used, the PPQ official must check desiccant tubes
before each reading and change Drierite® if its color is pink.
Take concentration readings at the times designated in the treatment schedule:
6
30 minutes
2 hours
4 hours
6 hours
12 hours
24 hours
!
CAUTION
Commodities used for food or feed cannot be re-treated. The commodity must be
either:
Returned to the country of origin
Re-exported to another country (if they will accept the shipment)
Destroyed by incineration
NOTICE
Living plant and plant products generate carbon dioxide gas, which interferes with
the MB readings from the T/C. In order to remove CO
2
, install an Ascarite® tube in
line with the Drierite® tube if fumigating living plant and plant products, including
fruits and vegetables, timber, flowers, and seeds.
6 If fumigating oak logs or lumber for export, see “Special Procedures for Adding Gas to Oak logs and
lumber.”

Chemical Treatments Fumigants—Methyl Bromide—Tarpaulin Fumigation
Conducting the Fumigation
02/2024-01 Treatment Manual 2-4-31
36 hours
48 hours
72 hours
Any final concentration reading
Avoid using hand-held two-way radios near the T/C analyzer. Two-way radios
may interfere with an accurate concentration reading.
Thirty-minute Reading
The 30-minute reading shows the initial concentration and distribution of gas.
The 30-minute reading can indicate leakage, sorption, incorrect dosage
calculation, or error in fumigant introduction—all of which require immediate
attention. If the 30-minute readings are below the minimum, require the
fumigator to check for leaks around the perimeter of the tarpaulin.
Concentration readings should not differ more than 4 ounces among the leads.
When concentration readings differ more than 4 ounces, run the fans to
equalize the gas and record readings in the Remarks block on the PPQ Form
429A. In some cases, several cycles of fan operation may be necessary to
equalize the readings. The PPQ official will record all gas readings on the PPQ
Form 429A or in the electronic 429 database.
Two-hour Reading
In comparison with the 30-minute reading, the 2-hour reading also will
indicate if the tarpaulin is leaking or the commodity is absorbing gas. Refer to
Table 2-4-8 on page 2-4-37for detailed instructions.
Final Reading
The final reading is required for all tarpaulin fumigations in order to determine
if the fumigation has been successfully completed. You (the PPQ official) may
start the final reading before the finishing time of the treatment so that aeration
commences at the finishing time. Starting the final reading before finishing
time is especially critical when fumigating perishables.
Additional Readings
Decide the need to take additional readings based on the following:
Any condition which could change the gas concentration, such as severe
winds, or rain
EXAMPLE
The dosage for the fumigation was 4 pounds (64 ounces). The 30-
minute reading was 50 ounces. The 2-hour reading is 26 ounces.
The 2-hour reading is low and according to Table 2-4-8 the
fumig
ation needs to be extended by 30 minutes.

Chemical Treatments Fumigants—Methyl Bromide—Tarpaulin Fumigation
Conducting the Fumigation
2-4-32 Treatment Manual 02/2024-01
Rate of gas concentration decrease
When concentration readings differ by more than 4 ounces, run the fans to
equalize the gas and record readings in the Remarks block on the APHIS
429A. Generally, gas should be evenly distributed, and you should not have to
restart the fans unless you added gas. If readings continue to differ by more
than 4 ounces, continue running the fans until the gas is evenly distributed.
If unpredicted severe winds occur, additional readings must be taken. Any
sharp or unusual decreases of the readings in relation to previous readings is a
clue to take corrective action and supplementary readings. Take additional
readings every 30 minutes until problems are rectified.
Sorptive commodities may also require additional concentration readings. See
Sorption on page 2-3-10.
Step 4: Determining the Need to Add Gas and Adjust Exposure
Use Table 2-4-5 to determine when to add gas or extend exposure period.
Table 2-4-5 Determine the Need to Add Gas and Adjust Exposure
If the lowest
gas reading is:
And the treat-
ment schedule is:
Then:
Below the
required mini-
mum concentra-
tion
T101-a-1 or equiv-
alent
1
1 T101-a-1 or equivalent schedules are those schedules that are:
NOT greater than 2 hours long (exposure time)
NOT greater than 4 lbs. per 1000 ft3 (dosage rate)
Minimum concentration readings and temperature ranges match EXACTLY the readings
in T101-a-1
If the minimum concentration readings do not meet these requirements, the schedule is NOT
equivalent. When schedules are NOT equivalent, use Table 2-4-5 to determine the length of
time to extend exposure and u
se the formula in to determine the amount of gas to add.
See Table 2-4-7 on page 2-4-36 for corrections at
0.5 hour, or Table 2-4-8 on page 2-4-37 for correc-
tions at 2 hours.
Other than T101-
a-1 or equivalent
1
See Adding Gas and Extending Exposure Period
to Commodities that are Fumigated Using Treat-
ment Schedules Other Than T101-a-1 or Equiva-
lent (may include perishables) on page 2-4-33
At or above the
requ
ired mini-
mum concentra-
tion
T101-a-1 or equiv-
alent
1
See Table 2-4-7 on page 2-4-36 for actions to take
at 0.5 hours, or Table 2-4-8 on page 2-4-37 for
action
s to take at 2 hours.
Other than T101-
a-1 or equivalent
1
No action necessary.

Chemical Treatments Fumigants—Methyl Bromide—Tarpaulin Fumigation
Special Procedures for Adding Gas and Extending Exposure Period
02/2024-01 Treatment Manual 2-4-33
Special Procedures for Adding Gas and Extending Exposure Period
7
Adding Gas and Extending Exposure Period to Commodities
that are Fumigated Using Treatment Schedules Other Than
T101-a-1 or Equivalent (may include perishables)
Use Table 2-4-6 to determine if you need to add gas or extend or decrease the
exposure time to T101-a-1 schedules that are not equivalent. Use the formula
in Figure 2-4-6 to determine the amount of gas to add.
When adding gas, require the fumigator to follow these steps:
1. Heat water in volatilizer.
2. Turn on fans.
3. Weigh cylinder.
7 The MB label does allow the extension of exposure time due to low gas readings for non-food commodities.
Figure 2-4-6 Formula for Determining the Amount of Gas to Add to Schedules
Not Equivalent to T101-a-1
Table 2-4-6 Determine the Extended Exposure Period for Non-equivalent
Schedules
If the exposure
time is:
And any individual
reading is below
minimum by:
1
1 If any individual reading is 50 percent or more below the minimum concentration reading,
then abort the treatment. For example, if the minimum reading is 38 ounces then the reading
50 percent below the minimum is 19 ounces (38 oz.- (30 oz. x 0.50) = 19 oz.) For oak logs
(T312-a, T312-a-alternative), refer to Special Procedures for Adding Gas to Oak Logs Using
T312-a or T312-a-Alternative for specific instructions.
Then extend exposure:
Less than 12 hours 10 oz. or less 10 percent of the time lapse since gas intro-
duction or the last acceptable reading
11 oz. or more 30 minutes
12 hours or more 10 oz. or less 10 percent of the time lapse since gas intro-
duction or the last acceptable reading
11 oz. or more 2 hours or 10 percent of the time lapse since
the last acceptable reading, whichever is
greater
1.6 number of ounces below minimum
volume in cubic feet
1000 cubic feet
-------------------------------------------------
1
16
------
pounds of gas to add=

Chemical Treatments Fumigants—Methyl Bromide—Tarpaulin Fumigation
Special Procedures for Adding Gas and Extending Exposure Period
2-4-34 Treatment Manual 02/2024-01
4. With SCBA on, open valve on cylinder and introduce gas.
5. Close valve when the weight of the cylinder indicates that the needed
amount of gas has been added.
6. The PPQ official must record quantity of fumigant added in Block 34 and
additional fan time in Block 30 of the PPQ Form 429A.
7. In the electronic 429, record the amount of gas added in the “Additional
Gas Recommended” field and the actual amount of additional gas added in
the “ACTUAL ADDITIONAL GAS” field. Record the additional fan time
in the “TIME FANS OPERATED” field in the Treatment form.
8. Note the time the fumigator started introducing additional gas and the time
the fumigator finished introducing gas and record in Block 40 (Remarks)
of the PPQ Form 429A or in the “Remarks” form in the electronic 429
database. Require the fumigator to run the fans for 30 minutes. Turn off
fans, then take a concentration reading. If all readings are above minimum
concentration levels, then proceed as usual with the remaining scheduled
concentration readings.
Adding Gas to Fruits, Vegetables, or Perishable Commodities
Using Schedule T101-a-1 or Equivalent
Use Table 2-4-7 and Table 2-4-8 to determine if you need to add gas or extend
or decrease the exposure time. Select the proper table based on the time of the
gas reading (30 minutes or 2 hours).
Use the formula in Figure 2-4-7 to determine the amount of gas to add.
Figure 2-4-7 Formula for Determining the Amount of Gas to Add to Schedules
Equivalent to T101-a-1
NOTICE
DO NOT average the gas concentration readings before using the tables. Base your
decision on whether to add gas from the LOWEST gas concentration reading of any
individual gas reading.
!
CAUTION
Fresh fruits and vegetables are sensitive to MB, so double check volume calcula-
tions and dosage measurements to avoid accidental overdoses.
1.6 number of ounces below minimum
volume in cubic feet
1000 cubic feet
-------------------------------------------------
1
16
------
pounds of gas to add=

Chemical Treatments Fumigants—Methyl Bromide—Tarpaulin Fumigation
Special Procedures for Adding Gas and Extending Exposure Period
02/2024-01 Treatment Manual 2-4-35
When adding gas, require the fumigator to follow these steps:
1. Heat water in volatilizer.
2. Turn on fans.
3. Weigh cylinder.
4. With SCBA on, open valve on cylinder and introduce gas.
5. Close valve when the weight of the cylinder indicates that the needed
amount of gas has been added.
6. The PPQ official must record quantity of fumigant added in Block 34 and
additional fan time in Block 30 of the PPQ Form 429A.
7. In the electronic 429, record the amount of gas added in the “Additional
Gas Recommended” field and the actual amount of additional gas added in
the “ACTUAL ADDITIONAL GAS” field. Record the additional fan time
in the “TIME FANS OPERATED” field in the Treatment form.
8. Note the time the fumigator started introducing additional gas and the time
the fumigator finished introducing gas and record in Block 40 (Remarks)
of the PPQ Form 429A or in the “Remarks” form in the electronic 429
database. Run the fans until there is even gas distribution throughout the
stack. Turn off fans, then take a concentration reading 30 minutes after the
gas has been introduced. If all readings are above minimum concentration
levels, then proceed as usual with the remaining scheduled concentration
readings.

Chemical Treatments Fumigants—Methyl Bromide—Tarpaulin Fumigation
Special Procedures for Adding Gas and Extending Exposure Period
2-4-36 Treatment Manual 02/2024-01
Table 2-4-7 Determine Gas Concentration Values and Corrections for Fruits and
Vegetables at the 30-minute Reading of T101-a-1 or Equivalent
Schedules
If the
schedule
is:
And the
minimum
concentration
reading (oz.) in
the schedule is:
And the
lowest
concentration
(oz.) is:
Then:
40-49 °F
4 lbs. for 2
hrs.
48 65 or greater REDUCE exposure by 15 minutes
64-48 TAKE 2 hour reading as scheduled
Lower than 48 1. ADD gas, and
2. EXTEND exposure by 15 minutes
50-59 °F
3 lbs. for 2
hrs.
38
52 or greater
REDUCE exposure by 15 minutes
51-38 TAKE 2 hour reading as scheduled
Lower than 38 1. ADD gas, and
2. EXTEND exposure by 15 minutes
60-69 °F
2.5 lbs. for
2 hrs.
32 48 or greater REDUCE exposure by 15 minutes
47-32 TAKE 2 hour reading as scheduled
Lower than 32 1. ADD gas, and
2. EXTEND exposure by 15 minutes
70-79 °F
2 lbs. for 2
hrs.
26 37 or greater REDUCE exposure by 15 minutes
36-26 TAKE 2 hour reading as scheduled
Lower than 26 1. ADD gas, and
2. EXTEND exposure by 15 minutes
80-89 °F
1.5 lbs. for
2 hrs.
19 27 or greater REDUCE exposure by 15 minutes
26-19 TAKE 2 hour reading as scheduled
Lower than 19 1. ADD gas, and
2. EXTEND exposure by 15 minutes

Chemical Treatments Fumigants—Methyl Bromide—Tarpaulin Fumigation
Special Procedures for Adding Gas and Extending Exposure Period
02/2024-01 Treatment Manual 2-4-37
Table 2-4-8 Determine Gas Concentration Values and Corrections for Fruits and
Vegetables at the 2-Hour Reading of T101-a-1 or Equivalent
Schedules
If the schedule
is:
And the lowest
concentration (oz.) at 2
hours is:
Then do not add gas, but::
40-49 °F
4 lbs. for 2 hrs.
38 and above AERATE commodity
37-28 EXTEND exposure by 15 minutes
27-25 EXTEND exposure by 30 minutes
Lower than 25 ABORT
50-59 °F
3 lbs. for 2 hrs.
29 and above AERATE commodity
28-24 EXTEND exposure by 15 minutes
23-21 EXTEND exposure by 30 minutes
Lower than 21 ABORT
60-69 °F
2.5 lbs. for 2 hrs.
24 and above AERATE commodity
23-21 EXTEND exposure by 15 minutes
20-18 EXTEND exposure by 30 minutes
Lower than 18 ABORT
70-79 °F
2 lbs. for 2 hrs.
19 and above AERATE commodity
18-16 EXTEND exposure by 15 minutes
15-13 EXTEND exposure by 30 minutes
Lower than 13 ABORT
80-89 °F
1.5 lbs. for 2 hrs.
14 and above AERATE commodity
13-12 EXTEND exposure by 15 minutes
11-10 EXTEND exposure by 30 minutes
Lower than 10 ABORT

Chemical Treatments Fumigants—Methyl Bromide—Tarpaulin Fumigation
Aeration
2-4-38 Treatment Manual 02/2024-01
Step 5: Exhausting the Gas
Require the fumigator to exhaust the gas at the completion of the exposure
period. If the treatment schedule is a FIFRA Section 18 Exemption, then the
PPQ official must verify the final gas concentration reading. Record detector
tube readings and the time interval from the aeration in the corresponding
fields in “DETECTOR READINGS”.
Aeration
The fumigator must:
Arrange for the aeration to proceed once the treatment is completed.
Consider the wind direction when pointing the exhaust duct, and face the
duct outlet toward an open area away from people.
Ensure that, during the first 10 minutes of aeration, no one is present
within 200 feet downwind of the exhaust duct outlet.
Determine aeration buffer zones in accordance with Environmental
Protection Agency (EPA) Methyl Bromide Commodity Fumigation
Buffer Zone Lookup Tables.
Ensure no one is present within the perimeter of the aeration buffer zone
unless they are wearing SCBA.
Refer to “Buffer Zone Overlap for Multiple Enclosures”.
Follow all label instructions, state, county, and local regulations, in
addition to the instructions in this manual.
Inform people located in occupied structures and personnel in the
immediate area within the buffer zone that release of MB is about to take
place and give them the option of leaving the area or remaining inside the
building.
Restrict access to the area where the exhaust duct extends beyond the
enclosure.
Responsibility for Aerating the Commodity
The label requires that at least two people trained in the use of the fumigant
must be present at all times during gas introduction, treatment, and aeration.
The PPQ official, however, is not required to be present at the fumigation site
throughout the aeration process unless specified by the label or by State or
local regulations. Refer to Table 2-4-9 to determine responsibility for aerating
the commodity.

Chemical Treatments Fumigants—Methyl Bromide—Tarpaulin Fumigation
Aeration Buffer Zones
02/2024-01 Treatment Manual 2-4-39
Refer to Table 2-4-10 to determine which aeration procedure to use.
Aeration Buffer Zones
The aeration buffer zones are determined by the fumigator in accordance with
Environmental Protection Agency (EPA) Methyl Bromide Commodity
Fumigation Buffer Zone Lookup Tables.
Wearing Respiratory Protection
The fumigator must wear approved respiratory protection (SCBA, supplied air
respirator, or a combination unit) when:
A risk of exposure to concentrations above 5 ppm exists; this includes any
time the concentration is unknown
Opening the tarpaulin for aeration
Removing the tarpaulin if measured levels of fumigant are above 5 ppm
Table 2-4-9 Determine Responsibility for Aerating the Commodity
If the treatment schedule is: Then:
A FIFRA Section 18 Exemption 1. PPQ official must be present at the initiation of
aeration and to VERIFY the final aeration readings.
2. USE Table 2-4-10 to determine which aeration
p
rocedure to follow.
A labeled Treatment Schedule 1. RELEASE the fumigation to the fumigator to aerate
according to Table 2-4-10.
2.
RELEASE the commodity.
Table 2-4-10 Determine the Aeration Procedure
If: And: And: Then:
Nonsorptive Containerized GO to page 2-4-40
Noncontainerized Fresh fruits and
ve
getables, and cut
flowers
GO to page 2-4-43
Other than fresh fruits and
ve
getables, and cut
flowers
GO to page 2-4-41
Sorptive,
including yams
and chestnuts
(see Sorption on
pag
e 2-3-10 for
a list of sorptive
commodities)
Containerized GO to page 2-4-47
Noncontainerized GO to page 2-4-45

Chemical Treatments Fumigants—Methyl Bromide—Tarpaulin Fumigation
Aerating Nonsorptive, Containerized Cargo—Indoors and Outdoors
2-4-40 Treatment Manual 02/2024-01
Setting up the air introduction and exhaust systems (if they were not set up
prior to gas introduction)
MB 2016 Label
Aerating Nonsorptive, Containerized Cargo—Indoors and Outdoors
Step 1: Installing Exhaust System
Advise the fumigator to:
1. Install an exhaust fan (minimum of 5,200 cfm capacity) to a 16 inch, or
greater, diameter duct located at the floor near rear doors of the container.
2. Install an air introduction duct system consisting of a 3,750 cfm, or greater,
fan attached to a 12 inch, or larger, duct which reaches two-thirds of the
length of the container at the top of the load. Have the ducts installed prior
to the start of fumigation. For indoor fumigation, extend the exhaust duct at
least 30 feet beyond the building or through a vertical stack extending
through the roof. For outdoor fumigations, extend the exhaust duct at least
30 feet beyond the container.
Refer to Figure 2-4-8 and the associated example for the formula for
calculating the air exchange rate (AER).
NOTICE
If MB concentration levels are between 1-4 ppm, the PPQ official and the fumigator
may wear an air purifying respirator NIOSH certified half-mask or full face piece with
a cartridge.
NOTICE
The exhaust fan(s) must be capable of a minimum of 10 air exchanges per hour. The
sum of cubic feet per minute (cfm) of the exhaust fan(s) or exhaust blower divided by
the volume of the enclosure (in cubic feet) and multiplying the fraction by 60 equals
the number of complete gas volume exchanges per hour.
Figure 2-4-8 Formula to Calculate Air Exchange Rate
(AER)
EXAMPLE

Chemical Treatments Fumigants—Methyl Bromide—Tarpaulin Fumigation
Aerating Nonsorptive, Noncontainerized Cargo—Indoors and Outdoors
02/2024-01 Treatment Manual 2-4-41
Step 2: Aerating the Commodity
Advise the fumigator to:
1. Connect the exhaust duct to the exhaust fan.
2. Start the exhaust fan(s) and lift the end of the tarpaulin opposite the end at
which the exhaust fan and duct are located.
3. Aerate for 3 hours.
4. Stop the aeration fans.
5. Use a colorimetric tube to take a concentration reading in the airspace
around and, when feasible, within the carton or box. Exceptions may
include compressed cotton and other very difficult to probe commodities.
Obtain prior approval from S&T-TMT for exceptions to this rule.
For FIFRA Section 18 Exemptions, record the concentration reading (in ppm),
date, and time in Block 39 of PPQ Form 429A. In the electronic 429 database,
record the date, time, and detector reading (in ppm) in “Detector Readings”
field.
Then use Table 2-4-11 to determine when to release the commodity.
Aerating Nonsorptive, Noncontainerized Cargo—Indoors and
Outdoors
Step 1:
Advise the fumigator to:
1. Install an exhaust duct (minimally one 3,500 cfm capacity fan connected to
an exhaust duct). An exhaust duct is optional for outdoor fumigations.
2. Extend the exhaust duct outlet to an outside area where there is adequate
ventilation and at least 30 feet away from the building or through a vertical
exhaust stack extending through the roof.
Table 2-4-11 Determine When to Release the Commodity for Nonsorptive,
Containerized Cargo
If the gas concentration level is: Then:
5 ppm or less RELEASE the commodity
6 ppm or more 1. CONTINUE aeration until the concentration is 5
ppm or less, then
2. RELEASE the commodity

Chemical Treatments Fumigants—Methyl Bromide—Tarpaulin Fumigation
Aerating Nonsorptive, Noncontainerized Cargo—Indoors and Outdoors
2-4-42 Treatment Manual 02/2024-01
Step 2: Aerating the Commodity
Advise the fumigator to:
1. Start the exhaust fan.
2. Lift the end of the tarpaulin opposite the end with the exhaust fan and duct
(if used).
3. Aerate the enclosure for 2 hours.
Outdoor Fumigations
Advise the fumigator to:
1. Stop the fans.
2. Remove the tarpaulin.
3. Take concentration readings with colorimetric tubes in the airspace around
and, when feasible, inside the box or cartons.
For FIFRA Section 18 Exemptions, record the concentration reading (in ppm),
date, and time in Block 39 of PPQ Form 429A. In the electronic 429 database,
record the date, time, and detector reading (in ppm) in the “Detector Readings”
field.
Then use Table 2-4-12 to determine when to release the commodity.
Indoor Fumigations
Advise the fumigator to:
1. Stop the fans.
NOTICE
The exhaust fan(s) must be capable of a minimum of four air exchanges per hour.
The sum of cubic feet per minute (cfm) of the exhaust fan(s) or exhaust blower
divided by the volume of the enclosure (in cubic feet) and multiplying the fraction by
60 equals the complete gas volume exchanges per hour.
Refer to Figure 2-4-8 and the associated example for the formula for calculating the
a
ir exchange rate (AER).
Table 2-4-12 Determine When to Release the Commodity for Nonsorptive,
Noncontainerized Cargo—Outdoors
If the gas concentration level is: Then:
5 ppm or less RELEASE the commodity
6 ppm or more 1. CONTINUE aeration and take concentration
readings until the level is 5 ppm or less, then
2. RELEASE the commodity

Chemical Treatments Fumigants—Methyl Bromide—Tarpaulin Fumigation
Aeration Procedures for Fresh Fruits, Vegetables, and Cut Flowers—Indoors or Outdoors
02/2024-01 Treatment Manual 2-4-43
2. Take concentration readings with colorimetric tubes in the airspace around
and, when feasible, in the carton or box.
For FIFRA Section 18 Exemptions, record the concentration reading (in ppm),
date, and time in Block 39 of PPQ Form 429A. In the electronic 429 database,
record the date, time, and detector reading (in ppm) in the “Detector Readings”
field.
Then use Table 2-4-13 to determine when to release the commodity.
Aeration Procedures for Fresh Fruits, Vegetables, and Cut Flowers—
Indoors or Outdoors
Step 1: Installing Exhaust System
Use Table 2-4-14 to determine fan size.
Table 2-4-13 Determine When to Release the Commodity for Nonsorptive,
Noncontainerized Cargo—Indoors
If the gas
concentration level
is:
Then:
5 ppm or less 1. ADVISE fumigator to REMOVE the tarpaulin, and
2. RELEASE the commodity
6 ppm to 99 ppm 1. ADVISE fumigator to REMOVE the tarpaulin, and
2. CONTINUE aeration until the concentration is 5 ppm or less, then
3. RELEASE the commodity
100 ppm or above 1. CONTINUE aeration and take concentration readings until the
concentration level is below 100 ppm, then remove the tarpaulin,
and
2. CONTINUE aeration until concentration is 5 ppm or less, then
3. RELEASE the commodity
NOTICE
Do not use these procedures for fresh chestnuts or yams. (See procedures for sorp-
tive commodities on page 2-4-45.)

Chemical Treatments Fumigants—Methyl Bromide—Tarpaulin Fumigation
Aeration Procedures for Fresh Fruits, Vegetables, and Cut Flowers—Indoors or Outdoors
2-4-44 Treatment Manual 02/2024-01
An alternate procedure to using exhaust fans and ducts is to aerate through a
vertical stack.
Step 2: Aerating the Commodity
Advise the fumigator to:
1. Connect the exhaust duct to the exhaust fan.
2. Start the exhaust fan(s) and lift the end of the tarpaulin opposite the end at
which the exhaust fan and duct are located.
3. Aerate for 2 hours.
4. Remove the tarpaulin and allow 2 hours for passive aeration.
5. Stop the fans and take concentration readings with colorimetric tubes in the
airspace around and, when feasible, inside the cartons or boxes.
For FIFRA Section 18 Exemptions, record the concentration reading (in ppm),
date, and time in Block 39 of PPQ Form 429A. In the electronic 429 database,
record the date, time, and detector reading (in ppm) in the “Detector Readings”
field.
Table 2-4-14 Determine Number of Fans for Aeration of Fresh Fruits,
Vegetables, and Cut Flowers
If the enclosure is: Then:
Up to 1,000 cu ft USE one fan, 67-350 cfm
1,001 - 15,000 cu ft USE one or two fans. The sum of the cfm of the fans divided
by the volume of the enclosure and multiplying the fraction by
60 should equal four air exchanges per hour or more. Refer to
Figure 2-4-8 and the associated example. Connect the fan(s)
to exh
aust duct(s) 3 feet in diameter.
15,001 - 25,000 cu ft USE two fans, each 1,000 to 5,000 cfm. The sum of the cfm of
the fans divided by the volume of the enclosure and multiply-
ing the fraction by 60 should equal four air exchanges per
hour or more. Connect fan(s) to exhaust duct(s) 3 feet in
diameter.
More than 25,000 cu ft CONTACT S&T-TMT for advice prior to conducting the first
fumigation.
NOTICE
The exhaust fan(s) must be capable of a minimum of four air exchanges per hour.
The sum of cubic feet per minute (cfm) of the exhaust fan(s) or exhaust blower
divided by the volume of enclosure (in cubic feet) and multiplying the fraction by 60
equals the number of complete gas volume exchanges per hour. Refer to
Figure 2-4-8 and associated example for the formula for calculating air exchange
rate (AER).

Chemical Treatments Fumigants—Methyl Bromide—Tarpaulin Fumigation
Aerating Sorptive, Noncontainerized Cargo—Indoors and Outdoors
02/2024-01 Treatment Manual 2-4-45
Then use Table 2-4-15 to determine when to release the commodity.
Aerating Sorptive, Noncontainerized Cargo—Indoors and Outdoors
Step 1: Installing the Exhaust System
Advise the fumigator to:
1. Install an exhaust duct (minimally one 3,500 cfm capacity fan connected to
an exhaust duct.)
2. Extend the exhaust duct outlet to an outside area where there is adequate
ventilation and at least 30 feet away from the building or through a vertical
exhaust stack extending through the roof.
Step 2: Aerating the Commodity
Outdoor Fumigations
Advise the fumigator to:
1. Lift both ends of the tarpaulin.
2. Start the circulation fans and exhaust fans (if available).
3. Aerate oak logs and lumber a minimum of 48 hours. If, after 48 hours, the
concentration is 5 ppm or greater, continue aeration for 24 more hours.
Continue this procedure until concentration readings are less than 5 ppm.
4. Run the fans for 4 hours for commodities other than oak logs and lumber.
5. Remove the tarpaulin.
6. Stop the fans and take concentration readings with colorimetric tubes in the
airspace around and, when feasible, inside the cartons or boxes.
For FIFRA Section 18 Exemptions, record the concentration reading (in ppm),
date, and time in Block 39 of PPQ Form 429A. In the electronic 429 database,
record the date, time, and detector reading (in ppm) in the “Detector Readings”
field.
Then use Table 2-4-16 to determine when to release the commodity.
Table 2-4-15 Determine When to Release the Commodity After Aeration of Fresh
Fruits, Vegetables, and Cut Flowers—Indoors or Outdoors
If the gas concentration level is: Then:
5 ppm or less RELEASE the commodity
6 ppm or more 1. CONTINUE aeration and take concentration
readings until the level is 5 ppm or less, then
2. RELEASE the commodity

Chemical Treatments Fumigants—Methyl Bromide—Tarpaulin Fumigation
Aerating Sorptive, Noncontainerized Cargo—Indoors and Outdoors
2-4-46 Treatment Manual 02/2024-01
Indoor Fumigations
Advise the fumigator to:
1. Complete the installation of the exhaust duct.
2. Start the circulation fans and exhaust fans.
3. Lift the end of the tarpaulin opposite the exhaust fan.
4. Aerate oak logs and lumber a minimum of 48 hours. If, after 48 hours, the
concentration is 5 ppm or greater, continue aeration for 24 more hours.
Continue this procedure until concentration readings are less than 5 ppm.
5. Run the fans for 4 hours for commodities other than oak logs and lumber.
6. Stop the fans and take concentration readings with colorimetric tubes in the
airspace around and, when feasible, inside the carton or box.
7. Remove the tarpaulin.
For FIFRA Section 18 Exemptions, record the concentration reading (in ppm),
date, and time in Block 39 of PPQ Form 429A. In the electronic 429 database,
record the date, time, and detector reading (in ppm) in the “Detector Readings”
form.
Then use Table 2-4-17 to determine when to release the commodity.
Table 2-4-16 Determine when to Release the Commodity for Sorptive,
Noncontainerized Cargo—Outdoors
If the gas concentration level is: Then:
5 ppm or less RELEASE the commodity
6 ppm or more 1. CONTINUE aeration and take concentration
readings until the level is 5 ppm or less, then
2. RELEASE the commodity
Table 2-4-17 Determine When to Release the Commodity for Sorptive,
Noncontainerized Cargo—Indoors
If the gas
concentration level
is:
Then:
5 ppm or less 1. ADVISE fumigator to REMOVE the tarpaulin, and
2. RELEASE the commodity
6 ppm to 99 ppm 1. ADVISE fumigator to REMOVE the tarpaulin, and
2. CONTINUE aeration until the concentration is 5 ppm or less, then
3. RELEASE the commodity
100 ppm or above 1. CONTINUE aeration and take concentration readings until the
concentration level is below 100 ppm, then remove the tarpaulin,
and
2. CONTINUE aeration until concentration is 5 ppm or less, then
3. RELEASE the commodity

Chemical Treatments Fumigants—Methyl Bromide—Tarpaulin Fumigation
Aerating Sorptive Commodities in Containers—Indoors and Outdoors
02/2024-01 Treatment Manual 2-4-47
Aerating Sorptive Commodities in Containers—Indoors and
Outdoors
Step 1: Installing the Exhaust System
Advise the fumigator to:
1. Install an exhaust fan (minimum of 5,200 cfm capacity) to a 16 inch or
greater diameter duct located at the floor near rear doors of the container.
2. Install an air introduction duct system consisting of a 3,750 cfm or greater
fan attached to a 12 inch or greater duct which reaches two-thirds of the
length of the container at the top of the load. Have the ducts installed prior
to the start of the fumigation. For indoor fumigations, extend the exhaust
duct at least 30 feet beyond the building or through a vertical stack
extending through the roof. For outdoor fumigations, extend the exhaust
duct 30 feet beyond the container.
Step 2: Aerating the Commodity
Indoors
Advise the fumigator to:
1. Complete installation of exhaust duct and begin exhaust fan operation.
2. Lift both ends of the tarpaulin and begin exhaust fan operation. Do not
remove the tarpaulin until the gas concentration level is below 100 ppm
(see Table 2-4-18).
3. Start the circulation and air introduction fans. Require a minimum of 4
hours aeration for all sorptive commodities. Sorptive commodities
generally require 12 hours or longer to aerate; however, since sorptive
commodities vary in their rates of desorption, aeration may be completed
in less than 12 hours.
4. Aerate oak logs and lumber a minimum of 48 hours. If, after 48 hours, the
concentration is 5 ppm or greater, continue aeration for 24 more hours.
Continue this procedure until concentration readings are less than 5 ppm.
5. Stop the fans and take concentration readings with colorimetric tubes in the
airspace around and, when feasible, inside the carton or box.
For FIFRA Section 18 Exemptions, record the concentration reading (in ppm),
date, and time in Block 39 of PPQ Form 429A. In the electronic 429 database,
record the date, time, and detector reading (in ppm) in the “Detector Readings”
form.
Then use Table 2-4-18 to determine when to release the commodity.

Chemical Treatments Fumigants—Methyl Bromide—Tarpaulin Fumigation
Aerating Sorptive Commodities in Containers—Indoors and Outdoors
2-4-48 Treatment Manual 02/2024-01
Outdoors
Advise the fumigator to:
1. Complete installation of exhaust duct and begin exhaust fan.
2. Lift both ends of the tarpaulin that are furthest from exhaust fan.
3. Start the circulation and air introduction fans. Require a minimum of 4
hours aeration for all sorptive commodities. Sorptive commodities
generally require 12 hours or longer to aerate; however, since sorptive
commodities vary in their rates of desorption, aeration may be completed
in less than 12 hours.
4. Aerate oak logs and lumber a minimum of 48 hours. If, after 48 hours, the
concentration is 5 ppm or greater, continue aeration for 24 more hours.
Continue this procedure until concentration readings are less than 5 ppm.
5. Remove the tarpaulin after 4 hours aeration.
6. Stop the circulation fans and take concentration readings with colorimetric
tubes in the airspace around and, when feasible, inside the cartons or boxes.
For FIFRA Section 18 Exemptions, record the concentration reading (in ppm),
date, and time in Block 39 of PPQ Form 429A. In the electronic 429 database,
record the date, time, and detector reading (in ppm) in the “Detector Readings”
form.
Then use Table 2-4-19 to determine when to release the commodity.
Table 2-4-18 Determine When to Release the Commodity for Sorptive
Commodities in Containers—Indoors
If the gas
concentration level
is:
Then:
5 ppm or less 1. ADVISE fumigator to REMOVE the tarpaulin, and
2. RELEASE the commodity
6 ppm to 99 ppm 1. ADVISE fumigator to REMOVE the tarpaulin, and
2. CONTINUE aeration until the concentration is 5 ppm or less, then
3. RELEASE the commodity
100 ppm or above 1. CONTINUE aeration and take concentration readings until the
concentration level is below 100 ppm, then remove the tarpaulin,
and
2. CONTINUE aeration until concentration is 5 ppm or less, then
3. RELEASE the commodity

Chemical Treatments Fumigants—Methyl Bromide—Tarpaulin Fumigation
Aerating Sorptive Commodities in Containers—Indoors and Outdoors
02/2024-01 Treatment Manual 2-4-49
Table 2-4-19 Determine when to Release the Commodity for Sorptive
Commodities in Containers—Outdoors
If the gas concentration level is: Then:
5 ppm or less RELEASE the commodity
6 ppm or more 1. CONTINUE aeration and take concentration
readings until the level is 5 ppm or less, then
2. RELEASE the commodity

Chemical Treatments Fumigants—Methyl Bromide—Tarpaulin Fumigation
Aerating Sorptive Commodities in Containers—Indoors and Outdoors
2-4-50 Treatment Manual 02/2024-01

02/2024-01 Treatment Manual 2-5-1
Chapter
2
Chemical Treatments
Fumigants—Methyl Bromide—Chamber
Fumigation
Contents
Methods and Procedures 2-5-1
2016 Methyl Bromide Label Information 2-5-1
Materials Needed 2-5-3
Conducting the Fumigation 2-5-6
Aeration 2-5-10
Normal Atmospheric Pressure Chamber—Aerating Noncontainerized Cargo
2-5-12
Vacuum Fumigation Chambers—Aerating Containerized and
Noncontainerized Cargo 2-5-13
Methods and Procedures
The procedures covered in this section provide commercial fumigators and
chamber owners with the methods, responsibilities, and precautions for normal
atmospheric pressure (NAP) and vacuum chamber fumigations. The chamber
owner is responsible for hiring a state certified fumigator and for ensuring that
the chamber is certified for conducting PPQ quarantine treatments.
2016 Methyl Bromide Label Information
In 2015, the Environmental Protection Agency (EPA) directed all methyl
bromide (MB) registrants to amend the use directions on the labels of all 100%
MB products. EPA required the changes in order to reflect recommendations in
an EPA report.
1
These amendments modify the use directions for fumigation and aeration
procedures, modify respiratory requirements and equipment and update gas
monitoring equipment. EPA requires all labels on newly manufactured MB to
reflect these recommendations effective October 01, 2016; however, EPA is
allowing existing stocks of MB to be used in accordance with the use
directions on the existing stock’s (older) labels.
1 ““Report of Food Quality Protection Act (FQPA) Tolerance Reassessment and Risk Management
Decision (TRED) for methyl bromide, and Reregistration Eligibility Decision (RED) for Methyl
Bromide’s Commodity Uses”, archive dated August 2006.

Chemical Treatments Fumigants—Methyl Bromide—Chamber Fumigation
2016 Methyl Bromide Label Information
2-5-2 Treatment Manual 02/2024-01
PPQ officials and fumigators must closely examine gas cylinder labels in order
to validate that the dosage, exposure, and commodity are either on the cylinder
label or covered by a FIFRA Section 18 exemption. If a label is not affixed to
the cylinder, DO NOT allow the fumigator to use that cylinder.
New Buffer Zone Requirements
All 2016 MB labels now require both a treatment and an aeration buffer zone.
Both the treatment and aeration buffer zones are specific to the enclosure being
fumigated and must be determined by the Environmental Protection Agency
(EPA) Methyl Bromide Commodity Fumigation Buffer Zone Lookup Tables.
The fumigators are responsible for using this website to determine the buffer
zones and reporting both buffer zones to the PPQ official. If the treatment
buffer zone is determined to be less than 30 feet, the PPQ official will maintain
PPQ’s standard 30 foot treatment buffer zone; otherwise, the new treatment
buffer zone must be observed. If the aeration buffer zone is determined to be
less than 200 feet, then PPQ’s standard “200 feet for 10 minutes” aeration
buffer zone still applies for the first 10 minutes of aeration.
The fumigator must refer to EPA’s website to determine the minimum aeration
buffer zone to be maintained until the aeration period is complete and the
fumigator has verified that gas concentration levels meet the conditions in the
MB label.
Transiting through buffer zones
The label permits vehicles to transit through both treatment and aeration buffer
zones under specific conditions found in the label; it is up to the fumigator
determine how or whether vehicles may transit in accordance with the label.
When using the newer 2016 MB label, changes to certain procedures and
equipment in this chapter are displayed in a NOTICE box with a heading titled
“MB 2016 Label”.
NOTICE
USDA-APHIS granted the State of California a waiver from the 200’ aeration buffer
zone requirement provided the following criteria are met:
The local CA Department of Pesticides or local Air Pollutions Department has issued a local
permit allowing less than 200’ aeration buffer zone.
The permit applies only to a chamber with a vertical aeration stack.
USDA-APHIS may consider other waivers on a case-by-case basis.

Chemical Treatments Fumigants—Methyl Bromide—Chamber Fumigation
Materials Needed
02/2024-01 Treatment Manual 2-5-3
MB 2016 Label (example)
When using existing stocks, follow the equipment and procedural guidance
that is displayed in the body of the text (outside of the NOTICE box).
If there is no “MB 2016 Label” NOTICE box, then the instructions apply to all
MB labels, 2016 and older.
Materials Needed
PPQ Official Provides
APHIS-approved leak detection device
Calculator (optional)
Forms (PPQ Form 429A and APHIS Form 2061 if necessary)
Self-contained breathing apparatus (SCBA) or supplied air respirator
NOTICE
Use this information when the fumigator is using the 2016 MB label.

Chemical Treatments Fumigants—Methyl Bromide—Chamber Fumigation
Materials Needed
2-5-4 Treatment Manual 02/2024-01
MB 2016 Label
Fumigator Provides
APHIS-approved gas detection device
2
(e.g. thermal conductivity device,
infrared device, etc.)
APHIS-approved leak detection device
Auxiliary pump for purging long gas sample tubes
Carbon dioxide filter (e.g. Ascarite®)
Colorimetric tubes (Refer to Appendix E for a list of APHIS-approved
product ranges)
Desiccant (e.g. Dririte®)
Electrical wiring (grounded, permanent type), three prong extension cords
Gas introduction line
Heat supply
NOTICE
In addition to the bulleted equipment list required from PPQ, PPQ must also
provide:
Air purifying respirator NIOSH certified half-mask or full face piece with
a cartridge for concentrations between 1 and 4 ppm
APHIS-approved continuous real time gas monitoring device
Permanently mounted in PPQ owned facilities only, PureAire
Monitoring Systems, Inc., model Air Check Advantage. The Air
Check Advantage can be calibrated either by the manufacturer or by
the PPQ official. Calibrate according to the manufacturer’s User
Guide. Refer to Chapter 8: Equipment for more information.
Portable Photoionization Detector (PID), RAE Systems, Inc. model
MiniRAE 3000. The MiniRAE 3000 must be calibrated by the PPQ
official according to the manufacturer’s User Guide. Refer to Chapter
8: Equipment for more information.
Self contained breathing apparatus (SCBA) NIOSH approval prefix TC-
13F or supplied air respirator NIOSH approval prefix TC-19C
2 The methyl bromide monitor must be calibrated annually. Refer to Chapter 8: Equipment for
calibration information. If using a thermal conductivity (TC) analyzer, Drierite® and Ascarite® must
be used.

Chemical Treatments Fumigants—Methyl Bromide—Chamber Fumigation
Materials Needed
02/2024-01 Treatment Manual 2-5-5
Methyl bromide
Scale or graduated cylinder for volume (liquid measurements)
3
SCBA or supplied air respirator
Temperature recorder and temperature sensors
4
Thermometer
5
Volatilizer
Warning signs/placarding
MB 2016 Label
3 All scales must be calibrated by the State, a company that is certified to conduct scale calibrations,
or by the fumigator under the supervision of PPQ. The source and date of calibration must be posted
in a visible location on or with the scale at all times. The scale must be calibrated a following every
repair or minimum of every year.
4 Temperature sensors must be calibrated annually by the manufacturer or National Institute of
Standards and Technology (NIST) within the range of 40 °F to 80 °F (4.4 °C to 26.7 °C)
5 The thermometer must be calibrated or replaced annually.
NOTICE
In addition to the bulleted equipment list required from the fumigator, the
fumigator must also provide:
Air purifying respirator NIOSH certified half-mask or full face piece with
a cartridge for concentrations between 1 and 4 ppm
APHIS-approved direct read gas detection device
Colorimetric tubes (e.g. Draeger, Sensidyne)
APHIS-approved continuous real time gas monitoring device
Permanently mounted in PPQ owned facilities only, PureAire
Monitoring Systems, Inc., model Air Check Advantage
Portable Photoionization Detector (PID), RAE Systems, Inc. model
MiniRAE 3000
Devices must be calibrated according to the manufacturer’s User
Guide. Refer to Chapter 8: Equipment for more information.
Self contained breathing apparatus (SCBA) NIOSH approval prefix TC-
13F or supplied air respirator NIOSH approval prefix TC-19C

Chemical Treatments Fumigants—Methyl Bromide—Chamber Fumigation
Conducting the Fumigation
2-5-6 Treatment Manual 02/2024-01
Conducting the Fumigation
Step 1: Selecting a Treatment Schedule
The PPQ official will select an appropriate treatment schedule to effectively
eliminate the plant pest without damaging the commodity to be fumigated.
Turn to the treatment schedule index and look up by commodity or by pest the
treatment schedule(s) available. Treatment schedules which are approved for
chambers will be listed as either “NAP” (normal atmospheric pressure) or as
“vacuum.”
Step 2: Issuing a PPQ Form 523 (Emergency Action Notification)
When an intercepted pest is identified and confirmed by a PPQ Area Identifier
as requiring action, the CBP or PPQ official will issue a Form 523 (Emergency
Action Notification - EAN) to the owner, broker, or representative. The EAN
will list all treatment options. Refer to Appendix A in the Manual for
Agricultural Clearance for instructions on completing and distributing the
EAN.
Step 3: Determining Section 18 Exemptions and Sampling Requirements
After selecting the treatment schedule, the PPQ official will determine which
treatment schedules are FIFRA Section 18 Exemptions. The schedule will be
followed by an “IMPORTANT” note to help you determine the current
exemption status. Some treatment schedules are only FIFRA Section 18
Exemptions at specific temperature ranges. Check the treatment schedule and
temperature to determine if the fumigation will be a FIFRA Section 18
Exemption.

Chemical Treatments Fumigants—Methyl Bromide—Chamber Fumigation
Conducting the Fumigation
02/2024-01 Treatment Manual 2-5-7
Residue monitoring by taking samples of the commodity prior to the start of
the fumigation and after aeration is no longer required.
Step 4: Setting up the Fumigation Site
MB 2016 Label
NOTICE
The PPQ official and the fumigator must select a secure area where traffic and
people are restricted from entering and which is isolated from people working.
A nonwork area is preferred to help prevent accidents.
The treatment and aeration buffer zones are determined by the fumigator in
accordance with EPA’s fumigation buffer zone tables. [https://www.epa.gov/
pesticide-registration/mbcommoditybuffer]
The buffer zones surround the area where access is limited during treatment. If
the fumigator determines that the buffer zone is less than 30’, then PPQ
requires a 30’ buffer zone. If the fumigator determines that the buffer zone is
greater than 30’, then PPQ must observe the prescribed buffer zone.
The treatment and aeration buffer zones extend from the perimeter of the
enclosure to a distance determined by the fumigator in accordance with the
label. Entry by any person except the PPQ official and the fumigator is
prohibited except as provided in the “Exceptions to Buffer Zone Entry
Restrictions” section of the label.
The treatment buffer zone begins when the fumigant is introduced into the
enclosure and ends when aeration begins, at which point the aeration buffer
zone requirements apply.
The fumigator must define the treatment and aeration buffer zone perimeters
using physical barriers (such as walls, ropes, etc.) and placards to limit access
to the buffer zone. Placards must meet all label requirements regarding specific
warnings, information, and language.
The fumigator will permit transiting through buffer zones in accordance with
the “Transit Exception” section of the label.
Buffer Zone Overlap for Multiple Enclosures
For multiple enclosures where buffer zones overlap, the fumigator must
recalculate both the treatment and aeration buffer zones in accordance with the
label and supply them to the PPQ official.

Chemical Treatments Fumigants—Methyl Bromide—Chamber Fumigation
Conducting the Fumigation
2-5-8 Treatment Manual 02/2024-01
Step 5: Measuring the Temperature
The PPQ official must determine the temperature of the commodity in order to
select the proper dosage rate. Depending on whether or not you are fumigating
a pulpy fruit or vegetable, you may use either the commodity temperature or
an average of the commodity and air temperatures. A pulpy fruit or vegetable
can support internal feeding insects, is fleshy and moist, and can be probed
with a temperature measuring device. Examples include, but are not limited to
peppers, onions, and grapes.
Determine the temperature to use in selecting the proper dosage rate:
For fruits, pulpy vegetables, or logs use only the commodity temperature.
For all other commodities, use both the commodity and air temperature.
To take the temperature readings, use a bimetallic, mercury, or digital long-
stem thermometer that has been calibrated. Use Table 2-5-1 to determine
which temperature to use when selecting the proper dosage rate for
commodities other than fresh fruits, vegetables, or logs. Record the
temperatures in Block 22 of the PPQ Form 429A.
In the electronic 429 database, record the temperatures in the space and
commodity fields in the Treatment form.
NOTICE
Commodity and space temperatures must be 40 °F or above.
!
CAUTION
The presence of ice indicates temperatures below 40 °F. If ice is present anywhere
in the box, pallet, or fumigation enclosure, DO NOT fumigate the commodity.

Chemical Treatments Fumigants—Methyl Bromide—Chamber Fumigation
Conducting the Fumigation
02/2024-01 Treatment Manual 2-5-9
Step 6: Calculating the Dosage
In order to calculate the dosage, the PPQ official must have the following
information:
Temperature of commodity and air (°F)
Treatment schedule
Volume of the fumigation chamber (ft
3
)
The PPQ official must refer to the specific treatment schedule to determine the
dosage rate (pounds/ft
3
).
Refer to the formula in Figure 2-5-1 for calculating dosage:
Table 2-5-1 Determine Whether to Use Commodity or Air Temperature for
Determining Dosage Rate
If the air temperature is: And:
Then, for commodities
other than fresh fruits or
vegetables or logs and
lumber
1
:
1 Use commodity temperature for fresh fruits or vegetables or logs and lumber.
Higher than the commodity
temperature
Use the single lowest
commodity temperature for
determining the dosage rate
(do not use the average
commodity temperature.)
Lower than the commodity
temperature
By less than 10 degrees
By 10 degrees or more Use the average of the air
and commodity temperature
for determining the dosage
rate.
Figure 2-5-1 Formula for Calculating MB Dosage for Chamber Fumigations
Dosage (lbs.)
Volume (ft3) Dosage Rate (lbs.)
1,000 ft3
----------------------------------------------------------------------------------=

Chemical Treatments Fumigants—Methyl Bromide—Chamber Fumigation
Aeration
2-5-10 Treatment Manual 02/2024-01
Step 7: Conducting the Fumigation
Since fumigation chambers vary by manufacturer and model, refer to the
manufacturer’s operating manual to determine how to use the chamber. In
NAP chambers, run circulation fans for 15 minutes following introduction of
the gas.
Taking concentration readings is not required when conducting chamber
fumigations.
Step 8: Leak Detection
Turn on any leak detection devices prior to gas introduction and ensure that
they run throughout the entire fumigation and aeration.
Aeration
The fumigator must:
Arrange for the aeration to proceed once the treatment is completed.
Consider the wind direction when pointing the exhaust duct, and face the
duct outlet toward an open area away from people.
Ensure that, during the first 10 minutes of aeration, no one is present
within 200 feet downwind of the exhaust duct outlet (see California
waiver details on page 2-5-2).
Determine aeration buffer zones in accordance with EPA’s fumigation
buffer zone tables (https://www.epa.gov/pesticide-registration/
mbcommoditybuffer).
Ensure no one is present within the perimeter of the aeration buffer zone
unless they are wearing SCBA.
Refer to “Buffer Zone Overlap for Multiple Enclosures”.
Follow all label instructions, state, county, and local regulations, in
addition to the instructions in this manual.
Inform people located in occupied structures and personnel in the
immediate area within the buffer zone that release of MB is about to take
place and give them the option of leaving the area or remaining inside the
building.
EXAMPLE
Using a fumigation chamber which has a volume of 500 ft
3
, you
determine the temperature of the commodity and space is 72 °F. The
treatment schedule requires 2 lbs. MB/1,000 ft
3
at 70 °F or above. To
calculate dosage multiply the volume (500 ft
3
) by the dosage rate (2
lbs. MB/1,000 ft
3
). This equals 1.0 lbs. of MB needed for the dosage.

Chemical Treatments Fumigants—Methyl Bromide—Chamber Fumigation
Responsibility for Aerating the Commodity
02/2024-01 Treatment Manual 2-5-11
Restrict access to the area where the exhaust duct extends beyond the
enclosure.
Secure the fumigation area and allow only the chamber operator and the
PPQ official monitoring the fumigation into the secure area.
Responsibility for Aerating the Commodity
Responsibility for aerating the chamber and releasing the commodity depends
on whether the treatment schedule used was a labeled use or FIFRA Section 18
exemption. Use Table 2-5-2 to determine responsibility for aerating the
commodity.
Use Table 2-5-3 to determine which procedures to follow for aerating normal
atmospheric pressure (NAP) and vacuum chambers.
Each chamber must be equipped with at least one permanent, metal gas
sampling tube to allow the fumigator to take colorimetric tube readings during
the aeration. Any extensions of the gas sampling tube or flexible connectors
must be made of Teflon™ tubing or metal. The extensions of the sampling
tube must run from an area in between the treated boxes and end outside the
chamber to allow for colorimetric tube readings.
!
WARNING
Do not allow motorized vehicles to operate within the secure area.
Table 2-5-2 Determine the Responsibility for Aerating the Commodity During
Chamber Fumigations
If the fumigation chamber
is:
And the treatment
schedule is:
Then:
Privately or State owned A labeled treatment RELEASE the fumigation to
the fumigator to aerate and
release the commodity.
A FIFRA Section 18
Exemption (noted in the
treatment schedules)
1. PPQ official must be
present at the initiation of
aeration, and to verify the
final aeration readings.
2. USE Table 2-5-3 to
de
termine which aeration
procedures to follow
PPQ owned
Table 2-5-3 Determine the Aeration Procedure for Chamber Fumigations
If the chamber is: Then:
NAP Use the procedures on page 2-5-12.
V
acuum Use the procedures on page 2-5-13.

Chemical Treatments Fumigants—Methyl Bromide—Chamber Fumigation
Wearing Respiratory Protection
2-5-12 Treatment Manual 02/2024-01
Wearing Respiratory Protection
The fumigator must wear approved respiratory protection (SCBA, supplied air
respirator, or a combination unit) when there is a risk of exposure to
concentrations above 5 ppm; this includes any time the concentration is
unknown.
MB 2016 Label
Normal Atmospheric Pressure Chamber—Aerating
Noncontainerized Cargo
Advise the fumigator to:
1. While wearing SCBA, turn on the chamber fans.
2. Aerate a minimum of 3 hours for all commodities.
3. Stop the fans and take concentration readings with colorimetric tubes in the
airspace around and, when feasible, within the carton or box.
Use Table 2-5-4 to determine when to release the commodity.
For FIFRA Section 18 exemptions, record the concentration reading (in ppm),
date, and time in Block 39 of PPQ Form 429A. In the electronic 429 database,
record the date, time, and detector reading (ppm) in the “Detector Readings”
form.
NOTICE
If MB concentration levels are between 1-4 ppm, the PPQ official and the fumigator
may wear an air purifying respirator NIOSH certified half-mask or full face piece with
a cartridge.
Table 2-5-4 Determine When to Release the Commodity After NAP Fumigation
If the gas concentration is: Then:
5 ppm or less 1. CONTINUE aeration for 30 minutes.
2. REQUIRE the fumigator to confirm that gas concen-
trations remain at 5 ppm or less.
3. RELEASE commodity.
6 ppm or more 1. REQUIRE the fumigator to conduct two additional air
washes.
2. TAKE gas concentration readings.
3. If concentration readings are 5 ppm or less, CON-
TINUE aeration for 30 minutes.
4. REQUIRE the fumigator to confirm that gas concen-
trations remain at 5 ppm or less.
5. RELEASE the commodity.

Chemical Treatments Fumigants—Methyl Bromide—Chamber Fumigation
Vacuum Fumigation Chambers—Aerating Containerized and Noncontainerized Cargo
02/2024-01 Treatment Manual 2-5-13
Vacuum Fumigation Chambers—Aerating Containerized and
Noncontainerized Cargo
Advise the fumigator to:
1. Adjust any vacuum remaining at the end of the fumigation to zero by
temporarily opening the air intake valve, then closing it.
2. Draw a 15 inch vacuum and adjust it to zero.
3. Repeat this process of drawing a 15 inch vacuum and releasing it a
minimum of four times.
4. Take concentration readings using a colorimetric tube in the airspace
around and, when feasible, within the carton or box.
For FIFRA Section 18 exemptions, record the concentration reading (in ppm),
date, and time in Block 39 of PPQ Form 429A. In the electronic 429 database,
record the date, time, and detector reading (in ppm) in the “Detector Readings”
form.
Use Table 2-5-5 to determine when to release the commodity.
Table 2-5-5 Determine When to Release the Commodity After Vacuum
Fumigation
If the gas concentration is: Then:
5 ppm or less 1. CONTINUE aeration for 30 minutes.
2. REQUIRE the fumigator to confirm that gas concen-
trations remain at 5 ppm or less.
3. RELEASE commodity.
6 ppm or above 1. REQUIRE the fumigator to conduct two additional air
washes.
2. TAKE gas concentration readings.
3. If concentration readings are 5 ppm or less, CON-
TINUE aeration for 30 minutes.
4. REQUIRE the fumigator to confirm that gas concen-
trations remain at 5 ppm or less.
5. RELEASE the commodity.

Chemical Treatments Fumigants—Methyl Bromide—Chamber Fumigation
Vacuum Fumigation Chambers—Aerating Containerized and Noncontainerized Cargo
2-5-14 Treatment Manual 02/2024-01

02/2024-01 Treatment Manual 2-6-1
Chapter
2
Chemical Treatments
Fumigants—Methyl Bromide—Ship Fumigation
for Emergency Situations
Contents
Methods and Procedures 2-6-1
2016 Methyl Bromide Label Information 2-6-1
Materials Needed 2-6-3
PPQ Official Provides 2-6-3
Fumigator Provides 2-6-3
Taking Safety Measures When Fumigating Ships 2-6-5
Preparing to Fumigate 2-6-6
Conducting the Fumigation 2-6-11
Aeration 2-6-14
Wearing Respiratory Protection 2-6-15
Methods and Procedures
The procedures covered in this section provide the methods, responsibilities,
and precautions for the fumigation of dry stores, galleys, and crew quarters
infested with Khapra beetle and other pests that require treatment.
Emergency fumigation for other pests and commodities may be approved on a
case-by-case basis. Contact USDA-APHIS-PPQ Field Operations at
PPQ.Ops.T[email protected] for more information.
Even though ship fumigations are allowed by the manufacturers of methyl
bromide, APHIS policy PROHIBITS fumigation of bulk commodities in the
ship hold because of the difficulty in meeting APHIS standards.
2016 Methyl Bromide Label Information
In 2015, the Environmental Protection Agency (EPA) directed all methyl
bromide (MB) registrants to amend the use directions on the labels of all 100%
MB products. EPA required the changes in order to reflect recommendations in
an EPA report.
1
1 “Report of Food Quality Protection Act (FQPA) Tolerance Reassessment and Risk Management
Decision (TRED) for methyl bromide, and Reregistration Eligibility Decision (RED) for Methyl
Bromide’s Commodity Uses”, archive dated August 2006.

Fumigants—Methyl Bromide—Ship Fumigation for Emergency Situations
2016 Methyl Bromide Label Information
2-6-2 Treatment Manual 02/2024-01
These amendments modify the use directions for fumigation and aeration
procedures, modify respiratory requirements and equipment and update gas
monitoring equipment. EPA requires all labels on newly manufactured MB to
reflect these recommendations effective October 01, 2016; however, EPA is
allowing existing stocks of MB to be used in accordance with the use
directions on the existing stock’s (older) labels.
PPQ officials and fumigators must closely examine gas cylinder labels in order
to validate that the dosage, exposure, and commodity are either on the cylinder
label or covered by a FIFRA Section 18 exemption. If a label is not affixed to
the cylinder, DO NOT allow the fumigator to use that cylinder.
New Buffer Zone Requirements
All 2016 MB labels now require both a treatment and an aeration buffer zone.
Both the treatment and aeration buffer zones are specific to the enclosure being
fumigated and must be determined by tables in the Environmental Protection
Agency (EPA) Methyl Bromide Commodity Fumigation Buffer Zone Lookup
Tables. The fumigators are responsible for using this website to determine the
buffer zones and reporting both buffer zones to the PPQ official. If the
treatment buffer zone is determined to be less than 30 feet, the PPQ official
will maintain PPQ’s standard 30 foot treatment buffer zone; otherwise, the new
treatment buffer zone must be observed. If the aeration buffer zone is
determined to be less than 200 feet, then PPQ’s standard “200 feet for 10
minutes” aeration buffer zone still applies for the first 10 minutes of aeration.
The fumigator must refer to EPA’s website to determine the minimum aeration
buffer zone to be maintained until the aeration period is complete and the
fumigator has verified that gas concentration levels meet the conditions in the
MB label.
Transiting through buffer zones
The label permits vehicles to transit through both treatment and aeration buffer
zones under specific conditions found in the label; it is up to the fumigator
determine how or whether vehicles may transit in accordance with the label.
When using the newer 2016 MB label, changes to certain procedures and
equipment in this chapter are displayed in a NOTICE box with a heading titled
“MB 2016 Label”.
MB 2016 Label (example)
NOTICE
Use this information when the fumigator is using the 2016 MB label.

Fumigants—Methyl Bromide—Ship Fumigation for Emergency Situations
Materials Needed
02/2024-01 Treatment Manual 2-6-3
When using existing stocks, follow the equipment and procedural guidance
that is displayed in the body of the text (outside of the NOTICE box).
If there is no “MB 2016 Label” NOTICE box, then the instructions apply to all
MB labels, 2016 and older.
Materials Needed
PPQ Official Provides
APHIS-approved leak detection device
Calculator (optional)
PPQ Form 429A and the electronic 429 database
SCBA or supplied air respirator
MB 2016 Label
Fumigator Provides
Adhesive sealer, tape, and putty or other pliable material for sealing off
holes around pipes
NOTICE
In addition to the bulleted equipment list required from PPQ, PPQ must also
provide:
Air purifying respirator NIOSH certified half-mask or full face piece with
a cartridge for concentrations between 1 and 4 ppm
APHIS-approved continuous real time gas monitoring device
Permanently mounted in PPQ owned facilities only, PureAire
Monitoring Systems, Inc., model Air Check Advantage. The Air
Check Advantage can be calibrated either by the manufacturer or by
the PPQ official. Calibrate according to the manufacturer’s User
Guide. Refer to Chapter 8: Equipment for more information.
Portable Photoionization Detector (PID), RAE Systems, Inc. model
MiniRAE 3000. The MiniRAE 3000 must be calibrated by the PPQ
official according to the manufacturer’s User Guide. Refer to Chapter
8: Equipment for more information.
Self contained breathing apparatus (SCBA) NIOSH approval prefix TC-
13F or supplied air respirator NIOSH approval prefix TC-19C

Fumigants—Methyl Bromide—Ship Fumigation for Emergency Situations
Materials Needed
2-6-4 Treatment Manual 02/2024-01
APHIS-approved gas detection device
2
(e.g. thermal conductivity device,
infrared device, etc.)
Auxiliary pump for purging long gas sample tubes
Carbon dioxide filter (Ascarite
®
)
Colorimetric tubes (Draeger/Kitagawa)
Dessicant (Drierite
®
)
Electrical wiring (ground, permanent type), three prong extension cords
Exhaust blower and ducts
Fans (circulation, exhaust, and introduction)
Framework and supports
Gas sampling tubes (leads)
Gas supply line
Heat supply
Insecticides and spray equipment
Methyl bromide
Padding
Sand or water snakes
Scales or dispensers
3
SCBA or supplied air respirator
Tape
Tarpaulin and supports
Temperature recorder and temperature sensors
4
Thermometer
5
Volatilizer
Warning signs
2 The methyl bromide monitor must be calibrated annually. Refer to Chapter 8: Equipment for
calibration information. If using a thermal conductivity (TC) analyzer, Drierite® and Ascarite® must
be used.
3 All scales must be calibrated by the State, a company that is certified to conduct scale calibrations,
or by the fumigator under the supervision of PPQ. The source and date of calibration must be posted
in a visible location on or with the scale at all times. The scale must be calibrated a following every
repair or minimum of every year.
4 Temperature sensors must be calibrated annually by the manufacturer or National Institute of
Standards and Technology (NIST) within the range of 40 °F to 80 °F (4.4 °C to 26.7 °C)
5 The thermometer must be calibrated or replaced annually.

Fumigants—Methyl Bromide—Ship Fumigation for Emergency Situations
Taking Safety Measures When Fumigating Ships
02/2024-01 Treatment Manual 2-6-5
The PPQ official and the fumigator should be prepared to use auxiliary power
if shore power is not available as most ships’ power is 220 volts.
MB 2016 Label
Taking Safety Measures When Fumigating Ships
The most important consideration when fumigating ships is the protection of
human life. The commercial fumigator has the following safety responsibilities
when fumigating ships:
Conduct fumigation properly to result in an effective treatment
Evacuate gas from ship and aerate when fumigation is completed
Observe all safety precautions while fumigating
Prevent access of unauthorized personnel, including the ship’s crew, to the
fumigated area
Test with a gas detector, all areas aboard ship to ensure freedom from MB
before allowing crew members access to the ship
The commercial fumigator must abide by the following guidelines when
fumigating ships:
NOTICE
In addition to the bulleted equipment list required from the fumigator, the
fumigator must also provide:
Air purifying respirator NIOSH certified half-mask or full face piece with
a cartridge for concentrations between 1 and 4 ppm
APHIS-approved direct read gas detection device
Colorimetric tubes (e.g. Draeger, Sensidyne)
APHIS-approved continuous real time gas monitoring device
Permanently mounted in PPQ owned facilities only, PureAire
Monitoring Systems, Inc., model Air Check Advantage
Portable Photoionization Detector (PID), RAE Systems, Inc. model
MiniRAE 3000
Devices must be calibrated according to the manufacturer’s User
Guide. Refer to Chapter 8: Equipment for more information.
Self contained breathing apparatus (SCBA) NIOSH approval prefix TC-
13F or supplied air respirator NIOSH approval prefix TC-19C

Fumigants—Methyl Bromide—Ship Fumigation for Emergency Situations
Preparing to Fumigate
2-6-6 Treatment Manual 02/2024-01
Have a representative present throughout the entire fumigation. The
representative must be familiar with directions for using the fumigant,
warnings, antidotes, etc., shown on the label, on the gas cylinder, and
contained in the manufacturer’s application manual.
Have adequate first-aid equipment, SCBA, and other safety equipment
available
Have all areas of the ship tested with a gas detector prior to crew reentry.
Pay particular attention to all fumigated areas, crew quarters, and the
engine rooms
Provide for immediate contact with the responsible ship’s officer to
provide information and access to areas of the ship which may be needed
to assure a safe fumigation
Preparing to Fumigate
Step 1: Meeting with Ship’s Captain and Agent
When planning a ship fumigation, the PPQ official must meet with the ship’s
captain, agent, and the fumigation company representative to discuss the
conditions of the fumigation. If cargo is present in an area about to be
fumigated, determine if any materials might be adversely affected by the
fumigant (see Residual Effect on page 2-3-11 for a list of commodities
adversely affected by MB.) Notify the ship’s agent of possible effects and if
conditions permit, allow removal of the material for an alternate treatment.
Discuss plans for removing all crew from the ship. Prior to fumigating a vessel,
the master of the vessel and the fumigator must determine whether it is
suitably designed to allow for safe occupancy by the ship’s crew. If it is
determined that it does not allow for safe occupancy, then all crew members
must be removed.
It is the responsibility of the commercial fumigator to comply with all label
requirements, and with State, local, and U.S. Coast Guard regulations (See
Coast Guard Regulations on page B-1-1) concerning shipboard fumigation.
Step 2: Selecting a Treatment Schedule
Refer to T402—Containers, Ships, and Surrounding Areas for the correct
treatment. Select a treatment schedule based on the plant pest and commodity
to be fumigated. Consider all the commodities present in the area to be
fumigated when determining the best treatment available. In the case of
Khapra beetle fumigation, determine if finely milled products (example–flour)
will be fumigated. To ensure all life stages have been mitigated, have all
fumigated commodities destroyed either by incineration or sterilization after
the fumigation has been completed.

Fumigants—Methyl Bromide—Ship Fumigation for Emergency Situations
Preparing to Fumigate
02/2024-01 Treatment Manual 2-6-7
Treating Deck Areas
Areas which may be pest contaminated or suspected of being contaminated,
such as the deck, hatch covers, drain channels, crevices around hatches,
hallways, and similar areas that cannot be fumigated, should be treated
according to T402-b-3-1 Pest: Trogoderma granarium (Khapra Beetle).
Step 3: Determine Buffer Zones
MB 2016 Label
Step 4: Preparing Areas to be Fumigated
Open all bins, drawers, and cupboards. Stack all bagged commodities on
pallets to facilitate gas distribution and penetration.
NOTICE
The fumigator will determine the treatment buffer zone in accordance with the
Environmental Protection Agency (EPA) Methyl Bromide Commodity
Fumigation Buffer Zone Lookup Tables.
The treatment buffer zone surrounds the area where access is limited during
treatment. If the fumigator determines that the buffer zone is less than 30’, then
PPQ requires a 30’ buffer zone. If the fumigator determines that the buffer zone
is greater than 30’, then PPQ must observe the prescribed buffer zone.
The treatment buffer zone extends from the perimeter of the enclosure to a
distance determined by the fumigator in accordance with the label. Entry by
any person except the PPQ official and the fumigator is prohibited except as
provided in the “Exceptions to Buffer Zone Entry Restrictions” section of the
label.
The treatment buffer zone begins when the fumigant is introduced into the
enclosure and ends when aeration begins, at which point the aeration buffer
zone requirements apply.
The fumigator must define treatment and aeration buffer zone perimeters using
physical barriers (such as walls, ropes, etc.) and placards to limit access to the
buffer zone. Placards must meet all label requirements regarding specific
warnings, information, and language.
The fumigator will permit transiting through buffer zones in accordance with
the “Transit Exception” section of the label.
Buffer Zone Overlap for Multiple Enclosures
For multiple enclosures where buffer zones overlap, the fumigator must
recalculate both the treatment and aeration buffer zones in accordance with the
label and supply them to the PPQ official.

Fumigants—Methyl Bromide—Ship Fumigation for Emergency Situations
Preparing to Fumigate
2-6-8 Treatment Manual 02/2024-01
Step 5: Arranging and Operating Fans
Storerooms normally require a minimum of two, 1,800 cfm fans. Ensure that
the fumigator places one fan at a low level and the other at a high level. Fans
with capacity above 1,800 cfm create strong air currents which could result in
gas leakage around the seals. If you are fumigating an area which includes the
galley and adjoining storerooms, ensure that the fumigator places the fans to
evenly distribute gas. Make certain that fans can be turned on and off from an
area outside the fumigation site.
Require the fumigator to test all fans to ensure that they are in good operating
condition. Operate fans during the gas introduction and for 30 minutes after
introduction is completed.
Step 6: Placing Gas Sampling Tubes
The fumigator must place gas sampling tubes in areas and commodities which
will give representative samples within the fumigated area. Require the
fumigator to bring all tubes to one central point outside the treatment buffer
zone of the area being fumigated. Label all gas sampling tubes so they can be
easily identified when you take concentration readings. Label each tube by
identifying the level of the hold and whether the gas sampling tube is in a
commodity or space.
The fumigator must place a minimum of two gas sampling tubes in open space
and at least one gas sampling tube within the commodity considered to be the
most difficult for the fumigant to penetrate.
Step 7: Placing the Gas Introduction Lines
Numerous gas introduction lines may be necessary in order to obtain even gas
distribution throughout the fumigation area. Require the fumigator to place the
gas introduction line directly through an opening from the outside (example–a
door or window) directly above a fan. The introduction line must be securely
attached to the top of the fan to prevent movement of the hose. An unsecured
introduction line could move the line out of the airflow. Require the fumigator
to place a piece of nonpermeable sheeting (example–plastic or vinyl) over the
commodity in front of and below each gas supply line. The nonpermeable
sheet will prevent any liquid MB from coming in contact with commodities
and will prevent damage.
Step 8: Measuring the Temperature
The PPQ official must determine the temperature of the commodity and the air
(space) in order to select the proper dosage rate using a calibrated thermometer.
Record the temperatures in Block 22 on the PPQ Form 429A.
In the electronic 429 database, record the temperatures in the space and
commodity fields in the Treatment form.

Fumigants—Methyl Bromide—Ship Fumigation for Emergency Situations
Preparing to Fumigate
02/2024-01 Treatment Manual 2-6-9
If the temperature is below the minimum listed for the treatment schedule, then
require the fumigator to heat the hold or other space to be fumigated.
Step 9: Sealing Stores
One of the most important steps in preparing for a ship fumigation is sealing all
openings and areas which have the potential to leak gas. Consider the entire
area to be fumigated as a natural atmospheric chamber and make the area as
gas tight as possible. The most important task is to locate all openings (e.g.,
drain pipes, bilge drain holes, or air ducts) and seal them.
Ensure that the fumigator does not seal or make gas tight recessed areas, ducts,
or similar apertures which may harbor an infestation. In some cases, it is better
to seal sources of leaks on the outside of the area to be fumigated. Require the
fumigator to use caulking compound or tape for sealing small spaces, doors,
and other openings. For sealing larger areas, such as hatch cover openings, use
polyethylene or similar material secured with tape or adhesive spray. When
practical, seal air ventilation ducts on the outside of the space being fumigated
so sealing tape can be removed when the fumigator evacuates the gas and
begins aeration.
Require the fumigator to look for and seal off the following ship areas when
preparing a ship for fumigation:
Air vents
All passageways, engine room, and other crew areas for electric pipeline
or other duct work common with cargo holds
Bilge and drainwell vents and drains to all cargo holds sometimes
common with more than one hold or engine room bilges
CO
2
piping to all cargo holds; degassing systems (older ships) which
usually run from hold to hold
Drains
Dumbwaiter openings
Emergency escape hatches from shaft alley and escape hatches from all
holds
Engine room—recirculation air systems controlled from and common
with the engine room areas—especially on newer ships; check for drilled
holes or other openings in fore and aft bulkheads of engine room spaces,
all engine room vent systems, and housing or casing leading into spaces
to be fumigated
Galley intake and exhaust systems (may be common with the dry stores)
Heating, air conditioning, electrical, communication, and ventilation
systems

Fumigants—Methyl Bromide—Ship Fumigation for Emergency Situations
Preparing to Fumigate
2-6-10 Treatment Manual 02/2024-01
Inner bottom and deep tank covers to ensure that they are closed prior to
fumigating
Pipes and other utility conduits through decks and bulkheads
Fire and smoke detector systems from fumigated areas
Steam-smothering systems for connection between holds
Vents in shaft alley and gear lockers to holds; breaks in bulkhead
Wall plates
Step 10: Measuring Volume
Obtain the volume of the dry stores, galleys, and crew quarters from the chief
mate, captain, the ship’s plan, or by measuring the actual dimensions.
Step 11: Calculating Dosage
Use the formula in Figure 2-6-1 to calculate dosage.
Step 12: Making a Final Check
Just before introducing the gas, the PPQ official and the fumigator must ensure
that the following activities are performed:
Check all sealed areas to make sure they are securely taped and free from
holes
Check the gas introduction line connections to make sure they are tight
Check to make sure all safety equipment is available and in working order
Check to make sure the ship’s gangway and areas to be fumigated are
properly placarded and the area is secured. A guard should be present at
the entrance to the gangway to restrict access to the ship. If the crew has
been removed, walk through the quarters and other areas to make sure no
one is on board
Figure 2-6-1 Formula for Calculating MB Dosage for Vessel Fumigations
EXAMPLE
The dry storage area is infested with Khapra beetle. The volume is
8,000 ft
3
, and the temperature is 65 °F. The treatment schedule lists
the dosage rate as 6 lbs. MB/1,000 ft
3
. To calculate the dosage,
multiply the volume (8,000 ft
3
) by the dosage rate (6 lbs./1,000 ft
3
).
This equals 48 lbs. of MB needed for the dosage.
Dosage (lbs.)
Volume (ft3) Dosage Rate (lbs.)
1,000 ft3
----------------------------------------------------------------------------------=

Fumigants—Methyl Bromide—Ship Fumigation for Emergency Situations
Conducting the Fumigation
02/2024-01 Treatment Manual 2-6-11
Place fumigant cylinder with gas introduction line on scale and take initial
weight reading. Make sure the gas introduction line is attached to the
cylinder. After obtaining the correct weight, subtract the dosage to be
introduced into the enclosure. When the entire dosage has been
introduced, the scale will be balanced.
Start volatilizer and heat water to 200 °F or above
Take gas concentration readings to determine if any contaminant gases are
present
Turn on all fans and gas detection devices to make sure they work
Conducting the Fumigation
Step 1: Introducing the Gas
MB 2016 Label
Require the fumigator and PPQ official to use SCBA while introducing and
adding gas. Require the fumigator to turn on all fans while introducing the gas.
When using large cylinders of MB, have the fumigator slightly open the valve
then close the valve. Using an APHIS-approved continuous real time gas
detection device, check all connections on the gas introduction line for leaks. If
leaks are found, the fumigator must tighten the connections and repeat the test.
When no leaks are found, require the fumigator to open the valve to the point
where 3 to 4 pounds of MB are being introduced per minute. The water
temperature in the volatilizer should never go below 150 °F at any time during
gas introduction. The water in the volatilizer can include an antifreeze and
should be handled with appropriate safeguards.
!
CAUTION
The acceptable air concentration level for methyl bromide (MB) is 5 ppm. A
respirator (approved SCBA) is required if the MB concentration level in the air is
unknown or greater than 5 ppm at any time. The PPQ official and the fumigator must
use SCBA while introducing the gas, checking for leaks, when taking aeration
readings, and inside the buffer zone.
NOTICE
If MB concentration levels are between 1-4 ppm, the PPQ official and the fumigator
may wear an air purifying respirator NIOSH certified half-mask or full face piece with
a cartridge.
!
CAUTION
Do not touch the introduction line with your bare hands—you may get burned! Have
the fumigator close the cylinder valve once the proper dosage has been introduced.

Fumigants—Methyl Bromide—Ship Fumigation for Emergency Situations
Conducting the Fumigation
2-6-12 Treatment Manual 02/2024-01
The fumigation time begins when all the gas has been introduced. The PPQ
official must record the time gas introduction was started and completed in
Block 32 on the PPQ Form 429A.
In the electronic 429 database, record the fumigation date, gas introduction
start and finish time in the corresponding fields under the “GAS
INTRODUCTION” heading on the Treatment form.
Require the fumigator to run the fans for 30 minutes after all the gas has been
introduced. The PPQ official must take the initial concentration reading 30
minutes after all the gas has been introduced.
When using cylinders, getting the final amounts of gas out of the cylinder may
take a long time. Consider taking gas concentration readings 30 minutes after
the gas is first introduced. If the gas distribution is even (all readings within 4
ounces of each other) and at an adequately high concentration, then require the
fumigator to turn off the fans. Running the fans longer may contribute to gas
leakage. Allow the remainder of the gas to discharge at its slow rate with
intermittent running of the fans for dispersal.
Step 2: Taking Concentration Readings
The PPQ official must take concentration readings with an APHIS-approved
gas detection device to determine the gas concentration and distribution within
the area being fumigated. If using a T/C, check Drierite
®
tubes before each
reading and change Drierite
®
if its color is pink. Take concentration readings at
the times prescribed in the treatment schedule.
Consult the treatment schedule being used for the actual concentration
readings. You may start the final concentration reading 30 minutes prior to the
end of the exposure period.
Take additional readings when there is indication that the gas is not properly
distributed or the minimum gas concentration is not being maintained. Record
readings on PPQ Form 429A.

Fumigants—Methyl Bromide—Ship Fumigation for Emergency Situations
Conducting the Fumigation
02/2024-01 Treatment Manual 2-6-13
Step 3: Testing for Leaks
Require the fumigator to wear the SCBA and use an APHIS-approved
continuous real time gas detection device to test for leaks after all the gas has
been introduced. Test around the perimeter of the area being fumigated,
especially where doors, windows, pipes, electric cords, gas sampling tubes,
and gas introduction lines are present. If the fumigator detects leaks, ensure
they are sealed with additional tape, adhesive, or by placing more polyethylene
and adhesive over the leaking areas.
Step 4: Adding Gas and Extending Exposure
If you determine that you need to add gas and extend time, use the formula in
Figure 2-6-2 to calculate the amount of gas to add and Table 2-6-1 to determine
how long to extend the exposure period.
Use Table 2-6-1 to determine how long to extend the exposure period:
Figure 2-6-2 Formula for Determining the Amount of Gas to Add for Vessel
Fumigation
EXAMPLE
You are fumigating a ship’s storeroom for Khapra beetle and the
minimum concentration for the 2-hour reading is listed at 50 oz., but
your readings average 45 oz. The volume of the storeroom is 1,500
ft
3
. Using the formula in Figure 2-6-2, you would figure the following:
1.6 x 5 (oz. below minimum) x 1,500/1,000
8 x 1.50 = 12 oz. gas to be added
1.6 number of ounces below minimum
volume in cubic feet
1000 cubic feet
-------------------------------------------------
1
16
------
pounds of gas to add=

Fumigants—Methyl Bromide—Ship Fumigation for Emergency Situations
Aeration
2-6-14 Treatment Manual 02/2024-01
Step 5: Exhausting the Gas
Require the fumigator to exhaust the gas at the completion of the exposure
period. Record detector tube readings and the time interval from the aeration in
the corresponding fields in “DETECTOR READINGS” on the PPQ Form
429A.
Removal of the fumigant is facilitated by using an outside blower to force fresh
air through portable canvas, plastic, or similar ducts. Another method is to use
compressed air hoses to force fresh air into the area. Require the fumigator to
use suction type fans with portable ducts to evacuate gas from storerooms to
outside, downwind areas away from crew areas, preferably on the offshore side
of the ship. Ensure that the fumigator does not point the ducts upward, since
dissipation onto the deck may occur. Use the ship’s aeration/ventilation
equipment if possible. Make sure that use of ship’s equipment will not
distribute the exhausted gas to other areas within the ship.
Aeration
The fumigator must:
Arrange for the aeration to proceed once the treatment is completed.
Consider the wind direction when pointing the exhaust duct, and face the
duct outlet toward an open area away from people.
Ensure that, during the first 10 minutes of aeration, no one is present
within 200 feet downwind of the exhaust duct outlet.
Determine aeration buffer zones in accordance with Environmental
Protection Agency (EPA) Methyl Bromide Commodity Fumigation
Buffer Zone Lookup Tables.
Ensure no one is present within the perimeter of the aeration buffer zone
unless they are wearing SCBA.
Refer to “Buffer Zone Overlap for Multiple Enclosures”.
Table 2-6-1 Determine Time for Extended Exposure
If the exposure time is:
And the reading is below
minimum by:
Then extend exposure:
12 hours or more 10 oz. or less 10 percent of the time lapse
since gas introduction or the
last reading
11 oz. or more 2 hours or 10 percent of the
time lapse since last
reading, whichever is
greater

Fumigants—Methyl Bromide—Ship Fumigation for Emergency Situations
Wearing Respiratory Protection
02/2024-01 Treatment Manual 2-6-15
Follow all label instructions, state, county, and local regulations, in
addition to the instructions in this manual.
Inform people located in occupied structures and personnel in the
immediate area within the buffer zone that release of MB is about to take
place and give them the option of leaving the area or remaining inside the
building.
Restrict access to the area where the exhaust duct extends beyond the
enclosure.
Wearing Respiratory Protection
The fumigator must wear approved respiratory protection (SCBA, supplied air
respirator, or combination unit) when there is a risk of exposure to
concentrations above 5 ppm; this includes any time the concentration is
unknown.
MB 2016 Label
Aerating the Area
Advise the fumigator to:
1. Wearing the SCBA, open doors, hatches, tarpaulins, and areas to facilitate
aeration.
2. Connect the exhaust system.
3. Start the exhaust system (minimum 3,500 cfm exhaust fan connected to an
exhaust duct).
4. Aerate until gas concentrations are 5 ppm or less.
5. Stop the aeration fans.
6. While wearing SCBA, take a concentration reading with a colorimetric
tube in the airspace within the fumigated area.
The PPQ official must record the date, concentration reading, and time on PPQ
Form 429A. In the electronic 429 database, record the time, and detector
reading (in ppm) in the corresponding fields on the “Detector Readings” form.
NOTICE
If MB concentration levels are between 1-4 ppm, the PPQ official and the fumigator
may wear an air purifying respirator NIOSH certified half-mask or full face piece with
a cartridge.

Fumigants—Methyl Bromide—Ship Fumigation for Emergency Situations
Wearing Respiratory Protection
2-6-16 Treatment Manual 02/2024-01

02/2024-01 Treatment Manual 2-7-1
Chapter
2
Chemical Treatments
Fumigants—Methyl Bromide—Structure
Fumigation
Under Construction
The information in this chapter has been temporarily removed. For more
information, contact USDA-APHIS-PPQ Field Operations at
PPQ.Ops.T[email protected].

Chemical Treatments Fumigants—Methyl Bromide—Structure Fumigation
Under Construction
2-7-2 Treatment Manual 02/2024-01

02/2024-01 Treatment Manual 2-8-1
Chapter
2
Chemical Treatments
Fumigants—Methyl Bromide—Special
Procedures for Container Fumigations Without
a Tarpaulin
Contents
Introduction 2-8-1
2016 Methyl Bromide Label Information 2-8-1
Responsibilities 2-8-3
Methods and Procedures 2-8-4
Materials Needed 2-8-5
PPQ Officer Provides 2-8-5
Fumigator Provides 2-8-6
Preparing to Fumigate 2-8-7
Conducting the Fumigation 2-8-17
Aeration 2-8-25
Responsibility for Aerating the Commodity 2-8-26
Wearing Respiratory Protection 2-8-26
Introduction
APHIS allows the fumigation of a container WITHOUT a tarpaulin provided
the containers are located outdoors and can be shown to be structurally sound.
For cut flower, fresh fruit and vegetable treatments of 4 hours duration or less,
APHIS may approve on a case-by-case basis the use of containers without the
use of a tarpaulin. The commercial fumigator should contact the local PPQ
office to initiate the process for container approval. Refer to Table 2-8-1 for
detailed responsibilities.
The integrity of these containers (ability to hold methyl bromide adequately) is
predetermined by passing a pressure test. See Container Prepping and Pre-
Testing on page 2-8-14.
2016 Methyl Bromide Label Information
In 2015, the Environmental Protection Agency (EPA) directed all methyl
bromide (MB) registrants to amend the use directions on the labels of all 100%
MB products. EPA required the changes in order to reflect recommendations in
an EPA report.
1

Fumigants—Methyl Bromide—Special Procedures for Container Fumigations Without a Tarpaulin
2016 Methyl Bromide Label Information
2-8-2 Treatment Manual 02/2024-01
These amendments modify the use directions for fumigation and aeration
procedures, modify respiratory requirements and equipment and update gas
monitoring equipment. EPA requires all labels on newly manufactured MB to
reflect these recommendations effective October 01, 2016; however, EPA is
allowing existing stocks of MB to be used in accordance with the use
directions on the existing stock’s (older) labels.
PPQ officials and fumigators must closely examine gas cylinder labels in order
to validate that the dosage, exposure, and commodity are either on the cylinder
label or covered by a FIFRA Section 18 exemption. If a label is not affixed to
the cylinder, DO NOT allow the fumigator to use that cylinder.
New Buffer Zone Requirements
All 2016 MB labels now require both a treatment and an aeration buffer zone.
Both the treatment and aeration buffer zones are specific to the enclosure being
fumigated and must be determined by tables in the Environmental Protection
Agency (EPA) Methyl Bromide Commodity Fumigation Buffer Zone Lookup
Tables. The fumigators are responsible for using this website to determine the
buffer zones and reporting both buffer zones to the PPQ official. If the
treatment buffer zone is determined to be less than 30 feet, the PPQ official
will maintain PPQ’s standard 30 foot treatment buffer zone; otherwise, the new
treatment buffer zone must be observed. If the aeration buffer zone is
determined to be less than 200 feet, then PPQ’s standard “200 feet for 10
minutes” aeration buffer zone still applies for the first 10 minutes of aeration.
The fumigator must refer to EPA’s website to determine the minimum aeration
buffer zone to be maintained until the aeration period is complete and the
fumigator has verified that gas concentration levels meet the conditions in the
MB label.
Transiting through buffer zones
The label permits vehicles to transit through both treatment and aeration buffer
zones under specific conditions found in the label; it is up to the fumigator
determine how or whether vehicles may transit in accordance with the label.
When using the newer 2016 MB label, changes to certain procedures and
equipment in this chapter are displayed in a NOTICE box with a heading titled
“MB 2016 Label”.
1 “Report of Food Quality Protection Act (FQPA) Tolerance Reassessment and Risk Management
Decision (TRED) for methyl bromide, and Reregistration Eligibility Decision (RED) for Methyl
Bromide’s Commodity Uses”, archive dated August 2006.

Fumigants—Methyl Bromide—Special Procedures for Container Fumigations Without a Tarpaulin
Responsibilities
02/2024-01 Treatment Manual 2-8-3
MB 2016 Label (example)
When using existing stocks, follow the equipment and procedural guidance
that is displayed in the body of the text (outside of the NOTICE box).
If there is no “MB 2016 Label” NOTICE box, then the instructions apply to all
MB labels, 2016 and older.
Responsibilities
Refer to Table 2-8-1 for the processes and responsible parties when approving
a container for tarpless fumigation.
NOTICE
Use this information when the fumigator is using the 2016 MB label.
Table 2-8-1 Responsibilities for Approving Tarpless Container Fumigations
Action:
Responsible Party
Local
PPQ
Field
Office
Field
Opera-
tions Hub
(FO-H)
QPAS S&T-TMT
1. Receives request from fumigator about tarpless
fumigation. Request includes fumigator contact
information and details of fumigation location
X
2. Local field office sends details of the inquiry to: X
3. FO-H sends details of the inquiry to: X X
4. Acknowledges receipt of request via email to the
fumigator; sends requirements for pressure test-
ing (see Container Prepping and Pre-Testing) and
ensures that the requirements are understood
X X (if non-routine) X (if non-rou-
tine)
5. Fumigator submits proposed protocol to: X
6. Once protocol is agreed upon, fumigator is notified
whether the protocol is approved or denied by:
X
7. When fumigator is ready for on sight approval,
dates for testing are scheduled by:
X X (if non-rou-
tine)
8. On sight approval conducted, trip report, including
recommendation, sent to S&T-TMT and QPAS by:
X X (if non-routine)
9. Concurrence reached over whether approval is
granted
XX X
10. Notification of approval in writing sent by: X

Fumigants—Methyl Bromide—Special Procedures for Container Fumigations Without a Tarpaulin
Methods and Procedures
2-8-4 Treatment Manual 02/2024-01
Methods and Procedures
The procedures covered in this section provide PPQ officials and commercial
fumigators with the methods, responsibilities, and precautions for container
fumigation without a tarpaulin.
A refrigerated container may be used for fumigations without a tarpaulin
provided the following requirements are met:
Air exchange vents must be closed and taped if any openings are visible
Air introduction and exhaust ducts installed
Container must be a refrigerated sea container or refrigerated over-the-
road freight trailer with metal flooring
Container must have three gas monitoring leads in the front-high, middle-
middle, and rear-low of the container (the “rear” is considered to be at the
doors)
Container must be packed (in some cases repacked) so that two circulation
fans can be placed on top of the commodity; one in the front and one in
the back
Packing will ensure a minimum of 18 inches of air space above the
commodity
Rear fan (at the doors) has the gas introduction hose attached to it and is
referred to as the gas introduction fan
Use fans that have the capacity to move a volume of air in cubic feet per
minute equivalent to the total volume of the container
Container must have all drainage holes (corner drip holes) sealed
Container must not have side doors or rear doors with damaged/missing
gaskets
Container must successfully complete the Official Pressure Test described
in this chapter
11. Training of local PPQ officials (pressure testing)
by:
X
12. Follow up audits conducted if needed X X (if non-routine)
Table 2-8-1 Responsibilities for Approving Tarpless Container Fumigations (continued)
Action:
Responsible Party
Local
PPQ
Field
Office
Field
Opera-
tions Hub
(FO-H)
QPAS S&T-TMT

Fumigants—Methyl Bromide—Special Procedures for Container Fumigations Without a Tarpaulin
Materials Needed
02/2024-01 Treatment Manual 2-8-5
Container must have all refrigeration units turned off during pressure
testing and when under fumigation
Materials Needed
PPQ Officer Provides
Calculator (optional)
PPQ Form 429B
Self-contained breathing apparatus (SCBA) or supplied air respirator
Stopwatch
MB 2016 Label
NOTICE
In addition to the bulleted equipment list required from PPQ, PPQ must also
provide:
Air purifying respirator NIOSH certified half-mask or full face piece with
a cartridge for concentrations between 1 and 4 ppm
APHIS-approved continuous real time gas monitoring device
Permanently mounted in PPQ owned facilities only, PureAire
Monitoring Systems, Inc., model Air Check Advantage. The Air
Check Advantage can be calibrated either by the manufacturer or by
the PPQ official. Calibrate according to the manufacturer’s User
Guide. Refer to Chapter 8: Equipment for more information.
Portable Photoionization Detector (PID), RAE Systems, Inc. model
MiniRAE 3000. The MiniRAE 3000 must be calibrated by the PPQ
official according to the manufacturer’s User Guide. Refer to Chapter
8: Equipment for more information.
Self contained breathing apparatus (SCBA) NIOSH approval prefix TC-
13F or supplied air respirator NIOSH approval prefix TC-19C

Fumigants—Methyl Bromide—Special Procedures for Container Fumigations Without a Tarpaulin
Materials Needed
2-8-6 Treatment Manual 02/2024-01
Fumigator Provides
Aeration fans with ducts
APHIS-approved methyl bromide monitor
1
(e.g. thermal conductivity
device, infrared device, etc.)
Auxiliary pump or Mighty Vac for purging long gas sampling lines
Colorimetric tubes (see Appendix E for a list of APHIS-approved product
ranges)
Ducts (introduction and exhaust)
Electrical wiring (grounded, permanent type), three-prong extension cords
Fans (circulation and introduction)
Gas introduction hose
Gas sampling tubes
Methyl bromide
Pressure testing equipment
Any device or equipment with the ability to pressurize a container (for
example, blowers, compressors, tanks, manifolds)
Manometer
Sealing putty
Scales or dispensers
2
Self-contained breathing apparatus (SCBA) or supplied air respirator
Tape
Temperature recorder and temperature sensors
3
Thermometer
4
Volatilizer
Warning signs/placarding
1 Methyl bromide monitor must be calibrated annually. See Equipment on page 8-1-1 for calibration
information. If using a thermal conductivity (T/C) analyzer, Drierite® and Ascarite® must be used.
2 All scales must be calibrated by the State, a company that is certified to conduct scale calibrations,
or by a state-certified fumigator under the supervision of PPQ. The source and date of calibration
must be posted in a visible location on or with the scale at all times. The scale must be calibrated a
minimum of every year.
3 Temperature sensors must be calibrated annually by the manufacturer or National Institute of
Standards and Technology (NIST) within the range of 40 °F to 80 °F (4.4 °C to 26.7 °C).
4 The thermometer must be calibrated or replaced annually.

Fumigants—Methyl Bromide—Special Procedures for Container Fumigations Without a Tarpaulin
Preparing to Fumigate
02/2024-01 Treatment Manual 2-8-7
MB 2016 Label
Preparing to Fumigate
Step 1: Selecting the Container
The fumigator must obtain a letter of authorization from the owner of the
container, the shipping line, or the broker prior to attempting to gain access
through the container doors or making any structural changes to the containers.
The fumigator will maintain the letters of authorization and provide copies to
the local PPQ office upon request. PPQ is not responsible for any damage
incurred by the fumigator due to modification or manipulation of a container's
original condition.
Step 2: Selecting the Fumigation Site
The PPQ official and the fumigator must consider the following factors when
selecting a fumigation site:
Aeration requirements
Electrical power supply
Nonwork area that can be effectively marked and safeguarded or isolated
Water supply
NOTICE
In addition to the bulleted equipment list required from the fumigator, the
fumigator must also provide:
Air purifying respirator NIOSH certified half-mask or full face piece with
a cartridge for concentrations between 1 and 4 ppm
APHIS-approved direct read gas detection device
Colorimetric tubes (e.g. Draeger, Sensidyne)
APHIS-approved continuous real time gas monitoring device
Permanently mounted in PPQ owned facilities only, PureAire
Monitoring Systems, Inc., model Air Check Advantage
Portable Photoionization Detector (PID), RAE Systems, Inc. model
MiniRAE 3000
Devices must be calibrated according to the manufacturer’s User
Guide. Refer to Chapter 8: Equipment for more information.
Self contained breathing apparatus (SCBA) NIOSH approval prefix TC-
13F or supplied air respirator NIOSH approval prefix TC-19C

Fumigants—Methyl Bromide—Special Procedures for Container Fumigations Without a Tarpaulin
Preparing to Fumigate
2-8-8 Treatment Manual 02/2024-01
Well-lighted area
Well-protected area
Buffer Zone Overlap for Multiple Enclosures
Aeration Requirements
The fumigator must restrict access to the area where the exhaust duct extends
beyond the container. Before a fumigation begins, the fumigator must ensure
the exhaust duct is located in a safe place. During the first 10 minutes of
aeration, the fumigator must not allow anyone within 200 feet downwind of
the exhaust duct outlet. The fumigator is responsible for planning the
fumigation so that aeration can be safely conducted immediately following the
fumigation.
MB 2016 Label
Electrical Power Supply
Require the fumigator to supply an adequate electrical source to run the
circulation fans and the gas detection unit. A separate line should be available
for the gas detection unit. Electrical outlets must be grounded and conveniently
located in relation to the fumigation area. PPQ does not allow the use of
generators as a power source, except under emergency conditions.
NOTICE
The fumigator is responsible for all aspects of aeration. When the fumigation is
a Section 18 exemption fumigation, the PPQ official is required to verify the
final gas concentration reading(s). Refer to xx for more information.

Fumigants—Methyl Bromide—Special Procedures for Container Fumigations Without a Tarpaulin
Preparing to Fumigate
02/2024-01 Treatment Manual 2-8-9
Nonwork Area-MB 2016 Label
Nonwork Area
The PPQ official and the fumigator must select a secure area where traffic and
people are restricted from entering and that is isolated from people working. A
nonwork area is preferred to help prevent accidents such as a forklift piercing a
container. The fumigation area is the area 30 feet surrounding the container(s)
and is separated from the non-fumigation area by a physical barrier such as
ropes, barricades, or walls.
Restrict access to the fumigation and aeration areas to the fumigator’s
employees and PPQ employees monitoring the treatment. The area outside the
30-foot perimeter is usually regarded as a safe distance from the fumigation.
NOTICE
The fumigator will determine the treatment buffer zone in accordance with the
Environmental Protection Agency (EPA) Methyl Bromide Commodity
Fumigation Buffer Zone Lookup Tables.
The treatment buffer zone surrounds the area where access is limited during
treatment. If the fumigator determines that the buffer zone is less than 30’, then
PPQ requires a 30’ buffer zone. If the fumigator determines that the buffer zone
is greater than 30’, then PPQ must observe the prescribed buffer zone.
The treatment buffer zone extends from the perimeter of the enclosure to a
distance determined by the fumigator in accordance with the label. Entry by
any person except the PPQ official and the fumigator is prohibited except as
provided in the “Exceptions to Buffer Zone Entry Restrictions” section of the
label.
The treatment buffer zone begins when the fumigant is introduced into the
enclosure and ends when aeration begins, at which point the aeration buffer
zone requirements apply.
The fumigator must define treatment and aeration buffer zone perimeters using
physical barriers (such as walls, ropes, etc.) and placards to limit access to the
buffer zone. Placards must meet all label requirements regarding specific
warnings, information, and language.
The fumigator will permit transiting through buffer zones in accordance with
the “Transit Exception” section of the label.
Buffer Zone Overlap for Multiple Enclosures
For multiple enclosures where buffer zones overlap, the fumigator must
recalculate both the treatment and aeration buffer zones in accordance with the
label and supply them to the PPQ official.

Fumigants—Methyl Bromide—Special Procedures for Container Fumigations Without a Tarpaulin
Preparing to Fumigate
2-8-10 Treatment Manual 02/2024-01
The fumigator must placard within the perimeter of the secure area (including
the entrance) with the appropriate DANGER/PELIGRO signs. Make sure the
placards meet the appropriate fumigant label or labeling requirements. The
skull and crossbones should be present as well as “AREA UNDER
FUMIGATION, DO NOT ENTER/NO ENTRE”; date of the fumigation; name
of the fumigant used; and the name, address, and telephone number of the
fumigator. Unless you (PPQ) authorize their use, do not allow motorized
vehicles to operate within 30 feet of the fumigation and aeration areas. The 30-
foot perimeter is not specifically mentioned on the MB label, but is required
for PPQ officials.
When multiple containers are being fumigated, there must be sufficient space
for a person wearing SCBA to walk between the containers.
Water Supply
A water supply is necessary for safety purposes. Water is necessary for
washing off MB if the liquid form is spilled on someone. If no permanent
water is present on site, the fumigator must provide a five-gallon supply of
potable, unfrozen water.
Well-Lighted Area
The fumigator will ensure that the area has adequate lighting for safety
purposes and for ease in reading gas detection units, thermometers, and for
determining whether a container has holes or places where the MB may leak.
Well-Ventilated, Sheltered Area
The PPQ official and the fumigator must select sites that well-ventilated and
sheltered. A well-ventilated site is required for exhausting the gas. Avoid areas
where strong drafts are likely to occur.
Ensure that the fumigator selects a site that is semi-sheltered, such as the
leeward side of a warehouse or pier to offer some protection from severe
winds. Severe winds are defined as sustained winds or gusts of 30 m.p.h. or
higher for any time period. Do not allow the fumigation to proceed if there is a
forecast from the National Weather Service of severe winds and/or
thunderstorms at the beginning of or for the entire length of the fumigation.
Some gas will escape from the container even in the best conditions. The
fumigator must ensure that the exhausted gas does not endanger people
NOTICE
Nontarped containerized fumigations cannot be conducted in a warehouse

Fumigants—Methyl Bromide—Special Procedures for Container Fumigations Without a Tarpaulin
Preparing to Fumigate
02/2024-01 Treatment Manual 2-8-11
working outdoors. When treatments are conducted in a particular location on a
regular basis, a permanent site should be designated.
Step 3: Arranging the Containers
Ensure that the containers are not loaded beyond 80 percent of their capacity.
There must be a space of a minimum of 18 inches above the commodity. This
allows a crawl space for placing the gas sampling lines and fans, and facilitates
uniform gas distribution. (Some restacking of cargo may be necessary to meet
this requirement.) Require the commodity to be on pallets to allow adequate
space (at least 2 inches) below the commodity.
APHIS does not allow stacking of containers. Stacking creates a safety risk to
the person(s) installing fans, sampling lines, and aeration ducts.
Step 4: Arranging and Operating Fans
Require the fumigator to use a minimum of two 2,500 cfm fans for efficient
gas circulation. Ensure that the fans are placed on top of the palletized
commodity; one fan at the doors (rear) and one fan in the front. The rear fan is
the gas introduction fan and should be pointed into the container. The front fan
is pointing in the opposite direction.
Step 5: Placing the Gas Introduction Line
MB is converted from a liquid into a gas by a volatilizer. The hose that runs
from the MB cylinder into the volatilizer must be 3000 PSI hydraulic high
pressure hose with a 3/8 inch inner diameter (ID) or larger. From the
volatilizer, MB gas is introduced into the container by means of a gas
introduction hose. The gas introduction line must be a minimum of 350 PSI
with a 1/2 inch ID or larger. Ensure that the fumigator places the introduction
line directly above the fan at the rear door of the container. Each container
must have a gas introduction line.
Step 6: Placing the Gas Sampling Tubes
Ensure that the fumigator installs at least three gas sampling tubes per
container. Insert the gas introduction line and sampling tubes between the
closed rear door gaskets, or in some other location that does not interfere with
successful pressure testing. Position the gas sampling tubes as follows:
Front low — near the floor at the door end of the container
Rear high — rear of the load at the high end opposite the fan
Middle center — mid way from front to back, at mid depth
NOTICE
Do not run the container’s fan or refrigeration unit during the fumigation.

Fumigants—Methyl Bromide—Special Procedures for Container Fumigations Without a Tarpaulin
Preparing to Fumigate
2-8-12 Treatment Manual 02/2024-01
Require the fumigator to use gas sampling tubes of sufficient length to extend
from the sampling position inside the container to at least 30 feet beyond the
container. Ensure that all the gas sampling tubes meet in one area for ease and
safety in taking gas concentration readings. Do not permit gas sampling tubes
to be spliced. Before starting the fumigation, check for gas sampling tube
blockage or pinching by connecting each tube to the gas detection device for a
short time. If the line is blocked, the flow to the device will drop sharply. Tubes
can also be checked with a MityVac
®
hand pump or other air pump device.
Require the fumigator to replace any defective gas sampling tubes.
Step 7: Measuring the Temperature
The PPQ official must determine the temperature of the commodity in order to
select the proper dosage rate. To take the temperature readings, use a calibrated
bimetallic, mercury, or digital long-stem thermometer.
Depending on whether or not you are fumigating a pulpy fruit or vegetable,
you may use either the commodity temperature or an average of the
commodity and air temperatures. A pulpy fruit or vegetable can support
internal feeding insects, is fleshy and moist, and can be probed with a
temperature measuring device. Examples include, but are not limited to
peppers, onions, and grapes.
For pulpy fruits and pulpy vegetables, insert the thermometer into the pulp and
use the only the commodity temperature to determine the dosage rate. For
commodities that have been refrigerated, probe the fruits that have the lowest
pulp temperature. Again, fumigate only when the fruit pulp is at 40°F or
higher.
If the commodity has no pulp (e.g., peas, beans, grains, herbs, spices, etc.),
take the temperature of the air space immediately surrounding the commodity
as well as the commodity temperature and use Table 2-8-2 to determine the
correct temperature to use when selecting the proper dosage rate.
NOTICE
Do not fumigate at temperatures below 40°F.
The presence of ice indicates temperatures below 40°F. If ice is present anywhere in
the box, pallet, or container, do not fumigate the commodity.

Fumigants—Methyl Bromide—Special Procedures for Container Fumigations Without a Tarpaulin
Preparing to Fumigate
02/2024-01 Treatment Manual 2-8-13
Step 8: Measuring the Volume
Using a 100-foot tape measure, the PPQ official and the fumigator must
carefully measure the length, width, and height of the container. Never
estimate the measurements. An error in measurement of as little as 12 inches
can result in miscalculating the dosage by as much as 15 percent. When
measuring, round off to the nearest quarter foot (e.g., 2 1/4 inches = 0.25 feet).
In the case of fumigations of edible commodities, an error can result in an
unacceptable level of residue on the commodity.
Formula for determining volume:
length x width x height = volume in cubic feet
The PPQ official must record volume in Block 26 of PPQ Form 429B. In the
electronic 429 database, record the length, width, and height in the
corresponding fields under the “AMT of Gas Introduced” heading on the
treatment form.
Step 9: Calculating the Dosage
The PPQ official must calculate dosage by doing the following:
1. Refer to the treatment schedule for the correct dosage rate (lbs/1,000 ft
3
)
based on temperature (°F).
2. Multiply by the dosage (lbs/1,000 ft
3
) rate by the volume (ft
3
) to get the
dosage in pounds.
3. Round to the nearest quarter pound.
Table 2-8-2 Determine Whether to Use Commodity or Air Temperature for
Determining Dosage Rate For Nonpulpy Commodities
If the air temperature is: And: Then:
Higher than the commodity
temperature
Use the single lowest commod-
ity temperature for determining
the dosage rate (DO NOT use
the average commodity tem-
peratures).
Lower than the commodity
temperature
By less than 10 degrees
By 10 degrees or more Use the average of the single
lowest air and commodity tem-
peratures for determining the
dosage rate.
(Never initiate a fumigation if
any temperature reads lower
than 40°F.)
EXAMPLE
A stack with measurements H=10’6”, L=42’3”, W=10’9”
10.50 x 42.25 x 10.75 = 4,768.9 ft
3
rounded to 4,769 ft
3

Fumigants—Methyl Bromide—Special Procedures for Container Fumigations Without a Tarpaulin
Preparing to Fumigate
2-8-14 Treatment Manual 02/2024-01
Formula for calculating dosage:
The PPQ official must record dosage in Block 33 of PPQ Form 429B. In the
electronic 429 database, the PPQ official must enter the dosage rate in the
“dosage” field and the total amount of gas required for the fumigation will be
displayed in the “Gas Required” field.
Step 10: Container Pressure Testing
In order to ensure that the container can maintain the required gas
concentrations, it must be pressure tested. Sea containers or over-the-road
freight trailers may be considered for pressure testing and tarpless fumigation
if they possess solid metal walls and ceilings, a channeled solid metal floor,
and were originally manufactured with two rear doors. Side doors are not
permitted.
Any process for pressure testing or tarpless container fumigation which
requires modification or a structural change to the container will require a
letter of authorization from the owner. The fumigator shall maintain the letters
of authorization and provide copies to the local PPQ office upon request. The
container owners must agree to repair any container with modified drain holes
before they are used for tarpless fumigation.
Required Equipment
The fumigator must supply the following equipment for the pressure test:
Any device or equipment with the ability to pressurize a container (for
example, blowers, compressors, tanks, manifolds)
A manometer for recording the internal container pressure during the test.
The units may be either Pascals (Pa) or inches of water, and must be able
to reach a minimum of 250 Pa or 1.0 inch of water.
Sealing putty for plugging around drain holes, gaps between door gaskets,
and sealing around pressure insertion hose.
Container Prepping and Pre-Testing
In preparation for the pressure test, the fumigator must:
1. Close vents and turn off refrigeration unit
Figure 2-8-1 Formula for MB Calculating Dosage for Container Fumigations
Without a Tarpaulin
Dosage (lbs.)
Volume (ft3) Dosage Rate (lbs.)
1,000 ft3
----------------------------------------------------------------------------------=

Fumigants—Methyl Bromide—Special Procedures for Container Fumigations Without a Tarpaulin
Preparing to Fumigate
02/2024-01 Treatment Manual 2-8-15
2. Seal corner drain holes
3. Repair any visible damage to the container or any parts potentially
impacting air tightness
4. Attach a pressurization and monitoring apparatus to the container
5. Pressurize the container to a minimum pressure of 250 Pa (1.0 inch of
water)
6. Monitor the pressure to ensure that the decrease from 200 Pa to 100 Pa (0.8
inches to 0.4 inches) takes at least 15 seconds
7. Identify and repair leaks
After the fumigator has conducted a successful pressure test, PPQ will observe
and record the official time for the final pressure test.
Official Pressure Test
The PPQ official will:
1. Observe the fumigator pressurizing the container to 250 Pa (1.0 inches).
2. Allow the pressure to decrease to 200 Pa and then record the time it takes
to decrease from 200 Pa to 100 Pa (0.8 inches to 0.4 inches) with a
stopwatch.
A successful (passing) test is defined by a minimum of 15 seconds transpiring
while pressure decreases from 200 Pa to 100 Pa (0.8 inches to 0.4 inches). The
PPQ official should confirm a passing test before permitting the fumigator to
proceed with a tarpless fumigation. Record the passing test time on PPQ Form
429B, and enter it into the electronic 429 database. This data field is in the
“Treatment” tab of the fumigation report in the “Setup” section. If “Approved
Tarpless Container” is selected as the “Enclosure” type, then two additional
fields appear in the report, “Was the pressure test conducted?” and “Pressure
Test Time (seconds).” Record the time it takes the pressure to drop from 200 to
100 Pa and enter the time (in seconds) into the fumigation report. Officials are
not to stop timing after the time exceeds 15 seconds; continue timing until the
pressure reaches 100 Pa or 90 seconds have elapsed. If the latter occurs, record
“90” seconds as pressure loss interval.
If the container fails the pressure test (as defined by not holding pressure for a
minimum of 15 seconds), record the time lapse in “REMARKS” in PPQ Form
429B and in the electronic 429 database. Tarp the container and fumigate
according to this manual, Chapter 2-4-Chemical Treatments, Fumigants,
Methyl Bromide, Tarpaulin Fumigation.
Ensure that the fumigator places three gas sampling tubes within the container
as described in Placing the Gas Sampling Tubes. Ensure the placement of the

Fumigants—Methyl Bromide—Special Procedures for Container Fumigations Without a Tarpaulin
Preparing to Fumigate
2-8-16 Treatment Manual 02/2024-01
lines where they exit the container so the integrity of the sealed container is
maintained. For example, an acceptable location for sampling tubes is along
the sill of the container below the left door, pressed onto a small snake of
plumbers putty to make a good seal with the sill and door gasket.
Step 11: Making a Final Check
Before introducing the gas, the PPQ official and the fumigator must ensure
that the following activities are performed:
Turn on all circulation fans and APHIS-approved methyl bromide gas
detection monitors to make sure they work.
Warm up and zero (if required) the APHIS-approved methyl bromide gas
detection monitor as described in the Equipment chapter of this manual.
Start volatilizer and heat water to 200°F or above (See Volatilizer on page
8-1-14 for temperature monitoring procedures.) A minimum temperature
of 150°F is required at all times during the introduction process.
Place fumigant cylinder with gas introduction hose on scale and take
initial weight reading.
Ensure the gas introduction hose is attached to the cylinder.
After obtaining the correct weight, subtract the dosage to be introduced
into the container.
After introducing the proper amount of gas, the scale will be balanced.
Ensure the container is placarded and the area is secured; only people
working on the fumigation can be in the area.
Ensure that any vents or holes in the container are sealed.
Ensure all gas sampling tubes are labeled and are not crimped or crushed.
Visually inspect lines or use an electric or Mityvac
®
hand pump to
check for blockage.

Fumigants—Methyl Bromide—Special Procedures for Container Fumigations Without a Tarpaulin
Conducting the Fumigation
02/2024-01 Treatment Manual 2-8-17
Confirm that there is enough gas in the cylinder and if necessary, that
other cylinders are available.
Ensure that all safety equipment, especially SCBA, is available and in
working order.
Confirm that the gas introduction line connections are tight and free of
leaks.
If using a T/C monitor, install Drierite® and Ascarite® filters as stated in
the instructions in this manual.
Conducting the Fumigation
Step 1: Introducing the Gas
MB 2016 Label
Require the fumigator and PPQ official to use SCBA while introducing and
adding gas. The PPQ official is not required to be in the treatment buffer zone
during the fumigation except as required for monitoring activity. The PPQ
official must ensure that the fumigator turns on all circulation fans before
NOTICE
When conducting fumigations, erroneous readings can occur if the sampling lines
become blocked or crimped. It would be impossible to install a new sampling line
during a fumigation treatment. Therefore, to avoid an unsuccessful fumigation, test
sampling lines before the treatment begins.
Refer to the following steps to detect blocked sampling tubes with the use of a Mity-
Vac® hand-held pump (for supplier, see Appendix E.)
1. Prior to gas introduction, connect a MityVac® hand-held vacuum pump to sampling tubes.
2. Squeeze the handle on the MityVac
® unit. If the line is blocked, a vacuum will be indicated
on the MityVac
® gauge. For sampling tubes longer than 25 feet, squeeze the handle two or
three times. The MityVac
® pump has the capacity to attain and hold 25 inches of Hg vacuum
and a minimum of 7 psig pressure.
3. Disconnect the MityVac
® pump from the sampling tube and repeat this procedure for each
sampling tube. (Connect sampling tubes to the gas analyzer prior to fumigant introduction.)
!
CAUTION
The acceptable air concentration level for methyl bromide (MB) is 5 ppm. A respira-
tor (approved SCBA) is required if the MB concentration level in the air is unknown
or greater than 5 ppm at any time. The PPQ official and the fumigator must use
SCBA while introducing the gas, checking for leaks, when taking aeration readings,
and inside the buffer zone.
NOTICE
If MB concentration levels are between 1-4 ppm, the PPQ official and the fumigator
may wear an air purifying respirator NIOSH certified half-mask or full face piece with
a cartridge.

Fumigants—Methyl Bromide—Special Procedures for Container Fumigations Without a Tarpaulin
Conducting the Fumigation
2-8-18 Treatment Manual 02/2024-01
introducing the gas. When using large cylinders of MB, the fumigator should
slightly open the cylinder valve, then close the valve.
With an APHIS-approved continuous real time gas detection device, the
fumigator must check all connections on the gas introduction line (between the
MB cylinder and the volatilizer) for leaks. If leaks are found, advise the
fumigator to tighten the connections and repeat the test. If no leaks are found,
require the fumigator to open the valve to the point where three to four pounds
of MB are introduced per minute.
The water temperature in the volatilizer should never go below 150°F at any
time during gas introduction. The water in the volatilizer can include an
antifreeze and should be handled with the appropriate safeguards. See
Volatilizer on page 8-1-14 for temperature monitoring procedures.
The fumigation time begins once all the gas has been introduced. The PPQ
official must record the time gas introduction was started and completed in
Block 32 on PPQ Form 429B. In the electronic 429 database, record the
fumigation date, gas introduction start and finish time in the corresponding
fields under the “GAS INTRODUCTION” heading in the Treatment form.
Require the fumigator to run the fans for 30 minutes to achieve even gas
distribution. The PPQ official must take the initial concentration reading 30
minutes after all the gas has been introduced.
When evacuating large cylinders, getting the final amount of gas out may take
a long time. Consider taking a gas concentration reading 30 minutes after the
gas was first introduced. If the gas distribution is even (all readings within 4
DANGER
!
If the PPQ official or fumigator notices a cloud, plume, vapor, or mist coming from
the introduction equipment during gas introduction, the fumigator must TURN OFF
the valve on the gas cylinder, EVACUATE the area immediately, and ABORT the
fumigation.
No person should place any part of their body into the cloud, plume, vapor, or mist.
After the cloud plume has dissipated, measure gas concentration levels at the gas
cylinder using any APHIS-approved continuous real time gas detection device.
When gas concentration levels at the cylinder reach 5 ppm or less, the fumigator
must identify the source of the leak and correct it before restarting the fumigation.
Any person within the treatment buffer zone must wear and use SCBA equipment
during gas introduction and gas addition.
!
CAUTION
Do not touch the introduction line with your bare hands — you could get burned!
Close the cylinder valve once the proper dosage has been introduced.

Fumigants—Methyl Bromide—Special Procedures for Container Fumigations Without a Tarpaulin
Conducting the Fumigation
02/2024-01 Treatment Manual 2-8-19
ounces of each other) and at a significantly high concentration, advise the
fumigator to turn off the fans. Running the fans longer can contribute to gas
leakage. Allow the remainder of the gas to discharge while intermittently
running the fans. Normally, all the gas should be introduced within 30 minutes.
If the fumigator detects excessive leakage (concentration readings of 50
percent or less of the minimum concentration), do not attempt to correct the
problem by adding more gas. Aerate the container and return, re-export, or
destroy the commodity. Commodities used for food or feed cannot be
retreated.
Step 2: Taking Concentration Readings
The PPQ official must take concentration readings 30 minutes after gas
introduction. Use an APHIS-approved gas detection device to determine the
gas concentration and distribution within the container. Allow gas
concentration readings to stabilize; do not disconnect the sampling line from
the gas detection device when the minimum concentration reading has been
met.
Take concentration readings at the times designated in the treatment schedule.
Concentration readings should not differ more than 4 ounces among the lines.
When concentration readings differ more than 4 ounces, run the fans to
equalize the gas and record readings in the Remarks block on the PPQ Form
429B. In some case, several cycles of fan operation may be necessary to
NOTICE
Do not begin counting fumigation time until all the gas has been introduced and the
valve on the MB tank is closed.
NOTICE
Before taking a reading, always purge sampling lines with a mechanical or hand
pump. If using a T/C unit, connect it to the sampling line, adjust the gas flow rate to
1.0, and wait until the meter registering “ounces per thousand cubic feet” stabilizes
before taking a reading. (This may take a minute or more, depending upon the length
of the tubing and whether or not an auxiliary pump is used.)

Fumigants—Methyl Bromide—Special Procedures for Container Fumigations Without a Tarpaulin
Conducting the Fumigation
2-8-20 Treatment Manual 02/2024-01
equalize the readings. The PPQ official must record all gas readings on the
PPQ Form 429B and in the electronic 429 database.
Step 3: Determining the Need to Add Gas and Adjust Exposure
Use Table 2-8-3 to determine when to add gas or extend the exposure.
NOTICE
Avoid using hand-held, two-way radios near a T/C unit. Using two-way radios near a
T/C unit will interfere with accurate concentration readings.
Table 2-8-3 Determine the Need to Add Gas and Adjust Exposure
If the lowest gas
reading is:
And the schedule is: Then:
Below the required
minimum concentra-
tion
T101-a-1 or equivalent
a
a T101-a-1 or equivalent schedules are those schedules that are:
NOT greater than 2 hours long (exposure time)
NOT greater than 4 lbs. per 1000 ft
3
(dosage rate)
Minimum concentration readings and temperature ranges match EXACTLY the readings
in T101-a-1
If the minimum concentration readings do not meet these requirements, the schedule is NOT
equivalent. When schedules are NOT equivalent, use Table 2-8-4 to determine the length of
time to e
xtend exposure and use the formula in Figure 2-8-2 on page 2-21 to determine the
amount of
gas to add.
SEE Table 2-8-5 for corrections at
0.5 hours, or Table 2-8-6 for cor-
rections at 2 hours
Other than T101-a-1 or
equivalent
1
See Adding Gas and Extending
Exposure to Commodities that are
Fumigated Using Treatment
Schedules Other Than T101-a-1 or
Equivalent (may include perish-
ables) on page 2-8-21
At or above the
requ
ired minimum
concentration
T101-a-1 or equivalent
1
SEE Table 2-8-5 for corrections at
0.5 hours, or Table 2-8-6 for cor-
rection
s at 2 hours
Other than T101-a-1 or
equivalent
1
NO ACTION necessary

Fumigants—Methyl Bromide—Special Procedures for Container Fumigations Without a Tarpaulin
Conducting the Fumigation
02/2024-01 Treatment Manual 2-8-21
Adding Gas and Extending Exposure to Commodities that
are Fumigated Using Treatment Schedules Other Than T101-
a-1 or Equivalent (may include perishables)
Once you have determined that you need to add gas and extend time, use the
formula in Figure 2-8-2 to calculate the amount of gas to add and Table 2-8-4
to determine how long to extend the exposure period.
Adding Gas
When adding gas, require the fumigator to follow these steps:
1. Heat water in volatilizer.
2. Turn on fans.
3. Weigh the cylinder.
4. With SCBA on, open valve on cylinder and introduce the gas.
5. Close valve when the weight of the cylinder indicates that the needed
amount of gas has been added.
The PPQ official must record quantity of fumigant added in Block 34 and
additional fan time in Block 30 of PPQ Form 429B.
In the electronic 429, record the amount of additional gas listed in the
Treatment Manual in the added in the “Additional Gas Recommended” field
and the actual amount of additional gas added in the “Actual Additional Gas”
field. Record the additional fan time in the “TIME FANS OPERATED” field in
the Treatment form.
Figure 2-8-2 Formula for Determining the Amount of Gas to Add for Schedules
Not T101-a-1 Equivalent and Conducted in a Container Without a
Tarpaulin
Table 2-8-4 Determine the Extended Exposure Period to Commodities that are
Not T101-a-1 Equivalent
And any individual reading
is below minimum by:
Then extend exposure:
10 oz. or less 10 percent of the time lapse since gas introduction or the
last acceptable reading
11 oz. or more 30 minutes
1.6 number of ounces below minimum
volume in cubic feet
1000 cubic feet
-------------------------------------------------
1
16
------
pounds of gas to add=

Fumigants—Methyl Bromide—Special Procedures for Container Fumigations Without a Tarpaulin
Conducting the Fumigation
2-8-22 Treatment Manual 02/2024-01
Note the time the fumigator started and finished introducing additional gas and
record in Block 40 (Remarks) of PPQ Form 429B and in the “Remarks” form
in the electronic 429 database. Require the fumigator to run the fans until there
is even gas distribution throughout the stack. Turn off fans, then take a
concentration reading 30 minutes after the gas has been introduced. If all
readings are above minimum concentration levels, proceed as usual with the
remaining scheduled concentration readings.
Adding Gas to Fruits, Vegetables, or Perishable Commodities
Using Schedules T101-a-1 or Equivalent
Use Table 2-8-5 and Table 2-8-6 to determine if you need to add gas or extend
or decrease the exposure time. Select the proper table based on the time of the
gas reading (30 minutes or 2 hours). Use the formula in Figure 2-8-3 to
determine the amount of gas to add.
Adding Gas
When adding gas, require the fumigator to follow these steps:
1. Heat water in volatilizer.
2. Turn on fans.
3. Weigh the cylinder.
4. With SCBA on, open valve on cylinder and introduce the gas.
Figure 2-8-3 Formula for Determining the Amount of Gas to Add For T101-a-1
Equivalent Schedules for Container Fumigations Without a
Tarpaulin
NOTICE
DO NOT average the concentration readings before using the tables. Base your
decision on whether to add gas from the LOWEST gas concentration of any individ-
ual gas reading.
NOTICE
Fresh fruits and vegetables are sensitive to MB so you should double check volume
calculations and dosage measurements to avoid accidental overdoses.
1.6 number of ounces below minimum
volume in cubic feet
1000 cubic feet
-------------------------------------------------
1
16
------
pounds of gas to add=

Fumigants—Methyl Bromide—Special Procedures for Container Fumigations Without a Tarpaulin
Conducting the Fumigation
02/2024-01 Treatment Manual 2-8-23
5. Close valve when the weight of the cylinder indicates that the needed
amount of gas has been added.
The PPQ official must record quantity of fumigant added in Block 34 and
additional fan time in Block 30 of PPQ Form 429B.
In the electronic 429, record the amount of additional gas listed in the
Treatment Manual in the added in the “Additional Gas Recommended” field
and the actual amount of additional gas added in the “Actual Additional Gas”
field. Record the additional fan time in the “TIME FANS OPERATED” field in
the Treatment form.
Note the time the fumigator started and finished introducing additional gas and
record in Block 40 (Remarks) of PPQ Form 429B and in the “Remarks” form
in the electronic 429 database. Require the fumigator to run the fans until there
is even gas distribution throughout the stack. Turn off fans, then take a
concentration reading 30 minutes after the gas has been introduced. If all
readings are above minimum concentration levels, proceed as usual with the
remaining scheduled concentration readings.

Fumigants—Methyl Bromide—Special Procedures for Container Fumigations Without a Tarpaulin
Conducting the Fumigation
2-8-24 Treatment Manual 02/2024-01
Table 2-8-5 Determine Gas Concentration Values and Corrections for Fruits and
Vegetables at the 30-Minute Reading
If the
schedule
is:
And the mini-
mum concen-
tration (oz.) in
the schedule
is:
And the lowest
concentration
reading (oz.) is:
Then:
40-49
°F
4 lbs. for 2
hrs.
48 65 or greater REDUCE exposure by 15 minutes
64-48 TAKE 2 hour reading as scheduled
Lower than 48 1. ADD gas, and
2. EXTEND exposure by 15 minutes
50-59
°F
3 lbs. for 2
hrs.
38
52 or greater
REDUCE exposure by 15 minutes
51-38 TAKE 2 hour reading as scheduled
Lower than 38 1. ADD gas, and
2. EXTEND exposure by 15 minutes
60-69
°F
2.5 lbs. for
2 hrs.
32
48 or greater
REDUCE exposure by 15 minutes
47-32 TAKE 2 hour reading as scheduled
Lower than 32 1. ADD gas, and
2. EXTEND exposure by 15 minutes
70-79
°F
2.0 lbs. for
2 hrs.
26
37 or greater
REDUCE exposure by 15 minutes
36-26 TAKE 2 hour reading as scheduled
Lower than 26 1. ADD gas, and
2. EXTEND exposure by 15 minutes
80-89
°F
1.5 lbs. for
2 hrs.
19
27 or greater
REDUCE exposure by 15 minutes
26-19 TAKE 2 hour reading as scheduled
Lower than 19 1. ADD gas, and
2. EXTEND exposure by 15 minutes

Fumigants—Methyl Bromide—Special Procedures for Container Fumigations Without a Tarpaulin
Aeration
02/2024-01 Treatment Manual 2-8-25
Step 4: Exhausting the Gas
Require the fumigator to exhaust the gas at the completion of the exposure
period. If the treatment schedule is a FIFRA Section 18 Exemption, then the
PPQ official must verify the final gas concentration reading of the commodity.
Detector tube readings and the time interval from the aeration must be
recorded in the corresponding fields in the “DETECTOR READINGS” form.
Aeration
The fumigator must:
Arrange for the aeration to proceed once the treatment is completed.
Consider the wind direction when pointing the exhaust duct, and face the
duct outlet toward an open area away from people.
Table 2-8-6 Determine Gas Concentration Values and Corrections for Fruits and
Vegetables at the 2-Hour Reading
If the schedule is:
And the lowest concen-
tration reading (oz.) at 2
hours is:
Then DO NOT add gas, but:
40-49 °F
4 lbs. for 2 hrs.
38 and above AERATE the commodity
37-28 EXTEND exposure by 15 minutes
27-25 EXTEND exposure by 30 minutes
Lower than 25 ABORT
50-59
°F
3 lbs. for 2 hrs.
29 and above AERATE the commodity
28-24 EXTEND exposure by 15 minutes
23-21 EXTEND exposure by 30 minutes
Lower than 21 ABORT
60-69
°F
2.5 lbs. for 2 hrs.
24 and above AERATE the commodity
23-21 EXTEND exposure by 15 minutes
20-18 EXTEND exposure by 30 minutes
Lower than 18 ABORT
70-79
°F
2.0 lbs. for 2 hrs.
19 and above AERATE the commodity
18-16 EXTEND exposure by 15 minutes
15-13 EXTEND exposure by 30 minutes
Lower than 13 ABORT
80-89
°F
1.5 lbs. for 2 hrs.
14 and above AERATE the commodity
13-12 EXTEND exposure by 15 minutes
11-10 EXTEND exposure by 30 minutes
Lower than 10 ABORT

Fumigants—Methyl Bromide—Special Procedures for Container Fumigations Without a Tarpaulin
Aeration
2-8-26 Treatment Manual 02/2024-01
Ensure that, during the first 10 minutes of aeration, no one is present
within 200 feet downwind of the exhaust duct outlet.
Determine aeration buffer zones in accordance with Environmental
Protection Agency (EPA) Methyl Bromide Commodity Fumigation
Buffer Zone Lookup Tables.
Ensure no one is present within the perimeter of the aeration buffer zone
unless they are wearing SCBA.
Refer to “Buffer Zone Overlap for Multiple Enclosures”.
Follow all label instructions, state, county, and local regulations, in
addition to the instructions in this manual.
Inform people located in occupied structures and personnel in the
immediate area within the buffer zone that release of MB is about to take
place and give them the option of leaving the area or remaining inside the
building.
Restrict access to the area where the exhaust duct extends beyond the
enclosure.
Responsibility for Aerating the Commodity
The label requires that at least two people trained in the use of the fumigant
must be present at all times during gas introduction, treatment, and aeration.
The PPQ official, however, is not required to be continuously present at the
fumigation site throughout the aeration process unless specified by the label or
by State or local regulations.
Refer to Table 2-8-7 to determine who is responsible for aerating the
commodity.
Wearing Respiratory Protection
The fumigator must wear approved respiratory protection (SCBA, supplied air
respirator, or a combination unit) when:
A risk of exposure to concentrations above 5 ppm exists; this includes
anytime the concentration is unknown
Opening the container for aeration
Table 2-8-7 Determine Responsibility for Aerating the Commodity for Tarpless
Container Fumigation
If the Treatment schedule is: Then:
A FIFRA Section 18 Exemption PPQ official must be present at the initiation
of aeration and to VERIFY the final aeration
readings.
A labeled treatment schedule RELEASE the fumigation to the fumigator to
aerate and RELEASE the commodity.

Fumigants—Methyl Bromide—Special Procedures for Container Fumigations Without a Tarpaulin
Aeration
02/2024-01 Treatment Manual 2-8-27
Setting up the air introduction and exhaust systems
MB 2016 Label
Step 1: Installing the Exhaust System
Advise the fumigator to:
1. Install an exhaust fan (minimum of 5,200 cfm capacity) with one end of a
round ventilation duct at least 16 inches in diameter, oriented so that the
fan pulls air through the duct. The fan dimensions should complement the
diameter of ductwork chosen, fitting flush and tight so that no leaks exist
between the fan and duct. The exhaust duct will be at least 30 feet in length
with the fan end placed external and alongside the container extending
toward the nose, so the exhaust air is directed away from the end of the
container which is opened during aeration.
2. Install a fresh air introduction fan (minimum 3,750 cfm) with a round
ventilation duct at least 12 inches in diameter, oriented so that the fan
pushes the air through the duct. The fan dimensions should complement the
diameter of ductwork chosen, fitting flush and tight so that no leaks exist
between the fan and duct. Extend the introduction duct (non-fan end) along
top of the load two-thirds of the length of the container.
Palletized Partial Loads
For palletized partial loads (where at least 2 feet of open space is present at the
door end of the container), ensure that the fumigator extends the exhaust duct
intake (non-fan end) on the container floor with the duct face flush against the
bottom of the load along a side of the container. Store the remaining section of
the exhaust duct and fan at the rear of the load so it is easily accessible at the
start of aeration.
NOTICE
If MB concentration levels are between 1-4 ppm, the PPQ official and the fumigator
may wear an air purifying respirator NIOSH certified half-mask or full face piece with
a cartridge.
SAFETY
Install air introduction and exhaust ducts prior to fumigation in order to limit human
exposure to the fumigant at the start of aeration.

Fumigants—Methyl Bromide—Special Procedures for Container Fumigations Without a Tarpaulin
Aeration
2-8-28 Treatment Manual 02/2024-01
Full Loads
For full loads (where less than 2 feet of open space is available at the door end
of the container and there is no central aisle between pallets), if there is room to
store the duct inside the container during fumigation, ensure that the fumigator
secures the duct (non-fan end) face flush against the load at the floor/pallet/
commodity interface along a side of the container so it will not shift or twist
during aeration. Use straps, ties, or other fasteners to secure this interface
tightly. If there is not sufficient room to pre-install the duct prior to fumigation,
the fumigator can carry out these steps at the start of aeration.
For partial or full loads where a central aisle exists between the pallets, ensure
that the fumigator places the duct along the floor center and extend 1-2 feet
into this space if possible.
Refer to Figure 2-8-4 for detailed diagrams of air and exhaust ducts. In this
diagram, air introduction ducts are blue and exhaust ducts are red.
Step 2: Aerating the Commodity
Advise the fumigator to:
1. While wearing SCBA, open the doors of each container.
2. Turn on all fumigant circulation fans inside the container and leave them
on throughout the aeration.
3. Start the container introduction and exhaust duct fans.
4. Require a minimum of 4 hours aeration for all sorptive commodities.
5. Stop the fans and take concentration readings with colorimetric tubes in the
airspace around and, when feasible, within the commodity.
Figure 2-8-4 Ductwork configuration for aeration of untarped containers: full
loads (top) and partial loads (bottom)

Fumigants—Methyl Bromide—Special Procedures for Container Fumigations Without a Tarpaulin
Aeration
02/2024-01 Treatment Manual 2-8-29
6. RELEASE the commodity when the concentration reading is 5 ppm or less.

Fumigants—Methyl Bromide—Special Procedures for Container Fumigations Without a Tarpaulin
Aeration
2-8-30 Treatment Manual 02/2024-01

02/2024-01 Treatment Manual 2-9-1
Chapter
2
Chemical Treatments
Fumigants—Methyl Bromide—Closed-door
Container Fumigation
Contents
Methods and Procedures 2-9-1
2016 Methyl Bromide Label Information 2-9-1
Materials Needed 2-9-3
Preparing to Fumigate 2-9-5
Conducting the Fumigation 2-9-17
Aeration 2-9-21
Methods and Procedures
The procedures covered in this section provide PPQ officials and commercial
fumigators with the methods, responsibilities, and precautions for closed-door
container fumigations.
2016 Methyl Bromide Label Information
In 2015, the Environmental Protection Agency (EPA) directed all methyl
bromide (MB) registrants to amend the use directions on the labels of all 100%
MB products. EPA required the changes in order to reflect recommendations in
an EPA report.
1
These amendments modify the use directions for fumigation and aeration
procedures, modify respiratory requirements and equipment and update gas
monitoring equipment. EPA requires all labels on newly manufactured MB to
reflect these recommendations effective October 01, 2016; however, EPA is
allowing existing stocks of MB to be used in accordance with the use
directions on the existing stock’s (older) labels.
PPQ officials and fumigators must closely examine gas cylinder labels in order
to validate that the dosage, exposure, and commodity are either on the cylinder
label or covered by a FIFRA Section 18 exemption. If a label is not affixed to
the cylinder, DO NOT allow the fumigator to use that cylinder.
1 “Report of Food Quality Protection Act (FQPA) Tolerance Reassessment and Risk Management
Decision (TRED) for methyl bromide, and Reregistration Eligibility Decision (RED) for Methyl
Bromide’s Commodity Uses”, archive dated August 2006.

Fumigants—Methyl Bromide—Closed-door Container Fumigation
2016 Methyl Bromide Label Information
2-9-2 Treatment Manual 02/2024-01
New Buffer Zone Requirements
All 2016 MB labels now require both a treatment and an aeration buffer zone.
Both the treatment and aeration buffer zones are specific to the enclosure being
fumigated and must be determined by tables in the Environmental Protection
Agency (EPA) Methyl Bromide Commodity Fumigation Buffer Zone Lookup
Tables. The fumigators are responsible for using this website to determine the
buffer zones and reporting both buffer zones to the PPQ official. If the
treatment buffer zone is determined to be less than 30 feet, the PPQ official
will maintain PPQ’s standard 30 foot treatment buffer zone; otherwise, the new
treatment buffer zone must be observed. If the aeration buffer zone is
determined to be less than 200 feet, then PPQ’s standard “200 feet for 10
minutes” aeration buffer zone still applies for the first 10 minutes of aeration.
The fumigator must refer to EPA’s website to determine the minimum aeration
buffer zone to be maintained until the aeration period is complete and the
fumigator has verified that gas concentration levels meet the conditions in the
MB label.
Transiting through buffer zones
The label permits vehicles to transit through both treatment and aeration buffer
zones under specific conditions found in the label; it is up to the fumigator
determine how or whether vehicles may transit in accordance with the label.
When using the newer 2016 MB label, changes to certain procedures and
equipment in this chapter are displayed in a NOTICE box with a heading titled
“MB 2016 Label”.
MB 2016 Label (example)
When using existing stocks, follow the equipment and procedural guidance
that is displayed in the body of the text (outside of the NOTICE box).
If there is no “MB 2016 Label” NOTICE box, then the instructions apply to all
MB labels, 2016 and older.
NOTICE
Use this information when the fumigator is using the 2016 MB label.

Fumigants—Methyl Bromide—Closed-door Container Fumigation
Materials Needed
02/2024-01 Treatment Manual 2-9-3
Materials Needed
PPQ Official Provides
APHIS-approved leak detection device
Calculator (optional)
Forms (PPQ Form 429A and APHIS Form 2061, if necessary)
Self-contained breathing apparatus (SCBA) or supplied air respirator
MB 2016 Label
Fumigator Provides
APHIS-approved gas detection device
2
(e.g. thermal conductivity device,
infrared device, etc.)
Auxiliary pump for purging long gas sample tubes
Carbon dioxide filter (Ascarite
®)
NOTICE
In addition to the bulleted equipment list required from PPQ, PPQ must also
provide:
Air purifying respirator NIOSH certified half-mask or full face piece with
a cartridge for concentrations between 1 and 4 ppm
APHIS-approved continuous real time gas monitoring device
Permanently mounted in PPQ owned facilities only, PureAire
Monitoring Systems, Inc., model Air Check Advantage. The Air
Check Advantage can be calibrated either by the manufacturer or by
the PPQ official. Calibrate according to the manufacturer’s User
Guide. Refer to Chapter 8: Equipment for more information.
Portable Photoionization Detector (PID), RAE Systems, Inc. model
MiniRAE 3000. The MiniRAE 3000 must be calibrated by the PPQ
official according to the manufacturer’s User Guide. Refer to Chapter
8: Equipment for more information.
Self contained breathing apparatus (SCBA) NIOSH approval prefix TC-
13F or supplied air respirator NIOSH approval prefix TC-19C
2 The methyl bromide monitor must be calibrated annually. Refer to Chapter 8: Equipment for
calibration information. If using a thermal conductivity (TC) analyzer, Drierite® and Ascarite® must
be used.

Fumigants—Methyl Bromide—Closed-door Container Fumigation
Materials Needed
2-9-4 Treatment Manual 02/2024-01
Colorimetric tubes (Refer to Gas Detector Tube (Colorimetric) and
Apparatus on page E-1-20 for a list of APHIS-approved product ranges)
Desiccant (Drierite
®
)
Electrical wiring (grounded, permanent type), three prong extension cords
Exhaust blower and ducts
Fans (circulation, exhaust, and introduction)
Framework and supports
Gas introduction line
Gas sampling tubes (leads)
Heat supply
Insecticides and spray equipment
Loose sand
Measuring tape
Methyl bromide
Padding
Sand or water snakes or adhesive sealer
Scales or dispensers
3
Self-contained breathing apparatus (SCBA) or supplied air respirator
Tape
Tape measure
Tarpaulin and supports
Temperature recorder
Temperature sensors
4
Thermometer
5
Volatilizer
Warning signs/placarding
3 All scales must be calibrated by the State, a company that is certified to conduct scale calibrations,
or by the fumigator under the supervision of PPQ. The source and date of calibration must be posted
in a visible location on or with the scale at all times. The scale must be calibrated a minimum of every
6 months.
4 Temperature sensors must be calibrated annually by the manufacturer or National Institute of
Standards and Technology (NIST) within the range of 40 °F to 80 °F (4.4 °C to 26.7 °C).
5 The thermometer must be calibrated or replaced annually.

Fumigants—Methyl Bromide—Closed-door Container Fumigation
Preparing to Fumigate
02/2024-01 Treatment Manual 2-9-5
MB 2016 Label
Preparing to Fumigate
APHIS has historically required dry box ocean containers (non-refrigerated
containers with a tongue-and-groove flooring) be fumigated under tarp with
the doors open. The total methyl bromide gas introduced is based on the entire
volume under the tarpaulin. This is referred to as “open-door container
fumigation.” As an alternative to the “open-door” procedure, APHIS also
allows for the fumigation of wood products (includes logs, lumber, and
bamboo) in dry box containers with the doors closed. This procedure
eliminates the need to include the empty space under the container as part of
the total volume fumigated. This procedure is referred to as “closed-door
container fumigation” and can be used only with the following treatment
schedules:
T312-a
T312-a-Alternative
T312-b
T404-b-1-1
T404-d
NOTICE
In addition to the bulleted equipment list required from the fumigator, the
fumigator must also provide:
Air purifying respirator NIOSH certified half-mask or full face piece with
a cartridge for concentrations between 1 and 4 ppm
APHIS-approved direct read gas detection device
Colorimetric tubes (e.g. Draeger, Sensidyne)
APHIS-approved continuous real time gas monitoring device
Permanently mounted in PPQ owned facilities only, PureAire
Monitoring Systems, Inc., model Air Check Advantage
Portable Photoionization Detector (PID), RAE Systems, Inc. model
MiniRAE 3000
Devices must be calibrated according to the manufacturer’s User
Guide. Refer to Chapter 8: Equipment for more information.
Self contained breathing apparatus (SCBA) NIOSH approval prefix TC-
13F or supplied air respirator NIOSH approval prefix TC-19C

Fumigants—Methyl Bromide—Closed-door Container Fumigation
Preparing to Fumigate
2-9-6 Treatment Manual 02/2024-01
T404-e-1
Step 1: Selecting the Container
The fumigator must obtain a letter of authorization from the owner of the
container, the shipping line, or the broker prior to attempting to gain access
through the container doors or making any structural changes to the containers.
The fumigator will maintain the letters of authorization and provide copies to
the local PPQ office. PPQ will not be held responsible for any damage
incurred by the fumigator due to modification or manipulation of a container’s
original condition.
No dry box container will be permitted to be fumigated using this procedure if
it has side doors, if the rear gasket is missing, or if the gasket is damaged such
that gas lines cannot be placed effectively with the doors closed. PPQ officials
must ensure that all vents are sealed on each container to be fumigated. If this
cannot be accomplished, the fumigator will be required to fumigate with the
doors open.
Step 2: Selecting a Fumigation Site
The PPQ official and the fumigator must consider the following factors when
selecting a fumigation site:
Ability to Heat
Aeration Requirements
Electrical Power Supply
Impervious Surface
Nonwork Area
Water Supply
Well-Lighted Areas
Well-Ventilated, Sheltered Area
Ability to Heat
When cooler temperatures (below 40 °F) are expected, the fumigator must
ensure that the commodity temperatures are maintained above 40 °F. The PPQ
official will take the ambient (air) temperature 12 inches above the ground.
Temperatures must be maintained at or above the starting treatment
temperature for the entire duration of the treatment. Additionally, the PPQ
official will monitor the temperature of the container using a temperature
sensor and a temperature recorder. Specifications for the temperature recording
system are as follows:
Accurate to within ±0.6 °C or ±1.0 °F in the treatment temperature range
of 4.4 °C to 26.7 °C (40 °F to 80 °F)

Fumigants—Methyl Bromide—Closed-door Container Fumigation
Preparing to Fumigate
02/2024-01 Treatment Manual 2-9-7
Calibrated annually by the National Institute of Standards and Technology
(NIST) or by the manufacturer
The calibration certificate will list a correction factor, if needed, and
the correction factor would be applied to the actual temperature
reading to obtain the true temperature.
Capable of printing all temperature readings or downloading data to a
secure source once per hour throughout the entire treatment (all
temperature data must be accessible at a safe distance during the
fumigation)
Tamper-proof
If one or more temperature readings dip below the minimum temperature
required for the selected dosage rate in the treatment schedule, the fumigation
will be considered a failed treatment. The container must be heated to the
minimum temperature in the treatment schedule and the fumigation restarted.
The gas remaining in the container does not need to be evacuated, but
additional gas may need to be added to meet the required concentration
readings for a new fumigation. There are two options for re-treatment,
depending on the treatment schedule used.
1. Reheat the container and restart the fumigation at the original dosage rate.
The gas remaining in the container does not need to be evacuated, but
additional gas may need to be added to meet the required concentration
readings for a new fumigation.
2. Re-fumigate the container at the lower temperature using the dosage
required by this manual for that temperature. (This option may not be
available for all schedules.) The gas remaining in the container does not
need to be evacuated, but additional gas may need to be added to meet the
required concentration readings for a new fumigation.
Require the fumigator to place one temperature sensor in each container in the
coldest location in the container, which will be near the floor towards the
middle of the container at the end of a log-stack. If there is only one log-stack
in a container, require the fumigator to place the temperature sensor near the
floor at the end of the stack closest to the container doors. Refer to
Figure 2-9-1 for further information on temperature sensor placement.

Fumigants—Methyl Bromide—Closed-door Container Fumigation
Preparing to Fumigate
2-9-8 Treatment Manual 02/2024-01
Aeration Requirements
The fumigator is responsible for all aspects of aeration. Refer to xx for more
information.
Electrical Power Supply
An adequate electrical source must be available to run the circulation fans and
the gas detection device. A separate line should be available for the gas
detection device. Electrical outlets must be grounded and conveniently located
in relation to the fumigation area. PPQ does not allow generators to be used as
a power source except under emergency conditions.
Impervious Surface
Select an asphalt, concrete, or tight wooden surface—not soil, gravel, or other
porous material. If you must fumigate on a porous surface, require the
fumigator to cover the surface with plastic tarpaulins. For large fumigations,
covering the surface is not usually practical because pallets must be
rearranged and heavy equipment used to move the commodity. On docks,
wharfs, and piers, require the fumigator to seal cracks, holes, and manhole
covers which will allow the MB to escape through the floor.
Figure 2-9-1 Diagram of placement of temperature sensors, represented by a
star

Fumigants—Methyl Bromide—Closed-door Container Fumigation
Preparing to Fumigate
02/2024-01 Treatment Manual 2-9-9
Nonwork Area - MB 2016 Label
NOTICE
The fumigator will determine the treatment buffer zone in accordance with the
Environmental Protection Agency (EPA) Methyl Bromide Commodity
Fumigation Buffer Zone Lookup Tables.
The treatment buffer zone surrounds the area where access is limited during
treatment. If the fumigator determines that the buffer zone is less than 30’, then
PPQ requires a 30’ buffer zone. If the fumigator determines that the buffer zone
is greater than 30’, then PPQ must observe the prescribed buffer zone.
The treatment buffer zone extends from the perimeter of the enclosure to a
distance determined by the fumigator in accordance with the label. Entry by
any person except the PPQ official and the fumigator is prohibited except as
provided in the “Exceptions to Buffer Zone Entry Restrictions” section of the
label.
The treatment buffer zone begins when the fumigant is introduced into the
enclosure and ends when aeration begins, at which point the aeration buffer
zone requirements apply.
The fumigator must define treatment and aeration buffer zone perimeters using
physical barriers (such as walls, ropes, etc.) and placards to limit access to the
buffer zone. Placards must meet all label requirements regarding specific
warnings, information, and language.
The fumigator will permit transiting through buffer zones in accordance with
the “Transit Exception” section of the label.
Buffer Zone Overlap for Multiple Enclosures
For multiple enclosures where buffer zones overlap, the fumigator must
recalculate both the treatment and aeration buffer zones in accordance with the
label and supply them to the PPQ official.

Fumigants—Methyl Bromide—Closed-door Container Fumigation
Preparing to Fumigate
2-9-10 Treatment Manual 02/2024-01
Nonwork Area
The PPQ official and the fumigator must select a secure area where traffic and
people are restricted from entering and which is isolated from people working.
The fumigator must placards clearly in sight of all who come near. Placards
must meet label requirements regarding specific warnings, information, and
language. Placards generally include the name of the fumigant, the fumigation
date, time, and the name of the company conducting the fumigation. The
fumigator must restrict access to the warehouse to the fumigator’s employees
and PPQ employees monitoring the treatment. PPQ officials who work within
the 30-foot perimeter must wear (and use) respiratory protection (SCBA), until
the gas levels are safe to breathe and validated as safe by gas monitoring. The
30-foot perimeter is not specifically mentioned on the MB label, but is
required for PPQ officials. When space is tight, it is permissible to overlap two
adjoining 30-foot perimeters. However, there must be sufficient space for a
person wearing SCBA to walk between the tarpaulins.
Water Supply
A water supply is necessary for safety purposes. Water is necessary for
washing off MB if the liquid form is spilled on someone. Water is also used to
fill the volatilizer. If no permanent water is present on a temporary site, the
fumigator must provide a portable shower that meets OSHA specifications or
a 5-gallon supply of clean water. All permanent fumigation sites must have a
safety shower/eyewash station installed and maintained in good working order
throughout the year or when fumigations are performed at the site.

Fumigants—Methyl Bromide—Closed-door Container Fumigation
Preparing to Fumigate
02/2024-01 Treatment Manual 2-9-11
Well-Lighted Areas
The fumigator will ensure that the area has adequate lighting for safety
purposes and for ease in reading gas concentration, thermometers, and for
determining whether a tarpaulin has holes or tears.
Well-Ventilated, Sheltered Area
The PPQ official and the fumigator must select sites that are well-ventilated
and sheltered. A well-ventilated site is required for exhausting gas before and
when the tarpaulin is removed from the container(s). Most warehouses have
high ceilings and a number of windows/doors which can be used for
ventilation. Some gas will escape from the tarpaulin, even in the best
conditions. Avoid areas where strong drafts are likely to occur.
In warehouses, the fumigator must provide an exhaust system to exhaust MB
to the outside of the building. The fumigator must ensure that the exhausted
gas does not reenter the building, nor endanger people working outside.
When treatments are conducted in a particular location on a regular basis, the
PPQ official must ensure that the fumigator designated a permanent site. At
such sites, the fan used to remove the fumigant from the enclosure during
aeration must be connected to a permanent stack extending above the roof
level.
If fumigations are conducted outside, ensure that the fumigator selects a site
that is semi-sheltered, such as the leeward side of a warehouse, pier, or
building that offers some protection from severe winds. Severe winds are
defined as sustained winds or gusts of 30 m.p.h. or higher for any time period.
Do not allow the fumigator to proceed if there is a forecast from the National
Weather Service of severe winds and/or thunderstorms at the beginning of, or
for the entire length of the fumigation.
Step 3: Arranging the Containers
Ensure that the fumigator places no more than 8 containers that are 20 to 40
feet in length under a single tarpaulin. APHIS does not allow stacking of
containers. Stacking may create too great a safety risk to the person placing the
tarp, fans, and gas monitoring leads.
Containers should not be loaded beyond 80 percent of their capacity. No
additional head space is required between the roof of the container and the tarp
unless the pest is found on the outside of the container. If the pest is found on

Fumigants—Methyl Bromide—Closed-door Container Fumigation
Preparing to Fumigate
2-9-12 Treatment Manual 02/2024-01
the exterior of the container, then DO NOT use this procedure. See
Fumigants—Methyl Bromide—Tarpaulin Fumigation on page 2-4-1.
Step 4: Arranging and Operating Fans
For proper gas circulation, require the fumigator to place two axial-type
(blade) fans in each container. The fans must have the capacity to move a
volume in cubic feet per minute (CFM) equivalent to the total volume of the
container. Require the fumigator to place one fan at the rear of the container
(doors) pointed inward, and the second fan placed in the front (nose) of the
container pointed in the opposite direction. In addition, require the fumigator
to place the exhaust fans and ducts as instructed in Aeration on page 2-9-21.
Step 5: Placing the Gas Introduction Lines
MB is converted from a liquid into a gas by a volatilizer. The hose that runs
from the MB cylinder into the volatilizer must be 3000 PSI hydraulic high
pressure hose with a 3/8 inch inner diameter (ID) or larger. From the
volatilizer, MB gas is introduced into the structure by means of a gas
introduction line. The gas introduction line must be a minimum of 350 PSI
with a 1/2 inch ID or larger. Require the fumigator to place the introduction
line directly above the fan at the rear door of the container. Each container
must have a gas introduction line.
Step 6: Placing the Gas Sampling Tubes
Require the fumigator to install at least three gas sampling tubes per container,
positioned as follows:
Front low—near the floor at the door end of the container
Rear high—rear of the load at the high end opposite the fan
Middle center—mid way from front to back, at mid depth
If treating for khapra beetle, the fumigator must install the following
additional gas sampling tubes:
High (in the commodity)
Low (in the commodity)
Require the fumigator to install gas sampling tubes of sufficient length to
extend from the sampling position inside the container to at least 30 feet
beyond the tarpaulin. Ensure that all the gas sampling tubes meet in one area
for ease and safety in taking gas concentration readings. Do not splice gas
sampling tubes. Before starting the fumigation, check for gas sampling tube
blockage or pinching by connecting each tube to the gas detection device for a
short time. If the line is blocked, the flow to the device will drop sharply. Tubes
can also be checked with a MityVac hand pump or other air pump device.
Replace any defective gas sampling tubes.

Fumigants—Methyl Bromide—Closed-door Container Fumigation
Preparing to Fumigate
02/2024-01 Treatment Manual 2-9-13
Require the fumigator to secure all gas sampling tubes under the tarpaulin and
label each one at the end where the gas concentration readings will be taken.
By labeling each gas sampling tube, the PPQ official will be able to record
concentration readings easily.
Step 7: Padding Corners
Ensure that the fumigator looks for corners and sharp angles which could tear
the tarpaulin. Do not allow the fumigator to use the commodity to support the
tarpaulin. If the sharp angles or corners cannot be eliminated, the fumigator
must cover them with burlap or other suitable padding (e.g., old tires or cloth).
Step 8: Measuring the Temperature
The PPQ official must determine the temperature of the commodity in order to
select the proper dosage rate using a calibrated bimetallic, mercury, or digital
long-stem thermometer.
Select several representative locations within the stack at the ends of the logs
or pieces of lumber and drill holes in them to accommodate a thermometer.
After drilling, wait at least 10 minutes to allow the wood around the holes to
cool. Insert the thermometer into the holes drilled. All readings (not just the
average) must be above 40 °F.
If fumigating multiple containers under one tarp, take temperature readings in
each container under the tarp. Base the dosage calculation on the lowest
reading obtained. (Do not average temperatures.) All readings must be above
40 °F to initiate the fumigation. If not, you must postpone it.
Record the temperatures in Block 22 of the PPQ Form 429A.
In the electronic 429 database, record the temperatures in the space and
commodity fields in the Treatment form.
NOTICE
Regardless of the commodity, never fumigate at temperatures below 40 °F.
Temperature recordings should be rounded to the nearest tenth of a degree (°C or
°F)

Fumigants—Methyl Bromide—Closed-door Container Fumigation
Preparing to Fumigate
2-9-14 Treatment Manual 02/2024-01
Step 9: Covering the Stack
The fumigator must cover the stack, check the tarpaulin for rips, tears, and
holes, look at the spots that have been taped, and verify they are properly
sealed. If needed, the fumigator must repair all holes.
The tarpaulin should be made of a material such as vinyl, polyethylene plastic,
or coated nylon.
4 mil vinyl or polyethylene plastic tarpaulins are only approved for one
usage
6 mil vinyl or polyethylene plastic tarpaulins may be used up to four times
with the PPQ official’s approval for each usage
10 to 12 mil vinyl or plastic coated nylon tarpaulins may be approved for
multiple uses with the PPQ official’s approval for each usage
The fumigator should cover all corners and sharp ends with burlap or other
padding to prevent the tarpaulin from ripping. Have the fumigator pull the
tarpaulin over the containers, being careful not to catch or tear the tarpaulin.
The tarpaulin must be large enough to provide a floor overlap of at least 18
inches around all sides of the stack. Carefully lay the tarpaulin out to prevent
excess folds or wrinkles along the floor, especially around the corners.
Step 10: Sealing the Tarpaulin
The fumigator must seal the tarpaulin with loose, wet sand, sand snakes, water
snakes, adhesives, or a combination. If there is danger of crushing or crimping
the gas sampling or introduction tubes, use the loose, wet sand. If using snakes,
use two rows of snakes along the sides and three rows on the corners. The
snakes should overlap each other by approximately 1 foot. The goal in sealing
the tarpaulin is to get the tarpaulin to lie flat against the floor to prevent gas
from leaking out. When wind is not a factor, plastic tape may be used for
sealing the tarp. The tape must be at least 2 inches in width, and applied (only
to a smooth surface) with the aid of high-tack spray adhesive.
The fumigator must seal corners by laying two sand snakes around the corner
and working the tarpaulin until it is flat. Place a third snake on top of the two
other snakes to provide additional weight to force the tarpaulin against the
NOTICE
When the commodity and air temperature drastically differ, moisture may condense
inside the gas sampling tubes or inside the gas detection device and cause
inaccurate gas concentration readings. Check the gas sampling tubes frequently for
possible puddling of condensed water, and drain it off, as needed, before taking a
reading. Also, check the Drierite frequently, and change it as soon as it becomes
saturated with water (turns pink), to obtain true gas concentration readings. Never
fumigate commodities that are frozen.

Fumigants—Methyl Bromide—Closed-door Container Fumigation
Preparing to Fumigate
02/2024-01 Treatment Manual 2-9-15
floor. Loose, wet sand can be used in the area where the gas introduction line,
electrical cords, and gas sampling tubes extend from under the tarpaulin.
Step 11: Measuring the Volume
Using a 100-foot tape measure, the PPQ official and the fumigator must
carefully measure the length, width, and height of the container. The area
underneath the container is not included in the calculations. Never estimate the
measurements. When measuring, round off to the nearest quarter foot
(Example: 3 inches = .25 feet).
Formula for determining volume:
Length x width x height = volume in cubic feet
The PPQ official must record volume in Block 26 of the PPQ Form 429A.
In the electronic 429 database, record the length, width, and height in the
corresponding fields under the “AMT of Gas Introduced” heading on the
Treatment form. The total volume of the enclosure will be calculated.
Step 12: Calculating the Dosage
The PPQ official must calculate dosage by doing the following:
1. Refer to the treatment schedule for the correct dosage rate (lbs./1,000 ft
3
)
based on temperature (°F).
2. Multiply by the dosage (lbs./1,000 ft
3
) rate by the volume (ft
3
) to get the
dosage in pounds.
Round to the nearest 1/4 pound.
The formula for calculating dosage is:
EXAMPLE
A stack with measurements H=10’6”, L=42’3”, and W=10’9”
10.50 x 42.25 x 10.75 = 4,768.9 ft
3
round to 4,769 ft
3
Figure 2-9-2 Formula for Calculating MB Dosage for Closed-Door Container
Fumigations
Dosage (lbs.)
Volume (ft3) Dosage Rate (lbs.)
1,000 ft3
----------------------------------------------------------------------------------=

Fumigants—Methyl Bromide—Closed-door Container Fumigation
Preparing to Fumigate
2-9-16 Treatment Manual 02/2024-01
In the electronic 429 database, the PPQ official must enter the dosage rate in
the “dosage” field and the total amount of gas required for the fumigation will
be displayed in the “GAS REQUIRED” field.
Step 13: Making a Final Check
Before introducing the gas, the PPQ official and the fumigator must ensure that
the following activities are performed:
Check tarpaulin to make sure it is free from rips and tears
Check that all gas sampling tubes are labeled and are not crimped or
crushed.
Visually inspect tubes, or use a T/C analyzer, an electric pump, or a
Mityvac
®
hand pump to check tubes for unrestricted flow
Check that all safety equipment, especially SCBA is available and in
working order.
Check that tarpaulin is placarded and the area is secured. Only people
working on the fumigation may be in the area.
Check that there is enough gas in the cylinder and, if necessary, that other
cylinders are available.
Check that the gas introduction line connections are tight and free of
leaks.
If using a T/C, install Drierite
®
and Ascarite
®
tubes as stated in the
instructions in this manual.
Place fumigant cylinder with gas introduction line on scale and take initial
weight reading.
NOTICE
Erroneous gas readings may occur if the sampling tubes become blocked or
crimped. It would be impossible to install new sampling tubes during the fumigation.
To avoid an unsuccessful fumigation, test sampling tubes before the treatment
begins.
Refer to the following steps to test the sampling tubes using a MityVac pump: (See
Mityvac Hand-Held Vacuum Pump on page 8-1-23)
1
. Prior to gas introduction, connect a MityVac hand-held vacuum pump to a sam-
pling tube.
2. Squeeze the handle on the MityVac unit. If the line is blocked, a vacuum will be
indicated on the MityVac gauge. For sampling tubes longer than 25 feet, squeeze
the handle two or three times. The MityVac pump has the capacity to attain and hold
25 inches of Hg vacuum and a minimum of 7 psig pressure.
3. Disconnect the MityVac pump from the sampling tube and repeat this procedure
for each sampling tube.
NOTICE
Other gas detection devices may not require the use of Drierite
®
or Ascarite®.

Fumigants—Methyl Bromide—Closed-door Container Fumigation
Conducting the Fumigation
02/2024-01 Treatment Manual 2-9-17
Ensure the gas introduction hose is attached to the cylinder.
After obtaining the correct weight, subtract the dosage to be
introduced into the enclosure.
After the fumigator has introduced the proper amount of gas, the scale
will be balanced.
Start volatilizer and heat water to 200 °F or above. A minimum
temperature of 150 °F is required at all times during the introduction
process. Refer to Chapter 8-Equipment for temperature monitoring
procedures.
Turn on all fans and APHIS-approved gas detection devices to make sure
they work.
Warm up and zero (if required) APHIS-approved gas detection devices as
described in Chapter 8-Equipment.
Conducting the Fumigation
Step 1: Introducing the Gas
MB 2016 Label
Require the fumigator and PPQ official to use SCBA while introducing and
adding gas. Ensure that the fumigator turns on all fans before introducing the
gas. When using large cylinders of MB, the fumigator should slightly open the
cylinder valve, then close the valve. With an APHIS-approved continuous real
time gas detection device, the fumigator must check all connections on the gas
introduction hose for leaks. If leaks are found, the fumigator must tighten the
connections and repeat the test. When no leaks are found, require the
fumigator to open the valve to the point where 3 to 4 pounds of MB are being
introduced per minute. The water temperature in the volatilizer should never
go below 150 °F at any time during gas introduction. The water in the
volatilizer may include antifreeze and should be handled with the appropriate
safeguards.
!
CAUTION
The acceptable air concentration level for methyl bromide (MB) is 5 ppm. A respira-
tor (approved SCBA) is required if the MB concentration level in the air is unknown
or greater than 5 ppm at any time. The PPQ official and the fumigator must use
SCBA while introducing the gas, checking for leaks, when taking aeration readings,
and inside the buffer zone.
NOTICE
If MB concentration levels are between 1-4 ppm, the PPQ official and the fumigator
may wear an air purifying respirator NIOSH certified half-mask or full face piece with
a cartridge.

Fumigants—Methyl Bromide—Closed-door Container Fumigation
Conducting the Fumigation
2-9-18 Treatment Manual 02/2024-01
The fumigation time begins once all the gas has been introduced. The PPQ
official must record the time gas introduction was started and completed in
Block 32 on the PPQ Form 429A.
In the electronic 429 database, record the fumigation date, gas introduction
start and finish time in the corresponding fields under the “GAS
INTRODUCTION” heading on the Treatment form.
Require the fumigator to run the fans for 60 minutes to achieve even gas
distribution. After gas is evenly distributed, require the fumigator to turn the
fans off. The PPQ official must take the initial concentration reading 60
minutes after all the gas has been introduced.
Step 2: Testing for Leaks
Require the fumigator to wear the SCBA while checking for leaks. The
fumigator must use an APHIS-approved leak detection device to test for leaks
before the 60 minute reading or anytime when the concentration level is
unknown or above 5 ppm. The fumigator must test around the perimeter of the
tarpaulin on the floor, corners, and especially where electric cords, gas
sampling tubes, or gas introduction lines are present. When the fumigator
detects leaks, ensure they are sealed using more sand or sand snakes for floor
leaks and tape for sealing small holes in the tarpaulin. Use loose, wet sand to
reduce leakage from electric cords, gas sampling tubes, gas introduction lines,
or uneven flooring.
If the fumigator detects excessive leakage (concentration readings of 50
percent or less of the minimum concentration) in a tarpaulin which cannot be
corrected in a practical way, do not attempt to correct the problem by adding
more gas. Require the fumigator to quickly evacuate the remaining gas from
the enclosure, eliminate the problem, and construct a new enclosure. Aerate as
usual following procedures on page 2-9-21. Record the aborted fumigation in
Block 40 (Remarks) of the PPQ Form 429A or in the “Remarks” form in the
electronic 429 database. Restart the fumigation in the new enclosure.
NOTICE
Do not begin counting fumigation time until all the gas has been introduced and the
valve on the MB tank is closed.
NOTICE
If an employee encounters unsafe conditions (such as holes in the tarpaulin or a
breach in safety protocol) and the condition(s) cannot be corrected in a timely
manner, the employee may CANCEL the fumigation. Consult with a PPQ Supervisor
prior to cancellation.

Fumigants—Methyl Bromide—Closed-door Container Fumigation
Conducting the Fumigation
02/2024-01 Treatment Manual 2-9-19
Any “closed-door” treatment that is aborted cannot be retreated until the
remaining containers have completed treatment and all have aerated for a
minimum of 48 hours. Refumigate aborted containers with both container
doors open. Report aborted fumigations in the 429A as required by the
Environmental Protection Agency.
Step 3: Taking Concentration Readings
The PPQ official must take concentration readings with an APHIS-approved
gas detection device to determine the gas concentration and distribution within
the enclosure. If used, check desiccant tubes before each reading and change
Drierite
®
if its color is pink. Allow gas concentration readings to stabilize; do
not disconnect the sampling line from the gas detection device when the
minimum concentration reading has been met.
Take concentration readings at the times designated in the treatment schedule.
Concentration readings should not differ more than 10 ounces among the
leads. If they do, run the fans for an additional 30 minutes and take another
reading to verify that gas concentration levels have equalized. In some cases,
several cycles of fan operation may be necessary to equalize the readings.
Record all gas readings on the PPQ Form 429A or in the electronic 429
database. Regardless of the number of containers under each tarp, every
container must have a separate 429 record.
Step 4: Determining the Need to Add Gas and Adjust Exposure
If the lowest gas reading is BELOW the required minimum indicated by the
treatment schedule, you must add gas and extend the exposure period. Use the
formula in Figure 2-9-3 to determine the amount of gas to add.
NOTICE
Before taking a reading, always purge sampling lines with a mechanical or hand
pump. If using a T/C unit, connect it to the sampling lead, adjust the gas flow rate to
1.0, and wait until the meter registering “ounces per thousand cubic feet” stabilizes
before taking a reading. (This may take a minute or more, depending upon the length
of the tubing and whether or not an auxiliary pump is used.)
!
CAUTION
Avoid using hand-held two-way radios near the T/C unit. Using two-way radios near
the T/C unit will interfere with an accurate concentration reading.

Fumigants—Methyl Bromide—Closed-door Container Fumigation
Conducting the Fumigation
2-9-20 Treatment Manual 02/2024-01
Use Table 2-9-1 to determine how long to extend the exposure period.
Require the fumigator to follow these procedures when adding gas:
1. Heat water in volatilizer.
2. Turn on fans.
3. Weigh the cylinder.
4. With SCBA on, open cylinder valve and introduce the gas.
5. Close valve when the weight of the cylinder indicates that the needed
amount of gas has been added.
The PPQ official must record quantity of fumigant added in Block 34 and the
additional fan time in Block 30 of the PPQ Form 429A.
In the electronic 429, record the amount of additional gas listed in the
Treatment Manual in the “Additional Gas Recommended” field and the actual
amount of additional gas added in the “ACTUAL ADDITIONAL GAS” field.
Record the additional fan time in the “TIME FANS OPERATED” field in the
Treatment form.
Note the time the fumigator started introducing additional gas and the time the
fumigator finished introducing gas and record in Block 40 (Remarks) of the
PPQ Form 429A or in the “Remarks” form in the electronic 429 database. Run
Figure 2-9-3 Formula for Determining the Amount of Gas to Add to Closed-Door
Containerized Cargo
Table 2-9-1 Determine the Extended Exposure Period for Closed-Door
Containerized Cargo
If any individual reading is
below minimum by:
1
1 If any individual reading is 50 percent or more below the minimum concentration reading,
then abort the treatment. For oak logs (T312-a, T312-a-alternative), refer to the ACIR
treatment schedule for specific instructions.
Then extend exposure:
10 oz. or less 10 percent of the time lapse since gas introduction or
the last acceptable reading
11 oz. or more 2 hours or 10 percent of time lapse since last
acceptable reading, whichever is greater
1.6 number of ounces below minimum
volume in cubic feet
1000 cubic feet
-------------------------------------------------
1
16
------
pounds of gas to add=

Fumigants—Methyl Bromide—Closed-door Container Fumigation
Aeration
02/2024-01 Treatment Manual 2-9-21
the fans for 30 minutes. Turn off fans, then take a concentration reading. If all
readings are above minimum concentration levels and within 10 ounces of
each other, then proceed as usual with the remaining scheduled concentration
readings. If the readings are not above the minimum or within 10 ounces of
each other, run the fans for another 30 minutes. It may take several cycles to
stabilize the gas concentration.
Step 5: Exhausting the Gas
Require the fumigator to exhaust the gas at the completion of the exposure
period.
Aeration
The fumigator must:
Arrange for the aeration to proceed once the treatment is completed.
Consider the wind direction when pointing the exhaust duct, and face the
duct outlet toward an open area away from people.
Ensure that, during the first 10 minutes of aeration, no one is present
within 200 feet downwind of the exhaust duct outlet.
Determine aeration buffer zones in accordance with Environmental
Protection Agency (EPA) Methyl Bromide Commodity Fumigation
Buffer Zone Lookup Tables.
Ensure no one is present within the perimeter of the aeration buffer zone
unless they are wearing SCBA.
Refer to “Buffer Zone Overlap for Multiple Enclosures”.
Follow all label instructions, state, county, and local regulations, in
addition to the instructions in this manual.
Inform people located in occupied structures and personnel in the
immediate area within the buffer zone that release of MB is about to take
place and give them the option of leaving the area or remaining inside the
building.
Restrict access to the area where the exhaust duct extends beyond the
enclosure.
Wearing Respiratory Protection
The fumigator must wear approved respiratory protection (SCBA, supplied air
respirator, or a combination unit) when:
A risk of exposure to concentrations above 5 ppm exists; this includes any
time the concentration is unknown
Setting up the air introduction and exhaust system

Fumigants—Methyl Bromide—Closed-door Container Fumigation
Aeration
2-9-22 Treatment Manual 02/2024-01
Opening the container door(s)
Opening the tarpaulin for aeration
MB 2016 Label
Advise the fumigator to:
Install an exhaust fan (minimum of 5,200 cfm capacity) with one end of a
round ventilation duct at least 16 inches in diameter, oriented so that the
fan pulls air through the duct. The fan dimensions should complement the
diameter of the duct work chosen, fitting flush and tight so that no leaks
exist between the fan and duct. For indoor fumigations, extend the
exhaust duct (fan end) at least 30 feet beyond the building or into a
vertical stack extending through the roof. For outdoor fumigations, the
exhaust duct will be at least 30 feet in length with the fan end placed
external and alongside the container extending toward the nose, so the
exhaust air is directed away from the end of the container which is
opened during aeration.
Palletized Partial Loads
For palletized partial loads (where at least 2 feet of open space is present at the
door end of the container), extend the exhaust duct intake (non-fan end) on the
container floor with the duct face flush against the bottom of the load along a
side of the container. Store the remaining section of the exhaust duct and fan at
the rear of the load so it is easily accessible at the start of aeration.
Full Loads
For full loads (where less than 2 feet of open space is available at the door end
of the container and there is no central aisle between pallets), if there is room
to store the exhaust duct inside the container during fumigation, secure the
exhaust duct intake (non-fan end) face flush against the load at the floor/pallet/
commodity interface along a side of the container so it will not shift or twist
during aeration. Use straps, ties, or other fasteners to secure this interface
tightly. If there is not sufficient room to pre-install the exhaust duct prior to
fumigation, carry out these steps at the start of aeration.
For partial or full loads where a central aisle exists between the pallets, run the
exhaust intake duct along the floor center and extend 1-2 feet into this space, if
possible. Store the remaining section of the exhaust duct and fan at the rear of
the load so it is easily accessible at the start of aeration.
NOTICE
If MB concentration levels are between 1-4 ppm, the PPQ official and the fumigator
may wear an air purifying respirator NIOSH certified half-mask or full face piece with
a cartridge.

Fumigants—Methyl Bromide—Closed-door Container Fumigation
Aeration
02/2024-01 Treatment Manual 2-9-23
Non-Palletized Logs
For non-palletized logs, secure the duct face flush against the load at the floor/
interface on a side of the container so it will not shift or twist during aeration.
Integrate an air introduction fan (minimum 3,750 cfm) with a round
ventilation duct at least 12 inches in diameter, oriented so that the fan
pushes the air through the duct. The fan dimensions should complement
the diameter of duct work chosen, fitting flush and tight so that no leaks
exist between the fan and duct. Extend the introduction duct (non-fan
end) along top of the load two-thirds of the length of the container. For
partial loads, the intake duct may run along the container floor, with the
end placed on top of the load. Store the remaining introduction duct and
fan at the rear of the load so it is easily accessible at the start of aeration.
Integrate an additional exhaust fan (minimum of 5,200 cfm capacity) with
one end of a round ventilation duct at least 16 inches in diameter, oriented
so that the fan pulls air through the duct. The fan dimensions should
complement the diameter of duct work chosen, fitting flush and tight so
that no leaks exist between the fan and duct. This duct will be used to
aerate the space between the container and tarp prior to tarp removal. The
duct length should be approximately 10 feet and should remain outside
the tarp during fumigation.
Refer to Figure 2-9-4 for detailed diagrams of air and exhaust ducts. In this
diagram, air introduction ducts are blue and exhaust ducts are red.
NOTICE
If commodities other than logs are not palletized, consult S&T-TMT before treat-
ment.
NOTICE
Install introduction and exhaust ducts prior to fumigation in order to limit human
exposure to the fumigant at the start of aeration.

Fumigants—Methyl Bromide—Closed-door Container Fumigation
Aeration
2-9-24 Treatment Manual 02/2024-01
Step 6: Aerating the Commodity
Advise the fumigator to:
1. While wearing SCBA, insert a spacer (at least 16 square inches in area) to
vent the tarpaulin at the nose end of the container. At the opposite end of
the tarp, insert the additional exhaust duct 5 feet under the tarp and turn the
fan on.
2. Exhaust the gas from underneath the containers before opening the doors
of the containers for at least 15 minutes or until the gas concentration level
underneath the containers is below 5 ppm.
3. While wearing SCBA, remove the tarp when the gas concentration level
underneath the containers is below 5 ppm.
4. With the tarp removed and while wearing SCBA, turn off the fan used to
aerate the space and open the doors of each container.
5. Turn on all fumigant circulation fans inside the container and leave them
on throughout the aeration.
6. Start the container introduction and exhaust ducts fans. Require a minimum
of 4 hours aeration for all sorptive commodities. Sorptive commodities
generally require 12 hours or longer to aerate; however, since sorptive
commodities vary in their rates of desorption, aeration may be completed
in less than 12 hours.
7. Aerate oak logs and lumber a minimum of 48 hours. If, after 48 hours, the
concentration is 5 ppm or greater, continue aeration for 24 more hours.
Continue this procedure until concentration readings are less than 5 ppm.
8. Stop the fans and take concentration readings with colorimetric tubes in the
airspace around and, when feasible, within the log stack.
9. RELEASE the commodity when the concentration reading is 5 ppm or less.
Figure 2-9-4 Duct work configuration for aeration of closed-door containers:
full loads (top) and partial loads (bottom)

02/2024-01 Treatment Manual 2-10-1
Chapter
2
Chemical Treatments
Fumigants—Sulfuryl Fluoride
Contents
Properties and Use 2-10-1
Leak Detection 2-10-2
Tarpaulin Fumigation 2-10-2
Sealing 2-10-2
Circulation 2-10-3
Prevention of Condensation 2-10-3
Gas Sampling Lines 2-10-3
Gas Introduction 2-10-3
Dosage Rate 2-10-4
Measure Gas Concentrations 2-10-5
Replacing Lost Gas 2-10-5
Aeration 2-10-5
Structural Fumigation 2-10-5
Chamber Fumigation 2-10-6
Shipboard Fumigation 2-10-6
Safety and First Aid 2-10-6
Protective Clothing 2-10-6
If SF is Inhaled 2-10-7
If Liquid SF is Spilled on the Skin 2-10-7
If Liquid SF is in the Eyes 2-10-7
Consult the Vikane
1
Gas Fumigant Label and Structural Fumigation Manual
for more detailed instructions and additional supportive information.
Properties and Use
Sulfuryl fluoride (SF) is a compressed-gas fumigant which is used primarily
against insects that attack wood. The following characteristics make this
fumigant especially desirable:
2.88 times heavier than air
High vapor pressure—13,442 mm Hg @ 770 °F
Low solubility in water and low sorption by soil or commodity
Odorless, colorless, and nonflammable
1 Trademark of Dow AgroSciences

Chemical Treatments Fumigants—Sulfuryl Fluoride
Leak Detection
2-10-2 Treatment Manual 02/2024-01
Penetrates wood better than any other commercial fumigants, including
methyl bromide
Relatively nonreactive
Very low loss through plastic tarpaulins
SF boils at minus 67 °F. SF is not registered for use on foodstuffs or on living
plant material.
SF is effective at very low dosages on dry wood termites where control of the
adult stage is the only concern (typically 0.5 to 1.0 lbs/1,000
2
). Higher dosages
are required for control of the egg stage of other insects (typically 3 to 5 lbs/
1,000
2
). Consult treatment schedules in this manual for specific dosages.
Leak Detection
Interscan (Model GF 1900) or Miran gas analyzers (these units are portable)
may be used to detect SF in the range of 0 to 150 ppm respectively. Consult the
Vikane Structural Fumigation Manual for further instructions. Colorimetric
(“detector”) tubes are not available for detecting SF gas leaks around
tarpaulins, chambers, and application equipment.
Tarpaulin Fumigation
Sealing
The commodity to be fumigated should be placed onto a relatively even and
non-porous surface, such as concrete, asphalt, or macadam. Special attention
should be given to the seal along the ground or floor. The inspector should
have tape, sand, or water snakes properly positioned.
NOTICE
Refer to the Vikane label and Vikane Structural Fumigation Manual for a detailed
discussion of proper procedures.
Also, refer to Fumigants—Methyl Bromide—Tarpaulin Fumigation for additional
information on
the following:
Placing gas sampling lines
Sealing tarpaulins
Securing fumigation areas
Selecting fumigation sites
Taking concentration readings

Chemical Treatments Fumigants—Sulfuryl Fluoride
Tarpaulin Fumigation
02/2024-01 Treatment Manual 2-10-3
Circulation
Fans are necessary to distribute SF and to help prevent condensation. The
number of fans depends upon the cubic volume of the enclosure being treated,
and the arrangement of cargo. Axial fans of approximately 5,000 cfm have
proven effective. Usually two fans are used, one on either end facing the lower
center and upper center of the load. If the enclosure is over 35 feet long,
additional fans should be used. It is usually not necessary to run fans longer
than 15 minutes after the gas has been introduced.
Prevention of Condensation
In cool weather, moisture may condense under tarpaulins if the sun is shining
directly on the load. Continuous air circulation can prevent this from
occurring. Do not tarp or seal any item while it is wet.
Gas Sampling Lines
A thermal conductivity unit calibrated for Vikane must be available for
readings. Sampling lines should be arranged so that gas samples are drawn
from representative parts of the fumigation area and lead to a common point.
A minimum of three sampling lines should be placed in enclosures of up to
10,000 ft
3
at the following locations:
Center of the load, midway from the bottom to the top of the load
Front of the load, 3 inches from the floor
Rear of the load, at the top
When 10,000 to 15,000 ft
3
are being treated, two additional lines should be
appropriately deployed.
Gas Introduction
Unlike methyl bromide, SF does not require the use of a volatilizer to speed up
its conversion from a liquid to a gas. The gas introduction tube should be
placed directly in the air flow of a fan away from the cargo. Also, place a drip
cloth under the tube. The introduction rate is controlled by the introduction line
length and diameter. A 1/8-inch-inside-diameter by 100-foot-long hose will
allow a flow rate of approximately 2 pounds per minute, while a 25-foot-long
hose will allow approximately 4 pounds per minute.

Chemical Treatments Fumigants—Sulfuryl Fluoride
Tarpaulin Fumigation
2-10-4 Treatment Manual 02/2024-01
It is important not to overshoot the ability of the fan to rapidly disperse the
cool air near the fumigant introduction site. Fan capacity should be at least
1,000 cfm for each pound of Vikane introduced per minute. In addition, a
volatilizer (heat exchanger) may be used in fumigating containers or small
chambers to prevent a “fog-out” (condensation) which could cause corrosion
or damage to the contents. The last few pounds of fumigant will turn to gas
within the cylinder before moving out, and the flow rate will be reduced. The
cylinder and tubing will often become frosted. Be certain that no open flame or
glowing hot surfaces above 400 °C are present since corrosive substances
(mainly hydrofluoric acid) are formed when SF is exposed to such conditions.
To avoid possible damage, do not apply the fumigant directly to any surface.
Dosage Rate
To control a particular pest, locate the proper fumigation schedule to be
followed in the Treatment Manual. The three variables in these schedules are
temperature, dosage, and exposure duration. Treatment is not recommended
below 50 °F. Dosages are in pounds per 1,000 feet
3
of space. To determine the
total amount of fumigant required by weight in pounds, divide the total volume
of space by 1,000. Then multiply the resulting figure by the dosage rate
schedule expressed in pounds (per 1,000 feet
3
). The cylinder should be placed
on a scale, and the flow of gas is controlled by the valve and introduction line
until the desired cylinder end-weight is obtained. The valve should be turned
fully open to fill the fumigant introduction hose with liquid SF. Initially, the
valve should be opened slightly until flow has begun and then opened about
one full turn, giving full flow through the 1/8” fumigant introduction hose.
Table 2-10-1 Effect of Hose Inside Diameter on Rate of Gas Introduction
through a 25-Foot Hose (approximates, depending on cylinder
pressure)
Inside Diameter (inches) Vikane Per Minute (pounds)
1/8 4
1/4 20
1/2 45
Table 2-10-2 Effect of Hose Length on Rate of Gas Introduction Through a 1/8-
Inch Inside Diameter Hose
Hose Length (in feet) Pounds Vikane Per Minute
25 ft 4.0
50 ft 2.8
100 ft
2.0
1
1 Where fumigant introduction rates lower than 2 lbs/min are needed, a longer hose can be
used, e.g., 200 ft.

Chemical Treatments Fumigants—Sulfuryl Fluoride
Structural Fumigation
02/2024-01 Treatment Manual 2-10-5
Measure Gas Concentrations
During the course of fumigation, minimum concentrations must be maintained
according to the schedules used. Readings on the thermal conductivity if not
calibrated for Vikane, must be multiplied by a factor to obtain the actual
ounces per 1,000 feet
3
present. Contact the USDA-APHIS-PPQ-S&T-TMT for
calibration information. Record the gas reading without the multiplied factor
on PPQ Form 429A and the electronic 429 database. Do not use filters
containing sodium hydroxide (Ascarite) with SF. Fresh desiccant (Drierite)
should be used with the T/C unit. Desiccant should be changed at appropriate
intervals to insure accurate readings.
Replacing Lost Gas
When it appears that additional SF will be needed, the officer should use their
best judgment to determine the amount of gas to add, according to the
prevailing conditions of tarpaulin tightness or wind conditions. Usually, 1.6 oz.
of gas should be added for every ounce of deficiency in the minimum
concentration required.
Aeration
For detailed guidelines, consult the Vikane Gas Fumigant label, Vikane
Structural Fumigation Manual, and Aeration on page 2-4-38. The threshold
limit value for SF is 5 ppm (20 mg/cubic meter), the same as for MB. Since no
colorimetric (“detector”) tubes are available for SF, a suitable instrument must
be used, such as the Interscan GF 1900 or Miran (calibrated for SF).
Structural Fumigation
Refer to the section on MB structural fumigation (or aeration) in this manual,
the Vikane label, and Vikane Structural Fumigation Manual for a detailed
discussion of proper procedures.
When preparing a structure for fumigation with SF, the surrounding soil should
be watered thoroughly at the base of trees, shrubs, and other ornamental plants
around the perimeter of the structure to prevent loss of fumigant into the soil.
Watering around the plants will protect the roots; however, plants and grass
closer than 1 foot may die even if this precaution is taken.
Before placing the tarpaulin over the structure, be sure to remove items for
which the use of SF is not registered. These include food, feed, drugs, and
medicines. Extinguish all flames (including pilot lights), unplug all heating
elements, and turn off all lights. Open all internal doors.

Chemical Treatments Fumigants—Sulfuryl Fluoride
Chamber Fumigation
2-10-6 Treatment Manual 02/2024-01
Chamber Fumigation
Refer to the section on MB chamber fumigation (and aeration) in this manual,
the Vikane label, and Vikane Structural Fumigation Manual for a detailed
discussion of proper procedures.
The gas will generally be introduced through a volatilizer or heat exchanger in
order to prevent a “fog-out” which could damage the contents. Introducing a
very small amount of gas into a small chamber, however, is difficult to do with
precise accuracy because the amount introduced must be calculated by weight
loss from the cylinder. The scale used beneath the cylinder must be readable in
ounces or grams, not just in pounds or kilograms.
Shipboard Fumigation
Refer to the section on MB ship fumigation (and aeration) in this manual, the
Vikane label, and Vikane Structural Fumigation Manual for a detailed
discussion of proper procedures. Surface ships (only those in port) must be
fumigated at dock side, and not when the vessels are underway. Shipboard
fumigation is also regulated by the U.S. Coast Guard (Department of
Transportation). That regulation appears as 46CFR 147A.
Safety and First Aid
Read and understand all directions and safety precautions on the Vikane label
before applying. Additional information is presented in the Vikane Structural
Fumigation Manual. There is no known antidote for SF. Vikane is odorless.
However, the chance of a lethal exposure is not probable unless an individual
actually enters the fumigation space. An SCBA must be worn by anyone in the
fumigated areas when the level exceeds 5 ppm.
Protective Clothing
Wear goggles or full face shield for eye protection during introduction of the
fumigant. Do not wear gloves or rubber boots. Do not reuse clothing or shoes
that have become contaminated with liquid SF until thoroughly aerated and
cleaned.
!
CAUTION
Trying to measure out a small quantity of SF in a graduated glass tube (sight
gauge)—which is common practice with MB chamber fumigations—should never be
attempted with SF because the cylinder pressure is much greater, and the glass
gauge may explode and shatter.

Chemical Treatments Fumigants—Sulfuryl Fluoride
Safety and First Aid
02/2024-01 Treatment Manual 2-10-7
If SF is Inhaled
An individual who has inhaled high concentrations of SF may exhibit the
following symptoms:
Difficulty breathing
Dulled awareness
Nausea
Numbness in the extremities
Slowed body movements
Slowed or garbled speech
If any of the above symptoms appear, immediately do the following:
Remove the victim to fresh air
Put victim at complete rest
Keep the victim warm and see that breathing is normal and unhampered;
if breathing has stopped, give artificial respiration
Do not give anything by mouth to an unconscious person
Obtain medical assistance
If Liquid SF is Spilled on the Skin
Immediately apply water to the contaminated area of clothing before
removing. Wash contaminated skin thoroughly or shower.
If Liquid SF is in the Eyes
Flush with plenty of water for at least 20 minutes, and get medical attention.
Damage to the eye may result from cold or freezing temperatures.

Chemical Treatments Fumigants—Sulfuryl Fluoride
Safety and First Aid
2-10-8 Treatment Manual 02/2024-01

02/2024-01 Treatment Manual 2-11-1
Chapter
2
Chemical Treatments
Fumigants—Phosphine
Contents
Properties and Use 2-11-1
Phosphine 2-11-3
Carbon Dioxide 2-11-4
Leak Detection: Gas Analysis 2-11-4
Safety 2-11-4
Applicator Requirements 2-11-4
Storage and Handling 2-11-5
First Aid Treatment 2-11-6
Respiratory Protection 2-11-7
MP, AP, ECO2FUME®, and VAPORPH3OS® 2-11-8
Packaging 2-11-8
Dispensing ECO2FUME® Fumigant Gas 2-11-10
Blending VAPORPH3OS® Fumigant Gas 2-11-14
Dosage 2-11-17
Preparing to Fumigate Break Bulk Cargo 2-11-20
Preparing to Fumigate Containerized Cargo 2-11-27
Preparing to Fumigate Bulk Commodities 2-11-28
Probing 2-11-29
Aeration Requirements 2-11-30
Contacts 2-11-31
Cytec® 2-11-31
USDA-APHIS-PPQ-S&T-TMT 2-11-31
Properties and Use
There are a number of phosphine formulations registered with the United
States Environmental Protection Agency (EPA) to control a variety of insects
currently infesting raw agricultural commodities, processed foods, animal
feed, feed ingredients, and nonfood commodities, including tobacco.
Aluminum phosphine (AP), magnesium phosphide (MP), ECO
2
FUME
®
and
VA PO RP H
3
OS
®
are phosphine formulations that are currently approved for
use by Plant Protection and Quarantine (PPQ). Always refer to this manual to
determine if there is an available treatment. There are commodities and pests
listed on the labels that are not authorized for treatment by USDA PPQ.
AP and MP are solid products and are available under various trade names
(Table 2-11-2) as tablets, pellets, prepacs, bags, or plates. In the presence of

Chemical Treatments Fumigants—Phosphine
Properties and Use
2-11-2 Treatment Manual 02/2024-01
moisture, phosphine (hydrogen phosphide, PH
3
) a colorless gas, is emitted
from the solid product.
The flash point of PH is 212 °F. Direct contact with a liquid could cause
spontaneous combustion. In case of fire, a CO
2
dry chemical fire extinguisher
should be used. Never use water to extinguish a PH-ignited fire. PH has an
odor somewhat like garlic, which enables the gas to serve as its own warning
agent. However, under some conditions, the odor can be lost, even at high toxic
concentrations.
ECO
2
FUME
®
fumigant gas is a nonflammable, premixed mixture of
phosphine and carbon dioxide. The phosphine is liquefied and mixed with
carbon dioxide in high-pressure cylinders for shipment. Phosphine, the active
ingredient, makes up 2 percent by weight (2.6 percent by volume) of the
product. The carbon dioxide is used as a propellant and a flame inhibitor,
making the product nonflammable in air. Do not store the fumigant near heat
or open flame. Do not drop, puncture, or incinerate the cylinder.
Under pressure, ECO
2
FUME
®
is a poisonous liquefied gas. The product is
withdrawn from the cylinder as a liquid, but dispensed as a gas. When
expanding from a liquid to a gas, the volume of ECO
2
FUME
®
is multiplied by
hundreds. Proper dispensing equipment (see Dispensing ECO2FUME®
Fumigant Gas on page 2-11-10) is necessary to ensure a safe and effective
fumigation; therefore, always contact the manufacturer concerning proper
dispensing equipment for the fumigant. Fumigators should provide PPQ with
all Cytec® equipment authorization documentation. The documentation
should be on file and available for periodic audits by the USDA.
The rate at which phosphine is dispensed is not dependent on temperature or
humidity, but on the dispensing equipment used. Unlike metal phosphide
fumigants, the phosphine is not generated through a chemical reaction and its
release is instantaneous. The choice of dispensing methods will depend on the
type and duration of the fumigation planned.
VA PO RP H
3
OS
®
consists of 100 percent phosphine gas packaged in high-
pressure gas cylinders. Unlike solid phosphide fumigants, the phosphine is not
generated through a chemical reaction and its release is instantaneous.
Phosphine is pyrophoric and will spontaneously ignite in air. Phosphine is
dispensed as a gas from the cylinder and can be safely blended with carbon
dioxide to less than 3 percent volume (30,000 ppm) or diluted with the
surrounding air to 1 percent volume (10,000 ppm) to eliminate the
flammability hazard. Contact the manufacturer for approved blending
equipment necessary to ensure a safe and effective fumigation. Never store the
cylinders where the temperature will exceed 125 °F. Fumigators should

Chemical Treatments Fumigants—Phosphine
Properties and Use
02/2024-01 Treatment Manual 2-11-3
provide PPQ with all Cytec® equipment authorization documentation. The
documentation should be on file and available for periodic audits by the
USDA.
Phosphine
Phosphine (PH) is highly toxic to humans and other animals. Avoid exposure
to nontarget organisms. The current U.S. OSHA Permissible Exposure Limit
(PEL) for phosphine is 0.3 ppm as an 8-hour time weighted average. The Short
Term Exposure Limit (STEL) for phosphine is 1 ppm as a 15-minute time
weighted average.
Phosphine is colorless and, at concentrations below the OSHA PEL, has the
odor of decaying fish or garlic. Intermittent low concentration exposure may
cause headaches, malaise, ringing of ears, fatigue, nausea, and chest pressure.
Moderate exposure causes weakness, vomiting, and pain in the stomach and
chest with difficult breathing. Phosphine gas reacts with moisture to form
phosphoric acid, which causes pulmonary edema.
Phosphine may spontaneously ignite in air at levels above its lower
flammability limit of 1.8 percent v/v (18,000 ppm). Do not exceed this
concentration because, under these conditions, explosions can occur that could
cause severe personal injury. Never allow the buildup of phosphine to exceed
explosive concentrations.
Under high vacuum conditions, phosphine gas can cause an explosive hazard.
Do not apply either fumigant in vacuum chambers.
Phosphine can react with certain metals and cause corrosion (especially at
higher temperatures and lower relative humidity). Gold, silver, copper, brass,
and other copper alloys are susceptible to corrosion.
!
CAUTION
Remove or protect the following items prior to fumigation:
Batteries and battery chargers
Brass sprinkler heads
Communication devices
Computers
Electric motors
Electronic or electrical equipment
Fork lifts
Smoke detectors
Switching gears
Temperature monitoring systems

Chemical Treatments Fumigants—Phosphine
Leak Detection: Gas Analysis
2-11-4 Treatment Manual 02/2024-01
Fans and blowers used with phosphine products should be manufactured from
materials resistant to the fumigant. Aluminum or plastic wheels and housings
are preferred. For phosphine fumigations, always contact the manufacturer for
recommended fan and blower types.
Carbon Dioxide
In a liquefied state and when contact is made with exposed areas of the body,
carbon dioxide can cause frostbite and freeze burns. Overexposure to carbon
dioxide at low levels can cause headache, nausea, weakness, confusion, and
labored breathing. Overexposure to higher concentrations can cause excitation,
dizziness, euphoria, loss of consciousness, coma, and death.
The current U.S. OSHA PEL for carbon dioxide is 5,000 ppm as an 8-hour
time weighted average.
Leak Detection: Gas Analysis
Phosphine levels can be detected using either colorimetric detector tubes or
any approved electronic instrument, such as the PortaSens detector. (See
Phosphine Detector on page 8-1-23 for instructions on how to use the
PortaSens.) This equipment is used to determine both the high (fumigation
concentration) and low (personnel safety) levels of PH. Do not use thermal
conductivity (T/C) units to measure PH.
Safety
Applicator Requirements
Before using ECO
2
FUME
®
and VAPORPH
3
OS
®
, all users (fumigators) are
required to attend the fumigant gas product stewardship course offered by
Cytec® Industries. PPQ Officers are not required to attend the stewardship
courses, but attendance is recommended.
It is a violation of Federal law to use AP, MP, ECO
2
FUME
®
and
VA PO RP H
3
OS
®
fumigants in a manner inconsistent with their labeling. These
fumigants are Restricted Use Pesticides that can only be used by certified
applicators. Prior to using the fumigants, submit to PPQ all documentation
concerning applicator certification and stewardship program completion by
personnel working for the fumigation company. The documentation should be
on file and available for periodic audits by the USDA.
A certified applicator must be physically present, responsible for, and maintain
visual and/or voice contact with all fumigation workers during the application

Chemical Treatments Fumigants—Phosphine
Safety
02/2024-01 Treatment Manual 2-11-5
of the fumigants and during the initial opening of the fumigation structure for
aeration.
Storage and Handling
Although PH is flammable and can ignite when exposed to excessive moisture,
the commercial precautions of AP and MP are considered fire safe and
explosion safe when used in accordance with the manufacturer’s instruction.
Place no more than 10 pellets of Phostoxin in a single envelope, which is
supplied by the manufacturer. A Fumi-Cel plate should not contact another
Fumi-Cel plate or the commodity.
Store containers of AP and MP in a cool, dry, locked, ventilated, protected area
not subject to extremes of temperature. Never allow water to come in contact
with AP or MP. The shelf life of unopened containers is virtually unlimited.
When a tube or container is first opened, the odor of PH (garlic) and ammonia
will be noticeable and a blue flame sometimes occurs. However, the quantity
of free PH present within that container should not be considered dangerous.
When planning a storage area for ECO
2
FUME
®
and VAPORPH
3
OS
®
cylinders, consider the needs of the local authorities. Provide all emergency
response personnel with Material Safety Data Sheets (MSDS) and detailed
information regarding the quantities of product stored and the nature and
location of the storage area.
Develop an Emergency Response Plan that defines procedures and outlines
responsibilities in the event of an accident. Train all site personnel in the plan.
Store all cylinders with the valve discharge cap securely in place.
In addition to instructions and precautions found on the label, be certain to:
Allow only properly trained personnel to conduct fumigations under the
supervision of certified pesticide applicator(s)
Always wear safety glasses when handling pressurized equipment
Always work in pairs, never alone—a minimum of two people must be
present during the introduction, sampling, and aeration of the fumigant
Comply with all regulations
Do not apply either PH fumigant in vacuum chambers
Ensure that first aid equipment, MSDS sheets, and fumigant labels are
readily available at the fumigation site
Never eat, drink, or smoke when handling PH products
Placard the area to be fumigated and an area extending 30 feet from the
fumigation enclosure—refer to the fumigation label for appropriate
wording on all placards

Chemical Treatments Fumigants—Phosphine
Safety
2-11-6 Treatment Manual 02/2024-01
Read and understand sections XI. STORAGE OF CYLINDERS and XII.
TRANSPORT in the ECO
2
FUME
®
and VAPORPH
3
OS
®
Application
Manual
Remove placards when aeration is complete and concentrations are below
the TLV
Only certified pesticide applicators or individuals under the direct
supervision of the certified applicator should remove placards
Study and follow the recommended application procedure
Wear dry cloth gloves when handling AP or MP products
Wear leather or leather-faced cotton gloves when connecting or
disconnecting ECO
2
FUME
®
and VAPORPH
3
OS
®
cylinders from the
dispensing or blending equipment
Wear steel-toed shoes
First Aid Treatment
Mild inhalation exposure causes:
Fatigue
Malaise
Nausea
Pressure in chest
Ringing of the ears
Moderate inhalation exposure causes:
Chest pain
Diarrhea
Dyspnea (difficulty breathing)
Epigastric pain
Vomiting
Weakness
Severe inhalation poisoning can occur within a few hours or up to several
days—symptoms may be:
Cyanosis (blue or purple skin color)
Death
Dizziness
Pulmonary edema (fluid in lungs)

Chemical Treatments Fumigants—Phosphine
Respiratory Protection
02/2024-01 Treatment Manual 2-11-7
Unconsciousness
Respiratory Protection
When applying AP, MP, ECO
2
FUME
®
and VAPORPH
3
OS
®
, respiratory
protection must be available at the site. An adequate number of NIOSH-
approved self-contained breathing apparati (SCBA) with full face piece and
operated in pressure-demand mode must be available.
The slow evolution of PH from the AP or MP enables the operator to dispense
the tablets, pellets, packets, plates, or pre-pack ropes safely, usually without
the need for wearing an SCBA.
However, wear SCBA during exposure to concentrations in excess of
permitted limits (Table 2-11-1) or when concentrations are unknown. If the
concentration of phosphine is unknown or known to exceed the STEL’s for
phosphine and/or carbon dioxide, wear SCBA during troubleshooting for
leaks. Use respiratory protection according to local regulations, including
regular worker training in using respiratory protection equipment properly,
medical clearance for respirator use, fit testing, inspection, maintenance, and
cleaning and storage of respiratory protection equipment.
DANGER
!
Get the victim to fresh air, treat for shock, and call a physician.
Table 2-11-1 NIOSH Recommended Respiratory Protection When Applying
Phosphine
Phosphine Gas (ppm) Minimum Respiratory Protection
0.3 - 3.0 Supplied-air respirator
3.1 - 7.5 Supplied-air respirator operated in a continuous-flow mode
7.6 - 15 1. SCBA with full face piece, OR
2. Supplied-air respirator with full face piece, OR
3. Air-purifying full face piece respirator (gas mask) with chin
style front or back-mounted canister
16 - 50 1. Supplied-air respirator with a full face piece and operated
in pressure-demand mode, OR
2. SCBA with full face piece and operated in pressure-
demand mode

Chemical Treatments Fumigants—Phosphine
MP, AP, ECO
2
FUME
®
, and VAPORPH
3
OS
®
2-11-8 Treatment Manual 02/2024-01
MP, AP, ECO
2
FUME
®
, and VAPORPH
3
OS
®
Packaging
AP and MP are packaged in a variety of ways, depending on the manufacturer.
Use Table 2-11-2 to determine the amount of phosphine liberated by each
product.
ECO
2
FUME
®
fumigant gas is packaged in a steel compressed gas cylinder
designed, manufactured, maintained, and filled in compliance with regulations
established by the United States Department of Transportation (DOT).
(Figure 2-11-1). The product flows to the dispensing equipment through the
cylinder outlet valve, which is equipped with a “dip tube.” This tube extends to
the bottom of the cylinder to facilitate the withdrawal of the liquefied gas
mixture. As liquid is withdrawn from the cylinder, some of the product
vaporizes to fill the remaining space in the cylinder. Through this vaporization,
the cylinder pressure is maintained.
Table 2-11-2 Amount of Phosphine Liberated by Various Products
Product Type
Unit and Weight in
Grams
Grams of
Phosphine
Degesch Fumi-Cel
®
MP 1 plate; 117.0 33.0
Degesch Fumi-Strip
®
MP 20 plates; 2340.0 660.0
Degesch Phostoxin
®
AP 1 tablet; 3.0 1.0
Degesch Phostoxin
®
Tablet Prepac Rope
AP 1 prepac; 99.0 (strip
or rope of 33 tablets)
33.0
Detia AP 1 tablet; 3.0 1.0
Detia Rotox AP AP 1 pellet; 0.6 0.2
Detia Gas EX-B AP 1 bag or sachet;
34.0
11.4
Fumiphos tablets AP 1 tablet; 3.0 1.0
Fumiphos pellets AP 1 pellet; 0.6 0.2
Fumiphos bags AP 1 bag; 34.0 11.0
Fumitoxin AP 1 tablet; 3.0 1.0
Fumitoxin AP 1 pellet; 0.6 0.2
Fumitoxin AP 1 bag; 34.0 11.0
Gastoxin AP 1 tablet; 3.0 1.0
Gastoxin AP 1 pellet; 0.6 0.2
“L” Fume AP
AP
1 pellet; 0.5
1 pellet; 0.6
0.18
0.22
Phos-Kill AP 1 tablet; 3.0 1.1
Phos-Kill AP 1 pellet; 0.6 0.22
Phos-Kill AP 1 bag; 34.0 12.0

Chemical Treatments Fumigants—Phosphine
MP, AP, ECO
2
FUME
®
, and VAPORPH
3
OS
®
02/2024-01 Treatment Manual 2-11-9
The capacity of one
2
ECO
2
FUME
®
cylinder at 200 and 500 ppm is 78,000 and
31,100 ft
3
respectively. With the volume of ECO
2
FUME
®
at 500 ft
3
the
internal volume of the cylinder is 49 liters. The maximum cylinder pressure is
2,400 psig.
The Compressed Gas Association (CGA) established the valve outlet fitting as
a CGA350. The valve outlet is protected by a threaded gas tight outlet cap,
which must be secured whenever the cylinder is not in use. To dispense
ECO
2
FUME
®
fumigant gas at the time of fumigation, attach only Cytec®-
provided (or approved) dispensing equipment to the cylinder valve outlet.
Using any other dispensing equipment is prohibited.
Most compressed gas cylinder valves are equipped with a safety device that
releases the cylinder contents due to fire exposure or over-pressurization.
Because ECO
2
FUME
®
and VAPORPH
3
OS
®
fumigant gases are poisonous,
Hazard Class A, the DOT regulations prohibit using such a device.
Each cylinder is supplied with a cylinder cap designed to protect the outlet
valve. Secure this cap whenever a cylinder is not in use. It is unlawful to
transport an ECO
2
FUME
®
or VAPORPH
3
OS
®
fumigant gas cylinder without
the valve outlet cap and the cylinder cap securely in place.
ECO
2
FUME
®
and VAPORPH
3
OS
®
fumigant gas cylinders can only be refilled
by authorized distributors. They can be filled countless times within a 5-year
Figure 2-11-1 Diagram of ECO
2
FUME
®
Gas Cylinder

Chemical Treatments Fumigants—Phosphine
MP, AP, ECO
2
FUME
®
, and VAPORPH
3
OS
®
2-11-10 Treatment Manual 02/2024-01
period. Every 5 years, however, the cylinder is required, by law, to be tested by
a qualified facility.
VA PO RP H
3
OS
®
is packaged in much the same way as ECO
2
FUME
®
with two
critical exceptions. First, VAPORPH
3
OS
®
does not contain a dip tube, which
means the fumigant is withdrawn from the cylinder directly through the outlet
valve. Second, the capacity of one VAPORPH
3
OS
®
cylinder at 200 and 500
ppm is 2.25M and 900,000 ft
3
respectively. With the volume of
VA PO RP H
3
OS
®
at 500 ft
3
, the internal volume of the cylinder is 49 liters. The
maximum cylinder pressure is 2,400 psig. One VAPORPH
3
OS
®
cylinder
contains 18,000 grams of phosphine and is capable of fumigating 2.25M ft
3
.
Dispensing ECO
2
FUME
®
Fumigant Gas
The following instructions are intended to provide general guidelines for
typical ECO
2
FUME
®
fumigation. There are a number of critical factors
involved in the design of dispensing equipment (see Figure 2-11-2). As such,
dispensing equipment must meet both high-pressure standards and chemical
compatibility requirements. Improper or inappropriate use of dispensing
equipment can result in severe injury or death. Application inconsistent with
the labeling and Application Manual is a violation of Federal law. Buyer
assumes all risk should the product be used contrary to label or Application
Manual instructions.
!
WARNING
ECO
2
FUME
®
cylinders are painted yellow with a dark green shoulder and cap. If you
receive a cylinder of a different color or without a Cytec® ECO
2
FUME
®
label, do
not use the cylinder. Contact your distributor or Cytec® with the cylinder serial
nu
mber.
!
WARNING
VAPORPH
3
OS
®
cylinders are painted silver with a red shoulder. If you receive a
cylinder of a different color or without a VAPORPH
3
OS
®
label, do not use the
cylinder. Contact your distributor or Cytec® with the cylinder serial number.

Chemical Treatments Fumigants—Phosphine
MP, AP, ECO
2
FUME
®
, and VAPORPH
3
OS
®
02/2024-01 Treatment Manual 2-11-11
Equipment Specification and Use
The equipment used to dispense ECO
2
FUME
®
provides a means of containing
the gas during the fumigation and controlling the release of the product into the
desired space. While some dispensing equipment has been developed and used
to date, it cannot be expected to cover all possible fumigation scenarios. The
development of suitable dispensing equipment is an ongoing process based on
the needs of the users and available technology.
The design of dispensing equipment must account for a number of technical
issues including pressure rating, material compatibility, temperature
limitations, and operator safety. For this reason, only use appropriate
equipment when dispensing ECO
2
FUME
®
. Only persons trained in the proper
use of ECO
2
FUME
®
and the dispensing equipment shall be permitted to use
ECO
2
FUME
®
for fumigation. Consult the instruction materials provided with
the dispensing equipment for their proper use and maintenance.
Unapproved Dispensing Methods
It has been common practice with other cylinderized fumigants, to place the
cylinder in the space to be fumigated and the cylinder outlet valve opened to
allow the fumigant to release. This is not an approved dispensing method and
should not be used with ECO
2
FUME
®
.
Figure 2-11-2 Diagram of One Type of Dispensing Equipment for ECO2FUME

Chemical Treatments Fumigants—Phosphine
MP, AP, ECO
2
FUME
®
, and VAPORPH
3
OS
®
2-11-12 Treatment Manual 02/2024-01
Approved Dispensing Methods
The approved dispensing methods for ECO
2
FUME
®
include using pressure-
reducing regulators for slow release and selected piping components for quick
release. The slow release of ECO
2
FUME
®
is generally used for fumigating
bulk storage facilities such as silos or bins, or for small fumigation chambers or
spaces, and for fumigating stacked materials under tarpaulins. The quick
release method is used for space fumigation, or where the commodity to be
treated is warehoused. The selection of the dispensing method will depend on
the size of the fumigation, the time required, and facility limitations.
Two gas regulators, ambient and heated, have been developed for use with
ECO
2
FUME
®
. Each of the regulators is designed to reduce the high cylinder
pressure (less than 30 psig) and provide the heat necessary to vaporize the
fumigant. Once reduced to this lower pressure, the fumigant can be distributed
to the desired dispensing points using inexpensive and easy-to-use materials,
such as plastic tubing. Flow indicators are used with regulated dispensers to
measure and set the dispensing rate.
Ambient Heater Regulated Dispenser. The slower of the two dispensers relies on
ambient heat to vaporize the fumigant and is limited to a dispensing rate of
about one-half pound of ECO
2
FUME
®
per hour.
Heated Regulated Dispenser. The heated regulator uses an external heating
vaporizer to provide the energy needed to vaporize the liquid fumigant at a
much higher rate than the ambient heat regulator. This regulator is limited to a
dispensing rate of about 24 pounds of ECO
2
FUME
®
per hour. The equipment
is designed for a service pressure up to 3,000 psig. From the cylinder, the
liquid mixture flows down a flexible hose or pigtail through a filter and into a
heater. The heater is thermostatically controlled and the temperature setting
can be adjusted. Exiting the heater, ECO
2
FUME
®
gas flows through an
actuated valve that can be used for emergency shutdown purposes.
ECO
2
FUME
®
gas then flows through a gas regulator that drops the pressure to
30 psig. A diaphragm valve is used to control the gas flow at any desired value
up to 100 liters/minute as indicated by the flow rotameter. The heater provides
1,000 watts of power that can vaporize a maximum of 100 ppm. Lower
rotameter ranges are possible. ECO
2
FUME
®
regulator assemblies, equipped
with basic features, are available through authorized ECO
2
FUME
®
distributors. Multiple regulators may be used together to achieve higher
fumigant flows than available through a single regulator and custom
equipment can be developed for specific types of applications.

Chemical Treatments Fumigants—Phosphine
MP, AP, ECO
2
FUME
®
, and VAPORPH
3
OS
®
02/2024-01 Treatment Manual 2-11-13
Quick-Release Dispensing Equipment. When the fumigation space is very large,
such as a mill, warehouse, or large fumigation chamber, using a number of
cylinders is anticipated, a quick means of dispensing ECO
2
FUME
®
is
available. Specially selected components can be used to direct the cylinder
discharge into the fumigation space without the need to enter the space during
the fumigation. Using this method, a single cylinder can be completely
discharged in as little as 15 minutes. Unlike the regulated dispensing methods,
the dispensing rate is not adjustable and generally, entire cylinders are emptied
using this process. If partial cylinder contents are needed, the ECO
2
FUME
®
cylinder can be placed on a weight scale and the amount of released fumigant
can be measured. The quick release method must not be used for fumigation
of small-sized stacked materials under tarpaulins, however, the quick
dispensing method will be used for most applications. Three techniques of
quick dispensing are presented in this section, with the major difference being
the tubing size.
1. One technique uses high pressure tubing (stainless steel or hydraulic hose
with a nylon core) connected directly to the cylinder valve. The tubing is
then routed into the fumigation space. When the cylinder valve is opened
the majority of the liquid will be dispensed in 4 to 5 minutes. The last few
pounds below the cylinder internal dip pipe will require several additional
minutes to vaporize and be dispensed. When the cylinder is empty of
liquid, approximately 18 pounds of gas will remain in the cylinder. For
larger fumigations, manifolds may be used with the cylinders to make the
dispensing faster. Always leak test the dispensing piping and cylinder
connection before opening the cylinder valve.
2. When a slower dispensing rate is desired, use smaller tubing (stainless steel
or hydraulic hose with a nylon core). The fumigator must not throttle the
cylinder valve to slow the dispensing rate; to do so will cause a high
pressure drop through the valve. The pressure drop will result in cooling
and dry ice formation. This solid dry ice formation will plug the dispensing
pipe and possibly the cylinder valve. Attaching a short section of 1/8 inch
tubing to the end of the 1/4 inch tubing will slow the dispensing rate to
approximately 5 pounds per minute. Use a calibrated scale to ensure the
proper amount of product dispensed.
3. If a dispensing rate of less than 5 pounds per minute is required, a small
section of 1/16 inch tubing, 0.04 inch internal diameter (stainless steel or
hydraulic hose with a nylon core) can be attached to the end of the 1/4 inch
tubing to slow the dispensing rate to approximately 1.6 pounds per minute.
Use a scale to ensure the proper amount of product is dispensed. The tubing
is also available in smaller internal diameters (I.D.) for reduced dispensing
rates. When 1/8 inch tubing or 1/16 inch tubing is used, a filter is
recommended to prevent plugging of the smaller tubing.

Chemical Treatments Fumigants—Phosphine
MP, AP, ECO
2
FUME
®
, and VAPORPH
3
OS
®
2-11-14 Treatment Manual 02/2024-01
Blending VAPORPH
3
OS
®
Fumigant Gas
The following instructions are intended to provide general guidelines for
typical fumigations. There are a number of critical factors involved in the
design of blending equipment. As such, blending equipment must meet both
high-pressure standards and chemical compatibility requirements. Improper or
inappropriate use of blending equipment may result in severe injury or death.
Application inconsistent with the labeling and Application Manual is a
violation of Federal law. Buyer assumes all risk should the product be used
contrary to label or Application Manual instructions.
Equipment Specification and Use
The equipment used to blend VAPORPH
3
OS
®
on site with carbon dioxide or
surrounding air into a nonflammable gas mixture provides a means of
containing the gas during the application and controlling the release of the
product into the desired space. While some blending equipment has been
developed and used to date, they cannot be expected to cover all possible
fumigation scenarios. The development of suitable blending equipment is an
ongoing process based on the needs of the users and available technology.
Blending equipment design must account for a number of technical issues
including pressure rating, material compatibility, temperature limitations and
operator safety, and controlling the phosphine concentration between 2.0 and
2.9 percent volume for carbon dioxide blending, and less than 10,000 ppm (1
percent volume) for dilution with air. For this reason, use only Cytec®-
approved equipment in VAPORPH
3
OS
®
blending. Only persons trained in the
proper use of VAPORPH
3
OS
®
and the dispensing equipment shall be permitted
to use VAPORPH
3
OS
®
for fumigation. These persons must also be licensed
pesticide applicators.
Consult the instruction materials provided with the blending equipment or
dilution equipment for their proper use and maintenance. FOSFOQUIM, the
authorized manufacturer of the phosphine air blending equipment, will provide
training and written instructions for the use and maintenance of its HDS
equipment.
Unapproved Dispensing Methods
It has been common practice with other cylinderized fumigants to place the
cylinder in the space to be fumigated and the cylinder outlet valve opened to
allow the fumigant to release. This is not an approved dispensing method and
should not be used with VAPORPH
3
OS
®
. VAPORPH
3
OS
®
phosphine
fumigant is pyrophoric and will spontaneously ignite in air. VAPORPH
3
OS
®
must be properly blended with carbon dioxide or diluted with air to eliminate
the flammability hazard.

Chemical Treatments Fumigants—Phosphine
MP, AP, ECO
2
FUME
®
, and VAPORPH
3
OS
®
02/2024-01 Treatment Manual 2-11-15
Blending Equipment for VAPORPH
3
OS
®
and Carbon Dioxide
Phosphine gas (VAPORPH
3
OS
®
) from high-pressure cylinders flows into the
blender unit where it combines with carbon dioxide gas sourced from bulk
storage, mobile bulk truck, semibulk, or cylinders. Various models of on-site
blending equipment have been designed, built, and tested. All of the designs
have incorporated engineering safeguards to ensure that the blended product is
a nonflammable mixture.
One design uses a pressure regulator and flow control orifice on both the
VA PO RP H
3
OS
®
and carbon dioxide gases to control the flow rate and to
properly blend VAPORPH
3
OS
®
with carbon dioxide. The size of each orifice
is engineered for a specific fixed flow rate and, therefore, the blending rate
cannot be adjusted. By controlling the pressure drop across the orifice plates,
the phosphine concentration can be controlled around 2.5 percent v/v.
A more sophisticated design uses mass meters, control valves, and the
electronics to allow an adjustable blending rate while maintaining the proper
blend of phosphine concentration from going outside the range of 2.0 to 2.9
percent volume (1.6 to 2.2 percent weight). The product from this equipment is
equivalent to ECO
2
FUME
®
fumigant gas. Blending equipment is intended for
large facilities that have on-site carbon dioxide bulk storage and vaporizing
equipment or facilities where it is feasible to bring in bulk carbon dioxide and
vaporizing equipment for the fumigation. The blending equipment is designed
for use only with carbon dioxide gas; therefore, a bulk supply of liquid carbon
dioxide must be equipped with suitable vaporizing equipment. Contact
Cytec® for blending equipment design specifications and recommendations.
For smaller fumigation jobs, it is recommended that preblended ECO
2
FUME
®
cylinders be used. VAPORPH
3
OS
®
fumigant gas can only be blended with
Figure 2-11-3 Diagram of One Type of Blending Equipment for VAPORPH3OS

Chemical Treatments Fumigants—Phosphine
MP, AP, ECO
2
FUME
®
, and VAPORPH
3
OS
®
2-11-16 Treatment Manual 02/2024-01
registered carbon dioxide products. Never allow the buildup of phosphine to
exceed explosive concentrations. When phosphine is blended with carbon
dioxide, the LFL is raised to 3 percent v/v. The fumigator should always check
with Cytec® for approved blending equipment. Fumigators should provide
PPQ with all Cytec® equipment authorization documentation. The
documentation should be on file and available for periodic audits by the
USDA.
Blending Equipment for VAPORPH
3
OS
®
and Forced Air
Phosphine gas (VAPORPH
3
OS
®
) can spontaneously ignite in air if the
concentration is greater than 1.8 percent (18,000 ppm). With specialized
equipment, pure phosphine can be safely blended with a forced air stream to
ensure the final concentration does not exceed 10,000 ppm (55 percent of the
Lower Flammability Limit of 18,000 ppm). The equipment has incorporated
engineering safeguards to ensure the flammable concentration is never
exceeded.
Various models of phosphine/forced air blending equipment have been
designed, built, and tested. The Horn Diluphos System (HDS) from
FOSFOQUIM is approved by Cytec® and the USDA-APHIS-PPQ-S&T-TMT
to blend VAPORPH
3
OS
®
with forced air (see section on HDS80 and HDS200
Blending Equipment). One design uses inert gas (nitrogen or carbon dioxide)
to prepurge the phosphine lines and equipment. Once purged, phosphine flows
through a pressure regulator and flow controller to the mixing point. Here,
phosphine is safely blended into the forced air stream. The forced air can be
supplied by various fans, blowers, or compressors. The air flow is measured
and the phosphine flow will stop if the air flow is insufficient.
If the phosphine flow is stopped for any reason, post-purging of the phosphine
lines and equipment is automatic.

Chemical Treatments Fumigants—Phosphine
MP, AP, ECO
2
FUME
®
, and VAPORPH
3
OS
®
02/2024-01 Treatment Manual 2-11-17
Dosage
The dosage rate for AP, MP, ECO
2
FUME
®
and VAPORPH
3
OS
®
is measured in
grams per 1,000 cubic feet or grams per cubic meter and varies with the
commodity, treatment temperature, and type of enclosure. The initial fumigant
dose is determined by the volume of the space to be fumigated and the required
phosphine dose rate needed to kill the target pest. ECO
2
FUME
®
and
VA PO RP H
3
OS
®
fumigant gas and carbon dioxide/forced air can be added if
the desired target concentration changes due to a loss of the fumigant through
leaks in the fumigation enclosure.
AP and MP
To calculate the number of tablets or pellets of AP or MP required for the
fumigation:
Dosage Rate = the dosage rate from the treatment schedule (grams)
Volume of enclosure = Length x Width x Height (ft
3
)
Grams of phosphine liberated = Table 2-11-2
Step 1: Grams of PH
3
= (Dosage Rate x Volume of enclosure)/1,000 ft
3
Step 2: Number of Tablets or Pellets needed = grams of PH
3
/grams of
phosphine liberated
Figure 2-11-4 Diagram of VAPORPH
3
OS
®
and Forced Air Blending Equipment

Chemical Treatments Fumigants—Phosphine
MP, AP, ECO
2
FUME
®
, and VAPORPH
3
OS
®
2-11-18 Treatment Manual 02/2024-01
ECO
2
FUME
®
Method 1:
1 gram of phosphine (PH
3
) = 25 ppm PH
3
/1,000 ft
3
To calculate the total amount of ECO
2
FUME
®
required for each treatment:
Target concentration in ppm = (Dosage rate in grams from Treatment
Schedule x 25 ppm)
Grams of PH
3
= (Target concentration x Volume of enclosure)/25,000
Pounds of ECO
2
FUME
®
= (Target concentration x Volume)/226,800
Method 2:
1 pound of ECO
2
FUME
®
= 9.07 grams PH
3
Divide the dosage rate from the treatment schedule (in grams) by 9.07
EXAMPLE
T308-b-2. Tobacco for Export in a warehouse requires 20 grams of
phosphine per 1,000 ft
3
. The size of the warehouse is 100’ x 75’ x
50’. To determine the number of Fumiphos tablets and pellets to
introduce, use the following procedure:
100’ x 75’ x 50’ = 375,000 ft
3
Step 1: (20 g x 375,000 ft
3
)/1,000 ft
3
= 7,500 g
Step 2:
Tablets: 7,500/1.0 = 7,500 tablets
Pellets: 7,500/0.2 = 37,500 pellets
EXAMPLE
T301-d-1-2 Cotton and cotton products requires 36 g of phosphine
per 1,000 ft
3
. The volume of this enclosure is 10’ x 10’ x 10’. To
determine the pounds of
ECO
2
FUME
®
follow these steps:
Step 1: Convert grams of phosphine to ppm:
36 g x 25 = 900 ppm / 1,000 ft
3
Step 2: Determine total volume of the enclosure
10’ x 10’ x 10’ = 1,000 ft
3
Step 3: Apply the formula to determine the amount of ECO
2
FUME
®
to introduce (900 ppm x 1,000 ft
3
) / 226,800 = 3.97 pounds
Therefore, 3.97 pounds of ECO
2
FUME
®
will be introduced into the
structure.

Chemical Treatments Fumigants—Phosphine
MP, AP, ECO
2
FUME
®
, and VAPORPH
3
OS
®
02/2024-01 Treatment Manual 2-11-19
VAPORPH
3
OS
®
To calculate the amount of VAPORPH
3
OS
®
required for the fumigation:
1 pound of VAPORPH
3
OS
®
= 454 grams PH
3
Target concentration = the desired phosphine concentration (ppm) from the
treatment schedule
Step 1: Grams of PH
3
= (Target concentration x Volume of enclosure)/25,000
Blending with CO
2
. Once the amount of phosphine has been determined, the
appropriate amount of carbon dioxide must be calculated. It is recommended
that twice the amount of carbon dioxide be available to ensure an adequate
supply for the initial dose, the addition of gas, and equipment purging.
To calculate the amount of carbon dioxide required for the fumigation:
Step 2: Pounds of CO
2
= (Grams of PH
3
/454) x 105.3
Blending with Forced Air. When blending with forced air, only the amount of
phosphine needs to be calculated. A closed circulation system is created if the
air supply is sourced from inside the fumigation enclosure. This will prevent a
positive pressure from developing within the fumigation space. If recirculation
is not used, the perimeter of the fumigation site will need to be monitored
because the air will be displaced from the fumigation space. The HDS 80
blending equipment used with forced air dispenses at 50g/min. If the minimum
air flow is not maintained, the blending equipment will automatically shut
down and phosphine will no longer be dispensed.
EXAMPLE
Assuming the same Treatment Schedule as the previous example
(T301-d-1-2 Cotton and cotton products):
36
/ 9.07 = 3.97 pounds
NOTICE
When the amount of gas introduced is less than 68 pounds, use a calibrated scale to
determine when the proper amount of gas has been introduced into the space.
EXAMPLE
T301-d-1-2 Cotton and cotton products requires 36 g of phosphine
per 1,000 ft
3
. The volume of the enclosure is 75,000 ft
3
. To determine
the amount of VAPORPH
3
OS
®
gas to introduce, follow these steps:
Step 1: (36 g x 25 x 75,000 ft
3
) / 25,000 = 2,700 grams PH
3
Step 2: (2,700 / 454) x 105.3 = 626 pounds CO
2

Chemical Treatments Fumigants—Phosphine
MP, AP, ECO
2
FUME
®
, and VAPORPH
3
OS
®
2-11-20 Treatment Manual 02/2024-01
Adding ECO
2
FUME
®
and VAPORPH
3
OS
®
Gas to an Enclosure
Depending on the sealability of the type of space to be fumigated, it may be
necessary to add additional gas to the structure in order to maintain the target
concentration required by the treatment schedule.
To calculate the amount of ECO
2
FUME
®
/VAPORPH
3
OS
®
to be added:
Grams of PH
3
= (Target Concentration - Actual Concentration) x Volume/
25,000
The target and actual concentrations are measured in ppm and must be
monitored with a device approved by S&T-TMT.
Preparing to Fumigate Break Bulk Cargo
Break bulk cargo has been unloaded from a ship hold, a container, or rail car.
This cargo can be fumigated by covering the pallets, boxes, or raw cargo with
an impervious tarpaulin.
Always check this manual to determine if there is an approved treatment
schedule using either AP, MP, ECO
2
FUME
®
or VAPORPH
3
OS
®
fumigant for
the infested commodity. Treatment schedules typically list the commodity to
fumigate with its associated pest(s). If the commodity in question does not
have a treatment schedule, contact the USDA-APHIS-PPQ-S&T-TMT to
determine if there is an alternative treatment available.
Step 1: Site Selection
Consider the following factors when selecting a fumigation site:
Ability to heat (in colder areas)
Aeration requirements
Electrical power supply
Impervious surface
Nonwork area that can be effectively marked and safeguarded or isolated
Water supply
Well-lighted area
Well-ventilated, sheltered area
Ability to Heat Area
When cool temperatures (below 40 °F) are expected, heat the site to maintain
commodity temperatures above 40 °F; take the ambient temperature 12 inches
above the floor.

Chemical Treatments Fumigants—Phosphine
MP, AP, ECO
2
FUME
®
, and VAPORPH
3
OS
®
02/2024-01 Treatment Manual 2-11-21
The temperature of the enclosure must be monitored using a temperature
recording system, consisting of temperature sensors and a data recorder. The
temperature recording system must meet the following specifications:
Accurate to within ± 0.6 °C or ±1.0 °F in the treatment temperature range
of 4.4 °C to 26.7 °C (40 °F to 80 °F)
Calibrated annually by the National Institute of Standards and Technology
(NIST) or by the manufacturer
The calibration certificate will list a correction factor, if needed, and
the correction factor would be applied to the actual temperature
reading to obtain the true temperature.
Capable of printing all temperature readings or downloading data to a
secure source once per hour throughout the entire treatment (all
temperature data must be accessible at a safe distance during the
fumigation)
Tamper-proof
If one or more of the temperature readings go below 40 °F the fumigation will
be considered a failed treatment. The commodity must be re-treated, returned
to the country of origin, reexported, or destroyed.
Place temperature sensors evenly throughout the enclosure. The placement of
the sensors will vary depending on the item fumigated and the configuration of
the fumigation site. Contact USDA-APHIS-PPQ-S&T-TMT for instructions
regarding the exact placement of the temperature sensors.
Because phosphoric acid will be produced if phosphine is burned, never
use flame or exposed electrical element heaters during treatment.
Contact USDA-APHIS-PPQ-S&T-TMT for appropriate heating
sources.
An Impervious Surface
Select an asphalt, concrete, or tight wooden surface, not soil or gravel, or other
porous surfaces. If you must fumigate on a porous surface, cover the surface
with plastic tarpaulins.
For large fumigations, covering the surface is not usually practical because
pallets must be rearranged and heavy equipment used to move the commodity.
On docks, wharfs, and piers, check for cracks, holes, and manhole covers that
will allow the phosphine gas to escape through the floor.
Seal all cracks, holes, and manhole covers with plastic tarpaulins.

Chemical Treatments Fumigants—Phosphine
MP, AP, ECO
2
FUME
®
, and VAPORPH
3
OS
®
2-11-22 Treatment Manual 02/2024-01
A Nonwork Area
Select a secure nonwork area where traffic and people are restricted from
entering.
The fumigation area is considered either the entire structure area or an
area that extends 30 feet from the tarpaulin and is separated by a physical
barrier, such as ropes, barricades, or walls.Place placards clearly in sight
of all who come near.
If a wall of gas-impervious material is less than 30 feet from the tarpaulin,
the wall may serve as the edge of the secured area.
Additional guidelines may be required by some state’s Department of
Agriculture. Some states (California, for example) require a 100-foot
buffer zone.
Place placards clearly in sight of all who come near
Placards must meet label requirements regarding specific warnings,
information, and language.
Placards generally include the name of the fumigant, the fumigation
date, time, and the name of the company conducting the fumigation.
Restrict access to the fumigation area to the fumigator’s employees
and PPQ employees monitoring the treatment.
Use rope or marker tape to limit access within 30 feet of the enclosure.
Do not allow motor vehicles (including forklifts) to operate within 30
feet of the enclosure during fumigation and aeration periods.
The area outside the 30-foot perimeter is usually regarded as a safe
distance from the tarpaulin.
The 30-foot perimeter is not specifically mentioned on the AP, MP,
ECO
2
FUME
®
and VAPORPH
3
OS
®
labels, but is required for safety to
PPQ Officers.
Electrical Power Supply
An adequate electrical source must be available to run the dispensing
equipment (ECO
2
FUME
®
and VAPORPH
3
OS
®
only).
A separate line should be available for the dispensing and blending units.
NOTICE
Gas concentrations should never exceed 0.3 ppm phosphine and 5,000 ppm carbon
dioxide in the safety zone (30 feet from the enclosure where officers are taking gas
concentration readings).
Use colorimetric tubes or other approved devices to measure gas concentrations.

Chemical Treatments Fumigants—Phosphine
MP, AP, ECO
2
FUME
®
, and VAPORPH
3
OS
®
02/2024-01 Treatment Manual 2-11-23
Electrical outlets must be grounded and conveniently located in relation
to the fumigation area.
Except under emergency conditions, do not use generators as a power
source.
Water Supply
A water supply is necessary for safety purposes; if no permanent water source
is present on site, the fumigator must provide a portable, 5-gallon supply of
clean water.
Well-Lighted Area
The area should have adequate lighting for safety purposes and for ease in
reading the gas monitoring devices, thermometers, and for determining
whether a tarpaulin has holes or tears.
Well-ventilated, Sheltered Area
Select sites that are well-ventilated and in a sheltered area. A well-ventilated
site is required for exhausting gas before and when the tarpaulin is removed
from the stack.
If fumigations are conducted outside, select a site that is semisheltered such as
the leeward side of a warehouse, pier, or building that offers some protection
from strong winds.
Step 2: Arranging the Stack
Arrange the cargo in a square or rectangular shape, if possible, to make it
easy to cover and to calculate the volume of the stack.
An even-shaped stack is easier to tarp.
By arranging the stack evenly and with space between pallets or
cartons, the fumigant will be effectively distributed.
The height of the stack should be uniform so dosage can be calculated
accurately.
The maximum size for an enclosure is 25,000 ft
3
Contact the USDA-APHIS-PPQ-S&T-TMT to get approval for any
enclosures larger than 25,000 ft
3
For very large enclosures, it may be necessary to add more sampling
leads or introduce the fumigant at several sites.

Chemical Treatments Fumigants—Phosphine
MP, AP, ECO
2
FUME
®
, and VAPORPH
3
OS
®
2-11-24 Treatment Manual 02/2024-01
When the fumigation involves multiple stacks, allow 10 feet of space
between each uncovered stack; after the stack is tarped, there should be
approximately 5 feet between enclosures.
Step 3: Padding the Corners
Examine all areas that typically tear tarpaulins, e.g., corners and sharp angles.
If the sharp angles or corners cannot be eliminated, they must be covered with
burlap or other suitable padding (e.g., old tires or cloth).
Step 4: Covering the Stack
After covering the stack, check the tarpaulin for rips, tears, and holes. Look at
the taped areas and verify they are properly sealed. Have the fumigator repair
all holes.
The tarpaulin must be made of a tough material such as vinyl, polyethylene
plastic, or coated nylon. The tarpaulins should be a minimum of 2-mil
thickness; however, it is recommended to use 6 mil tarpaulins whenever
possible.
The tarpaulin must be large enough to provide a floor overlap of at least 18
inches around all sides of the stack. Carefully lay the tarpaulin out to prevent
excess folds or wrinkles along the floor, especially around corners.
Step 5: Sealing the Tarp
The goal in sealing the tarpaulin is to get it to lay flat against the floor to
prevent gas from leaking out. Seal the tarpaulin with loose, wet sand, sand
snakes, water snakes, adhesives, or a combination. If there is danger of
crushing or crimping the gas sampling or introduction tubes, use the loose, wet
sand. If using snakes, use two rows of snakes along the sides and three rows on
the corners. The snakes should overlap each other by approximately 1 foot.
Seal corners by laying two sand snakes around the corner and working the
tarpaulin until it is flat. To force the tarpaulin against the floor, place a third
snake on top of the two other snakes to provide additional weight. Loose, wet
sand can be used in the area where the gas introduction line, electrical cords,
and gas sampling tubes extend from under the tarpaulin.
Step 6: Introducing the Gas
Depending upon the type of AP or MP formulation used, the gas may be
dispensed in a variety of methods. Follow the application procedures from the
manufacturer’s label for detailed instructions on gas introduction.
For ECO
2
FUME
®
and VAPORPH
3
OS
®
, install the gas introduction line(s) at
ground level on the floor or secured onto a pallet. These lines should not be
located in or attached to commodity package and should be secured to
eliminate the movement of the line(s). Direct the discharge toward the center
of the space being treated and away from equipment, if possible. For tarpaulin

Chemical Treatments Fumigants—Phosphine
MP, AP, ECO
2
FUME
®
, and VAPORPH
3
OS
®
02/2024-01 Treatment Manual 2-11-25
enclosures, control the dispensing rate of the gas. The tarpaulin can become
damaged and sealing undone if the fumigant is dispensed at high speeds. For
small enclosures, a cylinder pressure less than 100 psig is recommended. A
regulated dispenser with a pressure regulator and flow restricting nozzles are
options to control the rate of the fumigant.
Place the fumigant cylinder with gas introduction line on a calibrated scale and
take an initial weight reading. Ensure the gas introduction line is attached to
the cylinder. After obtaining the correct weight, subtract the dosage to be
introduced into the enclosure. After introducing the proper amount of gas, the
scale will be balanced.
When no further fumigant is required to maintain target concentration levels,
close all cylinder valves, depressurize the dispensing equipment, and
disconnect all ECO
2
FUME
®
or VAPORPH
3
OS
®
cylinders. Replace the
cylinder cap after the valve discharge cap is securely installed.
Step 7: Placing the Gas Sampling Tubes
Place a minimum of three gas sampling tubes for fumigations up to 10,000 ft
3
.
Position the gas sampling tubes in the following locations:
Front—low and front of the load, 3 inches above the floor
Middle—center of the load (inside the box with the commodity), midway
from bottom to top of load
Rear—high and rear of the load, at the extreme top of the load
For fumigations from 10,001 to 25,000 ft
3
, use six gas sampling tubes. Position
the gas sampling tubes in the following locations:
Front—low and front of the load, 3 inches above the floor
Lower rear quarter section (inside the box with the commodity)
Middle—center of the stack (inside the box with the commodity), midway
from bottom to top
Rear—high and rear of the stack, at the extreme top of the load
Upper front quarter section (inside the box with the commodity)
Upper rear quarter section
For approval of fumigations larger than 25,000 ft
3
, contact the USDA-APHIS-
PPQ-S&T-TMT for instructions regarding the number of gas sampling tubes,
and for other technical information.
Before inserting into the commodity, cover the end of the gas sampling tubes
with burlap or wire gauze taped to the tube.

Chemical Treatments Fumigants—Phosphine
MP, AP, ECO
2
FUME
®
, and VAPORPH
3
OS
®
2-11-26 Treatment Manual 02/2024-01
Use gas sampling tubes of sufficient length to extend from the sampling
position inside the enclosure to at least 30 feet beyond the tarpaulin. Connect
all the gas sampling tubes in one area for ease and safety in recording gas
concentration readings. Do not splice gas sampling tubes. Fix all gas sampling
tubes securely in place under the tarpaulin and label each one where the gas
concentration readings will be recorded. By labeling each gas sampling tube,
concentration readings can be easily recorded.
Step 8: Testing for Leaks
To ensure they are within acceptable levels outside the fumigation area,
monitor phosphine and carbon dioxide levels at the fumigation site and 30 feet
from the fumigation enclosure. Phosphine and carbon dioxide levels can be
detected using chemical-specific colorimetric tubes or electronic monitors,
e.g., Draeger and PortaSens detection kits. Do not use a Gow-Mac or
Fumiscope to record gas readings.
The fumigator should leak test all connections and fittings before opening the
cylinder valve. Instructions concerning cylinder leak detection can be found
under the section “Poison Gas Hazards–Leak Detection and Repair” of the
ECO
2
FUME
®
and VAPORPH
3
OS
®
fumigant Application Manuals.
Step 9: Monitoring Gas Concentrations
Take concentration readings within the enclosure using sampling lines
connected to an APHIS-approved phosphine monitoring device. The
fumigation does not begin until all of the gas has been introduced. Monitoring
must take place 30 feet or more from the enclosure.
Phosphine and carbon dioxide levels can be detected using chemical-specific
colorimetric tubes or approved electronic monitors, e.g., Draeger and
PortaSens detection kits. To determine if additional gas is needed, check gas
concentration levels 30 minutes after the fumigant is added and periodically
throughout the fumigation. Record gas concentration readings on PPQ Form
429A and in the electronic 429 database at the time intervals prescribed by the
treatment schedule in this manual.
The 30-minute reading shows the initial concentration and distribution of gas
and can indicate leakage, incorrect dosage calculation, or error in fumigant
introduction.
If the desired phosphine concentration is met before all of the gas is
introduced, stop the addition of ECO
2
FUME
®
or VAPORPH
3
OS
®
and check
all calculations. When fumigating with ECO
2
FUME
®
, 200 ppm of phosphine
will release 7,700 ppm of carbon dioxide.

Chemical Treatments Fumigants—Phosphine
MP, AP, ECO
2
FUME
®
, and VAPORPH
3
OS
®
02/2024-01 Treatment Manual 2-11-27
Preparing to Fumigate Containerized Cargo
Containers require small amounts of phosphine. Therefore, AP, MP, or
ECO
2
FUME
®
fumigant gas (not VAPORPH
3
OS
®
) is recommended for all
container fumigations for which an approved treatment exists.
PPQ does allow the fumigation of nontarped containers provided the container
can be completely sealed in order to prevent gas loss.
To fumigate containerized cargo, follow Steps 1 through 9 in the previous
section, Preparing to Fumigate Break Bulk Cargo on page 2-11-20.
Additional Considerations for Fumigating Containerized Cargo
If fumigating a nontarped container:
Close and secure one of the doors
If possible, caulk all joints and drape entire doorway with polyethylene
sheeting, securing the edges to the inner walls, floor, and ceiling with
duct tape
Seal all openings and joints
Inspect the roof, floor, and walls for holes and cracks
Containers require close inspection and a great deal of sealing to
prevent fumigant leakage
Seal all openings with either duct tape or caulking compound
If possible, drape remaining doorway with polyethylene sheeting before
the door is closed
Close door and secure
NOTICE
Erroneous readings can occur if the monitoring leads become blocked or crimped. It
would be impossible to install a new monitoring lead during a fumigation treatment;
therefore, always test monitoring leads before the treatment begins.
In order to detect blocked monitoring leads, follow the procedure below using a
Mityvac® hand-held pump (for supplier, See Vacuum Pump on page E-1-54.)
1. Prior to fumigant introduction, connect the Mityvac® hand-held vacuum pump to a monitor-
ing lead.
2. Squeeze the handle on the Mityvac
® unit. If the lead is blocked, a vacuum will be indicated
on the vacuum gauge of the Mityvac
® unit. For monitoring leads longer than 25 feet,
squeeze the handle two or three times. The Mityvac
® hand-held pump has the capacity to
attain and hold 25 inches of Hg vacuum and a minimum of 7 psig pressure.
3. Disconnect the Mityvac
® hand-held pump from the monitoring lead, and repeat this proce-
dure for each monitoring lead. Connect monitoring leads to the gas analyzer prior to fumi-
gant introduction.

Chemical Treatments Fumigants—Phosphine
MP, AP, ECO
2
FUME
®
, and VAPORPH
3
OS
®
2-11-28 Treatment Manual 02/2024-01
If doorway is draped with polyethylene, it may not be necessary to
seal the door from the outside
If doorway is not draped, seal all cracks, openings, and joints with
masking tape and caulking compound from the outside
Secure edges to door jams and floor
Placard all doors of the container with the appropriate warnings before
fumigation begins
If fumigating a tarped container:
If unable to completely seal the container, use a tarpaulin to cover the
entire container
Use a 4, 6, 10, or 12 mil vinyl, polyethylene plastic, or coated nylon
tarpaulin
After covering the container with a tarpaulin, check for rips, tears, and
holes
Examine all taped areas and verify they are properly sealed
Have the fumigator repair all holes
The tarpaulin must be large enough to provide a floor overlap of at least
18 inches around all sides of the container—carefully lay the tarpaulin out
to prevent excess folds or wrinkles along the floor, especially around
corners
Preparing to Fumigate Bulk Commodities
AP, MP, ECO
2
FUME
®
and VAPORPH
3
OS
®
can be used to fumigate any type
of bulk commodity storage for which there is an approved treatment in this
manual. These include, but are not limited to, bins, tanks, flat storage, and
bunkers. The most important aspects of a successful fumigation, as with any
fumigant, are the degree to which the space is sealed and the assurance that the
minimum fumigant concentrations are maintained for the required time.
To fumigate bulk commodities, use the procedures outlined in the section,
Preparing to Fumigate Break Bulk Cargo on page 2-11-20.

Chemical Treatments Fumigants—Phosphine
MP, AP, ECO
2
FUME
®
, and VAPORPH
3
OS
®
02/2024-01 Treatment Manual 2-11-29
Probing
AP and MP Fumigation
When treating large quantities of grain or other bulk commodities, it will be
necessary to “probe” tablets or pellets into the mass of the commodity for
adequate distribution. Specially constructed probes made of steel tubing one
and one-quarter inch in diameter are generally available as described below:
Head Piece—Dosing device and numerical counter to indicate number of
tablets used
Tubing—Usually in 3-foot sections that can be added to one another to
provide the desired length
End Piece—Cut obliquely and provided with a hinged flap, closing the
entrance to the tube
When the tube is inserted into the commodity, the flap is closed and
prevents the commodity from entering
When the probe is withdrawn, the flap opens due to the slightly larger
diameter on the flap
The tablets or pellets are then released one at a time as the probe is
withdrawn
Grain or other bulk or loose commodities up to 30 feet deep can be probed.
Best results are obtained by probing twice every square foot and as regularly as
possible. Penetration of phosphine is up to 10 feet below the area in which the
tablets are placed. When large bulk grain stores are treated, many probes can
be placed prior to treatment. One head piece can be moved from probe to
probe, or pellets or tablets can be placed in the tubes by hand (use surgical or
disposable thin rubber or polyethylene gloves).
Gas generation starts within 4 hours of placing the pellets or tablets (depending
on relative humidity). Therefore, the whole procedure of pellet or tablet
placement or tarpaulin covering must be accomplished within this time frame.
It is possible to work in a probed area if the area is covered with a gas-proof
tarpaulin. Monitor gas concentrations to determine if toxic levels are
approached and take corrective action to prevent exposure.
Additional Considerations for Fumigating Bulk Commodities
Based on the size of the structure being fumigated, refer to the
ECO
2
FUME
®
and VAPORPH
3
OS
®
Application Manuals for acceptable
dispensing equipment
For large storage facilities, (>25,000 ft
3
), consider multiple dispensing
points to assist in fumigant distribution

Chemical Treatments Fumigants—Phosphine
MP, AP, ECO
2
FUME
®
, and VAPORPH
3
OS
®
2-11-30 Treatment Manual 02/2024-01
Contact the USDA-APHIS-PPQ-S&T-TMT for a determination on the
number of sampling lines for large fumigations
If a bulk consignment is in a large storage facility with a high roof, it may
be better to tarp on top of the grain, rather than seal the roof
When side walls of the facility are not gas impervious, place tarpaulins
(minimum 6 mm thickness) around the outside of the facility to the
height of the commodity
If it is known ahead of time that grain or cottonseed will require treatment
prior to placement in a means of conveyance or storage, properly seal the
space before loading. Use tarpaulins of at least 6 mm thickness if walls
are permeable since lighter tarpaulins may tear.
Aeration Requirements
Break Bulk, Containers, and Bulk Fumigations
Following completion of treatment, aerate phosphine-treated commodities
using either electric exhaust fans or by passive aeration in the open air.
Personnel are not allowed to enter or reenter fumigated areas until gas
concentrations are determined to be below the Threshold Limit Values (TLV)
for phosphine and carbon dioxide. Check ambient air and the air inside the
box, carton, bin, etc., of the commodity during aeration. Measure gas
concentration levels with a sensitive gas detection device. Aerate all
commodities to acceptable tolerance levels (Table 2-11-3). Because they can
continue to release gas after the initial gas levels have dropped to acceptable
levels, continue to monitor densely packed commodities. A certified applicator
must be physically present, responsible for, and maintain visual and/or voice
contact with all fumigation workers during the initial opening of the
fumigation structure for aeration. Always follow the aeration instructions
provided with the fumigant label.

Chemical Treatments Fumigants—Phosphine
Contacts
02/2024-01 Treatment Manual 2-11-31
Disposal of AP and MP Residue
Following treatment with AP, a powdery residue, essentially aluminum
hydroxide, will remain. Collect this material and mix it in a container of water
to which liquid detergent has been added (2 tablespoons of detergent per gallon
of water). Bury or deposit the liquid in an approved pesticide disposal landfill.
Following treatment with MP, dispose of the plates by burial in an approved
landfill or by burning where approved by local ordinances.
Follow the manufacturer’s label instructions for detailed disposal guidelines.
Contacts
Cytec
®
Cytec Industries, Inc.
5 Garret Mountain Plaza
West Patterson, NJ 07242
Phone: (973) 357-3100
email: [email protected]
USDA-APHIS-PPQ-S&T-TMT
13601 Old Cutler Road, Bldg. 63
Miami, FL 33158 USA
Phone: 305-278-4877
Fax: 305-278-4898
email: [email protected]
Table 2-11-3 Phosphine Residue Tolerances
Commodity
Tolerance of Phosphine
Residues (ppm)
Minimum Aeration Period
(hours)
Animal feeds, grains, nuts,
and dates
0.1 48
Processed foods 0.01 48
Fresh fruits and vegetables 0.01 48
Nonfood commodities <0.3 None
Tobacco <0.3 48

Chemical Treatments Fumigants—Phosphine
Contacts
2-11-32 Treatment Manual 02/2024-01

01/2016-132 Treatment Manual 2-12-1
Chapter
2
Chemical Treatments
Aerosols
Contents
Introduction 2-12-1
10% d-phenothrin 2-12-1
Passenger Compartment Application 2-12-2
Treating Baggage/Cargo Holds 2-12-4
Precautions for Aircraft Transiting Airports at High-Risk for Japanese
Beetles 2-12-6
2% d-phenothrin + 2% permethrin 2-12-6
Ordering Information 2-12-8
10% d-phenothrin 2-12-8
2% d-phenothrin + 2% permethrin 2-12-8
Precautions 2-12-8
Introduction
The information in this section provides CBP and PPQ officials and
commercial applicators the procedures and precautions for applying aerosol
insecticides in aircraft.
PPQ uses aerosol insecticides to treat for Japanese beetle, Khapra beetle, and
other hitchhiking pests. Respirators are recommended but not required by the
chemical labels.
There are currently two aerosols approved for use in aircraft passenger areas,
aircraft cargo holds, and aircraft pods, Callington 1-Shot™ (2% d-phenothrin +
2% permethrin) and 10% d-phenothrin.
10% d-phenothrin
The application rate (T409-b-1) is 8 g/1,000 ft3. Without an extender tube, the
aerosol can is calibrated to dispense 5 grams per second; therefore 8 grams per
1,000 cubic feet will take 1.6 seconds to dispense.
!
WARNING
Do not subject these chemicals to extreme temperatures.
!
CAUTION
10% d-phenothrin is not approved for use in California, except in Federal installa-
tions such as military airports.

Chemical Treatments Aerosols
10% d-phenothrin
2-12-2 Treatment Manual 01/2016-132
Apply 10% d-phenothrin in the cargo or passenger areas of the aircraft no more
than one hour before loading.
The time needed to spray the aerosol is a function the following three things:
Volume (in 1000 cubic feet) of a specific area in the aircraft
Spray rate of the nozzle (in grams per second)
Required application rate for the pesticide (in grams per 1000 cubic feet)
This relationship is shown in the formula in Figure 2-12-1.
Passenger Compartment Application
Treatment of passenger compartments is under the authority of a compliance
agreement between PPQ and the airline or other contractor.
Ensure that the compliance holder follows these application procedures:
1. Vacuum the compartment before treatment.
2. Close flight deck windows.
3. Thoroughly inspect flight deck area and remove any insects. Keep
windows closed until departure.
Figure 2-12-1 Formula for Calculating Aerosol Spray Time in Specific Areas of
Aircraft
EXAMPLE
You are supervising the application of 10% d-phenothrin. The volume
of the aircraft cabin is 10,800 ft
3
: The required application rate is 8g/
1,000 ft
3
. The spray rate of the nozzle is 5.0 g/sec.
10,800/1,000 = 10.8 units of 1,000 ft
3
8/5 = 1.6 seconds
1.6 seconds x 10.8 = 17.3 or 17 seconds of dispensing time
!
CAUTION
Never treat passenger compartments when passengers are inside.
Volume of a specific area in the aircraft
Required Application Rate
Spray Rate of Nozzle
----------------------------------------------------------------
Time Needed to Spray Aerosol=

Chemical Treatments Aerosols
10% d-phenothrin
01/2016-132 Treatment Manual 2-12-3
4. Close flight deck door to prevent aerosol from entering the flight deck.
5. Install barrier curtains (i.e. doors, plastic sheets, or prefabricated
structures) in galley areas to prevent aerosol particles from entering the
galley area.
6. Outside the galley areas, cover the following items with an impervious
material, such as polyethylene.
Beverage and food preparation surfaces
Exposed oxygen masks
7. Open doors to bathrooms and carefully inspect. Remove any insects, then
close bathroom doors.
8. Check aisles and remove all obstacles.
9. Put on safety glasses (and respirator, if desired).
10. Stop all aircraft ventilation systems.
11. Close aircraft entrance doors.
12. Treat at the rates in T409-b-1.
13. Start (perhaps with another applicator) 10 feet from the end of the aircraft.
While backing slowly through the aircraft, dispense aerosol in a sweeping
motion with cans pointing upward at a 45° angle. Keep the dispensing
valve fully depressed. To avoid wetting surfaces, hold the nozzle at least 18
inches away from all surfaces.
14. When treating passenger aircraft with two aisles, it is recommended to
have two individuals dispensing the material at the same time. When
dispensing the aerosol, use a stopwatch, a wristwatch with a second hand,
or count aloud using the technique 1001, 1002, etc. Accurate timing not
only ensures the proper amount is dispensed, but also increases the
likelihood of obtaining an equal distribution.
15. Exit the aircraft and close all doors.
16. Keep the aircraft closed for 15 minutes post-treatment.
17. After the 15-minute post-treatment period, start the aircraft ventilation
system.
18. Ventilate the aircraft for 15 minutes before boarding passengers, crew, or
ground personnel.
NOTICE
Curtains must be full-length to prevent the entrance of aerosol particles into the gal-
ley. If the curtains are not full-length, use other means to seal the entrance. Airlines
should provide materials, such as polyethylene, to seal galley areas.
!
WARNING
The individual who starts the ventilation equipment must wear safety glasses.

Chemical Treatments Aerosols
10% d-phenothrin
2-12-4 Treatment Manual 01/2016-132
19. If aerosol particles are still noted in the air after the ventilation period,
continue aeration until the particles disappear.
20. After treatment and ventilation, safeguard the aircraft until departure.
Post-Treatment Cleanup Procedure
Ensure that the compliance holder follows these post-treatment clean up
procedures:
Do not open flight deck doors.
Do not remove barriers from galleys until catering is completed; insects
can enter during the catering process.
Reinspect and collect all insects.
Remove covers used to protect specific items outside the galley (e.g.,
drinking fountains).
Thoroughly wash hands, faces, and arms before smoking, eating, or
drinking.
Maintaining a Pest-Free Condition in the Passenger Compartment
After treating a passenger compartment, ensure that the aircraft is kept pest-
free with the following procedures:
Keep the barrier (closure, curtain, or door) from the galley to the inside of
the aircraft closed until after catering. After catering, thoroughly inspect
for insects in the galley area.
Monitor the entrance to the aircraft to determine if insects are entering.
Remove and destroy any insects that enter the aircraft.
Use enclosed walkways to board passengers either from the terminal or
from the vehicles carrying passengers to the aircraft.
Treating Baggage/Cargo Holds
Whenever possible, treat baggage/cargo holds before loading. Treatment
before loading allows penetration of the insecticide to cargo areas that become
inaccessible after loading.
Loaded aircraft that stand open during the day must be treated, regardless of
loading time. Insects often fly into and remain in open aircraft.
NOTICE
Military (and other) cargo is often stored outside on pallets for lengthy periods.
Insects (Japanese beetles in particular) often rest overnight on the cargo pallets.
Loading the aircraft with infested pallets will infest the aircraft. Therefore, treat the
aircraft holds containing cargo pallets that have been stored outside and are likely to
be infested. After treatment, remove all insects.

Chemical Treatments Aerosols
10% d-phenothrin
01/2016-132 Treatment Manual 2-12-5
Treating Loaded Baggage/Cargo Holds
To treat a loaded baggage/cargo hold, ensure that the compliance holder
follows these application procedures:
1. Ensure that there are no live animals on board before treatment. (If there
are, remove them (in cages or holding containers) to a protected area, away
from the treatment environment.)
2. If possible, visually inspect baggage/cargo hold before loading; collect and
destroy all insects found.
3. If possible, visually inspect all baggage or cargo as it is being loaded.
4. Put on safety glasses (and respirator, if desired).
5. Treat the baggage/cargo hold at the rates in T409-b-1.
6. In small holds, open the hatch just enough to allow a hand and the aerosol
container inside; as an alternative, apply through an open porthole, if
available, in the hatch. Many holds are small; therefore, applicators may
treat these small areas by standing at the hatch and directing the spray
either aft or forward.
7. If live animals are being shipped following treatment, keep baggage/cargo
hold closed for 15 minutes.
8. Open the hold door(s); use a mechanical barrier to protect the treated hold.
9. Ventilate the baggage/cargo hold for 15 - 30 minutes.
10. If live animals are being shipped, check the animals and cages for live
beetles before loading and then reload the animals.
11. Close hold door(s).
Treating Unloaded Baggage/Cargo Pods
To treat unloaded baggage/cargo pods, ensure that the compliance holder
follows these application procedures:
1. Select relatively airtight pods in good condition and without hand holes.
2. Put on safety glasses (and respirator, if desired).
3. Slightly open the pod door.
4. Spray for 1 second.
5. Keep pod closed for 15 minutes.
6. Open and ventilate the pod for 15 - 30 minutes.
7. Load baggage or cargo.
8. Close pod.

Chemical Treatments Aerosols
2% d-phenothrin + 2% permethrin
2-12-6 Treatment Manual 01/2016-132
Precautions for Aircraft Transiting Airports at High-Risk for
Japanese Beetles
The following precautions must be used for aircraft transiting high-risk
airports.
Keep cargo holds closed except during loading and unloading.
Keep flight deck windows closed.
Seal off the galley(s) if the aircraft is to be catered at the hazardous
airport. Inspect galleys after catering, but before removing barriers
separating the galleys from the cabins.
Use enclosed walkways to board passengers. Always keep the enclosed
walkway tight against the aircraft.
2% d-phenothrin + 2% permethrin
Currently, there is one manufacturer of this aerosol, 1-Shot™, Callington Inc.
1-Shot™ is labeled for use only in aircraft.
The application rate (refer to T409-b-3) is 40 g/1,000 ft3. One, 150-gram can
treats 3,750 cubic feet and takes 75 seconds to dispense completely.
Apply using the following procedures:
1. Calculate the number of cans needed (refer to Table 5-5-7 through Table 5-
5-29 or use the formula in Figure 2-12-1 on page 2-12-2).
2. Prearrange cans in the treatment areas.
3. Dispense partial cans into the farthest parts of the cargo hold before
dispensing full cans. Carefully remove the locking tab that keeps the nozzle
depressed using caution not to damage the dispensing mechanism.
(Figure 2-12-2)
4. Fully depress the nozzle when dispensing.
5. To dispense a full can, depress the spray nozzle on the top of the can until
the locking tab engages. Once the locking tab is engaged, the can sprays
continuously until empty. (Figure 2-12-3)
!
CAUTION
Do not apply in the passenger cabin area of the aircraft or when passengers or crew
are present.

Chemical Treatments Aerosols
2% d-phenothrin + 2% permethrin
01/2016-132 Treatment Manual 2-12-7
6. Ventilate the aircraft for 30 minutes before boarding passengers, crew, or
ground personnel.
Figure 2-12-2 Preparing to Dispense a Partial Can of 2% d-phenothrin + 2%
permethrin
Figure 2-12-3 Preparing to Dispense a Full Can of 2% d-phenothrin + 2%
permethrin

Chemical Treatments Aerosols
Ordering Information
2-12-8 Treatment Manual 01/2016-132
Ordering Information
10% d-phenothrin
Currently, 10 percent d-phenothrin is available from USDA-APHIS-PPQ. For
ordering and shipping information, contact your Field Operations Program
Manager or the USDA-APHIS-PPQ Quarantine and Policy Analysis staff in
Riverdale, Maryland.
2% d-phenothrin + 2% permethrin
Purchase 1-Shot™ directly from the manufacturer (Callington Inc.) using a
micropurchase card. Email the following information to
Delivery address
Method of payment
Quantity (consider local storage capabilities)
Precautions
Refer to the manufacturer’s labels and material safety data sheets for more
detailed safety instructions, but in general:
Do not apply when animals or people are present.
Do not smoke or eat during application and not until after washing. Wash
as soon as possible after application of pesticides.
Remove or cover food, food preparation surfaces, and equipment prior to
treatment.
The applicator may wear a suitable respirator, approved by the National
Institute of Safety and Health (NIOSH).
The applicator may wear goggles or safety glasses if the applicator
experiences any eye irritation.
Wipe any pesticide residue noted on smooth surfaces after treatment using
a clean damp cloth.
!
CAUTION
10% d-phenothrin is not approved for use in California, except in Federal installa-
tions such as military airports.
NOTICE
Supplies are limited.
10% d-phenothrin will be available only until existing supplies are depleted.

10/2020-40 Treatment Manual 2-13-1
Chapter
2
Chemical Treatments
Dips
Contents
Overview 2-13-1
Safety and Dip Treatment Equipment and Materials 2-13-1
Personal Protective Equipment (PPE) 2-13-1
Dip Treatment Equipment and Materials 2-13-2
Dip Treatment Procedures 2-13-3
Sodium Hypochlorite (Bleach) Treatments 2-13-5
Bleach Product Formulation Dilution Information 2-13-5
Adjusting pH 2-13-7
Using pH Test Color Strips 2-13-7
Health and Safety When Adjusting pH 2-13-7
Safety Responsibilities 2-13-8
Overview
As with other treatments, chemical dips require careful planning and
preparation. Make sure you have all the necessary safety and treatment
equipment and materials ready before you start the dip treatment procedure.
When you handle pesticides, always comply with the pesticide label
instructions, and State and local regulations.
Safety and Dip Treatment Equipment and Materials
The following lists include safety equipment (personal protective equipment,
PPE) and basic material that you will need for dip treatments. However, other
materials may be required by additional label requirements that are specific to
the chemical being used.
Personal Protective Equipment (PPE)
Always check the label and Safety Data Sheet (SDS) for additional
requirements of personal protective equipment. The following is a basic list of
PPE that you will need for dip treatments:
Chemical-resistant footwear (rubber or neoprene boots)
Chemical-resistant gloves (neoprene)
Chemical-resistant headgear for overhead exposure
Chemical-resistant rain suit with hood

Chemical Treatments Dips
Safety and Dip Treatment Equipment and Materials
2-13-2 Treatment Manual 10/2020-40
Protective eye wear (goggles)
Respirator (per label and SDS requirements)
Dip Treatment Equipment and Materials
Always check the label for additional requirements for equipment and
materials. The following is a basic list of equipment and materials you will
need for dip treatments:
Fans
1
Liquid soap
1
Mixing containers and dipping containers must be provided with lids to
prevent spills during transportation and storage
New boxes (when reconditioning or excess contamination of original
boxes is not possible)
Newspaper or any other absorbent paper
Packing material
1
Pallets
1
Pesticides
Plastic bags (4 to 6 mil plastic)
1
Shear scissors
1 This equipment will be provided by USDA when available.
NOTICE
A mechanical exhaust is the preferred method of aeration when it is specifically
installed to remove chemical fumes from the treatment area. Fans may be used if
they do not cause airborne pesticides to contaminate the treatment facility or the
breathable air. The flow of air should be across the dip vat/container and away from
people in the treatment area.
NOTICE
Place plastic backed paper on pallets prior to covering with paper and/or absorbent
paper to preclude the pesticide being absorbed onto the wood.
NOTICE
Place plastic backed paper on pallets prior to covering with paper and/or absorbent
paper to preclude the pesticide being absorbed onto the wood.
NOTICE
Pesticides should be fresh (not over 1 year old). Labels and SDS must be attached
to the pesticide container and all instructions must be followed.

Chemical Treatments Dips
Safety and Dip Treatment Equipment and Materials
10/2020-40 Treatment Manual 2-13-3
Sponges
Dip Treatment Procedures
Step 1: Plan for the Dip Treatment
Before you start the dip treatment, inform the customer (broker/importer) of
the specific material and PPE that will be needed to perform the dip treatment
procedure. All required materials and equipment must be available at the time
of treatment.
Step 2: Designate Restricted Use Areas
Designate the following restricted use areas:
Measuring and mixing area—The measuring and mixing area for the
specific pesticide(s) must be in a well-ventilated area away from food
preparation, eating areas, and offices. Areas that contain mechanical
exhaust systems are preferred.
Plant material dipping area—The plant material dipping area must be
an area where access is limited by a barricade or warning signs. Areas
that contain mechanical exhaust systems are preferred.
Plant material drying area—The plant material drying area must have
proper air circulation and exhaust ventilation. These areas should be
closed to the dipping area. The route from the dipping area to the drying
area should be lined with plastic backed absorbent paper or plastic and
paper to catch excess pesticide solution.
Step 3: Prepare Plant Material
Prepare the plant material for the dip treatment according to the PPQ Treatment
Manual and pesticide label requirements.
Step 4: Prepare the Pesticide Solution
1. Measure the amount of water required for the treatment.
2. Measure the amount of pesticide required for the treatment.
3. Prepare a pesticide paste as follows:
!
CAUTION
Wear PPE and keep the exhaust system running when you are preparing pesticide
solutions. To minimize your exposure to the pesticide dust or airborne particles, keep
the pesticide between you and the exhaust.
NOTICE
It is important to use fresh chemicals for every solution. If questions arise during this
procedure, stop and seek assistance from the USDA-APHIS-PPQ-S&T-TMT (305)
278-4877.

Chemical Treatments Dips
Safety and Dip Treatment Equipment and Materials
2-13-4 Treatment Manual 10/2020-40
A. Add the previously measured amount of water into a clean and empty
container, for example, an empty can or plastic container.
B. Form a paste (with dry pesticides) by adding the measured pesticide to
the small amount of water and mix gently.
C. Dilute the paste by slowly adding more water from the previously
measured water.
D. Slowly add the concentrated solution(s) to the rest of the measured
water.
4. Add some drops of liquid soap to the solution (soap is used as a sticking
agent).
5. Mix the final solution by stirring it gently.
Step 5: Dip the Plants in the Pesticide Solution
Dip the plants in the solution for the time required by this manual.
Step 6: Remove the Plants from the Pesticide Solution
Remove the plants from the solution and allow excess solution to drip into the
dipping container.
Step 7: Dry the Plants
Place the plants on newspaper covered pallets and allow them to dry (make
sure to space the plants out for maximum drying).
Step 8: Disinfect Original Shipping Containers
Disinfect the original shipping containers with a sponge containing the
pesticide solution. The plant material may be packed with new packing
material in a previously used container that has been disinfected.
Step 9: Clean Up the Treatment Area and Equipment
Discard all empty containers, excess pesticides, packing materials, plastic
bags/backing materials, and newspaper/absorbent paper in compliance with
instructions on the label and State/local regulations. Decontaminate all
treatment areas and equipment while you are wearing your PPE.
Step 10: Release the Cargo
After the plant material is dry, release it to the customer or broker if agreed to
by the airline and if it has been released by Customs.
!
CAUTION
Thoroughly dry the plants before releasing them to the customer.
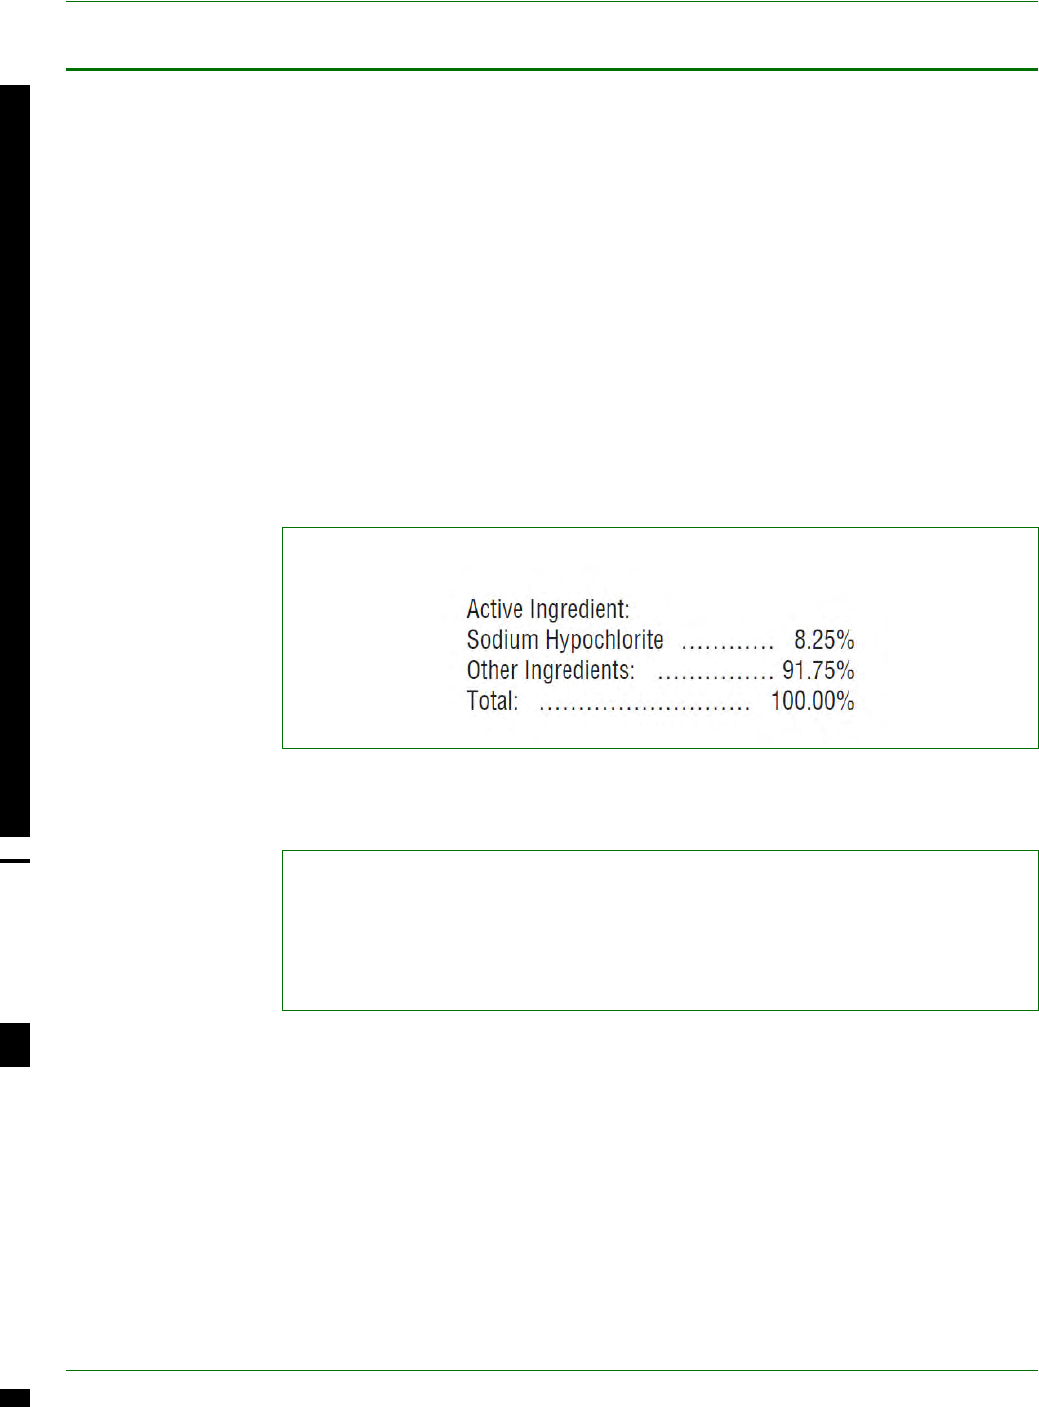
Chemical Treatments Dips
Sodium Hypochlorite (Bleach) Treatments
10/2020-40 Treatment Manual 2-13-5
Sodium Hypochlorite (Bleach) Treatments
Sodium hypochlorite is considered a pesticide and is regulated by the EPA.
Applicators must follow the EPA label and have it available when applying
sodium hypochlorite. Each EPA registration has a rate, application method, and
site. The site being treated must be listed on the label. If the site is not on the
EPA label, you cannot use the product.
The applicator must read and follow all precautionary statements on the EPA
label and associated container. Always refer to the EPA label for use sites and
dilutions.
Bleach Product Formulation Dilution Information
Refer to the label to determine the concentration (% concentrate) of the sodium
hypochlorite product you are using. In the example in Figure 2-13-1, the
percent concentrate is 8.25%.
Determine the total parts of water needed using the formula in Figure 2-13-2.
Figure 2-13-1 Example of % Concentrate From Puma® Label (EPA #5813-100)
Figure 2-13-2 Formula to Determine Total Parts of Water to Prepare a Bleach
Disinfectant
BleachConcentrate
DesiredFinalDilution
---------------------------------------------------------- 1 T o ta l Pa rts Wa t er=–

Chemical Treatments Dips
Sodium Hypochlorite (Bleach) Treatments
2-13-6 Treatment Manual 10/2020-40
Table 2-13-1 provides calculated values of common dilution formulations used
by PPQ. If the bleach formulation and desired solution values are not included
in Table 2-13-1, refer to the formula in Figure 2-13-2.
EXAMPLE
The treatment schedule, T511-1, requires a 0.525% chlorine solution
(5,250 ppm). The sodium hypochlorite product you are using has
8.25% active ingredient.
Calculate the dilution as follows:
[8.25% / 0.525%] - 1 = 15.71 - 1 = 14.71
Do not convert the percentage values to decimals before dividing.
The final result can be rounded up or down.
In this example, you would take 1 part of the 8.25% product and add
15 equal parts of water to make a 0.525% disinfecting solution.
Apply this dilution using any volume. For example:
Mix 1 cup bleach with 15 cups water.
Mix 1 tablespoon bleach with 15 tablespoons water.
Table 2-13-1 Common Products Dilution Ratio to Add to 1 Part Bleach
Bleach Formulation Desired Solution (PPM) Parts Volume of Water
5.25% 200 262
5,250 9
6% 200 299
5,250 10
8.25% 200 411
5,250 15
8.3% 200 414
5,250 15
8.4% 200 419
5,250 15
8.5% 200 424
5,250 15
8.6% 200 429
5,250 15
10% 200 499
5,250 18
12.5% 200 624
5,250 23
15% 200 749
5,250 28

Chemical Treatments Dips
Sodium Hypochlorite (Bleach) Treatments
10/2020-40 Treatment Manual 2-13-7
Adjusting pH
The bleach solution must be pH 5.5 to 7.0. Use pH test color strip kits to
determine the pH of the solution. If needed, adjust the pH to 5.5 to 7.0 using
5% acetic acid (white vinegar) under a fume hood or in a well-ventilated area.
Avoid a pH lower than 5.5.
Using pH Test Color Strips
Use pH test strips with a range of 0-14 pH with color chart intervals from 1 to
14.
1. Remove the test strip from the bottle and recap the bottle tightly.
2. Dip the strip in the bleach solution deep enough to wet the test pad(s) and
remove according to bottle directions.
3. Remove excess water by shaking the strip once briskly according to bottle
directions.
4. Hold strip horizontally, pad side up, for 15 seconds according to bottle
directions.
5. Compare the color of the strip with the color chart on the bottle.
Health and Safety When Adjusting pH
Acidifying sodium hypochlorite solutions to modify the pH may result in
release of chlorine gas.
Follow all safety precautions listed on the label. Precautions include, but are
not limited to:
Respiratory Protection—When exposures exceed the OSHA 8-hour time
weighted average of 0.5 ppm or the OSHA 15-minute short term
exposure limit of 1 ppm, an air-purifying respirator with proper chemical
cartridges or air-supplying respirator must be worn. When exposure
levels exceed the NIOSH IDLH of 10 ppm, an air-supplying respirator
must be worn.
Personal Protective Equipment (PPE)—Wear ANSI-approved safety
glasses or goggles, chemical resistant gloves, lab coat or protective
clothing, long pants, and closed-toe shoes.
!
WARNING
Chlorine gas can cause severe skin burns and eye damage. It is corrosive to the
respiratory tract and may be fatal if inhaled. Adverse symptoms may include pain
and redness in the eyes, coughing, blistering of the skin, and stomach pain. The
absence of odor is not a reliable indicator of safety.

Chemical Treatments Dips
Safety Responsibilities
2-13-8 Treatment Manual 10/2020-40
Engineering Controls—Work under a certified chemical fume hood. In the
field, ensure adequate exhaust ventilation is provided to ensure exposures
remain permissible exposure levels.
Safety Responsibilities
The PPQ Officer is responsible for the following safety issues:
Make the broker/importer aware of his or her responsibilities as it pertains
to:
Materials
Personal protective equipment (PPE)
Health hazard and safety concerns when performing the dip treatment
process
All personnel involved in the dip treatment process are required to wear
the appropriate and label required PPE while performing the treatment.
PPQ Officers may need to wear PPE if the dip treatment process area
prevents them from observing the process from outside the restricted
area.
Designated dip treatment process areas must be located away from food
preparation, eating areas, and offices. Make every effort to place dip
treatment processes in an area containing a mechanical exhaust.
The broker/importer personnel involved with treatments must be aware
and briefed on the location of the emergency eyewash and all other
required safety equipment. They also need to be aware of the areas that
they will be limited to working within and any other specific restrictions
determined by the PPQ Officer in charge of the process. The PPQ Officer
monitoring the process should be aware of the procedures to be followed
in the event of an accidental release of the pesticide or an injury to one of
the broker/importer’s personnel.
The broker/importer personnel should shower as soon as possible after
performing a dip treatment. The PPQ Officer should ensure that
personnel are aware of the location and route to the shower. Guidance
should also include instruction on how to disrobe and dispose of clothing
used during dip treatment processes. All contaminated clothing and PPE
must be removed before entering the shower room. Contaminated
clothing should be placed in plastic bags and PPE in separate plastic bags.
Inform the broker/importer personnel that clothes worn during treatment
must be washed in hot water with detergent and that they should be
washed separately from other clothes.

Chemical Treatments Dips
Safety Responsibilities
10/2020-40 Treatment Manual 2-13-9
Release the plant material to the broker/importer only if they are using or
provide a vehicle that has a compartment physically separated from the
cab, for example, a pick-up truck or tractor trailer.

Chemical Treatments Dips
Safety Responsibilities
2-13-10 Treatment Manual 10/2020-40

09/2012-01 Treatment Manual 2-14-1
Chapter
2
Chemical Treatments
Dusts
Contents
This section for future development.

Chemical Treatments Dusts
Contents
2-14-2 Treatment Manual 09/2012-01

09/2012-01 Treatment Manual 2-15-1
Chapter
2
Chemical Treatments
Sprays
Contents
This section for future development.

Chemical Treatments Sprays
Contents
2-15-2 Treatment Manual 09/2012-01

10/2002-04 Treatment Manual 3-1-1
Chapter
3
Nonchemical Treatments
Overview
Contents
Heat 3-2-1
Cold Treatment (CT) 3-7-1
Irradiation 3-8-1
The nonchemical treatment section of this manual is organized as follows:
Cold
Heat
Irradiation
Use the Table of Contents at the beginning of each section to quickly find the
information you need. If the Table of Contents is not specific enough, then turn
to the Index to find the topic and its page number.

Nonchemical Treatments Overview
Contents
3-1-2 Treatment Manual 10/2002-04

06/2008-25 Treatment Manual 3-2-1
Chapter
3
Nonchemical Treatments
Heat
Contents
Introduction 3-2-1
Heat – Hot Water Immersion 3-3-1
Heat – Steam Treatments 3-4-1
Heat – Vapor Heat and Forced Hot Air 3-5-1
Heat – Forced Hot Air – Niger Seed 3-6-1
Introduction
Heat treatments are generally based on maintaining the plant material at a
specific temperature for a specified time. Heat treatments, as other quarantine
treatments, are designed to kill plant pests without destroying or appreciably
devaluing the infested commodity. The following heat treatments are described
in this section:
Hot Water Immersion Treatment
Steam Treatments
Vapor Heat and Forced Hot Air Treatment
Forced Hot Air – Niger Seed

Nonchemical Treatments Heat
Introduction
3-2-2 Treatment Manual 06/2008-25

02/2020-30 Treatment Manual 3-3-1
Chapter
3
Nonchemical Treatments
Heat – Hot Water Immersion
Contents
Hot Water Immersion Treatment—Fruit Fly Host Commodities Such as
Mangoes 3-3-3
Principle 3-3-3
Schedules 3-3-3
Procedures 3-3-3
Checklist of USDA-APHIS Minimum Requirements for Hot Water Immersion
Treatment Facilities: General Requirements 3-3-4
Proposal Submission 3-3-4
On-Site Inspection Option 3-3-4
Facility Design 3-3-4
Electrical and Electronic Components 3-3-6
Wiring 3-3-6
Computers and Microprocessors 3-3-6
Commercial Line Conditioner (Surge Protector) 3-3-6
Electrical Generator 3-3-6
Fruit Sizing Equipment 3-3-6
Boilers and Thermostatic Controls 3-3-7
Adequate Water Heating Capacity 3-3-7
Thermostatic Controls (Set Point) 3-3-7
Multiple Set Point Option 3-3-7
Water Circulation 3-3-8
Temperature Sensors 3-3-8
Type of Sensor 3-3-8
Number of Sensors Required and Their Placement 3-3-8
Tank Access for Temporary Placement of Portable Sensors 3-3-9
Certified Glass-Mercury, Non-mercury, and Digital Thermometer 3-3-9
Temperature Recorder 3-3-9
Automatic Operation 3-3-9
Long-Term Recording 3-3-9
Recording Frequency 3-3-9
Accuracy 3-3-10
Repeatability 3-3-10
Calibration 3-3-10
Range 3-3-10
APHIS-Approved Recorder Models 3-3-10
Approved Strip Chart (Pen) Recorder Models 3-3-11
Approved Data Logger Recorder Models 3-3-11

Nonchemical Treatments Heat – Hot Water Immersion
Contents
3-3-2 Treatment Manual 02/2020-30
Chart Paper Specifications 3-3-12
Alarm System 3-3-13
Safeguarding the Treated Fruit 3-3-13
Layout and Flow Pattern 3-3-13
Garbage Disposal 3-3-13
Quarantine Area 3-3-13
Pretreatment Warming Options 3-3-14
Post-treatment Cooling Options 3-3-14
Refrigerated Room 3-3-15
Fans 3-3-15
Hydrocooling 3-3-15
Facility Changes 3-3-15
Safety and Health Checklist 3-3-15
Work Plan 3-3-16
Plant Material Not Tolerant to Fumigation 3-3-16
Address for Technical Contact 3-3-17

Nonchemical Treatments Heat – Hot Water Immersion
Hot Water Immersion Treatment—Fruit Fly Host Commodities Such as Mangoes
02/2020-30 Treatment Manual 3-3-3
Hot Water Immersion Treatment—Fruit Fly Host Commodities Such
as Mangoes
Principle
Hot water immersion treatment (also called hydrothermal treatment) uses
heated water to raise the temperature of the commodity to the required
temperature for a specified period of time. This is used primarily for certain
fruits that are hosts of fruit flies, but may also be used for nursery stock for a
variety of pests.
Schedules
Refer to the appropriate section in the this manual for treatment schedules. The
time/temperature relationship varies with the commodity and pest. Typically,
the pulp temperature is raised using water heated to between 115 °F and 118 °F
for a prescribed period of time.
Procedures
Before the start of each treatment, examine the facility for proper
operation of the heating, circulation, and recording equipment. Examine
continuous flow equipment (submerged conveyor belt) at the start of each
day or run.
Commodities subject to size restrictions require a preliminary culling
procedure to eliminate oversized items prior to treatment.
Conduct all treatments in an approved tank.
Entire treatment will be under general monitoring of APHIS, and may be
further governed by a signed work plan (for foreign facilities), or
compliance agreement (for domestic facilities).
Load immersion tanks in a manner approved by the USDA, usually using
baskets with perforations that allow adequate water circulation and heat
exchange.
Number each treatment container or lot before placing in the immersion
tank.
Record the temperature and duration of each hot water dip with an
automatic temperature recording system.
A responsible employee of the packing company must indicate on the
printed temperature record the starting time, lot number, duration of
each treatment, and initial each entry.
An alternative recording system can be used only with prior APHIS
approval.

Nonchemical Treatments Heat – Hot Water Immersion
Checklist of USDA-APHIS Minimum Requirements for Hot Water Immersion Treatment Facilities: General Requirements
3-3-4 Treatment Manual 02/2020-30
During certification, the average pulp temperature becomes the
minimum commercial treatment pulp temperature.
During commercial treatments, the “Adjusted Tank Sensor
Temperature” is used as the lowest treatment temperature. See
Hypothetical Certification Results: Treatment Tank with Multiple Set
Points on page 6-5-3 for more information.
Stamp all boxes of hot water-treated fruit, “Treated with Hot Water,
APHIS-USDA,” together with the numerical designation APHIS has
assigned to the particular treatment facility.
When treatment is complete, promptly move commodities treated at
origin to an insect-free enclosure.
Use insect-proof containers, screened or enclosed rooms, doors with
air curtains, or some combination to maintain commodities insect free
throughout the shipping process.
Checklist of USDA-APHIS Minimum Requirements for Hot Water
Immersion Treatment Facilities: General Requirements
Proposal Submission
Follow guidance from APHIS-PPQ Preclearance and Offshore Programs
(POP) when submitting proposals for new hot water facilities.
On-Site Inspection Option
When the construction is 75 percent complete, the firm can request APHIS to
make an on-site inspection. This interim inspection is optional. However, a
final inspection is required, as well as performance tests of the equipment. All
costs involved must be prepaid by the requesting firm.
Facility Design
APHIS does not provide construction details, but only this list of minimum
requirements. Design and construction of the hot water facility is the
responsibility of the owner, in consultation with an engineering firm.
(Engineering firms and sources of supply are provided in Appendix E on page
E-1-1). To take into account variations in facility size, availability of materials,
economic feasibility, and individual preference, APHIS allows a wide range of
design flexibility.
Although each facility is somewhat unique, there are two basic designs for hot
water facilities. The two types are referred to as the Batch System (Sometimes
called “Jacuzzi System”) and the Continuous Flow System.

Nonchemical Treatments Heat – Hot Water Immersion
Checklist of USDA-APHIS Minimum Requirements for Hot Water Immersion Treatment Facilities: General Requirements
02/2020-30 Treatment Manual 3-3-5
Batch System (Sometimes called “Jacuzzi System”)
Most hot water immersion treatment facilities are the batch system type. In this
system, baskets of fruit are loaded onto a platform, which is then lowered into
the hot water immersion tank where the fruit remain at the prescribed
temperature for a certain length of time, then are taken out, usually by means
of an overhead hoist. In this system, the treatment chart must indicate (by an
identifiable marking) when a fruit basket is prematurely removed from the
tank. Other alternatives include a solenoid switch, sensor, or similar device that
disengages whenever a basket is removed from the treatment tank, or a locking
device to make it physically impossible to remove the fruit until the treatment
is fully complete.
Continuous Flow System
In the continuous flow type of system, the fruit are submerged (either loosely
or in wire or plastic mesh baskets) on a conveyor belt, which moves slowly
from one end of the hot water tank to the other. Belt speed is set to ensure the
fruits are submerged for the required length of time. This system requires an
instrument to monitor the speed of the conveyor belt. This can be
accomplished by attaching a speed indicator (encoder) to the gear mechanism.
The belt speed is recorded on the same chart as the time and temperature, and
also indicates whether the belt is moving or stopped during the treatment cycle.
Smaller fruits require less treatment time than larger fruits. Therefore,
conveyor belt speed should be adjustable to accommodate treatments of
different lengths of time. As an alternative, the belt speed may remain constant,
but the length of the submerged portion of the belt is adjusted according to the
length of treatment time required for the particular size of fruit. The conveyor
must prohibit either forward or backward movement of the fruit during
treatment (due to flotation).
Some operators believe that treating fruit while it passes through the system on
a conveyor belt is an advantage. Few new systems of this type were built after
1990, presumably because mechanical fruit damage (scratching of the peel)
often occurs if the fruit are not in baskets. The system also occupies much
more floor space in the plant than a batch system.
Water Quality
The water used for washing, dipping, hydrocooling, or showering the fruit
should be chlorinated at a level not to exceed 200 parts per million (ppm). This
level is easier to maintain if the water is first filtered and run through a
flocculation process to remove organic material that would otherwise bind with
the chlorine.
The facility should check the water for microbial contamination on a regular
basis. To maintain sanitary conditions, change water as necessary. Implement
standard operating procedures to include water change schedules for all

Nonchemical Treatments Heat – Hot Water Immersion
Electrical and Electronic Components
3-3-6 Treatment Manual 02/2020-30
processes that use water. To ensure the safety of the fruit, the facility must
clean and sanitize surfaces that come into contact with water, such as wash
tanks, hot water tanks, and hydrocooling tanks, as often as necessary. To ensure
efficient operation, routinely inspect and maintain equipment designed to assist
in maintaining water quality, such as chlorine injectors, filtration systems, and
backflow devices.
Electrical and Electronic Components
Wiring
Electrical wiring throughout the facility must meet both international, as well
as local safety code requirements. To eliminate shock hazard, earth grounding
is required for all electrical wiring located in the vicinity of water. To prevent
damage, shield wires inside metal or PVC conduit.
Computers and Microprocessors
To maintain accuracy and reliability, place computers and microprocessors in a
climate-controlled (air conditioned) room. This room should be above tank
level, provide a clear view of the treatment tank(s), and be lockable. This room
can also serve as an office for the inspector.
Commercial Line Conditioner (Surge Protector)
A commercial line conditioner is recommended for use with computers and
microprocessors to provide protection from voltage irregularity (power
surges), noise reduction, and harmonic distortion.
Electrical Generator
In the event of a power outage and to provide a secondary source of electricity
to enable continued plant operation, an electrical generator is recommended as
a backup power supply.
Fruit Sizing Equipment
In the treatment schedule, the duration of hot water immersion depends on the
particular weight class and variety of the fruit being processed. The inspector
must visually inspect and weigh the largest fruit until the inspector is satisfied
that all of the fruit is within the weight class. The weight inspection must
occur for each lot change (orchard or variety) to ensure the accuracy of the
sizing equipment. No mangoes will be accepted that are over the weight class.
!
CAUTION
Periodic monitoring by the facility is critical, because chlorine levels above 300 ppm
can result in metal corrosion.

Nonchemical Treatments Heat – Hot Water Immersion
Boilers and Thermostatic Controls
02/2020-30 Treatment Manual 3-3-7
It is very important to have accurate sizing equipment that sorts the fruit into
groups, either by diameter or by weight. (Weight sorting is the preferred
method.) If the weight range is too broad, recalibrate the equipment.
Boilers and Thermostatic Controls
Adequate Water Heating Capacity
The hot water facility must have adequate water heating capacity (i.e., a
powerful enough boiler), and accurate enough thermostatic controls to hold the
water temperature at or above the temperatures prescribed in the treatment
schedule for the given length of time.
Thermostatic Controls (Set Point)
APHIS requires that the thermostatic controls be automatic. The temperature
set point(s) are determined and approved during the official performance test,
and must be high enough to ensure the water in the treatment tank will meet or
exceed the minimum treatment temperature prescribed for the fruit. Once
approved, do not tamper with the temperature set points. Temperature set
points must remain constant for the entire shipping season. However, if the
operator of the facility requests a change in set points, the inspector should
conduct a new performance test. If this test is unsuccessful, revert the tanks to
their prior set points.
Multiple Set Point Option
Managers of some facilities use multiple set points for each tank. The initial set
point is higher than the other set points. All set points will be selected by the
facility manager or systems engineer based on results of the preliminary
performance test.
Verify the set points during the official performance test, and the same
procedure must be repeated on each subsequent commercial treatment. This
system works only for tanks that treat only one cage (basket) of fruit at a time.
NOTICE
Tanks are not allowed to have any set point that is lower than the standard treatment
temperature for the commodity being treated (115 °F in the case of mangoes).

Nonchemical Treatments Heat – Hot Water Immersion
Water Circulation
3-3-8 Treatment Manual 02/2020-30
Water Circulation
Install a water circulation system in the tank to provide uniform water
temperatures throughout the treatment process and to avoid the formation of
cool pockets during treatment. To guarantee that the equipment is not turned
off during the treatment process, the controls for the circulation pumps or
propellers must be tamper resistant. For the safety of personnel working in the
area, shield pulleys on all pumps located within 6 feet of the floor.
After the first 5 minutes of treatment (with the tank sensor at “lowest
temperature permitted at that set point”), differences in the lowest and highest
actual temperature sensor readings of more than 1.8 °F may be accepted on a
case-by-case basis.
Using a flotation barrier, keep the fruit at least 4 inches (10.2 cm) below the
water surface during the treatment.
Temperature Sensors
Type of Sensor
Permanently install platinum 100-ohm resistive thermal detectors (RTD
sensors) in the lower third of the tank. The resistance of an RTD sensor linearly
changes with temperature, whereas thermistors and thermocouples are
nonlinear and less stable. Major advantages of RTD sensors include long-term
stability, high signal levels, and overall accuracy of the system. Place the
sensor unit within the distal 1 inch(2.54 cm) of the sensor rod. The sensor must
have an outer sheath of 0.25 inch (6.4 mm) or less in diameter.
Number of Sensors Required and Their Placement
For continuous flow systems, the minimum number of sensors required is at
least 10 per tank, which must be spaced throughout the length of the conveyor.
For batch systems, the requirement is at least two sensors per tank. However,
in tanks that treat multiple baskets (cages) of fruit, there must be at least one
sensor per basket position. (A tank with four basket positions, for example,
would require at least four sensors.) In both the batch and continuous flow
systems, install sensors in the lower third of the tank.

Nonchemical Treatments Heat – Hot Water Immersion
Temperature Recorder
02/2020-30 Treatment Manual 3-3-9
Tank Access for Temporary Placement of Portable Sensors
The hot water tank must be designed to accommodate the temporary
placement of numerous portable sensors or probes to be used during the
performance testing procedure required for certification or recertification.
During the testing procedure and at the direction of the inspector who conducts
the performance test, position the temporary sensors throughout the load of
fruit. The facility is required to purchase and have available 24 portable
thermistor or thermocouple sensors (each with its own flexible cord at least 10
feet in length), and a portable temperature monitor that reads to the nearest
one-tenth of a degree.
Certified Glass-Mercury, Non-mercury, and Digital
Thermometer
The treatment facility is required to have at least one high-accuracy, water-
immersible, certified mercury, non-mercury, or digital thermometer on the
premises at all times. This thermometer must be accurate to 0.1 °F (or C) and
will cover the range between 113 °F to 118 °F (45 °C to 47.8 °C). It will be
used as the standard against which all sensors are calibrated.
Temperature Recorder
Use an automatic temperature recorder (strip chart or data logger) to record the
time and temperature during each treatment.
Automatic Operation
The instrument used for recording the time and temperature must be capable
of automatic operation whenever the hot water treatment system is activated.
Long-Term Recording
The recording equipment must be capable of nonstop recording for an
extended period of time. Continuous flow systems require recording
equipment capable of operating for up to 12 consecutive hours.
Recording Frequency
The time interval between prints will be no less than once every 2 minutes.
Alternatively, a strip chart system can be used that gives continuous color pen
lines. The numerical print or pen line representing each temperature channel
(sensor) must be uniquely identified by color, number, or symbol. It is not
necessary to record temperatures from sensors located in portions of the tank
not in use.

Nonchemical Treatments Heat – Hot Water Immersion
Temperature Recorder
3-3-10 Treatment Manual 02/2020-30
Accuracy
The accuracy of the temperature recording system (i.e., sensors and recorders)
must be within 0.5 °F (0.3 °C) of the true temperature (as verified by a
certified mercury, non-mercury, or digital thermometer). The temperature
variation for the control sensors should be as close to zero as possible.
Repeatability
When used under field conditions over an extended period of time, the
recording equipment must be capable of repeatability to within 0.1 °F (or C) of
the true calibrated readings. Failure to maintain reliability, accuracy, and
readability in a previously approved instrument will result in canceling
approval. The design, construction, and materials must be such that the typical
environmental conditions (including vibration) will not affect performance.
Calibration
Individually calibrate channels (sensors) against a certified mercury, non-
mercury, or digital thermometer reading in tenths of a degree Fahrenheit or
Centigrade, within the range of 113 °F to 118 °F (45 °C to 47.8 °C). The
engineering firm that installs the recording equipment must also calibrate it.
(Calibration equipment often used for this purpose includes, for example, a
Decade instrument and relay range cards.) Calibrate the sensors at or near the
fruit treatment temperature (around 115 °F), not at 32 °F.
Range
The recorder must be programmed to cover the entire range between 113 °F to
118 °F (45 °C to 47.8 °C), with a resolution of one-tenth of a degree. The range
should not extend below 100 °F (37.8 °C) nor above 130 °F (54.4 °C). If the
range band of the recorder is wider than this, restrict it (narrowed) with proper
programming.
APHIS-Approved Recorder Models
Some recorder models currently on the market are not approved by APHIS for
various reasons. For example, if the recorder only displays the sensor numbers
and temperatures without making a printout on paper; or if it prints out the
temperature data only after the treatment has been completed, it is not
approved by APHIS. (These are known as “memory loggers.”) These two
types of recorder models do not provide an adequate level of monitoring
during treatment. Also, revolving circular charts are not acceptable because of
the difficulty in reading fractions of one degree.
Temperature recorder models presently approved by APHIS are listed below.
They can be either of the strip chart or data logger type. Some have adjustable
chart speeds. Additional temperature recorder models may be added to this list
upon petition to the USDA-APHIS-PPQ-S&T-TMT. To seek APHIS approval

Nonchemical Treatments Heat – Hot Water Immersion
Temperature Recorder
02/2020-30 Treatment Manual 3-3-11
for recorder models not listed, submit the manufacturer’s technical brochure to
the USDA-APHIS-PPQ-S&T-TMT for evaluation.
Approved Strip Chart (Pen) Recorder Models
Chessel 346
Honeywell DPR 100A (3-channel capability)
Honeywell DPR 100B (6-channel capability)
Honeywell DPR 100C (3-channel capability)
Honeywell DPR 100D (6-channel capability)
Honeywell DPR 180 (36-channel capability)
Honeywell DPR 1000 (6-channel capability)
Honeywell DPR 3000, version D4 (32-channel capability)
Molytek 2702
Neuberger P1Y
Toshiba AR201
Tracor 3000
Approved Data Logger Recorder Models
ASICS Systems B & C
Chino AA Series
Cole Parmer (32-channel capability)
Contech (10-, 16-, and 32-channel capability)
Model: Smart Seda
Flotek (must be attached to a printer)
HACCP Warrior PTR-4 (4-channel capability)
HAACP Warrior PTR-10 (10-channel capability)
Hidrosoft
Honeywell DPR I00B (6-channel capability)
Honeywell DPR-1500 (30-channel capability)
Honeywell DPR-3000, version D4 (32-channel capability)
HyThsoft v2
IBM-PC (must be attached to a printer)
NOTICE
Strip chart recorders are no longer approved for installation in new facilities or used
to replace any style of recorder.

Nonchemical Treatments Heat – Hot Water Immersion
Temperature Recorder
3-3-12 Treatment Manual 02/2020-30
Koyo, Model Direct Logic DL 350, with Hidro Soft
Nanmac H30-1
National Instruments (all HTS models and Labview 6.1 software)
NOJOXTEN-BR with software–Automation Studio V 3.09 IEC 61131-3-
ST
Omega OM-205
Omega OM-503
Ryan Data Mentor (12-channel capability)
Tracor Westronics (DDR10)
Chart Paper Specifications
Celsius or Fahrenheit Scale
Temperature can be recorded either in Fahrenheit or Celsius, although
Fahrenheit is preferred by APHIS.
Scale Deflection
Scale deflection on the strip chart paper must be at least 0.10 inches for each
degree Fahrenheit, or at least 5 mm for each degree Celsius. Greater width
between whole degrees, however, is preferred. Between each line representing
one degree, there must also be finer lines, each representing subdivisions of
one-tenth or two-tenths of a degree, in the range of 113 °F to 118 °F (45 °C to
47.8 °C).
Sample Required
Submit a sample of the strip chart or numerical printout made by the recording
equipment to USDA-APHIS-PPQ-S&T-TMT. It should be in the exact format
to be used at the facility during the treatment cycle. Each symbol on the print
wheel (or ink color, in the case of strip charts) must correspond to and identify
the particular sensor that it represents.
Chart Speed
Chart speed for strip chart recorders must be no less than 1 inch for every 5
minutes of treatment time.
Chart Length
The chart paper must be long enough to display at least 1 entire treatment.
Continuous flow systems must contain enough chart paper to continuously
record temperatures for up to 12 consecutive hours.

Nonchemical Treatments Heat – Hot Water Immersion
Alarm System
02/2020-30 Treatment Manual 3-3-13
Alarm System
An alarm is required for all batch (Jacuzzi) systems, in order to notify
packinghouse employees that a treatment has been completed for a particular
basket (cage). This system can be an audible noise (such as a horn, buzzer, or
bell) or a highly visible light attached to a timing device located on the
equipment that indicates time and temperature. Some facilities use both a noise
and a light. To avoid “overcooking,” the alarm system alerts the operator of the
hoist to remove a basket from the tank at the end of treatment.
Safeguarding the Treated Fruit
Layout and Flow Pattern
Design the flow pattern of the fruit moving through the hot water treatment
process to ensure that fruit waiting to be loaded into the hot water immersion
tank cannot become mixed with fruit that has already completed treatment.
Submit a drawing showing the proposed layout of the packinghouse to USDA-
APHIS-PPQ-S&T-TMT for approval.
Garbage Disposal
In order not to attract fruit flies, place cut fruit, culled fruit, rotting fruit, and
miscellaneous garbage into covered containers and remove from the premises
daily.
Quarantine Area
Bring treated fruit to an insect-free enclosure immediately after treatment. The
treated fruit must remain there until loading into insect-proof shipping
containers. The designated enclosure is usually a screened room. Packing line
equipment, hydrocooling equipment, and cool storage room (if any), should be
located in this area, but this equipment is not a requirement. To prevent the
movement of untreated fruit (accidentally or intentionally) into the insect-free
quarantine area, enforce effective procedures.
Screening and Other Materials
Ordinary window screen or mosquito netting (at least 100 mesh per square
inch) is sufficient to exclude fruit flies. Inspect it regularly and repair it as often
as needed. Solid glass, concrete, drywall, or wooden walls are also acceptable.

Nonchemical Treatments Heat – Hot Water Immersion
Pretreatment Warming Options
3-3-14 Treatment Manual 02/2020-30
Air Curtain
Place on the wall or ceiling prior to entering any quarantine area an apparatus
that generates a high-velocity wind barrier or air curtain (such as fans or
blowers and associated air-directing chambers or enclosures such as baffles,
boxes, etc.). This device must exclude the possible entry of fruit flies into the
insect-free enclosure. (For facilities approved prior to July 1, 1997, vertically
hang clear plastic flaps, as minimally required, at the doors to the insect-free
enclosure.)
Loading of Treated Fruit
When not in use, close doors leading from the quarantine area to the loading
dock. When loading, truck vans and containers must form a fly-proof seal with
the exterior wall. Prior to loading, inspect and disinfect truck vans and
containers. If wooden pallets are used, they must be completely free of wood-
infesting insects and bark. Apply a numbered APHIS seal to each container
before its departure.
Pretreatment Warming Options
Prewarming the fruit is sometimes desirable in order to meet the APHIS
requirement that all fruit pulp temperatures be at least 70 °F before the start of
the certification performance test. At the very least, the fruit pulp temperature
must reach the minimum pulp temperature stabilized during the certification
test for commercial treatment. After prewarming, take pulp temperatures from
the mangoes located at the coldest part of the crates and/or baskets. Do not
take the pulp temperatures from the mangoes that are located on the outside of
the basket or crate.
Post-treatment Cooling Options
Cooling the fruit after hot water treatment is not an APHIS requirement.
However, from the standpoint of fruit quality, many facilities choose to install
a system to cool the fruit after removal from the hot water.
Hydrocooling of the treated mangoes is allowed after a waiting period of 30
minutes following treatment, unless the original dip times indicated in the
treatment schedule are extended for 10 minutes. Allowing the fruit to simply
stand for at least 30 minutes after being removed from the hot water tank is
thought to be helpful in killing immature stages of fruit flies because the
mangoes complete their “cooking” process during that time.

Nonchemical Treatments Heat – Hot Water Immersion
Facility Changes
02/2020-30 Treatment Manual 3-3-15
Refrigerated Room
The recommended storage temperature for mangoes is between 55 °F and 57
°F (12.8 °C and 13.9 °C) at 85 to 90 percent relative humidity. These
temperatures delay softening and prolong storage life to approximately 2 to 3
weeks.
Fans
APHIS allows the use of fans in the screen room to blow air over the fruit as
soon as they are removed from the hot water tank (if desired). However, the
ambient air cannot be less than 70 °F.
Hydrocooling
APHIS allows the use of a cool water tank or shower system, but with the
following provisions:
During the waiting period and hydrocooling period, safeguard the
mangoes in a room or tunnel, separate from the hot water tanks
Water temperatures used during hydrocooling must be 70 °F or above
Water used for hydrocooling should be chlorinated (not to exceed 200
ppm)
Any other chemicals, such as fungicides, are optional, but must be
approved in advance by the FDA
Facility Changes
Hot water immersion treatment facilities whose construction was approved
under earlier guidelines can continue to operate with APHIS approval. Newer
facilities, however, are required to meet the current requirements outlined in
this checklist, which in most cases are more strict.
Once USDA-APHIS-PPQ-S&T-TMT has formally approved the plans and
drawings for a hot water immersion treatment facility, the facility can make no
further changes in the equipment without APHIS approval. Any proposed
changes or improvements must be described in writing (with accompanying
drawings, if necessary) and must be approved by APHIS in writing. Examples
of proposed changes include adding additional treatment tanks, adding a cold
storage room, and changing the model of the temperature recorder.
Safety and Health Checklist
Adequate lavatory
Admission of children or unauthorized persons into the treatment and
packing areas is prohibited if not accompanied by a responsible employee

Nonchemical Treatments Heat – Hot Water Immersion
Work Plan
3-3-16 Treatment Manual 02/2020-30
Approved safety ladders or walkways (catwalks, etc.) for observing
treatment tank operations
Electric power meets safety code requirements
Electrical wiring, including switches and other connections, contained
in metal or PVC conduit and grounded to prevent electrical shock
Engines, pulleys, drive belts, and other hazardous moving parts, if located
within 6 feet of floor level, guarded with a safety shield or barrier
Fire extinguisher located near the boiler
First aid kit located near moving machinery
Hard hats for workers and visitors must be worn in the treatment and
loading areas (optional if not required by local regulations)
Steam and hot water pipes insulated or otherwise protected
Sufficient lighting provided in working areas
Work Plan
A Work Plan is a formal agreement signed by a representative of each
treatment facility in a particular country, the Agriculture Ministry of the host
government, and by USDA-APHIS. Work Plans govern the day-to-day
operations of each facility and can be improved from one year to the next.
Work Plans usually contain additional provisions not included in this checklist.
Fruit exporters are required to operate under general APHIS monitoring and to
be in full compliance with all APHIS regulations as outlined in detail in the
current Work Plan. The operator of the facility, as well as the inspector
assigned to the facility, should each keep a copy available to resolve any
disputes.
Plant Material Not Tolerant to Fumigation
Propagative material may be free from visible pests, but certain pathogens may
cause undetectable symptoms.
Hot water dip treatment (52 °C/125.6 °F for 30 minutes), combined with hand
removal of visible pests is effective against numerous pests. See T201-p-4
Plant Material Not Tolerant to Fumigation on page 5-3-9 for a list of pests
controlled.
Operational procedures and equipment specifications are under development.

Nonchemical Treatments Heat – Hot Water Immersion
Address for Technical Contact
02/2020-30 Treatment Manual 3-3-17
Address for Technical Contact
USDA-APHIS-PPQ-S&T-TMT
13601 Old Cutler Road, Bldg. 63
Miami, FL 33158 USA
Phone: 305-278-4877
Fax: 305-278-4898
email: [email protected]

Nonchemical Treatments Heat – Hot Water Immersion
Address for Technical Contact
3-3-18 Treatment Manual 02/2020-30

07/2019-26 Treatment Manual 3-4-1
Chapter
3
Nonchemical Treatments
Heat – Steam Treatments
Contents
Principle 3-4-1
Steam Pressure Sterilization 3-4-1
Loose Masses of Material 3-4-2
Closely Packed Material 3-4-2
Steam Jet Method 3-4-3
Principle
Steam at a temperature of 212 °F will destroy most pathogenic microorganisms
of the common vegetative forms or the spore types when in the growing or
vegetative state in a short period of exposure. Some spores, however, are much
more resistant and will withstand prolonged periods of exposure to steam at
atmospheric pressure. Saturated steam at temperatures of 240 °F to 248 °F (10
to 15 lbs. pure steam pressure) will destroy the most resistant spores in a brief
interval of exposure. However, near-complete air discharge from the autoclave
or steam chamber is necessary. When steam is admitted to a chamber from
which the air is completely evacuated, the temperature of the steam throughout
the chamber will advance at once to the maximum range that can be attained
for the pressure carried. If air remains in the chamber, the ultimate temperature
will be reduced dependent upon the quantity of air remaining. Refer to a
recording or indicating thermometer for correct chamber temperature-pressure
relationships.
Detailed operational procedures and equipment specifications are under
development.
Steam Pressure Sterilization
Live steam is introduced into a closed chamber containing the material to be
treated until the required temperature and pressure are indicated. The
temperature/pressure relationship is maintained at or above this point for the
required exposure period. The exposure period will depend on the nature of the
material, quantity, and its penetrable condition.

Nonchemical Treatments Heat – Steam Treatments
Steam Pressure Sterilization
3-4-2 Treatment Manual 07/2019-26
Loose Masses of Material
For loose masses of material, which permit rapid and complete penetration of
steam to all parts of the mass, no initial vacuum is needed, but air must be
released until steam vapor escapes, and exposure at 20 pounds pressure for 10
minutes, 15 pounds for 15 minutes, or 10 pounds for 20 minutes is sufficient.
Closely Packed Material
For closely packed material, such as soil or baled straw, special measures are
needed to ensure rapid heat penetration to all parts of the material. Baled rice
straw, for example, is required to have a density of less than 30 pounds per
cubic foot since penetration at higher densities is too slow to be practical. Soil,
if in large containers, will not allow adequate treatment under normal
sterilization exposure periods. Quicker penetration of the steam is obtained by
first exhausting the air in the chamber to a high vacuum and then introducing
live steam until the required positive pressure is reached.
Examples of the pressure-temperature relationships are listed in Table 3-4-1.
The gauge pressure in pounds per square inch corresponds to the temperature
of saturated steam in degrees Fahrenheit. Zero gauge pressure corresponds to
an absolute pressure of 14.7 pounds per square inch. The figures are based
upon the complete replacement of air by steam. If air replacement is not
complete, the temperature for any given pressure will be less than the
corresponding temperature.
Table 3-4-1 Pressure Temperature Relationships
Gauge Pressure (lbs. per sq. in.) Temperature °F
10 239.4
15 249.8
20 258.8
30 274.1
40 286.7
50 297.7
60 307.4

Nonchemical Treatments Heat – Steam Treatments
Steam Jet Method
07/2019-26 Treatment Manual 3-4-3
Steam Jet Method
Live steam from a jet or nozzle is forced into or through a more or less loose
and open mass of material in such amount and for such period required to raise
the temperature of all parts of the mass to approximately 212 °F. This method
takes advantage of the considerable latent heat liberated when steam condenses
into water. This process does not effect complete sterilization since spore-
forming bacteria are not always destroyed. Since no spore-forming bacteria
are known that cause plant diseases, however, and fungi are readily killed by
the temperatures reached, this process is effective for quarantine purposes if
the necessary degree of heat is generated in all parts of the material.

Nonchemical Treatments Heat – Steam Treatments
Steam Jet Method
3-4-4 Treatment Manual 07/2019-26

12/2015-130 Treatment Manual 3-5-1
Chapter
3
Nonchemical Treatments
Heat – Vapor Heat and Forced Hot Air
Contents
Introduction 3-5-1
Procedures 3-5-2
Pretreatment 3-5-2
Loading 3-5-3
Conducting the Treatment 3-5-3
Verifying the Treatment 3-5-3
Post-Treatment Handling 3-5-4
Record Keeping 3-5-4
Common Problems and Failure Points 3-5-5
Introduction
Vapor Heat (VH) and Forced Hot Air (FHA) treatments use heated air to warm
fruit to temperatures that are lethal to target pests, primarily fruit flies.
Generally, VH treatment differs from FHA only in the relative humidity of the
air in the treatment chamber; higher humidity levels may preserve fruit quality.
Unless otherwise noted, information in this chapter applies to both VH and
FHA treatments for fruits and vegetables.
Each treatment facility is encouraged to develop automated data collection
systems designed to automate treatment tracking and ensure that treatment
specifications are met.
This chapter describes processes for routine (commercial) treatments for fresh
fruits and vegetables at VH and FHA facilities. See Certification of Forced Hot
Air and Vapor Heat Treatment Facilities on page 6-7-1 for VH and FHA
certification and equipment requirements.
VH treatment schedules can be found in T106—Vapor Heat on page 5-2-27.
FHA treatment schedules can be found in T103—High Temperature Forced
Air on page 5-2-21.

Nonchemical Treatments Heat – Vapor Heat and Forced Hot Air
Procedures
3-5-2 Treatment Manual 12/2015-130
Procedures
Before any treatments are conducted at a facility, the authorized PPQ official
or APHIS designated representative should familiarize themselves with the
facility and the way the chamber functions. The official should also carefully
review the treatment schedule for the commodity(ies) that will be treated, and
any special requirements specified during certification, in the work plan, or in
the compliance agreement. The PPQ official or APHIS designated
representative approving the facility has the option to increase the number of
permanent temperature sensors based on testing performed at the facility.
Pretreatment
Prior to treatment, the PPQ official or APHIS designated representative must
ensure that the facility and the chamber are in good working order and the
temperature sensors are functioning properly. For the purposes of this chapter,
the term “sensors” will refer to both permanent and portable temperature
sensors. Conduct a brief facility inspection, including chamber and equipment,
before any other steps in the treatment process are taken. During this
inspection, the official verifies that all safeguarding and quarantine measures
are in place and that there are no obvious problems that may affect the
treatment. If any deficiencies are found, correct them prior to treatment. After
the inspection, the official will assist facility personnel in the calibration of the
temperature sensors. See Calibrating the Sensors on page 6-7-4 for calibration
procedures.
Before treatment, the official ensures that the commodity meets the
requirements specified in this manual, the certification conditions, the work
plan, and/or the compliance agreement. These requirements generally include:
Fruit size and weight requirements: Verify the process and/or
equipment used to sort the fruit by measuring or weighing the fruit that is
to be treated. Weigh and measure the largest fruit per treatment lot. If fruit
are found that do not meet the size and weight requirements, evaluate the
sorting process and/or equipment and resort the fruit.
Fruit pulp temperature: There are no specific pretreatment fruit pulp
temperature requirements. However, the temperature of the fruit pulps
within the treatment lot should not vary by more than 3.0 °C (5.0 °F). The
PPQ official verifies that the pulp temperatures meet this requirement
prior to treatment.
Pest inspection: The PPQ official conducts pest inspections required by
the work plan and/or compliance agreement.

Nonchemical Treatments Heat – Vapor Heat and Forced Hot Air
Procedures
12/2015-130 Treatment Manual 3-5-3
Loading
Load the fruit into containers (crates, lugs, or bins) according to the
requirements in the certification conditions or work plan. Generally, these
requirements will indicate whether or not the fruit must be sorted and the
volume of fruit allowed in each container.
Load the containers onto pallets or into cabinets according to the requirements
in the certification conditions or work plan. These requirements may specify
that containers with larger fruit must be located in the colder areas of the stack,
or that certain layers of containers are left empty when partial loads are treated.
The sensors are placed in the largest fruit in the treatment lot as it is being
loaded into the containers. Insert the tip of the sensor into an area of the fruit
pulp that will take the longest to reach treatment temperature. The PPQ official
or APHIS designated representative monitors the placement of the sensors and
verifies that the probes are placed in the locations required by the certification
conditions.
Conducting the Treatment
After all the fruit is loaded into the containers and onto the pallets, and the
sensors are properly installed into the heaviest fruit, load the fruit into the
chamber. Close and lock the chamber doors to prevent accidental openings.
The PPQ official or APHIS designated representative (and the NPPO official,
if required by the work plan or compliance agreement) must initial the
treatment temperature record and the chamber operator can then initiate the
treatment.
During the treatment, the PPQ official or APHIS designated representative
must monitor the sensor data to ensure the treatment is proceeding in the
approved manner. The official must also check the chamber for leaks or other
problems during the treatment.
Verifying the Treatment
The PPQ official or APHIS designated representative must review the
treatment temperature record after the treatment is complete. The official must
ensure that the temperature and recording interval requirements have been met.
Additionally, the official must verify that the requirements for the duration of
the run up and dwell times are conducted according to the treatment schedule.
Time requirements for the run up and dwell times are continuous. Once the
official determines that all the treatment requirements are met, the official
must sign and date the treatment record.
Important Treatment Terminology
The following terms are referred to in the treatment schedules:

Nonchemical Treatments Heat – Vapor Heat and Forced Hot Air
Record Keeping
3-5-4 Treatment Manual 12/2015-130
Heat up time: the minimum time allowed for all the temperature probes
to reach the prescribed minimum pulp temperature (may also be referred
to as the approach or run-up time)
Heat up recording interval: the time interval required for recording
temperatures during the heat up time
Minimum air temperature: the minimum temperature required for the
air in the chamber
Minimum pulp temperature at end of heat up: the minimum
temperature required for all fruit pulp temperature probes
Dwell time: the length of time all pulp temperature probes must maintain
the minimum pulp temperature
Dwell recording interval: the time interval required for recording
temperatures during the dwell time
Cooling method: optional and may be either hydrocooled or air cooled
Post-Treatment Handling
After the treatment is complete, move the fruit from the chamber into the
quarantine area. Cool the fruit according to the requirements listed in the
treatment schedule.
Record Keeping
Keep all treatment records at the treatment facility for 1 year after treatment.
The facility must also maintain a record of all problems and/or breakdowns,
and any maintenance performed on the chamber. All the records listed above
must be made available to the PPQ official upon request.
Table 3-5-1 Example of a Treatment Schedule
Heat Up Time: 4 hours
Heat Up Recording Interval: 5 minutes
Minimum Air Temperature: N/A
Minimum Pulp Temperature at End of Heat Up: 47.2 °C/117.0 °F
Dwell Time: 5 minutes
Dwell Recording Interval: 5 minutes
Cooling Method: Forced air or Hydrocooled
NOTICE
“N/A” in any of the requirements in the Treatment Schedule indicates that PPQ has
no requirement.

Nonchemical Treatments Heat – Vapor Heat and Forced Hot Air
Common Problems and Failure Points
12/2015-130 Treatment Manual 3-5-5
Common Problems and Failure Points
If the temperature recording intervals and minimum temperature requirements
are not met, the treatment fails. The only exception to this is that a sensor may
record no data for a single recording interval during the treatment. (Note: This
does not mean the temperature may be out of range, only that the data may be
missing.) After reviewing the treatment data, the official should sign and date
the data.
If a problem arises during treatment, such as a sensor stops recording data,
records above other sensors, appears to be broken, or if the temperature drops
below the required temperature, the following actions must be taken:
After the treatment is complete, test the sensor according to calibration
procedures.
If the sensor passes calibration, then there was a problem with the
treatment. FAIL the treatment.
If the sensor fails calibration, then there was a problem with the sensor.
PASS the treatment. If there is more than one failed sensor, then fail
the treatment.
The facility manager must determine if the fruit will be re-treated or will be
removed from the chamber into the non-quarantine area.

Nonchemical Treatments Heat – Vapor Heat and Forced Hot Air
Common Problems and Failure Points
3-5-6 Treatment Manual 12/2015-130

08/2011-66 Treatment Manual 3-6-1
Chapter
3
Nonchemical Treatments
Heat – Forced Hot Air – Niger Seed
Contents
Heat Treatment of Niger Seed (Guizotia abyssinica) 3-6-1
Minimum Requirements for Heat Treatment Facilities 3-6-1
Treatment Requirements 3-6-2
Documentation Requirements 3-6-2
Sanitation and Pest Control 3-6-2
The Plant and Warehouse Premises 3-6-2
Containers and Packaging 3-6-2
Waste Disposal 3-6-2
Post Treatment Requirements 3-6-2
Heat Treatment of Niger Seed (Guizotia abyssinica)
Niger seed is imported into the United States for bird feed and is frequently
contaminated with Federal noxious weed seeds. In order to devitalize the weed
seeds, the Niger seed is required to undergo heat treatment in accordance with
T412 treatment schedule. Conduct the heat treatment in a foreign or domestic
APHIS-certified treatment facility.
Minimum Requirements for Heat Treatment Facilities
If the facility is located in the United States, it must be constructed near the
port environs (10 miles or less). The facility and equipment must adhere to the
following requirements:
All facilities must comply with treatment schedule T412-a in this
Treatment Manual. See Certification of Niger seed Treatment Facilities
on page 6-6-1 for certification guidelines.
All facilities must possess a current work plan or compliance agreement.
Facility operators or managers must record the following information on
each treatment recorder printout:
Date
Lot number
Operator signature

Nonchemical Treatments Heat – Forced Hot Air – Niger Seed
Sanitation and Pest Control
3-6-2 Treatment Manual 08/2011-66
Treatment Requirements
The Niger seed heat treatment schedule requires the seed be treated for a
minimum of 15 minutes at 248 °F/120 °C. Determine if the treatment standards
are met using the following guidance:
Examine treatment recorder printout for completion of treatment and
verify that the Niger seed was kept at the target temperature for the
required time.
If records indicate that any temperature reading fell below 248 °F/120 °C
for 15 minutes, nullify the treatment for that specific lot, correct the
reason for the faulty treatment, and re-treat the seed.
Documentation Requirements
Maintain a log book of all Niger seed treatments.
Maintain records of equipment breakdowns and repairs, changes, or
modifications to the treatment process, facility, and/or equipment.
Sanitation and Pest Control
The Plant and Warehouse Premises
Require the facility manager to ensure that there is a cleaning and control
program in the plant and/or warehouse, and that there are no potential breeding
grounds for pests on the premises.
Containers and Packaging
Require the facility manager to ensure that seed containers and/or packaging,
whether used or new, is checked and cleaned for pests so that the packages are
not a source of pests and contamination.
Waste Disposal
To minimize contamination risk and eliminate pest breeding sites, require the
facility manager to implement a regular waste program for waste and
nonconforming or infested produce.
Post Treatment Requirements
After treatment and cooling, immediately place the Niger seed in new bags or
in a storage area only for treated seed. Dispose of the original bags in a manner
that will eliminate regulated pests. PPQ will:
Sample treated seeds for actionable contaminants according to guidelines
in the work plan or compliance agreement, or by conducting random
inspections and TZ (tetrazolium) tests as needed at the port of entry.

Nonchemical Treatments Heat – Forced Hot Air – Niger Seed
Post Treatment Requirements
08/2011-66 Treatment Manual 3-6-3
Label each treated sample with the following information:
Bill of lading number
Container and lot number
Date the sample was taken
Date the seeds were treated
Origin of seed
Vessel name and nationality
Send the sample to an APHIS-approved testing facility
When the laboratory results are available, send the results with the information
above to the address identified on the work plan or compliance agreement.

Nonchemical Treatments Heat – Forced Hot Air – Niger Seed
Post Treatment Requirements
3-6-4 Treatment Manual 08/2011-66

05/2023-66 Treatment Manual 3-7-1
Chapter
3
Nonchemical Treatments
Cold Treatment (CT)
Contents
Intransit Cold Treatment in Conventional Vessels, Self-Refrigerated (Integral)
Containers, and Warehouses 3-7-2
Packaging—Pallet Covers 3-7-2
Precooling Procedures 3-7-2
Initiating Intransit Cold Treatment in Vessels and Containers 3-7-3
Verification of Temperature Recording Equipment 3-7-3
Calibration of Temperature Sensors 3-7-4
Loading of Commodity in Conventional Vessels and Self-Refrigerated
(Integral) Containers—General 3-7-6
Conventional Vessels 3-7-8
Placement of Temperature Sensors 3-7-8
Self-Refrigerated (Integral) Containers 3-7-9
Secure the Load 3-7-10
Treatment Requirements 3-7-11
Prepare Documents 3-7-11
Distribution of Documents 3-7-11
Clearance of Cold Treated Consignments 3-7-12
Conventional Vessels 3-7-12
PPQ Form 556, InTransit Cold Treatment Report 3-7-13
Cold Treatment in Refrigerated Warehouses 3-7-16
Initiating the Cold Treatment 3-7-16
Placement of Temperature Sensors 3-7-17
Quick Freeze Guidelines 3-7-17
Contact Information 3-7-18

Nonchemical Treatments Cold Treatment (CT)
Intransit Cold Treatment in Conventional Vessels, Self-Refrigerated (Integral) Containers, and Warehouses
3-7-2 Treatment Manual 05/2023-66
Intransit Cold Treatment in Conventional Vessels, Self-Refrigerated
(Integral) Containers, and Warehouses
The use of sustained cold temperatures as a means of insect control has been
employed for many years. Rigid adherence to specified temperatures and time
periods effectively eliminates certain insect infestations. Treatments may be
conducted in warehouses, refrigerated compartments of transporting vessels
(Conventional Vessels), containers cooled by the ship’s refrigeration system
(Container Vessels), or by individually refrigerated containers (Self-
Refrigerated/Integral Containers). Information concerning conventional
vessels, self-refrigerated containers, and warehouses is found in this chapter.
Only certified USDA representatives have permission to conduct warehouse,
vessel, and/or container approval tests under the general guidance of USDA-
APHIS-PPQ-S&T-TMT. Refer to the S&T Intransit Cold Treatment website
for information regarding the testing of specific vessels and/or containers.
Packaging—Pallet Covers
If the pallet is covered, the pallet cover must be approved by S&T. See
Packaging—USDA-Approved For Cold Treatment on page E-30 for a list of
APHIS-approved cold treatment pallet covers. Contact [email protected] for
approval specifications.
Precooling Procedures
Experience with intransit cold treatments and Computational Fluid Dynamics
(CFD) modeling of refrigerated vessel compartments show that the fruit must
be precooled at or below the prescribed cold treatment temperature before
loading. Otherwise, a large quantity of fruit in the middle of large pallet groups
may require a week or more to reach the cold treatment temperature.
Fruit intended for intransit cold treatment must be precooled to the
temperature at which the fruit will be treated prior to beginning treatment.
Conduct random fruit pulp sampling in the precooling location prior to loading
in order to verify that the commodity has completed precooling.
NOTICE
The precooling process cannot be conducted in the intransit cold treatment convey-
ance unless authorized by the Executive Director of USDA-APHIS-PPQ Plant Health
Programs.

Nonchemical Treatments Cold Treatment (CT)
Initiating Intransit Cold Treatment in Vessels and Containers
05/2023-66 Treatment Manual 3-7-3
Use the following general guidelines for fruit pulp sampling in the precooling
location:
Pulp temperatures will be taken by personnel authorized by APHIS, which
includes industry representatives
Take pulp temperatures by probing the fruit on the periphery of the pallet
If pulp temperatures are 0.28 °C (0.5 °F) or more above the
temperature at which the fruit will be treated, the pallet will remain in
the precooling location for further precooling
Also, sample fruit pulp temperatures immediately before the fruit is loaded on
the intransit cold treatment conveyance. Take fruit pulp temperatures by
probing fruit in the top of the pallet. An official authorized by APHIS will
sample the fruit pulp temperatures in all sections of the load to verify
temperatures have not risen appreciably. If the pulp temperatures for the
sample are 0.28 °C (0.5 °F) or more above the temperature at which the fruit
will be treated, the pallet will be rejected and returned to the precooling
location for further precooling until the fruit reaches the treatment temperature.
Initiating Intransit Cold Treatment in Vessels and Containers
For cold treatments conducted in approved vessels and containers, the ship’s
officers will have already received instructions on the APHIS requirements
from their owners. However, a discussion by the authorized APHIS official
with these individuals will provide for better understanding and cooperation.
Such a discussion should include:
General treatment procedures in accordance with 7CFR 305.6
Stowage arrangement
Temperature sensor and instrument calibration testing
Treatment conditions
Ensure that there is an adequate communication system in place between
personnel in the compartments and the recording room.
Verification of Temperature Recording Equipment
Approved vessels and containers must be capable of maintaining fruit pulp
temperatures within the specified CT schedules. To monitor these treatments,
they must be equipped with a temperature recording device which meets the
approval of USDA-APHIS-PPQ-S&T-TMT. All approved temperature
recording devices must be password protected and tamper proof and have the
ability to record the date, time, sensor number, and temperature during all
calibrations and actual treatments.

Nonchemical Treatments Cold Treatment (CT)
Initiating Intransit Cold Treatment in Vessels and Containers
3-7-4 Treatment Manual 05/2023-66
If APHIS determines that the records and calibrations can be manipulated, the
vessel and/or container will be suspended from conducting cold treatments
until proper equipment is installed. Submit any changes to the temperature
recording and monitoring equipment to USDA-APHIS-PPQ-S&T-TMT for
approval before installation in the vessel or container. Compare the existing
equipment with the equipment listed at https://treatments.cphst.org/vessels/ to
determine if new equipment has been installed that was not approved by S&T-
TMT.
Specifications for temperature recording installations and other requirements
for approval are discussed in Certification of Cold Treatment on page 6-4-1.
Refer to Appendix E for a list of approved temperature recorders.
Strip Chart Recorder
Data Logger
A sufficient supply of log sheets must be available to provide a continuous
record of calibration and treatment temperatures. The instrument should be in
operation for at least 30 minutes prior to calibration tests. Examine a
completed log sheet printout and the functioning of the visual scanner, the
printer, and the high limit setting. Check the log sheets for proper format and
serialization. Activate the temperature set-point for an alarm printout to verify
that this function is operational.
Calibration of Temperature Sensors
Calibrate all air and pulp temperature sensors in a clean ice water slurry
mixture that is at 0 °C (32 °F), the freezing/melting point of fresh water.
NOTICE
Since December 31, 2005, strip chart recorders were no longer acceptable
temperature recording devices. Consequently, by December 31, 2008, there should
be no strip chart recorders in use for APHIS cold treatment.
Contact USDA-APHIS-PPQ-S&T-TMT for approved temperature recording
in
strumentation.
NOTICE
Data logger installations are utilized to record various components of the vessel’s
operating systems. Temperature recording is only a part of the record produced.
Under S&T-TMT approval requirements, the log sheets upon which the intransit cold
treatment is recorded are generally more detailed in design than the standard
commercial log sheet. They are prepared and serialized to facilitate scanning and to
provide a level of security against fraudulent records. The USDA log should be
printed on separate sheets with no other ship data interspersed. Data loggers are
programmed to print out the temperatures above a set limit in a contrasting color.
Some instruments print a symbol to indicate this. The limit is set at the time of
loading to a temperature level that coincides with the projected treatment schedule.

Nonchemical Treatments Cold Treatment (CT)
Initiating Intransit Cold Treatment in Vessels and Containers
05/2023-66 Treatment Manual 3-7-5
1. Check individual sensors to verify that they are properly labeled and
correctly connected to the temperature recorder. This can be accomplished
by hand warming each sensor when its number appears on the visual
display panel of the recording instrument. A temperature change, which
can be observed on the instrument, should occur. If the instrument fails to
react, the sensor is incorrectly connected or malfunctioning and should be
corrected by the instrument representative.
2. Prepare a mixture of clean ice and fresh water in a clean insulated
container.
3. Crush or chip the ice to completely fill the container.
4. Add enough water to stir the mixture.
5. Stir the ice and water for a minimum of 2 minutes to ensure the water is
completely cooled and good mixing has occurred.
Generally, the ice will occupy approximately 85 percent of the total
volume of the container, with the water occupying the remaining
space.
6. Add more ice as the ice melts.
7. Stir the ice water slurry to maintain a temperature of 0 °C (32 °F).
8. Submerge the sensors in the ice water slurry without touching the sides or
bottom of the container.
9. Stir the slurry mixture again.
10. Continue testing of each sensor in the ice water slurry until the temperature
reading stabilizes.
11. Allow at least a 1-minute interval between two consecutive readings for
any one sensor; however, the interval cannot exceed 5 minutes.
The difference between the two readings cannot exceed 0.1 °C.
12. Record at least two consecutive readings on a written calibration report. If
the two readings are different, test the sensors again and record the
temperature.
13. Contact an instrument company representative immediately if the time
interval exceeds the normal amount of time required to verify the reading
and accuracy of the sensor and recorder system.
The recorder used with the sensors must be capable of printing or
displaying on demand and not just at hourly intervals.
14. Have the instrument company representative correct any deficiencies in the
equipment before certification.
15. Replace any sensor that reads more than +/- 0.3 °C (0.5 °F) from the
standard 0 °C (32 °F).

Nonchemical Treatments Cold Treatment (CT)
Loading of Commodity in Conventional Vessels and Self-Refrigerated (Integral) Containers—General
3-7-6 Treatment Manual 05/2023-66
16. Replace and recalibrate any sensors that malfunction.
17. Determine the calibration factors to the nearest tenth of 1 degree Celsius.
18. If the temperature recorder microprocessor can be zeroed, tared, or if the
calibration factors can be otherwise entered into the recorder
microprocessor for automatic adjustment, this must be done. In this case,
verify that the adjustment factors have been entered or that the recorder
was zeroed or tared by the instrument company representative. Enter zero
as the calibration factor for each individual probe in the online 556
database <https://treatments.cphst.org//> (if the database is not used, then
enter zero for each individual probe in the written calibration report that is
submitted with the consignment).
19. If the temperature recorder microprocessor cannot be zeroed, tared, or if
the calibration factors cannot be entered into the recorder microprocessor
memory (so that they are sustained in memory and can be viewed again
after all the factors are entered), the calibration factors for each individual
probe must be recorded in the online 556 database <https://
treatments.cphst.org//> (if the database is not used, then enter the
calibration factors for each individual probe on the written calibration
report that is submitted with the consignment).
20. After the calibration factors have been accounted for, no other changes
should be made to the temperature recorder microprocessor.
21. Refer to the section on Clearance of Cold Treated Consignments for
complete instructions on entering data into the Form 556 or preparing
written calibration reports.
Loading of Commodity in Conventional Vessels and Self-
Refrigerated (Integral) Containers—General
1. Each compartment or container must contain only one type of fruit loaded
in one type of carton.
2. Load fruit directly from the precooling area so fruit temperatures do not
rise significantly after loading and during the transfer of the container to
the vessel.
3. Open the cartons in which the sensors will be located and insert the sensors
well into the fruit (Figure 3-7-1). The tip of the sensor must not extend
through the fruit.
NOTICE
In countries with which USDA-APHIS has a cooperative agreement, these activities
can be conducted by qualified officials from that country. Contact the USDA-APHIS-
PPQ-S&T
-TMT for a list of qualified officials.

Nonchemical Treatments Cold Treatment (CT)
Loading of Commodity in Conventional Vessels and Self-Refrigerated (Integral) Containers—General
05/2023-66 Treatment Manual 3-7-7
In the case of small fruit, cover a minimum of two thirds of the tip of the sensor
using multiple fruit. If, for example, the fruit is grapes, insert the sensor
directly into the grapes in a shish kebob fashion (Figure 3-7-2). Completely
cover the probe with the top layer of fruit in the top of the box or carton located
in the middle of the pallet.
4. Securely close the cartons following insertion of the sensors. If the fruit is
palletized, it may be necessary to insert the sensor into the fruit from the
side of the carton. If the side of the carton or box is opened to insert a
sensor, reseal the opened side of the carton or box using tape.
Figure 3-7-1 Proper Placement of Pulp Sensor within Larger Fruit
Figure 3-7-2 Proper Placement of Pulp Sensor within Smaller Fruit

Nonchemical Treatments Cold Treatment (CT)
Loading of Commodity in Conventional Vessels and Self-Refrigerated (Integral) Containers—General
3-7-8 Treatment Manual 05/2023-66
Conventional Vessels
There are two sensor types used for the compartments during cold treatment.
Ambient air sensors—the cables which are attached to the ceiling of the
compartment should be long enough to extend from the ceiling to the
floor. Place the sensors on the center line of the vessel approximately 30
centimeters from the ceiling. Attach the sensors in such a way that they
do not touch the bulkhead and are protected from damage from the cargo.
One sensor must be located on the fore and aft bulkheads of each
compartment.
In the case of twin deck compartments, two sensors are required in the
upper compartment plus one sensor in the lower compartment. Place the
lower sensor on the bulkhead furthest from the cooling unit. Ensure that
all sensors are readily detachable and stowed in compartments to protect
from damage when not in use.
Fruit pulp sensors—the cables which are attached to the side walls of the
compartment must be distributed throughout the compartment so that all
areas of the compartment can be reached. The cables should be long
enough to extend from the hold walls to 3 meters beyond the center line
of the ship hold.
Placement of Temperature Sensors
All of the sensors for conventional vessels must be located at the mid-level of
the pallets as depicted in Figure 3-7-3. The black circles represent pulp
sensors.
NOTICE
Hanging decks, hatch coamings within vessels, and double-stacking of pallets
are not approved for intransit cold treatment. The treatment will not begin until all
double-stacked pallets are reconfigured into a single-stack pallet arrangement and
any pallets located in hanging decks or hatch coamings are removed.
Contact USDA-APHIS-PPQ-S&T-TMT for more information regarding hatch
coamings
or hanging decks for particular vessels.
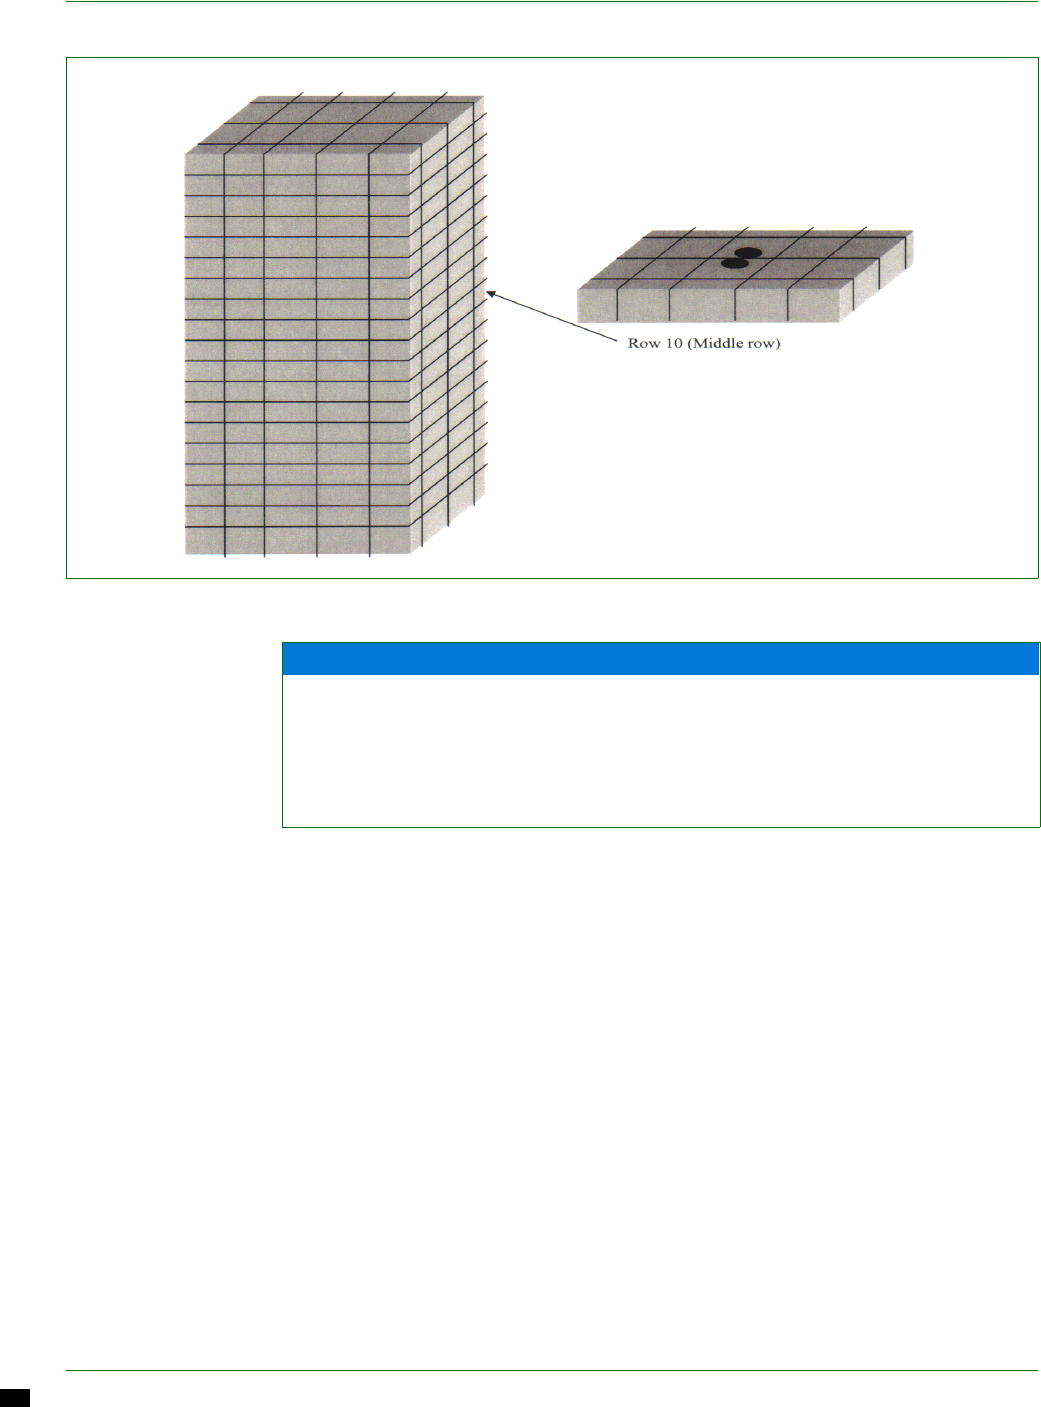
Nonchemical Treatments Cold Treatment (CT)
Loading of Commodity in Conventional Vessels and Self-Refrigerated (Integral) Containers—General
05/2023-66 Treatment Manual 3-7-9
Self-Refrigerated (Integral) Containers
When loading refrigerated containers, place the warmest fruit in the last
quarter of the load (near the back doors of the container), completely cover the
floor and ensure that the load is of uniform height.
Place a numbered seal on the loaded container. This must not be removed until
the load has been cleared at the port of destination.
Use a minimum of three pulp sensors. Place all sensors as far into a box of fruit
as possible. Use Figure 3-7-4 as a general guideline for sensor placement.
Place the first sensor, labeled USDA1, in a box at the top of the stack of
fruit nearest to the air return intake.
Place the second sensor, labeled USDA2, slightly aft of the middle of the
container, halfway between the top and bottom of the stack.
Figure 3-7-3 Fruit Stack with Middle Row Temperature Probe Placement
NOTICE
It is highly recommended that more temperature sensors be installed than the
minimum number required for each refrigerated compartment. If a sensor
malfunctions during a treatment, the certified USDA representative has the option of
disregarding it, providing that an additional working sensor is present, and the
functional sensors were appropriately placed, certified, and calibrated. Otherwise,
the entire treatment must be repeated for the fruit in that compartment.

Nonchemical Treatments Cold Treatment (CT)
Loading of Commodity in Conventional Vessels and Self-Refrigerated (Integral) Containers—General
3-7-10 Treatment Manual 05/2023-66
Place the third sensor, labeled USDA3, one pallet stack in from the doors
of the container, halfway between the top and bottom of the stack.
Secure the Load
Place a piece of cardboard that extends from the front edge of the second to last
pallet row to the back doors on the container floor before the last pallet row is
loaded. Once the cardboard is installed properly, load the last pallet row so the
pallets rest on top of the cardboard. Place a second piece of cardboard
perpendicular to the first piece of cardboard and staple to the cartons in the last
pallet row (Figure 3-7-5). The placement of the cardboard between the back
doors of the container and the last row of pallets aids in maximizing air flow
through the pallets. Complete this procedure for all pallets in the last pallet row
of the container.
Figure 3-7-4 40-foot Refrigerated Container with 18 Pallets of Fruit (not drawn to scale)
Figure 3-7-5 Proper Placement of Cardboard Between the Last Pallet Row of Fruit and the Back Doors
of the Container

Nonchemical Treatments Cold Treatment (CT)
Prepare Documents
05/2023-66 Treatment Manual 3-7-11
Treatment Requirements
Temperatures must be recorded at intervals no longer than 1 hour apart. Gaps
of longer than 1 hour may invalidate the treatment or cause treatment failure.
Fruit pulp temperatures must be maintained at the temperatures specified in
the treatment schedule with no more than 0.39 °C (0.7 °F) variation in
temperature between two consecutive hourly readings. Failure to comply with
this requirement may result in treatment failure.
The time required to complete the treatment begins when all temperature
probes reach the prescribed treatment schedule temperature.
Prepare Documents
Complete the following PPQ forms and worksheets:
“Calibration of Temperature Probes” record showing the temperature
readings as taken from the temperature chart or log sheet during the
calibration testing. Record readings to the nearest tenth of one degree.
When the loading of each compartment has been completed, obtain the
temperature reading of each fruit probe from the temperature recorder and
record on this form.
“Location of Temperature Sensors” record to show the actual position of
each fruit temperature sensor. (See sample form in Appendix A.) This can
be accomplished by a written description or by a diagrammatic sketch.
Include compartment loading start and end times and dates on the form.
PPQ Form 203, Foreign Site Certificate (for APHIS pre-inspected fruit)
Shipper’s manifest containing the quantity and kind of commodity
Distribution of Documents
Conventional Vessels and Self-Refrigerated (Integral) Containers
Place the following documents in a sealed envelope and give to the Captain for
presentation to the clearance official at the port of arrival.
Original “Calibration of Temperature Probes”
Original “Location of Temperature Sensors”
For reference purposes, present the Captain with the following documents:
Copy of the “Calibration of Temperature Probes”
Copy of the “Location of Temperature Sensors”

Nonchemical Treatments Cold Treatment (CT)
Clearance of Cold Treated Consignments
3-7-12 Treatment Manual 05/2023-66
Send copies of all documents to the clearance official at the port of arrival and
to USDA-APHIS-PPQ-S&T-TMT.
Clearance of Cold Treated Consignments
USDA-APHIS-PPQ-S&T-TMT has developed electronic versions of all
required documentation for containerized, intransit cold treatments (not
vessel). PPQ officials must use the 556 Cold Treatment database to clear all
containerized, intransit cold treatments. Contact [email protected] to
request access and training.
Off-loading of self-refrigerated containerized fruit that is under treatment must
be accomplished rapidly. Containers must be off-loaded and treatment
reconvened within 2 or 3 hours from the time the container was disconnected
from the refrigerating unit. The pulp sensors should never exceed the
maximum allowable treatment temperature.
Observe the stacking pattern. Double stacking is not permitted. Do not release
the consignment if the pallets have been double stacked.
Conventional Vessels
The “Calibration of Temperature Sensors” and “Location of Portable Sensors”
documents from the country of origin should have been received at the port of
entry prior to the arrival of the carrying vessel.
The document, “Calibration of Temperature Sensors,” is required for all
consignments and includes information regarding the loading date and location
of temperature sensors within the commodity, as well as calibration correction
factors for every sensor.
Refer to the S&T Intransit Cold Treatment website to familiarize yourself with
the compartment layout.
Check the documents and any accompanying correspondence for comments
relating to deficiencies noted at origin. The documents must bear the signature
of an APHIS-approved official or of an authorized official of the exporting
country. A list of authorized names and signatures for each country is on file at
S&T-TMT and is available upon request.
Inform shipping line officials and pier supervisors of the quarantine safeguards
to be observed pending clearance. The authorized APHIS official boarding the
vessel must have several calibrated thermometers.

Nonchemical Treatments Cold Treatment (CT)
Clearance of Cold Treated Consignments
05/2023-66 Treatment Manual 3-7-13
PPQ Form 556, InTransit Cold Treatment Report
Complete PPQ Form 556, InTransit Cold Treatment Report. Record the date
and time of completion of each compartment and the officer’s signature on the
temperature chart or log sheet. Do not add fruit to the compartment after
loading has been completed.
Complete the entries on the PPQ Form 556 during the actual performance of
each step of the clearance procedure. The PPQ Form 556 instructions provide
for a progressive clearance in the event that treatments are not completed
before a vessel sails for a second U.S. port.
The Officer responsible for a U.S. vessel is typically the Chief Engineer or
Reefer Engineer. The Officer responsible for a Foreign Flag vessel is typically
the Chief Officer or Captain.
Inform the ship’s officer to withhold discharging the treated commodity until
clearance has been completed. Obtain the clearance officer’s copy of the
calibration documents from the ship’s officer (Record in Blocks 1-6 and 10).
Proceed to the data logger with the ship’s officer and retrieve a temperature
printout.
Review the temperature chart.

Nonchemical Treatments Cold Treatment (CT)
Clearance of Cold Treated Consignments
3-7-14 Treatment Manual 05/2023-66
The vessel is permitted to store logged temperatures on magnetic media
instead of printed on paper. However, the stored data must be printed in the
presence of the authorized APHIS official.
Assemble log sheets so that a review can be made starting at the beginning of
the temperature record. Check the calibration record; compare the actual
calibration readings on log sheets with the calibration data on the calibration
document (record in Block 23).
NOTICE
If the initial treatment period is broken because of excessive temperatures, failure of
the recorder, or improper procedure, and the treatment is later restarted, enter the
date and time of restart on the second line of item 28.
Air temperatures may occasionally exceed treatment temperatures during defrost
cycles; however, fruit temperatures should not rise appreciably during this time and
must not exceed the temperature listed in the schedule. During non-defrost times,
the temperatures of the air sensors should never exceed the maximum allowable
treatment temperature.
For each compartment of a hold, the hourly sensor printouts will be examined by a
PPQ official at the port of entry. Based on these records, the PPQ official will make a
determination as to whether to accept the treatment as satisfactory. In case of
dispute, the ultimate decision will be made by the Officer in Charge (PPQ), who will
take all factors into consideration.
Occasionally, for example, there are cases in which one or two sensors in a
compartment mechanically malfunctioned during the voyage due to situations
beyond the ship’s control (e.g., rough seas). This is generally excusable, as long as
the other sensors in the same compartment showed no readings higher than the
cold treatment schedule allows. If, however, the ship stopped at another port while in
route to the discharge destination in the U.S., but failed to have the facility sensor(s)
repaired and recalibrated, it may be considered negligence on the part of the
shipping line. The fruit from such refrigerated compartments would have to be
retreated (in a cold warehouse) to be eligible for entry.
If a sensor is reading consistently high, it should be tested by using the ice water
bath technique. If this sensor proves to be accurate (i.e., readings within +/- 0.3 °C
from zero) then it must be assumed that the high readings obtained in the fruit were
indeed accurate, which would be sufficient grounds for rejection. For additional
evidence, the PPQ official can also obtain independent fruit pulp readings from a
hand-held portable temperature-sensing instrument in the area of the load where
high readings were obtained from the ship’s sensor(s).

Nonchemical Treatments Cold Treatment (CT)
Clearance of Cold Treated Consignments
05/2023-66 Treatment Manual 3-7-15
Review the log sheets up to when the loading of the compartment was
complete. Determine the maximum and minimum fruit temperature at the time
the sensors were inserted (record in Blocks 24, 25, and 26).
Continue reviewing the log sheets through the precooling period to the time
when treatment commenced. Note abnormalities in the temperature readings
that could indicate an irregularity in the treatment process (record in Block 27).
Review the treatment portion of the log sheets for irregularities and excessive
temperatures (record in Block 28).
Clearance Action by Authorized APHIS Official
The authorized APHIS official will:
Hold shipment pending further evaluation if total effects of irregularities
are not consistent with treatment requirements. Contact the supervisor
regarding the reasons for holding the consignment.
Record all exceptions in the narrative form and attach to the clearance
report.
Release consignment for discharge if all requirements have been met and
notify ship’s officers, pier superintendents, and Customs and Border
Protection Agriculture Specialist(s).
Inspection of Load and Compartments
Time permitting, examine the load and compartments during and after
unloading. Observe sensor locations, labeling, and physical condition and
report irregularities.
NOTICE
Many data logger installations are programmed to record temperature variations to
one-hundredth of a degree centigrade (0.01 °C). With this high resolution of
temperature readings, a deviation of up to three-hundredths of a degree can be
expected from consecutive readings in a standard ice water test. Accordingly,
calibration certifications that are acceptable under our accuracy requirements show
either the average of two consecutive calibration readings or two consecutive
readings that are within three-hundredths of a degree centigrade of each other.
Report deviations beyond this standard.
NOTICE
If the initial treatment period is broken because of excessive temperatures, failure of
the data logger, or improper procedure, and the treatment is later restarted, enter the
date and time of restart on the second line of item 28.

Nonchemical Treatments Cold Treatment (CT)
Cold Treatment in Refrigerated Warehouses
3-7-16 Treatment Manual 05/2023-66
Distribution of Clearance Documents
After final clearance, the completed PPQ Form 556 with supporting documents
are to be distributed as follows:
Keep copies of the PPQ Form 556 and the chart printouts at the port of
arrival.
Send copies of the PPQ Form 556 to USDA-APHIS-PPQ-S&T-TMT.
Cold Treatment in Refrigerated Warehouses
The warehouse must be approved by PPQ (see Certifying Facilities).
The consignment must move directly from the port of entry to the cold storage
warehouse with no diversion or delay.
The warehouse must provide the necessary security for safeguarding each
consignment.
The unloading of containers which arrive at the warehouse under seal must be
conducted under PPQ supervision.
Initiating the Cold Treatment
The procedures for the verification of recording equipment and calibration of
temperature sensors are the same as those outlined for vessels in Intransit Cold
Treatment in Conventional Vessels, Self-Refrigerated (Integral) Containers,
and Warehouses on page 3-7-2, Initiating Intransit Cold Treatment in Vessels
and Containers on page 3-7-3, Verification of Temperature Recording
Equipment on page 3-7-3, and Calibration of Temperature Sensors on page
3-7-4. These activities must be performed under the direction of an authorized
APHIS official.
Arrange stowage to provide for adequate air distribution throughout the
consignment, and to allow for the sampling of pulp temperatures in any desired
location. To accomplish this, leave aisles between rows of pallets, with the
aisles parallel to the air flow. Allow space between pallets. Double stacking of
pallets is not allowed; therefore treatments will not begin until pallets are
reconfigured to a single stacked pallet arrangement. However, rack systems are
acceptable provided they have been approved by S&T-TMT.

Nonchemical Treatments Cold Treatment (CT)
Quick Freeze Guidelines
05/2023-66 Treatment Manual 3-7-17
Placement of Temperature Sensors
After loading is completed, take fruit temperatures at various locations
throughout the load to determine the location of the warmest fruit. Place
temperature sensors throughout the load, being sure to place sensors in the
warmest areas. Under some conditions, additional air circulation will be
required to cool the consignment uniformly. The use of additional fans or
blowers will depend on the particular circumstances at the time of treatment.
Placement of sensors should be under the direction of an authorized APHIS
official. Insert the sensor well into the fruit. The tip of the sensor must not
extend through the fruit (Figure 3-7-1). If necessary (in the case of small fruit),
the sensor should penetrate multiple fruit (Figure 3-7-2). The number and
location of the temperature sensors are determined during warehouse
certification. (Table 3-7-1)
Quick Freeze Guidelines
Freezing will ruin the market quality of most fresh fruits and vegetables,
except for thick-skinned items such as durian and coconut. Generally, this
treatment is used on fruits and vegetables that will be processed into another
form (e.g. for puree, juice, or mashed vegetables).
Freezing is an acceptable method of mitigating the pests listed in the schedule.
Treatment may result in commodity destruction. APHIS is not liable for
damage to the commodity. Importers that choose freezing as a treatment do so
at their own risk.
Operational procedures and equipment specifications are under development.
Table 3-7-1 Number of Sensors in a Warehouse
Cubic Feet Cubic Meters Number of
Pallets
Number
of Air
Sensors
Number
of Pulp
Sensors
Total
Number
of
Sensors
0 - 10,000 0 - 283 1 - 100 1 2 3
10,001 - 20,000 284 - 566 101 - 200 1 3 4
20,001 - 30,000 567 - 849 201 - 300 1 4 5
30,001 - 40,000 850 - 1132 301 - 400 1 5 6
40,001 - 50,000 1133 - 1415 401 - 500 1 6 7
50,001 - 60,000 1416 - 1698 501 - 600 1 7 8
60,001 - 70,000 1699 - 1981 601 - 700 1 8 9
70,001 - 80,000 1982 - 2264 701 - 800 1 9 10
80,001 - 90,000 2265 - 2547 801 - 900 1 10 11
90,001 - 100,000 2548 - 2830 901 - 1000 1 11 12
Over 100,000 > 2830 1000+ Must be approved by S&T-TMT

Nonchemical Treatments Cold Treatment (CT)
Contact Information
3-7-18 Treatment Manual 05/2023-66
Contact Information
USDA-APHIS-PPQ-S&T-TMT
13601 Old Cutler Road, Bldg. 63
Miami, FL 33158 USA
Phone: 305-278-4877
email: [email protected]
Fax: 305-278-4898

05/2023-66 Treatment Manual 3-8-1
Chapter
3
Nonchemical Treatments
Irradiation
Contents
Introduction 3-8-1
Authorities and Other Responsible Parties 3-8-2
Treatment Objectives 3-8-2
Efficacy 3-8-2
Treatment 3-8-3
Dosimetry 3-8-3
Dose Mapping 3-8-4
Facility Approval 3-8-4
Documentation 3-8-4
Terminology 3-8-5
Introduction
This chapter provides background and general information for the use of
irradiation as a phytosanitary treatment of plant pests. Irradiation was first
approved by APHIS in 1997 for use on papayas from Hawaii for export to the
U.S. mainland, Guam, Puerto Rico, and the U.S. Virgin Islands. In 2002,
irradiation was approved as a phytosanitary treatment for all admissible fresh
fruits and vegetables from all countries.

Nonchemical Treatments Irradiation
Authorities and Other Responsible Parties
3-8-2 Treatment Manual 05/2023-66
Authorities and Other Responsible Parties
7CFR 305.31 through 305.9
Food and Drug Administration (FDA) — The FDA is responsible for
determining the labeling requirements for irradiated food.
International Standard for Phytosanitary Measures #18 (ISPM) — This
International Standard provides technical guidance on the specific
procedures for the application of ionizing radiation as a phytosanitary
treatment for regulated pests or articles.
National nuclear regulatory authority of the country where the facility is
located
Treatment Objectives
The objective of phytosanitary treatments is to prevent the introduction or
spread of regulated pests. As a phytosanitary treatment, irradiation may reduce
the risk of introduction by achieving certain responses, known as “endpoints,”
in the targeted pest(s). These endpoints are:
Inability to emerge or fly
Inactivation or devitalization (seeds may germinate, but seedlings do not
grow, or tubers, bulbs, or cuttings do not sprout)
Mortality
Sterility (inability to reproduce)
Efficacy
Unlike the Probit 9 mortality required for many chemical and nonchemical
quarantine treatments, the use of irradiation as a phytosanitary measure
presents a new paradigm to PPQ. The officer inspecting the treated
consignment upon arrival in the U.S. may encounter living insects. However,
this is to be expected since the treatment endpoint may not necessarily be
mortality.

Nonchemical Treatments Irradiation
Treatment
05/2023-66 Treatment Manual 3-8-3
Treatment
There are three types of ionizing radiation:
Electrons generated from machine sources up to 10 MeV (eBeam)
Radioactive isotopes (gamma rays from cobalt-60 or cesium-137)
X-rays (up to 7.5 MeV)
The unit of measure for absorbed dose from any type of radiation is gray (Gy).
Modified atmospheres with low oxygen levels may reduce treatment efficacy
at a prescribed dose. Do not irradiate commodities that are in packaging or
other conditions that cause oxygen levels to be less than 10%. Modified
atmosphere packaging must be approved by S&T. See Packaging—USDA-
Approved For Modified Atmosphere Irradiation on page E-29 for a list of
APHIS-approved modified atmosphere irradiation packaging. Contact
[email protected] for approval specifications.
Treatment procedures should also ensure that the minimum absorbed dose
(Dmin) is fully attained throughout the commodity to provide the prescribed
level of efficacy. Owing to the differences in the configuration of lots being
treated, higher doses than the Dmin may be received by some of the
commodities to ensure that the Dmin is achieved throughout the configured
commodity. All treatments must be certified by verifying Dmin with approved
dosimetry systems.
The minimum absorbed dose for the most-tolerant unmitigated pest is required
if more than one pest is present. Refer to Table 5-2-1 on page 5-2-25 to
determine the required minimum absorbed dose. For example, if a
consignment of grapes is infested with both Mediterranean fruit fly and
codling moth, the commodity would be irradiated using a minimum dose of
200 Gy.
Dosimetry
Dosimetry is the system used by the facility to determine absorbed dose. The
absorbed dose is a quantity of radiation energy (measured in Gray (Gy))
absorbed per unit of mass of the commodity.
The dosimetry system should be calibrated in accordance with international
standards or appropriate national standards (e.g., Standard ISO/ASTM 51261
Guide for Selection and Calibration of Dosimetry Systems for Radiation
Processing).

Nonchemical Treatments Irradiation
Facility Approval
3-8-4 Treatment Manual 05/2023-66
Dose Mapping
Prior to routine treatments, the region(s) of lowest and highest dose absorbance
must be mapped for each treatment configuration. Configurations may be
defined by a variety of criteria which may vary by facility. Factors that affect
dose mapping commonly include:
Density and composition of the material treated
Orientation of the product, stacking, volume, and packaging
Shape and/or size
Dose mapping of the product in each geometric packing configuration,
arrangement and product density that will be used during routine treatments
should be required by APHIS prior to the approval of a facility for the
treatment application. Only the configurations approved by APHIS should be
used for actual treatments.
The data obtained from the dose mapping is used to determine the proper
number and placement of dosimeters during routine operations.
Facility Approval
Chapter 6-8 of this manual, Certifying Irradiation Treatment Facilities, covers
the requirements for irradiation facility approval.
Documentation
The tracking and reporting of an irradiation treatment is critical to the integrity
of the entire irradiation process. Treatment failure is linked to non-compliance,
not pest detection. Consequently, an electronic database, Irradiation Reporting
and Accountability Database (IRADS) was developed to standardize data
entry, accurately and quickly produce data summaries and analysis, and allow
access to a geographically diverse group of people. PPQ officials must use
IRADS to monitor all phytosanitary irradiation treatments. Contact
[email protected] to request access and training.
NOTICE
The Irradiation Reporting and Accountability Database (IRAD) is a component of the
Commodity Treatment Informat
ion System (CTIS) <https://treatments.cphst.org//>
developed by USDA-APHIS-PPQ-S&T-TMT. Access to this web-based system will
be permitted depending on the user’s specific role or function in the irradiation
process.

Nonchemical Treatments Irradiation
Terminology
05/2023-66 Treatment Manual 3-8-5
Terminology
absorbed dose. quantity of radiation energy (in gray) absorbed per unit of
mass of a specified target [ISPM No. 18]
dose mapping. measurement of the absorbed dose distribution within a
process load through the use of dosimeters placed at specific locations within
the process load [ISPM No. 18]
dosimeter. a device that, when irradiated, exhibits a quantifiable change in
some property of the device which can be related to absorbed dose in a given
material using appropriate analytical instrumentation and techniques [ISPM
No. 18]
dosimetry. a system used for determining absorbed dose, consisting of
dosimeters, measurement instruments and their associated reference standards,
and procedures for the system’s use [ISPM No. 18]
gray (Gy). unit of absorbed dose where 1 Gy is equivalent to the absorption of
1 joule per kilogram (1 Gy = 1 J.kg-1) [ISPM No. 18]
ionizing radiation. charged particles and electromagnetic waves that, as a
result of physical interaction, create ions by either primary or secondary
processes [ISPM No. 18]
irradiation. treatment with any type of ionizing radiation [ISPM No. 18]
minimum absorbed dose. the localized minimum absorbed dose within the
process load [ISPM No. 18] (Dmin)
radura. internationally recognized symbol used to indicate when a food
product has been irradiated

Nonchemical Treatments Irradiation
Terminology
3-8-6 Treatment Manual 05/2023-66

08/2008-27 Treatment Manual 4-1-1
Chapter
4
Residue Monitoring
Collecting, Packaging, and Shipping
Contents
Overview 4-1-1
Safety 4-1-2
Collecting the Sample 4-1-2
Pretreatment Sample 4-1-2
Post-Treatment Sample 4-1-2
Labeling the Sample 4-1-3
Storing the Sample 4-1-3
Shipping Samples 4-1-3
Quarantine Requirements 4-1-3
Overview
Methyl bromide fumigants, except those with “Q” labels, are subject to
requirements of the FIFRA Section 18 Quarantine Exemption. When
commodities intended for food or feed are fumigated with methyl bromide
under the FIFRA Section 18 Quarantine Exemption, one additional EPA
requirement must be met: PPQ must monitor aeration by sampling the gas
concentration to determine when a commodity may be released.
In the past, PPQ used residue monitoring to comply with the Environmental
Protection Agency’s (EPA) guidelines for fumigation of edible food or feed
products conducted under a Section 18 Quarantine Exemption. PPQ took and
analyzed samples of fumigated commodities, and they reported the resulting
data yearly to EPA. When a fumigation was conducted under a Section 18
Quarantine Exemption, samples were taken only when the commodity would
be eaten by people or fed to animals. When the commodity would not be used
for food or feed, PPQ did not take samples.
For example, if thyme would be used as an herb and fumigated under the
schedule (T101-n-2), PPQ would sample the commodity because it would be
eaten. On the other hand, if that same thyme were treated but imported as a cut
NOTICE
Currently, Plant Protection and Quarantine (PPQ) is not taking samples of
commodities for residue monitoring. However, if residue monitoring becomes
necessary, this section provides guidelines for taking samples that will be used for
monitoring fumigant residues.

Residue Monitoring Collecting, Packaging, and Shipping
Safety
4-1-2 Treatment Manual 08/2008-27
flower, sampling would not be necessary because it would be used for
decoration—not eating.
Safety
Pretreatment samples will be shipped with dry ice. Be sure to store dry ice in
well-ventilated areas and to transport dry ice and samples packed in dry ice in
well-ventilated containers. Wear gloves when handling dry ice. For detailed
information, see Safety Data Sheets.
The Department of Transportation (DOT) considers dry ice a hazardous
material and requires that aircraft record the amount of dry ice carried in the
cargo hold. Amounts of 5 pounds or less are not stringently regulated;
however, include the weight of dry ice on the shipping label. In addition, some
overnight delivery companies have restrictions on shipping dry ice. Equip
shipping containers with loose-fitting lids to prevent an explosive release of
sublimating carbon dioxide. Identify dry ice as ORM-A on the shipping label.
Also indicate on the label that the package contains diagnostic specimens.
Collecting the Sample
You must take a sample prior to treatment (pretreatment) and after aeration is
completed (post-treatment). To avoid contaminating the sample, handle it as
little as possible. Take pretreatment and post-treatment samples from the same
general location within a given lot (i.e., the same bags, boxes, or other
containers).
Some ports receive commodities several times a month. These shipments need
not be sampled each time. For frequently received commodities, ports should
develop a routine sample collection plan, such as one sample collected per
week. However, when a new commodity is received or a commodity is
received infrequently (once a week or less), collect a sample each time the
commodity is treated.
Pretreatment Sample
1. Collect a minimum of 450g (approximately 1 lb.), except for herbs, of
which you need to collect 150 grams (approximately one-third pound). If
you are collecting fruits or vegetables that are heavy (for example,
grapefruit or yams), be sure to collect at least two pieces of produce that
weigh 450g.
2. Place these samples in containers with dry ice.
3. Ship the pretreatment samples separately from post-treatment samples.
Post-Treatment Sample

Residue Monitoring Collecting, Packaging, and Shipping
Labeling the Sample
08/2008-27 Treatment Manual 4-1-3
1. Collect a minimum of 450g (approximately 1 lb.), except for herbs, of
which you need to collect 150 grams (approximately one-third pound). If
you are collecting fruits or vegetables that are heavy (for example,
grapefruit or yams), be sure to collect at least two pieces of produce that
weigh 450g.
2. Ship the post-treatment samples separately from the pretreatment samples
and in accordance with standard shipping practices. If the samples require
refrigeration, then ship the samples with wet ice or ice packs. If the
samples are normally shipped at ambient temperature (e.g., yams), ship
them without ice.
Labeling the Sample
Label each sample container with the State, county, date, and name of contents,
and whether the sample is “pre” or “post” treatment. For this label, use
waterproof ink on a strip of masking tape or other label material. Be sure to
attach the label before leaving the sampling site. Securely fasten a plastic
envelope containing the yellow copy of the APHIS Form 2061 to the side of
the sampling container. Label this envelope with the same information that you
placed on the sample container (State, county, date, and name of contents, and
whether the sample was “pre” or “post” treatment).
Storing the Sample
Immediately place the samples in a freezer or refrigerator until ready to
package the samples for shipping.
Shipping Samples
Quarantine Requirements
Contact the State Plant Health Director to determine where to ship the samples.
Ship all samples in leakproof, double sealed containers. Ensure the
pretreatment sample is secure since it does not meet entry requirements for the
United States.
Ship samples in coolers with dry ice packed above the samples. The lid of the
cooler should be loose fitting to allow gases to escape. Ship the samples using
the contract overnight delivery service, or the U.S. Postal Service overnight
delivery.

Residue Monitoring Collecting, Packaging, and Shipping
Shipping Samples
4-1-4 Treatment Manual 08/2008-27

02/2024-01 Treatment Manuals 5-1-1
Chapter
5
Treatment Schedules
Index
Contents
T100 - Schedules for Fruits, Nuts, and Vegetables 5-2-1
T200 - Schedules for Propagative Plant Material 5-3-1
T300 - Schedules for Miscellaneous Plant Products 5-4-1
T400 - Schedules for Miscellaneous Products 5-5-1
T500 - Schedules for Plant Pests or Pathogens 5-6-1
T600 - Controlled Atmosphere Temperature Treatment System 5-7-1
D301 - Schedules for Domestic Movement of Regulated Articles 5-8-1

Treatment Schedules Index
Contents
5-1-2 Treatment Manuals 02/2024-01

08/2024-05 Treatment Manual 5-2-1
Chapter
5
Treatment Schedules
T100 - Schedules for Fruits, Nuts, and
Vegetables
Contents
Reporting Commodity Injury 5-2-1
FIFRA Section 18 Exemption 5-2-2
Determine the Correct Label for Fumigation 5-2-2
How Fruits and Vegetables are Listed 5-2-2
T101—Methyl Bromide Fumigation 5-2-3
T102—Water Treatment 5-2-20
T103—High Temperature Forced Air 5-2-21
T104—Pest Specific/Host Variable 5-2-22
T105—Irradiation 5-2-24
T106—Vapor Heat 5-2-27
T107—Cold Treatment 5-2-29
T108—Fumigation Plus Cold Treatment of Fruits 5-2-35
T109—Cold Treatment Plus Fumigation of Fruits 5-2-36
T110-c Miscellaneous Food/Feed Commodities 5-2-37
Reporting Commodity Injury
Record any new or unusual observations relating to injury of commodity and
report them to Quarantine Policy, Analysis and Support (QPAS) in Riverdale.
Give pertinent details of the treatment and conditions regarding its application.
In appraising the effect of a particular treatment, take care to distinguish
between the actual or apparent effects directly attributable to the treatment and
those relating to factors or conditions not subject to PPQ control.
Commodities in the T100 series are intended for consumption as food or feed.
These commodities may have to be treated with methyl bromide to control a
pest.

Treatment Schedules T100 - Schedules for Fruits, Nuts, and Vegetables
FIFRA Section 18 Exemption
5-2-2 Treatment Manual 08/2024-05
FIFRA Section 18 Exemption
Methyl bromide fumigants, except those with “Q” labels, are subject to
requirements of the Federal Insecticide, Fungicide, and Rodenticide Act
(FIFRA), Section 18 Quarantine Exemption. When commodities intended for
food or feed are fumigated with methyl bromide under the FIFRA Section 18
Quarantine Exemption, one additional EPA requirement must be met: PPQ
must monitor aeration by sampling the gas concentration to determine when a
commodity may be released.
In ACIR, fumigation schedules under the FIFRA Section 18 Quarantine
Exemption are identified by the following note:
Determine the Correct Label for Fumigation
Always use the label of the fumigant to determine if the commodity can be
treated. Fumigation schedules in this publication are intended to clarify and
expand commercial labels for methyl bromide. The EPA only authorizes
fumigation for commodities that are listed on the label of the gas being used
for the fumigation. Also, to comply with State regulations, a fumigant must be
registered in the State where it is being used.
Although the EPA only authorizes the use of a pesticide on a crop, animal, or
site that is listed on the label of a pesticide, specific pests do not have to be
listed on the label to use the pesticide. An amendment to FIFRA in 1978
permits the use of a pesticide to control a pest not on the label if the application
is to a crop, animal, or site specified on the label, unless mentioned otherwise.
How Fruits and Vegetables are Listed
Fruits and vegetables that are to be fumigated with methyl bromide (T101s)
will be listed in alphabetical order. Each schedule will have an assigned letter,
e.g., Apples T101-a-1, Zucchini T101-h-3. For fruits and vegetables that
require treatment as a condition of entry, refer to the Agricultural Commodity
Import Requirements (ACIR) database for the specific treatment.
NOTICE
Do not use this treatment schedule if its FIFRA Section 18 Exemption has expired.
For the current exemption status, call your local State Plant Health Director (SPHD).

Treatment Schedules T100 - Schedules for Fruits, Nuts, and Vegetables
T101—Methyl Bromide Fumigation
08/2024-05 Treatment Manual 5-2-3
T101—Methyl Bromide Fumigation
T101-a-1 Apple and Pear
Pest: External feeders
Treatment: T101-a-1—MB at NAP—tarpaulin or chamber
T101-a-3 Apricot, Peach, Plum, Nectarine
Pest: External feeders
Treatment: T101-a-3—MB at NAP—tarpaulin or chamber
T101-b-1 Asparagus
Pest: External feeders, such as Noctuidae, Thrips spp. (except Scirtothrips
dorsalis from Thailand), Copitarsia spp.
Treatment: T101-b-1—MB (“Q” label only) at NAP—tarpaulin or chamber
T101-b-1-1 Asparagus from Thailand, Australia, and New Zealand
Pest: Scirtothrips dorsalis (Thailand), Halotydeus destructor (Australia, New
Zealand)
Treatment: T101-b-1-1
T101-c-1 Avocado (from Hawaii, Israel, or the Philippines)
Pest: Ceratitis capitata (Mediterranean fruit fly), Bactrocera dorsalis (Oriental
fruit fly), and Zeugodacus cucurbitae (melon fly; formerly known as
Bactrocera cucurbitae)
Treatment: T101-c-1
T101-d-1 Banana
Pest: External feeders such as Noctuidae, Thrips spp., Copitarsia spp.
Treatment: T101-d-1

Treatment Schedules T100 - Schedules for Fruits, Nuts, and Vegetables
T101-e-1 Bean (except Faba Bean), Dry
5-2-4 Treatment Manual 08/2024-05
T101-e-1 Bean (except Faba Bean), Dry
Pest: Bruchidae (seed beetles)
Treatment: T101-e-1
T101-g-1 Beet
Pest: Internal feeders
Treatment: T101-g-1
T101-g-1-1 Beet
Pest: External feeders
Treatment: T101-g-1-1
T101-h-1 Blackberry
Pest: External feeders such as Noctuidae, Thrips spp., Copitarsia spp.,
Pentatomidae, and Tarsonemus spp.
Treatment: T101-h-1
T101-i-1 Blueberry
Pest: External feeders
Treatment: T101-i-1
T101-i-1-1 Blueberry
Pest: Ceratitis capitata (Mediterranean fruit fly), Anastrepha fraterculus
(South American fruit fly), and Lobesia botrana (European grapevine moth)
Treatment: T101-i-1-1—MB at NAP—tarpaulin or chamber

Treatment Schedules T100 - Schedules for Fruits, Nuts, and Vegetables
T101-i-1-2 Blueberry
08/2024-05 Treatment Manual 5-2-5
T101-i-1-2 Blueberry
Pest: Ceratitis capitata (Mediterranean fruit fly), Anastrepha fraterculus
(South American fruit fly), and Lobesia botrana (European grapevine moth)
Treatment: T101-i-1-2—MB at NAP—chamber
T101-i-1-3 Blueberry
Pest: Lobesia botrana (European grapevine moth)
Treatment: T101-i-1-3—MB at NAP—tarpaulin
T101-i-1-4 Blueberry
Pest: Lobesia botrana (European grapevine moth)
Treatment: T101-i-1-4—MB at NAP—chamber
T101-n-2 Broccoli (Brassica oleracea var. botrytis)
Pest: External feeders and leaf miners
Treatment: T101-n-2—MB at NAP—tarpaulin or chamber
T101-n-2 Broccoli, Chinese (Gai Lon) (Brassica oleracea L. var.
alboglabra)
Pest: External feeders and leaf miners
Treatment: T101-n-2—MB at NAP—tarpaulin or chamber
T101-n-2 Broccoli raab (Rapini) (Brassica rapa or B. campestris)
Pest: External feeders and leaf miners
Treatment: T101-n-2—MB at NAP—tarpaulin or chamber

Treatment Schedules T100 - Schedules for Fruits, Nuts, and Vegetables
T101-n-2 Brussels Sprouts (Brassica oleracea var. gemmifera)
5-2-6 Treatment Manual 08/2024-05
T101-n-2 Brussels Sprouts (Brassica oleracea var. gemmifera)
Pest: External feeders and leaf miners
Treatment: T101-n-2—MB at NAP—tarpaulin or chamber
T101-j-1 Cabbage
Includes both European and Chinese cabbage
Pest: External feeders
Treatment: T101-j-1—MB at NAP—tarpaulin or chamber
T101-n-2 Cabbage (Brassica oleracea)
Pest: External feeders and leaf miners
Treatment: T101-n-2—MB at NAP—tarpaulin or chamber
T101-n-2 Cabbage, Chinese (Bok Choy) (Brassica chinensis)
Pest: External feeders and leaf miners
Treatment: T101-n-2—MB at NAP—tarpaulin or chamber
T101-n-2 Cabbage, Chinese (Napa) (Brassica pekinensis)
Pest: External feeders and leaf miners
Treatment: T101-n-2—MB at NAP—tarpaulin or chamber
T101-n-2 Cabbage, Chinese Mustard (Gai Choy) (Brassica
campestris)
Pest: External feeders and leaf miners
Treatment: T101-n-2—MB at NAP—tarpaulin or chamber

Treatment Schedules T100 - Schedules for Fruits, Nuts, and Vegetables
T101-k-1 Cantaloupe
08/2024-05 Treatment Manual 5-2-7
T101-k-1 Cantaloupe
Pest: External feeders
Treatment: T101-k-1—MB at NAP—tarpaulin or chamber
T101-l-1 Carrot
Pest: External feeders
Treatment: T101-l-1—MB at NAP—tarpaulin or chamber
T101-m-1 Carrot
Pest: Internal feeders
Treatment: T101-m-1—MB, chamber, 15” vacuum
T101-n-1 Cassava (Manihot and Yuca)
Pest: External feeders, Slugs
Treatment: T101-n-1—MB at NAP—tarpaulin or chamber
T101-n-2 Cauliflower (Brassica oleracea var. botrytis)
Pest: External feeders and leaf miners
Treatment: T101-n-2—MB at NAP—tarpaulin or chamber
T101-n-2 Cavalo broccolo (Brassica oleracea var botrytis)
Pest: External feeders and leaf miners
Treatment: T101-n-2—MB at NAP—tarpaulin or chamber
T101-n-1 Celeriac (Celery Root)
Pest: External feeders
Treatment: T101-n-1—MB at NAP—tarpaulin or chamber

Treatment Schedules T100 - Schedules for Fruits, Nuts, and Vegetables
T101-o-1 Celery (Above Ground Parts)
5-2-8 Treatment Manual 08/2024-05
T101-o-1 Celery (Above Ground Parts)
Pest: External feeders
Treatment: T101-o-1—MB at NAP—tarpaulin or chamber
T101-p-1 Chayote (Fruit Only)
Pest: External feeders
Treatment: T101-p-1—MB at NAP—tarpaulin or chamber
T101-r-1 Cherry
Pest: Insects other than fruit flies
Treatment: T101-r-1—MB at NAP—tarpaulin or chamber
T101-s-1 Cherry
Pest: Rhagoletis indifferens (Western cherry fruit fly) and Cydia pomonella
(codling moth)
Treatment: T101-s-1—MB at NAP—chamber only
T101-s-1-1 Cherry From Australia
Pest: Ceratitis capitata (Mediterranean fruit fly)
Treatment: T101-s-1-1—MB at NAP—chamber only
T101-t-1 Chestnut (Except Water Chestnut)
Pest: Cydia splendana (nut fruit tortrix) and Curculio spp.
Treatment: T101-t-1—MB at NAP—tarpaulin or chamber
T101-u-1 Chestnut (Except Water Chestnut)
Pest: Cydia splendana (nut fruit tortrix) and Curculio spp.
Treatment: T101-u-1—MB in 26” vacuum—chamber

Treatment Schedules T100 - Schedules for Fruits, Nuts, and Vegetables
T101-v-1 Chicory (Above Ground Parts)
08/2024-05 Treatment Manual 5-2-9
T101-v-1 Chicory (Above Ground Parts)
Pest: External feeders
Treatment: T101-v-1—MB at NAP—tarpaulin or chamber
T101-n-1 Chicory Root
Pest: External feeders
Treatment: T101-n-1—MB at NAP—tarpaulin or chamber
T101-w-1 Cipollini (Bulbs)
Pest: Exosoma lusitanica (chrysomelid beetle)
Treatment: T101-w-1—MB in 15” vacuum—chamber
T101-w-1-2 Citrus From United States (Interstate Movement)
Pest: Ceratitis capitata (Mediterranean fruit fly)
Treatment: T101-w-1-2—MB at NAP—tarpaulin or chamber
T101-n-2-1 Grapefruit, Kumquat, Lemon, Lime, Orange,Tangerine/
Clementine/Mandarin, Tangelo, and Tango from Chile
Pest: External feeders and Brevipalpus chilensis (Chilean false red mite)
Treatment: T101-n-2-1—MB at NAP—tarpaulin or chamber
T101-j-2-1 Clementine (Tangerine), Grapefruit, Orange From Mexico
and Quarantine Areas of the U.S.
Pest: Anastrepha spp.
Treatment: T101-j-2-1—MB at NAP—chamber

Treatment Schedules T100 - Schedules for Fruits, Nuts, and Vegetables
T101-n-2 Coles (Brassica spp.)
5-2-10 Treatment Manual 08/2024-05
T101-n-2 Coles (Brassica spp.)
Pest: External feeders and leaf miners
Treatment: T101-n-2—MB at NAP—tarpaulin or chamber
T101-n-2 Collard Greens (Brassica oleracea var. acephala)
Pest: External feeders and leaf miners
Treatment: T101-n-2—MB at NAP—tarpaulin or chamber
T101-x-1 Copra
(Dried coconuts and whole coconuts without the husk)
Pest: External feeders
Treatment: T101-x-1—MB (“Q” label only) at NAP—tarpaulin or chamber
T101-x-1-1 Corn-On-the-Cob (Green corn, Sweet Corn)
Pest: Ostrinia nubilalis (European corn borer)
Treatment: T101-x-1-1—MB at NAP—tarpaulin or chamber
T101-y-1 Cucumber
Pest: External feeders
Treatment: T101-y-1—MB at NAP—tarpaulin or chamber
T101-z-1 Dasheen (Eddoe, Malanga, Tannia, Tanya, Taro, and Yautia)
Pest: External feeders
Treatment: T101-z-1—MB at NAP—tarpaulin or chamber
T101-a-2 Dasheen
Pest: Internal feeders
Treatment: T101-a-2—MB chamber, 15” vacuum—chamber

Treatment Schedules T100 - Schedules for Fruits, Nuts, and Vegetables
T101-b-2 Endive
08/2024-05 Treatment Manual 5-2-11
T101-b-2 Endive
Pest: External feeders
Treatment: T101-b-2—MB at NAP—tarpaulin or chamber
T101-c-2 Faba (Fava) Bean (Dried)
Pest: Bruchidae (seed beetles)
Treatment: T101-c-2—MB in 26” vacuum—chamber
T101-d-2 Faba (Fava) Bean (Dried)
Pest: Bruchidae (seed beetles)
Treatment: T101-d-2—MB at NAP—tarpaulin or chamber
T101-e-2 Garlic
Pest: Brachycerus spp.(garlic beetles and Dyspessa ulula garlic
carpenterworm)
Treatment: T101-e-2—MB in 15” vacuum—chamber
T101-f-2 Ginger (Rhizome)
Pest: Internal feeders
Treatment: T101-f-2—MB chamber, 15” vacuum—chamber
T101-g-2 Ginger (Rhizome)
Pest: External feeders
Treatment: T101-g-2—MB at NAP—tarpaulin or chamber
T101-h-2 Grape
Pest: Lobesia botrana (European grapevine moth)
Treatment T101-h-2—MB at NAP—tarpaulin

Treatment Schedules T100 - Schedules for Fruits, Nuts, and Vegetables
T101-h-2-1 Grape
5-2-12 Treatment Manual 08/2024-05
T101-h-2-1 Grape
Pest: Ceratitis capitata (Mediterranean fruit fly)
Treatment: T101-h-2-1—MB at NAP—tarpaulin or chamber
T101-i-2 Grape
Pest: External feeders and insects other than Ceratitis capitata (Mediterranean
fruit fly) and mealybugs
Treatment: T101-i-2—MB at NAP—tarpaulin or chamber
T101-i-2-1 Grape, Baby Kiwi (Actinidia arguta), and Pomegranate
Pest: Brevipalpus chilensis (Chilean false red mite)
Treatment: T101-i-2-1—MB at NAP—tarpaulin or chamber
T101-i-2-2 Fig (Ficus carica)
Pest: Brevipalpus chilensis (Chilean false red mite)
Treatment: T101-i-2-2—MB at NAP—chamber
T101-j-2 Grapefruit and Other Kinds of Citrus
Pest: Aleurocanthus woglumi (citrus blackfly)
Treatment: T101-j-2—MB at NAP—tarpaulin or chamber
T101-k-2 Green Pod Vegetables
(Snap, string, yard-long beans, peas, pigeon peas, and lablab beans)
Pest: Cydia fabivora, Crocidosema aporema, Maruca vitrata (exotic legume
pod borers), Melanagromyza obtusa (pigeon pea pod fly), and leaf miners
Treatment: T101-k-2—MB in 15” vacuum—chamber

Treatment Schedules T100 - Schedules for Fruits, Nuts, and Vegetables
T101-k-2-1 Green Pod Vegetables
08/2024-05 Treatment Manual 5-2-13
T101-k-2-1 Green Pod Vegetables
(Snap, string, yard-long beans, peas, pigeon peas, and lablab beans)
Pest: Cydia fabivora, Crocidosema aporema, Maruca vitrata (exotic legume
pod borers), Melanagromyza obtusa (pigeon pea pod fly), and leaf miners
Treatment: T101-k-2-1—MB at NAP—tarpaulin or chamber
T101-n-2-1-1 Dried Herbs, Spices, and Mint (Mentha spp.) (All Plant
Parts and Seeds)
Pest: Various stored product pests, not including khapra beetle
Treatment: T101-n-2-1-1—MB (“Q” label only) at NAP
T101-n-2 Fresh Herbs, Spices, and Mint (Mentha spp.) (All Plant
Parts Except Seeds)
Pest: External feeders and leaf miners
Treatment: T101-n-2—MB at NAP—tarpaulin or chamber
T101-l-2 Horseradish
Pest: Baris lepidii (imported crucifer weevil)
Treatment: T101-l-2—MB in 15” vacuum—chamber
T101-n-2 Kale (Brassica oleracea var. acephala)
Pest: External feeders and leaf miners
Treatment: T101-n-2—MB at NAP—tarpaulin or chamber
T101-m-2 Kiwi
Pest: External feeders (excludes Brevipalpus chilensis), Nysius huttoni (wheat
bug)
Treatment: T101-m-2—MB at NAP—tarpaulin or chamber

Treatment Schedules T100 - Schedules for Fruits, Nuts, and Vegetables
T101-m-2-1 Kiwi
5-2-14 Treatment Manual 08/2024-05
T101-m-2-1 Kiwi
Pest: Ceratitis capitata (Mediterranean fruit fly)
Treatment: T101-m-2-1—MB at NAP—tarpaulin or chamber
T101-m-2-2 Kiwi
Pest: Brevipalpus chilensis (Chilean false red mite)
Treatment: T101-m-2-2—MB at NAP—tarpaulin or chamber
T101-n-2 Kohlrabi (Brassica oleracea var. gongylodes)
Pest: External feeders and leaf miners
Treatment: T101-n-2—MB at NAP—tarpaulin or chamber
T101-n-3 Kumquat (Fortunella japonica)
Pest: Brevipalpus chilensis, Ceratitis capitata (Wiedemann) and Anastrepha
fracterculus (Wiedmann)
Treatment: T101-n-3 MB at NAP—chamber
T101-n-2 Leafy Vegetables
Pest: External feeders and leaf miners
Treatment: T101-n-2—MB at NAP—tarpaulin or chamber
T101-q-2 Leeks
Pest: Internal feeders (including leaf miners)
Treatment: T101-q-2—MB at NAP—tarpaulin or chamber
T101-e-1 Lentils (Dry)
Pest: Bruchidae (seed beetles)
Treatment: T101-e-1—MB at NAP—tarpaulin or chamber

Treatment Schedules T100 - Schedules for Fruits, Nuts, and Vegetables
T101-n-2 Lettuce From Spain
08/2024-05 Treatment Manual 5-2-15
T101-n-2 Lettuce From Spain
Pest: Autographa gamma, Helicoverpa armigera, Mamestra brassicae,
Spodoptera littoralis
Treatment: T101-n-2—MB at NAP—tarpaulin or chamber
T101-b-1-1 Lychee (Litchi)
Pest: Mealybugs (Pseudococcidae)
Treatment: T101-b-1-1—MB (“Q” label only) at NAP—tarpaulin or chamber
T101-o-2 Melons (Including Honeydew, Muskmelon, and
Watermelon)
Pest: External feeders such as Noctuidae, Thrips spp., Copitarsia spp.
Treatment: T101-o-2—MB at NAP—tarpaulin or chamber
T101-n-2 Mizuna (Brassica rapa Japonica Group)
Pest: External feeders and leaf miners
Treatment: T101-n-2—MB at NAP—tarpaulin or chamber
T101-n-2 Mustard Greens (Brassica juncea)
Pest: External feeders and leaf miners
Treatment: T101-n-2—MB at NAP—tarpaulin or chamber
T101-n-2 Mustard Spinach (Brassica rapa Perviridis group)
Pest: External feeders and leaf miners
Treatment: T101-n-2—MB at NAP—tarpaulin or chamber
T101-p-2 Okra
Pest: Pectinophora gossypiella (pink bollworm)
Treatment: T101-p-2—MB at NAP—chamber

Treatment Schedules T100 - Schedules for Fruits, Nuts, and Vegetables
T101-p-2-1 Okra
5-2-16 Treatment Manual 08/2024-05
T101-p-2-1 Okra
Pest: Pectinophora gossypiella (pink bollworm)
Treatment: T101-p-2-1—MB at NAP—tarpaulin
T101-q-2 Onion
Pest: Internal feeders and leaf miners
Treatment: T101-q-2—MB at NAP—tarpaulin or chamber
T101-g-1 Parsnip
Pest: Internal feeders
Treatment: T101-g-1—MB chamber, 15” vacuum—chamber
T101-e-1 Peas (Dry)
Pest: Bruchidae (seed beetles)
Treatment: T101-e-1—MB at NAP—tarpaulin or chamber
T101-a-3 Peppers
Pest: Internal pests (except fruit flies) and external pests (except mealybugs)
Treatment: T101-a-3—MB at NAP—tarpaulin or chamber
T101-r-2 Pineapple
Pest: Internal feeders
Treatment: T101-r-2—MB (“Q” label only) at NAP—tarpaulin or chamber
T101-s-2 Pineapple
Pest: External feeders
Treatment: T101-s-2—MB (“Q” label if under 70
o
F(21.1
o
C)) at NAP—
tarpaulin or chamber

Treatment Schedules T100 - Schedules for Fruits, Nuts, and Vegetables
T101-t-2 Plantain
08/2024-05 Treatment Manual 5-2-17
T101-t-2 Plantain
Pest: External feeders such as Noctuidae, Thrips spp., Copitarsia spp.
Treatment: T101-t-2—MB at NAP—tarpaulin or chamber
T101-AA—Plum
Pest: Lobesia botrana (European grapevine moth)
There are two alternative treatments, T101-AA-1 and -AA-2.
Fumigate after cold storage (34 °F or lower) for a minimum of 10 days.
The cold storage is not subject to verification by PPQ nor CBP and is not a
quarantine treatment.
T101-AA-1—Plum
Treatment: T101-AA-1—MB at NAP—tarpaulin or chamber
T101-AA-2—Plum
Treatment: T101-AA-2—MB at NAP—tarpaulin or chamber
T101-u-2 Potato (White or Irish)
Pest: Graphognathus spp. (white fringed beetles)
Treatment: T101-u-2—MB at NAP—tarpaulin or chamber
T101-v-2 Potato (White or Irish)
Pest: Ostrinia nubilalis (European corn borer) and Phthorimaea operculela
(potato tuberworm)
Treatment: T101-v-2—MB at NAP—tarpaulin or chamber
T101-e-1 Pulses, Dried
Pest: Bruchidae (seed beetles)
Treatment: T101-e-1—MB at NAP—tarpaulin or chamber

Treatment Schedules T100 - Schedules for Fruits, Nuts, and Vegetables
T101-w-2 Pumpkin
5-2-18 Treatment Manual 08/2024-05
T101-w-2 Pumpkin
Pest: External feeders
Treatment: T101-w-2—MB at NAP—tarpaulin or chamber
T101-g-1 Radish
Pest: Internal feeders
Treatment: T101-g-1—MB chamber, 15” vacuum—chamber
T101-n-2 Rape Greens (Brassica napus)
Pest: External feeders and leaf miners
Treatment: T101-n-2—MB at NAP—tarpaulin or chamber
T101-x-2 Raspberry
Pest: External feeders such as Noctuidae, Thrips spp., Copitarsia spp.,
Pentatomidae
Treatment: T101-x-2—MB at NAP—tarpaulin or chamber
T101-q-2 Shallots
Pest: Internal feeders (including leaf miners)
Treatment: T101-q-2—MB at NAP—tarpaulin or chamber
T101-y-2 Squash (Winter, Summer, and Chayote)
Pest: External feeders
Treatment: T101-y-2—MB at NAP—tarpaulin or chamber
T101-z-2 Strawberry
Pest: External feeders
Treatment: T101-z-2—MB at NAP—tarpaulin or chamber

Treatment Schedules T100 - Schedules for Fruits, Nuts, and Vegetables
T101-b-3-1 Sweet Potato (Ipomoea)
08/2024-05 Treatment Manual 5-2-19
T101-b-3-1 Sweet Potato (Ipomoea)
Pest: External and internal feeders
Treatment: T101-b-3-1—MB at NAP—tarpaulin or chamber
T101-c-3 Tomato (from quarantine areas in the United States)
Pest: Ceratitis capitata (Mediterranean fruit fly)
Treatment: T101-c-3—MB at NAP—tarpaulin or chamber
T101-c-3-1 Tomato (From Chile)
Pest: Phthorimaea absoluta (tomato leafminer) (formerly Tuta absoluta
(tomato fruit moth)) and Rhagoletis tomatis (tomato fruit fly)
Treatment: T101-c-3-1—MB at NAP—tarpaulin or chamber
T101-d-3 Tuna (Opuntia) and All Other Fruits From Cacti (Dragon
Fruit, Yellow Dragon Fruit, Prickly Pear, Pitaya, Pitahaya)
Pest: Ceratitis capitata (Mediterranean fruit fly)
Treatment: T101-d-3—MB at NAP—tarpaulin or chamber
T101-e-3 Tuna (Opuntia) and All Other Fruits From Cacti (Dragon
Fruit, Yellow Dragon Fruit, Prickly Pear, Pitahaya, Pitaya)
Pest: External feeders and leaf miners
Treatment: T101-e-3—MB at NAP—tarpaulin or chamber
T101-g-1 Turnip
Pest: Internal feeders
Treatment: T101-g-1—MB chamber, 15” vacuum—chamber
T101-f-3 Yam (Dioscorea spp.)
Pest: Internal and external feeders
Treatment: T101-f-3—MB at NAP—tarpaulin or chamber

Treatment Schedules T100 - Schedules for Fruits, Nuts, and Vegetables
T101-h-3 Zucchini
5-2-20 Treatment Manual 08/2024-05
T101-h-3 Zucchini
Pest: External feeders
Treatment: T101-h-3—MB at NAP—tarpaulin or chamber
T102—Water Treatment
T102-b Cherimoya From Chile
Pest: Brevipalpus chilensis (Chilean false red mite)
Treatment: T102-b—Soapy water and wax
T102-c Durian and Other Large Fruits, such as Breadfruit
Pest: External feeders, scales, and mealybugs (Pseudococcidae)
Treatment: T102-c—Warm, soapy water and brushing
T102-e Limes
Pest: Mealybugs (Pseudococcidae) and other surface pests
Treatment: T102-e—Hot water immersion
T102-b-1 Limes From Chile
Pest: Brevipalpus chilensis (Chilean false red mite)
Treatment: T102-b-1—Soapy water and wax
!
CAUTION
Whenever water comes into contact with fresh produce, the water’s quality dictates
the potential for pathogen contamination. To reduce the risk of food-borne illnesses,
the water used for washing, treatments, and cooling must be fortified with sodium
hypochlorite (household bleach), and constantly maintained at a chlorine level not to
exceed 200 ppm.

Treatment Schedules T100 - Schedules for Fruits, Nuts, and Vegetables
T102-d-1 Longan Fruit From Hawaii
08/2024-05 Treatment Manual 5-2-21
T102-d-1 Longan Fruit From Hawaii
Pest: Ceratitis capitata (Mediterranean fruit fly) and Bactrocera dorsalis
(Oriental fruit fly)
Treatment: T102-d-1—Hot water immersion
T102-d Lychee (Litchi) Fruit From Hawaii
Pest: Ceratitis capitata (Mediterranean fruit fly) and Bactrocera dorsalis
(Oriental fruit fly)
Treatment: T102-d—Hot water immersion
T102-a Mango
Pest: Ceratitis capitata (Mediterranean fruit fly), Anastrepha spp., Anastrepha
ludens (Mexican fruit fly)
Treatment: T102-a—Hot water immersion
T102-b-2 Passion Fruit From Chile
Pest: Brevipalpus chilensis (Chilean false red mite)
Treatment: T102-b-2—Soapy water and wax
T103—High Temperature Forced Air
T103-a-1 Citrus From Mexico and Infested Areas in the United States
Pest: Anastrepha spp.
Treatment: T103-a-1—High temperature forced air
T103-b-1 Citrus From Hawaii
Pest: Ceratitis capitata (Mediterranean fruit fly), Bactrocera dorsalis (Oriental
fruit fly), and Zeugodacus cucurbitae (melon fly; formerly known as
Bactrocera cucurbitae)
Treatment: T103-b-1—High temperature forced air

Treatment Schedules T100 - Schedules for Fruits, Nuts, and Vegetables
T103-c-1 Mango From Mexico
5-2-22 Treatment Manual 08/2024-05
T103-c-1 Mango From Mexico
Pest: Anastrepha ludens (Mexican fruit fly), Anastrepha obliqua (West Indian
fruit fly), and Anastrepha serpentina (black fruit fly)
Treatment: T103-c-1—High temperature forced air
T103-d Mountain Papaya From Chile (T103-d-1) and Papaya From
Belize and Hawaii (T103-d-2)
Pest: Ceratitis capitata (Mediterranean fruit fly), Bactrocera dorsalis (Oriental
fruit fly), and Zeugodacus cucurbitae (melon fly; formerly known as
Bactrocera cucurbitae)
Treatment: T103-d—High temperature forced air
T103-e Rambutan From Hawaii
Pest: Ceratitis capitata (Mediterranean fruit fly), and Bactrocera dorsalis
(Oriental fruit fly)
Treatment: T103-e—High temperature forced air
T104—Pest Specific/Host Variable
For the treatments that follow, never exceed the labeled or Section 18 dosage
and time for the specific commodity at a given temperature. The specific
commodity being treated determines if the schedule is a labeled treatment or
one authorized under a Section 18 exemption.
For example, oranges cannot be treated for hitchhikers using T104-a-1 at 40-
49 °F because this schedule requires 4 lbs. of methyl bromide/1,000 ft
3
. The
methyl bromide “Q” label allows a maximum of only 3 lbs. at this temperature
range. Therefore, the oranges would have to be heated to at least 50 °F before
fumigation because at 50 °F a dosage of only 3 lbs./1,000 ft
3
is required.
Although the following treatments are pest specific, the treatment schedule for
the associated host will determine if and when a pest specific treatment can be
used. Always check the schedule for the host before selecting the proper
treatment schedule. Also, consult the methyl bromide label, and do not exceed
the restrictions on dosage and exposure time.

Treatment Schedules T100 - Schedules for Fruits, Nuts, and Vegetables
T104-a-1 Various Commodities
08/2024-05 Treatment Manual 5-2-23
T104-a-1 Various Commodities
Pest: Hitchhikers and surface pests such as: thrips, aphids, scale insects, leaf
miners, spider mites (Tetranychidae), lygaeid bugs, ants, earwigs, surface-
feeding caterpillars, and slugs
Treatment: T104-a-1—MB at NAP—tarpaulin or chamber
T104-a-1: 70 °F or above - FIFRA Yes, Various Commodities
T104-a-1: 70 °F or above - FIFRA No, Various Commodities
T104-a-1: 60 °F or above - FIFRA Yes, Various Commodities
T104-a-1: 60 °F or above - FIFRA No, Various Commodities
T104-a-1: 50 °F or above - FIFRA Yes, Various Commodities
T104-a-1: 50 °F or above - FIFRA No, Various Commodities
T104-a-1: 40 °F or above - FIFRA Yes, Various Commodities
T104-a-1: 40 °F or above - FIFRA No, Various Commodities
T104-a-2 Various Commodities
Pest: Mealybugs (Pseudococcidae)
Treatment: T104-a-2—MB at NAP—tarpaulin or chamber
T104-a-2: 80 °F or above - FIFRA Yes, Various Commodities
T104-a-2: 80 °F or above - FIFRA No, Various Commodities
T104-a-2: 70 °F or above - FIFRA Yes, Various Commodities
T104-a-2: 70 °F or above - FIFRA No, Various Commodities
T104-a-2: 60 °F or above - FIFRA Yes, Various Commodities
T104-a-2: 60 °F or above - FIFRA No, Various Commodities

Treatment Schedules T100 - Schedules for Fruits, Nuts, and Vegetables
T105—Irradiation
5-2-24 Treatment Manual 08/2024-05
T105—Irradiation
Irradiation (IR) is an approved treatment for all imported fruits and vegetables
and for fruits and vegetables moved interstate from Hawaii, Puerto Rico, and
the U.S. Virgin Islands. In addition, irradiation can be used against particular
pests of cut flowers and foliage; however, some damage may occur. Refer to
Table 5-2-1 for a list of pest-specific doses.
Treatment must be conducted at approved facilities in a foreign country,
Hawaii, Puerto Rico, U.S. Virgin Islands, or any area in the U.S. mainland.
Refer to 7 CFR 305.9(a)(1) when irradiating in facilities located in AL, AZ,
CA, FL, GA, KY, LA, MS, NV, NM, NC, SC, TN, TX, or VA.
Refer to the Agricultural Commodity Import Requirements (ACIR) database
Facilities tab for a list of approved United States irradiation facilities.
Refer to chapter Certifying Irradiation Treatment Facilities on page 6-8-1 of
this manual for facility certification requirements.
Commodities that are currently admissible with a treatment or systems
approach could also use irradiation as an alternative treatment, provided all the
pests targeted by the treatment or systems approach are neutralized by the
irradiation dose. Use of irradiation in place of a systems approach or another
treatment must be approved and appear in the this manual and the Agricultural
Commodity Import Requirements (ACIR) database prior to use.
NOTICE
When designing the facility’s dosimetry system and procedures for its operation, the
facility operator must address guidance and principles from American Society for
Testing Materials (ASTM) standards or an equivalent standard recognized by the
Administrator of APHIS.
The American Society for Testing Materials (ASTM) publication, ISO/ASTM 51261-
2002 (E), “Standard Guide for Selection and Calibration of Dosimetry Systems for
Radiation Processing” is available from:
ASTM
100 Barr Harbor Drive
West Conshohocken, PA
USA
19428-2959

Treatment Schedules T100 - Schedules for Fruits, Nuts, and Vegetables
T105—Irradiation
08/2024-05 Treatment Manual 5-2-25
The minimum absorbed doses (MAD) listed in Table 5-2-1 can be applied only
when all pests of concern can be mitigated. For example, if a country has
Mexican fruit fly, West Indian fruit fly, and Sapote fruit fly, the MAD would
have to be 100 Gy, not 70 Gy.
Table 5-2-1 Pest-Specific Minimum Absorbed Dose (Gy) For Any Approved Imported Fruits,
Vegetables, and Cut Flowers, and Fruits, Vegetables, and Cut Flowers Moved Interstate
from Hawaii, Puerto Rico, and the U.S. Virgin Islands
Scientific Name Common Name
Minimum
Absorbed
Dose (Gy) Not
To Exceed
1,000 Gy
Rhagoletis pomonella Apple maggot 60
Anastrepha ludens Mexican fruit fly 70
Anastrepha obliqua West Indian fruit fly
Anastrepha suspensa Caribbean fruit fly
Conotrachelus nenuphar Plum curculio 92
Anastrepha serpentina Sapote fruit fly 100
Bactrocera jarvisi Jarvis fruit fly
Bactrocera tryoni Queensland fruit fly
Ceratitis capitata Mediterranean fruit fly
Copitarsia decolora (only eggs and larvae)
Aspidiotus destructor Coconut scale 150
Zeugodacus cucurbitae (formerly known as
Bactrocera cucurbitae)
Melon fruit fly
Bactrocera dorsalis Oriental fruit fly
Cylas formicarius elegantulus Sweet potato weevil
Euscepes postfasciatus West Indian sweet potato weevil
Omphisa anastomosalis Sweet potato vine borer
Pseudaulacaspis pentagona White peach scale
All other fruit flies of the family Tephritidae which are
not listed above
Sternochetus frigidus (Fabr.) Mango pulp weevil 165
Cydia pomonella Codling moth (only eggs and larvae) 200
Epiphyas postvittana Light Brown Apple Moth (only eggs and larvae)
Grapholita molesta Oriental fruit moth (only eggs and larvae)
Cryptophlebia ombrodelta Litchi fruit moth (only eggs and larvae) 250
Cryptophlebia illepida Koa seedworm
Eggs and larvae of the family Tortricidae not listed 290
Brevipalpus chilensis Chilean false red mite 300
Sternochetus mangiferae Mango seed weevil
Plant pests of the class Insecta not listed above,
except pupae and adults of the order Lepidoptera
400

Treatment Schedules T100 - Schedules for Fruits, Nuts, and Vegetables
T105-a-1 Approved Imported Fruits, Vegetables, and Cut Flowers from Specific Countries; Fruits, Vegetables, and Cut
5-2-26 Treatment Manual 08/2024-05
T105-a-1 Approved Imported Fruits, Vegetables, and Cut Flowers
from Specific Countries; Fruits, Vegetables, and Cut Flowers Moved
Interstate from Hawaii, Puerto Rico, and the U.S. Virgin Islands
Pest: All fruit flies from the family Tephritidae (Refer to Table 5-2-1 for other
pests that can be treated at 150 Gy or less.) Treat using a minimum absorbed
dose of 150 Gy, not to exceed 1,000 Gy.
Treatment: T105-a 1—IR at 150 Gy
T105-a-2 Approved Imported Fruits, Vegetables, and Cut Flowers
from Specific Countries; Fruits, Vegetables, and Cut Flowers Moved
Interstate from Hawaii, Puerto Rico, and the U.S. Virgin Islands
Pest: Fruit flies from the family Tephritidae and all insect pests except adults
and pupae of the order Lepidoptera
Treatment: T105-a-2—IR at 400 Gy
T105-a-3 Approved Imported Fruits, Vegetables, and Cut Flowers
from Specific Countries; Fruits, Vegetables, and Cut Flowers Moved
Interstate from Hawaii, Puerto Rico, and the U.S. Virgin Islands
Pest: Sternochetus mangiferae (mango seed weevil), and all fruit flies from the
family Tephritidae
Treatment: T105-a-3—IR at 300 Gy
T105-a-4 Mango
Pest: Sternochetus frigidus (mango pulp weevil)
Treatment: T105-a-4—IR at 165 Gy

Treatment Schedules T100 - Schedules for Fruits, Nuts, and Vegetables
T106—Vapor Heat
08/2024-05 Treatment Manual 5-2-27
T106—Vapor Heat
T106-a Various Commodities From Mexico: Clementine (T106-a-1),
Grapefruit (T106-a-2), Mango (Manila Variety Only; T106-a-3), Orange
(T106-a-4)
Pest: Anastrepha spp. (includes Mexican fruit fly, A. ludens)
Treatment: T106-a-1—Vapor Heat
Treatment: T106-a-2—Vapor Heat
Treatment: T106-a-3—Vapor Heat
Treatment: T106-a-4—Vapor Heat
T106-b Bell Pepper (T106-b-1), Eggplant (T106-b-2), Mountain
Papaya (T106-b-3), Papaya (T106-b-4), Pineapple (T106-b-5), Squash
(T106-b-6), Tomato (T106-b-7), Zucchini (T106-b-8)
Pest: Ceratitis capitata (Mediterranean fruit fly), Bactrocera dorsalis (Oriental
fruit fly), and Zeugodacus cucurbitae (melon fly; formerly known as
Bactrocera cucurbitae)
Treatment: T106-b—Vapor heat
Treatment: T106-b-1 Bell Pepper
Treatment: T106-b-2 Eggplant
Treatment: T106-b-3 Mountain Papaya
Treatment: T106-b-4 Papaya
Treatment: T106-b-5 Pineapple
Treatment: T106-b-6 Squash
Treatment: T106-b-7 Tomato
Treatment: T106-b-8 Zucchini

Treatment Schedules T100 - Schedules for Fruits, Nuts, and Vegetables
T106-a-1-1 Clementine or Orange From Mexico
5-2-28 Treatment Manual 08/2024-05
T106-a-1-1 Clementine or Orange From Mexico
Treatment: T106-a-1-1—Vapor heat
T106-f Litchi and Longan From Hawaii
Pest: Ceratitis capitata (Mediterranean fruit fly) and Bactrocera dorsalis
(Oriental fruit fly)
Treatment: T106-f—Vapor heat
T106-d-1 Mango From the Philippines (Island of Guimaras Only)
Pest: Bactrocera occipitalis, Zeugodacus cucurbitae (melon fly; formerly
known as Bactrocera cucurbitae), and Bactrocera dorsalis (Oriental fruit fly;
formerly known as Bactrocera philippinensis)
Treatment: T106-d-1—Vapor heat
T106-d Mango from Taiwan
Pest: Bactrocera dorsalis (Oriental fruit fly) and Zeugodacus cucurbitae
(melon fly; formerly known as Bactrocera cucurbitae)
Treatment: T106-d—Vapor heat
T106-c Papaya
Pest: Ceratitis capitata (Mediterranean fruit fly), Bactrocera dorsalis (Oriental
fruit fly), and Zeugodacus cucurbitae (melon fly; formerly known as
Bactrocera cucurbitae)
Treatment: T106-c—Vapor heat
T106-e Yellow Dragon Fruit (Hylocereus megalanthus) From
Colombia
Pest: Ceratitis capitata (Mediterranean fruit fly) and Anastrepha fraterculus
(South American fruit fly)
Treatment: T106-e—Vapor heat

Treatment Schedules T100 - Schedules for Fruits, Nuts, and Vegetables
T106-g Rambutan From Hawaii
08/2024-05 Treatment Manual 5-2-29
T106-g Rambutan From Hawaii
Pest: Ceratitis capitata (Mediterranean fruit fly) and Bactrocera dorsalis
(Oriental fruit fly)
Treatment: T106-g—Vapor heat
T106-h Sweet Potato From Hawaii
Pest: Cylas formicarius (sweet potato weevil), Euscepes postfasciatus (West
Indian sweet potato weevil), and Omphisa anastomosalis (sweet potato vine
borer)
Treatment: T106-h—Vapor heat
T107—Cold Treatment
Pulp of the Fruit
The pulp of the fruit must be at or below the indicated temperature at time of
beginning treatment for all cold treatments.
Fruits for Which Cold Treatment is Authorized
The following cold treatment schedules are authorized by Plant Protection and
Quarantine (PPQ) for the control of specific pests associated with
consignments of fruit. The cold treatment schedule that must be used for a
specific commodity from a specific country is listed in the Agricultural
Commodity Import Requirements (ACIR) database. These cold treatment
schedules indicate the specific pests for which they are designed to control.
Treatment upon arrival may be accomplished at authorized ports as named in
the permits.
Treatment in-transit may be authorized for specifically equipped and approved
vessels or containers, and from approved countries for entry at ports named in
the permits. Intransit cold treatment authorization must be preceded by a visit
to the country of origin by a PPQ Official to explain loading, inspection, and
certification procedures to designated certifying officials of the country of
origin. Refrigerated compartments on carrying vessels and cold storage
warehouses must have prior certification by PPQ. Authorization of cold
treatments from countries with direct sailing time less than the number of days
prescribed for in-transit cold treatment must be contingent on the importer

Treatment Schedules T100 - Schedules for Fruits, Nuts, and Vegetables
T107-a Apple, Apricot, Avocado, Blueberry, Cape Gooseberry, Cherry, Citrus, Ethrog, Grape, Kiwi, Loquat, Litchi (Lychee),
5-2-30 Treatment Manual 08/2024-05
understanding that the prescribed in-transit refrigeration period must be met
before arrival of the vessel at the approved U.S. port.
Gaps in the cold treatment data printout for pulp sensors and air sensors shall
be allowed or disallowed on a case-by-case basis, taking into account the
number of gaps, the length of each gap, and the temperatures before and after.
Air temperatures may occasionally exceed treatment temperatures during
defrost cycles; however, fruit temperatures should not rise appreciably during
this time. During non-defrost times, the temperatures of the air sensors should
never exceed the maximum allowable treatment temperature.
T107-a Apple, Apricot, Avocado, Blueberry, Cape Gooseberry,
Cherry, Citrus, Ethrog, Grape, Kiwi, Loquat, Litchi (Lychee),
Nectarine, Orange, Ortanique, Peach, Pear, Persimmon, Plum,
Plumcot, Pomegranate, Pummelo, Quince, Sand Pear
Pest: Ceratitis capitata (Mediterranean fruit fly) and Ceratitis rosa (Natal fruit
fly)
Treatment: T107-a—Cold treatment
T107-a-1 Apple, Apricot, Blueberry, Cherry, Grape, Grapefruit, Kiwi,
Mandarin, Nectarine, Orange, Peach, Pear, Plum, Pomegranate,
Quince, Sweet Orange, Tangelo, Tangerine (Includes Clementine)
Pest: Ceratitis capitata (Mediterranean fruit fly) and species of Anastrepha
(other than Anastrepha ludens)
Treatment: T107-a-1—Cold treatment
T107-a-2 Orange (Citrus sinensis) and Tangor (Citrus nobilis) From
Australia
Pest: Ceratitis capitata (Mediterranean fruit fly)
Treatment: T107-a-2—Cold treatment
NOTICE
The fruit must be precooled at or below the target treatment temperature prior to
loading. A certified USDA representative must sample the fruit pulp temperatures
during loading in all sections of the lot until precooling has been accomplished.

Treatment Schedules T100 - Schedules for Fruits, Nuts, and Vegetables
T107-a-3 Lemon (Citrus limon) From Australia
08/2024-05 Treatment Manual 5-2-31
T107-a-3 Lemon (Citrus limon) From Australia
Pest: Ceratitis capitata (Mediterranean fruit fly)
Treatment: T107-a-3—Cold treatment
T107-b Apple, Apricot, Cherry, Ethrog, Grapefruit, Litchi, Longan,
Orange, Peach, Persimmon, Plum, Pomegranate, Tangerine
(includes Clementine), White Zapote
Pest: Anastrepha ludens (Mexican fruit fly)
Treatment: T107-b—Cold treatment
T107-c Apple, Apricot, Carambola, Cherry, Grape, Grapefruit,
Orange, Pomegranate, Tangerine (Includes Clementine)
Pest: Species of ‘Anastrepha (other than Anastrepha ludens)
Treatment: T107-c—Cold treatment
T107-d Apple, Citrus, Kiwi, Pear
Pest: Bactrocera tryoni (Queensland fruit fly)
Treatment: T107-d—Cold treatment
T107-d-1 Cherry From Australia
Pest: Bactrocera tryoni (Queensland fruit fly)
Treatment: T107-d-1—Cold treatment
T107-d-2 Orange (Citrus sinensis), Tangerine/Clementine/Mandarin
(C. reticulata), Tangelo (C. paradisi x C. reticulata), and Tangor (C.
nobilis) From Australia
Pest: Bactrocera tryoni (Queensland fruit fly) and B. neohumeralis (lesser
Queensland fruit fly)
Treatment: T107-d-2—Cold treatment

Treatment Schedules T100 - Schedules for Fruits, Nuts, and Vegetables
T107-d-3 Lemon (Citrus limon) and Grapefruit From Australia
5-2-32 Treatment Manual 08/2024-05
T107-d-3 Lemon (Citrus limon) and Grapefruit From Australia
Pest: Bactrocera tryoni (Queensland fruit fly) and B. neohumeralis (lesser
Queensland fruit fly)
Treatment: T107-d-3—Cold treatment

Treatment Schedules T100 - Schedules for Fruits, Nuts, and Vegetables
T107-e Apricot, Citrus, Grape, Nectarine, Peach, Plum
08/2024-05 Treatment Manual 5-2-33
T107-e Apricot, Citrus, Grape, Nectarine, Peach, Plum
Pest: Thaumatotibia leucotreta (false codling moth), Ceratitis capitata
(Mediterranean fruit fly), C. quinaria (five-spotted, Rhodesian, or
Zimbabwean fruit fly), C. rosa (Natal fruit fly), and Bactrocera dorsalis
(Oriental fruit fly; formerly known as Bactrocera invadens)
Treatment: T107-e—Cold treatment
T107-h Carambola, Litchi (lychee), Longan, Sand Pear
Pest: Bactrocera dorsalis (Oriental fruit fly), Zeugodacus cucurbitae (melon
fly; formerly known as Bactrocera cucurbitae), and Conopomorpha sinensis
(lychee fruit borer)
Treatment: T107-h—Cold treatment
T107-j Carambola, Litchi (Lychee), Longan, Sand Pear
Pest: Bactrocera dorsalis (Oriental fruit fly)
Treatment: T107-j—Cold treatment
T107-g Pecans and Hickory Nuts
Pest: Curculio caryae (pecan weevil)
Treatment: T107-g—Cold treatment
T107-f Ya Pear From China
Treatment: T107-f—Cold treatment
T107-i Barhi Date (Phoenix dactylifera L. ‘Barhi’)
Pest: Ceratitis capitata (Mediterranean fruit fly)
Treatment: T107-i—Cold treatment

Treatment Schedules T100 - Schedules for Fruits, Nuts, and Vegetables
T107-L Orange (Citrus sinensis) and Tangerine/Clementine/Mandarin (C. reticulata)
5-2-34 Treatment Manual 08/2024-05
T107-L Orange (Citrus sinensis) and Tangerine/Clementine/
Mandarin (C. reticulata)
Pest: Bactrocera zonata (Peach fruit fly), Ceratitis capitata (Mediterranean
fruit fly), C. rosa (Natal fruit fly), and Anastrepha spp. (other than A. ludens)
Treatment: T107-L Cold treatment
T107-m Guava (Psidium guajava)
Pest: Bactrocera dorsalis (Oriental fruit fly)
Treatment: T107-m—Cold treatment
T107-n Guava (Psidium guajava)
Pest: Bactrocera dorsalis (Oriental fruit fly), Zeugodacus cucurbitae (melon
fly; formerly known as B.cucurbitae), and Zeugodacus tau (formerly known as
B. tau)
Treatment: T107-n—Cold treatment
T107-o Nanfeng Honey Mandarin (Citrus x aurantium cv. ’Kinokuni’);
Ponkan (C. x poonensis hort. ex Tanaka); Sweet Orange (C.
sinensis); and Unshu/Satsuma Orange (C. unshiu) from China
Pest: Bactrocera correcta, B. dorsalis, B. occipitalis, B. pedestris, Zeugodacus
tau (formerly known as B. tau), and Zeugodacus cucurbitae (melon fly;
formerly known as B. cucurbitae)
Treatment: T107-o—Cold treatment

Treatment Schedules T100 - Schedules for Fruits, Nuts, and Vegetables
T108—Fumigation Plus Cold Treatment of Fruits
08/2024-05 Treatment Manual 5-2-35
T108—Fumigation Plus Cold Treatment of Fruits
The following treatment schedules (fumigation followed by cold treatment) are
authorized by Plant Protection and Quarantine (PPQ) for the control of specific
pests associated with consignments of fruit. The treatment schedule that must
be used for a specific commodity from a specific country is listed in the
Agricultural Commodity Import Requirements (ACIR) database. These
treatment schedules indicate the specific pests for which they are designed to
control.
T108-a Apple, Apricot, Avocado, Cherry, Grape, Kiwi, Nectarine,
Peach, Pear, Plum, Quince
Pest: Zeugodacus cucurbitae (melon fly; formerly known as Bactrocera
cucurbitae), Bactrocera dorsalis (Oriental fruit fly), Bactrocera tryoni
(Queensland fruit fly), Brevipalpus chilensis (Chilean false red mite), Ceratitis
capitata (Mediterranean fruit fly)
Treatment: T108-a-1—MB at NAP—Tarpaulin or Chamber Followed by Cold
Treatment
Treatment: T108-a-2—MB at NAP—Tarpaulin or Chamber Followed by Cold
Treatment
Treatment: T108-a-3—MB at NAP—Tarpaulin or Chamber Followed by Cold
Treatment
!
CAUTION
Some varieties of fruit may be injured by exposure to MB. Importers should be
encouraged to treat small samples of fruit to determine tolerance levels before ship-
ping commercial quantities. The USDA is not liable for damages caused by quaran-
tine.

Treatment Schedules T100 - Schedules for Fruits, Nuts, and Vegetables
T108-b Apple, Grape, and Pear
5-2-36 Treatment Manual 08/2024-05
T108-b Apple, Grape, and Pear
Pest: Austrotortrix spp. and Epiphyas spp. (light brown apple moth complex),
Bactrocera tryoni (Queensland fruit fly), Ceratitis capitata (Mediterranean
fruit fly), and other fruit flies.
Treatment: T108-b—MB at NAP—tarpaulin or chamber followed by cold
treatment
T109—Cold Treatment Plus Fumigation of Fruits
T109-d-1 Apple, Grape, and Pear From Australia
Pest: Austrotortrix spp. and Epiphyas spp. (light brown apple moth complex),
Bactrocera tryoni (Queensland fruit fly), Ceratitis capitata (Mediterranean
fruit fly), and other fruit flies
Treatment: T109-d-1—Cold treatment followed by MB at NAP—tarpaulin or
chamber
T109-a Apple (All Varieties from Japan and ‘Fuji’ Variety From the
Republic of Korea)
Pest: Carposina niponensis (peach fruit moth), Conogethes punctiferalis
(yellow peach moth), Tetranychus viennensis (fruit tree spider mite),
Tetranychus kanzawai (Kanzawa mite)
Two alternative schedules based on type of container:
T109-a-1 Apple (All Varieties from Japan and ‘Fuji’ Variety From the
Republic of Korea)
Apples in plastic field bins at maximum load factor 50 percent or less.
Treatment: T109-a-1—Cold treatment followed by MB at NAP—tarpaulin or
chamber

Treatment Schedules T100 - Schedules for Fruits, Nuts, and Vegetables
T109-a-2 Apple (All Varieties from Japan and ‘Fuji’ Variety From the Republic of Korea)
08/2024-05 Treatment Manual 5-2-37
T109-a-2 Apple (All Varieties from Japan and ‘Fuji’ Variety From the
Republic of Korea)
Apples in only cardboard cartons at maximum load factor 40 percent or less.
Treatment: T109-a-2—Cold treatment followed by MB at NAP—tarpaulin or
chamber
T110—Quick Freeze
Under Development: See Quick Freeze Guidelines on page 3-7-17 for
operational guidelines and equipment specifications.
T110-a
Treatment: T110-a—Quick freeze
T110-b
Treatment: T110-b—Quick freeze for destruction
T110-c Miscellaneous Food/Feed Commodities
T110-c-1
Pest: Quarantine-significant snails of the families Camaenidae (including the
former Bradybaenidae), Geomitridae, Helicidae, Hygromiidae, and
Succineidae, including the following genera: Backeljaia, Bradybaena,
Candidula, Cepaea, Cathaica, Cernuella, Cochlicella, Helicella, Theba,
Trochoidea, Xerolenta, Xeropicta, Xeroplexa, Xerosecta, Xerotricha
Treatment: T110-c-1—Cold treatment
NOTICE
Never use this treatment for the control of bruchid beetles in dried beans. Research
has shown that a treatment of -0.4 °F (-18 °C) for 14 days would be needed to be
efficacious.
NOTICE
Historically these treatments have been used on nonfood/nonfeed commodities. Be
aware that the treatment may result in severe damage to food or feed commodities.
T110-c schedules may only be used with permission from S&T-TMT. Contact TMT
by phone (305) 278-4877 or email ppqtmt@usda.gov for official approval.

Treatment Schedules T100 - Schedules for Fruits, Nuts, and Vegetables
T110-c-2
5-2-38 Treatment Manual 08/2024-05
T110-c-2
Pest: Quarantine-significant snails of the family Helicidae, including the
following genera: Helix, Otala
Treatment: T110-c-2 —Cold treatment
T110-c-3
Pest: Quarantine-significant snails of the family Achatinidae, including the
following genera: Achatina, Archachatina, Lignus, Limicolaria, Lissachatina
Treatment: T110-c-3—Cold treatment

03/2024-03 Treatment Manual 5-3-1
Chapter
5
Treatment Schedules
T200 - Schedules for Propagative Plant
Material
Contents
T201—Plants 5-3-2
T202—Bulbs, Corms, Tubers, Rhizomes, and Roots 5-3-10
T203—Seeds 5-3-12
The condition of the plants at the time of treatment may have a bearing on
reaction to treatment.
Report any new or unusual observances relating to treatment tolerance of
treated material to the USDA-APHIS-PPQ-S&T-TMT, giving details of the
treatment and the conditions of application. In appraising the effects of a
particular treatment, take care to distinguish between the actual or apparent
effects attributable to the treatment and those not related to the treatment.
NOTICE
Plant and plants parts treated under the T200 series schedules are not to be used
for food or feed purposes.
NOTICE
Containers. Give boxes, crates, and other propagative containers the same
treatment as the propagative material with which they are associated. Exceptions
are necessary, however, when significant pests are found infesting containers or
packing materials that would not be controlled by the treatment required for the
contents.

Treatment Schedules T200 - Schedules for Propagative Plant Material
T201—Plants
5-3-2 Treatment Manual 03/2024-03
T201—Plants
T201-q Aquatic Plants Infested with Freshwater Snails
Pest: Snails of the following families: Ampulariidae, Lymnaeidae,
Planorbidae, Viviparidae
Treatment: T201-q
T201-e-1 Bromeliads
Pest: External feeders
Treatment: T201-e-1 MB (“Q” label only) at NAP—tarpaulin or chamber
T201-e-2 Bromeliads
Pest: Internal feeders, such as borers and miners
Treatment: T201-e-2 MB (“Q” label only) at 15” vacuum
T201-f-1 Cacti and Other Succulents
Pest: External feeders (other than soft scales) infesting collected dormant and
nondormant plant material
Treatment: T201-f-1 MB (“Q” label only) at NAP—tarpaulin or chamber
T201-f-2 Cacti and Other Succulents
Pest: Borers and soft scales
Treatment: T201-f-2 MB (“Q” label only) in 15” vacuum
!
CAUTION
Plant Tolerance. In general, nursery stock should be fumigated in a normal atmo-
spheric pressure (NAP) chamber. Damage may occur when treatment is performed
under a tarpaulin. When selecting a treatment for a particular pest, consider the tol-
erance of the plant material to the treatment. Refer to the “Handbook of Plant Toler-
ances to Quarantine Treatments” to determine if a genus or species is tolerant to
treatment.

Treatment Schedules T200 - Schedules for Propagative Plant Material
T201-g-1 Chrysanthemum spp., Rooted and Unrooted Cuttings
03/2024-03 Treatment Manual 5-3-3
T201-g-1 Chrysanthemum spp., Rooted and Unrooted Cuttings
Pest: Aphids
Treatment: T201-g-1 MB (“Q” label only) at NAP—tarpaulin or chamber
T201-g-2 Chrysanthemum spp., Rooted and Unrooted Cuttings
Pest: External feeders
Treatment: T201-g-2 Malathion-carbaryl chemical dip—Hand removal of
pests of infested parts plus a malathion-carbaryl chemical dip. Solution
prepared by adding 3 level tablespoons of 25 percent malathion wettable
powder and 3 level tablespoons of 50 percent carbaryl wettable powder to each
gallon of water. The addition of a sticker-spreader formulation may be required
for hard to wet plants. Use fresh chemicals and prepare dip for the same day
use. Plants, including the roots, should be entirely submerged in the chemical
dip for 30 seconds.
T201-g-3 Chrysanthemum spp., Rooted and Unrooted Cuttings*
Pest: Leaf miners, aphids, mites, etc.
Treatment: T201-g-3—Hot water at 110-111 °F for 20 minutes

Treatment Schedules T200 - Schedules for Propagative Plant Material
T201-l Commodities Infested with Quarantine-Significant Slugs
5-3-4 Treatment Manual 03/2024-03
T201-l Commodities Infested with Quarantine-Significant Slugs
Pest: Quarantine significant slugs of the families Agriolimacidae, Arionidae,
Limacidae, Milacidae, Philomycidae, and Veronicellidae, including the
following genera:
Agriolimax, Arion, Colosius, Deroceras, Diplosolenodes, Leidyula, Limax,
Meghimatium, Milax, Pallifera, Pseudoveronicella, Sarasinula,
Semperula, Vaginulus, Veronicella
Treatment: T201-l MB (“Q” label only) at NAP—tarpaulin or chamber
T201-h-1 Cycads—Excluding Dioon edule (Chestnut Dioon)
Pest: External feeders
Treatment: T201-h-1 MB (“Q” label only) in 15” vacuum
T201-a-1 Deciduous Woody Plants (Dormant)
Pest: External feeders
Treatment: T201-a-1 MB (“Q” label only) at NAP
T201-a-2 Deciduous Woody Plants (Dormant)
Pest: Borers
Treatment: T201-a-2 MB (“Q” label only) in 26” vacuum
T201-h-2 Dioon edule (Chestnut Dioon)
Pest: External feeders
Treatment: T201-h-2 MB (“Q” label only) in 26” vacuum
T201-i-1 Dieffenbachia spp., Dracaena spp., Philodendron spp.
(Plants and Cuttings)
Pest: External feeders
Treatment: T201-i-1 MB (“Q” label only) at NAP—tarpaulin or chamber

Treatment Schedules T200 - Schedules for Propagative Plant Material
T201-i-2 Dieffenbachia spp., Dracaena spp., Philodendron spp. (Plants and Cuttings)
03/2024-03 Treatment Manual 5-3-5
T201-i-2 Dieffenbachia spp., Dracaena spp., Philodendron spp.
(Plants and Cuttings)
Pest: Internal feeders
Treatment: T201-i-2 MB (“Q” label only) in 26” vacuum
T201-b-1 Evergreens (Broadleaved and Coniferous Genera)
Pest: External feeders
Treatment: T201-b-1 MB (“Q” label only) at NAP—tarpaulin or chamber
T201-k-1 Foliated Host Plants of Dialeurodes citri (Citrus Whitefly),
Excluding Osmanthus americanus
Pest: Dialeurodes citri (citrus whitefly)
Treatment: T201-k-1 MB (“Q” label only) at NAP
T201-c-1 Greenhouse-Grown Plants, Herbaceous Plants and
Cuttings, and Greenwood Cuttings of Woody Plants
Pest: External feeders, leaf miners, mealybugs, thrips
Treatment: T201-c-1 MB (“Q” label only) at NAP—tarpaulin or chamber
T201-c-2 Greenhouse-Grown Plants, Herbaceous Plants and
Cuttings, and Greenwood Cuttings of Woody Plants
Pest: Borers, soft scales
Treatment: T201-c-2 MB (“Q” label only) in 15” vacuum
T201-n Host Plants of Aleurocanthus woglumi (Citrus Blackfly)
Pest: Aleurocanthus woglumi (citrus blackfly)
Treatment: T201-n MB (“Q” label only) at NAP—tarpaulin or chamber

Treatment Schedules T200 - Schedules for Propagative Plant Material
T201-o-1 Host Plants of Omalonyx spp. and Succinea spp. (Snails)
5-3-6 Treatment Manual 03/2024-03
T201-o-1 Host Plants of Omalonyx spp. and Succinea spp. (Snails)
Pest: Omalonyx spp. and Succinea spp. (snails)
Treatment: T201-o-1 Water Spray
T201-o-2 Host Plants of Omalonyx spp. and Succinea spp. (Snails)
Treatment: T201-o-2 Chemical Dip—Dip plants with a Malathion-carbaryl
chemical dip. Solution prepared by adding 3 level tablespoons of 25 percent
Malathion wettable powder and 6 level tablespoons of 50 percent carbaryl
wettable powder per gallon of water with a sticker-spreader formulation.
T201-k-2 Nonfoliated Host Plants of Dialeurodes citri (Citrus
Whitefly), Excluding Osmanthus americanus
Pest: Dialeurodes citri (citrus whitefly)
Treatment: T201-k-2 MB (“Q” label) at NAP
T201-d-1 Orchids, Plants, and Cuttings (Dormant or Nondormant)
Pest: External feeders, other than soft scales
Treatment: T201-d-1 MB (“Q” label only) at NAP—tarpaulin or chamber
T201-d-2 Orchids, Plants, and Cuttings
Pest: External feeders (other than soft scales) infesting greenhouse-grown
plant material
Treatment: T201-d-2 MB (“Q” label only) at NAP—tarpaulin or chamber

Treatment Schedules T200 - Schedules for Propagative Plant Material
T201-d-3 Orchids, Plants, and Cuttings
03/2024-03 Treatment Manual 5-3-7
T201-d-3 Orchids, Plants, and Cuttings
Pest: Borers, cattleya fly, Mordellistena spp., soft scales, Vinsonia spp.
Treatment: T201-d-3 MB (“Q” label only) in 15” vacuum
T201-d-4 Orchids, Plants, and Cuttings
Pest: Cecidomyid galls
Treatment: T201-d-4 Excised in all cases
T201-d-5 Orchids, Plants, and Cuttings
Pest: Leaf miner, Eurytoma spp., infesting Rhynchostylis
Treatment: T201-d-5 Hot water
T201-e-3-1 Pineapple Slips
Pest: Various
Treatment: T201-e-3-1 MB (“Q” label only) at NAP
T201-e-3-2 Pineapple Slips
Treatment: T201-e-3-2 MB (“Q” label only) in 26” vacuum
T201-j Pines (Pinus spp.) From Canada (destined to California,
Idaho, Oregon, and Utah)
Pest: Rhyacionia buoliana (European pine shoot moth)
Treatment: T201-j MB (“Q” label only) at NAP
T201-m-1 Plant Cuttings (Scion Wood)
Pest: External feeders
Treatment: T201-m-1 MB (“Q” label only) at NAP—tarpaulin or chamber

Treatment Schedules T200 - Schedules for Propagative Plant Material
T201-m-2 Plant Cuttings (Greenwood Cuttings of Woody Plants and Herbaceous Plant Cuttings)
5-3-8 Treatment Manual 03/2024-03
T201-m-2 Plant Cuttings (Greenwood Cuttings of Woody Plants and
Herbaceous Plant Cuttings)
Pest: External feeders
Treatment: T201-m-2 MB (“Q” label only) at NAP—tarpaulin or chamber
T201-m-3 Plant Cuttings (Root Cuttings)
Pest: External feeders
Treatment: T201-m-3 MB (“Q” label only) at NAP—chamber
T201-m-4 Plant Cuttings (Root Cuttings)
Pest: External feeders
Treatment: T201-m-4 MB (“Q” label only) at NAP—tarpaulin
T201-p Plant Material Not Tolerant to Fumigation
Three treatments based on pest
Propagative material known to be sensitive to fumigation (see Handbook of
Plant Tolerance to Quarantine Treatments) should be handled using T201-p-1
or T201-p-4. The selection of the method will depend upon the character of the
plant material and the type of pests that may be found.
T201-p-1 Plant Material Not Tolerant to Fumigation
Pest: Actionable pests excluding scale insects
Treatment: T201-p-1 Hand removal

Treatment Schedules T200 - Schedules for Propagative Plant Material
T201-p-2 Plant Material Not Tolerant to Fumigation
03/2024-03 Treatment Manual 5-3-9
T201-p-2 Plant Material Not Tolerant to Fumigation
Pest: Actionable Pests
Treatment: T201-p-2 Hand removal plus chemical dip—Hand removal of pests
of infested parts plus a malathion/carbaryl chemical dip. Solution prepared by
adding 3 level tablespoons of 25 percent malathion wettable powder and 3
level tablespoons of 50 percent carbaryl wettable powder to each gallon of
water. The addition of a sticker-spreader formulation may be required for hard
to wet plants. Use fresh chemicals and prepare dip for the same day use. Plants,
including the roots, should be entirely submerged in the chemical dip for 30
seconds.
T201-p-3 Plant Material Not Tolerant to Fumigation—Deleted (Docket
APHIS-13-009-2, July 21, 2015)
T201-p-4 Plant Material Not Tolerant to Fumigation
Pests:
Insects (Aphididae, Thripidae, Formicidae, Coccidae,, Pseudococcidae,
Diaspididae, Pyralidae, Tortricidae, Syrphidae, Scarabaeidae,
Curculionidae, Tenebrionidae)
Snails (Ampullariidae, Planorbidae)
Mites (Acaridae, Tarsonemidae, Tetranychidae, Tydeidae)
Nematodes (Pratylenchus (genus only))
Treatment: T201-p-4 Hand removal plus hot water treatment

Treatment Schedules T200 - Schedules for Propagative Plant Material
T202—Bulbs, Corms, Tubers, Rhizomes, and Roots
5-3-10 Treatment Manual 03/2024-03
T202—Bulbs, Corms, Tubers, Rhizomes, and Roots
T202-b Astilbe Roots
Pest: Otiorhynchus (formerly Brachyrhinus) larvae
Treatment: T202-b MB (“Q” label only) in 26” vacuum
T202-c Banana Roots
Pest: External feeders
Treatment: T202-c Hot water
T202-j Garlic
Pest: Brachycerus spp. (garlic beetles) and Dyspessa ulula (Bkh.) (onion/garlic
carpenterworm)
Treatment: T202-j MB (“Q” label only) in 15” vacuum
T202-j-1 Garlic
Pest: Brachycerus spp. (garlic beetles) and Dyspessa ulula (Bkh.) (onion/garlic
carpenterworm)
Treatment: T202-j-1 MB at NAP—tarpaulin or chamber
T202-e-1 Gladiolus spp.
Pest: Taeniothrips simplex (gladiolus thrips)
Treatment: T202-e-1 MB (“Q” label only) at NAP
T202-e-2 Gladiolus spp.
Pest: Taeniothrips simplex (gladiolus thrips)
Treatment: T202-e-2 MB (“Q” label only) in 26” vacuum

Treatment Schedules T200 - Schedules for Propagative Plant Material
T202-f Horseradish Roots
03/2024-03 Treatment Manual 5-3-11
T202-f Horseradish Roots
Pest: External feeders
Treatment: T202-f MB in 15” vacuum
T202-g Lily Bulbs Packed in Subsoil
Pest: Internal feeders
Treatment: T202-g MB (“Q” label only) at NAP
T202-h Lycoris
Pest: Taeniothrips eucharii
Treatment: T202-h MB in 26” vacuum
T202-i-1 Narcissus
Pest: Steneotarsonemus laticeps (bulb scale mite)
Treatment: T202-i-1 MB (“Q” label only) at NAP
T202-i-2 Narcissus
Pest: Steneotarsonemus laticeps (bulb scale mite)
Treatment: T202-i-2 MB (“Q” label only) in 26” vacuum chamber
T202-i-3 Narcissus
Pest: Steneotarsonemus laticeps (bulb scale mite)
Treatment: T202-i-3 Hot water
T202-a-1 Selaginella spp. (Resurrection Plants)
Pest: External feeders
Treatment: T202-a-1 MB (“Q” label only) at NAP—chamber

Treatment Schedules T200 - Schedules for Propagative Plant Material
T202-a-2 Selaginella spp. (Resurrection Plants)
5-3-12 Treatment Manual 03/2024-03
T202-a-2 Selaginella spp. (Resurrection Plants)
Pest: External feeders
Treatment: T202-a-2 MB (“Q” label only) at NAP—tarpaulin
T202-a-3 Selaginella spp. (Resurrection Plants)
Pest: Internal feeders
Treatment: T202-a-3 MB (“Q” label only) in 26” vacuum—chamber
T202-d Yams (Dioscorea spp.) and Sweet Potatoes (Ipomoea spp.)
Pest: Internal and external feeders
Treatment: T202-d MB (“Q” label only) at NAP—tarpaulin
T203—Seeds
T203-m Avocado (Seeds Only Without Pulp)
Pest: Avocado seed weevils (Conotrachelus spp., Heilipus lauri, and
Caulophilus latinasus); avocado stem weevil (Copturus aguacatae), and
avocado seed moth (Stenoma catenifer)
Treatment: T203-m MB (“Q” label only) in 26” vacuum
NOTICE
Any seed listed in other import manuals as requiring treatment, regardless of excep-
tion or waiver, is not eligible for a Small Lots of Seed (SLS) permit.
!
CAUTION
MB fumigation may effect germination. Obtain the importers consent prior to
fumigation.

Treatment Schedules T200 - Schedules for Propagative Plant Material
T203-e Chestnuts (Excludes Water Chestnuts) and Acorns
03/2024-03 Treatment Manual 5-3-13
T203-e Chestnuts (Excludes Water Chestnuts) and Acorns
From all countries except Canada and Mexico
Pest: Internal feeders
Treatment: T203-e MB (“Q” label only) in 26” vacuum
T203-e-1 Chestnuts (Excludes Water Chestnuts) and Acorns
Pest: Cydia splendana (nut fruit tortrix) and Curculio spp.
Treatment: T203-e-1 MB at NAP—tarpaulin or chamber
T203-i-1 Conifer Seeds (Species with Small Seeds, Such as Picea
spp., Pinus sylvestris, and Pinus mugo)
Pest: External feeders
Treatment: T203-i-1 MB (“Q” label only) at NAP
T203-i-2 Conifer Seeds (Species With Small Seeds, Such as Picea
spp., Pinus sylvestris, and Pinus mugo)
Pest: Internal feeders, nutlike seeds, or when seeds are tightly packed so as to
make fumigant penetration questionable.
Treatment: T203-i-2 MB (“Q” label only) in 26” vacuum
T203-i-3 Conifer Seeds (Species with Small Seeds, Such as Picea
spp., Pinus sylvestris, and Pinus mugo)
Pest: External feeders
Treatment: T203-i-3 MB (“Q” label only) tarpaulin
T203-f-1 Cottonseed—Bagged, Packaged, or in Bulk
Pest: External feeders
Treatment: T203-f-1 MB (“Q” label only) at NAP—chamber

Treatment Schedules T200 - Schedules for Propagative Plant Material
T203-f-2 Cottonseed—Bagged, Packaged, or in Bulk
5-3-14 Treatment Manual 03/2024-03
T203-f-2 Cottonseed—Bagged, Packaged, or in Bulk
Pest: External feeders
Treatment: T203-f-2 MB (“Q” label only) at NAP—tarpaulin
T203-f-3 Cottonseed—Bagged, Packaged, or in Bulk
Pest: External feeders
Treatment: T203-f-3 MB (“Q” label only) in 26” vacuum—chamber
T203-f-4 Cottonseed—Bagged, Packaged, or in Bulk
Pest: External feeders
Treatment: T203-f-4 Phosphine at NAP
T203-g-1 Pods and Seeds of Kenaf, Hibiscus, and Okra
Pest: Internal feeders
Treatment: T203-g-1 MB (“Q” label only) at NAP—tarpaulin or chamber
T203-g-2 Pods and Seeds of Kenaf, Hibiscus, and Okra
Pest: Internal feeders
Treatment: T203-g-2 MB (“Q” label only) in 26” vacuum—chamber (kenaf
and okra seed only)
T203-g-3 Pods and Seeds of Kenaf, Hibiscus, and Okra
Pest: Internal feeders
Treatment: T203-g-3 Phosphine at NAP
T203-k Macadamia Nuts (as Seeds)
Pest: Cryptophlebia illepida (koa seedworm)
Treatment: T203-k MB (“Q” label only) at NAP

Treatment Schedules T200 - Schedules for Propagative Plant Material
T203-k-1 Macadamia Nuts (as Seeds)
03/2024-03 Treatment Manual 5-3-15
T203-k-1 Macadamia Nuts (as Seeds)
Pest: Cryptophlebia illepida (koa seedworm)
Treatment: T203-k-1 MB (“Q” label only) tarpaulin
T203-h Rosmarinus Seeds
Pest: Juvenile Helicella spp. (snails) or internal feeders
Treatment: T203-h MB (“Q” label only) at 26” vacuum
T203-l Seeds
Pest: Trogoderma granarium (khapra beetle)
Treatment: T203-l MB (“Q” label only) at NAP—tarpaulin or chamber
T203-b Seeds Excluding Seeds of Vicia spp.
Pest: Bruchidae (seed beetles)
Treatment: T203-b MB (“Q” label only) in 26” vacuum
T203-o (deleted)
T203-a-1 Seeds Not Specifically Listed in the T203 Schedules
Pest: External feeders
Treatment: T203-a-1 MB (“Q” label only) at NAP
T203-a-2 Seeds Not Specifically Listed in the T203 Schedules
Pest: Internal feeders, except Megastigmus spp.
Treatment: T203-a-2 MB (“Q” label only) in 26” vacuum
T203-a-3 Seeds Not Specifically Listed in the T203 Schedules
Pest: External feeders
Treatment: T203-a-3 MB (“Q” label only) tarpaulin

Treatment Schedules T200 - Schedules for Propagative Plant Material
T203-o-1 Seeds of Casuarina
5-3-16 Treatment Manual 03/2024-03
T203-o-1 Seeds of Casuarina
Pest: Bootanomyia spp. (in Casuarina)
Treatment: T203-o-1 MB (“Q” label only) in 26” vacuum
T203-j Seeds of Hevea brasiliensis (Rubber Tree)
Pest: Seed-boring insects
Treatment: T203-j MB (“Q” label only) at NAP
T203-j-1 Seeds of Hevea brasiliensis (Rubber Tree)
Pest: Seed-boring insects
Treatment: T203-j-1 MB (“Q” label only) tarpaulin
T203-o-3 Seeds of Leguminosae (Fabaceae)
Pest: Bruchophagus spp., Eurytoma spp.
Treatment: T203-o-3 MB (“Q” label only) in 26” vacuum
T203-c Seeds of Leguminosae (Fabaceae)
Pest: Caryedon spp.
Treatment: T203-c MB (“Q” label only) at NAP—chamber
T203-o-4-1 Seeds of Leguminosae (Fabaceae)
Pest: Caryedon spp. (in or with, etc.)
Treatment: T203-o-4-1 MB (“Q” label only) in 26” vacuum
T203-o-4-2 Seeds of Leguminosae (Fabaceae)
Pest: Caryedon spp. (in or with, etc.)
Treatment: T203-o-4-2 MB (“Q” label only) in 26” vacuum

Treatment Schedules T200 - Schedules for Propagative Plant Material
T203-d-1 Seeds of Leguminosae (Fabaceae), excluding Vicia faba
03/2024-03 Treatment Manual 5-3-17
T203-d-1 Seeds of Leguminosae (Fabaceae), excluding Vicia faba
Pest: Bruchidae (seed beetles) excluding the beetles of Caryedon spp.
Treatment: T203-d-1 MB at NAP—tarpaulin or chamber
T203-o-5 Seeds of Lonicera and Other Seeds
Pest: Rhagoletis cerasi (European cherry fruit fly) pupae (Diptera: Tephritidae)
Treatment: T203-o-5 MB (“Q” label only) at NAP
T203-p Seeds of Citrus (Rutaceae Family)
Pest: Citrus canker (Xanthomonas citri)
Treatment: T203-p Hot water plus chemical dip
T203-o-2 Seeds of Umbelliferae
Pest: Systole spp. (in Umbelliferae)
Treatment: T203-o-2 MB (“Q” label only) in 26” vacuum
T203-c-1 Seeds of Vicia spp. (Vetch Seeds) Including Seeds of Vicia
faba
Pest: Bruchidae (seed beetles)
Treatment: T203-c-1 MB (“Q” label only) at NAP tarpaulin or chamber
T203-d-2 Seeds of Vicia spp. (Vetch Seeds) Including Seeds of Vicia
faba
Pest: Bruchidae (seed beetles)
Treatment: T203-d-2 MB (“Q” label only) in 26” vacuum (except Vicia faba)
Treatment: T203-d-2 MB (“Q” label only) in 26” vacuum (use for Vicia faba)


03/2024-03 Treatment Manual 5-4-1
Chapter
5
Treatment Schedules
T300 - Schedules for Miscellaneous Plant
Products
Contents
T301-a—Cotton and Cotton Products (Pectinophora spp.) 5-4-2
T302—Grains and Seeds Not Intended for Propagation 5-4-4
T303—Rice 5-4-7
T304—Alpha (alfa) Grass and Handicrafts (Stipa tenacissima, Ampelodesmos
mauritanicus) 5-4-9
T305—Cut Flowers and Greenery 5-4-10
T306—Bags and Bagging Material, Covers 5-4-10
T307—Khapra Beetle Infested Material 5-4-11
T308—Tobacco 5-4-13
T309—Broomcorn and Broomcorn Articles 5-4-14
T310—Tick-Infested Materials (Nonfood) 5-4-15
T311—Hay, Baled 5-4-16
T312—Oak Logs and Lumber 5-4-16
T313—Christmas Trees 5-4-16
T314—Logs and Firewood 5-4-17
During the extended exposure period, the concentrations must remain stable
and the prescribed minimums be met at the end of the extension. Otherwise,
the treatment may be voided and retreatment required. Examples of
commodities for which extended exposure periods may be approved include:
cotton piece goods, baled cotton, bagging, wood, marble, soil as such, etc.
Examples of commodities for which no extension may be approved include:
cottonseed, grain, tobacco, etc. An extension of exposure period for other
purposes is not permitted except as may be prescribed in various schedules for
concentration readings below minimum.
Additional safety precautions, including additional aeration, may be required
because of the extended exposure period. The PPQ officer or the commercial
fumigator will specify any needed precautions.
NOTICE
Exposure period may be extended for any commodity which cannot be used for
food or propagation. This extension is only a matter of convenience for the importer
and is intended only for the purpose of reducing treatment costs. The request for
extension must come from the importer or an authorized representative and should
be confirmed in writing. A letter is not required for each treatment. A single blanket
request is acceptable and renewed each year, as required.

Treatment Schedules T300 - Schedules for Miscellaneous Plant Products
T301-a—Cotton and Cotton Products (Pectinophora spp.)
5-4-2 Treatment Manual 03/2024-03
T301-a—Cotton and Cotton Products (Pectinophora spp.)
T301-a-3 Baled lint or linters
Pest: Pectinophora spp.
Treatment: T301-a-3—MB (“Q” label only) at NAP—tarpaulin
T301-a-7 Cottonseed (samples and bulk)
Pest: Pectinophora spp.
Treatment: T301-a-7—Acid delinting and heat treatment (alternative
treatment)
T301-b—Cotton and Cotton Products (Khapra Beetle)
T301-b-1-1 Baled lint, linters, waste, piece goods, gin trash
Pest: Trogoderma granarium (khapra beetle)
Treatment: T301-b-1-1—MB (“Q” label only) at NAP —tarpaulin
T301-b-1-2 Baled lint, linters, waste, piece goods, gin trash
Pest: Trogoderma granarium (khapra beetle)
Treatment: T301-b-1-2—MB (“Q” label only) in 26” vacuum chamber
T301-b-2 Cottonseed, cottonseed products, or samples
Pest: Trogoderma granarium (khapra beetle)
Treatment: T301-b-2—MB (“Q” label only) at NAP—tarpaulin
T301-b-3 Cottonseed meal (not for food or feed)
Pest: Trogoderma granarium (khapra beetle)
Treatment: T301-b-3—MB (“Q” label only) at NAP

Treatment Schedules T300 - Schedules for Miscellaneous Plant Products
T301-c Cotton and cotton products
03/2024-03 Treatment Manual 5-4-3
T301-c Cotton and cotton products
Pest: Globodera rostochiensis (golden nematode)
Treatment: T301-c—MB (“Q” label) at NAP—chamber
T301-d-1-1 Cotton and cotton products
Pest: Anthonomus grandis (boll weevil)
Treatment: T301-d-1-1—MB (“Q” label only) at NAP—tarpaulin
T301-d-1-2 Cotton and cotton products
Pest: Anthonomus grandis (boll weevil)
Treatment: T301-d-1-2—Phosphine at NAP—tarpaulin or chamber
T301-a-1-1 Lint, linters, cottonseed meal and hulls, gin trash, waste,
or other baled or bulk commodities (except samples)
Pest: Pectinophora spp.
Treatment: T301-a-1-1—MB (“Q” label only) at NAP—chamber
T301-a-1-2 Lint, linters, cottonseed meal and hulls, gin trash, waste,
or other baled or bulk commodities (except samples)
Pest: Pectinophora spp.
Treatment: T301-a-1-2—MB (“Q” label only) in 26” vacuum—chamber
T301-a-6 Lint, linters, and cottonseed (bulk, sacked, or packaged
cottonseed, lint or linters, cottonseed hulls, gin trash, and all other
baled or bulk cotton commodities)
Pest: Pectinophora spp.
Treatment: T301-a-6—Phosphine at NAP

Treatment Schedules T300 - Schedules for Miscellaneous Plant Products
T301-a-2 Lint (except baled lint or linters), cottonseed hulls and meal, gin trash, waste, or other baled or bulk commodities
5-4-4 Treatment Manual 03/2024-03
T301-a-2 Lint (except baled lint or linters), cottonseed hulls and
meal, gin trash, waste, or other baled or bulk commodities
(excluding samples)
Pest: Pectinophora spp.
Treatment: T301-a-2—MB (“Q” label only) at NAP—tarpaulin
T301-a-4 Packaged cottonseed
Pest: Pectinophora spp.
Treatment: T301-a-4—MB (“Q” label only) at NAP—tarpaulin
T301-a-5-1 Samples of cotton and cotton products
Pest: Pectinophora spp.
Treatment: T301-a-5-1—MB at NAP—chamber
T301-a-5-2 Samples of cotton and cotton products
Pest: Pectinophora spp.
Treatment: T301-a-5-2—MB in 26” vacuum—chamber
T301-e Cottonseed for food or feed
Pest: Fusarium oxysporum f. sp. vasinfectum strains VCG 01111 and VCG
01112
Treatment: 301-e—MB at NAP—tarpaulin
T302—Grains and Seeds Not Intended for Propagation
If grain and seeds are for propagation, use appropriate treatment in T203
schedules.
T302-g-1 Acorns not intended for propagation
Pest: Cydia splendana (nut fruit tortrix) and Curculio spp. (weevils)
Treatment: T302-g-1—MB at NAP—tarpaulin, chamber, or van container

Treatment Schedules T300 - Schedules for Miscellaneous Plant Products
T302-g-2 Acorns not intended for propagation
03/2024-03 Treatment Manual 5-4-5
T302-g-2 Acorns not intended for propagation
Pest: Cydia splendana (nut fruit tortrix) and Curculio spp. (weevils)
Treatment: T302-g-2—MB in 26” vacuum—chamber
T302-a-1-1 Ear corn
Pest: Borers
Treatment: T302-a-1-1—MB at NAP—chamber only
T302-a-1-2 Ear corn
Pest: Borers
Treatment: T302-a-1-2—Dry heat
T302-c—Grains and seeds not intended for propagation, and plant
gums
T302-c-1 Grains and seeds not intended for propagation, and plant
gums
Pest: Trogoderma granarium (khapra beetle)
Treatment: T302-c-1—MB (“Q” label only) at NAP—tarpaulin
T302-c-2 Grains and seeds not intended for propagation, and plant
gums
Pest: Trogoderma granarium (khapra beetle)
Treatment: T302-c-2—MB (“Q” label gas) in 26” vacuum—chamber (load
limit 75 percent of chamber volume)

Treatment Schedules T300 - Schedules for Miscellaneous Plant Products
T302-c-3 Grains and seeds not intended for propagation, and plant gums
5-4-6 Treatment Manual 03/2024-03
T302-c-3 Grains and seeds not intended for propagation, and plant
gums
Pest: Trogoderma granarium (khapra beetle)
Treatment: T302-c-3—MB (“Q” gas only) in NAP—chamber
When both woodborers and khapra beetles are involved, use Schedule T404-d
T302-d Grains and seeds not intended for propagation and
contaminated with cottonseed
Pest: Pectinophora spp.
Treatment: T301-a-1-1 Lint, linters, cottonseed meal and hulls, gin trash,
waste, or other baled or bulk commodities (except samples) or T301-a-1-2
Lint, linters, cottonseed meal and hulls, gin trash, waste, or trash waste or other
baled or builk commodities (except samples)
T302-e-1 Grains and seeds not intended for propagation
The following commodities are considered as “grains and seeds not for
propagation” and are on the MB labels at the rates in the bulleted list:
40 F and above: barley, corn, oats, popcorn, processed food and grains,
rice, rye, sorghum (milo), wheat, dried beans and peas, dried faba beans,
peanuts and tree nuts (almonds, Brazil nuts, bushnuts, butternuts,
cashews, filberts, hickory nuts, macadamia nuts, pecans, pistachios,
walnuts), seeds of dried herbs and spices (refer to T101-n-2-1-1)
FIFRA Section 18:
40 F and above: unprocessed cucurbit seed, coffee bean (green unroasted),
and oilseeds (See Appendix F: Crop Group 20 for a list of commodities
included in the oilseed group)
Pest: Insects other than Trogoderma granarium (khapra beetle)
Treatment: T302-e-1—MB (“Q” label only) at NAP—chamber

Treatment Schedules T300 - Schedules for Miscellaneous Plant Products
T302-e-2 Grains and seeds not intended for propagation
03/2024-03 Treatment Manual 5-4-7
T302-e-2 Grains and seeds not intended for propagation
Pest: Insects other than Trogoderma granarium (khapra beetle)
Treatment: T302-e-2—MB (“Q” label only) at 26” vacuum—chamber
T302-e-3 Grains and seeds not intended for propagation
Pest: Insects other than Trogoderma granarium (khapra beetle)
Treatment: T302-e-3—MB (“Q” label only) tarpaulin or chamber
T302-f Grains and seeds (excluding Rosmarinus seed) not intended
for propagation
Pest: Snails
Treatment: T302-f—Mechanical separation by screening or hand removal
T302-b-1-1 Shelled corn
Treatment: T302-b-1-1 Reserved
T302-b-1-2 Shelled corn contaminated with cottonseed
Pest: Pectinophora spp.
Treatment: T302-b-1-2
T303—Rice
T303-a (removed)
T303-a-1 through T303-a-3 have been removed. Effective November 1, 2011,
APHIS reclassified Panicle Rice Mite (Steneotarsonemus spinki, PRM) to a
non-quarantine pest.

Treatment Schedules T300 - Schedules for Miscellaneous Plant Products
T303-d-1 Articles made with rice straw
5-4-8 Treatment Manual 03/2024-03
T303-d-1 Articles made with rice straw
Pest: Fungal diseases of rice or internal feeders
Treatment: T303-d-1—Dry heat at 180-200 °F for 2 hours
T303-d-2 Articles made with rice straw
Pest: Fungal diseases of rice or internal feeders
Treatment: T303-d-2—Steam sterilization
T303-d-2-1 Articles made with rice straw
Pest: Fungal diseases of rice or internal feeders
Treatment: T303-d-2-1—Steam sterilization, use T303-b-1 Rice straw hulls
(tightly packed) imported for purposes other than approved processing.
T303-d-2-3 Articles made with rice straw for indoor use only
Pest: Internal feeders
Treatment: T303-d-2-3—MB (“Q” label only) at NAP—tarpaulin or chamber
T303-d-2-2 Articles made with rice straw for indoor use only
Pest: Internal feeders
Treatment: T303-d-2-2—MB (“Q” label only) in 26” vacuum
T303-b-1 Rice straw and hulls (tightly packed) imported for purposes
other than approved processing
Pest: Fungal diseases of rice
Treatment: T303-b-1—Steam sterilization, for closely packed commodity

Treatment Schedules T300 - Schedules for Miscellaneous Plant Products
T303-b-2 Rice straw and hulls (loosely packed) imported for purposes other than approved processing
03/2024-03 Treatment Manual 5-4-9
T303-b-2 Rice straw and hulls (loosely packed) imported for
purposes other than approved processing
Pest: Fungal diseases of rice
Treatment: T303-b-2—Steam sterilization, for commodity packed as loose
masses
Use T303-b-1 Rice straw and hulls (tightly packed) imported for purposes oter
than approved processing or, if without initial vacuum, bleed air until steam
vapor escapes.
T303-c-1 Rice straw and hulls imported in small lots of 25 lbs. or less
Pest: Fungal diseases of rice
Treatment: T303-c-1—Dry heat at 212 °F for 1 hour
T304—Alpha (alfa) Grass and Handicrafts (Stipa tenacissima,
Ampelodesmos mauritanicus)
T304-a Alpha (alfa) grass and handicrafts (Stipa tenacissima,
Ampelodesmos mauritanicus)
Pest: Infested with Harmolita spp. (jointworms)
Treatment: T304-a—MB at NAP—chamber only
T304-b Alpha (alfa) grass and handicrafts (Stipa tenacissima,
Ampelodesmos mauritanicus)
Pest: Infested with Harmolita spp. (jointworms)
Treatment: T304-b—MB in 26” vacuum

Treatment Schedules T300 - Schedules for Miscellaneous Plant Products
T305—Cut Flowers and Greenery
5-4-10 Treatment Manual 03/2024-03
T305—Cut Flowers and Greenery
T305-a Cut flowers and greenery
Pest: External feeders, leaf miners
1
, hitchhikers, surface pests, and slugs
Treatment: T305-a—MB (“Q” label only) at NAP—tarpaulin or chamber
T305-b Cut flowers and greenery
Pest: Borers or soft scales
Treatment: T305-b—MB (“Q” label only) in 15” vacuum
T305-c Cut flowers and greenery
Pest: Mealybugs
Treatment: T305-c—MB (“Q” label only) at NAP—tarpaulin or chamber
T306—Bags and Bagging Material, Covers
T306-a Bags and bagging material or covers used to contain root
crops
Pest: Globodera rostochiensis (golden nematode)
Treatment: T306-a—MB (“Q” label only) in 26” vacuum
T306-b Bags and bagging material or covers used for cotton only
Pest: Pectinophora spp.
Treatment: T306-b—MB (Bulk consignments)
Treatment: T306-b—MB (Other than bulk consignments)

Treatment Schedules T300 - Schedules for Miscellaneous Plant Products
T306-c—Bags and bagging material or covers
03/2024-03 Treatment Manual 5-4-11
T306-c—Bags and bagging material or covers
T306-c-1 Bags and bagging material or covers
Pest: Trogoderma granarium (khapra beetle)
Treatment: T306-c-1—MB (“Q” label only) at NAP
T306-c-2 Bags and bagging material or covers
Pest: Trogoderma granarium (khapra beetle)
Treatment: T306-c-2—MB (“Q” label only) in 26” vacuum
T306-d-1 Bagging from unroasted coffee beans
Pest: Various
Treatment: T306-d-1—MB (“Q” label only) at NAP
T306-d-2 Bagging from unroasted coffee beans
Pest: Various
Treatment: T306-d-2—MB (“Q” label only) in 26” vacuum
T307—Khapra Beetle Infested Material
T307-a Feeds and milled products heated as part of the processing
procedure, or other commodities that can be subjected to heat
Pest: Khapra beetle
Treatment: T307-a—Heat treatment

Treatment Schedules T300 - Schedules for Miscellaneous Plant Products
Reference Table for Miscellaneous Products Infested with Khapra beetle
5-4-12 Treatment Manual 03/2024-03
Reference Table for Miscellaneous Products Infested with Khapra
beetle
Pest: Khapra beetle
Treatment: Summary of fumigation treatments
Table 5-4-1 Fumigation Treatment Options for Khapra Beetle Infested Material
Bags and bagging See
T306-c—Bags and bagging material or covers on
page 5-4-11
Cotton products See T301-b—Cotton and Cotton Products (Khapra Bee-
tle) on page 5-4-2
Finely ground oily meals See T306-c—Bags and bagging material or covers on
page 5-4-11
Grains and seeds See T302-c—Grains and seeds not intended for propa-
gation, and plant gums on page 5-4-5
Flour See T306-c—Bags and bagging material or covers on
page 5-4-11
Sorptive materials (See
Sorption on page 2-3-10 for a
list of sorptive materials)
See
T302-c—Grains and seeds not intended for propa-
gation, and plant gums on page 5-4-5
Goatskins, lambskins,
sheepskins (skins and
hides),
See T416—Goatskins, Lambskins, Sheepskins (Skins
and Hides) on page 5-5-19
Other miscellaneous prod-
ucts
See T302-c—Grains and seeds not intended for propa-
gation, and plant gums on page 5-4-5

Treatment Schedules T300 - Schedules for Miscellaneous Plant Products
T308—Tobacco
03/2024-03 Treatment Manual 5-4-13
T308—Tobacco
T308-e Blended strip tobacco
Pest: Lasioderma serricorne (cigarette beetle) and Ephestia elutella (tobacco
moth)
Treatment: T308-e—Vacuum-steam flow method
T308-c Leaf tobacco
Pest: Lasioderma serricorne (cigarette beetle) and Ephestia elutella (tobacco
moth)
Treatment: T308-c—Vacuum-steam flow process followed by reconditioning
T308-d Stored tobacco
Pest: Lasioderma serricorne (cigarette beetle) and Ephestia elutella (tobacco
moth)
Treatment: T308-d—Kabat
®
T308-a-1 Tobacco (flue-cured and burley in hogshead and cases;
Turkish in bales; cigar filler/binder in cases or bales; and cigar
wrappers in bales)
Pest: Lasioderma serricorne (cigarette beetle) and Ephestia elutella (tobacco
moth)
Treatment: T308-a-1—MB in 28” vacuum
T308-a-2 Tobacco (flue cured and burley in hogshead and cases;
Turkish in bales; cigar filler/binder in cases or bales; and cigar
wrappers in bales)
Pest: Lasioderma serricorne (cigarette beetle) and Ephestia elutella (tobacco
moth)
Treatment: T308-a-2—MB at NAP—tarpaulin or chamber

Treatment Schedules T300 - Schedules for Miscellaneous Plant Products
T308-b-1 Tobacco (flue cured and burley in hogshead and cases; Turkish in bales; cigar filler/binder in cases or bales; and
5-4-14 Treatment Manual 03/2024-03
T308-b-1 Tobacco (flue cured and burley in hogshead and cases;
Turkish in bales; cigar filler/binder in cases or bales; and cigar
wrappers in bales)
Pest: Lasioderma serricorne (cigarette beetle) and Ephestia elutella (tobacco
moth)
Treatment: T308-b-1—Phosphine at NAP—tarpaulin or freight containers
T308-b-2 Tobacco (flue cured and burley in hogshead and cases;
Turkish in bales; cigar filler/binder in cases or bales; and cigar
wrappers in bales)
Pest: Lasioderma serricorne (cigarette beetle) and Ephestia elutella (tobacco
moth)
Treatment: T308-b-2—Phosphine at NAP—warehouses
T309—Broomcorn and Broomcorn Articles
T309-a Broomcorn and broomcorn articles
Pest: Ostrinia nubilalis (European corn borers)
Treatment: T309-a—MB in 26” vacuum
Pest: Ticks
Treatment: T309-a—MB in 26” vacuum
Pest: Sawflies
Treatment: T309-a—MB in 26” vacuum
T309-b-1 Broomcorn and broomcorn articles
Pest: Ostrinia nubilalis (European corn borers), ticks, and sawflies
Treatment: T309-b-1—MB at NAP—chamber

Treatment Schedules T300 - Schedules for Miscellaneous Plant Products
T309-b-2 Broomcorn and broomcorn articles
03/2024-03 Treatment Manual 5-4-15
T309-b-2 Broomcorn and broomcorn articles
Pest: Ostrinia nubilalis (European corn borers), ticks, and sawflies
Treatment: T309-b-2—MB at NAP—Railroad car, refrigerated container,
highway van, tarpaulin
T309-c Broomcorn and broomcorn articles
Pest: Ostrinia nubilalis (European corn borers), ticks, and sawflies
Treatment: T309-c—Steam sterilization
T310—Tick-Infested Materials (Nonfood)
T310-a Nonfood materials
Pest: Ticks
Treatment: T310-a—MB (“Q” label only) at NAP
T310-b Nonfood materials
Pest: Ticks
Treatment: T310-b—MB (“Q” label only) in 26” vacuum
T310-c Nonfood materials
Treatment: T310-c (Vacant)
T310-d Nonfood materials
Pest: Ticks
Treatment: T310-d—Sulfuryl fluoride at NAP

Treatment Schedules T300 - Schedules for Miscellaneous Plant Products
T311—Hay, Baled
5-4-16 Treatment Manual 03/2024-03
T311—Hay, Baled
T311 Baled hay
Pest: Mayetiola destructor (Hessian fly), Oulema melanopus (cereal leaf
beetle)
Treatment: T311—Phosphine at NAP
T312—Oak Logs and Lumber
There are two alternative treatments for the MB fumigation of Oak logs, T312-
a and T312-a-Alternative. Do not combine the schedules.
T312-a Oak Logs
Pest: Oak wilt disease
Treatment: T312-a—MB (“Q” label only) at NAP
T312-a-Alternative Oak logs
Pest: Oak wilt disease
Treatment: T312-a-Alternative—MB (“Q” label only) at NAP
T312-b Oak lumber
Pest: Oak wilt disease
Treatment: T312-b—MB (“Q” label only) at NAP
T313—Christmas Trees
T313-a Cut conifer Christmas trees
Pest: Lymantria dispar (spongy moth) and L. dispar dispar (flighted spongy
moth complex egg masses)
Treatment: T313-a—MB (“Q” label only) at NAP—tarpaulin or chamber

Treatment Schedules T300 - Schedules for Miscellaneous Plant Products
T313-b Cut pine Christmas trees and pine logs
03/2024-03 Treatment Manual 5-4-17
T313-b Cut pine Christmas trees and pine logs
Pest: Tomicus piniperda (pine shoot beetle)
Treatment: T313-b—MB (“Q” label only) at NAP—chamber or tarpaulin
T313-c Cut Christmas trees (Araucariaceae, Cephalotaxaceae,
Cupressaceae, Pinaceae, Podocarpaceae, Sciadopityaceae,
Taxaceae)
Pest: External feeders, leaf miners, needle miners, sheath miners, hitchhikers,
surface pests, and slugs
Treatment: T313-c—MB (“Q” label only) at NAP—chamber or tarpaulin
T314—Logs and Firewood
T314-a Regulated Wood Articles, Including Fraxinus (Ash Logs and
Firewood) and all Hardwood Firewood From Emerald Ash Borer
Quarantine Areas
Pest: Agrilus planipennis (emerald ash borer)
Treatment: T314-a—Heat treatment
T314-b All logs (including firewood) from spongy moth and flighted
spongy moth complex quarantine areas
Pest: Lymantria dispar (spongy moth) and L. dispar dispar (flighted spongy
moth complex egg masses)
Treatment: T314-b—Heat treatment
T314-c Regulated wood articles
Pest: Various wood pests
Treatment: T314-c—Heat treatment

Treatment Schedules T300 - Schedules for Miscellaneous Plant Products
T314-c Regulated wood articles
5-4-18 Treatment Manual 03/2024-03

02/2024-01 Treatment Manual 5-5-1
Chapter
5
Treatment Schedules
T400 - Schedules for Miscellaneous Products
Contents
Commodities treated with the schedules in this chapter are not to be used for
food or feed.
T401—Railroad Cars (Empty) 5-5-3
T402—Containers, Ships, and Surrounding Areas 5-5-3
T403—Miscellaneous Cargo (Nonfood, Nonfeed Commodities) 5-5-5
T404—Wood Products Including Containers 5-5-10
T405—Bags and Bagging Material 5-5-12
T406—Golden Nematode Contaminations 5-5-12
T407—Mechanical Cotton Pickers and Other Cotton Equipment 5-5-13
T408—Soil as Such and Soil Contaminating Durable Commodities 5-5-13
T409—Aircraft 5-5-15
T410—Tick Infestations 5-5-16
T411—Ant Infestations—Nonplant Products 5-5-16
T412—Noxious Weed Seeds (Devitalization Treatment) 5-5-16
T413—Brassware From Mumbai (Bombay), India 5-5-17
T414—Inanimate, Nonfood Articles with Spongy Moth or Flighted Spongy
Moth Complex Egg Masses 5-5-17
T415—Garbage and Quarantine Material Interceptions for Destruction
5-5-18
T416—Goatskins, Lambskins, Sheepskins (Skins and Hides) 5-5-19

Treatment Schedules T400 - Schedules for Miscellaneous Products
Contents
5-5-2 Treatment Manual 02/2024-01
During the extended exposure period, the concentrations must remain stable
and the prescribed minimums be met at the end of the extension. Otherwise,
the treatment may be voided and retreatment required. Examples of
commodities for which extended exposure periods may be approved include:
cotton piece goods, baled cotton, bagging, wood, marble, soil as such, etc.
Examples of commodities for which no extension may be approved include:
cottonseed, grain, tobacco, etc. An extension of exposure period for other
purposes is not permitted except as may be prescribed in various schedules for
concentration readings below minimum.
Additional safety precautions, including additional aeration, may be required
because of the extended exposure period. The PPQ officer or the commercial
fumigator will specify any needed precautions.
NOTICE
Exposure period may be extended for any commodity which cannot be used for
food or propagation. This extension is only a matter of convenience for the importer
and is intended only for the purpose of reducing treatment costs. The request for
extension must come from the importer or his authorized representative and should
be confirmed in writing. A letter is not required for each treatment. A single blanket
request should be considered as acceptable and renewed each year, as required.

Treatment Schedules T400 - Schedules for Miscellaneous Products
T401—Railroad Cars (Empty)
02/2024-01 Treatment Manual 5-5-3
T401—Railroad Cars (Empty)
T401-a Railroad Cars (Empty)
Pest: Pectinophora gossypiella (pink bollworm) and fruit flies
Treatment: T401-a
T401-b Railroad Cars (Empty)
Pest: Trogoderma granarium (khapra beetle)
Treatment: T401-b
T401-c Railroad Cars (Empty)
Pest: For nematode cysts
Treatment: T401-c
T402—Containers, Ships, and Surrounding Areas
T402-b-3-1 Pest: Trogoderma granarium (Khapra Beetle)
Treatment: T402-b-3-1
T402-b-3-2 Deleted
T402-d Pests: Miscellaneous Hitchhiking Insects (E.g., Crickets,
Scarab Beetles, Ants, Africanized Honeybee Swarms, Spotted
Lanternfly)
Treatment: T402-d
T402-c Empty Holds (Precautionary Treatment for Grain Exports)
Pest: Without khapra beetle infestation
Treatment: T402-c

Treatment Schedules T400 - Schedules for Miscellaneous Products
T402-a-1 Ship Holds and Any Nonplant Cargo Material Within Holds
5-5-4 Treatment Manual 02/2024-01
T402-a-1 Ship Holds and Any Nonplant Cargo Material Within Holds
Pest: Quarantine-significant snails of the family Achatinidea, including the
following genera: Achatina, Archachatina, Lignus, Limicolaria, Lissachatina
Treatment: T402-a-1
T402-a-2 Ship Holds and Any Nonplant Cargo Material Within Holds
Pest: Quarantine-significant snails of the family Geomitridae, Hygromiidae,
including the following genera: Backeljaia, Candidula, Cernuella,
Cochlicella, Helicella, Helicopsis, Hygromia, Monacha, Monachoides,
Platytheba, Pseudotrichia, Trochoidea, Xerolenta, Xeropicta, Xeroplexa,
Xerosecta, Xerotricha
Treatment: T402-a-2
T402-a-3 Ship Holds and Any Nonplant Cargo Material Within Holds
Pest: Quarantine-significant snails of the families Helicidae and Succineidae,
including the following genera: Arianta, Cepaea,Cornu, Helix, Massylaea,
Omalonyx, Otala, Succinea, Theba
Treatment: T402-a-3
T402-b-1 Ship Holds and Storerooms That Do Not Contain Finely
Milled Products, Such as Flour or Appreciable Quantities of Tightly
Packed Cargo, Such as Baled Materials
Pest: Trogoderma granarium (khapra beetle)
Treatment: T402-b-1

Treatment Schedules T400 - Schedules for Miscellaneous Products
T402-b-2 Ship Holds and Storerooms That Contain Milled Products or With Appreciable Quantities of Tightly Packed or
02/2024-01 Treatment Manual 5-5-5
T402-b-2 Ship Holds and Storerooms That Contain Milled Products
or With Appreciable Quantities of Tightly Packed or Baled Materials
Pest: Trogoderma granarium (khapra beetle)
Treatment: T402-b-2
T402-e Articles Regulated for Spongy Moth (Lymantria dispar),
Flighted Spongy Moth Complex (L. dispar dispar), and Spotted
Lanternfly (Lycorma delicatula) Egg Masses
Treatment: T402-e
T403—Miscellaneous Cargo (Nonfood, Nonfeed Commodities)
T403-a-1 Miscellaneous Cargo (Nonfood, Nonfeed Commodities)
Pest: Quarantine-significant snails of the family Achatinidae, including the
following genera: Achatina, Archachatina, Lignus, Limicolaria, Lissachatina
Treatment: T403-a-1—Use T402-a-1 for temperatures of 55 °F and above, use
T403-a-6-1 for temperatures below 55 °F.
T403-a-2-1 Miscellaneous Cargo (Nonfood, Nonfeed Commodities)
Pest: Quarantine-significant snails of the family Geomitridae and
Hygromiidae, including the following genera: Backeljaia, Candidula,
Cernuella, Cochlicella, Helicella, Helicopsis, Hygromia, Monacha,
Monachoides, Platytheba, Pseudotrichia, Trochoidea, Xerolenta, Xeropicta,
Xeroplexa, Xerosecta, Xerotricha
Treatment: T403-a-2-1
T403-a-2-2 Miscellaneous Cargo (Nonfood, Nonfeed Commodities)
Pest: Quarantine-significant snails of the family Geomitridae and
Hygromiidae, including the following genera: Backeljaia, Candidula,
Cernuella, Cochlicella, Helicella, Helicopsis, Hygromia, Monacha,
Monachoides, Platytheba, Pseudotrichia, Trochoidea, Xerolenta, Xeropicta,
Xeroplexa, Xerosecta, Xerotricha
Treatment: T403-a-2-2

Treatment Schedules T400 - Schedules for Miscellaneous Products
T403-a-2-3 Miscellaneous Cargo (Nonfood, Nonfeed Commodities)
5-5-6 Treatment Manual 02/2024-01
T403-a-2-3 Miscellaneous Cargo (Nonfood, Nonfeed Commodities)
Pest: Quarantine-significant snails of the family Geomitridae and
Hygromiidae, including the following genera: Backeljaia, Candidula,
Cernuella, Cochlicella, Helicella, Helicopsis, Monacha, Platytheba,
Pseudotrichia, Trochoidea, Xerolenta, Xeropicta, Xeroplexa, Xerosecta,
Xerotricha
Treatment: T403-a-2-3
T403-a-3 Miscellaneous Cargo (Nonfood, Nonfeed Commodities)
Pest: Quarantine-significant slugs of the families Agriolimacidae, Arionidae,
Limacidae, Milacidae, Philomycidae, and Veronicellidae, including the
following genera: Agriolimax, Arion, Colosius, Deroceras, Diplosolenodes,
Leidyula, Limax, Meghimatium, Milax, Pallifera, Pseudoveronicella,
Sarasinula, Semperula, Vaginulus, Veronicella
Treatment: T403-a-3
T403-a-4-1 Miscellaneous Cargo (Nonfood, Nonfeed Commodities)
Pest: Quarantine-significant snails of the family Helicidae, including the
following genera: Arianta, Cepaea, Cornu, Helix, Massylaea, Otala, Theba
Treatment: T403-a-4-1
T403-a-4-2 Miscellaneous Cargo (Nonfood, Nonfeed Commodities)
Pest: Quarantine-significant snails of the family Helicidae, including the
following genera: Cepaea, Cornu, Helix, Massylaea, Otala, Theba
Treatment: T403-a-4-2
T403-a-4-3 Miscellaneous Cargo (Nonfood, Nonfeed Commodities)
Pest: Quarantine-significant snails of the family Helicidae, including the
following genera: Arianta, Cepaea, Cornu, Helix, Otala, Theba
Treatment: T403-a-4-3—Cold treatment, use T403-a-6-1

Treatment Schedules T400 - Schedules for Miscellaneous Products
T403-a-5-1 Miscellaneous Cargo (Nonfood, Nonfeed Commodities)
02/2024-01 Treatment Manual 5-5-7
T403-a-5-1 Miscellaneous Cargo (Nonfood, Nonfeed Commodities)
Pest: Quarantine-significant snails of the families Camaenidae (including the
former Bradybaenidae) and Succineidae, including the following genera:
Acusta, Bradybaena, Cathaica, Omalonyx, Succinea
Treatment: T403-a-5-1
T403-a-5-2 Miscellaneous Cargo (Nonfood, Nonfeed Commodities)
Pest: Quarantine-significant snails of the families Camaenidae (including the
former Bradybaenidae) and Succineidae, including the following genera:
Bradybaena, Cathaica, Omalonyx, Succinea
Treatment: T403-a-5-2
T403-a-5-3 Miscellaneous Cargo (Nonfood, Nonfeed Commodities)
Pest: Quarantine-significant snails of the families Camaenidae (including the
former Bradybaenidae) and Succineidae, including the following genera:
Bradybaena, Cathaica, Omalonyx, Succinea
Treatment: 403-a-5-3—Cold treatment, use T403-a-6-1
T403-a-6-1 Miscellaneous Cargo (Nonfood, Nonfeed Commodities)
Pest: Quarantine-significant snails sensitive to cold treatment, members of the
families Camaenidae (including the former Bradybaenidae), Geomitridae,
Helicidae, Helicellidae, Hygromiidae, and Succineidae, including the
following genera: Blackeljaia, Bradybaena, Candidula, Cepaea, Cathaica,
Cernuella, Cochlicella, Helicella, Theba, Trochoidea, Xerolenta, Xeropicta,
Xerosecta, Xerotricha
Treatment: T403-a-6-1
T403-a-6-2 Miscellaneous Cargo (Nonfood, Nonfeed Commodities)
Pest: Quarantine-significant snails sensitive to cold treatment, certain members
of the family Helicidae, including the following genera: Helix, Otala
Treatment: T403-a-6-2

Treatment Schedules T400 - Schedules for Miscellaneous Products
T403-a-6-3 Miscellaneous Cargo (Nonfood, Nonfeed Commodities)
5-5-8 Treatment Manual 02/2024-01
T403-a-6-3 Miscellaneous Cargo (Nonfood, Nonfeed Commodities)
Pest: Quarantine-significant snails sensitive to cold treatment, of the family
Achatinidae, including the following genera: Achatina, Archachatina, Lignus,
Limicolaria, Lissachatina
Treatment: T403-a-6-3
T403-b Miscellaneous Cargo (Nonfood, Nonfeed Commodities)
Pest: Trogoderma granarium (khapra beetle)
Treatment: T403-b—MB at NAP, use T401-b or T402-b-2.
T403-c Miscellaneous Cargo (Nonfood, Nonfeed Commodities)
Pest: Globodera rostochiensis (golden nematode)
Treatment: T403-c
T403-d Miscellaneous Cargo (Nonfood, Nonfeed Commodities)
Pest: Wood borers or termites
Treatment: T403-d use appropriate T404 schedules
T403-e-1-1 Miscellaneous Cargo (Nonfood, Nonfeed Commodities)
That is Not Sorptive or Difficult to Penetrate
Pest: Quarantine-significant insects not specifically provided for elsewhere in
nonfood or nonfeed commodities
Treatment: T403-e-1-1
T403-e-1-2 Miscellaneous Cargo (Nonfood, Nonfeed Commodities)
That is Sorptive or Difficult to Penetrate
Pest: Quarantine-significant insects not specifically provided for elsewhere in
nonfood or nonfeed commodities
Treatment: T403-e-1-2

Treatment Schedules T400 - Schedules for Miscellaneous Products
T403-e-2 Miscellaneous Cargo (Nonfood, Nonfeed Commodities) That is Not Sorptive or Difficult to Penetrate
02/2024-01 Treatment Manual 5-5-9
T403-e-2 Miscellaneous Cargo (Nonfood, Nonfeed Commodities)
That is Not Sorptive or Difficult to Penetrate
Pest: Quarantine-significant pests other than insects, including quarantine-
significant snail families Helicarionidae and Streptaxidae, and subfamily
Subulininae
Treatment: T403-e-2
T403-f Miscellaneous Cargo (Nonfood, Nonfeed Commodities)
Pest: Pieris spp. (cabbageworms, all life stages) and all other Lepidoptera,
hitchhiking insects, including non-Lepidoptera.
Treatment: T403-f

Treatment Schedules T400 - Schedules for Miscellaneous Products
T404—Wood Products Including Containers
5-5-10 Treatment Manual 02/2024-01
T404—Wood Products
1
Including Containers
T404-b-5-1 Surface Spray for the Following Pests: Borers (Wood
Wasps, Anobiidae, Bostrichiadae, Cerambycidae, and Lyctidae),
Carpenter Ants, and Other Wood Infesting Ants, Carpenter Bees,
and Termites
Treatment: T404-b-5-1
T404-a Wood Products Including Containers
Pest: Globodera rostochiensis (golden nematode)
Treatment: T404-a
T404-b-2 Wood Products Including Containers
Pest: Borers (wood wasps, carpenter ants, carpenter bees, and termites)
Treatment: T404-b-2
T404-b-1-1 Wood Products Including Containers
Pest: Listed in the treatment document
Treatment: T404-b-1-1
T404-b-1-2 Wood Products Including Containers
Pest: Listed in the treatment document
Treatment: T404-b-1-2
T404-b-4 Wood Products Including Containers
Pest: Listed in the treatment document
Treatment: T404-b-4
1 Bamboo: use T404-d to fumigate any bamboo products.

Treatment Schedules T400 - Schedules for Miscellaneous Products
T404-c-1-1 Wood Products Including Containers
02/2024-01 Treatment Manual 5-5-11
T404-c-1-1 Wood Products Including Containers
Pest: Termites
Treatment: T404-c-1-1
T404-c-1-2 Wood Products Including Containers
Pest: Termites
Treatment: T404-c-1-2
T404-c-2 Wood Products Including Containers
Pest: Termites
Treatment: T404-c-2
T404-d Wood Products Including Containers
Pest: Borers and Trogoderma granarium (khapra beetle)
Treatment: T404-d
T404-e—Approved Marking for Regulated Wood Packing Material
T404-e-1—Regulated Wood Packing Material (WPM)
Pest: Various
Treatment: T404-e-1
T404-e-2 Regulated Wood Packing Material (WPM)
Pest: Various
Treatment: T404-e-2

Treatment Schedules T400 - Schedules for Miscellaneous Products
T404-f Pinus radiata Wood Chips From Chile and Eucalyptus Wood Chips From South America
5-5-12 Treatment Manual 02/2024-01
T404-f Pinus radiata Wood Chips From Chile and Eucalyptus Wood
Chips From South America
Treatment: T404-f (Eucalyptus)
Treatment: T404-f (Pinus radiata)
T405—Bags and Bagging Material
See T306 schedules.
T406—Golden Nematode Contaminations
T406-a Miscellaneous Cargo (Nonfood, Nonfeed Commodities)
Pest: Globodera rostochiensis (golden nematode)
Treatment: T406-a
T406-c Piers, Barges, Railroad Cars, Automobiles, Used Farm
Equipment, etc.
Pest: Globodera rostochiensis (golden nematode)
Treatment: T406-c
T406-b Used Farm Equipment, Construction Equipment, Containers,
etc.
Pest: Globodera rostochiensis (golden nematode)
Treatment: T406-b

Treatment Schedules T400 - Schedules for Miscellaneous Products
T406-d Used Farm Equipment (Without Cabs), Construction Equipment (Without Cabs), and Used Containers
02/2024-01 Treatment Manual 5-5-13
T406-d Used Farm Equipment (Without Cabs), Construction
Equipment (Without Cabs), and Used Containers
Pest: Globodera rostochiensis (golden nematode)
Treatment: T406-d
T407—Mechanical Cotton Pickers and Other Cotton Equipment
T407 Mechanical Cotton Pickers and Other Cotton Equipment
Pest: Pectinophora gossypiella (pink bollworm)
Treatment: T407
T408—Soil as Such and Soil Contaminating Durable Commodities
T408-e-1 Herbarium Specimens of Mosses and Liverworts in Soil
and Originating in Golden Nematode-free Countries
Pest: (precautionary)
Treatment: T408-e-1
T408-e-2 Herbarium Specimens of Mosses and Liverworts in Soil
and Originating in Countries with Golden Nematode
Pest: Globodera rostochiensis (golden nematode)
Treatment: T408-e-2
T408-a Soil As Such
Two alternative treatments
Pest: Various pests and pathogens found in soil (including striga)
Treatment: T408-a

Treatment Schedules T400 - Schedules for Miscellaneous Products
T408-b Soil As Such
5-5-14 Treatment Manual 02/2024-01
T408-b Soil As Such
Pest: Various pests and pathogens found in soil
Treatment: T408-b
T408-b-1 Soil Contaminating Durable Commodities (e.g., Equipment,
Cobblestone, Marble)
Pest: Various pests and pathogens found in soil
Treatment: T408-b-1
T408-c-1 Soil As Such
Pest: Globodera rostochiensis (golden nematode)
Treatment: T408-c-1
T408-c-2 Soil As Such
Pest: Globodera rostochiensis (golden nematode)
Treatment: T408-c-2
T408-d-1 Soil As Such
Pest: Insects
Treatment: T408-d-1
T408-d-2 Soil As Such
Pest: Insects
Treatment: T408-d-2
T408-f Soil Contaminated Durable Commodities (e.g., Equipment,
Cobblestone, Marble) (Precautionary Treatment)
Pest: Soil fungi, nematodes, and certain soil insects
Treatment: T408-f

Treatment Schedules T400 - Schedules for Miscellaneous Products
T408-g-1 Soil Contaminated Nonfood or Nonfeed Commodities
02/2024-01 Treatment Manual 5-5-15
T408-g-1 Soil Contaminated Nonfood or Nonfeed Commodities
Pest: Striga spp. (witchweed)
Treatment: T408-g-1
T408-g-2 Soil Contaminated Nonfood or Nonfeed Commodities
Pest: Striga spp. (witchweed)
Treatment: T408-g-2
T409—Aircraft
T409-a Aircraft (cargo holds only)
Pest: Trogoderma granarium (khapra beetle)
Treatment: T409-a
T409-b Aircraft
T409-b-1 Aircraft
Pest: Hitchhiking insect pests, except khapra beetle
Treatment: T409-b-1
T409-b-2 (Placeholder)
This is a placeholder for a future treatment.
T409-b-3 Aircraft
Treatment: T409-b-3

Treatment Schedules T400 - Schedules for Miscellaneous Products
T410—Tick Infestations
5-5-16 Treatment Manual 02/2024-01
T410—Tick Infestations
T410 Nonplant Articles (i.e., Bat Guano, Fence Posts, etc.)
Pest: Ticks
Treatment: Use T310 schedules
T411—Ant Infestations—Nonplant Products
Pest: Ants
Treatment: T411
T412—Noxious Weed Seeds (Devitalization Treatment)
T412-a Guizotia abyssinica (Niger Seed)
Pest: Weed seeds of the following genera:
Asphodelus fistulosus (onionweed)
Digitaria spp. (includes African couchgrass)
Oryza spp. (red rice)
Paspalum scrobiculatum (Kodo-millet)
Prosopis spp. (includes mesquites)
Solanum viarum (tropical soda apple)
Striga spp. (witchweed)
Urochloa panicoides (liver-seed grass)
Treatment: T412-a
T412-b-1 Noxious Weed Seeds (Devitalization Treatment)
Pest: Cuscuta spp.
Treatment: T412-b-1
T412-b-2 Noxious Weed Seeds (Devitalization Treatment)
Pest: Cuscuta spp.
Treatment: T412-b-2

Treatment Schedules T400 - Schedules for Miscellaneous Products
T412-b-3 Deleted
02/2024-01 Treatment Manual 5-5-17
T412-b-3 Deleted
T413—Brassware From Mumbai (Bombay), India
T413-a Brassware From Mumbai (Bombay), India
Pest: Trogoderma granarium (khapra beetle)
Treatment: T413-a
T413-b Brassware From Mumbai (Bombay), India
Treatment: T413-b
T414—Inanimate, Nonfood Articles with Spongy Moth or Flighted
Spongy Moth Complex Egg Masses
T414 Inanimate, Nonfood Articles with Spongy Moth and Flighted
Spongy Moth Egg Masses
Pest: Spongy moth (Lymantria dispar) and Flighted Spongy Moth Complex (L.
dispar dispar) egg masses
Treatment: T414

Treatment Schedules T400 - Schedules for Miscellaneous Products
T415—Garbage and Quarantine Material Interceptions for Destruction
5-5-18 Treatment Manual 02/2024-01
T415—Garbage and Quarantine Material Interceptions for
Destruction
Three alternative treatments are approved. The treatments can be used for
commodity destruction. Refer to the Glossary for the definitions of quarantine
material interceptions (QMI) and garbage.
Authorized users must refer to the APHIS Regulated Garbage Program
Manual for guidance on handling regulated garbage.
T415-a Garbage and Quarantine Material Interceptions for
Destruction
Pest: Insect pests and pathogens
Treatment: T415-a
T415-b Garbage and Quarantine Material Interceptions for
Destruction
Pest: Insect pests and pathogens
Treatment: T415-b
T415-c Garbage and Quarantine Material Interceptions for
Destruction
Pest: Insect pests and plant pathogens
Treatment: T415-c

Treatment Schedules T400 - Schedules for Miscellaneous Products
T416—Goatskins, Lambskins, Sheepskins (Skins and Hides)
02/2024-01 Treatment Manual 5-5-19
T416—Goatskins, Lambskins, Sheepskins (Skins and Hides)
T416-a-1 Goatskins, Lambskins, Sheepskins (Skins and Hides)
Pest: Trogoderma granarium (khapra beetle)
Treatment: T416-a-1
T416-a-2 Goatskins, Lambskins, Sheepskins (Skins and Hides)
Pest: Trogoderma granarium (khapra beetle)
Treatment: T416-a-2
T416-a-3 Goatskins, Lambskins, Sheepskins (Skins and Hides)
Pest: Trogoderma granarium (khapra beetle)
Treatment: T416-a-3

Treatment Schedules T400 - Schedules for Miscellaneous Products
T416-a-3 Goatskins, Lambskins, Sheepskins (Skins and Hides)
5-5-20 Treatment Manual 02/2024-01

02/2024-01 Treatment Manual 5-6-1
Chapter
5
Treatment Schedules
T500 - Schedules for Plant Pests or Pathogens
Contents
General Schedules
T501—Infestation of Chrysomyxa spp., Cercospora spp., and Phoma
chrysanthemi on Various Commodities 5-6-4
T502—Treatment for Infestation of Potato Cyst Nematode on Various
Commodities 5-6-5
T503—Treatments for Infestations of Downy Mildews and Physoderma
Diseases of Maize 5-6-5
T504—Treatment for Infestation of Flag Smut on Various Commodities
5-6-6
T505—Treatment for Infestation of Chrysomyxa spp. on Various Commodities
5-6-6
T506—Treatment for Infestation of Potato Cyst Nematode on Various
Commodities 5-6-7
T507—Treatment for Infestation of Phyllosticta bromeliae, Uredo, and
Septoria gentianae (Gentian Leaf Spot) on Various Commodities
5-6-7
T508—Treatment for Infestation of Rusts on Various Commodities 5-6-8
T509—Treatment for Infestation of Various Plant Pests of Camellia and
Orchids 5-6-8
T510—Treatment for Infestation of Various Corn-Related Diseases 5-6-9
T511—Precautionary Treatment for Xanthomonas axonopodis, pv. citri (Citrus
Canker) 5-6-9
T512—(Deleted) 5-6-9
T513—Treatment for Infestations of Ascochyta on Various Commodities
5-6-9
T514—Treatment for Infestations of Xanthomonas albilineans and X.
vasculorum 5-6-10
T515—Treatment for Infestations of Various Sugarcane-Related Diseases
5-6-10
T516—(Deleted) 5-6-11
T517—(Deleted) 5-6-11
T518—Treatment for Infestations of Various Rice-Related Diseases 5-6-11
T519—Treatment for Infestations of Various Rice-Related Diseases 5-6-11
T520—Treatment for Infestation of Verticillium albo-atrum on Various
Commodities 5-6-12
T521—Treatment for Infestation of Plant Pathogenic Fungi and Bacteria on
Articles Made with Dried Plant Material 5-6-12

Treatment Schedules T500 - Schedules for Plant Pests or Pathogens
Contents
5-6-2 Treatment Manual 02/2024-01
Hot Water Treatments
T551—Treatment for Infestation of Globodera rostochiensis and G. pallida
(Nematodes) on Convallaria (Pips) 5-6-12
T552—Treatment for Infestation of Ditylenchus dipsaci and D. destructor
5-6-13
T553—Treatment for Infestations of Nematodes on Various Plant
Commodities 5-6-14
T554—Treatment for Infestations of Ditylenchus dipsaci and D. destructor on
Hyacinthus 5-6-15
T555—Treatment for Infestations of Ditylenchus dipsaci on Narcissus
5-6-15
T556—Treatment for Infestations of Root-Knot Nematodes (Meloidogyne
spp.) on Calla 5-6-15
T557—Treatment for Infestations of Meloidogyne spp. and Pratylenchus spp.
on Chrysanthemum (not including Pyrethrum) 5-6-16
T558—Treatment for Infestations of Pratylenchus Surface Diseases on
Fragaria (Strawberry) 5-6-16
T559—Treatment for Infestations of Foliar Nematodes on Begonia and Oryza
(Paddy Rice) 5-6-16
T560—Treatment for Infestations of Meloidogyne spp. on Rosa 5-6-16
T561—Treatment for Infestations of Cercospora mamaonis and Phomopsis
carica-papayae on Papayas 5-6-17
T562—(Deleted) 5-6-17
T563—(Deleted) 5-6-17
T564—Treatment for Infestations of Foliar Nematodes on Various
Commodities 5-6-17
T565—Treatment for Infestations of Nematodes on Various Commodities
5-6-17
T566—Treatment for Infestations of Various Diseases on Broomcorn,
Broomcorn Articles, and Lilium (Bulbs) 5-6-18
T567—Treatment for Infestations of Bulb Nematodes on Various
Commodities 5-6-19
T568—Treatment for Infestations of Foliar Nematodes on Senecio 5-6-19
T569—Treatment for Infestations of Foliar Nematodes on Fragaria
(Strawberry) 5-6-19
T570—Treatment for Infestations of Various Diseases on Acalypha and
Aconitum 5-6-19
T571—(Deleted) 5-6-20
The following section lists the recommended treatments or actions to be
applied to items or commodities found infected with various diseases, or
infested with various plant pests, including nematodes. Commodities may
include cut flowers and greenery, propagative plant materials, as well as entire
plants. Due to recent restrictions and prohibitions on the use of certain
chemicals, every effort has been made to substitute the best alternative

Treatment Schedules T500 - Schedules for Plant Pests or Pathogens
Contents
02/2024-01 Treatment Manual 5-6-3
treatment available to us. The diseases and commodities for which these
treatments are recommended are listed in the Index to Schedules, and with the
following treatment schedules. Ports should endeavor to make post-treatment
examinations or arrange to have the consignee or importer submit data
concerning the material following the treatment. Ports should forward any
information of this nature to:
USDA-APHIS-PPQ-S&T-TMT
Science and Technology, Treatment Mitigation Technology
13601 Old Cutler Road, Bldg. 63
Miami, FL 33158 USA
Phone: 305-278-4877
Fax: 305-278-4898
email: [email protected]

Treatment Schedules T500 - Schedules for Plant Pests or Pathogens
T501—Infestation of Chrysomyxa spp., Cercospora spp., and Phoma chrysanthemi on Various Commodities
5-6-4 Treatment Manual 02/2024-01
T501—Infestation of Chrysomyxa spp., Cercospora spp., and Phoma
chrysanthemi on Various Commodities
T501-1—Azalea
Pest: Chrysomyxa spp.
Treatment: T501-1
T501-2—Azaleodendron
Pest: Chrysomyxa spp.
Treatment: T501-2
T501-4—Chrysanthemum
Pest: Phoma chrysanthemi
Treatment: T501-4
T501-5—Christmas Trees
Pest: Phoma chrysanthemi
Treatment: T501-5
T501-3—Orchid
Pest: Cercospora spp.
Treatment: T501-3
T501-6—Rhododendron
Pest: Chrysomyxa spp.
Treatment: T501-6

Treatment Schedules T500 - Schedules for Plant Pests or Pathogens
T502—Treatment for Infestation of Potato Cyst Nematode on Various Commodities
02/2024-01 Treatment Manual 5-6-5
T502—Treatment for Infestation of Potato Cyst Nematode on Various
Commodities
T502-1—Bags and Bagging Used for Commodities Grown in Soil
Treatment: T502-1
T502-2—Covers Used for Commodities Grown in Soil
Treatment: T502-2
T502-3—Soil
Treatment: T502-3
T503—Treatments for Infestations of Downy Mildews and
Physoderma Diseases of Maize
T503-1—Bags and Bagging (Used) for Small Grains
Pest: Diseases listed in 7CFR 319.24: Downy mildews and Physoderma
diseases of maize
Treatment: T503-1-2
Treatment: T503-1-3
Treatment: T503-1-4
T503-2—Covers Used for Small Grains
Pest: Diseases listed in 7CFR 319.24: Downy mildews and Physoderma
diseases of maize
Treatment: T503-2-2
Treatment: T503-2-3
Treatment: T503-2-4

Treatment Schedules T500 - Schedules for Plant Pests or Pathogens
T504—Treatment for Infestation of Flag Smut on Various Commodities
5-6-6 Treatment Manual 02/2024-01
T504—Treatment for Infestation of Flag Smut on Various
Commodities
T504-1—Bags and Bagging (Used) for Small Grains
Pest: Flag smut
Treatment: T504-1-1
Treatment: T504-1-2
T504-2—Covers Used for Wheat
Pest: Flag smut
Treatment: T504-2-1
Treatment: T504-2-2
T505—Treatment for Infestation of Chrysomyxa spp. on Various
Commodities
T505-1—Azaleodendron
Pest: Chrysomyxa spp.
Treatment: T505-1-1
Treatment: T505-1-2
T505-2—Rhododendron
Pest: Chrysomyxa spp.
Treatment: T505-2-1
Treatment: T505-2-2

Treatment Schedules T500 - Schedules for Plant Pests or Pathogens
T506—Treatment for Infestation of Potato Cyst Nematode on Various Commodities
02/2024-01 Treatment Manual 5-6-7
T506—Treatment for Infestation of Potato Cyst Nematode on Various
Commodities
T506-1—Containers
Pest: Potato cyst nematode
Treatment: T506-1-1
Treatment: T506-1-3
T506-2—Nonplant Articles
Pest: Potato cyst nematode
Treatment: T506-2-1
Treatment: T506-2-3
T507—Treatment for Infestation of Phyllosticta bromeliae, Uredo,
and Septoria gentianae (Gentian Leaf Spot) on Various Commodities
T507-1—Bromeliads—Deleted
Pest: Phyllosticta bromeliae, Uredo spp.
Treatment: T507-1—deleted
T507-2—Gentiana—Deleted
Pest: Septoria gentianae
Treatment: T507-2—deleted
Regulatory Authority
Captan is no longer labeled for use on Bromeliads. T507-1 has been removed under autho-
rization of 7 CFR 305.3((b)(1)(iv)) and is subject to change pending notice and comment.
Refuse entry, reexport, or destroy the commodity. (November 2020)
Regulatory Authority
Captan is no longer labeled for use on Gentiana. T507-2 has been removed under authori-
zation of 7 CFR 305.3((b)(1)(iv)) and is subject to change pending notice and comment.
Refuse entry, reexport, or destroy the commodity. (November 2020)

Treatment Schedules T500 - Schedules for Plant Pests or Pathogens
T508—Treatment for Infestation of Rusts on Various Commodities
5-6-8 Treatment Manual 02/2024-01
T508—Treatment for Infestation of Rusts on Various Commodities
T508-1—Orchids (to Florida)
Pest: Rusts
Treatment: T508-1
T509—Treatment for Infestation of Various Plant Pests of Camellia
and Orchids
T509-1—Camellia
Pest: Cylindrosporium camelliae
Treatment: T509-1-1
Treatment: T509-1-2
T509-2—Orchids
Pest:
Hemileia spp.
Leptosphaeria spp.
Mycosphaerella spp.
Opiodothella orchidearum
Phomopsis orchidophilia
Phyllachora spp.
Phyllosticta spp.
Sphenospora spp.
Sphaerodothis spp.
Uredo spp. (except U. scabies)
Treatment: T509-2-1
Treatment: T509-2-2

Treatment Schedules T500 - Schedules for Plant Pests or Pathogens
T510—Treatment for Infestation of Various Corn-Related Diseases
02/2024-01 Treatment Manual 5-6-9
T510—Treatment for Infestation of Various Corn-Related Diseases
T510-1—Corn (Seed) (Commercial Lots Not for Propagation)
Pest: Various corn-related diseases
Treatment: T510-1
T510-2—Corn (seed) (small lots for propagation but not for food,
feed, or oil purposes)
Pest: Various corn-related diseases
Treatment: T510-2
T511—Precautionary Treatment for Xanthomonas axonopodis, pv.
citri (Citrus Canker)
T511-1—Seeds of Citrus spp., Fortunella spp., Clausena lansium and
Poncirus trifoliata (and all cultivars, varieties, and hybrids)
Pest: Xanthomonas axonopodis, pv. citri (citrus canker)
Treatment: T511-1
T511-2—Fruit of Citrus spp., Fortunella spp., Clausena lansium and
Poncirus trifoliata (and all cultivars, varieties, and hybrids)
Pest: Xanthomonas axonopodis, pv. citri (citrus canker)
Treatment: T511-2
T512—(Deleted)
T513—Treatment for Infestations of Ascochyta on Various
Commodities

Treatment Schedules T500 - Schedules for Plant Pests or Pathogens
T513-1—Orchids
5-6-10 Treatment Manual 02/2024-01
T513-1—Orchids
Pest: Ascochyta spp.
Treatment: T513-1
T514—Treatment for Infestations of Xanthomonas albilineans and X.
vasculorum
T514-1—Saccharum (Sugarcane) (Seed pieces)
Pest: Xanthomonas albilineans and X. vasculorum
Treatment: T514-1
T514-2—Saccharum (Sugarcane) (True seed (fuzz))—Deleted
Pest: Xanthomonas albilineans and X. vasculorum
Treatment: T514-2
T514-3—Saccharum (Sugarcane) (Bagasse)
Pest: Xanthomonas albilineans and X. vasculorum
Treatment: T514-3
T514-4—Saccharum (Sugarcane) (Field and processing equipment)
Pest: Xanthomonas albilineans and X. vasculorum
Treatment: T514-4
T515—Treatment for Infestations of Various Sugarcane-Related
Diseases
T515-1—Sugarcane (Baled)
Pest: Various sugarcane-related diseases
Treatment: T515-1

Treatment Schedules T500 - Schedules for Plant Pests or Pathogens
T515-2—Sugarcane (Loose Sugarcane)
02/2024-01 Treatment Manual 5-6-11
T515-2—Sugarcane (Loose Sugarcane)
Pest: Various sugarcane-related diseases
Treatment: T515-2-1
Treatment: T515-2-3
Treatment: T515-2-4
Treatment: T515-2-5
T516—(Deleted)
T517—(Deleted)
T518—Treatment for Infestations of Various Rice-Related Diseases
T518-1—Brooms Made of Rice Straw
Pest: Various rice-related diseases
Treatment: T518-1
T518-2-1—Novelties Made of Rice Straw
Pest: Various rice-related diseases
Treatment: T518-2-1
Treatment: T518-2-2
T519—Treatment for Infestations of Various Rice-Related Diseases
T519-1—Closely Packed Rice Straw and Hulls
Pest: Various rice-related diseases
Treatment: T519-1

Treatment Schedules T500 - Schedules for Plant Pests or Pathogens
T519-2—Loose Rice Straw and Hulls
5-6-12 Treatment Manual 02/2024-01
T519-2—Loose Rice Straw and Hulls
Pest: Various rice-related diseases
Treatment: T519-2
T520—Treatment for Infestation of Verticillium albo-atrum on
Various Commodities
T520-1—Seeds of Alfalfa (Medicago falcata, M. gaetula, M. glutinosa,
M. media, and M. sativa) from Europe—Deleted
Pest: Verticillium albo-atrum
Treatment: T520-1-1
Treatment: T520-1-2
T521—Treatment for Infestation of Plant Pathogenic Fungi and
Bacteria on Articles Made with Dried Plant Material
Pest: Various Plant Pathogenic Fungi and Bacteria
Treatment: T521
T551—Treatment for Infestation of Globodera rostochiensis and G.
pallida (Nematodes) on Convallaria (Pips)
T551-1—Convallaria (Pips)
Pest: Globodera rostochiensis, G. pallida
Treatment: T551-1

Treatment Schedules T500 - Schedules for Plant Pests or Pathogens
T552—Treatment for Infestation of Ditylenchus dipsaci and D. destructor
02/2024-01 Treatment Manual 5-6-13
T552—Treatment for Infestation of Ditylenchus dipsaci and D.
destructor
T552-1—Allium, Amaryllis, and Bulbs (NSPF)
Pest: Bulb nematodes: Ditylenchus dipsaci, D. destructor
Treatment: T552-1

Treatment Schedules T500 - Schedules for Plant Pests or Pathogens
T553—Treatment for Infestations of Nematodes on Various Plant Commodities
5-6-14 Treatment Manual 02/2024-01
T553—Treatment for Infestations of Nematodes on Various Plant
Commodities
T553-1—Achimenes, Actinidia, Agapanthus, Aloe, Amorphophallus
(bulbs), Ampelopsis, Anchusa, Anemone, Astilbe, Begonia (tubers),
Bletilla hyacinthina (bulbs)(NSPF), Cactus, Calliopsis, Campanula,
Cestrum, Cimicifuga, Cissus, Clematis, Convolvulus japonicus,
Curcuma (turmeric), Cyclamen, Cytisus, Dahlia (tubers), Dracaena,
Epimedium pinnatum (only; other spp. not tolerant), Euonymus alata
(only), Eupatorium, Euphorbia, Fragaria (strawberry), Gardenia,
Gentiana, Gerbera, Gesneria, Geum, Gladiolus, Heliopsis,
Helleborus, Hibiscus, Hosta, Hoya, Iris, Jasminum, Kaempferia,
Kohleria, Naegelia, Orchid, Ornithogalum, Paeonia, Passiflora,
Polyanthes (tuberose), Primula, Reichsteineria, Sansevieria,
Scabiosa, Sedum, Senecio (Lingularis), Sinningia, Thompsonia
nepalensis, Tydaea, Verbena, Vitis (grape), Weigela, Zantedeschia,
Zingiberaceae
Pest: Root-knot nematodes (Meloidogyne spp.)
Treatment: T553-1
T553-2—Anchusa, Astilbe, Clematis, Dicentra, Gardenia, Helleborus,
Hibiscus, Kniphofia, Primula
Pest: Lesion nematodes (Pratylenchus spp.)
Treatment: T553-2
T553-3—Armoracia (Horseradish Roots), Bulbs (NSPF)
Pest: Golden nematodes (Globodera rostochiensis and G. pallida)
Treatment: T553-3

Treatment Schedules T500 - Schedules for Plant Pests or Pathogens
T553-4—Bletilla hyacinthina
02/2024-01 Treatment Manual 5-6-15
T553-4—Bletilla hyacinthina
Pest: Foliar nematodes (Aphelenchoides fragariae)
Treatment: T553-4
T553-5—Humulus
Pest: Cyst nematodes (Heterodera humuli)
Treatment: T553-5
T554—Treatment for Infestations of Ditylenchus dipsaci and D.
destructor on Hyacinthus
T554-1—Hyacinthus (bulbs), Iris (bulbs and rhizomes), Tigridia
Pest: Bulb nematodes—Ditylenchus dipsaci and D. destructor
Treatment: T554-1-1
Treatment: T554-1-2
T555—Treatment for Infestations of Ditylenchus dipsaci on
Narcissus
T555-1—Narcissus (bulbs)
Pest: Bulb nematodes (Ditylenchus dipsaci)
Treatment: T555-1
T556—Treatment for Infestations of Root-Knot Nematodes
(Meloidogyne spp.) on Calla
T556-1—Calla (rhizomes)
Pest: Root-knot nematodes (Meloidogyne spp.)

Treatment Schedules T500 - Schedules for Plant Pests or Pathogens
T557—Treatment for Infestations of Meloidogyne spp. and Pratylenchus spp. on Chrysanthemum (not including Pyrethrum)
5-6-16 Treatment Manual 02/2024-01
Treatment: T556-1
T557—Treatment for Infestations of Meloidogyne spp. and
Pratylenchus spp. on Chrysanthemum (not including Pyrethrum)
T557-1—Chrysanthemum (not including Pyrethrum)
Pest: Meloidogyne spp. and Pratylenchus spp.
Treatment: T557-1
T558—Treatment for Infestations of Pratylenchus Surface Diseases
on Fragaria (Strawberry)
T558-1—Fragaria (Strawberry)
Pest: Pratylenchus spp. (surface diseases)
Treatment: T558-1
T559—Treatment for Infestations of Foliar Nematodes on Begonia
and Oryza (Paddy Rice)
T559-1—Begonia
Pest: White tip nematode (Aphelenchoides besseyi)
Treatment: T559-1
T559-2—Oryza (Paddy Rice)
Pest: White tip nematode (Aphelenchoides besseyi)
Treatment: T559-2
T560—Treatment for Infestations of Meloidogyne spp. on Rosa
T560-1—Rosa spp. (except multiflora, which is not tolerant)
Pest: Meloidogyne spp.
Treatment: T560-1

Treatment Schedules T500 - Schedules for Plant Pests or Pathogens
T561—Treatment for Infestations of Cercospora mamaonis and Phomopsis carica-papayae on Papayas
02/2024-01 Treatment Manual 5-6-17
T561—Treatment for Infestations of Cercospora mamaonis and
Phomopsis carica-papayae on Papayas
T561-1—Papaya
Pest: Cercospora mamaonis and Phomopsis carica-papayae
Treatment: T561-1
T562—(Deleted)
T563—(Deleted)
T564—Treatment for Infestations of Foliar Nematodes on Various
Commodities
T564-1—Astilbe, Bletilla hyacinthina, Cimicifuga, Epimedium
pinnatum (only; other spp. not tolerant), Hosta, Paeonia
Pest: Foliar nematode (Aphelenchoides besseyi)
Treatment: T564-1
T565—Treatment for Infestations of Nematodes on Various
Commodities
T565-1—Amaryllis
Pest: Ditylenchus destructor
Treatment: T565-1
T565-2—Crocus
Pest: Aphelenchoides subtenuis, Ditylenchus destructor
Treatment: T565-2

Treatment Schedules T500 - Schedules for Plant Pests or Pathogens
T565-3—Gladiolus
5-6-18 Treatment Manual 02/2024-01
T565-3—Gladiolus
Pest: Ditylenchus destructor
Treatment: T565-3
T565-4—Scilla
Pest: Ditylenchus dipsaci
Treatment: T565-4
T565-5—Solanum (Potato Tubers)
Pest: Globodera rostochiensis, G. pallida
Treatment: T565-5
T566—Treatment for Infestations of Various Diseases on
Broomcorn, Broomcorn Articles, and Lilium (Bulbs)
T566-1—Broomcorn
Pest: Precautionary treatment for corn-related diseases
Treatment: T566-1
T566-2—Broomcorn Articles
Pest: Precautionary treatment for corn-related diseases
Treatment: T566-2
T566-3—Lilium (Bulbs)
Pest: Aphelenchoides fragariae
Treatment: T566-3

Treatment Schedules T500 - Schedules for Plant Pests or Pathogens
T567—Treatment for Infestations of Bulb Nematodes on Various Commodities
02/2024-01 Treatment Manual 5-6-19
T567—Treatment for Infestations of Bulb Nematodes on Various
Commodities
T567-1—Muscari, Ornithogalum, Polyanthes (Tuberose)
Pest: Bulb nematodes (Ditylenchus dipsaci)
Treatment: T567-1
T568—Treatment for Infestations of Foliar Nematodes on Senecio
T568-1—Senecio (Lingularis)
Pest: Foliar nematodes (Aphelenchoides fragariae)
Treatment: T568-1
T569—Treatment for Infestations of Foliar Nematodes on Fragaria
(Strawberry)
T569-1—Fragaria (Strawberry)
Pest: Foliar nematodes (Aphelenchoides fragariae)
Treatment: T569-1
T570—Treatment for Infestations of Various Diseases on Acalypha
and Aconitum
T570-1—Acalypha
Pest: Pratylenchus spp.
Treatment: T570-1
T570-2—Aconitum
Pest: Aphelenchoides fragariae
Treatment: T570-2

Treatment Schedules T500 - Schedules for Plant Pests or Pathogens
T571—(Deleted)
5-6-20 Treatment Manual 02/2024-01
T571—(Deleted)

11/2013-100 Treatment Manual 5-7-1
Chapter
5
Treatment Schedules
T600 - Controlled Atmosphere Temperature
Treatment System
This information in this chapter has been removed.

Treatment Schedules T600 - Controlled Atmosphere Temperature Treatment System
This information in this chapter has been removed.
5-7-2 Treatment Manual 11/2013-100

08/2024-05 Treatment Manual 5-8-1
Chapter
5
Treatment Schedules
D301 - Schedules for Domestic Movement of
Regulated Articles
These treatments are to be used only for domestic movement of regulated
articles and are conducted in conjunction with a systems approach. State and
local guidelines may apply.
Refer to the Agricultural Commodity Import Requirements (ACIR) database
Treatment Manual tab, Treatments - D301 - Schedules for Domestic
Movement of Regulated Articles to find all of the domestic treatments in 7
CFR 301 and several Federal Orders.

Treatment Schedules D301 - Schedules for Domestic Movement of Regulated Articles
5-8-2 Treatment Manual 08/2024-05

02/2020-30 Treatment Manual 6-1-1
Chapter
6
Certifying Facilities
Overview
Contents
Certification of Vacuum Fumigation Chambers 6-2-1
Certifying Normal Atmospheric Fumigation Chambers 6-3-1
Certification of Cold Treatment 6-4-1
Certification of Hot Water Immersion Facilities 6-5-1
Certification of Niger seed Treatment Facilities 6-6-1
Certification of Forced Hot Air and Vapor Heat Treatment Facilities 6-7-1
Certifying Irradiation Treatment Facilities 6-8-1
Certifying Facilities for the Heat Treatment of Firewood 6-9-1
The Certification of Facilities section of this manual is organized by the
following categories:
Vacuum Fumigation Chambers
Atmospheric Fumigation Chambers
Cold Treatment Facilities
Hot Water Immersion Facilities
Niger seed Treatment Facilities
Forced Hot Air and Vapor Heat Treatment Facilities
Irradiation Treatment Facilities
Firewood Heat Treatment Facilities
Domestic and foreign treatment facilities must be certified by APHIS before
they can perform treatments to meet United States quarantine requirements.
Specific requirements for each type of facility are included in this section.
After the USDA-APHIS-PPQ-S&T-TMT has approved blueprints or drawings
of a treatment facility, the treatment facility can request certification from Plant
Protection and Quarantine at local ports or State Plant Health Directors.

Certifying Facilities Overview
6-1-2 Treatment Manual 02/2020-30
NOTICE
Send blueprints or drawings of domestic treatment facilities to:
USDA-APHIS-PPQ-S&T-TMT
13601 Old Cutler Road, Bldg. 63
Miami, FL 33158 USA
Phone: 305-278-4877
Fax: 305-278-4898
email: ppqt[email protected]ov
Request certification from the State Plant Health Directors listed on the PPQ Plant
Hea
lth Program Overview website.
NOTICE
Send blueprints or drawings and request for certification of foreign treatment
facilities to:
Director, Preclearance Programs
USDA-APHIS-PPQ
4700 River Road, Unit 60
Riverdale, MD 20737
Phone: (301) 851-2312
For foreign treatment facilities, the company requesting certification is responsible
for paying money into a trust fund account to pay the salary, travel costs, and per
diem of a PPQ Officer to be sent on temporary duty.
Sea-going vessels that participate in the APHIS cold treatment program for fresh fruit
may be certified at a port in the USA or at a foreign port. Also, if the certification is to
be carried out overseas, a trust fund account will be needed to cover the costs.
For details, call PPQ Quarantine Policy, Analysis and Support (QPAS) at (301) 851-
2312.

05/2023-66 Treatment Manual 6-2-1
Chapter
6
Certifying Facilities
Certification of Vacuum Fumigation Chambers
Contents
Submission and Approval of a New Chamber Construction 6-2-1
Construction and Performance Standards 6-2-1
Vacuum Chamber 6-2-2
Vacuum Pump 6-2-2
Fumigant Introduction Systems 6-2-2
Circulation and Exhaust System 6-2-3
Accessories 6-2-3
Certification Standards 6-2-4
Checklist 6-2-6
Submission and Approval of a New Chamber Construction
The facility submits an engineering construction plan and chamber
requirements to the appropriate State and country officials and to USDA-
APHIS-PPQ-S&T-TMT for approval.
Download a fillable Application for USDA Fumigation Facility Approval
Form located on the S&T website.
Contact [email protected] with questions regarding the application.
Construction and Performance Standards
Vacuum fumigation consists of placing the commodity in a gas tight metal
chamber, removing most of the air, and replacing a small portion of it with a
gas which is lethal to insects and other pests. Vacuum fumigation provides a
more rapid penetration of commodities undergoing treatment than is obtained
in normal atmospheric fumigations.

Certifying Facilities Certification of Vacuum Fumigation Chambers
Construction and Performance Standards
6-2-2 Treatment Manual 05/2023-66
Vacuum Chamber
Vacuum chambers are usually welded steel construction. A rectangular
chamber might be preferred for more effective use of space. Reinforcement of
the chamber body by means of steel ribs, or other supports, is usually required
to enable the chamber to withstand the difference in pressures when the
vacuum is drawn. Doors can be provided at one or both ends of the chamber. In
cylindrical chambers, the doors can be either concave or convex, but in
rectangular chambers flat doors are commonly used with suitable
reinforcements. The doors can be hinged at the side, or at the top and
counterbalanced. Many doors are fitted with special mechanisms for rapid
closing. Door gaskets should be durable and at the same time provide gastight
seal. To a large extent, the efficiency of a chamber depends upon the tightness
with which the door or doors will seal. All other chamber openings must be
equally tight to sustain the prescribed vacuum over a specified period of time.
To permit circulation beneath the load, the chamber must be designed to
enable the stacking of commodities on pallets, skids, or small trucks. Small
chambers that are usually hand loaded have removable floors.
Vacuum Pump
Each installation requires a high quality, high capacity vacuum pump. The
vacuum pump should have the capacity to reduce the chamber pressure to 1 to
2 inches (25 to 51 millimeters) of mercury (28 to 29 inches or 711 to 737
millimeters vacuum) in 15 minutes or less.
Fumigant Introduction Systems
The size of the chamber will determine the introduction system needed. For
small chambers and for introducing fumigants in small quantities, measure the
fumigant by volume using a graduated dispenser. For larger chambers, place
the gas supply cylinder on a platform scale and measure the amount of
fumigant by weight.
For methyl bromide, a volatilizing unit is required to ensure fumigant
introduction in a gaseous state. The volatilizer is located outside of the
chamber between the gas cylinder or dispenser and the introduction port of the
chamber. Essentially, the volatilizer consists of a metal coil submerged in water
hot enough to vaporize the fumigant. The volatilizer must maintain the water
temperature to at least 150 °F throughout the entire gas introduction period.
Within the chamber, the gas introduction system should consist of tubing with
multiple, graduated openings that will provide uniform distribution of the
fumigant throughout the length of the chamber. Ensure that the fumigant enters
the chamber from multiple points along the ceiling.

Certifying Facilities Certification of Vacuum Fumigation Chambers
Construction and Performance Standards
05/2023-66 Treatment Manual 6-2-3
Circulation and Exhaust System
Adequate gas distribution is often hindered by the cargo placed in the chamber.
To overcome this, equip vacuum chambers with a circulation system. If fans
are employed, the number of fans required would depend upon the chamber
design, volume, and loading arrangements. A minimum of 2 fans is normally
required for chambers of over 1,000 cubic feet capacity (28.31 m
3
). Place the
fans at opposite ends of the chamber facing each other—one high, one low.
Additional fans might be required for larger chambers. The fans should be
capable of circulating air at the rate of at least one-third the volume of the
chamber per minute. Some fumigants require nonsparking, explosion-proof
circulation systems.
In most installations, the vacuum pump is used to remove the fumigant
following the exposure period. The air-gas mixture is pumped out of the
chamber through exhaust ducts or stacks installed for that purpose. The actual
height of these stacks will vary with the location of the chamber, and may be
regulated by local, state, or federal safety ordinances.
Accessories
Equip chambers with a vacuum gauge and an instrument for measuring and
recording the vacuum drawn and maintained during the exposure period.
Install a temperature monitoring device in chambers used for quarantine
treatments that are 6 hours or more in length. Combination temperature and
vacuum recorders are available.
Temperature sensors are usually attached to the outside of the chamber with a
remote sensing unit attached to the inside wall or inserted into the product.
Specifications for the temperature recording system are as follows:
Accurate to within ± 0.6 °C or ±1.0 °F in the treatment temperature range
of 4.4 °C to 26.7 °C (40 °F to 80 °F)
Calibrated annually by the National Institute of Standards and Technology
(NIST) or by the manufacturer
The calibration certificate will list a correction factor, if needed, and
the correction factor would be applied to the actual temperature
reading to obtain the true temperature.
Capable of printing all temperature readings or downloading data to a
secure source once per hour throughout the entire treatment (all
temperature data must be accessible at a safe distance during the
fumigation)
Tamper-proof

Certifying Facilities Certification of Vacuum Fumigation Chambers
Construction and Performance Standards
6-2-4 Treatment Manual 05/2023-66
If one or more of the temperature readings go below 40 °F the fumigation will
be considered a failed treatment. The commodity must be re-treated, returned
to the country of origin, reexported, or destroyed.
Certification Standards
To qualify for program approval, vacuum chambers must be able to meet or
exceed specified vacuum leakage tests. There are four classification levels in
which a chamber may be certified. The tests are listed in Table 6-2-1 and
determine the classification under which the chamber qualifies.
In addition to the classification tests in Table 6-2-1, ALL chambers must be
capable of meeting the following requirement: A vacuum equivalent to 26
inches (660 mm) of mercury is drawn. The vacuum is then reduced to 5 inches
(127 mm) and held for a period of 4 hours. A vacuum of 2 inches (55 mm) or
more after 4 hours is considered adequate for this test.
Chambers classified “Superior” or “A” are approved for all vacuum
treatments. These chambers are to be tested annually.
Chambers classified “B” are approved for all vacuum schedules up to and
including 28-inch (711 mm) sustained vacuum. These chambers are to be
tested semi-annually.
Chambers classified “C” are approved for all vacuum schedules up to and
including 26-inch (711 mm) sustained vacuum. These chambers are to be
tested semi-annually.
!
CAUTION
Commodities used for food or feed may not be re-treated. If commodities fall into this
category, the only options are:
Return to the country of origin
Reexported to another country if they will accept the shipment
Destroy by incineration
NOTICE
There should be no commodity in the chamber during the certification procedure.
Table 6-2-1 Vacuum Chamber Classification Table
Classification
Initial Vacuum
(inches)
Allowable Vacuum Loss
4 hr. 6 hr. 16 hr. 24 hr.
Superior 28 1/2 — 1/2” — 1”
A 28 1/2 1/2” — 1” 2”
B 28 1/2 1” — 2 1/2” 3”
C 26 1” — 2 1/2” 3”

Certifying Facilities Certification of Vacuum Fumigation Chambers
Construction and Performance Standards
05/2023-66 Treatment Manual 6-2-5
During each certification, conduct a preventative maintenance inspection. The
maintenance inspection will ensure the merit of each unit and correct any
deficiencies prior to certification. Refer to Table 6-2-2 for an inspection
checklist.
Once the chamber has met the requirements in Table 6-2-1 and passes the
preventative maintenance check, the approving APHIS official must complete
PPQ Form 480 (Treatment Facility Construction, Operation and Test Data),
and PPQ Form 482 (Certificate of Approval). A copy of each of the forms
should be given to the owner/operator of the chamber and also mailed to:
USDA-APHIS-PPQ-S&T-TMT
13601 Old Cutler Road, Bldg. 63
Miami, FL 33158 USA
Phone: 305-278-4877
Fax: 305-278-4898
email: [email protected]
Approving a chamber for vacuum fumigation does not include approving
atmospheric (NAP) fumigations. If the vacuum chamber will also be used as a
normal atmospheric pressure chamber, it must also pass a pressure leakage test
(see Pressure-leakage Test for NAP Fumigation Chambers).
Actual detailed instructions for constructing a vacuum chamber are not
included in this discussion. The information presented is designed to list the
component parts needed and the function of each.
!
CAUTION
Never use methyl bromide to check for leaks in the chamber. Use compressed air to
check for leaks.

Certifying Facilities Certification of Vacuum Fumigation Chambers
Construction and Performance Standards
6-2-6 Treatment Manual 05/2023-66
Checklist
Use the checklist in Table 6-2-2 as a guide during chamber certifications..
Table 6-2-2 Chamber Checklist
CHAMBER AND VOLATILIZER YES NO
Has chamber been measured and total volume calculated?
Has chamber been checked for integrity?
Smoke test
Pressure test
Have fans been tested to recirculate at least one third of the total volume per minute?
Is gas monitoring required (by the workplan)?
If yes, are sampling leads properly placed (in commodity, if required)?
Are sampling leads one quarter inch inner diameter and free from blockage?
Will a scale be used to apply fumigant?
If yes, has the scale been calibrated and certified this year?
Is the graduated dispenser in good condition?
Are the door seals and gaskets in good condition?
Is the copper tubing in the volatilizer intact? (check for holes)
Are the vacuum and temperature gages accurate?
REQUIRED EQUIPMENT
Tape measure or electronic measuring device
Calculator
Stop watch
Air (leaf) blower with appropriate fittings and adapters
Manometer (including tubing and appropriate liquid)
Digital anemometer
Gas detection device (calibrated within one year)
Dessicant (Drierite®) and Ascarite®
Auxiliary pump (for large chambers)
Digital thermometer (accuracy 0.1 F) with probe
REQUIRED SAFETY EQUIPMENT
Gas leak detection device
Self contained breathing apparatus
First aid kit, including eye wash
Emergency medical treatment facility map and phone number

Certifying Facilities Certification of Vacuum Fumigation Chambers
Construction and Performance Standards
05/2023-66 Treatment Manual 6-2-7
REQUIRED DOCUMENTATION
PPQ Form 480, Treatment Facility
PPQ Form 482, Certificate of Approval
Material safety data sheet
Warning placard (English and Spanish)
Special local need label and permit (if applicable)
Table 6-2-2 Chamber Checklist (continued)

Certifying Facilities Certification of Vacuum Fumigation Chambers
Construction and Performance Standards
6-2-8 Treatment Manual 05/2023-66

05/2023-66 Treatment Manual 6-3-1
Chapter
6
Certifying Facilities
Certifying Normal Atmospheric Fumigation
Chambers
Contents
Construction and Performance Standards 6-3-1
Basic Elements for Design and Construction of Chambers 6-3-3
Pallets and Bins 6-3-3
Gastight Construction 6-3-4
Circulation and Exhaust Systems 6-3-6
Fumigant Dispensing System 6-3-8
Pressure-leakage Test for NAP Fumigation Chambers 6-3-9
Other Auxiliary Equipment 6-3-11
Phosphine Chambers 6-3-11
Checklist 6-3-13
Construction and Performance Standards
The primary purpose of a fumigation program is to obtain quarantine control of
the pests in all stages of development in, on, or with the product being
fumigated. A fumigation chamber is defined as a stationary enclosure into
which the product can be loaded and where fumigant will be maintained at the
prescribed concentration for the required exposure period.
When constructing a normal atmospheric (NAP) fumigation chamber, the
primary consideration is to make it as gastight as possible. In addition,
companies must install circulation equipment in chambers that are to be used
for methyl bromide (MB) fumigations to ensure proper distribution of the
fumigant throughout the chamber. The chamber must retain these qualities of
tightness and fumigant circulation during every fumigation.
Although chamber sizes are not restricted to specific dimensions, companies
should size chambers according to the volume of material to be fumigated.
Experience has shown that two moderately sized chambers are preferable to
one large chamber.
Chamber manufacturers should select the construction material according to
the type of product to be fumigated and the method of operation involved.
Wood frame construction with light metal sheathing or plywood can be used if
the products to be fumigated are lightweight and are to be hand loaded. Heavy
products, often loaded by machinery or handtrucks, require heavy-gauge sheet

Certifying Facilities Certifying Normal Atmospheric Fumigation Chambers
Construction and Performance Standards
6-3-2 Treatment Manual 05/2023-66
metal, masonry, or metal plate construction. It is advisable to construct the
chamber in the most durable manner consistent with its intended use.
Auxiliary equipment is required to measure, vaporize, circulate, and exhaust
the fumigant. Chamber manufacturers should size such equipment according to
the volume of the chamber. When relatively small amounts of MB are to be
used, they are often measured by volume in graduated dispensers. When larger
amounts are to be used, the fumigant is most often measured by weight with
the use of an approved and calibrated measuring scale.
Chambers can be equipped with heating or refrigeration units, depending on
the climatic environment and the products to be fumigated. Product injury or
an ineffective fumigation can occur within certain temperature ranges.
Although provisions for temperature control are not generally mandatory, in
certain fumigation operations, temperature control is necessary and therefore
must be considered in the design and construction of fumigation chambers.
While complete construction details for an atmospheric fumigation chamber
are not contained in this chapter, sufficient information is available to develop
specifications for a proposed structure. Firms considering chambers for
approval by the USDA must submit a completed fumigation chamber approval
application and other required information (e.g. manuals, technical sheets) to
their local APHIS-PPQ contact.
Download a fillable Application for USDA Fumigation Facility Approval
Form located on the S&T website.
Contact [email protected] with questions regarding the application.
Local APHIS-PPQ personnel will determine the feasibility of constructing the
proposed chamber with regards to PPQ resources and requirements. If these
are permitted, local personnel will review the submitted application for
completeness and forward to the National Operations Manager for Import and
Exclusion Treatments.
National Operations Manager for Import and Exclusion Treatments
USDA-APHIS-PPQ
1730 Varsity Drive, Suite 300
Raleigh, NC 27606

Certifying Facilities Certifying Normal Atmospheric Fumigation Chambers
Construction and Performance Standards
05/2023-66 Treatment Manual 6-3-3
The National Operations Manager for Import and Exclusion Treatments will
subsequently forward the application to the following office:
USDA-APHIS-PPQ-S&T-TMT
13601 Old Cutler Road, Bldg. 63
Miami, FL 33158 USA
Phone: 305-278-4877
Fax: 305-278-4898
email: [email protected]
Basic Elements for Design and Construction of Chambers
Gastight and remains so during every use
Provides an efficient system for circulating and exhausting the fumigant
Provides an efficient system for dispensing the fumigant
Provides heating or refrigeration units when required for fumigation
efficiency, to prevent product injury, or to meet label temperature
requirements
Provides a temperature recording system when treatments are 6 hours or
longer in duration
Provides suitable fittings to facilitate a pressure-leakage test and gas
concentration sampling
The criteria listed above deal primarily with the efficiency of the fumigation
chamber itself. In determining the ultimate design and construction, it is
essential to give consideration to the safe and practical operation of the facility.
All requirements outlined in this chapter apply to all USDA-approved
fumigation chambers that use MB and phosphine, unless specifically noted.
See Phosphine Chambers on page 6-3-11 for additional information specific to
phosphine.
Pallets and Bins
All material placed in the chamber must be on pallets or bins. Load pallets and
bins in the chamber so that there is at least two inches of space under the
commodity and between each pallet or bin. Fumigation of double-stacked
commodities has been conducted in some locations, and approval for this
practice is granted on an individual basis. The proposed double-stacked
configuration must be designed to ensure that safe and effective fumigations
are conducted. Prior to chamber certification, take gas concentration readings
throughout the fumigated load to demonstrate that even readings can be
achieved with the proposed configuration.

Certifying Facilities Certifying Normal Atmospheric Fumigation Chambers
Construction and Performance Standards
6-3-4 Treatment Manual 05/2023-66
Do not fumigate items or combinations of items (e.g., commodity, packaging)
that are sorptive or whose sorptive capacities are unknown unless gas readings
are taken by an APHIS representative. Take gas readings for each chamber
certification and anytime there is a change in commodity, packaging material,
increase in chamber load capacity, or changes to the chamber itself (unless the
effect of the change is known and will not decrease gas concentrations below
required levels.) See Sorption on page 2-3-10 for additional information on
sorption, sorptive materials, and packaging.
Gastight Construction
Interior surfaces must be impervious to the fumigant and can be constructed of
metal, cement, concrete block, tile, or plywood. Any other material that is to be
used on the interior surface of the chamber must be approved by PPQ prior to
installation. Sorbent materials (e.g., foam, insulation) cannot be installed on
the interior surfaces of the chamber, although they can be used in areas that
will not be exposed to the fumigant. PPQ does allow the use of foam to seal
joints in a phosphine chamber.
Introduction lines, fittings, pipes, exhaust stacks, and other structures that
could come into contact with MB should be constructed of the following
materials that are compatible with this gas:
Brass
Copper
Carbon steel
Stainless steel
Polyethylene
Polypropylene
Polytetrafluoroethylene (PTFE; Teflon
®
)
Aluminum and galvanized metal are also acceptable if no liquid MB could
come into contact with these materials, although there may be possible
reactivity problems with long-term use.
Do not use the following materials for introduction lines, fittings, pipes, or
other structures that could come into contact with MB:
Natural rubber
Nylon
Polyvinyl chloride (PVC)
Tygon
®
tubing should not be used as gas sampling or introduction lines

Certifying Facilities Certifying Normal Atmospheric Fumigation Chambers
Construction and Performance Standards
05/2023-66 Treatment Manual 6-3-5
Seal joints with appropriate compound, solders, or welds for the construction
materials used. When wood or a combination of wood and sheet metal are
used, seal all joints and seams with a nonhardening material. This makes a
gastight seal and allows for expansion and contraction without leakage. Use
mastic tape to seal the seams between wall joints in plywood chambers. In
masonry construction, joint (strike) the mortar between all courses of cement
blocks to produce a smooth, compact surface. Poured concrete structures
should also have smooth, compact surfaces. Weld all metal joints.
Fit all doors and vents with proper gaskets. PPQ recommends that chamber
operators replace all door and vent door gaskets (regardless of construction
material) once per season in chambers that receive moderate use. In chambers
that receive heavier use (e.g., fumigations performed several times per week
for an entire season), it is recommended that the gaskets be replaced more
frequently.
The following list of materials are compatible with MB and can be used as
construction material for gaskets:
Fluoroelastomer (FKM) (for example, Dupont™ Viton
®
)
Ethylene Propylene Diene Monomer (EPDM) (acceptable even though
chemical compatibility charts indicate that it should not be exposed to
MB; inspect regularly for damage and replace when needed)
Neoprene (acceptable even though chemical compatibility charts indicate
that it should not be exposed to MB; inspect regularly for damage and
replace when needed)
Nitrile (Buna-N)
Silicone
Polytetrafluoroethylene (PTFE; Teflon
®
)
Ensure that all openings for wiring, thermometers, tubing, and ports for
pressure-leakage tests, etc. are gastight. PPQ requires a minimum of three
fittings to be installed in each chamber for measuring gas concentration.
Additional fittings may be required in certain circumstances, such as large
chambers or chambers in which the commodity will be double-stacked.
Paint interior surfaces (except for metal) with epoxy resin, vinyl plastic, or
asphalt base paints. Additional paint types may be approved if the
manufacturer’s specifications show compatibility of the paint with the
fumigant to be used. Such paint coverings make the surfaces less sorptive, an
important factor in maintaining gas concentrations. Although not mandatory,
many fumigation chamber operators install concrete bumpers on the floor
around the sides of the chamber to prevent forklift damage to the walls.

Certifying Facilities Certifying Normal Atmospheric Fumigation Chambers
Construction and Performance Standards
6-3-6 Treatment Manual 05/2023-66
The construction and fastening of chamber doors is most critical to the
chamber’s ability to hold the gas. Chamber doors can be mounted using hinges,
sliding rails, cantilevers, etc., and can be tightened against the associated
gasket with turnscrews, hydraulic rams, clamps, etc. Approval will be based on
review of the individual system. PPQ does note that small guillotine-style
doors are less likely to leak than many other door types and chamber doors that
are hinged at the top are less likely to sag than those hinged at the side. Heavy-
duty or industrial hinges are required for doors that are hinged at the side.
Regardless of the method used to mount and fasten the doors, it is important
that a high-quality gasket is installed around the entire perimeter of the
chamber opening. To obtain the maximum seal possible, uniformly and tightly
compress the doors against the gaskets.
Circulation and Exhaust Systems
Fans or blowers delivering the prescribed minimum air movement are essential
to proper fumigant distribution.
Various methods can be used to circulate the fumigant within the chamber.
Equipment should be capable of circulating air at the rate of at least one-third
the volume of the chamber per minute. A minimum of two fans is required for
chambers greater than 1,000 cubic feet, although this requirement may be
waived by local APHIS-PPQ personnel on an individual basis, i.e., when one
fan can be shown to achieve adequate and uniform gas concentrations
throughout the fumigated load. Position the fans in one of these three
configurations:
at opposite ends of the chamber, facing each other–one high and one low
all mounted high on one wall of the chamber
one fan is placed at the top and one at the bottom of a duct or enclosed
space
Local APHIS-PPQ personnel may also approve chamber setups resembling
precoolers. In this arrangement, two rows of pallets are positioned with
approximately a two-foot tunnel in between them and a large fan (that meets
minimum air flow requirements) at the front that pulls the fumigant through
the pallets and redistributes it above the pallets into the room. In some cases,
this setup may utilize a second fan which can both facilitate the circulation of
the air/gas mixture and serve as the exhaust fan during aeration.
NOTICE
Aluminum base paints are not acceptable because of the corrosive effect caused by
a reaction between such paints and the fumigant.

Certifying Facilities Certifying Normal Atmospheric Fumigation Chambers
Construction and Performance Standards
05/2023-66 Treatment Manual 6-3-7
Ductwork is recommended for larger chambers, especially those that are long
and narrow. It serves to pick up the air/gas mixture near the floor and blow it
across the top of the load.
Additional fans might be required in certain cases (e.g., larger chambers,
chambers in which the commodities are double-stacked, chambers without
ductwork or return fans.) A blower located outside the chamber can also be
used, but this method increases the possibility of leakage considerably.
The exhaust fan(s) must be capable of a minimum of ten air exchanges per
hour. The sum of cubic feet per minute (cfm) of the exhaust fan(s) or exhaust
blower divided by the volume of enclosure (in cubic feet), and multiplying the
fraction by 60, equals the number of complete gas volume exchanges per hour.
Refer to Figure 6-3-1 and the associated example for the formula for
calculating the air exchange rate (AER).
Size exhaust blowers according to the volume of the chamber.
APHIS PPQ requires a minimum of four gas exchanges per hour during
aeration, although fifteen or higher is preferable, especially for perishable
commodities. The quality of perishable commodities may be impacted even at
or around the minimum required aeration rate of four gas exchanges per hour.
If the exhaust flow is connected to a MB recovery system, it must not impede
the flow rate to less than four volumes per hour. Frequently, circulation and
exhaust systems are designed to utilize the same blower. Extend the exhaust
stack at least 15 feet above all nearby structures. Local air quality control
agencies may require more stringent measures. It is essential that the air/gas
mixture is vented to the outside, with all local safety ordinances being
followed.
NOTICE
Deviations from these guidelines may be permissible but will require additional test-
ing to ensure efficacy.
Figure 6-3-1 Formula to Calculate Air Exchange Rate (AER)
EXAMPLE

Certifying Facilities Certifying Normal Atmospheric Fumigation Chambers
Construction and Performance Standards
6-3-8 Treatment Manual 05/2023-66
Fumigant Dispensing System
The dispensing system needed will vary with the type of fumigant being used.
The fumigant MB is usually introduced into the chamber through an
introduction line extending from the volatilizer to the air stream in front of the
introduction fan. Within the chamber, this tube should contain properly spaced
openings through which the fumigant is dispersed.
Ensure that no liquid MB comes into contact with the commodity by one of the
following methods:
Placing a piece of impermeable sheeting (e.g., plastic or rubberized
canvas) over the commodity below and to the front of each gas
introduction line
Placing a drip pan wherever the gas is introduced into the chamber
Using a gas introduction line with holes in the sides but solid on the
bottom
Graduated dispensers are used to measure small quantities of MB by volume
and generally should not be used to introduce fumigant into chambers larger
than 2,000 cubic feet. Place the dispenser in the introduction line between the
supply cylinder and the volatilizer. For larger quantities of fumigant, place the
supply cylinder on a platform scale and weigh the fumigant used. The
measured amount of fumigant must pass through a volatilizer where it is
converted from a liquid to a vapor.
The volatilizer consists of a metal coil submerged in heated water. When 5
pounds or less of MB are used, a simple volatilizer can be made with a 25-foot
coil of 3/8 inch outer diameter coiled copper tubing immersed in a container of
hot water. When amounts greater than 5 pounds are to be used, the copper
tubing used in the volatilizer must consist of a minimum of 50 feet of 1/2 inch
outer diameter coiled copper tubing. Volatilizers constructed as sealed metal
units, in which there is no way to verify the amount or type of tubing inside,
should be replaced at the discretion of local APHIS-PPQ personnel. The water
in the volatilizer must reach 200 °F or above with a minimum temperature of
150 °F during gas introduction. The fumigator must provide local PPQ
personnel with a record of the temperature of the water in the volatilizer both at
the beginning and the end of gas introduction.
The line that runs from the methyl bromide cylinder to the copper tubing in the
volatilizer must be a 3000 PSI hydraulic high pressure hose (preferably steel-
braided) with a 3/8 inch or larger inner diameter. The line that exits the
NOTICE
You are not required to record the temperature of the water in the volatilizer on the
PPQ Form 429B or in the electronic 429 database.

Certifying Facilities Certifying Normal Atmospheric Fumigation Chambers
Construction and Performance Standards
05/2023-66 Treatment Manual 6-3-9
volatilizer and runs into the enclosure must be a 350 PSI tubing with a ½ inch
or greater inner diameter. The chamber operator may wish to install either a
pressure release trap (i.e., burp tube) or pull a slight vacuum in the chamber
prior to dispensing the fumigant to mitigate against the increased pressure
accompanying gas introduction, although neither of these recommendations is
mandatory.
The maximum rate of fumigant introduction from a gas introduction line is 4
pounds of gas per minute, unless the fumigator can demonstrate that a faster
rate of introduction would not result in the temperature of the water in the
volatilizer falling below 150
o
F anytime during the entire gas introduction
process. This temperature requirement is necessary to ensure that no MB can
be introduced as a liquid into the chamber. Purge all gas introduction lines with
either compressed air or nitrogen after gas introduction.
Calibrate both the scale and the thermometer on the volatilizer annually,
although the latter may instead be replaced annually with a thermometer that
comes with a certificate of calibration. Written documentation of calibration
must be present at the time of fumigation. All calibrations must be performed
by the appropriate state governmental department of weights and measures, the
National Institute of Standards and Technology (NIST), or an approved
calibration company.
Pressure-leakage Test for NAP Fumigation Chambers
Before a chamber is used for fumigation, it must be checked for tightness using
a pressure-leakage test. The chamber must pass this test to be certified. The
certifier may also perform a smoke candle test to identify the location of any
leaks which could pose safety hazards during fumigation, especially if the
retention time is low during the pressure-leakage test or the certifier suspects
leakage. This will allow the operator the opportunity to correct these spots
before any MB is introduced into the chamber, thus minimizing the likelihood
of human exposure to the fumigant.
Conduct the pressure-leakage test using an open-arm or electronic manometer.
See Open-Arm Manometer on page 8-1-19 for a detailed description of this
type of manometer. Refer to Appendix E for a list of approved manometers.
The procedure for conducting a pressure-leakage test is as follows:
1. Install an opening (usually 2- inches in diameter) in the chamber to which a
blower or other device for introducing air can be attached.
2. Attach a 2-inch ball-valve between the opening (pipe fitting) and the
blower. This will stop the flow of air when the chamber has reached
pressure and prevent the air from venting out of that opening.

Certifying Facilities Certifying Normal Atmospheric Fumigation Chambers
Construction and Performance Standards
6-3-10 Treatment Manual 05/2023-66
3. Install an additional opening, such as a gas sampling line opening, for the
manometer. This opening should be located within 15 inches of the hole for
the blower. Both openings should be situated approximately 4 to 5 feet
from the floor, so readings can easily be taken.
4. Close chamber as for fumigation.
5. Attach one end of the manometer to the chamber opening.
6. Pressurize the chamber using a blower (or other device that blows high
volumes of air) to a total pressure of 25 mm (12.5 mm in each arm of the
manometer) for chambers constructed partially or entirely of plywood or
50 mm for chambers constructed of materials such as cement or cinder
blocks.
7. Discontinue blower and close its opening.
8. Observe time for pressure to recede.
For a chamber constructed of materials, such as cement or cinder blocks, the
time lapse for the chamber pressure to recede from 25 mm to 2.5 mm in each
arm of the manometer must be:
22 to 29 seconds; reinspect chambers every 6 months
30 seconds or longer; reinspect chambers annually
For plywood chambers, the time lapse for the chamber pressure to recede from
12.5 mm to 1.25 mm in each arm must be:
60 seconds or longer; reinspect chambers annually
During each certification, PPQ must conduct a preventative maintenance
inspection. The maintenance inspection will ensure the merit of each unit and
correct any deficiencies prior to certification. Refer to Table 6-3-1 for an
inspection checklist.
Once the chamber has passed the pressure-leakage test and the preventative
maintenance check, the approving APHIS official must complete PPQ Form
480 (Treatment Facility Construction, Operation and Test Data), and PPQ
Form 482 (Certificate of Approval). Give a copy of each of the forms to the
owner/operator of the chamber and mail to:
USDA-APHIS-PPQ-S&T-TMT
13601 Old Cutler Road, Bldg. 63
Miami, FL 33158 USA
Phone: 305-278-4877
Fax: 305-278-4898
email: [email protected]

Certifying Facilities Certifying Normal Atmospheric Fumigation Chambers
Construction and Performance Standards
05/2023-66 Treatment Manual 6-3-11
Other Auxiliary Equipment
For chambers located inside a building, USDA requires that low-level gas
monitoring devices be installed in the same room as the fumigation chamber.
Multiple monitors may be necessary depending on the configuration of the
facility.
According to the needs of the operation, other auxiliary equipment may be
necessary. When heat is required, steam pipes or low-temperature electric strip
heaters are generally recommended. Do not use open flame or exposed electric
coils as they tend to break down the gas and form undesirable compounds. Size
refrigeration units to the volume of the chamber and the type and amount of
commodity involved.
Install a temperature monitoring device in chambers used for quarantine
treatments that are six hours or more in duration. Temperature recording
thermometers are usually attached to the outside of the chamber with a remote
sensing unit attached to the inside wall or inserted into the product.
Specifications for the temperature recording system are:
Accurate to within ± 0.6 °C or ±1.0 °F in the treatment temperature range
of 4.4 °C to 26.7 °C (40 °F to 80 °F)
Calibrated annually by the National Institute of Standards and Technology
(NIST) or by the manufacturer
The calibration certificate will list a correction factor, if needed, and
the correction factor would be applied to the actual temperature
reading to obtain the true temperature.
Capable of printing all temperature readings or downloading data to a
secure source once per hour throughout the entire treatment (all
temperature data must be accessible at a safe distance during the
fumigation)
Tamper-proof
Phosphine Chambers
Phosphine can react with certain metals (e.g., gold, silver, copper, brass, and
other copper alloys) and cause corrosion, especially at higher temperatures and
relative humidities. Fans, blowers, and tubing should not be constructed from
these or any other materials, such as urethane or other rubber, that are not
resistant to phosphine. It is recommended that all wiring be external to the
chamber, but is required (at a minimum) that all wiring, electrical and exhaust
systems be non-sparking and explosion proof.
All gas dispensing equipment used with cylinderized formulations of
phosphine must be approved by the registrant. VAPORPH3OS can only be
introduced via Cytec-approved blending equipment. ECO2FUME must be

Certifying Facilities Certifying Normal Atmospheric Fumigation Chambers
Construction and Performance Standards
6-3-12 Treatment Manual 05/2023-66
introduced via stainless steel or hydraulic dispensing lines of suitable pressure
rating and materials of construction, as determined by Cytec. Heat sources are
generally not used or necessary in phosphine introduction, although some
methods of cylinderized phosphine introduction may use electric vaporizers.
Contact the registrant for additional information on this issue. Circulation fans
are not needed in phosphine chambers.

Certifying Facilities Certifying Normal Atmospheric Fumigation Chambers
Construction and Performance Standards
05/2023-66 Treatment Manual 6-3-13
Checklist
Use the checklist in Table 6-3-1 as a guide during chamber certifications.
Table 6-3-1 Chamber Checklist
Chamber and Volatilizer Yes No
Has chamber been measured and total volume calculated, including all areas where
the fumigant penetrates (for example, ductwork)?
Has chamber been checked for integrity?
Smoke test
Pressure test
Have fans been tested to recirculate at least 1/3 of the total volume per minute?
Can gas monitoring be adequately performed?
Are sampling leads properly placed?
Are sampling leads 1/4 inch inner diameter polyethylene or polypropylene and free
from blockage?
Will a scale be used to apply fumigant?
If yes, has the scale been calibrated and certified this year?
If no, Is the graduated dispenser in good condition?
Are the door seals and gaskets in good condition?
Is the copper tubing in the volatilizer intact? (check for holes, if possible)
Is the temperature gauge accurate and has it been calibrated within one year?
Required Equipment and Documentation
Tape measure or electronic measuring device
Calcu
lator
Stop watch
Air (leaf) blower with appropriate fittings and adapters
Manometer (including tubing and appropriate liquid)
Digital anemometer
Gas detection device (calibrated within 1 year)
Dessicant (Drierite
®
) and Ascarite
®
Auxiliary pump (for large chambers)
Digital thermometer (accuracy 0.1 °F) with probe
Smoke candles
Gas leak detection device
Self contained breathing apparatus (SCBA)
First aid kit, including eye wash
Emergency medical treatment facility map and phone number
PPQ Form 480, Treatment Facility Construction, Operation, and Test Data
PPQ Form 482, Certificate of Approval
Safety data sheet (SDS)
Warning placard (English and Spanish)
Special local need label and permit (if applicable)

Certifying Facilities Certifying Normal Atmospheric Fumigation Chambers
Construction and Performance Standards
6-3-14 Treatment Manual 05/2023-66

05/2023-66 Treatment Manual 6-4-1
Chapter
6
Certifying Facilities
Certification of Cold Treatment
Contents
Introduction 6-4-1
Standards for Temperature Recording Systems 6-4-2
Temperature Recording System 6-4-2
Temperature Sensors 6-4-3
Remote Data Transmission (RDT) Systems 6-4-3
Certification of Vessels Used for In-Transit Cold Treatment 6-4-5
Plan and Specification Approval 6-4-5
Certification Testing 6-4-6
Documentation 6-4-7
Certificate of Approval 6-4-8
Application for USDA Vessel Approval 6-4-9
Certification of Self-Refrigerated Containers Used for In-Transit Cold
Treatment 6-4-9
Certification Requirements 6-4-9
Letter of Certification 6-4-9
Application for USDA Container Certification 6-4-10
Certification of Warehouses Used for Cold Treatment 6-4-10
Plan and Specification Approval 6-4-10
Certification Testing 6-4-11
Application for USDA Warehouse Approval 6-4-12
Calibration of Temperature Sensors 6-4-12
Contact Information 6-4-14
USDA-APHIS-PPQ-S&T-TMT 6-4-14
Introduction
Since the early 1900s, sustained cold temperature has been employed as an
effective post-harvest method for the control of the Mediterranean and certain
other tropical fruit flies. Exposing infested fruit to temperatures of 2.2 °C (36
°F) or below for specific periods of time results in the mortality of the various
life stages of this group of notoriously injurious insects. Procedures were
developed to effectively apply cold treatment (CT) to fruit while in transport in
refrigerated holds of ships, in refrigerated containers, and in warehouses
located in the country of origin or in the United States.
Self-refrigerated (integral) containers, conventional vessels, and warehouses
utilized for regulatory cold treatment are subject to approval by the USDA.

Certifying Facilities Certification of Cold Treatment
Standards for Temperature Recording Systems
6-4-2 Treatment Manual 05/2023-66
Approval is needed only when treating fruit under USDA regulations and does
not constitute an endorsement for the carrying or storage of refrigerated cargo.
Only officials authorized by APHIS have permission to conduct warehouse,
vessel, or container certification under the general guidance of S&T-TMT.
Refer to the S&T-TMT website for a complete list of USDA-certified vessels
and containers for in-transit cold treatment.
Standards for Temperature Recording Systems
Temperature recording systems may consist of various electronic components
such as temperature sensors, computers, printers, and cables, and are required
for temperature recording installations in cold treatment vessels, refrigerated
containers, or warehouses. Submit plans and specifications of the temperature
recording system to USDA-APHIS-PPQ-S&T-TMT for review and approval
before installation.
Temperature Recording System
Accuracy—The accuracy of the system must be within plus or minus 0.3
°C (0.5 °F) of the true temperature in the range of minus 3 °C (27 °F) to
plus 3 °C (37 °F).
Ensure the instrument is capable of repeatability in the range of minus
3 °C to plus 3 °C (27 °F to 37 °F).
Automatic Operation—The system must be capable of automatic
operation whenever the treatment system is activated.
Long-Term Recording—The system must be capable of continuous
recording of date, time, sensor number, and temperature during all
calibrations and for the duration of a voyage and/or treatment period.
Password Protection—All approved temperature recording devices must
be password protected and tamper proof.
Range—The recorder must be programmed to cover the entire range
between minus 3 °C to plus 3 °C (27 °F to 37 °F), with a resolution of 0.1
(°C or °F).
Recording Frequency—The time interval between prints will be no less
than once every hour. For each sensor, the temperature value, location/
identification, time, and date must print once per hour.
Repeatability—When used under treatment conditions over an extended
period of time, the system must be capable of repeatability in the range of
minus 3 °C to plus 3 °C (27 °F to 37 °F). The design, construction, and
materials must be such that the typical environmental conditions
(including vibration) will not affect performance.

Certifying Facilities Certification of Cold Treatment
Standards for Temperature Recording Systems
05/2023-66 Treatment Manual 6-4-3
Visual Display—The system must have a visual display so the
temperature can be reviewed manually during the treatment and
calibrations.
Temperature Sensors
Construction Standards—Sensors should have an outer sheath diameter
of 0.25 inches (6.4 millimeters) or less. The sensing unit must be in the
first inch of the sensor.
Identification—Identify all sensors to distinguish the sensors in one
compartment from those in other compartments.
Place an identifying number on the box where the sensor originates
and on a permanent tag where the cable joins the sensor.
Identify the sensors for each compartment so the air sensors are
numbered first (e.g., A1, A2—air; A3, A4,....,etc.,—fruit pulp).
Location—Post a diagram next to the recording instrument that shows the
location and identification of each sensor by compartment.
Air sensors—Place sensors on the center line of the vessel, fore and
aft, approximately 30 centimeters from the ceiling and connected to
cables at least 3 meters in length
Fruit sensors—Distribute fruit sensors throughout the compartment so
all areas of the compartment can be reached (5- to 15-meter cable
lengths are usually sufficient). The number and location is dependent
upon cubic capacity of the compartment. Refer to Table 6-4-1 on page
6-4-6 for guidance for vessels and Table 6-4-2 on page 6-4-11 for
guidance for warehouses. Three temperature sensors are required for
refrigerated containers. These are labeled USDA1, USDA2, and
USDA3.
Contact USDA-APHIS-PPQ-S&T-TMT for a complete list of approved
temperature recording systems.
Remote Data Transmission (RDT) Systems
RDT systems communicate wirelessly via cellular or satellite connections with
refrigerated container temperature controllers to monitor the temperature of
commodities undergoing in-transit cold treatments. When connected to the
communications grid, cold treatment data logs containing recorded data from
the temperature controller’s memory are downloadable. Data records are
currently output to Commodity Treatment Information System (CTIS) 556 In-
Transit Cold Treatment database (https://coldtreatment.cphst.org) in XML
format.
NOTICE
RDT systems are currently only approved for use in refrigerated containers.

Certifying Facilities Certification of Cold Treatment
Standards for Temperature Recording Systems
6-4-4 Treatment Manual 05/2023-66
Refer to Appendix E for a list of approved RDT systems.
Requirements for RDT Systems
RDT systems must be approved by USDA-APHIS-PPQ-S&T-TMT before
they can be used in APHIS-approved cold treatments. Before requesting
APHIS approval for RDT systems, the system must meet the following
requirements:
1. Compatible with a USDA-approved refrigerated container temperature
controller. The system must transmit temperature data retrieved directly
from the USDA-approved controller/recorder built into the refrigerated
container. The RDT system cannot use a separate or additional recorder.
2. Complete a minimum of 30 cold treatment trials of randomly selected
commodity shipments. Trials must result in:
A. successful passing of the cold treatment schedule for the commodity
shipped
B. successful RDT data matches with the USDA-approved temperature
controller data
C. successful upload of RDT data to the CTIS 556 In-Transit Cold
Treatment test database
3. Complete a 3-month operational field implementation with details
discussed between the manufacturer and USDA-APHIS-PPQ-S&T-TMT.
The implementation phase consists of a successful passing of a minimum
of 30 randomly selected RDT cold treatment data logs (minimum of 10
data logs per month) that:
A. are identical to the data downloaded manually from the USDA-
approved refrigerated container temperature controller
B. are successfully uploaded to the CTIS 556 In-Transit Cold Treatment
database (https://coldtreatment.cphst.org) in XML format.
C. successfully pass the cold treatment for the commodity being shipped
USDA-APHIS-PPQ-S&T-TMT must also receive the most current technical
brochure from the manufacturer.
Contact USDA-APHIS-PPQ-S&T-TMT for additional information.

Certifying Facilities Certification of Cold Treatment
Certification of Vessels Used for In-Transit Cold Treatment
05/2023-66 Treatment Manual 6-4-5
Certification of Vessels Used for In-Transit Cold Treatment
Vessels used in cold treatment must be certified by a qualified APHIS-PPQ
employee or a designated representative before treating fruit under USDA
regulations. Refrigeration (reefer) vessels presented for approval must be
classified under the rules of the American Bureau of Shipping or a comparable
internationally recognized ship classification society.
Submit plans, drawings, and specifications to USDA-APHIS-PPQ-S&T-TMT
prior to the first vessel certification. Conduct certification tests prior to the
vessel receiving final approval to conduct a cold treatment. Certification will
be performed every 3 years or sooner if APHIS determines that a malfunction
or alteration of the system warrants a recertification.
Plan and Specification Approval
Prior to the start of vessel construction, an application for vessel approval,
detailed drawings of the vessel’s physical characteristics, and a written
description of all the equipment related to treatment must be reviewed and
approved by USDA-APHIS-PPQ-S&T-TMT. Submit all plans and supporting
materials in Standard English.
Plans and specifications must include the following information:
Completed Application for USDA Vessel Approval
Drawings showing the dimensions of the refrigerated compartments
Example of an hourly printout from the recording system (must include
date, time, temperature unit, vessel name)
Number and location of air and pulp sensors in each compartment (see
Table 6-4-1 on page 6-4-6)
Specifications of the recording system
Specifications of refrigeration equipment (including air circulation)
The review of plans and process descriptions may take up to 60 days and
subsequent requests for additional information may further extend this time.
Vessel owners will receive a letter granting plan approval or describing plan
deficiencies and necessary remedial measures.
Following plan approval, build the vessel according to the plans. If deviations
from the plans are necessary, USDA-APHIS-PPQ-S&T-TMT must approve
the changes. Submit changes in a manner similar to a new construction
application.

Certifying Facilities Certification of Cold Treatment
Certification of Vessels Used for In-Transit Cold Treatment
6-4-6 Treatment Manual 05/2023-66
Certification Testing
Make the vessel available for an on-site certification visit by a PPQ official
when all documents and a completed application have been submitted and
approved by the USDA-APHIS-PPQ-S&T-TMT.
Contact the State Plant Health Director or Officer-in-Charge at the port of call
to arrange vessel certification at a U.S. port.
Establish a cooperative agreement and other arrangements as needed with
USDA for vessel certification inspections made at a foreign location. This will
require a 60-day notification before the inspection can be scheduled. For
specific information on the required procedure, contact:
USDA-APHIS-PPQ
Preclearance and Offshore Programs
4700 River Road, Unit 67
Riverdale, MD 20737
Phone: (301) 851-2162
A representative from the temperature recorder company who is familiar with
the installation should be on hand to correct any deficiencies in the system.
Before requesting final inspection, the vessel’s owner must complete all
arrangements. Calibration and identification tests will be made during the
inspection. Refer to Calibration of Temperature Sensors for calibration
procedures for all temperature sensors.
Determining the Number of Temperature Sensors
The number and location of temperature sensors is based on the cubic capacity
of the compartment. Refer to Table 6-4-1 to determine the number and location
of sensors. Always place the air sensors on the fore and aft bulkheads. Always
distribute the pulp sensors throughout the compartment so that all areas can be
reached.
NOTICE
Do not conduct vessel certification if temperatures in the vessel holds are lower than
-1.0 °C (plus or minus 0.3 °C) or 30.2 °F (plus or minus 0.5 °F).
Table 6-4-1 Number of Temperature Sensors per Compartment
Cubic Feet Cubic Meters
Number of
Air Sensors
1
Number of
Pulp Sensors
Total Number
of Sensors
0 - 10,000 0 - 283 2 or 3 2 4 or 5
10,001 - 15,000 284 - 425 2 or 3 3 5 or 6
15,001 - 25,000 426 - 708 2 or 3 4 6 or 7

Certifying Facilities Certification of Cold Treatment
Certification of Vessels Used for In-Transit Cold Treatment
05/2023-66 Treatment Manual 6-4-7
Frequency of Certification Testing
A certification test is required every 3 years. No extensions to this 3 year
requirement will be granted. Make requests for renewal at least 60 days before
expiration to the S&T-TMT or USDA-PPQ Preclearance Programs.
Certification testing is also required any time a malfunction, breakdown, or
other failure occurs (excluding temperature sensors) that requires
modifications to the recording and monitoring system(s).
Documentation
The APHIS official will document all tests during certification. For final
approval, email a copy of the signed PPQ Form 449—R, Temperature
Recording Calibration Report, copies of all charts and/or printouts, and any
other pertinent addenda or appendices to [email protected].
25,001 - 45,000 709 - 1,274 2 or 3 5 7 or 8
45,000 - 70,000 1,275 - 1,980 2 or 3 6 8 or 9
70,001 - 100,000 1,981 - 2,830 2 or 3 8 10 or 11
> 100,000 >2,830 Contact S&T-TMT
1 In the case of twin deck compartments, two air sensors are required in the upper deck plus
one air sensor in the lower compartment. This sensor should be located on the bulkhead far-
thest from the cooling unit.
NOTICE
It is highly recommended that more temperature sensors be installed than the
minimum number required for each refrigerated compartment. If a sensor
malfunctions during a treatment, the Port Director has the option of disregarding it,
providing that an additional working sensor is present, and the functional sensors
were uniformly distributed. Otherwise, the entire treatment must be repeated for the
fruit in that compartment.
Designate two of the sensors as air sensors, and the others as pulp sensors. Any
sensors above the required minimum may be either pulp or air sensors.
For compartments exceeding 100,000 cubic feet, contact the USDA-APHIS-PPQ-
S&T
-TMT for the minimum number of required sensors.
T
able 6-4-1 Number of Temperature Sensors per Compartment
Cubic Feet Cubic Meters
Number of
Air Sensors
1
Number of
Pulp Sensors
Total Number
of Sensors

Certifying Facilities Certification of Cold Treatment
Certification of Vessels Used for In-Transit Cold Treatment
6-4-8 Treatment Manual 05/2023-66
Certificate of Approval
Upon meeting all requirements, the vessel will be designated as approved to
conduct in-transit cold treatments under the provisions of the PPQ Fruit and
Vegetable Quarantine 56. A PPQ Form 482—Certificate of Approval, listing
the approved refrigerated compartments will be issued to the vessel. This
approval is for equipment only, and each consignment of fruit must satisfy all
requirements as described in Sections 319.56 and 305.6 of the Code of Federal
Regulations as a condition of entry into the United States.

Certifying Facilities Certification of Cold Treatment
Certification of Self-Refrigerated Containers Used for In-Transit Cold Treatment
05/2023-66 Treatment Manual 6-4-9
Application for USDA Vessel Approval
Download a fillable Application for USDA Vessel Approval.
Contact [email protected] with questions regarding the application.
Certification of Self-Refrigerated Containers Used for In-Transit Cold
Treatment
Certify refrigerated containers used as cold treatment facilities before carrying
treated fruit under USDA regulations. Classify refrigerated containers under
the rules of the American Bureau of Shipping or a comparable internationally
recognized classification society.
Certification Requirements
Download and complete an Application for USDA Container Certification.
Submit the completed application to [email protected]. Submit all plans and
supporting materials in Standard English.
Include the following specifications in the application:
Air flow rate
Container size
Make and model of refrigeration unit
Make and model of temperature recorder/control unit
Type of sensor
At least three sensors are necessary for each container and must be
labeled USDA1, USDA2, and USDA3
Letter of Certification
Upon meeting all requirements, the container(s) will be certified to conduct in-
transit cold treatments under the provisions of the PPQ Fruit and Vegetable
Quarantine 56. A Letter of Certification listing the refrigerated container(s)
will be issued to the owner. This certification is for container(s) only, and each
consignment of fruit must satisfy all requirements as described in Sections
319.56 and 305.6 of the Code of Federal Regulations as a condition of entry for
importation into the United States.

Certifying Facilities Certification of Cold Treatment
Certification of Warehouses Used for Cold Treatment
6-4-10 Treatment Manual 05/2023-66
Application for USDA Container Certification
Download a fillable Application for USDA Container Certification.
Contact [email protected] for any questions regarding the application.
Certification of Warehouses Used for Cold Treatment
The local APHIS-PPQ inspector will certify refrigerated warehouses for use as
cold treatment facilities before treating fruit under USDA regulations. In
addition to the general requirements, warehouse approval is subject to specific
geographical pest-risk considerations as outlined in Title 7, Section 305.6 of
the Code of Federal Regulations.
USDA-APHIS-PPQ-S&T-TMT will approve plans and specifications prior to
the initial warehouse certification. Conduct a performance survey prior to the
warehouse receiving approval to conduct cold treatments under USDA
regulations.
Plan and Specification Approval
Prior to the start of warehouse construction, submit a completed Application
for USDA Warehouse Approval, detailed drawings of the physical
characteristics, and a written description of all the treatment related equipment
to USDA-APHIS-PPQ-S&T-TMT. Submit all plans and supporting materials
in Standard English.
Include the following information in the application:
Address of the warehouse location
Drawings showing the dimensions, cubic capacity, and door locations
Make and model of the refrigeration equipment
Method for segregating fruit under treatment and securing it from other
foreign or domestic articles
Name and address of the firm owning the warehouse chamber
Number and location of sensors (see Table 6-4-2 on page 6-4-11)
Specification of the air circulation system; must indicate the number of air
changes and direction of air flow
Specifications of the recording system
NOTICE
Drawings may be hand-drawn, but must clearly show location of refrigeration units,
circulation fans, temperature recorder, and sensors.

Certifying Facilities Certification of Cold Treatment
Certification of Warehouses Used for Cold Treatment
05/2023-66 Treatment Manual 6-4-11
Certification Testing
When all documents and a completed application have been submitted and
approved by the USDA-APHIS-PPQ-S&T-TMT, the warehouse owner should
make the warehouse available for an on-site certification visit by a local PPQ
official. To arrange warehouse certification, contact the State Plant Health
Director or Officer-in-Charge for the port. Before requesting final inspection,
the warehouse owner must complete all arrangements as directed by the PPQ
officer. The PPQ official will conduct calibration and identification tests during
the inspection.
Refer to Calibration of Temperature Sensors for calibration procedures for all
temperature sensors.
Determining the Number of Temperature Sensors
The number and location of temperature sensors is based on the cubic capacity.
Refer to Table 6-4-2 to determine the number and location of sensors. The
minimum requirement is three sensors—one air sensor and two pulp sensors.
Sensor cables must be long enough to reach all areas of the load.
Table 6-4-2 Number of Temperature Sensors in a Warehouse
Cubic Feet
Cubic
Meters
Num-
ber of
Pal-
lets
Number
of Air
Sensors
Number of Pulp
Sensors
Total Num-
ber of Sen-
sors
0 - 10,000 0 - 283 1 -
100
12 3
10,001 -
20,000
284 -
566
101 -
200
13 4
20,001 -
30,000
567 -
849
201 -
300
14 5
30,001 -
40,000
850 -
1132
301 -
400
15 6
40,001 -
50,000
1133 -
1415
401 -
500
16 7
50,001 -
60,000
1416 -
1698
501 -
600
17 8
60,001 -
70,000
1699 -
1981
601 -
700
18 9
70,001 -
80,000
1982 -
2264
701 -
800
19 10
80,001 -
90,000
2265 -
2547
801 -
900
110 11
90,001 -
100,000
2548 -
2830
901 -
1000
111 12
> 100,000 >2830 1000+ Must be approved by S&T-TMT

Certifying Facilities Certification of Cold Treatment
Calibration of Temperature Sensors
6-4-12 Treatment Manual 05/2023-66
Frequency of Certification Testing
A certification test is required every year. Submit requests for recertification to
the local PPQ office at least 60 days before expiration. Certification testing is
also required any time a malfunction, breakdown, or other failure occurs
(excluding temperature sensors) that requires modifications to the recording
and monitoring system(s).
Application for USDA Warehouse Approval
Download a fillable Application for USDA Warehouse Approval.
Contact [email protected] with questions regarding the application.
Calibration of Temperature Sensors
Calibrate all temperature sensors using a clean freshwater ice water slurry at 0
°C (32 °F).
Use the following steps to make the ice water slurry:
1. Check individual sensors to verify that they are properly labeled and
correctly connected to the temperature recorder. This can be accomplished
by hand warming each sensor when its’ number appears on the visual
display panel of the recording instrument. A temperature change, observed
on the instrument.should occur. If the instrument fails to react, the sensor is
incorrectly connected or malfunctioning and should be corrected by the
instrument representative.
2. Prepare a mixture of clean ice and fresh water in a clean insulated
container.
NOTICE
If a refrigerated room is equipped according to the cubic capacity of the storage area
(rather than of the load itself), the same criteria apply.
It is highly recommended that additional sensors beyond the required minimum be
installed.
NOTICE
It is APHIS policy to use the standard “rounding rule.” In determining calibration
factors, if the reading is 0.05 or higher, round to the next higher number in tenths. If it
is 0.04 or lower, round to the lower number. For example: If the calibration factor was
0.15, round to 0.2. If it was 0.32, round to 0.3. Similar rounding can be used in actual
treatment readings. If an actual reading was 34.04, round to 34.0, add or subtract the
calibration factor, if necessary. If it was 34.07, round to 34.1, add or subtract the
calibration factor, if necessary.

Certifying Facilities Certification of Cold Treatment
Calibration of Temperature Sensors
05/2023-66 Treatment Manual 6-4-13
3. Crush or chip the ice and completely fill the container.
4. Add enough water to stir the mixture.
5. Stir the ice and water for a minimum of 2 minutes to ensure the water is
completely cooled and good mixing has occurred.
The percentage of ice is estimated at 80 to 85 percent while the water
fills the air voids (15 to 20 percent).
6. Add more ice as the ice melts.
7. Prepare and stir the ice water slurry to maintain a temperature of 0 °C (32
°F).
8. Submerge the sensors in the ice water slurry without touching the sides or
bottom of the container.
9. Stir the mixture.
10. Continue testing of each sensor in the ice water slurry until the temperature
reading stabilizes.
11. Record two consecutive readings of the stabilized temperature on the
temperature chart or log sheet.
The temperature recording device should be in manual mode to
provide an instantaneous readout.
12. Allow at least a 1-minute interval between two consecutive readings for
any one sensor; however the interval should not exceed 5 minutes.
The variance between the two readings should not exceed 0.1 °.
13. Contact an instrument company representative immediately if the time
interval exceeds the normal amount of time required to verify the reading
and accuracy of the sensor and recorder system.
The recorder used with the sensors must be capable of printing or
displaying on demand and not just at hourly intervals.
14. Correct any deficiencies in the equipment before certification.
15. Replace any sensor that reads more than plus or minus 0.3 °C (0.5 °F) from
the standard 0 °C (32 °F).
16. Replace and recalibrate any sensors that malfunction.
17. Document the recalibration and replacement of the sensor(s) on the PPQ
Form 449-R, Temperature Recording Calibration Report.
18. Determine the calibrations to the nearest tenth of 1 degree.

Certifying Facilities Certification of Cold Treatment
Contact Information
6-4-14 Treatment Manual 05/2023-66
Contact Information
USDA-APHIS-PPQ-S&T-TMT
13601 Old Cutler Road, Bldg. 63
Miami, FL 33158 USA
Phone: 305-278-4877
Fax: 305-278-4898
email: [email protected]

05/2023-66 Treatment Manual 6-5-1
Chapter
6
Certifying Facilities
Certification of Hot Water Immersion Facilities
Contents
Introduction 6-5-1
Submission and Approval of a New Facility Construction 6-5-2
Preliminary Performance Testing 6-5-2
New Procedures for Hot Water Facility Certification and Commercial Testing
6-5-3
Mango Temperatures Prior to Treatment 6-5-4
Permanent Probe Temperature 6-5-4
Procedures for Conducting the Annual APHIS Performance Test 6-5-4
Protocols for Foreign Treatment Facilities 6-5-7
Addresses for Technical Contact 6-5-7
USDA-APHIS-PPQ-S&T-TMT 6-5-7
Preclearance and Offshore Programs 6-5-7
Introduction
Quarantine treatment by immersion in hot water is used primarily for fruits that
are hosts of tropical fruit flies. Exposing the fruit to a temperature of at least
115 °F (46.1 °C) for specific periods of time (depending upon the specific pest,
type of fruit, and size of fruit) constitutes a quarantine treatment. The U.S.
Department of Agriculture (USDA), Animal and Plant Health Inspection
Service (APHIS) incorporates this principle of insect control into its
regulations to facilitate the importation or interstate movement of certain fruits
from areas where tropical fruit flies are the significant pests of concern.
Commercial facilities using hot water immersion treatment are subject to
USDA-APHIS certification on an annual basis. More frequent tests may be
required at the option of APHIS. APHIS certification is given solely in
conjunction with quarantine treatment requirements.
NOTICE
The certifying official shall check with the manager of the facility to be sure that he is
aware of the requirement for using potable water. Whenever water comes into
contact with fresh produce, the water’s quality dictates the potential for pathogen
contamination. To reduce the risk of food-borne illnesses, the water used for
washing, treatments, and cooling must be fortified with sodium hypochlorite
(household bleach), and constantly maintained at a chlorine level not to exceed 200
ppm.

Certifying Facilities Certification of Hot Water Immersion Facilities
Submission and Approval of a New Facility Construction
6-5-2 Treatment Manual 05/2023-66
Submission and Approval of a New Facility Construction
The facility submits an application for approval of a new facility or for
approval of plans to begin construction of a new facility.
Download and complete a fillable Application for USDA Hot Water Treatment
Facility Approval.
Preliminary Performance Testing
If the facility has not been previously certified by APHIS, the operators should
conduct preliminary, informal performance tests on their own (together with an
engineer, if needed), to assure themselves that their equipment is in good
working order.
By trial and error, the manager of the facility should decide on a tentative
temperature set point for their tanks. This should be done by immersing one or
more full baskets of fruit into each tank, to be certain that the water
temperature (nearest the fruit) reaches at least 115.0 °F (46.1 °C) within 5
minutes. A thermostatic set point for each tank is typically in the range of
115.8 °F to 116.9 °F (46.6 °C to 47.2 °C).
As an option, some hot water immersion systems use an initial higher set point
for the first several minutes, then automatically drop to a lower set point for the
remainder of the treatment. (If this programming option is used, the change to
the second set point must be done automatically, not manually.)
Data from the preliminary tests need not be recorded on official forms. These
data, however, must be presented to APHIS, as evidence that the facility is
ready for the official performance test.
Once the facility has been officially certified, APHIS does not require the
facility to present the preliminary performance test data in subsequent years,
except when there have been major engineering changes to the equipment.

Certifying Facilities Certification of Hot Water Immersion Facilities
New Procedures for Hot Water Facility Certification and Commercial Testing
05/2023-66 Treatment Manual 6-5-3
New Procedures for Hot Water Facility Certification and Commercial
Testing
These guidelines have been issued to provide a more accurate reflection of the
tank’s coldest temperatures. They are not intended to replace existing
procedures, but to be used in conjunction with the current operational
framework. These guidelines are only needed for facilities not capturing
interior probe temperatures with actual sensors and are only in place until each
facility begins capturing interior temperatures with actual sensors.
Furthermore, these guidelines will be in effect until each facility develops a
procedure for placing probes in the coldest locations of the tank. Facilities
already using temporary probes as a routine part of commercial testing can
disregard the procedures outlined below. All new equipment and procedures
must be approved by the USDA-APHIS-PPQ-S&T-TMT before
implementation.
Refer to Table 6-5-1 for information regarding adjusted temperatures and set
points:
1. Average minimum pulp temperatures must be taken from a minimum of
five fruit extracted from the coldest fruit before treatment. On certification
day, this average pulp temperature becomes the minimum commercial
treatment pulp temperature permitted. All fruit must be at or above 70 °F
to be hot water treated.
Table 6-5-1 Hypothetical Certification Results: Treatment Tank with Multiple Set
Points
Column No.
1
23 45 6
Tank Sen-
sor
(Lowest)
(°F)
Portable
Sensor
(Lowest)
(°F)
Adjusted
Tank Sensor
Temperature
1
(°F)
1 Adjusted Tank Sensor Temperature Equation:
Take the amount of temperature exceeding 115.0 from Portable Sensor (Lowest) in column 2,
and subtract it from Tank Sensor (Lowest) in column 1 (116.0 - 0.9 = 115.1).
Set Point
(°F)
Treatment
Interval
(minutes)
Pulp Tem-
perature
(°F)
116.0 115.9 115.1 117.0 5 78
115.5 115.4 115.1 116.0 6 - 30 78
115.3 115.2 115.1 115.5 31 - 60 78
115.1 115.0 115.1 115.3 61 - 75 78
115.0 115.0 115.0 115.0 76 - 90 78

Certifying Facilities Certification of Hot Water Immersion Facilities
Procedures for Conducting the Annual APHIS Performance Test
6-5-4 Treatment Manual 05/2023-66
2. The “adjusted tank sensor temperature” is determined by taking the amount
of temperature exceeding 115.0 from Portable Sensor (Lowest) in column
2, and subtract it from Tank Sensor (Lowest) in column 1.
3. During certification, establish the set point with its lowest corresponding
charted temperature. Document these values on the PPQ Form 482,
Certificate of Approval, and an attachment in the format of Table 6-5-1.
4. The Table 6-5-1 attachment and PPQ Form 482 must be displayed in a
prominent location at the facility.
5. During commercial treatments, the “Adjusted Tank Sensor Temperature” is
used as the lowest treatment temperature. The commercial treatment fails if
the tank temperature is below the “Adjusted Tank Sensor Temperature.”
Mango Temperatures Prior to Treatment
During certification, determine and record an average pulp temperature (prior
to treatment). Calculate this averaged pulp temperature by averaging pulp
temperatures from the five “coldest” mangoes before treatment (mangoes
extracted from the coldest locations). This temperature becomes the minimum
pretreatment pulp temperature allowable for commercial treatments.
Therefore, during subsequent commercial treatments, mangoes must be at or
above this minimum temperature before beginning treatment. (Any fruit below
70 °F cannot be treated per manual requirements.)
Permanent Probe Temperature
During certification, record from the printout/chart each set point with its
lowest corresponding charted (permanent probe) temperature. A treatment tank
may have one set point or multiple set points. If the tank has multiple set
points, these set points are for a fixed length of treatment time. Refer to
Table 6-5-1 for a detailed explanation. This “adjusted tank temperature sensor”
(always above 115.0 °F) becomes the lowest temperature permitted for that set
point, or the “standard” at that set point. Commercial temperatures (permanent
probe temperatures from the chart/printout) must be equal to or greater than
the set point standard for each length of time. Document each “adjusted tank
sensor temperature” determined during certification, on the PPQ Form 482,
Certificate of Approval and on the attachment to the Certificate.
Procedures for Conducting the Annual APHIS Performance Test
To approve the facility, the APHIS officer (or designated representative) shall
take the following steps:
1. If the facility has not been previously certified, or if modifications have
been made since the last performance test, compare the plans and drawings
with the actual installation.

Certifying Facilities Certification of Hot Water Immersion Facilities
Procedures for Conducting the Annual APHIS Performance Test
05/2023-66 Treatment Manual 6-5-5
Clearly show dimensions, water circulation, temperature sensing and
recording systems, and safeguarding precautions in the plans and
specifications.
2. Conduct a performance test (at least annually), during an actual treatment
as described below, to determine or verify a temperature “set point” for the
system, and to determine the minimum duration of time required between
the immersion of successive baskets of fruit within the same tank.
3. Inspect the heating, water circulation, and alarm systems, and check to see
that all necessary safeguards (including screens, fans, locks, and air
curtains) are secure and operational.
4. Calibrate the portable sensors, recording the results on APHIS Form 205,
or a plain sheet of paper.
A. Using a factory-calibrated mercury, non-mercury, or digital
thermometer as the standard, compare the reading of each portable
sensor to the standard, and record any deviation.
B. To facilitate this process, a specially designed portable temperature
calibrator may be used, which uses either hot air or a swirling hot water
bath, set at approximately the temperature at which treatments will take
place. A treatment tank can also be used for this purpose, provided that
the water is kept in motion.
5. Examine the calibration of the tank’s permanent RTD sensors, and record
the results on APHIS Form 206.
6. Tape the cords of three or four portable water temperature sensors to the
skins of three or four selected fruits in each basket. Do not cover the end of
the sensor with tape.
7. Insert a portable pulp temperature sensor approximately 1 centimeter into
the flesh of one or more fruits in the tank.
A. Hold the sensor in place with tape.
B. It is not necessary to have a pulp temperature sensor in each basket.
8. Set the fruit at ambient temperature (70 °F or above) immediately prior to
the performance test.
If the fruit is pre-warmed by artificial means, note this routine as a
condition of approval that should be followed for each commercial
treatment.
9. On the location diagram (APHIS Form 207), show the relative position of
each portable sensor used in the test, and indicate whether it is a “water” or
“pulp” sensor. Number each sensor.

Certifying Facilities Certification of Hot Water Immersion Facilities
Procedures for Conducting the Annual APHIS Performance Test
6-5-6 Treatment Manual 05/2023-66
10. While the fruit are immersed in water, use an electronic thermometer to
monitor the temperatures of each portable sensor at various times
throughout the test. Record this information on APHIS Form 208 for each
tank.
As a second option, a portable automatic recording instrument can be used.
It must, however, operate independently from the temperature recording
system installed at the facility.
11. During the performance test, lower the baskets of fruit into the hot water
immersion tank.
A. Closely monitor the water temperature sensors during the first 5
minutes of treatment.
APHIS requires that the temperatures of all water temperature sensors
must reach at least 115 °F (46.1 °C) within 5 minutes; if not, in order
to achieve the 5-minute temperature recovery requirement, repeat the
test using other fruit using a slightly higher water temperature set point,
and/or a slightly longer time interval between subsequent basket
immersions.
B. Run the test for the full duration (up to 90 minutes, depending upon
fruit size).
During that time, all water temperature sensors must read at least 115
°F (46.1 °C) at the 5-minute point and beyond. In addition, the pulp
temperature sensor (or sensors) must read at least 113 °F (45 °C) by the
end of the test.
NOTICE
It should be noted that APHIS standards for passing the official performance test are
higher than the standards accepted for commercial treatments. This is intentional.
During commercial treatments of mangoes, the water in the tank is allowed up to 5
minutes to reach the minimum treatment temperature of 115 °F after the fruit have
been submerged.
NOTICE
The mango hot water schedules also have a built-in tolerance for subnormal
temperatures in the range of 113.7 °F to 114.9 °F for up to 10 minutes (in the case of
65 or 75-minute treatments), or 15 minutes (in the case of 90-minute treatments).
This tolerance was designed to “save” an ongoing treatment during an emergency
situation, such as an electrical power outage. However, for the purposes of the
official performance test, all water temperature sensors are required to read at least
115.0 °F within the first 5 minutes, and to maintain temperatures at or above that
threshold during the remainder of the treatment.

Certifying Facilities Certification of Hot Water Immersion Facilities
Protocols for Foreign Treatment Facilities
05/2023-66 Treatment Manual 6-5-7
12. For issuance of a Certificate of Approval (PPQ Form 482), submit all
supporting documents to the APHIS Regional Office (or to another APHIS
office delegated by the Region).
13. APHIS will certify the facility only when all requirements are met,
including two successful hot water immersion treatments in each tank
using standard fruit loads.
For annual recertification, however, only one successful performance test
is required per tank, unless the work plan requires additional tests. Submit
a copy of PPQ Form 482, the corresponding attachment (Table 6-5-1), all
forms used in the certification or recertification, and printouts from the
temperature recorder to USDA-APHIS-PPQ-S&T-TMT.
Protocols for Foreign Treatment Facilities
Contact the USDA-APHIS-PPQ Preclearance and Offshore Programs to obtain
protocols for foreign treatment facilities.
Addresses for Technical Contact
USDA-APHIS-PPQ-S&T-TMT
13601 Old Cutler Road, Bldg. 63
Miami, FL 33158 USA
Phone: 305-278-4877
Fax: 305-278-4898
email: [email protected]
Preclearance and Offshore Programs
Director, Preclearance and Offshore Programs
USDA, APHIS, PPQ, POP
4700 River Road, 4th Floor
Riverdale, MD 20737
Phone: (301) 851-2281

Certifying Facilities Certification of Hot Water Immersion Facilities
Addresses for Technical Contact
6-5-8 Treatment Manual 05/2023-66

05/2023-66 Treatment Manual 6-6-1
Chapter
6
Certifying Facilities
Certification of Niger seed Treatment Facilities
Contents
PPQ Regulation for the Entry of Niger Seeds into the United States 6-6-1
The Certification Process 6-6-1
Step 1—Submission and Approval of Engineering Construction Plan and
Facility Requirements 6-6-2
Step 2—Request Certification for a Treatment Facility 6-6-2
Step 3—Conduct the Certification Test 6-6-2
Step 4—Certification of the Treatment Facility 6-6-4
PPQ Regulation for the Entry of Niger Seeds into the United States
In accordance with the guidance provided in this manual, heat treat Niger seeds
(Guizotia abyssinica) from any foreign place for possible infestation with
noxious weed seeds or prohibited pathogens at or before the time of arrival into
the United States. Conduct the heat treatment in a foreign or domestic APHIS-
certified treatment facility.
The Certification Process
Certification of Niger seed treatment facilities includes the following steps:
Step 1—Submission and Approval of Engineering Construction Plan and
Facility Requirements on page 6-6-2
Step 2—Request Certification for a Treatment Facility on page 6-6-2
Step 3—Conduct the Certification Test on page 6-6-2
Step 4—Certification of the Treatment Facility on page 6-6-4

Certifying Facilities Certification of Niger seed Treatment Facilities
PPQ Regulation for the Entry of Niger Seeds into the United States
6-6-2 Treatment Manual 05/2023-66
Step 1—Submission and Approval of Engineering
Construction Plan and Facility Requirements
The facility submits an engineering construction plan and facility requirements
to the appropriate State and country officials and to USDA-APHIS-PPQ-S&T-
TMT for approval. The plans must include facility dimensions, capacity,
heating unit specifications, and temperature/time recording system
specifications.
Download a fillable Application for USDA Niger Seed Heat Treatment
Facility Approval form.
Contact [email protected] with questions regarding the application.
USDA-APHIS-PPQ-S&T-TMT
13601 Old Cutler Road, Bldg. 63
Miami, FL 33158 USA
Phone: 305-278-4877
Fax: 305-278-4898
email: [email protected]
Facilities must comply with state, local, and country requirements. Design the
equipment in a manner that will maintain the temperature at or above
temperatures prescribed in the treatment schedule, T412-a. When the plans and
requirements are approved, construct the treatment facility accordingly.
Advanced written approval from S&T-TMT is required for any modification of
the original plans.
Step 2—Request Certification for a Treatment Facility
The facility must submit a written request to S&T-TMT to request certification
of a Niger seed treatment facility. The request should include the following:
Assurance that the facility manager accepts responsibility for facility
operations
Assurance that the required equipment is on-site
Data from at least two preliminary performance tests indicating the
facility meets performance requirements for certification, including
copies of completed recorder printouts
Names, addresses, and phone numbers of the facility, facility manager or
supervisor, and plant construction engineer
Step 3—Conduct the Certification Test
Initial certification testing will be conducted by S&T-TMT in conjunction
with PPQ. For the purpose of recertification, S&T-TMT can delegate this
responsibility to others.

Certifying Facilities Certification of Niger seed Treatment Facilities
PPQ Regulation for the Entry of Niger Seeds into the United States
05/2023-66 Treatment Manual 6-6-3
Equipment and Materials
The treatment facility must supply the following equipment and materials in
order to conduct a performance test for certification:
Certified calibrated thermometer (temperature range to at least 270 °F
(132.2 °C))
Copy of plans and specifications showing dimensions and other details of
heating and temperature recording systems
Stopwatch and tape measure
Temperature recording system to record temperature and treatment time
Facility Standards and Specifications
To qualify for certification/recertification, the treatment facility must conform
to the following minimum standards and specifications:
An action plan to address any pests that may be associated with the
storage, treatment, and shipment of Niger seeds
Audible alarm or highly visible light on burners or other equipment to
indicate that the treatment equipment is not operating properly
Automatic and continuous heating controls throughout the treatment
process (manual adjustments are allowed, but must not negate the PPQ
Form 480 guidelines)
Gear systems used to control the Niger seed conveyor (if applicable)
capable of being adjusted as needed to meet treatment requirements (the
speed of the treatment conveyor cannot exceed the speed recorded on the
PPQ Form 480)
Permanent temperature sensors (minimum of two) placed at the beginning
and end of treatment area in the seeds at commercial treatment depth
Accuracy of the temperature recording system and permanent sensors
must be within plus or minus 0.5 °F (0.3 °C) of true temperature
Portable temperature sensors (provided by facility or certifier) accurate to
plus or minus 0.1 °C and calibrated at least once a year. The sensor must
come with a calibration sheet containing correction factors not to exceed
plus or minus 0.1 °C. Apply the calibration factors to the portable sensor
readings.
Proper sanitation measures to ensure there are no potential breeding
grounds for pests on the premises and therefore, little risk of reinfestation
or cross-contamination
Recording system capable of recording temperature readings on a recorder
printout in time intervals not exceeding 4 minutes between readings

Certifying Facilities Certification of Niger seed Treatment Facilities
PPQ Regulation for the Entry of Niger Seeds into the United States
6-6-4 Treatment Manual 05/2023-66
Secure valves and controls that affect heat flow to the treatment system to
avoid manipulation during the treatment process by unauthorized
personnel
Seed processing equipment with the ability to divert for retreatment any
untreated or treated seeds that do not meet treatment standards
Speed indicator located on the conveyor for continuous treatment areas
System to divert any untreated seeds away from the treated seeds (DO
NOT mix treated and untreated seeds)
Treated seeds stored in a location separate from the untreated seeds. The
treated and untreated seeds must be handled in a manner to prevent cross-
contamination
Step 4—Certification of the Treatment Facility
Use the following steps to obtain certification:
1. Record the speed of the belt before Niger seeds are in the treatment area.
Place an object at beginning of belt. Use a stop watch or digital watch to
record the time for the object to go from the beginning to end of treatment
area. The speed must be 15 minutes or greater.
2. Attach approved portable temperature sensors (minimum of two) to the
facility permanent sensors to duplicate the same angle and depth as the
permanent sensors (the sensors are located at the beginning and end of the
treatment area).
3. Niger seeds must be at a maximum depth during certification.
4. Treat the seed at 248 °F/120 °C for 4 or more hours. Seed that passes the
certification is considered a positive treatment. The treated seed must pass
TZ (tetrazolium) testing as stated in the work plan or compliance
agreement.
5. Record the hertz or RPM of the treatment conveyor belt speed during
certification. Verify that the speed indicator has been calibrated during the
past year. Record the speed of the treatment conveyor belt on the PPQ
Form 482.
6. Record the time that the treatment started and stopped on the portable
sensor printout and facility recorder printout.
7. Check the system to verify that no cross-contamination has occurred.
8. Place the treated seed in new bags or store in silos designated for treated
seed.
NOTICE
The appropriate permits and approval to import Niger seeds must be approved by
the PPQ Permit Unit prior to shipping the commodity to the United States.

Certifying Facilities Certification of Niger seed Treatment Facilities
PPQ Regulation for the Entry of Niger Seeds into the United States
05/2023-66 Treatment Manual 6-6-5
9. Verify that all portable sensors recorded 248 °F/121 °C or higher during the
4 or more hour treatment.
10. Ensure compliance with the latest work plan or compliance agreement.
11. Repeat treatment if certification fails.
If treatment standards are not met during performance testing, APHIS will not
certify the facility. Provide a copy of the data sheet with explanation as to why
the test was not acceptable to the facility operator for corrective action.
Certification of the Niger seed facility and equipment will be given after a
successful treatment has been recorded (4 or more hours at 248 °F/120 °C).
Upon certification, APHIS will issue a Certificate of Approval (PPQ Form
482). The conditions of approval must contain the following:
Must operate under the latest work plan or compliance agreement
Treat the seed for at least 15 minutes at a temperature of at least 248 °F/
120 °C. Temperatures below 248 °F/120 °C will nullify the treatment.
Treatment conveyor belt must operate at a speed not to exceed (x)Hertz
or (x)RPM (x=speed of treatment conveyor belt)

Certifying Facilities Certification of Niger seed Treatment Facilities
PPQ Regulation for the Entry of Niger Seeds into the United States
6-6-6 Treatment Manual 05/2023-66

05/2023-66 Treatment Manual 6-7-1
Chapter
6
Certifying Facilities
Certification of Forced Hot Air and Vapor Heat
Treatment Facilities
Contents
Introduction 6-7-1
Plan and Process Approval 6-7-2
Preliminary Performance Testing 6-7-4
Official Certification Testing 6-7-4
Calibrating the Sensors 6-7-4
Thermal Mapping 6-7-5
Conducting a Test Treatment 6-7-7
Certification 6-7-7
Verification of Sensor Calibration 6-7-7
Documentation 6-7-8
Contact Information 6-7-8
USDA-APHIS-PPQ-S&T-TMT 6-7-8
Preclearance and Offshore Programs 6-7-8
Introduction
Forced hot air (FHA) and vapor heat (VH) treatment facilities must be
certified by a qualified APHIS inspector. For brevity, “certification” and
“recertification” will both be referred to as “certification” in this chapter.
For foreign treatment facilities, the physical location of the facility must be
approved by the USDA APHIS PPQ Preclearance and Offshore Programs
(POP). Domestic treatment facilities are approved by PPQ Field Operations or
other entity defined in the workplan. After PPQ or POP approves the facility
location and prior to the first facility certification, USDA-APHIS-PPQ-S&T-
TMT must approve the plan and process description. Facilities must conduct
tests prior to APHIS certification to ensure that the chamber meets treatment
requirements. Certification tests must be carried out prior to treatment at the
beginning of the shipping season once per year or whenever APHIS
determines that a malfunction or alteration in the system warrants a
certification test.
Certification will be granted on the basis of the ability of the chamber to meet
treatment requirements, extent and condition of phytosanitary safeguards,
sanitary (human health) conditions, and safety conditions. Facilities must be
certified for each species (in some cases each variety or subspecies) of fruit,

Certifying Facilities Certification of Forced Hot Air and Vapor Heat Treatment Facilities
Plan and Process Approval
6-7-2 Treatment Manual 05/2023-66
each chamber load configuration (half full, quarter full, etc.) and, for some
species, each size class of fruit treated. For example, mango and papaya are
separate species and must be certified separately.
Facilities should be aware that certification may not be the only condition
under which they may treat fruit for shipment to or within the United States. In
addition to certification, there are other requirements, such as operational
workplans, compliance agreements, and import permits that must be satisfied
prior to treatment. Treatment facility managers outside the United States
should contact POP. Managers of facilities in the United States or its territories
should contact their local PPQ office for a complete list of requirements.
Plan and Process Approval
Prior to the start of facility construction, a detailed plan of the facility’s
physical characteristics and a written, step by step description of all the
processes related to treatment must be approved by USDA-APHIS-PPQ-S&T-
TMT (all plans and supporting materials must be submitted in Standard
English). Plans and process descriptions for facilities within the United States
and its territories must be submitted through the local PPQ office. Facilities
outside the United States should consult POP for the appropriate plan
submission procedure.
Download a fillable Application for USDA Vapor Heat/Forced Hot Air
Treatment Chamber Approval form.
Contact [email protected] with questions regarding the application.
At a minimum, plans must include the following information as diagrams and/
or written descriptions:
Areas designated for fruit arrival
Areas designated for loading of treated fruit
Areas for storage of untreated fruit
Crates, lugs, bins, etc., that will be used to hold fruit during treatment,
including total volume and projected fruit capacity
Delineations of area(s) for storage of treated and untreated fruit
Description of all processes related to treatment of fruit. These
descriptions should reference diagrams with numbers where appropriate
Hot water bath used for sensor calibration must have an accuracy of
±0.3°C (0.5 °F)
Physical location of facility

Certifying Facilities Certification of Forced Hot Air and Vapor Heat Treatment Facilities
Plan and Process Approval
05/2023-66 Treatment Manual 6-7-3
Post-treatment cooling system
Post-treatment packing
Pre-treatment sorting and grading areas
Reference thermometer must be approved by USDA-APHIS-PPQ-S&T-
TMT or listed in Equipment on page 8-1-1. Calibrate reference
thermometers once per year using an approved company listed in
Appendix E of this manual.
Systems designed to ensure phytosanitary security of the treated fruit
Systems designed to ensure water which comes into contact with fruit is
free of microbial or any other contaminants that may adversely affect
human health
Temperature recording system requirements:
Permanent and portable sensors and the temperature recorder must
have an accuracy of ±0.3 °C (0.5 °F) and must be approved by USDA-
APHIS-PPQ-S&T-TMT or listed in Appendix E.
Permanent sensors issued by the chamber manufacturer (not portable
sensors) must be platinum 100-ohm resistive thermal detectors (RTD).
The sensor unit must be within the distal 1 inch (2.54 cm) of the
sensor. The sensor must have an outer sheath of 0.25 inches (6.4 mm)
or less in diameter.
Recorder must be capable of printing the date, time, temperature (°F or
°C), and alarms.
Treatment chamber including heating system, crate arrangement within
the chamber, and air flow
The number of permanent sensors is determined by the facility manufacturer.
The APHIS official is responsible for facility approval and has the option to
increase the number of permanent sensors as determined during chamber
certification.
The process of reviewing the plans and process descriptions may take as long
as sixty days and subsequent requests for additional information may further
extend this time. Facilities should take this time constraint into account when
developing a project timeline. Facilities will receive a letter granting plan
approval or describing plan deficiencies. Plan approvals expire one year from
the approval date if the facility has not been certified.

Certifying Facilities Certification of Forced Hot Air and Vapor Heat Treatment Facilities
Preliminary Performance Testing
6-7-4 Treatment Manual 05/2023-66
Preliminary Performance Testing
Following plan approval, the facility should be built according to the facility
engineered plans. If deviations from the plans (including changes to the
heating and temperature recording systems) are necessary, USDA-APHIS-
PPQ-S&T-TMT must approve these changes. Submit changes in a manner
similar to that described in Plan and Process Approval.
After construction is completed, the facility must be tested to be sure it can
meet all treatment requirements. These trials should test the ability of the
treatment chambers to heat a full (maximum) load of fruit according to the
treatment guidelines. Any problems or deficiencies found in the facility must
be corrected and the preliminary tests must be re-run until all treatment
requirements are met. After the facility representative is satisfied that the
treatment system is running properly and can fully meet treatment
requirements, they must submit results of the test to Preclearance and Offshore
Programs or the local APHIS office for review.
Facilities will be provided with specific requirements as part of the plan
approval letter. General requirements for test result submission are as follows:
A diagram of chamber that shows location of each permanent sensor
Amount, type, and size of fruit in load and in each crate
Time and temperature data from the test run(s)
After POP reviews the results from the preliminary performance test, they will
issue an approval or rejection letter. If approval is granted, the facility
representative can then schedule an official certification test.
Official Certification Testing
The official certification test has two main components:
1. Calibrating the portable and permanent sensors
2. Thermal mapping (cold spot mapping)
These steps are discussed below in detail. Complete a certification test for each
combination of fruit species, chamber load configuration, and, in some cases,
fruit size class.
Calibrating the Sensors
If the facility is outside the United States, it is the responsibility of the exporter
to provide sensors for the certification procedure. Temperature sensors can be
either permanent or portable.

Certifying Facilities Certification of Forced Hot Air and Vapor Heat Treatment Facilities
Official Certification Testing
05/2023-66 Treatment Manual 6-7-5
Calibrate temperature sensors in a swirling hot water bath with a factory
calibrated certified reference mercury, non-mercury, or digital thermometer
with 0.1 °C (0.2 °F) graduations as a standard. The temperature of the swirling
hot water bath must consistently read the treatment temperature on the certified
reference thermometer. Place temperature sensors into the hot water bath and
keep them there until the certified reference thermometer reads the treatment
temperature for 10 consecutive minutes. After the temperature stabilizes,
remove the sensors and read the data. Do not use any sensor that deviates by
more than ±0.3 °C (0.5 °F) from the treatment temperature. Record the greatest
deviation for each sensor as the correction factor for that sensor. Any sensor
that cannot be calibrated or repaired may not be used.
Thermal Mapping
Thermal mapping determines the placement of sensors in the chamber.
Because the sensors will be placed in the coldest areas of the chamber, this
process is also referred to as “cold spot mapping” or “cold spot testing”. The
sensors are placed throughout the chamber and the treatment is conducted. The
sensors that took the longest time to record treatment temperature represent
colder areas of the chamber. The thermal mapping procedure is as follows:
1. Based on basic thermodynamics and data from the preliminary
performance test, develop hypotheses about which regions of the chamber
are most likely to have cold spots. This will be based primarily on the
direction of the air flow in the chamber. Chambers in which air flows in a
single vertical direction will generally have cold regions in portions of the
load that come into contact with the heated air last. For example, if the
chamber delivers hot air from the bottom, the top of the load is likely to
take longer to heat up because the fruit at the bottom absorbs heat first. In
chambers where the air flow changes direction or the air delivery is
horizontal, it may be more difficult to form these types of hypotheses.
2. The fruits selected for the test must be similar in size, ripeness, and variety.
Sort the fruit and select a subset totaling the number of sensors plus 20
percent. The difference between the heaviest and lightest fruit must not be
more than 5 percent or higher (at the discretion of the certifying official) of
the heaviest fruit’s weight.
NOTICE
Use only sensors approved by USDA-APHIS-PPQ-S&T-TMT. Refer to Appendix E
for a list of approved sensors.
The number of portable and permanent sensors is determined by the APHIS certify-
ing official. The APHIS official has the option to increase the number of sensors
required.
NOTICE
Refer to Appendix E for a list of approved digital thermometers.

Certifying Facilities Certification of Forced Hot Air and Vapor Heat Treatment Facilities
Official Certification Testing
6-7-6 Treatment Manual 05/2023-66
3. Place one sensor in each of the largest fruit collected. Place the most
sensitive portion of the sensor in the area of the fruit pulp most resistant to
temperature change, usually the center of the fruit or close to the pit.
4. Based on the hypotheses formed in #1 above, place the majority of the
sensors in the areas thought to be cold regions. In order to verify the
hypothesis, place a portion of the sensors in the areas thought to be warmer.
If no hypotheses were formed in #1 above, sensors must be placed in a
systematic pattern that can provide a complete thermal map of the entire
load.
5. Create a map of the chamber that shows the relative horizontal and vertical
location of each sensor.
6. Conduct the treatment.
7. Remove the sensors and read their data.
8. Determine the amount of time each sensor took to reach treatment
temperature. The sensors which required the longest time to reach
treatment temperature indicate cold spots.
9. Create a map of the cold spots based on the map created in step #5 and the
analysis completed in step #8.
10. Repeat this process for each load/volume configuration to ensure that
correct and consistent cold spots are found. Results from the two
consecutive tests must be similar.
11. Based on the conclusion of two consecutive tests, create a map showing the
location of each permanent temperature sensor for each load/volume
configuration.
NOTICE
Each chamber may require a different number of sensors depending on factors such
as the chamber size, chamber dimensions, air flow patterns, and size and species of
the fruit. Typically, a chamber approximately the size of a standard 40 ft. shipping
container will require about 60 sensors.
NOTICE
All sensors must reach treatment temperature.
NOTICE
If thermal mapping shows that difference in the time required to reach treatment
temperature between any two sensors is greater than 2 hours, the chamber will not
be certified.
A facility cannot perform a commercial treatment between recertification tests.

Certifying Facilities Certification of Forced Hot Air and Vapor Heat Treatment Facilities
Conducting a Test Treatment
05/2023-66 Treatment Manual 6-7-7
Conducting a Test Treatment
Conduct a test treatment in order to verify that the chamber is capable of
meeting treatment requirements and for any of the following situations:
A new facility is approved
The heating system is changed
The recording system is changed
Test treatments are only required for the maximum load/volume configuration
that the facility will be certified for and may be done in conjunction with the
thermal mapping. The procedure for conducting a test treatment is as follows:
1. Place sensors in areas of the load that are thought to be cold spots (based on
thermal mapping data).
2. Conduct the treatment.
3. During treatment, inspect the outside of the chamber to be sure it is free of
leaks, is operating smoothly, and generally is in good working order.
4. After treatment is completed, review the temperature logs. All sensors
must have reached the treatment temperature.
5. After a successful test treatment, continue to Certification section.
Certification
Upon successful completion of the facility certification test (as indicated by
completion of the APHIS Form 482), the commercial treatments can begin.
A certification test is required once a year, usually at the beginning of the
shipping season, if a new heating or recording system is approved, or
whenever the system has a malfunction, breakdown, or other failure (excluding
malfunction of temperature sensors.)
Verification of Sensor Calibration
Verify the integrity of the temperature sensors daily using the process
described in Calibrating the Sensors on page 6-7-4.
Calibration can also occur whenever any part of the permanent temperature
recording system fails or is replaced, or at the discretion of the APHIS
inspector.

Certifying Facilities Certification of Forced Hot Air and Vapor Heat Treatment Facilities
Documentation
6-7-8 Treatment Manual 05/2023-66
Documentation
All tests performed during certification must be documented by the APHIS
official. Send a copy of the signed APHIS Form 482, copies of all thermal
maps, description of load size limitations, description of any other special
limitations placed on the treatment, and any other pertinent addenda or
appendices, to USDA-APHIS-PPQ-S&T-TMT for final approval.
Contact Information
USDA-APHIS-PPQ-S&T-TMT
13601 Old Cutler Road, Bldg. 63
Miami, FL 33158 USA
Phone: 305-278-4877
Fax: 305-278-4898
email: [email protected]
Preclearance and Offshore Programs
Director, Preclearance and Offshore Programs
USDA, APHIS, PPQ, POP
4700 River Road, 4th Floor
Riverdale, MD 20737
Phone: (301) 851-2281

05/2023-66 Treatment Manual 6-8-1
Chapter
6
Certifying Facilities
Certifying Irradiation Treatment Facilities
Contents
Introduction 6-8-1
Pre-Certification Requirements 6-8-2
Plan Approval Application 6-8-2
Certification Requirements 6-8-3
Certification by the National Nuclear Regulatory Authority 6-8-4
Approved Source 6-8-4
Dosimetry System 6-8-5
Standard Operating Procedures 6-8-7
Staff Training 6-8-9
Infrastructure 6-8-9
Safeguarding 6-8-10
Process Configurations 6-8-10
Facility Compliance Agreement 6-8-10
PPQ Form 482 Certificate of Approval 6-8-11
Recertification 6-8-11
Adding Cobalt 60 6-8-12
Audits 6-8-13
Contacts 6-8-13
Introduction
Certification of irradiation facilities ensures that each facility’s equipment and
personnel are able to safely, accurately, and consistently administer the
required minimum absorbed dose (MAD) to all components of the commodity.
This chapter describes the process and requirements for certification of
facilities that irradiate agricultural products for import into or movement
within the United States.
Facilities, exporters, and others interested in the administrative and operational
processes for establishing irradiation programs, applying for permits, and

Certifying Facilities Certifying Irradiation Treatment Facilities
Pre-Certification Requirements
6-8-2 Treatment Manual 05/2023-66
signing compliance agreements can find more information on the USDA
APHIS PPQ irradiation treatment website.
PPQ officials reviewing plan approval applications or conducting certification
and recertification activities must follow the guidelines in this chapter. If a
PPQ official finds that a deviation from these guidelines is necessary, or if a
facility requests a deviation, the PPQ official will direct the facility to develop
a detailed proposal outlining the need for the deviation. The proposal will be
forwarded to USDA-APHIS-PPQ-S&T-TMT for review. Following review,
S&T-TMT will make a recommendation to the Treatment Cross Functional
Working Group (TCFWG) for a decision. The TCFWG will make the final
decision on the proposal and the operational unit will communicate the
decision to the facility. The process of reviewing a proposal may take as long
as 60 days.
Pre-Certification Requirements
Prior to starting any certification work, facilities located in the United States
should contact USDA-APHIS PPQ Field Operations to discuss the
certification process and requirements. This discussion will help facilitate the
certification process and processes associated with the establishment of an
operational program.
Facilities located in countries other than the Unites States should contact the
National Plant Protection Organization (NPPO) in their country to request
information and certification to PPQ via official channels. Foreign facilities
should not contact PPQ without first consulting with their NPPO.
Plan Approval Application
The first step in the certification process is a to download and complete the
Application for Irradiation Facility Approval form.
The application collects information about the facility, including radiation
source type and strength, standard operating procedures, facility diagram, and
other information that helps PPQ understand how the facility operates.
Facilities located in the United States should send the completed application to
USDA-APHIS PPQ Field Operations. Facilities located in countries other
than the United States must submit their applications through their NPPO,
which will then forward the application to USDA-APHIS International
Services (IS). The application will then be forwarded to PPQ Phytosanitary

Certifying Facilities Certifying Irradiation Treatment Facilities
Certification Requirements
05/2023-66 Treatment Manual 6-8-3
Issues Management (PIM), and Preclearance and Offshore Programs (POP)
(refer to Figure 6-8-1).
The S&T-TMT review may take as long as 60 days. Facilities are encouraged
to submit their applications well in advance of the desired certification date.
Following review, S&T-TMT will communicate the results of the review
through the appropriate operational unit, including Field Operations and POP.
The results may be approval of the application or a request for additional
information or clarification.
Once the application is approved by S&T-TMT, an onsite certification
inspection can be scheduled. The appropriate operational unit will work with
the facility to schedule a date for the certification inspection. S&T-TMT will
provide a copy of the application, along with any notes or relevant information
to the certifying official. This information will help prepare the certifying
official.
Certification Requirements
Certification will include a review of the following:
Dosimetry system
Phytosanitary safeguards
Standard operating procedures and documentation
The facility structure
Treatment and certification records
Figure 6-8-1 Flow Diagram for Plan Approval Application for Irradiation
Facilities in Countries Other Than the United States

Certifying Facilities Certifying Irradiation Treatment Facilities
Certification Requirements
6-8-4 Treatment Manual 05/2023-66
Other processes, procedures, equipment or infrastructure that may affect
treatment or safeguarding
Prior to conducting the certification activities, the certifying official must:
Carefully review the Application for Irradiation Facility Approval to gain
a full understanding of the processes, procedures, and systems used at the
facility.
Develop an agenda with the facility to ensure that the official is able to
observe or examine all the necessary minimum processes, procedures,
and/or systems required for certification.
Familiarize themselves with the American Society for Testing and
Materials (ASTM) standards that apply to the facility. See ASTM
Standards on page 6-8-13.
Review the standards for selection and calibration of dosimetry systems,
estimating uncertainty, processing standards, and the standards specific to
the routine dosimetry system.
Certification by the National Nuclear Regulatory Authority
For facilities using radioactive isotopes, certification by the National Nuclear
Regulatory Authority (NNRA) of the country in which the facility is located is
one of the most important things to verify during certification. This
certification is important because it indicates that the facility meets national
and international standards for safety, security, and monitoring. In the United
States, some States have agreements with the U.S. Nuclear Regulatory
Commission (NRC) that allow agencies in those states to issue the
certifications. Certifying officials who certify facilities must verify that the
certificate issued by the NNRA is current.
Approved Source
Three sources of radiation are approved by APHIS for phytosanitary
treatments:
Electrons generated from machine sources up to 10 MeV (eBeam)
Radioactive isotopes (gamma rays from cobalt-60)
X-rays (up to 7.5 MeV)
The certifying official must verify that the facility is using one of these sources
by examining the facility’s records and/or verifying that standard operating
procedures (SOPs) are in place that ensure delivery of radiation at the
appropriate energy level.

Certifying Facilities Certifying Irradiation Treatment Facilities
Certification Requirements
05/2023-66 Treatment Manual 6-8-5
Dosimetry System
The routine dosimetry system is critical for accurate and precise measurement
of dose. Measurements of dose may not provide assurance that the proper
treatment was delivered if the dosimetry system is not properly configured,
calibrated, operated by qualified individuals, and precise in the appropriate
dose range. The certifying official must ensure that the dosimetry system, and
the management and operation of that system, meet the requirements in this
chapter.
The facility’s routine dosimetry system must follow guidance in ISO/ASTM
standard 51261 “Standard Guide for Selection and Calibration of Dosimetry
Systems for Radiation Processing” and other ASTM standards that specifically
address the routine dosimetry system in use. Facility staff should be well-
versed in the applicable standards and have copies on hand for reference. See
ASTM Standards on page 6-8-13.
Absorbed Dose Range
The facility’s routine dosimetry system must be accurate and precise in the
dose range required for PPQ treatments. When selecting a routine dosimetry
system, facilities must follow guidance from dosimetry system-specific ASTM
standards to determine which systems meet PPQ’s dose range requirements.
For example, ISO/ASTM 51310 “Standard Practice for Use of a Radiochromic
Optical Waveguide Dosimetry System” provides guidance that “The absorbed
dose range is from 1 to 10,000 Gy for photons.”. Because this range includes
the PPQ irradiation treatments, this is an acceptable dosimetry system. See
ASTM Standards on page 6-8-13
Calibration
Calibration of the routine dosimetry system is critical to measuring absorbed
dose during routine treatments. Descriptions of calibration techniques and
procedures can be found in ISO/ASTM standard 51261 “Standard Guide for
Selection and Calibration of Dosimetry Systems for Radiation Processing”.
Facilities must follow guidance in the procedures and techniques described in
these standards or in equivalent standards recognized by the APHIS
Administrator. The certifying official should review calibration procedures and
documentation with the facility staff to verify that the routine dosimetry system
has been calibrated using guidance from and adherence to the applicable
ASTM standards.
All routine dosimetry system calibration must be traceable to the U.S National
Institute of Standards and Technology (NIST). Facilities must keep records
that show traceability of calibration to NIST, including certificates of
calibration from NIST.

Certifying Facilities Certifying Irradiation Treatment Facilities
Certification Requirements
6-8-6 Treatment Manual 05/2023-66
Uncertainty Estimates
Facilities must develop estimates of measurement uncertainty associated with
routine dosimetry systems. Uncertainty parameters describe variability in
measurement estimates and measurement correction factors can be calculated
from these estimates. Each facility must follow guidance in ISO/ASTM 51707
“Standard Guide for Estimating Uncertainties in Dosimetry for Radiation
Processing”. Certifying officials should review uncertainty estimates and
related correction values with facility staff and verify that procedures used to
develop the estimates and correction values follow guidance in the relevant
ASTM standards. See ASTM Standards on page 6-8-13.
Influence Factors
Dosimetry systems can be influenced by factors that introduce error into
estimates of absorbed dose. The influencing factors may include heat,
humidity, or light, and the magnitude of the effects of these factors vary
between dosimetry systems. Influencing factors are described in ASTM
standards for specific dosimetry systems, such as ISO/ASTM 51310 “Standard
Practice for Use of a Radiochromic Optical Waveguide Dosimetry System”.
Facilities must follow guidance in these standards when developing procedures
to mitigate the effect of influence factors on dose estimates. Certifying officials
should verify that facilities are aware of the influencing factors with the
potential to affect their dosimetry systems and have taken steps to minimize
these effects and/or account for the effect in measurement estimates.
Dosimetry Procedures
The facility dosimetry staff should demonstrate important dosimetry
procedures to the certifying official. These procedures should include, but are
not limited to:
Archiving dosimeters
Calculating estimates of absorbed dose and applying correction factors
Preparing and reading dosimeters
Storage and handling of dosimeters
Tracking dosimeters
Verification of calibration
The certifying official should verify that these procedures match those in the
facility’s SOPs and follow the guidance in the applicable ASTM standards.

Certifying Facilities Certifying Irradiation Treatment Facilities
Certification Requirements
05/2023-66 Treatment Manual 6-8-7
Standard Operating Procedures
Irradiation facilities must have SOPs that fully describe processes related to
treatment of APHIS regulated articles. Additionally, these SOPs must include
documentation of important data and events. The SOPs and documentation are
critical for ensuring that well designed processes are executed and that records
show that the processes were followed. The certifying official should carefully
examine the SOPs and documentation to ensure that they are being
implemented. Additionally, the facility should demonstrate to the certifying
official the procedures related to:
Analyzing routine dosimeters and reporting results
Certification of treatment, releasing articles for shipping, loading articles
into conveyances
Creating configurations and placing routine dosimeters on configurations
prior to treatment
Emergency shutdown and natural disaster preparedness
Inspection of conveyances
Managing pest detections and disposal or destruction of infested and/or
untreated articles (information on disposal and destruction for facilities in
the United States can be found in the Manual for Agricultural Clearance)
Maps of agricultural production areas within a four-square mile area (for
U.S. facilities in AL, AZ, CA, FL, GA, KY, LA, MS, NV, NC, SC, TN,
TX, VA)
Pest trapping, monitoring, and control
Post-treatment handling of articles and collection of routine dosimeters
Receiving articles and preparing them for treatment
Safeguarding or protecting articles from potential pest infestation pre- and
post-treatment
Verifying article, package condition, and package weights and labeling
Other procedures the PPQ official deems appropriate
Change Control
All facilities must maintain a change control system for managing changes to
SOPs and documentation. The change control system should be designed to
capture information about changes to the SOPs and documentation. This
system should collect information about:
Details about the change to the SOP or document
The person, or people, who authorized the change to the SOP or document
The reason the change was made to the SOP or document

Certifying Facilities Certifying Irradiation Treatment Facilities
Certification Requirements
6-8-8 Treatment Manual 05/2023-66
When the SOP or document was changed
Additionally, the change control system must include processes for ensuring
that old SOPs and documents are retired or no longer available for use.
The certifying official must review this system with the facility staff to ensure
that the change control system is properly implemented.
PPQ Specific Data Collection and Storage Requirements
PPQ has program specific data storage requirements that all facilities must
meet. All facilities must store the following general records:
Configuration and dose mapping records for each commodity that is
treated
Dosimetry system calibration records
Ionizing energy source
Operational Workplan(s) for the commodities treated at the facility
PPQ Form 482, Certificate of Approval
PPQ Treatment Schedule(s)
PPQ Compliance Agreement
Record(s) of training and credentials of facility employees
Written agreements with participating packing houses (for facilities
located outside the United States only)
Additionally, each facility must have a system for collecting and storing
information related to each treatment. The following information must be
stored for at least one year:
Date of irradiation treatment
Dosimetry data for each PPQ treatment
Evidence of compliance with the prescribed treatment
Irradiation processor’s certificate of treatment
Lot number (except for interstate movement)
Name and quantity of article treated
Packinghouse code (PHC) assigned by the NPPO of the exporting country
to the packinghouse where the articles were packed (except for interstate
movement)
Prescribed treatment

Certifying Facilities Certifying Irradiation Treatment Facilities
Certification Requirements
05/2023-66 Treatment Manual 6-8-9
Production unit code (PUC) assigned by the NPPO of the exporting
country to the area where the articles were produced (except for interstate
movement)
Treatment identification number (TIN)
Staff Training
All facility personnel with treatment-related responsibilities must have
received training in applicable standards, PPQ treatment requirements,
applicable operational workplans, and facility SOPs and documentation
systems. Training should be documented and available for review by the
inspecting official. Additionally, the inspecting official should evaluate the
knowledge of facility staff by requesting that they demonstrate operations, as
described in the Standard Operating Procedures section.
Infrastructure
Facilities may be designed and built to meet the needs of the operator and must
meet international safety and security requirements. However, there are several
PPQ specific requirements that must be met:
Inspection area
The facility must have an area for inspection of articles and packages.
Facilities located in the United States must have scales for verification
of box and load weights. Facilities located outside the United States
must be equipped with cutting boards, knives, magnifying glass, and
scales for use by PPQ officials.
Internet connection
The facility must have a high speed Internet connection that allows
uninterrupted connection to the Irradiation Reporting and
Accountability Database (IRADS).
Physical barrier between treated and untreated articles
The facility must have a sturdy physical barrier that separates the areas
where untreated and treated articles are present. The barrier may have
a door for personnel or equipment to pass through. However, this door
must remain closed when not in use.
PPQ workspace
The facility must set aside an area for the PPQ official to work. This
area should include a desk, chair, and access to high speed Internet.
The certifying official must verify that the infrastructure is in place and
functional.

Certifying Facilities Certifying Irradiation Treatment Facilities
Certification Requirements
6-8-10 Treatment Manual 05/2023-66
Safeguarding
Facilities must have phytosanitary safeguards in place to prevent pest
infestation and movement of pests. Safeguarding requirements may vary
depending on the location of the facility, the proximity of host crops, and the
risk of pests associated with commodities treated at the facility. PPQ
operational staff will develop safeguarding requirements for each facility based
on the unique circumstances at each facility. However, safeguarding
requirements frequently include measures such as:
Air curtains
Cold storage areas
Double doors
Screens on windows
Sealed cracks or holes that insects might move through
Process Configurations
During the certification activity, each facility must test at least one process
configuration. This test must be observed by the certifying official. This initial
test helps ensure that the facility fully understands the PPQ process
configuration, testing, and approval process, and can successfully conduct the
testing. Additionally, the configuration test also serves to provide evidence that
the facility can deliver a dose in the required range.
Contact USDA-APHIS PPQ Field Operations for more information on process
configurations.
Facility Compliance Agreement
Each PPQ certified facility must have a compliance agreement (or equivalent)
in place prior to certification. There are three standard compliance agreements,
one each for:
Facilities in the United States that treat articles imported from foreign
countries
Facilities in the United States that treat articles for interstate movement
Facilities located outside the United States
These standard compliance agreements may be modified to include
information specific to a facility or specific risks associated with the articles

Certifying Facilities Certifying Irradiation Treatment Facilities
Recertification
05/2023-66 Treatment Manual 6-8-11
that may be treated at the facility. Operational managers must review and
approve modifications to the compliance agreements.
PPQ Form 482 Certificate of Approval
When the certification activity is complete and the certifying official is
satisfied that all requirements are met, the certifying official will issue a PPQ
Form 482 Certificate of Approval. This form is the official certificate, and once
the facility receives the Form 482 it may begin routine treatments, provided it
has a current compliance agreement.
The certifying official should send electronic copies of the PPQ 482 to USDA-
APHIS-PPQ-S&T-TMT and USDA-APHIS PPQ Field Operations.
Recertification
Periodic certification of irradiation facilities is not required. However,
facilities will be recertified under the following conditions:
Changes to operations or infrastructure
Examples include but are not limited to altering the manner in which
articles are exposed to the source or changing dosimetry systems
Change to the source
Any irradiation source replenishment requires recertification. Further
examples include, but are not limited to, changes to the equipment that
delivers radiation, changing the cobalt configuration, or increasing or
reducing source strength by adding or removing source material
Management change
Change in management that results in new processes or procedures
that change operations at the facility
Problems with the facility
Examples include but are not limited to the inability to accurately
measure dose or the failure or inability to follow SOPs or document
processes
Facilities that are unsure if they require recertification should contact the
appropriate operational unit.
NOTICE
Compliance agreements will be reviewed annually by PPQ.
The compliance agreement between PPQ and the irradiation facility is different from
the compliance agreement between PPQ and importers. Refer to the USDA APHIS
PPQ Ir
radiation website for more information on compliance agreements with import-
er
s.

Certifying Facilities Certifying Irradiation Treatment Facilities
Recertification
6-8-12 Treatment Manual 05/2023-66
Certified facilities must provide at least 90 days’ notice prior to making
changes to the radiation source or changes to operations or infrastructure.
Notice of change in management or problems at a certified facility must be
made within 14 days. All information related to changes in source, occurrence
of problems, change in management, and/or changes to operations or
infrastructure should be detailed and specific, and clearly describe the situation
and the steps the facility is proposing to address any issues.
Facilities located in the United States should send recertification notifications
to USDA-APHIS PPQ Field Operations. Facilities located in other countries
must submit their recertification notifications through their NPPO, which will
in turn forward it to APHIS IS. The information will then be forwarded to PIM
and POP.
In some cases, recertification will not require an onsite recertification
inspection. Operational staff will review requests for recertification and decide
whether an onsite or remote recertification is appropriate.
Adding Cobalt 60
One of the most common reasons for recertification is the addition of new
cobalt 60 to increase total source strength. When cobalt 60 is added to an
irradiator, the facility must characterize the dose distribution of the new source
configuration. Facilities must follow the source characterization as described
in ISO/ASTM standard 51702 “Standard Practice for Dosimetry in a Gamma
Irradiation Facility for Radiation Processing”. Generally, the goal of this
characterization will be to describe the dose distribution of the new source and
its affects, if any, on the dose delivered to articles during treatment.
Facilities should send the written results of the source characterization to PPQ
operational units when the characterization is complete. These results should
include the following:
A detailed and specific narrative that describes the characterization
process that was followed
Analysis of the characterization data along with a detailed and specific
explanation of the analysis
Proposed course of action, including proposed actions for changing
existing process configurations
The data from the characterization study
PPQ will review the characterization information and determine if the facility’s
proposed course of action is appropriate and if the facility can be recertified.

Certifying Facilities Certifying Irradiation Treatment Facilities
Audits
05/2023-66 Treatment Manual 6-8-13
Audits
Onsite audits of facilities may be performed from time to time by PPQ. These
audits may cover a wide range of processes, procedures, and documentation at
a facility. Facilities should be prepared to demonstrate operational procedures
and have records available for review by the PPQ auditor. Audits will be
conducted when operational units determine that they are necessary.
Electronic audits may also be performed by PPQ. These electronic audits will
generally utilize data from the IRADS system to look for anomalies or
indications that treatments are not being applied correctly.
Contacts
ASTM Standards
Copies of the ISO/ASTM methods may be examined at the USDA APHIS
PPQ Headquarters Library located at 4700 River Road, Riverdale, MD, 20737.
Copies of ISO/ASTM Standard Methods may also be obtained from the
American Society for Testing and Materials, 100 Barr Harbor Dr., West
Conshohocken, PA 19428-2959.
USDA-APHIS International Services (IS)
Refer to the USDA-APHIS International Services website for a list of
International Service offices.
USDA-APHIS-PPQ-S&T-TMT
email: [email protected]
USDA-APHIS PPQ Field Operations
email: PPQ.Ops.T[email protected]

Certifying Facilities Certifying Irradiation Treatment Facilities
Contacts
6-8-14 Treatment Manual 05/2023-66

05/2024-04 Treatment Manual 6-9-1
Chapter
6
Certifying Facilities
Certifying Facilities for the Heat Treatment of
Firewood
Contents
Introduction 6-9-1
Plan and Process Approval 6-9-2
Official Certification Testing 6-9-3
Calibrating the Temperature Sensors 6-9-3
Thermal Mapping 6-9-4
Conducting a Test Treatment 6-9-5
Frequency of Certification and Temperature Sensor Calibration 6-9-5
Documentation 6-9-6
Contact Information 6-9-6
Introduction
Agrilus planipennis Fairmaire (Coleoptera: Buprestidae), commonly known as
the emerald ash borer (EAB), is a wood-boring insect that infests firewood.
This destructive beetle attacks all North American species of ash trees and has
been detected in many states across the United States and Canada. For more
information on EAB and biological control activities, visit the USDA Emerald
Ash Borer website.
The spongy moth (Lymantria dispar dispar), formerly known as the European
gypsy moth) is native to Europe and is well-established in parts of the United
States. The caterpillars feed on more than 300 species of trees and shrubs.
Potentially, all temperate hardwood growing areas of North America are at risk
from attack by the moth. Despite all attempts to prevent its movement, the
moth has been quite successful in increasing its range along the leading edge of
the quarantine area. For more information on the pest and a map of current
quarantine areas, visit the USDA Spongy Moth website.
The flighted spongy moth complex (FSMC; including Lymantria dispar
asiatica, L. dispar japonica, L. albescens, L. umbrosa, and L. post-alba,
formerly known as the Asian gypsy moth) is a group of exotic pests of Asian
origin not known to occur in the United States. FSMC are similar to the spongy
moth, but have a broader host range. For more information on FSMC, visit the
USDA Flighted Spongy Moth Complex website. USDA-APHIS-PPQ requires
heat treatment for egg masses of regulated Lymantria moths and all life stages
of Agrilus planipennis.

Certifying Facilities Certifying Facilities for the Heat Treatment of Firewood
Plan and Process Approval
6-9-2 Treatment Manual 05/2024-04
The treatment must occur in a certified heat treatment facility. The purpose of
this chapter is to provide guidelines for the certification of a heat treatment
facility.
Heat treatment facilities must be certified by a qualified PPQ official. For
brevity, “certification” and “recertification” will both be referred to as
“certification” in this chapter.
Certification tests must be carried out prior to treatment to allow movement of
wood from the current quarantine areas, or whenever a malfunction or
alteration in the system warrants a certification test.
Certification will be granted on the basis of the ability of the chamber to meet
treatment requirements, extent and condition of phytosanitary safeguards, and
safety conditions.
Facilities should be aware that certification may not be the only condition
under which firewood for shipment can be moved from quarantine areas. In
addition to certification, there are other requirements that must be satisfied
prior to treatment:
A compliance agreement
An operational work plan
Appropriate federal, state, or local permits
Treatment facility managers should contact their local PPQ office and/or local
state departments of agriculture for state-specific requirements.
Plan and Process Approval
Prior to the start of the certification process for a new or existing facility, a
detailed plan of the facility’s physical characteristics and a written, step by step
description of all the processes related to treatment must be approved by
USDA-APHIS. Plans and process descriptions must be submitted through the
local PPQ office.
At a minimum, plans must include a description of all processes related to the
heat treatment of firewood. These descriptions should reference diagrams with
numbers where appropriate. Submit the following information as diagrams
and/or written descriptions:
Areas designated for:
Arrival and storage of untreated firewood
Loading of untreated and treated firewood

Certifying Facilities Certifying Facilities for the Heat Treatment of Firewood
Official Certification Testing
05/2024-04 Treatment Manual 6-9-3
Storage of untreated and treated firewood
Crates, bins, racks, etc., used to hold firewood during treatment, including
total volume and projected capacity
Physical location of facility
Post-treatment cooling system
Post-treatment packaging
Pre-treatment sorting and grading areas
Systems to ensure phytosanitary security of the treated wood
Treatment chamber including heating system, arrangement within the
chamber, and air flow
The process of reviewing the plans and process descriptions may take as long
as 60 days, and subsequent requests for additional information may further
extend this time. Facilities should take this time constraint into account when
developing a project timeline. Facilities will receive a letter granting plan
approval or describing plan deficiencies. Plan approvals expire 1 year from the
approval date if the facility has not been certified.
Official Certification Testing
Following plan approval, facilities seeking certification must be tested to
ensure they can meet all treatment requirements. If deviations from the plans
are necessary, PPQ must approve these changes prior to testing. Changes
should be submitted in a manner similar to that described in Plan and Process
Approval.
The official certification test has three main components:
Calibrating the Temperature Sensors
Thermal Mapping (cold spot mapping)
Conducting a Test Treatment
These steps are discussed below in detail. A certification test must be
completed for each chamber load configuration.
Calibrating the Temperature Sensors
Calibrate all temperature sensors prior to facility certification tests and a
minimum of once annually thereafter. In addition, if a permanent temperature
NOTICE
Only temperature sensors approved by USDA-APHIS may be used. Contact the
PPQ personnel listed in Contact Information.

Certifying Facilities Certifying Facilities for the Heat Treatment of Firewood
Official Certification Testing
6-9-4 Treatment Manual 05/2024-04
recording system is used, the system must be recalibrated when any part or
portion of the system is repaired or replaced. Calibrations must be performed
by the temperature sensor manufacturer or by manufacturer trained
technicians. All temperature sensors must read within +/- 0.5 °C (0.9 °F) of the
treatment temperature.
Thermal Mapping
Thermal mapping determines the placement of permanent temperature sensors
in the chamber. Because the permanent temperature sensors will be placed in
the coldest areas of the chamber, this process is also referred to as cold spot
mapping, or cold spot testing. The process of thermal mapping is relatively
simple: portable temperature sensors are placed throughout the chamber and
the treatment is conducted. The sensors that took the longest time to record
treatment temperatures represent colder areas of the chamber.
The thermal mapping procedure is as follows:
1. Drill holes a minimum of 4 inches deep into the ends of the largest pieces
of wood. The diameter of the hole should be equivalent to the outer
diameter of the sensor.
2. Place sensors in the wood and in various locations throughout the entire
chamber.
3. Create a diagram of the chamber that shows the relative horizontal and
vertical location of each temperature sensor.
4. Conduct the treatment.
5. Remove the temperature sensors and analyze the temperature data.
6. Determine the amount of time each temperature sensor took to reach the
treatment temperature. The temperature sensors that required the longest
time to reach treatment temperatures indicate cold spots.
7. Create a map of the cold spots based on the map created in step #3.
8. Repeat this process for each load and volume configuration to ensure that
correct and consistent cold spots are found.
9. Based on the thermal maps created in step #7, create a map to indicate
where temperature sensors should be placed for each load and volume
configuration during daily operational treatments.
NOTICE
Each facility may require a different number of portable sensors depending on
factors such as the chamber size, chamber dimensions, and air flow patterns. A
facility that is less than or equal to 10,000 ft
3
will require about 20 sensors for a
thorough temperature mapping. Contact the PPQ personnel listed at the end of this
chapter for help in determining the number of sensors required for a facility larger
than 10,000 ft
3
.

Certifying Facilities Certifying Facilities for the Heat Treatment of Firewood
Frequency of Certification and Temperature Sensor Calibration
05/2024-04 Treatment Manual 6-9-5
Conducting a Test Treatment
A test treatment must be performed to verify that the chamber is capable of
meeting treatment requirements. Test treatments are only required for the
maximum load/volume configuration that the facility will be certified for, and
may be done in conjunction with the thermal mapping described above. The
procedure for conducting a test treatment is as follows:
1. Place permanent temperature sensors in areas of the load that are thought to
be cold spots (based on thermal mapping data).
2. Conduct the treatment.
3. After treatment is completed, review the temperature data from the
temperature sensors. All temperature sensors must have reached the
treatment temperature.
These trials should test the ability of the treatment chambers to heat a full
(maximum) load of wood according to the treatment guidelines. Any problems
or deficiencies found in the facility or with the treatment must be corrected
and the tests run again until all treatment requirements are met. After the
facility representative is satisfied the treatment system is running properly and
can fully meet treatment requirements, test results must be submitted to
USDA-APHIS for review.
The process of reviewing results from preliminary performance tests may take
as long as 30 days. After USDA-APHIS-PPQ reviews the results from the
preliminary performance test, a letter will be issued either approving or
rejecting the results. Once the facility is approved, treatment and shipment may
begin.
Frequency of Certification and Temperature Sensor Calibration
A certification test is required once a year, and/or whenever the system has a
malfunction, breakdown, or other failure that requires modifications that alter
the manner in which the system functions. This excludes the replacement of a
faulty temperature sensor.
All temperature sensors must be calibrated at the discretion of the PPQ
official, annually, or whenever any part of the temperature recording system
fails or is replaced. Use the process described in the Calibrating the
Temperature Sensors section of this chapter.

Certifying Facilities Certifying Facilities for the Heat Treatment of Firewood
Documentation
6-9-6 Treatment Manual 05/2024-04
Documentation
All tests performed during certification must be documented by the PPQ
official. A copy of the signed APHIS Form 482, copies of all thermal maps,
description of load size limitations, description of any other special limitations
placed on the treatment, and any other pertinent addenda or appendices must
be sent to USDA-APHIS-PPQ for final approval.
Contact Information
USDA-APHIS-PPQ
Russ Bulluck, National Operations Manager
Raleigh, NC 27606-5210
Phone: (919) 855-7182
USDA-APHIS-PPQ
Herbert Bolton, National Program Coordinator
4700 River Road, Unit 137
Riverdale, MD 20737
Phone: (301) 851-3594

05/2023-66 Treatment Manual 7-1-1
Chapter
7
Hazard Communication
Standard
Safety Data Sheets
Contents
Overview 7-1-1
OSHA Requirements 7-1-1
Overview
Safety data sheets (SDS) provide information about hazardous chemicals that
are used in the workplace. This information is necessary to safely handle
hazardous chemicals.
OSHA Requirements
The Occupational Safety and Health Administration (OSHA) requires that the
hazards of all chemicals produced or imported be evaluated, and information
concerning chemical hazards is communicated to employers and employees by
means of a comprehensive hazard communication program. A hazard
communication program should include, but not be limited to, the following:
Developing and maintaining a written hazard communication program for
the workplace, including lists of hazardous chemicals present at the
workplace
Development and implementation of employee training programs
regarding hazards of chemicals and protective measures
Labeling of containers of chemicals in the workplace, as well as
containers of chemicals being shipped to other workplaces
Preparation and distribution of SDS to employees and downstream
employees
Employers who do not produce or import chemicals need only focus on those
parts of 29 CFR 1910.1200 that deal with establishing a workplace program
and communicating information to their workers. Refer to the OSHA Hazard
Communication Standard for a general guide for employers to help determine
the compliance obligations under the regulation. The Hazard Communication
Standard includes the following topics:

Hazard Communication Standard Safety Data Sheets
OSHA Requirements
7-1-2 Treatment Manual 05/2023-66
Becoming familiar with the Rule
Identify Responsible Staff
Identify Hazardous Chemicals in the Workplace
Preparing and Implementing a Hazard Communication Program
Labels and Other Forms of Warning
Safety Data Sheets (SDS’s)
Employee Information and Training
Other Requirements
Checklist for Compliance
Further Assistance

05/2023-66 Treatment Manual 7-2-1
Chapter
7
Emergency Aid and Safety
Guidelines for Managing Pesticide Spills
Contents
Introduction 7-2-1
Emergency Spill Procedures 7-2-2
Identify Contacts and Telephone Numbers 7-2-3
Evaluate The Situation: Take Care of People First!!! 7-2-3
Safety and First Aid 7-2-3
Crash Notification 7-2-4
Contamination Control 7-2-5
Notification 7-2-5
Site Security 7-2-7
Cleanup Techniques 7-2-7
Decontamination 7-2-8
Post-Spill Procedures 7-2-9
Disposal of Contaminated Material 7-2-9
Environmental Monitoring 7-2-9
Reporting 7-2-9
Planning for Pesticide Spills 7-2-10
State Hazardous Waste Management Agencies 7-2-11
Accident or Spill Emergency Kit 7-2-11
Safety 7-2-11
Cleanup 7-2-12
Introduction
This document provides instructions for dealing with pesticide spills during
program operations. “Pesticide spill” refers to any unplanned spill or leakage
into the environment that occurs during storage, use, transport, or disposal of
pesticide. Examples include aircraft and surface vehicular crashes, jettisoning
pesticide cargoes from the air, and leaks or other equipment failures. After a
pesticide spill, the responsible program person should evaluate the situation
and begin appropriate corrective measures. Use Figure 7-2-1 to identify your
responsible program contact.
The Officer in Charge (OIC), Contracting Officer’s Representative (COR), or
other responsible program official should prepare a site-specific plan based on
the generic plan, Emergency Spill Procedures. (Refer to Figure 7-2-1 for an
abbreviated plan. Make a copy of this Figure, and keep it for your pocket
reference.) Prepare the plan before program operations begin by filling in the

Emergency Aid and Safety Guidelines for Managing Pesticide Spills
Emergency Spill Procedures
7-2-2 Treatment Manual 05/2023-66
names, telephone numbers, and other required information. Specific objectives
of each plan include:
Protecting people working in the spill area
Preventing or minimizing the risk of further pesticide exposure to people,
animals, and the environment
Cleanup of the area and disposal or detoxification of residual material
Notifying Federal, State, and local government officials of the magnitude
and details of the pesticide spill
Evaluation of the potential impact to the environment based on chemical
residues found in environmental components
Emergency Spill Procedures
Use this section as your guide to prepare a site-specific plan for pesticide spills.
Please complete the blanks for your specific program. The following is a
summary of factors you must consider when a pesticide spill occurs (details
follow this summary):
Identify Contacts and Phone Numbers
Evaluate the Situation
Safety and First Aid
Crash Notification
Contamination Control
Responsible Program Contact (Name)
(Work telephone number)
(Home telephone number)
IF A PESTICIDE SPILLS TAKE THE FOLLOWING STEPS:
1. Evaluate. (Take care of people first!!!)
2. Safety and First Aid. The most immediate concern is for the health and well-
being of persons in and around the area.
3. Call 911 for fire/rescue squad to obtain medical assistance for injured or con-
taminated persons.
4. Contamination Control. Consult pesticide label & SDS for appropriate protec-
tive clothing and hazards (or CHEMTREC Emergency Hotline (800) 424-9300).
Figure 7-2-1 Abbreviated Spill Plan, Personal Reference Card (Wallet-size)

Emergency Aid and Safety Guidelines for Managing Pesticide Spills
Emergency Spill Procedures
05/2023-66 Treatment Manual 7-2-3
Notification
Site Security
Cleanup Techniques
Decontamination
Identify Contacts and Telephone Numbers
You must know who to contact and where to call if a pesticide spill occurs.
Figure 7-2-2 identifies preliminary information that you will need in case of an
emergency. Fill in the blanks for your site-specific plan.
Evaluate The Situation: Take Care of People First!!!
1. Injury/pesticide exposure. Refer to Safety and First Aid.
2. Vehicle or aircraft crash. Refer to Crash Notification.
3. Spill containment. Refer to Contamination Control.
Safety and First Aid
The most immediate concern is for the health and well-being of persons in and
around the area.
1. Call 911 for fire/rescue squad to obtain medical assistance for injured or
contaminated persons.
2. Evacuate the immediate area, if necessary get upwind.
(Program name)
Responsible Program Contact (Name)
(Work telephone number)
(Home telephone number)
Alternative Program Contact (Name)
(Work telephone number)
(Home telephone number)
Figure 7-2-2 Emergency Contacts for Pesticide Spills

Emergency Aid and Safety Guidelines for Managing Pesticide Spills
Emergency Spill Procedures
7-2-4 Treatment Manual 05/2023-66
3. Remove injured people from the area. (Do not move a seriously injured
person unless absolutely essential because of the risk of further injury.)
4. Consult the pesticide label and/or MSDS for appropriate protective
equipment and hazards.
5. Administer first aid as necessary. See the pesticide’s SDS or contact the
nearest poison control center. Figure 7-2-3 identifies information that you
will need in case of an emergency. Fill in the blanks for your site-specific
plan.
6. Remove contaminated clothing and wash affected area with soap and
water. If eyes are contaminated, flush with clean water.
7. If individuals experience pesticide poisoning symptoms (blurred vision,
trembling, nausea, etc.) then transport them to the nearest medical
emergency facility.Figure 7-2-4 identifies information that you will need in
case of an emergency. Fill in the blanks for your site-specific plan.
8. Eliminate sources of ignition (e.g., pilot lights, electric motors, gasoline
engines, or smoking) to prevent the threat of fire or explosion from
flammable vapors.
Crash Notification
1. If the spill involved a vehicle or aircraft crash, contact the local police
(911) as soon as possible.
2. If the spill involved an aircraft crash, notify the nearest Federal Aviation
Administration (FAA) office. Figure 7-2-5 identifies information that you
(Center Name)
(Telephone)
Figure 7-2-3 Poison Control Center
(Address)
(How to get there)
Figure 7-2-4 Medical Emergency Facility

Emergency Aid and Safety Guidelines for Managing Pesticide Spills
Emergency Spill Procedures
05/2023-66 Treatment Manual 7-2-5
will need in case of an emergency. Fill in the blank for your site-specific
plan.
Contamination Control
1. Consult the pesticide label and/or SDS for appropriate protective clothing
and hazards (or call the CHEMTREC Emergency Hotline at (800) 424-
9300).
2. Try to contain the spilled pesticide at the original site, and prevent it from
entering streams, rivers, ponds, storm drains, wells, and water systems, as
follows:
A. If possible, reposition the pesticide container to stop further leakage.
B. Prevent the spill from spreading by trenching or encircling the area
with a dike of sand, sand snakes, absorbent material, soil, or rags.
C. If a liquid formulation spills, cover it with absorbent material; however,
use absorbent sparingly, since it also becomes hazardous waste. Use no
more than necessary.
D. If a dry formulation spills, securely cover it with polyethylene or plastic
tarpaulin to prevent tracking or airborne spreading of dust.
Notification
1. Notify state officials and the PPQ regional office by telephone.
Headquarters management will be notified through normal channels.
2. Contact the local Community-Right-To-Know or Emergency Planning
Coordinator (often the Fire Marshall). Figure 7-2-6 identifies information
that you will need in case of an emergency. Fill in the blanks for your site-
specific plan.
3. Call the CHEMTREC Emergency Hotline at (800) 424-9300.
(Telephone number)
Figure 7-2-5 Federal Aviation Administration (FFA) Office
(Name)
(Telephone number)
Figure 7-2-6 Community-Right-To-Know or Emergency Planning Coordinator
(Fire Marshall)

Emergency Aid and Safety Guidelines for Managing Pesticide Spills
Emergency Spill Procedures
7-2-6 Treatment Manual 05/2023-66
4. Notify the USDA-APHIS-PPQ Biloxi Station in Biloxi, Mississippi, at
(228) 385-9278.
5. If the spill involves a large area (4 hectares (10 acres) or more) or you
judge that it could affect a large area through runoff or other movement,
notify the State Fish and Game Department or equivalent through
appropriate channels. Figure 7-2-7 identifies information that you will
need in case of an emergency. Fill in the blank for your site-specific plan.
6. If animal poisoning may occur, notify the Regional Veterinary Services
(RVS) Office. Figure 7-2-8 identifies information that you will need in case
of an emergency. Fill in the blank for your site-specific plan.
7. If the spilled product is a Comprehensive Environmental Response,
Compensation, and Liability Act (CERCLA) classified hazardous
substance, or a Superfund Amendments and Reauthorization Act of 1986
(SARA) Title III classified extremely hazardous substance, spills of active
ingredient exceeding the reportable quantities may be reportable.
8. If you are unsure as to reporting under CERCLA or SARA, look at the
product’s SDS or call the National Response Center at (800) 424-8802 for
CERCLA, and for SARA call (800) 535-0202.
9. Notify your Regional Safety and Health Coordinator. Figure 7-2-9
identifies information that you will need in case of an emergency. Fill in
the blank for your site-specific plan.
(Telephone number)
Figure 7-2-7 Fish and Game Department
(Telephone number)
Figure 7-2-8 Regional Veterinary Services (VS) Office
(Telephone number)
Figure 7-2-9 Regional Safety and Health Coordinator

Emergency Aid and Safety Guidelines for Managing Pesticide Spills
Emergency Spill Procedures
05/2023-66 Treatment Manual 7-2-7
Site Security
Secure the spill site from unauthorized entry by roping off the area and posting
warning signs. If necessary, request assistance from local police. Figure 7-2-10
identifies information that you will need in case of an emergency. Fill in the
blank for your site-specific plan.
Cleanup Techniques
The following are general techniques. Consult local hazardous waste officials,
the pesticide’s label, or its SDS to determine specific cleanup and disposal
techniques. Refer to State Hazardous Waste Management Agencies for a list of
local hazardous waste officials. Figure 7-2-11 identifies information that you
will need in case of an emergency. Fill in the blanks for your site-specific plan.
Adequate cleanup of spilled pesticides is essential to minimize health or
environmental hazards. When cleaning pesticide spills, NEVER WORK
ALONE. Be sure to ventilate the area and use appropriate protective
equipment. Clean up dry spills (dusts, wettable powders, granular
formulations) as follows:
Clean up liquid spills by placing an appropriate absorbent material (floor-
sweeping compound, sawdust, sand, etc.) over the spilled pesticide. Work
the absorbent into the spill using a broom or other tool to force the
absorbent material into contact with the pesticide. Collect all spent
absorbent material and place into a properly labeled metal drum for
disposal.
Collect the pesticide and place it in heavy-duty plastic bags. Secure and
label the bags, properly identifying the pesticide and possible hazards. Set
the bags aside in a secured area for disposal.
(Telephone number)
Figure 7-2-10 Local Police
(Name)
(Telephone)
Figure 7-2-11 Local Hazardous Waste Official

Emergency Aid and Safety Guidelines for Managing Pesticide Spills
Emergency Spill Procedures
7-2-8 Treatment Manual 05/2023-66
Immediately cover powders, dusts, or granular materials with
polyethylene or plastic tarpaulin to prevent them from becoming
airborne. If outside, weight the tarp ends, especially the end facing into
the wind. Begin cleanup operations by rolling up the tarp while
simultaneously sweeping up the spilled pesticide using a broom and
shovel or dust pan. Avoid brisk movements to keep the dry pesticide from
becoming airborne. When practical, lightly sprinkle the material with
water to minimize dust. Always use an approved dust mask or respirator
when working with dry pesticide materials.
Depending on the pesticide, the size of the spill, and local conditions, you may
need to remove the top 1-inch layer of contaminated soil with a shovel and
dispose of it.
Decontamination
As soon as practical, decontaminate crashed aircraft, wrecked vehicles, and
pavements. See the pesticide’s SDS or label for specific instructions. For
aircraft, coordinate with investigating officials and FAA authorities. For
automobile wrecks, coordinate with appropriate law enforcement agencies or
investigative bodies.
Chlorine bleach, caustic soda (lye, sodium hydroxide) detergents, or burnt or
hydrated lime effectively decontaminate most spill areas (see appropriate SDS
for precautions when using these substances).
Spread decontaminates thinly and evenly over the spill area. Then, lightly
sprinkle the area with water to activate the decontaminate. Repeat the cleanup
procedures until all the spilled pesticide is removed.
Clean all equipment used for spill cleanup with detergent and appropriate
decontaminates. Collect all used decontaminates and rinse water and place
them in labeled metal drums. Place clothing and gloves that cannot be
decontaminated in the drums for proper disposal.
It may also be necessary to completely remove and dispose of contaminated
porous materials.
If pesticides have leaked or spilled on the soil, removal of the visibly
contaminated soil (top 1-inch) may be required using a shovel. In such cases,
!
CAUTION
Use bleach or lye, but never both together since this combination may liberate
poisonous chlorine gas. Lye or lime readily decomposes many pesticides, especially
the organophosphates, and carbamates. Clean up and remove as much of the
spilled pesticide as possible prior to applying any decontaminate. Allow 1 to 6 hours
reaction with the decontaminate before using an absorbent material.

Emergency Aid and Safety Guidelines for Managing Pesticide Spills
Post-Spill Procedures
05/2023-66 Treatment Manual 7-2-9
place the contaminated soil in metal drums for disposal. Chemical analysis of
monitoring samples may govern removal of additional soil.
Post-Spill Procedures
Disposal of Contaminated Material
You may contact the pesticide’s manufacturers for specific instructions
regarding their product. Also contact the State or Federal EPA office with
jurisdiction over the pesticide spill location about disposal, and consult with
the U.S. Department of Transportation (DOT) prior to shipping/transporting
across state lines. Shipping by licensed transporters may be required.
In general, place contaminated materials in sealed leak-proof metal disposal
drums. Label all drums properly and dispose of in an approved hazardous
waste disposal facility (incinerator, landfill site, etc.) under current EPA or
State permit. The pesticide’s labeling and MSDS contain specific information
concerning disposal.
Environmental Monitoring
After cleanup and disposal, if the pesticide spilled into the environment, collect
environmental monitoring samples. Contact USDA-APHIS-PPQ Field
Operations and request an Environmental Monitoring Coordinator if you need
help with sample collection.
Reporting
Report information regarding pesticide spills in accordance with the program’s
specific monitoring plan, and as required by state and federal law. In general,
reports should include:
1. Detailed map with the site of the pesticide spill clearly marked.
2. Information on location, time, spill area, terrain, pesticide spilled, how spill
occurred, and how managed.
3. Any other information the writer deems pertinent to the pesticide spill.
Upon completion of the chemical analyses, S&T will report its findings and
include the spill residue data in its programmatic environmental monitoring
report and distribute as appropriate.

Emergency Aid and Safety Guidelines for Managing Pesticide Spills
Planning for Pesticide Spills
7-2-10 Treatment Manual 05/2023-66
Planning for Pesticide Spills
Pesticides vary in toxicity as described in the pesticide’s labeling and SDS.
Actions taken following an accidental spill will depend upon the pesticide
toxicity involved. Always consult the labeling and SDS for your program’s
pesticides when planning for spills. Ensure that the telephone number of the
local poison control center is on your plan.
The Environmental Protection Agency (EPA) under the Federal Insecticide,
Fungicide, and Rodenticide Act (FIFRA), Resource Conservation and Recover
Act (RCRA), and CERCLA or Superfund are responsible for enforcing safe
pesticide use and disposal to most states. States may, therefore, acquire
primary responsibility for determining pesticide spill, cleanup, and disposal
procedures.
Not all states will perform or react to pesticide spills in the same way.
Therefore, the Port Director or COR should assist with cleanup, sample
collection, sample analysis, securing affected area, etc. The Port Director or
COR must monitor such activities to assure PPQ that the responsible parties
take proper actions during and after a spill. Keep in mind that legal actions as a
result of a pesticide spill may place liability on the cooperating Federal agency.
Program Managers should inform the PPQ Assistant Regional Director’s office
of procedures to follow when pesticide spills occur within their jurisdictions so
they may support field operations when needed. The Port Director, COR, or
Senior Staff Officer for any given PPQ operation is responsible for
implementing pesticide spill procedures. These officers must be familiar with
these guidelines and should make contingency plans for such pesticide spills in
advance of field operations.
Useful information for completing your spill plan is found in the appendices to
these guidelines. Include copies of the SDS (obtainable from the manufacturer)
for your program’s pesticides in your spill plan.

Emergency Aid and Safety Guidelines for Managing Pesticide Spills
State Hazardous Waste Management Agencies
05/2023-66 Treatment Manual 7-2-11
State Hazardous Waste Management Agencies
Consult local hazardous waste officials, the pesticide’s label, and its SDS when
a pesticide spill occurs to determine specific cleanup and disposal techniques.
Refer to the EPA website Links to Hazardous Waste Programs and U.S. State
Environmental Agencies for a list of State waste management agencies.
Accident or Spill Emergency Kit
The Port Director, COR, or their designee should have available a fully
supplied pesticide emergency spill cleanup/decontamination kit with
instructions for its use. The kit will have the label designation “For Use in
Handling and Cleanup of Accident Pesticide Spills Only.”
Responsible officials should use their discretion as to what items will be stored
in vehicles for immediate use. The following items should be immediately
available for responding to a pesticide spill:
Safety
First aid kit—bus and truck kit, (GSA #6545-00-664-5312), or equivalent
Fire extinguisher, 5-lb. size for class A, B, C fires

Emergency Aid and Safety Guidelines for Managing Pesticide Spills
Accident or Spill Emergency Kit
7-2-12 Treatment Manual 05/2023-66
Cleanup
One shovel, square-point, “D” handle (GSA 5120-00-224-9326, or
equivalent)
Twenty-five large, heavy-duty plastic bags with ties (GSA 8105-00-848-
9631, or equivalent)
Two pairs, unlined vinyl rubber boots
Four pairs, disposable coveralls
One 5-gallon water container
Four pairs, unlined vinyl rubber gloves
Two approved respirators with approved pesticide canisters (Self-
contained breathing apparatus must also be available in operations where
methyl bromide is utilized.)
One broom and dust pan
One pint bottle of liquid detergent
Two scrub brushes (GSA 7920-00-068-7903, or equivalent)
One plastic cover or tarpaulin (to cover dry spills) (GSA 8135-00-529-
6487)
Twenty-five pound bag, absorbent material (GSA 7930-00-269-1272), or
sweeping compound, sawdust, “kitty litter,” or other absorbent materials
One large metal or heavy-duty plastic garbage can with removable cover
for storing contaminated materials for later disposal
Several sand snakes should be kept in storage areas
Obtain many of these items through the GSA Federal Supply System or from a
local hardware store.
NOTICE
Use this can to store the spill kit materials during transport.

05/2023-66 Treatment Manual 8-1-1
Chapter
8
Equipment
Contents
Thermal Conductivity Gas Analyzers 8-1-2
Instrument Description 8-1-2
Drierite® 8-1-4
Ascarite® 8-1-5
Instrument Standardization 8-1-5
Operation Procedures 8-1-6
Maintenance 8-1-8
Repair and Calibration 8-1-8
Infrared Spectroscopy Gas Monitoring Device 8-1-9
General Operation 8-1-11
Calibration and Service 8-1-13
Contact Information 8-1-13
Respiratory Protection 8-1-13
Gas Detector Tubes or Gas Samples 8-1-13
Principles of Operations 8-1-14
Volatilizer 8-1-14
Air Velocity Measuring Instruments 8-1-17
Anemometer 8-1-17
Auxiliary Pump 8-1-18
Manometers 8-1-19
Open-Arm Manometer 8-1-19
Digital Manometer 8-1-21
Magnehelic® Pressure Gage 8-1-22
Mityvac Hand-Held Vacuum Pump 8-1-23
Usage 8-1-23
Phosphine Detector 8-1-23
PortaSens Phosphine Detector 8-1-23
Photo Ionization Detector 8-1-24
Principles of Operations 8-1-24
Description 8-1-24
Calibration 8-1-24
Certified Precision Thermometers: Calibration Guidelines 8-1-24
Water Trap 8-1-25
Electrochemical Gas Sensor and Pyrolyzer 8-1-26
Fans—Introduction and Aeration 8-1-27

Equipment
Thermal Conductivity Gas Analyzers
8-1-2 Treatment Manual 05/2023-66
Thermal Conductivity Gas Analyzers
The thermal conductivity gas analyzer (T/C) is a portable instrument
specifically designed to determine the concentration of gases under a tarpaulin
or within a chamber during a fumigation. These fumigation gases include
methyl bromide (MB) and sulfuryl fluoride (SF).
Instrument Description
Currently, there is one company that manufactures USDA-approved T/C
instruments used during a PPQ-monitored fumigation. The Fumiscope
®
(Figure 8-1-1) Models D, 4.0, 4.2, and 5.1 are manufactured by Key Chemical
and Equipment Co., Inc.
The Fumiscope
®
is lightweight, portable, and completely contained in a
compact metal case. It contains a thermal conductivity cell, scale, gas pump,
range switch, and gas flow meter. A gas drying tube is also included. For large
enclosures, an auxiliary pump may be needed.
Inlet
The inlet tube connector is the gas inlet for the instrument. The sampling lines
are 1/4” inner diameter (I.D.) and are connected to the inlet through the drying
tube.
Flow Rate Meter
The flow rate meter indicates the gas flow rate in “simulated cubic feet per
hour (SCFH).” Note: The flow rate should always be read at the middle of the
ball.
Figure 8-1-1 Fumiscope
®
Models D, 4.0, and 5.1

Equipment
Thermal Conductivity Gas Analyzers
05/2023-66 Treatment Manual 8-1-3
Flow Rate Adjustment
The flow rate adjustment dial controls the air or gas flow rate by adjusting the
pump. After connecting to the gas sampling line, adjust the flow rate upward
until it reads exactly 1.0 SCFH.
Scale or Digital Display
The scale or digital display indicates the concentration of the fumigant in
ounces per 1,000 cubic feet (milligrams per liter or grams per cubic meter).
Record the gas concentration reading only after this meter stabilizes, which
may take a minute or more (depending on the length of the tubing and whether
an auxiliary pump is being used). Digital Fumiscope
®
models can indicate a
range from 0 to 2,999 ounces per 1,000 cubic feet.
Zero Adjustment
The zero adjustment knob is used to adjust the display to zero after the
instrument has warmed up for at least 20 minutes. Set the Fumiscope
®
to zero
prior to taking a reading and after each reading.
The Model 5.1, has two knobs used to zero the display. The “Recenter Zero”
red knob acts as a coarse zero adjustment and the “Zero Adjust” knob acts as a
fine zero adjustment. (See Figure 8-1-2.) Adjust the red “Recenter Zero” knob
first to bring the display as close to zero as possible. Then adjust the “Zero
Adjust” knob to set the unit on zero.
Figure 8-1-2 Fumiscope® Model 5.1

Equipment
Thermal Conductivity Gas Analyzers
8-1-4 Treatment Manual 05/2023-66
Line Switches
Line switches control the electrical supply to the pump and scale.
Fumigant Selector Switch
The fumigant selector switch (Fumiscope
®
) changes the display to register
either methyl bromide or sulfuryl fluoride (Vikane
®
).
Exhaust Outlet
Always connect an exhaust line to the exhaust outlet to carry gas away from
the instrument and operator. When using the T/C unit in confined or poorly
ventilated areas, recirculate the exhaust gas back to the fumigation space or
exhaust it to the outside.
Drying Tube
Use drying tubes (filter tube) with a prepared chemical for removing certain
contaminant gases or vapors that interfere with correct fumigant concentration
readings. The tubes will contain a desiccant, such as Drierite
®
(granules of
anhydrous calcium sulfate), or Ascarite® (sodium hydroxide). Both are
available from scientific supply houses. Never mix Drierite
®
and Ascarite
®
in
the same tube.
When a drying tube is used, place a thin layer of glass wool or aquarium filter
wool at the bottom and top of the tube to prevent small particles from sifting
into the T/C unit. Using absorbent cotton or similar materials is not
recommended. Cotton tends to pick up moisture and to become matted, and
once matted, the cotton may restrict normal air flow, thus adversely affecting
the T/C unit’s operation.
Mount the drying tube vertically so the gas mixture moves through the drying
material and does not pass over the top. The gas mixture will pass over the top
of the drying tube when the tube is mounted horizontally (lengthwise).
Drierite
®
Always use anhydrous calcium sulfate (Drierite
®
) to remove moisture from the
gas sample. Insert the drying tubes in the gas sampling line just before the inlet
connection. Drierite
®
should be fresh and frequently changed to ensure correct
readings. Drierite
®
, blue in color when dry, turns pink when moisture is
absorbed. Replace the Drierite
®
when most of it has turned pink. In extremely
high moisture conditions, two Drierite
®
tubes can be connected in tandem.
Close drying tube openings when not in use.

Equipment
Thermal Conductivity Gas Analyzers
05/2023-66 Treatment Manual 8-1-5
Ascarite
®
T/C gas analyzers are sensitive to a number of gases other than MB. For
example, CO
2
may be troublesome when fumigating fruit where kerosene
heaters are placed under the tarpaulin to raise pulp temperatures, or with plant
material packed in peat moss or subsoil. Correct MB gas concentration
readings may be obtained if a CO
2
absorbent is used in the gas sampling line
before the air-gas mixture enters the T/C unit. A CO
2
absorbent that can be
used is Ascarite
®
. Observe the poison warning labels on the containers when
using Ascarite
®
. Tubes containing Ascarite
®
should be clearly labeled,
“Warning—Avoid contact with skin, eyes, and clothing.”
Because a chemical reaction will occur, never use Ascarite
®
when taking
readings of SF.
Instrument Standardization
Instrument standardization is the first and basic operation. In order to
standardize the instrument, do the following:
1. Connect the instrument to an electrical outlet with proper voltage and set
the pump and meter switches to “on”; if inoperable, check fuse
(replacements—Little Fuse or Buss #3AG 1/2 Amp.—should be kept on
hand).
2. Attach the drying tube to the inlet port.
A. Give the instrument a tightness test.
B. A tightness test can be accomplished by placing a finger over the inlet
of the drying tube; if the tubing and connections are tight, the flow ball
in the flow meter should then fall to zero.
3. Warm up the instrument for 20 to 30 minutes
4. Adjust the gas flow rate to one SCFH by adjusting the flow rate knob.
!
WARNING
During a fumigation of living plant products, such as plants, plant material, logs,
wood and wood products, use tubes containing Ascarite
®
to remove carbon dioxide
from gas samples. Discard used Ascarite
®
per label instructions. Connect the
Ascarite
®
tube between the Drierite
®
tube and the sample inlet. Never mix Drierite
®
and Ascarite
®
in the same tube. Replace Ascarite
®
when the granules begin to
aggregate or become moist.
NOTICE
The manufacturer recommends that the analyzer be kept at the same temperature
as the fumigated site. It may take up to two hours for the analyzer to acclimate if
moved from extreme temperatures.

Equipment
Thermal Conductivity Gas Analyzers
8-1-6 Treatment Manual 05/2023-66
A. If the flow rate knob is turned counterclockwise too far, the pump will
emit noises and cease to operate properly.
B. When properly adjusted, the flow ball should float at the center mark,
or slightly below it, on the calibrated glass cylinder.
C. The pump now draws dry, fresh air through the T/C cell; the air enters
via the inlet on the face of the instrument, passes through the cell, and
leaves through the exhaust outlet.
5. Turn the zero adjustment knob to obtain a zero reading on the meter.
A. To obtain a stable zero reading, several additional adjustments during
the first few minutes may be necessary.
If using Model 5.1, adjust the “Recenter Zero” red knob first, then adjust
the “Zero Adjust” knob to zero.
Standardization is now complete and readings can be made of fumigant-air
mixture drawn through the unit. At this point, it may be necessary to replace
the desiccant.
The difference in the thermal conductivity of the fumigant-air mixture as
compared with fresh air is measured electrically and indicated on the meter as
concentration readings in ounces of gas per 1,000 cubic feet. T/C units used in
PPQ must be calibrated for MB and/or SF by the manufacturer or an approved
outside contractor prior to use. When fumigations are under even a small
vacuum, readings will not be accurate.
Operation Procedures
Because of the variety of fumigation situations, some adjustments may be
necessary to meet specific needs. Nevertheless, this outline should be helpful
in establishing correct operational procedures.
The proper use of the T/C unit is discussed under two headings:
Selecting Operational Site
Measuring Gas Concentrations
Selecting Operational Site
The T/C unit should be at least 30 feet upwind from the fumigation site to
allow the operator to function without the fear of accidental exposure to gas
and to allow for easy exit in an emergency. It should be close enough to the
fumigation site to avoid using unreasonable lengths of sampling lines, to allow
for constant surveillance of the fumigation during testing, and to avoid
interference with other activities in the area. Avoid excessive wiring length.
When T/C unit readings in multiple locations are necessary, see that each
location is the best available.

Equipment
Thermal Conductivity Gas Analyzers
05/2023-66 Treatment Manual 8-1-7
The T/C unit should be supported on a sturdy, level surface, outside the traffic
pattern, and protected from wind, rain, excessive cold, and in hot weather, sun.
In some cases, temporary shelter, such as a tarpaulin cover, may be adequate.
The gas concentration readings indicated by the T/C unit may be inaccurate
unless the unit is placed in an area that is approximately the same temperature
as the gas mixture in the enclosure being fumigated. If the temperature of the
gas mixture within the fumigated enclosure is approximately equal to that of
the ambient air outside the enclosure, the gas concentration readings indicated
by the T/C unit’s meter will be generally more accurate. If there are great
differences between the two temperatures, water vapor may condense inside
the gas sampling leads. Such condensation, if desiccant is saturated, can result
in a lower than normal T/C meter reading, thus leading to the unnecessary
addition of fumigant to compensate for the apparent shortage. Therefore, if
vapor condensation appears inside the gas sampling leads, purge the line and
move the T/C unit to a new location where the ambient temperature
approximates that of the enclosure.
Most T/C units operate on 110 to 120 volts alternating current (AC). T/C units
operating on 210 to 220 volts AC on direct current (DC) are available for
overseas or other assignments, as necessary. A converter is required to use DC.
Keep extension wiring and gas sampling line length to a practical minimum
and raise extension wiring above floor level when feasible.
Measuring Gas Concentrations
As a protection for the cell and the pump of T/C units, use a drying tube filled
with Drierite
®
at all times.
When taking gas concentration readings, first warm up the unit for at least 20
to 30 minutes depending on ambient temperatures. Then turn on the pump and
adjust the gas flow meter to a 1.0 SCFH flow. Turn the zero adjustment knob to
obtain a zero reading on the meter. If using Model 5.1, adjust the “Recenter
Zero” red knob first, then adjust the “Zero Adjust” knob to zero.
The unit is now ready to measure gas samples drawn through labeled gas
sampling lines from the area being treated. The meter will indicate gas
concentrations in ounces per 1,000 cubic feet (grams per cubic meter).
NOTICE
If monitoring lines are stored outside, water may accumulate in the lines after heavy
rainfall.
If you observe water or suspect that there may be water in the sampling lines, install
a water trap. See Water Trap on page 8-1-25 for details on obtaining and using water
traps.

Equipment
Thermal Conductivity Gas Analyzers
8-1-8 Treatment Manual 05/2023-66
Connect the gas sampling line to the Drierite
®
tube using 1/4 inch ID
polyethylene tubing. Allow sufficient time to draw a true sample. With 150 to
200 feet of 1/4 inch ID tubing and a temperature of 70 °F, a sufficient amount
of time will be approximately 7 minutes. Stations equipped with small
auxiliary pumps can draw a sample through the same length of tubing in 12 to
15 seconds.
Wait until the analyzer reaches the maximum reading (at least 30 seconds) and
does not move for 30 seconds. Ensure the flow meter still reads 1.0 SCFH.
This is the gas reading. Record this reading on the PPQ Form 429A, 429B, and
in the electronic 429 database.
Disconnect the sampling line and allow the pump to draw uncontaminated air
through the T/C cell. The instrument should return to zero; however, it may be
necessary to re-zero the analyzer. Again, ensure that the flow meter reads 1.0
SCFH. Always re-zero the analyzer before taking the next reading.
After taking the final reading at the end of the fumigation, thoroughly purge
the unit by disconnecting it from the gas sampling line and allowing the pump
to draw fresh air through the instrument for several minutes.
Maintenance
If it is to function properly, the T/C unit requires the same attention as any
other equipment. While the instrument is designed specifically for field use,
the components, particularly the meter, may be damaged easily. To maintain an
instrument capable of accurate gas concentration readings, careful handling is
essential. If repairs are needed and are extensive, or the parts are not readily
available, there will be a delay in returning the instrument. Should the need for
a substitute T/C unit occur, the port should be prepared to obtain one from
another source.
Repair and Calibration
Under normal service, the T/C unit will hold its calibration for a considerable
length of time. To ensure all units are providing accurate gas concentration
readings, recalibrate T/C units at least annually; calibrate more often if use is
frequent.
Send the instrument by insured delivery service (i.e., Federal Express, United
Parcel Service, U.S. Postal Service priority mail) to one of the contractors
listed below. To prevent damage, the unit must be well-packed and shipped in
a durable, tamper-proof box.
Prepare a memorandum to accompany each instrument explaining the need for
sending the unit. Ensure all instruments are shipped with a proper return
address, name of a contact person, and telephone number. The T/C unit will be

Equipment
Infrared Spectroscopy Gas Monitoring Device
05/2023-66 Treatment Manual 8-1-9
calibrated for MB only, unless the PPQ office requests calibration for SF.
Notify the contractor if Ascarite
®
will be utilized during the readings, as
the T/C must be calibrated using this type of absorbent. All port locations
will be responsible for payments to contractors.
Use one of the following contractors for repair and calibration:
Cardinal Professional Products (BPA #45-6395-3-2871)
2675 W. Woodland Drive
Anaheim, CA 92801-2628
Phone: (714) 761-3292
http://cardinalproproducts.com/
Key Chemical and Equipment Co. (BPA #45-6395-3-2872)
13195 49th St. North
Unit A
Clearwater, Fl 33762
Phone: (727) 572-1159
Fax: (727) 572-4595
http://www.fumiscope.com/
Infrared Spectroscopy Gas Monitoring Device
Infrared spectroscopy is an accurate and efficient method for measuring methyl
bromide gas concentrations. There is one unit currently approved for use by
PPQ. The MB-ContainIR™ is manufactured by Spectros Instruments Inc.,
Hopedale, MA, and will be referred to in this document as the “Spectros.” The
Spectros is lightweight (9 pounds; 4 kg) and battery operated.
The Spectros uses a technology known as “non-dispersive infrared
technology” (NDIR). NDIR is based on Beer’s Law (also known as Lambert-
Beer Law or Beer-Lambert-Bouguer Law) that relates the absorption of light to
Figure 8-1-3 Spectros Methyl Bromide Monitor

Equipment
Infrared Spectroscopy Gas Monitoring Device
8-1-10 Treatment Manual 05/2023-66
the properties of the material through which the light is traveling. The Spectros
is not affected by other volatile organic compounds such as carbon dioxide,
eliminating the need for Ascarite
®
. Other benefits of the unit include:
Audible and visible programmable alarm
Battery powered and portable
Measuring range for methyl bromide 0-240 oz./1000 ft
3
(g/m
3
)
Accuracy 0.08 oz./1000 ft
3
(g/m
3
)
Sensitivity 0.16 oz/1000 ft
3
(g/m
3
)
Operating temperature 32 °F — 122 °F (0 °C — 50 °C)
Variable temperature compensation
The information and guidelines in this chapter are based on the Spectros Inc.
Operation and Maintenance Guide. Contact Spectros Instruments for more
detailed operating instructions or technical assistance.
Important points to remember:
NOTICE
Install a water trap and particulate filter in-line between the fumigation site and the monitor-
ing unit. See Respiratory Protection on page 8-1-13.
This monitor is not and should not be used as a worker safety clearance device.
This monitor is not set up to evaluate, test, or determine readings for other approved fumi-
gants that PPQ uses, such as phosphine or sulfuryl fluoride.
Do not operate the monitor in the presence of flammable liquids, vapors, or aerosols.
Do not use soap and water to clean the monitor; use a dry cloth to clean the monitor.
Maintain proper care and storage of the monitor when not in use.
Use only batteries supplied by the factory.
Operate the monitor at all times in a horizontal position. Operating the monitor in a vertical
position may cause inaccurate measurements.
Never operate this unit at or above 6,562 feet (2,000 meters).
The monitor must be maintained free of moisture or other contaminants.
Always place supplied filter on the gas sample line between the monitor and the sampling
line.
Always ensure that the direction of flow is correct for the supplied filter before using the mon-
itor.
Cap the ends of the gas sampling lines to prevent the possibility of mists, aerosol, oil, water,
dust, or other contaminants being drawn into the monitor.
The maximum length of the gas sampling line is 1,000 feet.
The monitor does not require Drierite
®
if the measuring range is greater than
2 oz./1000 ft
3
.
Return the monitor to the manufacturer for calibration every 6 months.

Equipment
Infrared Spectroscopy Gas Monitoring Device
05/2023-66 Treatment Manual 8-1-11
General Operation
Prior to taking gas concentration readings, follow the guidelines in Chapter 2-
4, Fumigants—Methyl Bromide—Tarpaulin Fumigation, Conducting the
Fumigation, to ensure proper installation of gas sampling lines and circulation
fans.
If not using direct current, ensure that the battery for the Spectros is fully
charged before the fumigation begins. When using the Spectros in battery
mode, press the “test” button and observe the number of LEDs that light up.
A red flashing LED on the battery indicates a low battery. Recharge the
battery per manufacturer instructions before using for gas monitoring.
Charging time is 3-4 hours for a fully discharged battery pack.
Four green LEDs on the battery indicate that the unit is fully charged and
monitoring can begin. A fully charged battery pack will power the
monitor for 8-10 hours.
Water Trap
Install a water trap and particulate filter in-line between the fumigation site and
the monitor in order to keep water from damaging the monitor. See Water Trap
on page 8-1-25 for more information.
Gas Sample Line
Using 1/4-inch flex tubing, connect the gas sample line to the monitor by
pushing the tubing onto the gas sample port on the front of the monitor. The
gas sample line can be up to 50 feet in length and should be free of kinks or
obstructions. If the gas sample line is longer than 300 feet, the instrument will
display “FAULT” on the display screen. Ensure that the end of the line is
positioned to prevent moisture or water intake, or utilize the filter element.
Purge Air Line
Connect the purge air line to the monitor by pushing the tubing onto the purge
air port on the left side of the monitor. The purge line can be up to 100 feet
maximum in length and should be in an area of fresh air. Ensure that the end of
the line is positioned to prevent moisture or water intake, or utilize the filter
element.
Exhaust Line
Connect the exhaust line to the monitor by pushing the tubing onto the exhaust
port’s barbed fitting. The exhaust line can be up to 50 feet in length and should
terminate outside the building. Ensure that the end of the tube is positioned to
prevent moisture or water intake.

Equipment
Infrared Spectroscopy Gas Monitoring Device
8-1-12 Treatment Manual 05/2023-66
Measuring Gas Concentration
To turn on the monitor, lift the shield in front of the handle and press the red
power ON/OFF toggle switch. Allow the monitor to warm up for 15 minutes.
The WARM UP screen is displayed and the ON light (green) will blink. After
15 minutes the ON light will stop blinking and glows steadily.
The data display screen will show:
ZONETEMP – enter temperature of the area being monitored in °C. The zone
is the area where the monitor is being operated, rather than the temperature of
the commodity undergoing fumigation.
The factory default temperature setting is 25 °C.
After the warm up period, the Data Display Screen will read either MEASURE
or PURGE in the upper left corner of the screen.
MEASURE indicates the monitor is actively measuring gas. The measurement
is shown in the lower section of the screen. The monitor measures up to 240g/
m
3
with a sensitivity of 0.16g/m
3
.
The measurement (reading) should stabilize (stop) before recording the
reading. This may take one or more purge cycles depending on the length of
the gas sample line.
The measurement cycle will run for 4 minutes before the purge cycle begins.
When the display shows “PURGE,” the monitor is resetting its infrared
detector to baseline. The PURGE cycle runs for 10 seconds.
A zero reading indicates the concentration measured is below the lower limit
of detection of 0.77g/m
3
(200ppm approximately).
NOTICE
If the monitor is turned off at any time during operation, the monitor will run through
an entire 15 minute WARM UP cycle, regardless of how long the monitor has been
running.
NOTICE
If kinks or obstructions occur in the line, the monitor may not function properly.
Check for crimped sampling lines. Make sure nothing is restricting the flow of either
the inlet sample air, purge air, or the exhaust (return sample line).

Equipment
Respiratory Protection
05/2023-66 Treatment Manual 8-1-13
Calibration and Service
Return the Spectros to the manufacturer every 6 months for a calibration check
and service. Contact Spectros to obtain a Service Request Form and Return
Materials Authorization Number (RMA). Ship the unit using an insured
carrier.
Contact Information
Spectros
Spectros Instruments, Inc.
17-D Airport Road
Hopedale, MA 01747
Phone: (508) 478-1648
Fax: (508) 590-0262
http://www.spectrosinstruments.com/
USDA-APHIS-PPQ-S&T-TMT
USDA-APHIS-PPQ-S&T-TMT
13601 Old Cutler Road, Bldg. 63
Miami, FL 33158 USA
Phone: 305-278-4877
Fax: 305-278-4898
email: [email protected]
Respiratory Protection
Fumigation or other treatments conducted under the monitored conditions
stated in this manual and other program manuals are safe operations. The
Occupational Safety and Health Administration (OSHA) has ruled that
employees with possible exposure to pesticides (including fumigants) must be
provided adequate respiratory protection from such exposure. Refer to
Appendix G for detailed respiratory protection information. USDA employees
may also refer to Chapter 11 in the APHIS Safety and Health Manual website
for additional respiratory information.
Gas Detector Tubes or Gas Samples
Use gas detector tubes to measure low level concentrations of MB, SF, and PH.

Equipment
Volatilizer
8-1-14 Treatment Manual 05/2023-66
Principles of Operations
Special pumps are used to draw a measured sample (usually 100 milliliters) of
an air-gas mixture. The sample is drawn through one or two detector tubes
where a chemical reaction with the tube reagent takes place, creating a stain.
The length of the stain is proportional to the concentration of the gas. Measure
the length of the stain by using a calibrated chart or by simply reading the
number from a scale printed on the glass tube.
Gas detector tubes are manufactured with a constant reagent weight with
corrections for variations in the diameter of each tube. Detailed operational
instructions accompany the equipment.
The detector tubes are specific for each fumigant and are usually available
from several manufacturers. However, it is advisable to use the pump supplied
by the manufacturer of the tube used. In an emergency, detector tubes available
under the trade names Auer, Draeger, Gastec, Kitagawa, and Mine Safety
Appliances can be used with pumps manufactured by any of these companies
provided they draw 100 milliliters. Because of the different diameters of the
tubes sold by each manufacturer, adapters may be necessary. The Kitagawa
pump uses a removable, stainless steel micro-orifice to reduce the rate of air
flow through many of its detector tubes. This provides greater accuracy in the
chemical reaction within the tube. Remove the orifice when using tubes
manufactured by other companies.
To increase shelf life, store tubes under refrigeration. Before each day’s use,
test pumps as provided by instructions with each kit and make repairs as
necessary. Keep spare parts and operational instructions with each kit for use
as needed.
When many samples must be drawn to a common point during a large
fumigation, an auxiliary pump can be used. If only one sample lead is
involved, it may be necessary to pull the fumigant through the line by pumping
several times. A used tube can be inserted in the pump to determine when the
fumigant has reached the pump.
Volatilizer
Methyl bromide must pass through a volatilizer (vaporizer) to ensure adequate
conversion of liquid MB to gaseous MB. Introduce the volatilized fumigant
into or near to the air flow of the gas introduction fan. When 5 pounds or less
of MB are used, a simple volatilizer can be made with a 25-foot coil of 3/8 inch
O.D. (outer diameter) coiled copper tubing immersed in a container of hot
water.

Equipment
Volatilizer
05/2023-66 Treatment Manual 8-1-15
When amounts greater than 5 pounds are to be used, the copper tubing used in
the volatilizer must consist of a minimum of 50 feet of 1/2 inch O.D. coiled
copper tubing immersed in a container of hot water.
Heat the water in all sizes of volatilizers to temperatures of 200 °F or above
with a minimum of 150 °F during the gas introduction process. Insert a
calibrated thermometer into the water to determine the water temperature.
Calibrate the thermometer once a year by an approved calibration company.
Present written documentation of calibration at the time of fumigation.
The line that runs from the MB cylinder to the copper tubing in the volatilizer
must be a 3000 PSI hydraulic high pressure hose with a 3/8 inch I.D. (inner
The volatilizer should be made of semi-hard copper tubing. It is important that gas be
introduced and discharged as shown by arrows. If applied in reverse order, it may move so
rapidly that some liquid will pass into the chamber.
Figure 8-1-4 Methyl Bromide Volatilizer Coil

Equipment
Volatilizer
8-1-16 Treatment Manual 05/2023-66
diameter) or larger. The line that exits the volatilizer and runs into the
enclosure must be a 350 PSI tubing with a 1/2 inch I.D. or greater.
Introduce the fumigant through the tubing at the rate of 3 to 4 pounds of gas
per minute. The gas introduction tube should feel hot to the touch as a good
measure of satisfactory vaporization.
Figure 8-1-5 Tubing Specifications

Equipment
Air Velocity Measuring Instruments
05/2023-66 Treatment Manual 8-1-17
Air Velocity Measuring Instruments
Anemometer
Use an anemometers (wind meters) to measure the air velocity of circulation
fans and air curtains. Wind meters must be approved by the USDA-APHIS-
PPQ-S&T-TMT. Submit specifications of unapproved wind meters to S&T-
TMT for approval. Refer to Appendix E for a list of approved models.
Fan Velocity
Measure the cubic feet per minute (cfm) of a fan by placing the anemometer 12
inches from the face of the fan to be tested. Take a minimum of three readings;
one from the center, and the others from points toward the outside of the fan.
Average the readings. If an anemometer is used, each measurement should be
for 1 minute, thereby giving the result in feet per minute. If a wind speed
indicator is used, the reading in miles per hour should be converted to feet per
minute by multiplying the miles per hour by 5,280 and dividing by 60.
Area of the fan is calculated by first measuring the radius (R)—distance from
the center of the fan to the end of a blade. Formula for area is Pi* R
2
where Pi
is equivalent to 3.14. The final answer should be given in cfm. Therefore, if the
radius of the blade is given in inches and not feet, the factor 1/144 must be
multiplied in to convert square inches to square feet. The full formula would
be: Feet per minute x R
2
(in inches) x 3.14 x 1/144 = cfm.
Air Curtain Velocity
Measure the velocity of air curtains with an anemometer. Anemometers used in
this capacity must meet the following specifications:
Calibrated once a year to NIST calibration and certification
CE certified with a certificate of conformity
Digital
Hand-held
+/- 3 percent accuracy
Record in at least one of the following units with the resolution in
parenthesis:
Beaufort (0.1)
ft/min (1)
EXAMPLE
If average air movement is 1,600 feet for 1 minute from a fan having
a 7 inch radius (14 inch diameter), the calculations are as follows:
1,600 x 7
2
x 3.14 x 1/144 = 1,700 cfm (approximate)

Equipment
Auxiliary Pump
8-1-18 Treatment Manual 05/2023-66
mph (1)
m/s (0.1)
km/h (0.1)
knots (0.1)
Tested to NIST-Traceable standards with a written certificate of tests
Auxiliary Pump
During large-enclosure fumigations, it is necessary to take numerous gas
concentration readings from various locations throughout the enclosure. Thus,
some sample leads may be over 200 feet long. Pump the fumigant to the
sampling point before making an accurate concentration reading using an
auxiliary pump. If the inspector must rely on the pump provided with the gas
sampler or T/C unit to pull the fumigant, a great deal of time will be needed
between readings.
Because it pumps the fumigant from many areas and keeps a constant pull, the
auxiliary pump will reduce sampling time to only the reading time.
Constructing a unit is relatively simple. Petcocks capable of accepting sample
leads are tapped and soldered to a short length of pipe. The pipe is connected to
the suction side of the pump. The pipe acts as a manifold. Opening or closing
the petcocks allows the gas samples to be drawn as required. Connect an
exhaust line of sufficient length to the pump to ensure the fumigant is removed
from the sample area.
It is important that all soldering be done in such a manner as to provide
gastight construction of the petcocks. The pump should be of sufficient size to
pull 1 cubic foot per minute through all of the leads on the manifold.
Therefore, the more leads, the higher the required capacity of the pump. Mount
the whole unit on a board large enough to keep vibration to a minimum. Keep
the unit weight down to allow easy transport.
Disconnect each sampling line from the auxiliary pump in turn, and close the
petcock. Attach the line to the T/C unit or gas detector. Obtain a reading and
reconnect the line to the auxiliary pump and open the petcock.

Equipment
Manometers
05/2023-66 Treatment Manual 8-1-19
Manometers
Manometers are devices that can be used to measure pressure during a
pressure-leakage test in a fumigation chamber. Pressure is defined as a force
per unit area. Refer to Appendix E for a list of commercial suppliers. Contact
S&T-TMT
1
for approval of manometers not list in Appendix E. Select a model
that encompasses the pressure range needed for pressure-leakage testing and
that displays the results in the required units of measurement. Consult the
operation manual of the specific manometer for complete information on
operation and maintenance.
Manometers offer a selection of pressure units, such as inches of water (inch
WC), pounds per square inch (PSI), bar (g), mbar (mb), pascal (Pa) , kilopascal
(kPa), ounce square in (ozin²), inches of mercury (in Hg), millimeters of
mercury (mmHg), foot water (ft. H2O), centimeters of water (cmH2), and
kilograms centimeters squared (kgcm²).
Open-Arm Manometer
2
The most accurate way to measure low air pressure is to balance a column of
liquid of known weight against it and measure the height of the liquid column
so balanced. The units of measure commonly used are inches of mercury (in.
Hg), using mercury as the fluid and inches of water (in. w.c.), using water or oil
as the fluid.
Figure 8-1-6 Auxiliary Pump
1 USDA-APHIS-PPQ-S&T-TMT, 13601 Old Cutler Road, Bldg. 63, Miami, FL 33158 USA, Phone: 305-
278-4877
2 The information included in this section has been extracted from the Dwyer-inst.com website.

Equipment
Manometers
8-1-20 Treatment Manual 05/2023-66
An open-arm manometer is typically a U-shaped tube partially filled with
liquid. The tube may be of glass or transparent plastic tubing. A ruler
calibrated in millimeter (mm) divisions or carefully measured lines on a
background is used to measure the difference in level of the liquid in the two
arms (or the level in one arm).
As displayed by the picture the center in Figure 8-1-7, when positive pressure
is applied to one arm, the liquid is forced down in that arm and up in the other.
The difference in height, “h,” which is the sum of the readings above and
below zero, indicates the pressure.
The picture of the manometer on the right in Figure 8-1-7 shows that when a
vacuum is applied to one arm, the liquid rises in that arm and falls in the other.
The difference in height “h,” which is the sum of the readings above and below
zero, indicates the amount of vacuum.
No manometer can be read more accurately than the accuracy with which the
specific gravity of the liquid inside the manometer is known. The liquid must
also have good “wetting” characteristics and be capable of forming a
consistent, well-shaped meniscus in the indicating tube to facilitate accurate,
repeatable readings.
The liquid used also affects the operating range of the manometer. Mercury,
being 13.6 times the weight of water, will move 1/13.6th the distance water
will move in response to a given pressure. Red gage oil, having a specific
gravity of 0.826 which is lighter than water, will move about 1.2 times farther
than water in response to a given pressure. This obviously, expands the scale
for easier, more precise reading.
Figure 8-1-7 Example of Pressure Measurement in an Open-arm Manometer

Equipment
Manometers
05/2023-66 Treatment Manual 8-1-21
Manometers for use with water are furnished with a fluorescent green
concentrate which, when added to water, serves as a setting agent and a dye to
improve the consistency and visibility of the meniscus for easier, more
accurate readability. Because of increased accuracy and consistency, S&T-
TMT recommends the use of red gage oil manometers.
Digital Manometer
The operating instructions for digital manometers differ depending on the
manufacturer and/or model, but all have the following basic functions:
1. Use fresh, new batteries before testing begins. Replace as needed.
A. Turn the power on.
B. Re-zero the manometer immediately before use.
C. Connect the positive port to the tubing of the component and vent to the
opposite port to the atmosphere to measure single positive pressure.
D. Connect the lower positive pressure to the negative port and the higher
positive pressure to the plus port to measure differential positive
pressure. The manometer calculates the difference.
E. Add positive pressure to the chamber. When the manometer reaches the
highest pressure, begin recording time. Stop time when the low
pressure is reached. Record the low and high pressures.
Electronic Manometer
When a fumigant is volatilized in a chamber at atmospheric pressure, a positive
pressure is created, which may then be continuously reduced by leakage of the
air-fumigant mixture. PPQ-approved chambers must be sufficiently tight to
retain the fumigant during the exposure period. A manometer is used during
the pressure leakage test for NAP chamber certification and the vacuum
leakage test for vacuum chamber certification. (See Pressure-leakage Test for
NAP Fumigation Chambers on page 6-3-9, and Certification Standards on
page 6-2-4 for detailed descriptions of the certification processes.) Use the
following example for the most accurate way to determine the pressure
measurement from a manometer.
EXAMPLE
Referencing Figure 8-1-8, the left arm of the open-arm manometer
measures 8 mm below zero. The right arm measures 7 above zero.
The sum of the two measurements equals 15 mm. Therefore, in this
example, 15 mm is the actual reading.

Equipment
Manometers
8-1-22 Treatment Manual 05/2023-66
Magnehelic® Pressure Gage
3
Magnehelic® Pressure Gages can be used instead of U-Tube or digital
manometers. The most common gages have units in “inches of water”, Pascals,
or PSI units. The most common unit is “inches of water”.
The operating instructions for Magnehelic® Pressure Gages differ depending
on the manufacturer and/or model, but all have the following basic functions:
Select an operating location that is free from excessive vibration and
ambient temperature below 140 F. Avoid direct sunlight. Sensing lines
have no length restrictions. Do not restrict the lines.
Calibrate the gage with the diaphragm in a vertical position. To ensure
maximum accuracy, mount the diaphragm in a vertical position during
operation.
Zero the gage after installation using the external zero adjust screw.
Connect tubing from the source of the pressure to either of the two high-
pressure pots. Plug the port not used. Vent one or both low-pressure pots
to the atmosphere.
Calibrate once per year if it is used less than 10 times per year.
Calibrate every four months if it is used at least 10 times per year.
Source: APHIS-PPQ
Figure 8-1-8 Example of U Tube Manometer
3 Dwyer-Inst.com

Equipment
Mityvac Hand-Held Vacuum Pump
05/2023-66 Treatment Manual 8-1-23
Mityvac Hand-Held Vacuum Pump
Detect blocked monitoring leads by using a Mityvac® hand-held vacuum
pump (for supplier, see Appendix E).
Usage
1. Prior to introducing fumigant, connect the Mityvac® hand-held vacuum
pump to a monitoring lead.
2. Squeeze the handle on the Mityvac® unit; if the lead is blocked, a vacuum
will be indicated on the vacuum gauge of the Mityvac® unit (squeeze the
handle two or three times for monitoring leads longer than 25 feet; the
Mityvac® hand-held pump has the capacity to attain and hold 25 inches of
Hg vacuum and a minimum of 7 psi pressure).
3. Disconnect the Mityvac ®hand-held pump from the monitoring lead, and
repeat this procedure for each monitoring lead (connect monitoring leads to
the gas analyzer prior to fumigant introduction).
Phosphine Detector
PortaSens Phosphine Detector
Description
Historically, measuring phosphine has been done using detector tubes specific
for phosphine (see Gas Detector Tubes or Gas Samples). The high cost
associated with these tubes has been a deterrent for many ports.
A more accurate, portable unit is recommended for use during phosphine
fumigations. The PortaSens, available from Analytical Technology, Inc. (ATI),
is a portable, battery-operated instrument for measuring various gas
concentrations in ambient air. The instrument can be ordered specifically for
phosphine in the 0 to 1,000 ppm range. Ranges from 0 to 1 ppm are available
also, along with other configurations. The PortaSens is a complete measuring
instrument containing an electrochemical sensor, sampling pump, flow cell
assembly, microprocessor electronics, and a two-line, backlit LCD display. The
unit is powered by a rechargeable NiCad battery located in the handle, with the
charger connection located at the bottom of the handle. Refer to the
manufacturer’s product literature for detailed operation instructions.

Equipment
Photo Ionization Detector
8-1-24 Treatment Manual 05/2023-66
Photo Ionization Detector
The Photo Ionization Detector (PID) is a portable vapor and gas detector that
detects a variety of organic compounds. For methyl bromide, the PID has been
used both as a leak detector to locate fumigant leakage around chambers,
application equipment, and temporary enclosures, and as a safety device
around fumigation sites.
Principles of Operations
The PID is used to indicate the presence and approximate concentration of
methyl bromide or other volatile organic compounds (VOC’s) present. This is
accomplished by photo ionization that occurs when an atom or molecule
absorbs light of sufficient energy to cause an electron to leave and create a
positive ion. Because PID’s measure all VOC’s, careful attention must be paid
to the presence of other VOC’s in the air. Other VOC include, but are not
limited to, cigarette smoke, perfume, soap, and exhaust fumes from vehicles.
Description
All PID’s have the same basic construction, differing only in detail by the
various manufacturers. Each has an ultraviolet lamp that emits photons that are
absorbed by the compound in an ionization chamber. Electrodes collect the
ions that are produced. The current that is generated provides a measure of the
concentration.
Calibration
PID’s are typically calibrated using isobutylene, a stable gas with a slightly
pungent odor. This gas is easy to handle and can be stored at high pressure,
allowing calibration bottles to be used for calibrations many times. The PID
manufacturer supplies a reference manual that describes calibration procedures
and provides a list of correction factors.
For a partial list of manufacturers, refer to Appendix E.
Certified Precision Thermometers: Calibration Guidelines
Before a thermometer can be used as a calibration standard, it must meet the
following requirements from an approved facility. All calibration facilities
must be approved by USDA-APHIS-PPQ-S&T-TMT, 13601 Old Cutler Road,
Bldg. 63, Miami, FL 33158; Phone (305) 278-4877.
A list of current approved facilities can be accessed in Appendix E.
Accuracy must be 0.1 °C or less for Centigrade thermometer or 0.1 °F or
less for Fahrenheit thermometer

Equipment
Water Trap
05/2023-66 Treatment Manual 8-1-25
ASTM thermometers must have five or more calibration points. Non-
ASTM precision thermometers must have calibration points at the
treatment temperature.
The calibration certificate issued by calibration facility lists one to five
calibration points, tabulated corrections for each calibration point, serial
and test identification number of the NIST standard, and explanatory
notes defining the conditions under which the test results were made.
The thermometer must be calibrated annually or as designated by S&T-
TMT. Thermometers with expired calibration certificates cannot be used
in quarantine treatments.
Thermometer must be calibrated against standards that are approved by
the National Institute of Standards and Technology (NIST)
Water Trap
When there is a large difference in temperature between the fumigation and
monitoring locations, water vapor may condense inside the gas monitoring
leads. Additionally, if monitoring leads are stored outside, water may
accumulate in the leads after heavy rainfall. If water is observed or suspected
in the monitoring leads, use forced air to remove water from the leads. If water
is observed in the water trap, remove the water from the trap and use forced air
to remove water from the leads.
Install a water trap in-line between the fumigation site and the monitor in order
to keep water from damaging the monitor. If using an infrared spectroscopy
analyzer to monitor gas concentrations, also install a particulate filter. A
particulate filter is not needed if monitoring gas concentrations with a T/C.
Contact your National Treatment Program Manager to obtain information
about acquiring a water trap.

Equipment
Electrochemical Gas Sensor and Pyrolyzer
8-1-26 Treatment Manual 05/2023-66
Electrochemical Gas Sensor and Pyrolyzer
Pyrolyzer technology combined with a renewable electrochemical sensor cell
provides sensitive and specific methyl bromide monitoring. Currently, there is
one unit approved for use during PPQ fumigations. The Air Check Advantage
methyl bromide monitor is manufactured by PureAire Monitoring Systems,
Inc.
4
The Air Check system may be permanently installed in a fumigation facility
and can continuously and remotely sample over distances of up to 100 feet.
The system has the following features:
Accuracy: ±10% or reading
Dimensions: 10" W x 7.0" H x 7.0" D
Operating Temperatures: -4 to 122
o
F (-20 to +50
o
C)
Power requirements: 24 VDC 2.0 amp
Figure 8-1-9 Example of a Water Trap
4 PureAire Monitoring Systems, Inc., 557 Capital Drive, Lake Zurich, IT 60047. PH: 888-788-8050;
pureairmonitoring.com

Equipment
Fans—Introduction and Aeration
05/2023-66 Treatment Manual 8-1-27
Repeatability: ±10% of full scale
Response time: within 60 seconds
Sensor range: 0-10 ppm (other ranges are available)
Sensor type: renewable electrochemical cell that is field rechargeable
User selectable alarms
Weight: 10 pounds (4.5 kg)
Initial Startup
Refer to the Air Check Advantage Manual for more detailed operating
instructions.
Allow at least a 2 hour warm up period. The sensor’s zero will stabilize during
this warm up period.
If, after the 2 hour warm up period, the LED display is reading a positive PPM,
then adjust the LED display to zero.
Connect a gas sampling tube to the monitor and begin gas sampling readings.
The MB gas is drawn through a pyrolyzer where it is heated and converted into
bromine that is detected by the electrochemical sensor.
Maintenance and Calibration
Ensure that the fumigator replaces the electrochemical cell every 6 months and
replaces the pyrolizer and O-rings when damaged. Ensure that the fumigator
calibrates the sensor every 3 months under continuous MB exposure or every 6
months under normal use.
Fans—Introduction and Aeration
When fumigating with methyl bromide, fans must be operational during gas
introduction and for at least 30 minutes after the gas has been introduced. Fans
are also required for aeration. Do not use plastic fans.
Fans must be:
Constructed of steel
Capable of circulating the equivalent cubic feet per minute (cfm) of the
total volume of the enclosure, but a minimum of 2,500 cfm
Minimum of 18 inches in diameter
NOTICE
The monitor is designed for continuous 24/7 operation. Do not power down unless
the monitor will be stored for a long period of time.

Equipment
Fans—Introduction and Aeration
8-1-28 Treatment Manual 05/2023-66
Require the fumigator to turn on all fans before gas introduction to ensure they
are functioning properly. Refer to Figure 8-1-13 for an example of an approved
fan.
Figure 8-1-10 Example of an Approved Fan
PMC Siz Cover

02/2021-44 Treatment Manual Glossary-1-1
Treatment
Manual
Glossary
Acronyms, Abbreviations, and Terms
absorbed dose. quantity of radiation (energy) absorbed per unit of mass of a
specified target
aeration, active. the use of fans or any other mechanical devices to aerate or
ventilate the treatment area
aeration, passive. non-mechanical ventilation (i.e. emoving tarpaulins,
opening doors or windows) of the treatment area
aeration buffer zone. an area that extends from the point of methyl bromide
emissions from the treatment area to a specified distance where access is
limited
a.i. active ingredient
anemometer. wind meter
APHIS. Animal and Plant Health Inspection Service
CERCLA. Comprehensive Environmental Response, Compensation, and
Liability Act
CHEMTREC. 24-hour emergency telephone service for spills
copra. dried coconuts and whole coconuts without the husk
COR. contracting officer’s representative
dose mapping. measurement of the absorbed dose distribution within a
process load through the use of dosimeters placed at specific locations within
the process load
dosimeter. a devices that when irradiated, exhibits a quantifiable change in
some property of the device which can be related to absorbed dose in a given
material using appropriate analytical instrumentation and techniques

Glossary
Acronyms, Abbreviations, and Terms
Glossary-1-2 Treatment Manual 02/2021-44
dosimetry. a system used for determining absorbed dose, consisting of
dosimeters, measurement instruments and their associated reference standards,
and procedures for the system’s use
DOT. U.S. Department of Transportation
EPA. Environmental Protection Agency
exhaust duct/stack. a duct or stack used to exhaust methyl bromide from the
treatment area
external Feeder. pest that normally inhabits the outside or outer part of its
host; contrast with hitchhiker and internal feeder
FAA. Federal Aviation Administration
FIFRA. Federal Insecticide, Fungicide, and Rodenticide Act
g. grams
garbage. all waste material that is derived in whole or in part from fruits,
vegetables, meats, or other plant or animal (including poultry) material, and
other refuse of any character whatsoever that has been associated with any
such material
Gy. gray
hitchhiker. pest transported by chance and not found inhabiting its host;
contrast with external feeder
internal feeder. a pest that normally inhabits the inside or inner part of its
host; contrast with external feeder
ionizing radiation. charged particles and electromagnetic waves that, as a
result of physical interaction, create ions by either primary or secondary
processes
irradiation. treatment with any type of ionizing radiation
ISPM. International Standards for Phytosanitary Measures; international
measures developed by the International Plant Protection Convention
m. meter
manometer. a device used to measure pressure during a pressure leakage test

Glossary
Acronyms, Abbreviations, and Terms
02/2021-44 Treatment Manual Glossary-1-3
mbar. millibar; mb; a unit of pressure
MB. methyl bromide
mg. milligram
mg/L. milligrams per liter
minimum absorbed dose. the localized minimum absorbed dose within the
process load (Dmin)
mmHg. millimeters of mercury; a measure of pressure
NIOSH. National Institute for Occupational Safety and Health
OIC. officer-in-charge
OSHA. U.S. Occupational Safety and Health Administration
Pa. pascal; a unit of pressure
PH. phosphine
PID. photoionization detector; a portable vapor and gas detector that detects a
variety of organic compounds
PSI. pounds per square inch
PEL. permissible exposure limit
ppb. parts per billion
ppm. parts per million
PPQ. Plant Protection and Quarantine
quarantine material interceptions (QMI). APHIS-regulated materials
confiscated from passenger and crew or found in the Customs and Border
Protection passenger and crew clearance areas, including bathrooms. QMI is
not Regulated Garbage.
radura. internationally recognized symbol used to indicate when a food
product has been irradiated
SCBA. self contained breathing apparatus

Glossary
Acronyms, Abbreviations, and Terms
Glossary-1-4 Treatment Manual 02/2021-44
SDS. safety data sheet (replaces Material Safety Data Sheet)
SF. sulfuryl flouride
STEL. short-term exposure limit
TLV. threshold limit value
treatment area. the structure, area, or space, which is or was enclosed or
sealed, to contain fumigant during fumigation and continuing until the
commodity or structure is moved or released
treatment buffer zone. an area surrounding a treatment area during the
treatment period where access is limited
USDA. U.S. Department of Agriculture
volatilizer. vaporizes liquid methyl bromide into a gaseous state

03/2024-03 Treatment Manual A-1
Appendix
A
Appendix A
Forms
Contents
APHIS Form 2061 (Residue Sample for Food or Feed Product) A-2
APHIS Form 205-R, Instructions and Worksheet for Calibrating Portable
Temperature Sensors A-3
APHIS Form 206-R, Test of the Accuracy of the Permanent RTD Sensors
Installed in Hot Water Tanks A-4
APHIS Form 207-R, Sensor Location Diagram Fruit Weights and Pulp
Temperatures A-5
APHIS Form 208, Performance Test for Mango Hot Water Immersion Tank
A-6
Calibration of Temperature Probes (Cold Treatment) A-7
Location of Temperature Sensors in Containerized Cargo (Cold Treatment)
A-8
PPQ Form 429A, Fumigation Record A-9
PPQ Form 429B, Fumigation Record (Without Tarpaulin) A-12
PPQ Form 519, Compliance Agreement A-17
PPQ Form 523, Emergency Action Notification A-20
PPQ Form 449-R, Temperature Recording Calibration Report A-30
PPQ Form 203, Foreign Site Certificate of Inspection and/or Treatment A-32
PPQ Form 556, In Transit Cold Treatment Clearance Report A-35
Worksite Specific Respiratory Protection Plan—Template A-36

Appendix A Forms
APHIS Form 2061 (Residue Sample for Food or Feed Product)
A-2 Treatment Manual 03/2024-03
APHIS Form 2061 (Residue Sample for Food or Feed Product)
The APHIS Form 2061 has been removed from this manual. Contact the
Manuals Unit to obtain a copy and instructions for use.

Appendix A Forms
APHIS Form 205-R, Instructions and Worksheet for Calibrating Portable Temperature Sensors
03/2024-03 Treatment Manual A-3
APHIS Form 205-R, Instructions and Worksheet for Calibrating
Portable Temperature Sensors
Figure A-1 APHIS Form 205-R, Instructions and Worksheet for Calibrating Portable Temperature
Sensors

Appendix A Forms
APHIS Form 206-R, Test of the Accuracy of the Permanent RTD Sensors Installed in Hot Water Tanks
A-4 Treatment Manual 03/2024-03
APHIS Form 206-R, Test of the Accuracy of the Permanent RTD
Sensors Installed in Hot Water Tanks
Figure A-2 APHIS Form 206-R, Test of the Accuracy of the Permanent RTD Sensors Installed in Hot
Water Tanks

Appendix A Forms
APHIS Form 207-R, Sensor Location Diagram Fruit Weights and Pulp Temperatures
03/2024-03 Treatment Manual A-5
APHIS Form 207-R, Sensor Location Diagram Fruit Weights and Pulp
Temperatures
Figure A-3 APHIS Form 207-R, Sensor Location Diagram Fruit Weights and Pulp Temperatures

Appendix A Forms
APHIS Form 208, Performance Test for Mango Hot Water Immersion Tank
A-6 Treatment Manual 03/2024-03
APHIS Form 208, Performance Test for Mango Hot Water Immersion
Tank
Figure A-4 APHIS Form 208, Performance Test for Mango Hot Water Immersion Tank
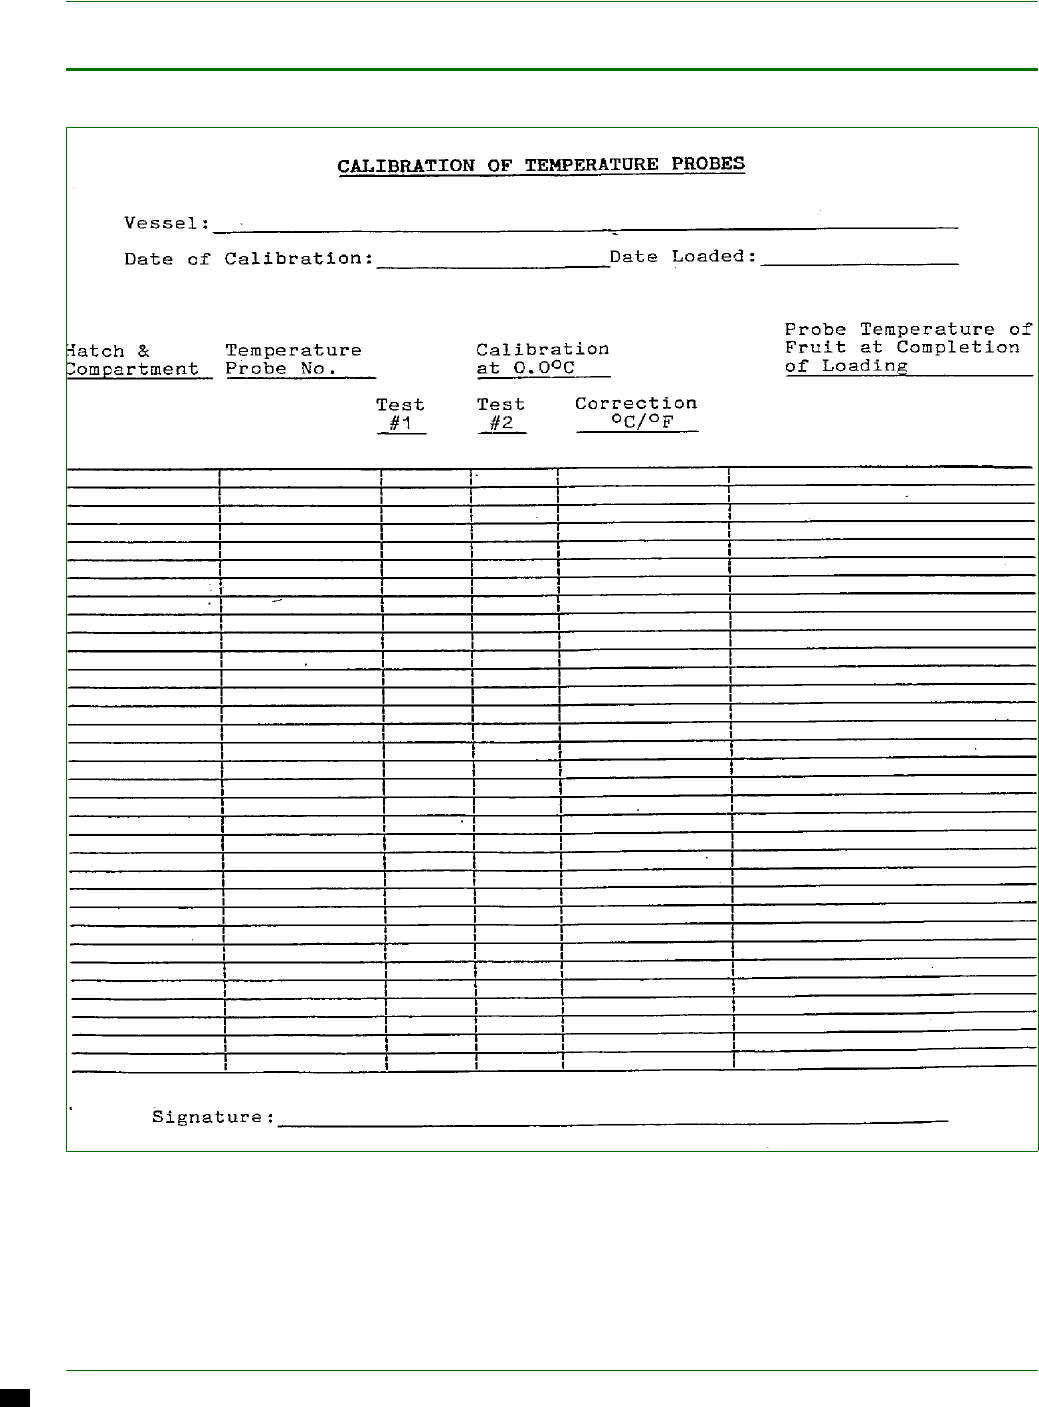
Appendix A Forms
Calibration of Temperature Probes (Cold Treatment)
03/2024-03 Treatment Manual A-7
Calibration of Temperature Probes (Cold Treatment)
Figure A-5 Calibration of Temperature Probes (Cold Treatment)

Appendix A Forms
Location of Temperature Sensors in Containerized Cargo (Cold Treatment)
A-8 Treatment Manual 03/2024-03
Location of Temperature Sensors in Containerized Cargo (Cold
Treatment)
Figure A-6 Location of Temperature Sensors in Containerized Cargo (Cold Treatment)

Appendix A Forms
PPQ Form 429A, Fumigation Record
03/2024-03 Treatment Manual A-9
PPQ Form 429A, Fumigation Record
Use PPQ Form 429A as a station record for all treatments conducted in
approved chambers or in temporary enclosures (containers, truck vans, railroad
cars, ships, warehouses, or other similar enclosures.)
Complete a paper PPQ Form 429A at the completion of every fumigation. Use
the information as a guide to complete the electronic 429 Fumigation Report in
the Commodity Treatment Information System (CTIS). The PPQ official must
record treatment oversight data into the electronic 429 database within 48
hours of the treatment being completed or approved by the supervisor. After
the electronic fumigation record is completed, the PPQ official must file the
paper PPQ Form 429A for a minimum of 3 years.
Treatments conducted under temporary enclosures require reporting of
minimum gas concentration readings. S&T-TMT tracks MB fumigant usage
using the electronic 429 database. Contact [email protected] to request
access.

Appendix A Forms
PPQ Form 429A, Fumigation Record
A-10 Treatment Manual 03/2024-03
Figure A-7 Example of PPQ Form 429A, Fumigation Record, With Tarpaulin (front)
UNITED STATES DEPARTMENT OF AGRICULTURE
ANIMAL AND PLANT HEALTH INSPECTION SERVICE
PLANT PROTECTION AND QUARANTINE
FUMIGATION RECORD
(WITH TARPAULIN)
1. STATION REPORTING
2. PEST AND INTERCEPTION NUMBER
3. CARRIER 4. ARRIVAL DATE 5. DATE INTERCEPTED 6. ORIGIN
7. PLACE OF ARRIVAL 8. DATE CONFIRMED 9. PORT OF LADING
10. FUMIGATION CONTRACTOR 11. DATE FUMIGATION ORDERED 12. COMMODITY
13. FUMIGATION SITE 14. DATE FUMIGATED 15. QUANTITY
16. MARKS 17. B/L NUMBER 18. ENTRY NUMBER 19. SHIPPER 20. CONSIGNEE
21. FUMIGANT AND TREATMENT SCHEDULE 22. TEMPERATURE
a. SPACE b. COMMODITY
23. GAS ANALYZER (type and serial number)
24. ENCLOSURE 25. WEATHER CONDITIONS 26. CUBIC CAPACITY 27. TREATMENT UNDER SECTION 18 EXEMPTION
YES NO
28. NUMBER OF FANS 29. TOTAL CFM’S FANS 30. TIME FANS OPERATED 31. FOOD OR FEED COMMODITY
YES NO
32. GAS INTRODUCTION
a. START b. FINISH
33. AMOUNT GAS INTRODUCED 34. GAS ADDED 35. RESIDUE SAMPLE TAKEN
YES NO
SAMPLE NUMBER
GAS CONCENTRATIONS
(gram per cubic meter [oz./1000 cu. ft.])
(To be prepared for fumigations when gas concentration readings are required while treatment is in progress.)
36.
DATE/TIME
37. PLACEMENT OF TEST LINES
38.
TIME INTERVAL
(from Block 32b)
39.
INSPECTOR’S INITIALS
SPACE
COMMODITY
DEFGH I J
FRONT
A
CENTER
B
REAR
C
40. DETECTOR TUBE READINGS (PPM)
41. REMARKS 42. CALCULATIONS
43. INSPECTOR SIGNATURE 44. DATE 45. REVIEWER SIGNATURE 46. DATE
PPQ FORM 429A (Previous edition is obsolete.)
AUG 2018

Appendix A Forms
PPQ Form 429A, Fumigation Record
03/2024-03 Treatment Manual A-11
Figure A-8 Example of PPQ Form 429A, Fumigation Record, With Tarpaulin (back)
FUMIGATION WITH TARPAULIN
NOTE: In preparation for the fumigation and prior to site selection, the officer should have determined (1) the immediate pest risk associated with the infested
commodity,
(2) the temperature requirements for the fumigation, and (3) the permeability of the packaging.
MATERIALS
FUMIGATOR PPQ
Tarpaulin
Sand Snakes
Loose Sand
Burlap / Padding
Masking Tape
Spray Adhesive
Pesticide and Spray
Equipment
Tarpaulin Supports
Fans (metal)
Extension Cords
2-3 Prong Plug Adapters
Fumigant with Pesticide
Label Attached
Gas Introduction Line
T/C Gas Analyzer
(Fumiscope) or Spectros
Unit
Volatilizer
Heat Supply for Volatilizer
Aeration Fans with Ducts
(introduction and exhaust)
Sampling Tubes/Lines
Weight Scales
Fumigation Warning
Treatment Placards
Self-Contained Breathing
Apparatus (SCBA)
Drierite
Ascarite
Approved Air Monitoring
Device per Fumigation
Label, PID-Photo Ionization
Detector
Tape Measure
Thermometer
Gas Detector Kit and
Detector Tubes for Section
18’s
Approved Heaters
(non-electrical heating
elements)
Approved Temperature
Recording Devices for
Treatments Over 6 Hours
Approved Temperature
Sensors for Treatments
Over 6 Hours
Auxiliary Pump or Mighty
Vacuum Pump
PPQ Treatment Manual
Fans (circulation and
introduction)
Self-Contained Breathing
Apparatus (SCBA)
PID-Photo Ionization
Detector
Tape Measure
Thermometer
Blank PPQ Form 429
PPQ Treatment Manual
PREPARATION PROCEDURES
(Section III Treatment Manual)
1. Site Selection
Ventilated Area
Sheltered Area
Impervious Surface
Non-Work Area
Proximity to Electrical
Source
Proximity to Commodity
2. Arrangement of Commodity
and Equipment
Stack Size Limitation
Air, Space, Below, and
Between Load
Placement of Tarpaulin
Supports
Placement of Padding
Placement of Fans
Placement of Gas
Introduction Line(s)
Placement of Sampling
Tubes/Lines
3. Tarpaulin Enclosure Cover
a. Cover
Condition
Air Space, Above Load
Floor Area 30 cm (12”)
Space Around Load
Overlap 45 cm (18”)
Border
b. Snakes
Contact Along Sides
Contact Around Corners
Overlap 15 cm (8”)
Minimum
Filled and Not Leaking
c. Sand
Perimeter
d. Adhesive
Perimeter
4. Treatment Schedule
Determination
Plant Pest
Commodity Temperature
Space Temperature
Volume Determination
Sorptive Commodity
Amount of Fumigant
5. Fumigant Introduction
Area Clear of
Unauthorized Personnel
Tarpaulin Condition of
Wear
Fan Operation
Fumigant Cylinder Weight
Gas Line Connections
Volatilizer Heated to 150
Degrees Fahrenheit
Introduction Rate
Check for Leaks
6. Safety
Gas Detection Tests for
Leakage
Wind Sock
7. Concentration Readings
T/C Gas Analyzer
(Fumiscope) or Spectros
Unit Calibrated
Reading Time Intervals
Gas Distribution
Maximum/Minimum
Readings Taken
8. Aeration (Multiple Stacks)
Exhaust Fan(s)
Exhaust Tube(s)
Exhausted in a Non-
Fumigation Area
Negligible Gas Readings
Before Tarpaulin
Removed
PID-Photo Ionization
Detector or Other
Detection Tests Used
During Aeration
PPQ FORM 429A (Reverse)

Appendix A Forms
PPQ Form 429B, Fumigation Record (Without Tarpaulin)
A-12 Treatment Manual 03/2024-03
PPQ Form 429B, Fumigation Record (Without Tarpaulin)
Use PPQ Form 429B as a station record for all treatments conducted in
containers that meet the conditions in Fumigants—Methyl Bromide—Special
Procedures for Container Fumigations Without a Tarpaulin on page 2-8-1.
Complete a paper PPQ Form 429B at the completion of every fumigation. Use
the information as a guide to complete the electronic 429 Fumigation Report in
the Commodity Treatment Information System (CTIS). The PPQ official must
record treatment oversight data into the electronic 429 database within 48
hours of the treatment being completed or approved by the supervisor. After
the electronic fumigation record is completed, the PPQ official must file the
paper PPQ Form 429B for a minimum of 3 years.
Treatments conducted under temporary enclosures require reporting of
minimum gas concentration readings. S&T-TMT tracks MB fumigant usage
using the electronic 429 database. Contact [email protected] to request
access.

Appendix A Forms
PPQ Form 429B, Fumigation Record (Without Tarpaulin)
03/2024-03 Treatment Manual A-13
Figure A-9 Example of PPQ Form 429B, Fumigation Record, Without Tarpaulin (front)
UNITED STATES DEPARTMENT OF AGRICULTURE
ANIMAL AND PLANT HEALTH INSPECTION SERVICE
PLANT PROTECTION AND QUARANTINE
FUMIGATION RECORD
(WITHOUT TARPAULIN)
1. STATION REPORTING
2. PEST AND INTERCEPTION NUMBER
3. CARRIER 4. ARRIVAL DATE 5. DATE INTERCEPTED 6. ORIGIN
7. PLACE OF ARRIVAL 8. DATE CONFIRMED 9. PORT OF LADING
10. FUMIGATION CONTRACTOR 11. DATE FUMIGATION ORDERED 12. COMMODITY
13. FUMIGATION SITE 14. DATE FUMIGATED 15. QUANTITY
16. MARKS 17. B/L NUMBER 18. ENTRY NUMBER 19. SHIPPER 20. CONSIGNEE
21. FUMIGANT AND TREATMENT SCHEDULE 22. TEMPERATURE
a. SPACE b. COMMODITY
23. GAS ANALYZER (type and serial number)
24. ENCLOSURE 25. WEATHER CONDITIONS 26. CUBIC CAPACITY 27. TREATMENT UNDER SECTION 18 EXEMPTION
YES NO
28. NUMBER OF FANS 29. TOTAL CFM’S FANS 30. TIME FANS OPERATED 31. FOOD OR FEED COMMODITY
YES NO
32. GAS INTRODUCTION
a. START b. FINISH
33. AMOUNT GAS INTRODUCED 34. GAS ADDED 35. RESIDUE SAMPLE TAKEN
YES NO
SAMPLE NUMBER
GAS CONCENTRATIONS
(gram per cubic meter [oz./1000 cu. ft.])
(To be prepared for fumigations when gas concentration readings are required while treatment is in progress.)
36.
DATE/TIME
37. PLACEMENT OF TEST LINES
38.
TIME INTERVAL
(from Block 32b)
39.
INSPECTOR’S INITIALS
SPACE
COMMODITY
D E F G H I J
FRONT
A
CENTER
B
REAR
C
40. DETECTOR TUBE READINGS (PPM)
41. REMARKS 42. CALCULATIONS
43. INSPECTOR SIGNATURE 44. DATE 45. REVIEWER SIGNATURE 46. DATE
PPQ FORM 429B (Previous edition is obsolete.)
JUN 2018

Appendix A Forms
PPQ Form 429B, Fumigation Record (Without Tarpaulin)
A-14 Treatment Manual 03/2024-03
Figure A-10 Example of PPQ Form 429B, Fumigation Record, Without Tarpaulin (back)
FUMIGATION WITHOUT TARPAULIN
NOTE: In preparation for the fumigation and prior to site selection, the officer should have determined (1) the immediate pest risk associated with the infested
commodity,
(2) the temperature requirements for the fumigation, and (3) the permeability of the packaging.
MATERIALS
FUMIGATOR PPQ
Masking Tape
Spray Adhesive
Pesticide and Spray
Equipment
Extension Cords
2-3 Prong Plug Adapters
Fumigant with Pesticide
Label Attached
Gas Introduction Line
T/C Gas Analyzer
(Fumiscope) or Spectros
Unit
Volatilizer
Heat Supply for Volatilizer
Aeration Fans with Ducts
(introduction and exhaust)
Sampling Tubes/Lines
Weight Scales
Fumigation Warning
Treatment Placards
Self-Contained Breathing
Apparatus (SCBA)
Drierite
Ascarite
Approved Air Monitoring
Device per Fumigation
Label, PID-Photo Ionization
Detector
Tape Measure
Thermometer
Gas Detector Kit and
Detector Tubes for Section
18’s
Approved Heaters
(non-electrical heating
elements)
Approved Temperature
Recording Devices for
Treatments Over 6 Hours
Approved Temperature
Sensors for Treatments
Over 6 Hours
Auxiliary Pump or Mighty
Vac Pump
PPQ Treatment Manual
Fans (circulation and
introduction)
Pressure Testing
Equipment, Manometer,
Sealing Putty, Device or
Equipment with Ability to
Pressurize a Contaner
Self-Contained Breathing
Apparatus (SCBA)
PID-Photo Ionization
Detector
Tape Measure
Thermometer
Blank PPQ Form 429
PPQ Treatment Manual
PREPARATION PROCEDURES
(Section III Treatment Manual)
1. Site Selection
Ventilated Area
Sheltered Area
Impervious Surface
Non-Work Area
Proximity to Electrical
Source
Proximity to Commodity
2. Pressure Testing
Use Approved Pressure
Testing Equipment
3. Arrangement of Commodity
and Equipment
Stack Size Limitation
Placement of Plastic
Sheeting Over Commodity
Near Introduction Line
Placement of Fans Inside
Container
Placement of Gas
Introduction Lines
Placement of Sampling
Tubes/Lines
4. Adhesive and Tape
Cover Vents and Door
Seals
5. Treatment Schedule
Determination
Plant Pest
Commodity Temperature
Space Temperature
Volume Determination
Sorptive Commodity
Amount of Fumigant
6. Fumigant Introduction
Area Clear of
Unauthorized Personnel
Fan Operation
Fumigant Cylinder Weight
Gas Line Connections
Volatilizer Heated to 150
Degrees Fahrenheit
Introduction Rate
Check for Leaks by
Fumigator
7. Safety
Gas Detection Tests for
Leakage
Wind Sock
Self-Contained Breathing
Apparatus (SCBA)
8. Concentration Readings
T/C Gas Analyzer
(Fumiscope) or Spectros
Unit Calibrated
Reading Time Intervals
Gas Distribution
Maximum/Minimum
Readings Taken
9. Aeration (Multiple
Containers)
Exhaust Fan(s)
Exhaust Tube(s)
Exhausted in a Non-
Fumigation Area
Negligible Gas Readings
Before Opening Doors
PID-Photo Ionization
Detector or Other
Detection Tests Used
During Aeration
PPQ FORM 429B (Reverse)

Appendix A Forms
PPQ Form 429B, Fumigation Record (Without Tarpaulin)
03/2024-03 Treatment Manual A-15
Table A-1 Instructions for Completing PPQ Form 429A and PPQ Form 429B
Block Instruction
1 Fill in the name of the PPQ work station where the fumigation occurs.
2 Fill in scientific name(s) of pest or insert “Precautionary” when fumigation is mandatory as a condition of
entry or movement. Include station interception number(s) if fumigation is based on pest findings.
3 Fill in ocean vessel name or aircraft identifying marks.
4 Fill in the date of arrival of the commodity at the port of entry.
5 Fill in the date the pest was intercepted.
6 Fill in the foreign port the commodity originated from.
7 Fill in the US port of arrival.
8 Fill in the date the pest was identified by the specialist.
9 Fill in the port of lading the commodity originated from.
10 Fill in the fumigation contractor performing the fumigation.
11 Fill in the date the fumigation was ordered.
12 Fill in the commodity requiring fumigation. if the commodity is a fruit or vegetable, enter the common name
and/or variety. Common names and varieties help track fumigant tolerances.
13 Fill in where the fumigation occurred.
14 Fill in the date the fumigation was completed.
15 Fill in the quantity of fumigated commodity.
16 Fill in any distinguishing marks to identify the fumigated commodity.
17 Fill in the bill of lading information of the fumigated commodity.
18 Fill in teh customs entry number of the shipment.
19 Fill in the shipper information.
20 Fill in teh consignee information who will receive the commodity.
21 Fill in fumigant (for example: MB, PH, SF), treatment schedule number, dosage rate, and exposure period
(MB 4 lbs/1,000 ft
3
for 12 hours).
22 Fill in the initial temperature of the (a) space in the enclosure and (b) commodity temperature. Specify
Celsius or Fahrenheit.
23
Fill in the type, model name, and serial number of gas monitoring equipment used (Fumiscope
®
#1234.)
24 Fill in the enclosure type: chamber, tarpless container, or tarped container. Indicate whether the tarp is
single- or multiple-use and the thickness (4 mil or 6 mil).
25 If treatment is conducted outside, fill in the weather conditions.
26
Fill in the cubic capacity of the enclosure (ft
3
).
27 If commodity is treated under APHIS Section 18 Exemption, check “Yes.” If commodity is treated at label
dosage or less, check “No.”
28 Fill in the number of fans used.
29 Fill in the total cubic feet per minute of air movement.
30 Fill in the amount of time the fans are operated.
31 If the commodity is for food or feed, check “Yes.” If nonfood or feed, check “No.”
32 Record time gas introduction (a) began and (b) ended. Treatment does not begin until gas is completely
introduced in the chamber or enclosure.
33 When the fumigant dosage is calculated by weight, fill in the dosage to the nearest quarter pound. If liquid
measures are needed, convert from weight to volume by using the conversion table in Appendix C.

Appendix A Forms
PPQ Form 429B, Fumigation Record (Without Tarpaulin)
A-16 Treatment Manual 03/2024-03
Distribution
File the original paper copies as directed by your supervisor. The original must
be retained for 3 years.
34 If additional gas is required, note under Remarks (Block 40) and show calculations (Block 41).
35 Check “Yes” or “No”. If needed, see Block 7 on APHIS Form 2061 for the Sample Number.
36 Record the date and time gas concentration readings are taken. Refer to the treatment schedule for
required times.
Gas concentration readings are not required for chamber treatments.
37 Specify where each gas sampling line is located, either in the space or the commodity. Use a minimum of
three gas sampling lines.
Methyl Bromide: Record the gas reading directly from the gas analyzer (lbs./1,000 ft
3
)
Sulfuryl Fluoride: Record the gas reading directly from the gas analyzer (lbs./1,000 ft
3
) or apply a correction
factor if calibrated using a correction factor.
Phosphine: Record the gas reading directly from the gas analyzer or colorimetric tubes (PPM)
38 Fill in the time intervals when gas concentration readings are taken.
39 Fill in PPQ official initials.
40 Fill in colorimetric tube readings (PPM).
41 Show calculations when additional gas is added. Note any unusual events that occurred during the
treatment. If the fumigation is aborted record details in this block.
For tarpless container fumigations, record the results of the pressure test in this block.
42
Show calculations for determining volume (L x W x H = ft
3
)
43 Fill in PPQ official signature.
44 Fill in date the fumigation was completed.
45 Fill in the reviewer signature
46 Fill in the date the reviewer signed.
Table A-1 Instructions for Completing PPQ Form 429A and PPQ Form 429B (continued)
Block Instruction

Appendix A Forms
PPQ Form 519, Compliance Agreement
03/2024-03 Treatment Manual A-17
PPQ Form 519, Compliance Agreement
Figure A-11 Example of PPQ Form 519, Compliance Agreement
According to the Paperwork Reduction Act of 1995, an agency may not conduct or sponsor, and a person is not required to respond to, a collection of information
unless it displays a valid OMB control number. The valid OMB control number
s for this information collection are 0579-0054, 0088, 0129, 0198, 0257, 0310, 0317,
0322,
0337, 0346, 0363, and 0369. The time required to complete this information collection is estimated to average 1.25 hours per response, including the time
for reviewing instructions, sear
ching existing data sources, gathering and maintaining the data needed, and completing and reviewing the collection of information.
20%$33529('
81,7('67$7(6'(3$570(172)$*5,&8/785(
$1,0$/$1'3/$17+($/7+,163(&7,216(59,&(
3/$173527(&7,21$1'48$5$17,1(
&203/,$1&($*5((0(17
1$0($1'0$,/,1*$''5(662)3(562125),50
/2&$7,21
5(*8/$7('$57,&/(6
$33/,&$%/()('(5$/48$5$17,1(6255(*8/$7,216
,:($*5((727+()2//2:,1*
6,*1$785(
7,7/(
'$7(6,*1('
7KHDIIL[LQJRIWKHVLJQDWXUHVEHORZZLOOYDOLGDWHWKLVDJUHHPHQWZKLFKVKDOOUHPDLQLQ
HIIHFWXQWLOFDQFHOHGEXWPD\EHUHYLVHGDVQHFHVVDU\RUUHYRNHGIRUQRQFRPSOLDQFH
$*5((0(17180%(5
'$7(2)$*5((0(17
334&%32)),&,$/1$0($1'7,7/(
$''5(66
6,*1$785(
86*29(510(1767$7($*(1&<2)),&,$/1$0($1'7,7/(
$''5(66
6,*1$785(
334)250$OOS
UHYLRXVHGLWLRQVDUHREVROHWH
6(3

Appendix A Forms
PPQ Form 519, Compliance Agreement
A-18 Treatment Manual 03/2024-03
Purpose
The PPQ Form 519 is a form that provides a signed, written agreement with
fumigators to indicate their understanding of methods, conditions, and
procedures necessary for compliance with regulations.
The PPQ Form 519 is also available electronically.
Instructions
PPQ ports that provide import, domestic, and predeparture treatments are
required to maintain Compliance Agreements with commercial pesticide
applicators, cold treatment facilities, irradiation facilities, and any other
entities performing treatments that mitigate a pest. PPQ may discontinue
certification of a particular treatment that did not meet the required time,
temperature, and concentration levels indicated in the treatment schedule.
Similarly, PPQ may not want to begin monitoring a fumigation if the tarp
appears inadequate and excessive leakage may lead to a safety problem.
Review compliance agreements at least annually, but preferably twice a year.
Amend compliance agreements as appropriate.
If the establishment fails to abide by the conditions of the agreement, then the
Port Director may cancel that agreement orally or in writing.
If you make an oral cancellation, confirm it in writing as soon as possible. The
establishment has 10 days to appeal the cancellation. Appeals must be made to
the Deputy Administrator.
Table A-2 Instructions for Completing PPQ Form 519, Compliance Agreement
Block Instruction
1, 8, 9, 10-12 Fill in.
2 Fill in the location of the specific property(s) for which the agreement is signed.
3 Fill in the specific regulated articles to which the agreement applies.
4 Fill in the titles, parts, and subparts.
5 Outline stipulations which apply to the fumigator for each quarantine or regulation affecting the
fumigator. Make clear to the fumigator that stipulations in the compliance agreement do not preclude
compliance with other sections of the quarantine or regulations. If space in Block 6 is inadequate for
listing the stipulations, then write “see Attached Sheets.”
6 Have a responsible official of the fumigator’s sign.
9 Assign a compliance agreement number.
13 Have the PPQ Port Director sign.
14-16 Complete only when State is involved in cooperating with enforcing Federal quarantines.

Appendix A Forms
PPQ Form 519, Compliance Agreement
03/2024-03 Treatment Manual A-19
Distribution
Table A-3 Distribution of PPQ Form 519, Compliance Agreement
If: Then:
Compliance agreement affects one work unit 1. GIVE original to the fumigator, and
2. KEEP a copy for port files in the area
where the fumigator is located
Compliance agreement affects more than
one work unit
1. GIVE original to the fumigator, and
2. GIVE copies to all work units affected by
the compliance agreement, and
3. KEEP a copy for port files in the area
where the fumigator is located

Appendix A Forms
PPQ Form 523, Emergency Action Notification
A-20 Treatment Manual 03/2024-03
PPQ Form 523, Emergency Action Notification
Figure A-12 Example of PPQ Form 523, Emergency Action Notification
FORM APPROVED - OMB NO. 0579-0102
U.S. DEPARTMENT OF AGRICULTURE
ANIMAL AND PLANT HEALTH INSPECTION SERVICE
PLANT PROTECTION AND QUARANTINE
EMERGENCY ACTION NOTIFICATION
1. PPQ LOCATION
4. LOCATION OF ARTICLES
3. NAME AND QUANTITY OF ARTICLE(S)
5. DESTINATION OF ARTICLES
8. SHIPMENT ID NO.(S)
13. COUNTRY OF ORIGIN
7. NAME OF CARRIER
10. PORT OF LADING 11. DATE OF ARRIVAL
17. AFTER RECEIPT OF THIS NOTIFICATION COMPLETE SPECIFIED ACTION
WITHIN
(
S
p
ecif
y
No. Hours or No. Da
y
s
)
:
18. SIGNATURE OF OFFICER:
ACKNOWLEDGMENT OF RECEIPT OF EMERGENCY ACTION NOTIFICATION
I hereby acknowledge receipt of the foregoing notification.
SIGNATURE AND TITLE:
DATE AND TIME:
19. REVOCATION OF NOTIFICATION
ACTION TAKEN:
SIGNATURE OF OFFICER:
DATE:
PPQ FORM 523 (JULY 2002) Previous editions are obsolete.
9. OWNER/CONSIGNEE OF ARTICLES
Name:
Address:
PHONE NO. FAX NO.
SS NO.
TAX ID NO.
15. FOREIGN CERTIFICATE NO.
15b. DATE
15a. PLACE ISSUED
Under Sections 411, 412, and 414 of the Plant Protection Act (7 USC 7711, 7712, and 7714) and Sections 10404 through 10407 of the Animal Health Protection
Act (7 USC 8303 through 8306), you are hereby notified, as owner or agent of the owner of said carrier, premises, and/or articles, to apply remedial measures for
the pest(s), noxious weeds, and or article(s) specified in Item 12, in a manner satisfactory to and under the supervision of an Agriculture Officer. Remedial
measures shall be in accordance with the action specified in Item 16 and shall be completed within the time specified in Item 17.
AFTER RECEIPT OF THIS NOTIFICATION, ARTICLES AND/OR CARRIERS HEREIN DESIGNATED MUST NOT BE MOVED EXCEPT AS DIRECTED BY
AN AGRICULTURE OFFICER. THE LOCAL OFFICER MAY BE CONTACTED AT:
Should the owner or owner's agent fail to comply with this order within the time specified below, USDA is authorized to recover from the owner or
agent cost of any care, handling, application of remedial measures, disposal, or other action incurred in connection with the remedial action,
destruction, or removal.
6. SHIPPER
12. ID OF PEST(S), NOXIOUS WEEDS, OR ARTICLE(S)
16. ACTION REQUIRED
TREATMENT:
RE-EXPORTATION:
DESTRUCTION:
OTHER:
SERIAL NO.
According to the Paperwork Reduction Act of 1995, no persons are required to respond to a collection of information unless it displays a valid OMB control number. The valid OMB control number for this
information is 0579-0102. The time required to complete this information collection is estimated to average 1 hour per response, including the time for reviewing instructions, searching existing data sources,
gathering and maintaining the data needed, and completing and reviewing the collection of information.
2. DATE ISSUED
14. GROWER NO.
12a. PEST ID NO.
12b. DATE INTERCEPTED

Appendix A Forms
PPQ Form 523, Emergency Action Notification
03/2024-03 Treatment Manual A-21
Purpose
The Emergency Action Notification (EAN) is a document that serves purposes
for APHIS regulations. When an emergency action must be taken on a
consignment, this form allows Customs and Border Protection Agriculture
pecialists (CBPAS) and/or Plant Protection and Quarantine (PPQ) to
communicate the need for a specific action on a consignment to the interested
parties. The EAN specifies to the broker, shipper, market owner, or other
stakeholder the reason(s) why the consignment is being refused and basic
explanation(s) as to what action is necessary.
The document also serves other critical needs. Use of the EAN information
assists in determining risks and identifying trends. Through data compilation
and analysis PPQ will use the information to update regulations, inform trade
partners of areas of concern in foreign countries, and help with domestic
emergencies. Targeting is another use for the information. CBPAS will be
better able to determine which consignments may need closer inspection.
An EAN must be issued from the Agricultural Risk Management System
(ARM) every time an emergency action is ordered for an agricultural purpose
in the cargo or express courier environment. Agricultural purposes would be
those that relate back to a violation of a regulation within the 7 CFR or 9 CFR
chapters.
Issue an EAN when:
The Agriculture Specialist finds an actionable pest, potential quarantine
pest, a contaminant, or prohibited product
The Agriculture Specialist needs to record a commercial seizure
The consignment contains non-compliant WPM
The consignment is in the express courier environment (i.e. FedEx, UPS,
DHL, etc.)
The consignment lacks proper documentation
Do not issue an EAN for the following reasons:
Condition of Entry/Precautionary Treatments—An EAN is not to be
issued for a consignment requiring treatment as a condition of entry.
Holding a Consignment—An EAN is only for taking immediate action.
Do not use an EAN as a hold or supplemental hold for a consignment for
any other reason than immediate treatment.
NOTICE
Do not issue the official EAN as a handwritten document, typed on a manual type-
writer, from any local database, or any means of issuance other than the ARM.

Appendix A Forms
PPQ Form 523, Emergency Action Notification
A-22 Treatment Manual 03/2024-03
Mail—Do not issue an EAN for any USPS mail. A Mail Interception
Notification (PPQ 287) must be used for these consignments.
No Inspection—An EAN is only to be issued if a consignment has been
inspected (either a physical inspection of the goods or a paperwork
inspection when that is the requirement) and an agricultural problem has
been found. Do not write an EAN in lieu of inspection.
Other Agencies’ Regulations—EAN's are not to be issued for a violation
of other agencies regulations. The only regulations that may be cited on
the EAN are chapters 7 CFR and 9 CFR.
Quality Issues—An EAN is not to be issued for the quality of a
consignment. If the consignment does not pose a pest risk, do not write
an EAN.
Selected Animal Products—EAN's are not to be issued on consignments
of live animals or live animal commodities that are regulated by
Veterinary Services. Refer to the Animal Product Manual for instructions
on these products.
Instructions
The instructions in Table A-4 are for initiating an EAN. The ARM electronic
version of PPQ Form 523 is the only method by which an official EAN may be
issued. Emergency Action Notifications may not be issued in any other
format. Fields marked with an asterisk (*) are mandatory fields.
Table A-4 Instructions for Initiating an EAN
Block Field Name Instructions
1 Issuing Port Select the port in which the EAN is being issued. Please note that some users
will have multiple locations. If the user is assigned to multiple locations, be sure
to select the correct location. If the user is not assigned to a port to which he/
she requires access, contact the help desk.
2 Date Issued Enter the date that the EAN was issued.

Appendix A Forms
PPQ Form 523, Emergency Action Notification
03/2024-03 Treatment Manual A-23
3 Name and
Quantity of
Manifested
Article
Article Category*
Article Name*
This block is to determine the commodity of the consignment. Only one
commodity is allowed to be listed per EAN. Do not list pallets, crates,
dunnage, etc., as the Name of Article unless they are the actual commodity
being shipped.
Article Category–Select a category (Animal Product, Plant Product, or
Miscellaneous). The user must select the appropriate category, as the other
fields in this block are dependent on it.
Animal Products
Animal Classification–Select the classification of the consignment. The
classification selected will determine the drop down list for the classification
category in the next field. See the Animal Products Manual (APM) contents
page for further clarification.
Classification Category–Select the classification category. The classification
category will determine if a classification subcategory is required. To decide on
a classification category see the APM classification selected in the previous
field.
Classification Subcategory–Select the classification subcategory. This
information can be found in consignment documentation.
*The drop down lists in this category have come directly from the Animal
Products Manual. If you need assistance with this menu, see the APM.
Plant Products
This selection is for fresh cut flowers, fresh fruits and vegetables, logs, lumber,
and propagative materials only. Any processed plant products (mulch,
handicrafts, potpourri, Chinese teas, etc.) will be found in the Miscellaneous
Category.
Miscellaneous Products
This category is for all products that do not fit into either Animal Products or
Plant Products as defined above. Select the category that best fits the
commodity. If there is not a category that fits your item, please contact the help
desk, National Coordinator, or Regional Coordinators before continuing. If the
user selects miscellaneous, a description of the article must be entered. The
description should be as accurate as the information available. For example,
brake pads, bolt screws, linen fabric, stuffed toys, etc. if the product is
agricultural but processed, the user must give an exact description of the
article. For example, wooden birdhouses with grass roofs, dried whole
apricots, wood carvings with bark edging, etc.
Article Name–This drop down list has been determined by the user’s previous
selections. If the user does not find the article name in the drop down list
please contact the help desk.
Quantity*
Unit of Measure*
Enter the numerical quantity of the consignment. When determining the article
quantity, use the most specific number. For example, kilograms is a better
selection than box count when dealing with most produce or meat products,
but square meter is a better selection for veneer. “Boxes/Crates” may not be
used if another option is available.
APHIS Permit
Number
APHIS Permit Number–If the consignment has any kind of APHIS permit,
enter the number here.
Table A-4 Instructions for Initiating an EAN (continued)
Block Field Name Instructions

Appendix A Forms
PPQ Form 523, Emergency Action Notification
A-24 Treatment Manual 03/2024-03
3 Name and
Quantity of
Manifested
Article
(continued)
Wood Packing
Material*
Check the appropriate boxes. If the user selects none or non-compliant, only
one box may be selected, but if the wood is non-compliant the user may
choose both non-compliant for timber pest and no markings. If wood is not
marked with an acceptable symbol, then it is considered unmarked.
4 Location of
Articles*
The location of articles is the place where the consignment is located when it is
inspected. For example: US Air Warehouse, 123 Airplane Way, Butte, MT
12345. Each port will have a local drop down list so that users will not have to
type addresses that have already been added to the system. If using the drop
down list, ensure that the correct location has been selected. If the location that
the user needs to select is not on the default list, it may be added by port users
and supervisors by selecting “Set Defaults.” All locations must contain the
name of the facility, the physical address, city, state, and zip code.
5 Delivery
Address of
Articles
Name* Enter the name of the company/individual accepting the goods as destination
of the articles (delivery address). Do not use the broker as destination. Do not
automatically assume that the consignee address and delivery address is the
same.
Address where the
articles will be
delivered*
Enter the address where the goods are intended to be delivered including
street address, city, state (within the US), country, and zip/postal code.
If the consignment has multiple destinations, the officer should include the
destination to which the majority of the consignment is being delivered. If the
consignments will be distributed evenly then choose the location to which the
product could potentially cause the greatest risk. When determining the
address to select, the officer should use his/her best judgment. Additional
delivery addresses should be entered into the “Comments” field on page 4 of
the data entry screens. Questions regarding this should be directed to the
officer’s first line supervisor.
6 Shipper Name* Enter the name of the shipper.
Address of
Shipper*
Enter the address of the shipper including street address, city, and country.
Enter state/province and postal code, if known. This must be a foreign
address.
7 Name of
Carrier
Name* Enter the name of the carrier company. For example: Northwest Airlines, M/V
Panama, Canadian Pacific, Yellow Freight. On the land borders, independent
trucks frequently cross. If the truck is independent, use the name of the owner
of the tractor. Do not enter vehicle numbers in this field. Do not enter
abbreviations for the name of carrier including airline codes.
Flight/Voyage Trip
Number*
Enter the appropriate number based on pathway. For trucks, use the trailer
license number.
8
Con
signment
Identification
Numbers
Airway Bill, Bill of
Lading, PAPS
Code*
Enter the bill of lading number. If the cargo is border cargo and does not have
a bill number, use the PAPS code. This is a mandatory field. Every
consignment will have this number at the time that consignment is
presented for inspection.
Tariff Number* Enter the 10-character tariff number as provided in ACS or ATS. This is
indicated in ATS as the HTS number. Do not add any punctuation, numbers
only. If the user cannot find the tariff number in ATS or ACS, then refer to the
U.S. International Trade Commission Harmonized Tariff Schedule website.
Table A-4 Instructions for Initiating an EAN (continued)
Block Field Name Instructions

Appendix A Forms
PPQ Form 523, Emergency Action Notification
03/2024-03 Treatment Manual A-25
8
Consignment
Identification
Numbers
(continued)
Customs Entry
Number*
Enter the Customs Entry Number. Do not add any punctuation, numbers only.
*If the entry has not yet been filed at the time of inspection, enter “Not Yet
Filed.”
*If the consignment is of low value (under $2,000 as of 09/2006) it is
considered informal and no entry number will ever be processed, enter
“Informal.”
Do not enter N/A or Not Available. If the user doesn’t have an entry
number other than listed above, describe why.
Container Number Enter the complete container number. This is usually a 4-letter code followed
by 5 or 6 numbers. Include the check digit.
ISPM Markings Enter the complete information from the ISPM Marking (IPPC wood marking). If
the officer finds a pest in marked wood, this is a required field.
Other Identifying
Number
This field is available to include another number that there is either not a field
for or can be used for a number collected for port policy. Examples include
invoice number, consignment number, etc. If the pathway is air cargo, the
House Airway Bill must be entered here.
Other Identifying
Number
Description
If the user enters an “Other Identifying Number” then this field must be
completed. The entry should clearly identify what the “Other Identifying
Number” is. Do not use abbreviations in the description other than HAWB for
“House Airway Bill.”
9 Consignee of
Articles
Name* Enter the name of the Consignee. This will be a company name most of the
time. If the consignment owner is an individual, enter the name of the
individual.
The Consignee is the owner of the consignment. The broker is usually not the
consignee.
Address of
Consignee*
Enter the street address of the consignee. Street address, city, and country
must be entered. Enter the state/province and postal code, if known.
Phone and Fax
Numbers
Enter the phone and fax numbers of consignee, if known.
10 Port of
Lading
City* Enter the foreign city where the consignment was last loaded onto a vessel,
plane, rail car, or vehicle.
Country* Enter the foreign country where the consignment was last loaded onto a
vessel, plane, rail car, or vehicle.
11 Date of Arrival* Enter the date that the consignment entered the port.
Table A-4 Instructions for Initiating an EAN (continued)
Block Field Name Instructions

Appendix A Forms
PPQ Form 523, Emergency Action Notification
A-26 Treatment Manual 03/2024-03
12 Reason for EAN* Select the reason(s) that the EAN is being issued. The following is a guideline
to help determine the reason.
Pest - If a pest or disease is found on, in, or with a consignment. Do not enter
a tentative ID. A national AQAS Pest ID number will be required.
Lacks Documentation or Certification - Consignment is missing
documentation or the documentation is not acceptable. Documents may
include, but are not limited to health certificates, FSIS paperwork, permits,
phytosanitary certificates, etc.
Contaminant (seed) - Consignment is found to have seed or seed heads that
are contaminants, but not part of the manifested commodity. A national AQAS
Pest ID number is required.
Contaminant (other) - Consignment is found to have any contaminant that
does not need to be sent to an identifier. Examples include blood, soil, manure,
etc.
Lacking ISPM15 Marking - Consignment was found to have unmarked or
improperly marked WPM.
Prohibited Animal Product - Consignment was found to be prohibited by 9
CFR regulation.
Prohibited Product - Consignment was found to be prohibited by 7 CFR
regulation.
12a Pest ID Number* Enter the Pest ID number generated by the Pest ID system. This number must
be provided by the identifier or an APHIS employee acting on behalf of an
identifier. If pest or seed contaminant is selected as the reason for the EAN,
then the user will have to enter the 17-digit Pest ID number. If the user does
not have the Pest ID number, the EAN may be saved and printed; however,
the EAN cannot be closed until this information has been added. The system
will not accept local pest ID numbers in any form.
12b Date Intercepted* Enter the date that the reason for writing the EAN was found. This date must
match the date that is entered on the Pest ID record (309A).
13 Country of Origin Enter country of origin. The country of origin is not necessarily the country from
which it is being shipped. The country of origin is the location where the
commodity was grown, manufactured, or produced. For example, a
consignment of handicrafts might be shipped from Canada, but were made in
China. China is the country of origin. Canada is the country of lading.
14 Grower/Facility
Number
Enter the number of the foreign facility in which the product was processed, or
the foreign grower number. This number is frequently found on the invoice. It
may also be available in ATS.
15 Foreign Sanitary
Certificate Status*
Select the status of the certificate. If a certificate is not required, continue to
Block 16.
15a Foreign Sanitary
Certificate Number
Enter the certificate number.
15b Place Issued Enter City/Country where the certificate was issued. This will be a foreign
address.
Date Issued Enter the date on which the certificate was issued.
Contact
Numbe
r
Phone Number* Enter the phone number at which the user issuing the EAN can be reached.
Table A-4 Instructions for Initiating an EAN (continued)
Block Field Name Instructions

Appendix A Forms
PPQ Form 523, Emergency Action Notification
03/2024-03 Treatment Manual A-27
16 Treatment
Schedule
Using the drop down menu, if treatment is available, select the appropriate
treatment schedule. The treatment schedule must be provided by a PPQ
Identifier or PPQ employee acting on behalf of an Identifier. CBPAI should not
select a treatment schedule that has not been approved by a PPQ Identifier or
PPQ employee acting on behalf of an Identifier.
Explanation Text* Select the explanation text that best matches the scenario for this EAN. This
explanation tells the acceptor of the EAN two things: 1) what the problem is,
and 2) how to correct the situation. This is where the options are given. Do not
use the “check boxes” printed on the form.
The identifier will verify Federally Recognized State Managed Phytosanitary
(FRSMP) Program status and/or FRSMP options. If the pest is a FRSMP Pro-
gram pest, then movement may be restricted.
Phyto-Fumigation
Disclaimer
If fumigation is an option, the phyto disclaimer must be selected.
CFR Regulation* Select the CFR under which the consignment is being regulated. More than
one CFR can be selected. To look up a CFR, refer to the Code of Federal
Reg
ulations.
Seal
Text If the consignment must be transferred to another location under seal, select
the text that is appropriate to the scenario. If the consignment is being sent for
treatment by PPQ, the quantity of the consignment being transferred
(preferable in box count) must be included.
NOTE: If the PPQ Officer supervising the treatment does not know the quantity
to be treated, the consignment will not be treated until that information is
provided from CBP.
Comments If the user has any additional comments to make, they should be recorded in
the Comment field. Do not repeat information that has previously been
provided. Do not enter any pest name in this location.
It may be helpful on a local level to enter a local ID number or broker
information here.
NOTE: These comments will print on the paper EAN.
Table A-4 Instructions for Initiating an EAN (continued)
Block Field Name Instructions
If the pest is:
And the commodity
is: Then:
A FRSMP
Program pest
Arriving in a FRSMP
Program State for that
pest
Use one of the following options:
Treat
Export
Destroy
Other
If "Other" is selected, then follow
requirements to "Re-direct and
Avoid" the FRSMP Program
State
Arriving in other than a
FRSMP Program State
for that pest
Use option "Other" and notify the
broker/importer of movement
restriction to "Avoid" FRSMP
Program States.
Not as above No FRSMP action is required.

Appendix A Forms
PPQ Form 523, Emergency Action Notification
A-28 Treatment Manual 03/2024-03
( * denotes a mandatory field)
Special Instructions for Infested Vessels Sailing Foreign Without
Treatment
When an infested vessel is allowed to sail foreign without treatment, type the
following statement in the “Comments” field on the EAN:
17 After Receipt of
Notification
Complete Specified
Action Within:
The user should select the amount of time allowed before treatment begins.
For example, if the consignment is to be re-exported then the user should
select the amount of time before the consignment must be on the conveyance
back to country of origin.
18 Name of Inspecting
Officer
Enter the name of the officer who inspected the consignment.
Do not enter the name of the person entering the data unless it is the same
individual.
Acknowledg-
ment of
Receipt of
Notification
Name of Recipient Enter the first and last name of the person accepting the EAN. The user must
have this person print their name next to the signature. The only acceptable
entry in this field is the first and last name of the person accepting the EAN. Do
not enter “On File.”
Title of Recipient Enter the title of the person accepting and signing the EAN. Preferably enter
name of their company as well. Example: Dispatcher, American Shipping.
Date Signed Enter the date the EAN was signed and accepted.
19 Revocation
Notification
Reason for Action
Taken*
Enter the reason that the EAN was written. This should match the data
entered in block 12.
19 Revocation
Notification
(continued)
Action Taken* Enter the action that was actually taken. Do not enter an action unless that
action was taken.
If the action was “Treatment,” select the treatment type.
If the action was “Other,” enter what action was taken in the “Additional
Remarks” section. Be descriptive in the narrative. If FRSMP option “Avoid” was
selected, then the additional comment should read “Broker/importer has been
notified.”
Was the Article
Mislabeled,
Misrepresented, or
Concealed?*
Select yes or no.
Form 518
Reference Number
If the above answer is yes, then a 518 number must be entered.
Additional Remarks If the user has additional information that was not previously recorded, it
should be entered here. This field is required if Action Taken-Treatment Type is
equal to “Other.” This field will not print at any time. These are private
comments visible only to system users.
Signature of
Officer*
Enter the name of the officer who completed or monitored the treatment,
received confirmation of destruction, or received confirmation of re-exportation.
Do not enter the data entry clerk’s name unless it is the same officer as
described above. This may be a different user than originally opened the EAN.
Date Action was
Completed*
Enter the date that the final action was completed.
Table A-4 Instructions for Initiating an EAN (continued)
Block Field Name Instructions

Appendix A Forms
PPQ Form 523, Emergency Action Notification
03/2024-03 Treatment Manual A-29
“The requirements of the Emergency Action Notification are suspended
upon condition that this vessel shall leave the territorial limits of the United
States within [list number] of hours after receipt of this notice. This vessel
shall not re-enter any port in the United States unless it has been treated in
accordance with the notification and certified by the person who applied
the treatment. If the certificate is not presented to the CBP officer when
arriving at a port in the United States, or if the CBP officer for any other
reason is not satisfied that the infestation has been eliminated, the
notification shall immediately become effective and treatment required.”
Distribution
Because PPQ Form 523 is now electronic, distribution as in the past, on every
EAN, is unnecessary. The procedure has been that the signing party, who is
responsible for the cargo, receives a hard copy of the notification. The hard
copy is necessary to communicate to the consignee or shipper, and also gives
the broker time to review the options and select one. The CBP contact number
is listed as well.
Routinely sending the EAN to any other parties is not required. Sharing
courtesy copies between PPQ and CBP should continue for local, regional, or
national projects. Ports may also keep their own hard copies.
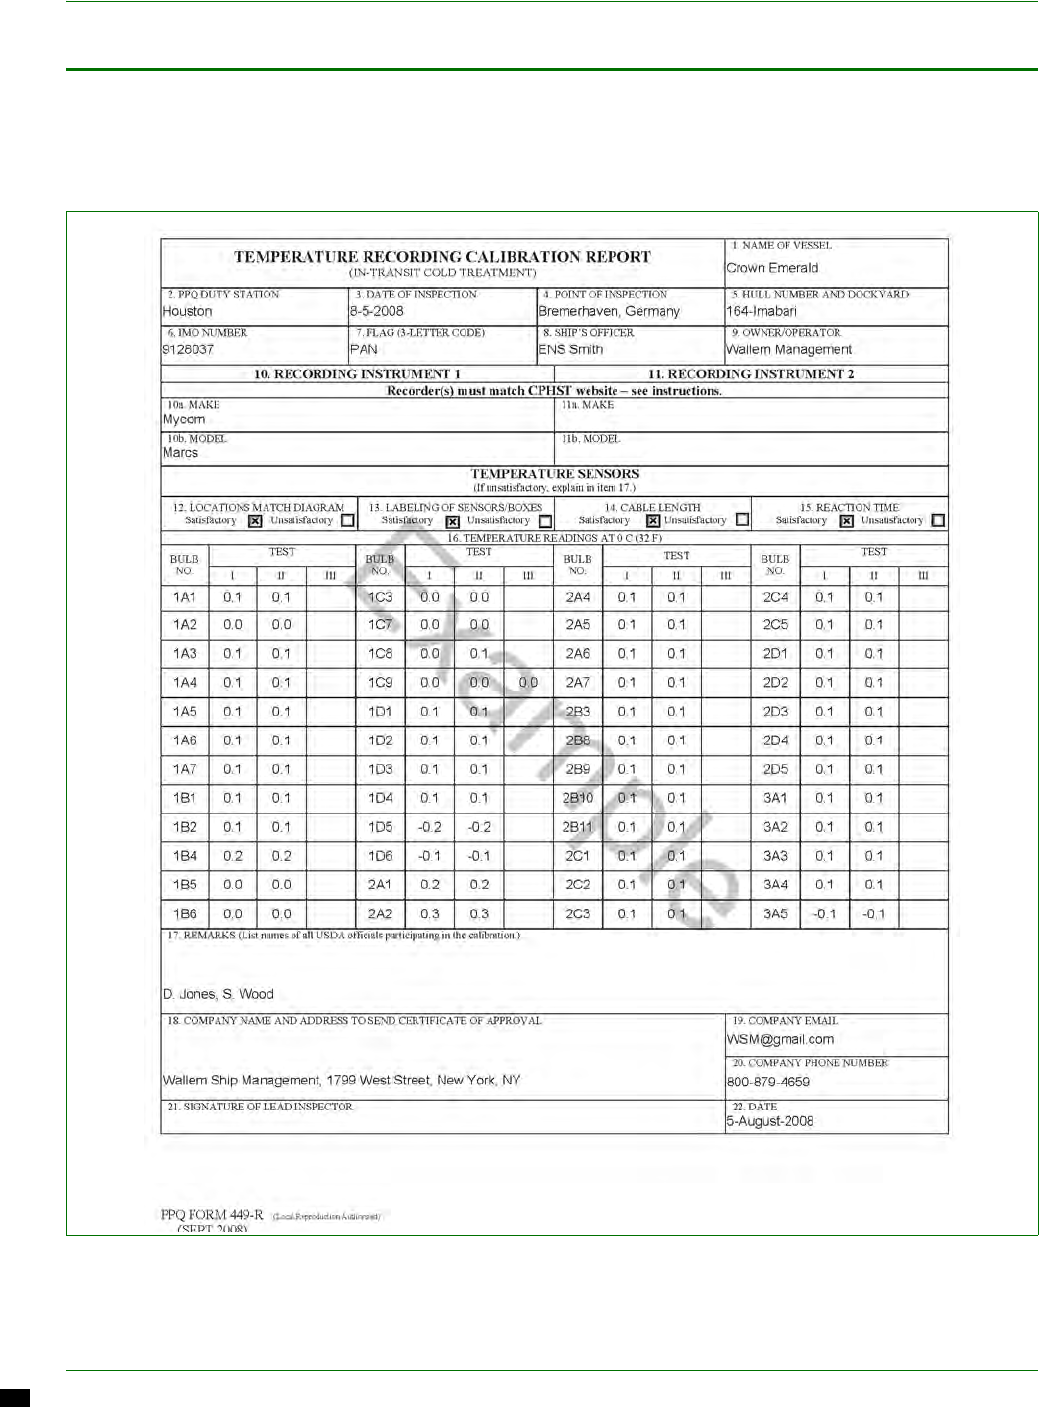
Appendix A Forms
PPQ Form 449-R, Temperature Recording Calibration Report
A-30 Treatment Manual 03/2024-03
PPQ Form 449-R, Temperature Recording Calibration Report
Use the PPQ Form 449-R to document the calibration of temperature sensors
for in transit cold treatment in vessels.
Figure A-13 Example of PPQ Form 449-R, Temperature Recording Calibration Report

Appendix A Forms
PPQ Form 449-R, Temperature Recording Calibration Report
03/2024-03 Treatment Manual A-31
Instructions for Completing PPQ Form 449-R
Table A-5 Instructions for Completing PPQ Form 449-R
Block Instructions
1 Verify that the vessel name agrees with the name on the S&T-TMT intransit cold treatment website.
2
PPQ Officer’s duty station
3 Date of inspection
4 Place of inspection
5 Verify that the hull number and dockyard agrees with the S&T-TMT intransit cold treatment website.
6
The IMO number is a unique identification number for every vessel engaged in commerce and pro-
vides a complete history of the vessel. Verify that the IMO number agrees with the S&T-TMT intransit
cold
treatment website. If this information is not on the S&T-TMT website, collect the number from the
ship’s officer and record in this block.
7 Verify that the flag (country of registry) agrees with the 3-letter code on the S&T-TMT intransit cold
t
reatment website.
8 Name of Captain, Chief Engineer, Reefer Engineer, or First Officer
9 Name of the shipping line owner or agent. Verify with S&T-TMT intransit cold treatment website.
10a
, b Verify the make and model agree with the information on the website. If the information differs from
that listed on the website, gather as much information as possible from the vessel’s crew regarding
when (date) instrument was changed, and whether or not they have any documentation from S&T-
TMT approving the changes. Record this additional information in the remarks section.
11a, b Multiple recorders may be used. Record the make and model.
12 Verify that the sensor and cable locations match the diagram on the S&T-TMT website.
13 Verify that the sensors and cables are labeled correctly and in accordance with the sensor diagram.
14 Confirm that air sensors are capable of reaching the floor and fruit sensors are capable of reaching all
areas of the compartment from their location along the walls (each should reach past the center line of
the compartment).
15 Do the sensors respond appropriately when hand-warmed?
16 TEST ALL AIR AND PULP SENSORS. If officer suspects a compartment to be a hanging deck, test
any sensors located in the space and make a notation in this block and in the narrative.
17 Record names of all USDA officials participating in the inspection, indicating lead officer for the report.
Include any other information deemed appropriate.
18 Include as much information as possible.
19 Company email.
20 Company phone number.
21 Signature of Lead Inspector.
22 Date the report is completed.

Appendix A Forms
PPQ Form 203, Foreign Site Certificate of Inspection and/or Treatment
A-32 Treatment Manual 03/2024-03
PPQ Form 203, Foreign Site Certificate of Inspection and/or
Treatment
Figure A-14 Example of PPQ Form 203, Foreign Site Certificate of Inspection and/or Treatment
According to the Paperwork Reduction Act of 1995, no persons are required to respond to a collection of information unless it displays a valid OMB control num ber. The
valid OMB control numbers for this information collection are 0579-0190 and 017 3. The time required to complete this information collection is estimated to a verage
.5 hours per response, including the time for reviewing instructions, searching existing data sources, gathering and maintaining the data needed, and completi ng and
reviewing the collection of information.
OMB APPROVED
0579-0190 and 0173
U.S DEPARTMENT OF AGRICULTURE
ANIMAL AND PLANT HEALTH INSPECTION SERVICE
PLANT PROTECTION AND QUARANTINE
1. CERTIFICATE NO. 2. COUNTRY OF ORIGIN
3. DATE LOADED 4. FOREIGN PORT OF EXPORT
FOREIGN SITE CERTIFICATE OF INSPECTION
AND/OR TREATMENT
5. CARRIER IDENTIFICATION 6. U.S. PORT OF ENTRY
7. SHIPPER (Name and Address - Include Zip Code) 8. CONSIGNEE (Name and Address - Include Zip Code)
10. NO. CONTAINERS
(Identify as box, sack,
1/2 Bruce box, flat,
cardboard box, etc.)
11. CONTAINER
IDENTIFICATION MARKS
9. COMMODITY
12. LOCATION OF INSPECTION AND/OR TREATMENT 13. DATE
This certifies that the shipment described above has been inspected and/or treated in accordance with agricultural requirements for
entry into the United States.
14. SIGNATURE OF PLANT PROTECTION AND QUARANTINE OFFICER 15. DATE ISSUED
PPQ FORM 203
(JUL 2007)

Appendix A Forms
PPQ Form 203, Foreign Site Certificate of Inspection and/or Treatment
03/2024-03 Treatment Manual A-33
Purpose
PPQ Form 203 verifies that PPQ has precleared the commodity it accompanies
(either through inspection or treatment) at the foreign site.
An electronic copy of this form is available in the APHIS-PPQ forms library.
Instructions
The Agriculture Specialist at Port of Entry (POE) examines this form when a
precleared commodity arrives at the port.
The APHIS officer completes this form at the foreign site where the
commodity is inspected or treated. The form may either be handwritten in ink
or typed. Use Table A-6 to decide what paperwork should be presented upon
the arrival of a precleared commodity.
Verify that any seals listed on the form are still intact. Also, confirm that the
information and conditions described on the form agree with the cargo
manifest, invoice, or any other CBP entry documents. Contact QPAS at 301-
851-2312 if any of the following occurs:
Information on the PPQ Form 203 does not match the entry documents
Table A-6 Determine Paperwork to Be Presented upon Arrival of a Precleared Commodity
If arriving from: And by:
Then the exporter or the exporter’s agent must provide the
following paperwork:
Australia, Japan, Korea,
or the Republic of South
Africa
Original (yellow or white) PPQ Form 203 for the commodity
Copy of the master PPQ Form 203 or original Phytosanitary
Certificate, specifying the number of units shipped or
remaining in cold storage from the master PPQ Form 203
Chile Vessel Original Chilean Phytosanitary Certificate
E-mail notification of the cargo on board and its status from
the IS Region II office to the POE
NOTE: No PPQ Form 203 will accompany the commodity
Air Original (yellow or white) PPQ Form 203 for the commodity
Original Chilean Phytosanitary Certificate
India or Thailand Original (yellow or white) PPQ Form 203 for the commodity
Original Indian or Thailand Phytosanitary Certificate
New Zealand Original PPQ Form 203 for the commodity, or a copy of the
master 203
If a master PPQ Form 203 is submitted, it must be
accompanied by an original “Details of Loading Certificate”,
which is a New Zealand Ministry of Agriculture form
specifying the number of units shipped or remaining in cold
storage from the master PPQ Form 203.
Other than a country
listed in the cells above
Original (yellow or white) PPQ Form 203 for the commodity

Appendix A Forms
PPQ Form 203, Foreign Site Certificate of Inspection and/or Treatment
A-34 Treatment Manual 03/2024-03
PPQ Form 203 is missing
Seals are broken
Instructions for Issuing Officer
The APHIS Issuing Officer will complete PPQ Form 203, as follows:
1. Type the form or write in ink.
2. Number the certificate using the numbering system assigned by the Area
Office with responsibility for the program.
3. If the commodity was treated, mark the form with the plant’s approved
stamp.
4. Fill in the remaining, self-explanatory information.
Distribution
Issuing Officer
The APHIS Issuing Officer will distribute PPQ Form 203 using Table A-7 as a
guide.
NOTICE
Refer to the Agricultural Commodity Import Requirements (ACIR) database for the
commodity being shipped. The commodity may be undergoing in-transit cold
treatment. If it is, you need to ensure that the commodity meets the time and
temperature requirements.
Table A-7 Distribution of PPQ Form 203, Foreign Site Certificate of Inspection
and/or Treatment
If: Then:
Original and first copy GIVE to the exporter (the original must be presented at
the first POE)
Copy SEND to the Area Office, IS, with responsibility for the
program
Copy RETAIN by the certifying APHIS officer
Copy (through the office of
cooperator)
1
1 This does not apply to all programs. Check the technical packet or with the IS Field Office in
Charge.
FAX a copy to the U.S. Port of Arrival
Copy ATTACH to trip report

Appendix A Forms
PPQ Form 556, In Transit Cold Treatment Clearance Report
03/2024-03 Treatment Manual A-35
PPQ Form 556, In Transit Cold Treatment Clearance Report
Figure A-15 Example of PPQ Form 556, In Transit Cold Treatment Clearance Report

Appendix A Forms
Worksite Specific Respiratory Protection Plan—Template
A-36 Treatment Manual 03/2024-03
Worksite Specific Respiratory Protection Plan—Template
A worksite specific respiratory protection plan is mandatory. Refer to
Figure A-16 through Figure A-23 for a generic template. Authorized users can
also refer to the Safety and Health Sharepoint site for other worksite plans.
Contact your FO Safety Manager for a site specific plan.
Figure A-16 Worksite Specific Respiratory Protection Plan—Template (page 1 of 8)
MANDATORY WORKSITE SPECIFIC RESPIRATORY PROTECTION PLAN
TEMPLATE
APHIS /PPQ FIELD OPERATIONS
RESPIRATORY PROTECTION PROGRAM
COMPLIANCE WITH THIS PUBLICATION IS MANDATORY
This operation instruction (OI) contains information and guidance for proper respirator selection, use, care
and maintenance. Template meets OSHA 29 CFR 190.134 Respiratory Protection requirements to
establish worksite specific plan.
DIRECTIONS:
1.1. Review Policy
1.2. Input your Program management position in accordance with identified font in black.
1.3. May edit or add specific procedures with approval of PPQ FO Safety and Health.
DOCUMENT APPROVAL:
1.4. Approval by Local Manager with signature/date
1.5. Approval by State Plant Health Director with signature/date
1.6. Approval by PPQ FO Safety Manager with signature/date
RECORDKEEPING:
1.7. Approved/signed copy (PDF file) of original must be sent to PPQ FO Safety Health Office.
1.8. Copy will be kept on Site, readily available for review.
-KWWSVXVGDJFFVKDUHSRLQWFRPVLWHVDSKLVSSTIOGRSVVDIHKHDOWK6LWH3DJHV334)2
5HVSLUDWRU\3URWHFWLRQDVS[

Appendix A Forms
Worksite Specific Respiratory Protection Plan—Template
03/2024-03 Treatment Manual A-37
Figure A-17 Worksite Specific Respiratory Protection Plan—Template (page 2 of 8)
TEMPLATE FOR SITE USE
RESPIRATORY PROTECTION PROGRAM
COMPLIANCE WITH THIS PUBLICATION IS MANDATORY
Approved By: NAME OF SPHD
This operation instruction (OI) contains information and guidance for proper respirator selection, use, care
and maintenance.
REFERENCES:
29 CFR 1910.134, Respiratory Protection
USDA APHIS Safety and Health Manual, Chap 11
GENERAL:
The use of respiratory protection should be a last resort. Substituting less hazardous materials or
processes, eliminating hazards through engineering changes or controls, isolating hazardous operations, or
providing administrative controls shall be considered before the decision is made to protect workers with
respirators.
No personnel may wear a respirator unless required or recommended by Site Supervisor in conjunction
with advice from Safety and Occupational Health Manager/Specialist.
CATEGORIES OF RESPIRATOR USAGE: Site Supervisor shall identify the location and use of all
respirators worn by employees.
Operation/Process
Type of
Respirator
Cartridge
Category
of Use
Type Change out
Frequency
Fumigation Process
Methyl Bromide
Readings > 5ppm
Full Face (SCBA) n/a n/a Required
Fumigation Process
Methyl bromide
Reading >1- < =4 ppm
APR ( Half Face)
or
APR (Full Face)
Organic
Vapor/Acid
Gas/P100
cartridges
-Change
immediately after
each use or if
air is restricted
when breathing
Required
Medical Clearance: Medical evaluation and clearance is required before performing tasks requiring use of
respirators in order to determine an employee is physically able to do the work and utilize the equipment
medically (ref. APHIS Safety and Health Manual, Chap 11, Sec 11.3.4, Para F) or (new ref. APHIS Safety
and Health Manual, Chap 7, Section 9, Dec. 2010). The evaluation must be performed by a physician or

Appendix A Forms
Worksite Specific Respiratory Protection Plan—Template
A-38 Treatment Manual 03/2024-03
Figure A-18 Worksite Specific Respiratory Protection Plan—Template (page 3 of 8)
licensed health care professional. Final evaluation approval shall be determined by an authorized APHIS
medical provider. The respirator user's medical status should be reviewed every year or as certifying
physician determines. The medical evaluation should include, as a minimum, an evaluation to identify
pulmonary and cardiovascular impairment.
Training: All personnel will receive initial respiratory protection training prior to wearing a respirator.
Periodic training will be accomplished by a work place supervisor annually. Documentation of the initial
and annual training will be documented on SF form 182 or equivalent. A copy of the training plan is
located in attachment 2.
Fit-Testing: After instruction, a quantitative fit-testing will be conducted. Contact Candace Robl for
assistance at (941) 359-3281. Fit Test documentation will be recorded and maintained by Site Supervisor.
Employees are only allowed to wear respirators for which they have been fit tested/trained. A respirator
fit-test shall be carried out for each wearer of a tight-fitting respirator at least once every 12 months. A
new fit test will be accomplished when a worker experiences a change in physical condition that could
affect respirator fit (e.g., weight change of more than 20 pounds, facial scarring, dental changes cosmetic
surgery, disfigurement, … etc.).
Program Compliance:
Site Supervisor: Supervisors will be familiar with the training/fit-testing status of all respirator wearers.
SF form 182 or computerized equivalent and 429 data base shall be used to record and track the date of the
most current certification. Supervisors will ensure personnel on the respirator protection program wear the
correct respiratory protection for which they have been fit-tested and trained prior to utilization.
Individuals: Individuals provided respiratory protection will use it according to the instructions and
training received. Report to their supervisor any change in medical status, which may impact their ability to
safely wear respiratory protection. Inspect, clean, and maintain any respiratory protection device issued to
them for their individual use. Wear only respiratory protection (mfg, make, model and size) for which they
have received fit-testing and training, and only for the tasks specified.
User Seal Check Procedures:
Workers who use tight-fitting respirators will perform positive and negative pressure checks to ensure
adequate seal is achieved each time the respirator is put on.
Positive Pressure Check: Close off exhalation valve and exhale gently into the face piece. The face fit is
considered satisfactory if a slight positive pressure can be built up inside the face piece without any
evidence of outward leakage of air at the seal. For most respirators this method of leak testing requires the
wearer to first remove the exhalation valve cover before closing off the exhalation valve and then carefully
replacing it after the test.
Negative Pressure Check: Close off inlet opening of the canister or cartridge(s) by covering with palm of
the hand(s) or by replacing the filter seal(s), inhale gently so that the face piece collapses slightly, and hold
breath for ten seconds. The design of the inlet opening of some cartridges cannot be effectively covered
with the palm of the hand; in those circumstances, covering the inlet opening of the cartridge with a thin
latex or nitrile glove can perform this test. If face piece remains in its slightly collapsed condition and no
inward leakage of air is detected, tightness of the respirator is considered satisfactory.
Respirator Sealing Problems:
A head covering which passes between the sealing surface of a tight-fitting respirator face piece and the
wearer’s face shall not be used.

Appendix A Forms
Worksite Specific Respiratory Protection Plan—Template
03/2024-03 Treatment Manual A-39
Figure A-19 Worksite Specific Respiratory Protection Plan—Template (page 4 of 8)
Wearing of protective equipment used by the wearer shall not interfere with seal of the respirator.
Personnel who are not clean-shaven or on a shaving waiver will not be permitted to wear a tight fitting
respirator. If personnel are on a shaving waiver they are disqualified from the tight fitting respirator
program until they can shave again.
Vision:
When a respirator user must wear corrective lenses, the wearer must use protective spectacles, goggles,
face shields or other eye and face protective devices such that the item shall be fitted to provide good
vision and shall be worn in such a manner as not to interfere with the proper seal of the respirator.
Spectacles with straps or temple bars that pass through the sealing surface of either negative or positive
pressure, tight-fitting, full-face piece respirators shall not be used.
Contact lenses will not be worn with respirators in a fuel systems repair area.
If an individual who must wear corrective lenses uses spectacle inserts with a full-face piece respirator,
then the government will purchase the spectacle inserts for the respirator, using a prescription provided by
the user.
Care, Inspection, and Maintenance of Respirators:
General Discussion: Each individual issued a respirator is responsible for its primary maintenance and
care. Supplied Air shall be of high purity and tested according to 29 CFR 1910.134(i)(1)(ii) . Copy
of results of breathing air shall be received form vendor and kept by supervisor or designated
Respiratory Program Manager.
Care:
Cleaning and sanitizing: Respirators issued to an individual shall be cleaned and sanitized at the end of
each day in which the respirator is used. Each respirator shall be cleaned and sanitized with MSA Cleaner
Sanitizer II before and after each use. (See Attachment 1)
Storage: Respirators shall be stored in a manner that will protect them against chemical agents and
physical agents such as vibration, shock, sunlight, heat, extreme cold, excessive moisture, or damaging
chemicals. Respirators shall be stored to prevent distortion of rubber or other elastomeric parts.
Respirators shall not be stored in such places as lockers and toolboxes unless they are protected from
contamination, distortion, and damage.
Inspection: The user shall inspect the respirator immediately before each use to ensure it is in proper
working condition. After cleaning and sanitizing, each respirator shall be inspected to determine if it is in
proper working condition, needs replacement of parts, needs repairs, or should be discarded. Air supplied
respirators will be inspected each month. Respirators, which do not meet applicable inspection criteria,
shall be immediately removed from service. Respirator inspection shall include a check for tightness of
connections; for the condition of the respiratory inlet covering, head harness, valves, connecting tubes,
harness assemblies, hoses, filters, cartridges and for the proper functioning of regulators, alarms, and other
warning systems. Each rubber or other elastomeric part shall be inspected for pliability and signs of
deterioration. The breathing air system shall be inspected to ensure it is fully charged prior to use
according to the manufacturer’s instructions.
Maintenance:
Only personnel trained in proper respirator maintenance and assembly shall do replacement of parts or
repairs.

Appendix A Forms
Worksite Specific Respiratory Protection Plan—Template
A-40 Treatment Manual 03/2024-03
Figure A-20 Worksite Specific Respiratory Protection Plan—Template (page 5 of 8)
Replacement parts shall be used only as designated for specific respirators.
Respiratory Documentation and Respirator Recordkeeping:
Site Supervisor establish and retain written information regarding medical evaluation, fit testing, respirator
training. Itemized PPE maintenance/care/cleaning and appropriate respirator cartridge/filter change-out
schedule shall be documented and retained. The documentation shall include User/respirator
model/cartridge type/change-out date/cleaning date/initials shall be readily available. The respirator itself
shall have a change-out date incorporated on the outside of each cartridge/filter which matches the latest
documentation entry.
Print Name / signature
POSITION or RESPONSIBLE SUPERVISOR
Attachments:
1. Respirator Cleaning Procedures
2. Respiratory Protection Shop Specific Training
3. Voluntary use of Respirator-Where Respirators are Not Required
Approved/Disapproved
Signature________________________________________Date_____________
Local Director/Manager
Signature________________________________________Date_____________
State Plant Health Director
Signature________________________________________Date____________
Safety and Health Office

Appendix A Forms
Worksite Specific Respiratory Protection Plan—Template
03/2024-03 Treatment Manual A-41
Figure A-21 Worksite Specific Respiratory Protection Plan—Template (page 6 of 8)
Attachment 1
RESPIRATOR CLEANING PROCEDURES
The following procedure is recommended for cleaning and disinfecting respirators:
1. Remove any filters, cartridges, canisters, or communication devices.
2. Wash face piece and breathing tube in a cleaner-disinfectant solution. Use a soft brush to facilitate
dirt removal.
3. Use MSA Cleaner Sanitizer II for proper sanitizing of respirators.
4. Rinse completely in clean, warm, water, which is less than or equal to 120 degrees F.
5. Air-dry in a clean area.
6. Clean other respirator parts as recommended by the manufacturer.
7. Inspect valves, head straps, and other parts; replace defective parts with new ones.
8. Insert new filters, cartridges, or canisters periodically as specified by the manufacturer; make sure
seal is tight.
9. Place in plastic bag or other closed container for storage.
10. Document cleaning date, respirator model and user for recordkeeping.

Appendix A Forms
Worksite Specific Respiratory Protection Plan—Template
A-42 Treatment Manual 03/2024-03
Figure A-22 Worksite Specific Respiratory Protection Plan—Template (page 7 of 8)
Attachment 2
SHOP SPECIFIC TRAINING LESSON PLAN
Respirator Requirement (Type and number of RP must be the same. Change to update for local
work unit)
This work center has a requirement for the use of XX different respirators.
List required respirators.
Why is a respirator required?
IAW USDA, PPQ Treatment Manual dated 1 Mar 2006 respirators are required when using
various fumigants during the following processes: Installing the exhaust system, opening the tarplin
for aeration, removing the tarpaulin if measured levels of fumigant are above 5 ppm and any time
during the aeration process when a risk of exposure to concentration above 5 ppm exists. This
includes any time the concentration is unknown.
Confined space incinerator inspection maintenance, cleaning and inspection of propagated material
shall require respirator use from possible unknown residual chemical exposure.
What are the potential acute and chronic health effects of exposure to the following material(s)?:
Headache, fatigue, skin irritation, loss of appetite, experience shortness of breath, dizziness,
unconsciousness, central nervous system depression, fever and death.
Weight of Respirators:
List weight of required respirators.
List Duration of Use.
List Frequency of Use.
List Expected Physical Work Effort.
List Additional Required PPE.
List Temperature/Humidity Extremes.
Administrative Controls.

Appendix A Forms
Worksite Specific Respiratory Protection Plan—Template
03/2024-03 Treatment Manual A-43
Figure A-23 Worksite Specific Respiratory Protection Plan—Template (page 8 of 8)
Attachment 3
Voluntary use of Respirator-Where Respirators are Not Required
APHIS may provide respirators at the request of employees if the Agency determines the respirator will not
in itself create a hazard. APHIS has determined disposable respirators will not be used when performing
PPQ plant inspection and incinerator duties. Disposable respirators do not protect against possible
contamination of pesticides. Disposable respirators will only protect against particulates at a given
efficiency rate and size. At a minimum, half face and or full face APR respirators with combination
VOC/HEPA cartridge shall be used when suspect possible unknown contaminates.

Appendix A Forms
Worksite Specific Respiratory Protection Plan—Template
A-44 Treatment Manual 03/2024-03

08/2012-79 Treatment Manual B-1
Appendix
B
Appendix B
Coast Guard Regulations
This Appendix contains information reprinted from 46CFR, October 1, 2011
Title 46—Shipping
Chapter 1—Coast Guard, Dept. of Transportation
Part 147A—Interim Regulations for Shipboard Fumigation
MINIMUM REQUIREMENTS
General
Sec. 147A.1 Purpose.
Sec. 147A.3 Applicability.
Sec. 147A.5 General requirement.
Sec. 147A.6 Right of Appeal.
Sec. 147A.7 Definitions.
Sec. 147A.9 Persons in charge of fumigation and the vessel; designation.
Sec. 147A.10 Notice to Captain of the Port.
Before Fumigation
Sec. 147A.11 Person in charge of fumigation; before fumigation.
Sec. 147A.13 Person in charge of the vessel, before fumigation.
During Fumigation
Sec. 147A.21 Person in charge of fumigation; during fumigation.
Sec. 147A.23 Person in charge of vessel; during fumigation.
Sec. 147A.25 Entry.
After Ventilation
Sec. 147A.31 Removal of fumigation material and warning signs.
SPECIAL REQUIREMENTS FOR FLAMMABLE FUMIGANTS
Sec. 147A.41 Person in charge of fumigation; flammable fumigants.
Sec. 147A.43 Other sources of ignition; flammable fumigants.
Authority: 46U.S.C. 5103; Department of Homeland Security Delegation, No.
0170.1.
Source: CGD 74-144, 39 FR 32998, Sept. 13, 1974, unless otherwise noted.

Appendix B Coast Guard Regulations
General
B-2 Treatment Manual 08/2012-79
General
Sec. 147A.1 Purpose.
The purpose of this part is to prescribe the requirements for shipboard
fumigation that are critical for the health and safety of the crew and any other
person who is on board a vessel during fumigation. These are interim rules
pending further study and promulgation of comprehensive regulations on
shipboard fumigation.
Sec. 147A.3 Applicability.
This part prescribes the rules for shipboard fumigation on vessels to which 49
CFR parts 171-179 apply under 49 CFR 176.5.
Sec. 147A.5 General requirement.
No person may cause or authorize shipboard fumigation contrary to the rules in
this part.
Sec. 147A.6 Right of Appeal.
Any person directly affected by a decision or action taken under this part, by or
on behalf of the Coast Guard, may appeal therefrom in accordance with
subpart 1.03 of this chapter.
Sec. 147A.7 Definitions.
As used in this part:
(a) Qualified person means a person who has experience with the particular
fumigant or knowledge of its properties and is familiar with fumigant detection
equipment and procedures, or an applicator who is certified by the
Environmental Protection Agency if his certification covers the fumigant that
is used.
(b) Fumigant means a substance or mixture of substances that is a gas or is
rapidly or progressively transformed to the gaseous state though some
nongaseous or particulate matter may remain in the space that is fumigated.
(c) Fumigation means the application of a fumigant on board a vessel to a
specific treatment space.
Sec. 147A.9 Persons in charge of fumigation and the vessel;
designation.
(a) The person, including any individual, firm, association, partnership, or
corporation, that is conducting a fumigation operation shall designate a person
in charge of fumigation for each operation.

Appendix B Coast Guard Regulations
Before Fumigation
08/2012-79 Treatment Manual B-3
(b) The operator of each vessel shall designate a person in charge of the vessel
for each fumigation operation.
Sec. 147A.10 Notice to Captain of the Port.
Unless otherwise authorized by the Captain of the Port, at least 24 hours before
fumigation the operator of the vessel shall notify the Coast Guard Captain of
the Port for the area where the vessel is to be fumigated, of the time and place
of the fumigation, and the name of the vessel that is to be fumigated.
Before Fumigation
Sec. 147A.11 Person in charge of fumigation; before
fumigation.
(a) The person in charge of fumigation shall notify the person in charge of the
vessel of:
(1) The space that is to be fumigated;
(2) The name, address, and emergency telephone number of the fumigation
company;
(3) The dates and times of fumigation;
(4) The characteristics of the fumigant;
(5) The spaces that are determined to be safe for occupancy paragraph
(b)(1)(i) of this section;
(6) The maximum allowable concentration of fumigant in spaces, if any, that
are determined to be safe for occupancy under paragraph (b)(1)(i) of this
section;
(7) The symptoms of exposure to the fumigant; and
(8) Emergency first aid treatment for exposure to the fumigant.
(b) The person in charge of fumigation shall ensure that:
(1) A marine chemist or other qualified person who has knowledge of and
experience in shipboard fumigation evaluates the vessel’s construction and
configuration and determines:
(i) Which spaces, if any, are safe for occupancy during fumigation; and

Appendix B Coast Guard Regulations
Before Fumigation
B-4 Treatment Manual 08/2012-79
(ii) The intervals that inspections must be made under Sec. 147A.21(a)(1);
(2) No persons or domestic animals are in the space that is to be fumigated
or the spaces that are designated as unsafe for occupancy under paragraph
(b)(1)(i) of this section;
(3) There is proper and secure sealing to confine the fumigant to the space
that is to be fumigated, including blanking off and sealing any ventilation
ducts and smoke detectors;
(4) The personal protection and fumigation detection equipment for the
fumigant that is to be used is on board the vessel;
(5) Warning signs are:
(i) Posted upon all gangplanks, ladders, and other points of access to the
vessel;
(ii) Posted on all entrances to the spaces that are designated as unsafe for
occupancy under paragraph (b)(1)(i) of this section; and
(iii) In accordance with 49 CFR 173.9(c) or section 8.10 of the General
Introduction of the International Maritime Dangerous Goods Code. The
word “unit” on the warning sign may be replaced with “vessel,” “barge,”
“hold,” or “space,” as appropriate.
(6) Watchmen are stationed at all entrances to:
(i) Spaces that are not determined to be safe for occupancy under
paragraph (b)(1)(i) of this section; or
(ii) The vessel, if no spaces are determined to be safe for occupancy
under paragraph (b)(1)(i) of this section.
Sec. 147A.13 Person in charge of the vessel, before
fumigation.
(a) After notice under Sec. 147A.11(a)(5), the person in charge of the vessel
shall notify the crew and all other persons on board the vessel who are not
participating in the fumigation of the spaces that are determined to be safe for
occupancy under Sec. 147A.11(b)(1)(i).
(b) If no spaces are determined to be safe for occupancy under Sec.
147A.11(b)(1)(i), the person in charge of the vessel shall ensure that the crew
and all persons who are not participating in the fumigation leave the vessel and
remain away during fumigation.

Appendix B Coast Guard Regulations
During Fumigation
08/2012-79 Treatment Manual B-5
During Fumigation
Sec. 147A.21 Person in charge of fumigation; during
fumigation.
(a) Until ventilation begins, or until the vessel leaves port, the person in charge
of fumigation shall ensure that a qualified person inspects the vessel as
follows:
(1) He must use detection equipment for the fumigant that is used to ensure
that the fumigant is confined to:
(i) The space that is fumigated, if partial occupancy is allowed under Sec.
147A.11(b)(1)(i).
(ii) The vessel, if no space is determined to be safe for occupancy under
Sec. 147A.11(b)(1)(i).
(2) He must make inspections at the intervals that are determined to be
necessary by the marine chemist or qualified person under Sec.
147A.11(b)(1)(i).
(b) If leakage occurs, the person in charge of fumigation shall:
(1) Notify the person in charge of the vessel that there is leakage;
(2) Ensure that all necessary measures are taken for the health and safety of
any person; and
(3) Notify the person in charge of the vessel when there is no danger to the
health and safety of any person.
(c) After the exposure period, if the vessel is in port, the person in charge of
fumigation shall ensure that fumigators or other qualified persons ventilate the
space that is fumigated as follows:
(1) Hatch covers and vent seals must be removed, other routes of access to
the atmosphere must be opened, and if necessary, mechanical ventilation
must be used.
(2) Personal protection equipment that is appropriate for the fumigant that is
used must be worn.
(d) If ventilation is completed before the vessel leaves port, the person in
charge of fumigation shall:

Appendix B Coast Guard Regulations
During Fumigation
B-6 Treatment Manual 08/2012-79
(1) Ensure that a qualified person, who is wearing the personal protection
equipment for the fumigant that is used if remote detection equipment is not
used, tests the space that is fumigated and determines if there is any danger to
the health and safety of any person, including a danger from fumigant that
may be retained in bagged, baled, or other absorbent cargo;
(2) Notify the person in charge of the vessel of this determination; and
(3) If it is determined that there is a danger:
(i) Ensure that all measures are taken that are necessary for the health and
safety of all persons; and
(ii) Notify the person in charge of the vessel when there is no danger to the
health and safety of any person.
Sec. 147A.23 Person in charge of vessel; during fumigation.
(a) The person in charge of the vessel shall ensure that the crew and all other
persons on board the vessel who are not participating in the fumigation restrict
their movement during fumigation to the spaces that are determined to be safe
for occupancy under Sec. 147A.11(b)(1)(i).
(b) The person in charge of the vessel shall ensure that the crew and all other
persons who are not participating in the fumigation follow any instructions of
the person in charge of fumigation that are issued under Sec. 147A.21(b)(2) or
(d)(3)(i) and that the vessel does not leave port if he is notified under:
(1) Section 147A.21(b)(1) that there is leakage, unless the person in charge of
fumigation notifies him under Sec. 147A.21(b)(3) of this subpart that there is
no danger; or
(2) Section 147A.21(d)(2) that there is a danger after ventilation, unless the
person in charge of the fumigation notifies him under Sec. 147A. 21(d)(3)(ii)
that there is no danger.
(c) If fumigation is not completed before the vessel leaves port, the person in
charge of the vessel shall ensure that personal protection and fumigant
detection equipment for the fumigant that is used is on board the vessel.
(d) If the vessel leaves port before fumigation is completed, the person in
charge of the vessel shall ensure that a qualified person makes periodic
inspections until ventilation is completed and this person shall use detection
equipment for the fumigant that is used to determine if:
(1) There is leakage of fumigant; or

Appendix B Coast Guard Regulations
During Fumigation
08/2012-79 Treatment Manual B-7
(2) There is a concentration of fumigant that is a danger to the health and
safety of any person.
(e) If the qualified person determines under paragraph (d) of this section that
there is leakage or a concentration of fumigant that is a danger to the health and
safety of any person, the person in charge of the vessel shall take all measures
that are, in his discretion, necessary to ensure health and safety of all persons
who are on board the vessel. If the danger is due to leakage, he shall also
ensure that qualified persons immediately ventilate in accordance with
paragraphs (c)(1) and (2) of Sec. 147A.21.
(f) If the vessel leaves port during the exposure period, the person in charge of
the vessel shall ensure that the space that is fumigated is ventilated by qualified
persons after the exposure period in accordance with paragraphs (c)(1) and (2)
of Sec. 147A.21.
(g) If ventilation is completed after the vessel leaves port, the person in charge
of the vessel shall ensure that a qualified person, who is wearing the personal
protection equipment for the fumigant that is used if remote detection
equipment is not used, tests the space that is fumigated to determine if there is
a danger to the health and safety of any person, including a danger from
fumigant that may be retained in bagged, baled, or other absorbent cargo. If the
qualified person determines that there is a danger, the person in charge of the
vessel shall take all measures that are, in his discretion, necessary to ensure the
health and safety of all persons who are on board the vessel.
Sec. 147A.25 Entry.
(a) No person may enter the spaces that immediately adjoin the space that is
fumigated during fumigation unless entry is for emergency purposes or the
space is tested and declared safe for human occupancy by a marine chemist or
other qualified person and is inspected under Sec. 147A.21(a)(2) or Sec.
147A.23(d).
(b) If entry is made for emergency purposes:
(1) No person may enter the space that is fumigated or any adjoining spaces
during fumigation unless he wears the personal protection equipment for the
fumigant that is in use;
(2) No person may enter the space that is fumigated unless the entry is made
by a two person team; and
(3) No person may enter the space that is fumigated unless he wears a lifeline
and safety harness and each lifeline is tended by a person who is outside the

Appendix B Coast Guard Regulations
After Ventilation
B-8 Treatment Manual 08/2012-79
space and who is wearing the personal protection equipment for the fumigant
that is in use.
After Ventilation
Sec. 147A.31 Removal of fumigation material and warning
signs.
After ventilation is completed and a marine chemist or other qualified person
determines that there is no danger to the health and safety of any person under
Sec. 147A.21(d) or Sec. 147A.23(g), the person in charge of fumigation or, if
the vessel has left port, the person in charge of the vessel shall ensure that all
warning signs are removed and fumigation containers and materials are
removed and disposed of in accordance with the manufacturer’s
recommendations.
Special Requirements for Flammable Fumigants
Sec. 147A.41 Person in charge of fumigation; flammable
fumigants.
(a) The person in charge of fumigation shall ensure that:
(1) Before the space that is to be fumigated is sealed, it is thoroughly cleaned,
and all refuse, oily waste, and other combustible material is removed;
(2) Before fumigation, all fire fighting equipment, including sprinklers and
fire pumps, is in operating condition; and
(3) Before and during fumigation, electrical circuits that are in the space that
is fumigated are de-energized.
(b) [Reserved]
Sec. 147A.43 Other sources of ignition; flammable fumigants.
While the space that is fumigated is being sealed or during fumigation, no
person may use matches, smoking materials, fires, open flames, or any other
source of ignition in any spaces that are not determined to be safe for
occupancy under Sec. 147A.11(b)(1)(i).

10/2016-01 Treatment Manual C-1
Appendix
C
Appendix C
Conversion Tables
Table C-1 Conversion Tables
To convert from: To: Multiply by:
Acres (a) Hectares (ha) 0.4047
Acres (a)
Square meters (m
2
)
4,047.0
Celsius Fahrenheit 9/5 (then add 32)
Centimeters, cu. (cm
3
) Cubic inches (in
3
)
0.061
Centimeters, sq. (cm
2
) Square inches (in
2
)
0.155
Centimeters (cm) Inches (in) 0.3937
Fahrenheit Celsius First subtract 32,
then multiply by 5/9
Feet, cubic (ft
3
)
Liters (L) 28.32
Feet, cubic (ft
3
) Cubic meters (m
3
)
0.0283
Feet, square (ft
2
) Square meters (m
2
)
0.0929
Feet, square (ft
2
) Sq. centimeters (cm
2
)
929.0
Feet (ft) Centimeters (cm) 30.48
Feet (ft) Meters (m) 0.3048
Gallons (gal) Liters (L) 3.785
Grams (g) Ounces (oz) 0.0353
Hectares (ha) Acres (a) 2.471
Inches (in) Centimeters (cm) 2.54
Inches, square (in
2
) Sq. centimeters (cm
2
)
6.4516
Inches, cubic (in
3
) Cu. centimeters (cm
3
)
16.387
Kilograms (kg) Pounds (lb) 2.205
Kilograms (kg) Ounces (oz) 35.27
Kilometers, sq. (km
2
) Square miles (mi
2
)
0.3861
Kilometers, sq. (km
2
)
Acres (a) 247.1
Kilometers (km) Miles (mi) 0.6214
Liters (L) Gallons (gal) 0.2642
Liters (L) Quarts (qt) 1.0567
Meters, cubic (m
3
) Cubic feet (ft
3
)
35.314
Meters, cubic (m
3
) Cubic yards (yd
3
)
1.308
Meters (m) Feet (ft) 3.281
Meters (m) Yards (yd) 1.0936
Meters, sq. (m
2
) Square inches (in
2
)
1,550.00
Meters (m) Inches (in) 39.37

Appendix C Conversion Tables
C-2 Treatment Manual 10/2016-01
Miscellaneous:
Pounds per acre (lb/a) x 1.1206 = kg/ha
Ounces (liquid) per acre x 73.14 = ml/ha
Gallons per acre (gal/a) x 9.3527 = liters per hectare (L/ha)
Pressure per square inch (PSI) x 6.894757 = kilopascals (kPa)
Inches mercury x 3.38 = kilopascals (kPa)
Kilogram per hectare (kg/ha) x 0.8924 = pounds per acre
Milliliters per hectare x 0.01367 = ounces (lq.) per acre
Liters per hectare (L/ha) x 0.1069 = gallons per acre
Kilopascals (kPa) x 0.145038 = pounds per square inch (PSI)
Grams per liter x 0.008345 = pounds per gallon
Kilopascals (kPa) x 0.29586 = inches mercury
Pound per cubic feet = 0.016 grams per cubic meter
Meters, sq. (m
2
) Square feet (ft
2
)
10.764
Miles, square (mi
2
)
Hectares (ha) 258.99
Miles, square (mi
2
) Sq. kilometers (km
2
)
2.5899
Miles, statute (mi) Meters (m) 1,609.347
Miles, statute (mi) Kilometers (km) 1.609
Milliliters (ml) Liquid ounces (lq oz) 0.0338
Nautical miles Meters (m) 1,852.00
Ounces, fluid (fl oz) Milliliters (ml) 29.57
Ounces (oz) Kilograms (kg) 0.0284
Ounces (oz) Grams (gm) 28.35
Pounds (lb) Kilograms (kg) 0.4536
Pounds (lb) Grams (g) 453.6
Quarts (qt) Liters (L) 0.9464
Tons, short (2000 lb) Metric tons (t) 0.9072
Tons, Metric (t) Tons, short 1.102
Yards, cubic (yd
3
)
Liters (L) 764.6
Yards, cubic (yd
3
) Cubic meters (m
3
)
0.765
Yards (yd) Meters (m) 0.9144
Yards (yd) Centimeters (cm) 91.44
Table C-1 Conversion Tables (continued)
To convert from: To: Multiply by:

04/2021-46 Treatment Manual D-1
Appendix
D
Appendix D
APHIS Certified Treatment Facilities and
Conveyances
Refer to Table D-1 for hyperlinks to lists of USDA-APHIS-PPQ certified
treatment facilities, vessels, and containers.
Table D-1 Hyperlinks to Lists of Certified Treatment Facilities, Vessels, and
Containers
Type Hyperlink
Cold treatment facilities United States- APHIS Certified Col
d Treatment Facilities
Fumigation providers in
the
Uniited States under
APHIS compliance
agreement
United States- Import Fumigation Treatment Facilities Under
APHIS Compliance Agreement
Grinding and processing
tr
eatment facilities in the
United States
United States- APHIS Certified Grinding and Processing
Treatment Facilities
Heat treatment facilities
in the Uni
ted States
United States- APHIS Certified Heat Treatment Facilities
Irradiation facilities United States- APHIS Certified Irra
diation Treatment Facilities
Maritime containers and
vessels
https://vessels.cphst.org/

Appendix D APHIS Certified Treatment Facilities and Conveyances
D-2 Treatment Manual 04/2021-46

05/2023-66 Treatment Manual E-1
Appendix
E
Appendix E
Reference Guide to Commercial Suppliers of
Treatment and Related Safety Equipment
This list is not intended to be all inclusive and is intended to be a reference
guide solely for the convenience of potential users, particularly PPQ plant
inspection stations. No endorsement is intended of the particular items listed,
and no discrimination is intended toward those products or companies that
may not be listed.
Products
Aeration Duct, Flexible E-4
Aerosol Insecticides E-4
Air Pump, Auxiliary E-5
Air-Purifying Respirator E-5
Air Velocity Measuring (Anemometer) E-6
Aluminum Phosphide E-7
Applicator (Dispenser) for Methyl Bromide E-8
Ascarite II E-8
Balances, Portable (for Weighing Individual Fruit) E-8
Batch Systems (Complete Installations, Hot Water Immersion Treatments)
E-9
Blower E-12
Bubble Fumigation System E-12
Cascade Air Tank Recharging System (for SCBA) E-12
Chain Hoist (Electronic) (for Hot Water Immersion Treatments) E-12
Consultants (for Hot Water Immersion Treatments) E-13
Curtains (Air, Safeguarding) E-14
Digital Thermistor Instrument (Hand-Held for Hot Water Immersion
Treatments) and Portable Sensors (Used in Performance Test) E-14
Drierite® (Anhydrous Calcium Sulfate) E-16
Electrochemical Gas Sensor and Pyrolyzer E-16
Exhaust Duct (Tube), Flexible E-16
Fans E-17
Fruit Crates (Plastic for Hot Water Immersion Treatments) E-17
NOTICE
Product manufacturer names and addresses are subject to change without notice.
PPQ does not routinely verify the accuracy of the information in this Appendix.

Appendix E Reference Guide to Commercial Suppliers of Treatment and Related Safety Equipment
Products
E-2 Treatment Manual 05/2023-66
Fruit Sizing Equipment (Automatic) E-17
Fumigators, Commercial E-17
Fungicides E-17
Gas Analyzers E-19
Gas Detector Tube (Colorimetric) and Apparatus E-20
Gas Drying Tube for Drierite® E-21
Germicides/Disinfectants E-22
Halide Gas Leak Detector (removed) E-22
Incinerators E-22
Magnesium Phosphide E-22
Manometer (Used in Pressure Leakage Test) E-23
Metam-Sodium E-25
Methyl Bromide E-25
Moisture Meter (For Wood) E-27
Newsletters and Trade Journals E-27
Packaging—Non-Routine USDA-Approved For Fumigation E-28
Packaging—USDA-Approved For Modified Atmosphere Irradiation E-29
Packaging—USDA-Approved For Cold Treatment E-30
Photo Ionization Detector E-31
Remote Data Transmission Systems E-31
Safety Equipment E-31
Scale (Portable Platform) E-31
Sealing Tape E-32
Self-Contained Breathing Apparatus (SCBA) E-32
Smoking Candle E-33
Snakes (Sand or Water Snakes) E-33
Soil Fumigants E-33
Spill Recovery Materials E-34
Steam Boilers (for Hot Water Immersion Treatments) E-34
Steam Generators E-35
Steam Sterilizers/Autoclaves E-35
Sulfuryl Fluoride (Vikane) E-35
Tarpaulins E-35
Temperature Recorders (Portable Type) for Cold Treatment in Self-Regulated
Containers E-36
Temperature Recorders/Controllers (Built-In Type) for Cold Treatment in Self-
Regulated Containers E-37
Temperature Recorders (Portable Type) for Cold Treatment in Warehouses
E-39
Temperature Recorders for Hot Water Immersion Treatment E-40
Temperature Recorders and Sensors—High Temperature (Niger Seed) E-43
Thermocouple Wire E-43
Thermometers E-44
Thermometers, Glass Mercury, Certified Precision E-45
Thermometers, Glass Non-mercury, Certified Precision E-47

Appendix E Reference Guide to Commercial Suppliers of Treatment and Related Safety Equipment
Products
05/2023-66 Treatment Manual E-3
Thermometers, Digital, Certified Precision E-47
Thermometers, Certified Precision, Approved Calibration Companies E-51
Thermometers, Recorders, and Sensors—General Use E-52
Tubing, Gas-Sampling E-54
Vacuum Pump E-54
Vapam E-55
Vapor Heat/Forced Hot Air (VH/FHA) Chamber Manufacturers E-55
Vapor Heat/Forced Hot Air (VH/FHA) Recorders E-55
Volatilizer E-56
Warning Signs and Placards E-57

Appendix E Reference Guide to Commercial Suppliers of Treatment and Related Safety Equipment
Aeration Duct, Flexible
E-4 Treatment Manual 05/2023-66
Aeration Duct, Flexible
(specify diameter and length)
Biesterfeld, U.S. Inc.
200 Madison Avenue
New York, NY 10016
Resmethrin
Fumigation Service and Supply, Inc.
16950 Westfield Park Road
Westfield, IN 46074
Aerosol Insecticides
Gilmore Marketing and Development, Inc.
80 Monroe Street, Suite G1
Memphis, TN 38103
Otis Laboratory
USDA-APHIS-PPQ-S&T
1398 W. Truck Road
Buzzards Bay, MA 02542
10% d-phenothrin
Southern Agricultural Insecticides, Inc.
Mailing Address:
P.O. Box 218
Palmetto, FL 34220
Physical Address:
7400 Bayshore Road
Rubonia, FL 34221
Resmethrin

Appendix E Reference Guide to Commercial Suppliers of Treatment and Related Safety Equipment
Air Pump, Auxiliary
05/2023-66 Treatment Manual E-5
Air Pump, Auxiliary
Barnant
(Sold as Thermo Scientific brand)
28W092 Commercial Avenue
Barrington, IL 60010
Cole-Parmer
625 East Bunker Court
Vernon Hills, IL 60061
“Air Cadet” Vacuum/Pressure Pump; Single-J7530-40; dual J7530-60)
McMaster-Carr Supply Co.
P.O. Box 740100
Atlanta, GA 30374-0100
Hand-held Mityvac® vacuum/pressure pump, zinc alloy, cat. no.
9963K12)
Air-Purifying Respirator (gas masks with cartridge for organic vapors)
Thermo Scientific
81 Wyman Street
Waltham, MA 02454
Air-Purifying Respirator
Air purifying respirators are available from many different companies,
including but not limited to Mine Safety Appliances (MSA), ULine, Northern
Safety and Industrial, Grainger, etc.
APHIS-approved air purifying respirators are:
MSA Advantage (half face) 420 and (full face) 1000
3M (half face) 6100, 6200, 6300 and (full face) 6700, 6800, 6900
North (half face) 7700 and (full face) 76008AS, 76008A
Survivair/Sperian (half face) 250000, 260000, 270000
For APHIS-approved cartridges, contact a PPQ Field Operations Safety and
Health Manager for approved organic vapor/acid gas N95 P100 cartridges.

Appendix E Reference Guide to Commercial Suppliers of Treatment and Related Safety Equipment
Air Velocity Measuring (Anemometer)
E-6 Treatment Manual 05/2023-66
Air Velocity Measuring (Anemometer)
Extech Instruments
®
9 Townsend West
Nashua, NH 03063
Mini Thermo-Anemometer Model #45118; Mini Thermo-Anemometer
with humidity model #45158
NK Nielson-Kellerman
21 Creek Circle
Boothwyn, PA 19061
Kestrel
®
Pocket Wind Meters (all models)
Trutech Tools
515 Turkey Foot Lake Road
Akron, OH 44319
Testo 417 Large Vane Anemometer
TSI, Inc. Alnor Products
500 Cardigan Road
Shoreview, MN 55126
Velometer Jr.
®

Appendix E Reference Guide to Commercial Suppliers of Treatment and Related Safety Equipment
Aluminum Phosphide
05/2023-66 Treatment Manual E-7
Aluminum Phosphide
Degesch America, Inc.
P.O. Box 116
153 Triangle Drive
Weyers Cave, VA 24486
Fumigation Service and Supply, Inc.
16950 Westfield Park Road
Westfield, IN 46074
Gilmore Marketing and Development, Inc.
80 Monroe Street, Suite G1
Memphis, TN 38103
Helena Chemical Co.
225 Schilling Boulevard, Suite 300
Collierville, TN 38017
ICD Group Metals, LLC
600 Madison Avenue
New York, NY 10022-1615
INCHEMA, Inc.
180 Old Tappan Road, Building 6
Old Tappan, NJ 07675
Loveland Products, Inc.
3005 Rocky Mountain Avenue
Loveland, CO 80538
Pestcon Systems, Inc.
1808 Firestone Parkway
Wilson, NC 27893-7991

Appendix E Reference Guide to Commercial Suppliers of Treatment and Related Safety Equipment
Applicator (Dispenser) for Methyl Bromide
E-8 Treatment Manual 05/2023-66
United Suppliers, Inc.
Box 538
30473 260th Street
Eldora, IA 50627
Applicator (Dispenser) for Methyl Bromide (sight gauges calibrated in ml,
grams, or pounds)
Applicator (Dispenser) for Methyl Bromide
Vuscamante North
(Attn: Sr. Maurilio Plata)
307 Montemorelos
Nuevo Leon, Mexico
Ascarite II
(Granules of sodium hydroxide-coated silica used to remove carbon dioxide
from gas samples)
Fisher Scientific
2000 Park Lane Drive
Pittsburgh, PA 15275
Sigma-Aldrich Chemical Company, Inc.
6000 North Teutonia Avenue
Milwaukee, WI 53209
Thomas Scientific
P.O. Box 99
99 High Hill Road at I-295
Swedesboro, NJ 08085-0099
Balances, Portable (for Weighing Individual Fruit)
Ohaus Corporation
7 Campus Drive
Suite 310
Parsippany, NJ 07054

Appendix E Reference Guide to Commercial Suppliers of Treatment and Related Safety Equipment
Batch Systems (Complete Installations, Hot Water Immersion Treatments)
05/2023-66 Treatment Manual E-9
Batch Systems (Complete Installations, Hot Water Immersion
Treatments)
Agri Machinery and Parts, Inc.
3489 All American Boulevard
Orlando, FL 32810
Agroindustrias Entegradas, S.A. de C.V.
Calle Cernicalo, No. 590
Col. Mor. S.H.C.P. 44490
Guadalajara, Jalisco
Mexico
Calderas Astro, S.A. de C.V.
Jose Herrera, No. 607-B
C.P. 36350
San Francisco del Rincon
Guanajuato, Guan.
Mexico
Construcciones Pyrsa
Depto. de Ingenieria
Anil No. 100
Col. Los Pinos
Celaya, Guanajuato
Mexico
Consultecnia
3a Calle 28-70, Zona 1
Quetzaltenango
Apartado Postal 537-1
Guatemala
Dica de Mexico, S.A.
Corretera - Navolato, km 8
Culiacan, Sinaloa
Mexico

Appendix E Reference Guide to Commercial Suppliers of Treatment and Related Safety Equipment
Batch Systems (Complete Installations, Hot Water Immersion Treatments)
E-10 Treatment Manual 05/2023-66
Diseños y Maquinaria Jer, S.A. de C.V. (“Jersa”)
Emiliano Zapata, No. 51-A
Cuatitlan Izcalli
Estado do Mexico, C.P. 54710
Mexico
Equipos Agroindustriales de Occidente, S.A. de C.V.
Avenida Washington, No. 1370
Guadalajara, Jalisco
Mexico
Frutico International
P.O. Box 35-A
Avenida Vallarta 2095
Culiacan, Sinaloa
Mexico
Guiar Industrial, S.A. de C.V.
Rayon No. 989
Colonia Moderna, Sector Juarez
Guadalajara, C.P. 44190, Jalisco
Mexico
“System Model No. 63-89”
Industria de Maquinas Agricolas GB Ltda.
Via Anhanguera, Km 150
Limeira / Sao Paulo
Brazil CEP 13480-970-Cx. Pt. 385
Industrial Equipment & Engineering Co. (I.E. & E.)
2045 Sprint Boulevard
Apopka, FL 32703

Appendix E Reference Guide to Commercial Suppliers of Treatment and Related Safety Equipment
Batch Systems (Complete Installations, Hot Water Immersion Treatments)
05/2023-66 Treatment Manual E-11
NOJOXTEN S.A. de C.V.
Eduardo Velazquez
Av Santa Margarit Razoa #283
Santa Margarita
Zapopan, Jalisco CP 45140
Mexico
NOJOXTEN-BR Automation Studio V3.09 IEC 61131-3-ST)
Produce Sorters International
7403 West Sunnyview Avenue
Visalia, CA 93291
Proyect Asesoria Industrial
Av. Los Diplomaticos 1318
San Salvador, El Salvador
or
8a Avenida 33-10, Zona 11
Guatemala, Guatemala
Pyrsa de Celaya
Calle Violeta No. 1204
Colonia Las Flores
Celaya, Guanajuato
Mexico
Silsa, S.A. de C.V.
Avenida Acueducto
597 Planta Alta
Colonia Tecoman
07330 Mexico 14, D.F.
Mexico
William B. Cresse, Inc.
117 Commerce Avenue
Lake Placid, FL 33852

Appendix E Reference Guide to Commercial Suppliers of Treatment and Related Safety Equipment
Blower
E-12 Treatment Manual 05/2023-66
Blower
(Used in pressure leakage test; may also be used to evacuate a fumigation
chamber)
W.W. Grainger, Inc.
Branch offices in various cities
William W. Meyer & Sons, Inc.
1700 Franklin Boulevard
Libertyville, IL 60048-4407
Bubble Fumigation System
Inflatable tarpaulin
B&G Equipment Company
135 Region South Drive
Jackson, GA 30233
Power Plastics
Station Road
Thirsk, N. Yorkshire Y07 1PZ
England
Cascade Air Tank Recharging System (for SCBA)
Mine Safety Appliance Co. (MSA)
1000 Cranberry Woods Drive
Cranberry Twp, PA 16066
Chain Hoist (Electronic) (for Hot Water Immersion Treatments)
Chemonics
1717 H Street, NW
Washington, DC 20006
Post-harvest advice; international consulting)

Appendix E Reference Guide to Commercial Suppliers of Treatment and Related Safety Equipment
Consultants (for Hot Water Immersion Treatments)
05/2023-66 Treatment Manual E-13
Columbus McKinnon Corp.
Industrial Products Division
140 John James Audubon Parkway
Amherst, NY 14228
Lodestar electronic chain hoist, capacity to 3 tons
Consultants (for Hot Water Immersion Treatments)
C.C. Coutinho Consulting
Av. Princess Leopddina, 238
Ap. 101 D
Graca - Ed Olga Pontes
Cep 40150-080 Salvador, Bahia
Brazil
USDA-APHIS-PPQ Science and Technology
USDA-APHIS-PPQ-S&T-TMT
13601 Old Cutler Road, Bldg. 63
Miami, FL 33158 USA
APHIS technical contact; approval of plans and drawings
Consultecnia
3a Calle 28-70, Zona 1
Quetzaltenango
Aparto Postal 537-1
Guatemala
Dica de Mexico, S.A.
Corretera - Navolato, km 8
Culiacan, Sinaloa
Mexico
Frutico International
P.O. Box 35-A
Avenida Vallarta 2095
Culiacan, Sinaloa
Mexico

Appendix E Reference Guide to Commercial Suppliers of Treatment and Related Safety Equipment
Curtains (Air, Safeguarding)
E-14 Treatment Manual 05/2023-66
GEC Instruments
5530 NW 97th Street
Gainesville, FL 32653
Engineering consulting
Nojoxten
Sta. Martha No. 276-A Col. Sta.
Margarita C.P. 45140
Zapopan, Jalisco
Mexico
North Bay Produce, Inc.
10a Calle 1-4, Zona 9
Guatemala, Guatemala
Societe d’Entretien & d’Installation (SODEIN)
Route de Carrefour #83
P.O. Box 995
Port-au-Prince, Haiti
Installation of temperature recording equipment, especially the Chessel
346
Curtains (Air, Safeguarding)
W.W. Grainger, Inc.
Branch offices in many cities
Digital Thermistor Instrument (Hand-Held for Hot Water Immersion
Treatments) and Portable Sensors (Used in Performance Test)
Advanced Industrial Services, Inc. (AIS)
3250 Susquehanna Trail
York, PA 17406
YSI 400 series thermister sensors
Allied Electronics
15721 NW 60th Avenue

Appendix E Reference Guide to Commercial Suppliers of Treatment and Related Safety Equipment
Digital Thermistor Instrument (Hand-Held for Hot Water Immersion Treatments) and Portable Sensors (Used in Performance
05/2023-66 Treatment Manual E-15
Miami Lakes, FL 33014
(Additional sales outlets in other cities)
Instruments include Cooper Instrument Corp.’s Model TM99A, and
thermister sensors with submersible 10 or 20 ft. cord, Catalog No. 2010
Contech
Rafael G. De Avila Aceves
Miguel Galindo 2033, J. del Country
Guadalajara, Jalisco, Mexico, C.P. 44210
Term 2252 thermometer; sensors SP20758-1 (see Measurement
Specialties) and adapter Part #364-A for Oakton Acorn Temp 4) and
sensors with YSI 400 series sensors (see Advanced Industrial Services,
Inc. (AIS))
Cooper Instrument Corp.
33 Reeds Gap Road
Middlefield, CT 06455
(Note: This company manufactures the Cooper instruments sold by Allied
Electronics, but does not sell directly to retail customers.)
Oakton Instruments
P.O. Box 5136
Vernon Hills, IL 60061
Acorn® Temp 4 Meter: use 400 series thermistor probe. Suggested
general purpose probes are:
Oakton air probe #WD-08491-08
Oakton penetration probe #WD-08491-16
Oakton general purpose probe 10, 50, or 100 feet #WD-08491-02,
#WD-08491-03, #WD-08491-04
Oakton Acorn® Temp 5 #EW-35626-10
Oakton products can be purchased at numerous distributors such as Cole-
Parmer, Davis Instruments, etc.
Recommended temperature sensors for Acorn® Temp 4.5 and 6 are from
Measurement Specialties.
Measurement Specialties
2670 Indian Ripple Road
Dayton, OH 45440
Sensor Model SP20758-1, long term immersion sensor with 4-meter cable
for use with Acorn® Temp 4, 5, an 6. Use Switchcraft adapter Part #364-

Appendix E Reference Guide to Commercial Suppliers of Treatment and Related Safety Equipment
Drierite
®
(Anhydrous Calcium Sulfate)
E-16 Treatment Manual 05/2023-66
A to connect sensor to Acorn® Temp 4, 5, and 6. Two conductor adapters
from 3.5mm to phone jack mono to 6.35 phone jack mono.
Switchcraft, Inc.
555 N. Elston Ave.
Chicago, IL 60630
Adapter Part #364-A (to connect SP20758-1 to the Acorn® Temp 4
Drierite
®
(Anhydrous Calcium Sulfate)
Fisher Scientific
2000 Park Lane Drive
Pittsburgh, PA 15275
Sigma-Aldrich Chemical Company, Inc.
6000 North Teutonia Avenue
Milwaukee, WI 53209
W.A. Hammond Drierite Co. (Manufacturer)
138 Dayton Avenue
Xenia, OH 45385
Electrochemical Gas Sensor and Pyrolyzer
PureAir Monitoring Systems, Inc.
557 Capital Drive
Lake Zurizh, IL 60047
Exhaust Duct (Tube), Flexible
Stock sizes available in diameters of 12, 16, and 24 inches. Available in 10 and
20 feet lengths, which may be attached by a ring coupling.
Gaskets, Inc.
301 W. Highway 16
Rio, WI 53960

Appendix E Reference Guide to Commercial Suppliers of Treatment and Related Safety Equipment
Fans
05/2023-66 Treatment Manual E-17
Super Vacuum Manufacturing Company, Inc.
P.O. Box 87
Loveland, CO 80539-0087
Fans
Super Vacuum Manufacturing Company, Inc.
P.O. Box 87
Loveland, CO 80539-0087
Fruit Crates (Plastic for Hot Water Immersion Treatments)
No listings.
Fruit Sizing Equipment (Automatic)
Hortagro International, b.v.
P.O. Box 4050
8901 EB Leeuwarden
Holland
Mechanical weight sizer with conveyor belt
Kerian Machines, Inc.
1709 Highway 81 South
P.O. Box 311
Roller type of sizing equipment
Fumigators, Commercial
Refer to your preferred Internet search engine to locate commercial
fumigators.
Fungicides
Bordeaux Mixture (hydrated lime + copper sulfate)

Appendix E Reference Guide to Commercial Suppliers of Treatment and Related Safety Equipment
Fungicides
E-18 Treatment Manual 05/2023-66
Chemtura Corporation
199 Benson Road
Middlebury, CT 06749
Product name: Nutra-Spray, Captan
Crystal Chemical Inter-America
6800 SW. 40th Street, Suite 499
Miami, FL 33155-3708
Product Name: Captanex
Drexel Chemical Co.
P.O. Box 13327
Memphis, TN 38113-0327
Phone: (901) 774-4370
Syngenta
1800 Concord Pike
P.O. Box 8353
Wilmington, DE 19803
Ferbam
Cytec Industries, Inc.
5 Garrett Mountain Plaza
West Patterson, NJ 07424
Product names: Carbamate WDB, Ferbam 76 WDG, Ferbam Granuflo
FMC Agricultural Products
Chemical Group
1735 Market Street
Philadelphia, PA 19103
Product names: Carbamate, Mancozeb
Arkema, Inc.
2000 Market Street
Philadelphia, PA 19103-3222
Product name: Penncozeb 80 WP
Rohm and Haas
100 Independence Mall West
Philadelphia, PA 19106

Appendix E Reference Guide to Commercial Suppliers of Treatment and Related Safety Equipment
Gas Analyzers
05/2023-66 Treatment Manual E-19
Product names: Dithane, Thiram
Bayer CropScience LP
P.O. Box 12014
2 T.W. Alexander Drive
Research Triangle Park, NC 27709
Product names: Cuprothex Super Mix
Cytec Industries, Inc.
5 Garrett Mountain Plaza
West Patterson, NJ 07424
Product names: Tech TMTD, Thianosan, THiLor, Thipel, Thiram
Granuflo, Thiram 65, Thiram 75-WDG, Zineb
Gas Analyzers
Analytical Technology, Inc.
6 Iron Bridge Drive
Collegeville, PA 19426
PortaSens Phosphine Detector
EB & S Solutions
6587 66th Avenue North
Pinellas Park, FL 33781

Appendix E Reference Guide to Commercial Suppliers of Treatment and Related Safety Equipment
Gas Detector Tube (Colorimetric) and Apparatus
E-20 Treatment Manual 05/2023-66
Interscan Corporation
4590 Ish Drive, #110
Simi Valley, CA 93063
Interscan Model GF 1900 pyrolysis unit, sensitive to SF at 0–50 ppm.)
Key Chemical and Equipment Co., Inc.
13195 49th Street North, Unit A
Clearwater, FL 33762
Fumiscope, Models D, 4.0, 4.2, and 5.12
Neal Systems, Inc.
122 Terry Drive
Newtown, PA 18940
Porta-Sens Phosphine Detector
Pest Fog, Inc.
1424 Bonita
P.O. Box 3703
Corpus Christi, TX 78463
Spectros Instruments, Inc.
17D Airport Road
Hopedale, MA 01747
Methyl bromide monitor MB-ContainIR
Sulfuryl fluoride monitor SF-Contain IR
Gas Detector Tube (Colorimetric) and Apparatus
APHIS/NOAA Centralized Warehouse
(must order by Fedstrip procedure)
FTS: 758-6222 (Draeger tubes)
Draeger Safety, Inc.
101 Technology Drive
Pittsburgh, PA 15275-1057
Draeger tubes in the ranges of 0.2–8.0 ppm Product #8103391; and 0.5–
30.0 ppm Product #8101671

Appendix E Reference Guide to Commercial Suppliers of Treatment and Related Safety Equipment
Gas Drying Tube for Drierite®
05/2023-66 Treatment Manual E-21
Lab Safety Supply
is now W.W. Grainger, Inc.
Branch offices in various cities
Matheson TriGas
Matheson-Kitagawa tubes in the range 0.5–10 ppm Product #8014-187sc
Protech Safety Equipment
37 East 21st Street
P.O. Box 455
Linden, NJ 07036
Draeger tubes
Sensidyne, LP
16333 Bay Vista Drive
Clearwater, FL 33760
Sensidyne/Gastec tubes in the range of 0.1–20 ppm Product #157SD
SKC, Inc.
863 Valley View Road
Eighty Four, PA 15330
Union Carbide Corp., Linde Division
National Specialty Gases Office
40 Veronica Avenue
Somerset, NJ 08873-3498
Sensidyne/Gastec tubes and apparatus
Gas Drying Tube for Drierite®
Wilmad-LabGlass
1172 NW Boulevard
Vineland, NJ 08360
Glass tube: Catalog #301-7501

Appendix E Reference Guide to Commercial Suppliers of Treatment and Related Safety Equipment
Germicides/Disinfectants
E-22 Treatment Manual 05/2023-66
Germicides/Disinfectants
Georgia-Pacific Corp.
300 W. Laurel Street
Bellingham, WA 98225
Halide Gas Leak Detector (removed)
Incinerators
Whitten Technology, Inc.
Air Burners Products Division
4390 Cargo Way
Palm City, FL 34990
Air Curtain Incinerators
Magnesium Phosphide
Degesch America, Inc.
P.O. Box 116
153 Triangle Drive
Weyers Cave, VA 24486
Fumigation Service and Supply, Inc.
16950 Westfield Park Road
Westfield, IN 46074
Helena Chemical Co.
225 Schilling Boulevard, Suite 300
Collierville, TN 38017

Appendix E Reference Guide to Commercial Suppliers of Treatment and Related Safety Equipment
Manometer (Used in Pressure Leakage Test)
05/2023-66 Treatment Manual E-23
Manometer (Used in Pressure Leakage Test)
Select the device based on pressure range and suitability.
Amazon
Digital, Magnehelic, U-tube
Cole-Parmer
625 East Bunker Court
Vernon Hills, IL 60061
Digital, Magnehelic, U-tube
Davis Calibration
1946 Greenspring Drive, Suite A
Timonium, MD 21093
Digital, U-tube
Dwyer Instruments, Inc.
102 Indiana Highway 212
Michigan City, IN 46360
Digital, Magnehelic, U-tube
E&E Process Instrumentation
4-40 North Rivermede Road
Concord, ON L4K 2H3
Digital, Magnehelic, U-tube
Extech
9 Townsend West
Nashua, NH 03063
Digital, Magnehelic
Fisher Scientific
2000 Park Lane Drive
Pittsburgh, PA 15275
Digital, Magnehelic, U-tube

Appendix E Reference Guide to Commercial Suppliers of Treatment and Related Safety Equipment
Manometer (Used in Pressure Leakage Test)
E-24 Treatment Manual 05/2023-66
Instrumart
35 Green Mountain Drive
S Burlington, VT 05403
Digital, Magnehelic
LabX
Digital, used
Meriam Process Technologies
10920 Madison Avenue
Cleveland, OH 44102
MSC Industrial Supply
75 Maxess Road
Melville, NY 11747-3151
Digital
OMEGA Engineering, Inc.
800 Connecticut Avenue
Suite 5N01
Norwalk, CT 06854
Digital
TruTech Tools
Digital
W.W. Granger, Inc.
Branch offices in many cities.
Zellweger Analytics
Neotronics Sieger Solomat Division
4331 Thurmond Tanner Road
P.O. Box 2100
Flowery Branch, GA 30542
Model No. 530 (0–19.99 inches of water

Appendix E Reference Guide to Commercial Suppliers of Treatment and Related Safety Equipment
Metam-Sodium
05/2023-66 Treatment Manual E-25
Metam-Sodium
Amvac Chemical Corporation
4100 East Washington Boulevard
Los Angeles, CA 90023
Methyl Bromide
Biesterfeld, U.S. Inc.
200 Madison Avenue
New York, NY 10016
Chemtura Corporation
199 Benson Road
Middlebury, CT 06749
Table E-1 Cylinder Tare, Net, and Gross Weights
Net Weight
Product
Description
Cylinder Tare
Weight (lbs.)
Cylinder Net
Weight (lbs.)
Cylinder
Gross Weight
(lbs.)
Comments
50 lbs–short 25 50 75
50 lbs–tall 30 50 80 Used for
Meth-O-Gas Q
only
100 lbs 35 100 135
175 lbs 50 175 225
200 lbs 50 200 250
1,500 lbs 350 1,500 1,850

Appendix E Reference Guide to Commercial Suppliers of Treatment and Related Safety Equipment
Methyl Bromide
E-26 Treatment Manual 05/2023-66
Degesch America, Inc.
Houston Division
P.O. Box 451036
Houston, TX 77245
Fumigation Service and Supply, Inc.
16950 Westfield Park Road
Westfield, IN 46074
Helena Chemical Co.
225 Schilling Boulevard, Suite 300
Collierville, TN 38017
ICD Group Metals, LLC
600 Madison Avenue
New York, NY 10022-1615
ICL Industrial Products (formerly Ameribrom, Inc.)
622 Emerson Road, Suite 500
St. Louis, MO 63141
Pestcon Systems, Inc.
1808 Firestone Parkway
Wilson, NC 27893-7991
Southern Agricultural Insecticides, Inc.
Mailing Address:
P.O. Box 218
Palmetto, FL 34220
Physical Address:
7400 Bayshore Road
Rubonia, FL 34221

Appendix E Reference Guide to Commercial Suppliers of Treatment and Related Safety Equipment
Moisture Meter (For Wood)
05/2023-66 Treatment Manual E-27
Moisture Meter (For Wood)
Delmhorst Instrument Company
51 Indian Lane East
Towaco, NJ 07082
Order: Moisture Meter G30
Electrode 26ES
Type 496 pin
(Above comes as package in carrying case)
Lignomat USA Ltd.
14345 NE Morris Court
Portland, OR 97230
Newsletters and Trade Journals
(containing articles on fumigation)
Fumigants and Pheromones
(free newsletter)
Fumigation Service and Supply, Inc.
16950 Westfield Park Road
Westfield, IN 46074
Pest Control Technology
(monthly for professional pest control operators)
4020 Kinross Lakes Parkway, Suite 201
Richfield, OH 44286
Pest Management Professional
(monthly for professional pest control operators)
Questex Media Group, Inc.
600 Superior Avenue East. Suite 1100
Cleveland, OH 44114
Customer Service Mailing Address:
Pest Management Monthly
P.O. Box 2090
Skokie, IL 60076-7990

Appendix E Reference Guide to Commercial Suppliers of Treatment and Related Safety Equipment
Packaging—Non-Routine USDA-Approved For Fumigation
E-28 Treatment Manual 05/2023-66
Packaging—Non-Routine USDA-Approved For Fumigation
Non-routine packaging is approved by S&T upon request. Contact
[email protected] for specifications for approval.
Dupont™ Tyvek® Air Cargo Covers (approved for methyl bromide
fumigation only)
12316 Amoretto Way
Raleigh, NC 27613
USA
Los Tres Castillos Ltda. (approved for methyl bromide fumigation only)
Bombero Gabriel Lima Millán N°1417
San Ramón
Santiago, Chile|
PACKFRESH SPA (approved for methyl bromide fumigation only)
Camino Lonquen
Sur Paradero #18
Calera de Tango, Santiago, Chile
PSS Envases SA (PacLife) (approved for methyl bromide fumigation only;
see also Packaging—USDA-Approved For Cold Treatment)
Los Duraznos 0683
La Pintana, Región Metropolitana
Chile
Quimas S.A. (SmartPac) (approved for methyl bromide fumigation only)
Los Yacimientos 1301
Maipu
Santiago, Chile
NOTICE
See Packaging Materials Approved for Fumigation on page 2-3-8 for a list of routine
packaging.

Appendix E Reference Guide to Commercial Suppliers of Treatment and Related Safety Equipment
Packaging—USDA-Approved For Modified Atmosphere Irradiation
05/2023-66 Treatment Manual E-29
VIJOM (approved for methyl bromide fumigation only)
Manufacturas de Plásticos Vijom Ltda.
Escorial s/n
Panquehue
San Felipe, Chile
VK Packaging SPA (approved for methyl bromide fumigation only)
Av Las Industrias 5155
San Antonio, V Region, Chile
Packaging—USDA-Approved For Modified Atmosphere Irradiation
Modified atmosphere irradiation packaging is approved by S&T upon request.
Contact [email protected] for specifications for approval.
Amcor AFAP
15 Keys Road Moorabbin
Victoria 3189
Australia
Aypek Packaging
NOSAB SEDIR CAD No. 15
PK 16140 Nilufer
Bursa, Turkey
Chantler Packages Inc. 880 Lakeshore Road East
Mississauga, ON
Canada L5E 1E1

Appendix E Reference Guide to Commercial Suppliers of Treatment and Related Safety Equipment
Packaging—USDA-Approved For Cold Treatment
E-30 Treatment Manual 05/2023-66
San Jorge Packaging SA
Avenida Einstein 923
Recoleta, Santiago, Chile
StePac L.A. Ltd.
Tefen Industrial Park
Building 12
P.O. Box 73
Tefen
Israel 2495900
TrendLife Deka Plastik Ltd. Sti.
Dogu Sanayi Sitesi 9. Blok No:11 Yenibosna
Istanbul
Turkey
Packaging—USDA-Approved For Cold Treatment
Cold treatment packaging is approved by S&T upon request. Contact
[email protected] for specifications for approval.
INDUPACK
Elias Aguirre 358 Of. 102
Miraflores, Lima, Peru
Liventus
Estoril 120 Torre A - Of. 716
Las Condes
Santiago, Chile|
PSS Envases SA (PacLife)
Los Duraznos 0683
La Pintana, Región Metropolitana
Chile
SURAGRA
Calle Chinchon 830 Of. 301
San Isidro Lima 27
Peru

Appendix E Reference Guide to Commercial Suppliers of Treatment and Related Safety Equipment
Photo Ionization Detector
05/2023-66 Treatment Manual E-31
Photo Ionization Detector
Mine Safety Appliances Co. (MSA)
1000 Cranberry Woods Drive
Cranberry Twp, PA 16066
Sirius Multigas Detector
Rae Systems
3775 North First Street
San Jose, CA 95134
Remote Data Transmission Systems
A.P. Moller-Maersk A/S
180 Park Avenue
Florham Park, NJ 07932
Remote Container Management System
Safety Equipment
United States Plastic Corporation
1390 Neubrecht Road
Lima, OH 45801-3196
Safety guards for belt and chain drives; fan guards; fire extinguishers;
safety equipment in general
Scale (Portable Platform)
(for weighing gas cylinders) Refer to your preferred Internet search engine for
additional manufacturers.
Arlington Scale Co., Inc.
38 Davey Street
Bloomfield, NJ 07003
Atlantic Scale Co., Inc.
136 Washington Avenue
Nutley, NJ 07110

Appendix E Reference Guide to Commercial Suppliers of Treatment and Related Safety Equipment
Sealing Tape
E-32 Treatment Manual 05/2023-66
See website for other locations in Hicksville, NY and Yonkers, NY
Eastern Scale of NJ
1053 Pennsylvania Avenue
Linden, NJ 07036-2240
Phifer Incorporated
Mailing address:
P.O. Box 1700
Tuscaloosa, AL 35403-1700
Shipping Address:
4400 Kauloosa Avenue
Tuscaloosa, AL 35401-7042
Fiberglass insect screening of various mesh sizes and colors
Sealing Tape
Degesch America, Inc.
Houston Division
P.O. Box 451036
Houston, TX 77245
Fumigation Service and Supply, Inc.
16950 Westfield Park Road
Westfield, IN 46074
ARMAK sealing tape
Self-Contained Breathing Apparatus (SCBA)
Mine Safety Appliances Co. (MSA)
MSA World Headquarters
Customer Service Center
P.O. Box 426
Pittsburg, PA 15230
MAS AirHawk Ultra Elite
USDA employees monitoring fumigations must order model ATO#A-
A2LB33A00F11AA1. The letter “F” is the size of the face mask. “F” is
medium, “G” is large, and “E” is small. Spectacle kits: center support part
#493581 or sidewire part #804638.

Appendix E Reference Guide to Commercial Suppliers of Treatment and Related Safety Equipment
Smoking Candle
05/2023-66 Treatment Manual E-33
Smoking Candle
(Candles of various sizes used in pressure leakage test.)
Superior Signal Co., Inc.
P.O. Box 96
Spotswood, NJ 08884
Snakes (Sand or Water Snakes)
Fumigation Service and Supply, Inc.
16950 Westfield Park Road
Westfield, IN 46074
Soil Fumigants
(Metam-Sodium, Vapam, etc.)
Buckman Laboratories International Inc.
1256 North McLean Boulevard
Memphis, TN 38108-1241
Product name: Busan 1020
Cytec Industries, Inc.
5 Garrett Mountain Plaza
West Patterson, NJ 07424
Products: Metam 32.7, Metam 42, Ucetam
OR-CAL, Inc.
29454 Meadowview Road
Junction City, OR 97448
Product name: Sectagon
NOTICE
Purchase only candles that emit white smoke. If candles that emit colored smoke
are used, their residue will stain the interior walls of the fumigation chamber, skin,
and clothing. Store candles in a dry, cool place.

Appendix E Reference Guide to Commercial Suppliers of Treatment and Related Safety Equipment
Spill Recovery Materials
E-34 Treatment Manual 05/2023-66
Syngenta
1800 Concord Pike
P.O. Box 8353
Wilmington, DC 19803
Product name: Vapam
Spill Recovery Materials
This section lists products to absorb spills of hazardous materials.
Ansul
One Stanton Street
Marinette, WI 54143
Product: Spill-X
Fumigation Service and Supply, Inc.
16950 Westfield Park Road
Westfield, IN 46074
New Pig Corp.
One Pork Avenue
P.O. Box 304
Tipton, PA 16684-0304
WYK Sorbents, LLC
11721 Lackland Road
St. Louis, MO 63146
Product: absorbent pillows and socks (free samples available)
Steam Boilers (for Hot Water Immersion Treatments)
Fulton Boiler Works, Inc.
3981 Port Street
Pulaski, NY 13142
oil-fired, gas-fired, or combination

Appendix E Reference Guide to Commercial Suppliers of Treatment and Related Safety Equipment
Steam Generators
05/2023-66 Treatment Manual E-35
Steam Generators
Sioux Corporation
One Sioux Plaza
Beresford, SD 57004
Steam Sterilizers/Autoclaves
Environmental Tectonics Corporation
125 James Way
Southhampton, PA 18966
Sulfuryl Fluoride (Vikane)
Dow AgroSciences LLC
9330 Zionsville Road
Indianapolis, IN 46268
Southern Agricultural Insecticides, Inc.
Mailing Address:
P.O. Box 218
Palmetto, FL 34220
Physical Address:
7400 Bayshore Road
Rubonia, FL 34221
Tarpaulins
Tarpaulins for fumigation are made by many companies. Use your preferred
Internet search engine to find additional manufacturers.
Elastec/American Marine
1309 West Main
Carmi, IL 62821
(see website for other locations)

Appendix E Reference Guide to Commercial Suppliers of Treatment and Related Safety Equipment
Temperature Recorders (Portable Type) for Cold Treatment in Self-Regulated Containers
E-36 Treatment Manual 05/2023-66
Poly-Flex, Inc.
2000 W. Marshall Drive
Grand Prairie, TX 75051
Raven Industries
205 E. 6th Street
Sioux Falls, SD 57104
Reef Industries, Inc. (Griffolyn Division)
9209 Almeda Genoa
Houston, TX 77075
Product: Inflatable tarpaulin (see “Bubble Fumigation System”)
Temperature Recorders (Portable Type) for Cold Treatment in Self-
Regulated Containers
Controlyne, Inc.
14 Highpoint
Cedar Grove, NJ 07009
ACR SmartReader 8 Logger)
DeltaTRAK, Inc.
P.O. Box 398
Pleasanton, CA 94566
DeltaTrak T-8, DeltaTrak CDX-100, CDX-300, CDX-22000
GE Sensing (formerly Kaye Instruments)
1100 Technology Park Drive
Billerica, MA 01821
Model DR-2B Digistrip II
International Reactor Corporation
521 Kiser Street
Dayton, OH 45404
Grant Squirrel Meter/Logger, Squirrel 2020 series with thermistors or
PT100 sensors

Appendix E Reference Guide to Commercial Suppliers of Treatment and Related Safety Equipment
Temperature Recorders/Controllers (Built-In Type) for Cold Treatment in Self-Regulated Containers
05/2023-66 Treatment Manual E-37
Metrosonics, Inc.
1060 Corporate Center Drive
Oconomowoc, WI 53066
DocuTemp 714A
Remonsys Limited
The Stables
Church Hanborough
WITNEY
Oxfordshire OX29 8AB
United Kingdom
Autolog Time/Temperature Monitor, AUTOLOG 2000 Data Logger,
Multilog2
Sensitech, Inc.
800 Cummings Center
Suite 258X
Beverly, MA 01915-6197
Data Mentor, RTM 2000 CTU
Wescor, Inc.
370 West 1700 South
Logan, UT 84321
Datapod
Temperature Recorders/Controllers (Built-In Type) for Cold
Treatment in Self-Regulated Containers
Carrier Transicold Division
Carrier Corporation
United Technologies
P.O. Box 4808, Carrier Parkway
Syracuse, NY 13221-4808
Micro Link 2 DataCorder
Micro Link 2i Controller/DataCorder
Micro Link 3 DataCorder
Micro Link 3i DataCorder
Micro Link 4 Controller
Micro Link 5 Controller

Appendix E Reference Guide to Commercial Suppliers of Treatment and Related Safety Equipment
Temperature Recorders/Controllers (Built-In Type) for Cold Treatment in Self-Regulated Containers
E-38 Treatment Manual 05/2023-66
Daikin Industries, Ltd.
Umeda Center Building, 2-4-12
Nakazaki-Nishi, Kita-ku, Osaka,
530-8323, Japan
Decos III Microproc. Temp. Controller
Decos IIIA, Decos IIIB
Decos IIIC
Decos IIID
DecosIIIE
DecosIIIF
DecosIIIG
DecosIIIH
DecosIIIi
DecosIIIJ
Decos V
Decos Va
Denso Corporation
1-1 Showa-Cho
Kariya, Aichi 44808661
Japan
Deft1000
Klinge Corporation
4075 East Market Street
York, PA 17402
ThermLogger II
Maersk Container Industry
Qingdao Ltd.
2 Lu, Weishan Cun, Liuting Zhen
Cheng Yang Qu
Qingdao, China
StarCool units CIM5 and CIM6
Matrix Dynamics
501 Doylestown Road
Lansdale, PA 19446

Appendix E Reference Guide to Commercial Suppliers of Treatment and Related Safety Equipment
Temperature Recorders (Portable Type) for Cold Treatment in Warehouses
05/2023-66 Treatment Manual E-39
Road Warrior 1, HACCP Warrior
Mitsubishi Heavy Industries
3-1, Asahi, Nishi, biwajima-cho, kiyosu,
Aichi Prefecture, 452-8561, Japan
MMCC III & MMCC IIIA, MMCC IIIA-47B
Thermo King Corporation
314 West 90th Street
Minneapolis, MN 55420
Thermoguard PA Microprocessor Temperature Controller
MP-D Microprocessor Controller
Thermoguard PA+ Microprocessor Controllers) (MP-2000, MP-3000,
MP-3000a, MP-4000)
Temperature Recorders (Portable Type) for Cold Treatment in
Warehouses
Computer Aided Solutions
8437 Mayfield Rd., Unit 104
Chesterland, OH 44026
Products: RTR-505-Pt Wireless Data Logger
Sensors: thermistor Pt 100
Evidencia LLP
505 Tennessee Street, Suite 502
Memphis, TN 38103
Products: ThermAssureRF, ThermProbeRF
Fluke Electronics Corporation
Comark Instruments
P.O. Box 500
Building 50-209
Beaverton, OR 97077
Comark RF500; RF500A/USA, and RF500AP/USA Wireless
Temperature Monitoring System
Inteligistics, Inc.
210 William Pitt Way, A11
Pittsburgh, PA 15238

Appendix E Reference Guide to Commercial Suppliers of Treatment and Related Safety Equipment
Temperature Recorders for Hot Water Immersion Treatment
E-40 Treatment Manual 05/2023-66
TES-31 wireless recorder, USP14966 sensor
Madge Tech
6 Warner Road
Warner, NH 03278
Model RFOT wireless temperature logger, sensors: RFOT-FR, RFOT-4,
RFOT-4-TD, RFOT-7, RFOT-12
MicroDAQ.com LTD
879 Maple Street
Contoocook, NH 03229
RTR-505-Pt wireless data logger; sensors: thermistor Pt 100
Temperature Recorders for Hot Water Immersion Treatment
Agri Machinery and Parts, Inc.
3489 All American Boulevard
Orlando, FL 32810
Honeywell strip chart recorders
Conax Technologies
2300 Walden Avenue
Buffalo, NY 14225
Contech
Avenida Circunvalacion #1590
Jardine Del Country, C.P. 42210
Guadalajara, Jalisco
Mexico
Contech data logger
Electro Scientific Industries, Inc.
13900 Science Park Drive
Portland, OR 97229-5497
Dekabox Delade Resister Instrument, Model No. DB62, which may be
used in the calibration of RTD sensors
Enterprise S.A. de C.V.
Rodriguez Saro 424
Colonia del Valle

Appendix E Reference Guide to Commercial Suppliers of Treatment and Related Safety Equipment
Temperature Recorders for Hot Water Immersion Treatment
05/2023-66 Treatment Manual E-41
03100 Mexico D.F.
Mexico
Honeywell and Molytek 2702 temperature recorders
Equipos Industriales Guadalajara
Aguador No. 3959-A
Int. 5 Fracc. La Calma
C.P. 45070, Zapopan, Jalisco
Honeywell instruments
Eurotherm Chessell
44621 Guilford Drive, Suite 100
Ashburn, VA 20147
Chessel strip-unit recorder, Model 346
Guiar Industrial, S.A. de C.V.
Rayon No. 989
Colonia Moderna
Sector Juarez
Guadalajara, C.P. 44190, Jalisco
Mexico
Honeywell instruments)
Honeywell International, Inc.
101 Columbia Road
Mailstop - M6/LM
Morristown, NJ 07962
Honeywell instruments)
Instrumentacion y Control Industrial
Santa Martha No. 269
Zapopan, Jalisco
Mexico
National and Honeywell instruments
Laboratorios Jael
Automation Division
Calle 2 Norte #7
Parque Industrila Francisco I. Madero
Puerto Chiapas, Tapachula, Chiapas
Mexico

Appendix E Reference Guide to Commercial Suppliers of Treatment and Related Safety Equipment
Temperature Recorders for Hot Water Immersion Treatment
E-42 Treatment Manual 05/2023-66
HyThsoft v 2
Nanmac Corporation
11 Mayhew Street
Framingham, MA 01702
Nanmac data logger, Model H30-1
National Instruments Corporation
11500 N. Mopac Expressway
Austin, TX 78759-3504
National Instruments
Neuberger Messinstrumente Gmbh
Steinerstr 16, D-8000
Munchen, Germany
Neuberger strip chart recorder P1Y
NOJOXTEN S.A. de C.V.
Eduardo Velazquez
Av Santa Margarit Razoa #283
Santa Margarita
Zapopan, Jalisco CP 45140
Mexico
NOJOXTEN-BR Automation Studio V3.09 IEC 61131-3-ST
NZ Automacao Ltda-ME
R. Areal
99 - Box Retiro 01125-20
Sao Paulo SP
Process Technologies, Inc.
154 Whitaker Road
Tampa, FL 33549
Telecontrol Y Systemas Automaticos Sac
Tacna 230 La Arena
Piura, Peru

Appendix E Reference Guide to Commercial Suppliers of Treatment and Related Safety Equipment
Temperature Recorders and Sensors—High Temperature (Niger Seed)
05/2023-66 Treatment Manual E-43
Vacuum Research Corp.
2419 Smallman Street
Pittsburgh, PA 15222
Molytek temperature recorder, Model 2702
William B. Cresse, Inc.
P.O. Box 906
117 Commerce Avenue
Lake Placid, FL 33852
Honewell strip chart recorder; Temperature Sensors TRD, 100 ohm
Temperature Recorders and Sensors—High Temperature (Niger
Seed)
Madge Tech Inc.
879 Maple Street
Contoocook, NH 03229 or
P.O. Box 50
Warner, NH 03278
Product: Model HiTemp 140
Omega Engineering, Inc.
P.O. Box 4047
One Omega Drive
Stamford, CT 06907-0047
Product: Model OM-CP-HiTemp 140
Mesa Laboratories, Inc.
Data Trace Division
12100 West 6th Avenue
Lakewood, CO 80228
Models: Data Trace Hi Temp Micropack III
Thermocouple Wire
Omega Engineering, Inc.
P.O. Box 4047
One Omega Drive
Stamford, CT 06907-0047
Product: Type “T” thermocouple wire Catalog No. PR-T-24

Appendix E Reference Guide to Commercial Suppliers of Treatment and Related Safety Equipment
Thermometers
E-44 Treatment Manual 05/2023-66
Thermometers
Cole-Parmer
625 East Bunker Court
Vernon Hills, IL 60061
Product: Digital thermometers, hand-held; EW-90080-09 Scientific
Thermistor Thermometer with USB
Contech
Rafael G. De Avila Aceves
Miguel Galindo 2033, J. del Country
Guadalajara, Jalisco, Mexico, C.P. 44210
Product: Term 2252 thermometer; sensors SP20758-1 (see Measurement
Specialties) and adapter Part #364-A for Oakton Acorn Temp 4) and
sensors with YSI 400 series sensors (see Advanced Industrial Services,
Inc. (AIS)
Cooper Atkins
33 Reeds Gap Road
Middlefield, CT 06455
Product: Electro-Therm hand-held digital thermometer. Instrument Model
Tm-99a (Electro-Therm), general purpose air/surface probes, 12 feet in
length, Cat. #20-10, puncture probe #1075 (no longer comes with offset
adjustment to change the temperature to true temperature with the aid of a
reference thermometer)
Davis Instruments
625 East Bunker Court
Vernon Hills, IL 60061-1844
Oakton Instruments
P.O. Box 5136
Vernon Hills, IL 60061
South/Latin America
Product: Acorn® Temp 4 Meter (use 400 series thermistor probe;
suggested general purpose probes are: Oakton air probe #WD-08491-08;
Oakton penetration probe #WD-08491-16; Oakton general purpose probe
10, 50, or 100 feet #WD-08491-02, #WD-08491-04, #WD-08491-03)

Appendix E Reference Guide to Commercial Suppliers of Treatment and Related Safety Equipment
Thermometers, Glass Mercury, Certified Precision
05/2023-66 Treatment Manual E-45
Omega Engineering, Inc.
P.O. Box 4047
One Omega Drive
Stamford, CT 06907-0047
Thermo Electric Company, Inc.
60-A Commerce Way
Totowa, NJ 07512
Product: Micromite indicator/calibrator: Model 3115-1-T-0-1-0-1
Probe for Micromite: Model T-18-G-304-0-036-4M1
Thermometers, Glass Mercury, Certified Precision
These thermometers are used as calibration standards in cold treatment, hot
water dip treatment, and hot air treatment.
Thermometers from other sources may be considered, as long as they meet the
specifications outlined in Chapter 8: Equipment.
Request approval for thermometers from:
USDA-APHIS-PPQ-S&T-TMT
13601 Old Cutler Road, Bldg. 63
Miami, FL 33158 USA
Phone: 305-278-4877
Fax: 305-278-4898
email: [email protected]
DC Scientific Glass
Mail. P.O. Box 1099
Pasadena, MD 21123
Physical Location: 510 McCormick Drive, Suite D
Hanover, MD 21076
Table E-2 DC Scientific Glass - Approved Thermometers
Catalog No. Type Range
Scale
Division
Calibration Points
Length
(mm)
Immersion
210-624 Extreme
Precision
30 to 124 °F 0.1 °F Minimum of one at
the treatment
temperature
610 Total
210-626 Extreme
Precision
30 to 124 °F 0.1 °F Minimum of one at
the treatment
temperature
610 3 inches

Appendix E Reference Guide to Commercial Suppliers of Treatment and Related Safety Equipment
Thermometers, Glass Mercury, Certified Precision
E-46 Treatment Manual 05/2023-66
Fisher Scientific
2000 Park Lane Drive
Pittsburgh, PA 15275
VWR
1310 Goshen Parkway
Westchester, PA 19380
10064F-C ASTM 77 to 131 °F 0.2 °F 5 calibration points
(32, 80, 95, 115,
130 °F)
379 Total
10064C-C ASTM 25 to 55 °C 0.1 °C 5 calibration points
(0, 25, 35, 45, 55
°C)
379 Total
67C-100MM-
C
ASTM 95 to 155 °C 0.2 °C 5 calibration points
(0, 100, 110, 130,
150 °C)
379 100 mm
Table E-2 DC Scientific Glass - Approved Thermometers (continued)
Catalog No. Type Range
Scale
Division
Calibration Points
Length
(mm)
Immersion
Table E-3 Fisher Scientific - Approved Thermometers
Catalog No. Type Range
Scale
Division
Calibration Points
Length
(mm)
Immersion
15-142C ASTM Mercury 77 to 131 °F 0.2 °F 5 calibration points
(32, 80, 95, 115,
130 °F)
379 Total
15-140C ASTM Mercury 25 to 55 °C 0.1 °C 5 calibration points
(0, 25, 35, 45, 55
°C)
379 Total
15-169-120 ASTM Mercury 95 to 155 °C 0.2 °C 5 calibration points
(0, 100, 110, 130,
150 °C)
379 Total
Table E-4 VWR - Approved Thermometers
Catalog No. Type Range
Scale
Division
Calibration
Points
Length
(mm)
Immersion
61099-068 ASTM Mercury 77 to 131 °F 0.2 °F 5 calibration points
(32, 80, 95, 115,
130 °F)
379 Total
15-61099-057 ASTM Mercury 25 to 55 °C 0.1 °C 5 calibration points
(0, 25, 35, 45, 55
°C)
379 Total

Appendix E Reference Guide to Commercial Suppliers of Treatment and Related Safety Equipment
Thermometers, Glass Non-mercury, Certified Precision
05/2023-66 Treatment Manual E-47
Thermometers, Glass Non-mercury, Certified Precision
These thermometers are used as calibration standards in cold treatment, hot
water dip treatment, and hot air treatment.
Thermometers from other sources may be considered, as long as they meet the
specifications outlined in Chapter 8: Equipment.
Request approval for thermometers from:
USDA-APHIS-PPQ-S&T-TMT
13601 Old Cutler Road, Bldg. 63
Miami, FL 33158 USA
Phone: 305-278-4877
Fax: 305-278-4898
email: [email protected]
Cole-Parmer
625 East Bunker Court
Vernon Hills, IL 60061
Thermometers, Digital, Certified Precision
These thermometers are used as a calibration standard and can be substituted
for mercury and non-mercury thermometers in cold treatment, hot water dip
treatment, and hot air treatment.
Thermometers from other sources may be considered, as long as they meet the
specifications outlined in Chapter 8: Equipment.
Request approval for thermometers from:
Table E-5 Cole-Parmer - Approved Thermometers
Catalog No. Type Range
Scale
Division
Calibration Points
Length
(mm)
Immersion
K-08007-15 Thermo-
Scientific
ERTCO®
77 to 131 °F 0.2 °F 5 calibration points
(32, 80, 95, 115,
130 °F)
379 Total
K-08007-14 Thermo-
Scientific
ERTCO®
25 to 55 °C 0.1 °C 5 calibration points
(0, 25, 35, 45, 55
°C)
379 Total
EW-08007-20 Thermo-
Scientific
ERTCO®
95 to 155 °C 0.2 °C 5 calibration points
(0, 100, 110, 130,
150 °C)
379 100 mm

Appendix E Reference Guide to Commercial Suppliers of Treatment and Related Safety Equipment
Thermometers, Digital, Certified Precision
E-48 Treatment Manual 05/2023-66
USDA-APHIS-PPQ-S&T-TMT
13601 Old Cutler Road, Bldg. 63
Miami, FL 33158 USA
Phone: 305-278-4877
Fax: 305-278-4898
email: [email protected]
Contech
Rafael G. De Avila Aceves
Miguel Galindo 2033, J. del Country
Guadalajara, Jalisco, Mexico, C.P. 44210
Term 2252 thermometer; sensors SP20758-1 (see Measurement
Specialties) and adapter Part #364-A for Oakton Acorn Temp 4) and
sensors with YSI 400 series sensors (see Advanced Industrial Services,
Inc. (AIS)))
Eutech Instruments
For Africa, Asia, Middle East and Pacific Rim:
Eutech Instruments Pte Ltd.
Blk 55, Ayer Rajah Crescent, #04-16/24, Singapore 139949
For Europe:
Eutech Instruments Europe B.V.
P.O. Box 254, 3860 AG Nijkerk
The Netherlands
For North and South America:
Oakton Instruments
P.O. Box 5136
Vernon Hills, IL 60061
Acorn® Temp 4 Meter (use 400 series thermistor probe; suggested
general purpose probes are: Oakton air probe #WD-08491-08; Oakton
penetration probe # WD-08491-16; Oakton general purpose probe 10, 50,
or 100 feet #WD-08491-02, #WD-08491-04, #WD-08491-03; Oakton
Acron Temp 5 #EW-35626-10))
Oakton products can be purchased at numerous distributors such as Cole-
Parmer, Davis Instruments, etc.
Cole-Parmer
625 East Bunker Court

Appendix E Reference Guide to Commercial Suppliers of Treatment and Related Safety Equipment
Thermometers, Digital, Certified Precision
05/2023-66 Treatment Manual E-49
Vernon Hills, IL 60061
For China:
Thermo Fisher Scientific
Building 6, No. 27 Xin Jinqiao Road
Shanghai 201206, China
For India:
Thermo Fisher Scientific
102, 104 Delphi ‘C’ Wing
Hiranandani Business Park
Powai, Mumbai - 400 076
Catalog # 60010-85: Digital thermometer with range -330 to 2210 °F or -
201 to 1210 °C; Resolution 0.1 °C/°F at 100.0 to 999.9 C/F; Accuracy +/-
0.1 °C/°F at 100 to 999.9 °C/°F; various probe lengths. Request NIST
traceable calibration with 5 temperature points or more and a certificate.
Fluke Corporation
6920 Seaway Boulevard
Everett, WA 98203
Model Name 1551A -9 to 20: 1551A EX Thermometer, Fixed RTD, -50
°C to -160 °C (-58 °F to 320 °F), choice of sensor length can be 9, 12, and
20 inches; Accuracy +/- 0.05 °C. Includes NVLAP-accredited report of
calibration; NIST traceable, User’s guide on CD-ROM, 3 AAA batteries
Model Name 1552A -9 to 20: 1552A EX Thermometer, Fixed RTD, -80
°C to 300 °C (-112 °F to 572 °F), Sensor length 12 inches; Accuracy +/-
0.05 °C; Includes NVLAP-accredited report of calibration; NIST
traceable, User’s guide on CD-ROM, 3 AAA batteries
OpticsPlanet, Inc.
3150 Commercial Avenue
Northbrook, IL 60062
Catalog #C1-LB-4000: Control Company Digital Data Logger
Thermometer with Probe 4000/61220-601; Accuracy +/- 0.05 °C;
Request NIST calibration and certificate with 5 or more temperature
points in treatment range.

Appendix E Reference Guide to Commercial Suppliers of Treatment and Related Safety Equipment
Thermometers, Digital, Certified Precision
E-50 Treatment Manual 05/2023-66
Palmer Wahl Instrumentation Group
234 Old Weaverville Road
Asheville, NC 28804-1228
Model DST600 Series: Precision hand-held reference thermometer;
Range -50 °F to 500 °F; Accuracy +/- 0.1 °C/°F over a 1 year period; with
certificate of calibration. Request NIST calibration and certificate with
temperature points in treatment range; choice of temperature sensors.
Tech Instrumentation, Inc.
750 E. Kiowa Avenue
P.O. Box 2029
Elizabeth, CO 80107
Catalog #TL-1W: Digital thermometer with range -44 °F to 600 °F and
-43 °C to 315 °C; Resolution 0.01 degrees; Accuracy -/+ 0.1 F below 300
°F; Various stem lengths; 4 point NIST traceable calibration included; 1
year warranty.
Thermco Products, Inc.
10 Millpond Drive
Lafayette, NJ 07848
Catalog #ACCD650P: High Precision Digital Pt100 Platinum
Thermometer; Range Pt100: -200 °C to +850 °C: Accuracy Pt100 +/-
0.03 from -50 °C to +199.99 °C; with certificate of calibration. Request
NIST calibration and certificate with 5 or more temperature points in
treatment range; ACCD1019 High Precision Probe Pt100 Platinum 12”
(405 mm)
Thermoprobe, Inc.
112-A Jetport Drive
Pearl, MS 39208
Catalog #TL-1W: Digital thermometer with range -44 °F to 600 °F and
-43 °C to 315 °C; Resolution 0.01 degrees; Accuracy -/+ 0.1 F below 300
°F; Various stem lengths; 4 point NIST traceable calibration included; 1
year warranty.
ThermoWorks
1762 W. 20 S., #100
Lindon, UT 84042

Appendix E Reference Guide to Commercial Suppliers of Treatment and Related Safety Equipment
Thermometers, Certified Precision, Approved Calibration Companies
05/2023-66 Treatment Manual E-51
Model P600 Series: Precision hand-held reference thermometer: Range
-328 °F to 842 °F; Accuracy 0.05 °F from -148 to 302 °F; with certificate
of calibration. Request NIST calibration and certificate with temperature
points in treatment range; choice of temperature sensors.
Thermometers, Certified Precision, Approved Calibration
Companies
Conduct thermometer calibration by USDA-approved calibration companies.
Follow the procedures for calibration summarized in Equipment.
DC Scientific Glass
Mail. P.O. Box 1099
Pasadena, MD 21123
Physical Location: 510 McCormick Drive, Suite D
Hanover, MD 21076
Barnstead International
(sold as Thermo Scientific brand)
2555 Kerper Boulevard
Dubuque, IA 52001
Fluke Corporation
6920 Seaway Boulevard
Everett, WA 98203
ICL Calibration Laboratories, Inc.
1501 Decker Avenue, Suite 118
Stuart, FL 34994
Calibration, repair, and adjustment of the Thermoprobe TL-1W
INNOCAL
625 East Bunker Court M/S 14
Vernon Hills, IL 60061-1844
Instrumentation Technical Services
20 Hagerty Boulevard, Suite 1
West Chester, PA 19382

Appendix E Reference Guide to Commercial Suppliers of Treatment and Related Safety Equipment
Thermometers, Recorders, and Sensors—General Use
E-52 Treatment Manual 05/2023-66
Measurement Assurance Technology
1600 Corporate Court, Suite 150
Irving, TX 75038
Phoenix Calibration DR
Calle 8, No. 9
Rosmil Residential
Santo Domingo, Dominican Republic
Thermoprobe, Inc.
112-A Jetport Drive
Pearl, MS 39208
VWR
Radnor Corporate Center
Building One, Suite 200
P.O. Box 6660
100 Matsonford Road
Radnor, PA 19087-8660
Thermometers, Recorders, and Sensors—General Use
CAS Datalogger
12628 Chillicothe Road, Unit J
Chesterland, OH 44026
dataTaker DT-85, Delphin Expert Logger Models 100, 200, 300

Appendix E Reference Guide to Commercial Suppliers of Treatment and Related Safety Equipment
Thermometers, Recorders, and Sensors—General Use
05/2023-66 Treatment Manual E-53
Cole-Parmer
625 East Bunker Court
Vernon Hills, IL 60061
Contech
Rafael G. De Avila Aceves
Miguel Galindo 2033, J. del Country
Guadalajara, Jalisco, Mexico, C.P. 44210
Term 2252 thermometer; sensors SP20758-1 (see Measurement
Specialties) and adapter Part #364-A for Oakton Acorn Temp 4) and
sensors with YSI 400 series sensors (see Advanced Industrial Services,
Inc. (AIS)))
GEC Instruments
5530 NW 97th Street
Gainesville, FL 32653
Model S16TC Type T Thermocouple
Model S4TC Type T Thermocouple
MadgeTech, Inc.
6 Warner Road
Warner, NH 03278
Model HITEMP 150A
Mesa Laboratories, Inc.
Data Trace Division
12100 West 6th Avenue
Models: Data Tracers, STO, LTO, and Micropack III
Nanmac Corporation
11 Mayhew Street
Framingham, MA 01702
National Instruments Corporation
11500 N. Mopac Expressway
Austin, TX 78759-3504
Nordic Sensors Industrial, Inc. (NSI)
1350 rue Nationale

Appendix E Reference Guide to Commercial Suppliers of Treatment and Related Safety Equipment
Tubing, Gas-Sampling
E-54 Treatment Manual 05/2023-66
Terrebonne, Quebec
Canada J6W 6M1
Omega Engineering, Inc.
P.O. Box 4047
One Omega Drive
Stamford, CT 06907-0047
Tubing, Gas-Sampling
(polyethylene or polypropylene)
Cole-Parmer
625 East Bunker Court
Vernon Hills, IL 60061
Consolidated Plastics Co. Inc.
4700 Prosper Drive
Stow, OH 44224
Fisher Scientific
2000 Park Lane Drive
Pittsburgh, PA 15275
Thomas Scientific
P.O. Box 99
99 High Hill Road at I-295
Swedesboro, NJ 08085-0099
Vacuum Pump
Air compressor for use with vacuum fumigation chambers.
Neward Enterprises, Inc.
Distributor: McMaster-Carr
P.O. Box 740100
Atlanta, GA 30374-0100
Product: Mityvac® hand-held vacuum pump. Zinc-alloy pump #9963K12

Appendix E Reference Guide to Commercial Suppliers of Treatment and Related Safety Equipment
Vapam
05/2023-66 Treatment Manual E-55
Sargent Welch
P.O. Box 4130
Buffalo, NY 14217
Vapam
(see Metam-Sodium)
Vapor Heat/Forced Hot Air (VH/FHA) Chamber Manufacturers
Quarantine Technologies International
463 Frankton Road
Queenstown, New Zealand
Forced Hot Air Model: Wide Body
FoodPro International, Inc. (FHA)
P.O. Box 53110
San Jose, CA, 95153-0110
Forced Hot Air Model 5S-VID-CS
Sanshu Sangyo Co., LTD.
11-2, Nanei 4-chome
Kagoshima 891-01 Japan
Model EHK-600P; EHK-1000P
Vapor Heat/Forced Hot Air (VH/FHA) Recorders
CHINO Works America, Inc.
Los Angeles Office
22301 S. Western Ave.
Suite 105
Torrence, CA 90501
Chicago Office
121 S. Wilke Rd.
Suite 226
Arlington Heights, IL. 60005

Appendix E Reference Guide to Commercial Suppliers of Treatment and Related Safety Equipment
Volatilizer
E-56 Treatment Manual 05/2023-66
Product: Model LE5100 Hybrid recorder LE5200; LE11733RNI; AA
series;
LE5133-111; AA-03-NRA
Contech
Rafael G. De Avila Aceves
Miguel Galindo 2033, J. del Country
Guadalajara, Jalisco, Mexico, C.P. 44210
Product: Contech monitoring and distributed control system with Smart
Seda to operate up to six forced air chambers.
Leeds & Northrup Instruments
615 E. Carson Street
Pittsburg, PA 15203-1021
Product: Micromax® Process Management Center 1986
OMEGA Engineering, INC.
800 Connecticut Ave.
Suite, 5N01
Norwalk, CT 06854
Product: OM6 data products recorder
Volatilizer
(for volatilizing liquid methyl bromide into a fumigant gas)
Degesch America, Inc.
Houston Division
P.O. Box 451036
Houston, TX 77245
Vacudyne, Inc.
375 East Joe Orr Road
Chicago Heights, IL 60411

Appendix E Reference Guide to Commercial Suppliers of Treatment and Related Safety Equipment
Warning Signs and Placards
05/2023-66 Treatment Manual E-57
Warning Signs and Placards
Carlton Industries, L.P.
P.O. Box 280
La Grange, TX 78945
Champion America
P.O. Box 3092
Stony Creek, CT 06405

Appendix E Reference Guide to Commercial Suppliers of Treatment and Related Safety Equipment
Warning Signs and Placards
E-58 Treatment Manual 05/2023-66

12/2020-42 Treatment Manual F-1
Appendix
F
Appendix F
EPA Crop Groups
Contents
Crop Group 1: Root and Tuber F-2
Crop Group 2: Leaves of Root and Tuber Vegetables F-3
Crop Group 3: Bulb Vegetable (Allium spp.) F-4
Crop Group 4: Leafy Vegetables (except Brassica vegetables) F-5
Crop Group 5: Brassica (Cole) Leafy Vegetables F-6
Crop Group 6: Legume Vegetables (succulent or dried) F-7
Crop Group 7: Leaves of Legume Vegetables F-8
Crop Group 8: Fruiting Vegetables F-9
Crop Group 9: Cucurbit Vegetables F-10
Crop Group 10: Citrus Fruit F-11
Crop Group 11: Pome Fruit F-12
Crop Group 12: Stone Fruit F-13
Crop Group 13: Berries and Small Fruit F-14
Crop Group 14: Tree Nuts F-16
Crop Group 15: Cereal Grains F-17
Crop Group 16: Forage, Fodder, and Straw of Cereal Grains F-18
Crop Group 17: Grass, Forage, Fodder, and Hay F-19
Crop Group 18: Nongrass Animal Feeds (Forage, Fodder, Straw, and Hay)
F-20
Crop Group 19: Herbs and Spices F-21
Crop Group 20: Oilseed F-23
Crop Group 21: Edible Fungi F-24
Crop Group 22: Stalk, Stem, and Leaf Petiole Vegetables F-25
Crop Group 23: Tropical and Subtropical Fruit, Edible Peels F-26
Crop Group 24: Tropical and Subtropical Fruit, Inedible Peels F-30
Introduction
The EPA requires chemical tolerances for residue data on raw agricultural
commodities intended for human or animal consumption.
This Appendix lists the individual commodities in each crop group and is
intended as a quick reference for the reader. These tables are updated annually
and may not reflect the current crop groups in the EPA Crop Group tables
(CFR 40 180.41). Refer to the EPA Crop Group tables for the most recent
information. All commodities included in the EPA sub-groups of each EPA
crop group are also eligible for the FIFRA Section 18 exemption fumigation.

Appendix F EPA Crop Groups
Crop Group 1: Root and Tuber
F-2 Treatment Manual 12/2020-42
Crop Group 1: Root and Tuber
Table F-1 Crop Group 1: Root and Tuber
Arracacha (Arracacia xanthorrhiza)
Arrowroot (Maranta arundinacea)
Artichoke, Chinese (Stachys affinis)
Artichoke, Jerusalem (Helianthus tuberosus)
Beet, garden (Beta vulgaris)
Beet, sugar (Beta vulgaris)
Burdock, edible (Arctium lappa)
Canna, edible (Queensland arrowroot) (Canna indica)
Carrot (Daucus carota)
Cassava, bitter and sweet (Manihot esculenta)
Celeriac (celery root) (Apium graveolens var. rapaceum)
Chayote (root) (Sechium edule)
Chervil, turnip-rooted (Chaerophyllum bulbosum)
Chicory (Cichorium intybus)
Chufa (Cyperus esculentus)
Dasheen (taro) (Colocasia esculenta)
Ginger (Zingiber officinale)
Ginseng (Panax quinquefolius)
Horseradish (Armoracia rusticana)
Leren (Calathea allouia)
Parsley, turnip-rooted (Petroselinum crispum var. tuberosum)
Parsnip (Pastinaca sativa)
Potato (Solanum tuberosum)
Radish (Raphanus sativus)
Radish, oriental (daikon) (Raphanus sativus subvar. longipinnatus)
Rutabaga (Brassica campestris var. napobrassica)
Salsify (oyster plant) (Tragopogon porrifolius)
Salsify, black (Scorzonera hispanica)
Salsify, Spanish (Scolymus hispanicus)
Skirret (Sium sisarum)
Sweet potato (Ipomoea batatas)
T
anier (cocoyam) (Xanthosoma sagittifolium)
Turmeric (Curcuma longa)
Turnip (Brassica rapa var. rapa)
Yam bean (jicama, manoic pea) (Pachyrhizus spp.)
Yam, true (Dioscorea spp.)

Appendix F EPA Crop Groups
Crop Group 2: Leaves of Root and Tuber Vegetables
12/2020-42 Treatment Manual F-3
Crop Group 2: Leaves of Root and Tuber Vegetables
Table F-2 Crop Group 2: Leaves of Root and Tuber Vegetables
Beet, garden (Beta vulgaris)
Beet, sugar (Beta vulgaris)
Burdock, edible (Arctium lappa)
Carrot (Daucus carota)
Cassava, bitter and sweet (Manihot esculenta)
Celeriac (celery root) (Apium graveolens var. rapaceum)
Chervil, turnip-rooted (Chaerophyllum bulbosum)
Chicory (Cichorium intybus)
Dasheen (taro) (Colocasia esculenta)
Parsnip (Pastinaca sativa)
Radish (Raphanus sativus)
Radish, oriental (daikon) (Raphanus sativus subvar. longipinnatus)
Rutabaga (Brassica campestris var. napobrassica)
Salsify, black (Scorzonera hispanica)

Appendix F EPA Crop Groups
Crop Group 3: Bulb Vegetable (Allium spp.)
F-4 Treatment Manual 12/2020-42
Crop Group 3: Bulb Vegetable (Allium spp.)
Table F-3 Crop Group 3: Bulb Vegetable (Allium spp.)
Chive, fresh leaves (Allium schoenoprasum L.)
Chive, Chinese, fresh leaves (Allium tuberosum Rottler ex Spreng)
Daylily, bulb (Hemerocallus fulva (L.) L. var. fulva)
Elegans hosta (Hosta sieboldiana (Hook.) Engl)
Fritillaria, bulb (Fritillaria L. fritillary)
Fritillaria, leaves (Fritillaria L. fritillary)
Garlic, bulb (Allium sativum)
Garlic, bulb (Allium sativum L. var. sativum) (A. sativum Common Garlic Group)
Garlic, great headed, bulb (Allium ampeloprasum L. var. ampeloprasum) (A. ampeloprasum
Great Headed Garlic Group)
Garlic, great headed (elephant) (Allium ampeloprasum var. ampeloprasum)
Garlic, Serpent, bulb (Allium sativum var. ophioscorodon or A. sativum Ophioscorodon
Group)
Kurrat (Allium kurrat Schweinf. Ex. K. Krause or A. ampeloprasum Kurrat Group)
Lady’s leek (Allium cernuum Roth)
Leek (Allium ampeloprasum, A. porrum, A. tricoccum)
Leek Allium porrum L. (syn: A. ampeloprasum L. var. porrum (L.) J. Gay) (A. ampeloprasum
Leek Group)
Leek, wild (Allium tricoccum Aiton)
Lily, bulb (Lilium spp. (Lilium Leichtlinii var. maximowiczii, Lilium lancifolium)
Onion, Beltsville bunching (Allium x proliferum (Moench) Schard.) (syn: Allium fistulosum L. x
A. cepa L.)
Onion, Chinese, bulb (Allium c
hinense G. Don.) (syn: A. bakeri Regel)
Onion, dry bulb and green (Allium cepa, A. fistulosum)
Onion, fresh (Allium fistulosum L. var. caespitosum Makino)
Onion, green (Allium cepa L. var. cepa) (A. cepa Common Onion Group)
Onion, macrostem (Allium macrostemom) Bunge
Onion, pearl (Allium porrum var. sectivum or A. ampeloprasum Pearl Onion Group)
Onion, potato, bulb (Allium cepa L. var. aggregatum G. Don.) (A. cepa Aggregatum Group)
Onion, tree, tops (Allium x proliferum (Moench) Schrad. ex Willd.) (syn: A. cepa var.
proliferum (Moench) Regel; A. cepa L. var. bulbiferum L.H. Bailey; A. cepa L. var. viviparum
(Metz.) Alef.)
Onion, Welsh (Allium fistulosum)
Onion, Welsh, tops (Allium fistulosum L.)
Shallot (Allium cepa var. cepa)
Shallot, bulb (Allium cepa var. aggregatum G. Don.)
Shallot, fresh leaves (Allium cepa var. aggregatum G. Don.)
Cultivars, varieties, and/or hybrids of these.

Appendix F EPA Crop Groups
Crop Group 4: Leafy Vegetables (except Brassica vegetables)
12/2020-42 Treatment Manual F-5
Crop Group 4: Leafy Vegetables (except Brassica vegetables)
Table F-4 Crop Group 4: Leafy Vegetables (except Brassica vegetables)
Amaranth (leafy amaranth, Chinese spinach, tampala) (Amaranthus spp.)
Arugula (Roquette) (Eruca sativa)
Cardoon (Cynara cardunculus)
Celery (Apium graveolens var. dulce)
Celery, Chinese (Apium graveolens var. secalinum)
Celtuce (Lactuca sativa var. angustana)
Chervil (Anthriscus cerefolium)
Chrysanthemum, edible-leaved (Chrysanthemum coronarium var. coronarium)
Chrysanthemum, garland (Chrysanthemum coronarium var. spatiosum)
Corn salad (Valerianella locusta)
Cress, garden (Lepidium sativum)
Cress, upland (yellow rocket, winter cress) (Barbarea vulgaris)
Dandelion (Taraxacum officinale)
Dock (sorrel) (Rumex spp.)
Endive (escarole) (Cichorium endivia)
Fennel, Florence (finochio) (Foeniculum vulgare Azoricum Group)
Lettuce, head and leaf (Lactuca sativa)
Orach (Atriplex hortensis)
Parsley (Petroselinum crispum)
Purslane, garden (Portulaca oleracea)
Purslane, winter (Montia perfoliata)
Radicchio (red chicory) (Cichorium intybus)
Rhubarb (Rheum rhabarbarum)
Spinach (Spinacia oleracea)
Spinach, New Zealand (Tetragonia tetragonioides, T. expansa)
Spinach, vine (Malabar spinach, Indian spinach) (Basella alba)
Swiss chard (Beta vulgaris var. cicla)

Appendix F EPA Crop Groups
Crop Group 5: Brassica (Cole) Leafy Vegetables
F-6 Treatment Manual 12/2020-42
Crop Group 5: Brassica (Cole) Leafy Vegetables
Table F-5 Crop Group 5: Brassica (Cole) Leafy Vegetables
Broccoli (Brassica oleracea var. botrytis)
Broccoli, Chinese (gai lon) (Brassica alboglabra)
Broccoli raab (rapini) (Brassica campestris)
Brussels sprouts (Brassica oleracea var. gemmifera)
Cabbage (Brassica oleracea)
Cabbage, Chinese (bok choy) (Brassica chinensis)
Cabbage, Chinese (napa) (Brassica pekinensis)
Cabbage, Chinese mustard (gai choy) (Brassica campestris)
Cauliflower (Brassica oleracea var. botrytis)
Cavalo broccolo (Brassica oleracea var. botrytis)
Collards (Brassica oleracea var. acephala)
Kale (Brassica oleracea var. acephala)
Kohlrabi (Brassica oleracea var. gongylodes)
Mizuna (Brassica rapa Japonica Group)
Mustard Greens (Brassica juncea)
Mustard spinach (Brassica rapa Perviridis Group)
Rape greens (Brassica napus)

Appendix F EPA Crop Groups
Crop Group 6: Legume Vegetables (succulent or dried)
12/2020-42 Treatment Manual F-7
Crop Group 6: Legume Vegetables (succulent or dried)
Table F-6 Crop Group 6: Legume Vegetables (succulent or dried)
Bean (Lupinus spp.) (includes grain lupin, sweet lupin, white lupin, and white sweet lupin)
Bean (Phaseolus spp.) (includes field bean, kidney bean, lima bean, navy bean, pinto bean,
runner bean, snap bean, tepary bean, wax bean)
Bean (Vigna spp.) (includes adzuki bean, asparagus bean, blackeyed pea, catjang, Chinese
longbean, cowpea, Crowder pea, moth bean, mung bean, rice bean, southern pea, urd bean
yardlong bean)
Broad bean (fava bean) (Vicia faba)
Chickpea (garbanzo bean) (Cicer arietinum)
Guar (Cyamopsis tetragonoloba)
Jackbean (Canavalia ensiformis)
Lablab bean (hyacinth bean) (Lablab purpureus)
Lentil (Lens esculenta)
Pea (Pisum spp.) includes dwarf pea, edible-pod pea, English pea, field pea, garden pea,
green pea, snow pea, sugar snap pea)
Pigeon pea (Cajanus cajan)
Soybean (Glycine max)
Soybean (immature seed) (Glycine max)
Sword bean (Canavalia gladiata)

Appendix F EPA Crop Groups
Crop Group 7: Leaves of Legume Vegetables
F-8 Treatment Manual 12/2020-42
Crop Group 7: Leaves of Legume Vegetables
Table F-7 Crop Group 7: Leaves of Legume Vegetables
Any cultivar of bean (Phaseolus spp.), field pea (Pisum spp.), and soybean (Glycine max).
Plant parts of any legume vegetable included in the legume vegetables that will be used as
animal feed.

Appendix F EPA Crop Groups
Crop Group 8: Fruiting Vegetables
12/2020-42 Treatment Manual F-9
Crop Group 8: Fruiting Vegetables
Table F-8 Crop Group 8: Fruiting Vegetables
African eggplant (Solanum macrocarpon L.)
Bush tomato (Solanum centrale J.M. BlackCocona, Solanum sessiliflorum Dunal)
Currant tomato (Lycopersicon pimpinellifolium)
Eggplant (Solanum melongena L.)
Garden huckleberry (Solanum scabrum Mill)
Goji berry (Lycium barbarum)
Groundcherry (Physalis alkekengi L., P. grisea (Waterf.) M. Martinez, P. peruviana L., P.
pubescens)
Martynia (Proboscidea louisianica (Mill.) Thell)
Naranjilla (Solanum quitoense Lam)
Okra (Abelmoschus esculentus (L.) Moench)
Pea eggplant (Solanum torvum Sw.)
Pepino (Solanum muricatum Aiton)
Pepper, bell (Capsicum annuum L. var. annuum, Capsicum spp.)
Pepper, nonbell (Capsicum chinense Jacq., C. annuum L. var. annuum, C. frutescens L., C.
baccatum L., C. pubescens Ruiz & Pav., Capsicum spp.)
Roselle (Hibiscus sabdariffa L.)
Scarlet eggplant (Solanum aethiopicum L.)
Sunberry (Solanum retroflexum Dunal)
Tomatillo (Physalis philadelphica Lam)
Tomato (Solanum lycopersicum L., Solanum lycopersicum L. var. lycopersicum)
Tree tomato (Solanum betaceum Cav)
Cultivars, varieties, and/or hybrids of these

Appendix F EPA Crop Groups
Crop Group 9: Cucurbit Vegetables
F-10 Treatment Manual 12/2020-42
Crop Group 9: Cucurbit Vegetables
Table F-9 Crop Group 9: Cucurbit Vegetables
Chayote (fruit) (Sechium edule)
Chinese waxgourd (Chinese preserving melon) (Benincasa hispida)
Citron melon (Citrullus lanatus var. citroides)
Cucumber (Cucumis sativus)
Gherkin (Cucumis anguria)
Gourd, edible (Lagenaria spp.) (includes hyotan, cucuzza); (Luffa acutangula, L. cylindrica)
(includes hechima, Chinese okra)
Momordica spp. (includes balsam apple, balsam pear, bitter melon, Chinese cucumber)
Muskmelon (hybrids and/or cultivars of Cucumis melo) (includes true cantaloupe, canta-
loupe, casaba, crenshaw melon, golden pershaw melon, honeydew melon, honey balls,
mango melon, Persian melon, pineapple melon, Santa Claus melon, and snake melon)
Pumpkin (Cucurbita spp.)
Squash, summer (Cucurbita pepo var. melopepo) (includes crookneck squash, scallop
squash, straightneck squash, vegetable marrow, zucchini)
Squash, winter (Cucurbita maxima; C. moschata) (includes butternut squash, calabaza,
hubbard squash); (C. mixta; C. pepo) (includes acorn squash, spaghetti squash)
Watermelon (includes hybrids and/or varieties of Citrullus lanatus)

Appendix F EPA Crop Groups
Crop Group 10: Citrus Fruit
12/2020-42 Treatment Manual F-11
Crop Group 10: Citrus Fruit
Table F-10 Crop Group 10: Citrus Fruit
Australian desert lime (Eremocitrus glauca (Lindl.) Swingle)
Australian finger lime (Microcitrus australasica (F. Muell.) Swingle)
Australian round lime (Microcitrus australis (A. cunn. Ex Mudie) Swingle)
Brown River finger lime (Microcitrus papuana Winters)
Calamondin (Citrofortunella microcarpa (Bunge) Wijnands)
Citron (Citrus medica L.)
Citrus hybrids (Citrus spp., Eremocitrus spp., Fortunella spp., Microcitrus spp., and Poncirus
spp.)
Grapefruit (Citrus paradisi Macfad)
Japanese summer grapefruit (Citrus natsudaidai Hayata)
Kumquat (Fortunella spp.)
Lemon (Citrus limon (L.) Burm. f.)
Lime (Citrus aurantiifolia (Christm.) Swingle)
Mediterranean mandarin (Citrus deliciosa Ten)
Mount White lime (Microcitrus garrowayae (F.M. Bailey) Swingle)
New Guinea wild lime (Microcitrus warburgiana (F.M. Bailey) Tanaka)
Orange, sour (Citrus aurantium L.)
Orange, sweet (Citrus sinensis (L.) Osbeck)
Pummelo (Citrus maxima (Burm.) Merr)
Russell River lime (Microcitrus inodora (F.M. Bailey) Swingle)
Satsuma mandarin (Citrus unshiu Marcow)
Sweet lime (Citrus limetta Risso)
Tachibana orange (Citrus tachibana (Makino) Tanaka)
Tahiti lime (Citrus latifolia (Yu. Tanaka) Tanaka)
Tangelo (Citrus x tangelo J.W. Ingram & H.E. Moore)
Tangerine (Mandarin) (Citrus reticulata Blanco)
Tangor (Citrus nobilis Lour)
Trifoliate orange (Poncirus trifoliata (L.) Raf.)
Uniq fruit (Citrus aurantium Tangelo Group)
Cultivars, varieties, and/or hybrids of these

Appendix F EPA Crop Groups
Crop Group 11: Pome Fruit
F-12 Treatment Manual 12/2020-42
Crop Group 11: Pome Fruit
Table F-11 Crop Group 11: Pome Fruit
Apple (Malus domestica Borkh.)
Azarole (Crataegus azarolus L.)
Crabapple (Malus sylvestris (L.) Mill., M. prunifolia (Willd.) Borkh.)
Loquat (Eriobotrya japonica (Thunb.) Lindl.)
Mayhaw (Crataegus aestivalis (Walter) Torr. & A. Gray, C. opaca Hook. & Arn., and C. rufula
Sarg.)
Medlar (Mespilus germanica L.)
Pear (Pyrus communis L.)
Pear, Asian (Pyrus pyrifolia (Burm. f.) Nakai var. culta (Makino) Nakai)
Quince (Cydonia oblonga Mill.)
Quince, Chinese (Chaenomeles speciosa (Sweet) Nakai, Pseudocydonia sinensis (Thouin)
C.K. Schneid.)
Quince, Japanese (Chaenomeles japonica (Thunb.) Lindl. ex Spach)
Tejocote (Crataegus mexicana DC.)
Cultivars, varieties, and/or hybrids of these

Appendix F EPA Crop Groups
Crop Group 12: Stone Fruit
12/2020-42 Treatment Manual F-13
Crop Group 12: Stone Fruit
Table F-12 Crop Group 12: Stone Fruit
Apricot (Prunus armeniaca)
Apricot, Japanese (Prunus mume)
Capulin (Prunus serotina)
Cherry, black (Prunus serotina)
Cherry, Nanking (Prunus tomentosa)
Cherry, sweet (Prunus avium)
Cherry, tart (Prunus cerasus)
Jujube, Chinese (Ziziphus jujuba)
Nectarine (Prunus persica)
Peach (Prunus persica)
Plum (Prunus domestica, Prunus spp.)
Plum, American (Prunus americana)
Plum, beach (Prunus maritima)
Plum, Canada (Prunus nigra)
Plum, cherry (Prunus cerasifera)
Plum, Chickasaw (Prunus angustifolia)
Plum, Damson (Prunus domestica spp. insititia)
Plum, Japanese (Prunus salicina)
Plum, Klamath (Prunus subcordata)
Plum, prune (Prunus domestica L. subsp. domestica)
Plumcot (Prunus hybr.)
Sloe (Prunus spinosa L.)
Cultivars, varieties, and/or hybrids of these

Appendix F EPA Crop Groups
Crop Group 13: Berries and Small Fruit
F-14 Treatment Manual 12/2020-42
Crop Group 13: Berries and Small Fruit
Table F-13 Crop Group 13: Berries and Small Fruit
Amur river grape (Vitis amurensis Rupr)
Aronia berry (Aronia spp.)
Bayberry (Myrica spp.)
Bearberry (Arctostaphylos uva-ursi)
Bilberry (Vaccinium myrtillus L.)
Blackberry (Rubus spp.) (including Andean blackberry, arctic blackberry, bingleberry, black
satin berry, boysenberry, brombeere, California blackberry, Chesterberry, Cherokee black-
berry, Cheyenne blackberry, common blackberry, coryberry, darrowberry, dewberry, Dirksen
thornless berry, evergreen blackberry, Himalayaberry, hullberry, lavacaberry, loganberry, low-
berry, Lucretiaberry, mammoth blackberry, marionberry, mora, mures deronce, nectarberry,
Northern dewberry, olallieberry, Oregon evergreen berry, phenomenalberry, rangeberry,
rossberry, Shawnee blackberry, Southern dewberry, tayberry, youngberry, zarzamora, and
cultivars, varieties, and/or hybrids of these)
Blueberry, highbush (Vaccinium spp.)
Blueberry, lowbush (Vaccinium angustifolium Aiton)
Buffalo currant (Ribes aureum Pursh)
Buffaloberry (Shepherdia argentea (Pursh) Nutt.)
Che (Cudrania tricuspidata Bur. Ex Lavallee)
Chilean guava (Myrtus ugni Mol.)
Chokecherry (Prunus virginiana L.)
Cloudberry (Rubus chamaemorus L.)
Cranberry (Vaccinium macrocarpon Aiton)
Currant, black (Ribes nigrum L.)
Currant, red (Ribes rubrum L.)
Elderberry (Sambucus spp.)
European barberry (Berberis vulgaris L.)
Gooseberry (Ribes spp.)
Grape (Vitis spp.)
Highbush cranberry (Viburnum opulus L. var. Americanum Aiton)
Honeysuckle, edible (Lonicera caerula L. var. emphyllocalyx Nakai, Lonicera caerula L. var.
edulis Turcz. ex herder)
Huckleberry (Gaylussacia spp.)
Jostaberry (Ribes x nidigrolaria Rud. Bauer and A. Bauer)
Juneberry (Saskatoon berry) (Amelanchier spp.)
Kiwifruit, fuzzy (Actinidia deliciosa A. Chev.) (C.F. Liang and A.R. Fergusons, Actinidia
chinensis Planch.)
Kiwifruit, hardy (Actinidia arguta (Si
ebold and Zucc.) Planch. ex Miq)

Appendix F EPA Crop Groups
Crop Group 13: Berries and Small Fruit
12/2020-42 Treatment Manual F-15
Lingonberry (Vaccinium vitis-idaea L.)
Maypop (Passiflora incarnata L.)
Mountain pepper berries (Tasmannia lanceolata) (Poir.) A.C. Sm.
Mulberry (Morus spp.)
Muntries (Kunzea pomifera F. Muell.)
Native currant (Acrotriche depressa R. BR.)
Partridgeberry (Mitchella repens L.)
Phalsa (Grewia subinaequalis DC.)
Pincherry (Prunus pensylvanica L.f.)
Raspberry, black and red (Rubus spp.)
Riberry (Syzygium luehmannii)
Salal (Gaultheria shallon Pursh.)
Schisandra berry (Schisandra chinensis (Turcz.) Baill.)
Sea buckthorn (Hippophae rhamnoides L.)
Serviceberry (Sorbus spp.)
Strawberry (Fragaria x ananassa Duchesne)
Wild raspberry (Rubus muelleri Lefevre ex. P.J. Mull)
Cultivars, varieties, and/or hybrids of these
Table F-13 Crop Group 13: Berries and Small Fruit (continued)

Appendix F EPA Crop Groups
Crop Group 14: Tree Nuts
F-16 Treatment Manual 12/2020-42
Crop Group 14: Tree Nuts
Table F-14 Crop Group 14: Tree Nuts
Almond (Prunus dulcis)
Beech nut (Fagus spp.)
Brazil nut (Bertholletia excelsa)
Butternut (Juglans cinerea)
Cashew (Anacardium occidentale)
Chestnut (Castanea spp.)
Chinquapin (Castanea pumila)
Filbert (hazelnut) (Corylus spp.)
Hickory nut (Carya spp.)
Macadamia nut (bush nut) (Macadamia spp.)
Pecan (Carya illinoensis)
Walnut, black and English (Persian) (Juglans spp.)

Appendix F EPA Crop Groups
Crop Group 15: Cereal Grains
12/2020-42 Treatment Manual F-17
Crop Group 15: Cereal Grains
Table F-15 Crop Group 15: Cereal Grains
Barley (Hordeum spp.)
Buckwheat (Fagopyrum esculentum)
Corn (Zea mays)
Millet, pearl (Pennisetum glaucum)
Millet, proso (Panicum milliaceum)
Oats (Avena spp.)
Popcorn (Zea mays var. everta)
Rice (Oryza sativa)
Rye (Secale cereale)
Sorghum (milo) (Sorghum spp.)
Teosinte (Euchlaena mexicana)
Triticale (Triticum-Secale hybrids)
Wheat (Triticum spp.)
Wild rice (Zizania aquatica)

Appendix F EPA Crop Groups
Crop Group 16: Forage, Fodder, and Straw of Cereal Grains
F-18 Treatment Manual 12/2020-42
Crop Group 16: Forage, Fodder, and Straw of Cereal Grains
Table F-16 Crop Group 16: Forage, Fodder,and Straw of Cereal Grains
Crop Group 16 includes forage, fodder, stover, and straw of all commodities included in corn,
wheat, and the cereal grains group.

Appendix F EPA Crop Groups
Crop Group 17: Grass, Forage, Fodder, and Hay
12/2020-42 Treatment Manual F-19
Crop Group 17: Grass, Forage, Fodder, and Hay
Table F-17 Crop Group 17: Grass, Forage, Fodder, and Hay
The commodities included in Crop Group 17 are forage, fodder, stover, and hay of any grass,
Gramineae/Poaceae family (either green or cured) except sugarcane, and those included in
the cereal grains group, that will be fed to or grazed by livestock, all pasture and range
grasses and grasses grown for hay or silage (e.g. grass forage, fodder, and hay of Bermuda
grass, bluegrass, bromegrass, and fescue.)

Appendix F EPA Crop Groups
Crop Group 18: Nongrass Animal Feeds (Forage, Fodder, Straw, and Hay)
F-20 Treatment Manual 12/2020-42
Crop Group 18: Nongrass Animal Feeds (Forage, Fodder, Straw, and
Hay)
Table F-18 Crop Group 18: Nongrass Animal Feeds (Forage, Fodder, Straw, and
Hay)
Alfalfa (Medicago sativa subsp. sativa)
Bean, velvet (Mucuna pruriens var. utilis)
Clover (Trifolium spp., Melilotus spp.)
Kudzu (Pueraria lobata)
Lespedeza (Lespedeza spp.)
Lupin (Lupinus spp.)
Sainfoin (Onobrychis viciifolia)
Trefoil (Lotus spp.)
Vetch (Vicia spp.)
Vetch, crown (Coronilla varia)
Vetch, milk (Astragalus spp.)

Appendix F EPA Crop Groups
Crop Group 19: Herbs and Spices
12/2020-42 Treatment Manual F-21
Crop Group 19: Herbs and Spices
Table F-19 Crop Group 19: Herbs and Spices
Angelica (Angelica archangelica)
Anise (anise seed) (Pimpinella anisum)
Anise, star (Illicium verum)
Annatto (seed)
Balm (lemon balm) (Melissa officinalis)
Basil (Ocimum basilicum)
Borage (Borago officinalis)
Burnet (Sanguisorba minor)
Camomile (Anthemis nobilis)
Caper buds (Capparis spinosa)
Caraway (Carum carvi)
Caraway, black (Nigella sativa)
Cardamom (Elettaria cardamomum)
Cassia bark (Cinnamomum aromaticum)
Cassia buds (Cinnamomum aromaticum)
Catnip (Nepeta cataria)
Celery seed (Apicum graveolens)
Chervil (dried) (Anthriscus cerefolium)
Chive (Allium schoenoprasum)
Chive, Chinese (Allium tuberosum)
Cinnamon (Cinnamomum verum)
Clary (Salvia sclarea)
Clove buds (Eugenia caryophyllata)
Coriander (cilantro or Chinese parsley) (leaf) (Coriandrum sativum)
Costmary (Chrysanthemum balsamita)
Culantro (leaf) (Eryngium foetidum)
Culantro (seed) (Eryngium foetidum)
Cumin (Cuminum cyminum)
Curry (leaf) (Murraya koenigii)
Dill (dillweed) (Anethum graveolens)
Dill (seed) (Anethum graveolens)
Fennel (common) (Foeniculum vulgare)
Fennel, Florence (seed) (Foeniculum vulgare Azoricum Group)
Fenugreek (Trigonella foenumgraecum)
Grains of paradise (Aframomum melegueta)

Appendix F EPA Crop Groups
Crop Group 19: Herbs and Spices
F-22 Treatment Manual 12/2020-42
Horehound (Marrubium vulgare)
Hyssop (Hyssopus officinalis)
Juniper berry (Juniperus communis)
Lavender (Lavandula officinalis)
Lemongrass (Cymbopogon citratus)
Lovage (leaf) (Levisticum officinale)
Lovage (seed) (Levisticum officinale)
Mace (Myristica fragrans)
Marigold (Calendula officinalis)
Marjoram (Origanum spp.) (includes sweet or annual marjoram, wild marjoram or oregano,
and pot marjoram)
Mustard (seed) (Brassica juncea, B. hirta, B. nigra)
Nasturtium (Tropaeolum majus)
Nutmeg (Myristica fragrans)
Parsley (dried) (Petroselinum crispum)
Pennyroyal (Mentha pulegium)
Pepper, black (Piper nigrum)
Pepper, white
Poppy (seed) (Papaver somniferum)
Rosemary (Rosmarinus officinalis)
Rue (Ruta graveolens)
Saffron (Crocus sativus)
Sage (Salvia officinalis)
Savory, summer and winter (Satureja spp.)
Sweet bay (bay leaf) (Laurus nobilis)
Tansy (Tanacetum vulgare)
Tarragon (Artemisia dracunculus)
Thyme (Thymus spp.)
Vanilla (Vanilla planifolia)
Wintergreen (Gaultheria procumbens)
Woodruff (Galium odorata)
Wormwood (Artemisia absinthium)
Table F-19 Crop Group 19: Herbs and Spices (continued)

Appendix F EPA Crop Groups
Crop Group 20: Oilseed
12/2020-42 Treatment Manual F-23
Crop Group 20: Oilseed
Table F-20 Crop Group 20: Oilseed
Borage (Borago officinalis L.)
Calendula (Calendula officinalis L.)
Castor oil plant (Ricinus communis L.)
Chinese tallowtree, (Triadica sebifera (L.) Small)
Cottonseed (Gossypium hirsutum L.; Gossypium spp.)
Crambe (Crambe hispanica L.; C. abyssinica Hochst. ex R.E. Fr.)
Cuphea (Cuphea hyssopifolia Kunth)
Echium (Echium plantagineum L.)
Euphorbia (Euphorbia esula L.)
Evening primrose (Oenothera biennis L.)
Flax seed (Linum usitatissimum L.)
Gold of pleasure (Camelina sativa (L.) Crantz)
Hare's ear mustard (Conringia orientalis (L.) Dumort)
Jojoba (Simmondsia chinensis (Link) C.K. Schneid.)
Lesquerella (Lesquerella recurvata (Engelm. ex A. Gray) S. Watson)
Lunaria (Lunaria annua L.)
Meadowfoam (Limnanthes alba Hartw. ex Benth.)
Milkweed (Asclepias spp.)
Mustard seed (Brassica hirta Moench, Sinapis alba L. subsp. Alba.)
Niger seed (Guizotia abyssinica (L.f.) Cass.)
Oil radish (Raphanus sativus L. var. oleiformis Pers.)
Poppy seed (Papaver somniferum L. subsp. Somniferum)
Rapeseed (Brassica spp.; B. napus L.)
Rose hip (Rosa rubiginosa L.)
Safflower (Carthamus tinctorious L.)
Sesame (Sesamum indicum L., S. radiatum Schumach. & honn.)
Stokes aster (Stokesia laevis (Hill) Greene)
Sunflower (Helianthus annuus L.)
Sweet rocket (Hesperis matronalis L.)
Tallowwood (Ximenia americana L.)
T
ea oil plant (Camellia oleifera C. Abel)
Vernonia (Vernonia galamensis (Cass.) Less)
Cultivars, varieties, and/or hybrids of these

Appendix F EPA Crop Groups
Crop Group 21: Edible Fungi
F-24 Treatment Manual 12/2020-42
Crop Group 21: Edible Fungi
Table F-21 Crop Group 21: Edible Fungi
Blewitt (Lepista nuda)
Bunashimeji (Hypsizygus marrmoreus)
Chinese mushroom (Volvariella volvacea (Bull.) Singer)
Enoki (Flammulina velutipes (Curt.) Singer )
Hime-Matsutake (Agaricus blazei Murill)
Hirmeola (Auricularia auricular)
Maitake (Grifola frondosa)
Morel (Morchella spp.)
Nameko (Pholiota nameko)
Net Bearing (Dictyophora)
Oyster mushroom (Pleurotus spp. )
Pom Pom (Hericium erinaceus)
Reishi mushroom (Ganoderma lucidum (Leyss. Fr.) Karst.)
Rodman's agaricus (Agaricus bitorquis (Quel.) Saccardo)
Shiitake mushroom (Lentinula edodes (Berk.) Pegl.)
Shimeji (Tricholoma conglobatum)
Stropharia (Stropharia spp.)
Truffle (Tuber spp.)
White button mushroom (Agaricus bisporous (Lange) Imbach)
White Jelly Fungi (Tremella fuciformis)

Appendix F EPA Crop Groups
Crop Group 22: Stalk, Stem, and Leaf Petiole Vegetables
12/2020-42 Treatment Manual F-25
Crop Group 22: Stalk, Stem, and Leaf Petiole Vegetables
Table F-22 Crop Group 22: Stalk, Stem, and Leaf Petiole Vegetables
Agave (Agave spp.)
Aloe vera (Aloe vera (L.) Burm.f.)
Asparagus (Asparagus officinialis L.)
Bamboo shoots (Arundinaria spp., Bambusa spp.,Chimonobambusa spp.; Dendrocalamus
spp., Fargesia spp.; Gigantochloa spp., Nastus elatus; Phyllostachys spp.; Thyrsostachys
spp.)
Cardoon/Globe artichoke (Cynara cardunculus L.)
Celery (Apium graveolens var. dulce (Mill.) Pers.)
Celery, Chinese (Apium graveolens L. var. secalinum (Alef.) Mansf.)
Celtuce (Lactuca sativa var. angustana L.H. Bailey)
Fennel, Florence, fresh leaves and stalk (Foeniculum vulgare subsp. vulgare var. azoricum
(Mill.) Thell.)
Fern, edible, fiddlehead
Fuki (Petasites japonicus (Siebold & Zucc.) Maxim.)
Kale, sea (Crambe maritima L.)
Kohlrabi (Brassica oleracea L. var gongylodes L.)
Palm hearts (various species)
Prickly pear, pads (Opuntia ficus-indica (L.) Mill., Opuntia spp.)
Prickly pear, Texas, pads (Opuntia engelmannii Salm-Dyck ex Engelm. var. lindheimeri
(Engelm.) B.D. Parfitt & Pinkav)
Rhubarb (Rheum x rhabarbarum L.)
Udo (Aralia cordata Thunb.)
Zuiki (Colocasia gigantea (Blume) Hook. f.)
Cultivars, varieties, and hybrids of these commodities

Appendix F EPA Crop Groups
Crop Group 23: Tropical and Subtropical Fruit, Edible Peels
F-26 Treatment Manual 12/2020-42
Crop Group 23: Tropical and Subtropical Fruit, Edible Peels
Table F-23 Crop Group 23: Tropical and Subtropical Fruit, Edible Peels
Açaí (Euterpe oleracea Mart.)
Acerola (Malpighia emarginata DC.)
Achachairú (Garcinia gardneriana (Planch. & Triana) Zappi)
African plum (Vitex doniana Sweet)
Agritos (Berberis trifoliolata Moric.)
Almondette (Buchanania lanzan Spreng.)
Ambarella (Spondias dulcis Sol. ex Parkinson)
Apak palm (Brahea dulcis (Kunth) Mart.)
Appleberry (Billardiera scandens Sm.)
Arazá (Eugenia stipitata McVaugh)
Arbutus berry (Arbutus unedo L.)
Babaco (Vasconcellea x heilbornii (V.M. Badillo) V.M. Badillo)
Bacaba palm (Oenocarpus bacaba Mart.)
Bacaba-de-leque (Oenocarpus distichus Mart.)
Bayberry, red (Morella rubra Lour.)
Bignay (Antidesma bunius (L.) Spreng.)
Bilimbi (Averrhoa bilimbi L.)
Borojó (Borojoa patinoi Cuatrec.)
Breadnut (Brosimum alicastrum Sw.)
Cabeluda (Plinia glomerata (O. Berg) Amshoff)
Cajou, fruit (Anacardium giganteum Hance ex Engl.)
Cambucá (Marlierea edulis Nied.)
Carandas-plum (Carissa edulis Vahl)
Carob (Ceratonia siliqua L.)
Cashew apple (Anacardium occidentale L.)
Ceylon iron wood (Manilkara hexandra (Roxb.) Dubard)
Ceylon olive (Elaeocarpus serratus L.)
Cherry-of-the-Rio-Grande (Eugenia aggregata (Vell.) Kiaersk.)
Chinese olive, black (Canarium tramdenum C.D. Dai & Yakovlev)
Chinese olive, white (Canarium album (Lour.) Raeusch.)
Chirauli-nut (Buchanania latifolia Roxb.)
Ciruela verde (Bunchosia armeniaca (Cav.) DC.)
Cocoplum (Chrysobalanus icaco L.)

Appendix F EPA Crop Groups
Crop Group 23: Tropical and Subtropical Fruit, Edible Peels
12/2020-42 Treatment Manual F-27
Table F-24 Crop Group 23: Tropical and Subtropical Fruit, Edible Peels
Date (Phoenix dactylifera L.)
Davidson's plum (Davidsonia pruriens F. Muell.)
Desert-date (Balanites aegyptiacus (L.) Delile)
Doum palm coconut (Hyphaene thebaica (L.) Mart.)
False sandalwood (Ximenia americana L.)
Feijoa (Acca sellowiana (O. Berg) Burret)
Fig (Ficus carica L.)
Fragrant manjack (Cordia dichotoma G. Forst.)
Gooseberry, abyssinian (Dovyalis abyssinica (A. Rich.) Warb.)
Gooseberry, Ceylon (Dovyalis hebecarpa (Gardner) Warb.)
Gooseberry, Indian (Phyllanthus emblica L.)
Gooseberry, otaheite (Phyllanthus acidus (L.) Skeels)
Governor's plum (Flacourtia indica (Burm. F.) Merr.)
Grumichama (Eugenia brasiliensis Lam)
Guabiroba (Campomanesia xanthocarpa O. Berg)
Guava (Psidium guajava L.)
Guava berry (Myrciaria floribunda (H. West ex Willd.) O. Berg)
Guava, Brazilian (Psidium guineense Sw.)
Guava, cattley (Psidium cattleyanum Sabine)
Guava, Costa Rican (Psidium friedrichsthalianum (O. Berg) Nied.)
Guava, Para (Psidium acutangulum DC.)
Guava, purple strawberry (Psidium cattleyanum Sabine var. cattleyanum)
Guava, strawberry (Psidium cattleyanum Sabine var. littorale (Raddi) Fosberg)
Guava, yellow strawberry (Psidium cattleyanum Sabine var. cattleyanum forma lucidum O.
Deg.)
Guayabillo (Psidium sartorianum (O. Berg) Nied.)
Illawarra plum (Podocarpus elatus R. Br. Ex Endl.)
Imbé (Garcinia livingstonei T. Anderson)
Imbu (Spondias tuberosa Arruda ex Kost.)
Indian-plum (Flacourtia jangomas (Lour.). basionym)
Jaboticaba (Myrciaria cauliflora (Mart.) O. Berg)
Jamaica-cherry (Muntingia calabura L.)
Jambolan (Syzygium cumini (L.) Skeels)
Jelly palm (Butia capitata (Mart.) Becc.)
Jujube, Indian (Ziziphus mauritiana Lam.)

Appendix F EPA Crop Groups
Crop Group 23: Tropical and Subtropical Fruit, Edible Peels
F-28 Treatment Manual 12/2020-42
Table F-25 Crop Group 23: Tropical and Subtropical Fruit, Edible Peels
Kaffir-plum (Harpephyllum caffrum Bernh. Ex C. Krauss)
Kakadu plum (Terminalia latipes Benth. subsp. psilocarpa Pedley)
Kapundung (Baccaurea racemosa (Reinw.) Mull. Arg.)
Karanda (Carissa carandas L.)
Kwai muk (Artocarpus hypargyreus Hance ex Benth.)
Lemon aspen (Acronychia acidula F. Muell)
Mangaba (Hancornia speciosa Gomes)
Marian plum (Bouea macrophylla Griff.)
Mombin, malayan (Spondias pinnata (J. Koenig ex L. f.) Kurz)
Mombin, purple (Spondias purpurea L.)
Mombin, yellow (Spondias mombin L.)
Monkeyfruit (Artocarpus lacucha Buch. Ham.)
Monos plum (Pseudanamomis umbellulifera (Kunth) Kausel)
Mountain cherry (Bunchosia cornifolia Kunth)
Nance (Byrsonima crassifolia (L.) Kunth)
Natal plum (Carissa macrocarpa (Eckl.) A. DC.)
Noni (Morinda citrifolia L.)
Olive (Olea europaea L. subsp. europaea)
Papaya, mountain (Vasconcellea pubescens A. DC.)
Patauá (Oenocarpus bataua Mart.)
Peach palm, fruit (Bactris gasipaes Kunth var. gasipaes)
Persimmon, black (Diospyros texana Scheele)
Persimmon, Japanese (Diospyros kaki Thunb.)
Pitomba (Eugenia luschnathiana Klotzsch ex O. Berg)
Plum-of-Martinique (Flacourtia inermis Roxb.)
Pomerac (Syzygium malaccense (L.) Merr. & L.M. Perry)
Rambai (Baccaurea motleyana (Mull. Arg.) Mull. Arg.)
Rose apple (Syzygium jambos (L.) Alston)
Rukam (Flacourtia rukam Zoll. & Moritizi)
Rumberry (Myrciaria dubia (Kunth) McVaugh Myrtaceae)
Sea grape (Coccoloba uvifera (L.) L.)
Sentul (Sandoricum koetjape (Burm. F.) Merr.)
Sete-capotes (Campomanesia guazumifolia (Cambess.) O. Berg)
Silver aspen (Acronychia wilcoxian (F. Muell.) T.G. Hartley)
Starfruit (Averrhoa carambola L.)
Surinam cherry (Eugenia uniflora L.)

Appendix F EPA Crop Groups
Crop Group 23: Tropical and Subtropical Fruit, Edible Peels
12/2020-42 Treatment Manual F-29
Table F-26 Crop Group 23: Tropical and Subtropical Fruit, Edible Peels
Tamarind (Tamarindus indica L.)
Uvalha (Eugenia pyriformis Cambess )
Water apple (Syzygium aqueum (Burm. F.) Alston)
Water pear (Syzygium guineense (Willd.) DC)
Water berry (Syzygium cordatum Hochst. Ex C. Krauss)
Wax jambu (Syzygium samarangense (Blume) Merr. & L.M. Perry)
Cultivars, varieties, and hybrids of these commodities

Appendix F EPA Crop Groups
Crop Group 24: Tropical and Subtropical Fruit, Inedible Peels
F-30 Treatment Manual 12/2020-42
Crop Group 24: Tropical and Subtropical Fruit, Inedible Peels
Table F-27 Crop Group 24: Tropical and Subtropical Fruit, Inedible Peels
Abiu (Pouteria caimito (Ruiz & Pav.) Radlk)
Aisen (Boscia senegalensis (Pers.) Lam.)
Akee apple (Blighia sapida K.D. Koenig)
Atemoya (Annona cherimola Mill. X A. squamosa L.)
Avocado (Persea americana Mill.)
Avocado, Guatemalan (Persea americana Mill. var. guatemalensis)
Avocado, Mexican (Persea americana Mill. var. drymifolia (Schltdl. & Cham.) S.F. Blak)
Avocado, West Indian (Persea americana var. americana)
Bacury (Platonia insignis Mart.)
Bael fruit (Aegle marmelos (L.) Corrêa)
Banana (Musa spp.)
Banana, dwarf (Musa hybrids; Musa acuminata Colla)
Binjai (Mangifera caesia Jack)
Biriba (Annona mucosa Jacq.)
Breadfruit (Artocarpus altilis (Parkinson) Fosberg)
Burmese grape (Baccaurea ramiflora Lour.)
Canistel (Pouteria campechiana (Kunth) Baehni)
Cat's-eyes (Dimocarpus longan Lour. subsp. malesianus Leenh.)
Champedak (Artocarpus integer (Thunb.) Merr.)
Cherimoya (Annona cherimola Mill.)
Cupuacú (Theobroma grandiflorum (Willd. Ex Spreng.) K. Schum.)
Custard apple (Annona reticulata L.)
Dragon fruit (Hylocereus undatus (Haw.) Britton & Rose)
Durian (Durio zibethinus L.)
Elephant-apple (Limonia acidissima L.)
Etambe (Mangifera zeylanica (Blume) Hook. F.)
Granadilla (Passiflora ligularis Juss.)
Granadilla, giant (Passiflora quadrangularis L.)
Ilama (Annona macroprophyllata Donn. Sm.)
Ingá (Inga vera Willd. subsp. affinis (DC.) T.D. Penn.)
Jackfruit (Artocarpus heterophyllus Lam.)
Jatobá (Hymenaea courbaril L.)
Karuka (Pandanus julianettii Martelli)
Kei apple (Dovyalis caffra (Hook. F. & Harv.) Warb.)
Langsat (Lansium domesticum Corrêa)

Appendix F EPA Crop Groups
Crop Group 24: Tropical and Subtropical Fruit, Inedible Peels
12/2020-42 Treatment Manual F-31
Table F-28 Crop Group 24: Tropical and Subtropical Fruit, Inedible Peels
Lanjut (Mangifera lagenifera Griff.)
Longan (Dimocarpus longan Lour.)
Lucuma (Pouteria lucuma (Ruiz & Pav.) Kuntze)
Lychee (Litchi chinensis Sonn.)
Mabolo (Diospyros blancoi A. DC.)
Madras-thorn (Pithecellobium dulce (Roxb.) Benth.)
Mammy-apple (Mammea americana L.)
Manduro (Balanites maughamii Sprague)
Mango (Mangifera indica L.)
Mango, horse (Mangifera foetida Lour.)
Mango, Saipan (Mangifera odorata Griff.)
Mangosteen (Garcinia mangostana L. )
Marang (Artocarpus odoratissimus Blanco)
Marmaladebox (Genipa americana L.)
Matisia (Matisia cordata Humb. & Bonpl.)
Mesquite (Prosopis juliflora (Sw.) DC.)
Mongongo, fruit (Schinziophyton rautanenii (Schinz) Radcl.-Sm)
Monkey-bread-tree (Adansonia digitata L.)
Monstera (Monstera deliciosa Liebm.)
Nicobar-breadfruit (Pandanus leram Jones ex Fontana)
Paho (Mangifera altissima Blanco)
Pandanus (Pandanus utilis Bory)
Papaya (Carica papaya L.)
Passionflower, winged-stem (Passiflora alata Curtis)
Passionfruit (Passiflora edulis Sims)
Passionfruit, banana (Passiflora tripartita var. mollissima (Kunth) Holm-Niels. & P. Jorg.)
Passionfruit, purple (Passiflora edulis Sims forma edulis)
Passionfruit, yellow (Passiflora edulis Sims forma flavicarpa O. Deg.)
Pawpaw, common (Asimina triloba (L.) Dunal)
Pawpaw, small-flower (Asimina parviflora (Michx.) Dunal)
Pelipisan (Mangifera casturi Kosterm.)
Pequi (Caryocar brasiliense Cambess)
Pequia (Caryocar villosum (Aubl.) Pers.)
Persimmon, American (Diospyros virginiana L.)
Pineapple (Ananas comosus (L.) Merr.)
Pitahaya (Hylocereus polyrhizus (F.A.C. Weber) Britton & Rose)

Appendix F EPA Crop Groups
Crop Group 24: Tropical and Subtropical Fruit, Inedible Peels
F-32 Treatment Manual 12/2020-42
Table F-29 Crop Group 24: Tropical and Subtropical Fruit, Inedible Peels
Pitaya (Hylocereus sp. including H. megalanthus (H. ocamponis and H. polychizus)
Pitaya, amarilla (Hylocereus triangularis Britton & Rose)
Pitaya, roja (Hylocereus ocamponis (Salm-Dyck) Britton & Rose)
Pitaya, yellow (Hylocereus megalanthus (K. Schum. ex Vaupel) Ralf Bauer)
Plantain (Musa paradisiaca L.)
Pomegranate (Punica granatum L.)
Poshte (Annona liebmanniana Baill.)
Prickly pear, fruit (Opuntia ficus-indica (L.) Mill.)
Prickly pear, Texas, fruit (Opuntia engelmannii Salm-Dyck ex Engelm. var. lindheimeri
(Engelm.) B.D. Parfitt & Pinkav)
Pulasan (Nephelium ramboutan-ake (Labill.) Leenh.)
Quandong (Santalum acuminatum (R. Br.) DC.)
Rambutan (Nephelium lappaceum L.)
Saguaro (Carnegiea gigantea (Engelm.) Britton & Rose)
Sapodilla (Manilkara zapota (L.) P. Royen)
Sapote, black (Diospyros digyna Jacq.)
Sapote, green (Pouteria viridis (Pittier) Cronquist)
Sapote, mamey (Pouteria sapota (Jacq.) H.E. Moore & Stearn)
Sapote, white (Casimiroa edulis La Llave & Lex)
Sataw (Parkia speciosa Hassk.)
Satinleaf (Chrysophyllum oliviforme L.)
Screw-pine (Pandanus tectorius Parkinson)
Sierra Leone-tamarind (Dialium guineense Willd.)
Soncoya (Annona purpurea Moc. & Sessé ex Dunal)
Soursop (Annona muricata L.)
Spanish lime (Melicoccus bijugatus Jacq.)
Star apple (Chrysophyllum cainito L.)
Sugar apple (Annona squamosa L.)
Sun sapote (Licania platypus (Hemsl.) Fritsch)
Tamarind-of-the-Indies (Vangueria madagascariensis J.F. Gmel.)
Velvet tamarind (Dialium indum L.)
Wampi (Clausena lansium (Lour.) Skeels)
White star apple (Chrysophyllum albidum G. Don)
Wild loquat (Uapaca kirkiana Müll. Arg.)
Cultivars, varieties, and hybrids of these commodities

10/2016-01 Treatment Manual G-1
Appendix
G
Appendix G
Respirator Protection Information
Contents
Introduction G-1
Equipment Selection G-1
MB 2016 Label G-2
Responsibilities G-4
Workplace Specific Respiratory Protection Program Elements G-7
Respirator Selection, Use, and Limitations G-9
Occupational Medical Monitoring Program (OMMP) G-11
Fit Testing G-13
Training G-13
Care, Inspection, and Maintenance G-14
Verbal Communication Considerations G-16
Low Temperature Environment Considerations G-17
High Temperature Environment Considerations G-18
Introduction
The information in this chapter has been developed from the Department of
Labor, Occupational Safety and Health Administration (OSHA) standard Title
29, Code of Federal Regulations (CFR), Part 1910.134, and the APHIS Safety
and Health Manual (under revision). These guidelines apply to all APHIS
employees who must wear respiratory protection equipment. These are the
minimum requirements for an effective respiratory protection program. USDA
employees should also refer to the USDA-APHIS-PPQ Safety and Health
Sharepoint site or Chapter 11 in the APHIS Safety and Health Manual on the
APHIS myportal website for additional information.
Equipment Selection
USDA APHIS PPQ recommends two different types of supplied air systems to
provide breathing air to employees conducting fumigation activities. These
are:
Self Contained Breathing Apparatus (SCBA)
Cascade air supply system
Each of these systems is configured for one style of air mask. When methyl
bromide concentrations are unknown or 5 ppm and above, employees must

Appendix G Respirator Protection Information
MB 2016 Label
G-2 Treatment Manual 10/2016-01
wear and use SCBA. There is one approved air mask, the MSA Airhawk Ultra
Elite. (Figure G-5)
MB 2016 Label
Refer to Figure G-1 for approved half face respirators.
NOTICE
USDA APHIS PPQ approves the following half and full face air purifying respirators
for use in areas where methyl bromide levels are between 1 and 5 ppm (refer to
Appendix E for ordering information):
Half face respirators: MSA Advantage 420, 3M 6100, 6200, 6300, North 7700, Survivair/
Sperian 250000, 260000, 270000
Full face respirators: MSA Advantage 1000, 3M 6700, 6800, 6900, North 76008AS/
76008A
Figure G-1 Approved Half Face Respirators
3M 6100, 6200, 6300
North 7700
MSA Advantage 420
Surviviar/Sperian 250000,
260000, 270000
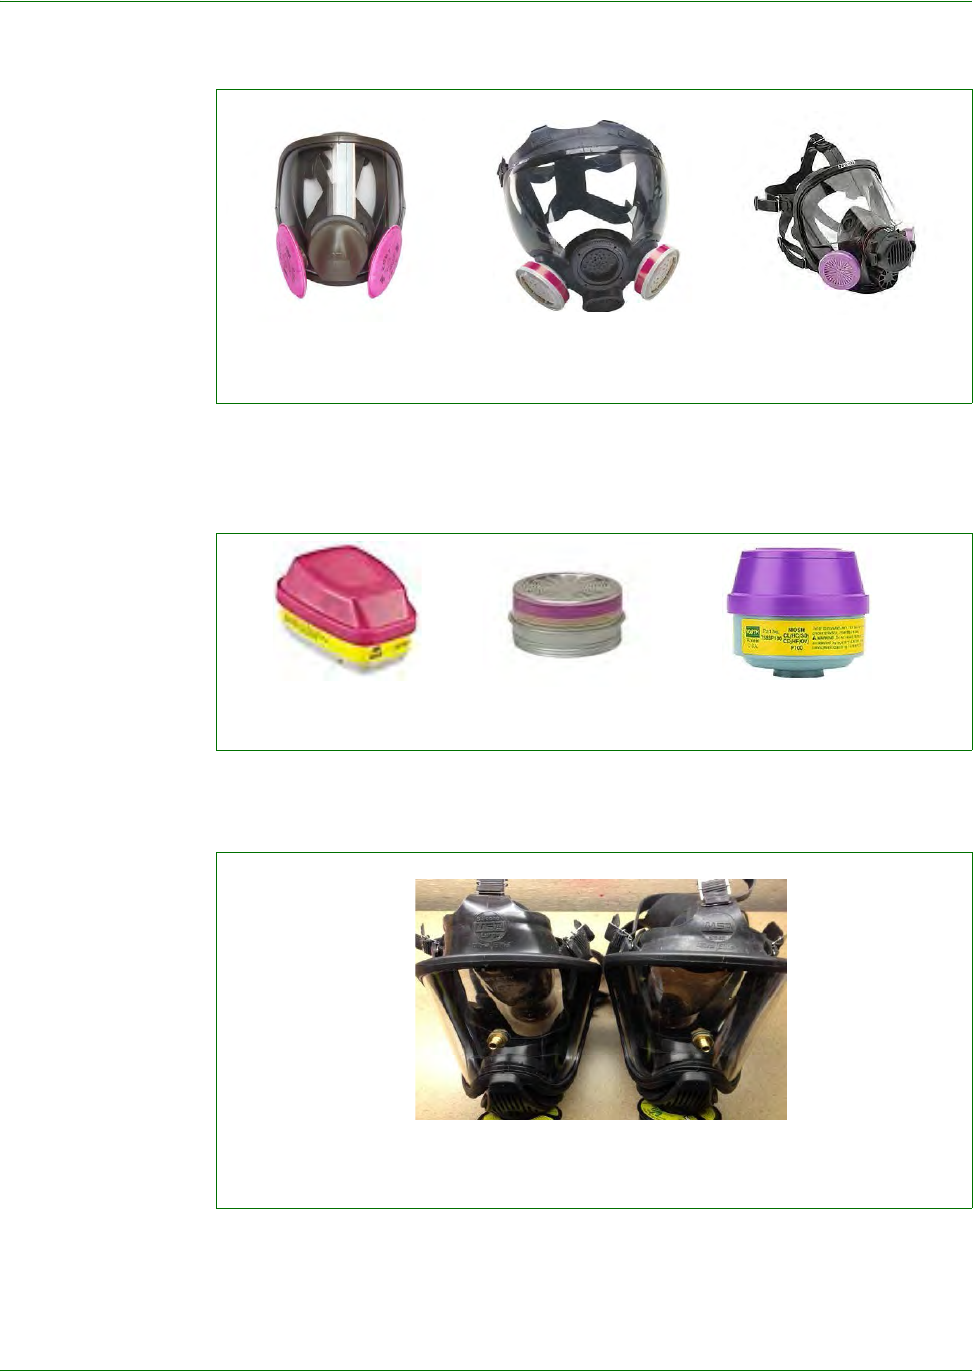
Appendix G Respirator Protection Information
MB 2016 Label
10/2016-01 Treatment Manual G-3
Refer to Figure G-2 for approved full face respirators.
Refer to Figure G-3 for approved organic vapor/acid gas/P100 cartridges for
both full and half face respirators.
Refer to Figure G-4 for approved SCBA.
Figure G-2 Approved Full Face Respirators
Figure G-3 Approved Organic Vapor/Acid Gas/P100 Cartridges
Figure G-4 Approved SCBA
3M 6700, 6800, 6900
North 76008AS/76008A
MSA Advantage 1000
3M
North
MSA Advantage
MSA AirHawk Ultra Elite

Appendix G Respirator Protection Information
Responsibilities
G-4 Treatment Manual 10/2016-01
If needed, employees may also order spectacle kits for the MSA AirHawk.
Models available include a center-support kit and a sidewire kit. See Figure G-
5.
Responsibilities
APHIS Safety, Health, and Environmental Programs
APHIS Safety, Health and Environmental Programs (SHEP) is responsible for:
ensuring that a physician or other licensed health care professional
determines that an employee is physically able to wear a respirator
establishing a medical evaluation protocol for respirator users and is the
authority on medical surveillance of respirators
establishing and conducting a respiratory protection program according to
the requirements of this manual and applicable OSHA standards when
respiratory protection is required and used
Managers and Supervisors
In workplaces where respiratory protection is used managers and supervisors
have a direct responsibility for protecting their employees and must:
advise all respirator wearers that they may safely leave the area at any
time for relief from respirator use in the event of equipment malfunction,
physical or psychological distress, procedural or communication failure,
significant deterioration of operating conditions, or any other conditions
that might warrant such relief
annually review the workplace-specific written plan and provide a copy to
the appropriate safety and health office with proper signature for approval
Figure G-5 Approved AirHawk Ultra Elite Spectacle Kit-Sidewire
MSA AirHawk Ultra Elite Spectacle Kit

Appendix G Respirator Protection Information
Responsibilities
10/2016-01 Treatment Manual G-5
appoint an individual to be responsible for the use, maintenance,
inspection, and care of common use, emergency, or escape respirators
contact applicable safety and health office whenever workplace operations
change to schedule appropriate evaluations when new hazardous
materials are introduced, processes or procedures are changed, or
engineering controls are modified or added
develop, maintain, and enforce a workplace-specific written plan
according to the guidance in 29 CFR 1910.134, Appendix A
document training on the employee safety and health record, or electronic
equivalent
ensure employees in the respiratory protection program wear the approved
respiratory protection for the hazard and for which they have been fit
tested and trained
ensure employees have received the necessary medical evaluations,
training, and fit testing before engaging in workplace operations requiring
the use of the respirator. Supervisors receive training from the applicable
safety office and should contact applicable safety office if they become a
manager/supervisor of a new work place
follow and enforce the cartridge change-out schedule developed by
supervisor/manager at worksite and include the schedule in the
workplace-specific written plan
maintain applicable standards in the workplace
notify applicable safety and health office of conflicts between respiratory
protection guidance and applicable standards
notify applicable safety office when new employees require fit testing or
when current employees have a change affecting their wear of respiratory
protection
provide copies of workplace-specific written plan to employees to hand-
carry to their medical evaluation when requested
provide for quality control of respirator breathing air (if used)
provide initial and periodic (annual and as changes occur) respiratory
protection training, including training to all employees in their workplace
who use “voluntary” use (filtering facepieces) respirators. (Refer to 29
CFR 1910.134, Appendix D for mandatory training requirements for
voluntary use respirators.)
NOTICE
Cylinders of purchased breathing air have a certificate of analysis from the supplier.
Discontinue the use of compressed breathing air and contact applicable safety office
if sample results are unsatisfactory and/or employees complain of taste, odor or irri-
tation from compressed breathing air.

Appendix G Respirator Protection Information
Responsibilities
G-6 Treatment Manual 10/2016-01
Employee Responsibilities
Employees who wear respiratory protection will:
complete initial respirator medical evaluation questionnaire (APHIS 29
Form, Occupational Exposures) and other physical examination
requirements as needed prior to performing duties requiring respiratory
protection
ensure that no facial hair comes between the sealing surface of the
facepiece and the face or interferes with valve function, if required, to
wear a tight-fitting facepiece
guard respirators against damage, do not use unsanitary, damaged or
unserviceable respirators, and turn in unserviceable respirators to their
supervisor
inspect, clean, and maintain any respiratory protection device issued to
them for their individual use
maintain the integrity of the National Institute of Occupational, Safety and
Health (NIOSH) certification by not mixing respirator parts from
different manufacturers
provide workplace-specific written program to the provider for the
medical evaluation when requested
receive initial and periodic training and fit testing (annual, and as changes
occur)
report to their supervisor any change in medical status which may impact
their ability to safely wear respiratory protection (e.g., weight changes,
facial scarring, dental changes, cosmetic surgery, disfigurement, etc.)
use the provided respiratory protection according to the instructions and
training received
wear only that respiratory protection for which they have received fit
testing and training, and only for the tasks specified
Work Unit Responsibilities
With assistance from the applicable safety office, the work unit will:
conduct fit testing on those individuals who have been medically cleared
by a physician or licensed health care provider
conduct routine surveys in workplaces where respirators are used
educate and train workplace supervisors, and those individuals appointed
to oversee the use, maintenance, and care of common use, or escape-only
respirators. Supervisor training will be repeated when a supervisor
becomes a supervisor of a different workplace
ensure fit testing is conducted according to OSHA and APHIS guidelines

Appendix G Respirator Protection Information
Workplace Specific Respiratory Protection Program Elements
10/2016-01 Treatment Manual G-7
maintain or have immediate access to current copies (paper or electronic)
of applicable OSHA standards (i.e., 29 CFR 1910, 29 CFR 1926), and the
NIOSH Certified Equipment List
provide guidance to workplace supervisors, as necessary, in the
preparation of the workplace-specific written plan and annual training
program
review workplace-specific written plans annually to ensure respiratory
protection procedures are addressed and submit to applicable safety office
for approval (refer to Figure A-22 on page A-1-42 for a site plan template
or see the USDA-APHIS-PPQ Safety and Health Sharepoint site for site-
specific plans)
Physician or Other Licensed Health Care Professional
(PLHCP)
The physician or PLHCP will:
conduct medical evaluations of individuals identified to wear a respirator,
as required
medically clear individuals to wear a respirator
review the respirator medical evaluation questionnaires and document as
outlined in Occupational Medical Monitoring Program (OMMP)
Workplace Specific Respiratory Protection Program Elements
The respiratory protection program must be conducted in accordance with
OHSA's standard 29 CFR 1910.134, APHIS Safety and Health Manual, and
this Treatment Manual.
The program elements of a respiratory protection program will be shared
among workplace supervisors, employees and the applicable safety office.
Only NOISH/MSHA approved respirators can be used by employees in federal
workplaces. No privately-procured respiratory protection device will be used
by federal employees in workplaces
Management must develop procedures to address the following at each
workplace:
fit testing procedures for tight-fitting respirators in 29 CFR 1910.134(f)
program evaluation procedures in 29 CFR 1910.134(l)
NOTICE
Management must ensure the respiratory protection program is evaluated annually.
The applicable safety office should assist management during review and report the
findings in writing to workplace supervisor with recommendation for correction if nec-
essary.

Appendix G Respirator Protection Information
Workplace Specific Respiratory Protection Program Elements
G-8 Treatment Manual 10/2016-01
training procedures in 29 CFR 1910.134(k)
The program evaluation will review the adequacy of the following elements as
a minimum:
air supply and breathing air (review of air testing results as appropriate)
and checking for breathing air outlet incompatibilities with other gas lines
filters used for each hazard
maintenance and storage practices (shared, emergency use, and individual
respirators)
the respirator for workplace exposures
work practices, documentation of inspections of shared and emergency
use respirators, and documentation of respirator training
The findings of these evaluations may be included in the workplace survey
reports.
Medical evaluations will be conducted as outlined in Occupational Medical
Monitoring Program (OMMP).
Workplace-Specific Program Elements
Supervisors in workplaces where respiratory protection is used must develop a
written plan as required by 29 CFR 1910.134(c). The plan must be approved
by the applicable safety office. Workplace-specific written plans must include
the following:
duration and frequency of respirator use (including use for rescue and
escape if applicable)
expected physical work effort involved in the process requiring
respiratory protection (see 29 CFR 1910.134 Appendix C, Part B)
proper use of respirators in routine and emergency situations
protective clothing and equipment to be worn while wearing the respirator
selection criteria—describe the processes in which respirators are required
type and weight of the respirators used by employees
temperature and humidity extremes that may be encountered
training procedures for required respirators (see 29 CFR 1910.134(k)(1-
6))
use, maintenance, and care procedures (describe the criteria that
employees use to determine when respirator filters, cassettes, or
cartridges must be changed)

Appendix G Respirator Protection Information
Respirator Selection, Use, and Limitations
10/2016-01 Treatment Manual G-9
Supervisors must ensure that approved respirators in their workplace are used,
are used correctly, and are in good condition.
Respirator Selection, Use, and Limitations
Select respirators according to 29 CFR 1910.134 (d) and the NIOSH Certified
Equipment List. Document the rationale for selection in the workplace-specific
written plan.
If a more stringent standard such as a substance-specific OSHA standard exists
for the contaminants, follow those guidelines and requirements for respirator
selection.
Employee Activity
Consider each employee’s activity and location in an inhalational hazardous
area when selecting the proper respiratory protection. For example, whether
the employee is in the hazardous area continuously or intermittently during the
work shift and whether the work rate is light, medium, or heavy.
Respirator Use Conditions
Take into account the period of time a respirator must be worn when selecting
a respirator. Consider the type of respirator application, such as for routine,
non-routine, emergency, or rescue use.
Location of the Potential Hazardous Area
Consider the location of the hazardous area with respect to a safe area, which
has respirable air, when selecting a respirator. This will permit planning for the
escape of employees if an emergency occurs, entry of employees to perform
maintenance duties, and rescue operations.
Operational Limitations
Environmental conditions and level of effort required of the respirator wearer
may affect respirator service life. For example, extreme physical exertion can
cause the user to deplete the air supply in a SCBA such that its service life is
reduced by half or more.
Immediately Dangerous to Life or Health (IDLH) Conditions
Evaluate all possible actions, such as increasing ventilation or isolating the
source of contaminants, to attain an atmosphere that is not IDLH before
authorizing employees to enter areas known to have IDLH conditions. Refer to
29 CFR 1910.134 g (3) and g(4) for procedures for IDLH atmospheres.

Appendix G Respirator Protection Information
Respirator Selection, Use, and Limitations
G-10 Treatment Manual 10/2016-01
Other Exposure Routes
Consider other exposure routes (e.g., skin absorption or external radiation)
when selecting respiratory protection. Wearing the respirator could increase
exposure by longer stay times in a hazardous environment such as exposures to
external radiation.
Document respirator selection on the workplace-specific written respiratory
protection plans.
Respirator Limitations
In addition to the following, refer to the requirements in 29 CFR 1910.134:
Communications—consider ambient environmental noise and
communication needs when specific respirators are selected. See Verbal
Communication Considerations.
Eye Irritation—if contaminants cause eye irritation, wear full facepiece
respirators or chemical protective goggles with half facepiece respirators.
Respirators in Low Temperature Environments—low temperatures may
cause detrimental effects on the performance of respirators. Consider the
effects of low temperatures in the selection and maintenance of
respirators and respirable gas supplies. See Low Temperature
Environment Considerations.
Respirators In High Temperature Environments—high temperatures may
affect the performance of the respirator, and may add undue physiological
stress. Consider the effects of high temperatures in respirator selection
and for medical approvals. See High Temperature Environment
Considerations.
Corrective Lenses
PPQ will pay for corrective lenses; however, employees are required to pay for
the personal doctor visit to get the prescription for the lenses.
!
WARNING
Wearing of contact lenses in contaminated atmospheres with a respiratory protection
device is prohibited.

Appendix G Respirator Protection Information
Occupational Medical Monitoring Program (OMMP)
10/2016-01 Treatment Manual G-11
Occupational Medical Monitoring Program (OMMP)
Medical Evaluation
Potential respirator wearers must complete a respirator medical evaluation
questionnaire and/or may receive a physical examination prior to initial fit
testing to identify existing medical conditions that would place the employee at
an increased health risk from the use of a respirator or interfere with the use or
wear of a respirator. The OSHA standard 29 CFR 1910.134 (e) and Appendix
C specifies the minimum mandatory requirements for medical evaluations.
Supervisors will assist employees in the completion of the APHIS Form 29
Occupational Exposure and ensure that the employees required to use
respirators are medically qualified and fit-tested for the appropriate respirator.
Contact the applicable PPQFO safety manager with any questions regarding
the medical clearance process before using a respirator.
Respirator Questionnaires and Medical Evaluations
All health care providers conducting medical evaluations and reviewing
completed respirator medical evaluation questionnaires for the respiratory
protection program must be a physician or other licensed health care
professional (PLHCP), as defined in 29 CFR 1910.134 (b). The Federal
Occupational Health (FOH) Medical Advisor meets the requirements of the
PLHCP and will be referred to as such in this section.
The medical evaluation consists of the respirator medical evaluation
questionnaire and a physical examination if wearing SCBA. The FOH Medical
Advisor determines medical evaluation expirations.
Following review of the respirator medical evaluation questionnaire, follow-up
medical evaluation may be needed. The FOH Medical Advisor will determine
what is needed. The FOH Medical Advisor is the determining official for the
employee’s ability to use a respirator.
The FOH Medical Advisor’s written recommendation will be in the form of a
medical clearance letter (MCL). The MCL is sent to the employee and
employer (applicable PPQFO Safety Manager). It is the employee’s
responsibility to provide a copy of the MCL to his/her supervisor. MCL’s will
be one of the following:
MCL for respirator use without restrictions
MCL for respirator use with restrictions. Follow all restrictions on the
MCL.
If an employee recovers from the medical condition and the
restrictions can be lifted, the employee’s personal doctor must notify

Appendix G Respirator Protection Information
Occupational Medical Monitoring Program (OMMP)
G-12 Treatment Manual 10/2016-01
the FOH Medical Advisor so the recommendations and restrictions
can be updated.
MCL for no respirator use.
The employee will not be allowed to perform any work activities that
require the use of a respirator. The FOH Medical Advisor will convey
to the employee the reason for the failure to pass the examination and
give the employee appropriate options. The reasons are personal
health issues identified through the medical history and physical
examination (including any testing) during the clearance process. In
some cases, there may be no options available. In most cases, there are
remedies that can be achieved by the employee working with his/her
healthcare provider. The employee has the option to do nothing, in
which case, the MCL for no respirator use will still stand.
The employee may elect to go to their personal physician to treat the
condition. All expenses for personal health issues are the
responsibility of the employee. Any documentation to support
reconsideration for medical clearance by the FOH Medical Advisor,
must be submitted to the FOH medical advisor by the employee or
their healthcare provider. Final determination for medical clearance
rests with the FOH medical advisor.
Follow-up Medical Evaluations
Based on an employee’s answers on the respirator medical evaluation
questionnaire, a follow-up medical evaluation may be required. The follow up
medical evaluation can be in the form of a physical examination, blood work,
and/or a stress test.
Workplace supervisors should be communicating with their employees and
know if they may have developed medical conditions affecting respirator use
since initial fit testing. Discretion is advised.
Supervisors should brief employees if there are any questions or concerns
about an employee’s ability to use a respirator due to a medical condition.
The supervisor will notify as soon as possible, the applicable safety and health
office if a worker who uses a respirator develops a medical condition that could
affect their ability to use a respirator.
When a worker reports to an annual respirator fit test, a program appointed fit-
tester will formally (e.g., with written verification that is locally developed)
ask if the employee has experienced any difficulty wearing a respirator and if
personnel are medically cleared to wear a respirator. If the worker responds
with a change in medical history, he or she will be directed back to the
supervisor, and will not be fit-tested until cleared by the FOH Medical Advisor.

Appendix G Respirator Protection Information
Fit Testing
10/2016-01 Treatment Manual G-13
Fit Testing
Fit Testing Procedures
Before an employee may be required to wear a respirator with a tight-fitting
facepiece, the employee must be fit tested with the same make, model, style,
and size of respirator that will be used in the workplace. Current fit tests from
other installations may be used if the employee will be using the same make,
model and style of respirator.
Perform fit testing according to 29 CFR 1910.134 and the APHIS Safety and
Health Manual.
Fit Test Failures
If a medically cleared employee cannot attain an adequate fit with a tight-
fitting respirator the applicable safety and health office should be contacted for
assistance.
Record Keeping
Records of respirator fit test results will include the information required in 29
CFR 1910.134 (m)(2)(i)(A-E). This information will be recorded on an
Certificate of Respirator Fit Test, or equivalent.
Copies of respirator fit test results will be given to the employee and their
supervisor to be maintained and filled in personnel records.
User Seal Check Procedures
Employees who use tight-fitting respirators will perform a user seal check to
ensure that an adequate seal is achieved each time the respirator is donned.
Employees will use either the positive and negative pressure check methods
listed in 29 CFR 1910.134, Appendix B-1, or the respirator manufacturer’s
recommended user seal check method.
Training
Initial Training
All personnel will receive initial respiratory protection training prior to
wearing a respirator. Use the USDA SF Form 182, Authorization, Agreement
and Certification of Training, to document the initial and annual training.
Management will provide or arrange for the initial training of supervisors who
have the responsibility of overseeing work activities of one or more persons
who must wear respirators and respirator wearers. Training will include the
requirements of 29 CFR 1910.134 (k).

Appendix G Respirator Protection Information
Care, Inspection, and Maintenance
G-14 Treatment Manual 10/2016-01
Periodic Training
Trained workplace supervisors will provide annual instruction and retraining to
respirator wearers. Training may also be conducted by applicable safety office
or fit-tester during the annual fit testing. Management will provide retraining
when notified by the supervisor of changes in the workplace or the type of
respirator which render previous training obsolete. Management will also
provide retraining when notified of or observed inadequacies in the employee’s
knowledge or use of the respirator indicate that the employee has not retained
the requisite understanding or skills.
Supervisors must discuss respiratory protection requirements with employees
during routine surveillance inspection. Supervisor training will be repeated
when a supervisor is relocated to a different workplace.
Documentation
Document training in AgLearn or electronic equivalent.
Care, Inspection, and Maintenance
Employees who are issued a respirator are responsible for its primary
maintenance and care. Where respirators are used collectively or kept ready for
emergencies by a workplace or operating activity, the supervisor of the activity
is responsible for establishing a respirator maintenance and cleaning program
as specified in 29 CFR 1910.134. This program includes care, inspection, and
maintenance of respirators.
Respirators
Cleaning and Disinfecting
In addition to the requirements in 29 CFR 1910.134, respirators issued
to an individual must be cleaned and disinfected, at a minimum, using
a respirator wipe at the end of each day in which the respirator is used.
Each respirator must be thoroughly cleaned and disinfected before
being worn by a different individual. Emergency use respirators must
be thoroughly cleaned and disinfected after being used. Refer to 29
CFR 1910.134, Appendix B-2.
Storage
Refer to 29 CFR 1910.134
Respirable Air and Oxygen for SCBA and Air-line Respirators
Compressed gaseous air, compressed gaseous oxygen, liquid air, and
liquid oxygen used for respiration must be of high purity and tested.
Inspection

Appendix G Respirator Protection Information
Care, Inspection, and Maintenance
10/2016-01 Treatment Manual G-15
Inspect respirators per 29 CFR 1910.134.
Each air and oxygen cylinder must be inspected to ensure that it is
fully charged according to the manufacturer's instructions.
The employee must inspect the respirator immediately before each use
and during cleaning to ensure that it is in proper working condition.
Inspect emergency or escape-only respirators prior to carrying it into
the workplace. After cleaning and disinfecting, inspect each respirator
to determine if it is in proper working condition, needs replacement of
parts or repairs, or needs to be discarded. Each respirator stored for
emergency or rescue use must be inspected at least monthly. Refer to
29 CFR 1910.134 (h)(3).
The record of inspection of emergency or rescue respirators must be
maintained on Inspection/Maintenance Record. Respirators that do not
meet applicable inspection criteria must be immediately removed from
service and repaired or replaced.
Maintenance
Refer to 29 CFR 1910.134(h) for maintenance and repair instructions.
Change cartridges, filters, or canisters of air-purifying respirators
immediately after each use or if air is restricted when breathing.
If, at any time an employee detects an increase in breathing resistance,
smells or tastes the contaminant, or detects the irritant properties of the
contaminant the employee must immediately leave the area and
replace the cartridge, filter or canister.
Breathing Air Quality and Use and Testing of Breathing Air
Containers
Breathing air quality and use, testing, and breathing air containers must
comply with 29 CFR 1910.134(i).
Ambient or Free-Air Pumps and Compressors
The workplace supervisor is responsible for inspecting ambient or free-air
pumps and compressors used with air-line (supplied-air) systems.
Air-line couplings must be incompatible with outlets for other gas systems
to prevent inadvertent servicing of air-line respirators with other gases or
oxygen.
Inspect the air-line, compressor and respirator to ensure all three
components match the air pressure and other requirements specified by
the manufacturers.
Place the pumps in a position to avoid entry of contaminated air into the
system.

Appendix G Respirator Protection Information
Verbal Communication Considerations
G-16 Treatment Manual 10/2016-01
Verbal Communication Considerations
Verbal communication in a noisy industrial environment can be difficult. It is
important to ensure that respirator wearers can comfortably communicate
when necessary because an employee who is speaking very loudly or yelling
may cause a facepiece seal leak, and the employee may be tempted to
temporarily dislodge the device in order to communicate. Both situations are
undesirable. There are several options that may be used to aid communications
when wearing respirators.
Speaking Diaphragms
A speaking diaphragm consists of a resonating surface and cavity that vibrates
during speech, amplifying the speaker’s voice outside of the respirator.
Consider the following when using speaking diaphragms:
Not all facepiece respirators are available with a speaking diaphragm.
Contact the equipment manufacturer for availability.
There are key components in maintaining the airtight integrity of the
facepiece requiring care when installing and handling.
Use of a respirator with a speaking diaphragm during welding, cutting,
burning, or grinding operations is of special concern, as flying sparks may
burn a hole in the diaphragm, creating a leak. Some manufacturers have
compensated for these applications by providing shrouds to cover the
diaphragm or by using metal diaphragms.
Built-In Microphones
Some respirator manufacturers make small microphones that are mounted
inside or connected to the respiratory inlet covering. The microphone may be
connected to a radio, telephone, loudspeaker, or other means of electronic
transmittal. Consider the following when using built-in microphones:
Any component that is attached to or through the respiratory inlet
covering may affect its function. In cases where the manufacturer
provides components, strictly adhere to the installation instructions and
leak test procedures to ensure that airtight integrity is maintained.
Voice activated communication systems may cause continuous sound
pickup of the blower, when used with powered air-purifying respirators,
or air flow noise, when used with supplied air devices.
Hand or Coded Signals
A predetermined set of signals may be useful in communicating.

Appendix G Respirator Protection Information
Low Temperature Environment Considerations
10/2016-01 Treatment Manual G-17
Cranial, Throat, or Ear Microphones
Cranial and throat microphones are held in place with a harness against the
wearer's head and larynx, respectively. Ear microphones are worn in the same
manner as a transistor radio earphone and function as both a microphone and
speaker. Use of these devices does not require making penetrations or
attachments to the respirator, and does not impact the NIOSH certification
status. They may be used with radios, telephones, loudspeakers, or other means
of electronic transmittal, similar to facepiece microphones. Consider the
following when using cranial, throat, or ear microphones:
Do not place cranial microphones under the head harness of facepiece
respirators since their dislodgement may loosen the respirator straps.
When connecting wires are passed underneath the bibs or neck seals of
supplied-air hoods or helmets, attach them to the wearer’s body to avoid
disturbing the bib positioning.
Telephone Handsets
Since a person exhales while speaking, the exhalation valve in a facepiece
respirator is partially open. This is a perfect location to place a handset or
hand-held microphone to obtain the clearest voice transmission. An alternative
is to hold the handset or microphone to the wearer's throat while speaking.
Safety Considerations
Electronic devices shall be selected and used with caution in explosive
atmospheres or Class I hazardous locations identified in Article 501 of the
National Electric Code (NEC). When required, ensure all such devices comply
with requirements for permissibility and intrinsically safe systems according to
Article 504 of the NEC. Consider the effects of radio frequency emissions
when utilizing such devices in the vicinity of sensitive electronic equipment.
Low Temperature Environment Considerations
A low temperature environment may cause lens fogging in a respiratory inlet
covering and freezing or improper sealing of the valves. Coating the inside
surface of the lens may inhibit fogging at temperatures approaching 0 degrees
Celsius (°C) (32 degrees Fahrenheit (°F)). Full facepieces are available with
nose cups that direct the warm and moist exhaled air through the exhalation
valve without contacting the lens. Facepieces with nose cups may provide
satisfactory vision at temperatures as low as -32 °C (-25 °F).
SCBA equipped with a full facepiece and certified for use below 32 °F shall be
equipped with a nose cup or other suitable accessory or coating to maintain the
device's NIOSH certification when it is used in environments below 32 °F.

Appendix G Respirator Protection Information
High Temperature Environment Considerations
G-18 Treatment Manual 10/2016-01
Additionally, there are several other important considerations that users should
be aware of when using SCBA in a low temperature environment. Users
should thoroughly review the manufacturer's instructions and, if necessary,
consult with the manufacturer to become thoroughly familiar with the
precautions and recommendations for use of a specific SCBA in cold weather
conditions. In general, consider the following:
Storage—elastomeric components such as facepieces and breathing tubes
may be prone to distortion if improperly stored in cold weather; such
distortion could prevent the user from an adequate fit
Accessory availability—cold temperature accessories and components
such as special elastomeric gaskets and diaphragms may not be readily
available
Respirator valves may freeze open or closed due to the presence of moisture at
very low temperatures. Some air-line respirators are approved with a device
called a “vortex tube” that warms the air supplied to the respiratory inlet
covering of the respirator.
High Temperature Environment Considerations
Working in a high temperature environment while wearing a respirator creates
additional stress on the wearer. Using a respirator that has a low weight, offers
a low resistance to breathing, possesses a minimal dead air space, and, if
feasible, provides a tempering of inlet air should minimize the additional
stress.
Dead air volume is the volume of previously exhaled air (which is available to
be inhaled) remaining in a respiratory inlet covering. Reducing the amount of
dead air volume in a respirator reduces the level of carbon dioxide in the
inhaled air, which is a major source of respirator usage related stress. This can
be accomplished through the use of powered air-purifying respirators,
continuous flow air-line respirators, use of a half facepiece respirator in lieu of
a full facepiece, and use of a nose cup in full face- piece devices (regardless of
the mode of operation).
Air-line respirators are recommended for use in a high temperature
environment. Air-line respirators approved with a vortex tube will
substantially reduce the temperature of the air supplied to the respirator. If air-
purifying respirators are to be used, a half facepiece respirator, where it offers
adequate protection, is preferable to the full facepiece.

Appendix G Respirator Protection Information
High Temperature Environment Considerations
10/2016-01 Treatment Manual G-19
Elastomeric components of respirators stored in high temperature
environments may deteriorate at an accelerated rate and the facepiece may
become permanently distorted. Use special care to prevent facepiece distortion.

Appendix G Respirator Protection Information
High Temperature Environment Considerations
G-20 Treatment Manual 10/2016-01

10/2023-01 Treatment Manual G-1-1
Treatment
Manual
A
B
C
D
E
F
G
H
I
J
K
L
M
N
O
P
Q
R
S
T
U
V
W
X
Y
Z
Index
A
a.i. Glossary-1-1
ability to heat
methyl bromide
2-4-8
absorbed dose
3-8-5
Acalypha
treatment options
5-6-19
Achatina
cold treatment
5-2-38, 5-5-8
MB at NAP treatment
5-5-4
other treatment options
5-5-5
Achatinidae
cold treatment
5-2-38, 5-5-8
Achimenes
5-6-14
Aconitum
treatment options
5-6-19
acorn
nonpropagative
5-4-4, 5-4-5
propagative
5-3-13
actionable pests
5-3-9
additional readings
methyl bromide
2-4-31
aerating
fresh fruit, vegetables, and cut flowers
2-4-43
nonsorptive containerized cargo
2-4-40
nonsorptive, noncontainerized cargo
2-4-41
sorptive containerized cargo
2-4-47
sorptive noncontainerized cargo
2-4-45
aeration
flexible duct
E-1-4
requirements
methyl b
romide
2-4-12
phosphine
2-11-30
sulfuryl flouride
2-10-5
aerosol insecticides
E-1-4
Africanized honeybee swarms
residual insect spray treatment
5-5-3
Agrilus planipennis
heat treatment
5-4-17
Agriolimacidae
MB at NAP treatment
5-3-4, 5-5-6
Agriolimax
MB at NAP treatment
5-3-4, 5-5-6
air curtain velocity measurement
8-1-17
air pump, auxiliary
E-1-5
air velocity measuring instrument
8-1-17
aircraft
treatment options
5-5-15
air-purifying respirator
E-1-5
Aleurocanthus woglumi
MB at NAP treatment
5-2-12, 5-3-5
Aleurocanthus woglumi host plants
tre
atment options
5-3-5
alfalfa seeds
5-6-12
Allium
5-6-13
Aloe
5-6-14
alpha grass and handicrafts
treatment options
5-4-9
Amaryllis
5-6-13, 5-6-17
Amorphophallus
5-6-14
Ampelodesma mauritanicus
5-4-9
Ampelopsis
5-6-14
Amphulariidae
hot water treatment
5-3-2
Anastrepha fraterculus
MB at NAP treatment
5-2-4, 5-2-5
vapor heat treatment
5-2-28
Anastrepha ludens
cold treatment
5-2-31
forced hot air treatment
5-2-22
hot water treatment
5-2-21
Anastrepha obliqua
forced hot air treatment
5-2-22
Anastrepha serpentina
forced hot air treatment
5-2-22
Anastrepha spp.
cold t
reatment
5-2-31
forced hot air treatment
5-2-21
MB at NAP/chamber only treatment
5-2-9
vapor heat treatment
5-2-27
Anchusa
5-6-14
anemometer
8-1-17
Anemone
5-6-14
Animal and Plant Health Inspection Service
Glos-
sary-1-1
ant
residual insecticidal spray treatment
5-5-3
Anthonomus grandis
MB at NAP/tarpaulin only treatment
5-4-3
ants
MB at NAP treatment
5-2-23, 5-5-16
Aphelenchoides besseyi
hot water treatment
5-6-16, 5-6-17
Aphelenchoides fragariae
5-6-15
hot water treatment (Lilium)
5-6-18
hot water treatment (Senecio)
5-6-19
Aphelenchoides subtenuis
hot water treatment
5-6-17
aphids
MB at NAP treatment
5-2-23, 5-3-3
APHIS
Glossary-1-1
APHIS Form
205-R, Instructions and Worksheet for Cali-
br
ating Portable Temperature Sen-

Index
G-1-2 Treatment Manual 10/2023-01
A
B
C
D
E
F
G
H
I
J
K
L
M
N
O
P
Q
R
S
T
U
V
W
X
Y
Z
sors A-1-3
2061, Residue Sample for Food or Feed Prod-
uct
A-1-2
206-R, Test of the Accuracy of the Permanent
RT
D Sensors Installed in Hot Water
Tanks
A-1-4
207-R, Sensor Location Diagram Fruit
Weigh
ts and Pulp Temperatures
A-
1-5
208, Performance Test for Mango Hot Water
Immersion Tan
t
A-1-6
apple maggot
irradiation treatment
5-2-25
apples
5-2-3
T107-a
5-2-30
T107-a-1
5-2-30
T107-b
5-2-31
T107-d
5-2-31
T109-a-1
5-2-36
T109-d-1
5-2-36
apricot
5-2-3, 5-2-30, 5-2-31
Archachatina
5-5-5
cold treatment
5-5-8
MB at NAP treatment
5-5-4
Arion
MB at NAP treatment
5-3-4, 5-5-6
Arionidae
MB at NAP treatment
5-3-4, 5-5-6
Armoracea
5-6-14
Ascarite®
8-1-5, E-1-8
Ascochyta spp.
5-6-10
ash logs
5-4-17
asparagus
from Thailand, Australia, and New Zealand
5-
2-3
Asphodelus fistulosus
5-5-16
Astilbe
5-6-14, 5-6-17
root
5-3-10
atmospheric fumigation chambers
basic design elements
6-3-3
certification of
6-1-1
circulation and exhaust systems
6-3-6
construction and performance standards
6-3-
1
other auxiliary equipment
6-3-11
Austrotortrix spp.
cold tr
eatment followed by MB at NAP
5-2-36
MB at NAP followed by cold treatment
5-2-36
autoclaves
E-1-35
Autographa gamma
MB at NAP treatment
5-2-15
automobiles
5-5-12
restricted MB fumigation item
2-3-11
auxiliary pump
8-1-18
avocado
5-2-30, 5-2-35
FIFRA section 18 exemption
2-3-3
from Hawaii, Israel, Philippines
5-2-3
seeds only, without pulp
5-3-12
avocado seed moth
MB in 26" vacuum treatment
5-3-12
avocado seed weevil
MB in 26" vacuum treatment
5-3-12
avocado stem weevil
MB in 26" vacuum treatment
5-3-12
B
Bactrocera cucurbitae
irradiation treatment
5-2-25
Bactrocera dorsalis
cold treatment
5-2-21, 5-2-22, 5-2-33, 5-2-34
fumigation plus cold treatment
5-2-35
hot water immersion treatment
5-2-21
irradiation treatment
5-2-25
MB at NAP treatment
5-2-3
vapor heat treatment
5-2-27, 5-2-28
Bactrocera jarvisi
irradiation treatment
5-2-25
Bactrocera occipitalis
vapor heat treatment
5-2-28
Bactrocera philippinensis
vapor heat treatment
5-2-28
Bactrocera tryoni
cold treatment
5-2-31
cold treatment followed by MB at NAP
5-2-36
fumigation plus cold treatment
5-2-35
MB at NAP followed by cold treatment
5-2-36
bags and bagging material
5-4-11
for cotton only
5-4-10
for small grains
5-6-5
for soil-grown commodities
5-6-5
for unroasted coffee beans
5-4-11
to contain root crops
5-4-10
treatment schedules for
5-4-10, 5-5-12
baking powder
restricted MB fumigation item
2-3-11
balances (portable) for weighing individual
E-1-8
baled hay
treatment options
5-4-16
baled lint
treatment options
5-4-2
banana
5-2-3
FIFRA section 18 exemption
2-3-3
FIFRA section 18 exempton
2-3-3
irradiated from Hawaii
5-3-10
barges
5-5-12
Baris lepidii
MB in 15" vacuum treatment
5-2-13
batch system
E-1-9
bean
dry
5-2-4
fava, dried
5-2-11
lablab
5-2-12
snap
5-2-12
string
5-2-12
beet
5-2-4
Begonia
5-6-14, 5-6-16
black fruit fly
forced hot air treatment
5-2-22
blackberry
5-2-4
blended strip tobacco
5-4-13
Bletilla hyacinthina
5-6-14, 5-6-15, 5-6-17
blower
E-1-12
blueberry
5-2-4, 5-2-5, 5-2-30
blueprints
restricted MB fumigation item
2-3-11
boilers and thermostatic controls

Index
10/2023-01 Treatment Manual G-1-3
A
B
C
D
E
F
G
H
I
J
K
L
M
N
O
P
Q
R
S
T
U
V
W
X
Y
Z
adequate water heating capacity 3-3-7
boll weevil
MB at NAP/tarpaulin only treatment
5-4-3
phosphine at NAP treatment
5-4-3
bone meal
restricted MB fumigation item
2-3-11
borers
dry heat treatment
5-4-5
MB at NAP treatment
5-5-11
MB at NAP/chamber only treatment
5-4-5
MB in 15" vacuum treatment
5-3-2, 5-3-7, 5-
4-10
MB in 26" vacuum treatment
5-3-4
SF at NAP treatment
5-5-10
box and package
penetration
2-3-8
Brachycerus
MB in 15" vacuum treatment
5-3-10
MB in 15" vacuum/chamber only treatment
5-
2-11
Brachyrhinus
MB in 26" vacuum treatment
5-3-10
Bradybaena
cold tr
eatment
5-2-37, 5-5-7
Bradybaena
cold treatment
5-5-7
MB at NAP treatment
5-5-7
Brassica
campestris
5-2-5, 5-2-6
Brassica le
afy vegetables 2-3-4
Brassica leafy vegetables
F-1-6
Brassica napus
5-2-18
Brassica oleracea
5-2-6
Brassica oleracea L. var. alboglabra
5-2-5
Brassica oleracea var. acephala
5-2-10
Brassica oleracea var. botrytis
5-2-5, 5-2-7
Brassica oleracea var. gemmifera
5-2-6
Brassica oleracea var. gongylode
5-2-14
Brassica pekinensis
5-2-6
Brassica rapa Japonica group
5-2-15
Brassica rapa Perviridis group
5-2-15
brassware
from Mumbai, India
5-5-17
breadfruit
5-2-20
break bulk cargo
fan arrangement and operation
2-4-16
gas introduction lines
2-4-17
gas sampling tubes
2-4-18, 2-4-20
Brevipalpus chilensis
irradiation treatment
5-2-25
MB at NAP treatment
5-2-9
soapy water and wax treatment
5-2-20, 5-2-
21
broccoli
5-2-5
Chinese
5-2-5
raap
5-2-5
bromeliads
5-3-2, 5-6-7
broomcorn and broomcorn articles
5-4-14, 5-4-15
treatment
5-4-14, 5-6-18
brooms made of rice straw
5-6-11
Bruchidae
MB at NAP treatment
5-2-4, 5-2-11, 5-2-16,
5-2-18, 5-3-17
MB in 26" vacuum treatment
5-3-15, 5-3-17
MB in 26" vacuum/chamber only treatment
5-
2-11
Bruchophagus
MB in 26"vacuum treatment
5-3-16
brussels sprouts
5-2-6
bubble fumigation system
E-1-12
bulb nematode
hot water dip treatment
5-6-19
other treatment options
5-6-13, 5-6-15
bulb scale mite
hot water treatment
5-3-11
MB at NAP treatment
5-3-11
bulb vegetables not on the label
FIFRA section 18 exemption
2-3-4
bulbs
5-6-13
bulbs, corms, tubers, rhizomes, and roots
5-3-10
butter
restricted MB fumigation item
2-3-11
C
cabbage 5-2-6
Chinese
5-2-6
Chinese mustard
5-2-6
cabbageworm
MB at NAP treatment
5-5-9
cactus
5-3-2, 5-6-14
FIFRA section 18 exemption
2-3-3
calibration companies approved
E-1-51
calibration of temperature probes
cold
A-1-7
Calla
rhizomes
5-6-15
Calliopsis
5-6-14
Camellia
5-6-8
Campanula
5-6-14
Candidula
5-2-37, 5-5-4, 5-5-5, 5-5-7
cantaloupe
5-2-7
Cape gooseberry
5-2-30
carambola
5-2-31, 5-2-33
carbon dioxide
2-11-4
Caribbean fruit fly
irradiation treatment
5-2-25
carpenter bee
SF at NAP treatment
5-5-10
Carposina niponensis
cold treatment followed by MB at NAP
5-2-36
carrot
5-2-7
Caryedon spp.
5-3-16
Cascade Air Tank Recharging System
E-1-12
cassava
manihot
5-2-7
Cathaica
5-5-7
Cathaica
5-2-37, 5-5-7, 5-5-7
cattleya fly
MB in 15" vacuum treatment
5-3-7
cauliflower
5-2-7
Caulophilus latinasus
MB in 26" vacuum treatment
5-3-12
cavalo broccolo
5-2-7
cecidomyid galls
5-3-7
celeriac
5-2-7
celery

Index
G-1-4 Treatment Manual 10/2023-01
A
B
C
D
E
F
G
H
I
J
K
L
M
N
O
P
Q
R
S
T
U
V
W
X
Y
Z
above ground 5-2-8
root
5-2-7
Cepaea
cold treatment
5-2-37, 5-5-7
MB at NAP treatment
5-5-4, 5-5-6
Cerambycidae
chlorpyrifos spray treatment
5-5-10
Ceratitis capitata
5-2-22
Ceratitis capitata
cold treatment
5-2-30, 5-2-33
cold treatment followed by MB at NAP
5-2-36
forced hot air treatment
5-2-21, 5-2-22
fumigation plus cold treatment
5-2-35
hot water immersion treatment
5-2-21
irradiation treatment
5-2-25
MB at NAP followed by cold treatment
5-2-36
MB at NAP treatment
5-2-3, 5-2-4, 5-2-5, 5-
2-9
, 5-2-12, 5-2-14, 5-2-19
vapor heat treatment
5-2-27, 5-2-28
Ceratitis rosa
cold treatment
5-2-30, 5-2-33
CERCLA
Glossary-1-1
Cercospora mamaonis
hot wat
er dip treatment
5-6-17
Cercospora spp.
Bordea
ux dip or spray treatment
5-6-17
Cernuella
cold treatment
5-2-37, 5-5-7
MB at NAP treatment
5-5-4, 5-5-5
Cersospora spp.treatment options
5-6-4
certified precision
8-1-24
certifying
facilities
6-1-1, 6-2-1
forced hot air treatment facilities
6-7-1
heat treatment of firewood facilities
6-9-1
hot water immersion treatment facilities
6-5-1
irradiation treatment facilities
6-8-1
vacuum fumigation chambers
6-2-1
vapor heat treatment facilities
6-7-1
certifying atmospheric fumigation chambers
6-3-1
certifying facilities
6-4-1
Cestrum
5-6-14
CFM calculation (fans)
8-1-17
chain hoist, electronic
E-1-12
charcoal
restricted MB fumigation item
2-3-11
chayote fruit only
5-2-8
chemical treatments
fumigants
2-2-1
methyl bromide
2-3-1
overview
2-1-1
CHEMTREC
Glossary-1-1
cherimoya from Chile
5-2-20
cherry
5-2-8, 5-2-30, 5-2-31, 5-2-35
chestnut
5-2-8, 5-3-13
chestnut dioon
5-3-4
chicory
above ground
5-2-9
root
5-2-9
Chilean false red mite
soapy water and wax treatment
5-2-20
Chilean false red mite of grapes
MB at NAP treatment
5-2-9
soapy water and wax treatment
5-2-21
Christmas trees
5-6-4
treatment schedules for
5-4-16
Chrysanthemum
5-6-4, 5-6-16
rooted and unrooted cuttings
5-3-3
Chrysanthemum spp.
roo
ted and unrooted cuttings
5-3-3
chrysomelid beetle
MB in 15" vacuum/chamber only treatment
5-
2-9
Chrysomyxa spp.
5-6-4, 5-6-6
cigarette beetle
Kabat application treatment
5-4-13
MB in 28" vacuum treatment
5-4-13
vacuum steam flow treatment
5-4-13
Cimicifuga
5-6-14, 5-6-17
cinder blocks
restricted MB fumigation item
2-3-11
Cipollini bulbs
5-2-9
Cissus
5-6-14
citrus
from citrus canker countries
5-6-9
from Hawaii
5-2-21
from Mexico and infested U.S. areas
5-2-21
from the U.S.
5-2-9
seeds of
5-3-17
citrus blackfly
MB at NAP treatment
5-2-12, 5-3-5
citrus canker
hot water treatment plus chemical dip
5-3-17
citrus whitefly
MB at NAP treatment
5-3-5, 5-3-6
Clematis
5-6-14
clementine
5-2-30
from Chile
5-2-9
from Mexico
5-2-27, 5-2-28
clementine from Mexico and U.S. quarantine areas
5-2-9
CO2 scrubbers
restricted MB fumigation item
2-3-11
coast guard regulations
B-1-1
Cochlicella
cold treatment
5-2-37, 5-5-7
MB at NAP treatment
5-5-4, 5-5-5
coconut
whole, without husk
5-2-10
codling moth
irradiation treatment
5-2-25
MB at NAP/chamber only treatment
5-2-8
cold treatment
certifying self refrigerated containers
6-4-9
integral containers used for cold treatment
temper
ature recording instrument
6-4-10
vessels used for intransit cold treatment
6-4-2
approval requirements
6-4-5
temperature recording systems stan-
dar
ds
6-4-2
warehouse certification
6-4-10
coles
5-2-10
collard greens
5-2-10
Colosius
5-3-4
MB at NAP treatment
5-5-6
commercial suppliers
E-1-1

Index
10/2023-01 Treatment Manual G-1-5
A
B
C
D
E
F
G
H
I
J
K
L
M
N
O
P
Q
R
S
T
U
V
W
X
Y
Z
Comprehensive Environmental Response, Com-
pensation, and Liability Act (CERCLA)
Glossary-1-
1
conifer seeds
5-3-13
Conogethes punctiferalis
cold treatment followed by MB at NAP
5-2-36
Conopomorpha sinensis
cold treatment
5-2-33
Conotrachelus nenuphar
5-2-25
Conotrachelus spp.
MB in
26" vacuum treatment
5-3-12
construction equipment
5-5-12
without cabs
5-5-13
consultants, hot water immersion treatments
E-1-
13
containerized cargo
methyl bromide
2-4-13
tarpaulin fumigation
2-4-13
fan arrangement and operation
2-4-17
gas introduction lines
2-4-17
gas sampling tubes
2-4-19
containers
5-5-12, 5-6-7
used
5-5-13
continuous flow system
3-3-5
contracting officer’s representative
Glossary-1-1
Convallaria
5-6-12
conversion tables
C-1-1
Convolvulus japonicus
5-6-14
Copitarsia spp.
MB at NAP treatme
nt
5-2-3, 5-2-4, 5-2-15, 5-
2-17
, 5-2-18
copra
5-2-10, Glossary-1-1
Copturus aguacatae
MB in 26" vacuum treatment
5-3-12
COR
Glossary-1-1
corn
corn-on-the-cob
5-2-10
related diseases, treatment schedules for
5-6-
9
seed, nonpropagative
5-6-9
seed, not for food, feed, or oil purposes
5-6-9
shelled and contaminated with cottonseed
5-
4-7
cotton and cotton products
5-4-3
samples of
5-4-4
treatment schedules for
5-4-2
cottonseed
5-4-3, 5-4-4
bagged, packaged, or bulk
5-3-13
hulls
5-4-3, 5-4-4
meal
5-4-2, 5-4-3, 5-4-4
covers
for small grains
5-6-5
for soil-grown commodities
5-6-5
for wheat
5-6-6
CPK
Glossary-1-2
creatine phosphokinase
Glossary-1-2
Crocidosema aporema
MB in 15" vacuum/chamber only treatment
5-
2-12
crop group
berries and small fruit
F-1-14
bulb vegetables
F-1-4
cereal grains
F-1-17
citrus fruit
F-1-11
cucurbit vegetables
F-1-10
edible fungi
F-1-24
forage, fodder, and straw of cereal grains
F-1-
18
fruiting vegetables
F-1-9
grass forage, fodder, hay
F-1-19
herbs and spices
F-1-21
leafy vegetables except Brass
ica F-1-5
leaves of legume vegetables
F-1-8
leaves of root and tuber vegetables
F-1-3
legume vegetables
F-1-7
nongrass animal feed
F-1-20
oilseed
F-1-23
pome fruit
F-1-12
root and tuber
F-1-2
stone fruit
F-1-13
tree nuts
F-1-16
tropical and subtropical fruit, edible peels
F-1-
26
, F-1-27, F-1-28, F-1-29
Cryptophlebia
illepida
5-2-25
illepida, MB at NAP treatment
5-3-14, 5-3-15
ombrodelta
5-2-25
cucumber
5-2-10
cucurbit vegetables
FIFRA section 18 exemption
2-3-4
Curculio caryae
5-2-33
Curculio spp.
MB at NAP
5-4-4
MB at NAP treatment
5-2-8, 5-3-13, 5-4-5
MB in 26" vacuum/chamber only treatment
5-
2-8
Curcuma
5-6-14
Cuscuta spp.
steam heat tr
eatment
5-5-16
cut
flowers and greenery
5-4-10
flowers and greenery treatment schedules
5-
4-10
pine Christmas trees
5-4-17
pine logs
5-4-17
cycads
5-3-4
Cyclamen
5-6-14
Cydia fabivora
MB at NAP treatment
5-2-12
MB in 15" vacuum/chamber only treatment
5-
2-12
Cydia pomonella
irradiation treatment
5-2-25
MB at NAP/chamber only treatment
5-2-8
Cydia splendana
MB at NAP treatment
5-2-8, 5-3-13, 5-4-4
MB in 26" vacuum/chamber only treatment
5-
2-8
, 5-4-5
Cylas formicarius elegantulus
irradiation treatment
5-2-25
cyst nematode
hot water treatment
5-6-15
Cytec® Industries, Inc.
2-11-31
Cytisus
5-6-14

Index
G-1-6 Treatment Manual 10/2023-01
A
B
C
D
E
F
G
H
I
J
K
L
M
N
O
P
Q
R
S
T
U
V
W
X
Y
Z
D
Dahlia 5-6-14
dasheen
5-2-10
FIFRA section 18 exemption
2-3-3
deciduous woody plants, dormant
5-3-4
decision tables, how to use
1-1-6
Deroceras
5-3-4, 5-5-6
Dialeurodes citri
MB at NAP treatment
5-3-5, 5-3-6
nonfoliated host plants treatment options
5-3-
6
Dicentra
5-6-14
Dieffenbachia spp.
5-3-4
digital thermistor instrument
E-1-14
Digitaria spp.
dry heat tr
eatment
5-5-16
Dioscorea spp.
5-2-19, 5-3-12
dip treatment
equipment
2-13-1
procedures
clean u
p
2-13-4
designate restricted use areas
2-13-3
dip plants
2-13-4
disinfect original shipping containers
2-
13-4
dry plants
2-13-4
prepare pesticide solution
2-13-3
prepare plant material
2-13-3
release cargo
2-13-4
remove plants
2-13-4
responsibilities
2-13-8
Diplosolenodes
5-3-4
disinfectants
E-1-22
dosage calculations
preparation
2-4-25, 2-9-15
dose mapping
3-8-5
dosimeter
3-8-5
dosimetry
3-8-5
DOT
U.S. Department of Transportation
Glossary-
1-2
Drierite®
8-1-4, E-1-16
drying tube
thermal conductivity gas analyzers
8-1-4
E
ECO2FUME® 2-11-8
electrical power supply
tarpaulin fumigation sites
2-4-11
electronic equipment
restricted MB fumigation item
2-3-11
emerald ash borer
heat treatment
5-4-17
empty holds
5-5-3
Environmental Protection Agency
Glossary-1-2
EPA
Glossary-1-2
EPDM rubber
restricted MB fumigation item
2-3-11
equipment reference guide to commercial suppliers
E-1-1
exhaust duct
E-1-16
exhaust outlet
8-1-4
exhausting gas
conducting fumigation
2-9-21
external feeder
Glossary-1-2
F
FAA Glossary-1-2
feather pillows
restricted MB fumigation item
2-3-11
Federal Aviation Administration
Glossary-1-2
Federal Insecticide, Fungicide, and Rodenticide Act
Glossary-1-2
feeds and milled products
5-4-11
FIFRA
Glossary-1-2
FIFRA Section 18 Exemption
5-2-2
FIFRA section 18 exemption
avocado
2-3-3
banana
2-3-3
cactus
2-3-3
crop group
Br
assica leafy vegetables
2-3-4
cucurbit vegetables
2-3-4
leafy vegetables
2-3-4
leaves of roots and tubers
2-3-4
root and tuber
2-3-3
stone fruit
2-3-4
unlabeled commodities from bulb vegeta-
bles
2-3-4
dasheen
2-3-3
herbs and spices, fresh
2-3-3
ivy gourd
2-3-3
kaffir lime leaves
2-3-3
longan
2-3-3
lychee
2-3-3
Malvaceae seeds
2-3-3
mint, dried
2-3-3
mint, fresh
2-3-3
plantain
2-3-3
pointed gourd
2-3-3
pomegranate
2-3-3
rambutan
2-3-3
treatment schedules
1-1-9
final reading methyl bromide
2-4-31
forced hot air treatment facilities
certification of
6-7-1
documentation
6-7-8
plan and process approval
6-7-2
preliminary performance testing
6-7-4
forced hot air treatment official performance testing
6-7-4
forms
APHIS Form 205-R, Instructions and Work-
sheet for Calibr
ating Portable Tem-
perature Sensors
A-1-3
APHIS Form 206-R, Test of the Accuracy of
the Per
manent RTD Sensors In-
stalled in Hot Water Tanks
A-1-4
APHIS Form 207-R, Sensor Location Diagram
Fr
uit Weights and Pulp Tempera-
tures
A-1-5
Calibration of Temperature Probes (Cold
Tr
eatment)
A-1-7
Location of Temperature Sensors in Contain-
er
ized Cargo (Cold Treatment)
A-1-
8

Index
10/2023-01 Treatment Manual G-1-7
A
B
C
D
E
F
G
H
I
J
K
L
M
N
O
P
Q
R
S
T
U
V
W
X
Y
Z
PPQ Form 203, Foreign Site Certificate of In-
spection and/or Treatment
A-1-32
PPQ Form 429A, Fumigation Record
A-1-9,
A-1-12
PPQ Form 449-R, Temperature Recording
Calibr
ation Report
A-1-30
PPQ Form 519, Compliance Agreement
A-1-
17
PPQ Form 523, Emergency Action Notification
A-1-20
PPQ Form 556, In Transit Cold Treatment
Clearance Re
port
A-1-35
fresh herbs
FIFRA section 18 exemption
2-3-3
fresh mint
FIFRA section 18 exemption
2-3-3
fresh spices
FIFRA section 18 exemption
2-3-3
fruit sizing equipment
3-3-6, E-1-17
fumigant selector switch
thermal conductivity gas analyzers
8-1-4
fumigants
physical properties of
2-2-5
thermal conductivity gas analyzer
8-1-2
fumigation
definition of
2-2-1
guidelines
2-2-3
Fumiscope®
8-1-2
fungal diseases
steam sterilization treatment
5-4-9
fungal rice diseases
dry heat treatment
5-4-8
fungicides
E-1-17
G
g Glossary-1-2
gas analyzers
E-1-19
gas detector tubes
8-1-13
gas detector tubes or gas samples
8-1-13
gas drying tube for Drierite®
E-1-21
gas introduction
methyl bromide
2-4-27, 2-9-17
gas introduction lines
methyl bromide
2-4-17
gas penetration and distribution
2-4-15
gas sampling tubes
methyl bromide
2-4-18, 2-9-12
grams
Glossary-1-2
gray
3-8-5, Glossary-1-2
Gy
3-8-5, Glossary-1-2
H
hazard communication program 7-1-1
HDT
highest dose tested
Glossary-1-2
heat treatment o firewood facilities
conducting test treatment
6-9-2, 6-9-5
contact information
6-9-6
documentation
6-9-6
heat treatment of firewood facilities
calibrating temperature sensors
6-9-3
certification
6-9-2
certification frequency
6-9-5
official certification testing
6-9-3
plan approval
6-9-2
thermal mapping
6-9-4
heat treatments, list of
3-2-1
herbs and spices, fresh
FIFRA section 18 exemption
2-3-3
high-protein flours
restricted MB fumigation item
2-3-12
hitchhiker
Glossary-1-2
hot water immersion
circulation
3-3-8
hydrocooling
3-3-15
post-treatment cooling options
3-3-14
pretreatment warming options
3-3-14
safeguarding treated fruit
3-3-13
temperature recorder specifications
3-3-9
temperature sensor specifications
3-3-8
hot water immersion treatment
batch system
3-3-5
continuous flow system
3-3-5
facilities
annua
l performance test
6-5-4
certification
6-5-1
foreign treatment facility protocols
6-5-7
permanent probe temperature
6-5-4
preliminary performance testing
6-5-2
facility electrical components
3-3-6
USDA checklist
3-3-4
facility design
3-3-4
on-site inspection
3-3-4
proposal submission
3-3-4
hot water immersion treatment consultants
E-1-13
I
impervious surface
methyl bromide
2-4-10
infrared spectroscopy gas monitoring device
Spectros
8-1-9
internal feeder
Glossary-1-2
intransit cold treatment
certified vessels and containers
6-4-2
temperature recording equipment standards
6-4-2
vessel certification
6-4-5
ionizing radiation
3-8-5
irradiation
3-8-1, 3-8-5
approved sources
6-8-4
ASTM Standards
6-8-13
audits
6-8-13
compliance agreements
6-8-10
conditions for recertification
6-8-11
documentation
3-8-4
domestic pre-certification
6-8-2
dose mapping
3-8-4
dosimetry
3-8-3
dosimetry system
6-8-5
facility certification
6-8-1
foreign pre-certification
6-8-2
standard operating procedures
6-8-7
terminology
3-8-5
treatment objectives
3-8-2
irradiation treatment facilities
certification of
6-8-1
ivy gourd

Index
G-1-8 Treatment Manual 10/2023-01
A
B
C
D
E
F
G
H
I
J
K
L
M
N
O
P
Q
R
S
T
U
V
W
X
Y
Z
FIFRA section 18 exemption 2-3-3
FIFRA Section 18 Exemptions
2-3-3
K
kaffir lime leaves
FIFRA section 18 exemption
2-3-3
FIFRA Section 18 Exemptions
2-3-3
L
lard
restricted MB fumigation item
2-3-11
leafy vegetables
FIFRA section 18 exemption
2-3-4
leather goods
restricted MB fumigation item
2-3-12
leaves of roots and tubers
FIFRA section 18 exemption
2-3-4
line switch
thermal conductivity gas analyzers
8-1-4
line switches
thermal conductivity gas analyzers
8-1-4
Lobesia botrana
MB at NAP treatment
5-2-4
MB chamber treatment
5-2-5
MB tarp or chamber treatment
5-2-5, 5-2-17
location of temperature sensors in containerized
cargo (cold treatment)
A-1-8
longan
FIFRA section 18 exemption
2-3-3
lychee
FIFRA section 18 exemption
2-3-3
M
m Glossary-1-2
magazines
restricted MB fumigation item
2-3-12
magnesium articles
restricted MB fumigation item
2-3-12
magnesium phosphide
E-1-22
Malvaceae seeds
FIFRA section 18 exemption
2-3-3
manometer
8-1-19, E-1-23
MB
Glossary-1-3
metam-sodium
E-1-25
meter
Glossary-1-2
methyl bromide
Glossary-1-3
"Q labels" and section 18 exemptions
2-3-2
box and package aeration
2-3-8
chamber fumigation
2-5-1
container fumigations without tarpaulin
2-8-1
gas analysis
2-3-5
humidity effects
2-3-8
properties and use
2-3-1
residual effect
2-3-11
ship fumigation
2-6-1
sorption
2-3-10
structure fumigation
2-7-1
tarpaulin fumigation
2-4-1
break bulk cargo
2-4-12
preparation
2-4-20
tarpaulin fumigation sites
ability to heat ar
ea
2-4-8
electrical power supply
2-4-11
impervious surface
2-4-10
nonwork area
2-4-11
water supply
2-4-11
well-ventilated sheltered area
2-4-8
methyl bromide 100%
E-1-25
mg
Glossary-1-3
milligram
Glossary-1-3
milligrams per liter
mg/L
Glossary-1-3
millimeters of mercury
Glossary-1-3
minimum absorbed dose
3-8-5
mint, dried
FIFRA section 18 exemption
2-3-3
mint, fresh
FIFRA section 18 exemption
2-3-3
Mityvac hand-held vacuum pump
8-1-23
mmHg
Glossary-1-3
moisture meter (for wood)
E-1-27
N
National Institute for Occupational Safety and
Health
Glossary-1-3
natural rubber goods
restricted MB fumigation item
2-3-12
neoprene
restricted MB fumigation item
2-3-12
newspapers
restricted MB fumigation item
2-3-12
NIOSH
Glossary-1-3
non-chemical treatments
cold treatment
3-7-1
nonwork area methyl bromide
2-4-11, 2-9-10
O
OIC
officer-in-charge
Glossary-1-3
OSHA
Glossary-1-3
P
padding corners
methyl bromide
2-4-20
paper with high rag or sulfur content
restricted MB fumigation item
2-3-12
parts per billion
Glossary-1-3
parts per million
Glossary-1-3
PEL
Glossary-1-3
perishable commodities in temporary enclosures
2-
2-3
permissible exposure
Glossary-1-3
pesticide spills
contaminated material
7-2-9
contamination control
7-2-5
crash notification
7-2-4
decontamination
7-2-8
emergency kit
7-2-11
emergency procedures
7-2-2
environmental monitoring
7-2-9
evaluate the situation
7-2-3
identify contacts
7-2-3
managing
7-2-1
planning for
7-2-10
post-spill procedure
7-2-9
reporting
7-2-9
safety and first aid
7-2-3
security
7-2-7
phosphine
2-11-16
phosphine detector
8-1-23

Index
10/2023-01 Treatment Manual G-1-9
A
B
C
D
E
F
G
H
I
J
K
L
M
N
O
P
Q
R
S
T
U
V
W
X
Y
Z
photography chemicals
restricted MB fumigation item
2-3-12
photography prints
restricted MB fumigation item
2-3-12
placards
E-1-57
Plant Protection and Quarantine
Glossary-1-3
plantain
FIFRA section 18 exemption
2-3-3
pointed gourd
FIFRA Section 18 Exemption
2-3-3
FIFRA section 18 exemption
2-3-3
polyurethane foam
restricted MB fumigation item
2-3-12
pomegranate
FIFRA section 18 exemption
2-3-3
pomegranate, fresh
FIFRA Section 18 Exemption
2-3-3
portable sensors
E-1-14
PortaSens phosphine detector
8-1-23
ppb
Glossary-1-3
ppm
Glossary-1-3
PPQ
Glossary-1-3
PPQ Form 203 Foreign Site Certificate of Inspec-
tion and/or Treatment
A-1-32
PPQ Form 429 Fumigation Record
A-1-17
PPQ Form 429A Fumigation Record
A-1-9, A-1-12
PPQ Form 523 Emergency Action Notification
A-1-
20
PPQ Form 556 In Transit Cold Treatment Clear-
ance Report
A-1-35
preclearance programs
6-4-1
pressure-leakage test for nap fumigation chambers
6-3-9
pulpy fruit definition
2-4-21
Q
quarantine treatments
monitoring of
2-2-2
fumigation guidelines
2-2-3
nonperishable commodities in temporary
enclosur
es
2-2-2
perishable commodities in temporary en-
closures
2-2-3
monitoring of perishable in temporary enclo-
sur
es
2-2-3
quarantine-significant slug treatment options
5-3-4
quick-release dispensing equipment
2-11-13
R
radura 3-8-5
rambutan
FIFRA section 18 exemption
2-3-3
rambutan from Hawaii
5-2-22, 5-2-29
refrigerated warehouses used for cold treatment
6-
4-10
residue monitoring
4-1-1
safety
4-1-2
sample
collection
4-1-2
labeling
4-1-3
shipment
4-1-3
storage
4-1-3
respiratory protection
8-1-13
restricted MB fumigation
automobiles
2-3-11
baking powder
2-3-11
restricted MB fumigation item
blueprints
2-3-11
bone meal
2-3-11
butter
2-3-11
charcoal
2-3-11
cinder blocks
2-3-11
CO2 scrubbers
2-3-11
electronic equipment
2-3-11
EPDM rubber
2-3-11
feather pillows
2-3-11
high-protein flours
2-3-12
lard
2-3-11
magazines
2-3-12
magnesium
2-3-12
natural rubber goods
2-3-12
neoprene
2-3-12
newspapers
2-3-12
paper
2-3-12
photography chemicals
2-3-12
photography prints
2-3-12
polyurethane
2-3-12
rug pads
2-3-12
silver polishing papers
2-3-12
soft yarns
2-3-12
sweaters
2-3-12
viscose rayon fabrics
2-3-12
woolens
2-3-12
yak rugs
2-3-12
root and tuber
FIFRA section 18 exemption
2-3-3
root and tuber crop group
FIFRA section 18 exemption
2-3-4
S
safety equipment E-1-31
sealing tape
E-1-32
Section 18 Exemption
commodities covered by
2-3-3
section 18 exemptions
commodities covered by
2-3-3
ship
hold
5-5-5
short-term exposure limit
Glossary-1-4
silver polishing papers
restricted MB fumigation item
2-3-12
smoking candle
E-1-33
snakes, sand or water
E-1-33
soft yarns
restricted MB fumigation
2-3-12
soil fumigants
E-1-33
Spectros
8-1-9
spill recovery materials
E-1-34
stack covering
methyl bromide
2-4-23
state hazardous waste management agencies
7-2-
11
steam boilers for hot water immersion treatments
E-1-34
steam generators
E-1-35
steam jet method
3-4-3
steam pressure sterilization
3-4-1

Index
G-1-10 Treatment Manual 10/2023-01
A
B
C
D
E
F
G
H
I
J
K
L
M
N
O
P
Q
R
S
T
U
V
W
X
Y
Z
steam sterilizers E-1-35
steam treatments
3-4-1
STEL
Glossary-1-4
stone fruit
FIFRA section 18 exemption
2-3-4
sulfuryl fluoride
E-1-35
suppliers
E-1-1
sweaters
restricted MB fumigation
2-3-12
T
T100—Treatment Schedules 5-2-1
T101—Methyl Bromide Fumigation Schedules
5-2-
3
T102—Water Treatment Schedules
5-2-20
T103—High Temperature Forced Air Schedules
5-
2-21
T104—Pest Specific/Host Variable Treatment
Schedules
5-2-22
T105—Irradiation Treatment Schedules
5-2-24
T106—Vapor Heat Schedules
5-2-27
T107—Cold Treatment Schedules
5-2-29
T108—Fumigation Plus Cold Treatment of Fruits
Schedules
5-2-35
T109—Cold Treatment Plus Fumigation of Fruits
Schedules
5-2-36
T200—Schedules
5-3-1
T201—Plant Treatment Schedules
5-3-2
T202—Bulbs, Corms, Tubers, Rhizomes, and
Roots Treatment Schedules
5-3-10
T203—Seeds Treatment Schedules
5-3-12
T300—Miscellaneous Treatment Schedules
5-4-1
T302—Grains and Seeds Not Intended for Propa-
gation Treatment Schedules
5-4-4
T303—Rice Straw and Hulls Treatment Schedules
5-4-7
T304—Alpha (alfa) Grass and Handicrafts Treat-
ment Schedules
5-4-9
T305—Cut Flowers and Greenery Treatment
Schedules
5-4-10
T306—Bags and Bagging Material Treatment
Schedules
5-4-10
T308—Tobacco Treatment Schedules
5-4-13
T309—Broomcorn and Broomcorn Articles Treat-
ment Schedules
5-4-14
T310—Tick-Infested Materials (Nonfood) Treat-
ment Schedules
5-4-15
T311 Baled Hay Treatment Schedules
5-4-16
T312—Oak Logs and Lumber Treatment Sched-
ules
5-4-16
T313—Christmas Trees Treatment Schedules
5-4-
16
T401—Railroad Cars Empty Treatment Schedules
5-5-3
T401—Treatment Schedules
5-5-1
T403—Nonfood Miscellaneous Cargo Treatment
Schedules
5-5-5
T404—Wood Products Treatment Schedules
5-5-
10
T405—Bags and Bagging Material Treatment
Schedules
5-5-12
T407—Mechanical Cotton Pickers and Other Cot-
ton Equipment Treatment Schedules
5-5-13
T408—Soil as Such and Soil Contaminating Dura-
ble Commodities Treatment Schedules
5-5-13
T409—Aircraft Treatment Schedules
5-5-15
T410—Tick Infestations Treatment Schedules
5-5-
16
T412—Noxious Weed Seeds Treatment Schedules
5-5-16
T413—Brassware from Mumbai, India Treatment
Schedules
5-5-17
T414—Inanimate, Nonfood Articles with Gypsy
Moth Egg Masses Treatment Schedules
5-5-17
T415—Garbage Treatment Schedules
5-5-18
T416—Goatskins, Lambskins, Sheepskins Treat-
ment Schedules
5-5-19
T501—Chrysomyxa spp., Cercospora spp., and
Phoma chrysanthemi Treatment Schedules
5-6-4
T501—Plant Pests or Pathogens Treatment Sched-
ules
5-6-1
T502—Potato Cyst Nematode Treatment Sched-
ules
5-6-5
T503—Downy Mildews and Physoderma Diseases
of Maize Treatment Schedules
5-6-5
T504—Flag Smut Treatment Schedules
5-6-6
T505—Chrysomyxa spp. Treatment Schedules
5-
6-6
T506—Potato Cyst Nematode Treatment Sched-
ules
5-6-7
T507—Phyllosticta bromeliae, Uredo, and Septoria
gentianae Treatment Schedules
5-6-7
T508—Rusts Treatment Schedules
5-6-8
T509—Plant Pests of Camellia and Orchids Treat-
ment Schedule
5-6-8
T510—Infestation of Corn-Related Diseases Treat-
ment Schedules
5-6-9
T511—Xanthomonas axonopodis, pv. citri (Citrus
Canker)
5-6-9
T513—Ascochyta on Various Commodities Treat-
ment Schedules
5-6-9
T514—Xanthomonas albilineans and X. vasculo-
rum Treatment Schedules
5-6-10
T515—Sugarcane-Related Diseases Treatment
Schedules
5-6-10
T518—Rice-Related Diseases Treatment Sched-
ules
5-6-11
T519—Rice-Related Diseases Treatment Sched-
ules
5-6-11
T520—Verticillium albo-atrum Treatment Sched-
ules
5-6-12
T521—Plant Pathogenic Fungi and Bacteria Treat-
ment Schedules
5-6-12
T551—Globodera rostochiensis and G. pallida on
Convallaria Treatment Schedules
5-6-12
T552—Ditylenchus dipsaci and D. destructor Treat-
ment Schedules
5-6-13
T553—Nematodes Treatment Schedules
5-6-14
T554—Ditylenchus dipsaci and D. destructor on
Hyacinthus Treatment Schedules
5-6-15
T555—Ditylenchus dipsaci on Narcissus Treatment
Schedule
5-6-15
T556—Root-Knot Nematodes (Meloidogyne spp.)
on Calla
5-6-15
T557—Meloidogyne spp. and Pratylenchus spp. on
Chrysanthemum
5-6-16

Index
10/2023-01 Treatment Manual G-1-11
A
B
C
D
E
F
G
H
I
J
K
L
M
N
O
P
Q
R
S
T
U
V
W
X
Y
Z
T558—Pratylenchus Surface Diseases on Fragaria
5-6-16
T559—Foliar Nematodes on Begonia and Oryza
Treatment Schedules
5-6-16
T560—Treatment for Infestations of Meloidogyne
spp. on Rosa
5-6-16
T561—Cercospora mamaonis and Phomopsis car-
ica-papayae on Papayas
5-6-17
T564—Foliar Nematodes Treatment Schedules
5-
6-17
T565—Nematodes Treatment Schedules
5-6-17
T566—Diseases on Broomcorn, Broomcorn Arti-
cles, and Lilium (Bulbs)
5-6-18
T567—Bulb Nematodes Treatment Schedules
5-6-
19
T568—Foliar Nematodes on Senecio Treatment
Schedules
5-6-19
T569—Foliar Nematodes on Fragaria Treatment
Schedules
5-6-19
T570—Diseases on Acalypha and Aconitum
5-6-19
Taeniothrips eucharii
5-3-11
Taeniothrips simplex
5-3-10
taking concentration readings
methyl bromide
2-4-30, 2-9-19
tarpaulin
10 mil uses
2-4-24
4 mil uses
2-4-23
6 mil uses
2-4-23
tarpaulin sealing
phosphine
2-11-24
sulfuryl fluoride
2-10-2
tarpaulins
E-1-35
temperature measurements
methyl bromide
2-4-21, 2-9-13
temperature recorder
APHIS-approved models
3-3-10
temperature recorders (built-in type) for cold treat-
ment in self-regulated containers
E-1-37
temperature recorders and sensors, general use
E-
1-52
temperature recorders for hot water immersion
treatment
E-1-40
temperature recording systems
standards for cold treatment
6-4-2
termites
MB at NAP treatment
5-5-11
testing for leaks
methyl bromide
2-4-29
phosphine
2-11-26
sulfuryl fluoride
2-10-2
thermal conductivity gas analyzers
8-1-2
fumigant selector switch
8-1-4
instrument description
8-1-2
line switches
8-1-4
thermocouple wire
E-1-43
thermometers
E-1-44
certified precision
8-1-24
certified precision approved calibration com-
panies
E-1-51
digital certified precision
E-1-47
glass mercury certified precision
E-1-45
glass non-mercury certified precision
E-1-47
threshold limit value
Glossary-1-4
TLV
Glossary-1-4
treatment facilities
certifying
6-4-1
treatment manual
advisories used
1-1-5
conventions of
1-1-4
ordering
1-1-10
purpose
1-1-2
related documents of
1-1-4
restrictions of
1-1-2
scope
1-1-2
updating
1-1-10
use of
1-1-9
users of
1-1-4
treatment schedules index
5-1-1
tubing, gas sampling
E-1-54
U
U.S. Occupational Safety and Health Administra-
tion
Glossary-1-3
United States Department of Agriculture
Glossary-
1-4
unlabeled commodities from bulb vegetable
FIFRA section 18 exemption
2-3-4
USDA
Glossary-1-4
V
vacuum chambers 6-2-1
vacuum fumigation chamber
2-5-13
accessories
6-2-3
certification
6-2-1
certification standards
6-2-4
circulation and exhaust system
6-2-3
construction and performance standards
6-2-
1
fumigant introduction systems
6-2-2
vacuum pumps
6-2-2, E-1-54
vapor heat treatment
3-5-1
vapor heat treatment facilities
certification
6-7-1
documentation
6-7-8
official performance testing
6-7-4
plan and process approval
6-7-2
preliminary performance testing
6-7-4
VAPORPH3OS®
2-11-14
Vikane
E-1-35
viscose rayon fabrics
restricted MB fumigation item
2-3-12
volatilizer
8-1-14, E-1-56
W
warehouses used for cold treatment 6-4-10
warning signs
E-1-57
water
supply
tar
paulin fumigation sites
2-4-11, 2-9-10
water trap
8-1-25
well-lighted areas
tarpaulin fumigation sites
2-4-11
wind meter
8-1-17
woolens, restricted MB fumigation item
2-3-12
Z
Zeugodacus cucurbitae (formerly known as Bactro-
cera cucurbitae)

