
Picnic Table
Dimensions
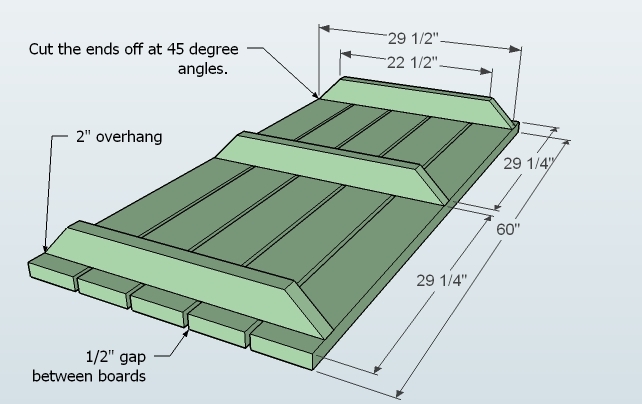
Overall Dimensions are shown above

Preparation
SHOPPING LIST
9 – 2×6 Stud Length OR 4 – 2×6 12′ Long and 1 – 2×6 Stud Length (8′ Length works if it is cheaper)
5 – 2×4 Boards, 8′ or Stud Length
2 1/2″ self-tapping deck screws
OPTIONAL: You can bolt the leg sets together with 3-1/2" bolts with nuts and washers. Make
sure all fasteners are exterior appropriate.
COMMON MATERIALS
2 1/2-inch screws
3-inch screws
1-1/4" Pocket Hole Screws
2-1/2" Pocket Hole Screws
Elmer's Wood Glue
Elmer's Wood Filler
120 grit sandpaper
primer
wood conditioner
paint
paint brush
CUT LIST
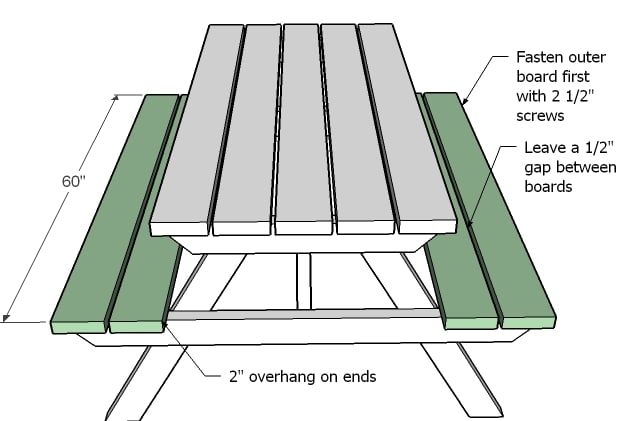
9 – 2×6 @ 60″ (Tabletop boards and Seat Boards)
3 – 2×4 @ 29 1/2″ (Tabletop Supports)
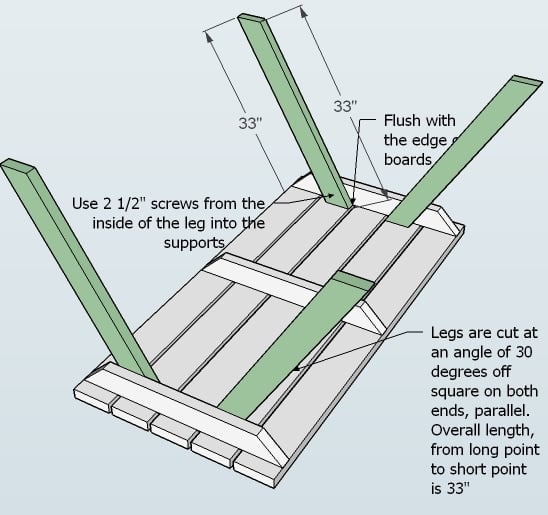
4 – 2×4 @ 33″ (Ends mitered at 30 degrees parallel)
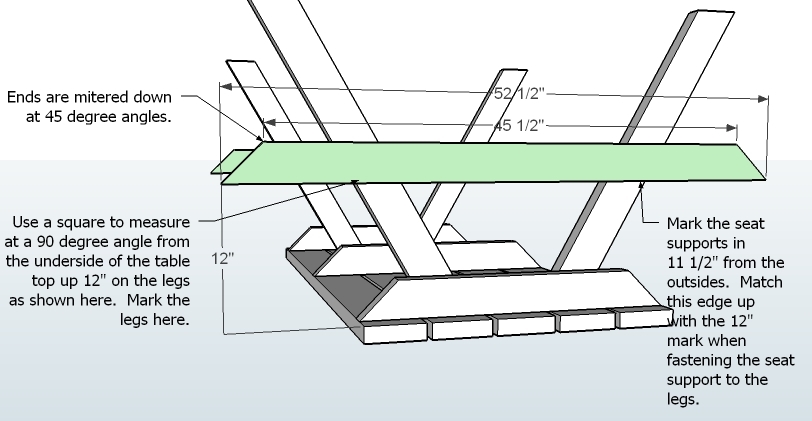
2 – 2×4 @ 52 1/2″ (Seat Supports)
2 – 2×4 @ 28 1/2″ (Cross Supports, ends mitered at 25 degrees parallel)

Instructions
STEP 1
Tabletop
Measure 2″ and 29 1/4″ from the outsides of all the tabletop boards and make a mark.
Cut your supports board ends at a 45-degree angle on the ends as shown above.
Then attach the tabletop boards to the supports through the tops using 2 1/2″ screws and glue.
Start on the outsides and work inward, keeping an even 1/2″ gap between the boards.
Use the marks you made to guide you in placing the support boards in line with the tabletop boards.
NOTE: Pocket hole users can attach from underneath with pocket holes to hide all screw holes.


STEP 3
Seat Supports
Take your square and measure at a 90-degree angle from the underside of the table up 12″ and make a mark
on the legs.
Cut your seat supports at 45-degree angles on the ends.
Then from the long point, measure 11 1/2″ in from the outer point and make a mark. Line this mark up with
the edge of the legs, keeping the top of the seat support (shown as the bottom because the table is upside
down) level with the marks made on the legs. Fasten with 2 1/2″ screws and glue.

STEP 4
Cross Supports
First, take a square of the table by measuring from the outer points of the legs to the diagonal opposite leg.
Do this for both diagonals. Push the opposite legs together on the longer diagonal until your diagonals
match up in distance.
Then cut your cross supports at 25 degrees off square on both ends, ends are parallel. Fasten in place using
2 1/2″ screws and glue, centered on the supports as shown above. For one of the cross supports, you will
need to screw at an angle from the side of the cross support in the tabletop support.

