
INSTRUCTION MANUAL
PLEASE READ THIS INSTRUCTION MANUAL
BEFORE YOU BEGIN ASSEMBLY
!
Cal./hr
Meter
START
STOP
RESET
ENTER
Quick Start
1.
Press " ENTER "
2.
Press " START "
3.
Get rowing!
WARNING :
Heart
rate monitori
ng systems
may be inaccura
te. If you feel faint,
stop exercisi
ng immediately
ReNegaDE
AIR ROWER UNLIMITED MAG.
MODEL # 601001
AIR ROWER UNLIMITED MAG.
cascadehealthandtness.com
HEALTH & FITNESS
R

2
contents
safety information 03
customer support 04
assembly instructions 05
Air Rower features explained 12
How to Fold Up and Fold Down
the Rower 14
computer instructions 15
- quick start
- button functions
- console display and feedback
- using workout programs
how to take care of your Air Rower 21
troubleshooting 21
exercising with your Air Rower 22
I-1 Console Assembly 27
exploded diagrams and parts list 28
your warranty 30
cascadehealthandtness.com

Safety Information
3
PLEASE READ THIS INSTRUCTION MANUAL BEFORE YOU BEGIN ASSEMBLY. GREAT
CARE HAS BEEN TAKEN TO DESIGN THESE INSTRUCTIONS AND FOLLOWING THEM
WILL HELP YOU WITH QUICKER ASSEMBLY AND MINIMISE THE RISK OF INJURY
Safety Standards
This rower meets the requirements of the EN ISO 20957-1: 2013, EN 957-7
It is important that you keep these instructions for future reference.
!
This product is not suitable for therapeutic purposes.
YOU ARE RESPONSIBLE FOR YOUR OWN SAFETY -
THIS LIST IS NOT EXHAUSTIVE.
r
Always assemble and operate the product on a level surface,
ensure that the product is stable before use.
r 5SZUPFOTVSFUIBUZPVSCBDLJTTUSBJHIUXIJMTUFYFSDJTJOH
especially for long periods
r
The safety level of this equipment can only be maintained
if it is regularly examined for wear and tear
r
Keep hands away from moving parts.
r
Replace defective components immediately, and/or
keep the equipment out of use until it is repaired.
r
Use only the adjustment settings as described in the
instructions. Always use the correct adjustment pin/xing.
r
Special attention should be taken to inspect the
components, such as pulleys, bearings, straps, rollers are
always more susceptible to wear before use.
r
Never leave any adjustment devices projecting from the
product.
r
Always wear suitable clothing and footwear e.g. tracksuit /
shorts / training shoes
r
Remove all personal jewellery before exercising.
r
Ensure you warm-up well before using the equipment as
this will help to prevent muscle strain.
r
After eating, allow 1-2 hours before exercising as this will
help to prevent muscle strain.
r /FWFSPWFSMPBEUIFFRVJQNFOUmUIFNBYJNVNVTFSXFJHIU
of this rower is 350lbs.
r
Don’t rock the rower form side to side
r
Never use the equipment in any other manner other than
the ways explained in these instructions and/or any
wall-chart supplied.
r
This product has an intergrated resistance system without
a constant power mode that is governed by magnetic
resistance.
r
Losing grip or suddenly releasing the handle could result in
an uncontrolled return, ensure there is freee space around
the product.
r
You may want to store this product away to save space -
be aware of moving mechanical parts which could cause
injury.
r
To prevent shock, keep all electical components, shuch as
the console, motor, cord and switch away from water.
r
Do not use any accessories that aren’t specically
recommended by the manufacturer, these might cause
injuries or cause the unit to fail.
r
Work within your recommended exercise level, do NOT
work to exhaustion.
r
If you feel any pain or abnormal symptoms, STOP YOUR
WORKOUT IMMEDIATELY. Consult your physician
immediately.
r
Parents and others in charge of children should be aware
of their responsibility, because the natural play instinct
and the fondness of experimenting of children can lead to
situations and behaviour for which the training equipment
is not intended
r
If children are allowed to use the equipment,
their mental and physical development and above all
their temperament should be taken into account. They
should be controlled and instructed in the correct use
of the equipment.
r
The equipment is under no circumstances
suitable as a children’s toy.
r
This appliance is not intended for use by persons
(including children) with reduced physical, sensory or
mental capabilities, or lack of experience and knowledge,
unless they have been given supervision or instruction
concerning use of the appliance by a person responsible
for their safety.
r The free area shall be not less than 0.6 m greater than
the training area in the directions from which the
equipment is accessed.
Injuries to health may result from incorrect or excessive training.
!
Heart Rate Monitoring System may be inaccurate, Over exercise may result in
serious injury or death. If you feel faint stop exercising immediately !
Be aware of the edges on the rower track rail when in use or move it around.
!
!
cascadehealthandtness.com
HEALTH & FITNESS
R

Customer Support
Should you require any assistance regarding this product please gather the following information,
and then contact us using the details below:
1. Serial no. - this can be found on
the sticker below, located as indicated.
For future reference, please write down
your serial number in the space
provided below.
2. Original purchase date
3. Place of purchase
4. Information about the place
and conditions of use
5. Precise description of the issue/defect
Your Serial No. is:
Care & Maintenance
r
Always place the equipment in a dry environment.
r
Use a warm, damp cloth to keep the product clean.
r
No wet cleaning of electrical components, unplug before any care and maintenance
r
The safety level of the equipment can be maintained only if it is regularly examined for damage and wear. This
includes any straps, pulleys, nuts, bolts, moving parts, bushes, chains, wheels, bearings & connection points etc
r
Ensure that you inspect the product regularly - at least once a week is recommended.
r
Ensure that all xings are tight before use.
r
Always replace damaged / worn components with original parts from the manufacturer.
Protect the environment by not disposing of this product with household waste.
Check your local authority for recycling advice and facilities (Europe only).
r
This appliance is not intended for use by persons (including children) with reduced physical, sensory or mental
capabilities, or lack of experience and knowledge, unless they have been given supervision or instruction
concerning use of the appliance by a person responsible for their safety.
r
Children should be supervised to ensure that they do not play with the appliance.
r
Non-rechargeable batteries are not to be recharged.
r
Rechargeable batteries are to be removed from the appliance before being charged.
r
Dierent types of batteries or new and used batteries are not to be mixed.
r
Batteries are to be inserted with the correct poiarity.
r
Exhausted batteries are to be removed form the appliance and safely disposed of
r
If the appliance is to be stored unused for a long period, the batteries should be removed.
r
The supply terminals are not to be short-circuited.
Contact Us
4
cascadehealthandtness.com
info@cascadehealthandfitness.com
p 425-402-4062

Assembly Instruction
If you suspect you may have some parts missing, please contact
us before going back to your retailer. Refer to the Customer
Support section on page 4 for contact details.
!
This Rower takes up
a oor space of 88 inch x 24.2 inch for use,
24.2 x 29.9 x 88 inch for fold up storage
and weighs 108lbs
!
Before you start
1. Prepare your work area -
it is important you
assemble the product in
a clean and uncluttered
space.
2. Work with a friend -
we recommend you
have someone assist
you with the assembly
as some of the
components are quite
heavy.
3. Open the carton -
checking any warnings
on the carton and make
sure you have it the
right way up.
4. Unpack the carton
Make sure you have
the following parts:
Tools and Consumables
5
Allen Key (6 and 5mm)
AA Batteries
x 4
Rower Track x 1
Part
No.
B
Foot Rest
x 1
Front Stabilizer
x 1
Part
No.
C
Rear Stabilizer
x 1
Part
No.
E
Part
No.
D
Main Frame
Part
No.
A
Seat
x 1
Part
No.
F
Part
No.
G
Rear Handle
x 1
Fixings
Part
No.
O
Lubricate
Oil
x 1
cascadehealthandtness.com
HEALTH & FITNESS
R

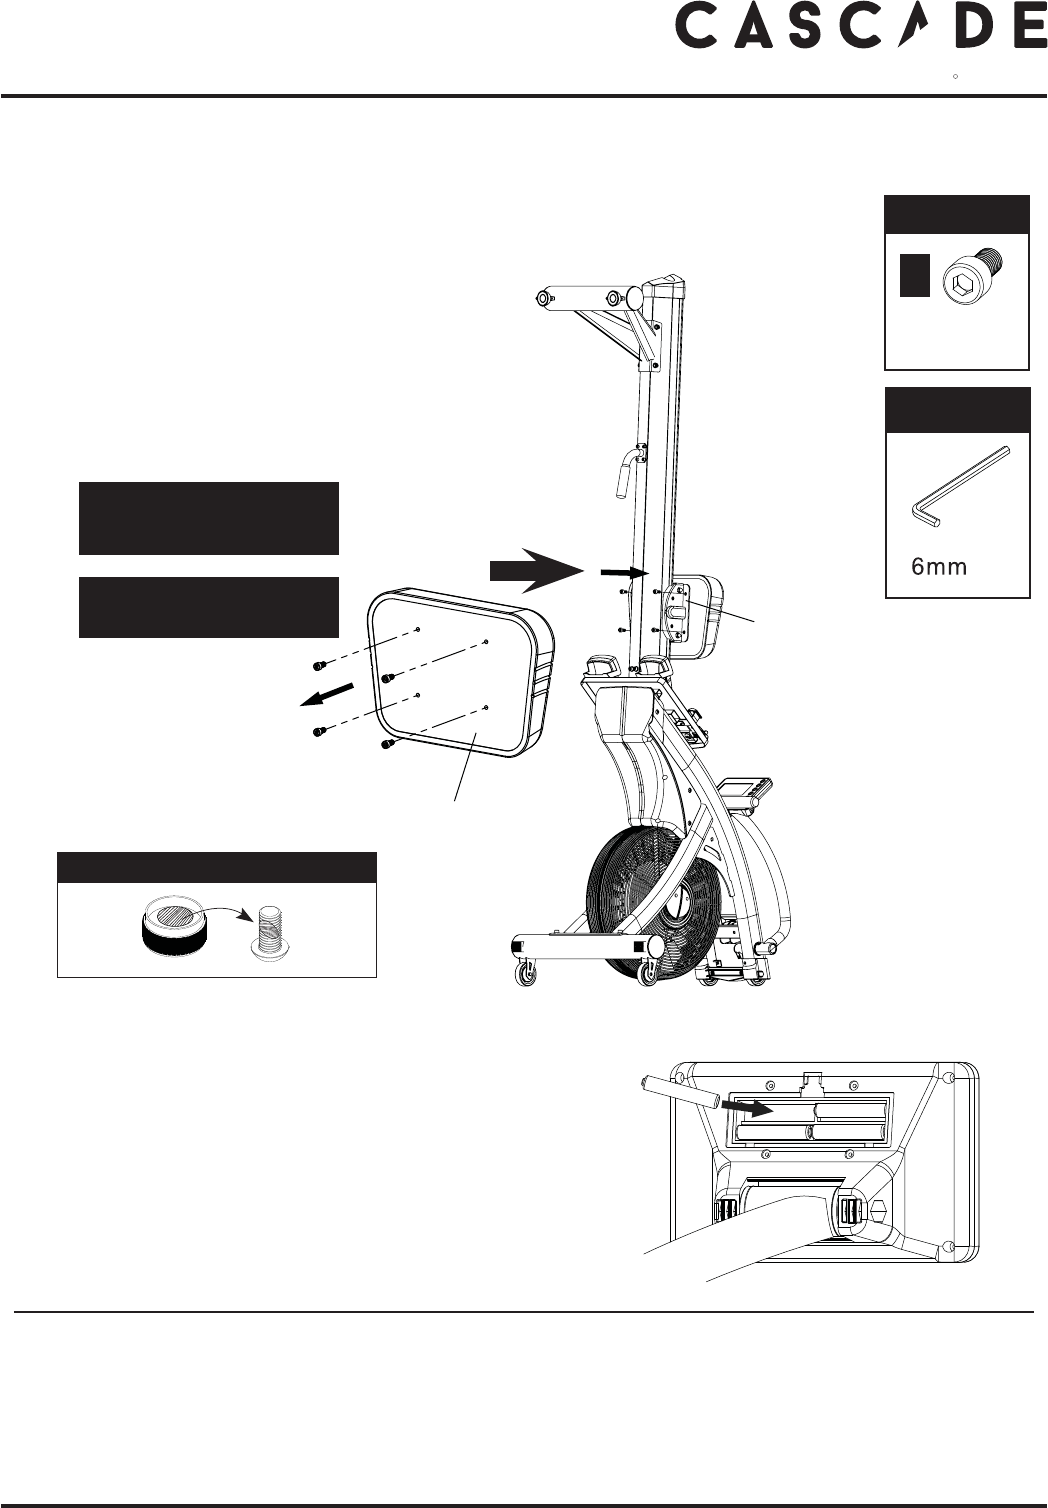
1. Locate the Handle Bar
Place the handle bar against the handle hooks in position shown.r
Pull out the r Stop Pin attached on pulling strap and remove the stopper carefully.
The pulling strap stopper is used for packaging purpose, which won’t be used r
again during the assembly.
6
All of the required bolts & washers had been pre-assembled to ensure its installation quality,
remove the relative bolts & washers then fasten as instructions
to complete your rower assembly.
!
3.
Strap
Stopper
2.
Stop
Pin
Handle
Bar
Handle
Hook
1.
cascadehealthandtness.com

7
2. Attach the Front Stabilizer
Be sure to t the parts in the
same order as the diagrams
shown.
!
Make sure the bolts are fully
tightened with the allen key.
!
Make sure the moving wheels
on the front stabilizer face out
after assembly.
!
2-1. Remove the cardboard tube from the front end stabilizer bracket
Loosen the r two M8 x 16mm Allen Head Bolts from the cardboard tube
and remove the cardboard tube.
The two Allen Head Bolts and the cardboard tube r
are used for packaging protection purpose,
which won’t be used again during the assembly.
2-2 Attach the front Stabilizer
Remove the r four M8 x 16mm Hex Socket Head Bolt & M8 x 19mm x1.5mm Curve
Washer from the Front Stabilizer (B) with the 6mm Allen Key provided as shown.
Attach the r Front Stabilizer (B) to the Main Frame (A) with four M8 x 16mm Hex
Socket Head Bolt (B5) & M8 x 19mm x1.5mm Curve Washer (B6) then tighten
these bolts with the 6mm Allen Key provided securely.
FIXINGS:FIXINGS:
x 4
FIXINGS:TOOLS:
Part
No.
B5
x
4
Part
No.
B6
FIXINGS:FIXINGS:
x 2
FIXINGS:TOOLS:
Cardboard
Tube
LUBRICATE BEFORE ASSEMBLY
cascadehealthandtness.com
HEALTH & FITNESS
R

8
Be sure to t the parts in the
same order as the diagrams
shown.
!
Make sure the bolts are fully
tightened with the allen key.
!
3. Attach the Foot Rest Assembly
FIXINGS:FIXINGS:
x 4
FIXINGS:TOOLS:
Part
No.
B5
x
4
Part
No.
B7
FIXINGS:FIXINGS:
x 4
FIXINGS:TOOLS:
Part
No.
B8
x
4
Part
No.
B7
3-1. Remove the bolts for Rower Track Assembly
Fold the rower main frame from the rear end, and stand r
the whole main frame vertically as shown.
Remove the r M8 x 16mm Hex Socket Head Bolt (B5)
& M8 x 16mm x1.5mm Flat Washer (B7) from the top
& bottom Rower Track Mounting Tube with the 6mm
Allen Key provided as shown.
Keep these bolts & washers somewhere until t
step 5. Rower Track Assembly
3-2. Attach the Foot Rest Assembly
Remove the r M8 x 30mm Hex Socket Head Bolt (B8) &
M8 x 16mm x1.5mm Flat Washer (B7) from the Foot
Rest mounting bracket with the 6mm Allen Key
provided as shown.
Insert the r Foot Rest Assembly and attach onto the
Main Frame Mounting Bracket carefully with four M8
x 30mm Hex Socket Head Bolt (B8) & M8 x 16mm
x1.5mm Flat Washer (B7) then tighten these bolts with
the 6mm Allen Key.
Rower Track
Mounting Tube
Main Frame
Mounting
Bracket
LUBRICATE BEFORE ASSEMBLY
LUBRICATE BEFORE ASSEMBLY
LUBRICATE BEFORE ASSEMBLY
cascadehealthandtness.com

9
4. Attach the Rear Stabilizer & the Rear Handle
Be sure to t the parts in the
same order as the diagrams
shown.
!
Make sure the bolts are fully
tightened with the allen key.
!
Be sure to t the parts in the
same order as the diagrams
shown.
!
Make sure the rear stabilizer is
fully tightened with
the allen key.
!
4-1. Attach the Rear Stabilizerr
Remove the r four M8 x 20mm Hex Socket Head Bolt
(B5) & M8 x 16mm x1.5mm Flat Washer (B7) from
both sides of the rear end Rower Track with the 6mm
Allen Key provided as shown.
Attach the r Rear Stabilizer (C) to the rear end of the
Rower Track with four M8 x 20mm Hex Socket Head
Bolt (B5) & M8 x 16mm x1.5mm Flat Washer (B7) then
tighten these bolts with the 6mm Allen Key securely.
4-2. Attach the Rear Handle
Remove the r four M6 x 16mm Hex Socket Head Bolt (B9) from the
Rower Track with the 5mm Allen Key provided as shown.
Attach the r Rear Handle (G) to the centre position of the Rower
Track with four M6 x 16mm Hex Socket Head Bolt (B9) then
tighten these bolts with the 5mm Allen Key securely.
Cut o the r Cable Tie which secured the Seat Carriage Assembly in
front end of the Rower Track.
FIXINGS:FIXINGS:
x 4
FIXINGS:TOOLS:
Part
No.
B9
FIXINGS:FIXINGS:
x 4
FIXINGS:TOOLS:
Part
No.
B5
x
4
Part
No.
B7
Rower
Track
Rower
Track
Seat Carriage
Assembly
LUBRICATE BEFORE ASSEMBLY
LUBRICATE BEFORE ASSEMBLY
cascadehealthandtness.com
HEALTH & FITNESS
R

10
Be sure to t the parts in the
same order as the diagrams
shown.
!
Make sure the rower track is fully
tightened with the allen key.
!
Hold the r Rower Track Assembly and slide it onto the mounting
tube of the main frame carefully.
Finger tighten r two M8 x 16mm Hex Socket Head Bolt (B5) & M8 x
16mm x1.5mm Flat Washer (B7) from the bottom of Rower Track
carefully.
With one hand, raise and hold the r Seat Carriage Assembly , with
the other nger tighten the two M8 x 16mm Hex Socket Head
Bolt (B5) & M8 x 16mm x1.5mm Flat Washer (B7) from the top of
Rower Track carefully.
When all four bolts and washers are in place, tighten with 6mm Allen r
Key provided securely.
Lower the seat carriage gently until it stops.r
5. Attach the Rower Track Assembly
FIXINGS:FIXINGS:
x 4
FIXINGS:TOOLS:
Part
No.
B5
x
4
Part
No.
B7
Seat
Carriage
Please lubricate the fastenings before assembly
by applying some of the “multi-purpose grease”
to each bolt shaft.
LUBRICATE BEFORE ASSEMBLY
cascadehealthandtness.com
11
6. Attach the Rower Seat
Remove the r four M8 x 16mm Hex Socket Head Bolt (B5)
from the bottom of Rower Seat with the 6mm Allen Key
provided as shown.
Attach the r Rower Seat to the Seat Carriage Assembly with
four M8 x 16mm Hex Socket Head Bolt (B5) as shown.
Tighten these bolts with the 6mm Allen Key provided r
securely.
NOTE : The front ( shorter edge ) of the seat should face to
the ground.
Final Checks
Your Rower is now assembled. Please make the following checks before you use it for the rst time.
r
Make sure all screws, bolts and nuts are tighten securely.
r
Make sure you have positioned it on a at , level surface.
FIXINGS:FIXINGS:
x 4
FIXINGS:TOOLS:
Part
No.
B5
Be sure to t the parts in the
same order as the diagrams
shown.
!
Make sure the bolts are fully
tightened with the allen key.
!
Rower Seat
Seat Carriage
Assembly
7. Power Up
Install the AA battery x 4 provided into the compartment in the back r
of the console properly
LUBRICATE BEFORE ASSEMBLY
cascadehealthandtness.com
HEALTH & FITNESS
R

Handle
Hook
Air Rower Features Explained
Rest the Pulling Handle
Before start your workout, place the pulling handle in the 1.
Handle Hook to make it easier to reach when you are
seated on the rower.
Adjusting the Foot Rest
To set the Foot Rest, pull the yellow lever with 1.
one hand and with the other to slide the Heel
piece up or down to achieve the required set-
ting, then release the yellow lever to lock it in
position.
Begin by setting the Foot Rest Heel so the strap 2.
crosses the ball of your foot.
As you gain familiarity with your Rower, you 3.
may choose to raise or lower the Foot Rest
Heel a notch for reasons of exibility or general
comfort.
Optimal setting permits the knee, lower leg and 4.
ankle to be perpendicular to the oor at the
beginning position.
r
Lowering the Foot Rest Heel permit more seat
carriage travel.
r
Raising the Foot Rest Heel cuts down on leg
exion.
Adjusting the Console
1. Adjust the console arm and console display to suitable
height and angle for easy viewing by rotating the arm and
console itself as shown.
12
Yellow Lever
Heel
Foot
Strap
Foot Rest Heel
cascadehealthandtness.com

Transporting your Air Rower
Your Rower has 4 transport wheels located on the front 1.
stabilizer & main frame.
Fold up the Rower using the rear handle underneath 2.
the rower track and then pull or push to move it around.
13
Adjusting the Resistance
This Rower features a speed independent (16 levels adjustable) system.1.
The harder you pull, the more resistance you will feel. 2.
As you put more eort into your rowing, you will go faster,
produce more watts, and burn more calories. But it is more
important to row for a longer time than to row harder.
The resistance is controlled by a magnet assembly, which is 3.
NPWFEDMPTFSPSGVSUIFSBXBZGSPNUIFGBOXIFFMBTTFNCMZm
the closer the magnet is to the fan wheel the harder the resistance.
The magnet is controlled manually, by twisting the dial knob.4.
The resistance levels goes from 1 = easy to 16 = hard. 5.
Levelling your Air Rower
1. To help you level the Rower on uneven surface, there are
2 height adjusters attached on the rear stabilizer.
2. Simply turn it to adjust the height of your Rower and
double secured the locked handle to the rear stabilizer as
required.
Locked
Handle
Dial
Knob
cascadehealthandtness.com
HEALTH & FITNESS
R

How to Fold Up and Fold Down the Rower
14
TO FOLD-UP YOUR ROWER TO FOLD-DOWN YOUR ROWER
NOTE: Use your right foot to stop
the front stabilizer and left hand
to hold the rower can make
the fold-up easily.
Adjust the console arm and console
for storage as shown.
Move the seat carriage to the front end.
Raise the rower from the rear end,
and stand the whole rower vertically.
Adjust the console arm and console
for easy viewing as shown.
Move the seat carriage to the suitable
position before setting on.
Stand yourself behind the rower comfortably
and hold the handle with left hand as shown.
Use your right foot to stop the front stabilizer
while lower the rower carefully.
1.
2.
3.
4.
1.
2.
3.
4.
cascadehealthandtness.com

Computer Instructions
15
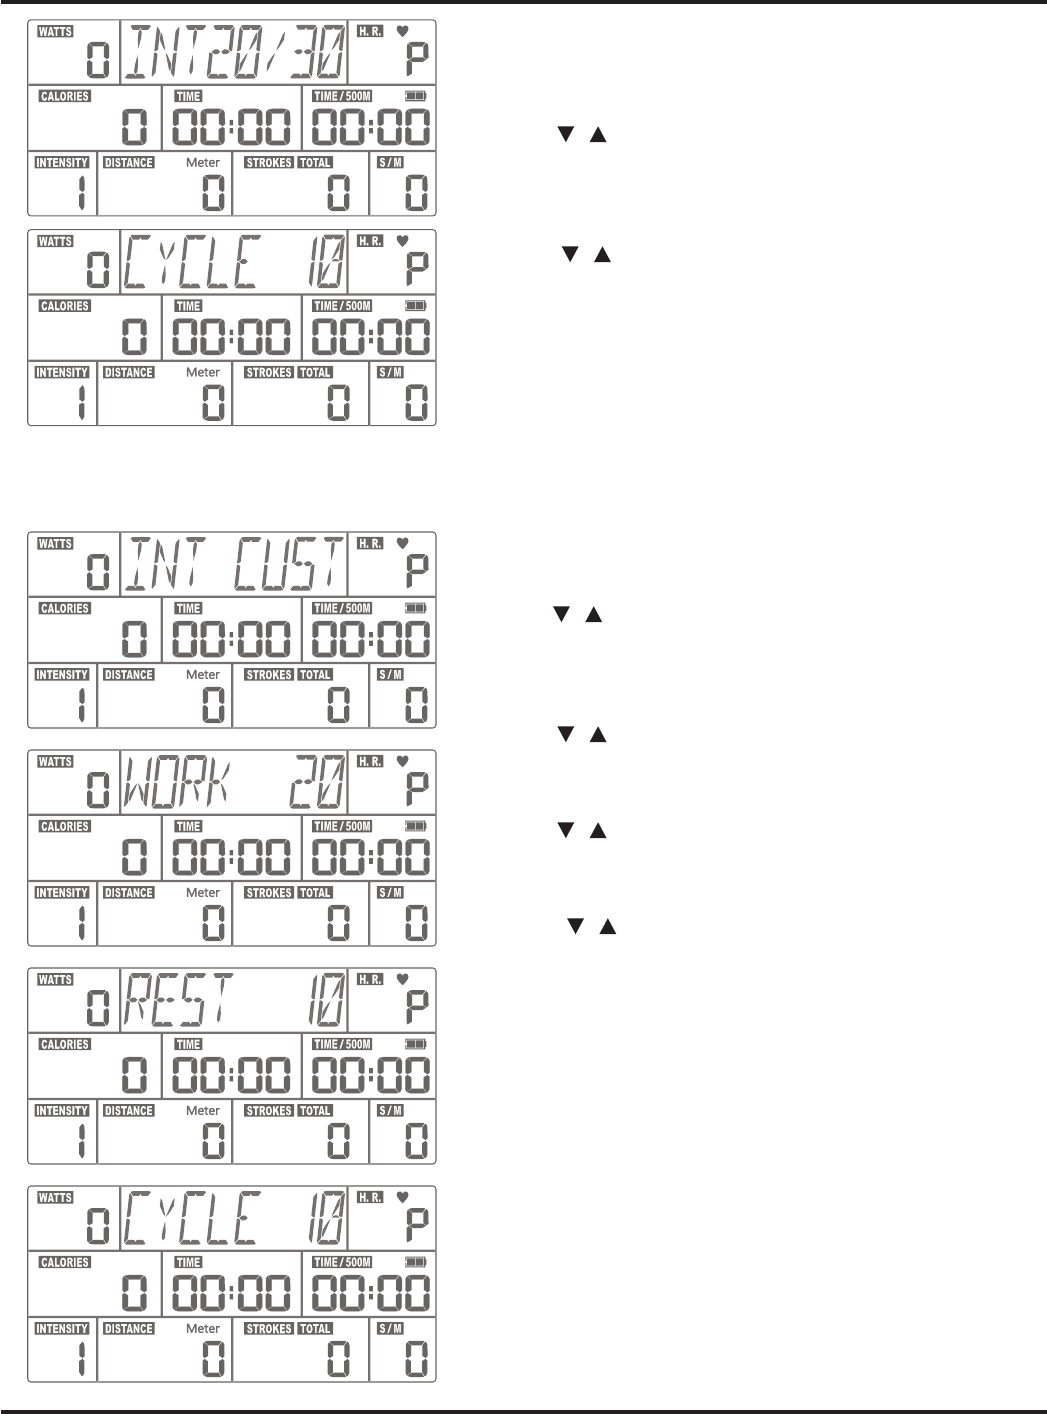
Quick Start
Use this mode if you just want a quick workout session and are not interested in setting up any personal data.
r
Row for a few seconds to power the console on.
r
Press the “ START “ button.
r
The values of WAT TS, CALORIES, TIME, TIME/ 500M, DISTANCE, STROKES, S/M, HEART RATE
( if heart rate signal is detected ) will start displaying.
r
The values of WAT TS, CALORIES, TIME, DISTANCE, STROKES will start counting upwards.
5PñOJTIUIJTRVJDLXPSLPVUTFTTJPOBOEWJFXZPVSXPSLPVUTVNNBSZm
r
Stop rowing.
r
Press “ STOP “ button.
r
The values of WAT TS, CALORIES, TIME, TIME/ 500M, DISTANCE, STROKES, S/M, HEART RATE
( if heart rate signal is detected ) will be displayed.
Button Functions
RESET
r
Press the “ RESET” button, during the program setting mode, to
return to “START” mode on display.
r
Press the “RESET” button, in “STOP” / “ PAUSE “ mode , to reset
all of the values on display to zero and return to “ START” mode.
START/STOP
r
To begin a workout or restart a paused program
r
To nish or pause a workout.
r
To select the pre-set programs of TIME, DISTANCE, CALORIES,
STROKES, S/M, INT 20 /10, INT 20/30 & INT CUST in the “
START “ mode.
r
To increase values when setting the target of the program.
Press and hold for rapid value change.
ENTER
r
To conrm the target settings / program selection.
r
To select the pre-set programs of INT CUST, INT 20/30,
INT 20 /10, S/M, STROKES, CALORIES, DISTANCE & TIME
in the “ START “ mode.
r
To decrease values when setting the target of the
program. Press and hold for rapid value change.
“ If you stop rowing without pressing the “STOP” button, after 5 seconds the program will automatically pause. You can resume
the program by rowing again. After 1 minute of inactivity the program will end. “
“ You can change the resistance at any point during the workout by dial knob as wished. “
cascadehealthandtness.com
HEALTH & FITNESS
R
START
STOP
RESET
ENTER
Quick Start
1. Press " ENTER " 2. Press " START " 3. Get rowing!
WARNING :
Heart rate monitoring systems
may be inaccurate. If you feel faint,
stop exercising immediately
Cal./hr
er

16
Console Display and Feedback
r
Indicates the current program
text message for reference.
r
Indicates the current energy (power)
generated this session, (for comparison
only, not to be used for medical purpose)
default counts up from zero to 999.
r
Indicates the current heart rate in beats per
minute (bpm), which are detected by a wireless
heart rate chest strap, displayed 30 ~ 220 bpm.
NOTE : To get your pulse reading throughout the
exercise, which it gets from you by a
5.4 kHz Polar Telemetry Chest Strap.
Heart Rate monitoring system may be
inaccurate, Over exercise may result in
serious injury or death. If you feel faint stop
exercising immediately !
!
Cal./hr
r
Indicates the time exercised
this session, default counts
up from 00:00 to 99:59 , but
counts down if a target had
been set (05:00 ~ 99:00).
r
Indicates the approximate calories
burned this session, (for comparison
only, not to be used for medical purpose)
default counts up from zero to 9999 cal,
but counts down if a target had been set
(10 ~ 990).
r
Indicates the time that is needed to achieve
500 meters distance travelled, which is
automatically calculated, default counts up
from 00:00 to 9:59 , but counts down if a target
had been set (1:00 ~ 9:55).
r
Indicates the distance
travelled this session,
default counts up from
0 to 99999 meter , but
counts down if a target
had been set
(100 ~ 9900 ).
r
Indicates the resistance level
loaded this session, 1= easy
and 16= hard.
r
Indicates the cycles
exercised this session,
default counts up from
0 to 9999 , but counts
down if a target had
been set (10 ~ 990).
r
Indicates the current Stroke Per
Minute you are rowing at , default
counts up from 0 to 99 , but counts
down if a target had been set
(10 ~ 99).
r
This S / M readout is automatically
calculated and displayed when
your rower in use and should be
used as a guide to pace in workout.
Mete
r
cascadehealthandtness.com

17
TARGET Programs
This console features 5 target programs : Target TIME, Target DIS-
TANCE, Target CALORIES, Target STROKES & Target S/M.
When you reach your target the console will sound a short alarm and
end the workout by coming a stop.
Target TIME
1. Make sure the console is switched on.
“SELECT PROGRAM OR QUICK START ” scrolled on the top
segment display.
2. Use the “ / “ buttons to select the program mode you want.
“TIME” ashed on the top segment display.
3. Press “ ENTER” to conrm your selection.
4. The default value of “ 20:00 “ is ashed in the TIME window.
5. Use the “
/ “ buttons to set your workout time
( 5:00 ~ 99:00 minutes).
6. Press “ ENTER” to conrm your setting.
“START” is shown on the top segment display.
7. Press “ START” to begin the workout and then start rowing.
The program will not start until you begin rowing.
NOTE : You can press ” STOP” button to end the program at any time.
The workout summary will displayed on the screen.
NOTE : You can change the resistance level ( 1~ 16 ) at any point
during the workout by dial knob as wished and some of
the readouts on display will be adjusted accordingly.
Target DISTANCE
1. Make sure the console is switched on.
“SELECT PROGRAM OR QUICK START ” scrolled on the top
segment display.
2. Use the “
/ “ buttons to select the program mode you want.
“DISTANCE” ashed on the top segment display.
3. Press “ ENTER” to conrm your selection.
4. The default value of “ 1000 “ is ashed in the DISTANCE window.
5. Use the “
/ “ buttons to set your target distance
( 100 ~ 9900 meters).
6. Press “ ENTER” to conrm your setting.
“START” is shown on the top segment display.
7. Press “ START” to begin the workout and then start rowing.
The program will not start until you begin rowing.
NOTE : You can press ” STOP” button to end the program at any time.
The workout summary will displayed on the screen.
NOTE : You can change the resistance level ( 1~ 16 ) at any point
during the workout by dial knob as wished and some of the
readouts on display will be adjusted accordingly.
Using Workout Programs
Mete
r
Mete
r
cascadehealthandtness.com
HEALTH & FITNESS
R

18
Target CALORIES
1. Make sure the console is switched on.
“SELECT PROGRAM OR QUICK START ” scrolled on the top
segment display.
2. Use the “
/ “ buttons to select the program mode you want.
“CALORIE” ashed on the top segment display.
3. Press “ ENTER” to conrm your selection.
4. The default value of “ 150 “ is ashed in the CALORIES window.
5. Use the “
/ “ buttons to set your target calories
( 10 ~ 990 calories).
6. Press “ ENTER” to conrm your setting.
“START” is shown on the top segment display.
7. Press “ START” to begin the workout and then start rowing.
The program will not start until you begin rowing.
NOTE : You can press ” STOP” button to end the program at any time.
The workout summary will displayed on the screen.
NOTE : You can change the resistance level ( 1~ 16 ) at any point
during the workout by dial knob as wished and some of
the readouts on display will be adjusted accordingly.
Target STROKES
1. Make sure the console is switched on.
“SELECT PROGRAM OR QUICK START ” scrolled on the top
segment display.
2. Use the “
/ “ buttons to select the program mode you want.
“STROKES” ashed on the top segment display.
3. Press “ ENTER” to conrm your selection.
4. The default value of “ 300 “ is ashed in the STROKES window.
5. Use the “
/ “ buttons to set your target stroke ( 10 ~ 990 ).
6. Press “ ENTER” to conrm your setting.
“START” is shown on the top segment display.
7. Press “ START” to begin the workout and then start rowing.
The program will not start until you begin rowing.
NOTE : You can press ” STOP” button to end the program at any time.
The workout summary will displayed on the screen.
NOTE : You can change the resistance level ( 1~ 16 ) at any point
during the workout by dial knob as wished and some of
the readouts on display will be adjusted accordingly.
Target S /M ( Stroke Per Minute )
1. Make sure the console is switched on.
“SELECT PROGRAM OR QUICK START ” scrolled on the top
segment display.
2. Use the “
/ “ buttons to select the program mode you want.
“S / M ” ashed on the top segment display.
3. Press “ ENTER” to conrm your selection.
4. The default value of “30 “ is ashed in the S / M window.
5. Use the “
/ “ buttons to set your target PACE ( 10 ~ 99 ).
6. Press “ENTER” to conrm your setting.
“START” is shown on the top segment display.
Mete
r
Mete
r
Mete
r
cascadehealthandtness.com

19
7. Press “START” to begin the workout and then start rowing.
The program will not start until you begin rowing.
NOTE : There will be a “
“ arrow ashed on the S/M window to
indicate your current S/M is faster than setting.
“SLOWER “ will be scrolled on the top segment display.
There will be a “ “ arrow ashed on the S/M window
to indicate your current S/M is slow than setting.
“ FASTER “ will be scrolled on the top segment display.
“ GREAT “ will be scrolled on the top segment display
when you reach the same S/M as setting.
NOTE : You can press ” STOP” button to end the program
at any time. The workout summary will displayed
on the screen.
NOTE : You can change the resistance level ( 1~ 16 ) at any
point during the workout by dial knob as wished and
some of the readouts on display will be adjusted
accordingly.
INTERVAL Programs
This console features 3 interval programs : INTERVAL 20/10,
INTERVAL 20/30 & INTERVAL CUSTOM.
The INTERVAL 20/10 & INTERVAL 20/30 programs oer users a series of
high-intensity workout intervals with preset time segments.
These High Intensity Interval Training ( H.I.I.T.) programs will automati-
cally indicate the start of each GO & REST interval.
When you reach the last “ REST “ segment the console will sound a short
alarm and end the workout by coming to a stop.
INTERVAL 20 /10
1. Make sure the console is switched on.
“SELECT PROGRAM OR QUICK START ” scrolled on the top
segment display.
2. Use the “
/ “ buttons to select the program mode you want.
“ INT 20 /10 “ ashed on the top segment display.
3. Press “ ENTER” to conrm your selection.
4. The default interval number “ CYCLE 10 “ ashed on the top
segment display.
5. Use the “
/ “ buttons to set the total interval numbers ( 1 ~ 99 ).
6. Press “ ENTER” to conrm your setting.
7. Press “ START” to begin the workout and then start rowing.
The program will not start until you begin rowing.
NOTE : You can press ” STOP” button to end the program at any time.
The workout summary will displayed on the screen.
NOTE : You can change the resistance level ( 1~ 16 ) at any point
during the workout by dial knob as wished and some of the
readouts on display will be adjusted accordingly.
Mete
r
Mete
r
Mete
r
Mete
r
Mete
r
cascadehealthandtness.com
HEALTH & FITNESS
R
20
INTERVAL 20 /30
1. Make sure the console is switched on.
“SELECT PROGRAM OR QUICK START ” scrolled on the top
segment display.
2. Use the “ / “ buttons to select the program mode you want.
“ INT 20 /30 “ ashed on the top segment display.
3. Press “ ENTER” to conrm your selection.
4. The default interval number “ CYCLE 10 “ ashed on the top
segment display.
5. Use the “
/ “ buttons to set the total interval numbers ( 1 ~ 99 ).
6. Press “ ENTER” to conrm your setting.
7. Press “ START” to begin the workout and then start rowing.
The program will not start until you begin rowing.
NOTE : You can press ” STOP” button to end the program at any time.
The workout summary will displayed on the screen.
NOTE : You can change the resistance level ( 1~ 16 ) at any point
during the workout by dial knob as wished and some of
the readouts on display will be adjusted accordingly.
INTERVAL CUSTOM
1. Make sure the console is switched on.
“SELECT PROGRAM OR QUICK START ” scrolled on the top
segment display.
2. Use the “ / “ buttons to select the program mode you want.
“ INT CUST “ ashed on the top segment display.
3. Press “ ENTER” to conrm your selection.
4. The default work segment time “ WORK 20 “ ashed on the top
segment display.
5. Use the “
/ “ buttons to set the work segment time ( 5 ~ 599 sec. ).
6. Press “ ENTER” to conrm your setting.
7. The default rest segment time “ REST 10 “ ashed on the top
segment display.
8. Use the “
/ “ buttons to set the rest segment time ( 5 ~ 599 sec. ).
9. Press “ ENTER” to conrm your setting.
10. The default interval number “ CYCLE 10 “ ashed on the top
segment display.
11. Use the “
/ “ buttons to set the total interval numbers ( 1 ~ 99 ).
12. Press “ ENTER” to conrm your setting.
13. Press “ START” to begin the workout and then start rowing.
The program will not start until you begin rowing.
NOTE : You can press ” STOP” button to end the program at any time.
The workout summary will displayed on the screen.
NOTE : You can change the resistance level ( 1~ 16 ) at any point
during the workout by dial knob as wished and some of
the readouts on display will be adjusted accordingly.
Mete
r
Mete
r
Mete
r
Mete
r
Mete
r
Mete
r
cascadehealthandtness.com

How to Take Care of Your Rower
21
Storage
Keep the equipment in a dry place with as little temperature variation as possible. Try to protect from dust and always unplug
when not in use (if applicable).
Troubleshooting
If you are having problems with your heart rate reading please note that some bres used in clothes eg) polyester, create static
electricity that may prevent a reliable heart rate reading. Mobile phones, TV’s, microwaves and other electrical appliances that
generate an electromagnetic eld may also interfere with heart rate measurement.
If you are still having problems with your equipment, please get in touch with your local distributor using the details found in
the Customer Support section on page 4.
Cleaning & Maintenance
Your rower is designed for indoor rowing used only and should not be used or stored in damp areas.
Ensure you regularly check components for wear and make sure all the nuts & bolts are tightened before each exercise session.
Rower Track – Clean daily before use.
r
Use a warm, damp cloth or non-abrasive scouring pad to wipe the top surface of the track with soap water or any glass
cleaner. Pay special attention on the both outside edges rails … remove any spots or dirt on it.
Seat Carriage Rollers – Clean daily before use.
r
These rollers are easily damaged by dust & dirt to aect its smooth moving, so should be check and clean regularly
before user if possible. Use a warm, damp cloth to clean the roller contact area with mild detergent if necessary.
Pulling Strap – Clean & check daily after use.
r
Check for nicks or cuts and fraying that may weaken the pulling strap’s integrity even though it is made of superior
quality Nylon webbing fabric to make it extremely strong. Also check the stitching at the handlebar end is intact.
Use a warm, damp cloth to clean the both surfaces of the pulling strap after every exercise if possible
Foot Rest Assembly –Clean & check every week before use.
r
This Foot Rest Assembly had a lot of moving parts. It is essential that these parts are in good condition all the times in used.
Check that if the foot strap buckle rmly holds the foot strap or not.
Check that if the foot heel self locking assembly is working correctly or not.
Make sure that if all of the nuts & bolts are tight and rm.
Use a warm, damp cloth to clean the foot heels contact area with mild detergent if necessary.
Check and Replace the
Console AA Battery mBQQSPYJNBUFMZFWFSZIPVSTJGFRVJQQFE
Clean for Dust on
Fan Wheel AssemblymBQQSPYJNBUFMZFWFSZNPOUI
Check for loose
Console armmBQQSPYJNBUFMZFWFSZNPOUI
Never remove the protective casing.
!
If you have a problem with your equipment, before you do anything else please check that all
the cables have been connected correctly. Loose cables are very common and many problems
can be solved by making sure the cables are properly connected
!
Loosen and remove the bolts of the rower seat to clean the rollers that inside of the seat carriage
!
Discontinue use immediately and contact your dealer for replacement if any of the symptoms are found.
!
cascadehealthandtness.com
HEALTH & FITNESS
R
Before Exercising Check:
r
You have to adequate space ie. at least 2ft (60cm) clearance on each side.
r
Check all bolts and locking pins are secured and protruding. In particular check all the bolts and pins for wear, replace
doubtful parts before using the equipment.
r
Always use your Air Rower on a at level solid surface.
r
Always work within your exercise level, do not work to exhaustion.
r
If you feel pain or unwell STOP YOUR WORKOUT IMMEDIATELY.
r
Injuries to health may result from incorrect or excessive training.
r
Please make sure you have read the safety guideline.
r
Consult your physician to be sure it is not dangerous for you to undertake a strenuous exercise program.
r
Pull straight back the handle with both hands.
r
Do not let the handle y onto the pulling strap guard.
r
Do not row with one hand only, abuse of the pulling strap can result in injury.
r
Never twist the pulling strap or pull from side to side.
r
Keep clothing free of the seat carriage on the rower track.
r
Be aware that the seat will roll forward on the rower track when not in use.
r
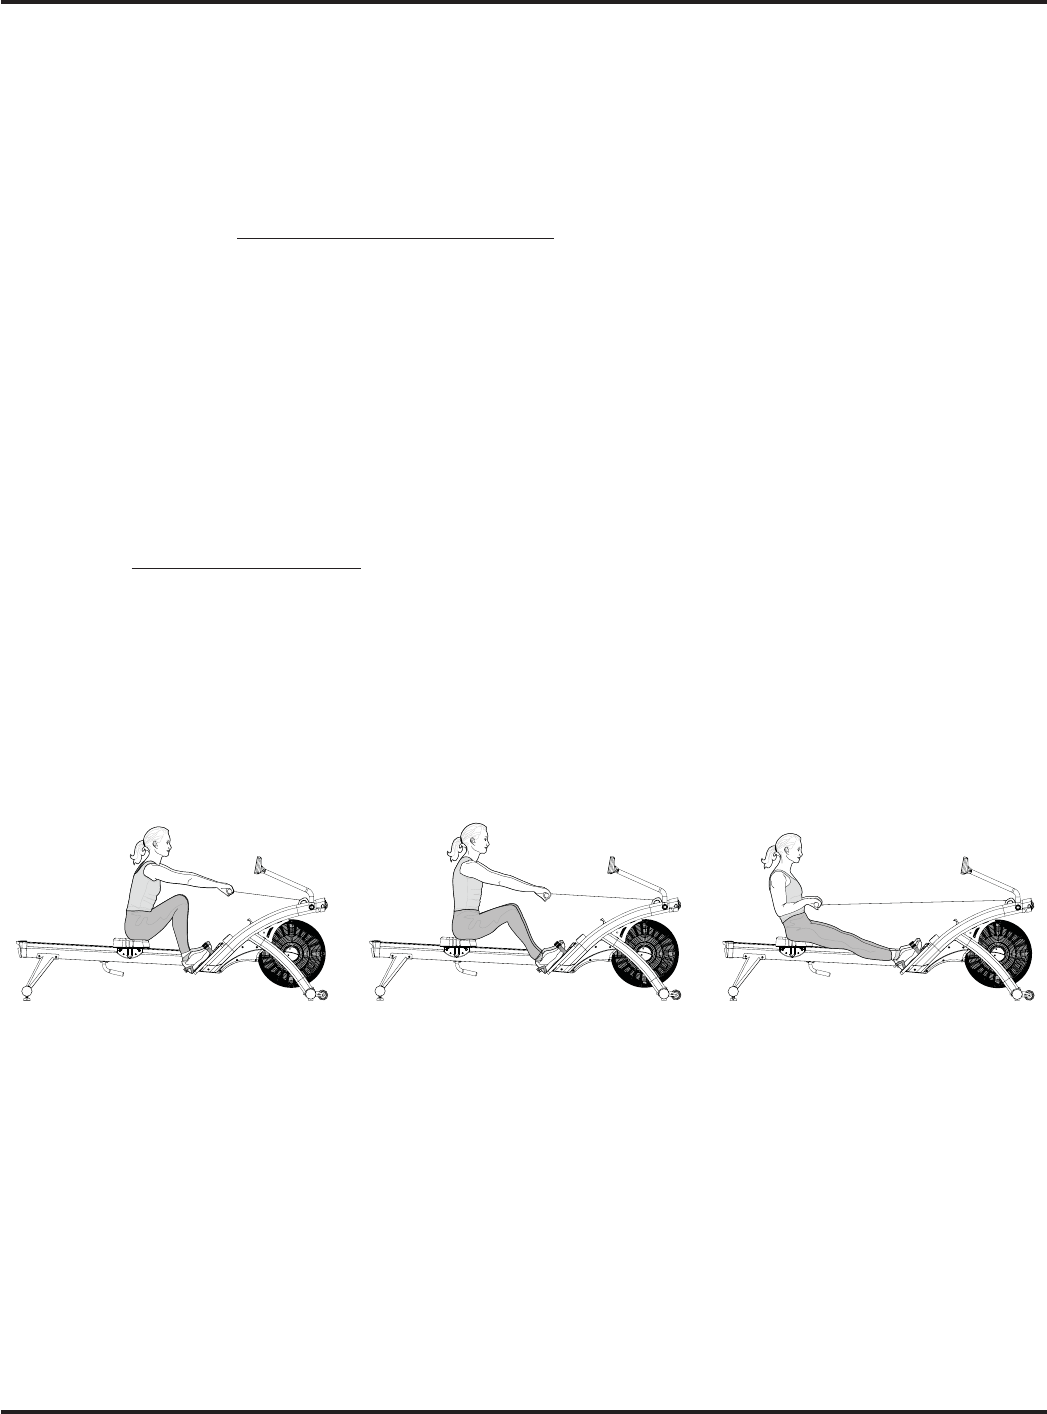
Check your Proper Rowing Techniques as below:
A. Forward body angle at the “ START”
The shins should not go beyond
vertical; and the forward body angle
should not be more than about
30 degrees, It should feel like a
comfortable amount of reach.
B. Coordination of the “ PULLING “
You should begin the pulling by
pressing down your legs, keeping the
arms straight, and without changing
the angle of the back initially. When
your legs are about halfway extended,
start prying open the back.Finally,
nish the drive by pulling the handle
all the way into your abdomen.
C. Layback at the “ FINISH”
Your back should swing past the
vertical by about 25 degrees at the
nish of the stroke. This layback
position should feel comfortable,
not stresses. You should feel your
abdominal muscles doing some
works when you sit in the nish
position.
r
Include some stretching in your exercise routine. A variety of aches and pains can be eased or prevented by investing a little
time in stretching without bouncing gently .
r
Start each workout with several minutes of easy rowing for a warm-up. Take at least 5 minutes to build your intensity before
starting a hard workout.
r
Start your exercise program gradually and build up to heavy work. If you have not rowed in over a week, take it easy for your
rst row.
r
Don’t expect to be able to jump right on where you left o and don’t try to do intense interval work. Start with a steady row at
a comfortable pace and try building the intensity gradually through several intervals of 1-3 minutes in length from next row.
r
Use a resistance level setting on 8. The best, all-purpose resistance setting for a great cardiovascular workout is in the setting
range of 6-10.
r
Rowing with the resistance setting too high can be detrimental to your training program by reducing your output and increas-
ing your risk of injury.
22
Exercising with Your Air Rower
cascadehealthandtness.com

r
The lower setting requires you to be a little faster in applying your power which, in the end, gives you a better workout.
r
Aim for a stroke rate / SPM of between 24 ~ 30 spm.
r
Allow a little extra time for warm-up, and start very easily.
r
Don’t expect to be abler to do a hard interval workout right away.
r
It is important to give your body a rest every so often, even though rowing makes you feel great and you want to do it
every day. We recommend taking at least one day o per week from rowing and it will make you more eager and have
a better workout next day.
r
Rowing is an extremely eective form of exercise. It strengthens the heart, improves circulation, as well as exercising all
the major muscle groups - back, waist, arms, shoulders, hips & legs.
r
Rowing is also impact-free and non-weight-bearing, which makes it that much more appropriate and valuable as a tool
for rehabilitation and recovery, and for people of all ages.
r
The pictures below show the proper body position in use during each stroke.
NOTE:
Have someone watch you to help you match your body positions as the pictures shown above.r
These positions should be blended together to make a smooth and continuous stroke with no stopping at any r
points in the stroke.
Your handle grip should be loose and comfortable and your wrist should be level during the rowing.r
Please ensure that ngers are not placed inside of the runner assembly when moving the product.r
When adjusting your exercise position and you need to steady yourself by holding onto the rower, ensure that it r
is the underside of the seat upholstery that you are grasping.
START
r
Extend your arms straight toward the
ywheel.
r-FBOZPVSVQQFSCPEZTMJHIUMZGPSXBSE
with back straight but not sti.
r4MJEFGPSXBSEPOUIFTFBUVOUJMZPVS
shins are vertical (or as close to this as
your exibility will allow).
r
Begin the drive by pushing o the
footplates with your legs.
r,FFQZPVSBSNTTUSBJHIUBOEPODFZPVS
legs are straight, lean back slightly.
r$PNQMFUFUIFNPWFCZQVMMJOHUIF
handle towards your torso, just below
the chest.
r
Pull the handle all the way into your
abdomen.
r4USBJHIUFOZPVSMFHT
r-FBOZPVSVQQFSCPEZCBDLTMJHIUMZ
PULLING FINISH
r
Extend your arms toward the ywheel.
r-FBOZPVSVQQFSCPEZGPSXBSEBUUIFIJQT
to follow the arms.
r(SBEVBMMZCFOEMFHTUPTMJEFGPSXBSEPOUIFTFBU
Be sure your arms are extended before you
bend your knees.
r
Draw your body forward until the shins are vertical.
r6QQFSCPEZTIPVMECFMFBOJOHGPSXBSEBUUIFIJQT
r"SNTTIPVMECFGVMMZFYUFOEFE
r:PVBSFSFBEZUPUBLFUIFOFYUTUSPLF
RETURN REPEAT
23
cascadehealthandtness.com
HEALTH & FITNESS
R
Fitness
Many things contribute to tness and well being but the most important factor is the condition of your heart and lungs and
how ecient they are in delivering oxygen via your blood to your muscles.
Your muscle use this oxygen to provide enough energy for daily activity.
This is called aerobic activity (with oxygen).
When you are t your heat and lungs work well and eciently.
This means your heart will not have to work so hard. It will pump a lot fewer times per minute so reducing the werar and tear
on your heart.
This in turm reduces the chances of your suering heart disease.
Fitness also helps you control your weight and reduces the eects of aging and stress.
You com across the need for tness continually in everyday life.
When you are t you can walk briskly up hills and stairs without being too out of breath once at the top you recover quickly.
As you can see there are great advantages in being t.
How to improve your tness
Like any muscle in your body your heart can be strengthened by systematic physical exercise which requires an increased blood
ow and heart rate.
You can measure your heart rate by taking a pulse reading.
Your heart of pulse rate corresponds directly to your exertion level and exercise eciency.
To improve your tness in a safe and eective way you need to exercise at a high enough level to improve your aerobic tness.
The area between these 2 levels is called the target zone.
It is important to exercise at the right intensity to stay within this zone.
For the best results you should exercise within the target zone and gradually increase the duration.
Ideally you should aim to exercise ( within zone ) for at least 15-20 minute continuously, 3-4 times per week.
Caution
Do not try to do too much to quickly start gradually and build up.
If you become ill, if you are under doctor care, or over 35-40 and not currently taking regular
exercise then we would advise you not to start to exercise without consulting your doctor.
24
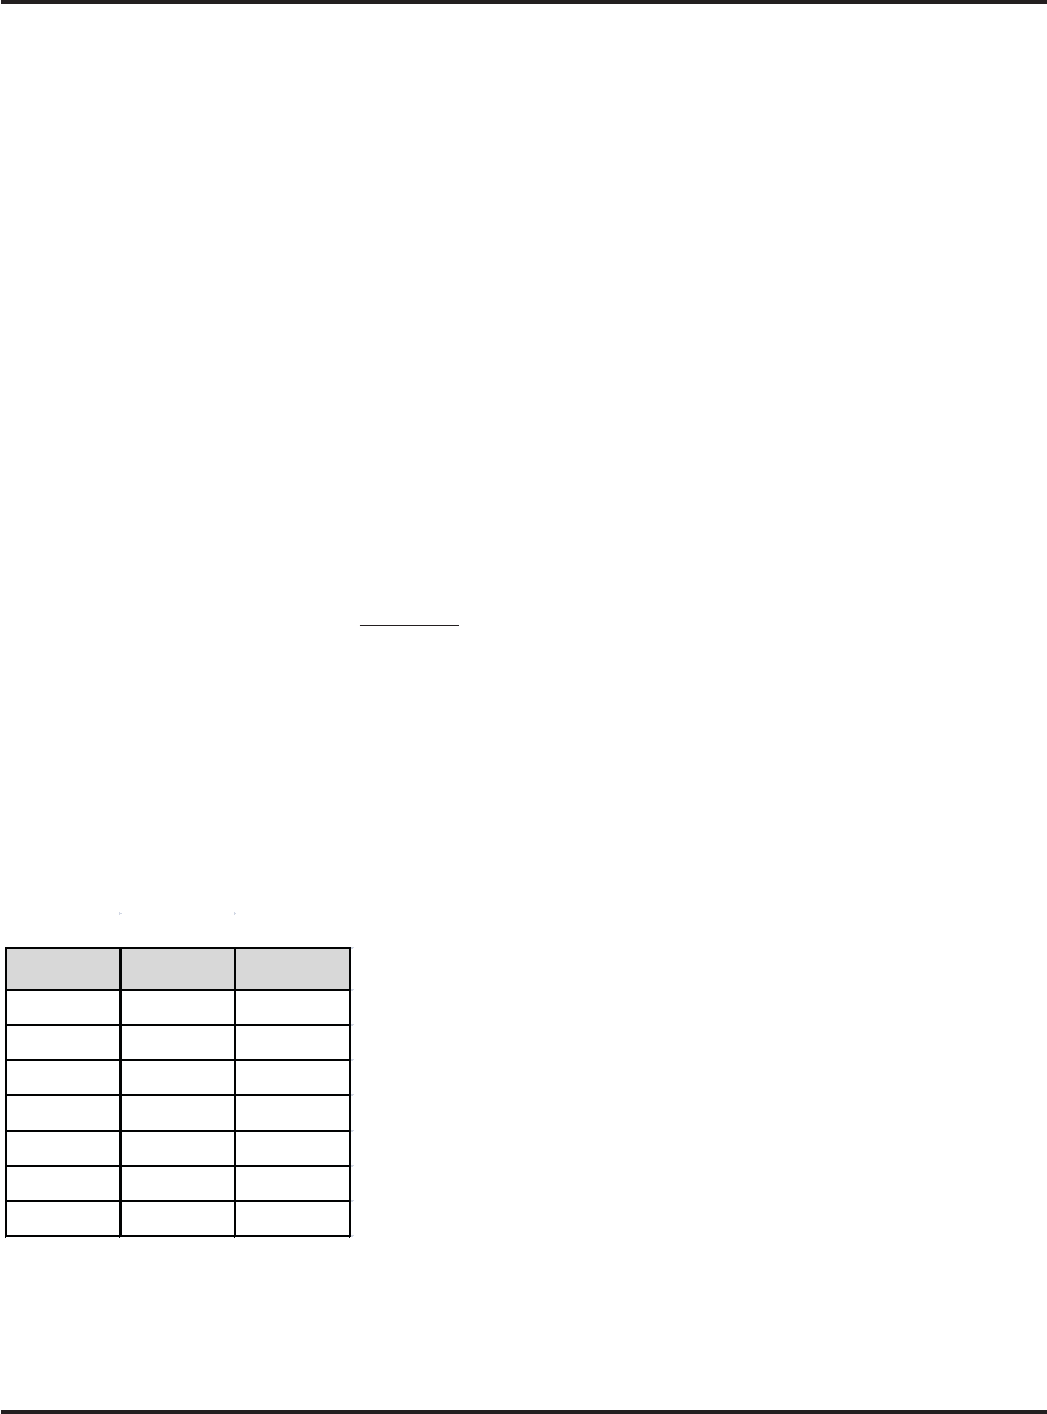
Spm Level Watt
20 11 51
30 7 79
30 11 104
35 9 123
40 8 143
40 11 183
40 13 209
Stroke=0.792m
Class A test parameters
cascadehealthandtness.com

25
PULSE
RATE
85% OF MAX.
70% OF MAX.
55% OF MAX.
RESET PULSE
MAXIMUM PULSE RATE
TIME
WARM UP COOL DOWN
EXERCISE SO THAT YOUR PULSE STAYS IN
THIS RATE FOR AT LEAST 15-20 MINUTES
COOL DOWN LEVEL
THIS IS HOW YOUR PULSE SHOULD BEHAVE DURING GENERAL FITNESS EXERCISE.
REMEMBER TO WARM UP AND COOL DOWN FOR A FEW MINUTES.
200
190
180
170
160
150
140
130
120
110
100
20 25 30 35 40 45 50 55 60 65
200
195
190
185
180
175
170
165
160
174
169
165
161
157
152
148
143
139
144
140
136
133
130
125
122
119
115
87% maximum
heart rate
TRAINING ZONE
H
E
A
R
T
R
A
T
E
B
E
A
T
S
P
E
R
M
I
N
U
T
E
The top of this bar
represents 100% of
maximum heart rate
for each age group.
155
135
111
The lower end of the
training zone represents
72% of maximum heart
rate for each age group.
AGE IN YEARS
FIND YOUR OWN EXERCISE PULSE RATE RANGE BY
MOVING UP THE VERTICAL LINE FOR YOUR AGE.
Example: Age 40, the vertical line meets the 70% level at about 128 and the 85% level
at about 154, pulse rate should remain between these values.
Use this graph to determine your personal target zone.
Target Zone
cascadehealthandtness.com
HEALTH & FITNESS
R

Always consult your doctor
before undertaking a new
exercise regime
If you experience nausea, dizziness or other abnormal
symptoms during exercise, stop at once and consult
your doctor
!
Correct rowing form
r
Sit on the rower, with your feet on the foot rest and inside the
foot straps
r
Ensure that the foot rest is adjusted correctly - you should be
stable and balanced whilst on the saddle. The basic rule for
getting the foot rest right is that as the seat reaches its farest
point, the leg is almost straight.
r
Try to ensure that your back is straight whilst exercising,
especially for long periods.
How long should I exercise for?
That really depends on your current level of tness. If you’re
just starting out on a new exercise program, you should
TUBSUHSBEVBMMZBOECVJMEVQmEPOPUUSZUPEPUPPNVDIUPP
quickly. 30 minutes, 3 times a week should be enough.
Don’t push yourself too hard - you should never feel
exhausted during or following exercise.
Heart Rate Training
To get the most out of your new piece of tness equipment
and see the best results from your training you should exercise
at the right level of eort, and that means listening to your
heart! Working out to a target heart rate means you can
direct your workout to achieve dierent goals:
Good health - For those wishing to improve quality of life
and general well being. Your sessions will need to be
done at an intensity of between 50-60% of your estimated
maximum heart rate, should last about 30 minutes and can
be done on most days of the week.
Weight lossm5PTFFBTJHOJñDBOUSFEVDUJPOJOCPEZGBUZPVS
sessions must be a little more intense - between 60 and
70% of your estimated maximum heart rate. These sessions
can also be performed on most days of the week for up to
30 minutes.
Improving Fitness levelsm5IFTFTFTTJPOTTIPVMECF
performed at 70-80% of your estimated maximum heart
rate and can also involve bouts of interval training that
would have your heart rate peaking for short times near
your maximum heart rate level. These are intense sessions
and will require at least a 48 hour rest between sessions.
Calculating your target heart rate
First, you need to nd your estimated maximum heart rate
using the formula ‘220 minus your age in years’. So, if you are
35 years old your estimated maximum heart rate is:
220 – 35 = 185 beats per minute (bpm)
Next, to calculate your target heart rate, simply multiply your
estimated maximum heart rate (185 bpm) by the applicable
percentage. So, if your goal is better heath:
185 x 60% = 111 bpm
NOTE: The important issue to remember with all
estimated calculations is that they are just estimates –
if you don’t feel comfortable exercising at your target
then reduce it to a level you are comfortable with.
!
Note: Heart rate training requires you to monitor your heart
rate throughout the workout. For this we recommend using a
chest strap (if your machine has a wireless receiver) or a heart
rate monitor.
Starting and nishing your workout
#FHJOBOEFOEFBDIXPSLPVUXJUIB8BSN6Q$PPM%PXOTFTTJPOmBGFXNJOVUFTPGTUSFUDIJOHUPIFMQQSFWFOUTUSBJOT
pulls and cramps
26
cascadehealthandtness.com

I - 1 Console Assembly
Heart Rate Reciver
(100mm)
3 PIN
H.R. Rec Connect Wire (3 PIN + 900mm)
Console Connect Wire
(7 PIN + 750mm)
Connect Wire (8 PIN + 700mm)
Console Connect Wire
(8 PIN + 750mm)
(900mm)
3 PIN
3 PIN
8 PIN
4 PIN
7 PIN
7 PIN 8 PIN
8 PIN
3 PIN
5 PIN
3 PIN
5 PIN
8 PIN
Magnetic Sensor x 2pcs
(150mm)
Φ 6 SENSOR
Black
A-17 Manual Tension
(4 PIN Connect Wire 650mm)
Red
(220mm)
2 PIN
2 PIN
cascadehealthandtness.com
HEALTH & FITNESS
R

Exploded Diagram
28
$
$
$
$
$
$
$
$
$
$
$
$
$
$
$
$
$
$
$
$
$
$
$
$
$
$
$
$
$
$
)
$
$
$
$
$
$
$
$
$
$
$
$
$
$
$
$
$
$
%
%
%
%
%
%
%
%
%
%
%
%
%
&
&
&
'
'
'
'
'
'
'
'
'
'
'
'
'
(
(
(
(
(
(
(
)
)
)
)
)
)
)
)
)
)
)
)
*
*
+
+
+
+
+
,
,
,
,
,
,
,
,,
,
-
cascadehealthandtness.com

29
Parts List
P/N DESCRIPTION Q'TY P/ N DESCRIPTION Q'TY
A Main Frame 1 B-7 M8*16*1.5mm Flat Washer 16
A-1 Handle Bar Holder 2 B-8 Hex Socket Head Bolt(M8*30mm) 4
A-2 Metal Top Cover 1 B-9 Hex Socket Head Bolt(M6*16mm) 4
A-3 Pull Strap Top Cover 1 B-10 Hex Socket Head Bolt(M6*12mm) 3
A-4 Main Cover (L) 1 B-11 Self Tapping Screw M4*12.7 4
A-5 Main Cover (R) 1 B-12 Cap Nut(M6) 2
A-6 Moving Wheel (With Bushing / C Clip) 2 B-13 Phillip Head Machine Screw M6*35mm2
A-6.1 Moving Wheel Bushing Φ6.1xΦ9.8x35.8mm 2 C-1 Rear Stabilizer 1
A-6.2 C Clip-S10 4 C-2 Height Adjustable Lock 2
A-7 Moving Wheel Cover (Top) 1 C-3 Height Adjustable Foot -Φ50mm 2
A-8 Moving Wheel Cover (Boom) 1 D-1 Seat (ND-39) 1
A-9 Fan Wheel Cover (L) 1 D-2 Seat Carriage - Side Plate 2
A-10 Fan Wheel Cover (R) 1 D-3 Seat Carriage - Flat Stop 2
A-11 Steel - Fan Wheel Cover (L) 1 D-4 Seat Carriage - Side Cover 2
A-12 Steel - Fan Wheel Cover (R) 1 D-5 Seat Carriage - AXLE 2
A-13 Plasc Strip 1 D-6 Seat Carriage - Moving Roller (Top) 4
A-14 Plasc Strip Holder 2 D-7 Seat Carriage - Moving Roller (Boom) 2
A-14.1 Phillip Head Machine Screw M4*10mm 2 D-8 Metal Spacer (12×8×2mm) 6
A-15 Manual Tension Fixed Pad 1 D-9 Nylon Locknut (M8) 2
A-16 Pull Strap Pulley Wheel 1 D-10 Axle Adjusng Screw 2
A-16.1 Metal Sleeve Φ12xΦ8.1x23mm 1 D-11 Flat Hex Head Screw 2
A-16.2 Metal Bushing Φ6.1X(Φ8+Φ11)X(10+1.5)L 2 D-12 Cap Nut(M8) 4
A-17 Manual Tension Knob 1 D-13 Phillip Head Machine Screw M5*8mm 4
A-18 Spring Box Assembled Set 2 E-1 Rower Track 1
A-19 Steel - Fly Wheel Set 1 E-2 Rower Track Rail 2
A-20 Aluminum Pad 3 E-3 Rear Breaket 1
A-21 Fixing screw M4*35mm 6 E-4 Rower Track Rear Cover 1
A-22 Plasc Bushing Φ10XΦ4X26.8mm 8 E-5 Rower Track Front Pad 1
A-23 Fly Wheel Axle Φ12×210mm 1 E-6 Fixing Pad 1
A-24 Wave Washer 1 E-7 Phillip Head Machine Screw M5*10mm 6
A-24.4 Metal Bushing Φ4XΦ(6+12)X(3.3+1.5)L 3 F-1 Foot Rest Plate 1
A-25 C Clip-S12 2 F-2 Foot Rest Pad ( R ) 1
A-26 Nut 3"26 8T 6 F-3 Foot Rest Pad ( L ) 1
A-27 Maganet Resistance Set 1 F-4 Pedal Adjustable Lever 2
A-27.1 Maganec Pad 1 F-5 Pedal locaon Key 2
A-27.2 Maganet 12 F-6 Pedal Strap 2
A-27.3 Phillip Head Machine Screw M4*8mm 3 F-7 Adjustable Foot Heel 2
A-27.5 Nut (M4) 2 F-8 Matel Bushing Φ4XΦ(6+12)X(3.3+1.5)L 2
A-27.6 Spring 1 F-9 Pedal Strap Locker 2
A-27.7 Phillip Head Machine Screw M4*12mm 2 F-10 Hex Socket Flat Head Bolt (M4*15mm) 2
A-27.8 Hex Socket Head Bolt(M5*8mm) 2 F-11 Hex Socket Flat Head Bolt (M5*15mm) 4
A-28 Bearing 6001zz 1 F-12 Nylon LockNut (M4) 2
A-29 Bearing 6201zz 2 F-13 Self Tapping Screw M4*8 8
A-30 Hex Socket Head Bolt(M5*12mm) 4 G-1 Rear Handle Bar 1
A-31 M5*13*1.5mm Flat Washer 4 G-2
PVC-Dipping Handle Bar Grip Φ7/8
ƻ
3T
ƻ
100mm 1
A-32 Phillip Head Machine Screw M4*8mm 2 H-1 Handle Bar 25.4×2T×480m (Aluminum) 1
A-33 Phillip Head Machine Screw M5*10mm 8 H-2 Strap Cover 2
A-34 M6 Nylon Locknut 3 H-3 Handle Bar Spacer 2
A-35 Hex Socket Head Bolt(M6*20mm) 1 H-4 PVC-Dipping Handle Bar Grip Φ25.4×5T×223mm 2
A-36 Hex Socket Head Bolt(M5*12mm) 4 H-5 Self Tapping Screw M3*8 2
A-37 Self Tapping Screw M4*20 3 I-1 Console Assembly 1
A-38 Self Tapping Screw M4*25 2 I-2 Console Support Frame 1
A-39 Phillip Head Machine Screw M6*12mm 6 I-3 Plasc Bushing Φ31.8mm 2
A-40 Phillip Head Machine Screw M6*50mm 2 I-4 Reducer 25.4mm 1
A-41 Bearing 608 zz 12 I-5 C Clip - S25 1
A-42 Hex Socket Head Bolt(M6*30mm) 4 I-6 Console Support Cover (Top) 1
B-1 Front Stabilizer 1 I-7 Console Support Cover (Boom) 1
B-2 Foot Stop 2 I-8 Self Tapping Screw M4*12 4
B-3 Stabilizer End Cap 3" 4 I-9 Nylon Cap Nut M8 1
B-4 Moving Wheel 2 I-10 Hex Socket Head Bolt(M8*85mm) 1
B-5 Hex Socket Head Bolt(M8*16mm) 16 I-11 Self Tapping Screw M4*12 1
B-6 Curve Washer 4 J Ribbed Belt - 370 J8 1
cascadehealthandtness.com
HEALTH & FITNESS
R

30
cascadehealthandtness.com
Cascade Health and Fitness Warranty
LABOR
FRAME LIFETIME
NON WEARABLE PARTS 5 YEARS
ELECTRONICS 2 YEARS
PEDALS 2 YEARS
WEARABLES 2 YEARS
Return Authorization #
prior to shipment
Your Billing Address
WARRANTY
PARTS
1 YEAR FOLLOWING
CUSTOMER INSTALLATION
NEED ASSISTANCE? Customer Service: (425) 402 - 4062
Prior to contacting our Customer Service Department, please have the following
information:
Your name, Customer Number, Shipping Address & Telephone Number
Serial Number(s) of the inoperable bike(s)
Date(s) of Purchase for the inoperable bike(s)
The above information will ensure that you are the only one ordering parts under
your warranty protection. If warranty replacement parts are shipped to you,
you may be required to return the inoperable part(s). To facilitate this process,
the following policy has been established:
Contact our
Customer Service Department
to receive a
instructions. These instructions will be sent along with your warranty
replacement part (s)
Cascade will incur all UPS Ground freight charges for Warranty Parts ordered
for a machine that is less than 90 days old. You are responsi
ble for freight
charges on warranty parts for machines that are more than 90 days old. You
will not be responsible for freight charges for any returned inoperable parts.
If an inoperable warranty parts(s) must be returned to our Customer Service
Department, we will pay the shipping cost and provide detailed return shipping

HEALTH & FITNESS
R
