
1
FORMATTING A LEGAL DOCUMENT IN MICROSOFT WORD
*
© 2023 The Writing Center at GULC. All rights reserved.
Knowing how to properly format a legal document is an essential skill for lawyers.
Unconventional or inconsistent formatting can distract the reader from the substance of your
legal document. Moreover, every federal and state court establishes its own rules as to how legal
documents should be formatted. Failure to comply with these rules may cause your document to
be rejected by the court. And if those reasons do not motivate you, knowing how to properly
format your document will save you a significant amount of time! This handout will cover the
following topics: font and spacing, headings, sections, page numbers, tables of authorities
(“TOA”), and tables of contents (“TOC”).
Font and Spacing............................................................................................................................. 2
Headings ......................................................................................................................................... 4
Sections ........................................................................................................................................... 8
Page Numbers ............................................................................................................................... 10
Tables of Authorities ..................................................................................................................... 12
Tables of Contents ........................................................................................................................ 16
*
Handout created by Katie DeMallie. This document was created using Microsoft Word for PC (2016). The
interface may appear slightly different on Microsoft Word for Mac, but these instructions should still apply. When
necessary, alternative directions for Microsoft Word for Mac have been provided.

2
Font and Spacing
The first thing that you should do after you open a Microsoft Word document is set the “Normal”
style for the font and spacing for your document. The “Normal” style will be the style of text
used for the body of your document. Follow the instructions below to set the “Normal” style for
your document.
1. Align the text to the desired position (e.g., left-aligned, center-aligned, etc.). The body of
most legal documents should be left-aligned, but some courts may ask for the body of the
test to be justified.
2. Adjust the font style and size to the proper setting using the drop-down menus in the
“Font” section of the home ribbon.
3. Open the paragraph settings by right-clicking anywhere in the body of your document.
Then click “Paragraph.”

3
4. Set the “line spacing” to the proper setting. The body of most legal documents should be
double-spaced. And set the spacing “before” and “after” to “0 pt.” Click “OK” when
done. This will ensure that you don’t have extra space between your paragraphs.
5. Right-click on the first box under the “Styles” section of the home ribbon.
6. Click “Update Normal to Match Selection.”
7. Click on the “Normal” box in the “Styles” section of the home ribbon any time you want
to add to the body of your document (i.e., any time you want to type non-heading text).

4
Headings
Creating headings in Microsoft Word will enable you to create a TOC (see the “Tables of
Contents” section below). You need to create a unique heading style for each type of heading in
your document that will appear in your TOC. The “Heading 1” style should be used for the major
components of your document (e.g., Table of Authorities, Statement of the Case, Argument,
etc.). The “Heading 2” style should be used for the primary point headings within the major
components. The “Heading 3” style should be used for any secondary point headings. Use as
many heading styles as necessary. Follow the instructions below to create a new heading style.
1. Align the text to the desired position (e.g., left-aligned, center-aligned, etc.).
2. Set the “line spacing” to “single” and set the spacing “after” to 12 pt. (see steps 3–4 in the
“Font and Spacing” section above). Headings should generally be single-spaced, but
adding space “after” the paragraph will ensure space between your heading and the body
of your document.

5
3. Type the title of your heading (e.g., “Table of Authorities”). The headings in the
examples throughout this document reflect generally accepted heading typeface and
numbering schemes. For heading typeface, the headings for the major components of
your document should be bold and all-caps; the primary point headings should be bold;
and all other point headings should be in ordinary typeface. For heading numbering, the
major components of your document should be un-numbered; the primary point headings
should use uppercase Roman numerals (I, II, III, etc.); secondary point headings should
use uppercase letters (A, B, C, etc.); tertiary point headings should use ordinary numerals
(1, 2, 3, etc.); quaternary point headings should use lowercase letters (a, b, c, etc.). But, as
always, be sure to check your professor’s policies, supervising attorney’s preferences,
applicable court rules, etc., to see if you should use a different typeface or numbering
scheme. Also, note that if you want the text of the heading to be in all caps, do not push
the “caps lock” key. Instead, type the title of your heading, highlight the heading, right-
click on the highlighted text, and click “Font.” Then, check the box that says “All caps”
in the pop-up window. Click “OK” when done.
4. Click enter and then click the “Normal” box in the “Styles” section of the home ribbon.
Now highlight the text of your heading, and the line directly below it.

6
5. Open the paragraph settings by right-clicking on the highlighted text. Be sure that the text
remains highlighted. Then click “Paragraph.”
6. Click on the tab at the top that says “Line and Page Breaks.” Now, check the boxes that
say “Keep with next” and “Keep lines together.” Click “OK” when done. This step will
prevent “widow” headings. A “widow” heading occurs when the heading appears at the
bottom of one page, but the body of text that follows that heading begins at the top of the
next page. This makes the heading feel out of place and can confuse the reader. To check
to see if you have done this step correctly, click on the paragraph symbol (¶) in the upper
right corner of the “Paragraph” section of the home page. Clicking this symbol allows
you to see whether certain formatting features have been activated or not. If you did this
correctly, you should see two black squares on the left side of the page. Those two black
squares indicate that those two lines of text will always appear together on the same page.
7
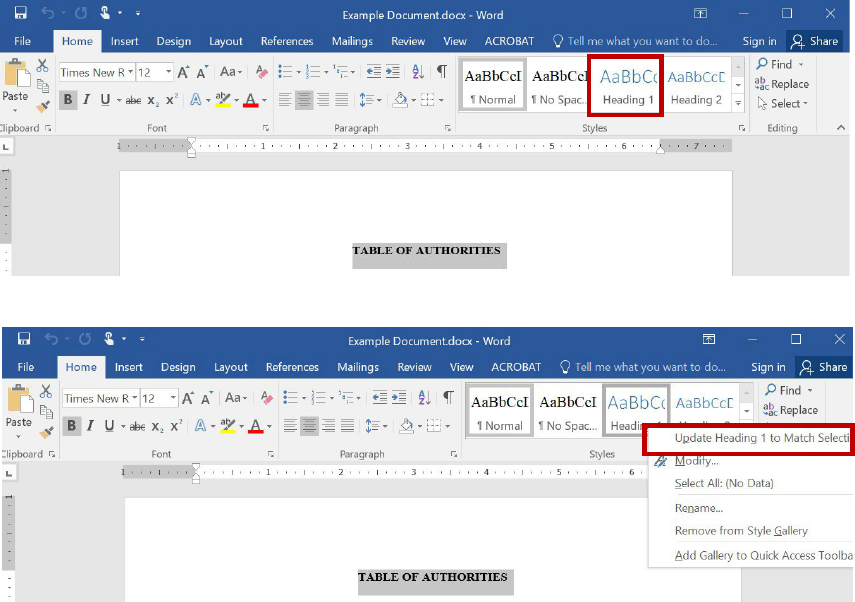
7. Highlight the title of your heading and then right-click on the “Heading 1” box under the
“Styles” section of the home ribbon.
8. Click “Update Heading 1 to Match Selection.”
9. Now, any time that you want to add a heading for a new major component of your
document (e.g., “Statement of the Issues Presented for review”), simply click “Heading
1” in the “Styles” section, and Microsoft Word will automatically adjust the formatting.
Then, type the text for your new heading.
10. If you want to add a primary point heading, repeat steps 1–6. This time, instead of right-
clicking on “Heading 1” in the “Styles” section, right-click on “Heading 2.” Then click
“Update Heading 2 to Match Selection.” Repeat this process for secondary point
headings, tertiary point headings, etc.
11. As noted in step 9, once you have set the “Heading 2” style for primary point headings,
“Heading 3” for secondary point headings, etc. You can simply click on the appropriate
heading style when you want to add a new point heading.
8
Cursor Here
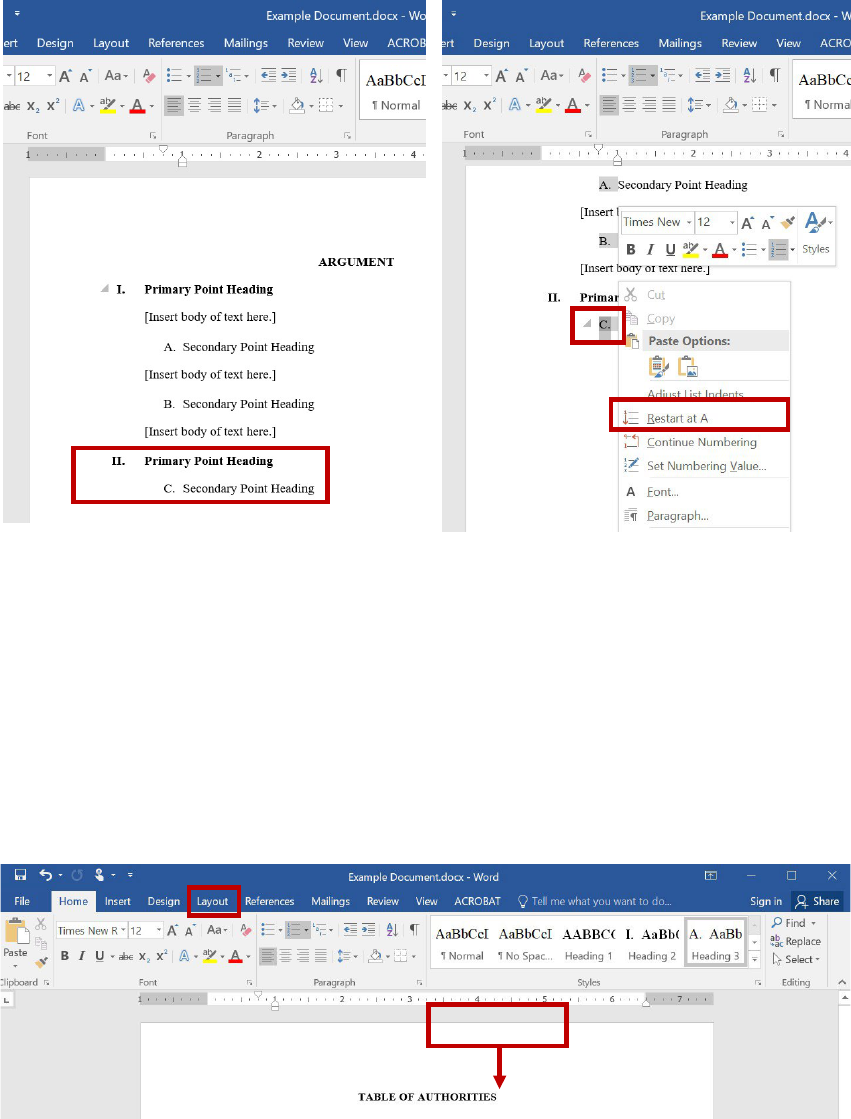
12. Note that when you add a secondary point heading underneath a primary point heading,
the secondary point heading may continue the numbering from a previous section. See
the image on the left below. To restart the numbering under the second primary point
heading, right-click on the item where you want to restart the numbering. In the example
below, right-click on the letter “c.” Then, click “Restart at a” in the pop-up window. Or if
you are using Microsoft Word for Mac, then click “Restart Numbering.”
Sections
Creating sections in Microsoft Word enables you to adjust the formatting of each section of your
document independently (e.g., number pages of one section using one type of numbering scheme
and another section using a different numbering scheme). Generally, you will want to create a
new section any time you want to begin typing on a blank page. Follow the instructions below to
create a new section.
1. Place your cursor where you want to insert a section break. In the example below, I
would place my cursor after the word “AUTHORITIES.” Then, click on the “Layout” tab
of the ribbon in your Microsoft Word document.

9
2. Click the drop-down menu next to “Breaks.”
3. Click on “Next Page” under the “Section Breaks” category.
4. If you click on the paragraph symbol (¶) in the upper right corner of the “Paragraph”
section of the home page (see step 6 of the “Headings” section above), you will be able to
see whether you successfully inserted a section break.

10
Page Numbers
Generally, you should number the pages of a legal document. Pages numbers are typically
aligned in the center of the bottom margin of the document. If the document requires a cover
page, the cover page is typically unnumbered. The pages containing a TOC and TOA are
typically numbered using lowercase Roman numerals (i, ii, iii, iv, etc.). And the substantive
portions of the document are typically numbered using ordinary numerals (1, 2, 3, 4, etc.). Of
course, always double check the court rules or your professor’s policies to ensure compliance
with page number formatting requirements. Follow the instructions below to add page numbers
to a document.
1. Double-click the margin area at the top or bottom of the page to which you want to add
page numbers to open up the “Header & Footer Tools” window.
2. Move the cursor to the footer of the page to which you want to add page numbers. Left-
click in the footer and align the text to the desired position (e.g., left-aligned, center-
aligned, etc.). As noted above, page numbers in legal documents are typically aligned in
the center of the page.
3. Click the drop-down menu next to “Page Number.”
4. Move the cursor to “Current Position” and then click “Plain Number.” Or, if you are
using Microsoft Word for Mac, just click “Page Number” from the drop-down menu.

11
5. The default in Microsoft Word is to add ordinary numerals to the entire document, but as
long as you created sections as discussed in the “Sections” section above, you will be
able to alter the formatting of the page numbers of a particular section individually. To
format the page number of a particular section of your document, double-click in the
margin area containing the page number that you want to adjust. The page number should
be highlighted. If not, highlight the page number. Then, click the drop-down menu next
to “Page Number,” as you did in step 3. Then, click “Format Page Numbers.”
6. Click on the drop-down menu next to “Number format” to change the numbering scheme.
Then, click the circle next to “Start at” to set the number that you want to use to begin the
numbering of that section.
7. If your document includes a cover page, you may need to remove the numbering from
that page of the document. To do so, first double-check to make sure that there is a
section break between the cover page and the rest of the document. Then, double-click
the margin area at the top or bottom of the cover page to open up the “Header & Footer
Tools” window. Then, highlight the page number on the cover page that was added by
default. Finally, check the box next to “Different First Page.” This will remove the page
number from the bottom of the cover page.

12
Tables of Authorities
A TOA lists all the sources cited in a legal document, organizes the sources by category (e.g.,
cases, statutes, rules, etc.), and notes the page number(s) on which each source is cited. If a
source is cited on more than one page, the TOA notes each page on which the source is cited.
Fortunately, Microsoft Word has a tool that enables you to easily create a TOA. Other students
may tell you that it is possible to manually create a TOA. While that may be true, using the
Microsoft Word tool is faster and more accurate. Moreover, the Microsoft Word tool allows you
to easily update the page numbers in your TOA if you make edits to your document. If you
manually create a TOA, you will also have to manually update the TOA. Follow the directions
below to create a TOA.
1. The first thing that you must do to create a TOA is to mark each of the citations in your
document. The process for marking your citations may be slightly different depending on
the format of the citation—that is, whether the citation is a full citation or a short citation.
a. If the citation is a full citation (i.e., this is the first time the citation to that source
appears in your document):
i. Highlight the entire citation. If there is a signal, do not highlight the signal.
Do not highlight the punctuation that precedes or follows the citation.
ii. Click on the “References” tab of the ribbon in your Microsoft Word
document and click “Mark Citation.”

13
iii. Once you click “Mark Citation,” a pop-up window will appear. The
citation that you highlighted should appear in the “Selected text” box. The
way that the citation appears in the “Selected text” box is how the citation
will appear in the TOA. The TOA should not include any pincites.
Therefore, if the citation that you highlighted includes a pincite, you will
want to delete the pincite from the citation in the “Selected text” box. You
should also remove the pincite from the text in the “Short citation” box.
Do not confuse Microsoft Word’s reference to “Short citation” with a
“Bluebook short citation.” They are NOT the same thing.
iv. Once you have removed the pincite, choose the correct “Category” for the
citation.
v. Click “Mark.” And then close the pop-up window.

14
vi. After you mark the citation, Microsoft Word will add hidden characters to
indicate that the citation has been marked. You can hide these characters
by clicking the paragraph symbol (¶) in the upper right corner of the
“Paragraph” section of the home page.
b. If the citation is a short citation (i.e., this is not the first time the source has been
cited):
i. Highlight the short citation (e.g., “Singer, 593 F.3d at 533” or “Id.”).
ii. Click on the “References” tab of the ribbon in your Microsoft Word
document and click “Mark Citation” (see step ii above).
iii. Choose the proper category (see step iv above).
iv. Scroll through the list of sources listed in the “Short citation” box and
choose the source to which the highlighted short citation refers.
v. Click “Mark.” And then close the pop-up window.

15
2. Once you have marked every citation in your document, go to the page of your document
where you want to insert the TOA.
3. If you have not already done so, click on the “Heading 1” box in the “Styles” section of
the home ribbon (or whichever heading style you used for the major components of your
document) and type “Table of Authorities” at the top of the page. Then hit the “enter”
key on your keyboard.
4. Click on the “References” tab of the ribbon in your Microsoft Word document.
5. Click “Insert Table of Authorities” in the “Table of Authorities” section of the ribbon.
6. Make sure that you select “All” under “Category.” Then, click “OK.”
7. Adjust the formatting if necessary. For example, in the TOA below, remove the extra
space between the “TABLE OF AUTHORITIES” heading and the TOA, and change
the font style and size of the source categories in the TOA.

16
8. If you make edits to your document, be sure to mark any new citations and be sure to
delete the hidden characters associated with any deleted citations. When you have
finalized your document, highlight the TOA, click on the “References” tab of the ribbon,
and click “Update Table.”
Tables of Contents
A TOC is an important component of most legal documents. It allows the reader to preview the
writer’s legal analysis. As long as you have created a unique heading style for each type of
heading in your document that you want to appear in the TOC (see “Headings” section above),
generating a TOC using the Microsoft Word tool is quite easy. As with a TOA, other students
may tell you that you can manually create a TOC. And as with a TOA, that is true, but using the
Microsoft Word tool is much easier. Follow the instructions below to insert a TOC.
1. Manually type “Table of Contents” on the page where you want to insert the TOC.
Format the text to match the formatting of the “Heading 1” style that you used for the
other major components of your document (e.g., Table of Authorities, Statement of the
Case, Argument, etc.), but do not actually click on the “Heading 1” box. Otherwise, the
“Table of Contents” will appear as an item in the TOC.
2. Once you have typed “Table of Contents,” hit the “enter” key on your keyboard.

17
3. Click on the “References” tab of the ribbon in your Microsoft Word document.
4. Click the drop-down menu next to “Table of Contents.”
5. Click “Custom Table of Contents.”

18
6. Adjust the number of heading levels that you want the TOC to include. For example, if
you have five types of headings (e.g., the major components of your document and four-
point heading levels), change the number next to “Show levels” to “5.” Also, make sure
that the boxes next to “Show page numbers” and “Right align page numbers” are
checked.
7. Click “OK.”
8. Adjust the formatting of the TOC if necessary. The TOC generated by Microsoft Word
will not preserve certain formatting features. For example, it will not preserve all-caps,
bold, underlining, italics, etc. You will have to adjust the formatting manually if desired.
You may also want to adjust the spacing of the TOC. Refer to this handout's “font and
spacing” section for advice on adjusting the spacing in a Microsoft Word document.
Additionally, check the indentation of the heading levels in the TOC and make sure they
align correctly and are visually appealing. You can use the white tab markers found on
the ruler at the top of the page to make adjustments to the indentation of the heading
levels. Also, when you have a particularly long heading, you may want to insert a line
break by holding the “shift” and “enter” keys on your keyboard to prevent the text of the
heading from overlapping with the page numbers on the right. Your TOC may be the first
thing that the reader sees, so it is important that the TOC be easy to follow and visually
appealing. Compare the two versions of the same TOC on the next page. The one on the
left is the version initially generated by Microsoft Word, and the one on the right is a
revised version. The paragraph tool (¶) has been turned on in the revised version so that
you can see hidden formatting features like the line breaks that were inserted.

19
Revised TOC
TOC Generated by Microsoft Word
