
Boardmaker 7 Editor
User’s Manual

User’s manual Boardmaker 7 Editor
Version 1.0.1
11/2020
All rights reserved.
Copyright © Tobii AB (publ)
No part of this document may be reproduced, stored in a retrieval system, or transmitted in any form, by any means
(electronic, photocopying, recording, or otherwise) without the prior written permission of the publisher.
Copyright protection claimed includes all forms and matters of copyrightable material and information allowed by statutory
or judicial law or hereafter granted, including without limitation, material generated from the software programs which are
displayed on the screen such as screen displays, menus, etc.
The information contained in this document is proprietary to Tobii Dynavox. Any reproduction in part or whole without prior
written authorization by Tobii Dynavox is prohibited.
Products that are referred to in this document may be either trademarks and/or registered trademarks of the respective
owners. The publisher and the author make no claim to these trademarks.
While every precaution has been taken in the preparation of this document, the publisher and the author assume no
responsibility for errors or omissions, or for damages resulting from the use of information contained in this document or
from the use of programs and source code that may accompany it. In no event shall the publisher and the author be liable
for any loss of profit or any other commercial damage caused or alleged to have been caused directly or indirectly by this
document.
Content subject to change without notice.
Please check Tobii Dynavox web site
www.TobiiDynavox.com for updated versions of this document.
Contact Information:
Tobii Dynavox AB
Karlsrovägen 2D
182 53 Danderyd
Sweden
+46 8 663 69 90
Tobii Dynavox LLC
2100 Wharton Street, Suite 400
Pittsburgh, PA 15203
USA
+1-800-344-1778
Table of Contents
1 Introduction ................................................................................................................................... 6
2 Getting Started.............................................................................................................................. 7
2.1 Log In...................................................................................................................................7
2.2 The Dashboard .....................................................................................................................7
2.2.1 Dashboard — Recent.............................................................................................7
2.2.2 Dashboard — My Boardmaker ................................................................................8
2.3 The Editor.............................................................................................................................9
2.4 Playing Activities ...................................................................................................................9
2.4.1 Boardmaker 7 Student Center.................................................................................9
2.4.2 Boardmaker Activities in Snap Core First ...............................................................10
3 Essential Tools and Elements..................................................................................................... 12
3.1 Editor .................................................................................................................................12
3.2 Toolbar...............................................................................................................................13
3.3 Pages Panel .......................................................................................................................13
3.4 Activity Settings ..................................................................................................................14
3.5 Properties Panel .................................................................................................................15
3.5.1 Alignment............................................................................................................15
3.5.2 Font ....................................................................................................................17
3.5.3 Type ...................................................................................................................17
3.5.4 Content ...............................................................................................................18
3.5.5 Background.........................................................................................................20
3.5.6 Style ...................................................................................................................21
3.5.7 State...................................................................................................................21
3.5.8 Advanced............................................................................................................21
3.6 Symbols Panel....................................................................................................................22
3.7 Boardmaker 7 Editor Software Modes...................................................................................23
3.8 Activity Organization............................................................................................................23
3.8.1 Create a Folder and Add Activities.........................................................................23
3.8.2 Rename an Activity ..............................................................................................23
3.8.3 Rename a Page...................................................................................................23
4 Templates ................................................................................................................................... 24
4.1 Create a New Activity ..........................................................................................................24
4.2 Create a New Page from a Template ....................................................................................25
4.3 My Curriculum ....................................................................................................................25
4.3.1 Activities-to-Go ....................................................................................................25
4.3.2 Core First Communication Book............................................................................27
5 Open Boardmaker v5 and v6 files .............................................................................................. 28
6 Draw and Arrange Page Objects................................................................................................ 30
6.1 Page Properties ..................................................................................................................30
6.2 Create a Grid of Objects ......................................................................................................31
6.3 Additional Editing Tools........................................................................................................31
7 Buttons........................................................................................................................................ 32
7.1 Add a Symbol to a Button ....................................................................................................32
7.2 Standard Buttons ................................................................................................................32
7.2.1 Standard Button Properties...................................................................................32
7.3 Group Buttons ....................................................................................................................33
7.3.1 Create a Group Button .........................................................................................33
7.3.2 Add Symbols to a Group Button ............................................................................33
7.3.3 Add a Label to a Group Button ..............................................................................34
7.3.4 Resize and Reposition Objects in a Group Button...................................................34
7.3.5 Group Button Properties .......................................................................................34
7.4 Symbolate Buttons ..............................................................................................................34
7.4.1 Draw a Symbolate Button .....................................................................................34
7.4.2 Symbolate Button Properties ................................................................................35
7.4.3 Change a Symbolate Symbol................................................................................35
7.5 Word Predictor Buttons........................................................................................................35
7.5.1 Draw a Word Predictor Button...............................................................................35
7.5.2 Word Predictor Button Properties ..........................................................................36
7.6 Target Buttons ....................................................................................................................36
7.6.1 Draw a Target Button............................................................................................36
7.6.2 Target Button Properties.......................................................................................36
7.7 Freeform Buttons ................................................................................................................36
7.7.1 Draw a Freeform Button .......................................................................................36
7.7.2 Freeform Button Properties...................................................................................36
7.8 Hotspots.............................................................................................................................37
7.8.1 Draw Rectangular Hotspots ..................................................................................37
7.8.2 Draw Freeform Hotspots.......................................................................................37
7.8.3 Hotspot Properties ...............................................................................................37
7.9 Button Shapes ....................................................................................................................37
7.9.1 Shapes Tool ........................................................................................................37
7.9.2 Shape setting — Button Properties........................................................................37
8 Symbols ...................................................................................................................................... 38
8.1 Browsing for Symbols..........................................................................................................38
8.1.1 Symbol Search Settings .......................................................................................38
8.2 Symbol Properties...............................................................................................................39
8.3 Set the Symbol Label Language...........................................................................................39
8.4 Edit Symbols ......................................................................................................................39
9 Labels ......................................................................................................................................... 42
9.1 Draw a Label ......................................................................................................................42
9.2 Label Properties..................................................................................................................42
10 Lines ........................................................................................................................................... 43
10.1 Line Properties....................................................................................................................43
11 Advanced Objects ...................................................................................................................... 44
11.1 Message Windows ..............................................................................................................44
11.1.1 Draw a Message Window .....................................................................................44
11.1.2 Message Window Properties ................................................................................44
11.2 Videos................................................................................................................................45
11.2.1 Create a Video Object ..........................................................................................45
11.2.2 Video Properties ..................................................................................................45
11.3 Group Boxes ......................................................................................................................45
11.3.1 Group Box Properties...........................................................................................45
11.4 Check Boxes and Radio Buttons ..........................................................................................45
11.4.1 Check Box and Radio Button Properties ................................................................46
11.5 Text Boxes..........................................................................................................................46
11.5.1 Text Box Properties ..............................................................................................46
11.6 Tab Control Objects.............................................................................................................46
11.6.1 Tab Control Properties..........................................................................................46
11.7 Scan Order .........................................................................................................................47
12 Create PDF (Print) ...................................................................................................................... 48
13 Rich Text Editor........................................................................................................................... 49
14 Actions ........................................................................................................................................ 50
14.1 Add Actions to an Object......................................................................................................50
14.2 Action Editor .......................................................................................................................50
14.3 Action Categories................................................................................................................52
14.4 Searching for Actions ..........................................................................................................53
15 Activity Properties....................................................................................................................... 54
16 User Settings .............................................................................................................................. 55
17 Access Methods ......................................................................................................................... 57
17.1 Simple Touch ......................................................................................................................57
17.2 Touch Enter ........................................................................................................................57
17.3 Touch Exit...........................................................................................................................57
17.4 Scanning ............................................................................................................................57
17.5 Mouse Pause......................................................................................................................58
17.6 Gaze Interaction .................................................................................................................58
Appendix A Actions ......................................................................................................................... 59
Appendix B Common Words........................................................................................................... 61

1 Introduction
Welcome to Boardmaker 7 Editor, the future of the Boardmaker Software Family! Equipped with an extensive collection of
powerful templates, an efficient new user interface, integration with myBoardmaker.com, and a host of time-saving tools,
Boardmaker 7 Editor gives you what you need to meet your students’ needs quickly.
● Easy to Learn and Use - Boardmaker 7 Editor has an intuitive new interface and simple page management.
● Create Engaging Activities Fast - Choose from hundreds of powerful and easy-to-use starter templates to create
fast solutions for your students.
● A Fresh Spin on an Old Favorite - Import your Boardmaker Version 5 and 6 boards and use Boardmaker 7 Editor
to edit, print, and share them.
● Seamless Integration with myBoardmaker.com - Download your online files for editing in Boardmaker 7 Editor.
6
1 Introduction
Boardmaker 7 Editor User’s manual v.1.0.1 - en-US

2 Getting Started
2.1 Log In
If you have a subscription, select Sign in to enter your email and password.
If you purchased a perpetual license, select Insert License Key to enter your license information.
Select Free Trial to try before you buy!
Some District users might not be prompted for sign in or license information.
2.2 The Dashboard
The Dashboard is your main hub for accessing and creating activities. It gives you access to activities stored on your
computer and on myBoardmaker.com, as well as buttons for the most common Boardmaker 7 Editor tasks:
● New... — create a new blank activity or a new template-based activity.
● Open... — open an existing activity stored on your computer.
● Community — Opens myBoardmaker.com in your browser, where you can find activities shared by other
Community members.
You must be logged in with your myBoardmaker.com account to access the Community. You can sign up
for an account for free.
2.2.1 Dashboard — Recent
The activities that have been opened most recently are shown in the Recent view on the Dashboard. Place the cursor over
any activity to access the Edit and Play options.
Figure 2.1 Dashboard — Recent
Boardmaker 7 Editor User’s manual v.1.0.1 - en-US
2 Getting Started
7

2.2.2 Dashboard — My Boardmaker
My Boardmaker shows your activities stored on myBoardmaker.com and/or your computer. Sign in using the email
address and password associated with your myBoardmaker.com account to access your online activities. If you don’t have
a myBoardmaker.com account, select Create Account to create one for free.
Tobii Dynavox has unified account access to our websites and apps, including GoBoardmaker.com,
myTobiiDynavox.com, efunding.TobiiDynavox.com, myMessageBanking.com, Boardmaker 7 Student Center,
Snap + Core First, Compass, Snap Scene, and ALL. If you have an existing account on any of these Tobii
Dynavox websites or apps, then you can use your same email and password to access myBoardmaker.com.
Figure 2.2 Dashboard — My Boardmaker
Activities found in the My Boardmaker section of the dashboard are files that are available on your myBoardmaker.com
account.
● Folders that exist on myBoardmaker.com also appear in Dashboard — My Boardmaker. Select a folder to browse
the activities inside.
● Activities with the
icon are available on myBoardmaker.com as well as on your computer. These activities are
ready to play or edit in Boardmaker 7 Editor any time, even if you’re offline. Changes that you make to these files in
Boardmaker 7 Editor are synced to the file on myBoardmaker.com the next time you have an internet connection.
● Activities that do not have the
icon are on myBoardmaker.com only, so you can’t yet work with them in
Boardmaker 7 Editor or access them while you’re offline. To make these activities available to play or edit in
Boardmaker 7 Editor, position the cursor over the activity and select Download. After a brief conversion process,
the activity will be available to play or edit.
You must have an active internet connection and be logged in to your myBoardmaker.com account.
8
2 Getting Started
Boardmaker 7 Editor User’s manual v.1.0.1 - en-US

2.3 The Editor
The Editor is the workspace where you edit, preview, and play your activities.
2.4 Playing Activities
The Preview and Play modes in the Boardmaker 7 Editor are designed to be used to test the activity you are editing or to
present group instruction when connected to an interactive whiteboard.
Students must play activities through the Boardmaker 7 Student Center or Snap Core First apps.
Student management and assigning activities in the Boardmaker 7 Student Center app requires a subscription.
2.4.1 Boardmaker 7 Student Center
The Boardmaker 7 Student Center app is designed to make it easy for educators to assign and track activities for their
students through the web. Students receive individual access to their assigned activities and can use any device where
the Boardmaker 7 Student Center app is installed.
For detailed information, see the Boardmaker 7 Student Center User’s Manual.
● Accessibility — customize the student’s access method settings once and they’ll have them each time they sign in
on the app.
● Tracking — teachers can track student progress when using performance-enabled activities.
● Teacher tools — assign activities, generate reports, and more through myBoardmaker.com
Boardmaker 7 Editor User’s manual v.1.0.1 - en-US
2 Getting Started
9

● Free to use — the Boardmaker 7 Student Center app is free to install and use on an unlimited number of devices!
Figure 2.3 Boardmaker 7 Student Center
2.4.2 Boardmaker Activities in Snap Core First
We strongly recommend that all students play Boardmaker activities in the Boardmaker 7 Student Center. The
Boardmaker 7 Student Center has many benefits, including activity assignment lists, performance tracking, and
superior activity fidelity.
Students can play Boardmaker activities in Snap Core First. Snap Core First pulls Boardmaker activities from the Snap
Activities folder within the student’s own Tobii Dynavox account. If you are an educator and want to assign activities for use
through Snap Core First, you can share activities to the student’s Tobii Dynavox account or to a group that they have
access to, then have their parent or caregiver move the activities into the appropriate folder for them.
See the Snap Core First User’s Manual for details and instructions on playing Boardmaker activities in Snap Core First.
Tracking of performance-enable activities is not available in Snap Core First.
Some Boardmaker actions do not work in Snap Core first:
ApplySpeechStyle Pitch
ChangeWordForm Print
ChangeWordVariant PrintMessageWindow
DoEmphasis PrintProject
DoPitch Rate
DoRate SaveText
DoSpell SaveTextAs
DoVoice SaveToTextFile
DoVolume SaveWordList
FileNew SetAccessMethod
Font SetBooleanSetting
FontFace SetNumberSetting
GetMessageFileName SetStringSetting
InsertImage SetVoice
InsertPause SpeechVolume
InsertSoundFile SpellCheck
InsertSpeechEffect SpellMode
10
2 Getting Started
Boardmaker 7 Editor User’s manual v.1.0.1 - en-US

IsPartOfSpeech SymbolateText
IsWordInDictionary SymbolateWhat
LoadText SymbolateWords
LoadTextAndSymbolate SymbolsForWord
LoadTextFromFile SymbolsFromTag
LoadWordList TransformWord
NewPageFromTemplate Voice
NewSpeechStyle WordsFromTag
PerfEvent WriteTextToFile
Boardmaker 7 Editor User’s manual v.1.0.1 - en-US
2 Getting Started
11

3 Essential Tools and Elements
3.1 Editor
Name Description
1 File Menu Save, Open, Import, User Settings, Activity Settings and Properties, Help, and more.
2 Toolbar Contains the editing and drawing tools as well as Print and Play.
3 Language Set software language.
4 Undo and Redo Undo and redo the last change made to the activity.
5 Return to
Dashboard
Close the current activity and go to the Dashboard.
6 Properties Panel View and edit properties of the selected object(s).
7
Symbols Panel Search for symbols, pictures on the web, or images uploaded to your My Media folder on
myBoardmaker.com to add to your activity.
8 Pages Panel Displays the pages in the current activity.
9 Editor workspace Area in which you create and edit your page(s).
10 Zoom controls Adjust the view of the workspace.
12
3 Essential Tools and Elements
Boardmaker 7 Editor User’s manual v.1.0.1 - en-US

3.2 Toolbar
Name Description
1
Select/Quick Select
Select objects on the page, or select the page itself.
2
Button
Create a button. Available button types: Standard, Group, Word Predictor, Target,
Symbolate, Hotspot, Freeform Button, Freeform Hotspot
3
Shapes
Create buttons in a variety of shapes.
4
Spray
Spray out copies of a selected object into a grid.
5
Line
Draw a horizontal, vertical, or diagonal line.
6
Label
Create a new text label.
7
Advanced
Create one of the following objects: Message Window, Video, Group Box, Checkbox,
Radio Button, Textbox, Tab Control, Scan.
8
Create PDF
Create a PDF of your activity. The PDF can then be printed.
9
Play
Enter Play mode to play your activity from the beginning or Preview Page to play just the
current page.
3.3 Pages Panel
The Pages panel displays the pages in the current activity. (See section 3.8 Activity Organization, page 23)
Boardmaker 7 Editor User’s manual v.1.0.1 - en-US
3 Essential Tools and Elements
13

Name Description
1 Pages Select a page to view it in the workspace.
2 Page options
Select to make a copy of the page, delete it, or edit the shared variables.
3 New Page Add a new page to your activity. You can create a blank page, copy a page from another
Activity, or copy a page from a template.
Select the left arrow to collapse the Pages Panel. This gives you a larger view of the page currently in the
workspace. To expand the Pages Panel, select the right arrow
.
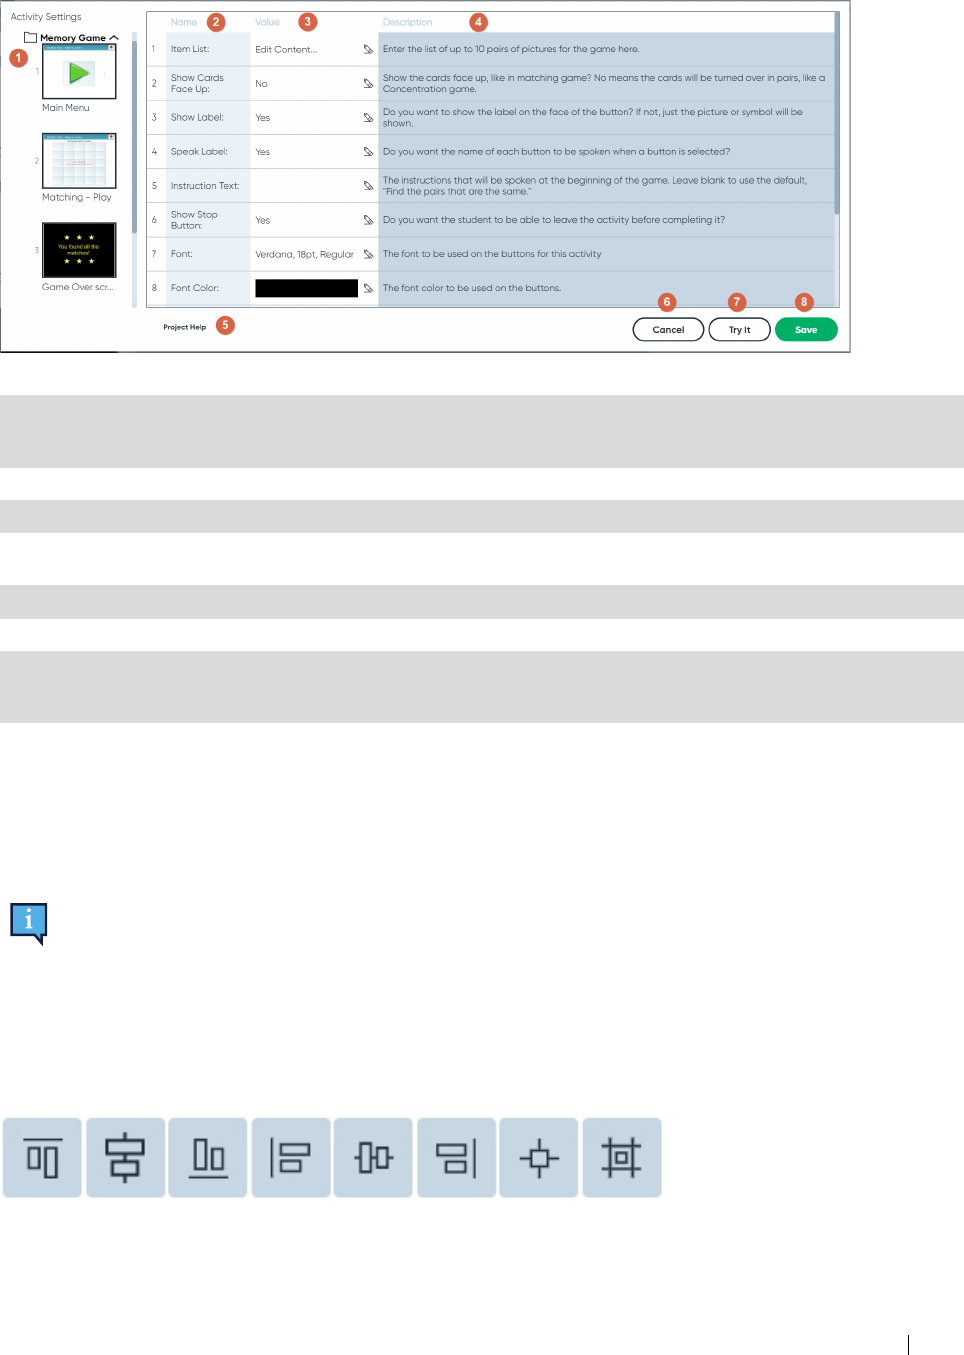
3.4 Activity Settings
Some on-screen (interactive) activities have activity settings that control how the activity works. In many cases, you will
customize and add content to an activity through the Activity Settings rather than editing the page. If you have created an
on-screen activity from a template, be sure to check the Activity Settings before you start editing the pages.
Activities that use Activity Settings for key features will automatically open the Activity Settings dialog when you
open the activity in the Editor.
1. Select File Menu > Activity Settings to open the Activity Settings dialog.
2. For each setting, select the Value column to enter a value.
There may be different settings for each page as well as at the activity level. Click on each page in the
Activity Panel to view the page settings (if any).
3. To test your settings in Preview mode, select Try it.
14
3 Essential Tools and Elements
Boardmaker 7 Editor User’s manual v.1.0.1 - en-US
4. Select Save to save your changes and return to the Editor.
Name Description
1 Activity Panel Displays the activity and pages. Click the activity name at the top of the Activity
Panel to view the activity level settings. Select a page to view the settings for that
page.
2 Name column Displays the name of each activity setting.
3 Value column Displays the current value for each activity setting.
4 Description column Displays a description of each activity setting. The description tells you about how
the setting is used in the activity so that you can set it properly.
5 Activity Help Select this button to view tips for using this activity.
6 Cancel button Discard your changes and return to the Editor.
7 Try It button Select this button to preview the activity in Play mode to test the activity settings.
When you're done testing it and exit Play mode, the Activity Settings dialog will still
be open in case you need to make any adjustments.
8 Save button Select this button to save your changes and return to the Editor.
3.5 Properties Panel
The options found in the Properties panel are used to customize screen objects. When an object (or the page itself) is
selected, the Properties panel displays the property options available for that object.
The Properties Panel groups vary depending on the object selected. Common properties that work the same for
several types of objects are described below. Properties that are unique to each object type are described in the
object sections.
3.5.1 Alignment
The alignment properties orient the selected object(s) in relation to the page dimensions or to each other. A single selected
object orients relative to the page dimensions. When multiple objects are selected, they orient relative to the object that
was selected first.
Figure 3.1 Alignment Tools — Top, Horizontal Center, Bottom, Left, Vertical Center, Right, Center, Align to Grid
Boardmaker 7 Editor User’s manual v.1.0.1 - en-US
3 Essential Tools and Elements
15


Tool One object Multiple objects — Yellow button selected first
Right
Center
To Grid*
* Page grid must be enabled. See section 16 User Settings
3.5.2 Font
The properties found in the Font section are used to define the text on the selected object.
● Font — Choose a font from the menu.
● Font Size — Choose a font size.
● Font Style — Set the current text to be bolded, italicized, and/or underlined.
● Horizontal align — Left align, center, or right align the current text.
● Vertical align — Top align, center, or bottom align the current text.
● Font color — Choose a color or enter a Hex or RGBA value for the current text .
● Font Highlight Color — Choose a color or enter a Hex or RGBA value for the highlight behind the current text.
Figure 3.2 Label with black font color and green highlight color
3.5.3 Type
Type Property (buttons only)
● Choose a button type:
– Group — See section 7.3 Group Buttons.
– Standard — See section 7.2 Standard Buttons.
– Symbolate — See section 7.4 Symbolate Buttons.
– Word Predictor — See section 7.5 Word Predictor Buttons.
Boardmaker 7 Editor User’s manual v.1.0.1 - en-US
3 Essential Tools and Elements
17

3.5.4 Content
Properties in the Content section of the Properties Panel vary depending on the current setting in the Layout
property, if available.
Content Properties — Standard and Word Predictor Button Layout
● Layout — Choose the layout for the symbol and label: Label on top, Label on bottom, Symbol only (no label), Label
left, Label right, Label only (no symbol).
Content Properties — Freeform Layout selected
● Layout — The Freeform Layout does not apply any automatic formatting. Objects can be arranged in any fashion.
Figure 3.3 Freeform Layout
● Margin — The amount of space, in pixels, to leave between objects and the edge of the page or containing object.
Content Properties — Auto-Center Layout selected
● Layout — The Auto-Center Layout automatically arranges objects in rows or columns, centered on the page or
containing object.
Figure 3.4 Auto-Center Layout
● Grid Margin — The amount of space, in pixels, between objects.
● Arrange By — Choose to arrange objects in rows (horizontally) or columns (vertically).
● Dynamic Insert — Dynamic Insert shows a preview of where the object you are dragging will go in the layout.
– Design only — Show dynamic insert in the Editor, but not in Preview and Play modes.
– Always — Show dynamic insert in the Editor, Preview mode, and Play mode.
– Never — Never show dynamic insert.
● Margin — The amount of space, in pixels, to leave between objects and the edge of the page or containing object.
18
3 Essential Tools and Elements
Boardmaker 7 Editor User’s manual v.1.0.1 - en-US

Page Content Properties — Auto-Grid Layout selected
● Layout — The Auto-Grid Layout automatically arranges objects in rows or columns, starting from the top left
corner.
Figure 3.5 Auto-Grid Layout
● Grid Margin — The amount of space, in pixels, between objects.
● Arrange By — Choose to arrange objects in rows (horizontally) or columns (vertically).
● Dynamic Insert — Dynamic Insert shows a preview of where the object you are dragging will go in the layout.
– Design only — Show dynamic insert in the Editor, but not in Preview and Play modes.
– Always — Show dynamic insert in the Editor, Preview mode, and Play mode.
– Never — Never show dynamic insert.
● Margin — The amount of space, in pixels, to leave between objects and the edge of the page or containing object.
Content Properties — Auto-Circular Layout selected
● Layout — The Auto—Circular Layout automatically arranges objects in a circle around the center of the page or
group object.
Figure 3.6 Auto-Circular Layout
● Grid Margin — The amount of space, in pixels, between objects.
● Arrange By — Choose to arrange objects in rows (horizontally) or columns (vertically).
● Dynamic Insert — Dynamic Insert shows a preview of where the object you are dragging will go in the page layout.
– Design only — Show dynamic insert in the Editor, but not in Preview and Play modes.
– Always — Show dynamic insert in the Editor, Preview mode, and Play mode.
– Never — Never show dynamic insert.
● Margin — The amount of space, in pixels, to leave between objects and the edge of the page or containing object.
Boardmaker 7 Editor User’s manual v.1.0.1 - en-US
3 Essential Tools and Elements
19

Content Properties — Grid Layout selected
● Layout — The Grid layout allows you to create a custom grid with a specified number of columns and rows.
Objects can be placed into any cell in the grid.
Figure 3.7 Grid Layout
● Grid Margin — The amount of space, in pixels, between objects.
● Grid Colums — The number of columns in the grid.
● Grid Rows — The number of rows in the grid.
● Insert Type — Choose how objects in the grid respond when a new object is added.
– Shift Right — When an object is placed in a cell that already holds an object, the first object shifts one cell to
the right. The shifting sequence continues left to right and top to bottom.
– Shift Down — When an object is placed in a cell that already holds an object, the first object shifts one cell
down. The shifting sequence continues from top to bottom and left to right.
– Replace — When an object is placed in a cell that already holds an object, the new object replaces the first
object.
– Empty Only — An object can only be placed in an empty cell.
– Swap — When an object is placed in a cell that already holds an object, the new object changes locations with
the first object, leaving all other objects in the grid unaffected.
● Snap type — Choose how an object appears when it is placed in the grid.
– Center — Center the object in the cell without changing the size of the object.
– Fill — Resize the object to fill the cell.
● Lines Visible — Choose when the lines in the grid are visible.
– Design only — Show grid lines in the Editor, but not in Preview and Play modes.
– Always — Show grid lines in the Editor, Preview mode, and Play mode.
– Never — Never show grid lines.
● Margin — The amount of space, in pixels, to leave between page objects and the edge of the page or containing
object.
3.5.5 Background
Background Properties
● Add Symbol — Choose a symbol or image to show as a background.
● Background Symbol Layout — Choose how the symbol appears in the background.
– Actual — Display the symbol in its original size.
– Stretch — Stretch the symbol to fit the full dimensions of the page or object.
– Tile — Repeat the symbol as a tile to fill the full dimensions of the page or object.
● Remove Image — Remove the symbol or image from the background.
● Fill — Choose the background color.
● Gradient Color — Choose a color for the background gradient.
● Gradient Style — Choose a gradient style for the background.
20
3 Essential Tools and Elements
Boardmaker 7 Editor User’s manual v.1.0.1 - en-US

3.5.6 Style
● Border color — Choose a color or enter a Hex or RGBA value for the border.
● Border size — Enter a numerical point value for the border size.
● Border style — Choose a style for the border.
Table 3.1 Border Styles
Solid
Round Dot
Square Dot
Round Dash
Square Dash
Round Dash Dot
Square Dash Dot
Round
3.5.7 State
● Disabled — A disabled object is visible but not selectable in Preview and Play modes. It is visually identifiable by
its gray color overlay.
● Hidden — A hidden object is not visible or selectable in Preview and Play modes.
● Selectable — When an object is marked “Not Selectable” it appears visually normal, but cannot be selected in
Preview and Play modes.
● Locked — A locked object is not selectable by left click in the Editor. This protects the button from being moved or
otherwise edited inadvertently. To unlock and edit a locked object, right click on the button in the Editor and select
Unlock from the menu.
A locked object does not follow the layout rules of its parent object. For example, if a locked button is in a
group button with a layout other than freeform, the locked button will remain in its original position when
other objects are added to the group button.
3.5.8 Advanced
● Object Name — The object name is a unique property that identifies the object for programming purposes. The
software automatically names each object, but you may find it easier to change the name to something you can
easily identify.
● Drag Type — Use the Drag Type menu to choose whether the button can be moved to a new position in Play and
Preview modes:
– None — The object is not moveable.
– Move — The object can be moved.
– Copy — The object creates a copy of itself that can be moved to a new position.
● Is Target — When enabled, the current object is designated as a target that will accept other page objects that are
dragged or copied into it in Preview and Play modes. When disabled, objects that are dragged or copied into it in
Preview and Play modes will snap back to their original position.
● Target Scanning — When using access methods other than Simple Touch, you can define how the scan highlight
behaves.
– Scan — Highlight the entire group button as a single target. The draggable object moved into the Target button
is placed in the next available position as defined by the target button layout.
– Scan and Position — Move the highlight inside the Target button to a specific position as defined by the Target
button layout.
Boardmaker 7 Editor User’s manual v.1.0.1 - en-US
3 Essential Tools and Elements
21

– Disable — Scan highlight passes over the Target button.
● Audio Cue — An audio cue is a short message that is spoken to identify an object when the cursor or scanning
highlight moves over the object. Type in the Audio Cue text field to set the audio cue text.
● Actions — Select to open the Action Editor, where you can view, add, and edit the actions assigned to the current
object. See section 14 Actions.
3.6 Symbols Panel
Use the Symbols panel to find and add symbols and pictures to your activity.
Name Description
1 Symbol
Search
Type in the text field to search for a symbol. You can also browse for symbols by category by
clicking on the folders.
2 My Media Access the pictures stored in the My Media section of your myBoardmaker.com account.
My Media is not available for free Community accounts.
A network connection is required to access My Media.
3 Web Search the web for pictures matching the keyword(s) you enter into the search text field.
A network connection is required to search the web.
4 Search Field Type your query into the text field. Use the (optional) buttons below to specify what parts of the
word to search in (Begins With, Anywhere, Whole Word, Ends With).
Select
Search Type to choose Normal, Rhymes with, Pattern, or Sounds like.
Select
Filters to specify color or black and white and to change the search language.
5
Label Search
Settings
Choose where you would like to search within the symbol labels:
● Begins With — Search only within the first portion of the label.
● Anywhere — Search within any part of the label.
● Whole Word — Search only for the entire word, exactly as you typed it.
● Ends With — Search only within the last portion of the label.
6 Search
results
The results of your search appear here. You may also use the folders in this area to browse for
symbols by category.
22
3 Essential Tools and Elements
Boardmaker 7 Editor User’s manual v.1.0.1 - en-US

3.7 Boardmaker 7 Editor Software Modes
Boardmaker 7 Editor modes:
● Dashboard — browse your activities and templates.
● Editor — edit activities by adding content to pages.
● Play — view your activity the way your students will. The activity plays from the first page (not necessarily the page
that is open in the Editor).
● Preview Page — play the current page, so you can see it as the student would see it.
When you are in Play or Preview mode, use the Stop button or <Esc> key on your keyboard to return to the
Editor.
Boardmaker 7 Editor is designed to be used for creating and editing activities. Students must play the on-screen
Boardmaker activities that you create in the Boardmaker 7 Student Center.
3.8 Activity Organization
● Folders are used to organize your activities. Create folders directly in the My Boardmaker area of the Dashboard or
on myBoardmaker.com
● Activities are files that contain pages that are used together. You can think of an activity as a book that contains
pages.
● Pages are like the pages of a book - they contain the content that the users will read (or interact with). This content
consists of objects such as buttons, message windows, symbols, and so on.
3.8.1 Create a Folder and Add Activities
1. Go to the My Boardmaker section of the Dashboard.
2. Select New Folder.
3. Type a name for your new folder.
4. Select Create.
5. Click and drag activities into the folder.
When saving a newly-created activity, you can choose the destination folder.
3.8.2 Rename an Activity
1. Go to the My Boardmaker section of the Dashboard.
2. Position the cursor over the activity that you would like to rename.
3. Select the three dots icon.
4. Select Rename.
5. Type the new name.
6. Select Rename.
3.8.3 Rename a Page
1. Open the activity in the editor.
2. In the Pages Panel on the left side of the screen, click in the page name.
3. Use your keyboard keys to delete the existing page name and type the new name.
4. Click anywhere outside the page name text to save your changes.
Boardmaker 7 Editor User’s manual v.1.0.1 - en-US
3 Essential Tools and Elements
23

4 Templates
Templates provide the framework for creating your own activities. Templates are designed for you to populate with your
own content quickly and easily. Some templates also have a Sample version, pre-filled with content that you can use right
away or edit to suit your needs.
When you create a new activity or page based on a template, the template page(s) are copied into your new activity/page
and then you can adjust the content however you wish.
Templates are available for the following types of activities:
● Art and Creativity - Develop creativity and artistic expression.
● Books and Presentations - Develop reading skills and present new information.
● Calendars - Review upcoming events and develop mathematical and time-based skills.
● Classroom Routines - Templates for daily attendance and student sign-in.
● Device Overlays - Create overlays for a wide range of digitized communication devices.
● Explore - Explore new information, pictures, and symbols through errorless activities.
● Flashcards - Build and master vocabulary.
● Games - Reinforce concepts and knowledge in fun and engaging formats.
● Graphic Organizers - Create cycles, list maps, storyboards, trees, and webs to visually display relationships.
● Labeling - Label the parts of the whole.
● Matching - Match words to related pictures or items.
● Mathematics - Build mathematical skills in areas such as counting, patterns, money, and graphs.
● Question and Answer - Reinforce and assess knowledge in a given area.
● Sequencing - Sequence items in the correct order.
● Sorting - Sort items into two, three, or four groups.
● Visual Schedules - Introduce and review daily events and planned transitions.
● Word Study - Develop knowledge of letters and their corresponding sounds, and understanding of how groups of
letters and sounds make words.
● Writing - Develop beginning composition and syntax skills.
Many of the on-screen interactive templates can also track student performance and report back results when
the activities are used by students associated with a myBoardmaker.com subscription account. These
performance-enabled templates are indicated by a
icon. To use the performance tracking feature, the
activity must be assigned to the student and then played by the student in the .
4.1 Create a New Activity
1. From the Dashboard, select New.... The New activity window opens.
2. Select a template category on the left side of the screen to view the available templates of that type.
For Activities-to-Go, select Printable, then Activities to Go.
If applicable, select a topic and sub-topic to refine your search.
3. Select a template.
Optional: Select the Favorite button at the bottom of the screen to add the selected template to the
Favorites category. Go to the Favorites category at any time to find favorite templates again quickly.
4. Select Create (use the empty template) or Create From Sample (use the pre-populated sample template) to
create your activity. The pages that are included in the template are added to the activity, and will appear in the
Pages panel.
Get started with customizing and adding content to your new template-based activity using the Activity Settings
and/or Edit-in-place. See sections 3.4 Activity Settings and 7.1 Add a Symbol to a Button.
24
4 Templates
Boardmaker 7 Editor User’s manual v.1.0.1 - en-US

4.2 Create a New Page from a Template
Choose a specific page from a template to add to your activity.
1. Open your activity in the Editor.
2. In the Pages panel, select + New Page.
3. In the floating toolbar, select New Page from Template.
4. Select a template from the list of templates.
5. Select Select.
6. Select a page from the template to copy to your activity.
7. Select Select.
4.3 My Curriculum
Full curriculum sets are currently available in English — U.S. and English — U.K.
The My Curriculum folder is where you’ll find our expert-designed curriculum: Activities-to-Go and Core First
Communication Book. When you add activities to My Curriculum, the activities are downloaded so that they are available
in Boardmaker 7 Editor to Edit, Print, or Play, even without an internet connection.
Add Activities to My Curriculum
1. From the Dashboard, select My Boardmaker.
2. Select My Curriculum.
3. Select Add Curriculum.
4. Choose a Curriculum.
5. Navigate through the folders until you find activities that you would like to add to My Curriculum.
6. Select Add Unit to My Curriculum to add all of the activities contained in the current folder. Certain folders allow
you to select a specific activity and add it individually.
7. Browse to a different folder to continue adding to My Curriculum or select Close to finish.
4.3.1 Activities-to-Go
Activities-to-Go provides topic-specific curriculum for students with special needs in grades K-12, including those who
need AAC to be successful. It targets the most common life skills, science, and social studies topics with the aim of helping
students build knowledge and vocabulary. With teacher guides and unit-based activities, you can provide differentiated
Boardmaker 7 Editor User’s manual v.1.0.1 - en-US
4 Templates
25

instruction around a common topic thanks to the levels we provide. Best of all, Activities-to-Go are designed to be edited,
so you can customize them easily using Boardmaker 7 Editor.
Activities-to-Go Book sample page
Activities-to-Go Craft sample page
Each Activities-to-Go unit includes the following:
● A Teacher Guide that explains the Big Idea, identifies the targeted vocabulary, and provides ideas for enhancing
instructions and supporting communication.
● Engaging, level-appropriate print activities such as games, communication boards, writing activities, quizzes, and
more.
The Activities-to-Go in the My Curriculum folder are complete and ready to use. You can download and print them as-is or
edit them first. Activities-to-Go templates are available in the Template browser, so you can use them as a model to make
your own activities. Just follow the steps in section 4.1 Create a New Activity to create a new activity from an Activities-to-
Go template.
Figure 4.1 Activities-to-Go templates
26
4 Templates
Boardmaker 7 Editor User’s manual v.1.0.1 - en-US

4.3.2 Core First Communication Book
The Core First Communication Book is a printable, tabbed communication book which mirrors the vocabulary in the Snap
Core First app. It includes a core page, Word Lists, QuickFires, keyboard, and topics. It is available in the 6x6 and 7x9 grid
sizes. Directions for assembling the book can be found on the first page of the file.
Boardmaker 7 Editor User’s manual v.1.0.1 - en-US
4 Templates
27

5 Open Boardmaker v5 and v6 files
You can import boards, board packages, and .zip files that were created in Boardmaker version 5 and above. Once
imported, these files are available for you to edit, print, and play.
1. Select the Open... button on the Dashboard screen.
2. In the file browser window that opens, select the file type drop down menu and choose the file type you are looking
for.
3. Navigate to the directory containing the desired file.
4. Select the .bm2 , .zbp, or .zip file you would like to import.
5. Select Open.
The Boardmaker Conversion Setup dialog opens.
Select Select New File to return to your file folder and choose a different file.
6. (Optional) Select Conversion Warnings, Conversion Fidelity, and Symbolate Fidelity settings from the drop-down
lists.
7. Select Import. The activity is saved as a new Boardmaker 7 Editor activity file and opens in the Editor.
28
5 Open Boardmaker v5 and v6 files
Boardmaker 7 Editor User’s manual v.1.0.1 - en-US

If you have selected Show All Conversions Warnings in the Conversion Setup Dialog, the Conversion
Warnings dialog will open, stating that the files have been successfully converted and listing any
inconsistencies in the conversion process. Select OK to close the Conversion Warning dialog.
Some legacy actions are not supported in Boardmaker 7 Editor :
● Access Method
● Cancel Speech
● Hibernate
● Infrared actions
● Lock Board
● Normal Volume Down
● Normal Volume Up
● Pause Speech
● Preview Text
● Preview Volume Up
● Preview Volume Down
● Quick Record
● Read Variables
● Read With Highlighting (Both)
● Rest Toggle
● Restart
● Scan Next
● Scan Sequence
● Set Brightness
● Set Label Live
● Shutdown
● Speak File
● Stopwatch
● svButtonHasText
● svTimer
● Use Loud Settings
● Use Soft Settings
● Voice 1
● Voice 2
● Voice 3
● Voice 4
● Write Text To File
● Write Variables
Boardmaker 7 Editor User’s manual v.1.0.1 - en-US
5 Open Boardmaker v5 and v6 files
29
6 Draw and Arrange Page Objects
Draw an object:
1. Select the tool for the object you want to draw. See section 3.2 Toolbar to learn about the object tools in the toolbar.
2. Move the cursor into the workspace where you want to place the object.
3. Click and drag diagonally. (To draw a perfectly square object hold down the Shift key while dragging.)
You can also add an object to a page by clicking on the tool, then dragging onto the page or by selecting
the tool and then clicking on the page.
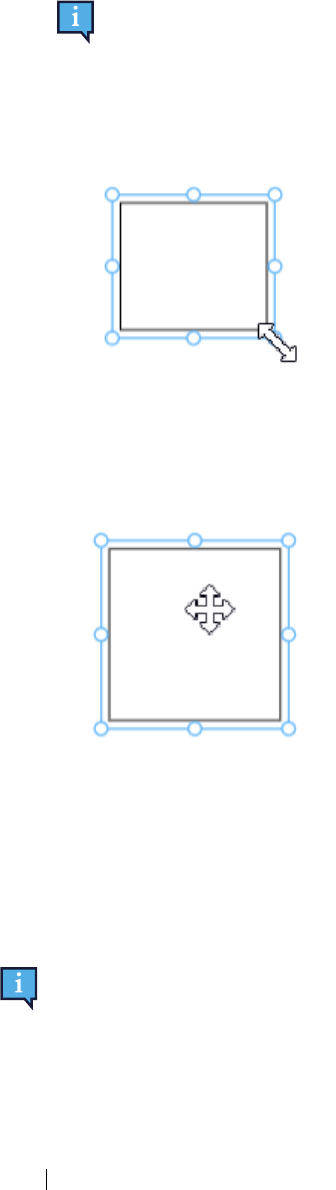
To re-size the object:
a. Select the object.
b. Move the cursor over one of the circles that appear on the edge or corner of the object (a double arrow will
appear).
c. Click and drag until the object is the desired size.
To move the object:
a. Select the object.
b. Drag it to any position in the workspace.
4. Use the Properties panel to customize the appearance, programming, and behavior of the object.
The options in the Properties panel vary depending on the type of object you have drawn. For information about the
Properties Panel, see section 3.5 Properties Panel.
6.1 Page Properties
The page itself is an object with its own properties. Experiment with different layouts, colors, and backgrounds to make
eye-catching activities!
For information about the Page Properties, see section 3.5 Properties Panel.
30
6 Draw and Arrange Page Objects
Boardmaker 7 Editor User’s manual v.1.0.1 - en-US

6.2 Create a Grid of Objects
You can create a grid of identical objects using the Spray tool.
1. Select the Spray tool in the toolbar.
2. Position the cursor over the object you would like to replicate.
3. Click and drag to create a line or grid of identical objects.
4. Release the selection when you have created the desired number of objects.
If you have assigned properties to the original object (symbol, style, actions, etc.), they will be copied to the other
objects in the grid.
6.3 Additional Editing Tools
The right click menu contains a wealth of tools to help you fine-tune the objects on the page.
Right click menu options vary depending on the object selected.
Right Click Menu Items
● Tools — Selection, spray, scan order, and page view tools:
– Selector Tool —
– Quick Selection Tool —
– Rectangular Spray — Spray copies of the selected object(s) in a rectangular grid layout.
– Circular Spray — Spray copies of the selected object(s) in a circular layout.
– Scan Order Tool — Use the Scan Order Tool to define the order in which objects are scanned. For more
information see section 11.7 Scan Order.
– Actual Size — Change the zoom to view the page at the actual dimensions.
– Fit to Screen — Change the zoom to fit the entire page within the window.
● Edit Actions — Edit actions for the currently selected object. For more information see section 14 Actions
● Select Contents — Select the contents of the currently selected object.
● Clear Contents — Clear all contents from the currently selected object.
● Select Parent — Select the parent object of the currently selected object.
● Undo — Undo the last edit.
● Redo — Redo the edit that was undone.
● Delete — Remove the selected object.
● Cut — Remove the selected object and store it in the clipboard to be pasted elsewhere.
● Copy — Copy the selected object to the clipboard.
● Paste — Paste the cut or copied object from the clipboard.
● Copy Style — Copy the shape, color, and border values
● Paste Style — Apply the copied style values to the selected object.
● Bring to Front — Bring the selected object in front of any overlapping objects.
● Send to Back — Send the selected object behind any overlapping objects.
● Lock — Lock the selected object to protect it from accidental edits.
● Align — To learn more about alignment see section
● Center — Center the object:
– Horizontal — Center the object on the horizontal axis.
– Vertical — Center the object on the vertical axis.
– Both — Center the object on both the vertical and horizontal axes.
● Size — Resize the object:
– Full Width — Resize the object to the maximum width possible on the page.
– Full Height — Resize the object to the maximum height possible on the page.
– Full Size — Resize the object to the maximum height and width possible on the page.
– To Grid — Resize the object to fit within the grid.
Boardmaker 7 Editor User’s manual v.1.0.1 - en-US
6 Draw and Arrange Page Objects
31

7 Buttons
Select the arrow beside the Button tool to create any of the following button types:
● Standard Button — these are the basic building blocks, capable of containing a symbol, a label, and actions.
● Group Button — can contain multiple symbols or other objects.
● Word Predictor Button — as the user types into the message window, the Word Predictor button anticipates the
user’s word choices.
● Target Button — a group button that has been pre-configured as a destination for a draggable button.
● Symbolate Button — the words on a Symbolate button are automatically symbolated. Symbolate button text is
entered in Edit mode and is read-only in Play and Preview modes.
For symbolated text that is editable in Play and Preview modes, use a symbolated Message Window.
● Hotspot — an invisible button that is usually placed over images or certain regions to make them interactive.
● Freeform Button — draw a button of any shape.
● Freeform Hotspot — draw a Hotspot of any shape.
7.1 Add a Symbol to a Button
Just type a label and choose a symbol — it’s that easy!
1. Draw a standard or freeform button in the workspace.
2. While the button is selected, type the desired label. The label appears on the button.
3. When you are finished typing the label, hit the Enter key on your keyboard.
The Add Symbol window opens.
Symbols matching the label text you have entered are displayed.
4. Select the desired symbol.
5. Select Select. The symbol and label appear on the button.
7.2 Standard Buttons
Standard buttons are the most commonly used objects in Boardmaker. Each standard button can hold a smartsym
(symbol and label) and can be customized extensively in terms of appearance and function using the Properties Panel and
actions.
7.2.1 Standard Button Properties
● Edit Symbol — See section 8.4 Edit Symbols.
● Edit Text — See section 13 Rich Text Editor.
For information about the rest of the Standard Button Properties, see section 3.5 Properties Panel.
32
7 Buttons
Boardmaker 7 Editor User’s manual v.1.0.1 - en-US

7.3 Group Buttons
A group button is a button into which you can place other objects - it acts as a container for other objects. You can place
multiple symbols (SmartSyms) in a group button, add a label (or labels), and arrange the objects in the group button in any
way you like.
Figure 7.1 Group button (grid layout) with two buttons, a label, and a SmartSym.
When objects are placed in a group button, they retain their original properties, so each object in the group button can be
resized or repositioned (or programmed) individually without affecting the properties of its “parent” - the group button.
Group buttons can also be used to create scanning groups and can be designated as “targets” so that other objects can be
dragged into them. See section 3.5 Properties Panel
7.3.1 Create a Group Button
1. Select the arrow beside the Button tool in the toolbar.
2. Select
Group.
3. Draw a group button anywhere on the page. See section 6 Draw and Arrange Page Objects.
You can also use the Type menu in the button Properties panel to transform an existing standard, symbolate, or
word predictor button into group button.
7.3.2 Add Symbols to a Group Button
Figure 7.2 Group Button - Multiple Symbols Selected
Boardmaker 7 Editor User’s manual v.1.0.1 - en-US
7 Buttons
33

1. Search for a symbol. See section 8.1 Browsing for Symbols.
2. Drag a symbol from the Symbols panel and drop it onto the group button.
3. Repeat steps 1 and 2 to add more symbols to the group button. (You can add as many symbols as you like.)
When you add a symbol to a button that already contains one or more symbols, you will be asked if you
want to add to or replace the existing symbol(s). Choose one of the following:
● Add To if you would like to keep the existing symbol(s) and also add the new symbol.
● Replace if you would like to replace the existing symbol(s) with the new symbol.
● Cancel to leave the button as it is, without adding the new symbol.
7.3.3 Add a Label to a Group Button
1. Draw a label in the group button. See section 6 Draw and Arrange Page Objects.
2. Enter and format the label text. See section 9 Labels.
7.3.4 Resize and Reposition Objects in a Group Button
You can manually reposition and resize objects inside a Group button the same way you would if they were on the page.
To resize multiple objects simultaneously, hold the Ctrl key and click each object to select. When the desired objects are
selected, resize any selected object to resize them all.
The default (Freeform) layout gives you full control to manually size and position the objects in the Group button
however you wish. Use the Layout drop-down menu in the Group button Properties to automatically organize the
contents of the group button in different ways. See section 3.5.4 Content.
Figure 7.3 Group Button Layout drop-down menu
7.3.5 Group Button Properties
For information about the Group Button Properties, see section 3.5 Properties Panel.
7.4 Symbolate Buttons
As you type in a Symbolate button, the symbol for the words you type appear automatically. The text in Symbolate buttons
is set in the Editor and is not editable in Play mode.
If you would like symbolated text that is editable in Play mode, create a Message Window and set Symbolate
Mode to On.
7.4.1 Draw a Symbolate Button
1. Select the Button drop-down menu in the toolbar.
2. Select
Symbolate.
3. Draw a Symbolate button anywhere on the page.
See section 6 Draw and Arrange Page Objects.
4. Select the Symbolate button.
5. Use the controls in the Button Properties panel to customize the Symbolate button.
34
7 Buttons
Boardmaker 7 Editor User’s manual v.1.0.1 - en-US

7.4.2 Symbolate Button Properties
Content Properties
● Margin — The amount of space, in pixels, to leave between text/symbols and the edge of the button.
● Symbolate — Choose the types of words to symbolate.
– All — Symbolate all words that have symbols.
– Nouns — Symbolate only nouns.
– Verbs — Symbolate only verbs.
– Adjectives — Symbolate only adjectives.
– Content Words — Symbolate only content words. Content words include nouns, verbs, adjectives, and some
common adverbs such as “quickly” and “slowly.”
– Words On List — Words from the word list you have selected are symbolated (see Word List property).
– Words Not On List — Symbolate all words that have symbols except the words from the word list (see Word
List property).
– Non Common Words — Symbolate only the words that are not on the list of common words. See Appendix B
Common Words.
● Symbol Location — Choose where the symbol displays in relation to the word with which it is paired.
● Symbol Height — Enter an integer between 10 and 100 to set the height of the symbols in pixels.
● All Same Width — When enabled, symbols display in a uniform width, so that words have equal spacing from
other words.
● Word List — This option is only available when the Symbolate property is set to Words On List or Words Not On
List. Select the Word List button to manually add words or upload a word list from a file.
For information about the Alignment, Type, Font, Background, Style, State, and Advanced Symbolate Button Properties,
see section 3.5 Properties Panel.
7.4.3 Change a Symbolate Symbol
Boardmaker 7 Editor uses predefined word/symbol pairings. Sometimes, the first symbol that appears may not be
appropriate for the context in which the symbol is being used. You can change the symbol for that instance of the word-
symbol pairing.
1. Right click on the symbol (not the word) that you want to change. The Add Symbol dialog opens.
2. Select the symbol that you would like to use.
3. Select Select. The symbol for that instance of the word is replaced with the symbol you chose.
7.5 Word Predictor Buttons
Word prediction can be very useful in helping users with the writing process. Boardmaker 7 Editor uses natural language
prediction, which examines the previous two words entered into the message window and then predicts the next word
based on words that would commonly follow the two words the user has entered.
As the user composes a message in the message window, the word prediction feature anticipates the user’s word choices
and displays various options in word predictor buttons. The user can then select a word predictor button, and the word on
the button is immediately sent to the message window.
The word prediction feature saves time and effort by freeing the user from having to type each letter of each word into the
message window.
7.5.1 Draw a Word Predictor Button
Typically, word predictor buttons are used in a row of four or five, located directly above, beneath, or to the side of a
message window. First, create the initial word predictor button and define its properties. Then, make as many copies of the
button as you like - the copies will have the same appearance and properties as the first button.
1. Select the arrow to the right of the Button tool in the toolbar.
2. Select Word Predictor.
3. Move the pointer into the area below or beside the message window where you want to place the first button. (You
don't have to be precise - you can move the button later.)
Boardmaker 7 Editor User’s manual v.1.0.1 - en-US
7 Buttons
35

4. Hold down the mouse button, and drag diagonally. (To draw a square button, hold down the Shift key while
dragging.)
5. Release the mouse button when the Word Predictor is the desired size and shape.
After you have created the initial word predictor button and set the properties, use the Spray tool to create
identical copies of the button.
7.5.2 Word Predictor Button Properties
For information about the Word Predictor Button Properties, see section 3.5 Properties Panel.
7.6 Target Buttons
A target button is a group button with the Is Target property preassigned. Target buttons allow the user to move other
objects on the page into the button in Preview and Play modes. You could, for example, design an activity in which the
user matches shapes or colors by dragging objects of a specific shape or color into a group button. Then you could
program the group button with actions to play a sound or speak a phrase when the user moves the object into the button
(trumpet - "That’s a square, good for you!" or "Sorry, try again.")
7.6.1 Draw a Target Button
1. Select the Button drop-down menu in the toolbar.
2. Select
Target.
3. Draw a Target button anywhere on the page.
See section 6 Draw and Arrange Page Objects.
4. Use the controls in the Button Properties panel to customize the Target button.
7.6.2 Target Button Properties
For information about the Target Button Properties, see section 3.5 Properties Panel.
7.7 Freeform Buttons
7.7.1 Draw a Freeform Button
1. Select the Button drop-down menu in the toolbar.
2. Select
Freeform Button.
3. Draw the desired Freeform button shape on the page:
● To draw a freehand button: Click and drag as desired to create the button shape. Release the mouse button to
finish the button. The button will automatically close off the shape with a straight line between the first and last
drawing points.
● To draw a polygonal button: Hold down the Ctrl key, and click to set the button corner. Continue holding down
the Ctrl key, and click again to set each corner of the polygon. Release the Ctrl key when the polygon is the
desired shape.
● To draw a freeform button with both straight and freehand sides: Hold down the Ctrl key, click and drag to draw
the first straight side of the polygon. Continue holding down the Ctrl key, and click again to set the next corner
of the polygon (if desired). Release the Ctrl key and drag around to complete the freeform portion of the button.
Release the mouse button when the button is the desired shape.
7.7.2 Freeform Button Properties
For information about the Freeform Button Properties, see section 3.5 Properties Panel.
36
7 Buttons
Boardmaker 7 Editor User’s manual v.1.0.1 - en-US

7.8 Hotspots
Use the Hotspot tool in the Button drop-down list to create a rectangular "hot spot." A hotspot can have actions assigned to
it, but it is invisible in Preview and Play modes. It has no borders, color, symbol, or other visible characteristics.
Hotspots are usually placed over images or scenes on a page. The hotspot can then be programmed so that when it is
selected, an action will be performed (for example, a sound plays, a message is spoken, or a page opens).
7.8.1 Draw Rectangular Hotspots
1. Select the arrow to the right of the Button tool in the toolbar, then select Hotspot .
2. Click and drag diagonally in the workspace. (To draw a square hotspot, hold down the Shift key while you are
dragging.
3. Release the mouse button when the new hotspot is the desired size and shape.
7.8.2 Draw Freeform Hotspots
1. Select the arrow to the right of the Button tool in the toolbar, then select Freeform Hotspot.
2. In the workspace, click, hold, and drag to create the hotspot in the shape you want.
3. Release the mouse button to automatically close off the hotspot with a straight line between the current mouse
position and the point where you started drawing the hotspot.
7.8.3 Hotspot Properties
For information about the Hotspot Properties, see section 3.5 Properties Panel.
7.9 Button Shapes
Standard, Group, Symbolate, and Word Predictor buttons can be created in a variety of shapes. There are two ways to
create different button shapes: the Shapes tool in the Toolbar and the Shape setting in the Button Properties panel.
7.9.1 Shapes Tool
1. Select the Shapes tool in the toolbar.
2. Select a shape.
3. Draw a button anywhere on the page.
See section 6 Draw and Arrange Page Objects.
4. Use the controls in the Button Properties panel to customize the button.
The default button type is Standard. You can change the button type to Group, Symbolate, or Word
Predictor using the Type menu in the Properties Panel.
7.9.2 Shape setting — Button Properties
1. Draw or select a Standard, Group, Symbolate, or Word Predictor button.
2. In the Properties Panel, scroll down to the Style section.
3. Select the Shape menu and choose a shape.
Boardmaker 7 Editor User’s manual v.1.0.1 - en-US
7 Buttons
37

8 Symbols
SmartSyms are symbol/label pairs that behave as a single object. You can place a SmartSym directly on a page, on an
object on a page, or use a SmartSym as the page background. SmartSyms can also be assigned actions.
8.1 Browsing for Symbols
Figure 8.1 Search for “bird” showing category folder and individual symbol results.
You can find symbols in either the Symbols panel or the Add Symbol window.
Browse in the Symbols panel:
1. Select the Symbols tab on the right side of the screen.
Browse in the Add Symbol window.
1. Select the page or an object that can contain a symbol (Standard Button, Group Button, etc).
2. In the Properties panel, select Add Symbol. The Add Symbol window will open.
You can also open the Add Symbol window through “edit in place” — select or create a blank button, type
a word and then hit the Enter key on your keyboard. The Add Symbol window will open and display
symbols related to the label.
8.1.1 Symbol Search Settings
Symbol Search Type
1. In the Symbols panel, select
Search Type.
2. Choose an option:
● Normal — search for the exact query that you type in the search field.
● Rhymes with — search for words that rhyme with your search query.
● Pattern — search for CVC, CCVC, or CVCC words.
38
8 Symbols
Boardmaker 7 Editor User’s manual v.1.0.1 - en-US

● Sounds like — search by sounds. Type a query (i.e. play), then choose which sounds within that query to
include in the search (i.e. p,l,e).
Symbol Search Filters
1. In the Symbols panel, select
Filters.
2. Select the Symbol Color menu options to choose to search for Color symbols or Black and White symbols.
3. Select the Search Language menu to set the language you would like to use to search for symbols.
4. Select Apply to use the filters you selected.
Select Reset Filters to restore the default filter settings.
Symbol Search Modifiers
● Begins With — return only results that begin with the query. For example, the query “dog” will return results that
include ”dogs” and “dog bed” but not “corn dog.”
● Anywhere — return results that contain the search query anywhere in the label. For example, the query “dog” will
return results that include “dog bed” and “hotdogger.”
● Whole Word — return only exact query matches. For example, the query “dog” will return only symbols with the
exact label, “dog” and not ”dogs” or dog bed.”
● Ends With — return only results that end with the query. For example, the query “dog” will return results that
include ”dog” and “prairie dog” but not “dog bed.”
8.2 Symbol Properties
● Maintain Aspect — When enabled, the symbol retains its original aspect ratio when it is resized.
● Selection Type — Choose the selectable area for the symbol.
– None — The symbol is not selectable in Preview and Play modes.
– Rectangle — Click anywhere within the bounding rectangle around the symbol to select it in Preview and Play
modes.
– Content — The user must click on the symbol or label text to select the symbol in Preview and Play modes.
For information about the other Symbol Properties, see section 3.5 Properties Panel.
8.3 Set the Symbol Label Language
Select a specific language for your symbol searches and for the label displayed with the symbols. You can use different
languages for your symbol searches and for the label text.
Changing the symbol language will not change the existing labels in your activities.
1. Select File Menu then choose User Settings.
The User Settings dialog will open.
2. Select Symbol & Language.
3. Select Language.
4. Select the desired language(s) in the Label Language and Search Language menus.
8.4 Edit Symbols
With Boardmaker 7 Editor, you can use the Symbol Editor to customize any symbol to suit your needs and preferences.
Boardmaker 7 Editor User’s manual v.1.0.1 - en-US
8 Symbols
39
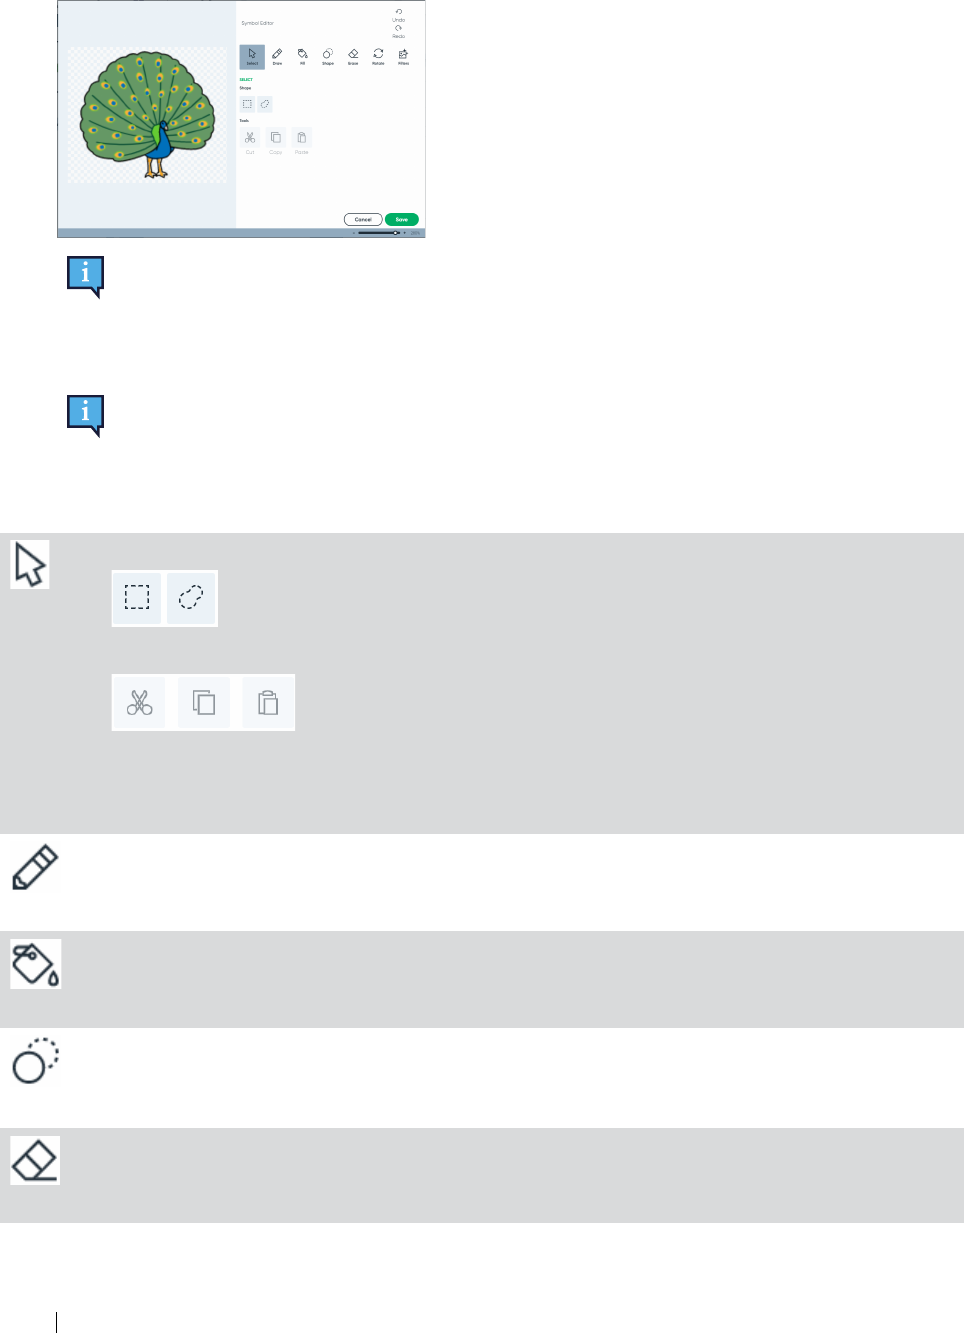
1. Right-click on the symbol you would like to customize, then choose Edit in Symbol Editor. The Symbol Editor
window will open.
The Symbol Editor is also accessible from the Properties Panel. Select a symbol on the page, then select
Edit Symbol in the Properties Panel.
2. Use the tools in the Symbol Editor toolbar to customize the symbol.
3. Select Save to apply the changes to the symbol or Cancel to discard the changes.
The changes made to a symbol in the Symbol Editor only apply to that instance of the symbol.
Table 8.1 Symbol Editor Tools
Tool Description
Select
Select an area of the symbol.
Use the Shape panel options to determine the shape of the area you are selecting.
Use the Cut tool to remove a selected area from the symbol and store it in the clipboard.
Use the Copy tool to copy the selected area to the clipboard.
Select Paste to paste from the clipboard.
Draw
Draw a freeform line on the symbol. Use the Brush and Color options to customize the width and color of
the line.
Fill
Select a color in the symbol and all pixels of the same color (within a bounded area) will be filled with a new
color. Select the Color option to customize the new color.
To fill every pixel of the same color in the symbol (ignoring bounded areas), select the Fill All check box.
Shape
Draw a shape. Use the Shape tool panel to select a specific shape and select Color to choose a color.
Erase
Select the Erase tool to erase some of the symbol. Use the Brush panel to select the size and shape of the
erase tool.
40
8 Symbols
Boardmaker 7 Editor User’s manual v.1.0.1 - en-US

Tool Description
Rotate
Change the orientation of the symbol: Flip Horizontal, Flip Vertical, Rotate Left, or Rotate Right.
Filters
Add color filters to the symbol: Inverse, Gray, Sepia, and Black & White.
Multiple filters can be used on the same image.
Undo
Undo the last change to the symbol. The Undo history clears when you select Save or Cancel.
Redo
Redo the last Undo. The Redo history clears when you select Save or Cancel.
Use the scale slider in the bottom right corner of the Symbol Editor window to zoom in on the symbol.
Boardmaker 7 Editor User’s manual v.1.0.1 - en-US
8 Symbols
41

9 Labels
Use the Label tool to place text anywhere on the page. You can use a Label to put a title on a page or object, to give
instructions, or write a description or story. You can assign actions to a label, symbolate the label text, and more!
If you place a label on any type of button, the label retains its own properties; it does not become a part of the
button.
9.1 Draw a Label
1. Select the Label tool in the toolbar.
2. Draw the label bounding box on the page.
For more information, see 6 Draw and Arrange Page Objects, page 30.
3. Type the desired label text.
4. Use the controls in the Label Properties panel to define the properties of the label.
9.2 Label Properties
● Symbolate Mode — Choose whether to symbolate the words in the label.
– Off — Do not symbolate words in the label.
– On — Symbolate words in the label.
– Defer — Follow the symbolate setting of the parent object.
● Auto Grow — Choose how the label text fits into the label bounding box.
– None — The bounding box does not expand automatically to accommodate the label text. Label text that does
not fit is cut off.
If Auto Grow is set to None, no visual indication will be provided if the text does not fit in the bounding
box and is therefore truncated.
– Width — The bounding box grows wider to accommodate the label text.
– Height — The bounding box grows taller to accommodate the label text.
– Both — The bounding box grows wider and taller to accommodate the label text.
Selection Type — Choose the selectable area for the label.
– None — The label is not selectable in Preview and Play modes.
– Rectangle — Click anywhere within the bounding rectangle around the label to select it in Preview and Play
modes.
– Content — The user must click on the label text to select the label in Preview and Play modes.
For information about the other Label Properties, see section 3.5 Properties Panel.
42
9 Labels
Boardmaker 7 Editor User’s manual v.1.0.1 - en-US

10 Lines
The Line Tool lets you draw freehand straight lines.
1. Select the
Line Tool in the Toolbar.
2. Click, hold, and drag to draw a line.
A line drawn starting on a button will cut off at the button border.
3. Use the controls in the Properties panel to customize the line.
10.1 Line Properties
For information about the Line Properties, see section 3.5 Properties Panel.
Boardmaker 7 Editor User’s manual v.1.0.1 - en-US
10 Lines
43

11 Advanced Objects
11.1 Message Windows
Message windows are primarily used to display or compose text. Buttons and other objects can be programmed with
actions that send text, symbols, and sound files to the Message Window or control its behavior.
11.1.1 Draw a Message Window
1. Select the Advanced tool in the toolbar.
2. Select
Message Window.
3. Draw a Message Window anywhere on the page.
You can draw more than one Message Window on a page.
4. Select the Message Window. The Message Window Properties panel opens.
5. Use the controls in the Message Windows Properties panel to define the Message Window.
11.1.2 Message Window Properties
● Symbolate Mode — Choose whether words in the Message Window display their associated symbol.
– Off — do not show symbols with words in the Message Window.
– On — show symbols with words in the Message Window.
– Defer — use the symbolate rule as defined by the User setting. See section 16 User Settings Message
Window Default Settings.
● Save in Play Mode — When enabled, the contents of the Message Window are stored when Boardmaker closes.
The next time the activity is opened, the contents of the Message Window are automatically restored.
● Response Type — Define the behavior of the Message Window when it is selected:
– Speak — the current Message Window text is spoken.
– Move Cursor — place the cursor in the selected place in the text.
– Speak Word — the selected word is spoken.
– Show Symbol — display the symbol for the currently selected word.
● Scroll Mode — Define how the Message Window scrolls text:
– Line-by-line — Scroll the Message Window text one line at a time.
– Page-by-page — Scroll the Message Window text by whole pages.
● Edit Mode(s) — Choose which software mode(s) permit text to be entered into the Message Window.
● Spell Mode — Set the spell check preference for the Message Window:
– None — spell check is disabled.
– Show — misspelled words are underlined in red.
– Show and Suggest — underline misspelled words and show suggested replacements. (In Design mode, right
click the misspelled word to see suggestions.)
● Keyboard Intent — Use a special on-screen keyboard when entering text in the message window.
– Text
– Rich Text
– Number
– Internet
– Phone
– Datetime
– None — Use the standard keyboard.
44
11 Advanced Objects
Boardmaker 7 Editor User’s manual v.1.0.1 - en-US

For information about the other Message Window Properties, see section 3.5 Properties Panel.
11.2 Videos
Adding a video to a page can make your activities more engaging for students.
11.2.1 Create a Video Object
1. Select the Advanced tool in the Toolbar.
2. Select
Video.
3. Use the Video Tool to draw a video object anywhere on the page.
For more information, see 6 Draw and Arrange Page Objects, page 30
Figure 11.1 Video Object
4. Select the video object. The Video Properties panel will open.
5. In the Properties panel, select Browse.
6. Select the video file that you would like to play in the Video object, then select Open.
7. Use the controls in the Video Properties panel to define the properties of the video.
11.2.2 Video Properties
● Touch Video — When enabled, the user can select the Video in play mode to toggle play or pause. When
disabled, the video must be triggered to play or pause by another object programmed with the appropriate action.
● Repeat Video — When enabled, the video repeats until it is stopped by an action or the page is closed.
● Show Controls — When enabled, video playback controls are displayed below the video.
For information about the other Video Properties, see section 3.5 Properties Panel.
11.3 Group Boxes
A group box acts as a container for groups of buttons, check boxes, radio buttons, or other objects. Objects in the group
box - either drawn in the box or moved into it - retain their individual properties, but will move as a unit when the group box
is moved. Group boxes can be designated as targets, and other objects can be moved into them - enabling you to create
challenging interactive activities.
One of the primary uses for group boxes is to create scanning groups - a collection of buttons (or other objects) can be
grouped together within the group box. When the user selects the group box, the scan pattern will work its way through all
the objects in it in the scan order you have designated.
11.3.1 Group Box Properties
For information about Group Box Properties, see section 3.5 Properties Panel.
11.4 Check Boxes and Radio Buttons
You can use radio buttons and check boxes to create checklists, question-and-answer activities, simple forms, and much
more. By default, each radio button or check box includes a frame in which a symbol will appear when it is selected. Radio
Boardmaker 7 Editor User’s manual v.1.0.1 - en-US
11 Advanced Objects
45

buttons and check boxes are drawn in exactly the same manner and share the same properties. The major difference
between them is that in each group of radio buttons, only one selection is allowed. That is, each time a radio button is
checked in one group (in a group button or group box or on a page) the other radio buttons will revert to an unchecked
state. Radio buttons are very useful for simple "yes/no" questions or for any activity (especially multiple choice activities) in
which there is only one correct answer.
Check boxes are each handled individually and do not affect other Check boxes. You should use Check boxes when
multiple selections are allowed, such as in a list.
11.4.1 Check Box and Radio Button Properties
● Type — Choose Check Box or Radio Button.
● Checked Symbol — Choose the symbol that appears inside the check box or radio button when it is checked.
● Unchecked Symbol — Choose the symbol that appears inside the check box or radio button when it is unchecked.
● Start Checked — When enabled, the check box or radio button is checked when the activity launches.
● Maintain Aspect — When enabled, the check box or radio button retains its original aspect ratio when it is resized.
● Show Frame — When enabled, the boundary around the check or radio button (not the text) is visible.
For information about other Check Box and Radio Button Properties, see section 3.5 Properties Panel.
11.5 Text Boxes
Text boxes are similar to message windows in that they display text messages entered by keyboard input in Preview and
Play modes. They differ from message windows, however, in that text boxes are used for short text entries - only one word
or line of text. Text boxes also differ from message windows in that they do not have symbolate properties.
11.5.1 Text Box Properties
● Is Password — When enabled, the text box will function as a password field.
● Keyboard Intent — Use a special on-screen keyboard when entering text in the message window.
– Text
– Rich Text
– Number
– Internet
– Phone
– Datetime
– None — Use the standard keyboard.
For information about other Text Box Properties, see section 3.5 Properties Panel.
11.6 Tab Control Objects
Use the Tab Control tool to create a new Tab Control on a page. Tab Controls are very similar to file folder tabs and enable
you to create multiple layers. You can place objects, such as symbols, buttons, or labels, in the tab pane for each tab in the
Tab Control, and you can choose a unique style for each tab - each tab can have a different layout, label, symbol, and
audio cue.
11.6.1 Tab Control Properties
● Add Tab — Create a new tab on the Tab Control.
● Delete Tab — Delete the currently selected tab on the Tab Control. There must be at least one tab on a Tab Control
at all times, so the last (only) tab cannot be deleted.
● Tab Width — Set the width (in pixels) of the tab(s) on the Tab Control.
● Tab Height — Set the height (in pixels) of the tab(s) on the Tab Control.
For information about other Tab Control Properties, see section 3.5 Properties Panel.
46
11 Advanced Objects
Boardmaker 7 Editor User’s manual v.1.0.1 - en-US

11.7 Scan Order
When Scanning is the chosen selection method, the software defaults to the Row/Column scanning order. The objects on
the page are scanned row-by-row, from left to right, and then from top to bottom. If you would like to scan objects in a
particular order on a page, use the Scan Order tool to specify the order in which the objects will scan.
1. Select the
Advanced tool in the Toolbar.
2. Select
Scan.
3. Click on the page objects in the order in which you would like them to be scanned.
Boardmaker 7 Editor User’s manual v.1.0.1 - en-US
11 Advanced Objects
47

12 Create PDF (Print)
1. Select Create PDF in the Toolbar. The Create PDF dialog opens.
2. Use the settings to customize your PDF creation. If you want to view your PDF right way, enable Open After
Creating.
3. Select Create. The file browser opens.
4. Navigate to the directory where you want to save your PDF, then select Choose. A PDF file of your activity is
created.
If you would like to print your activity on paper, open the PDF file in a PDF viewer such as Adobe Acrobat
and use the Print function in the PDF viewer to send the activity to your printer.
48
12 Create PDF (Print)
Boardmaker 7 Editor User’s manual v.1.0.1 - en-US

13 Rich Text Editor
Use the Rich Text Editor to add special formatting to the text you place on an object. To open the Rich Text Editor , select
the Edit Text button in the Content Properties group for an object that can contain text.
Figure 13.1 Rich Text Editor
Boardmaker 7 Editor User’s manual v.1.0.1 - en-US
13 Rich Text Editor
49

14 Actions
Actions are very simple commands that make your on-screen activities interactive. It is easy to program an object in
Boardmaker 7 Editor using actions. Just add one or more actions to an object using the Action Editor.
If you don’t feel comfortable working with the Action Editor, remember that interactive templates are pre-
programmed for you!
14.1 Add Actions to an Object
1. Select the object (or the page itself) to which you want to add actions. The Properties panel for that object opens.
2. Select the Actions button in the Advanced section of the Properties panel. The Action Editor opens, displaying any
actions that are currently assigned to the object.
You can also double-click the object to open the Action Editor.
3. Select +Add Action. You can:
● Search for an action. See section 14.4 Searching for Actions.
● Browse using the Action Category List. See section 14.3 Action Categories.
Select an action to assign it to the object.
If the action you have selected needs further information - for example, the name of a page to open or
sound to play - a menu or dialog will open. You must select or enter the required information to complete
the action.
4. Select Save & Close.
14.2 Action Editor
Use the Action Editor to assign actions to an object or page, or to edit actions already assigned.
To access the Action Editor:
● Select the Actions button in the Properties panel of any programmable object or
50
14 Actions
Boardmaker 7 Editor User’s manual v.1.0.1 - en-US

● Double-click directly on an object.
Figure 14.1 Actions Editor
Name Description
1 Assigned Actions List Displays all the actions assigned to the current object. (Actions are performed in the
sequence in which they are listed.)
2 Move Click and drag to move the action up or down in the list.
3 Delete Remove the action from the object.
Boardmaker 7 Editor User’s manual v.1.0.1 - en-US
14 Actions
51

Name Description
4 System Event A System Event is an occurrence that triggers the assigned actions to run. Select an
event to which you want to add actions (such as “Selected” or “PageOpen”). You can
have several event types, each with different actions, for an object.
5 Add Action Open the Add Action window to search or browse for actions to add to the object.
Figure 14.2 Add Action
Name Description
1 Go Back Return to the Actions Editor.
2 Search text box Enter your search criteria. Hit the Enter key on the keyboard to perform your search.
3 Category list List of action categories, arranged by category group.
4 Actions Actions in the currently selected category. Select an action to assign it to the object.
5 Favorite Select the star beside any action to add it to the Favorites category.
14.3 Action Categories
You can browse for actions using the category list on the left side of the Add Action window.
Select an action category to view all of the actions in that category - including a brief description of each action. Select an
action to add it to the action script for the object or page you are programming.
Select the star beside any action to add it to the Favorites category.
52
14 Actions
Boardmaker 7 Editor User’s manual v.1.0.1 - en-US

14.4 Searching for Actions
Use the Search Actions text field to search for actions by keyword.
1. In the Action Editor, type a key word into the Search Actions text box.
2. Hit the Enter key on the keyboard to display the search results.
3. Select an action in the search results to assign it to the object you are programming.
Select the star beside any action to add it to the Favorites category.
To view the complete list of available actions, see Appendix A Actions.
Boardmaker 7 Editor User’s manual v.1.0.1 - en-US
14 Actions
53

15 Activity Properties
To set the properties for the template, open the File menu and choose Activity Properties:
● Name — This field displays the file name of the activity. You cannot edit the name in this field. If you want to
rename the activity, then save the activity with a different file name.
● Author — If necessary, enter your name. This field is optional, but if you plan on sharing with other users or using
other users activities, then you might want to add your name so that you can identify your activities in the future.
● Description — Enter a description for the activity. If you plan on sharing the activity with other users, then make
sure to include a description of what the activity does.
● Tags — Enter one or more search tags to help you or other Boardmaker users find the activity in a search.
Separate multiple tags with a comma (,). For example, if the template is for a book about common school activities,
then you could enter the following tags: book,school,math.
Search tags make it easier for you and other Boardmaker users to find activities. When searching for on
myBoardmaker.com, the search will return all templates that have tags that closely match the search criteria.
When choosing tags for the activity, try to include tags that describe the scenario or type of activity in which a user
would want to use the activity.
When entering a tag, you can use letters, numbers, and underscores (_). You can’t use spaces or
punctuation.
● Version — (Optional) Enter a version number for the activity.
● Content Type — Define whether it is an Onscreen or Print activity.
● Thumbnail — Choose the thumbnail image for the activity. Select Change to browse to an image on your
computer. To use the default thumbnail, select Reset.
54
15 Activity Properties
Boardmaker 7 Editor User’s manual v.1.0.1 - en-US

16 User Settings
To edit User Settings, select the File Menu and choose User Settings.
General
● On Startup — Set the mode or Activity to open when Boardmaker starts up (Dashboard or Last Project).
● Sound — Set the device to use for audio input.
Interface
● Display Units — Choose the units to display on the ruler in the workspace.
● Grid — When enabled, a grid is displayed in the workspace in Edit mode.
● Snap to Grid — When enabled, objects snap to the nearest position in the grid.
● Grid Spacing — Define the size of the page grid.
● Spray Spacing — Define the default spacing between objects when using the Spray tool.
● Ruler — When enabled, a ruler is displayed on the edges of the workspace in the editor.
Play Mode
● Access Method — Choose the Access Method to use in Play mode. See section 17 Access Methods for
descriptions and setting details.
● Audio Cue — When enabled, audio cues play (for objects that have them) when the object is highlighted.
● Stop Button Display — Choose when to display the Stop button in Play mode (Accessible i.e. when using an
access method other than simple touch, Always, or never).
● Message Window Default Settings — Note that some of these settings can be overridden on individual Message
Window objects by adjusting the object properties.
– Auto-Capitalize — Automatically capitalize the first word in the message window and the first word in each
sentence.
– Auto-Space — Automatically insert a space between each word in the message window.
– Use Symbols — Symbolate words in the message window.
– Speak on Entry — When text is entered into the message window it is also spoken.
– Clear after Speech — After speaking the message window, clear the contents of the message window.
– Thick Cursor — Make the message window cursor wider, so it is easier to see.
– Print Orientation — Set the default orientation when printing.
– Print Margins — Set the default page margins when printing.
● Hover State — When enabled, selectable objects highlight when the cursor moves over them. (Hover state
highlight only appears in Play and Preview modes.)
Text to Speech
● Voice — The voice to use for text to speech.
● Voice Rate — The speed at which text is spoken. This may need to be adjusted if you change the Voice setting.
● Highlight Type — Choose the way in which text and symbols are highlighted when text is spoken. To disable
highlight, select None.
● Highlight Style — Choose the highlight style and color.
Symbol & Language
● Symbol Management — Choose the Symbol Libraries to use with Boardmaker 7.
● Symbol Search Ordering — Prioritize symbols so that the symbols you prefer come up first in symbol search.
– Presentation Order — Select a symbol set, then use the Up and Down buttons to move it up or down in the
list. The symbol sets near the top will appear first in symbol search results.
– Form — The preferred depiction style of humans in symbols.
– Gender — The preferred gender of humans in symbols.
– Skin Color — The preferred skin tone of humans in symbols.
– Age — The preferred age of humans in symbols.
– Symbol Color — Choose the default symbol color settings: color or black & white symbols. This setting can be
overridden in the Symbols panel Filters.
Boardmaker 7 Editor User’s manual v.1.0.1 - en-US
16 User Settings
55

● Content Filtering — Choose to Show all symbols (no content filtering), Hide Explicit Symbols (the symbol art is
explicit i.e. clearly and precisely drawn), or Hide symbols of mature words (symbols related to mature themes).
● Language — Set the default Label Language and Search Language. The Search Language setting can be
overridden in the Symbols panel Filters.
56
16 User Settings
Boardmaker 7 Editor User’s manual v.1.0.1 - en-US

17 Access Methods
17.1 Simple Touch
This is the default setting for the software. The object is immediately selected when you click it.
17.2 Touch Enter
Touch Enter works similarly to Simple Touch, in that you click to select. Touch Enter has the benefit of allowing you to
adjust the hold and release times to prevent accidental selections for motor movement support.
This is a good access method for a student who is able to use a mouse, but may have impaired motor skills that cause
reduced accuracy.
Touch Enter Settings
● Hold Time — To prevent making unintended selections, you click an object and hold down the mouse button for a
specified period of time (hold time) to select the object. Hold Time is the length of time that you must maintain
contact with a screen object (hold down the mouse button) before the object is selected.
● Release Time — Release time is the window of time after a screen object is selected during which the software will
not accept a new selection. This can help prevent accidental selections. The release time countdown starts when
the mouse button is released. If another object is selected before the release time window closes, the clock will
start over
17.3 Touch Exit
You click an object, hold down the mouse button for a specified period of time (hold time), and then release the mouse
button. The object is selected when the mouse button is released. You may also adjust the release time for this access
method.
This is a good access method for a student whose motor skills are impaired.
Touch Exit Settings
● Hold Time — To prevent making unintended selections, you click an object and hold down the mouse button for a
specified period of time (hold time) to select the object. Hold Time is the length of time that you must maintain
contact with a screen object (hold down the mouse button) before the object is selected.
● Release Time — Release time is the window of time after a screen object is selected during which the software will
not accept a new selection. This can help prevent accidental selections. The release time countdown starts when
the mouse button is released. If another object is selected before the release time window closes, the clock will
start over.
● Highlighting — Choose the style and color for the highlight that shows when an object is selected.
17.4 Scanning
If your motor skills prevent you from using one of the touch selection methods, Scanning is the ideal selection method.
When Scanning is active, the objects on the screen will be highlighted in a specific pattern.
Scan Type
● 1 Switch Autoscan — The software automatically scans the page at the speed and using the scan pattern you
have selected.
● 2 Switch scanning — One switch (a keyboard key or mouse button) is used to advance the scan highlight, and a
second switch (keyboard key or mouse button) is used to make selections.
Switch Input
● The switch is the way that the user will make selections. You will set one switch input for 1 Switch Autoscan Scan
Type. The 2 Switch Scan Type requires you to define two different switch inputs.
Boardmaker 7 Editor User’s manual v.1.0.1 - en-US
17 Access Methods
57

Other Scanning Settings
● Speed — the speed at which the scan highlight will move through the objects on the page (Autoscan only).
● Transition Time — the pause time between levels in
the scan pattern (Autoscan only).
● Hold Time — To prevent making unintended selections, you click an object and hold down the mouse button for a
specified period of time (hold time) to select the object. Hold Time is the length of time that you must maintain
contact with a screen object (hold down the mouse button) before the object is selected.
● Enable Back — When enabled, the Back button appears and is accessible using scanning.
● Enable Reset — When enabled, the Reset button appears and is accessible using scanning.
● Scan Back/Reset First — When enabled, the scan pattern always starts with the Back and/or Reset button(s).
● Scan Pattern — the order in which objects will be scanned – either by rows, by columns, or linearly (starting in the
top left corner, moving to the right, and then down).
● Number of Passes — Set how many times to scan a row or column without a selection being made.
● Then — Choose what happens when autoscan has completed the designated number of passes (not applicable to
infinite passes).
● Highlighting — Choose the style and color for the highlight that shows when an object is selected.
● Zoom — When enabled, screen objects zoom as they are scanned. When scanning multiple objects (rows or
columns), the object that is first in the pattern is zoomed and the other objects are highlighted as specified by the
Highlight Style setting.
17.5 Mouse Pause
Select an object by moving the cursor over the object and pausing for a set period of time. When the allotted time has
passed, and the cursor remains paused on the object, the object is selected. This is a good access method option if you
can maneuver a mouse but have difficulty pressing down on the mouse button to make a selection.
Mouse Pause Settings
● Highlighting — Choose the style and color for the highlight that shows when an object is selected.
17.6 Gaze Interaction
Move the cursor using your eyes. Selections are made by gazing at an object for a set amount of time (Dwell) or by
activating a switch.
This access method requires compatible gaze interaction hardware.
Gaze Interaction — Dwell Settings
● Dwell time — set the amount of time that the gaze must remain on an object in order to select it.
● Feedback Type — Gaze Feedback is a visual cue that shows the user where their gaze is registering on the
screen, how consistently, and for how long.
Set the style, color, and size of your Gaze Feedback.
Gaze Interaction — Switch Settings
● Switch Wait Time — the amount of time the user must wait between switch activations. Before this time is met,
any additional switch activations are ignored.
● Feedback Type — Gaze Feedback is a visual cue that shows the user where their gaze is registering on the
screen, how consistently, and for how long.
Set the style, color, and size of your Gaze Feedback.
58
17 Access Methods
Boardmaker 7 Editor User’s manual v.1.0.1 - en-US

Appendix A Actions
Actions can be found by browsing the action categories on the left side of the Add Action dialog or by keyword query in the
action search field. For detailed instructions see section 14 Actions.
Action Description
BackPage() Display the previous page in the page history.
ClearMessagewindow() Clear the contents of the message window.
DesymbolateAll(object) Remove all symbols from symbolated text in the designated screen object.
Disable(object) Disable the designated screen object.
Enable(object) Enable the designated screen object.
ExitApplication() Exit the current application and return to where you came from.
Hide(object) Hide the designated screen object.
InsertLabel() Insert the label text from the object containing this action into the message
window.
InsertLabel(object) Insert the label text from the designated object into the message window.
InsertSymbol() Insert the symbol from the object containing this action into the message window.
InsertSymbol(object) Insert the symbol from the designated object into the message window.
InsertText(text) Insert the designated text into the message window.
LaunchApplication
(applicationName)
Launch an external application.
LaunchFile(fileName) Launch a file using the associated application.
LaunchWebSite(webAddress) Launch the designated website using the default web browser.
LoadTextAndSymbolate() Prompt for a text file, then insert and symbolate the text from the file in the
message window at the current cursor position.
NextPage() Go to the next page in the current activity.
OpenVideoPlayer(videoID) Open the video player containing the designated video file.
PauseVideo(object) Pause the current video in the designated video object.
PictureSound(SoundID) Insert this object’s label and symbol into the message window, but play the
designated sound file instead of speaking the label.
PictureSpeech(speechText) Insert this object’s label and symbol into the message window, but speak the
specified text instead of speaking the label.
PlayRecording(name) Play the designated recorded sound.
PlaySound(soundId) Play the designated sound.
PlayVideo(object) Play the currently loaded video in the specified video object.
PopupVideo(videoID) Play the specified video in a full screen popup. The popup closes automatically
when the video ends.
PopupVideo(videoID, margin) Play the specified video in a popup. Specify the margin, in pixels, surrounding the
video popup from full screen. The popup closes automatically when the video
ends.
PreviousPage() Open the previous page in the current activity.
Print() Print the current activity.
PrintMessageWindow() Print the contents of the current message window.
ReadAndHighlight(object) Speak and highlight the text in the designated object.
Boardmaker 7 Editor User’s manual v.1.0.1 - en-US
Appendix A Actions
59

Action Description
RecordSound(name, seconds) Record sound from the system microphone using the record dialog in the center
of the screen. Specify the name of the recording file and the maximum number of
seconds to record.
SetHidden(object, value) Set the hidden/visible state of the designated screen object.
To hide the object, set value = TRUE. To make the object visible, set value =
FALSE.
SetObjectProp(object,
propertyName, value)
Set a named custom property for the designated screen object. Screen objects
can store any number of custom properties, accessible by a text name.
propertyName = name of the custom property
value = value for the custom property
SetText(object, text) Set the text in the designated screen object.
SetVolume(object, value) Set the volume (0–100) of the designated video object.
Show(object) Make visible the designated screen object.
ShowSymbolWindow() Show the zoomed symbol window for the word at the current message window
cursor position.
Sleep(seconds) Pause for the designated number of seconds before performing the next action.
Speak() Speak the contents of the current message window.
Speak(contentType) Speak the specified type of text in the current message window.
ContentType = “All”, “Selection”, “Word”, “Sentence”, or “Paragraph”
SpeakLabel() Speak the label of the current object.
SpeakLabel(object) Speak the label of the designated object.
SpeakLabel(object, wait) Speak the label of the designated object, then wait for the specified number of
seconds before performing the next action.
SpeakText(text) Speak the specified text.
SpeakText(text, wait) Speak the indicated text, then wait for the specified number of seconds before
performing the next action.
StopAllSound() Stop all sound currently playing.
StopVideo(object) Stop the video on the designated video object.
SymbolateAll(object) Symbolate all text in the designated object.
ToggleMute(object) Toggle mute on/off on the designated video object.
ToggleRepeat(object) Toggle repeat play on/off on the designated video object.
variable [ = value ] Create a variable assignment statement.
variable = unique variable name
value = value to assign to the named variable
60
Appendix A Actions
Boardmaker 7 Editor User’s manual v.1.0.1 - en-US

Appendix B
Common Words
"Common words" are words that are widely used in normal conversation. When defining the symbolate properties of a
message window, label, or symbolate button, you have the option of symbolating "common words" or "non-common
words."
Table B.1 Common Words
a
call funny just only
stop
why
about
came gave
keep
open
take will
after
can
get kind
or
tell wish
again
carry
give know
our
ten
with
all clean
go
laugh
out
then work
always cold
goes
let
over
there would
am come
going light
own
these write
an
could good like pick they
and cut got little play think
any
did
green
live please those
are
do
grow
long pretty three
around does had look pull to
as
done has made
put
today
ask don’t have make
ran
together
at
down he
many
read
too
ate
draw help
may
red
try
away
drink her
me
ride two
be
eat
here much right under
because eight him
must
see up
been
every
his
my seven upon
before fall hold myself shall
us
best far hot
never
she
use
better fast how
new
show wash
big find hurt
no
sing
we
black first I not sit well
blue five if
now
six
went
both fly in of sleep
were
bring for into off small what
brown found is old
so
when
but four it
on some
where
buy from its
once soon
which
by full jump
one
start
who
Boardmaker 7 Editor User’s manual v.1.0.1 - en-US
Appendix B Common Words
61

Boardmaker 7 Editor User’s manual v.1.0.1 - en-US
Support for Your Tobii Dynavox Device
Get Help Online
See the product-specific Support page for your Tobii Dynavox device. It contains up-to-date information about issues and tips & tricks related to the product. Find our Support pages
online at: www.TobiiDynavox.com/support-training
Contact Your Solution Consultant or Reseller
For questions or problems with your product, contact your Tobii Dynavox solution consultant or authorized reseller for assistance. They are most familiar with your personal setup and
can best help you with tips and product training. For contact details, visit www.TobiiDynavox.com/contact
Copyright ©Tobii AB (publ). Not all products and services offered in each local market. Specifications are subject to change without prior notice. All trademarks are the property of their respective owners.
