
Hand Sew a
Knit Garment
with Tina Bury

2
Hand Sewing Knit Garments
Kinship Handwork ~ all rights reserved. not for resale or prot
Materials Needed
Button Craft Thread
Made with a polyester core and polished cotton exterior allowing it to more easily
glide through fabric. It is the strongest thread and when hand-sewing a knit
garment, we want strong thread to keep our garments together.
Knit fabrics stretch and put a good deal of stress on the seams. Sewing machine
thread is too thin for hand sewing knit fabrics.
Embroidery oss is okay used to embellish your shirt, but not for construction.
Word of caution: thread weakens as it ages, vintage thread is never a good idea in
a garment or sewing project that will get use.
Needles
I like to use a Sharps #7 or 9 or a Milliners #7 or 9
Really it’s all personal preference and as along as your needle is thick enough to
accommodate button craft thread and thin enough to not leave visible holes in your
fabric and to move through the fabric with little effort, use what you prefer.
Fabric
Any knit fabric with enough stretch to accomodate your pattern and some amount
of structure will work. I nd that rayon and rayon or bamboo blended fabric are so
drapey that they aren’t as suited to hand sewing.
Fold-over elastic and/or knit binding to nish your edges
Depending on what pattern you choose to use, you will want a binding to nish off
the edge of the neckhole or fold-over elastic for a skirt.
You can choose between a variety of widths when it comes to fold-over elastic, 1/2”
- 5/8” (1.3 - 1.8 cm) are good starting points. For a neck binding, cut a strip of
knit fabric along the cross grain 1- 1 1/4” (2.5 - 4 cm) wide by the length of your
opening.
When converting a knit garment sewing pattern to be sewn by
hand...
• reduce all of the main seam allowances to 1/4” (.6 cm)
• remove the waist facing or neck seam allowance when using fold over elastic
or
binding your opening with a knit band, as applicable
• if leaving the hems /sleeves raw, remove the hem/sleeve allowance

3
Hand Sewing Knit Garments
Kinship Handwork ~ all rights reserved. not for resale or prot
Stitching
Rules of Thumb
Use a length of thread that, when held double, measure from your ngertips to
your elbow. Any longer and the thread is likely to tangle and cause all sorts of
havoc and irritation.
Once on the needle, run your thread through your ngers 5 or 6 times. This
works out the twists and puts a bit of natural oils from your hands on the
thread. It also encourages your threads to work together as you sew.
Sending some positive thoughts into the thread may help too!
Use a double knot on your thread to begin and end your stitches. (you need
around 3 inches of thread left in order to double knot your stitches at the end.)
Leave a 3/8-1/2” tail on your thread (any shorter and your stitches may come
undone over time)
Your stitches should be between 1/8” and 1/4” long. Smaller and they are
prone to pulling through the knit fabric, any larger and they can snag during
everyday use.
Stitches
We will construct the side seams and shoulder seams (if applicable) using a
running stitch. Running stitches, back stitches and blanket stitches don’t stretch
and should be used only on seams that do not encircle a body part, like the neck
opening or waist.
Running Stitch
A simple straight stitch where you either stab your needle up from the back of the
fabric and return down through the fabric an equal distance away (known as stab
stitching) or build your stitches up on your needle and pull the needle through
after you have several on the needle.
A short running stitch between 1/8-1/4” per stitch is what we are looking for. A
long running stitch is a basting stitch used to temporarily hold your fabric together.
4
Hand Sewing Knit Garments
Kinship Handwork ~ all rights reserved. not for resale or prot
Use a stretch stitch on all seams/stitching on the circumference of the garment or any
seams that need to be able to stretch. (hem, sleeve nish, neck band, waist) These
seams need to stretch and move with body and thus need a stitch that allows that to happen.
Stretch Stitches
(any stitch that is formed with a back and forth motion and stretches when pulled along the
seam of a knit fabric) Test your stitch on your fabric to ensure it stretches.
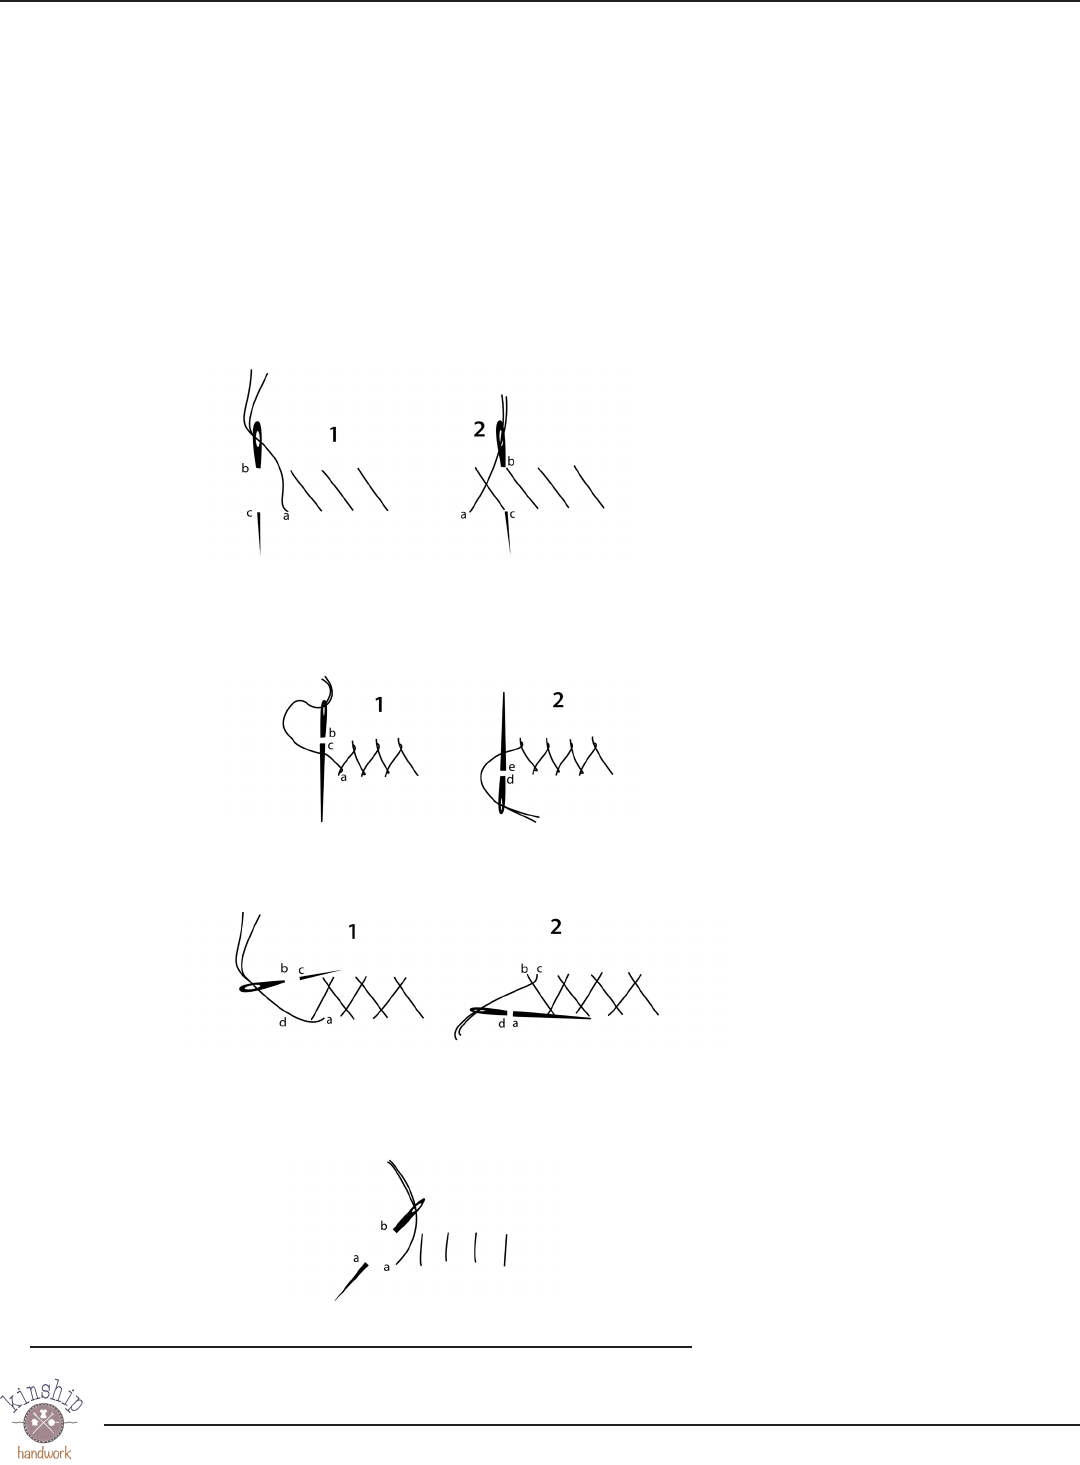
Cross Stitch: 1. Bring the needle up at a, down at b and back up at c
Form all of these slanted parellel stitches and then come back and do the cross stitch
2. Moving in the opposite direction, Come up at a, down at be and back up at c, crossing the
stitch you previously made. (this is but one way to do the cross stitch)
Cretin Stitch: 1. Bring the needle up at a, down at b and back up at c , keeping the thread
under the needle 2. Down at d and back up at e,. keeping the thread under the needle...
begining again
Herringbone Stitch: 1. Bring the needle up at a, down at b and back up at c
2. Down at d and back up at the next a...beginning again
Parallel Stitch: Bring the needle up at a, down at b and when it comes back up it will be at a
again.
Additional stretch stitches mentioned in how to video...
snail trail, rosebud, chevron, feather stitch

5
Hand Sewing Knit Garments
Kinship Handwork ~ all rights reserved. not for resale or prot
Constructing Your Knit Garment
Before you begin sewing your garment, you’ll have several design elements to consider.
Like...
• Do you want the seam allowance to be on the right or wrong side of the garment?
• Do you want to fell the seams to one side (keep the seam allowance together and top
stitch them down), with the seam allowance either on the inside or outside?
• Do you want to open the seam allowance up and stitch each side down separately?
• Would you rather keep it simple and simply sew the seam allowance only, letting the
allowance oat free?
• What stitches do you want to use to nish your seams - your side seams and your cir-
cumference seams?
Order of Basic Construction for Most Garments and Stitches to Use
1. Shoulder Seams - Sew your shoulder seams (if applicable) using a running
stitch and then fell the seams towards the back of the bodice and top
stitch the seams down using a running stitch. (When machine sewing, I
use elastic in the shoulder seam to give the shoulder seam support, but I
nd I don’t need to when I sew it like this.)
2. Sleeves - Insert your sleeves using a running stitch (if your armhole is snug, you
might want to increase it’s size a bit as the running stitch doesn’t
stretch) If you choose to top stitch your sleeve seam, use a run-
ning stitch with the seam allowances folded towards the bodice.
3. Side Seams - Stitch your side seams using a running a stitch. If
sewing a top/dress, stitch from the sleeve hem all the way to
the garment hem. Top stitch if desired, with seam allowances
pressed towards the back.

6
Hand Sewing Knit Garments
Kinship Handwork ~ all rights reserved. not for resale or prot
4. Waist of Dress - If sewing a dress with seperate bodice
and skirt pieces, sew the bodice to the skirt using a stretch
stitch of your choice.
5. Finishing the Neck - Attach the neck binding, if applicable,
by ironing the binding (1-1 1/4 inches wide by the length
of the opening) in half lengthwise and enclosing the neck
edge with the binding. Stitch down with the stretch stitch
of your choice...applying a slight bit of tension to the bind-
ing as you go.
6. Attaching Fold-over Elastic to a Skirt -
Attach the fold-over elastic to the skirt waist. Begin at
the back and enclose the waist edge inside the fold-over
elastic. Sew the fold-over elastic with the stretch stitch of
your choice. Apply a bit of tension on the elastic as you
sew it. Overlap the edges of the fold-over elastic and sew
down.
7. Hem - leave the sleeve and garment hems raw, or un-
stitched, if desired.
Otherwise, you can fold the hem allowance up towards the wrong side and
stitch them down with the stretch stitch of your choice or creatively nish
them with a binding much like the neck binding. *note - I nd that you need
at least a 1” hem allowance when folding it up and stitching it down to keep
the edge from rolling.
