
Developer Guide
Amazon Keyspaces (for Apache Cassandra)
Copyright © 2024 Amazon Web Services, Inc. and/or its affiliates. All rights reserved.

Amazon Keyspaces (for Apache Cassandra) Developer Guide
Amazon Keyspaces (for Apache Cassandra): Developer Guide
Copyright © 2024 Amazon Web Services, Inc. and/or its affiliates. All rights reserved.
Amazon's trademarks and trade dress may not be used in connection with any product or service
that is not Amazon's, in any manner that is likely to cause confusion among customers, or in any
manner that disparages or discredits Amazon. All other trademarks not owned by Amazon are
the property of their respective owners, who may or may not be affiliated with, connected to, or
sponsored by Amazon.

Amazon Keyspaces (for Apache Cassandra) Developer Guide
Table of Contents
What is Amazon Keyspaces? ........................................................................................................... 1
How it works ................................................................................................................................................. 1
High-level architecture ........................................................................................................................... 2
Cassandra data model ............................................................................................................................ 4
Accessing Amazon Keyspaces ............................................................................................................... 5
Use cases ........................................................................................................................................................ 6
What is CQL? ................................................................................................................................................. 7
Compare Amazon Keyspaces with Cassandra ................................................................................ 9
Functional differences with Apache Cassandra .................................................................................... 10
Apache Cassandra APIs, operations, and data types ..................................................................... 11
Asynchronous creation and deletion of keyspaces and tables .................................................... 11
Authentication and authorization ..................................................................................................... 11
Batch ........................................................................................................................................................ 11
Cluster configuration ............................................................................................................................ 11
Connections ............................................................................................................................................ 11
IN keyword ............................................................................................................................................ 12
CQL query throughput tuning ........................................................................................................... 12
FROZEN collections ............................................................................................................................... 13
Lightweight transactions ..................................................................................................................... 13
Load balancing ...................................................................................................................................... 14
Pagination ............................................................................................................................................... 14
Partitioners ............................................................................................................................................. 14
Prepared statements ............................................................................................................................ 14
Range delete .......................................................................................................................................... 15
System tables ........................................................................................................................................ 15
Timestamps ............................................................................................................................................ 15
Supported Cassandra APIs, operations, functions, and data types .................................................. 16
Cassandra API support ......................................................................................................................... 16
Cassandra control plane API support ............................................................................................... 18
Cassandra data plane API support .................................................................................................... 18
Cassandra function support ............................................................................................................... 19
Cassandra data type support ............................................................................................................. 19
Supported Cassandra consistency levels ............................................................................................... 21
Write consistency levels ...................................................................................................................... 21
iii

Amazon Keyspaces (for Apache Cassandra) Developer Guide
Read consistency levels ....................................................................................................................... 22
Unsupported consistency levels ........................................................................................................ 23
Migrating to Amazon Keyspaces .................................................................................................. 24
Migrating from Cassandra ........................................................................................................................ 25
Compatibility .......................................................................................................................................... 26
Estimate pricing .................................................................................................................................... 26
Migration strategy ................................................................................................................................ 35
Online migration ................................................................................................................................... 36
Offline migration .................................................................................................................................. 47
Hybrid migration ................................................................................................................................... 49
Migration tools ........................................................................................................................................... 52
Loading data using cqlsh .................................................................................................................... 54
Loading data using DSBulk ................................................................................................................. 66
Accessing Amazon Keyspaces ....................................................................................................... 79
Setting up AWS Identity and Access Management ............................................................................. 79
Sign up for an AWS account .............................................................................................................. 79
Create a user with administrative access ......................................................................................... 79
Setting up Amazon Keyspaces ................................................................................................................ 81
Using the console ....................................................................................................................................... 82
Using AWS CloudShell .............................................................................................................................. 82
Obtaining IAM permissions for AWS CloudShell ............................................................................ 83
Interacting with Amazon Keyspaces using AWS CloudShell ........................................................ 84
Create programmatic access credentials ............................................................................................... 85
Create service-specific credentials .................................................................................................... 86
Create IAM credentials for AWS authentication ............................................................................. 88
Service endpoints ....................................................................................................................................... 96
Ports and protocols .............................................................................................................................. 96
Global endpoints ................................................................................................................................... 97
AWS GovCloud (US) Region FIPS endpoints ................................................................................... 99
China Regions endpoints .................................................................................................................. 100
Using cqlsh ............................................................................................................................................. 100
Using the cqlsh-expansion ......................................................................................................... 101
How to manually configure cqlsh connections for TLS ........................................................... 106
Using the AWS CLI .................................................................................................................................. 107
Downloading and Configuring the AWS CLI ................................................................................. 108
Using the AWS CLI with Amazon Keyspaces ................................................................................. 108
iv

Amazon Keyspaces (for Apache Cassandra) Developer Guide
Using the API ............................................................................................................................................ 112
Using a Cassandra client driver ............................................................................................................ 112
Using a Cassandra Java client driver .............................................................................................. 113
Using a Cassandra Python client driver ......................................................................................... 126
Using a Cassandra Node.js client driver ........................................................................................ 129
Using a Cassandra .NET Core client driver .................................................................................... 133
Using a Cassandra Go client driver ................................................................................................. 135
Using a Cassandra Perl client driver ............................................................................................... 140
Connection tutorials ................................................................................................................................ 142
Connecting with VPC endpoints ..................................................................................................... 142
Connecting with Apache Spark ....................................................................................................... 161
Connecting from Amazon EKS ........................................................................................................ 174
Configure cross-account access ............................................................................................................. 194
Configure cross-account access in a shared VPC ......................................................................... 195
Configure cross-account access without a shared VPC ............................................................... 198
Getting started ............................................................................................................................ 200
Prerequisites .............................................................................................................................................. 201
Create a keyspace .................................................................................................................................... 201
Check keyspace creation status ............................................................................................................ 205
Create a table ........................................................................................................................................... 205
Check table creation status ................................................................................................................... 214
CRUD operations ...................................................................................................................................... 214
Create .................................................................................................................................................... 215
Read ....................................................................................................................................................... 219
Update .................................................................................................................................................. 223
Delete .................................................................................................................................................... 224
Delete a table ........................................................................................................................................... 226
Delete a keyspace .................................................................................................................................... 229
Managing serverless resources ................................................................................................... 232
Estimate row size ..................................................................................................................................... 233
Estimate capacity consumption ............................................................................................................ 236
Estimate the capacity consumption of range queries ................................................................. 237
Estimate the read capacity consumption of limit queries ......................................................... 238
Estimate the read capacity consumption of table scans ............................................................ 239
Estimate capacity consumption of LWT ........................................................................................ 239
Estimate capacity consumption of static columns ...................................................................... 240
v

Amazon Keyspaces (for Apache Cassandra) Developer Guide
Estimate capacity for a multi-Region table .................................................................................. 244
Estimate capacity consumption with CloudWatch ...................................................................... 245
Configure read/write capacity modes ................................................................................................. 246
Configure on-demand capacity mode ............................................................................................ 246
Configure provisioned throughput capacity mode ...................................................................... 249
View the capacity mode of a table ................................................................................................ 250
Change capacity mode ...................................................................................................................... 251
Manage throughput capacity with auto scaling ................................................................................ 252
How Amazon Keyspaces automatic scaling works ....................................................................... 253
How auto scaling works for multi-Region tables ........................................................................ 254
Usage notes ......................................................................................................................................... 255
Configure and update auto scaling policies .................................................................................. 256
Use burst capacity ................................................................................................................................... 269
Working with Amazon Keyspaces features ................................................................................ 270
System keyspaces .................................................................................................................................... 271
system ................................................................................................................................................. 272
system_schema ................................................................................................................................. 273
system_schema_mcs ....................................................................................................................... 274
system_multiregion_info ......................................................................................................... 276
Multi-Region Replication ........................................................................................................................ 277
Benefits ................................................................................................................................................. 278
Capacity modes and pricing ............................................................................................................. 279
How it works ....................................................................................................................................... 280
Usage notes ......................................................................................................................................... 283
Configure Multi-Region Replication ................................................................................................ 285
Backup and restore with point-in-time recovery .............................................................................. 308
How it works ....................................................................................................................................... 309
Use point-in-time recovery ............................................................................................................... 313
Expire data with Time to Live ............................................................................................................... 326
Integration with AWS services ......................................................................................................... 327
Create table with default TTL value .............................................................................................. 327
Update table default TTL value ...................................................................................................... 331
Create table with custom TTL ......................................................................................................... 335
Update table custom TTL ................................................................................................................. 337
Use INSERT to set custom TTL for new rows .............................................................................. 339
Use UPDATE to set custom TTL for rows and columns .............................................................. 340
vi

Amazon Keyspaces (for Apache Cassandra) Developer Guide
Client-side timestamps ........................................................................................................................... 341
Integration with AWS services ......................................................................................................... 343
Create table with client-side timestamps ...................................................................................... 343
Configure client-side timestamps ................................................................................................... 346
Use client-side timestamps in queries ........................................................................................... 349
Working with CQL queries ..................................................................................................................... 350
Use IN SELECT ................................................................................................................................... 350
Order results ........................................................................................................................................ 354
Paginate results .................................................................................................................................. 355
Working with partitioners ...................................................................................................................... 356
Change the partitioner ...................................................................................................................... 357
Working with AWS SDKs ........................................................................................................................ 358
Working with tags ................................................................................................................................... 359
Tagging restrictions ............................................................................................................................ 360
Tag keyspaces and tables ................................................................................................................. 361
Create cost allocation reports .......................................................................................................... 371
Create AWS CloudFormation resources ............................................................................................... 372
Amazon Keyspaces and AWS CloudFormation templates .......................................................... 372
Learn more about AWS CloudFormation ....................................................................................... 372
NoSQL Workbench ................................................................................................................................... 373
Download ............................................................................................................................................. 374
Getting started .................................................................................................................................... 374
Visualize a data model ...................................................................................................................... 376
Create a data model .......................................................................................................................... 380
Edit a data model ............................................................................................................................... 382
Commit a data model ....................................................................................................................... 384
Sample data models .......................................................................................................................... 395
Release history .................................................................................................................................... 396
Code examples ............................................................................................................................. 397
Basics .......................................................................................................................................................... 402
Hello Amazon Keyspaces .................................................................................................................. 403
Learn the basics .................................................................................................................................. 408
Actions .................................................................................................................................................. 470
Libraries and tools ....................................................................................................................... 515
Libraries and examples ........................................................................................................................... 515
Amazon Keyspaces (for Apache Cassandra) developer toolkit .................................................. 515
vii

Amazon Keyspaces (for Apache Cassandra) Developer Guide
Amazon Keyspaces (for Apache Cassandra) examples ................................................................ 515
AWS Signature Version 4 (SigV4) authentication plugins .......................................................... 515
Highlighted sample and developer tool repos .................................................................................. 516
Amazon Keyspaces Protocol Buffers .............................................................................................. 516
AWS CloudFormation template to create Amazon CloudWatch dashboard for Amazon
Keyspaces (for Apache Cassandra) metrics ................................................................................... 516
Using Amazon Keyspaces (for Apache Cassandra) with AWS Lambda ..................................... 516
Using Amazon Keyspaces (for Apache Cassandra) with Spring ................................................. 517
Using Amazon Keyspaces (for Apache Cassandra) with Scala ................................................... 517
Using Amazon Keyspaces (for Apache Cassandra) with AWS Glue ........................................... 517
Amazon Keyspaces (for Apache Cassandra) Cassandra query language (CQL) to AWS
CloudFormation converter ................................................................................................................ 517
Amazon Keyspaces (for Apache Cassandra) helpers for Apache Cassandra driver for Java . 518
Amazon Keyspaces (for Apache Cassandra) snappy compression demo ................................. 518
Amazon Keyspaces (for Apache Cassandra) and Amazon S3 codec demo .............................. 518
Best practices ............................................................................................................................... 519
NoSQL design ........................................................................................................................................... 520
NoSQL vs. RDBMS .............................................................................................................................. 521
Two key concepts ............................................................................................................................... 521
General approach ............................................................................................................................... 522
Connections ............................................................................................................................................... 523
How they work .................................................................................................................................... 523
How to configure connections ......................................................................................................... 524
VPC endpoint connections ............................................................................................................... 526
How to monitor connections ........................................................................................................... 527
How to handle connection errors ................................................................................................... 528
Data modeling .......................................................................................................................................... 528
Partition key design ........................................................................................................................... 529
Cost optimization ..................................................................................................................................... 531
Evaluate your costs at the table level ............................................................................................ 532
Evaluate your table's capacity mode .............................................................................................. 534
Evaluate your table's Application Auto Scaling settings ............................................................ 538
Identify your unused resources ....................................................................................................... 545
Evaluate your table usage patterns ................................................................................................ 550
Evaluate your provisioned capacity for right-sized provisioning .............................................. 551
Troubleshooting ........................................................................................................................... 561
viii

Amazon Keyspaces (for Apache Cassandra) Developer Guide
General errors ........................................................................................................................................... 562
General errors ...................................................................................................................................... 562
Connection errors .................................................................................................................................... 564
Errors connecting to an Amazon Keyspaces endpoint ................................................................ 564
Capacity management errors ................................................................................................................ 576
Serverless capacity errors ................................................................................................................. 576
Data definition language errors ............................................................................................................ 581
Data definition language errors ...................................................................................................... 581
Monitoring Amazon Keyspaces ................................................................................................... 586
Monitoring with CloudWatch ................................................................................................................ 587
Using metrics ....................................................................................................................................... 588
Metrics and dimensions .................................................................................................................... 589
Creating alarms ................................................................................................................................... 609
Logging with CloudTrail ......................................................................................................................... 610
Configuring log file entries in CloudTrail ...................................................................................... 610
DDL information in CloudTrail ......................................................................................................... 611
DML information in CloudTrail ........................................................................................................ 612
Understanding log file entries ......................................................................................................... 613
Security ........................................................................................................................................ 624
Data protection ........................................................................................................................................ 625
Encryption at rest ............................................................................................................................... 626
Encryption in transit .......................................................................................................................... 646
Internetwork traffic privacy .............................................................................................................. 646
AWS Identity and Access Management ............................................................................................... 648
Audience ............................................................................................................................................... 648
Authenticating with identities ......................................................................................................... 649
Managing access using policies ....................................................................................................... 652
How Amazon Keyspaces works with IAM ...................................................................................... 654
Identity-based policy examples ....................................................................................................... 659
AWS managed policies ...................................................................................................................... 666
Troubleshooting .................................................................................................................................. 673
Using service-linked roles ................................................................................................................. 676
Compliance validation ............................................................................................................................ 683
Resilience ................................................................................................................................................... 685
Infrastructure security ............................................................................................................................. 685
Using interface VPC endpoints ........................................................................................................ 686
ix

Amazon Keyspaces (for Apache Cassandra) Developer Guide
Configuration and vulnerability analysis for Amazon Keyspaces ................................................... 693
Security best practices ............................................................................................................................ 693
Preventative security best practices ............................................................................................... 693
Detective security best practices ..................................................................................................... 695
CQL language reference .............................................................................................................. 697
Language elements ................................................................................................................................. 698
Identifiers ............................................................................................................................................. 698
Constants .............................................................................................................................................. 698
Terms ..................................................................................................................................................... 699
Data types ............................................................................................................................................ 699
JSON encoding of Amazon Keyspaces data types ....................................................................... 703
DDL statements ........................................................................................................................................ 706
Keyspaces ............................................................................................................................................. 706
Tables .................................................................................................................................................... 709
DML statements ....................................................................................................................................... 721
SELECT .................................................................................................................................................. 722
INSERT ................................................................................................................................................... 724
UPDATE ................................................................................................................................................. 726
DELETE .................................................................................................................................................. 728
Built-in functions ..................................................................................................................................... 728
Scalar functions .................................................................................................................................. 729
Quotas .......................................................................................................................................... 731
Amazon Keyspaces service quotas ....................................................................................................... 731
Increasing or decreasing throughput (for provisioned tables) ........................................................ 736
Increasing provisioned throughput ................................................................................................. 736
Decreasing provisioned throughput ............................................................................................... 736
Amazon Keyspaces encryption at rest ................................................................................................. 737
Document history ........................................................................................................................ 738
x

Amazon Keyspaces (for Apache Cassandra) Developer Guide
What is Amazon Keyspaces (for Apache Cassandra)?
Amazon Keyspaces (for Apache Cassandra) is a scalable, highly available, and managed Apache
Cassandra–compatible database service. With Amazon Keyspaces, you don’t have to provision,
patch, or manage servers, and you don’t have to install, maintain, or operate software.
Amazon Keyspaces is serverless, so you pay for only the resources that you use, and the service
automatically scales tables up and down in response to application traffic. You can build
applications that serve thousands of requests per second with virtually unlimited throughput and
storage.
Note
Apache Cassandra is an open-source, wide-column datastore that is designed to handle
large amounts of data. For more information, see Apache Cassandra.
Amazon Keyspaces makes it easy to migrate, run, and scale Cassandra workloads in the AWS Cloud.
With just a few clicks on the AWS Management Console or a few lines of code, you can create
keyspaces and tables in Amazon Keyspaces, without deploying any infrastructure or installing
software.
With Amazon Keyspaces, you can run your existing Cassandra workloads on AWS using the same
Cassandra application code and developer tools that you use today.
For a list of available AWS Regions and endpoints, see Service endpoints for Amazon Keyspaces.
We recommend that you start by reading the following sections:
Topics
• Amazon Keyspaces: How it works
• Amazon Keyspaces use cases
• What is Cassandra Query Language (CQL)?
Amazon Keyspaces: How it works
Amazon Keyspaces removes the administrative overhead of managing Cassandra. To understand
why, it's helpful to begin with Cassandra architecture and then compare it to Amazon Keyspaces.
How it works 1

Amazon Keyspaces (for Apache Cassandra) Developer Guide
Topics
• High-level architecture: Apache Cassandra vs. Amazon Keyspaces
• Cassandra data model
• Accessing Amazon Keyspaces from an application
High-level architecture: Apache Cassandra vs. Amazon Keyspaces
Traditional Apache Cassandra is deployed in a cluster made up of one or more nodes. You are
responsible for managing each node and adding and removing nodes as your cluster scales.
A client program accesses Cassandra by connecting to one of the nodes and issuing Cassandra
Query Language (CQL) statements. CQL is similar to SQL, the popular language used in relational
databases. Even though Cassandra is not a relational database, CQL provides a familiar interface
for querying and manipulating data in Cassandra.
The following diagram shows a simple Apache Cassandra cluster, consisting of four nodes.
A production Cassandra deployment might consist of hundreds of nodes, running on hundreds
of physical computers across one or more physical data centers. This can cause an operational
High-level architecture 2

Amazon Keyspaces (for Apache Cassandra) Developer Guide
burden for application developers who need to provision, patch, and manage servers in addition to
installing, maintaining, and operating software.
With Amazon Keyspaces (for Apache Cassandra), you don’t need to provision, patch, or manage
servers, so you can focus on building better applications. Amazon Keyspaces offers two throughput
capacity modes for reads and writes: on-demand and provisioned. You can choose your table’s
throughput capacity mode to optimize the price of reads and writes based on the predictability and
variability of your workload.
With on-demand mode, you pay for only the reads and writes that your application actually
performs. You do not need to specify your table’s throughput capacity in advance. Amazon
Keyspaces accommodates your application traffic almost instantly as it ramps up or down, making
it a good option for applications with unpredictable traffic.
Provisioned capacity mode helps you optimize the price of throughput if you have predictable
application traffic and can forecast your table’s capacity requirements in advance. With provisioned
capacity mode, you specify the number of reads and writes per second that you expect your
application to perform. You can increase and decrease the provisioned capacity for your table
automatically by enabling automatic scaling.
You can change the capacity mode of your table once per day as you learn more about your
workload’s traffic patterns, or if you expect to have a large burst in traffic, such as from a major
event that you anticipate will drive a lot of table traffic. For more information about read and write
capacity provisioning, see the section called “Configure read/write capacity modes”.
Amazon Keyspaces (for Apache Cassandra) stores three copies of your data in multiple Availability
Zones for durability and high availability. In addition, you benefit from a data center and network
architecture that is built to meet the requirements of the most security-sensitive organizations.
Encryption at rest is automatically enabled when you create a new Amazon Keyspaces table and all
client connections require Transport Layer Security (TLS). Additional AWS security features include
monitoring, AWS Identity and Access Management, and virtual private cloud (VPC) endpoints. For
an overview of all available security features, see Security.
The following diagram shows the architecture of Amazon Keyspaces.
High-level architecture 3

Amazon Keyspaces (for Apache Cassandra) Developer Guide
A client program accesses Amazon Keyspaces by connecting to a predetermined endpoint
(hostname and port number) and issuing CQL statements. For a list of available endpoints, see the
section called “Service endpoints”.
Cassandra data model
How you model your data for your business case is critical to achieving optimal performance from
Amazon Keyspaces. A poor data model can significantly degrade performance.
Even though CQL looks similar to SQL, the backends of Cassandra and relational databases are
very different and must be approached differently. The following are some of the more significant
issues to consider:
Storage
You can visualize your Cassandra data in tables, with each row representing a record and each
column a field within that record.
Table design: Query first
There are no JOINs in CQL. Therefore, you should design your tables with the shape of your
data and how you need to access it for your business use cases. This might result in de-
normalization with duplicated data. You should design each of your tables specifically for a
particular access pattern.
Cassandra data model 4

Amazon Keyspaces (for Apache Cassandra) Developer Guide
Partitions
Your data is stored in partitions on disk. The number of partitions your data is stored in and
how it is distributed across the partitions is determined by your partition key. How you define
your partition key can have a significant impact upon the performance of your queries. For best
practices, see the section called “Partition key design”.
Primary key
In Cassandra, data is stored as a key-value pair. Every Cassandra table must have a primary key,
which is the unique key to each row in the table. The primary key is the composite of a required
partition key and optional clustering columns. The data that comprises the primary key must be
unique across all records in a table.
• Partition key – The partition key portion of the primary key is required and determines which
partition of your cluster the data is stored in. The partition key can be a single column, or it
can be a compound value composed of two or more columns. You would use a compound
partition key if a single column partition key would result in a single partition or a very few
partitions having most of the data and thus bearing the majority of the disk I/O operations.
• Clustering column – The optional clustering column portion of your primary key determines
how the data is clustered and sorted within each partition. If you include a clustering column
in your primary key, the clustering column can have one or more columns. If there are
multiple columns in the clustering column, the sorting order is determined by the order that
the columns are listed in the clustering column, from left to right.
For more information about NoSQL design and Amazon Keyspaces, see the section called “NoSQL
design”. For more information about Amazon Keyspaces and data modeling, see the section called
“Data modeling”.
Accessing Amazon Keyspaces from an application
Amazon Keyspaces (for Apache Cassandra) implements the Apache Cassandra Query Language
(CQL) API, so you can use CQL and Cassandra drivers that you already use. Updating your
application is as easy as updating your Cassandra driver or cqlsh configuration to point to the
Amazon Keyspaces service endpoint. For more information about the required credentials, see the
section called “Create IAM credentials for AWS authentication”.
Accessing Amazon Keyspaces 5

Amazon Keyspaces (for Apache Cassandra) Developer Guide
Note
To help you get started, you can find end-to-end code samples of connecting to Amazon
Keyspaces by using various Cassandra client drivers in the Amazon Keyspaces code example
repository on GitHub.
Consider the following Python program, which connects to a Cassandra cluster and queries a table.
from cassandra.cluster import Cluster
#TLS/SSL configuration goes here
ksp = 'MyKeyspace'
tbl = 'WeatherData'
cluster = Cluster(['NNN.NNN.NNN.NNN'], port=NNNN)
session = cluster.connect(ksp)
session.execute('USE ' + ksp)
rows = session.execute('SELECT * FROM ' + tbl)
for row in rows:
print(row)
To run the same program against Amazon Keyspaces, you need to:
• Add the cluster endpoint and port: For example, the host can be replaced with a service
endpoint, such as cassandra.us-east-2.amazonaws.com and the port number with: 9142.
• Add the TLS/SSL configuration: For more information on adding the TLS/SSL configuration to
connect to Amazon Keyspaces by using a Cassandra client Python driver, see Using a Cassandra
Python client driver to access Amazon Keyspaces programmatically.
Amazon Keyspaces use cases
The following are just some of the ways in which you can use Amazon Keyspaces:
• Build applications that require low latency – Process data at high speeds for applications
that require single-digit-millisecond latency, such as industrial equipment maintenance, trade
monitoring, fleet management, and route optimization.
Use cases 6

Amazon Keyspaces (for Apache Cassandra) Developer Guide
• Build applications using open-source technologies – Build applications on AWS using open-
source Cassandra APIs and drivers that are available for a wide range of programming languages,
such as Java, Python, Ruby, Microsoft .NET, Node.js, PHP, C++, Perl, and Go. For code examples,
see Libraries and tools.
• Move your Cassandra workloads to the cloud – Managing Cassandra tables yourself is time-
consuming and expensive. With Amazon Keyspaces, you can set up, secure, and scale Cassandra
tables in the AWS Cloud without managing infrastructure. For more information, see Managing
serverless resources.
What is Cassandra Query Language (CQL)?
Cassandra Query Language (CQL) is the primary language for communicating with Apache
Cassandra. Amazon Keyspaces (for Apache Cassandra) is compatible with the CQL 3.x API
(backward-compatible with version 2.x).
In CQL, data is stored in tables, columns, and rows. In this sense CQL is similar to Structured Query
Language (SQL). These are the key concepts in CQL.
• CQL elements – The fundamental elements of CQL are identifiers, constants, terms, and data
types.
• Data Definition Language (DDL) – DDL statements are used to manage data structures like
keyspaces and tables, which are AWS resources in Amazon Keyspaces. DDL statements are
control plane operations in AWS.
• Data Manipulation Language (DML) – DML statements are used to manage data within tables.
DML statements are used for selecting, inserting, updating, and deleting data. These are data
plane operations in AWS.
• Built-in functions – Amazon Keyspaces supports a variety of built-in scalar functions that you
can use in CQL statements.
For more information about CQL, see CQL language reference for Amazon Keyspaces (for Apache
Cassandra). For functional differences with Apache Cassandra, see the section called “Functional
differences with Apache Cassandra”.
To run CQL queries, you can do one of the following:
• Use the CQL editor in the AWS Management Console.
What is CQL? 7

Amazon Keyspaces (for Apache Cassandra) Developer Guide
• Use AWS CloudShell and the cqlsh-expansion.
•
Use a cqlsh client.
• Use an Apache 2.0 licensed Cassandra client driver.
In addition to CQL, you can perform Data Definition Language (DDL) operations in Amazon
Keyspaces using the AWS SDKs and the AWS Command Line Interface.
For more information about using these methods to access Amazon Keyspaces, see Accessing
Amazon Keyspaces (for Apache Cassandra).
What is CQL? 8

Amazon Keyspaces (for Apache Cassandra) Developer Guide
How does Amazon Keyspaces (for Apache Cassandra)
compare to Apache Cassandra?
To establish a connection to Amazon Keyspaces, you can either use a public AWS service endpoint
or a private endpoint using Interface VPC endpoints (AWS PrivateLink) in the Amazon Virtual
Private Cloud . Depending on the endpoint used, Amazon Keyspaces can appear to the client in one
of the following ways.
AWS service endpoint connection
This is a connection established over any public endpoint. In this case, Amazon Keyspaces
appears as a nine-node Apache Cassandra 3.11.2 cluster to the client.
Interface VPC endpoint connection
This is a private connection established using an interface VPC endpoint. In this case, Amazon
Keyspaces appears as a three-node Apache Cassandra 3.11.2 cluster to the client.
Independent of the connection type and the number of nodes that are visible to the client, Amazon
Keyspaces provides virtually limitless throughput and storage. To do this, Amazon Keyspaces
maps the nodes to load balancers that route your queries to one of the many underlying storage
partitions. For more information about connections, see the section called “How they work”.
Amazon Keyspaces stores data in partitions. A partition is an allocation of storage for a table,
backed by solid state drives (SSDs). Amazon Keyspaces automatically replicates your data across
multiple Availability Zones within an AWS Region for durability and high availability. As your
throughput or storage needs grow, Amazon Keyspaces handles the partition management for you
and automatically provisions the required additional partitions.
Amazon Keyspaces supports all commonly used Cassandra data-plane operations, such as creating
keyspaces and tables, reading data, and writing data. Amazon Keyspaces is serverless, so you don’t
have to provision, patch, or manage servers. You also don’t have to install, maintain, or operate
software. As a result, in Amazon Keyspaces you don't need to use the Cassandra control plane API
operations to manage cluster and node settings.
Amazon Keyspaces automatically configures settings such as replication factor and consistency
level to provide you with high availability, durability, and single-digit-millisecond performance.
9

Amazon Keyspaces (for Apache Cassandra) Developer Guide
For even more resiliency and low-latency local reads, Amazon Keyspaces offers multi-Region
replication.
Topics
• Functional differences: Amazon Keyspaces vs. Apache Cassandra
• Supported Cassandra APIs, operations, functions, and data types
• Supported Apache Cassandra read and write consistency levels and associated costs
Functional differences: Amazon Keyspaces vs. Apache
Cassandra
The following are the functional differences between Amazon Keyspaces and Apache Cassandra.
Topics
• Apache Cassandra APIs, operations, and data types
• Asynchronous creation and deletion of keyspaces and tables
• Authentication and authorization
• Batch
• Cluster configuration
• Connections
• IN keyword
• CQL query throughput tuning
• FROZEN collections
• Lightweight transactions
• Load balancing
• Pagination
• Partitioners
• Prepared statements
• Range delete
• System tables
• Timestamps
Functional differences with Apache Cassandra 10

Amazon Keyspaces (for Apache Cassandra) Developer Guide
Apache Cassandra APIs, operations, and data types
Amazon Keyspaces supports all commonly used Cassandra data-plane operations, such as creating
keyspaces and tables, reading data, and writing data. To see what is currently supported, see
Supported Cassandra APIs, operations, functions, and data types.
Asynchronous creation and deletion of keyspaces and tables
Amazon Keyspaces performs data definition language (DDL) operations, such as creating and
deleting keyspaces and tables, asynchronously. To learn how to monitor the creation status of
resources, see the section called “Check keyspace creation status” and the section called “Check
table creation status”. For a list of DDL statements in the CQL language reference, see the section
called “DDL statements”.
Authentication and authorization
Amazon Keyspaces (for Apache Cassandra) uses AWS Identity and Access Management (IAM)
for user authentication and authorization, and supports the equivalent authorization policies as
Apache Cassandra. As such, Amazon Keyspaces does not support Apache Cassandra's security
configuration commands.
Batch
Amazon Keyspaces supports unlogged batch commands with up to 30 commands in the batch.
Only unconditional INSERT, UPDATE, or DELETE commands are permitted in a batch. Logged
batches are not supported.
Cluster configuration
Amazon Keyspaces is serverless, so there are no clusters, hosts, or Java virtual machines (JVMs)
to configure. Cassandra’s settings for compaction, compression, caching, garbage collection, and
bloom filtering are not applicable to Amazon Keyspaces and are ignored if specified.
Connections
You can use existing Cassandra drivers to communicate with Amazon Keyspaces, but you need to
configure the drivers differently. Amazon Keyspaces supports up to 3,000 CQL queries per TCP
connection per second, but there is no limit on the number of connections a driver can establish.
Apache Cassandra APIs, operations, and data types 11

Amazon Keyspaces (for Apache Cassandra) Developer Guide
Most open-source Cassandra drivers establish a connection pool to Cassandra and load balance
queries over that pool of connections. Amazon Keyspaces exposes 9 peer IP addresses to drivers,
and the default behavior of most drivers is to establish a single connection to each peer IP address.
Therefore, the maximum CQL query throughput of a driver using the default settings is 27,000 CQL
queries per second.
To increase this number, we recommend increasing the number of connections per IP address your
driver is maintaining in its connection pool. For example, setting the maximum connections per IP
address to 2 doubles the maximum throughput of your driver to 54,000 CQL queries per second.
As a best practice, we recommend configuring drivers to use 500 CQL queries per second per
connection to allow for overhead and to improve distribution. In this scenario, planning for 18,000
CQL queries per second requires 36 connections. Configuring the driver for 4 connections across 9
endpoints provides for 36 connections performing 500 request per second. For more information
about best practices for connections, see the section called “Connections”.
When connecting with VPC endpoints, there might be fewer endpoints available. This means that
you have to increase the number of connections in the driver configuration. For more information
about best practices for VPC connections, see the section called “VPC endpoint connections”.
IN keyword
Amazon Keyspaces supports the IN keyword in the SELECT statement. IN is not supported
with UPDATE and DELETE. When using the IN keyword in the SELECT statement, the results of
the query are returned in the order of how the keys are presented in the SELECT statement. In
Cassandra, the results are ordered lexicographically.
When using ORDER BY, full re-ordering with disabled pagination is not supported and results
are ordered within a page. Slice queries are not supported with the IN keyword. TOKENS are not
supported with the IN keyword. Amazon Keyspaces processes queries with the IN keyword by
creating subqueries. Each subquery counts as a connection towards the 3,000 CQL queries per TCP
connection per second limit. For more information, see the section called “Use IN SELECT”.
CQL query throughput tuning
Amazon Keyspaces supports up to 3,000 CQL queries per TCP connection per second, but there is
no limit on the number of connections a driver can establish.
Most open-source Cassandra drivers establish a connection pool to Cassandra and load balance
queries over that pool of connections. Amazon Keyspaces exposes 9 peer IP addresses to drivers,
IN keyword
12

Amazon Keyspaces (for Apache Cassandra) Developer Guide
and the default behavior of most drivers is to establish a single connection to each peer IP address.
Therefore, the maximum CQL query throughput of a driver using the default settings will be
27,000 CQL queries per second.
To increase this number, we recommend increasing the number of connections per IP address your
driver is maintaining in its connection pool. For example, setting the maximum connections per IP
address to 2 will double the maximum throughput of your driver to 54,000 CQL queries per second.
For more information about best practices for connections, see the section called “Connections”.
When connecting with VPC endpoints, fewer endpoints are available. This means that you have to
increase the number of connections in the driver configuration. For more information about best
practices for VPC endpoint connections, see the section called “VPC endpoint connections”.
FROZEN collections
The FROZEN keyword in Cassandra serializes multiple components of a collection data type into a
single immutable value that is treated like a BLOB. INSERT and UPDATE statements overwrite the
entire collection.
Amazon Keyspaces supports up to five levels of nesting for frozen collections by default. For more
information, see the section called “Amazon Keyspaces service quotas”.
Amazon Keyspaces doesn't support inequality comparisons that use the entire frozen collection in a
conditional UPDATE or SELECT statement. The behavior for collections and frozen collections is the
same in Amazon Keyspaces.
When you're using frozen collections with client-side timestamps, in the case where the timestamp
of a write operation is the same as the timestamp of an existing column that isn't expired or
tombstoned, Amazon Keyspaces doesn't perform comparisons. Instead, it lets the server determine
the latest writer, and the latest writer wins.
For more information about frozen collections, see the section called “Collection types”.
Lightweight transactions
Amazon Keyspaces (for Apache Cassandra) fully supports compare and set functionality on INSERT,
UPDATE, and DELETE commands, which are known as lightweight transactions (LWTs) in Apache
Cassandra. As a serverless offering, Amazon Keyspaces (for Apache Cassandra) provides consistent
performance at any scale, including for lightweight transactions. With Amazon Keyspaces, there is
no performance penalty for using lightweight transactions.
FROZEN collections
13

Amazon Keyspaces (for Apache Cassandra) Developer Guide
Load balancing
The system.peers table entries correspond to Amazon Keyspaces load balancers. For best results,
we recommend using a round robin load-balancing policy and tuning the number of connections
per IP to suit your application's needs.
Pagination
Amazon Keyspaces paginates results based on the number of rows that it reads to process a
request, not the number of rows returned in the result set. As a result, some pages might contain
fewer rows than you specify in PAGE SIZE for filtered queries. In addition, Amazon Keyspaces
paginates results automatically after reading 1 MB of data to provide customers with consistent,
single-digit millisecond read performance. For more information, see the section called “Paginate
results”.
In tables with static columns, both Apache Cassandra and Amazon Keyspaces establish the
partition's static column value at the start of each page in a multi-page query. When a table has
large data rows, as a result of the Amazon Keyspaces pagination behavior, the likelihood is higher
that a range read operation result could return more pages for Amazon Keyspaces than for Apache
Cassandra. Consequently, there is a higher likelihood in Amazon Keyspaces that concurrent updates
to the static column could result in the static column value being different in different pages of the
range read result set.
Partitioners
The default partitioner in Amazon Keyspaces is the Cassandra-compatible Murmur3Partitioner.
In addition, you have the choice of using either the Amazon Keyspaces DefaultPartitioner or
the Cassandra-compatible RandomPartitioner.
With Amazon Keyspaces, you can safely change the partitioner for your account without having to
reload your Amazon Keyspaces data. After the configuration change has completed, which takes
approximately 10 minutes, clients will see the new partitioner setting automatically the next time
they connect. For more information, see the section called “Working with partitioners”.
Prepared statements
Amazon Keyspaces supports the use of prepared statements for data manipulation language (DML)
operations, such as reading and writing data. Amazon Keyspaces does not currently support the
Load balancing 14

Amazon Keyspaces (for Apache Cassandra) Developer Guide
use of prepared statements for data definition language (DDL) operations, such as creating tables
and keyspaces. DDL operations must be run outside of prepared statements.
Range delete
Amazon Keyspaces supports deleting rows in range. A range is a contiguous set of rows within a
partition. You specify a range in a DELETE operation by using a WHERE clause. You can specify the
range to be an entire partition.
Furthermore, you can specify a range to be a subset of contiguous rows within a partition by using
relational operators (for example, '>', '<'), or by including the partition key and omitting one or
more clustering columns. With Amazon Keyspaces, you can delete up to 1,000 rows within a range
in a single operation.
Range deletes are not isolated. Individual row deletions are visible to other operations while a
range delete is in process.
System tables
Amazon Keyspaces populates the system tables that are required by Apache 2.0 open-source
Cassandra drivers. The system tables that are visible to a client contain information that's unique to
the authenticated user. The system tables are fully controlled by Amazon Keyspaces and are read-
only. For more information, see the section called “System keyspaces”.
Read-only access to system tables is required, and you can control it with IAM access policies. For
more information, see the section called “Managing access using policies”. You must define tag-
based access control policies for system tables differently depending on whether you use the AWS
SDK or Cassandra Query Language (CQL) API calls through Cassandra drivers and developer tools.
To learn more about tag-based access control for system tables, see the section called “ Amazon
Keyspaces resource access based on tags”.
If you access Amazon Keyspaces using Amazon VPC endpoints, you see entries in the
system.peers table for each Amazon VPC endpoint that Amazon Keyspaces has permissions to
see. As a result, your Cassandra driver might issue a warning message about the control node itself
in the system.peers table. You can safely ignore this warning.
Timestamps
In Amazon Keyspaces, cell-level timestamps that are compatible with the default timestamps in
Apache Cassandra are an opt-in feature.
Range delete 15

Amazon Keyspaces (for Apache Cassandra) Developer Guide
The USING TIMESTAMP clause and the WRITETIME function are only available when client-side
timestamps are turned on for a table. To learn more about client-side timestamps in Amazon
Keyspaces, see the section called “Client-side timestamps”.
Supported Cassandra APIs, operations, functions, and data
types
Amazon Keyspaces (for Apache Cassandra) is compatible with Cassandra Query Language (CQL)
3.11 API (backward-compatible with version 2.x).
Amazon Keyspaces supports all commonly used Cassandra data-plane operations, such as creating
keyspaces and tables, reading data, and writing data.
The following sections list the supported functionality.
Topics
• Cassandra API support
• Cassandra control plane API support
• Cassandra data plane API support
• Cassandra function support
• Cassandra data type support
Cassandra API support
API operation Supported
CREATE KEYSPACE
Yes
ALTER KEYSPACE
Yes
DROP KEYSPACE
Yes
CREATE TABLE
Yes
ALTER TABLE
Yes
DROP TABLE
Yes
Supported Cassandra APIs, operations, functions, and data types 16

Amazon Keyspaces (for Apache Cassandra) Developer Guide
API operation Supported
CREATE INDEX
No
DROP INDEX
No
UNLOGGED BATCH
Yes
LOGGED BATCH
No
SELECT
Yes
INSERT
Yes
DELETE
Yes
UPDATE
Yes
USE
Yes
CREATE TYPE
No
ALTER TYPE
No
DROP TYPE
No
CREATE TRIGGER
No
DROP TRIGGER
No
CREATE FUNCTION
No
DROP FUNCTION
No
CREATE AGGREGATE
No
DROP AGGREGATE
No
CREATE MATERIALIZED VIEW
No
ALTER MATERIALIZED VIEW
No
Cassandra API support 17

Amazon Keyspaces (for Apache Cassandra) Developer Guide
API operation Supported
DROP MATERIALIZED VIEW
No
TRUNCATE
No
Cassandra control plane API support
Because Amazon Keyspaces is managed, the Cassandra control plane API operations to manage
cluster and node settings are not required. As a result, the following Cassandra features are not
applicable.
Feature Reason
Durable writes toggle All writes are durable
Read repair settings Not applicable
GC grace seconds Not applicable
Bloom filter settings Not applicable
Compaction settings Not applicable
Compression settings Not applicable
Caching settings Not applicable
Security settings Replaced by IAM
Cassandra data plane API support
Feature Supported
JSON support for SELECT and INSERT
statements
Yes
Static columns Yes
Cassandra control plane API support 18

Amazon Keyspaces (for Apache Cassandra) Developer Guide
Feature Supported
Time to Live (TTL) Yes
Cassandra function support
For more information about the supported functions, see the section called “Built-in functions”.
Function Supported
Aggregate functions
No
Blob conversion
Yes
Cast
Yes
Datetime functions
Yes
Timeconversion functions Yes
TimeUuid functions
Yes
Token
Yes
User defined functions (UDF)
No
Uuid
Yes
Cassandra data type support
Data type Supported Note
ascii
Yes
bigint
Yes
blob
Yes
Cassandra function support 19

Amazon Keyspaces (for Apache Cassandra) Developer Guide
Data type Supported Note
boolean
Yes
counter
Yes
date
Yes
decimal
Yes
double
Yes
float
Yes
frozen
Yes
inet
Yes
int
Yes
list
Yes
map
Yes
set
Yes
smallint
Yes
text
Yes
time
Yes
timestamp
Yes
timeuuid
Yes
tinyint
Yes
tuple
Yes
Cassandra data type support 20

Amazon Keyspaces (for Apache Cassandra) Developer Guide
Data type Supported Note
user-defined types
(UDT)
No To refactor UDTs with
Protocol Buffers, see Amazon
Keyspaces Protocol Buffers.
uuid
Yes
varchar
Yes
varint
Yes
Supported Apache Cassandra read and write consistency levels
and associated costs
The topics in this section describe which Apache Cassandra consistency levels are supported for
read and write operations in Amazon Keyspaces (for Apache Cassandra).
Topics
• Write consistency levels
• Read consistency levels
• Unsupported consistency levels
Write consistency levels
Amazon Keyspaces replicates all write operations three times across multiple Availability Zones
for durability and high availability. Writes are durably stored before they are acknowledged using
the LOCAL_QUORUM consistency level. For each 1 KB write, you are billed 1 write capacity unit
(WCU) for tables using provisioned capacity mode or 1 write request unit (WRU) for tables using
on-demand mode.
You can use cqlsh to set the consistency for all queries in the current session to LOCAL_QUORUM
using the following code.
CONSISTENCY LOCAL_QUORUM;
Supported Cassandra consistency levels 21

Amazon Keyspaces (for Apache Cassandra) Developer Guide
To configure the consistency level programmatically, you can set the consistency with the
appropriate Cassandra client drivers. For example, the 4.x version Java drivers allow you to set the
consistency level in the app config file as shown below.
basic.request.consistency = LOCAL_QUORUM
If you're using a 3.x version Java Cassandra driver, you can specify the
consistency level for the session by adding .withQueryOptions(new
QueryOptions().setConsistencyLevel(ConsistencyLevel.LOCAL_QUORUM) as shown in
the following code example.
Session session = Cluster.builder()
.addContactPoint(endPoint)
.withPort(portNumber)
.withAuthProvider(new SigV4AuthProvider("us-east-2"))
.withSSL()
.withQueryOptions(new
QueryOptions().setConsistencyLevel(ConsistencyLevel.LOCAL_QUORUM)
.build()
.connect();
To configure the consistency level for specific write operations, you can define the consistency
when you call QueryBuilder.insertInto with a setConsistencyLevel argument when
you're using the Java driver.
Read consistency levels
Amazon Keyspaces supports three read consistency levels: ONE, LOCAL_ONE, and LOCAL_QUORUM.
During a LOCAL_QUORUM read, Amazon Keyspaces returns a response reflecting the most recent
updates from all prior successful write operations. Using the consistency level ONE or LOCAL_ONE
can improve the performance and availability of your read requests, but the response might not
reflect the results of a recently completed write.
For each 4 KB read using ONE or LOCAL_ONE consistency, you are billed 0.5 read capacity units
(RCUs) for tables using provisioned capacity mode or 0.5 read request units (RRUs) for tables using
on-demand mode. For each 4 KB read using LOCAL_QUORUM consistency, you are billed 1 read
capacity unit (RCU) for tables using provisioned capacity mode or 1 read request units (RRU) for
tables using on-demand mode.
Read consistency levels 22
Amazon Keyspaces (for Apache Cassandra) Developer Guide
Billing based on read consistency and read capacity throughput mode per table for each 4 KB
of reads
Consistency level Provisioned On-demand
ONE
0.5 RCUs 0.5 RRUs
LOCAL_ONE
0.5 RCUs 0.5 RRUs
LOCAL_QUORUM
1 RCU 1 RRU
To specify a different consistency for read operations, call QueryBuilder.select with a
setConsistencyLevel argument when you're using the Java driver.
Unsupported consistency levels
The following consistency levels are not supported by Amazon Keyspaces and will result in
exceptions.
Unsupported consistency levels
Apache Cassandra Amazon Keyspaces
EACH_QUORUM
Not supported
QUORUM
Not supported
ALL
Not supported
TWO
Not supported
THREE
Not supported
ANY
Not supported
SERIAL
Not supported
LOCAL_SERIAL
Not supported
Unsupported consistency levels 23

Amazon Keyspaces (for Apache Cassandra) Developer Guide
Migrating to Amazon Keyspaces (for Apache Cassandra)
Migrating to Amazon Keyspaces (for Apache Cassandra) presents a range of compelling benefits
for businesses and organizations. Here are some key advantages that make Amazon Keyspaces an
attractive choice for migration.
• Scalability – Amazon Keyspaces is designed to handle massive workloads and scale seamlessly
to accommodate growing data volumes and traffic. With traditional Cassandra, scaling is not
performed on demand and requires planning for future peaks. With Amazon Keyspaces, you can
easily scale your tables up or down based on demand, ensuring that your applications can handle
sudden spikes in traffic without compromising performance.
• Performance – Amazon Keyspaces offers low-latency data access, enabling applications to
retrieve and process data with exceptional speed. Its distributed architecture ensures that read
and write operations are distributed across multiple nodes, delivering consistent, single-digit
millisecond response times even at high request rates.
• Fully managed – Amazon Keyspaces is a fully managed service provided by AWS. This means
that AWS handles the operational aspects of database management, including provisioning,
configuration, patching, backups, and scaling. This allows you to focus more on developing your
applications and less on database administration tasks.
• Serverless architecture – Amazon Keyspaces is serverless. You pay only for capacity consumed
with no upfront capacity provisioning required. You don't have servers to manage or instances to
choose. This pay-per-request model offers cost efficiency and minimal operational overhead, as
you only pay for the resources you consume without the need to provision and monitor capacity.
• NoSQL flexibility with schema – Amazon Keyspaces follows a NoSQL data model, providing
flexibility in schema design. With Amazon Keyspaces, you can store structured, semi-structured,
and unstructured data, making it well-suited for handling diverse and evolving data types.
Additionally, Amazon Keyspaces performs schema validation on write allowing for a centralized
evolution of the data model. This flexibility enables faster development cycles and easier
adaptation to changing business requirements.
• High availability and durability – Amazon Keyspaces replicates data across multiple Availability
Zones within an AWS Region, ensuring high availability and data durability. It automatically
handles replication, failover, and recovery, minimizing the risk of data loss or service disruptions.
Amazon Keyspaces provides an availability SLA of up to 99.999%. For even more resiliency and
low-latency local reads, Amazon Keyspaces offers multi-Region replication.
24

Amazon Keyspaces (for Apache Cassandra) Developer Guide
• Security and compliance – Amazon Keyspaces integrates with AWS Identity and Access
Management for fine-grained access control. It provides encryption at rest and in-transit, helping
to improve the security of your data. Amazon Keyspaces has been assessed by third-party
auditors for security and compliance with specific programs, including HIPAA, PCI DSS, and SOC,
enabling you to meet regulatory requirements. For more information, see the section called
“Compliance validation”.
• Integration with AWS Ecosystem – As part of the AWS ecosystem, Amazon Keyspaces
seamlessly integrates with other AWS services, for example AWS CloudFormation, Amazon
CloudWatch, and AWS CloudTrail. This integration enables you to build serverless architectures,
leverage infrastructure as code, and create real-time data-driven applications. For more
information, see Monitoring Amazon Keyspaces.
Topics
• Create a migration plan for migrating from Apache Cassandra to Amazon Keyspaces
• How to select the right tool for bulk uploading or migrating data to Amazon Keyspaces
Create a migration plan for migrating from Apache Cassandra
to Amazon Keyspaces
For a successful migration from Apache Cassandra to Amazon Keyspaces, we recommend a review
of the applicable migration concepts and best practices as well as a comparison of the available
options.
This topic outlines how the migration process works by introducing several key concepts and the
tools and techniques available to you. You can evaluate the different migration strategies to select
the one that best meets your requirements.
Topics
• Functional compatibility
• Estimate Amazon Keyspaces pricing
• Choose a migration strategy
• Online migration to Amazon Keyspaces: strategies and best practices
• Offline migration process: Apache Cassandra to Amazon Keyspaces
• Using a hybrid migration solution: Apache Cassandra to Amazon Keyspaces
Migrating from Cassandra 25

Amazon Keyspaces (for Apache Cassandra) Developer Guide
Functional compatibility
Consider the functional differences between Apache Cassandra and Amazon Keyspaces carefully
before the migration. Amazon Keyspaces supports all commonly used Cassandra data-plane
operations, such as creating keyspaces and tables, reading data, and writing data.
However there are some Cassandra APIs that Amazon Keyspaces doesn't support. For more
information about supported APIs, see the section called “Supported Cassandra APIs, operations,
functions, and data types”. For an overview of all functional differences between Amazon
Keyspaces and Apache Cassandra, see the section called “Functional differences with Apache
Cassandra”.
To compare the Cassandra APIs and schema that you're using with supported functionality in
Amazon Keyspaces, you can run a compatibility script available in the Amazon Keyspaces toolkit on
GitHub.
How to use the compatibility script
1. Download the compatibility Python script from GitHub and move it to a location that has
access to your existing Apache Cassandra cluster.
2.
The compatibility script uses similar parameters as CQLSH. For --host and --port enter the
IP address and the port you use to connect and run queries to one of the Cassandra nodes in
your cluster.
If your Cassandra cluster uses authentication, you also need to provide -username and -
password. To run the compatibility script, you can use the following command.
python toolkit-compat-tool.py --host hostname or IP -u "username" -p "password" --
port native transport port
Estimate Amazon Keyspaces pricing
This section provides an overview of the information you need to gather from your Apache
Cassandra tables to calculate the estimated cost for Amazon Keyspaces. Each one of your tables
requires different data types, needs to support different CQL queries, and maintains distinctive
read/write traffic.
Compatibility 26

Amazon Keyspaces (for Apache Cassandra) Developer Guide
Thinking of your requirements based on tables aligns with Amazon Keyspaces table-level resource
isolation and read/write throughput capacity modes. With Amazon Keyspaces, you can define read/
write capacity and automatic scaling policies for tables independently.
Understanding table requirements helps you prioritize tables for migration based on functionality,
cost, and migration effort.
Collect the following Cassandra table metrics before a migration. This information helps to
estimate the cost of your workload on Amazon Keyspaces.
• Table name – The name of the fully qualified keyspace and table name.
• Description – A description of the table, for example how it’s used, or what type of data is stored
in it.
• Average reads per second – The average number of coordinate-level reads against the table over
a large time interval.
• Average writes per second – The average number of coordinate-level writes against the table
over a large time interval.
• Average row size in bytes – The average row size in bytes.
• Storage size in GBs – The raw storage size for a table.
• Read consistency breakdown – The percentage of reads that use eventual consistency
(LOCAL_ONE or ONE) vs. strong consistency (LOCAL_QUORUM).
This table shows an example of the information about your tables that you need to pull together
when planning a migration.
Table
name
Descripti
on
Average
reads per
second
Average
writes per
second
Average
row size in
bytes
Storage
size in GBs
Read
consisten
cy
breakdown
mykeyspac
e.mytable
Used to
store
shopping
cart
history
10,000 5,000 2,200 2,000 100%
LOCAL_ONE
Estimate pricing 27

Amazon Keyspaces (for Apache Cassandra) Developer Guide
Table
name
Descripti
on
Average
reads per
second
Average
writes per
second
Average
row size in
bytes
Storage
size in GBs
Read
consisten
cy
breakdown
mykeyspac
e.mytable2
Used to
store latest
profile
informati
on
20,000 1,000 850 1,000 25%
LOCAL_QUO
RUM 75%
LOCAL_ONE
How to collect table metrics
This section provides step by step instructions on how to collect the necessary table metrics from
your existing Cassandra cluster. These metrics include row size, table size, and read/write requests
per second (RPS). They allow you to assess throughput capacity requirements for an Amazon
Keyspaces table and estimate pricing.
How to collect table metrics on the Cassandra source table
1. Determine row size
Row size is important for determining the read capacity and write capacity utilization
in Amazon Keyspaces. The following diagram shows the typical data distribution over a
Cassandra token range.
Estimate pricing 28

Amazon Keyspaces (for Apache Cassandra) Developer Guide
You can use a row size sampler script available on GitHub to collect row size metrics for each
table in your Cassandra cluster.
The script exports table data from Apache Cassandra by using cqlsh and awk to calculate the
min, max, average, and standard deviation of row size over a configurable sample set of table
data. The row size sampler passes the arguments to cqlsh, so the same parameters can be
used to connect and read from your Cassandra cluster.
The following statement is an example of this.
./row-size-sampler.sh 10.22.33.44 9142 \\
-u "username" -p "password" --ssl
For more information on how row size is calculated in Amazon Keyspaces, see the section
called “Estimate row size”.
2. Determine table size
With Amazon Keyspaces, you don't need to provision storage in advance. Amazon Keyspaces
monitors the billable size of your tables continuously to determine your storage charges.
Storage is billed per GB-month. Amazon Keyspaces table size is based on the raw size
(uncompressed) of a single replica.
To monitor the table size in Amazon Keyspaces, you can use the metric
BillableTableSizeInBytes, which is displayed for each table in the AWS Management
Console.
To estimate the billable size of your Amazon Keyspaces table, you can use either one of these
two methods:
• Use the average row size and multiply by the number or rows.
You can estimate the size of the Amazon Keyspaces table by multiplying the average row
size by the number of rows from your Cassandra source table. Use the row size sample
script from the previous section to capture the average row size. To capture the row count,
you can use tools like dsbulk count to determine the total number of rows in your
source table.
•
Use the nodetool to gather table metadata.
Estimate pricing 29

Amazon Keyspaces (for Apache Cassandra) Developer Guide
Nodetool is an administrative tool provided in the Apache Cassandra distribution that
provides insight into the state of the Cassandra process and returns table metadata. You
can use nodetool to sample metadata about table size and with that extrapolate the
table size in Amazon Keyspaces.
The command to use is nodetool tablestats. Tablestats returns the table's size and
compression ratio. The table's size is stored as the tablelivespace for the table and you
can divide it by the compression ratio. Then multiple this size value by the number of
nodes. Finally divide by the replication factor (typically three).
This is the complete formula for the calculation that you can use to assess table size.
((tablelivespace / compression ratio) * (total number of nodes))/ (replication
factor)
Let's assume that your Cassandra cluster has 12 nodes. Running the nodetool
tablestats command returns a tablelivespace of 200 GB and a compression
ratio of 0.5. The keyspace has a replication factor of three.
This is how the calculation for this example looks like.
(200 GB / 0.5) * (12 nodes)/ (replication factor of 3)
= 4,800 GB / 3
= 1,600 GB is the table size estimate for Amazon
Keyspaces
3. Capture the number of reads and writes
To determine the capacity and scaling requirements for your Amazon Keyspaces tables,
capture the read and write request rate of your Cassandra tables before the migration.
Amazon Keyspaces is serverless and you only pay for what you use. In general, the price of
read/write throughput in Amazon Keyspaces is based on the number and size of the requests.
There are two capacity modes in Amazon Keyspaces:
• On-demand – This is a flexible billing option capable of serving thousands of requests per
second without the need for capacity planning. It offers pay-per-request pricing for read and
write requests so that you pay only for what you use.
Estimate pricing 30

Amazon Keyspaces (for Apache Cassandra) Developer Guide
• Provisioned – If you choose provisioned throughput capacity mode, you specify the number
of reads and writes per second that are required for your application. This helps you manage
your Amazon Keyspaces usage to stay at or below a defined request rate to optimize price
and maintain predictability.
Provisioned mode offers auto scaling to automatically adjust your provisioned rate to scale
up or scale down to improve operational efficiency. For more information about serverless
resource management, see Managing serverless resources.
Because you provision read and write throughput capacity in Amazon Keyspaces separately,
you need to measure the request rate for reads and writes in your existing tables
independently.
To gather the most accurate utilization metrics from your existing Cassandra cluster, capture
the average requests per second (RPS) for coordinator-level read and write operations over an
extended period of time for a table that is aggregated over all nodes in a single data center.
Capturing the average RPS over a period of at least several weeks captures peaks and valleys in
your traffic patterns, as shown in the following diagram.
You have two options to determine the read and write request rate of your Cassandra table.
• Use existing Cassandra monitoring
You can use the metrics shown in the following table to observe read and write requests.
Note that the metric names can change based on the monitoring tool that you're using.
Estimate pricing 31

Amazon Keyspaces (for Apache Cassandra) Developer Guide
Dimension Cassandra JMX metric
Writes
org.apache.cassandra.metric
s:type=ClientRequest,
scope=Write,name=Latency#Co
unt
Reads
org.apache.cassandra.metric
s:type=ClientRequest,
scope=Read,name=Latency#Count
•
Use the nodetool
Use nodetool tablestats and nodetool info to capture average read and write
operations from the table. tablestats returns the total read and write count from the
time the node has been initiated. nodetool info provides the up-time for a node in
seconds.
To receive the per second average of read and writes, divide the read and write count
by the node up-time in seconds. Then, for reads you divide by the consistency level ad
for writes you divide by the replication factor. These calculations are expressed in the
following formulas.
Formula for average reads per second:
((number of reads * number of nodes in cluster) / read consistency quorum
(2)) / uptime
Formula for average writes per second:
((number of writes * number of nodes in cluster) / replication factor of 3) /
uptime
Let's assume we have a 12 node cluster that has been up for 4 weeks. nodetool info
returns 2,419,200 seconds of up-time and nodetool tablestats returns 1 billion
writes and 2 billion reads. This example would result in the following calculation.
Estimate pricing 32

Amazon Keyspaces (for Apache Cassandra) Developer Guide
((2 billion reads * 12 in cluster) / read consistency quorum (2)) / 2,419,200
seconds
= 12 billion reads / 2,419,200 seconds
= 4,960 read request per second
((1 billion writes * 12 in cluster) / replication
factor of 3) / 2,419,200 seconds
= 4 billion writes / 2,419,200 seconds
= 1,653 write request per second
4. Determine the capacity utilization of the table
To estimate the average capacity utilization, start with the average request rates and the
average row size of your Cassandra source table.
Amazon Keyspaces uses read capacity units (RCUs) and write capacity units (WCUs) to measure
provisioned throughput capacity for reads and writes for tables. For this estimate we use these
units to calculate the read and write capacity needs of the new Amazon Keyspaces table after
migration.
Later in this topic we'll discuss how the choice between provisioned and on-demand capacity
mode affects billing. But for the estimate of capacity utilization in this example, we assume
that the table is in provisioned mode.
•
Reads – One RCU represents one LOCAL_QUORUM read request, or two LOCAL_ONE read
requests, for a row up to 4 KB in size. If you need to read a row that is larger than 4 KB, the
read operation uses additional RCUs. The total number of RCUs required depends on the row
size, and whether you want to use LOCAL_QUORUM or LOCAL_ONE read consistency.
For example, reading an 8 KB row requires 2 RCUs using LOCAL_QUORUM read consistency,
and 1 RCU if you choose LOCAL_ONE read consistency.
• Writes – One WCU represents one write for a row up to 1 KB in size. All writes are using
LOCAL_QUORUM consistency, and there is no additional charge for using lightweight
transactions (LWTs).
The total number of WCUs required depends on the row size. If you need to write a row that
is larger than 1 KB, the write operation uses additional WCUs. For example, if your row size is
2 KB, you require 2 WCUs to perform one write request.
The following formula can be used to estimate the required RCUs and WCUs.
Estimate pricing 33

Amazon Keyspaces (for Apache Cassandra) Developer Guide
• Read capacity in RCUs can be determined by multiplying reads per second by number of
rows read per read multiplied by average row size divided by 4KB and rounded up to the
nearest whole number.
• Write capacity in WCUs can be determined by multiplying the number of requests by the
average row size divided by 1KB and rounded up to the nearest whole number.
This is expressed in the following formulas.
Read requests per second * ROUNDUP((Average Row Size)/4096 per unit) = RCUs per
second
Write requests per second * ROUNDUP(Average Row Size/1024 per unit) = WCUs per
second
For example, if you're performing 4,960 read requests with a row size of 2.5KB on your
Cassandra table, you need 4,960 RCUs in Amazon Keyspaces. If you're currently performing
1,653 write requests per second with a row size of 2.5KB on your Cassandra table, you need
4,959 WCUs per second in Amazon Keyspaces.
This example is expressed in the following formulas.
4,960 read requests per second * ROUNDUP( 2.5KB /4KB bytes per unit)
= 4,960 read requests per second * 1 RCU
= 4,960 RCUs
1,653 write requests per second * ROUNDUP(2.5KB/1KB per unit)
= 1,653 requests per second * 3 WCUs
= 4,959 WCUs
Using eventual consistency allows you to save up to half of the throughput capacity on
each read request. Each eventually consistent read can consume up to 8KB. You can calculate
eventual consistent reads by multiplying the previous calculation by 0.5 as shown in the
following formula.
4,960 read requests per second * ROUNDUP( 2.5KB /4KB per unit) * .5
= 2,480 read request per second * 1 RCU
= 2,480 RCUs
Estimate pricing 34

Amazon Keyspaces (for Apache Cassandra) Developer Guide
5. Calculate the monthly pricing estimate for Amazon Keyspaces
To estimate the monthly billing for the table based on read/write capacity throughput, you
can calculate the pricing for on-demand and for provisioned mode using different formulas
and compare the options for your table.
Provisioned mode – Read and write capacity consumption is billed on an hourly rate based on
the capacity units per second. First, divide that rate by 0.7 to represent the default autoscaling
target utilization of 70%. Then multiple by 30 calendar days, 24 hours per day, and regional
rate pricing.
This calculation is summarized in the following formulas.
(read capacity per second / .7) * 24 hours * 30 days * regional rate
(write capacity per second / .7) * 24 hours * 30 days * regional
rate
On-demand mode – Read and write capacity are billed on a per request rate. First, multiply
the request rate by 30 calendar days, and 24 hours per day. Then divide by one million request
units. Finally, multiply by the regional rate.
This calculation is summarized in the following formulas.
((read capacity per second * 30 * 24 * 60 * 60) / 1 Million read request units) *
regional rate
((write capacity per second * 30 * 24 * 60 * 60) / 1 Million write
request units) * regional rate
Choose a migration strategy
You can choose between the following migration strategies when migrating from Apache
Cassandra to Amazon Keyspaces:
• Online – This is a live migration using dual writes to start writing new data to Amazon Keyspaces
and the Cassandra cluster simultaneously. This migration type is recommended for applications
that require zero downtime during migration and read after write consistency.
For more information about how to plan and implement an online migration strategy, see the
section called “Online migration”.
Migration strategy 35

Amazon Keyspaces (for Apache Cassandra) Developer Guide
• Offline – This migration technique involves copying a data set from Cassandra to Amazon
Keyspaces during a downtime window. Offline migration can simplify the migration process,
because it doesn't require changes to your application or conflict resolution between historical
data and new writes.
For more information about how to plan an offline migration, see the section called “Offline
migration”.
• Hybrid – This migration technique allows for changes to be replicated to Amazon Keyspaces in
near real time, but without read after write consistency.
After reviewing the migration techniques and best practices discussed in this topic, you can place
the available options in a decision tree to design a migration strategy based on your requirements
and available resources.
Online migration to Amazon Keyspaces: strategies and best practices
If you need to maintain application availability during a migration from Apache Cassandra to
Amazon Keyspaces, you can prepare a custom online migration strategy by implementing the key
components discussed in this topic. By following these best practices for online migrations, you
can ensure that application availability and read-after-write consistency are maintained during the
entire migration process, minimizing the impact on your users.
When designing an online migration strategy from Apache Cassandra to Amazon Keyspaces, you
need to consider the following key steps.
1. Writing new data
• Application dual-writes: You can implement dual writes in your application using existing
Cassandra client libraries and drivers. Designate one database as the leader and the other as
the follower. Write failures to the follower database are recorded in a dead letter queue (DLQ)
for analysis.
• Messaging tier dual-writes: Alternatively, you can configure your existing messaging platform
to send writes to both Cassandra and Amazon Keyspaces using an additional consumer. This
creates eventually consistent views across both databases.
2. Migrating historical data
• Copy historical data: You can migrate historical data from Cassandra to Amazon Keyspaces
using AWS Glue or custom extract, transform, and load (ETL) scripts. Handle conflict
Online migration 36

Amazon Keyspaces (for Apache Cassandra) Developer Guide
resolution between dual writes and bulk loads using techniques like lightweight transactions
or timestamps.
• Use Time-To-Live (TTL): For shorter data retention periods, you can use TTL in both Cassandra
and Amazon Keyspaces to avoid uploading unnecessary historical data. As old data expires in
Cassandra and new data is written via dual-writes, Amazon Keyspaces eventually catches up.
3. Validating data
• Dual reads: Implement dual reads from both Cassandra (primary) and Amazon Keyspaces
(secondary) databases, comparing results asynchronously. Differences are logged or sent to a
DLQ.
• Sample reads: Use Λ functions to periodically sample and compare data across both systems,
logging any discrepancies to a DLQ.
4. Migrating the application
• Blue-green strategy: Switch your application to treat Amazon Keyspaces as the primary and
Cassandra as the secondary data store in a single step. Monitor performance and roll back if
issues arise.
• Canary deployment: Gradually roll out the migration to a subset of users first, incrementally
increasing traffic to Amazon Keyspaces as the primary until fully migrated.
5. Decommissioning Cassandra
Once your application is fully migrated to Amazon Keyspaces and data consistency is validated,
you can plan to decommission your Cassandra cluster based on data retention policies.
By planning an online migration strategy with these components, you can transition smoothly to
the fully managed Amazon Keyspaces service with minimal downtime or disruption. The following
sections go into each component in more detail.
Topics
• Writing new data during an online migration
• Uploading historical data during an online migration
• Validating data consistency during an online migration
• Migrating the application during an online migration
• Decommissioning Cassandra after an online migration
Online migration 37

Amazon Keyspaces (for Apache Cassandra) Developer Guide
Writing new data during an online migration
The first step in an online migration plan is to ensure that any new data written by the application
is stored in both databases, your existing Cassandra cluster and Amazon Keyspaces. The goal is to
provide a consistent view across the two data stores. You can do this by applying all new writes to
both databases. To implement dual writes, consider one of the following two options.
• Application dual writes – You can implement dual writes with minimal changes to your
application code by leveraging the existing Cassandra client libraries and drivers. You can either
implement dual writes in your existing application, or create a new layer in the architecture to
handle dual writes. For more information and a customer case study that shows how dual writes
were implemented in an existing application, see Cassandra migration case study.
When implementing dual writes, you can designate one database as the leader and the other
database as the follower. This allows you to keep writing to your original source, or leader
database without letting write failures to the follower, or destination database disrupt the critical
path of your application.
Instead of retrying failed writes to the follower, you can use Amazon Simple Queue Service to
record failed writes in a dead letter queue (DLQ). The DLQ lets you analyze the failed writes to
the follower and determine why processing did not succeed in the destination database.
For a more sophisticated dual write implementation, you can follow AWS best practices for
designing a sequence of local transactions using the saga pattern. A saga pattern ensures that
if a transaction fails, the saga runs compensating transactions to revert the database changes
made by the previous transactions.
When using dual-writes for an online migration, you can configure the dual-writes following
the saga pattern so that each write is a local transaction to ensure atomic operations across
heterogeneous databases. For more information about designing distributed application using
recommended design patterns for the AWS Cloud, see Cloud design patterns, architectures, and
implementations.
Online migration 38

Amazon Keyspaces (for Apache Cassandra) Developer Guide
• Messaging tier dual writes – Instead of implementing dual writes at the application layer, you
can use your existing messaging tier to perform dual writes to Cassandra and Amazon Keyspaces.
To do this you can configure an additional consumer to your messaging platform to send writes
to both data stores. This approach provides a simple low code strategy using the messaging tier
to create two views across both databases that are eventually consistent.
Uploading historical data during an online migration
After implementing dual writes to ensure that new data is written to both data stores in real time,
the next step in the migration plan is to evaluate how much historical data you need to copy or
bulk upload from Cassandra to Amazon Keyspaces. This ensures that both, new data and historical
data are going to be available in the new Amazon Keyspaces database before you’re migrating the
application.
Online migration 39

Amazon Keyspaces (for Apache Cassandra) Developer Guide
Depending on your data retention requirements, for example how much historical data you need to
preserve based on your organizations policies, you can consider one the following two options.
• Bulk upload of historical data – The migration of historical data from your existing Cassandra
deployment to Amazon Keyspaces can be achieved through various techniques, for example
using AWS Glue or custom scripts to extract, transform, and load (ETL) the data. For more
information about using AWS Glue to upload historical data, see the section called “Offline
migration”.
When planning the bulk upload of historical data, you need to consider how to resolve conflicts
that can occur when new writes are trying to update the same data that is in the process of being
uploaded. The bulk upload is expected to be eventually consistent, which means the data is
going to reach all nodes eventually.
If an update of the same data occurs at the same time due to a new write, you want to ensure
that it's not going to be overwritten by the historical data upload. To ensure that you preserve
the latest updates to your data even during the bulk import, you must add conflict resolution
either into the bulk upload scripts or into the application logic for dual writes.
For example, you can use the section called “Lightweight transactions” (LWT) to compare and set
operations. To do this, you can add an additional field to your data-model that represents time
of modification or state.
Additionally, Amazon Keyspaces supports the Cassandra WRITETIME timestamp function. You
can use Amazon Keyspaces client-side timestamps to preserve source database timestamps and
implement last-writer-wins conflict resolution. For more information, see the section called
“Client-side timestamps”.
• Using Time-to-Live (TTL) – For data retention periods shorter than 30, 60, or 90 days, you can
use TTL in Cassandra and Amazon Keyspaces during migration to avoid uploading unnecessary
historical data to Amazon Keyspaces. TTL allows you to set a time period after which the data is
automatically removed from the database.
During the migration phase, instead of copying historical data to Amazon Keyspaces, you can
configure the TTL settings to let the historical data expire automatically in the old system
(Cassandra) while only applying the new writes to Amazon Keyspaces using the dual-write
method. Over time and with old data continually expiring in the Cassandra cluster and new data
written using the dual-write method, Amazon Keyspaces automatically catches up to contain the
same data as Cassandra.
Online migration 40
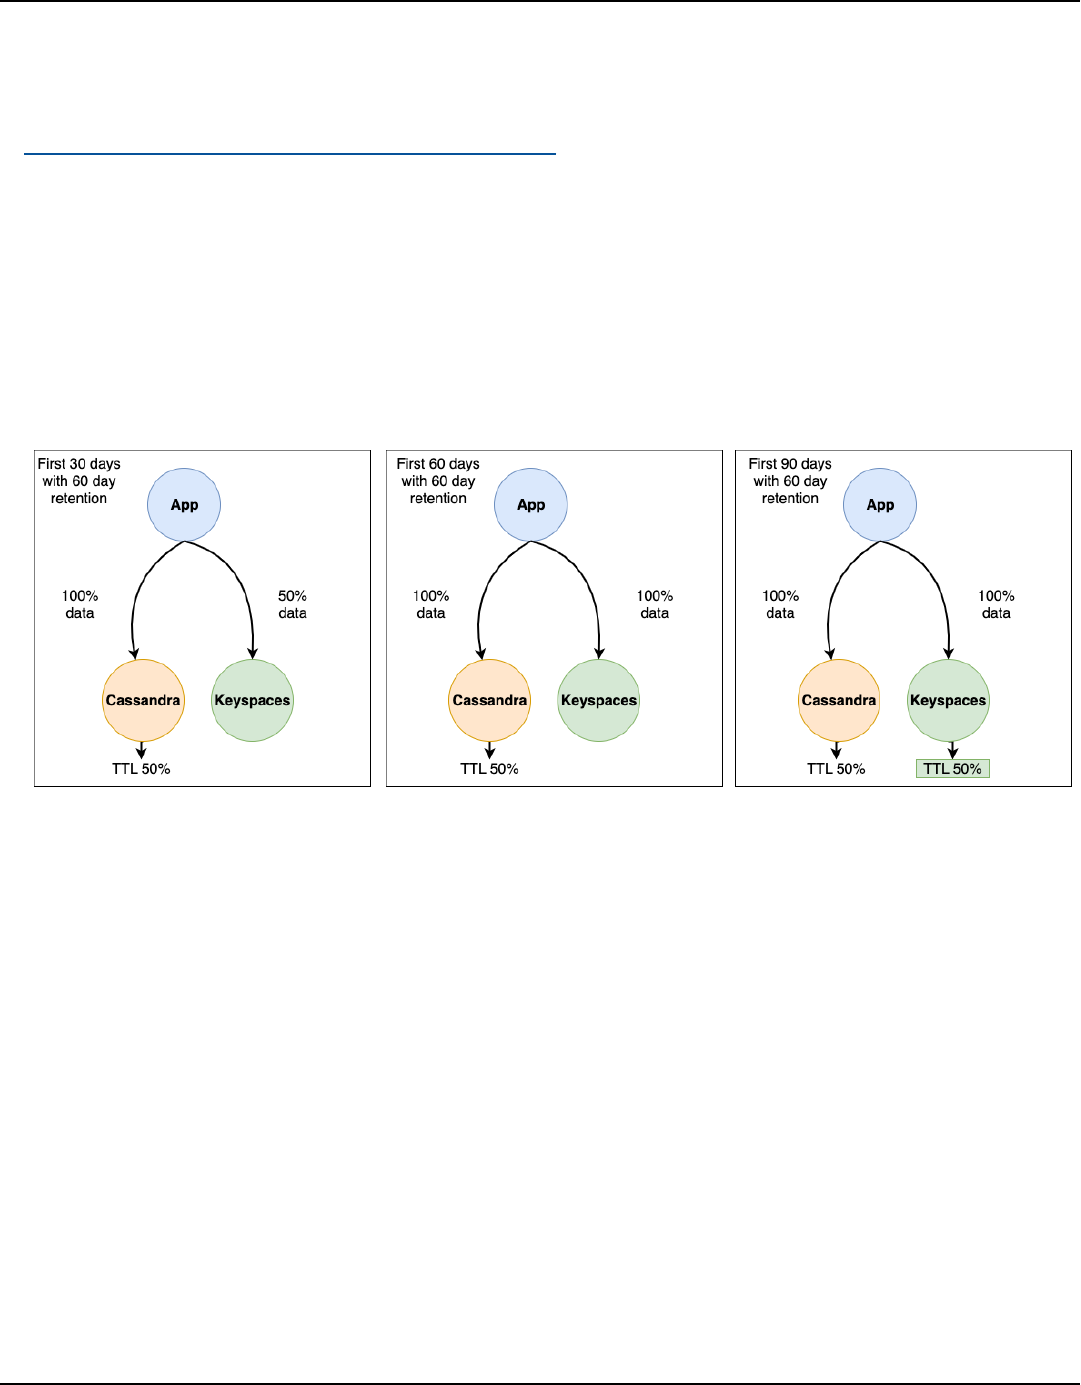
Amazon Keyspaces (for Apache Cassandra) Developer Guide
This approach can significantly reduce the amount of data to be migrated, resulting in a more
efficient and streamlined migration process. You can consider this approach when dealing with
large datasets with varying data retention requirements. For more information about TTL, see
the section called “Expire data with Time to Live”.
Consider the following example of a migration from Cassandra to Amazon Keyspaces using
TTL data expiration. In this example we set TTL for both databases to 60 days and show how
the migration process progresses over a period of 90 days. Both databases receive the same
newly written data during this period using the dual writes method. We're going to look at three
different phases of the migration, each phase is 30 days long.
How the migration process works for each phase is shown in the following images.
1. After the first 30 days, the Cassandra cluster and Amazon Keyspaces have been receiving new
writes. The Cassandra cluster also contains historical data that has not yet reached 60 days of
retention, which makes up 50% of the data in the cluster.
Data that is older than 60 days is being automatically deleted in the Cassandra cluster using
TTL. At this point Amazon Keyspaces contains 50% of the data stored in the Cassandra cluster,
which is made up of the new writes minus the historical data.
2. After 60 days, both the Cassandra cluster and Amazon Keyspaces contain the same data
written in the last 60 days.
3. Within 90 days, both Cassandra and Amazon Keyspaces contain the same data and are
expiring data at the same rate.
This example illustrates how to avoid the step of uploading historical data by using TTL with an
expiration date set to 60 days.
Online migration 41

Amazon Keyspaces (for Apache Cassandra) Developer Guide
Validating data consistency during an online migration
The next step in the online migration process is data validation. Dual writes are adding new data to
your Amazon Keyspaces database and you have completed the migration of historical data either
using bulk upload or data expiration with TTL.
Now you can use the validation phase to confirm that both data stores contain in fact the same
data and return the same read results. You can choose from one of the following two options to
validate that both your databases contain identical data.
• Dual reads – To validate that both, the source and the destination database contain the same set
of newly written and historical data, you can implement dual reads. To do so you read from both
your primary Cassandra and your secondary Amazon Keyspaces database similarly to the dual
writes method and compare the results asynchronously.
The results from the primary database are returned to the client, and the results from the
secondary database are used to validate against the primary resultset. Differences found can be
logged or sent to a dead letter queue (DLQ) for later reconciliation.
In the following diagram, the application is performing a synchronous read from Cassandra,
which is the primary data store) and an asynchronous read from Amazon Keyspaces, which is the
secondary data store.
Online migration 42

Amazon Keyspaces (for Apache Cassandra) Developer Guide
• Sample reads – An alternative solution that doesn’t require application code changes is to
use AWS Lambda functions to periodically and randomly sample data from both the source
Cassandra cluster and the destination Amazon Keyspaces database.
These Lambda functions can be configured to run at regular intervals. The Lambda function
retrieves a random subset of data from both the source and destination systems, and then
performs a comparison of the sampled data. Any discrepancies or mismatches between the two
datasets can be recorded and sent to a dedicated dead letter queue (DLQ) for later reconciliation.
This process is illustrated in the following diagram.
Online migration 43
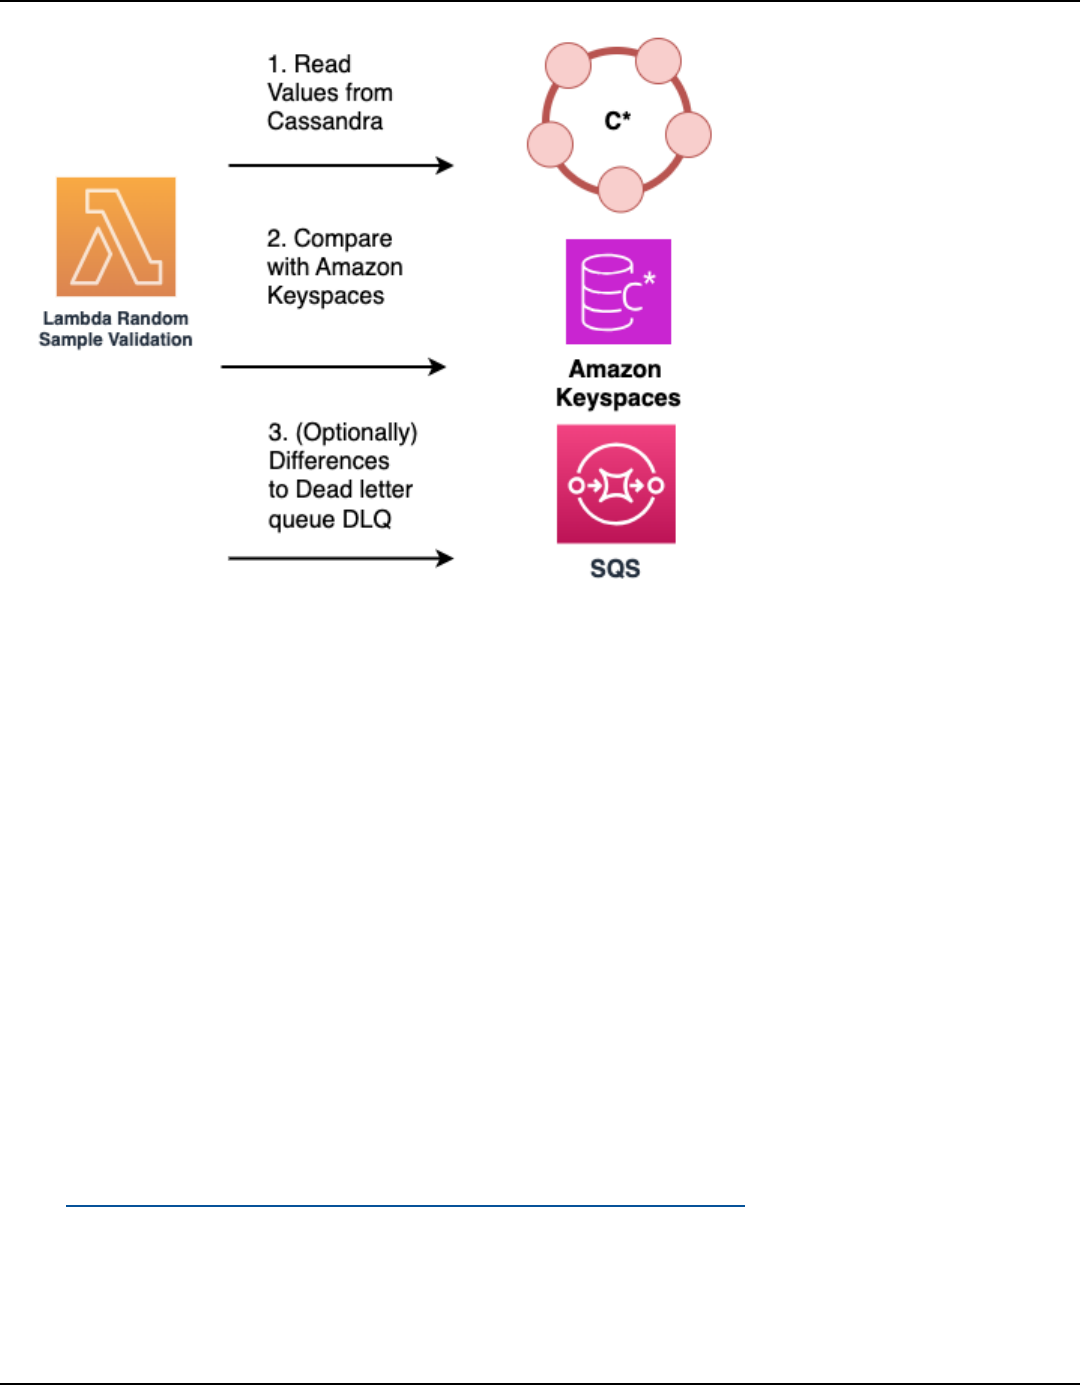
Amazon Keyspaces (for Apache Cassandra) Developer Guide
Migrating the application during an online migration
In the fourth phase of an online migration, you are migrating your application and transitioning to
Amazon Keyspaces as the primary data store. This means that you switch your application to read
and write directly from and to Amazon Keyspaces. To ensure minimal disruption to your users, this
should be a well-planned and coordinated process.
Two different recommended solution for application migration are available, the blue green cut
over strategy and the canary cut over strategy. The following sections outline these strategies in
more detail.
• Blue green strategy – Using this approach, you switch your application to treat Amazon
Keyspaces as the primary data store and Cassandra as the secondary data store in a single step.
You can do this using an AWS AppConfig feature flag to control the election of primary and
secondary data stores across the application instance. For more information about feature flags,
see Creating a feature flag configuration profile in AWS AppConfig.
After making Amazon Keyspaces the primary data store, you monitor the application's behavior
and performance, ensuring that Amazon Keyspaces meets your requirements and that the
migration is successful.
Online migration 44

Amazon Keyspaces (for Apache Cassandra) Developer Guide
For example, if you implemented dual-reads for your application, during the application
migration phase you transition the primary reads going from Cassandra to Amazon Keyspaces
and the secondary reads from Amazon Keyspaces to Cassandra. After the transition, you continue
to monitor and compare results as described in the data validation section to ensure consistency
across both databases before decommissioning Cassandra.
If you detect any issues, you can quickly roll back to the previous state by reverting to Cassandra
as the primary data store. You only proceed to the decommissioning phase of the migration if
Amazon Keyspaces is meeting all your needs as the primary data store.
• Canary strategy – In this approach, you gradually roll out the migration to a subset of your users
or traffic. Initially, a small percentage of your application's traffic, for example 5% of all traffic
is routed to the version using Amazon Keyspaces as the primary data store, while the rest of the
traffic continues to use Cassandra as the primary data store.
This allows you to thoroughly test the migrated version with real-world traffic and monitor its
performance, stability, and investigate potential issues. If you don't detect any issues, you can
incrementally increase the percentage of traffic routed to Amazon Keyspaces until it becomes the
primary data store for all users and traffic.
This staged roll out minimizes the risk of widespread service disruptions and allows for a more
controlled migration process. If any critical issues arise during the canary deployment, you
can quickly roll back to the previous version using Cassandra as the primary data store for the
affected traffic segment. You only proceed to the decommissioning phase of the migration after
you have validated that Amazon Keyspaces processes 100% of your users and traffic as expected.
The following diagram illustrates the individual steps of the canary strategy.
Online migration 45

Amazon Keyspaces (for Apache Cassandra) Developer Guide
Decommissioning Cassandra after an online migration
After the application migration is complete with your application is fully running on Amazon
Keyspaces and you have validated data consistency over a period of time, you can plan to
decommission your Cassandra cluster. During this phase, you can evaluate if the data remaining in
your Cassandra cluster needs to be archived or can be deleted. This depends on your organization’s
policies for data handling and retention.
By following this strategy and considering the recommended best practices described in this topic
when planning your online migration from Cassandra to Amazon Keyspaces, you can ensure a
seamless transition to Amazon Keyspaces while maintaining read-after-write consistency and
availability of your application.
Migrating from Apache Cassandra to Amazon Keyspaces can provide numerous benefits, including
reduced operational overhead, automatic scaling, improved security, and a framework that helps
you to reach your compliance goals. By planning an online migration strategy with dual writes,
Online migration 46

Amazon Keyspaces (for Apache Cassandra) Developer Guide
historical data upload, data validation, and a gradual roll out, you can ensure a smooth transition
with minimal disruption to your application and its users.
Implementing the online migration strategy discussed in this topic allows you to validate the
migration results, identify and address any issues, and ultimately decommission your existing
Cassandra deployment in favor of the fully managed Amazon Keyspaces service.
Offline migration process: Apache Cassandra to Amazon Keyspaces
Offline migrations are suitable when you can afford downtime to perform the migration. It's
common among enterprises to have maintenance windows for patching, large releases, or
downtime for hardware upgrades or major upgrades. Offline migration can use this window to
copy data and switch over the application traffic from Apache Cassandra to Amazon Keyspaces.
Offline migration reduces modifications to the application because it doesn't require
communication to both Cassandra and Amazon Keyspaces simultaneously. Additionally, with the
data flow paused, the exact state can be copied without maintaining mutations.
In this example, we use Amazon Simple Storage Service (Amazon S3) as a staging area for data
during the offline migration to minimize downtime. You can automatically import the data you
stored in Parquet format in Amazon S3 into an Amazon Keyspaces table using the Spark Cassandra
connector and AWS Glue. The following section is going to show the high-level overview of the
process. You can find code examples for this process on Github.
The offline migration process from Apache Cassandra to Amazon Keyspaces using Amazon S3 and
AWS Glue requires the following AWS Glue jobs.
1. An ETL job that extracts and transforms CQL data and stores it in an Amazon S3 bucket.
2. A second job that imports the data from the bucket to Amazon Keyspaces.
3. A third job to import incremental data.
How to perform an offline migration to Amazon Keyspaces from Cassandra running on Amazon
EC2 in a Amazon Virtual Private Cloud
1. First you use AWS Glue to export table data from Cassandra in Parquet format and save it to
an Amazon S3 bucket. You need to run an AWS Glue job using a AWS Glue connector to a VPC
where the Amazon EC2 instance running Cassandra resides. Then, using the Amazon S3 private
endpoint, you can save data to the Amazon S3 bucket.
Offline migration 47

Amazon Keyspaces (for Apache Cassandra) Developer Guide
The following diagram illustrates these steps.
2. Shuffle the data in the Amazon S3 bucket to improve data randomization. Evenly imported
data allows for more distributed traffic in the target table.
This step is required when exporting data from Cassandra with large partitions (partitions
with more than 1000 rows) to avoid hot key patterns when inserting the data into Amazon
Keyspaces. Hot key issues cause WriteThrottleEvents in Amazon Keyspaces and result in
increased load time.
3. Use another AWS Glue job to import data from the Amazon S3 bucket into Amazon Keyspaces.
The shuffled data in the Amazon S3 bucket is stored in Parquet format.
Offline migration 48

Amazon Keyspaces (for Apache Cassandra) Developer Guide
Using a hybrid migration solution: Apache Cassandra to Amazon
Keyspaces
The following migration solution can be considered a hybrid between online and offline migration.
With this hybrid approach, data is written to the destination database in near real time without
providing read after write consistency. This means that newly written data won’t be immediately
available and delays are to be expected. If you need read after write consistency, see the section
called “Online migration”.
For a near real time migration from Apache Cassandra to Amazon Keyspaces, you can choose
between two available methods.
• CQLReplicator – CQLReplicator is an open source utility available on Github that helps you to
migrate data from Apache Cassandra to Amazon Keyspaces in near real time.
To determine the writes and updates to propagate to the destination database, CQLReplicator
scans the Apache Cassandra token range and uses an AWS Glue job to remove duplicate events
and apply writes and updates directly to Amazon Keyspaces.
• Change data capture (CDC) – Apache Cassandra offers a built-in CDC feature that allows
capturing changes by copying the commit log to a separate CDC directory.
You can then use these logs to replicate data changes to other systems such as Amazon
Keyspaces, making CDC an effective option for data migration scenarios.
If you don't need read after write consistency, you can use either the CQLReplicator or a CDC
pipeline to migrate data from Apache Cassandra to Amazon Keyspaces based on your preferences
and familiarity with the tools and AWS services used in each solution. Using these methods to
migrate data in near real time can be considered a hybrid approach to migration that offers an
alternative to online migration.
Hybrid migration 49

Amazon Keyspaces (for Apache Cassandra) Developer Guide
This strategy is considered a hybrid approach, because in addition to the options outlined in this
topic, you have to implement some steps of the online migration progress, for example historical
data copy and the application migration strategies discussed in the online migration topic.
The following sections go over the hybrid migration options in more detail.
Topics
• Migrate data using CQLReplicator
• Migrate data using change data capture (CDC)
Migrate data using CQLReplicator
With CQLReplicator, you can read data from Apache Cassandra in near real time through
intelligently scanning the Cassandra token ring using CQL queries. CQLReplicator doesn’t use
Cassandra CDC and instead implements a caching strategy to reduce the performance penalties of
full scans.
To reduce the number of writes to the destination, CQLReplicator automatically removes duplicate
replication events. With CQLReplicator, you can tune the replication of changes from the source
database to the destination database, allowing for a near real time migration of data from Apache
Cassandra to Amazon Keyspaces.
The following diagram shows the typical architecture of a CQLReplicator job using AWS Glue.
1. To allow access to Apache Cassandra running in a private VPC, configure an AWS Glue
connection with the connection type Network.
2. To remove duplicates and enable key caching with the CQLReplicator job, configure Amazon
Simple Storage Service (Amazon S3).
3. The CQLReplicator job streams verified source database changes directly to Amazon Keyspaces.
Hybrid migration 50
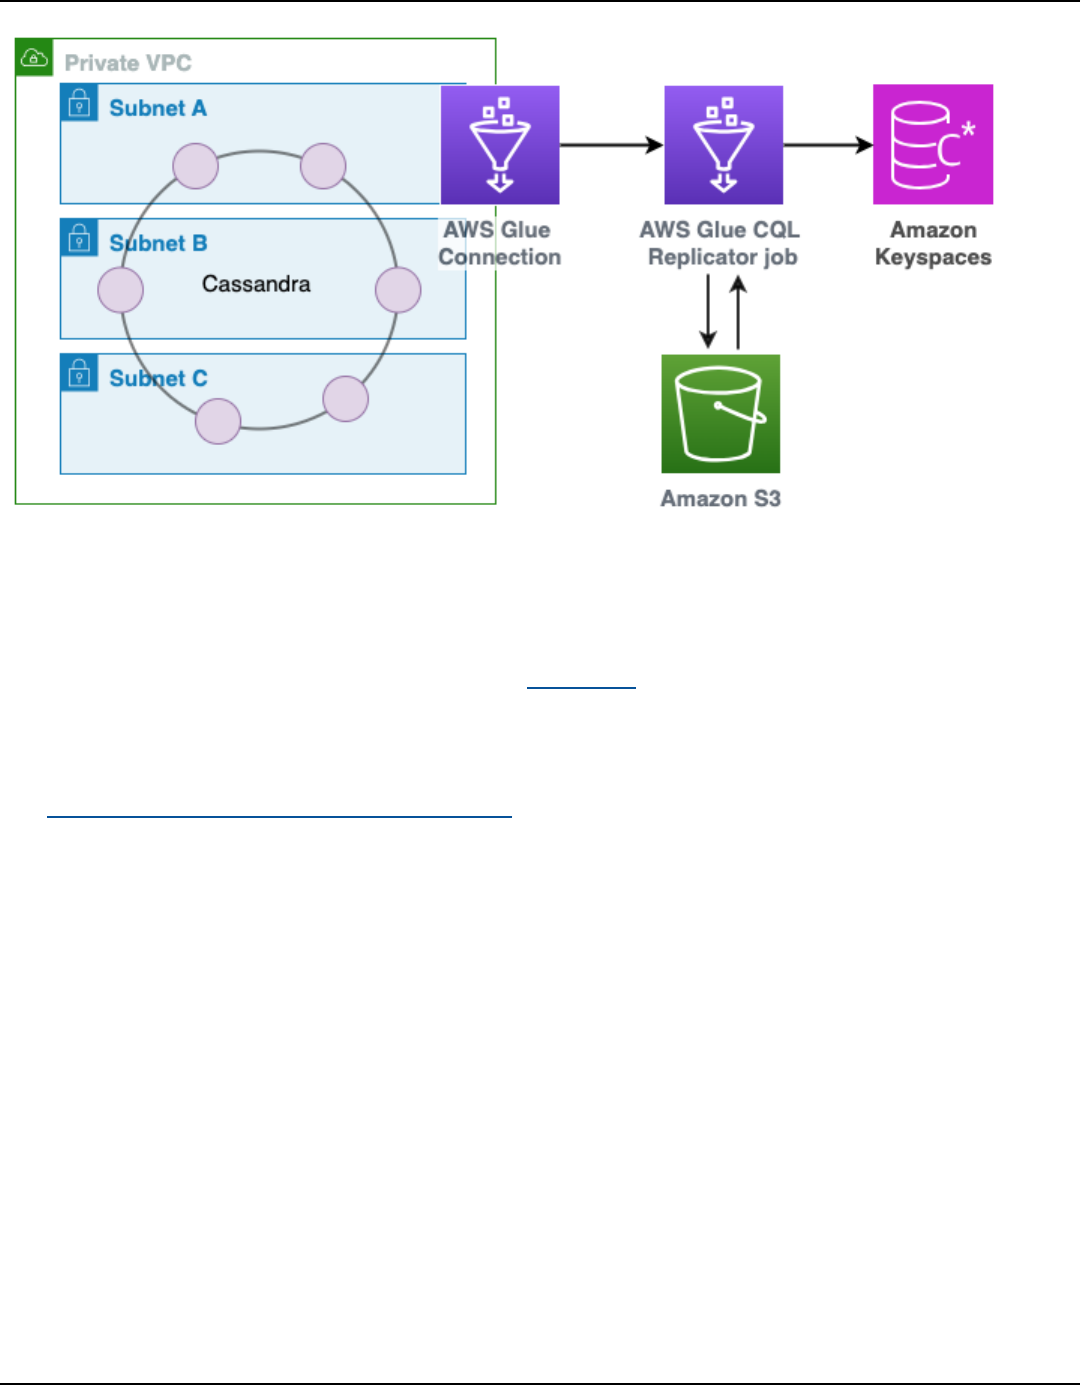
Amazon Keyspaces (for Apache Cassandra) Developer Guide
Migrate data using change data capture (CDC)
To successfully implement a change data capture (CDC) pipeline for migrating data from Cassandra
to Amazon Keyspaces, we recommend using the Debezium platform. Debezium is an open-source,
distributed platform for CDC, designed to monitor a database and capture row-level changes
reliably.
The Debezium connector for Apache Cassandra uploads changes to Amazon Managed Streaming
for Apache Kafka (Amazon MSK) so that they can be consumed and processed by downstream
consumers which in turn write the data to Amazon Keyspaces.
To address any potential data consistency issues, you can implement a process with Amazon MSK
where a consumer compares the keys or partitions in Cassandra with those in Amazon Keyspaces.
To implement this solution successfully, we recommend to consider the following.
• How to parse the CDC commit log, for example how to remove duplicate events.
• How to maintain the CDC directory, for example how to delete old logs.
• How to handle partial failures in Apache Cassandra, for example if a write only succeeds in one
out of three replicas.
This pattern treats changes from Cassandra as a "hint" that a key may have changed from its
previous state. To determine if there are changes to propagate to the destination database, you
Hybrid migration 51

Amazon Keyspaces (for Apache Cassandra) Developer Guide
must first read from the source Cassandra cluster using a LOCAL_QUORUM operation to receive the
latest records and then write them to Amazon Keyspaces.
In the case of range deletes or range updates, you may need to perform a comparison against the
entire partition to determine which write or update events need to be written to your destination
database.
In cases where writes are not idempotent, you also need to compare your writes with what is
already in the destination database before writing to Amazon Keyspaces.
The following diagram shows the typical architecture of a CDC pipeline using Debezium and
Amazon MSK.
How to select the right tool for bulk uploading or migrating
data to Amazon Keyspaces
In this section you can review the different tools that you can use to bulk upload or migrate data to
Amazon Keyspaces, and learn how to select the correct tool based on your needs. In addition, this
Migration tools 52

Amazon Keyspaces (for Apache Cassandra) Developer Guide
section provides an overview and use cases of the available step-by-step tutorials that demonstrate
how to import data into Amazon Keyspaces.
To review the available strategies to migrate workloads from Apache Cassandra to Amazon
Keyspaces, see the section called “Migrating from Cassandra”.
• Migration tools
• For large migrations, consider using an extract, transform, and load (ETL) tool. You can use
AWS Glue to quickly and effectively perform data transformation migrations. For more
information, see the section called “Offline migration”.
• CQLReplicator – CQLReplicator is an open source utility available on Github that helps you to
migrate data from Apache Cassandra to Amazon Keyspaces in near real time.
For more information, see the section called “CQLReplicator”.
• To learn how to use the Apache Cassandra Spark connector to write data to Amazon
Keyspaces, see the section called “Connecting with Apache Spark”.
•
Get started quickly with loading data into Amazon Keyspaces by using the cqlsh COPY FROM
command. cqlsh is included with Apache Cassandra and is best suited for loading small
datasets or test data. For step-by-step instructions, see the section called “Loading data using
cqlsh”.
• You can also use the DataStax Bulk Loader for Apache Cassandra to load data into Amazon
Keyspaces using the dsbulk command. DSBulk provides more robust import capabilities than
cqlsh and is available from the GitHub repository. For step-by-step instructions, see the section
called “Loading data using DSBulk”.
General considerations for data uploads to Amazon Keyspaces
• Break the data upload down into smaller components.
Consider the following units of migration and their potential footprint in terms of raw data size.
Uploading smaller amounts of data in one or more phases may help simplify your migration.
• By cluster – Migrate all of your Cassandra data at once. This approach may be fine for smaller
clusters.
• By keyspace or table – Break up your migration into groups of keyspaces or tables. This
approach can help you migrate data in phases based on your requirements for each workload.
Migration tools 53

Amazon Keyspaces (for Apache Cassandra) Developer Guide
• By data – Consider migrating data for a specific group of users or products, to bring the size of
data down even more.
• Prioritize what data to upload first based on simplicity.
Consider if you have data that could be migrated first more easily—for example, data that does
not change during specific times, data from nightly batch jobs, data not used during offline
hours, or data from internal apps.
Topics
• Tutorial: Loading data into Amazon Keyspaces using cqlsh
• Tutorial: Loading data into Amazon Keyspaces using DSBulk
Tutorial: Loading data into Amazon Keyspaces using cqlsh
This tutorial guides you through the process of migrating data from Apache Cassandra to Amazon
Keyspaces using the cqlsh COPY FROM command. The cqlsh COPY FROM command is useful
to quickly and easily upload small datasets to Amazon Keyspaces for academic or test purposes.
For more information about how to migrate production workloads, see the section called “Offline
migration”. In this tutorial, you'll complete the following steps:
Prerequisites – Set up an AWS account with credentials, create a JKS trust store file for the
certificate, and configure cqlsh to connect to Amazon Keyspaces.
1. Create source CSV and target table – Prepare a CSV file as the source data and create the target
keyspace and table in Amazon Keyspaces.
2. Prepare the data – Randomize the data in the CSV file and analyze it to determine the average
and maximum row sizes.
3. Set throughput capacity – Calculate the required write capacity units (WCUs) based on the data
size and desired load time, and configure the table's provisioned capacity.
4.
Configure cqlsh parameters – Determine optimal values for cqlsh COPY FROM parameters
like INGESTRATE, NUMPROCESSES, MAXBATCHSIZE, and CHUNKSIZE to distribute the workload
evenly.
5.
Run the cqlsh COPY FROM command – Run the cqlsh COPY FROM command to upload the
data from the CSV file to the Amazon Keyspaces table, and monitor the progress.
Loading data using cqlsh 54

Amazon Keyspaces (for Apache Cassandra) Developer Guide
Troubleshooting – Resolve common issues like invalid requests, parser errors, capacity errors, and
cqlsh errors during the data upload process.
Topics
• Prerequisites: Steps to complete before you can upload data using cqlsh COPY FROM
• Step 1: Create the source CSV file and a target table for the data upload
• Step 2: Prepare the source data for a successful data upload
• Step 3: Set throughput capacity for the table
• Step 4: Configure cqlsh COPY FROM settings
• Step 5: Run the cqlsh COPY FROM command to upload data from the CSV file to the target table
• Troubleshooting
Prerequisites: Steps to complete before you can upload data using cqlsh COPY
FROM
You must complete the following tasks before you can start this tutorial.
1. If you have not already done so, sign up for an AWS account by following the steps at the
section called “Setting up AWS Identity and Access Management”.
2. Create service-specific credentials by following the steps at the section called “Create service-
specific credentials”.
3. Set up the Cassandra Query Language shell (cqlsh) connection and confirm that you can
connect to Amazon Keyspaces by following the steps at the section called “Using cqlsh”.
Step 1: Create the source CSV file and a target table for the data upload
For this tutorial, we use a comma-separated values (CSV) file with the name
keyspaces_sample_table.csv as the source file for the data migration. The provided sample
file contains a few rows of data for a table with the name book_awards.
1. Create the source file. You can choose one of the following options:
•
Download the sample CSV file (keyspaces_sample_table.csv) contained in the
following archive file samplemigration.zip. Unzip the archive and take note of the path to
keyspaces_sample_table.csv.
Loading data using cqlsh 55

Amazon Keyspaces (for Apache Cassandra) Developer Guide
• To populate a CSV file with your own data stored in an Apache Cassandra database, you
can populate the source CSV file by using the cqlsh COPY TO statement as shown in the
following example.
cqlsh localhost 9042 -u "username" -p "password" --execute
"COPY mykeyspace.mytable TO 'keyspaces_sample_table.csv' WITH HEADER=true"
Make sure the CSV file you create meets the following requirements:
• The first row contains the column names.
• The column names in the source CSV file match the column names in the target table.
• The data is delimited with a comma.
• All data values are valid Amazon Keyspaces data types. See the section called “Data
types”.
2. Create the target keyspace and table in Amazon Keyspaces.
a.
Connect to Amazon Keyspaces using cqlsh, replacing the service endpoint, user name,
and password in the following example with your own values.
cqlsh cassandra.us-east-2.amazonaws.com 9142 -u "111122223333" -
p "wJalrXUtnFEMI/K7MDENG/bPxRfiCYEXAMPLEKEY" --ssl
b.
Create a new keyspace with the name catalog as shown in the following example.
CREATE KEYSPACE catalog WITH REPLICATION = {'class': 'SingleRegionStrategy'};
c. When the new keyspace is available, use the following code to create the target table
book_awards.
CREATE TABLE "catalog.book_awards" (
year int,
award text,
rank int,
category text,
book_title text,
author text,
publisher text,
PRIMARY KEY ((year, award), category, rank)
);
Loading data using cqlsh 56

Amazon Keyspaces (for Apache Cassandra) Developer Guide
If Apache Cassandra is your original data source, a simple way to create the Amazon Keyspaces
target table with matching headers is to generate the CREATE TABLE statement from the
source table, as shown in the following statement.
cqlsh localhost 9042 -u "username" -p "password" --execute "DESCRIBE
TABLE mykeyspace.mytable;"
Then create the target table in Amazon Keyspaces with the column names and data types
matching the description from the Cassandra source table.
Step 2: Prepare the source data for a successful data upload
Preparing the source data for an efficient transfer is a two-step process. First, you randomize the
data. In the second step, you analyze the data to determine the appropriate cqlsh parameter
values and required table settings to ensure that the data upload is successful.
Randomize the data
The cqlsh COPY FROM command reads and writes data in the same order that it appears in the
CSV file. If you use the cqlsh COPY TO command to create the source file, the data is written
in key-sorted order in the CSV. Internally, Amazon Keyspaces partitions data using partition keys.
Although Amazon Keyspaces has built-in logic to help load balance requests for the same partition
key, loading the data is faster and more efficient if you randomize the order. This is because you
can take advantage of the built-in load balancing that occurs when Amazon Keyspaces is writing to
different partitions.
To spread the writes across the partitions evenly, you must randomize the data in the source file.
You can write an application to do this or use an open-source tool, such as Shuf. Shuf is freely
available on Linux distributions, on macOS (by installing coreutils in homebrew), and on Windows
(by using Windows Subsystem for Linux (WSL)). One extra step is required to prevent the header
row with the column names to get shuffled in this step.
To randomize the source file while preserving the header, enter the following code.
tail -n +2 keyspaces_sample_table.csv | shuf -o keyspace.table.csv && (head
-1 keyspaces_sample_table.csv && cat keyspace.table.csv ) > keyspace.table.csv1 &&
mv keyspace.table.csv1 keyspace.table.csv
Loading data using cqlsh 57

Amazon Keyspaces (for Apache Cassandra) Developer Guide
Shuf rewrites the data to a new CSV file called keyspace.table.csv. You can now delete the
keyspaces_sample_table.csv file—you no longer need it.
Analyze the data
Determine the average and maximum row size by analyzing the data.
You do this for the following reasons:
• The average row size helps to estimate the total amount of data to be transferred.
• You need the average row size to provision the write capacity needed for the data upload.
• You can make sure that each row is less than 1 MB in size, which is the maximum row size in
Amazon Keyspaces.
Note
This quota refers to row size, not partition size. Unlike Apache Cassandra partitions,
Amazon Keyspaces partitions can be virtually unbound in size. Partition keys and clustering
columns require additional storage for metadata, which you must add to the raw size of
rows. For more information, see the section called “Estimate row size”.
The following code uses AWK to analyze a CSV file and print the average and maximum row size.
awk -F, 'BEGIN {samp=10000;max=-1;}{if(NR>1){len=length($0);t+=len;avg=t/
NR;max=(len>max ? len : max)}}NR==samp{exit}END{printf("{lines: %d, average: %d bytes,
max: %d bytes}\n",NR,avg,max);}' keyspace.table.csv
Running this code results in the following output.
using 10,000 samples:
{lines: 10000, avg: 123 bytes, max: 225 bytes}
You use the average row size in the next step of this tutorial to provision the write capacity for the
table.
Loading data using cqlsh 58

Amazon Keyspaces (for Apache Cassandra) Developer Guide
Step 3: Set throughput capacity for the table
This tutorial shows you how to tune cqlsh to load data within a set time range. Because you know
how many reads and writes you perform in advance, use provisioned capacity mode. After you
finish the data transfer, you should set the capacity mode of the table to match your application’s
traffic patterns. To learn more about capacity management, see Managing serverless resources.
With provisioned capacity mode, you specify how much read and write capacity you want
to provision to your table in advance. Write capacity is billed hourly and metered in write
capacity units (WCUs). Each WCU is enough write capacity to support writing 1 KB of data
per second. When you load the data, the write rate must be under the max WCUs (parameter:
write_capacity_units) that are set on the target table.
By default, you can provision up to 40,000 WCUs to a table and 80,000 WCUs across all the tables
in your account. If you need additional capacity, you can request a quota increase in the Service
Quotas console. For more information about quotas, see Quotas.
Calculate the average number of WCUs required for an insert
Inserting 1 KB of data per second requires 1 WCU. If your CSV file has 360,000 rows and you want
to load all the data in 1 hour, you must write 100 rows per second (360,000 rows / 60 minutes / 60
seconds = 100 rows per second). If each row has up to 1 KB of data, to insert 100 rows per second,
you must provision 100 WCUs to your table. If each row has 1.5 KB of data, you need two WCUs to
insert one row per second. Therefore, to insert 100 rows per second, you must provision 200 WCUs.
To determine how many WCUs you need to insert one row per second, divide the average row size
in bytes by 1024 and round up to the nearest whole number.
For example, if the average row size is 3000 bytes, you need three WCUs to insert one row per
second.
ROUNDUP(3000 / 1024) = ROUNDUP(2.93) = 3 WCUs
Calculate data load time and capacity
Now that you know the average size and number of rows in your CSV file, you can calculate how
many WCUs you need to load the data in a given amount of time, and the approximate time it
takes to load all the data in your CSV file using different WCU settings.
For example, if each row in your file is 1 KB and you have 1,000,000 rows in your CSV file, to load
the data in 1 hour, you need to provision at least 278 WCUs to your table for that hour.
Loading data using cqlsh 59

Amazon Keyspaces (for Apache Cassandra) Developer Guide
1,000,000 rows * 1 KBs = 1,000,000 KBs
1,000,000 KBs / 3600 seconds =277.8 KBs / second = 278 WCUs
Configure provisioned capacity settings
You can set a table’s write capacity settings when you create the table or by using the ALTER
TABLE CQL command. The following is the syntax for altering a table’s provisioned capacity
settings with the ALTER TABLE CQL statement.
ALTER TABLE mykeyspace.mytable WITH custom_properties={'capacity_mode':
{'throughput_mode': 'PROVISIONED', 'read_capacity_units': 100,
'write_capacity_units': 278}} ;
For the complete language reference, see the section called “ALTER TABLE”.
Step 4: Configure cqlsh COPY FROM settings
This section outlines how to determine the parameter values for cqlsh COPY FROM. The cqlsh
COPY FROM command reads the CSV file that you prepared earlier and inserts the data into
Amazon Keyspaces using CQL. The command divides up the rows and distributes the INSERT
operations among a set of workers. Each worker establishes a connection with Amazon Keyspaces
and sends INSERT requests along this channel.
The cqlsh COPY command doesn’t have internal logic to distribute work evenly among its
workers. However, you can configure it manually to make sure that the work is distributed evenly.
Start by reviewing these key cqlsh parameters:
• DELIMITER – If you used a delimiter other than a comma, you can set this parameter, which
defaults to comma.
•
INGESTRATE – The target number of rows that cqlsh COPY FROM attempts to process per
second. If unset, it defaults to 100,000.
•
NUMPROCESSES – The number of child worker processes that cqlsh creates for COPY FROM
tasks. The maximum for this setting is 16, the default is num_cores - 1, where num_cores is
the number of processing cores on the host running cqlsh.
• MAXBATCHSIZE – The batch size determines the maximal number of rows inserted into the
destination table in a single batch. If unset, cqlsh uses batches of 20 inserted rows.
• CHUNKSIZE – The size of the work unit that passes to the child worker. By default, it is set to
5,000.
Loading data using cqlsh 60

Amazon Keyspaces (for Apache Cassandra) Developer Guide
• MAXATTEMPTS – The maximum number of times to retry a failed worker chunk. After the
maximum attempt is reached, the failed records are written to a new CSV file that you can run
again later after investigating the failure.
Set INGESTRATE based on the number of WCUs that you provisioned to the target destination
table. The INGESTRATE of the cqlsh COPY FROM command isn’t a limit—it’s a target average.
This means it can (and often does) burst above the number you set. To allow for bursts and make
sure that enough capacity is in place to handle the data load requests, set INGESTRATE to 90% of
the table’s write capacity.
INGESTRATE = WCUs * .90
Next, set the NUMPROCESSES parameter to equal to one less than the number of cores on your
system. To find out what the number of cores of your system is, you can run the following code.
python -c "import multiprocessing; print(multiprocessing.cpu_count())"
For this tutorial, we use the following value.
NUMPROCESSES = 4
Each process creates a worker, and each worker establishes a connection to Amazon Keyspaces.
Amazon Keyspaces can support up to 3,000 CQL requests per second on every connection. This
means that you have to make sure that each worker is processing fewer than 3,000 requests per
second.
As with INGESTRATE, the workers often burst above the number you set and aren’t limited by
clock seconds. Therefore, to account for bursts, set your cqlsh parameters to target each worker to
process 2,500 requests per second. To calculate the amount of work distributed to a worker, use
the following guideline.
•
Divide INGESTRATE by NUMPROCESSES.
•
If INGESTRATE / NUMPROCESSES > 2,500, lower the INGESTRATE to make this formula true.
INGESTRATE / NUMPROCESSES <= 2,500
Loading data using cqlsh 61

Amazon Keyspaces (for Apache Cassandra) Developer Guide
Before you configure the settings to optimize the upload of our sample data, let's review the
cqlsh default settings and see how using them impacts the data upload process. Because cqlsh
COPY FROM uses the CHUNKSIZE to create chunks of work (INSERT statements) to distribute to
workers, the work is not automatically distributed evenly. Some workers might sit idle, depending
on the INGESTRATE setting.
To distribute work evenly among the workers and keep each worker at the optimal 2,500 requests
per second rate, you must set CHUNKSIZE, MAXBATCHSIZE, and INGESTRATE by changing the
input parameters. To optimize network traffic utilization during the data load, choose a value for
MAXBATCHSIZE that is close to the maximum value of 30. By changing CHUNKSIZE to 100 and
MAXBATCHSIZE to 25, the 10,000 rows are spread evenly among the four workers (10,000 / 2500 =
4).
The following code example illustrates this.
INGESTRATE = 10,000
NUMPROCESSES = 4
CHUNKSIZE = 100
MAXBATCHSIZE. = 25
Work Distribution:
Connection 1 / Worker 1 : 2,500 Requests per second
Connection 2 / Worker 2 : 2,500 Requests per second
Connection 3 / Worker 3 : 2,500 Requests per second
Connection 4 / Worker 4 : 2,500 Requests per second
To summarize, use the following formulas when setting cqlsh COPY FROM parameters:
• INGESTRATE = write_capacity_units * .90
• NUMPROCESSES = num_cores -1 (default)
• INGESTRATE / NUMPROCESSES = 2,500 (This must be a true statement.)
• MAXBATCHSIZE = 30 (Defaults to 20. Amazon Keyspaces accepts batches up to 30.)
• CHUNKSIZE = (INGESTRATE / NUMPROCESSES) / MAXBATCHSIZE
Now that you have calculated NUMPROCESSES, INGESTRATE, and CHUNKSIZE, you’re ready to load
your data.
Loading data using cqlsh 62

Amazon Keyspaces (for Apache Cassandra) Developer Guide
Step 5: Run the cqlsh COPY FROM command to upload data from the CSV file to
the target table
To run the cqlsh COPY FROM command, complete the following steps.
1. Connect to Amazon Keyspaces using cqlsh.
2. Choose your keyspace with the following code.
USE catalog;
3.
Set write consistency to LOCAL_QUORUM. To ensure data durability, Amazon Keyspaces doesn’t
allow other write consistency settings. See the following code.
CONSISTENCY LOCAL_QUORUM;
4.
Prepare your cqlsh COPY FROM syntax using the following code example.
COPY book_awards FROM './keyspace.table.csv' WITH HEADER=true
AND INGESTRATE=calculated ingestrate
AND NUMPROCESSES=calculated numprocess
AND MAXBATCHSIZE=20
AND CHUNKSIZE=calculated chunksize;
5. Run the statement prepared in the previous step. cqlsh echoes back all the settings that you've
configured.
a. Make sure that the settings match your input. See the following example.
Reading options from the command line: {'chunksize': '120', 'header': 'true',
'ingestrate': '36000', 'numprocesses': '15', 'maxbatchsize': '20'}
Using 15 child processes
b. Review the number of rows transferred and the current average rate, as shown in the
following example.
Processed: 57834 rows; Rate: 6561 rows/s; Avg. rate: 31751 rows/s
c. When cqlsh has finished uploading the data, review the summary of the data load
statistics (the number of files read, runtime, and skipped rows) as shown in the following
example.
Loading data using cqlsh 63

Amazon Keyspaces (for Apache Cassandra) Developer Guide
15556824 rows imported from 1 files in 8 minutes and 8.321 seconds (0 skipped).
In this final step of the tutorial, you have uploaded the data to Amazon Keyspaces.
Important
Now that you have transferred your data, adjust the capacity mode settings of your target
table to match your application’s regular traffic patterns. You incur charges at the hourly
rate for your provisioned capacity until you change it.
Troubleshooting
After the data upload has completed, check to see if rows were skipped. To do so, navigate to the
source directory of the source CSV file and search for a file with the following name.
import_yourcsvfilename.err.timestamp.csv
cqlsh writes any skipped rows of data into a file with that name. If the file exists in your source
directory and has data in it, these rows didn't upload to Amazon Keyspaces. To retry these rows,
first check for any errors that were encountered during the upload and adjust the data accordingly.
To retry these rows, you can rerun the process.
Common errors
The most common reasons why rows aren’t loaded are capacity errors and parsing errors.
Invalid request errors when uploading data to Amazon Keyspaces
In the following example, the source table contains a counter column, which results in logged
batch calls from the cqlsh COPY command. Logged batch calls are not supported by Amazon
Keyspaces.
Failed to import 10 rows: InvalidRequest - Error from server: code=2200 [Invalid query]
message=“Only UNLOGGED Batches are supported at this time.“, will retry later,
attempt 22 of 25
Loading data using cqlsh 64

Amazon Keyspaces (for Apache Cassandra) Developer Guide
To resolve this error, use DSBulk to migrate the data. For more information, see the section called
“Loading data using DSBulk”.
Parser errors when uploading data to Amazon Keyspaces
The following example shows a skipped row due to a ParseError.
Failed to import 1 rows: ParseError - Invalid ... –
To resolve this error, you need to make sure that the data to be imported matches the table
schema in Amazon Keyspaces. Review the import file for parsing errors. You can try using a single
row of data using an INSERT statement to isolate the error.
Capacity errors when uploading data to Amazon Keyspaces
Failed to import 1 rows: WriteTimeout - Error from server: code=1100 [Coordinator node
timed out waiting for replica nodes' responses]
message="Operation timed out - received only 0 responses." info={'received_responses':
0, 'required_responses': 2, 'write_type': 'SIMPLE', 'consistency':
'LOCAL_QUORUM'}, will retry later, attempt 1 of 100
Amazon Keyspaces uses the ReadTimeout and WriteTimeout exceptions to indicate when a
write request fails due to insufficient throughput capacity. To help diagnose insufficient capacity
exceptions, Amazon Keyspaces publishes WriteThrottleEvents and ReadThrottledEvents
metrics in Amazon CloudWatch. For more information, see the section called “Monitoring with
CloudWatch”.
cqlsh errors when uploading data to Amazon Keyspaces
To help troubleshoot cqlsh errors, rerun the failing command with the --debug flag.
When using an incompatible version of cqlsh, you see the following error.
AttributeError: 'NoneType' object has no attribute 'is_up'
Failed to import 3 rows: AttributeError - 'NoneType' object has no attribute 'is_up',
given up after 1 attempts
Confirm that the correct version of cqlsh is installed by running the following command.
cqlsh --version
Loading data using cqlsh 65

Amazon Keyspaces (for Apache Cassandra) Developer Guide
You should see something like the following for output.
cqlsh 5.0.1
If you're using Windows, replace all instances of cqlsh with cqlsh.bat. For example, to check the
version of cqlsh in Windows, run the following command.
cqlsh.bat --version
The connection to Amazon Keyspaces fails after the cqlsh client receives three consecutive errors of
any type from the server. The cqlsh client fails with the following message.
Failed to import 1 rows: NoHostAvailable - , will retry later, attempt 3 of 100
To resolve this error, you need to make sure that the data to be imported matches the table
schema in Amazon Keyspaces. Review the import file for parsing errors. You can try using a single
row of data by using an INSERT statement to isolate the error.
The client automatically attempts to reestablish the connection.
Tutorial: Loading data into Amazon Keyspaces using DSBulk
This step-by-step tutorial guides you through migrating data from Apache Cassandra to Amazon
Keyspaces using the DataStax Bulk Loader (DSBulk) available on GitHub. Using DSBulk is useful to
upload datasets to Amazon Keyspaces for academic or test purposes. For more information about
how to migrate production workloads, see the section called “Offline migration”. In this tutorial,
you complete the following steps.
Prerequisites – Set up an AWS account with credentials, create a JKS trust store file for the
certificate, configure cqlsh, download and install DSBulk, and configure an application.conf
file.
1. Create source CSV and target table – Prepare a CSV file as the source data and create the target
keyspace and table in Amazon Keyspaces.
2. Prepare the data – Randomize the data in the CSV file and analyze it to determine the average
and maximum row sizes.
3. Set throughput capacity – Calculate the required write capacity units (WCUs) based on the data
size and desired load time, and configure the table's provisioned capacity.
Loading data using DSBulk 66

Amazon Keyspaces (for Apache Cassandra) Developer Guide
4. Configure DSBulk settings – Create a DSBulk configuration file with settings like authentication,
SSL/TLS, consistency level, and connection pool size.
5. Run the DSBulk load command – Run the DSBulk load command to upload the data from the
CSV file to the Amazon Keyspaces table, and monitor the progress.
Topics
• Prerequisites: Steps you have to complete before you can upload data with DSBulk
• Step 1: Create the source CSV file and a target table for the data upload using DSBulk
• Step 2: Prepare the data to upload using DSBulk
• Step 3: Set the throughput capacity for the target table
• Step 4: Configure DSBulk settings to upload data from the CSV file to the target table
• Step 5: Run the DSBulk load command to upload data from the CSV file to the target table
Prerequisites: Steps you have to complete before you can upload data with
DSBulk
You must complete the following tasks before you can start this tutorial.
1. If you have not already done so, sign up for an AWS account by following the steps at the
section called “Setting up AWS Identity and Access Management”.
2. Create credentials by following the steps at the section called “Create IAM credentials for AWS
authentication”.
3. Create a JKS trust store file.
a.
Download the Starfield digital certificate using the following command and save sf-
class2-root.crt locally or in your home directory.
curl https://certs.secureserver.net/repository/sf-class2-root.crt -O
Note
You can also use the Amazon digital certificate to connect to Amazon Keyspaces
and can continue to do so if your client is connecting to Amazon Keyspaces
Loading data using DSBulk 67

Amazon Keyspaces (for Apache Cassandra) Developer Guide
successfully. The Starfield certificate provides additional backwards compatibility
for clients using older certificate authorities.
b. Convert the Starfield digital certificate into a trustStore file.
openssl x509 -outform der -in sf-class2-root.crt -out temp_file.der
keytool -import -alias cassandra -keystore cassandra_truststore.jks -file
temp_file.der
In this step, you need to create a password for the keystore and trust this certificate. The
interactive command looks like this.
Enter keystore password:
Re-enter new password:
Owner: OU=Starfield Class 2 Certification Authority, O="Starfield Technologies,
Inc.", C=US
Issuer: OU=Starfield Class 2 Certification Authority, O="Starfield
Technologies, Inc.", C=US
Serial number: 0
Valid from: Tue Jun 29 17:39:16 UTC 2004 until: Thu Jun 29 17:39:16 UTC 2034
Certificate fingerprints:
MD5: 32:4A:4B:BB:C8:63:69:9B:BE:74:9A:C6:DD:1D:46:24
SHA1: AD:7E:1C:28:B0:64:EF:8F:60:03:40:20:14:C3:D0:E3:37:0E:B5:8A
SHA256:
14:65:FA:20:53:97:B8:76:FA:A6:F0:A9:95:8E:55:90:E4:0F:CC:7F:AA:4F:B7:C2:C8:67:75:21:FB:5F:B6:58
Signature algorithm name: SHA1withRSA
Subject Public Key Algorithm: 2048-bit RSA key
Version: 3
Extensions:
#1: ObjectId: 2.5.29.35 Criticality=false
AuthorityKeyIdentifier [
KeyIdentifier [
0000: BF 5F B7 D1 CE DD 1F 86 F4 5B 55 AC DC D7 10 C2 ._.......[U.....
0010: 0E A9 88 E7 ....
]
[OU=Starfield Class 2 Certification Authority, O="Starfield Technologies,
Inc.", C=US]
SerialNumber: [ 00]
]
#2: ObjectId: 2.5.29.19 Criticality=false
BasicConstraints:[
CA:true
Loading data using DSBulk 68

Amazon Keyspaces (for Apache Cassandra) Developer Guide
PathLen:2147483647
]
#3: ObjectId: 2.5.29.14 Criticality=false
SubjectKeyIdentifier [
KeyIdentifier [
0000: BF 5F B7 D1 CE DD 1F 86 F4 5B 55 AC DC D7 10 C2 ._.......[U.....
0010: 0E A9 88 E7 ....
]
]
Trust this certificate? [no]: y
4. Set up the Cassandra Query Language shell (cqlsh) connection and confirm that you can
connect to Amazon Keyspaces by following the steps at the section called “Using cqlsh”.
5. Download and install DSBulk.
a. To download DSBulk, you can use the following code.
curl -OL https://downloads.datastax.com/dsbulk/dsbulk-1.8.0.tar.gz
b.
Then unpack the tar file and add DSBulk to your PATH as shown in the following example.
tar -zxvf dsbulk-1.8.0.tar.gz
# add the DSBulk directory to the path
export PATH=$PATH:./dsbulk-1.8.0/bin
c.
Create an application.conf file to store settings to be used by DSBulk. You can save
the following example as ./dsbulk_keyspaces.conf. Replace localhost with the
contact point of your local Cassandra cluster if you are not on the local node, for example
the DNS name or IP address. Take note of the file name and path, as you're going to need
to specify this later in the dsbulk load command.
datastax-java-driver {
basic.contact-points = [ "localhost"]
advanced.auth-provider {
class = software.aws.mcs.auth.SigV4AuthProvider
aws-region = us-east-1
}
}
d.
To enable SigV4 support, download the shaded jar file from GitHub and place it in the
DSBulk lib folder as shown in the following example.
Loading data using DSBulk 69

Amazon Keyspaces (for Apache Cassandra) Developer Guide
curl -O -L https://github.com/aws/aws-sigv4-auth-cassandra-java-driver-plugin/
releases/download/4.0.6-shaded-v2/aws-sigv4-auth-cassandra-java-driver-
plugin-4.0.6-shaded.jar
Step 1: Create the source CSV file and a target table for the data upload using
DSBulk
For this tutorial, we use a comma-separated values (CSV) file with the name
keyspaces_sample_table.csv as the source file for the data migration. The provided sample
file contains a few rows of data for a table with the name book_awards.
1. Create the source file. You can choose one of the following options:
•
Download the sample CSV file (keyspaces_sample_table.csv) contained in the
following archive file samplemigration.zip. Unzip the archive and take note of the path to
keyspaces_sample_table.csv.
• To populate a CSV file with your own data stored in an Apache Cassandra database, you
can populate the source CSV file by using dsbulk unload as shown in the following
example.
dsbulk unload -k mykeyspace -t mytable -f ./my_application.conf
> keyspaces_sample_table.csv
Make sure the CSV file you create meets the following requirements:
• The first row contains the column names.
• The column names in the source CSV file match the column names in the target table.
• The data is delimited with a comma.
• All data values are valid Amazon Keyspaces data types. See the section called “Data
types”.
2. Create the target keyspace and table in Amazon Keyspaces.
a.
Connect to Amazon Keyspaces using cqlsh, replacing the service endpoint, user name,
and password in the following example with your own values.
Loading data using DSBulk 70

Amazon Keyspaces (for Apache Cassandra) Developer Guide
cqlsh cassandra.us-east-2.amazonaws.com 9142 -u "111122223333" -
p "wJalrXUtnFEMI/K7MDENG/bPxRfiCYEXAMPLEKEY" --ssl
b.
Create a new keyspace with the name catalog as shown in the following example.
CREATE KEYSPACE catalog WITH REPLICATION = {'class': 'SingleRegionStrategy'};
c. After the new keyspace has a status of available, use the following code to create the
target table book_awards. To learn more about asynchronous resource creation and how
to check if a resource is available, see the section called “Check keyspace creation status”.
CREATE TABLE catalog.book_awards (
year int,
award text,
rank int,
category text,
book_title text,
author text,
publisher text,
PRIMARY KEY ((year, award), category, rank)
);
If Apache Cassandra is your original data source, a simple way to create the Amazon Keyspaces
target table with matching headers is to generate the CREATE TABLE statement from the
source table as shown in the following statement.
cqlsh localhost 9042 -u "username" -p "password" --execute "DESCRIBE
TABLE mykeyspace.mytable;"
Then create the target table in Amazon Keyspaces with the column names and data types
matching the description from the Cassandra source table.
Step 2: Prepare the data to upload using DSBulk
Preparing the source data for an efficient transfer is a two-step process. First, you randomize the
data. In the second step, you analyze the data to determine the appropriate dsbulk parameter
values and required table settings.
Loading data using DSBulk 71
Amazon Keyspaces (for Apache Cassandra) Developer Guide
Randomize the data
The dsbulk command reads and writes data in the same order that it appears in the CSV file. If
you use the dsbulk command to create the source file, the data is written in key-sorted order
in the CSV. Internally, Amazon Keyspaces partitions data using partition keys. Although Amazon
Keyspaces has built-in logic to help load balance requests for the same partition key, loading the
data is faster and more efficient if you randomize the order. This is because you can take advantage
of the built-in load balancing that occurs when Amazon Keyspaces is writing to different partitions.
To spread the writes across the partitions evenly, you must randomize the data in the source file.
You can write an application to do this or use an open-source tool, such as Shuf. Shuf is freely
available on Linux distributions, on macOS (by installing coreutils in homebrew), and on Windows
(by using Windows Subsystem for Linux (WSL)). One extra step is required to prevent the header
row with the column names to get shuffled in this step.
To randomize the source file while preserving the header, enter the following code.
tail -n +2 keyspaces_sample_table.csv | shuf -o keyspace.table.csv && (head
-1 keyspaces_sample_table.csv && cat keyspace.table.csv ) > keyspace.table.csv1 &&
mv keyspace.table.csv1 keyspace.table.csv
Shuf rewrites the data to a new CSV file called keyspace.table.csv. You can now delete the
keyspaces_sample_table.csv file—you no longer need it.
Analyze the data
Determine the average and maximum row size by analyzing the data.
You do this for the following reasons:
• The average row size helps to estimate the total amount of data to be transferred.
• You need the average row size to provision the write capacity needed for the data upload.
• You can make sure that each row is less than 1 MB in size, which is the maximum row size in
Amazon Keyspaces.
Note
This quota refers to row size, not partition size. Unlike Apache Cassandra partitions,
Amazon Keyspaces partitions can be virtually unbound in size. Partition keys and clustering
Loading data using DSBulk 72

Amazon Keyspaces (for Apache Cassandra) Developer Guide
columns require additional storage for metadata, which you must add to the raw size of
rows. For more information, see the section called “Estimate row size”.
The following code uses AWK to analyze a CSV file and print the average and maximum row size.
awk -F, 'BEGIN {samp=10000;max=-1;}{if(NR>1){len=length($0);t+=len;avg=t/
NR;max=(len>max ? len : max)}}NR==samp{exit}END{printf("{lines: %d, average: %d bytes,
max: %d bytes}\n",NR,avg,max);}' keyspace.table.csv
Running this code results in the following output.
using 10,000 samples:
{lines: 10000, avg: 123 bytes, max: 225 bytes}
Make sure that your maximum row size doesn't exceed 1 MB. If it does, you have to break up the
row or compress the data to bring the row size below 1 MB. In the next step of this tutorial, you use
the average row size to provision the write capacity for the table.
Step 3: Set the throughput capacity for the target table
This tutorial shows you how to tune DSBulk to load data within a set time range. Because you know
how many reads and writes you perform in advance, use provisioned capacity mode. After you
finish the data transfer, you should set the capacity mode of the table to match your application’s
traffic patterns. To learn more about capacity management, see Managing serverless resources.
With provisioned capacity mode, you specify how much read and write capacity you want
to provision to your table in advance. Write capacity is billed hourly and metered in write
capacity units (WCUs). Each WCU is enough write capacity to support writing 1 KB of data
per second. When you load the data, the write rate must be under the max WCUs (parameter:
write_capacity_units) that are set on the target table.
By default, you can provision up to 40,000 WCUs to a table and 80,000 WCUs across all the tables
in your account. If you need additional capacity, you can request a quota increase in the Service
Quotas console. For more information about quotas, see Quotas.
Calculate the average number of WCUs required for an insert
Inserting 1 KB of data per second requires 1 WCU. If your CSV file has 360,000 rows and you want
to load all the data in 1 hour, you must write 100 rows per second (360,000 rows / 60 minutes / 60
Loading data using DSBulk 73

Amazon Keyspaces (for Apache Cassandra) Developer Guide
seconds = 100 rows per second). If each row has up to 1 KB of data, to insert 100 rows per second,
you must provision 100 WCUs to your table. If each row has 1.5 KB of data, you need two WCUs to
insert one row per second. Therefore, to insert 100 rows per second, you must provision 200 WCUs.
To determine how many WCUs you need to insert one row per second, divide the average row size
in bytes by 1024 and round up to the nearest whole number.
For example, if the average row size is 3000 bytes, you need three WCUs to insert one row per
second.
ROUNDUP(3000 / 1024) = ROUNDUP(2.93) = 3 WCUs
Calculate data load time and capacity
Now that you know the average size and number of rows in your CSV file, you can calculate how
many WCUs you need to load the data in a given amount of time, and the approximate time it
takes to load all the data in your CSV file using different WCU settings.
For example, if each row in your file is 1 KB and you have 1,000,000 rows in your CSV file, to load
the data in 1 hour, you need to provision at least 278 WCUs to your table for that hour.
1,000,000 rows * 1 KBs = 1,000,000 KBs
1,000,000 KBs / 3600 seconds =277.8 KBs / second = 278 WCUs
Configure provisioned capacity settings
You can set a table’s write capacity settings when you create the table or by using the ALTER
TABLE command. The following is the syntax for altering a table’s provisioned capacity settings
with the ALTER TABLE command.
ALTER TABLE catalog.book_awards WITH custom_properties={'capacity_mode':
{'throughput_mode': 'PROVISIONED', 'read_capacity_units': 100, 'write_capacity_units':
278}} ;
For the complete language reference, see the section called “CREATE TABLE” and the section called
“ALTER TABLE”.
Loading data using DSBulk 74

Amazon Keyspaces (for Apache Cassandra) Developer Guide
Step 4: Configure DSBulk settings to upload data from the CSV file to the target
table
This section outlines the steps required to configure DSBulk for data upload to Amazon Keyspaces.
You configure DSBulk by using a configuration file. You specify the configuration file directly from
the command line.
1. Create a DSBulk configuration file for the migration to Amazon Keyspaces, in this example we
use the file name dsbulk_keyspaces.conf. Specify the following settings in the DSBulk
configuration file.
a.
PlainTextAuthProvider – Create the authentication provider with the
PlainTextAuthProvider class. ServiceUserName and ServicePassword should
match the user name and password you obtained when you generated the service-specific
credentials by following the steps at the section called “Create programmatic access
credentials”.
b.
local-datacenter – Set the value for local-datacenter to the AWS Region that
you're connecting to. For example, if the application is connecting to cassandra.us-
east-2.amazonaws.com, then set the local data center to us-east-2. For all available
AWS Regions, see the section called “Service endpoints”. To avoid replicas, set slow-
replica-avoidance to false.
c.
SSLEngineFactory – To configure SSL/TLS, initialize the SSLEngineFactory
by adding a section in the configuration file with a single line that specifies
the class with class = DefaultSslEngineFactory. Provide the path to
cassandra_truststore.jks and the password that you created previously.
d.
consistency – Set the consistency level to LOCAL QUORUM. Other write consistency
levels are not supported, for more information see the section called “Supported
Cassandra consistency levels”.
e. The number of connections per pool is configurable in the Java driver. For this example,
set advanced.connection.pool.local.size to 3.
The following is the complete sample configuration file.
datastax-java-driver {
basic.contact-points = [ "cassandra.us-east-2.amazonaws.com:9142"]
advanced.auth-provider {
class = PlainTextAuthProvider
Loading data using DSBulk 75

Amazon Keyspaces (for Apache Cassandra) Developer Guide
username = "ServiceUserName"
password = "ServicePassword"
}
basic.load-balancing-policy {
local-datacenter = "us-east-2"
slow-replica-avoidance = false
}
basic.request {
consistency = LOCAL_QUORUM
default-idempotence = true
}
advanced.ssl-engine-factory {
class = DefaultSslEngineFactory
truststore-path = "./cassandra_truststore.jks"
truststore-password = "my_password"
hostname-validation = false
}
advanced.connection.pool.local.size = 3
}
2.
Review the parameters for the DSBulk load command.
a.
executor.maxPerSecond – The maximum number of rows that the load command
attempts to process concurrently per second. If unset, this setting is disabled with -1.
Set executor.maxPerSecond based on the number of WCUs that you provisioned to
the target destination table. The executor.maxPerSecond of the load command isn’t
a limit – it’s a target average. This means it can (and often does) burst above the number
you set. To allow for bursts and make sure that enough capacity is in place to handle the
data load requests, set executor.maxPerSecond to 90% of the table’s write capacity.
executor.maxPerSecond = WCUs * .90
In this tutorial, we set executor.maxPerSecond to 5.
Note
If you are using DSBulk 1.6.0 or higher, you can use
dsbulk.engine.maxConcurrentQueries instead.
Loading data using DSBulk 76

Amazon Keyspaces (for Apache Cassandra) Developer Guide
b.
Configure these additional parameters for the DSBulk load command.
•
batch-mode – This parameter tells the system to group operations by partition key. We
recommend to disable batch mode, because it can result in hot key scenarios and cause
WriteThrottleEvents.
•
driver.advanced.retry-policy-max-retries – This determines how many times
to retry a failed query. If unset, the default is 10. You can adjust this value as needed.
•
driver.basic.request.timeout – The time in minutes the system waits for a query
to return. If unset, the default is "5 minutes". You can adjust this value as needed.
Step 5: Run the DSBulk load command to upload data from the CSV file to the
target table
In the final step of this tutorial, you upload the data into Amazon Keyspaces.
To run the DSBulk load command, complete the following steps.
1. Run the following code to upload the data from your csv file to your Amazon Keyspaces table.
Make sure to update the path to the application configuration file you created earlier.
dsbulk load -f ./dsbulk_keyspaces.conf --connector.csv.url keyspace.table.csv
-header true --batch.mode DISABLED --executor.maxPerSecond 5 --
driver.basic.request.timeout "5 minutes" --driver.advanced.retry-policy.max-
retries 10 -k catalog -t book_awards
2. The output includes the location of a log file that details successful and unsuccessful
operations. The file is stored in the following directory.
Operation directory: /home/user_name/logs/UNLOAD_20210308-202317-801911
3. The log file entries will include metrics, as in the following example. Check to make sure that
the number of rows is consistent with the number of rows in your csv file.
total | failed | rows/s | p50ms | p99ms | p999ms
200 | 0 | 200 | 21.63 | 21.89 | 21.89
Loading data using DSBulk 77

Amazon Keyspaces (for Apache Cassandra) Developer Guide
Important
Now that you have transferred your data, adjust the capacity mode settings of your target
table to match your application’s regular traffic patterns. You incur charges at the hourly
rate for your provisioned capacity until you change it. For more information, see the section
called “Configure read/write capacity modes”.
Loading data using DSBulk 78

Amazon Keyspaces (for Apache Cassandra) Developer Guide
Accessing Amazon Keyspaces (for Apache Cassandra)
You can access Amazon Keyspaces using the console, AWS CloudShell, programmatically by
running a cqlsh client, the AWS SDK, or by using an Apache 2.0 licensed Cassandra driver. Amazon
Keyspaces supports drivers and clients that are compatible with Apache Cassandra 3.11.2. Before
accessing Amazon Keyspaces, you must complete setting up AWS Identity and Access Management
and then grant an IAM identity access permissions to Amazon Keyspaces.
Setting up AWS Identity and Access Management
Sign up for an AWS account
If you do not have an AWS account, complete the following steps to create one.
To sign up for an AWS account
1. Open https://portal.aws.amazon.com/billing/signup.
2. Follow the online instructions.
Part of the sign-up procedure involves receiving a phone call and entering a verification code
on the phone keypad.
When you sign up for an AWS account, an AWS account root user is created. The root user
has access to all AWS services and resources in the account. As a security best practice, assign
administrative access to a user, and use only the root user to perform tasks that require root
user access.
AWS sends you a confirmation email after the sign-up process is complete. At any time, you can
view your current account activity and manage your account by going to https://aws.amazon.com/
and choosing My Account.
Create a user with administrative access
After you sign up for an AWS account, secure your AWS account root user, enable AWS IAM Identity
Center, and create an administrative user so that you don't use the root user for everyday tasks.
Setting up AWS Identity and Access Management 79

Amazon Keyspaces (for Apache Cassandra) Developer Guide
Secure your AWS account root user
1. Sign in to the AWS Management Console as the account owner by choosing Root user and
entering your AWS account email address. On the next page, enter your password.
For help signing in by using root user, see Signing in as the root user in the AWS Sign-In User
Guide.
2. Turn on multi-factor authentication (MFA) for your root user.
For instructions, see Enable a virtual MFA device for your AWS account root user (console) in
the IAM User Guide.
Create a user with administrative access
1. Enable IAM Identity Center.
For instructions, see Enabling AWS IAM Identity Center in the AWS IAM Identity Center User
Guide.
2. In IAM Identity Center, grant administrative access to a user.
For a tutorial about using the IAM Identity Center directory as your identity source, see
Configure user access with the default IAM Identity Center directory in the AWS IAM Identity
Center User Guide.
Sign in as the user with administrative access
• To sign in with your IAM Identity Center user, use the sign-in URL that was sent to your email
address when you created the IAM Identity Center user.
For help signing in using an IAM Identity Center user, see Signing in to the AWS access portal in
the AWS Sign-In User Guide.
Assign access to additional users
1. In IAM Identity Center, create a permission set that follows the best practice of applying least-
privilege permissions.
For instructions, see Create a permission set in the AWS IAM Identity Center User Guide.
Create a user with administrative access 80

Amazon Keyspaces (for Apache Cassandra) Developer Guide
2. Assign users to a group, and then assign single sign-on access to the group.
For instructions, see Add groups in the AWS IAM Identity Center User Guide.
Setting up Amazon Keyspaces
Access to Amazon Keyspaces resources is managed using IAM. Using IAM, you can attach policies
to IAM users, roles, and federated identities that grant read and write permissions to specific
resources in Amazon Keyspaces.
To get started with granting permissions to an IAM identity, you can use one of the AWS managed
policies for Amazon Keyspaces:
• AmazonKeyspacesFullAccess – this policy grants permissions to access all resources in Amazon
Keyspaces with full access to all features.
• AmazonKeyspacesReadOnlyAccess_v2 – this policy grants read-only permissions to Amazon
Keyspaces.
For a detailed explanation of the actions defined in the managed policies, see the section called
“AWS managed policies”.
To limit the scope of actions that an IAM identity can perform or limit the resources that the
identity can access, you can create a custom policy that uses the AmazonKeyspacesFullAccess
managed policy as a template and remove all permissions that you don't need. You can also limit
access to specific keyspaces or tables. For more information about how to restrict actions or limit
access to specific resources in Amazon Keyspaces, see the section called “How Amazon Keyspaces
works with IAM”.
To access Amazon Keyspaces after you have created the AWS account and created a policy that
grants an IAM identity access to Amazon Keyspaces, continue to one of the following sections:
• Using the console
• Using AWS CloudShell
Setting up Amazon Keyspaces 81

Amazon Keyspaces (for Apache Cassandra) Developer Guide
Accessing Amazon Keyspaces using the console
You can access the console for Amazon Keyspaces at https://console.aws.amazon.com/keyspaces/
home. For more information about AWS Management Console access, see Controlling IAM users
access to the AWS Management Console in the IAM User Guide.
You can use the console to do the following in Amazon Keyspaces:
• Create, delete, and manage keyspaces and tables.
• Monitor important table metrics on a table's Monitor tab:
• Billable table size (Bytes)
• Capacity metrics
• Run queries using the CQL editor, for example insert, update, and delete data.
• Change the partitioner configuration of the account.
• View performance and error metrics for the account on the dashboard.
To learn how to create an Amazon Keyspaces keyspace and table and set it up with sample
application data, see Getting started with Amazon Keyspaces (for Apache Cassandra).
Using AWS CloudShell to access Amazon Keyspaces
AWS CloudShell is a browser-based, pre-authenticated shell that you can launch directly from
the AWS Management Console. You can run AWS CLI commands against AWS services using your
preferred shell (Bash, PowerShell or Z shell). To work with Amazon Keyspaces using cqlsh, you
must install the cqlsh-expansion. For cqlsh-expansion installation instructions, see the
section called “Using the cqlsh-expansion”.
You launch AWS CloudShell from the AWS Management Console, and the AWS credentials
you used to sign in to the console are automatically available in a new shell session. This pre-
authentication of AWS CloudShell users allows you to skip configuring credentials when interacting
with AWS services such as Amazon Keyspaces using cqlsh or AWS CLI version 2 (pre-installed on
the shell's compute environment).
Using the console 82

Amazon Keyspaces (for Apache Cassandra) Developer Guide
Obtaining IAM permissions for AWS CloudShell
Using the access management resources provided by AWS Identity and Access Management,
administrators can grant permissions to IAM users so they can access AWS CloudShell and use the
environment's features.
The quickest way for an administrator to grant access to users is through an AWS managed policy.
An AWS managed policy is a standalone policy that's created and administered by AWS. The
following AWS managed policy for CloudShell can be attached to IAM identities:
•
AWSCloudShellFullAccess: Grants permission to use AWS CloudShell with full access to all
features.
If you want to limit the scope of actions that an IAM user can perform with AWS CloudShell, you
can create a custom policy that uses the AWSCloudShellFullAccess managed policy as a
template. For more information about limiting the actions that are available to users in CloudShell,
see Managing AWS CloudShell access and usage with IAM policies in the AWS CloudShell User
Guide.
Note
Your IAM identity also requires a policy that grants permission to make calls to Amazon
Keyspaces.
You can use an AWS managed policy to give your IAM identity access you Amazon Keyspaces, or
start with the managed policy as a template and remove the permissions that you don't need.
You can also limit access to specific keyspaces and tables to create a custom policy. The following
managed policy for Amazon Keyspaces can be attached to IAM identities:
• AmazonKeyspacesFullAccess – This policy grants permission to use Amazon Keyspaces with full
access to all features.
For a detailed explanation of the actions defined in the managed policy, see the section called
“AWS managed policies”.
For more information about how to restrict actions or limit access to specific resources in Amazon
Keyspaces, see the section called “How Amazon Keyspaces works with IAM”.
Obtaining IAM permissions for AWS CloudShell 83

Amazon Keyspaces (for Apache Cassandra) Developer Guide
Interacting with Amazon Keyspaces using AWS CloudShell
After you launch AWS CloudShell from the AWS Management Console, you can immediately start
to interact with Amazon Keyspaces using cqlsh or the command line interface. If you haven't
already installed the cqlsh-expansion, see the section called “Using the cqlsh-expansion” for
detailed steps.
Note
When using the cqlsh-expansion in AWS CloudShell, you don't need to configure
credentials before making calls, because you're already authenticated within the shell.
Connect to Amazon Keyspaces and create a new keyspace. Then read from a system table to
confirm that the keyspace was created using AWS CloudShell
1. From the AWS Management Console, you can launch CloudShell by choosing the following
options available on the navigation bar:
• Choose the CloudShell icon.
• Start typing "cloudshell" in Search box and then choose the CloudShell option.
2. You can establish a connection to Amazon Keyspaces using the following command. Make
sure to replace cassandra.us-east-1.amazonaws.com with the correct endpoint for your
Region.
cqlsh-expansion cassandra.us-east-1.amazonaws.com 9142 --ssl
If the connection is successful, you should see output similar to the following example.
Connected to Amazon Keyspaces at cassandra.us-east-1.amazonaws.com:9142
[cqlsh 6.1.0 | Cassandra 3.11.2 | CQL spec 3.4.4 | Native protocol v4]
Use HELP for help.
cqlsh current consistency level is ONE.
cqlsh>
3.
Create a new keyspace with the name mykeyspace. You can use the following command to do
that.
Interacting with Amazon Keyspaces using AWS CloudShell 84

Amazon Keyspaces (for Apache Cassandra) Developer Guide
CREATE KEYSPACE mykeyspace WITH REPLICATION = {'class': 'SingleRegionStrategy'};
4. To confirm that the keyspace was created, you can read from a system table using the
following command.
SELECT * FROM system_schema_mcs.keyspaces WHERE keyspace_name = 'mykeyspace';
If the call is successful, the command line displays a response from the service similar to the
following output:
keyspace_name | durable_writes | replication
----------------+----------------
+-------------------------------------------------------------------------------------
mykeyspace | True | {'class':
'org.apache.cassandra.locator.SimpleStrategy', 'replication_factor': '3'}
(1 rows)
Create credentials for programmatic access to Amazon
Keyspaces
To provide users and applications with credentials for programmatic access to Amazon Keyspaces
resources, you can do either of the following:
• Create service-specific credentials that are similar to the traditional username and password that
Cassandra uses for authentication and access management. AWS service-specific credentials
are associated with a specific AWS Identity and Access Management (IAM) user and can only be
used for the service they were created for. For more information, see Using IAM with Amazon
Keyspaces (for Apache Cassandra) in the IAM User Guide.
Warning
IAM users have long-term credentials, which presents a security risk. To help mitigate this
risk, we recommend that you provide these users with only the permissions they require
to perform the task and that you remove these users when they are no longer needed.
Create programmatic access credentials 85

Amazon Keyspaces (for Apache Cassandra) Developer Guide
• For enhanced security, we recommend to create IAM identities that are used across all AWS
services and use temporary credentials. The Amazon Keyspaces SigV4 authentication plugin for
Cassandra client drivers enables you to authenticate calls to Amazon Keyspaces using IAM access
keys instead of user name and password. To learn more about how the Amazon Keyspaces SigV4
plugin enables IAM users, roles, and federated identities to authenticate in Amazon Keyspaces
API requests, see AWS Signature Version 4 process (SigV4).
You can download the SigV4 plugins from the following locations.
• Java: https://github.com/aws/aws-sigv4-auth-cassandra-java-driver-plugin.
• Node.js: https://github.com/aws/aws-sigv4-auth-cassandra-nodejs-driver-plugin.
• Python: https://github.com/aws/aws-sigv4-auth-cassandra-python-driver-plugin.
• Go: https://github.com/aws/aws-sigv4-auth-cassandra-gocql-driver-plugin.
For code samples that show how to establish connections using the SigV4 authentication plugin,
see the section called “Using a Cassandra client driver”.
Topics
• Create service-specific credentials for programmatic access to Amazon Keyspaces
• Create and configure AWS credentials for Amazon Keyspaces
Create service-specific credentials for programmatic access to Amazon
Keyspaces
Service-specific credentials are similar to the traditional username and password that Cassandra
uses for authentication and access management. Service-specific credentials enable IAM users
to access a specific AWS service. These long-term credentials can't be used to access other AWS
services. They are associated with a specific IAM user and can't be used by other IAM users.
Important
Service-specific credentials are long-term credentials associated with a specific IAM user
and can only be used for the service they were created for. To give IAM roles or federated
identities permissions to access all your AWS resources using temporary credentials,
you should use AWS authentication with the SigV4 authentication plugin for Amazon
Keyspaces.
Create service-specific credentials 86

Amazon Keyspaces (for Apache Cassandra) Developer Guide
Use one of the following procedures to generate service-specific credentials.
Console
Create service-specific credentials using the console
1. Sign in to the AWS Management Console and open the AWS Identity and Access
Management console at https://console.aws.amazon.com/iam/home.
2. In the navigation pane, choose Users, and then choose the user that you created earlier
that has Amazon Keyspaces permissions (policy attached).
3. Choose Security Credentials. Under Credentials for Amazon Keyspaces, choose Generate
credentials to generate the service-specific credentials.
Your service-specific credentials are now available. This is the only time you can download
or view the password. You cannot recover it later. However, you can reset your password at
any time. Save the user and password in a secure location, because you'll need them later.
CLI
Create service-specific credentials using the AWS CLI
Before generating service-specific credentials, you need to download, install, and configure the
AWS Command Line Interface (AWS CLI):
1. Download the AWS CLI at http://aws.amazon.com/cli.
Note
The AWS CLI runs on Windows, macOS, or Linux.
2. Follow the instructions for Installing the AWS CLI and Configuring the AWS CLI in the AWS
Command Line Interface User Guide.
3. Using the AWS CLI, run the following command to generate service-specific credentials for
the user alice, so that she can access Amazon Keyspaces.
aws iam create-service-specific-credential \
--user-name alice \
--service-name cassandra.amazonaws.com
Create service-specific credentials 87

Amazon Keyspaces (for Apache Cassandra) Developer Guide
The output looks like the following.
{
"ServiceSpecificCredential": {
"CreateDate": "2019-10-09T16:12:04Z",
"ServiceName": "cassandra.amazonaws.com",
"ServiceUserName": "alice-at-111122223333",
"ServicePassword": "wJalrXUtnFEMI/K7MDENG/bPxRfiCYEXAMPLEKEY",
"ServiceSpecificCredentialId": "ACCAYFI33SINPGJEBYESF",
"UserName": "alice",
"Status": "Active"
}
}
In the output, note the values for ServiceUserName and ServicePassword. Save these
values in a secure location, because you'll need them later.
Important
This is the only time that the ServicePassword will be available to you.
Create and configure AWS credentials for Amazon Keyspaces
To access Amazon Keyspaces programmatically with the AWS CLI, the AWS SDK, or with
Cassandra client drivers and the SigV4 plugin, you need an IAM user or role with access keys.
When you use AWS programmatically, you provide your AWS access keys so that AWS can verify
your identity in programmatic calls. Your access keys consist of an access key ID (for example,
AKIAIOSFODNN7EXAMPLE) and a secret access key (for example, wJalrXUtnFEMI/K7MDENG/
bPxRfiCYEXAMPLEKEY). This topic walks you through the required steps in this process.
Security best practices recommend that you create IAM users with limited permissions and
instead associate IAM roles with the permissions needed to perform specific tasks. IAM users
can then temporarily assume IAM roles to perform the required tasks. For example, IAM users
in your account using the Amazon Keyspaces console can switch to a role to temporarily use
the permissions of the role in the console. The users give up their original permissions and take
on the permissions assigned to the role. When the users exit the role, their original permissions
are restored. The credentials the users use to assume the role are temporary. On the contrary,
IAM users have long-term credentials, which presents a security risk if instead of assuming roles
Create IAM credentials for AWS authentication 88

Amazon Keyspaces (for Apache Cassandra) Developer Guide
they have permissions directly assigned to them. To help mitigate this risk, we recommend that
you provide these users with only the permissions they require to perform the task and that you
remove these users when they are no longer needed. For more information about roles, see
Common scenarios for roles: Users, applications, and services in the IAM User Guide.
Topics
• Credentials required by the AWS CLI, the AWS SDK, or the Amazon Keyspaces SigV4 plugin for
Cassandra client drivers
• Create temporary credentials to connect to Amazon Keyspaces using an IAM role and the SigV4
plugin
• Create an IAM user for programmatic access to Amazon Keyspaces in your AWS account
• Create new access keys for an IAM user
• Store access keys for IAM users
Credentials required by the AWS CLI, the AWS SDK, or the Amazon Keyspaces
SigV4 plugin for Cassandra client drivers
The following credentials are required to authenticate the IAM user or role:
AWS_ACCESS_KEY_ID
Specifies an AWS access key associated with an IAM user or role.
The access key aws_access_key_id is required to connect to Amazon Keyspaces
programmatically.
AWS_SECRET_ACCESS_KEY
Specifies the secret key associated with the access key. This is essentially the "password" for the
access key.
The aws_secret_access_key is required to connect to Amazon Keyspaces programmatically.
AWS_SESSION_TOKEN – Optional
Specifies the session token value that is required if you are using temporary security credentials
that you retrieved directly from AWS Security Token Service operations. For more information,
see the section called “Create temporary credentials to connect to Amazon Keyspaces”.
Create IAM credentials for AWS authentication 89

Amazon Keyspaces (for Apache Cassandra) Developer Guide
If you are connecting with an IAM user, the aws_session_token is not required.
Create temporary credentials to connect to Amazon Keyspaces using an IAM role
and the SigV4 plugin
The recommended way to access Amazon Keyspaces programmatically is by using temporary
credentials to authenticate with the SigV4 plugin. In many scenarios, you don't need long-term
access keys that never expire (as you have with an IAM user). Instead, you can create an IAM role
and generate temporary security credentials. Temporary security credentials consist of an access
key ID and a secret access key, but they also include a security token that indicates when the
credentials expire. To learn more about how to use IAM roles instead of long-term access keys, see
Switching to an IAM role (AWS API).
To get started with temporary credentials, you first need to create an IAM role.
Create an IAM role that grants read-only access to Amazon Keyspaces
1. Sign in to the AWS Management Console and open the IAM console at https://
console.aws.amazon.com/iam/.
2. In the navigation pane, choose Roles, then Create role.
3. On the Create role page, under Select type of trusted entity, choose AWS service. Under
Choose a use case, choose Amazon EC2, then choose Next.
4. On the Add permissions page, under Permissions policies, choose Amazon Keyspaces Read
Only Access from the policy list, then choose Next.
5. On the Name, review, and create page, enter a name for the role, and review the Select
trusted entities and Add permissions sections. You can also add optional tags for the role on
this page. When you are done, select Create role. Remember this name because you’ll need it
when you launch your Amazon EC2 instance.
To use temporary security credentials in code, you programmatically call an AWS Security Token
Service API like AssumeRole and extract the resulting credentials and session token from your
IAM role that you created in the previous step. You then use those values as credentials for
subsequent calls to AWS. The following example shows pseudocode for how to use temporary
security credentials:
assumeRoleResult = AssumeRole(role-arn);
Create IAM credentials for AWS authentication 90

Amazon Keyspaces (for Apache Cassandra) Developer Guide
tempCredentials = new SessionAWSCredentials(
assumeRoleResult.AccessKeyId,
assumeRoleResult.SecretAccessKey,
assumeRoleResult.SessionToken);
cassandraRequest = CreateAmazoncassandraClient(tempCredentials);
For an example that implements temporary credentials using the Python driver to access Amazon
Keyspaces, see ???.
For details about how to call AssumeRole, GetFederationToken, and other API operations,
see the AWS Security Token Service API Reference. For information on getting the temporary
security credentials and session token from the result, see the documentation for the SDK that
you're working with. You can find the documentation for all the AWS SDKs on the main AWS
documentation page, in the SDKs and Toolkits section.
Create an IAM user for programmatic access to Amazon Keyspaces in your AWS
account
To obtain credentials for programmatic access to Amazon Keyspaces with the AWS CLI, the AWS
SDK, or the SigV4 plugin, you need to first create an IAM user or role. The process of creating a IAM
user and configuring that IAM user to have programmatic access to Amazon Keyspaces is shown in
the following steps:
1. Create the user in the AWS Management Console, the AWS CLI, Tools for Windows PowerShell,
or using an AWS API operation. If you create the user in the AWS Management Console, then the
credentials are created automatically.
2. If you create the user programmatically, then you must create an access key (access key ID and a
secret access key) for that user in an additional step.
3. Give the user permissions to access Amazon Keyspaces.
For information about the permissions that you need in order to create an IAM user, see
Permissions required to access IAM resources.
Console
Create an IAM user with programmatic access (console)
1. Sign in to the AWS Management Console and open the IAM console at https://
console.aws.amazon.com/iam/.
Create IAM credentials for AWS authentication 91

Amazon Keyspaces (for Apache Cassandra) Developer Guide
2. In the navigation pane, choose Users and then choose Add users.
3. Type the user name for the new user. This is the sign-in name for AWS.
Note
User names can be a combination of up to 64 letters, digits, and these characters:
plus (+), equal (=), comma (,), period (.), at sign (@), underscore (_), and hyphen (-).
Names must be unique within an account. They are not distinguished by case. For
example, you cannot create two users named TESTUSER and testuser.
4. Select Access key - Programmatic access to create an access key for the new user. You can
view or download the access key when you get to the Final page.
Choose Next: Permissions.
5. On the Set permissions page, choose Attach existing policies directly to assign
permissions to the new user.
This option displays the list of AWS managed and customer managed policies available in
your account. You can enter keyspaces into the search field to display only the policies
that are related to Amazon Keyspaces.
For Amazon Keyspaces, the available managed policies are
AmazonKeyspacesFullAccess and AmazonKeyspacesReadOnlyAccess. For more
information about each policy, see the section called “AWS managed policies”.
For testing purposes and to follow the connection tutorials, select the
AmazonKeyspacesReadOnlyAccess policy for the new IAM user. Note: As a best practice,
we recommend that you follow the principle of least privilege and create custom policies
that limit access to specific resources and only allow the required actions. For more
information about IAM policies and to view example policies for Amazon Keyspaces, see the
section called “Amazon Keyspaces identity-based policies”. After you have created custom
permission policies, attach your policies to roles and then let users assume the appropriate
roles temporarily.
Choose Next: Tags.
6. On the Add tags (optional) page you can add tags for the user, or choose Next: Review.
7. On the Review page you can see all of the choices you made up to this point. When you're
ready to proceed, choose Create user.
Create IAM credentials for AWS authentication 92

Amazon Keyspaces (for Apache Cassandra) Developer Guide
8. To view the user's access keys (access key IDs and secret access keys), choose Show next to
the password and access key. To save the access keys, choose Download .csv and then save
the file to a safe location.
Important
This is your only opportunity to view or download the secret access keys, and you
need this information before they can use the SigV4 plugin. Save the user's new
access key ID and secret access key in a safe and secure place. You will not have
access to the secret keys again after this step.
CLI
Create an IAM user with programmatic access (AWS CLI)
1. Create a user with the following AWS CLI code.
• aws iam create-user
2. Give the user programmatic access. This requires access keys, that can be generated in the
following ways.
• AWS CLI: aws iam create-access-key
• Tools for Windows PowerShell: New-IAMAccessKey
• IAM API: CreateAccessKey
Important
This is your only opportunity to view or download the secret access keys, and you
need this information before they can use the SigV4 plugin. Save the user's new
access key ID and secret access key in a safe and secure place. You will not have
access to the secret keys again after this step.
3.
Attach the AmazonKeyspacesReadOnlyAccess policy to the user that defines the user's
permissions. Note: As a best practice, we recommend that you manage user permissions by
adding the user to a group and attaching a policy to the group instead of attaching directly
to a user.
Create IAM credentials for AWS authentication 93

Amazon Keyspaces (for Apache Cassandra) Developer Guide
• AWS CLI: aws iam attach-user-policy
Create new access keys for an IAM user
If you already have an IAM user, you can create new access keys at any time. For more information
about key management, for example how to update access keys, see Managing access keys for IAM
users.
To create access keys for an IAM user (console)
1. Sign in to the AWS Management Console and open the IAM console at https://
console.aws.amazon.com/iam/.
2. In the navigation pane, choose Users.
3. Choose the name of the user whose access keys you want to create.
4. On the Summary page of the user, choose the Security credentials tab.
5. In the Access keys section, choose Create access key.
To view the new access key pair, choose Show. Your credentials will look something like this:
• Access key ID: AKIAIOSFODNN7EXAMPLE
• Secret access key: wJalrXUtnFEMI/K7MDENG/bPxRfiCYEXAMPLEKEY
Note
You will not have access to the secret access key again after this dialog box closes.
6. To download the key pair, choose Download .csv file. Store the keys in a secure location.
7. After you download the .csv file, choose Close.
When you create an access key, the key pair is active by default, and you can use the pair right
away.
Create IAM credentials for AWS authentication 94

Amazon Keyspaces (for Apache Cassandra) Developer Guide
Store access keys for IAM users
As a best practice, we recommend that you don't embed access keys directly into code. The AWS
SDKs and the AWS Command Line Tools enable you to put access keys in known locations so that
you do not have to keep them in code. Put access keys in one of the following locations:
• Environment variables – On a multitenant system, choose user environment variables, not
system environment variables.
•
CLI credentials file – The credentials and config file are updated when you run the
command aws configure. The credentials file is located at ~/.aws/credentials on
Linux, macOS, or Unix, or at C:\Users\USERNAME\.aws\credentials on Windows. This file
can contain the credential details for the default profile and any named profiles.
•
CLI configuration file – The credentials and config file are updated when you run the
command aws configure. The config file is located at ~/.aws/config on Linux, macOS,
or Unix, or at C:\Users\USERNAME\.aws\config on Windows. This file contains the
configuration settings for the default profile and any named profiles.
Storing access keys as environment variables is a prerequisite for the the section called
“Authentication plugin for Java 4.x”. The client searches for credentials using the default
credentials provider chain, and access keys stored as environment variables take precedent over all
other locations, for example configuration files. For more information, see Configuration settings
and precedence.
The following examples show how you can configure environment variables for the default user.
Linux, macOS, or Unix
$ export AWS_ACCESS_KEY_ID=AKIAIOSFODNN7EXAMPLE
$ export AWS_SECRET_ACCESS_KEY=wJalrXUtnFEMI/K7MDENG/bPxRfiCYEXAMPLEKEY
$ export AWS_SESSION_TOKEN=AQoDYXdzEJr...<remainder of security token>
Setting the environment variable changes the value used until the end of your shell session,
or until you set the variable to a different value. You can make the variables persistent across
future sessions by setting them in your shell's startup script.
Windows Command Prompt
C:\> setx AWS_ACCESS_KEY_ID AKIAIOSFODNN7EXAMPLE
Create IAM credentials for AWS authentication 95
Amazon Keyspaces (for Apache Cassandra) Developer Guide
C:\> setx AWS_SECRET_ACCESS_KEY wJalrXUtnFEMI/K7MDENG/bPxRfiCYEXAMPLEKEY
C:\> setx AWS_SESSION_TOKEN AQoDYXdzEJr...<remainder of security token>
Using set to set an environment variable changes the value used until the end of the current
command prompt session, or until you set the variable to a different value. Using setx to set an
environment variable changes the value used in both the current command prompt session and
all command prompt sessions that you create after running the command. It does not affect
other command shells that are already running at the time you run the command.
PowerShell
PS C:\> $Env:AWS_ACCESS_KEY_ID="AKIAIOSFODNN7EXAMPLE"
PS C:\> $Env:AWS_SECRET_ACCESS_KEY="wJalrXUtnFEMI/K7MDENG/bPxRfiCYEXAMPLEKEY"
PS C:\> $Env:AWS_SESSION_TOKEN="AQoDYXdzEJr...<remainder of security token>"
If you set an environment variable at the PowerShell prompt as shown in the previous
examples, it saves the value for only the duration of the current session. To make the
environment variable setting persistent across all PowerShell and Command Prompt sessions,
store it by using the System application in Control Panel. Alternatively, you can set the variable
for all future PowerShell sessions by adding it to your PowerShell profile. See the PowerShell
documentation for more information about storing environment variables or persisting them
across sessions.
Service endpoints for Amazon Keyspaces
Topics
• Ports and protocols
• Global endpoints
• AWS GovCloud (US) Region FIPS endpoints
• China Regions endpoints
Ports and protocols
You can access Amazon Keyspaces programmatically by running a cqlsh client, with an Apache 2.0
licensed Cassandra driver, or by using the AWS CLI and the AWS SDK.
The following table shows the ports and protocols for the different access mechanisms.
Service endpoints 96

Amazon Keyspaces (for Apache Cassandra) Developer Guide
Programmatic Access Port Protocol
CQLSH 9142 TLS
Cassandra Driver 9142 TLS
AWS CLI 443 HTTPS
AWS SDK 443 HTTPS
For TLS connections, Amazon Keyspaces uses the Starfield CA to authenticate against the server.
For more information, see the section called “How to manually configure cqlsh connections for
TLS” or the Before you begin section of your driver in the the section called “Using a Cassandra
client driver” chapter.
Global endpoints
Amazon Keyspaces is available in the following AWS Regions. This table shows the available service
endpoint for each Region.
Region
Name
Region Endpoint Protocol
US East
(Ohio)
us-east-2 cassandra.us-east-2.amazonaws.com HTTPS
and TLS
US
East (N.
Virginia)
us-east-1 cassandra.us-east-1.amazonaws.com
cassandra-fips.us-east-1.amazonaws.com
HTTPS
and TLS
TLS
US
West (N.
Californi
a)
us-
west-1
cassandra.us-west-1.amazonaws.com HTTPS
and TLS
US West
(Oregon)
us-
west-2
cassandra.us-west-2.amazonaws.com HTTPS
and TLS
Global endpoints 97

Amazon Keyspaces (for Apache Cassandra) Developer Guide
Region
Name
Region Endpoint Protocol
cassandra-fips.us-west-2.amazonaws.com TLS
Asia
Pacific
(Hong
Kong)
ap-
east-1
cassandra.ap-east-1.amazonaws.com HTTPS
and TLS
Asia
Pacific
(Mumbai)
ap-
south-1
cassandra.ap-south-1.amazonaws.com HTTPS
and TLS
Asia
Pacific
(Seoul)
ap-
northe
ast-2
cassandra.ap-northeast-2.amazonaws.com HTTPS
and TLS
Asia
Pacific
(Singapor
e)
ap-
southe
ast-1
cassandra.ap-southeast-1.amazonaws.com HTTPS
and TLS
Asia
Pacific
(Sydney)
ap-
southe
ast-2
cassandra.ap-southeast-2.amazonaws.com HTTPS
and TLS
Asia
Pacific
(Tokyo)
ap-
northe
ast-1
cassandra.ap-northeast-1.amazonaws.com HTTPS
and TLS
Canada
(Central)
ca-centra
l-1
cassandra.ca-central-1.amazonaws.com HTTPS
and TLS
Europe
(Frankfur
t)
eu-
central-1
cassandra.eu-central-1.amazonaws.com HTTPS
and TLS
Global endpoints 98

Amazon Keyspaces (for Apache Cassandra) Developer Guide
Region
Name
Region Endpoint Protocol
Europe
(Ireland)
eu-
west-1
cassandra.eu-west-1.amazonaws.com HTTPS
and TLS
Europe
(London)
eu-
west-2
cassandra.eu-west-2.amazonaws.com HTTPS
and TLS
Europe
(Paris)
eu-
west-3
cassandra.eu-west-3.amazonaws.com HTTPS
and TLS
Europe
(Stockhol
m)
eu-
north-1
cassandra.eu-north-1.amazonaws.com HTTPS
and TLS
Middle
East
(Bahrain)
me-
south-1
cassandra.me-south-1.amazonaws.com HTTPS
and TLS
South
America
(São
Paulo)
sa-east-1 cassandra.sa-east-1.amazonaws.com HTTPS
and TLS
AWS
GovCloud
(US-East)
us-gov-
east-1
cassandra.us-gov-east-1.amazonaws.com HTTPS
and TLS
AWS
GovCloud
(US-
West)
us-gov-
west-1
cassandra.us-gov-west-1.amazonaws.com HTTPS
and TLS
AWS GovCloud (US) Region FIPS endpoints
Available FIPS endpoints in the AWS GovCloud (US) Region. For more information, see Amazon
Keyspaces in the AWS GovCloud (US) User Guide.
AWS GovCloud (US) Region FIPS endpoints 99

Amazon Keyspaces (for Apache Cassandra) Developer Guide
Region
name
Region FIPS endpoint Protocol
AWS
GovCloud
(US-East)
us-gov-ea
st-1
cassandra.us-gov-east-1.amazonaws.com HTTPS and
TLS
AWS
GovCloud
(US-West)
us-gov-we
st-1
cassandra.us-gov-west-1.amazonaws.com HTTPS and
TLS
China Regions endpoints
The following Amazon Keyspaces endpoints are available in the AWS China Regions.
To access these endpoints, you have to sign up for a separate set of account credentials unique to
the China Regions. For more information, see China Signup, Accounts, and Credentials.
Region
name
Region Endpoint Protocol
China
(Beijing)
cn-north-1 cassandra.cn-north-1.amazonaws.com.cn HTTPS and
TLS
China
(Ningxia)
cn-northw
est-1
cassandra.cn-northwest-1.amazonaws.com.cn HTTPS and
TLS
Using cqlsh to connect to Amazon Keyspaces
To connect to Amazon Keyspaces using cqlsh, you can use the cqlsh-expansion. This is
a toolkit that contains common Apache Cassandra tooling like cqlsh and helpers that are
preconfigured for Amazon Keyspaces while maintaining full compatibility with Apache Cassandra.
The cqlsh-expansion integrates the SigV4 authentication plugin and allows you to connect
using IAM access keys instead of user name and password. You only need to install the cqlsh
scripts to make a connection and not the full Apache Cassandra distribution, because Amazon
China Regions endpoints 100

Amazon Keyspaces (for Apache Cassandra) Developer Guide
Keyspaces is serverless. This lightweight install package includes the cqlsh-expansion and the
classic cqlsh scripts that you can install on any platform that supports Python.
Note
Murmur3Partitioner is the recommended partitioner for Amazon Keyspaces and the
cqlsh-expansion. The cqlsh-expansion doesn't support the Amazon Keyspaces
DefaultPartitioner. For more information, see the section called “Working with
partitioners”.
For general information about cqlsh, see cqlsh: the CQL shell.
Topics
• Using the cqlsh-expansion to connect to Amazon Keyspaces
• How to manually configure cqlsh connections for TLS
Using the cqlsh-expansion to connect to Amazon Keyspaces
Installing and configuring the cqlsh-expansion
1.
To install the cqlsh-expansion Python package, you can run a pip command. This installs
the cqlsh-expansion scripts on your machine using a pip install along with a file containing
a list of dependencies. The --user flag tells pip to use the Python user install directory for
your platform. On a Unix based system, that should be the ~/.local/ directory.
You need Python 3 to install the cqlsh-expansion, to find out your Python version, use
Python --version. To install, you can run the following command.
python3 -m pip install --user cqlsh-expansion
The output should look similar to this.
Collecting cqlsh-expansion
Downloading cqlsh_expansion-0.9.6-py3-none-any.whl (153 kB)
######################################## 153.7/153.7 KB 3.3 MB/s eta 0:00:00
Collecting cassandra-driver
Using the cqlsh-expansion
101

Amazon Keyspaces (for Apache Cassandra) Developer Guide
Downloading cassandra_driver-3.28.0-cp310-cp310-
manylinux_2_17_x86_64.manylinux2014_x86_64.whl (19.1 MB)
######################################## 19.1/19.1 MB 44.5 MB/s eta 0:00:00
Requirement already satisfied: six>=1.12.0 in /usr/lib/python3/dist-packages (from
cqlsh-expansion) (1.16.0)
Collecting boto3
Downloading boto3-1.29.2-py3-none-any.whl (135 kB)
######################################## 135.8/135.8 KB 17.2 MB/s eta 0:00:00
Collecting cassandra-sigv4>=4.0.2
Downloading cassandra_sigv4-4.0.2-py2.py3-none-any.whl (9.8 kB)
Collecting botocore<1.33.0,>=1.32.2
Downloading botocore-1.32.2-py3-none-any.whl (11.4 MB)
######################################## 11.4/11.4 MB 60.9 MB/s eta 0:00:00
Collecting s3transfer<0.8.0,>=0.7.0
Downloading s3transfer-0.7.0-py3-none-any.whl (79 kB)
######################################## 79.8/79.8 KB 13.1 MB/s eta 0:00:00
Collecting jmespath<2.0.0,>=0.7.1
Downloading jmespath-1.0.1-py3-none-any.whl (20 kB)
Collecting geomet<0.3,>=0.1
Downloading geomet-0.2.1.post1-py3-none-any.whl (18 kB)
Collecting python-dateutil<3.0.0,>=2.1
Downloading python_dateutil-2.8.2-py2.py3-none-any.whl (247 kB)
######################################## 247.7/247.7 KB 33.1 MB/s eta 0:00:00
Requirement already satisfied: urllib3<2.1,>=1.25.4 in /usr/lib/python3/dist-
packages (from botocore<1.33.0,>=1.32.2->boto3->cqlsh-expansion) (1.26.5)
Requirement already satisfied: click in /usr/lib/python3/dist-packages (from
geomet<0.3,>=0.1->cassandra-driver->cqlsh-expansion) (8.0.3)
Installing collected packages: python-dateutil, jmespath, geomet, cassandra-driver,
botocore, s3transfer, boto3, cassandra-sigv4, cqlsh-expansion
WARNING: The script geomet is installed in '/home/ubuntu/.local/bin' which is not
on PATH.
Consider adding this directory to PATH or, if you prefer to suppress this
warning, use --no-warn-script-location.
WARNING: The scripts cqlsh, cqlsh-expansion and cqlsh-expansion.init are
installed in '/home/ubuntu/.local/bin' which is not on PATH.
Consider adding this directory to PATH or, if you prefer to suppress this
warning, use --no-warn-script-location.
Successfully installed boto3-1.29.2 botocore-1.32.2 cassandra-driver-3.28.0
cassandra-sigv4-4.0.2 cqlsh-expansion-0.9.6 geomet-0.2.1.post1 jmespath-1.0.1
python-dateutil-2.8.2 s3transfer-0.7.0
If the install directory is not in the PATH, you need to add it following the instructions of your
operating system. Below is one example for Ubuntu Linux.
Using the cqlsh-expansion
102

Amazon Keyspaces (for Apache Cassandra) Developer Guide
export PATH="$PATH:/home/ubuntu/.local/bin"
To confirm that the package is installed, you can run the following command.
cqlsh-expansion --version
The output should look like this.
cqlsh 6.1.0
2.
To configure the cqlsh-expansion, you can run a post-install script to automatically
complete the following steps:
1.
Create the .cassandra directory in the user home directory if it doesn't already exist.
2.
Copy a preconfigured cqlshrc configuration file into the .cassandra directory.
3.
Copy the Starfield digital certificate into the .cassandra directory. Amazon Keyspaces
uses this certificate to configure the secure connection with Transport Layer Security (TLS).
Encryption in transit provides an additional layer of data protection by encrypting your data
as it travels to and from Amazon Keyspaces.
To review the script first, you can access it in the Github repo at post_install.py.
To use the script, you can run the following command.
cqlsh-expansion.init
Note
The directory and file created by the post-install script are not removed when you
uninstall the cqlsh-expansion using pip uninstall, and have to be deleted
manually.
Connecting to Amazon Keyspaces using the cqlsh-expansion
1. Configure your AWS Region and add it as a user environment variable.
Using the cqlsh-expansion
103

Amazon Keyspaces (for Apache Cassandra) Developer Guide
To add your default Region as an environment variable on a Unix based system, you can run
the following command. For this example, we use US East (N. Virginia).
export AWS_DEFAULT_REGION=us-east-1
For more information about how to set environment variables, including for other platforms,
see How to set environment variables.
2. Find your service endpoint.
Choose the appropriate service endpoint for your Region. To review the available endpoints
for Amazon Keyspaces, see the section called “Service endpoints”. For this example, we use the
endpoint cassandra.us-east-1.amazonaws.com.
3. Configure the authentication method.
Connecting with IAM access keys (IAM users, roles, and federated identities) is the
recommended method for enhanced security.
Before you can connect with IAM access keys, you need to complete the following steps:
a. Create an IAM user, or follow the best practice and create an IAM role that IAM users can
assume. For more information on how to create IAM access keys, see the section called
“Create IAM credentials for AWS authentication”.
b. Create an IAM policy that grants the role (or IAM user) at least read-only access to Amazon
Keyspaces. For more information about the permissions required for the IAM user or role
to connect to Amazon Keyspaces, see the section called “Accessing Amazon Keyspaces
tables”.
c. Add the access keys of the IAM user to the user's environment variables as shown in the
following example.
export AWS_ACCESS_KEY_ID=AKIAIOSFODNN7EXAMPLE
export AWS_SECRET_ACCESS_KEY=wJalrXUtnFEMI/K7MDENG/bPxRfiCYEXAMPLEKEY
For more information about how to set environment variables, including for other
platforms, see How to set environment variables.
Using the cqlsh-expansion
104

Amazon Keyspaces (for Apache Cassandra) Developer Guide
Note
If you're connecting from an Amazon EC2 instance, you also need to configure
an outbound rule in the security group that allows traffic from the instance
to Amazon Keyspaces. For more information about how to view and edit EC2
outbound rules, see Add rules to a security group in the Amazon EC2 User Guide.
4.
Connect to Amazon Keyspaces using the cqlsh-expansion and SigV4 authentication.
To connect to Amazon Keyspaces with the cqlsh-expansion, you can use the following
command. Make sure to replace the service endpoint with the correct endpoint for your
Region.
cqlsh-expansion cassandra.us-east-1.amazonaws.com 9142 --ssl
If the connection is successful, you should see output similar to the following example.
Connected to Amazon Keyspaces at cassandra.us-east-1.amazonaws.com:9142
[cqlsh 6.1.0 | Cassandra 3.11.2 | CQL spec 3.4.4 | Native protocol v4]
Use HELP for help.
cqlsh current consistency level is ONE.
cqlsh>
If you encounter a connection error, see the section called “Cqlsh connection errors” for
troubleshooting information.
• Connect to Amazon Keyspaces with service-specific credentials.
To connect with the traditional username and password combination that Cassandra uses
for authentication, you must first create service-specific credentials for Amazon Keyspaces
as described in the section called “Create service-specific credentials”. You also have to
give that user permissions to access Amazon Keyspaces, for more information see the
section called “Accessing Amazon Keyspaces tables”.
After you have created service-specific credentials and permissions for the user, you must
update the cqlshrc file, typically found in the user directory path ~/.cassandra/. In
the cqlshrc file, go to the Cassandra [authentication] section and comment out the
Using the cqlsh-expansion
105

Amazon Keyspaces (for Apache Cassandra) Developer Guide
SigV4 module and class under [auth_provider] using the ";" character as shown in the
following example.
[auth_provider]
; module = cassandra_sigv4.auth
; classname = SigV4AuthProvider
After you have updated the cqlshrc file, you can connect to Amazon Keyspaces with
service-specific credentials using the following command.
cqlsh-expansion cassandra.us-east-1.amazonaws.com 9142 -u myUserName -
p myPassword --ssl
Cleanup
•
To remove the cqlsh-expansion package you can use the pip uninstall command.
pip3 uninstall cqlsh-expansion
The pip3 uninstall command doesn't remove the directory and related files created by
the post-install script. To remove the folder and files created by the post-install script, you can
delete the .cassandra directory.
How to manually configure cqlsh connections for TLS
Amazon Keyspaces only accepts secure connections using Transport Layer Security (TLS). You can
use the cqlsh-expansion utility that automatically downloads the certificate for you and installs
a preconfigured cqlshrc configuration file. For more information, see the section called “Using
the cqlsh-expansion” on this page.
If you want to download the certificate and configure the connection manually, you can do so using
the following steps.
1.
Download the Starfield digital certificate using the following command and save sf-class2-
root.crt locally or in your home directory.
How to manually configure cqlsh connections for TLS
106

Amazon Keyspaces (for Apache Cassandra) Developer Guide
curl https://certs.secureserver.net/repository/sf-class2-root.crt -O
Note
You can also use the Amazon digital certificate to connect to Amazon Keyspaces and
can continue to do so if your client is connecting to Amazon Keyspaces successfully. The
Starfield certificate provides additional backwards compatibility for clients using older
certificate authorities.
2.
Open the cqlshrc configuration file in the Cassandra home directory, for example
${HOME}/.cassandra/cqlshrc and add the following lines.
[connection]
port = 9142
factory = cqlshlib.ssl.ssl_transport_factory
[ssl]
validate = true
certfile = path_to_file/sf-class2-root.crt
Using the AWS CLI to connect to Amazon Keyspaces
You can use the AWS Command Line Interface (AWS CLI) to control multiple AWS services from the
command line and automate them through scripts. With Amazon Keyspaces you can use the AWS
CLI for data definition language (DDL) operations, such as creating a table. In addition, you can use
infrastructure as code (IaC) services and tools such as AWS CloudFormation and Terraform.
Before you can use the AWS CLI with Amazon Keyspaces, you must get an access key ID and
secret access key. For more information, see the section called “Create IAM credentials for AWS
authentication”.
For a complete listing of all the commands available for Amazon Keyspaces in the AWS CLI, see the
AWS CLI Command Reference.
Topics
• Downloading and Configuring the AWS CLI
• Using the AWS CLI with Amazon Keyspaces
Using the AWS CLI 107

Amazon Keyspaces (for Apache Cassandra) Developer Guide
Downloading and Configuring the AWS CLI
The AWS CLI is available at https://aws.amazon.com/cli. It runs on Windows, macOS, or Linux.
After downloading the AWS CLI, follow these steps to install and configure it:
1. Go to the AWS Command Line Interface User Guide
2. Follow the instructions for Installing the AWS CLI and Configuring the AWS CLI
Using the AWS CLI with Amazon Keyspaces
The command line format consists of a Amazon Keyspaces operation name followed by the
parameters for that operation. The AWS CLI supports a shorthand syntax for the parameter values,
as well as JSON. The following Amazon Keyspaces examples use AWS CLI shorthand syntax. For
more information, see Using shorthand syntax with the AWS CLI.
The following command creates a keyspace with the name catalog.
aws keyspaces create-keyspace --keyspace-name 'catalog'
The command returns the resource Amazon Resource Name (ARN) in the output.
{
"resourceArn": "arn:aws:cassandra:us-east-1:111222333444:/keyspace/catalog/"
}
To confirm that the keyspace catalog exists, you can use the following command.
aws keyspaces get-keyspace --keyspace-name 'catalog'
The output of the command returns the following values.
{
"keyspaceName": "catalog",
"resourceArn": "arn:aws:cassandra:us-east-1:111222333444:/keyspace/catalog/"
}
The following command creates a table with the name book_awards. The partition key of the
table consists of the columns year and award and the clustering key consists of the columns
Downloading and Configuring the AWS CLI 108

Amazon Keyspaces (for Apache Cassandra) Developer Guide
category and rank, both clustering columns use the ascending sort order. (For easier readability,
long commands in this section are broken into separate lines.)
aws keyspaces create-table --keyspace-name 'catalog' --table-name 'book_awards'
--schema-definition 'allColumns=[{name=year,type=int},
{name=award,type=text},{name=rank,type=int},
{name=category,type=text}, {name=author,type=text},
{name=book_title,type=text},{name=publisher,type=text}],
partitionKeys=[{name=year},
{name=award}],clusteringKeys=[{name=category,orderBy=ASC},{name=rank,orderBy=ASC}]'
This command results in the following output.
{
"resourceArn": "arn:aws:cassandra:us-east-1:111222333444:/keyspace/catalog/table/
book_awards"
}
To confirm the metadata and properties of the table, you can use the following command.
aws keyspaces get-table --keyspace-name 'catalog' --table-name 'book_awards'
This command returns the following output.
{
"keyspaceName": "catalog",
"tableName": "book_awards",
"resourceArn": "arn:aws:cassandra:us-east-1:111222333444:/keyspace/catalog/table/
book_awards",
"creationTimestamp": 1645564368.628,
"status": "ACTIVE",
"schemaDefinition": {
"allColumns": [
{
"name": "year",
"type": "int"
},
{
"name": "award",
"type": "text"
},
{
Using the AWS CLI with Amazon Keyspaces 109

Amazon Keyspaces (for Apache Cassandra) Developer Guide
"name": "category",
"type": "text"
},
{
"name": "rank",
"type": "int"
},
{
"name": "author",
"type": "text"
},
{
"name": "book_title",
"type": "text"
},
{
"name": "publisher",
"type": "text"
}
],
"partitionKeys": [
{
"name": "year"
},
{
"name": "award"
}
],
"clusteringKeys": [
{
"name": "category",
"orderBy": "ASC"
},
{
"name": "rank",
"orderBy": "ASC"
}
],
"staticColumns": []
},
"capacitySpecification": {
"throughputMode": "PAY_PER_REQUEST",
"lastUpdateToPayPerRequestTimestamp": 1645564368.628
},
Using the AWS CLI with Amazon Keyspaces 110

Amazon Keyspaces (for Apache Cassandra) Developer Guide
"encryptionSpecification": {
"type": "AWS_OWNED_KMS_KEY"
},
"pointInTimeRecovery": {
"status": "DISABLED"
},
"ttl": {
"status": "ENABLED"
},
"defaultTimeToLive": 0,
"comment": {
"message": ""
}
}
When creating tables with complex schemas, it can be helpful to load the table's schema definition
from a JSON file. The following is an example of this. Download the schema definition example
JSON file from schema_definition.zip and extract schema_definition.json, taking note of the
path to the file. In this example, the schema definition JSON file is located in the current directory.
For different file path options, see How to load parameters from a file.
aws keyspaces create-table --keyspace-name 'catalog'
--table-name 'book_awards' --schema-definition 'file://
schema_definition.json'
The following examples show how to create a simple table with the name myTable with additional
options. Note that the commands are broken down into separate rows to improve readability. This
command shows how to create a table and:
• set the capacity mode of the table
• enable Point-in-time recovery for the table
• set the default Time to Live (TTL) value for the table to one year
• add two tags for the table
aws keyspaces create-table --keyspace-name 'catalog' --table-name 'myTable'
--schema-definition 'allColumns=[{name=id,type=int},{name=name,type=text},
{name=date,type=timestamp}],partitionKeys=[{name=id}]'
--capacity-specification
'throughputMode=PROVISIONED,readCapacityUnits=5,writeCapacityUnits=5'
Using the AWS CLI with Amazon Keyspaces 111

Amazon Keyspaces (for Apache Cassandra) Developer Guide
--point-in-time-recovery 'status=ENABLED'
--default-time-to-live '31536000'
--tags 'key=env,value=test' 'key=dpt,value=sec'
This example shows how to create a new table that uses a customer managed key for encryption
and has TTL enabled to allow you to set expiration dates for columns and rows. To run this sample,
you must replace the resource ARN for the customer managed AWS KMS key with your own key
and ensure Amazon Keyspaces has access to it.
aws keyspaces create-table --keyspace-name 'catalog' --table-name 'myTable'
--schema-definition 'allColumns=[{name=id,type=int},{name=name,type=text},
{name=date,type=timestamp}],partitionKeys=[{name=id}]'
--encryption-specification
'type=CUSTOMER_MANAGED_KMS_KEY,kmsKeyIdentifier=arn:aws:kms:us-
east-1:111222333444:key/11111111-2222-3333-4444-555555555555'
--ttl 'status=ENABLED'
Using the API to connect to Amazon Keyspaces
You can use the AWS SDK and the AWS Command Line Interface (AWS CLI) to work interactively
with Amazon Keyspaces. You can use the API for data language definition (DDL) operations, such
as creating a keyspace or a table. In addition, you can use infrastructure as code (IaC) services and
tools such as AWS CloudFormation and Terraform.
Before you can use the AWS CLI with Amazon Keyspaces, you must get an access key ID and
secret access key. For more information, see the section called “Create IAM credentials for AWS
authentication”.
For a complete listing of all operations available for Amazon Keyspaces in the API, see Amazon
Keyspaces API Reference.
Using a Cassandra client driver to access Amazon Keyspaces
programmatically
You can use many third-party, open-source Cassandra drivers to connect to Amazon Keyspaces.
Amazon Keyspaces is compatible with Cassandra drivers that support Apache Cassandra version
3.11.2. These are the drivers and latest versions that we’ve tested and recommend to use with
Amazon Keyspaces:
Using the API 112

Amazon Keyspaces (for Apache Cassandra) Developer Guide
•
Java v3.3
•
Java v4.17
•
Python Cassandra-driver 3.29.1
•
Node.js cassandra driver -v 4.7.2
•
GO using GOCQL v1.6
•
.NET CassandraCSharpDriver -v 3.20.1
For more information about Cassandra drivers, see Apache Cassandra Client drivers.
Note
To help you get started, you can view and download end-to-end code examples that
establish connections to Amazon Keyspaces with popular drivers. See Amazon Keyspaces
examples on GitHub.
The tutorials in this chapter include a simple CQL query to confirm that the connection to Amazon
Keyspaces has been successfully established. To learn how to work with keyspaces and tables after
you connect to an Amazon Keyspaces endpoint, see CQL language reference. For a step-by-step
tutorial that shows how to connect to Amazon Keyspaces from an Amazon VPC endpoint, see the
section called “Connecting with VPC endpoints”.
Topics
• Using a Cassandra Java client driver to access Amazon Keyspaces programmatically
• Using a Cassandra Python client driver to access Amazon Keyspaces programmatically
• Using a Cassandra Node.js client driver to access Amazon Keyspaces programmatically
• Using a Cassandra .NET Core client driver to access Amazon Keyspaces programmatically
• Using a Cassandra Go client driver to access Amazon Keyspaces programmatically
• Using a Cassandra Perl client driver to access Amazon Keyspaces programmatically
Using a Cassandra Java client driver to access Amazon Keyspaces
programmatically
This section shows you how to connect to Amazon Keyspaces by using a Java client driver.
Using a Cassandra Java client driver 113

Amazon Keyspaces (for Apache Cassandra) Developer Guide
Note
Java 17 and the DataStax Java Driver 4.17 are currently only in Beta support. For
more information, see https://docs.datastax.com/en/developer/java-driver/4.17/
upgrade_guide/.
To provide users and applications with credentials for programmatic access to Amazon Keyspaces
resources, you can do either of the following:
• Create service-specific credentials that are associated with a specific AWS Identity and Access
Management (IAM) user.
• For enhanced security, we recommend to create IAM access keys for IAM identities that are used
across all AWS services. The Amazon Keyspaces SigV4 authentication plugin for Cassandra client
drivers enables you to authenticate calls to Amazon Keyspaces using IAM access keys instead of
user name and password. For more information, see the section called “Create IAM credentials
for AWS authentication”.
Note
For an example how to use Amazon Keyspaces with Spring Boot, see https://github.com/
aws-samples/amazon-keyspaces-examples/tree/main/java/datastax-v4/spring.
Topics
• Before you begin
• Step-by-step tutorial to connect to Amazon Keyspaces using the DataStax Java driver for Apache
Cassandra using service-specific credentials
• Step-by-step tutorial to connect to Amazon Keyspaces using the 4.x DataStax Java driver for
Apache Cassandra and the SigV4 authentication plugin
• Connect to Amazon Keyspaces using the 3.x DataStax Java driver for Apache Cassandra and the
SigV4 authentication plugin
Before you begin
To connect to Amazon Keyspaces, you need to complete the following tasks before you can start.
Using a Cassandra Java client driver 114
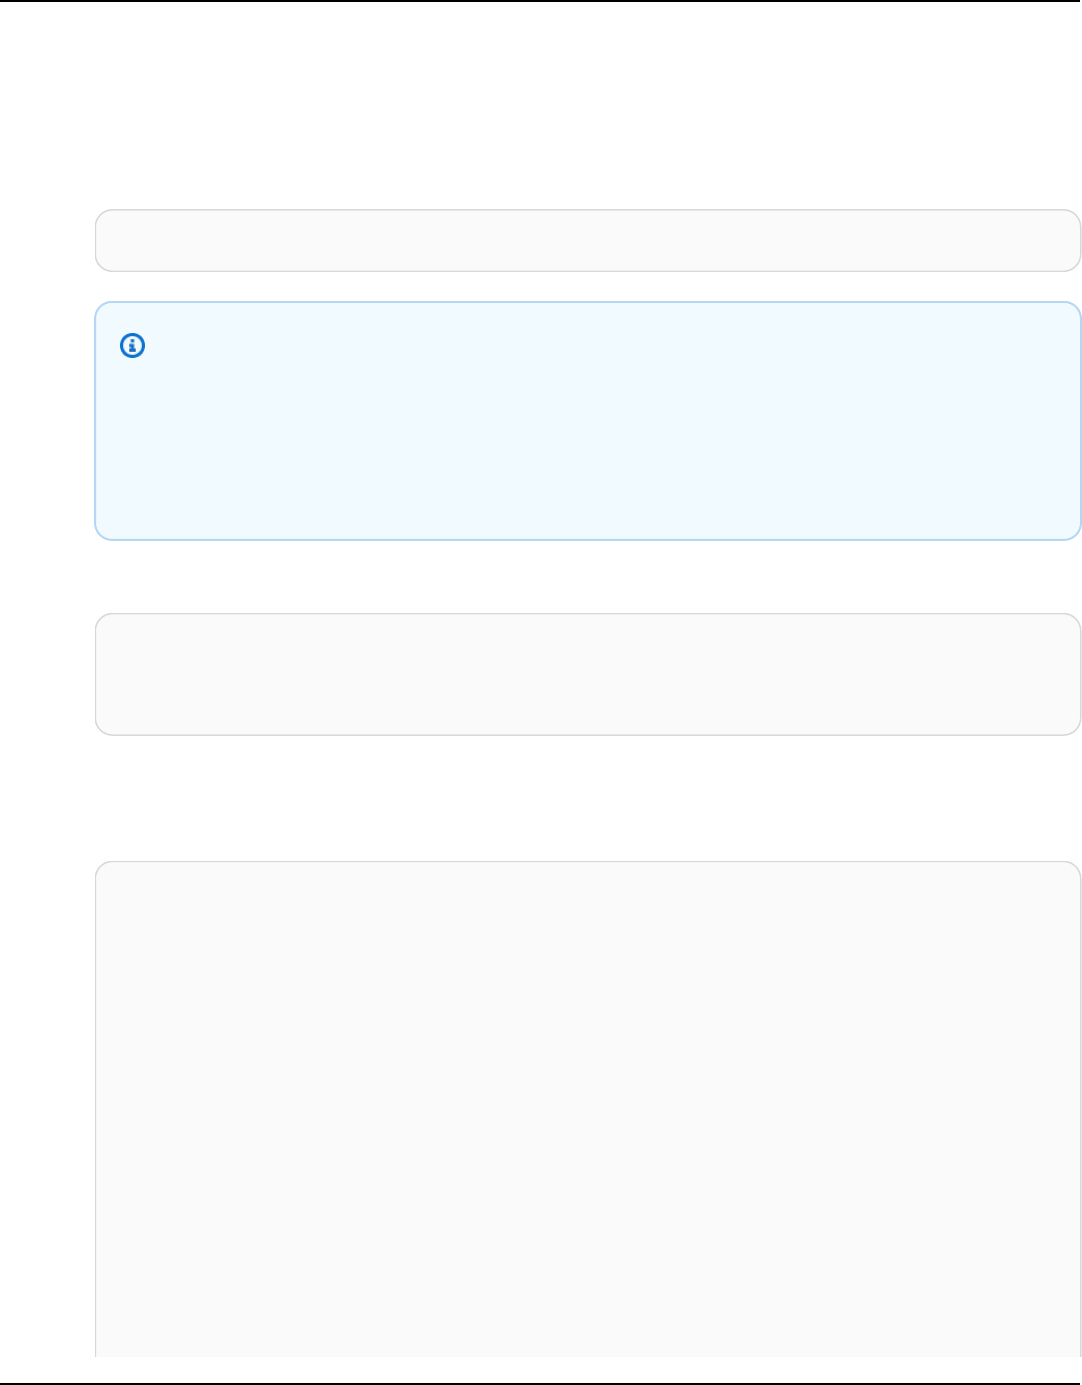
Amazon Keyspaces (for Apache Cassandra) Developer Guide
1. Amazon Keyspaces requires the use of Transport Layer Security (TLS) to help secure
connections with clients.
a.
Download the Starfield digital certificate using the following command and save sf-
class2-root.crt locally or in your home directory.
curl https://certs.secureserver.net/repository/sf-class2-root.crt -O
Note
You can also use the Amazon digital certificate to connect to Amazon Keyspaces
and can continue to do so if your client is connecting to Amazon Keyspaces
successfully. The Starfield certificate provides additional backwards compatibility
for clients using older certificate authorities.
b. Convert the Starfield digital certificate into a trustStore file.
openssl x509 -outform der -in sf-class2-root.crt -out temp_file.der
keytool -import -alias cassandra -keystore cassandra_truststore.jks -file
temp_file.der
In this step, you need to create a password for the keystore and trust this certificate. The
interactive command looks like this.
Enter keystore password:
Re-enter new password:
Owner: OU=Starfield Class 2 Certification Authority, O="Starfield Technologies,
Inc.", C=US
Issuer: OU=Starfield Class 2 Certification Authority, O="Starfield
Technologies, Inc.", C=US
Serial number: 0
Valid from: Tue Jun 29 17:39:16 UTC 2004 until: Thu Jun 29 17:39:16 UTC 2034
Certificate fingerprints:
MD5: 32:4A:4B:BB:C8:63:69:9B:BE:74:9A:C6:DD:1D:46:24
SHA1: AD:7E:1C:28:B0:64:EF:8F:60:03:40:20:14:C3:D0:E3:37:0E:B5:8A
SHA256:
14:65:FA:20:53:97:B8:76:FA:A6:F0:A9:95:8E:55:90:E4:0F:CC:7F:AA:4F:B7:C2:C8:67:75:21:FB:5F:B6:58
Signature algorithm name: SHA1withRSA
Subject Public Key Algorithm: 2048-bit RSA key
Version: 3
Using a Cassandra Java client driver 115

Amazon Keyspaces (for Apache Cassandra) Developer Guide
Extensions:
#1: ObjectId: 2.5.29.35 Criticality=false
AuthorityKeyIdentifier [
KeyIdentifier [
0000: BF 5F B7 D1 CE DD 1F 86 F4 5B 55 AC DC D7 10 C2 ._.......[U.....
0010: 0E A9 88 E7 ....
]
[OU=Starfield Class 2 Certification Authority, O="Starfield Technologies,
Inc.", C=US]
SerialNumber: [ 00]
]
#2: ObjectId: 2.5.29.19 Criticality=false
BasicConstraints:[
CA:true
PathLen:2147483647
]
#3: ObjectId: 2.5.29.14 Criticality=false
SubjectKeyIdentifier [
KeyIdentifier [
0000: BF 5F B7 D1 CE DD 1F 86 F4 5B 55 AC DC D7 10 C2 ._.......[U.....
0010: 0E A9 88 E7 ....
]
]
Trust this certificate? [no]: y
2. Attach the trustStore file in the JVM arguments:
-Djavax.net.ssl.trustStore=path_to_file/cassandra_truststore.jks
-Djavax.net.ssl.trustStorePassword=my_password
Step-by-step tutorial to connect to Amazon Keyspaces using the DataStax Java
driver for Apache Cassandra using service-specific credentials
The following step-by-step tutorial walks you through connecting to Amazon Keyspaces using a
Java driver for Cassandra using service-specific credentials. Specifically, you'll use the 4.0 version of
the DataStax Java driver for Apache Cassandra.
Topics
• Step 1: Prerequisites
• Step 2: Configure the driver
Using a Cassandra Java client driver 116

Amazon Keyspaces (for Apache Cassandra) Developer Guide
• Step 3: Run the sample application
Step 1: Prerequisites
To follow this tutorial, you need to generate service-specific credentials and add the DataStax Java
driver for Apache Cassandra to your Java project.
• Generate service-specific credentials for your Amazon Keyspaces IAM user by completing the
steps in the section called “Create service-specific credentials”. If you prefer to use IAM access
keys for authentication, see the section called “Authentication plugin for Java 4.x”.
• Add the DataStax Java driver for Apache Cassandra to your Java project. Ensure that you're using
a version of the driver that supports Apache Cassandra 3.11.2. For more information, see the
DataStax Java driver for Apache Cassandra documentation.
Step 2: Configure the driver
You can specify settings for the DataStax Java Cassandra driver by creating a configuration file
for your application. This configuration file overrides the default settings and tells the driver to
connect to the Amazon Keyspaces service endpoint using port 9142. For a list of available service
endpoints, see the section called “Service endpoints”.
Create a configuration file and save the file in the application's resources folder—for example,
src/main/resources/application.conf. Open application.conf and add the following
configuration settings.
1. Authentication provider – Create the authentication provider with the
PlainTextAuthProvider class. ServiceUserName and ServicePassword should match
the user name and password you obtained when you generated the service-specific credentials
by following the steps in Create service-specific credentials for programmatic access to
Amazon Keyspaces.
Note
You can use short-term credentials by using the authentication plugin for the DataStax
Java driver for Apache Cassandra instead of hardcoding credentials in your driver
configuration file. To learn more, follow the instructions for the the section called
“Authentication plugin for Java 4.x”.
Using a Cassandra Java client driver 117

Amazon Keyspaces (for Apache Cassandra) Developer Guide
2.
Local data center – Set the value for local-datacenter to the Region you're connecting to.
For example, if the application is connecting to cassandra.us-east-2.amazonaws.com,
then set the local data center to us-east-2. For all available AWS Regions, see ???. Set slow-
replica-avoidance = false to load balance against fewer nodes.
3. SSL/TLS – Initialize the SSLEngineFactory by adding a section in the configuration file with a
single line that specifies the class with class = DefaultSslEngineFactory. Provide the
path to the trustStore file and the password that you created previously. Amazon Keyspaces
doesn't support hostname-validation of peers, so set this option to false.
datastax-java-driver {
basic.contact-points = [ "cassandra.us-east-2.amazonaws.com:9142"]
advanced.auth-provider{
class = PlainTextAuthProvider
username = "ServiceUserName"
password = "ServicePassword"
}
basic.load-balancing-policy {
local-datacenter = "us-east-2"
slow-replica-avoidance = false
}
advanced.ssl-engine-factory {
class = DefaultSslEngineFactory
truststore-path = "./src/main/resources/cassandra_truststore.jks"
truststore-password = "my_password"
hostname-validation = false
}
}
Note
Instead of adding the path to the trustStore in the configuration file, you can also add the
trustStore path directly in the application code or you can add the path to the trustStore to
your JVM arguments.
Using a Cassandra Java client driver 118

Amazon Keyspaces (for Apache Cassandra) Developer Guide
Step 3: Run the sample application
This code example shows a simple command line application that creates a connection pool
to Amazon Keyspaces by using the configuration file we created earlier. It confirms that the
connection is established by running a simple query.
package <your package>;
// add the following imports to your project
import com.datastax.oss.driver.api.core.CqlSession;
import com.datastax.oss.driver.api.core.config.DriverConfigLoader;
import com.datastax.oss.driver.api.core.cql.ResultSet;
import com.datastax.oss.driver.api.core.cql.Row;
public class App
{
public static void main( String[] args )
{
//Use DriverConfigLoader to load your configuration file
DriverConfigLoader loader =
DriverConfigLoader.fromClasspath("application.conf");
try (CqlSession session = CqlSession.builder()
.withConfigLoader(loader)
.build()) {
ResultSet rs = session.execute("select * from system_schema.keyspaces");
Row row = rs.one();
System.out.println(row.getString("keyspace_name"));
}
}
}
Note
Use a try block to establish the connection to ensure that it's always closed. If you don't
use a try block, remember to close your connection to avoid leaking resources.
Using a Cassandra Java client driver 119

Amazon Keyspaces (for Apache Cassandra) Developer Guide
Step-by-step tutorial to connect to Amazon Keyspaces using the 4.x DataStax Java
driver for Apache Cassandra and the SigV4 authentication plugin
The following section describes how to use the SigV4 authentication plugin for the open-source 4.x
DataStax Java driver for Apache Cassandra to access Amazon Keyspaces (for Apache Cassandra).
The plugin is available from the GitHub repository.
The SigV4 authentication plugin allows you to use IAM credentials for users or roles when
connecting to Amazon Keyspaces. Instead of requiring a user name and password, this plugin signs
API requests using access keys. For more information, see the section called “Create IAM credentials
for AWS authentication”.
Step 1: Prerequisites
To follow this tutorial, you need to complete the following tasks.
• If you haven't already done so, create credentials for your IAM user or role following the steps
at the section called “Create IAM credentials for AWS authentication”. This tutorial assumes that
the access keys are stored as environment variables. For more information, see the section called
“Manage access keys”.
• Add the DataStax Java driver for Apache Cassandra to your Java project. Ensure that you're using
a version of the driver that supports Apache Cassandra 3.11.2. For more information, see the
DataStax Java Driver for Apache Cassandra documentation.
• Add the authentication plugin to your application. The authentication plugin supports version
4.x of the DataStax Java driver for Apache Cassandra. If you’re using Apache Maven, or a build
system that can use Maven dependencies, add the following dependencies to your pom.xml file.
Important
Replace the version of the plugin with the latest version as shown at GitHub repository.
<dependency>
<groupId>software.aws.mcs</groupId>
<artifactId>aws-sigv4-auth-cassandra-java-driver-plugin</artifactId>
<version>4.0.9</version>
</dependency>
Using a Cassandra Java client driver 120

Amazon Keyspaces (for Apache Cassandra) Developer Guide
Step 2: Configure the driver
You can specify settings for the DataStax Java Cassandra driver by creating a configuration file
for your application. This configuration file overrides the default settings and tells the driver to
connect to the Amazon Keyspaces service endpoint using port 9142. For a list of available service
endpoints, see the section called “Service endpoints”.
Create a configuration file and save the file in the application's resources folder—for example,
src/main/resources/application.conf. Open application.conf and add the following
configuration settings.
1.
Authentication provider – Set the advanced.auth-provider.class to a new instance
of software.aws.mcs.auth.SigV4AuthProvider. The SigV4AuthProvider is the
authentication handler provided by the plugin for performing SigV4 authentication.
2.
Local data center – Set the value for local-datacenter to the Region you're connecting to.
For example, if the application is connecting to cassandra.us-east-2.amazonaws.com,
then set the local data center to us-east-2. For all available AWS Regions, see ???. Set slow-
replica-avoidance = false to load balance against all available nodes.
3.
Idempotence – Set the default idempotence for the application to true to configure the
driver to always retry failed read/write/prepare/execute requests. This is a best practice for
distributed applications that helps to handle transient failures by retrying failed requests.
4. SSL/TLS – Initialize the SSLEngineFactory by adding a section in the configuration file with a
single line that specifies the class with class = DefaultSslEngineFactory. Provide the
path to the trustStore file and the password that you created previously. Amazon Keyspaces
doesn't support hostname-validation of peers, so set this option to false.
5.
Connections – Create at least 3 local connections per endpoint by setting local.size =
3. This is a best practice that helps your application to handle overhead and traffic bursts.
For more information about how to calculate how many local connections per endpoint your
application needs based on expected traffic patterns, see the section called “How to configure
connections”.
6. Retry policy – The Amazon Keyspaces retry policy
AmazonKeyspacesExponentialRetryPolicy is an alternative to the
DefaultRetryPolicy that comes with the Cassandra driver. The main difference
between the two retry policies is that you can configure the amount of retry attempts
for the AmazonKeyspacesExponentialRetryPolicy to meet your needs. By default,
the number of retry attempts for the AmazonKeyspacesExponentialRetryPolicy
is set to 3. In addition, the Amazon Keyspaces retry policy doesn't return the generic
Using a Cassandra Java client driver 121

Amazon Keyspaces (for Apache Cassandra) Developer Guide
NoHostAvailableException. Instead, the Amazon Keyspaces retry policy passes back
the original exception returned by the service. For more code examples implementing retry
policies, see Amazon Keyspaces retry policies on Github.
7.
Prepared statements – Set prepare-on-all-nodes to false to optimize network usage.
datastax-java-driver {
basic {
contact-points = [ "cassandra.us-east-2.amazonaws.com:9142"]
request {
timeout = 2 seconds
consistency = LOCAL_QUORUM
page-size = 1024
default-idempotence = true
}
load-balancing-policy {
local-datacenter = "us-east-2"
class = DefaultLoadBalancingPolicy
slow-replica-avoidance = false
}
}
advanced {
auth-provider {
class = software.aws.mcs.auth.SigV4AuthProvider
aws-region = us-east-2
}
ssl-engine-factory {
class = DefaultSslEngineFactory
truststore-path = "./src/main/resources/cassandra_truststore.jks"
truststore-password = "my_password"
hostname-validation = false
}
connection {
connect-timeout = 5 seconds
max-requests-per-connection = 512
pool {
local.size = 3
}
}
retry-policy {
class = com.aws.ssa.keyspaces.retry.AmazonKeyspacesExponentialRetryPolicy
max-attempts = 3
min-wait = 10 mills
Using a Cassandra Java client driver 122

Amazon Keyspaces (for Apache Cassandra) Developer Guide
max-wait = 100 mills
}
prepared-statements {
prepare-on-all-nodes = false
}
}
}
Note
Instead of adding the path to the trustStore in the configuration file, you can also add the
trustStore path directly in the application code or you can add the path to the trustStore to
your JVM arguments.
Step 3: Run the application
This code example shows a simple command line application that creates a connection pool
to Amazon Keyspaces by using the configuration file we created earlier. It confirms that the
connection is established by running a simple query.
package <your package>;
// add the following imports to your project
import com.datastax.oss.driver.api.core.CqlSession;
import com.datastax.oss.driver.api.core.config.DriverConfigLoader;
import com.datastax.oss.driver.api.core.cql.ResultSet;
import com.datastax.oss.driver.api.core.cql.Row;
public class App
{
public static void main( String[] args )
{
//Use DriverConfigLoader to load your configuration file
DriverConfigLoader loader =
DriverConfigLoader.fromClasspath("application.conf");
try (CqlSession session = CqlSession.builder()
.withConfigLoader(loader)
.build()) {
ResultSet rs = session.execute("select * from system_schema.keyspaces");
Row row = rs.one();
Using a Cassandra Java client driver 123

Amazon Keyspaces (for Apache Cassandra) Developer Guide
System.out.println(row.getString("keyspace_name"));
}
}
}
Note
Use a try block to establish the connection to ensure that it's always closed. If you don't
use a try block, remember to close your connection to avoid leaking resources.
Connect to Amazon Keyspaces using the 3.x DataStax Java driver for Apache
Cassandra and the SigV4 authentication plugin
The following section describes how to use the SigV4 authentication plugin for the 3.x open-source
DataStax Java driver for Apache Cassandra to access Amazon Keyspaces. The plugin is available
from the GitHub repository.
The SigV4 authentication plugin allows you to use IAM credentials for users and roles when
connecting to Amazon Keyspaces. Instead of requiring a user name and password, this plugin signs
API requests using access keys. For more information, see the section called “Create IAM credentials
for AWS authentication”.
Step 1: Prerequisites
To run this code sample, you first need to complete the following tasks.
• Create credentials for your IAM user or role following the steps at the section called “Create IAM
credentials for AWS authentication”. This tutorial assumes that the access keys are stored as
environment variables. For more information, see the section called “Manage access keys”.
• Follow the steps at the section called “Before you begin” to download the Starfield digital
certificate, convert it to a trustStore file, and attach the trustStore file in the JVM arguments to
your application.
• Add the DataStax Java driver for Apache Cassandra to your Java project. Ensure that you're using
a version of the driver that supports Apache Cassandra 3.11.2. For more information, see the
DataStax Java Driver for Apache Cassandra documentation.
• Add the authentication plugin to your application. The authentication plugin supports version
3.x of the DataStax Java driver for Apache Cassandra. If you’re using Apache Maven, or a build
Using a Cassandra Java client driver 124

Amazon Keyspaces (for Apache Cassandra) Developer Guide
system that can use Maven dependencies, add the following dependencies to your pom.xml file.
Replace the version of the plugin with the latest version as shown at GitHub repository.
<dependency>
<groupId>software.aws.mcs</groupId>
<artifactId>aws-sigv4-auth-cassandra-java-driver-plugin_3</artifactId>
<version>3.0.3</version>
</dependency>
Step 2: Run the application
This code example shows a simple command line application that creates a connection pool to
Amazon Keyspaces. It confirms that the connection is established by running a simple query.
package <your package>;
// add the following imports to your project
import software.aws.mcs.auth.SigV4AuthProvider;
import com.datastax.driver.core.Cluster;
import com.datastax.driver.core.ResultSet;
import com.datastax.driver.core.Row;
import com.datastax.driver.core.Session;
public class App
{
public static void main( String[] args )
{
String endPoint = "cassandra.us-east-2.amazonaws.com";
int portNumber = 9142;
Session session = Cluster.builder()
.addContactPoint(endPoint)
.withPort(portNumber)
.withAuthProvider(new SigV4AuthProvider("us-east-2"))
.withSSL()
.build()
.connect();
ResultSet rs = session.execute("select * from system_schema.keyspaces");
Row row = rs.one();
System.out.println(row.getString("keyspace_name"));
Using a Cassandra Java client driver 125

Amazon Keyspaces (for Apache Cassandra) Developer Guide
}
}
Usage notes:
For a list of available endpoints, see the section called “Service endpoints”.
See the following repository for helpful Java driver policies, examples, and best practices when
using the Java Driver with Amazon Keyspaces: https://github.com/aws-samples/amazon-
keyspaces-java-driver-helpers.
Using a Cassandra Python client driver to access Amazon Keyspaces
programmatically
In this section, we show you how to connect to Amazon Keyspaces using a Python client driver.
To provide users and applications with credentials for programmatic access to Amazon Keyspaces
resources, you can do either of the following:
• Create service-specific credentials that are associated with a specific AWS Identity and Access
Management (IAM) user.
• For enhanced security, we recommend to create IAM access keys for IAM users or roles that are
used across all AWS services. The Amazon Keyspaces SigV4 authentication plugin for Cassandra
client drivers enables you to authenticate calls to Amazon Keyspaces using IAM access keys
instead of user name and password. For more information, see the section called “Create IAM
credentials for AWS authentication”.
Topics
• Before you begin
• Connect to Amazon Keyspaces using the Python driver for Apache Cassandra and service-specific
credentials
• Connect to Amazon Keyspaces using the DataStax Python driver for Apache Cassandra and the
SigV4 authentication plugin
Before you begin
You need to complete the following task before you can start.
Using a Cassandra Python client driver 126

Amazon Keyspaces (for Apache Cassandra) Developer Guide
Amazon Keyspaces requires the use of Transport Layer Security (TLS) to help secure connections
with clients. To connect to Amazon Keyspaces using TLS, you need to download an Amazon digital
certificate and configure the Python driver to use TLS.
Download the Starfield digital certificate using the following command and save sf-class2-
root.crt locally or in your home directory.
curl https://certs.secureserver.net/repository/sf-class2-root.crt -O
Note
You can also use the Amazon digital certificate to connect to Amazon Keyspaces and
can continue to do so if your client is connecting to Amazon Keyspaces successfully. The
Starfield certificate provides additional backwards compatibility for clients using older
certificate authorities.
curl https://certs.secureserver.net/repository/sf-class2-root.crt -O
Connect to Amazon Keyspaces using the Python driver for Apache Cassandra and
service-specific credentials
The following code example shows you how to connect to Amazon Keyspaces with a Python client
driver and service-specific credentials.
from cassandra.cluster import Cluster
from ssl import SSLContext, PROTOCOL_TLSv1_2 , CERT_REQUIRED
from cassandra.auth import PlainTextAuthProvider
ssl_context = SSLContext(PROTOCOL_TLSv1_2 )
ssl_context.load_verify_locations('path_to_file/sf-class2-root.crt')
ssl_context.verify_mode = CERT_REQUIRED
auth_provider = PlainTextAuthProvider(username='ServiceUserName',
password='ServicePassword')
cluster = Cluster(['cassandra.us-east-2.amazonaws.com'], ssl_context=ssl_context,
auth_provider=auth_provider, port=9142)
session = cluster.connect()
r = session.execute('select * from system_schema.keyspaces')
print(r.current_rows)
Using a Cassandra Python client driver 127

Amazon Keyspaces (for Apache Cassandra) Developer Guide
Usage notes:
1.
Replace "path_to_file/sf-class2-root.crt" with the path to the certificate saved in the
first step.
2.
Ensure that the ServiceUserName and ServicePassword match the user name and password
you obtained when you generated the service-specific credentials by following the steps to
Create service-specific credentials for programmatic access to Amazon Keyspaces.
3. For a list of available endpoints, see the section called “Service endpoints”.
Connect to Amazon Keyspaces using the DataStax Python driver for Apache
Cassandra and the SigV4 authentication plugin
The following section shows how to use the SigV4 authentication plugin for the open-source
DataStax Python driver for Apache Cassandra to access Amazon Keyspaces (for Apache Cassandra).
If you haven't already done so, begin with creating credentials for your IAM role following the steps
at the section called “Create IAM credentials for AWS authentication”. This tutorial uses temporary
credentials, which requires an IAM role. For more information about temporary credentials, see the
section called “Create temporary credentials to connect to Amazon Keyspaces”.
Then, add the Python SigV4 authentication plugin to your environment from the GitHub
repository.
pip install cassandra-sigv4
The following code example shows how to connect to Amazon Keyspaces by using the open-source
DataStax Python driver for Cassandra and the SigV4 authentication plugin. The plugin depends on
the AWS SDK for Python (Boto3). It uses boto3.session to obtain temporary credentials.
from cassandra.cluster import Cluster
from ssl import SSLContext, PROTOCOL_TLSv1_2 , CERT_REQUIRED
from cassandra.auth import PlainTextAuthProvider
import boto3
from cassandra_sigv4.auth import SigV4AuthProvider
ssl_context = SSLContext(PROTOCOL_TLSv1_2)
ssl_context.load_verify_locations('path_to_file/sf-class2-root.crt')
ssl_context.verify_mode = CERT_REQUIRED
Using a Cassandra Python client driver 128

Amazon Keyspaces (for Apache Cassandra) Developer Guide
# use this if you want to use Boto to set the session parameters.
boto_session = boto3.Session(aws_access_key_id="AKIAIOSFODNN7EXAMPLE",
aws_secret_access_key="wJalrXUtnFEMI/K7MDENG/
bPxRfiCYEXAMPLEKEY",
aws_session_token="AQoDYXdzEJr...<remainder of token>",
region_name="us-east-2")
auth_provider = SigV4AuthProvider(boto_session)
# Use this instead of the above line if you want to use the Default Credentials and not
bother with a session.
# auth_provider = SigV4AuthProvider()
cluster = Cluster(['cassandra.us-east-2.amazonaws.com'], ssl_context=ssl_context,
auth_provider=auth_provider,
port=9142)
session = cluster.connect()
r = session.execute('select * from system_schema.keyspaces')
print(r.current_rows)
Usage notes:
1.
Replace "path_to_file/sf-class2-root.crt" with the path to the certificate saved in the
first step.
2.
Ensure that the aws_access_key_id, aws_secret_access_key, and the
aws_session_token match the Access Key, Secret Access Key, and Session Token
you obtained using boto3.session. For more information, see Credentials in the AWS SDK for
Python (Boto3).
3. For a list of available endpoints, see the section called “Service endpoints”.
Using a Cassandra Node.js client driver to access Amazon Keyspaces
programmatically
This section shows you how to connect to Amazon Keyspaces by using a Node.js client driver. To
provide users and applications with credentials for programmatic access to Amazon Keyspaces
resources, you can do either of the following:
• Create service-specific credentials that are associated with a specific AWS Identity and Access
Management (IAM) user.
Using a Cassandra Node.js client driver 129

Amazon Keyspaces (for Apache Cassandra) Developer Guide
• For enhanced security, we recommend to create IAM access keys for IAM users or roles that are
used across all AWS services. The Amazon Keyspaces SigV4 authentication plugin for Cassandra
client drivers enables you to authenticate calls to Amazon Keyspaces using IAM access keys
instead of user name and password. For more information, see the section called “Create IAM
credentials for AWS authentication”.
Topics
• Before you begin
• Connect to Amazon Keyspaces using the Node.js DataStax driver for Apache Cassandra and
service-specific credentials
• Connect to Amazon Keyspaces using the DataStax Node.js driver for Apache Cassandra and the
SigV4 authentication plugin
Before you begin
You need to complete the following task before you can start.
Amazon Keyspaces requires the use of Transport Layer Security (TLS) to help secure connections
with clients. To connect to Amazon Keyspaces using TLS, you need to download an Amazon digital
certificate and configure the Python driver to use TLS.
Download the Starfield digital certificate using the following command and save sf-class2-
root.crt locally or in your home directory.
curl https://certs.secureserver.net/repository/sf-class2-root.crt -O
Note
You can also use the Amazon digital certificate to connect to Amazon Keyspaces and
can continue to do so if your client is connecting to Amazon Keyspaces successfully. The
Starfield certificate provides additional backwards compatibility for clients using older
certificate authorities.
curl https://certs.secureserver.net/repository/sf-class2-root.crt -O
Using a Cassandra Node.js client driver 130

Amazon Keyspaces (for Apache Cassandra) Developer Guide
Connect to Amazon Keyspaces using the Node.js DataStax driver for Apache
Cassandra and service-specific credentials
Configure your driver to use the Starfield digital certificate for TLS and authenticate using service-
specific credentials. For example:
const cassandra = require('cassandra-driver');
const fs = require('fs');
const auth = new cassandra.auth.PlainTextAuthProvider('ServiceUserName',
'ServicePassword');
const sslOptions1 = {
ca: [
fs.readFileSync('path_to_file/sf-class2-root.crt', 'utf-8')],
host: 'cassandra.us-west-2.amazonaws.com',
rejectUnauthorized: true
};
const client = new cassandra.Client({
contactPoints: ['cassandra.us-west-2.amazonaws.com'],
localDataCenter: 'us-west-2',
authProvider: auth,
sslOptions: sslOptions1,
protocolOptions: { port: 9142 }
});
const query = 'SELECT * FROM system_schema.keyspaces';
client.execute(query)
.then( result => console.log('Row from Keyspaces %s',
result.rows[0]))
.catch( e=> console.log(`${e}`));
Usage notes:
1.
Replace "path_to_file/sf-class2-root.crt" with the path to the certificate saved in the
first step.
2.
Ensure that the ServiceUserName and ServicePassword match the user name and password
you obtained when you generated the service-specific credentials by following the steps to
Create service-specific credentials for programmatic access to Amazon Keyspaces.
3. For a list of available endpoints, see the section called “Service endpoints”.
Using a Cassandra Node.js client driver 131

Amazon Keyspaces (for Apache Cassandra) Developer Guide
Connect to Amazon Keyspaces using the DataStax Node.js driver for Apache
Cassandra and the SigV4 authentication plugin
The following section shows how to use the SigV4 authentication plugin for the open-source
DataStax Node.js driver for Apache Cassandra to access Amazon Keyspaces (for Apache Cassandra).
If you haven't already done so, create credentials for your IAM user or role following the steps at
the section called “Create IAM credentials for AWS authentication”.
Add the Node.js SigV4 authentication plugin to your application from the GitHub repository. The
plugin supports version 4.x of the DataStax Node.js driver for Cassandra and depends on the AWS
SDK for Node.js. It uses AWSCredentialsProvider to obtain credentials.
$ npm install aws-sigv4-auth-cassandra-plugin --save
This code example shows how to set a Region-specific instance of SigV4AuthProvider as the
authentication provider.
const cassandra = require('cassandra-driver');
const fs = require('fs');
const sigV4 = require('aws-sigv4-auth-cassandra-plugin');
const auth = new sigV4.SigV4AuthProvider({
region: 'us-west-2',
accessKeyId:'AKIAIOSFODNN7EXAMPLE',
secretAccessKey: 'wJalrXUtnFEMI/K7MDENG/bPxRfiCYEXAMPLEKEY'});
const sslOptions1 = {
ca: [
fs.readFileSync('path_to_filecassandra/sf-class2-root.crt', 'utf-8')],
host: 'cassandra.us-west-2.amazonaws.com',
rejectUnauthorized: true
};
const client = new cassandra.Client({
contactPoints: ['cassandra.us-west-2.amazonaws.com'],
localDataCenter: 'us-west-2',
authProvider: auth,
sslOptions: sslOptions1,
protocolOptions: { port: 9142 }
});
Using a Cassandra Node.js client driver 132

Amazon Keyspaces (for Apache Cassandra) Developer Guide
const query = 'SELECT * FROM system_schema.keyspaces';
client.execute(query).then(
result => console.log('Row from Keyspaces %s', result.rows[0]))
.catch( e=> console.log(`${e}`));
Usage notes:
1.
Replace "path_to_file/sf-class2-root.crt" with the path to the certificate saved in the
first step.
2.
Ensure that the accessKeyId and secretAccessKey match the Access Key and Secret
Access Key you obtained using AWSCredentialsProvider. For more information, see Setting
Credentials in Node.js in the AWS SDK for JavaScript in Node.js.
3. To store access keys outside of code, see best practices at the section called “Manage access
keys”.
4. For a list of available endpoints, see the section called “Service endpoints”.
Using a Cassandra .NET Core client driver to access Amazon Keyspaces
programmatically
This section shows you how to connect to Amazon Keyspaces by using a .NET Core client driver.
The setup steps will vary depending on your environment and operating system, you might have
to modify them accordingly. Amazon Keyspaces requires the use of Transport Layer Security (TLS)
to help secure connections with clients. To connect to Amazon Keyspaces using TLS, you need to
download a Starfield digital certificate and configure your driver to use TLS.
1. Download the Starfield certificate and save it to a local directory, taking note of the path.
Following is an example using PowerShell.
$client = new-object System.Net.WebClient
$client.DownloadFile("https://certs.secureserver.net/repository/sf-class2-
root.crt","path_to_file\sf-class2-root.crt")
2. Install the CassandraCSharpDriver through nuget, using the nuget console.
PM> Install-Package CassandraCSharpDriver
Using a Cassandra .NET Core client driver 133

Amazon Keyspaces (for Apache Cassandra) Developer Guide
3. The following example uses a .NET Core C# console project to connect to Amazon Keyspaces and
run a query.
using Cassandra;
using System;
using System.Collections.Generic;
using System.Linq;
using System.Net.Security;
using System.Runtime.ConstrainedExecution;
using System.Security.Cryptography.X509Certificates;
using System.Text;
using System.Threading.Tasks;
namespace CSharpKeyspacesExample
{
class Program
{
public Program(){}
static void Main(string[] args)
{
X509Certificate2Collection certCollection = new
X509Certificate2Collection();
X509Certificate2 amazoncert = new X509Certificate2(@"path_to_file\sf-
class2-root.crt");
var userName = "ServiceUserName";
var pwd = "ServicePassword";
certCollection.Add(amazoncert);
var awsEndpoint = "cassandra.us-east-2.amazonaws.com" ;
var cluster = Cluster.Builder()
.AddContactPoints(awsEndpoint)
.WithPort(9142)
.WithAuthProvider(new PlainTextAuthProvider(userName, pwd))
.WithSSL(new
SSLOptions().SetCertificateCollection(certCollection))
.Build();
var session = cluster.Connect();
var rs = session.Execute("SELECT * FROM system_schema.tables;");
foreach (var row in rs)
{
Using a Cassandra .NET Core client driver 134

Amazon Keyspaces (for Apache Cassandra) Developer Guide
var name = row.GetValue<String>("keyspace_name");
Console.WriteLine(name);
}
}
}
}
Usage notes:
a.
Replace "path_to_file/sf-class2-root.crt" with the path to the certificate saved in
the first step.
b.
Ensure that the ServiceUserName and ServicePassword match the user name and
password you obtained when you generated the service-specific credentials by following the
steps to Create service-specific credentials for programmatic access to Amazon Keyspaces.
c. For a list of available endpoints, see the section called “Service endpoints”.
Using a Cassandra Go client driver to access Amazon Keyspaces
programmatically
This section shows you how to connect to Amazon Keyspaces by using a Go client driver. To provide
users and applications with credentials for programmatic access to Amazon Keyspaces resources,
you can do either of the following:
• Create service-specific credentials that are associated with a specific AWS Identity and Access
Management (IAM) user.
• For enhanced security, we recommend to create IAM access keys for IAM users and roles that are
used across all AWS services. The Amazon Keyspaces SigV4 authentication plugin for Cassandra
client drivers enables you to authenticate calls to Amazon Keyspaces using IAM access keys
instead of user name and password. For more information, see the section called “Create IAM
credentials for AWS authentication”.
Topics
• Before you begin
• Connect to Amazon Keyspaces using the Gocql driver for Apache Cassandra and service-specific
credentials
Using a Cassandra Go client driver 135

Amazon Keyspaces (for Apache Cassandra) Developer Guide
• Connect to Amazon Keyspaces using the Go driver for Apache Cassandra and the SigV4
authentication plugin
Before you begin
You need to complete the following task before you can start.
Amazon Keyspaces requires the use of Transport Layer Security (TLS) to help secure connections
with clients. To connect to Amazon Keyspaces using TLS, you need to download an Amazon digital
certificate and configure the Python driver to use TLS.
Download the Starfield digital certificate using the following command and save sf-class2-
root.crt locally or in your home directory.
curl https://certs.secureserver.net/repository/sf-class2-root.crt -O
Note
You can also use the Amazon digital certificate to connect to Amazon Keyspaces and
can continue to do so if your client is connecting to Amazon Keyspaces successfully. The
Starfield certificate provides additional backwards compatibility for clients using older
certificate authorities.
curl https://certs.secureserver.net/repository/sf-class2-root.crt -O
Connect to Amazon Keyspaces using the Gocql driver for Apache Cassandra and
service-specific credentials
1. Create a directory for your application.
mkdir ./gocqlexample
2. Navigate to the new directory.
cd gocqlexample
3. Create a file for your application.
Using a Cassandra Go client driver 136

Amazon Keyspaces (for Apache Cassandra) Developer Guide
touch cqlapp.go
4. Download the Go driver.
go get github.com/gocql/gocql
5. Add the following sample code to the cqlapp.go file.
package main
import (
"fmt"
"github.com/gocql/gocql"
"log"
)
func main() {
// add the Amazon Keyspaces service endpoint
cluster := gocql.NewCluster("cassandra.us-east-2.amazonaws.com")
cluster.Port=9142
// add your service specific credentials
cluster.Authenticator = gocql.PasswordAuthenticator{
Username: "ServiceUserName",
Password: "ServicePassword"}
// provide the path to the sf-class2-root.crt
cluster.SslOpts = &gocql.SslOptions{
CaPath: "path_to_file/sf-class2-root.crt",
EnableHostVerification: false,
}
// Override default Consistency to LocalQuorum
cluster.Consistency = gocql.LocalQuorum
cluster.DisableInitialHostLookup = false
session, err := cluster.CreateSession()
if err != nil {
fmt.Println("err>", err)
}
defer session.Close()
// run a sample query from the system keyspace
Using a Cassandra Go client driver 137

Amazon Keyspaces (for Apache Cassandra) Developer Guide
var text string
iter := session.Query("SELECT keyspace_name FROM system_schema.tables;").Iter()
for iter.Scan(&text) {
fmt.Println("keyspace_name:", text)
}
if err := iter.Close(); err != nil {
log.Fatal(err)
}
session.Close()
}
Usage notes:
a.
Replace "path_to_file/sf-class2-root.crt" with the path to the certificate saved in
the first step.
b.
Ensure that the ServiceUserName and ServicePassword match the user name and
password you obtained when you generated the service-specific credentials by following the
steps to Create service-specific credentials for programmatic access to Amazon Keyspaces.
c. For a list of available endpoints, see the section called “Service endpoints”.
6. Build the program.
go build cqlapp.go
7. Run the program.
./cqlapp
Connect to Amazon Keyspaces using the Go driver for Apache Cassandra and the
SigV4 authentication plugin
The following code sample shows how to use the SigV4 authentication plugin for the open-source
Go driver to access Amazon Keyspaces (for Apache Cassandra).
If you haven't already done so, create credentials for your IAM user or role following the steps at
the section called “Create IAM credentials for AWS authentication”.
Add the Go SigV4 authentication plugin to your application from the GitHub repository. The plugin
supports version 1.2.x of the open-source Go driver for Cassandra and depends on the AWS SDK for
Go.
Using a Cassandra Go client driver 138

Amazon Keyspaces (for Apache Cassandra) Developer Guide
$ go mod init
$ go get github.com/aws/aws-sigv4-auth-cassandra-gocql-driver-plugin
In this code sample, the Amazon Keyspaces endpoint is represented by the Cluster class. It uses
the AwsAuthenticator for the authenticator property of the cluster to obtain credentials.
package main
import (
"fmt"
"github.com/aws/aws-sigv4-auth-cassandra-gocql-driver-plugin/sigv4"
"github.com/gocql/gocql"
"log"
)
func main() {
// configuring the cluster options
cluster := gocql.NewCluster("cassandra.us-west-2.amazonaws.com")
cluster.Port=9142
var auth sigv4.AwsAuthenticator = sigv4.NewAwsAuthenticator()
auth.Region = "us-west-2"
auth.AccessKeyId = "AKIAIOSFODNN7EXAMPLE"
auth.SecretAccessKey = "wJalrXUtnFEMI/K7MDENG/bPxRfiCYEXAMPLEKEY"
cluster.Authenticator = auth
cluster.SslOpts = &gocql.SslOptions{
CaPath: "path_to_file/sf-class2-root.crt",
EnableHostVerification: false,
}
cluster.Consistency = gocql.LocalQuorum
cluster.DisableInitialHostLookup = false
session, err := cluster.CreateSession()
if err != nil {
fmt.Println("err>", err)
return
}
defer session.Close()
// doing the query
var text string
iter := session.Query("SELECT keyspace_name FROM system_schema.tables;").Iter()
Using a Cassandra Go client driver 139

Amazon Keyspaces (for Apache Cassandra) Developer Guide
for iter.Scan(&text) {
fmt.Println("keyspace_name:", text)
}
if err := iter.Close(); err != nil {
log.Fatal(err)
}
}
Usage notes:
1.
Replace "path_to_file/sf-class2-root.crt" with the path to the certificate saved in the
first step.
2.
Ensure that the AccessKeyId and SecretAccessKey match the access key and secret access
key you obtained using AwsAuthenticator. For more information, see Configuring the AWS
SDK for Go in the AWS SDK for Go.
3. To store access keys outside of code, see best practices at the section called “Manage access
keys”.
4. For a list of available endpoints, see the section called “Service endpoints”.
Using a Cassandra Perl client driver to access Amazon Keyspaces
programmatically
This section shows you how to connect to Amazon Keyspaces by using a Perl client driver. For this
code sample, we used Perl 5. Amazon Keyspaces requires the use of Transport Layer Security (TLS)
to help secure connections with clients.
Important
To create a secure connection, our code samples use the Starfield digital certificate to
authenticate the server before establishing the TLS connection. The Perl driver doesn't
validate the server's Amazon SSL certificate, which means that you can't confirm that you
are connecting to Amazon Keyspaces. The second step, to configure the driver to use TLS
when connecting to Amazon Keyspaces is still required, and ensures that data transferred
between the client and server is encrypted.
Using a Cassandra Perl client driver 140

Amazon Keyspaces (for Apache Cassandra) Developer Guide
1. Download the Cassandra DBI driver from https://metacpan.org/pod/DBD::Cassandra and install
the driver to your Perl environment. The exact steps depend on the environment. The following
is a common example.
cpanm DBD::Cassandra
2. Create a file for your application.
touch cqlapp.pl
3. Add the following sample code to the cqlapp.pl file.
use DBI;
my $user = "ServiceUserName";
my $password = "ServicePassword";
my $db = DBI->connect("dbi:Cassandra:host=cassandra.us-
east-2.amazonaws.com;port=9142;tls=1;",
$user, $password);
my $rows = $db->selectall_arrayref("select * from system_schema.keyspaces");
print "Found the following Keyspaces...\n";
for my $row (@$rows) {
print join(" ",@$row['keyspace_name']),"\n";
}
$db->disconnect;
Important
Ensure that the ServiceUserName and ServicePassword match the user name and
password you obtained when you generated the service-specific credentials by following
the steps to Create service-specific credentials for programmatic access to Amazon
Keyspaces.
Note
For a list of available endpoints, see the section called “Service endpoints”.
4. Run the application.
Using a Cassandra Perl client driver 141

Amazon Keyspaces (for Apache Cassandra) Developer Guide
perl cqlapp.pl
Use a step-by-step tutorial to connect to Amazon Keyspaces
This topic includes various tutorials that show the detailed steps required to connect to Amazon
Keyspaces programmatically. The tutorials cover different popular cross-service access scenarios
and demonstrate how to integrate Amazon Keyspaces with other AWS services, for example
Amazon Virtual Private Cloud or Amazon Elastic Kubernetes Service, or other open source
technologies like Apache Spark. For step-by-step tutorials that demonstrate how to connect
to Amazon Keyspaces using different Apache Cassandra drivers, see the section called “Using a
Cassandra client driver”.
Topics
• Tutorial: Connecting to Amazon Keyspaces using an interface VPC endpoint
• Connecting to Amazon Keyspaces with Apache Spark
• Tutorial: Connecting to Amazon Keyspaces from Amazon Elastic Kubernetes Service
Tutorial: Connecting to Amazon Keyspaces using an interface VPC
endpoint
This tutorial walks you through setting up and using an interface VPC endpoint for Amazon
Keyspaces.
Interface VPC endpoints enable private communication between your virtual private cloud (VPC)
running in Amazon VPC and Amazon Keyspaces. Interface VPC endpoints are powered by AWS
PrivateLink, which is an AWS service that enables private communication between VPCs and AWS
services. For more information, see the section called “Using interface VPC endpoints”.
Topics
• Tutorial prerequisites and considerations
• Step 1: Launch an Amazon EC2 instance
• Step 2: Configure your Amazon EC2 instance
• Step 3: Create a VPC endpoint for Amazon Keyspaces
• Step 4: Configure permissions for the VPC endpoint connection
Connection tutorials 142

Amazon Keyspaces (for Apache Cassandra) Developer Guide
• Step 5: Configure monitoring with CloudWatch
• Step 6: (Optional) Best practices to configure the connection pool size for your application
• Step 7: (Optional) Clean up
Tutorial prerequisites and considerations
Before you start this tutorial, follow the AWS setup instructions in Accessing Amazon Keyspaces
(for Apache Cassandra). These steps include signing up for AWS and creating an AWS Identity and
Access Management (IAM) principal with access to Amazon Keyspaces. Take note of the name of
the IAM user and the access keys because you'll need them later in this tutorial.
Create a keyspace with the name myKeyspaceand at least one table to test the connection using
the VPC endpoint later in this tutorial. You can find detailed instructions in Getting started.
After completing the prerequisite steps, proceed to Step 1: Launch an Amazon EC2 instance.
Step 1: Launch an Amazon EC2 instance
In this step, you launch an Amazon EC2 instance in your default Amazon VPC. You can then create
and use a VPC endpoint for Amazon Keyspaces.
To launch an Amazon EC2 instance
1. Open the Amazon EC2 console at https://console.aws.amazon.com/ec2/.
2. Choose Launch Instance and do the following:
From the EC2 console dashboard, in the Launch instance box, choose Launch instance, and
then choose Launch instance from the options that appear.
Under Name and tags, for Name, enter a descriptive name for your instance.
Under Application and OS Images (Amazon Machine Image):
• Choose Quick Start, and then choose Ubuntu. This is the operating system (OS) for your
instance.
• Under Amazon Machine Image (AMI), you can use the default image that is marked as
Free tier eligible. An Amazon Machine Image (AMI) is a basic configuration that serves as a
template for your instance.
Connecting with VPC endpoints 143

Amazon Keyspaces (for Apache Cassandra) Developer Guide
Under Instance Type:
• From the Instance type list, choose the t2.micro instance type, which is selected by default.
Under Key pair (login), for Key pair name, choose one of the following options for this
tutorial:
• If you don't have an Amazon EC2 key pair, choose Create a new key pair and follow the
instructions. You will be asked to download a private key file (.pem file). You will need this
file later when you log in to your Amazon EC2 instance, so take note of the file path.
• If you already have an existing Amazon EC2 key pair, go to Select a key pair and choose your
key pair from the list. You must already have the private key file ( .pem file) available in order
to log in to your Amazon EC2 instance.
Under Network Settings:
• Choose Edit.
• Choose Select an existing security group.
• In the list of security groups, choose default. This is the default security group for your VPC.
Continue to Summary.
• Review a summary of your instance configuration in the Summary panel. When you're ready,
choose Launch instance.
3. On the completion screen for the new Amazon EC2 instance, choose the Connect to instance
tile. The next screen shows the necessary information and the required steps to connect to
your new instance. Take note of the following information:
• The sample command to protect the key file
• The connection string
• The Public IPv4 DNS name
After taking note of the information on this page, you can continue to the next step in this
tutorial (Step 2: Configure your Amazon EC2 instance).
Connecting with VPC endpoints 144

Amazon Keyspaces (for Apache Cassandra) Developer Guide
Note
It takes a few minutes for your Amazon EC2 instance to become available. Before you go
on to the next step, ensure that the Instance State is running and that all of its Status
Checks have passed.
Step 2: Configure your Amazon EC2 instance
When your Amazon EC2 instance is available, you can log into it and prepare it for first use.
Note
The following steps assume that you're connecting to your Amazon EC2 instance from a
computer running Linux. For other ways to connect, see Connect to your Linux instance in
the Amazon EC2 User Guide.
To configure your Amazon EC2 instance
1. You need to authorize inbound SSH traffic to your Amazon EC2 instance. To do this, create a
new EC2 security group, and then assign the security group to your EC2 instance.
a. In the navigation pane, choose Security Groups.
b. Choose Create Security Group. In the Create Security Group window, do the following:
•
Security group name – Enter a name for your security group. For example: my-ssh-
access
• Description – Enter a short description for the security group.
• VPC – Choose your default VPC.
• In the Inbound rules section, choose Add Rule and do the following:
• Type – Choose SSH.
• Source – Choose My IP.
• Choose Add rule.
On the bottom of the page, confirm the configuration settings and choose Create
Security Group.
Connecting with VPC endpoints 145

Amazon Keyspaces (for Apache Cassandra) Developer Guide
c. In the navigation pane, choose Instances.
d. Choose the Amazon EC2 instance that you launched in Step 1: Launch an Amazon EC2
instance.
e. Choose Actions, choose Security, and then choose Change Security Groups.
f. In Change Security Groups, select the security group that you created earlier in this
procedure (for example, my-ssh-access). The existing default security group should
also be selected. Confirm the configuration settings and choose Assign Security Groups.
2. Use the following command to protect your private key file from access. If you skip this step,
the connection fails.
chmod 400 path_to_file/my-keypair.pem
3.
Use the ssh command to log in to your Amazon EC2 instance, as in the following example.
ssh -i path_to_file/my-keypair.pem ubuntu@public-dns-name
You need to specify your private key file (.pem file) and the public DNS name of your instance.
(See Step 1: Launch an Amazon EC2 instance).
The login ID is ubuntu. No password is required.
For more information about allowing connections to your Amazon EC2 instance and for AWS
CLI instructions, see Authorize inbound traffic for your Linux instances in the Amazon EC2 User
Guide.
4. Download and install the latest version of the AWS Command Line Interface.
a.
Install unzip.
sudo apt install unzip
b.
Download the zip file with the AWS CLI.
curl "https://awscli.amazonaws.com/awscli-exe-linux-x86_64.zip" -o
"awscliv2.zip"
c. Unzip the file.
unzip awscliv2.zip
Connecting with VPC endpoints 146

Amazon Keyspaces (for Apache Cassandra) Developer Guide
d. Install the AWS CLI.
sudo ./aws/install
e. Confirm the version of the AWS CLI installation.
aws --version
The output should look like this:
aws-cli/2.9.19 Python/3.9.11 Linux/5.15.0-1028-aws exe/x86_64.ubuntu.22 prompt/
off
5. Configure your AWS credentials, as shown in the following example. Enter your AWS access key
ID, secret key, and default Region name when prompted.
aws configure
AWS Access Key ID [None]: AKIAIOSFODNN7EXAMPLE
AWS Secret Access Key [None]: wJalrXUtnFEMI/K7MDENG/bPxRfiCYEXAMPLEKEY
Default region name [None]: us-east-1
Default output format [None]:
6.
You have to use a cqlsh connection to Amazon Keyspaces to confirm that your VPC endpoint
has been configured correctly. If you use your local environment or the Amazon Keyspaces CQL
editor in the AWS Management Console, the connection automatically goes through the public
endpoint instead of your VPC endpoint. To use cqlsh to test your VPC endpoint connection in
this tutorial, complete the setup instructions in Using cqlsh to connect to Amazon Keyspaces.
You are now ready to create a VPC endpoint for Amazon Keyspaces.
Step 3: Create a VPC endpoint for Amazon Keyspaces
In this step, you create a VPC endpoint for Amazon Keyspaces using the AWS CLI. To create the VPC
endpoint using the VPC console, you can follow the Create a VPC endpoint instructions in the AWS
PrivateLink Guide. When filtering for the Service name, enter Cassandra.
Connecting with VPC endpoints 147

Amazon Keyspaces (for Apache Cassandra) Developer Guide
To create a VPC endpoint using the AWS CLI
1. Before you begin, verify that you can communicate with Amazon Keyspaces using its public
endpoint.
aws keyspaces list-tables --keyspace-name 'myKeyspace'
The output shows a list of Amazon Keyspaces tables that are contained in the specified
keyspace. If you don't have any tables, the list is empty.
{
"tables": [
{
"keyspaceName": "myKeyspace",
"tableName": "myTable1",
"resourceArn": "arn:aws:cassandra:us-east-1:111122223333:/keyspace/
catalog/table/myTable1"
},
{
"keyspaceName": "myKeyspace",
"tableName": "myTable2",
"resourceArn": "arn:aws:cassandra:us-east-1:111122223333:/keyspace/
catalog/table/myTable2"
}
]
}
2. Verify that Amazon Keyspaces is an available service for creating VPC endpoints in the current
AWS Region. (The command is shown in bold text, followed by example output.)
aws ec2 describe-vpc-endpoint-services
{
"ServiceNames": [
"com.amazonaws.us-east-1.cassandra",
"com.amazonaws.us-east-1.cassandra-fips"
]
}
In the example output, Amazon Keyspaces is one of the services available, so you can proceed
with creating a VPC endpoint for it.
Connecting with VPC endpoints 148

Amazon Keyspaces (for Apache Cassandra) Developer Guide
3. Determine your VPC identifier.
aws ec2 describe-vpcs
{
"Vpcs": [
{
"VpcId": "vpc-a1234bcd",
"InstanceTenancy": "default",
"State": "available",
"DhcpOptionsId": "dopt-8454b7e1",
"CidrBlock": "111.31.0.0/16",
"IsDefault": true
}
]
}
In the example output, the VPC ID is vpc-a1234bcd.
4. Use a filter to gather details about the subnets of the VPC.
aws ec2 describe-subnets --filters "Name=vpc-id,Values=vpc-a1234bcd"
{
{
"Subnets":[
{
"AvailabilityZone":"us-east-1a",
"AvailabilityZoneId":"use2-az1",
"AvailableIpAddressCount":4085,
"CidrBlock":"111.31.0.0/20",
"DefaultForAz":true,
"MapPublicIpOnLaunch":true,
"MapCustomerOwnedIpOnLaunch":false,
"State":"available",
"SubnetId":"subnet-920aacf9",
"VpcId":"vpc-a1234bcd",
"OwnerId":"111122223333",
"AssignIpv6AddressOnCreation":false,
"Ipv6CidrBlockAssociationSet":[
],
"SubnetArn":"arn:aws:ec2:us-east-1:111122223333:subnet/subnet-920aacf9",
Connecting with VPC endpoints 149

Amazon Keyspaces (for Apache Cassandra) Developer Guide
"EnableDns64":false,
"Ipv6Native":false,
"PrivateDnsNameOptionsOnLaunch":{
"HostnameType":"ip-name",
"EnableResourceNameDnsARecord":false,
"EnableResourceNameDnsAAAARecord":false
}
},
{
"AvailabilityZone":"us-east-1c",
"AvailabilityZoneId":"use2-az3",
"AvailableIpAddressCount":4085,
"CidrBlock":"111.31.32.0/20",
"DefaultForAz":true,
"MapPublicIpOnLaunch":true,
"MapCustomerOwnedIpOnLaunch":false,
"State":"available",
"SubnetId":"subnet-4c713600",
"VpcId":"vpc-a1234bcd",
"OwnerId":"111122223333",
"AssignIpv6AddressOnCreation":false,
"Ipv6CidrBlockAssociationSet":[
],
"SubnetArn":"arn:aws:ec2:us-east-1:111122223333:subnet/subnet-4c713600",
"EnableDns64":false,
"Ipv6Native":false,
"PrivateDnsNameOptionsOnLaunch":{
"HostnameType":"ip-name",
"EnableResourceNameDnsARecord":false,
"EnableResourceNameDnsAAAARecord":false
}
},
{
"AvailabilityZone":"us-east-1b",
"AvailabilityZoneId":"use2-az2",
"AvailableIpAddressCount":4086,
"CidrBlock":"111.31.16.0/20",
"DefaultForAz":true,
"MapPublicIpOnLaunch":true,
}
]
Connecting with VPC endpoints 150

Amazon Keyspaces (for Apache Cassandra) Developer Guide
}
In the example output, there are two available subnet IDs: subnet-920aacf9 and
subnet-4c713600.
5.
Create the VPC endpoint. For the --vpc-id parameter, specify the VPC ID from the previous
step. For the --subnet-id parameter, specify the subnet IDs from the previous step. Use
the --vpc-endpoint-type parameter to define the endpoint as an interface. For more
information about the command, see create-vpc-endpoint in the AWS CLI Command
Reference.
aws ec2 create-vpc-endpoint --vpc-endpoint-type Interface --vpc-id vpc-a1234bcd
--service-name com.amazonaws.us-east-1.cassandra --subnet-id subnet-920aacf9
subnet-4c713600
{
"VpcEndpoint": {
"VpcEndpointId": "vpce-000ab1cdef23456789",
"VpcEndpointType": "Interface",
"VpcId": "vpc-a1234bcd",
"ServiceName": "com.amazonaws.us-east-1.cassandra",
"State": "pending",
"RouteTableIds": [],
"SubnetIds": [
"subnet-920aacf9",
"subnet-4c713600"
],
"Groups": [
{
"GroupId": "sg-ac1b0e8d",
"GroupName": "default"
}
],
"IpAddressType": "ipv4",
"DnsOptions": {
"DnsRecordIpType": "ipv4"
},
"PrivateDnsEnabled": true,
"RequesterManaged": false,
"NetworkInterfaceIds": [
"eni-043c30c78196ad82e",
"eni-06ce37e3fd878d9fa"
],
Connecting with VPC endpoints 151

Amazon Keyspaces (for Apache Cassandra) Developer Guide
"DnsEntries": [
{
"DnsName": "vpce-000ab1cdef23456789-m2b22rtz.cassandra.us-
east-1.vpce.amazonaws.com",
"HostedZoneId": "Z7HUB22UULQXV"
},
{
"DnsName": "vpce-000ab1cdef23456789-m2b22rtz-us-
east-1a.cassandra.us-east-1.vpce.amazonaws.com",
"HostedZoneId": "Z7HUB22UULQXV"
},
{
"DnsName": "vpce-000ab1cdef23456789-m2b22rtz-us-
east-1c.cassandra.us-east-1.vpce.amazonaws.com",
"HostedZoneId": "Z7HUB22UULQXV"
},
{
"DnsName": "vpce-000ab1cdef23456789-m2b22rtz-us-
east-1b.cassandra.us-east-1.vpce.amazonaws.com",
"HostedZoneId": "Z7HUB22UULQXV"
},
{
"DnsName": "vpce-000ab1cdef23456789-m2b22rtz-us-
east-1d.cassandra.us-east-1.vpce.amazonaws.com",
"HostedZoneId": "Z7HUB22UULQXV"
},
{
"DnsName": "cassandra.us-east-1.amazonaws.com",
"HostedZoneId": "ZONEIDPENDING"
}
],
"CreationTimestamp": "2023-01-27T16:12:36.834000+00:00",
"OwnerId": "111122223333"
}
}
}
Step 4: Configure permissions for the VPC endpoint connection
The procedures in this step demonstrate how to configure rules and permissions for using the VPC
endpoint with Amazon Keyspaces.
Connecting with VPC endpoints 152

Amazon Keyspaces (for Apache Cassandra) Developer Guide
To configure an inbound rule for the new endpoint to allow TCP inbound traffic
1. In the Amazon VPC console, on the left-side panel, choose Endpoints and choose the endpoint
you created in the earlier step.
2. Choose Security groups and then choose the security group associated with this endpoint.
3. Choose Inbound rules and then choose Edit inbound rules.
4. Add an inbound rule with Type as CQLSH / CASSANDRA. This sets the Port range,
automatically to 9142.
5. To save the new inbound rule, choose Save rules.
To configure IAM user permissions
1. Confirm that the IAM user used to connect to Amazon Keyspaces has the appropriate
permissions. In AWS Identity and Access Management (IAM), you can use the AWS managed
policy AmazonKeyspacesReadOnlyAccess to grant the IAM user read access to Amazon
Keyspaces.
a. Sign in to the AWS Management Console and open the IAM console at https://
console.aws.amazon.com/iam/.
b. On the IAM console dashboard, choose Users, and then choose your IAM user from the list.
c. On the Summary page, choose Add permissions.
d. Choose Attach existing policies directly.
e. From the list of policies, choose AmazonKeyspacesReadOnlyAccess, and then choose
Next: Review.
f. Choose Add permissions.
2. Verify that you can access Amazon Keyspaces through the VPC endpoint.
aws keyspaces list-tables --keyspace-name 'my_Keyspace'
If you want, you can try some other AWS CLI commands for Amazon Keyspaces. For more
information, see the AWS CLI Command Reference.
Note
The minimum permissions required for an IAM user or role to access Amazon Keyspaces
are read permissions to the system table, as shown in the following policy. For more
Connecting with VPC endpoints 153

Amazon Keyspaces (for Apache Cassandra) Developer Guide
information about policy-based permissions, see the section called “Identity-based
policy examples”.
{
"Version":"2012-10-17",
"Statement":[
{
"Effect":"Allow",
"Action":[
"cassandra:Select"
],
"Resource":[
"arn:aws:cassandra:us-east-1:555555555555:/keyspace/system*"
]
}
]
}
3. Grant the IAM user read access to the Amazon EC2 instance with the VPC.
When you use Amazon Keyspaces with VPC endpoints, you need to grant the IAM user or role
that accesses Amazon Keyspaces read-only permissions to your Amazon EC2 instance and the
VPC to gather endpoint and network interface data. Amazon Keyspaces stores this information
in the system.peers table and uses it to manage connections.
Note
The managed policies AmazonKeyspacesReadOnlyAccess_v2 and
AmazonKeyspacesFullAccess include the required permissions to let Amazon
Keyspaces access the Amazon EC2 instance to read information about available
interface VPC endpoints.
a. Sign in to the AWS Management Console and open the IAM console at https://
console.aws.amazon.com/iam/.
b. On the IAM console dashboard, choose Policies.
c. Choose Create policy, and then choose the JSON tab.
d. Copy the following policy and choose Next: Tags.
Connecting with VPC endpoints 154

Amazon Keyspaces (for Apache Cassandra) Developer Guide
{
"Version":"2012-10-17",
"Statement":[
{
"Sid":"ListVPCEndpoints",
"Effect":"Allow",
"Action":[
"ec2:DescribeNetworkInterfaces",
"ec2:DescribeVpcEndpoints"
],
"Resource": "*"
}
]
}
e.
Choose Next: Review, enter the name keyspacesVPCendpoint for the policy, and
choose Create policy.
f. On the IAM console dashboard, choose Users, and then choose your IAM user from the list.
g. On the Summary page, choose Add permissions.
h. Choose Attach existing policies directly.
i. From the list of policies, choose keyspacesVPCendpoint, and then choose Next: Review.
j. Choose Add permissions.
4.
To verify that the Amazon Keyspaces system.peers table is getting updated with VPC
information, run the following query from your Amazon EC2 instance using cqlsh. If you
haven't already installed cqlshon your Amazon EC2 instance in step 2, follow the instructions
in the section called “Using the cqlsh-expansion”.
SELECT peer FROM system.peers;
The output returns nodes with private IP addresses, depending on your VPC and subnet setup
in your AWS Region.
peer
---------------
112.11.22.123
112.11.22.124
112.11.22.125
Connecting with VPC endpoints 155

Amazon Keyspaces (for Apache Cassandra) Developer Guide
Note
You have to use a cqlshconnection to Amazon Keyspaces to confirm that your VPC
endpoint has been configured correctly. If you use your local environment or the
Amazon Keyspaces CQL editor in the AWS Management Console, the connection
automatically goes through the public endpoint instead of your VPC endpoint. If you
see nine IP addresses, these are the entries Amazon Keyspaces automatically writes to
the system.peers table for public endpoint connections.
Step 5: Configure monitoring with CloudWatch
This step shows you how to use Amazon CloudWatch to monitor the VPC endpoint connection to
Amazon Keyspaces.
AWS PrivateLink publishes data points to CloudWatch about your interface endpoints. You can use
metrics to verify that your system is performing as expected. The AWS/PrivateLinkEndpoints
namespace in CloudWatch includes the metrics for interface endpoints. For more information, see
CloudWatch metrics for AWS PrivateLink in the AWS PrivateLink Guide.
To create a CloudWatch dashboard with VPC endpoint metrics
1. Open the CloudWatch console at https://console.aws.amazon.com/cloudwatch/.
2. In the navigation pane, choose Dashboards. Then choose Create dashboard. Enter a name for
the dashboard and choose Create.
3. Under Add widget, choose Number.
4. Under Metrics, choose AWS/PrivateLinkEndpoints.
5. Choose Endpoint Type, Service Name, VPC Endpoint ID, VPC ID.
6.
Select the metrics ActiveConnections and NewConnections, and choose Create Widget.
7. Save the dashboard.
The ActiveConnections metric is defined as the number of concurrent active connections that
the endpoint received during the last one-minute period. The NewConnections metric is defined
as the number of new connections that were established through the endpoint during the last one-
minute period.
Connecting with VPC endpoints 156

Amazon Keyspaces (for Apache Cassandra) Developer Guide
For more information about creating dashboards, see Create dashboard in the CloudWatch User
Guide.
Step 6: (Optional) Best practices to configure the connection pool size for your
application
In this section, we outline how to determine the ideal connection pool size based on the query
throughput requirements of your application.
Amazon Keyspaces allows a maximum of 3,000 CQL queries per second per TCP connection. So
there's virtually no limit on the number of connections that a driver can establish with Amazon
Keyspaces. However, we recommend that you match the connection pool size to the requirements
of your application and consider the available endpoints when you're using Amazon Keyspaces with
VPC endpoint connections.
You configure the connection pool size in the client driver. For example, based on a local pool
size of 2 and a VPC interface endpoint created across 3 Availability Zones, the driver establishes
6 connections for querying (7 in total, which includes a control connection). Using these 6
connections, you can support a maximum of 18,000 CQL queries per second.
If your application needs to support 40,000 CQL queries per second, work backwards from the
number of queries that are needed to determine the required connection pool size. To support
40,000 CQL queries per second, you need to configure the local pool size to be at least 5, which
supports a minimum of 45,000 CQL queries per second.
You can monitor if you exceed the quota for the maximum number of operations per second, per
connection by using the PerConnectionRequestRateExceeded CloudWatch metric in the AWS/
Cassandra namespace. The PerConnectionRequestRateExceeded metric shows the number
of requests to Amazon Keyspaces that exceed the quota for the per-connection request rate.
The code examples in this step show how to estimate and configure connection pooling when
you're using interface VPC endpoints.
Java
You can configure the number of connections per pool in the Java driver. For a complete
example of a Java client driver connection, see the section called “Using a Cassandra Java client
driver”.
When the client driver is started, first the control connection is established for administrative
tasks, such as for schema and topology changes. Then the additional connections are created.
Connecting with VPC endpoints 157

Amazon Keyspaces (for Apache Cassandra) Developer Guide
In the following example, the local pool size driver configuration is specified as 2. If the VPC
endpoint is created across 3 subnets within the VPC, this results in 7 NewConnections in
CloudWatch for the interface endpoint, as shown in the following formula.
NewConnections = 3 (VPC subnet endpoints created across) * 2 (pool size) + 1
( control connection)
datastax-java-driver {
basic.contact-points = [ "cassandra.us-east-1.amazonaws.com:9142"]
advanced.auth-provider{
class = PlainTextAuthProvider
username = "ServiceUserName"
password = "ServicePassword"
}
basic.load-balancing-policy {
local-datacenter = "us-east-1"
slow-replica-avoidance = false
}
advanced.ssl-engine-factory {
class = DefaultSslEngineFactory
truststore-path = "./src/main/resources/cassandra_truststore.jks"
truststore-password = "my_password"
hostname-validation = false
}
advanced.connection {
pool.local.size = 2
}
}
If the number of active connections doesn’t match your configured pool size (aggregation
across subnets) + 1 control connection, something is preventing the connections from being
created.
Node.js
You can configure the number of connections per pool in the Node.js driver. For a complete
example of a Node.js client driver connection, see the section called “Using a Cassandra Node.js
client driver”.
Connecting with VPC endpoints 158

Amazon Keyspaces (for Apache Cassandra) Developer Guide
For the following code example, the local pool size driver configuration is specified as 1. If the
VPC endpoint is created across 4 subnets within the VPC, this results in 5 NewConnections in
CloudWatch for the interface endpoint, as shown in the following formula.
NewConnections = 4 (VPC subnet endpoints created across) * 1 (pool size) + 1
( control connection)
const cassandra = require('cassandra-driver');
const fs = require('fs');
const types = cassandra.types;
const auth = new cassandra.auth.PlainTextAuthProvider('ServiceUserName',
'ServicePassword');
const sslOptions1 = {
ca: [
fs.readFileSync('/home/ec2-user/sf-class2-root.crt', 'utf-8')],
host: 'cassandra.us-east-1.amazonaws.com',
rejectUnauthorized: true
};
const client = new cassandra.Client({
contactPoints: ['cassandra.us-east-1.amazonaws.com'],
localDataCenter: 'us-east-1',
pooling: { coreConnectionsPerHost: { [types.distance.local]:
1 } },
consistency: types.consistencies.localQuorum,
queryOptions: { isIdempotent: true },
authProvider: auth,
sslOptions: sslOptions1,
protocolOptions: { port: 9142 }
});
Step 7: (Optional) Clean up
If you want to delete the resources that you have created in this tutorial, follow these procedures.
To remove your VPC endpoint for Amazon Keyspaces
1. Log in to your Amazon EC2 instance.
2.
Determine the VPC endpoint ID that is used for Amazon Keyspaces. If you omit the grep
parameters, VPC endpoint information is shown for all services.
Connecting with VPC endpoints 159

Amazon Keyspaces (for Apache Cassandra) Developer Guide
aws ec2 describe-vpc-endpoint-services | grep ServiceName | grep cassandra
{
"VpcEndpoint": {
"PolicyDocument": "{\"Version\":\"2008-10-17\",\"Statement\":[{\"Effect\":
\"Allow\",\"Principal\":\"*\",\"Action\":\"*\",\"Resource\":\"*\"}]}",
"VpcId": "vpc-0bbc736e",
"State": "available",
"ServiceName": "com.amazonaws.us-east-1.cassandra",
"RouteTableIds": [],
"VpcEndpointId": "vpce-9b15e2f2",
"CreationTimestamp": "2017-07-26T22:00:14Z"
}
}
In the example output, the VPC endpoint ID is vpce-9b15e2f2.
3. Delete the VPC endpoint.
aws ec2 delete-vpc-endpoints --vpc-endpoint-ids vpce-9b15e2f2
{
"Unsuccessful": []
}
The empty array [] indicates success (there were no unsuccessful requests).
To terminate your Amazon EC2 instance
1. Open the Amazon EC2 console at https://console.aws.amazon.com/ec2/.
2. In the navigation pane, choose Instances.
3. Choose your Amazon EC2 instance.
4. Choose Actions, choose Instance State, and then choose Terminate.
5. In the confirmation window, choose Yes, Terminate.
Connecting with VPC endpoints 160

Amazon Keyspaces (for Apache Cassandra) Developer Guide
Connecting to Amazon Keyspaces with Apache Spark
Apache Spark is an open-source engine for large-scale data analytics. Apache Spark enables you to
perform analytics on data stored in Amazon Keyspaces more efficiently. You can also use Amazon
Keyspaces to provide applications with consistent, single-digit-millisecond read access to analytics
data from Spark. The open-source Spark Cassandra Connector simplifies reading and writing data
between Amazon Keyspaces and Spark.
Amazon Keyspaces support for the Spark Cassandra Connector streamlines running Cassandra
workloads in Spark-based analytics pipelines by using a fully managed and serverless database
service. With Amazon Keyspaces, you don’t need to worry about Spark competing for the same
underlying infrastructure resources as your tables. Amazon Keyspaces tables scale up and down
automatically based on your application traffic.
The following tutorial walks you through steps and best practices required to read and write data
to Amazon Keyspaces using the Spark Cassandra Connector. The tutorial demonstrates how to
migrate data to Amazon Keyspaces by loading data from a file with the Spark Cassandra Connector
and writing it to an Amazon Keyspaces table. Then, the tutorial shows how to read the data back
from Amazon Keyspaces using the Spark Cassandra Connector. You would do this to run Cassandra
workloads in Spark-based analytics pipelines.
Topics
• Prerequisites for establishing connections to Amazon Keyspaces with the Spark Cassandra
Connector
• Step 1: Configure Amazon Keyspaces for integration with the Apache Cassandra Spark Connector
• Step 2: Configure the Apache Cassandra Spark Connector
• Step 3: Create the application configuration file
• Step 4: Prepare the source data and the target table in Amazon Keyspaces
• Step 5: Write and read Amazon Keyspaces data using the Apache Cassandra Spark Connector
• Troubleshooting common errors when using the Spark Cassandra Connector with Amazon
Keyspaces
Connecting with Apache Spark 161

Amazon Keyspaces (for Apache Cassandra) Developer Guide
Prerequisites for establishing connections to Amazon Keyspaces with the Spark
Cassandra Connector
Before you connect to Amazon Keyspaces with the Spark Cassandra Connector, you need to make
sure that you've installed the following. The compatibility of Amazon Keyspaces with the Spark
Cassandra Connector has been tested with the following recommended versions:
• Java version 8
• Scala 2.12
• Spark 3.4
• Cassandra Connector 2.5 and higher
• Cassandra driver 4.12
1. To install Scala, follow the instructions at https://www.scala-lang.org/download/scala2.html.
2. To install Spark 3.4.1, follow this example.
curl -o spark-3.4.1-bin-hadoop3.tgz -k https://dlcdn.apache.org/spark/spark-3.4.1/
spark-3.4.1-bin-hadoop3.tgz
# now to untar
tar -zxvf spark-3.4.1-bin-hadoop3.tgz
# set this variable.
export SPARK_HOME=$PWD/spark-3.4.1-bin-hadoop3
```
Step 1: Configure Amazon Keyspaces for integration with the Apache Cassandra
Spark Connector
In this step, you confirm that the partitioner for your account is compatible with the Apache
Spark Connector and setup the required IAM permissions. The following best practices help you to
provision sufficient read/write capacity for the table.
1.
Confirm that the Murmur3Partitioner partitioner is the default partitioner for your
account. This partitioner is compatible with the Spark Cassandra Connector. For more
information on partitioners and how to change them, see the section called “Working with
partitioners”.
Connecting with Apache Spark 162

Amazon Keyspaces (for Apache Cassandra) Developer Guide
2. Setup your IAM permissions for Amazon Keyspaces, using interface VPC endpoints, with
Apache Spark.
• Assign read/write access to the user table and read access to the system tables as shown in
the IAM policy example listed below.
• Populating the system.peers table with your available interface VPC endpoints is required
for clients accessing Amazon Keyspaces with Spark over VPC endpoints.
{
"Version":"2012-10-17",
"Statement":[
{
"Effect":"Allow",
"Action":[
"cassandra:Select",
"cassandra:Modify"
],
"Resource":[
"arn:aws:cassandra:us-east-1:111122223333:/keyspace/mykeyspace/table/
mytable",
"arn:aws:cassandra:us-east-1:111122223333:/keyspace/system*"
]
},
{
"Sid":"ListVPCEndpoints",
"Effect":"Allow",
"Action":[
"ec2:DescribeNetworkInterfaces",
"ec2:DescribeVpcEndpoints"
],
"Resource":"*"
}
]
}
3. Consider the following best practices to configure sufficient read/write throughput capacity
for your Amazon Keyspaces table to support the traffic from the Spark Cassandra Connector.
• Start using on-demand capacity to help you test the scenario.
• To optimize the cost of table throughput for production environments, use a rate limiter
for traffic from the connector, and configure your table to use provisioned capacity with
Connecting with Apache Spark 163

Amazon Keyspaces (for Apache Cassandra) Developer Guide
automatic scaling. For more information, see the section called “Manage throughput
capacity with auto scaling”.
• You can use a fixed rate limiter that comes with the Cassandra driver. There are some rate
limiters tailored to Amazon Keyspaces in the AWS samples repo.
• For more information about capacity management, see the section called “Configure read/
write capacity modes”.
Step 2: Configure the Apache Cassandra Spark Connector
Apache Spark is a general-purpose compute platform that you can configure in different ways. To
configure Spark and the Spark Cassandra Connector for integration with Amazon Keyspaces, we
recommend that you start with the minimum configuration settings described in the following
section, and then increase them later as appropriate for your workload.
• Create Spark partition sizes smaller than 8 MBs.
In Spark, partitions represent an atomic chunk of data that can be run in parallel. When you
are writing data to Amazon Keyspaces with the Spark Cassandra Connector, the smaller the
Spark partition, the smaller the amount of records that the task is going to write. If a Spark task
encounters multiple errors, it fails after the designated number of retries has been exhausted.
To avoid replaying large tasks and reprocessing a lot of data, keep the size of the Spark partition
small.
• Use a low concurrent number of writes per executor with a large number of retries.
Amazon Keyspaces returns insufficient capacity errors back to Cassandra drivers as operation
timeouts. You can't address timeouts caused by insufficient capacity by changing the configured
timeout duration because the Spark Cassandra Connector attempts to retry requests
transparently using the MultipleRetryPolicy. To ensure that retries don’t overwhelm
the driver’s connection pool, use a low concurrent number of writes per executor with a large
number of retries. The following code snippet is an example of this.
spark.cassandra.query.retry.count = 500
spark.cassandra.output.concurrent.writes = 3
• Break down the total throughput and distribute it across multiple Cassandra sessions.
Connecting with Apache Spark 164

Amazon Keyspaces (for Apache Cassandra) Developer Guide
• The Cassandra Spark Connector creates one session for each Spark executor. Think about
this session as the unit of scale to determine the required throughput and the number of
connections required.
• When defining the number of cores per executor and the number of cores per task, start low
and increase as needed.
• Set Spark task failures to allow processing in the event of transient errors. After you become
familiar with your application's traffic characteristics and requirements, we recommend setting
spark.task.maxFailures to a bounded value.
• For example, the following configuration can handle two concurrent tasks per executor, per
session:
spark.executor.instances = configurable -> number of executors for the session.
spark.executor.cores = 2 -> Number of cores per executor.
spark.task.cpus = 1 -> Number of cores per task.
spark.task.maxFailures = -1
• Turn off batching.
• We recommend that you turn off batching to improve random access patterns. The following
code snippet is an example of this.
spark.cassandra.output.batch.size.rows = 1 (Default = None)
spark.cassandra.output.batch.grouping.key = none (Default = Partition)
spark.cassandra.output.batch.grouping.buffer.size = 100 (Default = 1000)
•
Set SPARK_LOCAL_DIRS to a fast, local disk with enough space.
•
By default, Spark saves map output files and resilient distributed datasets (RDDs) to a /tmp
folder. Depending on your Spark host’s configuration, this can result in no space left on the
device style errors.
•
To set the SPARK_LOCAL_DIRS environment variable to a directory called /example/spark-
dir, you can use the following command.
export SPARK_LOCAL_DIRS=/example/spark-dir
Connecting with Apache Spark 165

Amazon Keyspaces (for Apache Cassandra) Developer Guide
Step 3: Create the application configuration file
To use the open-source Spark Cassandra Connector with Amazon Keyspaces, you need to provide
an application configuration file that contains the settings required to connect with the DataStax
Java driver. You can use either service-specific credentials or the SigV4 plugin to connect.
If you haven't already done so, you need to convert the Starfield digital certificate into a trustStore
file. You can follow the detailed steps at the section called “Before you begin” from the Java driver
connection tutorial. Take note of the trustStore file path and password because you need this
information when you create the application config file.
Connect with SigV4 authentication
This section shows you an example application.conf file that you can use when connecting
with AWS credentials and the SigV4 plugin. If you haven't already done so, you need to generate
your IAM access keys (an access key ID and a secret access key) and save them in your AWS
config file or as environment variables. For detailed instructions, see the section called “Required
credentials for AWS authentication”.
In the following example, replace the file path to your trustStore file, and replace the password.
datastax-java-driver {
basic.contact-points = ["cassandra.us-east-1.amazonaws.com:9142"]
basic.load-balancing-policy {
class = DefaultLoadBalancingPolicy
local-datacenter = us-east-1
slow-replica-avoidance = false
}
basic.request {
consistency = LOCAL_QUORUM
}
advanced {
auth-provider = {
class = software.aws.mcs.auth.SigV4AuthProvider
aws-region = us-east-1
}
ssl-engine-factory {
class = DefaultSslEngineFactory
truststore-path = "path_to_file/cassandra_truststore.jks"
truststore-password = "password"
hostname-validation=false
}
Connecting with Apache Spark 166

Amazon Keyspaces (for Apache Cassandra) Developer Guide
}
advanced.connection.pool.local.size = 3
}
Update and save this configuration file as /home/user1/application.conf. The following
examples use this path.
Connect with service-specific credentials
This section shows you an example application.conf file that you can use when connecting
with service-specific credentials. If you haven't already done so, you need to generate service-
specific credentials for Amazon Keyspaces. For detailed instructions, see the section called “Create
service-specific credentials”.
In the following example, replace username and password with your own credentials. Also,
replace the file path to your trustStore file, and replace the password.
datastax-java-driver {
basic.contact-points = ["cassandra.us-east-1.amazonaws.com:9142"]
basic.load-balancing-policy {
class = DefaultLoadBalancingPolicy
local-datacenter = us-east-1
}
basic.request {
consistency = LOCAL_QUORUM
}
advanced {
auth-provider = {
class = PlainTextAuthProvider
username = "username"
password = "password"
aws-region = "us-east-1"
}
ssl-engine-factory {
class = DefaultSslEngineFactory
truststore-path = "path_to_file/cassandra_truststore.jks"
truststore-password = "password"
hostname-validation=false
}
metadata = {
schema {
token-map.enabled = true
}
Connecting with Apache Spark 167

Amazon Keyspaces (for Apache Cassandra) Developer Guide
}
}
}
Update and save this configuration file as /home/user1/application.conf to use with the
code example.
Connect with a fixed rate
To force a fixed rate per Spark executor, you can define a request throttler. This request throttler
limits the rate of requests per second. The Spark Cassandra Connector deploys a Cassandra session
per executor. Using the following formula can help you achieve consistent throughput against a
table.
max-request-per-second * numberOfExecutors = total throughput against a table
You can add this example to the application config file that you created earlier.
datastax-java-driver {
advanced.throttler {
class = RateLimitingRequestThrottler
max-requests-per-second = 3000
max-queue-size = 30000
drain-interval = 1 millisecond
}
}
Step 4: Prepare the source data and the target table in Amazon Keyspaces
In this step, you create a source file with sample data and an Amazon Keyspaces table.
1. Create the source file. You can choose one of the following options:
• For this tutorial, you use a comma-separated values (CSV) file with the name
keyspaces_sample_table.csv as the source file for the data migration. The provided
sample file contains a few rows of data for a table with the name book_awards.
•
Download the sample CSV file (keyspaces_sample_table.csv) that is contained
in the following archive file samplemigration.zip. Unzip the archive and take note of
the path to keyspaces_sample_table.csv.
Connecting with Apache Spark 168

Amazon Keyspaces (for Apache Cassandra) Developer Guide
• If you want to follow along with your own CSV file to write data to Amazon Keyspaces,
make sure that the data is randomized. Data that is read directly from a database or
exported to flat files is typically ordered by the partition and primary key. Importing
ordered data to Amazon Keyspaces can cause it to be written to smaller segments of
Amazon Keyspaces partitions, which results in an uneven traffic distribution. This can lead
to slower performance and higher error rates.
In contrast, randomizing data helps to take advantage of the built-in load balancing
capabilities of Amazon Keyspaces by distributing traffic across partitions more evenly.
There are various tools that you can use for randomizing data. For an example that uses
the open-source tool Shuf, see the section called “Step 2: Prepare the data” in the data
migration tutorial. The following is an example that shows how to shuffle data as a
DataFrame.
import org.apache.spark.sql.functions.randval
shuffledDF = dataframe.orderBy(rand())
2. Create the target keyspace and table in Amazon Keyspaces.
a.
Connect to Amazon Keyspaces using cqlsh, and replace the service endpoint, user name,
and password in the following example with your own values.
cqlsh cassandra.us-east-2.amazonaws.com 9142 -u "111122223333" -
p "wJalrXUtnFEMI/K7MDENG/bPxRfiCYEXAMPLEKEY" --ssl
b.
Create a new keyspace with the name catalog as shown in the following example.
CREATE KEYSPACE catalog WITH REPLICATION = {'class': 'SingleRegionStrategy'};
c. After the new keyspace has a status of available, use the following code to create the
target table book_awards. To learn more about asynchronous resource creation and how
to check if a resource is available, see the section called “Check keyspace creation status”.
CREATE TABLE catalog.book_awards (
year int,
award text,
rank int,
category text,
book_title text,
author text,
Connecting with Apache Spark 169

Amazon Keyspaces (for Apache Cassandra) Developer Guide
publisher text,
PRIMARY KEY ((year, award), category, rank)
);
Step 5: Write and read Amazon Keyspaces data using the Apache Cassandra Spark
Connector
In this step, you start by loading the data from the sample file into a DataFrame with the Spark
Cassandra Connector. Next, you write the data from the DataFrame into your Amazon Keyspaces
table. You can also use this part independently, for example, to migrate data into an Amazon
Keyspaces table. Finally, you read the data from your table into a DataFrame using the Spark
Cassandra Connector. You can also use this part independently, for example, to read data from an
Amazon Keyspaces table to perform data analytics with Apache Spark.
1. Start the Spark Shell as shown in the following example. Note that this example is using SigV4
authentication.
./spark-shell --files application.conf --conf
spark.cassandra.connection.config.profile.path=application.conf
--packages software.aws.mcs:aws-sigv4-auth-cassandra-java-driver-
plugin:4.0.5,com.datastax.spark:spark-cassandra-connector_2.12:3.1.0 --conf
spark.sql.extensions=com.datastax.spark.connector.CassandraSparkExtensions
2. Import the Spark Cassandra Connector with the following code.
import org.apache.spark.sql.cassandra._
3.
To read data from the CSV file and store it in a DataFrame, you can use the following code
example.
var df =
spark.read.option("header","true").option("inferSchema","true").csv("keyspaces_sample_table.csv")
You can display the result with the following command.
scala> df.show();
The output should look similar to this.
Connecting with Apache Spark 170

Amazon Keyspaces (for Apache Cassandra) Developer Guide
+----------------+----+-----------+----+------------------+--------------------
+-------------+
| award|year| category|rank| author| book_title|
publisher|
+----------------+----+-----------+----+------------------+--------------------
+-------------+
|Kwesi Manu Prize|2020| Fiction| 1| Akua Mansa| Where did you go?|
SomePublisher|
|Kwesi Manu Prize|2020| Fiction| 2| John Stiles| Yesterday|
Example Books|
|Kwesi Manu Prize|2020| Fiction| 3| Nikki Wolf|Moving to the Cha...|
AnyPublisher|
| Wolf|2020|Non-Fiction| 1| Wang Xiulan| History of Ideas|
Example Books|
| Wolf|2020|Non-Fiction| 2|Ana Carolina Silva| Science Today|
SomePublisher|
| Wolf|2020|Non-Fiction| 3| Shirley Rodriguez|The Future of Sea...|
AnyPublisher|
| Richard Roe|2020| Fiction| 1| Alejandro Rosalez| Long Summer|
SomePublisher|
| Richard Roe|2020| Fiction| 2| Arnav Desai| The Key|
Example Books|
| Richard Roe|2020| Fiction| 3| Mateo Jackson| Inside the Whale|
AnyPublisher|
+----------------+----+-----------+----+------------------+--------------------
+-------------+
You can confirm the schema of the data in the DataFrame as shown in the following example.
scala> df.printSchema
The output should look like this.
root
|-- award: string (nullable = true)
|-- year: integer (nullable = true)
|-- category: string (nullable = true)
|-- rank: integer (nullable = true)
|-- author: string (nullable = true)
|-- book_title: string (nullable = true)
|-- publisher: string (nullable = true)
Connecting with Apache Spark 171

Amazon Keyspaces (for Apache Cassandra) Developer Guide
4.
Use the following command to write the data in the DataFrame to the Amazon Keyspaces
table.
df.write.cassandraFormat("book_awards", "catalog").mode("APPEND").save()
5. To confirm that the data was saved, you can read it back to a dataframe, as shown in the
following example.
var newDf = spark.read.cassandraFormat("book_awards", "catalog").load()
Then you can show the data that is now contained in the dataframe.
scala> newDf.show()
The output of that command should look like this.
+--------------------+------------------+----------------+-----------+-------------
+----+----+
| book_title| author| award| category|
publisher|rank|year|
+--------------------+------------------+----------------+-----------+-------------
+----+----+
| Long Summer| Alejandro Rosalez| Richard Roe| Fiction|
SomePublisher| 1|2020|
| History of Ideas| Wang Xiulan| Wolf|Non-Fiction|Example
Books| 1|2020|
| Where did you go?| Akua Mansa|Kwesi Manu Prize| Fiction|
SomePublisher| 1|2020|
| Inside the Whale| Mateo Jackson| Richard Roe| Fiction|
AnyPublisher| 3|2020|
| Yesterday| John Stiles|Kwesi Manu Prize| Fiction|Example
Books| 2|2020|
|Moving to the Cha...| Nikki Wolf|Kwesi Manu Prize| Fiction|
AnyPublisher| 3|2020|
|The Future of Sea...| Shirley Rodriguez| Wolf|Non-Fiction|
AnyPublisher| 3|2020|
| Science Today|Ana Carolina Silva| Wolf|Non-Fiction|
SomePublisher| 2|2020|
| The Key| Arnav Desai| Richard Roe| Fiction|Example
Books| 2|2020|
Connecting with Apache Spark 172

Amazon Keyspaces (for Apache Cassandra) Developer Guide
+--------------------+------------------+----------------+-----------+-------------
+----+----+
Troubleshooting common errors when using the Spark Cassandra Connector with
Amazon Keyspaces
If you're using Amazon Virtual Private Cloud and you connect to Amazon Keyspaces, the most
common errors experienced when using the Spark connector are caused by the following
configuration issues.
•
The IAM user or role used in the VPC lacks the required permissions to access the system.peers
table in Amazon Keyspaces. For more information, see the section called “Populating
system.peers table entries with interface VPC endpoint information”.
• The IAM user or role lacks the required read/write permissions to the user table and read access
to the system tables in Amazon Keyspaces. For more information, see the section called “Step 1:
Configure Amazon Keyspaces”.
• The Java driver configuration doesn't disable hostname verification when creating the SSL/TLS
connection. For examples, see the section called “Step 2: Configure the driver”.
For detailed connection troubleshooting steps, see the section called “VPC endpoint connection
errors”.
In addition, you can use Amazon CloudWatch metrics to help you troubleshoot issues with your
Spark Cassandra Connector configuration in Amazon Keyspaces. To learn more about using
Amazon Keyspaces with CloudWatch, see the section called “Monitoring with CloudWatch”.
The following section describes the most useful metrics to observe when you're using the Spark
Cassandra Connector.
PerConnectionRequestRateExceeded
Amazon Keyspaces has a quota of 3,000 requests per second, per connection. Each Spark
executor establishes a connection with Amazon Keyspaces. Running multiple retries can exhaust
your per-connection request rate quota. If you exceed this quota, Amazon Keyspaces emits a
PerConnectionRequestRateExceeded metric in CloudWatch.
Connecting with Apache Spark 173

Amazon Keyspaces (for Apache Cassandra) Developer Guide
If you see PerConnectionRequestRateExceeded events present along with other system or user
errors, it's likely that Spark is running multiple retries beyond the allotted number of requests
per connection.
If you see PerConnectionRequestRateExceeded events without other errors, then you
might need to increase the number of connections in your driver settings to allow for more
throughput, or you might need to increase the number of executors in your Spark job.
StoragePartitionThroughputCapacityExceeded
Amazon Keyspaces has a quota of 1,000 WCUs or WRUs per second/3,000 RCUs or RRUs per
second, per-partition. If you're seeing StoragePartitionThroughputCapacityExceeded
CloudWatch events, it could indicate that data is not randomized on load. For examples how to
shuffle data, see the section called “Step 4: Prepare the source data and the target table”.
Common errors and warnings
If you're using Amazon Virtual Private Cloud and you connect to Amazon Keyspaces, the Cassandra
driver might issue a warning message about the control node itself in the system.peers table.
For more information, see the section called “Common errors and warnings”. You can safely ignore
this warning.
Tutorial: Connecting to Amazon Keyspaces from Amazon Elastic
Kubernetes Service
This tutorial walks you through the steps required to set up an Amazon Elastic Kubernetes Service
(Amazon EKS) cluster to host a containerized application that connects to Amazon Keyspaces using
SigV4 authentication.
Amazon EKS is a managed service that eliminates the need to install, operate, and maintain
your own Kubernetes control plane. Kubernetes is an open-source system that automates the
management, scaling, and deployment of containerized applications.
The tutorial provides step-by-step guidance to configure, build, and deploy a containerized Java
application to Amazon EKS. In the last step you run the application to write data to an Amazon
Keyspaces table.
Topics
• Prerequisites for connecting from Amazon EKS to Amazon Keyspaces
Connecting from Amazon EKS 174

Amazon Keyspaces (for Apache Cassandra) Developer Guide
• Step 1: Configure the Amazon EKS cluster and setup IAM permissions
• Step 2: Configure the application
• Step 3: Create the application image and upload the Docker file to your Amazon ECR repository
• Step 4: Deploy the application to Amazon EKS and write data to your table
• Step 5: (Optional) Cleanup
Prerequisites for connecting from Amazon EKS to Amazon Keyspaces
Create the following AWS resources before you can begin with the tutorial
1. Before you start this tutorial, follow the AWS setup instructions in Accessing Amazon
Keyspaces (for Apache Cassandra). These steps include signing up for AWS and creating an
AWS Identity and Access Management (IAM) principal with access to Amazon Keyspaces.
2.
Create an Amazon Keyspaces keyspace with the name aws and a table with the name user
that you can write to from the containerized application running in Amazon EKS later in this
tutorial. You can do this either with the AWS CLI or using cqlsh.
AWS CLI
aws keyspaces create-keyspace --keyspace-name 'aws'
To confirm that the keyspace was created, you can use the following command.
aws keyspaces list-keyspaces
To create the table, you can use the following command.
aws keyspaces create-table --keyspace-name 'aws' --table-name 'user' --schema-
definition 'allColumns=[
{name=username,type=text}, {name=fname,type=text},
{name=last_update_date,type=timestamp},{name=lname,type=text}],
partitionKeys=[{name=username}]'
To confirm that your table was created, you can use the following command.
aws keyspaces list-tables --keyspace-name 'aws'
Connecting from Amazon EKS 175
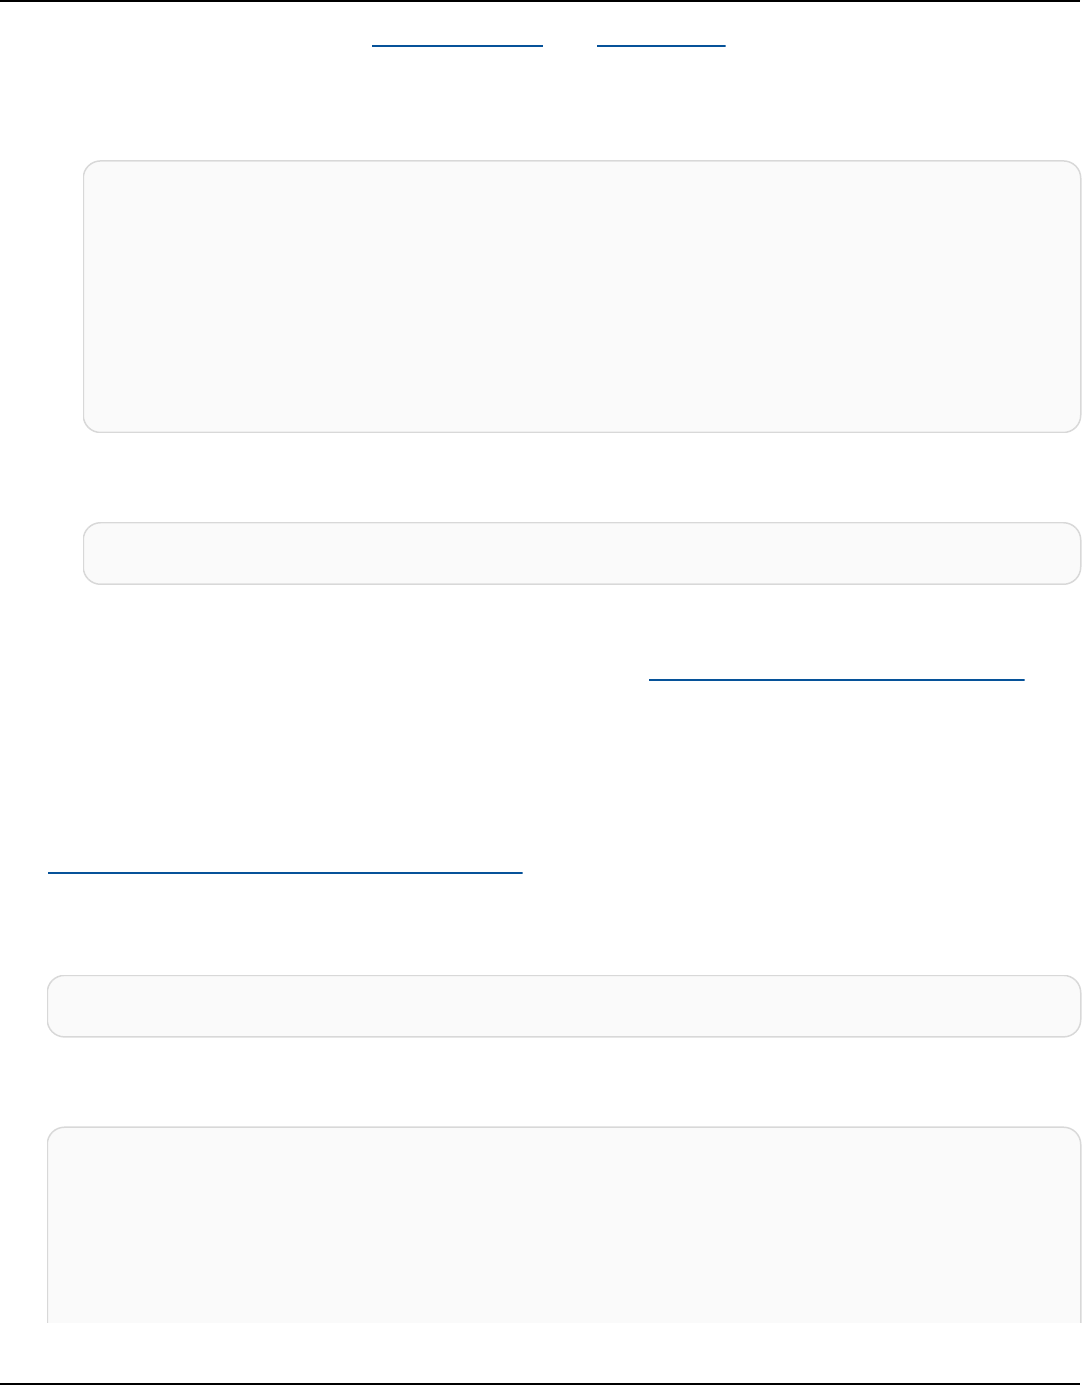
Amazon Keyspaces (for Apache Cassandra) Developer Guide
For more information, see create keyspace and create table in the AWS CLI Command
Reference.
cqlsh
CREATE KEYSPACE aws WITH replication = {'class': 'SimpleStrategy',
'replication_factor': '3'} AND durable_writes = true;
CREATE TABLE aws.user (
username text PRIMARY KEY,
fname text,
last_update_date timestamp,
lname text
);
To verify that your table was created, you can use the following statement.
SELECT * FROM system_schema.tables WHERE keyspace_name = "aws";
Your table should be listed in the output of this statement. Note that there can be a delay
until the table is created. For more information, see the section called “CREATE TABLE”.
3. Create an Amazon EKS cluster with a Fargate - Linux node type. Fargate is a serverless
compute engine that lets you deploy Kubernetes Pods without managing Amazon Amazon EC2
instances. To follow this tutorial without having to update the cluster name in all the example
commands, create a cluster with the name my-eks-cluster following the instructions at
Getting started with Amazon EKS – eksctl in the Amazon EKS User Guide. When your cluster
is created, verify that your nodes and the two default Pods are running and healthy. You can
do so with the following command.
kubectl get pods -A -o wide
You should see something similar to this output.
NAMESPACE NAME READY STATUS RESTARTS AGE IP
NODE NOMINATED NODE READINESS
GATES
kube-system coredns-1234567890-abcde 1/1 Running 0 18m
192.0.2.0 fargate-ip-192-0-2-0.region-code.compute.internal <none>
<none>
Connecting from Amazon EKS 176

Amazon Keyspaces (for Apache Cassandra) Developer Guide
kube-system coredns-1234567890-12345 1/1 Running 0 18m
192.0.2.1 fargate-ip-192-0-2-1.region-code.compute.internal <none>
<none>
4. Install Docker. For instructions on how to install Docker on an Amazon EC2 instance, see Install
Docker in the Amazon Elastic Container Registry User Guide.
Docker is available for many different operating systems, including most modern Linux
distributions, like Ubuntu, and even macOS and Windows. For more information about how to
install Docker on your particular operating system, go to the Docker installation guide.
5. Create an Amazon ECR repository. Amazon ECR is an AWS managed container image registry
service that you can use with your preferred CLI to push, pull, and manage Docker images. For
more information about Amazon ECR repositories, see the Amazon Elastic Container Registry
User Guide. You can use the following command to create a repository with the name my-
ecr-repository.
aws ecr create-repository --repository-name my-ecr-repository
After completing the prerequisite steps, proceed to the section called “Step 1: Configure the
Amazon EKS cluster”.
Step 1: Configure the Amazon EKS cluster and setup IAM permissions
Configure the Amazon EKS cluster and create the IAM resources that are required to allow an
Amazon EKS service account to connect to your Amazon Keyspaces table
1. Create an Open ID Connect (OIDC) provider for the Amazon EKS cluster. This is needed to use
IAM roles for service accounts. For more information about OIDC providers and how to create
them, see Creating an IAM OIDC provider for your cluster in the Amazon EKS User Guide.
a. Create an IAM OIDC identity provider for your cluster with the following command. This
example assumes that your cluster name is my-eks-cluster. If you have a cluster with a
different name, remember to update the name in all future commands.
eksctl utils associate-iam-oidc-provider --cluster my-eks-cluster --approve
b. Confirm that the OIDC identity provider has been registered with IAM with the following
command.
Connecting from Amazon EKS 177

Amazon Keyspaces (for Apache Cassandra) Developer Guide
aws iam list-open-id-connect-providers --region aws-region
The output should look similar to this. Take note of the OIDC's Amazon Resource Name
(ARN), you need it in the next step when you create a trust policy for the service account.
{
"OpenIDConnectProviderList": [
..
{
"Arn": "arn:aws:iam::111122223333:oidc-provider/oidc.eks.aws-
region.amazonaws.com/id/EXAMPLED539D4633E53DE1B71EXAMPLE"
}
]
}
2. Create a service account for the Amazon EKS cluster. Service accounts provide an identity for
processes that run in a Pod. A Pod is the smallest and simplest Kubernetes object that you can
use to deploy a containerized application. Next, create an IAM role that the service account
can assume to obtain permissions to resources. You can access any AWS service from a Pod
that has been configured to use a service account that can assume an IAM role with access
permissions to that service.
a. Create a new namespace for the service account. A namespace helps to isolate cluster
resources created for this tutorial. You can create a new namespace using the following
command.
kubectl create namespace my-eks-namespace
b. To use a custom namespace, you have to associate it with a Fargate profile. The following
code is an example of this.
eksctl create fargateprofile \
--cluster my-eks-cluster \
--name my-fargate-profile \
--namespace my-eks-namespace \
--labels *=*
c.
Create a service account with the name my-eks-serviceaccount in the namespace my-
eks-namespace for your Amazon EKS cluster by using the following command.
Connecting from Amazon EKS 178

Amazon Keyspaces (for Apache Cassandra) Developer Guide
cat >my-serviceaccount.yaml <<EOF
apiVersion: v1
kind: ServiceAccount
metadata:
name: my-eks-serviceaccount
namespace: my-eks-namespace
EOF
kubectl apply -f my-serviceaccount.yaml
d. Run the following command to create a trust policy file that instructs the IAM role to trust
your service account. This trust relationship is required before a principal can assume a
role. You need to make the following edits to the file:
•
For the Principal, enter the ARN that IAM returned to the list-open-id-connect-
providers command. The ARN contains your account number and Region.
•
In the condition statement, replace the AWS Region and the OIDC id.
• Confirm that the service account name and namespace are correct.
You need to attach the trust policy file in the next step when you create the IAM role.
cat >trust-relationship.json <<EOF
{
"Version": "2012-10-17",
"Statement": [
{
"Effect": "Allow",
"Principal": {
"Federated": "arn:aws:iam::111122223333:oidc-provider/
oidc.eks.aws-region.amazonaws.com/id/EXAMPLED539D4633E53DE1B71EXAMPLE"
},
"Action": "sts:AssumeRoleWithWebIdentity",
"Condition": {
"StringEquals": {
"oidc.eks.aws-region.amazonaws.com/
id/EXAMPLED539D4633E53DE1B71EXAMPLE:sub": "system:serviceaccount:my-eks-
namespace:my-eks-serviceaccount",
"oidc.eks.aws-region.amazonaws.com/
id/EXAMPLED539D4633E53DE1B71EXAMPLE:aud": "sts.amazonaws.com"
}
}
Connecting from Amazon EKS 179

Amazon Keyspaces (for Apache Cassandra) Developer Guide
}
]
}
EOF
Optional: You can also add multiple entries in the StringEquals or StringLike
conditions to allow multiple service accounts or namespaces to assume the role. To allow
your service account to assume an IAM role in a different AWS account, see Cross-account
IAM permissions in the Amazon EKS User Guide.
3.
Create an IAM role with the name my-iam-role for the Amazon EKS service account to
assume. Attach the trust policy file created in the last step to the role. The trust policy specifies
the service account and OIDC provider that the IAM role can trust.
aws iam create-role --role-name my-iam-role --assume-role-policy-document file://
trust-relationship.json --description "EKS service account role"
4. Assign the IAM role permissions to Amazon Keyspaces by attaching an access policy.
a. Attach an access policy to define the actions the IAM role can perform on specific
Amazon Keyspaces resources. For this tutorial we use the AWS managed policy
AmazonKeyspacesFullAccess, because our application is going to write data to your
Amazon Keyspaces table. As a best practise however, it's recommended to create custom
access policies that implement the least privileges principle. For more information, see the
section called “How Amazon Keyspaces works with IAM”.
aws iam attach-role-policy --role-name my-iam-role --policy-
arn=arn:aws:iam::aws:policy/AmazonKeyspacesFullAccess
Confirm that the policy was successfully attached to the IAM role with the following
statement.
aws iam list-attached-role-policies --role-name my-iam-role
The output should look like this.
{
"AttachedPolicies": [
{
"PolicyName": "AmazonKeyspacesFullAccess",
Connecting from Amazon EKS 180

Amazon Keyspaces (for Apache Cassandra) Developer Guide
"PolicyArn": "arn:aws:iam::aws:policy/AmazonKeyspacesFullAccess"
}
]
}
b. Annotate the service account with the Amazon Resource Name (ARN) of the IAM role it can
assume. Make sure to update the role ARN with your account ID.
kubectl annotate serviceaccount -n my-eks-namespace my-eks-serviceaccount
eks.amazonaws.com/role-arn=arn:aws:iam::111122223333:role/my-iam-role
5. Confirm that the IAM role and the service account are correctly configured.
a. Confirm that the IAM role's trust policy is correctly configured with the following
statement.
aws iam get-role --role-name my-iam-role --query Role.AssumeRolePolicyDocument
The output should look similar to this.
{
"Version": "2012-10-17",
"Statement": [
{
"Effect": "Allow",
"Principal": {
"Federated": "arn:aws:iam::111122223333:oidc-provider/
oidc.eks.aws-region.amazonaws.com/id/EXAMPLED539D4633E53DE1B71EXAMPLE"
},
"Action": "sts:AssumeRoleWithWebIdentity",
"Condition": {
"StringEquals": {
"oidc.eks.aws-region/id/
EXAMPLED539D4633E53DE1B71EXAMPLE:aud": "sts.amazonaws.com",
"oidc.eks.aws-region.amazonaws.com/id/
EXAMPLED539D4633E53DE1B71EXAMPLE:sub": "system:serviceaccount:my-eks-
namespace:my-eks-serviceaccount"
}
}
}
]
}
Connecting from Amazon EKS 181

Amazon Keyspaces (for Apache Cassandra) Developer Guide
b. Confirm that the Amazon EKS service account is annotated with the IAM role.
kubectl describe serviceaccount my-eks-serviceaccount -n my-eks-namespace
The output should look similar to this.
Name: my-eks-serviceaccount
Namespace:my-eks-namespace
Labels: <none>
Annotations: eks.amazonaws.com/role-arn: arn:aws:iam::111122223333:role/my-iam-
role
Image pull secrets: <none>
Mountable secrets: <none>
Tokens: <none>
[...]
After you created the Amazon EKS service account, the IAM role, and configured the required
relationships and permissions, proceed to the section called “Step 2: Configure the application”.
Step 2: Configure the application
In this step you build your application that connects to Amazon Keyspaces using the SigV4 plugin.
You can view and download the example Java application from the Amazon Keyspaces example
code repo on Github. Or you can follow along using your own application, making sure to complete
all configuration steps.
Configure your application and add the required dependencies.
1. You can download the example Java application by cloning the Github repository using the
following command.
git clone https://github.com/aws-samples/amazon-keyspaces-examples.git
2. After downloading the Github repo, unzip the downloaded file and navigate to the
resources directory to the application.conf file.
a. Application configuration
In this step you configure the SigV4 authentication plugin. You can use the following
example in your application. If you haven't already done so, you need to generate your
Connecting from Amazon EKS 182

Amazon Keyspaces (for Apache Cassandra) Developer Guide
IAM access keys (an access key ID and a secret access key) and save them in your AWS
config file or as environment variables. For detailed instructions, see the section called
“Required credentials for AWS authentication”. Update the AWS Region and the service
endpoint for Amazon Keyspaces as needed. For more service endpoints, see the section
called “Service endpoints”. Replace the truststore location, truststore name, and the
truststore password with your own.
datastax-java-driver {
basic.contact-points = ["cassandra.aws-region.amazonaws.com:9142"]
basic.load-balancing-policy.local-datacenter = "aws-region"
advanced.auth-provider {
class = software.aws.mcs.auth.SigV4AuthProvider
aws-region = "aws-region"
}
advanced.ssl-engine-factory {
class = DefaultSslEngineFactory
truststore-path = "truststore_locationtruststore_name.jks"
truststore-password = "truststore_password;"
}
}
b. Add the STS module dependency.
This adds the ability to use a WebIdentityTokenCredentialsProvider that returns
the AWS credentials that the application needs to provide so that the service account can
assume the IAM role. You can do this based on the following example.
<dependency>
<groupId>com.amazonaws</groupId>
<artifactId>aws-java-sdk-sts</artifactId>
<version>1.11.717</version>
</dependency>
c. Add the SigV4 dependency.
This package implements the SigV4 authentication plugin that is needed to authenticate
to Amazon Keyspaces
<dependency>
<groupId>software.aws.mcs</groupId>
Connecting from Amazon EKS 183

Amazon Keyspaces (for Apache Cassandra) Developer Guide
<artifactId>aws-sigv4-auth-cassandra-java-driver-plugin</
artifactId>
<version>4.0.3</version>
</dependency>
3. Add a logging dependency.
Without logs, troubleshooting connection issues is impossible. In this tutorial, we use slf4j
as the logging framework, and use logback.xml to store the log output. We set the logging
level to debug to establish the connection. You can use the following example to add the
dependency.
<dependency>
<groupId>org.slf4j</groupId>
<artifactId>slf4j-api</artifactId>
<version>2.0.5</version>
</dependency>
You can use the following code snippet to configure the logging.
<configuration>
<appender name="STDOUT" class="ch.qos.logback.core.ConsoleAppender">
<encoder>
<pattern>%d{HH:mm:ss.SSS} [%thread] %-5level %logger{36} - %msg%n</
pattern>
</encoder>
</appender>
<root level="debug">
<appender-ref ref="STDOUT" />
</rootv
</configuration>
Note
The debug level is needed to investigate connection failures. After you have
successfully connected to Amazon Keyspaces from your application, you can change
the logging level to info or warning as needed.
Connecting from Amazon EKS 184

Amazon Keyspaces (for Apache Cassandra) Developer Guide
Step 3: Create the application image and upload the Docker file to your Amazon
ECR repository
In this step, you compile the example application, build a Docker image, and push the image to
your Amazon ECR repository.
Build your application, build a Docker image, and submit it to Amazon Elastic Container
Registry
1. Set environment variables for the build that define your AWS Region. Replace the Regions in
the examples with your own.
export CASSANDRA_HOST=cassandra.aws-region.amazonaws.com:9142
export CASSANDRA_DC=aws-region
2. Compile your application with Apache Maven version 3.6.3 or higher using the following
command.
mvn clean install
This creates a JAR file with all dependencies included in the target directory.
3. Retrieve your ECR repository URI that's needed for the next step with the following command.
Make sure to update the Region to the one you've been using.
aws ecr describe-repositories --region aws-region
The output should look like in the following example.
"repositories": [
{
"repositoryArn": "arn:aws:ecr:aws-region:111122223333:repository/my-ecr-
repository",
"registryId": "111122223333",
"repositoryName": "my-ecr-repository",
"repositoryUri": "111122223333.dkr.ecr.aws-region.amazonaws.com/my-ecr-
repository",
"createdAt": "2023-11-02T03:46:34+00:00",
"imageTagMutability": "MUTABLE",
"imageScanningConfiguration": {
"scanOnPush": false
Connecting from Amazon EKS 185

Amazon Keyspaces (for Apache Cassandra) Developer Guide
},
"encryptionConfiguration": {
"encryptionType": "AES256"
}
},
4. From the application's root directory build the Docker image using the repository URI from the
last step. Modify the Docker file as needed. In the build command, make sure to replace your
account ID and set the AWS Region to the Region where the Amazon ECR repository my-ecr-
repository is located.
docker build -t 111122223333.dkr.ecr.aws-region.amazonaws.com/my-ecr-
repository:latest .
5. Retrieve an authentication token to push the Docker image to Amazon ECR. You can do so with
the following command.
aws ecr get-login-password --region aws-region | docker login --username AWS --
password-stdin 111122223333.dkr.ecr.aws-region.amazonaws.com
6. First, check for existing images in your Amazon ECR repository. You can use the following
command.
aws ecr describe-images --repository-name my-ecr-repository --region aws-region
Then, push the Docker image to the repo. You can use the following command.
docker push 111122223333.dkr.ecr.aws-region.amazonaws.com/my-ecr-repository:latest
Step 4: Deploy the application to Amazon EKS and write data to your table
In this step of the tutorial, you configure the Amazon EKS deployment for your application, and
confirm that the application is running and can connect to Amazon Keyspaces.
To deploy an application to Amazon EKS, you need to configure all relevant settings in a file called
deployment.yaml. This file is then used by Amazon EKS to deploy the application. The metadata
in the file should contain the following information:
•
Application name the name of the application. For this tutorial, we use my-keyspaces-app.
Connecting from Amazon EKS 186

Amazon Keyspaces (for Apache Cassandra) Developer Guide
•
Kubernetes namespace the namespace of the Amazon EKS cluster. For this tutorial, we use my-
eks-namespace.
• Amazon EKS service account name the name of the Amazon EKS service account. For this
tutorial, we use my-eks-serviceaccount.
•
image name the name of the application image. For this tutorial, we use my-keyspaces-app.
• Image URI the Docker image URI from Amazon ECR.
• AWS account ID your AWS account ID.
• IAM role ARN the ARN of the IAM role created for the service account to assume. For this
tutorial, we use my-iam-role.
• AWS Region of the Amazon EKS cluster the AWS Region you created your Amazon EKS cluster
in.
In this step, you deploy and run the application that connects to Amazon Keyspaces and writes
data to the table.
1.
Configure the deployment.yaml file. You need to replace the following values:
•
name
•
namespace
•
serviceAccountName
•
image
•
AWS_ROLE_ARN value
•
The AWS Region in CASSANDRA_HOST
•
AWS_REGION
You can use the following file as an example.
apiVersion: apps/v1
kind: Deployment
metadata:
name: my-keyspaces-app
namespace: my-eks-namespace
spec:
replicas: 1
selector:
Connecting from Amazon EKS 187

Amazon Keyspaces (for Apache Cassandra) Developer Guide
matchLabels:
app: my-keyspaces-app
template:
metadata:
labels:
app: my-keyspaces-app
spec:
serviceAccountName: my-eks-serviceaccount
containers:
- name: my-keyspaces-app
image: 111122223333.dkr.ecr.aws-region.amazonaws.com/my-ecr-
repository:latest
ports:
- containerPort: 8080
env:
- name: CASSANDRA_HOST
value: "cassandra.aws-region.amazonaws.com:9142"
- name: CASSANDRA_DC
value: "aws-region"
- name: AWS_WEB_IDENTITY_TOKEN_FILE
value: /var/run/secrets/eks.amazonaws.com/serviceaccount/token
- name: AWS_ROLE_ARN
value: "arn:aws:iam::111122223333:role/my-iam-role"
- name: AWS_REGION
value: "aws-region"
2.
Deploy deployment.yaml.
kubectl apply -f deployment.yaml
The output should look like this.
deployment.apps/my-keyspaces-app created
3. Check the status of the Pod in your namespace of the Amazon EKS cluster.
kubectl get pods -n my-eks-namespace
The output should look similar to this example.
NAME READY STATUS RESTARTS AGE
Connecting from Amazon EKS 188

Amazon Keyspaces (for Apache Cassandra) Developer Guide
my-keyspaces-app-123abcde4f-g5hij 1/1 Running 0 75s
For more details, you can use the following command.
kubectl describe pod my-keyspaces-app-123abcde4f-g5hij -n my-eks-namespace
Name: my-keyspaces-app-123abcde4f-g5hij
Namespace: my-eks-namespace
Priority: 2000001000
Priority Class Name: system-node-critical
Service Account: my-eks-serviceaccount
Node: fargate-ip-192-168-102-209.ec2.internal/192.168.102.209
Start Time: Thu, 23 Nov 2023 12:15:43 +0000
Labels: app=my-keyspaces-app
eks.amazonaws.com/fargate-profile=my-fargate-profile
pod-template-hash=6c56fccc56
Annotations: CapacityProvisioned: 0.25vCPU 0.5GB
Logging: LoggingDisabled: LOGGING_CONFIGMAP_NOT_FOUND
Status: Running
IP: 192.168.102.209
IPs:
IP: 192.168.102.209
Controlled By: ReplicaSet/my-keyspaces-app-6c56fccc56
Containers:
my-keyspaces-app:
Container ID:
containerd://41ff7811d33ae4bc398755800abcdc132335d51d74f218ba81da0700a6f8c67b
Image: 111122223333.dkr.ecr.aws-region.amazonaws.com/
my_eks_repository:latest
Image ID: 111122223333.dkr.ecr.aws-region.amazonaws.com/
my_eks_repository@sha256:fd3c6430fc5251661efce99741c72c1b4b03061474940200d0524b84a951439c
Port: 8080/TCP
Host Port: 0/TCP
State: Running
Started: Thu, 23 Nov 2023 12:15:19 +0000
Finished: Thu, 23 Nov 2023 12:16:17 +0000
Ready: True
Restart Count: 1
Environment:
CASSANDRA_HOST: cassandra.aws-region.amazonaws.com:9142
CASSANDRA_DC: aws-region
Connecting from Amazon EKS 189

Amazon Keyspaces (for Apache Cassandra) Developer Guide
AWS_WEB_IDENTITY_TOKEN_FILE: /var/run/secrets/eks.amazonaws.com/
serviceaccount/token
AWS_ROLE_ARN: arn:aws:iam::111122223333:role/my-iam-role
AWS_REGION: aws-region
AWS_STS_REGIONAL_ENDPOINTS: regional
Mounts:
/var/run/secrets/eks.amazonaws.com/serviceaccount from aws-iam-token (ro)
/var/run/secrets/kubernetes.io/serviceaccount from kube-api-access-fssbf (ro)
Conditions:
Type Status
Initialized True
Ready True
ContainersReady True
PodScheduled True
Volumes:
aws-iam-token:
Type: Projected (a volume that contains injected data from
multiple sources)
TokenExpirationSeconds: 86400
kube-api-access-fssbf:
Type: Projected (a volume that contains injected data from
multiple sources)
TokenExpirationSeconds: 3607
ConfigMapName: kube-root-ca.crt
ConfigMapOptional: <nil>
DownwardAPI: true
QoS Class: BestEffort
Node-Selectors: <none>
Tolerations: node.kubernetes.io/not-ready:NoExecute op=Exists for
300s
node.kubernetes.io/unreachable:NoExecute op=Exists for
300s
Events:
Type Reason Age From Message
---- ------ ---- ---- -------
Warning LoggingDisabled 2m13s fargate-scheduler Disabled logging
because aws-logging configmap was not found. configmap "aws-logging" not found
Normal Scheduled 89s fargate-scheduler Successfully
assigned my-eks-namespace/my-keyspaces-app-6c56fccc56-mgs2m to fargate-
ip-192-168-102-209.ec2.internal
Normal Pulled 75s kubelet
Successfully pulled image "111122223333.dkr.ecr.aws-region.amazonaws.com/
my_eks_repository:latest" in 13.027s (13.027s including waiting)
Connecting from Amazon EKS 190

Amazon Keyspaces (for Apache Cassandra) Developer Guide
Normal Pulling 54s (x2 over 88s) kubelet Pulling image
"111122223333.dkr.ecr.aws-region.amazonaws.com/my_eks_repository:latest"
Normal Created 54s (x2 over 75s) kubelet Created container
my-keyspaces-app
Normal Pulled 54s kubelet
Successfully pulled image "111122223333.dkr.ecr.aws-region.amazonaws.com/
my_eks_repository:latest" in 222ms (222ms including waiting)
Normal Started 53s (x2 over 75s) kubelet Started container
my-keyspaces-app
4. Check the Pod's logs to confirm that your application is running and can connect to your
Amazon Keyspaces table. You can do so with the following command. Make sure to replace the
name of your deployment.
kubectl logs -f my-keyspaces-app-123abcde4f-g5hij -n my-eks-namespace
You should be able to see application log entries confirming the connection to Amazon
Keyspaces like in the example below.
2:47:20.553 [s0-admin-0] DEBUG c.d.o.d.i.c.metadata.MetadataManager
- [s0] Adding initial contact points [Node(endPoint=cassandra.aws-
region.amazonaws.com/1.222.333.44:9142, hostId=null, hashCode=e750d92)]
22:47:20.562 [s0-admin-1] DEBUG c.d.o.d.i.c.c.ControlConnection - [s0] Initializing
with event types [SCHEMA_CHANGE, STATUS_CHANGE, TOPOLOGY_CHANGE]
22:47:20.564 [s0-admin-1] DEBUG c.d.o.d.i.core.context.EventBus - [s0] Registering
com.datastax.oss.driver.internal.core.metadata.LoadBalancingPolicyWrapper$$Lambda
$812/0x0000000801105e88@769afb95 for class
com.datastax.oss.driver.internal.core.metadata.NodeStateEvent
22:47:20.566 [s0-admin-1] DEBUG c.d.o.d.i.c.c.ControlConnection -
[s0] Trying to establish a connection to Node(endPoint=cassandra.us-
east-1.amazonaws.com/1.222.333.44:9142, hostId=null, hashCode=e750d92)
5. Run the following CQL query on your Amazon Keyspaces table to confirm that one row of data
has been written to your table:
SELECT * from aws.user;
You should see the following output:
fname | lname | username | last_update_date
----------+-------+----------+-----------------------------
Connecting from Amazon EKS 191

Amazon Keyspaces (for Apache Cassandra) Developer Guide
random | k | test | 2023-12-07 13:58:31.57+0000
Step 5: (Optional) Cleanup
Follow these steps to remove all the resources created in this tutorial.
Remove the resources created in this tutorial
1. Delete your deployment. You can use the following command to do so.
kubectl delete deployment my-keyspaces-app -n my-eks-namespace
2. Delete the Amazon EKS cluster and all Pods contained in it. This also deletes related resources
like the service account and OIDC identity provider. You can use the following command to do
so.
eksctl delete cluster --name my-eks-cluster --region aws-region
3. Delete the IAM role used for the Amazon EKS service account with access permissions to
Amazon Keyspaces. First, you have to remove the managed policy that is attached to the role.
aws iam detach-role-policy --role-name my-iam-role --policy-arn
arn:aws:iam::aws:policy/AmazonKeyspacesFullAccess
Then you can delete the role using the following command.
aws iam delete-role --role-name my-iam-role
For more information, see Deleting an IAM role (AWS CLI) in the IAM User Guide.
4. Delete the Amazon ECR repository including all the images stored in it. You can do so using the
following command.
aws ecr delete-repository \
--repository-name my-ecr-repository \
--force \
--region aws-region
Connecting from Amazon EKS 192

Amazon Keyspaces (for Apache Cassandra) Developer Guide
Note that the force flag is required to delete a repository that contains images. To delete
your image first, you can do so using the following command.
aws ecr batch-delete-image \
--repository-name my-ecr-repository \
--image-ids imageTag=latest \
--region aws-region
For more information, see Delete an image in the Amazon Elastic Container Registry User
Guide.
5. Delete the Amazon Keyspaces keyspace and table. Deleting the keyspace automatically deletes
all tables in that keyspace. You can use one the following options to do so.
AWS CLI
aws keyspaces delete-keyspace --keyspace-name 'aws'
To confirm that the keyspace was deleted, you can use the following command.
aws keyspaces list-keyspaces
To delete the table first, you can use the following command.
aws keyspaces delete-table --keyspace-name 'aws' --table-name 'user'
To confirm that your table was deleted, you can use the following command.
aws keyspaces list-tables --keyspace-name 'aws'
For more information, see delete keyspace and delete table in the AWS CLI Command
Reference.
cqlsh
DROP KEYSPACE IF EXISTS "aws";
To verify that your keyspaces was deleted, you can use the following statement.
Connecting from Amazon EKS 193

Amazon Keyspaces (for Apache Cassandra) Developer Guide
SELECT * FROM system_schema.keyspaces ;
Your keyspace should not be listed in the output of this statement. Note that there can be
a delay until the keyspaces is deleted. For more information, see the section called “DROP
KEYSPACE”.
To delete the table first, you can use the following command.
DROP TABLE "aws.user"
To confirm that your table was deleted, you can use the following command.
SELECT * FROM system_schema.tables WHERE keyspace_name = "aws";
Your table should not be listed in the output of this statement. Note that there can be a
delay until the table is deleted. For more information, see the section called “DROP TABLE”.
Configure cross-account access to Amazon Keyspaces with VPC
endpoints
You can create and use separate AWS accounts to isolate resources and for use in different
environments, for example development and production. This topic walks you through cross-
account access for Amazon Keyspaces using interface VPC endpoints in an Amazon Virtual Private
Cloud. For more information about IAM cross-account access configuration, see Example scenario
using separate development and production accounts in the IAM User Guide.
For more information about Amazon Keyspaces and private VPC endpoints, see the section called
“Using interface VPC endpoints”.
Topics
• Configure cross-account access to Amazon Keyspaces using VPC endpoints in a shared VPC
• Configuring cross-account access to Amazon Keyspaces without a shared VPC
Configure cross-account access 194

Amazon Keyspaces (for Apache Cassandra) Developer Guide
Configure cross-account access to Amazon Keyspaces using VPC
endpoints in a shared VPC
You can create different AWS accounts to separate resources from applications. For example, you
can create one account for your Amazon Keyspaces tables, a different account for applications in
a development environment, and another account for applications in a production environment.
This topic walks you through the configuration steps required to set up cross-account access for
Amazon Keyspaces using interface VPC endpoints in a shared VPC.
For detailed steps how to configure a VPC endpoint for Amazon Keyspaces, see the section called
“Step 3: Create a VPC endpoint for Amazon Keyspaces”.
In this example we use the following three accounts in a shared VPC:
•
Account A – This account contains infrastructure, including the VPC endpoints, the VPC
subnets, and Amazon Keyspaces tables.
•
Account B – This account contains an application in a development environment that needs to
connect to the Amazon Keyspaces table in Account A.
•
Account C – This account contains an application in a production environment that needs to
connect to the Amazon Keyspaces table in Account A.
Configure cross-account access in a shared VPC 195

Amazon Keyspaces (for Apache Cassandra) Developer Guide
Account A is the account that contains the resources that Account B and Account C need to
access, so Account A is the trusting account. Account B and Account C are the accounts with
the principals that need access to the resources in Account A, so Account B and Account C
are the trusted accounts. The trusting account grants the permissions to the trusted accounts by
sharing an IAM role. The following procedure outlines the configuration steps required in Account
A.
Configuration for Account A
1. Use AWS Resource Access Manager to create a resource share for the subnet and share the
private subnet with Account B and Account C.
Configure cross-account access in a shared VPC 196

Amazon Keyspaces (for Apache Cassandra) Developer Guide
Account B and Account C can now see and create resources in the subnet that has been
shared with them.
2. Create an Amazon Keyspaces private VPC endpoint powered by AWS PrivateLink. This creates
multiple endpoints across shared subnets and DNS entries for the Amazon Keyspaces service
endpoint.
3. Create an Amazon Keyspaces keyspace and table.
4. Create an IAM role that has full access to the Amazon Keyspaces table, read access to the
Amazon Keyspaces system tables, and is able to describe the Amazon EC2 VPC resources as
shown in the following policy example.
{
"Version": "2012-10-17",
"Statement": [
{
"Sid": "CrossAccountAccess",
"Effect": "Allow",
"Action": [
"ec2:DescribeNetworkInterfaces",
"ec2:DescribeVpcEndpoints",
"cassandra:*"
],
"Resource": "*"
}
]
}
5.
Configure the IAM role trust policy that Account B and Account C can assume as trusted
accounts as shown in the following example.
{
"Version": "2012-10-17",
"Statement": [
{
"Effect": "Allow",
"Principal": {
"AWS": "arn:aws:iam::111111111111:root"
},
"Action": "sts:AssumeRole",
"Condition": {}
}
Configure cross-account access in a shared VPC 197

Amazon Keyspaces (for Apache Cassandra) Developer Guide
]
}
For more information about cross-account IAM policies, see Cross-account policies in the IAM
User Guide.
Configuration in Account B and Account C
1.
In Account B and Account C, create new roles and attach the following policy that allows
the principal to assume the shared role created in Account A.
{
"Version": "2012-10-17",
"Statement": [
{
"Effect": "Allow",
"Principal": {
"Service": "ec2.amazonaws.com"
},
"Action": "sts:AssumeRole"
}
]
}
Allowing the principal to assume the shared role is implemented using the AssumeRole API of
the AWS Security Token Service (AWS STS). For more information, see Providing access to an
IAM user in another AWS account that you own in the IAM User Guide.
2.
In Account B and Account C, you can create applications that utilize the SIGV4
authentication plugin, which allows an application to assume the shared role to connect to the
Amazon Keyspaces table located in Account A through the VPC endpoint in the shared VPC.
For more information about the SIGV4 authentication plugin, see the section called “Create
programmatic access credentials”.
Configuring cross-account access to Amazon Keyspaces without a
shared VPC
If the Amazon Keyspaces table and private VPC endpoint are owned by different accounts but are
not sharing a VPC, applications can still connect cross-account using VPC endpoints. Because the
Configure cross-account access without a shared VPC 198

Amazon Keyspaces (for Apache Cassandra) Developer Guide
accounts are not sharing the VPC endpoints, Account A, Account B, and Account C require
their own VPC endpoints. To the Cassandra client driver, Amazon Keyspaces appears like a single
node instead of a multi-node cluster. Upon connection, the client driver reaches the DNS server
which returns one of the available endpoints in the account’s VPC.
You can also access Amazon Keyspaces tables across different accounts without a shared VPC
endpoint by using the public endpoint or deploying a private VPC endpoint in each account. When
not using a shared VPC, each account requires its own VPC endpoint. In this example Account
A, Account B, and Account C require their own VPC endpoints to access the table in Account
A. When using VPC endpoints in this configuration, Amazon Keyspaces appears as a single node
cluster to the Cassandra client driver instead of a multi-node cluster. Upon connection, the client
driver reaches the DNS server which returns one of the available endpoints in the account’s
VPC. But the client driver is not able to access the system.peers table to discover additional
endpoints. Because there are less hosts available, the driver makes less connections. To adjust this,
increase the connection pool setting of the driver by a factor of three.
Configure cross-account access without a shared VPC 199

Amazon Keyspaces (for Apache Cassandra) Developer Guide
Getting started with Amazon Keyspaces (for Apache
Cassandra)
If you're new to Apache Cassandra and Amazon Keyspaces, this tutorial guides you through
installing the necessary programs and tools to use Amazon Keyspaces successfully. You'll learn
how to create a keyspace and table using Cassandra Query Language (CQL), the AWS Management
Console, or the AWS Command Line Interface (AWS CLI). You then use Cassandra Query Language
(CQL) to perform create, read, update, and delete (CRUD) operations on data in your Amazon
Keyspaces table.
This tutorial covers the following steps.
• Prerequisites – Before starting the tutorial, follow the AWS setup instructions to sign up for
AWS and create an IAM user with access to Amazon Keyspaces. Then you set up the cqhsh-
expansion and AWS CloudShell. Alternatively you can use the AWS CLI to create resources in
Amazon Keyspaces.
• Step 1: Create a keyspace and table – In this section, you'll create a keyspace named "catalog"
and a table named "book_awards" within it. You'll specify the table's columns, data types,
partition key, and clustering column using the AWS Management Console, CQL, or the AWS CLI.
•
Step 2: Perform CRUD operations – Here, you'll use the cqlsh-expansion in CloudShell to
insert, read, update, and delete data in the "book_awards" table. You'll learn how to use various
CQL statements like SELECT, INSERT, UPDATE, and DELETE, and practice filtering and modifying
data.
• Step 3: Clean up resources – To avoid incurring charges for unused resources, this section
guides you through deleting the "book_awards" table and "catalog" keyspace using the console,
CQL, or the AWS CLI.
For tutorials to connect programmatically to Amazon Keyspaces using different Apache Cassandra
client drivers, see the section called “Using a Cassandra client driver”. For code examples using
different AWS SDKs, see Code examples for Amazon Keyspaces using AWS SDKs.
Topics
• Tutorial prerequisites and considerations
• Create a keyspace in Amazon Keyspaces
• Check keyspace creation status in Amazon Keyspaces
200

Amazon Keyspaces (for Apache Cassandra) Developer Guide
• Create a table in Amazon Keyspaces
• Check table creation status in Amazon Keyspaces
• Create, read, update, and delete data (CRUD) using CQL in Amazon Keyspaces
• Delete a table in Amazon Keyspaces
• Delete a keyspace in Amazon Keyspaces
Tutorial prerequisites and considerations
Before you can get started with Amazon Keyspaces, follow the AWS setup instructions in Accessing
Amazon Keyspaces (for Apache Cassandra). These steps include signing up for AWS and creating an
AWS Identity and Access Management (IAM) user with access to Amazon Keyspaces.
To complete all the steps of the tutorial, you need to install cqlsh. You can follow the setup
instructions at Using cqlsh to connect to Amazon Keyspaces.
To access Amazon Keyspaces using cqlsh or the AWS CLI, we recommend using AWS CloudShell.
CloudShell is a browser-based, pre-authenticated shell that you can launch directly from the AWS
Management Console. You can run AWS Command Line Interface (AWS CLI) commands against
Amazon Keyspaces using your preferred shell (Bash, PowerShell or Z shell). To use cqlsh, you must
install the cqlsh-expansion. For cqlsh-expansion installation instructions, see the section
called “Using the cqlsh-expansion”. For more information about CloudShell see the section
called “Using AWS CloudShell”.
To use the AWS CLI to create, view, and delete resources in Amazon Keyspaces, follow the setup
instructions at the section called “Downloading and Configuring the AWS CLI”.
After completing the prerequisite steps, proceed to Create a keyspace in Amazon Keyspaces.
Create a keyspace in Amazon Keyspaces
In this section, you create a keyspace using the console, cqlsh, or the AWS CLI.
Note
Before you begin, make sure that you have configured all the tutorial prerequisites.
Prerequisites 201

Amazon Keyspaces (for Apache Cassandra) Developer Guide
A keyspace groups related tables that are relevant for one or more applications. A keyspace
contains one or more tables and defines the replication strategy for all the tables it contains. For
more information about keyspaces, see the following topics:
• Data definition language (DDL) statements in the CQL language reference: Keyspaces
• Quotas for Amazon Keyspaces (for Apache Cassandra)
In this tutorial we create a single-Region keyspace, and the replication strategy of the keyspace is
SingleRegionStrategy. Using SingleRegionStrategy, Amazon Keyspaces replicates data
across three Availability Zones in one AWS Region. To learn how to create multi-Region keyspaces,
see the section called “Create a multi-Region keyspace”.
Using the console
To create a keyspace using the console
1. Sign in to the AWS Management Console, and open the Amazon Keyspaces console at https://
console.aws.amazon.com/keyspaces/home.
2. In the navigation pane, choose Keyspaces.
3. Choose Create keyspace.
4.
In the Keyspace name box, enter catalog as the name for your keyspace.
Name constraints:
• The name can't be empty.
•
Allowed characters: alphanumeric characters and underscore ( _ ).
• Maximum length is 48 characters.
5. Under AWS Regions, confirm that Single-Region replication is the replication strategy for the
keyspace.
6. To create the keyspace, choose Create keyspace.
7.
Verify that the keyspace catalog was created by doing the following:
a. In the navigation pane, choose Keyspaces.
b.
Locate your keyspace catalog in the list of keyspaces.
Create a keyspace 202

Amazon Keyspaces (for Apache Cassandra) Developer Guide
Using CQL
The following procedure creates a keyspace using CQL.
To create a keyspace using CQL
1. Open AWS CloudShell and connect to Amazon Keyspaces using the following command. Make
sure to update us-east-1 with your own Region.
cqlsh-expansion cassandra.us-east-1.amazonaws.com 9142 --ssl
The output of that command should look like this.
Connected to Amazon Keyspaces at cassandra.us-east-1.amazonaws.com:9142
[cqlsh 6.1.0 | Cassandra 3.11.2 | CQL spec 3.4.4 | Native protocol v4]
Use HELP for help.
cqlsh current consistency level is ONE.
2. Create your keyspace using the following CQL command.
CREATE KEYSPACE catalog WITH REPLICATION = {'class': 'SingleRegionStrategy'};
SingleRegionStrategy uses a replication factor of three and replicates data across three
AWS Availability Zones in its Region.
Note
Amazon Keyspaces defaults all input to lowercase unless you enclose it in quotation
marks.
3. Verify that your keyspace was created.
SELECT * from system_schema.keyspaces;
The output of this command should look similar to this.
cqlsh> SELECT * from system_schema.keyspaces;
keyspace_name | durable_writes | replication
Create a keyspace 203

Amazon Keyspaces (for Apache Cassandra) Developer Guide
-------------------------+----------------
+-------------------------------------------------------------------------------------
system_schema | True | {'class':
'org.apache.cassandra.locator.SimpleStrategy', 'replication_factor': '3'}
system_schema_mcs | True | {'class':
'org.apache.cassandra.locator.SimpleStrategy', 'replication_factor': '3'}
system | True | {'class':
'org.apache.cassandra.locator.SimpleStrategy', 'replication_factor': '3'}
system_multiregion_info | True | {'class':
'org.apache.cassandra.locator.SimpleStrategy', 'replication_factor': '3'}
catalog | True | {'class':
'org.apache.cassandra.locator.SimpleStrategy', 'replication_factor': '3'}
(5 rows)
Using the AWS CLI
The following procedure creates a keyspace using the AWS CLI.
To create a keyspace using the AWS CLI
1. To confirm that your environment is setup, you can run the following command in CloudShell.
aws keyspaces help
2. Create your keyspace using the following AWS CLI statement.
aws keyspaces create-keyspace --keyspace-name 'catalog'
3. Verify that your keyspace was created with the following AWS CLI statement
aws keyspaces get-keyspace --keyspace-name 'catalog'
The output of this command should look similar to this example.
{
"keyspaceName": "catalog",
"resourceArn": "arn:aws:cassandra:us-east-1:123SAMPLE012:/keyspace/catalog/",
"replicationStrategy": "SINGLE_REGION"
}
Create a keyspace 204

Amazon Keyspaces (for Apache Cassandra) Developer Guide
Check keyspace creation status in Amazon Keyspaces
Amazon Keyspaces performs data definition language (DDL) operations, such as creating and
deleting keyspaces, asynchronously.
You can monitor the creation status of new keyspaces in the AWS Management Console, which
indicates when a keyspace is pending or active. You can also monitor the creation status of a new
keyspace programmatically by using the system_schema_mcs keyspace. A keyspace becomes
visible in the system_schema_mcs keyspaces table when it's ready for use.
The recommended design pattern to check when a new keyspace is ready for use is to poll the
Amazon Keyspaces system_schema_mcs keyspaces table (system_schema_mcs.*). For a list of
DDL statements for keyspaces, see the the section called “Keyspaces” section in the CQL language
reference.
The following query shows whether a keyspace has been successfully created.
SELECT * FROM system_schema_mcs.keyspaces WHERE keyspace_name = 'mykeyspace';
For a keyspace that has been successfully created, the output of the query looks like the following.
keyspace_name | durable_writes | replication
--------------+-----------------+--------------
mykeyspace | true |{...} 1 item
Create a table in Amazon Keyspaces
In this section, you create a table using the console, cqlsh, or the AWS CLI.
A table is where your data is organized and stored. The primary key of your table determines how
data is partitioned in your table. The primary key is composed of a required partition key and one
or more optional clustering columns. The combined values that compose the primary key must be
unique across all the table’s data. For more information about tables, see the following topics:
• Partition key design: the section called “Partition key design”
• Working with tables: the section called “Check table creation status”
Check keyspace creation status 205

Amazon Keyspaces (for Apache Cassandra) Developer Guide
• DDL statements in the CQL language reference: Tables
• Table resource management: Managing serverless resources
• Monitoring table resource utilization: the section called “Monitoring with CloudWatch”
• Quotas for Amazon Keyspaces (for Apache Cassandra)
When you create a table, you specify the following:
• The name of the table.
• The name and data type of each column in the table.
• The primary key for the table.
• Partition key – Required
• Clustering columns – Optional
Use the following procedure to create a table with the specified columns, data types, partition
keys, and clustering columns.
Using the console
The following procedure creates the table book_awards with these columns and data types.
year int
award text
rank int
category text
book_title text
author text
publisher text
To create a table using the console
1. Sign in to the AWS Management Console, and open the Amazon Keyspaces console at https://
console.aws.amazon.com/keyspaces/home.
2. In the navigation pane, choose Keyspaces.
3.
Choose catalog as the keyspace you want to create this table in.
4. Choose Create table.
5.
In the Table name box, enter book_awards as a name for your table.
Create a table 206

Amazon Keyspaces (for Apache Cassandra) Developer Guide
Name constraints:
• The name can't be empty.
•
Allowed characters: alphanumeric characters and underscore ( _ ).
• Maximum length is 48 characters.
6. In the Columns section, repeat the following steps for each column that you want to add to
this table.
Add the following columns and data types.
year int
award text
rank int
category text
book_title text
author text
publisher text
a. Name – Enter a name for the column.
Name constraints:
• The name can't be empty.
•
Allowed characters: alphanumeric characters and underscore ( _ ).
• Maximum length is 48 characters.
b. Type – In the list of data types, choose the data type for this column.
c. To add another column, choose Add column.
7.
Choose award and year as the partition keys under Partition Key. A partition key is required
for each table. A partition key can be made of one or more columns.
8.
Add category and rank as Clustering columns. Clustering columns are optional and
determine the sort order within each partition.
a. To add a clustering column, choose Add clustering column.
b. In the Column list, choose category. In the Order list, choose ASC to sort in ascending
order on the values in this column. (Choose DESC for descending order.)
c. Then select Add clustering column and choose rank.
Create a table 207

Amazon Keyspaces (for Apache Cassandra) Developer Guide
9. In the Table settings section, choose Default settings.
10. Choose Create table.
11. Verify that your table was created.
a. In the navigation pane, choose Tables.
b. Confirm that your table is in the list of tables.
c. Choose the name of your table.
d. Confirm that all your columns and data types are correct.
Note
The columns might not be listed in the same order that you added them to the
table.
Using CQL
This procedure creates a table with the following columns and data types using CQL. The year and
award columns are partition keys with category and rank as clustering columns, together they
make up the primary key of the table.
year int
award text
rank int
category text
book_title text
author text
publisher text
To create a table using CQL
1. Open AWS CloudShell and connect to Amazon Keyspaces using the following command. Make
sure to update us-east-1 with your own Region.
cqlsh-expansion cassandra.us-east-1.amazonaws.com 9142 --ssl
The output of that command should look like this.
Create a table 208

Amazon Keyspaces (for Apache Cassandra) Developer Guide
Connected to Amazon Keyspaces at cassandra.us-east-1.amazonaws.com:9142
[cqlsh 6.1.0 | Cassandra 3.11.2 | CQL spec 3.4.4 | Native protocol v4]
Use HELP for help.
cqlsh current consistency level is ONE.
2.
At the keyspace prompt (cqlsh:keyspace_name>), create your table by entering the
following code into your command window.
CREATE TABLE catalog.book_awards (
year int,
award text,
rank int,
category text,
book_title text,
author text,
publisher text,
PRIMARY KEY ((year, award), category, rank)
);
Note
ASC is the default clustering order. You can also specify DESC for descending order.
Note that the year and award are partition key columns. Then, category and rank are
the clustering columns ordered by ascending order (ASC). Together, these columns form the
primary key of the table.
3. Verify that your table was created.
SELECT * from system_schema.tables WHERE keyspace_name='catalog.book_awards' ;
The output should look similar to this.
keyspace_name | table_name | bloom_filter_fp_chance | caching | cdc | comment
| compaction | compression | crc_check_chance | dclocal_read_repair_chance
| default_time_to_live | extensions | flags | gc_grace_seconds | id |
max_index_interval | memtable_flush_period_in_ms | min_index_interval |
read_repair_chance | speculative_retry
Create a table 209

Amazon Keyspaces (for Apache Cassandra) Developer Guide
---------------+------------+------------------------+---------+-----+---------
+------------+-------------+------------------+----------------------------
+----------------------+------------+-------+------------------+----
+--------------------+-----------------------------+--------------------
+--------------------+-------------------
(0 rows)>
4. Verify your table's structure.
SELECT * FROM system_schema.columns WHERE keyspace_name = 'catalog' AND table_name
= 'book_awards';
The output of this statement should look similar to this example.
keyspace_name | table_name | column_name | clustering_order | column_name_bytes
| kind | position | type
---------------+-------------+-------------+------------------
+------------------------+---------------+----------+------
catalog | book_awards | year | none |
0x79656172 | partition_key | 0 | int
catalog | book_awards | award | none |
0x6177617264 | partition_key | 1 | text
catalog | book_awards | category | asc |
0x63617465676f7279 | clustering | 0 | text
catalog | book_awards | rank | asc |
0x72616e6b | clustering | 1 | int
catalog | book_awards | author | none |
0x617574686f72 | regular | -1 | text
catalog | book_awards | book_title | none |
0x626f6f6b5f7469746c65 | regular | -1 | text
catalog | book_awards | publisher | none |
0x7075626c6973686572 | regular | -1 | text
(7 rows)
Confirm that all the columns and data types are as you expected. The order of the columns
might be different than in the CREATE statement.
Create a table 210

Amazon Keyspaces (for Apache Cassandra) Developer Guide
Using the AWS CLI
This procedure creates a table with the following columns and data types using the AWS CLI.
The year and award columns make up the partition key with category and rank as clustering
columns.
year int
award text
rank int
category text
book_title text
author text
publisher text
To create a table using the AWS CLI
The following command creates a table with the name book_awards. The partition key of the
table consists of the columns year and award and the clustering key consists of the columns
category and rank, both clustering columns use the ascending sort order. (For easier readability,
the schema-definition of the table create command in this section is broken into separate
lines.)
1. You can create the table using the following statement.
aws keyspaces create-table --keyspace-name 'catalog' \
--table-name 'book_awards' \
--schema-definition 'allColumns=[{name=year,type=int},
{name=award,type=text},{name=rank,type=int},
{name=category,type=text}, {name=author,type=text},
{name=book_title,type=text},{name=publisher,type=text}],
partitionKeys=[{name=year},
{name=award}],clusteringKeys=[{name=category,orderBy=ASC},{name=rank,orderBy=ASC}]'
This command results in the following output.
{
"resourceArn": "arn:aws:cassandra:us-east-1:111222333444:/keyspace/catalog/
table/book_awards"
}
2. To confirm the metadata and properties of the table, you can use the following command.
Create a table 211

Amazon Keyspaces (for Apache Cassandra) Developer Guide
aws keyspaces get-table --keyspace-name 'catalog' --table-name 'book_awards'
This command returns the following output.
{
"keyspaceName": "catalog",
"tableName": "book_awards",
"resourceArn": "arn:aws:cassandra:us-east-1:123SAMPLE012:/keyspace/catalog/
table/book_awards",
"creationTimestamp": "2024-07-11T15:12:55.571000+00:00",
"status": "ACTIVE",
"schemaDefinition": {
"allColumns": [
{
"name": "year",
"type": "int"
},
{
"name": "award",
"type": "text"
},
{
"name": "category",
"type": "text"
},
{
"name": "rank",
"type": "int"
},
{
"name": "author",
"type": "text"
},
{
"name": "book_title",
"type": "text"
},
{
"name": "publisher",
"type": "text"
}
],
Create a table 212

Amazon Keyspaces (for Apache Cassandra) Developer Guide
"partitionKeys": [
{
"name": "year"
},
{
"name": "award"
}
],
"clusteringKeys": [
{
"name": "category",
"orderBy": "ASC"
},
{
"name": "rank",
"orderBy": "ASC"
}
],
"staticColumns": []
},
"capacitySpecification": {
"throughputMode": "PAY_PER_REQUEST",
"lastUpdateToPayPerRequestTimestamp": "2024-07-11T15:12:55.571000+00:00"
},
"encryptionSpecification": {
"type": "AWS_OWNED_KMS_KEY"
},
"pointInTimeRecovery": {
"status": "DISABLED"
},
"defaultTimeToLive": 0,
"comment": {
"message": ""
},
"replicaSpecifications": []
}
To perform CRUD (create, read, update, and delete) operations on the data in your table, proceed
to the section called “CRUD operations”.
Create a table 213

Amazon Keyspaces (for Apache Cassandra) Developer Guide
Check table creation status in Amazon Keyspaces
Amazon Keyspaces performs data definition language (DDL) operations, such as creating and
deleting tables, asynchronously. You can monitor the creation status of new tables in the AWS
Management Console, which indicates when a table is pending or active. You can also monitor the
creation status of a new table programmatically by using the system schema table.
A table shows as active in the system schema when it's ready for use. The recommended design
pattern to check when a new table is ready for use is to poll the Amazon Keyspaces system schema
tables (system_schema_mcs.*). For a list of DDL statements for tables, see the the section called
“Tables” section in the CQL language reference.
The following query shows the status of a table.
SELECT keyspace_name, table_name, status FROM system_schema_mcs.tables WHERE
keyspace_name = 'mykeyspace' AND table_name = 'mytable';
For a table that is still being created and is pending,the output of the query looks like this.
keyspace_name | table_name | status
--------------+------------+--------
mykeyspace | mytable | CREATING
For a table that has been successfully created and is active, the output of the query looks like the
following.
keyspace_name | table_name | status
--------------+------------+--------
mykeyspace | mytable | ACTIVE
Create, read, update, and delete data (CRUD) using CQL in
Amazon Keyspaces
In this step of the tutorial, you'll learn how to insert, read, update, and delete data in an Amazon
Keyspaces table using CQL data manipulation language (DML) statements. In Amazon Keyspaces,
Check table creation status 214

Amazon Keyspaces (for Apache Cassandra) Developer Guide
you can only create DML statements in CQL language. In this tutorial, you'll practice running DML
statements using the cqlsh-expansion with AWS CloudShell in the AWS Management Console.
• Inserting data – This section covers inserting single and multiple records into a table using the
INSERT statement. You'll learn how to upload data from a CSV file and verify successful inserts
using SELECT queries.
•
Reading data – Here, you'll explore different variations of the SELECT statement to retrieve data
from a table. Topics include selecting all data, selecting specific columns, filtering rows based on
conditions using the WHERE clause, and understanding simple and compound conditions.
• Updating data – In this section, you'll learn how to modify existing data in a table using the
UPDATE statement. You'll practice updating single and multiple columns while understanding
restrictions around updating primary key columns.
•
Deleting data – The final section covers deleting data from a table using the DELETEstatement.
You'll learn how to delete specific cells, entire rows, and the implications of deleting data versus
deleting the entire table or keyspace.
Throughout the tutorial, you'll find examples, tips, and opportunities to practice writing your own
CQL queries for various scenarios.
Topics
• Inserting and loading data into an Amazon Keyspaces table
• Read data from a table using the CQL SELECT statement in Amazon Keyspaces
• Update data in an Amazon Keyspaces table using CQL
• Delete data from a table using the CQL DELETE statement
Inserting and loading data into an Amazon Keyspaces table
To create data in your book_awards table, use the INSERT statement to add a single row.
1. Open AWS CloudShell and connect to Amazon Keyspaces using the following command. Make
sure to update us-east-1 with your own Region.
cqlsh-expansion cassandra.us-east-1.amazonaws.com 9142 --ssl
The output of that command should look like this.
Create 215

Amazon Keyspaces (for Apache Cassandra) Developer Guide
Connected to Amazon Keyspaces at cassandra.us-east-1.amazonaws.com:9142
[cqlsh 6.1.0 | Cassandra 3.11.2 | CQL spec 3.4.4 | Native protocol v4]
Use HELP for help.
cqlsh current consistency level is ONE.
2. Before you can write data to your Amazon Keyspaces table using cqlsh, you must set the write
consistency for the current cqlsh session to LOCAL_QUORUM. For more information about
supported consistency levels, see the section called “Write consistency levels”. Note that this
step is not required if you are using the CQL editor in the AWS Management Console.
CONSISTENCY LOCAL_QUORUM;
3. To insert a single record, run the following command in the CQL editor.
INSERT INTO catalog.book_awards (award, year, category, rank, author, book_title,
publisher)
VALUES ('Wolf', 2023, 'Fiction',3,'Shirley Rodriguez','Mountain', 'AnyPublisher') ;
4. Verify that the data was correctly added to your table by running the following command.
SELECT * FROM catalog.book_awards ;
The output of the statement should look like this.
year | award | category | rank | author | book_title | publisher
------+-------+----------+------+-------------------+------------+--------------
2023 | Wolf | Fiction | 3 | Shirley Rodriguez | Mountain | AnyPublisher
(1 rows)
To insert multiple records from a file using cqlsh
1.
Download the sample CSV file (keyspaces_sample_table.csv) contained in
the archive file samplemigration.zip. Unzip the archive and take note of the path to
keyspaces_sample_table.csv.
Create 216

Amazon Keyspaces (for Apache Cassandra) Developer Guide
2. Open AWS CloudShell in the AWS Management Console and connect to Amazon Keyspaces
using the following command. Make sure to update us-east-1 with your own Region.
cqlsh-expansion cassandra.us-east-1.amazonaws.com 9142 --ssl
3.
At the cqlsh prompt (cqlsh>), specify a keyspace.
USE catalog ;
4.
Set write consistency to LOCAL_QUORUM. For more information about supported consistency
levels, see the section called “Write consistency levels”.
CONSISTENCY LOCAL_QUORUM;
5. In the AWS CloudShell choose Actions on the top right side of the screen and then choose
Upload file to upload the csv file downloaded earlier. Take note of the path to the file.
6.
At the keyspace prompt (cqlsh:catalog>), run the following statement.
COPY book_awards (award, year, category, rank, author, book_title, publisher) FROM
'/home/cloudshell-user/keyspaces_sample_table.csv' WITH header=TRUE ;
The output of the statement should look similar to this.
cqlsh:catalog> COPY book_awards (award, year, category, rank, author,
book_title, publisher) FROM '/home/cloudshell-user/
keyspaces_sample_table.csv' WITH delimiter=',' AND header=TRUE ;
cqlsh current consistency level is LOCAL_QUORUM.
Reading options from /home/cloudshell-user/.cassandra/cqlshrc:[copy]:
{'numprocesses': '16', 'maxattempts': '1000'}
Create 217

Amazon Keyspaces (for Apache Cassandra) Developer Guide
Reading options from /home/cloudshell-user/.cassandra/cqlshrc:[copy-from]:
{'ingestrate': '1500', 'maxparseerrors': '1000', 'maxinserterrors': '-1',
'maxbatchsize': '10', 'minbatchsize': '1', 'chunksize': '30'}
Reading options from the command line: {'delimiter': ',', 'header': 'TRUE'}
Using 16 child processes
Starting copy of catalog.book_awards with columns [award, year, category, rank,
author, book_title, publisher].
OSError: handle is closed 0 rows/s; Avg. rate: 0 rows/s
Processed: 9 rows; Rate: 0 rows/s; Avg. rate: 0 rows/s
9 rows imported from 1 files in 0 day, 0 hour, 0 minute, and 26.706 seconds (0
skipped).
7. Verify that the data was correctly added to your table by running the following query.
SELECT * FROM book_awards ;
You should see the following output.
year | award | category | rank | author | book_title
| publisher
------+------------------+-------------+------+--------------------
+-----------------------+---------------
2020 | Wolf | Non-Fiction | 1 | Wang Xiulan | History
of Ideas | Example Books
2020 | Wolf | Non-Fiction | 2 | Ana Carolina Silva |
Science Today | SomePublisher
2020 | Wolf | Non-Fiction | 3 | Shirley Rodriguez | The Future of
Sea Ice | AnyPublisher
2020 | Kwesi Manu Prize | Fiction | 1 | Akua Mansa | Where did
you go? | SomePublisher
2020 | Kwesi Manu Prize | Fiction | 2 | John Stiles |
Yesterday | Example Books
2020 | Kwesi Manu Prize | Fiction | 3 | Nikki Wolf | Moving to the
Chateau | AnyPublisher
2020 | Richard Roe | Fiction | 1 | Alejandro Rosalez | Long
Summer | SomePublisher
2020 | Richard Roe | Fiction | 2 | Arnav Desai |
The Key | Example Books
2020 | Richard Roe | Fiction | 3 | Mateo Jackson | Inside
the Whale | AnyPublisher
Create 218

Amazon Keyspaces (for Apache Cassandra) Developer Guide
(9 rows)
To learn more about using cqlsh COPY to upload data from csv files to an Amazon Keyspaces
table, see the section called “Loading data using cqlsh”.
Read data from a table using the CQL SELECT statement in Amazon
Keyspaces
In the Inserting and loading data into an Amazon Keyspaces table section, you used the SELECT
statement to verify that you had successfully added data to your table. In this section, you refine
your use of SELECT to display specific columns, and only rows that meet specific criteria.
The general form of the SELECT statement is as follows.
SELECT column_list FROM table_name [WHERE condition [ALLOW FILTERING]] ;
Topics
• Select all the data in your table
• Select a subset of columns
• Select a subset of rows
Select all the data in your table
The simplest form of the SELECT statement returns all the data in your table.
Important
In a production environment, it's typically not a best practice to run this command, because
it returns all the data in your table.
To select all your table's data
1. Open AWS CloudShell and connect to Amazon Keyspaces using the following command. Make
sure to update us-east-1 with your own Region.
cqlsh-expansion cassandra.us-east-1.amazonaws.com 9142 --ssl
Read 219

Amazon Keyspaces (for Apache Cassandra) Developer Guide
2. Run the following query.
SELECT * FROM catalog.book_awards ;
Using the wild-card character ( * ) for the column_list selects all columns. The output of the
statement looks like the following example.
year | award | category | rank | author | book_title
| publisher
------+------------------+-------------+------+--------------------
+-----------------------+---------------
2020 | Wolf | Non-Fiction | 1 | Wang Xiulan | History
of Ideas | AnyPublisher
2020 | Wolf | Non-Fiction | 2 | Ana Carolina Silva |
Science Today | SomePublisher
2020 | Wolf | Non-Fiction | 3 | Shirley Rodriguez | The Future of
Sea Ice | AnyPublisher
2020 | Kwesi Manu Prize | Fiction | 1 | Akua Mansa | Where did
you go? | SomePublisher
2020 | Kwesi Manu Prize | Fiction | 2 | John Stiles |
Yesterday | Example Books
2020 | Kwesi Manu Prize | Fiction | 3 | Nikki Wolf | Moving to the
Chateau | AnyPublisher
2020 | Richard Roe | Fiction | 1 | Alejandro Rosalez | Long
Summer | SomePublisher
2020 | Richard Roe | Fiction | 2 | Arnav Desai |
The Key | Example Books
2020 | Richard Roe | Fiction | 3 | Mateo Jackson | Inside
the Whale | AnyPublisher
Select a subset of columns
To query for a subset of columns
1. Open AWS CloudShell and connect to Amazon Keyspaces using the following command. Make
sure to update us-east-1 with your own Region.
cqlsh-expansion cassandra.us-east-1.amazonaws.com 9142 --ssl
2.
To retrieve only the award, category, and year columns, run the following query.
Read 220

Amazon Keyspaces (for Apache Cassandra) Developer Guide
SELECT award, category, year FROM catalog.book_awards ;
The output contains only the specified columns in the order listed in the SELECT statement.
award | category | year
------------------+-------------+------
Wolf | Non-Fiction | 2020
Wolf | Non-Fiction | 2020
Wolf | Non-Fiction | 2020
Kwesi Manu Prize | Fiction | 2020
Kwesi Manu Prize | Fiction | 2020
Kwesi Manu Prize | Fiction | 2020
Richard Roe | Fiction | 2020
Richard Roe | Fiction | 2020
Richard Roe | Fiction | 2020
Select a subset of rows
When querying a large dataset, you might only want records that meet certain criteria. To do this,
you can append a WHERE clause to the end of our SELECT statement.
To query for a subset of rows
1. Open AWS CloudShell and connect to Amazon Keyspaces using the following command. Make
sure to update us-east-1 with your own Region.
cqlsh-expansion cassandra.us-east-1.amazonaws.com 9142 --ssl
2. To retrieve only the records for the awards of a given year, run the following query.
SELECT * FROM catalog.book_awards WHERE year=2020 AND award='Wolf' ;
The preceding SELECT statement returns the following output.
year | award | category | rank | author | book_title |
publisher
------+-------+-------------+------+--------------------+-----------------------
+---------------
Read 221

Amazon Keyspaces (for Apache Cassandra) Developer Guide
2020 | Wolf | Non-Fiction | 1 | Wang Xiulan | History of Ideas |
AnyPublisher
2020 | Wolf | Non-Fiction | 2 | Ana Carolina Silva | Science Today |
SomePublisher
2020 | Wolf | Non-Fiction | 3 | Shirley Rodriguez | The Future of Sea Ice |
AnyPublisher
Understanding the WHERE clause
The WHERE clause is used to filter the data and return only the data that meets the specified
criteria. The specified criteria can be a simple condition or a compound condition.
How to use conditions in a WHERE clause
• A simple condition – A single column.
WHERE column_name=value
You can use a simple condition in a WHERE clause if any of the following conditions are met:
• The column is the only partition key column of the table.
•
You add ALLOW FILTERING after the condition in the WHERE clause.
Be aware that using ALLOW FILTERING can result in inconsistent performance, especially with
large, and multi-partitioned tables.
•
A compound condition – Multiple simple conditions connected by AND.
WHERE column_name1=value1 AND column_name2=value2 AND column_name3=value3...
You can use compound conditions in a WHERE clause if any of the following conditions are met:
•
The columns you can use in the WHERE clause need to include either all or a subset of the
columns in the table's partition key. If you want to use only a subset of the columns in the
WHERE clause, you must include a contiguous set of partition key columns from left to right,
beginning with the partition key's leading column. For example, if the partition key columns
are year, month, and award then you can use the following columns in the WHERE clause:
•
year
•
year AND month
•
year AND month AND award
Read 222
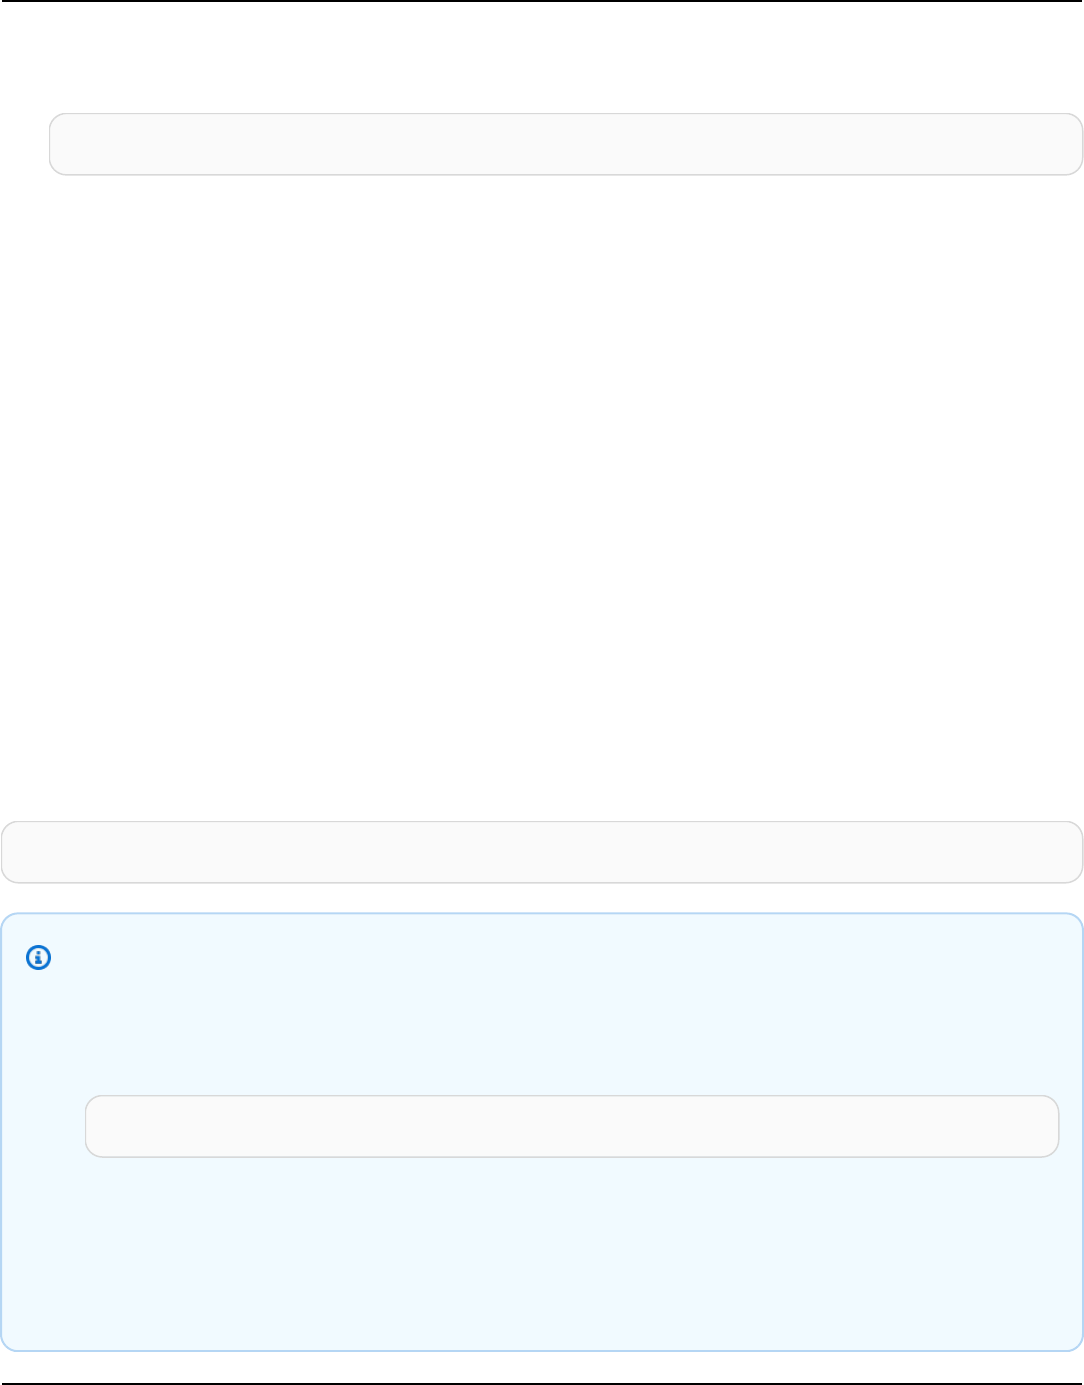
Amazon Keyspaces (for Apache Cassandra) Developer Guide
•
You add ALLOW FILTERING after the compound condition in the WHERE clause, as in the
following example.
SELECT * FROM my_table WHERE col1=5 AND col2='Bob' ALLOW FILTERING ;
Be aware that using ALLOW FILTERING can result in inconsistent performance, especially with
large, and multi-partitioned tables.
Try it
Create your own CQL queries to find the following from your book_awards table:
• Find the winners of the 2020 Wolf awards and display the book titles and authors, ordered by
rank.
• Show the first prize winners for all awards in 2020 and display the book titles and award names.
Update data in an Amazon Keyspaces table using CQL
To update the data in your book_awards table, use the UPDATE statement.
The general form of the UPDATE statement is as follows.
UPDATE table_name SET column_name=new_value WHERE primary_key=value ;
Tip
•
You can update multiple columns by using a comma-separated list of column_names
and values, as in the following example.
UPDATE my_table SET col1='new_value_1', col2='new_value2' WHERE col3='1' ;
• If the primary key is composed of multiple columns, all primary key columns and their
values must be included in the WHERE clause.
• You cannot update any column in the primary key because that would change the
primary key for the record.
Update 223

Amazon Keyspaces (for Apache Cassandra) Developer Guide
To update a single cell
Using your book_awards table, change the name of a publisher the for winner of the non-fiction
Wolf awards in 2020.
UPDATE book_awards SET publisher='new Books' WHERE year = 2020 AND award='Wolf' AND
category='Non-Fiction' AND rank=1;
Verify that the publisher is now new Books.
SELECT * FROM book_awards WHERE year = 2020 AND award='Wolf' AND category='Non-Fiction'
AND rank=1;
The statement should return the following output.
year | award | category | rank | author | book_title | publisher
------+-------+-------------+------+-------------+------------------+-----------
2020 | Wolf | Non-Fiction | 1 | Wang Xiulan | History of Ideas | new Books
Try it
Advanced: The winner of the 2020 fiction "Kwezi Manu Prize" has changed their name. Update this
record to change the name to 'Akua Mansa-House'.
Delete data from a table using the CQL DELETE statement
To delete data in your book_awards table, use the DELETE statement.
You can delete data from a row or from a partition. Be careful when deleting data, because
deletions are irreversible.
Deleting one or all rows from a table doesn't delete the table. Thus you can repopulate it with data.
Deleting a table deletes the table and all data in it. To use the table again, you must re-create it
and add data to it. Deleting a keyspace deletes the keyspace and all tables within it. To use the
keyspace and tables, you must re-create them, and then populate them with data. You can use
Amazon Keyspaces Point-in-time (PITR) recovery to help restore deleted tables, to learn more see
the section called “Backup and restore with point-in-time recovery” . To learn how to restore a
deleted table with PITR enabled, see the section called “Restore a deleted table”.
Delete 224

Amazon Keyspaces (for Apache Cassandra) Developer Guide
Delete cells
Deleting a column from a row removes the data from the specified cell. When you display that
column using a SELECT statement, the data is displayed as null, though a null value is not stored
in that location.
The general syntax to delete one or more specific columns is as follows.
DELETE column_name1[, column_name2...] FROM table_name WHERE condition ;
In your book_awards table, you can see that the title of the book that won the first price of the
2020 "Richard Roe" price is "Long Summer". Imagine that this title has been recalled, and you need
to delete the data from this cell.
To delete a specific cell
1. Open AWS CloudShell and connect to Amazon Keyspaces using the following command. Make
sure to update us-east-1 with your own Region.
cqlsh-expansion cassandra.us-east-1.amazonaws.com 9142 --ssl
2.
Run the following DELETE query.
DELETE book_title FROM catalog.book_awards WHERE year=2020 AND award='Richard Roe'
AND category='Fiction' AND rank=1;
3. Verify that the delete request was made as expected.
SELECT * FROM catalog.book_awards WHERE year=2020 AND award='Richard Roe' AND
category='Fiction' AND rank=1;
The output of this statement looks like this.
year | award | category | rank | author | book_title | publisher
------+-------------+----------+------+-------------------+------------
+---------------
2020 | Richard Roe | Fiction | 1 | Alejandro Rosalez | null |
SomePublisher
Delete 225

Amazon Keyspaces (for Apache Cassandra) Developer Guide
Delete rows
There might be a time when you need to delete an entire row, for example to meet a data deletion
request. The general syntax for deleting a row is as follows.
DELETE FROM table_name WHERE condition ;
To delete a row
1. Open AWS CloudShell and connect to Amazon Keyspaces using the following command. Make
sure to update us-east-1 with your own Region.
cqlsh-expansion cassandra.us-east-1.amazonaws.com 9142 --ssl
2.
Run the following DELETE query.
DELETE FROM catalog.book_awards WHERE year=2020 AND award='Richard Roe' AND
category='Fiction' AND rank=1;
3. Verify that the delete was made as expected.
SELECT * FROM catalog.book_awards WHERE year=2020 AND award='Richard Roe' AND
category='Fiction' AND rank=1;
The output of this statement looks like this after the row has been deleted.
year | award | category | rank | author | book_title | publisher
------+-------+----------+------+--------+------------+-----------
(0 rows)
You can delete expired data automatically from your table using Amazon Keyspaces Time to Live,
for more information, see the section called “Expire data with Time to Live”.
Delete a table in Amazon Keyspaces
To avoid being charged for tables and data that you don't need, delete all the tables that you're not
using. When you delete a table, the table and its data are deleted and you stop accruing charges
Delete a table 226

Amazon Keyspaces (for Apache Cassandra) Developer Guide
for them. However, the keyspace remains. When you delete a keyspace, the keyspace and all its
tables are deleted and you stop accruing charges for them.
You can delete a table using the console, CQL, or the AWS CLI. When you delete a table, the table
and all its data are deleted.
Using the console
The following procedure deletes a table and all its data using the AWS Management Console.
To delete a table using the console
1. Sign in to the AWS Management Console, and open the Amazon Keyspaces console at https://
console.aws.amazon.com/keyspaces/home.
2. In the navigation pane, choose Tables.
3. Choose the box to the left of the name of each table that you want to delete.
4. Choose Delete.
5.
On the Delete table screen, enter Delete in the box. Then, choose Delete table.
6. To verify that the table was deleted, choose Tables in the navigation pane, and confirm that
the book_awards table is no longer listed.
Using CQL
The following procedure deletes a table and all its data using CQL.
To delete a table using CQL
1. Open AWS CloudShell and connect to Amazon Keyspaces using the following command. Make
sure to update us-east-1 with your own Region.
cqlsh-expansion cassandra.us-east-1.amazonaws.com 9142 --ssl
2. Delete your table by entering the following statement.
DROP TABLE IF EXISTS catalog.book_awards ;
3. Verify that your table was deleted.
SELECT * FROM system_schema.tables WHERE keyspace_name = 'catalog' ;
Delete a table 227

Amazon Keyspaces (for Apache Cassandra) Developer Guide
The output should look like this. Note that this might take some time, so re-run the statement
after a minute if you don't see this result.
keyspace_name | table_name | bloom_filter_fp_chance | caching | cdc | comment
| compaction | compression | crc_check_chance | dclocal_read_repair_chance
| default_time_to_live | extensions | flags | gc_grace_seconds | id |
max_index_interval | memtable_flush_period_in_ms | min_index_interval |
read_repair_chance | speculative_retry
---------------+------------+------------------------+---------+-----+---------
+------------+-------------+------------------+----------------------------
+----------------------+------------+-------+------------------+----
+--------------------+-----------------------------+--------------------
+--------------------+-------------------
(0 rows)
Using the AWS CLI
The following procedure deletes a table and all its data using the AWS CLI.
To delete a table using the AWS CLI
1. Open CloudShell
2. Delete your table with the following statement.
aws keyspaces delete-table --keyspace-name 'catalog' --table-name 'book_awards'
3. To verify that your table was deleted, you can list all tables in a keyspace.
aws keyspaces list-tables --keyspace-name 'catalog'
You should see the following output. Note that this asynchronous operation can take some
time. Re-run the command again after a short while to confirm that the table has been
deleted.
{
"tables": []
}
Delete a table 228

Amazon Keyspaces (for Apache Cassandra) Developer Guide
Delete a keyspace in Amazon Keyspaces
To avoid being charged for keyspaces, delete all the keyspaces that you're not using. When you
delete a keyspace, the keyspace and all its tables are deleted and you stop accruing charges for
them.
You can delete a keyspace using either the console, CQL, or the AWS CLI.
Using the console
The following procedure deletes a keyspace and all its tables and data using the console.
To delete a keyspace using the console
1. Sign in to the AWS Management Console, and open the Amazon Keyspaces console at https://
console.aws.amazon.com/keyspaces/home.
2. In the navigation pane, choose Keyspaces.
3. Choose the box to the left of the name of each keyspace that you want to delete.
4. Choose Delete.
5.
On the Delete keyspace screen, enter Delete in the box. Then, choose Delete keyspace.
6.
To verify that the keyspace catalog was deleted, choose Keyspaces in the navigation pane
and confirm that it is no longer listed. Because you deleted its keyspace, the book_awards
table under Tables should also not be listed.
Using CQL
The following procedure deletes a keyspace and all its tables and data using CQL.
To delete a keyspace using CQL
1. Open AWS CloudShell and connect to Amazon Keyspaces using the following command. Make
sure to update us-east-1 with your own Region.
cqlsh-expansion cassandra.us-east-1.amazonaws.com 9142 --ssl
2. Delete your keyspace by entering the following statement.
DROP KEYSPACE IF EXISTS catalog ;
Delete a keyspace 229

Amazon Keyspaces (for Apache Cassandra) Developer Guide
3. Verify that your keyspace was deleted.
SELECT * from system_schema.keyspaces ;
Your keyspace should not be listed. Note that because this is an asynchronous operation, there
can be a delay until the keyspace is deleted. After the keyspace has been deleted, the output
of the statement should look like this.
keyspace_name | durable_writes | replication
-------------------------+----------------
+-------------------------------------------------------------------------------------
system_schema | True | {'class':
'org.apache.cassandra.locator.SimpleStrategy', 'replication_factor': '3'}
system_schema_mcs | True | {'class':
'org.apache.cassandra.locator.SimpleStrategy', 'replication_factor': '3'}
system | True | {'class':
'org.apache.cassandra.locator.SimpleStrategy', 'replication_factor': '3'}
system_multiregion_info | True | {'class':
'org.apache.cassandra.locator.SimpleStrategy', 'replication_factor': '3'}
(4 rows)
Using the AWS CLI
The following procedure deletes a keyspace and all its tables and data using the AWS CLI.
To delete a keyspace using the AWS CLI
1. Open AWS CloudShell
2. Delete your keyspace by entering the following statement.
aws keyspaces delete-keyspace --keyspace-name 'catalog'
3. Verify that your keyspace was deleted.
aws keyspaces list-keyspaces
The output of this statement should look similar to this. Note that because this is an
asynchronous operation, there can be a delay until the keyspace is deleted.
Delete a keyspace 230

Amazon Keyspaces (for Apache Cassandra) Developer Guide
{
"keyspaces": [
{
"keyspaceName": "system_schema",
"resourceArn": "arn:aws:cassandra:us-east-1:123SAMPLE012:/keyspace/
system_schema/",
"replicationStrategy": "SINGLE_REGION"
},
{
"keyspaceName": "system_schema_mcs",
"resourceArn": "arn:aws:cassandra:us-east-1:123SAMPLE012:/keyspace/
system_schema_mcs/",
"replicationStrategy": "SINGLE_REGION"
},
{
"keyspaceName": "system",
"resourceArn": "arn:aws:cassandra:us-east-1:123SAMPLE012:/keyspace/
system/",
"replicationStrategy": "SINGLE_REGION"
},
{
"keyspaceName": "system_multiregion_info",
"resourceArn": "arn:aws:cassandra:us-east-1:123SAMPLE012:/keyspace/
system_multiregion_info/",
"replicationStrategy": "SINGLE_REGION"
}
]
}
Delete a keyspace 231

Amazon Keyspaces (for Apache Cassandra) Developer Guide
Managing serverless resources in Amazon Keyspaces (for
Apache Cassandra)
Amazon Keyspaces (for Apache Cassandra) is serverless. Instead of deploying, managing, and
maintaining storage and compute resources for your workload through nodes in a cluster, Amazon
Keyspaces allocates storage and read/write throughput resources directly to tables.
Amazon Keyspaces provisions storage automatically based on the data stored in your tables.
It scales storage up and down as you write, update, and delete data, and you pay only for the
storage you use. Data is replicated across multiple Availability Zones for high availability. Amazon
Keyspaces monitors the size of your tables continuously to determine your storage charges. For
more information about how Amazon Keyspaces calculates the billable size of the data, see the
section called “Estimate row size”.
This chapter covers key aspects of resource management in Amazon Keyspaces.
• Estimate row size – To estimate the encoded size of rows in Amazon Keyspaces, consider factors
like partition key metadata, clustering column metadata, column identifiers, data types, and
row metadata. This encoded row size is used for billing, quota management, and provisioned
throughput capacity planning.
• Estimate capacity consumption – This section covers examples of how to estimate read and
write capacity consumption for common scenarios like range queries, limit queries, table
scans, lightweight transactions, static columns, and multi-Region tables. You can use Amazon
CloudWatch to monitor actual capacity utilization. For more information about monitoring with
CloudWatch, see the section called “Monitoring with CloudWatch”.
• Configure read/write capacity modes – You can choose between two capacity modes for
processing reads and writes on your tables:
• On-demand mode (default) – Pay per request for read and write throughput. Amazon
Keyspaces can instantly scale capacity up to any previously reached traffic level.
• Provisioned mode – Specify the required number of read and write capacity units in advance.
This mode helps maintain predictable throughput performance.
• Manage throughput capacity with automatic scaling – For provisioned tables, you can enable
automatic scaling to adjust throughput capacity automatically based on actual application
traffic. Amazon Keyspaces uses target tracking to increase or decrease provisioned capacity,
keeping utilization at your specified target.
232

Amazon Keyspaces (for Apache Cassandra) Developer Guide
• Use burst capacity effectively – Amazon Keyspaces provides burst capacity by reserving a
portion of unused throughput for handling spikes in traffic. This flexibility allows occasional
bursts of activity beyond your provisioned throughput.
To troubleshoot capacity errors, see the section called “Serverless capacity errors”.
Topics
• Estimate row size in Amazon Keyspaces
• Estimate capacity consumption of read and write throughput in Amazon Keyspaces
• Configure read/write capacity modes in Amazon Keyspaces
• Manage throughput capacity automatically with Amazon Keyspaces auto scaling
• Use burst capacity effectively in Amazon Keyspaces
Estimate row size in Amazon Keyspaces
Amazon Keyspaces provides fully managed storage that offers single-digit millisecond read and
write performance and stores data durably across multiple AWS Availability Zones. Amazon
Keyspaces attaches metadata to all rows and primary key columns to support efficient data access
and high availability.
This section provides details about how to estimate the encoded size of rows in Amazon Keyspaces.
The encoded row size is used when calculating your bill and quota use. You should also use the
encoded row size when calculating provisioned throughput capacity requirements for tables. To
calculate the encoded size of rows in Amazon Keyspaces, you can use the following guidelines.
•
For regular columns, which are columns that aren't primary keys, clustering columns, or STATIC
columns, use the raw size of the cell data based on the data type and add the required metadata.
For more information about the data types supported in Amazon Keyspaces, see the section
called “Data types”. Some key differences in how Amazon Keyspaces stores data type values and
metadata are listed below.
• The space required for each column name is stored using a column identifier and added to each
data value stored in the column. The storage value of the column identifier depends on the
overall number of columns in your table:
• 1–62 columns: 1 byte
• 63–124 columns: 2 bytes
Estimate row size 233

Amazon Keyspaces (for Apache Cassandra) Developer Guide
• 125–186 columns: 3 bytes
For each additional 62 columns add 1 byte. Note that in Amazon Keyspaces, up to 225 regular
columns can be modified with a single INSERT or UPDATE statement. For more information, see
the section called “Amazon Keyspaces service quotas”.
• Partition keys can contain up to 2048 bytes of data. Each key column in the partition key
requires up to 3 bytes of metadata. When calculating the size of your row, you should assume
each partition key column uses the full 3 bytes of metadata.
• Clustering columns can store up to 850 bytes of data. In addition to the size of the data value,
each clustering column requires up to 20% of the data value size for metadata. When calculating
the size of your row, you should add 1 byte of metadata for each 5 bytes of clustering column
data value.
• Amazon Keyspaces stores the data value of each partition key and clustering key column twice.
The extra overhead is used for efficient querying and built-in indexing.
•
Cassandra ASCII, TEXT, and VARCHAR string data types are all stored in Amazon Keyspaces
using Unicode with UTF-8 binary encoding. The size of a string in Amazon Keyspaces equals the
number of UTF-8 encoded bytes.
•
Cassandra INT, BIGINT, SMALLINT, and TINYINT data types are stored in Amazon Keyspaces as
data values with variable length, with up to 38 significant digits. Leading and trailing zeroes are
trimmed. The size of any of these data types is approximately 1 byte per two significant digits +
1 byte.
•
A BLOB in Amazon Keyspaces is stored with the value's raw byte length.
•
The size of a Null value or a Boolean value is 1 byte.
•
A column that stores collection data types like LIST or MAP requires 3 bytes of metadata,
regardless of its contents. The size of a LIST or MAP is (column id) + sum (size of nested
elements) + (3 bytes). The size of an empty LIST or MAP is (column id) + (3 bytes). Each
individual LIST or MAP element also requires 1 byte of metadata.
•
STATIC column data doesn't count towards the maximum row size of 1 MB. To calculate the
data size of static columns, see the section called “Calculate static column size per logical
partition”.
• Client-side timestamps are stored for every column in each row when the feature is turned on.
These timestamps take up approximately 20–40 bytes (depending on your data), and contribute
to the storage and throughput cost for the row. For more information, see the section called
“Client-side timestamps”.
Estimate row size 234
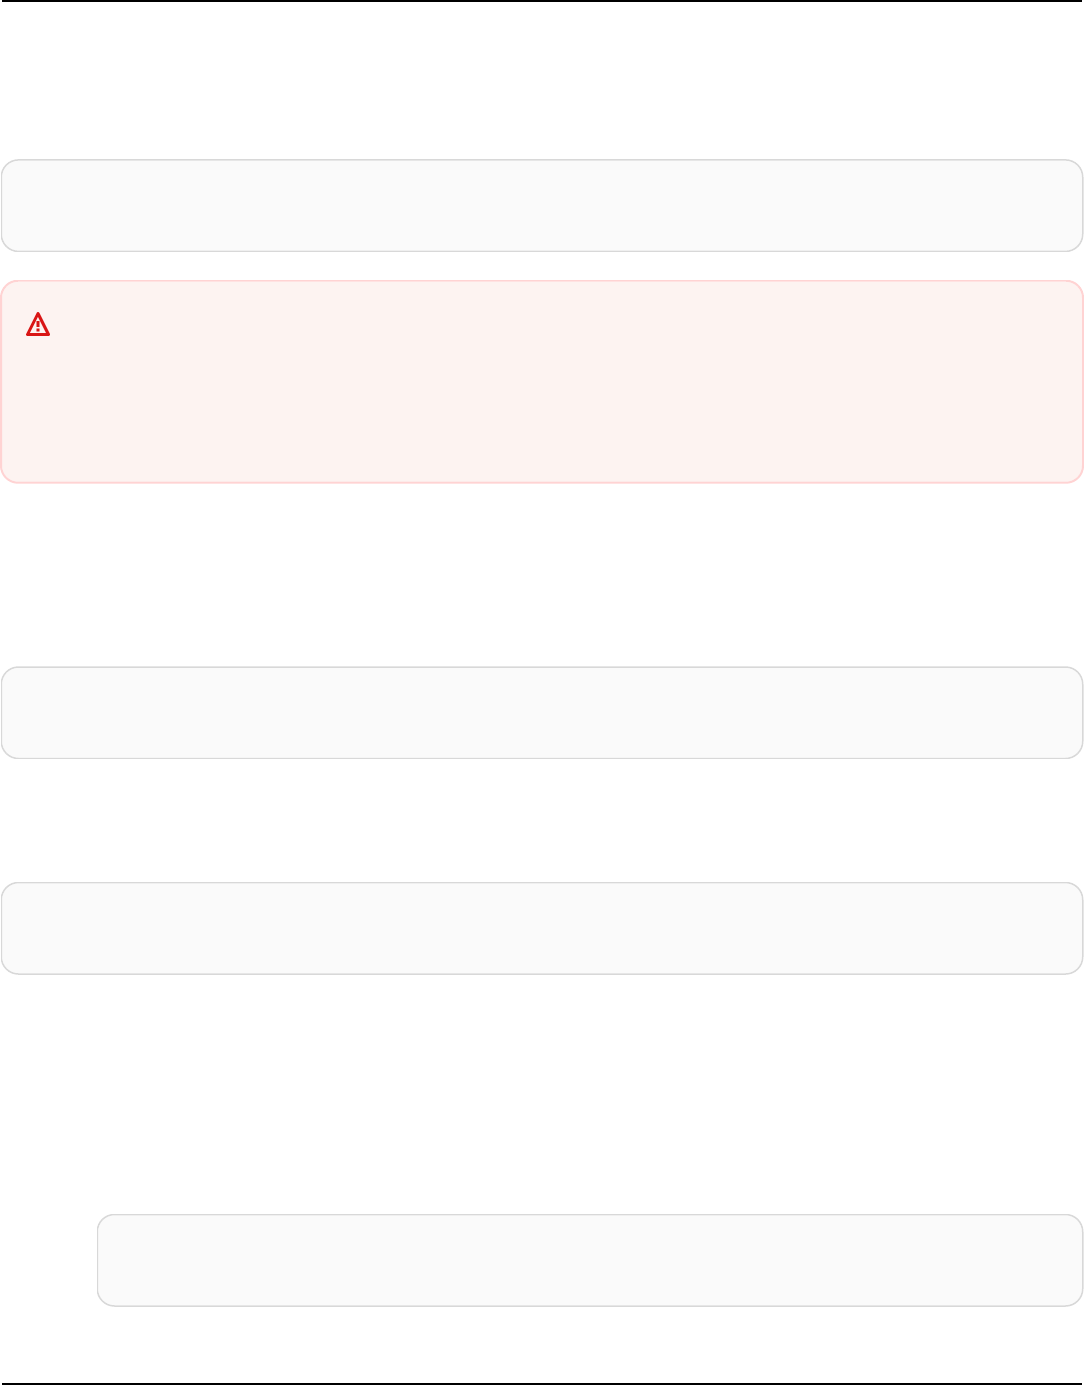
Amazon Keyspaces (for Apache Cassandra) Developer Guide
• Add 100 bytes to the size of each row for row metadata.
The total size of an encoded row of data is based on the following formula:
partition key columns + clustering columns + regular columns + row metadata = total
encoded size of row
Important
All column metadata, for example column ids, partition key metadata, clustering column
metadata, as well as client-side timestamps and row metadata count towards the
maximum row size of 1 MB.
Consider the following example of a table where all columns are of type integer. The table has two
partition key columns, two clustering columns, and one regular column. Because this table has five
columns, the space required for the column name identifier is 1 byte.
CREATE TABLE mykeyspace.mytable(pk_col1 int, pk_col2 int, ck_col1 int, ck_col2 int,
reg_col1 int, primary key((pk_col1, pk_col2),ck_col1, ck_col2));
In this example, we calculate the size of data when we write a row to the table as shown in the
following statement:
INSERT INTO mykeyspace.mytable (pk_col1, pk_col2, ck_col1, ck_col2, reg_col1)
values(1,2,3,4,5);
To estimate the total bytes required by this write operation, you can use the following steps.
1. Calculate the size of a partition key column by adding the bytes for the data type stored in the
column and the metadata bytes. Repeat this for all partition key columns.
a. Calculate the size of the first column of the partition key (pk_col1):
(2 bytes for the integer data type) x 2 + 1 byte for the column id + 3 bytes
for partition key metadata = 8 bytes
b. Calculate the size of the second column of the partition key (pk_col2):
Estimate row size 235

Amazon Keyspaces (for Apache Cassandra) Developer Guide
(2 bytes for the integer data type) x 2 + 1 byte for the column id + 3 bytes
for partition key metadata = 8 bytes
c. Add both columns to get the total estimated size of the partition key columns:
8 bytes + 8 bytes = 16 bytes for the partition key columns
2. Calculate the size of the clustering column by adding the bytes for the data type stored in the
column and the metadata bytes. Repeat this for all clustering columns.
a. Calculate the size of the first column of the clustering column (ck_col1):
(2 bytes for the integer data type) x 2 + 20% of the data value (2 bytes) for
clustering column metadata + 1 byte for the column id = 6 bytes
b. Calculate the size of the second column of the clustering column (ck_col2):
(2 bytes for the integer data type) x 2 + 20% of the data value (2 bytes) for
clustering column metadata + 1 byte for the column id = 6 bytes
c. Add both columns to get the total estimated size of the clustering columns:
6 bytes + 6 bytes = 12 bytes for the clustering columns
3. Add the size of the regular columns. In this example we only have one column that stores a
single digit integer, which requires 2 bytes with 1 byte for the column id.
4. Finally, to get the total encoded row size, add up the bytes for all columns and add the
additional 100 bytes for row metadata:
16 bytes for the partition key columns + 12 bytes for clustering columns + 3 bytes
for the regular column + 100 bytes for row metadata = 131 bytes.
To learn how to monitor serverless resources with Amazon CloudWatch, see the section called
“Monitoring with CloudWatch”.
Estimate capacity consumption of read and write throughput in
Amazon Keyspaces
Estimate capacity consumption 236

Amazon Keyspaces (for Apache Cassandra) Developer Guide
When you read or write data in Amazon Keyspaces, the amount of read/write request units
(RRUs/WRUs) or read/write capacity units (RCUs/WCUs) your query consumes depends on the
total amount of data Amazon Keyspaces has to process to run the query. In some cases, the
data returned to the client can be a subset of the data that Amazon Keyspaces had to read to
process the query. For conditional writes, Amazon Keyspaces consumes write capacity even if the
conditional check fails.
To estimate the total amount of data being processed for a request, you have to consider the
encoded size of a row and the total number of rows. This topic covers some examples of common
scenarios and access patterns to show how Amazon Keyspaces processes queries and how that
affects capacity consumption. You can follow the examples to estimate the capacity requirements
of your tables and use Amazon CloudWatch to observe the read and write capacity consumption
for these use cases.
For information on how to calculate the encoded size of rows in Amazon Keyspaces, see the section
called “Estimate row size”.
Topics
• Estimate the capacity consumption of range queries in Amazon Keyspaces
• Estimate the read capacity consumption of limit queries
• Estimate the read capacity consumption of table scans
• Estimate capacity consumption of lightweight transactions in Amazon Keyspaces
• Estimate capacity consumption for static columns in Amazon Keyspaces
• Estimate and provision capacity for a multi-Region table in Amazon Keyspaces
• Estimate read and write capacity consumption with Amazon CloudWatch in Amazon Keyspaces
Estimate the capacity consumption of range queries in Amazon
Keyspaces
To look at the read capacity consumption of a range query, we use the following example table
which is using on-demand capacity mode.
pk1 | pk2 | pk3 | ck1 | ck2 | ck3 | value
-----+-----+-----+-----+-----+-----+-------
a | b | 1 | a | b | 50 | <any value that results in a row size larger than 4KB>
a | b | 1 | a | b | 60 | value_1
Estimate the capacity consumption of range queries 237
Amazon Keyspaces (for Apache Cassandra) Developer Guide
a | b | 1 | a | b | 70 | <any value that results in a row size larger than 4KB>
Now run the following query on this table.
SELECT * FROM amazon_keyspaces.example_table_1 WHERE pk1='a' AND pk2='b' AND pk3=1 AND
ck1='a' AND ck2='b' AND ck3 > 50 AND ck3 < 70;
You receive the following result set from the query and the read operation performed by Amazon
Keyspaces consumes 2 RRUs in LOCAL_QUORUM consistency mode.
pk1 | pk2 | pk3 | ck1 | ck2 | ck3 | value
-----+-----+-----+-----+-----+-----+-------
a | b | 1 | a | b | 60 | value_1
Amazon Keyspaces consumes 2 RRUs to evaluate the rows with the values ck3=60 and ck3=70 to
process the query. However, Amazon Keyspaces only returns the row where the WHERE condition
specified in the query is true, which is the row with value ck3=60. To evaluate the range specified
in the query, Amazon Keyspaces reads the row matching the upper bound of the range, in this case
ck3 = 70, but doesn’t return that row in the result. The read capacity consumption is based on
the data read when processing the query, not on the data returned.
Estimate the read capacity consumption of limit queries
When processing a query that uses the LIMIT clause, Amazon Keyspaces reads rows up to
the maximum page size when trying to match the condition specified in the query. If Amazon
Keyspaces can't find sufficient matching data that meets the LIMIT value on the first page, one
or more paginated calls could be needed. To continue reads on the next page, you can use a
pagination token. The default page size is 1MB. To consume less read capacity when using LIMIT
clauses, you can reduce the page size. For more information about pagination, see the section
called “Paginate results”.
For an example, let's look at the following query.
SELECT * FROM my_table WHERE partition_key=1234 LIMIT 1;”
If you don’t set the page size, Amazon Keyspaces reads 1MB of data even though it returns only 1
row to you. To only have Amazon Keyspaces read one row, you can set the page size to 1 for this
query. In this case, Amazon Keyspaces would only read one row provided you don’t have expired
Estimate the read capacity consumption of limit queries 238

Amazon Keyspaces (for Apache Cassandra) Developer Guide
rows based on Time-to-live settings or client-side timestamps. To consume less read capacity, we
recommend to set your page size equal to the LIMIT value to reduce the amount of data Amazon
Keyspaces reads.
Estimate the read capacity consumption of table scans
Queries that result in full table scans, for example queries using the ALLOW FILTERING option, are
another example of queries that process more reads than what they return as results. And the read
capacity consumption is based on the data read, not the data returned.
For the table scan example we use the following example table in on-demand capacity mode.
pk | ck | value
---+----+---------
pk | 10 | <any value that results in a row size larger than 4KB>
pk | 20 | value_1
pk | 30 | <any value that results in a row size larger than 4KB>
Amazon Keyspaces creates a table in on-demand capacity mode with four partitions by default.
In this example table, all the data is stored in one partition and the remaining three partitions are
empty.
Now run the following query on the table.
SELECT * from amazon_keyspaces.example_table_2;
This query results in a table scan operation where Amazon Keyspaces scans all four partitions of
the table and consumes 6 RRUs in LOCAL_QUORUM consistency mode. First, Amazon Keyspaces
consumes 3 RRUs for reading the three rows with pk=‘pk’. Then, Amazon Keyspaces consumes
the additional 3 RRUs for scanning the three empty partitions of the table. Because this query
results in a table scan, Amazon Keyspaces scans all the partitions in the table, including partitions
without data.
Estimate capacity consumption of lightweight transactions in Amazon
Keyspaces
Lightweight transactions (LWT) allow you to perform conditional write operations against your
table data. Conditional update operations are useful when inserting, updating and deleting records
based on conditions that evaluate the current state.
Estimate the read capacity consumption of table scans 239

Amazon Keyspaces (for Apache Cassandra) Developer Guide
In Amazon Keyspaces, all write operations require LOCAL_QUORUM consistency and there is no
additional charge for using LWTs. The difference for LWTs is that when a LWT condition check
results in FALSE, it consumes write capacity units. The number of write capacity units consumed
depends on the size of the row. If the row size is 2 KB, the failed conditional write consumes two
write capacity units. If the row doesn’t currently exist in the table, the operation consumes one
write capacity unit. By monitoring the ConditionalCheckFailed metric in CloudWatch you can
determine the capacity consumed by LWT condition check failures.
Estimate capacity consumption for static columns in Amazon Keyspaces
In an Amazon Keyspaces table with clustering columns, you can use the STATIC keyword to create
a static column. The value stored in a static column is shared between all rows in a logical partition.
When you update the value of this column, Amazon Keyspaces applies the change automatically to
all rows in the partition.
This section describes how to calculate the encoded size of data when you're writing to static
columns. This process is handled separately from the process that writes data to the nonstatic
columns of a row. In addition to size quotas for static data, read and write operations on static
columns also affect metering and throughput capacity for tables independently. For functional
differences with Apache Cassandra when using static columns and paginated range read results,
see the section called “Pagination”.
Topics
• Calculate the static column size per logical partition in Amazon Keyspaces
• Estimate capacity throughput requirements for read/write operations on static data in Amazon
Keyspaces
Calculate the static column size per logical partition in Amazon Keyspaces
This section provides details about how to estimate the encoded size of static columns in Amazon
Keyspaces. The encoded size is used when you're calculating your bill and quota use. You should
also use the encoded size when you calculate provisioned throughput capacity requirements for
tables. To calculate the encoded size of static columns in Amazon Keyspaces, you can use the
following guidelines.
• Partition keys can contain up to 2048 bytes of data. Each key column in the partition key
requires up to 3 bytes of metadata. These metadata bytes count towards your static data size
Estimate capacity consumption of static columns 240

Amazon Keyspaces (for Apache Cassandra) Developer Guide
quota of 1 MB per partition. When calculating the size of your static data, you should assume
that each partition key column uses the full 3 bytes of metadata.
• Use the raw size of the static column data values based on the data type. For more information
about data types, see the section called “Data types”.
• Add 104 bytes to the size of the static data for metadata.
• Clustering columns and regular, nonprimary key columns do not count towards the size of static
data. To learn how to estimate the size of nonstatic data within rows, see the section called
“Estimate row size”.
The total encoded size of a static column is based on the following formula:
partition key columns + static columns + metadata = total encoded size of static data
Consider the following example of a table where all columns are of type integer. The table has two
partition key columns, two clustering columns, one regular column, and one static column.
CREATE TABLE mykeyspace.mytable(pk_col1 int, pk_col2 int, ck_col1 int, ck_col2
int, reg_col1 int, static_col1 int static, primary key((pk_col1, pk_col2),ck_col1,
ck_col2));
In this example, we calculate the size of static data of the following statement:
INSERT INTO mykeyspace.mytable (pk_col1, pk_col2, static_col1) values(1,2,6);
To estimate the total bytes required by this write operation, you can use the following steps.
1. Calculate the size of a partition key column by adding the bytes for the data type stored in the
column and the metadata bytes. Repeat this for all partition key columns.
a. Calculate the size of the first column of the partition key (pk_col1):
4 bytes for the integer data type + 3 bytes for partition key metadata = 7
bytes
b. Calculate the size of the second column of the partition key (pk_col2):
4 bytes for the integer data type + 3 bytes for partition key metadata = 7
bytes
Estimate capacity consumption of static columns 241

Amazon Keyspaces (for Apache Cassandra) Developer Guide
c. Add both columns to get the total estimated size of the partition key columns:
7 bytes + 7 bytes = 14 bytes for the partition key columns
2. Add the size of the static columns. In this example, we only have one static column that stores
an integer (which requires 4 bytes).
3. Finally, to get the total encoded size of the static column data, add up the bytes for the
primary key columns and static columns, and add the additional 104 bytes for metadata:
14 bytes for the partition key columns + 4 bytes for the static column + 104 bytes
for metadata = 122 bytes.
You can also update static and nonstatic data with the same statement. To estimate the total
size of the write operation, you must first calculate the size of the nonstatic data update. Then
calculate the size of the row update as shown in the example at the section called “Estimate row
size”, and add the results.
In this case, you can write a total of 2 MB—1 MB is the maximum row size quota, and 1 MB is the
quota for the maximum static data size per logical partition.
To calculate the total size of an update of static and nonstatic data in the same statement, you can
use the following formula:
(partition key columns + static columns + metadata = total encoded size of static data)
+ (partition key columns + clustering columns + regular columns + row metadata = total
encoded size of row)
= total encoded size of data written
Consider the following example of a table where all columns are of type integer. The table has two
partition key columns, two clustering columns, one regular column, and one static column.
CREATE TABLE mykeyspace.mytable(pk_col1 int, pk_col2 int, ck_col1 int, ck_col2
int, reg_col1 int, static_col1 int static, primary key((pk_col1, pk_col2),ck_col1,
ck_col2));
In this example, we calculate the size of data when we write a row to the table, as shown in the
following statement:
Estimate capacity consumption of static columns 242

Amazon Keyspaces (for Apache Cassandra) Developer Guide
INSERT INTO mykeyspace.mytable (pk_col1, pk_col2, ck_col1, ck_col2, reg_col1,
static_col1) values(2,3,4,5,6,7);
To estimate the total bytes required by this write operation, you can use the following steps.
1. Calculate the total encoded size of static data as shown earlier. In this example, it's 122 bytes.
2. Add the size of the total encoded size of the row based on the update of nonstatic data,
following the steps at the section called “Estimate row size”. In this example, the total size of
the row update is 134 bytes.
122 bytes for static data + 134 bytes for nonstatic data = 256 bytes.
Estimate capacity throughput requirements for read/write operations on static
data in Amazon Keyspaces
Static data is associated with logical partitions in Cassandra, not individual rows. Logical partitions
in Amazon Keyspaces can be virtually unbound in size by spanning across multiple physical storage
partitions. As a result, Amazon Keyspaces meters write operations on static and nonstatic data
separately. Furthermore, writes that include both static and nonstatic data require additional
underlying operations to provide data consistency.
If you perform a mixed write operation of both static and nonstatic data, this results in two
separate write operations—one for nonstatic and one for static data. This applies to both on-
demand and provisioned read/write capacity modes.
The following example provides details about how to estimate the required read capacity units
(RCUs) and write capacity units (WCUs) when you're calculating provisioned throughput capacity
requirements for tables in Amazon Keyspaces that have static columns. You can estimate how
much capacity your table needs to process writes that include both static and nonstatic data by
using the following formula:
2 x WCUs required for nonstatic data + 2 x WCUs required for static data
For example, if your application writes 27 KBs of data per second and each write includes 25.5 KBs
of nonstatic data and 1.5 KBs of static data, then your table requires 56 WCUs (2 x 26 WCUs + 2 x 2
WCUs).
Estimate capacity consumption of static columns 243
Amazon Keyspaces (for Apache Cassandra) Developer Guide
Amazon Keyspaces meters the reads of static and nonstatic data the same as reads of multiple
rows. As a result, the price of reading static and nonstatic data in the same operation is based on
the aggregate size of the data processed to perform the read.
To learn how to monitor serverless resources with Amazon CloudWatch, see the section called
“Monitoring with CloudWatch”.
Estimate and provision capacity for a multi-Region table in Amazon
Keyspaces
You can configure the throughput capacity of a multi-Region table in one of two ways:
• On-demand capacity mode, measured in write request units (WRUs)
• Provisioned capacity mode with auto scaling, measured in write capacity units (WCUs)
You can use provisioned capacity mode with auto scaling or on-demand capacity mode to help
ensure that a multi-Region table has sufficient capacity to perform replicated writes to all AWS
Regions.
Note
Changing the capacity mode of the table in one of the Regions changes the capacity mode
for all replicas.
By default, Amazon Keyspaces uses on-demand mode for multi-Region tables. With on-demand
mode, you don't need to specify how much read and write throughput that you expect your
application to perform. Amazon Keyspaces instantly accommodates your workloads as they ramp
up or down to any previously reached traffic level. If a workload’s traffic level hits a new peak,
Amazon Keyspaces adapts rapidly to accommodate the workload.
If you choose provisioned capacity mode for a table, you have to configure the number of read
capacity units (RCUs) and write capacity units (WCUs) per second that your application requires.
To plan a multi-Region table's throughput capacity needs, you should first estimate the number of
WCUs per second needed for each Region. Then you add the writes from all Regions that your table
is replicated in, and use the sum to provision capacity for each Region. This is required because
every write that is performed in one Region must also be repeated in each replica Region.
Estimate capacity for a multi-Region table 244

Amazon Keyspaces (for Apache Cassandra) Developer Guide
If the table doesn't have enough capacity to handle the writes from all Regions, capacity exceptions
will occur. In addition, inter-Regional replication wait times will rise.
For example, if you have a multi-Region table where you expect 5 writes per second in US East (N.
Virginia), 10 writes per second in US East (Ohio), and 5 writes per second in Europe (Ireland), you
should expect the table to consume 20 WCUs in each Region: US East (N. Virginia), US East (Ohio),
and Europe (Ireland). That means that in this example, you need to provision 20 WCUs for each of
the table's replicas. You can monitor your table's capacity consumption using Amazon CloudWatch.
For more information, see the section called “Monitoring with CloudWatch”.
Because each multi-Region write is billed as 1.25 times WCUs, you would see a total of 75 WCUs
billed in this example. For more information about pricing, see Amazon Keyspaces (for Apache
Cassandra) pricing.
For more information about provisioned capacity with Amazon Keyspaces auto scaling, see the
section called “Manage throughput capacity with auto scaling”.
Note
If a table is running in provisioned capacity mode with auto scaling, the provisioned write
capacity is allowed to float within those auto scaling settings for each Region.
Estimate read and write capacity consumption with Amazon
CloudWatch in Amazon Keyspaces
To estimate and monitor read and write capacity consumption, you can use a CloudWatch
dashboard. For more information about available metrics for Amazon Keyspaces, see the section
called “Metrics and dimensions”.
To monitor read and write capacity units consumed by a specific statement with CloudWatch, you
can follow these steps.
1. Create a new table with sample data
2. Configure a Amazon Keyspaces CloudWatch dashboard for the table. To get started, you can use
a dashboard template available on Github.
3.
Run the CQL statement, for example using the ALLOW FILTERING option, and check the read
capacity units consumed for the full table scan in the dashboard.
Estimate capacity consumption with CloudWatch 245

Amazon Keyspaces (for Apache Cassandra) Developer Guide
Configure read/write capacity modes in Amazon Keyspaces
Amazon Keyspaces has two read/write capacity modes for processing reads and writes on your
tables:
• On-demand (default)
• Provisioned
The read/write capacity mode that you choose controls how you are charged for read and write
throughput and how table throughput capacity is managed.
Topics
• Configure on-demand capacity mode
• Configure provisioned throughput capacity mode
• View the capacity mode of a table in Amazon Keyspaces
• Change capacity mode
Configure on-demand capacity mode
Amazon Keyspaces (for Apache Cassandra) on-demand capacity mode is a flexible billing option
capable of serving thousands of requests per second without capacity planning. This option offers
pay-per-request pricing for read and write requests so that you pay only for what you use.
When you choose on-demand mode, Amazon Keyspaces can scale the throughput capacity for your
table up to any previously reached traffic level instantly, and then back down when application
traffic decreases. If a workload’s traffic level hits a new peak, the service adapts rapidly to increase
throughput capacity for your table. You can enable on-demand capacity mode for both new and
existing tables.
On-demand mode is a good option if any of the following is true:
• You create new tables with unknown workloads.
• You have unpredictable application traffic.
• You prefer the ease of paying for only what you use.
Configure read/write capacity modes 246

Amazon Keyspaces (for Apache Cassandra) Developer Guide
To get started with on-demand mode, you can create a new table or update an existing table to
use on-demand capacity mode using the console or with a few lines of Cassandra Query Language
(CQL) code. For more information, see the section called “Tables”.
Topics
• Read request units and write request units
• Peak traffic and scaling properties
• Initial throughput for on-demand capacity mode
Read request units and write request units
With on-demand capacity mode tables, you don't need to specify how much read and write
throughput you expect your application to use in advance. Amazon Keyspaces charges you for the
reads and writes that you perform on your tables in terms of read request units (RRUs) and write
request units (WRUs).
•
One RRU represents one LOCAL_QUORUM read request, or two LOCAL_ONE read requests, for a
row up to 4 KB in size. If you need to read a row that is larger than 4 KB, the read operation uses
additional RRUs. The total number of RRUs required depends on the row size, and whether you
want to use LOCAL_QUORUM or LOCAL_ONE read consistency. For example, reading an 8 KB row
requires 2 RRUs using LOCAL_QUORUM read consistency, and 1 RRU if you choose LOCAL_ONE
read consistency.
•
One WRU represents one write for a row up to 1 KB in size. All writes are using LOCAL_QUORUM
consistency, and there is no additional charge for using lightweight transactions (LWTs). If you
need to write a row that is larger than 1 KB, the write operation uses additional WRUs. The total
number of WRUs required depends on the row size. For example, if your row size is 2 KB, you
require 2 WRUs to perform one write request.
For information about supported consistency levels, see the section called “Supported Cassandra
consistency levels”.
Peak traffic and scaling properties
Amazon Keyspaces tables that use on-demand capacity mode automatically adapt to your
application’s traffic volume. On-demand capacity mode instantly accommodates up to double the
previous peak traffic on a table. For example, your application's traffic pattern might vary between
Configure on-demand capacity mode 247

Amazon Keyspaces (for Apache Cassandra) Developer Guide
5,000 and 10,000 LOCAL_QUORUM reads per second, where 10,000 reads per second is the previous
traffic peak.
With this pattern, on-demand capacity mode instantly accommodates sustained traffic of up to
20,000 reads per second. If your application sustains traffic of 20,000 reads per second, that peak
becomes your new previous peak, enabling subsequent traffic to reach up to 40,000 reads per
second.
If you need more than double your previous peak on a table, Amazon Keyspaces automatically
allocates more capacity as your traffic volume increases. This helps ensure that your table has
enough throughput capacity to process the additional requests. However, you might observe
insufficient throughput capacity errors if you exceed double your previous peak within 30 minutes.
For example, suppose that your application's traffic pattern varies between 5,000 and 10,000
strongly consistent reads per second, where 20,000 reads per second is the previously reached
traffic peak. In this case, the service recommends that you space your traffic growth over at least
30 minutes before driving up to 40,000 reads per second.
To learn how to estimate read and write capacity consumption of a table, see the section called
“Estimate capacity consumption”.
To learn more about default quotas for your account and how to increase them, see Quotas.
Initial throughput for on-demand capacity mode
If you create a new table with on-demand capacity mode enabled or switch an existing table to on-
demand capacity mode for the first time, the table has the following previous peak settings, even
though it hasn't served traffic previously using on-demand capacity mode:
• Newly created table with on-demand capacity mode: The previous peak is 2,000 WRUs and
6,000 RRUs. You can drive up to double the previous peak immediately. Doing this enables newly
created on-demand tables to serve up to 4,000 WRUs and 12,000 RRUs.
• Existing table switched to on-demand capacity mode: The previous peak is half the previous
WCUs and RCUs provisioned for the table or the settings for a newly created table with on-
demand capacity mode, whichever is higher.
Configure on-demand capacity mode 248

Amazon Keyspaces (for Apache Cassandra) Developer Guide
Configure provisioned throughput capacity mode
If you choose provisioned throughput capacity mode, you specify the number of reads and writes
per second that are required for your application. This helps you manage your Amazon Keyspaces
usage to stay at or below a defined request rate to optimize price and maintain predictability. To
learn more about automatic scaling for provisioned throughput see the section called “Manage
throughput capacity with auto scaling”.
Provisioned throughput capacity mode is a good option if any of the following is true:
• You have predictable application traffic.
• You run applications whose traffic is consistent or ramps up gradually.
• You can forecast capacity requirements to optimize price.
Read capacity units and write capacity units
For provisioned throughput capacity mode tables, you specify throughput capacity in terms of read
capacity units (RCUs) and write capacity units (WCUs):
•
One RCU represents one LOCAL_QUORUM read per second, or two LOCAL_ONE reads per second,
for a row up to 4 KB in size. If you need to read a row that is larger than 4 KB, the read operation
uses additional RCUs.
The total number of RCUs required depends on the row size, and whether you want
LOCAL_QUORUM or LOCAL_ONE reads. For example, if your row size is 8 KB, you require 2 RCUs to
sustain one LOCAL_QUORUM read per second, and 1 RCU if you choose LOCAL_ONE reads.
• One WCU represents one write per second for a row up to 1 KB in size. All writes are using
LOCAL_QUORUM consistency, and there is no additional charge for using lightweight transactions
(LWTs). If you need to write a row that is larger than 1 KB, the write operation uses additional
WCUs.
The total number of WCUs required depends on the row size. For example, if your row size is 2
KB, you require 2 WCUs to sustain one write request per second. For more information about
how to estimate read and write capacity consumption of a table, see the section called “Estimate
capacity consumption”.
Configure provisioned throughput capacity mode 249

Amazon Keyspaces (for Apache Cassandra) Developer Guide
If your application reads or writes larger rows (up to the Amazon Keyspaces maximum row size of
1 MB), it consumes more capacity units. To learn more about how to estimate the row size, see the
section called “Estimate row size”. For example, suppose that you create a provisioned table with 6
RCUs and 6 WCUs. With these settings, your application could do the following:
•
Perform LOCAL_QUORUM reads of up to 24 KB per second (4 KB × 6 RCUs).
•
Perform LOCAL_ONE reads of up to 48 KB per second (twice as much read throughput).
• Write up to 6 KB per second (1 KB × 6 WCUs).
Provisioned throughput is the maximum amount of throughput capacity an application can
consume from a table. If your application exceeds your provisioned throughput capacity, you might
observe insufficient capacity errors.
For example, a read request that doesn’t have enough throughput capacity fails with a
Read_Timeout exception and is posted to the ReadThrottleEvents metric. A write request that
doesn’t have enough throughput capacity fails with a Write_Timeout exception and is posted to
the WriteThrottleEvents metric.
You can use Amazon CloudWatch to monitor your provisioned and actual throughput metrics
and insufficient capacity events. For more information about these metrics, see the section called
“Metrics and dimensions”.
Note
Repeated errors due to insufficient capacity can lead to client-side driver
specific exceptions, for example the DataStax Java driver fails with a
NoHostAvailableException.
To change the throughput capacity settings for tables, you can use the AWS Management Console
or the ALTER TABLE statement using CQL, for more information see the section called “ALTER
TABLE”.
To learn more about default quotas for your account and how to increase them, see Quotas.
View the capacity mode of a table in Amazon Keyspaces
You can query the system table in the Amazon Keyspaces system keyspace to review capacity mode
information about a table. You can also see whether a table is using on-demand or provisioned
View the capacity mode of a table 250

Amazon Keyspaces (for Apache Cassandra) Developer Guide
throughput capacity mode. If the table is configured with provisioned throughput capacity mode,
you can see the throughput capacity provisioned for the table.
Example
SELECT * from system_schema_mcs.tables where keyspace_name = 'mykeyspace' and
table_name = 'mytable';
A table configured with on-demand capacity mode returns the following.
{
'capacity_mode': {
'last_update_to_pay_per_request_timestamp':
'1579551547603',
'throughput_mode': 'PAY_PER_REQUEST'
}
}
A table configured with provisioned throughput capacity mode returns the following.
{
'capacity_mode': {
'last_update_to_pay_per_request_timestamp':
'1579048006000',
'read_capacity_units': '5000',
'throughput_mode': 'PROVISIONED',
'write_capacity_units': '6000'
}
}
The last_update_to_pay_per_request_timestamp value is measured in milliseconds.
To change the provisioned throughput capacity for a table, use the section called “ALTER TABLE”.
Change capacity mode
When you switch a table from provisioned capacity mode to on-demand capacity mode, Amazon
Keyspaces makes several changes to the structure of your table and partitions. This process can
Change capacity mode 251

Amazon Keyspaces (for Apache Cassandra) Developer Guide
take several minutes. During the switching period, your table delivers throughput that is consistent
with the previously provisioned WCU and RCU amounts.
When you switch from on-demand capacity mode back to provisioned capacity mode, your table
delivers throughput that is consistent with the previous peak reached when the table was set to
on-demand capacity mode.
Note
You can switch capacity modes from provisioned to on-demand only once in a 24-hour
period.
Manage throughput capacity automatically with Amazon
Keyspaces auto scaling
Many database workloads are cyclical in nature or are difficult to predict in advance. For example,
consider a social networking app where most of the users are active during daytime hours. The
database must be able to handle the daytime activity, but there's no need for the same levels of
throughput at night.
Another example might be a new mobile gaming app that is experiencing rapid adoption. If the
game becomes very popular, it could exceed the available database resources, which would result
in slow performance and unhappy customers. These kinds of workloads often require manual
intervention to scale database resources up or down in response to varying usage levels.
Amazon Keyspaces (for Apache Cassandra) helps you provision throughput capacity efficiently
for variable workloads by adjusting throughput capacity automatically in response to actual
application traffic. Amazon Keyspaces uses the Application Auto Scaling service to increase and
decrease a table's read and write capacity on your behalf. For more information about Application
Auto Scaling, see the Application Auto Scaling User Guide.
Note
To get started with Amazon Keyspaces automatic scaling quickly, see the section called
“Configure and update auto scaling policies”.
Manage throughput capacity with auto scaling 252

Amazon Keyspaces (for Apache Cassandra) Developer Guide
How Amazon Keyspaces automatic scaling works
The following diagram provides a high-level overview of how Amazon Keyspaces automatic scaling
manages throughput capacity for a table.
To enable automatic scaling for a table, you create a scaling policy. The scaling policy specifies
whether you want to scale read capacity or write capacity (or both), and the minimum and
maximum provisioned capacity unit settings for the table.
The scaling policy also defines a target utilization. Target utilization is the ratio of consumed
capacity units to provisioned capacity units at a point in time, expressed as a percentage.
Automatic scaling uses a target tracking algorithm to adjust the provisioned throughput of the
table upward or downward in response to actual workloads. It does this so that the actual capacity
utilization remains at or near your target utilization.
You can set the automatic scaling target utilization values between 20 and 90 percent for your
read and write capacity. The default target utilization rate is 70 percent. You can set the target
utilization to be a lower percentage if your traffic changes quickly and you want capacity to begin
scaling up sooner. You can also set the target utilization rate to a higher rate if your application
traffic changes more slowly and you want to reduce the cost of throughput.
For more information about scaling policies, see Target tracking scaling policies for Application
Auto Scaling in the Application Auto Scaling User Guide.
How Amazon Keyspaces automatic scaling works 253

Amazon Keyspaces (for Apache Cassandra) Developer Guide
When you create a scaling policy, Amazon Keyspaces creates two pairs of Amazon CloudWatch
alarms on your behalf. Each pair represents your upper and lower boundaries for provisioned and
consumed throughput settings. These CloudWatch alarms are triggered when the table's actual
utilization deviates from your target utilization for a sustained period of time. To learn more about
Amazon CloudWatch, see the Amazon CloudWatch User Guide.
When one of the CloudWatch alarms is triggered, Amazon Simple Notification Service (Amazon
SNS) sends you a notification (if you have enabled it). The CloudWatch alarm then invokes
Application Auto Scaling to evaluate your scaling policy. This in turn issues an Alter Table
request to Amazon Keyspaces to adjust the table's provisioned capacity upward or downward
as appropriate. To learn more about Amazon SNS notifications, see Setting up Amazon SNS
notifications.
Amazon Keyspaces processes the Alter Table request by increasing (or decreasing) the table's
provisioned throughput capacity so that it approaches your target utilization.
Note
Amazon Keyspaces auto scaling modifies provisioned throughput settings only when the
actual workload stays elevated (or depressed) for a sustained period of several minutes.
The target tracking algorithm seeks to keep the target utilization at or near your chosen
value over the long term. Sudden, short-duration spikes of activity are accommodated by
the table's built-in burst capacity.
How auto scaling works for multi-Region tables
To ensure that there's always enough read and write capacity for all table replicas in all AWS
Regions of a multi-Region table in provisioned capacity mode, we recommend that you configure
Amazon Keyspaces auto scaling.
When you use a multi-Region table in provisioned mode with auto scaling, you can't disable
auto scaling for a single table replica. But you can adjust the table's read auto scaling settings
for different Regions. For example, you can specify different read capacity and read auto scaling
settings for each Region that the table is replicated in.
The read auto scaling settings that you configure for a table replica in a specified Region overwrite
the general auto scaling settings of the table. The write capacity, however, has to remain
How auto scaling works for multi-Region tables 254

Amazon Keyspaces (for Apache Cassandra) Developer Guide
synchronized across all table replicas to ensure that there's enough capacity to replicate writes in
all Regions.
Amazon Keyspaces auto scaling independently updates the provisioned capacity of the table in
each AWS Region based on the usage in that Region. As a result, the provisioned capacity in each
Region for a multi-Region table might be different when auto scaling is active.
You can configure the auto scaling settings of a multi-Region table and its replicas using the
Amazon Keyspaces console, API, AWS CLI, or CQL. For more information on how to create and
update auto scaling settings for multi-Region tables, see the section called “Update provisioned
capacity and auto scaling settings for a multi-Region table”.
Note
If you use auto scaling for multi-Region tables, you must always use Amazon Keyspaces
API operations to configure auto scaling settings. If you use Application Auto Scaling API
operations directly to configure auto scaling settings, you don't have the ability to specify
the AWS Regions of the multi-Region table. This can result in unsupported configurations.
Usage notes
Before you begin using Amazon Keyspaces automatic scaling, you should be aware of the
following:
• Amazon Keyspaces automatic scaling can increase read capacity or write capacity as often as
necessary, in accordance with your scaling policy. All Amazon Keyspaces quotas remain in effect,
as described in Quotas.
• Amazon Keyspaces automatic scaling doesn't prevent you from manually modifying provisioned
throughput settings. These manual adjustments don't affect any existing CloudWatch alarms
that are attached to the scaling policy.
• If you use the console to create a table with provisioned throughput capacity, Amazon Keyspaces
automatic scaling is enabled by default. You can modify your automatic scaling settings at any
time. For more information, see the section called “Turn off Amazon Keyspaces auto scaling for a
table”.
• If you're using AWS CloudFormation to create scaling policies, you should manage the scaling
policies from AWS CloudFormation so that the stack is in sync with the stack template. If you
Usage notes 255
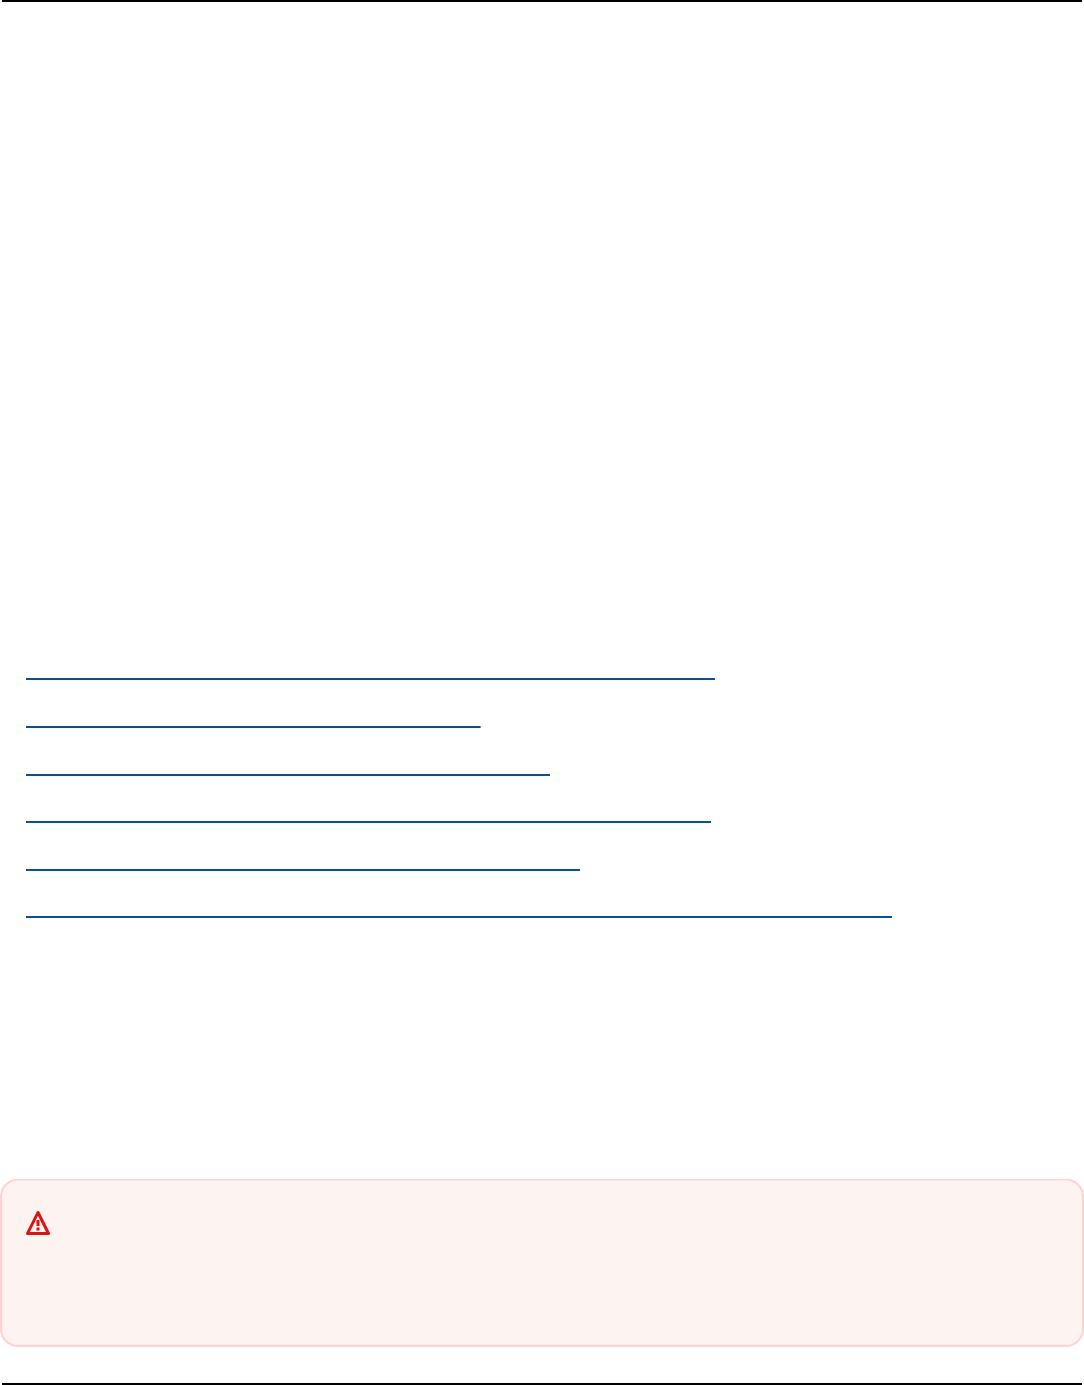
Amazon Keyspaces (for Apache Cassandra) Developer Guide
change scaling policies from Amazon Keyspaces, they will get overwritten with the original
values from the AWS CloudFormation stack template when the stack is reset.
• If you use CloudTrail to monitor Amazon Keyspaces automatic scaling, you might see alerts
for calls made by Application Auto Scaling as part of its configuration validation process.
You can filter out these alerts by using the invokedBy field, which contains application-
autoscaling.amazonaws.com for these validation checks.
Configure and update Amazon Keyspaces automatic scaling policies
You can use the console, CQL, or the AWS Command Line Interface (AWS CLI) to configure Amazon
Keyspaces automatic scaling for new and existing tables. You can also modify automatic scaling
settings or disable automatic scaling.
For more advanced features like setting scale-in and scale-out cooldown times, we recommend
that you use CQL or the AWS CLI to manage Amazon Keyspaces scaling policies.
Topics
• Configure permissions for Amazon Keyspaces automatic scaling
• Create a new table with automatic scaling
• Configure automatic scaling on an existing table
• View your table's Amazon Keyspaces auto scaling configuration
• Turn off Amazon Keyspaces auto scaling for a table
• View auto scaling activity for a Amazon Keyspaces table in Amazon CloudWatch
Configure permissions for Amazon Keyspaces automatic scaling
To get started, confirm that the principal has the appropriate permissions to create and manage
automatic scaling settings. In AWS Identity and Access Management (IAM), the AWS managed
policy AmazonKeyspacesFullAccess is required to manage Amazon Keyspaces scaling policies.
Important
application-autoscaling:* permissions are required to disable automatic scaling on
a table. You must turn off auto scaling for a table before you can delete it.
Configure and update auto scaling policies 256

Amazon Keyspaces (for Apache Cassandra) Developer Guide
To set up an IAM user or role for Amazon Keyspaces console access and Amazon Keyspaces
automatic scaling, add the following policy.
To attach the AmazonKeyspacesFullAccess policy
1. Sign in to the AWS Management Console and open the IAM console at https://
console.aws.amazon.com/iam/.
2. On the IAM console dashboard, choose Users, and then choose your IAM user or role from the
list.
3. On the Summary page, choose Add permissions.
4. Choose Attach existing policies directly.
5. From the list of policies, choose AmazonKeyspacesFullAccess, and then choose Next: Review.
6. Choose Add permissions.
Create a new table with automatic scaling
When you create a new Amazon Keyspaces table, you can automatically enable auto scaling for the
table's write or read capacity. This allows Amazon Keyspaces to contact Application Auto Scaling
on your behalf to register the table as a scalable target and adjust the provisioned write or read
capacity.
For more information on how to create a multi-Region table and configure different auto scaling
settings for table replicas, see the section called “Create a multi-Region table in provisioned mode”.
Note
Amazon Keyspaces automatic scaling requires the presence of a service-linked role
(AWSServiceRoleForApplicationAutoScaling_CassandraTable) that performs
automatic scaling actions on your behalf. This role is created automatically for you. For
more information, see the section called “Using service-linked roles”.
Console
Create a new table with automatic scaling enabled using the console
1. Sign in to the AWS Management Console, and open the Amazon Keyspaces console at
https://console.aws.amazon.com/keyspaces/home.
Configure and update auto scaling policies 257

Amazon Keyspaces (for Apache Cassandra) Developer Guide
2. In the navigation pane, choose Tables, and then choose Create table.
3. On the Create table page in the Table details section, select a keyspace and provide a
name for the new table.
4. In the Columns section, create the schema for your table.
5. In the Primary key section, define the primary key of the table and select optional
clustering columns.
6. In the Table settings section, choose Customize settings.
7. Continue to Read/write capacity settings.
8. For Capacity mode, choose Provisioned.
9. In the Read capacity section, confirm that Scale automatically is selected.
In this step, you select the minimum and maximum read capacity units for the table, as well
as the target utilization.
• Minimum capacity units – Enter the value for the minimum level of throughput that the
table should always be ready to support. The value must be between 1 and the maximum
throughput per second quota for your account (40,000 by default).
• Maximum capacity units – Enter the maximum amount of throughput you want to
provision for the table. The value must be between 1 and the maximum throughput per
second quota for your account (40,000 by default).
• Target utilization – Enter a target utilization rate between 20% and 90%. When traffic
exceeds the defined target utilization rate, capacity is automatically scaled up. When
traffic falls below the defined target, it is automatically scaled down again.
Note
To learn more about default quotas for your account and how to increase them, see
Quotas.
10. In the Write capacity section, choose the same settings as defined in the previous step for
read capacity, or configure capacity values manually.
11. Choose Create table. Your table is created with the specified automatic scaling parameters.
Configure and update auto scaling policies 258

Amazon Keyspaces (for Apache Cassandra) Developer Guide
Cassandra Query Language (CQL)
Create a new table with Amazon Keyspaces automatic scaling using CQL
To configure auto scaling settings for a table programmatically, you use the
AUTOSCALING_SETTINGS statement that contains the parameters for Amazon Keyspaces auto
scaling. The parameters define the conditions that direct Amazon Keyspaces to adjust your
table's provisioned throughput, and what additional optional actions to take. In this example,
you define the auto scaling settings for mytable.
The policy contains the following elements:
•
AUTOSCALING_SETTINGS – Specifies if Amazon Keyspaces is allowed to adjust throughput
capacity on your behalf. The following values are required:
•
provisioned_write_capacity_autoscaling_update:
•
minimum_units
•
maximum_units
•
provisioned_read_capacity_autoscaling_update:
•
minimum_units
•
maximum_units
•
scaling_policy – Amazon Keyspaces supports the target tracking policy. To define the
target tracking policy, you configure the following parameters.
•
target_value – Amazon Keyspaces auto scaling ensures that the ratio of consumed
capacity to provisioned capacity stays at or near this value. You define target_value as
a percentage.
•
disableScaleIn: (Optional) A boolean that specifies if scale-in is disabled or
enabled for the table. This parameter is disabled by default. To turn on scale-in, set
the boolean value to FALSE. This means that capacity is automatically scaled down for
a table on your behalf.
•
scale_out_cooldown – A scale-out activity increases the provisioned throughput of
your table. To add a cooldown period for scale-out activities, specify a value, in seconds,
for scale_out_cooldown. If you don't specify a value, the default value is 0. For more
information about target tracking and cooldown periods, see Target Tracking Scaling
Policies in the Application Auto Scaling User Guide.
•
scale_in_cooldown – A scale-in activity decreases the provisioned throughput of
your table. To add a cooldown period for scale-in activities, specify a value, in seconds,
Configure and update auto scaling policies 259

Amazon Keyspaces (for Apache Cassandra) Developer Guide
for scale_in_cooldown. If you don't specify a value, the default value is 0. For more
information about target tracking and cooldown periods, see Target Tracking Scaling
Policies in the Application Auto Scaling User Guide.
Note
To further understand how target_value works, suppose that you have a table with
a provisioned throughput setting of 200 write capacity units. You decide to create a
scaling policy for this table, with a target_value of 70 percent.
Now suppose that you begin driving write traffic to the table so that the actual write
throughput is 150 capacity units. The consumed-to-provisioned ratio is now (150 / 200),
or 75 percent. This ratio exceeds your target, so auto scaling increases the provisioned
write capacity to 215 so that the ratio is (150 / 215), or 69.77 percent—as close to your
target_value as possible, but not exceeding it.
For mytable, you set TargetValue for both read and write capacity to 50 percent. Amazon
Keyspaces auto scaling adjusts the table's provisioned throughput within the range of 5–
10 capacity units so that the consumed-to-provisioned ratio remains at or near 50 percent.
For read capacity, you set the values for ScaleOutCooldown and ScaleInCooldown to 60
seconds.
You can use the following statement to create a new Amazon Keyspaces table with auto scaling
enabled.
CREATE TABLE mykeyspace.mytable(pk int, ck int, PRIMARY KEY (pk, ck))
WITH CUSTOM_PROPERTIES = {
'capacity_mode': {
'throughput_mode': 'PROVISIONED',
'read_capacity_units': 1,
'write_capacity_units': 1
}
} AND AUTOSCALING_SETTINGS = {
'provisioned_write_capacity_autoscaling_update': {
'maximum_units': 10,
'minimum_units': 5,
'scaling_policy': {
'target_tracking_scaling_policy_configuration': {
'target_value': 50
Configure and update auto scaling policies 260

Amazon Keyspaces (for Apache Cassandra) Developer Guide
}
}
},
'provisioned_read_capacity_autoscaling_update': {
'maximum_units': 10,
'minimum_units': 5,
'scaling_policy': {
'target_tracking_scaling_policy_configuration': {
'target_value': 50,
'scale_in_cooldown': 60,
'scale_out_cooldown': 60
}
}
}
};
CLI
Create a new table with Amazon Keyspaces automatic scaling using the AWS CLI
To configure auto scaling settings for a table programmatically, you use the
autoScalingSpecification action that defines the parameters for Amazon Keyspaces auto
scaling. The parameters define the conditions that direct Amazon Keyspaces to adjust your
table's provisioned throughput, and what additional optional actions to take. In this example,
you define the auto scaling settings for mytable.
The policy contains the following elements:
•
autoScalingSpecification – Specifies if Amazon Keyspaces is allowed to adjust
capacity throughput on your behalf. You can enable auto scaling for read and for
write capacity separately. Then you must specify the following parameters for
autoScalingSpecification:
•
writeCapacityAutoScaling – The maximum and minimum write capacity units.
•
readCapacityAutoScaling – The maximum and minimum read capacity units.
•
scalingPolicy – Amazon Keyspaces supports the target tracking policy. To define the
target tracking policy, you configure the following parameters.
•
targetValue – Amazon Keyspaces auto scaling ensures that the ratio of consumed
capacity to provisioned capacity stays at or near this value. You define targetValue as a
percentage.
Configure and update auto scaling policies 261

Amazon Keyspaces (for Apache Cassandra) Developer Guide
•
disableScaleIn: (Optional) A boolean that specifies if scale-in is disabled or
enabled for the table. This parameter is disabled by default. To turn on scale-in, set
the boolean value to FALSE. This means that capacity is automatically scaled down for
a table on your behalf.
•
scaleOutCooldown – A scale-out activity increases the provisioned throughput of
your table. To add a cooldown period for scale-out activities, specify a value, in seconds,
for ScaleOutCooldown. The default value is 0. For more information about target
tracking and cooldown periods, see Target Tracking Scaling Policies in the Application
Auto Scaling User Guide.
•
scaleInCooldown – A scale-in activity decreases the provisioned throughput of your
table. To add a cooldown period for scale-in activities, specify a value, in seconds, for
ScaleInCooldown. The default value is 0. For more information about target tracking
and cooldown periods, see Target Tracking Scaling Policies in the Application Auto
Scaling User Guide.
Note
To further understand how TargetValue works, suppose that you have a table with
a provisioned throughput setting of 200 write capacity units. You decide to create a
scaling policy for this table, with a TargetValue of 70 percent.
Now suppose that you begin driving write traffic to the table so that the actual write
throughput is 150 capacity units. The consumed-to-provisioned ratio is now (150 / 200),
or 75 percent. This ratio exceeds your target, so auto scaling increases the provisioned
write capacity to 215 so that the ratio is (150 / 215), or 69.77 percent—as close to your
TargetValue as possible, but not exceeding it.
For mytable, you set TargetValue for both read and write capacity to 50 percent. Amazon
Keyspaces auto scaling adjusts the table's provisioned throughput within the range of 5–
10 capacity units so that the consumed-to-provisioned ratio remains at or near 50 percent.
For read capacity, you set the values for ScaleOutCooldown and ScaleInCooldown to 60
seconds.
When creating tables with complex auto scaling settings, it's helpful to load the auto scaling
settings from a JSON file. For the following example, you can download the example JSON file
from auto-scaling.zip and extract auto-scaling.json, taking note of the path to the file. In
Configure and update auto scaling policies 262

Amazon Keyspaces (for Apache Cassandra) Developer Guide
this example, the JSON file is located in the current directory. For different file path options, see
How to load parameters from a file.
aws keyspaces create-table --keyspace-name mykeyspace --table-name mytable
\ --schema-definition 'allColumns=[{name=pk,type=int},
{name=ck,type=int}],partitionKeys=[{name=pk},{name=ck}]'
\ --capacity-specification
throughputMode=PROVISIONED,readCapacityUnits=1,writeCapacityUnits=1
\ --auto-scaling-specification file://auto-scaling.json
Configure automatic scaling on an existing table
You can update an existing Amazon Keyspaces table to turn on auto scaling for the table's write or
read capacity. If you're updating a table that is currently in on-demand capacity mode, than you
first have to change the table's capacity mode to provisioned capacity mode.
For more information on how to update auto scaling settings for a multi-Region table, see the
section called “Update provisioned capacity and auto scaling settings for a multi-Region table”.
Amazon Keyspaces automatic scaling requires the presence of a service-linked role
(AWSServiceRoleForApplicationAutoScaling_CassandraTable) that performs automatic
scaling actions on your behalf. This role is created automatically for you. For more information, see
the section called “Using service-linked roles”.
Console
Configure Amazon Keyspaces automatic scaling for an existing table
1. Sign in to the AWS Management Console, and open the Amazon Keyspaces console at
https://console.aws.amazon.com/keyspaces/home.
2. Choose the table that you want to work with, and go to the Capacity tab.
3. In the Capacity settings section, choose Edit.
4. Under Capacity mode, make sure that the table is using Provisioned capacity mode.
5. Select Scale automatically and see step 6 in the section called “Create a new table with
automatic scaling” to edit read and write capacity.
6. When the automatic scaling settings are defined, choose Save.
Configure and update auto scaling policies 263

Amazon Keyspaces (for Apache Cassandra) Developer Guide
Cassandra Query Language (CQL)
Configure an existing table with Amazon Keyspaces automatic scaling using CQL
You can use the ALTER TABLE statement for an existing Amazon Keyspaces table to configure
auto scaling for the table's write or read capacity. If you're updating a table that is currently in
on-demand capacity mode, you have to set capacity_mode to provisioned. If your table is
already in provisioned capacity mode, this field can be omitted.
In the following example, the statement updates the table mytable, which is in on-demand
capacity mode. The statement changes the capacity mode of the table to provisioned mode
with auto scaling enabled.
The write capacity is configured within the range of 5–10 capacity units with a target value
of 50%. The read capacity is also configured within the range of 5–10 capacity units with a
target value of 50%. For read capacity, you set the values for scale_out_cooldown and
scale_in_cooldown to 60 seconds.
ALTER TABLE mykeyspace.mytable
WITH CUSTOM_PROPERTIES = {
'capacity_mode': {
'throughput_mode': 'PROVISIONED',
'read_capacity_units': 1,
'write_capacity_units': 1
}
} AND AUTOSCALING_SETTINGS = {
'provisioned_write_capacity_autoscaling_update': {
'maximum_units': 10,
'minimum_units': 5,
'scaling_policy': {
'target_tracking_scaling_policy_configuration': {
'target_value': 50
}
}
},
'provisioned_read_capacity_autoscaling_update': {
'maximum_units': 10,
'minimum_units': 5,
'scaling_policy': {
'target_tracking_scaling_policy_configuration': {
'target_value': 50,
'scale_in_cooldown': 60,
Configure and update auto scaling policies 264

Amazon Keyspaces (for Apache Cassandra) Developer Guide
'scale_out_cooldown': 60
}
}
}
};
CLI
Configure an existing table with Amazon Keyspaces automatic scaling using the AWS CLI
For an existing Amazon Keyspaces table, you can turn on auto scaling for the table's write or
read capacity using the UpdateTable operation.
You can use the following command to turn on Amazon Keyspaces auto scaling for an existing
table. The auto scaling settings for the table are loaded from a JSON file. For the following
example, you can download the example JSON file from auto-scaling.zip and extract auto-
scaling.json, taking note of the path to the file. In this example, the JSON file is located in
the current directory. For different file path options, see How to load parameters from a file.
For more information about the auto scaling settings used in the following example, see the
section called “Create a new table with automatic scaling”.
aws keyspaces update-table --keyspace-name mykeyspace --table-name mytable
\ --capacity-specification
throughputMode=PROVISIONED,readCapacityUnits=1,writeCapacityUnits=1
\ --auto-scaling-specification file://auto-scaling.json
View your table's Amazon Keyspaces auto scaling configuration
You can use the console, CQL, or the AWS CLI to view and update the Amazon Keyspaces automatic
scaling settings of a table.
Console
View automatic scaling settings using the console
1. Choose the table you want to view and go to the Capacity tab.
2. In the Capacity settings section, choose Edit. You can now modify the settings in the Read
capacity or Write capacity sections. For more information about these settings, see the
section called “Create a new table with automatic scaling”.
Configure and update auto scaling policies 265

Amazon Keyspaces (for Apache Cassandra) Developer Guide
Cassandra Query Language (CQL)
View your table's Amazon Keyspaces automatic scaling policy using CQL
To view details of the auto scaling configuration of a table, use the following command.
SELECT * FROM system_schema_mcs.autoscaling WHERE keyspace_name = 'mykeyspace' AND
table_name = 'mytable';
The output for this command looks like this.
keyspace_name | table_name | provisioned_read_capacity_autoscaling_update
|
provisioned_write_capacity_autoscaling_update
---------------+------------
+-------------------------------------------------------------------------------------------------------------------------------------------------------------------------------------------------------------------
+----------------------------------------------------------------------------------------------------------------------------------------------------------------------------------------------------------------
mykeyspace | mytable | {'minimum_units': 5, 'maximum_units':
10, 'scaling_policy': {'target_tracking_scaling_policy_configuration':
{'scale_out_cooldown': 60, 'disable_scale_in': false, 'target_value':
50, 'scale_in_cooldown': 60}}} | {'minimum_units': 5, 'maximum_units':
10, 'scaling_policy': {'target_tracking_scaling_policy_configuration':
{'scale_out_cooldown': 0, 'disable_scale_in': false, 'target_value': 50,
'scale_in_cooldown': 0}}}
CLI
View your table's Amazon Keyspaces automatic scaling policy using the AWS CLI
To view the auto scaling configuration of a table, you can use the get-table-auto-scaling-
settings operation. The following CLI command is an example of this.
aws keyspaces get-table-auto-scaling-settings --keyspace-name mykeyspace --table-
name mytable
The output for this command looks like this.
{
"keyspaceName": "mykeyspace",
"tableName": "mytable",
"resourceArn": "arn:aws:cassandra:us-east-1:5555-5555-5555:/keyspace/mykeyspace/
table/mytable",
Configure and update auto scaling policies 266

Amazon Keyspaces (for Apache Cassandra) Developer Guide
"autoScalingSpecification": {
"writeCapacityAutoScaling": {
"autoScalingDisabled": false,
"minimumUnits": 5,
"maximumUnits": 10,
"scalingPolicy": {
"targetTrackingScalingPolicyConfiguration": {
"disableScaleIn": false,
"scaleInCooldown": 0,
"scaleOutCooldown": 0,
"targetValue": 50.0
}
}
},
"readCapacityAutoScaling": {
"autoScalingDisabled": false,
"minimumUnits": 5,
"maximumUnits": 10,
"scalingPolicy": {
"targetTrackingScalingPolicyConfiguration": {
"disableScaleIn": false,
"scaleInCooldown": 60,
"scaleOutCooldown": 60,
"targetValue": 50.0
}
}
}
}
}
Turn off Amazon Keyspaces auto scaling for a table
You can turn off Amazon Keyspaces auto scaling for your table at any time. If you no longer need
to scale your table's read or write capacity, you should consider turning off auto scaling so that
Amazon Keyspaces doesn't continue modifying your table’s read or write capacity settings. You can
update the table using the console, CQL, or the AWS CLI.
Turning off auto scaling also deletes the CloudWatch alarms that were created on your behalf.
To delete the service-linked role used by Application Auto Scaling to access your Amazon
Keyspaces table, follow the steps in the section called “Deleting a service-linked role for Amazon
Keyspaces”.
Configure and update auto scaling policies 267

Amazon Keyspaces (for Apache Cassandra) Developer Guide
Note
To delete the service-linked role that Application Auto Scaling uses, you must disable
automatic scaling on all tables in the account across all AWS Regions.
Console
Turn off Amazon Keyspaces automatic scaling for your table using the console
Using the Amazon Keyspaces console
1. Sign in to the AWS Management Console, and open the Amazon Keyspaces console at
https://console.aws.amazon.com/keyspaces/home.
2. Choose the table you want to update and go to the Capacity tab.
3. In the Capacity settings section, choose Edit.
4. To disable Amazon Keyspaces automatic scaling, clear the Scale automatically check box.
Disabling automatic scaling deregisters the table as a scalable target with Application Auto
Scaling.
Cassandra Query Language (CQL)
Turn off Amazon Keyspaces automatic scaling for your table using CQL
The following statement turns off auto scaling for write capacity of the table mytable.
ALTER TABLE mykeyspace.mytable
WITH AUTOSCALING_SETTINGS = {
'provisioned_write_capacity_autoscaling_update': {
'autoscaling_disabled': true
}
};
CLI
Turn off Amazon Keyspaces automatic scaling for your table using the AWS CLI
The following command turns off auto scaling for the table's read capacity. It also deletes the
CloudWatch alarms that were created on your behalf.
Configure and update auto scaling policies 268

Amazon Keyspaces (for Apache Cassandra) Developer Guide
aws keyspaces update-table --keyspace-name mykeyspace --table-name mytable
\ --auto-scaling-specification
readCapacityAutoScaling={autoScalingDisabled=true}
View auto scaling activity for a Amazon Keyspaces table in Amazon CloudWatch
You can monitor how Amazon Keyspaces automatic scaling uses resources by using Amazon
CloudWatch, which generates metrics about your usage and performance. Follow the steps in the
Application Auto Scaling User Guide to create a CloudWatch dashboard.
Use burst capacity effectively in Amazon Keyspaces
Amazon Keyspaces provides some flexibility in your per-partition throughput provisioning by
providing burst capacity. Whenever you're not fully using a partition's throughput, Amazon
Keyspaces reserves a portion of that unused capacity for later bursts of throughput to handle
usage spikes.
Amazon Keyspaces currently retains up to 5 minutes (300 seconds) of unused read and write
capacity. During an occasional burst of read or write activity, these extra capacity units can be
consumed quickly—even faster than the per-second provisioned throughput capacity that you've
defined for your table.
Amazon Keyspaces can also consume burst capacity for background maintenance and other tasks
without prior notice.
Note that these burst capacity details might change in the future.
Use burst capacity 269

Amazon Keyspaces (for Apache Cassandra) Developer Guide
Working with Amazon Keyspaces (for Apache Cassandra)
features
This chapter provides details about working with Amazon Keyspaces and various database features,
for example backup and restore, Time to Live, and Multi-Region Replication.
• Time to Live – Amazon Keyspaces expires data from tables automatically based on the Time to
Live value you set. Learn how to configure TTL and how to use it in your tables.
• PITR – Protect your Amazon Keyspaces tables from accidental write or delete operations by
creating continuous backups of your table data. Learn how to configure PITR on your tables
and how to restore a table to a specific point in time or how to restore a table that has been
accidentally deleted.
• Working with multi-Region tables – Multi-Region tables in Amazon Keyspaces must have write
throughput capacity configured in either on-demand or provisioned capacity mode with auto
scaling. Plan the throughput capacity needs by estimating the required write capacity units
(WCUs) for each Region, and provision the sum of writes from all Regions to ensure sufficient
capacity for replicated writes.
• Static columns – Amazon Keyspaces handles static columns differently from regular columns.
This section covers calculating the encoded size of static columns, metering read/write
operations on static data, and guidelines for working with static columns.
• Queries and pagination – Amazon Keyspaces supports advanced querying capabilities like
using the IN operator with SELECT statements, ordering results with ORDER BY, and automatic
pagination of large result sets. This section explains how Amazon Keyspaces processes these
queries and provides examples.
•
Partitioners – Amazon Keyspaces provides three partitioners: Murmur3Partitioner (default),
RandomPartitioner, and DefaultPartitioner. You can change the partitioner per Region
at the account level using the AWS Management Console or Cassandra Query Language (CQL).
• Client-side timestamps – Client-side timestamps are Cassandra-compatible timestamps that
Amazon Keyspaces persists for each cell in your table. Use client-side timestamps for conflict
resolution and to let your client application determine the order of writes.
• Tagging resources – You can label Amazon Keyspaces resources like keyspaces and tables using
tags. Tags help categorize resources, enable cost tracking, and let you configure access control
based on tags. This section covers tagging restrictions, operations, and best practices for Amazon
Keyspaces.
270

Amazon Keyspaces (for Apache Cassandra) Developer Guide
• AWS CloudFormation templates – AWS CloudFormation helps you model and set up your
Amazon Keyspaces keyspaces and tables so that you can spend less time creating and managing
your resources and infrastructure.
Topics
• System keyspaces in Amazon Keyspaces
• Multi-Region Replication for Amazon Keyspaces (for Apache Cassandra)
• Backup and restore data with point-in-time recovery for Amazon Keyspaces
• Expire data with Time to Live (TTL) for Amazon Keyspaces (for Apache Cassandra)
• Client-side timestamps in Amazon Keyspaces
• Working with CQL queries in Amazon Keyspaces
• Working with partitioners in Amazon Keyspaces
• Using this service with an AWS SDK
• Working with tags and labels for Amazon Keyspaces resources
• Create Amazon Keyspaces resources with AWS CloudFormation
• Using NoSQL Workbench with Amazon Keyspaces (for Apache Cassandra)
System keyspaces in Amazon Keyspaces
This section provides details about working with system keyspaces in Amazon Keyspaces (for
Apache Cassandra).
Amazon Keyspaces uses four system keyspaces:
•
system
•
system_schema
•
system_schema_mcs
•
system_multiregion_info
The following sections provide details about the system keyspaces and the system tables that are
supported in Amazon Keyspaces.
System keyspaces 271

Amazon Keyspaces (for Apache Cassandra) Developer Guide
system
This is a Cassandra keyspace. Amazon Keyspaces uses the following tables.
Table names Column names Comments
local key, bootstrap
ped, broadcast
_address, cluster_n
ame, cql_versi
on, data_cent
er, gossip_ge
neration, host_id,
listen_address,
native_protocol_ve
rsion, partition
er, rack, release_v
ersion, rpc_addre
ss, schema_version,
thrift_version,
tokens, truncated_at
Information about the local
keyspace.
peers peer, data_center,
host_id, preferred
_ip, rack, release_v
ersion, rpc_addre
ss, schema_version,
tokens
Query this table to see
the available endpoints
. For example, if you're
connecting through a public
endpoint, you see a list of
nine available IP addresses.
If you're connecting through
a FIPS endpoint, you see a
list of three IP addresses. If
you're connecting through
an AWS PrivateLink VPC
endpoint, you see the
list of IP addresses that
you have configured. For
more information, see the
system
272

Amazon Keyspaces (for Apache Cassandra) Developer Guide
Table names Column names Comments
section called “Populati
ng system.peers table
entries with interface VPC
endpoint information”.
size_estimates keyspace_name,
table_name, range_sta
rt, range_end,
mean_partition_size,
partitions_count
This table defines the total
size and number of partition
s for each token range for
every table. This is needed for
the Apache Cassandra Spark
Connector, which uses the
estimated partition size to
distribute the work.
prepared_statements prepared_id,
logged_keyspace,
query_string
This table contains informati
on about saved queries.
system_schema
This is a Cassandra keyspace. Amazon Keyspaces uses the following tables.
Table names Column names Comments
keyspaces keyspace_name,
durable_writes,
replication
Information about a specific
keyspace.
tables keyspace_name,
table_name, bloom_fil
ter_fp_chance,
caching, comment,
compaction, compressi
on, crc_check
_chance, dclocal_r
Information about a specific
table.
system_schema
273

Amazon Keyspaces (for Apache Cassandra) Developer Guide
Table names Column names Comments
ead_repair_chance,
default_time_to_li
ve, extensions,
flags, gc_grace_
seconds, id,
max_index_interval
, memtable_flush_per
iod_in_ms, min_index
_interval, read_repa
ir_chance, speculati
ve_retry
columns keyspace_name,
table_name, column_na
me, clusterin
g_order, column_na
me_bytes, kind,
position, type
Information about a specific
column.
system_schema_mcs
This is an Amazon Keyspaces keyspace that stores information about AWS or Amazon Keyspaces
specific settings.
Table names Column names Comments
keyspaces keyspace_name,
durable_writes,
replication
Query this table to find
out programmatically if a
keyspace has been created.
For more information, see
the section called “Check
keyspace creation status”.
tables keyspace_name,
creation_time,
Query this table to find out
the status of a specific table.
system_schema_mcs
274

Amazon Keyspaces (for Apache Cassandra) Developer Guide
Table names Column names Comments
speculative_retry,
cdc, gc_grace_
seconds, crc_check
_chance, min_index
_interval, bloom_fil
ter_fp_chance,
flags, custom_pr
operties, dclocal_r
ead_repair_chance,
table_name, caching,
default_time_to_li
ve, read_repa
ir_chance, max_index
_interval, extension
s, compaction,
comment, id, compressi
on, memtable_
flush_period_in_ms,
status
For more information, see the
section called “Check table
creation status”.
You can also query this
table to list settings that are
specific to Amazon Keyspaces
and are stored as custom_pr
operties . For example:
•
capacity_mode
•
client_side_timest
amps
•
encryption_specifi
cation
•
point_in_time_reco
very
•
ttl
tables_history keyspace_name,
table_name, event_tim
e, creation_time,
custom_properties,
event
Query this table to learn
about schema changes for a
specific table.
columns keyspace_name,
table_name, column_na
me, clusterin
g_order, column_na
me_bytes, kind,
position, type
This table is identical to
the Cassandra table in the
system_schema keyspace.
system_schema_mcs
275

Amazon Keyspaces (for Apache Cassandra) Developer Guide
Table names Column names Comments
tags resource_id,
keyspace_name,
resource_name,
resource_type, tags
Query this table to find out if
a keyspace has tags. For more
information, see the section
called “View table tags”.
autoscaling keyspace_name,
table_name, provision
ed_read_capacity_a
utoscaling_update,
provisioned_write_
capacity_autoscali
ng_update
Query this table to get the
auto scaling settings of a
provisioned table. Note
that these settings won't
be available until the table
is active. To query this
table, you have to specify
keyspace_name and
table_name in the WHERE
clause. For more informati
on, see the section called
“View your table's Amazon
Keyspaces auto scaling
configuration”.
system_multiregion_info
This is an Amazon Keyspaces keyspace that stores information about Multi-Region Replication.
Table names Column names Comments
tables keyspace_name,
table_name, region,
status
This table contains informati
on about multi-Region tables
—for example, the AWS
Regions that the table is
replicated in and the table's
status. You can also query this
table to list settings that are
specific to Amazon Keyspaces
system_multiregion_info
276

Amazon Keyspaces (for Apache Cassandra) Developer Guide
Table names Column names Comments
that are stored as custom_pr
operties . For example:
•
capacity_mode
To query this table, you
have to specify keyspace_
name and table_name in
the WHERE clause. For more
information, see the section
called “Create a multi-Region
keyspace”.
autoscaling keyspace_name,
table_name, provision
ed_read_capacity_a
utoscaling_update,
provisioned_write_
capacity_autoscali
ng_update, region
Query this table to get the
auto scaling settings of
a multi-Region provision
ed table. Note that these
settings won't be available
until the table is active. To
query this table, you have to
specify keyspace_name
and table_name in the
WHERE clause. For more
information, see the section
called “Update provisioned
capacity and auto scaling
settings for a multi-Region
table”.
Multi-Region Replication for Amazon Keyspaces (for Apache
Cassandra)
You can use Amazon Keyspaces Multi-Region Replication to replicate your data with automated,
fully managed, active-active replication across the AWS Regions of your choice. With active-active
Multi-Region Replication 277

Amazon Keyspaces (for Apache Cassandra) Developer Guide
replication, each Region is able to perform reads and writes in isolation. You can improve both
availability and resiliency from Regional degradation, while also benefiting from low-latency local
reads and writes for global applications.
With Multi-Region Replication, Amazon Keyspaces asynchronously replicates data between
Regions, and data is typically propagated across Regions within a second. Also, with Multi-Region
Replication, you no longer have the difficult work of resolving conflicts and correcting data
divergence issues, so you can focus on your application.
By default, Amazon Keyspaces replicates data across three Availability Zones within the same AWS
Region for durability and high availability. With Multi-Region Replication, you can create multi-
Region keyspaces that replicate your tables in up to six different geographic AWS Regions of your
choice.
Topics
• Benefits of using Multi-Region Replication
• Capacity modes and pricing
• How Multi-Region Replication works in Amazon Keyspaces
• Amazon Keyspaces Multi-Region Replication usage notes
• Configure Multi-Region Replication for Amazon Keyspaces (for Apache Cassandra)
Benefits of using Multi-Region Replication
Multi-Region Replication provides the following benefits.
• Global reads and writes with single-digit millisecond latency – In Amazon Keyspaces,
replication is active-active. You can serve both reads and writes locally from the Regions closest
to your customers with single-digit millisecond latency at any scale. You can use Amazon
Keyspaces multi-Region tables for global applications that need a fast response time anywhere
in the world.
• Improved business continuity and protection from single-Region degradation – With Multi-
Region Replication, you can recover from degradation in a single AWS Region by redirecting your
application to a different Region in your multi-Region keyspace. Because Amazon Keyspaces
offers active-active replication, there is no impact to your reads and writes.
Amazon Keyspaces keeps track of any writes that have been performed on your multi-Region
keyspace but haven't been propagated to all replica Regions. After the Region comes back online,
Benefits 278

Amazon Keyspaces (for Apache Cassandra) Developer Guide
Amazon Keyspaces automatically syncs any missing changes so that you can recover without any
application impact.
• High-speed replication across Regions – Multi-Region Replication uses fast, storage-based
physical replication of data across Regions, with a replication lag that is typically less than 1
second.
Replication in Amazon Keyspaces has little to no impact on your database queries because it
doesn’t share compute resources with your application. This means that you can address high-
write throughput use cases or use cases with sudden spikes or bursts in throughput without any
application impact.
• Consistency and conflict resolution – Any changes made to data in any Region are replicated to
the other Regions in a multi-Region keyspace. If applications update the same data in different
Regions at the same time, conflicts can arise.
To help provide eventual consistency, Amazon Keyspaces uses cell-level timestamps and a last
writer wins reconciliation between concurrent updates. Conflict resolution is fully managed and
happens in the background without any application impact.
For more information about supported configurations and features, see the section called “Usage
notes”.
Capacity modes and pricing
For a multi-Region keyspace, you can either use on-demand capacity mode or provisioned capacity
mode. For more information, see the section called “Configure read/write capacity modes”.
For on-demand mode, you're billed 1.25 write request units (WRUs) to write up to 1 KB of data per
row. You're billed for writes in each Region of your multi-Region keyspace. For example, writing a
row of 3 KB of data in a multi-Region keyspace with two Regions requires 7.5 WRUs: 3 * 1.25 * 2 =
7.5 WRUs. Additionally, writes that include both static and non-static data require additional write
operations.
For provisioned mode, you're billed 1.25 write capacity units (WCUs) to write up to 1 KB of data per
row. You're billed for writes in each Region of your multi-Region keyspace. For example, writing a
row of 3 KB of data per second in a multi-Region keyspace with two Regions requires 7.5 WCUs:
3 * 1.25 * 2 = 7.5 WCUs. Additionally, writes that include both static and non-static data require
additional write operations.
Capacity modes and pricing 279

Amazon Keyspaces (for Apache Cassandra) Developer Guide
For more information about pricing, see Amazon Keyspaces (for Apache Cassandra) pricing.
How Multi-Region Replication works in Amazon Keyspaces
This section provides an overview of how Amazon Keyspaces Multi-Region Replication works. For
more information about pricing, see Amazon Keyspaces (for Apache Cassandra) pricing.
Topics
• How Multi-Region Replication works in Amazon Keyspaces
• Multi-Region Replication conflict resolution
• Multi-Region Replication disaster recovery
• Multi-Region Replication and integration with point-in-time recovery (PITR)
• Multi-Region Replication and integration with AWS services
How Multi-Region Replication works in Amazon Keyspaces
Amazon Keyspaces Multi-Region Replication implements a data resiliency architecture that
distributes your data across independent and geographically distributed AWS Regions. It uses
active-active replication, which provides local low latency with each Region being able to perform
reads and writes in isolation.
When you create an Amazon Keyspaces multi-Region keyspace, you can select up to five additional
Regions where the data is going to be replicated to. Each table you create in a multi-Region
keyspace consists of multiple replica tables (one per Region) that Amazon Keyspaces considers as a
single unit.
Every replica has the same table name and the same primary key schema. When an application
writes data to a local table in one Region, the data is durably written using the LOCAL_QUORUM
consistency level. Amazon Keyspaces automatically replicates the data asynchronously to the other
replication Regions. The replication lag across Regions is typically less than one second and doesn't
impact your application’s performance or throughput.
After the data is written, you can read it from the multi-Region table in another replication Region
with the LOCAL_ONE/LOCAL_QUORUM consistency levels. For more information about supported
configurations and features, see the section called “Usage notes”.
How it works 280

Amazon Keyspaces (for Apache Cassandra) Developer Guide
Multi-Region Replication conflict resolution
Amazon Keyspaces Multi-Region Replication is fully managed, which means that you don't
have to perform replication tasks such as regularly running repair operations to clean-up data
synchronization issues. Amazon Keyspaces monitors data consistency between tables in different
AWS Regions by detecting and repairing conflicts, and synchronizes replicas automatically.
Amazon Keyspaces uses the last writer wins method of data reconciliation. With this conflict
resolution mechanism, all of the Regions in a multi-Region keyspace agree on the latest update
and converge toward a state in which they all have identical data. The reconciliation process has
no impact on application performance. To support conflict resolution, client-side timestamps are
automatically turned on for multi-Region tables and can't be turned off. For more information, see
the section called “Client-side timestamps”.
How it works 281

Amazon Keyspaces (for Apache Cassandra) Developer Guide
Multi-Region Replication disaster recovery
With Amazon Keyspaces Multi-Region Replication, writes are replicated asynchronously across each
Region. In the rare event of a single Region degradation or failure, Multi-Region Replication helps
you to recover from disaster with little to no impact to your application. Recovery from disaster is
typically measured using values for Recovery time objective (RTO) and Recovery point objective
(RPO).
Recovery time objective – The time it takes a system to return to a working state after a disaster.
RTO measures the amount of downtime your workload can tolerate, measured in time. For disaster
recovery plans that use Multi-Region Replication to fail over to an unaffected Region, the RTO can
be nearly zero. The RTO is limited by how quickly your application can detect the failure condition
and redirect traffic to another Region.
Recovery point objective – The amount of data that can be lost (measured in time). For disaster
recovery plans that use Multi-Region Replication to fail over to an unaffected Region, the RPO
is typically single-digit seconds. The RPO is limited by replication latency to the failover target
replica.
In the event of a Regional failure or degradation, you don't need to promote a secondary Region
or perform database failover procedures because replication in Amazon Keyspaces is active-active.
Instead, you can use Amazon Route53 to route your application to the nearest healthy Region. To
learn more about Route53, see What is Amazon Route53?.
If a single AWS Region becomes isolated or degraded, your application can redirect traffic to a
different Region using Route53 to perform reads and writes against a different replica table. You
can also apply custom business logic to determine when to redirect requests to other Regions. An
example of this is making your application aware of the multiple endpoints that are available.
When the Region comes back online, Amazon Keyspaces resumes propagating any pending writes
from that Region to the replica tables in other Regions. It also resumes propagating writes from
other replica tables to the Region that is now back online.
Multi-Region Replication and integration with point-in-time recovery (PITR)
Point-in-time recovery is supported in multi-Region tables. To successfully restore a multi-Region
table with PITR, the following conditions have to be met.
• The source and the target table must be configured as multi-Region tables.
How it works 282

Amazon Keyspaces (for Apache Cassandra) Developer Guide
• The replication Regions for the keyspace of the source table and for the keyspace of the target
table must be the same.
You can run the restore statement from any of the Regions that the source table is available in.
Amazon Keyspaces automatically restores the target table in each Region. For more information
about PITR, see the section called “How it works”.
Multi-Region Replication and integration with AWS services
You can monitor replication performance between tables in different AWS Regions by using
Amazon CloudWatch metrics. The following metric provides continuous monitoring of multi-
Region keyspaces.
•
ReplicationLatency – This metric measures the time it took to replicate updates, inserts,
or deletes from one replica table to another replica table in a multi-Region keyspace.
For more information about how to monitor CloudWatch metrics, see the section called
“Monitoring with CloudWatch”.
Amazon Keyspaces Multi-Region Replication usage notes
Consider the following when you're using Multi-Region Replication with Amazon Keyspaces.
• You can select up to six of the available public AWS Regions. AWS GovCloud (US) Regions, China
Regions, and AWS Regions that are disabled by default are not supported.
• Consider the following workarounds until the features become available:
• Select the replication Regions when you create the keyspace. You can't add or remove Regions
afterwards.
• Configure Time to Live (TTL) when creating the multi-Region table. You won't be able to
enable and disable TTL, or adjust the TTL value later. For more information, see the section
called “Expire data with Time to Live”.
• For encryption at rest, use an AWS owned key. Customer managed keys are currently not
supported for multi-Region tables. For more information, see
the section called “How it works”.
• When you're using provisioned capacity management with Amazon Keyspaces auto scaling, make
sure to use the Amazon Keyspaces API operations to create and configure your multi-Region
Usage notes 283

Amazon Keyspaces (for Apache Cassandra) Developer Guide
tables. The underlying Application Auto Scaling API operations that Amazon Keyspaces calls on
your behalf don't have multi-Region capabilities.
For more information, see the section called “Update provisioned capacity and auto scaling
settings for a multi-Region table”. For more information on how to estimate the write capacity
throughput of provisioned multi-Region tables, see the section called “Estimate capacity for a
multi-Region table”.
• Although data is automatically replicated across the selected Regions of a multi-Region table,
when a client connects to an endpoint in one Region and queries the system.peers table, the
query returns only local information. The query result appears like a single data center cluster to
the client.
•
Amazon Keyspaces Multi-Region Replication is asynchronous, and it supports LOCAL_QUORUM
consistency for writes. LOCAL_QUORUM consistency requires that an update to a row is durably
persisted on two replicas in the local Region before returning success to the client. The
propagation of writes to the replicated Region (or Regions) is then performed asynchronously.
Amazon Keyspaces Multi-Region Replication doesn't support synchronous replication or QUORUM
consistency.
• When you create a multi-Region keyspace or table, any tags that you define during the creation
process are automatically applied to all keyspaces and tables in all Regions. When you change
the existing tags using ALTER KEYSPACE or ALTER TABLE, the update is only applied to the
keyspace or table in the Region where you're making the change.
•
Amazon CloudWatch provides a ReplicationLatency metric for each replicated Region. It
calculates this metric by tracking arriving rows, comparing their arrival time with their initial
write time, and computing an average. Timings are stored within CloudWatch in the source
Region. For more information, see the section called “Monitoring with CloudWatch”.
It can be useful to view the average and maximum timings to determine the average and worst-
case replication lag. There is no SLA on this latency.
• When using a multi-Region table in on-demand mode, you may observe an increase in latency
for asynchronous replication of writes if a table replica experiences a new traffic peak. Similar to
how Amazon Keyspaces automatically adapts the capacity of a single-Region on-demand table
to the application traffic it receives, Amazon Keyspaces automatically adapts the capacity of a
multi-Region on-demand table replica to the traffic that it receives. The increase in replication
latency is transient because Amazon Keyspaces automatically allocates more capacity as your
traffic volume increases. Once all replicas have adapted to your traffic volume, replication latency
Usage notes 284

Amazon Keyspaces (for Apache Cassandra) Developer Guide
should return back to normal. For more information, see the section called “Peak traffic and
scaling properties”.
• When using a multi-Region table in provisioned mode, if your application exceeds your
provisioned throughput capacity, you may observe insufficient capacity errors and an increase
in replication latency. To ensure that there's always enough read and write capacity for all table
replicas in all AWS Regions of a multi-Region table, we recommend that you configure Amazon
Keyspaces auto scaling. Amazon Keyspaces auto scaling helps you provision throughput capacity
efficiently for variable workloads by adjusting throughput capacity automatically in response to
actual application traffic. For more information, see the section called “How auto scaling works
for multi-Region tables”.
Configure Multi-Region Replication for Amazon Keyspaces (for Apache
Cassandra)
You can use the console, Cassandra Query Language (CQL), or the AWS Command Line Interface to
create and manage multi-Region keyspaces and tables in Amazon Keyspaces.
This section provides examples of how to create and manage multi-Region keyspaces and tables.
All tables that you create in a multi-Region keyspace automatically inherit the multi-Region
settings from the keyspace.
For more information about supported configurations and features, see the section called “Usage
notes”.
Topics
• Configure the IAM permissions required to create multi-Region keyspaces and tables
• Configure the IAM permissions required to add an AWS Region to a keyspace
• Create a multi-Region keyspace in Amazon Keyspaces
• Create a multi-Region table with default settings in Amazon Keyspaces
• Create a multi-Region table in provisioned mode with auto scaling in Amazon Keyspaces
• Update the provisioned capacity and auto scaling settings for a multi-Region table in Amazon
Keyspaces
• View the provisioned capacity and auto scaling settings for a multi-Region table in Amazon
Keyspaces
• Turn off auto scaling for a table in Amazon Keyspaces
Configure Multi-Region Replication 285

Amazon Keyspaces (for Apache Cassandra) Developer Guide
• Set the provisioned capacity of a multi-Region table manually in Amazon Keyspaces
Configure the IAM permissions required to create multi-Region keyspaces and
tables
To successfully create multi-Region keyspaces and tables, the IAM principal needs to be able to
create a service-linked role. This service-linked role is a unique type of IAM role that is predefined
by Amazon Keyspaces. It includes all the permissions that Amazon Keyspaces requires to perform
actions on your behalf. For more information about the service-linked role, see the section called
“Multi-Region Replication”.
To create the service-linked role required by Multi-Region Replication, the policy for the IAM
principal requires the following elements:
•
iam:CreateServiceLinkedRole – The action the principal can perform.
•
arn:aws:iam::*:role/aws-service-role/replication.cassandra.amazonaws.com/
AWSServiceRoleForKeyspacesReplication – The resource that the action can be
performed on.
•
iam:AWSServiceName": "replication.cassandra.amazonaws.com – The only AWS
service that this role can be attached to is Amazon Keyspaces.
The following is an example of the policy that grants the minimum required permissions to a
principal to create multi-Region keyspaces and tables.
{
"Effect": "Allow",
"Action": "iam:CreateServiceLinkedRole",
"Resource": "arn:aws:iam::*:role/aws-service-role/
replication.cassandra.amazonaws.com/AWSServiceRoleForKeyspacesReplication",
"Condition": {"StringLike": {"iam:AWSServiceName":
"replication.cassandra.amazonaws.com"}}
}
For additional IAM permissions for multi-Region keyspaces and tables, see the Actions, resources,
and condition keys for Amazon Keyspaces (for Apache Cassandra) in the Service Authorization
Reference.
Configure Multi-Region Replication 286

Amazon Keyspaces (for Apache Cassandra) Developer Guide
Configure the IAM permissions required to add an AWS Region to a keyspace
To add a Region to a keyspace, the IAM principal needs the following permissions:
•
cassandra:Alter
•
cassandra:AlterMultiRegionResource
•
cassandra:Create
•
cassandra:CreateMultiRegionResource
•
cassandra:Select
•
cassandra:SelectMultiRegionResource
•
cassandra:Modify
•
cassandra:ModifyMultiRegionResource
If the keyspace and table has tags, the IAM principal requires additional permissions.
•
cassandra:TagResource
•
cassandra:TagMultiRegionResource
If the table is configured in provisioned mode with auto scaling enabled, the following additional
permissions are needed.
•
application-autoscaling:RegisterScalableTarget
•
application-autoscaling:DeregisterScalableTarget
•
application-autoscaling:DescribeScalableTargets
•
application-autoscaling:PutScalingPolicy
•
application-autoscaling:DescribeScalingPolicies
Create a multi-Region keyspace in Amazon Keyspaces
This section provides examples of how to create a multi-Region keyspace. You can do this on the
Amazon Keyspaces console, using CQL or the AWS CLI. All tables that you create in a multi-Region
keyspace automatically inherit the multi-Region settings from the keyspace.
Configure Multi-Region Replication 287

Amazon Keyspaces (for Apache Cassandra) Developer Guide
Note
When creating a multi-Region keyspace, Amazon Keyspaces creates a service-linked role
with the name AWSServiceRoleForAmazonKeyspacesReplication in your account.
This role allows Amazon Keyspaces to replicate writes to all replicas of a multi-Region table
on your behalf. To learn more, see the section called “Multi-Region Replication”.
Console
Create a multi-Region keyspace (console)
1. Sign in to the AWS Management Console, and open the Amazon Keyspaces console at
https://console.aws.amazon.com/keyspaces/home.
2. In the navigation pane, choose Keyspaces, and then choose Create keyspace.
3. For Keyspace name, enter the name for the keyspace.
4. In the Multi-Region replication section, you can add up to five additional Regions that are
available in the list.
5. To finish, choose Create keyspace.
Cassandra Query Language (CQL)
Create a multi-Region keyspace using CQL
1.
To create a multi-Region keyspace, use NetworkTopologyStrategy to specify the AWS
Regions that the keyspace is going to be replicated in. You must include your current
Region and at least one additional Region.
All tables in the keyspace inherit the replication strategy from the keyspace. You can't
change the replication strategy at the table level.
NetworkTopologyStrategy – The replication factor for each Region is three because
Amazon Keyspaces replicates data across three Availability Zones within the same AWS
Region, by default.
The following CQL statement is an example of this.
CREATE KEYSPACE mykeyspace
Configure Multi-Region Replication 288

Amazon Keyspaces (for Apache Cassandra) Developer Guide
WITH REPLICATION = {'class':'NetworkTopologyStrategy', 'us-east-1':'3', 'ap-
southeast-1':'3','eu-west-1':'3' };
2.
You can use a CQL statement to query the tables table in the
system_multiregion_info keyspace to programmatically list the Regions and the
status of the multi-Region table that you specify. The following code is an example of this.
SELECT * from system_multiregion_info.tables WHERE keyspace_name = 'mykeyspace'
AND table_name = 'mytable';
The output of the statement looks like the following:
keyspace_name | table_name | region | status
----------------+----------------+----------------+--------
mykeyspace | mytable | us-east-1 | ACTIVE
mykeyspace | mytable | ap-southeast-1 | ACTIVE
mykeyspace | mytable | eu-west-1 | ACTIVE
CLI
Create a new multi-Region keyspace using the AWS CLI
• To create a multi-Region keyspace, you can use the following CLI statement. Specify your
current Region and at least one additional Region in the regionList.
aws keyspaces create-keyspace --keyspace-name mykeyspace
\ --replication-specification
replicationStrategy=MULTI_REGION,regionList=us-east-1,eu-west-1
To create a multi-Region table, see the section called “Create a multi-Region table with default
settings” and the section called “Create a multi-Region table in provisioned mode”.
Create a multi-Region table with default settings in Amazon Keyspaces
This section provides examples of how to create a multi-Region table in on-demand mode with all
default settings. You can do this on the Amazon Keyspaces console, using CQL or the AWS CLI. All
tables that you create in a multi-Region keyspace automatically inherit the multi-Region settings
from the keyspace.
Configure Multi-Region Replication 289

Amazon Keyspaces (for Apache Cassandra) Developer Guide
To create a multi-Region keyspace, see the section called “Create a multi-Region keyspace”.
Console
Create a multi-Region table with default settings (console)
1. Sign in to the AWS Management Console, and open the Amazon Keyspaces console at
https://console.aws.amazon.com/keyspaces/home.
2. Choose a multi-Region keyspace.
3. On the Tables tab, choose Create table.
4. For Table name, enter the name for the table. The AWS Regions that this table is being
replicated in are shown in the info box.
5. Continue with the table schema.
6. Under Table settings, continue with the Default settings option. Note the following
default settings for multi-Region tables.
• Capacity mode – The default capacity mode is On-demand. For more information about
configuring provisioned mode, see the section called “Create a multi-Region table in
provisioned mode”.
• Encryption key management – Only the AWS owned key option is supported.
• Client-side timestamps – This feature is required for multi-Region tables.
• Choose Customize settings if you need to turn on Time to Live (TTL) for the table and
all its replicas.
Note
You won't be able to change TTL settings on an existing multi-Region table.
7. To finish, choose Create table.
Cassandra Query Language (CQL)
Create a multi-Region table in on-demand mode with default settings
• To create a multi-Region table with default settings, you can use the following CQL
statement.
Configure Multi-Region Replication 290

Amazon Keyspaces (for Apache Cassandra) Developer Guide
CREATE TABLE mykeyspace.mytable(pk int, ck int, PRIMARY KEY (pk, ck))
WITH CUSTOM_PROPERTIES = {
'capacity_mode':{
'throughput_mode':'PAY_PER_REQUEST'
},
'point_in_time_recovery':{
'status':'enabled'
},
'encryption_specification':{
'encryption_type':'AWS_OWNED_KMS_KEY'
},
'client_side_timestamps':{
'status':'enabled'
}
};
CLI
Using the AWS CLI
1. To create a multi-Region table with default settings, you only need to specify the schema.
You can use the following example.
aws keyspaces create-table --keyspace-name mykeyspace --table-name mytable
\ --schema-definition
'allColumns=[{name=pk,type=int}],partitionKeys={name= pk}'
The output of the command is:
{
"resourceArn": "arn:aws:cassandra:us-east-1:111122223333:/keyspace/
mykeyspace/table/mytable"
}
2. To confirm the table's settings, you can use the following statement.
aws keyspaces get-table --keyspace-name mykeyspace --table-name mytable
The output shows all default settings of a multi-Region table.
Configure Multi-Region Replication 291

Amazon Keyspaces (for Apache Cassandra) Developer Guide
{
"keyspaceName": "mykeyspace",
"tableName": "mytable",
"resourceArn": "arn:aws:cassandra:us-east-1:111122223333:/keyspace/
mykeyspace/table/mytable",
"creationTimestamp": "2023-12-19T16:50:37.639000+00:00",
"status": "ACTIVE",
"schemaDefinition": {
"allColumns": [
{
"name": "pk",
"type": "int"
}
],
"partitionKeys": [
{
"name": "pk"
}
],
"clusteringKeys": [],
"staticColumns": []
},
"capacitySpecification": {
"throughputMode": "PAY_PER_REQUEST",
"lastUpdateToPayPerRequestTimestamp": "2023-12-19T16:50:37.639000+00:00"
},
"encryptionSpecification": {
"type": "AWS_OWNED_KMS_KEY"
},
"pointInTimeRecovery": {
"status": "DISABLED"
},
"defaultTimeToLive": 0,
"comment": {
"message": ""
},
"clientSideTimestamps": {
"status": "ENABLED"
},
"replicaSpecifications": [
{
"region": "us-east-1",
"status": "ACTIVE",
Configure Multi-Region Replication 292

Amazon Keyspaces (for Apache Cassandra) Developer Guide
"capacitySpecification": {
"throughputMode": "PAY_PER_REQUEST",
"lastUpdateToPayPerRequestTimestamp": 1702895811.469
}
},
{
"region": "eu-north-1",
"status": "ACTIVE",
"capacitySpecification": {
"throughputMode": "PAY_PER_REQUEST",
"lastUpdateToPayPerRequestTimestamp": 1702895811.121
}
}
]
}
Create a multi-Region table in provisioned mode with auto scaling in Amazon
Keyspaces
This section provides examples of how to create a multi-Region table in provisioned mode with
auto scaling. You can do this on the Amazon Keyspaces console, using CQL or the AWS CLI.
For more information about supported configurations and Multi-Region Replication features, see
the section called “Usage notes”.
To create a multi-Region keyspace, see the section called “Create a multi-Region keyspace”.
When you create a new multi-Region table in provisioned mode with auto scaling settings, you
can specify the general settings for the table that are valid for all AWS Regions that the table is
replicated in. You can then overwrite read capacity settings and read auto scaling settings for each
replica. The write capacity, however, remains synchronized between all replicas to ensure that
there's enough capacity to replicate writes across all Regions.
Note
Amazon Keyspaces automatic scaling requires the presence of a service-linked role
(AWSServiceRoleForApplicationAutoScaling_CassandraTable) that performs
automatic scaling actions on your behalf. This role is created automatically for you. For
more information, see the section called “Using service-linked roles”.
Configure Multi-Region Replication 293

Amazon Keyspaces (for Apache Cassandra) Developer Guide
Console
Create a new multi-Region table with automatic scaling enabled
1. Sign in to the AWS Management Console, and open the Amazon Keyspaces console at
https://console.aws.amazon.com/keyspaces/home.
2. Choose a multi-Region keyspace.
3. On the Tables tab, choose Create table.
4. On the Create table page in the Table details section, select a keyspace and provide a
name for the new table.
5. In the Columns section, create the schema for your table.
6. In the Primary key section, define the primary key of the table and select optional
clustering columns.
7. In the Table settings section, choose Customize settings.
8. Continue to Read/write capacity settings.
9. For Capacity mode, choose Provisioned.
10. In the Read capacity section, confirm that Scale automatically is selected.
You can select to configure the same read capacity units for all AWS Regions that the table
is replicated in. Alternatively, you can clear the check box and configure the read capacity
for each Region differently.
If you choose to configure each Region differently, you select the minimum and maximum
read capacity units for each table replica, as well as the target utilization.
• Minimum capacity units – Enter the value for the minimum level of throughput that the
table should always be ready to support. The value must be between 1 and the maximum
throughput per second quota for your account (40,000 by default).
• Maximum capacity units – Enter the maximum amount of throughput that you want to
provision for the table. The value must be between 1 and the maximum throughput per
second quota for your account (40,000 by default).
• Target utilization – Enter a target utilization rate between 20% and 90%. When traffic
exceeds the defined target utilization rate, capacity is automatically scaled up. When
traffic falls below the defined target, it is automatically scaled down again.
Configure Multi-Region Replication 294

Amazon Keyspaces (for Apache Cassandra) Developer Guide
• Clear the Scale automatically check box if you want to provision the table's read
capacity manually. This setting applies to all replicas of the table.
Note
To ensure that there's enough read capacity for all replicas, we recommend
Amazon Keyspaces automatic scaling for provisioned multi-Region tables.
Note
To learn more about default quotas for your account and how to increase them, see
Quotas.
11. In the Write capacity section, confirm that Scale automatically is selected. Then configure
the capacity units for the table. The write capacity units stay synced across all AWS Regions
to ensure that there is enough capacity to replicate write events across the Regions.
• Clear Scale automatically if you want to provision the table's write capacity manually.
This setting applies to all replicas of the table.
Note
To ensure that there's enough write capacity for all replicas, we recommend
Amazon Keyspaces automatic scaling for provisioned multi-Region tables.
12. Choose Create table. Your table is created with the specified automatic scaling parameters.
Cassandra Query Language (CQL)
Create a multi-Region table with provisioned capacity mode and auto scaling using CQL
• To create a multi-Region table in provisioned mode with auto scaling, you must first
specify the capacity mode by defining CUSTOM_PROPERTIES for the table. After specifying
provisioned capacity mode, you can configure the auto scaling settings for the table using
AUTOSCALING_SETTINGS.
Configure Multi-Region Replication 295

Amazon Keyspaces (for Apache Cassandra) Developer Guide
For detailed information about auto scaling settings, the target tracking policy, target
value, and optional settings, see the section called “Create a new table with automatic
scaling”.
To define the read capacity for a table replica in a specific Region, you can configure the
following parameters as part of the table's replica_updates:
• The Region
• The provisioned read capacity units (optional)
• Auto scaling settings for read capacity (optional)
The following example shows a CREATE TABLE statement for a multi-Region table in
provisioned mode. The general write and read capacity auto scaling settings are the same.
However, the read auto scaling settings specify additional cooldown periods of 60 seconds
before scaling the table's read capacity up or down. In addition, the read capacity auto
scaling settings for the Region US East (N. Virginia) are higher than those for other replicas.
Also, the target value is set to 70% instead of 50%.
CREATE TABLE mykeyspace.mytable(pk int, ck int, PRIMARY KEY (pk, ck))
WITH CUSTOM_PROPERTIES = {
'capacity_mode': {
'throughput_mode': 'PROVISIONED',
'read_capacity_units': 5,
'write_capacity_units': 5
}
} AND AUTOSCALING_SETTINGS = {
'provisioned_write_capacity_autoscaling_update': {
'maximum_units': 10,
'minimum_units': 5,
'scaling_policy': {
'target_tracking_scaling_policy_configuration': {
'target_value': 50
}
}
},
'provisioned_read_capacity_autoscaling_update': {
'maximum_units': 10,
'minimum_units': 5,
'scaling_policy': {
Configure Multi-Region Replication 296

Amazon Keyspaces (for Apache Cassandra) Developer Guide
'target_tracking_scaling_policy_configuration': {
'target_value': 50,
'scale_in_cooldown': 60,
'scale_out_cooldown': 60
}
}
},
'replica_updates': {
'us-east-1': {
'provisioned_read_capacity_autoscaling_update': {
'maximum_units': 20,
'minimum_units': 5,
'scaling_policy': {
'target_tracking_scaling_policy_configuration': {
'target_value': 70
}
}
}
}
}
};
CLI
Create a new multi-Region table in provisioned mode with auto scaling using the AWS CLI
• To create a multi-Region table in provisioned mode with auto scaling configuration, you
can use the AWS CLI. Note that you must use the Amazon Keyspaces CLI create-table
command to configure multi-Region auto scaling settings. This is because Application Auto
Scaling, the service that Amazon Keyspaces uses to perform auto scaling on your behalf,
doesn't support multiple Regions.
For more information about auto scaling settings, the target tracking policy, target value,
and optional settings, see the section called “Create a new table with automatic scaling”.
To define the read capacity for a table replica in a specific Region, you can configure the
following parameters as part of the table's replicaSpecifications:
• The Region
• The provisioned read capacity units (optional)
Configure Multi-Region Replication 297

Amazon Keyspaces (for Apache Cassandra) Developer Guide
• Auto scaling settings for read capacity (optional)
When you're creating provisioned multi-Region tables with complex auto scaling settings
and different configurations for table replicas, it's helpful to load the table's auto scaling
settings and replica configurations from JSON files.
To use the following code example, you can download the example JSON files from auto-
scaling.zip, and extract auto-scaling.json and replication.json. Take note of the
path to the files.
In this example, the JSON files are located in the current directory. For different file path
options, see How to load parameters from a file.
aws keyspaces create-table --keyspace-name mykeyspace --table-name mytable
\ --schema-definition 'allColumns=[{name=pk,type=int},
{name=ck,type=int}],partitionKeys=[{name=pk},{name=ck}]'
\ --capacity-specification
throughputMode=PROVISIONED,readCapacityUnits=1,writeCapacityUnits=1
\ --auto-scaling-specification file://auto-scaling.json
\ --replica-specifications file://replication.json
Update the provisioned capacity and auto scaling settings for a multi-Region
table in Amazon Keyspaces
This section includes examples of how to use the console, CQL, and the AWS CLI to manage the
Amazon Keyspaces auto scaling settings of provisioned multi-Region tables. For more information
about general auto scaling configuration options and how they work, see the section called
“Manage throughput capacity with auto scaling”.
Note that if you're using provisioned capacity mode for multi-Region tables, you must always use
Amazon Keyspaces API calls to configure auto scaling. This is because the underlying Application
Auto Scaling API operations are not Region-aware.
For more information on how to estimate write capacity throughput of provisioned multi-Region
tables, see the section called “Estimate capacity for a multi-Region table”.
For more information about the Amazon Keyspaces API, see Amazon Keyspaces API Reference.
Configure Multi-Region Replication 298

Amazon Keyspaces (for Apache Cassandra) Developer Guide
When you update the provisioned mode or auto scaling settings of a multi-Region table, you can
update read capacity settings and the read auto scaling configuration for each replica of the table.
The write capacity, however, remains synchronized between all replicas to ensure that there's
enough capacity to replicate writes across all Regions.
Cassandra Query Language (CQL)
Update the provisioned capacity and auto scaling settings of a multi-Region table using CQL
•
You can use ALTER TABLE to update the capacity mode and auto scaling settings of an
existing table. If you're updating a table that is currently in on-demand capacity mode,
capacity_mode is required. If your table is already in provisioned capacity mode, this field
can be omitted.
For detailed information about auto scaling settings, the target tracking policy, target
value, and optional settings, see the section called “Create a new table with automatic
scaling”.
In the same statement, you can also update the read capacity and auto scaling settings of
table replicas in specific Regions by updating the table's replica_updates property. The
following statement is an example of this.
ALTER TABLE mykeyspace.mytable
WITH CUSTOM_PROPERTIES = {
'capacity_mode': {
'throughput_mode': 'PROVISIONED',
'read_capacity_units': 1,
'write_capacity_units': 1
}
} AND AUTOSCALING_SETTINGS = {
'provisioned_write_capacity_autoscaling_update': {
'maximum_units': 10,
'minimum_units': 5,
'scaling_policy': {
'target_tracking_scaling_policy_configuration': {
'target_value': 50
}
}
},
'provisioned_read_capacity_autoscaling_update': {
'maximum_units': 10,
Configure Multi-Region Replication 299

Amazon Keyspaces (for Apache Cassandra) Developer Guide
'minimum_units': 5,
'scaling_policy': {
'target_tracking_scaling_policy_configuration': {
'target_value': 50,
'scale_in_cooldown': 60,
'scale_out_cooldown': 60
}
}
},
'replica_updates': {
'us-east-1': {
'provisioned_read_capacity_autoscaling_update': {
'maximum_units': 20,
'minimum_units': 5,
'scaling_policy': {
'target_tracking_scaling_policy_configuration': {
'target_value': 70
}
}
}
}
}
};
CLI
Update the provisioned capacity and auto scaling settings of a multi-Region table using the
AWS CLI
• To update the provisioned mode and auto scaling configuration of an existing table, you
can use the AWS CLI update-table command.
Note that you must use the Amazon Keyspaces CLI commands to create or modify multi-
Region auto scaling settings. This is because Application Auto Scaling, the service that
Amazon Keyspaces uses to perform auto scaling of table capacity on your behalf, doesn't
support multiple AWS Regions.
To update the read capacity for a table replica in a specific Region, you can change one of
the following optional parameters of the table's replicaSpecifications:
• The provisioned read capacity units (optional)
Configure Multi-Region Replication 300

Amazon Keyspaces (for Apache Cassandra) Developer Guide
• Auto scaling settings for read capacity (optional)
When you're updating multi-Region tables with complex auto scaling settings and different
configurations for table replicas, it's helpful to load the table's auto scaling settings and
replica configurations from JSON files.
To use the following code example, you can download the example JSON files from auto-
scaling.zip, and extract auto-scaling.json and replication.json. Take note of the
path to the files.
In this example, the JSON files are located in the current directory. For different file path
options, see How to load parameters from a file.
aws keyspaces update-table --keyspace-name mykeyspace --table-name mytable
\ --capacity-specification
throughputMode=PROVISIONED,readCapacityUnits=1,writeCapacityUnits=1
\ --auto-scaling-specification file://auto-scaling.json
\ --replica-specifications file://replication.json
View the provisioned capacity and auto scaling settings for a multi-Region table
in Amazon Keyspaces
You can view a multi-Region table's provisioned capacity and auto scaling settings on the Amazon
Keyspaces console, using CQL, or the AWS CLI. This section provides examples of how to do this
using CQL and the AWS CLI.
Cassandra Query Language (CQL)
View the provisioned capacity and auto scaling settings of a multi-Region table using CQL
• To view the auto scaling configuration of a multi-Region table, use the following command.
SELECT * FROM system_multiregion_info.autoscaling WHERE keyspace_name =
'mykeyspace' AND table_name = 'mytable';
The output for this command looks like the following:
Configure Multi-Region Replication 301

Amazon Keyspaces (for Apache Cassandra) Developer Guide
keyspace_name | table_name | region |
provisioned_read_capacity_autoscaling_update
|
provisioned_write_capacity_autoscaling_update
----------------+------------+----------------
+-------------------------------------------------------------------------------------------------------------------------------------------------------------------------------------------------------------------
+-----------------------------------------------------------------------------------------------------------------------------------------------------------------------------------------------------------------
mykeyspace | mytable | ap-southeast-1 | {'minimum_units': 5,
'maximum_units': 10, 'scaling_policy':
{'target_tracking_scaling_policy_configuration': {'scale_out_cooldown':
60, 'disable_scale_in': false, 'target_value': 50, 'scale_in_cooldown':
60}}} | {'minimum_units': 5, 'maximum_units': 10, 'scaling_policy':
{'target_tracking_scaling_policy_configuration': {'scale_out_cooldown': 0,
'disable_scale_in': false, 'target_value': 50, 'scale_in_cooldown': 0}}}
mykeyspace | mytable | us-east-1 | {'minimum_units': 5,
'maximum_units': 20, 'scaling_policy':
{'target_tracking_scaling_policy_configuration': {'scale_out_cooldown':
60, 'disable_scale_in': false, 'target_value': 70, 'scale_in_cooldown':
60}}} | {'minimum_units': 5, 'maximum_units': 10, 'scaling_policy':
{'target_tracking_scaling_policy_configuration': {'scale_out_cooldown': 0,
'disable_scale_in': false, 'target_value': 50, 'scale_in_cooldown': 0}}}
mykeyspace | mytable | eu-west-1 | {'minimum_units': 5,
'maximum_units': 10, 'scaling_policy':
{'target_tracking_scaling_policy_configuration': {'scale_out_cooldown':
60, 'disable_scale_in': false, 'target_value': 50, 'scale_in_cooldown':
60}}} | {'minimum_units': 5, 'maximum_units': 10, 'scaling_policy':
{'target_tracking_scaling_policy_configuration': {'scale_out_cooldown': 0,
'disable_scale_in': false, 'target_value': 50, 'scale_in_cooldown': 0}}}
CLI
View the provisioned capacity and auto scaling settings of a multi-Region table using the
AWS CLI
•
To view the auto scaling configuration of a multi-Region table, you can use the get-
table-auto-scaling-settings operation. The following CLI command is an example
of this.
Configure Multi-Region Replication 302

Amazon Keyspaces (for Apache Cassandra) Developer Guide
aws keyspaces get-table-auto-scaling-settings --keyspace-name mykeyspace --
table-name mytable
You should see the following output.
{
"keyspaceName": "mykeyspace",
"tableName": "mytable",
"resourceArn": "arn:aws:cassandra:us-east-1:777788889999:/keyspace/
mykeyspace/table/mytable",
"autoScalingSpecification": {
"writeCapacityAutoScaling": {
"autoScalingDisabled": false,
"minimumUnits": 5,
"maximumUnits": 10,
"scalingPolicy": {
"targetTrackingScalingPolicyConfiguration": {
"disableScaleIn": false,
"scaleInCooldown": 0,
"scaleOutCooldown": 0,
"targetValue": 50.0
}
}
},
"readCapacityAutoScaling": {
"autoScalingDisabled": false,
"minimumUnits": 5,
"maximumUnits": 20,
"scalingPolicy": {
"targetTrackingScalingPolicyConfiguration": {
"disableScaleIn": false,
"scaleInCooldown": 60,
"scaleOutCooldown": 60,
"targetValue": 70.0
}
}
}
},
"replicaSpecifications": [
{
"region": "us-east-1",
"autoScalingSpecification": {
Configure Multi-Region Replication 303

Amazon Keyspaces (for Apache Cassandra) Developer Guide
"writeCapacityAutoScaling": {
"autoScalingDisabled": false,
"minimumUnits": 5,
"maximumUnits": 10,
"scalingPolicy": {
"targetTrackingScalingPolicyConfiguration": {
"disableScaleIn": false,
"scaleInCooldown": 0,
"scaleOutCooldown": 0,
"targetValue": 50.0
}
}
},
"readCapacityAutoScaling": {
"autoScalingDisabled": false,
"minimumUnits": 5,
"maximumUnits": 20,
"scalingPolicy": {
"targetTrackingScalingPolicyConfiguration": {
"disableScaleIn": false,
"scaleInCooldown": 60,
"scaleOutCooldown": 60,
"targetValue": 70.0
}
}
}
}
},
{
"region": "eu-north-1",
"autoScalingSpecification": {
"writeCapacityAutoScaling": {
"autoScalingDisabled": false,
"minimumUnits": 5,
"maximumUnits": 10,
"scalingPolicy": {
"targetTrackingScalingPolicyConfiguration": {
"disableScaleIn": false,
"scaleInCooldown": 0,
"scaleOutCooldown": 0,
"targetValue": 50.0
}
}
},
Configure Multi-Region Replication 304
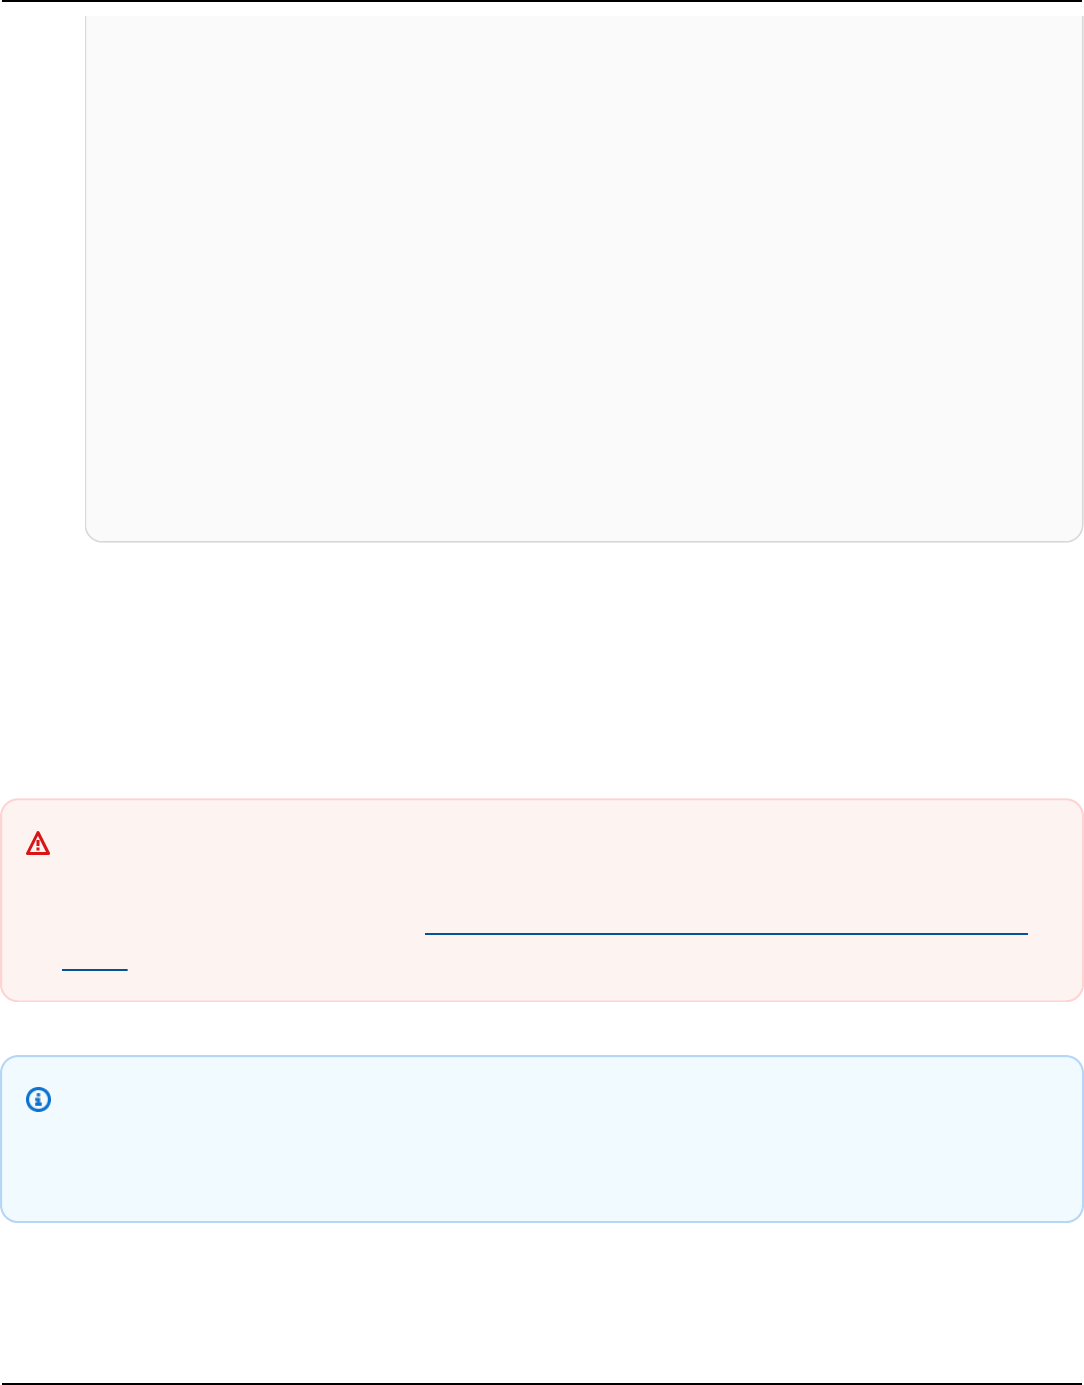
Amazon Keyspaces (for Apache Cassandra) Developer Guide
"readCapacityAutoScaling": {
"autoScalingDisabled": false,
"minimumUnits": 5,
"maximumUnits": 10,
"scalingPolicy": {
"targetTrackingScalingPolicyConfiguration": {
"disableScaleIn": false,
"scaleInCooldown": 60,
"scaleOutCooldown": 60,
"targetValue": 50.0
}
}
}
}
}
]
}
Turn off auto scaling for a table in Amazon Keyspaces
This section provides examples of how to turn off auto scaling for a multi-Region table in
provisioned capacity mode. You can do this on the Amazon Keyspaces console, using CQL or the
AWS CLI.
Important
We recommend using auto scaling for multi-Region tables that use provisioned capacity
mode. For more information, see the section called “Estimate capacity for a multi-Region
table”.
Note
To delete the service-linked role that Application Auto Scaling uses, you must disable
automatic scaling on all tables in the account across all AWS Regions.
Configure Multi-Region Replication 305

Amazon Keyspaces (for Apache Cassandra) Developer Guide
Console
Turn off Amazon Keyspaces automatic scaling for an existing multi-Region table on the
console
1. Sign in to the AWS Management Console, and open the Amazon Keyspaces console at
https://console.aws.amazon.com/keyspaces/home.
2. Choose the table that you want to work with and choose the Capacity tab.
3. In the Capacity settings section, choose Edit.
4. To disable Amazon Keyspaces automatic scaling, clear the Scale automatically check box.
Disabling automatic scaling deregisters the table as a scalable target with Application Auto
Scaling. To delete the service-linked role that Application Auto Scaling uses to access your
Amazon Keyspaces table, follow the steps in the section called “Deleting a service-linked
role for Amazon Keyspaces”.
5. When the automatic scaling settings are defined, choose Save.
Cassandra Query Language (CQL)
Turn off auto scaling for a multi-Region table using CQL
•
You can use ALTER TABLE to turn off auto scaling for an existing table. Note that you can't
turn off auto scaling for an individual table replica.
In the following example, auto scaling is turned off for the table's read capacity.
ALTER TABLE mykeyspace.mytable
WITH AUTOSCALING_SETTINGS = {
'provisioned_read_capacity_autoscaling_update': {
'autoscaling_disabled': true
}
};
CLI
Turn off auto scaling for a multi-Region table using the AWS CLI
•
You can use the AWS CLI update-table command to turn off auto scaling for an existing
table. Note that you can't turn off auto scaling for an individual table replica.
Configure Multi-Region Replication 306

Amazon Keyspaces (for Apache Cassandra) Developer Guide
In the following example, auto scaling is turned off for the table's read capacity.
aws keyspaces update-table --keyspace-name mykeyspace --table-name mytable
\ --auto-scaling-specification
readCapacityAutoScaling={autoScalingDisabled=true}
Set the provisioned capacity of a multi-Region table manually in Amazon
Keyspaces
If you have to turn off auto scaling for a multi-Region table, you can provision the table's read
capacity for a replica table manually using CQL or the AWS CLI.
Note
We recommend using auto scaling for multi-Region tables that use provisioned capacity
mode. For more information, see the section called “Estimate capacity for a multi-Region
table”.
Cassandra Query Language (CQL)
Setting the provisioned capacity of a multi-Region table manually using CQL
•
You can use ALTER TABLE to provision the table's read capacity for a replica table
manually.
ALTER TABLE mykeyspace.mytable
WITH CUSTOM_PROPERTIES = {
'capacity_mode': {
'throughput_mode': 'PROVISIONED',
'read_capacity_units': 1,
'write_capacity_units': 1
},
'replica_updates': {
'us-east-1': {
'read_capacity_units': 2
}
}
};
Configure Multi-Region Replication 307

Amazon Keyspaces (for Apache Cassandra) Developer Guide
CLI
Set the provisioned capacity of a multi-Region table manually using the AWS CLI
•
If you have to turn off auto scaling for a multi-Region table, you can use update-table to
provision the table's read capacity for a replica table manually.
aws keyspaces update-table --keyspace-name mykeyspace --table-name mytable
\ --capacity-specification
throughputMode=PROVISIONED,readCapacityUnits=1,writeCapacityUnits=1
\ --replica-specifications region="us-east-1",readCapacityUnits=5
Backup and restore data with point-in-time recovery for
Amazon Keyspaces
Point-in-time recovery (PITR) helps protect your Amazon Keyspaces tables from accidental write or
delete operations by providing you continuous backups of your table data.
For example, suppose that a test script writes accidentally to a production Amazon Keyspaces
table. With point-in-time recovery, you can restore that table's data to any second in time since
PITR was enabled within the last 35 days. If you delete a table with point-in-time recovery enabled,
you can query for the deleted table's data for 35 days (at no additional cost), and restore it to the
state it was in just before the point of deletion.
You can restore an Amazon Keyspaces table to a point in time by using the console, the AWS SDK
and the AWS Command Line Interface (AWS CLI), or Cassandra Query Language (CQL). For more
information, see Use point-in-time recovery in Amazon Keyspaces.
Point-in-time operations have no performance or availability impact on the base table, and
restoring a table doesn't consume additional throughput.
For information about PITR quotas, see Quotas.
For information about pricing, see Amazon Keyspaces (for Apache Cassandra) pricing.
Topics
• How point-in-time recovery works in Amazon Keyspaces
• Use point-in-time recovery in Amazon Keyspaces
Backup and restore with point-in-time recovery 308

Amazon Keyspaces (for Apache Cassandra) Developer Guide
How point-in-time recovery works in Amazon Keyspaces
This section provides an overview of how Amazon Keyspaces point-in-time recovery (PITR) works.
For more information about pricing, see Amazon Keyspaces (for Apache Cassandra) pricing.
Topics
• Time window for PITR continuous backups
• PITR restore settings
• PITR restore of encrypted tables
• PITR restore of multi-Region tables
• Table restore time with PITR
• Amazon Keyspaces PITR and integration with AWS services
Time window for PITR continuous backups
Amazon Keyspaces PITR uses two timestamps to maintain the time frame for which restorable
backups are available for a table.
• Earliest restorable time – Marks the time of the earliest restorable backup. The earliest restorable
backup goes back up to 35 days or when PITR was enabled, whichever is more recent. The
maximum backup window of 35 days can't be modified.
• Current time – The timestamp for the latest restorable backup is the current time. If no
timestamp is provided during a restore, current time is used.
When PITR is enabled, you can restore to any point in time between
EarliestRestorableDateTime and CurrentTime. You can only restore table data to a time
when PITR was enabled.
If you disable PITR and later reenable it again, you reset the start time for the first available backup
to when PITR was reenabled. This means that disabling PITR erases your backup history.
Note
Data definition language (DDL) operations on tables, such as schema changes, are
performed asynchronously. You can only see completed operations in your restored
table data, but you might see additional actions on your source table if they were in
How it works 309

Amazon Keyspaces (for Apache Cassandra) Developer Guide
progress at the time of the restore. For a list of DDL statements, see the section called “DDL
statements”.
A table doesn't have to be active to be restored. You can also restore deleted tables if PITR was
enabled on the deleted table and the deletion occurred within the backup window (or within the
last 35 days).
Note
If a new table is created with the same qualified name (for example, mykeyspace.mytable)
as a previously deleted table, the deleted table will no longer be restorable. If you attempt
to do this from the console, a warning is displayed.
PITR restore settings
When you restore a table using PITR, Amazon Keyspaces restores your source table's schema and
data to the state based on the selected timestamp (day:hour:minute:second) to a new table.
PITR doesn't overwrite existing tables.
In addition to the table's schema and data, PITR restores the custom_properties from the
source table. Unlike the table's data, which is restored based on the selected timestamp between
earliest restore time and current time, custom properties are always restored based on the table's
settings as of the current time.
The settings of the restored table match the settings of the source table with the timestamp of
when the restore was initiated. If you want to overwrite these settings during restore, you can do
so using WITH custom_properties. Custom properties include the following settings.
• Read/write capacity mode
• Provisioned throughput capacity settings
• PITR settings
If the table is in provisioned capacity mode with auto scaling enabled, the restore
operation also restores the table's auto scaling settings. You can overwrite them using the
autoscaling_settings parameter in CQL or autoScalingSpecification with the CLI. For
How it works 310

Amazon Keyspaces (for Apache Cassandra) Developer Guide
more information on auto scaling settings, see the section called “Manage throughput capacity
with auto scaling”.
When you do a full table restore, all table settings for the restored table come from the current
settings of the source table at the time of the restore.
For example, suppose that a table's provisioned throughput was recently lowered to 50 read
capacity units and 50 write capacity units. You then restore the table's state to three weeks ago.
At this time, its provisioned throughput was set to 100 read capacity units and 100 write capacity
units. In this case, Amazon Keyspaces restores your table data to that point in time, but uses the
current provisioned throughput settings (50 read capacity units and 50 write capacity units).
The following settings are not restored, and you must configure them manually for the new table.
• AWS Identity and Access Management (IAM) policies
• Amazon CloudWatch metrics and alarms
•
Tags (can be added to the CQL RESTORE statement using WITH TAGS)
PITR restore of encrypted tables
When you restore a table using PITR, Amazon Keyspaces restores your source table's encryption
settings. If the table was encrypted with an AWS owned key (default), the table is restored with
the same setting automatically. If the table you want to restore was encrypted using a customer
managed key, the same customer managed key needs to be accessible to Amazon Keyspaces to
restore the table data.
You can change the encryption settings of the table at the time of restore. To change from an
AWS owned key to a customer managed key, you need to supply a valid and accessible customer
managed key at the time of restore.
If you want to change from a customer managed key to an AWS owned key, confirm that Amazon
Keyspaces has access to the customer managed key of the source table to restore the table with an
AWS owned key. For more information about encryption at rest settings for tables, see the section
called “How it works”.
Note
If the table was deleted because Amazon Keyspaces lost access to your customer managed
key, you need to ensure the customer managed key is accessible to Amazon Keyspaces
How it works 311

Amazon Keyspaces (for Apache Cassandra) Developer Guide
before trying to restore the table. A table that was encrypted with a customer managed
key can't be restored if Amazon Keyspaces doesn't have access to that key. For more
information, see Troubleshooting key access in the AWS Key Management Service
Developer Guide.
PITR restore of multi-Region tables
You can restore a multi-Region table using PITR. For the restore operation to be successful, both
the source and the destination table have to be replicated to the same AWS Regions.
Amazon Keyspaces restores the settings of the source table in each of the replicated Regions that
are part of the keyspace. You can also override settings during the restore operation. For more
information about settings that can be changed during the restore, see the section called “Restore
settings”.
For more information about Multi-Region Replication, see the section called “How it works”.
Table restore time with PITR
The time it takes you to restore a table is based on multiple factors and isn't always correlated
directly to the size of the table.
The following are some considerations for restore times.
• You restore backups to a new table. It can take up to 20 minutes (even if the table is empty) to
perform all the actions to create the new table and initiate the restore process.
• Restore times for large tables with well-distributed data models can be several hours or longer.
• If your source table contains data that is significantly skewed, the time to restore might increase.
For example, if your table’s primary key is using the month of the year as a partition key, and all
your data is from the month of December, you have skewed data.
A best practice when planning for disaster recovery is to regularly document average restore
completion times and establish how these times affect your overall Recovery Time Objective.
Amazon Keyspaces PITR and integration with AWS services
The following PITR operations are logged using AWS CloudTrail to enable continuous monitoring
and auditing.
How it works 312

Amazon Keyspaces (for Apache Cassandra) Developer Guide
• Create a new table with PITR enabled or disabled.
• Enable or disable PITR on an existing table.
• Restore an active or a deleted table.
For more information, see Logging Amazon Keyspaces API calls with AWS CloudTrail.
You can perform the following PITR actions using AWS CloudFormation.
• Create a new table with PITR enabled or disabled.
• Enable or disable PITR on an existing table.
For more information, see the Cassandra Resource Type Reference in the AWS CloudFormation User
Guide.
Use point-in-time recovery in Amazon Keyspaces
With Amazon Keyspaces (for Apache Cassandra), you can restore tables to a specific point in time
using Point-in-Time Restore (PITR). PITR enables you to restore a table to a prior state within the
last 35 days, providing data protection and recovery capabilities. This feature is valuable in cases
such as accidental data deletion, application errors, or for testing purposes. You can quickly and
efficiently recover data, minimizing downtime and data loss. The following sections guide you
through the process of restoring tables using PITR in Amazon Keyspaces, ensuring data integrity
and business continuity.
Topics
• Configure restore table IAM permissions for Amazon Keyspaces PITR
• Configure PITR for a table in Amazon Keyspaces
• Turn off PITR for an Amazon Keyspaces table
• Restore a table from backup to a specified point in time in Amazon Keyspaces
• Restore a deleted table using Amazon Keyspaces PITR
Configure restore table IAM permissions for Amazon Keyspaces PITR
This section summarizes how to configure permissions for an AWS Identity and Access
Management (IAM) principal to restore Amazon Keyspaces tables. In IAM, the AWS managed policy
Use point-in-time recovery 313

Amazon Keyspaces (for Apache Cassandra) Developer Guide
AmazonKeyspacesFullAccess includes the permissions to restore Amazon Keyspaces tables.
To implement a custom policy with minimum required permissions, consider the requirements
outlined in the next section.
To successfully restore a table, the IAM principal needs the following minimum permissions:
•
cassandra:Restore – The restore action is required for the target table to be restored.
•
cassandra:Select – The select action is required to read from the source table.
•
cassandra:TagResource – The tag action is optional, and only required if the restore
operation adds tags.
This is an example of a policy that grants minimum required permissions to a user to restore tables
in keyspace mykeyspace.
{
"Version":"2012-10-17",
"Statement":[
{
"Effect":"Allow",
"Action":[
"cassandra:Restore",
"cassandra:Select"
],
"Resource":[
"arn:aws:cassandra:us-east-1:111122223333:/keyspace/mykeyspace/*",
"arn:aws:cassandra:us-east-1:111122223333:/keyspace/system*"
]
}
]
}
Additional permissions to restore a table might be required based on other selected features. For
example, if the source table is encrypted at rest with a customer managed key, Amazon Keyspaces
must have permissions to access the customer managed key of the source table to successfully
restore the table. For more information, see the section called “PITR and encrypted tables”.
If you are using IAM policies with condition keys to restrict incoming traffic to specific sources,
you must ensure that Amazon Keyspaces has permission to perform a restore operation on your
principal's behalf. You must add an aws:ViaAWSService condition key to your IAM policy if your
policy restricts incoming traffic to any of the following:
Use point-in-time recovery 314

Amazon Keyspaces (for Apache Cassandra) Developer Guide
•
VPC endpoints with aws:SourceVpce
•
IP ranges with aws:SourceIp
•
VPCs with aws:SourceVpc
The aws:ViaAWSService condition key allows access when any AWS service makes a request
using the principal's credentials. For more information, see IAM JSON policy elements: Condition
key in the IAM User Guide.
The following is an example of a policy that restricts source traffic to a specific IP address and
allows Amazon Keyspaces to restore a table on the principal's behalf.
{
"Version":"2012-10-17",
"Statement":[
{
"Sid":"CassandraAccessForCustomIp",
"Effect":"Allow",
"Action":"cassandra:*",
"Resource":"*",
"Condition":{
"Bool":{
"aws:ViaAWSService":"false"
},
"ForAnyValue:IpAddress":{
"aws:SourceIp":[
"123.45.167.89"
]
}
}
},
{
"Sid":"CassandraAccessForAwsService",
"Effect":"Allow",
"Action":"cassandra:*",
"Resource":"*",
"Condition":{
"Bool":{
"aws:ViaAWSService":"true"
}
}
}
Use point-in-time recovery 315

Amazon Keyspaces (for Apache Cassandra) Developer Guide
]
}
For an example policy using the aws:ViaAWSService global condition key, see the section called
“VPC endpoint policies and Amazon Keyspaces point-in-time recovery (PITR)”.
Configure PITR for a table in Amazon Keyspaces
You can configure a table in Amazon Keyspaces for backup and restore operations using PITR with
the console, CQL, and the AWS CLI.
When creating a new table using CQL or the AWS CLI, you must explicitly enable PITR in the create
table statement. When you create a new table using the console, PITR will be enable by default.
To learn how to restore a table, see the section called “Restore a table to a point in time”.
Console
Configure PITR for a table using the console
1. Sign in to the AWS Management Console, and open the Amazon Keyspaces console at
https://console.aws.amazon.com/keyspaces/home.
2. In the navigation pane, choose Tables and select the table you want to edit.
3. On the Backups tab, choose Edit.
4. In the Edit point-in-time recovery settings section, select Enable Point-in-time recovery.
5. Choose Save changes.
Cassandra Query Language (CQL)
Configure PITR for a table using CQL
1.
You can manage PITR settings for tables by using the point_in_time_recovery custom
property.
To enable PITR when you're creating a new table, you must set the status of
point_in_time_recovery to enabled. You can use the following CQL command as an
example.
CREATE TABLE "my_keyspace1"."my_table1"(
"id" int,
Use point-in-time recovery 316

Amazon Keyspaces (for Apache Cassandra) Developer Guide
"name" ascii,
"date" timestamp,
PRIMARY KEY("id"))
WITH CUSTOM_PROPERTIES = {
'capacity_mode':{'throughput_mode':'PAY_PER_REQUEST'},
'point_in_time_recovery':{'status':'enabled'}
}
Note
If no point-in-time recovery custom property is specified, point-in-time recovery is
disabled by default.
2. To enable PITR for an existing table using CQL, run the following CQL command.
ALTER TABLE mykeyspace.mytable
WITH custom_properties = {'point_in_time_recovery': {'status': 'enabled'}}
CLI
Configure PITR for a table using the AWS CLI
1.
You can manage PITR settings for tables by using the UpdateTable API.
To enable PITR when you're creating a new table, you must include point-in-time-
recovery 'status=ENABLED' in the create table command. You can use the following
AWS CLI command as an example. The command has been broken into separate lines to
improve readability.
aws keyspaces create-table --keyspace-name 'myKeyspace' --table-name 'myTable'
--schema-definition 'allColumns=[{name=id,type=int},
{name=name,type=text},{name=date,type=timestamp}],partitionKeys=[{name=id}]'
--point-in-time-recovery 'status=ENABLED'
Note
If no point-in-time recovery value is specified, point-in-time recovery is disabled by
default.
Use point-in-time recovery 317

Amazon Keyspaces (for Apache Cassandra) Developer Guide
2. To confirm the point-in-time recovery setting for a table, you can use the following AWS
CLI command.
aws keyspaces get-table --keyspace-name 'myKeyspace' --table-name 'myTable'
3. To enable PITR for an existing table using the AWS CLI, run the following command.
aws keyspaces update-table --keyspace-name 'myKeyspace' --table-name 'myTable'
--point-in-time-recovery 'status=ENABLED'
Turn off PITR for an Amazon Keyspaces table
You can turn off PITR for an Amazon Keyspaces table at any time using the console, CQL, or the
AWS CLI.
Important
Disabling PITR deletes your backup history immediately, even if you reenable PITR on the
table within 35 days.
To learn how to restore a table, see the section called “Restore a table to a point in time”.
Console
Disable PITR for a table using the console
1. Sign in to the AWS Management Console, and open the Amazon Keyspaces console at
https://console.aws.amazon.com/keyspaces/home.
2. In the navigation pane, choose Tables and select the table you want to edit.
3. On the Backups tab, choose Edit.
4. In the Edit point-in-time recovery settings section, clear the Enable Point-in-time
recovery check box.
5. Choose Save changes.
Use point-in-time recovery 318

Amazon Keyspaces (for Apache Cassandra) Developer Guide
Cassandra Query Language (CQL)
Disable PITR for a table using CQL
• To disable PITR for an existing table, run the following CQL command.
ALTER TABLE mykeyspace.mytable
WITH custom_properties = {'point_in_time_recovery': {'status': 'disabled'}}
CLI
Disable PITR for a table using the AWS CLI
• To disable PITR for an existing table, run the following AWS CLI command.
aws keyspaces update-table --keyspace-name 'myKeyspace' --table-name 'myTable'
--point-in-time-recovery 'status=DISABLED'
Restore a table from backup to a specified point in time in Amazon Keyspaces
The following section demonstrates how to restore an existing Amazon Keyspaces table to a
specified point in time.
Note
This procedure assumes that the table you're using has been configured with point-in-time
recovery. To enable PITR for a table, see the section called “Configure PITR”.
Important
While a restore is in progress, don't modify or delete the AWS Identity and Access
Management (IAM) policies that grant the IAM principal (for example, user, group, or
role) permission to perform the restore. Otherwise, unexpected behavior can result. For
example, if you remove write permissions for a table while that table is being restored, the
underlying RestoreTableToPointInTime operation can't write any of the restored data
to the table.
Use point-in-time recovery 319

Amazon Keyspaces (for Apache Cassandra) Developer Guide
You can modify or delete permissions only after the restore operation is complete.
Console
Restore a table to a specified point in time using the console
1. Sign in to the AWS Management Console, and open the Amazon Keyspaces console at
https://console.aws.amazon.com/keyspaces/home.
2. In the navigation pane on the left side of the console, choose Tables.
3. In the list of tables, choose the table you want to restore.
4. On the Backups tab of the table, in the Point-in-time recovery section, choose Restore.
5. For the new table name, enter a new name for the restored table, for example
mytable_restored.
6. To define the point in time for the restore operation, you can choose between two options:
• Select the preconfigured Earliest time.
• Select Specify date and time and enter the date and time you want to restore the new
table to.
Note
You can restore to any point in time within Earliest time and the current time.
Amazon Keyspaces restores your table data to the state based on the selected date
and time (day:hour:minute:second).
7. Choose Restore to start the restore process.
The table that is being restored is shown with the status Restoring. After the restore
process is finished, the status of the restored table changes to Active.
Cassandra Query Language (CQL)
Restore a table to a point in time using CQL
1. You can restore an active table to a point-in-time between
earliest_restorable_timestamp and the current time. Current time is the default.
Use point-in-time recovery 320

Amazon Keyspaces (for Apache Cassandra) Developer Guide
To confirm that point-in-time recovery is enabled for the table, query the
system_schema_mcs.tables as shown in this example.
SELECT custom_properties
FROM system_schema_mcs.tables
WHERE keyspace_name = 'mykeyspace' AND table_name = 'mytable';
Point-in-time recovery is enabled as shown in the following sample output.
custom_properties
-----------------
{
...,
"point_in_time_recovery": {
"earliest_restorable_timestamp":"2020-06-30T19:19:21.175Z"
"status":"enabled"
}
}
2. •
Restore the table to the current time. When you omit the WITH restore_timestamp
= ... clause, the current timestamp is used.
RESTORE TABLE mykeyspace.mytable_restored
FROM TABLE mykeyspace.mytable;
•
You can also restore to a specific point in time, defined by a restore_timestamp
in ISO 8601 format. You can specify any point in time during the last
35 days. For example, the following command restores the table to the
EarliestRestorableDateTime.
RESTORE TABLE mykeyspace.mytable_restored
FROM TABLE mykeyspace.mytable
WITH restore_timestamp = '2020-06-30T19:19:21.175Z';
For a full syntax description, see the section called “RESTORE TABLE” in the language
reference.
3. To verify that the restore of the table was successful, query the
system_schema_mcs.tables to confirm the status of the table.
Use point-in-time recovery 321

Amazon Keyspaces (for Apache Cassandra) Developer Guide
SELECT status
FROM system_schema_mcs.tables
WHERE keyspace_name = 'mykeyspace' AND table_name = 'mytable_restored'
The query shows the following output.
status
------
RESTORING
The table that is being restored is shown with the status Restoring. After the restore
process is finished, the status of the table changes to Active.
CLI
Restore a table to a point in time using the AWS CLI
1.
Create a simple table named myTable that has PITR enabled. The command has been
broken up into separate lines for readability.
aws keyspaces create-table --keyspace-name 'myKeyspace' --table-name 'myTable'
--schema-definition 'allColumns=[{name=id,type=int},
{name=name,type=text},{name=date,type=timestamp}],partitionKeys=[{name=id}]'
--point-in-time-recovery 'status=ENABLED'
2.
Confirm the properties of the new table and review the earliestRestorableTimestamp
for PITR.
aws keyspaces get-table --keyspace-name 'myKeyspace' --table-name 'myTable'
The output of this command returns the following.
{
"keyspaceName": "myKeyspace",
"tableName": "myTable",
"resourceArn": "arn:aws:cassandra:us-east-1:111222333444:/keyspace/
myKeyspace/table/myTable",
"creationTimestamp": "2022-06-20T14:34:57.049000-07:00",
"status": "ACTIVE",
Use point-in-time recovery 322

Amazon Keyspaces (for Apache Cassandra) Developer Guide
"schemaDefinition": {
"allColumns": [
{
"name": "id",
"type": "int"
},
{
"name": "date",
"type": "timestamp"
},
{
"name": "name",
"type": "text"
}
],
"partitionKeys": [
{
"name": "id"
}
],
"clusteringKeys": [],
"staticColumns": []
},
"capacitySpecification": {
"throughputMode": "PAY_PER_REQUEST",
"lastUpdateToPayPerRequestTimestamp": "2022-06-20T14:34:57.049000-07:00"
},
"encryptionSpecification": {
"type": "AWS_OWNED_KMS_KEY"
},
"pointInTimeRecovery": {
"status": "ENABLED",
"earliestRestorableTimestamp": "2022-06-20T14:35:13.693000-07:00"
},
"defaultTimeToLive": 0,
"comment": {
"message": ""
}
}
3. •
To restore a table to a point in time, specify a restore_timestamp in ISO
8601 format. You can chose any point in time during the last 35 days in one
Use point-in-time recovery 323

Amazon Keyspaces (for Apache Cassandra) Developer Guide
second intervals. For example, the following command restores the table to the
EarliestRestorableDateTime.
aws keyspaces restore-table --source-keyspace-name 'myKeyspace' --source-
table-name 'myTable' --target-keyspace-name 'myKeyspace' --target-table-name
'myTable_restored' --restore-timestamp "2022-06-20 21:35:14.693"
The output of this command returns the ARN of the restored table.
{
"restoredTableARN": "arn:aws:cassandra:us-east-1:111222333444:/keyspace/
myKeyspace/table/myTable_restored"
}
•
To restore the table to the current time, you can omit the restore-timestamp
parameter.
aws keyspaces restore-table --source-keyspace-name 'myKeyspace' --source-
table-name 'myTable' --target-keyspace-name 'myKeyspace' --target-table-name
'myTable_restored1'"
Restore a deleted table using Amazon Keyspaces PITR
The following procedure shows how to restore a deleted table from backup to the time of deletion.
You can do this using CQL or the AWS CLI.
Note
This procedure assumes that PITR was enabled on the deleted table.
Cassandra Query Language (CQL)
Restore a deleted table using CQL
1. To confirm that point-in-time recovery is enabled for a deleted table, query the system
table. Only tables with point-in-time recovery enabled are shown.
SELECT custom_properties
Use point-in-time recovery 324

Amazon Keyspaces (for Apache Cassandra) Developer Guide
FROM system_schema_mcs.tables_history
WHERE keyspace_name = 'mykeyspace' AND table_name = 'my_table';
The query shows the following output.
custom_properties
------------------
{
...,
"point_in_time_recovery":{
"restorable_until_time":"2020-08-04T00:48:58.381Z",
"status":"enabled"
}
}
2. Restore the table to the time of deletion with the following sample statement.
RESTORE TABLE mykeyspace.mytable_restored
FROM TABLE mykeyspace.mytable;
CLI
Restore a deleted table using the AWS CLI
1. Delete a table that you created previously that has PITR enabled. The following command
is an example.
aws keyspaces delete-table --keyspace-name 'myKeyspace' --table-name 'myTable'
2. Restore the deleted table to the time of deletion with the following command.
aws keyspaces restore-table --source-keyspace-name 'myKeyspace' --source-
table-name 'myTable' --target-keyspace-name 'myKeyspace' --target-table-name
'myTable_restored2'
The output of this command returns the ARN of the restored table.
{
"restoredTableARN": "arn:aws:cassandra:us-east-1:111222333444:/keyspace/
myKeyspace/table/myTable_restored2"
Use point-in-time recovery 325

Amazon Keyspaces (for Apache Cassandra) Developer Guide
}
Expire data with Time to Live (TTL) for Amazon Keyspaces (for
Apache Cassandra)
Amazon Keyspaces (for Apache Cassandra) Time to Live (TTL) helps you simplify your application
logic and optimize the price of storage by expiring data from tables automatically. Data that you
no longer need is automatically deleted from your table based on the Time to Live value that you
set.
This makes it easier to comply with data retention policies based on business, industry, or
regulatory requirements that define how long data needs to be retained or specify when data must
be deleted.
For example, you can use TTL in an AdTech application to schedule when data for specific ads
expires and is no longer visible to clients. You can also use TTL to retire older data automatically
and save on your storage costs.
You can set a default TTL value for the entire table, and overwrite that value for individual rows
and columns. TTL operations don't impact your application's performance. Also, the number of
rows and columns marked to expire with TTL doesn't affect your table's availability.
Amazon Keyspaces automatically filters out expired data so that expired data isn't returned in
query results or available for use in data manipulation language (DML) statements. Amazon
Keyspaces typically deletes expired data from storage within 10 days of the expiration date.
In rare cases, Amazon Keyspaces may not be able to delete data within 10 days if there is sustained
activity on the underlying storage partition to protect availability. In these cases, Amazon
Keyspaces continues to attempt to delete the expired data once traffic on the partition decreases.
After the data is permanently deleted from storage, you stop incurring storage fees.
You can set, modify, or disable default TTL settings for new and existing tables by using the
console, Cassandra Query Language (CQL), or the AWS CLI.
On tables with default TTL configured, you can use CQL statements to override the default TTL
settings of the table and apply custom TTL values to rows and columns. For more information,
see the section called “Use INSERT to set custom TTL for new rows” and the section called “Use
UPDATE to set custom TTL for rows and columns”.
Expire data with Time to Live 326

Amazon Keyspaces (for Apache Cassandra) Developer Guide
TTL pricing is based on the size of the rows being deleted or updated by using Time to Live. TTL
operations are metered in units of TTL deletes. One TTL delete is consumed per KB of data per
row that is deleted or updated.
For example, to update a row that stores 2.5 KB of data and to delete one or more columns within
the row at the same time requires three TTL deletes. Or, to delete an entire row that contains 3.5
KB of data requires four TTL deletes.
One TTL delete is consumed per KB of deleted data per row. For more information about pricing,
see Amazon Keyspaces (for Apache Cassandra) pricing.
Topics
• Amazon Keyspaces Time to Live and integration with AWS services
• Create a new table with default Time to Live (TTL) settings
• Update the default Time to Live (TTL) value of a table
• Create table with custom Time to Live (TTL) settings enabled
• Update table with custom Time to Live (TTL)
• Use the INSERT statement to set custom Time to Live (TTL) values for new rows
• Use the UPDATE statement to edit custom Time to Live (TTL) settings for rows and columns
Amazon Keyspaces Time to Live and integration with AWS services
The following TTL metric is available in Amazon CloudWatch to enable continuous monitoring.
•
TTLDeletes – The units consumed to delete or update data in a row by using Time to Live
(TTL).
For more information about how to monitor CloudWatch metrics, see the section called
“Monitoring with CloudWatch”.
When you use AWS CloudFormation, you can turn on TTL when creating an Amazon Keyspaces
table. For more information, see the AWS CloudFormation User Guide.
Create a new table with default Time to Live (TTL) settings
In Amazon Keyspaces, you can set a default TTL value for all rows in a table when the table is
created.
Integration with AWS services 327

Amazon Keyspaces (for Apache Cassandra) Developer Guide
The default TTL value for a table is zero, which means that data doesn't expire automatically. If the
default TTL value for a table is greater than zero, an expiration timestamp is added to each row.
TTL values are set in seconds, and the maximum configurable value is 630,720,000 seconds, which
is the equivalent of 20 years.
After table creation, you can overwrite the table's default TTL setting for specific rows or columns
with CQL DML statements. For more information, see the section called “Use INSERT to set custom
TTL for new rows” and the section called “Use UPDATE to set custom TTL for rows and columns”.
When you enable TTL on a table, Amazon Keyspaces begins to store additional TTL-related
metadata for each row. In addition, TTL uses expiration timestamps to track when rows or columns
expire. The timestamps are stored as row metadata and contribute to the storage cost for the row.
After the TTL feature is enabled, you can't disable it for a table. Setting the table’s
default_time_to_live to 0 disables default expiration times for new data, but it doesn't
deactivate the TTL feature or revert the table back to the original Amazon Keyspaces storage
metadata or write behavior.
The following examples show how to create a new table with a default TTL value.
Console
Create a new table with a Time to Live default value using the console.
1. Sign in to the AWS Management Console, and open the Amazon Keyspaces console at
https://console.aws.amazon.com/keyspaces/home.
2. In the navigation pane, choose Tables, and then choose Create table.
3. On the Create table page in the Table details section, select a keyspace and provide a
name for the new table.
4. In the Schema section, create the schema for your table.
5. In the Table settings section, choose Customize settings.
6. Continue to Time to Live (TTL).
In this step, you select the default TTL settings for the table.
For the Default TTL period, enter the expiration time and choose the unit of time you
entered, for example seconds, days, or years. Amazon Keyspaces will store the value in
seconds.
Create table with default TTL value 328

Amazon Keyspaces (for Apache Cassandra) Developer Guide
7. Choose Create table. Your table is created with the specified default TTL value.
Cassandra Query Language (CQL)
Create a new table with a default TTL value using CQL
1. The following statement creates a new table with the default TTL value set to 3,024,000
seconds, which represents 35 days.
CREATE TABLE my_table (
userid uuid,
time timeuuid,
subject text,
body text,
user inet,
PRIMARY KEY (userid, time)
) WITH default_time_to_live = 3024000;
2.
To confirm the TTL settings for the new table, use the cqlsh DESCRIBE statement as
shown in the following example. The output shows the default TTL setting for the table as
default_time_to_live.
DESC TABLE my_table;
CREATE TABLE my_keyspace.my_table (
userid uuid,
time timeuuid,
body text,
subject text,
user inet,
PRIMARY KEY (userid, time)
) WITH CLUSTERING ORDER BY (time ASC)
AND bloom_filter_fp_chance = 0.01
AND caching = {'class': 'com.amazonaws.cassandra.DefaultCaching'}
AND comment = ''
AND compaction = {'class': 'com.amazonaws.cassandra.DefaultCompaction'}
AND compression = {'class': 'com.amazonaws.cassandra.DefaultCompression'}
AND crc_check_chance = 1.0
AND dclocal_read_repair_chance = 0.0
AND default_time_to_live = 3024000
AND gc_grace_seconds = 7776000
Create table with default TTL value 329

Amazon Keyspaces (for Apache Cassandra) Developer Guide
AND max_index_interval = 2048
AND memtable_flush_period_in_ms = 3600000
AND min_index_interval = 128
AND read_repair_chance = 0.0
AND speculative_retry = '99PERCENTILE';
CLI
Create a new table with a default TTL value using the AWS CLI
1. You can use the following command to create a new table with the default TTL value set to
one year.
aws keyspaces create-table --keyspace-name 'myKeyspace' --table-name 'myTable' \
--schema-definition 'allColumns=[{name=id,type=int},
{name=name,type=text},{name=date,type=timestamp}],partitionKeys=[{name=id}]' \
--default-time-to-live '31536000'
2. To confirm the TTL status of the table, you can use the following command.
aws keyspaces get-table --keyspace-name 'myKeyspace' --table-name 'myTable'
The output of the command looks like in the following example
{
"keyspaceName": "myKeyspace",
"tableName": "myTable",
"resourceArn": "arn:aws:cassandra:us-east-1:123SAMPLE012:/keyspace/
myKeyspace/table/myTable",
"creationTimestamp": "2024-09-02T10:52:22.190000+00:00",
"status": "ACTIVE",
"schemaDefinition": {
"allColumns": [
{
"name": "id",
"type": "int"
},
{
"name": "date",
"type": "timestamp"
},
Create table with default TTL value 330

Amazon Keyspaces (for Apache Cassandra) Developer Guide
{
"name": "name",
"type": "text"
}
],
"partitionKeys": [
{
"name": "id"
}
],
"clusteringKeys": [],
"staticColumns": []
},
"capacitySpecification": {
"throughputMode": "PAY_PER_REQUEST",
"lastUpdateToPayPerRequestTimestamp": "2024-09-02T10:52:22.190000+00:00"
},
"encryptionSpecification": {
"type": "AWS_OWNED_KMS_KEY"
},
"pointInTimeRecovery": {
"status": "DISABLED"
},
"ttl": {
"status": "ENABLED"
},
"defaultTimeToLive": 31536000,
"comment": {
"message": ""
},
"replicaSpecifications": []
}
Update the default Time to Live (TTL) value of a table
You can update an existing table with a new default TTL value. TTL values are set in seconds, and
the maximum configurable value is 630,720,000 seconds, which is the equivalent of 20 years.
When you enable TTL on a table, Amazon Keyspaces begins to store additional TTL-related
metadata for each row. In addition, TTL uses expiration timestamps to track when rows or columns
expire. The timestamps are stored as row metadata and contribute to the storage cost for the row.
Update table default TTL value 331

Amazon Keyspaces (for Apache Cassandra) Developer Guide
After TTL has been enabled for a table, you can overwrite the table's default TTL setting for
specific rows or columns with CQL DML statements. For more information, see the section called
“Use INSERT to set custom TTL for new rows” and the section called “Use UPDATE to set custom
TTL for rows and columns”.
After the TTL feature is enabled, you can't disable it for a table. Setting the table’s
default_time_to_live to 0 disables default expiration times for new data, but it doesn't
deactivate the TTL feature or revert the table back to the original Amazon Keyspaces storage
metadata or write behavior.
Follow these steps to update default Time to Live settings for existing tables using the console,
CQL, or the AWS CLI.
Console
Update the default TTL value of a table using the console
1. Sign in to the AWS Management Console, and open the Amazon Keyspaces console at
https://console.aws.amazon.com/keyspaces/home.
2. Choose the table that you want to update, and then choose the Additional settings tab.
3. Continue to Time to Live (TTL) and choose Edit.
4. For the Default TTL period, enter the expiration time and choose the unit of time, for
example seconds, days, or years. Amazon Keyspaces will store the value in seconds. This
doesn't change the TTL value of existing rows.
5. When the TTL settings are defined, choose Save changes.
Cassandra Query Language (CQL)
Update the default TTL value of a table using CQL
1.
You can use ALTER TABLE to edit default Time to Live (TTL) settings of a table. To update
the default TTL settings of the table to 2,592,000 seconds, which represents 30 days, you
can use the following statement.
ALTER TABLE my_table WITH default_time_to_live = 2592000;
Update table default TTL value 332

Amazon Keyspaces (for Apache Cassandra) Developer Guide
2.
To confirm the TTL settings for the updated table, use the cqlsh DESCRIBE statement as
shown in the following example. The output shows the default TTL setting for the table as
default_time_to_live.
DESC TABLE my_table;
The output of the statement should look similar to this example.
CREATE TABLE my_keyspace.my_table (
id int PRIMARY KEY,
date timestamp,
name text
) WITH bloom_filter_fp_chance = 0.01
AND caching = {'class': 'com.amazonaws.cassandra.DefaultCaching'}
AND comment = ''
AND compaction = {'class': 'com.amazonaws.cassandra.DefaultCompaction'}
AND compression = {'class': 'com.amazonaws.cassandra.DefaultCompression'}
AND crc_check_chance = 1.0
AND dclocal_read_repair_chance = 0.0
AND default_time_to_live = 2592000
AND gc_grace_seconds = 7776000
AND max_index_interval = 2048
AND memtable_flush_period_in_ms = 3600000
AND min_index_interval = 128
AND read_repair_chance = 0.0
AND speculative_retry = '99PERCENTILE';
CLI
Update the default TTL value of a table using the AWS CLI
1.
You can use update-table to edit the default TTL value a table. To update the default
TTL settings of the table to 2,592,000 seconds, which represents 30 days, you can use the
following statement.
aws keyspaces update-table --keyspace-name 'myKeyspace' --table-name 'myTable'
--default-time-to-live '2592000'
2. To confirm the updated default TTL value, you can use the following statement.
Update table default TTL value 333

Amazon Keyspaces (for Apache Cassandra) Developer Guide
aws keyspaces get-table --keyspace-name 'myKeyspace' --table-name 'myTable'
The output of the statement should look like in the following example.
{
"keyspaceName": "myKeyspace",
"tableName": "myTable",
"resourceArn": "arn:aws:cassandra:us-east-1:123SAMPLE012:/keyspace/
myKeyspace/table/myTable",
"creationTimestamp": "2024-09-02T10:52:22.190000+00:00",
"status": "ACTIVE",
"schemaDefinition": {
"allColumns": [
{
"name": "id",
"type": "int"
},
{
"name": "date",
"type": "timestamp"
},
{
"name": "name",
"type": "text"
}
],
"partitionKeys": [
{
"name": "id"
}
],
"clusteringKeys": [],
"staticColumns": []
},
"capacitySpecification": {
"throughputMode": "PAY_PER_REQUEST",
"lastUpdateToPayPerRequestTimestamp": "2024-09-02T10:52:22.190000+00:00"
},
"encryptionSpecification": {
"type": "AWS_OWNED_KMS_KEY"
},
"pointInTimeRecovery": {
Update table default TTL value 334

Amazon Keyspaces (for Apache Cassandra) Developer Guide
"status": "DISABLED"
},
"ttl": {
"status": "ENABLED"
},
"defaultTimeToLive": 2592000,
"comment": {
"message": ""
},
"replicaSpecifications": []
}
Create table with custom Time to Live (TTL) settings enabled
To create a new table with Time to Live custom settings that can be applied to rows and columns
without enabling TTL default settings for the entire table, you can use the following commands.
Note
If a table is created with ttl custom settings enabled, you can't disable the setting later.
Cassandra Query Language (CQL)
Create a new table with custom TTL setting using CQL
•
CREATE TABLE my_keyspace.my_table (id int primary key) WITH
CUSTOM_PROPERTIES={'ttl':{'status': 'enabled'}};
CLI
Create a new table with custom TTL setting using the AWS CLI
1. You can use the following command to create a new table with TTL enabled.
aws keyspaces create-table --keyspace-name 'myKeyspace' --table-name 'myTable' \
--schema-definition
'allColumns=[{name=id,type=int},{name=name,type=text},
{name=date,type=timestamp}],partitionKeys=[{name=id}]' \
Create table with custom TTL 335

Amazon Keyspaces (for Apache Cassandra) Developer Guide
--ttl 'status=ENABLED'
2. To confirm that TTL is enabled for the table, you can use the following statement.
aws keyspaces get-table --keyspace-name 'myKeyspace' --table-name 'myTable'
The output of the statement should look like in the following example.
{
"keyspaceName": "myKeyspace",
"tableName": "myTable",
"resourceArn": "arn:aws:cassandra:us-east-1:123SAMPLE012:/keyspace/
myKeyspace/table/myTable",
"creationTimestamp": "2024-09-02T10:52:22.190000+00:00",
"status": "ACTIVE",
"schemaDefinition": {
"allColumns": [
{
"name": "id",
"type": "int"
},
{
"name": "date",
"type": "timestamp"
},
{
"name": "name",
"type": "text"
}
],
"partitionKeys": [
{
"name": "id"
}
],
"clusteringKeys": [],
"staticColumns": []
},
"capacitySpecification": {
"throughputMode": "PAY_PER_REQUEST",
"lastUpdateToPayPerRequestTimestamp": "2024-09-02T11:18:55.796000+00:00"
},
"encryptionSpecification": {
Create table with custom TTL 336

Amazon Keyspaces (for Apache Cassandra) Developer Guide
"type": "AWS_OWNED_KMS_KEY"
},
"pointInTimeRecovery": {
"status": "DISABLED"
},
"ttl": {
"status": "ENABLED"
},
"defaultTimeToLive": 0,
"comment": {
"message": ""
},
"replicaSpecifications": []
}
Update table with custom Time to Live (TTL)
To enable Time to Live custom settings for a table so that TTL values can be applied to individual
rows and columns without setting a TTL default value for the entire table, you can use the
following commands.
Note
After ttl is enabled, you can't disable it for the table.
Cassandra Query Language (CQL)
Enable custom TTL settings for a table using CQL
•
ALTER TABLE my_table WITH CUSTOM_PROPERTIES={'ttl':{'status': 'enabled'}};
CLI
Enable custom TTL settings for a table using the AWS CLI
1. You can use the following command to update the custom TTL setting of a table.
Update table custom TTL 337

Amazon Keyspaces (for Apache Cassandra) Developer Guide
aws keyspaces update-table --keyspace-name 'myKeyspace' --table-name 'myTable'
--ttl 'status=ENABLED'
2. To confirm that TTL is now enabled for the table, you can use the following statement.
aws keyspaces get-table --keyspace-name 'myKeyspace' --table-name 'myTable'
The output of the statement should look like in the following example.
{
"keyspaceName": "myKeyspace",
"tableName": "myTable",
"resourceArn": "arn:aws:cassandra:us-east-1:123SAMPLE012:/keyspace/
myKeyspace/table/myTable",
"creationTimestamp": "2024-09-02T11:32:27.349000+00:00",
"status": "ACTIVE",
"schemaDefinition": {
"allColumns": [
{
"name": "id",
"type": "int"
},
{
"name": "date",
"type": "timestamp"
},
{
"name": "name",
"type": "text"
}
],
"partitionKeys": [
{
"name": "id"
}
],
"clusteringKeys": [],
"staticColumns": []
},
"capacitySpecification": {
"throughputMode": "PAY_PER_REQUEST",
"lastUpdateToPayPerRequestTimestamp": "2024-09-02T11:32:27.349000+00:00"
Update table custom TTL 338
Amazon Keyspaces (for Apache Cassandra) Developer Guide
},
"encryptionSpecification": {
"type": "AWS_OWNED_KMS_KEY"
},
"pointInTimeRecovery": {
"status": "DISABLED"
},
"ttl": {
"status": "ENABLED"
},
"defaultTimeToLive": 0,
"comment": {
"message": ""
},
"replicaSpecifications": []
}
Use the INSERT statement to set custom Time to Live (TTL) values for
new rows
Note
Before you can set custom TTL values for rows using the INSERT statement, you must first
enable custom TTL on the table. For more information, see the section called “Update table
custom TTL”.
To overwrite a table's default TTL value by setting expiration dates for individual rows, you can use
the INSERT statement:
•
INSERT – Insert a new row of data with a TTL value set.
Setting TTL values for new rows using the INSERT statement takes precedence over the default
TTL setting of the table.
The following CQL statement inserts a row of data into the table and changes the default TTL
setting to 259,200 seconds (which is equivalent to 3 days).
INSERT INTO my_table (userid, time, subject, body, user)
Use INSERT to set custom TTL for new rows
339

Amazon Keyspaces (for Apache Cassandra) Developer Guide
VALUES (B79CB3BA-745E-5D9A-8903-4A02327A7E09, 96a29100-5e25-11ec-90d7-
b5d91eceda0a, 'Message', 'Hello','205.212.123.123')
USING TTL 259200;
To confirm the TTL settings for the inserted row, use the following statement.
SELECT TTL (subject) from my_table;
Use the UPDATE statement to edit custom Time to Live (TTL) settings
for rows and columns
Note
Before you can set custom TTL values for rows and columns, you must enable TTL on the
table first. For more information, see the section called “Update table custom TTL”.
You can use the UPDATE statement to overwrite a table's default TTL value by setting the
expiration date for individual rows and columns:
• Rows – You can update an existing row of data with a custom TTL value.
• Columns – You can update a subset of columns within existing rows with a custom TTL value.
Setting TTL values for rows and columns takes precedence over the default TTL setting for the
table.
To change the TTL settings of the 'subject' column inserted earlier from 259,200 seconds (3 days)
to 86,400 seconds (one day), use the following statement.
UPDATE my_table USING TTL 86400 set subject = 'Updated Message' WHERE userid =
B79CB3BA-745E-5D9A-8903-4A02327A7E09 and time = 96a29100-5e25-11ec-90d7-b5d91eceda0a;
You can run a simple select query to see the updated record before the expiration time.
SELECT * from my_table;
The query shows the following output.
Use UPDATE to set custom TTL for rows and columns
340

Amazon Keyspaces (for Apache Cassandra) Developer Guide
userid | time | body |
subject | user
--------------------------------------+--------------------------------------+-------
+-----------------+-----------------
b79cb3ba-745e-5d9a-8903-4a02327a7e09 | 96a29100-5e25-11ec-90d7-b5d91eceda0a | Hello |
Updated Message | 205.212.123.123
50554d6e-29bb-11e5-b345-feff819cdc9f | cf03fb21-59b5-11ec-b371-dff626ab9620 | Hello |
Message | 205.212.123.123
To confirm that the expiration was successful, run the same query again after the configured
expiration time.
SELECT * from my_table;
The query shows the following output after the 'subject' column has expired.
userid | time | body |
subject | user
--------------------------------------+--------------------------------------+-------
+---------+-----------------
b79cb3ba-745e-5d9a-8903-4a02327a7e09 | 96a29100-5e25-11ec-90d7-b5d91eceda0a | Hello |
null | 205.212.123.123
50554d6e-29bb-11e5-b345-feff819cdc9f | cf03fb21-59b5-11ec-b371-dff626ab9620 | Hello |
Message | 205.212.123.123
Client-side timestamps in Amazon Keyspaces
In Amazon Keyspaces, client-side timestamps are Cassandra-compatible timestamps that are
persisted for each cell in your table. You can use client-side timestamps for conflict resolution
by letting your client applications determine the order of writes. For example, when clients of a
globally distributed application make updates to the same data, client-side timestamps persist the
order in which the updates were made on the clients. Amazon Keyspaces uses these timestamps to
process the writes.
Amazon Keyspaces client-side timestamps are fully managed. You don’t have to manage low-level
system settings such as clean-up and compaction strategies.
When you delete data, the rows are marked for deletion with a tombstone. Amazon Keyspaces
removes tombstoned data automatically (typically within 10 days) without impacting your
application performance or availability. Tombstoned data isn't available for data manipulation
Client-side timestamps 341

Amazon Keyspaces (for Apache Cassandra) Developer Guide
language (DML) statements. As you continue to perform reads and writes on rows that contain
tombstoned data, the tombstoned data continues to count towards storage, read capacity units
(RCUs), and write capacity units (WCUs) until it's deleted from storage.
After client-side timestamps have been turned on for a table, you can specify a timestamp with
the USING TIMESTAMP clause in your Data Manipulation Language (DML) CQL query. For more
information, see the section called “Use client-side timestamps in queries”. If you do not specify a
timestamp in your CQL query, Amazon Keyspaces uses the timestamp passed by your client driver.
If the client driver doesn’t supply timestamps, Amazon Keyspaces assigns a cell-level timestamp
automatically, because timestamps can't be NULL. To query for timestamps, you can use the
WRITETIME function in your DML statement.
Amazon Keyspaces doesn't charge extra to turn on client-side timestamps. However, with client-
side timestamps you store and write additional data for each value in your row. This can lead to
additional storage usage and in some cases additional throughput usage. For more information
about Amazon Keyspaces pricing, see Amazon Keyspaces (for Apache Cassandra) pricing.
When client-side timestamps are turned on in Amazon Keyspaces, every column of every row
stores a timestamp. These timestamps take up approximately 20–40 bytes (depending on your
data), and contribute to the storage and throughput cost for the row. These metadata bytes also
count towards your 1-MB row size quota. To determine the overall increase in storage space (to
ensure that the row size stays under 1 MB), consider the number of columns in your table and
the number of collection elements in each row. For example, if a table has 20 columns, with each
column storing 40 bytes of data, the size of the row increases from 800 bytes to 1200 bytes. For
more information on how to estimate the size of a row, see the section called “Estimate row size”.
In addition to the extra 400 bytes for storage, in this example, the number of write capacity units
(WCUs) consumed per write increases from 1 WCU to 2 WCUs. For more information on how to
calculate read and write capacity, see the section called “Configure read/write capacity modes”.
After client-side timestamps have been turned on for a table, you can't turn it off.
To learn more about how to use client-side timestamps in queries, see the section called “Use
client-side timestamps in queries”.
Topics
• How Amazon Keyspaces client-side timestamps integrate with AWS services
• Create a new table with client-side timestamps in Amazon Keyspaces
• Configure client-side timestamps for a table in Amazon Keyspaces
Client-side timestamps 342

Amazon Keyspaces (for Apache Cassandra) Developer Guide
• Use client-side timestamps in queries in Amazon Keyspaces
How Amazon Keyspaces client-side timestamps integrate with AWS
services
The following client-side timestamps metric is available in Amazon CloudWatch to enable
continuous monitoring.
•
SystemReconciliationDeletes – The number of delete operations required to remove
tombstoned data.
For more information about how to monitor CloudWatch metrics, see the section called
“Monitoring with CloudWatch”.
When you use AWS CloudFormation, you can enable client-side timestamps when creating a
Amazon Keyspaces table. For more information, see the AWS CloudFormation User Guide.
Create a new table with client-side timestamps in Amazon Keyspaces
Follow these examples to create a new Amazon Keyspaces table with client-side timestamps
enabled using the Amazon Keyspaces AWS Management Console, Cassandra Query Language
(CQL), or the AWS Command Line Interface
Console
Create a new table with client-side timestamps (console)
1. Sign in to the AWS Management Console, and open the Amazon Keyspaces console at
https://console.aws.amazon.com/keyspaces/home.
2. In the navigation pane, choose Tables, and then choose Create table.
3. On the Create table page in the Table details section, select a keyspace and provide a
name for the new table.
4. In the Schema section, create the schema for your table.
5. In the Table settings section, choose Customize settings.
6. Continue to Client-side timestamps.
Choose Turn on client-side timestamps to turn on client-side timestamps for the table.
Integration with AWS services 343

Amazon Keyspaces (for Apache Cassandra) Developer Guide
7. Choose Create table. Your table is created with client-side timestamps turned on.
Cassandra Query Language (CQL)
Create a new table using CQL
1. To create a new table with client-side timestamps enabled using CQL, you can use the
following example.
CREATE TABLE my_keyspace.my_table (
userid uuid,
time timeuuid,
subject text,
body text,
user inet,
PRIMARY KEY (userid, time)
) WITH CUSTOM_PROPERTIES = {'client_side_timestamps': {'status': 'enabled'}};
2.
To confirm the client-side timestamps settings for the new table, use a SELECT statement
to review the custom_properties as shown in the following example.
SELECT custom_properties from system_schema_mcs.tables where keyspace_name =
'my_keyspace' and table_name = 'my_table';
The output of this statement shows the status for client-side timestamps.
'client_side_timestamps': {'status': 'enabled'}
AWS CLI
Create a new table using the AWS CLI
1. To create a new table with client-side timestamps enabled, you can use the following
example.
./aws keyspaces create-table \
--keyspace-name my_keyspace \
--table-name my_table \
--client-side-timestamps 'status=ENABLED' \
Create table with client-side timestamps 344

Amazon Keyspaces (for Apache Cassandra) Developer Guide
--schema-definition 'allColumns=[{name=id,type=int},{name=date,type=timestamp},
{name=name,type=text}],partitionKeys=[{name=id}]'
2. To confirm that client-side timestamps are turned on for the new table, run the following
code.
./aws keyspaces get-table \
--keyspace-name my_keyspace \
--table-name my_table
The output should look similar to this example.
{
"keyspaceName": "my_keyspace",
"tableName": "my_table",
"resourceArn": "arn:aws:cassandra:us-east-2:555555555555:/keyspace/
my_keyspace/table/my_table",
"creationTimestamp": 1662681206.032,
"status": "ACTIVE",
"schemaDefinition": {
"allColumns": [
{
"name": "id",
"type": "int"
},
{
"name": "date",
"type": "timestamp"
},
{
"name": "name",
"type": "text"
}
],
"partitionKeys": [
{
"name": "id"
}
],
"clusteringKeys": [],
"staticColumns": []
},
"capacitySpecification": {
Create table with client-side timestamps 345

Amazon Keyspaces (for Apache Cassandra) Developer Guide
"throughputMode": "PAY_PER_REQUEST",
"lastUpdateToPayPerRequestTimestamp": 1662681206.032
},
"encryptionSpecification": {
"type": "AWS_OWNED_KMS_KEY"
},
"pointInTimeRecovery": {
"status": "DISABLED"
},
"clientSideTimestamps": {
"status": "ENABLED"
},
"ttl": {
"status": "ENABLED"
},
"defaultTimeToLive": 0,
"comment": {
"message": ""
}
}
Configure client-side timestamps for a table in Amazon Keyspaces
Follow these examples to turn on client-side timestamps for existing tables using the Amazon
Keyspaces AWS Management Console, Cassandra Query Language (CQL), or the AWS Command
Line Interface.
Console
To turn on client-side timestamps for an existing table (console)
1. Sign in to the AWS Management Console, and open the Amazon Keyspaces console at
https://console.aws.amazon.com/keyspaces/home.
2. Choose the table that you want to update, and then choose Additional settings tab.
3. On the Additional settings tab, go to Modify client-side timestamps and select Turn on
client-side timestamps
4. Choose Save changes to change the settings of the table.
Configure client-side timestamps 346

Amazon Keyspaces (for Apache Cassandra) Developer Guide
Cassandra Query Language (CQL)
Using a CQL statement
1.
Turn on client-side timestamps for an existing table with the ALTER TABLE CQL
statement.
ALTER TABLE my_table WITH custom_properties = {'client_side_timestamps':
{'status': 'enabled'}};;
2.
To confirm the client-side timestamps settings for the new table, use a SELECT statement
to review the custom_properties as shown in the following example.
SELECT custom_properties from system_schema_mcs.tables where keyspace_name =
'my_keyspace' and table_name = 'my_table';
The output of this statement shows the status for client-side timestamps.
'client_side_timestamps': {'status': 'enabled'}
AWS CLI
Using the AWS CLI
1. You can turn on client-side timestamps for an existing table using the AWS CLI using the
following example.
./aws keyspaces update-table \
--keyspace-name my_keyspace \
--table-name my_table \
--client-side-timestamps 'status=ENABLED'
2. To confirm that client-side timestamps are turned on for the table, run the following code.
./aws keyspaces get-table \
--keyspace-name my_keyspace \
--table-name my_table
Configure client-side timestamps 347

Amazon Keyspaces (for Apache Cassandra) Developer Guide
The output should look similar to this example and state the status for client-side
timestamps as ENABLED.
{
"keyspaceName": "my_keyspace",
"tableName": "my_table",
"resourceArn": "arn:aws:cassandra:us-east-2:555555555555:/keyspace/
my_keyspace/table/my_table",
"creationTimestamp": 1662681312.906,
"status": "ACTIVE",
"schemaDefinition": {
"allColumns": [
{
"name": "id",
"type": "int"
},
{
"name": "date",
"type": "timestamp"
},
{
"name": "name",
"type": "text"
}
],
"partitionKeys": [
{
"name": "id"
}
],
"clusteringKeys": [],
"staticColumns": []
},
"capacitySpecification": {
"throughputMode": "PAY_PER_REQUEST",
"lastUpdateToPayPerRequestTimestamp": 1662681312.906
},
"encryptionSpecification": {
"type": "AWS_OWNED_KMS_KEY"
},
"pointInTimeRecovery": {
"status": "DISABLED"
Configure client-side timestamps 348

Amazon Keyspaces (for Apache Cassandra) Developer Guide
},
"clientSideTimestamps": {
"status": "ENABLED"
},
"ttl": {
"status": "ENABLED"
},
"defaultTimeToLive": 0,
"comment": {
"message": ""
}
}
Use client-side timestamps in queries in Amazon Keyspaces
After you have turned on client-side timestamps, you can pass the timestamp in your INSERT,
UPDATE, and DELETE statements with the USING TIMESTAMP clause.
The timestamp value is a bigint representing a number of microseconds since the standard base
time known as the epoch: January 1 1970 at 00:00:00 GMT. A timestamp that is supplied by the
client has to fall between the range of 2 days in the past and 5 minutes in the future from the
current wall clock time.
Amazon Keyspaces keeps timestamp metadata for the life of the data. You can use the WRITETIME
function to look up timestamps that occurred years in the past. For more information about CQL
syntax, see the section called “DML statements”.
The following CQL statement is an example of how to use a timestamp as an update_parameter.
INSERT INTO catalog.book_awards (year, award, rank, category, book_title, author,
publisher)
VALUES (2022, 'Wolf', 4, 'Non-Fiction', 'Science Update', 'Ana Carolina Silva',
'SomePublisher')
USING TIMESTAMP 1669069624;
If you do not specify a timestamp in your CQL query, Amazon Keyspaces uses the timestamp
passed by your client driver. If no timestamp is supplied by the client driver, Amazon Keyspaces
assigns a server-side timestamp for your write operation.
To see the timestamp value that is stored for a specific column, you can use the WRITETIME
function in a SELECT statement as shown in the following example.
Use client-side timestamps in queries 349

Amazon Keyspaces (for Apache Cassandra) Developer Guide
SELECT year, award, rank, category, book_title, author, publisher, WRITETIME(year),
WRITETIME(award), WRITETIME(rank),
WRITETIME(category), WRITETIME(book_title), WRITETIME(author), WRITETIME(publisher)
from catalog.book_awards;
Working with CQL queries in Amazon Keyspaces
This section gives an introduction into working with queries in Amazon Keyspaces (for Apache
Cassandra). The CQL statements available to query, transform, and manage data are SELECT,
INSERT, UPDATE, and DELETE. The following topics outline some of the more complex options
available when working with queries. For the complete language syntax with examples, see the
section called “DML statements”.
Topics
• Use the IN operator with the SELECT statement in a query in Amazon Keyspaces
• Order results with ORDER BY in Amazon Keyspaces
• Paginate results in Amazon Keyspaces
Use the IN operator with the SELECT statement in a query in Amazon
Keyspaces
SELECT IN
You can query data from tables using the SELECT statement, which reads one or more columns
for one or more rows in a table and returns a result-set containing the rows matching the request.
A SELECT statement contains a select_clause that determines which columns to read and to
return in the result-set. The clause can contain instructions to transform the data before returning
it. The optional WHERE clause specifies which rows must be queried and is composed of relations
on the columns that are part of the primary key. Amazon Keyspaces supports the IN keyword in
the WHERE clause. This section uses examples to show how Amazon Keyspaces processes SELECT
statements with the IN keyword.
This examples demonstrates how Amazon Keyspaces breaks down the SELECT statement
with the IN keyword into subqueries. In this example we use a table with the name
my_keyspace.customers. The table has one primary key column department_id, two
Working with CQL queries 350

Amazon Keyspaces (for Apache Cassandra) Developer Guide
clustering columns sales_region_id and sales_representative_id, and one column that
contains the name of the customer in the customer_name column.
SELECT * FROM my_keyspace.customers;
department_id | sales_region_id | sales_representative_id | customer_name
---------------+-----------------+-------------------------+--------------
0 | 0 | 0 | a
0 | 0 | 1 | b
0 | 1 | 0 | c
0 | 1 | 1 | d
1 | 0 | 0 | e
1 | 0 | 1 | f
1 | 1 | 0 | g
1 | 1 | 1 | h
Using this table, you can run the following SELECT statement to find the customers in the
departments and sales regions that you are interested in with the IN keyword in the WHERE clause.
The following statement is an example of this.
SELECT * FROM my_keyspace.customers WHERE department_id IN (0, 1) AND sales_region_id
IN (0, 1);
Amazon Keyspaces divides this statement into four subqueries as shown in the following output.
SELECT * FROM my_keyspace.customers WHERE department_id = 0 AND sales_region_id = 0;
department_id | sales_region_id | sales_representative_id | customer_name
---------------+-----------------+-------------------------+--------------
0 | 0 | 0 | a
0 | 0 | 1 | b
SELECT * FROM my_keyspace.customers WHERE department_id = 0 AND sales_region_id = 1;
department_id | sales_region_id | sales_representative_id | customer_name
---------------+-----------------+-------------------------+--------------
0 | 1 | 0 | c
0 | 1 | 1 | d
SELECT * FROM my_keyspace.customers WHERE department_id = 1 AND sales_region_id = 0;
department_id | sales_region_id | sales_representative_id | customer_name
Use IN SELECT
351

Amazon Keyspaces (for Apache Cassandra) Developer Guide
---------------+-----------------+-------------------------+--------------
1 | 0 | 0 | e
1 | 0 | 1 | f
SELECT * FROM my_keyspace.customers WHERE department_id = 1 AND sales_region_id = 1;
department_id | sales_region_id | sales_representative_id | customer_name
---------------+-----------------+-------------------------+--------------
1 | 1 | 0 | g
1 | 1 | 1 | h
When the IN keyword is used, Amazon Keyspaces automatically paginates the results in any of the
following cases:
• After every 10th subquery is processed.
• After processing 1MB of logical IO.
•
If you configured a PAGE SIZE, Amazon Keyspaces paginates after reading the number of
queries for processing based on the set PAGE SIZE.
•
When you use the LIMIT keyword to reduce the number of rows returned, Amazon Keyspaces
paginates after reading the number of queries for processing based on the set LIMIT.
The following table is used to illustrate this with an example.
For more information about pagination, see the section called “Paginate results”.
SELECT * FROM my_keyspace.customers;
department_id | sales_region_id | sales_representative_id | customer_name
---------------+-----------------+-------------------------+--------------
2 | 0 | 0 | g
2 | 1 | 1 | h
2 | 2 | 2 | i
0 | 0 | 0 | a
0 | 1 | 1 | b
0 | 2 | 2 | c
1 | 0 | 0 | d
1 | 1 | 1 | e
1 | 2 | 2 | f
3 | 0 | 0 | j
3 | 1 | 1 | k
Use IN SELECT
352

Amazon Keyspaces (for Apache Cassandra) Developer Guide
3 | 2 | 2 | l
You can run the following statement on this table to see how pagination works.
SELECT * FROM my_keyspace.customers WHERE department_id IN (0, 1, 2, 3) AND
sales_region_id IN (0, 1, 2) AND sales_representative_id IN (0, 1);
Amazon Keyspaces processes this statement as 24 subqueries, because the cardinality of the
Cartesian product of all the IN terms contained in this query is 24.
department_id | sales_region_id | sales_representative_id | customer_name
---------------+-----------------+-------------------------+--------------
0 | 0 | 0 | a
0 | 1 | 1 | b
1 | 0 | 0 | d
1 | 1 | 1 | e
---MORE---
department_id | sales_region_id | sales_representative_id | customer_name
---------------+-----------------+-------------------------+--------------
2 | 0 | 0 | g
2 | 1 | 1 | h
3 | 0 | 0 | j
---MORE---
department_id | sales_region_id | sales_representative_id | customer_name
---------------+-----------------+-------------------------+--------------
3 | 1 | 1 | k
This example shows how you can use the ORDER BY clause in a SELECT statement with the IN
keyword.
SELECT * FROM my_keyspace.customers WHERE department_id IN (3, 2, 1) ORDER BY
sales_region_id DESC;
department_id | sales_region_id | sales_representative_id | customer_name
---------------+-----------------+-------------------------+--------------
3 | 2 | 2 | l
3 | 1 | 1 | k
3 | 0 | 0 | j
2 | 2 | 2 | i
Use IN SELECT
353

Amazon Keyspaces (for Apache Cassandra) Developer Guide
2 | 1 | 1 | h
2 | 0 | 0 | g
1 | 2 | 2 | f
1 | 1 | 1 | e
1 | 0 | 0 | d
Subqueries are processed in the order in which the partition key and clustering key columns are
presented in the query. In the example below, subqueries for partition key value ”2“ are processed
first, followed by subqueries for partition key value ”3“ and ”1“. Results of a given subquery are
ordered according to the query's ordering clause, if present, or the table's clustering order defined
during table creation.
SELECT * FROM my_keyspace.customers WHERE department_id IN (2, 3, 1) ORDER BY
sales_region_id DESC;
department_id | sales_region_id | sales_representative_id | customer_name
---------------+-----------------+-------------------------+--------------
2 | 2 | 2 | i
2 | 1 | 1 | h
2 | 0 | 0 | g
3 | 2 | 2 | l
3 | 1 | 1 | k
3 | 0 | 0 | j
1 | 2 | 2 | f
1 | 1 | 1 | e
1 | 0 | 0 | d
Order results with ORDER BY in Amazon Keyspaces
The ORDER BY clause specifies the sort order of the results returned in a SELECT statement. The
statement takes a list of column names as arguments and for each column you can specify the
sort order for the data. You can only specify clustering columns in ordering clauses, non-clustering
columns are not allowed.
The two available sort order options for the returned results are ASC for ascending and DESC for
descending sort order.
SELECT * FROM my_keyspace.my_table ORDER BY (col1 ASC, col2 DESC, col3 ASC);
col1 | col2 | col3
------+------+------
Order results 354

Amazon Keyspaces (for Apache Cassandra) Developer Guide
0 | 6 | a
1 | 5 | b
2 | 4 | c
3 | 3 | d
4 | 2 | e
5 | 1 | f
6 | 0 | g
SELECT * FROM my_keyspace.my_table ORDER BY (col1 DESC, col2 ASC, col3 DESC);
col1 | col2 | col3
------+------+------
6 | 0 | g
5 | 1 | f
4 | 2 | e
3 | 3 | d
2 | 4 | c
1 | 5 | b
0 | 6 | a
If you don't specify the sort order in the query statement, the default ordering of the clustering
column is used.
The possible sort orders you can use in an ordering clause depend on the sort order assigned to
each clustering column at table creation. Query results can only be sorted in the order defined
for all clustering columns at table creation or the inverse of the defined sort order. Other possible
combinations are not allowed.
For example, if the table's CLUSTERING ORDER is (col1 ASC, col2 DESC, col3 ASC), then the valid
parameters for ORDER BY are either (col1 ASC, col2 DESC, col3 ASC) or (col1 DESC, col2 ASC, col3
DESC). For more information on CLUSTERING ORDER, see table_options under the section
called “CREATE TABLE”.
Paginate results in Amazon Keyspaces
Amazon Keyspaces automatically paginates the results from SELECT statements when the data
read to process the SELECT statement exceeds 1 MB. With pagination, the SELECT statement
results are divided into "pages" of data that are 1 MB in size (or less). An application can process the
first page of results, then the second page, and so on. Clients should always check for pagination
tokens when processing SELECT queries that return multiple rows.
Paginate results 355

Amazon Keyspaces (for Apache Cassandra) Developer Guide
If a client supplies a PAGE SIZE that requires reading more than 1 MB of data, Amazon Keyspaces
breaks up the results automatically into multiple pages based on the 1 MB data-read increments.
For example, if the average size of a row is 100 KB and you specify a PAGE SIZE of 20, Amazon
Keyspaces paginates data automatically after it reads 10 rows (1000 KB of data read).
Because Amazon Keyspaces paginates results based on the number of rows that it reads to process
a request and not the number of rows returned in the result set, some pages may not contain any
rows if you are running filtered queries.
For example, if you set PAGE SIZE to 10 and Keyspaces evaluates 30 rows to process your SELECT
query, Amazon Keyspaces will return three pages. If only a subset of the rows matched your query,
some pages may have less than 10 rows. For an example how the PAGE SIZE of LIMIT queries
can affect read capacity, see the section called “Estimate the read capacity consumption of limit
queries”.
For a comparison with Apache Cassandra pagination, see the section called “Pagination”.
Working with partitioners in Amazon Keyspaces
In Apache Cassandra, partitioners control which nodes data is stored on in the cluster. Partitioners
create a numeric token using a hashed value of the partition key. Cassandra uses this token to
distribute data across nodes. Clients can also use these tokens in SELECT operations and WHERE
clauses to optimize read and write operations. For example, clients can efficiently perform parallel
queries on large tables by specifying distinct token ranges to query in each parallel job.
Amazon Keyspaces provides three different partitioners.
Murmur3Partitioner (Default)
Apache Cassandra-compatible Murmur3Partitioner. The Murmur3Partitioner is the
default Cassandra partitioner in Amazon Keyspaces and in Cassandra 1.2 and later versions.
RandomPartitioner
Apache Cassandra-compatible RandomPartitioner. The RandomPartitioner is the default
Cassandra partitioner for versions earlier than Cassandra 1.2.
Keyspaces Default Partitioner
The DefaultPartitioner returns the same token function results as the
RandomPartitioner.
Working with partitioners 356

Amazon Keyspaces (for Apache Cassandra) Developer Guide
The partitioner setting is applied per Region at the account level. For example, if you change the
partitioner in US East (N. Virginia), the change is applied to all tables in the same account in this
Region. You can safely change your partitioner at any time. Note that the configuration change
takes approximately 10 minutes to complete. You do not need to reload your Amazon Keyspaces
data when you change the partitioner setting. Clients will automatically use the new partitioner
setting the next time they connect.
How to change the partitioner in Amazon Keyspaces
You can change the partitioner by using the AWS Management Console or Cassandra Query
Language (CQL).
AWS Management Console
To change the partitioner using the Amazon Keyspaces console
1. Sign in to the AWS Management Console, and open the Amazon Keyspaces console at
https://console.aws.amazon.com/keyspaces/home.
2. In the navigation pane, choose Configuration.
3. On the Configuration page, go to Edit partitioner.
4. Select the partitioner compatible with your version of Cassandra. The partitioner change
takes approximately 10 minutes to apply.
Note
After the configuration change is complete, you have to disconnect and reconnect
to Amazon Keyspaces for requests to use the new partitioner.
Cassandra Query Language (CQL)
1. To see which partitioner is configured for the account, you can use the following query.
SELECT partitioner from system.local;
If the partitioner hasn't been changed, the query has the following output.
partitioner
Change the partitioner 357

Amazon Keyspaces (for Apache Cassandra) Developer Guide
--------------------------------------------
com.amazonaws.cassandra.DefaultPartitioner
2.
To update the partitioner to the Murmur3 partitioner, you can use the following statement.
UPDATE system.local set
partitioner='org.apache.cassandra.dht.Murmur3Partitioner' where key='local';
3. Note that this configuration change takes approximately 10 minutes to complete. To
confirm that the partitioner has been set, you can run the SELECT query again. Note that
due to eventual read consistency, the response might not reflect the results of the recently
completed partitioner change yet. If you repeat the SELECT operation again after a short
time, the response should return the latest data.
SELECT partitioner from system.local;
Note
You have to disconnect and reconnect to Amazon Keyspaces so that requests use
the new partitioner.
Using this service with an AWS SDK
AWS software development kits (SDKs) are available for many popular programming languages.
Each SDK provides an API, code examples, and documentation that make it easier for developers to
build applications in their preferred language.
SDK documentation Code examples
AWS SDK for C++ AWS SDK for C++ code examples
AWS CLI AWS CLI code examples
AWS SDK for Go AWS SDK for Go code examples
AWS SDK for Java AWS SDK for Java code examples
AWS SDK for JavaScript AWS SDK for JavaScript code examples
Working with AWS SDKs 358

Amazon Keyspaces (for Apache Cassandra) Developer Guide
SDK documentation Code examples
AWS SDK for Kotlin AWS SDK for Kotlin code examples
AWS SDK for .NET AWS SDK for .NET code examples
AWS SDK for PHP AWS SDK for PHP code examples
AWS Tools for PowerShell Tools for PowerShell code examples
AWS SDK for Python (Boto3) AWS SDK for Python (Boto3) code examples
AWS SDK for Ruby AWS SDK for Ruby code examples
AWS SDK for Rust AWS SDK for Rust code examples
AWS SDK for SAP ABAP AWS SDK for SAP ABAP code examples
AWS SDK for Swift AWS SDK for Swift code examples
Example availability
Can't find what you need? Request a code example by using the Provide feedback link at
the bottom of this page.
Working with tags and labels for Amazon Keyspaces resources
You can label Amazon Keyspaces (for Apache Cassandra) resources using tags. Tags let you
categorize your resources in different ways—for example, by purpose, owner, environment, or other
criteria. Tags can help you do the following:
• Quickly identify a resource based on the tags that you assigned to it.
• See AWS bills broken down by tags.
• Control access to Amazon Keyspaces resources based on tags. For IAM policy examples using
tags, see the section called “Authorization based on Amazon Keyspaces tags”.
Working with tags 359

Amazon Keyspaces (for Apache Cassandra) Developer Guide
Tagging is supported by AWS services like Amazon Elastic Compute Cloud (Amazon EC2), Amazon
Simple Storage Service (Amazon S3), Amazon Keyspaces, and more. Efficient tagging can provide
cost insights by enabling you to create reports across services that carry a specific tag.
To get started with tagging, do the following:
1. Understand Restrictions for using tags to label resources in Amazon Keyspaces.
2. Create tags by using Tag keyspaces and tables in Amazon Keyspaces.
3. Use Create cost allocation reports using tags for Amazon Keyspaces to track your AWS costs per
active tag.
Finally, it is good practice to follow optimal tagging strategies. For information, see AWS tagging
strategies.
Restrictions for using tags to label resources in Amazon Keyspaces
Each tag consists of a key and a value, both of which you define. The following restrictions apply:
• Each Amazon Keyspaces keyspace or table can have only one tag with the same key. If you try to
add an existing tag (same key), the existing tag value is updated to the new value.
• Tags applied to a keyspace do not automatically apply to tables within that keyspace. To apply
the same tag to a keyspace and all its tables, each resource must be individually tagged.
• When you create a multi-Region keyspace or table, any tags that you define during the creation
process are automatically applied to all keyspaces and tables in all Regions. When you change
existing tags using ALTER KEYSPACE or ALTER TABLE, the update is only applied to the
keyspace or table in the Region where you're making the change.
• A value acts as a descriptor within a tag category (key). In Amazon Keyspaces the value cannot be
empty or null.
• Tag keys and values are case sensitive.
• The maximum key length is 128 Unicode characters.
• The maximum value length is 256 Unicode characters.
• The allowed characters are letters, white space, and numbers, plus the following special
characters: + - = . _ : /
• The maximum number of tags per resource is 50.
Tagging restrictions 360

Amazon Keyspaces (for Apache Cassandra) Developer Guide
•
AWS-assigned tag names and values are automatically assigned the aws: prefix, which you can't
assign. AWS-assigned tag names don't count toward the tag limit of 50. User-assigned tag names
have the prefix user: in the cost allocation report.
• You can't backdate the application of a tag.
Tag keyspaces and tables in Amazon Keyspaces
You can add, list, edit, or delete tags for keyspaces and tables using the Amazon Keyspaces (for
Apache Cassandra) console, the AWS CLI, or Cassandra Query Language (CQL). You can then
activate these user-defined tags so that they appear on the AWS Billing and Cost Management
console for cost allocation tracking. For more information, see Create cost allocation reports using
tags for Amazon Keyspaces.
For bulk editing, you can also use Tag Editor on the console. For more information, see Working
with Tag Editor in the AWS Resource Groups User Guide.
For information about tag structure, see Restrictions for using tags to label resources in Amazon
Keyspaces.
Topics
• Add tags when creating a new keyspace
• Add tags to a keyspace
• Delete tags from a keyspace
• View the tags of a keyspace
• Add tags when creating a new table
• Add tags to a table
• Delete tags from a table
• View the tags of a table
Add tags when creating a new keyspace
You can use the Amazon Keyspaces console, CQL or the AWS CLI to add tags when you create a
new keyspace.
Tag keyspaces and tables 361

Amazon Keyspaces (for Apache Cassandra) Developer Guide
Console
Set a tag when creating a new keyspace using the console
1. Sign in to the AWS Management Console, and open the Amazon Keyspaces console at
https://console.aws.amazon.com/keyspaces/home.
2. In the navigation pane, choose Keyspaces, and then choose Create keyspace.
3. On the Create keyspace page, provide a name for the keyspace.
4. Under Tags choose Add new tag and enter a key and a value.
5. Choose Create keyspace.
Cassandra Query Language (CQL)
Set a tag when creating a new keyspace using CQL
• The following example creates a new keyspace with tags.
CREATE KEYSPACE mykeyspace WITH TAGS = {'key1':'val1', 'key2':'val2'};
CLI
Set a tag when creating a new keyspace using the AWS CLI
• The following statement creates a new keyspace with tags.
aws keyspaces create-keyspace --keyspace-name 'myKeyspace' --tags
'key=key1,value=val1' 'key=key2,value=val2'
Add tags to a keyspace
The following examples show how to add tags to a keyspace in Amazon Keyspaces.
Console
Add a tag to an existing keyspace using the console
1. Sign in to the AWS Management Console, and open the Amazon Keyspaces console at
https://console.aws.amazon.com/keyspaces/home.
Tag keyspaces and tables 362

Amazon Keyspaces (for Apache Cassandra) Developer Guide
2. In the navigation pane, choose Keyspaces.
3. Choose a keyspace from the list. Then choose the Tags tab where you can view the tags of
the keyspace.
4. Choose Manage tags to add, edit, or delete tags.
5. Choose Save changes.
Cassandra Query Language (CQL)
Add a tag to an existing keyspace using CQL
•
ALTER KEYSPACE mykeyspace ADD TAGS {'key1':'val1', 'key2':'val2'};
CLI
Add a tag to an existing keyspace using the AWS CLI
• The following example shows how to add new tags to an existing keyspace.
aws keyspaces tag-resource --resource-arn 'arn:aws:cassandra:us-
east-1:111222333444:/keyspace/myKeyspace/' --tags 'key=key3,value=val3'
'key=key4,value=val4'
Delete tags from a keyspace
Console
Delete a tag from an existing keyspace using the console
1. Sign in to the AWS Management Console, and open the Amazon Keyspaces console at
https://console.aws.amazon.com/keyspaces/home.
2. In the navigation pane, choose Keyspaces.
3. Choose a keyspace from the list. Then choose the Tags tab where you can view the tags of
the keyspace.
4. Choose Manage tags and delete the tags you don't need anymore.
5. Choose Save changes.
Tag keyspaces and tables 363
Amazon Keyspaces (for Apache Cassandra) Developer Guide
Cassandra Query Language (CQL)
Delete a tag from an existing keyspace using CQL
•
ALTER KEYSPACE mykeyspace DROP TAGS {'key1':'val1', 'key2':'val2'};
CLI
Delete a tag from an existing keyspace using the AWS CLI
• The following statement removes the specified tags from a keyspace.
aws keyspaces untag-resource --resource-arn 'arn:aws:cassandra:us-
east-1:111222333444:/keyspace/myKeyspace/' --tags 'key=key3,value=val3'
'key=key4,value=val4'
View the tags of a keyspace
The following examples show how to read tags using the console, CQL or the AWS CLI.
Console
View the tags of a keyspace using the Amazon Keyspaces console
1. Sign in to the AWS Management Console, and open the Amazon Keyspaces console at
https://console.aws.amazon.com/keyspaces/home.
2. In the navigation pane, choose Keyspaces.
3. Choose a keyspace from the list. Then choose the Tags tab where you can view the tags of
the keyspace.
Cassandra Query Language (CQL)
View the tags of a keyspace using CQL
To read the tags attached to a keyspace, use the following CQL statement.
SELECT * FROM system_schema_mcs.tags WHERE valid_where_clause;
Tag keyspaces and tables 364

Amazon Keyspaces (for Apache Cassandra) Developer Guide
The WHERE clause is required, and must use one of the following formats:
•
keyspace_name = 'mykeyspace' AND resource_type = 'keyspace'
•
resource_id = arn
• The following statement shows whether a keyspace has tags.
SELECT * FROM system_schema_mcs.tags WHERE keyspace_name = 'mykeyspace' AND
resource_type = 'keyspace';
The output of the query looks like the following.
resource_id | keyspace_name
| resource_name | resource_type | tags
-----------------------------------------------------------------
+---------------+---------------+---------------+------
arn:aws:cassandra:us-east-1:123456789:/keyspace/mykeyspace/ | mykeyspace
| mykeyspace | keyspace | {'key1': 'val1', 'key2': 'val2'}
CLI
View the tags of a keyspace using the AWS CLI
• This example shows how to list the tags of the specified resource.
aws keyspaces list-tags-for-resource --resource-arn 'arn:aws:cassandra:us-
east-1:111222333444:/keyspace/myKeyspace/'
The output of the last command looks like this.
{
"tags": [
{
"key": "key1",
"value": "val1"
},
{
"key": "key2",
Tag keyspaces and tables 365

Amazon Keyspaces (for Apache Cassandra) Developer Guide
"value": "val2"
},
{
"key": "key3",
"value": "val3"
},
{
"key": "key4",
"value": "val4"
}
]
}
Add tags when creating a new table
You can use the Amazon Keyspaces console, CQL or the AWS CLI to add tags to new keyspaces and
tables when you create them.
Console
Add a tag when creating a new table using the (console)
1. Sign in to the AWS Management Console, and open the Amazon Keyspaces console at
https://console.aws.amazon.com/keyspaces/home.
2. In the navigation pane, choose Tables, and then choose Create table.
3. On the Create table page in the Table details section, select a keyspace and provide a
name for the table.
4. In the Schema section, create the schema for your table.
5. In the Table settings section, choose Customize settings.
6. Continue to the Table tags – optional section, and choose Add new tag to create new tags.
7. Choose Create table.
Cassandra Query Language (CQL)
Add tags when creating a new table using CQL
• The following example creates a new table with tags.
Tag keyspaces and tables 366

Amazon Keyspaces (for Apache Cassandra) Developer Guide
CREATE TABLE mytable(...) WITH TAGS = {'key1':'val1', 'key2':'val2'};
CLI
Add tags when creating a new table using the AWS CLI
• The following example shows how to create a new table with tags. The command creates
a table myTable in an already existing keyspace myKeyspace. Note that the command has
been broken up into different lines to help with readability.
aws keyspaces create-table --keyspace-name 'myKeyspace' --table-name 'myTable'
--schema-definition 'allColumns=[{name=id,type=int},
{name=name,type=text},{name=date,type=timestamp}],partitionKeys=[{name=id}]'
--tags 'key=key1,value=val1' 'key=key2,value=val2'
Add tags to a table
You can add tags to an existing table in Amazon Keyspaces using the console, CQL or the AWS CLI.
Console
Add tags to a table using the Amazon Keyspaces console
1. Sign in to the AWS Management Console, and open the Amazon Keyspaces console at
https://console.aws.amazon.com/keyspaces/home.
2. In the navigation pane, choose Tables.
3. Choose a table from the list and choose the Tags tab.
4. Choose Manage tags to add tags to the table.
5. Choose Save changes.
Cassandra Query Language (CQL)
Add tags to a table using CQL
• The following statement shows how to add tags to an existing table.
Tag keyspaces and tables 367

Amazon Keyspaces (for Apache Cassandra) Developer Guide
ALTER TABLE mykeyspace.mytable ADD TAGS {'key1':'val1', 'key2':'val2'};
CLI
Add tags to a table using the AWS CLI
• The following example shows how to add new tags to an existing table.
aws keyspaces tag-resource --resource-arn 'arn:aws:cassandra:us-
east-1:111222333444:/keyspace/myKeyspace/table/myTable' --tags
'key=key3,value=val3' 'key=key4,value=val4'
Delete tags from a table
Console
Delete tags from a table using the Amazon Keyspaces console
1. Sign in to the AWS Management Console, and open the Amazon Keyspaces console at
https://console.aws.amazon.com/keyspaces/home.
2. In the navigation pane, choose Tables.
3. Choose a table from the list and choose the Tags tab.
4. Choose Manage tags to delete tags from the table.
5. Choose Save changes.
Cassandra Query Language (CQL)
Delete tags from a table using CQL
• The following statement shows how to delete tags from an existing table.
ALTER TABLE mytable DROP TAGS {'key3':'val3', 'key4':'val4'};
Tag keyspaces and tables 368

Amazon Keyspaces (for Apache Cassandra) Developer Guide
CLI
Add tags to a table using the AWS CLI
• The following statement removes the specified tags from a keyspace.
aws keyspaces untag-resource --resource-arn 'arn:aws:cassandra:us-
east-1:111222333444:/keyspace/myKeyspace/table/myTable' --tags
'key=key3,value=val3' 'key=key4,value=val4'
View the tags of a table
The following examples show how to the tags of a table in Amazon Keyspaces using the console,
CQL, or the AWS CLI.
Console
View the tags of a table using the console
1. Sign in to the AWS Management Console, and open the Amazon Keyspaces console at
https://console.aws.amazon.com/keyspaces/home.
2. In the navigation pane, choose Tables.
3. Choose a table from the list and choose the Tags tab.
Cassandra Query Language (CQL)
View the tags of a table using CQL
To read the tags attached to a table, use the following CQL statement.
SELECT * FROM system_schema_mcs.tags WHERE valid_where_clause;
The WHERE clause is required, and must use one of the following formats:
•
keyspace_name = 'mykeyspace' AND resource_name = 'mytable'
•
resource_id = arn
• The following query returns the tags of the specified table.
Tag keyspaces and tables 369

Amazon Keyspaces (for Apache Cassandra) Developer Guide
SELECT * FROM system_schema_mcs.tags WHERE keyspace_name = 'mykeyspace' AND
resource_name = 'mytable';
The output of that query looks like the following.
resource_id |
keyspace_name | resource_name | resource_type | tags
----------------------------------------------------------------------------
+---------------+---------------+---------------+------
arn:aws:cassandra:us-east-1:123456789:/keyspace/mykeyspace/table/mytable
| mykeyspace | mytable | table | {'key1': 'val1', 'key2':
'val2'}
CLI
View the tags of a table using the AWS CLI
• This example shows how to list the tags of the specified resource.
aws keyspaces list-tags-for-resource --resource-arn 'arn:aws:cassandra:us-
east-1:111222333444:/keyspace/myKeyspace/table/myTable'
The output of the last command looks like this.
{
"tags": [
{
"key": "key1",
"value": "val1"
},
{
"key": "key2",
"value": "val2"
},
{
"key": "key3",
"value": "val3"
},
Tag keyspaces and tables 370

Amazon Keyspaces (for Apache Cassandra) Developer Guide
{
"key": "key4",
"value": "val4"
}
]
}
Create cost allocation reports using tags for Amazon Keyspaces
AWS uses tags to organize resource costs on your cost allocation report. AWS provides two types of
cost allocation tags:
• An AWS-generated tag. AWS defines, creates, and applies this tag for you.
• User-defined tags. You define, create, and apply these tags.
You must activate both types of tags separately before they can appear in Cost Explorer or on a
cost allocation report.
To activate AWS-generated tags:
1. Sign in to the AWS Management Console and open the Billing and Cost Management console at
https://console.aws.amazon.com/billing/home#/.
2. In the navigation pane, choose Cost Allocation Tags.
3. Under AWS-Generated Cost Allocation Tags, choose Activate.
To activate user-defined tags:
1. Sign in to the AWS Management Console and open the Billing and Cost Management console at
https://console.aws.amazon.com/billing/home#/.
2. In the navigation pane, choose Cost Allocation Tags.
3. Under User-Defined Cost Allocation Tags, choose Activate.
After you create and activate tags, AWS generates a cost allocation report with your usage and
costs grouped by your active tags. The cost allocation report includes all of your AWS costs for each
billing period. The report includes both tagged and untagged resources, so that you can clearly
organize the charges for resources.
Create cost allocation reports 371

Amazon Keyspaces (for Apache Cassandra) Developer Guide
Note
Currently, any data transferred out from Amazon Keyspaces won't be broken down by tags
on cost allocation reports.
For more information, see Using cost allocation tags.
Create Amazon Keyspaces resources with AWS CloudFormation
Amazon Keyspaces is integrated with AWS CloudFormation, a service that helps you model and set
up your AWS keyspaces and tables so that you can spend less time creating and managing your
resources and infrastructure. You create a template that describes the keyspaces and tables that
you want, and AWS CloudFormation takes care of provisioning and configuring those resources for
you.
When you use AWS CloudFormation, you can reuse your template to set up your Amazon
Keyspaces resources consistently and repeatedly. Just describe your resources once, and then
provision the same resources over and over in multiple AWS accounts and Regions.
Amazon Keyspaces and AWS CloudFormation templates
To provision and configure resources for Amazon Keyspaces, you must understand AWS
CloudFormation templates. Templates are formatted text files in JSON or YAML. These templates
describe the resources that you want to provision in your AWS CloudFormation stacks. If you're
unfamiliar with JSON or YAML, you can use AWS CloudFormation Designer to help you get started
with AWS CloudFormation templates. For more information, see What is AWS CloudFormation
designer? in the AWS CloudFormation User Guide.
Amazon Keyspaces supports creating keyspaces and tables in AWS CloudFormation. For the tables
you create using AWS CloudFormation templates, you can specify the schema, read/write mode,
provisioned throughput settings, and other supported features. For more information, including
examples of JSON and YAML templates for keyspaces and tables, see Cassandra resource type
reference in the AWS CloudFormation User Guide.
Learn more about AWS CloudFormation
To learn more about AWS CloudFormation, see the following resources:
Create AWS CloudFormation resources 372

Amazon Keyspaces (for Apache Cassandra) Developer Guide
• AWS CloudFormation
• AWS CloudFormation User Guide
• AWS CloudFormation command line interface User Guide
Using NoSQL Workbench with Amazon Keyspaces (for Apache
Cassandra)
NoSQL Workbench is a client-side application that helps you design and visualize nonrelational
data models for Amazon Keyspaces more easily. NoSQL Workbench clients are available for
Windows, macOS, and Linux.
Designing data models and creating resources automatically
NoSQL Workbench provides you a point-and-click interface to design and create Amazon
Keyspaces data models. You can easily create new data models from scratch by defining
keyspaces, tables, and columns. You can also import existing data models and make
modifications (such as adding, editing, or removing columns) to adapt the data models for
new applications. NoSQL Workbench then enables you to commit the data models to Amazon
Keyspaces or Apache Cassandra, and create the keyspaces and tables automatically. To learn
how to build data models, see the section called “Create a data model” and the section called
“Edit a data model”.
Visualizing data models
Using NoSQL Workbench, you can visualize your data models to help ensure that the data
models can support your application’s queries and access patterns. You can also save and export
your data models in a variety of formats for collaboration, documentation, and presentations.
For more information, see the section called “Visualize a data model”.
Topics
• Download NoSQL Workbench
• Getting started with NoSQL Workbench
• Visualize data models with NoSQL Workbench
• Create a new data model with NoSQL Workbench
• Edit existing data models with NoSQL Workbench
NoSQL Workbench 373

Amazon Keyspaces (for Apache Cassandra) Developer Guide
• How to commit data models to Amazon Keyspaces and Apache Cassandra
• Sample data models in NoSQL Workbench
• Release history for NoSQL Workbench
Download NoSQL Workbench
Follow these instructions to download and install NoSQL Workbench.
To download and install NoSQL Workbench
1. Use one of the following links to download NoSQL Workbench for free.
Operating System Download Link
macOS Download for macOS
Linux* Download for Linux
Windows Download for Windows
* NoSQL Workbench supports Ubuntu 12.04, Fedora 21, and Debian 8 or any newer versions of
these Linux distributions.
2. After the download completes, start the application and follow the onscreen instructions to
complete the installation.
Getting started with NoSQL Workbench
To get started with NoSQL Workbench, on the Database Catalog page in NoSQL Workbench,
choose Amazon Keyspaces, and then choose Launch.
Download 374

Amazon Keyspaces (for Apache Cassandra) Developer Guide
This opens the NoSQL Workbench home page for Amazon Keyspaces where you have the following
options to get started:
1. Create a new data model.
2. Import an existing data model in JSON format.
3. Open a recently edited data model.
4. Open one of the available sample models.
Getting started 375

Amazon Keyspaces (for Apache Cassandra) Developer Guide
Each of the options opens the NoSQL Workbench data modeler. To continue creating a new data
model, see the section called “Create a data model”. To edit an existing data model, see the section
called “Edit a data model”.
Visualize data models with NoSQL Workbench
Using NoSQL Workbench, you can visualize your data models to help ensure that the data models
can support your application’s queries and access patterns. You also can save and export your data
models in a variety of formats for collaboration, documentation, and presentations.
After you have created a new data model or edited an existing data model, you can visualize the
model.
Visualizing data models with NoSQL Workbench
When you have completed the data model in the data modeler, choose Visualize data model.
Visualize a data model 376
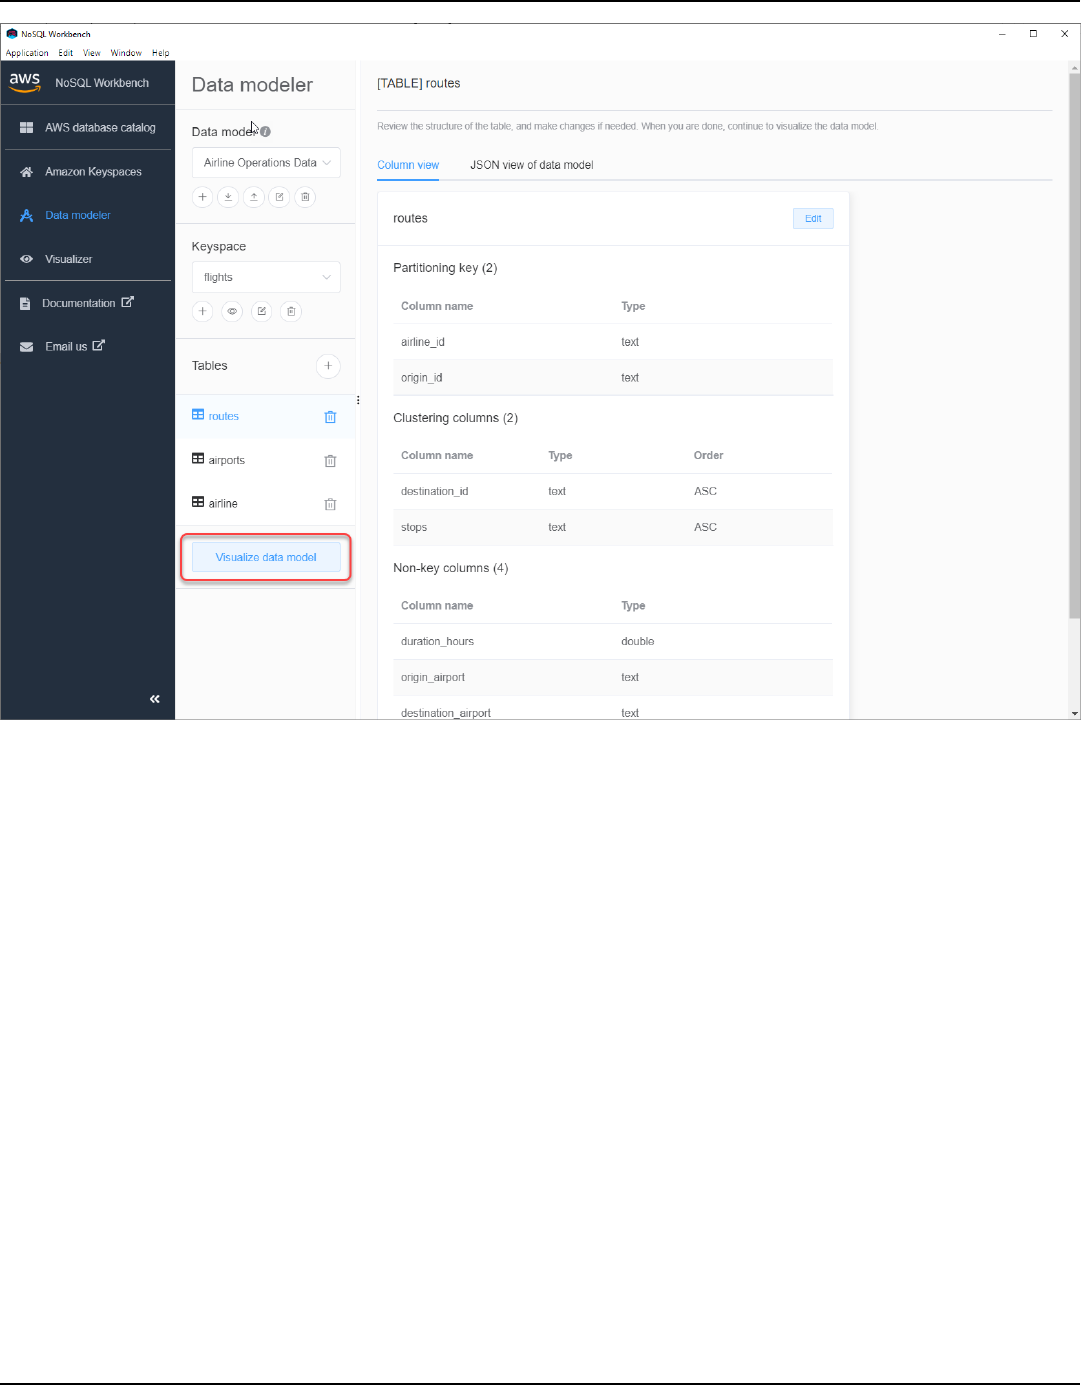
Amazon Keyspaces (for Apache Cassandra) Developer Guide
This takes you to the data visualizer in NoSQL Workbench. The data visualizer provides a visual
representation of the table's schema and lets you add sample data. To add sample data to a table,
choose a table from the model, and then choose Edit. To add a new row of data, choose Add new
row at the bottom of the screen. Choose Save when you're done.
Visualize a data model 377
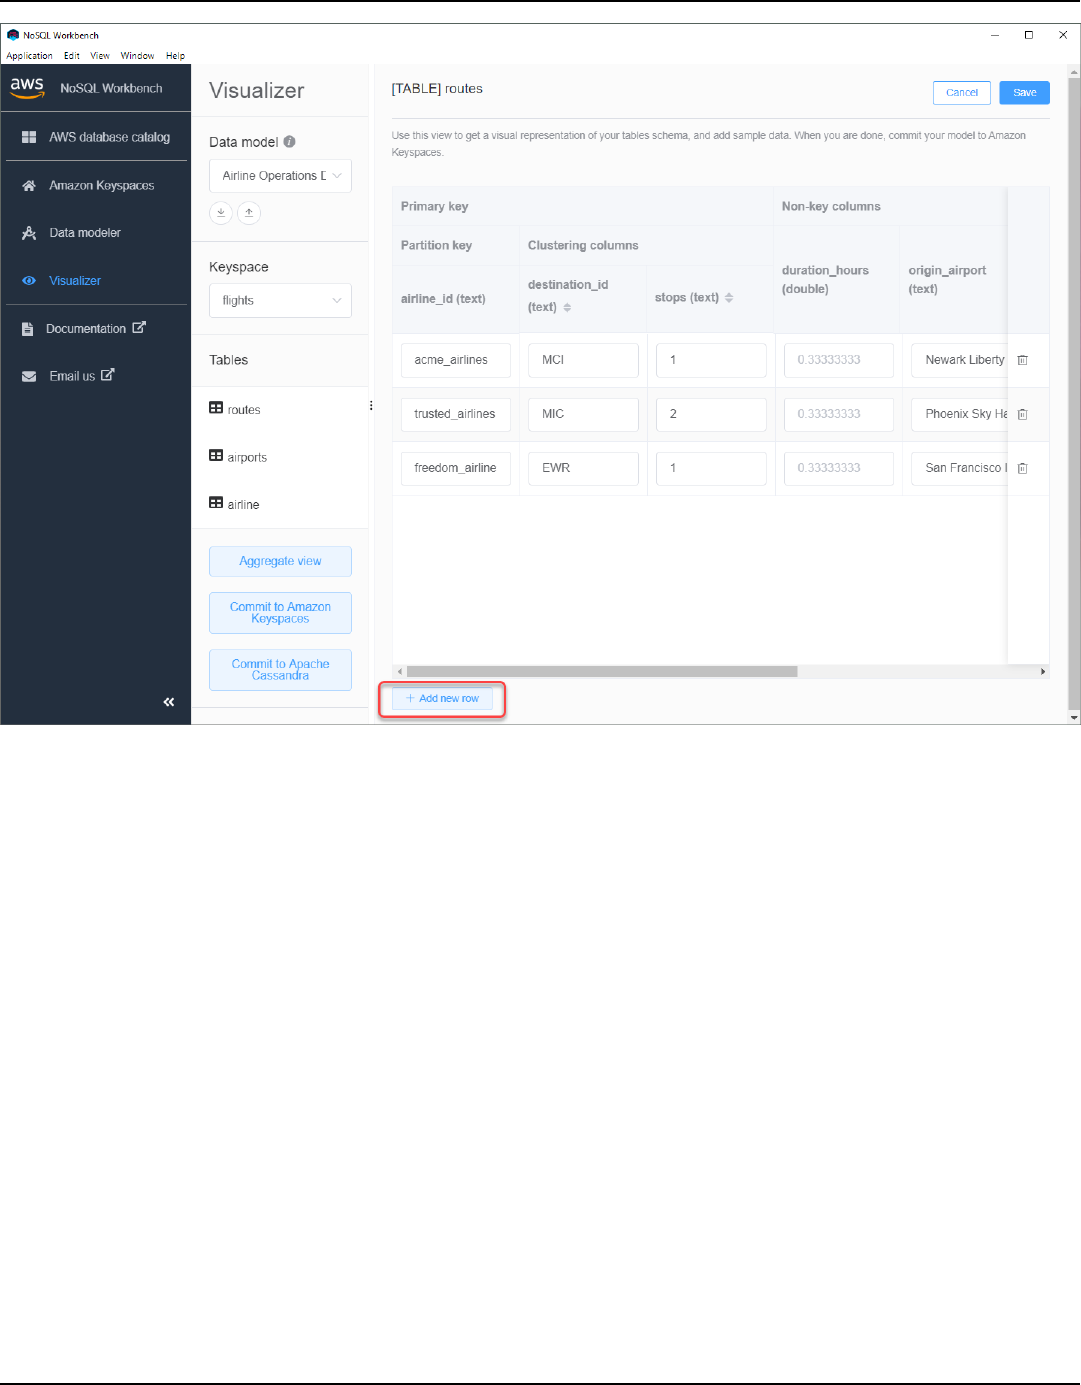
Amazon Keyspaces (for Apache Cassandra) Developer Guide
Aggregate view
After you have confirmed the table's schema, you can aggregate data model visualizations.
Visualize a data model 378

Amazon Keyspaces (for Apache Cassandra) Developer Guide
After you have aggregated the view of the data model, you can export the view to a PNG file. To
export the data model to a JSON file, choose the upload sign under the data model name.
Note
You can export the data model in JSON format at any time in the design process.
Visualize a data model 379

Amazon Keyspaces (for Apache Cassandra) Developer Guide
You have the following options to commit the changes:
• Commit to Amazon Keyspaces
• Commit to an Apache Cassandra cluster
To learn more about how to commit changes, see the section called “Commit a data model”.
Create a new data model with NoSQL Workbench
You can use the NoSQL Workbench data modeler to design new data models based on your
application's data access patterns. To create a new data model for Amazon Keyspaces, you can use
the NoSQL Workbench data modeler to create keyspaces, tables, and columns. Follow these steps
to create a new data model.
1. To create a new keyspace, choose the plus sign under Keyspace.
In this step, choose the following properties and settings.
Create a data model 380

Amazon Keyspaces (for Apache Cassandra) Developer Guide
• Keyspace name – Enter the name of the new keyspace.
• Replication strategy – Choose the replication strategy for the keyspace. Amazon Keyspaces
uses the SingleRegionStrategy to replicate data three times automatically in multiple AWS
Availability Zones. If you're planning to commit the data model to an Apache Cassandra
cluster, you can choose SimpleStrategy or NetworkTopologyStrategy.
• Keyspaces tags – Resource tags are optional and let you categorize your resources in
different ways—for example, by purpose, owner, environment, or other criteria. To learn
more about tags for Amazon Keyspaces resources, see the section called “Working with
tags”.
2. Choose Add keyspace definition to create the keyspace.
3. To create a new table, choose the plus sign next to Tables. In this step, you define the
following properties and settings.
• Table name – The name of the new table.
• Columns – Add a column name and choose the data type. Repeat these steps for every
column in your schema.
• Partition key – Choose columns for the partition key.
• Clustering columns – Choose clustering columns (optional).
Create a data model 381

Amazon Keyspaces (for Apache Cassandra) Developer Guide
• Capacity mode – Choose the read/write capacity mode for the table. You can choose
provisioned or on-demand capacity. To learn more about capacity modes, see the section
called “Configure read/write capacity modes”.
• Table tags – Resource tags are optional and let you categorize your resources in different
ways—for example, by purpose, owner, environment, or other criteria. To learn more about
tags for Amazon Keyspaces resources, see the section called “Working with tags”.
4. Choose Add table definition to create the new table.
5. Repeat these steps to create additional tables.
6. Continue to the section called “Visualizing a Data Model” to visualize the data model that you
created.
Edit existing data models with NoSQL Workbench
You can use the data modeler to import and modify existing data models created using NoSQL
Workbench. The data modeler also includes a few sample data models to help you get started with
Edit a data model 382

Amazon Keyspaces (for Apache Cassandra) Developer Guide
data modeling. The data models you can edit with NoSQL Workbench can be data models that are
imported from a file, the provided sample data models, or data models that you created previously.
1. To edit a keyspace, choose the edit symbol under Keyspace.
In this step, you can edit the following properties and settings.
• Keyspace name – Enter the name of the new keyspace.
• Replication strategy – Choose the replication strategy for the keyspace. Amazon Keyspaces
uses the SingleRegionStrategy to replicate data three times automatically in multiple AWS
Availability Zones. If you're planning to commit the data model to an Apache Cassandra
cluster, you can choose SimpleStrategy or NetworkTopologyStrategy.
• Keyspaces tags – Resource tags are optional and let you categorize your resources in
different ways—for example, by purpose, owner, environment, or other criteria. To learn
more about tags for Amazon Keyspaces resources, see the section called “Working with
tags”.
2. Choose Save edits to update the keyspace.
3. To edit a table, choose Edit next to the table name. In this step, you can update the following
properties and settings.
Edit a data model 383

Amazon Keyspaces (for Apache Cassandra) Developer Guide
• Table name – The name of the new table.
• Columns – Add a column name and choose the data type. Repeat these steps for every
column in your schema.
• Partition key – Choose columns for the partition key.
• Clustering columns – Choose clustering columns (optional).
• Capacity mode – Choose the read/write capacity mode for the table. You can choose
provisioned or on-demand capacity. To learn more about capacity modes, see the section
called “Configure read/write capacity modes”.
• Table tags – Resource tags are optional and let you categorize your resources in different
ways—for example, by purpose, owner, environment, or other criteria. To learn more about
tags for Amazon Keyspaces resources, see the section called “Working with tags”.
4. Choose Save edits to update the table.
5. Continue to the section called “Visualizing a Data Model” to visualize the data model that you
updated.
How to commit data models to Amazon Keyspaces and Apache
Cassandra
This section shows you how to commit completed data models to Amazon Keyspaces and Apache
Cassandra clusters. This process automatically creates the server-side resources for keyspaces and
tables based on the settings that you defined in the data model.
Commit a data model 384

Amazon Keyspaces (for Apache Cassandra) Developer Guide
Topics
• Before you begin
• Connect to Amazon Keyspaces with service-specific credentials
• Connect to Amazon Keyspaces with AWS Identity and Access Management (IAM) credentials
• Use a saved connection
• Commit to Apache Cassandra
Before you begin
Amazon Keyspaces requires the use of Transport Layer Security (TLS) to help secure connections
with clients. To connect to Amazon Keyspaces using TLS, you need to complete the following task
before you can start.
•
Download the Starfield digital certificate using the following command and save sf-class2-
root.crt locally or in your home directory.
Commit a data model 385

Amazon Keyspaces (for Apache Cassandra) Developer Guide
curl https://certs.secureserver.net/repository/sf-class2-root.crt -O
Note
You can also use the Amazon digital certificate to connect to Amazon Keyspaces and
can continue to do so if your client is connecting to Amazon Keyspaces successfully. The
Starfield certificate provides additional backwards compatibility for clients using older
certificate authorities.
curl https://certs.secureserver.net/repository/sf-class2-root.crt -O
After you have saved the certificate file, you can connect to Amazon Keyspaces. One option is
to connect by using service-specific credentials. Service-specific credentials are a user name and
password that are associated with a specific IAM user and can only be used with the specified
service. The second option is to connect with IAM credentials that are using the AWS Signature
Version 4 process (SigV4). To learn more about these two options, see the section called “Create
programmatic access credentials”.
To connect with service-specific credentials, see the section called “Connect with service-specific
credentials”.
To connect with IAM credentials, see the section called “Connect with IAM credentials”.
Connect to Amazon Keyspaces with service-specific credentials
This section shows how to use service-specific credentials to commit the data model you created or
edited with NoSQL Workbench.
1. To create a new connection using service-specific credentials, choose the Connect by using
user name and password tab.
• Before you begin, you must create service-specific credentials using the process
documented at the section called “Create service-specific credentials”.
Commit a data model 386

Amazon Keyspaces (for Apache Cassandra) Developer Guide
After you have obtained the service-specific credentials, you can continue to set up the
connection. Continue with one of the following:
• User name – Enter the user name.
• Password – Enter the password.
• AWS Region – For available Regions, see the section called “Service endpoints”.
• Port – Amazon Keyspaces uses port 9142.
Alternatively, you can import saved credentials from a file.
2. Choose Commit to update Amazon Keyspaces with the data model.
Commit a data model 387

Amazon Keyspaces (for Apache Cassandra) Developer Guide
Commit a data model 388

Amazon Keyspaces (for Apache Cassandra) Developer Guide
Connect to Amazon Keyspaces with AWS Identity and Access Management (IAM)
credentials
This section shows how to use IAM credentials to commit the data model created or edited with
NoSQL Workbench.
1. To create a new connection using IAM credentials, choose the Connect by using IAM
credentials tab.
• Before you begin, you must create IAM credentials using one of the following methods.
• For console access, use your IAM user name and password to sign in to the AWS
Management Console from the IAM sign-in page. For information about AWS security
credentials, including programmatic access and alternatives to long-term credentials,
see AWS security credentials in the IAM User Guide. For details about signing in to your
AWS account, see How to sign in to AWS in the AWS Sign-In User Guide.
• For CLI access, you need an access key ID and a secret access key. Use temporary
credentials instead of long-term access keys when possible. Temporary credentials
include an access key ID, a secret access key, and a security token that indicates when
the credentials expire. For more information, see Using temporary credentials with AWS
resources in the IAM User Guide.
• For API access, you need an access key ID and secret access key. Use IAM user access
keys instead of AWS account root user access keys. For more information about creating
access keys, see Managing access keys for IAM users in the IAM User Guide.
For more information, see Managing access keys for IAM users.
After you have obtained the IAM credentials, you can continue to set up the connection.
• Connection name – The name of the connection.
• AWS Region – For available Regions, see the section called “Service endpoints”.
• Access key ID – Enter the access key ID.
• Secret access key – Enter the secret access key.
• Port – Amazon Keyspaces uses port 9142.
• AWS public certificate – Point to the AWS certificate that was downloaded in the first step.
Commit a data model 389

Amazon Keyspaces (for Apache Cassandra) Developer Guide
• Persist connection – Select this check box if you want to save the AWS connection secrets
locally.
2. Choose Commit to update Amazon Keyspaces with the data model.
Commit a data model 390

Amazon Keyspaces (for Apache Cassandra) Developer Guide
Commit a data model 391

Amazon Keyspaces (for Apache Cassandra) Developer Guide
Use a saved connection
If you have previously set up a connection to Amazon Keyspaces, you can use that as the default
connection to commit data model changes. Choose the Use saved connections tab and continue to
commit the updates.
Commit to Apache Cassandra
This section walks you through making the connections to an Apache Cassandra cluster to commit
the data model created or edited with NoSQL Workbench.
Commit a data model 392

Amazon Keyspaces (for Apache Cassandra) Developer Guide
Note
Only data models that have been created with SimpleStrategy or
NetworkTopologyStrategy can be committed to Apache Cassandra clusters. To change
the replication strategy, edit the keyspace in the data modeler.
1. • User name – Enter the user name if authentication is enabled on the cluster.
• Password – Enter the password if authentication is enabled on the cluster.
• Contact points – Enter the contact points.
• Local data center – Enter the name of the local data center.
• Port – The connection uses port 9042.
2. Choose Commit to update the Apache Cassandra cluster with the data model.
Commit a data model 393

Amazon Keyspaces (for Apache Cassandra) Developer Guide
Commit a data model 394

Amazon Keyspaces (for Apache Cassandra) Developer Guide
Sample data models in NoSQL Workbench
The home page for the modeler and visualizer displays a number of sample models that ship with
NoSQL Workbench. This section describes these models and their potential uses.
Topics
• Employee data model
• Credit card transactions data model
• Airline operations data model
Employee data model
This data model represents an Amazon Keyspaces schema for an employee database application.
Applications that access employee information for a given company can use this data model.
The access patterns supported by this data model are:
• Retrieval of an employee record with a given ID.
• Retrieval of an employee record with a given ID and division.
• Retrieval of an employee record with a given ID and name.
Credit card transactions data model
This data model represents an Amazon Keyspaces schema for credit card transactions at retail
stores.
The storage of credit card transactions not only helps stores with bookkeeping, but also helps store
managers analyze purchase trends, which can help them with forecasting and planning.
The access patterns supported by this data model are:
• Retrieval of transactions by credit card number, month and year, and date.
• Retrieval of transactions by credit card number, category, and date.
• Retrieval of transactions by category, location, and credit card number.
• Retrieval of transactions by credit card number and dispute status.
Sample data models 395

Amazon Keyspaces (for Apache Cassandra) Developer Guide
Airline operations data model
This data model shows data about plane flights, including airports, airlines, and flight routes.
Key components of Amazon Keyspaces modeling that are demonstrated are key-value pairs,
wide-column data stores, composite keys, and complex data types such as maps to demonstrate
common NoSQL data-access patterns.
The access patterns supported by this data model are:
• Retrieval of routes originating from a given airline at a given airport.
• Retrieval of routes with a given destination airport.
• Retrieval of airports with direct flights.
• Retrieval of airport details and airline details.
Release history for NoSQL Workbench
The following table describes the important changes in each release of the NoSQL Workbench
client-side application.
Change Description Date
NoSQL Workbench for
Amazon Keyspaces – GA.
NoSQL Workbench for
Amazon Keyspaces is
generally available.
October 28, 2020
NoSQL Workbench preview
released.
NoSQL Workbench is a client-
side application that helps
you design and visualize
nonrelational data models
for Amazon Keyspaces more
easily. NoSQL Workbench
clients are available for
Windows, macOS, and Linux.
For more information, see
NoSQL Workbench for
Amazon Keyspaces.
October 5, 2020
Release history 396

Amazon Keyspaces (for Apache Cassandra) Developer Guide
Code examples for Amazon Keyspaces using AWS SDKs
The following code examples show how to use Amazon Keyspaces with an AWS software
development kit (SDK).
Basics are code examples that show you how to perform the essential operations within a service.
Actions are code excerpts from larger programs and must be run in context. While actions show you
how to call individual service functions, you can see actions in context in their related scenarios.
For a complete list of AWS SDK developer guides and code examples, see Using this service with
an AWS SDK. This topic also includes information about getting started and details about previous
SDK versions.
Get started
Hello Amazon Keyspaces
The following code examples show how to get started using Amazon Keyspaces.
.NET
AWS SDK for .NET
Note
There's more on GitHub. Find the complete example and learn how to set up and run
in the AWS Code Examples Repository.
namespace KeyspacesActions;
public class HelloKeyspaces
{
private static ILogger logger = null!;
static async Task Main(string[] args)
{
// Set up dependency injection for Amazon Keyspaces (for Apache
Cassandra).
using var host = Host.CreateDefaultBuilder(args)
397

Amazon Keyspaces (for Apache Cassandra) Developer Guide
.ConfigureLogging(logging =>
logging.AddFilter("System", LogLevel.Debug)
.AddFilter<DebugLoggerProvider>("Microsoft",
LogLevel.Information)
.AddFilter<ConsoleLoggerProvider>("Microsoft",
LogLevel.Trace))
.ConfigureServices((_, services) =>
services.AddAWSService<IAmazonKeyspaces>()
.AddTransient<KeyspacesWrapper>()
)
.Build();
logger = LoggerFactory.Create(builder => { builder.AddConsole(); })
.CreateLogger<HelloKeyspaces>();
var keyspacesClient =
host.Services.GetRequiredService<IAmazonKeyspaces>();
var keyspacesWrapper = new KeyspacesWrapper(keyspacesClient);
Console.WriteLine("Hello, Amazon Keyspaces! Let's list your keyspaces:");
await keyspacesWrapper.ListKeyspaces();
}
}
• For API details, see ListKeyspaces in AWS SDK for .NET API Reference.
Java
SDK for Java 2.x
Note
There's more on GitHub. Find the complete example and learn how to set up and run
in the AWS Code Examples Repository.
import software.amazon.awssdk.regions.Region;
import software.amazon.awssdk.services.keyspaces.KeyspacesClient;
import software.amazon.awssdk.services.keyspaces.model.KeyspaceSummary;
import software.amazon.awssdk.services.keyspaces.model.KeyspacesException;
398

Amazon Keyspaces (for Apache Cassandra) Developer Guide
import software.amazon.awssdk.services.keyspaces.model.ListKeyspacesRequest;
import software.amazon.awssdk.services.keyspaces.model.ListKeyspacesResponse;
import java.util.List;
/**
* Before running this Java (v2) code example, set up your development
* environment, including your credentials.
*
* For more information, see the following documentation topic:
*
* https://docs.aws.amazon.com/sdk-for-java/latest/developer-guide/get-
started.html
*/
public class HelloKeyspaces {
public static void main(String[] args) {
Region region = Region.US_EAST_1;
KeyspacesClient keyClient = KeyspacesClient.builder()
.region(region)
.build();
listKeyspaces(keyClient);
}
public static void listKeyspaces(KeyspacesClient keyClient) {
try {
ListKeyspacesRequest keyspacesRequest =
ListKeyspacesRequest.builder()
.maxResults(10)
.build();
ListKeyspacesResponse response =
keyClient.listKeyspaces(keyspacesRequest);
List<KeyspaceSummary> keyspaces = response.keyspaces();
for (KeyspaceSummary keyspace : keyspaces) {
System.out.println("The name of the keyspace is " +
keyspace.keyspaceName());
}
} catch (KeyspacesException e) {
System.err.println(e.awsErrorDetails().errorMessage());
System.exit(1);
}
}
}
399

Amazon Keyspaces (for Apache Cassandra) Developer Guide
• For API details, see ListKeyspaces in AWS SDK for Java 2.x API Reference.
Kotlin
SDK for Kotlin
Note
There's more on GitHub. Find the complete example and learn how to set up and run
in the AWS Code Examples Repository.
/**
Before running this Kotlin code example, set up your development environment,
including your credentials.
For more information, see the following documentation topic:
https://docs.aws.amazon.com/sdk-for-kotlin/latest/developer-guide/setup.html
*/
suspend fun main() {
listKeyspaces()
}
suspend fun listKeyspaces() {
val keyspacesRequest =
ListKeyspacesRequest {
maxResults = 10
}
KeyspacesClient { region = "us-east-1" }.use { keyClient ->
val response = keyClient.listKeyspaces(keyspacesRequest)
response.keyspaces?.forEach { keyspace ->
println("The name of the keyspace is ${keyspace.keyspaceName}")
}
}
}
400

Amazon Keyspaces (for Apache Cassandra) Developer Guide
• For API details, see ListKeyspaces in AWS SDK for Kotlin API reference.
Python
SDK for Python (Boto3)
Note
There's more on GitHub. Find the complete example and learn how to set up and run
in the AWS Code Examples Repository.
import boto3
def hello_keyspaces(keyspaces_client):
"""
Use the AWS SDK for Python (Boto3) to create an Amazon Keyspaces (for Apache
Cassandra)
client and list the keyspaces in your account.
This example uses the default settings specified in your shared credentials
and config files.
:param keyspaces_client: A Boto3 Amazon Keyspaces Client object. This object
wraps
the low-level Amazon Keyspaces service API.
"""
print("Hello, Amazon Keyspaces! Let's list some of your keyspaces:\n")
for ks in keyspaces_client.list_keyspaces(maxResults=5).get("keyspaces", []):
print(ks["keyspaceName"])
print(f"\t{ks['resourceArn']}")
if __name__ == "__main__":
hello_keyspaces(boto3.client("keyspaces"))
• For API details, see ListKeyspaces in AWS SDK for Python (Boto3) API Reference.
401

Amazon Keyspaces (for Apache Cassandra) Developer Guide
Code examples
• Basic examples for Amazon Keyspaces using AWS SDKs
• Hello Amazon Keyspaces
• Learn the basics of Amazon Keyspaces with an AWS SDK
• Actions for Amazon Keyspaces using AWS SDKs
• Use CreateKeyspace with an AWS SDK or CLI
• Use CreateTable with an AWS SDK or CLI
• Use DeleteKeyspace with an AWS SDK or CLI
• Use DeleteTable with an AWS SDK or CLI
• Use GetKeyspace with an AWS SDK or CLI
• Use GetTable with an AWS SDK or CLI
• Use ListKeyspaces with an AWS SDK or CLI
• Use ListTables with an AWS SDK or CLI
• Use RestoreTable with an AWS SDK or CLI
• Use UpdateTable with an AWS SDK or CLI
Basic examples for Amazon Keyspaces using AWS SDKs
The following code examples show how to use the basics of Amazon Keyspaces (for Apache
Cassandra) with AWS SDKs.
Examples
• Hello Amazon Keyspaces
• Learn the basics of Amazon Keyspaces with an AWS SDK
• Actions for Amazon Keyspaces using AWS SDKs
• Use CreateKeyspace with an AWS SDK or CLI
• Use CreateTable with an AWS SDK or CLI
• Use DeleteKeyspace with an AWS SDK or CLI
• Use DeleteTable with an AWS SDK or CLI
• Use GetKeyspace with an AWS SDK or CLI
• Use GetTable with an AWS SDK or CLI
• Use ListKeyspaces with an AWS SDK or CLI
Basics 402

Amazon Keyspaces (for Apache Cassandra) Developer Guide
• Use ListTables with an AWS SDK or CLI
• Use RestoreTable with an AWS SDK or CLI
• Use UpdateTable with an AWS SDK or CLI
Hello Amazon Keyspaces
The following code examples show how to get started using Amazon Keyspaces.
.NET
AWS SDK for .NET
Note
There's more on GitHub. Find the complete example and learn how to set up and run
in the AWS Code Examples Repository.
namespace KeyspacesActions;
public class HelloKeyspaces
{
private static ILogger logger = null!;
static async Task Main(string[] args)
{
// Set up dependency injection for Amazon Keyspaces (for Apache
Cassandra).
using var host = Host.CreateDefaultBuilder(args)
.ConfigureLogging(logging =>
logging.AddFilter("System", LogLevel.Debug)
.AddFilter<DebugLoggerProvider>("Microsoft",
LogLevel.Information)
.AddFilter<ConsoleLoggerProvider>("Microsoft",
LogLevel.Trace))
.ConfigureServices((_, services) =>
services.AddAWSService<IAmazonKeyspaces>()
.AddTransient<KeyspacesWrapper>()
)
.Build();
Hello Amazon Keyspaces 403

Amazon Keyspaces (for Apache Cassandra) Developer Guide
logger = LoggerFactory.Create(builder => { builder.AddConsole(); })
.CreateLogger<HelloKeyspaces>();
var keyspacesClient =
host.Services.GetRequiredService<IAmazonKeyspaces>();
var keyspacesWrapper = new KeyspacesWrapper(keyspacesClient);
Console.WriteLine("Hello, Amazon Keyspaces! Let's list your keyspaces:");
await keyspacesWrapper.ListKeyspaces();
}
}
• For API details, see ListKeyspaces in AWS SDK for .NET API Reference.
Java
SDK for Java 2.x
Note
There's more on GitHub. Find the complete example and learn how to set up and run
in the AWS Code Examples Repository.
import software.amazon.awssdk.regions.Region;
import software.amazon.awssdk.services.keyspaces.KeyspacesClient;
import software.amazon.awssdk.services.keyspaces.model.KeyspaceSummary;
import software.amazon.awssdk.services.keyspaces.model.KeyspacesException;
import software.amazon.awssdk.services.keyspaces.model.ListKeyspacesRequest;
import software.amazon.awssdk.services.keyspaces.model.ListKeyspacesResponse;
import java.util.List;
/**
* Before running this Java (v2) code example, set up your development
* environment, including your credentials.
*
* For more information, see the following documentation topic:
*
Hello Amazon Keyspaces 404

Amazon Keyspaces (for Apache Cassandra) Developer Guide
* https://docs.aws.amazon.com/sdk-for-java/latest/developer-guide/get-
started.html
*/
public class HelloKeyspaces {
public static void main(String[] args) {
Region region = Region.US_EAST_1;
KeyspacesClient keyClient = KeyspacesClient.builder()
.region(region)
.build();
listKeyspaces(keyClient);
}
public static void listKeyspaces(KeyspacesClient keyClient) {
try {
ListKeyspacesRequest keyspacesRequest =
ListKeyspacesRequest.builder()
.maxResults(10)
.build();
ListKeyspacesResponse response =
keyClient.listKeyspaces(keyspacesRequest);
List<KeyspaceSummary> keyspaces = response.keyspaces();
for (KeyspaceSummary keyspace : keyspaces) {
System.out.println("The name of the keyspace is " +
keyspace.keyspaceName());
}
} catch (KeyspacesException e) {
System.err.println(e.awsErrorDetails().errorMessage());
System.exit(1);
}
}
}
• For API details, see ListKeyspaces in AWS SDK for Java 2.x API Reference.
Hello Amazon Keyspaces 405

Amazon Keyspaces (for Apache Cassandra) Developer Guide
Kotlin
SDK for Kotlin
Note
There's more on GitHub. Find the complete example and learn how to set up and run
in the AWS Code Examples Repository.
/**
Before running this Kotlin code example, set up your development environment,
including your credentials.
For more information, see the following documentation topic:
https://docs.aws.amazon.com/sdk-for-kotlin/latest/developer-guide/setup.html
*/
suspend fun main() {
listKeyspaces()
}
suspend fun listKeyspaces() {
val keyspacesRequest =
ListKeyspacesRequest {
maxResults = 10
}
KeyspacesClient { region = "us-east-1" }.use { keyClient ->
val response = keyClient.listKeyspaces(keyspacesRequest)
response.keyspaces?.forEach { keyspace ->
println("The name of the keyspace is ${keyspace.keyspaceName}")
}
}
}
• For API details, see ListKeyspaces in AWS SDK for Kotlin API reference.
Hello Amazon Keyspaces 406

Amazon Keyspaces (for Apache Cassandra) Developer Guide
Python
SDK for Python (Boto3)
Note
There's more on GitHub. Find the complete example and learn how to set up and run
in the AWS Code Examples Repository.
import boto3
def hello_keyspaces(keyspaces_client):
"""
Use the AWS SDK for Python (Boto3) to create an Amazon Keyspaces (for Apache
Cassandra)
client and list the keyspaces in your account.
This example uses the default settings specified in your shared credentials
and config files.
:param keyspaces_client: A Boto3 Amazon Keyspaces Client object. This object
wraps
the low-level Amazon Keyspaces service API.
"""
print("Hello, Amazon Keyspaces! Let's list some of your keyspaces:\n")
for ks in keyspaces_client.list_keyspaces(maxResults=5).get("keyspaces", []):
print(ks["keyspaceName"])
print(f"\t{ks['resourceArn']}")
if __name__ == "__main__":
hello_keyspaces(boto3.client("keyspaces"))
• For API details, see ListKeyspaces in AWS SDK for Python (Boto3) API Reference.
For a complete list of AWS SDK developer guides and code examples, see Using this service with
an AWS SDK. This topic also includes information about getting started and details about previous
SDK versions.
Hello Amazon Keyspaces 407
Amazon Keyspaces (for Apache Cassandra) Developer Guide
Learn the basics of Amazon Keyspaces with an AWS SDK
The following code examples show how to:
• Create a keyspace and table. The table schema holds movie data and has point-in-time recovery
enabled.
• Connect to the keyspace using a secure TLS connection with SigV4 authentication.
• Query the table. Add, retrieve, and update movie data.
• Update the table. Add a column to track watched movies.
• Restore the table to its previous state and clean up resources.
.NET
AWS SDK for .NET
Note
There's more on GitHub. Find the complete example and learn how to set up and run
in the AWS Code Examples Repository.
global using System.Security.Cryptography.X509Certificates;
global using Amazon.Keyspaces;
global using Amazon.Keyspaces.Model;
global using KeyspacesActions;
global using KeyspacesScenario;
global using Microsoft.Extensions.Configuration;
global using Microsoft.Extensions.DependencyInjection;
global using Microsoft.Extensions.Hosting;
global using Microsoft.Extensions.Logging;
global using Microsoft.Extensions.Logging.Console;
global using Microsoft.Extensions.Logging.Debug;
global using Newtonsoft.Json;
namespace KeyspacesBasics;
/// <summary>
/// Amazon Keyspaces (for Apache Cassandra) scenario. Shows some of the basic
Learn the basics 408

Amazon Keyspaces (for Apache Cassandra) Developer Guide
/// actions performed with Amazon Keyspaces.
/// </summary>
public class KeyspacesBasics
{
private static ILogger logger = null!;
static async Task Main(string[] args)
{
// Set up dependency injection for the Amazon service.
using var host = Host.CreateDefaultBuilder(args)
.ConfigureLogging(logging =>
logging.AddFilter("System", LogLevel.Debug)
.AddFilter<DebugLoggerProvider>("Microsoft",
LogLevel.Information)
.AddFilter<ConsoleLoggerProvider>("Microsoft",
LogLevel.Trace))
.ConfigureServices((_, services) =>
services.AddAWSService<IAmazonKeyspaces>()
.AddTransient<KeyspacesWrapper>()
.AddTransient<CassandraWrapper>()
)
.Build();
logger = LoggerFactory.Create(builder => { builder.AddConsole(); })
.CreateLogger<KeyspacesBasics>();
var configuration = new ConfigurationBuilder()
.SetBasePath(Directory.GetCurrentDirectory())
.AddJsonFile("settings.json") // Load test settings from .json file.
.AddJsonFile("settings.local.json",
true) // Optionally load local settings.
.Build();
var keyspacesWrapper =
host.Services.GetRequiredService<KeyspacesWrapper>();
var uiMethods = new UiMethods();
var keyspaceName = configuration["KeyspaceName"];
var tableName = configuration["TableName"];
bool success; // Used to track the results of some operations.
uiMethods.DisplayOverview();
uiMethods.PressEnter();
Learn the basics 409

Amazon Keyspaces (for Apache Cassandra) Developer Guide
// Create the keyspace.
var keyspaceArn = await keyspacesWrapper.CreateKeyspace(keyspaceName);
// Wait for the keyspace to be available. GetKeyspace results in a
// resource not found error until it is ready for use.
try
{
var getKeyspaceArn = "";
Console.Write($"Created {keyspaceName}. Waiting for it to become
available. ");
do
{
getKeyspaceArn = await
keyspacesWrapper.GetKeyspace(keyspaceName);
Console.Write(". ");
} while (getKeyspaceArn != keyspaceArn);
}
catch (ResourceNotFoundException)
{
Console.WriteLine("Waiting for keyspace to be created.");
}
Console.WriteLine($"\nThe keyspace {keyspaceName} is ready for use.");
uiMethods.PressEnter();
// Create the table.
// First define the schema.
var allColumns = new List<ColumnDefinition>
{
new ColumnDefinition { Name = "title", Type = "text" },
new ColumnDefinition { Name = "year", Type = "int" },
new ColumnDefinition { Name = "release_date", Type = "timestamp" },
new ColumnDefinition { Name = "plot", Type = "text" },
};
var partitionKeys = new List<PartitionKey>
{
new PartitionKey { Name = "year", },
new PartitionKey { Name = "title" },
};
var tableSchema = new SchemaDefinition
Learn the basics 410

Amazon Keyspaces (for Apache Cassandra) Developer Guide
{
AllColumns = allColumns,
PartitionKeys = partitionKeys,
};
var tableArn = await keyspacesWrapper.CreateTable(keyspaceName,
tableSchema, tableName);
// Wait for the table to be active.
try
{
var resp = new GetTableResponse();
Console.Write("Waiting for the new table to be active. ");
do
{
try
{
resp = await keyspacesWrapper.GetTable(keyspaceName,
tableName);
Console.Write(".");
}
catch (ResourceNotFoundException)
{
Console.Write(".");
}
} while (resp.Status != TableStatus.ACTIVE);
// Display the table's schema.
Console.WriteLine($"\nTable {tableName} has been created in
{keyspaceName}");
Console.WriteLine("Let's take a look at the schema.");
uiMethods.DisplayTitle("All columns");
resp.SchemaDefinition.AllColumns.ForEach(column =>
{
Console.WriteLine($"{column.Name,-40}\t{column.Type,-20}");
});
uiMethods.DisplayTitle("Cluster keys");
resp.SchemaDefinition.ClusteringKeys.ForEach(clusterKey =>
{
Console.WriteLine($"{clusterKey.Name,-40}\t{clusterKey.OrderBy,-20}");
});
Learn the basics 411

Amazon Keyspaces (for Apache Cassandra) Developer Guide
uiMethods.DisplayTitle("Partition keys");
resp.SchemaDefinition.PartitionKeys.ForEach(partitionKey =>
{
Console.WriteLine($"{partitionKey.Name}");
});
uiMethods.PressEnter();
}
catch (ResourceNotFoundException ex)
{
Console.WriteLine($"Error: {ex.Message}");
}
// Access Apache Cassandra using the Cassandra drive for C#.
var cassandraWrapper =
host.Services.GetRequiredService<CassandraWrapper>();
var movieFilePath = configuration["MovieFile"];
Console.WriteLine("Let's add some movies to the table we created.");
var inserted = await cassandraWrapper.InsertIntoMovieTable(keyspaceName,
tableName, movieFilePath);
uiMethods.PressEnter();
Console.WriteLine("Added the following movies to the table:");
var rows = await cassandraWrapper.GetMovies(keyspaceName, tableName);
uiMethods.DisplayTitle("All Movies");
foreach (var row in rows)
{
var title = row.GetValue<string>("title");
var year = row.GetValue<int>("year");
var plot = row.GetValue<string>("plot");
var release_date = row.GetValue<DateTime>("release_date");
Console.WriteLine($"{release_date}\t{title}\t{year}\n{plot}");
Console.WriteLine(uiMethods.SepBar);
}
// Update the table schema
uiMethods.DisplayTitle("Update table schema");
Console.WriteLine("Now we will update the table to add a boolean field
called watched.");
// First save the current time as a UTC Date so the original
Learn the basics 412

Amazon Keyspaces (for Apache Cassandra) Developer Guide
// table can be restored later.
var timeChanged = DateTime.UtcNow;
// Now update the schema.
var resourceArn = await keyspacesWrapper.UpdateTable(keyspaceName,
tableName);
uiMethods.PressEnter();
Console.WriteLine("Now let's mark some of the movies as watched.");
// Pick some files to mark as watched.
var movieToWatch = rows[2].GetValue<string>("title");
var watchedMovieYear = rows[2].GetValue<int>("year");
var changedRows = await cassandraWrapper.MarkMovieAsWatched(keyspaceName,
tableName, movieToWatch, watchedMovieYear);
movieToWatch = rows[6].GetValue<string>("title");
watchedMovieYear = rows[6].GetValue<int>("year");
changedRows = await cassandraWrapper.MarkMovieAsWatched(keyspaceName,
tableName, movieToWatch, watchedMovieYear);
movieToWatch = rows[9].GetValue<string>("title");
watchedMovieYear = rows[9].GetValue<int>("year");
changedRows = await cassandraWrapper.MarkMovieAsWatched(keyspaceName,
tableName, movieToWatch, watchedMovieYear);
movieToWatch = rows[10].GetValue<string>("title");
watchedMovieYear = rows[10].GetValue<int>("year");
changedRows = await cassandraWrapper.MarkMovieAsWatched(keyspaceName,
tableName, movieToWatch, watchedMovieYear);
movieToWatch = rows[13].GetValue<string>("title");
watchedMovieYear = rows[13].GetValue<int>("year");
changedRows = await cassandraWrapper.MarkMovieAsWatched(keyspaceName,
tableName, movieToWatch, watchedMovieYear);
uiMethods.DisplayTitle("Watched movies");
Console.WriteLine("These movies have been marked as watched:");
rows = await cassandraWrapper.GetWatchedMovies(keyspaceName, tableName);
foreach (var row in rows)
{
var title = row.GetValue<string>("title");
var year = row.GetValue<int>("year");
Console.WriteLine($"{title,-40}\t{year,8}");
Learn the basics 413

Amazon Keyspaces (for Apache Cassandra) Developer Guide
}
uiMethods.PressEnter();
Console.WriteLine("We can restore the table to its previous state but
that can take up to 20 minutes to complete.");
string answer;
do
{
Console.WriteLine("Do you want to restore the table? (y/n)");
answer = Console.ReadLine();
} while (answer.ToLower() != "y" && answer.ToLower() != "n");
if (answer == "y")
{
var restoredTableName = $"{tableName}_restored";
var restoredTableArn = await keyspacesWrapper.RestoreTable(
keyspaceName,
tableName,
restoredTableName,
timeChanged);
// Loop and call GetTable until the table is gone. Once it has been
// deleted completely, GetTable will raise a
ResourceNotFoundException.
bool wasRestored = false;
try
{
do
{
var resp = await keyspacesWrapper.GetTable(keyspaceName,
restoredTableName);
wasRestored = (resp.Status == TableStatus.ACTIVE);
} while (!wasRestored);
}
catch (ResourceNotFoundException)
{
// If the restored table raised an error, it isn't
// ready yet.
Console.Write(".");
}
}
uiMethods.DisplayTitle("Clean up resources.");
Learn the basics 414

Amazon Keyspaces (for Apache Cassandra) Developer Guide
// Delete the table.
success = await keyspacesWrapper.DeleteTable(keyspaceName, tableName);
Console.WriteLine($"Table {tableName} successfully deleted from
{keyspaceName}.");
Console.WriteLine("Waiting for the table to be removed completely. ");
// Loop and call GetTable until the table is gone. Once it has been
// deleted completely, GetTable will raise a ResourceNotFoundException.
bool wasDeleted = false;
try
{
do
{
var resp = await keyspacesWrapper.GetTable(keyspaceName,
tableName);
} while (!wasDeleted);
}
catch (ResourceNotFoundException ex)
{
wasDeleted = true;
Console.WriteLine($"{ex.Message} indicates that the table has been
deleted.");
}
// Delete the keyspace.
success = await keyspacesWrapper.DeleteKeyspace(keyspaceName);
Console.WriteLine("The keyspace has been deleted and the demo is now
complete.");
}
}
namespace KeyspacesActions;
/// <summary>
/// Performs Amazon Keyspaces (for Apache Cassandra) actions.
/// </summary>
public class KeyspacesWrapper
{
private readonly IAmazonKeyspaces _amazonKeyspaces;
Learn the basics 415

Amazon Keyspaces (for Apache Cassandra) Developer Guide
/// <summary>
/// Constructor for the KeyspaceWrapper.
/// </summary>
/// <param name="amazonKeyspaces">An Amazon Keyspaces client object.</param>
public KeyspacesWrapper(IAmazonKeyspaces amazonKeyspaces)
{
_amazonKeyspaces = amazonKeyspaces;
}
/// <summary>
/// Create a new keyspace.
/// </summary>
/// <param name="keyspaceName">The name for the new keyspace.</param>
/// <returns>The Amazon Resource Name (ARN) of the new keyspace.</returns>
public async Task<string> CreateKeyspace(string keyspaceName)
{
var response =
await _amazonKeyspaces.CreateKeyspaceAsync(
new CreateKeyspaceRequest { KeyspaceName = keyspaceName });
return response.ResourceArn;
}
/// <summary>
/// Create a new Amazon Keyspaces table.
/// </summary>
/// <param name="keyspaceName">The keyspace where the table will be
created.</param>
/// <param name="schema">The schema for the new table.</param>
/// <param name="tableName">The name of the new table.</param>
/// <returns>The Amazon Resource Name (ARN) of the new table.</returns>
public async Task<string> CreateTable(string keyspaceName, SchemaDefinition
schema, string tableName)
{
var request = new CreateTableRequest
{
KeyspaceName = keyspaceName,
SchemaDefinition = schema,
TableName = tableName,
PointInTimeRecovery = new PointInTimeRecovery { Status =
PointInTimeRecoveryStatus.ENABLED }
};
Learn the basics 416

Amazon Keyspaces (for Apache Cassandra) Developer Guide
var response = await _amazonKeyspaces.CreateTableAsync(request);
return response.ResourceArn;
}
/// <summary>
/// Delete an existing keyspace.
/// </summary>
/// <param name="keyspaceName"></param>
/// <returns>A Boolean value indicating the success of the action.</returns>
public async Task<bool> DeleteKeyspace(string keyspaceName)
{
var response = await _amazonKeyspaces.DeleteKeyspaceAsync(
new DeleteKeyspaceRequest { KeyspaceName = keyspaceName });
return response.HttpStatusCode == HttpStatusCode.OK;
}
/// <summary>
/// Delete an Amazon Keyspaces table.
/// </summary>
/// <param name="keyspaceName">The keyspace containing the table.</param>
/// <param name="tableName">The name of the table to delete.</param>
/// <returns>A Boolean value indicating the success of the action.</returns>
public async Task<bool> DeleteTable(string keyspaceName, string tableName)
{
var response = await _amazonKeyspaces.DeleteTableAsync(
new DeleteTableRequest { KeyspaceName = keyspaceName, TableName =
tableName });
return response.HttpStatusCode == HttpStatusCode.OK;
}
/// <summary>
/// Get data about a keyspace.
/// </summary>
/// <param name="keyspaceName">The name of the keyspace.</param>
/// <returns>The Amazon Resource Name (ARN) of the keyspace.</returns>
public async Task<string> GetKeyspace(string keyspaceName)
{
var response = await _amazonKeyspaces.GetKeyspaceAsync(
new GetKeyspaceRequest { KeyspaceName = keyspaceName });
return response.ResourceArn;
}
Learn the basics 417

Amazon Keyspaces (for Apache Cassandra) Developer Guide
/// <summary>
/// Get information about an Amazon Keyspaces table.
/// </summary>
/// <param name="keyspaceName">The keyspace containing the table.</param>
/// <param name="tableName">The name of the Amazon Keyspaces table.</param>
/// <returns>The response containing data about the table.</returns>
public async Task<GetTableResponse> GetTable(string keyspaceName, string
tableName)
{
var response = await _amazonKeyspaces.GetTableAsync(
new GetTableRequest { KeyspaceName = keyspaceName, TableName =
tableName });
return response;
}
/// <summary>
/// Lists all keyspaces for the account.
/// </summary>
/// <returns>Async task.</returns>
public async Task ListKeyspaces()
{
var paginator = _amazonKeyspaces.Paginators.ListKeyspaces(new
ListKeyspacesRequest());
Console.WriteLine("{0, -30}\t{1}", "Keyspace name", "Keyspace ARN");
Console.WriteLine(new string('-', Console.WindowWidth));
await foreach (var keyspace in paginator.Keyspaces)
{
Console.WriteLine($"{keyspace.KeyspaceName,-30}\t{keyspace.ResourceArn}");
}
}
/// <summary>
/// Lists the Amazon Keyspaces tables in a keyspace.
/// </summary>
/// <param name="keyspaceName">The name of the keyspace.</param>
/// <returns>A list of TableSummary objects.</returns>
public async Task<List<TableSummary>> ListTables(string keyspaceName)
{
Learn the basics 418

Amazon Keyspaces (for Apache Cassandra) Developer Guide
var response = await _amazonKeyspaces.ListTablesAsync(new
ListTablesRequest { KeyspaceName = keyspaceName });
response.Tables.ForEach(table =>
{
Console.WriteLine($"{table.KeyspaceName}\t{table.TableName}\t{table.ResourceArn}");
});
return response.Tables;
}
/// <summary>
/// Restores the specified table to the specified point in time.
/// </summary>
/// <param name="keyspaceName">The keyspace containing the table.</param>
/// <param name="tableName">The name of the table to restore.</param>
/// <param name="timestamp">The time to which the table will be restored.</
param>
/// <returns>The Amazon Resource Name (ARN) of the restored table.</returns>
public async Task<string> RestoreTable(string keyspaceName, string tableName,
string restoredTableName, DateTime timestamp)
{
var request = new RestoreTableRequest
{
RestoreTimestamp = timestamp,
SourceKeyspaceName = keyspaceName,
SourceTableName = tableName,
TargetKeyspaceName = keyspaceName,
TargetTableName = restoredTableName
};
var response = await _amazonKeyspaces.RestoreTableAsync(request);
return response.RestoredTableARN;
}
/// <summary>
/// Updates the movie table to add a boolean column named watched.
/// </summary>
/// <param name="keyspaceName">The keyspace containing the table.</param>
/// <param name="tableName">The name of the table to change.</param>
/// <returns>The Amazon Resource Name (ARN) of the updated table.</returns>
public async Task<string> UpdateTable(string keyspaceName, string tableName)
Learn the basics 419

Amazon Keyspaces (for Apache Cassandra) Developer Guide
{
var newColumn = new ColumnDefinition { Name = "watched", Type =
"boolean" };
var request = new UpdateTableRequest
{
KeyspaceName = keyspaceName,
TableName = tableName,
AddColumns = new List<ColumnDefinition> { newColumn }
};
var response = await _amazonKeyspaces.UpdateTableAsync(request);
return response.ResourceArn;
}
}
using System.Net;
using Cassandra;
namespace KeyspacesScenario;
/// <summary>
/// Class to perform CRUD methods on an Amazon Keyspaces (for Apache Cassandra)
database.
///
/// NOTE: This sample uses a plain text authenticator for example purposes only.
/// Recommended best practice is to use a SigV4 authentication plugin, if
available.
/// </summary>
public class CassandraWrapper
{
private readonly IConfiguration _configuration;
private readonly string _localPathToFile;
private const string _certLocation = "https://certs.secureserver.net/
repository/sf-class2-root.crt";
private const string _certFileName = "sf-class2-root.crt";
private readonly X509Certificate2Collection _certCollection;
private X509Certificate2 _amazoncert;
private Cluster _cluster;
// User name and password for the service.
private string _userName = null!;
Learn the basics 420

Amazon Keyspaces (for Apache Cassandra) Developer Guide
private string _pwd = null!;
public CassandraWrapper()
{
_configuration = new ConfigurationBuilder()
.SetBasePath(Directory.GetCurrentDirectory())
.AddJsonFile("settings.json") // Load test settings from .json file.
.AddJsonFile("settings.local.json",
true) // Optionally load local settings.
.Build();
_localPathToFile = Path.GetTempPath();
// Get the Starfield digital certificate and save it locally.
var client = new WebClient();
client.DownloadFile(_certLocation, $"{_localPathToFile}/
{_certFileName}");
//var httpClient = new HttpClient();
//var httpResult = httpClient.Get(fileUrl);
//using var resultStream = await httpResult.Content.ReadAsStreamAsync();
//using var fileStream = File.Create(pathToSave);
//resultStream.CopyTo(fileStream);
_certCollection = new X509Certificate2Collection();
_amazoncert = new X509Certificate2($"{_localPathToFile}/
{_certFileName}");
// Get the user name and password stored in the configuration file.
_userName = _configuration["UserName"]!;
_pwd = _configuration["Password"]!;
// For a list of Service Endpoints for Amazon Keyspaces, see:
// https://docs.aws.amazon.com/keyspaces/latest/devguide/
programmatic.endpoints.html
var awsEndpoint = _configuration["ServiceEndpoint"];
_cluster = Cluster.Builder()
.AddContactPoints(awsEndpoint)
.WithPort(9142)
.WithAuthProvider(new PlainTextAuthProvider(_userName, _pwd))
.WithSSL(new SSLOptions().SetCertificateCollection(_certCollection))
.WithQueryOptions(
new QueryOptions()
Learn the basics 421

Amazon Keyspaces (for Apache Cassandra) Developer Guide
.SetConsistencyLevel(ConsistencyLevel.LocalQuorum)
.SetSerialConsistencyLevel(ConsistencyLevel.LocalSerial))
.Build();
}
/// <summary>
/// Loads the contents of a JSON file into a list of movies to be
/// added to the Apache Cassandra table.
/// </summary>
/// <param name="movieFileName">The full path to the JSON file.</param>
/// <returns>A list of movie objects.</returns>
public List<Movie> ImportMoviesFromJson(string movieFileName, int numToImport
= 0)
{
if (!File.Exists(movieFileName))
{
return null!;
}
using var sr = new StreamReader(movieFileName);
string json = sr.ReadToEnd();
var allMovies = JsonConvert.DeserializeObject<List<Movie>>(json);
// If numToImport = 0, return all movies in the collection.
if (numToImport == 0)
{
// Now return the entire list of movies.
return allMovies;
}
else
{
// Now return the first numToImport entries.
return allMovies.GetRange(0, numToImport);
}
}
/// <summary>
/// Insert movies into the movie table.
/// </summary>
/// <param name="keyspaceName">The keyspace containing the table.</param>
/// <param name="movieTableName">The Amazon Keyspaces table.</param>
/// <param name="movieFilePath">The path to the resource file containing
/// movie data to insert into the table.</param>
Learn the basics 422

Amazon Keyspaces (for Apache Cassandra) Developer Guide
/// <returns>A Boolean value indicating the success of the action.</returns>
public async Task<bool> InsertIntoMovieTable(string keyspaceName, string
movieTableName, string movieFilePath, int numToImport = 20)
{
// Get some movie data from the movies.json file
var movies = ImportMoviesFromJson(movieFilePath, numToImport);
var session = _cluster.Connect(keyspaceName);
string insertCql;
RowSet rs;
// Now we insert the numToImport movies into the table.
foreach (var movie in movies)
{
// Escape single quote characters in the plot.
insertCql = $"INSERT INTO {keyspaceName}.{movieTableName}
(title, year, release_date, plot) values($${movie.Title}$$, {movie.Year},
'{movie.Info.Release_Date.ToString("yyyy-MM-dd")}', $${movie.Info.Plot}$$)";
rs = await session.ExecuteAsync(new SimpleStatement(insertCql));
}
return true;
}
/// <summary>
/// Gets all of the movies in the movies table.
/// </summary>
/// <param name="keyspaceName">The keyspace containing the table.</param>
/// <param name="tableName">The name of the table.</param>
/// <returns>A list of row objects containing movie data.</returns>
public async Task<List<Row>> GetMovies(string keyspaceName, string tableName)
{
var session = _cluster.Connect();
RowSet rs;
try
{
rs = await session.ExecuteAsync(new SimpleStatement($"SELECT * FROM
{keyspaceName}.{tableName}"));
// Extract the row data from the returned RowSet.
var rows = rs.GetRows().ToList();
return rows;
Learn the basics 423

Amazon Keyspaces (for Apache Cassandra) Developer Guide
}
catch (Exception ex)
{
Console.WriteLine(ex.Message);
return null!;
}
}
/// <summary>
/// Mark a movie in the movie table as watched.
/// </summary>
/// <param name="keyspaceName">The keyspace containing the table.</param>
/// <param name="tableName">The name of the table.</param>
/// <param name="title">The title of the movie to mark as watched.</param>
/// <param name="year">The year the movie was released.</param>
/// <returns>A set of rows containing the changed data.</returns>
public async Task<List<Row>> MarkMovieAsWatched(string keyspaceName, string
tableName, string title, int year)
{
var session = _cluster.Connect();
string updateCql = $"UPDATE {keyspaceName}.{tableName} SET watched=true
WHERE title = $${title}$$ AND year = {year};";
var rs = await session.ExecuteAsync(new SimpleStatement(updateCql));
var rows = rs.GetRows().ToList();
return rows;
}
/// <summary>
/// Retrieve the movies in the movies table where watched is true.
/// </summary>
/// <param name="keyspaceName">The keyspace containing the table.</param>
/// <param name="tableName">The name of the table.</param>
/// <returns>A list of row objects containing information about movies
/// where watched is true.</returns>
public async Task<List<Row>> GetWatchedMovies(string keyspaceName, string
tableName)
{
var session = _cluster.Connect();
RowSet rs;
try
{
rs = await session.ExecuteAsync(new SimpleStatement($"SELECT
title, year, plot FROM {keyspaceName}.{tableName} WHERE watched = true ALLOW
FILTERING"));
Learn the basics 424

Amazon Keyspaces (for Apache Cassandra) Developer Guide
// Extract the row data from the returned RowSet.
var rows = rs.GetRows().ToList();
return rows;
}
catch (Exception ex)
{
Console.WriteLine(ex.Message);
return null!;
}
}
}
• For API details, see the following topics in AWS SDK for .NET API Reference.
• CreateKeyspace
• CreateTable
• DeleteKeyspace
• DeleteTable
• GetKeyspace
• GetTable
• ListKeyspaces
• ListTables
• RestoreTable
• UpdateTable
Java
SDK for Java 2.x
Note
There's more on GitHub. Find the complete example and learn how to set up and run
in the AWS Code Examples Repository.
Learn the basics 425

Amazon Keyspaces (for Apache Cassandra) Developer Guide
/**
* Before running this Java (v2) code example, set up your development
* environment, including your credentials.
*
* For more information, see the following documentation topic:
*
* https://docs.aws.amazon.com/sdk-for-java/latest/developer-guide/get-
started.html
*
* Before running this Java code example, you must create a
* Java keystore (JKS) file and place it in your project's resources folder.
*
* This file is a secure file format used to hold certificate information for
* Java applications. This is required to make a connection to Amazon Keyspaces.
* For more information, see the following documentation topic:
*
* https://docs.aws.amazon.com/keyspaces/latest/devguide/using_java_driver.html
*
* This Java example performs the following tasks:
*
* 1. Create a keyspace.
* 2. Check for keyspace existence.
* 3. List keyspaces using a paginator.
* 4. Create a table with a simple movie data schema and enable point-in-time
* recovery.
* 5. Check for the table to be in an Active state.
* 6. List all tables in the keyspace.
* 7. Use a Cassandra driver to insert some records into the Movie table.
* 8. Get all records from the Movie table.
* 9. Get a specific Movie.
* 10. Get a UTC timestamp for the current time.
* 11. Update the table schema to add a ‘watched’ Boolean column.
* 12. Update an item as watched.
* 13. Query for items with watched = True.
* 14. Restore the table back to the previous state using the timestamp.
* 15. Check for completion of the restore action.
* 16. Delete the table.
* 17. Confirm that both tables are deleted.
* 18. Delete the keyspace.
*/
public class ScenarioKeyspaces {
Learn the basics 426

Amazon Keyspaces (for Apache Cassandra) Developer Guide
public static final String DASHES = new String(new char[80]).replace("\0",
"-");
/*
* Usage:
* fileName - The name of the JSON file that contains movie data. (Get this
file
* from the GitHub repo at resources/sample_file.)
* keyspaceName - The name of the keyspace to create.
*/
public static void main(String[] args) throws InterruptedException,
IOException {
String fileName = "<Replace with the JSON file that contains movie
data>";
String keyspaceName = "<Replace with the name of the keyspace to
create>";
String titleUpdate = "The Family";
int yearUpdate = 2013;
String tableName = "Movie";
String tableNameRestore = "MovieRestore";
Region region = Region.US_EAST_1;
KeyspacesClient keyClient = KeyspacesClient.builder()
.region(region)
.build();
DriverConfigLoader loader =
DriverConfigLoader.fromClasspath("application.conf");
CqlSession session = CqlSession.builder()
.withConfigLoader(loader)
.build();
System.out.println(DASHES);
System.out.println("Welcome to the Amazon Keyspaces example scenario.");
System.out.println(DASHES);
System.out.println(DASHES);
System.out.println("1. Create a keyspace.");
createKeySpace(keyClient, keyspaceName);
System.out.println(DASHES);
System.out.println(DASHES);
Thread.sleep(5000);
System.out.println("2. Check for keyspace existence.");
checkKeyspaceExistence(keyClient, keyspaceName);
Learn the basics 427

Amazon Keyspaces (for Apache Cassandra) Developer Guide
System.out.println(DASHES);
System.out.println(DASHES);
System.out.println("3. List keyspaces using a paginator.");
listKeyspacesPaginator(keyClient);
System.out.println(DASHES);
System.out.println(DASHES);
System.out.println("4. Create a table with a simple movie data schema and
enable point-in-time recovery.");
createTable(keyClient, keyspaceName, tableName);
System.out.println(DASHES);
System.out.println(DASHES);
System.out.println("5. Check for the table to be in an Active state.");
Thread.sleep(6000);
checkTable(keyClient, keyspaceName, tableName);
System.out.println(DASHES);
System.out.println(DASHES);
System.out.println("6. List all tables in the keyspace.");
listTables(keyClient, keyspaceName);
System.out.println(DASHES);
System.out.println(DASHES);
System.out.println("7. Use a Cassandra driver to insert some records into
the Movie table.");
Thread.sleep(6000);
loadData(session, fileName, keyspaceName);
System.out.println(DASHES);
System.out.println(DASHES);
System.out.println("8. Get all records from the Movie table.");
getMovieData(session, keyspaceName);
System.out.println(DASHES);
System.out.println(DASHES);
System.out.println("9. Get a specific Movie.");
getSpecificMovie(session, keyspaceName);
System.out.println(DASHES);
System.out.println(DASHES);
System.out.println("10. Get a UTC timestamp for the current time.");
ZonedDateTime utc = ZonedDateTime.now(ZoneOffset.UTC);
Learn the basics 428

Amazon Keyspaces (for Apache Cassandra) Developer Guide
System.out.println("DATETIME = " + Date.from(utc.toInstant()));
System.out.println(DASHES);
System.out.println(DASHES);
System.out.println("11. Update the table schema to add a watched Boolean
column.");
updateTable(keyClient, keyspaceName, tableName);
System.out.println(DASHES);
System.out.println(DASHES);
System.out.println("12. Update an item as watched.");
Thread.sleep(10000); // Wait 10 secs for the update.
updateRecord(session, keyspaceName, titleUpdate, yearUpdate);
System.out.println(DASHES);
System.out.println(DASHES);
System.out.println("13. Query for items with watched = True.");
getWatchedData(session, keyspaceName);
System.out.println(DASHES);
System.out.println(DASHES);
System.out.println("14. Restore the table back to the previous state
using the timestamp.");
System.out.println("Note that the restore operation can take up to 20
minutes.");
restoreTable(keyClient, keyspaceName, utc);
System.out.println(DASHES);
System.out.println(DASHES);
System.out.println("15. Check for completion of the restore action.");
Thread.sleep(5000);
checkRestoredTable(keyClient, keyspaceName, "MovieRestore");
System.out.println(DASHES);
System.out.println(DASHES);
System.out.println("16. Delete both tables.");
deleteTable(keyClient, keyspaceName, tableName);
deleteTable(keyClient, keyspaceName, tableNameRestore);
System.out.println(DASHES);
System.out.println(DASHES);
System.out.println("17. Confirm that both tables are deleted.");
checkTableDelete(keyClient, keyspaceName, tableName);
checkTableDelete(keyClient, keyspaceName, tableNameRestore);
Learn the basics 429

Amazon Keyspaces (for Apache Cassandra) Developer Guide
System.out.println(DASHES);
System.out.println(DASHES);
System.out.println("18. Delete the keyspace.");
deleteKeyspace(keyClient, keyspaceName);
System.out.println(DASHES);
System.out.println(DASHES);
System.out.println("The scenario has completed successfully.");
System.out.println(DASHES);
}
public static void deleteKeyspace(KeyspacesClient keyClient, String
keyspaceName) {
try {
DeleteKeyspaceRequest deleteKeyspaceRequest =
DeleteKeyspaceRequest.builder()
.keyspaceName(keyspaceName)
.build();
keyClient.deleteKeyspace(deleteKeyspaceRequest);
} catch (KeyspacesException e) {
System.err.println(e.awsErrorDetails().errorMessage());
System.exit(1);
}
}
public static void checkTableDelete(KeyspacesClient keyClient, String
keyspaceName, String tableName)
throws InterruptedException {
try {
String status;
GetTableResponse response;
GetTableRequest tableRequest = GetTableRequest.builder()
.keyspaceName(keyspaceName)
.tableName(tableName)
.build();
// Keep looping until table cannot be found and a
ResourceNotFoundException is
// thrown.
while (true) {
response = keyClient.getTable(tableRequest);
Learn the basics 430

Amazon Keyspaces (for Apache Cassandra) Developer Guide
status = response.statusAsString();
System.out.println(". The table status is " + status);
Thread.sleep(500);
}
} catch (ResourceNotFoundException e) {
System.err.println(e.awsErrorDetails().errorMessage());
}
System.out.println("The table is deleted");
}
public static void deleteTable(KeyspacesClient keyClient, String
keyspaceName, String tableName) {
try {
DeleteTableRequest tableRequest = DeleteTableRequest.builder()
.keyspaceName(keyspaceName)
.tableName(tableName)
.build();
keyClient.deleteTable(tableRequest);
} catch (KeyspacesException e) {
System.err.println(e.awsErrorDetails().errorMessage());
System.exit(1);
}
}
public static void checkRestoredTable(KeyspacesClient keyClient, String
keyspaceName, String tableName)
throws InterruptedException {
try {
boolean tableStatus = false;
String status;
GetTableResponse response = null;
GetTableRequest tableRequest = GetTableRequest.builder()
.keyspaceName(keyspaceName)
.tableName(tableName)
.build();
while (!tableStatus) {
response = keyClient.getTable(tableRequest);
status = response.statusAsString();
System.out.println("The table status is " + status);
Learn the basics 431

Amazon Keyspaces (for Apache Cassandra) Developer Guide
if (status.compareTo("ACTIVE") == 0) {
tableStatus = true;
}
Thread.sleep(500);
}
List<ColumnDefinition> cols =
response.schemaDefinition().allColumns();
for (ColumnDefinition def : cols) {
System.out.println("The column name is " + def.name());
System.out.println("The column type is " + def.type());
}
} catch (KeyspacesException e) {
System.err.println(e.awsErrorDetails().errorMessage());
System.exit(1);
}
}
public static void restoreTable(KeyspacesClient keyClient, String
keyspaceName, ZonedDateTime utc) {
try {
Instant myTime = utc.toInstant();
RestoreTableRequest restoreTableRequest =
RestoreTableRequest.builder()
.restoreTimestamp(myTime)
.sourceTableName("Movie")
.targetKeyspaceName(keyspaceName)
.targetTableName("MovieRestore")
.sourceKeyspaceName(keyspaceName)
.build();
RestoreTableResponse response =
keyClient.restoreTable(restoreTableRequest);
System.out.println("The ARN of the restored table is " +
response.restoredTableARN());
} catch (KeyspacesException e) {
System.err.println(e.awsErrorDetails().errorMessage());
System.exit(1);
}
}
public static void getWatchedData(CqlSession session, String keyspaceName) {
Learn the basics 432

Amazon Keyspaces (for Apache Cassandra) Developer Guide
ResultSet resultSet = session
.execute("SELECT * FROM \"" + keyspaceName + "\".\"Movie\" WHERE
watched = true ALLOW FILTERING;");
resultSet.forEach(item -> {
System.out.println("The Movie title is " + item.getString("title"));
System.out.println("The Movie year is " + item.getInt("year"));
System.out.println("The plot is " + item.getString("plot"));
});
}
public static void updateRecord(CqlSession session, String keySpace, String
titleUpdate, int yearUpdate) {
String sqlStatement = "UPDATE \"" + keySpace
+ "\".\"Movie\" SET watched=true WHERE title = :k0 AND year
= :k1;";
BatchStatementBuilder builder =
BatchStatement.builder(DefaultBatchType.UNLOGGED);
builder.setConsistencyLevel(ConsistencyLevel.LOCAL_QUORUM);
PreparedStatement preparedStatement = session.prepare(sqlStatement);
builder.addStatement(preparedStatement.boundStatementBuilder()
.setString("k0", titleUpdate)
.setInt("k1", yearUpdate)
.build());
BatchStatement batchStatement = builder.build();
session.execute(batchStatement);
}
public static void updateTable(KeyspacesClient keyClient, String keySpace,
String tableName) {
try {
ColumnDefinition def = ColumnDefinition.builder()
.name("watched")
.type("boolean")
.build();
UpdateTableRequest tableRequest = UpdateTableRequest.builder()
.keyspaceName(keySpace)
.tableName(tableName)
.addColumns(def)
.build();
keyClient.updateTable(tableRequest);
Learn the basics 433

Amazon Keyspaces (for Apache Cassandra) Developer Guide
} catch (KeyspacesException e) {
System.err.println(e.awsErrorDetails().errorMessage());
System.exit(1);
}
}
public static void getSpecificMovie(CqlSession session, String keyspaceName)
{
ResultSet resultSet = session.execute(
"SELECT * FROM \"" + keyspaceName + "\".\"Movie\" WHERE title =
'The Family' ALLOW FILTERING ;");
resultSet.forEach(item -> {
System.out.println("The Movie title is " + item.getString("title"));
System.out.println("The Movie year is " + item.getInt("year"));
System.out.println("The plot is " + item.getString("plot"));
});
}
// Get records from the Movie table.
public static void getMovieData(CqlSession session, String keyspaceName) {
ResultSet resultSet = session.execute("SELECT * FROM \"" + keyspaceName +
"\".\"Movie\";");
resultSet.forEach(item -> {
System.out.println("The Movie title is " + item.getString("title"));
System.out.println("The Movie year is " + item.getInt("year"));
System.out.println("The plot is " + item.getString("plot"));
});
}
// Load data into the table.
public static void loadData(CqlSession session, String fileName, String
keySpace) throws IOException {
String sqlStatement = "INSERT INTO \"" + keySpace + "\".\"Movie\" (title,
year, plot) values (:k0, :k1, :k2)";
JsonParser parser = new JsonFactory().createParser(new File(fileName));
com.fasterxml.jackson.databind.JsonNode rootNode = new
ObjectMapper().readTree(parser);
Iterator<JsonNode> iter = rootNode.iterator();
ObjectNode currentNode;
int t = 0;
while (iter.hasNext()) {
// Add 20 movies to the table.
if (t == 20)
Learn the basics 434

Amazon Keyspaces (for Apache Cassandra) Developer Guide
break;
currentNode = (ObjectNode) iter.next();
int year = currentNode.path("year").asInt();
String title = currentNode.path("title").asText();
String plot = currentNode.path("info").path("plot").toString();
// Insert the data into the Amazon Keyspaces table.
BatchStatementBuilder builder =
BatchStatement.builder(DefaultBatchType.UNLOGGED);
builder.setConsistencyLevel(ConsistencyLevel.LOCAL_QUORUM);
PreparedStatement preparedStatement = session.prepare(sqlStatement);
builder.addStatement(preparedStatement.boundStatementBuilder()
.setString("k0", title)
.setInt("k1", year)
.setString("k2", plot)
.build());
BatchStatement batchStatement = builder.build();
session.execute(batchStatement);
t++;
}
System.out.println("You have added " + t + " records successfully!");
}
public static void listTables(KeyspacesClient keyClient, String keyspaceName)
{
try {
ListTablesRequest tablesRequest = ListTablesRequest.builder()
.keyspaceName(keyspaceName)
.build();
ListTablesIterable listRes =
keyClient.listTablesPaginator(tablesRequest);
listRes.stream()
.flatMap(r -> r.tables().stream())
.forEach(content -> System.out.println(" ARN: " +
content.resourceArn() +
" Table name: " + content.tableName()));
} catch (KeyspacesException e) {
System.err.println(e.awsErrorDetails().errorMessage());
System.exit(1);
Learn the basics 435

Amazon Keyspaces (for Apache Cassandra) Developer Guide
}
}
public static void checkTable(KeyspacesClient keyClient, String keyspaceName,
String tableName)
throws InterruptedException {
try {
boolean tableStatus = false;
String status;
GetTableResponse response = null;
GetTableRequest tableRequest = GetTableRequest.builder()
.keyspaceName(keyspaceName)
.tableName(tableName)
.build();
while (!tableStatus) {
response = keyClient.getTable(tableRequest);
status = response.statusAsString();
System.out.println(". The table status is " + status);
if (status.compareTo("ACTIVE") == 0) {
tableStatus = true;
}
Thread.sleep(500);
}
List<ColumnDefinition> cols =
response.schemaDefinition().allColumns();
for (ColumnDefinition def : cols) {
System.out.println("The column name is " + def.name());
System.out.println("The column type is " + def.type());
}
} catch (KeyspacesException e) {
System.err.println(e.awsErrorDetails().errorMessage());
System.exit(1);
}
}
public static void createTable(KeyspacesClient keyClient, String keySpace,
String tableName) {
try {
// Set the columns.
ColumnDefinition defTitle = ColumnDefinition.builder()
Learn the basics 436

Amazon Keyspaces (for Apache Cassandra) Developer Guide
.name("title")
.type("text")
.build();
ColumnDefinition defYear = ColumnDefinition.builder()
.name("year")
.type("int")
.build();
ColumnDefinition defReleaseDate = ColumnDefinition.builder()
.name("release_date")
.type("timestamp")
.build();
ColumnDefinition defPlot = ColumnDefinition.builder()
.name("plot")
.type("text")
.build();
List<ColumnDefinition> colList = new ArrayList<>();
colList.add(defTitle);
colList.add(defYear);
colList.add(defReleaseDate);
colList.add(defPlot);
// Set the keys.
PartitionKey yearKey = PartitionKey.builder()
.name("year")
.build();
PartitionKey titleKey = PartitionKey.builder()
.name("title")
.build();
List<PartitionKey> keyList = new ArrayList<>();
keyList.add(yearKey);
keyList.add(titleKey);
SchemaDefinition schemaDefinition = SchemaDefinition.builder()
.partitionKeys(keyList)
.allColumns(colList)
.build();
PointInTimeRecovery timeRecovery = PointInTimeRecovery.builder()
Learn the basics 437

Amazon Keyspaces (for Apache Cassandra) Developer Guide
.status(PointInTimeRecoveryStatus.ENABLED)
.build();
CreateTableRequest tableRequest = CreateTableRequest.builder()
.keyspaceName(keySpace)
.tableName(tableName)
.schemaDefinition(schemaDefinition)
.pointInTimeRecovery(timeRecovery)
.build();
CreateTableResponse response = keyClient.createTable(tableRequest);
System.out.println("The table ARN is " + response.resourceArn());
} catch (KeyspacesException e) {
System.err.println(e.awsErrorDetails().errorMessage());
System.exit(1);
}
}
public static void listKeyspacesPaginator(KeyspacesClient keyClient) {
try {
ListKeyspacesRequest keyspacesRequest =
ListKeyspacesRequest.builder()
.maxResults(10)
.build();
ListKeyspacesIterable listRes =
keyClient.listKeyspacesPaginator(keyspacesRequest);
listRes.stream()
.flatMap(r -> r.keyspaces().stream())
.forEach(content -> System.out.println(" Name: " +
content.keyspaceName()));
} catch (KeyspacesException e) {
System.err.println(e.awsErrorDetails().errorMessage());
System.exit(1);
}
}
public static void checkKeyspaceExistence(KeyspacesClient keyClient, String
keyspaceName) {
try {
GetKeyspaceRequest keyspaceRequest = GetKeyspaceRequest.builder()
.keyspaceName(keyspaceName)
Learn the basics 438

Amazon Keyspaces (for Apache Cassandra) Developer Guide
.build();
GetKeyspaceResponse response =
keyClient.getKeyspace(keyspaceRequest);
String name = response.keyspaceName();
System.out.println("The " + name + " KeySpace is ready");
} catch (KeyspacesException e) {
System.err.println(e.awsErrorDetails().errorMessage());
System.exit(1);
}
}
public static void createKeySpace(KeyspacesClient keyClient, String
keyspaceName) {
try {
CreateKeyspaceRequest keyspaceRequest =
CreateKeyspaceRequest.builder()
.keyspaceName(keyspaceName)
.build();
CreateKeyspaceResponse response =
keyClient.createKeyspace(keyspaceRequest);
System.out.println("The ARN of the KeySpace is " +
response.resourceArn());
} catch (KeyspacesException e) {
System.err.println(e.awsErrorDetails().errorMessage());
System.exit(1);
}
}
}
• For API details, see the following topics in AWS SDK for Java 2.x API Reference.
• CreateKeyspace
• CreateTable
• DeleteKeyspace
• DeleteTable
• GetKeyspace
• GetTable
Learn the basics 439

Amazon Keyspaces (for Apache Cassandra) Developer Guide
• ListKeyspaces
• ListTables
• RestoreTable
• UpdateTable
Kotlin
SDK for Kotlin
Note
There's more on GitHub. Find the complete example and learn how to set up and run
in the AWS Code Examples Repository.
/**
Before running this Kotlin code example, set up your development environment,
including your credentials.
For more information, see the following documentation topic:
https://docs.aws.amazon.com/sdk-for-kotlin/latest/developer-guide/setup.html
This example uses a secure file format to hold certificate information for
Kotlin applications. This is required to make a connection to Amazon Keyspaces.
For more information, see the following documentation topic:
https://docs.aws.amazon.com/keyspaces/latest/devguide/using_java_driver.html
This Kotlin example performs the following tasks:
1. Create a keyspace.
2. Check for keyspace existence.
3. List keyspaces using a paginator.
4. Create a table with a simple movie data schema and enable point-in-time
recovery.
5. Check for the table to be in an Active state.
6. List all tables in the keyspace.
7. Use a Cassandra driver to insert some records into the Movie table.
Learn the basics 440

Amazon Keyspaces (for Apache Cassandra) Developer Guide
8. Get all records from the Movie table.
9. Get a specific Movie.
10. Get a UTC timestamp for the current time.
11. Update the table schema to add a ‘watched’ Boolean column.
12. Update an item as watched.
13. Query for items with watched = True.
14. Restore the table back to the previous state using the timestamp.
15. Check for completion of the restore action.
16. Delete the table.
17. Confirm that both tables are deleted.
18. Delete the keyspace.
*/
/*
Usage:
fileName - The name of the JSON file that contains movie data. (Get this
file from the GitHub repo at resources/sample_file.)
keyspaceName - The name of the keyspace to create.
*/
val DASHES: String = String(CharArray(80)).replace("\u0000", "-")
suspend fun main() {
val fileName = "<Replace with the JSON file that contains movie data>"
val keyspaceName = "<Replace with the name of the keyspace to create>"
val titleUpdate = "The Family"
val yearUpdate = 2013
val tableName = "MovieKotlin"
val tableNameRestore = "MovieRestore"
val loader = DriverConfigLoader.fromClasspath("application.conf")
val session =
CqlSession
.builder()
.withConfigLoader(loader)
.build()
println(DASHES)
println("Welcome to the Amazon Keyspaces example scenario.")
println(DASHES)
println(DASHES)
println("1. Create a keyspace.")
createKeySpace(keyspaceName)
println(DASHES)
Learn the basics 441

Amazon Keyspaces (for Apache Cassandra) Developer Guide
println(DASHES)
delay(5000)
println("2. Check for keyspace existence.")
checkKeyspaceExistence(keyspaceName)
println(DASHES)
println(DASHES)
println("3. List keyspaces using a paginator.")
listKeyspacesPaginator()
println(DASHES)
println(DASHES)
println("4. Create a table with a simple movie data schema and enable point-
in-time recovery.")
createTable(keyspaceName, tableName)
println(DASHES)
println(DASHES)
println("5. Check for the table to be in an Active state.")
delay(6000)
checkTable(keyspaceName, tableName)
println(DASHES)
println(DASHES)
println("6. List all tables in the keyspace.")
listTables(keyspaceName)
println(DASHES)
println(DASHES)
println("7. Use a Cassandra driver to insert some records into the Movie
table.")
delay(6000)
loadData(session, fileName, keyspaceName)
println(DASHES)
println(DASHES)
println("8. Get all records from the Movie table.")
getMovieData(session, keyspaceName)
println(DASHES)
println(DASHES)
println("9. Get a specific Movie.")
getSpecificMovie(session, keyspaceName)
Learn the basics 442

Amazon Keyspaces (for Apache Cassandra) Developer Guide
println(DASHES)
println(DASHES)
println("10. Get a UTC timestamp for the current time.")
val utc = ZonedDateTime.now(ZoneOffset.UTC)
println("DATETIME = ${Date.from(utc.toInstant())}")
println(DASHES)
println(DASHES)
println("11. Update the table schema to add a watched Boolean column.")
updateTable(keyspaceName, tableName)
println(DASHES)
println(DASHES)
println("12. Update an item as watched.")
delay(10000) // Wait 10 seconds for the update.
updateRecord(session, keyspaceName, titleUpdate, yearUpdate)
println(DASHES)
println(DASHES)
println("13. Query for items with watched = True.")
getWatchedData(session, keyspaceName)
println(DASHES)
println(DASHES)
println("14. Restore the table back to the previous state using the
timestamp.")
println("Note that the restore operation can take up to 20 minutes.")
restoreTable(keyspaceName, utc)
println(DASHES)
println(DASHES)
println("15. Check for completion of the restore action.")
delay(5000)
checkRestoredTable(keyspaceName, "MovieRestore")
println(DASHES)
println(DASHES)
println("16. Delete both tables.")
deleteTable(keyspaceName, tableName)
deleteTable(keyspaceName, tableNameRestore)
println(DASHES)
println(DASHES)
Learn the basics 443

Amazon Keyspaces (for Apache Cassandra) Developer Guide
println("17. Confirm that both tables are deleted.")
checkTableDelete(keyspaceName, tableName)
checkTableDelete(keyspaceName, tableNameRestore)
println(DASHES)
println(DASHES)
println("18. Delete the keyspace.")
deleteKeyspace(keyspaceName)
println(DASHES)
println(DASHES)
println("The scenario has completed successfully.")
println(DASHES)
}
suspend fun deleteKeyspace(keyspaceNameVal: String?) {
val deleteKeyspaceRequest =
DeleteKeyspaceRequest {
keyspaceName = keyspaceNameVal
}
KeyspacesClient { region = "us-east-1" }.use { keyClient ->
keyClient.deleteKeyspace(deleteKeyspaceRequest)
}
}
suspend fun checkTableDelete(
keyspaceNameVal: String?,
tableNameVal: String?,
) {
var status: String
var response: GetTableResponse
val tableRequest =
GetTableRequest {
keyspaceName = keyspaceNameVal
tableName = tableNameVal
}
try {
KeyspacesClient { region = "us-east-1" }.use { keyClient ->
// Keep looping until the table cannot be found and a
ResourceNotFoundException is thrown.
while (true) {
response = keyClient.getTable(tableRequest)
Learn the basics 444

Amazon Keyspaces (for Apache Cassandra) Developer Guide
status = response.status.toString()
println(". The table status is $status")
delay(500)
}
}
} catch (e: ResourceNotFoundException) {
println(e.message)
}
println("The table is deleted")
}
suspend fun deleteTable(
keyspaceNameVal: String?,
tableNameVal: String?,
) {
val tableRequest =
DeleteTableRequest {
keyspaceName = keyspaceNameVal
tableName = tableNameVal
}
KeyspacesClient { region = "us-east-1" }.use { keyClient ->
keyClient.deleteTable(tableRequest)
}
}
suspend fun checkRestoredTable(
keyspaceNameVal: String?,
tableNameVal: String?,
) {
var tableStatus = false
var status: String
var response: GetTableResponse? = null
val tableRequest =
GetTableRequest {
keyspaceName = keyspaceNameVal
tableName = tableNameVal
}
KeyspacesClient { region = "us-east-1" }.use { keyClient ->
while (!tableStatus) {
response = keyClient.getTable(tableRequest)
status = response!!.status.toString()
Learn the basics 445

Amazon Keyspaces (for Apache Cassandra) Developer Guide
println("The table status is $status")
if (status.compareTo("ACTIVE") == 0) {
tableStatus = true
}
delay(500)
}
val cols = response!!.schemaDefinition?.allColumns
if (cols != null) {
for (def in cols) {
println("The column name is ${def.name}")
println("The column type is ${def.type}")
}
}
}
}
suspend fun restoreTable(
keyspaceName: String?,
utc: ZonedDateTime,
) {
// Create an aws.smithy.kotlin.runtime.time.Instant value.
val timeStamp =
aws.smithy.kotlin.runtime.time
.Instant(utc.toInstant())
val restoreTableRequest =
RestoreTableRequest {
restoreTimestamp = timeStamp
sourceTableName = "MovieKotlin"
targetKeyspaceName = keyspaceName
targetTableName = "MovieRestore"
sourceKeyspaceName = keyspaceName
}
KeyspacesClient { region = "us-east-1" }.use { keyClient ->
val response = keyClient.restoreTable(restoreTableRequest)
println("The ARN of the restored table is ${response.restoredTableArn}")
}
}
fun getWatchedData(
session: CqlSession,
keyspaceName: String,
Learn the basics 446

Amazon Keyspaces (for Apache Cassandra) Developer Guide
) {
val resultSet = session.execute("SELECT * FROM \"$keyspaceName\".
\"MovieKotlin\" WHERE watched = true ALLOW FILTERING;")
resultSet.forEach { item: Row ->
println("The Movie title is ${item.getString("title")}")
println("The Movie year is ${item.getInt("year")}")
println("The plot is ${item.getString("plot")}")
}
}
fun updateRecord(
session: CqlSession,
keySpace: String,
titleUpdate: String?,
yearUpdate: Int,
) {
val sqlStatement =
"UPDATE \"$keySpace\".\"MovieKotlin\" SET watched=true WHERE title = :k0
AND year = :k1;"
val builder = BatchStatement.builder(DefaultBatchType.UNLOGGED)
builder.setConsistencyLevel(ConsistencyLevel.LOCAL_QUORUM)
val preparedStatement = session.prepare(sqlStatement)
builder.addStatement(
preparedStatement
.boundStatementBuilder()
.setString("k0", titleUpdate)
.setInt("k1", yearUpdate)
.build(),
)
val batchStatement = builder.build()
session.execute(batchStatement)
}
suspend fun updateTable(
keySpace: String?,
tableNameVal: String?,
) {
val def =
ColumnDefinition {
name = "watched"
type = "boolean"
}
val tableRequest =
Learn the basics 447

Amazon Keyspaces (for Apache Cassandra) Developer Guide
UpdateTableRequest {
keyspaceName = keySpace
tableName = tableNameVal
addColumns = listOf(def)
}
KeyspacesClient { region = "us-east-1" }.use { keyClient ->
keyClient.updateTable(tableRequest)
}
}
fun getSpecificMovie(
session: CqlSession,
keyspaceName: String,
) {
val resultSet =
session.execute("SELECT * FROM \"$keyspaceName\".\"MovieKotlin\" WHERE
title = 'The Family' ALLOW FILTERING ;")
resultSet.forEach { item: Row ->
println("The Movie title is ${item.getString("title")}")
println("The Movie year is ${item.getInt("year")}")
println("The plot is ${item.getString("plot")}")
}
}
// Get records from the Movie table.
fun getMovieData(
session: CqlSession,
keyspaceName: String,
) {
val resultSet = session.execute("SELECT * FROM \"$keyspaceName\".
\"MovieKotlin\";")
resultSet.forEach { item: Row ->
println("The Movie title is ${item.getString("title")}")
println("The Movie year is ${item.getInt("year")}")
println("The plot is ${item.getString("plot")}")
}
}
// Load data into the table.
fun loadData(
session: CqlSession,
fileName: String,
Learn the basics 448

Amazon Keyspaces (for Apache Cassandra) Developer Guide
keySpace: String,
) {
val sqlStatement =
"INSERT INTO \"$keySpace\".\"MovieKotlin\" (title, year, plot) values
(:k0, :k1, :k2)"
val parser = JsonFactory().createParser(File(fileName))
val rootNode = ObjectMapper().readTree<JsonNode>(parser)
val iter: Iterator<JsonNode> = rootNode.iterator()
var currentNode: ObjectNode
var t = 0
while (iter.hasNext()) {
if (t == 50) {
break
}
currentNode = iter.next() as ObjectNode
val year = currentNode.path("year").asInt()
val title = currentNode.path("title").asText()
val info = currentNode.path("info").toString()
// Insert the data into the Amazon Keyspaces table.
val builder = BatchStatement.builder(DefaultBatchType.UNLOGGED)
builder.setConsistencyLevel(ConsistencyLevel.LOCAL_QUORUM)
val preparedStatement: PreparedStatement = session.prepare(sqlStatement)
builder.addStatement(
preparedStatement
.boundStatementBuilder()
.setString("k0", title)
.setInt("k1", year)
.setString("k2", info)
.build(),
)
val batchStatement = builder.build()
session.execute(batchStatement)
t++
}
}
suspend fun listTables(keyspaceNameVal: String?) {
val tablesRequest =
ListTablesRequest {
keyspaceName = keyspaceNameVal
Learn the basics 449

Amazon Keyspaces (for Apache Cassandra) Developer Guide
}
KeyspacesClient { region = "us-east-1" }.use { keyClient ->
keyClient
.listTablesPaginated(tablesRequest)
.transform { it.tables?.forEach { obj -> emit(obj) } }
.collect { obj ->
println(" ARN: ${obj.resourceArn} Table name: ${obj.tableName}")
}
}
}
suspend fun checkTable(
keyspaceNameVal: String?,
tableNameVal: String?,
) {
var tableStatus = false
var status: String
var response: GetTableResponse? = null
val tableRequest =
GetTableRequest {
keyspaceName = keyspaceNameVal
tableName = tableNameVal
}
KeyspacesClient { region = "us-east-1" }.use { keyClient ->
while (!tableStatus) {
response = keyClient.getTable(tableRequest)
status = response!!.status.toString()
println(". The table status is $status")
if (status.compareTo("ACTIVE") == 0) {
tableStatus = true
}
delay(500)
}
val cols: List<ColumnDefinition>? =
response!!.schemaDefinition?.allColumns
if (cols != null) {
for (def in cols) {
println("The column name is ${def.name}")
println("The column type is ${def.type}")
}
}
}
Learn the basics 450

Amazon Keyspaces (for Apache Cassandra) Developer Guide
}
suspend fun createTable(
keySpaceVal: String?,
tableNameVal: String?,
) {
// Set the columns.
val defTitle =
ColumnDefinition {
name = "title"
type = "text"
}
val defYear =
ColumnDefinition {
name = "year"
type = "int"
}
val defReleaseDate =
ColumnDefinition {
name = "release_date"
type = "timestamp"
}
val defPlot =
ColumnDefinition {
name = "plot"
type = "text"
}
val colList = ArrayList<ColumnDefinition>()
colList.add(defTitle)
colList.add(defYear)
colList.add(defReleaseDate)
colList.add(defPlot)
// Set the keys.
val yearKey =
PartitionKey {
name = "year"
}
val titleKey =
Learn the basics 451

Amazon Keyspaces (for Apache Cassandra) Developer Guide
PartitionKey {
name = "title"
}
val keyList = ArrayList<PartitionKey>()
keyList.add(yearKey)
keyList.add(titleKey)
val schemaDefinitionOb =
SchemaDefinition {
partitionKeys = keyList
allColumns = colList
}
val timeRecovery =
PointInTimeRecovery {
status = PointInTimeRecoveryStatus.Enabled
}
val tableRequest =
CreateTableRequest {
keyspaceName = keySpaceVal
tableName = tableNameVal
schemaDefinition = schemaDefinitionOb
pointInTimeRecovery = timeRecovery
}
KeyspacesClient { region = "us-east-1" }.use { keyClient ->
val response = keyClient.createTable(tableRequest)
println("The table ARN is ${response.resourceArn}")
}
}
suspend fun listKeyspacesPaginator() {
KeyspacesClient { region = "us-east-1" }.use { keyClient ->
keyClient
.listKeyspacesPaginated(ListKeyspacesRequest {})
.transform { it.keyspaces?.forEach { obj -> emit(obj) } }
.collect { obj ->
println("Name: ${obj.keyspaceName}")
}
}
}
Learn the basics 452

Amazon Keyspaces (for Apache Cassandra) Developer Guide
suspend fun checkKeyspaceExistence(keyspaceNameVal: String?) {
val keyspaceRequest =
GetKeyspaceRequest {
keyspaceName = keyspaceNameVal
}
KeyspacesClient { region = "us-east-1" }.use { keyClient ->
val response: GetKeyspaceResponse =
keyClient.getKeyspace(keyspaceRequest)
val name = response.keyspaceName
println("The $name KeySpace is ready")
}
}
suspend fun createKeySpace(keyspaceNameVal: String) {
val keyspaceRequest =
CreateKeyspaceRequest {
keyspaceName = keyspaceNameVal
}
KeyspacesClient { region = "us-east-1" }.use { keyClient ->
val response = keyClient.createKeyspace(keyspaceRequest)
println("The ARN of the KeySpace is ${response.resourceArn}")
}
}
• For API details, see the following topics in AWS SDK for Kotlin API reference.
• CreateKeyspace
• CreateTable
• DeleteKeyspace
• DeleteTable
• GetKeyspace
• GetTable
• ListKeyspaces
• ListTables
• RestoreTable
• UpdateTable
Learn the basics 453

Amazon Keyspaces (for Apache Cassandra) Developer Guide
Python
SDK for Python (Boto3)
Note
There's more on GitHub. Find the complete example and learn how to set up and run
in the AWS Code Examples Repository.
Run an interactive scenario at a command prompt.
class KeyspaceScenario:
"""Runs an interactive scenario that shows how to get started using Amazon
Keyspaces."""
def __init__(self, ks_wrapper):
"""
:param ks_wrapper: An object that wraps Amazon Keyspace actions.
"""
self.ks_wrapper = ks_wrapper
@demo_func
def create_keyspace(self):
"""
1. Creates a keyspace.
2. Lists up to 10 keyspaces in your account.
"""
print("Let's create a keyspace.")
ks_name = q.ask(
"Enter a name for your new keyspace.\nThe name can contain only
letters, "
"numbers and underscores: ",
q.non_empty,
)
if self.ks_wrapper.exists_keyspace(ks_name):
print(f"A keyspace named {ks_name} exists.")
else:
ks_arn = self.ks_wrapper.create_keyspace(ks_name)
ks_exists = False
while not ks_exists:
wait(3)
ks_exists = self.ks_wrapper.exists_keyspace(ks_name)
Learn the basics 454

Amazon Keyspaces (for Apache Cassandra) Developer Guide
print(f"Created a new keyspace.\n\t{ks_arn}.")
print("The first 10 keyspaces in your account are:\n")
self.ks_wrapper.list_keyspaces(10)
@demo_func
def create_table(self):
"""
1. Creates a table in the keyspace. The table is configured with a schema
to hold
movie data and has point-in-time recovery enabled.
2. Waits for the table to be in an active state.
3. Displays schema information for the table.
4. Lists tables in the keyspace.
"""
print("Let's create a table for movies in your keyspace.")
table_name = q.ask("Enter a name for your table: ", q.non_empty)
table = self.ks_wrapper.get_table(table_name)
if table is not None:
print(
f"A table named {table_name} already exists in keyspace "
f"{self.ks_wrapper.ks_name}."
)
else:
table_arn = self.ks_wrapper.create_table(table_name)
print(f"Created table {table_name}:\n\t{table_arn}")
table = {"status": None}
print("Waiting for your table to be ready...")
while table["status"] != "ACTIVE":
wait(5)
table = self.ks_wrapper.get_table(table_name)
print(f"Your table is {table['status']}. Its schema is:")
pp(table["schemaDefinition"])
print("\nThe tables in your keyspace are:\n")
self.ks_wrapper.list_tables()
@demo_func
def ensure_tls_cert(self):
"""
Ensures you have a TLS certificate available to use to secure the
connection
to the keyspace. This function downloads a default certificate or lets
you
specify your own.
"""
Learn the basics 455

Amazon Keyspaces (for Apache Cassandra) Developer Guide
print("To connect to your keyspace, you must have a TLS certificate.")
print("Checking for TLS certificate...")
cert_path = os.path.join(
os.path.dirname(__file__), QueryManager.DEFAULT_CERT_FILE
)
if not os.path.exists(cert_path):
cert_choice = q.ask(
f"Press enter to download a certificate from
{QueryManager.CERT_URL} "
f"or enter the full path to the certificate you want to use: "
)
if cert_choice:
cert_path = cert_choice
else:
cert = requests.get(QueryManager.CERT_URL).text
with open(cert_path, "w") as cert_file:
cert_file.write(cert)
else:
q.ask(f"Certificate {cert_path} found. Press Enter to continue.")
print(
f"Certificate {cert_path} will be used to secure the connection to
your keyspace."
)
return cert_path
@demo_func
def query_table(self, qm, movie_file):
"""
1. Adds movies to the table from a sample movie data file.
2. Gets a list of movies from the table and lets you select one.
3. Displays more information about the selected movie.
"""
qm.add_movies(self.ks_wrapper.table_name, movie_file)
movies = qm.get_movies(self.ks_wrapper.table_name)
print(f"Added {len(movies)} movies to the table:")
sel = q.choose("Pick one to learn more about it: ", [m.title for m in
movies])
movie_choice = qm.get_movie(
self.ks_wrapper.table_name, movies[sel].title, movies[sel].year
)
print(movie_choice.title)
print(f"\tReleased: {movie_choice.release_date}")
print(f"\tPlot: {movie_choice.plot}")
Learn the basics 456

Amazon Keyspaces (for Apache Cassandra) Developer Guide
@demo_func
def update_and_restore_table(self, qm):
"""
1. Updates the table by adding a column to track watched movies.
2. Marks some of the movies as watched.
3. Gets the list of watched movies from the table.
4. Restores to a movies_restored table at a previous point in time.
5. Gets the list of movies from the restored table.
"""
print("Let's add a column to record which movies you've watched.")
pre_update_timestamp = datetime.utcnow()
print(
f"Recorded the current UTC time of {pre_update_timestamp} so we can
restore the table later."
)
self.ks_wrapper.update_table()
print("Waiting for your table to update...")
table = {"status": "UPDATING"}
while table["status"] != "ACTIVE":
wait(5)
table = self.ks_wrapper.get_table(self.ks_wrapper.table_name)
print("Column 'watched' added to table.")
q.ask(
"Let's mark some of the movies as watched. Press Enter when you're
ready.\n"
)
movies = qm.get_movies(self.ks_wrapper.table_name)
for movie in movies[:10]:
qm.watched_movie(self.ks_wrapper.table_name, movie.title, movie.year)
print(f"Marked {movie.title} as watched.")
movies = qm.get_movies(self.ks_wrapper.table_name, watched=True)
print("-" * 88)
print("The watched movies in our table are:\n")
for movie in movies:
print(movie.title)
print("-" * 88)
if q.ask(
"Do you want to restore the table to the way it was before all of
these\n"
"updates? Keep in mind, this can take up to 20 minutes. (y/n) ",
q.is_yesno,
):
starting_table_name = self.ks_wrapper.table_name
Learn the basics 457

Amazon Keyspaces (for Apache Cassandra) Developer Guide
table_name_restored =
self.ks_wrapper.restore_table(pre_update_timestamp)
table = {"status": "RESTORING"}
while table["status"] != "ACTIVE":
wait(10)
table = self.ks_wrapper.get_table(table_name_restored)
print(
f"Restored {starting_table_name} to {table_name_restored} "
f"at a point in time of {pre_update_timestamp}."
)
movies = qm.get_movies(table_name_restored)
print("Now the movies in our table are:")
for movie in movies:
print(movie.title)
def cleanup(self, cert_path):
"""
1. Deletes the table and waits for it to be removed.
2. Deletes the keyspace.
:param cert_path: The path of the TLS certificate used in the demo. If
the
certificate was downloaded during the demo, it is
removed.
"""
if q.ask(
f"Do you want to delete your {self.ks_wrapper.table_name} table and "
f"{self.ks_wrapper.ks_name} keyspace? (y/n) ",
q.is_yesno,
):
table_name = self.ks_wrapper.table_name
self.ks_wrapper.delete_table()
table = self.ks_wrapper.get_table(table_name)
print("Waiting for the table to be deleted.")
while table is not None:
wait(5)
table = self.ks_wrapper.get_table(table_name)
print("Table deleted.")
self.ks_wrapper.delete_keyspace()
print(
"Keyspace deleted. If you chose to restore your table during the
"
"demo, the original table is also deleted."
)
Learn the basics 458

Amazon Keyspaces (for Apache Cassandra) Developer Guide
if cert_path == os.path.join(
os.path.dirname(__file__), QueryManager.DEFAULT_CERT_FILE
) and os.path.exists(cert_path):
os.remove(cert_path)
print("Removed certificate that was downloaded for this demo.")
def run_scenario(self):
logging.basicConfig(level=logging.INFO, format="%(levelname)s:
%(message)s")
print("-" * 88)
print("Welcome to the Amazon Keyspaces (for Apache Cassandra) demo.")
print("-" * 88)
self.create_keyspace()
self.create_table()
cert_file_path = self.ensure_tls_cert()
# Use a context manager to ensure the connection to the keyspace is
closed.
with QueryManager(
cert_file_path, boto3.DEFAULT_SESSION, self.ks_wrapper.ks_name
) as qm:
self.query_table(qm, "../../../resources/sample_files/movies.json")
self.update_and_restore_table(qm)
self.cleanup(cert_file_path)
print("\nThanks for watching!")
print("-" * 88)
if __name__ == "__main__":
try:
scenario = KeyspaceScenario(KeyspaceWrapper.from_client())
scenario.run_scenario()
except Exception:
logging.exception("Something went wrong with the demo.")
Define a class that wraps keyspace and table actions.
class KeyspaceWrapper:
"""Encapsulates Amazon Keyspaces (for Apache Cassandra) keyspace and table
actions."""
Learn the basics 459

Amazon Keyspaces (for Apache Cassandra) Developer Guide
def __init__(self, keyspaces_client):
"""
:param keyspaces_client: A Boto3 Amazon Keyspaces client.
"""
self.keyspaces_client = keyspaces_client
self.ks_name = None
self.ks_arn = None
self.table_name = None
@classmethod
def from_client(cls):
keyspaces_client = boto3.client("keyspaces")
return cls(keyspaces_client)
def create_keyspace(self, name):
"""
Creates a keyspace.
:param name: The name to give the keyspace.
:return: The Amazon Resource Name (ARN) of the new keyspace.
"""
try:
response = self.keyspaces_client.create_keyspace(keyspaceName=name)
self.ks_name = name
self.ks_arn = response["resourceArn"]
except ClientError as err:
logger.error(
"Couldn't create %s. Here's why: %s: %s",
name,
err.response["Error"]["Code"],
err.response["Error"]["Message"],
)
raise
else:
return self.ks_arn
def exists_keyspace(self, name):
"""
Checks whether a keyspace exists.
:param name: The name of the keyspace to look up.
Learn the basics 460

Amazon Keyspaces (for Apache Cassandra) Developer Guide
:return: True when the keyspace exists. Otherwise, False.
"""
try:
response = self.keyspaces_client.get_keyspace(keyspaceName=name)
self.ks_name = response["keyspaceName"]
self.ks_arn = response["resourceArn"]
exists = True
except ClientError as err:
if err.response["Error"]["Code"] == "ResourceNotFoundException":
logger.info("Keyspace %s does not exist.", name)
exists = False
else:
logger.error(
"Couldn't verify %s exists. Here's why: %s: %s",
name,
err.response["Error"]["Code"],
err.response["Error"]["Message"],
)
raise
return exists
def list_keyspaces(self, limit):
"""
Lists the keyspaces in your account.
:param limit: The maximum number of keyspaces to list.
"""
try:
ks_paginator = self.keyspaces_client.get_paginator("list_keyspaces")
for page in ks_paginator.paginate(PaginationConfig={"MaxItems":
limit}):
for ks in page["keyspaces"]:
print(ks["keyspaceName"])
print(f"\t{ks['resourceArn']}")
except ClientError as err:
logger.error(
"Couldn't list keyspaces. Here's why: %s: %s",
err.response["Error"]["Code"],
err.response["Error"]["Message"],
)
raise
Learn the basics 461

Amazon Keyspaces (for Apache Cassandra) Developer Guide
def create_table(self, table_name):
"""
Creates a table in the keyspace.
The table is created with a schema for storing movie data
and has point-in-time recovery enabled.
:param table_name: The name to give the table.
:return: The ARN of the new table.
"""
try:
response = self.keyspaces_client.create_table(
keyspaceName=self.ks_name,
tableName=table_name,
schemaDefinition={
"allColumns": [
{"name": "title", "type": "text"},
{"name": "year", "type": "int"},
{"name": "release_date", "type": "timestamp"},
{"name": "plot", "type": "text"},
],
"partitionKeys": [{"name": "year"}, {"name": "title"}],
},
pointInTimeRecovery={"status": "ENABLED"},
)
except ClientError as err:
logger.error(
"Couldn't create table %s. Here's why: %s: %s",
table_name,
err.response["Error"]["Code"],
err.response["Error"]["Message"],
)
raise
else:
return response["resourceArn"]
def get_table(self, table_name):
"""
Gets data about a table in the keyspace.
:param table_name: The name of the table to look up.
:return: Data about the table.
"""
try:
Learn the basics 462

Amazon Keyspaces (for Apache Cassandra) Developer Guide
response = self.keyspaces_client.get_table(
keyspaceName=self.ks_name, tableName=table_name
)
self.table_name = table_name
except ClientError as err:
if err.response["Error"]["Code"] == "ResourceNotFoundException":
logger.info("Table %s does not exist.", table_name)
self.table_name = None
response = None
else:
logger.error(
"Couldn't verify %s exists. Here's why: %s: %s",
table_name,
err.response["Error"]["Code"],
err.response["Error"]["Message"],
)
raise
return response
def list_tables(self):
"""
Lists the tables in the keyspace.
"""
try:
table_paginator = self.keyspaces_client.get_paginator("list_tables")
for page in table_paginator.paginate(keyspaceName=self.ks_name):
for table in page["tables"]:
print(table["tableName"])
print(f"\t{table['resourceArn']}")
except ClientError as err:
logger.error(
"Couldn't list tables in keyspace %s. Here's why: %s: %s",
self.ks_name,
err.response["Error"]["Code"],
err.response["Error"]["Message"],
)
raise
def update_table(self):
"""
Updates the schema of the table.
Learn the basics 463

Amazon Keyspaces (for Apache Cassandra) Developer Guide
This example updates a table of movie data by adding a new column
that tracks whether the movie has been watched.
"""
try:
self.keyspaces_client.update_table(
keyspaceName=self.ks_name,
tableName=self.table_name,
addColumns=[{"name": "watched", "type": "boolean"}],
)
except ClientError as err:
logger.error(
"Couldn't update table %s. Here's why: %s: %s",
self.table_name,
err.response["Error"]["Code"],
err.response["Error"]["Message"],
)
raise
def restore_table(self, restore_timestamp):
"""
Restores the table to a previous point in time. The table is restored
to a new table in the same keyspace.
:param restore_timestamp: The point in time to restore the table. This
time
must be in UTC format.
:return: The name of the restored table.
"""
try:
restored_table_name = f"{self.table_name}_restored"
self.keyspaces_client.restore_table(
sourceKeyspaceName=self.ks_name,
sourceTableName=self.table_name,
targetKeyspaceName=self.ks_name,
targetTableName=restored_table_name,
restoreTimestamp=restore_timestamp,
)
except ClientError as err:
logger.error(
"Couldn't restore table %s. Here's why: %s: %s",
restore_timestamp,
err.response["Error"]["Code"],
err.response["Error"]["Message"],
Learn the basics 464

Amazon Keyspaces (for Apache Cassandra) Developer Guide
)
raise
else:
return restored_table_name
def delete_table(self):
"""
Deletes the table from the keyspace.
"""
try:
self.keyspaces_client.delete_table(
keyspaceName=self.ks_name, tableName=self.table_name
)
self.table_name = None
except ClientError as err:
logger.error(
"Couldn't delete table %s. Here's why: %s: %s",
self.table_name,
err.response["Error"]["Code"],
err.response["Error"]["Message"],
)
raise
def delete_keyspace(self):
"""
Deletes the keyspace.
"""
try:
self.keyspaces_client.delete_keyspace(keyspaceName=self.ks_name)
self.ks_name = None
except ClientError as err:
logger.error(
"Couldn't delete keyspace %s. Here's why: %s: %s",
self.ks_name,
err.response["Error"]["Code"],
err.response["Error"]["Message"],
)
raise
Learn the basics 465

Amazon Keyspaces (for Apache Cassandra) Developer Guide
Define a class that creates a TLS connection to a keyspace, authenticates with SigV4, and
sends CQL queries to a table in the keyspace.
class QueryManager:
"""
Manages queries to an Amazon Keyspaces (for Apache Cassandra) keyspace.
Queries are secured by TLS and authenticated by using the Signature V4
(SigV4)
AWS signing protocol. This is more secure than sending username and password
with a plain-text authentication provider.
This example downloads a default certificate to secure TLS, or lets you
specify
your own.
This example uses a table of movie data to demonstrate basic queries.
"""
DEFAULT_CERT_FILE = "sf-class2-root.crt"
CERT_URL = f"https://certs.secureserver.net/repository/sf-class2-root.crt"
def __init__(self, cert_file_path, boto_session, keyspace_name):
"""
:param cert_file_path: The path and file name of the certificate used for
TLS.
:param boto_session: A Boto3 session. This is used to acquire your AWS
credentials.
:param keyspace_name: The name of the keyspace to connect.
"""
self.cert_file_path = cert_file_path
self.boto_session = boto_session
self.ks_name = keyspace_name
self.cluster = None
self.session = None
def __enter__(self):
"""
Creates a session connection to the keyspace that is secured by TLS and
authenticated by SigV4.
"""
ssl_context = SSLContext(PROTOCOL_TLSv1_2)
Learn the basics 466

Amazon Keyspaces (for Apache Cassandra) Developer Guide
ssl_context.load_verify_locations(self.cert_file_path)
ssl_context.verify_mode = CERT_REQUIRED
auth_provider = SigV4AuthProvider(self.boto_session)
contact_point = f"cassandra.
{self.boto_session.region_name}.amazonaws.com"
exec_profile = ExecutionProfile(
consistency_level=ConsistencyLevel.LOCAL_QUORUM,
load_balancing_policy=DCAwareRoundRobinPolicy(),
)
self.cluster = Cluster(
[contact_point],
ssl_context=ssl_context,
auth_provider=auth_provider,
port=9142,
execution_profiles={EXEC_PROFILE_DEFAULT: exec_profile},
protocol_version=4,
)
self.cluster.__enter__()
self.session = self.cluster.connect(self.ks_name)
return self
def __exit__(self, *args):
"""
Exits the cluster. This shuts down all existing session connections.
"""
self.cluster.__exit__(*args)
def add_movies(self, table_name, movie_file_path):
"""
Gets movies from a JSON file and adds them to a table in the keyspace.
:param table_name: The name of the table.
:param movie_file_path: The path and file name of a JSON file that
contains movie data.
"""
with open(movie_file_path, "r") as movie_file:
movies = json.loads(movie_file.read())
stmt = self.session.prepare(
f"INSERT INTO {table_name} (year, title, release_date, plot) VALUES
(?, ?, ?, ?);"
)
for movie in movies[:20]:
self.session.execute(
stmt,
Learn the basics 467

Amazon Keyspaces (for Apache Cassandra) Developer Guide
parameters=[
movie["year"],
movie["title"],
date.fromisoformat(movie["info"]
["release_date"].partition("T")[0]),
movie["info"]["plot"],
],
)
def get_movies(self, table_name, watched=None):
"""
Gets the title and year of the full list of movies from the table.
:param table_name: The name of the movie table.
:param watched: When specified, the returned list of movies is filtered
to
either movies that have been watched or movies that have
not
been watched. Otherwise, all movies are returned.
:return: A list of movies in the table.
"""
if watched is None:
stmt = SimpleStatement(f"SELECT title, year from {table_name}")
params = None
else:
stmt = SimpleStatement(
f"SELECT title, year from {table_name} WHERE watched = %s ALLOW
FILTERING"
)
params = [watched]
return self.session.execute(stmt, parameters=params).all()
def get_movie(self, table_name, title, year):
"""
Gets a single movie from the table, by title and year.
:param table_name: The name of the movie table.
:param title: The title of the movie.
:param year: The year of the movie's release.
:return: The requested movie.
"""
return self.session.execute(
SimpleStatement(
f"SELECT * from {table_name} WHERE title = %s AND year = %s"
Learn the basics 468

Amazon Keyspaces (for Apache Cassandra) Developer Guide
),
parameters=[title, year],
).one()
def watched_movie(self, table_name, title, year):
"""
Updates a movie as having been watched.
:param table_name: The name of the movie table.
:param title: The title of the movie.
:param year: The year of the movie's release.
"""
self.session.execute(
SimpleStatement(
f"UPDATE {table_name} SET watched=true WHERE title = %s AND year
= %s"
),
parameters=[title, year],
)
• For API details, see the following topics in AWS SDK for Python (Boto3) API Reference.
• CreateKeyspace
• CreateTable
• DeleteKeyspace
• DeleteTable
• GetKeyspace
• GetTable
• ListKeyspaces
• ListTables
• RestoreTable
• UpdateTable
For a complete list of AWS SDK developer guides and code examples, see Using this service with
an AWS SDK. This topic also includes information about getting started and details about previous
SDK versions.
Learn the basics 469

Amazon Keyspaces (for Apache Cassandra) Developer Guide
Actions for Amazon Keyspaces using AWS SDKs
The following code examples demonstrate how to perform individual Amazon Keyspaces actions
with AWS SDKs. Each example includes a link to GitHub, where you can find instructions for setting
up and running the code.
The following examples include only the most commonly used actions. For a complete list, see the
Amazon Keyspaces (for Apache Cassandra) API Reference.
Examples
• Use CreateKeyspace with an AWS SDK or CLI
• Use CreateTable with an AWS SDK or CLI
• Use DeleteKeyspace with an AWS SDK or CLI
• Use DeleteTable with an AWS SDK or CLI
• Use GetKeyspace with an AWS SDK or CLI
• Use GetTable with an AWS SDK or CLI
• Use ListKeyspaces with an AWS SDK or CLI
• Use ListTables with an AWS SDK or CLI
• Use RestoreTable with an AWS SDK or CLI
• Use UpdateTable with an AWS SDK or CLI
Use CreateKeyspace with an AWS SDK or CLI
The following code examples show how to use CreateKeyspace.
Action examples are code excerpts from larger programs and must be run in context. You can see
this action in context in the following code example:
• Learn the basics
Actions 470

Amazon Keyspaces (for Apache Cassandra) Developer Guide
.NET
AWS SDK for .NET
Note
There's more on GitHub. Find the complete example and learn how to set up and run
in the AWS Code Examples Repository.
/// <summary>
/// Create a new keyspace.
/// </summary>
/// <param name="keyspaceName">The name for the new keyspace.</param>
/// <returns>The Amazon Resource Name (ARN) of the new keyspace.</returns>
public async Task<string> CreateKeyspace(string keyspaceName)
{
var response =
await _amazonKeyspaces.CreateKeyspaceAsync(
new CreateKeyspaceRequest { KeyspaceName = keyspaceName });
return response.ResourceArn;
}
• For API details, see CreateKeyspace in AWS SDK for .NET API Reference.
Java
SDK for Java 2.x
Note
There's more on GitHub. Find the complete example and learn how to set up and run
in the AWS Code Examples Repository.
public static void createKeySpace(KeyspacesClient keyClient, String
keyspaceName) {
try {
Actions 471

Amazon Keyspaces (for Apache Cassandra) Developer Guide
CreateKeyspaceRequest keyspaceRequest =
CreateKeyspaceRequest.builder()
.keyspaceName(keyspaceName)
.build();
CreateKeyspaceResponse response =
keyClient.createKeyspace(keyspaceRequest);
System.out.println("The ARN of the KeySpace is " +
response.resourceArn());
} catch (KeyspacesException e) {
System.err.println(e.awsErrorDetails().errorMessage());
System.exit(1);
}
}
• For API details, see CreateKeyspace in AWS SDK for Java 2.x API Reference.
Kotlin
SDK for Kotlin
Note
There's more on GitHub. Find the complete example and learn how to set up and run
in the AWS Code Examples Repository.
suspend fun createKeySpace(keyspaceNameVal: String) {
val keyspaceRequest =
CreateKeyspaceRequest {
keyspaceName = keyspaceNameVal
}
KeyspacesClient { region = "us-east-1" }.use { keyClient ->
val response = keyClient.createKeyspace(keyspaceRequest)
println("The ARN of the KeySpace is ${response.resourceArn}")
}
}
Actions 472
Amazon Keyspaces (for Apache Cassandra) Developer Guide
• For API details, see CreateKeyspace in AWS SDK for Kotlin API reference.
Python
SDK for Python (Boto3)
Note
There's more on GitHub. Find the complete example and learn how to set up and run
in the AWS Code Examples Repository.
class KeyspaceWrapper:
"""Encapsulates Amazon Keyspaces (for Apache Cassandra) keyspace and table
actions."""
def __init__(self, keyspaces_client):
"""
:param keyspaces_client: A Boto3 Amazon Keyspaces client.
"""
self.keyspaces_client = keyspaces_client
self.ks_name = None
self.ks_arn = None
self.table_name = None
@classmethod
def from_client(cls):
keyspaces_client = boto3.client("keyspaces")
return cls(keyspaces_client)
def create_keyspace(self, name):
"""
Creates a keyspace.
:param name: The name to give the keyspace.
:return: The Amazon Resource Name (ARN) of the new keyspace.
"""
try:
response = self.keyspaces_client.create_keyspace(keyspaceName=name)
self.ks_name = name
self.ks_arn = response["resourceArn"]
Actions 473

Amazon Keyspaces (for Apache Cassandra) Developer Guide
except ClientError as err:
logger.error(
"Couldn't create %s. Here's why: %s: %s",
name,
err.response["Error"]["Code"],
err.response["Error"]["Message"],
)
raise
else:
return self.ks_arn
• For API details, see CreateKeyspace in AWS SDK for Python (Boto3) API Reference.
For a complete list of AWS SDK developer guides and code examples, see Using this service with
an AWS SDK. This topic also includes information about getting started and details about previous
SDK versions.
Use CreateTable with an AWS SDK or CLI
The following code examples show how to use CreateTable.
Action examples are code excerpts from larger programs and must be run in context. You can see
this action in context in the following code example:
• Learn the basics
.NET
AWS SDK for .NET
Note
There's more on GitHub. Find the complete example and learn how to set up and run
in the AWS Code Examples Repository.
/// <summary>
/// Create a new Amazon Keyspaces table.
Actions 474

Amazon Keyspaces (for Apache Cassandra) Developer Guide
/// </summary>
/// <param name="keyspaceName">The keyspace where the table will be
created.</param>
/// <param name="schema">The schema for the new table.</param>
/// <param name="tableName">The name of the new table.</param>
/// <returns>The Amazon Resource Name (ARN) of the new table.</returns>
public async Task<string> CreateTable(string keyspaceName, SchemaDefinition
schema, string tableName)
{
var request = new CreateTableRequest
{
KeyspaceName = keyspaceName,
SchemaDefinition = schema,
TableName = tableName,
PointInTimeRecovery = new PointInTimeRecovery { Status =
PointInTimeRecoveryStatus.ENABLED }
};
var response = await _amazonKeyspaces.CreateTableAsync(request);
return response.ResourceArn;
}
• For API details, see CreateTable in AWS SDK for .NET API Reference.
Java
SDK for Java 2.x
Note
There's more on GitHub. Find the complete example and learn how to set up and run
in the AWS Code Examples Repository.
public static void createTable(KeyspacesClient keyClient, String keySpace,
String tableName) {
try {
// Set the columns.
ColumnDefinition defTitle = ColumnDefinition.builder()
.name("title")
Actions 475

Amazon Keyspaces (for Apache Cassandra) Developer Guide
.type("text")
.build();
ColumnDefinition defYear = ColumnDefinition.builder()
.name("year")
.type("int")
.build();
ColumnDefinition defReleaseDate = ColumnDefinition.builder()
.name("release_date")
.type("timestamp")
.build();
ColumnDefinition defPlot = ColumnDefinition.builder()
.name("plot")
.type("text")
.build();
List<ColumnDefinition> colList = new ArrayList<>();
colList.add(defTitle);
colList.add(defYear);
colList.add(defReleaseDate);
colList.add(defPlot);
// Set the keys.
PartitionKey yearKey = PartitionKey.builder()
.name("year")
.build();
PartitionKey titleKey = PartitionKey.builder()
.name("title")
.build();
List<PartitionKey> keyList = new ArrayList<>();
keyList.add(yearKey);
keyList.add(titleKey);
SchemaDefinition schemaDefinition = SchemaDefinition.builder()
.partitionKeys(keyList)
.allColumns(colList)
.build();
PointInTimeRecovery timeRecovery = PointInTimeRecovery.builder()
.status(PointInTimeRecoveryStatus.ENABLED)
Actions 476

Amazon Keyspaces (for Apache Cassandra) Developer Guide
.build();
CreateTableRequest tableRequest = CreateTableRequest.builder()
.keyspaceName(keySpace)
.tableName(tableName)
.schemaDefinition(schemaDefinition)
.pointInTimeRecovery(timeRecovery)
.build();
CreateTableResponse response = keyClient.createTable(tableRequest);
System.out.println("The table ARN is " + response.resourceArn());
} catch (KeyspacesException e) {
System.err.println(e.awsErrorDetails().errorMessage());
System.exit(1);
}
}
• For API details, see CreateTable in AWS SDK for Java 2.x API Reference.
Kotlin
SDK for Kotlin
Note
There's more on GitHub. Find the complete example and learn how to set up and run
in the AWS Code Examples Repository.
suspend fun createTable(
keySpaceVal: String?,
tableNameVal: String?,
) {
// Set the columns.
val defTitle =
ColumnDefinition {
name = "title"
type = "text"
}
Actions 477

Amazon Keyspaces (for Apache Cassandra) Developer Guide
val defYear =
ColumnDefinition {
name = "year"
type = "int"
}
val defReleaseDate =
ColumnDefinition {
name = "release_date"
type = "timestamp"
}
val defPlot =
ColumnDefinition {
name = "plot"
type = "text"
}
val colList = ArrayList<ColumnDefinition>()
colList.add(defTitle)
colList.add(defYear)
colList.add(defReleaseDate)
colList.add(defPlot)
// Set the keys.
val yearKey =
PartitionKey {
name = "year"
}
val titleKey =
PartitionKey {
name = "title"
}
val keyList = ArrayList<PartitionKey>()
keyList.add(yearKey)
keyList.add(titleKey)
val schemaDefinitionOb =
SchemaDefinition {
partitionKeys = keyList
allColumns = colList
}
Actions 478

Amazon Keyspaces (for Apache Cassandra) Developer Guide
val timeRecovery =
PointInTimeRecovery {
status = PointInTimeRecoveryStatus.Enabled
}
val tableRequest =
CreateTableRequest {
keyspaceName = keySpaceVal
tableName = tableNameVal
schemaDefinition = schemaDefinitionOb
pointInTimeRecovery = timeRecovery
}
KeyspacesClient { region = "us-east-1" }.use { keyClient ->
val response = keyClient.createTable(tableRequest)
println("The table ARN is ${response.resourceArn}")
}
}
• For API details, see CreateTable in AWS SDK for Kotlin API reference.
Python
SDK for Python (Boto3)
Note
There's more on GitHub. Find the complete example and learn how to set up and run
in the AWS Code Examples Repository.
class KeyspaceWrapper:
"""Encapsulates Amazon Keyspaces (for Apache Cassandra) keyspace and table
actions."""
def __init__(self, keyspaces_client):
"""
:param keyspaces_client: A Boto3 Amazon Keyspaces client.
"""
self.keyspaces_client = keyspaces_client
Actions 479

Amazon Keyspaces (for Apache Cassandra) Developer Guide
self.ks_name = None
self.ks_arn = None
self.table_name = None
@classmethod
def from_client(cls):
keyspaces_client = boto3.client("keyspaces")
return cls(keyspaces_client)
def create_table(self, table_name):
"""
Creates a table in the keyspace.
The table is created with a schema for storing movie data
and has point-in-time recovery enabled.
:param table_name: The name to give the table.
:return: The ARN of the new table.
"""
try:
response = self.keyspaces_client.create_table(
keyspaceName=self.ks_name,
tableName=table_name,
schemaDefinition={
"allColumns": [
{"name": "title", "type": "text"},
{"name": "year", "type": "int"},
{"name": "release_date", "type": "timestamp"},
{"name": "plot", "type": "text"},
],
"partitionKeys": [{"name": "year"}, {"name": "title"}],
},
pointInTimeRecovery={"status": "ENABLED"},
)
except ClientError as err:
logger.error(
"Couldn't create table %s. Here's why: %s: %s",
table_name,
err.response["Error"]["Code"],
err.response["Error"]["Message"],
)
raise
else:
return response["resourceArn"]
Actions 480
Amazon Keyspaces (for Apache Cassandra) Developer Guide
• For API details, see CreateTable in AWS SDK for Python (Boto3) API Reference.
For a complete list of AWS SDK developer guides and code examples, see Using this service with
an AWS SDK. This topic also includes information about getting started and details about previous
SDK versions.
Use DeleteKeyspace with an AWS SDK or CLI
The following code examples show how to use DeleteKeyspace.
Action examples are code excerpts from larger programs and must be run in context. You can see
this action in context in the following code example:
• Learn the basics
.NET
AWS SDK for .NET
Note
There's more on GitHub. Find the complete example and learn how to set up and run
in the AWS Code Examples Repository.
/// <summary>
/// Delete an existing keyspace.
/// </summary>
/// <param name="keyspaceName"></param>
/// <returns>A Boolean value indicating the success of the action.</returns>
public async Task<bool> DeleteKeyspace(string keyspaceName)
{
var response = await _amazonKeyspaces.DeleteKeyspaceAsync(
new DeleteKeyspaceRequest { KeyspaceName = keyspaceName });
return response.HttpStatusCode == HttpStatusCode.OK;
}
Actions 481

Amazon Keyspaces (for Apache Cassandra) Developer Guide
• For API details, see DeleteKeyspace in AWS SDK for .NET API Reference.
Java
SDK for Java 2.x
Note
There's more on GitHub. Find the complete example and learn how to set up and run
in the AWS Code Examples Repository.
public static void deleteKeyspace(KeyspacesClient keyClient, String
keyspaceName) {
try {
DeleteKeyspaceRequest deleteKeyspaceRequest =
DeleteKeyspaceRequest.builder()
.keyspaceName(keyspaceName)
.build();
keyClient.deleteKeyspace(deleteKeyspaceRequest);
} catch (KeyspacesException e) {
System.err.println(e.awsErrorDetails().errorMessage());
System.exit(1);
}
}
• For API details, see DeleteKeyspace in AWS SDK for Java 2.x API Reference.
Actions 482

Amazon Keyspaces (for Apache Cassandra) Developer Guide
Kotlin
SDK for Kotlin
Note
There's more on GitHub. Find the complete example and learn how to set up and run
in the AWS Code Examples Repository.
suspend fun deleteKeyspace(keyspaceNameVal: String?) {
val deleteKeyspaceRequest =
DeleteKeyspaceRequest {
keyspaceName = keyspaceNameVal
}
KeyspacesClient { region = "us-east-1" }.use { keyClient ->
keyClient.deleteKeyspace(deleteKeyspaceRequest)
}
}
• For API details, see DeleteKeyspace in AWS SDK for Kotlin API reference.
Python
SDK for Python (Boto3)
Note
There's more on GitHub. Find the complete example and learn how to set up and run
in the AWS Code Examples Repository.
class KeyspaceWrapper:
"""Encapsulates Amazon Keyspaces (for Apache Cassandra) keyspace and table
actions."""
def __init__(self, keyspaces_client):
"""
Actions 483

Amazon Keyspaces (for Apache Cassandra) Developer Guide
:param keyspaces_client: A Boto3 Amazon Keyspaces client.
"""
self.keyspaces_client = keyspaces_client
self.ks_name = None
self.ks_arn = None
self.table_name = None
@classmethod
def from_client(cls):
keyspaces_client = boto3.client("keyspaces")
return cls(keyspaces_client)
def delete_keyspace(self):
"""
Deletes the keyspace.
"""
try:
self.keyspaces_client.delete_keyspace(keyspaceName=self.ks_name)
self.ks_name = None
except ClientError as err:
logger.error(
"Couldn't delete keyspace %s. Here's why: %s: %s",
self.ks_name,
err.response["Error"]["Code"],
err.response["Error"]["Message"],
)
raise
• For API details, see DeleteKeyspace in AWS SDK for Python (Boto3) API Reference.
For a complete list of AWS SDK developer guides and code examples, see Using this service with
an AWS SDK. This topic also includes information about getting started and details about previous
SDK versions.
Use DeleteTable with an AWS SDK or CLI
The following code examples show how to use DeleteTable.
Actions 484

Amazon Keyspaces (for Apache Cassandra) Developer Guide
Action examples are code excerpts from larger programs and must be run in context. You can see
this action in context in the following code example:
• Learn the basics
.NET
AWS SDK for .NET
Note
There's more on GitHub. Find the complete example and learn how to set up and run
in the AWS Code Examples Repository.
/// <summary>
/// Delete an Amazon Keyspaces table.
/// </summary>
/// <param name="keyspaceName">The keyspace containing the table.</param>
/// <param name="tableName">The name of the table to delete.</param>
/// <returns>A Boolean value indicating the success of the action.</returns>
public async Task<bool> DeleteTable(string keyspaceName, string tableName)
{
var response = await _amazonKeyspaces.DeleteTableAsync(
new DeleteTableRequest { KeyspaceName = keyspaceName, TableName =
tableName });
return response.HttpStatusCode == HttpStatusCode.OK;
}
• For API details, see DeleteTable in AWS SDK for .NET API Reference.
Actions 485

Amazon Keyspaces (for Apache Cassandra) Developer Guide
Java
SDK for Java 2.x
Note
There's more on GitHub. Find the complete example and learn how to set up and run
in the AWS Code Examples Repository.
public static void deleteTable(KeyspacesClient keyClient, String
keyspaceName, String tableName) {
try {
DeleteTableRequest tableRequest = DeleteTableRequest.builder()
.keyspaceName(keyspaceName)
.tableName(tableName)
.build();
keyClient.deleteTable(tableRequest);
} catch (KeyspacesException e) {
System.err.println(e.awsErrorDetails().errorMessage());
System.exit(1);
}
}
• For API details, see DeleteTable in AWS SDK for Java 2.x API Reference.
Kotlin
SDK for Kotlin
Note
There's more on GitHub. Find the complete example and learn how to set up and run
in the AWS Code Examples Repository.
suspend fun deleteTable(
Actions 486

Amazon Keyspaces (for Apache Cassandra) Developer Guide
keyspaceNameVal: String?,
tableNameVal: String?,
) {
val tableRequest =
DeleteTableRequest {
keyspaceName = keyspaceNameVal
tableName = tableNameVal
}
KeyspacesClient { region = "us-east-1" }.use { keyClient ->
keyClient.deleteTable(tableRequest)
}
}
• For API details, see DeleteTable in AWS SDK for Kotlin API reference.
Python
SDK for Python (Boto3)
Note
There's more on GitHub. Find the complete example and learn how to set up and run
in the AWS Code Examples Repository.
class KeyspaceWrapper:
"""Encapsulates Amazon Keyspaces (for Apache Cassandra) keyspace and table
actions."""
def __init__(self, keyspaces_client):
"""
:param keyspaces_client: A Boto3 Amazon Keyspaces client.
"""
self.keyspaces_client = keyspaces_client
self.ks_name = None
self.ks_arn = None
self.table_name = None
@classmethod
def from_client(cls):
Actions 487

Amazon Keyspaces (for Apache Cassandra) Developer Guide
keyspaces_client = boto3.client("keyspaces")
return cls(keyspaces_client)
def delete_table(self):
"""
Deletes the table from the keyspace.
"""
try:
self.keyspaces_client.delete_table(
keyspaceName=self.ks_name, tableName=self.table_name
)
self.table_name = None
except ClientError as err:
logger.error(
"Couldn't delete table %s. Here's why: %s: %s",
self.table_name,
err.response["Error"]["Code"],
err.response["Error"]["Message"],
)
raise
• For API details, see DeleteTable in AWS SDK for Python (Boto3) API Reference.
For a complete list of AWS SDK developer guides and code examples, see Using this service with
an AWS SDK. This topic also includes information about getting started and details about previous
SDK versions.
Use GetKeyspace with an AWS SDK or CLI
The following code examples show how to use GetKeyspace.
Action examples are code excerpts from larger programs and must be run in context. You can see
this action in context in the following code example:
• Learn the basics
Actions 488

Amazon Keyspaces (for Apache Cassandra) Developer Guide
.NET
AWS SDK for .NET
Note
There's more on GitHub. Find the complete example and learn how to set up and run
in the AWS Code Examples Repository.
/// <summary>
/// Get data about a keyspace.
/// </summary>
/// <param name="keyspaceName">The name of the keyspace.</param>
/// <returns>The Amazon Resource Name (ARN) of the keyspace.</returns>
public async Task<string> GetKeyspace(string keyspaceName)
{
var response = await _amazonKeyspaces.GetKeyspaceAsync(
new GetKeyspaceRequest { KeyspaceName = keyspaceName });
return response.ResourceArn;
}
• For API details, see GetKeyspace in AWS SDK for .NET API Reference.
Java
SDK for Java 2.x
Note
There's more on GitHub. Find the complete example and learn how to set up and run
in the AWS Code Examples Repository.
public static void checkKeyspaceExistence(KeyspacesClient keyClient, String
keyspaceName) {
try {
GetKeyspaceRequest keyspaceRequest = GetKeyspaceRequest.builder()
Actions 489

Amazon Keyspaces (for Apache Cassandra) Developer Guide
.keyspaceName(keyspaceName)
.build();
GetKeyspaceResponse response =
keyClient.getKeyspace(keyspaceRequest);
String name = response.keyspaceName();
System.out.println("The " + name + " KeySpace is ready");
} catch (KeyspacesException e) {
System.err.println(e.awsErrorDetails().errorMessage());
System.exit(1);
}
}
• For API details, see GetKeyspace in AWS SDK for Java 2.x API Reference.
Kotlin
SDK for Kotlin
Note
There's more on GitHub. Find the complete example and learn how to set up and run
in the AWS Code Examples Repository.
suspend fun checkKeyspaceExistence(keyspaceNameVal: String?) {
val keyspaceRequest =
GetKeyspaceRequest {
keyspaceName = keyspaceNameVal
}
KeyspacesClient { region = "us-east-1" }.use { keyClient ->
val response: GetKeyspaceResponse =
keyClient.getKeyspace(keyspaceRequest)
val name = response.keyspaceName
println("The $name KeySpace is ready")
}
}
Actions 490

Amazon Keyspaces (for Apache Cassandra) Developer Guide
• For API details, see GetKeyspace in AWS SDK for Kotlin API reference.
Python
SDK for Python (Boto3)
Note
There's more on GitHub. Find the complete example and learn how to set up and run
in the AWS Code Examples Repository.
class KeyspaceWrapper:
"""Encapsulates Amazon Keyspaces (for Apache Cassandra) keyspace and table
actions."""
def __init__(self, keyspaces_client):
"""
:param keyspaces_client: A Boto3 Amazon Keyspaces client.
"""
self.keyspaces_client = keyspaces_client
self.ks_name = None
self.ks_arn = None
self.table_name = None
@classmethod
def from_client(cls):
keyspaces_client = boto3.client("keyspaces")
return cls(keyspaces_client)
def exists_keyspace(self, name):
"""
Checks whether a keyspace exists.
:param name: The name of the keyspace to look up.
:return: True when the keyspace exists. Otherwise, False.
"""
try:
response = self.keyspaces_client.get_keyspace(keyspaceName=name)
self.ks_name = response["keyspaceName"]
self.ks_arn = response["resourceArn"]
Actions 491

Amazon Keyspaces (for Apache Cassandra) Developer Guide
exists = True
except ClientError as err:
if err.response["Error"]["Code"] == "ResourceNotFoundException":
logger.info("Keyspace %s does not exist.", name)
exists = False
else:
logger.error(
"Couldn't verify %s exists. Here's why: %s: %s",
name,
err.response["Error"]["Code"],
err.response["Error"]["Message"],
)
raise
return exists
• For API details, see GetKeyspace in AWS SDK for Python (Boto3) API Reference.
For a complete list of AWS SDK developer guides and code examples, see Using this service with
an AWS SDK. This topic also includes information about getting started and details about previous
SDK versions.
Use GetTable with an AWS SDK or CLI
The following code examples show how to use GetTable.
Action examples are code excerpts from larger programs and must be run in context. You can see
this action in context in the following code example:
• Learn the basics
.NET
AWS SDK for .NET
Note
There's more on GitHub. Find the complete example and learn how to set up and run
in the AWS Code Examples Repository.
Actions 492

Amazon Keyspaces (for Apache Cassandra) Developer Guide
/// <summary>
/// Get information about an Amazon Keyspaces table.
/// </summary>
/// <param name="keyspaceName">The keyspace containing the table.</param>
/// <param name="tableName">The name of the Amazon Keyspaces table.</param>
/// <returns>The response containing data about the table.</returns>
public async Task<GetTableResponse> GetTable(string keyspaceName, string
tableName)
{
var response = await _amazonKeyspaces.GetTableAsync(
new GetTableRequest { KeyspaceName = keyspaceName, TableName =
tableName });
return response;
}
• For API details, see GetTable in AWS SDK for .NET API Reference.
Java
SDK for Java 2.x
Note
There's more on GitHub. Find the complete example and learn how to set up and run
in the AWS Code Examples Repository.
public static void checkTable(KeyspacesClient keyClient, String keyspaceName,
String tableName)
throws InterruptedException {
try {
boolean tableStatus = false;
String status;
GetTableResponse response = null;
GetTableRequest tableRequest = GetTableRequest.builder()
.keyspaceName(keyspaceName)
.tableName(tableName)
.build();
Actions 493

Amazon Keyspaces (for Apache Cassandra) Developer Guide
while (!tableStatus) {
response = keyClient.getTable(tableRequest);
status = response.statusAsString();
System.out.println(". The table status is " + status);
if (status.compareTo("ACTIVE") == 0) {
tableStatus = true;
}
Thread.sleep(500);
}
List<ColumnDefinition> cols =
response.schemaDefinition().allColumns();
for (ColumnDefinition def : cols) {
System.out.println("The column name is " + def.name());
System.out.println("The column type is " + def.type());
}
} catch (KeyspacesException e) {
System.err.println(e.awsErrorDetails().errorMessage());
System.exit(1);
}
}
• For API details, see GetTable in AWS SDK for Java 2.x API Reference.
Kotlin
SDK for Kotlin
Note
There's more on GitHub. Find the complete example and learn how to set up and run
in the AWS Code Examples Repository.
suspend fun checkTable(
keyspaceNameVal: String?,
tableNameVal: String?,
) {
var tableStatus = false
Actions 494

Amazon Keyspaces (for Apache Cassandra) Developer Guide
var status: String
var response: GetTableResponse? = null
val tableRequest =
GetTableRequest {
keyspaceName = keyspaceNameVal
tableName = tableNameVal
}
KeyspacesClient { region = "us-east-1" }.use { keyClient ->
while (!tableStatus) {
response = keyClient.getTable(tableRequest)
status = response!!.status.toString()
println(". The table status is $status")
if (status.compareTo("ACTIVE") == 0) {
tableStatus = true
}
delay(500)
}
val cols: List<ColumnDefinition>? =
response!!.schemaDefinition?.allColumns
if (cols != null) {
for (def in cols) {
println("The column name is ${def.name}")
println("The column type is ${def.type}")
}
}
}
}
• For API details, see GetTable in AWS SDK for Kotlin API reference.
Python
SDK for Python (Boto3)
Note
There's more on GitHub. Find the complete example and learn how to set up and run
in the AWS Code Examples Repository.
Actions 495

Amazon Keyspaces (for Apache Cassandra) Developer Guide
class KeyspaceWrapper:
"""Encapsulates Amazon Keyspaces (for Apache Cassandra) keyspace and table
actions."""
def __init__(self, keyspaces_client):
"""
:param keyspaces_client: A Boto3 Amazon Keyspaces client.
"""
self.keyspaces_client = keyspaces_client
self.ks_name = None
self.ks_arn = None
self.table_name = None
@classmethod
def from_client(cls):
keyspaces_client = boto3.client("keyspaces")
return cls(keyspaces_client)
def get_table(self, table_name):
"""
Gets data about a table in the keyspace.
:param table_name: The name of the table to look up.
:return: Data about the table.
"""
try:
response = self.keyspaces_client.get_table(
keyspaceName=self.ks_name, tableName=table_name
)
self.table_name = table_name
except ClientError as err:
if err.response["Error"]["Code"] == "ResourceNotFoundException":
logger.info("Table %s does not exist.", table_name)
self.table_name = None
response = None
else:
logger.error(
"Couldn't verify %s exists. Here's why: %s: %s",
table_name,
err.response["Error"]["Code"],
err.response["Error"]["Message"],
)
Actions 496

Amazon Keyspaces (for Apache Cassandra) Developer Guide
raise
return response
• For API details, see GetTable in AWS SDK for Python (Boto3) API Reference.
For a complete list of AWS SDK developer guides and code examples, see Using this service with
an AWS SDK. This topic also includes information about getting started and details about previous
SDK versions.
Use ListKeyspaces with an AWS SDK or CLI
The following code examples show how to use ListKeyspaces.
Action examples are code excerpts from larger programs and must be run in context. You can see
this action in context in the following code example:
• Learn the basics
.NET
AWS SDK for .NET
Note
There's more on GitHub. Find the complete example and learn how to set up and run
in the AWS Code Examples Repository.
/// <summary>
/// Lists all keyspaces for the account.
/// </summary>
/// <returns>Async task.</returns>
public async Task ListKeyspaces()
{
var paginator = _amazonKeyspaces.Paginators.ListKeyspaces(new
ListKeyspacesRequest());
Console.WriteLine("{0, -30}\t{1}", "Keyspace name", "Keyspace ARN");
Actions 497

Amazon Keyspaces (for Apache Cassandra) Developer Guide
Console.WriteLine(new string('-', Console.WindowWidth));
await foreach (var keyspace in paginator.Keyspaces)
{
Console.WriteLine($"{keyspace.KeyspaceName,-30}\t{keyspace.ResourceArn}");
}
}
• For API details, see ListKeyspaces in AWS SDK for .NET API Reference.
Java
SDK for Java 2.x
Note
There's more on GitHub. Find the complete example and learn how to set up and run
in the AWS Code Examples Repository.
public static void listKeyspacesPaginator(KeyspacesClient keyClient) {
try {
ListKeyspacesRequest keyspacesRequest =
ListKeyspacesRequest.builder()
.maxResults(10)
.build();
ListKeyspacesIterable listRes =
keyClient.listKeyspacesPaginator(keyspacesRequest);
listRes.stream()
.flatMap(r -> r.keyspaces().stream())
.forEach(content -> System.out.println(" Name: " +
content.keyspaceName()));
} catch (KeyspacesException e) {
System.err.println(e.awsErrorDetails().errorMessage());
System.exit(1);
}
}
Actions 498

Amazon Keyspaces (for Apache Cassandra) Developer Guide
• For API details, see ListKeyspaces in AWS SDK for Java 2.x API Reference.
Kotlin
SDK for Kotlin
Note
There's more on GitHub. Find the complete example and learn how to set up and run
in the AWS Code Examples Repository.
suspend fun listKeyspacesPaginator() {
KeyspacesClient { region = "us-east-1" }.use { keyClient ->
keyClient
.listKeyspacesPaginated(ListKeyspacesRequest {})
.transform { it.keyspaces?.forEach { obj -> emit(obj) } }
.collect { obj ->
println("Name: ${obj.keyspaceName}")
}
}
}
• For API details, see ListKeyspaces in AWS SDK for Kotlin API reference.
Python
SDK for Python (Boto3)
Note
There's more on GitHub. Find the complete example and learn how to set up and run
in the AWS Code Examples Repository.
class KeyspaceWrapper:
Actions 499

Amazon Keyspaces (for Apache Cassandra) Developer Guide
"""Encapsulates Amazon Keyspaces (for Apache Cassandra) keyspace and table
actions."""
def __init__(self, keyspaces_client):
"""
:param keyspaces_client: A Boto3 Amazon Keyspaces client.
"""
self.keyspaces_client = keyspaces_client
self.ks_name = None
self.ks_arn = None
self.table_name = None
@classmethod
def from_client(cls):
keyspaces_client = boto3.client("keyspaces")
return cls(keyspaces_client)
def list_keyspaces(self, limit):
"""
Lists the keyspaces in your account.
:param limit: The maximum number of keyspaces to list.
"""
try:
ks_paginator = self.keyspaces_client.get_paginator("list_keyspaces")
for page in ks_paginator.paginate(PaginationConfig={"MaxItems":
limit}):
for ks in page["keyspaces"]:
print(ks["keyspaceName"])
print(f"\t{ks['resourceArn']}")
except ClientError as err:
logger.error(
"Couldn't list keyspaces. Here's why: %s: %s",
err.response["Error"]["Code"],
err.response["Error"]["Message"],
)
raise
• For API details, see ListKeyspaces in AWS SDK for Python (Boto3) API Reference.
Actions 500

Amazon Keyspaces (for Apache Cassandra) Developer Guide
For a complete list of AWS SDK developer guides and code examples, see Using this service with
an AWS SDK. This topic also includes information about getting started and details about previous
SDK versions.
Use ListTables with an AWS SDK or CLI
The following code examples show how to use ListTables.
Action examples are code excerpts from larger programs and must be run in context. You can see
this action in context in the following code example:
• Learn the basics
.NET
AWS SDK for .NET
Note
There's more on GitHub. Find the complete example and learn how to set up and run
in the AWS Code Examples Repository.
/// <summary>
/// Lists the Amazon Keyspaces tables in a keyspace.
/// </summary>
/// <param name="keyspaceName">The name of the keyspace.</param>
/// <returns>A list of TableSummary objects.</returns>
public async Task<List<TableSummary>> ListTables(string keyspaceName)
{
var response = await _amazonKeyspaces.ListTablesAsync(new
ListTablesRequest { KeyspaceName = keyspaceName });
response.Tables.ForEach(table =>
{
Console.WriteLine($"{table.KeyspaceName}\t{table.TableName}\t{table.ResourceArn}");
});
return response.Tables;
}
Actions 501

Amazon Keyspaces (for Apache Cassandra) Developer Guide
• For API details, see ListTables in AWS SDK for .NET API Reference.
Java
SDK for Java 2.x
Note
There's more on GitHub. Find the complete example and learn how to set up and run
in the AWS Code Examples Repository.
public static void listTables(KeyspacesClient keyClient, String keyspaceName)
{
try {
ListTablesRequest tablesRequest = ListTablesRequest.builder()
.keyspaceName(keyspaceName)
.build();
ListTablesIterable listRes =
keyClient.listTablesPaginator(tablesRequest);
listRes.stream()
.flatMap(r -> r.tables().stream())
.forEach(content -> System.out.println(" ARN: " +
content.resourceArn() +
" Table name: " + content.tableName()));
} catch (KeyspacesException e) {
System.err.println(e.awsErrorDetails().errorMessage());
System.exit(1);
}
}
• For API details, see ListTables in AWS SDK for Java 2.x API Reference.
Actions 502

Amazon Keyspaces (for Apache Cassandra) Developer Guide
Kotlin
SDK for Kotlin
Note
There's more on GitHub. Find the complete example and learn how to set up and run
in the AWS Code Examples Repository.
suspend fun listTables(keyspaceNameVal: String?) {
val tablesRequest =
ListTablesRequest {
keyspaceName = keyspaceNameVal
}
KeyspacesClient { region = "us-east-1" }.use { keyClient ->
keyClient
.listTablesPaginated(tablesRequest)
.transform { it.tables?.forEach { obj -> emit(obj) } }
.collect { obj ->
println(" ARN: ${obj.resourceArn} Table name: ${obj.tableName}")
}
}
}
• For API details, see ListTables in AWS SDK for Kotlin API reference.
Python
SDK for Python (Boto3)
Note
There's more on GitHub. Find the complete example and learn how to set up and run
in the AWS Code Examples Repository.
class KeyspaceWrapper:
Actions 503

Amazon Keyspaces (for Apache Cassandra) Developer Guide
"""Encapsulates Amazon Keyspaces (for Apache Cassandra) keyspace and table
actions."""
def __init__(self, keyspaces_client):
"""
:param keyspaces_client: A Boto3 Amazon Keyspaces client.
"""
self.keyspaces_client = keyspaces_client
self.ks_name = None
self.ks_arn = None
self.table_name = None
@classmethod
def from_client(cls):
keyspaces_client = boto3.client("keyspaces")
return cls(keyspaces_client)
def list_tables(self):
"""
Lists the tables in the keyspace.
"""
try:
table_paginator = self.keyspaces_client.get_paginator("list_tables")
for page in table_paginator.paginate(keyspaceName=self.ks_name):
for table in page["tables"]:
print(table["tableName"])
print(f"\t{table['resourceArn']}")
except ClientError as err:
logger.error(
"Couldn't list tables in keyspace %s. Here's why: %s: %s",
self.ks_name,
err.response["Error"]["Code"],
err.response["Error"]["Message"],
)
raise
• For API details, see ListTables in AWS SDK for Python (Boto3) API Reference.
Actions 504

Amazon Keyspaces (for Apache Cassandra) Developer Guide
For a complete list of AWS SDK developer guides and code examples, see Using this service with
an AWS SDK. This topic also includes information about getting started and details about previous
SDK versions.
Use RestoreTable with an AWS SDK or CLI
The following code examples show how to use RestoreTable.
Action examples are code excerpts from larger programs and must be run in context. You can see
this action in context in the following code example:
• Learn the basics
.NET
AWS SDK for .NET
Note
There's more on GitHub. Find the complete example and learn how to set up and run
in the AWS Code Examples Repository.
/// <summary>
/// Restores the specified table to the specified point in time.
/// </summary>
/// <param name="keyspaceName">The keyspace containing the table.</param>
/// <param name="tableName">The name of the table to restore.</param>
/// <param name="timestamp">The time to which the table will be restored.</
param>
/// <returns>The Amazon Resource Name (ARN) of the restored table.</returns>
public async Task<string> RestoreTable(string keyspaceName, string tableName,
string restoredTableName, DateTime timestamp)
{
var request = new RestoreTableRequest
{
RestoreTimestamp = timestamp,
SourceKeyspaceName = keyspaceName,
SourceTableName = tableName,
TargetKeyspaceName = keyspaceName,
TargetTableName = restoredTableName
Actions 505

Amazon Keyspaces (for Apache Cassandra) Developer Guide
};
var response = await _amazonKeyspaces.RestoreTableAsync(request);
return response.RestoredTableARN;
}
• For API details, see RestoreTable in AWS SDK for .NET API Reference.
Java
SDK for Java 2.x
Note
There's more on GitHub. Find the complete example and learn how to set up and run
in the AWS Code Examples Repository.
public static void restoreTable(KeyspacesClient keyClient, String
keyspaceName, ZonedDateTime utc) {
try {
Instant myTime = utc.toInstant();
RestoreTableRequest restoreTableRequest =
RestoreTableRequest.builder()
.restoreTimestamp(myTime)
.sourceTableName("Movie")
.targetKeyspaceName(keyspaceName)
.targetTableName("MovieRestore")
.sourceKeyspaceName(keyspaceName)
.build();
RestoreTableResponse response =
keyClient.restoreTable(restoreTableRequest);
System.out.println("The ARN of the restored table is " +
response.restoredTableARN());
} catch (KeyspacesException e) {
System.err.println(e.awsErrorDetails().errorMessage());
System.exit(1);
}
Actions 506

Amazon Keyspaces (for Apache Cassandra) Developer Guide
}
• For API details, see RestoreTable in AWS SDK for Java 2.x API Reference.
Kotlin
SDK for Kotlin
Note
There's more on GitHub. Find the complete example and learn how to set up and run
in the AWS Code Examples Repository.
suspend fun restoreTable(
keyspaceName: String?,
utc: ZonedDateTime,
) {
// Create an aws.smithy.kotlin.runtime.time.Instant value.
val timeStamp =
aws.smithy.kotlin.runtime.time
.Instant(utc.toInstant())
val restoreTableRequest =
RestoreTableRequest {
restoreTimestamp = timeStamp
sourceTableName = "MovieKotlin"
targetKeyspaceName = keyspaceName
targetTableName = "MovieRestore"
sourceKeyspaceName = keyspaceName
}
KeyspacesClient { region = "us-east-1" }.use { keyClient ->
val response = keyClient.restoreTable(restoreTableRequest)
println("The ARN of the restored table is ${response.restoredTableArn}")
}
}
• For API details, see RestoreTable in AWS SDK for Kotlin API reference.
Actions 507

Amazon Keyspaces (for Apache Cassandra) Developer Guide
Python
SDK for Python (Boto3)
Note
There's more on GitHub. Find the complete example and learn how to set up and run
in the AWS Code Examples Repository.
class KeyspaceWrapper:
"""Encapsulates Amazon Keyspaces (for Apache Cassandra) keyspace and table
actions."""
def __init__(self, keyspaces_client):
"""
:param keyspaces_client: A Boto3 Amazon Keyspaces client.
"""
self.keyspaces_client = keyspaces_client
self.ks_name = None
self.ks_arn = None
self.table_name = None
@classmethod
def from_client(cls):
keyspaces_client = boto3.client("keyspaces")
return cls(keyspaces_client)
def restore_table(self, restore_timestamp):
"""
Restores the table to a previous point in time. The table is restored
to a new table in the same keyspace.
:param restore_timestamp: The point in time to restore the table. This
time
must be in UTC format.
:return: The name of the restored table.
"""
try:
restored_table_name = f"{self.table_name}_restored"
self.keyspaces_client.restore_table(
Actions 508

Amazon Keyspaces (for Apache Cassandra) Developer Guide
sourceKeyspaceName=self.ks_name,
sourceTableName=self.table_name,
targetKeyspaceName=self.ks_name,
targetTableName=restored_table_name,
restoreTimestamp=restore_timestamp,
)
except ClientError as err:
logger.error(
"Couldn't restore table %s. Here's why: %s: %s",
restore_timestamp,
err.response["Error"]["Code"],
err.response["Error"]["Message"],
)
raise
else:
return restored_table_name
• For API details, see RestoreTable in AWS SDK for Python (Boto3) API Reference.
For a complete list of AWS SDK developer guides and code examples, see Using this service with
an AWS SDK. This topic also includes information about getting started and details about previous
SDK versions.
Use UpdateTable with an AWS SDK or CLI
The following code examples show how to use UpdateTable.
Action examples are code excerpts from larger programs and must be run in context. You can see
this action in context in the following code example:
• Learn the basics
Actions 509

Amazon Keyspaces (for Apache Cassandra) Developer Guide
.NET
AWS SDK for .NET
Note
There's more on GitHub. Find the complete example and learn how to set up and run
in the AWS Code Examples Repository.
/// <summary>
/// Updates the movie table to add a boolean column named watched.
/// </summary>
/// <param name="keyspaceName">The keyspace containing the table.</param>
/// <param name="tableName">The name of the table to change.</param>
/// <returns>The Amazon Resource Name (ARN) of the updated table.</returns>
public async Task<string> UpdateTable(string keyspaceName, string tableName)
{
var newColumn = new ColumnDefinition { Name = "watched", Type =
"boolean" };
var request = new UpdateTableRequest
{
KeyspaceName = keyspaceName,
TableName = tableName,
AddColumns = new List<ColumnDefinition> { newColumn }
};
var response = await _amazonKeyspaces.UpdateTableAsync(request);
return response.ResourceArn;
}
• For API details, see UpdateTable in AWS SDK for .NET API Reference.
Actions 510

Amazon Keyspaces (for Apache Cassandra) Developer Guide
Java
SDK for Java 2.x
Note
There's more on GitHub. Find the complete example and learn how to set up and run
in the AWS Code Examples Repository.
public static void updateTable(KeyspacesClient keyClient, String keySpace,
String tableName) {
try {
ColumnDefinition def = ColumnDefinition.builder()
.name("watched")
.type("boolean")
.build();
UpdateTableRequest tableRequest = UpdateTableRequest.builder()
.keyspaceName(keySpace)
.tableName(tableName)
.addColumns(def)
.build();
keyClient.updateTable(tableRequest);
} catch (KeyspacesException e) {
System.err.println(e.awsErrorDetails().errorMessage());
System.exit(1);
}
}
• For API details, see UpdateTable in AWS SDK for Java 2.x API Reference.
Actions 511

Amazon Keyspaces (for Apache Cassandra) Developer Guide
Kotlin
SDK for Kotlin
Note
There's more on GitHub. Find the complete example and learn how to set up and run
in the AWS Code Examples Repository.
suspend fun updateTable(
keySpace: String?,
tableNameVal: String?,
) {
val def =
ColumnDefinition {
name = "watched"
type = "boolean"
}
val tableRequest =
UpdateTableRequest {
keyspaceName = keySpace
tableName = tableNameVal
addColumns = listOf(def)
}
KeyspacesClient { region = "us-east-1" }.use { keyClient ->
keyClient.updateTable(tableRequest)
}
}
• For API details, see UpdateTable in AWS SDK for Kotlin API reference.
Actions 512

Amazon Keyspaces (for Apache Cassandra) Developer Guide
Python
SDK for Python (Boto3)
Note
There's more on GitHub. Find the complete example and learn how to set up and run
in the AWS Code Examples Repository.
class KeyspaceWrapper:
"""Encapsulates Amazon Keyspaces (for Apache Cassandra) keyspace and table
actions."""
def __init__(self, keyspaces_client):
"""
:param keyspaces_client: A Boto3 Amazon Keyspaces client.
"""
self.keyspaces_client = keyspaces_client
self.ks_name = None
self.ks_arn = None
self.table_name = None
@classmethod
def from_client(cls):
keyspaces_client = boto3.client("keyspaces")
return cls(keyspaces_client)
def update_table(self):
"""
Updates the schema of the table.
This example updates a table of movie data by adding a new column
that tracks whether the movie has been watched.
"""
try:
self.keyspaces_client.update_table(
keyspaceName=self.ks_name,
tableName=self.table_name,
addColumns=[{"name": "watched", "type": "boolean"}],
)
Actions 513

Amazon Keyspaces (for Apache Cassandra) Developer Guide
except ClientError as err:
logger.error(
"Couldn't update table %s. Here's why: %s: %s",
self.table_name,
err.response["Error"]["Code"],
err.response["Error"]["Message"],
)
raise
• For API details, see UpdateTable in AWS SDK for Python (Boto3) API Reference.
For a complete list of AWS SDK developer guides and code examples, see Using this service with
an AWS SDK. This topic also includes information about getting started and details about previous
SDK versions.
Actions 514

Amazon Keyspaces (for Apache Cassandra) Developer Guide
Amazon Keyspaces (for Apache Cassandra) libraries and
tools
This section provides information about Amazon Keyspaces (for Apache Cassandra) libraries, code
examples, and tools.
Topics
• Libraries and examples
• Highlighted sample and developer tool repos
Libraries and examples
You can find Amazon Keyspaces open-source libraries and developer tools on GitHub in the AWS
and AWS samples repos.
Amazon Keyspaces (for Apache Cassandra) developer toolkit
This repository provides a docker image with helpful developer tools for Amazon Keyspaces.
For example, it includes a CQLSHRC file with best practices, an optional AWS authentication
expansion for cqlsh, and helper tools to perform common tasks. The toolkit is optimized for
Amazon Keyspaces, but also works with Apache Cassandra clusters.
https://github.com/aws-samples/amazon-keyspaces-toolkit.
Amazon Keyspaces (for Apache Cassandra) examples
This repo is our official list of Amazon Keyspaces example code. The repo is subdivided into
sections by language (see Examples). Each language has its own subsection of examples. These
examples demonstrate common Amazon Keyspaces service implementations and patterns that you
can use when building applications.
https://github.com/aws-samples/amazon-keyspaces-examples/.
AWS Signature Version 4 (SigV4) authentication plugins
The plugins enable you to manage access to Amazon Keyspaces by using AWS Identity and Access
Management (IAM) users and roles.
Libraries and examples 515

Amazon Keyspaces (for Apache Cassandra) Developer Guide
Java: https://github.com/aws/aws-sigv4-auth-cassandra-java-driver-plugin.
Node.js: https://github.com/aws/aws-sigv4-auth-cassandra-nodejs-driver-plugin.
Python: https://github.com/aws/aws-sigv4-auth-cassandra-python-driver-plugin.
Go: https://github.com/aws/aws-sigv4-auth-cassandra-gocql-driver-plugin.
Highlighted sample and developer tool repos
Below are a selection of helpful community tools for Amazon Keyspaces (for Apache Cassandra).
Amazon Keyspaces Protocol Buffers
You can use Protocol Buffers (Protobuf) with Amazon Keyspaces to provide an alternative to
Apache Cassandra User Defined Types (UDTs). Protobuf is a free and open-source cross-platform
data format which is used to serialize structured data. You can store Protobuf data using the
CQL BLOB data type and refactor UDTs while preserving structured data across applications and
programming languages.
This repository provides a code example that connects to Amazon Keyspaces, creates a new table,
and inserts a row containing a Protobuf message. Then the row is read with strong consistency.
https://github.com/aws-samples/amazon-keyspaces-examples/tree/main/java/datastax-v4/
protobuf-user-defined-types
AWS CloudFormation template to create Amazon CloudWatch
dashboard for Amazon Keyspaces (for Apache Cassandra) metrics
This repository provides AWS CloudFormation templates to quickly set up CloudWatch metrics
for Amazon Keyspaces. Using this template will allow you to get started more easily by providing
deployable prebuilt CloudWatch dashboards with commonly used metrics.
https://github.com/aws-samples/amazon-keyspaces-cloudwatch-cloudformation-templates.
Using Amazon Keyspaces (for Apache Cassandra) with AWS Lambda
The repository contains examples that show how to connect to Amazon Keyspaces from Lambda.
Below are some examples.
Highlighted sample and developer tool repos 516

Amazon Keyspaces (for Apache Cassandra) Developer Guide
C#/.NET: https://github.com/aws-samples/amazon-keyspaces-examples/tree/main/dotnet/
datastax-v3/connection-lambda.
Java: https://github.com/aws-samples/amazon-keyspaces-examples/tree/main/java/datastax-v4/
connection-lambda.
Another Lambda example that shows how to deploy and use Amazon Keyspaces from a Python
Lambda is available from the following repo.
https://github.com/aws-samples/aws-keyspaces-lambda-python
Using Amazon Keyspaces (for Apache Cassandra) with Spring
This is an example that shows you how to use Amazon Keyspaces with Spring Boot.
https://github.com/aws-samples/amazon-keyspaces-examples/tree/main/java/datastax-v4/spring
Using Amazon Keyspaces (for Apache Cassandra) with Scala
This is an example that shows how to connect to Amazon Keyspaces using the SigV4 authentication
plugin with Scala.
https://github.com/aws-samples/amazon-keyspaces-examples/tree/main/scala/datastax-v4/
connection-sigv4
Using Amazon Keyspaces (for Apache Cassandra) with AWS Glue
This is an example that shows how to use Amazon Keyspaces with AWS Glue.
https://github.com/aws-samples/amazon-keyspaces-examples/tree/main/scala/datastax-v4/aws-
glue
Amazon Keyspaces (for Apache Cassandra) Cassandra query language
(CQL) to AWS CloudFormation converter
This package implements a command-line tool for converting Apache Cassandra Query Language
(CQL) scripts to AWS CloudFormation (CloudFormation) templates, which allows Amazon
Keyspaces schemas to be easily managed in CloudFormation stacks.
https://github.com/aws/amazon-keyspaces-cql-to-cfn-converter.
Using Amazon Keyspaces (for Apache Cassandra) with Spring 517

Amazon Keyspaces (for Apache Cassandra) Developer Guide
Amazon Keyspaces (for Apache Cassandra) helpers for Apache
Cassandra driver for Java
This repository contains driver policies, examples, and best practices when using the DataStax Java
Driver with Amazon Keyspaces (for Apache Cassandra).
https://github.com/aws-samples/amazon-keyspaces-java-driver-helpers.
Amazon Keyspaces (for Apache Cassandra) snappy compression demo
This repository demonstrates how to compress, store, and read/write large objects for faster
performance and lower throughput and storage costs.
https://github.com/aws-samples/amazon-keyspaces-compression-example.
Amazon Keyspaces (for Apache Cassandra) and Amazon S3 codec demo
Custom Amazon S3 Codec supports transparent, user-configurable mapping of UUID pointers to
Amazon S3 objects.
https://github.com/aws-samples/amazon-keyspaces-large-object-s3-demo.
Amazon Keyspaces (for Apache Cassandra) helpers for Apache Cassandra driver for Java 518

Amazon Keyspaces (for Apache Cassandra) Developer Guide
Best practices for designing and architecting with
Amazon Keyspaces (for Apache Cassandra)
Use this section to quickly find recommendations for maximizing performance and minimizing
throughput costs when working with Amazon Keyspaces.
Contents
• Key differences and design principles of NoSQL design
• Differences between relational data design and NoSQL
• Two key concepts for NoSQL design
• Approaching NoSQL design
• Optimize client driver connections for the serverless environment
• How connections work in Amazon Keyspaces
• How to configure connections in Amazon Keyspaces
• How to configure connections over VPC endpoints in Amazon Keyspaces
• How to monitor connections in Amazon Keyspaces
• How to handle connection errors in Amazon Keyspaces
• Data modeling best practices: recommendations for designing data models
• How to use partition keys effectively in Amazon Keyspaces
• Use write sharding to evenly distribute workloads across partitions
• Sharding using compound partition keys and random values
• Sharding using compound partition keys and calculated values
• Optimizing costs of Amazon Keyspaces tables
• Evaluate your costs at the table level
• How to view the costs of a single Amazon Keyspaces table
• Cost Explorer's default view
• How to use and apply table tags in Cost Explorer
• Evaluate your table's capacity mode
• What table capacity modes are available
• When to select on-demand capacity mode
• When to select provisioned capacity mode
519

Amazon Keyspaces (for Apache Cassandra) Developer Guide
• Additional factors to consider when choosing a table capacity mode
• Evaluate your table's Application Auto Scaling settings
• Understanding your Application Auto Scaling settings
• How to identify tables with low target utilization (<=50%)
• How to address workloads with seasonal variance
• How to address spiky workloads with unknown patterns
• How to address workloads with linked applications
• Identify your unused resources to optimize costs in Amazon Keyspaces
• How to identify unused resources
• Identifying unused table resources
• Cleaning up unused table resources
• Cleaning up unused point-in-time recovery (PITR) backups
• Evaluate your table usage patterns to optimize performance and cost
• Perform fewer strongly-consistent read operations
• Enable Time to Live (TTL)
• Evaluate your provisioned capacity for right-sized provisioning
• How to retrieve consumption metrics from your Amazon Keyspaces tables
• How to identify under-provisioned Amazon Keyspaces tables
• How to identify over-provisioned Amazon Keyspaces tables
Key differences and design principles of NoSQL design
NoSQL database systems like Amazon Keyspaces use alternative models for data management,
such as key-value pairs or document storage. When you switch from a relational database
management system to a NoSQL database system like Amazon Keyspaces, it's important to
understand the key differences and specific design approaches.
Topics
• Differences between relational data design and NoSQL
• Two key concepts for NoSQL design
• Approaching NoSQL design
NoSQL design 520

Amazon Keyspaces (for Apache Cassandra) Developer Guide
Differences between relational data design and NoSQL
Relational database systems (RDBMS) and NoSQL databases have different strengths and
weaknesses:
• In RDBMS, data can be queried flexibly, but queries are relatively expensive and don't scale well
in high-traffic situations (see the section called “Data modeling”).
• In a NoSQL database such as Amazon Keyspaces, data can be queried efficiently in a limited
number of ways, outside of which queries can be expensive and slow.
These differences make database design different between the two systems:
• In RDBMS, you design for flexibility without worrying about implementation details or
performance. Query optimization generally doesn't affect schema design, but normalization is
important.
• In Amazon Keyspaces, you design your schema specifically to make the most common and
important queries as fast and as inexpensive as possible. Your data structures are tailored to the
specific requirements of your business use cases.
Two key concepts for NoSQL design
NoSQL design requires a different mindset than RDBMS design. For an RDBMS, you can go ahead
and create a normalized data model without thinking about access patterns. You can then extend it
later when new questions and query requirements arise. You can organize each type of data into its
own table.
How NoSQL design is different
• By contrast, you shouldn't start designing your schema for Amazon Keyspaces until you know the
questions it needs to answer. Understanding the business problems and the application use cases
up front is essential.
• You should maintain as few tables as possible in an Amazon Keyspaces application. Having fewer
tables keeps things more scalable, requires less permissions management, and reduces overhead
for your Amazon Keyspaces application. It can also help keep backup costs lower overall.
NoSQL vs. RDBMS 521

Amazon Keyspaces (for Apache Cassandra) Developer Guide
Approaching NoSQL design
The first step in designing your Amazon Keyspaces application is to identify the specific query
patterns that the system must satisfy.
In particular, it is important to understand three fundamental properties of your application's
access patterns before you begin:
• Data size: Knowing how much data will be stored and requested at one time helps to determine
the most effective way to partition the data.
• Data shape: Instead of reshaping data when a query is processed (as an RDBMS system does), a
NoSQL database organizes data so that its shape in the database corresponds with what will be
queried. This is a key factor in increasing speed and scalability.
• Data velocity: Amazon Keyspaces scales by increasing the number of physical partitions that are
available to process queries, and by efficiently distributing data across those partitions. Knowing
in advance what the peak query loads will be might help determine how to partition data to best
use I/O capacity.
After you identify specific query requirements, you can organize data according to general
principles that govern performance:
• Keep related data together. Research on routing-table optimization 20 years ago found that
"locality of reference" was the single most important factor in speeding up response time:
keeping related data together in one place. This is equally true in NoSQL systems today, where
keeping related data in close proximity has a major impact on cost and performance. Instead
of distributing related data items across multiple tables, you should keep related items in your
NoSQL system as close together as possible.
As a general rule, you should maintain as few tables as possible in an Amazon Keyspaces
application.
Exceptions are cases where high-volume time series data are involved, or datasets that have very
different access patterns. A single table with inverted indexes can usually enable simple queries
to create and retrieve the complex hierarchical data structures required by your application.
• Use sort order. Related items can be grouped together and queried efficiently if their key
design causes them to sort together. This is an important NoSQL design strategy.
General approach 522

Amazon Keyspaces (for Apache Cassandra) Developer Guide
• Distribute queries. It is also important that a high volume of queries not be focused on one
part of the database, where they can exceed I/O capacity. Instead, you should design data keys
to distribute traffic evenly across partitions as much as possible, avoiding "hot spots."
These general principles translate into some common design patterns that you can use to model
data efficiently in Amazon Keyspaces.
Optimize client driver connections for the serverless
environment
To communicate with Amazon Keyspaces, you can use any of the existing Apache Cassandra client
drivers of your choice. Because Amazon Keyspaces is a serverless service, we recommend that
you optimize the connection configuration of your client driver for the throughput needs of your
application. This topic introduces best practices including how to calculate how many connections
your application requires, as well as monitoring and error handling of connections.
Topics
• How connections work in Amazon Keyspaces
• How to configure connections in Amazon Keyspaces
• How to configure connections over VPC endpoints in Amazon Keyspaces
• How to monitor connections in Amazon Keyspaces
• How to handle connection errors in Amazon Keyspaces
How connections work in Amazon Keyspaces
This sections gives an overview of how client driver connections work in Amazon Keyspaces.
Because Cassandra client driver misconfiguration can result in PerConnectionRequestExceeded
events in Amazon Keyspaces, configuring the right amount of connections in the client driver
configuration is required to avoid these and similar connection errors.
When connecting to Amazon Keyspaces, the driver requires a seed endpoint to establish an initial
connection. Amazon Keyspaces uses DNS to route the initial connection to one of the many
available endpoints. The endpoints are attached to network load balancers that in turn establish
a connection to one of the request handlers in the fleet. After the initial connection is established,
the client driver gathers information about all available endpoints from the system.peers
Connections 523
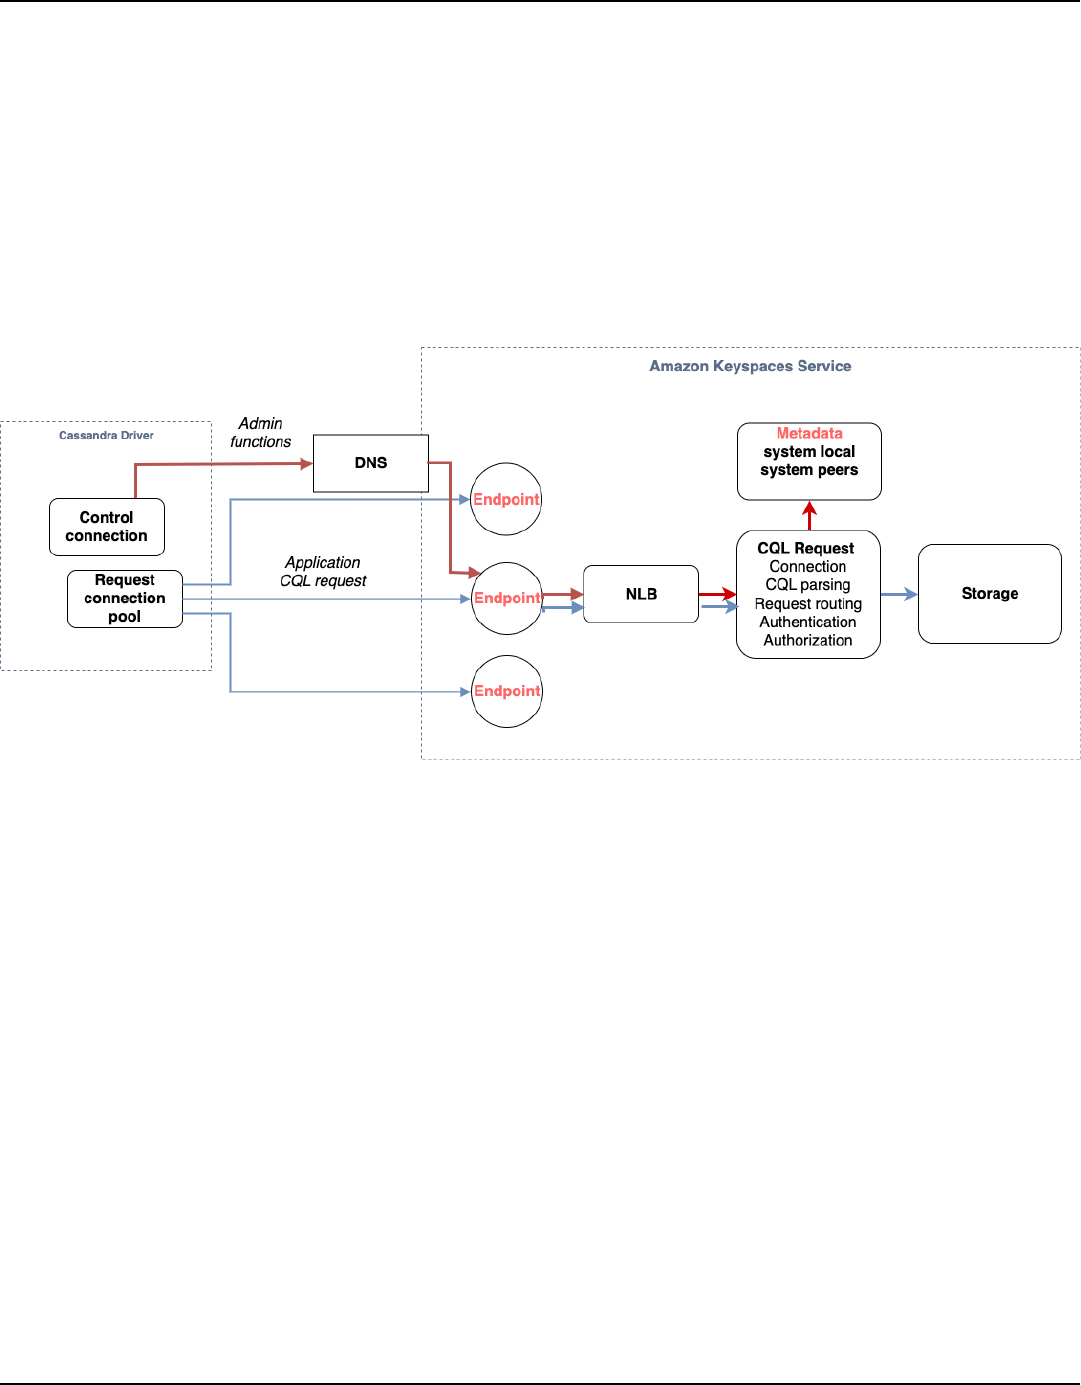
Amazon Keyspaces (for Apache Cassandra) Developer Guide
table. With this information, the client driver can create additional connections to the listed
endpoints. The number of connections the client driver can create is limited by the number of local
connections specified in the client driver settings. By default, most client drivers establish one
connection per endpoint and establish a connection pool to Cassandra and load balance queries
over that pool of connections. Although multiple connections can be established to the same
endpoint, behind the network load balancer they may be connected to many different request
handlers. When connecting through the public endpoint, establishing one connection to each
of the nine endpoints listed in the system.peers table results in nine connections to different
request handlers.
How to configure connections in Amazon Keyspaces
Amazon Keyspaces supports up to 3,000 CQL queries per TCP connection per second. Because
there's no limit on the number of connections a driver can establish, we recommend to target only
500 CQL requests per second per connection to allow for overhead, traffic bursts, and better load
balancing. Follow these steps to ensure that your driver's connection is correctly configured for the
needs of your application.
Increase the number of connections per IP address your driver is maintaining in its connection
pool.
• Most Cassandra drivers establish a connection pool to Cassandra and load balance queries
over that pool of connections. The default behavior of most drivers is to establish a single
connection to each endpoint. Amazon Keyspaces exposes nine peer IP addresses to drivers, so
based on the default behavior of most drivers, this results in 9 connections. Amazon Keyspaces
supports up to 3,000 CQL queries per TCP connection per second, therefore, the maximum
How to configure connections 524

Amazon Keyspaces (for Apache Cassandra) Developer Guide
CQL query throughput of a driver using the default settings is 27,000 CQL queries per second.
If you use the driver's default settings, a single connection may have to process more than
the maximum CQL query throughput of 3,000 CQL queries per second. This could result in
PerConnectionRequestExceeded events.
•
To avoid PerConnectionRequestExceeded events, you must configure the driver to create
additional connections per endpoint to distribute the throughput.
• As a best practice in Amazon Keyspaces, assume that each connection can support 500 CQL
queries per second.
• That means that for a production application that needs to support an estimated 27,000
CQL queries per second distributed over the nine available endpoints, you must configure six
connections per endpoint. This ensures that each connection processes no more than 500
requests per second.
Calculate the number of connections per IP address you need to configure for your driver based
on the needs of your application.
To determine the number of connections you need to configure per endpoint for your application,
consider the following example. You have an application that needs to support 20,000 CQL queries
per second consisting of 10,000 INSERT, 5,000 SELECT, and 5,000 DELETE operations. The Java
application is running on three instances on Amazon Elastic Container Service (Amazon ECS) where
each instance establishes a single session to Amazon Keyspaces. The calculation you can use to
estimate how many connections you need to configure for your driver uses the following input.
1. The number of requests per second your application needs to support.
2. The number of the available instances with one subtracted to account for maintenance or
failure.
3. The number of available endpoints. If you're connecting over public endpoints, you have nine
available endpoints. If you're using VPC endpoints, you have between two and five available
endpoints, depending on the Region.
4. Use 500 CQL queries per second per connection as a best practice for Amazon Keyspaces.
5. Round up the result.
For this example, the formula looks like this.
How to configure connections 525

Amazon Keyspaces (for Apache Cassandra) Developer Guide
20,000 CQL queries / (3 instances - 1 failure) / 9 public endpoints / 500 CQL queries
per second = ROUND(2.22) = 3
Based on this calculation, you need to specify three local connections per endpoint in the driver
configuration. For remote connections, configure only one connection per endpoint.
How to configure connections over VPC endpoints in Amazon
Keyspaces
When connecting over private VPC endpoints, you have most likely 3 endpoints available. The
number of VPC endpoints can be different per Region, based on the number of Availability Zones,
and the number of subnets in the assigned VPC. US East (N. Virginia) Region has five Availability
Zones and you can have up to five Amazon Keyspaces endpoints. US West (N. California) Region
has two Availability Zones and you can have up to two Amazon Keyspaces endpoints. The number
of endpoints does not impact scale, but it does increase the number of connections you need to
establish in the driver configuration. Consider the following example. Your application needs to
support 20,000 CQL queries and is running on three instances on Amazon ECS where each instance
establishes a single session to Amazon Keyspaces. The only difference is how many endpoints are
available in the different AWS Regions.
Connections required in the US East (N. Virginia) Region:
20,000 CQL queries / (3 instances - 1 failure) / 5 private VPC endpoints / 500 CQL
queries per second = 4 local connections
Connections required in the US West (N. California) Region:
20,000 CQL queries / (3 instances - 1 failure) / 2 private VPC endpoints / 500 CQL
queries per second = 10 local connections
Important
When using private VPC endpoints, additional permissions are required for Amazon
Keyspaces to discover the available VPC endpoints dynamically and populate the
system.peers table. For more information, see the section called “Populating
system.peers table entries with interface VPC endpoint information”.
VPC endpoint connections 526

Amazon Keyspaces (for Apache Cassandra) Developer Guide
When accessing Amazon Keyspaces through a private VPC endpoint using a different AWS account,
it’s likely that you only see a single Amazon Keyspaces endpoint. Again this doesn't impact the
scale of possible throughput to Amazon Keyspaces, but it may require you to increase the number
of connections in your driver configuration. This example shows the same calculation for a single
available endpoint.
20,000 CQL queries / (3 instances - 1 failure) / 1 private VPC endpoints / 500 CQL
queries per second = 20 local connections
To learn more about cross-account access to Amazon Keyspaces using a shared VPC, see the section
called “Configure cross-account access in a shared VPC”.
How to monitor connections in Amazon Keyspaces
To help identify the number of endpoints your application is connected to, you can log the number
of peers discovered in the system.peers table. The following example is an example of Java code
which prints the number of peers after the connection has been established.
ResultSet result = session.execute(new SimpleStatement("SELECT * FROM system.peers"));
logger.info("number of Amazon Keyspaces endpoints:" + result.all().stream().count());
Note
The CQL console or AWS console are not deployed within a VPC and therefore use the
public endpoint. As a result, running the system.peers query from applications located
outside of the VPCE often results in 9 peers. It may also be helpful to print the IP addresses
of each peer.
You can also observe the number of peers when using a VPC endpoint by setting up VPCE Amazon
CloudWatch metrics. In CloudWatch, you can see the number of connections established to the VPC
endpoint. The Cassandra drivers establish a connection for each endpoint to send CQL queries and
a control connection to gather system table information. The image below shows the VPC endpoint
CloudWatch metrics after connecting to Amazon Keyspaces with 1 connection configured in the
driver settings. The metric is showing six active connections consisting of one control connection
and five connections (1 per endpoint across Availability Zones).
How to monitor connections 527
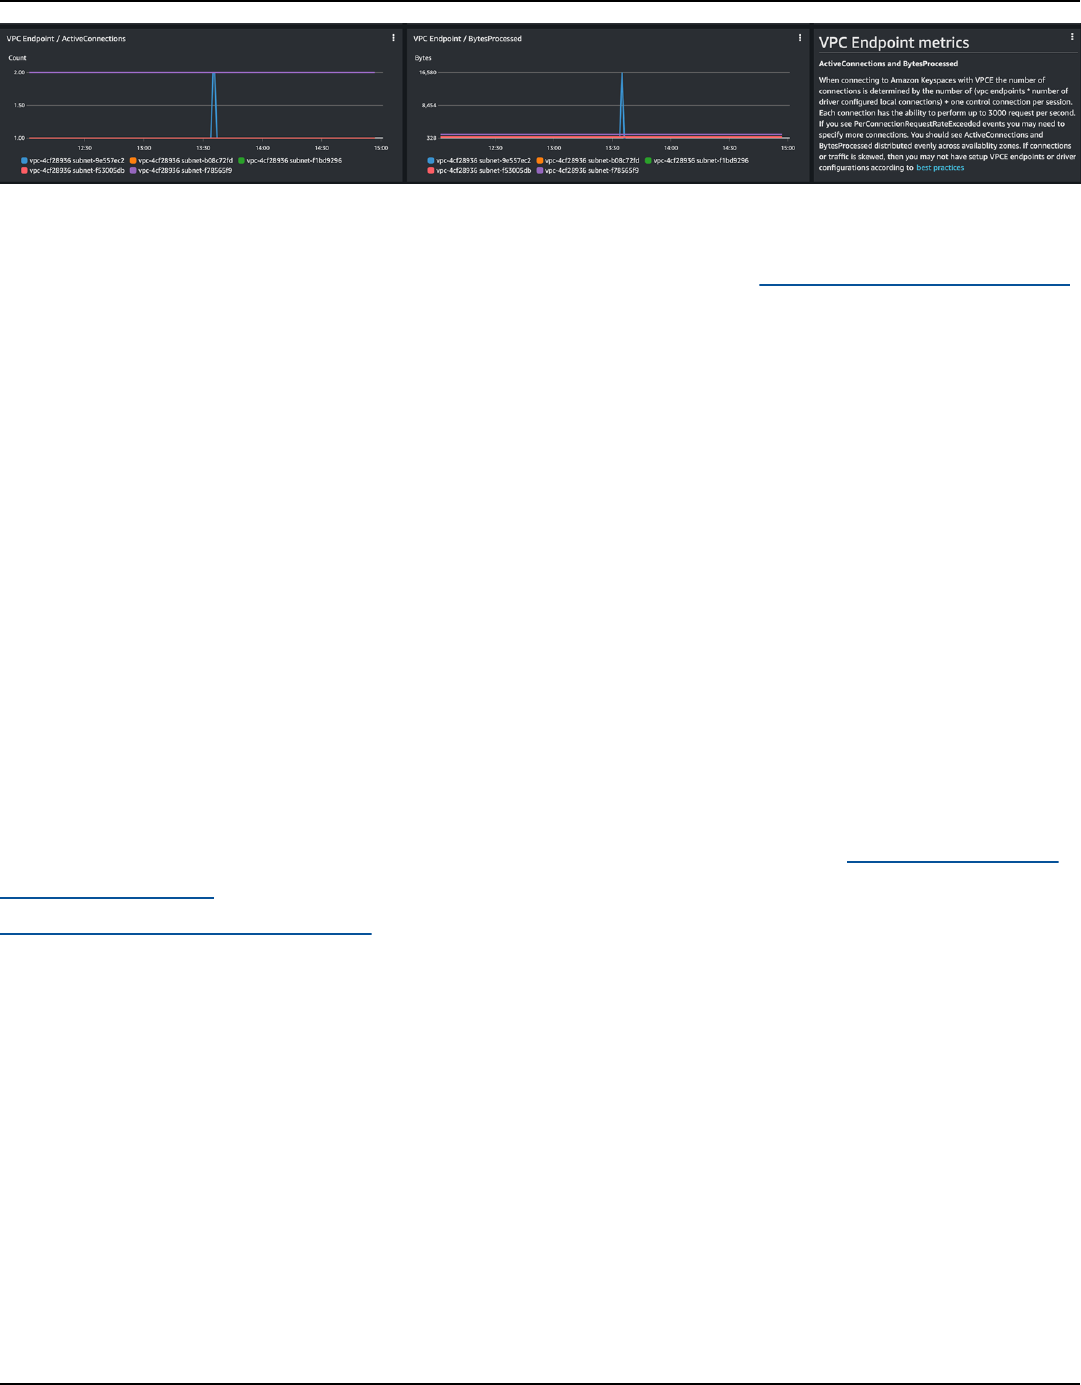
Amazon Keyspaces (for Apache Cassandra) Developer Guide
To get started with monitoring the number of connections using a CloudWatch graph, you can
deploy this AWS CloudFormation template available on GitHub in the Amazon Keyspaces template
repository.
How to handle connection errors in Amazon Keyspaces
When exceeding the 3,000 request per connection quota, Amazon Keyspaces returns a
PerConnectionRequestExceededevent and the Cassandra driver receives a WriteTimeout
or ReadTimeout exception. You should retry this exception with exponential backoff in your
Cassandra retry policy or in your application. You should provide exponential backoff to avoid
sending additional request.
The default retry policy attempts to try next host in the query plan. Because Amazon
Keyspaces may have one to three available endpoints when connecting to the VPC endpoint,
you may also see the NoHostAvailableException in addition to the WriteTimeout and
ReadTimeout exceptions in your application logs. You can use Amazon Keyspaces provided retry
policies, which retry on the same endpoint but across different connections.
You can find examples for exponential retry policies for Java on GitHub in the Amazon Keyspaces
Java code examples repository. You can find additional language examples on Github in the
Amazon Keyspaces code examples repository.
Data modeling best practices: recommendations for designing
data models
Effective data modeling is crucial for optimizing performance and minimizing costs when
working with Amazon Keyspaces (for Apache Cassandra). This topic covers key considerations and
recommendations for designing data models that suit your application's data access patterns.
• Partition Key Design – The partition key plays a critical role in determining how data is
distributed across partitions in Amazon Keyspaces. Choosing an appropriate partition key can
significantly impact query performance and throughput costs. This section discusses strategies
How to handle connection errors 528

Amazon Keyspaces (for Apache Cassandra) Developer Guide
for designing partition keys that promote even distribution of read and write activity across
partitions.
• Key Considerations:
• Uniform activity distribution – Aim for uniform read and write activity across all partitions to
minimize throughput costs and leverage burst capacity effectively.
• Access patterns – Align your partition key design with your application's primary data access
patterns.
• Partition size – Avoid creating partitions that grow too large, as this can impact performance
and increase costs.
To visualize and design data models more easily, you can use the NoSQL Workbench.
Topics
• How to use partition keys effectively in Amazon Keyspaces
How to use partition keys effectively in Amazon Keyspaces
The primary key that uniquely identifies each row in an Amazon Keyspaces table can consist of
one or multiple partition key columns, which determine which partitions the data is stored in, and
one or more optional clustering column, which define how data is clustered and sorted within a
partition.
Because the partition key establishes the number of partitions your data is stored in and how the
data is distributed across these partitions, how you chose your partition key can have a significant
impact upon the performance of your queries. In general, you should design your application for
uniform activity across all partitions on disk.
Distributing read and write activity of your application evenly across all partitions helps to
minimize throughput costs and this applies to on-demand as well as provisioned read/write
capacity modes. For example, if you are using provisioned capacity mode, you can determine
the access patterns that your application needs, and estimate the total read capacity units (RCU)
and write capacity units (WCU) that each table requires. Amazon Keyspaces supports your access
patterns using the throughput that you provisioned as long as the traffic against a given partition
does not exceed 3,000 RCUs and 1,000 WCUs.
Amazon Keyspaces offers additional flexibility in your per-partition throughput provisioning by
providing burst capacity, for more information see the section called “Use burst capacity”.
Partition key design 529

Amazon Keyspaces (for Apache Cassandra) Developer Guide
Topics
• Use write sharding to evenly distribute workloads across partitions
Use write sharding to evenly distribute workloads across partitions
One way to better distribute writes across a partition in Amazon Keyspaces is to expand the space.
You can do this in several different ways. You can add an additional partition key column to which
you write random numbers to distribute the rows among partitions. Or you can use a number that
is calculated based on something that you're querying on.
Sharding using compound partition keys and random values
One strategy for distributing loads more evenly across a partition is to add an additional partition
key column to which you write random numbers. Then you randomize the writes across the larger
space.
For example, consider the following table which has a single partition key representing a date.
CREATE TABLE IF NOT EXISTS tracker.blogs (
publish_date date,
title text,
description int,
PRIMARY KEY (publish_date));
To more evenly distribute this table across partitions, you could include an additional partition key
column shard that stores random numbers. For example:
CREATE TABLE IF NOT EXISTS tracker.blogs (
publish_date date,
shard int,
title text,
description int,
PRIMARY KEY ((publish_date, shard)));
When inserting data you might choose a random number between 1 and 200 for the shard
column. This yields compound partition key values like (2020-07-09, 1), (2020-07-09, 2),
and so on, through (2020-07-09, 200). Because you are randomizing the partition key, the
writes to the table on each day are spread evenly across multiple partitions. This results in better
parallelism and higher overall throughput.
Partition key design 530

Amazon Keyspaces (for Apache Cassandra) Developer Guide
However, to read all the rows for a given day, you would have to query the rows for all the shards
and then merge the results. For example, you would first issue a SELECT statement for the
partition key value (2020-07-09, 1). Then issue another SELECT statement for (2020-07-09,
2), and so on, through (2020-07-09, 200). Finally, your application would have to merge the
results from all those SELECT statements.
Sharding using compound partition keys and calculated values
A randomizing strategy can greatly improve write throughput. But it's difficult to read a specific
row because you don't know which value was written to the shard column when the row was
written. To make it easier to read individual rows, you can use a different strategy. Instead of using
a random number to distribute the rows among partitions, use a number that you can calculate
based upon something that you want to query on.
Consider the previous example, in which a table uses today's date in the partition key. Now suppose
that each row has an accessible title column, and that you most often need to find rows by title
in addition to date. Before your application writes the row to the table, it could calculate a hash
value based on the title and use it to populate the shard column. The calculation might generate
a number between 1 and 200 that is fairly evenly distributed, similar to what the random strategy
produces.
A simple calculation would likely suffice, such as the product of the UTF-8 code point values for
the characters in the title, modulo 200, + 1. The compound partition key value would then be the
combination of the date and calculation result.
With this strategy, the writes are spread evenly across the partition key values, and thus across
the physical partitions. You can easily perform a SELECT statement for a particular row and date
because you can calculate the partition key value for a specific title value.
To read all the rows for a given day, you still must SELECT each of the (2020-07-09, N) keys
(where N is 1–200), and your application then has to merge all the results. The benefit is that you
avoid having a single "hot" partition key value taking all of the workload.
Optimizing costs of Amazon Keyspaces tables
This section covers best practices on how to optimize costs for your existing Amazon Keyspaces
tables. You should look at the following strategies to see which cost optimization strategy best
suits your needs and approach them iteratively. Each strategy provides an overview of what might
Cost optimization 531

Amazon Keyspaces (for Apache Cassandra) Developer Guide
be impacting your costs, how to look for opportunities to optimize costs, and prescriptive guidance
on how to implement these best practices to help you save.
Topics
• Evaluate your costs at the table level
• Evaluate your table's capacity mode
• Evaluate your table's Application Auto Scaling settings
• Identify your unused resources to optimize costs in Amazon Keyspaces
• Evaluate your table usage patterns to optimize performance and cost
• Evaluate your provisioned capacity for right-sized provisioning
Evaluate your costs at the table level
The Cost Explorer tool found within the AWS Management Console allows you to see costs broken
down by type, for example read, write, storage, and backup charges. You can also see these costs
summarized by period such as month or day.
One common challenge with Cost Explorer is that you can't review the costs of only one particular
table easily, because Cost Explorer doesn't let you filter or group by costs of a specific table. You
can view the metric Billable table size (Bytes) of each table in the Amazon Keyspaces console on
the table's Monitor tab. If you need more cost related information per table, this section shows you
how to use tagging to perform individual table cost analysis in Cost Explorer.
Topics
• How to view the costs of a single Amazon Keyspaces table
• Cost Explorer's default view
• How to use and apply table tags in Cost Explorer
How to view the costs of a single Amazon Keyspaces table
You can see basic information about an Amazon Keyspaces table in the console, including the
primary key schema, the billable table size, and capacity related metrics. You can use the size of the
table to calculate the monthly storage cost for the table. For example, $0.25 per GB in the US East
(N. Virginia) AWS Region.
Evaluate your costs at the table level 532

Amazon Keyspaces (for Apache Cassandra) Developer Guide
If the table is using provisioned capacity mode, the current read capacity unit (RCU) and write
capacity unit (WCU) settings are returned as well. You can use this information to calculate the
current read and write costs for the table. Note that these costs could change, especially if you
have configured the table with Amazon Keyspaces automatic scaling.
Cost Explorer's default view
The default view in Cost Explorer provides charts showing the cost of consumed resources, for
example throughput and storage. You can choose to group these costs by period, such as totals by
month or by day. The costs of storage, reads, writes, and other categories can be broken out and
compared as well.
How to use and apply table tags in Cost Explorer
By default, Cost Explorer does not provide a summary of the costs for any one specific table,
because it combines the costs of multiple tables into a total. However, you can use AWS resource
tagging to identify each table by a metadata tag. Tags are key-value pairs that you can use for a
variety of purposes, for example to identify all resources belonging to a project or department. For
more information, see the section called “Working with tags”.
For this example, we use a table with the name MyTable.
1. Set a tag with the key of table_name and the value of MyTable.
2. Activate the tag within Cost Explorer and then filter on the tag value to gain more visibility
into each table's costs.
Evaluate your costs at the table level 533

Amazon Keyspaces (for Apache Cassandra) Developer Guide
Note
It may take one or two days for the tag to start appearing in Cost Explorer
You can set metadata tags yourself in the console, or programmatically with CQL, the AWS CLI, or
the AWS SDK. Consider requiring a table_name tag to be set as part of your organization’s new
table creation process. For more information, see the section called “Create cost allocation reports”.
Evaluate your table's capacity mode
This section provides an overview of how to select the appropriate capacity mode for your Amazon
Keyspaces table. Each mode is tuned to meet the needs of a different workload in terms of
responsiveness to change in throughput, as well as how that usage is billed. You must balance
these factors when making your decision.
Topics
• What table capacity modes are available
• When to select on-demand capacity mode
• When to select provisioned capacity mode
• Additional factors to consider when choosing a table capacity mode
What table capacity modes are available
When you create an Amazon Keyspaces table, you must select either on-demand or provisioned
capacity mode. For more information, see the section called “Configure read/write capacity
modes”.
On-demand capacity mode
The on-demand capacity mode is designed to eliminate the need to plan or provision the capacity
of your Amazon Keyspaces table. In this mode, your table instantly accommodates requests
without the need to scale any resources up or down (up to twice the previous peak throughput of
the table).
On-demand tables are billed by counting the number of actual requests against the table, so you
only pay for what you use rather than what has been provisioned.
Evaluate your table's capacity mode 534

Amazon Keyspaces (for Apache Cassandra) Developer Guide
Provisioned capacity mode
The provisioned capacity mode is a more traditional model where you can define how much
capacity the table has available for requests either directly or with the assistance of Application
Auto Scaling. Because a specific capacity is provisioned for the table at any given time, billing is
based off of the capacity provisioned rather than the number of requests. Going over the allocated
capacity can also cause the table to reject requests and reduce the experience of your application's
users.
Provisioned capacity mode requires a balance between not over-provisioning or under provisioning
the table to achieve both, low occurrence of insufficient throughput capacity errors, and optimized
costs.
When to select on-demand capacity mode
When optimizing for cost, on-demand mode is your best choice when you have an unpredictable
workload similar to the one shown in the following graph.
These factors contribute to this type of workload:
• Unpredictable request timing (resulting in traffic spikes)
• Variable volume of requests (resulting from batch workloads)
• Drops to zero or below 18% of the peak for a given hour (resulting from development or test
environments)
For workloads with the above characteristics, using Application Auto Scaling to maintain enough
capacity for the table to respond to spikes in traffic may lead to undesirable outcomes. Either the
table could be over-provisioned and costing more than necessary, or the table could be under
Evaluate your table's capacity mode 535

Amazon Keyspaces (for Apache Cassandra) Developer Guide
provisioned and requests are leading to unnecessary low capacity throughput errors. In cases like
this, on-demand tables are the better choice.
Because on-demand tables are billed by request, there is nothing further you need to do at the
table level to optimize for cost. You should regularly evaluate your on-demand tables to verify the
workload still has the above characteristics. If the workload has stabilized, consider changing to
provisioned mode to maintain cost optimization.
When to select provisioned capacity mode
An ideal workload for provisioned capacity mode is one with a more predictable usage pattern like
shown in the graph below.
The following factors contribute to a predictable workload:
• Predicable/cyclical traffic for a given hour or day
• Limited short term bursts of traffic
Since the traffic volumes within a given time or day are more stable, you can set the provisioned
capacity relatively close to the actual consumed capacity of the table. Cost optimizing a
provisioned capacity table is ultimately an exercise in getting the provisioned capacity (blue line) as
close to the consumed capacity (orange line) as possible without increasing ThrottledRequests
events for the table. The space between the two lines is both, wasted capacity as well as insurance
against a bad user experience due to insufficient throughput capacity errors.
Amazon Keyspaces provides Application Auto Scaling for provisioned capacity tables, which
automatically balances this on your behalf. You can track your consumed capacity throughout the
day and configure the provisioned capacity of the table based on a handful of variables.
Evaluate your table's capacity mode 536

Amazon Keyspaces (for Apache Cassandra) Developer Guide
Minimum capacity units
You can set the minimum capacity of a table to limit the occurrence of insufficient throughput
capacity errors, but it doesn't reduce the cost of the table. If your table has periods of low usage
followed by a sudden burst of high usage, setting the minimum can prevent Application Auto
Scaling from setting the table capacity too low.
Maximum capacity units
You can set the maximum capacity of a table to limit a table scaling higher than intended. Consider
applying a maximum for development or test tables, where large-scale load testing is not desired.
You can set a maximum for any table, but be sure to regularly evaluate this setting against the
table baseline when using it in production, to prevent accidental insufficient throughput capacity
errors.
Target utilization
Setting the target utilization of the table is the primary means of cost optimization for a
provisioned capacity table. Setting a lower percent value here increases how much the table is
over-provisioned, increasing cost, but reducing the risk of insufficient throughput capacity errors.
Setting a higher percentage value decreases by how much the table is over-provisioned, but
increases the risk of insufficient throughput capacity errors.
Additional factors to consider when choosing a table capacity mode
When deciding between the two capacity modes, there are some additional factors worth
considering.
When deciding between the two table modes, consider how much this additional discount affects
the cost of the table. In many cases, even a relatively unpredictable workload can be more cost
effective to run on an over-provisioned provisioned capacity table with reserved capacity.
Improving predictability of your workload
In some situations, a workload may seemingly have both, a predictable and an unpredictable
pattern. While this can be easily supported with an on-demand table, costs will likely be lower if
the unpredictable patterns in the workload can be improved.
One of the most common causes of these patterns are batch imports. This type of traffic can often
exceed the baseline capacity of the table to such a degree that insufficient throughput capacity
Evaluate your table's capacity mode 537

Amazon Keyspaces (for Apache Cassandra) Developer Guide
errors would occur if it were to run. To keep a workload like this running on a provisioned capacity
table, consider the following options:
• If the batch occurs at scheduled times, you can schedule an increase to your application auto-
scaling capacity before it runs.
• If the batch occurs randomly, consider trying to extend the time it takes to run rather than
executing as fast as possible.
• Add a ramp up period to the import, where the velocity of the import starts small but is slowly
increased over a few minutes until Application Auto Scaling has had the opportunity to start
adjusting table capacity.
Evaluate your table's Application Auto Scaling settings
This section provides an overview of how to evaluate the Application Auto Scaling settings on your
Amazon Keyspaces tables. Amazon Keyspaces Application Auto Scaling is a feature that manages
table throughput based on your application traffic and your target utilization metric. This ensures
your tables have the required capacity required for your application patterns.
The Application Auto Scaling service monitors your current table utilization and compares it to
the target utilization value: TargetValue. It notifies you if it is time to increase or decrease the
allocated capacity.
Topics
• Understanding your Application Auto Scaling settings
• How to identify tables with low target utilization (<=50%)
• How to address workloads with seasonal variance
• How to address spiky workloads with unknown patterns
• How to address workloads with linked applications
Understanding your Application Auto Scaling settings
Defining the correct value for the target utilization, initial step, and final values is an activity that
requires involvement from your operations team. This allows you to properly define the values
based on historical application usage, which is used to trigger the Application Auto Scaling policies.
The utilization target is the percentage of your total capacity that needs to be met during a period
of time before the Application Auto Scaling rules apply.
Evaluate your table's Application Auto Scaling settings 538

Amazon Keyspaces (for Apache Cassandra) Developer Guide
When you set a high utilization target (a target around 90%) it means your traffic needs to be
higher than 90% for a period of time before the Application Auto Scaling is activated. You should
not use a high utilization target unless your application is very constant and doesn’t receive spikes
in traffic.
When you set a very low utilization (a target less than 50%) it means your application would
need to reach 50% of the provisioned capacity before it triggers an Application Auto Scaling policy.
Unless your application traffic grows at a very aggressive rate, this usually translates into unused
capacity and wasted resources.
How to identify tables with low target utilization (<=50%)
You can use either the AWS CLI or AWS Management Console to monitor and identify the
TargetValues for your Application Auto Scaling policies in your Amazon Keyspaces resources:
AWS CLI
1. Return the entire list of resources by running the following command:
aws application-autoscaling describe-scaling-policies --service-namespace
cassandra
This command will return the entire list of Application Auto Scaling policies that are issued
to any Amazon Keyspaces resource. If you only want to retrieve the resources from a
particular table, you can add the –resource-id parameter. For example:
aws application-autoscaling describe-scaling-policies --service-namespace
cassandra --resource-id "keyspace/keyspace-name/table/table-name”
2. Return only the auto scaling policies for a particular table by running the following
command
aws application-autoscaling describe-scaling-policies --service-namespace
cassandra --resource-id "keyspace/keyspace-name/table/table-name”
The values for the Application Auto Scaling policies are highlighted below. You need to
ensure that the target value is greater than 50% to avoid over-provisioning. You should
obtain a result similar to the following:
{
Evaluate your table's Application Auto Scaling settings 539

Amazon Keyspaces (for Apache Cassandra) Developer Guide
"ScalingPolicies": [
{
"PolicyARN": "arn:aws:autoscaling:<region>:<account-
id>:scalingPolicy:<uuid>:resource/keyspaces/table/table-name-scaling-policy",
"PolicyName": $<full-gsi-name>”,
"ServiceNamespace": "cassandra",
"ResourceId": "keyspace/keyspace-name/table/table-name",
"ScalableDimension": "cassandra:index:WriteCapacityUnits",
"PolicyType": "TargetTrackingScaling",
"TargetTrackingScalingPolicyConfiguration": {
"TargetValue": 70.0,
"PredefinedMetricSpecification": {
"PredefinedMetricType": "KeyspacesWriteCapacityUtilization"
}
},
"Alarms": [
...
],
"CreationTime": "2022-03-04T16:23:48.641000+10:00"
},
{
"PolicyARN": "arn:aws:autoscaling:<region>:<account-
id>:scalingPolicy:<uuid>:resource/keyspaces/table/table-name/index/<index-
name>:policyName/$<full-gsi-name>-scaling-policy",
"PolicyName":$<full-table-name>”,
"ServiceNamespace": "cassandra",
"ResourceId": "keyspace/keyspace-name/table/table-name",
"ScalableDimension": "cassandra:index:ReadCapacityUnits",
"PolicyType": "TargetTrackingScaling",
"TargetTrackingScalingPolicyConfiguration": {
"TargetValue": 70.0,
"PredefinedMetricSpecification": {
"PredefinedMetricType": "CassandraReadCapacityUtilization"
}
},
"Alarms": [
...
],
"CreationTime": "2022-03-04T16:23:47.820000+10:00"
}
]
}
Evaluate your table's Application Auto Scaling settings 540

Amazon Keyspaces (for Apache Cassandra) Developer Guide
AWS Management Console
1. Log into the AWS Management Console and navigate to the CloudWatch service page at
Getting Started with the AWS Management Console. Select the appropriate AWS Region if
necessary.
2. On the left navigation bar, select Tables. On the Tables page, select the table's Name.
3. On the Table Details page on the Capacity tab, review your table's Application Auto
Scaling settings.
If your target utilization values are less than or equal to 50%, you should explore your table
utilization metrics to see if they are under-provisioned or over-provisioned.
How to address workloads with seasonal variance
Consider the following scenario: your application is operating under a minimum average value
most of the time, but the utilization target is low so your application can react quickly to events
that happen at certain hours in the day and you have enough capacity and avoid getting throttled.
This scenario is common when you have an application that is very busy during normal office
hours (9 AM to 5 PM) but then it works at a base level during after hours. Since some users start
to connect before 9 am, the application uses this low threshold to ramp up quickly to get to the
required capacity during peak hours.
This scenario could look like this:
•
Between 5 PM and 9 AM the ConsumedWriteCapacityUnits units stay between 90 and 100
• Users start to connect to the application before 9 AM and the capacity units increases
considerably (the maximum value you’ve seen is 1500 WCU)
• On average, your application usage varies between 800 to 1200 during working hours
If the previous scenario applies to your application, consider using scheduled application auto
scaling, where your table could still have an Application Auto Scaling rule configured, but with a
less aggressive target utilization that only provisions the extra capacity at the specific intervals you
require.
You can use the AWS CLI to execute the following steps to create a scheduled auto scaling rule that
executes based on the time of day and the day of the week.
Evaluate your table's Application Auto Scaling settings 541

Amazon Keyspaces (for Apache Cassandra) Developer Guide
1. Register your Amazon Keyspaces table as a scalable target with Application Auto Scaling. A
scalable target is a resource that Application Auto Scaling can scale out or in.
aws application-autoscaling register-scalable-target \
--service-namespace cassandra \
--scalable-dimension cassandra:table:WriteCapacityUnits \
--resource-id keyspace/keyspace-name/table/table-name \
--min-capacity 90 \
--max-capacity 1500
2. Set up scheduled actions according to your requirements.
You need two rules to cover the scenario: one to scale up and another to scale down. The first
rule to scale up the scheduled action is shown in the following example.
aws application-autoscaling put-scheduled-action \
--service-namespace cassandra \
--scalable-dimension cassandra:table:WriteCapacityUnits \
--resource-id keyspace/keyspace-name/table/table-name \
--scheduled-action-name my-8-5-scheduled-action \
--scalable-target-action MinCapacity=800,MaxCapacity=1500 \
--schedule "cron(45 8 ? * MON-FRI *)" \
--timezone "Australia/Brisbane"
The second rule to scale down the scheduled action is shown in this example.
aws application-autoscaling put-scheduled-action \
--service-namespace cassandra \
--scalable-dimension cassandra:table:WriteCapacityUnits \
--resource-id keyspace/keyspace-name/table/table-name \
--scheduled-action-name my-5-8-scheduled-down-action \
--scalable-target-action MinCapacity=90,MaxCapacity=1500 \
--schedule "cron(15 17 ? * MON-FRI *)" \
--timezone "Australia/Brisbane"
3. Run the following command to validate both rules have been activated:
aws application-autoscaling describe-scheduled-actions --service-namespace
cassandra
You should get a result like this:
Evaluate your table's Application Auto Scaling settings 542

Amazon Keyspaces (for Apache Cassandra) Developer Guide
{
"ScheduledActions": [
{
"ScheduledActionName": "my-5-8-scheduled-down-action",
"ScheduledActionARN":
"arn:aws:autoscaling:<region>:<account>:scheduledAction:<uuid>:resource/keyspaces/
table/table-name:scheduledActionName/my-5-8-scheduled-down-action",
"ServiceNamespace": "cassandra",
"Schedule": "cron(15 17 ? * MON-FRI *)",
"Timezone": "Australia/Brisbane",
"ResourceId": "keyspace/keyspace-name/table/table-name",
"ScalableDimension": "cassandra:table:WriteCapacityUnits",
"ScalableTargetAction": {
"MinCapacity": 90,
"MaxCapacity": 1500
},
"CreationTime": "2022-03-15T17:30:25.100000+10:00"
},
{
"ScheduledActionName": "my-8-5-scheduled-action",
"ScheduledActionARN":
"arn:aws:autoscaling:<region>:<account>:scheduledAction:<uuid>:resource/keyspaces/
table/table-name:scheduledActionName/my-8-5-scheduled-action",
"ServiceNamespace": "cassandra",
"Schedule": "cron(45 8 ? * MON-FRI *)",
"Timezone": "Australia/Brisbane",
"ResourceId": "keyspace/keyspace-name/table/table-name",
"ScalableDimension": "cassandra:table:WriteCapacityUnits",
"ScalableTargetAction": {
"MinCapacity": 800,
"MaxCapacity": 1500
},
"CreationTime": "2022-03-15T17:28:57.816000+10:00"
}
]
}
The following picture shows a sample workload that always keeps the 70% target utilization.
Notice how the auto scaling rules are still applying and the throughput is not getting reduced.
Evaluate your table's Application Auto Scaling settings 543

Amazon Keyspaces (for Apache Cassandra) Developer Guide
Zooming in, we can see there was a spike in the application that triggered the 70% auto scaling
threshold, forcing the autoscaling to kick in and provide the extra capacity required for the
table. The scheduled auto scaling action will affect maximum and minimum values, and it's your
responsibility to set them up.
Evaluate your table's Application Auto Scaling settings 544

Amazon Keyspaces (for Apache Cassandra) Developer Guide
How to address spiky workloads with unknown patterns
In this scenario, the application uses a very low utilization target, because you don’t know the
application patterns yet, and you want to ensure your workload is not experiencing low capacity
throughput errors.
Consider using on-demand capacity mode instead. On-demand tables are perfect for spiky
workloads where you don’t know the traffic patterns. With on-demand capacity mode, you pay per
request for the data reads and writes your application performs on your tables. You do not need to
specify how much read and write throughput you expect your application to perform, as Amazon
Keyspaces instantly accommodates your workloads as they ramp up or down.
How to address workloads with linked applications
In this scenario, the application depends on other systems, like batch processing scenarios where
you can have big spikes in traffic according to events in the application logic.
Consider developing custom application auto-scaling logic that reacts to those events where
you can increase table capacity and TargetValues depending on your specific needs. You
could benefit from Amazon EventBridge and use a combination of AWS services like Λ and Step
Functions to react to your specific application needs.
Identify your unused resources to optimize costs in Amazon Keyspaces
This section provides an overview of how to evaluate your unused resources regularly. As your
application requirements evolve, you should ensure no resources are unused and contributing to
unnecessary Amazon Keyspaces costs. The procedures described below use Amazon CloudWatch
metrics to identify unused resources and take action to reduce costs.
You can monitor Amazon Keyspaces using CloudWatch, which collects and processes raw data from
Amazon Keyspaces into readable, near real-time metrics. These statistics are retained for a period
of time, so that you can access historical information to better understand your utilization. By
default, Amazon Keyspaces metric data is sent to CloudWatch automatically. For more information,
see What is Amazon CloudWatch? and Metrics retention in the Amazon CloudWatch User Guide.
Topics
• How to identify unused resources
• Identifying unused table resources
• Cleaning up unused table resources
Identify your unused resources 545

Amazon Keyspaces (for Apache Cassandra) Developer Guide
• Cleaning up unused point-in-time recovery (PITR) backups
How to identify unused resources
To identify unused tables you can take a look at the following CloudWatch metrics over a period of
30 days to understand if there are any active reads or writes on a specific table:
ConsumedReadCapacityUnits
The number of read capacity units consumed over the specified time period, so you can track how
much consumed capacity you have used. You can retrieve the total consumed read capacity for a
table.
ConsumedWriteCapacityUnits
The number of write capacity units consumed over the specified time period, so you can track how
much consumed capacity you have used. You can retrieve the total consumed write capacity for a
table.
Identifying unused table resources
Amazon CloudWatch is a monitoring and observability service which provides the Amazon
Keyspaces table metrics you can use to identify unused resources. CloudWatch metrics can be
viewed through the AWS Management Console as well as through the AWS Command Line
Interface.
AWS Command Line Interface
To view your tables metrics through the AWS Command Line Interface, you can use the
following commands.
1. First, evaluate your table's reads:
Note
If the table name is not unique within your account, you must also specify the name
of the keyspace.
aws cloudwatch get-metric-statistics --metric-name
Identify your unused resources 546

Amazon Keyspaces (for Apache Cassandra) Developer Guide
ConsumedReadCapacityUnits --start-time <start-time> --end-time <end-
time> --period <period> --namespace AWS/Cassandra --statistics Sum --
dimensions Name=TableName,Value=<table-name>
To avoid falsely identifying a table as unused, evaluate metrics over a longer period.
Choose an appropriate start-time and end-time range, such as 30 days, and an appropriate
period, such as 86400.
In the returned data, any Sum above 0 indicates that the table you are evaluating received
read traffic during that period.
The following result shows a table receiving read traffic in the evaluated period:
{
"Timestamp": "2022-08-25T19:40:00Z",
"Sum": 36023355.0,
"Unit": "Count"
},
{
"Timestamp": "2022-08-12T19:40:00Z",
"Sum": 38025777.5,
"Unit": "Count"
},
The following result shows a table not receiving read traffic in the evaluated period:
{
"Timestamp": "2022-08-01T19:50:00Z",
"Sum": 0.0,
"Unit": "Count"
},
{
"Timestamp": "2022-08-20T19:50:00Z",
"Sum": 0.0,
"Unit": "Count"
},
2. Next, evaluate your table’s writes:
aws cloudwatch get-metric-statistics --metric-name
ConsumedWriteCapacityUnits --start-time <start-time> --end-time <end-
time> --period <period> --namespace AWS/Cassandra --statistics Sum --
Identify your unused resources 547

Amazon Keyspaces (for Apache Cassandra) Developer Guide
dimensions Name=TableName,Value=<table-name>
To avoid falsely identifying a table as unused, you will want to evaluate metrics over a
longer period. Choose an appropriate start-time and end-time range, such as 30 days, and
an appropriate period, such as 86400.
In the returned data, any Sum above 0 indicates that the table you are evaluating received
read traffic during that period.
The following result shows a table receiving write traffic in the evaluated period:
{
"Timestamp": "2022-08-19T20:15:00Z",
"Sum": 41014457.0,
"Unit": "Count"
},
{
"Timestamp": "2022-08-18T20:15:00Z",
"Sum": 40048531.0,
"Unit": "Count"
},
The following result shows a table not receiving write traffic in the evaluated period:
{
"Timestamp": "2022-07-31T20:15:00Z",
"Sum": 0.0,
"Unit": "Count"
},
{
"Timestamp": "2022-08-19T20:15:00Z",
"Sum": 0.0,
"Unit": "Count"
},
AWS Management Console
The following steps allow you to evaluate your resource utilization through the AWS
Management Console.
Identify your unused resources 548

Amazon Keyspaces (for Apache Cassandra) Developer Guide
1. Log into the AWS Management Console and navigate to the CloudWatch service page at
https://console.aws.amazon.com/cloudwatch/. Select the appropriate AWS Region in the
top right of the console, if necessary.
2. On the left navigation bar, locate the Metrics section and choose All metrics.
3. The action above opens a dashboard with two panels. In the top panel, you can see
currently graphed metrics. On the bottom you can select the metrics available to graph.
Choose Amazon Keyspaces in the bottom panel.
4. In the Amazon Keyspaces metrics selection panel, choose the Table Metrics category to
show the metrics for your tables in the current region.
5. Identify your table name by scrolling down the menu, then choose the metrics
ConsumedReadCapacityUnits and ConsumedWriteCapacityUnits for your table.
6. Choose the Graphed metrics (2) tab and adjust the Statistic column to Sum.
7. To avoid falsely identifying a table as unused, evaluate the table metrics over a longer
period. At the top of the graph panel, choose an appropriate time frame, such as 1 month,
to evaluate your table. Choose Custom, choose 1 Months in the drop-down menu, and
choose Apply.
8. Evaluate the graphed metrics for your table to determine if it is being used. Metrics that
have gone above 0 indicate that a table has been used during the evaluated time period. A
flat graph at 0 for both read and write indicates that a table is unused.
Cleaning up unused table resources
If you have identified unused table resources, you can reduce their ongoing costs in the following
ways.
Note
If you have identified an unused table but would still like to keep it available in case it
needs to be accessed in the future, consider switching it to on-demand mode. Otherwise,
you can consider deleting the table.
Capacity modes
Amazon Keyspaces charges for reading, writing, and storing data in your Amazon Keyspaces tables.
Identify your unused resources 549

Amazon Keyspaces (for Apache Cassandra) Developer Guide
Amazon Keyspaces has two capacity modes, which come with specific billing options for processing
reads and writes on your tables: on-demand and provisioned. The read/write capacity mode
controls how you are charged for read and write throughput and how you manage capacity.
For on-demand mode tables, you don't need to specify how much read and write throughput you
expect your application to perform. Amazon Keyspaces charges you for the reads and writes that
your application performs on your tables in terms of read request units and write request units.
If there is no activity on your table, you do not pay for throughput but you still incur a storage
charge.
Deleting tables
If you’ve discovered an unused table and would like to delete it, consider to make a backup or
export the data first.
Backups taken through AWS Backup can leverage cold storage tiering, further reducing cost. Refer
to the Managing backup plans documentation for information on how to use a lifecycle to move
your backup to cold storage.
After your table has been backed up, you may choose to delete it either through the AWS
Management Console or through the AWS Command Line Interface.
Cleaning up unused point-in-time recovery (PITR) backups
Amazon Keyspaces offers Point-in-time recovery, which provides continuous backups for 35 days
to help you protect against accidental writes or deletes. PITR backups have costs associated with
them.
Refer to the documentation at the section called “Backup and restore with point-in-time recovery”
to determine if your tables have backups enabled that may no longer be needed.
Evaluate your table usage patterns to optimize performance and cost
This section provides an overview of how to evaluate if you are efficiently using your Amazon
Keyspaces tables. There are certain usage patterns which are not optimal for Amazon Keyspaces,
and they allow room for optimization from both a performance and a cost perspective.
Topics
• Perform fewer strongly-consistent read operations
Evaluate your table usage patterns 550

Amazon Keyspaces (for Apache Cassandra) Developer Guide
• Enable Time to Live (TTL)
Perform fewer strongly-consistent read operations
Amazon Keyspaces allows you to configure read consistency on a per-request basis. Read requests
are eventually consistent by default. Eventually consistent reads are charged at 0.5 RCU for up to 4
KB of data.
Most parts of distributed workloads are flexible and can tolerate eventual consistency. However,
there can be access patterns requiring strongly consistent reads. Strongly consistent reads are
charged at 1 RCU for up to 4 KB of data, essentially doubling your read costs. Amazon Keyspaces
provides you with the flexibility to use both consistency models on the same table.
You can evaluate your workload and application code to confirm if strongly consistent reads are
used only where required.
Enable Time to Live (TTL)
Time to Live (TTL) helps you simplify your application logic and optimize the price of storage by
expiring data from tables automatically. Data that you no longer need is automatically deleted
from your table based on the Time to Live value that you set.
Evaluate your provisioned capacity for right-sized provisioning
This section provides an overview of how to evaluate if you have right-sized provisioning on
your Amazon Keyspaces tables. As your workload evolves, you should modify your operational
procedures appropriately, especially when your Amazon Keyspaces table is configured in
provisioned mode and you have the risk to over-provision or under-provision your tables.
The procedures described in this section require statistical information that should be captured
from the Amazon Keyspaces tables that are supporting your production application. To understand
your application behavior, you should define a period of time that is significant enough to capture
the data seasonality of your application. For example, if your application shows weekly patterns,
using a three week period should give you enough room for analysing application throughput
needs.
If you don’t know where to start, use at least one month’s worth of data usage for the calculations
below.
Evaluate your provisioned capacity for right-sized provisioning 551

Amazon Keyspaces (for Apache Cassandra) Developer Guide
While evaluating capacity, for Amazon Keyspaces tables you can configure Read Capacity Units
(RCUs) and Write Capacity Units (WCU) independently.
Topics
• How to retrieve consumption metrics from your Amazon Keyspaces tables
• How to identify under-provisioned Amazon Keyspaces tables
• How to identify over-provisioned Amazon Keyspaces tables
How to retrieve consumption metrics from your Amazon Keyspaces tables
To evaluate the table capacity, monitor the following CloudWatch metrics and select the
appropriate dimension to retrieve table information:
Read Capacity Units Write Capacity Units
ConsumedReadCapacityUnits ConsumedWriteCapacityUnits
ProvisionedReadCapacityUnits ProvisionedWriteCapacityUnits
ReadThrottleEvents WriteThrottleEvents
You can do this either through the AWS CLI or the AWS Management Console.
AWS CLI
Before you retrieve the table consumption metrics, you need to start by capturing some
historical data points using the CloudWatch API.
Start by creating two files: write-calc.json and read-calc.json. These files represent
the calculations for the table. You need to update some of the fields, as indicated in the table
below, to match your environment.
Note
If the table name is not unique within your account, you must also specify the name of
the keyspace.
Evaluate your provisioned capacity for right-sized provisioning 552

Amazon Keyspaces (for Apache Cassandra) Developer Guide
Field Name Definition Example
<table-name>
The name of the table that
you are analysing
SampleTable
<period>
The period of time that you
are using to evaluate the
utilization target, based in
seconds
For a 1-hour period you
should specify: 3600
<start-time>
The beginning of your
evaluation interval, specified
in ISO8601 format
2022-02-21T23:00:00
<end-time>
The end of your evaluatio
n interval, specified in
ISO8601 format
2022-02-22T06:00:00
The write calculations file retrieves the number of WCU provisioned and consumed in the time
period for the date range specified. It also generates a utilization percentage that can be used
for analysis. The full content of the write-calc.json file should look like in the following
example.
{
"MetricDataQueries": [
{
"Id": "provisionedWCU",
"MetricStat": {
"Metric": {
"Namespace": "AWS/Cassandra",
"MetricName": "ProvisionedWriteCapacityUnits",
"Dimensions": [
{
"Name": "TableName",
"Value": "<table-name>"
}
]
},
"Period": <period>,
Evaluate your provisioned capacity for right-sized provisioning 553

Amazon Keyspaces (for Apache Cassandra) Developer Guide
"Stat": "Average"
},
"Label": "Provisioned",
"ReturnData": false
},
{
"Id": "consumedWCU",
"MetricStat": {
"Metric": {
"Namespace": "AWS/Cassandra",
"MetricName": "ConsumedWriteCapacityUnits",
"Dimensions": [
{
"Name": "TableName",
"Value": "<table-name>""
}
]
},
"Period": <period>,
"Stat": "Sum"
},
"Label": "",
"ReturnData": false
},
{
"Id": "m1",
"Expression": "consumedWCU/PERIOD(consumedWCU)",
"Label": "Consumed WCUs",
"ReturnData": false
},
{
"Id": "utilizationPercentage",
"Expression": "100*(m1/provisionedWCU)",
"Label": "Utilization Percentage",
"ReturnData": true
}
],
"StartTime": "<start-time>",
"EndTime": "<end-time>",
"ScanBy": "TimestampDescending",
"MaxDatapoints": 24
}
Evaluate your provisioned capacity for right-sized provisioning 554

Amazon Keyspaces (for Apache Cassandra) Developer Guide
The read calculations file uses a similar metrics. This file retrieves how many RCUs were
provisioned and consumed during the time period for the date range specified. The contents of
the read-calc.json file should look like in this example.
{
"MetricDataQueries": [
{
"Id": "provisionedRCU",
"MetricStat": {
"Metric": {
"Namespace": "AWS/Cassandra",
"MetricName": "ProvisionedReadCapacityUnits",
"Dimensions": [
{
"Name": "TableName",
"Value": "<table-name>"
}
]
},
"Period": <period>,
"Stat": "Average"
},
"Label": "Provisioned",
"ReturnData": false
},
{
"Id": "consumedRCU",
"MetricStat": {
"Metric": {
"Namespace": "AWS/Cassandra",
"MetricName": "ConsumedReadCapacityUnits",
"Dimensions": [
{
"Name": "TableName",
"Value": "<table-name>"
}
]
},
"Period": <period>,
"Stat": "Sum"
},
"Label": "",
"ReturnData": false
Evaluate your provisioned capacity for right-sized provisioning 555

Amazon Keyspaces (for Apache Cassandra) Developer Guide
},
{
"Id": "m1",
"Expression": "consumedRCU/PERIOD(consumedRCU)",
"Label": "Consumed RCUs",
"ReturnData": false
},
{
"Id": "utilizationPercentage",
"Expression": "100*(m1/provisionedRCU)",
"Label": "Utilization Percentage",
"ReturnData": true
}
],
"StartTime": "<start-time>",
"EndTime": "<end-time>",
"ScanBy": "TimestampDescending",
"MaxDatapoints": 24
}
Once you've created the files, you can start retrieving utilization data.
1. To retrieve the write utilization data, issue the following command:
aws cloudwatch get-metric-data --cli-input-json file://write-calc.json
2. To retrieve the read utilization data, issue the following command:
aws cloudwatch get-metric-data --cli-input-json file://read-calc.json
The result for both queries is a series of data points in JSON format that can be used for
analysis. Your results depend on the number of data points you specified, the period, and your
own specific workload data. It could look like in the following example.
{
"MetricDataResults": [
{
"Id": "utilizationPercentage",
"Label": "Utilization Percentage",
"Timestamps": [
"2022-02-22T05:00:00+00:00",
Evaluate your provisioned capacity for right-sized provisioning 556

Amazon Keyspaces (for Apache Cassandra) Developer Guide
"2022-02-22T04:00:00+00:00",
"2022-02-22T03:00:00+00:00",
"2022-02-22T02:00:00+00:00",
"2022-02-22T01:00:00+00:00",
"2022-02-22T00:00:00+00:00",
"2022-02-21T23:00:00+00:00"
],
"Values": [
91.55364583333333,
55.066631944444445,
2.6114930555555556,
24.9496875,
40.94725694444445,
25.61819444444444,
0.0
],
"StatusCode": "Complete"
}
],
"Messages": []
}
Note
If you specify a short period and a long time range, you might need to modify the
MaxDatapoints value, which is by default set to 24 in the script. This represents one
data point per hour and 24 per day.
AWS Management Console
1. Log into the AWS Management Console and navigate to the CloudWatch service page at
Getting Started with the AWS Management Console. Select the appropriate AWS Region if
necessary.
2. Locate the Metrics section on the left navigation bar and choose All metrics.
3. This opens a dashboard with two panels. The top panel shows you the graphic, and the
bottom panel has the metrics that you want to graph. Choose the Amazon Keyspaces
panel.
4. Choose the Table Metrics category from the sub panels. This shows you the tables in your
current AWS Region.
Evaluate your provisioned capacity for right-sized provisioning 557
Amazon Keyspaces (for Apache Cassandra) Developer Guide
5. Identify your table name by scrolling down the menu and selecting the write operation
metrics: ConsumedWriteCapacityUnits and ProvisionedWriteCapacityUnits
Note
This example talks about write operation metrics, but you can also use these steps
to graph the read operation metrics.
6. Select the Graphed metrics (2) tab to modify the formulas. By default CloudWatch chooses
the statistical function Average for the graphs.
7. While having both graphed metrics selected (the checkbox on the left) select the menu
Add math, followed by Common, and then select the Percentage function. Repeat the
procedure twice.
First time selecting the Percentage function.
Second time selecting the Percentage function.
8. At this point you should have four metrics in the bottom menu. Let’s work on the
ConsumedWriteCapacityUnits calculation. To be consistent, you need to match the
names with the ones you used in the AWS CLI section. Click on the m1 ID and change this
value to consumedWCU.
9. Change the statistic from Average to Sum. This action automatically creates another metric
called ANOMALY_DETECTION_BAND. For the scope of this procedure, you can ignore this
by removing the checkbox on the newly generated ad1 metric.
10. Repeat step 8 to rename the m2 ID to provisionedWCU. Leave the statistic set to Average.
11. Choose the Expression1 label and update the value to m1 and the label to Consumed
WCUs.
Note
Make sure you have only selected m1 (checkbox on the left) and provisionedWCU
to properly visualize the data. Update the formula by clicking in Details and
changing the formula to consumedWCU/PERIOD(consumedWCU). This step might
also generate another ANOMALY_DETECTION_BAND metric, but for the scope of
this procedure you can ignore it.
Evaluate your provisioned capacity for right-sized provisioning 558

Amazon Keyspaces (for Apache Cassandra) Developer Guide
12. You should now have two graphics: one that indicates your provisioned WCUs on the table
and another that indicates the consumed WCUs.
13. Update the percentage formula by selecting the Expression2 graphic (e2). Rename
the labels and IDs to utilizationPercentage. Rename the formula to match 100*(m1/
provisionedWCU).
14. Remove the checkbox from all the metrics except utilizationPercentage to visualize your
utilization patterns. The default interval is set to 1 minute, but feel free to modify it as
needed.
The results you get depend on the actual data from your workload. Intervals with more than
100% utilization are prone to low throughput capacity error events. Amazon Keyspaces
offers burst capacity, but as soon as the burst capacity is exhausted, anything above 100%
experiences low throughput capacity error events.
How to identify under-provisioned Amazon Keyspaces tables
For most workloads, a table is considered under-provisioned when it constantly consumes more
than 80% of its provisioned capacity.
Burst capacity is an Amazon Keyspaces feature that allow customers to temporarily consume more
RCUs/WCUs than originally provisioned (more than the per-second provisioned throughput that
was defined for the table). The burst capacity was created to absorb sudden increases in traffic
due to special events or usage spikes. This burst capacity limited, for more information, see the
section called “Use burst capacity”. As soon as the unused RCUs and WCUs are depleted, you
can experience low capacity throughput error events if you try to consume more capacity than
provisioned. When your application traffic is getting close to the 80% utilization rate, your risk of
experiencing low capacity throughput error events is significantly higher.
The 80% utilization rate rule varies from the seasonality of your data and your traffic growth.
Consider the following scenarios:
• If your traffic has been stable at ~90% utilization rate for the last 12 months, your table has just
the right capacity
• If your application traffic is growing at a rate of 8% monthly in less than 3 months, you will
arrive at 100%
• If your application traffic is growing at a rate of 5% in a little more than 4 months, you will still
arrive at 100%
Evaluate your provisioned capacity for right-sized provisioning 559

Amazon Keyspaces (for Apache Cassandra) Developer Guide
The results from the queries above provide a picture of your utilization rate. Use them as a guide to
further evaluate other metrics that can help you choose to increase your table capacity as required
(for example: a monthly or weekly growth rate). Work with your operations team to define what is
a good percentage for your workload and your tables.
There are special scenarios where the data is skewed when you analyse it on a daily or weekly
basis. For example, with seasonal applications that have spikes in usage during working hours (but
then drop to almost zero outside of working hours), you could benefit from scheduling application
auto-scaling, where you specify the hours of the day (and the days of the week) to increase
the provisioned capacity, as well as when to reduce it. Instead of aiming for higher capacity so
you can cover the busy hours, you can also benefit from Amazon Keyspaces table auto-scaling
configurations if your seasonality is less pronounced.
How to identify over-provisioned Amazon Keyspaces tables
The query results obtained from the scripts above provide the data points required to perform
some initial analysis. If your data set presents values lower than 20% utilization for several
intervals, your table might be over-provisioned. To further define if you need to reduce the number
of WCUs and RCUS, you should revisit the other readings in the intervals.
When your table contains several low usage intervals, you can benefit from using Application Auto
Scaling policies, either by scheduling Application Auto Scaling or by just configuring the default
Application Auto Scaling policies for the table that are based on utilization.
If you have a workload with a low utilization to high throttle ratio (Max(ThrottleEvents)/
Min(ThrottleEvents) in the interval), this could happen when you have a very spiky workload
where traffic increases significantly on specific days (or times of day), but is otherwise consistently
low. In these scenarios, it might be beneficial to use scheduled Application Auto Scaling.
Evaluate your provisioned capacity for right-sized provisioning 560

Amazon Keyspaces (for Apache Cassandra) Developer Guide
Troubleshooting Amazon Keyspaces (for Apache
Cassandra)
This guide covers troubleshooting steps for various scenarios when working with Amazon
Keyspaces (for Apache Cassandra). It includes information on resolving general errors, connection
issues, capacity management problems, and Data Definition Language (DDL) errors.
• General errors
•
Troubleshooting top-level exceptions like NoNodeAvailableException,
NoHostAvailableException, and AllNodesFailedException.
• Isolating underlying errors from Java driver exceptions.
• Implementing retry policies and configuring connections correctly.
• Connection issues
•
Resolving errors when connecting to Amazon Keyspaces endpoints using cqlsh or Apache
Cassandra client drivers.
• Troubleshooting VPC endpoint connections, Cassandra-stress connections, and IAM
configuration errors.
• Handling connection losses during data imports.
• Capacity management errors
• Recognizing and resolving insufficient capacity errors related to tables, partitions, and
connections.
• Monitoring relevant Amazon Keyspaces metrics in Amazon CloudWatch Logs.
• Optimizing connections and throughput for improved performance.
• Data Definition Language (DDL) errors
• Troubleshooting errors when creating, accessing, or restoring keyspaces and tables.
• Handling failures related to custom Time to Live (TTL) settings, column limits, and range
deletes.
• Considerations for heavy delete workloads.
For troubleshooting guidance specific to IAM access, see the section called “Troubleshooting”. For
more information about security best practices, see the section called “Security best practices”.
561

Amazon Keyspaces (for Apache Cassandra) Developer Guide
Topics
• Troubleshooting general errors in Amazon Keyspaces
• Troubleshooting connection errors in Amazon Keyspaces
• Troubleshooting capacity management errors in Amazon Keyspaces
• Troubleshooting data definition language errors in Amazon Keyspaces
Troubleshooting general errors in Amazon Keyspaces
Getting general errors? Here are some common issues and how to resolve them.
General errors
You're getting one of the following top-level exceptions that can occur due to many different
reasons.
•
NoNodeAvailableException
•
NoHostAvailableException
•
AllNodesFailedException
These exceptions are generated by the client driver and can occur either when you're establishing
the control connection or when you're performing read/write/prepare/execute/batch requests.
When the error occurs while you're establishing the control connection, it's a sign that all the
contact points specified in your application are unreachable. When the error occurs while
performing read/write/prepare/execute queries, it indicates that all of the retries for that request
have been exhausted. Each retry is attempted on a different node when you're using the default
retry policy.
How to isolate the underlying error from top-level Java driver exceptions
These general errors can be caused either by connection issues or when performing read/write/
prepare/execute operations. Transient failures have to be expected in distributed systems, and
should be handled by retrying the request. The Java driver doesn't automatically retry when
connection errors are encountered, so it's recommended to implement the retry policy when
establishing the driver connection in your application. For a detailed overview of connection best
practices, see the section called “Connections”.
General errors 562

Amazon Keyspaces (for Apache Cassandra) Developer Guide
By default, the Java driver sets idempotence to false for all request, which means the Java driver
doesn't automatically retry failed read/write/prepare request. To set idempotence to true and
tell the driver to retry failed requests, you can do so in a few different ways. Here's one example
how you can set idempotence programmatically for a single request in your Java application.
Statement s = new SimpleStatement("SELECT * FROM my_table WHERE id = 1");
s.setIdempotent(true);
Or you can set the default idempotence for your entire Java application programmatically as
shown in the following example.
// Make all statements idempotent by default:
cluster.getConfiguration().getQueryOptions().setDefaultIdempotence(true);
//Set the default idempotency to true in your Cassandra configuration
basic.request.default-idempotence = true
Another recommendation is to create a retry policy at the application level. In this case, the
application needs to catch the NoNodeAvailableException and retry the request. We
recommend 10 retries with exponential backoff starting at 10ms and working up to 100ms with a
total time of 1 second for all retries.
Another option is to apply the Amazon Keyspaces exponential retry policy when establishing the
Java driver connection available on Github.
Confirm that you have established connections to more than one node when using the default
retry policy. You can do so using the following query in Amazon Keyspaces.
SELECT * FROM system.peers;
If the response for this query is empty, this indicates that you're working with a single node for
Amazon Keyspaces. If you're using the default retry policy, there will be no retries because the
default retry always occurs on a different node. To learn more about establishing connections over
VPC endpoints, see the section called “VPC endpoint connections”.
For a step-by-step tutorial that shows how to establish a connection to Amazon Keyspaces using
the Datastax 4.x Cassandra driver, see the section called “Authentication plugin for Java 4.x”.
General errors 563

Amazon Keyspaces (for Apache Cassandra) Developer Guide
Troubleshooting connection errors in Amazon Keyspaces
Having trouble connecting? Here are some common issues and how to resolve them.
Errors connecting to an Amazon Keyspaces endpoint
Failed connections and connection errors can result in different error messages. The following
section covers the most common scenarios.
Topics
• I can't connect to Amazon Keyspaces with cqlsh
• I can't connect to Amazon Keyspaces using a Cassandra client driver
I can't connect to Amazon Keyspaces with cqlsh
You're trying to connect to an Amazon Keyspaces endpoint using cqlsh and the connection fails
with a Connection error.
If you try to connect to an Amazon Keyspaces table and cqlsh hasn't been configured properly,
the connection fails. The following section provides examples of the most common configuration
issues that result in connection errors when you're trying to establish a connection using cqlsh.
Note
If you're trying to connect to Amazon Keyspaces from a VPC, additional permissions are
required. To successfully configure a connection using VPC endpoints, follow the steps in
the the section called “Connecting with VPC endpoints”.
You're trying to connect to Amazon Keyspaces using cqlsh, but you get a connection timed
out error.
This might be the case if you didn't supply the correct port, which results in the following error.
# cqlsh cassandra.us-east-1.amazonaws.com 9140 -u "USERNAME" -p "PASSWORD" --ssl
Connection error: ('Unable to connect to any servers', {'3.234.248.199': error(None,
"Tried connecting to [('3.234.248.199', 9140)]. Last error: timed out")})
Connection errors 564

Amazon Keyspaces (for Apache Cassandra) Developer Guide
To resolve this issue, verify that you're using port 9142 for the connection.
You're trying to connect to Amazon Keyspaces using cqlsh, but you get a Name or service
not known error.
This might be the case if you used an endpoint that is misspelled or doesn't exist. In the following
example, the name of the endpoint is misspelled.
# cqlsh cassandra.us-east-1.amazon.com 9142 -u "USERNAME" -p "PASSWORD" --ssl
Traceback (most recent call last):
File "/usr/bin/cqlsh.py", line 2458, in >module>
main(*read_options(sys.argv[1:], os.environ))
File "/usr/bin/cqlsh.py", line 2436, in main
encoding=options.encoding)
File "/usr/bin/cqlsh.py", line 484, in __init__
load_balancing_policy=WhiteListRoundRobinPolicy([self.hostname]),
File "/usr/share/cassandra/lib/cassandra-driver-internal-only-3.11.0-bb96859b.zip/
cassandra-driver-3.11.0-bb96859b/cassandra/policies.py", line 417, in __init__
socket.gaierror: [Errno -2] Name or service not known
To resolve this issue when you're using public endpoints to connect, select an available endpoint
from the section called “Service endpoints”, and verify that the name of the endpoint doesn't have
any errors. If you're using VPC endpoints to connect, verify that the VPC endpoint information is
correct in your cqlsh configuration.
You're trying to connect to Amazon Keyspaces using cqlsh, but you receive an
OperationTimedOut error.
Amazon Keyspaces requires that SSL is enabled for connections to ensure strong security. The SSL
parameter might be missing if you receive the following error.
# cqlsh cassandra.us-east-1.amazonaws.com -u "USERNAME" -p "PASSWORD"
Connection error: ('Unable to connect to any servers', {'3.234.248.192':
OperationTimedOut('errors=Timed out creating connection (5 seconds),
last_host=None',)})
#
To resolve this issue, add the following flag to the cqlsh connection command.
--ssl
Errors connecting to an Amazon Keyspaces endpoint 565

Amazon Keyspaces (for Apache Cassandra) Developer Guide
You're trying to connect to Amazon Keyspaces using cqlsh, and you receive a SSL transport
factory requires a valid certfile to be specified error.
In this case, the path to the SSL/TLS certificate is missing, which results in the following error.
# cat .cassandra/cqlshrc
[connection]
port = 9142
factory = cqlshlib.ssl.ssl_transport_factory
#
# cqlsh cassandra.us-east-1.amazonaws.com -u "USERNAME" -p "PASSWORD" --ssl
Validation is enabled; SSL transport factory requires a valid certfile to be specified.
Please provide path to the certfile in [ssl] section as 'certfile' option in /
root/.cassandra/cqlshrc (or use [certfiles] section) or set SSL_CERTFILE environment
variable.
#
To resolve this issue, add the path to the certfile on your computer.
certfile = path_to_file/sf-class2-root.crt
You're trying to connect to Amazon Keyspaces using cqlsh, but you receive a No such file or
directory error.
This might be the case if the path to the certificate file on your computer is wrong, which results in
the following error.
# cat .cassandra/cqlshrc
[connection]
port = 9142
factory = cqlshlib.ssl.ssl_transport_factory
[ssl]
validate = true
certfile = /root/wrong_path/sf-class2-root.crt
#
# cqlsh cassandra.us-east-1.amazonaws.com -u "USERNAME" -p "PASSWORD" --ssl
Errors connecting to an Amazon Keyspaces endpoint 566

Amazon Keyspaces (for Apache Cassandra) Developer Guide
Connection error: ('Unable to connect to any servers', {'3.234.248.192': IOError(2, 'No
such file or directory')})
#
To resolve this issue, verify that the path to the certfile on your computer is correct.
You're trying to connect to Amazon Keyspaces using cqlsh, but you receive a [X509] PEM lib
error.
This might be the case if the SSL/TLS certificate file sf-class2-root.crt is not valid, which
results in the following error.
# cqlsh cassandra.us-east-1.amazonaws.com -u "USERNAME" -p "PASSWORD" --ssl
Connection error: ('Unable to connect to any servers', {'3.234.248.241':
error(185090057, u"Tried connecting to [('3.234.248.241', 9142)]. Last error: [X509]
PEM lib (_ssl.c:3063)")})
#
To resolve this issue, download the Starfield digital certificate using the following command. Save
sf-class2-root.crt locally or in your home directory.
curl https://certs.secureserver.net/repository/sf-class2-root.crt -O
You're trying to connect to Amazon Keyspaces using cqlsh, but you receive an unknown SSL
error.
This might be the case if the SSL/TLS certificate file sf-class2-root.crt is empty, which results
in the following error.
# cqlsh cassandra.us-east-1.amazonaws.com -u "USERNAME" -p "PASSWORD" --ssl
Connection error: ('Unable to connect to any servers', {'3.234.248.220': error(0,
u"Tried connecting to [('3.234.248.220', 9142)]. Last error: unknown error
(_ssl.c:3063)")})
#
To resolve this issue, download the Starfield digital certificate using the following command. Save
sf-class2-root.crt locally or in your home directory.
curl https://certs.secureserver.net/repository/sf-class2-root.crt -O
Errors connecting to an Amazon Keyspaces endpoint 567

Amazon Keyspaces (for Apache Cassandra) Developer Guide
You're trying to connect to Amazon Keyspaces using cqlsh, but you receive a SSL:
CERTIFICATE_VERIFY_FAILED error.
This might be the case if the SSL/TLS certificate file could not be verified, which results in the
following error.
Connection error: ('Unable to connect to any servers', {'3.234.248.223':
error(1, u"Tried connecting to [('3.234.248.223', 9142)]. Last error: [SSL:
CERTIFICATE_VERIFY_FAILED] certificate verify failed (_ssl.c:727)")})
To resolve this issue, download the certificate file again using the following command. Save sf-
class2-root.crt locally or in your home directory.
curl https://certs.secureserver.net/repository/sf-class2-root.crt -O
You're trying to connect to Amazon Keyspaces using cqlsh, but you're receiving a Last error:
timed out error.
This might be the case if you didn't configure an outbound rule for Amazon Keyspaces in your
Amazon EC2 security group, which results in the following error.
# cqlsh cassandra.us-east-1.amazonaws.com 9142 -u "USERNAME" -p "PASSWORD" --ssl
Connection error: ('Unable to connect to any servers', {'3.234.248.206': error(None,
"Tried connecting to [('3.234.248.206', 9142)]. Last error: timed out")})
#
To confirm that this issue is caused by the configuration of the Amazon EC2 instance and not
cqlsh, you can try to connect to your keyspace using the AWS CLI, for example with the following
command.
aws keyspaces list-tables --keyspace-name 'my_keyspace'
If this command also times out, the Amazon EC2 instance is not correctly configured.
To confirm that you have sufficient permissions to access Amazon Keyspaces, you can use the AWS
CloudShell to connect with cqlsh. If that connections gets established, you need to configure the
Amazon EC2 instance.
To resolve this issue, confirm that your Amazon EC2 instance has an outbound rule that allows
traffic to Amazon Keyspaces. If that is not the case, you need to create a new security group for
Errors connecting to an Amazon Keyspaces endpoint 568

Amazon Keyspaces (for Apache Cassandra) Developer Guide
the EC2 instance, and add a rule that allows outbound traffic to Amazon Keyspaces resources. To
update the outbound rule to allow traffic to Amazon Keyspaces, choose CQLSH/CASSANDRA from
the Type drop-down menu.
After creating the new security group with the outbound traffic rule, you need to add it to the
instance. Select the instance and then choose Actions, then Security, and then Change security
groups. Add the new security group with the outbound rule, but make sure that the default group
also remains available.
For more information about how to view and edit EC2 outbound rules, see Add rules to a security
group in the Amazon EC2 User Guide.
You're trying to connect to Amazon Keyspaces using cqlsh, but you receive an Unauthorized
error.
This might be the case if you're missing Amazon Keyspaces permissions in the IAM user policy,
which results in the following error.
# cqlsh cassandra.us-east-1.amazonaws.com 9142 -u "testuser-at-12345678910" -p
"PASSWORD" --ssl
Connection error: ('Unable to connect to any servers', {'3.234.248.241':
AuthenticationFailed('Failed to authenticate to 3.234.248.241: Error from server:
code=2100 [Unauthorized] message="User arn:aws:iam::12345678910:user/testuser has no
permissions."',)})
#
To resolve this issue, ensure that the IAM user testuser-at-12345678910 has permissions to
access Amazon Keyspaces. For examples of IAM policies that grant access to Amazon Keyspaces, see
the section called “Identity-based policy examples”.
For troubleshooting guidance that's specific to IAM access, see the section called
“Troubleshooting”.
You're trying to connect to Amazon Keyspaces using cqlsh, but you receive a Bad credentials
error.
This might be the case if the user name or password is wrong, which results in the following error.
# cqlsh cassandra.us-east-1.amazonaws.com 9142 -u "USERNAME" -p "PASSWORD" --ssl
Connection error: ('Unable to connect to any servers', {'3.234.248.248':
AuthenticationFailed('Failed to authenticate to 3.234.248.248: Error from server:
Errors connecting to an Amazon Keyspaces endpoint 569

Amazon Keyspaces (for Apache Cassandra) Developer Guide
code=0100 [Bad credentials] message="Provided username USERNAME and/or password are
incorrect"',)})
#
To resolve this issue, verify that the USERNAME and PASSWORD in your code match the user name
and password you obtained when you generated service-specific credentials.
Important
If you continue to see errors when trying to connect with cqlsh, rerun the command with
the --debug option and include the detailed output when contacting AWS Support.
I can't connect to Amazon Keyspaces using a Cassandra client driver
The following sections shows the most common errors when connecting with a Cassandra client
driver.
You're trying to connect to an Amazon Keyspaces table using the DataStax Java driver, but you
receive an NodeUnavailableException error.
If the connection on which the request is attempted is broken, it results in the following error.
[com.datastax.oss.driver.api.core.NodeUnavailableException: No connection
was available to Node(endPoint=vpce-22ff22f2f22222fff-aa1bb234.cassandra.us-
west-2.vpce.amazonaws.com/11.1.1111.222:9142, hostId=1a23456b-
c77d-8888-9d99-146cb22d6ef6, hashCode=123ca4567)]
To resolve this issue, find the heartbeat value and lower it to 30 seconds if it's higher.
advanced.heartbeat.interval = 30 seconds
Then look for the associated time out and ensure the value is set to at least 5 seconds.
advanced.connection.init-query-timeout = 5 seconds
You're trying to connect to an Amazon Keyspaces table using a driver and the SigV4 plugin, but
you receive an AttributeError error.
Errors connecting to an Amazon Keyspaces endpoint 570

Amazon Keyspaces (for Apache Cassandra) Developer Guide
If the credentials are not correctly configured, it results in the following error.
cassandra.cluster.NoHostAvailable: (‘Unable to connect to any servers’,
{‘44.234.22.154:9142’: AttributeError(“‘NoneType’ object has no attribute
‘access_key’“)})
To resolve this issue, verify that you're passing the credentials associated with your IAM user or role
when using the SigV4 plugin. The SigV4 plugin requires the following credentials.
•
AWS_ACCESS_KEY_ID – Specifies an AWS access key associated with an IAM user or role.
•
AWS_SECRET_ACCESS_KEY– Specifies the secret key associated with the access key. This is
essentially the "password" for the access key.
To learn more about access keys and the SigV4 plugin, see the section called “Create IAM
credentials for AWS authentication”.
You're trying to connect to an Amazon Keyspaces table using a driver, but you receive a
PartialCredentialsError error.
If the AWS_SECRET_ACCESS_KEY is missing, it can result in the following error.
cassandra.cluster.NoHostAvailable: (‘Unable to connect to any servers’,
{‘44.234.22.153:9142’:
PartialCredentialsError(‘Partial credentials found in config-file, missing:
aws_secret_access_key’)})
To resolve this issue, verify that you're passing both the AWS_ACCESS_KEY_ID and the
AWS_SECRET_ACCESS_KEY when using the SigV4 plugin. To learn more about access keys and the
SigV4 plugin, see the section called “Create IAM credentials for AWS authentication”.
You're trying to connect to an Amazon Keyspaces table using a driver, but you receive an
Invalid signature error.
This might be the case if you used wrong credentials, which results in the following error.
cassandra.cluster.NoHostAvailable: (‘Unable to connect to any servers’,
{‘44.234.22.134:9142’:
AuthenticationFailed(‘Failed to authenticate to 44.234.22.134:9142: Error from server:
code=0100
[Bad credentials] message=“Authentication failure: Invalid signature”’)})
Errors connecting to an Amazon Keyspaces endpoint 571

Amazon Keyspaces (for Apache Cassandra) Developer Guide
To resolve this issue, verify that the credentials you're passing are associated with the IAM user or
role that you configured to access Amazon Keyspaces. To learn more about access keys and the
SigV4 plugin, see the section called “Create IAM credentials for AWS authentication”.
My VPC endpoint connection doesn't work properly
You're trying to connect to Amazon Keyspaces using VPC endpoints, but you're receiving token
map errors or you are experiencing low throughput.
This might be the case if the VPC endpoint connection isn't correctly configured.
To resolve these issues, verify the following configuration details. To follow a step-by-step tutorial
to learn how to configure a connection over interface VPC endpoints for Amazon Keyspaces see the
section called “Connecting with VPC endpoints”.
1. Confirm that the IAM entity used to connect to Amazon Keyspaces has read/write access to the
user table and read access to the system tables as shown in the following example.
{
"Version":"2012-10-17",
"Statement":[
{
"Effect":"Allow",
"Action":[
"cassandra:Select",
"cassandra:Modify"
],
"Resource":[
"arn:aws:cassandra:us-east-1:111122223333:/keyspace/mykeyspace/table/
mytable",
"arn:aws:cassandra:us-east-1:111122223333:/keyspace/system*"
]
}
]
}
2. Confirm that the IAM entity used to connect to Amazon Keyspaces has the required read
permissions to access the VPC endpoint information on your Amazon EC2 instance as shown in
the following example.
{
"Version":"2012-10-17",
Errors connecting to an Amazon Keyspaces endpoint 572

Amazon Keyspaces (for Apache Cassandra) Developer Guide
"Statement":[
{
"Sid":"ListVPCEndpoints",
"Effect":"Allow",
"Action":[
"ec2:DescribeNetworkInterfaces",
"ec2:DescribeVpcEndpoints"
],
"Resource":"*"
}
]
}
Note
The managed policies AmazonKeyspacesReadOnlyAccess_v2 and
AmazonKeyspacesFullAccess include the required permissions to let Amazon
Keyspaces access the Amazon EC2 instance to read information about available
interface VPC endpoints.
For more information about VPC endpoints, see the section called “Using interface VPC
endpoints for Amazon Keyspaces”
3. Confirm that the SSL configuration of the Java driver sets hostname validation to false as
shown in this example.
hostname-validation = false
For more information about driver configuration, see the section called “Step 2: Configure the
driver”.
4. To confirm that the VPC endpoint has been configured correctly, you can run the following
statement from within your VPC.
Note
You can't use your local developer environment or the Amazon Keyspaces CQL editor
to confirm this configuration, because they use the public endpoint.
Errors connecting to an Amazon Keyspaces endpoint 573

Amazon Keyspaces (for Apache Cassandra) Developer Guide
SELECT peer FROM system.peers;
The output should look similar to this example and return between 2 to 6 nodes with private
IP addresses, depending on your VPC setup and AWS Region.
peer
---------------
192.0.2.0.15
192.0.2.0.24
192.0.2.0.13
192.0.2.0.7
192.0.2.0.8
(5 rows)
I can't connect using cassandra-stress
You're trying to connect to Amazon Keyspaces using the cassandra-stress command, but
you're receiving an SSL context error.
This happens if you try to connect to Amazon Keyspaces, but you don't have the trustStore setup
correctly. Amazon Keyspaces requires the use of Transport Layer Security (TLS) to help secure
connections with clients.
In this case, you see the following error.
Error creating the initializing the SSL Context
To resolve this issue, follow the instructions to set up a trustStore as shown in this topic the section
called “Before you begin”.
Once the trustStore is setup, you should be able to connect with the following command.
./cassandra-stress user profile=./profile.yaml n=100 "ops(insert=1,select=1)"
cl=LOCAL_QUORUM -node "cassandra.eu-north-1.amazonaws.com" -port native=9142
-transport ssl-alg="PKIX" truststore="./cassandra_truststore.jks" truststore-
password="trustStore_pw" -mode native cql3 user="user_name" password="password"
Errors connecting to an Amazon Keyspaces endpoint 574

Amazon Keyspaces (for Apache Cassandra) Developer Guide
I can't connect using IAM identities
You're trying to connect to an Amazon Keyspaces table using an IAM identity, but you're
receiving an Unauthorized error.
This happens if you try to connect to an Amazon Keyspaces table using an IAM identity (for
example, an IAM user) without implementing the policy and giving the user the required
permissions first.
In this case, you see the following error.
Connection error: ('Unable to connect to any servers', {'3.234.248.202':
AuthenticationFailed('Failed to authenticate to 3.234.248.202:
Error from server: code=2100 [Unauthorized] message="User
arn:aws:iam::1234567890123:user/testuser has no permissions."',)})
To resolve this issue, verify the permissions of the IAM user. To connect with a standard driver, a
user must have at least SELECT access to the system tables, because most drivers read the system
keyspaces/tables when they establish the connection.
For example IAM policies that grant access to Amazon Keyspaces system and user tables, see the
section called “Accessing Amazon Keyspaces tables”.
To review the troubleshooting section specific to IAM, see the section called “Troubleshooting”.
I'm trying to import data with cqlsh and the connection to my Amazon Keyspaces table is lost
You're trying to upload data to Amazon Keyspaces with cqlsh, but you're receiving connection
errors.
The connection to Amazon Keyspaces fails after the cqlsh client receives three consecutive errors of
any type from the server. The cqlsh client fails with the following message.
Failed to import 1 rows: NoHostAvailable - , will retry later, attempt 3 of 100
To resolve this error, you need to make sure that the data to be imported matches the table
schema in Amazon Keyspaces. Review the import file for parsing errors. You can try using a single
row of data by using an INSERT statement to isolate the error.
The client automatically attempts to reestablish the connection.
Errors connecting to an Amazon Keyspaces endpoint 575

Amazon Keyspaces (for Apache Cassandra) Developer Guide
Troubleshooting capacity management errors in Amazon
Keyspaces
Having trouble with serverless capacity? Here are some common issues and how to resolve them.
Serverless capacity errors
This section outlines how to recognize errors related to serverless capacity management and how
to resolve them. For example, you might observe insufficient capacity events when your application
exceeds your provisioned throughput capacity.
Because Apache Cassandra is cluster-based software that is designed to run on a fleet of nodes,
it doesn’t have exception messages related to serverless features such as throughput capacity.
Most drivers only understand the error codes that are available in Apache Cassandra, so Amazon
Keyspaces uses that same set of error codes to maintain compatibility.
To map Cassandra errors to the underlying capacity events, you can use Amazon CloudWatch to
monitor the relevant Amazon Keyspaces metrics. Insufficient-capacity events that result in client-
side errors can be categorized into these three groups based on the resource that is causing the
event:
• Table – If you choose Provisioned capacity mode for a table, and your application exceeds your
provisioned throughput, you might observe insufficient-capacity errors. For more information,
see the section called “Configure read/write capacity modes”.
• Partition – You might experience insufficient-capacity events if traffic against a given partition
exceeds 3,000 RCUs or 1,000 WCUs. We recommend distributing traffic uniformly across
partitions as a best practice. For more information, see the section called “Data modeling”.
• Connection – You might experience insufficient throughput if you exceed the quota for the
maximum number of operations per second, per connection. To increase throughput, you can
increase the number of default connections when configuring the connection with the driver.
To learn how to configure connections for Amazon Keyspaces, see the section called “How to
configure connections”. For more information about optimizing connections over VPC endpoints,
see the section called “VPC endpoint connections”.
To determine which resource is causing the insufficient-capacity event that is returning the client-
side error, you can check the dashboard in the Amazon Keyspaces console. By default, the console
Capacity management errors 576

Amazon Keyspaces (for Apache Cassandra) Developer Guide
provides an aggregated view of the most common capacity and traffic related CloudWatch metrics
in the Capacity and related metrics section on the Capacity tab for the table.
To create your own dashboard using Amazon CloudWatch, check the following Amazon Keyspaces
metrics.
•
PerConnectionRequestRateExceeded – Requests to Amazon Keyspaces that exceed the
quota for the per-connection request rate. Each client connection to Amazon Keyspaces can
support up to 3000 CQL requests per second. You can perform more than 3000 requests per
second by creating multiple connections.
•
ReadThrottleEvents – Requests to Amazon Keyspaces that exceed the read capacity for a
table.
•
StoragePartitionThroughputCapacityExceeded – Requests to an Amazon Keyspaces
storage partition that exceed the throughput capacity of the partition. Amazon Keyspaces
storage partitions can support up to 1000 WCU/WRU per second and 3000 RCU/RRU per second.
To mitigate these exceptions, we recommend that you review your data model to distribute
read/write traffic across more partitions.
•
WriteThrottleEvents – Requests to Amazon Keyspaces that exceed the write capacity for a
table.
To learn more about CloudWatch, see the section called “Monitoring with CloudWatch”. For a list
of all available CloudWatch metrics for Amazon Keyspaces, see the section called “Metrics and
dimensions”.
Note
To get started with a custom dashboard that shows all commonly observed metrics for
Amazon Keyspaces, you can use a prebuilt CloudWatch template available on GitHub in the
AWS samples repository.
Topics
• I'm receiving NoHostAvailable insufficient capacity errors from my client driver
• I'm receiving write timeout errors during data import
• I can't see the actual storage size of a keyspace or table
Serverless capacity errors 577

Amazon Keyspaces (for Apache Cassandra) Developer Guide
I'm receiving NoHostAvailable insufficient capacity errors from my client driver
You're seeing Read_Timeout or Write_Timeout exceptions for a table.
Repeatedly trying to write to or read from an Amazon Keyspaces table with insufficient capacity
can result in client-side errors that are specific to the driver.
Use CloudWatch to monitor your provisioned and actual throughput metrics, and insufficient
capacity events for the table. For example, a read request that doesn’t have enough throughput
capacity fails with a Read_Timeout exception and is posted to the ReadThrottleEvents metric.
A write request that doesn’t have enough throughput capacity fails with a Write_Timeout
exception and is posted to the WriteThrottleEvents metric. For more information about these
metrics, see the section called “Metrics and dimensions”.
To resolve these issues, consider one of the following options.
• Increase the provisioned throughput for the table, which is the maximum amount of throughput
capacity an application can consume. For more information, see the section called “Read capacity
units and write capacity units”.
• Let the service manage throughput capacity on your behalf with automatic scaling. For more
information, see the section called “Manage throughput capacity with auto scaling”.
• Chose On-demand capacity mode for the table. For more information, see the section called
“Configure on-demand capacity mode”.
If you need to increase the default capacity quota for your account, see Quotas.
You're seeing errors related to exceeded partition capacity.
When you're seeing the error StoragePartitionThroughputCapacityExceeded the partition
capacity is temporarily exceeded. This might be automatically handled by adaptive capacity or on-
demand capacity. We recommend reviewing your data model to distribute read/write traffic across
more partitions to mitigate these errors. Amazon Keyspaces storage partitions can support up to
1000 WCU/WRU per second and 3000 RCU/RRU per second. To learn more about how to improve
your data model to distribute read/write traffic across more partitions, see the section called “Data
modeling”.
Write_Timeout exceptions can also be caused by an elevated rate of concurrent write operations
that include static and nonstatic data in the same logical partition. If traffic is expected to run
multiple concurrent write operations that include static and nonstatic data within the same logical
Serverless capacity errors 578

Amazon Keyspaces (for Apache Cassandra) Developer Guide
partition, we recommend writing static and nonstatic data separately. Writing the data separately
also helps to optimize the throughput costs.
You're seeing errors related to exceeded connection request rate.
You're seeing PerConnectionRequestRateExceeded due to one of the following causes.
• You might not have enough connections configured per session.
• You might be getting fewer connections than available peers, because you don't have the VPC
endpoint permissions configured correctly. For more information about VPC endpoint policies,
see the section called “Using interface VPC endpoints for Amazon Keyspaces”.
• If you're using a 4.x driver, check to see if you have hostname validation enabled. The driver
enables TLS hostname verification by default. This configuration leads to Amazon Keyspaces
appearing as a single-node cluster to the driver. We recommend that you turn hostname
verification off.
We recommend that you follow these best practices to ensure that your connections and
throughput are optimized:
• Configure CQL query throughput tuning.
Amazon Keyspaces supports up to 3,000 CQL queries per TCP connection per second, but there is
no limit on the number of connections a driver can establish.
Most open-source Cassandra drivers establish a connection pool to Cassandra and load balance
queries over that pool of connections. Amazon Keyspaces exposes 9 peer IP addresses to drivers.
The default behavior of most drivers is to establish a single connection to each peer IP address.
Therefore, the maximum CQL query throughput of a driver using the default settings will be
27,000 CQL queries per second.
To increase this number, we recommend that you increase the number of connections per IP
address that your driver is maintaining in its connection pool. For example, setting the maximum
connections per IP address to 2 will double the maximum throughput of your driver to 54,000
CQL queries per second.
• Optimize your single-node connections.
By default, most open-source Cassandra drivers establish one or more connections to every IP
address advertised in the system.peers table when establishing a session. However, certain
Serverless capacity errors 579

Amazon Keyspaces (for Apache Cassandra) Developer Guide
configurations can lead to a driver connecting to a single Amazon Keyspaces IP address. This
can happen if the driver is attempting SSL hostname validation of the peer nodes (for example,
DataStax Java drivers), or when it's connecting through a VPC endpoint.
To get the same availability and performance as a driver with connections to multiple IP
addresses, we recommend that you do the following:
• Increase the number of connections per IP to 9 or higher depending on the desired client
throughput.
• Create a custom retry policy that ensures that retries are run against the same node.
• If you use VPC endpoints, grant the IAM entity that is used to connect to Amazon Keyspaces
access permissions to query your VPC for the endpoint and network interface information. This
improves load balancing and increases read/write throughput. For more information, see ???.
I'm receiving write timeout errors during data import
You're receiving a timeout error when uploading data using the cqlsh COPY command.
Failed to import 1 rows: WriteTimeout - Error from server: code=1100 [Coordinator node
timed out waiting for replica nodes' responses]
message="Operation timed out - received only 0 responses." info={'received_responses':
0, 'required_responses': 2, 'write_type': 'SIMPLE', 'consistency':
'LOCAL_QUORUM'}, will retry later, attempt 1 of 100
Amazon Keyspaces uses the ReadTimeout and WriteTimeout exceptions to indicate when a
write request fails due to insufficient throughput capacity. To help diagnose insufficient capacity
exceptions, Amazon Keyspaces publishes the following metrics in Amazon CloudWatch.
•
WriteThrottleEvents
•
ReadThrottledEvents
•
StoragePartitionThroughputCapacityExceeded
To resolve insufficient-capacity errors during a data load, lower the write rate per worker or the
total ingest rate, and then retry to upload the rows. For more information, see the section called
“Step 4: Configure cqlsh COPY FROM settings”. For a more robust data upload option, consider
using DSBulk, which is available from the GitHub repository. For step-by-step instructions, see the
section called “Loading data using DSBulk”.
Serverless capacity errors 580

Amazon Keyspaces (for Apache Cassandra) Developer Guide
I can't see the actual storage size of a keyspace or table
You can't see the actual storage size of the keyspace or table.
To learn more about the storage size of your table, see the section called “Evaluate your costs at
the table level”. You can also estimate storage size by starting to calculate the row size in a table.
Detailed instructions for calculating the row size are available at the section called “Estimate row
size”.
Troubleshooting data definition language errors in Amazon
Keyspaces
Having trouble creating resources? Here are some common issues and how to resolve them.
Data definition language errors
Amazon Keyspaces performs data definition language (DDL) operations asynchronously—for
example, creating and deleting keyspaces and tables. If an application is trying to use the resource
before it's ready, the operation fails.
You can monitor the creation status of new keyspaces and tables in the AWS Management Console,
which indicates when a keyspace or table is pending or active. You can also monitor the creation
status of a new keyspace or table programmatically by querying the system schema table. A
keyspace or table becomes visible in the system schema when it's ready for use.
Note
To optimize the creation of keyspaces using AWS CloudFormation, you can use this utility
to convert CQL scripts into CloudFormation templates. The tool is available from the
GitHub repository.
Topics
• I created a new keyspace, but I can't view or access it
• I created a new table, but I can't view or access it
• I'm trying to restore a table using Amazon Keyspaces point-in-time recovery (PITR), but the
restore fails
Data definition language errors 581

Amazon Keyspaces (for Apache Cassandra) Developer Guide
• I'm trying to use INSERT/UPDATE to edit custom Time to Live (TTL) settings, but the operation
fails
• I'm trying to upload data to my Amazon Keyspaces table and I get an error about exceeding the
number of columns
• I'm trying to delete data in my Amazon Keyspaces table and the deletion fails for the range
I created a new keyspace, but I can't view or access it
You're receiving errors from your application that is trying to access a new keyspace.
If you try to access a newly created Amazon Keyspaces keyspace that is still being created
asynchronously, you will get an error. The following error is an example.
InvalidRequest: Error from server: code=2200 [Invalid query] message="unconfigured
keyspace mykeyspace"
The recommended design pattern to check when a new keyspace is ready for use is to poll the
Amazon Keyspaces system schema tables (system_schema_mcs.*).
For more information, see the section called “Check keyspace creation status”.
I created a new table, but I can't view or access it
You're receiving errors from your application that is trying to access a new table.
If you try to access a newly created Amazon Keyspaces table that is still being created
asynchronously, you will get an error. For example, trying to query a table that isn't available yet
fails with an unconfigured table error.
InvalidRequest: Error from server: code=2200 [Invalid query] message="unconfigured
table mykeyspace.mytable"
Trying to view the table with sync_table() fails with a KeyError.
KeyError: 'mytable'
The recommended design pattern to check when a new table is ready for use is to poll the Amazon
Keyspaces system schema tables (system_schema_mcs.*).
This is the example output for a table that is being created.
Data definition language errors 582

Amazon Keyspaces (for Apache Cassandra) Developer Guide
user-at-123@cqlsh:system_schema_mcs> select table_name,status from
system_schema_mcs.tables where keyspace_name='example_keyspace' and
table_name='example_table';
table_name | status
------------+----------
example_table | CREATING
(1 rows)
This is the example output for a table that is active.
user-at-123@cqlsh:system_schema_mcs> select table_name,status from
system_schema_mcs.tables where keyspace_name='example_keyspace' and
table_name='example_table';
table_name | status
------------+----------
example_table | ACTIVE
(1 rows)
For more information, see the section called “Check table creation status”.
I'm trying to restore a table using Amazon Keyspaces point-in-time recovery
(PITR), but the restore fails
If you're trying to restore an Amazon Keyspaces table with point-in-time recovery (PITR), and you
see the restore process begin but not complete successfully, you might not have configured all of
the required permissions that are needed by the restore process for this particular table.
In addition to user permissions, Amazon Keyspaces might require permissions to perform actions
during the restore process on your principal's behalf. This is the case if the table is encrypted with a
customer managed key, or if you're using IAM policies that restrict incoming traffic.
For example, if you're using condition keys in your IAM policy to restrict source traffic to specific
endpoints or IP ranges, the restore operation fails. To allow Amazon Keyspaces to perform the
Data definition language errors 583

Amazon Keyspaces (for Apache Cassandra) Developer Guide
table restore operation on your principal's behalf, you must add an aws:ViaAWSService global
condition key in the IAM policy.
For more information about permissions to restore tables, see the section called “Configure IAM
permissions for restore”.
I'm trying to use INSERT/UPDATE to edit custom Time to Live (TTL) settings, but
the operation fails
If you're trying to insert or update a custom TTL value, the operation might fail with the following
error.
TTL is not yet supported.
To specify custom TTL values for rows or columns by using INSERT or UPDATE operations, you
must first enable TTL for the table. You can enable TTL for a table using the ttl custom property.
For more information about enabling custom TTL settings for tables, see the section called
“Update table custom TTL”.
I'm trying to upload data to my Amazon Keyspaces table and I get an error about
exceeding the number of columns
You're uploading data and have exceeded the number of columns that can be updated
simultaneously.
This error occurs when your table schema exceeds the maximum size of 350 KB. For more
information, see Quotas.
I'm trying to delete data in my Amazon Keyspaces table and the deletion fails for
the range
You're trying to delete data by partition key and receive a range delete error.
This error occurs when you're trying to delete more than 1,000 rows in one delete operation.
Range delete requests are limited by the amount of items that can be deleted in a
single range.
For more information, see the section called “Range delete”.
Data definition language errors 584

Amazon Keyspaces (for Apache Cassandra) Developer Guide
To delete more than 1,000 rows within a single partition, consider the following options.
• Delete by partition – If the majority of partitions are under 1,000 rows, you can attempt to
delete data by partition. If the partitions contain more than 1,000 rows, attempt to delete by the
clustering column instead.
• Delete by clustering column – If your model contains multiple clustering columns, you can use
the column hierarchy to delete multiple rows. Clustering columns are a nested structure, and you
can delete many rows by operating against the top-level column.
• Delete by individual row – You can iterate through the rows and delete each row by its full
primary key (partition columns and clustering columns).
• As a best practice, consider splitting your rows across partitions – In Amazon Keyspaces, we
recommend that you distribute your throughput across table partitions. This distributes data
and access evenly across physical resources, which provides the best throughput. For more
information, see the section called “Data modeling”.
Consider also the following recommendations when you're planning delete operations for heavy
workloads.
• With Amazon Keyspaces, partitions can contain a virtually unbounded number of rows. This
allows you to scale partitions “wider” than the traditional Cassandra guidance of 100 MB. It’s not
uncommon for time series or ledgers to grow over a gigabyte of data over time.
• With Amazon Keyspaces, there are no compaction strategies or tombstones to consider when
you have to perform delete operations for heavy workloads. You can delete as much data as you
want without impacting read performance.
Data definition language errors 585

Amazon Keyspaces (for Apache Cassandra) Developer Guide
Monitoring Amazon Keyspaces (for Apache Cassandra)
Monitoring is an important part of maintaining the reliability, availability, and performance of
Amazon Keyspaces and your other AWS solutions. AWS provides the following monitoring tools
to watch Amazon Keyspaces, report when something is wrong, and take automatic actions when
appropriate:
• Amazon Keyspaces offers a preconfigured dashboard in the AWS Management Console showing
the latency and errors aggregated across all tables in the account.
• Amazon CloudWatch monitors your AWS resources and the applications you run on AWS in
real time. You can collect and track metrics with customized dashboards. For example, you can
create a baseline for normal Amazon Keyspaces performance in your environment by measuring
performance at various times and under different load conditions. As you monitor Amazon
Keyspaces, store historical monitoring data so that you can compare it with current performance
data, identify normal performance patterns and performance anomalies, and devise methods to
address issues. To establish a baseline, you should, at a minimum, monitor for system errors. For
more information, see the Amazon CloudWatch User Guide.
• Amazon CloudWatch alarms monitor a single metric over a time period that you specify, and
perform one or more actions based on the value of the metric relative to a given threshold over
a number of time periods. For example if you use Amazon Keyspaces in provisioned mode with
application auto scaling, the action is a notification sent by the Amazon Simple Notification
Service (Amazon SNS) to evaluate an Application Auto Scaling policy.
CloudWatch alarms do not invoke actions simply because they are in a particular state. The
state must have changed and been maintained for a specified number of periods. For more
information, see Monitoring Amazon Keyspaces with Amazon CloudWatch.
• Amazon CloudWatch Logs enables you to monitor, store, and access your log files from Amazon
Keyspaces tables, CloudTrail, and other sources. CloudWatch Logs can monitor information in the
log files and notify you when certain thresholds are met. You can also archive your log data in
highly durable storage. For more information, see the Amazon CloudWatch Logs User Guide.
• AWS CloudTrail captures API calls and related events made by or on behalf of your AWS account
and delivers the log files to an Amazon S3 bucket that you specify. You can identify which users
and accounts called AWS, the source IP address from which the calls were made, and when the
calls occurred. For more information, see the AWS CloudTrail User Guide.
586

Amazon Keyspaces (for Apache Cassandra) Developer Guide
Amazon EventBridge is a serverless event bus service that makes it easy to connect your
applications with data from a variety of sources. EventBridge delivers a stream of real-time data
from your own applications, Software-as-a-Service (SaaS) applications, and AWS services and
routes that data to targets such as Lambda. This enables you to monitor events that happen in
services, and build event-driven architectures. For more information, see the Amazon EventBridge
User Guide.
Topics
• Monitoring Amazon Keyspaces with Amazon CloudWatch
• Logging Amazon Keyspaces API calls with AWS CloudTrail
Monitoring Amazon Keyspaces with Amazon CloudWatch
You can monitor Amazon Keyspaces using Amazon CloudWatch, which collects raw data and
processes it into readable, near real-time metrics. These statistics are kept for 15 months, so that
you can access historical information and gain a better perspective on how your web application or
service is performing.
You can also set alarms that watch for certain thresholds, and send notifications or take actions
when those thresholds are met. For more information, see the Amazon CloudWatch User Guide.
Note
To get started quickly with a preconfigured CloudWatch dashboard showing common
metrics for Amazon Keyspaces, you can use an AWS CloudFormation template available
from https://github.com/aws-samples/amazon-keyspaces-cloudwatch-cloudformation-
templates.
Topics
• How do I use Amazon Keyspaces metrics?
• Amazon Keyspaces metrics and dimensions
• Creating CloudWatch alarms to monitor Amazon Keyspaces
Monitoring with CloudWatch 587

Amazon Keyspaces (for Apache Cassandra) Developer Guide
How do I use Amazon Keyspaces metrics?
The metrics reported by Amazon Keyspaces provide information that you can analyze in different
ways. The following list shows some common uses for the metrics. These are suggestions to get
you started, not a comprehensive list. For more information about metrics and retention, see
Metrics.
How can I? Relevant metrics
How can I determine if any
system errors occurred?
You can monitor SystemErrors to determine whether any
requests resulted in a server error code. Typically, this metric
should be equal to zero. If it isn't, you might want to investiga
te.
How can I compare average
provisioned read to consumed
read capacity?
To monitor average provisioned read capacity and consumed
read capacity
1.
Set the Period for ConsumedReadCapacityUnits and
ProvisionedReadCapacityUnits to the interval
you want to monitor.
2.
Change the Statistic for ConsumedReadCapaci
tyUnits from Average to Sum.
3. Create a new empty Math expression.
4. In the Details section of the new math expression, enter
the Id of ConsumedReadCapacityUnits and divide
the metric by the CloudWatch PERIOD function of the
metric (metric_id/(PERIOD(metric_id)).
5.
Unselect ConsumedReadCapacityUnits .
You can now compare your average consumed read capacity
to your provisioned capacity. For more information on basic
arithmetic functions and how to create a time series see Using
metric math.
Using metrics 588

Amazon Keyspaces (for Apache Cassandra) Developer Guide
How can I? Relevant metrics
How can I compare average
provisioned write to
consumed write capacity?
To monitor average provisioned write capacity and consumed
write capacity
1.
Set the Period for ConsumedWriteCapacityUnits
and ProvisionedWriteCapacityUnits to the
interval you want to monitor.
2.
Change the Statistic for ConsumedWriteCapac
ityUnits from Average to Sum.
3. Create a new empty Math expression.
4. In the Details section of the new math expression, enter
the Id of ConsumedWriteCapacityUnits and divide
the metric by the CloudWatch PERIOD function of the
metric (metric_id/(PERIOD(metric_id)).
5.
Unselect ConsumedWriteCapacityUnits .
You can now compare your average consumed write capacity
to your provisioned capacity. For more information on basic
arithmetic functions and how to create a time series see Using
metric math.
Amazon Keyspaces metrics and dimensions
When you interact with Amazon Keyspaces, it sends the following metrics and dimensions to
Amazon CloudWatch. All metrics are aggregated and reported every minute. You can use the
following procedures to view the metrics for Amazon Keyspaces.
To view metrics using the CloudWatch console
Metrics are grouped first by the service namespace, and then by the various dimension
combinations within each namespace.
1. Open the CloudWatch console at https://console.aws.amazon.com/cloudwatch/.
2. If necessary, change the Region. On the navigation bar, choose the Region where your AWS
resources reside. For more information, see AWS service endpoints.
Metrics and dimensions 589

Amazon Keyspaces (for Apache Cassandra) Developer Guide
3. In the navigation pane, choose Metrics.
4.
Under the All metrics tab, choose AWS/Cassandra.
To view metrics using the AWS CLI
• At a command prompt, use the following command.
aws cloudwatch list-metrics --namespace "AWS/Cassandra"
Amazon Keyspaces metrics and dimensions
The metrics and dimensions that Amazon Keyspaces sends to Amazon CloudWatch are listed here.
Amazon Keyspaces metrics
Amazon CloudWatch aggregates Amazon Keyspaces metrics at one-minute intervals.
Not all statistics, such as Average or Sum, are applicable for every metric. However, all of these
values are available through the Amazon Keyspaces console, or by using the CloudWatch console,
AWS CLI, or AWS SDKs for all metrics. In the following table, each metric has a list of valid statistics
that are applicable to that metric.
Metric Description
AccountMaxTableLevelReads
The maximum number of read capacity units that can be
used by a table of an account. For on-demand tables this
limit caps the maximum read request units a table can
use.
Units: Count
Valid Statistics:
•
Maximum – The maximum number of read capacity
units that can be used by a table of the account.
AccountMaxTableLev
elWrites
The maximum number of write capacity units that can
be used by a table of an account. For on-demand tables
Metrics and dimensions 590

Amazon Keyspaces (for Apache Cassandra) Developer Guide
Metric Description
this limit caps the maximum write request units a table
can use.
Units: Count
Valid Statistics:
•
Maximum – The maximum number of write capacity
units that can be used by a table of the account.
AccountProvisioned
ReadCapacityUtilization
The percentage of provisioned read capacity units
utilized by an account.
Units: Percent
Valid Statistics:
•
Maximum – The maximum percentage of provisioned
read capacity units utilized by the account.
•
Minimum – The minimum percentage of provisioned
read capacity units utilized by the account.
•
Average – The average percentage of provisioned
read capacity units utilized by the account. The metric
is published for five-minute intervals. Therefore, if you
rapidly adjust the provisioned read capacity units, this
statistic might not reflect the true average.
Metrics and dimensions 591

Amazon Keyspaces (for Apache Cassandra) Developer Guide
Metric Description
AccountProvisioned
WriteCapacityUtilization
The percentage of provisioned write capacity units
utilized by an account.
Units: Percent
Valid Statistics:
•
Maximum – The maximum percentage of provisioned
write capacity units utilized by the account.
•
Minimum – The minimum percentage of provisioned
write capacity units utilized by the account.
•
Average – The average percentage of provisioned
write capacity units utilized by the account. The metric
is published for five-minute intervals. Therefore, if you
rapidly adjust the provisioned write capacity units, this
statistic might not reflect the true average.
BillableTableSizeInBytes
The billable size of the table in bytes. It is the sum of the
encoded size of all rows in the table. This metric helps
you track your table storage costs over time.
Units: Bytes
Dimensions: Keyspace, TableName
Valid Statistics:
•
Maximum – The maximum storage size of the table.
•
Minimum – The minimum storage size of the table.
•
Average – The average storage size of the table. This
metric is calculated over 4 - 6 hour intervals.
Metrics and dimensions 592

Amazon Keyspaces (for Apache Cassandra) Developer Guide
Metric Description
ConditionalCheckFa
iledRequests
The number of failed lightweight transaction (LWT)
write requests. The INSERT, UPDATE, and DELETE
operations let you provide a logical condition that must
evaluate to true before the operation can proceed. If this
condition evaluates to false, ConditionalCheckFa
iledRequests is incremented by one. Condition
checks that evaluate to false consume write capacity
units based on the size of the row. For more information,
see the section called “Estimate capacity consumption
of LWT”.
Units: Count
Dimensions: Keyspace, TableName
Valid Statistics:
•
Minimum
•
Maximum
•
Average
•
SampleCount
•
Sum
Metrics and dimensions 593

Amazon Keyspaces (for Apache Cassandra) Developer Guide
Metric Description
ConsumedReadCapacityUnits
The number of read capacity units consumed over the
specified time period. For more information, see Read/
Write capacity mode.
Note
To understand your average throughput utilizati
on per second, use the Sum statistic to calculate
the consumed throughput for the one minute
period. Then divide the sum by the number of
seconds in a minute (60) to calculate the average
ConsumedReadCapacityUnits per second
(recognizing that this average does not highlight
any large but brief spikes in read activity that
occurred during that minute). For more informati
on on comparing average consumed read
capacity to provisioned read capacity, see the
section called “Using metrics”
Units: Count
Dimensions: Keyspace, TableName
Valid Statistics:
•
Minimum – The minimum number of read capacity
units consumed by any individual request to the table.
•
Maximum – The maximum number of read capacity
units consumed by any individual request to the table.
•
Average – The average per-request read capacity
consumed.
Metrics and dimensions 594

Amazon Keyspaces (for Apache Cassandra) Developer Guide
Metric Description
Note
The Average value is influenced by periods of
inactivity where the sample value will be zero.
•
Sum – The total read capacity units consumed.
This is the most useful statistic for the ConsumedR
eadCapacityUnits metric.
•
SampleCount – The number of requests to Amazon
Keyspaces, even if no read capacity was consumed.
Note
The SampleCount value is influenced by
periods of inactivity where the sample value
will be zero.
Metrics and dimensions 595

Amazon Keyspaces (for Apache Cassandra) Developer Guide
Metric Description
ConsumedWriteCapac
ityUnits
The number of write capacity units consumed over
the specified time period. You can retrieve the total
consumed write capacity for a table. For more informati
on, see Read/Write capacity mode.
Note
To understand your average throughput utilizati
on per second, use the Sum statistic to calculate
the consumed throughput for the one minute
period. Then divide the sum by the number of
seconds in a minute (60) to calculate the average
ConsumedWriteCapacityUnits per second
(recognizing that this average does not highlight
any large but brief spikes in write activity that
occurred during that minute). For more informati
on on comparing average consumed write
capacity to provisioned write capacity, see the
section called “Using metrics”
Units: Count
Dimensions: Keyspace, TableName
Valid Statistics:
•
Minimum – The minimum number of write capacity
units consumed by any individual request to the table.
•
Maximum – The maximum number of write capacity
units consumed by any individual request to the table.
•
Average – The average per-request write capacity
consumed.
Metrics and dimensions 596

Amazon Keyspaces (for Apache Cassandra) Developer Guide
Metric Description
Note
The Average value is influenced by periods of
inactivity where the sample value will be zero.
•
Sum – The total write capacity units consumed.
This is the most useful statistic for the ConsumedW
riteCapacityUnits metric.
•
SampleCount – The number of requests to Amazon
Keyspaces, even if no write capacity was consumed.
Note
The SampleCount value is influenced by
periods of inactivity where the sample value
will be zero.
Metrics and dimensions 597

Amazon Keyspaces (for Apache Cassandra) Developer Guide
Metric Description
MaxProvisionedTabl
eReadCapacityUtilization
The percentage of provisioned read capacity units
utilized by the highest provisioned read table of an
account.
Units: Percent
Valid Statistics:
•
Maximum – : The maximum percentage of provisioned
read capacity units utilized by the highest provisioned
read table of the account.
•
Minimum – The minimum percentage of provisioned
read capacity units utilized by the highest provisioned
read table of the account.
•
Average – The average percentage of provisioned
read capacity units utilized by the highest provisioned
read table of the account. The metric is published for
five-minute intervals. Therefore, if you rapidly adjust
the provisioned read capacity units, this statistic might
not reflect the true average.
Metrics and dimensions 598

Amazon Keyspaces (for Apache Cassandra) Developer Guide
Metric Description
MaxProvisionedTabl
eWriteCapacityUtil
ization
The percentage of provisioned write capacity utilized by
the highest provisioned write table of an account.
Units: Percent
Valid Statistics:
•
Maximum – The maximum percentage of provisioned
write capacity units utilized by the highest provisioned
write table of the account.
•
Minimum – The minimum percentage of provisioned
write capacity units utilized by the highest provisioned
write table of the account.
•
Average – The average percentage of provisioned
write capacity units utilized by the highest provisioned
write table of the account. The metric is published for
five-minute intervals. Therefore, if you rapidly adjust
the provisioned write capacity units, this statistic
might not reflect the true average.
Metrics and dimensions 599

Amazon Keyspaces (for Apache Cassandra) Developer Guide
Metric Description
PerConnectionReque
stRateExceeded
Requests to Amazon Keyspaces that exceed the per-
connection request rate quota. Each client connection to
Amazon Keyspaces can support up to 3000 CQL requests
per second. Clients can create multiple connections to
increase throughput.
When you're using Multi-Region Replication, each
replicated write also contributes to this quota. As a
best practice, we recommend to increase the number
of connections to your tables to avoid PerConnec
tionRequestRateExceeded errors. There is no
limit to the number of connections you can have in
Amazon Keyspaces.
Units: Count
Dimensions: Keyspace, TableName, Operation
Valid Statistics:
•
SampleCount
•
Sum
Metrics and dimensions 600

Amazon Keyspaces (for Apache Cassandra) Developer Guide
Metric Description
ProvisionedReadCap
acityUnits
The number of provisioned read capacity units for a
table.
The TableName dimension returns the Provision
edReadCapacityUnits for the table.
Units: Count
Dimensions: Keyspace, TableName
Valid Statistics:
•
Minimum – The lowest setting for provisioned read
capacity. If you use ALTER TABLE to increase read
capacity, this metric shows the lowest value of
provisioned ReadCapacityUnits during this time
period.
•
Maximum – The highest setting for provisioned read
capacity. If you use ALTER TABLE to decrease read
capacity, this metric shows the highest value of
provisioned ReadCapacityUnits during this time
period.
•
Average – The average provisioned read capacity.
The ProvisionedReadCapacityUnits metric
is published at five-minute intervals. Therefore, if you
rapidly adjust the provisioned read capacity units, this
statistic might not reflect the true average.
Metrics and dimensions 601

Amazon Keyspaces (for Apache Cassandra) Developer Guide
Metric Description
ProvisionedWriteCa
pacityUnits
The number of provisioned write capacity units for a
table.
The TableName dimension returns the Provision
edWriteCapacityUnits for the table.
Units: Count
Dimensions: Keyspace, TableName
Valid Statistics:
•
Minimum – The lowest setting for provisioned write
capacity. If you use ALTER TABLE to increase write
capacity, this metric shows the lowest value of
provisioned WriteCapacityUnits during this
time period.
•
Maximum – The highest setting for provisioned write
capacity. If you use ALTER TABLE to decrease write
capacity, this metric shows the highest value of
provisioned WriteCapacityUnits during this
time period.
•
Average – The average provisioned write capacity.
The ProvisionedWriteCapacityUnits metric
is published at five-minute intervals. Therefore, if you
rapidly adjust the provisioned write capacity units, this
statistic might not reflect the true average.
Metrics and dimensions 602

Amazon Keyspaces (for Apache Cassandra) Developer Guide
Metric Description
ReadThrottleEvents
Requests to Amazon Keyspaces that exceed the
provisioned read capacity for a table, or account level
quotas, request per connection quotas, or partition level
quotas.
Units: Count
Dimensions: Keyspace, TableName, Operation
Valid Statistics:
•
SampleCount
•
Sum
ReplicationLatency
This metric only applies to multi-Region keyspaces
and measures the time it took to replicate updates,
inserts, or deletes from one replica table to another
replica table in a multi-Region keyspace.
Units: Millisecond
Dimensions: TableName, ReceivingRegion
Valid Statistics:
•
Average
•
Maximum
•
Minimum
Metrics and dimensions 603

Amazon Keyspaces (for Apache Cassandra) Developer Guide
Metric Description
ReturnedItemCountBySelect The number of rows returned by multi-row SELECT
queries during the specified time period. Multi-row
SELECT queries are queries which do not contain the
fully qualified primary key, such as full table scans and
range queries.
The number of rows returned is not necessarily the
same as the number of rows that were evaluated. For
example, suppose that you requested a SELECT * with
ALLOW FILTERING on a table that had 100 rows,
but specified a WHERE clause that narrowed the results
so that only 15 rows were returned. In this case, the
response from SELECT would contain a ScanCount of
100 and a Count of 15 returned rows.
Units: Count
Dimensions: Keyspace, TableName, Operation
Valid Statistics:
•
Minimum
•
Maximum
•
Average
•
SampleCount
•
Sum
Metrics and dimensions 604

Amazon Keyspaces (for Apache Cassandra) Developer Guide
Metric Description
StoragePartitionTh
roughputCapacityExceeded
Requests to an Amazon Keyspaces storage partition
that exceed the throughput capacity of the partition.
Amazon Keyspaces storage partitions can support up
to 1000 WCU/WRU per second and 3000 RCU/RRU per
second. We recommend reviewing your data model to
distribute read/write traffic across more partitions to
mitigate these exceptions.
Note
Logical Amazon Keyspaces partitions can span
multiple storage partitions and are virtually
unbounded in size.
Units: Count
Dimensions: Keyspace, TableName, Operation
Valid Statistics:
•
SampleCount
•
Sum
SuccessfulRequestCount
The number of successful requests processed over the
specified time period.
Units: Count
Dimensions: Keyspace, TableName, Operation
Valid Statistics:
•
SampleCount
Metrics and dimensions 605

Amazon Keyspaces (for Apache Cassandra) Developer Guide
Metric Description
SuccessfulRequestLatency
The successful requests to Amazon Keyspaces during the
specified time period. SuccessfulRequestLatency
can provide two different kinds of information:
•
The elapsed time for successful requests (Minimum,
Maximum, Sum, or Average).
•
The number of successful requests (SampleCount ).
SuccessfulRequestLatency reflects activity
only within Amazon Keyspaces and does not take into
account network latency or client-side activity.
Units: Milliseconds
Dimensions: Keyspace, TableName, Operation
Valid Statistics:
•
Minimum
•
Maximum
•
Average
•
SampleCount
SystemErrors
The requests to Amazon Keyspaces that generate a
ServerError during the specified time period. A
ServerError usually indicates an internal service
error.
Units: Count
Dimensions: Keyspace, TableName, Operation
Valid Statistics:
•
Sum
•
SampleCount
Metrics and dimensions 606

Amazon Keyspaces (for Apache Cassandra) Developer Guide
Metric Description
SystemReconciliati
onDeletes
The units consumed to delete tombstoned data when
client-side timestamps are enabled. Each SystemRec
onciliationDelete provides enough capacity
to delete or update up to 1KB of data per row. For
example, to update a row that stores 2.5 KB of data
and to delete one or more columns within the row at
the same time requires 3 SystemReconciliati
onDeletes . Or, to delete an entire row that contains
3.5 KB of data requires 4 SystemReconciliati
onDeletes .
Units: Count
Dimensions: Keyspace, TableName
Valid Statistics:
•
Sum – The total number of SystemReconciliati
onDeletes consumed in a time period.
TTLDeletes
The units consumed to delete or update data in a row
by using Time to Live (TTL). Each TTLDelete provides
enough capacity to delete or update up to 1KB of data
per row. For example, to update a row that stores 2.5
KB of data and to delete one or more columns within
the row at the same time requires 3 TTL deletes. Or,
to delete an entire row that contains 3.5 KB of data
requires 4 TTL deletes.
Units: Count
Dimensions: Keyspace, TableName
Valid Statistics:
•
Sum – The total number of TTLDeletes consumed
in a time period.
Metrics and dimensions 607

Amazon Keyspaces (for Apache Cassandra) Developer Guide
Metric Description
UserErrors
Requests to Amazon Keyspaces that generate an
InvalidRequest error during the specified time
period. An InvalidRequest usually indicates a client-
side error, such as an invalid combination of parameter
s, an attempt to update a nonexistent table, or an
incorrect request signature.
UserErrors represents the aggregate of invalid
requests for the current AWS Region and the current
AWS account.
Units: Count
Dimensions: Keyspace, TableName, Operation
Valid Statistics:
•
Sum
•
SampleCount
WriteThrottleEvents
Requests to Amazon Keyspaces that exceed the
provisioned write capacity for a table, or account level
quotas, request per connection quotas, or partition level
quotas.
Units: Count
Dimensions: Keyspace, TableName, Operation
Valid Statistics:
•
SampleCount
•
Sum
Metrics and dimensions 608

Amazon Keyspaces (for Apache Cassandra) Developer Guide
Dimensions for Amazon Keyspaces metrics
The metrics for Amazon Keyspaces are qualified by the values for the account, table name, or
operation. You can use the CloudWatch console to retrieve Amazon Keyspaces data along any of
the dimensions in the following table.
Dimension Description
Keyspace
This dimension limits the data to a specific keyspace. This value
can be any keyspace in the current Region and the current AWS
account.
Operation
This dimension limits the data to one of the Amazon Keyspaces
CQL operations, such as INSERT or SELECT operations.
TableName
This dimension limits the data to a specific table. This value
can be any table name in the current Region and the current
AWS account. If the table name is not unique within the
account, you must also specify Keyspace.
Creating CloudWatch alarms to monitor Amazon Keyspaces
You can create an Amazon CloudWatch alarm for Amazon Keyspaces that sends an Amazon Simple
Notification Service (Amazon SNS) message when the alarm changes state. An alarm watches a
single metric over a time period that you specify. It performs one or more actions based on the
value of the metric relative to a given threshold over a number of time periods. The action is a
notification sent to an Amazon SNS topic or an Application Auto Scaling policy.
When you use Amazon Keyspaces in provisioned mode with Application Auto Scaling, the service
creates two pairs of CloudWatch alarms on your behalf. Each pair represents your upper and lower
boundaries for provisioned and consumed throughput settings. These CloudWatch alarms are
triggered when the table's actual utilization deviates from your target utilization for a sustained
period of time. To learn more about CloudWatch alarms created by Application Auto Scaling, see
the section called “How Amazon Keyspaces automatic scaling works”.
Alarms invoke actions for sustained state changes only. CloudWatch alarms do not invoke actions
simply because they are in a particular state. The state must have changed and been maintained
for a specified number of periods.
Creating alarms 609

Amazon Keyspaces (for Apache Cassandra) Developer Guide
For more information about creating CloudWatch alarms, see Using Amazon CloudWatch alarms in
the Amazon CloudWatch User Guide.
Logging Amazon Keyspaces API calls with AWS CloudTrail
Amazon Keyspaces is integrated with AWS CloudTrail, a service that provides a record of actions
taken by a user, role, or an AWS service in Amazon Keyspaces. CloudTrail captures Data Definition
Language (DDL) API calls and Data Manipulation Language (DML) API calls for Amazon Keyspaces
as events. The calls that are captured include calls from the Amazon Keyspaces console and
programmatic calls to the Amazon Keyspaces API operations.
If you create a trail, you can enable continuous delivery of CloudTrail events to an Amazon Simple
Storage Service (Amazon S3) bucket, including events for Amazon Keyspaces.
If you don't configure a trail, you can still view the most recent supported events on the CloudTrail
console in Event history. Using the information collected by CloudTrail, you can determine the
request that was made to Amazon Keyspaces, the IP address from which the request was made,
who made the request, when it was made, and additional details.
To learn more about CloudTrail, see the AWS CloudTrail User Guide.
Topics
• Configuring Amazon Keyspaces log file entries in CloudTrail
• Amazon Keyspaces Data Definition Language (DDL) information in CloudTrail
• Amazon Keyspaces Data Manipulation Language (DML) information in CloudTrail
• Understanding Amazon Keyspaces log file entries
Configuring Amazon Keyspaces log file entries in CloudTrail
Each Amazon Keyspaces API action logged in CloudTrail includes request parameters that are
expressed in CQL query language. For more information, see the CQL language reference.
You can view, search, and download recent events in your AWS account. For more information, see
Viewing events with CloudTrail event history.
For an ongoing record of events in your AWS account, including events for Amazon Keyspaces,
create a trail. A trail enables CloudTrail to deliver log files to an Amazon S3 bucket. By default,
Logging with CloudTrail 610

Amazon Keyspaces (for Apache Cassandra) Developer Guide
when you create a trail in the console, the trail applies to all AWS Regions. The trail logs events
from all Regions in the AWS partition and delivers the log files to the Amazon S3 bucket that you
specify. Additionally, you can configure other AWS services to further analyze and act upon the
event data collected in CloudTrail logs.
For more information, see the following topics in the AWS CloudTrail User Guide:
• Overview for creating a trail
• CloudTrail supported services and integrations
• Configuring Amazon SNS notifications for CloudTrail
• Receiving CloudTrail log files from multiple Regions
• Receiving CloudTrail log files from multiple accounts
Every event or log entry contains information about who generated the request. The identity
information helps you determine the following:
• Whether the request was made with root or AWS Identity and Access Management (IAM) user
credentials.
• Whether the request was made with temporary security credentials for a role or federated user.
• Whether the request was made by another AWS service.
For more information, see the CloudTrail userIdentity element.
Amazon Keyspaces Data Definition Language (DDL) information in
CloudTrail
CloudTrail is enabled on your AWS account when you create the account. When a DDL activity
occurs in Amazon Keyspaces, that activity is automatically recorded as a CloudTrail event along
with other AWS service events in Event history. The following table shows the DDL statements
that are logged for Amazon Keyspaces.
CloudTrail
eventName
Statement CQL action AWS SDK action
CreateKeyspace DDL
CREATE KEYSPACE CreateKeyspace
DDL information in CloudTrail 611

Amazon Keyspaces (for Apache Cassandra) Developer Guide
CloudTrail
eventName
Statement CQL action AWS SDK action
DropKeyspace DDL
DROP KEYSPACE DeleteKeyspace
CreateTable DDL
CREATE TABLE CreateTable
DropTable DDL
DROP TABLE DeleteTable
AlterTable DDL
ALTER TABLE UpdateTable ,
TagResource ,
UntagResource
Amazon Keyspaces Data Manipulation Language (DML) information in
CloudTrail
To enable logging of Amazon Keyspaces DML statements with CloudTrail, you have to first
enable logging of data plane API activity in CloudTrail. You can start logging Amazon Keyspaces
DML events in new or existing trails by choosing to log activity for the data event type
Cassandra table using the CloudTrail console, or by setting the resources.type value to
AWS::Cassandra::Table using the AWS CLI, or CloudTrail API operations. For more information,
see Logging data events.
The following table shows the data events that are logged by CloudTrail for Cassandra table.
CloudTrail
eventName
Statement CQL action AWS SDK action
Select DML
SELECT GetKeyspa
ce , GetTable,
ListKeysp
aces , ListTable
s ListTagsF
orResource
Insert DML
INSERT
no AWS SDK actions
available
DML information in CloudTrail 612

Amazon Keyspaces (for Apache Cassandra) Developer Guide
CloudTrail
eventName
Statement CQL action AWS SDK action
Update DML
UPDATE
no AWS SDK actions
available
Delete DML
DELETE
no AWS SDK actions
available
Understanding Amazon Keyspaces log file entries
CloudTrail log files contain one or more log entries. An event represents a single request from
any source and includes information about the requested action, the date and time of the action,
request parameters, and so on. CloudTrail log files aren't an ordered stack trace of the public API
calls, so they don't appear in any specific order.
The following example shows a CloudTrail log entry that demonstrates the CreateKeyspace,
DropKeyspace, CreateTable, and DropTable actions:
{
"Records": [
{
"eventVersion": "1.05",
"userIdentity": {
"type": "AssumedRole",
"principalId": "AKIAIOSFODNN7EXAMPLE:alice",
"arn": "arn:aws:sts::111122223333:assumed-role/users/alice",
"accountId": "111122223333",
"sessionContext": {
"sessionIssuer": {
"type": "Role",
"principalId": "AKIAIOSFODNN7EXAMPLE",
"arn": "arn:aws:iam::111122223333:role/Admin",
"accountId": "111122223333",
"userName": "Admin"
},
"webIdFederationData": {},
"attributes": {
"mfaAuthenticated": "false",
"creationDate": "2020-01-15T18:47:56Z"
Understanding log file entries 613

Amazon Keyspaces (for Apache Cassandra) Developer Guide
}
}
},
"eventTime": "2020-01-15T18:53:04Z",
"eventSource": "cassandra.amazonaws.com",
"eventName": "CreateKeyspace",
"awsRegion": "us-east-1",
"sourceIPAddress": "10.24.34.01",
"userAgent": "Cassandra Client/ProtocolV4",
"requestParameters": {
"rawQuery": "\n\tCREATE KEYSPACE \"mykeyspace\"\n\tWITH\n\t\tREPLICATION =
{'class': 'SingleRegionStrategy'}\n\t\t",
"keyspaceName": "mykeyspace"
},
"responseElements": null,
"requestID": "bfa3e75d-bf4d-4fc0-be5e-89d15850eb41",
"eventID": "d25beae8-f611-4229-877a-921557a07bb9",
"readOnly": false,
"resources": [
{
"accountId": "111122223333",
"type": "AWS::Cassandra::Keyspace",
"ARN": "arn:aws:cassandra:us-east-1:111122223333:/keyspace/mykeyspace/"
}
],
"eventType": "AwsApiCall",
"apiVersion": "3.4.4",
"recipientAccountId": "111122223333",
"managementEvent": true,
"eventCategory": "Management",
"tlsDetails": {
"tlsVersion": "TLSv1.2",
"cipherSuite": "ECDHE-RSA-AES128-GCM-SHA256",
"clientProvidedHostHeader": "cassandra.us-east-1.amazonaws.com"
},
{
"eventVersion": "1.05",
"userIdentity": {
"type": "AssumedRole",
"principalId": "AKIAIOSFODNN7EXAMPLE:alice",
"arn": "arn:aws:sts::111122223333:assumed-role/users/alice",
"accountId": "111122223333",
"sessionContext": {
"sessionIssuer": {
Understanding log file entries 614

Amazon Keyspaces (for Apache Cassandra) Developer Guide
"type": "Role",
"principalId": "AKIAIOSFODNN7EXAMPLE",
"arn": "arn:aws:iam::111122223333:role/Admin",
"accountId": "111122223333",
"userName": "Admin"
},
"webIdFederationData": {},
"attributes": {
"mfaAuthenticated": "false",
"creationDate": "2020-01-15T18:47:56Z"
}
}
},
"eventTime": "2020-01-15T19:28:39Z",
"eventSource": "cassandra.amazonaws.com",
"eventName": "DropKeyspace",
"awsRegion": "us-east-1",
"sourceIPAddress": "10.24.34.01",
"userAgent": "Cassandra Client/ProtocolV4",
"requestParameters": {
"rawQuery": "DROP KEYSPACE \"mykeyspace\"",
"keyspaceName": "mykeyspace"
},
"responseElements": null,
"requestID": "66f3d86a-56ae-4c29-b46f-abcd489ed86b",
"eventID": "e5aebeac-e1dd-41e3-a515-84fe6aaabd7b",
"readOnly": false,
"resources": [
{
"accountId": "111122223333",
"type": "AWS::Cassandra::Keyspace",
"ARN": "arn:aws:cassandra:us-east-1:111122223333:/keyspace/mykeyspace/"
}
],
"eventType": "AwsApiCall",
"apiVersion": "3.4.4",
"recipientAccountId": "111122223333",
"managementEvent": true,
"eventCategory": "Management",
"tlsDetails": {
"tlsVersion": "TLSv1.2",
"cipherSuite": "ECDHE-RSA-AES128-GCM-SHA256",
"clientProvidedHostHeader": "cassandra.us-east-1.amazonaws.com"
},
Understanding log file entries 615

Amazon Keyspaces (for Apache Cassandra) Developer Guide
{
"eventVersion": "1.05",
"userIdentity": {
"type": "AssumedRole",
"principalId": "AKIAIOSFODNN7EXAMPLE:alice",
"arn": "arn:aws:sts::111122223333:assumed-role/users/alice",
"accountId": "111122223333",
"sessionContext": {
"sessionIssuer": {
"type": "Role",
"principalId": "AKIAIOSFODNN7EXAMPLE",
"arn": "arn:aws:iam::111122223333:role/Admin",
"accountId": "111122223333",
"userName": "Admin"
},
"webIdFederationData": {},
"attributes": {
"mfaAuthenticated": "false",
"creationDate": "2020-01-15T18:47:56Z"
}
}
},
"eventTime": "2020-01-15T18:55:24Z",
"eventSource": "cassandra.amazonaws.com",
"eventName": "CreateTable",
"awsRegion": "us-east-1",
"sourceIPAddress": "10.24.34.01",
"userAgent": "Cassandra Client/ProtocolV4",
"requestParameters": {
"rawQuery": "\n\tCREATE TABLE \"mykeyspace\".\"mytable\"(\n\t\t\"ID\" int,
\n\t\t\"username\" text,\n\t\t\"email\" text,\n\t\t\"post_type\" text,\n\t\tPRIMARY
KEY((\"ID\", \"username\", \"email\")))",
"keyspaceName": "mykeyspace",
"tableName": "mytable"
},
"responseElements": null,
"requestID": "5f845963-70ea-4988-8a7a-2e66d061aacb",
"eventID": "fe0dbd2b-7b34-4675-a30c-740f9d8d73f9",
"readOnly": false,
"resources": [
{
"accountId": "111122223333",
"type": "AWS::Cassandra::Table",
Understanding log file entries 616

Amazon Keyspaces (for Apache Cassandra) Developer Guide
"ARN": "arn:aws:cassandra:us-east-1:111122223333:/keyspace/mykeyspace/table/
mytable"
}
],
"eventType": "AwsApiCall",
"apiVersion": "3.4.4",
"recipientAccountId": "111122223333",
"managementEvent": true,
"eventCategory": "Management",
"tlsDetails": {
"tlsVersion": "TLSv1.2",
"cipherSuite": "ECDHE-RSA-AES128-GCM-SHA256",
"clientProvidedHostHeader": "cassandra.us-east-1.amazonaws.com"
},
{
"eventVersion": "1.05",
"userIdentity": {
"type": "AssumedRole",
"principalId": "AKIAIOSFODNN7EXAMPLE:alice",
"arn": "arn:aws:sts::111122223333:assumed-role/users/alice",
"accountId": "111122223333",
"sessionContext": {
"sessionIssuer": {
"type": "Role",
"principalId": "AKIAIOSFODNN7EXAMPLE",
"arn": "arn:aws:iam::111122223333:role/Admin",
"accountId": "111122223333",
"userName": "Admin"
},
"webIdFederationData": {},
"attributes": {
"mfaAuthenticated": "false",
"creationDate": "2020-01-15T18:47:56Z"
}
}
},
"eventTime": "2020-01-15T19:27:59Z",
"eventSource": "cassandra.amazonaws.com",
"eventName": "DropTable",
"awsRegion": "us-east-1",
"sourceIPAddress": "10.24.34.01",
"userAgent": "Cassandra Client/ProtocolV4",
"requestParameters": {
"rawQuery": "DROP TABLE \"mykeyspace\".\"mytable\"",
Understanding log file entries 617

Amazon Keyspaces (for Apache Cassandra) Developer Guide
"keyspaceName": "mykeyspace",
"tableName": "mytable"
},
"responseElements": null,
"requestID": "025501b0-3582-437e-9d18-8939e9ef262f",
"eventID": "1a5cbedc-4e38-4889-8475-3eab98de0ffd",
"readOnly": false,
"resources": [
{
"accountId": "111122223333",
"type": "AWS::Cassandra::Table",
"ARN": "arn:aws:cassandra:us-east-1:111122223333:/keyspace/mykeyspace/table/
mytable"
}
],
"eventType": "AwsApiCall",
"apiVersion": "3.4.4",
"recipientAccountId": "111122223333",
"managementEvent": true,
"eventCategory": "Management",
"tlsDetails": {
"tlsVersion": "TLSv1.2",
"cipherSuite": "ECDHE-RSA-AES128-GCM-SHA256",
"clientProvidedHostHeader": "cassandra.us-east-1.amazonaws.com"
}
]
}
The following log file shows an example of a SELECT statement.
{
"eventVersion": "1.09",
"userIdentity": {
"type": "IAMUser",
"principalId": "AKIAIOSFODNN7EXAMPLE",
"arn": "arn:aws:iam::111122223333:user/alice",
"accountId": "111122223333",
"userName": "alice"
},
"eventTime": "2023-11-17T10:38:04Z",
"eventSource": "cassandra.amazonaws.com",
"eventName": "Select",
"awsRegion": "us-east-1",
Understanding log file entries 618

Amazon Keyspaces (for Apache Cassandra) Developer Guide
"sourceIPAddress": "10.24.34.01",
"userAgent": "Cassandra Client/ProtocolV4",
"requestParameters": {
"keyspaceName": "my_keyspace",
"tableName": "my_table",
"conditions": [
"pk = **(Redacted)",
"ck < 3**(Redacted)0",
"region = 't**(Redacted)t'"
],
"select": [
"pk",
"ck",
"region"
],
"allowFiltering": true
},
"responseElements": null,
"requestID": "6d83bbf0-a3d0-4d49-b1d9-e31779a28628",
"eventID": "e00552d3-34e9-4092-931a-912c4e08ba17",
"readOnly": true,
"resources": [
{
"accountId": "111122223333",
"type": "AWS::Cassandra::Table",
"ARN": "arn:aws:cassandra:us-east-1:111122223333:/keyspace/my_keyspace/
table/my_table"
}
],
"eventType": "AwsApiCall",
"apiVersion": "3.4.4",
"managementEvent": false,
"recipientAccountId": "111122223333",
"eventCategory": "Data",
"tlsDetails": {
"tlsVersion": "TLSv1.3",
"cipherSuite": "TLS_AES_128_GCM_SHA256",
"clientProvidedHostHeader": "cassandra.us-east-1.amazonaws.com"
}
}
The following log file shows an example of an INSERT statement.
Understanding log file entries 619

Amazon Keyspaces (for Apache Cassandra) Developer Guide
{
"eventVersion": "1.09",
"userIdentity": {
"type": "IAMUser",
"principalId": "AKIAIOSFODNN7EXAMPLE",
"arn": "arn:aws:iam::111122223333:user/alice",
"accountId": "111122223333",
"userName": "alice"
},
"eventTime": "2023-12-01T22:11:43Z",
"eventSource": "cassandra.amazonaws.com",
"eventName": "Insert",
"awsRegion": "us-east-1",
"sourceIPAddress": "10.24.34.01",
"userAgent": "Cassandra Client/ProtocolV4",
"requestParameters": {
"keyspaceName": "my_keyspace",
"tableName": "my_table",
"primaryKeys": {
"pk": "**(Redacted)",
"ck": "1**(Redacted)8"
},
"columnNames": [
"pk",
"ck",
"region"
],
"updateParameters": {
"TTL": "2**(Redacted)0"
}
}
},
"responseElements": null,
"requestID": "edf8af47-2f87-4432-864d-a960ac35e471",
"eventID": "81b56a1c-9bdd-4c92-bb8e-92776b5a3bf1",
"readOnly": false,
"resources": [
{
"accountId": "111122223333",
"type": "AWS::Cassandra::Table",
"ARN": "arn:aws:cassandra:us-east-1:111122223333:/keyspace/my_keyspace/table/
my_table"
}
Understanding log file entries 620

Amazon Keyspaces (for Apache Cassandra) Developer Guide
],
"eventType": "AwsApiCall",
"apiVersion": "3.4.4",
"managementEvent": false,
"recipientAccountId": "111122223333",
"eventCategory": "Data",
"tlsDetails": {
"tlsVersion": "TLSv1.3",
"cipherSuite": "TLS_AES_128_GCM_SHA256",
"clientProvidedHostHeader": "cassandra.us-east-1.amazonaws.com"
}
}
The following log file shows an example of an UPDATE statement.
{
"eventVersion": "1.09",
"userIdentity": {
"type": "IAMUser",
"principalId": "AKIAIOSFODNN7EXAMPLE",
"arn": "arn:aws:iam::111122223333:user/alice",
"accountId": "111122223333",
"userName": "alice"
},
"eventTime": "2023-12-01T22:11:43Z",
"eventSource": "cassandra.amazonaws.com",
"eventName": "Update",
"awsRegion": "us-east-1",
"sourceIPAddress": "10.24.34.01",
"userAgent": "Cassandra Client/ProtocolV4",
"requestParameters": {
"keyspaceName": "my_keyspace",
"tableName": "my_table",
"primaryKeys": {
"pk": "'t**(Redacted)t'",
"ck": "'s**(Redacted)g'"
},
"assignmentColumnNames": [
"nonkey"
],
"conditions": [
"nonkey < 1**(Redacted)7"
]
Understanding log file entries 621

Amazon Keyspaces (for Apache Cassandra) Developer Guide
},
"responseElements": null,
"requestID": "edf8af47-2f87-4432-864d-a960ac35e471",
"eventID": "81b56a1c-9bdd-4c92-bb8e-92776b5a3bf1",
"readOnly": false,
"resources": [
{
"accountId": "111122223333",
"type": "AWS::Cassandra::Table",
"ARN": "arn:aws:cassandra:us-east-1:111122223333:/keyspace/my_keyspace/table/
my_table"
}
],
"eventType": "AwsApiCall",
"apiVersion": "3.4.4",
"managementEvent": false,
"recipientAccountId": "111122223333",
"eventCategory": "Data",
"tlsDetails": {
"tlsVersion": "TLSv1.3",
"cipherSuite": "TLS_AES_128_GCM_SHA256",
"clientProvidedHostHeader": "cassandra.us-east-1.amazonaws.com"
}
}
The following log file shows an example of a DELETE statement.
{
"eventVersion": "1.09",
"userIdentity": {
"type": "IAMUser",
"principalId": "AKIAIOSFODNN7EXAMPLE",
"arn": "arn:aws:iam::111122223333:user/alice",
"accountId": "111122223333",
"userName": "alice",
},
"eventTime": "2023-10-23T13:59:05Z",
"eventSource": "cassandra.amazonaws.com",
"eventName": "Delete",
"awsRegion": "us-east-1",
"sourceIPAddress": "10.24.34.01",
"userAgent": "Cassandra Client/ProtocolV4",
"requestParameters": {
Understanding log file entries 622

Amazon Keyspaces (for Apache Cassandra) Developer Guide
"keyspaceName": "my_keyspace",
"tableName": "my_table",
"primaryKeys": {
"pk": "**(Redacted)",
"ck": "**(Redacted)"
},
"conditions": [],
"deleteColumnNames": [
"m",
"s"
],
"updateParameters": {}
},
"responseElements": null,
"requestID": "3d45e63b-c0c8-48e2-bc64-31afc5b4f49d",
"eventID": "499da055-c642-4762-8775-d91757f06512",
"readOnly": false,
"resources": [
{
"accountId": "111122223333",
"type": "AWS::Cassandra::Table",
"ARN": "arn:aws:cassandra:us-east-1:111122223333:/keyspace/my_keyspace/table/
my_table"
}
],
"eventType": "AwsApiCall",
"apiVersion": "3.4.4",
"managementEvent": false,
"recipientAccountId": "111122223333",
"eventCategory": "Data",
"tlsDetails": {
"tlsVersion": "TLSv1.3",
"cipherSuite": "TLS_AES_128_GCM_SHA256",
"clientProvidedHostHeader": "cassandra.us-east-1.amazonaws.com"
}
}
Understanding log file entries 623

Amazon Keyspaces (for Apache Cassandra) Developer Guide
Security in Amazon Keyspaces (for Apache Cassandra)
Cloud security at AWS is the highest priority. As an AWS customer, you benefit from a data center
and network architecture that is built to meet the requirements of the most security-sensitive
organizations.
Security is a shared responsibility between AWS and you. The shared responsibility model describes
this as security of the cloud and security in the cloud:
• Security of the cloud – AWS is responsible for protecting the infrastructure that runs AWS
services in the AWS Cloud. AWS also provides you with services that you can use securely. The
effectiveness of our security is regularly tested and verified by third-party auditors as part of
the AWS compliance programs. To learn about the compliance programs that apply to Amazon
Keyspaces, see AWS Services in scope by compliance program.
• Security in the cloud – Your responsibility is determined by the AWS service that you use. You
are also responsible for other factors including the sensitivity of your data, your organization’s
requirements, and applicable laws and regulations.
This documentation will help you understand how to apply the shared responsibility model when
using Amazon Keyspaces. The following topics show you how to configure Amazon Keyspaces to
meet your security and compliance objectives. You'll also learn how to use other AWS services that
can help you to monitor and secure your Amazon Keyspaces resources.
Topics
• Data protection in Amazon Keyspaces
• AWS Identity and Access Management for Amazon Keyspaces
• Compliance validation for Amazon Keyspaces (for Apache Cassandra)
• Resilience and disaster recovery in Amazon Keyspaces
• Infrastructure security in Amazon Keyspaces
• Configuration and vulnerability analysis for Amazon Keyspaces
• Security best practices for Amazon Keyspaces
624

Amazon Keyspaces (for Apache Cassandra) Developer Guide
Data protection in Amazon Keyspaces
The AWS shared responsibility model applies to data protection in Amazon Keyspaces (for Apache
Cassandra). As described in this model, AWS is responsible for protecting the global infrastructure
that runs all of the AWS Cloud. You are responsible for maintaining control over your content
that is hosted on this infrastructure. You are also responsible for the security configuration and
management tasks for the AWS services that you use. For more information about data privacy,
see the Data Privacy FAQ. For information about data protection in Europe, see the AWS Shared
Responsibility Model and GDPR blog post on the AWS Security Blog.
For data protection purposes, we recommend that you protect AWS account credentials and set
up individual users with AWS IAM Identity Center or AWS Identity and Access Management (IAM).
That way, each user is given only the permissions necessary to fulfill their job duties. We also
recommend that you secure your data in the following ways:
• Use multi-factor authentication (MFA) with each account.
• Use SSL/TLS to communicate with AWS resources. We require TLS 1.2 and recommend TLS 1.3.
• Set up API and user activity logging with AWS CloudTrail. For information about using CloudTrail
trails to capture AWS activities, see Working with CloudTrail trails in the AWS CloudTrail User
Guide.
• Use AWS encryption solutions, along with all default security controls within AWS services.
• Use advanced managed security services such as Amazon Macie, which assists in discovering and
securing sensitive data that is stored in Amazon S3.
• If you require FIPS 140-3 validated cryptographic modules when accessing AWS through a
command line interface or an API, use a FIPS endpoint. For more information about the available
FIPS endpoints, see Federal Information Processing Standard (FIPS) 140-3.
We strongly recommend that you never put confidential or sensitive information, such as your
customers' email addresses, into tags or free-form text fields such as a Name field. This includes
when you work with Amazon Keyspaces or other AWS services using the console, API, AWS CLI, or
AWS SDKs. Any data that you enter into tags or free-form text fields used for names may be used
for billing or diagnostic logs. If you provide a URL to an external server, we strongly recommend
that you do not include credentials information in the URL to validate your request to that server.
Topics
• Encryption at rest in Amazon Keyspaces
Data protection 625

Amazon Keyspaces (for Apache Cassandra) Developer Guide
• Encryption in transit in Amazon Keyspaces
• Internetwork traffic privacy in Amazon Keyspaces
Encryption at rest in Amazon Keyspaces
Amazon Keyspaces (for Apache Cassandra) encryption at rest provides enhanced security by
encrypting all your data at rest using encryption keys stored in AWS Key Management Service (AWS
KMS). This functionality helps reduce the operational burden and complexity involved in protecting
sensitive data. With encryption at rest, you can build security-sensitive applications that meet strict
compliance and regulatory requirements for data protection.
Amazon Keyspaces encryption at rest encrypts your data using 256-bit Advanced Encryption
Standard (AES-256). This helps secure your data from unauthorized access to the underlying
storage.
Amazon Keyspaces encrypts and decrypts the table data transparently. Amazon Keyspaces uses
envelope encryption and a key hierarchy to protect data encryption keys. It integrates with AWS
KMS for storing and managing the root encryption key. For more information about the encryption
key hierarchy, see the section called “How it works”. For more information about AWS KMS
concepts like envelope encryption, see AWS KMS management service concepts in the AWS Key
Management Service Developer Guide.
When creating a new table, you can choose one of the following AWS KMS keys (KMS keys):
• AWS owned key – This is the default encryption type. The key is owned by Amazon Keyspaces (no
additional charge).
• Customer managed key – This key is stored in your account and is created, owned, and managed
by you. You have full control over the customer managed key (AWS KMS charges apply).
You can switch between the AWS owned key and the customer managed key at any given time. You
can specify a customer managed key when you create a new table or change the KMS key of an
existing table by using the console or programmatically using CQL statements. To learn how, see
Encryption at rest: How to use customer managed keys to encrypt tables in Amazon Keyspaces.
Encryption at rest using the default option of AWS owned keys is offered at no additional charge.
However, AWS KMS charges apply for customer managed keys. For more information about pricing,
see AWS KMS pricing.
Encryption at rest 626

Amazon Keyspaces (for Apache Cassandra) Developer Guide
Amazon Keyspaces encryption at rest is available in all AWS Regions, including the AWS China
(Beijing) and AWS China (Ningxia) Regions. For more information, see Encryption at rest: How it
works in Amazon Keyspaces.
Topics
• Encryption at rest: How it works in Amazon Keyspaces
• Encryption at rest: How to use customer managed keys to encrypt tables in Amazon Keyspaces
Encryption at rest: How it works in Amazon Keyspaces
Amazon Keyspaces (for Apache Cassandra) encryption at rest encrypts your data using the 256-bit
Advanced Encryption Standard (AES-256). This helps secure your data from unauthorized access
to the underlying storage. All customer data in Amazon Keyspaces tables is encrypted at rest by
default, and server-side encryption is transparent, which means that changes to applications aren't
required.
Encryption at rest integrates with AWS Key Management Service (AWS KMS) for managing the
encryption key that is used to encrypt your tables. When creating a new table or updating an
existing table, you can choose one of the following AWS KMS key options:
• AWS owned key – This is the default encryption type. The key is owned by Amazon Keyspaces (no
additional charge).
• Customer managed key – This key is stored in your account and is created, owned, and managed
by you. You have full control over the customer managed key (AWS KMS charges apply).
AWS KMS key (KMS key)
Encryption at rest protects all your Amazon Keyspaces data with a AWS KMS key. By default,
Amazon Keyspaces uses an AWS owned key, a multi-tenant encryption key that is created and
managed in an Amazon Keyspaces service account.
However, you can encrypt your Amazon Keyspaces tables using a customer managed key in your
AWS account. You can select a different KMS key for each table in a keyspace. The KMS key you
select for a table is also used to encrypt all its metadata and restorable backups.
You select the KMS key for a table when you create or update the table. You can change the
KMS key for a table at any time, either in the Amazon Keyspaces console or by using the ALTER
Encryption at rest 627

Amazon Keyspaces (for Apache Cassandra) Developer Guide
TABLE statement. The process of switching KMS keys is seamless, and doesn't require downtime
or cause service degradation.
Key hierarchy
Amazon Keyspaces uses a key hierarchy to encrypt data. In this key hierarchy, the KMS key is the
root key. It's used to encrypt and decrypt the Amazon Keyspaces table encryption key. The table
encryption key is used to encrypt the encryption keys used internally by Amazon Keyspaces to
encrypt and decrypt data when performing read and write operations.
With the encryption key hierarchy, you can make changes to the KMS key without having to
reencrypt data or impacting applications and ongoing data operations.
Encryption at rest 628

Amazon Keyspaces (for Apache Cassandra) Developer Guide
Table key
The Amazon Keyspaces table key is used as a key encryption key. Amazon Keyspaces uses
the table key to protect the internal data encryption keys that are used to encrypt the data
stored in tables, log files, and restorable backups. Amazon Keyspaces generates a unique data
encryption key for each underlying structure in a table. However, multiple table rows might be
protected by the same data encryption key.
When you first set the KMS key to a customer managed key, AWS KMS generates a data key. The
AWS KMS data key refers to the table key in Amazon Keyspaces.
When you access an encrypted table, Amazon Keyspaces sends a request to AWS KMS to use the
KMS key to decrypt the table key. Then, it uses the plaintext table key to decrypt the Amazon
Keyspaces data encryption keys, and it uses the plaintext data encryption keys to decrypt table
data.
Amazon Keyspaces uses and stores the table key and data encryption keys outside of AWS KMS.
It protects all keys with Advanced Encryption Standard (AES) encryption and 256-bit encryption
keys. Then, it stores the encrypted keys with the encrypted data so that they're available to
decrypt the table data on demand.
Table key caching
To avoid calling AWS KMS for every Amazon Keyspaces operation, Amazon Keyspaces caches
the plaintext table keys for each connection in memory. If Amazon Keyspaces gets a request
for the cached table key after five minutes of inactivity, it sends a new request to AWS KMS to
decrypt the table key. This call captures any changes made to the access policies of the KMS key
in AWS KMS or AWS Identity and Access Management (IAM) since the last request to decrypt the
table key.
Envelope encryption
If you change the customer managed key for your table, Amazon Keyspaces generates a new
table key. Then, it uses the new table key to reencrypt the data encryption keys. It also uses the
new table key to encrypt previous table keys that are used to protect restorable backups. This
process is called envelope encryption. This ensures that you can access restorable backups even
if you rotate the customer managed key. For more information about envelope encryption, see
Envelope Encryption in the AWS Key Management Service Developer Guide.
Topics
Encryption at rest 629

Amazon Keyspaces (for Apache Cassandra) Developer Guide
• AWS owned keys
• Customer managed keys
• Encryption at rest usage notes
AWS owned keys
AWS owned keys aren't stored in your AWS account. They are part of a collection of KMS keys that
AWS owns and manages for use in multiple AWS accounts. AWS services can use AWS owned keys
to protect your data.
You can't view, manage, or use AWS owned keys, or audit their use. However, you don't need to do
any work or change any programs to protect the keys that encrypt your data.
You aren't charged a monthly fee or a usage fee for use of AWS owned keys, and they don't count
against AWS KMS quotas for your account.
Customer managed keys
Customer managed keys are keys in your AWS account that you create, own, and manage. You have
full control over these KMS keys.
Use a customer managed key to get the following features:
• You create and manage the customer managed key, including setting and maintaining the key
policies, IAM policies, and grants to control access to the customer managed key. You can enable
and disable the customer managed key, enable and disable automatic key rotation, and schedule
the customer managed key for deletion when it is no longer in use. You can create tags and
aliases for the customer managed keys you manage.
• You can use a customer managed key with imported key material or a customer managed key in
a custom key store that you own and manage.
• You can use AWS CloudTrail and Amazon CloudWatch Logs to track the requests that Amazon
Keyspaces sends to AWS KMS on your behalf. For more information, see the section called “Step
6: Configure monitoring with AWS CloudTrail”.
Customer managed keys incur a charge for each API call, and AWS KMS quotas apply to these KMS
keys. For more information, see AWS KMS resource or request quotas.
When you specify a customer managed key as the root encryption key for a table, restorable
backups are encrypted with the same encryption key that is specified for the table at the time the
Encryption at rest 630

Amazon Keyspaces (for Apache Cassandra) Developer Guide
backup is created. If the KMS key for the table is rotated, key enveloping ensures that the latest
KMS key has access to all restorable backups.
Amazon Keyspaces must have access to your customer managed key to provide you access to
your table data. If the state of the encryption key is set to disabled or it's scheduled for deletion,
Amazon Keyspaces is unable to encrypt or decrypt data. As a result, you are not able to perform
read and write operations on the table. As soon as the service detects that your encryption key is
inaccessible, Amazon Keyspaces sends an email notification to alert you.
You must restore access to your encryption key within seven days or Amazon Keyspaces deletes
your table automatically. As a precaution, Amazon Keyspaces creates a restorable backup of your
table data before deleting the table. Amazon Keyspaces maintains the restorable backup for 35
days. After 35 days, you can no longer restore your table data. You aren't billed for the restorable
backup, but standard restore charges apply.
You can use this restorable backup to restore your data to a new table. To initiate the restore, the
last customer managed key used for the table must be enabled, and Amazon Keyspaces must have
access to it.
Note
When you're creating a table that's encrypted using a customer managed key that's
inaccessible or scheduled for deletion before the creation process completes, an error
occurs. The create table operation fails, and you're sent an email notification.
Encryption at rest usage notes
Consider the following when you're using encryption at rest in Amazon Keyspaces.
• Server-side encryption at rest is enabled on all Amazon Keyspaces tables and can't be disabled.
The entire table is encrypted at rest, you can't select specific columns or rows for encryption.
• By default, Amazon Keyspaces uses a single-service default key (AWS owned key) for encrypting
all of your tables. If this key doesn’t exist, it's created for you. Service default keys can't be
disabled.
• Encryption at rest only encrypts data while it's static (at rest) on a persistent storage media. If
data security is a concern for data in transit or data in use, you must take additional measures:
Encryption at rest 631

Amazon Keyspaces (for Apache Cassandra) Developer Guide
• Data in transit: All your data in Amazon Keyspaces is encrypted in transit. By default,
communications to and from Amazon Keyspaces are protected by using Secure Sockets Layer
(SSL)/Transport Layer Security (TLS) encryption.
• Data in use: Protect your data before sending it to Amazon Keyspaces by using client-side
encryption.
• Customer managed keys: Data at rest in your tables is always encrypted using your customer
managed keys. However operations that perform atomic updates of multiple rows encrypt
data temporarily using AWS owned keys during processing. This includes range delete
operations and operations that simultaneously access static and non-static data.
• A single customer managed key can have up to 50,000 grants. Every Amazon Keyspaces table
associated with a customer managed key consumes 2 grants. One grant is released when the
table is deleted. The second grant is used to create an automatic snapshot of the table to
protect from data loss in case Amazon Keyspaces lost access to the customer managed key
unintentionally. This grant is released 42 days after deletion of the table.
Encryption at rest: How to use customer managed keys to encrypt tables in
Amazon Keyspaces
You can use the console or CQL statements to specify the AWS KMS key for new tables and update
the encryption keys of existing tables in Amazon Keyspaces. The following topic outlines how to
implement customer managed keys for new and existing tables.
Topics
• Prerequisites: Create a customer managed key using AWS KMS and grant permissions to Amazon
Keyspaces
• Step 3: Specify a customer managed key for a new table
• Step 4: Update the encryption key of an existing table
• Step 5: Use the Amazon Keyspaces encryption context in logs
• Step 6: Configure monitoring with AWS CloudTrail
Encryption at rest 632

Amazon Keyspaces (for Apache Cassandra) Developer Guide
Prerequisites: Create a customer managed key using AWS KMS and grant permissions to
Amazon Keyspaces
Before you can protect an Amazon Keyspaces table with a customer managed key, you must first
create the key in AWS Key Management Service (AWS KMS) and then authorize Amazon Keyspaces
to use that key.
Step 1: Create a customer managed key using AWS KMS
To create a customer managed key to be used to protect an Amazon Keyspaces table, you can
follow the steps in Creating symmetric encryption KMS keys using the console or the AWS API.
Step 2: Authorize the use of your customer managed key
Before you can choose a customer managed key to protect an Amazon Keyspaces table, the policies
on that customer managed key must give Amazon Keyspaces permission to use it on your behalf.
You have full control over the policies and grants on the customer managed key. You can provide
these permissions in a key policy, an IAM policy, or a grant.
Amazon Keyspaces doesn't need additional authorization to use the default AWS owned key to
protect the Amazon Keyspaces tables in your AWS account.
The following topics show how to configure the required permissions using IAM policies and grants
that allow Amazon Keyspaces tables to use a customer managed key.
Topics
• Key policy for customer managed keys
• Example key policy
• Using grants to authorize Amazon Keyspaces
Key policy for customer managed keys
When you select a customer managed key to protect an Amazon Keyspaces table, Amazon
Keyspaces gets permission to use the customer managed key on behalf of the principal who makes
the selection. That principal, a user or role, must have the permissions on the customer managed
key that Amazon Keyspaces requires.
At a minimum, Amazon Keyspaces requires the following permissions on a customer managed key:
• kms:Encrypt
Encryption at rest 633

Amazon Keyspaces (for Apache Cassandra) Developer Guide
• kms:Decrypt
• kms:ReEncrypt* (for kms:ReEncryptFrom and kms:ReEncryptTo)
• kms:GenerateDataKey* (for kms:GenerateDataKey and kms:GenerateDataKeyWithoutPlaintext)
• kms:DescribeKey
• kms:CreateGrant
Example key policy
For example, the following example key policy provides only the required permissions. The policy
has the following effects:
• Allows Amazon Keyspaces to use the customer managed key in cryptographic operations
and create grants—but only when it's acting on behalf of principals in the account who have
permission to use Amazon Keyspaces. If the principals specified in the policy statement don't
have permission to use Amazon Keyspaces, the call fails, even when it comes from the Amazon
Keyspaces service.
• The kms:ViaService condition key allows the permissions only when the request comes
from Amazon Keyspaces on behalf of the principals listed in the policy statement. These
principals can't call these operations directly. Note that the kms:ViaService value,
cassandra.*.amazonaws.com, has an asterisk (*) in the Region position. Amazon Keyspaces
requires the permission to be independent of any particular AWS Region.
•
Gives the customer managed key administrators (users who can assume the db-team role) read-
only access to the customer managed key and permission to revoke grants, including the grants
that Amazon Keyspaces requires to protect the table.
• Gives Amazon Keyspaces read-only access to the customer managed key. In this case, Amazon
Keyspaces can call these operations directly. It doesn't have to act on behalf of an account
principal.
Before using an example key policy, replace the example principals with actual principals from your
AWS account.
{
"Id": "key-policy-cassandra",
"Version":"2012-10-17",
"Statement": [
{
Encryption at rest 634

Amazon Keyspaces (for Apache Cassandra) Developer Guide
"Sid" : "Allow access through Amazon Keyspaces for all principals in the account
that are authorized to use Amazon Keyspaces",
"Effect": "Allow",
"Principal": {"AWS": "arn:aws:iam::111122223333:user/db-lead"},
"Action": [
"kms:Encrypt",
"kms:Decrypt",
"kms:ReEncrypt*",
"kms:GenerateDataKey*",
"kms:DescribeKey",
"kms:CreateGrant"
],
"Resource": "*",
"Condition": {
"StringLike": {
"kms:ViaService" : "cassandra.*.amazonaws.com"
}
}
},
{
"Sid": "Allow administrators to view the customer managed key and revoke
grants",
"Effect": "Allow",
"Principal": {
"AWS": "arn:aws:iam::111122223333:role/db-team"
},
"Action": [
"kms:Describe*",
"kms:Get*",
"kms:List*",
"kms:RevokeGrant"
],
"Resource": "*"
}
]
}
Using grants to authorize Amazon Keyspaces
In addition to key policies, Amazon Keyspaces uses grants to set permissions on a customer
managed key. To view the grants on a customer managed key in your account, use the ListGrants
operation. Amazon Keyspaces doesn't need grants, or any additional permissions, to use the AWS
owned key to protect your table.
Encryption at rest 635

Amazon Keyspaces (for Apache Cassandra) Developer Guide
Amazon Keyspaces uses the grant permissions when it performs background system maintenance
and continuous data protection tasks. It also uses grants to generate table keys.
Each grant is specific to a table. If the account includes multiple tables encrypted under the same
customer managed key, there is a grant of each type for each table. The grant is constrained by the
Amazon Keyspaces encryption context, which includes the table name and the AWS account ID. The
grant includes permission to retire the grant if it's no longer needed.
To create the grants, Amazon Keyspaces must have permission to call CreateGrant on behalf of
the user who created the encrypted table.
The key policy can also allow the account to revoke the grant on the customer managed key.
However, if you revoke the grant on an active encrypted table, Amazon Keyspaces will not be able
to protect and maintain the table.
Step 3: Specify a customer managed key for a new table
Follow these steps to specify the customer managed key on a new table using the Amazon
Keyspaces console or CQL.
Create an encrypted table using a customer managed key (console)
1. Sign in to the AWS Management Console, and open the Amazon Keyspaces console at https://
console.aws.amazon.com/keyspaces/home.
2. In the navigation pane, choose Tables, and then choose Create table.
3. On the Create table page in the Table details section, select a keyspace and provide a name
for the new table.
4. In the Schema section, create the schema for your table.
5. In the Table settings section, choose Customize settings.
6. Continue to Encryption settings.
In this step, you select the encryption settings for the table.
In the Encryption at rest section under Choose an AWS KMS key, choose the option Choose
a different KMS key (advanced), and in the search field, choose an AWS KMS key or enter an
Amazon Resource Name (ARN).
Encryption at rest 636

Amazon Keyspaces (for Apache Cassandra) Developer Guide
Note
If the key you selected is not accessible or is missing the required permissions, see
Troubleshooting key access in the AWS Key Management Service Developer Guide.
7. Choose Create to create the encrypted table.
Create a new table using a customer managed key for encryption at rest (CQL)
To create a new table that uses a customer managed key for encryption at rest, you can use the
CREATE TABLE statement as shown in the following example. Make sure to replace the key ARN
with an ARN for a valid key with permissions granted to Amazon Keyspaces.
CREATE TABLE my_keyspace.my_table(id bigint, name text, place text STATIC, PRIMARY
KEY(id, name)) WITH CUSTOM_PROPERTIES = {
'encryption_specification':{
'encryption_type': 'CUSTOMER_MANAGED_KMS_KEY',
'kms_key_identifier':'arn:aws:kms:eu-
west-1:5555555555555:key/11111111-1111-111-1111-111111111111'
}
};
If you receive an Invalid Request Exception, you need to confirm that the customer
managed key is valid and Amazon Keyspaces has the required permissions. To confirm that the key
has been configured correctly, see Troubleshooting key access in the AWS Key Management Service
Developer Guide.
Step 4: Update the encryption key of an existing table
You can also use the Amazon Keyspaces console or CQL to change the encryption keys of an
existing table between an AWS owned key and a customer managed KMS key at any time.
Update an existing table with the new customer managed key (console)
1. Sign in to the AWS Management Console, and open the Amazon Keyspaces console at https://
console.aws.amazon.com/keyspaces/home.
2. In the navigation pane, choose Tables.
3. Choose the table that you want to update, and then choose the Additional settings tab.
Encryption at rest 637

Amazon Keyspaces (for Apache Cassandra) Developer Guide
4. In the Encryption at rest section, choose Manage Encryption to edit the encryption settings
for the table.
Under Choose an AWS KMS key, choose the option Choose a different KMS key (advanced),
and in the search field, choose an AWS KMS key or enter an Amazon Resource Name (ARN).
Note
If the key you selected is not valid, see Troubleshooting key access in the AWS Key
Management Service Developer Guide.
Alternatively, you can choose an AWS owned key for a table that is encrypted with a customer
managed key.
5. Choose Save changes to save your changes to the table.
Update the encryption key used for an existing table
To change the encryption key of an existing table, you use the ALTER TABLE statement to specify
a customer managed key for encryption at rest. Make sure to replace the key ARN with an ARN for
a valid key with permissions granted to Amazon Keyspaces.
ALTER TABLE my_keyspace.my_table WITH CUSTOM_PROPERTIES = {
'encryption_specification':{
'encryption_type': 'CUSTOMER_MANAGED_KMS_KEY',
'kms_key_identifier':'arn:aws:kms:eu-
west-1:5555555555555:key/11111111-1111-111-1111-111111111111'
}
};
If you receive an Invalid Request Exception, you need to confirm that the customer
managed key is valid and Amazon Keyspaces has the required permissions. To confirm that the key
has been configured correctly, see Troubleshooting key access in the AWS Key Management Service
Developer Guide.
To change the encryption key back to the default encryption at rest option with AWS owned keys,
you can use the ALTER TABLE statement as shown in the following example.
ALTER TABLE my_keyspace.my_table WITH CUSTOM_PROPERTIES = {
Encryption at rest 638
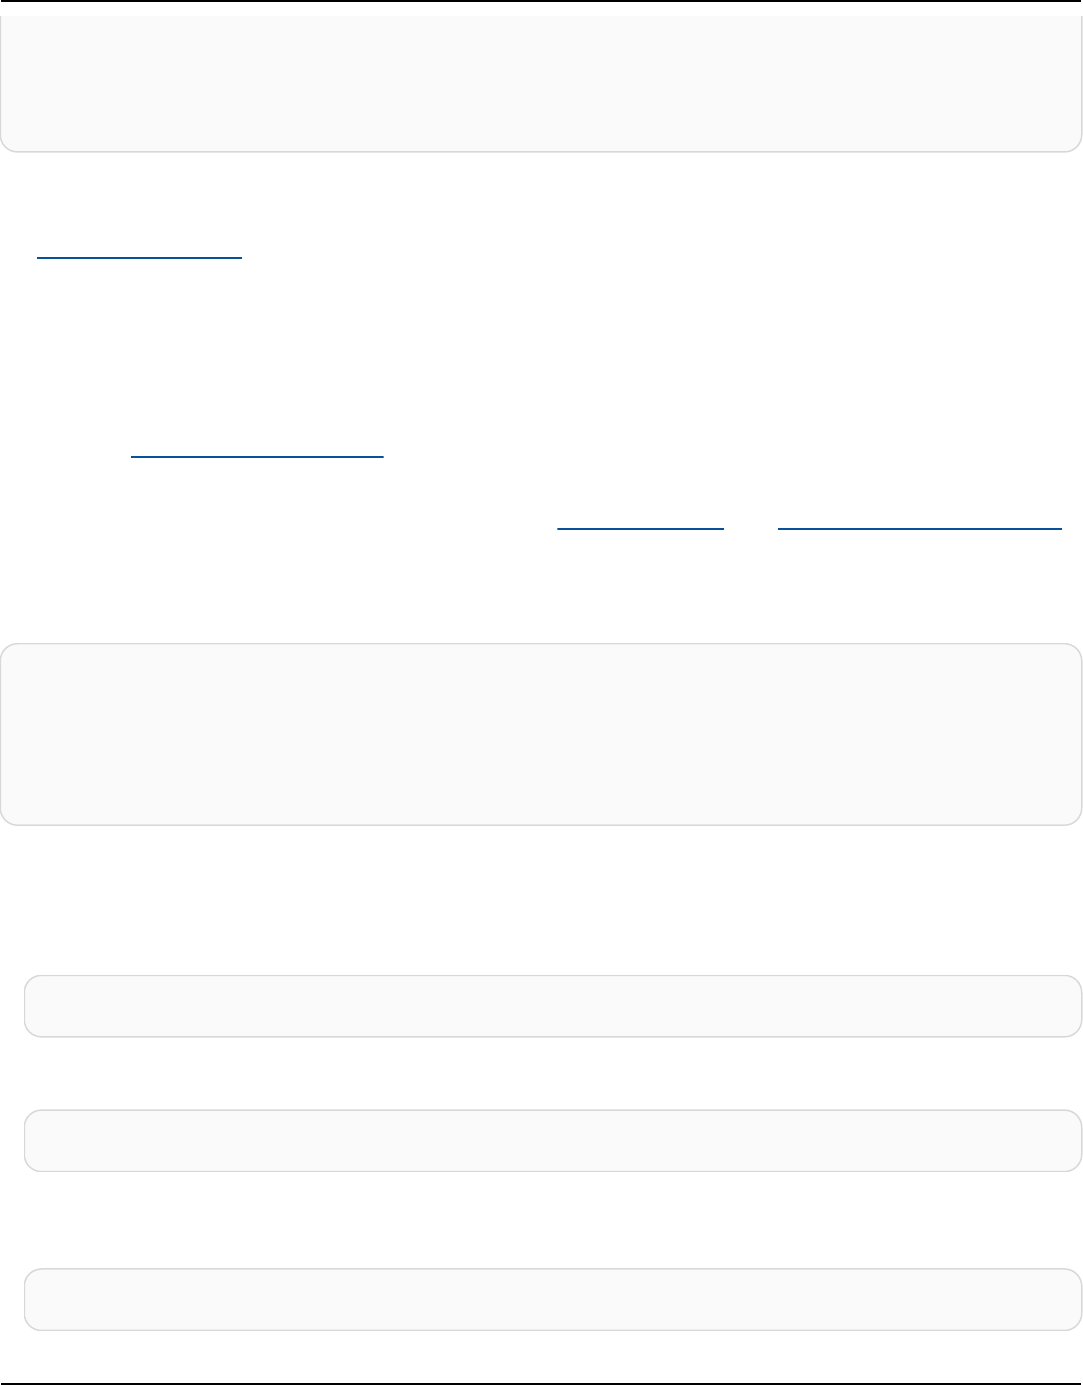
Amazon Keyspaces (for Apache Cassandra) Developer Guide
'encryption_specification':{
'encryption_type' : 'AWS_OWNED_KMS_KEY'
}
};
Step 5: Use the Amazon Keyspaces encryption context in logs
An encryption context is a set of key–value pairs that contain arbitrary nonsecret data. When you
include an encryption context in a request to encrypt data, AWS KMS cryptographically binds
the encryption context to the encrypted data. To decrypt the data, you must pass in the same
encryption context.
Amazon Keyspaces uses the same encryption context in all AWS KMS cryptographic operations.
If you use a customer managed key to protect your Amazon Keyspaces table, you can use the
encryption context to identify the use of the customer managed key in audit records and logs. It
also appears in plaintext in logs, such as in logs for AWS CloudTrail and Amazon CloudWatch Logs.
In its requests to AWS KMS, Amazon Keyspaces uses an encryption context with three key–value
pairs.
"encryptionContextSubset": {
"aws:cassandra:keyspaceName": "my_keyspace",
"aws:cassandra:tableName": "mytable"
"aws:cassandra:subscriberId": "111122223333"
}
• Keyspace – The first key–value pair identifies the keyspace that includes the table that Amazon
Keyspaces is encrypting. The key is aws:cassandra:keyspaceName. The value is the name of
the keyspace.
"aws:cassandra:keyspaceName": "<keyspace-name>"
For example:
"aws:cassandra:keyspaceName": "my_keyspace"
• Table – The second key–value pair identifies the table that Amazon Keyspaces is encrypting. The
key is aws:cassandra:tableName. The value is the name of the table.
"aws:cassandra:tableName": "<table-name>"
Encryption at rest 639

Amazon Keyspaces (for Apache Cassandra) Developer Guide
For example:
"aws:cassandra:tableName": "my_table"
• Account – The third key–value pair identifies the AWS account. The key is
aws:cassandra:subscriberId. The value is the account ID.
"aws:cassandra:subscriberId": "<account-id>"
For example:
"aws:cassandra:subscriberId": "111122223333"
Step 6: Configure monitoring with AWS CloudTrail
If you use a customer managed key to protect your Amazon Keyspaces tables, you can use AWS
CloudTrail logs to track the requests that Amazon Keyspaces sends to AWS KMS on your behalf.
The GenerateDataKey, DescribeKey, Decrypt, and CreateGrant requests are discussed in
this section. In addition, Amazon Keyspaces uses a RetireGrant operation to remove a grant when
you delete a table.
GenerateDataKey
Amazon Keyspaces creates a unique table key to encrypt data at rest. It sends a
GenerateDataKey request to AWS KMS that specifies the KMS key for the table.
The event that records the GenerateDataKey operation is similar to the following example
event. The user is the Amazon Keyspaces service account. The parameters include the Amazon
Resource Name (ARN) of the customer managed key, a key specifier that requires a 256-bit key,
and the encryption context that identifies the keyspace, the table, and the AWS account.
{
"eventVersion": "1.08",
"userIdentity": {
"type": "AWSService",
"invokedBy": "AWS Internal"
},
"eventTime": "2021-04-16T04:56:05Z",
Encryption at rest 640

Amazon Keyspaces (for Apache Cassandra) Developer Guide
"eventSource": "kms.amazonaws.com",
"eventName": "GenerateDataKey",
"awsRegion": "us-east-1",
"sourceIPAddress": "AWS Internal",
"userAgent": "AWS Internal",
"requestParameters": {
"keySpec": "AES_256",
"encryptionContext": {
"aws:cassandra:keyspaceName": "my_keyspace",
"aws:cassandra:tableName": "my_table",
"aws:cassandra:subscriberId": "123SAMPLE012"
},
"keyId": "arn:aws:kms:eu-
west-1:5555555555555:key/11111111-1111-111-1111-111111111111"
},
"responseElements": null,
"requestID": "5e8e9cb5-9194-4334-aacc-9dd7d50fe246",
"eventID": "49fccab9-2448-4b97-a89d-7d5c39318d6f",
"readOnly": true,
"resources": [
{
"accountId": "123SAMPLE012",
"type": "AWS::KMS::Key",
"ARN": "arn:aws:kms:eu-
west-1:5555555555555:key/11111111-1111-111-1111-111111111111"
}
],
"eventType": "AwsApiCall",
"managementEvent": true,
"eventCategory": "Management",
"recipientAccountId": "123SAMPLE012",
"sharedEventID": "84fbaaf0-9641-4e32-9147-57d2cb08792e"
}
DescribeKey
Amazon Keyspaces uses a DescribeKey operation to determine whether the KMS key you
selected exists in the account and Region.
The event that records the DescribeKey operation is similar to the following example event.
The user is the Amazon Keyspaces service account. The parameters include the ARN of the
customer managed key and a key specifier that requires a 256-bit key.
Encryption at rest 641

Amazon Keyspaces (for Apache Cassandra) Developer Guide
{
"eventVersion": "1.08",
"userIdentity": {
"type": "IAMUser",
"principalId": "AIDAZ3FNIIVIZZ6H7CFQG",
"arn": "arn:aws:iam::123SAMPLE012:user/admin",
"accountId": "123SAMPLE012",
"accessKeyId": "AKIAIOSFODNN7EXAMPLE",
"userName": "admin",
"sessionContext": {
"sessionIssuer": {},
"webIdFederationData": {},
"attributes": {
"mfaAuthenticated": "false",
"creationDate": "2021-04-16T04:55:42Z"
}
},
"invokedBy": "AWS Internal"
},
"eventTime": "2021-04-16T04:55:58Z",
"eventSource": "kms.amazonaws.com",
"eventName": "DescribeKey",
"awsRegion": "us-east-1",
"sourceIPAddress": "AWS Internal",
"userAgent": "AWS Internal",
"requestParameters": {
"keyId": "arn:aws:kms:eu-
west-1:5555555555555:key/11111111-1111-111-1111-111111111111"
},
"responseElements": null,
"requestID": "c25a8105-050b-4f52-8358-6e872fb03a6c",
"eventID": "0d96420e-707e-41b9-9118-56585a669658",
"readOnly": true,
"resources": [
{
"accountId": "123SAMPLE012",
"type": "AWS::KMS::Key",
"ARN": "arn:aws:kms:eu-
west-1:5555555555555:key/11111111-1111-111-1111-111111111111"
}
],
"eventType": "AwsApiCall",
"managementEvent": true,
Encryption at rest 642

Amazon Keyspaces (for Apache Cassandra) Developer Guide
"eventCategory": "Management",
"recipientAccountId": "123SAMPLE012"
}
Decrypt
When you access an Amazon Keyspaces table, Amazon Keyspaces needs to decrypt the table key
so that it can decrypt the keys below it in the hierarchy. It then decrypts the data in the table.
To decrypt the table key, Amazon Keyspaces sends a Decrypt request to AWS KMS that specifies
the KMS key for the table.
The event that records the Decrypt operation is similar to the following example event. The
user is the principal in your AWS account who is accessing the table. The parameters include
the encrypted table key (as a ciphertext blob) and the encryption context that identifies the
table and the AWS account. AWS KMS derives the ID of the customer managed key from the
ciphertext.
{
"eventVersion": "1.08",
"userIdentity": {
"type": "AWSService",
"invokedBy": "AWS Internal"
},
"eventTime": "2021-04-16T05:29:44Z",
"eventSource": "kms.amazonaws.com",
"eventName": "Decrypt",
"awsRegion": "us-east-1",
"sourceIPAddress": "AWS Internal",
"userAgent": "AWS Internal",
"requestParameters": {
"encryptionContext": {
"aws:cassandra:keyspaceName": "my_keyspace",
"aws:cassandra:tableName": "my_table",
"aws:cassandra:subscriberId": "123SAMPLE012"
},
"encryptionAlgorithm": "SYMMETRIC_DEFAULT"
},
"responseElements": null,
"requestID": "50e80373-83c9-4034-8226-5439e1c9b259",
"eventID": "8db9788f-04a5-4ae2-90c9-15c79c411b6b",
"readOnly": true,
"resources": [
Encryption at rest 643

Amazon Keyspaces (for Apache Cassandra) Developer Guide
{
"accountId": "123SAMPLE012",
"type": "AWS::KMS::Key",
"ARN": "arn:aws:kms:eu-
west-1:5555555555555:key/11111111-1111-111-1111-111111111111"
}
],
"eventType": "AwsApiCall",
"managementEvent": true,
"eventCategory": "Management",
"recipientAccountId": "123SAMPLE012",
"sharedEventID": "7ed99e2d-910a-4708-a4e3-0180d8dbb68e"
}
CreateGrant
When you use a customer managed key to protect your Amazon Keyspaces table, Amazon
Keyspaces uses grants to allow the service to perform continuous data protection and
maintenance and durability tasks. These grants aren't required on AWS owned keys.
The grants that Amazon Keyspaces creates are specific to a table. The principal in the
CreateGrant request is the user who created the table.
The event that records the CreateGrant operation is similar to the following example event.
The parameters include the ARN of the customer managed key for the table, the grantee
principal and retiring principal (the Amazon Keyspaces service), and the operations that the
grant covers. It also includes a constraint that requires all encryption operations use the
specified encryption context.
{
"eventVersion": "1.08",
"userIdentity": {
"type": "IAMUser",
"principalId": "AIDAZ3FNIIVIZZ6H7CFQG",
"arn": "arn:aws:iam::arn:aws:kms:eu-
west-1:5555555555555:key/11111111-1111-111-1111-111111111111:user/admin",
"accountId": "arn:aws:kms:eu-
west-1:5555555555555:key/11111111-1111-111-1111-111111111111",
"accessKeyId": "AKIAI44QH8DHBEXAMPLE",
"userName": "admin",
"sessionContext": {
"sessionIssuer": {},
"webIdFederationData": {},
Encryption at rest 644

Amazon Keyspaces (for Apache Cassandra) Developer Guide
"attributes": {
"mfaAuthenticated": "false",
"creationDate": "2021-04-16T04:55:42Z"
}
},
"invokedBy": "AWS Internal"
},
"eventTime": "2021-04-16T05:11:10Z",
"eventSource": "kms.amazonaws.com",
"eventName": "CreateGrant",
"awsRegion": "us-east-1",
"sourceIPAddress": "AWS Internal",
"userAgent": "AWS Internal",
"requestParameters": {
"keyId": "a7d328af-215e-4661-9a69-88c858909f20",
"operations": [
"DescribeKey",
"GenerateDataKey",
"Decrypt",
"Encrypt",
"ReEncryptFrom",
"ReEncryptTo",
"RetireGrant"
],
"constraints": {
"encryptionContextSubset": {
"aws:cassandra:keyspaceName": "my_keyspace",
"aws:cassandra:tableName": "my_table",
"aws:cassandra:subscriberId": "123SAMPLE012"
}
},
"retiringPrincipal": "cassandratest.us-east-1.amazonaws.com",
"granteePrincipal": "cassandratest.us-east-1.amazonaws.com"
},
"responseElements": {
"grantId":
"18e4235f1b07f289762a31a1886cb5efd225f069280d4f76cd83b9b9b5501013"
},
"requestID": "b379a767-1f9b-48c3-b731-fb23e865e7f7",
"eventID": "29ee1fd4-28f2-416f-a419-551910d20291",
"readOnly": false,
"resources": [
{
"accountId": "123SAMPLE012",
Encryption at rest 645

Amazon Keyspaces (for Apache Cassandra) Developer Guide
"type": "AWS::KMS::Key",
"ARN": "arn:aws:kms:eu-
west-1:5555555555555:key/11111111-1111-111-1111-111111111111"
}
],
"eventType": "AwsApiCall",
"managementEvent": true,
"eventCategory": "Management",
"recipientAccountId": "123SAMPLE012"
}
Encryption in transit in Amazon Keyspaces
Amazon Keyspaces only accepts secure connections using Transport Layer Security (TLS).
Encryption in transit provides an additional layer of data protection by encrypting your data
as it travels to and from Amazon Keyspaces. Organizational policies, industry or government
regulations, and compliance requirements often require the use of encryption in transit to increase
the data security of your applications when they transmit data over the network.
To learn how to encrypt cqlsh connections to Amazon Keyspaces using TLS, see the section called
“How to manually configure cqlsh connections for TLS”. To learn how to use TLS encryption with
client drivers, see the section called “Using a Cassandra client driver”.
Internetwork traffic privacy in Amazon Keyspaces
This topic describes how Amazon Keyspaces (for Apache Cassandra) secures connections from
on-premises applications to Amazon Keyspaces and between Amazon Keyspaces and other AWS
resources within the same AWS Region.
Traffic between service and on-premises clients and applications
You have two connectivity options between your private network and AWS:
• An AWS Site-to-Site VPN connection. For more information, see What is AWS Site-to-Site VPN?
in the AWS Site-to-Site VPN User Guide.
• An AWS Direct Connect connection. For more information, see What is AWS Direct Connect? in
the AWS Direct Connect User Guide.
Encryption in transit 646

Amazon Keyspaces (for Apache Cassandra) Developer Guide
As a managed service, Amazon Keyspaces (for Apache Cassandra) is protected by AWS
global network security. For information about AWS security services and how AWS protects
infrastructure, see AWS Cloud Security. To design your AWS environment using the best practices
for infrastructure security, see Infrastructure Protection in Security Pillar AWS Well‐Architected
Framework.
You use AWS published API calls to access Amazon Keyspaces through the network. Clients must
support the following:
• Transport Layer Security (TLS). We require TLS 1.2 and recommend TLS 1.3.
• Cipher suites with perfect forward secrecy (PFS) such as DHE (Ephemeral Diffie-Hellman) or
ECDHE (Elliptic Curve Ephemeral Diffie-Hellman). Most modern systems such as Java 7 and later
support these modes.
Additionally, requests must be signed by using an access key ID and a secret access key that is
associated with an IAM principal. Or you can use the AWS Security Token Service (AWS STS) to
generate temporary security credentials to sign requests.
Amazon Keyspaces supports two methods of authenticating client requests. The first method uses
service-specific credentials, which are password based credentials generated for a specific IAM user.
You can create and manage the password using the IAM console, the AWS CLI, or the AWS API. For
more information, see Using IAM with Amazon Keyspaces.
The second method uses an authentication plugin for the open-source DataStax Java Driver for
Cassandra. This plugin enables IAM users, roles, and federated identities to add authentication
information to Amazon Keyspaces (for Apache Cassandra) API requests using the AWS Signature
Version 4 process (SigV4). For more information, see the section called “Create IAM credentials for
AWS authentication”.
Traffic between AWS resources in the same Region
Interface VPC endpoints enable private communication between your virtual private cloud (VPC)
running in Amazon VPC and Amazon Keyspaces. Interface VPC endpoints are powered by AWS
PrivateLink, which is an AWS service that enables private communication between VPCs and AWS
services. AWS PrivateLink enables this by using an elastic network interface with private IPs in
your VPC so that network traffic does not leave the Amazon network. Interface VPC endpoints
don't require an internet gateway, NAT device, VPN connection, or AWS Direct Connect connection.
For more information, see Amazon Virtual Private Cloud and Interface VPC endpoints (AWS
Internetwork traffic privacy 647

Amazon Keyspaces (for Apache Cassandra) Developer Guide
PrivateLink). For example policies, see the section called “Using interface VPC endpoints for
Amazon Keyspaces”.
AWS Identity and Access Management for Amazon Keyspaces
AWS Identity and Access Management (IAM) is an AWS service that helps an administrator securely
control access to AWS resources. IAM administrators control who can be authenticated (signed in)
and authorized (have permissions) to use Amazon Keyspaces resources. IAM is an AWS service that
you can use with no additional charge.
Topics
• Audience
• Authenticating with identities
• Managing access using policies
• How Amazon Keyspaces works with IAM
• Amazon Keyspaces identity-based policy examples
• AWS managed policies for Amazon Keyspaces
• Troubleshooting Amazon Keyspaces identity and access
• Using service-linked roles for Amazon Keyspaces
Audience
How you use AWS Identity and Access Management (IAM) differs, depending on the work that you
do in Amazon Keyspaces.
Service user – If you use the Amazon Keyspaces service to do your job, then your administrator
provides you with the credentials and permissions that you need. As you use more Amazon
Keyspaces features to do your work, you might need additional permissions. Understanding how
access is managed can help you request the right permissions from your administrator. If you
cannot access a feature in Amazon Keyspaces, see Troubleshooting Amazon Keyspaces identity and
access.
Service administrator – If you're in charge of Amazon Keyspaces resources at your company, you
probably have full access to Amazon Keyspaces. It's your job to determine which Amazon Keyspaces
features and resources your service users should access. You must then submit requests to your IAM
administrator to change the permissions of your service users. Review the information on this page
AWS Identity and Access Management 648

Amazon Keyspaces (for Apache Cassandra) Developer Guide
to understand the basic concepts of IAM. To learn more about how your company can use IAM with
Amazon Keyspaces, see How Amazon Keyspaces works with IAM.
IAM administrator – If you're an IAM administrator, you might want to learn details about how you
can write policies to manage access to Amazon Keyspaces. To view example Amazon Keyspaces
identity-based policies that you can use in IAM, see Amazon Keyspaces identity-based policy
examples.
Authenticating with identities
Authentication is how you sign in to AWS using your identity credentials. You must be
authenticated (signed in to AWS) as the AWS account root user, as an IAM user, or by assuming an
IAM role.
You can sign in to AWS as a federated identity by using credentials provided through an identity
source. AWS IAM Identity Center (IAM Identity Center) users, your company's single sign-on
authentication, and your Google or Facebook credentials are examples of federated identities.
When you sign in as a federated identity, your administrator previously set up identity federation
using IAM roles. When you access AWS by using federation, you are indirectly assuming a role.
Depending on the type of user you are, you can sign in to the AWS Management Console or the
AWS access portal. For more information about signing in to AWS, see How to sign in to your AWS
account in the AWS Sign-In User Guide.
If you access AWS programmatically, AWS provides a software development kit (SDK) and a
command line interface (CLI) to cryptographically sign your requests by using your credentials. If
you don't use AWS tools, you must sign requests yourself. For more information about using the
recommended method to sign requests yourself, see Signing AWS API requests in the IAM User
Guide.
Regardless of the authentication method that you use, you might be required to provide additional
security information. For example, AWS recommends that you use multi-factor authentication
(MFA) to increase the security of your account. To learn more, see Multi-factor authentication in the
AWS IAM Identity Center User Guide and Using multi-factor authentication (MFA) in AWS in the IAM
User Guide.
AWS account root user
When you create an AWS account, you begin with one sign-in identity that has complete access to
all AWS services and resources in the account. This identity is called the AWS account root user and
Authenticating with identities 649

Amazon Keyspaces (for Apache Cassandra) Developer Guide
is accessed by signing in with the email address and password that you used to create the account.
We strongly recommend that you don't use the root user for your everyday tasks. Safeguard your
root user credentials and use them to perform the tasks that only the root user can perform. For
the complete list of tasks that require you to sign in as the root user, see Tasks that require root
user credentials in the IAM User Guide.
IAM users and groups
An IAM user is an identity within your AWS account that has specific permissions for a single person
or application. Where possible, we recommend relying on temporary credentials instead of creating
IAM users who have long-term credentials such as passwords and access keys. However, if you have
specific use cases that require long-term credentials with IAM users, we recommend that you rotate
access keys. For more information, see Rotate access keys regularly for use cases that require long-
term credentials in the IAM User Guide.
An IAM group is an identity that specifies a collection of IAM users. You can't sign in as a group. You
can use groups to specify permissions for multiple users at a time. Groups make permissions easier
to manage for large sets of users. For example, you could have a group named IAMAdmins and give
that group permissions to administer IAM resources.
Users are different from roles. A user is uniquely associated with one person or application, but
a role is intended to be assumable by anyone who needs it. Users have permanent long-term
credentials, but roles provide temporary credentials. To learn more, see When to create an IAM user
(instead of a role) in the IAM User Guide.
IAM roles
An IAM role is an identity within your AWS account that has specific permissions. It is similar to an
IAM user, but is not associated with a specific person. You can temporarily assume an IAM role in
the AWS Management Console by switching roles. You can assume a role by calling an AWS CLI or
AWS API operation or by using a custom URL. For more information about methods for using roles,
see Using IAM roles in the IAM User Guide.
IAM roles with temporary credentials are useful in the following situations:
• Federated user access – To assign permissions to a federated identity, you create a role
and define permissions for the role. When a federated identity authenticates, the identity
is associated with the role and is granted the permissions that are defined by the role. For
information about roles for federation, see Creating a role for a third-party Identity Provider
Authenticating with identities 650

Amazon Keyspaces (for Apache Cassandra) Developer Guide
in the IAM User Guide. If you use IAM Identity Center, you configure a permission set. To control
what your identities can access after they authenticate, IAM Identity Center correlates the
permission set to a role in IAM. For information about permissions sets, see Permission sets in
the AWS IAM Identity Center User Guide.
• Temporary IAM user permissions – An IAM user or role can assume an IAM role to temporarily
take on different permissions for a specific task.
• Cross-account access – You can use an IAM role to allow someone (a trusted principal) in a
different account to access resources in your account. Roles are the primary way to grant cross-
account access. However, with some AWS services, you can attach a policy directly to a resource
(instead of using a role as a proxy). To learn the difference between roles and resource-based
policies for cross-account access, see Cross account resource access in IAM in the IAM User Guide.
• Cross-service access – Some AWS services use features in other AWS services. For example, when
you make a call in a service, it's common for that service to run applications in Amazon EC2 or
store objects in Amazon S3. A service might do this using the calling principal's permissions,
using a service role, or using a service-linked role.
• Forward access sessions (FAS) – When you use an IAM user or role to perform actions in
AWS, you are considered a principal. When you use some services, you might perform an
action that then initiates another action in a different service. FAS uses the permissions of the
principal calling an AWS service, combined with the requesting AWS service to make requests
to downstream services. FAS requests are only made when a service receives a request that
requires interactions with other AWS services or resources to complete. In this case, you must
have permissions to perform both actions. For policy details when making FAS requests, see
Forward access sessions.
• Service role – A service role is an IAM role that a service assumes to perform actions on your
behalf. An IAM administrator can create, modify, and delete a service role from within IAM. For
more information, see Creating a role to delegate permissions to an AWS service in the IAM
User Guide.
• Service-linked role – A service-linked role is a type of service role that is linked to an AWS
service. The service can assume the role to perform an action on your behalf. Service-linked
roles appear in your AWS account and are owned by the service. An IAM administrator can
view, but not edit the permissions for service-linked roles.
• Applications running on Amazon EC2 – You can use an IAM role to manage temporary
credentials for applications that are running on an EC2 instance and making AWS CLI or AWS API
requests. This is preferable to storing access keys within the EC2 instance. To assign an AWS role
to an EC2 instance and make it available to all of its applications, you create an instance profile
Authenticating with identities 651

Amazon Keyspaces (for Apache Cassandra) Developer Guide
that is attached to the instance. An instance profile contains the role and enables programs that
are running on the EC2 instance to get temporary credentials. For more information, see Using
an IAM role to grant permissions to applications running on Amazon EC2 instances in the IAM
User Guide.
To learn whether to use IAM roles or IAM users, see When to create an IAM role (instead of a user)
in the IAM User Guide.
Managing access using policies
You control access in AWS by creating policies and attaching them to AWS identities or resources.
A policy is an object in AWS that, when associated with an identity or resource, defines their
permissions. AWS evaluates these policies when a principal (user, root user, or role session) makes
a request. Permissions in the policies determine whether the request is allowed or denied. Most
policies are stored in AWS as JSON documents. For more information about the structure and
contents of JSON policy documents, see Overview of JSON policies in the IAM User Guide.
Administrators can use AWS JSON policies to specify who has access to what. That is, which
principal can perform actions on what resources, and under what conditions.
By default, users and roles have no permissions. To grant users permission to perform actions on
the resources that they need, an IAM administrator can create IAM policies. The administrator can
then add the IAM policies to roles, and users can assume the roles.
IAM policies define permissions for an action regardless of the method that you use to perform the
operation. For example, suppose that you have a policy that allows the iam:GetRole action. A
user with that policy can get role information from the AWS Management Console, the AWS CLI, or
the AWS API.
Identity-based policies
Identity-based policies are JSON permissions policy documents that you can attach to an identity,
such as an IAM user, group of users, or role. These policies control what actions users and roles can
perform, on which resources, and under what conditions. To learn how to create an identity-based
policy, see Creating IAM policies in the IAM User Guide.
Identity-based policies can be further categorized as inline policies or managed policies. Inline
policies are embedded directly into a single user, group, or role. Managed policies are standalone
policies that you can attach to multiple users, groups, and roles in your AWS account. Managed
Managing access using policies 652

Amazon Keyspaces (for Apache Cassandra) Developer Guide
policies include AWS managed policies and customer managed policies. To learn how to choose
between a managed policy or an inline policy, see Choosing between managed policies and inline
policies in the IAM User Guide.
Resource-based policies
Resource-based policies are JSON policy documents that you attach to a resource. Examples of
resource-based policies are IAM role trust policies and Amazon S3 bucket policies. In services that
support resource-based policies, service administrators can use them to control access to a specific
resource. For the resource where the policy is attached, the policy defines what actions a specified
principal can perform on that resource and under what conditions. You must specify a principal
in a resource-based policy. Principals can include accounts, users, roles, federated users, or AWS
services.
Resource-based policies are inline policies that are located in that service. You can't use AWS
managed policies from IAM in a resource-based policy.
Access control lists (ACLs)
Access control lists (ACLs) control which principals (account members, users, or roles) have
permissions to access a resource. ACLs are similar to resource-based policies, although they do not
use the JSON policy document format.
Amazon S3, AWS WAF, and Amazon VPC are examples of services that support ACLs. To learn more
about ACLs, see Access control list (ACL) overview in the Amazon Simple Storage Service Developer
Guide.
Other policy types
AWS supports additional, less-common policy types. These policy types can set the maximum
permissions granted to you by the more common policy types.
• Permissions boundaries – A permissions boundary is an advanced feature in which you set
the maximum permissions that an identity-based policy can grant to an IAM entity (IAM user
or role). You can set a permissions boundary for an entity. The resulting permissions are the
intersection of an entity's identity-based policies and its permissions boundaries. Resource-based
policies that specify the user or role in the Principal field are not limited by the permissions
boundary. An explicit deny in any of these policies overrides the allow. For more information
about permissions boundaries, see Permissions boundaries for IAM entities in the IAM User Guide.
Managing access using policies 653

Amazon Keyspaces (for Apache Cassandra) Developer Guide
• Service control policies (SCPs) – SCPs are JSON policies that specify the maximum permissions
for an organization or organizational unit (OU) in AWS Organizations. AWS Organizations is a
service for grouping and centrally managing multiple AWS accounts that your business owns. If
you enable all features in an organization, then you can apply service control policies (SCPs) to
any or all of your accounts. The SCP limits permissions for entities in member accounts, including
each AWS account root user. For more information about Organizations and SCPs, see Service
control policies in the AWS Organizations User Guide.
• Session policies – Session policies are advanced policies that you pass as a parameter when you
programmatically create a temporary session for a role or federated user. The resulting session's
permissions are the intersection of the user or role's identity-based policies and the session
policies. Permissions can also come from a resource-based policy. An explicit deny in any of these
policies overrides the allow. For more information, see Session policies in the IAM User Guide.
Multiple policy types
When multiple types of policies apply to a request, the resulting permissions are more complicated
to understand. To learn how AWS determines whether to allow a request when multiple policy
types are involved, see Policy evaluation logic in the IAM User Guide.
How Amazon Keyspaces works with IAM
Before you use IAM to manage access to Amazon Keyspaces, you should understand what IAM
features are available to use with Amazon Keyspaces. To get a high-level view of how Amazon
Keyspaces and other AWS services work with IAM, see AWS services that work with IAM in the IAM
User Guide.
Topics
• Amazon Keyspaces identity-based policies
• Amazon Keyspaces resource-based policies
• Authorization based on Amazon Keyspaces tags
• Amazon Keyspaces IAM roles
Amazon Keyspaces identity-based policies
With IAM identity-based policies, you can specify allowed or denied actions and resources as well
as the conditions under which actions are allowed or denied. Amazon Keyspaces supports specific
How Amazon Keyspaces works with IAM 654

Amazon Keyspaces (for Apache Cassandra) Developer Guide
actions and resources, and condition keys. To learn about all of the elements that you use in a
JSON policy, see IAM JSON policy elements reference in the IAM User Guide.
To see the Amazon Keyspaces service-specific resources and actions, and condition context keys
that can be used for IAM permissions policies, see the Actions, resources, and condition keys for
Amazon Keyspaces (for Apache Cassandra) in the Service Authorization Reference.
Actions
Administrators can use AWS JSON policies to specify who has access to what. That is, which
principal can perform actions on what resources, and under what conditions.
The Action element of a JSON policy describes the actions that you can use to allow or deny
access in a policy. Policy actions usually have the same name as the associated AWS API operation.
There are some exceptions, such as permission-only actions that don't have a matching API
operation. There are also some operations that require multiple actions in a policy. These
additional actions are called dependent actions.
Include actions in a policy to grant permissions to perform the associated operation.
Policy actions in Amazon Keyspaces use the following prefix before the action: cassandra:. For
example, to grant someone permission to create an Amazon Keyspaces keyspace with the Amazon
Keyspaces CREATE CQL statement, you include the cassandra:Create action in their policy.
Policy statements must include either an Action or NotAction element. Amazon Keyspaces
defines its own set of actions that describe tasks that you can perform with this service.
To specify multiple actions in a single statement, separate them with commas as follows:
"Action": [
"cassandra:CREATE",
"cassandra:MODIFY"
]
To see a list of Amazon Keyspaces actions, see Actions Defined by Amazon Keyspaces (for Apache
Cassandra) in the Service Authorization Reference.
Resources
Administrators can use AWS JSON policies to specify who has access to what. That is, which
principal can perform actions on what resources, and under what conditions.
How Amazon Keyspaces works with IAM 655
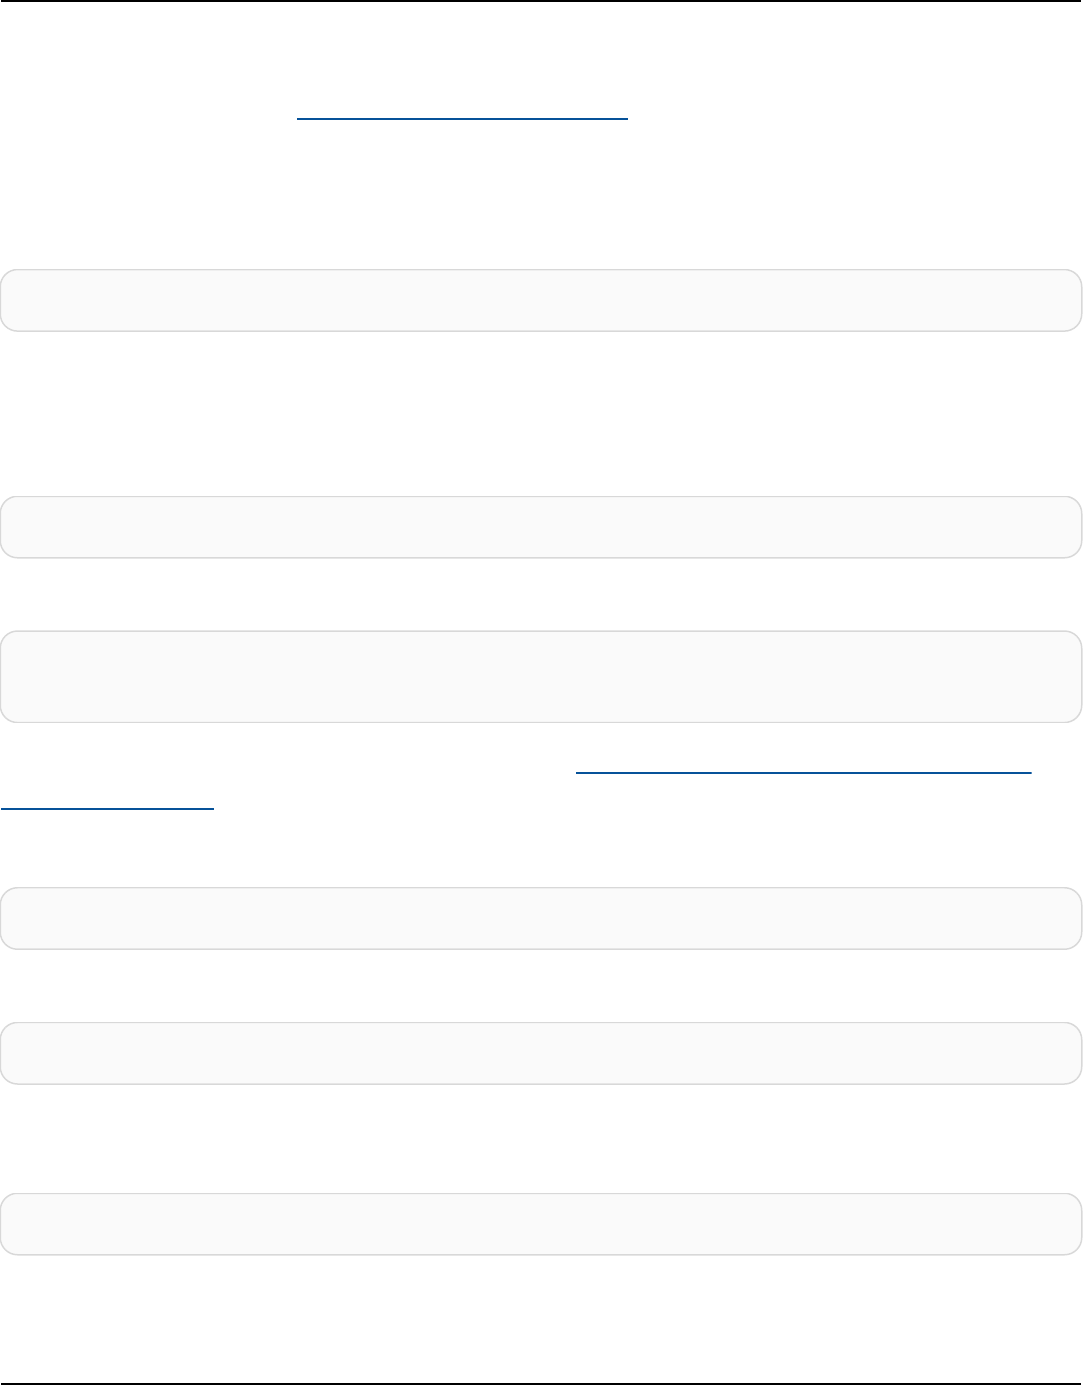
Amazon Keyspaces (for Apache Cassandra) Developer Guide
The Resource JSON policy element specifies the object or objects to which the action applies.
Statements must include either a Resource or a NotResource element. As a best practice,
specify a resource using its Amazon Resource Name (ARN). You can do this for actions that support
a specific resource type, known as resource-level permissions.
For actions that don't support resource-level permissions, such as listing operations, use a wildcard
(*) to indicate that the statement applies to all resources.
"Resource": "*"
In Amazon Keyspaces keyspaces and tables can be used in the Resource element of IAM
permissions.
The Amazon Keyspaces keyspace resource has the following ARN:
arn:${Partition}:cassandra:${Region}:${Account}:/keyspace/${KeyspaceName}/
The Amazon Keyspaces table resource has the following ARN:
arn:${Partition}:cassandra:${Region}:${Account}:/keyspace/${KeyspaceName}/table/
${tableName}
For more information about the format of ARNs, see Amazon Resource Names (ARNs) and AWS
service namespaces.
For example, to specify the mykeyspace keyspace in your statement, use the following ARN:
"Resource": "arn:aws:cassandra:us-east-1:123456789012:/keyspace/mykeyspace/"
To specify all keyspaces that belong to a specific account, use the wildcard (*):
"Resource": "arn:aws:cassandra:us-east-1:123456789012:/keyspace/*"
Some Amazon Keyspaces actions, such as those for creating resources, cannot be performed on a
specific resource. In those cases, you must use the wildcard (*).
"Resource": "*"
To connect to Amazon Keyspaces programmatically with a standard driver, a principal must
have SELECT access to the system tables, because most drivers read the system keyspaces/
How Amazon Keyspaces works with IAM 656

Amazon Keyspaces (for Apache Cassandra) Developer Guide
tables on connection. For example, to grant SELECT permissions to an IAM user for mytable
in mykeyspace, the principal must have permissions to read both, mytable and the system
keyspace. To specify multiple resources in a single statement, separate the ARNs with commas.
"Resource": "arn:aws:cassandra:us-east-1:111122223333:/keyspace/mykeyspace/table/
mytable",
"arn:aws:cassandra:us-east-1:111122223333:/keyspace/system*"
To see a list of Amazon Keyspaces resource types and their ARNs, see Resources Defined by Amazon
Keyspaces (for Apache Cassandra) in the Service Authorization Reference. To learn with which
actions you can specify the ARN of each resource, see Actions Defined by Amazon Keyspaces (for
Apache Cassandra).
Condition keys
Administrators can use AWS JSON policies to specify who has access to what. That is, which
principal can perform actions on what resources, and under what conditions.
The Condition element (or Condition block) lets you specify conditions in which a statement
is in effect. The Condition element is optional. You can create conditional expressions that use
condition operators, such as equals or less than, to match the condition in the policy with values in
the request.
If you specify multiple Condition elements in a statement, or multiple keys in a single
Condition element, AWS evaluates them using a logical AND operation. If you specify multiple
values for a single condition key, AWS evaluates the condition using a logical OR operation. All of
the conditions must be met before the statement's permissions are granted.
You can also use placeholder variables when you specify conditions. For example, you can grant
an IAM user permission to access a resource only if it is tagged with their IAM user name. For more
information, see IAM policy elements: variables and tags in the IAM User Guide.
AWS supports global condition keys and service-specific condition keys. To see all AWS global
condition keys, see AWS global condition context keys in the IAM User Guide.
Amazon Keyspaces defines its own set of condition keys and also supports using some global
condition keys. To see all AWS global condition keys, see AWS global condition context keys in the
IAM User Guide.
How Amazon Keyspaces works with IAM 657

Amazon Keyspaces (for Apache Cassandra) Developer Guide
All Amazon Keyspaces actions support the aws:RequestTag/${TagKey}, the
aws:ResourceTag/${TagKey}, and the aws:TagKeys condition keys. For more information, see
the section called “ Amazon Keyspaces resource access based on tags”.
To see a list of Amazon Keyspaces condition keys, see Condition Keys for Amazon Keyspaces (for
Apache Cassandra) in the Service Authorization Reference. To learn with which actions and resources
you can use a condition key, see Actions Defined by Amazon Keyspaces (for Apache Cassandra).
Examples
To view examples of Amazon Keyspaces identity-based policies, see Amazon Keyspaces identity-
based policy examples.
Amazon Keyspaces resource-based policies
Amazon Keyspaces does not support resource-based policies. To view an example of a detailed
resource-based policy page, see https://docs.aws.amazon.com/lambda/latest/dg/access-control-
resource-based.html.
Authorization based on Amazon Keyspaces tags
You can manage access to your Amazon Keyspaces resources by using tags. To manage resource
access based on tags, you provide tag information in the condition element of a policy using
the cassandra:ResourceTag/key-name, aws:RequestTag/key-name, or aws:TagKeys
condition keys. For more information about tagging Amazon Keyspaces resources, see the section
called “Working with tags”.
To view example identity-based policies for limiting access to a resource based on the tags on that
resource, see Amazon Keyspaces resource access based on tags.
Amazon Keyspaces IAM roles
An IAM role is an entity within your AWS account that has specific permissions.
Using temporary credentials with Amazon Keyspaces
You can use temporary credentials to sign in with federation, to assume an IAM role, or to assume
a cross-account role. You obtain temporary security credentials by calling AWS STS API operations
such as AssumeRole or GetFederationToken.
How Amazon Keyspaces works with IAM 658

Amazon Keyspaces (for Apache Cassandra) Developer Guide
Amazon Keyspaces supports using temporary credentials with the AWS Signature Version 4 (SigV4)
authentication plugin available from the Github repo for the following languages:
• Java: https://github.com/aws/aws-sigv4-auth-cassandra-java-driver-plugin.
• Node.js: https://github.com/aws/aws-sigv4-auth-cassandra-nodejs-driver-plugin.
• Python: https://github.com/aws/aws-sigv4-auth-cassandra-python-driver-plugin.
• Go: https://github.com/aws/aws-sigv4-auth-cassandra-gocql-driver-plugin.
For examples and tutorials that implement the authentication plugin to access Amazon Keyspaces
programmatically, see the section called “Using a Cassandra client driver”.
Service-linked roles
Service-linked roles allow AWS services to access resources in other services to complete an action
on your behalf. Service-linked roles appear in your IAM account and are owned by the service. An
IAM administrator can view but not edit the permissions for service-linked roles.
For details about creating or managing Amazon Keyspaces service-linked roles, see the section
called “Using service-linked roles”.
Service roles
Amazon Keyspaces does not support service roles.
Amazon Keyspaces identity-based policy examples
By default, IAM users and roles don't have permission to create or modify Amazon Keyspaces
resources. They also can't perform tasks using the console, CQLSH, AWS CLI, or AWS API. An IAM
administrator must create IAM policies that grant users and roles permission to perform specific
API operations on the specified resources they need. The administrator must then attach those
policies to the IAM users or groups that require those permissions.
To learn how to create an IAM identity-based policy using these example JSON policy documents,
see Creating policies on the JSON tab in the IAM User Guide.
Topics
• Policy best practices
• Using the Amazon Keyspaces console
Identity-based policy examples 659

Amazon Keyspaces (for Apache Cassandra) Developer Guide
• Allow users to view their own permissions
• Accessing Amazon Keyspaces tables
• Amazon Keyspaces resource access based on tags
Policy best practices
Identity-based policies determine whether someone can create, access, or delete Amazon
Keyspaces resources in your account. These actions can incur costs for your AWS account. When you
create or edit identity-based policies, follow these guidelines and recommendations:
• Get started with AWS managed policies and move toward least-privilege permissions – To
get started granting permissions to your users and workloads, use the AWS managed policies
that grant permissions for many common use cases. They are available in your AWS account. We
recommend that you reduce permissions further by defining AWS customer managed policies
that are specific to your use cases. For more information, see AWS managed policies or AWS
managed policies for job functions in the IAM User Guide.
• Apply least-privilege permissions – When you set permissions with IAM policies, grant only the
permissions required to perform a task. You do this by defining the actions that can be taken on
specific resources under specific conditions, also known as least-privilege permissions. For more
information about using IAM to apply permissions, see Policies and permissions in IAM in the
IAM User Guide.
• Use conditions in IAM policies to further restrict access – You can add a condition to your
policies to limit access to actions and resources. For example, you can write a policy condition to
specify that all requests must be sent using SSL. You can also use conditions to grant access to
service actions if they are used through a specific AWS service, such as AWS CloudFormation. For
more information, see IAM JSON policy elements: Condition in the IAM User Guide.
• Use IAM Access Analyzer to validate your IAM policies to ensure secure and functional
permissions – IAM Access Analyzer validates new and existing policies so that the policies
adhere to the IAM policy language (JSON) and IAM best practices. IAM Access Analyzer provides
more than 100 policy checks and actionable recommendations to help you author secure and
functional policies. For more information, see IAM Access Analyzer policy validation in the IAM
User Guide.
• Require multi-factor authentication (MFA) – If you have a scenario that requires IAM users
or a root user in your AWS account, turn on MFA for additional security. To require MFA when
API operations are called, add MFA conditions to your policies. For more information, see
Configuring MFA-protected API access in the IAM User Guide.
Identity-based policy examples 660

Amazon Keyspaces (for Apache Cassandra) Developer Guide
For more information about best practices in IAM, see Security best practices in IAM in the IAM User
Guide.
Using the Amazon Keyspaces console
Amazon Keyspaces doesn't require specific permissions to access the Amazon Keyspaces console.
You need at least read-only permissions to list and view details about the Amazon Keyspaces
resources in your AWS account. If you create an identity-based policy that is more restrictive than
the minimum required permissions, the console won't function as intended for entities (IAM users
or roles) with that policy.
Two AWS managed policies are available to the entities for Amazon Keyspaces console access.
• AmazonKeyspacesReadOnlyAccess_v2 – This policy grants read-only access to Amazon
Keyspaces.
• AmazonKeyspacesFullAccess – This policy grants permissions to use Amazon Keyspaces with full
access to all features.
For more information about Amazon Keyspaces managed policies, see the section called “AWS
managed policies”.
Allow users to view their own permissions
This example shows how you might create a policy that allows IAM users to view the inline and
managed policies that are attached to their user identity. This policy includes permissions to
complete this action on the console or programmatically using the AWS CLI or AWS API.
{
"Version": "2012-10-17",
"Statement": [
{
"Sid": "ViewOwnUserInfo",
"Effect": "Allow",
"Action": [
"iam:GetUserPolicy",
"iam:ListGroupsForUser",
"iam:ListAttachedUserPolicies",
"iam:ListUserPolicies",
"iam:GetUser"
],
"Resource": ["arn:aws:iam::*:user/${aws:username}"]
Identity-based policy examples 661
Amazon Keyspaces (for Apache Cassandra) Developer Guide
},
{
"Sid": "NavigateInConsole",
"Effect": "Allow",
"Action": [
"iam:GetGroupPolicy",
"iam:GetPolicyVersion",
"iam:GetPolicy",
"iam:ListAttachedGroupPolicies",
"iam:ListGroupPolicies",
"iam:ListPolicyVersions",
"iam:ListPolicies",
"iam:ListUsers"
],
"Resource": "*"
}
]
}
Accessing Amazon Keyspaces tables
The following is a sample policy that grants read-only (SELECT) access to the Amazon Keyspaces
system tables. For all samples, replace the Region and account ID in the Amazon Resource Name
(ARN) with your own.
Note
To connect with a standard driver, a user must have at least SELECT access to the system
tables, because most drivers read the system keyspaces/tables on connection.
{
"Version":"2012-10-17",
"Statement":[
{
"Effect":"Allow",
"Action":[
"cassandra:Select"
],
"Resource":[
"arn:aws:cassandra:us-east-1:111122223333:/keyspace/system*"
]
Identity-based policy examples 662

Amazon Keyspaces (for Apache Cassandra) Developer Guide
}
]
}
The following sample policy adds read-only access to the user table mytable in the keyspace
mykeyspace.
{
"Version":"2012-10-17",
"Statement":[
{
"Effect":"Allow",
"Action":[
"cassandra:Select"
],
"Resource":[
"arn:aws:cassandra:us-east-1:111122223333:/keyspace/mykeyspace/table/
mytable",
"arn:aws:cassandra:us-east-1:111122223333:/keyspace/system*"
]
}
]
}
The following sample policy assigns read/write access to a user table and read access to the system
tables.
Note
System tables are always read-only.
{
"Version":"2012-10-17",
"Statement":[
{
"Effect":"Allow",
"Action":[
"cassandra:Select",
"cassandra:Modify"
],
Identity-based policy examples 663

Amazon Keyspaces (for Apache Cassandra) Developer Guide
"Resource":[
"arn:aws:cassandra:us-east-1:111122223333:/keyspace/mykeyspace/table/
mytable",
"arn:aws:cassandra:us-east-1:111122223333:/keyspace/system*"
]
}
]
}
The following sample policy allows a user to create tables in keyspace mykeyspace.
{
"Version":"2012-10-17",
"Statement":[
{
"Effect":"Allow",
"Action":[
"cassandra:Create",
"cassandra:Select"
],
"Resource":[
"arn:aws:cassandra:us-east-1:111122223333:/keyspace/mykeyspace/*",
"arn:aws:cassandra:us-east-1:111122223333:/keyspace/system*"
]
}
]
}
Amazon Keyspaces resource access based on tags
You can use conditions in your identity-based policy to control access to Amazon Keyspaces
resources based on tags. These policies control visibility of the keyspaces and tables in the account.
Note that tag-based permissions for system tables behave differently when requests are made
using the AWS SDK compared to Cassandra Query Language (CQL) API calls via Cassandra drivers
and developer tools.
•
To make List and Get resource requests with the AWS SDK when using tag-based access, the
caller needs to have read access to system tables. For example, Select action permissions are
required to read data from system tables via the GetTable operation. If the caller has only tag-
based access to a specific table, an operation that requires additional access to a system table
will fail.
Identity-based policy examples 664

Amazon Keyspaces (for Apache Cassandra) Developer Guide
• For compatibility with established Cassandra driver behavior, tag-based authorization policies
are not enforced when performing operations on system tables using Cassandra Query Language
(CQL) API calls via Cassandra drivers and developer tools.
The following example shows how you can create a policy that grants permissions to a user to view
a table if the table's Owner contains the value of that user's user name. In this example you also
give read access to the system tables.
{
"Version":"2012-10-17",
"Statement":[
{
"Sid":"ReadOnlyAccessTaggedTables",
"Effect":"Allow",
"Action":"cassandra:Select",
"Resource":[
"arn:aws:cassandra:us-east-1:111122223333:/keyspace/mykeyspace/table/*",
"arn:aws:cassandra:us-east-1:111122223333:/keyspace/system*"
],
"Condition":{
"StringEquals":{
"aws:ResourceTag/Owner":"${aws:username}"
}
}
}
]
}
You can attach this policy to the IAM users in your account. If a user named richard-roe
attempts to view an Amazon Keyspaces table, the table must be tagged Owner=richard-roe or
owner=richard-roe. Otherwise, he is denied access. The condition tag key Owner matches both
Owner and owner because condition key names are not case-sensitive. For more information, see
IAM JSON policy elements: Condition in the IAM User Guide.
The following policy grants permissions to a user to create tables with tags if the table's Owner
contains the value of that user's user name.
{
"Version": "2012-10-17",
"Statement": [
Identity-based policy examples 665

Amazon Keyspaces (for Apache Cassandra) Developer Guide
{
"Sid": "CreateTagTableUser",
"Effect": "Allow",
"Action": [
"cassandra:Create",
"cassandra:TagResource"
],
"Resource": "arn:aws:cassandra:us-east-1:111122223333:/keyspace/mykeyspace/
table/*",
"Condition":{
"StringEquals":{
"aws:RequestTag/Owner":"${aws:username}"
}
}
}
]
}
AWS managed policies for Amazon Keyspaces
An AWS managed policy is a standalone policy that is created and administered by AWS. AWS
managed policies are designed to provide permissions for many common use cases so that you can
start assigning permissions to users, groups, and roles.
Keep in mind that AWS managed policies might not grant least-privilege permissions for your
specific use cases because they're available for all AWS customers to use. We recommend that you
reduce permissions further by defining customer managed policies that are specific to your use
cases.
You cannot change the permissions defined in AWS managed policies. If AWS updates the
permissions defined in an AWS managed policy, the update affects all principal identities (users,
groups, and roles) that the policy is attached to. AWS is most likely to update an AWS managed
policy when a new AWS service is launched or new API operations become available for existing
services.
For more information, see AWS managed policies in the IAM User Guide.
AWS managed policies 666

Amazon Keyspaces (for Apache Cassandra) Developer Guide
AWS managed policy: AmazonKeyspacesReadOnlyAccess_v2
You can attach the AmazonKeyspacesReadOnlyAccess_v2 policy to your IAM identities.
This policy grants read-only access to Amazon Keyspaces and includes the required permissions
when connecting through private VPC endpoints.
Permissions details
This policy includes the following permissions.
•
Amazon Keyspaces – Provides read-only access to Amazon Keyspaces.
•
Application Auto Scaling – Allows principals to view configurations from Application Auto
Scaling. This is required so that users can view automatic scaling policies that are attached to a
table.
•
CloudWatch – Allows principals to view metric data and alarms configured in CloudWatch.
This is required so users can view the billable table size and CloudWatch alarms that have been
configured for a table.
•
AWS KMS – Allows principals to view keys configured in AWS KMS. This is required so users
can view AWS KMS keys that they create and manage in their account to confirm that the key
assigned to Amazon Keyspaces is a symmetric encryption key that is enabled.
•
Amazon EC2 – Allows principals connecting to Amazon Keyspaces through VPC endpoints to
query the VPC on your Amazon EC2 instance for endpoint and network interface information.
This read-only access to the Amazon EC2 instance is required so Amazon Keyspaces can look up
and store available interface VPC endpoints in the system.peers table used for connection
load balancing.
To review the policy in JSON format, see AmazonKeyspacesReadOnlyAccess_v2.
AWS managed policy: AmazonKeyspacesReadOnlyAccess
You can attach the AmazonKeyspacesReadOnlyAccess policy to your IAM identities.
AWS managed policies 667

Amazon Keyspaces (for Apache Cassandra) Developer Guide
This policy grants read-only access to Amazon Keyspaces.
Permissions details
This policy includes the following permissions.
•
Amazon Keyspaces – Provides read-only access to Amazon Keyspaces.
•
Application Auto Scaling – Allows principals to view configurations from Application Auto
Scaling. This is required so that users can view automatic scaling policies that are attached to a
table.
•
CloudWatch – Allows principals to view metric data and alarms configured in CloudWatch.
This is required so users can view the billable table size and CloudWatch alarms that have been
configured for a table.
•
AWS KMS – Allows principals to view keys configured in AWS KMS. This is required so users
can view AWS KMS keys that they create and manage in their account to confirm that the key
assigned to Amazon Keyspaces is a symmetric encryption key that is enabled.
To review the policy in JSON format, see AmazonKeyspacesReadOnlyAccess.
AWS managed policy: AmazonKeyspacesFullAccess
You can attach the AmazonKeyspacesFullAccess policy to your IAM identities.
This policy grants administrative permissions that allow your administrators unrestricted access to
Amazon Keyspaces.
Permissions details
This policy includes the following permissions.
•
Amazon Keyspaces – Allows principals to access any Amazon Keyspaces resource and perform
all actions.
AWS managed policies 668

Amazon Keyspaces (for Apache Cassandra) Developer Guide
•
Application Auto Scaling – Allows principals to create, view, and delete automatic scaling
policies for Amazon Keyspaces tables. This is required so that administrators can manage
automatic scaling policies for Amazon Keyspaces tables.
•
CloudWatch – Allows principals to see the billable table size as well as create, view, and delete
CloudWatch alarms for Amazon Keyspaces automatic scaling policies. This is required so that
administrators can view the billable table size and create a CloudWatch dashboard.
•
IAM – Allows Amazon Keyspaces to create service-linked roles with IAM automatically when the
following features are turned on:
•
Application Auto Scaling – When an administrator enables Application Auto Scaling for
a table, Amazon Keyspaces creates a service-linked role to perform automatic scaling actions
on your behalf.
•
Amazon Keyspaces Multi-Region Replication – When an administrator creates
a multi-Region keyspace, a service-linked role is automatically created to perform data
replication to the selected AWS Regions on your behalf.
For more information about service-linked roles, see the section called “Using service-linked
roles”.
•
AWS KMS – Allows principals to view keys configured in AWS KMS. This is required so that users
can view AWS KMS keys that they create and manage in their account to confirm that the key
assigned to Amazon Keyspaces is a symmetric encryption key that is enabled.
•
Amazon EC2 – Allows principals connecting to Amazon Keyspaces through VPC endpoints to
query the VPC on your Amazon EC2 instance for endpoint and network interface information.
This read-only access to the Amazon EC2 instance is required so Amazon Keyspaces can look up
and store available interface VPC endpoints in the system.peers table used for connection
load balancing.
To review the policy in JSON format, see AmazonKeyspacesFullAccess.
Amazon Keyspaces updates to AWS managed policies
View details about updates to AWS managed policies for Amazon Keyspaces since this service
began tracking these changes. For automatic alerts about changes to this page, subscribe to the
RSS feed on the Document history page.
AWS managed policies 669

Amazon Keyspaces (for Apache Cassandra) Developer Guide
Change Description Date
AmazonKeyspacesFullAccess –
Update to an existing policy
Amazon Keyspaces added
new read-only permissio
ns for clients connecting to
Amazon Keyspaces through
interface VPC endpoints
to access the Amazon EC2
instance to lookup network
information.
Amazon Keyspaces stores
available interface VPC
endpoints in the system.pe
ers table for connectio
n load balancing. For more
information, see the section
called “Using interface VPC
endpoints”.
October 3, 2023
AmazonKeyspacesRea
dOnlyAccess_v2 – New policy
Amazon Keyspaces created
a new policy to add read-
only permissions for clients
connecting to Amazon
Keyspaces through interface
VPC endpoints to access
the Amazon EC2 instance to
lookup network information.
Amazon Keyspaces stores
available interface VPC
endpoints in the system.pe
ers table for connectio
n load balancing. For more
information, see the section
called “Using interface VPC
endpoints”.
September 12, 2023
AWS managed policies 670

Amazon Keyspaces (for Apache Cassandra) Developer Guide
Change Description Date
AmazonKeyspacesFullAccess –
Update to an existing policy
Amazon Keyspaces added
new permissions to allow
Amazon Keyspaces to create
a service-linked role when an
administrator creates a multi-
Region keyspace.
Amazon Keyspaces uses the
service-linked role to perform
data replication tasks on your
behalf. For more information,
see the section called “Multi-
Region Replication”.
June 5, 2023
AmazonKeyspacesRea
dOnlyAccess – Update to an
existing policy
Amazon Keyspaces added
new permissions to allow
users to view the billable size
of a table using CloudWatch.
Amazon Keyspaces integrate
s with Amazon CloudWatch
to allow you to monitor the
billable table size. For more
information, see the section
called “Amazon Keyspaces
metrics and dimensions”.
July 7, 2022
AWS managed policies 671

Amazon Keyspaces (for Apache Cassandra) Developer Guide
Change Description Date
AmazonKeyspacesFullAccess –
Update to an existing policy
Amazon Keyspaces added
new permissions to allow
users to view the billable size
of a table using CloudWatch.
Amazon Keyspaces integrate
s with Amazon CloudWatch
to allow you to monitor the
billable table size. For more
information, see the section
called “Amazon Keyspaces
metrics and dimensions”.
July 7, 2022
AmazonKeyspacesRea
dOnlyAccess – Update to an
existing policy
Amazon Keyspaces added
new permissions to allow
users to view AWS KMS keys
that have been configured for
Amazon Keyspaces encryption
at rest.
Amazon Keyspaces encryptio
n at rest integrates with
AWS KMS for protecting and
managing the encryption
keys used to encrypt data
at rest. To view the AWS
KMS key configured for
Amazon Keyspaces, read-only
permissions have been added.
June 1, 2021
AWS managed policies 672

Amazon Keyspaces (for Apache Cassandra) Developer Guide
Change Description Date
AmazonKeyspacesFullAccess –
Update to an existing policy
Amazon Keyspaces added
new permissions to allow
users to view AWS KMS keys
that have been configured for
Amazon Keyspaces encryption
at rest.
Amazon Keyspaces encryptio
n at rest integrates with
AWS KMS for protecting and
managing the encryption
keys used to encrypt data
at rest. To view the AWS
KMS key configured for
Amazon Keyspaces, read-only
permissions have been added.
June 1, 2021
Amazon Keyspaces started
tracking changes
Amazon Keyspaces started
tracking changes for its AWS
managed policies.
June 1, 2021
Troubleshooting Amazon Keyspaces identity and access
Use the following information to help you diagnose and fix common issues that you might
encounter when working with Amazon Keyspaces and IAM.
Topics
• I'm not authorized to perform an action in Amazon Keyspaces
• I modified an IAM user or role and the changes did not take effect immediately
• I can't restore a table using Amazon Keyspaces point-in-time recovery (PITR)
• I'm not authorized to perform iam:PassRole
• I'm an administrator and want to allow others to access Amazon Keyspaces
• I want to allow people outside of my AWS account to access my Amazon Keyspaces resources
Troubleshooting 673

Amazon Keyspaces (for Apache Cassandra) Developer Guide
I'm not authorized to perform an action in Amazon Keyspaces
If the AWS Management Console tells you that you're not authorized to perform an action, then
you must contact your administrator for assistance. Your administrator is the person that provided
you with your user name and password.
The following example error occurs when the mateojackson IAM user tries to use the console to
view details about a table but does not have cassandra:Select permissions for the table.
User: arn:aws:iam::123456789012:user/mateojackson is not authorized to perform:
cassandra:Select on resource: mytable
In this case, Mateo asks his administrator to update his policies to allow him to access the mytable
resource using the cassandra:Select action.
I modified an IAM user or role and the changes did not take effect immediately
IAM policy changes may take up to 10 minutes to take effect for applications with existing,
established connections to Amazon Keyspaces. IAM policy changes take effect immediately when
applications establish a new connection. If you have made modifications to an existing IAM user or
role, and it has not taken immediate effect, either wait for 10 minutes or disconnect and reconnect
to Amazon Keyspaces.
I can't restore a table using Amazon Keyspaces point-in-time recovery (PITR)
If you are trying to restore an Amazon Keyspaces table with point-in-time recovery (PITR), and
you see the restore process begin, but not complete successfully, you might not have configured
all of the required permissions that are needed by the restore process. You must contact your
administrator for assistance and ask that person to update your policies to allow you to restore a
table in Amazon Keyspaces.
In addition to user permissions, Amazon Keyspaces may require permissions to perform actions
during the restore process on your principal's behalf. This is the case if the table is encrypted with a
customer-managed key, or if you are using IAM policies that restrict incoming traffic. For example,
if you are using condition keys in your IAM policy to restrict source traffic to specific endpoints or
IP ranges, the restore operation fails. To allow Amazon Keyspaces to perform the table restore
operation on your principal's behalf, you must add an aws:ViaAWSService global condition key
in the IAM policy.
Troubleshooting 674

Amazon Keyspaces (for Apache Cassandra) Developer Guide
For more information about permissions to restore tables, see the section called “Configure IAM
permissions for restore”.
I'm not authorized to perform iam:PassRole
If you receive an error that you're not authorized to perform the iam:PassRole action, your
policies must be updated to allow you to pass a role to Amazon Keyspaces.
Some AWS services allow you to pass an existing role to that service instead of creating a new
service role or service-linked role. To do this, you must have permissions to pass the role to the
service.
The following example error occurs when an IAM user named marymajor tries to use the console
to perform an action in Amazon Keyspaces. However, the action requires the service to have
permissions that are granted by a service role. Mary does not have permissions to pass the role to
the service.
User: arn:aws:iam::123456789012:user/marymajor is not authorized to perform:
iam:PassRole
In this case, Mary's policies must be updated to allow her to perform the iam:PassRole action.
If you need help, contact your AWS administrator. Your administrator is the person who provided
you with your sign-in credentials.
I'm an administrator and want to allow others to access Amazon Keyspaces
To allow others to access Amazon Keyspaces, you must grant permission to the people or
applications that need access. If you are using AWS IAM Identity Center to manage people
and applications, you assign permission sets to users or groups to define their level of access.
Permission sets automatically create and assign IAM policies to IAM roles that are associated with
the person or application. For more information, see Permission sets in the AWS IAM Identity Center
User Guide.
If you are not using IAM Identity Center, you must create IAM entities (users or roles) for the people
or applications that need access. You must then attach a policy to the entity that grants them
the correct permissions in Amazon Keyspaces. After the permissions are granted, provide the
credentials to the user or application developer. They will use those credentials to access AWS.
To learn more about creating IAM users, groups, policies, and permissions, see IAM Identities and
Policies and permissions in IAM in the IAM User Guide.
Troubleshooting 675

Amazon Keyspaces (for Apache Cassandra) Developer Guide
I want to allow people outside of my AWS account to access my Amazon
Keyspaces resources
You can create a role that users in other accounts or people outside of your organization can use to
access your resources. You can specify who is trusted to assume the role. For services that support
resource-based policies or access control lists (ACLs), you can use those policies to grant people
access to your resources.
To learn more, consult the following:
• To learn whether Amazon Keyspaces supports these features, see How Amazon Keyspaces works
with IAM.
• To learn how to provide access to your resources across AWS accounts that you own, see
Providing access to an IAM user in another AWS account that you own in the IAM User Guide.
• To learn how to provide access to your resources to third-party AWS accounts, see Providing
access to AWS accounts owned by third parties in the IAM User Guide.
• To learn how to provide access through identity federation, see Providing access to externally
authenticated users (identity federation) in the IAM User Guide.
• To learn the difference between using roles and resource-based policies for cross-account access,
see Cross account resource access in IAM in the IAM User Guide.
Using service-linked roles for Amazon Keyspaces
Amazon Keyspaces (for Apache Cassandra) uses AWS Identity and Access Management (IAM)
service-linked roles. A service-linked role is a unique type of IAM role that is linked directly to
Amazon Keyspaces. Service-linked roles are predefined by Amazon Keyspaces and include all the
permissions that the service requires to call other AWS services on your behalf.
Topics
• Using roles for Amazon Keyspaces application auto scaling
• Using roles for Amazon Keyspaces Multi-Region Replication
Using roles for Amazon Keyspaces application auto scaling
Amazon Keyspaces (for Apache Cassandra) uses AWS Identity and Access Management (IAM)
service-linked roles. A service-linked role is a unique type of IAM role that is linked directly to
Using service-linked roles 676

Amazon Keyspaces (for Apache Cassandra) Developer Guide
Amazon Keyspaces. Service-linked roles are predefined by Amazon Keyspaces and include all the
permissions that the service requires to call other AWS services on your behalf.
A service-linked role makes setting up Amazon Keyspaces easier because you don’t have to
manually add the necessary permissions. Amazon Keyspaces defines the permissions of its service-
linked roles, and unless defined otherwise, only Amazon Keyspaces can assume its roles. The
defined permissions include the trust policy and the permissions policy, and that permissions policy
cannot be attached to any other IAM entity.
You can delete a service-linked role only after first deleting its related resources. This protects your
Amazon Keyspaces resources because you can't inadvertently remove permission to access the
resources.
For information about other services that support service-linked roles, see AWS services that work
with IAM and look for the services that have Yes in the Service-linked roles column. Choose a Yes
with a link to view the service-linked role documentation for that service.
Service-linked role permissions for Amazon Keyspaces
Amazon Keyspaces uses the service-linked role named
AWSServiceRoleForApplicationAutoScaling_CassandraTable to allow Application Auto Scaling to
call Amazon Keyspaces and Amazon CloudWatch on your behalf.
The AWSServiceRoleForApplicationAutoScaling_CassandraTable service-linked role trusts the
following services to assume the role:
•
cassandra.application-autoscaling.amazonaws.com
The role permissions policy allows Application Auto Scaling to complete the following actions on
the specified Amazon Keyspaces resources:
•
Action: cassandra:Select on arn:*:cassandra:*:*:/keyspace/system/table/*
•
Action: cassandra:Select on the resource arn:*:cassandra:*:*:/keyspace/
system_schema/table/*
•
Action: cassandra:Select on the resource arn:*:cassandra:*:*:/keyspace/
system_schema_mcs/table/*
•
Action: cassandra:Alter on the resource arn:*:cassandra:*:*:"*"
Using service-linked roles 677

Amazon Keyspaces (for Apache Cassandra) Developer Guide
Creating a service-linked role for Amazon Keyspaces
You don't need to manually create a service-linked role for Amazon Keyspaces automatic scaling.
When you enable Amazon Keyspaces auto scaling on a table with the AWS Management Console,
CQL, the AWS CLI, or the AWS API, Application Auto Scaling creates the service-linked role for you.
If you delete this service-linked role, and then need to create it again, you can use the same process
to recreate the role in your account. When you enable Amazon Keyspaces auto scaling for a table,
Application Auto Scaling creates the service-linked role for you again.
Important
This service-linked role can appear in your account if you completed an action in another
service that uses the features supported by this role. To learn more, see A new role
appeared in my AWS account.
If you delete this service-linked role, and then need to create it again, you can use the same process
to recreate the role in your account. When you enable Amazon Keyspaces automatic application
scaling for a table, Application Auto Scaling creates the service-linked role for you again.
Editing a service-linked role for Amazon Keyspaces
Amazon Keyspaces does not allow you to edit the
AWSServiceRoleForApplicationAutoScaling_CassandraTable service-linked role. After you
create a service-linked role, you cannot change the name of the role because various entities
might reference the role. However, you can edit the description of the role using IAM. For more
information, see Editing a service-linked role in the IAM User Guide.
Deleting a service-linked role for Amazon Keyspaces
If you no longer need to use a feature or service that requires a service-linked role, we recommend
that you delete that role. That way you don’t have an unused entity that isn't actively monitored or
maintained. However, you must first disable automatic scaling on all tables in the account across all
AWS Regions before you can delete the service-linked role manually. To disable automatic scaling
on Amazon Keyspaces tables, see the section called “Turn off Amazon Keyspaces auto scaling for a
table”.
Using service-linked roles 678

Amazon Keyspaces (for Apache Cassandra) Developer Guide
Note
If Amazon Keyspaces automatic scaling is using the role when you try to modify the
resources, then the deregistration might fail. If that happens, wait for a few minutes and
try the operation again.
To manually delete the service-linked role using IAM
Use the IAM console, the AWS CLI, or the AWS API to delete the
AWSServiceRoleForApplicationAutoScaling_CassandraTable service-linked role. For more
information, see Deleting a Service-Linked Role in the IAM User Guide.
Note
To delete the service-linked role used by Amazon Keyspaces automatic scaling, you must
first disable automatic scaling on all tables in the account.
Supported Regions for Amazon Keyspaces service-linked roles
Amazon Keyspaces supports using service-linked roles in all of the Regions where the service is
available. For more information, see Service endpoints for Amazon Keyspaces.
Using roles for Amazon Keyspaces Multi-Region Replication
Amazon Keyspaces (for Apache Cassandra) uses AWS Identity and Access Management (IAM)
service-linked roles. A service-linked role is a unique type of IAM role that is linked directly to
Amazon Keyspaces. Service-linked roles are predefined by Amazon Keyspaces and include all the
permissions that the service requires to call other AWS services on your behalf.
A service-linked role makes setting up Amazon Keyspaces easier because you don’t have to
manually add the necessary permissions. Amazon Keyspaces defines the permissions of its service-
linked roles, and unless defined otherwise, only Amazon Keyspaces can assume its roles. The
defined permissions include the trust policy and the permissions policy, and that permissions policy
cannot be attached to any other IAM entity.
You can delete a service-linked role only after first deleting its related resources. This protects your
Amazon Keyspaces resources because you can't inadvertently remove permission to access the
resources.
Using service-linked roles 679

Amazon Keyspaces (for Apache Cassandra) Developer Guide
For information about other services that support service-linked roles, see AWS services that work
with IAM and look for the services that have Yes in the Service-linked roles column. Choose a Yes
with a link to view the service-linked role documentation for that service.
Service-linked role permissions for Amazon Keyspaces
Amazon Keyspaces uses the service-linked role named
AWSServiceRoleForAmazonKeyspacesReplication to allow Amazon Keyspaces to replicate writes
to all replicas of a multi-Region table on your behalf.
The AWSServiceRoleForAmazonKeyspacesReplication service-linked role trusts the following
services to assume the role:
•
replication.cassandra.amazonaws.com
The role permissions policy named KeyspacesReplicationServiceRolePolicy allows Amazon
Keyspaces to complete the following actions:
•
Action: cassandra:Select
•
Action: cassandra:SelectMultiRegionResource
•
Action: cassandra:Modify
•
Action: cassandra:ModifyMultiRegionResource
Although the Amazon Keyspaces service-linked role
AWSServiceRoleForAmazonKeyspacesReplication provides the permissions: "Action:" for the
specified Amazon Resource Name (ARN) "arn:*" in the policy, Amazon Keyspaces supplies the ARN
of your account.
You must configure permissions to allow your users, groups, or roles to create, edit, or delete a
service-linked role. For more information, see Service-linked role permissions in the IAM User Guide.
Creating a service-linked role for Amazon Keyspaces
You can't manually create a service-linked role. When you create a multi-Region keyspace in the
AWS Management Console, the AWS CLI, or the AWS API, Amazon Keyspaces creates the service-
linked role for you.
Using service-linked roles 680

Amazon Keyspaces (for Apache Cassandra) Developer Guide
If you delete this service-linked role, and then need to create it again, you can use the same process
to recreate the role in your account. When you create a multi-Region keyspace, Amazon Keyspaces
creates the service-linked role for you again.
Editing a service-linked role for Amazon Keyspaces
Amazon Keyspaces does not allow you to edit the AWSServiceRoleForAmazonKeyspacesReplication
service-linked role. After you create a service-linked role, you cannot change the name of the role
because various entities might reference the role. However, you can edit the description of the role
using IAM. For more information, see Editing a service-linked role in the IAM User Guide.
Deleting a service-linked role for Amazon Keyspaces
If you no longer need to use a feature or service that requires a service-linked role, we recommend
that you delete that role. That way you don’t have an unused entity that is not actively monitored
or maintained. However, you must first delete all multi-Region keyspaces in the account across all
AWS Regions before you can delete the service-linked role manually.
Cleaning up a service-linked role
Before you can use IAM to delete a service-linked role, you must first delete any multi-Region
keyspaces and tables used by the role.
Note
If the Amazon Keyspaces service is using the role when you try to delete the resources, then
the deletion might fail. If that happens, wait for a few minutes and try the operation again.
To delete Amazon Keyspaces resources used by the
AWSServiceRoleForAmazonKeyspacesReplication (console)
1. Sign in to the AWS Management Console, and open the Amazon Keyspaces console at https://
console.aws.amazon.com/keyspaces/home.
2. Choose Keyspaces from the left-side panel.
3. Select all multi-Region keyspaces from the list.
4. Choose Delete confirm the deletion and choose Delete keyspaces.
You can also delete multi-Region keyspaces programmatically using any of the following methods.
Using service-linked roles 681

Amazon Keyspaces (for Apache Cassandra) Developer Guide
• The Cassandra Query Language (CQL) ??? statement.
• The delete-keyspace operation of the AWS CLI.
• The DeleteKeyspace operation of the Amazon Keyspaces API.
Manually delete the service-linked role
Use the IAM console, the AWS CLI, or the AWS API to delete the
AWSServiceRoleForAmazonKeyspacesReplication service-linked role. For more information, see
Deleting a service-linked role in the IAM User Guide.
Supported Regions for Amazon Keyspaces service-linked roles
Amazon Keyspaces does not support using service-linked roles in every Region where the service
is available. You can use the AWSServiceRoleForAmazonKeyspacesReplication role in the following
Regions.
Region name Region identity Support in
Amazon Keyspaces
US East (N. Virginia) us-east-1 Yes
US East (Ohio) us-east-2 Yes
US West (N. California) us-west-1 Yes
US West (Oregon) us-west-2 Yes
Asia Pacific (Mumbai) ap-south-1 Yes
Asia Pacific (Osaka) ap-northeast-3 Yes
Asia Pacific (Seoul) ap-northeast-2 Yes
Asia Pacific (Singapore) ap-southeast-1 Yes
Asia Pacific (Sydney) ap-southeast-2 Yes
Asia Pacific (Tokyo) ap-northeast-1 Yes
Canada (Central) ca-central-1 Yes
Using service-linked roles 682

Amazon Keyspaces (for Apache Cassandra) Developer Guide
Region name Region identity Support in
Amazon Keyspaces
Europe (Frankfurt) eu-central-1 Yes
Europe (Ireland) eu-west-1 Yes
Europe (London) eu-west-2 Yes
Europe (Paris) eu-west-3 Yes
South America (São Paulo) sa-east-1 Yes
AWS GovCloud (US-East) us-gov-east-1 No
AWS GovCloud (US-West) us-gov-west-1 No
Compliance validation for Amazon Keyspaces (for Apache
Cassandra)
Third-party auditors assess the security and compliance of Amazon Keyspaces (for Apache
Cassandra) as part of multiple AWS compliance programs. These include:
• ISO/IEC 27001:2013, 27017:2015, 27018:2019, and ISO/IEC 9001:2015. For more information,
see AWS ISO and CSA STAR certifications and services.
• System and Organization Controls (SOC)
• Payment Card Industry (PCI)
• Federal Risk and Authorization Management Program (FedRAMP) High
• Health Insurance Portability and Accountability Act (HIPAA)
To learn whether an AWS service is within the scope of specific compliance programs, see AWS
services in Scope by Compliance Program and choose the compliance program that you are
interested in. For general information, see AWS Compliance Programs.
You can download third-party audit reports using AWS Artifact. For more information, see
Downloading Reports in AWS Artifact.
Compliance validation 683

Amazon Keyspaces (for Apache Cassandra) Developer Guide
Your compliance responsibility when using AWS services is determined by the sensitivity of your
data, your company's compliance objectives, and applicable laws and regulations. AWS provides the
following resources to help with compliance:
• Security and Compliance Quick Start Guides – These deployment guides discuss architectural
considerations and provide steps for deploying baseline environments on AWS that are security
and compliance focused.
• Architecting for HIPAA Security and Compliance on Amazon Web Services – This whitepaper
describes how companies can use AWS to create HIPAA-eligible applications.
Note
Not all AWS services are HIPAA eligible. For more information, see the HIPAA Eligible
Services Reference.
• AWS Compliance Resources – This collection of workbooks and guides might apply to your
industry and location.
• AWS Customer Compliance Guides – Understand the shared responsibility model through the
lens of compliance. The guides summarize the best practices for securing AWS services and map
the guidance to security controls across multiple frameworks (including National Institute of
Standards and Technology (NIST), Payment Card Industry Security Standards Council (PCI), and
International Organization for Standardization (ISO)).
• Evaluating Resources with Rules in the AWS Config Developer Guide – The AWS Config service
assesses how well your resource configurations comply with internal practices, industry
guidelines, and regulations.
• AWS Security Hub – This AWS service provides a comprehensive view of your security state within
AWS. Security Hub uses security controls to evaluate your AWS resources and to check your
compliance against security industry standards and best practices. For a list of supported services
and controls, see Security Hub controls reference.
• Amazon GuardDuty – This AWS service detects potential threats to your AWS accounts,
workloads, containers, and data by monitoring your environment for suspicious and malicious
activities. GuardDuty can help you address various compliance requirements, like PCI DSS, by
meeting intrusion detection requirements mandated by certain compliance frameworks.
• AWS Audit Manager – This AWS service helps you continuously audit your AWS usage to simplify
how you manage risk and compliance with regulations and industry standards.
Compliance validation 684

Amazon Keyspaces (for Apache Cassandra) Developer Guide
Resilience and disaster recovery in Amazon Keyspaces
The AWS global infrastructure is built around AWS Regions and Availability Zones. AWS Regions
provide multiple physically separated and isolated Availability Zones, which are connected with
low-latency, high-throughput, and highly redundant networking. With Availability Zones, you can
design and operate applications and databases that automatically fail over between Availability
Zones without interruption. Availability Zones are more highly available, fault tolerant, and
scalable than traditional single or multiple data center infrastructures.
Amazon Keyspaces replicates data automatically three times in multiple AWS Availability Zones
within the same AWS Region for durability and high availability.
For more information about AWS Regions and Availability Zones, see AWS global infrastructure.
In addition to the AWS global infrastructure, Amazon Keyspaces offers several features to help
support your data resiliency and backup needs.
Multi-Region Replication
Amazon Keyspaces provides Multi-Region Replication if you need to replicate your data or
applications over greater geographic distances. You can replicate your Amazon Keyspaces tables
across up to six different AWS Regions of your choice. For more information, see the section
called “Multi-Region Replication”.
Point-in-time recovery (PITR)
PITR helps protect your Amazon Keyspaces tables from accidental write or delete operations by
providing you continuous backups of your table data. For more information, see Point-in-time
recovery for Amazon Keyspaces.
Infrastructure security in Amazon Keyspaces
As a managed service, Amazon Keyspaces (for Apache Cassandra) is protected by AWS
global network security. For information about AWS security services and how AWS protects
infrastructure, see AWS Cloud Security. To design your AWS environment using the best practices
for infrastructure security, see Infrastructure Protection in Security Pillar AWS Well‐Architected
Framework.
You use AWS published API calls to access Amazon Keyspaces through the network. Clients must
support the following:
Resilience 685

Amazon Keyspaces (for Apache Cassandra) Developer Guide
• Transport Layer Security (TLS). We require TLS 1.2 and recommend TLS 1.3.
• Cipher suites with perfect forward secrecy (PFS) such as DHE (Ephemeral Diffie-Hellman) or
ECDHE (Elliptic Curve Ephemeral Diffie-Hellman). Most modern systems such as Java 7 and later
support these modes.
Additionally, requests must be signed by using an access key ID and a secret access key that is
associated with an IAM principal. Or you can use the AWS Security Token Service (AWS STS) to
generate temporary security credentials to sign requests.
Amazon Keyspaces supports two methods of authenticating client requests. The first method uses
service-specific credentials, which are password based credentials generated for a specific IAM user.
You can create and manage the password using the IAM console, the AWS CLI, or the AWS API. For
more information, see Using IAM with Amazon Keyspaces.
The second method uses an authentication plugin for the open-source DataStax Java Driver for
Cassandra. This plugin enables IAM users, roles, and federated identities to add authentication
information to Amazon Keyspaces (for Apache Cassandra) API requests using the AWS Signature
Version 4 process (SigV4). For more information, see the section called “Create IAM credentials for
AWS authentication”.
You can use an interface VPC endpoint to keep traffic between your Amazon VPC and Amazon
Keyspaces from leaving the Amazon network. Interface VPC endpoints are powered by AWS
PrivateLink, an AWS technology that enables private communication between AWS services using
an elastic network interface with private IPs in your Amazon VPC. For more information, see the
section called “Using interface VPC endpoints”.
Using Amazon Keyspaces with interface VPC endpoints
Interface VPC endpoints enable private communication between your virtual private cloud (VPC)
running in Amazon VPC and Amazon Keyspaces. Interface VPC endpoints are powered by AWS
PrivateLink, which is an AWS service that enables private communication between VPCs and AWS
services.
AWS PrivateLink enables this by using an elastic network interface with private IP addresses in
your VPC so that network traffic does not leave the Amazon network. Interface VPC endpoints
don't require an internet gateway, NAT device, VPN connection, or AWS Direct Connect connection.
For more information, see Amazon Virtual Private Cloud and Interface VPC endpoints (AWS
PrivateLink).
Using interface VPC endpoints 686

Amazon Keyspaces (for Apache Cassandra) Developer Guide
Topics
• Using interface VPC endpoints for Amazon Keyspaces
• Populating system.peers table entries with interface VPC endpoint information
• Controlling access to interface VPC endpoints for Amazon Keyspaces
• Availability
• VPC endpoint policies and Amazon Keyspaces point-in-time recovery (PITR)
• Common errors and warnings
Using interface VPC endpoints for Amazon Keyspaces
You can create an interface VPC endpoint so that traffic between Amazon Keyspaces and your
Amazon VPC resources starts flowing through the interface VPC endpoint. To get started, follow
the steps to create an interface endpoint. Next, edit the security group associated with the
endpoint that you created in the previous step, and configure an inbound rule for port 9142. For
more information, see Adding, removing, and updating rules.
For a step-by-step tutorial to configure a connection to Amazon Keyspaces through a VPC
endpoint, see the section called “Connecting with VPC endpoints”. To learn how to configure cross-
account access for Amazon Keyspaces resources separated from applications in different AWS
accounts in a VPC, see the section called “Configure cross-account access”.
Populating system.peers table entries with interface VPC endpoint information
Apache Cassandra drivers use the system.peers table to query for node information about
the cluster. Cassandra drivers use the node information to load balance connections and retry
operations. Amazon Keyspaces populates nine entries in the system.peers table automatically
for clients connecting through the public endpoint.
To provide clients connecting through interface VPC endpoints with similar functionality, Amazon
Keyspaces populates the system.peers table in your account with an entry for each Availability
Zone where a VPC endpoint is available. To look up and store available interface VPC endpoints
in the system.peers table, Amazon Keyspaces requires that you grant the IAM entity used to
connect to Amazon Keyspaces access permissions to query your VPC for the endpoint and network
interface information.
Using interface VPC endpoints 687

Amazon Keyspaces (for Apache Cassandra) Developer Guide
Important
Populating the system.peers table with your available interface VPC endpoints improves
load balancing and increases read/write throughput. It is recommended for all clients
accessing Amazon Keyspaces using interface VPC endpoints and is required for Apache
Spark.
To grant the IAM entity used to connect to Amazon Keyspaces permissions to look up the necessary
interface VPC endpoint information, you can update your existing IAM role or user policy, or create
a new IAM policy as shown in the following example.
{
"Version":"2012-10-17",
"Statement":[
{
"Sid":"ListVPCEndpoints",
"Effect":"Allow",
"Action":[
"ec2:DescribeNetworkInterfaces",
"ec2:DescribeVpcEndpoints"
],
"Resource":"*"
}
]
}
Note
The managed policies AmazonKeyspacesReadOnlyAccess_v2 and
AmazonKeyspacesFullAccess include the required permissions to let Amazon Keyspaces
access the Amazon EC2 instance to read information about available interface VPC
endpoints.
To confirm that the policy has been set up correctly, query the system.peers table to
see networking information. If the system.peers table is empty, it could indicate that
the policy hasn't been configured successfully or that you have exceeded the request rate
quota for DescribeNetworkInterfaces and DescribeVPCEndpoints API actions.
Using interface VPC endpoints 688

Amazon Keyspaces (for Apache Cassandra) Developer Guide
DescribeVPCEndpoints falls into the Describe* category and is considered a non-mutating
action. DescribeNetworkInterfaces falls into the subset of unfiltered and unpaginated non-
mutating actions, and different quotas apply. For more information, see Request token bucket sizes
and refill rates in the Amazon EC2 API Reference.
If you do see an empty table, try again a few minutes later to rule out request rate quota issues. To
verify that you have configured the VPC endpoints correctly, see the section called “VPC endpoint
connection errors”. If your query returns results from the table, your policy has been configured
correctly.
Controlling access to interface VPC endpoints for Amazon Keyspaces
With VPC endpoint policies, you can control access to resources in two ways:
• IAM policy – You can control the requests, users, or groups that are allowed to access Amazon
Keyspaces through a specific VPC endpoint. You can do this by using a condition key in the policy
that is attached to an IAM user, group, or role.
• VPC policy – You can control which VPC endpoints have access to your Amazon Keyspaces
resources by attaching policies to them. To restrict access to a specific keyspace or table to only
allow traffic coming through a specific VPC endpoint, edit the existing IAM policy that restricts
resource access and add that VPC endpoint.
The following are example endpoint policies for accessing Amazon Keyspaces resources.
• IAM policy example: Restrict all access to a specific Amazon Keyspaces table unless traffic
comes from the specified VPC endpoint – This sample policy can be attached to an IAM user,
role, or group. It restricts access to a specified Amazon Keyspaces table unless incoming traffic
originates from a specified VPC endpoint.
{
"Version": "2012-10-17",
"Statement": [
{
"Sid": "UserOrRolePolicyToDenyAccess",
"Action": "cassandra:*",
"Effect": "Deny",
"Resource": [
Using interface VPC endpoints 689

Amazon Keyspaces (for Apache Cassandra) Developer Guide
"arn:aws:cassandra:us-east-1:111122223333:/keyspace/
mykeyspace/table/mytable",
"arn:aws:cassandra:us-east-1:111122223333:/keyspace/system*"
],
"Condition": { "StringNotEquals" : { "aws:sourceVpce": "vpce-abc123" } }
}
]
}
Note
To restrict access to a specific table, you must also include access to the system tables.
System tables are read-only.
• VPC policy example: Read-only access – This sample policy can be attached to a VPC endpoint.
(For more information, see Controlling access to Amazon VPC resources). It restricts actions to
read-only access to Amazon Keyspaces resources through the VPC endpoint that it's attached to.
{
"Version": "2012-10-17",
"Statement": [
{
"Sid": "ReadOnly",
"Principal": "*",
"Action": [
"cassandra:Select"
],
"Effect": "Allow",
"Resource": "*"
}
]
}
• VPC policy example: Restrict access to a specific Amazon Keyspaces table – This sample
policy can be attached to a VPC endpoint. It restricts access to a specific table through the VPC
endpoint that it's attached to.
{
"Version": "2012-10-17",
"Statement": [
{
Using interface VPC endpoints 690

Amazon Keyspaces (for Apache Cassandra) Developer Guide
"Sid": "RestrictAccessToTable",
"Principal": "*",
"Action": "cassandra:*",
"Effect": "Allow",
"Resource": [
"arn:aws:cassandra:us-east-1:111122223333:/keyspace/
mykeyspace/table/mytable",
"arn:aws:cassandra:us-east-1:111122223333:/keyspace/system*"
]
}
]
}
Note
To restrict access to a specific table, you must also include access to the system tables.
System tables are read-only.
Availability
Amazon Keyspaces supports using interface VPC endpoints in all of the AWS Regions where the
service is available. For more information, see ???.
VPC endpoint policies and Amazon Keyspaces point-in-time recovery (PITR)
If you are using IAM policies with condition keys to restrict incoming traffic, the table restore
operation may fail. For example, if you restrict source traffic to specific VPC endpoints using
aws:SourceVpce condition keys, the table restore operation fails. To allow Amazon Keyspaces
to perform a restore operation on your principal's behalf, you must add an aws:ViaAWSService
condition key to your IAM policy. The aws:ViaAWSService condition key allows access when any
AWS service makes a request using the principal's credentials. For more information, see IAM JSON
policy elements: Condition key in the IAM User Guide. The following policy is an example of this.
{
"Version":"2012-10-17",
"Statement":[
{
"Sid":"CassandraAccessForVPCE",
"Effect":"Allow",
"Action":"cassandra:*",
Using interface VPC endpoints 691

Amazon Keyspaces (for Apache Cassandra) Developer Guide
"Resource":"*",
"Condition":{
"Bool":{
"aws:ViaAWSService":"false"
},
"StringEquals":{
"aws:SourceVpce":[
"vpce-12345678901234567"
]
}
}
},
{
"Sid":"CassandraAccessForAwsService",
"Effect":"Allow",
"Action":"cassandra:*",
"Resource":"*",
"Condition":{
"Bool":{
"aws:ViaAWSService":"true"
}
}
}
]
}
Common errors and warnings
If you're using Amazon Virtual Private Cloud and you connect to Amazon Keyspaces, you might
see the following warning.
Control node cassandra.us-east-1.amazonaws.com/1.111.111.111:9142 has an entry
for itself in system.peers: this entry will be ignored. This is likely due to a
misconfiguration;
please verify your rpc_address configuration in cassandra.yaml on all nodes in your
cluster.
This warning occurs because the system.peers table contains entries for all of the Amazon VPC
endpoints that Amazon Keyspaces has permissions to view, including the Amazon VPC endpoint
that you're connected through. You can safely ignore this warning.
For other errors, see the section called “VPC endpoint connection errors”.
Using interface VPC endpoints 692

Amazon Keyspaces (for Apache Cassandra) Developer Guide
Configuration and vulnerability analysis for Amazon Keyspaces
AWS handles basic security tasks like guest operating system (OS) and database patching, firewall
configuration, and disaster recovery. These procedures have been reviewed and certified by the
appropriate third parties. For more details, see the following resources:
• Shared responsibility model
• Amazon Web Services: Overview of security processes(whitepaper)
Security best practices for Amazon Keyspaces
Amazon Keyspaces (for Apache Cassandra) provides a number of security features to consider as
you develop and implement your own security policies. The following best practices are general
guidelines and don’t represent a complete security solution. Because these best practices might not
be appropriate or sufficient for your environment, treat them as helpful considerations rather than
prescriptions.
Topics
• Preventative security best practices for Amazon Keyspaces
• Detective security best practices for Amazon Keyspaces
Preventative security best practices for Amazon Keyspaces
The following security best practices are considered preventative because they can help you
anticipate and prevent security incidents in Amazon Keyspaces.
Use encryption at rest
Amazon Keyspaces encrypts at rest all user data that's stored in tables by using encryption keys
stored in AWS Key Management Service (AWS KMS). This provides an additional layer of data
protection by securing your data from unauthorized access to the underlying storage.
By default, Amazon Keyspaces uses an AWS owned key for encrypting all of your tables. If this
key doesn’t exist, it's created for you. Service default keys can't be disabled.
Alternatively, you can use a customer managed key for encryption at rest. For more
information, see Amazon Keyspaces Encryption at Rest.
Configuration and vulnerability analysis for Amazon Keyspaces 693

Amazon Keyspaces (for Apache Cassandra) Developer Guide
Use IAM roles to authenticate access to Amazon Keyspaces
For users, applications, and other AWS services to access Amazon Keyspaces, they must include
valid AWS credentials in their AWS API requests. You should not store AWS credentials directly
in the application or EC2 instance. These are long-term credentials that are not automatically
rotated, and therefore could have significant business impact if they are compromised. An IAM
role enables you to obtain temporary access keys that can be used to access AWS services and
resources.
For more information, see IAM Roles.
Use IAM policies for Amazon Keyspaces base authorization
When granting permissions, you decide who is getting them, which Amazon Keyspaces APIs
they are getting permissions for, and the specific actions you want to allow on those resources.
Implementing least privilege is key in reducing security risks and the impact that can result
from errors or malicious intent.
Attach permissions policies to IAM identities (that is, users, groups, and roles) and thereby grant
permissions to perform operations on Amazon Keyspaces resources.
You can do this by using the following:
• AWS managed (predefined) policies
• Customer managed policies
Use IAM policy conditions for fine-grained access control
When you grant permissions in Amazon Keyspaces, you can specify conditions that determine
how a permissions policy takes effect. Implementing least privilege is key in reducing security
risks and the impact that can result from errors or malicious intent.
You can specify conditions when granting permissions using an IAM policy. For example, you
can do the following:
• Grant permissions to allow users read-only access to specific keyspaces or tables.
• Grant permissions to allow a user write access to a certain table, based upon the identity of
that user.
For more information, see Identity-Based Policy Examples.
Preventative security best practices 694

Amazon Keyspaces (for Apache Cassandra) Developer Guide
Consider client-side encryption
If you store sensitive or confidential data in Amazon Keyspaces, you might want to encrypt that
data as close as possible to its origin so that your data is protected throughout its lifecycle.
Encrypting your sensitive data in transit and at rest helps ensure that your plaintext data isn’t
available to any third party.
Detective security best practices for Amazon Keyspaces
The following security best practices are considered detective because they can help you detect
potential security weaknesses and incidents.
Use AWS CloudTrail to monitor AWS Key Management Service (AWS KMS) AWS KMS key usage
If you're using a customer managed AWS KMS key for encryption at rest, usage of this key is
logged into AWS CloudTrail. CloudTrail provides visibility into user activity by recording actions
taken on your account. CloudTrail records important information about each action, including
who made the request, the services used, the actions performed, parameters for the actions,
and the response elements returned by the AWS service. This information helps you track
changes made to your AWS resources and troubleshoot operational issues. CloudTrail makes it
easier to ensure compliance with internal policies and regulatory standards.
You can use CloudTrail to audit key usage. CloudTrail creates log files that contain a history
of AWS API calls and related events for your account. These log files include all AWS KMS API
requests that were made using the console, AWS SDKs, and command line tools, in addition to
those made through integrated AWS services. You can use these log files to get information
about when the AWS KMS key was used, the operation that was requested, the identity of the
requester, the IP address that the request came from, and so on. For more information, see
Logging AWS Key Management Service API Calls with AWS CloudTrail and the AWS CloudTrail
User Guide.
Use CloudTrail to monitor Amazon Keyspaces data definition language (DDL) operations
CloudTrail provides visibility into user activity by recording actions taken on your account.
CloudTrail records important information about each action, including who made the request,
the services used, the actions performed, parameters for the actions, and the response
elements returned by the AWS service. This information helps you to track changes made to
your AWS resources and to troubleshoot operational issues. CloudTrail makes it easier to ensure
compliance with internal policies and regulatory standards.
Detective security best practices 695

Amazon Keyspaces (for Apache Cassandra) Developer Guide
All Amazon Keyspaces DDL operations are logged in CloudTrail automatically. DDL operations
let you create and manage Amazon Keyspaces keyspaces and tables.
When activity occurs in Amazon Keyspaces, that activity is recorded in a CloudTrail event along
with other AWS service events in the event history. For more information, see Logging Amazon
Keyspaces operations by using AWS CloudTrail. You can view, search, and download recent
events in your AWS account. For more information, see Viewing events with CloudTrail event
history in the AWS CloudTrail User Guide.
For an ongoing record of events in your AWS account, including events for Amazon Keyspaces,
create a trail. A trail enables CloudTrail to deliver log files to an Amazon Simple Storage Service
(Amazon S3) bucket. By default, when you create a trail on the console, the trail applies to all
AWS Regions. The trail logs events from all Regions in the AWS partition and delivers the log
files to the S3 bucket that you specify. Additionally, you can configure other AWS services to
further analyze and act upon the event data collected in CloudTrail logs.
Tag your Amazon Keyspaces resources for identification and automation
You can assign metadata to your AWS resources in the form of tags. Each tag is a simple
label that consists of a customer-defined key and an optional value that can make it easier to
manage, search for, and filter resources.
Tagging allows for grouped controls to be implemented. Although there are no inherent types
of tags, they enable you to categorize resources by purpose, owner, environment, or other
criteria. The following are some examples:
• Access – Used to control access to Amazon Keyspaces resources based on tags. For more
information, see the section called “Authorization based on Amazon Keyspaces tags”.
• Security – Used to determine requirements such as data protection settings.
• Confidentiality – An identifier for the specific data-confidentiality level that a resource
supports.
• Environment – Used to distinguish between development, test, and production infrastructure.
For more information, see AWS tagging strategies and Adding tags and labels to resources.
Detective security best practices 696

Amazon Keyspaces (for Apache Cassandra) Developer Guide
CQL language reference for Amazon Keyspaces (for
Apache Cassandra)
After you connect to an Amazon Keyspaces endpoint, you use Cassandra Query Language (CQL) to
work with your database. CQL is similar in many ways to Structured Query Language (SQL).
• CQL elements – This section covers the fundamental elements of CQL supported in Amazon
Keyspaces, including identifiers, constants, terms, and data types. It explains concepts like string
types, numeric types, collection types, and more.
• Data Definition Language (DDL) – DDL statements are used to manage data structures like
keyspaces and tables in Amazon Keyspaces. This section covers statements for creating, altering,
and dropping keyspaces and tables, as well as restoring tables from a point-in-time backup.
• Data Manipulation Language (DML) – DML statements are used to manage data within
tables. This section covers statements for selecting, inserting, updating, and deleting data. It
also explains advanced querying capabilities like using the IN operator, ordering results, and
pagination.
• Built-in functions – Amazon Keyspaces supports a variety of built-in scalar functions that you
can use in CQL statements. This section provides an overview of these functions, including
examples of their usage.
Throughout this topic, you'll find detailed syntax, examples, and best practices for using CQL
effectively in Amazon Keyspaces.
Topics
• Cassandra Query Language (CQL) elements in Amazon Keyspaces
• DDL statements (data definition language) in Amazon Keyspaces
• DML statements (data manipulation language) in Amazon Keyspaces
• Built-in functions in Amazon Keyspaces
697

Amazon Keyspaces (for Apache Cassandra) Developer Guide
Cassandra Query Language (CQL) elements in Amazon
Keyspaces
Learn about the Cassandra Query Language (CQL) elements that are supported by Amazon
Keyspaces, including identifiers, constants, terms, and data types.
Topics
• Identifiers
• Constants
• Terms
• Data types
• JSON encoding of Amazon Keyspaces data types
Identifiers
Identifiers (or names) are used to identify tables, columns, and other objects. An identifier can be
quoted or not quoted. The following applies.
identifier ::= unquoted_identifier | quoted_identifier
unquoted_identifier ::= re('[a-zA-Z][a-zA-Z0-9_]*')
quoted_identifier ::= '"' (any character where " can appear if doubled)+ '"'
Constants
The following constants are defined.
constant ::= string | integer | float | boolean | uuid | blob | NULL
string ::= '\'' (any character where ' can appear if doubled)+ '\''
'$$' (any character other than '$$') '$$'
integer ::= re('-?[0-9]+')
float ::= re('-?[0-9]+(\.[0-9]*)?([eE][+-]?[0-9+])?') | NAN | INFINITY
boolean ::= TRUE | FALSE
uuid ::= hex{8}-hex{4}-hex{4}-hex{4}-hex{12}
hex ::= re("[0-9a-fA-F]")
blob ::= '0' ('x' | 'X') hex+
Language elements 698
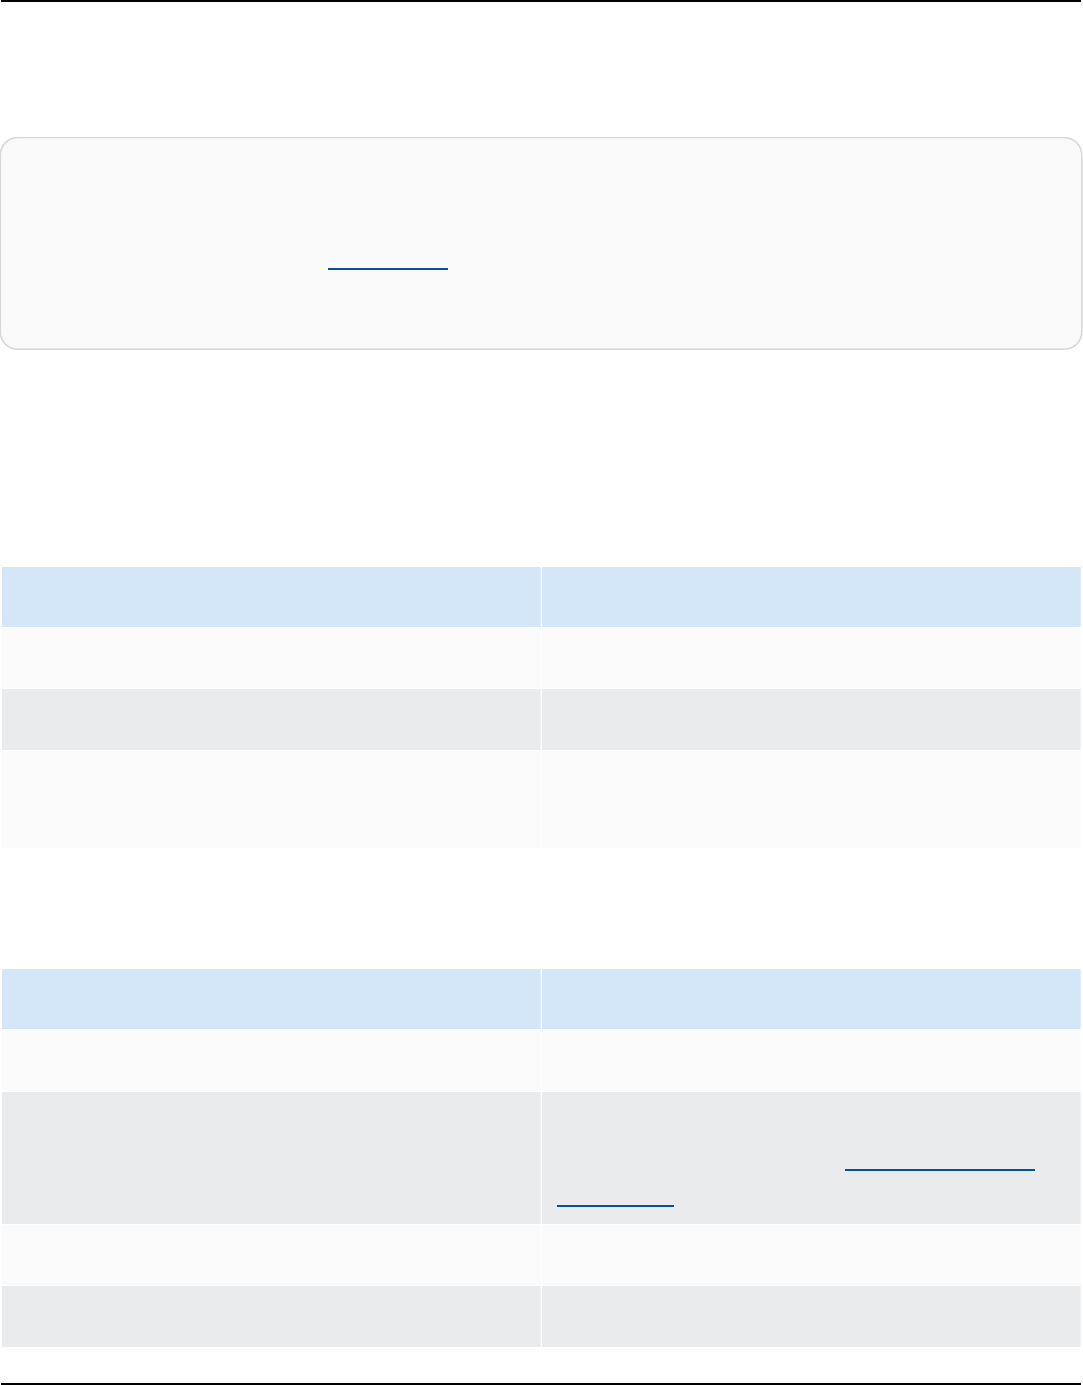
Amazon Keyspaces (for Apache Cassandra) Developer Guide
Terms
A term denotes the kind of values that are supported. Terms are defined by the following.
term ::= constant | literal | function_call | arithmetic_operation |
type_hint | bind_marker
literal ::= collection_literal | tuple_literal
function_call ::= identifier '(' [ term (',' term)* ] ')'
arithmetic_operation ::= '-' term | term ('+' | '-' | '*' | '/' | '%') term
Data types
Amazon Keyspaces supports the following data types:
String types
Data type Description
ascii
Represents an ASCII character string.
text
Represents a UTF-8 encoded string.
varchar Represents a UTF-8 encoded string (varchar
is an alias for text).
Numeric types
Data type Description
bigint
Represents a 64-bit signed long.
counter
Represents a 64-bit signed integer counter.
For more information, see the section called
“Counters”.
decimal
Represents a variable-precision decimal.
double
Represents a 64-bit IEEE 754 floating point.
Terms 699

Amazon Keyspaces (for Apache Cassandra) Developer Guide
Data type Description
float
Represents a 32-bit IEEE 754 floating point.
int
Represents a 32-bit signed int.
varint
Represents an integer of arbitrary precision.
Counters
A counter column contains a 64-bit signed integer. The counter value is incremented or
decremented using the the section called “UPDATE” statement, and it cannot be set directly. This
makes counter columns useful for tracking counts. For example, you can use counters to track the
number of entries in a log file or the number of times a post has been viewed on a social network.
The following restrictions apply to counter columns:
•
A column of type counter cannot be part of the primary key of a table.
•
In a table that contains one or more columns of type counter, all columns in that table must be
of type counter.
In cases where a counter update fails (for example, because of timeouts or loss of connection with
Amazon Keyspaces), the client doesn't know whether the counter value was updated. If the update
is retried, the update to the counter value might get applied a second time.
Blob type
Data type Description
blob
Represents arbitrary bytes.
Boolean type
Data type Description
boolean Represents true or false.
Data types 700

Amazon Keyspaces (for Apache Cassandra) Developer Guide
Time-related types
Data type Description
timestamp
64-bit signed integer representing the date
and time since epoch (January 1 1970 at
00:00:00 GMT) in milliseconds.
timeuuid
Represents a version 1 UUID.
Collection types
Data type Description
list
Represents an ordered collection of literal
elements.
map
Represents an unordered collection of key-
value pairs.
set
Represents an unordered collection of one or
more literal elements.
You declare a collection column by using the collection type followed by another data type (for
example, TEXT or INT) in angled brackets. You can create a column with a SET of TEXT, or you can
create a MAP of TEXT and INT key-value pairs, as shown in the following example.
SET <TEXT>
MAP <TEXT, INT>
A non-frozen collection allows you to make updates to each individual collection element. Client-
side timestamps and Time to Live (TTL) settings are stored for individual elements.
When you use the FROZEN keyword on a collection type, the values of the collection are serialized
into a single immutable value, and Amazon Keyspaces treats them like a BLOB. This is a frozen
collection. An INSERT or UPDATE statement overwrites the entire frozen collection. You can't make
updates to individual elements inside a frozen collection.
Data types 701

Amazon Keyspaces (for Apache Cassandra) Developer Guide
Client-side timestamps and Time to Live (TTL) settings apply to the entire frozen collection, not to
individual elements. Frozen collection columns can be part of the PRIMARY KEY of a table.
You can nest frozen collections. For example, you can define a MAP within a SET if the MAP is using
the FROZEN keyword, as shown in the following example.
SET <FROZEN> <MAP <TEXT, INT>>>
Amazon Keyspaces supports nesting of up to five levels of frozen collections by default. For more
information, see the section called “Amazon Keyspaces service quotas”. For more information
about functional differences with Apache Cassandra, see the section called “FROZEN collections”.
For more information about CQL syntax, see the section called “CREATE TABLE” and the section
called “ALTER TABLE”.
Tuple type
The tuple data type represents a bounded group of literal elements. You can use a tuple as an
alternative to a user defined type. You don't need to use the FROZEN keyword for tuples. This
is because a tuple is always frozen and you can't update elements individually.
Other types
Data type Description
inet
A string representing an IP address, in either
IPv4 or IPv6 format.
Static
In an Amazon Keyspaces table with clustering columns, you can use the STATIC keyword to create
a static column of any type.
The following statement is an example of this.
my_column INT STATIC
For more information about working with static columns, see the section called “Estimate capacity
consumption of static columns”.
Data types 702

Amazon Keyspaces (for Apache Cassandra) Developer Guide
JSON encoding of Amazon Keyspaces data types
Amazon Keyspaces offers the same JSON data type mappings as Apache Cassandra. The following
table describes the data types Amazon Keyspaces accepts in INSERT JSON statements and the
data types Amazon Keyspaces uses when returning data with the SELECT JSON statement.
For single-field data types such as float, int, UUID, and date, you also can insert data as a
string. For compound data types and collections, such as tuple, map, and list, you can also
insert data as JSON or as an encoded JSON string.
JSON data type Data types accepted
in INSERT JSON
statements
Data types returned
in SELECT JSON
statements
Notes
ascii string string
Uses JSON character
escape \u.
bigint integer, string integer
String must be a valid
64-bit integer.
blob string string
String should begin
with 0x followed by
an even number of
hex digits.
boolean boolean, string boolean
String must be either
true or false.
date string string Date in format YYYY-
MM-DD , timezone
UTC.
decimal integer, float,
string
float
Can exceed 32-bit
or 64-bit IEEE-754
floating point
precision in client-si
de decoder.
JSON encoding of Amazon Keyspaces data types 703

Amazon Keyspaces (for Apache Cassandra) Developer Guide
JSON data type Data types accepted
in INSERT JSON
statements
Data types returned
in SELECT JSON
statements
Notes
double integer, float,
string
float
String must be a valid
integer or float.
float integer, float,
string
float
String must be a valid
integer or float.
inet string string
IPv4 or IPv6 address.
int integer, string integer
String must be a valid
32-bit integer.
list list, string list
Uses the native JSON
list representation.
map map, string map
Uses the native JSON
map representation.
smallint integer, string integer
String must be a valid
16-bit integer.
set list, string list
Uses the native JSON
list representation.
text string string
Uses JSON character
escape \u.
time string string
Time of day in
format HH-MM-SS[
.fffffffff] .
JSON encoding of Amazon Keyspaces data types 704

Amazon Keyspaces (for Apache Cassandra) Developer Guide
JSON data type Data types accepted
in INSERT JSON
statements
Data types returned
in SELECT JSON
statements
Notes
timestamp integer, string string
A timestamp. String
constants allow you
to store timestamps
as dates. Date stamps
with format YYYY-
MM-DD HH:MM:SS.
SSS are returned.
timeuuid string string
Type 1 UUID. See
constants for the
UUID format.
tinyint integer, string integer
String must be a valid
8-bit integer.
tuple list, string list
Uses the native JSON
list representation.
uuid string string
See constants for the
UUID format.
varchar string string
Uses JSON character
escape \u.
varint integer, string integer
Variable length;
might overflow 32-
bit or 64-bit integers
in client-side decoder.
JSON encoding of Amazon Keyspaces data types 705

Amazon Keyspaces (for Apache Cassandra) Developer Guide
DDL statements (data definition language) in Amazon
Keyspaces
Data definition language (DDL) is the set of Cassandra Query Language (CQL) statements that you
use to manage data structures in Amazon Keyspaces (for Apache Cassandra), such as keyspaces
and tables. You use DDL to create these data structures, modify them after they are created,
and remove them when they're no longer in use. Amazon Keyspaces performs DDL operations
asynchronously. For more information about how to confirm that an asynchronous operation has
completed, see the section called “Asynchronous creation and deletion of keyspaces and tables”.
The following DDL statements are supported:
• CREATE KEYSPACE
• ALTER KEYSPACE
• DROP KEYSPACE
• CREATE TABLE
• ALTER TABLE
• RESTORE TABLE
• DROP TABLE
Topics
• Keyspaces
• Tables
Keyspaces
A keyspace groups related tables that are relevant for one or more applications. In terms of a
relational database management system (RDBMS), keyspaces are roughly similar to databases,
tablespaces, or similar constructs.
Note
In Apache Cassandra, keyspaces determine how data is replicated among multiple storage
nodes. However, Amazon Keyspaces is a fully managed service: The details of its storage
DDL statements 706

Amazon Keyspaces (for Apache Cassandra) Developer Guide
layer are managed on your behalf. For this reason, keyspaces in Amazon Keyspaces are
logical constructs only, and aren't related to the underlying physical storage.
For information about quota limits and constraints for Amazon Keyspaces keyspaces, see Quotas.
Statements for keyspaces
• CREATE KEYSPACE
• ALTER KEYSPACE
• DROP KEYSPACE
CREATE KEYSPACE
Use the CREATE KEYSPACE statement to create a new keyspace.
Syntax
create_keyspace_statement ::=
CREATE KEYSPACE [ IF NOT EXISTS ] keyspace_name
WITH options
Where:
•
keyspace_name is the name of the keyspace to be created.
• options are one or more of the following:
•
REPLICATION – A map that indicates the replication strategy for the keyspace:
•
SingleRegionStrategy – For a single-Region keyspace. (Required)
•
NetworkTopologyStrategy – Specify at least two and up to six AWS Regions. The
replication factor for each Region is three. (Optional)
•
DURABLE_WRITES – Writes to Amazon Keyspaces are always durable, so this option isn't
required. However, if specified, the value must be true.
•
TAGS – A list of key-value pair tags to be attached to the resource when you create it.
(Optional)
Example
Keyspaces 707

Amazon Keyspaces (for Apache Cassandra) Developer Guide
Create a keyspace as follows.
CREATE KEYSPACE my_keyspace
WITH REPLICATION = {'class': 'SingleRegionStrategy'} and TAGS ={'key1':'val1',
'key2':'val2'} ;
To create a multi-Region keyspace, specify NetworkTopologyStrategy and include at least two
and up to six AWS Regions. The replication factor for each Region is three.
CREATE KEYSPACE my_keyspace
WITH REPLICATION = {'class':'NetworkTopologyStrategy', 'us-east-1':'3', 'ap-
southeast-1':'3','eu-west-1':'3'};
ALTER KEYSPACE
You can use ALTER KEYSPACE to add or remove tags from a keyspace.
To add or remove tags, you can use the following syntax.
Syntax
alter_keyspace_statement ::=
ALTER KEYSPACE keyspace_name
[[ADD | DROP] TAGS
Where:
•
keyspace_name is the name of the keyspace to be altered.
•
TAGS – A list of key-value pair tags to be added or removed from the keyspace.
Example
Alter a keyspace as follows.
ALTER KEYSPACE my_keyspace ADD TAGS {'key1':'val1', 'key2':'val2'};
DROP KEYSPACE
Use the DROP KEYSPACE statement to remove a keyspace—including all of its contents, such as
tables.
Keyspaces 708

Amazon Keyspaces (for Apache Cassandra) Developer Guide
Syntax
drop_keyspace_statement ::=
DROP KEYSPACE [ IF EXISTS ] keyspace_name
Where:
• keyspace_name is the name of the keyspace to be dropped.
Example
DROP KEYSPACE "myGSGKeyspace";
Tables
Tables are the primary data structures in Amazon Keyspaces. Data in a table is organized into rows
and columns. A subset of those columns is used to determine partitioning (and ultimately data
placement) through the specification of a partition key.
Another set of columns can be defined into clustering columns, which means that they can
participate as predicates in query execution.
By default, new tables are created with on-demand throughput capacity. You can change the
capacity mode for new and existing tables. For more information about read/write capacity
throughput modes, see the section called “Configure read/write capacity modes”.
For tables in provisioned mode, you can configure optional AUTOSCALING_SETTINGS. For more
information about Amazon Keyspaces auto scaling and the available options, see the section called
“Configure automatic scaling on an existing table”.
For information about quota limits and constraints for Amazon Keyspaces tables, see Quotas.
Statements for tables
• CREATE TABLE
• ALTER TABLE
• RESTORE TABLE
• DROP TABLE
Tables 709

Amazon Keyspaces (for Apache Cassandra) Developer Guide
CREATE TABLE
Use the CREATE TABLE statement to create a new table.
Syntax
create_table_statement ::= CREATE TABLE [ IF NOT EXISTS ] table_name
'('
column_definition
( ',' column_definition )*
[ ',' PRIMARY KEY '(' primary_key ')' ]
')' [ WITH table_options ]
column_definition ::= column_name cql_type [ FROZEN ][ STATIC ][ PRIMARY KEY]
primary_key ::= partition_key [ ',' clustering_columns ]
partition_key ::= column_name
| '(' column_name ( ',' column_name )* ')'
clustering_columns ::= column_name ( ',' column_name )*
table_options ::= [table_options]
| CLUSTERING ORDER BY '(' clustering_order
')' [ AND table_options ]
| options
| CUSTOM_PROPERTIES
| AUTOSCALING_SETTINGS
| default_time_to_live
| TAGS
clustering_order ::= column_name (ASC | DESC) ( ',' column_name (ASC | DESC) )*
Where:
•
table_name is the name of the table to be created.
•
column_definition consists of the following:
•
column_name – The name of the column.
•
cql_type – An Amazon Keyspaces data type (see Data types).
Tables 710

Amazon Keyspaces (for Apache Cassandra) Developer Guide
•
FROZEN – Designates this column of type collection (for example, LIST, SET, or MAP) as
frozen. A frozen collection is serialized into a single immutable value and treated like a BLOB.
For more information, see the section called “Collection types”.
•
STATIC – Designates this column as static. Static columns store values that are shared by all
rows in the same partition.
•
PRIMARY KEY – Designates this column as the table's primary key.
•
primary_key consists of the following:
•
partition_key
•
clustering_columns
•
partition_key:
• The partition key can be a single column, or it can be a compound value composed of two or
more columns. The partition key portion of the primary key is required and determines how
Amazon Keyspaces stores your data.
•
clustering_columns:
• The optional clustering column portion of your primary key determines how the data is
clustered and sorted within each partition.
•
table_options consist of the following:
•
CLUSTERING ORDER BY – The default CLUSTERING ORDER on a table is composed of your
clustering keys in the ASC (ascending) sort direction. Specify it to override the default sort
behavior.
•
CUSTOM_PROPERTIES – A map of settings that are specific to Amazon Keyspaces.
•
capacity_mode: Specifies the read/write throughput capacity mode for
the table. The options are throughput_mode:PAY_PER_REQUEST and
throughput_mode:PROVISIONED. The provisioned capacity mode requires
read_capacity_units and write_capacity_units as inputs. The default is
throughput_mode:PAY_PER_REQUEST.
•
client_side_timestamps: Specifies if client-side timestamps are enabled or disabled for
the table. The options are {'status': 'enabled'} and {'status': 'disabled'}.
If it's not specified, the default is status:disabled. After client-side timestamps are
enabled for a table, this setting cannot be disabled.
•
encryption_specification: Specifies the encryption options for encryption at rest. If
it's not specified, the default is encryption_type:AWS_OWNED_KMS_KEY. The encryption
Tables 711

Amazon Keyspaces (for Apache Cassandra) Developer Guide
option customer managed key requires the AWS KMS key in Amazon Resource Name (ARN)
format as input: kms_key_identifier:ARN: kms_key_identifier:ARN.
•
point_in_time_recovery: Specifies if point-in-time restore is enabled or disabled for the
table. The options are status:enabled and status:disabled. If it's not specified, the
default is status:disabled.
•
replica_updates: Specifies the settings of a multi-Region table that are specific to
an AWS Region. For a multi-Region table, you can configure the table's read capacity
differently per AWS Region. You can do this by configuring the following parameters. For
more information and examples, see the section called “Create a multi-Region table in
provisioned mode”.
•
region – The AWS Region of the table replica with the following settings:
•
read_capacity_units
•
TTL: Enables Time to Live custom settings for the table. To enable, use status:enabled.
The default is status:disabled. After TTL is enabled, you can't disable it for the table.
•
AUTOSCALING_SETTINGS includes the following optional settings for tables in provisioned
mode. For more information and examples, see the section called “Create a new table with
automatic scaling”.
•
provisioned_write_capacity_autoscaling_update:
•
autoscaling_disabled – To enable auto scaling for write capacity, set the value to
false. The default is true. (Optional)
•
minimum_units – The minimum level of write throughput that the table should always
be ready to support. The value must be between 1 and the max throughput per second
quota for your account (40,000 by default).
•
maximum_units – The maximum level of write throughput that the table should always
be ready to support. The value must be between 1 and the max throughput per second
quota for your account (40,000 by default).
•
scaling_policy – Amazon Keyspaces supports the target tracking policy. The auto
scaling target is the provisioned write capacity of the table.
•
target_tracking_scaling_policy_configuration – To define the target
tracking policy, you must define the target value. For more information about target
tracking and cooldown periods, see Target Tracking Scaling Policies in the Application
Auto Scaling User Guide.
•
target_value – The target utilization rate of the table. Amazon Keyspaces auto
scaling ensures that the ratio of consumed capacity to provisioned capacity stays at or
Tables 712

Amazon Keyspaces (for Apache Cassandra) Developer Guide
near this value. You define target_value as a percentage. A double between 20 and
90. (Required)
•
scale_in_cooldown – A cooldown period in seconds between scaling activities that
lets the table stabilize before another scale in activity starts. If no value is provided,
the default is 0. (Optional)
•
scale_out_cooldown – A cooldown period in seconds between scaling activities
that lets the table stabilize before another scale out activity starts. If no value is
provided, the default is 0. (Optional)
•
disable_scale_in: A boolean that specifies if scale-in is disabled or enabled
for the table. This parameter is disabled by default. To turn on scale-in, set the
boolean value to FALSE. This means that capacity is automatically scaled down for a
table on your behalf. (Optional)
•
provisioned_read_capacity_autoscaling_update:
•
autoscaling_disabled – To enable auto scaling for read capacity, set the value to
false. The default is true. (Optional)
•
minimum_units – The minimum level of throughput that the table should always be
ready to support. The value must be between 1 and the max throughput per second quota
for your account (40,000 by default).
•
maximum_units – The maximum level of throughput that the table should always be
ready to support. The value must be between 1 and the max throughput per second quota
for your account (40,000 by default).
•
scaling_policy – Amazon Keyspaces supports the target tracking policy. The auto
scaling target is the provisioned read capacity of the table.
•
target_tracking_scaling_policy_configuration – To define the target
tracking policy, you must define the target value. For more information about target
tracking and cooldown periods, see Target Tracking Scaling Policies in the Application
Auto Scaling User Guide.
•
target_value – The target utilization rate of the table. Amazon Keyspaces auto
scaling ensures that the ratio of consumed capacity to provisioned capacity stays at or
near this value. You define target_value as a percentage. A double between 20 and
90. (Required)
•
scale_in_cooldown – A cooldown period in seconds between scaling activities that
lets the table stabilize before another scale in activity starts. If no value is provided,
the default is 0. (Optional)
Tables 713

Amazon Keyspaces (for Apache Cassandra) Developer Guide
•
scale_out_cooldown – A cooldown period in seconds between scaling activities
that lets the table stabilize before another scale out activity starts. If no value is
provided, the default is 0. (Optional)
•
disable_scale_in: A boolean that specifies if scale-in is disabled or enabled
for the table. This parameter is disabled by default. To turn on scale-in, set the
boolean value to FALSE. This means that capacity is automatically scaled down for a
table on your behalf. (Optional)
•
replica_updates: Specifies the AWS Region specific auto scaling settings of a multi-
Region table. For a multi-Region table, you can configure the table's read capacity differently
per AWS Region. You can do this by configuring the following parameters. For more
information and examples, see the section called “Update provisioned capacity and auto
scaling settings for a multi-Region table”.
•
region – The AWS Region of the table replica with the following settings:
•
provisioned_read_capacity_autoscaling_update
•
autoscaling_disabled – To enable auto scaling for the table's read capacity, set
the value to false. The default is true. (Optional)
Note
Auto scaling for a multi-Region table has to be either enabled or disabled for
all replicas of the table.
•
minimum_units – The minimum level of read throughput that the table should
always be ready to support. The value must be between 1 and the max throughput
per second quota for your account (40,000 by default).
•
maximum_units – The maximum level of read throughput that the table should
always be ready to support. The value must be between 1 and the max throughput
per second quota for your account (40,000 by default).
•
scaling_policy – Amazon Keyspaces supports the target tracking policy. The auto
scaling target is the provisioned read capacity of the table.
•
target_tracking_scaling_policy_configuration – To define the target
tracking policy, you must define the target value. For more information about
target tracking and cooldown periods, see Target Tracking Scaling Policies in the
Application Auto Scaling User Guide.
Tables 714

Amazon Keyspaces (for Apache Cassandra) Developer Guide
•
target_value – The target utilization rate of the table. Amazon Keyspaces auto
scaling ensures that the ratio of consumed read capacity to provisioned read
capacity stays at or near this value. You define target_value as a percentage. A
double between 20 and 90. (Required)
•
scale_in_cooldown – A cooldown period in seconds between scaling activities
that lets the table stabilize before another scale in activity starts. If no value is
provided, the default is 0. (Optional)
•
scale_out_cooldown – A cooldown period in seconds between scaling
activities that lets the table stabilize before another scale out activity starts. If no
value is provided, the default is 0. (Optional)
•
disable_scale_in: A boolean that specifies if scale-in is disabled
or enabled for the table. This parameter is disabled by default. To turn on
scale-in, set the boolean value to FALSE. This means that read capacity is
automatically scaled down for a table on your behalf. (Optional)
•
default_time_to_live – The default Time to Live setting in seconds for the table.
•
TAGS – A list of key-value pair tags to be attached to the resource when it's created.
•
clustering_order consists of the following:
•
column_name – The name of the column.
•
ASC | DESC – Sets the ascendant (ASC) or descendant (DESC) order modifier. If it's not
specified, the default order is ASC.
Example
CREATE TABLE IF NOT EXISTS "my_keyspace".my_table (
id text,
name text,
region text,
division text,
project text,
role text,
pay_scale int,
vacation_hrs float,
manager_id text,
PRIMARY KEY (id,division))
WITH CUSTOM_PROPERTIES={
'capacity_mode':{
Tables 715

Amazon Keyspaces (for Apache Cassandra) Developer Guide
'throughput_mode':
'PROVISIONED', 'read_capacity_units': 10, 'write_capacity_units': 20
},
'point_in_time_recovery':{'status':
'enabled'},
'encryption_specification':{
'encryption_type':
'CUSTOMER_MANAGED_KMS_KEY',
'kms_key_identifier':'arn:aws:kms:eu-
west-1:5555555555555:key/11111111-1111-111-1111-111111111111'
}
}
AND CLUSTERING ORDER BY (division ASC)
AND TAGS={'key1':'val1', 'key2':'val2'}
AND default_time_to_live = 3024000;
In a table that uses clustering columns, non-clustering columns can be declared as static in the
table definition. For more information about static columns, see the section called “Estimate
capacity consumption of static columns”.
Example
CREATE TABLE "my_keyspace".my_table (
id int,
name text,
region text,
division text,
project text STATIC,
PRIMARY KEY (id,division));
ALTER TABLE
Use the ALTER TABLE statement to add new columns, add tags, or change the table's custom
properties.
Syntax
alter_table_statement ::= ALTER TABLE table_name
[ ADD ( column_definition | column_definition_list) ]
Tables 716

Amazon Keyspaces (for Apache Cassandra) Developer Guide
[[ADD | DROP] TAGS {'key1':'val1', 'key2':'val2'}]
[ WITH table_options [ , ... ] ] ;
column_definition ::= column_name cql_type
Where:
•
table_name is the name of the table to be altered.
•
column_definition is the name of the column and data type to be added.
•
column_definition_list is a comma-separated list of columns placed inside parentheses.
•
table_options consist of the following:
•
CUSTOM_PROPERTIES – A map of settings specific to Amazon Keyspaces.
•
capacity_mode: Specifies the read/write throughput capacity mode for
the table. The options are throughput_mode:PAY_PER_REQUEST and
throughput_mode:PROVISIONED. The provisioned capacity mode requires
read_capacity_units and write_capacity_units as inputs. The default is
throughput_mode:PAY_PER_REQUEST.
•
client_side_timestamps: Specifies if client-side timestamps are enabled or disabled for
the table. The options are {'status': 'enabled'} and {'status': 'disabled'}.
If it's not specified, the default is status:disabled. After client-side timestamps are
enabled for a table, this setting cannot be disabled.
•
encryption_specification: Specifies the encryption option for encryption
at rest. The options are encryption_type:AWS_OWNED_KMS_KEY and
encryption_type:CUSTOMER_MANAGED_KMS_KEY. The encryption option customer
managed key requires the AWS KMS key in Amazon Resource Name (ARN) format as input:
kms_key_identifier:ARN.
•
point_in_time_recovery: Specifies if point-in-time restore is enabled or disabled
for the table. The options are status:enabled and status:disabled. The default is
status:disabled.
•
replica_updates: Specifies the AWS Region specific settings of a multi-Region table.
For a multi-Region table, you can configure the table's read capacity differently per AWS
Region. You can do this by configuring the following parameters. For more information and
examples, see the section called “Update provisioned capacity and auto scaling settings for a
multi-Region table”.
Tables 717

Amazon Keyspaces (for Apache Cassandra) Developer Guide
•
region – The AWS Region of the table replica with the following settings:
•
read_capacity_units
•
ttl: Enables Time to Live custom settings for the table. To enable, use status:enabled.
The default is status:disabled. After ttlis enabled, you can't disable it for the table.
•
AUTOSCALING_SETTINGS includes the optional auto scaling settings for provisioned tables.
For syntax and detailed descriptions, see the section called “CREATE TABLE”. For examples, see
the section called “Configure automatic scaling on an existing table”.
•
default_time_to_live: The default Time to Live setting in seconds for the table.
•
TAGS is a list of key-value pair tags to be attached to the resource.
Note
With ALTER TABLE, you can only change a single custom property. You can't combine more
than one ALTER TABLE command in the same statement.
Examples
The following statement shows how to add a column to an existing table.
ALTER TABLE mykeyspace.mytable ADD (ID int);
This statement shows how to add two collection columns to an existing table:
•
A frozen collection column col_frozen_list that contains a nested frozen collection
•
A non-frozen collection column col_map that contains a nested frozen collection
ALTER TABLE my_Table ADD(col_frozen_list FROZEN<LIST<FROZEN<SET<TEXT>>>>, col_map
MAP<INT, FROZEN<SET<INT>>>);
To change a table's capacity mode and specify read and write capacity units, you can use the
following statement.
ALTER TABLE mykeyspace.mytable WITH CUSTOM_PROPERTIES={'capacity_mode':
{'throughput_mode': 'PROVISIONED', 'read_capacity_units': 10, 'write_capacity_units':
20}};
Tables 718

Amazon Keyspaces (for Apache Cassandra) Developer Guide
The following statement specifies a customer managed KMS key for the table.
ALTER TABLE mykeyspace.mytable WITH CUSTOM_PROPERTIES={
'encryption_specification':{
'encryption_type': 'CUSTOMER_MANAGED_KMS_KEY',
'kms_key_identifier':'arn:aws:kms:eu-
west-1:5555555555555:key/11111111-1111-111-1111-111111111111'
}
};
To enable point-in-time restore for a table, you can use the following statement.
ALTER TABLE mykeyspace.mytable WITH CUSTOM_PROPERTIES={'point_in_time_recovery':
{'status': 'enabled'}};
To set a default Time to Live value in seconds for a table, you can use the following statement.
ALTER TABLE my_table WITH default_time_to_live = 2592000;
This statement enables custom Time to Live settings for a table.
ALTER TABLE mytable WITH CUSTOM_PROPERTIES={'ttl':{'status': 'enabled'}};
RESTORE TABLE
Use the RESTORE TABLE statement to restore a table to a point in time. This statement requires
point-in-time recovery to be enabled on a table. For more information, see the section called
“Backup and restore with point-in-time recovery”.
Syntax
restore_table_statement ::=
RESTORE TABLE restored_table_name FROM TABLE source_table_name
[ WITH table_options [ , ... ] ];
Where:
•
restored_table_name is the name of the restored table.
Tables 719

Amazon Keyspaces (for Apache Cassandra) Developer Guide
•
source_table_name is the name of the source table.
•
table_options consists of the following:
•
restore_timestamp is the restore point time in ISO 8601 format. If it's not specified, the
current timestamp is used.
•
CUSTOM_PROPERTIES – A map of settings specific to Amazon Keyspaces.
•
capacity_mode: Specifies the read/write throughput capacity mode for
the table. The options are throughput_mode:PAY_PER_REQUEST and
throughput_mode:PROVISIONED. The provisioned capacity mode requires
read_capacity_units and write_capacity_units as inputs. The default is the current
setting from the source table.
•
encryption_specification: Specifies the encryption option for encryption
at rest. The options are encryption_type:AWS_OWNED_KMS_KEY and
encryption_type:CUSTOMER_MANAGED_KMS_KEY. The encryption option customer
managed key requires the AWS KMS key in Amazon Resource Name (ARN) format as input:
kms_key_identifier:ARN. To restore a table encrypted with a customer managed key to
a table encrypted with an AWS owned key, Amazon Keyspaces requires access to the AWS
KMS key of the source table.
•
point_in_time_recovery: Specifies if point-in-time restore is enabled or disabled for
the table. The options are status:enabled and status:disabled. Unlike when you
create new tables, the default status for restored tables is status:enabled because the
setting is inherited from the source table. To disable PITR for restored tables, you must set
status:disabled explicitly.
•
replica_updates: Specifies the AWS Region specific settings of a multi-Region table. For
a multi-Region table, you can configure the table's read capacity differently per AWS Region.
You can do this by configuring the following parameters.
•
region – The AWS Region of the table replica with the following settings:
•
read_capacity_units
•
AUTOSCALING_SETTINGS includes the optional auto scaling settings for provisioned tables.
For detailed syntax and descriptions, see the section called “CREATE TABLE”.
•
TAGS is a list of key-value pair tags to be attached to the resource.
Tables 720

Amazon Keyspaces (for Apache Cassandra) Developer Guide
Note
Deleted tables can only be restored to the time of deletion.
Example
RESTORE TABLE mykeyspace.mytable_restored from table mykeyspace.my_table
WITH restore_timestamp = '2020-06-30T04:05:00+0000'
AND custom_properties = {'point_in_time_recovery':{'status':'disabled'},
'capacity_mode':{'throughput_mode': 'PROVISIONED', 'read_capacity_units': 10,
'write_capacity_units': 20}}
AND TAGS={'key1':'val1', 'key2':'val2'};
DROP TABLE
Use the DROP TABLE statement to remove a table from the keyspace.
Syntax
drop_table_statement ::=
DROP TABLE [ IF EXISTS ] table_name
Where:
•
IF EXISTS prevents DROP TABLE from failing if the table doesn't exist. (Optional)
•
table_name is the name of the table to be dropped.
Example
DROP TABLE "myGSGKeyspace".employees_tbl;
DML statements (data manipulation language) in Amazon
Keyspaces
Data manipulation language (DML) is the set of Cassandra Query Language (CQL) statements
that you use to manage data in Amazon Keyspaces (for Apache Cassandra) tables. You use DML
statements to add, modify, or delete data in a table.
DML statements 721

Amazon Keyspaces (for Apache Cassandra) Developer Guide
You also use DML statements to query data in a table. (Note that CQL doesn't support joins or
subqueries.)
Topics
• SELECT
• INSERT
• UPDATE
• DELETE
SELECT
Use a SELECT statement to query data.
Syntax
select_statement ::= SELECT [ JSON ] ( select_clause | '*' )
FROM table_name
[ WHERE 'where_clause' ]
[ ORDER BY 'ordering_clause' ]
[ LIMIT (integer | bind_marker) ]
[ ALLOW FILTERING ]
select_clause ::= selector [ AS identifier ] ( ',' selector [ AS identifier ] )
selector ::= column_name
| term
| CAST '(' selector AS cql_type ')'
| function_name '(' [ selector ( ',' selector )* ] ')'
where_clause ::= relation ( AND relation )*
relation ::= column_name operator term
TOKEN
operator ::= '=' | '<' | '>' | '<=' | '>=' | IN | CONTAINS | CONTAINS KEY
ordering_clause ::= column_name [ ASC | DESC ] ( ',' column_name [ ASC | DESC ] )*
Examples
SELECT name, id, manager_id FROM "myGSGKeyspace".employees_tbl ;
SELECT JSON name, id, manager_id FROM "myGSGKeyspace".employees_tbl ;
SELECT 722

Amazon Keyspaces (for Apache Cassandra) Developer Guide
For a table that maps JSON-encoded data types to Amazon Keyspaces data types, see the section
called “JSON encoding of Amazon Keyspaces data types”.
Using the IN keyword
The IN keyword specifies equality for one or more values. It can be applied to the partition key
and the clustering column. Results are returned in the order the keys are presented in the SELECT
statement.
Examples
SELECT * from mykeyspace.mytable WHERE primary.key1 IN (1,2) and clustering.key1 = 2;
SELECT * from mykeyspace.mytable WHERE primary.key1 IN (1,2) and clustering.key1 <= 2;
SELECT * from mykeyspace.mytable WHERE primary.key1 = 1 and clustering.key1 IN (1, 2);
SELECT * from mykeyspace.mytable WHERE primary.key1 <= 2 and clustering.key1 IN (1, 2)
ALLOW FILTERING;
For more information about the IN keyword and how Amazon Keyspaces processes the statement,
see the section called “Use IN SELECT”.
Ordering results
The ORDER BY clause specifies the sort order of the returned results. It takes as arguments a list of
column names along with the sort order for each column. You can only specify clustering columns
in ordering clauses. Non-clustering columns are not allowed. The sort order options are ASC for
ascending and DESC for descending sort order. If the sort order is omitted, the default ordering of
the clustering column is used. For possible sort orders, see the section called “Order results”.
Example
SELECT name, id, division, manager_id FROM "myGSGKeyspace".employees_tbl WHERE id =
'012-34-5678' ORDER BY division;
When using ORDER BY with the IN keyword, results are ordered within a page. Full re-ordering
with disabled pagination is not supported.
TOKEN
You can apply the TOKEN function to the PARTITION KEY column in SELECT and WHERE clauses.
With the TOKEN function, Amazon Keyspaces returns rows based on the mapped token value of the
PARTITION_KEY rather than on the value of the PARTITION KEY.
SELECT 723

Amazon Keyspaces (for Apache Cassandra) Developer Guide
TOKEN relations are not supported with the IN keyword.
Examples
SELECT TOKEN(id) from my_table;
SELECT TOKEN(id) from my_table WHERE TOKEN(id) > 100 and TOKEN(id) < 10000;
TTL function
You can use the TTL function with the SELECT statement to retrieve the expiration time in seconds
that is stored for a column. If no TTL value is set, the function returns null.
Example
SELECT TTL(my_column) from my_table;
The TTL function can’t be used on multi-cell columns such as collections.
WRITETIME function
You can use the WRITETIME function with the SELECT statement to retrieve the timestamp that
is stored as metadata for the value of a column only if the table uses client-side timestamps. For
more information, see the section called “Client-side timestamps”.
SELECT WRITETIME(my_column) from my_table;
The WRITETIME function can’t be used on multi-cell columns such as collections.
Note
For compatibility with established Cassandra driver behavior, tag-based authorization
policies are not enforced when you perform operations on system tables by using
Cassandra Query Language (CQL) API calls through Cassandra drivers and developer tools.
For more information, see the section called “ Amazon Keyspaces resource access based on
tags”.
INSERT
Use the INSERT statement to add a row to a table.
INSERT 724

Amazon Keyspaces (for Apache Cassandra) Developer Guide
Syntax
insert_statement ::= INSERT INTO table_name ( names_values | json_clause )
[ IF NOT EXISTS ]
[ USING update_parameter ( AND update_parameter )* ]
names_values ::= names VALUES tuple_literal
json_clause ::= JSON string [ DEFAULT ( NULL | UNSET ) ]
names ::= '(' column_name ( ',' column_name )* ')'
Example
INSERT INTO "myGSGKeyspace".employees_tbl (id, name, project, region, division, role,
pay_scale, vacation_hrs, manager_id)
VALUES ('012-34-5678','Russ','NightFlight','US','Engineering','IC',3,12.5,
'234-56-7890') ;
Update parameters
INSERT supports the following values as update_parameter:
•
TTL – A time value in seconds. The maximum configurable value is 630,720,000 seconds, which
is the equivalent of 20 years.
•
TIMESTAMP – A bigint value representing the number of microseconds since the standard base
time known as the epoch: January 1 1970 at 00:00:00 GMT. A timestamp in Amazon Keyspaces
has to fall between the range of 2 days in the past and 5 minutes in the future.
Example
INSERT INTO my_table (userid, time, subject, body, user)
VALUES (B79CB3BA-745E-5D9A-8903-4A02327A7E09, 96a29100-5e25-11ec-90d7-
b5d91eceda0a, 'Message', 'Hello','205.212.123.123')
USING TTL 259200;
JSON support
For a table that maps JSON-encoded data types to Amazon Keyspaces data types, see the section
called “JSON encoding of Amazon Keyspaces data types”.
INSERT 725

Amazon Keyspaces (for Apache Cassandra) Developer Guide
You can use the JSON keyword to insert a JSON-encoded map as a single row. For columns that
exist in the table but are omitted in the JSON insert statement, use DEFAULT UNSET to preserve
the existing values. Use DEFAULT NULL to write a NULL value into each row of omitted columns
and overwrite the existing values (standard write charges apply). DEFAULT NULL is the default
option.
Example
INSERT INTO "myGSGKeyspace".employees_tbl JSON '{"id":"012-34-5678",
"name": "Russ",
"project": "NightFlight",
"region": "US",
"division": "Engineering",
"role": "IC",
"pay_scale": 3,
"vacation_hrs": 12.5,
"manager_id": "234-56-7890"}';
If the JSON data contains duplicate keys, Amazon Keyspaces stores the last value for the key
(similar to Apache Cassandra). In the following example, where the duplicate key is id, the value
234-56-7890 is used.
Example
INSERT INTO "myGSGKeyspace".employees_tbl JSON '{"id":"012-34-5678",
"name": "Russ",
"project": "NightFlight",
"region": "US",
"division": "Engineering",
"role": "IC",
"pay_scale": 3,
"vacation_hrs": 12.5,
"id": "234-56-7890"}';
UPDATE
Use the UPDATE statement to modify a row in a table.
Syntax
update_statement ::= UPDATE table_name
UPDATE 726

Amazon Keyspaces (for Apache Cassandra) Developer Guide
[ USING update_parameter ( AND update_parameter )* ]
SET assignment ( ',' assignment )*
WHERE where_clause
[ IF ( EXISTS | condition ( AND condition )*) ]
update_parameter ::= ( integer | bind_marker )
assignment ::= simple_selection '=' term
| column_name '=' column_name ( '+' | '-' ) term
| column_name '=' list_literal '+' column_name
simple_selection ::= column_name
| column_name '[' term ']'
| column_name '.' `field_name
condition ::= simple_selection operator term
Example
UPDATE "myGSGKeyspace".employees_tbl SET pay_scale = 5 WHERE id = '567-89-0123' AND
division = 'Marketing' ;
To increment a counter, use the following syntax. For more information, see the section called
“Counters”.
UPDATE ActiveUsers SET counter = counter + 1 WHERE user = A70FE1C0-5408-4AE3-
BE34-8733E5K09F14 AND action = 'click';
Update parameters
UPDATE supports the following values as update_parameter:
•
TTL – A time value in seconds. The maximum configurable value is 630,720,000 seconds, which
is the equivalent of 20 years.
•
TIMESTAMP – A bigint value representing the number of microseconds since the standard base
time known as the epoch: January 1 1970 at 00:00:00 GMT. A timestamp in Amazon Keyspaces
has to fall between the range of 2 days in the past and 5 minutes in the future.
Example
UPDATE my_table (userid, time, subject, body, user)
VALUES (B79CB3BA-745E-5D9A-8903-4A02327A7E09, 96a29100-5e25-11ec-90d7-
b5d91eceda0a, 'Message', 'Hello again','205.212.123.123')
UPDATE 727

Amazon Keyspaces (for Apache Cassandra) Developer Guide
USING TIMESTAMP '2022-11-03 13:30:54+0400';
DELETE
Use the DELETE statement to remove a row from a table.
Syntax
delete_statement ::= DELETE [ simple_selection ( ',' simple_selection ) ]
FROM table_name
[ USING update_parameter ( AND update_parameter )* ]
WHERE where_clause
[ IF ( EXISTS | condition ( AND condition )*) ]
simple_selection ::= column_name
| column_name '[' term ']'
| column_name '.' `field_name
condition ::= simple_selection operator term
Where:
•
table_name is the table that contains the row you want to delete.
Example
DELETE manager_id FROM "myGSGKeyspace".employees_tbl WHERE id='789-01-2345' AND
division='Executive' ;
DELETE supports the following value as update_parameter:
•
TIMESTAMP – A bigint value representing the number of microseconds since the standard base
time known as the epoch: January 1 1970 at 00:00:00 GMT.
Built-in functions in Amazon Keyspaces
Amazon Keyspaces (for Apache Cassandra) supports a variety of built-in functions that you can use
in Cassandra Query Language (CQL) statements.
DELETE 728

Amazon Keyspaces (for Apache Cassandra) Developer Guide
Topics
• Scalar functions
Scalar functions
A scalar function performs a calculation on a single value and returns the result as a single value.
Amazon Keyspaces supports the following scalar functions.
Function Description
blobAsType
Returns a value of the specified data type.
cast
Converts one native data type into another
native data type.
currentDate
Returns the current date/time as a date.
currentTime
Returns the current date/time as a time.
currentTimestamp
Returns the current date/time as a timestamp.
currentTimeUUID Returns the current date/time as a timeuuid.
fromJson
Converts the JSON string into the selected
column's data type.
maxTimeuuid Returns the largest possible timeuuid for
timestamp or date string.
minTimeuuid Returns the smallest possible timeuuid for
timestamp or date string.
now Returns a new unique timeuuid. Supported
for INSERT, UPDATE, and DELETE statement
s, and as part of the WHERE clause in SELECT
statements.
toDate Converts either a timeuuid or a timestamp to
a date type.
Scalar functions 729

Amazon Keyspaces (for Apache Cassandra) Developer Guide
Function Description
toJson
Returns the column value of the selected
column in JSON format.
token
Returns the hash value of the partition key.
toTimestamp Converts either a timeuuid or a date to a
timestamp.
TTL
Returns the expiration time in seconds for a
column.
typeAsBlob Converts the specified data type into a blob.
toUnixTimestamp Converts either a timeuuid or a timestamp
into a bigInt.
uuid
Returns a random version 4 UUID. Supported
for INSERT, UPDATE, and DELETE statement
s, and as part of the WHERE clause in SELECT
statements.
writetime
Returns the timestamp of the value of the
specified column.
dateOf
(Deprecated) Extracts the timestamp of a
timeuuid, and returns the value as a date.
unixTimestampOf
(Deprecated) Extracts the timestamp of a
timeuuid, and returns the value as a raw, 64-
bit integer timestamp.
Scalar functions 730

Amazon Keyspaces (for Apache Cassandra) Developer Guide
Quotas for Amazon Keyspaces (for Apache Cassandra)
This section describes current quotas and default values for Amazon Keyspaces (for Apache
Cassandra).
Topics
• Amazon Keyspaces service quotas
• Increasing or decreasing throughput (for provisioned tables)
• Amazon Keyspaces encryption at rest
Amazon Keyspaces service quotas
The following table contains Amazon Keyspaces (for Apache Cassandra) quotas and the default
values. Information about which quotas can be adjusted is available in the Service Quotas console,
where you can also request quota increases. For more information on quotas, contact AWS
Support.
Quota Description Amazon Keyspaces default
Max keyspaces per AWS
Region
The maximum number of
keyspaces for this subscribe
r per Region. You can adjust
this default value in the
Service Quotas console.
256
Max tables per AWS Region The maximum number of
tables across all keyspaces for
this subscriber per Region.
You can adjust this default
value in the Service Quotas
console.
256
Max table schema size The maximum size of a table
schema.
350 KB
Amazon Keyspaces service quotas 731

Amazon Keyspaces (for Apache Cassandra) Developer Guide
Quota Description Amazon Keyspaces default
Max concurrent DDL
operations
The maximum number of
concurrent DDL operations
allowed for this subscriber per
Region.
50
Max queries per connection The maximum number of
CQL queries that can be
processed by a single client
TCP connection per second.
3000
Max row size The maximum size of a row,
excluding static column data.
For details, see the section
called “Estimate row size”.
1 MB
Max number of columns
in INSERT and UPDATE
statements
The maximum number of
columns allowed in CQL
INSERT or UPDATE statement
s. An INSERT or UPDATE
statement supports up to
225 regular columns when
Time to Live (TTL) is turned
off. If TTL is turned on, up to
166 regular columns can be
modified in a single operation
.
225/166
Max static data per logical
partition
The maximum aggregate
size of static data in a logical
partition. For details, see
the section called “Calculate
static column size per logical
partition”.
1 MB
Amazon Keyspaces service quotas 732

Amazon Keyspaces (for Apache Cassandra) Developer Guide
Quota Description Amazon Keyspaces default
Max subqueries per IN
SELECT statement
The maximum number of
subqueries you can use for
the IN keyword in a SELECT
statement. You can adjust this
default value in the Service
Quotas console.
100
Max number of nested frozen
collections per AWS Region
The maximum number of
nested collections supported
when you're using the
FROZEN keyword for a
column with a collection data
type. For more information
about frozen collections, see
the section called “Collecti
on types”. To increase the
nesting level, contact AWS
Support.
5
Max read throughput per
second
The maximum read
throughput per second—re
ad request units (RRUs) or
read capacity units (RCUs)
—that can be allocated to
a table per Region. You can
adjust this default value in
the Service Quotas console.
40,000
Amazon Keyspaces service quotas 733

Amazon Keyspaces (for Apache Cassandra) Developer Guide
Quota Description Amazon Keyspaces default
Max write throughput per
second
The maximum write
throughput per second—wr
ite request units (WRUs) or
write capacity units (WCUs)
—that can be allocated to
a table per Region. You can
adjust this default value in
the Service Quotas console.
40,000
Account-level read throughpu
t (provisioned)
The maximum number of
aggregate read capacity
units (RCUs) allocated for
the account per Region. This
is applicable only for tables
in provisioned read/writ
e capacity mode. You can
adjust this default value in
the Service Quotas console.
80,000
Account-level write
throughput (provisioned)
The maximum number of
aggregate write capacity
units (WCU) allocated for the
account per Region. This is
applicable only for tables
in provisioned read/writ
e capacity mode. You can
adjust this default value in
the Service Quotas console.
80,000
Amazon Keyspaces service quotas 734

Amazon Keyspaces (for Apache Cassandra) Developer Guide
Quota Description Amazon Keyspaces default
Max number of scalable
targets per Region per
account
The maximum number of
scalable targets for the
account per Region. An
Amazon Keyspaces table
counts as one scalable target
if auto scaling is enabled for
read capacity, and as another
scalable target if auto scaling
is enabled for write capacity.
You can adjust this default
value in the Service Quotas
console for Application
Auto Scaling by choosing
Scalable targets for Amazon
Keyspaces.
1,500
Max partition key size The maximum size of the
compound partition key.
Up to 3 bytes of additiona
l storage are added to the
raw size of each column
included in the partition key
for metadata.
2048 bytes
Max clustering key size The maximum combined size
of all clustering columns.
Up to 4 bytes of additional
storage are added to the raw
size of each clustering column
for metadata.
850 bytes
Amazon Keyspaces service quotas 735

Amazon Keyspaces (for Apache Cassandra) Developer Guide
Quota Description Amazon Keyspaces default
Max concurrent table restores
using Point-in-time Recovery
(PITR)
The maximum number of
concurrent table restores
using PITR per subscriber is
4. You can adjust this default
value in the Service Quotas
console.
4
Max amount of data restored
using point-in-time recovery
(PITR)
The maximum size of data
that can be restored using
PITR within 24 hours. You can
adjust this default value in
the Service Quotas console.
5 TB
Increasing or decreasing throughput (for provisioned tables)
Increasing provisioned throughput
You can increase ReadCapacityUnits or WriteCapacityUnits as often as necessary by using
the console or the ALTER TABLE statement. The new settings don't take effect until the ALTER
TABLE operation is complete.
You can't exceed your per-account quotas when you add provisioned capacity. And you can increase
the provisioned capacity for your tables as much as you need. For more information about per-
account quotas, see the preceding section, the section called “Amazon Keyspaces service quotas”.
Decreasing provisioned throughput
For every table in an ALTER TABLE statement, you can decrease ReadCapacityUnits or
WriteCapacityUnits (or both). The new settings don't take effect until the ALTER TABLE
operation is complete.
A decrease is allowed up to four times, anytime per day. A day is defined according to Universal
Coordinated Time (UTC). Additionally, if there was no decrease in the past hour, an additional
decrease is allowed. This effectively brings the maximum number of decreases in a day to 27 (4
decreases in the first hour, and 1 decrease for each of the subsequent 1-hour windows in a day).
Increasing or decreasing throughput (for provisioned tables) 736

Amazon Keyspaces (for Apache Cassandra) Developer Guide
Amazon Keyspaces encryption at rest
You can change encryption options between an AWS owned AWS KMS key and a customer
managed AWS KMS key up to four times within a 24-hour window, on a per table basis, starting
from when the table was created. If there was no change in the past six hours, an additional change
is allowed. This effectively brings the maximum number of changes in a day to eight (four changes
in the first six hours, and one change for each of the subsequent six-hour windows in a day).
You can change the encryption option to use an AWS owned AWS KMS key as often as necessary,
even if the earlier quota has been exhausted.
These are the quotas unless you request a higher amount. To request a service quota increase, see
AWS Support.
Amazon Keyspaces encryption at rest 737

Amazon Keyspaces (for Apache Cassandra) Developer Guide
Document history for Amazon Keyspaces (for Apache
Cassandra)
The following table describes the important changes to the documentation since the last release of
Amazon Keyspaces (for Apache Cassandra). For notification about updates to this documentation,
you can subscribe to an RSS feed.
• Latest documentation update: September 17, 2024
Change Description Date
ADD COLUMN support for
Amazon Keyspaces Multi-Reg
ion Replication
Amazon Keyspaces now
supports schema changes for
multi-Region tables.
September 17, 2024
Updated migration guidance
for Amazon Keyspaces
The updated migration
guidance outlines how to
create a migration plan to
successfully migrate from
Apache Cassandra to Amazon
Keyspaces, including different
strategies for offline and
online migrations.
June 28, 2024
Connect to Amazon
Keyspaces from Amazon
Elastic Kubernetes Service
You can now follow a step-
by-step tutorial to connect
to Amazon Keyspaces from
Amazon EKS.
February 7, 2024
Amazon Keyspaces auto
scaling APIs for provisioned
tables
Amazon Keyspaces now offers
CQL and AWS API support for
setting up auto scaling with
provisioned capacity mode.
January 23, 2024
738

Amazon Keyspaces (for Apache Cassandra) Developer Guide
Amazon Keyspaces Multi-Reg
ion Replication support for
provisioned tables
Amazon Keyspaces now
supports provisioned capacity
mode for multi-Region tables.
January 23, 2024
Amazon Keyspaces DML
activity included in CloudTrail
logs
You can now audit Amazon
Keyspaces Data Manipulation
Language (DML) API calls in
AWS CloudTrail.
December 20, 2023
Amazon Keyspaces support
for the FROZEN keyword
Amazon Keyspaces now
supports the FROZEN keyword
for collection data types.
November 15, 2023
Amazon Keyspaces managed
policy update
Amazon Keyspaces added
new permissions to the
AmazonKeyspacesFul
lAccess managed policy
to allow clients connecting to
Amazon Keyspaces through
interface VPC endpoints
access to the Amazon
EC2 instance to update
the Amazon Keyspaces
system.peers table with
network information from the
VPC.
October 3, 2023
739

Amazon Keyspaces (for Apache Cassandra) Developer Guide
Amazon Keyspaces managed
policy update
Amazon Keyspaces created a
new AmazonKeyspacesRea
dOnlyAccess_v2
managed policy to allow
clients connecting to Amazon
Keyspaces through interface
VPC endpoints access to
the Amazon EC2 instance
to update the Amazon
Keyspaces system.peers
table with network informati
on from the VPC.
September 12, 2023
Best practices for creating
connections in Amazon
Keyspaces
Learn how to improve
and optimize client driver
configurations in Amazon
Keyspaces.
June 30, 2023
System keyspaces are now
documented for Amazon
Keyspaces
Learn what is stored in system
keyspaces and how to query
them for useful information
in Amazon Keyspaces.
June 21, 2023
Amazon Keyspaces now
supports Multi-Region
Replication
Amazon Keyspaces Multi-Reg
ion Replication helps you to
maintain globally distributed
applications by providing you
with improved fault tolerance,
stability, and resilience.
June 5, 2023
740

Amazon Keyspaces (for Apache Cassandra) Developer Guide
Amazon Keyspaces managed
policy update
Amazon Keyspaces added
new permissions to the
AmazonKeyspacesFul
lAccess managed policy
to allow Amazon Keyspaces
to create a service-linked
role when an administr
ator creates a multi-Region
keyspace.
June 5, 2023
Amazon Keyspaces support
for the IN keyword
Amazon Keyspaces now
supports the IN keyword in
SELECT statements.
April 25, 2023
Cross-account access for
Amazon Keyspaces and
interface VPC endpoints
Learn how to implement
cross-account access for
Amazon Keyspaces with VPC
endpoints.
April 20, 2023
Amazon Keyspaces support
for client-side timestamps
Amazon Keyspaces client-si
de timestamps are Cassandra
-compatible cell-level
timestamps that help
distributed applications to
determine the order of write
operations when different
clients make changes to the
same data.
March 14, 2023
Getting started with Amazon
Keyspaces and interface VPC
endpoints
In this step-by-step tutorial,
learn how to connect to
Amazon Keyspaces from a
VPC.
March 1, 2023
741

Amazon Keyspaces (for Apache Cassandra) Developer Guide
Optimizing costs of Amazon
Keyspaces tables
Best practices and guidance
are available to help you
identify strategies for
optimizing costs of your
existing Amazon Keyspaces
tables.
February 17, 2023
The Murmur3Partitioner
is now the default
The Murmur3Partitioner
is now the default partition
er in Amazon Keyspaces.
November 17, 2022
Amazon Keyspaces now
supports Murmur3Pa
rtitioner
The Murmur3Partitioner
is now available in Amazon
Keyspaces.
November 9, 2022
Support update for empty
strings and blob values
Amazon Keyspaces now also
supports empty strings and
blob values as clustering
column values.
October 19, 2022
Amazon Keyspaces is now
available in AWS GovCloud
(US)
Amazon Keyspaces is
now available in the AWS
GovCloud (US) Region and is
in scope for FedRAMP-High
compliance. For information
about available endpoints, see
AWS GovCloud (US) Region
FIPS endpoints.
August 4, 2022
Monitor Amazon Keyspaces
table storage costs with
Amazon CloudWatch
Amazon Keyspaces now helps
you monitor and track table
storage costs over time with
the BillableTableSizeI
nBytes CloudWatch metric.
June 14, 2022
742

Amazon Keyspaces (for Apache Cassandra) Developer Guide
Amazon Keyspaces now
supports Terraform
You can now use Terraform
to perform data definition
language (DDL) operations in
Amazon Keyspaces.
June 9, 2022
Amazon Keyspaces token
function support
Amazon Keyspaces now helps
you optimize application
queries by using the token
function.
April 19, 2022
Amazon Keyspaces integrati
on with Apache Spark
Amazon Keyspaces now helps
you read and write data in
Apache Spark more easily by
using the open-source Spark
Cassandra Connector.
April 19, 2022
Amazon Keyspaces API
Reference
Amazon Keyspaces supports
control plane operations
to manage keyspaces and
tables using the AWS SDK and
AWS CLI. The API reference
guide describes the supported
control plane operations in
detail.
March 2, 2022
How to troubleshoot common
configuration issues when
using Amazon Keyspaces.
Learn more about how to
resolve common configura
tion issues you may encounter
when using Amazon
Keyspaces.
November 22, 2021
Amazon Keyspaces support
for Time to Live (TTL).
Amazon Keyspaces Time to
Live (TTL) helps you simplify
your application logic and
optimize the price of storage
by expiring data from tables
automatically.
October 18, 2021
743

Amazon Keyspaces (for Apache Cassandra) Developer Guide
Migrating data to Amazon
Keyspaces using DSBulk.
Step-by-step tutorial for
migrating data from Apache
Cassandra to Amazon
Keyspaces using the DataStax
Bulk Loader (DSBulk).
August 9, 2021
Amazon Keyspaces support
for VPC Endpoint entries in
the system.peers table.
Amazon Keyspaces allows you
to populate the system.pe
ers table with available
interface VPC endpoint
information to improve load
balancing and increase read/
write throughput.
July 29, 2021
Update to IAM managed
policies to support customer
managed AWS KMS keys.
IAM managed policies for
Amazon Keyspaces now
include permissions to list
and view available customer
managed AWS KMS keys
stored in AWS KMS.
June 1, 2021
Amazon Keyspaces support
for customer managed AWS
KMS keys.
Amazon Keyspaces allows you
to take control of customer
managed AWS KMS keys
stored in AWS KMS for
encryption at rest.
June 1, 2021
Amazon Keyspaces support
for JSON syntax
Amazon Keyspaces helps
you read and write JSON
documents more easily by
supporting JSON syntax for
INSERT and SELECT operation
s.
January 21, 2021
744

Amazon Keyspaces (for Apache Cassandra) Developer Guide
Amazon Keyspaces support
for static columns
Amazon Keyspaces now
helps you update and store
common data between
multiple rows efficiently by
using static columns.
November 9, 2020
GA release of NoSQL
Workbench support for
Amazon Keyspaces
NoSQL Workbench is a client-
side application that helps
you design and visualize
nonrelational data models
for Amazon Keyspaces more
easily. NoSQL Workbench
clients are available for
Windows, macOS, and Linux.
October 28, 2020
Preview release of NoSQL
Workbench support for
Amazon Keyspaces
NoSQL Workbench is a client-
side application that helps
you design and visualize
nonrelational data models
for Amazon Keyspaces more
easily. NoSQL Workbench
clients are available for
Windows, macOS, and Linux.
October 5, 2020
New code examples for
programmatic access to
Amazon Keyspaces
We continue to add code
examples for programmatic
access to Amazon Keyspaces
. Samples are now available
for Java, Python, Go, C#, and
Perl Cassandra drivers that
support Apache Cassandra
version 3.11.2.
July 17, 2020
745

Amazon Keyspaces (for Apache Cassandra) Developer Guide
Amazon Keyspaces point-in-
time recovery (PITR)
Amazon Keyspaces now
offers point-in-time recovery
(PITR) to help protect your
tables from accidental write
or delete operations by
providing you continuous
backups of your table data.
July 9, 2020
Amazon Keyspaces general
availability
With Amazon Keyspaces
, formerly known during
preview as Amazon Managed
Apache Cassandra Service
(MCS), you can use the
Cassandra Query Language
(CQL) code, Apache 2.0–licen
sed Cassandra drivers, and
developer tools that you
already use today.
April 23, 2020
Amazon Keyspaces automatic
scaling
Amazon Keyspaces (for
Apache Cassandra) integrate
s with Application Auto
Scaling to help you provision
throughput capacity efficient
ly for variable workloads in
response to actual application
traffic by adjusting throughpu
t capacity automatically.
April 23, 2020
Interface virtual private cloud
(VPC) endpoints for Amazon
Keyspaces
Amazon Keyspaces offers
private communication
between the service and your
VPC so that network traffic
doesn't leave the Amazon
network.
April 16, 2020
746

Amazon Keyspaces (for Apache Cassandra) Developer Guide
Tag-based access policies You can now use resource
tags in IAM policies to
manage access to Amazon
Keyspaces.
April 8, 2020
Counter data type Amazon Keyspaces now helps
you coordinate increments
and decrements to column
values by using counters.
April 7, 2020
Tagging resources Amazon Keyspaces now
enables you to label and
categorize resources by using
tags.
March 31, 2020
AWS CloudFormation support Amazon Keyspaces now helps
you automate the creation
and management of resources
by using AWS CloudForm
ation.
March 25, 2020
Support for IAM roles and
policies and SigV4 authentic
ation
Added information on how
you can use AWS Identity
and Access Managemen
t (IAM) to manage access
permissions and implement
security policies for Amazon
Keyspaces and how to use
the authentication plugin
for the DataStax Java Driver
for Cassandra to programma
tically access Amazon
Keyspaces using IAM roles and
federated identities.
March 17, 2020
747

Amazon Keyspaces (for Apache Cassandra) Developer Guide
Read/write capacity mode Amazon Keyspaces now
supports two read/write
throughput capacity modes.
The read/write capacity mode
controls how you're charged
for read and write throughpu
t and how table throughput
capacity is managed.
February 20, 2020
Initial release This documentation covers
the initial release of Amazon
Keyspaces (for Apache
Cassandra).
December 3, 2019
748
