
How to Make a Fillable Google Docs Form With
Tables
One of the more common uses of Google Docs is to make a Google Docs form.
Unfortunately, the most common method of creating a form using an underline
for form fields doesn’t work very well because filling out the form moves the
line and looks strange.
Thankfully, there are some tricks you can do with tables in a Google Docs
document that creates a perfect form that people can fill out while keeping the
lines in the form in place.
You can make a fillable Google Docs form with many different elements using
tables. Read on to learn how. If you want to see the final product, check out
the final form here.
How A Standard Google Docs Form Fails
The most common form field people like to insert into a fillable form is a
simple text field. This is a label next to an empty line that you want the user to
fill out.

The most common way people create such a form is simply by typing the label
for the field, and then using the underline key on the keyboard to create the
fillable fields.
This looks great, until someone actually tries to fill out the form. What you’ll
find is that filling out the fields ends up erasing the field lines under each entry.

This makes the final filled-out form look messing and strange. It would require
the person filling out the form to underline the text.
But this doesn’t look right either, because the underline doesn’t align perfectly
with the field lines.
This same issue happens when people try to make fillable forms using
Microsoft Word too. However, Word does offer some special features
for creating form letters that Google Docs doesn’t have.
But what Google Docs does do well is fillable forms using tables.
Make Fillable Form Fields With Tables
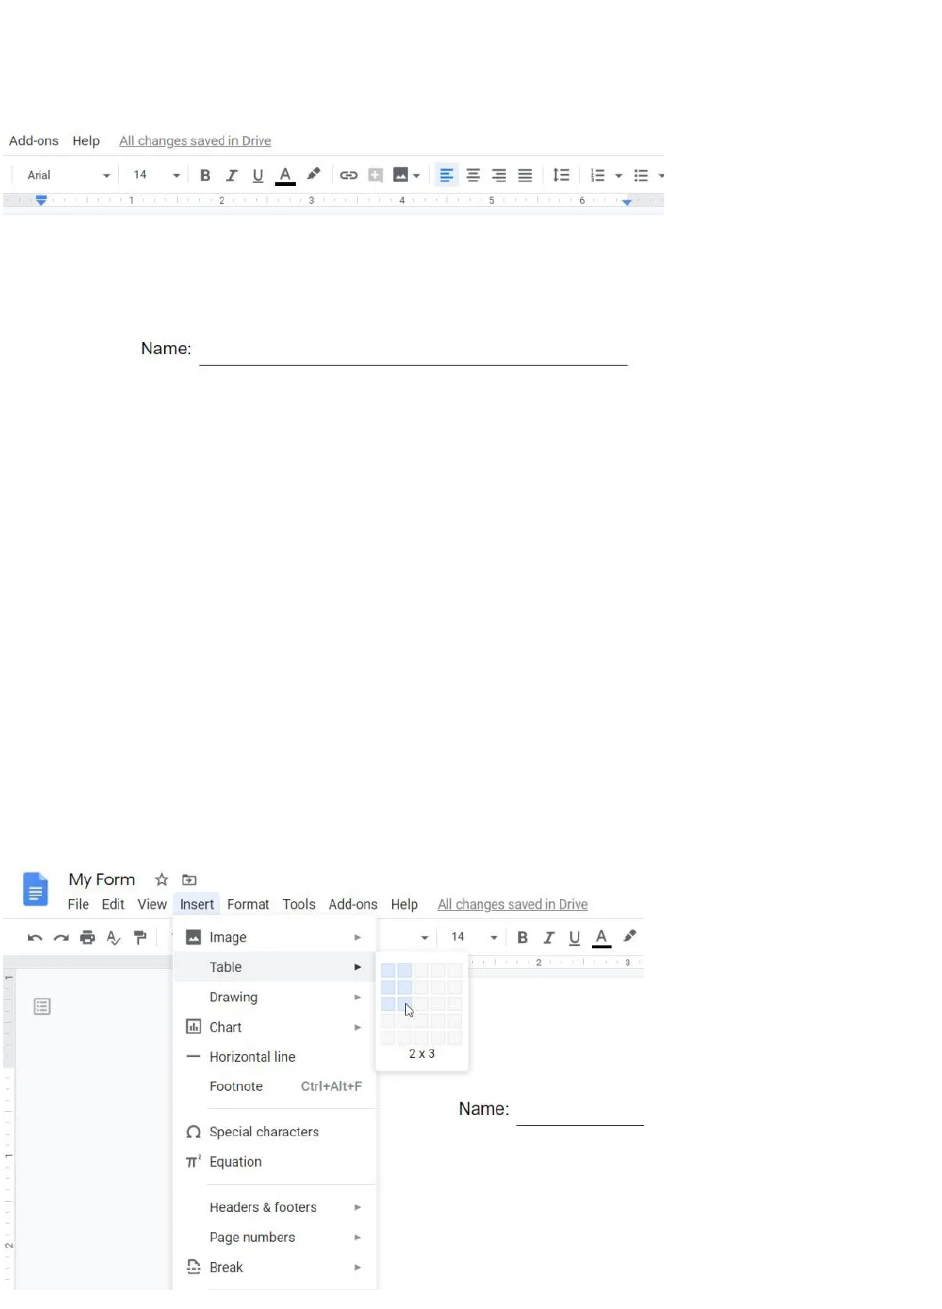
To get started creating your fillable Google Docs form, insert a table.

Select Insert from the menu, select Table, and then select the 2 x 1 size for
your table.
This inserts a plain looking table with just a couple of fields. Type the label for
your first field in the left cell, and select the right-align icon from the ribbon to
align the text to the right side of that cell.

At this point, you have everything you need to create your first full, fillable field
in your form.
First select the entire Name cell, select the border color icon from the ribbon
bar, and change the border color to white so that all border lines disappear.
Now that you have your label without a border, you need to change the entry
cell to only include the bottom line. Once you’re finished, this will appear like a
regular “underlined” field for the user to fill out.
Creating a cell with just a bottom line in Google Docs is a little tricky, because
you have to change the color of the top and side lines to white while leaving the
bottom line unchanged.

To take care of the upper line, select the entire cell, select the small down arrow
at the upper right of the cell, and choose the border option with only the top
line.
With the top cell selected, select the border color icon and choose white for the
top border color.
Repeat this process for the right border line as well. When you’re finished, you
should have your first fillable field ready.
For any other single-line fields in your form, you won’t have to repeat this
entire process. You can just copy this table and paste it anywhere in the form
where you want it, and change the label text.
Make Multiple Fillable Fields With Tables
If you want to create multiple fields, like address fields, you can also do this
with a table.
To create a field that requires three lines to fill out, insert another table but this
time choose a 2 x 3 table.

Repeat the same process as above. Add the label for the three fields in the first
cell on the left. Select all three left cells and remove the border color.
Remember to align the text to the right side of the cell.
You can also resize the width of the cells so they align with the table above it in
the form.
Now, repeat the process above with all three cells on the right.
• Set the top line and right line of the top cell white
• Set the right line of the middle cell white
• Set the right line of the bottom cell white

When you’re done, your form should now look like the example below.
As you can see, using tables, you can create regular-looking fillable text fields.
It’s also very easy to align all of these fields by resizing the table cells as
needed.
Make Checkbox Fields With A Table
You can create selection checkboxes for your form by using a table as well.
Follow the same process as above to create a table and format the fields.
1. Insert a 2 x 1 table
2. Set the left and right cell borders to all white
3. Type the label into the left cell and align the text to the right of the cell
Next, place the cursor in the right cell. Insert a checkbox by selecting the down
arrow next to the bullets icon and select the checkbox option.
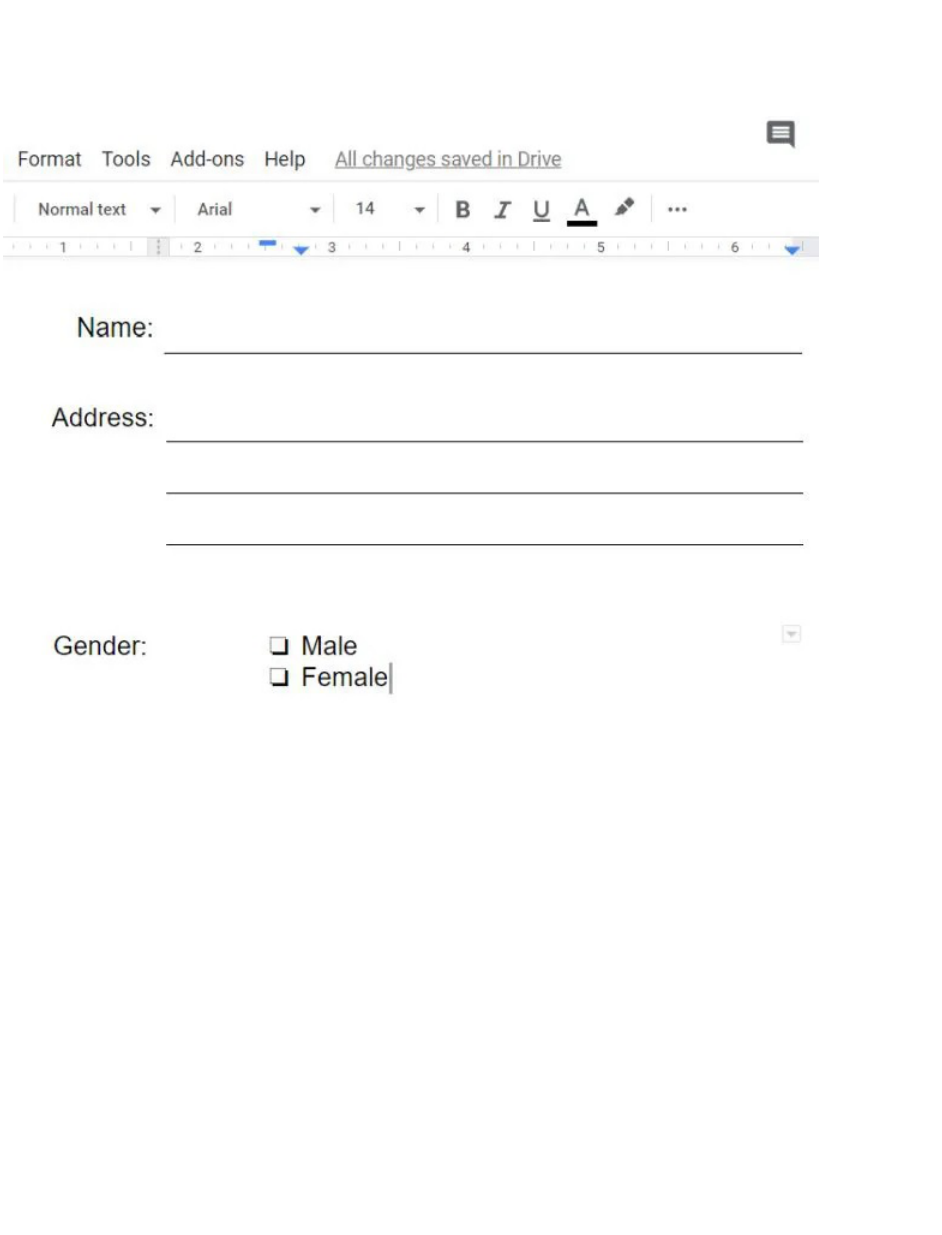
Type the text describing each checkbox, and press enter to add as many
checkboxes as you need for that section of the fillable form.
Keep in mind that these checkboxes can’t be selected just by clicking on them
with the mouse pointer. Selecting them requires that the user double-click on
the checkbox to select just that one. Then they need to right-click and select
the checkbox icon.

This is fairly straightforward, but somewhat different than people are used to.
So make sure to provide your user instructions, or type them directly into the
form as a help tip.
Now you have most of the components you need for almost any fillable form
you may need to create in Google Docs.
Make Text Field With A Table
The last fillable form feature that we’ll cover is a large freeform text field for
users to type anything they like inside a large text box.
This isn’t possible in a single line or multiline field because you need to tab to
the next line to continue typing.
To create a large text field, create the same type of table you created for the
multi-line field. That means you’ll enter a 2 x 3 table. If you want a larger text
field, you might consider a 2 x 4 or a 2 x 5 instead.

Now enter the label text in the first upper-left cell, then repeat the process in
the previous sections to set all of the left fields with white borders.
Then, for the fields on the right, you’re going to need to merge all of the cells
into one.
Select all of the fields, right click inside the selected area, and select Merge
cells.
Next, you need to create a border around the text area. Again, select all three
cells, and select the dropdown arrow at the upper right corner of the merged
cell. Select the 4-sided box icon.

This selects all four sides. Next, select the border color icon in the ribbon and
choose black.
This will create a line around all four sides of the merged cells to form one
single text entry field that people can type anything into.
Remember to resize the cells so the label and the box align with the rest of the
form.

Using Your new Fillable Google Docs Form
Now that you have your first form ready, go ahead and test it out by filling out
all of the fields!
You’ll find that the filled-out form is much more organized, all lines remain
where they’re supposed to, and it’s easy to use.
Now just make as many copies of your blank form that you need and share
them with people to start filling them out!
If you want to get a little more advanced, there are Google Docs add-ons that
let you make fillable documents using even more field types.
Articles courtesy of: https://helpdeskgeek.com/how-to/how-to-make-a-fillable-google-docs-form-with-
tables/
