
PureConnect®PureConnect®
2023 R32023 R3
Generated:
09-November-2023
Content last updated:
03-June-2020
See Change Log for summary of
changes.
Interactive UpdateInteractive Update
Technical ReferenceTechnical Reference
AbstractAbstract
Interactive Update is the recommended method for applying CIC 2015
R1 or later releases and patches to client workstations. It enables CIC
administrators to manage release and patch updates to CIC and other
PureConnect products and to download and apply the updates to client
workstations and other devices on the CIC system network.
For the latest version of this document, see the PureConnect
Documentation Library at: http://help.genesys.com/pureconnect.
For copyright and trademark information, see
https://help.genesys.com/pureconnect/desktop/copyright_and_trademark_information.htm.
1

2
4
5
5
5
6
6
6
6
6
6
7
7
7
7
7
7
8
8
8
8
8
9
10
10
10
10
10
10
10
11
11
11
12
12
12
13
13
13
13
15
16
16
17
19
21
22
22
23
24
24
25
25
27
27
28
28
30
33
35
35
36
Table of ContentsTable of Contents
Table of Contents
Introduction to Interactive Update
About Interactive Update
Interactive Update Provider
Local provider
Standalone provider
Remote provider
Interactive Update Client
Interactive Update Client service
Interactive Update Client application
Interactive Update Client configuration
Choose your release and patch deployment method
Interactive Update (recommended)
Manual download
Group policy deployment
Ports used by Interactive Update
Interactive Update configuration data file
Control frequency of automatic check for updates
Set maximum message size for large numbers of updates
Set response time for client service contacting local provider
Verify digital signature
Install a remote provider
Interaction Administrator configuration for Interactive Update
Interactive Update and CIC 2015 R1 or later
About Interactive Update 2015 R1 or later
Requirements
CIC server (local provider server)
Non-CIC server (remote or standalone provider server)
Client workstations
Web browser
New CIC installations
Apply CIC and Interactive Update release updates to existing installations
Apply CIC and Interactive Update patch updates
Interactive Update Provider
Launch Interactive Update Provider Config
Launch Interactive Update Provider Config on the CIC server
Launch Interactive Update Provider remotely
About page: Interactive Update Provider server information
Activity page: Monitor Interactive Update activity
View Update Activity
Use Activity Details for Troubleshooting
Report page: Display Interactive Update status report
Display the report
Display details for a status and a machine
Configuration page
Change the location of the database
Configure provider discovery
View the servers in a switchover pair
Add a server
Add an authorized user
Machines page: Machines overview
The Machines page
Machine details
Select a machine
Search for a machine
Group data by column heading
Groups page: Create and manage groups
Create a group
Add a machine to a group
Remove a machine from a group that you created
Modify the settings for a group
Remove a group
2

36
36
38
38
42
43
43
50
51
52
53
53
54
54
56
57
57
58
58
60
61
61
66
67
67
67
68
68
68
69
69
69
72
73
Updates page: Manage updates and installs
The Updates page
Updates data grid details
Update property details
Filter updates by product line and product component
Group updates by column heading
Add new updates
Modify existing update
Delete update
Mark as High Priority
View the status of an update
Change current state of updates
Mark updates to be pushed out to client machines
Related install relationships
Remove updates from client machines
Interactive Update Client
Interactive Update Client configuration details
Launch Interactive Update Client Configuration
Configuration tab: Specify how updates will be downloaded and installed
Provider Servers tab: Modify provider server list
Proxy Configuration tab: Add Web Proxy server information
Interactive Update Client application: How updates are applied
Interactive Update Client task tray icon
Interactive Update Client service
License verification
Release, patch, and ES deployment
Interactive Update troubleshooting
Customer Interaction Center Server update failed to apply
Invalid response from server
Refresh doesn't work when uploading multiple updates
Cannot download updates from a CIC server in a domain outside of ISA proxy server
Interactive Update Provider Config gets stuck on the Please Wait message
Processes need to be restarted when updates are being applied
Change Log
3

Introduction to Interactive UpdateIntroduction to Interactive Update
Interactive Update is the recommended method for applying CIC 2015 R1 or later releases and patches to client workstations.
Similar to the Microsoft Update process, Interactive Update enables administrators to manage release and patch updates to CIC
and other PureConnect products, and to download and apply the updates to client workstations and other devices on the CIC
system network.
Note:Note:
The CIC product suite has a new distribution model with new naming, faster release cycles, and higher quality. Interactive
Update 2.0 SU 5 was the last release using the older model. Interactive Update 2015 R1 or later can be applied to any Interactive
Update 2.0 SU.
4

About Interactive UpdateAbout Interactive Update
Interactive Update ProviderInteractive Update Provider
Interactive Update Provider consists of the following components:
Interactive Update Provider service distributes updates to client machines.
Interactive Update Provider Web interface is a Windows service that enables administrators and authorized users to manage configuration and deployment
of updates to client machines.
Interactive Update Provider Content Scanner service identifies available updates to download.
The Interactive Update uses the following types of providers:
Local provider
Standalone provider
Remote provider
Interactive Update Provider can be installed locally on one or more CIC Servers in a CIC implementation at a customer site. When Interactive Update Provider is
installed on the CIC Server, running the Interactive Provider install is a step in CIC Server installation procedure. Administrators at customer sites use the local
Interactive Update Provider to:
Specify the local provider server and additional peer servers, where client machines can get updates.
Specify the list of users authorized to manage the Interactive Update Provider Web interface.
Monitor Interactive Update activity.
Manage and modify Interactive Update Client Configuration settings for groups of client machines.
Manage updates and related installs for deployment to groups of client machines. Starting with Interactive Update 2016 R1, the local provider can also
manage updates and related installs for deployment to a remote provider. The remote provider then manages the deployment to groups of client machines.
Switchover pairSwitchover pair
If you install Interactive Update Provider on more than one CIC Server to use as a primary and backup server in a switchover pair, the local providers are
mutually exclusive. You must duplicate all configuration on both local providers.
Starting with Interactive Update 2016 R2, you can share the Interactive Update Provider database if you run a switchover pair. The benefits of sharing the
database include:
Improved reporting when using the ReportRepo rt page. For more information about the ReportRepo rt page, see Report page: Display Interactive Update status report.
You can enter configuration settings on either provider in a switchover pair.
You can locate the shared database in a separate location from the CIC Servers.
You can set up a shared database when you:
First install the CIC Server on the primary server in the switchover pair. During the install, enter the location for the shared database. The shared database
is created at this location. Then when you install the CIC Server on the backup server, enter the same database location.
If you do not enter a location for a shared database during the install, Interactive Update uses a separate database for the primary and backup server, and
you must duplicate all configuration on both servers.
Upgrade to Interactive Update 2016 R2 or later from Interactive Update 2016 R1 or earlier. After the upgrade, open the Interactive Update Provider Web
interface on each server in the switchover pair, and Interactive Update Provider prompts you to enter the shared database location.
For the primary server, if you enter a new database location, Interactive Update copies the current database to the new location for the shared database. If
you enter the current database location, Interactive Update continues to use a separate database for the primary and backup server, and you must duplicate
all configuration on both servers.
For the backup server, if you enter the new database location, Interactive Update merges the existing database on the backup server with the shared
database in the new location. Interactive Update deletes any duplicate machines during the merge.
Use the C o nfigurationCo nfiguration page in the Interactive Update Provider Web interface to set up the shared database by entering a new location. You can also use
the Configuratio nConfiguratio n page to change the location of an existing shared database that you previously set up for a switchover pair. Set up or change the
database location on each server in the switchover pair. For more information about the C o nfigurationCo nfiguration page, see Configuration page.
Impo rtant!Impo rtant!
If you use a shared database or shared location for static content, you must grant read/write NTFS permissions to the local machine accounts for all
provider servers and any service accounts associated with the Interactive Update Provider service.
To set NTFS Permissions:
1. In Windows Explorer, right-click the folder for shared content or the database file and select PropertiesProperties .
2. On the SecuritySecurity tab, select E ditEdit to change permissions.
3. Add the machine name of the server or service account to which to grant permissions and set permissions to allow full control.
Local providerLocal provider
5

Starting with Interactive Update 2.0 SU 5 and continuing with Interactive Update 2015 R1 or later, Interactive Update Provider can be installed on a non-CIC
server on the CIC network as a stand-alone provider. Using a stand-alone provider as a local provider to receive the following benefits:
Improved CIC server performance because the web service calls and file downloads that Interactive Update Provider manages are off-loaded to a separate
machine.
Only one provider to administer, instead of the two required when the provider is installed on primary and backup CIC servers in a switchover pair.
Note:Note:
When you run the Interactive Update Provider install on a non-CIC server, you must enter the path to the license file.
Starting with Interactive Update 2016 R1, you can install Interactive Update Provider as a remote provider. If you have remote sites that currently connect to
your Interactive Update Provider, you can reduce bandwidth usage by creating a remote provider at each site. A remote provider stores updates at each site.
The remote provider downloads updates to the remote site once. Client machines at the remote site retrieve their updates from their remote provider. An
administrator creates groups of machines and designates which remote provider the client machines use.
Use a remote provider to receive the following benefits:
Reduces the number of times that content must be delivered across the WAN.
Client machines at a remote site receive updates from the remote provider instead of the local provider.
Client machines at a remote site can contact any of the other providers if the remote provider becomes unavailable.
You cannot access the Interactive Update Provider Web interface on a remote provider machine.
Note:Note:
For information about installing Interactive Update Provider on a machine to function as a remote provider, see Install a remote provider in this
document.
For more information about groups, see Groups page: Create and manage groups.
Interactive Update ClientInteractive Update Client
Interactive Update Client is installed on:
The CIC server.
All client machines at the customer site that receive updates. A client machine is defined as a client workstation or any other device on the CIC network.
Starting with Interactive Update 2016 R1, Interactive Update Client is installed on a machine that functions as a remote provider.
This section includes:
Interactive Update Client service
Interactive Update Client application
Interactive Update Client configuration
The Interactive Update Client service is a Windows service that runs on the CIC server, a machine that functions as a remote provider, and all client machines
at the customer site.
On the CIC server, the Interactive Update Client service first verifies license information, and then connects to the provider and checks for available
updates for product components installed on the CIC server and client machines. Next, the Interactive Update Client service downloads updates from the
provider and installs them on the CIC server, as specified by the administrator in the Interaction Update Client configuration in the CIC server. The
Interactive Update Client service downloads updates for client machines that will be available to view in Interactive Update Provider ConfigurationInteractive Update Provider Configuration.
On a remote provider, the Interactive Update Client service connects to the local provider and checks for updates for product components installed on the
client machine. The Interactive Update Client service downloads updates for client machines to the remote provider.
On a client machine, the Interactive Update Client service connects to the local provider or the remote provider and checks for updates for product
components installed on the client machine. Next, the Interactive Update Client service downloads updates to product components from the local provider
or the remote provider and installs them on the client machine.
The Interactive Update Client application provides notification on the CIC server, a remote provider, and a client machine, that updates are available. The
Interactive Update Client application also provides notification to indicate download progress, installation progress, and whether a restart is required to
complete an update.
If allowed by the administrator, users can configure the Interactive Update Client application on their machines for update download method. Administrators
and users can also configure the Interactive Update Client application on client machines for more Provider Servers, and Web Proxy server information. The
Interactive Update Client configuration is available from StartStart -- Pro gramsPro grams -- PureCo nnectPureConnect -- Interactive Client Co nfigInteractive Client Config.
Standalone providerStandalone provider
Remote providerRemote provider
Interactive Update Client serviceInteractive Update Client service
Interactive Update Client applicationInteractive Update Client application
Interactive Update Client configurationInteractive Update Client configuration
6

Choose your release and patch deployment methodChoose your release and patch deployment method
You can choose to apply a PureConnect product release or patch in one of the following ways. If you choose to use Interactive Update, a number of options
are available.
Interactive Update (recommended)
Manual download
Group policy deployment
Genesys recommends using Interactive Update in either Automatic or Download update mode to apply releases and patches.
Automatic update mo deAutomatic update mo de: Interactive Update automatically checks for, downloads, and applies the applicable components in the latest release or patch
to the CIC server, workstations, and other devices on the CIC network at a specified time.
Starting with Interactive Update 2015 R3, you can no longer use automatic update mode with the Interactive Update Client application on the CIC server.
Do wnload update mo deDo wnload update mo de: Interactive Update automatically checks for and downloads the appropriate release or patch components; and the CIC
administrator determines when to apply the components to the CIC server, workstations, and all other devices on the CIC network. Alternatively, Interactive
Update simply checks for updates; and the CIC administrator (or a user, if allowed by the CIC administrator) determines when to download and when to
apply the release or patch components.
In the manual download procedure, you download the release or patch components from the Product Information site and apply the appropriate components to
the CIC server using Install.exe utility. You then can choose one of the following methods:
Allow Interactive Update to download and apply the appropriate release or patch components to workstations and other devices on the CIC network.
Manually download and apply the appropriate release or patch components to workstations and other devices on the CIC network.
For more about:
Installing a new release and applying the latest patch, see CIC Server Installation in the
PureConnect Installation and Configuration Guide at
https://help.genesys.com/cic/mergedProjects/wh_tr/mergedProjects/wh_tr_installation_and_configuration/desktop/chapter_11_cic_server_installation.htm.
The latest PureConnect release and the latest Interactive Update release, see PureConnect Product Release Information at
https://help.genesys.com/cic/desktop/pureconnect_product_releases.htm.
Note:Note:
Genesys recommends that you update certain non-CIC servers (off-servers), such as Interaction Media Servers and ASR servers, before updating the CIC
server. To apply updates to off-servers that must be updated before the CIC server, see Step 11: Apply the latest patch in the
PureConnect Installation and
Configuration Guide
at
https://help.genesys.com/cic/mergedProjects/wh_tr/mergedProjects/wh_tr_installation_and_configuration/desktop/step11__apply_the_latest_patch.htm.
You can use group policy deployment or similar medium to push release or patch updates to client workstations. For more information, see
Group Policy
Deployment for CIC Applications Technical Reference
in the PureConnect Documentation Library.
Ports used by Interactive UpdatePorts used by Interactive Update
Port 8092Port 8092 is the port used between the local provider (CIC server) and client workstations for downloading updates to client workstations.
Port 8042Port 8042 is the port used for the Interactive Update Client Service to send messages to the Interactive Update Client Application.
Port 8094Port 8094 is the port used for the Interactive Update Client Service to listen to messages from the Interactive Update Client Application.
Impo rtant!Impo rtant!
Interactive Update creates an exception to the firewall for ports 8092, 8042, and 8094 on Interactive Update Provider and/or Interactive Update Client or both to
enable Interactive Update traffic. Make sure that the ports are not closed off. Otherwise, Interactive Update will not function correctly.
Interactive Update configuration data fileInteractive Update configuration data file
All Interactive Update configuration data files are consolidated in single configuration file, InteractiveUpdate.config, located in the
\ProgramFiles\InteractiveIntelligence\InteractiveUpdate directory on the client machine.
The following options were added to the InteractiveUpdate.config file are available in Interactive Update 2015 R1 or later. To set these options, client
machines must exist in the default group.
Control frequency of automatic check for updates
Set maximum message size for large numbers of updates
Set response time for client service contacting local provider
Verify digital signature
Interactive Update (recommended)Interactive Update (recommended)
Manual downloadManual download
Group policy deploymentGroup policy deployment
7

Starting with Interactive Update 2.0 SU 5, administrators can set the minimum and maximum time for the AutomaticAutomatic option's check for updates timer in the
CheckForUpdates setting in the Client Settings section of InteractiveUpdate.config. The settings are:
CFUTimeMin="1800000"
CFUTimeMax="3600000"
CFUUseCustomTime="true"
These are not required fields, and if left blank, the current default of 30-60 minutes is used.
Starting with Interactive Update 2.0 SU 4, administrators can set the maximum message size above the default to allow for large numbers of updates in the
MaximumMessageSize setting in the ClientSettings section of InteractiveUpdate.config. This can help to avoid communication problems
between the client and the server, especially when numerous ES's are included.
The default setting is 262144 bytes
The maximum setting is 2147483647 bytes
Starting with Interactive Update 2.0 SU 5, administrators can set the response time for the client service contacting the local provider in the SendTimeout
setting in the ClientSettings section of InteractiveUpdate.config. This can help to avoid request timeouts occurring before client machine updates
are finished.
The default setting is 1 minute.
The maximum setting is 10 minutes.
Starting with Interactive Update 2015 R1, administrators can validate digital signatures on downloaded updates before adding them to Interactive Update
Provider, using the VerifyDigitalSignature setting. If this validation is not required, set it to False.
Install a remote providerInstall a remote provider
Starting with Interactive Update 2016 R1, you can install the Interactive Update Provider service on a server that you plan to use as a remote provider. For
information about installing the Interactive Update Provider service on the CIC server, refer to
PureConnect Installation and Configuration Guide.
To install Interactive Update Provider on a remote provider machine
1. Locate the Products installation utility (Install.exe) in the Installs directory on the CIC .iso.
2. Run Install.exe.
3. Select the Interactive UpdateInteractive Update tab, and then select Interactive Update Pro viderInteractive Update Provider.
4. Click InstallInstall .
5. Click OKOK to confirm the installation.
6. Enter the path to the license file, and click OKOK.
7. Press N extNext to proceed past the WelcomeWelco me screen.
8. Press N extNext to accept the default folder in the Destinatio n Fo lder Destinati on Fo lder screen. The install created a subdirectory for Interactive Update.
9. Click Remote Pro vider Remo te Provider in the Interactive Update Provider Interactive Update Provider ServerServer screen. Then enter the name or IP address of the local provider machine in the
Local Provider NameLocal Provider Name field. Click N extNext .
10. Click Ins tall Install to confirm that you are ready to install Interactive Update Provider..
11. Click FinishFinish.
12. Click YesYes to restart now.
Control frequency of automatic check for updatesControl frequency of automatic check for updates
Set maximum message size for large numbers of updatesSet maximum message size for large numbers of updates
Set response time for client service contacting local providerSet response time for client service contacting local provider
Verify digital signatureVerify digital signature
8

Interaction Administrator configuration for Interactive UpdateInteraction Administrator configuration for Interactive Update
Starting with Interactive Update 2016 R2, Interaction Administrator includes settings for Interactive Update. If Interactive Update Provider is installed on a CIC
server, the Interactive Update Provider service registers with the CIC server when the service starts. If Interactive Update Provider is not installed on a CIC
server, the local provider registers with the CIC server when you enter the CIC server in the Configuratio nConfiguratio n page on the local provider.
This registration automatically completes the settings in Interaction Administrator. These settings indicate the provider and that Interactive update is installed
and in use. The following example illustrates the settings in Interaction Administrator on the Update ServiceUpdate Service tab in System Configuratio nSystem C o nfiguration.
Interactive Update uses these settings to provide improved:
Error reporting. See Report page: Display Interactive Update status report.
Provider identification. See Provider Servers tab: Modify provider server list.
Impo rtant!Impo rtant!
The CIC server, Interactive Update, and the client applications on client machines must be on 2016 R2 or later versions in order for Interactive Update to
provide improved error reporting and provider identification.
9

Interactive Update and CIC 2015 R1 or laterInteractive Update and CIC 2015 R1 or later
This section describes requirements and installation information for Interactive Update 2015 R1 or later for CIC 2015 R1 or later.
About Interactive Update 2015 R1 or later
Requirements
New CIC installations
Apply CIC and Interactive Update release updates to existing installations
Apply CIC and Interactive Update patch updates
About Interactive Update 2015 R1 or laterAbout Interactive Update 2015 R1 or later
In the new distribution model, Interactive Update is always at the same release and patch level as CIC. For example, Interactive Update 2015 R1 was
released with CIC 2015 R1.
As with CIC 2015 R1 or later, Interactive Update 2015 R1 or later
release components
are .msi files. They are included on the CIC 2015 R1 or later .iso,
available on the PureConnect Product Downloads page at https://help.genesys.com/pureconnect/secure/Downloads.aspx.
As with CIC 2015 R1 Patch1 or later, Interactive Update 2015 R1 Patch1 or later
patch components
are .msp files. They are included on the CIC 2015 R1
Patch1 or later .iso, available on the PureConnect Product Downloads page at https://help.genesys.com/pureconnect/secure/Downloads.aspx.
Note:No te:
Starting with PureConnect 2018 R2, metadata in an installation package includes the updated Manufacturer Name property. Interactive Update Client
service verifies metadata fields such as the Manufacturer Name property in an installation package. For Interactive Update Provider to recognize
updates to product components, apply one of the following patch updates to Interactive Update Provider and Interactive Update Client: 2018 R2, 2018
R1 patch 3, 2017 R4 patch 8, 2017 R3 patch 15, 2017 R2 patch 20, 2017 R1 patch 26, 2016 R4 patch 30.
If you do not apply the patch update, Interactive Update Provider fails to recognize updates to product components and the following message appears
in the inin.updateproviderservice log file. Use the Log viewer utility to view the message in the log file.
Co mpany pro perty info fo r the patch is no t Interactive Co mpany pro perty info fo r the patch is no t Interactive Intelligence, Inc.: ManufacturerN ame='Genesys'Intelligence, Inc.: ManufacturerName='Genesys'
RequirementsRequirements
Interactive Update 2015 R1 or later generally has the same CIC server and client workstation requirements as CIC 2015 R1 or later.
Note:No te:
For the most recently supported versions and other details, see System Software Requirements page at
https://help.genesys.com/cic/mergedProjects/wh_tr/mergedProjects/wh_tr_installation_and_configuration/desktop/software_requirements.htm.
Microsoft Windows Server 2019 (64-bit)
Microsoft Windows Server 2016 (64-bit)
Microsoft Windows Server 2012 R2 (64-bit)
Microsoft .NET Framework 4.7 or later
ASP.NET 4.6
Microsoft Windows Server 2019 (64-bit)
Microsoft Windows Server 2016 (64-bit)
Microsoft Windows Server 2012 R2 (64-bit)
Microsoft .NET Framework 3.5
Note:No te:
The Interactive Update Provider running on Microsoft Windows 2012 R2 additionally requires .NET Framework 4.5.
ASP.NET 4.5
Microsoft Windows 10 Anniversary update and later
Microsoft Windows 8.1 (64-bit)
Microsoft Windows 7 SP1 (32-bit and 64-bit)
Microsoft .NET Framework 4.7 or later
We recommend using Internet Explorer 10 or later, Mozilla Firefox, or Google Chrome with Interactive Update Provider. We do not recommend using Internet
Explorer 9 or earlier due to memory leak issue.
CIC server (local provider server)CIC server (local provider server)
Non-CIC server (remote or standalone provider server)Non-CIC server (remote or standalone provider server)
Client workstationsClient workstations
Web browserWeb browser
10

New CIC installationsNew CIC installations
The Interactive Update 2015 R1 or later Provider and Client .msi files are included on the CIC 2015 R1 or later .iso, available on the PureConnect Product
Downloads page at https://help.genesys.com/pureconnect/secure/Downloads.aspx , and are installed as part of the CIC 2015 R1 or later installation
process.
When you install the CIC server using the Install.exe utility, you will select the Interactive Update Pro vider 2015 Interactive Update Provider 2015 R1 or later installR1 or later install , available in
the Interactive Interactive UpdateUpdate tab in Install.exe. This installs the Interactive Update Provider service and the Interactive Update Client service on the CIC
server. For more information, see "CIC Server Installation" in the
PureConnect Installation and Configuration Guide
in the PureConnect Documentation
Library.
The Interactive Update Client 2015 R1 or later installInteractive Update Client 2015 R1 or later install must be run separately on all workstations and other devices on the CIC network that receive
updates. This installs the Interactive Update Client service on these machines. The Interactive Update Client service then checks for updates to installed
PureConnect applications. For more information, see "Client Workstations" in
PureConnect Installation and Configuration Guide
in the PureConnect
Documentation Library.
Apply CIC and Interactive Update release updates to existing installationsApply CIC and Interactive Update release updates to existing installations
After the CIC server has been updated for the latest CIC and Interactive Update 2015 R1 or later releases, you can apply the latest CIC and Interactive Update
2015 R1 or later release components to CIC 2015 R1 or later workstations using Interactive Update.
For more information, see:
CIC Server Installation in the PureConnect Installation and Configuration Guide at
https://help.genesys.com/cic/mergedProjects/wh_tr/mergedProjects/wh_tr_installation_and_configuration/desktop/chapter_11_cic_server_installation.htm.
PureConnect Product Release Information at https://help.genesys.com/cic/desktop/pureconnect_product_releases.htm.
Note:No te:
In order to use Interactive Update to upgrade CIC 4.0 client workstations to 2015 R1 or later, Interactive Update 2.0 SU 5 or later is required. Interactive
Update 2.0 SU 5 and later contain product versioning that supports the new release model.
Apply CIC and Interactive Update patch updatesApply CIC and Interactive Update patch updates
After the latest patch has been applied to the CIC 2015 R1 or later server, you can apply the latest CIC and Interactive Update 2015 R1 or later patch
components to CIC 2015 R1 or later workstations using Interactive Update.
For more information, see:
CIC Server Installation in the PureConnect Installation and Configuration Guide at
https://help.genesys.com/cic/mergedProjects/wh_tr/mergedProjects/wh_tr_installation_and_configuration/desktop/chapter_11_cic_server_installation.htm.
PureConnect Product Release Information at https://help.genesys.com/cic/desktop/pureconnect_product_releases.htm.
11

Interactive Update ProviderInteractive Update Provider
Once a new CIC installation is completed, the CIC administrator and authorized users can launch and configure Interactive Update
Provider. This section describes how to configure and manage CIC product updates in Interactive Update Provider.
Launch Interactive Update Provider Config
About page: Interactive Update Provider server information
Activity page: Monitor Interactive Update activity
Report page: Display Interactive Update status report
Configuration page
Machines page: Machines overview
Groups page: Create and manage groups
Updates page: Manage updates and installs
Launch Interactive Update Provider ConfigLaunch Interactive Update Provider Config
Interactive Update Provider Config is a browser-based interface (web service) that runs on the CIC server. You can launch Interactive
Update Provider Config locally on the CIC server from the StartStart menu, or remotely, by pointing a browser to the Interactive Update
Provider Web pages.
Launch Interactive Update Provider Config on the CIC server
Launch Interactive Update Provider remotely
1. Log on directly to the CIC server (e.g. at the console or Remote Desktop).
2. Select StartStart > ProgramsPrograms > PureConnectPureConnect > Interactive Update Provider ConfigInteractive Update Provider Config.
The Interactive Update Provider configuration interface appears in your default browser.
Starting with Interactive Update 2015 R2, the Interactive Update Provider configuration interface includes the ReportRepo rt page. For more
information about the ReportReport page, see Report page: Display Interactive Update status report in this document.
Launch Interactive Update Provider Config on the CIC serverLaunch Interactive Update Provider Config on the CIC server
12

Before you can launch Interactive Update Provider from a remote computer, you must first be added to the list of users authorized
to have remote access to the Interactive Update Provider interface.
Authorized users can then open a browser and enter a URL as shown below, substituting the name of the CIC server in place of
<icservername>.
http://<icservername>:8092/InteractiveUpdate/StatusAbout.aspx
Port 8092 is always the default port used between the CIC server and client machines for downloading updates to client machines.
It cannot be changed.
About page: Interactive Update Provider server informationAbout page: Interactive Update Provider server information
When you launch Interactive Update Provider, it opens to the Status->AboutStatus->About page which displays the Interactive Update Provider
machine name, version, and IP address.
Activity page: Monitor Interactive Update activityActivity page: Monitor Interactive Update activity
Use the Status->ActivityStatus->Activity page to view update activity and initiate troubleshooting for any update events. This ActivityActivity page is
similar to the Windows operating system Event Log, providing entries for each update event with the ability to view and navigate
through details.
View Update Activity
Use Activity Details for Troubleshooting
Launch Interactive Update Provider remotelyLaunch Interactive Update Provider remotely
13

Click the StatusStatus icon [ ] and then the ActivityActivity icon [ ] to display the ActivityActivity page.
From here, you can sort data by columns, group data by TimeTime, MachineMachine , ApplicationApplication, ReleaseRelease, or PatchPatch columns.. Click the icon
[ ] in the InfoInfo column to view the details of an entry.
Note:Note:
In Interactive Update 2015 R1 and later, the InstallInstall and SUSU columns are replaced by the ApplicationApplication, ReleaseRelease and PatchPatch
columns. (The PatchPatch column is available starting with Interactive Update 2015 R2.)
To clear or refresh the activity log, right-click an entry in the Activity data grid and select ClearClear Activity Activity LogLo g or Refresh ActivityRefresh Activity
Lo gLog.
View Update ActivityView Update Activity
14

If the ActivityActivity page indicates that a Downlo ad Download FailedFailed ([ ] icon in the StatusStatus column), look at the Activity DetailsActivity Details dialog to
get more information about the failed update event.
To view update event details:
1. Double-click an entry on the ActivityActivity data grid, or click the blue icon [ ] in the InfoInfo column for an entry.
The Activity DetailsActivity Details dialog appears.
Note:Note:
In Interactive Update 2015 R3, the InstallInstall field is replaced with the ApplicationApplication field and the SUSU field is replaced with the
ReleaseRelease and PatchPatch fields.
2. To view the Activity DetailsActivity Details of the next entry in the list, click the up arrow [ ] to see the previous entry or the down arrow [
] to see the next entry in the list.
The text in the DescriptionDescription field may indicate useful information that will assist in troubleshooting problems.
Use Activity Details for TroubleshootingUse Activity Details for Troubleshooting
15
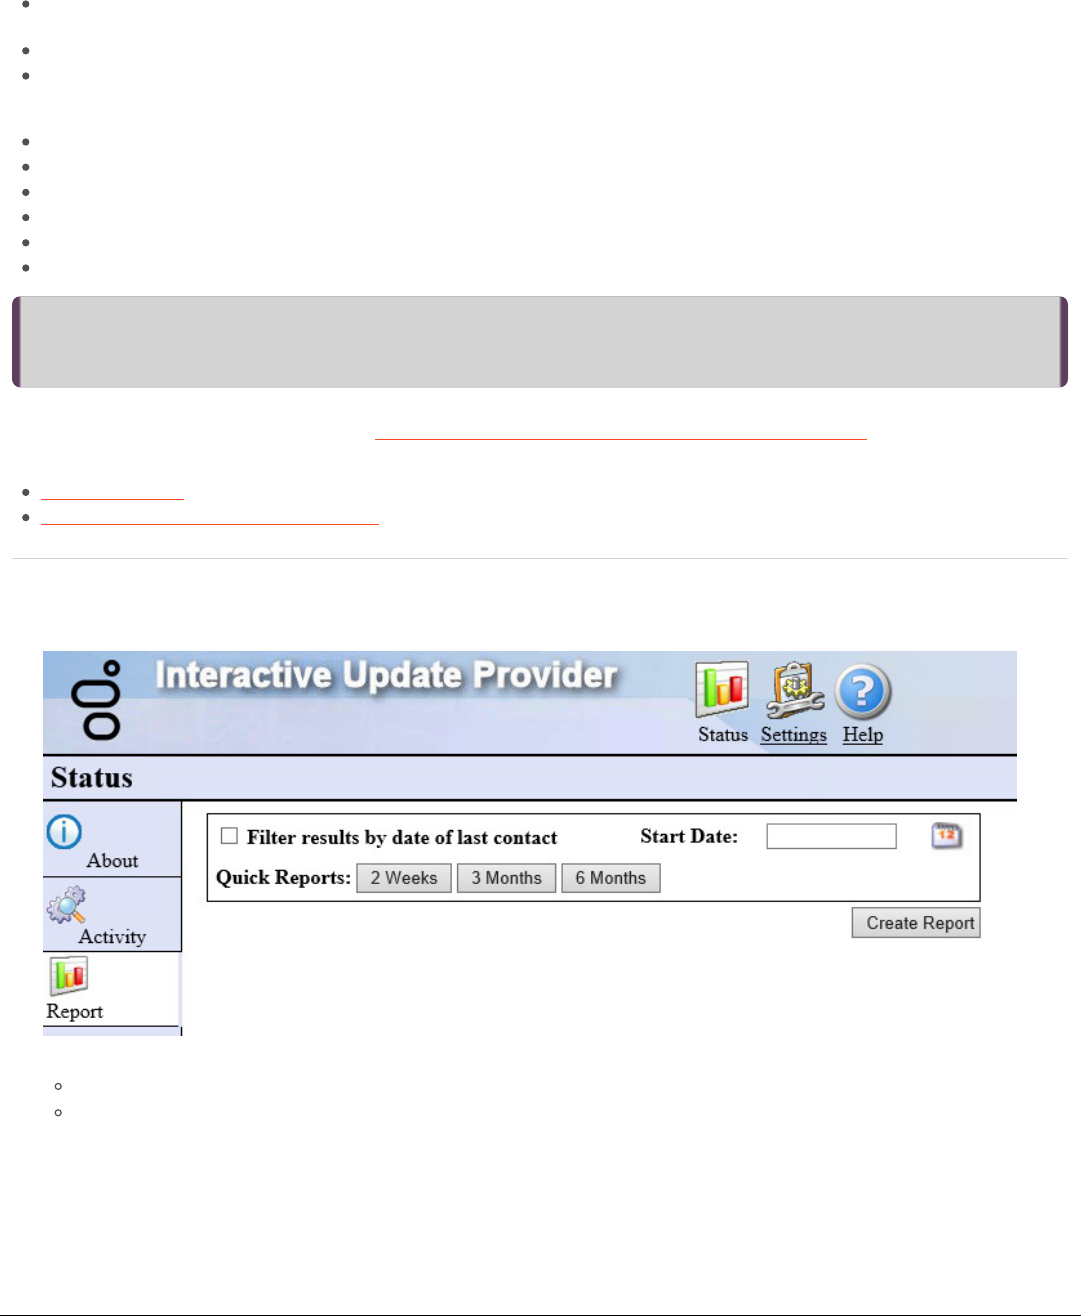
Report page: Display Interactive Update status reportReport page: Display Interactive Update status report
Starting with Interactive Update 2016 R2, the Interactive Update Provider configuration interface includes the ReportRepo rt page.
The ReportRepo rt page displays information about client machines and the following statuses:
ErrorState status indicates a client machine with an error (for example, the client machine cannot talk to Interactive Update
Provider or communication has been interrupted).
NeedsAttention status indicates a client machine with updates to install.
UpToDate status indicates a client machine with software updated to the current available version.
For example, use the ReportReport page to identify a client machine where:
Interactive Update Client is not installed.
Interactive Update Client is installed, but the service is disabled.
Interactive Update Client is not configured.
Interactive Update Client cannot contact the provider.
The client machine needs to restart.
Updates are available to install.
Impo rtant!Impo rtant!
CIC server, Interactive Update, and the client applications on client machines must be on 2016 R2 or later versions so that
errors can be reported through Session Manager to the Interactive Update Provider service and appear on the ReportRepo rt page.
In order for the Report page to include error reporting, you must complete the set up in Interaction Administrator on the UpdateUpdate
ServiceService tab in System Co nfigurationSystem Configuration. See Interaction Administrator configuration for Interactive Update.
This section include:
Display the report
Display details for a status and a machine
1. Click StatusStatus and then ReportRepo rt to display the ReportRepo rt page.
2. Do one of the following actions:
Click Filter results by date of last contactFilter results by date of last contact, select a start date, and then click Create Repo rtCreate Report to display a report.
Click a quick report (for example, Select 2 Weeks2 Weeks , 3 Months3 Months , or 6 Mo nths6 Months ) to display a report.
A report appears similar to the following example.
Display the reportDisplay the report
16

Note:Note:
The ReportRepo rt page saves your filter settings when you leave the page and applies the same filter the next time you display
the report.
To display an unfiltered report, clear the Filter results Filter results by date of last contactby date of last contact and StartStart DateDate fields, and click Apply.Apply.
The report grid contains the details for the report. Use the report grid to display:
Machines with a specific status.
Information about the status and the installed applications for the specific machine.
To display machines with a specific status, double click a row to expand a section.
Display details for a status and a machineDisplay details for a status and a machine
17

To display information about a machine, double-click a machine name in the MachineMachine column. The Status DetailStatus Detail dialog appears.
The StatusStatus tab contains the machine ID, the status, notes to provide an additional description about the status, and the date and
time of last contact. The StatusStatus tab also contains recent activity information similar to the activity log. The following example,
illustrates the StatusStatus tab for a machine with an error.
The Installed ApplicationsInstalled Applications tab indicates the installed products for a machine. For each product, the Installed ApplicationsInstalled Applicatio ns tab
indicates the version currently installed, the version available from the provider to install, and the status for that machine. For an
ErrorState status, the NotesNotes column contains additional information about the error. For the UpToDate status, the version in the
Available Available VersionV ersion column matches the version in the Installed VersionInstalled V ersio n column. For the NeedsAttention status, the version in
the Available Available VersionVersion column does not match the version in the Installed Installed V ersio nVersion column.
18

19

Configuration pageConfiguration page
Starting with Interactive Update 2016 R2, the ConfigurationConfiguration page replaces the Update ServersUpdate Servers page and the Administratio nAdministration
page.
Starting with Interactive Update 2016 R2, use the ConfigurationConfiguratio n page to:
Change the location of the database.
View the location of static content. The location of static content appears in the Static Content Locatio nStatic Content Location field on the
Configuratio nConfiguration page.
Configure provider discovery.
View the servers in a switchover pair.
Add a server.
Remove a server. To remove a server from the peer provider list, select the server, and click RemoveRemove. When you finish
removing servers, click ApplyApply. Servers with a -- next to the name are removed after you click the ApplyApply button.
Add an authorized user.
Remove an authorized user. To remove a user from the list, select a user name, and click the RemoveRemove button. When you finish
removing user names, click ApplyApply.
To access the ConfigurationConfiguration page, click the SettingsSettings icon [ ] and then click the Co nfigurationConfiguration icon [ ].
20

If running a switchover pair, you can change the location of the Interactive Update database. The Database Lo catio nDatabase Location field displays
the current location of the database. Change the location of the database to:
Set up a shared database if running a switchover pair. Change the location of the database on each server in the switchover
pair.
Change the location of an existing shared database that you previously set up for a switchover pair. Change the location of the
database on each server in the switchover pair.
To change the location of the database for the primary server in the switchover pair, access the Interactive Update Provider on the
primary local provider.
Note: Note: If you use the option of "using a shared database for multiple provider servers", the servers running IUpdate need to have
their computers added to the shared folder in the security setting. If the Computer objects aren't added then the permission check
fails, and the provider gets stuck.
1. From the Configuratio nConfiguration page, click next to the database location. The ManageManage DatabaseDatabase dialog appears.
2. Enter the location of the database, and click OKOK.
3. Click Co pyCo py to create a copy of the database at the new location.
4. Click Do neDone .
To change the location of the database for the backup server, access the Interactive Update Provider on the backup local provider.
1. From the Configuratio nConfiguration page, click next to the database location. The ManageManage DatabaseDatabase dialog appears.
2. Enter the same database location as you entered for the primary server. Click OKOK.
3. Do one of the following actions:
Click UseUse to use the same database as the primary server.
Click MergeMerge to merge the database on the backup server with the database on primary server. The merge uses the most
recent configuration settings for each machine.
4. Click Do neDone .
Change the location of the databaseChange the location of the database
21
Note:Note:
Provider discovery depends on network configuration. Consult your network administrator before turning on provider discovery.
Starting with Interactive Update 2016 R2, Interactive Update searches the network to discover available providers when a client
machine restarts or the Interactive Update Client service restarts. These available providers automatically appear in the list of
providers in the ProviderProvider ServersServers tab in Interactive Update Client Configuration.
To turn on provider discovery, click Disco veryDiscovery OnOn.
The discovery key determines which server a client machine can discover during a search. Set the DiscoveryDiscovery KeyKey field to
ProductionProduction to make this server available to all client machines during a search. Enter a different discovery key to limit the servers
that a client machine can find during a search. If you enter a different discovery key, you must manually change the discovery key in
the Interactive Update configuration data file for each client machine. A client machine can find only servers with the same
discovery key. After changing the configuration data file, restart the client service on the client machine to allow the changes to
take affect.
Starting with Interactive Update 2016 R2, if running a switchover pair, the primary and backup machines appear as switchover A and
switchover B in the ServersServers dialog.
1. From the Configuratio nConfiguration page, click the arrow next to ServersServers to view the servers in a switchover pair.
Configure provider discoveryConfigure provider discovery
View the servers in a switchover pairView the servers in a switchover pair
22

Starting with Interactive Update 2016 R3, you use the Add ServerAdd Server dialog to add a server.
1. From the Configuratio nConfiguration page, click the arrow next to ServersServers .
The ServersServers dialog appears.
2. Click AddAdd.
The Add ServerAdd Server dialog appears.
3. Complete the information and click OKOK.
When you add a server, it appears in consecutive order below the other provider servers already in the list. For users with an
advanced configuration that uses a secure proxy, click Show DetailsShow Details and complete the information.
4. When you finish adding servers, click ApplyApply.
Note:Note:
Servers with a + next to the name become available for use with Interactive Update after you click the ApplyApply button.
Add a serverAdd a server
23
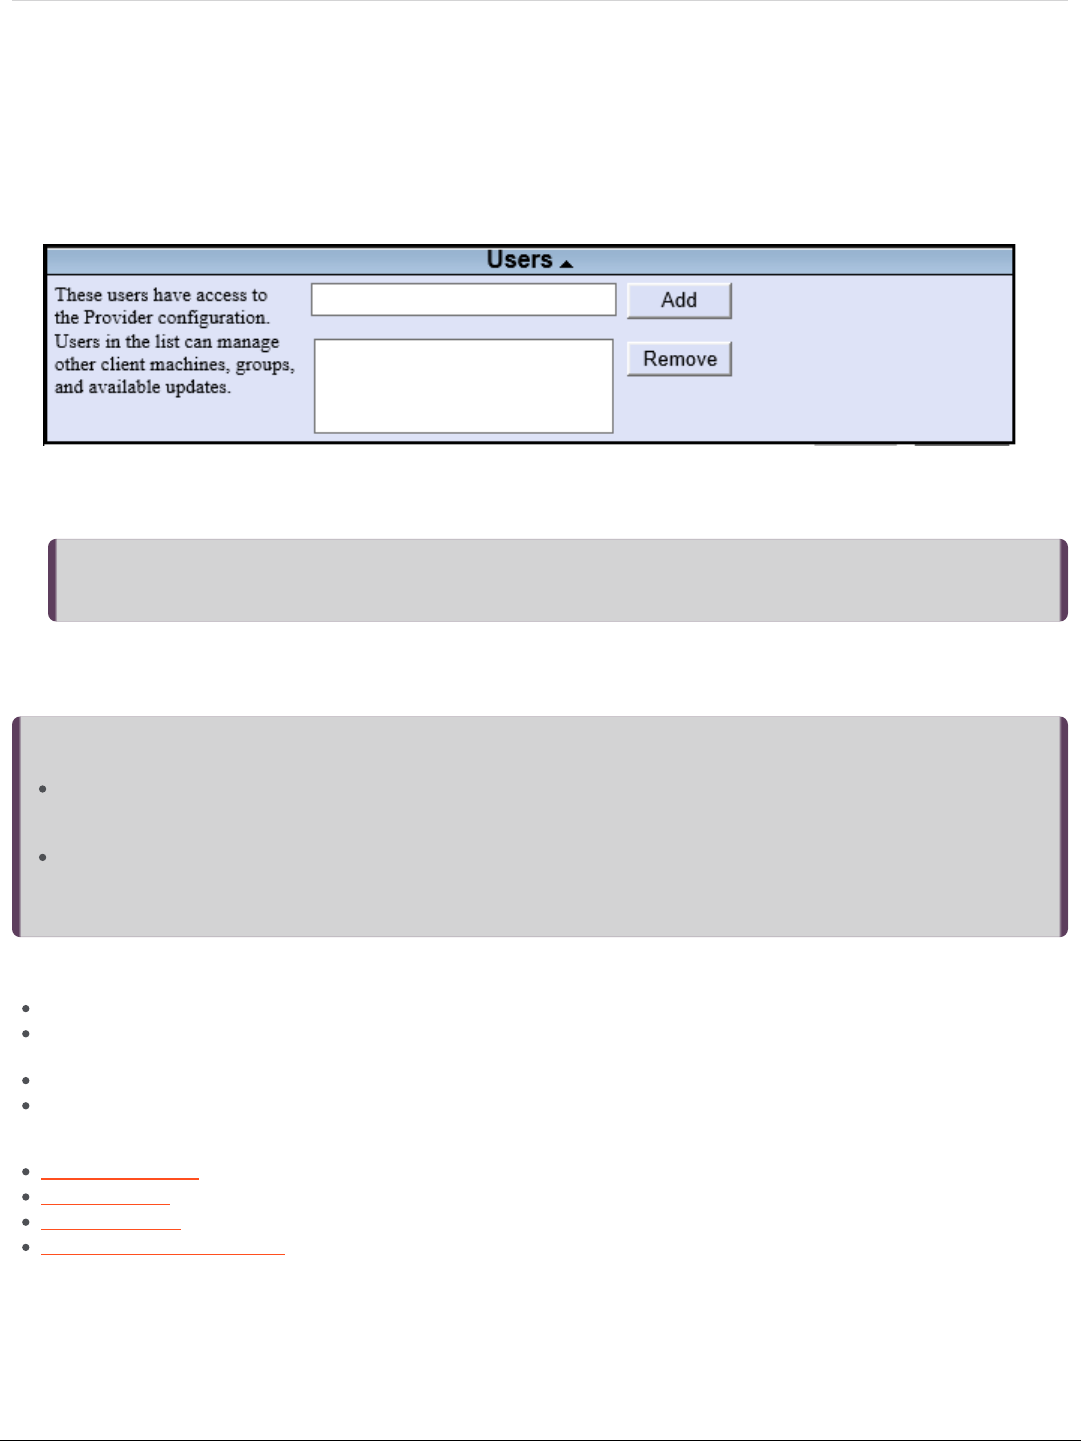
By default, anyone logged on to the CIC server has access to the local provider. If authorized, additional users can access the local
provider via a Web browser.
Use the AdministrationAdministration page to manage the list of users who have remote access to the local provider. These users are qualified
and approved for full administrative rights to make changes in Interactive Update Provider and monitor Interactive Update activity.
Add or remove authorized users as needed.
1. From the Configuratio nConfiguration page, click the arrow next to UsersUsers .
The UsersUsers dialog appears.
2. Enter the domain user name domain\username to include in the current list, and then click AddAdd.
When you add a user name, it appears in consecutive order below the user names already in the list.
3. When you finish adding user names, click the ApplyApply button.
Note:Note:
User names with a + or – next to the name become available for use with Interactive Update after you click the ApplyApply
button.
Machines page: Machines overviewMachines page: Machines overview
Note:Note:
With Interactive Update 2016 R1 and later:
The MachinesMachines page includes client machines and machines that you installed as a remote provider. When you install
Interactive Update Provider, you designate a machine as a remote provider. Refer to "Install a remote provider" in this
document.
You can no longer use the MachinesMachines page to create a group of machines. To create a group and configure the Interactive
Update Client Configuration settings for a group, use the GroupsGro ups page. See "Groups Page: Create and manage groups" in
this document.
The Settings->MachinesSettings->Machines page enables administrators and authorized users to view the client machines and remote provider
machines that receive updates from the local provider. Use the MachinesMachines page to identify the:
Group to which a machine belongs.
Interactive Update Client Configuration settings for a group of machines. The settings include download mode, download time,
and download interval (day).
Machine update activity.
Applications that have been installed on a machine.
This section includes:
The Machines page
Machine details
Select a machine
Group data by column heading
Add an authorized userAdd an authorized user
24
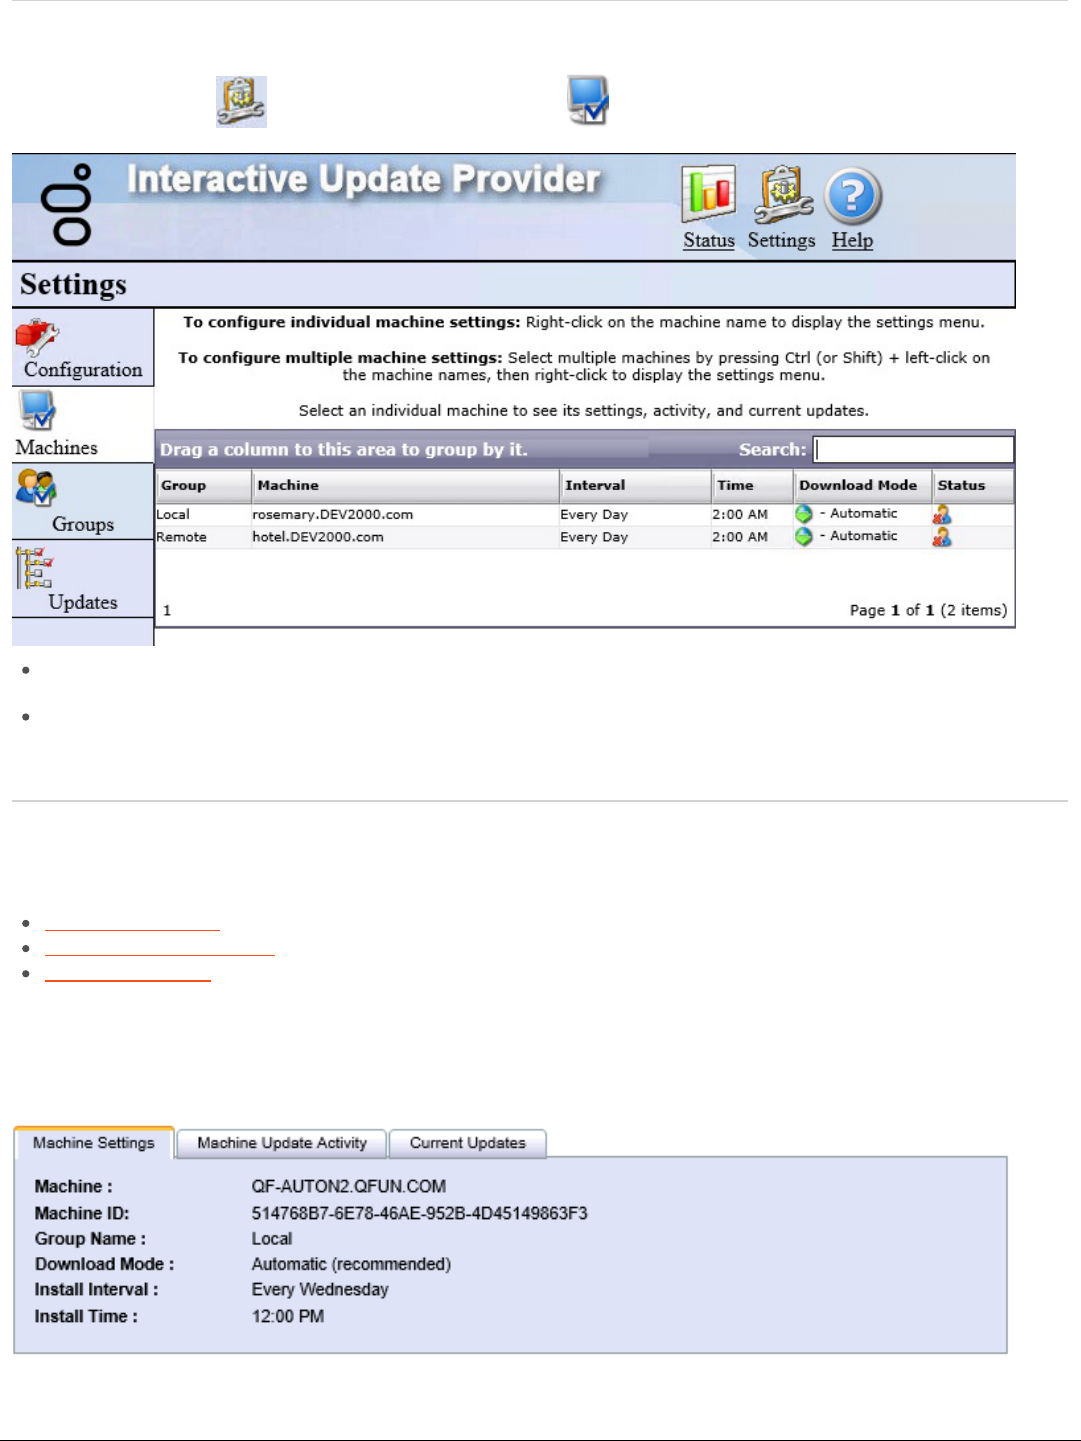
Click the SettingSettings icon [ ], and then click the MachinesMachines icon [ ] to view the MachinesMachines page.
The GroupGro up column indicates the group to which a machine belongs. A blank in the GroupGroup column indicates the machine is in
the default group.
Initially, the default group includes all machines. You can create groups (for example, Local and Remote groups) by using the
Gro upsGro ups page. Each group indicates the download mode, download time, and download interval (day) settings for the machines
in that group.
When you click a machine in the MachinesMachines page, the detailed settings and information for that machine appear in the area below
the data grid in the following tabs:
Machine Settings Tab
Machine Update Activity Tab
Current Updates Tab
Machine Settings TabMachine Settings Tab
The Machine SettingsMachine Settings tab displays the machine and group names, and the Interactive Update Client Configuration settings for the
machine: Download Mode, Install Interval (day), and Install Time.
The Machines pageThe Machines page
Machine detailsMachine details
25

Machine Update Activity TabMachine Update Activity Tab
The Machine Update ActivityMachine Update Activity tab displays the Success/Failure status of any update that has been attempted/applied on the
machine.
For detailed Machine Update Activity information for specific update attempt/application, click the icon in the InfoInfo column or
double-click the row.
Note:Note:
In Interactive Update 2015 R1 and later, the InstallInstall and SUSU columns are replaced by the ApplicationApplication, ReleaseRelease and PatchPatch
columns. (The PatchPatch column is available starting with Interactive Update 2015 R2.)
Current Updates TabCurrent Updates Tab
The Current UpdatesCurrent Updates tab lists the various PureConnect applications that have been installed on the machine, the current release
and versions for those applications, and any Engineering Special (ES) that might be applied.
Note:Note:
In Interactive Update 2015 R1 and later:
The SUSU column is replaced by the ReleaseRelease column.
The VersionVersion number is MM.mm.PP.BB where:
MM is the Major release number (for example, 15 for 2015)
mm is the Minor release number (for example, 01 for R1)
PP is the Patch number
BB is the Build number
26

To select a machine in the MachinesMachines data grid, click the machine.
To search for a machine in the MachinesMachines data grid, type the first letters of the machine name in the SearchSearch field.
Select a machineSelect a machine
Search for a machineSearch for a machine
27

The default view of the MachinesMachines page is ordered alphabetically by machine name. You can organize the machines by the IntervalInterval
and TimeTime column headings.
1. Click the appropriate column in the MachinesMachines page, for example the IntervalInterval column, and drag and drop it over the Drag aDrag a
column to this area to group by itcolumn to this area to group by it label at the top of the grid.
The machines are grouped by Interval.
2. The IntervalInterval column group is collapsed by default. Click the ++ (plus) sign to open the section.
To change the sorting order of the group, click the Group by: Gro up by: IntervalInterval label.
Groups page: Create and manage groupsGroups page: Create and manage groups
Note:Note:
With Interactive Update 2016 R1 and later, use the Gro upsGro ups page to create and manage a group of client machines.
The Settings->GroupsSettings->Groups page enables administrators and authorized users to create a group, manage the Interactive Update Client
Configuration settings, and designate the provider for a group of client machines. The configuration settings for the machines in the
group include:
Download mode
Install interval
Install time
Initially, the default group automatically includes all machines. With Interactive Update 2017 R1, CIC administrators can change the
configuration settings for the default group by using the Groups page. When a client machine in the default group contacts a
provider for the first time, the configuration settings for the default group will be used. If a client machine exists in the default group,
a user can update the configuration settings on the client machine by using Interactive Update Client Configuration.
Group data by column headingGroup data by column heading
28

A CIC administrator can create a group and add machines from the default group to the new group. If a client machine exists in a
group that an administrator created:
CIC administrators can update the configuration settings for the new group by using the GroupsGroups page.
User cannot update the configuration settings on a client machine.
For example, create a:
Local group to include the local client machines that receive updates from the local provider and create a Remote group to
include remote client machines that receive updates from the remote provider.
North Region group and a South Region group to indicate a different download day and time for each group.
The GroupsGro ups page contains the following panes:
Gro upsGro ups pane - Use this pane to add and remove groups.
SettingSetting pane - Use this pane to configure the settings for a group.
MembersMembers pane - Use this pane to add and remove a machine from a group.
This section includes:
Create a group
Add a machine to a group
Remove a machine from a group that you created
Modify the settings for a group
Remove a group
29

This section explains how to create a group. When you create a group, you configure the settings for the group and add one or more
machines to the group.
To create a group
1. Click AddAdd GroupGroup in the GroupsGro ups pane.
Create a groupCreate a group
30

The new group name (for example, New Group 1) appears in the GroupGroup column.
2. Click the new group name.
3. In the SettingsSettings pane, configure the settings for the group.
Refer to the following table to configure the settings.
31

SettingSetting OptionsOptions DescriptionDescription
Gro upGro up
NameName
None Type the name of the group. Use a name that identifies the group and the machines
that the group contains.
DownloadDownload
Mo deMode
Automatic
(recommended)
Download
updates for me,
but let me
choose when to
install them
Notify me, but
don’t
automatically
download or
install them
Turn off
Interactive
Update
The download mode for the machines in the group.
InstallInstall
IntervalInterval
Every Day
Every Sunday
Every Monday
Every Tuesday
Every
Wednesday
Every Thursday
Every Friday
Every Saturday
The day of the week when the machines in the group check for updates.
InstallInstall
TimeTime
AM (12:00 –
11:00)
PM (12:00 –
11:00)
The download time for when the machines in the group download/install the updates.
AssignAssign
Provider(s)Provider(s)
for groupfor gro up
membersmembers
None Select a provider to use for the group. This field indicates from which provider the
machines in the group receive updates. For example, for a group of remote client
machines, select a remote provider.
Select Assign Provider(s) for group members and then:
Click AddAdd to add the machine to the list of providers for the group.
Click NewNew to add a provider not in the list (for example, a reverse proxy). For users
with an advanced configuration that uses a secure proxy, click ShowShow DetailsDetails and
complete the information. Starting with Interactive Update 2016 R3, the SettingsSettings
pane includes the N ewNew button.
Click RemoveRemove to remove a machine from the list of providers for the group.
4. Click SaveSave SettingsSettings in the SettingsSettings pane.
5. In the MembersMembers pane, click AddAdd to select a machine to add to the group. The Add Members fo r Add Members fo r GroupGroup dialog box appears.
32

Use the IP Address ContainsIP Address Contains field and the Machine Name Co ntainsMachine Name Co ntains field to search for a machine.
6. Click a machine to add to the group. To select multiple machines, press Ctrl and click the machines to add to the group.
7. Click AddAdd to add the selected machine to the group. The machine you added no longer appears in the Add Add Members forMembers for
Gro upGro up dialog box. Click OKOK when you finish adding machines to the group.
This section explains how to add a machine to a group. When you add a machine to a group, Interactive Update Provider adds the
machine to the group you selected and removes the machine from the group in which it existed. A machine inherits the settings of
the new group.
To add a machine to a group:
1. In the GroupsGroups pane, select the group to which you want to add a machine.
Add a machine to a groupAdd a machine to a group
33

2. In the MembersMembers pane, click AddAdd. The Add Members for Gro upAdd Members for Gro up dialog box appears.
3. Click the machine to add to the group and click AddAdd. The machine no longer appears in the Add Members for Gro upAdd Members for Gro up dialog
box. To select multiple machines, press Ctrl and click the machines to add to the group.
4. Click OKOK when you finish adding machines to the group.
34
When you remove a machine from a group, Interactive Update Provider removes the machine from the group in which it exits and
adds the machine to the default group.
To remove a machine from a group that you created:
1. In the GroupsGroups pane, select the group in which the machine exists.
2. In the MembersMembers pane, select the machine to remove.
3. Click RemoveRemove .
This section explains how to modify the settings for a group of machines.
To modify the settings for a group
1. In the GroupsGroups pane, select the group to modify.
2. In the SettingsSettings pane, modify the settings for group. You cannot change settings for the default group.
3. Click Save SettingsSave Settings .
Remove a machine from a group that you createdRemove a machine from a group that you created
Modify the settings for a groupModify the settings for a group
35

If you remove a group that contains machines, the machines move to the default group.
To remove a group:
1. In the GroupsGroups pane, select the group to modify.
2. Click RemoveRemove GroupGroup.
The RemoveRemo ve GroupGroup dialog box appears.
3. Click OKOK to confirm.
Updates page: Manage updates and installsUpdates page: Manage updates and installs
The Settings->Updates pageSettings->Updates page enables CIC administrators and authorized users to manage the deployment of PureConnect
product updates from the local provider to the CIC server and client machines.
This section includes:
The Updates page
Updates data grid details
Update property details
Filter updates by product line and product component
Group updates by column heading
Add new updates
Modify existing update
Delete update
Mark as High Priority
View the status of an update
Change current state of updates
Mark updates to be pushed out to client machines
Related install relationships
Remove updates from client machines
Remove a groupRemove a group
The Updates pageThe Updates page
36

Click the SettingSettings icon [ ], and then click the, click the UpdatesUpdates icon [ ] to view the UpdatesUpdates page.
Product LineProduct Line
Drop-down list of PureConnect products components available to install on client machines. This may include CIC,
Interactive Update, Interaction Dialer, etc. Use to filter updates in the UpdatesUpdates data grid. The default view is all product
lines listed.
ProductPro duct
Drop-down list of all components for the selected product installed on the client machines. Use to filter updates in the
UpdatesUpdates data grid. The default view is all product components listed.
ActionAction
Drop-down list of update deployment actions. The Actio n Action listlist enables administrators to:
Add, modify, or delete updates. Modifying an existing update can include marking it to be pushed out to client machines
the next time those machines connect to the local provider.
Add or delete related install relationships. Use a related install relationship to associate an update for one product with
a new install of a second product. When the update for the first product is pushed to a client machine, the related install
for the second product is also pushed to the client machine.
The Action list is also available from theAction list is also available from the right-click right-click context menucontext menu after selecting one or more updates from the
UpdatesUpdates data grid. The right-click context menu has an additional action: Change Current StateChange Current State .
The Updates pageThe Updates page
37

In most cases, we reco mmend using the right-click context In most cases, we reco mmend using the right-click context menu.menu. This document emphasizes using the right-click
menu, except when adding a new update.
Updates data gridUpdates data grid
The default UpdatesUpdates data grid displays all product components available to be installed on client machines ordered from
oldest to newest, listed individually.
This section provides descriptions of the UpdatesUpdates data grid column headings.
ApplicationApplication
The product component name of the update as listed in the ProductProduct drop-down list. In Interactive Update 2015 R1 and later,
ApplicationApplication replaces DescriptionDescription as the name of this column.
ReleaseRelease
The product component update release version, for example, 2015 R1. In Interactive Update 2015 R1 and later, ReleaseRelease
replaces VersionVersion as the name of this column.
Note:Note:
CIC 4.0 SU’s still available in the provider are listed in this column as, for example, SU6.
PatchPatch
The product component update release patch version, for example, Patch1. Updates may also be listed in this column as GA
Install if referring to the initial release version, for example, 2015 R1. In Interactive Update 2015 R1 and later, PatchPatch replaces
SUSU as the name of this column.
Note:Note:
CIC 4.0 SU’s still available in the provider are listed in this column by version number, for example, 4.06.364.
Current StateCurrent State
Status of the update for deployment to client machines. Client machines read this state each time they connect to the local
provider to determine which updates are ready to apply locally. Current State may be listed as Pre-approval, Inactive, GA, or
Remove. See Change current state of updates for details.
StatusStatus
Important information about the status of an update. If nothing appears in this column, the update has not been downloaded
or activated on any client machines. See View the status of an update for details.
Updates data grid detailsUpdates data grid details
38

When you highlight a specific product component update in the UpdatesUpdates data grid, the detailed properties and related install
information for that update are displayed in the Update DetailsUpdate Details area below the UpdatesUpdates data grid.
The Update DetailsUpdate Details area has three tabs:
Update Properties Tab
Advanced Properties Tab
Related Installs Tab (not shown). If a Related InstallsRelated Installs tab is present, it lists any related install relationships that associate the
update to a new install of another product.
Update property detailsUpdate property details
39

Update Properties TabUpdate Properties Tab
The Update PropertiesUpdate Properties tab displays specific information about the update, in this example, IUpdateClient_2015_R1.msiIUpdateClient_2015_R1.msi .
File NameFile Name
The name of the update or install file.
Install TypeInstall Type
The Install Types are PatchPatch, InstallInstall , and ESES . Typically PatchPatch and ESES filenames end in .msp and InstallInstall represents GA
install and have filenames ending in .msi.
Install VersionInstall Version
The product version number is MM.mm.PP.BB where:
MM is the Major release number (for example, 15 for 2015)
mm is the Minor release number (for example, 01 for R1)
PP is the Patch number
BB is the Build number
Current StateCurrent State
Current state of the update: Pre-approval, Inactive, GA, or Remove.
Time InsertedTime Inserted
The time that this update file was added to the local provider.
40

Advanced Properties TabAdvanced Properties Tab
The Advanced PropertiesAdvanced Properties tab displays more detailed information that PureConnect Customer Care uses for troubleshooting.
Upgrade Co deUpgrade Co de
A unique identifier used to keep track of each product install. The Upgrade Code never changes for a product. This field was
added in Interactive Update 2015 R1 and later.
Product CodePro duct Code
A unique identifier used to keep track of each product install. A release and all of its patches share a Product Code. The
Product Code changes with each new .msi (release). In Interactive Update 2015 R1 and later, Product CodePro duct Code replaces
GUIDGUID as the name of this field.
MSI PropertiesMSI Properties
An advanced feature that the administrator can use to configure the update. Interactive Update passes these special
properties to Windows Installer when it runs this update.
High Priority UpdateHigh Priority Update
Starting with Interactive Update 2.0 SU 5 and continuing Interactive Update 2015 R1 or later, an update marked as HighHigh
PriorityPrio rity pushes to all client machines the next time they connect to the local provider, regardless of their configuration
settings. The High Priority designation is intended for emergency or critical updates that cannot wait for users to accept
them or for download/install times set by the administrator to occur.
DocumentationDocumentatio n
This path points to the Product Information site page for the product release. From here you can find information about the
product as and links for downloading releases and patches.
41

The default view of updates listed in the Updates data grid is ordered from oldest to newest, with each update listed individually. To
better organize the updates, you can filter the updates by product line and product component.
1. In the Product LineProduct Line drop-down list, select a product line, for example, IC.
2. In the ProductPro duct drop-down list, select a product component, for example, IC User Applications (64-bit).
3. Click the search icon [ ] to start the filter. All updates for the selected product line/product component (in this example, IC
User Applications (64-bit) appear in the Updates data grid.
Filter updates by product line and product componentFilter updates by product line and product component
42

The default view of updates listed in the Updates data grid is ordered from oldest to newest, with each update listed individually. To
better organize the updates, you can group by column heading.
Note:Note:
For a description of column headings, see "Updates data grid details".
1. Click a column in the Updates data grid, for example the ReleaseRelease column, and drag and drop it over the Drag a column toDrag a co lumn to
this this area to group by itarea to group by it label at the top of the grid. The list of updates is grouped by release.
Note:Note:
The release column groups are collapsed by default. Click the ++ (plus) sign to open the desired section.
To change the sorting order of the groups, click the Gro up Group by: Releaseby: Release label.
Starting with Interactive Update 2015 R2, the Add New UpdateAdd New Update action is enhanced to make it easier for the administrator to upload
the multiple updates required for PureConnect product releases and patches.
The enhanced Add New UpdateAdd New Update action uses update update directoriesdirecto ries to upload multiple updates to the local provider in "Pre-
Approval" [ ] status. If you choose the AutoAuto option, a background service scans the designated update directories for new
updates on a regular basis and automatically adds the updates to the local provider.
Note:Note:
Starting with PureConnect 2018 R2, metadata in an installation package includes the updated Manufacturer Name property.
Interactive Update Client service verifies metadata fields such as the Manufacturer Name property in an installation package.
For Interactive Update Provider to recognize updates to product components, apply one of the following patch updates to
Interactive Update Provider and Interactive Update Client: 2018 R2, 2018 R1 patch 3, 2017 R4 patch 8, 2017 R3 patch 15, 2017 R2
patch 20, 2017 R1 patch 26, 2016 R4 patch 30.
If you do not apply the patch update, Interactive Update Provider fails to recognize updates to product components and the
following message appears in the inin.updateprovderservice log file. Use the Log viewer utility to view the message in the log
file.
Company property info for the patch is not Interactive Intelligence, Company property info for the patch is not Interactive Intelligence, Inc.: ManufacturerName='Genesys'Inc.: ManufacturerName='Genesys'
Create and manage update directoriesCreate and manage update directories
Group updates by column headingGroup updates by column heading
Add new updatesAdd new updates
43

Create and manage update directoriesCreate and manage update directories
1. Select or create an update directory on the local provider (CIC server) or another network location.
2. Open the Interactive Update Provider Settings ->UpdatesSettings ->Updates page.
3. Click the Action drop-down list, select Add New UpdateAdd New Update , and then click the white and blue arrow [ ] to the side.
4. In the Manage FoldersManage Folders tab, type the update directory path in the top field and click AddAdd.
5. Verify the update directory location in the bottom field and click OKOK.
44

6. As needed, create update directories or remove existing update directories in the Manage Fo ldersManage Folders tab.
Note:Note:
If you want to automatically add updates to the local provider, select the AutoAuto option. For more information, see "Add new
updates (automatic)".
Add new updates (automatic)Add new updates (automatic)
Once you have created an update directory and added the directory in the Add New Update -> Manage FoldersAdd New Update -> Manage Folders tab, you can
choose to have a background service scan the update directory for new updates on a regular basis and automatically add the
updates to the local provider in "Pre-Approval" [ ] status.
1. Obtain the appropriate update files from the Product Information site, PureConnect Customer Care, or other means, and copy
them to the updates directory. For example:
45

2. Click the Action drop-down list, select Add New UpdateAdd New Update , and then click the white and blue arrow [ ] to the side.
3. In the Manage FoldersManage Folders tab, select the directory you want to update automatically and check the AutoAuto check box. If you have
multiple update directories, check the AutoAuto check box for the directories you want to update automatically.
The updates will be added to the UpdatesUpdates data grid with a Current State of "Pre-Approval" [ ]. No other steps are needed.
Note:Note:
The background service (the Update Content Scanner service) scan takes 90 seconds to begin and has an interval of 60
seconds between scans.
Once an update is added to the local provider, it is removed from the updates directory.
Make sure to mark the updates as GAGA when you are ready to push them out for deployment to client machines. See Mark
updates to be pushed out to client machines for details.
Add new updates (manual)Add new updates (manual)
Once you have created an update directory and added the directory in the Add New Update -> Manage FoldersAdd New Update -> Manage Folders tab, follow this
procedure to upload updates to the local provider whenever you choose.
1. Obtain the appropriate update files from the Product Information site, PureConnect Customer Care, or other means, and copy
them to the updates directory. For example:
46

2. Click the ActionAction drop-down list, select Add New UpdateAdd New Update, and then click the white and blue arrow [ ] to the side.
3. In the Upload UpdatesUpload Updates tab, click RefreshRefresh to display the designated update directories and the updates available in them.
47

4. Highlight the updates you want to upload pressing the Ctrl and/or Shift keys.
48

5. Click UploadUpload to upload the contents of the selected update directory to the local provider. An Uplo adingUploading progress bar
appears until the upload is complete.
6. The Upload Multiple FilesUpload Multiple Files dialog lists the updates you uploaded.
49

7. Click OKOK. The updates appear on the Updates data grid with a Current State of "Pre-Approval" [ ].
Note:Note:
Once an update is added to the local provider, it is removed from the updates directory.
Make sure to mark the updates as GAGA when you are ready to push them out for deployment to client machines. See Mark
updates to be pushed out to client machines for details.
See "Interactive Update Troubleshooting" for a work-around to issues that may occur when using Upload UpdatesUpload Updates .
The Modify Existing UpdateModify Existing Update action is available from the ActionAction drop-down list as well as the right-click context menu. It has the
same functionality as the Change Current StateChange Current State action: it modifies the current state of an existing update for client machines.
We recommend that you use Change Current StateChange Current State instead of Modify Existing UpdateModify Existing Update. See Change current state of updates
for details.
Modify existing updateModify existing update
50

Use the Delete UpdateDelete Update action to delete one or more obsolete or dated updates from the local provider (CIC server). You may want
to use to free up disk space on the CIC server when you are certain that the updates in question are no longer needed.
Note:Note:
If you want to uninstall/remove updates from client machines, change the current state of the update to RemoveRemove but do not
delete the update from the local provider (CIC server). See Change current state of updates for details.
To delete an update:
1. Highlight one or more updates, click the Action drop-down list, select Delete UpdateDelete Update, and then click the white and blue arrow [
].
2. If multiple updates were downloaded, the Delete Update?Delete Update? dialog lists the updates that will be deleted from local provider (CIC
server). Click OKOK.
3. The UpdatesUpdates data grid refreshes.
The deleted updates are no longer listed.
Delete updateDelete update
51

Starting with Interactive Update 2.0 SU 5 and continuing with Interactive Update 2015 R1 and later, you can mark one or more
updates as H igh Prio rityHigh Priority , to be pushed to all client machines the next time they connect to the local provider, regardless of the
client machine configuration settings. The High PriorityHigh Prio rity designation is intended for emergency or critical updates that cannot wait
for users to accept them or for download/install times set the administrator to occur.
Starting with Interactive Update 2016 R1, if a user on a client machine manually checks for updates when a high priority update is
available, the user can select to install the update now or later. If the user selects to install later, the high priority update installs at
the time of the next scheduled update.
To mark an update as High Priority:
1. Highlight one or more updates, right-click, and select Mark as High PriorityMark as High Priority.
2. If multiple updates were downloaded, a dialog lists the updates to be marked as High Priority. Click OKOK.
The UpdatesUpdates data grid refreshes. The StatusStatus column shows the High PriorityHigh Prio rity designation for these updates.
Mark as High PriorityMark as High Priority
52

The StatusStatus column in the UpdatesUpdates data grid indicates important information about the status of an update. If nothing appears in
this column, the update has not been downloaded or activated on any client machines.
StatusStatus DescriptionDescription
Indicates the CIC server is using an earlier version than this update. This update does not download to client machines.
Indicates this update has been "activated" or downloaded at least once on client machines. Use the mouse to hover over
the icon to see how many times it has been activated.
Indicates a related install has been associated with this update.
Indicates this update is marked as High Priority.
Each update on the CIC server has a current state that determines its status for distribution to client machines. Client machines
read this state each time they connect to the local provider to determine which updates are ready to apply locally. CIC
administrators can control the behavior and availability of each update by changing the Current StateCurrent State.
The Current StateCurrent State column in the UpdatesUpdates data grid shows the current state for each update.
To change the Current State of an update:
1. Highlight one or more updates, right-click, and select Change Current StateChange Current State.
View the status of an updateView the status of an update
Change current state of updatesChange current state of updates
53

Here is a description of the Current StateCurrent State modes.
CurrentCurrent
StateState
DescriptionDescription
Pre-
Approval
[ ]
The default state after an update is retrieved from the provider. New updates are not set to GAGA and pushed out
automatically. This state indicates the update is being tested and awaiting approval.
Inactive
[ ]
The update should not be pushed out to client machines, because, for example, it is old or obsolete. (Interactive
Update 2.0 SU 5 and later)
GA [ ]
The update is ready to be pushed out to client machines the next time they connect to the local provider. Once the
state is changed to GAGA (Generally Available), client machines that have the related applications installed will
automatically download and apply the update the next time they connect to the local provider.
Remove
[ ]
The update is ready to be removed from a client machine the next time the client connects to the local provider. This
state overrides local settings on the client machine and forces the application to be removed.
When new updates are downloaded from the provider to the local provider, they have a default state of Pre-ApprovalPre-Appro val [ ], awaiting
confirmation to be pushed out.
You must change the updates' state to GAGA [ ] in order to push out those updates (and any related installs) to client machines the
next time those machines connect to the local provider.
To mark an update to be pushed out to client machines:
For example, the IC Business Manager Applicatio ns 2015 R2IC Business Manager Applications 2015 R2 and IC Server Manager Applications 2015 R2IC Server Manager Applicatio ns 2015 R2 updates are
marked GAGA, to be pushed out to client machines the next time those machines connect to the local provider.
1. Highlight the update to push out, right click, and select Change Change Current State.Current State.
2. Select Mark as 'GA'Mark as 'GA' .
3. The Current StateCurrent State column icon for that entry changes to a document with a green check mark. The Updates data grid
refreshes. The Current StateCurrent State for the selected updates changes to GAGA.
Note:Note:
Only the latest patch for a release should be marked as GA. Mark any previously applied 2015 R1 or later patch releases as
Inactive to improve the performance of a provider. A provider has fewer patches to consider when responding to a request for
updates.
Starting with Interactive Update 2016 R1, the related install feature has changed. Now, you can add a related install relationship to
Mark updates to be pushed out to client machinesMark updates to be pushed out to client machines
Related install relationshipsRelated install relationships
54
associate an update for one product with a new install of another product. When the update for the first product is pushed to a
client machine, the related install for the second product is also pushed to the client machine.
To add a related install relationship:
1. Highlight the update, right click, and select Modify Modify Update PropertiesUpdate Properties .
2. Select the Related InstallsRelated Installs tab.
3. Select the product installation to associate with the update and click AddAdd.
The product you selected appears in the InstallInstall column.
To remove a product installation from the list, click the icon in the ActionAction column.
4. Click OKOK to create the relationship.
5. Click OKOK to confirm the update was modified.
To delete a related install relationship:
1. Highlight the update with the relationship to delete, right click, and select Delete RelationshipDelete Relationship.
To select multiple updates, press Ctrl and click the updates from which to delete all relationships.
55

2. Select OKOK to confirm that you want to delete the relationship.
If you want to remove previously applied updates (marked as GAGA) pushed out to client machines for troubleshooting purposes or to
clean up disk space, use the Change Current StateChange Current State…Mark Mark as 'Remove'as 'Remove' action. The next time the client machine connects to the
local provider, it will detect the updates are marked to be removed, and the updates will be uninstalled from the client machine. If an
earlier update version was installed, the client machine will
roll back
to that version.
To remove updates from client machines:
1. Highlight the active (marked as GAGA ) update you want to remove, right-click, and select Change Current Change Current StateState…Mark asMark as
'Remove''Remove' . The Current Current StateState column icon for the selected update changes to RemoveRemove [ ].
2. The next time the client machines connect to the local provider, the selected updates will be removed and the machine will
roll
back
to the earlier update version.
Remove updates from client machinesRemove updates from client machines
56

Interactive Update ClientInteractive Update Client
Interactive Update Client is installed on the CIC server, a remote provider, and all client machines at the customer site that will
receive updates.
This section includes:
Launch Interactive Update Client Configuration
Configuration tab: Specify how updates will be downloaded and installed
Provider Servers tab: Modify provider server list
Proxy Configuration tab: Add Web Proxy server information
Interactive Update Client application: How updates are applied
Interactive Update Client task tray icon
Interactive Update Client service
Interactive Update Client configuration detailsInteractive Update Client configuration details
57

To launch the Interactive Update Configuration on the CIC server or client machine:
1. Launch Interactive Update Client Configuration from the StartStart menu.
The Interactive Update Client ConfigurationInteractive Update Client Configuratio n dialog appears.
Note:Note:
Starting with Interactive Update 2016 R1, if the administrator includes the client machine in a group other than the default group,
the following message appears each time a user launches the Interactive Update Client Configuration on the client machine and
the user cannot modify the settings.
The method for downloading and installing updates:
Launch Interactive Update Client ConfigurationLaunch Interactive Update Client Configuration
Configuration tab: Specify how updates will be downloaded and installedConfiguration tab: Specify how updates will be downloaded and installed
58

On the CIC serverOn the CIC server, must be configured in the Interactive Update Client ConfigurationConfiguration tab.
On client machinesOn client machines , can be set by the administrator on the Interactive Update Provider Gro upsGro ups page if the client machine
does not exist in the default Group. Can be set by a user on their own machine in the Interactive Update Client ConfigurationConfiguration
tab if their machine exists in the default group.
Note:Note:
Interactive Update Client configuration settings cannot be changed while Interactive Update Client service is checking for or
applying updates.
To specify how updates are downloaded and installed:
1. Launch Interactive Update Client Configuration from the StartStart menu.
The InteractiveInteractive UpdateUpdate ClientClient ConfigurationConfiguratio n dialog appears.
2. In the ConfigurationConfiguration tab, do one of the following:
(RecommendedReco mmended) Select AutomaticAutomatic , and select a day and time in the drop-down lists. The update will be automatically
installed on the preset day/time as specified in the accompanying dropdown lists. For additional configuration options, see
Control frequency of automatic check for updates.
Note:Note:
Starting with Interactive Update 2015 R3, you can no longer select AutomaticAutomatic as the update mode when using Interactive
Update Client application on the CIC server.
Select Downlo ad ModeDo wnload Mode . This setting automatically downloads updates to the machine, but does not install them. When
updates are downloaded, the Interactive Update icon displays in the Windows taskbar. The associated tooltip reads UpdatesUpdates
are being downloaded.are being downloaded. When the download is complete, the tooltip text changes to Updates have been do wnloaded andUpdates have been downlo aded and
are ready to be installedare ready to be installed. Click the icon to install the updates.
Select No tify ModeNotify Mode . This setting displays the Interactive Update icon in the Windows taskbar when an update is available.
Click the icon to download and install the update.
Select Manual ModeManual Mo de. When this option is selected, all automatic behavior is turned off. Users are not alerted to available
updates, but they can select the Check For UpdatesCheck For Updates button to manually check for updates. Users should select this option
only if instructed to do so by their administrator or PureConnect Customer Care.
59

Note:Note:
When this option is selected on the CIC server, the description notes that if this machine is used to provide updates to
client machines, then the client machines will not receive updates either.
Click the OKOK or ApplyApply button to save your settings.
Note:Note:
You can set additional Interactive Update client configuration in the Interactive Update configuration data file. See
Interactive Update configuration data file in About Interactive Update 2015 R1 or later.
Administrators can modify the list of provider servers as needed in the Provider ServersProvider Servers tab.
Starting with Interactive Update 2016 R2, Interactive Update uses the following methods to identify available provider servers to
display in the list on the Pro viderProvider ServersServers tab:
Interactive Update searches the network to identify available provider servers when a client machine restarts or the Interactive
Update Client service restarts. For Interactive Update to search for provider servers, configure provider discovery in the
Configuratio nConfiguration page in Interactive Update Provider Web interface. See Configuration page in this document.
If provider discovery fails to identify a provider or if provider discovery is turned off, Interactive Update uses the provider server
that a client application (for example, IC Business Manager) identified as a backup provider server when connecting to
Interactive Update.
To use the backup provider server as a provider server, complete the set up in Interaction Administrator on the UpdateUpdate
ServiceService tab in System Co nfigurationSystem Configuration. See Interaction Administrator configuration for Interactive Update.
From the ProviderProvider ServersServers tab, you can browse to locate a provider.
Note:Note:
Users should not make any changes to the Provider ServersProvider Servers tab on their machines unless instructed by the administrator or
PureConnect Customer Care.
To modify the provider server list:
1. From the StartStart menu, select ProgramsPrograms > PureConnectPureConnect > InteractiveUpdateClientConfigInteractiveUpdateClientConfig.
2. Click the Pro vider ServersProvider Servers tab.
3. From the Provider ServersProvider Servers tab, you can:
Add a server name to the list of provider servers. To add a server name, click the AddAdd button and enter the name of the
server in the ServerServer field.
Browse to locate a provider.
Starting with Interactive Update 2016 R2, you can click BrowseBrowse to locate a provider server to add to the list.
Rename a server. To rename a server, highlight the current name and enter the new name in the ServerServer field.
Remove a server from the list of local provider servers. To remove a server from the list, highlight it, and click the RemoveRemo ve
button.
For users with an advanced configuration that uses a secure reverse proxy, click ShowShow DetailsDetails and complete the
information.
Starting with Interactive Update 2016 R3, the ProviderProvider ServersServers tab includes Sho wSho w DetailsDetails to access the Po rtPo rt , SecureSecure
Connection,Co nnection, and PathPath fields.
Test the connection to the provider. To test a connection to a provider, select a server and click the TestTest button.
Starting with Interactive Update 2015 R3, the TestTest button appears in the Pro viderProvider ServersServers tab.
4. Click OKOK or SaveSave to save your settings.
Provider Servers tab: Modify provider server listProvider Servers tab: Modify provider server list
60

If the customer site uses a Web proxy, administrators must add the appropriate Web proxy server information in the Pro xyProxy
Configuratio nConfiguration tab.
Note:Note:
Recommended Web proxy server (ISA proxy server) settings for use with Interactive Update Client will soon be available in
a separate document.
Users should not make any changes to the Proxy ConfigurationProxy Configuration tab on their machines unless instructed by the
administrator or PureConnect Customer Care.
To add Web Proxy server information:
1. From the StartStart menu, select ProgramsPrograms > PureConnectPureConnect > InteractiveUpdateClientConfigInteractiveUpdateClientConfig.
2. In the Interactive Update Co nfigurationInteractive Update Configuration dialog, click the Proxy ConfigurationProxy Configuration tab.
3. Click the Use a proxy server fo r Interactive UpdateUse a pro xy server for Interactive Update check box. Type the AddressAddress and Po rtPo rt for the Web proxy server.
4. If the Web proxy server is set up so that users must log in every time they want to connect to the Internet, click The pro xyThe proxy
server needs user authenticatio nserver needs user authenticatio n check box. Type the appropriate User NameUser Name and PasswordPassword. If the user is a domain
user, type the Do mainDomain name.
5. Test the proxy configuration. To test the proxy configuration, click TestTest . Starting with Interactive Update 2015 R3, the TestTest
button appears in the Pro viderProvider ServersServers tab.
6. Click the OKOK or SaveSave button to save your settings.
Interactive Update Client application: How updates are appliedInteractive Update Client application: How updates are applied
The Interactive Update Client application displays different icons, messages, and dialogs, depending on how Interactive Update has
been configured to download and apply updates to the CIC server or client machine.
Proxy Configuration tab: Add Web Proxy server informationProxy Configuration tab: Add Web Proxy server information
61

Starting with Interactive Update 2016 R2, Interactive Update will attempt to shut down client applications before updating.
As an example, the following procedure shows what the Interactive Update Client application on a client machine displays when the
Interactive Update Client Configuration is set to Notify Mode.
1. Click Check for UpdatesCheck fo r Updates at the bottom of the Interactive Update Client ConfigurationInteractive Update Client Co nfiguration dialog.
2. The Checking fo r UpdatesChecking fo r Updates dialog appears starting with Interactive Update 2015 R3. This dialog displays messages to
indicate the steps that Interactive Update executes to check for updates and a final message to indicate the number of updates
available or the software is up to date. This dialog displays a list of applications currently installed. In the Status column, a:
Indicates that the application is up to date.
Indicates that an update is available for the application.
62

3. Click InstallInstall .
4. The Interactive Update Client application prompts for the type of install — ExpressE xpress (default) or Custo mCusto m — available to install.
In this example, E xpressExpress is selected. Click InstallInstall .
5. The Interactive Update Client application lists the updates available to install. Click InstallInstall .
If you chose Express InstallE xpress Install , you are notified when Interactive Update has finished applying the updates.
If you chose Custo m InstallCustom Install, you are prompted to choose the updates to apply, for example:
63

Starting with Interactive Update 2015 R1, the update version number is displayed to aid in identifying the correct updates to
apply.
6. The Interactive Update Client application indicates the installation was completed and successful. Click CloseClo se to exit the
Interactive Update Client application.
64

Note:Note:
If the installation was not successful, view Additional Additio nal DetailsDetails for further actions to take, for example, restarting an
application or restarting the machine.
Starting with Interactive Update 2.0 SU 5, the following two notifications may appear in this dialog:
Appears if an update is waiting for another update to complete or if Interactive Update Client Configuration is in
Download Only mode.
Appears if an update has locked files or needs a restart.
Starting with Interactive Update 2015 R3, you can view the Install Log to diagnose an issue that occurred during the
installation of an update. To access the Install Log for an update, select an update and the V iew Install LogView Install Log link appears.
To view the log file, click the V iew Install LogView Install Log link.
65

Interactive Update Client task tray iconInteractive Update Client task tray icon
Starting with Interactive Update 2.0 SU 5, the Interactive Update Client task tray icon has a right-click menu that displays a variety of
options, depending on the current status of Interactive Update Client. For example:
The following table describes the Interactive Update Client right-click menu options:
OptionOption Occurs when…Occurs when… DescriptionDescription
Apply
Updates
Interactive Update Client configuration
is set to Download Mode.
When updates are finished downloading, select this option to install the
updates in the background.
Custom
Apply
Updates
Interactive Update Client configuration
is set to Download Mode.
When updates are finished downloading, select this option to choose the
updates to install.
Check for
Updates
No updates are available or are being
applied.
Select this option to manually check for updates.
Cancel
Updates
Updates are being applied. Select this option to:
Prevent any new tasks from starting.
Cancel current and pending downloads.
Display a dialog with the status of the current updates
Note:Note:
Canceling an update while it is in progress can cause issues that
require uninstalling and reinstalling the application.
Settings Always available. Select this option to display the Interactive Update Client configuration
dialog.
Exit Always available. Select this option to close the Interactive Update Client task tray icon.
Double-click the task tray icon to open a dialog that relates to the last activity Interactive Update Client performed. For example,
starting with Interactive Update 2016 R2 if a client machine requires a restart after an update, double-click the task tray icon and a
dialog appears requesting that you restart to finish applying the updates.
Point to the task tray icon to display tooltips that indicate the status of Interactive Update Client. For example, after Interactive
Updates finishes installing updates, the Successful Activation tooltip appears.
66

Interactive Update Client serviceInteractive Update Client service
This section describes miscellaneous Interactive Update Client service functionality.
Interactive Update Client service checks for the existence of the I3_FEATURE_SU_ALLOWED feature license key and will only allow
the installation if it is present. The I3_FEATURE_SU_ALLOWED feature license key signifies a current Licensing, Maintenance, and
Support contract with Genesys.
Starting with Interactive Update 2015 R1, the Interactive Update Client service deploys all updates (release and patch components,
plus any ESs related to the latest patch) marked as GA for a specified PureConnect product SU release in a single check for
updates.
Note:Note:
Only the latest patch for a release should be marked as GA. Mark any previously applied 2015 R1 or later patch releases as
Inactive to improve the performance of a provider. A provider has fewer patches to consider when responding to a request for
updates.
License verificationLicense verification
Release, patch, and ES deploymentRelease, patch, and ES deployment
67

Interactive Update troubleshootingInteractive Update troubleshooting
This section provides troubleshooting tips for Interactive Update.
Customer Interaction Center Server update failed to applyCustomer Interaction Center Server update failed to apply
If a CIC server update fails to apply, make sure to check the Application Event Log for any specific error messages pertaining to the
failure.
68

Invalid response from serverInvalid response from server
Certain operations in the Interactive Update Provider Web interface result in a request being sent from the browser to the server.
When a request does not reach the server as expected, Interactive Update displays the following error message:
There can be several reasons why this error occurred, anywhere from network configuration to a browser security settings issue,
due to recently tightened browser security settings. In most circumstances, adding http://localhost or http://127.0.0.1
to the Local Intranet zone resolves the issue.
To add this setting in Internet Explorer:
1. In the ToolsTools menu, select Internet Internet OptionsOptions .
2. Select the SecuritySecurity tab and click the Local Local intranetintranet SitesSites button.
3. In the Local intranetLocal intranet dialog, click the AdvancedAdvanced button.
4. In the Add this website to the zo neAdd this website to the zone text box, enter http://127.0.0. and click the AddAdd button.
The added web site appears in the WebsitesWebsites text box.
5. Close the dialogs and restart the browser for the settings to take effect.
69

Refresh doesn't work when uploading multiple updatesRefresh doesn't work when uploading multiple updates
If you select RefreshRefresh when uploading updates in Interactive Update 2.0 SU 5 and Interactive Update 2015 R1 or later, the InvalidInvalid
response from serverresponse from server message may appear, or RefreshRefresh may simply not work.
As a workaround, follow the instructions in the "Invalid response from server" troubleshooting topic to change the web address to
127.0.0.1.
Cannot download updates from a CIC server in a domain Cannot download updates from a CIC server in a domain outside of ISAoutside of ISA
proxy serverproxy server
If you experience issues with downloading updates in a Web proxy configuration, the problem may due to an ISA proxy server
configuration that PureConnect does not support. Recommended Web proxy server (ISA proxy server) settings for use with
Interactive Update Client will soon be available in a separate document.
Interactive Update Provider Config gets stuck on the Interactive Update Provider Config gets stuck on the ""Please WaitPlease Wait""
messagemessage
When using Internet Explorer to view the Interactive Update Provider Config, it gets stuck indefinitely on the Please WaitPlease Wait message.
To avoid this issue, modify the Internet Explorer settings:
1. From the Internet Options SecurityInternet Options Security tab, select Lo cal InternetLocal Internet , and click Custom LevelCustom Level .
70

2. Scroll down to Access data so urces acro ss domainsAccess data so urces acro ss domains and select E nableEnable.
71

72

Processes need to be restarted when updates are being appliedProcesses need to be restarted when updates are being applied
If Interactive Update Client displays a message stating that processes need be restarted while it is applying updates to client
workstations, close any PureConnect applications or services, and click the Restart Restart AppsApps button. You may be prompted to restart.
73

Change LogChange Log
The following changes have been made to this document since it was first published.
DateDate ChangesChanges
10-April-2012 Updated the document for IC 4.0 SU 1 and Interactive Update 2.0 SU 1.
03-October-2012 Added new section "IC 3.0 to IC 4.0 Client Workstation Migrations".
15-October-2013
In "Interactive Update 2.0 for IC 4.0", updated the "Requirements" section to add Microsoft Windows 8
support, added in IC 4.0 SU 3 and later.
In "About Interactive Update":
Updated "Ports used by Interactive Update".
Added new section "Interactive Update configuration data file".
In "IC 3.0 to IC 4.0 Client Workstation Migrations", updated "Required IC and Interactive Update
versions".
In "Interactive Update Client" in "Interactive Client service ", added item about deploying all SU
components and related ES's for a product service update release in a single check for updates.
02-July-2014
In "Interactive Update Client" in "Interactive Client Configuration, "made the following updates for
changes implemented in Interactive Update 2.0 SU 4 and SU 5:
Updated "Configuration tab: Specify how updates will be downloaded and installed" to add note that
Interactive Update Client configuration settings cannot be changed while Interactive Update is
checking for or applying updates.
Updated "Configuration tab: Specify how updates will be downloaded and installed" for replacement
of "Turn off Interactive Update" option with "Manual Mode" option.
Removed reference to "Offer updates again that I've previously disabled" as this option was removed.
In "About Interactive Update" in "Ports used by Interactive Update," changed port 8099 to port 8094 for
the port used for the Interactive Update Client Service to listen to messages from the Interactive Update
Client Application, made in Interactive Update 2.0 SU 5.
In "About Interactive Update" in "Interactive Update configuration data file", added descriptions of
options added in Interactive Update 2.0 SU 4 and SU 5: "CheckForUpdates," "MaximumMessageSize",
and "SendTimeout".
In "Interactive Update 2.0 for IC 4.0," added new section "Stand-alone provider", supported in Interactive
Update 2.0 SU 5 and later.
In "Interactive Update Provider", updated section "Updates page: Manage updates and installs" for
Interactive Update 2.0 SU5 including these new or modified features:
High Priority update
Inactive state
Delete Relationship
Multiple Uploads
Added or modified the following sections for the stand-alone provider, available in Interactive Update 2.0
SU 5 or later:
In "About Interactive Update," modified the "Local provider "section.
In "Interactive Update 2.0 for IC 4.0," added new section "Stand-alone provider, including note about
license file prompt."
Updated "Interactive Update Client application: How updates are applied," for additional icons available
in the Finished dialog in Interactive Update 2.0 SU 5 and later.
07-January-2015
Updated document to reflect changes required in the transition from Interactive Update 2.0 SU# to
Interactive Update 2015 R1 or later, such as updates to product version numbers, system requirements,
installation procedures, references to Interactive Intelligence Product Information site URLs, and
copyright and trademark information.
Updated document for Interactive Update 2015 R2. Includes enhanced functionality for adding multiple
updates in "Interactive Update Provider," section "Updates page: Add New Update."
74

23-February-2015
Updated copyright and trademark page.
For 2015 R3, in the "Interactive Update Client application: How updates are applied" section updated
screen shot in step 1, updated step 2 to show new Checking Checking for Updatesfor Updates dialog, updated step 3 to
click InstallInstall .
For 2015 R3, in the "Interactive update Client application: How updates are applied" section, step 6,
added information about V iew Install LogView Install Log link.
For 2015 R3, in the "Provider Servers tab: Modify provider server list" section updated screen shot before
step 3 and updated text in step 3 to include PortPo rt field and TestTest button.
For 2015 R3, in the "Launch Interactive Update Client Configuration "section, "Configuration tab: Specify
how updates will be downloaded and installed" section, and the "Interactive Update Client application:
How updates are applied" section, updated the screenshot showing the ConfigurationConfiguration tab. Also in the
"Interactive Update (recommended): section, added information that a user can no longer select
automatic update mode with IC Server."
For 2015 R3, in the "Using Activity Details for Troubleshooting" section, updated Activity DetailsActivity Details
screen shot in step 1 to show new fields ApplicationApplicatio n, ReleaseRelease, and PatchPatch.
04-March-2015
For 2015 R3, in the "Launch Interactive Update Client Configuration "section and the "Specify how
updates are downloaded and installed" section, updated first step to launch from StartStart menu so applies
to any version of Windows.
Updated "Apply CIC and Interactive Update release updates to existing installations" section to include
note about Interactive Update 2.0 SU 5 is required.
19-June-2015
Updated "IC Server (Provider server)" section to include requirements for ASP.NET.
Updated title page for rebranding.
10-July-2015
For 2016 R1 Updated "Machines page" section and "Updates page ", added "Groups page" section, "Install
remote provider "section, "Verify content on remote provider" section, updates through out to include
remote provider.
Updated screen shots throughout for rebranding.
27-July-2015
For 2016 R1 Updated "Provider Servers tab: Modify provider server list" section and "Proxy Configuration
tab: Add Web Prosy server information" section to include new screen shots.
Changed text to remove ApplyApply button and use SaveSave and OKOK buttons.
For 2016 R1 updated "Mark as High Priority" section to include note that when manually checking for
updates, user can select to update high priority update now or later.
For 2016 R1 updated "Updates Page" section.
Updated "Action" section about related install relationships.
Removed "Add Related Install", "Modify Related Install", and "Delete Related Install" sections.
Replaced with "Related Install Relations ships" section and add and delete procedure.
01-September-2015
For 2016 R1, from Troubleshooting section, removed "Interactive Update Provider does not push out
updates if they are higher than the IC Server version" section.
Updated "Install Remote Provider" procedure to show correct screen in step 3.
29-September-2015 For 2016 R1, Updated "Install Remote Provider" section to show correct screen in step 3.
06-October-2015 For 2016 R1, updated "Requirements" section.
10-November-2015 For 2016 R2:
Added "Configuration page" section.
Removed "Update Servers page" and "Administration page" sections.
Updated screenshots throughout.
Added Report page section.
Added "Interaction Administrator configuration for Interactive Update" section.
Updated task tray icon information.
Updated Provider Servers tab section to include provider discovery.
27-January-2016 For 2016 R3:
Updated "Report Page: Display Interactive Update status report","View the servers in a switchover pair",
"Add a server", "Create a group", "Modify the provider server list".
Updated copyright and trademark information.
75

10-March-2016 For 2016 R3, updated requirements section for Windows 10 version 1511.
08-April-2016 For 2016 R3, removed change for advanced connection dialog in "Install a remote provider".
03-August-2016 Updated Groups page section to indicate that administrator can change settings for default group.
15-February-2017 Added important note to "Switchover Pair" section to explain granting read/write NTFS permissions if using
a shared database or shared location for static content.
11-July-2017 Updated Microsoft .NET Framework 4.5.2 requirement to Microsoft .NET Framework 4.5.2 or later.
10-October-2017 Rebranding - Updated title page, copyright page, terminology, screen captures.
26-October-2017 Updated requirements to include Windows Server 2016.
07-December-2017 For Interactive Update Client service to recognize updates to product components, apply one of the
following patch updates to Interactive Update Provider and Interactive Update Client: 2018 R2, 2018 R1 patch
3, 2017 R4 patch 8, 2017 R3 patch 15, 2017 R2 patch 20, 2017 R1 patch 26, 2016 R4 patch 30, 2016 R3 patch
36
02-February-2018 Conversion to HTML.
05-February-2018 Updated requirements to remove Windows Server 2008.
22-May-2018 Updated requirements for Microsoft .NET Framework 4.7.
10-July-2018 Removed 2016 R3 patch 36 from list of required patches for Interactive Update Client service to recognize
updates to product components.
19-February-2019 Update for separate Language Pack .iso
30-July-2019 Reorganized the content only, which included combining some topics and deleting others that just had an
introductory sentence such as, "In this section...".
03-March-2020 Updated requirements to include Windows Server 2019.
05-March-2020 Removed references to updates.inin.com.
28-April-2020 Updated links from my.inin.com to new locations.
03-June-2020 Removed "CIC 3.0 to 2015 R1 or later client workstation migrations." Most, if not all, customers have already
migrated from CIC 2.4/3.0 to a later release.
76
