
Citrix Workspace app for
Windows
Citrix Product Documentation | docs.citrix.com May 10, 2021

Citrix Workspace app for Windows
Contents
About this release 3
System requirements and compatibility 27
Install and Uninstall 33
Deploy 43
Update 49
Get started 56
Configure 75
Authenticate 151
Secure communications 168
Storebrowse 178
Citrix Workspace app Desktop Lock 186
SDK and API 191
ICA Settings Reference 193
© 1999-2021 Citrix Systems, Inc. All rights reserved. 2

Citrix Workspace app for Windows
About this release
April 15, 2021
What’s new in 2103.1
Enhancement to keyboard layout configuration
The keyboard layout configuration now includes a Don’t sync option. The option is available for both
the Group Policy Object (GPO) policy and the GUI configurations.
When you select the Don’t sync option, the server keyboard layoutis used in the session and the client
keyboard layout is not synced to the server keyboard layout.
For more information, see Keyboard layout and language bar.
Option to disable storing of authentication tokens
Authentication tokens are encrypted and stored on the local disk so that you don’t need to reenter
your credentials when your system or session restarts.
With this release, Citrix Workspace app introduces an option to disable the storing of authentication
tokens on the local disk. For enhanced security, we now provide a Group Policy Object (GPO) policy
to configure the authentication token storage.
Note:
This configuration is applicable only in cloud deployments.
For more information, see Authentication tokens.
Microso Teams enhancements
• The VP9 video codec is now disabled by default.
• Enhancement to echo cancellation, auto gain control, noise suppression configurations: If Mi-
croso Teams configures these options, Citrix-redirected Teams honors the values as config-
ured. Otherwise, these options are set to True by default.
• DirectWShow is now the default renderer.
To change the default renderer, do the following:
– Launch the Registry editor.
– Navigate to the following key location: HKEY_CURRENT_USER\SOFTWARE\Citrix\
HDXMediaStream.
© 1999-2021 Citrix Systems, Inc. All rights reserved. 3

Citrix Workspace app for Windows
– Update the following value: ”UseDirectShowRendererAsPrimary”=dword
:00000000
Other possible values:
*
0: Media Foundation
*
1: DirectShow (Default)
– Relaunch the Citrix Workspace app.
What’s new in 2102
Proxy authentication support
Previously, on client machines configured for proxy authentication, if the proxy credentials were not
stored in Windows Credential Manager, you could not authenticate to Citrix Workspace app.
Now, on client machines configured for proxy authentication, if the proxy credentials are not stored in
Windows Credential Manager, an authentication prompt appears, asking you to enter the proxy cre-
dentials. Citrix Workspace app then saves the proxy server credentials in Windows Credential Man-
ager. This results in a seamless login experience because you do not need to manually save your
credentials in Windows Credential Manager before accessing Citrix Workspace app.
Microso Teams enhancements
• Improved video rendering.
• Performance and reliability improvements.
What’s new in 2012.1
This release addresses issues that help to improve overall performance and stability.
What’s new in 2012
Support for Italian language
Citrix Workspace app for Windows is now available in the Italian language.
Log collection
Log collection simplifies the process of collecting logs for Citrix Workspace app. The logs help Citrix
to troubleshoot, and, in cases of complicated issues, facilitate support.
You can now collect logs using the GUI.
For more information, see Log collection.
© 1999-2021 Citrix Systems, Inc. All rights reserved. 4

Citrix Workspace app for Windows
Support for the domain pass-through authentication on Citrix Workspace
This release introduces support for the domain pass-through authentication on Citrix Workspace,
along with the existing support for StoreFront.
Silent authentication for Citrix Workspace
Citrix Workspace app introduces a Group Policy Object (GPO) policy to enable silent authenticationfor
Citrix Workspace. This policy enables Citrix Workspace app to log in to Citrix Workspace automatically
at system startup. Use this policy only when domain pass-through (single sign-on) is configured for
Citrix Workspace on domain-joined devices.
For more information, see Silent Authentication.
Enhancement to app protection configuration
Previously, the authentication manager and the Self-Service plug-in dialogs were protected by de-
fault.
This release introduces a Group Policy Object (GPO) policy that lets you configure the anti-keylogging
and anti-screen-capturing functionalities separately for both the authentication manager and Self-
Service plug-in interfaces.
Note:
This GPO policy is not applicable for ICA and SaaS sessions. ICA and SaaS sessions continue to
be controlled using the Delivery Controller and Citrix Gateway Service.
For more information, see Enhancement to app protection configuration.
Microso Teams enhancements
• Peers can now see the presenter’s mouse pointer in a screen sharing session.
• The WebRTC media engine now honors the proxy server configured on the client device.
What’s new in 2010
This release addresses several issues that help to improve overall performance and stability.
What’s new in 2009.6
Support for FIDO2 authentication
FIDO2 authentication lets users take advantage of the local endpoint FIDO2 components. Users can
now authenticate using FIDO2 security keys or integrated biometrics. Devices must have Trusted Plat-
© 1999-2021 Citrix Systems, Inc. All rights reserved. 5

Citrix Workspace app for Windows
form Module (TPM) 2.0 and Windows Hello. For more information, see FIDO2: WebAuthn & CTAP.
Microso Teams enhancements
• Microso Teams now displays previously used peripheral devices in the Preferred devices list.
• The WebRTC media engine accurately determines the maximum encoding resolution possible
on an endpoint. The WebRTC media engine estimates multiple times a day and not only on first
launch.
• The Citrix Workspace app installer is now packaged with the Microso Teams ringtones.
• Echo cancellation improvements - Reducedecho level when a peer has a speaker or microphone
that generates an echo.
• Screen sharing improvements - Now when you do screensharing, only the Desktop Viewer
screen is captured in native bitmap format. Previously, client local windows that overlaid on
top of the Desktop Viewer window were blacked out.
What’s new in 2009
This release addresses issues that help to improve overall performance and stability.
What’s new in 2008
Group Policy Object (GPO) administrative template configuration for keyboard layout and
language bar
In addition to the existingGUI method, you can now configure keyboardlayout and language bar using
the Group Policy Object (GPO) administrative template.
For more information, see Keyboard layout and language bar.
CryptoKit update
Citrix Workspace app now supports Version 14.2.1 of the CryptoKit.
Language support
Citrix Workspace app for Windows is now available in the Portuguese (Brazil) language.
Authentication enhancement
To provide a seamless experience, the authenticationdialog now appears inside Citrix Workspace app.
The Store details appear on the logon screen. Authentication tokens are encrypted and stored so that
you don’t need to reenter the credentials in case of a system reboot or session restart.
© 1999-2021 Citrix Systems, Inc. All rights reserved. 6

Citrix Workspace app for Windows
Note:
This authentication enhancement is applicable only in cloud deployments.
Enhancement to app protection
Previously, when you are trying to take a screenshot of a protected window, the entire screen, includ-
ing the non-protected apps in the background, are blacked out.
Now, when you are taking a screenshot using a snipping tool, only the protected window is blacked
out. You can take a screenshot of the area outside the protected window.
However, if you are using the PrtScr key to capture a screenshot on a Windows 10 device, you must
minimize the protected window.
Additionally, this release addresses issues to improve the app protection feature.
Enhancement to Browser Content Redirection
• Cookies are now persistent across the sessions: When you exit and relaunch a browser, you are
not prompted to reenter your credentials.
• Browsers now honor the local system language.
What’s new in 2006.1
Support for Dual Tone Multi Frequency (DTMF) with Microso Teams
Support for Dual-Tone Multifrequency (DTMF) signaling interaction with telephony systems (for exam-
ple, PSTN) and conference calls in Microso Teams. This feature is enabled by default.
Enhancement to Microso Teams screen sharing
With this release, the contents shared using Microso Teams are limited to the contents of the Desktop
Viewer window. Areas outside the Desktop Viewer window are cropped, and the client’s local apps
that overlap the Desktop Viewer appear blacked out.
For more information, see Screen sharing.
Update to Citrix Analytics Service
Citrix Workspace app is instrumented to securely transmit data to Citrix Analytics Service from ICA
sessions that you launch from a browser.
For more information on how Citrix Analytics uses this information, see, Self-Service for Performance
and Self-service search for Virtual Apps and Desktops.
© 1999-2021 Citrix Systems, Inc. All rights reserved. 7

Citrix Workspace app for Windows
What’s new in 2002
App protection
Disclaimer
App protection policies work by filtering access to required functions of the underlying operat-
ing system (specific API calls required to capture screens or keyboard presses). This means that
app protection policies provide protection even against custom and purpose-built hacker tools.
However, as operating systems evolve, new ways of capturing screens and logging keys emerge.
While we continue to identify and address them, we can’t guarantee full protection in specific
configurations and deployments.
App protection is an add-on feature that provides enhanced security when using Citrix Virtual Apps
and Desktops. The feature restricts the ability of clients to be compromised by keylogging and screen
capturing malware. App protection prevents exfiltration of confidential information such as user cre-
dentials and sensitive information that is displayed on the screen. The feature prevents users and
attackers from taking screenshots and from using keyloggers to glean and exploit sensitive informa-
tion.
Note:
Citrix recommends that you only use the native Citrix Workspace app to launch a protected ses-
sion.
App protection is configured between StoreFront and the Controller using the Controller. For informa-
tion about configuring app protection on the Controller, see App protection in Citrix Virtual Apps and
Desktops documentation. This configuration is then applied to Citrix Workspace app by including the
app protection component using any of the following methods:
• GUI
• Command-line interface
You can include the app protection component both during the Citrix Workspace app installation or
on-demand installation.
Note:
• This feature is supported only on Microso Windows Desktop operating systems such as
Windows 10, Windows 8.1, and Windows 7.
• This feature is not supported over Remote Desktop Protocol (RDP).
For information about configuring app protection in Citrix Workspace app, see App protection.
Installer enhancement
In earlier releases, if an administrator tried to install Citrix Workspace app on a system that has a user-
installed instance of the app, the installation was blocked.
© 1999-2021 Citrix Systems, Inc. All rights reserved. 8

Citrix Workspace app for Windows
With this release, the administrators can now override the user-installed instance of Citrix Workspace
app and continue with the installation successfully.
Enhancement to Citrix Workspace Updates
In earlier releases, if Citrix Workspace app is installed by an administrator, a non-administrator might
not update it.
With this release, a non-administrator can update Citrix Workspace app on an admin-installed
instance. You can do that by right-clicking the Citrix Workspace app icon in the notification area and
selecting Check for Updates.
Note:
The Check for Updates option is now available on both the user-installed and the admin-
installed instances of Citrix Workspace app.
Support for outbound proxy
SmartControl allows administrators to define granular policies to configure and enforce user environ-
ment attributes for Citrix Virtual Apps and Desktops using Citrix Gateway. For instance, you might
want to prohibit users from mapping drives to their remote desktops. This can be achieved using the
SmartControl feature on Citrix Gateway.
However, the scenario changes when Citrix Workspace app and Citrix Gateway belong to separate
enterprise accounts. In such scenarios, the client domain cannot apply the SmartControl feature be-
cause the gateway does not exist on the client domain. Instead, you can use the Outbound ICA Proxy.
Outbound ICA Proxy lets you use the SmartControl feature even when Citrix Workspace app and Citrix
Gateway are deployed in dierent organizations.
Citrix Workspace app supports session launches using the Citrix ADC LAN proxy. Either a single, static
proxy can be configured or the proxy server can be selected at runtime using the outbound proxy
plug-in.
You can configure outbound proxies using the following methods:
• Static proxy: Proxy server is configured by providing a proxy host name and port number.
• Dynamic proxy: A single proxy server can be selected among one or more proxy servers using
the proxy plug-in DLL.
You can configure the outbound proxy using the Group Policy Object administrative template and the
Registry editor.
For more information about outbound proxy, see Outbound ICA Proxy support in the Citrix Gateway
documentation.
For more information about configuring the outbound proxy, see Outbound proxy.
© 1999-2021 Citrix Systems, Inc. All rights reserved. 9

Citrix Workspace app for Windows
Citrix Embedded Browser binaries
You can now exclude the Citrix Embedded Browser binaries so as to not use this feature.
This release introduces a command-line switch to exclude the Citrix Embedded Browser binaries. Run
the /InstallEmbeddedBrowser=N switch from the Citrix Workspace app install location to discon-
tinue the embedded browser feature.
You can exclude the Citrix Embedded Browser binaries only in the following cases:
• Fresh install
• Upgrade from a version that does not include the Citrix Embedded Browser binaries.
If your version of Citrix Workspace app includes the Citrix Embedded Browser binaries and you are
upgrading to Version 2002, the embedded browser binaries are automatically updated during the up-
grade.
Enhancement to desktop sharing with Microso Teams
When you share your workspace using Microso Teams, Citrix Workspace app displays a red border
that surrounds the area of the monitor that is currently being shared. You can share only the Desktop
Viewer window, or any local window overlaid on top of it. When you minimize the Desktop Viewer
window, screen sharing is paused.
Endpoint encoder performance estimator on Microso Teams
When the HdxTeams.exe process (the WebRTC media engine embedded in Citrix Workspace app that
handles Microso Teams redirection) is launched, it estimates the best encoding resolution that the
endpoint’s CPU can sustain without overloading. Possible values are 240p, 360p, 720p and 1080p.
The performance estimation process (also called webrtcapi.EndpointPerformance) runs when
HdxTeams.exe initializes. The macroblock code determines the best resolution that can be achieved
with a particular endpoint. The highest possible resolution is then included during the codec negoti-
ation between the peers, or between the peer and the conference server.
For information on configuring endpoint encoder, see Encoder performance estimator.
For information, see Optimization for Microso Teams in Citrix Virtual Apps and Desktops documen-
tation.
Enhancement to Citrix Analytics Service
With this release, Citrix Workspace app is instrumented to securely transmit the public IP address of
the most recent network hop to Citrix Analytics Service. This data is collected per session launch.
It helps Citrix Analytics Service to analyze whether poor performance issues are tied to specific geo-
graphic areas.
© 1999-2021 Citrix Systems, Inc. All rights reserved. 10

Citrix Workspace app for Windows
By default, the IP address logs are sent to Citrix Analytics Service. However, you can disable this option
on the Citrix Workspace app using the Registry editor.
To disable IP address log transmissions, navigate to the following registry path and set the
SendPublicIPAddress key to O.
• On 64-bit Windows machines, navigate to: HKEY_LOCAL_MACHINE\SOFTWARE\Wow6432Node
\Citrix\Dazzle.
• On 32-bit Windows machines, navigate to: HKEY_LOCAL_MACHINE\SOFTWARE\Citrix\
Dazzle.
Note:
• IP address transmissions are best-case eorts. Although Citrix Workspace app transmits
every IP address that it is launched on, some of the addresses might not be accurate.
• In closed customer environments, where the endpoints are operating within an intranet,
ensure that the URL https://locus.analytics.cloud.com/api/locateip is
whitelisted on the endpoint.
For more information on how Performance Analytics uses this information, see Self-Service for Perfor-
mance.
What’s new in 1911
Workspace with intelligence
This version of Citrix Workspace app for Windows is optimized to take advantage of the Workspace
intelligence features when they are released. For more information, see Workspace Intelligence Fea-
tures - Microapps.
Support for automatically enrolling Windows 10 devices in Citrix Endpoint Management
Note:
The auto-enroll feature is in Technical Preview. Citrix recommends using technical preview fea-
tures only in test environments.
Citrix Workspace app now allows Windows 10 devices to automatically enroll in Endpoint Manage-
ment.
Note:
• This feature is supported only on Windows 10 devices.
• This feature is applicable only on cloud deployments.
© 1999-2021 Citrix Systems, Inc. All rights reserved. 11

Citrix Workspace app for Windows
What’s new in 1909
New installer switch
This release introduces a new installer switch called /forceinstall.
Use this switch to clean up any existing configuration and registry entries of Citrix Workspace app on
the system in the following scenarios:
• You are upgrading from an unsupported version of Citrix Workspace app.
• The installation or upgrade is unsuccessful.
Note:
/forceinstall switch is the replacement for /rcu switch.
For more information, see Common parameters in the Install section.
Fixed issues
Fixed issues in 2103.1
Logon/Authentication:
• Even aer you enable the keep me signed in and don’t ask again for 60 days policies, Microso
Azure Multi-Factor Authentication might still prompt for authentication.
Note:
We recommend that users exit their stores rather than log o from their stores. If users log
o from stores using webview authentication, they might be prompted for authentication
again because Internet Explorer cookies are cleared in such scenarios. By default, the fix
is enabled (cookies are stored). You can disable the fix by using the GPO option. If you
disable the fix, the cookies are not stored and are cleared during logo.
[CVADHELP-14814]
• On Azure Active Directory (AD) joined devices, when Citrix Workspace app attempts to access a
store and then passes through endpoint logon credentials, users might not be authorized to log
on. Also, there is no option to log on with a dierent user account. [CVADHELP-14844]
Security issues:
• This fix improves security in an underlying component. [RFWIN-20912]
Session/Connection:
• When you launch a published desktop through a native Citrix Workspace app for Windows, the
native Citrix Workspace app automatically runs in the foreground within the desktop. The issue
occurs when the Local App Access feature enabled. [CVADHELP-15654]
© 1999-2021 Citrix Systems, Inc. All rights reserved. 12

Citrix Workspace app for Windows
• In scenarios where proxy servers do not use port 8080, Citrix Workspace app might fail to con-
nect to published applications and desktops. The issue occurs because Citrix Workspace app
for Windows might fail to use the proxy port and use the default port 8080 instead. [CVADHELP-
15977]
• Citrix Workspace app for Windows might ignore proxy type settings. The issue occurs with non-
English versions of the Microso Windows operating system. [CVADHELP-16017]
• When you press ALT + Tab key in a user session, a new, blank window of Citrix Workspace app
for Windows might open. [CVADHELP-16379]
• The Print Screen key might not capture screenshots even if/when the protected windows are
minimized. [RFWIN-16777]
• If you are using a webcam or a video in a Microso Teams call, the HDXrtcengine.exe might
turn unresponsive. For a workaround, see Knowledge Center article CTX296639. [HDX-29122]
• When you attempt to compose DBCS text using IME, underlines might be missing. The issue
occurs with Windows 10 2004 operating systems. [RFWIN-20006]
• Incorrectly set permissions on the C:\ProgramData\Citrix folder might cause Citrix
Workspace app to exit unexpectedly. [RFWIN-22753]
• In Microso Teams calls, the audio might be choppy. The issue occurs when the UDP traic port
is disabled. [HDX-27914]
User Interface:
• Citrix Workspace app for Windows might not close when you click the Exit option once. As a
workaround, select the Exit option twice for the Workspace app to close. [RFWIN-21518]
Fixed issues in 2102
Session/Connection:
• When you attempt to open an application from Favorites on a published desktop using Citrix
Workspace app with the vPrefer option enabled, the application might open with a spinning
circle. If the spinning circle remains, you cannot open the application again. [CVADHELP-13237]
• With the vPrefer option enabled, App-V applications might start on a remote server rather than
on a local server. [CVADHELP-15356]
• The StoreBrowse.exe command might fail to display the complete list of published appli-
cations when the application names are provided in the Chinese traditional or Japanese lan-
guages. [CVADHELP-15952]
• When the EnableFactoryReset registry setting is set to False, attempts to uninstall Citrix
Workspace app might fail with this error message:
This feature has been disabled.
[CVADHELP-16114]
© 1999-2021 Citrix Systems, Inc. All rights reserved. 13

Citrix Workspace app for Windows
• The log collection feature might fail to collect the CDF trace. [CVADHELP-16587]
System Exceptions:
• The Receiver.exe process might exit unexpectedly. [CVADHELP-15669]
User Interface:
• When using the Chinese or Japanese Input Method Editor (IME) to input text in a text box, the
text might appear outside of the text box in the top-le corner of the screen. [CVADHELP-15614]
Fixed issues in 2012.1
• Automatic update of Citrix Workspace app from Version 2012 to a later version fails with the
following error message:
“Could not load file or assemble Newtonso.Json”
The issue occurs only when automatic update is enabled on an admin-installed instance of the
Citrix Workspace app.
As a workaround, download Citrix Workspace app Version 2012.1 or later from the Citrix Down-
loads page and install it manually.
[RFWIN-21715]
Fixed issues in 2012
Installing, Uninstalling, Upgrading:
• When you attempt to refresh Citrix Workspace app by using its shortcut that is created manually,
the shortcut might get deleted and then recreated. [CVADHELP-15397]
Session/Connection:
• In a multi-monitor environment, attempts to maximize a user session might fail. The issue oc-
curs when you redock your laptop. [CVADHELP-13614]
• A security warning dialog might appear when you do one of the following:
– Retrieve an ICA file from StoreFront by using the Storebrowse command.
– Launch an application by using an ICA file rather than from a browser.
[CVADHELP-15221]
• In a double-hop scenario, attempts to launch an application using the shortcut in the Start
menu might fail. The issue occurs if you enable the one-instance-per-user application limit.
[CVADHELP-15576]
© 1999-2021 Citrix Systems, Inc. All rights reserved. 14

Citrix Workspace app for Windows
• You configure Citrix Workspace app for Windows to connect to all store accounts when estab-
lishing a session. If you log o from Citrix Workspace app and log back on, the store account
setting changes to one store account rather than defaulting to all accounts. [CVADHELP-15728]
• Attempts to share your screen in a Microso Teams call might result in a black screen. [HDX-
27041]
User Experience:
• Attempts to launch a session might fail aer you do a fresh installation of Citrix Workspace app
for Windows or upgrade an existing installation to the latest. The session launch is stuck on the
Preparing your desktop screen. The issue occurs when you configure Desktop Lock by using a
Citrix Gateway URL.
Note:
A black screen appears for some time before Desktop Lock appears the first time you con-
figure Citrix Workspace app for Windows by using a Citrix Gateway URL and Desktop Lock.
If the black screen remains for a long time, sign out by using Ctrl+Alt+Delete for physical
machines and Ctrl+Alt+End for virtual machines.
[CVADHELP-15334]
• With High DPI set to Yes or No, when you launch a desktop session, some elements in the CD
Viewer toolbar might not scale up to match the current DPI setting of the device. The issue
occurs when the DPI setting of the user device is greater than 100%. [CVADHELP-15418]
• Aer you upgrade Citrix Workspace app to Version 1912 CU1 from Version 1912, application enu-
meration might be slow, taking about 10 minutes to complete. [CVADHELP-15766]
Fixed issues in 2010
Keyboard
• When you use a Japanese language keyboard, Full-width input mode might fail to work with
Microso Excel launched on the local device. The issue occurs when the app protection feature
is enabled. [CVADHELP-15410]
Session/Connection
• Attempts to launch applications might fail aer you upgrade Citrix Workspace app for Windows
from version 2006 to version 2008 or later. The issue occurs with machines running non-English
(such as Swedish) number formats. [CVADHELP-15988]
• When you enable the app protection feature, the Pause/Break and Num Lock keys might be
mapped incorrectly. [RFWIN-20083]
© 1999-2021 Citrix Systems, Inc. All rights reserved. 15

Citrix Workspace app for Windows
• On Citrix Workspace app for Windows, when you add a cloud account using a store URL, this
error message might appear:
“Cannot connect to server.”
The issue occurs when the URL contains uppercase letter.
[RFWIN-20907]
• Microso Teams optimization: In a multi-monitor setup or a single monitor with high DPI, out-
going screensharing might not function properly. The other peer might view a black window
instead. [RFWIN-20854]
• When you click Help in the notification area of Citrix Workspace app for Windows, the Help page
appears in Traditional Chinese instead of English. [RFWIN-21069]
Fixed issues in 2009.6
• When you connect to Citrix Workspace app using a VPN and select the Refresh apps option, the
refresh action might fail. [CVADHELP-14418]
• Attempts to maximize the screen in a session that has a published instance of Microso Teams
running might fail. [RFWIN-20051]
• Desktop sessions might turn unresponsive intermittently or get disconnected. The issue occurs
when you set the Audio Quality option to Medium and enable the echo cancellation feature on
the Delivery Controller. [RFWIN-20557]
• Aer you upgrade Citrix Workspace app, multiple Workspace app icons might appear in the no-
tification area. [RFWIN-20589]
• When you try to access shared folders on a network, the Windows Security authentication
prompt might not appear. [RFWIN-20599]
• In a cloud deployment, attempts to connect to a store using proxy authentication might not
work. [RFWIN-20673]
• In cloud deployments, attempts to connecttoan existingstore might fail with the following error
message:
“Cannot Connect to Server.”
The issue occurs aer you upgrade Citrix Workspace app. As a workaround, reset Citrix
Workspace app or remove the store account and add it again. [RFWIN-20834]
Fixed issues in 2009
This release addresses issues that help to improve overall performance and stability.
© 1999-2021 Citrix Systems, Inc. All rights reserved. 16

Citrix Workspace app for Windows
Fixed issues in 2008
Installing, Uninstalling, Upgrading
• Attempts to use the auto-update functionality to automatically update the HDX RealTime Media
Engine (RTME) along with Citrix Workspace app might fail. The RTME fails to upgrade to the
latest version. [CVADHELP-15047]
Logon/Authentication
• When you configure Citrix Gateway to support single sign-on (SSO) through the Citrix Workspace
app, SSO might fail. The issue occurs when a user name or password contains special characters
such as %, =, and &. [CVADHELP-14564]
Session/Connection
• When you launch a published application from the Start menu without logging on to Citrix
Workspace app, two windows might appear, prompting you to log on to Citrix Workspace app.
The issue occurs if you configure the PNA address as STORE0 using the CitrixReceiver.exe com-
mand. [CVADHELP-13916]
• With the vPrefer option enabled in Citrix Workspace app, attempts to launch an App-V applica-
tion might fail with the following error message:
Cannot start
[CVADHELP-14039]
• The registry values related to the deprecated feature, HDX MediaStream for Flash (for example,
Flash and Flash2) might not be removed from the registry setting, HKEY_LOCAL_MACHINE\
SOFTWARE\WOW6432Node\Citrix\ICA Client\Engine\Configuration\Advanced\
Modules\ICA 3.0\VirtualDriver aer you upgrade the Citrix Workspace app. This issue
can cause a connection failure. [CVADHELP-14850]
• When you use Citrix Workspace app, the self-service window might intermittently display a
blank screen. [RFWIN-17563]
User Experience
• When you add an account using a store URL on Citrix Workspace app for Windows, it might take
a long time to complete. The issue occurs when the URL contains a port number. [CVADHELP-
14051]
© 1999-2021 Citrix Systems, Inc. All rights reserved. 17

Citrix Workspace app for Windows
Fixed issues in 2006.1
Content redirection
• With Browser Content Redirection (BCR) enabled, you might not be able to enter any text in
input fields on a page aer refreshing that page. The issue occurs with seamless sessions.
[CVADHELP-12922]
• When you attempt to redirect a long URL, the URL might not be redirected to a VDA and the
Redirector.exe process exits unexpectedly with the following exception:
INVALID_CRUNTIME_PARAMETER
[CVADHELP-13197]
Session/Connection
• Aer launching and exiting streamed media, audio becomes unavailable in the session.
[CVADHELP-13297]
• If you add two stores to Citrix Workspace app for Windows using two dierent accounts, the
Sign-in button might not work for the secondary store aer you remove the primary store.
[CVADHELP-13805]
• In a double-hop scenario, the Citrix HDX Engine might exit unexpectedly when you attempt to
launch a session. [CVADHELP-13915]
• When multifactor authentication is enabled and Windows Security dialog is used to log in, the
Active Directory Federation Services (ADFS) dialog does not appear when authenticating to
stores. [CVADHELP-14316]
• Attempts to take screenshots of sessions might succeed even when app protection is enabled.
[RFWIN-17455]
System Exceptions
• The wfica32.exe process might exit unexpectedly when you attempt to reconnect to a session.
The issue occurs with Version 1904.1 of Citrix Workspace app for Windows. [CVADHELP-12807]
User Interface
• An application might attempt to come to the foreground intermittently, displacing the current
application. Its icon in the taskbar might flash, informing the user that the application attempts
to come to the foreground. [CVADHELP-13071]
• When you minimize an application launched through Local App Access, the application’s icon
might disappear from the taskbar. [CVADHELP-13293]
• An extra Workspace app for Windows icon might appear in the notification area. [RFWIN-17499]
© 1999-2021 Citrix Systems, Inc. All rights reserved. 18

Citrix Workspace app for Windows
Fixed issues in 2002
Compared to Citrix Workspace app 1911 for Windows
HDX MediaStream Windows Media Redirection
• In a multi-monitor environment, when you play an MP4 video using the Windows Media Player
in a user session, the video might play correctly on the primary monitor. But, when you move
the player to a dierent screen, a black screen might appear on the secondary or an extended
monitor connected through DisplayLink using a docking station. [CVADHELP-11848]
Session/Connection
• When you attempt to reconnect to a session from the HDX RealTime Media Engine using a fast
smart card, the HDX RealTime Media Engine might exit unexpectedly. [CVADHELP-12605]
• When published applications receive many requests to play short sounds for a short period, the
wfica32.exe process might exit unexpectedly. [CVADHELP-12855]
• Aer a session timeout is reached, the session might automatically log o. When you attempt
to launch the session again, the session takes longer than normal to launch. The issue occurs
when there is a network disruption. [CVADHELP-13017]
• With Local App Access and Desktop Lock enabled, when you perform the Switch user function
aer pressing the Ctrl+Alt+Del key, the local user session might reconnect. But, when the server
session attempts to reconnect, the VDA is stuck on a white screen that displays the message
connected to desktop. The desktop never appears. [CVADHELP-13046]
• A seamless application window might be rendered partially truncated and remain truncated
until you manually resize the window. [CVADHELP-13108]
• Workspace app now performs a check of the presence of shortcut icons every time it refreshes
or starts. If an icon is not available, Workspace app fetches the icon again. Doing so ensures that
shortcuts appear correctly. [RFWIN-15501]
• When attempting to enable the Bidirectional Content Redirection policy (under Computer Con-
figuration > Administrative Templates > Classic Administrative Templates (ADM) > Citrix Compo-
nents > Citrix Workspace > User experience), you are prompted to type a URL-specific entry even
if you do not enable the URL-specific application or desktop overrides. [RFWIN-15867]
System Exceptions
• The Receiver.exe process might exit unexpectedly while capturing the CDF traces. [CVADHELP-
13077]
© 1999-2021 Citrix Systems, Inc. All rights reserved. 19

Citrix Workspace app for Windows
Fixed issues in 1911
Content Redirection
• With the bidirectional content redirection policy enabled, Internet Explorer running on a user
device might appear on the user’s taskbar. Also, the Internet Explorer browser window does not
appear in the foreground. [LD1924]
Installing, Uninstalling, Upgrading
• With the Citrix HDX RealTime Media Engine plug-in installed, you cannot start a session aer you
upgrade Citrix Receiver for Windows to Version 4.9 LTSR Cumulative Update. [LD1814]
Seamless Windows
• When you open a new window within a published application, the icon of the published appli-
cation might disappear from the taskbar. [LD1868]
Session/Connection
• With Local App Access or Desktop Lock enabled, attempts to launch a session might fail. The
Citrix logon screen displays the message please wait along with the Logo and Disconnect but-
tons. Also, the screen flickers for a few seconds and then the flickering stops, but the please
wait message remains there.[LD1124]
• The original client machine resolution might be unexpectedly applied to a user session aer Au-
tomatic Client Reconnection (ACR) completes the session reconnection aer a network outage.
The issue occurs when the DPI is not set to 100% on the user device and when you select Yes on
the Workspace app for Windows > Advanced Preferences > High DPI page. [LD1423]
• With the Vprefer option enabled in Citrix Workspace app, published applications might launch
locally, but you might experience the following two issues:
– The system environment is not expanded, For example, %computername% as a
command-line parameter is not expanded at the local client to PC12345. System envi-
ronment variables do not expand. For example, %computername% as a command-line
parameter does not expand to PC12345 on the local client machine.
– Command-line parameters are not passed back to the client. For example, when using
selfservice’.exe -qlaunch IE11 http://www.citrix.com, the command-line parameter is
passed as “Iexplore.exe %*” instead of being passed back to the client.
[LD1450]
• When you attempt to reconnect to a session from the HDX RealTime Media Engine using a fast
smart card, the HDX RealTime Media Engine might exit unexpectedly. [LD1655]
© 1999-2021 Citrix Systems, Inc. All rights reserved. 20

Citrix Workspace app for Windows
• When using Citrix Workspace app for Windows, if you minimize, maximize, or resize a desktop,
a gray screen might overlap the desktop. [LD1656]
• The Plantronics Blackwire 320 USB headset might disappear from the device list of Citrix Pref-
erences when it is connected to a USB 2.0 port. The issue occurs when you repeatedly switch
between the optimized and generic modes. [LD1864]
• In double-hop scenarios where VDAs for Desktop OS are running in the first hop and published
applications are running in the second hop, this error message might appear:
Citrix HDX Engine has stopped working.
Exception caused the program to stop working correctly. Please close the program.
The issue occurs when you use third-party applications with a custom virtual channel and re-
connect or seize the first hop desktop from a dierent client device.
[LD1898]
• Certain third-party applications might fail to work as seamless applications as expected. The is-
sue occurs when window styles (for example, WS_DISABLED) are not applied correctly. [LD1912]
• With Local App Access enabled, the following issues might occur when you launch a locally in-
stalled third-party application within a published desktop:
– With Desktop Lock enabled, the application might maximize and minimize to the top-right
corner of the screen. You can restore the application by clicking the application icon in the
task bar.
– With Desktop Lock disabled, a secondary window, such as the small authentication dialog
window, must be in focus. But, the main window is always on top, and the secondary
window is hidden behind the main window. The secondary window does not come into
focus until you set the desktop to window mode.
[LD1979]
• A seamless application window might be rendered partially truncated and remain truncated
until you manually resize the window. [LD2124]
• With the SelfServiceMode flag set to false, when you disable an application in Citrix Studio, the
application shortcut might still appear in the Start menu. [LD2126]
System Exceptions
• With Driver Verifier enabled for CtxUsbm.sys, a memory leak in CtxUsbm.sys can result in a blue
screen. Also, the development tool, Driver Verifier, must not be used in the production environ-
ment. [LD1973]
© 1999-2021 Citrix Systems, Inc. All rights reserved. 21

Citrix Workspace app for Windows
Fixed issues in 1909
Session/Connection
• In double-hop scenarios where VDAs for Desktop OS are running in the first hop and published
applications are running in the second hop, this error message might appear:
” Citrix HDX Engine has stopped working.
Exception caused the program to stop working correctly. Please close the program.”
The issue occurs when you use third-party applications with a custom virtual channel and re-
connect or seize the first hop desktop from a dierent client device. [LD0479]
• You reduce the monitor number from three to two by closing one monitor and then minimize
and maximize the applications. Two white screens might appear. The issue occurs when the
resolution of the laptop is dierent from the resolution of the others. Also, the issue occurs
when you dock or undock your laptop. [LD1558]
• Attempts to copy text from a published application to an endpoint might fail when using Citrix
Workspace app 1902 for Windows or later. [LD1972]
• When using the HDX Optimization for Microso Teams, when User1 starts a video call with User2
and then shares the desktop with User2, User2 might view video artifacts instead of a shared
desktop. [RFWIN-11863]
• When using the HDX Optimization for Microso Teams, when User1 starts a video call with User2,
both users can hear and see each other. But, when User1 starts sharing the desktop with User2,
User2 might see a gray screen instead of a shared desktop. The issue occurs when the call is
established on AMD clients. [RFWIN-11866]
• When using the HDX Optimization for Microso Teams, when User1 starts a video call with User2
and then adds User3 to the video call, the video screen might become black for User1. As a
result, the video screen displays as black for all the users. [RFWIN-11875]
• When using the HDX Optimization for Microso Teams, when User1 starts a video call with User2
from a published instance of an application and then shares the desktop with User2, User2
might view only a black screen instead of User1’s screen. [RFWIN-11952]
• In the registry path HKEY_LOCAL_MACHINE\SOFTWARE\WOW6432Node\Citrix\ICA Client
\Engine\Lockdown Profiles\All Regions\Lockdown\Client Engine\HotKeys,
when the DWORD value of the EnableCtrlAltEnd attribute is set to 1, published desktops
cannot be launched. [RFWIN-12091]
• When using the HDX Optimization for Microso Teams, the display window for the Desktop
Viewer might become unresponsive during a meeting or a call until you kill the HDXTeams.exe
process. [RFWIN-15231]
© 1999-2021 Citrix Systems, Inc. All rights reserved. 22

Citrix Workspace app for Windows
User Experience
• When you hover the mouse pointer over an application icon while several applications are run-
ning, the taskbar preview might show only the active window’s content.
Note: With client rendered Flash or Windows Media Redirection, the taskbar preview might not
display correctly. [LD1030]
• Application enumeration and filtering based on client names might not work in native Citrix
Receiver with the unified experience. [LD1427]
• When you launch a VDI desktop from Internet Explorer and move your mouse pointer toward
the VDI desktop window, the VDI desktop frame might lose the focus and the mouse pointer
hides behind the frame. [LD1486]
Known issues
Known issues in 2103.1
• The Self-Service plugin window is blank and no apps are displayed at session launch. The issue
occurs when using Intel Xe Graphics card. This is a third-party limitation. [CVADHELP-17005]
• Attempts to compose characters in Japanese, Chinese or Korean IME might not work properly.
The composition window appears misplaced and is not seamless. This issue does not occur
when using CVAD sessions and SaaS apps. [RFWIN-21158]
• Attempts to exit Citrix Workspace app might fail. The issue occurs when the user credentials
prompt appears repeatedly. [RFWIN-22491]
• Aer creating a desktop shortcut for an app and restarting the client device, the first attempt
to launch the app from the shortcut might fail. The issue occurs when you do not specify the
storedescription when installing Citrix Workspace app using the command-line interface.
[RFWIN-22510]
• When you download a .txt file from Citrix Files, the Japanese file name can appear garbled.
[RFWIN-22516]
Known issues in 2102
• Attempts to launch an ICA session might fail. The issue occurs when the proxy server uses port
8080 instead of a custom port. [CVADHELP-15977]
• In an application session, when you open an image to scan in Microso Paint, both the Microso
Paint application and the scanning process might become unresponsive. The issue occurs when
you launch the session in windowed mode. [RFWIN-21413]
• On machines configured for Azure Active Directory Multi-Factor Authentication (MFA), the login
prompt appears even when the Keep me signed in and Don’t ask again for 60 days options
are selected. [RFWIN-21623]
© 1999-2021 Citrix Systems, Inc. All rights reserved. 23

Citrix Workspace app for Windows
• Attempts to log in to Citrix Workspace app on Azure Active Directory-joined machines might fail.
The issue occurs when the authentication prompt does not appear. [RFWIN-21624]
• When you launch a published desktop session, the Self-Service plug-in dialog appears in the
foreground. The issue occurs when the Local App Access policy is enabled on the Delivery Con-
troller. [RFWIN-21629]
• Attempts to switch windows using the ALT + Tab keys might result in a blank Citrix Workspace
app screen. The issue occurs when you launch the session in windowed mode. [RFWIN-21828]
• If you are using a webcam or a video in a Microso Teams call, the HDXrtcengine.exe might
turn unresponsive. For a workaround, see the Knowledge Center article CTX296639. [HDX-
29122]
Known issues in 2012.1
No new issues have been observed in this release.
Known issues in 2012
• If you try to add a protected app to your Favorites, this message might appear, “Your apps are
not available at this time…” When you then click OK, this message appears, “Cannot add app.”
Aer you switch to the Favorites screen, the protected app is listed there, but you can’t remove
it from Favorites. [WSP-5497]
• In the Chrome browser with browser content redirection in eect, when you click a link that
opens a new tab, the tab might not open. As a workaround, select Always allow pop-ups and
redirects in the Pop-ups blocked message. [HDX-23950]
• Automatic update of Citrix Workspace app from Version 2012 to a later version fails with the
following error message:
“Could not load file or assemble Newtonso.Json”
The issue occurs only when automatic update is enabled on an admin-installed instance of the
Citrix Workspace app.
As a workaround, download Citrix Workspace app Version 2012.1 or later from the Citrix Down-
loads page and install it manually.
[RFWIN-21715]
• If you launch the app bar and then open the Connection Center menu in Citrix Workspace app
for Windows, the app bar doesn’t appear under the server that hosts it. [HDX-27504]
• If you use Citrix Workspace app for Windows and launch the app bar in a vertical position, the
bar covers the Start menu or the system clock tray. [HDX-27505]
© 1999-2021 Citrix Systems, Inc. All rights reserved. 24

Citrix Workspace app for Windows
Known issues in 2010
No new issues have been observed in this release.
Known issues in 2009.6
• Attempts to minimize or maximize the Citrix Workspace app screen might distort the screen
momentarily. [RFWIN-20692]
Known issues in 2009
No new issues have been observed in this release.
Known issues in 2008
• The Print Screen key might not capture screenshots even if/when the protected windows are
minimized. When this issue occurs, exit and restart the Citrix Workspace app. [RFWIN-16777]
• When a non-administrator logs in with the FastConnect API, the Self-Service window is blank.
As a workaround, restart the client device. [RFWIN-19804]
• When you launch a protected VDA session, attempts to capture a screenshot on a non-protected
VDA are blocked. [RFWIN-19823]
Known issues in 2006.1
• If the Media Foundation feature is uninstalled on a Windows 2012 R2 machine, the instance of
Citrix Workspace app installed on that server turns unresponsive. [RFWIN-17628]
Known issues in 2002
• Attempts to capture a screen using the Print Screen key might fail when a protected Citrix
Workspace app session is minimized. [RFWIN-15155]
• When you launch Microso Word both in a published session and on your local deviceand delete
the store from Accounts, the following error message appears when you launch the app on the
local device:
Do you want to find an application in Citrix Workspace to open this file?
[RFWIN-15884]
• Attempts to launch a session on an SSL-enabled VDA might fail. [RFWIN-16129]
• In a protected desktop session, attempts to take a screenshot of a non-protected session might
fail. [RFWIN-16704]
© 1999-2021 Citrix Systems, Inc. All rights reserved. 25

Citrix Workspace app for Windows
• You might not be able to remove store details that were added using the Group Policy Object
(GPO) administrative template using the GUI. [RFWIN-16754]
• Attempts to change the display in a protected session cause the session to exit. [RFWIN-16784]
Known issues in 1911
• Unable to connect to the StoreFront using the DUO authentication. [LD1497]
• The session window doesn’t appear in the foreground. [LD2089]
• The session might turn unresponsive in a double-hop scenario. [LD2185]
• When a webcam is used through generic USB redirection in a cloud deployment, the session
turns unresponsive with a blue screen. [LD2432]
• During session launch, the progress bar displays the Connecting.. message instead of the se-
lected app name. [LD2450]
• On a system configured with Dell Wyse RAM, the Citrix Workspace app installation fails with the
following error:
“The system cannot open the device or file specified”.
[LD2480]
• In a multi-display setup, the text might appear unclear. [LD2484]
• When you undock the laptop in a session, it turns unresponsive for some time and then the
following error appears:
“Connection interrupted”.
[LD2496]
• When you configure the bidirectional content redirection feature using the Group Policy Object
administrative policy, and you clear the option Enable URL-specific published application or
desktop overrides, the configuration is unsuccessful and the following error appears:
“No entries were added to the list. Make sure you added one entry in the list.”
[LD2510]
• In a Microso Teams meeting, when you set the video to On , the self-video preview might flicker
frequently. [RFWIN-11993]
• On a Windows 10 RS 6 system, when you set the UDT to O and disable the network using the
firewall command, the Common Gateway Protocol might not work. This is a third-party limita-
tion. As a workaround, enable the HDX Adaptive Transport policy on the DDC. [RFWIN-15116]
• The resource name is appended with “1” when the same resource is enabled in one site and
disabled in the other. [ RFWIN-15395]
© 1999-2021 Citrix Systems, Inc. All rights reserved. 26

Citrix Workspace app for Windows
• In Microso Teams, the video does not recover aer disconnect and reconnect while the video
preview is up. [RFWIN-15539]
Known issues in 1909
• With bidirectional content redirection enabled, the Internet Explorer window does not appear
in the foreground. [LD1924]
• When you switch users using CTRL+ALT+DEL and try to reconnect to a session, the session fails
to reconnect and turns unresponsive, and the following message appears:
“Connected to Desktop”
[LD2063]
• When you set the SelfServiceMode option to False in the Registry editor and click Refresh, the
app shortcuts are not deleted from the Start menu. [LD2126]
• URL redirection fails for URLs with more than 2048 characters. [LD2210]
Third-party notices
Citrix Workspace app for Windows might include third-party soware licensed under the terms de-
fined in the following document:
Citrix Workspace app for Windows Third-Party Notices (PDF Download)
System requirements and compatibility
April 23, 2021
Requirements
• Minimum 1 GB RAM.
• .NET Framework minimum requirements
– Self-Service plug-in requires .NET 4.6.2. It allows you to subscribe to and launch the apps
and desktops from the Workspace app user interface or command line. For more informa-
tion, see Using command-line parameters.
If you are trying to install or upgrade to Citrix Workspace app 1904 or later and the req-
uisite version of the .NET Framework is not available on your Windows system, the Citrix
Workspace app installer will download and install the required version of the .NET Frame-
work.
© 1999-2021 Citrix Systems, Inc. All rights reserved. 27

Citrix Workspace app for Windows
Note:
If you are trying to install or upgrade Citrix Workspace app with non-administrator privi-
leges and .NET Framework 4.6.2 or greater is not present on the system, the installation
fails.
• Latest version of Microso Visual C++ Redistributable.
Note:
Citrix recommends that you use the latest version of Microso Visual C++ Redistributable.
Otherwise, a restart prompt might appear during an upgrade.
Starting with Version 1904, Microso Visual C++ Redistributable installer is packaged with the
Citrix Workspace app installer. During Workspace app installation, the installer checks whether
the Microso Visual C++ Redistributable package is present on the system and installs it if nec-
essary.
Note:
Attempts to install the Citrix Workspace app with non-administrator privileges on a system
without the Microso Visual C++ Redistributable package might fail.
Only an administrator can install the Microso Visual C++ Redistributable package.
For troubleshooting issues with the .NET Framework or the Microso Visual C++ Redistributable
installation, see Citrix Knowledge Center article CTX250044.
Compatibility matrix
Citrix Workspace app is compatible with all the currently supported versions of Citrix Virtual Apps and
Desktops, and Citrix Gateway as listed in the Citrix Product Lifecycle Matrix.
Citrix Workspace app for Windows is compatible with the following Windows Operating systems:
Note:
• Citrix Workspace app 2009.5 and later prevents installation on unsupported operating sys-
tems.
• Support for Windows 7 has been stopped from Version 2006 onwards.
• The Citrix Gateway End-Point Analysis Plug-in (EPA) is supported on Citrix Workspace. On
the native Citrix Workspace app, it is supported only when using nFactor authentication.
For more information, see Configure pre-auth and post-auth EPA scan as a factor in nFactor
authentication in the Citrix ADC documentation.
© 1999-2021 Citrix Systems, Inc. All rights reserved. 28

Citrix Workspace app for Windows
Operating system
Windows 10 32-bit and 64-bit Enterprise Editions. For more information about compatible
Windows 10 versions, see Windows 10 Compatibility with Citrix Workspace app for Windows.
Windows 8.1, 32-bit and 64-bit editions (including Embedded edition)
Windows Server 2016
Windows Server 2012 R2, Standard, and, Datacenter editions
Windows Server 2019
Windows 10 Enterprise 2016 LTSB 1607
Windows 10 Enterprise LTSC 2019
Windows 10 IoT Enterprise *
*Supports Windows 10 IoT Enterprise 2015 LTSB, Windows 10 IoT Enterprise 2016 LTSB, Anniversary
Update, Creators Update, Falls Creators Update.
Windows 10 Compatibility with Citrix Workspace app for Windows
With the releaseof the Windows 10 OperatingSystem, Microso introduceda new way to build, deploy,
and service Windows: Windows as a service. New features are packaged into Feature Updates (major
versions like 1703, 1709, 1803). Bug fixes and security fixes are packaged into Quality Updates. These
updates that can be deployed using existing management tools like SCCM.
The following table lists supported Windows 10 versions.
Note:
• We do not recommend installing Citrix soware versions that are released earlier to the
Semi-Annual Channel version.
• Once a Windows 10 version reaches End of Service that version is no longer serviced or sup-
ported by the Microso. Citrix supports running its soware only on an operating system
that its manufacturer supports. For information about Windows 10 End of Service, see Mi-
croso’s Windows Lifecycle Fact Sheet.
Citrix Workspace app Version
Windows 10 Enterprise
Edition Version number Build number
2012 and later 20H2 19042.508
2006.1 and later 2004 19041.113
1911 and later 1909 18363.418
© 1999-2021 Citrix Systems, Inc. All rights reserved. 29

Citrix Workspace app for Windows
Citrix Workspace app Version
Windows 10 Enterprise
Edition Version number Build number
1909 and later 1903 18362.116
1812 and later 1809 17763.107
1808 and later 1803 17134.376
Validating free disk space
The following table provides details on the required disk space to install the Citrix Workspace app.
Installation type Required disk space
Fresh installation 572 MB
Upgrade 350 MB
Citrix Workspace app performs a check for the required disk space to complete the installation. The
verification is performed both during a fresh installation and an upgrade.
Note:
• The installer performs the check on the disk space only aer extracting the installation pack-
age.
• When the system is low on disk space during silent installation, the dialog does not appear
but the error message is recorded in the CTXInstall\\_TrolleyExpress-\*.log.
Connections, Certificates, and Authentication
Connections
• HTTP store
• HTTPS store
• Citrix Gateway 10.5 and later
Certificates
Note:
Citrix Workspace app for Windows is digitally signed. The digital signature is time-stamped. So,
the certificate is valid even aer the certificate is expired.
• Private (self-signed)
© 1999-2021 Citrix Systems, Inc. All rights reserved. 30

Citrix Workspace app for Windows
• Root
• Wildcard
• Intermediate
Private (self-signed) certificates
If a private certificate is installed on the remote gateway, you must install the root certificate of the
organization’s certificate authority on the user device that is accessing the Citrix resources.
Note:
If the remote gateway’s certificate cannot be verified upon connection (because the root certifi-
cate is not included in the local Keystore.), an untrusted certificate warning appears. If a user
chooses to continue through the warning, the apps are displayed but cannot be launched.
Root certificates
For domain-joined computers, you can use a Group Policy Object administrative template to
distribute and trust CA certificates.
For non-domain joined computers, the organization can create a custom install package to distribute
and install the CA certificate. Contact your system administrator for assistance.
Wildcard certificates
Wildcard certificates are used on a server within the same domain.
Citrix Workspace app supports wildcard certificates. Wildcard certificates must be used in accordance
with your organization’s security policy. In practice, an alternative to wildcard certificates is a certifi-
cate containing the list of server names with the Subject Alternative Name (SAN) extension. Private
and public certificate authorities issue these certificates.
Intermediate certificates
If your certificate chain includes an intermediate certificate, the intermediate certificate must be ap-
pended to the Citrix Gateway server certificate. For information, see Configuring Intermediate Certifi-
cates.
Authentication
Authentication to StoreFront
© 1999-2021 Citrix Systems, Inc. All rights reserved. 31

Citrix Workspace app for Windows
Workspace
for web
StoreFront
Services site
(native)
StoreFront,
Citrix Virtual
Apps and
Desktops
(native)
Citrix
Gateway to
Workspace
for web
Citrix
Gateway to
StoreFront
Services site
(native)
Anonymous Yes Yes
Domain Yes Yes Yes Yes* Yes*
Domain
pass-through
Yes Yes Yes
Security
token
Yes* Yes*
Two-factor
authentica-
tion (domain
with security
token)
Yes* Yes*
SMS Yes* Yes*
Smart card Yes Yes Yes Yes
User
certificate
Yes (Citrix
Gateway
plug-in)
Yes (Citrix
Gateway
plug-in)
* With or without the Citrix Gateway plug-in installed on the device.
Note:
Citrix Workspace app supports two-factor authentication (domain plus security token) using Cit-
rix Gateway to the StoreFront native service.
Certificate revocation list
Certificate revocation list (CRL) allows Citrix Workspace app to check if the server’s certificate is re-
voked. Checking the certificate helps to improve the cryptographic authentication of the server and
the overall security of the TLS connection between the user device and a server.
You can enable CRL checking at several levels. For example, you can configure Citrix Workspace app
to check only its local certificate list or to check the local and network certificate lists. In addition, you
can configure certificate checking to allow users to log on only if all the CRLs are verified.
© 1999-2021 Citrix Systems, Inc. All rights reserved. 32

Citrix Workspace app for Windows
If you are configuring certificate checking on your local computer, exit Citrix Workspace app. Ensure
all the Citrix Workspace components, including the Connection Center, are closed.
For more information, see the TLS section.
Install and Uninstall
April 15, 2021
You can install the Citrix Workspace app either by:
• Downloading the CitrixWorkspaceApp.exe installation package from the Download page or
• From your company’s download page (if available).
The package can be installed by:
• Running an interactive Windows-based installation wizard. Or
• Typing the installer file name, installation commands and installation properties using
the command-line interface. For information about installing Citrix Workspace app using
command-line interface, see Using command-line parameters.
Installation with administrator and non-administrator privileges:
Citrix Workspace app can be installed by both a user and an administrator. Administrator privileges
are required only when using pass-through authentication and Citrix Ready workspace hub with Citrix
Workspace app for Windows.
The following table describes the dierences when Citrix Workspace app is installed as an administra-
tor or a user:
Installation folder Installation type
Administrator C:\Program Files
(x86)\Citrix\ICA Client
Per-system installation
User %USERPROFILE%\AppData\Local\Citrix\ICA
Client
Per-user installation
Note:
Administrators can’t install Citrix Workspace app if a user-installed instance is present on the
system. We recommend that you uninstall all user-installed instances before installing the Citrix
Workspace app as an administrator.
© 1999-2021 Citrix Systems, Inc. All rights reserved. 33

Citrix Workspace app for Windows
Using a Windows-based installer
You can install Citrix Workspace app for Windows by manually running the CitrixWorkspaceApp.
exe installer package, using the following methods:
• Installation media
• Network share
• Windows Explorer
• Command-line interface
By default, the installer logs are at %temp%\CTXReceiverInstallLogs*.logs.
1. Launch the CitrixWorkspaceApp.exe file and click
Start
.
2. Read and accept the EULA and continue with the installation.
3. When installing on a domain-joined machine with administrator privileges, a single sign-on di-
alog appears. See Domain pass-through authentication for more information.
4. Follow the Windows-based installer to complete the installation.
Using command-line parameters
You can customize the Citrix Workspace app installer by specifying dierent command-line options.
The installer package self-extracts to the system temp directory before launching the setup program.
The space requirement includes program files, user data, and temp directories aer launching several
applications.
To install the Citrix Workspace app using the Windows command line, launch the command prompt.
And type the installer file name, installation commands and installation properties on a single line.
The available installation commands and properties are listed below:
CitrixWorkspaceApp.exe [commands] [properties]
List of command-line parameters
The parameters are broadly classified as follows:
• Common parameters
• Install parameters
• HDX features parameters
• Preferences and user interface parameters
• Authentication parameters
Common parameters
• /? Or /help - Lists all the installation commands and properties.
© 1999-2021 Citrix Systems, Inc. All rights reserved. 34

Citrix Workspace app for Windows
• /silent - Disables installation dialogs and prompts during installation.
• /noreboot - Suppresses the prompts to reboot during installation. When you suppress the
reboot prompt, the USB devices that are in a suspended state are not recognized. The USB
devices are activated only aer the device is restarted.
• /includeSSON - Requires you to install as an administrator. Indicates that the Citrix Workspace
app is installed with the single sign-on component. See Domain pass-through authentication
for more information.
• /rcu - This switch is eective only when upgrading from an unsupported version of the so-
ware. Indicates that Citrix Workspace app will be installed or upgraded by uninstalling existing
version. The /rcu switch also cleans up existing or older settings.
Note:
/rcu switch is deprecated from Version 1909. For more information, see Deprecation.
• /forceinstall - This switch is eective when cleaning up any existing configuration or entries
of Citrix Workspace app in the system. Use this switch in the following scenarios:
– Upgrading from an unsupported version of Citrix Workspace app version.
– The installation or upgrade is unsuccessful.
Install parameters
/AutoUpdateCheck
Indicates that Citrix Workspace app detects when an update is available.
Note:
This is a mandatory parameter that you must set to configure other parameters like /
AutoUpdateStream, /DeferUpdateCount, /AURolloutPriority.
• Auto (default) - You are notified when an update is available. Example, CitrixWorkspaceApp
.exe /AutoUpdateCheck=auto.
• Manual - You are not notified when an update is available. Check for updates manually. Exam-
ple, CitrixWorkspaceApp.exe /AutoUpdateCheck=manual.
• Disabled - Disables auto-updates. Example, CitrixWorkspaceApp.exe /AutoUpdateCheck
=disabled.
/AutoUpdateStream
If you have enabled auto-update, you can choose the release track you would like to update to. See
Lifecycle Milestones for more information.
© 1999-2021 Citrix Systems, Inc. All rights reserved. 35

Citrix Workspace app for Windows
• LTSR - Auto-updates to Long Term Service Release cumulative updates only. Example,
CitrixWorkspaceApp.exe /AutoUpdateStream=LTSR.
• Current- Auto-updates to the latest version of Citrix Workspaceapp. Example, CitrixWorkspaceApp
.exe /AutoUpdateStream=Current.
/DeferUpdateCount
Indicates the number of times that you can defer notifications when an update is available. For more
information, see Citrix Workspace Updates.
• -1(default)- Allows deferring notifications any number of times. Example, CitrixWorkspaceApp
.exe /DeferUpdateCount=-1.
• 0 - Indicates that you will receive one notification (only) for every available update. You
won’t be reminded again about the update. Example, CitrixWorkspaceApp.exe /
DeferUpdateCount=0.
• Any other number ‘n’ - Allows deferring notifications ‘n’ number of times. The Remind
me later option is displayed in the ‘n’ count. Example, CitrixWorkspaceApp.exe /
DeferUpdateCount=<n>.
/AURolloutPriority
When a new version of the app is released, Citrix rolls out the update for a specific deliveryperiod. With
this parameter, you can control at what time during the delivery period you can receive the update.
• Auto (default) - You receive the updates during the delivery period as configured by Citrix. Ex-
ample,
CitrixWorkspaceApp.exe /AURolloutPriority=Auto.
• Fast- You receive the updatesat the beginning of the deliveryperiod. Example, CitrixWorkspaceApp
.exe /AURolloutPriority=Fast.
• Medium - You receive the updates at the mid-delivery period. Example, CitrixWorkspaceApp
.exe /AURolloutPriority=Medium.
• Slow - Youreceive the updatesatthe end of the delivery period. Example, CitrixWorkspaceApp
.exe /AURolloutPriority=Slow.
/includeappprotection
Provides enhanced security by restricting the ability of clients to be compromised by keylogging and
screen-capturing malware.
• CitrixWorkspaceApp.exe /includeappprotection
See App protection for more information.
© 1999-2021 Citrix Systems, Inc. All rights reserved. 36

Citrix Workspace app for Windows
/InstallEmbeddedBrowser
Excludes the Citrix Embedded Browser binaries. Run the /InstallEmbeddedBrowser=N switch to
discontinue the embedded browser feature.
INSTALLDIR
Specifies the custom installation directory for Citrix Workspace app installation. The default path is
C:\Program Files\Citrix. Example, CitrixWorkspaceApp.exe INSTALLDIR=C:\Program
Files\Citrix.
ADDLOCAL
Installs one or more of the specified components. Example, CitrixWorkspaceapp.exe
ADDLOCAL=ReceiverInside,ICA_Client,AM,SELFSERVICE,DesktopViewer,Flash,Vd3d,
WebHelper,BrowserEngine, WorkspaceHub, USB.
Note:
By default, ReceiverInside, ICA_Client and AM are installed when installing the Citrix
Workspace app.
HDX features parameters
ALLOW_BIDIRCONTENTREDIRECTION
Indicates that the bidirectional content redirection between the client and the host and vice versa is
enabled. For more information, see the Bidirectional content redirection policy settings section in
Citrix Virtual Apps and Desktops documentation.
• 0 (default) – Indicates that the bidirectional content redirection is disabled. Example,
CitrixWorkspaceApp.exe ALLOW_BIDIRCONTENTREDIRECTION=0.
• 1 - Indicates that the bidirectional content redirectionis enabled. Example, CitrixWorkspaceApp
.exe ALLOW_BIDIRCONTENTREDIRECTION=1.
FORCE_LAA
Indicates that Citrix Workspace app is installed with the client-end Local App Access component. You
must install the workspace app with administrator privileges for this component to work. See the
Local App Access section in Citrix Virtual Apps and Desktops documentation for more information.
• 0 (default)- Indicates that LocalApp Access componentis not installed. Example, CitrixWorkspaceApp
.exe FORCE_LAA =0.
© 1999-2021 Citrix Systems, Inc. All rights reserved. 37

Citrix Workspace app for Windows
• 1 - Indicates that the client-end Local App Access component is installed. Example,
CitrixWorkspaceApp.exe FORCE_LAA =1.
LEGACYFTAICONS
Specifies if icons are displayed for documents or files that have file type associations with subscribed
applications.
• False (default) - Indicates that the icons are displayed for documents or files that have file type
associations with subscribed applications. When set to false, the operation system generates
an icon for the document that does not have a specific icon assigned to it. The icon generated
by the operation system is a generic icon overlaid with a smaller version of the application icon.
Example, CitrixWorkspaceApp.exe LEGACYFTAICONS=False.
• True - Indicates that the icons are not displayed for documents or files that have file type associa-
tions with subscribed applications. Example, CitrixWorkspaceApp.exe LEGACYFTAICONS
=True.
ALLOW_CLIENTHOSTEDAPPSURL
Enables the URL redirection feature on the user device. See the Local App Access section in the Citrix
Virtual Apps and Desktops documentation for more information.
• 0 (default)- Disables the URL redirectionfeatureon the user device. Example, CitrixWorkspaceApp
.exe ALLOW_CLIENTHOSTEDAPPSURL=0.
• 1- Enables the URL redirection feature on the user devices. Example, CitrixWorkspaceApp.
exe ALLOW_CLIENTHOSTEDAPPSURL=1.
Preference and user interface parameters
ALLOWADDSTORE
Allows you to configure the stores (HTTP or https) based on the specified parameter.
• S(default)- Allows you to add or remove secure stores only (configured with HTTPS). Example,
CitrixWorkspaceApp.exe ALLOWADDSTORE=S.
• A – Allows you to add or remove both secure stores (HTTPS) and non-secure stores (HTTP). Not
applicable if Citrix Workspace app is per-user installed. Example, CitrixWorkspaceApp.exe
ALLOWADDSTORE=A.
• N – Never allow users to add or remove their own store. Example, CitrixWorkspaceApp.exe
ALLOWADDSTORE=N.
© 1999-2021 Citrix Systems, Inc. All rights reserved. 38

Citrix Workspace app for Windows
ALLOWSAVEPWD
Allows you to save the store credentials locally. This parameter applies only to stores using the Citrix
Workspace app protocol.
• S(default)- Allows saving the password for secure stores only (configured with HTTPS). Example,
CitrixWorkspaceApp.exe ALLOWSAVEPWD=S.
• N - Does not allow saving the password. Example, CitrixWorkspaceApp.exe ALLOWSAVEPWD
=N.
• A - Allows saving the password for both secure stores (HTTPS) and non-secure stores (HTTP).
Example, CitrixWorkspaceApp.exe ALLOWSAVEPWD=A.
STARTMENUDIR
Specifies the directory for the shortcuts in the Start menu.
• <Directory Name> - By default, applications appear under Start > All Programs. You can
specify the relative path of the shortcuts in the \Programs folder. For example, to place short-
cuts under Start > All Programs > Workspace, specify STARTMENUDIR=\Workspace.
DESKTOPDIR
Specifies the directory for shortcuts on Desktop.
Note:
When using the DESKTOPDIR option, set the PutShortcutsOnDesktop key to True.
• <Directory Name> - You can specify the relative path of the shortcuts. For example, to place
shortcuts under Start > All Programs > Workspace, specify DESKTOPDIR=\Workspace.
SELFSERVICEMODE
Controls access to the self-service Workspace app user interface.
• True - Indicates that the user has access to self-service user interface. Example, CitrixWorkspaceApp
.exe SELFSERVICEMODE=True.
• False - Indicates that the user does not have access to the self-service user interface. Example,
CitrixWorkspaceApp.exe SELFSERVICEMODE=False.
ENABLEPRELAUNCH
Controls session pre-launch. See Application launch time for more information.
© 1999-2021 Citrix Systems, Inc. All rights reserved. 39

Citrix Workspace app for Windows
• True - Indicates that session pre-launch is enabled. Example, CitrixWorkspaceApp.exe
ENABLEPRELAUNCH=True.
• False - Indicates that session pre-launch is disabled. Example, CitrixWorkspaceApp.exe
ENABLEPRELAUNCH=False.
DisableSetting
Hides the Shortcuts and Reconnect option from being displayed in the Advanced Preferences sheet.
See Hiding specific settings from the Advanced Preferences sheet for more information.
• 0 (default) – Displays both Shortcuts and Reconnect options in the Advanced Preferences
sheet. Example, CitrixWorkspaceApp.exe DisableSetting=0.
• 1 – Displays only Reconnect optionin the Advanced Preferences sheet. Example, CitrixWorkspaceApp
.exe DisableSetting=1.
• 2 – Displays only Shortcuts option in the Advanced Preferences sheet. Example, CitrixWorkspaceApp
.exe DisableSetting=2.
• 3 – Both Shortcuts and Reconnect options are hidden from the Advanced Preferences sheet.
Example, CitrixWorkspaceApp.exe DisableSetting=3.
EnableCEIP
Indicates your participation in the Customer Experience Improvement Program. See CEIP for more
information.
• True (default)- Opt in to the Citrix Customer Improvement Program (CEIP). Example,
CitrixWorkspaceApp.exe EnableCEIP=True.
• False - Optout of the Citrix Customer Improvement Program(CEIP).Example, CitrixWorkspaceApp
.exe EnableCEIP=False.
EnableTracing
Controls the Always-on tracing feature.
• True (default)- Enables the Always-on tracing feature. Example. CitrixWorkspaceApp.exe
EnableTracing=true.
• False - Disables the Always-on tracing feature. Example, CitrixWorkspaceApp.exe
EnableTracing=false.
CLIENT_NAME
Specifies the name used to identify the user device to the server.
© 1999-2021 Citrix Systems, Inc. All rights reserved. 40

Citrix Workspace app for Windows
• <ClientName> - Specifies the name used identify the user device on the server. The
default name is %COMPUTERNAME%. Example, CitrixReceiver.exe CLIENT_NAME=%
COMPUTERNAME%.
ENABLE_DYNAMIC_CLIENT_NAME
Allows client name to be the same as the computer name. When you change the computer name, the
client name changes too.
• Yes (default) – Allows the client name to be the same as the computer name. Example,
CitrixWorkspaceApp.exe ENABLE_DYNAMIC_CLIENT_NAME=Yes.
• No - Does not allow the client name to be the same as the computer name. You must
specify a value for the CLIENT_NAME property. Example, CitrixWorkspaceApp.exe
ENABLE_DYNAMIC_CLIENT_NAME=No.
Authentication parameters
ENABLE_SSON
Enables single sign-on when the Workspace app is installed with the /includeSSON command. See
Domain pass-through authentication for more information.
• Yes (default) - Indicates that single sign-on is enabled. Example, CitrixWorkspaceApp.exe
ENABLE_SSON=Yes.
• No - Indicates that single sign-on is disabled. Example, CitrixWorkspaceApp.exe
ENABLE_SSON=No.
ENABLE_KERBEROS
Specifies whether the HDX engine must use Kerberos authentication. This applies only when single
sign-on authentication is enabled. For more information, see Domain pass-through authentication
with Kerberos.
• Yes - IndicatesthattheHDXengine will use Kerberosauthentication. Example, CitrixWorkspaceApp
.exe ENABLE_KERBEROS=Yes.
• No - Indicates that the HDX engine will not use Kerberos authentication. Example,
CitrixWorkspaceApp.exe ENABLE_KERBEROS=No.
In addition to the above properties, you can also specify the store URL that is used with the Workspace
app. You can add up to 10 stores. Use the following property to do so:
STOREx=”storename;http[s]://servername.domain/IISLocation/discovery;[On,
Off]; [storedescription]”
Values:
© 1999-2021 Citrix Systems, Inc. All rights reserved. 41

Citrix Workspace app for Windows
• x - Integers 0 through 9 used to identify a store.
• storename - Name of the store. This value must match the name configured on the StoreFront
server.
• servername.domain - The fully qualified domain name of the server hosting the store.
• IISLocation - the path to the store within IIS. The store URL must match the URL in the StoreFront
provision file. The store URL is in the following format /Citrix/store/discovery. To obtain
the URL, export a provisioning file from StoreFront, launch it in Notepad and copy the URL from
the Address element.
• [On, O] - The O option enables you to deliver disabled stores, giving users the choice of
whether they access them. When the store status is not specified, the default setting is On.
• storedescription - Description of the store, such as HR App Store.
Examples of a command-line installation
To specify the Citrix Gateway store URL:
CitrixWorkspaceApp.exe STORE0= HRStore;https://ag.mycompany.com##Storename;
On;Store
Where,
Storename
indicates the name of the store that needs to be configured.
Note:
• The Citrix Gateway store URL configured using this method does not support the PNA Ser-
vices Sites that are using Citrix Gateway.
• In a multi-store setup, Citrix Gateway store URL mustbe first in the list. Only 2 Citrix Gateway
store URL configuration is allowed.
To install all components silently and specify two application stores:
CitrixWorkspaceApp.exe /silent
STORE0=”AppStore;https://testserver.net/Citrix/MyStore/discovery;on;HR App
Store”
STORE1=”BackUpAppStore;https://testserver.net/Citrix/MyBackupStore/discovery
;on;Backup HR App Store”
Note:
• It is mandatory to include /discovery in the store URL for successful pass-through au-
thentication.
• The Citrix Gateway store URL must be the first entry in the list of configured store URLs.
Uninstall
Using Windows-based uninstaller:
© 1999-2021 Citrix Systems, Inc. All rights reserved. 42

Citrix Workspace app for Windows
You can uninstall Citrix Workspace app using the Windows Programs and Features utility (Add or Re-
move Programs).
Note:
During Citrix Workspace app installation, you get a prompt to uninstall the Citrix HDX RTME pack-
age. Click OK to continue the uninstallation.
Using the command-line interface:
You can uninstall Citrix Workspace app, from a command line by typing the following command:
CitrixWorkspaceApp.exe /uninstall
For silent uninstallation of Citrix Workspace app, run the following switch:
CitrixWorkspaceApp.exe /silent /uninstall
Note:
• The registry keys created by receiver.adm/receiver.adml or receiver.admx remain af-
ter uninstallation.
• If you find any entries in the Registry editor aer uninstallation, delete them manually.
Deploy
March 23, 2021
You can deploy the Citrix Workspace app in the following methods:
• Use Active Directory and sample startup scripts to deploy the Citrix Workspaceapp for Windows.
For information about Active Directory, see Using Active Directory and sample scripts.
• Before launching workspace for web, install the Workspace app for Windows. For more infor-
mation, see Using workspace for web.
• Use an Electronic Soware Distribution (ESD) tool like the Microso System Center Configura-
tion Manager 2012 R2. For more information, see Using System Center Configuration Manager
2012 R2.
Using Active Directory and sample scripts
You can use Active Directory Group Policy scripts to deploy Citrix Workspace app based on your or-
ganizational structure. Citrix recommends using the scripts rather than extracting the .msi files. For
general information about startup scripts, see the Microso documentation.
To use the scripts with Active Directory:
© 1999-2021 Citrix Systems, Inc. All rights reserved. 43

Citrix Workspace app for Windows
1. Create the Organizational Unit (OU) for each script.
2. Create a Group Policy Object (GPO) for the newly created OU.
Edit scripts
Edit the scripts with the following parameters in the header section of each file:
• Current Version of package - The specified version number is validated and if it is not pre-
sented, the deployment proceeds. For example, set DesiredVersion= 3.3.0.XXXX to ex-
actly match the version specified. If you specify a partial version, for example, 3.3.0, it matches
any version with that prefix (3.3.0.1111, 3.3.0.7777, and so on).
• Package Location/Deployment directory - The network share containing the packages and
that are not authenticated by the script. The shared folder must have Read permission set to
EVERYONE.
• Script Logging Directory - The network share where the install logs are copied and is not au-
thenticated by the script. The shared folder must have Read and Write permissions for EVERY-
ONE.
• Package Installer Command Line Options- These command-line options are passed to the
installer. For the command-line syntax, see Using command-line parameters.
Scripts
Citrix Workspace app installer includes the sample of both per-computer and per-user scripts to install
and uninstall Citrix Workspace app. The scripts are present in the Citrix Workspace app for Windows
Downloads page.
Deployment type To deploy To remove
Per-computer CheckAndDeployWorkspacePerMachineStartupScript
.bat
CheckAndRemoveWorkspacePerMachineStartupScript
.bat
Per-user CheckAndDeployWorkspacePerUserLogonScript
.bat
CheckAndRemoveWorkspacePerUserLogonScript
.bat
To add the startup scripts:
1. Open the Group Policy Management Console.
2. Select Computer Configuration or User Configuration > Policies > Windows Settings >
Scripts.
3. In the right-hand pane of the Group Policy Management Console, select Logon.
4. Select Show Files and copy the appropriate script to the folder displayed.
5. Close the dialog.
© 1999-2021 Citrix Systems, Inc. All rights reserved. 44

Citrix Workspace app for Windows
6. In the Properties menu, click Add and Browse to find and add the newly created script.
To deploy Citrix Workspace app for Windows:
1. Move the user devices designated to receive this deployment to the OU that you created.
2. Reboot the user device and log on.
3. Verify that the newly installed package is listed in the Program and Features.
To remove Citrix Workspace app for Windows:
1. Move the user devices designated for the removal to the OU you created.
2. Reboot the user device and log on.
3. Verify that the newly installed package is not listed in the Program and Features.
Using workspace for web
The workspace for web enables you to access StoreFront stores through a browser using a webpage.
Before connecting to an app from a browser, do the following:
1. Install the Citrix Workspace app for Windows.
2. Deploy the Citrix Workspace app from workspace for web
If workspace for web detects that a compatible version of Citrix Workspace app is not present, a
prompt appears asking you to download and install Citrix Workspace app for Windows.
Note:
The workspace for web does not support email-based account discovery.
Use the following configuration to prompt for the server address only.
1. Download CitrixWorkspaceApp.exe to your local computer.
2. Rename CitrixWorkspaceApp.exeto CitrixWorkspaceAppWeb.exe.
3. Deploy the renamed executable using your regular deployment method. If you use StoreFront,
see Configure StoreFront using the configuration files in the StoreFront documentation.
Using System Center Configuration Manager 2012 R2
You can use Microso System Center Configuration Manager (SCCM) to deploy Citrix Workspace app.
You can deploy the Citrix Workspace app using the SCCM using the following four parts:
1. Adding Citrix Workspace app to the SCCM deployment
2. Adding distribution points
3. Deploying the Citrix Workspace app to the soware center
4. Creating Device Collections
© 1999-2021 Citrix Systems, Inc. All rights reserved. 45

Citrix Workspace app for Windows
Adding Citrix Workspace app to the SCCM deployment
1. Copy the downloaded Citrix Workspace app installation folder to a folder on the Configuration
Manager server and launch the Configuration Manager console.
2. Select Soware Library > Application Management. Right-click Application and click Create
Application.
The Create Application wizard appears.
3. In the General pane, select Manually specify the application information and click Next.
4. In the General Information pane, specify information about the application such as Name,
Manufacturer, Soware version, and so on.
5. In the Application Catalog wizard, specify additional information such as Language, Applica-
tion name, User category and so on and click Next.
Note:
Users can see the information that you specify here.
6. In the Deployment Type pane, click Add to configure the deployment type for Citrix Workspace
app setup.
The Create Deployment Type wizard appears.
7. In the General pane: Set the deployment type to Windows Installer (*.msi file), select Manually
specify the deployment type information and click Next.
8. In the General Information pane: Specify deployment type details (For example: Workspace
Deployment) and click Next.
9. In the Content pane:
a) Provide the path where the Citrix Workspace app setup file is present. For example: Tools
on SCCM server.
b) Specify Installation program as one of the following:
• CitrixWorkspaceApp.exe /silent for default silent installation.
• CitrixWorkspaceApp.exe /silent /includeSSON to enable domain pass-
through.
• CitrixWorkspaceApp.exe /silent SELFSERVICEMODE=false to install Citrix
Workspace app in non-Self Service Mode.
c) Specify Uninstall program as CitrixWorkspaceApp.exe /silent /uninstall (to
enable uninstallation through SCCM).
10. In the Detection Method pane: Select Configure rules to detect the presence of this deploy-
ment type and click Add Clause.
The Detection Rule dialog appears.
© 1999-2021 Citrix Systems, Inc. All rights reserved. 46

Citrix Workspace app for Windows
• Set Setting Type to File System.
• Under Specify the file or folder to detect the application, set the following:
– Type – From the drop-down menu, select File.
– Path – %ProgramFiles(x86)%\Citrix\ICA Client\Receiver\
– File or folder name – receiver.exe
– Property – From the drop-down menu, select Version
– Operator - From the drop-down menu, select Greater than or equal to
– Value - Type 4.3.0.65534
Note:
This rule combination applies to Citrix Workspace app for Windows upgrades as well.
11. In the User Experience pane, set:
• Installation behavior - Install for system
• Logon requirement - Whether or not a user is logged on
• Installation program visibility - Normal
Click Next.
Note:
Do not specify any requirements and dependencies for this deployment type.
12. In the Summary pane, verify the settings for this deployment type. Click Next.
A success message appears.
13. In the Completion pane, a new deployment type (Workspace Deployment) is listed under the
Deployment types.
14. Click Next and click Close.
Add distribution points
1. Right-click Citrix Workspace app in the Configuration Manager console and select Distribute
Content.
The Distribute Content wizard appears.
2. In the Content Distribution pane, click Add > Distribution Points.
The Add Distribution Points dialog appears.
3. Browse to the SCCM server where the content is available and clicks OK.
In the Completion pane, a success message appears
4. Click Close.
© 1999-2021 Citrix Systems, Inc. All rights reserved. 47

Citrix Workspace app for Windows
Deploy Citrix Workspace app to the soware center
1. Right-click Citrix Workspace app in the Configuration Manager console select Deploy.
The Deploy Soware wizard appears.
2. Select Browse against Collection (can be Device Collection or User Collection) where the appli-
cation is to be deployed and click Next.
3. In the Deployment Settings pane, set Action to Install and Purpose to Required (enables unat-
tended installation). Click Next.
4. In the Scheduling pane, specify the schedule to deploy the soware on target devices.
5. In the User Experience pane, set the User notifications behavior; select Commit changes at
deadline or during a maintenance window (requires restart) and click Next to complete the
Deploy Soware wizard.
In the Completion pane, a success message appears.
Reboot the target endpoint devices (required only to start installation immediately).
On endpoint devices, Citrix Workspace app is visible in the Soware Center under Available Soware.
Installation is triggered automatically based on the configured schedule. Alternatively, you can also
schedule or install on-demand. The installation status is displayed in the Soware Center aer the
installation starts.
Creating device collections
1. Launch the Configuration Manager console, click Assets and Compliance > Overview > De-
vices.
2. Right-click Device Collections and select Create Device Collection.
The Create Device Collection wizard appears.
3. In the General pane, type the Name for the device and click Browse for Limiting collection.
This determines the scope of devices, which can be one the default Device Collections created
by SCCM.
Click Next.
4. In the Membership Rules pane, click Add Rule for filtering the devices.
The Create Direct Membership Rule wizard appears.
• In the Search for Resources pane, select the Attribute name based on the devices you
want to filter and provide the Value for Attribute name to select the devices.
© 1999-2021 Citrix Systems, Inc. All rights reserved. 48

Citrix Workspace app for Windows
5. Click Next. In the Select Resources pane, select the devices that are required to be part of device
collection.
In the Completion pane, a success message appears.
6. Click Close.
7. In the Membership rules pane, a new rule is listed under Click Next.
8. In the Completion pane, a success message appears. Click Close to complete the Create Device
Collection wizard.
The new device collection is listed in Device Collections. The new device collection is a part of
Device Collections while browsing in Deploy Soware wizard.
Note:
Attempts to configure Citrix Workspace app using the SCCM might fail when you set the
MSIRESTARTMANAGERCONTROL attribute to False.
As per our analysis, Citrix Workspace app for Windows is not the cause of this failure. Also,
retrying might yield successful deployment.
Update
March 23, 2021
Manual update
If you have alreadyinstalled Citrix Workspace app for Windows, download and installthe latest version
of the app from the Citrix Downloads page.
Automatic update
When a new version of the Citrix Workspace app is released, Citrix pushes the update on the system
that has the Citrix Workspace app installed.
Note:
• If you have configured an SSL intercepting outbound proxy, add an exception to the
Workspace auto-update signature service https://citrixupdates.cloud.com/ and
the download location https://downloadplugins.citrix.com/ to receive updates
from Citrix.
• Your system must have an internet connection to receive updates.
© 1999-2021 Citrix Systems, Inc. All rights reserved. 49

Citrix Workspace app for Windows
• By default, Citrix Workspace Updates is disabled on the VDA. This includes RDS multi-user
server machines, VDI and Remote PC Access machines.
• Citrix Workspace Updates are disabled on machines where Desktop Lock is installed.
• Workspace for web users cannot download the StoreFront policy automatically.
• Citrix Workspace updates can be limited to LTSR updates only.
• Citrix HDX RTME for Windows is included in Citrix Workspace Updates. You are notified
of the available HDX RTME update on both the LTSR and the current release of the Citrix
Workspace app.
Advanced configuration for automatic updates (Citrix Workspace Updates)
You can configure Citrix Workspace Updates using the following methods:
1. Group Policy Object (GPO) administrative template
2. Command-line interface
3. Graphical user interface
4. StoreFront
Configure Citrix Workspace Updates using the Group Policy Object administrative template
Open the Citrix Workspace app Group Policy Object administrative template by running gpedit.msc
and navigate to the Computer Configuration node, go to Administrative Templates > Citrix Compo-
nents > Citrix Workspace > Workspace Updates.
© 1999-2021 Citrix Systems, Inc. All rights reserved. 50

Citrix Workspace app for Windows
1. Enable or disable updates – Select Enabled or Disabled to enable or disable Workspace Up-
dates.
Note:
When you select Disabled, you are not notified of the new updates. This also hides the
Workspace Updates option from the Advanced Preferences sheet.
2. Update notification – When an update is available, you can choose to be automatically noti-
fied or check for them manually. Aer you have enabled Workspace updates, select one of the
following options from the Enable Citrix Workspace Update Policy drop-down:
• Auto - You are notified when an update is available (default).
• Manual - You are not notified when an update is available. Check for updates manually.
3. Select LTSR ONLY to get updates for LTSR only.
© 1999-2021 Citrix Systems, Inc. All rights reserved. 51
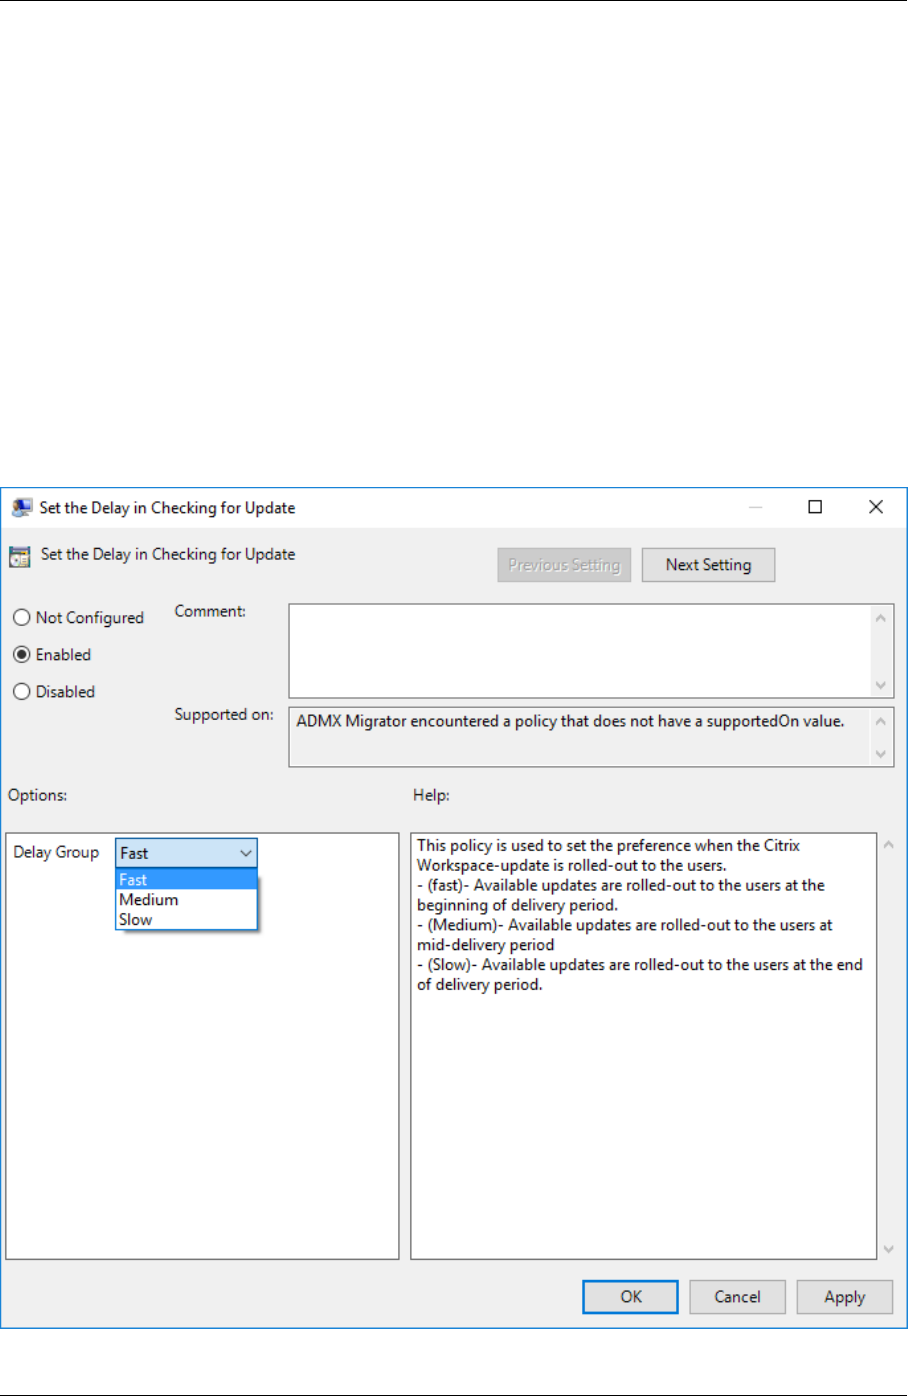
Citrix Workspace app for Windows
4. From the Citrix-Workspace-Update-DeferUpdate-Count drop-down, select a value between
-1 and 30:
• -1 - Allows deferring the notifications any number of times (default).
• 0 - You will receive only one notification for the update.
Configure the delay in checking for updates
When a new version of Workspace app is available, Citrix rolls the update during a specific delivery
period. With this property, you can control at what stage during the delivery period you can receive
the update.
To configure the delivery period, run gpedit.msc to launch the Group Policy Object administrative
template. Under Computer Configuration node, go to Administrative Templates > Citrix Compo-
nents > Citrix Workspace > Set the Delay in Checking for Update.
© 1999-2021 Citrix Systems, Inc. All rights reserved. 52

Citrix Workspace app for Windows
Select Enabled, and from the Delay Group drop-down, select one of the following:
• Fast – Update rollout happens at the beginning of the delivery period.
• Medium – Update rollout happens at the mid-delivery period.
• Slow – Update rollout happens at the end of the delivery period.
Note:
When you select Disabled, you are not notified of the available updates. This also hides the
Workspace Updates option from the Advanced Preferences sheet.
Configure Citrix Workspace Updates using the command-line interface
By specifying command-line parameters while installing Workspace app:
You can configure Workspace updates by specifying command-line parameters during the Citrix
Workspace app installation. See Install parameters for more information.
By using command-line parameters aer Citrix Workspace app has been installed:
Citrix Workspace Updates can also be configured aer installing the Citrix Workspace app for Win-
dows. Navigate to the location of CitrixReceiverUpdater.exe using the Windows command line.
Typically, CitrixWorkspaceUpdater.exe is at CitrixWorkspaceInstallLocation\Citrix\Ica
Client\Receiver. You may run this binary along with the command-line parameters listed in the
Install parameters section.
For example,
CitrixReceiverUpdater.exe /AutoUpdateCheck=auto /AutoUpdateStream=Current /
DeferUpdateCount=-1 /AURolloutPriority= fast
Note:
/AutoUpdateCheck is a mandatory parameter that you must set to configure other parameters
like /AutoUpdateStream, /DeferUpdateCount, /AURolloutPriority.
Configure Citrix Workspace Updates using the graphical user interface
Individual user can over-ride the Citrix Workspace Updates setting using the Advanced Preferences
dialog. This is a per-user configuration and the settings apply only to the current user. Right-click
Citrix Workspace app icon from the notification area. Select Advanced Preferences > Workspace
Updates. Select the notification preference and click Save.
© 1999-2021 Citrix Systems, Inc. All rights reserved. 53

Citrix Workspace app for Windows
Note:
You can hide all or part of the Advanced Preferences sheet available from the Citrix Workspace
app icon in the notification area. For more information, see the Advanced Preferences sheet sec-
tion.
Configure Citrix Workspace Updates using StoreFront
1. Use a text editor to open the web.config file, which is typically located in the C:\inetpub\
wwwroot\Citrix\Roaming directory.
2. Locate the user account element in the file (Store is the account name of your deployment)
For example: <account id=... name=”Store”>
Before the </account> tag, navigate to the properties of that user account:
1 <properties>
2 <clear/>
3 </properties>
3. Add the auto-update tag aer <clear /> tag.
1 <account>
2
3 <clear />
4
© 1999-2021 Citrix Systems, Inc. All rights reserved. 54

Citrix Workspace app for Windows
5 <account id=”d1197d2c-ac82-4f13-9346-2ee14d4b0202” name=”
F84Store”
6
7 description=”” published=”true” updaterType=”Citrix”
remoteAccessType=”None”>
8
9 <annotatedServices>
10
11 <clear />
12
13 <annotatedServiceRecord serviceRef=”1__Citrix_F84Store”>
14
15 <metadata>
16
17 <plugins>
18
19 <clear />
20
21 </plugins>
22
23 <trustSettings>
24
25 <clear />
26
27 </trustSettings>
28
29 <properties>
30
31 <property name=”Auto-Update-Check” value=”auto” />
32
33 <property name=”Auto-Update-DeferUpdate-Count” value
=”1” />
34
35 <property name=”Auto-Update-LTSR-Only” value
=”FALSE” />
36
37 <property name=”Auto-Update-Rollout-Priority” value=
”fast” />
38
39 </properties>
40
41 </metadata>
42
43 </annotatedServiceRecord>
44
© 1999-2021 Citrix Systems, Inc. All rights reserved. 55

Citrix Workspace app for Windows
45 </annotatedServices>
46
47 <metadata>
48
49 <plugins>
50
51 <clear />
52
53 </plugins>
54
55 <trustSettings>
56
57 <clear />
58
59 </trustSettings>
60
61 <properties>
62
63 <clear />
64
65 </properties>
66
67 </metadata>
68
69 </account>
The meaning of the properties and their possible values are detailed as follows:
• Auto-update-Check: Indicates that Citrix Workspace app detects an update automatically
when available.
• Auto-update-LTSR-Only: Indicates that the release update is for LTSR only.
• Auto-update-Rollout-Priority: Indicates the delivery period in which you can receive the up-
date.
• Auto-update-DeferUpdate-Count: Indicates the number of counts that you can defer the noti-
fications for the release updates.
Get started
May 3, 2021
This article is a reference document to help you set up your environment aer you install Citrix
Workspace app.
© 1999-2021 Citrix Systems, Inc. All rights reserved. 56

Citrix Workspace app for Windows
Prerequisites:
Verify that all the requirements are met as listed in the System requirements section.
Validating free disk space
See the following table for details on disk space required before installation:
Installation type Minimum disk space required
Fresh installation 572 MB
Upgrade 350 MB
Citrix Workspace app performs a check to verify whether there is enough available disk space to com-
plete the installation. The verification is performed both during a fresh installation and an upgrade.
During a fresh installation, the installation stops when there is insuicient disk space and the following
dialog appears.
When you are upgrading Citrix Workspace app, the installation ends when there is insuicient disk
space and the following dialog appears.
© 1999-2021 Citrix Systems, Inc. All rights reserved. 57

Citrix Workspace app for Windows
Note:
• The installer performs the check on the disk space only aer extracting the installation pack-
age.
• When the system is low on disk space during silent installation, the dialog does not appear
but the error message is recorded in the CTXInstall\\_TrolleyExpress-\*.log.
Configure the following before using the Citrix Workspace app:
• Group Policy Object administrative template
• StoreFront
• Citrix Gateway Store
• User accounts
• Client drive mapping
• DNS name resolution
Group Policy Object administrative template
We recommend that you use the Group Policy Object administrative template to configure rules for:
• Network routing
• Proxy servers
• Trusted server configuration
• User routing
• Remote user devices
• User experience.
You can use the receiver.admx / receiver.adml template files with domain policies and local com-
puter policies. For domain policies, import the template file using the Group Policy Management con-
sole. Importing is useful when applying Citrix Workspace app settings to a number of dierent user
devices throughout the enterprise. To modify on a single user device, import the template file using
the local Group Policy Editor on the device.
Citrix recommends using the Windows Group Policy Object (GPO) administrative template to config-
ure Citrix Workspace app.
The installation directory includes CitrixBase.admx and CitrixBase.adml, and, administrative
template files (receiver.adml or receiver.admx‘receiver.adml‘).
Note:
The .adm file is applicable with Windows XP Embedded platforms only. The .admx and .adml
files are for use with Windows Vista, Windows Server 2008, and other later versions of Windows.
For example: \<installation directory\>\Online Plugin\Configuration.
© 1999-2021 Citrix Systems, Inc. All rights reserved. 58

Citrix Workspace app for Windows
If Citrix Workspace app is installed without the VDA, the admx/adml files are typically found in the
C:\Program Files\Citrix\ICA Client\Configuration directory.
See the following table for information about Citrix Workspace app template files and their respective
locations.
Note:
Citrix recommends that you use the GPO template files provided with latest version of Citrix
Workspace app.
File type File location
receiver.adm <Installation Directory>\ICA
Client\Configuration
receiver.admx <Installation Directory>\ICA
Client\Configuration
receiver.adml <Installation Directory>\ICA
Client\Configuration\[MUIculture]
CitrixBase.admx <Installation Directory>\ICA
Client\Configuration
CitrixBase.adml <Installation Directory>\ICA
Client\Configuration\[MUIculture]
Note:
• If the CitrixBase.admx\adml is not added to the local GPO, the Enable ICA File Signing
policy might be lost.
• When upgrading Citrix Workspace app, add the latest template files to local GPO. Earlier
settings are retained aer import. For more information, see the following procedure:
To add the receiver.adm template file to the local GPO (Windows XP Embedded Operating system
only):
We recommend that you use the CitrixBase.admx and CitrixBase.adml files to ensure that the options
are correctly organized and displayed within the Group Policy Object Editor.
You can use .adm template files to configure both the local and the domain-based GPO.
1. Open the Citrix Workspace app Group Policy Object administrative template by running
gpedit.msc.
2. In the le pane of the Group Policy Editor, select the Administrative Templates folder.
© 1999-2021 Citrix Systems, Inc. All rights reserved. 59

Citrix Workspace app for Windows
3. From the Action menu, choose Add/Remove Templates.
4. Select Add and browse to the template file location \<Installation Directory>\ICA
Client\Configuration\receiver.adm.
5. Select Open to add the template and then Close to return to the Group Policy Editor.
Citrix Workspace app template file is available in the local GPO directory Administrative Tem-
plates > Classic Administrative Templates (ADM) > Citrix Components > Citrix Workspace.
Aer the .adm template files are added to the local GPO, the following message appears:
1 The following entry in the \[strings\] section is too long and has been
truncated:
2 Click OK to ignore the message.
To add the receiver.admx/adml template files to the local GPO (later versions of Windows Oper-
ating System):
You can use .adm template files to configure both the Local and the domain-based GPO. Refer to the
Microso MSDN article about managing ADMX files here.
Aer installing Citrix Workspace app, copy the template files as given below:
File type Copy from Copy to
receiver.admx Installation Directory
\ICA Client\
Configuration\receiver
.admx
%systemroot%\
policyDefinitions
CitrixBase.admx Installation Directory
\ICA Client\
Configuration\
CitrixBase.admx
%systemroot%\
policyDefinitions
receiver.adml Installation Directory
\ICA Client\
Configuration\[
MUIculture]receiver.
adml
%systemroot%\
policyDefinitions\[
MUIculture]
© 1999-2021 Citrix Systems, Inc. All rights reserved. 60

Citrix Workspace app for Windows
File type Copy from Copy to
CitrixBase.adml Installation Directory
\ICA Client\
Configuration\[
MUIculture]\CitrixBase
.adml
%systemroot%\
policyDefinitions\[
MUIculture]
Note:
Add the CitrixBase.admx/CitrixBase.adml to the \PolicyDefinitions folder to view the tem-
plate files in Administrative Templates > Citrix Components > Citrix Workspace.
StoreFront
Additionally, you must also configure Citrix Gateway to enable users to connect from outside the in-
ternal network (for example, users who connect from the Internet or from remote locations).
Note:
You might see the old StoreFront user interface if you select The Show all Stores option.
To configure StoreFront:
Install and configure StoreFront as described in the StoreFront documentation. Citrix Workspace app
requires an HTTPS connection. On an http-configured StoreFront, a set the registry key as described
in Using command-line parameters.
Note:
Citrix provides a template you can use to create a download site for Citrix Workspace app for
Windows.
Citrix Gateway Store
To add or specify a Citrix Gateway using the Group Policy Object administrative template:
1. Open the Citrix Workspace app Group Policy Object administrative template by running
gpedit.msc.
2. Under the Computer Configuration node, go to Administrative Templates > Classic Admin-
istrative Templates (ADM) > Citrix Components > Citrix Workspace > StoreFront.
3. Select Citrix Gateway URL/StoreFront Accounts List.
4. Edit the settings.
© 1999-2021 Citrix Systems, Inc. All rights reserved. 61

Citrix Workspace app for Windows
• Store name – Indicates the displayed store name
• Store URL – Indicates the URL of the store
• #Store name – Indicates the name of the store behind Citrix Gateway
• Store enabled state –Indicates the state of the store, On or O
• Store Description – Provides description of the store
5. Add or specify the Citrix Gateway URL. Enter the name of the URL, delimited by a semi-colon:
Example: CitrixWorkspaceApp.exe STORE0= HRStore;https://ag.mycompany.com##
Storename;On;Store
Where #Store name is the name of the store behind Citrix Gateway.
Starting with Version 1808, changes made to the Citrix Gateway URL/StoreFront Account List policy
are applied in a session aer app restart. A reset is not required.
Note:
Citrix Workspace app Version 1808 and later does not require resetting on a fresh installation. If
there is an upgrade to 1808 or later, you must reset the Citrix Workspace app for the changes to
take eect.
Limitations:
• Citrix Gateway URL must be listed as first followed by StoreFront URLs.
• No support for Multiple Citrix Gateway URLs.
• Citrix Gateway URL configured using this method does not support the PNA Services site behind
Citrix Gateway.
Manage workspace control reconnect
Workspace control lets applications follow users as they move between devices. For example,
workspace control enables clinicians in hospitals to move from workstation to workstation without
having to restart their applications on each device. For Citrix Workspace app, you manage workspace
control on client devices by modifying the registry. This can also be done for domain-joined client
devices using Group Policy.
Caution
Editing the registry incorrectly can cause serious problems that might require you to reinstall
your operating system. Citrix cannot guarantee that problems resulting from the incorrect use
of the Registry Editor can be solved. Use the Registry Editor at your own risk. Be sure to back up
the registry before you edit it.
Create WSCReconnectModeUser and modify the existing registry key WSCReconnectMode in the
Master Desktop Image or in the Citrix Virtual Apps server. The published desktop can change the be-
havior of the Citrix Workspace app.
© 1999-2021 Citrix Systems, Inc. All rights reserved. 62

Citrix Workspace app for Windows
WSCReconnectMode key settings for Citrix Workspace app:
• 0 = do not reconnect to any existing sessions
• 1 = reconnect on application launch
• 2 = reconnect on application refresh
• 3 = reconnect on application launch or refresh
• 4 = reconnect when Citrix Workspace interface opens
• 8 = reconnect on Windows logon
• 11 = combination of both 3 and 8
Disable workspace control
To disable workspace control, create the following key:
HKEY_LOCAL_MACHINE\SOFTWARE\Wow6432Node\Citrix\Dazzle (64-bit)
HKEY_LOCAL_MACHINE\SOFTWARE\Citrix\\Dazzle (32-bit)
Name: WSCReconnectModeUser
Type: REG_SZ
Value data: 0
Modify the following key from the default value of 3 to zero
HKEY_LOCAL_MACHINE\SOFTWARE\Wow6432Node\Citrix\Dazzle (64-bit)
HKEY_LOCAL_MACHINE\SOFTWARE\Citrix\Dazzle (32-bit)
Name: WSCReconnectMode
Type: REG_SZ
Value data: 0
Note:
Alternatively, you can set the WSCReconnectAll key to false if you do not want to create a new
key.
Changing the status indicator timeout
You can change the amount of time the status indicator displays when a user is launching a session. To
alter the time-out period, create a REG_DWORD value SI INACTIVE MS in HKEY_LOCAL_MACHINE\
SOFTWARE\Citrix\ICA CLIENT\Engine\. The REG_DWORD value can be set to 4 if you want the
status indicator to disappear sooner.
© 1999-2021 Citrix Systems, Inc. All rights reserved. 63

Citrix Workspace app for Windows
Customizing location for application shortcut using command line
The start menu integration and desktop shortcut only feature lets you bring published application
shortcuts into the Windows Start menu and onto the desktop. Users do not have to subscribe to
applications from the Citrix Workspace user interface. Start menu integration and desktop shortcut
management provide a seamless desktop experience for groups of users, who need access to a core
set of applications in a consistent way.
The flag is called SelfServiceMode and is set to True by default. When the administrator sets the
SelfServiceMode flag to False, you cannot access the self-service user interface. Instead, you can
access subscribed apps from the Start menu and desktop shortcuts. This is referred to as shortcut-
only mode.
Users and administrators can use several registry settings to customize the way shortcuts are set up.
Working with shortcuts
• Users cannot remove apps. All apps are mandatory when working with the SelfServiceMode
flag set to false (shortcut-only mode). If you remove a shortcut icon from the desktop, the icon
comesback when the user selects Refresh from the Citrix Workspace app iconin the notification
area.
• Users can configure only one store. The Account and Preferences options are not available.
This is to prevent the user from configuring additional stores. The administrator can give a user
special privileges to add more than one account using the Group Policy Object template, or by
manually adding a registry key (HideEditStoresDialog) on the client machine. When the admin-
istrator gives a user this privilege, the user has a Preferences option in the notification area,
where they can add and remove accounts.
• Users cannot remove apps using the Windows Control Panel.
• You can add desktop shortcuts via a customizable registry setting. Desktop shortcuts are not
added by default. Aer editing the registry settings, restart the Citrix Workspace app.
• Shortcuts are created in the Start menu with a category path as the default, UseCategoryAsStart-
MenuPath.
Note:
Windows 8/8.1 and Windows 10 do not allow the creation of nested folders within the Start menu.
Applications are displayed individually or under the root folder but not within the Category sub
folders defined with Citrix Virtual Apps.
• You can add a flag [/DESKTOPDIR=”Dir_name”] during installation to bring all shortcuts into a
single folder. CategoryPath is supported for desktop shortcuts.
• AutoReinstall Modified Apps feature can be enabled using the registrykeyAutoReInstallModifiedApps
. When AutoReInstallModifiedApps is enabled, any changes to attributes of pub-
lished apps and desktops on the server are reflected on the client machine. When
© 1999-2021 Citrix Systems, Inc. All rights reserved. 64

Citrix Workspace app for Windows
AutoReInstallModifiedApps is disabled, apps and desktop attributes are not up-
dated and shortcuts are not restored on refresh if deleted on the client. By default, the
AutoReInstallModifiedApps is enabled.
Customizing location for application shortcut using the Registry editor
Note:
• By default, registry keys use String format.
• Change registry keys before you configure a store. If at any time you or a user wants to
customize the registry keys, you or the user must reset Citrix Workspace app, configure the
registry keys, and then reconfigure the store.
Registry keys for 32-bit machines
Registry key: WSCSupported
Value: True
Key path:
1 - HKEY_CURRENT_USER\Software\Citrix\Dazzle
2 - HKEY_CURRENT_USER\Software\Citrix\Receiver\SR\Store” +
primaryStoreID +\Properties
3 - HKEY_LOCAL_MACHINE\Software\Policies\Citrix\Dazzle
4 - HKEY_LOCAL_MACHINE\Software\Citrix\Dazzle
Registry key: WSCReconnectAll
Value: True
Key path:
1 - `HKEY_CURRENT_USER\Software\Citrix\Dazzle`
2 - `HKEY_CURRENT_USER\Software\Citrix\Receiver\SR\Store” +
primaryStoreID + \Properties`
3 - `HKEY_LOCAL_MACHINE\Software\Policies\Citrix\Dazzle`
4 - `HKEY_LOCAL_MACHINe\Software\Citrix\Dazzle`
© 1999-2021 Citrix Systems, Inc. All rights reserved. 65

Citrix Workspace app for Windows
Registry key: WSCReconnectMode
Value: 3
Key path:
1 - HKEY_CURRENT_USER\Software\Citrix\Dazzle
2 - HKEY_CURRENT_USER\Software\Citrix\Receiver\SR\Store” +
primaryStoreID +\Properties
3 - HKEY_LOCAL_MACHINE\Software\Policies\Citrix\Dazzle
4 - HKEY_LOCAL_MACHINE\Software\Citrix\Dazzle
Registry key: WSCReconnectModeUser
Value: Registry is not created during installation.
Key path:
1 - HKEY_CURRENT_USER\Software\Citrix\Dazzle
2 - HKEY_CURRENT_USER\Software\Citrix\Receiver\SR\Store” + primaryStoreID
+\Properties
3 - HKEY_LOCAL_MACHINE\Software\Policies\Citrix\Dazzle
4 - HKEY_LOCAL_MACHINE\Software\Citrix\Dazzle
Registry keys for 64-bit machines:
Registry key: WSCSupported
Value: True
Key path:
1 - HKEY_CURRENT_USER\Software\Citrix\Dazzle
2 - HKEY_CURRENT_USER\Software\Citrix\Receiver\SR\Store” + primaryStoreID
+\Properties
3 - HKEY_LOCAL_MACHINE\Software\Wow6432Node\Policies\Citrix\Dazzle
4 - HKEY_LOCAL_MACHINE\Software\Wow6432Node\Citrix\Dazzle
© 1999-2021 Citrix Systems, Inc. All rights reserved. 66

Citrix Workspace app for Windows
Registry key: WSCReconnectAll
Value: True
Key path:
1 - HKEY_CURRENT_USER\Software\Citrix\Dazzle
2 - HKEY_CURRENT_USER\Software\Citrix\Receiver\SR\Store” +
primaryStoreID + \Properties
3 - HKEY_LOCAL_MACHINE\Software\Wow6432Node\Policies\Citrix\Dazzle
4 - HKEY_LOCAL_MACHINE\Software\Wow6432Node\Citrix\Dazzle
Registry key: WSCReconnectMode
Value: 3
Key path:
1 - HKEY_CURRENT_USER\Software\Citrix\Dazzle
2 - HKEY_CURRENT_USER\Software\Citrix\Receiver\SR\Store” +
primaryStoreID +\Properties
3 - HKEY_LOCAL_MACHINE\Software\Wow6432Node\Policies\Citrix\Dazzle
4 - HKEY_LOCAL_MACHINE\Software\Wow6432Node\Citrix\Dazzle
Registry key: WSCReconnectModeUser
Value: Registry is not created during installation.
Key path:
1 - HKEY_CURRENT_USER\Software\Citrix\Dazzle
2 - HKEY_CURRENT_USER\Software\Citrix\Receiver\SR\Store” + primaryStoreID
+\Properties
3 - HKEY_LOCAL_MACHINE\Software\Wow6432Node\Policies\Citrix\Dazzle
4 - HKEY_LOCAL_MACHINE\Software\Wow6432Node\Citrix\Dazzle
User accounts
You can provide users with the account information that they need to access virtual desktops and
application using the following:
© 1999-2021 Citrix Systems, Inc. All rights reserved. 67

Citrix Workspace app for Windows
• Configuring email-based account discovery
• Provisioning file
• Providing users with account information to enter manually
Important
Citrix recommends that you restart Citrix Workspace app aer the installation. This is to ensure
that users can add accounts and Citrix Workspace app can discover USB devices that were in a
suspended state during installation.
A dialog appears to indicate a successful installation, followed by the Add Account dialog. For a first
time user, the Add Account dialog requires you to enter an email or server address to set up an ac-
count.
Suppressing Add Account dialog
Add Account dialog is displayed when the store is not configured. Using the Add Account dialog, you
can set up a Citrix Workspace app account by entering email address or a server URL.
Citrix Workspace app determines the Citrix Gateway, StoreFront server, or Endpoint Management vir-
tual appliance associatedwith the email address and then promptsthe user to log on for enumeration.
Add account dialog can be suppressed in the following ways:
1. At system logon
© 1999-2021 Citrix Systems, Inc. All rights reserved. 68

Citrix Workspace app for Windows
Select Do not show this window automatically at logon to prevent the Add Account window
to pop up on subsequent logon.
This is a per-user setting and resets during Citrix Workspace app for Windows Reset.
2. Command-line Installation
Install Citrix Workspace app for Windows as an administrator using the command-line interface
with the following switch.
CitrixWorkspaceApp.exe /ALLOWADDSTORE=N
This is a per-machine setting. Consequently, the behavior applies to all users of that machine.
The following message is displayed when the Store is not configured.
© 1999-2021 Citrix Systems, Inc. All rights reserved. 69

Citrix Workspace app for Windows
Also, the Add Account dialog can be suppressed in the following ways.
• Renaming Citrix execution file:
Rename the CitrixWorkspaceApp.exe to CitrixWorkspaceAppWeb.exe to alter the behavior
of the Add Account dialog. When you rename the file, the Add Account dialog is not displayed
from the Start menu.
• Registry Editor:
To hide Add Account option from the Citrix Workspace app installation wizard, navigate
to the HKEY_CURRENT_USER\Software\Citrix\Receiver path and set the DWORD
HideAddAccountOnRestart key to 00000001 value.
Configure email-based account discovery
When you configure Citrix Workspace app for email-based account discovery, users enter their email
address rather than a server URL during initial Citrix Workspace app installation and configuration.
Citrix Workspace app determines the Citrix Gateway or StoreFront Server associated with the email
address based on Domain Name System (DNS) Service (SRV) records and then prompts the user to log
on to access virtual desktops and applications.
For more information, see Configuring email based account discovery.
Provide users with provisioning files
StoreFront provides provisioning files that users can open to connect to stores.
You can use StoreFront to create provisioning files containing connection details for accounts. Make
these files available to your users to enable them to configure Citrix Workspace app automatically.
Aer installing Citrix Workspace app, users simply open the file to configure Citrix Workspace app. If
you configure workspace for web, users can also obtain Citrix Workspace app provisioning files from
those sites.
Formore information, see To export store provisioning files for users in the StoreFront documentation.
Provide users with account information to enter manually
To enable users to set up accounts manually, be sure to distribute the information they need to con-
nect to their virtual desktops and applications.
• For connections to a StoreFront store, provide the URL for that server. For example:https://
servername.company.com.
• For connections through Citrix Gateway, first determine whether a user needs to see all config-
ured stores or just the store that has remote access enabled for a particular Citrix Gateway.
© 1999-2021 Citrix Systems, Inc. All rights reserved. 70

Citrix Workspace app for Windows
– To present all configured stores: Provide users with the Citrix Gateway fully qualified do-
main name.
– To limit access to a particular store: Provide users with the Citrix Gateway fully qualified
domain name and the store name in the form:
CitrixGatewayFQDN?MyStoreName:
For example, if a store named “SalesApps” has remote access enabled for server1.com and a store
named “HRApps” has remoteaccessenabledfor server2.com, a user mustenterserver1.com?SalesApps
to access SalesApps or enter server2.com?HRApps to access HRApps. This feature requires a first-time
user to create an account by entering a URL and is not available for email-based discovery.
When a user enters the details for a new account, Citrix Workspace app attempts to verify the connec-
tion. If successful, Citrix Workspace app prompts the user to log on to the account.
To manage accounts, open the Citrix Workspace app home page, and click , and then click Accounts.
Sharing multiple stores accounts automatically
Warning
Using the Registry Editor incorrectly can cause serious problems that can require you to reinstall
the operating system. Citrix cannot guarantee that problems resulting from incorrect use of the
Registry Editor can be solved. Use the Registry Editor at your own risk. Ensure you back up the
registry before you edit it.
If you have more than one store account, you can configure Citrix Workspace app for Windows to au-
tomatically connect to all accounts when establishing a session. To automatically view all accounts
when opening Citrix Workspace app:
For 32-bit systems:
Key path: HKEY_LOCAL_MACHINE\Software\Citrix\Dazzle
KeyName: CurrentAccount
Value: AllAccount
Type: REG_SZ
For 64-bit systems:
Key path: HKEY_LOCAL_MACHINE\\Software\\Wow6432Node\\Citrix\\Dazzle
KeyName: CurrentAccount
Value: AllAccount
Type: REG_SZ
© 1999-2021 Citrix Systems, Inc. All rights reserved. 71

Citrix Workspace app for Windows
Client drive-mapping
Citrix Workspace app for Windows supports device mapping on user devices so they are available from
within a session. Users can:
• Transparently access local drives, printers, and COM ports
• Cut and paste between the session and the local Windows clipboard
• Hear audio (system sounds and .wav files) played from the session
During logon, Citrix Workspace app informs the server of the available client drives, COM ports, and
LPT ports. By default, client drives are mapped to server drive letters and server print queues are
created for client printers so they appear to be directly connected to the session. These mappings are
available only for the current user during the current session. They are deleted when the user logs o
and recreated the next time the user logs on.
You can use the redirection policy settings to map user devices not automatically mapped at logon.
For more information, see the Citrix Virtual Apps and Desktops documentation.
Disable user device mappings
You can configure user device-mapping including options for drives, printers, and ports, using the
Windows Server Manager tool. For more information about the available options, see your Remote
Desktop Services documentation.
Redirect client folders
Client folder redirection changes the way client-side files are accessible on the host-side session.
When you enable only client drive mapping on the server, client-side full volumes are automatically
mapped to the sessions as Universal Naming Convention (UNC) links. When you enable client folder
redirection on the server and the user configures it on the user device, the portion of the local volume
specified by the user is redirected.
Only the user-specified folders appear as UNC links inside sessions instead of the complete file system
on the user device. If you disable UNC links through the registry, client folders appear as mapped
drives inside the session. For more information, including how to configure client folder redirection
for user devices, see the Citrix Virtual Apps and Desktops documentation.
Map client drives to host-side drive letters
Client drive mapping allows drive letters on the host-side to be redirected to drives that exist on the
user device. For example, drive H in a Citrix user session can be mapped to drive C of the user device
running Citrix Workspace app for Windows.
© 1999-2021 Citrix Systems, Inc. All rights reserved. 72

Citrix Workspace app for Windows
Client drive mapping is built into the standard Citrix device redirection facilities transparently. To File
Manager, Windows Explorer, and your applications, these mappings appear like any other network
mappings.
The server hosting virtual desktops and applications can be configured during installation to map
client drives automatically to a given set of drive letters. The default installation maps drive letters
assigned to client drives starting with V and works backward, assigning a drive letter to each fixed
drive and CD-ROM drive. (Floppy drives are assigned their existing drive letters.) This method yields
the following drive mappings in a session:
Client drive letter Is accessed by the server as:
A A
B B
C V
D U
The server can be configured so that the server drive letters do not conflict with the client drive letters;
in this case the server drive letters are changed to higher drive letters. For example, changing server
drives C to M and D to N allows client devices to access their C and D drives directly. This method yields
the following drive mappings in a session:
Client drive letter Is accessed by the server as:
A A
B B
C C
D D
The drive letter used to replace the server drive C is defined during Setup. All other fixed drive and CD-
ROM drive letters are replaced with sequential drive letters (for example; C > M, D > N, E > O). These
drive letters must not conflict with any existing network drive mappings. If a network drive is mapped
to the same drive letter as a server drive letter, the network drive mapping is not valid.
When a user device connects to a server, client mappings are reestablished unless automatic client
device mapping is disabled. Client drive mapping is enabled by default. To change the settings, use
the Remote Desktop Services (Terminal Services) Configuration tool. You can also use policies to give
you more control over how client device mapping is applied. For more information about policies,
© 1999-2021 Citrix Systems, Inc. All rights reserved. 73

Citrix Workspace app for Windows
see the Citrix Virtual Apps and Desktops documentation.
HDX Plug and Play USB device redirection
HDX Plug and Play USB device redirection enables dynamic redirection of media devices, including
cameras, scanners, media players, and point of sale (POS) devices to the server. You or the user can
restrict redirection of all or some of the devices. Edit policies on the server or apply group policies on
the user device to configure the redirection settings. For more information, see USB and client drive
considerations in the Citrix Virtual Apps and Desktops documentation.
Important
If you prohibit Plug and Play USB device redirection in a server policy, the user cannot override
that policy setting.
A user can set permissions in Citrix Workspace app to always allow or reject device redirection or to be
prompted each time a device is connected. The setting aects only devices plugged in aer the user
changes the setting.
To map a client COM port to a server COM port:
Client COMport mapping allows devicesattachedtothe COM ports of the user device to be used during
sessions. These mappings can be used like any other network mappings.
You can map client COM ports at the command prompt. You can also control client COM port mapping
from the Remote Desktop (Terminal Services) Configuration tool or using policies. For information
about policies, see the Citrix Virtual Apps and Desktops documentation.
Important
COM port mapping is not TAPI-compatible.
1. For Citrix Virtual Apps and Desktops deployments, enable the Client COM port redirection policy
setting.
2. Log on to Citrix Workspace app.
3. At a command prompt, type:
net use comx: \\\\\client\\comz:
where x is the number of the COM port on the server(ports 1 through 9 are available for mapping)
and z is the number of the client COM port you want to map.
4. To confirm the operation, type:
net use
at a command prompt. The list that appears contains mapped drives, LPT ports, and mapped
COM ports.
© 1999-2021 Citrix Systems, Inc. All rights reserved. 74

Citrix Workspace app for Windows
To use this COM port in a virtual desktop or application, install your user device to the mapped name.
For example, if you map COM1 on the client to COM5 on the server, install your COM port device on
COM5 during the session. Use this mapped COM port as you would a COM port on the user device.
DNS name resolution
You can configure Citrix Workspace app for Windows that uses the Citrix XML Service to request a Do-
main Name Service (DNS) name for a server instead of an IP address.
Important:
Unless your DNS environment is configured specifically to use this feature, Citrix recommends
that you do not enable DNS name resolution on the server.
DNS name resolution is disabled by default on the server and enabled by default on the Citrix
Workspace app. When DNS name resolution is disabled on the server, any Citrix Workspace app
request for a DNS name returns an IP address. There is no need to disable DNS name resolution on
Citrix Workspace app.
To disable DNS name resolution for specific user devices:
If your server deployment uses DNS name resolution and you experience issues with specific user
devices, you can disable DNS name resolution for those devices.
Caution
Using the Registry Editor incorrectly might cause serious problems that requires you to reinstall
the operating system. We do not guarantee that problems resulting from incorrect use of the
Registry Editor can be solved. Use the Registry Editor at your own risk. Ensure you back up the
registry before you edit it.
1. Add a string registry key xmlAddressResolutionType to HKEY\\_LOCAL\\_MACHINE\
Software\Wow6432Node\Citrix\ICA Client\Engine\Lockdown Profiles\All
Regions\Lockdown\Application Browsing.
2. Set the value to IPv4-Port.
3. Repeat for each user of the user devices.
Configure
April 15, 2021
When using the Citrix Workspace app for Windows, the following configurations allow you to access
their hosted applications and desktops.
© 1999-2021 Citrix Systems, Inc. All rights reserved. 75

Citrix Workspace app for Windows
Microso Teams
• Encode performance estimator
• Screen sharing
Screen sharing
Starting with Version 2006.1, new functionalities in the outgoing screen sharing feature for the Mi-
croso Teams application that uses HDX optimization are introduced.
The contents shared using Microso Teams are limited to the contents of the Desktop Viewer window.
Areas outside of the Desktop Viewer window (client local desktop, apps) are blacked out.
On a Windows 10 operating system, the following are not blacked out when they overlap the Desktop
Viewer window:
• Start menu, Search menu and Task View.
• Notification bar and Notifications that appear at the right-side of the task bar.
• On a multi-monitor set up with dierent DPI settings, if a local app is overlapping 2 dierent
monitors and its DPI does not match that of the main monitor which has the Desktop Viewer
window.
• App & preview shown when you mouse-hover over the app’s icon in the task bar.
Encoder performance estimator
HdxTeams.exe is the WebRTC media engine embedded in Citrix Workspace app that handles Mi-
croso Teams redirection. HdxTeams.exe can estimate the best encoding resolution that the end-
point’s CPU can sustain without overloading. Possible values are 240p, 360p, 720p and 1080p.
The performance estimation process (also called webrtcapi.EndpointPerformance) runs when
HdxTeams.exe initializes. The macroblock code determines the best resolution that can be achieved
with the particular endpoint. The Codec negotiation includes the highest possible resolution. The
Codec negotiation can be between the peers, or between the peer and the conference server.
There are four performance categories for endpoints that have its own maximum available resolution:
Endpoint performance Maximum resolution Registry key value
fast 1080p 3
medium 720p 2
slow 360p 1
very slow 240p 0
© 1999-2021 Citrix Systems, Inc. All rights reserved. 76

Citrix Workspace app for Windows
You can disable the VP9 or H264 codec using the configuration flags.
H264 is lighter on the CPU and consumes more bandwidth. Whereas, VP9 consumes more CPU power
using less bandwidth.
Registry Path in Citrix Workspace app:
Navigate to the registry path HKEY_CURRENT_USER\SOFTWARE\Citrix\HDXMediaStream and create
the following keys:\
Name Type Values Description
DisableVP9 DWORD 1; 0 1 - disable VP9 codec;
0 - enable
DisableH264 DWORD 1;0 1 - disable H.264
codec; 0 - enable
OverridePerformance DWORD 0;1;2;3 Force desired
performance. Value
must be in the range
between 0 and 3,
where 0 indicates
very slow and 3 very
fast.
For more information about Microso Teams optimization, see Optimization for Microso Teams.
App protection
Disclaimer
App protection policies work by filtering access to required functions of the underlying operat-
ing system (specific API calls required to capture screens or keyboard presses). This means that
app protection policies can provide protection even against custom and purpose-built hacker
tools. However, as operating systems evolve, new ways of capturing screens and logging keys
can emerge. While we continue to identify and address them, we cannot guarantee full protec-
tion in specific configurations and deployments.
App protection is an add-on feature that provides enhanced security when using Citrix Virtual Apps
and Desktops. The feature restricts the ability of clients to be compromised by keylogging and screen
capturing malware. App protection prevents exfiltration of confidential information such as user cre-
dentials and sensitive information displayed on the screen. The feature prevents users and attackers
from taking screenshots and from using keyloggers to glean and exploit sensitive information.
© 1999-2021 Citrix Systems, Inc. All rights reserved. 77

Citrix Workspace app for Windows
App protection requires that you install an add-on license on your License Server. A Citrix Virtual Desk-
tops license must also be present. For information on Licensing, see the Configure section in the Citrix
Virtual Apps and Desktops documentation.
Requirements:
• Citrix Virtual Apps and Desktops Version 1912 or later.
• StoreFront Version 1912.
• Citrix Workspace app Version 1912 or later.
Prerequisites:
• The app protection feature must be enabled on the Controller. For more information, see App
protection in Citrix Virtual Apps and Desktops documentation.
You can include the app protection component with Citrix Workspace app either:
• During Citrix Workspace app installation using the command-line interface or the GUI OR
• During an app launch (on-demand installation).
Note:
• This feature is supported only on desktop operating systems such as Windows 10, Windows
8.1. Note: Starting with Version 2006.1, Citrix Workspace app is not supported on Windows
7. Therefore, app protection does not work on Windows 7. For more information, see Dep-
recation.
• This feature is not supported over Remote Desktop Protocol (RDP).
On-premises HDX session protection:
Two policies provide anti-keylogging and anti-screen-capturing functionality in a session. These poli-
cies must be configured through PowerShell. No GUI is available for the purpose.
Note:
Starting with Version 2103, Citrix Cloud Virtual Apps and Desktops Service supports app protec-
tion with StoreFront only.
For information on app protection configuration on Citrix Virtual Apps and Desktops, see App protec-
tion.
App protection - Configuration in Citrix Workspace app
Note:
• Include the app protection component with Citrix Workspace app only if your administrator
has instructed you to do so.
• Adding the app protection component might impact the screen-capturing capabilities on
© 1999-2021 Citrix Systems, Inc. All rights reserved. 78
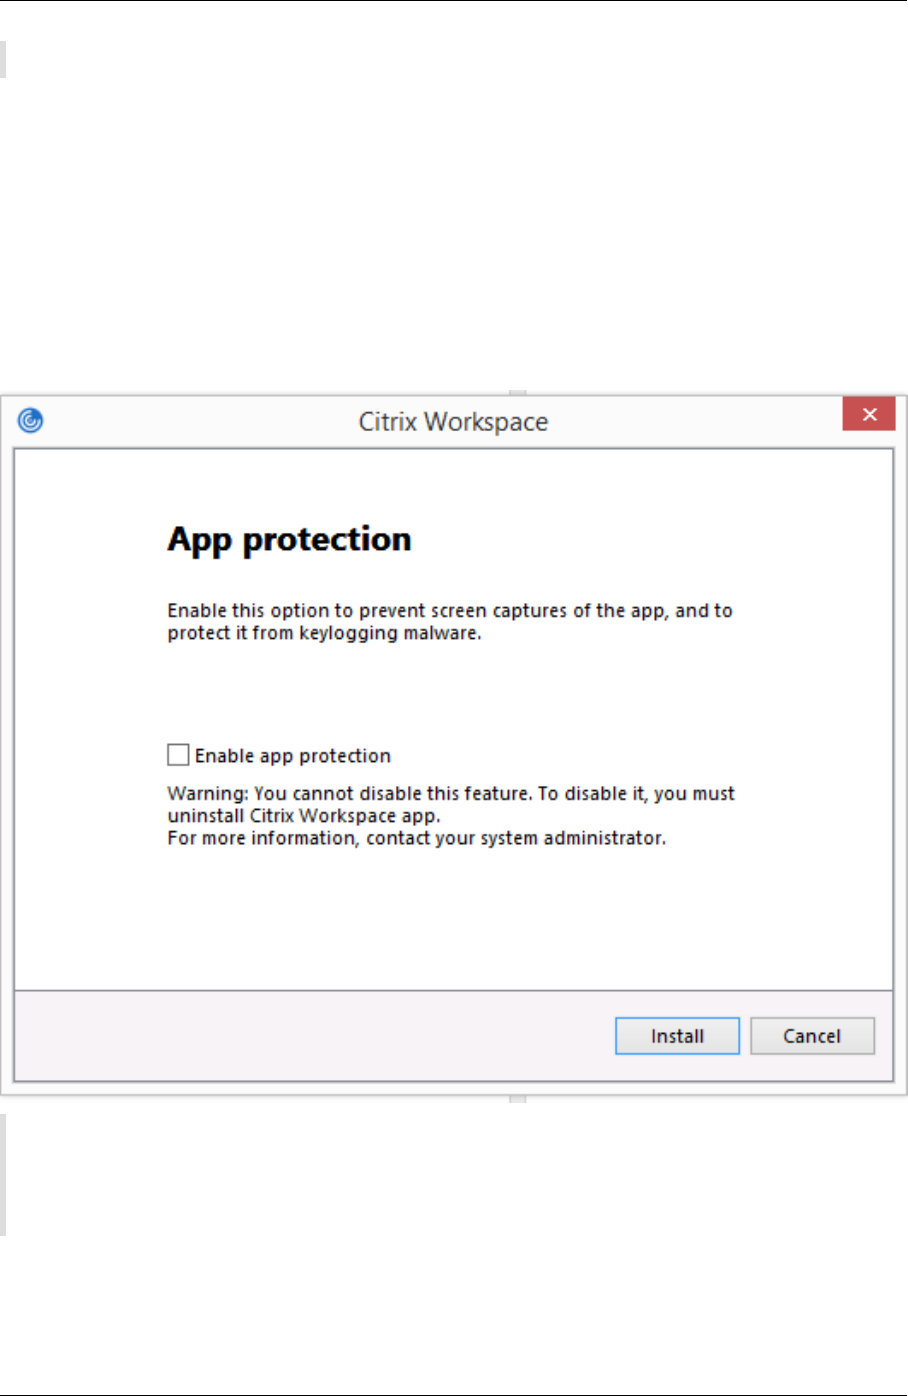
Citrix Workspace app for Windows
your device.
During the Citrix Workspaceapp installation, you can include app protection using one of the following
methods:
• GUI
• Command-line interface
GUI
During the Citrix Workspace app installation, use the following dialog to include the app protection
component. Select Enable app protection and then click Install to continue with the installation.
Note:
Not enabling app protection during installation causes a prompt to appear when you launch a
protected app. Follow the prompt to install the app protection component.
Command-line interface
© 1999-2021 Citrix Systems, Inc. All rights reserved. 79

Citrix Workspace app for Windows
Use the command-line switch /includeappprotection during Citrix Workspace app installation to
add the app protection component.
The following table provides information on screens protected depending on deployment:
App protection deployment Screens protected Screens not protected
Included in Citrix Workspace
app
Self-Service plug-in and Auth
manager / User credentials
dialog
Connection Center, Devices,
Any Citrix Workspace app
error messages, Auto client
reconnect, Add account
Configured on the Controller ICA session screen (both apps
and desktops)
Connection Center, Devices,
Any Citrix Workspace app
error messages, Auto client
reconnect, Add account
In earlier releases, when you are trying to take a screenshot of a protected window, the entire screen,
including the non-protected apps in the background, are blacked out.
Starting with Version 2008, when you are taking a screenshot, only the protected window is blacked
out. You can take a screenshot of the area outside the protected window.
Expected Behavior:
The expected behavior depends upon the method by which users access the StoreFront that has the
protected resources.
Note:
• Citrix recommends that you only use the native Citrix Workspace app to launch a protected
session.
• Behavior on the workspace for web:
The app protection component is not supported on the workspace for web configurations. Ap-
plications that are protected by app protection policies are not enumerated. For more informa-
tion about the resources assigned, contact your system administrator.
• Behavior on Citrix Workspace app versions that do not support app protection:
On Citrix Workspace app Version 1911 and earlier, applications that are protected by app protec-
tion policies are not enumerated on StoreFront.
• Behavior of apps that have the app protection feature configured on the Controller:
On an app protection configured-Controller, if you try to launch an application that is protected,
the app protection is installed on-demand. The following dialog appears:
© 1999-2021 Citrix Systems, Inc. All rights reserved. 80

Citrix Workspace app for Windows
Click Yes to install the app protection component. You can then launch the protected app.
• Behavior of protected session in case of Remote Desktop Protocol(RDP)
– Your active protected session disconnects, if you launch a Remote Desktop Protocol(RDP)
session.
– You cannot launch a protected session in a Remote Desktop Protocol(RDP) session.
Enhancement to app protection configuration
Previously, the authentication manager and the Self-Service plug-in dialogs were protected by de-
fault.
Starting with Version 2012, Citrix Workspace app introduces a Group Policy Object (GPO) policy that
lets you configure the anti-keylogging and anti-screen-capturing functionalities separately for both
the authentication manager and Self-Service plug-in interfaces.
Note:
This GPO policy is not applicable for ICA and SaaS sessions. The ICA and SaaS sessions continue
to be controlled using the Delivery Controller and Citrix Gateway Service.
Configuring app protection for the Self-Service plug-in interface:
1. Open the Citrix Workspace app Group Policy Object administrative template by running gpedit
.msc.
2. Under the Computer Configuration node, go to Administrative Templates > Citrix Compo-
nents > Citrix Workspace.
3. To configure anti-keylogging and anti-screen-capturing for the Self-Service plug-in dialog, se-
lect Self Service > Manage app protection policy.
4. Select one or both the following options:
• Anti-key logging: Prevents keyloggers from capturing keystrokes.
• Anti-screen-capturing: Prevents users from taking screenshots and sharing their screen.
5. Click Apply and OK.
© 1999-2021 Citrix Systems, Inc. All rights reserved. 81

Citrix Workspace app for Windows
Configuring app protection for authentication manager:
1. Open the Citrix Workspace app Group Policy Object administrative template by running gpedit
.msc.
2. Under the Computer Configuration node, go to Administrative Templates > Citrix Compo-
nents > Citrix Workspace.
3. To configure anti-keylogging and anti-screen-capturing for authentication manager, select User
authentication > Manage app protection policy.
4. Select one or both the following options:
• Anti-key logging: Prevents keyloggers from capturing keystrokes.
• Anti-screen-capturing: Prevents users from taking screenshots and sharing their screen.
5. Click Apply and OK.
App protection error logs:
Starting with Version 2103, the app protection logs are collected as part of Citrix Workspace app logs.
For more information about log collection, see Log collection.
You do not need to install or use a third-party app to collect the app protection logs specifically. How-
ever, DebugView can still be continued to be used for log collection.
The app protection logs are registered to the debug output. To collect these logs, do the following:
1. Download and install the DebugView app from the Microso website.
2. Launch the command prompt and run the following command:
Dbgview.exe /t /k /v /l C:\logs.txt
From the example above, you can view the logs in log.txt file.
The command indicates the following:
• /t – The DebugView app starts minimized in the notification area.
• /k – Enable kernel capture.
• /v – Enable verbose kernel capture.
• /l – Log the output to a specific file.
Uninstalling the app protection component:
To uninstall the app protection component, you must uninstall Citrix Workspace app from your sys-
tem. Restart the system for the changes to take eect.
Note:
App protection is supported only on upgrade from Version 1912 onwards.
Known issues or limitations:
• This feature is not supported on Microso Server operating systems such as Windows Server
2012 R2 and Windows Server 2016.
© 1999-2021 Citrix Systems, Inc. All rights reserved. 82

Citrix Workspace app for Windows
• This feature is not supported in double-hop scenarios.
• For this feature to function properly, disable the Client clipboard redirection policy on the VDA.
Log collection
Log collection simplifies the process of collecting logs for Citrix Workspace app. The logs help Citrix
to troubleshoot, and, in cases of complicated issues, facilitate support.
You can collect logs using the Graphical user interface.
Collecting logs:
1. Right-click the Citrix Workspace app icon in the notification area and select Advanced Prefer-
ences.
2. Select Log collection.
The Log collection dialog appears.
3. Select one of the following log levels:
• Low
• Medium
• Verbose
© 1999-2021 Citrix Systems, Inc. All rights reserved. 83

Citrix Workspace app for Windows
4. Click Start collecting logs to reproduce the issue and collect the latest logs.
The log collection process starts.
5. Click Stop collecting logs aer the issue is reproduced.
6. Click Save log to save the collected logs.
HDX adaptive throughput
HDX adaptive throughput intelligently fine-tunes the peak throughput of the ICA session by adjusting
output buers. The number of output buers is initially set at a high value. This high value allows
data to be transmitted to the client more quickly and eiciently, especially in high latency networks.
Providing better interactivity, faster file transfers, smoother video playback, higher framerate, and
resolution results in an enhanced user experience.
Session interactivity is constantly measured to determine whether any data streams within the ICA
session are adversely aecting interactivity. If that occurs, the throughput is decreased to reduce the
impact of the large data stream on the session and allow interactivity to recover.
This is feature is supported only on Citrix Workspace app 1811 for Windows and later.
Important:
HDX adaptive throughput changes the way that output buers are set by moving this mechanism
from the client to the VDA. Therefore, adjusting the number of output buers on the client as
described in CTX125027 has no eect.
© 1999-2021 Citrix Systems, Inc. All rights reserved. 84

Citrix Workspace app for Windows
Adaptive transport
Adaptive transport is a data transport mechanism that is faster, can scale, improves application inter-
activity, and is more interactive on challenging long-haul WAN and internet connections. Adaptive
transport maintains high server scalability and eicient use of bandwidth. By using adaptive trans-
port, ICA virtual channels automatically respond to changing network conditions. They intelligently
switch the underlying protocol between the Citrix protocol called Enlightened Data Transport (EDT)
and TCP to deliver the best performance. It improves data throughput for all ICA virtual channels
including Thinwire display remoting, file transfer (Client Drive Mapping), printing, and multimedia
redirection. The same setting is applicable for both LAN and WAN conditions.
In earlier releases, when HDXoverUDP is set to Preferred, data transport over EDT is used when pos-
sible, with fallback to TCP.
With session reliability enabled, EDT, and TCP are attempted in parallel during the initial connection,
session reliability reconnection, and auto client reconnect. This enhancement reduces connection
time when EDT is preferred but the required underlying UDP transport is unavailable and TCP must
be used.
By default, aer fallback to TCP, adaptive transport continues to seek EDT every five minutes.
Requirements:
• Citrix Virtual Apps and Desktops 7.12 or later.
• StoreFront 3.8.
• IPv4 VDAs only. IPv6 and mixed IPv6 and IPv4 configurations are not supported.
• Add firewall rules to allow inbound traic on UDP ports 1494 and 2598 of the VDA.
Note:
TCP ports 1494 and 2598 are also required and opened automatically when you install the VDA.
However, UDP ports 1494 and 2598 are not automatically opened. Set them to Enabled.
Adaptive transport must be configured on the VDA by applying the policy before it is available for
communication between the VDA and Citrix Workspace app.
Citrix Workspace app allows the adaptive transport by default. However, also by default, the client
attempts to use adaptive transport only if the VDA is configured to Preferred in the Citrix Studio policy
and if the setting has been applied on the VDA.
You can enable adaptive transport using the HDX Adaptive Transport policy setting. Set the new
policy to Preferred to use adaptive transport when possible, with fallback to TCP.
To disable adaptive transport on a specific client, set the EDT options appropriately using the Citrix
Workspace app for Windows Group Policy Object administrative template.
© 1999-2021 Citrix Systems, Inc. All rights reserved. 85

Citrix Workspace app for Windows
To configure adaptive transport using the Citrix Workspace app Group Policy Object (GPO)
administrative template
The following are optional configuration steps to customize your environment. For example, you
might choose to disable the feature for a particular client for security reasons.
Note:
By default, adaptive transport is disabled (O) and TCP is always used.
1. Open the Citrix Workspace app Group Policy Object administrative template by running
gpedit.msc.
2. Under the Computer Configuration node, go to Administrative Templates> Citrix Workspace
> Network routing.
3. Set the Transport protocol for Receiver policy to Enabled.
4. Select Communication Protocol for Citrix Workspace as required.
• O - Indicates that TCP is used for data transfer.
• Preferred - Indicates that the Citrix Workspace app tries to connect to the server using
UDP at first and then switches to TCP as a fallback.
• On - Indicates that the Citrix Workspace app for Windows connects to the server using UDP
only. There is no fallback to TCP with this option.
5. Click Apply and OK.
6. From the command line, run gpupdate /force command.
Also, for the adaptive transport configuration to take eect, add the Citrix Workspace app template
files to the Policy Definitions folder. For more information on adding template files to the local GPO,
see Group Policy Object template.
To confirm that the policy setting has taken eect:
Navigate to HKEY\\_LOCAL\\_MACHINE\SOFTWARE\Policies\Citrix\ICA Client\Engine\
Lockdown Profiles\All Regions\Lockdown\Network\UDT and verify that the HDXOverUDP
key is included.
For more information, see Adaptive transport section in Citrix Virtual Apps and Desktops documenta-
tion.
Advanced Preferences sheet
Starting with Version 4.10, you can customize the availability and the contents of the Advanced Pref-
erences sheet that is present in the right-click menu of the Citrix Workspace app icon in the notifica-
tion area. Doing so ensures that users can apply only administrator-specified settings on their sys-
tems. Specifically, can:
© 1999-2021 Citrix Systems, Inc. All rights reserved. 86

Citrix Workspace app for Windows
• Hide the Advanced Preferences sheet altogether
• Hide the following, specific settings from the sheet:
– Data collection
– Connection Center
– Configuration checker
– Keyboard and Language bar
– High DPI
– Support information
– Shortcuts and Reconnect
– Citrix Files
– Citrix Casting
Hiding Advanced Preferences option from the right-click menu
You can hide the Advanced Preferences sheet by using the Citrix Workspace app Group Policy Object
(GPO) administrative template:
1. Open the Citrix Workspace app Group Policy Object administrative template by running
gpedit.msc.
2. Under the Computer Configuration node, go to Administrative Templates> Citrix Workspace
> Self Service > Advanced Preferences Options.
3. Select the Disable Advance Preferences policy.
4. Select Enabled to hide the Advanced Preferences option from the right-click menu of the Citrix
Workspace app icon in the notification area.
Note:
By default, the Not Configured option is selected.
Hiding specific settings from the Advanced Preferences sheet
You can hide specific user-configurable settings from the Advanced Preferences sheet by using the
Citrix Workspace app Group Policy Object administrative template. To do this:
1. Open the Citrix Workspace app Group Policy Object administrative template by running
gpedit.msc.
2. Under the Computer Configuration node, go to Administrative Templates> Citrix Workspace
> Self Service > Advanced Preferences Options.
3. Select the policy for the setting that you want to hide.
The table below lists the options that you can select and the eect of each:
© 1999-2021 Citrix Systems, Inc. All rights reserved. 87

Citrix Workspace app for Windows
Options Action
Not Configured Displays the setting
Enabled Hides the setting
Disabled Displays the setting
You can hide the following specific settings from the Advanced Preferences sheet:
• Configuration checker
• Connection Center
• High DPI
• Data collection
• Delete saved passwords
• Keyboard and Language bar
• Shortcuts and Reconnect
• Support information
• Citrix Files
• Citrix Casting
Hiding the Reset Workspace option from the Advanced Preferences sheet using the Registry
editor
You can hide the Reset Workspace option from the Advanced Preferences sheet only using the Reg-
istry editor.
1. Launch the registry editor.
2. Navigate to HKEY_LOCAL_MACHINE\SOFTWARE\Citrix\Dazzle.
3. Create a String Value key EnableFactoryReset and set it to any of the following options:
• True - Displays the Reset Workspace option in the Advanced Preferences sheet.
• False - Hides the Reset Workspace option in the Advanced Preferences sheet.
Hiding Citrix Workspace Updates option from the Advanced Preferences sheet
Note:
The policy path for the Citrix Workspace Updates option is dierent from that of the other options
present in the Advanced Preferences sheet.
1. Open the Citrix Workspace app Group Policy Object administrative template by running
gpedit.msc.
© 1999-2021 Citrix Systems, Inc. All rights reserved. 88

Citrix Workspace app for Windows
2. Under the Computer Configuration node, go to Administrative Templates > Citrix Compo-
nents > Citrix Workspace > Workspace Updates.
3. Select the Workspace Updates policy.
4. Select Disabled to hide the Workspace Updates settings from the Advanced Preferences sheet.
Application delivery
When delivering applications with Citrix Virtual Apps and Desktops, consider the following options to
enhance the user experience:
• Web Access Mode - Without any configuration, Citrix Workspace app provides browser-based
access to applications and desktops. You can open a browser to a workspace for web to select
and use the applications you want. In this mode, no shortcuts are placed on the user’s desktop.
• Self-Service Mode - By adding a StoreFront account to Citrix Workspace app or configuring Cit-
rix Workspace app to point to a StoreFront website, you can configure self-service mode, which
allows you to subscribe to applications from the Citrix Workspace app user interface. This en-
hanced user experience is similar to that of a mobile app store. In a self-service mode, you can
configure mandatory, auto-provisioned, and featured app keyword settings as required.
Note:
By default, Citrix Workspaces app allows you to select the applications to display in the Start
menu.
• App shortcut-only mode - As a Citrix Workspace app for Windows administrator, you can config-
ure Citrix Workspace app to automatically place application and desktop shortcuts directly in
the Start menu or on the desktop in a similar way that Citrix Workspace app Enterprise places
them. The new shortcut only mode allows you to find all the published apps within the familiar
Windows navigation schema where you would expect to find them.
For more information, see the Create Delivery Groups section in the Citrix Virtual Apps and Desktops
documentation.
Configure self-service mode
By simply adding a StoreFront account to Citrix Workspace app or configuring Citrix Workspace app
to point to a StoreFront site, you can configure self-service mode, which allows users to subscribe to
applications from the Citrix Workspace user interface. This enhanced user experience is similar to that
of a mobile app store.
Note:
By default, Citrix Workspace app allows users to select the applications they want to display in
their Start menu.
© 1999-2021 Citrix Systems, Inc. All rights reserved. 89

Citrix Workspace app for Windows
In self-service mode, you can configure mandatory, auto-provisioned, and featured app keyword set-
tings as needed.
Append keywords to the descriptions you provide for delivery group applications:
• To make an individual app mandatory, so that it cannot be removed from Citrix Workspace app,
append the string KEYWORDS: Mandatory to the application description. There is no Remove
option for users to unsubscribe to mandatory apps.
• To automatically subscribe all users of a store to an application, append the string KEYWORDS:
Auto to the description. When users log on to the store, the application is automatically provi-
sioned without users needing to manually subscribe to the application.
• To advertise applications to users or to make commonly used applications easier to find by list-
ing them in the Citrix Workspace Featured list, append the string KEYWORDS: Featured to the
application description.
Customize the app shortcut location using the Group Policy Object template
1. Open the Citrix Workspace app Group Policy Object administrative template by running
gpedit.msc.
2. Under the Computer Configuration node, go to Administrative Templates > Citrix Compo-
nents > Citrix Workspace > Self Service.
3. Select Manage SelfServiceMode policy.
a) Select Enabled to view the Self-service user interface.
b) Select Disabled to subscribe to the apps manually. This option hides the Self-service user
interface.
4. Select Manage App Shortcut policy.
5. Select the options as required.
6. Click Apply and OK.
7. Restart Citrix Workspace app for the changes to take eect.
Using StoreFront account settings to customize app shortcut locations
You can set up shortcuts in the Start menu and on the desktop from the StoreFront site. The follow-
ing settings can be added in the web.config file in C:\inetpub\wwwroot\Citrix\Roamingin the
<annotatedServices> section:
• To put shortcuts on the desktop, use PutShortcutsOnDesktop. Settings: “true” or “false” (de-
fault is false).
• To put shortcuts in the Start menu, use PutShortcutsInStartMenu. Settings: “true” or “false”
(default is true).
• To use the category path in the Start menu, use UseCategoryAsStartMenuPath. Settings: “true”
or “false” (default is true).
© 1999-2021 Citrix Systems, Inc. All rights reserved. 90

Citrix Workspace app for Windows
Note:
Windows 8, 8.1 and Windows 10 do not allow the creation of nested folders within the Start menu.
Applications are displayed individually or under the root folder but not within Category sub fold-
ers defined with Citrix Virtual Apps and Desktops.
• To set a single directory for all shortcuts in the Start menu, use StartMenuDir. Setting: String
value, being the name of the folder into which shortcuts are written.
• To reinstall modified apps, use AutoReinstallModifiedApps. Settings: “true” or “false” (default
is true).
• To show a single directory for all shortcuts on the desktop, use DesktopDir. Setting: String
value, being the name of the folder into which shortcuts are written.
• To notcreate an entryon the clients ‘add/remove programs’, use DontCreateAddRemoveEntry
. Settings: “true” or “false” (default is false).
• To remove shortcuts and Citrix Workspace icon for an application that was previously available
from the Store but now is not available, use SilentlyUninstallRemovedResources. Set-
tings: “true” or “false” (default is false).
In the web.config file, add the changes in the XML section for the account. Find this section by locating
the opening tab:
<account id=... name=”Store”
The section ends with the </account> tag.
Before the end of the account section, in the first properties section:
<properties> <clear> <properties>
Properties can be added into this section aer the <clear /> tag, one per line, giving the name and
value. For example:
<property name=”PutShortcutsOnDesktop”value=”True”/>
Note:
Property elements added before the <clear /> tag may invalidate them. Removing the <clear />
tag when adding a property name and value is optional.
An extended example for this section is:
<properties <property name=”PutShortcutsOnDesktop”value=”True”<property
name=”DesktopDir”value=”Citrix Applications”>
Important
In multiple server deployments, use only one server at a time to make changes to the configura-
tion of the server group. Ensure that the Citrix StoreFront management console is not running
© 1999-2021 Citrix Systems, Inc. All rights reserved. 91

Citrix Workspace app for Windows
on any of the other servers in the deployment. Once complete, propagate your configuration
changes to the server group, so that the other servers in the deployment are updated. For more
information, see StoreFront documentation.
Using per-app settings in Citrix Virtual Apps and Desktops 7.x to customize app shortcut
locations
Citrix Workspace app can be configured to automatically place application and desktop shortcuts di-
rectly in the Start menu or on the desktop. This functionality was similar to previously released ver-
sions of Workspace for Windows, however, release 4.2.100 introduced the ability to control app short-
cut placement using Citrix Virtual Apps per app settings. This functionality is useful in environments
with a handful of applications that need to be displayed in consistent locations.
Using per app settings in XenApp 7.6 to customize app shortcut locations
To configure a per app publishing shortcut in XenApp 7.6:
1. In Citrix Studio, locate the Application Settings screen.
2. In the Application Settings screen, select Delivery. Using this screen, you can specify how
applications are delivered to users.
3. Select the appropriate icon for the application. Click Change to browse to the location of the
desired icon.
4. In the Application category field, optionally specify the category in Citrix Workspace app where
the application appears. For example, if you are adding shortcuts to Microso Oice applica-
tions, enter Microso Oice.
5. Select the Add shortcut to user’s desktop check box.
6. Click OK.
Reducing enumeration delays or digitally signing application stubs
If users experience delays in app enumeration at each logon, or if there is a need to digitally sign ap-
plication stubs, Citrix Workspace app provides functionality to copy the .EXE stubs from a network
share.
© 1999-2021 Citrix Systems, Inc. All rights reserved. 92

Citrix Workspace app for Windows
This functionality involves several steps:
1. Create the application stubs on the client machine.
2. Copy the application stubs to a common location accessible from a network share.
3. If necessary, prepare an allow list (or, sign the stubs with an Enterprise certificate.
4. Add a registry key to enable Workspace for Windows to create the stubs by copying them from
the network share.
If RemoveappsOnLogo and RemoveAppsonExit are enabled, and users are experiencing delays in
app enumeration at every logon, use the following workaround to reduce the delays:
1. Use regedit to add HKEY_CURRENT_USER\Software\Citrix\Dazzle /v ReuseStubs /t
REG_SZ /d “true”.
2. Use regedit to add HKEY_LOCAL_MACHINE\Software\Citrix\Dazzle /v ReuseStubs /t
REG_SZ /d “true”. HKEY_CURRENT_USER has preference over HKEY_LOCAL_MACHINE.
Caution
Editing the registry incorrectly can cause serious problems that may require you to reinstall your
operating system. Citrix cannot guarantee that problems resulting from the incorrect use of Reg-
istry Editor can be solved. Use Registry Editor at your own risk. Be sure to back up the registry
before you edit it.
Enable a machine to use pre-created stub executables that are stored on a network share:
1. On a client machine, create stub executables for all of the apps. To accomplish this, add all the
applications to the machine using Citrix Workspace app. Citrix Workspace app generates the
executables.
2. Harvest the stub executables from %APPDATA%\Citrix\SelfService. You only need the .exe
files.
3. Copy the executables to a network share.
4. For each client machine that is locked down, set the following registry keys:
a) Reg add HKEY_LOCAL_MACHINE\Software\Citrix\Dazzle /v CommonStubDirectory
/t REG_SZ /d “\\ShareOne\WorkspaceStubs”
b) Reg add HKEY_LOCAL_MACHINE\Software\Citrix\Dazzle /v
c) CopyStubsFromCommonStubDirectory /t REG_SZ /d “true”. It’s also possible to con-
figure these settings on HKEY_CURRENT_USER if you prefer. HKEY_CURRENT_USER has
preference over HKEY_LOCAL_MACHINE.
d) Exit and restart Citrix Workspace app for the changes to take eect.
Example use cases:
This topic provides use cases for app shortcuts.
© 1999-2021 Citrix Systems, Inc. All rights reserved. 93

Citrix Workspace app for Windows
Allowing users to choose what they want in the Start menu (Self-Service)
If you have dozens (or even hundreds) of apps, it’s best to allow users to select which applications
they want to Favorite and add to the Start menu:
If you want the user to choose the applications,
they want in their Start menu..
configure Citrix Workspace app in self-service
mode. In this mode, you also configure
auto-provisioned and mandatory app keyword
settings as needed.
If you want the user to choose the applications,
they want in their Start menu but also want
specific app shortcuts on the desktop..
configure Citrix Workspace app without any
options and then use per app settings for the
few apps that you want on the desktop. Use
auto provisioned and mandatory apps as
needed.
No app shortcuts in the Start menu
If a user has a family computer, you might not need or want app shortcuts at all. In such scenarios,
the simplest approach is browser access; install Citrix Workspace app without any configuration and
browse to workspace for web. You can also configure Citrix Workspace app for self-service access
without putting shortcuts anywhere.
If you want to prevent Citrix Workspace app
from putting application shortcuts in the Start
menu automatically.
configure Citrix Workspace app with
PutShortcutsInStartMenu=False. Citrix
Workspace app will not put apps in the Start
menu even in self-service mode unless you put
them there using per app settings.
All app shortcuts in the Start menu or on the Desktop
If the user has only a few apps, you can put them all in the Start menu or all on the desktop, or in a
folder on the desktop.
© 1999-2021 Citrix Systems, Inc. All rights reserved. 94

Citrix Workspace app for Windows
If you want Citrix Workspace app to put all
application shortcuts in the start menu
automatically..
configure Citrix Workspace app with
SelfServiceMode =False. All available apps
appear in the Start menu.
If you want all application shortcuts to put on
desktop..
configure Citrix Workspace app with
PutShortcutsOnDesktop = true. All available
apps appear in the desktop.
If you want all shortcuts to be, put on the
desktop in a folder…
configure Citrix Workspace app with
DesktopDir=Name of the desktop folder where
you want applications.
Per app settings in XenApp 6.5 or 7.x
If you want to set the location of shortcuts so every user finds them in the same place use XenApp per
App Settings:
If you want per-app settings to determine
where applications are placed independently
of whether in self-service mode or Start menu
mode..
configure Citrix Workspace app with
PutShortcutsInStartMenu=false and enable per
app settings.
Apps in category folders or in specific folders
If you want applications displayed in specific folders use the following options:
If you want the application shortcuts Citrix
Workspace app places in the start menu to be
shown in their associated category (folder)..
configure Citrix Workspace app with
UseCategoryAsStartMenuPath=True.
If you want the applications that Citrix
Workspace app puts in the Start menu to be in
a specific folder.
configure Citrix Workspace app with
StartMenuDir=the name of the Start menu
folder name.
© 1999-2021 Citrix Systems, Inc. All rights reserved. 95

Citrix Workspace app for Windows
Remove apps on logo or exit
If you don’t want users to see apps if another user is going to share the end point, you can ensure that
apps are removed when the user logs o and exits
If you want Citrix Workspace app to remove all
apps on logo..
configure Citrix Workspace app with
RemoveAppsOnLogo=True.
If you want Citrix Workspace app to remove
apps on exit..
configure Citrix Workspace app with
RemoveAppsOnExit=True.
Configuring Local App Access applications
When configuring Local App Access applications:
• To specify that a locally installed application must be used instead of an application available
in Citrix Workspace app, append the text string KEYWORDS:prefer=”pattern.” This feature is re-
ferred to as Local App Access.
Before installing an application on a user’s computer, Citrix Workspace app searches for the
specified patterns to determine if the application is installed locally. If it is, Citrix Workspace
app subscribes the application and does not create a shortcut. When the user starts the appli-
cation from the Citrix Workspace app window, Citrix Workspace app starts the locally installed
(preferred) application.
If a user uninstalls a preferred application outside of Citrix Workspace app, the application is un-
subscribed during the next Citrix Workspace app refresh. If a user uninstalls a preferred applica-
tion from the Citrix Workspace app dialog, Citrix Workspace app unsubscribes the application
but does not uninstall it.
Note:
The keyword prefer is applied when Citrix Workspace app subscribes an application. Adding the
keyword aer the application is subscribed has no eect.
You can specify the prefer keyword multiple times for an application. Only one match is needed to
apply the keyword to an application. The following patterns can be used in any combination:
• To specify that a locally installed application should be used instead of an application available
in Citrix Workspace app, append the text string KEYWORDS:prefer=”pattern”. This feature is re-
ferred to as Local App Access.
Before installing an application on a user’s computer, Citrix Workspace app searches for the
specified patterns to determine if the application is installed locally. If it is, Citrix Workspace
© 1999-2021 Citrix Systems, Inc. All rights reserved. 96

Citrix Workspace app for Windows
app subscribes the application and does not create a shortcut. When the user starts the appli-
cation from the Citrix Workspace app dialog, Citrix Workspace app starts the locally installed
(preferred) application.
If a user uninstalls a preferred application outside of Citrix Workspace app, the application is
unsubscribed during the next Citrix Workspace app refresh. If a user uninstalls a preferred ap-
plication from the Citrix Workspace app, Citrix Workspace app unsubscribes the application but
does not uninstall it.
Note:
The keyword prefer is applied when Citrix Workspace app subscribes an application. Adding the
keyword aer the application is subscribed has no eect.
You can specify the prefer keyword multiple times for an application. Only one match is needed to
apply the keyword to an application. The following patterns can be used in any combination:
• prefer=”ApplicationName”
The application name pattern matches any application with the specified application name in
the shortcut file name. The application name can be a word or a phrase. Quotation marks are re-
quired for phrases. Matching is not allowed on partial words or file paths and is case-insensitive.
The application name matching pattern is useful for overrides performed manually by an admin-
istrator.
KEYWORDS:prefer= Shortcut under Programs Matches?
Word \Microso Oice\Microso
Word 2010
Yes
Microso Word \Microso Oice\Microso
Word 2010
Yes
Console McAfee\VirusScan Console Yes
Virus McAfee\VirusScan Console No
Console McAfee\VirusScan Console Yes
• prefer=”\\Folder1\Folder2\…\ApplicationName”
The absolute path pattern matches the entire shortcut file path plus the entire application name
under the Start menu. The Programs folder is a sub folder of the Start menu directory, so you
must include it in the absolute path to target an application in that folder. Quotation marks
are required if the path contains spaces. The matching is case-sensitive. The absolute path
matching pattern is useful for overrides implemented programmatically in Citrix Virtual Apps
and Desktops.
© 1999-2021 Citrix Systems, Inc. All rights reserved. 97

Citrix Workspace app for Windows
KEYWORDS:prefer= Shortcut under Programs Matches?
\Programs\Microso
Oice\Microso Word 2010
\Programs\Microso
Oice\Microso Word 2010
Yes
\Microso Oice \Programs\Microso
Oice\Microso Word 2010
No
\Microso Word 2010 \Programs\Microso
Oice\Microso Word 2010
No
\Programs\Microso Word
2010
\Programs\Microso Word
2010
Yes
• prefer=”\Folder1\Folder2\…\ApplicationName”
The relative path pattern matches the relative shortcut file path under the Start menu. The rel-
ative path provided must contain the application name and can optionally include the folders
where the shortcut resides. Matching is successful if the shortcut file path ends with the rela-
tive path provided. Quotation marks are required if the path contains spaces. The matching
is case-sensitive. The relative path matching pattern is useful for overrides implemented pro-
grammatically.
KEYWORDS:prefer= Shortcut under Programs Matches?
\Microso Oice\Microso
Word 2010
\Microso Oice\Microso
Word 2010
Yes
\Microso Oice \Microso Oice\Microso
Word 2010
No
\Microso Word 2010 \Microso Oice\Microso
Word 2010
Yes
\Microso Word \Microso Word 2010 No
For information about other keywords, see “Additional recommendations” in Optimize the user expe-
rience section in the StoreFront documentation.
Graphics mode indicator
The Display graphics mode indicator policy has been updated to replace the display lossless indicator
policy.
This setting configures the graphics mode indicator to run in the user session. It allows you to see
© 1999-2021 Citrix Systems, Inc. All rights reserved. 98

Citrix Workspace app for Windows
details about the graphics mode in use, including graphics provider, encoder, hardware encoding,
image quality, progressive display status, and lossless text.
By default, the Display graphics mode indicator policy is disabled. It replaces the Display lossless
indicator policy of earlier releases, which was enabled by default.
Virtual display layout
This feature lets you define a virtual monitor layout that applies to the remote desktop and to virtually
split a single client monitor into up to eight monitors on the remote desktop. You can configure the
virtual monitors on the Monitor Layout tab in the Desktop Viewer. There, you can draw horizontal or
vertical lines to separate the screen into virtual monitors. The screen is split according to specified
percentages of the client monitor resolution.
You can set a DPI for the virtual monitors that is used for DPI scaling or DPI matching. Aer applying a
virtual monitor layout, resize or reconnect the session.
This configuration applies only to full-screen, single-monitor desktop sessions, and does not aect
any published applications. This configuration applies to all subsequent connections from this client.
Application launch time
Use the session prelaunch feature to reduce application launch time during normal or high traic peri-
ods, thus providing users with a better experience. The prelaunch feature allows a prelaunch session
to be created when a user logs on to Citrix Workspace app, or at a scheduled time if the user is already
logged on.
This prelaunch session reduces the launch time of the first application. When a user adds a new ac-
count connection to Citrix Workspace app for Windows, session prelaunch does not take eect until
the next session. The default application ctxprelaunch.exe is running in the session, but it is not visible
to you.
For more information, see that the session prelaunch and session linger guidance in the Citrix Virtual
Apps and Desktops article titled Manage delivery groups.
Session prelaunch is disabled by default. To enable session prelaunch, specify the ENABLEPRELAUNCH
=true parameter on the Workspace command line or set the EnablePreLaunch registry key to true.
The default setting, null, means that prelaunch is disabled.
Note:
If the client machine has been configured to support Domain Passthrough (SSON) authentica-
tion, prelaunch is automatically enabled. If you want to use Domain Pass-through (SSON) with-
© 1999-2021 Citrix Systems, Inc. All rights reserved. 99

Citrix Workspace app for Windows
out prelaunch, set the EnablePreLaunch registry key value to
false.
The registry locations are:
• HKEY_LOCAL_MACHINE\Software\[Wow6432Node\]Citrix\\Dazzle
• HKEY_CURRENT_USER\Software\Citrix\Dazzle
There are two types of prelaunch:
• Just-in-time prelaunch- prelaunch starts immediately aer the user’s credentials are authen-
ticated whether it is a high-traic period. Typically used for normal traic periods. A user can
trigger just-in-time prelaunch by restarting the Citrix Workspace app.
• Scheduled prelaunch- prelaunch starts at a scheduled time. Scheduled prelaunch starts only
when the user device is already running and authenticated. If those two conditions are not met
when the scheduled prelaunch time arrives, a session does not launch. To spread network and
server load, the session launches within a window of when it is scheduled. For example, if the
scheduled prelaunch is scheduled for 1:45 p.m., the session actually launches between 1:15 p.m.
and 1:45 p.m. Typically used for high-traic periods.
Configuring prelaunch on a Citrix Virtual Apps server consists of creating, modifying, or deleting
prelaunch applications, and updating user policy settings that control the prelaunch application.
You cannot customize the prelaunch feature using the receiver.admx file. However, you can change
the prelaunch configuration by modifying registry values during or aer Citrix Workspace app for Win-
dows installation.
• The HKEY_LOCAL_MACHINE values are written during client installation.
• The HKEY_CURRENT_USER values enable you to provide dierent users on the same machine
with dierent settings. Users can change the HKEY_CURRENT_USER values without administra-
tive permission. You can provide your users with scripts to accomplish this.
HKEY_LOCAL_MACHINE registry values:
For 64-bit Windows operating systems: HKEY_LOCAL_MACHINE\SOFTWARE\Wow6432Node\Citrix
\ICA Client\Prelaunch
For 32-bit Windows operating systems: HKEY_LOCAL_MACHINE\SOFTWARE\Citrix\ICA Client\
Prelaunch
Name: UserOverride
Type: REG_DWORD
Values:
0 - Use the HKEY_LOCAL_MACHINE values even if HKEY_CURRENT_USER values are also present.
1 - Use HKEY_CURRENT_USER values if they exist; otherwise, use the HKEY_LOCAL_MACHINE values.
© 1999-2021 Citrix Systems, Inc. All rights reserved. 100

Citrix Workspace app for Windows
Name: State
Type: REG_DWORD
Values:
0 - Disable prelaunch.
1 - Enable just-in-time prelaunch. (prelaunch starts aer the user’s credentials are authenticated.)
2 - Enable scheduled prelaunch. (prelaunch starts at the time configured for Schedule.)
Name: Schedule
Type: REG_DWORD
Value:
The time (24-hour format) and days of week for scheduled prelaunch entered in the following format:
HH:MM M:T:W:TH:F:S:SU where HH
and MM are hours and
minutes. M:T:W:TH:F:S:SU is
the days of the week. For
example, to enable scheduled
prelaunch on Monday,
Wednesday, and Friday at 1:45
p.m., set Schedule as
Schedule=13:45
1:0:1:0:1:0:0. The session
actually launches between
1:15 p.m. and 1:45 p.m.
HKEY_CURRENT_USER registry values:
HKEY_CURRENT_USER\SOFTWARE\Citrix\ICA Client\Prelaunch
The State and Schedule keys have the same values as for HKEY_LOCAL_MACHINE.
Bidirectional content redirection
The bidirectional content redirection policy allows you to enable or disable client to host and host
to client URL redirection. Server policies are set in Studio, and client policies are set from the Citrix
Workspace app Group Policy Object administration template.
Though Citrix also oers host to client redirection and Local App Access for client to URL redirection,
we recommend that you use bidirectional content redirection for domain-joined Windows clients.
You can enable bidirectional content redirection using one of the following methods:
1. Group Policy Object (GPO) administrative template
2. Registry editor
© 1999-2021 Citrix Systems, Inc. All rights reserved. 101

Citrix Workspace app for Windows
Note:
• Bidirectional content redirection does not work on session where Local App Access is en-
abled.
• Bidirectional content redirection must be enabled both on the server and the client. When
it is disabled either on the server or the client, the functionality is disabled.
• When you include URLs, you can specify one URL or a semi-colon delimited list of URLs. You
can use an asterisk (*) as a wildcard.
To enable bidirectional content redirection using the GPO administrative template:
Use Group Policy Object administrative template configuration only for a first-timeinstallation of Citrix
Workspace app for Windows.
1. Open the Citrix Workspace app Group Policy Object administrative template by running
gpedit.msc.
2. Under the User Configuration node, go to Administrative Templates > Classic Administrative
Templates (ADM) > Citrix Components > Citrix Workspace > User experience.
3. Select the Bidirectional Content Redirection policy.
© 1999-2021 Citrix Systems, Inc. All rights reserved. 102

Citrix Workspace app for Windows
1. In the Published Application or Desktop name field, provide the name of the resource used to
launch the redirected URL.
Note:
When you include URLs, specify a single URL or a semi-colon delimited list of URLs. You
can use an asterisk (*) as a wildcard.
2. From the Above Name is for Published Type, select Application or Desktop of the resource as
appropriate.
3. In the Allowed URLs to be redirected to VDA field, enter the URL that must be redirected. Sep-
© 1999-2021 Citrix Systems, Inc. All rights reserved. 103

Citrix Workspace app for Windows
arate the list with a semicolon.
4. Select Enable URL-specific published application for desktop overrides? option to override
a URL.
5. Click Show to display a list where the value name must match any of the URLs listed in the
Allowed URLs to be redirected to the VDA field. The value must match a published application
name.
6. In the Allowed URLs to be redirected to Client: field, enter the URL that must be redirected
from the server to the client. Separate the list with a semicolon.
Note:
When you include URLs, specify a single URL or a semi-colon delimited list of URLs. You
can use an asterisk (*) as a wildcard.
7. Click Apply and OK.
8. From the command line, run the gpupdate /force command.
To enable bidirectional content redirection using the registry:
To enable bidirectional content redirection, run the redirector.exe /RegIE command from the
Citrix Workspace app installation folder C:\Program Files (x86)\Citrix\ICA Client).
© 1999-2021 Citrix Systems, Inc. All rights reserved. 104

Citrix Workspace app for Windows
Important:
• Ensure that redirection rule does not result in a looping configuration. A looping configura-
tion results if VDA rules are set so that, for example, a URL, https://www.my\\_company
.com is configured to be redirected to the client, and the VDA.
• URL redirection supports only explicit URLs (those appearing in the address bar of the
browser or found using the in-browser navigation, depending on the browser).
• If two applications with same display name are configured to use multiple StoreFront ac-
counts, the display name in the primary StoreFront account is used for launching the appli-
cation or a desktop session.
• New browser window opens only when URL is redirected to the client. When URL is redi-
rected to VDA, if the browser is already open, then the redirected URL opens in the new
tab.
• Embedded links in files like documents, emails, PDF is supported.
• Ensure that only one of the server file type association and the host content redirectionpoli-
cies is set to Enabled on the same machine. Citrix recommends that you disable either the
server file type association feature or the Host Content (URL) Redirection feature to ensure
that URL redirection works properly.
Limitation:
No fallback mechanism is present if the redirection fails due to session launch issues.
Bloomberg keyboards
Citrix Workspace app supports the use of Bloomberg keyboard in a Citrix Virtual Apps and Desktops
session. The required components are installed with the plug-in. You can enable the Bloomberg key-
board feature when installing Citrix Workspace app for Windows or by using the Registry editor.
Multiple sessions with Bloomberg keyboards are not recommended. The keyboard operates in a
single-session environment only.
Configure Bloomberg keyboard:
Caution
Editing the registry incorrectly can cause serious problems that might require you to reinstall
your Operating system. Citrix cannot guarantee that problems resulting from the incorrect use
of Registry editor can be solved. Use Registry editor at your own risk. Be sure to back up the
registry before you edit it.
1. Locate the following key in the registry:
HKEY_LOCAL_MACHINE\SOFTWARE\Citrix\ICA Client\GenericUSB.
2. Do one of the following:
© 1999-2021 Citrix Systems, Inc. All rights reserved. 105

Citrix Workspace app for Windows
• To enable this feature, for the entry with type DWORD and Name EnableBloombergHID,
set the value to 1.
• To disable this feature, set the value to 0.
For more information on configuring Bloomberg Keyboard, see Knowledge Center article CTX122615.
To prevent the desktop viewer window from dimming:
If you have multiple Desktop Viewer windows, by default the desktops that are not active are dimmed.
If users want to view multiple desktops simultaneously, this can make the information on them un-
readable. You can disable the default behavior and prevent the DesktopViewer window from dimming
by editing the Registry editor.
Caution
Editing the registry incorrectly can cause serious problems that might require you to reinstall
your Operating system. Citrix cannot guarantee that problems resulting from the incorrect use
of Registry Editor can be solved. Use Registry Editor at your own risk. Be sure to back up the
registry before you edit it
• On the user device, create a REG_DWORD entry called DisableDimming in one of the following
keys, depending on whether you want to prevent dimming for the current user of the device or
the device itself. An entry exists if the Desktop Viewer has been used on the device:
– HKEY_CURRENT_USER\Software\Citrix\XenDesktop\DesktopViewer
– HKEY_LOCAL_MACHINE\Software\Citrix\XenDesktop\DesktopViewer
Optionally, instead of controlling dimming, you can define a local policy by creating the same
REG_WORD entry in one of the following keys:
• HKEY_CURRENT_USER\Software\Policies\Citrix\XenDesktop\DesktopViewer
• HKEY_LOCAL_MACHINE\Software\Policies\Citrix\XenDesktop\DesktopViewer
Before using these keys, check whether the Citrix Virtual Apps and Desktops administrator has set a
policy for this feature.
Set the entry to any non-zero value such as 1 or true.
If no entries are specified or the entry is set to 0, the Desktop Viewer window is dimmed. If multiple
entries are specified, the following precedence is used. The first entry that is located in this list, and
its value, determine whether the window is dimmed:
1. HKEY_CURRENT_USER\Soware\Policies\Citrix\…
2. HKEY_LOCAL_MACHINE\Soware\Policies\Citrix\…
3. HKEY_CURRENT_USER\Soware\Citrix\…
4. HKEY_LOCAL_MACHINE\Soware\Citrix\…
© 1999-2021 Citrix Systems, Inc. All rights reserved. 106

Citrix Workspace app for Windows
Citrix Casting
The Citrix Ready workspace hub combines digital and physical environments to deliver apps and data
within a secure smart space. The complete system connects devices (or things), like mobile apps and
sensors, to create an intelligent and responsive environment.
Citrix Ready workspace hub is built on the Raspberry Pi 3 platform. The device running Citrix
Workspace app connects to the Citrix Ready workspace hub and casts the apps or desktops on a
larger display. Citrix Casting is supported only on Microso Windows 10 Version 1607 and later or
Windows Server 2016.
Citrix Casting is a feature that has the capability to allow you to instantly and securely access any app
from a mobile device and display on a large screen.
Note:
• Citrix Casting for Windows supports Citrix Ready workspace hub Version 2.40.3839 and
later. Workspace hub with earlier versions might not get detected or cause a casting error.
• The Citrix Casting feature is not supported on Citrix Workspace app for Windows (Store).
Prerequisites:
• Bluetooth enabled on the device for hub discovery.
• Both Citrix Ready workspace hub and Citrix Workspace app must be on the same network.
• Port 55555 must not be blocked between the device running Citrix Workspace app and the Citrix
Ready workspace hub.
• For Citrix Casting, port 1494 must not be blocked.
• Port 55556 is the default port for SSL connections between mobile devices and the Citrix Ready
workspace hub. You can configure a dierent SSL port on Raspberry Pi’s settings page. If the
SSL port is blocked, users cannot establish SSL connections to the workspace hub.
• Citrix Casting is supported only on Microso Windows 10 Version 1607 and later or Windows
Server 2016.
Configure Citrix Casting launch
Note:
You can hide all or part of the Advanced Preferences sheet available from the Citrix Workspace
app icon in the notification area. For more information, see Advanced Preferences sheet.
1. Right-click the Citrix Workspace app icon from the notification area and select Advanced Pref-
erences.
The Advanced Preferences dialog appears.
2. Select Citrix Casting.
© 1999-2021 Citrix Systems, Inc. All rights reserved. 107
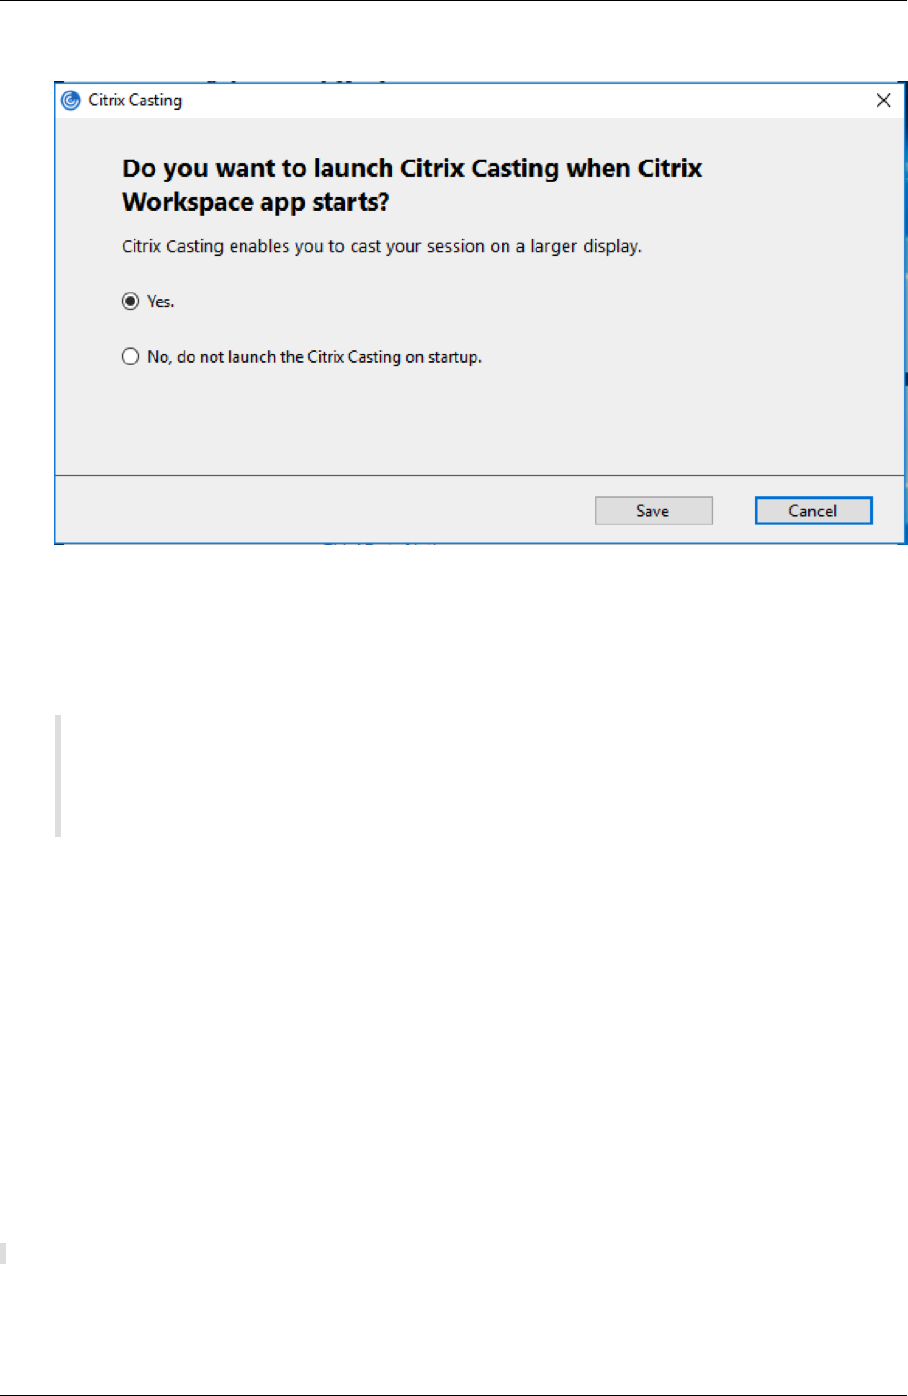
Citrix Workspace app for Windows
The Citrix Casting dialog appears.
3. Select one of the options:
• Yes – Indicates that Citrix Casting is launched when Citrix Workspace app starts.
• No, do not launch the Citrix Casting on startup – Indicates that Citrix Casting does not
launch when Citrix Workspace app starts.
Note:
Selecting the option No does not terminate the current screen casting session. The setting
is applied only at the next Citrix Workspace app launch.
4. Click Save to apply the changes.
How to use Citrix Casting with Citrix Workspace app
1. Log on to Citrix Workspace app and enable Bluetooth on your device.
The list of available hubs is displayed. The list is sorted by the RSSI value of the workspace hub
beacon package.
2. Select the workspace hub to cast your screen and choose one of the following:
• Mirror to duplicate the primary screen and cast the display to the connected workspace
hub device.
• Extend to use the workspace hub device screen as your secondary screen.
© 1999-2021 Citrix Systems, Inc. All rights reserved. 108
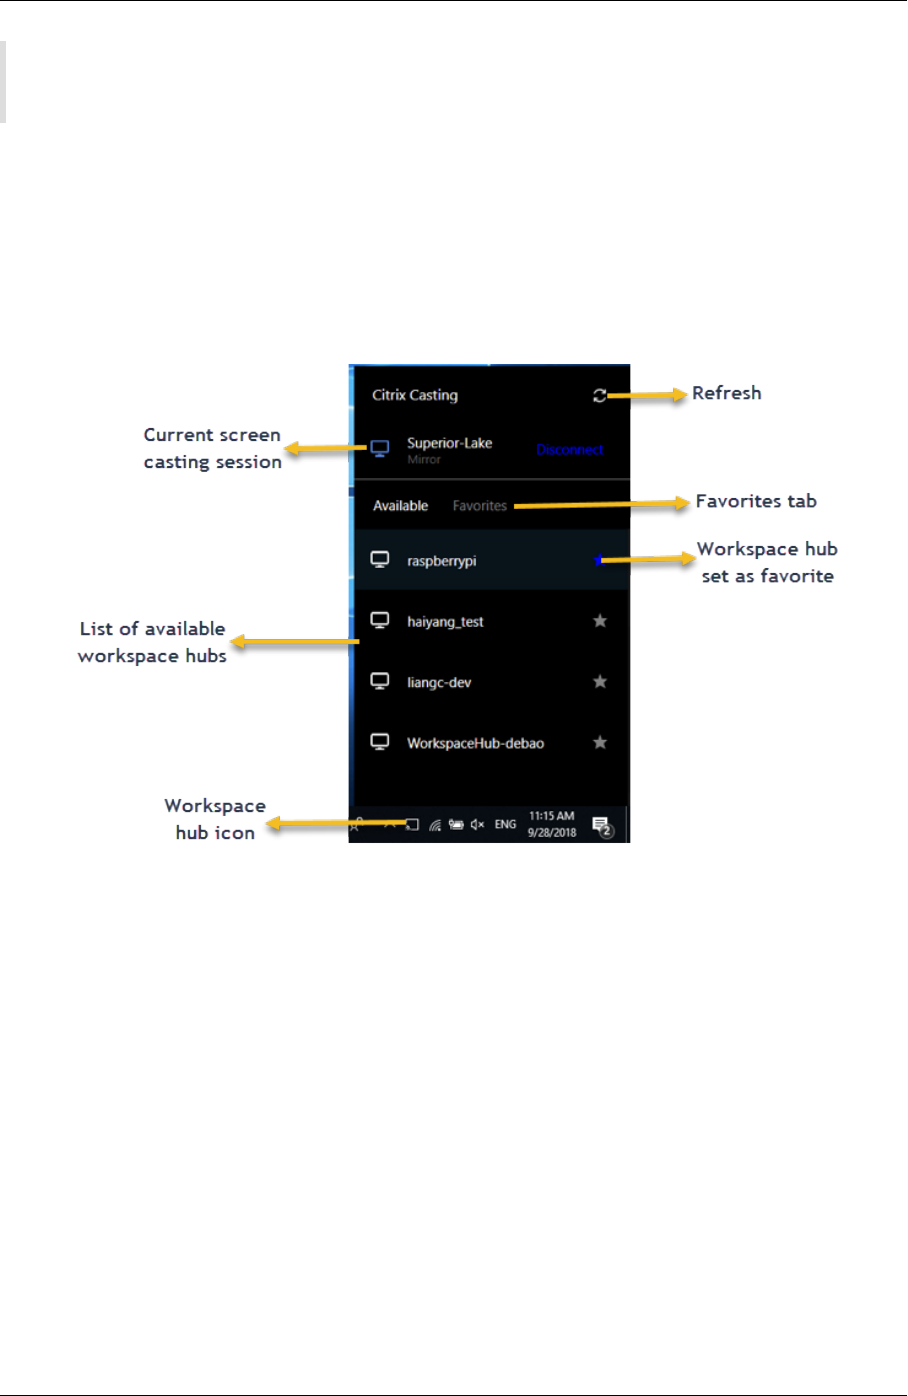
Citrix Workspace app for Windows
Note:
Exiting Citrix Workspace app does not exit Citrix Casting.
In the Citrix Casting notification dialog, the following options are available:
1. The current screen casting session displayed at the top.
2. Refresh icon.
3. Disconnect to stop the current screen casting session.
4. Star icon to add the workspace hub to Favorites.
5. Right-click the workspace hub icon in the notification area and select Exit to disconnect the
screen casting session and to exit Citrix Ready workspace hub.
Self-check list
If Citrix Workspace app cannot detect and communicate with any available workspace hubs in range,
ensure that you do the following as part of self-check:
1. Citrix Workspace app and Citrix Ready workspace hub are connected to the same network.
2. Bluetooth is enabled and working properly on the device where Citrix Workspace app is
launched.
3. The device where Citrix Workspace app is launched is within range (less than 10 meters and
without any obstructing objects such as walls) of Citrix Ready workspace hub.
4. Launch a browser in Citrix Workspace app and type http://<hub_ip>:55555/device-
details.xml to check whether the workspace hub device details are displayed.
5. Click Refresh in Citrix Ready workspace hub and try reconnecting to the workspace hub.
© 1999-2021 Citrix Systems, Inc. All rights reserved. 109

Citrix Workspace app for Windows
Known issues and limitations
1. Citrix Casting does not work unless the device is connected to the same network as the Citrix
Ready workspace hub.
2. In case of network issues, there might be a lag in display on the workspace hub device.
3. When you select Extend, the primary screen where Citrix Ready workspace app is launched
flashes multiple times.
4. In Extend mode, you cannot set the secondary display as the primary display.
5. The screen casting session automatically disconnects when there is any change in the display
settings on the device. For example, change in screen resolution, change in screen orientation.
6. During the screen casting session, if the device running Citrix Workspace app locks, sleeps or
hibernates, an error appears at login.
7. Multiple screen casting sessions are not supported.
8. The maximum screen resolution supported by Citrix Casting is 1920 x 1440.
9. Citrix Casting supports Citrix Ready workspace hub Version 2.40.3839 and later. Workspace hub
with earlier versions might not get detected or cause a casting error.
10. This feature is not supported on Citrix Workspace app for Windows (Store).
11. On Windows 10, Build 1607, Citrix Casting in Extend mode might not be properly positioned.
For more information about Citrix Ready workspace hub, see the Citrix Ready workspace hub section
in the Citrix Virtual Apps and Desktops documentation.
Composite USB device redirection
Configuring composite USB redirection:
1. Open the Citrix Workspace app Group Policy Object administrative template by running
gpedit.msc.
2. Under the User Configuration node, go to Administrative Templates > Citrix Components >
Citrix Workspace > Remoting client devices > Generic USB Remoting.
3. Select the SplitDevices policy.
4. Select Enabled.
5. Click Apply Click OK to save the policy.
To allow or deny an interface:
1. Open the Citrix Workspace app Group Policy Object administrative template by running
gpedit.msc.
2. Under the User Configuration node, go to Administrative Templates > Citrix Components >
Citrix Workspace > Remoting client devices > Generic USB Remoting.
3. Select USB Device Rules policy.
4. Select Enabled.
© 1999-2021 Citrix Systems, Inc. All rights reserved. 110

Citrix Workspace app for Windows
5. In the USB Device Rules text box, add the USB device that you want to allow or deny.
For example, ALLOW: vid=047F pid= C039 split=01 intf=00,03 - allows 00 and 03 in-
terface and restrict others.
6. Click Apply and OK.
In a desktop session, split USB devices are displayed in the Desktop Viewer under Devices. Also, you
can view split USB devices from Preferences > Devices.
Note:
When you split a composite USB device for generic USB redirection, you must select the device
from Desktop Viewer or Connection Center to redirect the device.
In an application session, split USB devices are displayed in the Connection Center.
The table below provides details on the behavior scenarios when a USB interface is allowed or denied.
To allow an interface:
© 1999-2021 Citrix Systems, Inc. All rights reserved. 111

Citrix Workspace app for Windows
Split Interface Action
TRUE Valid number 0 -n Allow specified interface
TRUE Invalid number Allow all interfaces
FALSE Any value Allow Generic USB of parent
device
Not specified Any value Allow Generic USB of parent
device
For example, SplitDevices- true indicates that all devices split.
To deny an interface:
Split Interface Action
TRUE Valid number 0 -n Deny specified interface
TRUE Invalid number Deny all interfaces
FALSE Any value Deny Generic USB of parent
device
Not specified Any value Deny Generic USB of parent
device
For example, SplitDevices- false indicates that devices are not split with specified interface number.
Example: MyPlantronics headset
Interface number:
• Audio Interface Class -0
• HID Interface Class-3
Sample rules used for MyPlantronics headset:
• ALLOW: vid=047F pid= C039 split=01 intf=00,03 /Allowed 00 and 03
interface, restrict others
• DENY: vid=047F pid= C039 split=01 intf=00,03 / deny 00 and 03
Limitation:
Citrix recommends that you do not split interfaces for a webcam. As a workaround, redirect the device
to a single device using Generic USB redirection. For a better performance, use the optimized virtual
channel.
© 1999-2021 Citrix Systems, Inc. All rights reserved. 112

Citrix Workspace app for Windows
DPI scaling
Citrix Workspace app allows the operating system to control the session resolution.
You can apply high DPI in a session but the feature is disabled by default. This means that session
scaling follows the operating system resolution.
You can configure DPI scaling using the following options:
1. Group Policy Object (GPO) administrative template (per-machine configuration)
2. Advanced Preferences (per-user configuration)
Limitations:
• Even with this feature enabled, a slight blur has been observed in the Desktop Viewer.
• In a session, when you change the DPI settings and relaunch it, the size of the session window
might not be appropriate. As a workaround, resize the session window.
To configure DPI scaling using GPO administrative template:
1. Open the Citrix Workspace app Group Policy Object administrative template by running
gpedit.msc.
2. Under the Computer Configuration node, go to Administrative Templates> Citrix Compo-
nents > Citrix Workspace > DPI
3. Select High DPI policy.
© 1999-2021 Citrix Systems, Inc. All rights reserved. 113

Citrix Workspace app for Windows
4. Select from one of the following options:
a) Yes - Indicates that high DPI is applied in a session.
b) No, use the native resolution - Indicates that the resolution is set by the operating system.
5. Click Apply and OK.
6. From the command line, run the gpupdate /force command to apply the changes.
Configure DPI scaling using the graphical user interface:
Note:
You can hide all or part of the Advanced Preferences sheet available from the Citrix Workspace
app for Windows icon in the notification area. For more information, see Advanced Preferences
sheet.
1. Right-click Citrix Workspace app icon from the notification area.
2. Select Advanced Preferences and click DPI settings.
© 1999-2021 Citrix Systems, Inc. All rights reserved. 114

Citrix Workspace app for Windows
The DPI settings dialog appears.
3. Select one of the following options:
a) Yes - Indicates that high DPI is applied in a session.
b) No, use the native resolution - Indicates that the Workspace app detects the DPI on the
VDA and applies it.
c) Let the operating system scale the resolution - By default, this option is selected. It allows
the Windows to handle the DPI scaling. This option also means that the High DPI policy is
set to disabled.
4. Click Save.
5. Restart the Citrix Workspace app session for the changes to take eect.
DPI scaling options
There are three possible settings for DPI scaling in the Citrix Workspace app - Scaled, Unscaled, and
Operating system scaling. The use cases for the dierent settings are as follows.
Scaled:
The scaled setting scales the resolution on the VDA similarly to Operating system scaling, however this
setting supports mixed DPI scenarios. This corresponds to the UI setting Yes, or the High DPI policy
set to Enabled in the GPO policy. This setting works well for mixed DPI scenarios when connecting to
© 1999-2021 Citrix Systems, Inc. All rights reserved. 115

Citrix Workspace app for Windows
modern VDAs. This is the only way to scale seamless sessions. Scaling might cause blurriness in the
images, particularly in the case of text. There can be poor performance when connecting to legacy
VDAs (6.5, or configured for Legacy Graphics). Local App Access, RTOP, and other plug-ins that use
screen positioning APIs do not work with scaling. By design, seamless apps jumps between monitors
in this mode to maintain correct scaling.
This setting is recommended for users on Windows 10 connecting to modern VDAs. It supports mixed
DPI without any additional impact on server resources.
Unscaled:
The unscaled setting sends the full resolution of all monitors in the session. These resolutions are un-
scaled and can result in small text and icons in apps and desktops. This corresponds to the UI setting
“No” and the HighDPI policy is set to Enabled in the GPO. This setting does not cause any blurriness
due to scaling, but can result in small text and icons. When connecting to a desktop session, the DPI
can be set within the VDA resulting in the desired scaling. This is not possible on RDS desktops, or
seamless applications. Enabling this setting causes sessions with higher resolution which can impact
server performance and scalability.
This setting is recommended for desktop sessions requiring the best image quality, where the addi-
tional server resources are acceptable. It can also be used in cases where the small text and icons are
not an issue for the user.
Operating system scaling:
Operating system scaling is the default and corresponds to the UI setting “Let the operating system
scale the resolution”. The High DPI policy set to Disabled in this scenario. This lets the Windows Oper-
ating system handle the DPI scaling for a session. The resolution on the VDA is scaled based on the DPI,
resulting in a smaller resolution than the client device. This works well for single monitor sessions,
and is eicient when connecting to 6.5 VDAs, or VDAs configured for Legacy Graphics. This method
does not support Mixed DPI- all monitors must have the same DPI or the session does not work. Scal-
ing can cause blurriness in the images, particularly in the case of text. There might also be issues with
cursor sizes on Windows 10 Operating system.
This setting is recommended for users on Windows 7 endpoints, or those connecting to legacy VDAs.
It can also be used on Windows 10 if there is no Mixed DPI.
Virtual display layout
This feature lets you define a virtual monitor layout that applies to the remote desktop and to virtually
split a single client monitor into up to eight monitors on the remote desktop. You can configure the
virtual monitors on the Monitor Layout tab in the Desktop Viewer. There, you can draw horizontal or
vertical lines to separate the screen into virtual monitors. The screen is split according to specified
percentages of the client monitor resolution.
You can set a DPI for the virtual monitors that is used for DPI scaling or DPI matching. Aer applying a
© 1999-2021 Citrix Systems, Inc. All rights reserved. 116

Citrix Workspace app for Windows
virtual monitor layout, resize or reconnect the session.
This configuration applies only to full-screen, single-monitor desktop sessions, and does not aect
any published applications. This configuration applies to all subsequent connections from this client.
Generic client Input Method Editors (IME)
Note:
If you’re using a Windows 10 Version 2004 operating system, you might face certain technical
issues when using the IME feature in a session. Those issues are the result of a third-party limita-
tion. For more information, see the Microso Support article.
Configuring generic client IME using the command-line interface:
• To enable generic client IME, run the wfica32.exe /localime:on command from the Citrix
Workspace app installation folder C:\Program Files (x86)\Citrix\ICA Client.
• To disable generic client IME, run the wfica32.exe /localime:off command from the Citrix
Workspace app installation folder C:\Program Files (x86)\Citrix\ICA Client.
Note:
You can use the command-line switch wfica32.exe /localime:on to enable both generic
client IME and keyboard layout synchronization.
• To disable generic client IME, run the wfica32.exe /localgenericime:off command
from the Citrix Workspace app installation folder C:\Program Files (x86)\Citrix\ICA
Client. This command does not aect keyboard layout synchronization settings.
© 1999-2021 Citrix Systems, Inc. All rights reserved. 117

Citrix Workspace app for Windows
If you have disabled generic client IME using the command-line interface, you can enable the feature
again by running the wfica32.exe /localgenericime:on command.
Toggle:
Citrix Workspace app supports toggle functionality for this feature. You can run the wfica32.exe
/localgenericime:on command to enable or disable the feature. However, the keyboard layout
synchronization settings take precedence over the toggle switch. If keyboard layout synchronization
is set to O, toggling does not enable generic client IME.
Configure generic client IME using the graphical user interface:
Generic client IME requires VDA Version 7.13 or later.
Generic client IME feature can be enabled by enabling keyboard layout synchronization. For more
information, see Keyboard layout synchronization.
Citrix Workspace app allows you to configure dierent options to use generic client IME. You can select
from one these options based on your requirements and usage.
1. Right-click the Citrix Workspace app icon in the notification area and select Connection Center.
2. Select Preferences and Local IME.
© 1999-2021 Citrix Systems, Inc. All rights reserved. 118

Citrix Workspace app for Windows
The options below are available to support dierent IME modes:
1. Enable Server IME – Disables local IME and only the languages set on the server can be used.
2. Set Local IME to High Performance mode – Uses local IME with limited bandwidth. This option
restricts the candidate window functionality.
3. Set Local IME to Best Experience mode – Uses local IME with best user experience. This op-
tion consumes high bandwidth. By default, this option is selected when generic client IME is
enabled.
The changes are applied only for the current session.
Enabling hotkey configuration using a registry editor:
When generic client IME is enabled, you can use the Shi+F4 hotkeys to select dierent IME modes.
The dierent options for IME modes appear in the top-right corner of the session.
By default, the hotkey for generic client IME is disabled.
In the registry editor, navigate to HKEY_CURRENT_USER\SOFTWARE\Citrix\ICA Client\Engine
\Lockdown Profiles\All Regions\Lockdown\Client Engine\Hot Key.
Select AllowHotKey and change the default value to 1.
You can use the Shi+F4 hotkeys to select dierent IME modes in a session.
© 1999-2021 Citrix Systems, Inc. All rights reserved. 119

Citrix Workspace app for Windows
The dierent options for IME modes appear in the top-right corner of the session while switching using
these hotkey combinations.
Limitations:
• Generic client IME does not support UWP (Universal Windows Platform) apps such as Search UI,
and the Edge browser of the Windows 10 operating system. As a workaround, use the server IME
instead.
• Generic client IME is not supported on Internet Explorer Version 11 in Protected Mode. As a
workaround, you can disable Protected Mode by using Internet Options. To do this, click Se-
curity and clear Enable Protected Mode.
H.265 video encoding
Citrix Workspace app supports the use of the H.265 video codec for hardware acceleration of remote
graphics and videos. To benefit from this feature, it must be supported and enabled on both the VDA
and Citrix Workspace app. If the GPU on the endpoint does not support H.265 decoding using the
DXVA interface, the H265 Decoding for graphics policy settings is ignored and the session falls back to
using the H.264 video codec.
Prerequisites:
1. VDA 7.16 and later.
2. Enable the Optimize for 3D graphics workload policy on the VDA.
3. Enable the Use hardware encoding for video codec policy on the VDA.
Note:
H.265 encoding is supported only on the NVIDIA GPU.
In Citrix Workspace app for Windows, this feature is set to Disabled by default.
Configuring Citrix Workspace app to use H.265 video encoding using Citrix Group Policy Object
(GPO) administrative template:
© 1999-2021 Citrix Systems, Inc. All rights reserved. 120

Citrix Workspace app for Windows
1. Open the Citrix Workspace app Group Policy Object administrative template by running
gpedit.msc.
2. Under the Computer Configuration node, go to Administrative Templates> Citrix Workspace
> User Experience.
3. Select the H265 Decoding for graphics policy.
4. Select Enabled.
5. Click Apply and OK.
Configuring H.265 video encoding using Registry editor:
Enabling H.265 video encoding on a non-domain joined network on a 32-bit operating system:
1. Launch the Registry Editor using regedit on the Run command.
2. Navigate to HKEY_LOCAL_MACHINE\SOFTWARE\Policies\Citrix\ICA Client\
Graphics Engine.
3. Create a DWORD key by name EnableH265 and set the value of the key to 1.
Enabling H.265 video encoding on a non-domain joined network on a 64-bit operating system:
1. Launch the Registry Editor using regedit on the Run command.
2. Navigate to HKEY_LOCAL_MACHINE\SOFTWARE\Wow6432Node\Policies\Citrix\ICA
Client\Graphics Engine.
3. Create a DWORD key by name EnableH265 and set the value of the key to 1.
Restart the session for the changes to take eect.
Note:
• If the Hardware acceleration for Graphics policy is disabled in the Citrix Workspace app
for Windows Group Policy Object administrative template, the H265 Decoding for graphics
policy settings is ignored and the feature does not work.
• Run the HDX Monitor 3.x tool to identify if H.265 video encoder is enabled within the ses-
sions. For more information about HDX Monitor 3.x tool, see the Knowledge Center article
CTX135817.
Keyboard layout and language bar
Keyboard layout
Note:
You can hide all or part of the Advanced Preferences sheet available from the Citrix Workspace
app icon in the notification area. For more information, see Advanced Preferences sheet.
Keyboard layout synchronization enables you to switch among preferred keyboard layouts on the
client device. This feature is disabled by default. The keyboard layout synchronization allows the
client keyboard layout to automatically synchronize to the Virtual Apps and Desktops session.
© 1999-2021 Citrix Systems, Inc. All rights reserved. 121

Citrix Workspace app for Windows
To configure keyboard layout synchronization using the GPO administrative template:
Note:
The GPO configuration takes precedence over the StoreFront and the GUI configurations.
1. Open the Citrix Workspace app Group Policy Object administrative template by running
gpedit.msc.
2. Under the Computer Configuration or User Configuration node, go to Administrative Tem-
plates > Administrative Templates (ADM) > Citrix Components > Citrix Workspace > User
experience.
3. Select the Keyboard settings policy.
4. Select Enabled and select one the options below:
• Allow dynamic sync - From the drop-down menu, select Yes or No. This option synchro-
nizes the client keyboard layout to the server when you change the client keyboard layout.
When selected, this option also enables the client IME for East Asian languages.
Selecting Yes for this option overrides the following two options.
• Sync mode on session launch - From the drop-down menu, select one of the following
options:
– Sync only once - when session launches - Synchronizes the client keyboard layout to
the server when the session launches. Any changes you make to the client keyboard
© 1999-2021 Citrix Systems, Inc. All rights reserved. 122

Citrix Workspace app for Windows
layout during the session do not take eect immediately. To apply the changes, log
o and log back on.
– Don’t sync - Indicates that the client uses the keyboard layout present on the server.
5. Select Apply and OK.
To configure keyboard layout synchronization using the graphical user interface:
1. From the Citrix Workspace app icon in the notification area icon, select Advanced Preferences
> Keyboard and Language bar.
The Keyboard and Language bar dialog appears.
2. Select from one of the following options:
• Sync only once - when the session launches - Indicates that the keyboard layout is
synced from the VDA only once at the session launch.
• Allow dynamic sync - Indicates that the keyboard layout is synced dynamically to the VDA
when the client keyboard is changed in a session.
• Don’t sync - Indicates that the client uses the keyboard layout present on the server.
© 1999-2021 Citrix Systems, Inc. All rights reserved. 123

Citrix Workspace app for Windows
3. Click Save.
To configure keyboard layout synchronization using CLI:
Run the following command from the Citrix Workspace app for Windows installation folder.
Typically, Citrix Workspace app installation folder is located at C:\Program files (x86)\Citrix
\ICA Client.
• To enable: wfica32:exe /localime:on
• To disable: wfica32:exe /localime:off
Using the client keyboard layout optionactivates the Client IME (Input Method Editor). If users working
in Japanese, Chinese, or Korean prefer to use the Server IME, they must disable the client keyboard
layout option by selecting No, or running wfica32:exe /localime:off. The session reverts to the
keyboard layout provided by the remote server when they connect to the next session.
Sometimes, switching the client keyboard layout does not take eect in an active session. To resolve
this issue, log o from Citrix Workspace app and login again.
Configuring keyboard sync on Windows VDA
Note:
The following procedure applies only on Windows server 2016 and later. On Windows Server 2012
R2 and earlier, the keyboard sync feature is enabled by default.
1. Launch the Registry editor and navigate to HKEY_LOCAL_MACHINE\Software\Citrix\
IcaIme.
2. Create the DWORD entry DisableKeyboardSync and set its value to 0.
1 disables the keyboard layout sync feature.
3. Restart the session for the changes to take eect.
Aer you enable the keyboard layout on both the VDA and Citrix Workspace app, the following window
appears when you switch keyboard layouts.
This window indicates that the session keyboard layout is being switched to the client keyboard lay-
out.
Configuring keyboard sync on Linux VDA
Launch the command prompt and run the following command:
/opt/Citrix/VDA/bin/ctxreg update -k ”HKEY_LOCAL_MACHINE\System\CurrentControlSet
\Control\Citrix\LanguageBar”-v ”SyncKeyboardLayout”-d ”0x00000001”
© 1999-2021 Citrix Systems, Inc. All rights reserved. 124

Citrix Workspace app for Windows
Restart the VDA for the changes to take eect.
For more information about keyboard layout synchronization feature on Linux VDA, see Dynamic key-
board layout synchronization.
Hide the keyboard layout switch notification dialog:
The keyboard layout change notification dialog lets you know that the VDA session is switching the
keyboard layout. The keyboard layout switch needs approximately two seconds to switch. When you
hide the notification dialog, wait for some time before you start typing to avoid incorrect character
input.
Warning
Editing the registry incorrectly can cause serious problems that might require you to reinstall
your operating system. Citrix cannot guarantee that problems resulting from the incorrect use
of Registry Editor can be solved. Use Registry Editor at your own risk. Be sure to back up the
registry before you edit it.
Hide the keyboard layout switch notification dialog using the Registry editor:
1. Launch the Registry editor and navigate to HKEY_LOCAL_MACHINE\Software\Citrix\
IcaIme.
2. Create a String Value key by name HideNotificationWindow.
3. Set the DWORD value to 1.
4. Click OK.
5. Restart the session for the changes to take eect.
Limitations:
• Remote applications which run with elevated privilege (for example, right-click an application
icon > Run as administrator) cannot be synchronized with the client keyboard layout. As a
workaround, manually change the keyboard layout on the server side (VDA) or disable UAC.
• If the user changes the keyboard layout on the client to a layout which is not supported on the
server, the keyboard layout synchronization feature is disabled for security reasons - an unrec-
ognized keyboard layout is treated as a potential security threat. To restore the keyboard layout
synchronization feature, log o and relog in to the session.
• In an RDP session, you cannot change the keyboard layout using Alt + Shi shortcuts. As a
workaround, use the language bar in the RDP session to switch the keyboard layout.
Language bar
The language bar displays the preferred input language in a session. The language bar appears in a
session by default.
© 1999-2021 Citrix Systems, Inc. All rights reserved. 125

Citrix Workspace app for Windows
Note:
This feature is available in sessions running on VDA 7.17 and later.
Configure the language bar using the GPO administrative template:
The language bar displays the preferred input language in an application session.
1. Open the Citrix Workspace app Group Policy Object administrative template by running
gpedit.msc.
2. Under the Computer Configuration or User Configuration node, go to Administrative Tem-
plates > Administrative Templates (ADM) > Citrix Components > Citrix Workspace > User
experience.
3. Select the Language bar policy.
4. Select Enabled and select one of the options below:
• Yes – Indicates that the language bar is displayed in an application session.
• No, hide the language bar – Indicates that the language bar is hidden in an application
session.
5. Click Apply and OK.
Configure language bar using the graphical user interface:
1. Right-click the Citrix Workspace app icon from the notification area and select Advanced Pref-
erences.
2. Select Keyboard and Language bar.
3. Select the Language bar tab.
4. Select from one of the following options:
a) Yes - Indicates that the language bar is displayed in a session.
b) No, hide the language bar - Indicates that the language bar is hidden in a session.
5. Click Save.
The setting changes take eect immediately.
© 1999-2021 Citrix Systems, Inc. All rights reserved. 126
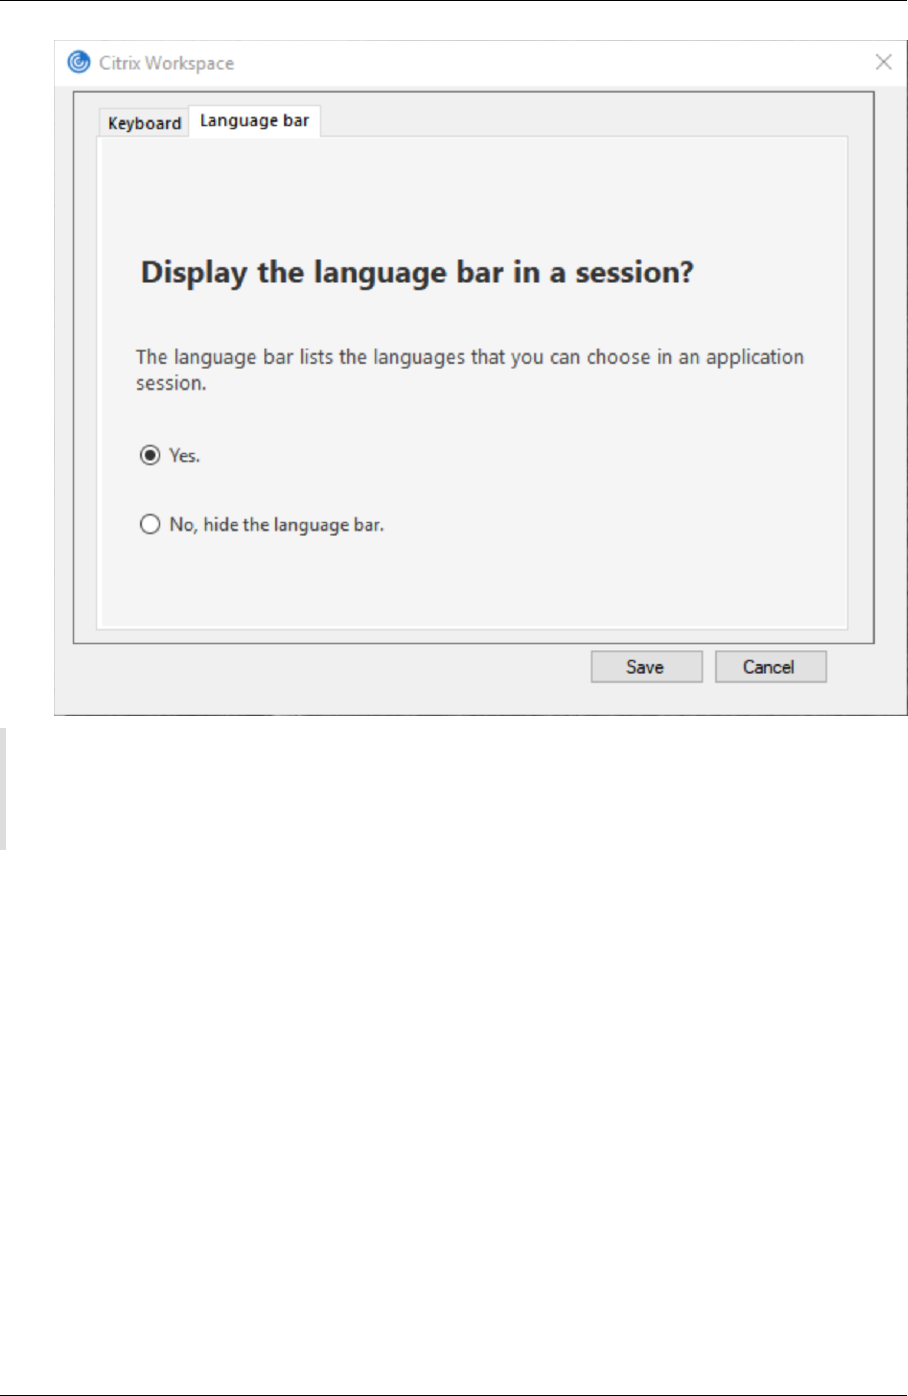
Citrix Workspace app for Windows
Note:
• You can change the settings in an active session.
• The remote language bar does not appear in a session if there is only one input language.
Hide the language bar tab from the Advanced Preferences sheet:
You can hide the language bar tab from the Advanced Preferences sheet by using the registry.
1. Launch the registry editor.
2. NavigatetoHKEY_LOCAL_MACHINE\SOFTWARE\Citrix\ICA Client\Engine\Configuration
\Advanced\Modules\LocalIME.
3. Create a DWORD value key, ToggleOLanguageBarFeature, and set it to 1 to hide the Language
bar option from the Advanced Preferences sheet.
USB support
USB support enables you to interact with a wide range of USB devices when connected to a Citrix
Virtual Apps and Desktops. You can plug USB devices into their computers and the devices are re-
mote to their virtual desktop. USB devices available for remoting include flash drives, smartphones,
PDAs, printers, scanners, MP3 players, security devices, and tablets. Desktop Viewer users can control
© 1999-2021 Citrix Systems, Inc. All rights reserved. 127

Citrix Workspace app for Windows
whether USB devices are available on the Citrix Virtual Apps and Desktops using a preference in the
toolbar.
Isochronous features in USB devices, such as webcams, microphones, speakers, and headsets are
supported in typical low latency/high-speed LAN environments. This allows these devices to interact
with packages, such as Microso Oice Communicator and Skype.
The following types of device are supported directly in a Citrix Virtual Apps and Desktops session, and
so does not use USB support:
• Keyboards
• Mice
• Smart cards
Specialist USB devices (for example, Bloomberg keyboards and 3-D mice) can be configured to use
USB support. For information on configuring Bloomberg keyboards, see
Configure Bloomberg keyboards.
For information on configuring policy rules for other specialist USB devices, see Knowledge Center
article
CTX122615.
By default, certain types of USB devices are not supported for remoting through Citrix Virtual Apps
and Desktops. For example, a user may have a network interface card attached to the system board
by internal USB. Remoting this device would not be appropriate. The following types of USB device
are not supported by default in a Citrix Virtual Apps and Desktops session:
• Bluetooth dongles
• Integrated network interface cards
• USB hubs
• USB graphics adapters
USB devices connected to a hub can be remote, but the hub itself cannot be remote.
The following types of USB device are not supported by default for use in a Citrix Virtual Apps session:
• Bluetooth dongles
• Integrated network interface cards
• USB hubs
• USB graphics adapters
• Audio devices
• Mass storage devices
How USB support works:
When a user plugs in a USB device, it is checked against the USB policy, and, if allowed, remoted to the
virtual desktop. If the device is denied by the default policy, it is available only to the local desktop.
© 1999-2021 Citrix Systems, Inc. All rights reserved. 128

Citrix Workspace app for Windows
When a user plugs in a USB device, a notification appears to inform the user about a new device. The
user can decide which USB devices are remoted to the virtual desktop by selecting devices from the
list each time they connect. Alternatively, the user can configure USB support so that all USB devices
plugged in both before and/or during a session is automatically remoted to the virtual desktop that is
in focus.
Mass storage devices
For mass storage devices only, in addition to USB support, remote access is available through client
drive mapping, which you configure through the Citrix Workspace app for Windows policy Remoting
client devices > Client drive mapping. When this policy is applied, the drives on the user device
are automatically mapped to drive letters on the virtual desktop when users log on. The drives are
displayed as shared folders with mapped drive letters.
The main dierences between the two types of remoting policy are:
Feature Client drive mapping USB support
Enabled by default Yes No
Read-only access
configurable
Yes No
Safe to remove device during
a session
No Yes, if the user clicks Safely
Remove Hardware in the
notification area
If both Generic USB and the client drive-mapping policies are enabled and a mass storage device is in-
serted before a session starts, it is redirected using client drive mapping first, before being considered
for redirection through USB support. If it is inserted aer a session has started, it will be considered
for redirection using USB support before client drive mapping.
USB device classes allowed by default:
Dierent classes of USB device are allowed by the default USB policy rules.
Although they are on this list, some classes are only available for remoting in Citrix Virtual Apps and
Desktops sessions aer additional configuration. These are noted below.
• Audio (Class 01)- Includes audio input devices (microphones), audio output devices, and MIDI
controllers. Modern audio devices generally use isochronous transfers, which are supported
by XenDesktop 4 or later. Audio (Class01) is not applicable to Citrix Virtual Apps because these
devices are not available for remoting in Citrix Virtual Apps using USB support.
© 1999-2021 Citrix Systems, Inc. All rights reserved. 129

Citrix Workspace app for Windows
Note:
Some specialty devices (for example, VOIP phones) require additional configuration. For more
information, see Knowledge Center article CTX123015.
• Physical Interface Devices (Class 05)- These devices are similar to Human Interface Devices
(HIDs), but generally provide “real-time” input or feedback and include force feedback joysticks,
motion platforms, and force feedback endoskeletons.
• Still Imaging (Class 06)- Includes digital cameras and scanners. Digital cameras oen support
the still imaging class which uses the Picture Transfer Protocol (PTP) or Media Transfer Protocol
(MTP) to transfer images to a computer or other peripheral. Cameras may also appear as mass
storage devices and it may be possible to configure a camera to use either class, through setup
menus provided by the camera itself.
Note:
If a camera appears as a mass storage device, client drive mapping is used and USB support is
not required.
• Printers (Class 07)- In general most printers are included in this class, although some use
vendor-specific protocols (class ). Multi-function printers may have an internal hub or be
composite devices. In both cases the printing element generally uses the Printers class and the
scanning or fax element uses another class; for example, Still Imaging.
Printers normally work appropriately without USB support.
Note
This class of device (in particular printers with scanning functions) requires additional con-
figuration. For instructions on this, see Knowledge Center article CTX123015.
• Mass Storage (Class 08)- The most common mass storage devices are USB flash drives; others
include USB-attached hard drives, CD/DVD drives, and SD/MMC card readers. There are a wide
variety of devices with internal storage that also present a mass storage interface; these include
media players, digital cameras, and mobile phones. Mass Storage (Class 08) is not applicable
to Citrix Virtual Apps because these devices are not available for remoting in Citrix Virtual Apps
using USB support. Known subclasses include:
– 01 Limited flash devices
– 02 Typically CD/DVD devices (ATAPI/MMC-2)
– 03 Typically tape devices (QIC-157)
– 04 Typically floppy disk drives (UFI)
– 05 Typically floppy disk drives (SFF-8070i)
– 06 Most mass storage devices use this variant of SCSI
© 1999-2021 Citrix Systems, Inc. All rights reserved. 130

Citrix Workspace app for Windows
Mass storage devices can oen be accessed through client drive mapping, and so USB support
is not required.
• Content Security (Class 0d)- Content security devices enforce content protection, typically for
licensing or digital rights management. This class includes dongles.
• Video (Class 0e)- The video class covers devices that are used to manipulate video or video-
related material, such as webcams, digital camcorders, analog video converters, some televi-
sion tuners, and some digital cameras that support video streaming.
Important
Most video streaming devices use isochronous transfers, which are supported by XenDesktop 4
or later. Some video devices (for example webcams with motion detection) require additional
configuration. For instructions on this, see Knowledge Center article CTX123015.
• Personal Healthcare (Class 0f)- These devices include personal healthcare devices such as
blood pressure sensors, heart rate monitors, pedometers, pill monitors, and spirometry.
• Application and Vendor Specific (Classes fe and )- Many devices use vendor-specific proto-
cols or protocols not standardized by the USB consortium, and these usually appear as vendor-
specific (class ).
USB devices classes denied by default
The following dierent classes of USB device are denied by the default USB policy rules.
• Communications and CDC Control (Classes 02 and 0a). The default USB policy does not allow
these devices, because one of the devices may be providing the connection to the virtual desk-
top itself.
• Human Interface Devices (Class 03). Includes a wide variety of both input and output devices.
Typical Human Interface Devices (HIDs) are keyboards, mice, pointing devices, graphic tablets,
sensors, game controllers, buttons, and control functions.
Subclass 01 is known as the “boot interface” class and is used for keyboards and mice.
The default USB policy does not allow USB keyboards (class 03, subclass 01, protocol 1), or USB
mice (class 03, subclass 01, protocol 2). This is because most keyboards and mice are handled
appropriately without USB support and it is normally necessary to use these devices locally as
well remotely when connecting to a virtual desktop.
• USB Hubs (Class 09). USB hubs allow extra devices to be connected to the local computer. It is
not necessary to access these devices remotely.
• Smart Card (Class 0b). Smart card readers include contactless and contact smart card readers,
and also USB tokens with an embedded smart card-equivalent chip.
© 1999-2021 Citrix Systems, Inc. All rights reserved. 131

Citrix Workspace app for Windows
Smart card readers are accessed using smart card remoting and do not require USB support.
• Wireless Controller (Class e0). Some of these devices may be providing critical network access,
or connecting critical peripherals, such as Bluetooth keyboards or mice.
The default USB policy does not allow these devices. However, there may be particular devices
to which it is appropriate to provide access using USB support.
• Miscellaneous network devices (Class ef, subclass 04)- Some of these devices may be pro-
viding critical network access. The default USB policy does not allow these devices. However,
there may be particular devices to which it is appropriate to provide access using USB support.
Update the list of USB devices available for remoting
You can update the range of USB devices available for remoting to desktops by editing the Citrix
Workspace for Windows template file. This allows you to make changes to the Citrix Workspace for
Windows using Group Policy. The file is located in the following installed folder:
\C:\Program Files\Citrix\ICA Client\Configuration\en
Alternatively, you can edit the registry on each user device, adding the following registry key:
HKEY_LOCAL_MACHINE\SOFTWARE\Policies\Citrix\ICA Client\GenericUSB Type=String Name=”DeviceRules”
Value=
Important
Editing the Registry incorrectly can cause serious problems that may require you to reinstall your
operating system. Citrix cannot guarantee that problems resulting from the incorrect use of Reg-
istry Editor can be solved. Use Registry Editor at your own risk. Be sure to back up the registry
before you edit it.
The product default rules are stored in:
HKEY_LOCAL_MACHINE\SOFTWARE\Citrix\ICA Client\GenericUSB Type=MultiSz Name=“DeviceRules”
Value=
Do not edit the product default rules.
For more information about USB devices policy settings, see USB devices policy settings in Citrix Vir-
tual Apps and Desktops documentation.
Configuring USB audio
Note:
• When you upgrade or install Citrix Workspace app for Windows for the first time, add the
latest template files to the local GPO. For more information on adding template files to the
© 1999-2021 Citrix Systems, Inc. All rights reserved. 132

Citrix Workspace app for Windows
local GPO, see Group Policy Object administrative template. In case of an upgrade, the ex-
isting settings are retained while importing the latest files.
• This feature is available only on Citrix Virtual Apps server.
To configure USB audio devices:
1. Open the Citrix Workspace app Group Policy Object administrative template by running
gpedit.msc.
2. Under the Computer Configuration node, go to Administrative Templates > Classic Admin-
istrative Templates (ADM) > Citrix Components > Citrix Workspace > User experience, and
select Audio through Generic USB Redirection.
3. Edit the settings.
4. Click Apply and OK.
5. Open cmd prompt in administrator mode.
6. Run the below command
gpupdate /force.
vPrefer launch
In earlier releases, you could specify that the instance of an app installed on the VDA (referred to as lo-
cal instance in this document) must be launched in preference to the published application by setting
the KEYWORDS:prefer=”application” attribute in Citrix Studio.
Starting with Version 4.11, in a double-hop scenario (where Citrix Workspace app is running on the VDA
that is hosting your session), you can now control whether Citrix Workspace app launches the local
instance of an application installed on the VDA (if available as a local app) in preference to launching
a hosted instance of the application.
vPrefer is available on StoreFront Version 3.14 and Citrix Virtual Desktops 7.17 and later.
When you launch the application, Citrix Workspace app reads the resource data present on the Store-
Front server and applies the settings based on the vprefer flag at the time of enumeration. Citrix
Workspace app searches for the installation path of the application in the Windows registry on the
VDA and, if present, launches the local instance of the application. Otherwise, a hosted instance of
the application is launched.
If you launch an application that is not installed on the VDA, the hosted application is launched. For
more information on how the local launch is handled on StoreFront, see Control of local application
launch on published desktops in the Citrix Virtual Apps and Desktops documentation.
If you do not want the local instance of the application to be launched on the VDA, set the Lo-
calLaunchDisabled to True using the PowerShell on the Delivery Controller. For more information,
see the Citrix Virtual Apps and Desktops documentation.
This feature helps to launch applications faster, thereby providing a better user experience. You can
© 1999-2021 Citrix Systems, Inc. All rights reserved. 133

Citrix Workspace app for Windows
configure it by using the Group Policy Object (GPO) administrative template. By default, vPrefer is
enabled only in a double-hop scenario.
Note:
When you upgradeor install Citrix Workspaceapp for the first time, add the latest templatefiles to
the local GPO. For more information on adding template files to the local GPO, see Group Policy
Object administrative template. In case of an upgrade, the existing settings are retained while
importing the latest files.
1. Open the Citrix Workspace app GPO administrative template by running gpedit.msc.
2. Under the Computer Configuration node, go to Administrative Template > Citrix Component
> Citrix Workspace > SelfService.
3. Select the vPrefer policy.
4. Select Enabled and from the Allow apps drop-down menu, select one of the following options:
• Allow all apps: This option launches the local instance of all apps on the VDA. Citrix
Workspace app searches for the installed application (including the native Windows apps
such as Notepad, Calculator, WordPad, Command prompt) and launches the application
on the VDA instead of the hosted app.
• Allow installed apps: This option launches the local instance of the installed app on the
VDA. If the app is not installed on the VDA, it launches the hosted app. By default, Allow
installed apps
is selected when the
vPrefer
policy is set to
Enabled
. This option excludes
the native Windows operating system applications such as Notepad, Calculator etc.
• Allow network apps
: This option launches the instance of an app that is published on a
shared network.
5. Click Apply and OK.
6. Restart the session for the changes to take eect.
Limitation:
• Workspace for web does not support this feature.
Workspace configuration
Citrix Workspace app for Windows supports configuring Workspace for subscribers, who might be us-
ing one or more services available from Citrix Cloud.
Citrix Workspace app will intelligently display only the specific workspace resources to which users
are entitled. All your digital workspace resources available in Citrix Workspace app are powered by
the Citrix Cloud Workspace experience service.
A workspace is part of a digital workspace solution that enables IT to securely deliver access to apps
from any device.
This screenshot is an example of what the workspace experience looks like to your subscribers. This
© 1999-2021 Citrix Systems, Inc. All rights reserved. 134

Citrix Workspace app for Windows
interface is evolving and may look dierent to what your subscribers are working with today. For
example, it might say “StoreFront” at the top of the page instead of “Workspace”.
Content Collaboration Service integration
This release introduces integration of Citrix Content Collaboration Service with Citrix Workspace app.
Citrix Content Collaboration enables you to easily and securely exchange documents, send large docu-
ments by email, securely handle document transfers to third parties, and access a collaborationspace.
Citrix Content Collaboration provides many ways to work, including a web-based interface, mobile
clients, desktop apps, and integration with Microso Outlook and Gmail.
You can access Citrix Content Collaboration functionality from the Citrix Workspace app using the
Files tab displayed within Citrix Workspace app. You can view the Files tab only if Content Collabora-
tion Service is enabled in the Workspace configuration from the Citrix Cloud console.
Note:
Citrix Content Collaboration integration in Citrix Workspace app is not supported on Windows
Server 2012 and Windows Server 2016 due to a security option set in the operating system.
The following image displays example contents of the Files tab of the new Citrix Workspace app:
© 1999-2021 Citrix Systems, Inc. All rights reserved. 135

Citrix Workspace app for Windows
Limitations:
• Resetting Citrix Workspace app does not cause Citrix Content Collaboration to log o.
• Switching stores in Citrix Workspace app does not cause Citrix Content Collaboration to log o.
Configure download location for Citrix Files using the Registry editor:
1. Launch the Registry editor and navigate to HKEY_CURRENT_USER\Software\Citrix\
Dazzle\.
2. Create a String Value key by name DownloadPreference.
3. Copy and paste the preferred download path for Citrix Files to the Value column.
4. If you want a prompt for every download, set the Value column to * .
For information about configuring Citrix Files download location using the Advanced Preferences UI,
see Configuring download location using Advanced Preferences in Citrix Workspace app for Windows
Help documentation.
© 1999-2021 Citrix Systems, Inc. All rights reserved. 136

Citrix Workspace app for Windows
SaaS apps
Secure access to SaaS applications provides a unified user experience that delivers published SaaS
applications to the users. SaaS apps are available with single sign-on. Administrators can now protect
the organization’s network and end-user devices from malware and data leaks by filtering access to
specific websites and website categories.
Citrix Workspace app for Windows support the use of SaaS apps using the Citrix Secure Workspace
Access. The service enables administrators to provide a cohesive experience, integrating single sign-
on, and content inspection.
Delivering SaaS apps from the cloud has the following benefits:
• Simple configuration – Easy to operate, update, and consume.
• Single sign-on – Hassle-free log on with single sign-on.
• Standard template for dierent apps – Template-based configuration of popular.
Prerequisites:
• The SaaS application must support SAML 2.0 authentication to be able to apply the single sign-
on feature.
• The Enable enhanced security option must be enabled on the Citrix Secure Workspace Access
so that the embedded browser is used while rendering a SaaS application. If this is option is not
enabled, SaaS apps are launched using the default browser as set on the client.
Note:
Citrix Workspace app aggregates the apps, desktops, and files that are published both from on-
premises and cloud environments for a unified user experience.
Citrix Workspace app includes embedded browser to launch the SaaS apps. This results in a better
user experience when accessing secure SaaS apps.
Note:
• In case of workspace for web, SaaS apps are launched only in the default browser as set on
the client and not in the embedded browser.
• The user experience between an ICA session app and a secure SaaS app might vary.
The embedded browser supports operations such as toolbar, clipboard, Print, Download, and Water-
mark. These operations are applied in Citrix Workspace app as defined in the policy configuration on
the Citrix Secure Workspace Access.
Operations that you can perform using the embedded browser:
Toolbar - When the toolbar option is enabled on an app, you can view the Back, Forward, and Refresh
options in the launched app. The toolbar also displays an ellipsis that includes Clipboard operations.
© 1999-2021 Citrix Systems, Inc. All rights reserved. 137

Citrix Workspace app for Windows
Clipboard - When the clipboard access is enabled on an app, you can use the Cut, Copy, and Paste
options that appear in the toolbar in the launched app. When the option is disabled, the Cut, Copy,
and Paste options are grayed out.
Print- You can run a print command in the launched app if the print option is enabled. When disabled,
the print option does not appear in the launched app.
Navigation - The next and the previous icon appear in the toolbarin the launched app if the navigation
option is enabled.
Download - You can download files from the launched app if the download option is enabled. Right-
click on the launched app and select Save as. Browse to the desired location and click Download.
Note:
When you download a file, a progress bar is not displayed to indicate the status of the download.
The download, however, is successful.
Watermark - When the watermark option is enabled, a watermark containing the user name and the
IP address of the client machine appears in the launched app. The watermark is semi-transparent and
cannot be edited to display any other information.
Configuring cache using the GPO:
When multiple users use the same device to log in to access the Secure SaaS apps, the cache gets
carried forward to the subsequent user, thereby sharing browsing information across users.
To address this issue, Citrix Workspace app introducesa newGroup Policy Object (GPO) administrative
policy. This policy will disallow the storing of the browser cache on the local device.
1. Open the Citrix Workspace app Group Policy Object administrative template by running
gpedit.msc.
2. Under the Computer Configuration node, go to Administrative Templates> Citrix Workspace
> Citrix Secure browser.
3. Select the Cache policy.
Note: By default, this policy is set to Enabled.
4. To disable it, select Disabled and click Apply and OK.
5. Restart Citrix Workspace app for the change to take eect.
Limitations:
1. When you launch a published app with print option enabled and download disabled, and give
a print command on a launched app, you might be able to save the PDF even when the down-
load functionality is restricted. As a workaround, to strictly disable the download functionality,
disable the print option.
2. Videos embedded in an app might not work.
For more information about Workspace configuration, see Workspace configuration in Citrix Cloud.
© 1999-2021 Citrix Systems, Inc. All rights reserved. 138

Citrix Workspace app for Windows
Forinformationon how to configure SaaS apps using Citrix Secure Workspace Access, see Citrix Secure
Workspace Access documentation.
PDF printing
Citrix Workspace app for Windows supports PDF printing in a session. The Citrix PDF Universal Printer
driver allows you to print documents that are launched using hosted applications and desktops run-
ning on Citrix Virtual Apps and Desktops.
When you select the Citrix PDF Printer option from the Print dialog, the printer driver converts the
file to a PDF and transfers the PDF to the local device. The PDF is then launched using the default PDF
viewer for viewing and prints from a locally attached printer.
Citrix recommends the Google Chrome browser or Adobe Acrobat Reader for PDF viewing.
You can enable Citrix PDF printing using Citrix Studio on the Delivery Controller.
Prerequisites:
• Citrix Workspace app Version 1808 or later.
• Citrix Virtual Apps and Desktops Version 7 1808 or later.
• At least one PDF viewer must be installed on your computer.
To enable PDF printing:
1. On the Delivery Controller, use the Citrix Studio, to select the Policy node in the le pane. You
can either create a policy or edit an existing policy.
2. Set the Auto-create PDF Universal Printer policy to Enabled.
Restart the Citrix Workspace app session for the changes to take eect.
Limitation:
• PDF viewing and printing are not supported on the Microso Edge browser.
Expanded tablet mode in Windows 10 using Windows Continuum
Windows Continuum is a Windows 10 feature that adapts to the way the client device is used. Citrix
Workspace app for Windows Version 4.10 and later supports Windows Continuum, including dynamic
change of modes.
For touch-enabled devices, the Windows 10 VDA starts in tablet mode when there is no keyboard or
mouse attached. It starts in desktop mode when either a keyboard or a mouse or both are attached.
Detaching or attaching the keyboard on any client device or the screen on a 2-in-1 device like a Surface
Pro toggles between tablet and desktop modes. For more information, see Tablet mode for touch-
screen devices in Citrix Virtual Apps and Desktops documentation.
© 1999-2021 Citrix Systems, Inc. All rights reserved. 139

Citrix Workspace app for Windows
The Windows 10 VDA detects the presence of a keyboard or a mouse on a touch-enabled client device
when you connect or reconnect to a session. It also detects when you attach or detach a keyboard
or mouse during the session. This feature is enabled by default on the VDA. To disable the feature,
modify the Tablet mode toggle policy using Citrix Studio.
Tablet mode oers a user interface that is better suited to touchscreens:
• Slightly larger buttons.
• The Start screen and all apps you start open in a full screen.
• The taskbar contains a Back button.
• Icons are removed from the taskbar.
Desktop mode oers the traditional user interface where you interact in the same manner as using a
PC with a keyboard and mouse.
Note:
Workspace for web does not support Windows Continuum feature.
Browser content redirection
Browser content redirection prevents the rendering of webpages in the allow list on the VDA side. This
feature uses Citrix Workspace app to instantiate a corresponding rendering engine on the client side,
which fetches the HTTP and HTTPS content from the URL.
Note:
You can specify that webpages be redirected to the VDA side (and not redirected on the client
side) by using a block list.
Browser content redirection supports the Google Chrome browser as well as Internet Explorer
browser. Browser content redirection redirects the contents of a web browser to a client device, and
creates a corresponding browser embedded within the Citrix Workspace app. This feature oloads
network usage, page processing, and graphics rendering to the endpoint. Doing so improves the user
experience when browsing demanding webpages, especially webpages that incorporate HTML5 or
WebRTC video.
For more information, see Browser content redirection.
Citrix Analytics
Citrix Workspace app is instrumented to securely transmit logs to Citrix Analytics. The logs are ana-
lyzed and stored on Citrix Analytics servers when enabled. For more information about Citrix Analyt-
ics, see Citrix Analytics.
© 1999-2021 Citrix Systems, Inc. All rights reserved. 140

Citrix Workspace app for Windows
Relative mouse
The relative mouse feature determines how far the mouse has moved since the last frame within a
window or screen.
The relative mouse uses the pixel delta between the mouse movements. For example, when you
change the direction of the camera using mouse controls, the feature is eicient. Also, apps oen
hide the mouse cursor because the position of the cursor relative to the screen coordinates is not
relevant when manipulating a 3-D object or scene.
Relative mouse support provides an option to interpret the mouse position in a relative rather than
an absolute manner. This capability is required for applications that demand relative mouse input
rather than absolute.
You can configure the feature both on a per-user and a per-session basis. This gives you more granular
control on the availability of the feature.
Note
This feature can be applied in a published desktop session only.
Configuring the feature using the Registry Editor or the default.ica file allows the setting to be persis-
tent even aer the session is terminated.
Configuring relative mouse using the Registry editor
To configure the feature, set the following registry keys as applicable and then restart the session for
the changes to take eect:
To make the feature available on a per-session basis:
HKEY_LOCAL_MACHINE\SOFTWARE\Policies\Citrix\ICA Client\Engine\Lockdown
Profiles\All Regions\Lockdown\Virtual Channels\RelativeMouse
To make the feature available on a per-user basis:
HKEY_CURRENT_USER\Software\Policies\Citrix\ICA Client\Engine\Lockdown
Profiles\All Regions\Lockdown\Virtual Channels\RelativeMouse
1 - Name: RelativeMouse
2 - Type: REG_SZ
3 - Value: True
Note:
• The values set in the Registry editor take precedence over the ICA file settings.
• The values set in HKEY_LOCAL_MACHINE and HKEY_CURRENT_USER must be the same.
© 1999-2021 Citrix Systems, Inc. All rights reserved. 141

Citrix Workspace app for Windows
Dierent values in these might cause conflicts.
Configuring the relative mouse using the default.ica file
1. Open the default.ica file typically at C:\inetpub\wwwroot\Citrix\<site name>\conf\
default.ica, where sitename is the name specified for the site when it was created. In case of
StoreFront customers, default.ica file is typically located at C:\inetpub\wwwroot\Citrix\<
Storename>\App_Data\default.ica, where storename is the name specified for the store
when it was created.
2. Add a new key by name RelativeMouse in the WFClient section, with its value set to the same
configuration as the JSON object.
3. Set the value as required:
• true – To enable relative mouse
• false – To disable relative mouse
4. Restart the session for the changes to take eect.
Note:
The values set in the Registry editor take precedence over the ICA file settings.
Enabling relative mouse from the Desktop Viewer
1. Log on to Citrix Workspace app.
2. Launch a published desktop session.
3. From the Desktop Viewer toolbar, select Preferences.
The Citrix Workspace - Preferences window appears.
4. Select Connections.
5. Under Relative Mouse settings, enable Use relative mouse.
6. Click Apply and OK.
Note:
Configuring relative mouse from the Desktop Viewer applies the feature to per-session only.
Hardware decoding
When using Citrix Workspace app (with HDX engine 14.4), the GPU can be used for H.264 decoding
wherever it is available at the client. The API layer used for GPU decoding is DirectX Video Acceleration.
To enable hardware decoding using Citrix Workspace app Group Policy Object administrative
template:
© 1999-2021 Citrix Systems, Inc. All rights reserved. 142

Citrix Workspace app for Windows
1. Open the Citrix Workspace app Group Policy Object administrative template by running
gpedit.msc.
2. Under the Computer Configuration node, go to Administrative Templates> Citrix Workspace
>User Experience.
3. Select Hardware Acceleration for graphics.
4. Select Enabled and click Apply and OK.
To validate if the policy was applied and hardware acceleration is being used for an active ICA session,
look for the following registry entries:
Registry Path: HKEY_CURRENT_USER\SOFTWARE\Citrix\ICA Client\CEIP\Data\GfxRender.
Tip
The value for Graphics_GfxRender_Decoder and Graphics_GfxRender_Renderer should be 2.
© 1999-2021 Citrix Systems, Inc. All rights reserved. 143

Citrix Workspace app for Windows
If the value is 1, that means CPU-based decoding is being used.
When using the hardware decoding feature, consider the following limitations:
• If the client has two GPU’s and if one of the monitors is active on the second GPU, CPU decoding
will be used.
• When connecting to a Citrix Virtual Apps server running on Windows Server 2008 R2, Citrix rec-
ommends that you do not to use hardware decoding on the user’s Windows device. If enabled,
issues like slow performance while highlighting text and flickering issues are seen.
Microphone input
Citrix Workspace app supports multiple client-side microphone inputs. Locally installed microphones
can be used for:
• Real-time activities, such as sophone calls and Web conferences.
• Hosted recording applications, such as dictation programs.
• Video and audio recordings.
Citrix Workspace app users can select whether to use microphones attached to their device using Con-
nection Center. Citrix Virtual Apps and Desktops users can also use the Citrix Virtual Apps and Desk-
tops viewer Preferences to disable their microphones and webcams.
Client drive-mapping
Client drive mapping supports the transfer of data between the host and the client as a stream. The
file transfer adapts to the changing network throughput conditions. It also uses any available extra
bandwidth to scale up the data transfer rate.
By default, this feature is enabled.
To disable this feature, set the following registry key and then restart the server:
Path: HKEY_LOCAL_MACHINE\System\Currentcontrolset\services\picadm\Parameters
Name: DisableFullStreamWrite
Type: REG_DWORD
Value:
0x01 - disables
0 or delete - enables
Multi-monitor support
You can use up to eight monitors with Citrix Workspace app for Windows.
© 1999-2021 Citrix Systems, Inc. All rights reserved. 144

Citrix Workspace app for Windows
Each monitor in a multiple monitor configuration has its own resolution designed by its manufacturer.
Monitors can have dierent resolutions and orientations during sessions.
Sessions can span multiple monitors in two ways:
• Full screen mode, with multiple monitors shown inside the session; applications snap to moni-
tors as they would locally.
Citrix Virtual Apps and Desktops: To display the Desktop Viewer window across any rectangu-
lar subset of monitors, resize the window across any part of those monitors and click Maximize.
• Windowed mode, with one single monitor image for the session; applications do not snap to
individual monitors.
Citrix Virtual Apps and Desktops: When any desktop in the same assignment (formerly “desktop
group”) is launched subsequently, the window setting is preserved and the desktop is displayed
across the same monitors. Multiple virtual desktops can be displayed on one device provided the
monitor arrangement is rectangular. If the primary monitor on the device is used by the Citrix
Virtual Apps and Desktops session, it becomes the primary monitor in the session. Otherwise, the
numerically lowest monitor in the session becomes the primary monitor.
To enable multi-monitor support, ensure the following:
• The user device is configured to support multiple monitors.
• The operating system must be able to detect each of the monitors. On Windows platforms, to
verify that this detection occurs, go to Settings > System and click Display and confirm that
each monitor appears separately.
• Aer your monitors are detected:
– Citrix Virtual Desktops: Configure the graphics memory limit using the Citrix Machine
Policy setting Display memory limit.
– Citrix Virtual Apps: Depending on the version of the Citrix Virtual Apps server, you have
installed:
*
Configure the graphics memory limit using the Citrix Computer Policy setting Dis-
play memory limit.
*
From the Citrix management console for the Citrix Virtual Apps server, select the farm
and in the task pane, select Modify Server Properties > Modify all properties > Server
Default > HDX Broadcast > Display (or Modify Server Properties > Modify all proper-
ties > Server Default > ICA > Display) and set the Maximum memory to use for each
session’s graphics.
Ensure that the setting is large enough (in kilobytes) to provide suicient graphic memory. If this
setting is not high enough, the published resource is restricted to the subset of the monitors that fits
within the size specified.
Using Citrix Virtual desktops on dual monitor:
© 1999-2021 Citrix Systems, Inc. All rights reserved. 145

Citrix Workspace app for Windows
1. Select the Desktop Viewer and click the down arrow.
2. Select Window.
3. Drag the Citrix Virtual Desktops screen between the two monitors. Ensure that about half the
screen is present in each monitor.
4. From the Citrix Virtual Desktop toolbar, select Full-screen.
The screen is now extended to both the monitors.
For information about calculating the session’s graphic memory requirements for Citrix Virtual Apps
and Desktops, see Knowledge Center article CTX115637.
Printer
To override the printer settings on the user device
1. From the Print menu available from an application on the user device, choose Properties.
2. On the Client Settings tab, click Advanced Optimizations and make changes to the Image Com-
pression and Image and Font Caching options.
On-screen keyboard control
To enable touch-enabled access to virtual applications and desktops from Windows tablets, Citrix
Workspace app automatically displays the on-screen keyboard when you activate a text entry field,
and when the device is in tent or tablet mode.
On some devices and in some circumstances, Citrix Workspace app cannot accuratelydetect the mode
of the device, and the on-screen keyboard may appear when you do not want it to.
To suppress the on-screen keyboard from appearing when using a convertible device, create
a REG_DWORD value DisableKeyboardPopup in HKEY_CURRENT_USER\SOFTWARE\Citrix\ICA
Client\Engine\Configuration\Advanced\Modules\MobileReceiver and set the value to 1.
Note:
On a x64 machine, create the value in HKEY_LOCAL_MACHINE\SOFTWARE\Wow6432Node\Citrix\ICA
Client\Engine\Configuration\Advanced\Modules\MobileReceiver.
The keys can be set to 3 dierent modes as given below:
• Automatic: AlwaysKeyboardPopup = 0; DisableKeyboardPopup = 0
• Always popup (on-screen keyboard): AlwaysKeyboardPopup = 1; DisableKeyboardPopup = 0
• Never popup (on-screen keyboard): AlwaysKeyboardPopup = 0; DisableKeyboardPopup = 1
© 1999-2021 Citrix Systems, Inc. All rights reserved. 146

Citrix Workspace app for Windows
Keyboard shortcuts
You can configure combinations of keys that Citrix Workspace app interprets as having special func-
tionality. When the keyboard shortcuts policy is enabled, you can specify Citrix Hotkey mappings,
behavior of Windows hotkeys, and keyboard layout for sessions.
1. Open the Citrix Workspace app Group Policy Object administrative template by running
gpedit.msc.
2. Under the Computer Configuration node, go to Administrative Templates> Citrix Compo-
nents > Citrix Workspace > User Experience.
3. Select the Keyboard shortcuts policy.
4. Select Enabled, and the desired options.
5. Restart the Citrix Workspace app session for the changes to take eect.
Citrix Workspace app support for 32-bit color icons:
Citrix Workspace app supports 32-bit high color icons and automatically selects the color depth for ap-
plications visible in the Connection Center dialog, the Start menu, and task bar to provide for seam-
less applications.
Caution
Editing the registry incorrectly can cause serious problems that may require you to reinstall your
operating system. Citrix cannot guarantee that problems resulting from the incorrect use of Reg-
istry Editor can be solved. Use Registry Editor at your own risk. Be sure to back up the registry
before you edit it.
To set a preferred depth, you can add a string registry key named TWIDesiredIconColor to HKEY
\\_LOCAL\\_MACHINE\SOFTWARE\Wow6432Node\Citrix\ICA Client\Engine\Lockdown
Profiles\All Regions\Preferences and set it to the desired value. The possible color depths
for icons are 4, 8, 16, 24, and 32 bits-per-pixel. The user can select a lower color depth for icons if the
network connection is slow.
Desktop Viewer
Dierent enterprises have dierent corporate needs. Your requirements for the way users access vir-
tual desktops may vary from user to user and may vary as your corporate needs evolve. The user
experience of connecting to virtual desktops and the extent of user involvement in configuring the
connections depend on how you set up Citrix Workspace app for Windows.
Use the desktop viewer when users need to interact with their virtual desktop. The user’s virtual
desktop can be a published virtual desktop, or a shared or dedicated desktop. In this access scenario,
the DesktopViewer toolbarfunctionalityallows the user to open a virtual desktopin a window and pan
© 1999-2021 Citrix Systems, Inc. All rights reserved. 147

Citrix Workspace app for Windows
and scale that desktop inside their local desktop. Users can set preferences and work with more than
one desktop using multiple Citrix Virtual Apps and Desktops connections on the same user device.
Note:
Use Citrix Workspace app to change the screen resolution on their virtual desktops. You cannot
change Screen Resolution using Windows Control Panel.
Keyboard input in Desktop Viewer
In Desktop Viewer sessions, Windows logo key+L is directed to the local computer.
Ctrl+Alt+Delete is directed to the local computer.
Key presses that activate Sticky Keys, Filter Keys, and Toggle Keys (Microso accessibility features) are
normally directed to the local computer.
As an accessibility feature of the Desktop Viewer, pressing Ctrl+Alt+Break displays the Desktop Viewer
toolbar buttons in a pop-up window.
Ctrl+Esc is sent to the remote, virtual desktop.
Note:
By default, if the Desktop Viewer is maximized, Alt+Tab switches focus between windows inside
the session. If the Desktop Viewer is displayed in a window, Alt+Tab switches focus between
windows outside the session.
Hotkey sequences are key combinations designed by Citrix. For example, the Ctrl+F1 sequence repro-
duces Ctrl+Alt+Delete, and Shi+F2 switches applications between full-screen and windowed mode.
You cannot use hotkey sequences with virtual desktops displayed in the Desktop Viewer (that is, with
Citrix Virtual Apps and Desktops sessions), but you can use them with published applications (that is,
with Citrix Virtual Apps sessions).
Virtual desktops
From within a desktop session, users cannot connect to the same virtual desktop. Attempting to do
so will disconnect the existing desktop session. Therefore, Citrix recommends:
• Administrators should not configure the clients on a desktop to point to a site that publishes the
same desktop
• Users should not browse to a site that hosts the same desktop if the site is configured to auto-
matically reconnect users to existing sessions
• Users should not browse to a site that hosts the same desktop and try to launch it
Be aware that a user who logs on locally to a computer that is acting as a virtual desktop blocks con-
nection to that desktop.
© 1999-2021 Citrix Systems, Inc. All rights reserved. 148

Citrix Workspace app for Windows
If your users connect to virtual applications (published with Citrix Virtual Apps) from within a virtual
desktop and your organization has a separate Citrix Virtual Apps administrator, Citrix recommends
working with them to define device mapping such that desktop devices are mapped consistently
within desktop and application sessions. Because local drives are displayed as network drives in
desktop sessions, the Citrix Virtual Apps administrator needs to change the drive-mapping policy to
include network drives.
Status indicator time-out
You can change the amount of time the status indicator displays when a user is launching a session.
To alter the time-out period, perform the following steps:
1. Launch the Registry Editor.
2. Navigate to the following path:
• On a 64-bit: HKEY_LOCAL_MACHINE\SOFTWARE\Wow6432Node\Citrix\ICA CLIENT\
Engine
• On a 32-bit: HKEY_LOCAL_MACHINE\SOFTWARE\Citrix\ICA CLIENT\Engine\
3. Create a registry key as follows:
• Type: REG_DWORD
• Name: SI INACTIVE MS
• Value: 4, if you want the status indicator to disappear sooner.
When you configure this key, the status indicator might appear and disappear frequently. This behav-
ior is as designed. To suppress the status indicator, do the following:
1. Launch the Registry Editor.
2. Navigate to the following path:
• On a 64-bit: HKEY_LOCAL_MACHINE\SOFTWARE\Wow6432Node\Citrix\ICA CLIENT\
• On a 32-bit: HKEY_LOCAL_MACHINE\SOFTWARE\Citrix\ICA CLIENT\
3. Create a registry key as follows:
• Type: REG_DWORD
• Name: NotificationDelay
• Value: Any value in millisecond (for example, 120000)
Customer Experience Improvement Program (CEIP)
© 1999-2021 Citrix Systems, Inc. All rights reserved. 149

Citrix Workspace app for Windows
Data collected Description What we use it for
Configuration and usage data The Citrix Customer
Experience Improvement
Program (CEIP) gathers
configuration and usage data
from Citrix Workspace app for
Windows and automatically
sends the data to Citrix and
Google Analytics.
This data helps Citrix improve
the quality, reliability, and
performance of Citrix
Workspace app.
Additional information
Citrix will handle your data in accordance with the terms of your contract with Citrix, and protect it as
specified in the Citrix Services Security Exhibit available on the Citrix Trust Center.
Citrix also uses Google Analytics to collect certain data from Citrix Workspace app as part of CEIP.
Please review how Google handles data collected for Google Analytics.
You can turn o sending CEIP data to Citrix and Google Analytics (except for the two data elements
collected for Google Analytics indicated by an * in the second table below) by:
1. Right-click the Citrix Workspace app icon from the notification area.
2. Select Advanced Preferences.
The Advanced Preferences dialog appears.
3. Select Data Collection.
4. Select No, Thanks to disable CEIP or to forego participation.
5. Click Save.
Alternatively, you can navigate to the following registry entry and set the value as suggested:
Path: HKEY_LOCAL_MACHINE\ SOFTWARE\Citrix\ICA Client\CEIP
Key: Enable_CEIP
Value: False
Note:
Once you select No Thanks in the data collection dialog or set the Enable_CEIP key to False, if
you would like to disable sending the final two CEIP data elements collected by Google Analytics
(that is, Operating System version & Workspace app version) navigate to the following registry
entry and set the value as suggested:
Path: HKEY_LOCAL_MACHINE\ SOFTWARE\Citrix\ICA Client\CEIP
Key: DisableHeartbeat
© 1999-2021 Citrix Systems, Inc. All rights reserved. 150

Citrix Workspace app for Windows
Value: True
The specific CEIP data elements collected by Citrix are:
Operating system
version
Workspace app
version
External devices
connected
Screen resolution
Flash version Desktop Lock
configuration
Touch enabled Authentication
configuration
Session launch
method
Graphics
configuration
Desktop Viewer
configuration
Printing
Connection error Time to launch Workspace app
language
VDA information
SSON state Installer state Time to install Connection protocol
Internet Explorer
version
The specific CEIP data elements collected by Google Analytics are:
Operating system
version*
Workspace app
version*
Authentication
configuration
Workspace app
language
Session launch
method
Connection error Connection protocol VDA information
Installer
configuration
Installer state Client keyboard
layout
Store configuration
Auto-update
preference
Connection Center
usage
App protection
configuration
Reason for oline
banner
Authenticate
April 15, 2021
To maximize the security of your environment, you must secure the connections between Citrix
Workspace app and the resources you publish. You can configure various types of authentication for
© 1999-2021 Citrix Systems, Inc. All rights reserved. 151

Citrix Workspace app for Windows
your Citrix Workspace app, including domain pass-through, smart card, and Kerberos pass-through.
Domain pass-through authentication
Single sign-on lets you authenticate to a domain and use Citrix Virtual Apps and Desktops without
having to reauthenticate again.
When you log on to Citrix Workspace app, your credentials are passed through to StoreFront, along
with the enumerated apps and desktops and Start menu settings. Aer configuring single sign-on,
you can log on to Citrix Workspace app and launch Citrix Virtual Apps and Desktops sessions without
having to retype your credentials.
All web browsers require you to configure single sign-on using the Group Policy Object(GPO) admin-
istrative template. For more information about configuring single sign-on using Group Policy Object
administrative template, see Configure single sign-on with Citrix Gateway.
You can configure single sign-on on both fresh installation or upgrade setup, using any of the following
options:
• Command-line interface
• GUI
Configure single sign-on during fresh installation
To configure single sign-on during fresh installation, perform the following steps:
1. Configuration on StoreFront.
2. Configure XML trust services on the Delivery Controller.
3. Modify Internet Explorer settings.
4. Install Citrix Workspace app with single sign-on.
Configure single sign-on on StoreFront
Single sign-on lets you authenticate to a domain and use Citrix Virtual Apps and Desktops delivered by
that domain without having to reauthenticate to each app or desktop. When you add a store using the
Storebrowse utility, your credentials are passed through to the Citrix Gateway server, along with the
apps and desktops enumerated for you, including your Start menu settings. Aer configuring single
sign-on, you can add the store, enumerate your apps and desktops, and launch the required resources
without having to type your credentials multiple times.
Depending on the Citrix Virtual Apps and Desktops deployment, single sign-on authentication can be
configured on StoreFront using the Management Console.
Use the table below for dierent use cases and its respective configuration:
© 1999-2021 Citrix Systems, Inc. All rights reserved. 152

Citrix Workspace app for Windows
Use case Configuration details Additional information
Configured SSON on
StoreFront
Launch Citrix Studio, go to
Store > Manage
Authentication methods >
enable Domain
pass-through
.
When Citrix Workspace app is
not configured with Single
sign-on, it automatically
switches the authentication
method from
Domain
pass-through to Username
and Password, if available.
When workspace for web is
required
Launch Store > Workspace
for Websites > Manage
Authentication methods >
enable Domain
pass-through.
When Citrix Workspace app is
not configured with Single
sign-on, it automatically
switches the authentication
method from Domain
pass-through to Username
and Password, if available.
Configure single sign-on with Citrix Gateway
You enable single sign-on with Citrix Gateway using the GPO administrative template.
1. Open the Citrix Workspace app GPO administrative template by running gpedit.msc.
2. Under the Computer Configuration node, go to Administrative Template > Citrix Compo-
nents > Citrix Workspace > User Authentication.
3. Select Single Sign-on for Citrix Gateway policy.
4. Select
Enabled
.
5. Click Apply and OK.
6. Restart Citrix Workspace app for the changes to take eect.
Configure XML trust services on the Delivery Controller
On Citrix Virtual Apps and Desktops, run the following PowerShell command as an administrator on
the Delivery Controller:
asnp Citrix* Set-BrokerSite -TrustRequestsSentToTheXmlServicePort $True
Modify the Internet Explorer settings
1. Add the StoreFront server to the list of trusted sites using Internet Explorer. To do this:
a) Launch Internet Options from the Control panel.
© 1999-2021 Citrix Systems, Inc. All rights reserved. 153

Citrix Workspace app for Windows
b) Click Security > Local Internet and click Sites.
The Local intranet window appears.
c) Select Advanced.
d) Add the URL of the StoreFront FQDN with the appropriate HTTP or HTTPS protocols.
e) Click Apply and OK.
2. Modify the User Authentication settings in Internet Explorer. To do this:
a) Launch Internet Options from the Control panel.
b) Click Security tab > Trusted Sites.
c) Click Custom level. The Security Settings – Trusted Sites Zone window appears.
d) In the User Authentication pane, select Automatic logon with current user name and
password.
e) Click Apply and OK.
Configure single sign-on using the command-line interface
Install Citrix Workspace app with the /includeSSON switch and restart Citrix Workspace app for the
changes to take eect.
Note:
If Citrix Workspace app for Windows is installed without the single sign-on component, upgrad-
ing to the latest version of Citrix Workspace app with the /includeSSON switch is not supported.
Configure single sign-on using the graphical user interface
1. Locate the Citrix Workspace app installation file (CitrixWorkspaceApp.exe).
2. Double-click CitrixWorkspaceApp.exe to launch the installer.
3. In the Enable Single Sign-on installation wizard, select the Enable Single Sign-on option.
4. Click Next and follow the prompts to complete the installation.
You can now log on to an existing store (or configure a new store) using Citrix Workspace app without
providing user credentials.
© 1999-2021 Citrix Systems, Inc. All rights reserved. 154

Citrix Workspace app for Windows
Configure single sign-on on workspace for web
You can configure single sign-on on workspace for web using the Group Policy Object administrative
template.
1. Open the workspace for web GPO administrative template by running gpedit.msc.
2. Under the Computer Configuration node, go to Administrative Template > Citrix Component
> Citrix Workspace > User Authentication.
3. Select the Local user name password policy and set it to Enabled.
4. Click Enable pass-through authentication. This option allows workspace for web to use your
login credentials for authentication on the remote server.
5. Click Allow pass-through authentication for all ICA connections. This option bypasses any
authentication restriction and allows credentials to pass-through on all the connections.
6. Click Apply and OK.
7. Restart the workspace for web for the changes to take eect.
Verify that the single sign-on is enabled by launching the Task Manager and check if the ssonsvr.
exe process is running.
Configure single sign-on using Active Directory
Complete the following steps to configure Citrix Workspaceapp for pass-through authentication using
Active Directory group policy. In this scenario, you can achieve the single sign-on authentication with-
out using the enterprise soware deployment tools, such as Microso System Center Configuration
Manager.
1. Download and place the Citrix Workspace app installation file (CitrixWorkspaceApp.exe) on
a suitable network share. It must be accessible by the target machines you install Citrix
Workspace app on.
2. Get the CheckAndDeployWorkspacePerMachineStartupScript.battemplate from the
Citrix Workspace app for Windows Download page.
3. Edit the content to reflect the location and the version of CitrixWorkspaceApp.exe.
4. In the Active Directory Group Policy Management console, type CheckAndDeployWorkspacePerMachineStartupScript
.bat as a startup script. For more information on deploying the startup scripts, see the Active
Directory section.
5. In the Computer Configuration node, go to Administrative Templates > Add/Remove Tem-
plates to add the icaclient.adm file.
6. Aer adding the icaclient.adm template, go to Computer Configuration > Administrative
Templates > Citrix Components > Citrix Workspace > User authentication.
7. Select the Local user namepassword policy and set it to Enabled.
© 1999-2021 Citrix Systems, Inc. All rights reserved. 155

Citrix Workspace app for Windows
8. Select Enable pass-through authentication and click Apply.
9. Restart the machine for the changes to take eect.
Configure single sign-on on StoreFront
StoreFront configuration
Open Citrix Studio on the StoreFront server and select Authentication > Add /Remove Authentica-
tion Methods. Select Domain pass-through.
Authentication tokens
Authentication tokens are encrypted and stored on the local disk so that you don’t need to reenter
your credentials when your system or session restarts. Citrix Workspace app provides an option to
disable the storing of authentication tokens on the local disk.
For enhanced security, we now provide a Group Policy Object (GPO) policy to configure the authenti-
cation token storage.
Note:
This configuration is applicable only in cloud deployments.
To disable storing of authentication tokens using the Group Policy Object (GPO) policy:
1. Open the Citrix Workspace app Group Policy Object administrative template by running gpedit
.msc.
2. Under the Computer Configuration node, go to Administrative Templates > Citrix Compo-
nents > SelfService.
3. In the Store authentication tokens policy, select one of the following:
© 1999-2021 Citrix Systems, Inc. All rights reserved. 156

Citrix Workspace app for Windows
• Enabled: Indicatesthatthe authentication tokensare stored on the disk. This is the default
option.
• Disabled: Indicates that the authentication tokens are not stored on the disk. You must
reenter your credentials when your system or session restarts.
4. Click Apply and OK.
Configuration Checker
Configuration Checker lets you run a test to ensure that single sign-on is configured properly. The
test runs on dierent checkpoints of the single sign-on configuration and displays the configuration
results.
1. Right-click Citrix Workspace app icon in the notification area and click Advanced Preferences.
The Advanced Preferences dialog appears.
2. Click Configuration Checker.
The Citrix Configuration Checker window appears.
© 1999-2021 Citrix Systems, Inc. All rights reserved. 157

Citrix Workspace app for Windows
3. Select SSONChecker from the Select pane.
4. Click Run. A progress bar appears, displaying the status of the test.
The Configuration Checker window has the following columns:
1. Status: Displays the result of a test on a specific check point.
• A green check mark indicates that the specific checkpoint is configured properly.
• A blue I indicates information about the checkpoint.
• A Red X indicates that the specific checkpoint is not configured properly.
2. Provider: Displays the name of the module on which the test is run. In this case, single sign-on.
3. Suite: Indicates the category of the test. For example, Installation.
4. Test: Indicates the name of the specific test that is run.
5. Details: Provides additional information about the test, irrespective of pass or fail.
The user gets more information about each checkpoint and the corresponding results.
The following tests are performed:
1. Installed with single sign-on.
2. Logon credential capture.
3. Network Provider registration: The test result against Network Provider registration displays
a green check mark only when “Citrix Single Sign-on” is set to be first in the list of Network
Providers. If Citrix Single Sign-on appears anywhere else in the list, the test result against Net-
work Provider registration appears with a blue I and additional information.
4. Single sign-on process is running.
5. Group Policy: By default, this policy is configured on the client.
6. Internet Settings for Security Zones: Ensure that you add the Store/XenApp Service URL to the
list of Security Zones in the Internet Options.
If the Security Zones are configured via Group policy, any change in the policy requires the Ad-
vanced Preferences window to be reopened for the changes to take eect and to display the
correct status of the test.
7. Authentication method for StoreFront.
Note:
• If you are accessing workspace for web, the test results are not applicable.
• If Citrix Workspace app is configured with multiple stores, the authentication method test
runs on all the configured stores.
• You can save the test results as reports. The default report format is .txt.
Hide the Configuration Checker option from the Advanced Preferences window
1. Open the Citrix Workspace app GPO administrative template by running gpedit.msc.
© 1999-2021 Citrix Systems, Inc. All rights reserved. 158

Citrix Workspace app for Windows
2. Go to Citrix Components > Citrix Workspace > Self Service > DisableConfigChecker.
3. Click Enabled to hide the Configuration Checker option from the Advanced Preferences win-
dow.
4. Click Apply and OK.
5. Run the gpupdate /force command.
Limitation:
Configuration Checker does not include the checkpoint for the configuration of trust requests sent to
the XML service on Citrix Virtual Apps and Desktops servers.
Beacon test
Citrix Workspace app allows you to perform a beacon test using the Beacon checker that is available as
part of the Configuration Checker utility. Beacon test helps to confirm if the beacon (ping.citrix.com)
is reachable. This diagnostic test helps to eliminate one of the many possible causes for slow resource
enumeration, that is beacon not being available. To run the test, right-click the Citrix Workspace app
in the notification area and select Advanced Preferences > Configuration Checker. Select Beacon
checker from the list of Tests and click Run.
The test results can be any of the following:
• Reachable – Citrix Workspace app is successfully able to contact the beacon.
• Not reachable - Citrix Workspace app is unable to contact the beacon.
• Partially reachable - Citrix Workspace app is able to contact the beacon intermittently.
Note:
• The test results are not applicable on workspace for web.
• The test results can be saved as reports. The default format for the report is .txt.
Domain pass-through authentication with Kerberos
This topic applies only to connections between Citrix Workspace app for Windows and StoreFront,
Citrix Virtual Apps and Desktops.
Citrix Workspace app supports Kerberos for domain pass-through authentication for deployments
that use smart cards. Kerberos is one of the authentication methods included in Integrated Windows
Authentication (IWA).
When enabled, Kerberos authenticates without passwords for Citrix Workspace app. Thereby, pre-
venting Trojan horse-style attacks on the user device that try to gain access to passwords. Users can
log on using any authentication method and access published resources. For example, a biometric
authenticator such as a fingerprint reader.
© 1999-2021 Citrix Systems, Inc. All rights reserved. 159

Citrix Workspace app for Windows
When you log on using a smart card to Citrix Workspace app, StoreFront, Citrix Virtual Apps and Desk-
tops configured for smart card authentication- the Citrix Workspace app:
1. Captures the smart card PIN during single sign-on.
2. Uses IWA (Kerberos) to authenticate the user to StoreFront. StoreFront then provides your
Workspace app with information about available the Citrix Virtual Apps and Desktops.
Note
Enable Kerberos to avoid an extran PIN prompt. If Kerberos authentication is not used,
Citrix Workspace app authenticates to StoreFront using the smart card credentials.
3. The HDX engine (previously referred to as the ICA client) passes the smart card PIN to the VDA to
log the user on to Citrix Workspace app session. Citrix Virtual Apps and Desktops then delivers
the requested resources.
To use Kerberos authentication with Citrix Workspace app, ensure that your Kerberos configuration
conforms to the following.
• Kerberos works only between Citrix Workspace app and servers that belong to the same or to
trusted Windows Server domains. Servers must also be trusted for delegation, an option you
configure through the Active Directory Users and Computers management tool.
• Kerberos must be enabled both on the domain and Citrix Virtual Apps and Desktops. For en-
hanced security and to ensure that Kerberos is used, disable any non-Kerberos IWA options on
the domain.
• Kerberos logon is not available for Remote Desktop Services connections that are configured to
use either Basic authentication, always use specified logon information, or always prompt for
a password.
Warning
Using Registry editor incorrectly might cause serious problems that can require you to reinstall
the operating system. Citrix cannot guarantee that problems resulting from incorrect use of Reg-
istry editor can be solved. Use Registry Editor at your own risk. Ensure you back up the registry
before you edit it.
Domain pass-through authentication with Kerberos for use with smart cards
See the smart card information present in the Secure your deployment section in the Citrix Virtual
Apps and Desktops documentation before continuing.
When you install Citrix Workspace app for Windows, include the following command-line option:
• /includeSSON
© 1999-2021 Citrix Systems, Inc. All rights reserved. 160

Citrix Workspace app for Windows
This option installs the single sign-on component on the domain-joined computer, enabling
your workspace to authenticate to StoreFront using IWA (Kerberos). The single sign-on compo-
nent stores the smart card PIN, which is used by the HDX engine when it remotes the smart card
hardware and credentials to Citrix Virtual Apps and Desktops. Citrix Virtual Apps and Desktops
automatically selects a certificate from the smart card and obtains the PIN from the HDX engine.
A related option, ENABLE_SSON, is enabled by default.
If a security policy prevents you from enabling single sign-on on a device, configure Citrix Workspace
app using Group Policy Object administrative template.
1. Open the Citrix Workspace app Group Policy Object administrative template by running
gpedit.msc.
2. Choose Administrative Templates > Citrix Components > Citrix Workspace > User authenti-
cation > Local user name and password
3. Select Enable pass-through authentication.
4. Restart Citrix Workspace app for the changes to take eect.
© 1999-2021 Citrix Systems, Inc. All rights reserved. 161

Citrix Workspace app for Windows
To configure StoreFront:
When you configure the authentication service on the StoreFront server, select the Domain pass-
through option. That setting enables Integrated Windows Authentication. You do not need to select
the Smart card option unless you also have non domain-joined clients connecting to StoreFront
using smart cards.
For more information about using smart cards with StoreFront, see Configure the authentication ser-
vice in the StoreFront documentation.
Smart card
Citrix Workspace app for Windows supports the following smart card authentication:
• Pass-through authentication (single sign-on) - Pass-through authentication captures smart
card credentials when users log on to Citrix Workspace app. Citrix Workspace app uses the cap-
tured credentials as follows:
© 1999-2021 Citrix Systems, Inc. All rights reserved. 162

Citrix Workspace app for Windows
– Users of domain-joined devices who log on to Citrix Workspace app using the smart card
can start virtual desktops and applications without needing to reauthenticate.
– Citrix Workspace app running on non-domain joined devices with smart card credentials
must type their credentials again to start a virtual desktop or application.
Pass-through authentication requires configuration both on StoreFront and Citrix Workspace
app.
• Bimodal authentication - Bimodal authentication oers users a choice between using a smart
card and typing the user name and password. This feature is eective when you cannot use the
smart card. For example, the logon certificate has expired. Dedicated stores must be set up per
site to allow Bimodal authentication, using the DisableCtrlAltDel method set to False to allow
smart cards. Bimodal authentication requires StoreFront configuration.
Using the Bimodal authentication, StoreFront administrator can allow the user both user name
and password and smart card authentication to the same store by selecting them in the Store-
Front console. See StoreFront documentation.
• Multiple certificates - Multiple certificates can be availed for a single smart card and if multi-
ple smart cards are in use. When you insert a smart card in a card reader, the certificates are
applicable to all applications running on the user device, including Citrix Workspace app.
• Client certificate authentication - Client certificate authentication requires Citrix Gateway and
StoreFront configuration.
– For access to StoreFront through Citrix Gateway, you must reauthenticate aer removing
the smart card.
– When the Citrix Gateway SSL configuration is set to Mandatory client certificate authen-
tication, operation is more secure. However mandatory client certificate authentication
is not compatible with bimodal authentication.
• Double hop sessions - If a double-hop is required, a connection is established between Citrix
Workspace app and the user’s virtual desktop.
• Smart card-enabled applications - Smart card-enabled applications, such as Microso Out-
look and Microso Oice, allow users to digitally sign or encrypt documents available in Citrix
Virtual Apps and Desktops sessions.
Limitations:
• Certificates must be stored on smart card and not on the user device.
• Citrix Workspace app does not save the choice of the user certificate, but stores the PIN when
configured. The PIN is cached in non-paged memory only during the user session and is not
stored on the disk.
• Citrix Workspace app does not reconnect to a session when a smart card is inserted.
© 1999-2021 Citrix Systems, Inc. All rights reserved. 163

Citrix Workspace app for Windows
• When configured for smart card authentication, Citrix Workspace app does not support virtual
private network (VPN) single-sign on or session pre-launch. To use VPN with smart card authen-
tication, install the Citrix GatewayPlug-in and log on through a webpage, using their smart cards
and PINs to authenticate at each step. Pass-through authentication to StoreFront with the Citrix
Gateway Plug-in is not available for smart card users.
• Citrix Workspace app updater communications with citrix.com and the Merchandising Server
are not compatible with smart card authentication on Citrix Gateway.
Warning
Some configuration requires registry edits. Using Registry editor incorrectly might cause prob-
lems that can require you to reinstall the operating system. Citrix cannot guarantee that prob-
lems resulting from incorrect use of RegistryEditorcanbe solved. Ensure you back up the registry
before you edit it.
To enable single sign-on for smart card authentication:
To configure Citrix Workspace app for Windows, include the following command-line option during
installation:
• ENABLE_SSON=Yes
Single sign-on is another term for pass-through authentication. Enabling this setting prevents
Citrix Workspace app from displaying a second prompt for a PIN.
• In the Registry editor, navigate to the following path and set SSONCheckEnabled string to
False if the single sign-on component is not installed.
HKEY_CURRENT_USER\Software{ Wow6432 } \Citrix\AuthManager\protocols\
integratedwindows\
HKEY_LOCAL_MACHINE\Software{ Wow6432 } \Citrix\AuthManager\protocols\
integratedwindows\
The key prevents the Citrix Workspace app authentication manager from checking for the single
sign-on component, thus allowing Citrix Workspace app to authenticate to StoreFront.
To enable smart card authentication to StoreFront instead of Kerberos, install Citrix Workspace app
for Windows with the following command-line options:
• /includeSSON installs single sign-on (pass-through) authentication. Enables credential
caching and the use of pass-through domain-based authentication.
• If the user is logging on to the endpoint with a dierent method to smart card for Citrix
Workspace app for Windows authentication (for example, user name and password), the
command line is:
/includeSSON LOGON_CREDENTIAL_CAPTURE_ENABLE=No
© 1999-2021 Citrix Systems, Inc. All rights reserved. 164

Citrix Workspace app for Windows
This prevents the credentials being captured at logon time and allows Citrix Workspace app to store
the PIN when logging on to Citrix Workspace app.
1. Open the Citrix Workspace app Group Policy Object administrative template by running
gpedit.msc.
2. Go to Administrative Templates > Citrix Components > Citrix Workspace > User Authentica-
tion > Local user name and password.
3. Select Enable pass-through authentication. Depending on the configuration and security set-
tings, select Allow pass-through authentication for all ICA option for pass-through authenti-
cation to work.
To configure StoreFront:
• When you configure the authentication service, select the Smart card check box.
For more information about using smart cards with StoreFront, see Configure the authentication ser-
vice in the StoreFront documentation.
To enable user devices for smart card use:
1. Import the certificate authority root certificate into the device’s keystore.
2. Install your vendor’s cryptographic middleware.
3. Install and configure Citrix Workspace app.
To change how certificates are selected:
By default, if multiple certificates are valid, Citrix Workspace app prompts the user to choose a certifi-
cate from the list. Alternatively, you can configure Citrix Workspace app to use the default certificate
(per the smart card provider) or the certificate with the latest expiry date. If there are no valid logon
certificates, the user is notified, and given the option to use an alternate logon method if available.
A valid certificate must have all of these characteristics:
• The current time of the clock on the local computer is within the certificate validity period.
• The Subject public key must use the RSA algorithm and have a key length of 1024 bits, 2048
bits, or 4096 bits.
• Key usage must contain digital signature.
• Subject Alternative Name must contain the User Principal Name (UPN).
• Enhanced key usage must contain smart card logon and client authentication, or all key usages.
• One of the Certificate Authorities on the certificate’s issuer chain must match one of the permit-
ted Distinguished Names (DN) sent by the server in the TLS handshake.
Change how certificates are selected by using either of the following methods:
• On the Citrix Workspaceappcommandline, specify the option AM_CERTIFICATESELECTIONMODE
={ Prompt | SmartCardDefault | LatestExpiry }.
© 1999-2021 Citrix Systems, Inc. All rights reserved. 165

Citrix Workspace app for Windows
Prompt is the default. For SmartCardDefault or LatestExpiry, if multiple certificates meet
the criteria, Citrix Workspace app prompts the user to choose a certificate.
Add the following key value to
the registry key
HKEY_CURRENT_USER OR
HKEY_LOCAL_MACHINE\
Software\[Wow6432Node\
Citrix\AuthManager:
CertificateSelectionMode={
Prompt
SmartCardDefault LatestExpiry }.
•
Values defined in HKEY_CURRENT_USER take precedence over values in HKEY_LOCAL_MACHINE to
best assist the user in selecting a certificate.
To use CSP PIN prompts:
By default, the PIN prompts presented to users are provided by Citrix Workspace app for Windows
rather than the smart card Cryptographic Service Provider (CSP). Citrix Workspace app prompts users
to enter a PIN when required and then passes the PIN to the smart card CSP. If your site or smart
card has more stringent security requirements, such as to disallow caching the PIN per-process or
per-session, you can configure Citrix Workspace app to instead use the CSP components to manage
the PIN entry, including the prompt for a PIN.
Change how PIN entry is handled by using either of the following methods:
• On the Citrix Workspace app command line, specify the option AM_SMARTCARDPINENTRY=CSP.
• Add the following key value to the registry key HKEY_LOCAL_MACHINE\Software\[
Wow6432Node\Citrix\AuthManager: SmartCardPINEntry=CSP.
Smart card support and removal changes
A Citrix Virtual Apps session is logged o when the smart card is removed – if Citrix Workspace app
is configured with smart card as the authentication method, the corresponding policy has to be con-
figured on Citrix Workspace app for Windows to enforce the Citrix Virtual Apps session for logo. The
user is still logged into the Citrix Workspace app session.
Limitation:
When you log on to the Citrix Workspace app site using smart card authentication, the user name is
displayed as Logged On.
© 1999-2021 Citrix Systems, Inc. All rights reserved. 166

Citrix Workspace app for Windows
Fast smart card
Fast smart card is an improvement over the existing HDX PC/SC-based smart card redirection. It im-
proves performance when smart cards are used in high-latency WAN environments.
Fast smart cards are supported on Linux VDA only.
To enable fast smart card logon on Citrix Workspace app:
Fast smart card logon is enabled by default on the VDA and disabled by default on Citrix Workspace
app. To enable fast smart card logon, include the following parameter in the default.ica file of the
associated StoreFront site:
1 copy[WFClient]
2 SmartCardCryptographicRedirection=On
To disable fast smart card logon on Citrix Workspace app:
Todisable fast smart cardlogonon Citrix Workspaceapp, removethe SmartCardCryptographicRedirection
parameter from the default.ica file of the associated StoreFront site.
For more information, see smart-cards.
Silent authentication for Citrix Workspace
Citrix Workspace app introduces a Group Policy Object (GPO) policy to enable silent authentication for
Citrix Workspace. This policy enables Citrix Workspace app to log in to Citrix Workspace automatically
at system startup. Use this policy only when domain pass-through (single sign-on) is configured for
Citrix Workspace on domain-joined devices.
For this policy to function, the following criteria must be met:
• Single sign-on must be enabled.
• The SelfServiceMode key must be set to Off in the Registry editor.
Enabling silent authentication:
1. Open the Citrix Workspace app Group Policy Object administrative template by running gpedit
.msc.
2. Under the Computer Configuration node, go to Administrative Templates > Citrix Workspace
> Self Service.
3. Click Silent authentication for Citrix Workspace policy and set it to Enabled.
4. Click Apply and OK.
© 1999-2021 Citrix Systems, Inc. All rights reserved. 167

Citrix Workspace app for Windows
Secure communications
April 23, 2021
Integrate your Citrix Workspace app connections using the following technologies to communicate
securely:
• Citrix Gateway.
• A firewall: Network firewalls can allow or block packets based on the destination address and
port.
• Trusted server.
• For Citrix Virtual Apps deployments only: A SOCKS proxy server or secure proxy server. Proxy
servers helps to limit access to and from the network. They also handle the connections be-
tween Citrix Workspace app and the server. Citrix Workspace app supports SOCKS and secure
proxy protocols.SSL Relay solutions with Transport Layer Security (TLS) protocols.
Outbound proxy support
SmartControl allows administrators to configure and enforce policies that aect environment. For
instance, you might want to prohibit users from mapping drives to their remote desktops. You can
achieve the granularity using the SmartControl feature on the Citrix Gateway.
The scenario changes when the Citrix Workspace app and the Citrix Gateway belong to separate en-
terprise accounts. In such cases, the client domain cannot apply the SmartControl feature because
the gateway does not exist on the domain. You can then use the Outbound ICA Proxy. The Outbound
ICA Proxy feature lets you use the SmartControl feature even when Citrix Workspace app and Citrix
Gateway are deployed in dierent organizations.
Citrix Workspace app supports session launches using the NetScaler LAN proxy. Use the outbound
proxy plug-in to configure a single static proxy or select a proxy server at runtime.
You can configure outbound proxies using the following methods:
• Static proxy: Proxy server is configured by giving a proxy host name and port number.
• Dynamic proxy: A single proxy server can be selected among one or more proxy servers using
the proxy plug in DLL.
You can configure the outbound proxy using the Group Policy Object administrative template or the
Registry editor.
For more information about outbound proxy, see Outbound ICA Proxy support in the Citrix Gateway
documentation.
Outbound proxy support - Configuration
© 1999-2021 Citrix Systems, Inc. All rights reserved. 168

Citrix Workspace app for Windows
Note:
If both static proxy and dynamic proxies are configured, the dynamic proxy configuration takes
precedence.
Configuring the outbound proxy using the GPO administrative template:
1. Open the Citrix Workspace app Group Policy Object administrative template by running
gpedit.msc.
2. Under the Computer Configuration node, go to Administrative Templates> Citrix Workspace
> Network routing.
3. Select one of the following options:
• For static proxy: Select the Configure NetScaler LAN proxy manually policy. Select En-
abled and then provide the host name and port number.
• For dynamic proxy: Select the Configure NetScaler LAN proxy using DLL policy. Select
Enabled and then provide the full path to the DLL file. For example, C:\Workspace\
Proxy\ProxyChooser.dll.
4. Click Apply and OK.
Configuring the outbound proxy using the Registry editor:
• For static proxy:
– Launch the Registry editor and navigate to HKEY_LOCAL_MACHINE\SOFTWARE\
Policies\Citrix\ICA Client\Engine\Network Routing\Proxy\NetScaler.
– Create DWORD value keys as follows:
”StaticProxyEnabled”=dword:00000001
”ProxyHost”=”testproxy1.testdomain.com
”ProxyPort”=dword:000001bb
• For dynamic proxy:
– Launch the Registry editor and navigate to HKEY_LOCAL_MACHINE\SOFTWARE\
Policies\Citrix\ICA Client\Engine\Network Routing\Proxy\NetScaler
LAN Proxy.
– Create DWORD value keys as follows:
”DynamicProxyEnabled”=dword:00000001
”ProxyChooserDLL”=”c:\\Workspace\\Proxy\\ProxyChooser.dll”
TLS
Transport Layer Security (TLS) is the replacement for the SSL (Secure Sockets Layer) protocol. The
Internet Engineering Taskforce (IETF) renamed it TLS when it took over responsibility for the develop-
ment of TLS as an open standard.
© 1999-2021 Citrix Systems, Inc. All rights reserved. 169

Citrix Workspace app for Windows
TLS secures data communications by providing server authentication, encryption of the data stream,
and message integrity checks. Some organizations, including U.S. government organizations, require
the use of TLS to secure data communications. These organizations might also require the use of
validated cryptography, such as Federal Information Processing Standard (FIPS) 140. FIPS 140 is a
standard for cryptography.
To use TLS encryption as the communication medium, you must configure the user device and the
Citrix Workspace app. For information about securing StoreFront communications, see the Secure
section in the StoreFront documentation.
Pre-requisites:
See the System requirements section.
You can use the cipher suites below to:
• Enforce use of TLS: We recommend that you use TLS for connections using untrusted networks,
including the Internet.
• Enforce use of FIPS (Federal Information Processing Standards): Approved cryptography and
comply with the recommendations in NIST SP 800-52. These options are disabled by default.
• Enforce use of a specific version of TLS, and specific TLS cipher suites: Citrix supports TLS 1.0,
TLS 1.1 and TLS 1.2 protocols.
• Connect only to specific servers.
• Check for revocation of the server certificate.
• Check for a specific server-certificate issuance policy.
• Select a particular client certificate, if the server is configured to request one.
The following cipher suites are deprecated for enhanced security:
• Cipher suites RC4 and 3DES
• Cipher suites with prefix “TLS_RSA_*”
• TLS_RSA_WITH_AES_256_GCM_SHA384 (0x009d)
• TLS_RSA_WITH_AES_128_GCM_SHA256 (0x009c)
• TLS_RSA_WITH_AES_256_CBC_SHA256 (0x003d)
• TLS_RSA_WITH_AES_256_CBC_SHA (0x0035)
• TLS_RSA_WITH_AES_128_CBC_SHA (0x002f)
• TLS_RSA_WITH_RC4_128_SHA (0x0005)
• TLS_RSA_WITH_3DES_EDE_CBC_SHA (0x000a)
Citrix Workspace app supports only the following cipher suites:
• TLS_ECDHE_RSA_WITH_AES_256_GCM_SHA384 (0xc030)
• TLS_ECDHE_RSA_WITH_AES_256_CBC_SHA384 (0xc028)
• TLS_ECDHE_RSA_WITH_AES_128_CBC_SHA (0xc013)
For DTLS 1.0 users, Citrix Workspace app supports only the following cipher suite:
© 1999-2021 Citrix Systems, Inc. All rights reserved. 170

Citrix Workspace app for Windows
• TLS_ECDHE_RSA_WITH_AES_128_CBC_SHA (0xc013)
TLS support
1. Open the Citrix Workspace app GPO administrative template by running gpedit.msc.
2. Under the Computer Configuration node, go to Administrative Templates> Citrix Workspace
> Network routing, and select the TLS and Compliance Mode Configuration policy.
3. Select Enabled to enable secure connections and to encrypt communication on the server. Set
the following options:
Note:
Citrix recommends TLS for secure connections.
a) Select Require TLS for all connections to force Citrix Workspace app to use TLS for con-
nections to published applications and desktops.
© 1999-2021 Citrix Systems, Inc. All rights reserved. 171

Citrix Workspace app for Windows
b) From the Security Compliance Mode menu, select the appropriate option:
i. None - No compliance mode is enforced.
ii. SP800-52 – Select SP800-52 for compliance with NIST SP 800-52. Select this option
only if the servers or gateway complies with NIST SP 800-52 recommendations.
Note:
If you select SP800-52, FIPS Approved cryptography is automatically used, even if
Enable FIPS is not selected. You must also enable the Windows security option, Sys-
tem Cryptography: Use FIPS-compliant algorithms for encryption, hashing, and
signing. Otherwise, Citrix Workspace app might fail to connect to the published ap-
plications and desktops.
If you select SP800-52, set the Certificate Revocation Check Policy setting to Full access
check and CRL required.
When you select SP800-52, Citrix Workspace app verifies that the server certificate com-
plies with the recommendations in NIST SP 800-52. If the server certificate does not com-
ply, Citrix Workspace app might fail to connect.
i. Enable FIPS – Select this option to enforce the use of FIPS approved cryptography.
You must also enable the Windows security option from the operating system group
policy, System Cryptography: Use FIPS-compliant algorithms for encryption,
hashing, and signing. Otherwise, Citrix Workspace app might fail to connect to
published applications and desktops.
c) From the Allowed TLS servers drop-down menu, select the port number. Use a comma-
separated list to ensure that Workspace app connects only to a specified server. You can
specify wildcards and port numbers. For example, *.citrix.com: 4433 allows connections
to any server whose common name ends with .citrix.com on port 4433. The issuer of
the certificate asserts the accuracy of the information in a security certificate. If Citrix
Workspace does not recognize or trust the issuer, the connection is rejected.
d) From the TLS version menu, select one of the following options:
• TLS 1.0, TLS 1.1, or TLS 1.2 - This is the default setting. This option is recommended only
if there is a business requirement for TLS 1.0 for compatibility.
• TLS 1.1 or TLS 1.2 – Use this option to ensure that the connections use either TLS 1.1 or TLS
1.2.
• TLS 1.2 - This option is recommended if TLS 1.2 is a business requirement.
a) TLS cipher set - To enforce use of a specific TLScipher set, select either Government (GOV),
Commercial (COM),or All (ALL). In certain cases of Citrix Gatewayconfigurations, you might
need to select COM. Citrix Workspace app supports RSA keys of 1024, 2048, and 3072-bit
lengths. Root certificates with RSA keys of 4096-bit length are also supported.
© 1999-2021 Citrix Systems, Inc. All rights reserved. 172

Citrix Workspace app for Windows
Note:
Citrix does’nt recommend using RSA keys of 1024-bit length.
• Any: When “Any” is set, the policy is not configured and any of the following cipher suites
are allowed:
a) TLS_RSA_WITH_RC4_128_MD5
b) TLS_RSA_WITH_RC4_128_SHA
c) TLS_RSA_WITH_3DES_EDE_CBC_SHA
d) TLS_RSA_WITH_AES_128_CBC_SHA
e) TLS_RSA_WITH_AES_256_CBC_SHA
f) TLS_RSA_WITH_AES_128_GCM_SHA256
g) TLS_RSA_WITH_AES_256_GCM_SHA384
• Commercial: When “Commercial” is set, only the following cipher suites are allowed:
a) TLS_RSA_WITH_RC4_128_MD5
b) TLS_RSA_WITH_RC4_128_SHA
c) TLS_RSA_WITH_AES_128_CBC_SHA
d) TLS_RSA_WITH_AES_128_GCM_SHA256
• Government: When “Government” is set, only the following cipher suites are allowed:
a) TLS_RSA_WITH_AES_256_CBC_SHA
b) TLS_RSA_WITH_3DES_EDE_CBC_SHA
c) TLS_RSA_WITH_AES_128_GCM_SHA256
d) TLS_RSA_WITH_AES_256_GCM_SHA384
a) From the Certificate Revocation Check Policy menu, select any of the following:
• Check with No Network Access - Certificate Revocation list check is performed. Only local
certificate revocation list stores are used. All distribution points are ignored. Finding the
Certificate RevocationListis not mandatory to verify the servercertificate that is presented
by the target SSL Relay/Citrix Secure Web Gateway server.
• Full Access Check - Certificate Revocation List check is performed. Local Certificate Re-
vocation List stores and all distribution points are used. If revocation information for a
certificate is found, the connection is rejected. Finding a Certificate Revocation List is not
critical for verification of the server certificate presented by the target server.
• Full Access Check and CRL Required - Certificate Revocation List check is performed, ex-
cluding the root Certificate Authority. Local Certificate Revocation List stores and all distri-
bution points are used. If revocation information for a certificate is found, the connection
is rejected. Finding all required Certificate Revocation Lists is critical for verification.
• Full Access Check and CRL Required All - Certificate Revocation List check is performed,
© 1999-2021 Citrix Systems, Inc. All rights reserved. 173

Citrix Workspace app for Windows
including the root CA. Local Certificate Revocation List stores and all distribution points
are used. If revocation information for a certificate is found, the connection is rejected.
Finding all required Certificate Revocation Lists is critical for verification.
• No Check - No Certificate Revocation List check is performed.
a) Using the Policy Extension OID, you can limit Citrix Workspace app to connect only to
servers with a specific certificate issuance policy. When you select Policy Extension OID,
Citrix Workspace app accepts only server certificates containing that Policy Extension OID.
b) From the Client Authentication menu, select any of the following:
• Disabled - Client Authentication is disabled.
• Display certificate selector - Always prompt the user to select a certificate.
• Select automatically if possible - Prompt the user only if there a choice of the certificate
to identify.
• Not configured – Indicates that client authentication is not configured.
• Use specified certificate - Use the client certificate as set in the Client Certificate option.
a) Use the Client Certificate setting to specify the identifying certificate’s thumbprint to
avoid prompting the user unnecessarily.
b) Click Apply and OK to save the policy.
The following matrices provide details of internal and external network connections:
© 1999-2021 Citrix Systems, Inc. All rights reserved. 174

Citrix Workspace app for Windows
Firewall
Network firewalls can allow or block packets based on the destination address and port. If you are
using a firewall, Citrix Workspace app for Windows must be able to communicate through the firewall
with both the Web server and Citrix server.
Common Citrix Communication Ports
Source Type Port Details
Citrix Workspace app TCP 80/443 Communication with
StoreFront
ICA or HDX TCP/UDP 1494 Access to applications
and virtual desktops
ICA or HDX with
Session Reliability
TCP/UDP 2598 Access to applications
and virtual desktops
ICA or HDX over SSL TCP/UDP 443 Access to applications
and virtual desktops
For more information on ports, see the Knowledge Center article CTX101810.
Proxy server
Proxy servers are used to limit access to and from your network, and to handle connections between
Citrix Workspace app for Windows and servers. Citrix Workspace app supports SOCKS and secure
© 1999-2021 Citrix Systems, Inc. All rights reserved. 175

Citrix Workspace app for Windows
proxy protocols.
When communicating with the server, Citrix Workspace app uses proxy server settings that are config-
ured remotely on the server running workspace for web.
In communicating with the web server, Citrix Workspace app uses the proxy server settings configured
through the Internet settings of the default Web browser on the user device. You must configure the
Internet settings of the default Web browser on the user device accordingly.
Configure the proxy settings using the Registry Editor to enforce Citrix Workspace app to honor or
discard the proxy server during connections.
Warning
Editing the registry incorrectly can cause serious problems that may require you to reinstall your
operating system. Citrix cannot guarantee that problems resulting from the incorrect use of Reg-
istry Editor can be solved.
1. Navigate to \HKEY_LOCAL_MACHINE\SOFTWARE\WOW6432Node\Citrix\AuthManager
2. Set the ProxyEnabled(REG_SZ) .
• True – indicates that Citrix Workspace app honors the proxy server during connections.
• False - indicates that Citrix Workspace app discards the proxy server during connections.
3. Restart the Citrix Workspace app for the changes to take eect.
Trusted server
Trusted server configuration identifies and enforces trust relations in Citrix Workspace app connec-
tions.
When you enable Trusted server, Citrix Workspace app specifies the requirements and decides if the
connection to the server can be trusted or not. For example, a Citrix Workspace app connecting to a
certain address (such as https://\*.citrix.com with a specific connection type (such as TLS) is
directed to a trusted zone on the server
When you enable this feature, connected server resides in the Windows Trusted Sites zone. For in-
structions about adding servers to the Windows Trusted Sites zone, see the Internet Explorer online
help.
To enable trusted server configuration using Group Policy Object administrative template
Pre-requisite:
Exit from the Citrix Workspace app components including the Connection Center.
1. Open the Citrix Workspace app GPO administrative template by running gpedit.msc.
2. Under the Computer Configuration node, go to Administrative Templates > Classic Adminis-
trative Templates(ADM) > Citrix Components > Citrix Workspace > Network Routing > Con-
figure trusted server configuration.
© 1999-2021 Citrix Systems, Inc. All rights reserved. 176

Citrix Workspace app for Windows
3. Select Enabled to force Citrix Workspace app to perform region identification.
4. Select Enforce trusted server configuration. This forces the client toperform the identification
using a trusted server.
5. From the Windows internet zone drop-down menu, select the client-server address. This set-
ting is applicable only to Windows Trusted Site zone.
6. In the Address field, set the client-server address for trusted site zone other than Windows. You
can use a comma-separated list.
7. Click OK and Apply.
ICA file signing
The ICA file signing helps protect you from an unauthorized application or desktop launch. Citrix
Workspace app verifies that a trusted source generated the application or desktop launch based on
an administrative policy and protects against the launch from untrusted servers. You can configure
ICA file signing using the Group policy objects administrative template or StoreFront. ICA file signing
is not enabled by default.
For information about enabling ICA file signing for StoreFront, see Enable ICA file signing in StoreFront
documentation.
Configure ICA file signature
Note:
If the CitrixBase.admx\adml is not added to the local GPO, the Enable ICA File Signing policy
might not be present.
1. Open the Citrix Workspace app Group Policy Object administrative template by running
gpedit.msc
2. Under the Computer Configuration node, go to Administrative Templates > Citrix Compo-
nents.
3. Select Enable ICA File Signing policy and select one of the options as required:
a) Enabled - Indicates that you can add the signing certificate thumbprint to the whitelist of
trusted certificate thumbprints.
b) Trust Certificates - Click Show to remove the existing signing certificate thumbprint from
the whitelist. You can copy and paste the signing certificate thumbprints from the signing
certificate properties.
c) Security policy - Select one of the following options from the menu.
i. Only allow signed launches (more secure): Allows only signed-application or desktop
launch from a trusted server. A security warning appears when there is an invalid sig-
nature. The session launch fails due to non-authorization.
© 1999-2021 Citrix Systems, Inc. All rights reserved. 177

Citrix Workspace app for Windows
ii. Prompt user on unsigned launches (less secure) - A message prompt appears when an
unsigned or invalidly signed session is launched. You can choose to either continue
the launch or cancel the launch (default).
4. Click Apply and OK to save the policy.
5. Restart the Citrix Workspace app session for the changes to take eect.
To select and distribute a digital signature certificate:
When selecting a digital signature certificate, we recommend you choose from the following priori-
tized list:
1. Buy a code-signing certificate or SSL signing certificate from a public Certificate Authority (CA).
2. If your enterprise has a private CA, create a code-signing certificate or SSL signing certificate
using the private CA.
3. Use an existing SSL certificate.
4. Create a root CA certificate and distribute it to user devices using GPO or manual installation.
Local Security Authority (LSA) protection
Citrix Workspace app supports Windows Local Security Authority (LSA) protection, which maintains
information about all aspects of local security on a system. This support provides the LSA level of
system protection to hosted desktops.
Storebrowse
April 12, 2021
Storebrowse is a command-line utility that interacts between the client and the server. It is used to
authenticate all the operations within StoreFront and with Citrix Gateway.
Using the Storebrowse utility, administrators can automate the following operations:
• Add a store.
• Enumerate the published apps and desktops from a configured store.
• Generate an ICA file by selecting any published Citrix Virtual Apps and Desktops manually.
• Generate an ICA file using the Storebrowse command line.
• Launch the published application.
The Storebrowse utility is a part of the Authmanager component. Aer installing the Citrix Workspace
app, the Storebrowse utility is located in the AuthManager installation folder.
To confirm that the Storebrowse utility is installed along with the Authmanager component, check
the following registry path:
© 1999-2021 Citrix Systems, Inc. All rights reserved. 178

Citrix Workspace app for Windows
When Citrix Workspace app is installed by administrators:
On a 32-bit machine [HKEY_LOCAL_MACHINE\SOFTWARE\Citrix\AuthManager\Install]
On a 64-bit machine [HKEY_LOCAL_MACHINE\SOFTWARE\WOW6432Node\Citrix\AuthManager\Install]
When Citrix Workspace app is installed by users (non-administrators):
On a 32-bit machine [HKEY_CURRENT_USER\SOFTWARE\Citrix\AuthManager\Install]
On a 64-bit machine [HKEY_CURRENT_USER\SOFTWARE\WOW6432Node\Citrix\AuthManager\Install]
Requirements
• Citrix Workspace app Version 1808 for Windows or later.
• Minimum of 530 MB of free disk space.
• 2 GB RAM.
Compatibility Matrix
Storebrowse utility is compatible with the following Operating systems:
Operating system
Windows 10 32-bit and 64-bit editions
Windows 8.1, 32-bit and 64-bit editions
Windows 7 SP1, 32-bit and 64-bit editions
Windows Thin PC
Windows Server 2016
Windows Server 2012 R2, Standard, and, Datacenter editions
Windows Server 2012, Standard, and, Datacenter editions
Windows Server 2008 R2, 64-bit edition
Windows Server 2008 R2, 64-bit edition
© 1999-2021 Citrix Systems, Inc. All rights reserved. 179

Citrix Workspace app for Windows
Connections
Storebrowse utility supports the following types of connections:
• HTTP store
• HTTPS store
• Citrix Gateway 11.0 and later
Note:
On an HTTP store, Storebrowse utility does not accept credentials using the command-line.
Authentication methods
StoreFront servers
StoreFront supports dierent authentication methods to access stores, however, not all are recom-
mended. For security purposes, some of the authentication methods are disabled by default while
creating a store.
• Username and Password: Enter the credentials to be authenticated to access stores. By de-
fault, Explicit authentication is enabled when you create your first store.
• Domain Pass-through: Aer authenticating to the domain-joined windows computers, you are
automatically logged on to stores. To use this option, enable pass-through authentication when
installing the Citrix Workspace app. For more information on domain pass-through, see Config-
uring Pass-through authentication.
• HTTP Basic: Enable HTTP Basic authentication so that the Storebrowse utility can communi-
cate with the StoreFront servers. This option is disabled by default on the StoreFront server.
You must enable the HTTP Basic authentication method.
Storebrowse utility supports authentication methods in any of the following methods:
• Using the AuthManager that is in-built along with the Storebrowse utility. Note: You must en-
able HTTP Basic authentication method on the StoreFront while working with the Storebrowse
utility. This applies when user provides the credentials using the Storebrowse commands.
• External Authmanager that can be included with Citrix Workspace app for Windows.
Single sign-on with Citrix Gateway
Additional to the newly added Citrix Gateway support, you can now use single sign-on with it. You can
add a store and enumerate the published resources without having to provide your user credentials.
For more information about single sign-on support with Citrix Gateway, see Support for single sign-on
with Citrix Gateway.
© 1999-2021 Citrix Systems, Inc. All rights reserved. 180

Citrix Workspace app for Windows
Note:
This feature is supported only on domain-joined machines where the Citrix Gatewayis configured
with the single sign-on authentication.
Launch published desktop or application
You can now launch a resource directly from the store without having to use an ICA file.
Command usage
The following section provides detailed informationabout the commands that you can use from Store-
browse utility.
-a, –addstore
Description:
Adds new store. Returns the full URL of the store. If return fails, an error is reported.
Note:
Multi-store configuration is supported on Storebrowse utility.
Command example on StoreFront:
Command:
storebrowse.exe ‒U *username* -P *password* -D *domain* -a *URL of Storefront
*
Example:
.\storebrowse.exe ‒U { Username } ‒P { Password } ‒D { Domain } ‒a [https://
my.firstexamplestore.net](https://my.firstexamplestore.net)
Command example on Citrix Gateway:
Command:
storebrowse.exe ‒U *username* -P *password* -D *domain* -a *URL of CitrixGateway
*
Example:
.\storebrowse.exe ‒U { Username } ‒P { Password } ‒D { Domain } ‒a <https://
mysecondexample.com>
© 1999-2021 Citrix Systems, Inc. All rights reserved. 181

Citrix Workspace app for Windows
/?
Description:
Provides details on Storebrowse utility usage.
(-l), –liststore
Description:
Lists the stores that are added by the user.
Command Example on StoreFront:
.\storebrowse.exe ‒l
Command Example on Citrix Gateway:
.\storebrowse.exe ‒l
(-M 0x2000 -E)
Description:
Enumerates resources.
Command example on StoreFront:
.\storebrowse.exe ‒U { Username } ‒P { Password } ‒D { Domain } ‒M 0x2000 ‒E
<https://my.firstexamplestore.net/Citrix/Store/discovery>
Command example on Citrix Gateway:
.\storebrowse.exe ‒U { Username } ‒P { Password } ‒D { Domain } ‒M 0x2000 ‒E
<https://my.secondexample.net>
-q, –quicklaunch
Description:
Generates the ICA file for published apps and desktops using the Storebrowse utility. The quicklaunch
option requires a launch URL as an input along with the Store URL. The launch URL which can either
be the StoreFront server or Citrix Gateway URL. The ICA file is generated in the %LocalAppData%\
Citrix\Storebrowse\cache directory.
You can get the launch URL for any published apps and desktops by running the following command:
.\storebrowse ‒M 0X2000 ‒E https://myfirstexamplestore.net/Citrix/Second/
discovery
© 1999-2021 Citrix Systems, Inc. All rights reserved. 182

Citrix Workspace app for Windows
A typical launch URL looks like below:
'Controller.Calculator''Calculator''\' ''http://abc-sf.xyz.com/Citrix/
Stress/resources/v2/Q29udHJvbGxlci5DYWxjdWxhdG9y/launch/ica
Command example on StoreFront:
.\storebrowse.exe ‒U { Username } ‒P { Password } ‒D { Domain } ‒q { Launch_URL_of_published_
apps and desktops } <https://my.firstexamplestore.net/Citrix/Store/resources
/v2/Q2hJkOlmNoPQrSTV9y/launch/ica> <https://my.firstexamplestore.net/Citrix
/Store/discovery>
Command example on Citrix Gateway:
.\storebrowse.exe ‒U { Username } ‒P { Password } ‒D { Domain } ‒q { Launch_URL_of_published_
apps and desktops } <https://my.secondexmaplestore.com>
-L, –launch
Description:
Generates the required ICA file for published apps and desktops using the Storebrowse utility. The
launch option requires the name of the resource along with the Store URL. The name which can either
be the StoreFront server or the Citrix Gateway URL. The ICA file is generated in the %LocalAppData
%\Citrix\Storebrowse\cache directory.
Run the below command to get the display name of the published apps and desktops:
.\storebrowse ‒M 0X2000 ‒E https://myfirstexamplestore.net/Citrix/Second/
discovery
This command results in the following output:
'Controller.Calculator''Calculator''\' ''http://abc-sf.xyz.com/Citrix/
Stress/resources/v2/Q29udHJvbGxlci5DYWxjdWxhdG9y/launch/ica
The name that is in bold in the above output is used as an input parameter to the launch option.
Command example on StoreFront:
.\storebrowse.exe -U { Username } ‒P { Password } ‒D { Domain } ‒L “{
Resource_Name } <https://my.firstexamplestore.net/Citrix/Store/discovery>
Command example on Citrix Gateway:
<.\storebrowse.exe ‒U { Username } ‒P { Password } ‒D { Domain } ‒L { Resource_Name
} https://my.secondexamplestore.com>
© 1999-2021 Citrix Systems, Inc. All rights reserved. 183

Citrix Workspace app for Windows
-S, –sessionlaunch
Description:
With this command, ou can add a store, enumerate and launch the published resources. This option
takes the following as parameters:
• Username
• Password
• Domain
• Name of the resource to be launched
• Store URL
However, if the user does not provide the credentials, the AuthManager prompts to enter the creden-
tials and then the resource is launched.
You can get the name of the resource of published apps and desktops by running the command below:
.\storebrowse ‒M 0X2000 ‒E https://myfirstexamplestore.net/Citrix/Second/
discovery
This command results in the following output:
'Controller.Calculator''Calculator''\' ''http://abc-sf.xyz.com/Citrix/
Stress/resources/v2/Q29udHJvbGxlci5DYWxjdWxhdG9y/launch/ica
The name that is in bold in the above output will be used as input parameter to the -S option.
Command example on StoreFront:
.\storebrowse.exe -U { Username } ‒P { Password } ‒D { Domain } ‒S “{
Friendly_Resource_Name } <https://my.firstexamplestore.net/Citrix/Store/
discovery >
Command example on Citrix Gateway:
.\storebrowse.exe ‒U { Username } ‒P { Password } ‒D { Domain } ‒S { Friendly_Resource_Name
} <https://my.secondexamplestore.com>
-f, –filefolder
Description:
Generates the ICA file in the custom path for a published apps and desktops.
The launch option requires a folder name and the name of the resource as the input with the Store
URL. The Store URL can either be the StoreFront server or Citrix Gateway URL.
Command example on StoreFront:
.\storebrowse.exe ‒f “C:\Temp\Launch.ica” ‒L “Resource_Name” { Store }
© 1999-2021 Citrix Systems, Inc. All rights reserved. 184

Citrix Workspace app for Windows
Command example on Citrix Gateway:
.\storebrowse.exe ‒f “C:\Temp\Launch.ica” ‒L “Resource_Name” { NSG_URL }
-t, –traceauthentication
Description:
Generates logs for the AuthManager component. Logs are generated only if the Storebrowse utility is
using an in-built AuthManager. Logs are generated in the localappdata%\Citrix\Storebrowse
\logs directory.
Note:
This option must not be the last parameter listed in the user’s command line.
Command example on StoreFront:
.\storebrowse.exe ‒t ‒U { UserName } ‒P { Password } ‒D { Domain } ‒a {
StoreURL }
Command example on Citrix Gateway:
.\storebrowse.exe ‒t ‒U { UserName } ‒P { Password } ‒D { Domain } ‒a {
NSG_URL }
-d, –deletestore
Description:
Deletes existing StoreFront or Citrix Gateway store.
Command example on StoreFront:
.\storebrowse.exe ‒d https://my.firstexamplestore.net/Citrix/Store/discovery
Command example on Citrix Gateway:
.\storebrowse.exe ‒d https://my.secondexmaplestore.com
Single sign-on support with Citrix Gateway
Single sign-on lets you authenticate to a domain and use Citrix Virtual Apps and Desktops delivered
by that domain without having to re-authenticate to each app or desktop. When you add a store, your
credentials are passed through to the Citrix Gateway server, along with the enumerated Citrix Virtual
Apps and Desktops, and your Start menu settings.
This feature is supported on Citrix Gateway Version 11 and later.
© 1999-2021 Citrix Systems, Inc. All rights reserved. 185

Citrix Workspace app for Windows
Prerequisites:
For the prerequisites on how to configure Single Sign-On for Citrix Gateway, see Configure domain
pass-through authentication.
The single sign-on feature with Citrix Gateway can be enabled using the Group Policy Object (GPO)
administrative template.
1. Open the Citrix Workspace app GPO administrative template by running gpedit.msc
2. Under the Computer Configuration node, go to Administrative Template> Citrix Component
> Citrix Workspace > User Authentication > Single Sign-on for Citrix Gateway.
3. Use the toggle options to Enable or Disable the Single Sign-On option.
4. Click Apply and OK.
5. Restart the Citrix Workspace app session for the changes to take eect.
Limitations:
• Enable the HTTP Basic Authentication method on the StoreFront server for credential injection
operations with the Storebrowse utility.
• If you have a HTTP store, and when you try connecting to the store using the utility to enumer-
ate or launch the published Citrix Virtual Apps and Desktops, the credential injection using the
command-line option is unsupported. As a workaround, use the external AuthManager mod-
ule if you do not provide credential using the command line.
• Storebrowse utility currently supports only single store configured the Citrix Gateway on the
StoreFront server.
• Credential Injection in the Storebrowse utility works only if the Citrix Gateway is configured with
Single-Factor Authentication.
• The command-line options Username (-U), Password (-P) and Domain (-D) of the Store-
browse utility are case-sensitive and must be in upper case only.
Citrix Workspace app Desktop Lock
January 6, 2021
You can use the Citrix Workspace app Desktop Lock when you do not need to interact with the local
desktop. You can use the Desktop Viewer (if enabled), however it has only the following set of options
on the toolbar:
• Ctrl+Alt+Del
• Preferences
• Devices
• Disconnect.
© 1999-2021 Citrix Systems, Inc. All rights reserved. 186

Citrix Workspace app for Windows
Citrix Workspace app for Windows with Desktop Lock works on domain-joined machines, which are
SSON-enabled (Single Sign-On) and store configured. It does not support PNA sites. Previous versions
of Desktop Lock are not supported when you upgrade to Citrix Receiver for Windows 4.2 or later.
You must install Citrix Workspace app for Windows with the /includeSSON flag. You must configure
the store and Single Sign-on, either using the adm/admx file or cmdline option. For more information,
see Install.
Then, install the Citrix Workspace app Desktop Lock as an administrator using the CitrixWorkspaceDesktopLock
.msi available in the Citrix Downloads page.
System requirements
• Microso Visual C++ 2005 Service Pack 1 Redistributable Package. For more information, see
the Microso Download page.
• Supported on Windows 7 (including Embedded Edition), Windows 7 Thin PC, Windows 8, and
Windows 8.1 and Windows 10 (Anniversary update included).
• Connects to StoreFront through native protocols only.
• Domain-joined end points.
• User devices must be connected to a local area network (LAN) or wide area network (WAN).
Local App Access
Important
Enabling Local App Access might permit local desktop access unless a full lock down has been
applied with the Group Policy Object template or a similar policy. For more information, see the
Configure Local App Access and URL redirection section in the Citrix Virtual Apps and Desktops
documentation.
Working with Citrix Workspace app Desktop Lock
• You can use Citrix Workspace app Desktop Lock with the following Citrix Workspace app fea-
tures:
– 3Dpro, Flash, USB, HDX Insight, Microso Lync 2013 plug-in, and local app access
– Domain, two-factor, or smart card authentication only
• Disconnecting the Citrix Workspace app Desktop Lock session logs out the end device.
• Flash redirection is disabled on Windows 8 and later versions. Flash redirection is enabled on
Windows 7.
• The Desktop Viewer is optimized for Citrix Workspace app Desktop Lock with no Home, Restore,
Maximize, and Display properties.
• Ctrl+Alt+Del is available on the desktop viewer toolbar.
© 1999-2021 Citrix Systems, Inc. All rights reserved. 187

Citrix Workspace app for Windows
• Mostwindows shortcut keys are passed to the remote session, with the exception of Windows+L.
• Ctrl+F1 triggers Ctrl+Alt+Del when you disable the connection or desktop viewer for desktop
connections.
Note:
With the Desktop Lock installed, and LiveInDesktopDisconnectOnLock set to False in the
registry path HKEY_LOCAL_MACHINE\SOFTWARE\Citrix\Dazzle Or HKEY_LOCAL_MACHINE
\SOFTWARE\Wow6432Node\Citrix\Dazzle, the active session gets disconnected when the
end-point wakes up from hibernation or standby mode.
Install Citrix Workspace app Desktop Lock
This procedure installs Citrix Workspace app for Window so that virtual desktops appear using Citrix
Workspace app Desktop Lock. For deployments that use smart cards, see
Smart card.
1. Log on using a local administrator account.
2. At a command prompt, run the following command (located in the Citrix Workspace app and
Plug-ins > Windows > Citrix Workspace app folder on the installation media).
For example:
1 CitrixWorkspaceApp.exe
2 /includeSSON
3 STORE0=”DesktopStore;https://my.storefront.server/Citrix/MyStore/
discovery;on;Desktop Store”
For command details, see the Citrix Workspace app install documentation at Install.
3. In the same folder on the installation media, double-click CitrixWorkspaceDesktopLock.
msi . The Desktop Lock wizard appears. Follow the prompts.
4. When the installation completes, restart the user device. If you have permission to access a desk-
top and you log on as a domain user, the device appears using Citrix Workspace app Desktop
Lock.
Toallow administrationof the user deviceaerinstallation, the account used toinstall CitrixWorkspaceDesktopLock
.msi is excluded from the replacement shell. If that account is later deleted, you will not be able to
log on and administer the device.
To run a silent install of Citrix Workspace Desktop Lock, use the following command line:
msiexec /i CitrixWorkspaceDesktopLock.msi /qn
© 1999-2021 Citrix Systems, Inc. All rights reserved. 188

Citrix Workspace app for Windows
Configure Citrix Workspace app Desktop Lock
When you have logged in as a non-administrator, Desktop Lock automatically launches an assigned
desktop session.
Using Active Directory policies prevent users from hibernating virtual desktops.
Use the same administrator account to configure Citrix Workspace app Desktop Lock as you did to
install it.
• Ensure that the receiver.admx (or receiver.adml) and receiver_usb.admx (.adml) files are loaded
into Group Policy (where the policies appear in Computer Configuration or User Configuration >
Administrative Templates > Classic Administrative Templates (ADMX) > Citrix Components). The
.admx files are located in %Program Files%\Citrix\ICA Client\Configuration\.
• USB preferences - When a user plugs in a USB device, that device is automatically remoted to the
virtual desktop; no user interaction is required. The virtual desktop is responsible for controlling
the USB device and displaying it in the user interface.
– Enable the USB policy rule.
– In Citrix Workspace app > Remoting client devices > Generic USB Remoting, enable and
configure the Existing USB Devices and New USB Devices policies.
• Drive mapping - In Citrix Workspace app> Remoting client devices, enable and configure the
Client drive mapping policy.
• Microphone - In Citrix Workspace app > Remoting client devices, enable and configure the Client
microphone policy.
Configure smart cards for use with Windows Desktop Lock
1. Configure StoreFront.
a) Configure the XML Service to use DNS Address Resolution for Kerberos support.
b) Configure StoreFront sites for HTTPS access, create a server certificate signed by your do-
main certificate authority, and add HTTPS binding to the default website.
c) Ensure pass-through authentication with smart card is enabled (enabled by default).
d) Enable Kerberos.
e) Enable Kerberos and pass-through authentication with smart card.
f) Enable Anonymous access on the IIS Default Web Site and use Integrated Windows Authen-
tication.
g) Ensure the IIS Default Web Site does not require SSL and ignores client certificates.
2. Use the Group Policy Management Console to configure Local Computer Policies on the user
device.
a) Import the Receiver.admx template from %ProgramFiles%\Citrix\ICA Client\Configuration\.
b) Expand Administrative Templates > Classic Administrative Templates (ADMX) > Citrix Com-
ponents > Citrix Workspace > User authentication.
© 1999-2021 Citrix Systems, Inc. All rights reserved. 189

Citrix Workspace app for Windows
c) Enable Smart card authentication.
d) Enable Local user name and password.
3. Configure the user device before installing Citrix Workspace app Desktop Lock.
a) Add the URL for the Delivery Controller to the Windows Internet Explorer Trusted Sites list.
b) Add the URL for the first Delivery Group to the Internet Explorer Trusted Sites list in the
form desktop://delivery-group-name.
c) Enable Internet Explorer to use automatic logon for Trusted Sites.
When Citrix Workspace app Desktop Lock is installed on the user device, a consistent smart card re-
moval policy is enforced. For example, if the Windows smart card removal policy is set to Force logo
for the desktop, the user must log o from the user device as well, regardless of the Windows smart
card removal policy set on it. This ensures that the user device is not le in an inconsistent state. This
applies only to user devices with the Citrix Workspace app Desktop Lock.
Remove Desktop Lock
Be sure to remove both of the components listed below.
1. Log on with the same local administrator account that was used to install and configure Citrix
Workspace app Desktop Lock.
2. From the Windows feature for removing or changing programs:
• Remove Citrix Workspace app Desktop Lock.
• Remove Citrix Workspace app for Windows.
Passing Windows shortcut keys to the remote session
Most windows shortcut keys are passed to the remote session. This section highlights some of the
common ones.
Windows
• Win+D - Minimize all windows on the desktop.
• Alt+Tab - Change active window.
• Ctrl+Alt+Delete - via Ctrl+F1 and the desktop viewer toolbar.
• Alt+Shi+Tab
• Windows+Tab
• Windows+Shi+Tab
• Windows+All Character keys
Windows 8
• Win+C - Open charms.
© 1999-2021 Citrix Systems, Inc. All rights reserved. 190

Citrix Workspace app for Windows
• Win+Q - Search charm.
• Win+H - Share charm.
• Win+K - Devices charm.
• Win+I - Settings charm.
• Win+Q - Search apps.
• Win+W - Search settings.
• Win+F - Search files.
Windows 8 apps
• Win+Z - Get to app options.
• Win+. - Snap app to the le.
• Win+Shi+. - Snap app to the right.
• Ctrl+Tab - Cycle through app history.
• Alt+F4 - Close an app.
Desktop
• Win+D - Open desktop.
• Win+, - Peek at desktop.
• Win+B - Back to desktop.
Other
• Win+U - Open Ease of Access Center.
• Ctrl+Esc - Start screen.
• Win+Enter - Open Windows Narrator.
• Win+X - Open system utility settings menu.
• Win+PrintScrn - Take a screen shot and save to pictures.
• Win+Tab - Open switch list.
• Win+T - Preview open windows in taskbar.
SDK and API
March 14, 2021
© 1999-2021 Citrix Systems, Inc. All rights reserved. 191

Citrix Workspace app for Windows
Certificate Identity Declaration SDK
The Certificate Identity Declaration (CID) SDK lets developers create a plug-in that lets Citrix
Workspace app authenticate to the StoreFront server by using the certificate installed on the client
machine. CID declares the user’s smart card identity to a StoreFront server without performing a
smart card-based authentication.
The CID SDK lets developers create a utility using which Citrix Workspace app can authenticate to the
StoreFront server by using the certificate installed on the client machine.
For more information, see the Certificate Identity Declaration SDK for Citrix Workspace app for Win-
dows documentation.
Citrix Common Connection Manager SDK
Common Connection Manager (CCM) SDK provides set of native APIs that enables you to interact and
perform basic operations programmatically. This SDK does not require a separate download because
it is a part of the Citrix Workspace app for Windows installation package.
Note:
Some of APIs that are related to launch require the ICA file to initiate the launch process to Citrix
Virtual Apps and Desktops sessions.
The CCM SDK capabilities include:
• Session launch
– Allows launching applications and desktops using the generated ICA file.
• Session disconnect
– Similar to the disconnect operation using the Connection Center. The disconnect can be
for all the sessions or to a specific user.
• Session logo
– Similar to the logo operation using the Connection Center. The logo can be for all the
sessions or to a specific user.
• Session information
– Provides dierent methods to get connection-related information of the sessions
launched. This includes desktop session, application session and reverse seamless
application session
For more information about the SDK documentation, see Programmers guide to Citrix CCM SDK.
Citrix Virtual Channel SDK
The Citrix Virtual Channel soware development kit (SDK) supports writing server-side applications
and client-side drivers for additional virtual channels using the ICA protocol. The server-side virtual
© 1999-2021 Citrix Systems, Inc. All rights reserved. 192

Citrix Workspace app for Windows
channel applications are on Citrix Virtual Apps and Desktops servers. If you want to write virtual
drivers for other client platforms, contact Citrix Technical support.
The Virtual Channel SDK provides:
• The Citrix Virtual Driver Application Programming Interface (VDAPI) is used with the virtual chan-
nel functions in the Citrix Server API SDK (WFAPI SDK) to create new virtual channels. The virtual
channel support provided by VDAPI makes it easy to write your own virtual channels.
• The Windows Monitoring API, which enhances the visual experience and support for third-party
applications integrated with ICA.
• Working source code for virtual channel sample programs to demonstrate programming tech-
niques.
• The Virtual Channel SDK requires the WFAPI SDK to write the server side of the virtual channel.
For more information, see Citrix Virtual Channel SDK for Citrix Workspace app for Windows documen-
tation.
Fast Connect 3 Credential Insertion API
The Fast Connect 3 Credential Insertion API provides an interface that supplies user credentials to the
Single Sign-on (SSON) feature.This feature is available in Citrix Workspace app for Windows Version
4.2 and later. Using this API, Citrix partners can provide authentication and SSO products that use
StoreFront to log users on to virtual applications or desktops and then disconnect users from those
sessions.
For more information, see Fast Connect 3 Credential Insertion API for Citrix Workspace app for Win-
dows documentation.
ICA Settings Reference
February 1, 2021
The ICA Settings Reference file provides registry settings and ICA file settings lists, allowing admin-
istrators to customize the behavior of the Citrix Workspace app. You can also use the ICA Settings
Reference to troubleshoot an unexpected Citrix Workspace app behavior.
ICA Settings Reference (PDF download)
© 1999-2021 Citrix Systems, Inc. All rights reserved. 193

Locations
Corporate Headquarters | 851 Cypress Creek Road Fort Lauderdale, FL 33309, United States
Silicon Valley | 4988 Great America Parkway Santa Clara, CA 95054, United States
© 2021 Citrix Systems, Inc. All rights reserved. Citrix, the Citrix logo, and other marks appearing herein are property of
Citrix Systems, Inc. and/or one or more of its subsidiaries, and may be registered with the U.S. Patent and Trademark Oice
and in other countries. All other marks are the property of their respective owner(s).
Citrix Product Documentation | docs.citrix.com May 10, 2021
