
© 2022
QuickBooks Online for Business Owners
Introductory Training

©2022
Standard Legal Notices
This training material is presented without warranty of any kind, either
express or implied respecting the contents of this book, including but not
limited to implied warranties for the book’s quality, performance,
merchantability, or fitness for any particular purpose.
Copyright
Presentation and workbook copyright© 2022 by Intuit. All rights reserved.
Printed in the United States of America. No part of this book may be used or
reproduced in any form or by any means without prior written permission
from Intuit. Material remains the property of Intuit.
Trademark Acknowledgments
All product names and services mentioned in this workbook are trademarks or
registered trademarks of their respective companies.
Disclaimer

QuickBooks Online Foundations
QuickBooks Online Discount
3

QuickBooks Online Foundations
QuickBooks® Online Foundations
Important Information about the Structure of this Training
READ THIS SLIDE BEFORE MOVING ON.
Our QuickBooks Online course is intended to help the business owner establish a strong
financial foundation using QuickBooks® Online as a bookkeeping, business management
and cash flow building tool. The material provides action steps, in order, for establishing
bookkeeping best practices and ensuring accurate financial information.
Please ask questions throughout the training. Entrepreneurial success is
based on the ability to understand what your numbers are telling you and
how to use them to improve company performance.
In addition to what you will learn today, these manuals are for use
as a post class reference guide.
(The Craig’s Landscaping test drive company resets itself when you log out. Occasionally
you may encounter a screen shot that looks different than
what is posted in the manual. Our materials are updated throughout the year, however
with technology advances,
prompting updates, you may encounter an update
that is not yet reflected in this manual.)
We are happy you are here and look forward
to helping you master QuickBooks!
4

QuickBooks Online Foundations
QuickBooks® Online Foundations
The most important reason to advance our knowledge of QuickBooks® Online and basic
bookkeeping principles, whether you are a business owner or employee, is to gain an
understanding of what the numbers mean and how to use them to improve business
performance.
While we identify specific learning objectives at the beginning of each section,
4 Overall Objectives include:
1. Introduction to basic features in QuickBooks Online and how they apply to best practice
bookkeeping and accounting principles.
2. How to effectively and efficiently use QuickBooks Online to manage daily tasks and
develop an understanding of how the data is entered, processed and reviewed.
3. How to customize QuickBooks Online to meet the specific needs of a business.
4. How to access and use data in QuickBooks Online to analyze the current financial
condition of a company and establish action steps for improvement.
The Importance of QuickBooks® Online and Managing Cash Flow:
Business owners typically identify Cash Flow as their number one area of concern.
QuickBooks Accounting Software, when utilized correctly, allows users to run Cash Flow
projections and develop a Cash Flow management strategy to prevent shortfalls. This
training will help participants develop a strong knowledge base of how to use QuickBooks
reports to manage a business and build cash flow.
The foundation of business success is in the daily use of accurate, real-time financial data.
What we measure, we manage; what we manage, we improve.
5

QuickBooks Online Foundations
The Power of QuickBooks® Online
It is important to focus on the areas of our business that contribute most to
profitability. QuickBooks helps us quickly identify areas of focus if we know
where to look.
The 80/20 rule, the ‘Pareto Principle’, is a powerful concept that consistently rings true.
In most cases, 20% of our customers generate 80% of our net profit. At the same time, 20%
of the goods or services we sell contribute 80% of our revenue, etc. You get the idea.
The most important aspect of accurate financial data
is the action plan it creates.
By generating daily reports that uncover the best customers, jobs, services, or products,
you will soon see how you can refocus internal efforts on doing highly valuable work.
Accurate real-time data with one click access to reports, is an enormous benefit of using
QuickBooks® Online the ‘right-way’.
6

QuickBooks Online Foundations
Table of Contents
Section 1 - A Business Owners Journey 10
The Business Owner’s Journey 11
Case Study Storyline 12
Section 2 – Getting Started in QuickBooks Online 13
Goals 14
Features 15
Craig’s Landscaping Test Drive Company
Setup Your Company File 19
Navigation 26
Doable Action Steps 37
Section 3 – Set Up Your New QuickBooks® Online Company 38
Goals 39
Account and Settings 40
Manage Users 60
Lists 64
Chart of Accounts 66
Doable Action Steps 75
Section 4 - Products and Services 80
Goals 81
Products and Services 82
Products and Services List 83
Products and Services Types 86
Products and Services Reports 94
Doable Action Steps 95
Section 5 – Beginning Balances 97
Goals 98
Beginning Balances 99
Historical Transactions 101
Recurring Transactions 104
Doable Action Steps 107
7

QuickBooks Online Foundations
Table of Contents
Section 6 – Bank & Credit Card Accounts 108
Goals 109
Connect Accounts 111
Banking Center 112
Transfers 123
Reconcile Accounts 124
Doable Action Steps 129
Section 7 - Understanding Your Numbers 130
Goals 131
Balance Sheet 133
Profit and Loss 139
Ask My Accountant 142
Audit Log 144
Closing Date 145
Doable Action Steps 147
Section 8 - Accounts Payable (A/P) 148
Goals 149
Vendor Center 151
Contractors 157
1099s 158
Expenses 162
Checks 163
Bills 164
Pay Bills 165
Bill Pay for QuickBooks Online 166
Vendor Credits 167
Apply Vendor Credits 168
A/P Reports 169
Doable Action Steps 170
8

QuickBooks Online Foundations
Table of Contents
Section 9 – Accounts Receivable (A/R) 171
Goals 172
Customer Center 174
Sales Receipts 182
Bank Deposits 184
Invoices 186
Receive Payments 187
QuickBooks Payments 189
Credit Memos 190
Apply Credits 191
Refund Receipts 192
Sales and A/R Reports 193
Statements 195
Doable Action Steps 197
Appendix A – Additional Features 198
Appendix B – Glossary of Terms & Keyboard Shortcuts 202
Appendix C – Resources 207
9

10
SECTION 1:
A BUSINESS OWNERS JOURNEY
The Business Owner’s Journey
Case Study Storyline
Online Foundations

QuickBooks Online Foundations
The Business Owner’s Journey
As a business owner moves through various stages of building and growing a business, from
inception to the realization of goals, it is important to track data every step of the way to
help guide us to entrepreneurial success. You may be surprised to learn that most action
steps in a business intertwine directly with your accounting application. For this reason, it
is important to set up QuickBooks Online early in the business journey to save significant
time, money and stress!
Let’s consider why this matters. One example includes the fact that qualified business
expenses are often overlooked, forgotten or lost in the shuffle. Let’s say you stopped by the
local office supply store to grab a new headset. If QBO was already set up, you would
simply open the app on your phone, snap a picture of your receipt, make a few selections
and the software takes care of the rest. QBO attaches the receipt to the transaction,
correctly codes the transaction and does the bookkeeping for you. Next time you go to
“Expenses” in QBO, you can find exactly what you are looking for in seconds.
Another example includes setting up your business bank account and company credit card.
Did you know with one action step you can import every transaction from both, have them
correctly coded and entered in the correct location in the accounting app? You can log into
one place, QBO, to check bank balances, see what cleared and what is outstanding, see
how much people owe you and how much you owe, look at cash flow projections and
more!
It is wise to set up your accounting app in early stages to save time on manual data entry.
11

QuickBooks Online Foundations
Case Study Storyline
Throughout the Introductory and Advanced training sections, we follow the journey of
small business owner, Chris Craig, owner of Craig’s Landscaping. Chris is a landscaping
specialist with training in water and soil conservation. Her company, located in San Pablo,
CA, is a full-service landscaping company servicing commercial and residential clients with a
focus on new construction. Services include landscape design and implementation,
installation of irrigation systems, trees, flowers, shrubbery, sod, concrete, rock, etc. Services
also include mowing and clean-up, pest control, trimming, and more. The company
provides monthly subscription services as well as services on an “as needed” basis.
Craig’s was established as an S-Corp Limited Liability Company (see Appendix for additional
information on S-Corps) and uses the 1120 S Tax Form to file taxes. Chris currently has two
employees. Craig’s Landscaping is required to collect sales tax on items the company sells
such as trees, fountains, etc. She has established a goal of building a 2-million-dollar
business over the next 2 years, increasing the number of employees, trucks, locations, etc.
Chris understands to thrive, she needs a solid financial foundation in place and an in-depth
understanding of how to use financial data to continually improve company performance.
Let’s begin by guiding Chris through the important process of setting up her accounting
application, QuickBooks Online®, to track all money flowing in and out of the business. It is
an important early step, as the automation built into the application completes much of the
bookkeeping process. By eliminating most of the manual data entry, Craig’s Landscaping
will be a more profitable company. As we help Chris become the hero of her own story,
consider how each section pertains to your own business. Do not hesitate to ask questions
if you see numbers, categories, or anything else you do not understand.
Let the adventure begin as we watch the data come to life and take on meaning!
12

13
SECTION 2:
GETTING STARTED IN
QUICKBOOKS ONLINE
Goals
Features
Setup Your Company File
Navigation
Doable Action Steps
Online Foundations

QuickBooks Online Foundations
Section 2 Goals
Upon completion of Section 2, each participant will be familiar with:
• How to use additional features.
• How to choose the right subscription for your business.
• How to setup a company file.
• How to navigate using QuickBooks Online Plus.
Chris Craig understands “order of operations” is important when taking steps to set up her
accounting application, however, she has no idea where to begin and what to do in what
order. Chris considers financial literacy to be outside of her skillset and is intimidated by her
lack of understanding of financial data. Not to worry, this training is the first step to gain in-
depth understanding of what the numbers mean.
Now that the entity selection has been made (S-Corp), Craig’s Landscaping has been
registered with the State, IRS, etc., Chris is ready to implement best practice policies related
to the daily management of the business.
Her first step is to learn about the financial tools built into QuickBooks Online and how they
can help her grow a profitable business. Chris then needs to setup and customize Craig’s
accounting application to meet the company’s specific needs and begin tracking all money
flowing in and out of the business.
Let’s follow Chris as she learns to navigate the powerful features in QBO. Economic analysis
by Sage and Plum Research estimates the use of accounting software could save a small
business upwards of $24,000 per year, equivalent to getting 27.6 days a year back to focus
on revenue-generating activities. WOW!
While progressing through the training, give some thought to which features best meet the
specific needs of your business.
14

QuickBooks Online Foundations
Features
Chrome Browser
Chrome is the recommended browser used to access QuickBooks Online. There are a few
things you need to know going forward.
Cookies and Cache
If you receive an error message when trying to access your company file:
Click the three dots in the upper right section of the Chrome browser.
Click More Tools.
Click Clear browsing data.
15

QuickBooks Online Foundations
Features
Select the Time range, Cookies and other site data, and Cached images and files.
Click Clear data.
Create Bookmarks to save favorite pages. Click the Star on the right top of the browser bar
to create bookmarks. Choose a name and select a folder, then click done. Incognito Mode
“referred to as private browsing” is a privacy feature that disables the browsing history of
Chrome.
16

QuickBooks Online Foundations
Features
Multiple Windows
Web-based applications utilize the functionality of web browsers. Imagine working in
several different windows in your QuickBooks® Online company file. Log in to your
company data file (in this example we will use Google Chrome).
Right click the QuickBooks Tab -> Duplicate. You now have multiple windows open for your
data file and can perform multiple tasks. This is a great way to enter and review historical
transactions during the setup or cleanup process.
Another way to access multiple windows is as follows:
After logging into QuickBooks® Online go to the URL/address bar and copy (Ctrl + C) the
website’s address. Then, open a new tab. Paste (Ctrl + V) this address into the window.
The tabs are as follows: first tab – Dashboard, second tab – Search, and
third tab – Bank Deposit.
Note: In Chrome you can create an additional user specifically for QuickBooks® Online. You
can then save all your favorite tabs/pages and have them available when you log in to your
company data file.
17

QuickBooks Online Foundations
Features
QuickBooks Online Mobile App
The QuickBooks Online Mobile App allows instant access to your QBO data from
your mobile device. More and more business owners are on the go and need easy and fast
visibility to their accounting data. You can create multiple types of transactions and attach
supporting documents or photos from your mobile app. Download the QuickBooks® Mobile
App to your Android phone, iPhone, or tablet. Once you complete the installation, log in to
your company file.
QuickBooks Mobile App
Compare Mobile App Features
How to Use the QuickBooks Mobile App Tutorial
How to Attach Receipts Using Your Mobile Phone
Log in to your company data file from a computer. Click the Search icon and select the
transaction you just created from your mobile app to add or change information as needed.
Verify the receipt photo/document is now available in the attachments list.
18

QuickBooks Online Foundations
Setup Your Company File
Setup Wizard
Complete the following steps to successfully create your new Intuit QuickBooks Online
Account. Fill in the required fields -> Create Account -> Next.
If you have an existing Intuit account, click Sign in -> Username or Email -> Password.
Verify your account. Click Continue.
Next, you will see a “Welcome! We’re glad you’re here” window. Click Next.
19

QuickBooks Online Foundations
Set Up Your Company File
For the Legal business name, use the exact legal business name used when you set up your
entity (to prevent problems with the IRS). Click Next.
Next, select the best option relevant to your situation. Are you importing from QuickBooks
Desktop, using another financial application, spreadsheets or other? If you are not
importing data, choose Nothing, I’m just getting started. Click Next.
20

QuickBooks Online Foundations
Set Up Your Company File
Search and select the industry specific to your business. This will auto-populate a basic
Chart of Accounts category list. You will learn how to manage your Chart of Accounts later
in the training.
Important! If you leave the field blank and click Skip for now, less account categories will
auto-populate. This will reduce the amount of time you spend on customizing your Chart of
Accounts.
Select the entity type used when setting up your business. Click Next.
21

QuickBooks Online Foundations
Set Up Your Company File
Select the options that apply to your company. Do you provide services, sell products, or
both? Click Next.
What is your role in the business? Select the option that applies, click Next.
22

QuickBooks Online Foundations
Set Up Your Company File
Who helps run your business? Select the option that applies. Click Next.
Note: If you choose, I fly Solo, you can always add payroll and contractor info later.
The next window that appears is based on your selections above. If you choose employees,
an option to add a payroll subscription will appear. Click I don’t want to add payroll.
Next, click Skip for now. You can always connect third-party applications later.
23

QuickBooks Online Foundations
Set Up Your Company File
Would you like to continue setting up your QuickBooks company file or explore a little first?
You can click Skip for now, if you're not sure.
You can link bank and credit card accounts to manage data from the Banking Center. We
will cover the banking section more in depth later in the training. Click Skip for now.
24

QuickBooks Online Foundations
Set Up Your Company File
You have the option to setup customer invoices and track receipts and bills. Click Skip for
now.
What is everything you want to setup? Check all options to match the screen shot below.
Click Next or Skip for now. You will see a window pop up, We’re almost ready to dive in!
Click Let’s Go.
25

QuickBooks Online Foundations
Navigation
Let’s start with Navigation and master moving around QuickBooks Online. There are two
ways to view the left navigation bar. Click the Gear icon.
Click Switch to Accountant or Business view.
26
Left Navigation Bar
Business View
Note: We will use Accountant vs. Business View for the remainder of this training.
Your subscription may look slightly different depending on which version you are
using. It is also possible updates have been released.
Left Navigation Bar
Accountant View

QuickBooks Online Foundations
Navigation
Left Navigation Bar (Business View)
The Business view allows you to customize and bookmark centers and features. It is a
different view and way to organize your centers and features.
27
Use the + New icon to manually input data for Customers,
Vendors, Employees and other.
The links on the left side act as your menu bar and will take
you to frequently used areas in QuickBooks® Online.
Post Bank and Credit Card transactions in the Banking
Center.
View Expense history and Vendor information.
Access Sales, Customers and Products from the Sales
Center.
Manage Customers and Leads.
Run Payroll and Track time.
Review and maintain Sales and Payroll taxes.
Customize the list, create and manage Bookmarks.
Click the dots to the right of the name in the Left Navigation Bar. Select Customize this
menu to create a custom list using the Bookmark feature.

QuickBooks Online Foundations
Navigation
Left Navigation Bar (Accountant View)
This view comes organized and is more specific to features related to the centers. You do
not have the Bookmark feature in this view. Note: This is a personal preference. You can
switch between the views.
28
Use the + New icon to manually input data for Customers,
Vendors, Employees and other.
The links on the left side act as your menu bar and will take
you to frequently used areas in QuickBooks® Online.
Post Bank and Credit Card transactions in the Banking
Center.
View Expense history and Vendor information.
Access Sales, Customers and Products from the Sales
Center.
Manage Projects and Workers.
Run Payroll and Track time.
View and customize reports.
Review and maintain Sales and Payroll taxes.
Track your Mileage.
Maintain your Chart of Accounts categories.
Invite an Accountant or find a ProAdvisor.
Explore the Application Marketplace.

QuickBooks Online Foundations
Navigation
Dashboard (Getting things done).
Once the new company setup process is complete, you will automatically land on
the Dashboard (Getting things done) tab. The icons shown in the screen shots
below are shortcuts to various areas of QuickBooks Online.
Feel free to click and explore. You cannot hurt anything by navigating
through the clickable icons.
29

QuickBooks Online Foundations
Navigation
Dashboard (Business Overview).
Monitor the activity and status of your company, access your data and drill down to
detailed information with a simple click.
You can access Customers, Vendors, Transactions, and Reports. You can also organize and
monitor Bank and Credit Card accounts, review Income and Expenses, and watch Sales
trends.
Tip: Click anywhere there is a word in bolded color, an icon, a drop-down arrow, etc.
Feel free to explore without worry!
Let’s begin!
30

QuickBooks Online Foundations
Navigation
31
Sales
The Sales section of the
Dashboard displays a
graphical view of sales
for the prior month.
Click the drop-down
arrow next to Last
Month to change the
period for which the data
is displayed.
Profit and Loss
This section of the
Dashboard provides a
graphical view of your net
income, income, and
expenses for the last 30
days.
Click the drop-down arrow
next to Last Month to
change the period for
which the data is displayed.

QuickBooks Online Foundations
Navigation
32
Expenses
The Expenses section of the Dashboard
allows you to view a graph of expenses
broken down by amounts based on the
last 30 days.
Scroll your mouse over the graph to
create a pop-up of expenses related to
specific categories.
Click the drop-down arrow next to Last
Month to change the period for which
the data is displayed.
Income
The income section of the
Dashboard allows you to view
Invoices that are open, overdue,
and paid in the last 30 days.
Click the Invoices color bars to
view and manage a detailed list
of open invoices currently owed
to you by your customers.

QuickBooks Online Foundations
Navigation
Access and manage bank accounts from the Dashboard. Turning on the Privacy button will
hide the bank balances. Change the order of how your accounts are displayed and access
registers. You can connect bank and credit cards accounts here and in the Banking Center.
Note: The order displayed here will be the same in the Bank Center.
33

QuickBooks Online Foundations
Navigation
The + New icon in the Left Navigation Bar provides access to data input windows. This is
where you go to Create Invoices, Receive payments, Enter Expenses, Checks, Bills and
more. Although you will spend most of your time in the banking center, you still need to
know how to enter transactions manually.
Click the (+ New) icon to create manual transactions.
Tip: Always enter data from “top to bottom, left to right’ to avoid missing fields that require
information.
Additional Icons include Help, Search, Notifications and Settings. Click the Help icon to
address questions for specific areas of QuickBooks®. Click the Bell icon to view recent
notifications and the C icon to sign out.
34

QuickBooks Online Foundations
Navigation
The Search (magnifying glass) icon at the top of the Dashboard will allow you to easily
search recent and historical transactions.
Click the Search icon.
Enter a transaction number, date, amount etc.
for a simple search.
Click Advanced Search to filter specific transaction types and more. Click the down-arrows
to the right of All transactions, Reference no. or Contains. to access additional search
options.
35

QuickBooks Online Foundations
Navigation
Click the Gear icon at the top right of your Dashboard to access company default settings,
lists, and tools.
Logo
Click the Logo icon to add your custom company logo from your desktop or hard drive.
36

QuickBooks Online Foundations
Section 2 Doable Action Steps
All business owners should complete this section and apply the knowledge to their own
company file. Remember! You can always refer to various sections of training if you need
additional reminders of how features works.
1. Review Video Links - Ctrl + Left Click
Billing and Subscriptions
How to Get Started with QuickBooks Online
How to Use QuickBooks Mobile App
2. Choose your Subscription and signup if you have not already done so.
3. Explore these features:
Chrome – Clear your cookies and cache.
Multiple Windows – Create a duplicate window.
Mobile App – Go to the app store and install QuickBooks Online on your mobile device.
4. Dashboard - Click through words in bold as well as icons, drop-down arrows, etc.
5. Left Navigation Bar – Choose your view, then click on the Centers and explore.
6. + New – Learn how to navigate this menu and click through various options to become
familiar with the different fields per window.
7. Search - Become familiar with search filters.
8. Gear – Learn to navigate the Gear menu and click through various options.
37

38
SECTION 3:
SET UP YOUR NEW
QUICKBOOKS® ONLINE COMPANY
Goals
Account and Settings
Manage Users
Chart of Accounts
Doable Action Steps
Online Foundations

QuickBooks Online Foundations
Section 3 Goals
Upon completion of Section 3 each participant will be familiar with:
• How to manage Account and Settings default preferences.
• How to set up and manage Users.
• How to import Lists.
• How to set up and use the Chart of Accounts, and how it connects to all
transactions.
Now that Chris understands how to navigate QBO and where to locate important features,
it is time to customize the application for Craig’s Landscaping. Let’s help her select settings
that will best serve the needs of her business in the Accounts and Settings section, then
move on to set up Users and Permissions.
To eliminate the need to hand enter data, let’s also walk Chris through the process of how
to import lists. We will then help her establish the all-important Chart of Accounts (COA), a
financial tool that provides a complete listing of every account in the general ledger of a
company, broken into subcategories.
QuickBooks is a very forgiving program. Most mistakes can be fixed, as you can go back and
make historical changes. However, a correct setup will prevent the need to do so.
An accurate accounting software setup and optimized Chart of Accounts is very
important. After attending the training, if you need additional help customizing the
application to meet the unique needs of your business, please reach out to your
Accountant for assistance.
39
QuickBooks Online Foundations
Account and Settings
Use Account and Settings to turn on/off QuickBooks® Online features. It is important to
turn off features you will not be using because it creates less fields during the input
process. It is OK to turn on features as the need arises. This creates more efficiency and less
guess work.
Although it is simple to turn settings on and off, it is important to set up your company
settings and data correctly. Seek help from your Instructor/Advisor if you find you are
“guessing.”
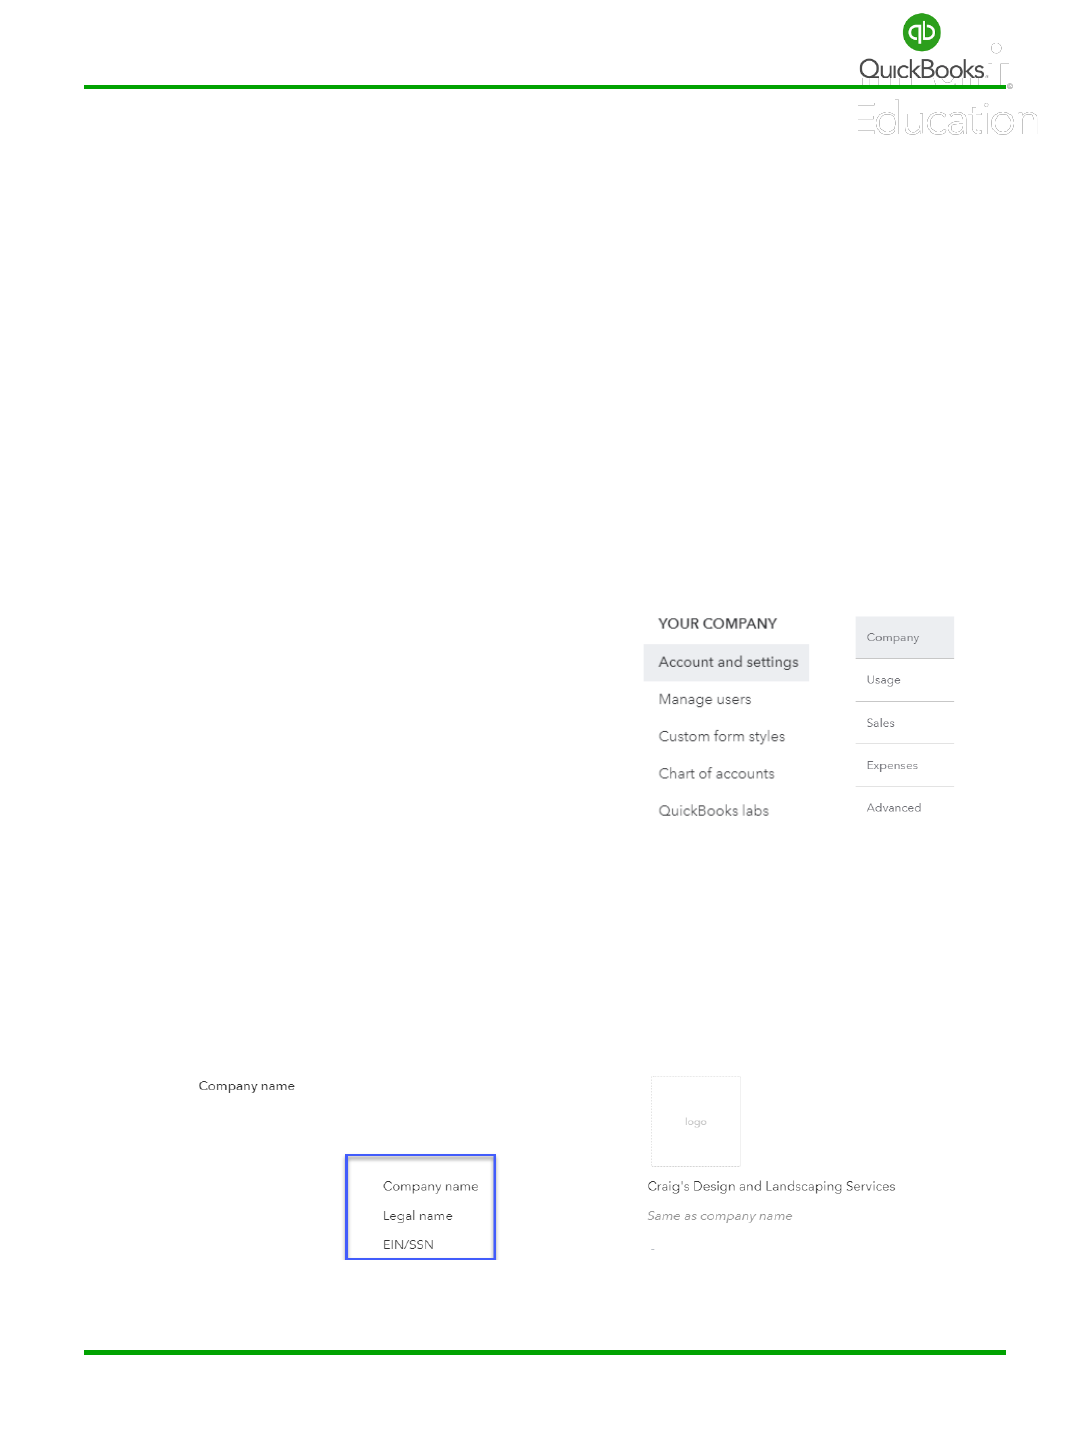
Click the Gear icon to review, edit, and turn on/off settings.
Click Account and Settings.
Click the Company tab in the left menu bar;
then click the setting you choose to edit or
click the pencil on the right side of the screen.
Company Name
Add a customized logo, verify your company name, or add a legal name and EIN to match
the information on the company tax return. Click Save anytime you change settings.
40

QuickBooks Online Foundations
Account and Settings
Company Type
Select the legal entity type you will use when filing your tax return, then select industry
type. Click Save.
Contact Info
Verify or edit contact info. Click Save.
Address
Verify or edit your company address. Click Save.
41

QuickBooks Online Foundations
Account and Settings
Communications with Intuit
Click Marketing Preferences to allow or disallow promotional offers from Intuit.
Usage
Click the Usage tab in the left menu bar.
This is where you monitor users and
account categories limits. If you reach the limits,
you will be required to upgrade your subscription.
42

QuickBooks Online Foundations
Account and Settings
Sales Settings
Click the Sales tab in the left menu bar.
Click the setting you choose to edit or
click the pencil on the right side of the screen.
Customize
Click Customize Look and Feel to customize invoices, estimates, and sales receipts.
You can edit the existing standard template or create a new custom template.
Click New Style. Select Style and choose the type of sales form you would like to customize.
Select a template, add a title and logo, choose a color scheme, and preview the form.
Let’s choose Invoice for this example.
43

QuickBooks Online Foundations
Account and Settings
44
Select the Design tab to change your invoice template, add a logo, modify color schemes,
change font sizes, or print a sample.
Select the Content tab and then click on Invoice Form to change the header, form name
and numbers, or displayed information, or to add a customer field.
Select the Emails tab to change the outgoing email subject and default message. Note:
Do not overlook the Reminder Email feature.
Select the Payments tab to add ACH and Credit Card payment options to your sales
forms. Note: This will require you to sign up for Intuit Merchant Services.
Click Preview PDF to review the sales form or click Done.

QuickBooks Online Foundations
Account and Settings
Sales Form Content
Click Sales Form Content to select and turn on/off settings for sales forms.
Preferred Invoice Terms sets the default payment date. "Net 30" means payment is due 30
days from the date used to create the invoice.
Preferred Delivery Method will allow you to set a preferred default to print or send sales
forms later.
Shipping adds a shipping field to sales forms.
Custom fields can be added and managed in Gear settings -> Lists -> Custom fields.
Custom Transaction Numbers allows you to choose your own numbering system.
Service Date creates a service date field. This tracks the dates services were performed
when they are different from the invoice date.
Note: When you turn on the Shipping feature, be sure to add the default shipping account
category in the Advanced->Chart of Accounts Settings.
45

QuickBooks Online Foundations
Account and Settings
Discount will add a discount field to invoices.
Deposit adds a deposit field to invoices and allows you to offset the balance owed with
amounts paid before the service was completed.
Note: Once you turn on Discounts, you will need to add a discount account in the
Advanced -> Chart of Accounts Settings.
Tips and Gratuity- Adds a tips field to sales forms. Select (Just Me) to record tip income or
select (My Team) to track tips that need to be paid out to your team.
Note: Once you turn on Tips and Gratuity, you will need to add a Tip Income (Just Me)
account or Tips Payable (My Team) account in the Accounts and Settings->Advanced->Tips
Payable Account.
Tags allow you to create tags and tag groups to customize the way you track information.
(Recommended feature we will cover in more detail later in the training.)
46

QuickBooks Online Foundations
Account and Settings
Click Products and Services to turn on/off desired settings.
Show Product/Service column on sales forms adds a column so you can choose from the
list of products or services.
Show SKU column allows you to track products and services by SKU number.
Turn on price rules allows you to provide discounts for specific products to certain
customers for a specified amount of time.
Track quantity and price/rate adds a field to show quantities and pricing on sales forms.
Track inventory quantity on hand allows the tracking of products you buy, store and sell.
Late Fees allow you to automatically apply a flat fee or percentage to outstanding invoices.
Select “Default charge applied to overdue invoices” to turn this feature on. Select Flat fee
or Percentage of remaining balance and continue to select the required information. Click
Save.
47

QuickBooks Online Foundations
Account and Settings
Progress invoicing
Progress invoicing allows you to create multiple partial invoices from a single estimate.
(This feature is great for contractors providing services for new construction.)
Messages
Click Messages to add a default email message sent with sales forms, invoices, estimates,
credit memos, sales receipts, statements, and refund receipts.
Click Email me a copy to receive a copy of emailed sales forms
48

QuickBooks Online Foundations
Account and Settings
You can include a Cc or Bcc email as well. Your default message sent with sales forms can
be changed when creating estimates, invoices and other sales forms.
Note: A default email message sent with reminders is also available.
Click Reminders to change the default subject and email message. Turn on Automatic
invoice reminders and let the system do the work for you.
49

QuickBooks Online Foundations
Account and Settings
Online Delivery
Click Online delivery to attach sales forms as a PDF, show summary or detail, and change
your email text preference.
Statements
Click Statements to change settings to display all your customers’ unpaid transactions by a
single line item or include detail. Show aging table displays outstanding balances by days
delinquent at the bottom of the statement. Send a courtesy statement when customers are
no longer current. Click Save->Done in the bottom right corner.
50

QuickBooks Online Foundations
Account and Settings
Expenses
Click the Expenses tab in the Account and Settings
menu bar and then click the setting you choose to edit
or click the pencil on the right side of the screen.
Bills and Expenses
Click Bills and expenses to turn on/off settings, add columns on forms, and track expenses.
Show Items table on expense and purchase forms adds products column to forms.
Show Tags field adds a field that allows you to track transactions using tags and tag groups.
Track expenses and Items by customer adds a column to track transactions by customers.
Make expenses and items billable adds a column to track expenses billable to the
customer and gives you the option to add a default markup rate.
Track billable expenses and items as income allows you to use one or multiple income
accounts to track billable expenses. Note: Go to Advanced > Chart of accounts > Billable
expenses income account.
Default bill payment terms is used to set default terms for bills, such as net 30.
51

QuickBooks Online Foundations
Account and Settings
Purchase Orders
Click Purchase orders to turn on/off Use purchase orders and create custom fields.
Purchase orders are used to track product purchased from vendors. This is helpful when
tracking open orders for inventory and in comparing costs to actual bills.
Custom fields allow you to add extra fields to Purchase Orders to track information using
custom reports.
Custom transaction numbers allow you the option to use your own numbering system. If
this is not checked, QuickBooks® Online will automatically assign a number.
Default message on purchase orders adds a default message to all Purchase Orders. This
can be changed when adding new Purchase Orders in QuickBooks® Online.
Note: Click Messages to change outgoing email messages specifically for purchase orders.
Click Save -> Done.
52

QuickBooks Online Foundations
Account and Settings
Payments Tab
This is where you manage your QuickBooks Online and merchant service subscriptions.
Time
Click Time to turn on/off and edit settings.
First day of work week sets the starting day of a work week on the timecard entry form.
Add Service field to timesheets is a field used to enter specific services performed.
Allow time to be billable is a feature that tracks billable time by customer.
Show billing rate to users entering time allows users to view the rates you use to invoice
customers.
53

QuickBooks Online Foundations
Account and Settings
Advanced
Click Advanced in the Account and Settings menu bar
and then click the setting you choose to edit or click
the pencil on the right side of the screen.
Click Accounting to turn on/off and change settings.
First month of fiscal year is usually January, based on the calendar.
Some companies use a different month to start their fiscal year.
First month of income tax year lets you click the drop-down arrow to select January or
Same as fiscal year.
Accounting Method includes two Accounting methods for running reports: accrual and
cash. If you use Accounts Receivable and/or Accounts Payable in QuickBooks® Online, then
choose the Accrual basis. If not, then use the Cash basis.
Close the books is a great feature that allows you to close a period and assign a password.
Turning on this setting triggers a warning box that prevents users from changing historical
data, especially important when sales, payroll, and tax returns have been filed.
54

QuickBooks Online Foundations
Account and Settings
Company Type
Tax Form
Click the Tax form drop-down list to select the entity type you used when filing your
company’s tax return. If you are unsure about this, contact your accountant.
Chart of Accounts
Click Chart of Accounts to turn on/off account numbers and assign default income
accounts. This allows business owners to organize their Chart of Accounts categories in a
way that is meaningful to them.
55

QuickBooks Online Foundations
Account and Settings
Categories: Classes
Classes allow you to track transactions in order to gather data and review reports by a
specific class.
For example, Craig’s can track commercial vs residential jobs, or jobs per city to determine
sales by city for state license reporting. The use of classes provides the capability to review
Profit & Loss by class.
Click the appropriate box to turn on Track classes. Then click “Warn me when a transaction
isn’t assigned a class.” This will create an alert when the class entry is missed during the
data entry process.
Assign classes gives you the option to assign classes to a transaction or to individual line
items.
56

QuickBooks Online Foundations
Account and Settings
Locations
Track locations is used to gather data for a specific location, department, property, etc. Not
all businesses need to use locations. An example; Craig’s could use locations to track sales
by county or sales by property address. This provides the ability to review a Profit & Loss by
location.
Automation
Click Automation to turn on/off settings for pre-filled forms, apply credits, and more.
Pre-fill Forms with previously entered content fills form fields with memorized content
from prior vendor, customer, and employee transactions.
Automatically apply credits posts outstanding credits to newly created invoices.
Automatically invoice unbilled activity creates an invoice for tagged transactions waiting
to be billed to a customer. When the invoice is generated, an alert is sent to the activities
section of the Dashboard.
Automatically apply bill payments applies bill payments to the oldest open bill first.
57

QuickBooks Online Foundations
Account and Settings
Projects
Turning on Projects allows you to organize all job-related activity in one place. It allows you
to review all Sales, Expenses, and Time by Project. Here we can track information from a
cost perspective.
Currency
Multicurrency lets you track transactions in foreign currencies. Use it only if you have bank
accounts, customers, or vendors that do not use your home currency. Otherwise, select the
default, Home Currency. Warning! Once you select a home currency, you will not be able
to change the currency. Select Multicurrency
Note: Once you turn this feature on, you cannot turn it off or change your home currency.
58
QuickBooks Online Foundations
Account and Settings
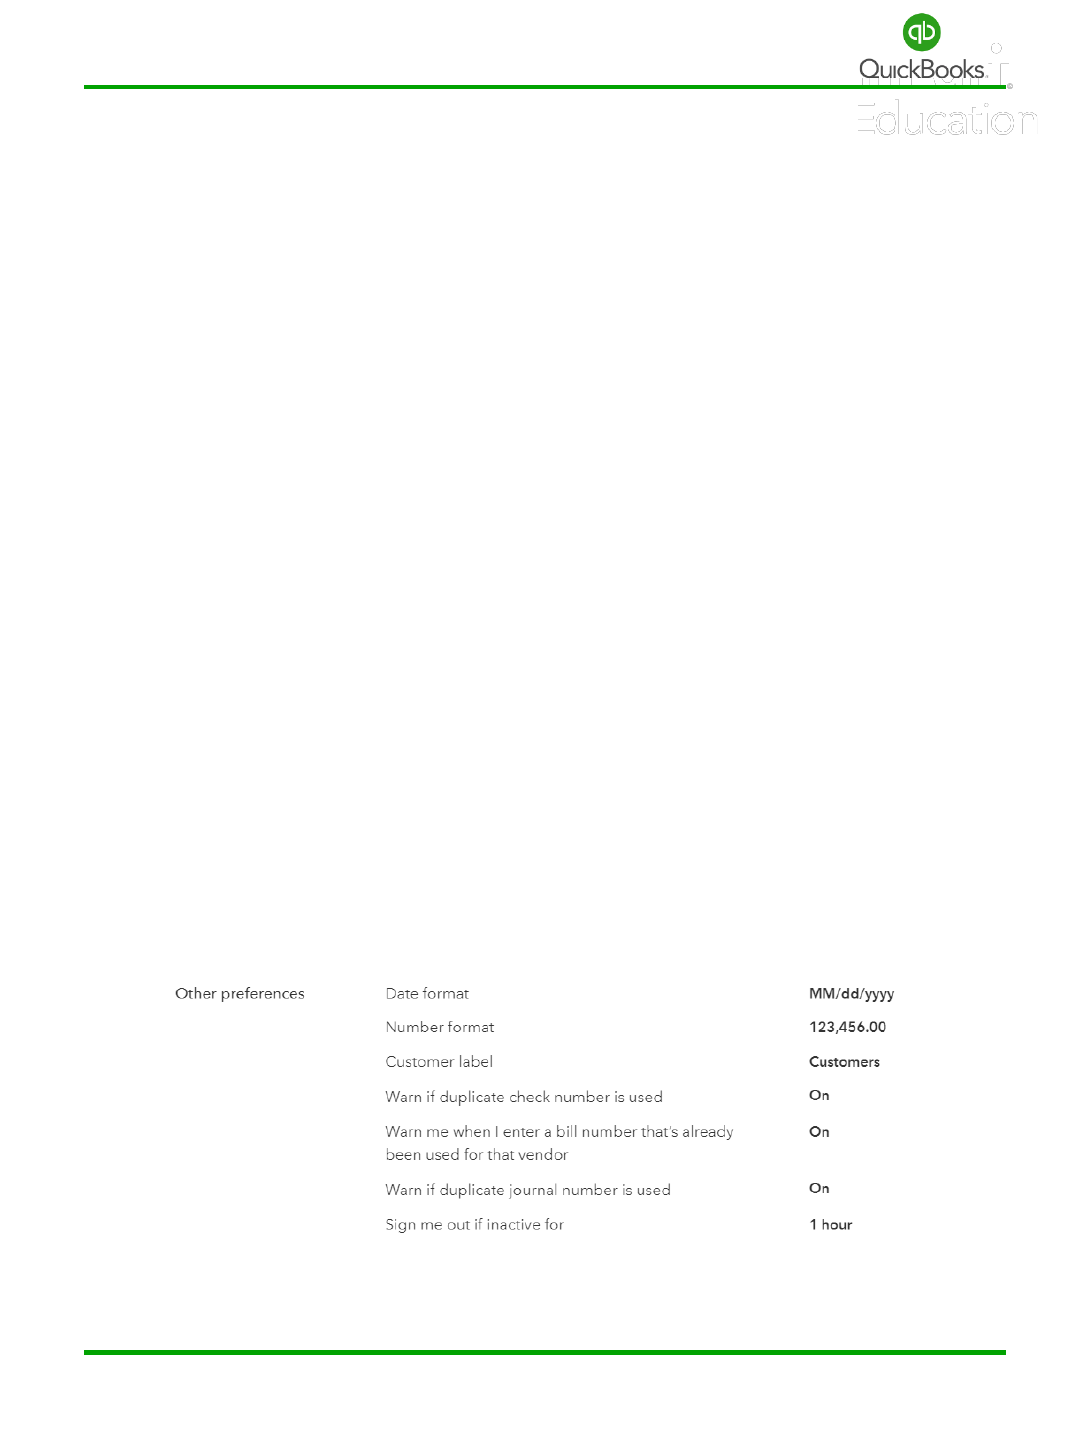
Other Preferences
Click Other Preferences to turn on/off and edit settings that trigger warnings and
formatting preferences.
Date format is a preference with several options.
Number format is a personal preference.
Customer label reflects the type of customers you service or sell to. The label you choose
will appear on the Navigation Menu Bar and transactions related to customers, such as
invoices, sales orders, credit memos, etc.
Warn if duplicate check number is used populates a warning box when a duplicate check is
entered.
Warn me when I enter a bill number that’s already been used for that vendor populates a
warning box when a duplicate number is used.
Warn if duplicate journal number is used populates a warning box when a duplicate
journal entry number is used.
Sign me out if inactive for a period. It let's you choose between 1 and 3 hours. Click Save ->
Done.
59

QuickBooks Online Foundations
Manage Users
When inviting users, you can determine how much or little access a user has to your
company data. Maintaining user access is important to implement checks and balances and
view activity by user. This can serve as a training tool to address and avoid common errors.
Click the Gear icon -> Manage Users.
Select the Users tab to add and customize a user or select the Accounting Firms tab to
invite your accountant. The initial user is known as the primary admin. If you want to
transfer this role to another user, set them up as an admin user and use the action drop-
down menu to transfer the rights to the new user. The new user will receive an email
notification.
60
Note: You can add up to two accountants to your QuickBooks® Online data file in
addition to the number of users your subscriptions allow. In order to do this, your
accountant must subscribe to QuickBooks® Online Accountant.

QuickBooks Online Foundations
Manage Users
Click Add User to add a new user.
Standard User will allow you to select which areas a user can access.
Company admin has access to all areas of QuickBooks® Online Plus.
Reports only will allow users access to most reports; the exceptions are Payroll and
Contact info. They do not count toward your user limit.
Time Tracking only limits users to entering their time. They do not count towards your user
limit.
Click Next and follow the screens until you have successfully added a user.
Note: User options may be limited depending on the type of subscription. This example is
based on the Plus version of QuickBooks® Online.
61

QuickBooks Online Foundations
Manage Users
Continue to click Next until you complete the Add User process.
Note: A box appears with a list of access rights based on your selection.
For those with a Plus subscription, you will have the ability to set the administrative rights
for specific users.
62

QuickBooks Online Foundations
Manage Users
Enter username and email information; an invite will be sent to the user. They will be
invited to accept the invite and create a password.
To invite an accounting firm with administrative rights to your company data,
from the Manage Users main screen click Accounting Firms if your accountant subscribes
to QuickBooks® Online Accountant.
Enter your accountant’s email address and ask your accountant to accept the invite.
63

QuickBooks Online Foundations
Lists
Lists are one of the basic features of QuickBooks® Online. Lists are triggered when turning
on features in Account and Settings. A list is a series of like information compiled into an
organized directory. This helps save time and ensures that information is entered
consistently and correctly.
Click the Gear icon.
Click All Lists -> Select the list you would like to maintain.
64

QuickBooks Online Foundations
Lists
Importing Lists
You can import list information from Excel or Google Sheets to save time. You can import
customers, vendors, accounts, and products and services. You can download a sample file
to see how to set up your import file.
Click Gear icon -> Import data.
Click on the icons to access and download the sample CSV, Excel, or Google template. You
can download or preview a sample file to get started.
Note: What type of lists can be imported? Review above.
65

QuickBooks Online Foundations
Chart of Accounts
The Chart of Accounts is a list of categories that make up your Balance Sheet and
Profit & Loss Statements. Every transaction entered in QuickBooks® will post to the
accounts list. This is how data is compiled to produce important reports used to manage a
business.
Balance Sheet
Assets (what your company owns): bank accounts, petty cash, fixed assets (equipment or
vehicles), inventory, undeposited funds (payments from customers waiting to be
deposited).
Liabilities (what your company owes): accounts payable, loans, sales, payroll taxes.
Equity (the net worth of your company): Money that owners contribute to or draw from
the business and an accumulation of net profits and losses from the start of the business to
present or sale.
Profit & Loss
Income (what you have earned): sales of products, labor, interest, rental income, materials,
etc.
Expenses (what you have spent): office expenses, wages, professional fees, rent, utilities,
etc.
The Profit & Loss Statement shows the net loss or gain for a period. At the end of a
calendar or fiscal year, the net profit or loss rolls into the equity section of the Balance
Sheet.
Note: Keep your Chart of Accounts simple. Add new accounts when you need to track
specific information. Use reports to customize information within an account. Discuss
account changes with your accountant. Start by adding bank and credit card accounts.
66

QuickBooks Online Foundations
Chart of Accounts
Manage Accounts
Click the Gear icon -> Chart of Accounts.
Or Left Navigation Bar -> Accounting -> Chart of Accounts.
Click View Register to manage transactions for a specific account.
Click the drop-down list to edit, make inactive, or run reports.
Click the header name to sort by column.
Type an account name in the Filter by name field to search for an account.
Select Show all or categories that count towards your usage limits.
Click the pencil icon to edit multiple Chart-of-Account names.
Click the printer icon to print a list of your Chart of Accounts.
Click the gear icon to add/remove display columns, change the number of rows, or include
inactive accounts.
Note: Remember to turn on account numbers in Accounts and Settings if you want to
customize the organization of your Chart of Accounts.
67

QuickBooks Online Foundations
Chart of Accounts
Add Accounts
Click New or the drop-down list to
add an account or import from a .csv file.
Create a new account and name it Ask My Accountant. Set the Account Type to Other
Expense and the Detail Type to Other Miscellaneous Expense. Change the account name
to “Ask My Accountant”.
This will position the account at the bottom of your Profit & Loss Statement, where it will
stand out as a reminder to address or research questionable transactions before processing
financials for the month or year. Click Save and New to add another account or Save and
Close to return to the Chart of Accounts list.
Note: Home Depot and Walmart are not account categories. They are vendors used to
purchase supplies and materials (supplies and materials are account categories).
68

QuickBooks Online Foundations
Chart of Accounts
69
Click New from the Chart of
Accounts List.
Select the Account Type from
the drop-down menu.
In this example we are setting
up a new bank account.
Select the appropriate
Detail Type.
Each Account Type has a
specific detail type list to
select from.
Being consistent with type
choices is important in case
you need to merge
accounts in the future.
Add Bank Accounts

QuickBooks Online Foundations
Chart of Accounts
Edit Account
From the Chart of Accounts list locate the account you would like to edit.
In this example: The Loan Payable is a five-year vehicle loan and should be categorized as a
long-term liability. Current liabilities are usually paid within a year; examples are sales and
payroll taxes, lines of credit etc.
From the Action Menu column, click the drop-down list->Edit.
Use the Account Type drop-down list to change the type from Other Current Liabilities to
Long Term Liabilities. Change the Detail Type to Notes Payable and change the name and
description to be more specific. Remember to click Save and Close.
70
QuickBooks Online Foundations
Chart of Accounts
Make Inactive
From the Chart of Accounts List:
Click one time to highlight the account you would like to inactivate.
For this example, we will inactivate the Miscellaneous account.
Click Make inactive in the action column drop-down list.
An “alert” will pop up and ask you to confirm. Click Yes.
The Miscellaneous account will no longer appear in the
Chart of Accounts List. However, the account is technically
inactive and will appear on the list when you choose
Include Inactive from the gear icon.
71

QuickBooks Online Foundations
Chart of Accounts
Merge Accounts
Merging accounts is helpful if two or more accounts are being used for the same types of
transactions and you want to combine the transactions into a single account.
Caution: The merge process cannot be undone and is permanent. It is important to confirm
that the merge process will not affect the financial statements used to file tax returns.
It is advisable to discuss the cleanup of your Chart of Accounts with your Instructor,
Accountant or QuickBooks ProAdvisor before merging accounts.
In this example we have two accounts being used to track office expenses.
We will merge Accounting with Bookkeeping from the Chart of Account Settings window.
Click one time to highlight the account you will keep, “Office Expenses.”
Click Edit from the Action Column drop-down list.
Note: The Account Type and Detail Type must be the same for accounts you intend to
merge. When merging sub-accounts, both accounts must be a sub of the same parent
account.
72

QuickBooks Online Foundations
Chart of Accounts
Highlight the name Accounting and copy (Ctrl + C) the account name.
Click the Cancel button in the lower left to return to the Chart of Accounts Settings List.
Select the account “Bookkeeper.”
Click Edit from the action column drop-down list.
Highlight the Name Bookkeeper and Paste (Ctrl + V) to replace “Bookkeeper” with
“Accounting.” Click Save -> Yes.
73

QuickBooks Online Foundations
Chart of Accounts
Sub-accounts
Sub-accounts are a great way to organize your Chart of Accounts when used properly.
It is important to select sub-accounts in all transactions and avoid using the main account.
Click New from the Chart of Accounts List.
For this example, we will create sub-accounts for automobile expenses.
Note: The Account Type is Expenses, the Detail Type is Auto, and the Name is Service.
Click the box Is sub-account and select the main account Automobile. repeat the process
to create additional subaccounts for Fuel, License, and Service.
Now that you have created a Main Account for Automobile and sub-accounts for Fuel,
License, and Service, the Chart of Accounts should look like this:
74

QuickBooks Online Foundations
Section 3 Doable Action Steps
All business owners should complete this section and apply the knowledge to their own
company file. Remember! You can always refer to various sections of training if you need
additional reminders of how features works.
1. Watch the video Links - Ctrl + Left Click
How to Set Up Company Settings
How to Customize Invoices and Sales Forms
How to Add & Manage Users for Your Company
Understanding the Chart of Accounts
How to Add Accounts to your Chart of Accounts
2. Review your Company and Account settings and turn on/off features that are specific
to your company. Turn off anything you do not currently need. If you are unsure about
what settings you need, talk to your Instructor/Accountant.
3. Add users (Bookkeeper, Tax Professional, etc.).
4. Customize your Chart of Accounts.
Information that may help - Remember Office Depot, Costco, Walmart, etc. are not
account categories, they are vendors. Another example, Office Expense can include
postage, supplies, printers etc..
75

QuickBooks Online Foundations
Section 3 Doable Action Steps
Important to note: Your subscription will auto-populate some Chart of Accounts categories
based on the industry you choose in the setup process. Here is a sample Chart of Accounts
that auto-populated when the industry field was left blank. (Yours will not look like this.)
Your challenge is to manually add, edit, merge or inactivate accounts to create your own
custom Chart of Accounts. Keep it simple.
76

QuickBooks Online Foundations
Section 3 Doable Action Steps
77

QuickBooks Online Foundations
Section 3 Doable Action Steps
78

QuickBooks Online Foundations
Section 3 Doable Action Steps
79

80
SECTION 4
PRODUCTS AND SERVICES
Goals
Product and Services List
Product and Service Types
Product and Sales Reports
Doable Action Steps
Online Foundation Training

QuickBooks Online Foundations
Section 4 Goals
Upon completion of Section 4, each participant will be familiar with:
• How to set up Products and Services.
• How to manage the Products and Services list.
• How to determine Products and Services types.
• How to review Products and Services reports.
The next step in the Craig’s Landscaping setup process is to create a Products and Services
list. The Products and Services list represents the list of Products and/or Services that a
business sells, a foundational element in QuickBooks Online. Items from the Products and
Services list are used to create Customer Invoices, Purchase Orders, Checks, etc. The list
also interacts with the Inventory feature and keeps track of Inventory on hand, Sales of
specific items and far more.
Chris wants to track Inventory items such as sprinkler and irrigation system parts they stock
and sell customers. She also wants to track non-inventory items, such as special-order
fountains and service items for labor related repairs and installations. While the differences
in these classifications may seem confusing, we will explain these in-depth as we proceed
through this section of training.
WOW! Think Inventory Management is not important? Look at these stats:
• Carrying too much extra inventory can increase costs by as much as 35%
(2020 Easier Accounting)
• 50% of excess Inventory goes unused each year
• Excess Inventory makes up 15-18% in annual carrying costs
• 90% of maintenance, repair, and operations (MRO) Inventory is used less than 6x a
year (Source Grangier Consulting Services)
Setting up the Products and Services list is mandatory in QuickBooks Online, so let’s help
Chris take the next step to establishing her solid financial foundation.
81

QuickBooks Online Foundations
Product and Services
Products and services are required on sales forms, bills, checks, and expenses to track sales
and costs per item.
• Inventory items – Products we purchase, store on a shelf, and sell later. This type of
item is tracked as an Inventory Asset on your Balance Sheet. When we sell an
inventory item, the asset is reduced, and the sale and cost of the item is recorded
on the Profit and Loss as income and Cost of Goods Sold.
• Non-inventory items – Products we do not stock but buy and sell to customers. We
can track how many we have sold without tracking quantity on hand. The sale is
recorded as Income and the purchase is recorded as Cost of Goods Sold on the
Profit & Loss.
• Service items –Services you provide customers such as Installation Fees (fountains,
etc.) and Landscape Design. This type of item also allows us to see how much we
have sold per item.
• Bundle Items – A group of multiple existing items. A Bundle will populate on sales
forms when we use them. This works great when you have recurring invoices with
multiple items that are the same each month.
Note: If you are using a shopping cart or other third-party platform to track sales, you will
need to map the application to QBO if you want to sync the information.
82

QuickBooks Online Foundations
Products and Services List
Products and Services
It is time to set up a list of Products and Services if you are using invoices and sales receipts
to charge customers, generate sales reports and track top selling items.
Click the Gear icon -> Products and Services.
If the following window appears, click Add an item.
If not, continue forward to the next slides.
Select a type to add or click the X to return to the products and services list window. We
will utilize Inventory, Non-inventory, Service, and Bundle items.
Note: You are not required to use the Products and Services list. However, if you intend to
invoice customers, track sales and populate sales reports you will need to create and
maintain a Products and Services list. Products and services allow you to use standardized
descriptions across all customer sales forms.
83

QuickBooks Online Foundations
Products and Services List
Products and Services
It is time to set up a list of products and services you currently offer customers. As you add
items to your list, you can use the following features to manage your products and services.
This will help ensure accuracy between the list and the Chart of Accounts.
Click the Gear icon.
Click Products and Services.
Click the Small Gear to add or remove columns
you wish to display in your Products and Services list.
This will provide information at the time of need.
You can Print or Export your list.
84

QuickBooks Online Foundations
Products and Services List
Search Products and Services
Use the Search and Filter features to find specific items. You can filter by Status (Active,
Inactive, or All), as well as by Type and Category.
Edit Products and Services
Click Edit to change information for a Product or Service.
Click the down arrow to duplicate, inactivate, or
run a report for a service item.
Run Reports or group products/services by Category.
The Product and Services list displays information for
each product or service.
Click the Gear icon to add and remove columns from the list.
85

QuickBooks Online Foundations
Products and Services Types
Inventory Item
Inventory items are products we purchase, store on a shelf, and sell later.
Enter the Name of the Inventory item, SKU number if applicable, Upload a Photo of the
product, and organize products by Category.
Click the Gear icon -> select Inventory.
Note: The name and category fields are filled in. Categories help us group Products and
Services. If you are using Classes, you can add a default Class to an item.
Note: Non-Inventory items and Services and Bundles can be reclassified as an Inventory
item if you decide to stock it in inventory at some point. Once you change the type to an
Inventory item, you cannot change it again.
86
QuickBooks Online Foundations
Products and Services Types
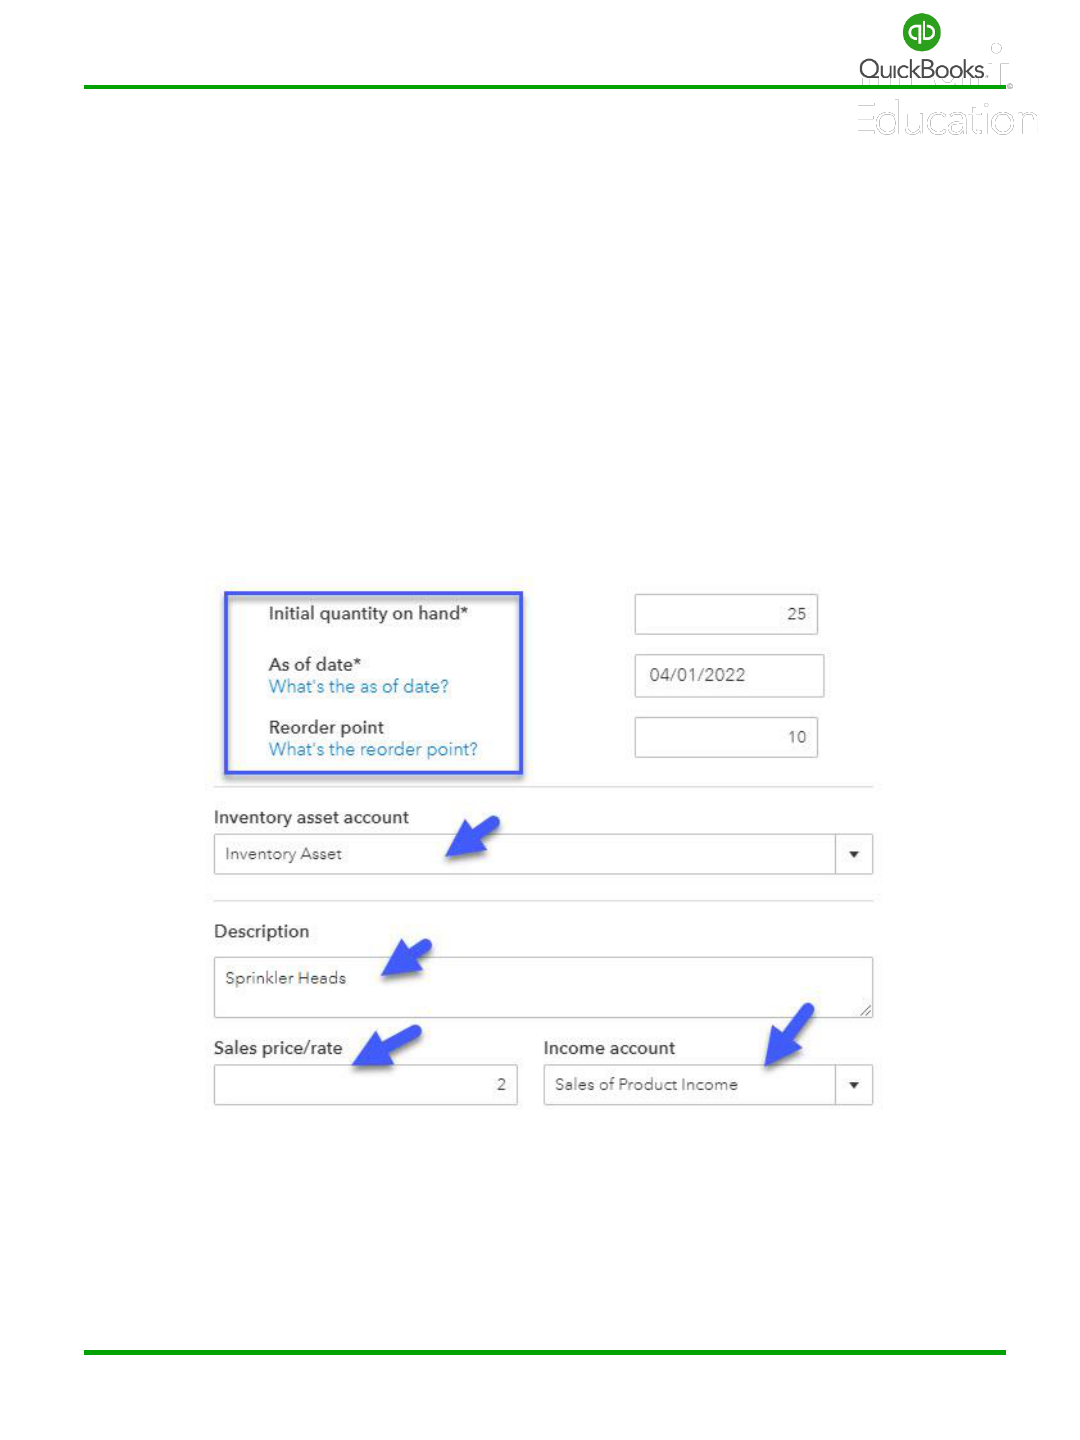
When you create an Inventory Item, the quantity and starting value will be zero. It is
important to set the starting value date prior to the date you will use when entering
transactions related to this item. The re-order point alerts us when we are getting low as
we sell those items. The Inventory Asset default account tracks current inventory value on
our Balance Sheet. The description will auto populate on sales receipts and invoices. It is
important to set a default sales price and income account. This helps us track a value for
income on the Profit & Loss. This information is also tracked with Inventory and Sales
reports.
Note: For each product and service, you need to enter an income account in order to
record the sale properly. Products allow you to set reorder points to track low quantities.
87

QuickBooks Online Foundations
Products and Services Types
The last section of an Inventory Item setup is to enter purchase information. Products we
sell are often considered taxable and we are required to collect the tax on behalf of the
state. It is important to select the taxable option to track this information. The purchase
information will auto-populate on purchase orders, bills, checks and expenses. The cost and
expense accounts will track and post information to the Profit and Loss. We will discuss
sales tax, purchasing and inventory later in this training.
Note: What you need to know about Inventory items: Inventory is anything you buy, sell,
and track quantity on hand. Inventory is available with QuickBooks Plus and Advanced.
When you setup an inventory item, you must specify the quantity on hand as the starting
point (even if it is zero). You can adjust the quantity on hand. Use the Open Purchase Order
Detail report to see the inventory items that have been ordered and are waiting to be
received.
88

QuickBooks Online Foundations
Products and Services Types
Sales Tax
As you create new taxable products or items, you can edit the sales tax default options. It is
important to carefully set the default for each item. This will help with accuracy to ensure
you apply the correct rates and prevent errors when collecting and reporting to your sales
tax agency.
89

QuickBooks Online Foundations
Products and Services Types
Non-Inventory Item
Non-inventory items are products we sell to customers without tracking quantity on hand.
We purchase them specifically for jobs and projects. This type of item gives us the ability to
track sales of items without having to keep track of inventory.
Click the Gear icon -> Products and Services -> New -> select Non-Inventory.
Note: The name and category fields are filled in. Categories help us organize products and
services and you can change the type after you create the product or service in the system.
In our example, fountains can be purchased as Inventory items and made available for sale,
or they can be treated as Non-inventory which allows the customer to order a specific
fountain for a specific project.
90

QuickBooks Online Foundations
Products and Services Types
Notice the box, “I sell this product/service to my customers”, is checked. A sales price and
income account are required. This Non-inventory item is taxable. We do not check the box
“I purchase this product/service from a vendor” when we do not purchase the item from a
supplier to resell. An example would be a product you create from multiple other parts and
sell it as a whole product. In this case, we do purchase custom items from vendors for
specific jobs. However, we do not store them as inventory. Important! Remember to verify
your sales tax default settings.
91

QuickBooks Online Foundations
Products and Services Types
Service Item
A Service item is used to track all services you provide customers.
Click the Gear icon -> select Service.
Notice you can change a service item type after you set up the service. This helps to fix
errors when setting the type incorrectly.
Note: The sales tax field would be set to “Nontaxable”; the purchase information does not
typically apply to service items. Simply uncheck the box “I purchase this product/service
from a vendor.” We would not need a ‘Design’ income category since we are tracking sales
by service. We already have it set up as a Service item tracked through reports.
92

QuickBooks Online Foundations
Products and Service Types
Bundle
A bundle is created when we group individual items together as a package. This helps to
populate several line items on a Sales Receipt or Invoice using one item made up of
multiple items. Each individual item has its own default setting, then is grouped in the
bundle.
93

QuickBooks Online Foundations
Product and Services Reports
Do not overlook the power of reports and the importance of consistently utilizing the
information to manage your business. In most Centers or areas of QuickBooks Online, you
will find useful reports to help develop a deeper understanding of your business and how to
use the financial data to continually improve company performance. Reports can be very
powerful when the data is accurate.
Click Reports in the Left Navigation Bar -> Standard -> Search Sales to locate the following
reports, (save them as favorites):
Sales by Products/Services Summary provides a summarized view for all sales of Products
and Services. When sorted in descending order, we can see our top selling products or
services instantly.
Sales by Products/and Services Detail - Provides detailed information for sales of Products
and Services.
94

QuickBooks Online Foundations
Section 4 Doable Action Steps
All business owners should complete this section. Apply the knowledge to your own
company file. You can always refer to the training in each section if you need a friendly
reminder.
In order to record sales and invoice customers, we need to set up our Products and Services
items. Remember, this allows you to track sales by Product or Service to determine top
selling Products and Services. Chris has determined items that will be used when recording
sales going forward.
Profit and Pricing Analysis Best Practices
The success of your business depends on how well finances are managed. Unfortunately,
many business owners do not understand exactly where they are making money. In order
to properly manage and grow your business, you must identify ways to sell more Products
and Services at the most profitable margins. The Implementation of Pricing best practices
will help you understand what price point to sell Products and Services, identify where you
are making money and where you are not profitable, and provide needed direction in how
to improve company performance.
Once your accounting application is up and running and you have at least several months of
data, we recommend the following:
1. Sales and Profit Forecasting
2. Comparing Cost of Goods Sold to Sales Price
3. Analysis of Profit Margins by Product Line
4. Learning about Volume, Cost and Price Drivers and applying the knowledge to your
own data.
95

QuickBooks Online Foundations
Section 4 Doable Action Steps
All business owners should complete this section and apply the knowledge to their own
company file. Remember! You can always refer to various sections of training if you need
additional reminders of how features works.
1. Review Video Links – Ctrl + Left Click
How to set up products & services
How to Use Reports Center: Categories, Insights & Information
2. Brainstorm a list of items you are selling. (Services, Inventory, or Non-Inventory items)
This list should reflect the items you want to track using Products and Services reports.
3. Determine the types of Products and Services you will need to set up.
4. Determine whether you will use Classes with Products and Services.
5. Determine whether your Products are taxable.
6. Determine sales price per Product or Service.
7. Determine the cost of each item if applicable.
8. Create your Products and Services List.
9. Determine how you will organize your Products & Services List by using categories to
group your items.
Click the Gear icon -> All lists -> Product Categories -> New Category. Assign the
category to each item on your list.
96

97
SECTION 5
BEGINNING BALANCES
Goals
Beginning Balances
Historical Transactions
Recurring Transactions
Doable Action Steps
Online Foundation Training

QuickBooks Online Foundations
Section 5 Goals
Upon completion of Section 5, each participant will be familiar with:
• How to enter Beginning Balances.
• How to enter Historical Transactions.
• How to manage Recurring Transactions.
• How and when to use Adjusting Journal Entries.
When Craig’s Landscaping was first established, Chris incurred costs prior to setting up her
business bank account. She bought a truck, took out a loan and used a personal credit card
to pay for various items and services. In addition, she bought items she has not yet paid for,
and has bills coming due. Chris provided services to a few clients without getting her
accounting application setup in advance and used a Word.doc to create invoices for new
customers. She wants to add the information to the Accounts Receivable Center. How does
she go about entering the above information in QBO?
Fortunately, Chris kept a shoebox full of receipts and asked her accountant to create journal
entries to record beginning balances. Had she opened her bank account and run expenses
through the bank, this process would have been much easier and saved hours of time. (You
do need an Employer Identification Number to set up a business bank account.) The
accountant pointed out the importance of adding an Adjusting Journal Entry (AJE) for all
startup costs, including those paid by the owner personally. He is also creating a balance
sheet for 12/31 of the prior year to simplify the process for Chris.
Taking advantage of efficiencies in an accounting application translates into higher profit
margins and not missing an expense; one more reason to setup your accounting application
early in the process.
98

QuickBooks Online Foundations
Beginning Balances
It is important to verify or enter beginning balances and historical data. Your accountant
can assist you in using a journal entry or you can add beginning balances when adding bank
accounts to your Chart of Accounts list.
If you have converted data, then you would have compared a Balance Sheet and Profit &
Loss Statement (set for all dates and accrual basis) in QuickBooks® Online with the same
reports in the accounting application you were using.
Enter beginning balances when setting up a new bank account, credit card account, and
other assets and liabilities. Opening balances default to Open Balance Equity in the Chart
of Accounts.
Note: Accounts Receivable (customer invoices) and Accounts Payable (unpaid bills) should
be entered individually to match beginning balances.
99

QuickBooks Online Foundations
Beginning Balances
Journal Entries are used to record beginning balance transactions, or transactions that
occur outside of the business bank and credit card accounts. QuickBooks automatically
enters the date and journal entry number, but you can change them anytime. You must enter
at least two accounts and at least one debit and one credit, in order to save the journal
entry. The debit and credit totals must match.
Click + New -> Journal Entry.
Verify the date and Journal number. Enter the account, amounts, description and name if
applicable. Click Save.
Note: What is required to create a journal entry? Accountants typically provide adjusting
journal entries when completing the tax return. For example, Depreciation Expense is used
in conjunction with Fixed Assets. We depreciate assets over specific periods of time.
100

QuickBooks Online Foundations
Historical Transactions
Entering Historical Information
When you start a new QBO file, you may need to enter historical data. Use the following
process for each area of the business:
Accounts Receivable – Enter transactions (invoices, incoming payments, and deposits) in
the same order and date they were created or received. This process creates a historical
record of transactions by customer.
Invoice – Click the + New icon -> Invoice and enter each invoice sent between your start
date and today. Be sure to use the correct dates as well as the Products and Services List.
Receive Payment – Click the + New icon -> Receive Payment and enter all payments
received from Customers between your start date and today. When payments are received,
they are posted to a default holding account known as Undeposited Funds.
Bank Deposit – Click the + New icon -> Bank Deposit to select payments and post deposits
to the bank register. This is a very important step intended to group payments that match
the deposit sent to the bank. This step clears out the Undeposited Funds holding account.
101

QuickBooks Online Foundations
Historical Transactions
Accounts Payable – Manually enter bills and bill payments in the same order and date they
were created or paid. This process creates a historical record of transactions for a vendor.
Bills – Click the + New -> Bill and enter any outstanding bills.
Pay Bills – Click the + New -> Pay bills to attach payments to bills.
Bank Transactions – If you are entering historical transactions for more than a one-month
time frame, enter the transactions one month at a time and reconcile all bank and credit
card accounts before going on to the next month.
There are three ways to enter historical bank transactions: manually, using the import
feature or connecting bank accounts (per Section 2 training).
Use the following process to enter bank transactions:
1) Manually enter all checks by clicking the + New icon -> Check and entering all checks
posted one month at a time.
2) Manually enter debits by clicking the + New icon -> Expenses and entering all debits
posted to the bank one month at a time.
3) Connect the bank account to QuickBooks® Online – Dashboard -> Connect Accounts
or Banking -> Add Account and follow the setup process. Use caution when selecting
the period to download transactions to avoid duplicate transactions.
4) Export and import transactions from your bank to QuickBooks Online.
5) Complete Bank Reconciliation – Click the Gear icon -> Reconcile. Deposits and bill
payments should already be posted to the register.
102

QuickBooks Online Foundations
Historical Transactions
In this example, we created a Journal Entry to record the purchase of a truck and
corresponding loan. You will see that it increases Assets and Liabilities on the Balance
Sheet. We record beginning bank balances to reflect accurate Cash on Hand. Legal and
license fees increase the Expense categories on the Profit & Loss.
If personal accounts were used by the business owner prior to setting up the accounting
application, this shows how to enter those transactions. Since the owner paid out of their
personal accounts, we post the total to Owner Contributions which increases the equity
section of the Balance Sheet.
103

QuickBooks Online Foundations
Recurring Transactions
Recurring transactions are memorized transactions that recur daily, weekly, monthly, etc.
Use this feature to record repetitive transactions such as bills, checks, auto-debits, invoices,
and credit memos. When properly maintained, the use of Recurring transactions can save
considerable time and effort. Work-flow efficiencies translate into higher profit margins.
Note: It is important to understand the different types of Recurring Transactions and the
following Recurring Transaction options:
Scheduled – Automatically records the transactions.
Reminder – Appears on your dashboard and when selected, will take you to the reminder
list to edit or enter the transaction.
Unscheduled – Appears on the recurring transaction list to use at any time, however, does
not record the transaction.
Click the Gear icon -> Recurring Transactions under Lists.
In the Recurring Transactions window, you can filter by Name, Template Type, or
Transaction Type. You can also filter by location if the feature is turned on.
Use the Reminder List to create or skip memorized transactions. Use the drop-down arrow
to Run a Report.
Click Edit from the Action column to change default information for a recurring bill.
Click the drop-down arrow in the Action column to select, duplicate, resume or delete a
recurring transaction. Click the Gear icon to change the number of Rows displayed.
104

QuickBooks Online Foundations
Recurring Transactions
Click New and select the Transaction Type to create a Recurring Transaction.
Enter all details. It is important to maintain your Recurring Transaction list.
105

QuickBooks Online Foundations
Recurring Transactions
Click New and select the Transaction Type to create a Recurring Transaction.
Enter all details. It is important to maintain your Recurring Transaction list.
106

QuickBooks Online Foundations
Section 5 Doable Action Steps
All business owners should complete this section and apply the knowledge to their own
company file. Remember! You can always refer to various sections of training if you need
additional reminders of how features works.
1. Review the video link – Ctrl + Left Click
How to use Journal Entries
2. Gather receipts for all expenses paid from personal bank or credit cards accounts.
3. Gather purchase agreements for vehicles, equipment etc.
4. If you have existing invoices for customers from another system, save them as .pdfs so
you can attach them to transactions in QBO.
5. Gather all unpaid bills, if any.
6. If you have filed a tax return for this business, save a copy.
7. If you have a bookkeeper, provide this info and request they input the data in your
new company file.
8. If you do not have a bookkeeper, reach out to your advisor/accountant for assistance.
Best Practices
a. Keep personal and business transactions separate. This is one of the biggest
mistakes a business owner makes. If possible, set up a business account prior to
paying for expenses or bills for the business. This is a great way to avoid bad habits.
b. Keep good records when starting your business. If you do pay for expenses out of
your personal bank or credit card account prior to opening a business account, you
will need to record them using Adjusting Journal Entries. Avoid the extra time,
increase efficiencies and drop more to your bottom line by setting up your business
bank account early in the process.
107

108
SECTION 6
BANK & CREDIT CARD
ACCOUNTS
Goals
Connect Accounts
Banking Center
Transfers
Reconcile Accounts
Doable Action Steps
Online Foundations Training

QuickBooks Online Foundations
Section 6 Goals
Upon completion of Section 6, each participant will be familiar with:
• How to connect bank and credit card accounts.
• How to manage transactions.
• How to transfer funds.
• How to reconcile bank and credit card accounts.
• How to access and view bank reports.
Chris was surprised to learn she can connect Craig’s Landscaping bank and credit card
accounts directly to QuickBooks Online. This means all transactions will automatically
import into the app, saving considerable time and money. She will also be able to view real
time bank balances right in QuickBooks Online.
Chris would like an overview of how the Banking Center works and information on how to
connect the accounts and manage transactions. She would like clarification on how to
transfer funds. Chris has never done a bank reconciliation and is unclear on why the person
in charge of the books needs to reconcile the bank and credit card accounts each month;
doesn’t the accounting application reconcile for them?
Chris also needs a clear understanding of what checks, and deposits have not yet cleared
the bank. She would be wise to check bank balances daily on the mobile app to gain a
better understanding of her business and catch fraudulent activity in an early phase.
Chris would also like to pursue funding options as she realizes she could scale her business
much faster if she had access to additional capital.
Let’s show the Chris how to access bank reports, ensure she understands the types of
information these reports provide, and explain simple funding options right within QBO.
109

QuickBooks Online Foundations
QuickBooks Capital
WOW! 70% of new businesses need funding to grow (Federal Reserve Small Business Credit
Survey: Report on Startup Firms) and Chris realizes that she could scale more quickly if she
had additional capital. Let’s look at some of her options.
What is QuickBooks Capital?
QuickBooks Capital is a service offered by Intuit Financing Inc. that provides QuickBooks
customers with a range of funding options including term loans, lines of credit, invoice
financing, SBA loans, and more. All you need to apply is an updated QuickBooks file.
QuickBooks Capital offers funding in two different ways:
•By directly underwriting loans.
•By providing a marketplace for you to explore and match with curated lenders.
Visit https://quickbooks.intuit.com/capital/ for additional information.
To access QuickBooks Capital from within QBO, simply go to the left navigation bar and click
Capital. The inquiry will not affect your credit rating.
110

QuickBooks Online Foundations
Connect Accounts
Connecting bank and credit card accounts to QuickBooks® Online is a simple process. It is
important you understand how to manage the Bank Center to avoid posting old and/or
duplicate transactions. Although connecting your bank and credit card accounts is a great
way to enter historical transactions, it is recommended that new users also become
comfortable manually entering transactions. Please seek help from your Instructor or
Accountant to avoid costly cleanup if you believe you need additional assistance.
There are two ways to connect bank and credit card accounts to your company file.
The first option:
Click Dashboard in the Left Navigation Bar.
Click Connect Accounts.
The Second Option:
Click Banking in the Left Navigation Bar.
Click Link account.
111

QuickBooks Online Foundations
Banking Center
Let’s walk through the manual export and import process for bank and credit card
transactions. Once you login to your online bank account outside of QuickBooks Online,
determine how transactions are exported, the date range available and the type of export
available. Some banks won’t let you go back more than 18 months (or even 3 months) at a
time. There might be several download file types available, depending on which bank you
use. The QuickBooks web connect option is preferred. Once you successfully download and
save the export file from your bank, the next step is to go to the Banking Center in
QuickBooks Online.
Click Banking -> drop-down arrow to the right of Link Account -> Upload from file.
Click Browse and select the bank file you downloaded from your computer.
Click Continue. Follow the connection wizard.
Select the account category from the Chart of Accounts List you want the transactions to
connect with. Be careful!
112

QuickBooks Online Foundations
Banking Center
Map fields between QBO and the bank account.
Select the field options, change the Amount field to Spent and select one of the column
options. Click Continue.
Select all the transactions available to import. Click Continue.
A window will appear to inform you how many transactions are being imported. Make sure
all transactions are selected. Sometimes the system will not accept a transaction, simply
uncheck those with issues and manually enter them later.
Do you want to import now? Click Yes -> Done.
113

QuickBooks Online Foundations
Banking Center
Banking Center
Now that your bank and credit card accounts are connected, you can manage transactions
for each account. Organize your bank and credit card accounts to avoid posting duplicate
transactions. Start with main checking, additional checking, savings, then credit card
accounts.
Click Dashboard from the Left Navigation Bar -> Bank accounts pencil -> Re-arrange the
order of accounts -> Save.
114

QuickBooks Online Foundations
Banking Center
Click Banking (Transactions) in the Left Navigation Bar.
The Banking Center window will appear. All accounts linked to the bank or transactions
manually imported will appear in the Banking Center. Click on the bank or credit card
account you would like to manage.
As the bank populates transactions, they reside in the Review section of the Bank Center.
It is up to you to accept these transactions. Once accepted they post to the bank register
and move to the Reviewed section. If a duplicate or old transaction appears for review,
simply exclude the transaction. On occasion, you might want to undo an excluded
transaction and move it back to review.
Search or filter transactions to accept or post transactions more efficiently.
115

QuickBooks Online Foundations
Banking Center
You can access the Bank Register and other options include printing, exporting to Excel and
changing the columns displayed using the Gear icon. We recommend changing settings to
match the screen shots provided.
When bank transactions populate in the Bank Center, they look for existing transactions to
find a match. The order in which transactions are posted is important in order to avoid
duplicate transactions and costly cleanup. We recommend the following industry best
practices order:
1. Sync or Import Payroll when using a payroll service or QuickBooks Payroll.
2. Receive payments against invoices and make deposits.
3. Clear up Undeposited Funds.
4. Apply Checks to Open Bills.
5. When posting transactions start with the main checking account and additional
checking, then move on to savings, credit card etc.
6. Open and review each transaction.
116

QuickBooks Online Foundations
Banking Center
Click on individual transactions to open the window with all available fields. Notice the
different options:
Categorize –The preferred option. It allows you to control where the transactions are going
and is more forgiving if you need to make changes later.
Find match – Looks for a transaction that already exists in the register. The order of
operations is very important. When you complete the undeposited funds deposit process,
the bank feeds will match up the transactions and all you do is verify and accept them.
Record as transfer – Recognizes transfers between accounts and sometimes picks up
expenses or ACH payments as transfers. Transfers do not require a vendor name. Let’s say
you are transferring funds from the checking to the savings account. You can use Record as
Transfer or change it to Categorize, Create a Vendor Named Transfer and select the savings
account as the category from the Chart of Accounts. Transfers are not as forgiving if you
need to make edits later. Also, it only recognizes balance sheet accounts.
Record as credit card payment – Creates a payment from the checking to the credit card
account. This feature is not as forgiving as categorize and harder to change later. It only
recognizes credit card accounts in the Chart of Accounts.
117

QuickBooks Online Foundations
Banking Center
While the transaction is open, verify the date, vendor, category, and any other fields that
require information. When you turn on features such as Locations and Classes, they will
appear in each transaction. It is your job to assign a Location or Class as you accept the
transactions. This will prevent having to go back and edit transactions, a time-consuming
process.
Memo – This is an extremely valuable field that provides bank description information that
tells a story. Often the vendor's name and other important information can help us to
complete the transaction.
Notice the options to Add attachments, Create a rule, Exclude or Split transactions.
Split – Provides the option to split a transaction between account categories and classes. It
can be very helpful when you need to split an expense or principal and interest for a loan
payment.
118

QuickBooks Online Foundations
Banking Center
Rules
Rules are a great way to identify where a transaction should be posted. Rules save time
during the Review and Accept process because they memorize how specific transactions for
specific vendors should be recorded. Keep in mind, QuickBooks will remember prior posted
transactions and populate vendor names and categories based on the memorization of the
rule. Take time to review each transaction before accepting to avoid costly cleanup errors.
Click the Rules Tab -> New rule. Customize your rule by selecting available options, adding
conditions, Transaction type, Payee and Category.
Danger! Danger! Turn off auto-add until you are confident using the Banking Center and
rules. Auto-add automatically accepts transactions to the bank register without your
knowledge. We recommend you change description to bank text when setting conditions.
This will help the system recognize transactions to automatically assign the
vendor/customer and account category.
119

QuickBooks Online Foundations
Banking Center
Chris was learning how to review and categorize transactions in the Banking Center. She
started to panic as she noticed some of the transactions were automatically posting with
incorrect information.
Oh no! An auto-add rule was accidentally created, and transactions are being posted to the
wrong account category. How can she fix this issue?
Go to the Banking Center -> Rules -> Delete the rule.
1. Go to the banking center -> categorized tab -> locate and undo the transactions.
This will move them back to the review tab. Whew! That was a close one.
What if a duplicate transaction populates or an old transaction re-appears because she
deleted the transaction from the bank register?
1. Go to the Banking Center -> Review Tab -> Exclude Unwanted Transactions.
This will move the transactions to the excluded tab where you can undo and bring them
back to review if you need them.
120

QuickBooks Online Foundations
Banking Center
Receipts
Receipt Capture in QuickBooks Online allows users to directly upload receipts to
the QuickBooks Online Banking Center where QuickBooks will read the receipt and either
match it to an existing transaction or allow users to add a new transaction.
Click the Receipts tab.
Drag and drop receipts directly into QuickBooks Online or select Browse to upload them.
Ensure that each image or file contains only a single receipt.
Upload from Google Drive by logging into your Google account.
Forward from email will require you to setup a custom email address with Intuit.
Create transactions from uploaded receipts (pdfs). You can turn receipts into bills or
expenses. This step should be completed prior to managing the Banking Center.
121

QuickBooks Online Foundations
Banking Center
Mobile App
To scan a receipt, install the "QuickBooks Accounting: Invoicing and Expenses" app on your
phone. Then, open the app and tap the menu button. Select the Receipt Camera and snap a
photo of your receipt. Once you do, it will automatically appear in the Receipts tab with any
other receipts you have added.
Click the “For review” tab to manage receipts or bills. Use the Batch actions menu to select
multiple documents to Confirm, Review or Delete attachments.
Note: You can send multiple receipts in one email, however if you send too many, the file
size may exceed your email provider’s limits.
122
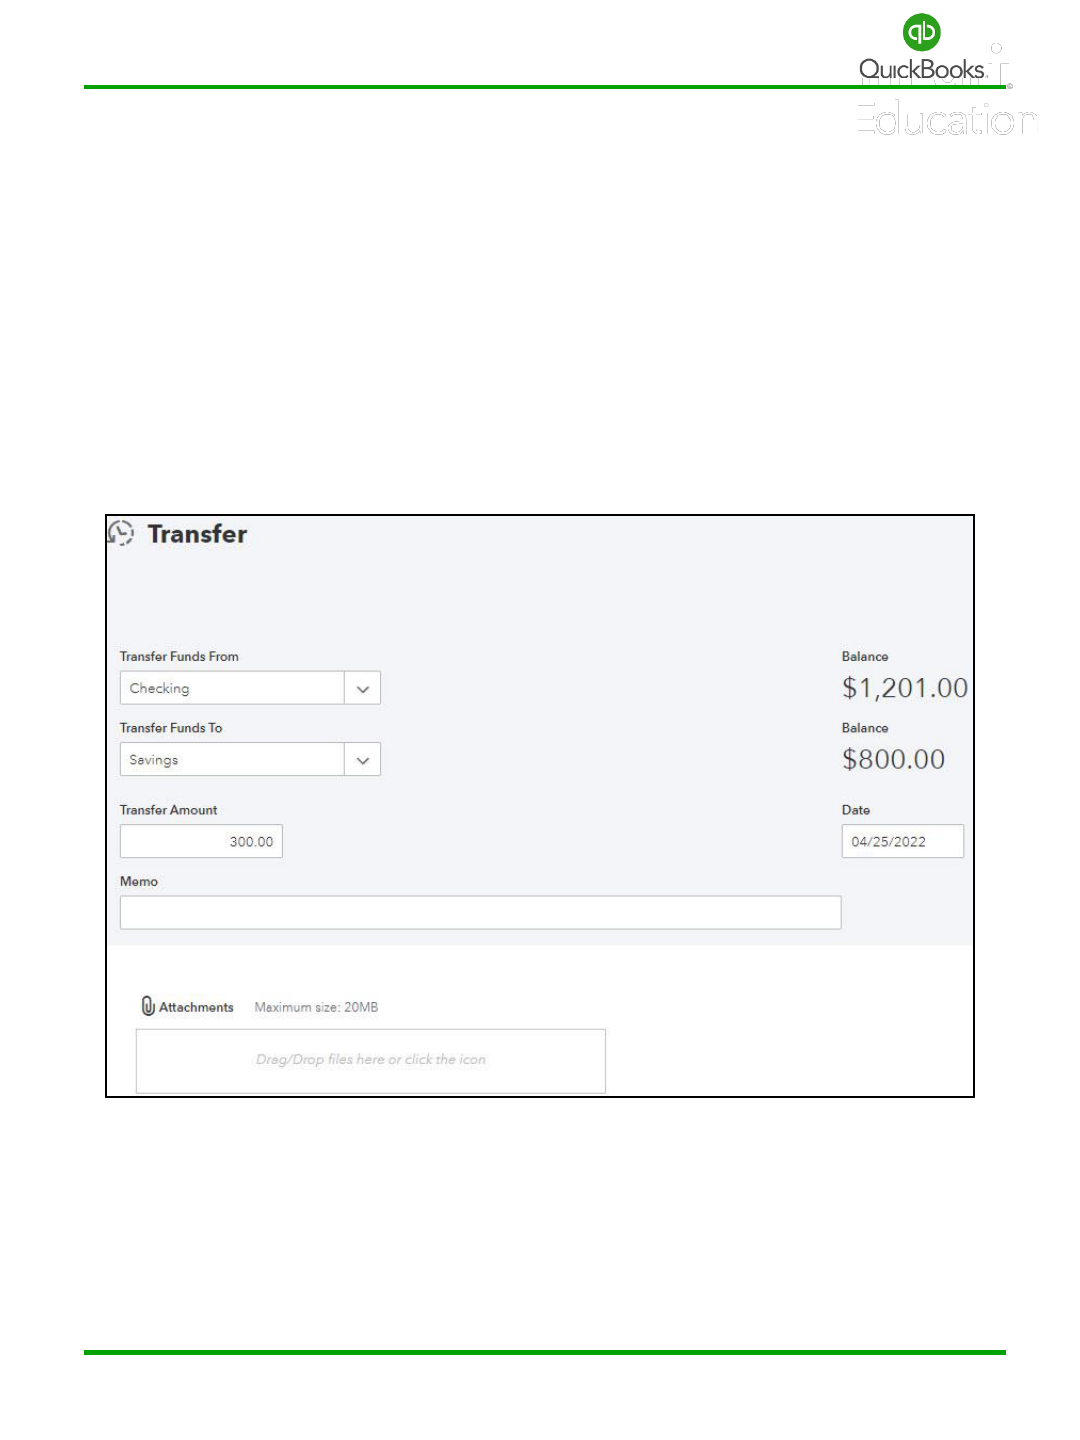
QuickBooks Online Foundations
Transfers
Transfers
In some cases, a payment to a Vendor or Payee populates as a transfer type transaction
instead of an expense. In this case, we recommend you change it to a categorized
transaction, as explained in the Banking Center section.
Click + New and select Transfer to move money from one bank account to another.
Note: Transfers do not require a vendor name and need to be deleted if you need to adjust
or correct a mistake.
123

QuickBooks Online Foundations
Reconcile Accounts
Reconciling your bank and credit card accounts is an important task to ensure all
transactions are accounted for, input errors are corrected, and all outstanding transactions
are verified. Completing the bank reconciliation process for all financial accounts is key to
accurate data and financial statements.
Click the Gear icon -> Reconcile -> Get started -> Let’s do it.
Select the Account you wish to reconcile from the drop-down list.
Refer to the bank statement to verify the Beginning balance, enter the Ending balance, and
enter the Ending Date. Click Start reconciling.
Note: Always reconcile accounts using this process. Never clear transactions directly from
the bank register as this can cause problems.
124

QuickBooks Online Foundations
Reconcile Accounts
Now you are ready to reconcile the account.
Select Deposits and check off all deposit and credit transactions that appear on the bank
statement. Verify outstanding transactions and make corrections as needed.
Select Payments and check off all checks and ACH transactions that appear on the bank
statement. Verify outstanding transactions; research and make corrections as needed.
125

QuickBooks Online Foundations
Reconcile Accounts
Click Edit Info to change the ending balance or statement date.
Verify that the following match the bank statement:
1. Beginning Balance
2. Statement Ending Balance
3. Payments Total
4. Deposit Total
The Difference should be $0.00 when you are done.
Click the drop-down arrow to choose one of the following options:
Finish now to complete the bank reconciliation process.
Finish later to save your work and resume later.
Close without Saving to start over—your work will not be saved.
Now that we have completed a successful Bank Reconciliation in QuickBooks®, you can
click Done or View Report (a reconciliation report will open providing summary and detail
information).
126

QuickBooks Online Foundations
Reconcile Accounts
Once the bank and credit card accounts are reconciled, reports and historical information
are available from the reconcile window. If you are no longer in the reconcile window, click
Gear -> Reconcile. Click Summary to access a list of recent reconciliation summaries.
Click History by account to access all reconciliation summaries by account.
Click Show me around for a step-by-step tour.
127

QuickBooks Online Foundations
Reconcile Accounts
Once the bank and credit card accounts are reconciled, reports and historical information
are available from the reconcile window.
If you are no longer in the reconcile window, click Gear -> Reconcile
Click Summary to access a list of recent reconciliation summaries. Double-click the
summary you wish to review.
Click the Hide additional information to hide transactions after Period end date.
128

QuickBooks Online Foundations
Section 6 Doable Action Steps
All business owners should complete this section and apply the knowledge to their own
company file. Remember! You can always refer to various sections of training if you need
additional reminders of how features works.
1. Review Video Links:
How to Connect your Bank Account & Credit Cards
How to Categorize Transactions from your Bank and Credit Card
How to Reconcile an Account: Statements & Records, & More
2. Connect your Bank and Credit Card accounts.
3. Accept transactions for connected accounts. Remember to complete all fields
required and always fill in customer/vendor and category fields.
4. Create rules as needed.
5. Reconcile your Bank accounts.
6. Reconcile your Credit Cards accounts.
Best Practices
• Keep a separate bank and credit card account for your business. Avoid using them
for personal transactions. This will reduce the number of transactions, vendor’s you
will need to create and will keep cash in the company.
• Follow the order of operations when posting accounts and transactions.
• Create rules to help with accuracy and efficiencies.
• Reconcile bank and credit card accounts each month.
• Monitor bank balances from your computer or mobile app.
129

130
SECTION 7
UNDERSTANDING YOUR NUMBERS
Goals
Balance Sheet
Profit & Loss
Ask My Accountant
Audit Log
Closing Date
Doable Action Steps
Online Foundations

QuickBooks Online Foundations
Section 7 Goals
Upon completion of Section 7 each participant will be familiar with:
• How to save and group Custom Reports.
• How to setup and review a Balance Sheet Statement.
• How to setup and review a Profit & Loss Statement.
• How to create a report and utilize Ask My Accountant.
• How to review an Audit Log.
• How to set a Closing Date and Password.
The importance of understanding and utilizing financial reports cannot be overstated. Many
business owners are embarrassed to admit their lack of knowledge when it comes to
understanding what their numbers mean. Financial statements provide a snapshot of a
business’s financial health, giving insight into its performance, operations, and cash flow.
They are essential and provide information about a company's revenue, expenses,
profitability, and debt.
As we begin to break down the numbers for Chris, she will soon learn it is not rocket
science as she watches the numbers take on meaning. Chris has never been able to
determine whether her business is healthy. Now that the reconciliation process is complete
and she can trust the numbers, she begins to understand how much information is
available to help her continually improve company performance. In fact, Chris finds herself
saying, “Why didn’t I know this earlier? This would have changed everything”.
Methodical action steps will put Chris back on the right track. Experience what it must feel
like to have the blinders removed and see a clear picture of how to grow and thrive! We
highly recommend you attend the Advanced QBO Training session following this class to
additional insights into reports and what the numbers mean!
131

QuickBooks Online Foundations
Understanding Your Numbers
Customizing and viewing reports on a regular basis will ensure the accuracy of your company
data, and help you make better management decisions. Financial analysis and reporting are
the bedrocks of modern business, and the benefits are vast; improved cash flow, debt and
liabilities management, trend identification, real time tracking, etc. Financial reports also
help you remain in compliance with various regulations.
The Custom Reports section allows you to save Custom Reports in groups and streamline the
time it takes to review reports daily, weekly, monthly, etc.
Once you understand what the numbers mean in your reports and where the data is coming
from, it will become obvious why creating unnecessary account categories leads to costly
cleanup. The various reports clarify what is going on in each area of our business. Invest time
to familiarize yourself with key reports that apply to your business. If you are unsure what
reports to track, talk to your Instructor/Advisor or Accountant for advice. Keep in mind you
can customize and create detailed and summarized reports as you learn more.
All business owners should focus on three main financial reports:
• Balance Sheet
• Profit & Loss
Other important reports include:
• Ask My Accountant
• Audit Log
132

QuickBooks Online Foundations
Balance Sheet
The Balance Sheet provides information about the assets the business owns. There are
several types of assets including current assets, cash in the bank and money owed by
customers. Fixed assets are tangible items purchased, such as a vehicle or equipment used
to produce money. Fixed assets are depreciated over time and are typical items that cost
more than $2,500. Other assets include leasehold improvements, purchase of a business,
security deposits, etc.
Now let’s discuss liabilities, what the business owes. Short-term liabilities are paid within a
year and include sales and payroll taxes, garnishments, lines of credit, credit cards etc.
Long-term liabilities take more than a year to pay back and include vehicle or equipment
loans, SBA or building loans etc.
Finally, the equity section tells us how much your business is worth, tracking all profits and
losses from the time you start the business to the present. This section tracks all the stock,
owner distributions and contributions over the years. All information is rolled into retained
earnings, owner's equity, or member equity depending on the type of entity.
Click Reports in the Left Navigation Bar -> Standard -> Scroll to Business Overview
-> Balance Sheet. Click the “Star” to save the report as a favorite or use the search feature.
133

QuickBooks Online Foundations
Balance Sheet
Balance Sheet
There are several ways to filter the data for your Custom Reports. Change the Report
period, display Columns, Show non-zero or active only, and Accounting method. Also
Compare Report periods.
The Collapse option consolidates all sub-account balances within the main account. The
Expand option displays all sub-account balances. Sort by ascending or descending order
and Add notes. Click the appropriate icon to Email, Print or Export a report.
Click Customize to change the date range, accounting method and negative numbers
display.
134

QuickBooks Online Foundations
Balance Sheet
Click Rows/Columns to change the way Columns are displayed, Show non-zero rows and
columns, or add percentage of rows and columns.
Click Filter to select specific Customers, Vendors, or Product/Service items to be displayed.
Click Header/Footer to add your logo, change the Report title, remove information
displayed, and change the alignment of the report. Click Run Report.
135

QuickBooks Online Foundations
Balance Sheet
Click Save Customization.
Name your Custom Report or use the default name, add this report to a group, or share it
with a coworker. Organizing your reports in groups will save time locating and reviewing
your favorite reports.
Click Save.
Now simply click on Reports -> Custom Reports to quickly access your customized
Balance Sheet.
136

QuickBooks Online Foundations
Balance Sheet
This sample displays the Assets portion of the Balance Sheet. In order to rely on your
financial data, it is important to verify that all Asset account balances are accurate.
137

QuickBooks Online Foundations
Balance Sheet
This sample displays the Liability and Equity sections of a Balance Sheet. In order to rely on
your financial data, it is important to verify that all Liability and Equity account balances are
accurate.
138

QuickBooks Online Foundations
Profit & Loss
Profit & Loss
The Profit & Loss Report is an accumulation of income and expenses for a period. At the
end of each year the net profit or loss rolls into the Equity section of the Balance Sheet.
Each new year starts with a zero balance for income and expenses.
The Profit & Loss continues with the story about the health of our business. Are we
meeting our sales growth targets? When we subtract expenses directly related to revenue,
we can determine our Gross Profit Margin. Do we have enough Gross Profit to pay all other
costs? When we subtract all other expenses from Gross Profit, we can determine Net
Income before tax and whether we are profitable. Each category is a percentage of Income
which we use as a cash management tool.
Click Reports in the Left Navigation Bar -> Reports -> Standard -> Scroll to Business
Overview. Click Profit and Loss % of Total Income or use the search feature.
139

QuickBooks Online Foundations
Profit & Loss
Click Customize.
Change the Negative numbers to display with parenthesis and check the box “Show in red.”
Just like the Balance Sheet, you can add Rows and Columns, filter information, or change
“Header/Footer” options.
Note: It is important to choose the same date range and accounting method used to
customize the Balance Sheet.
140

QuickBooks Online Foundations
Profit & Loss
Use the “collapse/expand” feature to hide or unhide subaccounts when customizing
reports.
Note: Remember to click Save Customization and add this report to your new report group
in Custom Reports.
141

QuickBooks Online Foundations
Ask My Accountant
This report can be a very helpful tool. It is used to post transactions when the user is not
sure which category to use. The Memo field allows the user to post notes and questions for
their Accountant. It can be a great way to train a new bookkeeper or business owner.
Click on Accounting in the Left Navigation Bar -> Chart of Accounts tab. Locate Ask My
Accountant in other expense type, then click Run report.
Click Customize -> Header/Footer to change the Header to Ask My Accountant.
Change the Report Period to All Dates then click Run report. Remember click Save
Customization to save your report in Custom Reports.
Notice the Accountant’s response in the Memo/Description field to post the transaction to
Fixed Assets/Computer Equipment.
Note: It is important to clear up all transactions on this report before year end and
especially before filing a tax return. This is a placeholder for transactions that need more
information to post in the correct account or category.
142

QuickBooks Online Foundations
Fraud Prevention
Fraud is a serious problem for small business owners and the statistics are startling.
According to a survey by AFP (Association for Financial Professionals), fraud hit an all time
high. 82% of U.S. businesses reported experiencing payment fraud.
We hope this got your attention, it should. Fraud prevention must be addressed and given
serious consideration as you work to build a solid financial foundation in your business. The
good news is, QuickBooks Online has tools built into the application designed to help you
implement fraud prevention processes to detect and prevent fraudulent activity.
Fraudulent activity can take on many forms, including asset misappropriation, billing,
expense reimbursement, skimming, cash register disbursements, and check tampering
schemes to name a few.
Biz Q&A:
• How do you prevent fraud from occurring in a business?
• How do you identify areas where the likelihood of fraud is the greatest?
• How do you protect your business assets and cash?
Wow!
According to the Association of Certified Fraud Examiners, the average business will lose
approximately 7% of revenues due to employee theft. Small businesses have a 38%
greater amount of fraud than larger companies, due to lack of internal controls.
Once your accounting application is set up, we recommend you seek the advice of an
accountant to verify you are taking full advantage of the fraud prevention tools in QBO and
ensure you have internal controls built into your system.
143

QuickBooks Online Foundations
Audit Log
The Audit Log Report is a good way to view activity by user. This is a great training tool used
to enforce accurate data entry. The Audit Log is also a way to detect fraudulent activity.
Click Reports -> All -> Scroll to Business Overview -> Audit Log.
Click the Filter button to search historical transactions by Users, Dates, or Events.
Notice the filter criteria is set for a specific user and the historical data indicates when he
logged in and out, as well as specific transactions that were edited by Craig Carlson.
Click the Gear icon to select columns to view. Click View to see details for a specific
transaction.
144

QuickBooks Online Foundations
Closing Date
Close the books
This is a great feature that allows you to close a period and assign a password. Turning on
this setting triggers a warning box that prevents users from changing historical data, a
powerful fraud prevention tool. We learned about the closing date features when we
completed the setup section of this training.
We encourage you to use the closing date feature once you have reconciled all bank and
credit card accounts, reviewed your financials, and filed sales tax, payroll tax or income tax
returns. Remember to set a date and password. If a user tries to change an invoice or
delete a transaction, etc. a warning window will pop up and require the password.
145

QuickBooks Online Foundations
Section 7 Doable Action Steps
All business owners should complete this section. Apply the knowledge to your own
company file. Remember! You can always refer to various sections of training if you need
additional reminders of how features works.
Take Interest in your Books
The most important thing you can do to reduce fraud is to take interest in your accounting
records. Randomly and periodically ask to review your financial reports. It is important to
understand what the reports should look like and what to look for. If there are significant
variances, review them so you understand what occurred.
Ethics Policy:
Consider adapting an ethics policy that clearly outlines your business policy for ethics and
integrity. The policy should be distributed to all employees. It is important to set an
example as the business owner. For example, do not take inventory, office supplies or cash
out of the drawer. If employees see this behavior, they will justify their actions because of
the boss’s actions.
Segregation of Duties:
It is also important to limit access based on team member’s areas of responsibility. For
example, an employee with Accounts Payable access should not have access to Accounts
Receivable or Bank Statement balancing. Employees who process and enter transactions
should not be allowed to configure settings or set up books. There should be no single
employee in the business (other than the business owner) who has full administrative
rights or too much responsibility.
146

QuickBooks Online Foundations
Section 7 Doable Action Steps
All business owners should complete this section and apply the knowledge to their own
company file. Remember! You can always refer to various sections of training if you need
additional reminders of how features works.
1. Watch Video Links – Ctrl + Left Click
Understanding the Balance Sheet in Quick Books Online
Understanding Profit & Loss Statement: Income, Cost of Goods
How to use the Audit Log in QuickBooks Online
2. Create, Save and Review the following reports:
Balance Sheet
Profit & Loss with Percentages
Ask My Accountant
3. Review the Audit Log and filter feature.
147

148
SECTION 8
ACCOUNTS PAYABLE
Goals
Vendor Center
Contractors
1099s
Expenses
Checks
Bills
Pay Bills
Bill Pay for QuickBooks Online
Vendor Credits
Apply Vendor Credits
A/P Reports
Doable Action Steps
Online Foundations Training

QuickBooks Online Foundations
Section 8 Goals
Upon completion of Section 8 each participant will be familiar with:
• Overview of Accounts Payable.
• How to turn on/off Accounts Payable-related Accounts and Settings.
• How to manage the Vendor Center.
• How to track Contractor information.
• How to Create Checks and Expenses.
• How to Create Credit Card Expenses.
• How and when to Create and Pay Bills.
• How to view and save Accounts Payable-related reports.
Many business owners underestimate the impact of not implementing an Accounts Payable
policy. It’s just paying the bills, right? WRONG. The lack of internal controls and ineffective
Accounts Payable processes can end up costing the business in fraudulent payments,
double payments, late fees, lost discounts, additional allocation of labor to locate invoices,
poor cash flow, etc. Also, the Accounts Payable process can affect vendor relationships;
e.g., reduced credit requiring payment up front, and less favorable payment terms.
Chris would like Craig’s Landscaping to implement a best practice Accounts Payable policy
that includes entering bills as they come in and setting payment dates at the end of the
terms to stretch payables and prevent late fees. In addition, Chris would like more
information on how to use the Vendor Center. Let’s show her how to setup a new vendor,
create and pay bills, create checks and expenses and handle credit card expenses. What do
you recommend regarding Accounts Payable reports? What kind of information can these
reports provide? How can this information be used to improve company performance?
The A/P process has a significant impact on cash flow and should be closely monitored.
149

QuickBooks Online Foundations
More about Accounts Payable
In the Accounts Payable section, we will discuss the importance of implementing an
Accounts Payable policy, establishing internal controls to prevent payment fraud and
managing your bill payment process to take advantage of discounts offered by vendors. This
process has a significant impact on cash flow. Consistently implementing a ‘best practice’
Accounts Payable Policy is far more important than most business owners realize.
Wow!
According to JPMorgan, 78% of U.S. businesses were exposed to attempted or actual
payments fraud in 2019; however, due to increased awareness, improved training and more
vigilant best practices, only 48% of exposed businesses experienced a case of fraud costing
$250,000 or more.
While fraud is a huge problem for small business owners, many do not understand how
costly it is to process an invoice. In their Benchmark study, Aberdeen Group found that the
industry average cost to process an invoice was $15.61. “Laggard” companies (bottom 30%)
had an even larger average cost of $38.77, while “Best-in-Class” companies (top 20%) had
an average cost of just $3.09.
For the above reasons and more, implementation of a best practice Accounts Payable
policy will be an integral part of your success!
150

QuickBooks Online Foundations
Vendor Center
Click Expenses -> Vendors in the Left Navigation Bar to access the Vendor Center. Here, we
will view open and overdue bills, maintain Vendor information, and view historical
transactions. Use the search bar to find a Vendor or company. You can email Vendors
directly by clicking the drop-down arrow for Batch actions. You can click Prepare 1099s and
complete the step-by-step wizard.
151
Click the drop-
down arrow in the
Action column to
create bills, create
expenses, write
checks, and more.
Click the Gear icon
to add and remove
columns displayed.

QuickBooks Online Foundations
Vendor Center
Add Vendor
Click New Vendor
Enter the Company name and other details you have on file. The Company name, Vendor
display name and Name to print on checks can be different. The display name can be
unique to manage your vendor list. The Company name will appear on expense forms.
152

QuickBooks Online Foundations
Vendor Center
Next, add Address Information. You can click the Map link for directions to this vendor
location. Use the Notes and Attachment features to keep important information or
agreements for this vendor. This information is for internal purposes and will not be seen by
the vendor.
153

QuickBooks Online Foundations
Vendor Center
You can use the information provided by vendors who provide a service and complete a W9
form to enter the Business ID No. Check the Track payments for 1099 box for all vendors
for which you are required to file 1099s. The Expense rates field is a default rate you use to
invoice customers for expenses incurred while providing a service. Payment Terms auto-
populate when you select a default term here. Add a vendor Account no. for reference
purposes.
Adding a Default expense category from your Chart of Accounts list here will help save
time as it auto-populates on expense forms. This is especially helpful when new users are
learning how to categorize transactions.
154

QuickBooks Online Foundations
Vendor Center
Click on a Vendor from the list in the Vendor Center.
Use the bar/arrow to Search by name or company.
Sort by name or Open balance.
Collapse the list by clicking the bar/arrow icon.
Click the symbol icon to add a new Vendor.
Each Vendor has Transaction List and Vendor Details tabs containing transaction history
and Vendor information, respectively. You can choose to print or export transaction history
to Excel.
Select Transactions, then click the drop-down arrow for Batch actions to print or
recategorize transactions. Click the drop-down arrow for Filter to sort by Type and Date.
Click the Gear to select columns to display. Note: Display options change as you turn on/off
features in Account and Settings.
155

QuickBooks Online Foundations
Vendor Center
Edit Vendor
Click on the Vendor in the Vendor Center that you wish to edit. Click the Edit button to
open the Vendor information window.
Make Inactive
Select from the Action column in the Vendor Center to
make a Vendor inactive or edit the Vendor and click the
Make Inactive button.
Merge Vendors
Edit the Vendor you intend to keep, copy (Ctrl + C) the Vendor Name, and then click cancel.
Edit the Vendor you intend to merge and paste (Ctrl + V) to replace the Vendor Name with
the correct name. Click Save.
A Please Confirm warning box will appear; click Yes to confirm. The old Vendor will be
removed from the list and remain in an inactive status. Note: The merge process cannot be
undone.
156

QuickBooks Online Foundations
Contractors
Add Contractor
It’s crunch time and we realize we are missing Contractor information to process 1099s.
You can invite Contractors via email. The Contractor will be prompted to input the required
information.
Click Payroll in the left navigation bar. Click Contractors -> Add a contractor.
Enter Name and Email to send Contractor invite to complete their profile. This will setup an
account to safely share their personal information. Use the Contractor Center to write a
check, create an expense or bill, and prepare 1099s.
Click the vendor's name to view more details, payments and documents.
Click the down-arrow in the Active button to inactivate a vendor.
157

QuickBooks Online Foundations
1099s
Many business owners are unaware of their responsibility to file 1099 forms with the
Internal Revenue Service each year. If you pay an individual or business $600 or more for
services rendered, you are required to file form 1099-NEC. However, you are NOT required
to file form 1099 for services rendered, when the entity is a Corporation. Form W-9 is used
to determine entity type and reporting information. It is important to supply and require
recipients to fill out form W-9. This will save you a lot of time tracking down information at
the end of each year.
If you pay rent for a building or space, you are required to file form 1099-Misc.
If you borrow money from an individual and pay interest, you are required to file form
1099-Int.
If you pay via credit card, all payments are reported on a 1099-K form.
It is important to incorporate the following best practices in your business:
• Require all individuals or businesses providing services to complete a W-9 form.
• Do not pay for services rendered until you receive a signed W-9 form.
• Add a recurring event to complete 1099 filing before January 31
st
each year.
• Keep track of all 1099 recipients in QuickBooks Online all year.
Note: You can visit www.irs.gov to learn more about the various types of 1099 reporting.
The general rule is that you must issue a Form 1099-NEC to any vendors or sub-contractors
you have paid at least $600 in rents, services, prizes and awards, or other income payments
in the course of your trade/business in a given tax year (you do not need to issue 1099s for
payments made for personal purposes).
158

QuickBooks Online Foundations
1099s
W-9 Form
Th W-9 Form requires the recipients name, address, entity type, Social Security number or
Employer Identification Number, signature and date.
159

QuickBooks Online Foundations
1099s
Next, Go to the Vendor or Contractors Center, click Prepare 1099s -> Continue your 1099s
and review your company information. You must have a Tax ID.
Click Next.
Contractor services rendered are always Box 1 of form 1099-NEC. There can be multiple
categories per box. It all depends on the categories used when posting transactions related
to recipients. Rents are reported on Box 1 of 1099-MISC. Select all categories that apply.
Click Next.
160

QuickBooks Online Foundations
1099s
Review your Contractor's info. Required information will appear in red. Edit the Vendor and
add missing information. If you notice Vendors missing from the list, click Add from Vendor
list. Click Next or Save and finish later.
Next, you will verify the totals. If the name still appears in red, add the missing information
to complete the process. Click Finish preparing 1099s or Save and finish later.
The last step is to select one of the options. If you select Automated E-File and Delivery,
Intuit will process the forms. If you choose Print & Mail, you will receive a kit in the mail
and will be responsible for filing the forms.
161

QuickBooks Online Foundations
Expenses
It is important to differentiate between Checks and Expenses. While many checks are
written for expenses, (not all checks), they are handled in a different manner than Expenses
in QBO. This makes a difference when bank transactions attempt to find a match during the
sync process in the Banking Center. Expenses are typically debits/ACH and credit card-type
transactions.
To enter expenses manually: Click the + New icon -> Expense.
Enter or verify the following information:
Vendor name, bank account, payment date, and reference number.
Enter the account, description, and amount, specify whether the expense is billable, and
assign the transaction to a customer or job.
Click Item details to enter the Product/Service you are tracking. This section is typically
used when tracking inventory-related products. Click Save and New or Save and Close.
162

QuickBooks Online Foundations
Checks
Here is where we enter checks written manually or checks to be printed. Be sure to include
the check number in the reference number field. Also, select Check instead of Expense.
This makes a difference when bank transactions attempt to find a match during the sync
process in the Banking Center.
Click the + New icon -> Check.
Enter or verify the following information:
Payee name, bank account, payment date, and check no.
Enter the account, description, and amount, specify whether the check is billable, and
assign the transaction to a customer or job.
Click Item Details to enter the Product/Service you are tracking. This section is typically
used when tracking inventory and non-inventory related products.
Click Save and New or Save and Close.
163

QuickBooks Online Foundations
Bills
Bills are an important part of Accounts Payable. We enter bills to be paid later. Use reports
to monitor due dates and budget for next bill pay day.
Click the + New icon -> Bill.
Enter or verify the following information:
Vendor name, mailing address, terms, bill date, due date, and bill no.
Enter the account and amount, specify whether the bill is billable, apply sales tax, and
assign the transaction to a customer or job.
Click Item details to enter the Product/Service you are tracking. This section is typically
used when tracking inventory-related products.
Click Save and New or Save and Close.
164

QuickBooks Online Foundations
Pay Bills
To Pay Bills
Click the + New icon -> Pay Bills -> Select the Payment account -> Select the Payment date.
Select the bills you want to pay. If you need to make a partial payment, simply change the
amount in the Payment column. Click the drop-down arrow to change the Filter criteria or
click the Gear icon to change the number of rows being displayed.
If you are paying with a handwritten check, uncheck Print later and click Pay Bills. If you are
printing a check, select Print later. Click Save and Print or Save and Close. After you select
Save and Print, the Print Checks Setup window will appear. Simply follow the steps.
165

QuickBooks Online Foundations
Bill Pay for QuickBooks Online
The Bill Pay feature in QuickBooks Online is designed to streamline your payment process,
thus sending more to the bottom line. Systemizing Accounts Payable can reduce costs
significantly and drastically reduce the time it takes to manage the process.
Key benefits:
• Track payment status such as estimated delivery times and remittance information.
Paying by check? Receive visual proof once it's been deposited.
• Pay your Vendors and Contractors, international and domestic, with the same
process. Pay one bill at a time, or several at once. Enter payment amount, choose
your process date, and click submit - that's it.
• Bills and invoices sync automatically with QuickBooks Online, reducing double data
entry and speeding up account reconciliation.
How it works with QuickBooks
Bill Pay integrates with QuickBooks Online Essentials, Plus, and Advanced, so you can pay,
track, and manage bills right inside the software.
Review Video Links
Bill Pay for QuickBooks Online
166

QuickBooks Online Foundations
Vendor Credits
On occasion, you will receive a credit from a vendor for returned merchandise or due to an
error in billing.
Click the + New icon -> Vendor Credit.
Enter the following information:
Select a Vendor, payment date, ref no., account, amount, billable, tax, and customer or job.
Enter the expense in the Account field or click the Item Details if you are tracking inventory
products. Click Save and Close.
167

QuickBooks Online Foundations
Apply Vendor Credits
Tracking and applying Vendor credits has a positive impact on Cash Flow.
Click the + New icon -> Click Pay Bills -> Select the Payment account and Payment date.
Select the Vendor you wish to pay, and the credit will appear in the Credit Applied column.
You can pay the balance or adjust the amount in the Payment column.
Vendor Credits are automatically applied to the oldest bill when the setting is turned on.
We have turned off the automatically apply credits feature for this training.
168

QuickBooks Online Foundations
Accounts Payable (A/P) Reports
There are several reports to support Accounts Payable. Let’s explore the options and then
determine which reports are best for your company.
Click Reports in the Left Navigation Bar.
Click Standard.
Scroll to What you owe.
Accounts Payable Aging Summary – provides a summary view of balances we owe Vendors
or suppliers.
Accounts Payable Aging Detail – provides a detailed view of outstanding bills we owe
Vendors or suppliers.
Unpaid Bills –used to verify outstanding bills by Vendor and helps bookkeepers clean up
incorrect transactions.
Expenses by Vendor Summary – provides a total per Vendor for a date range.
169

QuickBooks Online Foundations
Section 8 Doable Action Steps
If you do not need this feature skip this section. Otherwise follow the steps.
1. Review Video Links – Ctrl + Left Click
How to Record Spending Overview
How to Manage Your Vendor List: Adding, Editing & Removing
How to Record Spending: Transactions, Bills & Payments
How to manage bills with QuickBooks Online
How to Setup a Contractor
2. Provide service vendors a W-9 and enter 1099 tracking information.
Navigate to the Vendor Center and edit the Vendor.
Add Business ID -> Select Track payments for 1099.
3. Determine if you will use the Bill Pay app or manually enter and pay bills.
170

171
SECTION 9
ACCOUNTS RECEIVABLE
Goals
Customer Center
Sales Receipts
Invoices
Receive Payments
QuickBooks Payments
Bank Deposits
Credit Memos
Apply Credits
Refund Receipts
Sales and A/R Reports
Statements
Doable Action Steps
Online Foundations Training

QuickBooks Online Foundations
Section 9 Goals
Upon completion of Section 9 each participant will be familiar with:
• An overview of Accounts Receivable.
• How to correctly use Customer and Accounts Receivable-related accounts and settings.
• How to use the Customer Center.
• How and when to use a Sales Receipt versus an Invoice.
• How to Receive Payments and Record Deposits.
• How to view and save Sales and Accounts Receivable-related reports.
Chris was constantly chasing down payments from customers and had difficulty keeping track of
balances owed. She was worried about her cash flow situation and whether there would be
enough money to pay bills. Craig’s Landscaping had billed more than enough to cover all
expenses, however needed a way to speed up the payment process.
Let’s help Chris incorporate a new Accounts Receivable policy; one that includes emailing all
invoices with a Pay Now link to speed up the payment process and improve customer balance
tracking. Once a payment has been made from the link, the payment will auto post to the invoice
reducing the amount of time spent on bookkeeping. Also, let’s help Chris set up an automated
process for recurring billing to invoice her weekly maintenance contracts.
Now that Chris understands how to use reports as a management tool, let’s show her the proper
way to record daily transactions in the business, starting with Accounts Receivable. To do this, she
must become familiar with the Customer Center, and how-to setup Customers in the system.
Chris has also asked for clarification on when to use an Invoice versus a Sales Receipt and does
not understand the difference between the two. We will cover this topic in detail and provide
clear instruction on how to record payments received as well as bank deposits.
172

QuickBooks Online Foundations
More About Accounts Receivable
In the Accounts Receivable section, we discuss the importance of managing open invoices,
money owed to you by your customers. You might be surprised by how costly this process
can be if an efficient system is not in place. The affect on cash flow can be profound.
Wow!
According to the Harvard Business Review, here is an average of what receivables cost a
company. This does not include the probability of collection, which falls drastically the
further out an unpaid bill is allowed to go.
30 days – 1.82%
60 days – 9.20%
90 days – 17.74%
120 days – 26.71%
Did you know?
By reducing Average Time to Payment by just one day, a typical company with an average
15-18% receivable doing:
• 250K in annual sales, would add $700.00 per one day decrease in average time to
payment to their cash flow.
• 500K in annual sales, would add $1400.00 per one day decrease in average time to
payment to their cash flow.
• 1M in annual sales, would add $2800 per one day decrease in average time to
payment to their cash flow.
173

QuickBooks Online Foundations
Customer Center
The Customer Center includes options for maintaining Customer lists, adding invoices,
receiving payments, and viewing transactions related to your Customers.
From the left navigation bar click Invoicing -> Customers to access the Customer Center.
Click the Invoices tab to view and manage invoices. Click the drop-down arrow to select
from a list of options, such as Send Reminders, Create Statements, Invoices, Sales
Receipts, and Estimates.
Use Batch Actions to create statements or email several invoices at one time. The search
field is a quick way to find a customer.
Click the Gear icon to edit the way columns are displayed.
Note: You can manage Sales, Products and Services and
more, from the Sales Center.
174

QuickBooks Online Foundations
Customer Center
Add Customer
From the customer center click New Customer.
Enter Customer and Display Name (the way you would like the name displayed in the
Customer list). Add address and contact information.
175

QuickBooks Online Foundations
Customer Center
Next, add Address Information. You can click the Map link for directions to this customer
location.
Use the Notes and Attachment features to keep important information or agreements for
this customer. This information is for internal purposes and will not be seen by the
customer.
The Attachments tab allows you to drag and drop attachments specific to a Customer.
176

QuickBooks Online Foundations
Customer Center
The Additional info tab is where you can assign a Customer type to track specific
information. Create the Customer types list first. Click Customer types from the Customer
Center. Manage default sales tax codes for this customer and add beginning balances.
177

QuickBooks Online Foundations
Customer Center
Once you click on a Customer from the list you have the option to Filter by name or details.
Sort by name or open balance.
Collapse the list by clicking the bar/arrow icon.
Click the symbol to add a new Customer.
Each Customer has a Transaction List and a Customer Details tab where you can view
transaction history and Customer information. Track Late Fees per Customer or send
transactions and reminders using the Batch Actions options. You can print, export to Excel,
or use the Gear icon to change the way the information is displayed on the screen.
178

QuickBooks Online Foundations
Customer Center
Edit Customer
Editing Customer information is important to ensure all sales receipts and invoices are sent
to the correct location or email address.
From the Customer Center, click on the Customer's name you wish to edit. Click the Edit
button to open the Customer information window to add or make changes. You can make a
Customer inactive or copy the display name to merge with another Customer.
Click Save when done.
179
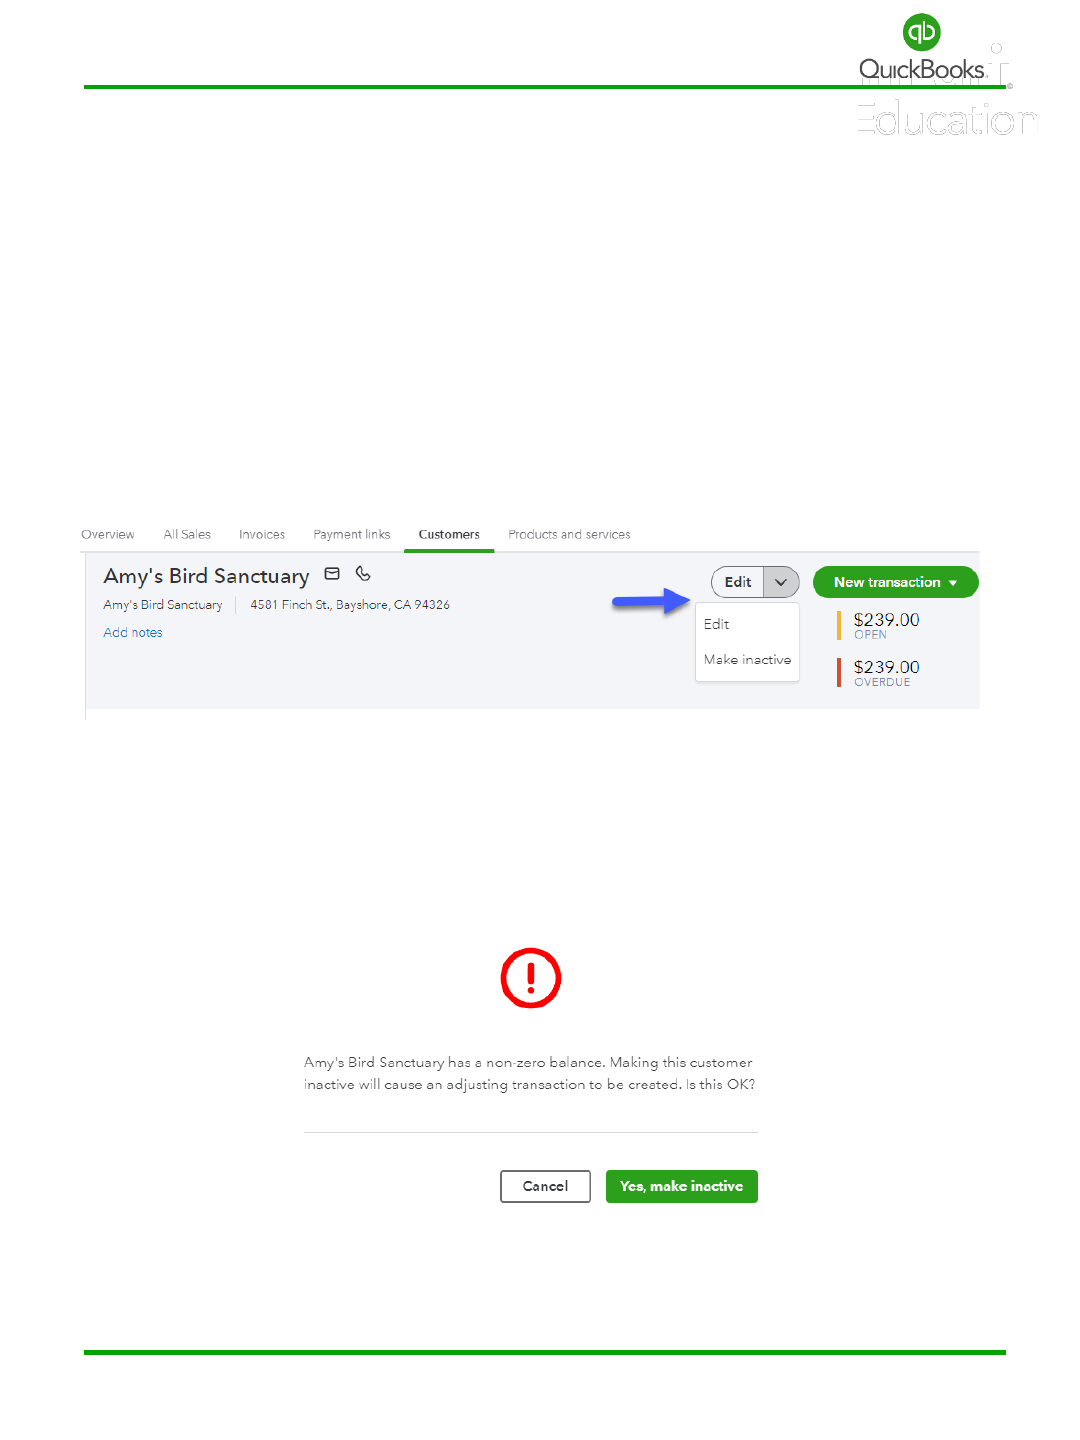
QuickBooks Online Foundations
Customer Center
Make Inactive
Making a Customer inactive does not remove them from the system. You will have the
option to view inactive Customers in the Customer Center. Maintaining your Customer list
is very useful and cuts down on time searching for Customers while entering transactions.
From the Customer Center click the Customer you would like to make inactive.
Click the drop-down arrow next to Edit. Click the Make Inactive.
Note: A warning message will appear if there is an outstanding balance for a Customer you
are trying to inactivate. An adjusting transaction will be created if you click Yes.
180

QuickBooks Online Foundations
Customer Center
Merge Customers
Merging Customers is useful when there are duplicate names in the Customer list.
From the Customer Center, click the Customer you intend to keep.
Click Edit and copy (Ctrl + C) the Customer display name; then click cancel.
Click on the Customer you intend to merge.
Click Edit and paste (Ctrl + V) to replace the Customer display name with the correct name.
Click Save.
A Please Confirm warning box will appear; click Yes to confirm. The old Customer will be
removed from the list and remain in an inactive status.
Note: The merge process cannot be undone.
181

QuickBooks Online Foundations
Sales Receipts
A Sales Receipt is used when a Customer pays you on the spot for goods or services and
you need to record the sale after the fact.
Click the + New icon -> Sales Receipt under the Customers menu.
It is important to understand the difference between the Sales Receipt and Invoice process.
Processing a Sales Receipt requires two steps. 1) Create Sales Receipt using Undeposited
Funds for the Deposit to category. 2) Bank Deposit.
Undeposited Funds is a holding account that allows you to receive Sales Receipts or
payments against invoices. This allows you to group payments from multiple Customers
into one deposit in order to match the deposit sent to the bank.
182

QuickBooks Online Foundations
Sales Receipts
The middle section of a Sales Receipt requires the Items we are selling. This is where your
Products and Services or Items list comes into play. This allows us to track sales by Item to
determine our top selling Product or Service.
The last section of a Sales Receipt records sales tax, discounts and tips. You can switch the
order of the sales tax and discounts, so the discount is taken prior to the sales tax
calculation.
183

QuickBooks Online Foundations
Bank Deposits
Creating bank deposits is a very important step that follows the Sales Receipt or receive
payment process and is often overlooked. This can lead to a compounding issue with
Undeposited Funds and can be costly to clean up.
Click the + New icon -> Bank Deposit.
It is very important to select the correct bank account for each deposit. Some businesses
have multiple accounts. Make sure that the total amount of selected individual payments
in Undeposited Funds matches the total amount deposited at the bank. Checks and cash
might be grouped together, whereas credit card payments are deposited based on the
batch transferred to the bank. For this example, we deposited online Customer sales for
both locations.
184

QuickBooks Online Foundations
Invoices
An Invoice is used when a customer agrees to pay you later. Terms are set up to determine
how long the customer has before payment is due. If they do not pay within a specified
time, the Invoice is considered overdue.
An Invoice requires three-steps. 1) Create invoice. 2) Receive payment to undeposited
funds. 3) Bank Deposit. Click the + New icon -> Invoice.
Enter the following information:
Customer name, email, invoice date, terms, invoice date and verify the location
information.
Many business owners end up with duplicate transactions and unnecessary cleanup when
they do not complete the steps in the proper order, or when they post payments directly to
the bank account instead of Undeposited Funds.
185

QuickBooks Online Foundations
Invoices
The next section of an invoice is all about the Products or Services you are selling the
Customer. In this example, we used the catering service bundle to collect the up-front
setup, equipment rental and delivery fee.
The last section of a Sales Receipt records sales tax, discounts and tips. You can switch the
order of the sales tax and discounts, so the discount is taken prior to the sales tax
calculation.
186

QuickBooks Online Foundations
Receive Payments
Receiving full or partial payments against open invoices is part of the Account’s Receivable
management process. Having accurate Customer balances is key to avoiding messy cleanup
and cash flow issues.
Note: Always apply the amount received to the appropriate Invoice. This will ensure that
the Invoice is closed out properly. If a partial payment is received, then a balance will
remain on your Accounts Receivable Aging report for that Customer.
If you use Square or PayPal, merchant fees are deducted for each transaction. Other
merchant services will deduct their fees at the end of the month. Not to worry! Merchant
fees will be addressed in the Bank Deposit process.
Undeposited Funds is simply an asset account that acts like a clearing account. When
payments are posted to Undeposited Funds, they sit in this account until a deposit is made
to offset the balance.
When a payment is received, Undeposited Funds is debited, and Accounts Receivable is
credited. When a deposit is made, the bank account is debited, and Undeposited Funds is
credited. Undeposited Funds should ultimately have a zero balance.
Select Undeposited Funds for the Deposit To box.
This will allow you to group cash, checks, and credit card payments to match the deposit
sent to the bank. It is very important to match deposits in QuickBooks to the deposits
posted at your bank. This will help to create a more efficient reconciliation process.
187

QuickBooks Online Foundations
Receive Payments
Click the + New icon -> Receive Payment.
Enter the following information:
Customer name, date, method, reference, and deposit account.
Select Invoices and verify the total received.
Verify the Invoices selected; match the payment stub or backup.
Notice the Find by invoice no. and Filter feature.
Click Save and Close or Save and New.
188

QuickBooks Online Foundations
QuickBooks Payments
There are several options to help receive payments faster through automation.
QuickBooks Payments is one of those options and is designed to speed up the Accounts
Receivable cycle and improve cash flow.
The payment systems allows Customers to pay directly from an invoice by credit card, debit
card, ACH or eCheck, by clicking a link embedded in the invoice. No more waiting on a
check in the mail.
QuickBooks Payments also allows you to get paid on the go by accepting debit or credit
cards on your phone. In addition, QuickBooks Payments makes it easy to set recurring
invoices to be automatically sent and paid.
189

QuickBooks Online Foundations
Credit Memos
Credit Memos are used to clear out uncollectible Invoices and to clean up odd transactions
in Accounts Receivable. Use the Open Invoice report to help keep A/R accurate.
Click the + New icon -> Credit Memo.
Review the Invoice you are trying to clear out in order to create an accurate Credit Memo.
Enter the following information:
Customer, date, and product or service being credited. Verify the amount.
Click the Print or Preview link if you want to print the Credit Memo to deliver it manually to
the customer or Save and Send if you want it emailed to the customer.
Note: The credit will now appear in the customer’s account balance.
190

QuickBooks Online Foundations
Apply Credits
Applying existing Credits to open Invoices can be accomplished by receiving a zero payment
and selecting both the Invoice and Credit. Another method is clicking Account and Settings
-> Advanced Settings -> Automation -> Automatically Apply Credits. This method will
automatically apply Credits to the oldest open Invoice.
Click the + New icon -> Receive Payment. Enter the following Information:
Customer and date. Check off both the Invoice and Credit Memo and verify that the total
payment received is zero.
Note: Verify the customer balance is correct and review an Open Invoice report to confirm
there are no errors, outstanding Invoices, or Credit Memos.
191

QuickBooks Online Foundations
Refund Receipts
There may be a time when you need to refund a customer. Using Refund Receipt is the best
method.
Click the + New icon -> Refund Receipt.
Enter the following information:
Customer, date, payment method, refund from, product/service, etc. Once you choose the
bank account you can check the Print Later or Print or Preview link at the bottom of the
screen. Click Save and Close or Save and Send.
192

QuickBooks Online Foundations
Sales and (A/R) Reports
Accounts Receivable Reports
Let’s look at reports related to Accounts Receivable.
Click Reports in the Left Navigation Bar Menu -> Standard.
Scroll to Who owes you -> select Accounts receivable aging detail.
Recommended Reports are as follows:
Accounts Receivable Aging Summary informs us of the outstanding total balances for our
Customers.
Accounts Receivable Aging Detail provides us with a more in-depth view of the
outstanding balances for our Customers and whether they are current or past due.
Remember, the number of days it takes to collect a payment has a direct effect on cash
flow. The older the Invoices become, the more costly the collection process becomes.
The Open Invoice report provides open Invoice detail for each Customer. This is a great tool
to help clean up your Accounts Receivable.
193

QuickBooks Online Foundations
Sales and (A/R) Reports
Next, we will locate and save a few sales reports as favorites. The Sales by Customer
Summary report helps us identify our top Customers.
Sales Reports
Let’s look at reports related to Sales.
Click Reports in the Left Navigation Bar -> Standard.
Scroll to Sales and Customers Section -> Sales by Customer Summary.
Sales by Customer Summary: Identifies the top 20% of our Customers that bring in 80% of
our revenue.
Sales by Product/Service Summary provides a historical glimpse of the best-selling
products and services for a specific date range. This report includes Quantity, Amount, % of
Sales and Avg. Price, Cost of Goods Sold (COGS), and Gross Margin.
Click Reports in the Left Navigation Bar -> Standard.
Scroll to Sales and Customers -> select Sales by Product/Service Summary.
Note: Customize these reports by changing the sort option to “Total in descending order.”
194

QuickBooks Online Foundations
Statements
Statements are typically sent to Customers with outstanding Invoices. This process should
be part of your Accounts Receivable and Collections policy. There are two ways to populate
Statements. The first option is as follows:
Click the + New icon.
Click Statement from the “Other” list.
This is a basic Statement that will populate
for all Customers.
A Balance Forward Statement shows all activity between your start and end dates, plus
the balance from the prior period.
An Open Item Statement shows only items for the last 365 days that have not yet been
paid.
A Transaction Statement shows each transaction and the total amount billed and received
for the period, instead of a running balance. This option is especially useful for Year-End
Contribution Statements that nonprofits send out.
Use the Statement Management section to select Customers, edit the delivery method,
and preview Statements before they are sent.
195

QuickBooks Online Foundations
Statements
In the following screens:
Select Statement Type and Statement Date.
Select Customer Balance Status.
Set Start and End Dates.
Next, select the Recipients you would like to send Statements to. You can change email
addresses on the fly.
The second option for populating Statements is more specific to Customers with
outstanding balances.
Click Invoicing -> Customers.
Select the Customers you want to receive a Statement.
Click Batch actions -> Create Statements.
196

QuickBooks Online Foundations
Section 9 Doable Action Steps
If you do not need to use the Accounts Receivable features, skip this section. Otherwise
follow the steps.
1. Review Video Links – Ctrl + Left Click
How to Add, Edit & Manage Your Customers List
Invoices vs sales receipts: which to use when
How to Record a Sales Receipt
How to Send Estimates, Quotes, & Proposals
How to Convert an Estimate Into an Invoice
How to create a customer invoice
How to Create an Invoice: Billable Time & Expenses
How to Record an Invoice Payment (using Undeposited Funds)
How to record a bank deposit (using undeposited funds)
How to Track What Customers Owe You: Accounts Receivables & More
How to Record Customer Credit: Credit Memos & Balances
How to Refund Customers: Refund Receipts
Track What You've Sold: Products & Services
2. Review and save the following reports:
Accounts Receivable Aging Summary
Accounts Receivable Aging Detail
Open Invoices
Sales by Customer Summary
Sales by Product/Service Summary
197

198
APPENDIX A
ADDITIONAL FEATURES
Attachments
Mileage
Import from Desktop
Online Foundations Training

QuickBooks Online Foundations
Attachments
This feature allows you to drag and drop files directly into the Attachment Center, where
you can manage documents and create transactions.
Click the Gear icon. Click Attachments under Lists.
Select the Attachment paperclip or use the drag and drop feature to import files.
Click Go to My Accountant to locate shared documents.
Click the drop-down arrow for Batch actions to export documents or create a batch of
Invoices or Expenses. Click the drop-down arrow in the Action column to edit, delete, or
create an Invoice or Expense for a single file. Click the Gear icon to change the way columns
and rows are displayed.
199

QuickBooks Online Foundations
Mileage
Tracking mileage is a necessary task for many business owners. You can manually track your
mileage from within the company file or use the mobile app. Be sure to check with your tax
professional to keep up with proper methods for tax purposes.
Within the company file:
Click Mileage from the Left Navigation Bar. Choose QR option OR add trip manually.
Mileage can be tracked for business or personal, and the history will be kept for years.
Click the Add trip button to Download trips, Import trips and Manage vehicles.
200

QuickBooks Online Foundations
Import Data from Desktop
Business owners transitioning from the QuickBooks Desktop version to QuickBooks Online,
will be interested in this important Import feature. Learn how-to set up a new company
when converting from the Desktop version of QuickBooks Online by reviewing the
information below:
Click Gear Icon -> Import desktop data.
Click See how it works, watch the video and follow the instructions.
201

202
APPENDIX B
GLOSSARY OF TERMS
KEYBOARD SHORTCUTS
Online Foundations Training

QuickBooks Online Foundations
Glossary of Terms
Accounts Receivable - Accounts receivable (AR) is the balance of money owed to you for
goods received or services delivered but not yet paid by customers.
Accounts Payable - Accounts payable are amounts due to vendors or suppliers for goods or
services received that you have not yet paid for.
Assets – An asset is anything of value that can be converted into cash.
Fixed Asset - A fixed asset is a long-term tangible piece of property or equipment that a
firm owns and uses in its operations to generate income. Fixed assets are not expected to
be consumed or converted into cash within a year.
Liabilities – Your company debt. What you owe.
Equity - The net worth of a company. This is the difference between what you owe
(liabilities) and what you own (assets).
Balance Sheet - A financial statement of assets, liabilities, and capital; the report details the
balance of income and expenditure over a specified period.
Profit & Loss - A financial statement that summarizes the revenues, costs, and expenses
incurred during a specified period, usually a fiscal quarter or year.
Statement of Cash Flow - A financial statement that provides aggregate data regarding all
cash inflows a company receives from its ongoing operations and external investment
sources.
Cash Flow Projection - A cash flow projection shows the amount of money expected to
come into a business minus money expected to go out over a determined amount of time.
Cash flow - Cash flow is the net amount of cash and cash-equivalents being transferred into
and out of a business.
203

QuickBooks Online Foundations
Glossary of Terms
Cost Analysis – The goal of Cost Analysis is to determine the true cost of the products or
services you are offering.
Expenses – A resource or service you spend money on in order to generate revenue
(wages, computers, etc.).
Direct Cost – A cost that can be directly tied to the production of specific goods or services.
Indirect Cost – A cost that is not directly related to a cost object (such as a specific project,
facility, function or product).
Overhead - Ongoing business expenses not directly attributed to creating a product or
service.
Breakeven - The level of production at which the costs of production equal the revenues for
a product or service.
Variable Costs - A variable cost is an expense that changes in proportion with production
output.
Fixed Costs – A cost that does not change with an increase or decrease in the amount of
goods or services produced or sold.
Inventory – Products you purchase and currently stock to resell or products in stock you
produce from raw goods to sell.
204

QuickBooks Online Foundations
Glossary of Terms
Revenue, Sales, Income - Revenue is the income a company generates before any expenses
are subtracted from the calculation. Sales are the proceeds a company generates from
selling goods or services to its customers. Income is a company's total earnings or profit.
Cost of Goods Sold - An account for costs directly related to producing a service or product
for sale.
Chart of Accounts - An organizational tool that provides a digestible breakdown of all the
financial transactions that a company conducted during a specific accounting period,
broken down into subcategories.
Gross Payroll vs Net Payroll - Gross payroll refers to the total amount of money the
company pays out for its employees during a pay period. Net payroll refers to the money
that employees receive from the company after it deducts the required withholdings.
Gross Profit Margin - Gross profit margin is the proportion of money left over from
revenues after accounting for the cost of goods sold (COGS).
Net Profit Margin - Net profit margin is the percentage of profit generated from revenue
after accounting for all expenses, costs, and cash flow items.
Contribution Margin – Determines how much revenue can be used to contribute to fixed
costs and profit.
Cash vs Accrual Basis – Cash basis accounts for the costs and sales where payments have
already changed hands. Accrual includes AP, and AR where services and goods have been
provided, but have not yet been paid for.
205

QuickBooks Online Foundations
Keyboard Shortcuts
From the Dashboard use [Ctrl]+[Alt]+[?] to show Keyboard Reference while logged into
QuickBooks®
Regular Pages
Ctrl + Alt + i Invoice
Ctrl + Alt + w Check
Ctrl + Alt + e Estimate
Ctrl + Alt + x Expense
Ctrl + Alt + r Receive payment
Ctrl + Alt + c Customers
Ctrl + Alt + v Vendors
Ctrl + Alt + a Chart of accounts
Ctrl + Alt + l Lists
Ctrl + Alt + h Help
Ctrl + Alt + f Search transactions
Transaction Pages
Ctrl + Alt + x Exit transaction view Ctrl + Alt + c Cancel
Ctrl + Alt + s Save and new Ctrl + Alt + d Save and close
Ctrl + Alt + m Save and send (think of it as “send as message”)
Ctrl + p Print
206

207
APPENDIX C
RESOURCES
Debits & Credits
Quick Accounting Review
Online Foundations Training

QuickBooks Online Foundations
Debits & Credits
208

QuickBooks Online Foundations
Quick Accounting Review
209
ASSETS
(what you own
—things of
commercial value)
=
Liabilities
(what you owe others)
+
Equity
(what your business is currently
worth; in other words, your assets
minus liabilities)
•
Bank accounts
•
Accounts payable
(unpaid bills)
•
Assets left over after paying
all liabilities
•
Petty cash
•
Loans
•
Owner investment
•
Fixed assets
(equipment,
computers, trucks,
etc.)
•
Credit cards
•
Owner draws
•
Inventory
•
Taxes
(income tax, sales
tax, payroll tax
owed to the
government, etc.)
•
Stock
• Cash & checks on hand
(not yet deposited in
the bank)
•
Line of credit
balance
•
Retained earnings
•
Accounts receivable
(what others owe
you that you have
not yet collected)
•
Accrued wages
(compensation
earned but not
yet paid to
employees)
As you can see, revenue
increases equity and expenses
decrease equity.

QuickBooks Online Foundations
Thank you for participating!
Thank you for including us on your journey to entrepreneurial success! We hope this
training has been helpful and shed light on important building blocks necessary to
develop a solid financial foundation. Our mission is to provide the support you need
throughout every phase of growth.
Small business is the mainstay of the U.S. economy, and the health of your business
is important to the well-being of our nation.
Do not hesitate to reach out for additional help and advice from your Instructor,
Advisor or Accountant.
Here’s to a prosperous future!
210
