


Navigation
Panels
There is a retractable panel at the bottom of the workspace that contains the Markups
list. To hide or reveal this panel, tap its nub . When in landscape mode, there is also
a panel to the left that contains either the Tab Access tabs, File Access, or the Studio
panel where you can join either a Studio Session or Studio Project. To hide or reveal this
panel, tap its nub .
Command Bar
Tap any icon on the Command bar to access frequently used tools in Revu iPad. Each
tool is described below:
Tab Access: Use to access one of Revu iPad's tabs (which are described
below).
Create New: Use to start a new PDF.
File Access: Use to open a PDF. Go here to learn more about File Access.
Document Manager: Use to access a Studio Project or a file from a cloud
account like Dropbox, Box, ShareFile or WebDAV.

Send To: Use to email, flatten, print or save the current file to your iPad.
Studio: Use to access Studio Sessions or Studio Projects.
Page Indicator: Shows the current location in the PDF. Flip through pages in a
document by swiping across the screen or by tapping or .
Page View Navigator: Move between page views by tapping or .
Markups and Field Verification: Opens the Markups toolbar to the right of
the screen. is a shortcut to the measurement tools.
Preferences: Use to access release notes and configuration tools for Revu
iPad. Go here to learn more about Preferences.
Tab Access
The following tabs are found under Tab Access:
Tool Chest - Go here to learn more about the Tool Chest.
Thumbnails - Tap a thumbnail to jump straight to that page. From here you can
also:
l
Grab two corners of a thumbnail with your thumb and finger and give it a
twist to rotate a page.
l
Tap and hold a thumbnail to rearrange pages.
l
Tap

to insert a page above the currently selected thumbnail or tap to insert
a page below it.
l
Tap a thumbnail and tap to delete the page.
l
Tap to enter Multi-page mode. Tap multiple thumbnails to perform any of
the above actions on several pages at once. Additionally, while in this mode
you can:
l
Tap and hold any of the selected thumbnails and tap Extract and
Email to extract the pages into a single file and attach them to an email.
Note that you can use this function on a single page, but it is only
available when in Multi-page mode.
l
Tap and hold any of the selected thumbnails and tap Deselect All to
deselect all thumbnails.
l
Tap again to turn off Multi-page mode.
Bookmarks - Tap any bookmark to jump to a page, snapshot view or website.
From here you can also:
l
Tap to add a new bookmark. The page you want to add a bookmark to must
be the active page in the workspace.
l
Tap a bookmark and tap to delete it. The page you want to delete a bookmark
from must be the active page in the workspace.
l
Double-tap a bookmark to rename it.


Document Manager
The Document Manager is where you connect your iPad to Studio Projects or cloud
accounts and sync files. Once files are synced to your iPad, use the Document Manager
to manage the local versions.
Adding a Cloud Account
Syncing Files
Icons in the Document Manager
Edit Mode in the Document Manager

Adding a Cloud Account
To add a Studio Project or a cloud account like Dropbox, Box, ShareFile or WebDAV to
Revu iPad:
1.
Tap . Tap to get to the Home screen if necessary.
2.
Tap Add Account and choose the type of cloud account to add.
3.
When adding a Studio Project, you can enter the Project ID directly or tap Existing
Projects to call up a list of Projects in which you are currently active and choose one
of them. Tap Join to add the account.
4.
When adding another service, enter your login information as required by the
service. Tap Login to launch the login page for the service.
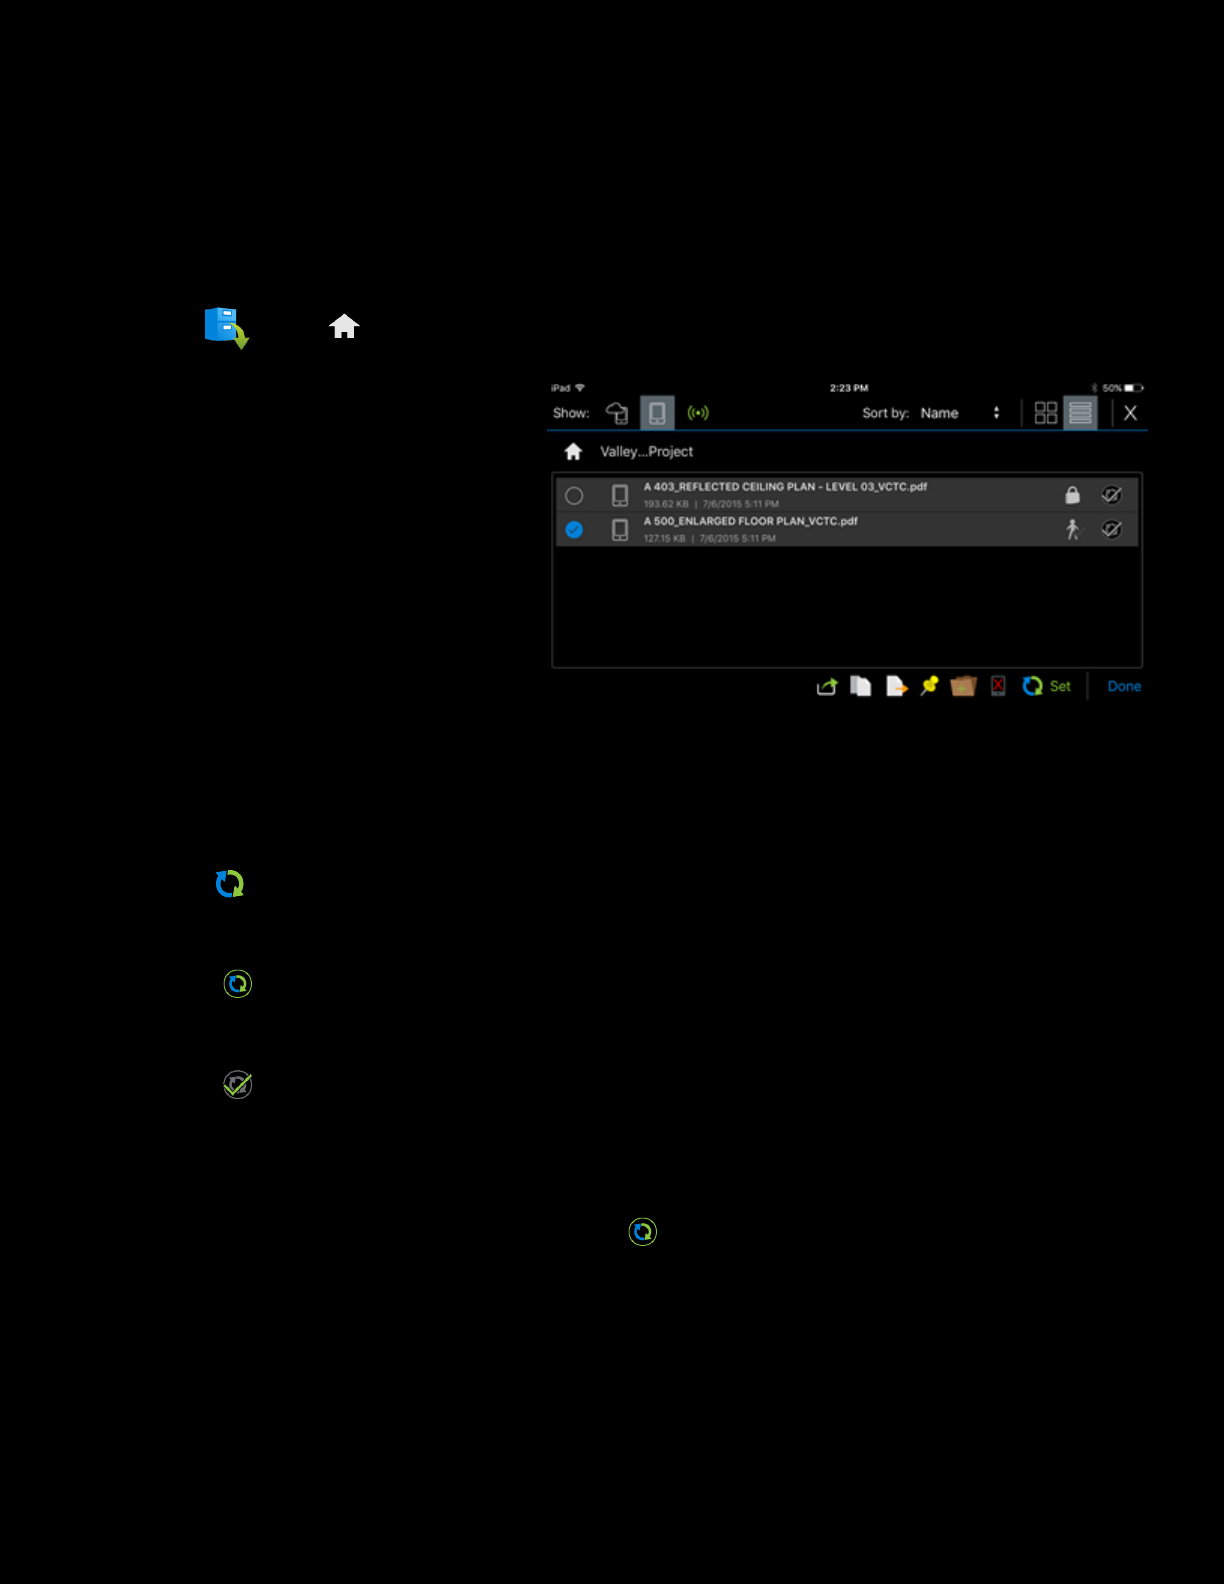
Syncing Files
Once you have your Studio Project or cloud account set up in Revu iPad, you will want to
sync your files:
1.
Tap . Tap to get to the Home screen if necessary.
2.
Choose a Project or cloud
account.
3.
Tap Edit. The Edit toolbar
appears and selection buttons
appear beside the current
documents.
4.
Tap the selector button beside the documents you wish to sync. Anything with a
checked circle will be set for syncing.
5.
Tap Set, then tap Done. Sync icons will appear for each document selected.
l
Indicates that the document is out of date and ready to be synced.
l
Indicates that the document is up to date and does not need to be synced.
6.
To sync all documents shown as being out of date, tap Sync. To sync individual out-
of-date documents, tap their respective icons.
While files are being synced, you can navigate away from the Document Manager and
perform other tasks. If you attempt to access a document that is in the sync queue, it will
automatically take priority and be synced first.

Revu iPad will remember your selections the next time you open the Studio Project or
cloud account, making future syncs even simpler.
Icons in the DocumentManager
The following icons appear at the top of the Document Manager when you're viewing
a Studio Project or cloud account:
Tap to view all PDFs available to the device, whether saved locally
or in the cloud.
Tap to view only PDFs saved locally to the device.
Tap to go into Offline mode. This simulates the loss of an Internet
connection for both the Document Manager and Studio Projects
and Sessions. When in this mode, the icon changes to . Tap
again to go back to Online mode.
Tap to go directly to the Document Manager's Home screen.
Tap to turn on Thumbnail view.
Tap to turn on List view.
Tap to close the Document Manager.
Documents in the Document Manager are accompanied by different icons to indicate
various statuses, including:

Indicates a local file that has been synced with your device.
Indicates a remote file that is available on the server, but has not
been downloaded to your device.

Edit Mode in the Document Manager
Edit Mode in the Document Manager gives you access to a few specialized actions. To
use the Document Manager's Edit Mode:
1.
Tap .
2.
Tap the Documents folder, a Studio Project, or a cloud account to view the
documents within.
3.
Tap Edit. The Edit toolbar appears and selection buttons appear beside the current
documents. Tap the selection button beside a document to edit it. The following
actions are available:
Opens an email message with the selected documents attached.
Copies the selected documents to a new folder. Navigate to an
existing folder or create a new one.
Moves the selected documents to a new folder. Navigate to an
existing folder or create a new one.
Pins the selected documents. Select an existing category or add a
new one.
Creates a new folder in the current location.
Removes the selected documents from the device. This action
does not delete the documents from their cloud accounts.

File Access
Revu iPad's File Access gives you easy access to recently opened files and folders. You
can also sync files from here, as well as organize PDFs and folders in custom categories.
To open File Access, tap . From there, you can:
l
Tap a file to open it. PDFs are automatically opened in Revu iPad while the Open
With menu opens for other file types.
l
Tap beside any PDF in the Synced or Pending Upload categories to sync it with
the copy in the cloud account (see Syncing Files for more information).
l
Tap to open Edit Mode. From there you can:
l
Select any number of files and/or folders, then tap Pin to organize them into
categories. Either select an existing category or tap Create to create a new
one.
l
Select any number of files and/or folders, then tap Remove to remove them
from the list.
l
Removing a file or folder from Recents does not delete it from the iPad's
Documents folder if it has been saved there.
l
Removing a pinned file or folder from another category just releases the
pin.

Markups
Use the standard iPad touch commands — tap, swipe, drag and hold — to markup PDFs in
Revu iPad. Images saved to the iPad's Photo Library or a cloud account, as well as
photos and videos taken with the iPad's built-in camera, can be embedded directly in a
markup using Capture.
Placing Markups
Stamp Markups
Multi-Selecting Markups
Deleting Markups
Cutting, Copying or Setting as Default
Capture

Placing Markups
1.
Tap to open the Markups toolbar and choose the markup you want. Swipe
up or down on the toolbar to reveal more markups.
2.
Tap the place on your PDF where you want to add the markup. For some you
need to tap two points, for others you need to tap and drag. You'll get the
hang of it pretty quickly.
l
Tip: When placing a Cloud+ markup, the callout box automatically
extends from the last corner placed unless that has it landing off the
page, in which case the best available space is taken.
3.
To move a markup, tap and hold to pick it up, then slide it to the desired
position.
4.
To resize a markup, tap it to reveal its control points and use them to adjust the
markup's dimensions.
5.
You can Undo or Redo actions at any time.
6.
When you're done, Confirm or Discard your changes on the
document's tab.

Stamp Markups
Several stamps come installed with Revu iPad.
To place a stamp, tap Stamps on
the Markups toolbar and select the
desired stamp from the menu that
appears.
To import a new stamp, tap Import
Stamp from the Stamps menu
instead.
To delete a stamp, open the
Stamps menu and swipe the stamp
you want to delete to the left to reveal
the Delete button.
PDF stamps are currently supported, including those with dynamic text elements.
Stamps with JavaScript can be imported but their JavaScript components will not
function.
Multi-Selecting Markups
You can select multiple markups and perform the following actions on them as a group:
l
Delete
l
Edit Common Properties
l
Cut or Copy

Tap on the Markups toolbar and trace a shape that contains all the desired markups
to multi-select.
Deleting Markups
There are two ways to delete markups:
1.
Tap and hold a markup to bring up the context menu and tap Delete.
2.
Tap a markup and tap on the Markups toolbar.
Cutting, Copying or Setting as Default
To cut, copy or set a customized markup as the default for its type, tap and hold the
markup to bring up the context menu and tap the desired option.
Capture
Capture allows you to embed a space-saving pop-up media gallery into any markup. You
can embed photos directly from your iPad's built-in camera or add existing images from
your Photo Library or cloud service using the Capture's pop-up viewer. Videos can also
be embedded but must be taken with the iPad; videos previously taken with your iPad
and saved in your Photo Library can be added to a markup.
Adding a Photo or Video From the Camera Tool
1.
Tap to open the Markups toolbar.
2.
Tap the markup into which you wish to embed a photo or video, then tap on the

Markups toolbar.The iPad Camera tool opens.
3.
Select Photo or Video, as appropriate.
4.
Take the picture or record the video. To discard the media and take it again, tap
Retake. Otherwise, tap Use Photo or Use Video. The media is automatically
embedded in the markup and a Camera icon is displayed next to the markup.
Adding or Deleting Media With Capture's Pop-up
Viewer
1.
Tap the next to the markup to open Capture's pop-up viewer.
l
If the markup does not have a Camera icon next to it, it currently has no
embedded images or videos. In this case, tap and hold the markup to bring
up the context menu and tap Capture to open the viewer.
2.
In the viewer, you can:

l
Navigate media by swiping or tapping the current image to reveal the
navigation arrows.
l
Add saved media by tapping and selecting Add from Photo Library or Add
from Doc Manager.
l
Add new media from the Camera tool.
l
Delete media by navigating to it and tapping .
3.
To close the viewer, tap away from it.

Signature Tool
Electronic signatures can be placed anywhere on a PDF in Revu iPad. To place a
signature:
1.
Tap then the markup tool.
2.
Tap on the PDF where the signature should be placed.
l
To scale the signature to fit a specific length, tap and drag a line of the
desired length.
3.
Sign inside the Signature tool that appears.
4.
Tap to change the signature's color.
5.
Tap to change the signature's line thickness.
6.
To save the signature to the Tool Chest, tap . This will create a new tool set
called Signatures and allow the signature to be easily reused.

7.
To delete the signature and sign again, tap .
8.
To close the Signature tool without placing a signature, tap .
9.
Tap OK to place the signature.
10.
Once the signature is placed, its properties can be edited like any other markup.
Note: While
Revu iPad
allows for the placement of electronic signatures, it does not
support digital signatures. Use
Revu for the desktop
for digital signatures.


Calibrating and Taking Measurements
1.
Tap then the tab.
2.
You might need to calibrate the scale of the PDF, especially
if this is the first time you're opening it.
l
If you know the scale, you can enter it under Scale.
l
To calibrate the scale, tap Calibrate then tap and
drag between two points of a known distance on the
PDF. Tap to verify the measurement, enter the
distance measured and tap OK.
l
If your PDF turns blue when you tap Calibrate, it
has one or more viewports that are conflicting
with the calibration. Tap Clear Viewports to
remove them.
l
Set the Precision to determine the exactness of the
measurements displayed on the PDF. The ranges are
from 0.0001 to 1 or 1/32 to 1.
l
If you want to save this calibration for the page, turn on
Store Scale in Page.
3.
Tap the measurement type you want. The available tools are:
Length* Area Perimeter
Volume Radius
Count: This tool puts counters on the PDF that appear in the Markups list
as a single line item with a grand total. Double-tap when you place the
last one to stop counting.

* If you want a multi-segment linear measurement, use Perimeter.
Note: In addition to accessing these measurement types from the tab, you can
also access them from the Markups toolbar. Tap on the Command bar to jump
straight to them.
Depth
PDF drawings will have a default depth. To change this value for a specific
measurement:
1.
Tap the measurement to select it.
2.
Tap then the tab.
3.
Enter the new value in the Depth field.
4.
To confirm the new depth, minimize the keyboard . To discard it, tap anywhere
away from the keyboard.
MeasurementProperties
See Editing Properties for information about editing measurement properties.

Editing Properties
You can customize a markup or a measurement by editing its properties.
1.
Tap to open the Markups toolbar.
2.
Tap the desired markup, then tap at the bottom of the Markups toolbar to
switch to the Properties toolbar (shown at the right). Swipe up or down on
the toolbar to scroll to additional properties.
l
To edit several markups at once, tap on the Markups toolbar then
tap and drag to trace a shape that contains all the desired markups
before switching to the Properties toolbar. Only properties that the
selected markups have in common can be edited in this way.
3.
Tap a property you wish to customize and make changes on the pop-up that
appears.
4.
In addition, the following properties are available for field verification
measurements only. Tap any of them to activate:
Shows or hides an area caption for applicable
measurements.
Shows or hides all applicable measurements.
Shows or hides the centroidal location of applicable
measurements.
5.
Tap at the bottom of the Properties toolbar to switch back to the Markups
toolbar.

Tool Sets and the Tool Chest
Revu iPad's handy Tool Chest™ comes preloaded with sequence, punch, proofreading
and review tool sets. You can also save custom markups to the Tool Chest for easy
reuse, create custom tool sets, and import and export tool sets.
Managing Tool Sets
Saving Markups to the Tool Chest
Importing Tool Sets

Managing Tool Sets
1.
Tap then the tab and tap .
2.
To create a new custom tool set, tap and enter a name for the tool set, then tap
OK.
3.
To export tool sets, tap and fill in the circles of the tool sets to be exported. Tap
Export to save them to a folder or Email to send them in an email as an attachment.
4.
To delete a tool set, tap and tap next to it, then tap Delete.
5.
To rearrange the order of tool sets, tap and tap and hold a tool set and
slide it up or down in the desired order.
6.
To hide or show a tool set, tap the circle to the left of the tool set's name. Tool sets
with filled circles are shown while those with empty ones are hidden.
Saving Markups to the ToolChest
To save a markup to your Tool Chest, just tap and hold it to bring up the context menu
and tap Add to My Tools.

If you want to move the saved markup out of your My Tools tool set to another one:
1.
Tap then the tab.
2.
Tap and hold the markup to bring up the context menu and tap Cut.
3.
Tap and hold a spot on the tool set you want to move it to and tap Paste.
Importing Tool Sets
Before you can import a tool set into Revu iPad, it must be uploaded to a cloud account,
like a Bluebeam Studio Project, Dropbox or Box, or sent to you as an email attachment.
Then, just access that cloud account or email on your iPad and tap the tool set to
automatically import it into your ToolChest.


Opening and Navigating the Markups List
brings up the Markups list.
scrolls left and right. You can also swipe in either direction to scroll through
columns, or up and down to scroll through rows.
When you tap a row in the Markups list, Revu iPad automatically jumps to the location of
the associated markup. Similarly, tapping a markup on the PDF takes you directly to its
entry in the Markups list.

Editing the Markups List
The Markups list can be edited to make updates like adding or replying to comments,
checking off items or changing a status. The only information that cannot be altered are
dates, times and pages. Double-tap a field to edit it.
Commenting and Replying to Markups
To add a comment for a particular markup, tap the markup icon at the far left in the
Markups list to open the Comments dialog box. Markups that already have comments will
have a reply arrow below them.
From the Comments dialog box, you can:
l
Add a new comment by tapping .
l
Reply to an existing comment by tapping to the right of the comment in the
Comments dialog box. A white triangle icon to the right of the comment means it

already has one or more replies: tap the triangle to scroll through the replies.
l
Edit your comment or reply to one by double-tapping it.
l
Delete a comment or reply by swiping it right-to-left and tapping Delete, or by
tapping and tapping to the left of the desired comment, then tapping
Delete.
Note: When deleting replies, any replies that follow it in the thread will also be
deleted.
Sorting Values
Tap any column header to sort the Markups list by that data. Tap it again to reverse the
order.
Filtering Values
Filtering lets you choose the range of data that displays in each column so you only see
the information that is pertinent to you at the moment, instead of everything all at once.
1.
Tap on the Markups list.
2.
Select a column to filter by.
3.
Choose your filter criteria. Tap All to include all values, tap a specific value to
include only markups containing it or tap Custom to create a more advanced filter.

4.
In the list view, the headers of filtered columns will be highlighted orange. To clear
all filters, tap .
Managing Columns
You can determine which columns are visible and their display order.
1.
Tap on the Markups list.
2.
Tap the circle to the left of a column to show or hide it. Columns with full circles are
shown while columns with empty ones are hidden.
3.
To rearrange the column order, tap and hold to the right of its name and
slide it up or down.
Custom Columns
The Markups list in Revu iPad recognizes Custom Columns in PDFs created in Revu for
the desktop. Additionally, you can export Custom Columns as an XML file out of Revu for
the desktop and import them into any PDF in Revu iPad. Custom Columns can be
filtered, sorted, hidden and rearranged like the default columns.
Import Custom Columns
Before you can import Custom Columns into Revu iPad, the exported XML file must be
uploaded to a cloud account, like a Studio Project, Dropbox or Box. Then, just access

that cloud account on your iPad and tap the exported XMLfile to automatically import it
into the currently active PDF.
Note: No other PDFs will be affected by the imported Custom Columns, even if they are
open in other tabs. Be sure the PDFyou want to import the CustomColumns into is
currently active.

Forms
Revu iPad supports PDFform filling. You can enter information into form fields and
interact with most form function fields.
Note: While Revu iPad supports Acroforms, XFA forms are not currently supported.
Additionally, Revu iPad does not support digital signatures. See Signatures for more
information about Revu iPad's signing capabilities.

Studio Sessions
Using Studio Sessions, you can collaborate with several colleagues at the same time on
PDFs, in real time or on your own time. Since a Studio Session is a real-time
collaboration tool, it requires a persistent Internet connection.
Studio is optimized to take advantage of Studio GO® for faster rendering.
Joining a Studio Session
Starting a Studio Session
Adding New Documents
Using Studio Sessions Offline

Joining a Studio Session
1.
Tap . If you are not currently logged in to Studio, you will see ; tap it to
connect.
l
To join a Studio Session for the first time, tap and enter the ID of the Studio
Session, then tap Join. If you have been granted access to the Studio
Session, you will be logged in automatically.
l
To join a Studio Session that you've joined previously, tap the tab and tap
the Session you want to join.
2.
To markup a PDF, tap it to open it, then tap to open the Markups toolbar.
Marking up a PDFin a Session is the same as marking one up outside of a Session,
though your markups will show up on the PDF for the other attendees in real time.
3.
To review an events log of what's happened in the Session, pull open the
bottom panel and tap the tab. The events will be shown on the Record tab.

4.
To leave the Session without signing out of Studio, tap at the top of the screen
to bring up the Studio panel (if necessary), then tap Leave.
l
To sign out of Studio completely, tap Sign-Out instead.

Starting a Session
You can use Revu iPad to start your own Studio Sessions. As the host, you can invite
attendees, upload the PDFs you want to review and set permissions for attendees.
Note: While you can start a Studio Session in Revu iPad, you cannot finish one there. To
finish a Studio Session, please use Revu for the desktop.
1.
Tap . If you are not currently logged in to Studio, you will see ; tap it to
connect. Then tap on the Studio panel.
2.
Enter a Session Name, then tap Add Files and select from the list of locally synced
documents to add files to the Session.
3.
Tap Options to set general attendee Permissions. You can also choose to restrict
attendee access to only those you invite (Restrict Attendees) and set an expiration

date for the Session (Session Expires).
Note: Permissions cannot be changed mid-Session in Revu iPad, only in Revu for
the desktop.
4.
When you're finished, tap Back then OK.
5.
Tap Email to add invitees manually or tap Contacts to add them from your contacts
list.
6.
Tap Message to include a message with your invitations. Tap OK when you're
finished.

7.
Tap OK to send the invitations.

Adding New Documents
You can only upload new documents into a Studio Session if you are the host or if the
host has granted you this permission.
1.
Tap . If you are not currently logged in to Studio, you will see ; tap it to
connect. Then tap the tab.
2.
Tap the Session to which you wish to add a document.
3.
Tap on the Documents bar.
4.
Choose a locally synced document and tap OK.
Using Studio Sessions Offline
You can use Studio Sessions offline by accessing cached copies of Session documents;
any changes you make to them will be automatically uploaded to the Session the next
time you're online. Revu iPad does not automatically cache copies of Session
documents by default, so you will need to cache them manually before going offline.
1.
Tap . If you are not currently logged in to Studio, you will see ; tap it to
connect. Then tap the tab.

2.
Tap the Session that has the documents you want to work with and open each
document to cache the latest version.
l
Though Revu iPad does not cache Sessions documents automatically by
default, you can set it to do so for a specified number of documents in the
Studio Preferences.
3.
To go offline voluntarily, tap . Otherwise, Revu iPad will automatically go into
offline mode when you lose connectivity.
Note: Going offline will take Revu iPad offline for both Studio and the
Document Manager.
4.
While in offline mode, you can mark up cached documents as usual. Markups will be
tracked in the Pending section of the Studio tab on the bottom panel. When
connectivity is restored, changes stored in the Pending tab are automatically
uploaded to the Session document.

Studio Projects
Studio Projects is a lightweight Document Management System native to Revu iPad. Use
it to check in and check out documents for viewing and editing; it does not require a
persistent Internet connection.
Studio is optimized to take advantage of Studio GO® for faster rendering.
Joining a Project
Studio Projects Offline
Checking in Offline Changes

Joining a Project
1.
Tap . If you are not currently logged in to Studio, you will see ; tap it to
connect.
l
To join a Studio Project for the first time, tap and enter the ID of the Studio
Project, then tap Join. If you have been granted access to the Studio Project,
you will be logged in automatically.
l
To join a Studio Project that you've joined previously, connect to Studio by
tapping (if you see , you're already connected), then tap the tab
and tap the Project you want to join.
2.
Navigate to the document you want to open. While navigating through Projects, you
might notice the following icons, which indicate:
The document is currently checked out by another user. It can't be
checked out until that user checks it back in.

The document is currently checked out to you. Tap it to open.
The document is currently checked out to a Studio Session. You
can open the last version that was checked in to the Studio Project,
but you can't check it out and it won't have any changes that were
subsequently made in the Session.
The document is locked and will be opened in read-only mode
unless you check it out first. To check it out, tap and hold in
the document's tab and select Check Out from the menu that
appears.
3.
To save changes to a document you've checked out, tap on the document's tab
and confirm that you want to save the changes.
4.
To check in a document, tap and hold and select Check In from the menu
that appears.

Studio Projects Offline
Files and folders synced from a Studio Project to your iPad will remain available to you
regardless of Internet access.
To open synced Project files while offline, tap , select a Project and choose a file.
Remember: only files that were synced to your iPad before you went offline are available.
In addition to the icons described in the previous section, you might notice the following
icons:
The document has been saved locally into a synced folder and is
waiting to be synced to the Project. It can be edited freely and
uploaded as a new file without conflict once you reconnect to the Project.
The document has been edited offline without being checked out. If
somebody else has since checked it out, you will not be able to check
in your changes. You can still save the PDFlocally using a long tap on its tab
or the Send To button and upload it as a new document.
Lastly, a note about locked documents:
When offline, this icon indicates a document that has been synced but
you have not checked out. You can make changes to it (unlock it by
checking it out as described in the previous section), but be aware that this
can result in conflicts when you try to check in your changes. Whenever
possible, you should check out files before going offline if you will need to edit
them.

Checking in Offline Changes
Once you are able to reconnect to the Internet and access your Studio Project, you can
check in your offline changes using the Document Manager.
1.
Tap . If you see at the top of the dialog box that opens, tap it to get to the
Home screen (if you don't see it, you're already there).
2.
Select your Studio Project.
3.
Choose the file(s) that contain the changes you want to check in.
4.
Tap Sync.
If you attempt to check in a PDF that was edited while offline, you might encounter a
conflict during sync. To resolve such a conflict, tap the icon to the right of the file name
and select one of the three options:
l
Pull cloud file: Downloads the Project copy of the file and replaces your local copy
with it.
l
Push local file: Uploads your local copy of the file and replaces the Project copy
with it.
l
Pull cloud file, push local file: Uploads your local copy of the file to the Project with a
different file name, then downloads the Project copy of the file and replaces your
local copy with it.

Preferences
Tap in the upper-right corner to access Preferences for Revu iPad, where you will
find release notes as well as several customizations and configuration options for Revu
iPad. From there you can:
l
Read the latest release notes, as well as the notes for previous versions, from the
Release Notes tab.
l
Change how file names are truncated from the General tab.
l
Enable the Magnifier Tool to automatically appear for all markups, not just Field
Verification Measurements, from the Markup tab.
l
Change Studio server or login credentials from the Studio tab.
Set the number of documents that are automatically downloaded when you enter a
Session from the Studio tab.
l
Enable or disable Studio GO and delete all associated Studio GO cached data from
the Studio tab.
Studio GO is an advanced document delivery system designed to speed up
the rendering of documents retrieved from Studio Sessions or Projects. It adds
some amount of overhead to Studio documents, increasing their size within
Studio, and might result in some increase in the time it takes to download the
document to your iPad from Studio the first time.
l
Set the image quality used to display photos from the Photo tab.
l
Make Revu iPad remember the last location viewed in the Document Manager and
automatically go back there the next time you browse for a file from the Doc

Manager tab.
l
Change how Revu iPad sorts alphanumeric files in the Document Manager from the
Doc Manager tab. When "Sort Naturally" is off, files will be sorted alphabetically and
when it's on they will be sorted numerically. For example:
Naturally Off Naturally On
A1 A1
A100 A2
A11 A11
A2 A100
l
Change the default action Revu iPad takes to resolve conflicts in Studio from the
Sync tab.

Index
A
Add files to a Studio Session 43
Add Markups to Tool Chest 28
Arranging Tool Sets 28
B
Bookmarks 6
Box account 9
C
Calibrate 24
Camera 18
Capture 18
Check in Studio Project files 47
offline changes 49
Cloud account 9
Columns in the Markups List 34
Command bar 4
Commenting to Markups 32
Conflict with offline sync of Studio Pro-
ject file 49
Create new PDF 4
Custom Columns 34
import 34
D
Deleting locally cached file 13
Deleting Markup Comments 33
Deleting Markups 18
Deleting Tool Sets 28
Depth 25
Document Manager 8
create folder 13
edit mode 13
icons 11
settings 50
sorting 50
Dropbox account 9
E
Edit Markups List 32
Edit Properties 26
Electronic signatures 21
properties 26
Email PDF 5, 13
Enable Magnifier tool 50
Exporting Tool Sets 28
F
Field verification measurements 23

File Access 14
File name truncation 50
Filtering the Markups List 33
Forms 36
G
General Settings 50
H
Hide a Tool Set 28
I
Icons
Document Manager 11
Studio Projects 46, 48
Image
add to a markup 19
quality setting 50
Importing Custom Columns 34
Importing Tool Sets 29
J
Join a Studio Project 46
Join a Studio Session 38
L
Login, Studio server, changing 50
M
Magnifier tool 50
Markups 15
add a photo 18
add an image 19
commenting 32
default configuration 18
deleting 18
edit properties 26
multi-selecting 17
placing 16
replying 32
save to Tool Chest 28
Stamps 17
Markups List 30
custom columns 34
edit 32
filtering 33
manage columns 34
sorting 33
Measurements 23
precision 24
properties 26

taking 24
Move PDF 13
Multi-selecting Markups 17
My Tools 28
N
Navigating 4
O
Offline, Studio Projects 48
Offline, Studio Sessions 43
P
Panels 4
PDF
calibrate 24
create new 4
email 5, 13
move 13
print 5
save to iPad 5
scale 24
Photo 18
Pin 13-14
Placing Markups 16
Precision, measurements 24
Preferences 50
Print 5
Properties
editing 26
electronic signatures 26
markup 26
measurement 26
R
Rearranging Tool Sets 28
Release Notes 50
Replying to Markup comments 32
S
Save PDF to iPad 5
Scale 24
Search 7
Setting default markup configuration 18
Settings 50
ShareFile account 9
Show a Tool Set 28
Signature Properties 26
Signatures 21
Sorting the Markups List 33
Stamps 17

Start a Studio Session 40
Studio
Projects 45
check in files 47
check in offline changes 49
conflict, offline sync 49
icons 46, 48
joining 46
Sessions 37
adding files 43
joining 38
Offline 43
starting 40
Studio GO 50
Studio server login, changing 50
Sync files 14
Sync files with cloud account 10
Sync offline changes, Studio
Projects 49
T
Tab Access 4-5
Taking measurements 24
Thumbnails 5
Tool Chest 27
Tool Sets 27
arranging 28
deleting 28
exporting 28
hide or show 28
importing 29
move tools 29
saving markups to 28
Truncation of file names 50
W
WebDAV account 9
