
RANOREX
WEB AND MOBILE TESTING
USERGUIDE
TABLE OF CONTENTS
WEB AND MOBILE TESTING ................................................................................................... 3
WEB TESTING .................................................................................................................................. 4
Build a web test ....................................................................................................................... 5
Website structure in Ranorex Studio .................................................................................... 14
Advanced web testing ........................................................................................................... 20
Cross-browser testing ........................................................................................................... 27
ENDPOINTS ................................................................................................................................... 44
Endpoint settings .................................................................................................................. 46
Add an Android/iOS endpoint ............................................................................................... 48
Add a WebDriver endpoint.................................................................................................... 51
Capabilities configurator ....................................................................................................... 58
Ranorex Parallel Runner........................................................................................................ 59
MOBILE TESTING ............................................................................................................................ 61
Prepare your device .............................................................................................................. 63
Connect mobile devices ......................................................................................................... 71
Instrument apps .................................................................................................................... 73
Create a mobile test .............................................................................................................. 80
Run a mobile test .................................................................................................................. 91
Android app testing example ................................................................................................ 93
Android mobile web test example ...................................................................................... 105
iOS app testing example ..................................................................................................... 110
iOS mobile web test example .............................................................................................. 120
ADVANCED MOBILE TESTING ........................................................................................................... 125
iOS Service App .................................................................................................................... 125
Non-UI Testing .................................................................................................................... 127
Cross-device mobile tests .................................................................................................... 130
Automate Android system apps .......................................................................................... 140
Test Android Wear apps ...................................................................................................... 145
Instrumentation with source code on iOS ........................................................................... 148

Web and mobile testing
Web testing and all different types of mobile testing represent an emerging field concerning
automated software testing. Ranorex offers a wide range of tools and methods to cover as
many test challenges as possible. They are all described herein.
Web testing
Endpoints
Mobile testing
Android testing
iOS testing

Web testing
This chapter describes how to test web applications and web sites using Ranorex Studio.
Thanks to the Ranorex plug-ins for Microsoft Internet Explorer, Mozilla Firefox, Google
Chrome, and Chromium, building and running web tests is essentially the same as doing so
for desktop tests. However, there are some differences and important considerations. We’ll
explain these in the various subchapters.
Supported browsers
Ranorex Studio supports the following browsers for test automation:
• Microsoft Internet Explorer
• Microsoft Edge (Chromium-based)
• Microsoft Edge (Legacy)
• Mozilla Firefox
• Google Chrome
• Chromium
Ranorex Studio uses special browser plug-ins to enable test automation with these browsers.
Note
You can test even more platform and browser combinations with our ⇢
Selenium WebDriver integration.
Web testing overview
Web testing and desktop testing in Ranorex Studio are very similar. The basic web testing
process in Ranorex Studio is as follows:

Note
Web sites can have highly complex structures. This is why it may sometimes be
a good idea or even necessary to extend the above process by manually
tweaking the recorded test with additional code. We’ll cover this in the later
subchapters.
Recommended knowledge
Before you start web testing, you should be familiar with the basics of how web sites work.
You should also understand the concepts covered in the following Ranorex-Studio chapters:
Ranorex Studio fundamentals
The ⇢ Ranorex Studio Fundamentals contain the chapters dealing with all the basic elements
of working with Ranorex Studio, like actions, repositories, and reporting.
Ranorex Studio advanced and expert
For web testing, we recommend reading through the advanced chapters ⇢ RanoreXPath and
⇢ Ranorex Spy. Also, knowing your way around ⇢ code modules and the ⇢ user code library
will be helpful when tweaking web tests with additional code.
Build a web test
In this chapter, you’ll learn how to build a simple web test from start to finish, including
recording the test, running it, and viewing the test run report.
Test definition
Our test will contain the following steps:
Start the browser and open the URL www.ranorex.com/web-testing-examples/
Check if the Ranorex Studio logo is displayed at the top.

Click Open dialog.
Click OK to confirm and close the dialog window.
Close the browser.

Note
In automated tests, using the action Close application is usually more robust
than closing an application “manually” by clicking the X in the application
window. This is why the default web test project uses this action.
Create a new web test
We’ll create a new web test using the ⇢ RocketStart wizard.
On the Ranorex Studio Start Page, click New test solution using wizard… or go to
File > New > Solution using wizard…
Click Web.
Follow the instructions of the wizard. Name your solution WebTest. When
prompted, select Mozilla Firefox as your browser (make sure it’s installed on your
computer) and specify www.ranorex.com/web-testing-examples/ as the URL.
When asked to select the recording behavior, select Add browsers to whitelist, as
our test will only cover interactions with the previously selected browser. If we
were going to interact with desktop applications and wanted this in our test, we’d
select Do not use whitelisting.
On the final screen, click Finish. Ranorex Studio will then open the prepared
solution.

The prebuilt web test will look like this:
Test suite view
This is where you build and control your tests.
The solution comes with a test suite project that contains a simple prebuilt test suite
structure. It contains a test case with three recording modules: OpenBrowser, which
starts the browser and navigates to the URL; Recording1, which is empty and ready
for you to record test actions; and CloseBrowser, which closes the browser.
Recording module view
In the recording module view of Recording1, you can record and manage test
actions.

Empty actions table
This is where your recorded actions appear.
Record the test
Before you start recording, make sure Firefox is running and the URL www.ranorex.com/web-
testing-examples/ is opened. Don’t record these steps. They are already included in the
prebuilt project.
Once that’s done, you can start recording.
In the recording module view, Click RECORD. Ranorex Studio is minimized.
The Recorder control panel appears in the bottom right.
Validate the logo
In the control panel, click Validate.
Mouse over the Ranorex Studio logo and click it when the purple frame surrounds
it as in the screenshot.

The Select element window opens. Check if the correct image has been selected
and click Next to confirm.
The Validation settings open. We’re checking that the logo exists and is visible. Both
of these attributes should already be selected. Click OK to confirm.
Open and confirm the dialog window
In the browser, click Open dialog. A simple dialog window opens.
Click OK to confirm and close the dialog.

Finally, in the Recorder control panel, click Stop to finish the recording.
Results
The control panel disappears and Ranorex Studio comes back into focus, showing the
following:

Action table with three recorded actions.
Repository with repository items referencing the three UI elements interacted with
during the recording.
Run the test and review the report
Let’s run the test and review the test run report.
Close all instances of Firefox.
Click the tab WebTest.rxtst to switch to the test suite view and click RUN.

Report
Once the test run has finished, the report will appear. In our case, it should look like this:
A detailed view of the test case shows that all actions were executed successfully.

Reference
Reports are explained in Ranorex Studio fundamentals > ⇢ Reporting
Website structure in Ranorex Studio
Ranorex Studio can recognize the entire HTML architecture of a website and make it available
for automated tests. Use Ranorex Spy to browse through a website’s structure and see how
it’s represented within Ranorex Studio. Websites are organized into three basic parts in Spy.
These are explained below.
Domain object model (DOM)
This is the top-level node. Each website opened in a browser has its own DOM node in Spy.

Browser in Spy showing five DOM nodes, each representing an individual website.
Browser-specific elements
Each browser also has browser-specific elements that aren’t contained in a DOM node. These
relate mostly to control elements and application windows, e.g.:
• Window controls (minimize, maximize, close)
• Pop-ups
• Dialog windows
These elements are organized in browser-specific FORM nodes.

Tab control elements in a browser (note the website in the tab is still a DOM node).
Window controls in a browser.
Dialog window in a browser.
These elements are organized in browser-specific FORM nodes.
Note
Browser-specific elements can cause issues in cross-browser tests because
naturally, different browsers have different elements. They should either be
avoided or individualized in these cases.
You can handle browser-specific elements in the RanoreXPath or in code.
A RanoreXPath handling a button for two different browsers by way of their process names
would look as follows:
/form[@processname='firefox' or
[@processname='chrome']//button[@text='OK']
If you want to include more process names, the following is a more economical way of doing
so:
/form[@processname~'[iexplore|IEXPLORE|chrome|firefox]'//button[@text=
'OK']
The Ranorex Automation Library included in Ranorex Studio also makes it possible to
differentiate between browser-specific elements by way of various variables and methods in

code. For example, the variable BrowserName allows distinguishing between different
browsers. The following code example demonstrates this:
C#
// Click the OK button in popping up dialog of one of the supported browser
// If the current browser is Internet Explorer
if(webDocument.BrowserName == "IE")
{
Button okIE = "/form[@processname~'(iexplore|IEXPLORE)']//button[@text='OK']";
okIE.Click();
}
// If the current browser is Mozilla Firefox
else if(webDocument.BrowserName == "Mozilla")
{
Button okFF = "/form[@processname='firefox']//button[@text='OK']";
okFF.Click();
}
// If the current browser is Google Chrome
else if(webDocument.BrowserName == "Chrome")
{
Button okChrome = "/form[@processname='chrome']//button[@text='OK']";
okChrome.Click();
}
// If the current browser is Apple Safari
else if(webDocument.BrowserName == "Safari")
{
Button okSafari = "/form[@processname='Safari']//button[@text='OK']";
okSafari.Click();
}

VB.NET
C#
VB.NET
' Click the OK button in popping up dialog of one of the supported browser
' If the current browser is Internet Explorer
If webDocument.BrowserName = "IE" Then
Dim okIE As Button = "/form[@processname~'(iexplore|IEXPLORE)']//button[@text='OK
']"
okIE.Click()
' If the current browser is Mozilla Firefox
ElseIf webDocument.BrowserName = "Mozilla" Then
Dim okFF As Button = "/form[@processname='firefox']//button[@text='OK']"
okFF.Click()
End If
' If the current browser is Google Chrome
ElseIf webDocument.BrowserName = "Chrome" Then
Dim okChrome As Button = "/form[@processname='chrome']//button[@text='OK']"
okChrome.Click()
End If
' If the current browser is Apple Safari
ElseIf webDocument.BrowserName = "Safari" Then
Dim okSafari As Button = "/form[@processname='Safari']//button[@text='OK']"
okSafari.Click()
End If
The WebDocument class and its variables and methods are described in the Ranorex API
documentation under Ranorex > WebDocument.


Advanced web testing
In this chapter, we’ll cover some advanced topics regarding web testing.
Use the Wait for action to wait until an element has loaded
Loading times that take longer than usual are a common issue in web tests. They can cause
tests to fail and can get quite annoying, as they are often outside of the tester’s control. One
way to work around these loading times is by instructing the test to wait until a certain
element has loaded. In Ranorex Studio, you can easily do so with the Wait for action.
In the action table, add a Wait for action after an action that loads a web page and
before an action that manipulates an element on the loaded page.
Wait for action with 10s waiting time. The action waits until the linked repository
item exists. This should be the repository item that is manipulated in the following
action.
The repository item that the action waits for to exist.
Note
Your test can still fail if loading takes longer than the time set in the Wait for
action and the repository item doesn’t exist. Choose a sensible time value that
prevents failure because of insignificant loading delays and doesn’t keep your
test searching for an element for too long.

Note
Instead of the Wait for action, you can also use the Delay action to pause your
test run.
However, the Delay action always pauses the test run for the specified time,
regardless of an element existing or not. This is why you should use the Wait for
action if there is a repository item you can sensibly link it to. This way, your test
won’t idle unnecessarily.
Use the Set value action to enter values more robustly
Entering values like text strings in web forms is a common scenario in web tests. This can
either be accomplished by simulating the keypresses on a keyboard (Key sequence action) or
by directly setting the form to a specific value. The latter is usually more robust because no
mouse clicks or similar are required, so there is less potential for failure. Conversely, this can
cause the test to miss certain defects because you deviate farther from a true user
experience.
Test situation
In our example, we’ll enter a name in the sample form on the Ranorex test website. The
process is as follows:
Enter the name in the text field of the form.
Click Submit to submit the name.
The page that appears as a result.

What it looks like in the action table
Set value action that enters the name in the text field.
Repository item Testname that represents the text field.
Result
The value is set directly in the form without any mouse clicks or typing.

Reference
For more details on the Set value action, refer to Ranorex Studio fundamentals >
Actions > ⇢ Action properties.
Use the Get value action to read out values for use in the test
It’s often useful or necessary to read out values on websites (numbers, strings, etc.) and use
them further along in the test. The simplest way to do this is with the Get value action.
Test situation
In our example, we’ll read out a list value to reuse it in the sample form on the Ranorex test
website.
With the default values selected, clicking the Submit button produces the following result:
Color/testcolor is set to green.
Colors/testmultiple is set to green and yellow.
We’ll now
• get the value blue from the testmultiple parameter and
• set the testcolor parameter to this read-out value.

What it looks like in the action table
The Get value action reads out the value blue from the Colors field and passes it to
the variable $Color.
The Set value action uses the value of the variable $Color and sets the field
Color/testcolor to it.
Result
The resulting page will look like this:
The field testcolor now has the value blue, as set by the Set value action.
The testmultiple field is still set to the default values. The Get value action only reads
out the value blue.

Reference
For more details on the Get value action, refer to Ranorex Studio fundamentals >
Actions > ⇢ Action properties.
WebDocument Adapter
The WebDocument Adapter creates a representation of the complete website including all
tags (e.g. the header tag, body tag, etc.). Furthermore it offers useful ways to make your test
scripts more effective.
The following sample shows how to use these features:
C#
// Identify a web document by its title
WebDocument webDocument = "/dom[@caption='Ranorex Test Page']";
// Open a website
webDocument.Navigate("http://www.ranorex.com");
// Wait until the document is loaded
webDocument.WaitForDocumentLoaded();
// Execute a javascript code
webDocument.ExecuteScript("history.back();");
VB.NET
' Identify a web document by its title
Dim webDocument As WebDocument = "/dom[@caption='Ranorex Test Page']"
' Open a website
webDocument.Navigate("http://www.ranorex.com")

' Wait until the document is loaded
webDocument.WaitForDocumentLoaded()
' Execute a javascript code
webDocument.ExecuteScript("history.back();")
Find or filter web elements
The Ranorex Framework offers a wide range of adapters for each HTML tag elements (e.g.:
ATag adapter for <a> tags). Each adapter has specific methods and attributes; the link tag
(<a>) for example has additional attributes like HREF, TARGET and REL.
C#
// Start IE with a specific website
System.Diagnostics.Process.Start("iexplore.exe", "/web-testing-examples");
// Identify the webdocument by its title
WebDocument webDocument = "/dom[@caption='Ranorex Test Page']";
// Find a link by its link text (innertext)
ATag link = webDocument.FindSingle(".//a[@innertext='simple link']");
link.Click();
VB.NET
' Start IE with a specific website
System.Diagnostics.Process.Start("iexplore.exe", "/web-testing-examples")
' Identify the webdocument by its title
Dim webDocument As WebDocument = "/dom[@caption='Ranorex Test Page']"
' Find a link by its link text (innertext)
Dim link As ATag = webDocument.FindSingle(".//a[@innertext='simple link']")
link.Click()

Repositories and the WebDocument
The following example shows how to access the methods of the WebDocument using a
repository:
C#
// Load repository
ProjectRepository repo = ProjectRepository.Instance;
// Open a website
repo.WebPage.Self.Navigate("http://www.ranorex.com");
// Wait until the document is loaded
repo.WebPage.Self.WaitForDocumentLoaded();
VB.NET
' Load repository
Dim repo As ProjectRepository = ProjectRepository.Instance
' Open a website
repo.WebPage.Self.Navigate("http://www.ranorex.com")
' Wait until the document is loaded
repo.WebPage.Self.WaitForDocumentLoaded()
Cross-browser testing
Cross-browser testing involves executing one test across multiple browsers. This can save a
lot of time and reduce maintenance efforts, but it comes with its own challenges. In this
chapter, we’ll go through a cross-browser example step by step.
Test scenario
We want to use Ranorex Studio to test a specific scenario on three different browsers:
Microsoft Internet Explorer, Google Chrome, and Mozilla Firefox. We want to accomplish this
with only one test that works for all these browsers.

To demonstrate our cross-browser example, we’ll use a free Dropbox account. Dropbox is a
registered trademark of Dropbox, Inc. and Dropbox International Unlimited Company. Their
terms of services and privacy policy apply. Ranorex GmbH, Ranorex, Inc. and Dropbox, Inc.
are not affiliated in any way.
Note
You will need to create your own free Dropbox account for this example.
Our test will go through four steps that are defined as follows:
Start
Start the browser and go to the URL www.dropbox.com
Click Sign in to reach the sign-in page.
Sign-in
Enter e-mail address and password.
Uncheck the option Remember me.
Click Sign in.

Check account
Here, we’ll check if we’re signed in to the correct account. There are different ways to do this.
In our example, we’ll click our account picture and validate the account name.
Click the account picture to open the account menu.
Check if the displayed account name is the same as that of our fictional person (John
Public, in our case).
Sign out
Click the account picture to open the account menu (if it isn’t still open).
Click Sign out.

Create a new web test
To get started, first create a new web test as explained in ⇢ Build a web test and keep the
following in mind:
• Give your solution a meaningful name (e.g. CrossBrowserTest).
• Enter www.dropbox.com when asked for the URL.
• You’ll only be able to select one browser in the wizard. This is fine, choose Firefox.
We’ll extend the test to the other browsers later.
• When asked to select the recording behavior, select Add browsers to whitelist.
• Click Finish. The new test solution appears.
Before recording
We’ll first record our web test on a single browser. Later, we’ll adapt it to work across multiple
browsers.
Before we start recording, we’ll need to make the following preparations (if you’ve instructed
the wizard to start the browsers automatically, you can skip this).
Start Firefox.
Go to www.dropbox.com

Record the test
Open the Recording1 module. Click RECORD.
Click Sign in.
Enter your e-mail address and password.
Uncheck Remember me.
Click Sign in.
Wait until the page has loaded and click the account picture.
Validation
Here we’ll insert a ⇢ validation to check whether we’re logged in to the right account. We’ll
do this by validating the account name, John Public in our case.
In the Recorder control panel, click Validate.

Mouse over the account name in the account menu. A purple frame will indicate
which element is currently selected. Click to confirm the selection.
In the window that opens, check if the correct element has been selected. If not,
correct the selection. Click Next to confirm.
Make sure the attributes Exists and InnerText with the account name are checked.
Click OK to confirm.

Finish the recording
After the validation is configured, Ranorex Studio will continue recording. It’s time to finish
the recording.
In the opened account menu, click Sign out.
Click Stop in the Recorder control panel to finish the recording.
Result
After stopping the recording, you’ll be returned to Ranorex Studio, with the resulting
recording being displayed. Let’s take a look at this initial version of our cross-browser test.

Action table showing 11 actions (your recording may differ slightly in the amount of
actions).
Repository with 8 repository items organized into two folders.
Optimize test for cross-browser adaptation
Before we start turning the test into a cross-browser test, we should optimize it.
Combine key sequences
Sometimes Ranorex Studio will split key sequences. This can happen because the sequence
wasn’t entered fast enough, for example. You should combine key sequences wherever it
makes sense.
Select the key sequences you want to combine and open the context menu.
Click Merge selected keyboard items.
Optimize key sequence content
Sometimes, entering special characters can result in unnecessarily complex strings. Simply
correct them manually in the action table.
In the example below, we simply replaced the superfluous keypresses with @.
Unoptimized
Optimized
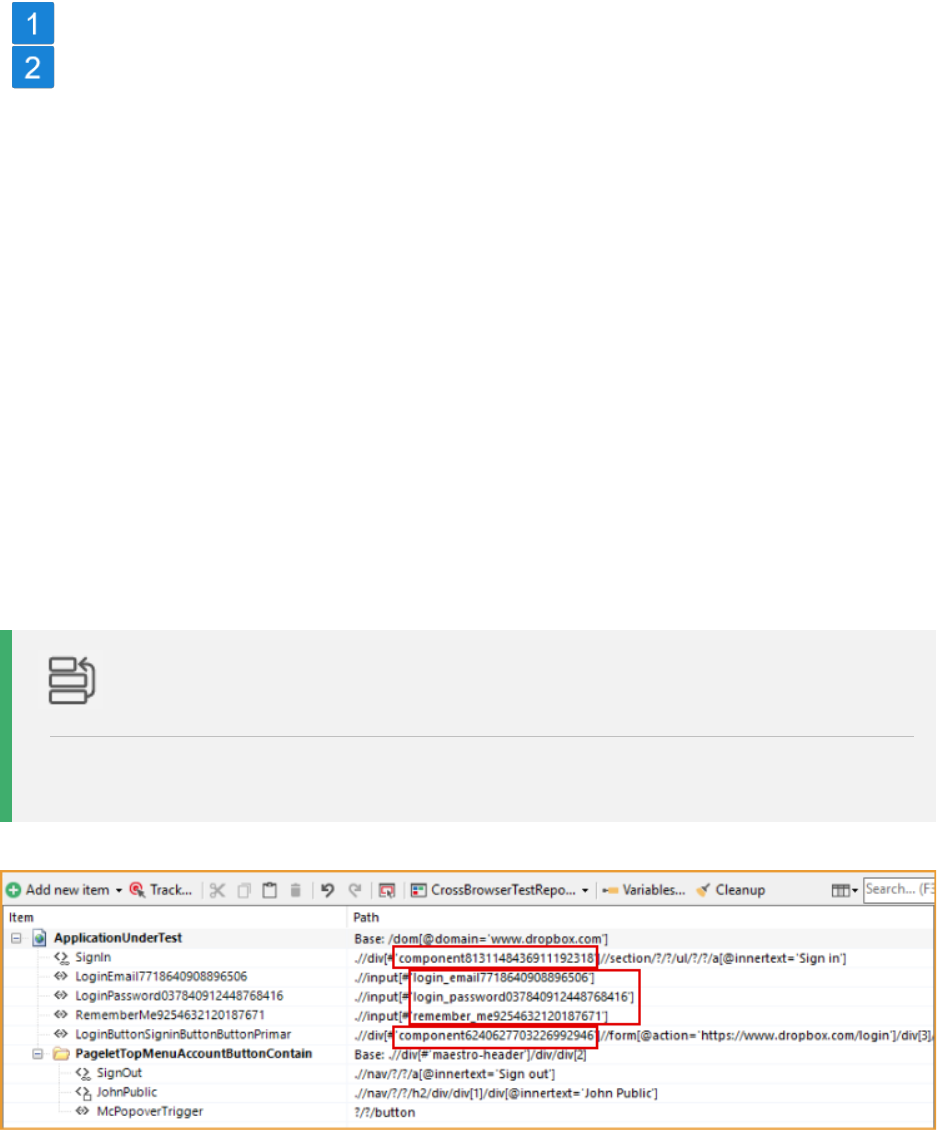
Find and replace dynamic identifiers
Many applications contain so-called dynamic UI elements. These changes whenever a
particular event happens, e.g. when you reload a web page. It’s often harder for automated
testing tools to find these UI elements reliably. This is because identifiers that are robust for
static UI elements (like the element ID) change all the time for dynamic UI elements. This is
why you need to fall back on other identifiers for dynamic UI elements.
For web elements, Ranorex Studio uses an intelligent algorithm that recognizes when a UI
element is dynamic. It ignores dynamic identifiers and uses a robust, static identifier instead.
This means you should normally not need to find and replace dynamic identifiers from your
repository items. However, in some cases a dynamic identifier may be missed and you’ll have
to replace it by hand.
Dynamic identifiers usually appear in the RanoreXPath with a name prefix and a long
character string that changes whenever the element is loaded (see paths marked in red in
image).
Reference
Replacing dynamic identifiers with more robust ones is explained in Ranorex Studio
expert > ⇢ Mapping dynamic UI-Elements.
In our example, the improved repository looks like this:

Empty text fields
In automated testing, it’s a good idea to make sure text fields are empty before something is
entered in them.
The four actions in the image represent entering the e-mail address into the text field
represented by the repository item LoginEmail.
Click into the text field.
Press Ctrl + A to select any existing text in the field.
Press Delete to delete the text.
Enter the e-mail address.
If the text field is already empty, actions 2 and 3 won’t have any effect. The test will continue
without issue. Alternatively, you can also use the Set value action to replace all of these four
actions or just the actions for emptying the text field.
Structure your test
Your tests should always be well structured. This is why you should organize your actions into
various recording modules and structure them in the test suite.

Reference
Organizing recording modules is described in
Ranorex Studio fundamentals > Ranorex Recorder > ⇢ Manage recording modules.
Structuring test suites is explained in
Ranorex Studio fundamentals > Test suite > ⇢ Test suite structure.
In our example, we’ve organized the recorded actions into the following modules and
structured the test suite as seen below:
Setup region containing the module for starting the browser and opening the URL.
Four recording modules to go to the sign in page, sign into Dropbox, check the
account, and log out.
Teardown region containing the module for closing the browser.
Cross-browser functionality
Now that we’ve optimized the test, we can implement the cross-browser functionality.
Cross-browser testing is based on data-driven testing and variables.
Reference
These topics are described in
Ranorex Studio advanced > ⇢ Data-driven testing
Ranorex Studio advanced > ⇢ Variables and parameters.
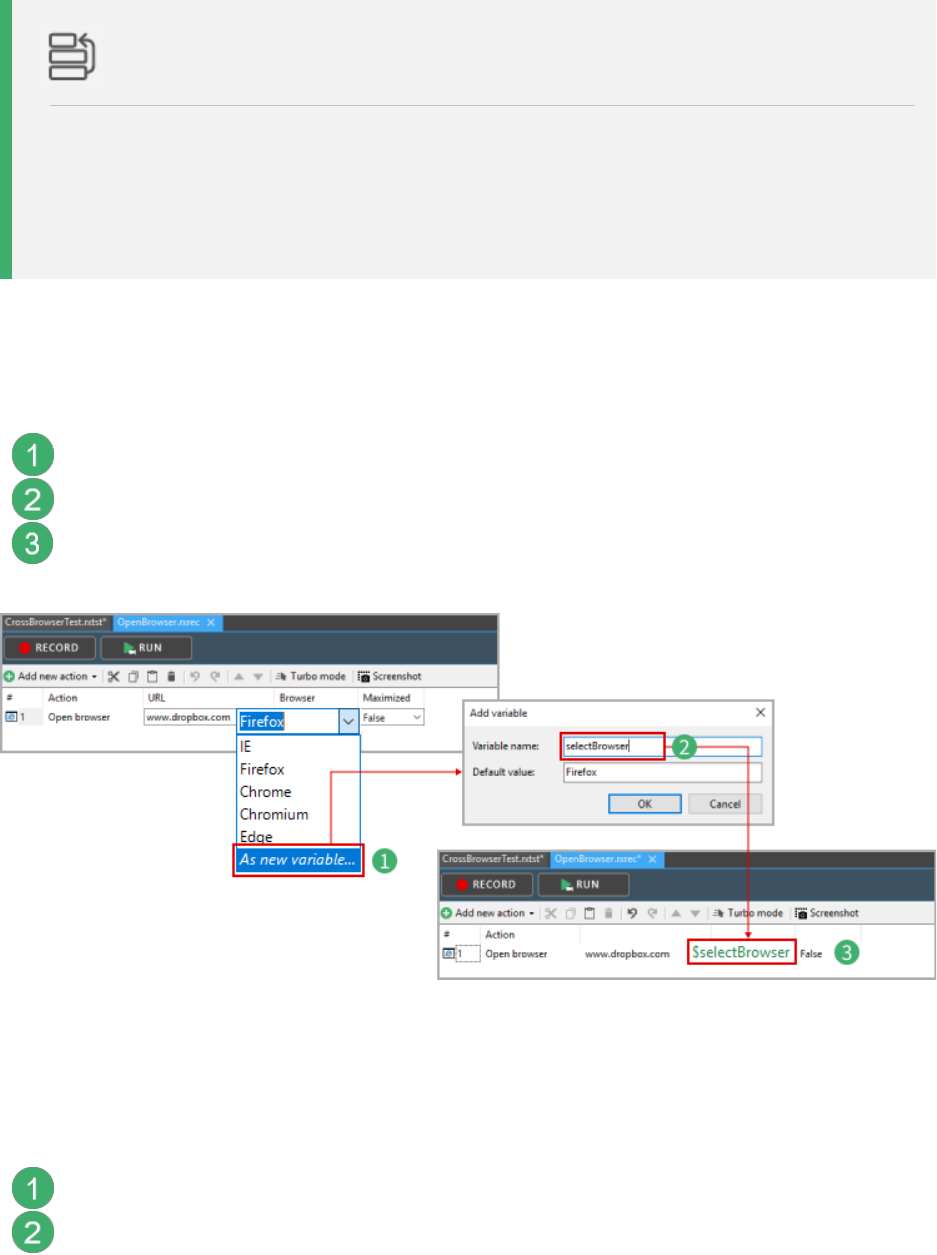
Make the browser type a variable
As a first step, we need to replace the fixed browser in our OpenBrowser.rxrec module with a
variable. This variable will take on the different browsers as value during the test run.
Open the drop-down menu for the Browser property and click As new variable…
Enter a name for the variable, e.g. selectBrowser, and click OK.
The browser type is now a variable in the actions table.
Create the data source containing the browsers
In this step, we’ll create a data source to provide values to the browser type variable.
Open the context menu of the test case in the test suite view.
Click Data source…

Click New > Simple data table and enter a name for the table, e.g. BrowserList.
Use the Add column… and Add row… buttons to create the table and fill it with the
values in the image below.
Click OK.

Reference
Creating data sources is explained in
Ranorex Studio advanced > Data-driven testing > ⇢ Data and data management.
Binding the data to the variable
Open the context menu of the test case in the test suite view.
Click Data binding…
Under Variable binding > Module variable, select the variable
OpenBrowser.selectBrowser from the drop-down menu to bind it to the Browser
column of the data source.
Click OK.


Test suite structure with a test case containing setup/teardown regions and
modules.
The test case contains a data source called BrowserList with 3 rows of data.
The module OpenBrowser contains one variable that is bound to a data source.
Results
After the test run, the report should look as follows:
Three test cases were completed successfully.
Our single test case was iterated three times, once for each row in the data source,
i.e. once for each browser. Hence, three successful test cases.
Bringing up the details of the OpenBrowser module for an iteration shows the value passed
to the variable:

Reference
Reports are explained in Ranorex Studio fundamentals > ⇢ Reporting.
Download the sample solution
You can download the completed sample solution file from the link below:
Sample Cross Browser Test
Attention
The recording module Login.rxrec does not contain any login data. Fill in
your own Dropbox account data. You will also need to change the content of
the Validation attribute InnerText to your own account name in the
recording module VerifyAccount.rxrec.
Install the sample solution:
Unzip to any folder on your computer.
Start Ranorex Studio and open the solution file CrossBrowserTest.rxsln
Hint
The sample solution is available for Ranorex versions 8.3 or higher. You must
agree to the automatic solution upgrade for later versions.

Endpoints
Endpoints are the gateways through which a locally executed test exchanges data with an
external AUT. In simpler words, they allow you to test an external application or system as if it
were on your machine.
Manage endpoints
Endpoints that have been added to Ranorex Studio are displayed and managed in the
Endpoints pad. Click the endpoints symbol in the menu bar to bring up the Endpoints pad. By
default, it appears on the right edge of the screen.
Empty Endpoints pad.
Endpoints pad displaying the endpoint list with three endpoints.
Endpoint list
If your endpoint list is empty, you’ll see a corresponding message and a button to add an
endpoint. If you’ve already added at least one endpoint, the endpoint list will appear as
follows:

Refresh and Add endpoint buttons.
Search field for endpoints.
Click to access this endpoint’s settings.
Endpoint name
Connection status (Connected/Error/Connecting…)
Endpoint ID: IP number for network connections, ID for USB connections.
Automation root status symbol (explained in ⇢ Endpoint settings)
Endpoint type (Android, iOS, WebDriver)
Shortcuts and command line execution
Aside from the usual test executable, the /output/ folder also contains shortcuts for each
endpoint. These shortcuts allow you to execute the test directly on a specific endpoint. The
endpoint is represented in the shortcut’s file name as @<endpoint>.

Shortcut for an Android endpoint.
Shortcut for an iOS endpoint.
Reference
You can also manually trigger test runs on endpoints through the command line. The
required arguments are listed in Ranorex Studio fundamentals > Test suite > ⇢ Run
tests without Ranorex Studio.
Endpoint settings
In this chapter, we’ll explain the available settings for endpoints.
Note
Most of the settings explained here are valid for Android, iOS, and WebDriver
endpoints. WebDriver endpoints have some additional, more complex settings
that we explain separately in ⇢ Add a WebDriver endpoint.
Endpoint settings
Click the button to the right of an endpoint to bring up its settings.

Set as automation root
• Click to set an endpoint as the automation root.
• This means that tests will only be able to interact with this endpoint and will receive
and send all data for test execution through this endpoint.
• To reflect this, the run buttons in the Ranorex Studio toolbar and the test
suite/recorder view will change accordingly. You can also set an endpoint as the
automation root by clicking the symbol to its left in the endpoint list.
View details – Displays a detailed view of the endpoint’s properties:
• Connection status and type

• Endpoint name
• Ranorex Service (version of the Ranorex Service App)
• OS of the mobile device (Android/iOS only)
• Address
• Instrumented apps (Android/iOS only. Click the symbol next to an app to start it on
the device. Click the rocket button to ⇢ instrument and deploy an app to the
device).
Instrument and deploy app (Android/iOS only)
• Click to ⇢ instrument and deploy an app to the mobile device.
• Opens the ⇢ Ranorex Instrumentation Wizard.
Save ADB log (Android only)
• Saves the log file of the Android debug bridge.
Refresh/Edit/Delete – self-explanatory
Attention
Be careful when editing the endpoint’s address. A wrong address will result in a
connection error and test failure.
Add an Android/iOS endpoint
In this chapter, you’ll learn how to add an Android or iOS endpoint.
⇢ Adding a WebDriver endpoint is explained separately.
Preparation
Note
Make sure you have applied the required ⇢ device settings to your mobile
device.

Turn on your mobile device and connect it to a power source.
Start the Ranorex Service App.
Connect the device to your computer via USB (recommended) or WiFi (same
network as computer).
Add endpoint
Open the endpoint list.
An empty endpoint list.
Endpoint list with Localhost (the computer) and two endpoints added.
In an empty endpoint list, click Add endpoint. Or, in a list of existing
endpoints, click +.

Select the OS of your mobile device and then select your device from the list below.
You can also enter the device’s address manually by clicking Other device…
Click Add endpoint.
Note
If your device doesn’t appear in the list, refresh it and make sure all required ⇢
device settings have been applied.
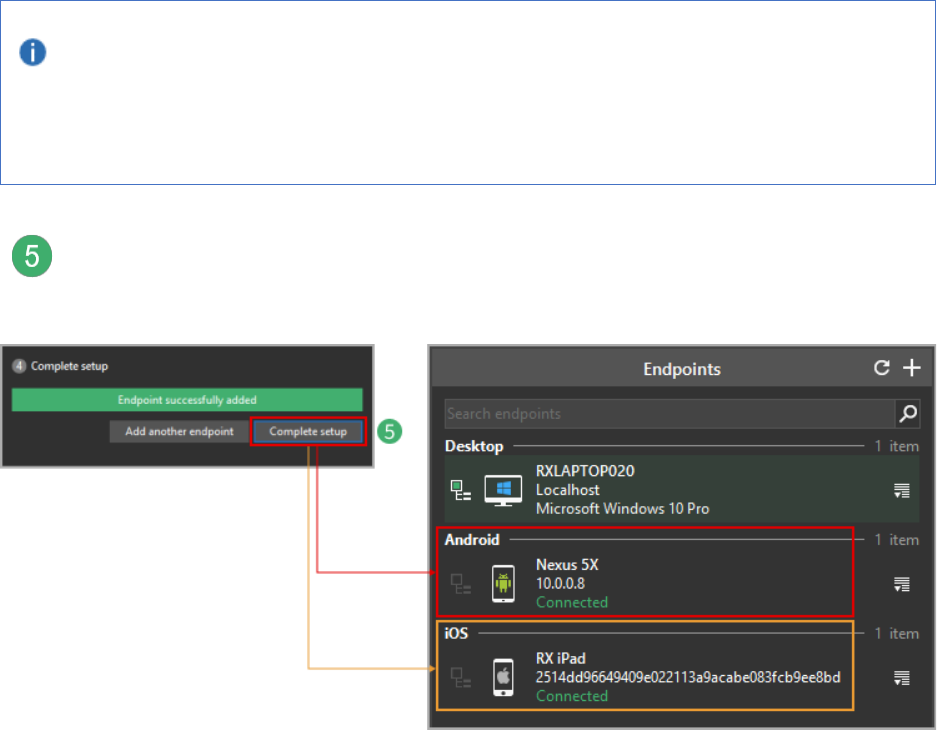
Click Complete setup to return to the endpoint list or Add another endpoint. In
either case, the newly-added endpoint appears in the endpoint list.
Add a WebDriver endpoint
In this chapter, you’ll learn how to add and configure WebDriver endpoints.
Preparation
Set up a WebDriver infrastructure, start the server, and note its address.
Ranorex Studio supports Selenium and Appium through WebDriver endpoints.
Selenium WebDriver
• Setting up a Selenium infrastructure is covered in ⇢ Selenium WebDriver integration.
Appium WebDriver
• On Appium, Ranorex Studio currently supports only mobile web tests.

• For help with setting up an Appium infrastructure, please refer to the official Appium
documentation.
• Also, make sure you set the command timeout to at least 30 seconds in the ⇢ plugin
settings for WebDriver.
Add an endpoint for WebDriver
Open the endpoint list.
An empty endpoint list.
Endpoint list with Localhost (the computer) and two additional endpoints.
In an empty endpoint list, click Add endpoint. Or, in list that is not empty, click +.

Select WebDriver.
Enter a name for this endpoint.
Enter the server address.
Note
In a default Selenium environment, you must add /wd/hub to the URL or IP
address of your Selenium server. Only change or omit this path if you have set up
your Selenium infrastructure differently.

Click Test connection to see if a connection can be established. If the test fails,
check that your server address is correct and that the server is running.
Click Add endpoint and Complete setup.
The new WebDriver endpoint appears in the endpoint list.

Add an endpoint configuration to a WebDriver endpoint
Endpoint configurations allow you to tell a Selenium WebDriver endpoint how to behave
during test execution. Selenium calls these characteristics of an endpoint capabilities. Most
commonly, they define what OS, browser, and browser version the WebDriver endpoint
simulates. In Ranorex, the sum of all capabilities defined for an endpoint is called an endpoint
configuration.
Endpoint configurations make it possible to easily execute tests in a Selenium grid on
multiple different system configurations without actually needing to have any of these
systems present.
To add a configuration to an endpoint:
Click the symbol to the right of a Selenium WebDriver endpoint.
Click View details.

Click Add new configuration.
Endpoint information showing name, connection status, and server address.
List of currently running browsers with browser name and URL.
Specify the endpoint configuration
Enter a name.
Enter a description (optional).
Enter the configuration, i.e. the capabilities definition, as JSON.
Make sure it conforms to the requirements of your Selenium Grid provider. Selenium
provides a list of capabilities. In the screenshot, the capabilities JSON conforms to
the requirements for Sauce Labs.

Note
If you are unfamiliar with JSON, use the Ranorex Studio ⇢ capabilities
configurator. Simply select your capabilities and provider and let the
configurator put together the JSON. Then, just paste the JSON into the
Capabilities JSON box of the endpoint.
Click Save to confirm. The configuration appears in the endpoint details.
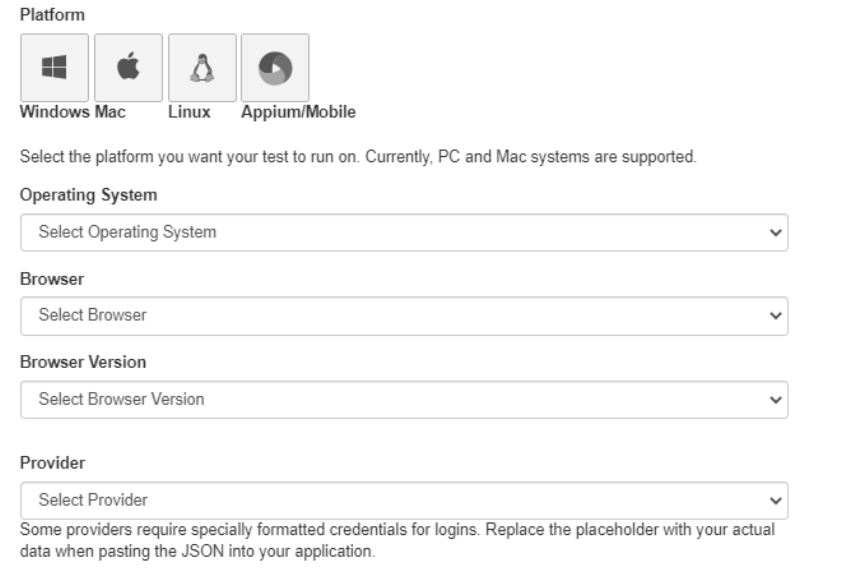
Capabilities configurator
The capabilities configurator lets you generate your capabilities as a JSON in an easy and
straightforward way.
Simply select your desired options in the fields below. If you want to connect to a service like
SauceLabs, select the appropriate option and then replace the placeholders in the JSON with
your credentials.
Finally, copy the generated JSON and paste it into the ‘Capabilities JSON’ text box of your
configuration in Ranorex Studio.

Ranorex Parallel Runner
Ranorex Parallel Runner is a command-line tool that allows you to run a test across multiple
capability sets on a Selenium Grid through a WebDriver endpoint in parallel. The tool reads
the capability sets from an Excel template file.
Using Ranorex Parallel Runner
This tool is located in the Bin folder of your Ranorex installation. By default, this is
C:\Program Files (x86)\Ranorex\Bin\Ranorex.ParallelRunner.exe
It’s a good idea to run the tool with –help for the first time to display all available arguments:

Under the Usage: header, the three different use cases for the tool and the required
arguments are listed.
To get started, you’ll need to specify a set of capabilities. To do so, use this argument to
create the required Excel template. You can specify a location and filename if desired. By
default, the file will be created in the Bin folder and called CapabilitiesMatrix.xlsx. Follow
the instructions in the Excel file and define your capabilities.
Use this argument pattern to run your test with the defined capability sets on the specified
WebDriver endpoint in parallel. The –o argument is optional. If you don’t specify a path, the
Parallel Runner will generate a folder called parallelRuns in the folder where the test suite
executable is located.
Use this argument pattern to permutate an Excel template file and display all the
configurations resulting from the capability sets defined in the Excel file. The -j argument is
optional and transforms the output into JSON which can be entered in the Capabilities JSON
text box of a ⇢WebDriver endpoint’s configuration in Ranorex Studio.
Ranorex.ParallelRunner.exe -c []
Ranorex.ParallelRunner.exe -t -m -e [-o ]
Ranorex.ParallelRunner.exe -m -p [-j]

Mobile Testing
In this chapter, you’ll learn how to test apps and websites on mobile devices including
smartphones and tablets. You’ll learn how to connect devices to Ranorex Studio, instrument
apps, and create and run automated mobile tests.
System requirements
Supported devices
Ranorex Studio supports Android and iOS mobile devices.
Connection
Mobile testing requires that you connect your device to the computer that Ranorex Studio is
installed on. You can do so by USB (recommended) or WiFi.
Note
Ranorex iOS implementation requires that ports 31000 TCP and 31000 UDP
must be open on your computer.
Additionally, Ranorex Android requires other ports above 31000 TCP; therefore,
enable ports up to 31020.
On some Android devices, such as Huawei, ports 31000 – 31900 are already
used. However, the RxService application chooses the next available ports,
which are detailed in a message after the RxServices installation. Make sure to
open these ports on your computer and correctly configured the Endpoints in
Ranorex Studio for Discovery and Device port fields.
Use the correct automation libraries for mobile testing
Test automation of Android/iOS apps is based on the Ranorex automation libraries for mobile
testing. To ensure automation works smoothly, always use the automation libraries that
correspond to your currently installed version of Ranorex Studio. Otherwise, you will receive
technology limitation warnings or even errors.
You can download the automation libraries for the different Ranorex Studio versions from the
mobile download archive.
If you absolutely must use earlier automation libraries, you can do so as long as they only
produce warnings, but this is not recommended. In this case, simply close the technology
limitation warning.
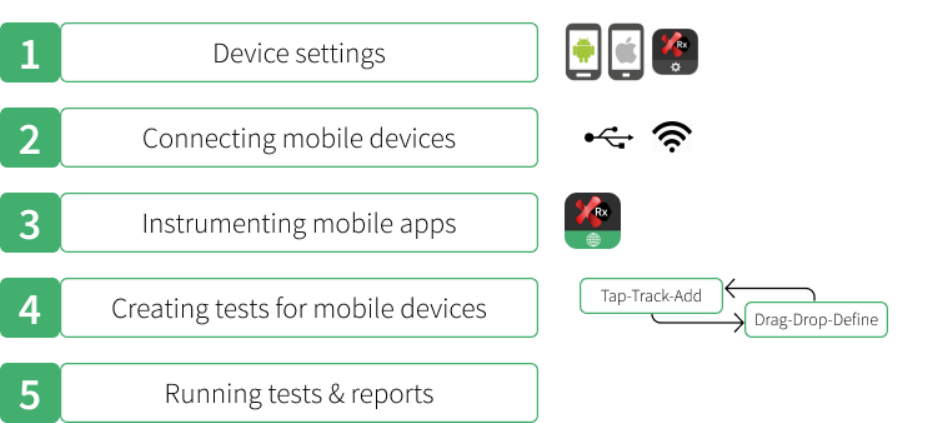
The basic procedure of mobile testing
Mobile tests in Ranorex Studio always follow the same basic procedure, regardless of the type
of device. The mobile OS and the type of test (app test or mobile web test) then determine the
specific actions and settings in the steps this basic procedure entails.
Prepare your device
• Enter the recommended device settings for Android and iOS
• Install the Ranorex Service App
Connect your device
• Choose a connection type

• Add the device as an endpoint in Ranorex Studio
Instrument apps
• Pre-instrumented Ranorex web browser (Android, iOS)
• Instrument Android apps
• Instrument iOS apps
• Pre-instrumented iOS sample app
Create a mobile test
• Create a solution for mobile testing
• Choose technology and test type
• Create the mobile test
Run a mobile test and get the report
The following chapters explain each of these steps in detail.
Prepare your device
Before you can connect your device to Ranorex Studio and add it as an endpoint, you need to
make certain preparations.
Android device settings
Activate developer mode
Mobile testing requires that some developer mode settings be activated. This mode is
normally hidden on Android devices. To activate it:
Go to your device’s settings.
Find the Build number entry. It’s normally located in the About section, but the
exact location may vary depending on device manufacturer and Android version.
Refer to your device’s documentation for more information.
Tap the Build number quickly seven times.
The notification You are now a developer indicates that developer mode is now
active.
The settings should now contain an entry called Developer options:

Activate Stay awake
Enable USB debugging
In the Developer options, enable USB debugging.
Confirm.

Attention
For some Android devices, USB debugging does not work with the default
Windows USB driver. This makes testing with Ranorex Studio impossible. In
these cases, you need to install the device manufacturer’s special developer
USB drivers.
You can normally see that this is the case if Windows recognizes your device
correctly, but you can’t add it as an endpoint in Ranorex Studio.
Connect your device to a power source
Regardless of the connection type (USB/WiFi), make sure that your device is connected to a
power source at all times during test creation and execution.
This ensures that everything runs as intended and is particularly important for WiFi
connections, as it deactivates power saving.
iOS device settings
Deactivate Auto-Lock
Go to your device’s settings.

Select Display & Brightness.
Set Auto-Lock to Never.
Connect your device to a power source
Regardless of the connection type (USB/WiFi), make sure that your device is connected to a
power source at all times during test creation and execution.
This ensures that everything runs as intended and is particularly important for WiFi
connections, as it deactivates power saving.
Install the Ranorex Service App
To create and run mobile tests on your mobile device, you need to install the Ranorex Service
App on your device.
Where can I find the Ranorex Service App?
Scan the QR code below or go to https://www.ranorex.com/rxApp to download the Ranorex
Service App.

Mobile download archive
The mobile download archive is categorized according to Ranorex Studio versions and
mobile OS. Simply download the correct Ranorex Service App.
Ranorex Service App for Android
Ranorex Service App for iOS
Install the Ranorex Service App on Android
Tap the download link.
Confirm the security dialog.

Tap Settings in the following dialog.
Enable Allow from this source.
Confirm the access dialog.
The Ranorex Service App has been installed successfully.

Your Android device is now ready to be ⇢ connected to Ranorex Studio.
Install the Ranorex Service App on iOS
Tap the download link.
Confirm the security dialog.
The Ranorex Service App appears on the home screen.
iOS considers the Ranorex Service App “untrusted” because it wasn’t downloaded
from the App Store. Close the dialog.

Confirm Ranorex Service App as trusted
Before you can use the Service App, it needs to be trusted.
Go to Settings > General.
Go to Device Management.
Tap Ranorex GmbH.
Tap Trust “Ranorex GmbH”.
Tap Trust.
The Ranorex Service App is now trusted.
Your iOS device is now ready to be ⇢ connected to Ranorex Studio.
Connect mobile devices
Before you can create and run tests on your mobile device, you need to connect it to your
computer and to Ranorex Studio. This requires adding your device as an endpoint in Ranorex
Studio.
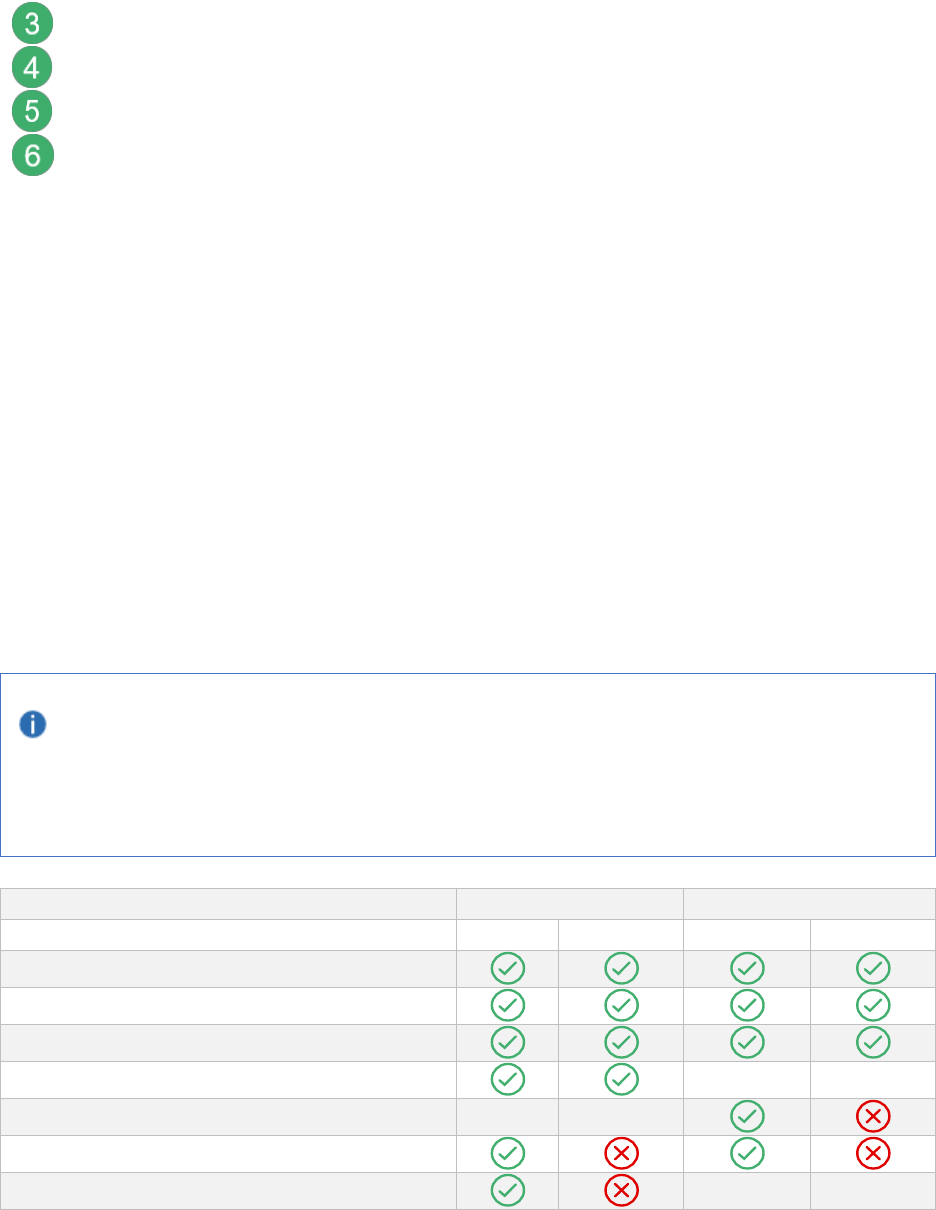
Connection types
You can connect your device to the computer that Ranorex Studio is installed on via USB or
WiFi. The following tables illustrate the differences between these connection types for
Android and iOS. We recommend using a USB connection, as this has no restrictions in
terms of functionality and is generally more reliable.
Note
Ports 31000 TCP and 31000 UDP must be open on your computer.
Android
iOS
USB
Wi-Fi
USB
Wi-Fi
Create tests
Run tests
Start/stop app
Install APK
Install IPA
Deploy (unattended)
Automate system apps

Connection requirements
Android USB connection
For some Android devices, USB debugging does not work with the default Windows USB
driver. This makes testing with Ranorex Studio impossible. In these cases, you need to install
the device manufacturer’s special developer USB drivers.
You can normally see that this is the case if Windows recognizes your devices correctly, but
you can’t add it as an endpoint in Ranorex Studio.
iOS USB connection
You must install iTunes to connect your iOS device to your computer via USB. It provides the
required drivers.
General network requirements and recommendations
Connect device to a power source
Regardless of the connection type (USB/WiFi), make sure that your device is connected to a
power source at all times during test creation and execution.
WiFi network
When connecting via WiFi, the mobile device must be in the same network as the computer.
USB hubs
When connecting via USB, avoid USB hubs. Always use your computers integrated USB ports
if possible.
Connect a device and add it as an endpoint
Note
In this example, the device is connected via USB. The process is basically the
same when connected via WiFi.

Connect the device to your computer via USB
For Android devices, a short sound will normally indicate that the device has been
recognized.
For iOS devices, iTunes will automatically open if the device is recognized.
The device also appears in your Windows settings if connected properly.
Add the device as an endpoint in Ranorex Studio
Reference
Adding a mobile device as an endpoint is explained in
Web and mobile testing > Endpoints > ⇢ Add an Android/iOS endpoint
Instrument apps
Before you can use test automation with a mobile app, you must instrument the app.
Instrumenting an app means configuring the app so that Ranorex Studio can access the GUI
and functions of the app for the purpose of creating and running an automated test.
Instrumenting apps works differently for Android and iOS, which is why the procedures are
explained separately in this chapter.
Attention
Whenever you update Ranorex Studio (i.e. use newer automation
libraries/Ranorex Service App), reinstrument your apps. Otherwise,
automation may not work as intended.

Attention
For iOS developers: As part of the instrumentation process, the app will be
compiled with the Ranorex automation library. This library adds additional
functions and permissions to your IPA.
Do NOT publish instrumented apps to the App Store.
Instrumented apps do not work with TestFlight.
Preinstrumented Ranorex Web Browser for Android
For web tests on Android devices, the preinstrumented Ranorex web browser for Android is
required.
Download and install the Ranorex Web Browser
Scan the QR code below or go to https://www.ranorex.com/rxApp to download the
Ranorex Web Browser for Android.
Select the preinstrumented browser in the mobile download archive:

Install it as you would any other app on your mobile device.
Opened Ranorex Web Browser.
The app is also listed in the Ranorex Service App, which indicates that it has been
instrumented correctly.
Preinstrumented Ranorex Web Browser for iOS
For web tests on iOS devices, the preinstrumented Ranorex web browser for iOS is required.
Download and install the Ranorex web browser
Scan the QR code below or go to https://www.ranorex.com/rxApp to download the
Ranorex Web Browser for iOS.
Select the preinstrumented browser in the mobile download archive:

Install it as you would any other app on your mobile device.
Opened Ranorex Web Browser.
The app is also listed in the Ranorex Service App, which indicates that it has been
instrumented correctly.
Instrument an Android app
You need to instrument Android apps before you can use them for mobile tests with Ranorex
Studio.

Note
It’s not possible to instrument apps that have been downloaded from Google
Play.
Reference
Instrumenting Android apps is explained in the following chapter:
Interfaces and connectivity > Ranorex Instrumentation Wizard > ⇢ Android apps.
Instrument an iOS app
You need to instrument iOS apps before you can use them for mobile tests with Ranorex
Studio.
Attention
Instrumenting iOS apps is challenging and not self-explanatory. It’s best done
by experienced iOS developers. To allow you to evaluate iOS testing with
Ranorex Studio without the hassle of instrumenting your own app, we provide
the preinstrumented KeePass app for your use.

Attention
For iOS developers: As part of the instrumentation process, the app will be compiled
with the Ranorex automation library. This library adds additional functions and
permissions to your IPA.
Do NOT publish instrumented apps to the App Store.
Instrumented apps do not work with TestFlight.
Note
It’s not possible to instrument apps that have been downloaded from the App Store,
as they are subject to DRM restrictions.
Instrumenting an iOS app means integrating a special Ranorex library (Ranorex libs) into the
source code of the app and then compiling it. Afterwards, the app needs to be signed with a
P12 certificate and the proper provisioning profile.
For more information on iOS development and release procedures, please refer to the official
Apple documentation.
There are two ways to instrument iOS apps:
• With the Ranorex Instrumentation Wizard (recommended)
Reference
Instrumenting iOS apps using the Instrumentation Wizard is explained in:
Interfaces and connectivity > Ranorex Instrumentation Wizard > ⇢ iOS apps
• Manual instrumentation of the source code in iOS with Xcode
iOS developers can integrate the Ranorex library, compile it, and sign the app
manually using Xcode.

Reference
Manual instrumentation is explained in the following chapter:
Web and mobile testing > Advanced mobile testing > ⇢ iOS source-code
instrumentation
Attention
After instrumenting and deploying the iOS app for the first time, start the app
manually once! Otherwise, it will not be visible within the Ranorex Service App.
Preinstrumented iOS sample app
Ranorex provides a preinstrumented iOS sample app for evaluation and learning purposes.
The app is KeyPass for iOS, distributed under the GNU General Publice License. For
information regarding the copyright holder and the license agreement, go to
https://keepass.info/help/v1/license.html.
Download and install the sample app
Scan the QR code below or go to https://www.ranorex.com/rxApp.
The mobile download archive is categorized according to Ranorex Studio versions
and mobile OS. Download the RxMiniKeePass app for iOS devices for your Ranorex
Studio version.
Next, install the sample app as you would any other app on your device.

The RxMiniKeypass app appears on your home screen.
Since the app is already instrumented, it also automatically appears in the Ranorex
Service App.
Create a mobile test
In this chapter, you’ll learn about the basics of creating a mobile test in Ranorex Studio.
Prerequisites
Before creating a mobile test, make sure you’ve completed all the necessary preparations:
Apply the necessary ⇢ device settings to your device and install the Ranorex
Service App.
⇢ Connect your device to the computer and ⇢ add it as an endpoint in Ranorex
Studio.
Finally:
If you want to test a mobile app, ⇢ instrument the app.
If you want to carry out a web test on your device, ⇢ install the
preinstrumented Ranorex Web Browser for Android (recommended) and/or
iOS (required).
Create a solution for mobile testing
To create a mobile test, you must use the RocketStart Wizard.

On the Ranorex Studio start page, click New solution using wizard… or click File >
New > New solution using wizard…
Click Mobile.
Follow the instructions of the wizard.
When you get to the screen below, choose which kind of mobile test you want to
create and click Continue.
Mobile iOS app test
Mobile Android app test
Mobile iOS web test
Mobile Android web test

Depending on your choice, the wizard will show you a checklist of necessary
preparations. If you followed our instructions under Prerequisites, you should
already have completed all of them. Click Continue.
Click Finish.
The prebuilt web test will look like this:

Test suite view
This is where you build and control your tests.
The test suite contains a test case with the empty recording module Recording1.
Note
The recording module has a different symbol than usual. This indicates that it’s
a mobile recording module, suitable only for building mobile tests. Standard
recording functionality is disabled for them.
All recording modules you create in this project are mobile recording modules.
Recording module view
In the recording module view of Recording1, you can start creating your mobile test
by adding actions.
Empty actions table
This is where your actions appear.
Create a mobile test
Now that we have our solution, we can start creating the actual mobile test. The procedure is
different from that for creating desktop or web tests, but it’s not complicated.

Click RECORD.
The dialog for selecting the mobile device and instrumented app appears.
Select your device and app. If you select the Ranorex Web Browser, also specify the
URL for the mobile web test.
Depending on your choice, different test types result. In our example:
Mobile Android web tests using the preinstrumented Ranorex Web Browser

Mobile Android app test using the instrumented Dropbox app
Mobile iOS web tests using the preinstrumented Ranorex Web Browser
Mobile iOS app test using the instrumented MiniKeePass app
Note
If your app doesn’t appear for selection, make sure that you’ve instrumented it
correctly.
Setup mobile test building
Click Create to start the setup process for mobile test creation.
Ranorex Studio will automatically carry out the following processes to set up mobile test
building:
In Ranorex Studio
Ranorex Studio starts the selected app on your mobile device and adds the respective action
in the action table.

The RUN button changes to reflect that it now runs the test on the current
automation root, i.e. the active endpoint/mobile devices, not the computer.
An action that starts the app on the mobile device has been added to the action
table.
On the mobile device
The instrumented device starts on the mobile device. In our case, this is the Dropbox mobile
app.

Attention
Regarding mobile iOS applications, it is necessary that the Ranorex Service
Application is running and active on the mobile device. Ensure that it is not
running in the background as this may prevent you from using the start/stop
functionality for the mobile application.
Ranorex Spy
Ranorex Spy starts in live tracking mode for all UI elements of the instrumented mobile app.
Element browser in Spy showing all the UI elements of the instrumented app.
Live view of the instrumented app on the mobile device
Build the test
Building a mobile test consists of two consecutive, iterated steps:
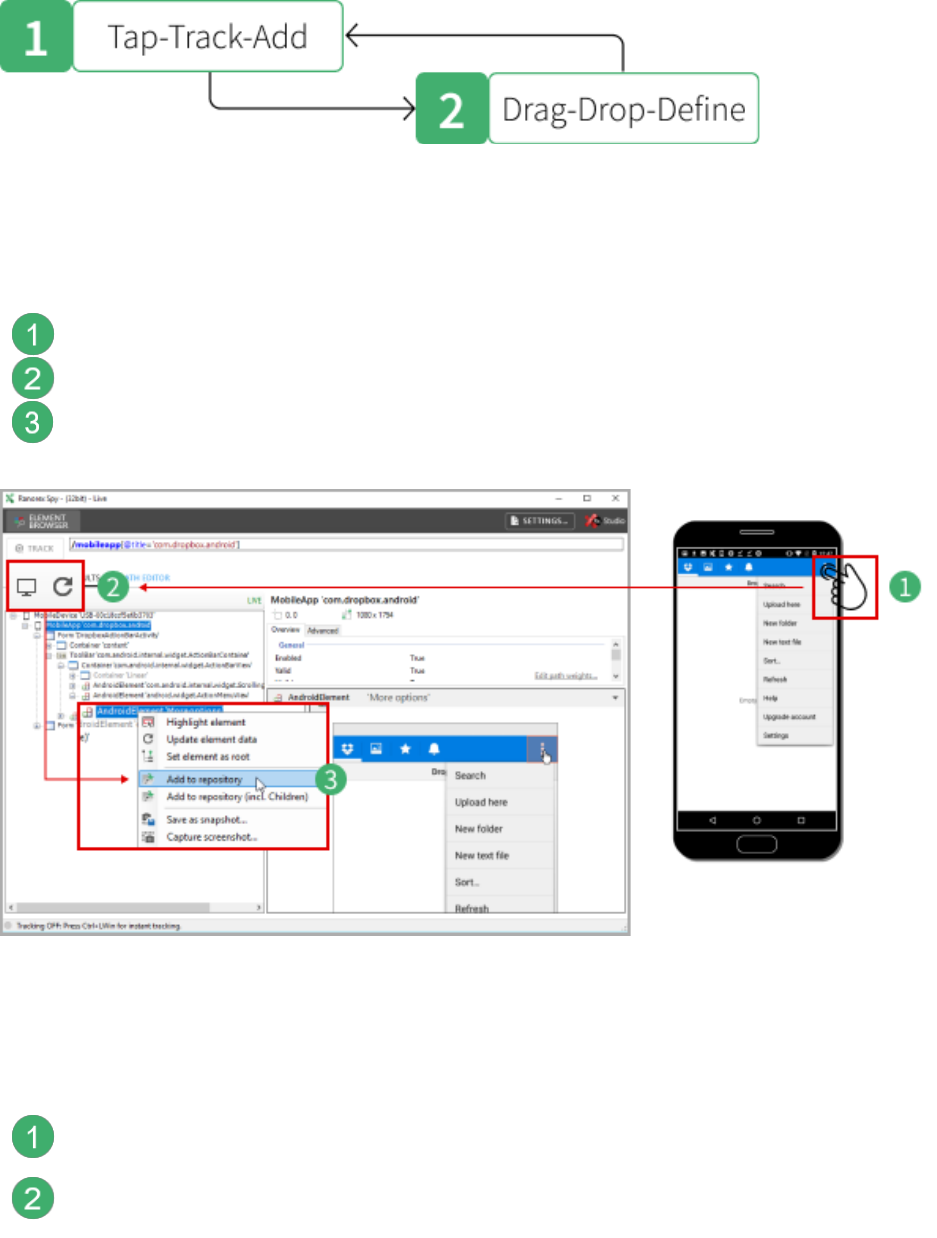
Step 1: Tap, Track, and Add
In this step, you add a UI element as a repository item to Ranorex Studio to make it available
for use in actions.
Tap: Make the element visible in the app, e.g. by tapping it.
Track: Update the live tracking in Spy by clicking Browse endpoint or Refresh.
Add: Select the element in the element tree, right-click it, and add it to the
repository. Alternatively, drag and drop it in the repository.
Step 2: Drag, Drop, and Define
In the second step, you “process” the UI element, i.e. you use it in an action.
Drag: From the repository, drag the repository item to the desired position in the
action table.
Drop: Drop it by releasing the left mouse button. The context menu opens. Select
the desired action.

Define: Make any necessary configurations to the action, e.g. setting timeouts,
content of key sequences, etc. The finished action is shown in the action table,
linked to the repository item representing the respective UI element in the app.
Note
You can shorten the procedure by directly dragging a UI element from Spy to the
action table.
Reference
You can find step-by-step instructions for creating mobile tests in
Web and mobile testing -> Mobile testing > ⇢ Android app testing example / ⇢ Android
mobile web test example
Web and mobile testing -> Mobile testing > ⇢ iOS app testing example / ⇢ iOS mobile
web test example

Tips for efficient test building
Remote control your app from Spy
You can remote control your app through Spy. This way, you won’t have to carry out all the
actions to bring up menus and different screens in the app on the actual mobile device.
In the live view of Spy, right-click a UI element and click Touch/Tap.
The action is executed on your mobile device as if you actually touched the screen.
Enter text in Spy instead
You can also enter text in a similar way.
In Spy, with a UI element selected, click the Advanced tab.
Find the Text attribute, enter your text, and confirm with Enter.
The text appears in the mobile app as if you typed it in using the screen keyboard.

Run a mobile test
For the most part, running mobile tests works the same as for any other test. There are just a
few preparations required.
Preparation
To execute a test on a mobile device, you need to make the following preparations:
• The device must be set as automation root in the endpoints pad. Alternatively, you
can specify an endpoint in the Run mobile app action. It will then override the
automation root.
• The Ranorex Service App must be installed on the mobile device.
Run the test
With the above preparations made, you can run the test like any other.
In the test suite view, click RUN. The test will be started and run on the mobile
device.

Attention
Do not touch the screen or any buttons on the mobile device while the test is
running. This would result in a test failure.
Note
The various available options for test runs are also the same as for other
tests. For more information, refer to ⇢ Execute a test suite.
Report
Once the test run has finished, the report appears.

The report for mobile tests does not differ from that for other tests.
Reference
Reports are explained in Ranorex Studio fundamentals > Reports > ⇢ Introduction
Android app testing example
In this chapter, we’ll go through an Android app test step by step.
Test scenario
We’ll test the freely available Dropbox mobile app. Our test contains the following steps:
1. Start the Dropbox app on the Android device.
2. Check if the Dropbox is empty.
3. Create a new folder called MyDocuments.
4. Create a screenshot of the Dropbox desktop with the folder in it.
5. Delete the folder.
6. Check if the Dropbox is empty.

7. Close the app.
Preparations
Device settings
• Apply the required ⇢ device settings to your Android device and install the Ranorex
Service App.
Connect mobile device
• ⇢ Connect your mobile device to your computer, preferably via USB, and ⇢ add it as
an endpoint in Ranorex Studio.
Instrument the app
• Download the Dropbox APK from the Dropbox website and ⇢ instrument it.
Create a Dropbox account
• You’ll need a free Dropbox account. Create one at www.dropbox.com.
Create a solution for mobile testing
⇢ Create a new solution for mobile testing using the RocketStart wizard.
Open the Endpoints pad.
Open the recording module Recording1.rxrec.
Ranorex Studio should now look as follows:

Empty action table in the recording module
Empty repository
Your device in the Endpoints pad.
Ranorex Service App running on the mobile device, showing the Dropbox app as
instrumented.
Create the test
Click RECORD.
The dialog for selecting the mobile device and instrumented app appears.
Select your Android device and app (the Dropbox app) and click Create.

Setup
Ranorex Studio now executes the following processes to set up mobile test building.
In Ranorex Studio
Ranorex Studio starts the selected app on your mobile device and adds the respective action
in the action table.
The RUN button changes to reflect that it now runs the test on the current
automation root, i.e. the active endpoint/mobile devices, not the computer.
An action that starts the app on the mobile device has been added to the action
table.

On the mobile device
The instrumented app starts on the mobile device. In our case, this is the Dropbox mobile
app.
Ranorex Spy
Ranorex Spy starts in live tracking mode for all UI elements of the instrumented mobile app.

Element browser in Spy showing all the UI elements of the instrumented app.
Live view of the instrumented app on the mobile device.
Build the recording module
Now we can start filling our recording module with actions.
We’ll do this using the two-step test-building procedure for mobile tests as explained in detail
in ⇢ Create a mobile test.
Validate that the Dropbox is empty
Step 1: Identify validation text
Ensure that the validation text Empty folder is visible on the mobile device.
Click Refresh in Spy.
Drag the UI element for Empty folder from Spy to the repository in Ranorex Studio.
Step 2: Define validation
Drag the new repository item to last position in the action table.
In the context menu that opens, click Validation.

Define the Validation action: For Match-Name, select Text and for Match-Value,
enter “Empty folder”.
Open the menu
Step 1: Identify UI element
Ensure that the button for opening the menu is visible on the mobile device.
Click Refresh in Spy.
Drag the UI element for the button from Spy to the repository in Ranorex Studio.
Step 2: Define action

Drag the new repository item to last position in the action table.
In the context menu that opens, click Validation.
Define the Validation action: For Match-Name, select Text and for Match-Value,
enter “Empty folder”.
Note
Creating these first two actions illustrates the 2-step procedure, which remains
the same for the following actions. Therefore, the following instructions don’t
describe the procedure in quite as much detail.
Create a new folder
The option to create a new folder is located in the breadcrumb menu of the Dropbox app.
Add the UI element for the menu option New folder to your repository with Spy.
Create a Touch action with this repository item.

Touch action linked to the repository item for the menu option New folder.
Enter folder name and create folder
Add the UI elements for the Folder name text field and the Create button to your
repository with Spy.
Create the following three actions with these repository items:

Touch action to place the cursor in the text field.
Set value action to enter the folder name.
Touch action tapping Create to create the folder.
Hint
If you want to test the functionality of the on-screen keyboard, you can also
automate entering the name by a series of touch actions on the keys.
Validate folder
Now we’ll validate that the folder exists. We’ll use image-based validation for this purpose.
Add the folder image to your repository with Spy.
Create the following action with this repository item.
Validation action that uses image-based validation.

Reference
Image-based validation is explained in Ranorex Studio fundamentals > Validation > ⇢
Image-based validation
Delete folder
Deleting the folder requires that we open a menu, tap the first Delete button, and then tap
the second Delete button.
Add the three required UI elements to your repository with Spy.
Create the following actions with this repository item.
Opens the folder menu by tapping the respective symbol.
Taps the first Delete button.
Taps the second Delete button.
Validate that the folder has been deleted and close app
The repository items that we need already exist. Use them to create the following
two actions.

Validates that the Dropbox home screen is empty (a simple copy of action #2).
Closes the app.
Completed recording module
If you followed our instructions, your completed recording should look like this:
You can now switch to the test suite view and run the test. However, in a real-life scenario, the
test wouldn’t be quite finished here. The next step would be to modularize the recording and
structure the test suite.

The concepts of modularizing and structuring apply to all recording modules and test suites,
whether for desktop, web, or mobile tests.
Reference
Managing recording modules is explained in:
Ranorex Studio fundamentals > Ranorex Studio Overview > ⇢ Manage recording
modules
Structuring a test suite is explained in:
Ranorex Studio fundamentals > Ranorex Studio Overview > ⇢ Test suite structure
A step-by-step example of building a full test suite is available in:
Ranorex Studio fundamentals > Ranorex Studio Overview > ⇢ Build a test
Android mobile web test example
In this chapter, we’ll cover the initial steps of a mobile web test on an Android device. After
these initial steps, test creation follows the same principles as in the ⇢ Android app test
example and ⇢ general web test creation.
Preparations
To create a mobile web test, you need to make the following preparations:
Device settings
• Apply the required ⇢ device settings to your Android device and install the Ranorex
Service App.
Connect mobile device
• ⇢ Connect your mobile device to your computer, preferably via USB, and ⇢ add it as
an endpoint in Ranorex Studio.
Install the Ranorex Web Browser app for Android

• Ranorex provides a ⇢ preinstrumented web browser that is required for creating and
executing Android web tests.
Choose a mobile browser
Ranorex provides a preinstrumented web browser. You need to use this browser to automate
Android web tests.
Reference
Installing this app is explained in Web and mobile testing > Mobile testing > ⇢
Instrument apps
Create a solution for mobile testing
⇢ Create a new solution for mobile testing using the RocketStart wizard.
Open the Endpoints pad.
Open the recording module Recording1.rxrec.
Ranorex Studio should now look as follows:
Empty action table in the recording module
Empty repository
Your device in the endpoints pad

Ranorex Service App running on the mobile device, showing the preinstrumented
web browser app. If you chose a different web browser and instrumented it
correctly, it will also appear here.
Create the test
Click RECORD.
The dialog for selecting the mobile device and instrumented app appears.
Select your Android device app (web browser), specify the URL, and click Create.

Setup
Ranorex Studio now executes the following processes to set up mobile test building:
In Ranorex Studio
Ranorex Studio starts the selected app on your mobile device and adds the respective actions
in the action table.
The RUN button changes to reflect that it now runs the test on the current
automation root, i.e. the active endpoint/mobile devices, not the computer.
An action that starts the app on the mobile device has been added to the action
table.
An action that navigates to the specified URL in the selected browser app has also
been added.
On the mobile device
Ranorex Studio starts the selected browser and navigates to the specified URL on the mobile
device.

Ranorex Spy
Ranorex Spy starts in live tracking mode for all UI elements of the instrumented mobile app.
Element browser in Spy showing all the UI elements of the instrumented app.

Live view of the instrumented app on the mobile device.
Build the test
From this point forward, test building follows the same principles as in the ⇢ Android app
test example and ⇢ general web test creation.
iOS app testing example
In this chapter, we’ll go through an iOS app test step by step.
Test scenario
We’ll test the preinstrumented iOS KeyPass mobile app that you can download from the
Ranorex website. Our test contains the following steps:
1. Start the app on the iOS device.
2. Create a new password database.
3. Name it MyPasswords.
4. Give it the password 1234.
5. Check if the category General exists.
6. Exit the app.
Preparations
Device settings
• Apply the required ⇢ device settings to your iOS device and install the Ranorex
Service App.
Connect mobile device
• ⇢ Connect your mobile device to your computer, preferably via USB, and ⇢ add it as
an endpoint in Ranorex Studio.
Instrument the app
• Download the ⇢ preinstrumented KeyPass app from our mobile download archive
and install it on your device.
Create a solution for mobile testing

⇢ Create a new solution for mobile testing using the RocketStart wizard.
Open the Endpoints pad.
Open the recording module Recording1.rxrec.
Ranorex Studio should now look as follows:
Empty action table in the recording module
Empty repository
Your device in the Endpoints pad.
Ranorex Service App running on the mobile device, showing the KeyPass app as
instrumented.
Create the test
Click RECORD.
The dialog for selecting the mobile device and instrumented app appears.

Select your iOS device and app (KeyPass app) and click Create.
Setup
Ranorex Studio now executes the following processes to set up mobile test building.
In Ranorex Studio
Ranorex Studio starts the selected app on your mobile device and adds the respective action
in the action table.

The RUN button changes to reflect that it now runs the test on the current
automation root, i.e. the active endpoint/mobile devices, not the computer.
An action that starts the app on the mobile device has been added to the action
table.
On the mobile device
The instrumented app starts on the mobile device. In our case, this is the KeyPass mobile
app.
Ranorex Spy
Ranorex Spy starts in live tracking mode for all UI elements of the instrumented mobile app.

Element browser in Spy showing all the UI elements of the instrumented 100app.
Live view of the instrumented app on the mobile device.
Build the recording module
Now we can start filling our recording module with actions.
We’ll do this using the two-step test-building procedure for mobile tests as explained in detail
in ⇢ Create a mobile test.
Create new password database
Step 1: Identify UI element and add to repository
Ensure that the + button is visible on the mobile device.
Click Refresh in Spy.
Drag the UI element for Empty folder from Spy to the repository in Ranorex Studio.

Step 2: Define action
Drag the new repository item to last position in the action table.
In the context menu that opens, click Touch.
The Touch action needs no further definition and is complete.

Note
Creating this action illustrates the 2-step procedure. It remains the same for the
following actions. Therefore, the following instructions don’t describe the
procedure in quite as much detail.
Enter the database name
After tapping the + button, a dialog opens asking for a name and a password for the new
database. To enter the name, we’ll need to create two actions.
Add the name text field to your repository with Spy.
Create the following two actions with this repository item:
Touch action that places the cursor in the text field.
Set value action that enters the name.
Hint
If you want to test the functionality of the on-screen keyboard, you can also
implement entering the name by a series of touch actions on the keys.

Enter and confirm the database password
Add the two text fields for the password and its confirmation to your repository with
Spy.
Create the following four actions with these repository items:
Touch action and Set value action to place the cursor in the text field and enter the
password.
Touch action and Set value action to place the cursor in the text field and repeat the
password.
Confirm database creation
Add the Done button to your repository with Spy.
Create the following action with this repository item:

Touch action that taps the Done button to confirm database creation.
Validate database file
Now we’ll validate whether the database was created correctly.
Add the file name to your repository with Spy.
Create the following action with this repository item:
Validates that the displayed file name is the same as the one entered during
database creation.
Delete database and close app
Add the Edit, (-) and Delete buttons to to your repository with Spy.
Create the following actions with these repository items:

Touch action that taps Edit.
Touch action that taps (-).
Touch action that taps Delete to confirm deletion.
Closes the app.
Completed recording module
If you followed our instructions, your completed recording should look like this:
You can now switch to the test suite view and run the test. However, in a real-life scenario, the
test wouldn’t be quite finished here. The next step would be to modularize the recording and
structure the test suite.

The concepts of modularizing and structuring apply to all recording modules and test suites
regardless of desktop, web, or mobile tests.
Reference
Managing recording modules is explained in:
Ranorex Studio fundamentals > Ranorex Studio Overview > ⇢ Manage recording
modules
Structuring a test suite is explained in:
Ranorex Studio fundamentals > Ranorex Studio Overview > ⇢ Test suite structure
A step-by-step example of building a full test suite is available in:
Ranorex Studio fundamentals > Ranorex Studio Overview > ⇢ Build a test
iOS mobile web test example
In this chapter, we’ll cover the initial steps of a mobile web test. After these initial steps, test
creation follows the same principles as in the ⇢ iOS app test example and ⇢ general web test
creation.
Preparations
To create a mobile web test, make the following preparations:
Device settings
• Apply the required ⇢ device settings to your iOS device and install the Ranorex
Service App.
Connect mobile device
• ⇢ Connect your mobile device to your computer, preferably via USB, and ⇢ add it as
an endpoint in Ranorex Studio.
Install the Ranorex Web Browser app for iOS

• Ranorex provides a ⇢ preinstrumented web browser that is required for creating and
executing iOS web tests.
Create a solution for mobile testing
⇢ Create a new solution for mobile testing using the RocketStart wizard.
Open the Endpoints pad.
Open the recording module Recording1.rxrec.
Ranorex Studio should now look as follows:
Empty action table in the recording module
Empty repository
Your device in the Endpoints pad
Ranorex Service App running on the mobile device, showing the preinstrumented
web browser app.
Create the test
Click RECORD.
The dialog for selecting the mobile device and instrumented app appears.

Select your iOS device, select the app (Ranorex Web Browser), specify the URL, and
click Create.
Setup
Ranorex Studio now executes the following processes to set up mobile test building:
In Ranorex Studio
Ranorex Studio starts the selected app on your mobile device and adds the respective actions
in the action table.

The RUN button changes to reflect that it now runs the test on the current
automation root, i.e. the active endpoint/mobile devices, not the computer.
An action that starts the app on the mobile device has been added to the action
table.
An action that navigates to the specified URL in the web browser app has also been
added.
On the mobile device
Ranorex Studio starts the preinstrumented web browser and navigates to the specified URL
on the mobile device.

Ranorex Spy
Ranorex Spy starts in live tracking mode for all UI elements of the instrumented mobile app.
Element browser in Spy showing all the UI elements of the instrumented app.
Live view of the instrumented app on the mobile device.
Build the test
From here on out, test building follows the same principles as in the ⇢ iOS app test example
and ⇢ general web test creation.

Advanced mobile testing
iOS Service App
This quick starting guide will show you, how to properly use the new iOS RxServiceApp to
create automated tests and how to prepare your iOS project so that start/stop app
functionality can be used.
Prepare Your iOS Project to Enable Start/Stop Functionality
The following step by step instructions are based on Xcode 6.
If the app will be instrumented manually, please do the following steps to register the custom
URL scheme so that the starting and stopping will work correctly:
• Open your project in Xcode 6.x
• Follow the instructions in the section: Instrumentation with source code on iOS
• In Xcode choose the “Info” tab
• Under Custome iOS Target Properties add URL types key
• Expand URL types key with Item0
• Expand Item0 with URL schemes
• Expand URL schemes with Item0 and write the app activity name as value

Note
• If no URL scheme is set, the app under test cannot be launched and you will get an
error message when you try to start the app with Ranorex. In the app list of the iOS
RxServiceApp there will be also a warning message “Can’t launch”.
• After Instrumenting and deploying the app for the first time, start the app manually
once.
• The newly instrumented and deployed app, needs to be started manually for the
first time, so that it gets registered at the RxServiceApp.
• If the app is instrumented with Ranorex Studio on the Windows machine, the
correct URL scheme will be set automatically.
• Due to restriction in Apple API it may occur that the instrumented IPA is not able to
run from with Ranorex Studio, while RxServices application is in the background
mode. It is recommended to perform any test while the instrumented IPA is in the
foreground
Proper use of the iOS Service App
To use the new start/stop functionality via USB or WiFi, make sure that the RxServiceApp is
running and is active on the device. You can either use the instrumentation wizard to deploy
the service app as described in ⇢ Instrumentation Wizard – iOS, or download and
install the service app on your device from our mobile download archive by scanning the
following QR Code or the using the following short URL:
Use the QR Code above or the url https://bitly.com/mArchive to directly access the
download archive on your mobile device.

Note
Start/Stop functionality can not be used from the home screen of the device, even if
the RxServiceApp is running in the background.
You can still create automated tests without the iOS RxServiceApp. Please note that without
the RxServiceApp the start/stop functionality won’t work.
To add a device without the service app, make sure that an instrumented app is running and
active on the device.
Note
• When using the start functionality, the app under test will be launched multiple
times, because it needs to be reseted into initial state.
• If you want to create automated test on an instrumented app that has no URL
Scheme, please make sure, that the RxServiceApp is not installed on the device and
that the testing app is active on the device.
Non-UI Testing
Next to automate testing of the user interface of mobile applications it’s also possible to
perform non-UI tests invoking technology dependent actions (see ⇢Detailed list of actions).
This feature allows you to get information about the devices hardware, the operating system
etc.
Non-UI testing on Android
You are able to get the device info of your Android device directly by right-clicking the mobile
device in Ranorex Spy.

You can access the non-UI testing methods in the action table by adding an invoke action on
the mobile app.

You can also access the non-UI testing methods within User Code Actions as well as Code
Modules.
The code should look something like the following:
C#
var app = repo.AndroidApp.Self.As<AndroidApp>();
// get an AndroidDeviceInfo object holding all available device info
var info = app.GetDeviceInfo();
// get a list of SMS from the device
var sms = app.GetSms();
// get a list of calls from the device
var calls = app.GetCalls();
// report the manufacturer of the device
Report.Info("Manufacturer: " + info.Manufacturer);
// report the manufacturer of the device
Report.Info("SMS: " + sms.ToString());

// report the manufacturer of the device
Report.Info("Calls: " + calls.ToString());
VB.NET
Dim app = repo.AndroidApp.Self.[As](Of AndroidApp)()
' get an AndroidDeviceInfo object holding all available device info
Dim info = app.GetDeviceInfo()
' get a list of SMS from the device
Dim sms = app.GetSms()
' get a list of calls from the device
Dim calls = app.GetCalls()
' report the manufacturer of the device
Report.Info("Manufacturer: " & info.Manufacturer)
' report the manufacturer of the device
Report.Info("SMS: " & sms.ToString())
' report the manufacturer of the device
Report.Info("Calls: " & calls.ToString())
Reference
For further information about code modules and user code actions please have a look
at the chapters ⇢Code modules and ⇢User code actions.
Cross-device mobile tests
In this chapter, we’ll show you how you can configure one test to run on several different
devices of the same mobile OS (Android OR iOS) consecutively and even in parallel.
The configuration is based on data-driven testing and is the same for both Android and iOS.
For the sake of simplicity, the screenshots refer to Android only.

Note
Make sure to add a Close application action when running your test on different
devices. Otherwise, the tests may run in a different order or be skipped for some
devices.
Configure a consecutive cross-device test
Open the first recording module in your test. It should contain the Run mobile app
action.
Click the Endpoint property and click As new variable…
Name the variable varMobileDevice. This variable will control which device the test
app will be started on, and therefore where the test will be run.

Switch to the test suite view.
Right-click the test suite that contains the recording with the Run mobile app action
and click Data source…
In the dialog that opens, click New > Simple data table.

Fill the data table with the names of the desired devices as they appear in the
endpoints pad.

Click Data binding and under Module variable, bind the data column with the
device names to the device variable varMobileDevice.

The test will now be iterated for each device in your data source. This will also be
reflected in your report.

Configure a parallel cross-device test
It’s also possible to run one test on multiple devices at the same time.
First:
Configure a variable as in steps 1-3 in the instructions for a consecutive cross-
device test above.
Or simply disable the existing data source if you’re working with the test from
the instructions for a consecutive cross-device test above.

In the test suite view, right-click the test suite node and click Global parameters…
Add a global parameter called globalMobileDevice.
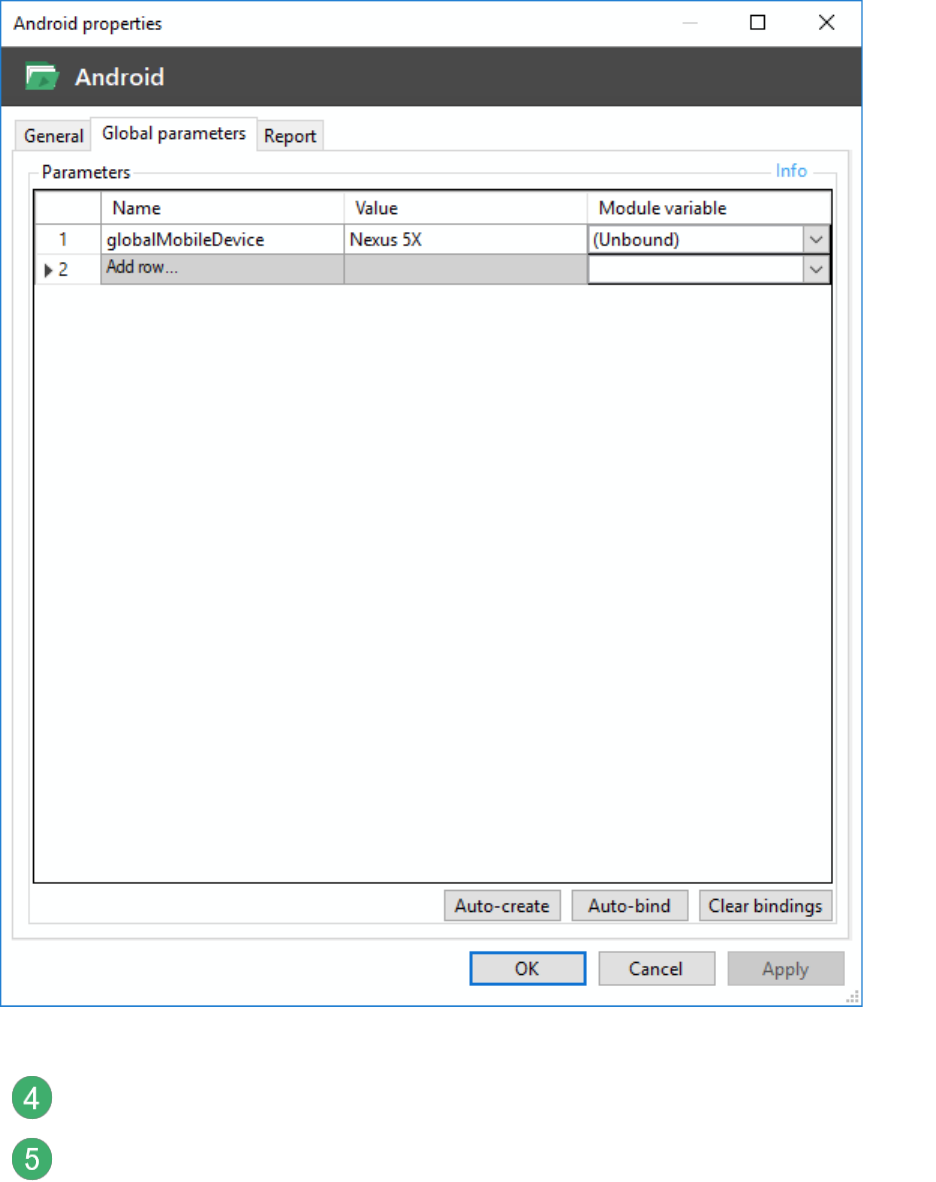
Right-click the test case that contains the recording where you specified the
variable and click Data binding…
Under Parameters > Module variable, bind the variable to the global parameter.

In the repository, find the app folder for your mobile app and click EDIT IN SPY.

Modify the path as in the screenshot below and ensure the attribute devicename
has the value $varMobileDevice, i.e. the device variable specified earlier.
To run your test in parallel, start it from a command line environment with the
following arguments:
start MobileTest.exe /pa:globalMobileDevice="Galaxy Nexus"
start MobileTest.exe /pa:globalMobileDevice="GT-P7500"
Reference
Running tests from the command line is explained in Ranorex Studio fundamentals
> Ranorex Studio Overview > ⇢ Run tests without Ranorex Studio
Automate Android system apps
When automating an Android App it might sometimes be necessary to leave the application
under test. For example, you want to:
• check if an issued notification has been received

• share something on a social network
• change the system settings
• …
To automate these tasks, you need to automate the Android OS. This comes with certain
special requirements and restrictions that are explained in this chapter.
Note
• To automate system apps the setting ‘Android OS Automation’ has to be
enabled. The setting can be found in the mobile section of the plugin specific
settings in ⇢settings dialog.
• To speed up the test execution of system app automation you can disable the
generation of screenshots for android. The setting can be found in the mobile
section of the plugin specific settings in ⇢settings dialog.

Restrictions
• To automate system apps a USB connection has to be established.
• Highlighting on the device does not work for system apps
Validate an Issued Notification
The following example will show how to validate a text in a received notification.
Create a new recording and select the mobile option as usual. Ranorex Spy will open and you
will notice a node labeled ‘MobileApp AndroidOS’ at the application level in the object tree.
To navigate through the element tree you can either use the tree view. Another way to
navigate is to use the image navigator which can be found at the bottom of the
Overview/Advanced tab. Clicking a UI element selects it, double-clicking outside the selected
element selects the parent.

To open the notification bar, a swipe action from the top of the screen has to be performed.
Navigate to a tree element including the navigation bar in the representing screenshot and
add this element to the repository using the context menu.
Add a swipe action by dragging/dropping the newly created repository item to the actions
table and choosing ‘Swipe Action’ as action type from the context menu.

In the properties pane set the swipe direction to ’90°’ and the start location to ‘0.5;0.0’ which
is the top center of the element.
Manually open the notification bar on your device and switch back to Ranorex Spy. Navigate
through the element tree until you’ll find the element you want to validate.

Add the specific element to the repository and add a validation action on the repository item
as described before.
Additionally, add a key press on the back button to return to the initial situation.
After adding these three actions, the recording is ready to be executed.
Test Android Wear apps
Following the instructions below you can easily create automated tests on compatible
Android Wear apps directly on real or emulated devices.
Prerequisites

• Install adb:
The Android Debug Bridge (adb) is a versatile command line tool that lets you
communicate with an emulator instance or connected Android device.
You can find it at BinRxEnvAndroidtools.
• Connect with the phone:
Download the Android Wear app on your phone and pair the watch with your phone.
You can find detailed information on how to do so
here: https://support.google.com/androidwear#topic=6056405
• Enable the debug mode:
On the smartphone go to “Developer Options” and enable “USB Debugging”.
On the watch got to “Developer Options” and enable “ADB Debugging” as well as
“Debug over Bluetooth”.
• Finally, open the Android Wear app on your smartphone, press the Settings button on
the top right and check the “Debugging over Bluetooth”. The target should be shown
as connected.
Note
If the target is still disconnected, try to restart both the smartphone and the
watch.
Getting Started
Connect the device via USB to your computer and call adb via command line by typing “adb
devices”.
It should print something like this:
List of devices attached
08937p69d0518aac device
This means you have successfully connected your phone to your computer. Now we need to
connect the watch too. Type the following commands:
adb forward tcp:6666 localabstract:/adb-hub
adb connect localhost:6666

Note
You need to accept the connection on your watch.
Type once again “adb devices”. You should now see a new device called localhost:6666:
08937p69d0518aac device
localhost:6666 device
In your Android Wear App, Host and Target should now show up as connected.
Note
Connecting host and target does not always work at first go. Try restarting both
devices in different order and be patient.
Now you can connect your devices, instrument your apps, and create your test.
Automate on an Emulated Device
The following instructions explain how to connect a Genymotion emulated smartphone with
a Google emulated watch.
First, download Genymotion setup and start any Genymotion emulator with Android 4.3 or
later. For Google’s emulated watch you need the AVD Manager.
Start the Android Studio, go to Tools -> Android -> AVD Manager. Create a new Virtual Wear
device and start it.
Next, install Google Apps or Gapps on the Genymotion smartphone. With Gapps, also the Play
Store will be installed, which is needed for downloading the Wear App.
Go to https://opengapps.org/#downloadsection and download the correct Gapps for your
emulator. To install Gapps on Genymotion, please follow these instructions.

Note
Gapps may sometimes be unstable when running on Genymotion emulators.
Follow the steps explained in ⇢Prerequisites and list your devices via adb as described
in ⇢Getting started.
It should print something like this:
List of devices attached
192.168.154.102:5555 device
This means you have successfully connected your emulated phone to your computer. Now
you need to connect the watch too. Type the following command into the command line:
adb -s {genimotion_ip}:{genimotion_port} -d forward tcp:5601 tcp:5601
Type once again the “adb devices” command. You should see a new device called emulator-
5600.
Now you can connect your devices, instrument your apps, and create your test.
Instrumentation with source code on iOS
In this chapter, we’ll show you how to instrument your app using source code on iOS. Simply
follow the instructions below. Alternatively, there are also many video tutorials on YouTube
that detail this process.
Attention
We recommend you only instrument with source code if you are an experienced iOS
developer.
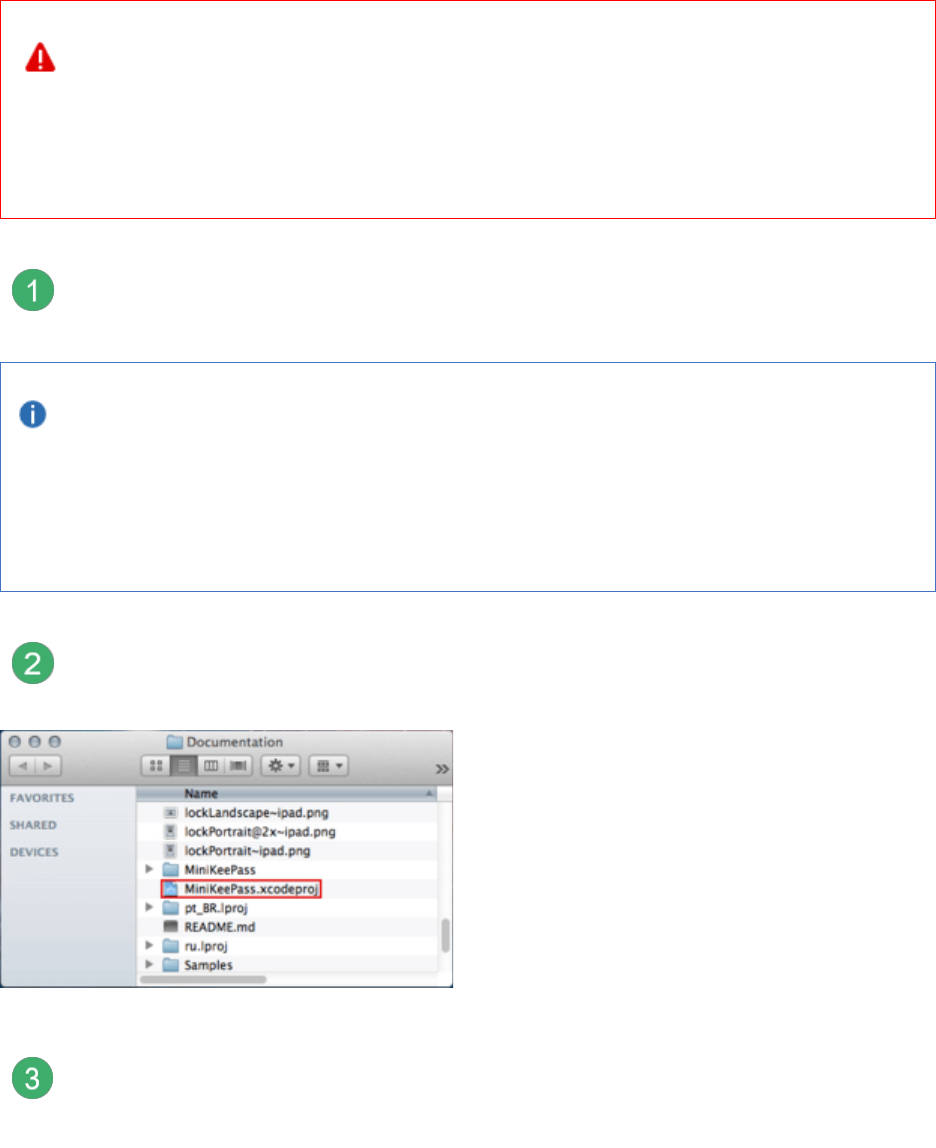
Attention
Whenever you update Ranorex Studio (i.e. use newer automation
libraries/Ranorex Service App), reinstrument your apps. Otherwise,
automation may not work as intended.
Download the automation lib from the Mobile Download Archive on your Mac.
Note
The file size of Ranorex Automation Library is about 30 megabytes. This does not
automatically make your app 30 megabytes bigger since it is a universal library
and only the parts essential for your app will dynamically be added when
compiling it.
Open the XCode project of your application under test.
To avoid shipping an instrumented app to your customers it is recommended to
create a separate target for your app under test. You should select the project file
and duplicate the existing target.

Rename the newly created target.
Note
As XCode does not automatically update all necessary files, you have to rename
them manually. You will have to alter the target itself, the targets .plist file (in
the workspace as well as in Build Settings -> Packaging), the targets’ project
name (Build Settings -> Packaging) and the schemes name (Product -> Manage
Schemes).
Add the previously downloaded automation lib to your newly created target.

After doing this, the automation lib will be listed in the ‘Linked Binary With Libraries’
list in the ‘Build Phases’ pane of the test target.

Add the CFNetwork framework to the list.
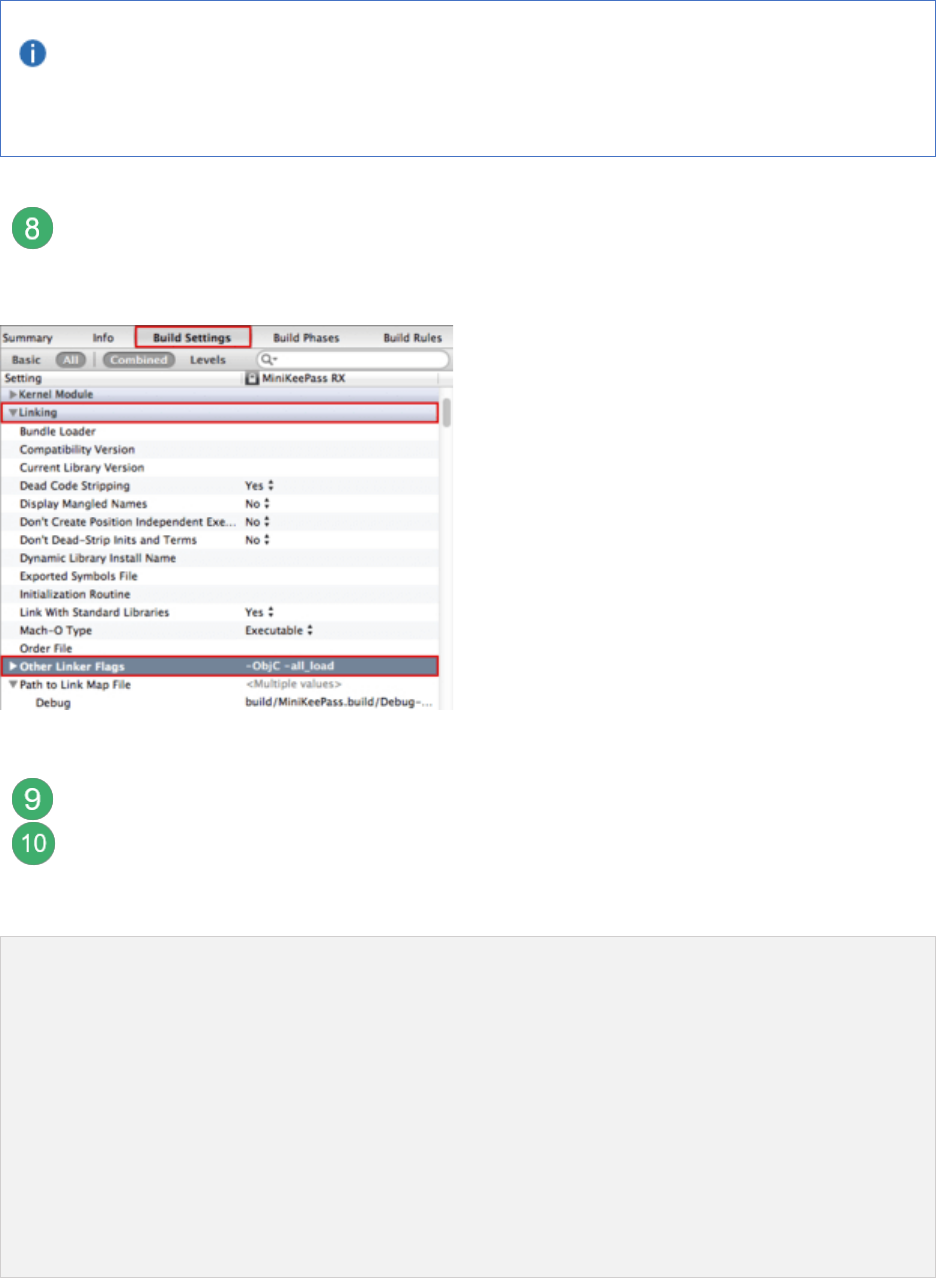
Note
Additionally, with iOS 8.3 add the IOKit.framework.
In the Build Settings pane of the test, add the switches ‘-ObjC -all_load’ to the
option Other Linker Flags.
Under the Info tab, add a Bundle display name key (CFBundleDisplayName).
Insert the URL schema in the application settings to open the instrumented IPA from
RxServices or Ranorex Studio, for more information review the iOS Service App page.
Below, an example of a schema:
<key>CFBundleURLTypes</key>
<array>
<dict>
<key>CFBundleTypeRole</key>
<string>Editor</string>
<key>CFBundleURLName</key>
<string>ranorex.your.application.name</string>
<key>CFBundleURLSchemes</key>
<array>
<string>ranorex.your.application.name</string>
</array>
</dict>
</array>

Attention
If a designer implements the existing Apple API, which restricts any schema
from running the application, the instrumented IPA does not run within
RxServices and Ranorex Studio.
Run the RxServices IPA, put it into the background, and next, run the instrumented
IPA and put it in the background as well. This makes the application recognizable by
the RxServices IPA.
The new IPAs should display in the list of available IPAs in the RxServices application and in
Ranorex Studio.
After performing these steps, your project can be built using the newly created target and
scheme for your iOS devices as well as simulators.
Note
If you see the debug output ‘RxAutomationEngine init‘ in the console pane,
your app has been instrumented successfully.

Note
• Because the Ranorex automation lib uses non-public APIs, make sure that
you do not submit a Ranorex instrumented app to the app store as your
app might be rejected and you might be banned from submitting apps to the
app store for a period of time.
• To add your device via Wi-Fi, it’s necessary that the application under test is
started on your iOS device or simulator.
• The development provisioning profile should be used for testing your app
and not the distribution provisioning profile.
• To improve the object recognition of your app under test set the
accessibility label attribute of your controls.
• Due to restriction in Apple API it may occur that the instrumented IPA is not
able to run from with Ranorex Studio, while RxServices application is in the
background mode. It is recommended to perform any test while the
instrumented IPA is in the foreground.
