
Mighty User Guide

2
Welcome to Fetch
Handy Tips 4
Watching Live TV 8
Using the TV Guide 11
Recording TV 14
Managing your Recordings 18
Watching Catch-Up TV on TV 24
Watching shows from the TV Store 26
Adding more Channels 29
Watching Movies 31
Watching Netflix, YouTube and other apps on TV 36
Watching live PPV events on TV 41
Using My Media Hub 42
Settings including Parental Controls 43
Pair a Bluetooth device 46
The Remote Control 49
3
Welcome to Fetch
Welcome to Fetch, your one-stop non-stop world of entertainment. This user guide shows you tips and tricks to
help you get the most out of your service, so you can enjoy all your entertainment in one place.
Everything you do on your Fetch Mighty starts from this Main Menu screen.
Home screen
Press
Menu
on your Fetch remote control to bring up the main menu.

4
Actions are available on most screens. They tell you how
to use the buttons on your remote to access key features.
• To access actions press .
• To record a program on now or later
press , go to show, and press
• To enable a series recording
press twice
• To set a reminder press .
Handy Tips
Here are a few handy tips to get you started.
Tips
Most used buttons
Actions
1
Menu
Back Exit
Menu
Brings up the main menu from any screen.
Use to navigate anywhere on your Fetch Mighty.
Press to select.
Press to show on screen actions.
Go back to previous screen by pressing
Back
.
• Other ways to control your Fetch box
You can also navigate Fetch from your mobile
phone or tablet if you’ve installed the Fetch
Mobi App (Page 42) or through your voice if you
have a Fetch Voice Remote (Page 6) paired with
your Fetch Mighty.
• Universal Remote
You can set up your remote to control your TV
via the Universal Remote Set Up (Page 48).
• Using your PIN
Various functions, including anything that
requires a purchase, prompts you to enter a
PIN. (You may want to keep this a secret from
your children).
Menu
Back Exit

5
You can watch videos about key features to get the most from your service at Menu > Apps > All > How To’s.
You can get explanations for features and symbols by selecting from the top right hand side of your screen.
How To videos
On screen Help
Use to select and press .
Use the on screen keypad to type.
Search starts automatically when you type one or more letter/number.
Select Full Search from on screen keypad to see all matching results.
If you don’t see the results you want, scroll to the end of the search screen and try
an Extended Search. This will include the program synopsis and YouTube.
When you choose a search result, we’ll let you know all ways to watch so you can
pick what’s best for you.
You can easily search for things to watch by keyword from the program name, synopsis, or cast and crew. Search covers
Free-to-Air and subscription channels, Catch-Up TV, TV Store, Movie Store, Movie Box, recordings, and streaming apps like
Prime Video, Netflix, YouTube, Stan and Paramount+. Search currently doesn’t cover the Optus Sport, Eros Now, YuppTV,
Acorn TV, iwonder, Vimeo or Kidoodle.TV apps. To search these you will need to do this within the individual apps.
1
2
3
4
5
6
Search

6
On your remote, hold down the voice button .
If you haven’t paired the remote yet, you’ll see a pairing prompt. Once paired, repeat step 1.
When you see the on screen prompt “I’m Listening” keep holding the voice button and speak into the remote.
You can ask Fetch to do something, like “Fetch popular movies” or “Play BBC First”. To launch a program,
channel or app you can just say the name, like “Bluey”, “Discovery Turbo” or “Netflix”.
If there are multiple results, Fetch will open them in a Search.
You can easily search and control Fetch using a Fetch voice remote (Page 48). You will need to pair the voice
remote to your Fetch Mighty using Bluetooth before this will work.
1
2
3
4
5
Voice Search and Voice Control
Tips
• If your spoken phrase wasn’t recognised, try
again and speak clearly.
• If you press without holding down the button
this will launch the Search (Page 5).
Note
The included remote varies depending on where you
got your Fetch Mighty. The Voice Remote is available
for purchase at fetch.com.au/voice.

7
Voice Command What it does
Change channels: “Fetch BBC First” or just “BBC First”
“Play Discovery Turbo”
“Seven HD”
Launches BBC First channel
Launches Discovery Turbo channel
Launches 7HD channel
Control playback: “Pause”
“Play”
“Rewind eight times”
“Fast forward”
Pause playback
Resume playback
Rewind playback eight times
Fast forward playback
Search for content: “Fetch Masterchef” or just “Masterchef”
“Search YouTube for funny videos”
“Harry Potter and the Order of the Phoenix”
“Search for The Expanse on Prime Video”
“Search for The West Wing”
Launches a Search on Fetch for this title
Launches a Search of YouTube
Launches a Search on Fetch for this title
Launches the title on Prime Video
Launches a Search and shows all ways to
watch this title
Launch an app: “Fetch Netflix” or just “Netflix”
“Open Prime”
“Go to SBS on Demand
Launches Netflix
Launches Prime Video
Launches SBS on Demand
Navigate Fetch: “Fetch recordings” or just “Recordings”
“Fetch Kids Movies”
“Go to Movie Store”
“Movie Box”
“Open Settings”
Opens Menu > My Stuff > Recordings
Opens Menu > Movies > Genre > Kids
Opens Menu > Movies > Movie Store
Opens Menu > Movies > Movie Box
Opens Menu > Manage > Settings
Here’s a list of some of the things you can say:
Note
While you can launch apps through voice commands, you can’t control or search using voice commands within apps.
You can only search for Netflix Exclusive Content through text entry, voice search isn’t supported for this content.
For more voice commands hold and say “Voice Help”.

8
Tips
Watching Live TV
Channel Switch
Use these up and down buttons
to move between channels.
To watch Free-to-Air or Subscription TV channels, press
Menu
then go to TV > TV Guide to select the channel you want to watch.
If you have been in any other area of the Fetch service you can go
back to watching TV by pressing
Exit
.
While watching Live TV use to see at a glance what’s playing on other channels. Press to go forward or
back. If you find something you like press to launch the channel.
2
Watch Live TV – Channel List

9
While watching Live TV the Information Bar appears anytime you change channel or when
you press on your remote.
You can go forward in the Info Bar to see what’s coming up or back to catch up on shows you’ve missed.
Press twice to see more detail on the highlighted show or to access options to record.
The Info Bar will disappear after about 5 seconds, or you can press Info again to remove it immediately.
Watch Live TV – Information Bar
Tips Tips
Closed Captions
When you see this symbol on a program from
the Information Bar, it means there are Closed
Captions available.
To turn on Closed Captions while watching a TV
channel, press on your remote. Repeat to turn
off Closed Captions again. On some remotes you
may need to press first and then press .
Watch from Start
If you’re late to a show and see
it means you can press the green button to replay
the show from the beginning.

10
Pause a program you’re watching now
You can pause a TV program you’re watching and resume anytime within the next 3 hours. If you change
channels you won’t be able to resume the paused channel.
Rewind live TV
You can rewind live TV back to the point where you started watching the channel.
Fast forward paused live TV
When you have paused or rewound live TV you can fast forward it until you catch up to the live stream.
When you start watching a channel, your Fetch Mighty automatically starts storing the channel for up to 3 hours
at a time. So you can pause, rewind, fast-forward as much as you like within this time, as long as you stay on
the same channel. You’ll see this from the Info Bar as a light blue line below the program info.
Pause, Play and Rewind Live TV
Press .
Press again to resume watching.
To exit Pause Live TV press .
Press for 2x speed, press it again to go faster.
Press to start watching again.
Press for 2x speed, press it again to go faster.
Press to start watching again.
1
1
1
2
2
2
3

11
The TV Guide is the easiest place to find what you want to watch right now, or record for later. You can move
forwards and backwards through the TV Guide, to go back and find shows that already aired. Set up Favourites to
easily see what’s on the channels you watch most.
Go to Menu > Manage > Settings > User Preferences > TV Guide and choose a TV Guide
Viewing option.
TV Guide Grid View
View all channels and programs at a time
TV Guide List View
View one channel at a time
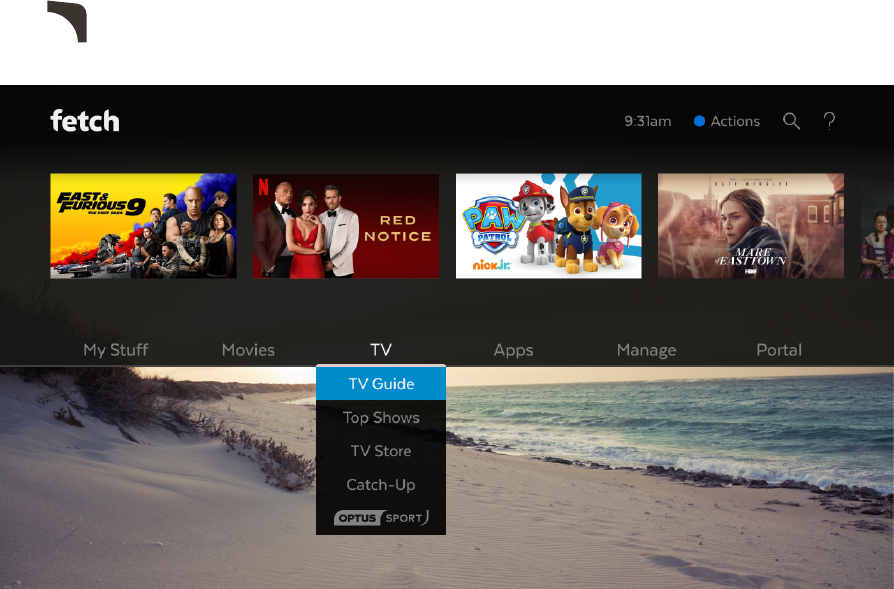
Using the TV Guide3
Tips
• Movies on TV are flagged
with the movie icon .
• Programs with are ready
to watch anytime, like virtual
playlist channels and shows
that aired and are available
to re-watch.
• Press on your remote
for program info. To change
your TV Guide preferences,
see Page 43.
See what’s on and coming up
Switch between list and grid view
Press on the remote or select TV Guide from TV on the main menu.
Press
or to skip forward and back a day in the TV Guide.
Press
to find channels and programs in the TV Guide.
1
2
3

12
You can go back a day in the TV Guide and watch programs you missed.
You can set a reminder to alert you when your favourite programs are about to start.
TV Guide – Reverse EPG
Set Reminders
In the TV Guide or Live TV Info Bar press to browse backwards into the
reverse EPG. Programs available to re-watch have a play icon .
Press to watch or press for program options.
If there are more ways to watch the show, like a recording or Catch-Up TV, we’ll let
you know.
In the TV Guide or Live TV Info Bar, highlight the program you want a reminder for
and press
or press to set a reminder through the Options menu.
A will appear beside programs with a reminder. Repeat the above step to
cancel a reminder.
1
1
2
2
3

13
Favourites let you set up your TV Guide to group your favourite channels at the top of the guide. So you can
quickly see what’s playing on the channels you watch most.
There are two ways to add channels to Favourites.
You can hide channels that you don’t want to appear in your TV Guide. Go to Menu > Manage > Settings >
Channels > Manage Channels and check the channels you want to hide.
Favourites
Hide channels
You can go to Menu > Manage > Settings > Channels > Manage Channels and then select Favourite for each
channel you want on your list. To remove a channel, simply uncheck the box.
Or, you can add them individually from the Info Bar or TV Guide by pressing .
• To remove a channel from Favourites from the Info Bar or TV Guide simply press .
• To find your Favourites, press to go to the top of the TV Guide.
• In the Live TV Channel List (Page 8) favourites are grouped at the bottom and have a yellow highlight
next to the channel number.
1
2

14
The Fetch Mighty box allows you to record Free-to-Air TV and any other channels that you are subscribed to. It
has space for up to 585 hours of HD recordings, and you can record individual episodes of a show, or set a Series
Recording to automatically record every episode of a show.
Recording TV4
Tips
You can watch shows on virtual
playlist channels like the Free-to-
Air Catch-Up TV channels (Page
25) or the Oxygen subscription
TV channel anytime. So, you
won’t see recording options on
these channels.
3 ways to set a recording
There are 3 ways to set a recording using your remote control.
From the Info Bar
From the TV Guide
When you are watching a show and decide you want to record it press to display the Info Bar.
Then simply press
once to set a recording and twice to set a Series recording.
Go to Menu > TV > TV Guide to see all your channels and set recordings using the simple steps shown
below.
Use
to find the channel and program you want to record.
To record press . To set a Series Recording (if available for that
show) press
twice. To cancel press .
Press to display recording options.
To set a Team Recording (if available for a match) select Set Team
Recording and press . Select your team then Save & Close.
1
2
1
2
3
4

15
Using Top Shows
Top Shows is where we make it easy for you to find new and popular shows so you can set a Series
Recording to record every episode or set a Team Recording to record all your favourite team’s games. Go
to Menu > TV.
Select Top Shows from the menu and press .
Use to explore shows and press to view the show info and
options.
Find the show you want to record, highlight Series Recording and
press .
Select Teams to find a sporting event and team you want to record and
press .
Change the options if you wish, then select Save & Close and press .
3
1
2
3
4
5

16
How many programs can you record at a time?
The number of channels you can record at the same time depends on which Fetch box you have, whether you are recording
Free-to-Air or Subscription channels, and what your bandwidth settings are.
The Mighty Fetch box has 4 tuners – three for recording and one for watching, and can record up to six channels whilst you watch a
seventh. Each of the three recording tuners in this box can record 2 Free-to-Air channels from the same channel family
at the same time.
The Gen 2 Fetch box has 3 tuners – two for recording and one for watching, and can record up to four channels whilst you watch a
fifth. Each of the two recording tuners in this box can record 2 Free-to-Air channels from the same channel family at the same time.
If you have an additional Fetch Mini in your home for Multiroom, you can set and manage recordings remotely on your connected
Fetch Mighty or Gen 2 box from the Fetch Mini. All boxes need to be on the same account, powered on and connected to the same
home network.
Here’s more info on how channel families work:
Free-to-Air channels are made up of families as shown here:
Seven Family Nine Family ABC Family
Recording multiple shows at the same time
Ten Family
*Available in Metro areas only.
**Available in Metro areas and some Regional areas.
SBS Family

17
Each tuner in the Gen 2 and Fetch Mighty boxes can record two channels from the same family at the same
time. For example, on the Mighty you can record 2 shows from the Ten family and 2 from the Seven family and
2 from the ABC family all at the same time, while you’re watching another channel.
There are no channel families for subscription channels. You can record any 2 subscription channels on Gen 2 or
any 3 subscription channels on the Mighty at the same time.
The number of subscription channels you can record at a time also depends on the bandwidth limit in User
Preferences (Page 43).
When you schedule a recording that creates a conflict, you will be prompted to cancel one of the recordings
Select Stop next to a recording you want to cancel and press .
Select Confirm to go ahead, or Cancel to close without stopping existing recordings.
A recording conflict arises when you try to schedule too many recordings at the same time
1
2
3
Recording conflicts

18
(red) Currently Recording
Recorded
Series Recording
Protected
Groups recordings from the same series in a folder
Watched
Managing your Recordings5
Finding your recordings
Recording Icons
• You’ll find all your TV recordings at Menu > My Stuff > Recordings.
• We automatically save all episodes of the same show together in folders
.
• To watch a recording, select the folder and press
. Then select the episode you want to watch and press
.
You will see different icons next to recordings in your recordings list. Here’s what they mean
Tips
To record every live game
your favourite sports team
plays (available for selected
sporting events only) go to TV
> Top Shows > Teams. Find and
manage your Teams in My Stuff >
Recordings > Series Priority.

19
How does Multiroom work?
All your Fetch boxes need to be on the same account, powered on and connected to your local network.
Select the sharing options in Menu > Manage > Settings > Multiroom > Options (Page 44) for each box in your
home. You can then share recordings, subscription channels, rentals and purchases.
If you’ve no antenna connected to your Fetch Mini, you can share Free-to-Air channels from a paired Mighty
or Gen 2 box. (Your paired Fetch Mighty still needs a TV antenna connection to receive and share digital Free-
to-Air TV). You can’t share Free-to-Air channels from one Fetch Mighty or Gen 2 box to another.
Which boxes support Multiroom?
The Gen 2, Mighty, and Mini boxes all support sharing.
* Multiroom may not be available on your Fetch service yet.
For more info or help, download the Multiroom User
Guide from fetch.com.au/guides
Multiroom
Watch recordings on another Fetch box
You can share recordings between up to three Fetch boxes in your home if your Fetch service includes the
Multiroom feature*. This means you can watch stuff you recorded on any Fetch box from any other box in your
home. You can watch content recorded on your other boxes from a Fetch Mini too.
You can’t set or manage recordings on other boxes from a Fetch Mighty or Gen 2 box. However, you can do this
from a Fetch Mini when you pair to your Fetch Mighty or Gen 2 box.
Finding your shared recordings
You’ll see shared recordings in Menu > My Stuff > Recordings.
• On Fetch Mighty or Gen 2, recordings on another box will have a Multiroom icon .
• On Fetch Mini, recordings on a paired box look the same as on that box. Recordings on an additional
unpaired box will show the Multiroom icon.

20
Things you can do with Series Recordings
Set the seasons you want to record
Set the number of episodes you want to keep
You can set the season option for a Series Recording to control which episodes to record. Record All
Seasons means all episodes from all seasons of the show will be recorded. Record Latest Season means
only the latest season onwards will record. Record Newest will only record newer episodes than the latest
episode and season onwards. If the episode is already on your Fetch box it won’t record again. You may
still get duplicate recordings if the correct season or episode info is unavailable.
When setting a Series Recording from the TV Guide press twice. Then press . Select Series
Recording, and change the Seasons setting using the on screen arrows.
You can choose the number of recorded episodes of a show you want to keep on the hard drive. If it’s
the evening news you may just want to keep 1 at a time (record today’s and delete yesterday’s), or you
can choose to keep 2, 5 or All (Managed), or All (Protected). Managed means it will be kept unless the box
needs space for more recordings. Protected means it will never be deleted unless you manually delete it.
When setting a Series Recording from the TV Guide adjust the Storage Setting using the on screen arrows.
1
2

21
Menu > My Stuff > Recordings > Series Priority
Set priorities of series recordings
Sometimes you might schedule more than the allowed number of recordings to occur at the same time
(Page 16). You can prioritise your Series Recordings so if this happens, the higher preference shows get
recorded.
To do this go to Menu > My Stuff> Recordings > Series Priority.
Use and to move series up and down the list so your
favourites are at the top.
Press to reschedule today’s recordings.
3
1
2

22
Protecting your recordings
Sorting by season and episode
Use to select a recording.
Press to activate the Options pop-up menu.
Use to navigate the options.
Press
to confirm your selection.
You can protect important recordings from being deleted by using the Protect feature. Simply go to your
recordings, select recording options and protect recording.
To make recordings easy to find they’re grouped by Season and Episode. For more ways to sort recordings, go to
Menu > My Stuff > Recordings > Recorded. Highlight a recording then press .
If you set up a Series Recording to Record All Seasons, the box will record every episode of the show that airs,
whatever season it is from. If you’re only interested in the most recent seasons highlight the seasons you don’t
want to keep in your recordings list and delete them by pressing . To change the Season Option, see Page 20.
1
2
3
4
Tips
To protect a Series Recording, use
the Storage Setting in the Series
Recording options (Page 20).

23
Deleting and restoring recordings
You don’t need to worry about your Fetch Mighty filling up. It will delete old recordings that are not protected if it
needs more space. But, if you’d like to delete a recording or folder highlight it and press .
If you delete a recording by mistake, go to My Stuff > Recordings > Deleted Items to restore it. Fetch also moves
recordings here and deletes them permanently when it needs to make more space on your box for new recordings.

24
Menu > TV > Catch-Up
Watching Catch-Up TV on TV6
If you forget to record something on TV you can watch it on catch up instead. Catch-Up TV is available for both
Free-to-Air and a selection of Subscription TV channels.
Select Catch-Up from TV on the main menu and press .
Select the Catch-Up service you want to access.
Use the to explore. Press to view episodes and to play.
To watch a show later, you can add it to My Stuff > Catch-Up by pressing .
1
2
3
4
Notes
• Streaming Catch-Up TV may count towards
your broadband usage.
• You may need to sign in to watch a Free-to-
Air Catch-Up TV service. If so, follow the on
screen prompts.

25
More ways of watching Catch-Up TV
To watch, go to the channel number, or select TV Guide from TV on the
main menu and press .
Use to navigate down to the Catch-Up TV channels in the guide at
channel 180 onwards.
Select any show or episode to watch.
You can browse or watch a selection of Free-to-Air Catch-Up TV services as virtual playlist channels, including
SBS On Demand, 7plus, 9Now, 10 play, ABC iview, and ABC Kids. You can pause, fast forward and rewind or use
the Info Bar to jump to the next or previous shows. You can’t record virtual playlist channels as they’re not live.
1
2
3
Tips
You can find any shows you
watch on these channels at Menu
> My Stuff > Catch-Up.

26
Menu > TV > TV Store
Watching shows from the TV Store7
In the TV Store you can buy individual episodes or full seasons of some of the most popular TV shows. TV
shows can’t be rented. When you buy a TV episode or season you are buying the right to watch it as often as
you like on your current Fetch subscription with your current Fetch Service Provider.
Select TV Store from TV on the main menu and press .
Select a TV show. The show names and number of seasons and
episodes available are shown.
Use to navigate and to make a selection.
The latest season of the TV show opens by default but you can see all
seasons available and select an older season from the TV show details.
1
2
3
4

27
Buy TV Episodes or Seasons
Use to select show from TV Store and press .
From the Season details screen, you can select to watch the full screen
trailer (if available), buy the season or add the show to your Wishlist in
Menu > My Stuff > TV Shows.
To buy an episode rather than the whole season, use to highlight
Episodes and press . Choose the episode you’d like to purchase.
To buy an episode or season, you’ll be asked to enter your Parental PIN
and press . You can choose to buy the SD or HD format if available.
Once you confirm the purchase the amount will come off your credit
card for Fetch retail customers or will be added to your next month’s bill
from your Fetch Service Provider.
If your purchase is successful the first available episode will download
ready to play.
1
2
3
4
5

28
Cost to buy TV episodes and seasons
TV episodes cost $3.49 for HD and $2.99 for SD. The price will vary on
occasion when specific sales might be on.
Season prices will vary depending on how many episodes are in the season,
but you do save money buying the whole season rather than the individual
episodes.
Episode purchases don’t count towards a Season purchase, so if you think you
want to watch the whole season it’s better to buy it all at once.
Note
You may watch the first episode of
some shows free of charge. Look for the
icon on the show or
go to TV > TV Store > Try 1st.

29
Adding more Channels 8
Bite-sized channel packs can be added on a month-to-month basis. You can add one or multiple packs, with 5
to choose from:
*Channels and content subject to change.
The minimum contract term on each pack is 1 month,
and you can add or remove them at any time with no
ongoing costs.
Menu > Manage > Subscriptions
• Kids Pack (7 channels)
• Vibe Pack (8 channels)
• Variety Pack (10 channels)
• Knowledge Pack (18 channels)
• Ultimate Pack (40+ channels, including all of the channels from the above packs)
Select Manage from the main menu and then choose Subscriptions.
Use to see available packs. Press to select pack.
Explore channels in pack using .
Press to subscribe to a pack. Repeat to unsubscribe.
Subscriptions on channel packs are for a minimum of 1 month.
1
2
3
How to add a pack
Note
You need a current subscription to a
channel pack to watch recordings made
on a channel too.
30
Channel Packs
What’s the Entertainment Pack?
The Entertainment Pack is an old add-on channel pack no longer available. If you are subscribed to this pack, you
can stay on this if you wish, but if you remove it, you can’t add it again.
What’s in the Ultimate Pack?
Upgrade to the Ultimate Pack for all the Entertainment channels and more. The Ultimate Pack includes all four
Skinny Packs: Vibe, Variety, Knowledge, and Kids.
If you prefer, you can also add just one or two Skinny Packs rather than the Ultimate Pack. If you try to add all
Skinny Packs, we’ll prompt you to get the Ultimate Pack as this is more cost-effective.
If you have the Entertainment Pack, you’d need to remove it before you can upgrade to the new Ultimate or
Skinny Packs.
For more info on available channels, go to: fetch.com.au/packages
Can I downgrade from the Ultimate Pack?
To downgrade from the Ultimate Pack to one or more Skinny Packs, you’d need to remove the Ultimate Pack
first. You can then add just the Skinny Packs you want.
31
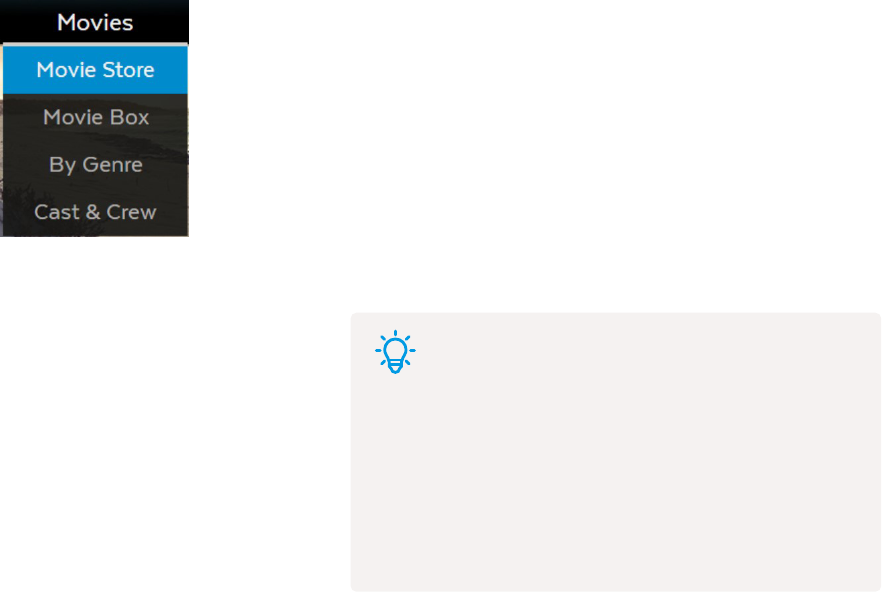
Menu > Movies > Movie Store
Watching Movies 9
There are 3 places you can watch movies on your Fetch service:
Renting and buying movies
When you rent a movie from the Movie Store you have 7 days to start watching,
and 48 hours to watch from when you first press play. You can watch the movie
as often as you want during this time.
When you buy a movie you are buying the right to watch it as often as you like
on your current Fetch subscription with your current Fetch Service Provider.
The Movie Store
The Movie Store offers over 9000 movies to buy or rent, ready to watch whenever you want. The cost of movies
you rent or buy will be added to your Fetch Service Provider account. When you buy or rent a movie you will be
prompted to enter your PIN number.
Go to Menu > Movies > Movie Store.
Tips
• On screen Rotten Tomatoes Ratings can help you
decide which movies or TV shows to watch.
• You can watch up to 2 items you rented or bought at a
time – on a mobile, tablet or Fetch Box. However, you
just can’t watch the same rented or bought item (movie
or TV episode) on more than one device at a time.

32
To buy or rent a movie use to select movie and press .
From the movie details screen, you can select to watch the full screen
trailer (if available), rent or buy the movie or add the movie to your
Wishlist.
To get a movie you will be prompted to enter your Parental PIN and
press .
You can choose to rent or buy the SD, HD or 4K format if available.
If your purchase is successful a will replace the on the title
image and the movie will download ready to play.
1
2
3
4
Finding your movies
To find movies you have rented or bought go to Menu > My Stuff > Movies >
My Movies.
To find your Wishlist go to Menu > My Stuff > Movies > Wishlist.

33
You’ll need to set up HDR on your TV first. Your TV may use a different name for HDR modes like “Ultra”
or “Deep Colour” so check your TV manual.
Then, go to Manage > Settings > Audio & Visual > Advanced > HDR Mode on Fetch to set up HDR.
1
2
Watching HDR
You can watch in High Dynamic Range (HDR) on Fetch Mighty or Fetch Mini 4K if your TV supports HDR.
What can I watch in HDR?
4K movies you rent or buy from the Movie Store are available in HDR, and there is HDR content on Netflix,
Prime Video, and YouTube. Currently, you can only watch Netflix in Dolby Vision on the Fetch Mini 4K and
Fetch Mighty (4th generation M681T) if the content and your TV supports this. To set up, you’d need to choose
‘Dolby Vision’ at Audio & Visual > Advanced > HDR Mode.
Watching 4K Ultra HD content
You can rent or buy select movies from the Movie Store in 4K Ultra HD. The movie will say if this is an option.
To watch 4K Ultra HD content on Fetch, you’ll need:
• A Fetch Mighty or Fetch Mini 4K connected to a 4K TV
• A steady home broadband speed of 15-25 Mbps
• Video setting set to Auto (4K – 2160P) in Manage > Settings > Audio & Visual (Page 42)
Your TV and home theatre equipment such as audio video receiver or sound bar needs HDMI inputs that
support 4K and HDMI 2.0/HDCP 2.2 signals. Check your TV or home theatre manual if you need more info.
Note
To watch Netflix in 4K/HDR/Dolby Vision or Stan in 4K you need a 4K/HDR/Dolby
Vision capable Fetch box, and streaming subscription plan that supports 4K. You don’t
need a subscription to watch YouTube in 4K (Page 36).

34
Movie Box
From the main menu, go to Movies > Movie Box and press to view the
movies or go to channel 100.
You can use the All, Just Out, Top Rated, and Last Chance tabs to help
you find movies.
Once you’ve chosen a movie select Play to start watching.
Movie Box brings you 30 movies at any time at no extra cost with a new movie added each day. It’s not
included in all subscriptions so you may need to upgrade your subscription to access it.
1
2
3

35
Movies on TV
Select the Movies on TV tab and press to see movies coming up on TV.
Use the to explore movies and press to view the movie info and options.
To record the movie, highlight or to set a reminder highlight and press .
There are loads of movies available on Free-to-Air TV that you can record to watch at any time. The Movies on
TV feature makes it easy to find upcoming movies and set recordings.
Go to Menu > TV > Top Shows > Movies on TV.
With so many movies to choose from it can be tricky
to decide what to watch. There are lots of ways you can
browse movies:
• Tabs (Popular, Just Out, Staff Picks)
• By Genre
• Cast & Crew
• Search
More Like This
View more shows or movies in the genre.
Cast & Crew
See the actors and director, if known, and view more shows or movies for them
1
2
3

36
Menu > Apps
Watching Netflix, YouTube
and other apps on TV
10
Fetch makes it easy for you to access YouTube, Plex, Vevo, and your subscriptions to Netflix, Stan, Prime Video,
Disney+, Hayu, Paramount+, BritBox, iwonder, Acorn TV, YuppTV and Eros Now on your TV. If you do not have a
Netflix, Disney+, Hayu or iwonder subscription you can sign up via the apps on your Fetch box using your remote.
You can sign up to Paramount+ via the app on your box if this option is available on your service.
To get a Prime Video, Stan, BritBox, Acorn TV, YuppTV or Eros Now subscription you’ll need to go to their website to
set up your account, then you can watch on Fetch using your new account details and your Fetch remote.
Select Apps from the main menu or press .
Use to select the application you want to access, then press .
Follow on screen prompts to use application.
1
2
3

37
• Movies, TV shows and more. Watch anywhere. Cancel at any time.
• Enjoying Netflix on Fetch is easy. If you’re already a member, just sign in with your username and
password. Not a member? Sign up via the app on your Fetch box using your remote. Your Netflix
subscription will be added to your Fetch Service Provider bill or account. Netflix streaming membership
required. More information at netflix.com.au.
• Disney+ is the streaming home for entertainment from Disney, Pixar, Marvel, Star Wars, National
Geographic, and general entertainment brand Star, which offers the latest from 20th Century Studios,
Disney Television Studios, FX, Searchlight Pictures, and more.
• If you already have a Disney+ subscription, log in with your Fetch remote. If you would like to move your
existing Disney+ subscription (not billed through Fetch) to your Fetch Service Provider bill or account, follow
the same steps below and make sure to enter your existing Disney+ Email and Password. After subscribing
through Fetch, direct Disney+ subscriptions will be paused automatically. If your subscription is through a
third party platform provider, such as Apple or Google, you will need to manage your subscription directly
with those providers.
• Not a member yet? Launch Disney+ on Fetch then select Subscribe and follow the prompts. You’ll need
to enter your Parental PIN to confirm your subscription. Once subscribed, you will need to activate your
Disney+ subscription to start using Disney+ on Fetch. To activate, you can use a mobile device to scan
the QR code shown on your box, then enter an Email and Password for Disney+ in your web browser.
Alternatively, you can visit fetchtv.com.au/disneyplus, follow the prompts and hit the ‘Activate Now’
button to activate your Disney+ subscription. Your Disney+ subscription will be added to your Fetch Service
Provider bill or account.

38
• Watch originals, exclusive shows and blockbuster movies.
• If you’re already a member, just log in with your username and password.
• Not a member? Try 7 days free and subscribe via the app on your Fetch box using your remote, if this
option is available on your service.
• Paramount+ subscription required. More information at paramountplus.com.
• Enjoy thousands of hours of entertainment, with first-run exclusives, award-winning TV shows,
blockbuster movies and more.
• If you’re already a member, just sign in with your Stan username and password.
• Not a member? Try one month free and sign up at stan.com.au/fetch.
• To watch Stan Sport you’ll need to add the Stan Sport subscription to your Stan account at stan.com.au.
In the app, choose Sport > Start Watching and follow the prompts to subscribe.
• Download the YouTube User Guide from fetch.com.au for details on how to use the YouTube App.
• Watch exclusive Amazon Originals as well as popular movies and TV shows.
• Enjoying Prime Video on Fetch is easy. If you’re already a member, follow the prompts to sign in with your
Amazon account and register your device.
• Not a member? Visit Menu > Apps > Prime Video, select “Register on the Amazon website” and follow the
prompts. Then visit PrimeVideo.com/my t v on your web browser to create an Amazon account and register
your device. To try one month free, sign up at PrimeVideo.com/watchonfetchtv.
• Amazon account and Prime Video streaming membership required.

39
• Watch the best of British shows including drama, comedy, documentary, lifestyle and more.
• If you’re already a member, sign in with your BritBox username and password. Not a member? Try 7 days
free and sign up at britbox.com/connect/fetch. Once signed up open BritBox on Fetch and enter the code.
• Watch world-class crime, thrillers and dramas.
• If you already have an Acorn TV subscription, log in with your Fetch remote.
• Not a subscriber? Sign up by choosing ‘Start free trial’, then use the QR code displayed or go to
au.acorn.tv/fetch.
• Watch your favourite reality shows with thousands of episodes and box sets.
• If you already have a Hayu subscription, sign in with your Fetch remote. You can use the QR code displayed,
or go to hayu.com/logintv in your web browser to enter the pairing code.
• Not a subscriber? Open Hayu on Fetch and select Sign In and then Register to sign up with your Fetch
remote. You’ll need to enter your Parental PIN to confirm your subscription. Your Hayu subscription will be
added to your Fetch Service Provider bill or account.
• Watch award-winning documentary films, TV series and shorts from various genres.
• Open the iwonder app on Fetch to get a pairing code. If you’re already a member, go to
iwonder.com/fetchtv to enter the code.
• Not a member yet? Try 14 days free and sign up at iwonder.com/fetchtv. Once signed up, enter the code
shown on screen. Then follow the prompts on Fetch to choose a plan and start your free trial. You’ll need to
enter your Parental PIN to confirm your subscription. Your iwonder subscription will be added to your Fetch
Service Provider bill or account.

40
• One of the world’s largest internet-based TV and On-demand service providers for South Asian content,
offering over 161+ Hindi channels, 5000+ Movies and 100+ TV shows in 11 languages.
• If you already have a YuppTV subscription, log in with your Fetch remote.
• Not a subscriber? Sign up at yupptv.com/fetchtv. Once signed up, open YuppTV on Fetch to log in.
• Enjoy Bollywood’s biggest movie collection. 1000s of Indian hits, exclusive series and originals.
• If you’re already a member, select “Login with Eros Now” to get a pairing code. Then visit
erosnow.com/activate to enter the code shown on screen.
• Not a member? Sign up at erosnow.com. Once signed up, open Eros Now on Fetch to log in.
Other Apps
Here are some more apps you can access on Fetch:
• Vevo
• Plex
• Vimeo
• Kidoodle.TV
• Aquarium screensaver
• Fireplace screensaver
• The Weather Network
For more info about apps on Fetch see fetch.com.au/features/streaming-apps.

41
Menu > Manage > Subscriptions
Watching live PPV events
on TV
11
From time to time you can pay to watch live sports and entertainment events on TV. With Pay Per View (PPV)
content, you’ll make a one-off payment which lets you watch a purchased event on your Fetch box, mobile or
tablet when it airs live on TV. You can’t record a PPV event you have purchased. Replays of purchased PPV
Events are available at Menu > TV > Catch-Up several hours after the conclusion of the PPV Event.
How to add a PPV event
To watch PPV
Select Manage from the main menu and then choose Subscriptions.
Use to see what’s available and press to select an event.
Press to purchase the event. You’ll need to enter your PIN to
confirm the one-off payment.
Please keep in mind, you can’t unsubscribe or cancel once you confirm
the purchase of a PPV event - so you can’t be refunded if you later
decide you no longer want to watch the event.
Go to TV > TV Guide
Use to find channel 970 for the PPV event and press .
Choose Watch and press . If you haven’t yet purchased the event,
we’ll prompt you to purchase it now.
1
1
2
2
3
3

42
Menu > My Stuff > My Media Hub
Using My Media Hub12
You can play video, music and image files from your computer, phone or tablet on your TV using your Fetch box.
The easiest way is to plug a USB into the side of your Fetch box.
If you have a home media server you can also access files wirelessly
straight from your computer on your TV using your Fetch box.
For more information, download the My Media Hub User guides for USB
and Media Servers from fetch.com.au/guides

43
View your downloads
View all your downloading items, change the order of downloads or delete items.
Set up for channels
Access the Free-to-Air (FTA) frequency scan that identifies and tunes all visible channels.
You can also add your favourite channels to your Favourites list or hide selected channels.
Optimise your sound and display
Select Audio & Visual > Video to optimise your TV screen display. To refine your video
settings or turn on HDR (High Dynamic Range) if your TV supports this, choose Advanced.
In Audio you can turn on Surround Sound 5.1 if using a surround sound system. Select
Bluetooth to pair headsets, speakers, or phones. For more information see Page 45.
Mobile & Tablet
Find your Activation Code (also called Fetch ID) which you need to sign in to the Fetch
Mobi App. Then you can control your Fetch Mighty like a remote control from your mobile
device. See the Mobile App Guide at fetch.com.au/guides for more information.
Channel Locking
Settings including Parental Controls
13
There are lots of things you can do in the Settings area at Menu > Manage > Settings. Here we outline the most
commonly used ones.
Use to highlight the channel you wish to lock.
Press which will prompt next to the locked channel.
Repeat for all channels you wish to lock.
To remove locking from previously locked channels repeat the above steps.
1
2
3
4

44
Set Parental Lock
You can set the program ratings levels that can be viewed. Use the to select an option and press .
Never Lock means you won’t need your PIN to watch. Always Lock means you’ll always need your PIN to watch content
at the set level. Time Lock lets you lock content between set times - such as MA+ programs between 6am and 9pm,
when children may be watching.
App Locking
In the Apps settings you can Lock individual apps so you always need your PIN to launch them. Or you can choose Allow
to launch an app without a PIN.
Change your Parental PIN
User Preferences
Select PIN Change in User Preferences and press .
Enter and confirm your new four digit PIN and press . A pop up
screen will let you know that the PIN was updated successfully.
1
2
Tips
The same PIN is used across all
Fetch boxes on your account
and also phones and tablets on
which you’re using the Fetch
Mobi App.
In the User Preferences, you can change recording options and change your PIN. Also find
the Activation Code (also called Fetch ID) for your Fetch Mighty, or set up your TV Guide
viewing options. Use to select an option and press .

45
TV Guide
Set your TV Guide viewing options. You can show or hide program info in the TV Guide Grid View (see Page 11) to see
more channels at a time.
Viewing Options
Boost the lifetime of your Fetch Mighty by stopping Pause Live TV after 3 hours of viewing a channel. Autoplay lets the
next episode of a show play automatically when watching recordings and TV shows.
Recording
Lets you add a recording start and stop time to all your scheduled recordings, set a Season option for Series Recordings,
or select the number of episodes you want to keep for all recordings. You can also set the rewind length to backtrack a
program/recording when fast-forwarding at high speeds.
Streaming
Lets you choose the number of streamed channels you can record at a time. Only shown if your service includes
streamed TV channels. The maximum number of channels will vary depending on your service.
Share content between your boxes
In the Multiroom settings you can turn on sharing so you can watch recordings on other
Fetch boxes in your home. Choose another name for your box to make it easier to see
which recordings you’re watching (Page 19).

46
Pair a Bluetooth Device14
You can pair your own device such as headphones, speakers, or phones via Bluetooth to your Fetch Mighty. So
you can listen to Fetch without disturbing anyone else in the room via headphones, or play music from your
phone on your Fetch Mighty and TV.
To pair headphones or phone using Bluetooth
Power on your headphones, speakers, or phone and make sure the device is ready to pair. For phones,
remember to turn on Bluetooth in the device settings.
Go to Menu > Manage > Settings > Audio & Visual > Bluetooth.
If not selected, tick Enable Bluetooth. Bluetooth will be
on automatically if using a Bluetooth Remote to
control your box (Page 48).
To pair a Bluetooth headset, choose Listen to Fetch
through headphones or speakers.
To pair your mobile device, choose Send music to Fetch
from your phone.
Select
to scan for your device then choose the device
name on the screen to pair.
1
2
3
4
Note
• Bluetooth pairing is only supported
on the Fetch Mighty and Fetch
Mini. It’s not supported on Gen 2
boxes.
• You can’t currently pair an
Apple iPad to the Fetch box via
Bluetooth.

47
Listen to Fetch through headphones or speakers
When listening to Fetch through Bluetooth headphones you can control the volume and pause or play from the
device. When watching TV with others in the room you can listen to Fetch through both the headphones and
TV. Select TV Audio in the Bluetooth settings. You can then change the volume on your headphones without
affecting the box.
Send music to Fetch from your phone
When you pair your phone to your Fetch Mighty via
Bluetooth, you can pick songs from your music library
or an app to play on your TV. Any audio you play from
your phone – such as Snapchat, Instagram, YouTube,
and Spotify – will play on your paired Fetch Mighty and
TV.

48
Tips and help for Bluetooth
If you are having trouble using Bluetooth on Fetch to listen through headphones, speakers or smartphones,
here are some things to try:
If you can’t pair headphones or speakers to your Fetch box, check your Bluetooth device is in “pairing
mode”. On headphones this is typically shown by a flashing light.
Check if your Bluetooth headphones or speakers are paired to another device. If so, disconnect them
from the other device then try to pair to your Fetch box again.
Make sure you’re in range of your Fetch box and there’s no interference from nearby devices like wireless
speakers or cordless phones.
Make sure your Bluetooth device is fully charged, or try changing the batteries in the device. Try turning
Bluetooth off and on or restarting your device to see if this helps.
Check for firmware updates on your Bluetooth device.
Check that you can pair your Bluetooth device to another device. If you can’t, then you may need to seek
help from your Bluetooth device manufacturer or documentation.
If you replace faulty Bluetooth headphones or speakers you were using with Fetch, you should ‘forget’
the device. Go to Manage > Settings > Audio & Visual > Bluetooth and press . This will stop the box
from trying to pair to an old device.
If you can, turn off Bluetooth on your Fetch box when you’re not using it. (So your device doesn’t pair
to your Fetch box whenever you’re in range). Go to Manage > Settings > Audio & Visual > Bluetooth and
untick Enable Bluetooth. If you’ve paired the Fetch Voice Remote via Bluetooth (Page 48) you can’t turn
off Bluetooth as the remote needs a Bluetooth connection for voice control.
1
2
3
4
5
6
7
8

49
The Remote Control15
The remote control brings Fetch to life. It has all the functions you need for quick and easy viewing.
Tips
To set up this universal remote see “Fetch Remote 4” user guide.
Once universal remote is set up, to set Fetch remote to control
the volume on your TV, press and VOL+ simultaneously and
wait for LED to blink once.
To set Fetch remote to control the volume on your Fetch Box,
press and VOL- simultaneously and wait for LED to blink
twice.
Press this button to turn the function keys into
numbers. Orange numbers will appear for you
to make your selection
Set top box power on/off
Channels Up
Channels Down
AvClear
TV Guide
Closed Captions
Main Menu
Fast Forward
Pause/Play
Record
Directional Arrow keys
Enter/Select
Exit
Exit from screen
Numeric Mode
Volume Up
Volume Down
Mute
Information Bar
Rewind
Opens Netflix
Stop
Back
Takes you up a level
Search
Opens Apps
e.g Youtube

50
Note
The included remote varies depending on where you got your
Fetch Mighty. If your remote looks different to the ones shown,
you can refer to the remote instructions at fetch.com.au/remote
or go to Menu > Manage > Settings > Remote Control. The Voice
Remote is available for purchase at fetch.com.au/voice.
Tips
To set up this universal remote, see “Fetch Remote 5” user
guide.
Pair the remote to enable voice control and voice search.
To pair, hold down and point the remote at your Fetch Mighty.
For voice control, hold down and speak into the microphone
at the top of the remote (Page 6).
It may take a few button presses to re-connect to your Fetch
Mighty.
Once universal remote is set up, to set Fetch remote to control
the volume on your TV, go to Manage > Settings > Remote
Control and choose Set to TV. To set Fetch remote to control the
volume on your Fetch Box, choose Set to Fetch Box.
Press this button to turn the function keys into
numbers. Orange numbers will appear for you
to make your selection
Set top box power on/off
Channels Up
Channels Down
AvClear
TV Guide
Closed Captions
Main Menu
Fast Forward
Pause/Play
Record
Directional Arrow keys
Enter/Select
Exit
Exit from screen
Numeric Mode
Volume Up
Volume Down
Mute
Information Bar
Rewind
Opens Netflix
Stop
Back
Takes you up a level
Voice
Opens Apps
e.g Youtube

51
Set up for Universal Remote
You can use this remote control to operate your TV as well as your Fetch Mighty.
Fetch will try to set up your remote for you when you first set up your box but if that didn’t work follow the
steps below.
Remote 5
Remote 4
Using a different Fetch remote?
If your Fetch remote control has different buttons to the one shown above or if your TV brand is not listed on
screen when you follow the steps above, you will need to refer to the Universal Remote Set Up Guide on
fetch.com.au or go to Menu > Manage > Settings > Remote Control.
Press and hold for 3 seconds until remote LED flashes twice. Your TV will now show a table of brands.
Press and hold the matching number on the remote control for your brand of TV.
As soon as TV turns off, stop pressing the remote. LED will blink twice. Your TV is now set up!
Go to Manage > Settings > Remote Control and choose Universal Setup.
If your remote isn’t paired yet, choose Pair Remote and wait for the TV to confirm the remote is paired.
Repeat step 1.
Follow on screen to see what to do next.
If needed your TV will show a table of brands to choose from.
Your TV will ask you to test the volume buttons operate your TV volume too. Follow on screen by
pressing the corresponding button on your remote.
If this works, confirm by pressing Fetch may ask you to test other buttons too such as the Vol-,
AV/Source, and TV Power, depending on your TV.
You’ll see a confirmation on screen when your TV is set up.
1
1
2
2
3
3

www.fetch.com.au
© Fetch TV Pty Limited. ABN 36 130 669 500. All rights reserved. Fetch TV Pty Limited is the owner of the
trade marks Fetch. The set top box and the Fetch service may only be used lawfully and in accordance with
relevant terms of use of which you are notified by your service provider. You must not use the electronic
program guide, or any part of it, for any purpose other than private and domestic purposes and you must not
sub-licence, sell, lease, lend, upload, download, communicate or distribute it (or any part of it) to any person.
Version: January 2023
