
Oracle® Cloud
Using the REST Adapter with Oracle
Integration Generation 2
E85421-84
July 2024
Oracle Cloud Using the REST Adapter with Oracle Integration Generation 2,
E85421-84
Copyright © 2017, 2024, Oracle and/or its affiliates.
Primary Author: Oracle Corporation
This software and related documentation are provided under a license agreement containing restrictions on use and
disclosure and are protected by intellectual property laws. Except as expressly permitted in your license agreement or
allowed by law, you may not use, copy, reproduce, translate, broadcast, modify, license, transmit, distribute, exhibit,
perform, publish, or display any part, in any form, or by any means. Reverse engineering, disassembly, or decompilation
of this software, unless required by law for interoperability, is prohibited.
The information contained herein is subject to change without notice and is not warranted to be error-free. If you find
any errors, please report them to us in writing.
If this is software, software documentation, data (as defined in the Federal Acquisition Regulation), or related
documentation that is delivered to the U.S. Government or anyone licensing it on behalf of the U.S. Government, then
the following notice is applicable:
U.S. GOVERNMENT END USERS: Oracle programs (including any operating system, integrated software, any
programs embedded, installed, or activated on delivered hardware, and modifications of such programs) and Oracle
computer documentation or other Oracle data delivered to or accessed by U.S. Government end users are "commercial
computer software," "commercial computer software documentation," or "limited rights data" pursuant to the applicable
Federal Acquisition Regulation and agency-specific supplemental regulations. As such, the use, reproduction,
duplication, release, display, disclosure, modification, preparation of derivative works, and/or adaptation of i) Oracle
programs (including any operating system, integrated software, any programs embedded, installed, or activated on
delivered hardware, and modifications of such programs), ii) Oracle computer documentation and/or iii) other Oracle
data, is subject to the rights and limitations specified in the license contained in the applicable contract. The terms
governing the U.S. Government's use of Oracle cloud services are defined by the applicable contract for such services.
No other rights are granted to the U.S. Government.
This software or hardware is developed for general use in a variety of information management applications. It is not
developed or intended for use in any inherently dangerous applications, including applications that may create a risk of
personal injury. If you use this software or hardware in dangerous applications, then you shall be responsible to take all
appropriate fail-safe, backup, redundancy, and other measures to ensure its safe use. Oracle Corporation and its
affiliates disclaim any liability for any damages caused by use of this software or hardware in dangerous applications.
Oracle®, Java, MySQL, and NetSuite are registered trademarks of Oracle and/or its affiliates. Other names may be
trademarks of their respective owners.
Intel and Intel Inside are trademarks or registered trademarks of Intel Corporation. All SPARC trademarks are used
under license and are trademarks or registered trademarks of SPARC International, Inc. AMD, Epyc, and the AMD logo
are trademarks or registered trademarks of Advanced Micro Devices. UNIX is a registered trademark of The Open
Group.
This software or hardware and documentation may provide access to or information about content, products, and
services from third parties. Oracle Corporation and its affiliates are not responsible for and expressly disclaim all
warranties of any kind with respect to third-party content, products, and services unless otherwise set forth in an
applicable agreement between you and Oracle. Oracle Corporation and its affiliates will not be responsible for any loss,
costs, or damages incurred due to your access to or use of third-party content, products, or services, except as set forth
in an applicable agreement between you and Oracle.

Contents
Preface
Audience viii
Documentation Accessibility viii
Diversity and Inclusion viii
Related Resources ix
Conventions ix
1
Understand the REST Adapter
REST Adapter Capabilities 1-1
REST Adapter Restrictions 1-5
Swagger/OpenAPI Restrictions 1-7
Publish Restrictions 1-7
Consume Restrictions 1-7
REST Adapter Use Cases 1-8
Workflow to Create and Add a REST Adapter Connection to an Integration 1-10
2
REST Adapter Concepts
Authentication Support 2-1
Authenticate Requests for Invoking Oracle Integration Flows 2-1
About Requests to Invoke Integrations 2-2
About OAuth 2.0 Grants 2-4
Use OAuth 2.0 Grants in Identity Domain Environments 2-10
Use OAuth 2.0 Grants in Oracle Identity Cloud Service Environments 2-28
Authentication Types 2-46
Role-Based Connections 2-46
Extensibility Support for Multiple OAuth Providers 2-47
REST API Support 2-48
Oracle Cloud Infrastructure REST API Support with the OCI Signature Version 1
Security Policy 2-48
On-Premises REST API Support with the Agent 2-48
Swagger and RAML Document Support for Describing External REST APIs 2-49
OpenAPI Support 2-59
iii

Support for Publishing Interfaces for Oracle Integration Flows as OpenAPI Documents 2-59
Consumption of OpenAPI Multipart for JSON and Form Data 2-59
Attachment Support 2-60
Multipart Attachment Support for Trigger and Invoke Connections 2-60
Support for application/octet-stream MIME Attachment (Binary) Payloads 2-64
Header, Token, Query Parameter, and Array Support 2-66
Standard and Custom Header Support 2-66
Nonstandard JWT Token Support 2-67
RFC 3986 Support for Encoding Query Parameters 2-67
Homogenous Multidimensional Array Support in JSON Documents 2-68
Swagger Support 2-69
REST Endpoint Metadata and a Swagger Link to a REST Metadata Description 2-70
View the Metadata for the Inbound REST Endpoint in Swagger Format 2-71
Security is Not Required for Swagger Definition and Metadata Catalog URL Connections 2-71
Mapper Connectivity Properties Support 2-71
Set REST Adapter Connectivity Properties in the Mapper 2-72
REST Endpoint Support 2-76
Support for Dynamic REST Endpoints 2-76
Configuration Parameters 2-78
Cross-Origin Resource Sharing (CORS) Support 2-78
Cross-Origin Resource Sharing (CORS) 2-78
Complex Schema Support 2-80
Complex Schema Support 2-80
3
Create a REST Adapter Connection
Prerequisites for Creating a Connection 3-1
Create a Connection 3-3
Configure Connection Properties for Invoke Connections 3-4
Configure Connection Security 3-6
Configure an Agent Group 3-14
Test the Connection 3-14
Upload an SSL Certificate 3-15
4
Add the REST Adapter Connection to an Integration
Add the REST Adapter as a Trigger Connection 4-1
REST Adapter Trigger Resource Configuration Page 4-2
REST Adapter Trigger Operations Page 4-4
REST Adapter Trigger Basic Information Page 4-4
REST Adapter Trigger Request Parameters Page 4-5
REST Adapter Trigger Request Page 4-5
iv

REST Adapter Trigger Request Header Page 4-7
REST Adapter Trigger CORS Configuration Page 4-8
REST Adapter Trigger Response Page 4-9
REST Adapter Trigger Response Header Page 4-11
REST Adapter Trigger Operation Selection Page 4-12
Summary Page 4-13
Add the REST Adapter as an Invoke Connection 4-13
REST Adapter Invoke Basic Information Page 4-13
REST Adapter Invoke Request Parameters Page 4-15
REST Adapter Invoke Request Page 4-16
REST Adapter Invoke Request Headers Page 4-18
REST Adapter Invoke Response Page 4-19
REST Adapter Invoke Response Header Page 4-21
REST Adapter Invoke Operation Selection Page 4-22
Summary Page 4-23
5
Implement Common Patterns Using the REST Adapter
OAuth-Protected Patterns 5-2
Configure the REST Adapter to Consume a REST API Protected with OAuth Custom
Two Legged Token-Based Authentication 5-2
Configure the REST Adapter to Consume a REST API Protected with OAuth Custom
Three Legged Flow Token-Based Authentication 5-8
Configure the REST Adapter to Consume a REST API Protected with OAuth 1.0 One-
Legged Authentication 5-12
Allow Client Applications to Consume an Integration Exposed as an OAuth-Protected
REST API 5-14
REST API Consumption Patterns 5-14
Configure the REST Adapter to Consume a REST API Protected with the API Key 5-15
Configure the REST Adapter to Consume an External REST API Described Using a
Swagger Document 5-16
Configure the REST Adapter to Consume an External REST API Described Using a
RAML Document 5-16
Configure the REST Adapter to Consume an External REST API with No Metadata
Described in a Document 5-17
Configure a REST Adapter to Consume a REST API that Expects Custom HTTP
Header Properties 5-20
Configure the REST Adapter to Consume an Amazon Web Services (AWS) REST API 5-21
JSON Content Patterns 5-22
Map JSON when the REST Adapter Request is Configured with multipart/form-data 5-22
JSON to XML Special Character Conversion 5-23
Send an Empty JSON Object 5-25
Copy Element Names as Values in JSON 5-27
Use JSON Objects With Single Elements Within an Array 5-28
v

OpenAPI Document Patterns 5-28
Publish REST-Based Integrations as OpenAPI Documents 5-28
Consume and Publish OpenAPI Documents with Multipart/Mixed and Multipart/Form-
Data 5-29
Best Practices for Invoking REST Endpoints 5-33
Override the Endpoint URI/Host Name for an External REST API at Runtime 5-33
Map to Construct the Payload for an External REST API that Accepts multipart/form-data as
the Content Type 5-34
Implement an Integration to Send an Incoming Message with a Base64-Encoded String to
an External REST API that Accepts a Multipart Attachment 5-39
Pass the Payload as URL-Encoded Form Data 5-40
Implement an Integration to Send a PDF/CSV Document Downloaded from an SFTP Server
to an External REST API that Accepts Only application/octet-stream as the Content Type 5-41
Configure the REST Adapter to Expose an Integration as a REST API 5-45
Enter q as a Standard HTTP Query Parameter with the Query as a Value 5-46
Configure Oracle Integration to Call Oracle Cloud Infrastructure Functions with the REST
Adapter 5-46
Configure a REST Adapter Trigger Connection to Work Asynchronously 5-48
Create a Keystore File for a Two-Way, SSL-Based Integration 5-49
6
Troubleshoot the REST Adapter
XML with an Empty Field for an Array Element Causes Malformed Badgerfish JSON Output 6-2
Access Token is Not Available Error Occurs When Using the OAuth Client Credentials
Security Policy 6-3
Multipart Form-Data Endpoint Invocation Fails When Media Type is null 6-3
Convert a Private Key from PKCS8 to RSA (PKCS1) Format for the OCI Signature Version 1
Security Policy 6-3
HTTP Error Response for Pre-20.4.2 Connections is Not Compliant with the OpenAPI
Specification 6-4
REST Services that Return Multiple Successful Responses 6-5
Error Handling with the REST Adapter 6-5
REST Service Invoked by the REST Adapter Returns a 401 Unauthorized Status Response 6-8
Configuration Limitation of Ten Pages in the Adapter Endpoint Configuration Wizard 6-8
Keys with Null Values During JSON Transformation are Removed 6-9
Large Sample JSON File Processing with Special Characters 6-9
SSL Certification Troubleshooting Issues 6-10
Fault and Response Pipeline Definitions in Basic Routing Integrations 6-10
Empty Arrays Are Not Supported in Sample JSON Files 6-12
Invoke Endpoint URI Must Match the Base URI + Resource URI in REST Adapter 6-12
JD Edwards Form Service Invocation with the REST Adapter Causes APIInvocation Error 6-12
REST Adapter Data is Only Saved When You Click Next 6-13
Convert XML to a JSON Document 6-13
Supported Special Characters in JSON Samples 6-14
vi


Preface
This guide describes how to configure this adapter as a connection in an integration in Oracle
Integration.
Note:
The use of this adapter may differ depending on the features you have, or whether
your instance was provisioned using Standard or Enterprise edition. These
differences are noted throughout this guide.
Topics:
• Audience
• Documentation Accessibility
• Diversity and Inclusion
• Related Resources
• Conventions
Audience
This guide is intended for developers who want to use this adapter in integrations in Oracle
Integration.
Documentation Accessibility
For information about Oracle's commitment to accessibility, visit the Oracle Accessibility
Program website at
http://www.oracle.com/pls/topic/lookup?ctx=acc&id=docacc
.
Access to Oracle Support
Oracle customers that have purchased support have access to electronic support through My
Oracle Support. For information, visit
http://www.oracle.com/pls/topic/lookup?
ctx=acc&id=info
or visit
http://www.oracle.com/pls/topic/lookup?ctx=acc&id=trs
if you
are hearing impaired.
Diversity and Inclusion
Oracle is fully committed to diversity and inclusion. Oracle respects and values having a
diverse workforce that increases thought leadership and innovation. As part of our initiative to
build a more inclusive culture that positively impacts our employees, customers, and partners,
we are working to remove insensitive terms from our products and documentation. We are also
Preface
viii

mindful of the necessity to maintain compatibility with our customers' existing technologies and
the need to ensure continuity of service as Oracle's offerings and industry standards evolve.
Because of these technical constraints, our effort to remove insensitive terms is ongoing and
will take time and external cooperation.
Related Resources
See these Oracle resources:
• Oracle Cloud
http://cloud.oracle.com
• Using Integrations in Oracle Integration Generation 2
• Using the Oracle Mapper with Oracle Integration Generation 2
Conventions
The following text conventions are used in this document:
Convention Meaning
boldface
Boldface type indicates graphical user interface elements associated with an
action, or terms defined in text or the glossary.
italic Italic type indicates book titles, emphasis, or placeholder variables for which
you supply particular values.
monospace
Monospace type indicates commands within a paragraph, URLs, code in
examples, text that appears on the screen, or text that you enter.
Preface
ix

1
Understand the REST Adapter
Review the following conceptual topics to learn about the REST Adapter and how to use it as a
connection in integrations in Oracle Integration. A typical workflow of adapter and integration
tasks is also provided.
Topics:
• REST Adapter Capabilities
• REST Adapter Restrictions
• REST Adapter Use Cases
• Workflow to Create and Add a REST Adapter Connection to an Integration
REST Adapter Capabilities
The REST Adapter can expose integrations as REST APIs by configuring a REST Adapter
connection as a trigger. The REST Adapter can also consume any external REST API by
configuring a REST Adapter connection as an invoke. This section identifies the capabilities of
the REST Adapter when used as a trigger or invoke connection.
Note:
The REST Adapter treats all endpoints as they are exposed. The REST Adapter
does not filter or change any of the APIs exposed by the application to which you are
connecting. If there is a native adapter for the application to which you are
connecting, use that adapter instead. If you choose to use the REST Adapter instead
of the native adapter, the API restrictions and deprecation policies apply as specified
in the respective application’s documentation.
To connect to the Oracle HCM Cloud SOAP APIs, see Oracle HCM Cloud Adapter
Capabilities.
• REST Adapter Capabilities When Exposing an Integration as a REST API by Configuring
the Connection as a Trigger
• REST Adapter Capabilities When Consuming External REST APIs by Configuring the
Connection as an Invoke
REST Adapter Capabilities When Exposing an Integration as a REST API by Configuring
the Connection as a Trigger
• Support for uploading complex XML schema definitions as a zipped archive to define data
definitions for XML content during REST Adapter configuration. See Complex Schema
Support.
• Support for uploading sample XML documents to define data definitions for XML content
during REST Adapter configuration. The following XML documents are supported for
schema generation:
1-1

– XML with no namespace.
– XML with a homogenous namespace.
– XML files up to 3 MB in size.
• Supports configuration of the following:
– Relative resource URI.
– Support for HTTP methods GET, PUT, POST, DELETE, and PATCH.
– Template and query parameters.
– Support for a request/response payload.
* Support for JSON, XML, binary (inline and unstructured), and URL-form-encoded
payloads.
* Support for homogenous JSON arrays including top-level arrays.
* Support for multidimensional JSON arrays (see Homogenous Multidimensional
Array Support in JSON Documents).
– REST APIs exposed using the REST Adapter are secured using Basic Authentication,
OAuth token-based authentication, and JWT-based authentication.
– REST APIs implement the HTTPS protocol, thereby enforcing all incoming requests to
have transport level security.
– REST APIs exposed using the REST Adapter are protected using Basic Authentication
and OAuth token-based authentication.
See Configuration Parameters.
• Enforces incoming message and attachment size limitations:
– Ensures that incoming (trigger) message requests without attachments do not exceed
50 MB in size. Messages with attachments (for example, multipart/mixed and multipart/
form-data) are not subject to this constraint. If the size of the structured message (for
example, XML/JSON) exceeds 50 MB, an HTTP error code message is returned to the
client:
413 Request entity too large
.
– Ensures that incoming (trigger) JSON attachments do not exceed 1 GB in size. If the
size of the JSON attachment exceeds 1 GB, an HTTP error code message is returned
to the client:
413 Request entity too large
.
– Ensures that incoming (trigger) structured message payload requests (any content-
type header containing JSON, XML, HTML, YAML, or YML) from a client do not
exceed the following:
* 10 MB in size for HTML, YAML, and YML
* 50 MB in size for JSON and XML
If the size of the structured message exceeds these values, an HTTP error code
message is returned to the client:
413 Request entity too large
.
For additional details about 50 MB payload support, limits, and best practices, see
Service Limits in Provisioning and Administering Oracle Integration Generation 2.
• Support for consumption and publication of OpenAPI with multipart/mixed and multipart/
form-data in REST Adapter trigger connections. See Consume and Publish OpenAPI
Documents with Multipart/Mixed and Multipart/Form-Data.
• Support for standard and custom HTTP headers to model an integration to expose
standard and custom HTTP header properties to Oracle Integration for downstream
processing (see Standard and Custom Header Support).
Chapter 1
REST Adapter Capabilities
1-2

• Support for multipart attachments (content-types: multipart/mixed, and multipart/form-data)
in request/response messages while creating an integration to expose a REST endpoint
that accepts incoming request messages with multipart attachments and/or sends
responses with multipart attachments (see Multipart Attachment Support for Trigger and
Invoke Connections).
• REST APIs exposed using the REST Adapter can be configured to be CORS-compliant
(see Cross-Origin Resource Sharing (CORS)).
• Support for exposing a REST endpoint that can accept the request and process it
asynchronously.
• A Swagger 2.0–compliant document is automatically produced for REST APIs exposed
using the REST Adapter. This document describes the metadata for the generated REST
APIs (see View the Metadata for the Inbound REST Endpoint in Swagger Format).
• Support for configuring multiple operation entry points with different resource URIs and
HTTP actions/verbs. Each operation represents a different pick action branch in a single
orchestrated integration. This feature eliminates the need to create multiple integrations
(each with a separate resource URI and verb) to perform different operations. See Receive
Requests for Multiple Resources in a Single REST Adapter Trigger Connection of Using
Integrations in Oracle Integration Generation 2.
• Support for generating sample cURL syntax on the Summary page of the Adapter
Endpoint Configuration Wizard for the configuration options that you have selected during
REST Adapter connection configuration, such as security policy, headers, parameters, and
so on. See Summary Page.
REST Adapter Capabilities When Consuming External REST APIs by Configuring the
Connection as an Invoke
• Enforces outgoing message and attachment size limitations:
– Ensures that responses containing attachments for outbound REST requests do not
exceed 1 GB. These attachments can be multipart/mixed, multipart/form-data, or
application/octet-stream. If the attachment exceeds 1 GB, an HTTP error code
message is returned:
413 Request entity too large
– Ensures that outgoing (invoke) messages returning an unstructured payload (multipart-
formdata and binary/octed-stream) from a client do not exceed 1 GB in size.
– Ensures that outgoing (invoke) messages returning structured message payloads (any
content-type header containing JSON, XML, HTML, YAML, or YML) to a client do not
exceed the following:
* 10 MB in size for HTML, YAML, and YML
* 50 MB in size for JSON and XML
For additional details about 50 MB payload support, limits, and best practices, see
Service Limits in Provisioning and Administering Oracle Integration Generation 2.
• Support for consuming any REST API described using Swagger 2.0/RAML/OpenAPI
documents and the Oracle Metadata Catalog. The REST Adapter can automatically
discover and present the available resources and operations present in the documents for
configurations. The metadata regarding operation-specific request and response
messages available in the document is automatically made available for mapping and
other activities (see Swagger and RAML Document Support for Describing External REST
APIs).
• Supports configuration of the following (see Configuration Parameters):
– Relative resource URI.
Chapter 1
REST Adapter Capabilities
1-3

– Support for HTTP methods GET, PUT, POST, DELETE, and PATCH.
– Template and query parameters.
– Support for a request/response payload:
* Support for JSON, XML, binary (inline and unstructured), and URL-form-encoded
payloads.
* Support for homogenous JSON arrays.
* Support for multidimensional JSON arrays (see Homogenous Multidimensional
Array Support in JSON Documents).
* Delivery of form parameters as part of a request body.
• Support for uploading sample XML documents to define the data definition for XML content
during REST Adapter configuration. The following XML documents are supported for
generating the data definition:
– XML with no namespace.
– XML with a homogenous namespace.
– XML files up to 3 MB in size.
• Support for uploading sample JSON documents to define data definitions during REST
Adapter configuration.
• Support for uploading complex XML schema definitions as a zipped archive to define data
definitions for XML content during REST Adapter configuration (see Complex Schema
Support).
• Support for accessing and setting standard and custom HTTP headers exposed by
external REST APIs (see Standard and Custom Header Support).
• Support for multipart attachments (content-type: multipart/mixed, and multipart/form-data )
in request/response messages in an integration while sending a request to an external
REST endpoint that accepts incoming request messages with multipart attachments and/or
sends responses with multipart attachments (see Multipart Attachment Support for Trigger
and Invoke Connections).
• Support for consuming external REST APIs that are not described using Swagger/RAML/
OpenAPI documents. You can declaratively specify the HTTP method and the sample
JSON document/XML schema for describing the shape of the request and response
messages.
• Support for consuming REST APIs protected using HTTP Basic Authentication, OAuth
Client Credentials (two-legged flow), OAuth Resource Owner Password Credentials (two-
legged flow), OAuth Authorization Code Credentials (three-legged flow), OAuth Custom
Three Legged Flow, OAuth Custom Two Legged Flow, OAuth 1.0a One Legged
Authentication, Amazon Web Services (AWS) Signature Version 4, and Oracle Cloud
Infrastructure (OCI) Signature Version 1. There is also support for consuming APIs that are
unprotected.
• Support for invoking external REST endpoints supporting the Amazon Web Services
(AWS) Signature Version 4 authentication type.
• Support for invoking Oracle Cloud Infrastructure cloud service REST APIs such as Oracle
functions, streaming, storage and so on as an integral part of Oracle Integration
orchestration flows.
• Support for invoking co-located REST APIs in an optimized manner.
The Oracle Integration runtime determines if the endpoint being invoked is co-located by
checking if the endpoint URL has a load balancer address. If the endpoint URL has a load
Chapter 1
REST Adapter Capabilities
1-4

balancer address, the endpoint is considered co-located and the HTTP request is
optimized by accessing the service locally using the non-SSL HTTP protocol.
• Extensibility support to access plurality of OAuth 2 providers (see Standard and Custom
Header Support).
• Support for dynamically changing the (invoke) outbound endpoint configuration (see
Support for Dynamic REST Endpoints).
• Support for consuming external REST APIs that are protected using transport level
security. The REST Adapter supports one-way SSL and two-way SSL. Oracle Integration
supports a certificate management user interface to upload public certificates for external
APIs that are protected either using lesser known certifying authorities (CA) or self-signed
certificates.
Support for external REST APIs hosted on a two-way SSL server requiring client side
(Oracle Integration) identity. Oracle Integration provides support for exchanging the client
side identity with the server hosting the external API.
• Support for publishing of REST-based integrations as OpenAPI documents. OpenAPI
support is available when configuring the REST Adapter as an invoke connection. You
provide a link to the OpenAPI document to publish or consume.
OpenAPI support enables you to perform the following tasks:
– Publish an OpenAPI document describing an Oracle Integration REST endpoint. You
can invoke the REST endpoint with the published document using a REST client such
as postman.
See Publish REST-Based Integrations as OpenAPI Documents.
– Consume an OpenAPI document using the REST Adapter.
OpenAPI-defined headers are automatically supported except for the standard headers
that are currently disabled in the Adapter Endpoint Configuration Wizard.
• Support for generating sample cURL syntax on the Summary page of the Adapter
Endpoint Configuration Wizard for the configuration options that you have selected during
REST Adapter connection configuration, such as security policy, headers, parameters, and
so on. See Summary Page.
REST Adapter Restrictions
Note the following REST Adapter restrictions.
• If the endpoint response doesn't include a
content-type
or if the
content-type
is set to
empty (
""
), the stream reference is not included in the response payload.
For this use case to succeed, the REST endpoint provider must update their service to
return the correct
content-type
in the response header.
• Transport Layer Security (TLS) version 1.3 is not supported.
• REST endpoints can be protected using two-way SSL or mutual TLS authentication
(mTLS). The REST Adapter supports accessing these endpoints. Authorization endpoints
that procure and manage OAuth access tokens are also REST endpoints. However, these
endpoints are not certified for use with the REST Adapter connection when protected using
two-way SSL.
• Two-way SSL is not supported for calls to external services through the connectivity agent.
Two-way SSL requires direct connectivity from Oracle Integration without the connectivity
agent.
• The maximum permissible limit for JSON file samples is 100 KB.
Chapter 1
REST Adapter Restrictions
1-5

• Plain/text content-type can be sent or received as unparsed content by the REST Adapter
using the raw payload option.
• Consuming external REST APIs that are protected using NTLM or digest token-based
authentication are not supported.
• When configuring the REST Adapter to work with the on-premises connectivity agent on
the Connections page, only the Basic Authentication, OAuth Client Credentials, OAuth
Resource Owner Password Credentials, OAuth Custom Two Legged Flow, and No
Security Policy security policies in the Security Policy list are supported.
The following security policies in the Security Policy list are not supported for use with the
connectivity agent:
– AWS Signature Version 4
– OAuth Authorization Code Credentials
– OAuth Custom Three Legged Flow
– API Key Based Authentication
– OAuth 1.0 One Legged Authentication
– OCI Signature Version 1
See On-Premises REST API Support with the Agent.
• The REST Adapter automatically encodes the value of query parameters before invoking a
service. The REST Adapter has no way of knowing if you have already encoded a query
parameter. Ensure that you assign unencoded values to query parameters. Assigning
encoded values leads to double encoding.
For example, assume query parameter
q
has the following value:
q=a+b
This may mean that the value of
q
was intended to be
a b
, but was encoded by the user.
The intention may also have been to send
a+b
, which must be URL-encoded as
a%2Bb
before sending.
• Polymorphic constructs are not supported when publishing OpenAPIs.
• Unicode characters in the range of
\u0000
to
\u001F
are control characters and are not
allowed in JSON elements.
• You can customize the response status. However, this is not shown as part of the Swagger
contract because runtime overrides are not known as part of the interface.
• HTTP response status cannot be customized under the following conditions:
– If the request is asynchronous one way. This is because the response status is always
201
.
– Errors that occur during trigger request/response handling are reported using a
predefined error code.
– Basic routing integrations (map my data integrations) don't allow fault handling and
error responses in such scenarios.
– If the HTTP response status is set to
204
, the response is sent back without any
content.
• If you use the OAuth 1.0 One Legged Authentication security policy for integrations with
Oracle NetSuite, the default HMAC-SHA1 signature encryption algorithm that is
automatically used is no longer supported starting with the May 2021 release of Oracle
Chapter 1
REST Adapter Restrictions
1-6

Integration. You must update your REST Adapter connections for integrations with Oracle
NetSuite to use HMAC-SHA256. After making the update, integration reactivation is not
required. See Configure Connection Security.
Note:
There are overall service limits for Oracle Integration. A service limit is the quota or
allowance set on a resource. See Service Limits.
Swagger/OpenAPI Restrictions
Not all Swagger constructs are understood by the REST Adapter. Note the following limitations
when publishing and consuming Swagger/OpenAPI.
Publish Restrictions
Note the following publish restrictions for the REST Adapter.
• Polymorphic constructs are not supported when publishing OpenAPIs.
• Endpoints created using REST Adapter trigger connections are described using a Swagger
and openAPI definition. REST endpoints having an XML request/response are not
correctly described. Clients must not rely on the Swagger/openAPI definition.
• Each REST Adapter trigger connection endpoint is published as a Swagger document. The
Swagger document usually has a single resource and verb.
However, in the case of multiple verbs and resources, the Swagger document has multiple
resources or paths in Swagger and multiple verbs for each resource.
• While OpenAPI lets you define dictionaries types where the keys are strings, dictionary
types are not supported in Oracle Integration.
• Only JSON payload is supported for publishing. XML payload is not supported.
Consume Restrictions
The REST Adapter as a client can be configured with a Swagger definition based on which it
can discover and list the existing resource. However, some Swagger operations cannot
currently be correctly consumed by the REST Adapter:
• Only three multipart combinations are supported for consumption:
– One or many file upload body parts and any number of plain text fields using multipart/
form-data
– One or many file upload body parts and one JSON body part using multipart/form-data
– One or many file upload body parts and one JSON body part using multipart/mixed
• Content of JSON must be an object
• XML
• Top-level array
• Raw/application/octet-stream
• External REST APIs that are described using OpenAPI 3.0
Chapter 1
REST Adapter Restrictions
1-7

• Swagger documents of external REST APIs that have metadata regarding content types
such as multipart/form-data, multipart/mixed, and application/octet-stream
• REST Adapter invoke connections cannot consume Swagger documents with recurring
nested structures. For example:
Employee → payroll → item (line 1, line2)
Manager → payroll → item (line 3, line4)
In such a case, the Swagger parser caches the first definition of
item
and uses that
causing incorrect manager schema. This issue is addressed, but the fix is currently not
enabled due to backward compatibility.
REST endpoints that do not have a request or a response cannot be consumed using a
Swagger-based connection or using the local integration. If an error appears after
initializing the local integration or the Adapter Endpoint Configuration Wizard with a
Swagger-based connection, check the limitations on consumption of certain Swaggers.
Note these additional restrictions:
• The missing server URL for the OpenAPI specification is resolved from the OpenAPI host
port. If the server URL is missing from the OpenAPI specification, the base URL is
resolved from the domain/host:port of the OpenAPI URL where the OpenAPI specification
is hosted. For an example, the target endpoint is resolved using the host and port where
the OpenAPI specification is hosted as follows:
http(s)://host:port/path-from-openapi
• Headers/custom headers must be added manually and are not discovered from the
OpenAPI specification.
• Connectivity agent limitations:
– Swagger API consumption does not work with the connectivity agent.
– OpenAPI consumption does not work with the connectivity agent.
• If a Swagger or OpenAPI specification defines multiple success responses, Oracle
Integration uses the responses based upon the following criteria:
– Oracle Integration first looks for a success response (
200
).
– If the definition does not contain a
200
response, Oracle Integration looks for a
response definition with
default
.
– If
default
is not defined, Oracle Integration looks for a response with a
201
definition.
In each category, Oracle Integration first uses the response corresponding to
application/json
. Otherwise, Oracle Integration uses the first response in the list of
responses for the status code.
REST Adapter Use Cases
The REST Adapter can be used to implement the following categories of use cases.
• Modernize the Existing Capability
• Shape the API Based on a Client Application's Needs
• Provide a Coarse-Grained API Based on a Client Domain's Needs
• No Application Adapter for an External REST API
Chapter 1
REST Adapter Use Cases
1-8

• Convert an Unmanaged API into an OAuth2–Protected API
Note:
When you provision a new instance of Oracle Integration, several sample integrations
are automatically included. Many of these samples are configured with the REST
Adapter. These fully designed samples help you get up and running quickly and
show you how easy it is to activate, invoke, and monitor an integration between
endpoints. See Running the Sample Integrations of Using Integrations in Oracle
Integration Generation 2.
Modernize the Existing Capability
There are scenarios in which partners or in-house client applications can consume only REST
APIs. The capability is exposed through non-HTTP interfaces such as JDBC. Or the capability
is exposed as a SOAP API. For example, status of the orders may reside in an on-premises
database that must be retrieved using a SQL query. You can build an integration that retrieves
order status and exposes it as a REST API by configuring the REST Adapter connection as a
trigger.
Shape the API Based on a Client Application's Needs
There are scenarios in which partners or in-house or channel-specific client applications
warrant only a very small subset of information compared to what is exposed by back end data
sources. For example, the Get Order SOAP operation exposed by the back end Oracle ERP
Cloud application can return several hundred attributes, while the client applications may need
less than one-tenth of that. You can build an integration that consumes the SOAP service to
retrieve the order details and exposes them as a REST API by configuring the REST Adapter
connection as a trigger. The response message for this new REST API can reflect only the
needed set of attributes by the client applications. The mapping of data from the back end
SOAP service to the REST API-specific response message is performed only for the subset of
attributes.
Provide a Coarse-Grained API Based on a Client Domain's Needs
There are scenarios in which the partners or in-house or channel-specific client applications
warrant an API that may not be exposed at the same level of granularity by back end systems.
For example, you want to expose an API to your partners for creating a sales order in your
application. However, the sales order application may need multiple service invocations for
creating one order. Exposing a single API for creating an order to partners abstracts the
internal implementation details. You can accomplish this by developing an integration that can
send multiple service invocations to the back end systems and expose them as a single REST
API by configuring the REST Adapter connection as a trigger.
No Application Adapter for an External REST API
Even though Oracle Integration delivers many adapters for facilitating integration with specific
applications, there are still several applications/capabilities for which specific adapters are
missing. In other situations, an integration can be built to invoke these external REST APIs by
configuring the REST Adapter connection as an invoke.
Convert an Unmanaged API into an OAuth2–Protected API
Applications with unprotected APIs or APIs protected using user credentials generally are
difficult to expose publicly. While an unprotected API can be misused, an API protected using
Chapter 1
REST Adapter Use Cases
1-9

user credentials requires a higher level of trust with the client. Also, a change in user
credentials implies that the client applications also need to update the credentials. You can
create an integration that invokes such APIs and exposes them through a REST Adapter
connection configured as a trigger, which is protected using OAuth 2.
Workflow to Create and Add a REST Adapter Connection to an
Integration
You follow a very simple workflow to create a connection with an adapter and include the
connection in an integration in Oracle Integration.
Step Description More Information
1 Create the adapter connections for
the applications you want to
integrate. The connections can be
reused in multiple integrations and
are typically created by the
administrator.
Create a REST Adapter Connection
2 Create the integration. When you
do this, you add trigger and invoke
connections to the integration.
Create Integrations and Add the REST Adapter Connection
to an Integration
3 Map data between the trigger
connection data structure and the
invoke connection data structure.
Map Data in Using Integrations in Oracle Integration
Generation 2
4 (Optional) Create lookups that map
the different values used by those
applications to identify the same
type of object (such as gender
codes or country codes).
Manage Lookups in Using Integrations in Oracle
Integration Generation 2
5 Activate the integration. Manage Integrations in Using Integrations in Oracle
Integration Generation 2
6 Monitor the integration on the
dashboard.
Monitor Integrations in Using Integrations in Oracle
Integration Generation 2
7 Track payload fields in messages
during runtime.
Assign Business Identifiers for Tracking Fields in Messages
and Manage Business Identifiers for Tracking Fields in
Messages in Using Integrations in Oracle Integration
Generation 2
8 Manage errors at the integration
level, connection level, or specific
integration instance level.
Manage Errors in Using Integrations in Oracle Integration
Generation 2
Chapter 1
Workflow to Create and Add a REST Adapter Connection to an Integration
1-10

2
REST Adapter Concepts
The following sections describe REST Adapter capabilities in more detail.
Topics:
• Authentication Support
• REST API Support
• OpenAPI Support
• Attachment Support
• Header, Token, Query Parameter, and Array Support
• Swagger Support
• Mapper Connectivity Properties Support
• REST Endpoint Support
• Cross-Origin Resource Sharing (CORS) Support
• Complex Schema Support
Authentication Support
The following sections describe REST Adapter authentication capabilities in more detail.
Topics:
• Authenticate Requests for Invoking Oracle Integration Flows
• Authentication Types
• Role-Based Connections
• Extensibility Support for Multiple OAuth Providers
Authenticate Requests for Invoking Oracle Integration Flows
Integrations support multiple authentication methods suited to different applications and use
cases. The adapters used as a trigger connection to stand up the endpoints/listener for a
specific integration can support one or multiple authentication methods.
The following sections discuss the use cases, pros and cons, prerequisites, and instructions
necessary for sending a request for each of the supported authentication methods.
Topics:
• About Requests to Invoke Integrations
• About OAuth 2.0 Grants
• Use OAuth 2.0 Grants in Identity Domain Environments
• Use OAuth 2.0 Grants in Oracle Identity Cloud Service Environments
2-1

See OAuth Grant Types.
About Requests to Invoke Integrations
All integrations using this adapter as a trigger connection are protected by default using HTTP
Basic Authentication and OAuth token-based authentication.
You currently can authenticate your requests to invoke integrations in either of the following
ways:
• Using HTTP Basic Authentication by sending the credentials of the user (that is, created in
Oracle Identity Cloud Service) through the HTTP authorization header
• Sending an OAuth access token in the header while invoking an Oracle Integration
endpoint after acquiring the access token from Oracle Identity Cloud Service that serves as
the OAuth authorization provider
You must have the ServiceUser role in Oracle Identity Cloud Service to invoke integrations.
Invoke Integration Endpoints Using HTTP Basic Authentication
This authentication method allows the credentials belonging to an Oracle Integration user to
send the request to invoke an integration. You must create this user in the Oracle Integration
identity provider Oracle Identity Cloud Service and ensure that the user was granted the role
for invoking an integration.
The user can be:
• Human - representing a business user such as a sales representative, technician, or any
other person for invoking an integration
• Nonhuman - representing a service integration account used by an external client
application for invoking an integration
Even though it's easy to implement the authentication scheme, this is the least secure way to
send a request to Oracle Integration for invoking an integration. Also, Oracle Integration
doesn't recommend this authentication scheme.
In addition, the customer must ensure the credentials, when reset, are provided to the client
application that invokes the integration to ensure a new set of credentials are being used from
then on.
Assign appropriate user(s) to the various Oracle Integration roles. For standard/production
configurations, use the ServiceUser role. (See Oracle Integration Roles in Provisioning and
Administering Oracle Integration Generation 2.)
1. From the
menu on the Oracle Cloud Infrastructure home page, select Identity &
Security, then select Federation.
2. In the Federation table, click OracleIdentityCloudService.
3. In the Oracle Identity Cloud Service Console field, click the URL.
4. Click the applications page icon.
Chapter 2
Authentication Support
2-2

5. Click the application.
6. To assign a user, go to the Application Roles section of Oracle Identity Cloud Service.
7. Make a request to trigger an endpoint.
curl --location --request GET 'https://OIC host/OIC endpoint' \
--header 'Authorization: Basic <base64-encoded username:password>'
Invoke Integration Endpoints Using OAuth Token-Based Authentication
This authentication scheme allows the external client to acquire a token that is also sent as
part of the request sent to invoke an integration.
The most important step for an application in the OAuth flow is how the application receives an
access token (and optionally a refresh token). A grant type is the mechanism used to retrieve
the token. OAuth defines several different access grant types that represent different
authorization mechanisms.
Applications can request an access token to access protected endpoints in different ways,
depending on the type of grant type specified in the Oracle Identity Cloud Service application.
A grant is a credential representing the resource owner's authorization to access a protected
resource.
The following sections discuss the various grant types and their pros/cons, along with
instructions on how to configure the specific grant type.
Chapter 2
Authentication Support
2-3

About OAuth 2.0 Grants
There are several OAuth 2.0 grant types you can use in Oracle Integration. Review the
following information to identify the grant type to use for your use case.
Chapter 2
Authentication Support
2-4

Grant Type About the Grant Type Use Cases and Risks
JWT user assertion
(recommended)
A user assertion is a user token
that contains identity information
about the user. The user can
either represent a human or a
service integration account
created for identifying a specific
calling application.
The user assertion is used
directly as an authorization grant
to obtain an access token. The
client details are provided either
as an authentication header in
the request or as a client
assertion.
The user assertion grant is more
secure than the resource owner
password credentials grant
because the user’s credentials
are never exposed.
The user assertion workflow:
• Is used with confidential
clients. The OAuth clients are
trusted to assert a user/
service integration account
identity on behalf of the user/
service integration account.
• The resource owner's
credentials (Oracle
Integration user) are never
accessible to the client
application. It just uses the
assertion of the resource
owner.
• It isn’t redirection-based. It
takes a request only from the
client application to the
authorization server. The
user is not redirected
between interfaces to
authorize the request.
This user assertion grant works
as follows:
• The client requests an
access token by providing a
user assertion. The client
details are provided either as
an authentication header in
the request or as a client
assertion.
• The OAuth service
authenticates the client and,
if valid, supplies an access
token.
The JWT user assertion
characteristics are as follows:
This grant is used by applications
that want to programmatically
invoke integrations without any
user intervention.
The client application
impersonates the user by sending
the user assertion to Oracle
Identity Cloud Service while
requesting token access. An
access token is returned in the
user context.
The user can either represent a
human or a service integration
account created for identifying a
specific calling application.
Oracle Integration recommends
the use of this grant for acquiring
an OAuth access token by the
applications that must
programmatically start the
integration without any user
intervention.
Risks
Carefully use this grant (only with
first party/trusted clients) because
it allows for trivial impersonation
to more highly privileged
accounts on services.
Usage
See Prerequisites for JWT User
Assertions.
Chapter 2
Authentication Support
2-5

Grant Type About the Grant Type Use Cases and Risks
• Does not require the client to
have knowledge of user
credentials.
• There is no browser-based
end user interaction.
• A refresh token is allowed.
• An access token is in the
context of the end user.
In this OAuth flow:
• A user attempts to access a
client application by sending
a generated user assertion.
• The client application
requests an access token,
and often a refresh token, by
providing a user assertion or
a third-party user assertion.
• The Oracle Identity Cloud
Service authorization server
returns the access token to
the client application.
• The client application uses
the access token in an API
call to invoke the integration.
Chapter 2
Authentication Support
2-6

Grant Type About the Grant Type Use Cases and Risks
Authorization code The authorization code grant type
is used by web and mobile
applications. It differs from most
of the other grant types by first
requiring the application to launch
a browser to begin the
integration. At a high level, the
integration consists of the
following steps:
• The application opens a
browser to send the user to
the OAuth server.
• The user sees the
authorization prompt and
approves the application
request.
• The user is redirected back
to the application with
authorization code in the
query string.
• The application exchanges
the authorization code for an
access token.
The authorization code has the
following characteristics:
• Does not require the client to
have knowledge of user
credentials.
• Is a browser-based end user
interaction.
• A refresh token is allowed.
• An access token is in the
context of the end user.
In this OAuth flow:
• A user clicks a link in a web
server client application to
request access to protected
resources.
• The client application
redirects the browser to the
Oracle Identity Cloud Service
authorization endpoint with a
request for an authorization
code:
oauth2/v1/authorize
• The
Oracle Identity Cloud Service
authorization server returns
an authorization code to the
client application through a
browser redirect after the
resource owner gives
consent.
• The client application
subsequently exchanges the
This grant is used by the
applications such as web portals
and mobile applications involving
user interactions that may end up
invoking the integrations. In this
type of use case, the user signing
in to the web portal/mobile
application explicitly provides the
consent by authenticating against
Oracle Integration to let their
application start the integration.
Usage
See Prerequisites for
Authorization Code.
Chapter 2
Authentication Support
2-7

Grant Type About the Grant Type Use Cases and Risks
authorization code for an
access token, and often a
refresh token.
• The
Oracle Identity Cloud Service
authorization server returns
the access token to the client
application.
• The client application uses
the access token in an API
call to invoke the integration.
Chapter 2
Authentication Support
2-8

Grant Type About the Grant Type Use Cases and Risks
Resource owner password
credential (ROPC)
The resource owner’s password
credentials (that is, the user
name and password) can be used
by the OAuth client directly as an
authorization grant to obtain an
access token.
The resource owner password
credentials grant type is suitable
for cases where the resource
owner has a trust relationship
with the OAuth client.
When using the resource owner
password credentials grant, the
user provides the credentials
(user name and password)
directly to the application. The
application then uses the
credentials to obtain an access
token from the OAuth token
service.
The resource owner password
credentials grant is a grant
workflow where the client
application, together with its client
identifier and secret, sends the
user name and password in
exchange for an access token.
Instead of the user having to log
in and approve the authorization
request in a web interface, the
user can enter the user name and
password in the client application
user interface directly. This
workflow has different security
properties than other OAuth
workflows. The primary difference
is that the user’s password is
accessible to the application. This
requires a strong trust of the
application by the user.
The resource owner password
credentials grant has the
following characteristics:
• The client is required to have
knowledge of user
credentials.
• Is not a browser-based end
user interaction.
• A refresh token is allowed.
• An access token is in the
context of the end user.
In this OAuth flow:
• The user clicks a link in the
client application requesting
access to protected
resources.
• The client application
requests the resource
This grant can be used by
applications that want to
programmatically invoke the
integration without any user
intervention.
Use this grant only with trusted
first-party clients that securely
handle user credentials.
Even though this grant type can
be used by client applications to
acquire an OAuth access token to
use for sending the request to
invoke an integration in a
programmatic manner, Oracle
Integration does not recommend
the resource owner password
credential grant because of the
following risks:
Risks
• This grant type carries a
higher risk than other grant
types because it maintains
the password anti-pattern
this protocol seeks to avoid.
The client can abuse the
password or the password
can unintentionally be
disclosed to an attacker (for
example, through log files or
other records kept by the
client).
• The application can request
a scope with complete
access to user resources
once it possesses the
password credential.
• Passwords expire.
• This grant is currently in a
deprecated state.
Usage
See Prerequisites for Resource
Owner Password Credentials.
Chapter 2
Authentication Support
2-9

Grant Type About the Grant Type Use Cases and Risks
owner's user name and
password.
• The user logs in with their
user name and password.
• The client application
exchanges those credentials
for an access token, and
often a refresh token, from
the Oracle Identity Cloud
Service authorization server.
• The Oracle Identity Cloud
Service authorization server
returns the access token to
the client application.
• The client application uses
the access token in an API
call to invoke the integration.
Use OAuth 2.0 Grants in Identity Domain Environments
To use an OAuth 2.0 grant type with this adapter in an identity domain environment of Oracle
Integration, you must perform the following prerequisites.
• Access the Identity Domain
• Prerequisites for Resource Owner Password Credentials
• Prerequisites for JWT User Assertion
• Prerequisites for Authorization Code
Access the Identity Domain
• Log in to the Oracle Cloud Infrastructure Console with your identity domain administrator
credentials.
1. In the navigation pane, click Identity & Security.
2. Click Domains.
3. Select your compartment.
4. Click the identity domain.
Chapter 2
Authentication Support
2-10

5. In the navigation pane, click Integrated applications.
This is the location at which you create the client application for your grant type.
Prerequisites for Resource Owner Password Credentials
To trigger the integration with OAuth, a client application is required.
• Configure the client application
• Add roles to the client application
Configure the client application
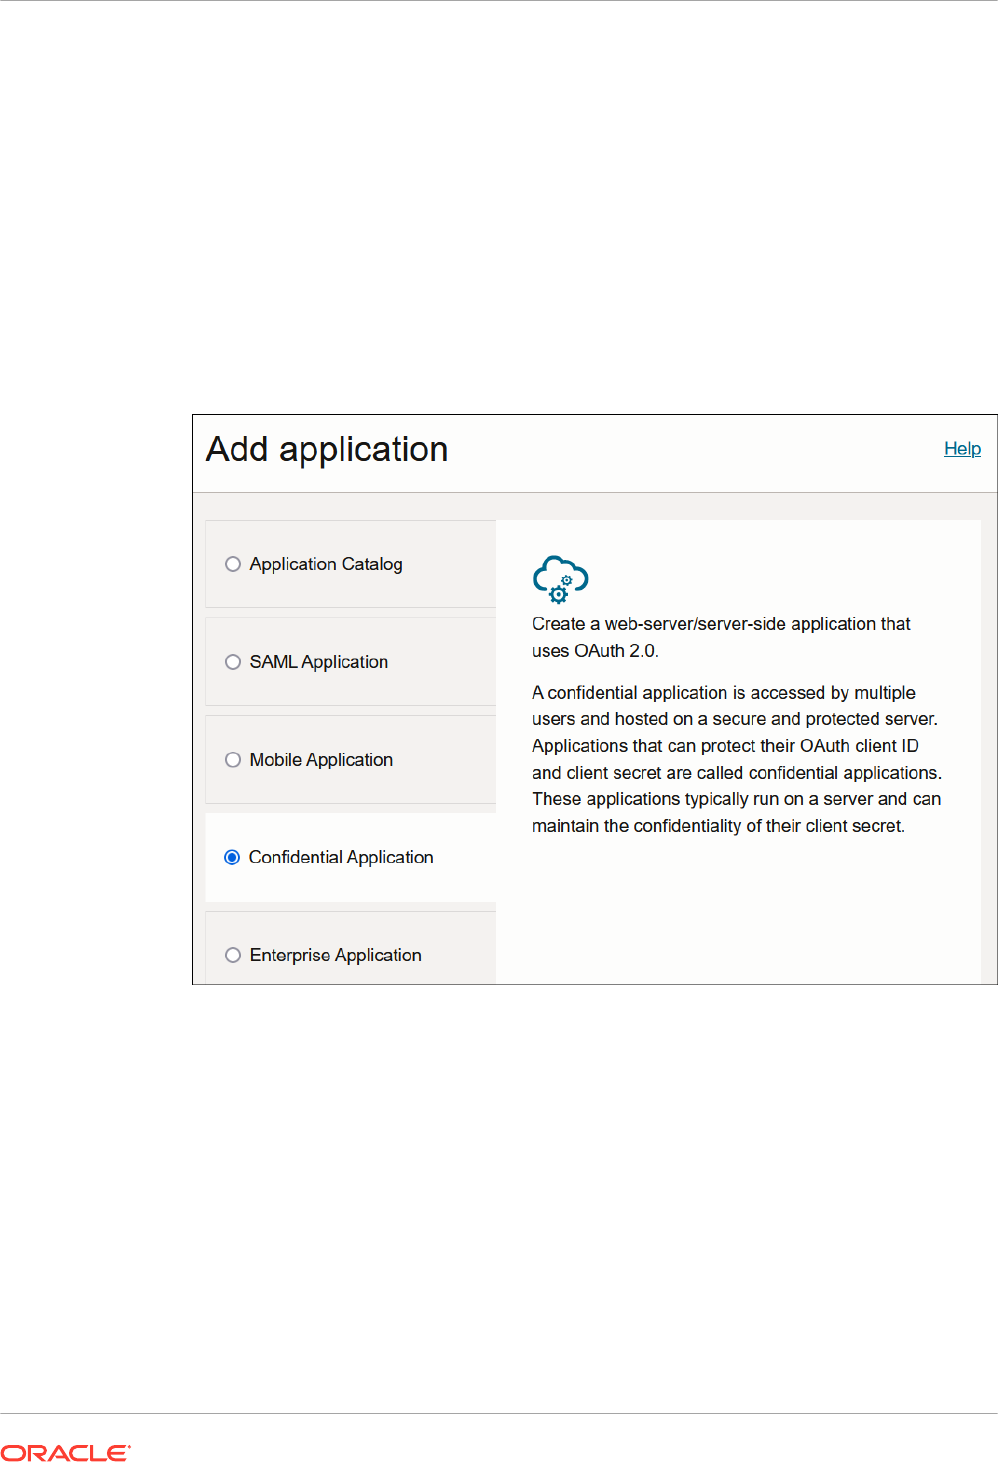
1. Click Add application.
2. Select Confidential Application, then click Launch workflow.
Chapter 2
Authentication Support
2-11

3. Enter a name. The remaining fields on this page are optional and can be ignored.
4. Click Next.
5. In the Client configuration box, select Configure this application as a client now.
6. For resource owner password credentials, select Resource owner and Refresh token in
the Allowed grant types section.
7. Complete the following steps:
a. Leave the Redirect URL, Post-logout redirect URL, and Logout URL fields blank.
b. For Client type, ensure that Confidential is selected.
c. Bypass several fields and scroll down to the Token issuance policy section.
Chapter 2
Authentication Support
2-12

d. Select Specific in the Authorized resources section.
e. Click the Add Resources check box.
f. Click Add scope.
g. Find the Oracle Integration application for your instance, and click .
h. Select the two scopes appended with the following details:
• urn:opc:resource:consumer::all
• ic/api/
i. Click Add.
The scopes are displayed in the Resources section.
j. Ignore the Add app roles check box. This selection is not required.
k. Click Next, then click Finish.
The details page for the client application is displayed.
8. Click Activate, and then Activate application to activate the client application for use.
9. In the General Information section, note the client ID and client secret values. These
values are required for the third-party application that is communicating with the identity
domain.
Add roles to the client application
Chapter 2
Authentication Support
2-13

1. In the navigation pane, click Oracle Cloud Services.
2. Select the specific application corresponding to the Oracle Integration instance.
3. In the navigation pane, click Application roles.
4. Select the following for the resource owner password credentials grant type:
a. Expand ServiceInvoker, then click Manage next to either Assigned users or
Assigned groups. For example, if you click Assigned users:
b. Click Show available users.
c. Select the user and click Assign, then click Close.
5. Validate the client application for the resource owner password credentials grant type.
Chapter 2
Authentication Support
2-14

a. To fetch the access client, make a request with the user name and password in the
payload.
##Syntax
curl -i -H 'Authorization: Basic <base64Encoded_clientid:secret>' -H
'Content-Type: application/x-www-form-urlencoded;charset=UTF-8' --
request POST https://
<Identity_Domain_Service_Instance>.identity.oraclecloud.com/oauth2/v1/
token -d 'grant_type=password&username=<user-
name>&password=<password>&scope=<App_Scope>%20offline_access'
###where
#### <base64-clientid-secret> - Base 64 encode clientId:ClientSecret
#### <username> - user for token needs to be issued (must be in
serviceinvoker role).
#### <password> - password for above user
#### <app_scope> - Scope added while creating application in client
configuration section (Ends with urn:opc:resource:consumer::all)
##Example
curl -i -H 'Authorization: Basic OGQyM...ZDA0Mjcz' -H 'Content-Type:
application/x-www-form-urlencoded;charset=UTF-8' --request POST https://
<identity_domain_host>/oauth2/v1/token -d
'grant_type=password&username=sampleUser&password=SamplePassword&scope=h
ttps://
<Resource_APP_Audience>urn:opc:resource:consumer::all%20offline_access'
b. Capture the
access_token
and
refresh_token
from the response.
{
"access_token": "eyJ4NXQjG...dfsdfsFgets2ed",
"token_type": "Bearer",
"expires_in": 3600,
"refresh_token": "AQAgY2MzNjVlOTVhOTRh...vM5S0MkrFSpzc="
}
c. Use the
access_token
in the authorization header to invoke the Oracle Integration
trigger endpoint.
curl --location --request GET 'https://OIC host/OIC endpoint' \
--header 'Authorization: Bearer eyJ4NXQjG...dfsdfsFgets2ed'
d. To update the access token, use the refresh token and make a request.
e. Capture the
access_token
and
refresh_token
from the response for further use.
curl -i -H 'Authorization: Basic <base64-clientid-secret>' -H 'Content-
Type: application/x-www-form-urlencoded;charset=UTF-8' --request POST
https://<Identity_Domain_Service_Instance>.identity.oraclecloud.com/
oauth2/v1/token -d
'grant_type=refresh_token&refresh_token=<refresh_token>'
##Example
curl -i -H 'Authorization: Basic OGQyM...ZDA0Mjcz' -H 'Content-Type:
application/x-www-form-urlencoded;charset=UTF-8' --request POST https://
<Identity_Domain_Service_Instance>.identity.oraclecloud.com/oauth2/v1/
token -d
Chapter 2
Authentication Support
2-15

'grant_type=refresh_token&refresh_token=AQAgY2MzNjVlOTVhOTRh...vM5S0MkrF
Spzc='
Prerequisites for JWT User Assertion
• Generate the key
• Configure the client application
• Add a certificate as a trusted partner
• Generate the JWT user assertion
• Validate the client application
Generate the key
You must first generate the key to import when you configure the client application for the JWT
user assertion.
1. Generate the self-signed key pair.
keytool -genkey -keyalg RSA -alias <your_alias> -keystore <keystore_file> -
storepass <password> -validity 365 -keysize 2048
##example
keytool -genkey -keyalg RSA -alias assert -keystore sampleKeystore.jks -
storepass samplePasswd -validity 365 -keysize 2048
2. Export the public key for signing the JWT assertion.
keytool -exportcert -alias <your_alias> -file <filename> -keystore
<keystore_file> -storepass <password>
##example
keytool -exportcert -alias assert -file assert.cer -keystore
sampleKeystore.jks -storepass samplePasswd
## This should show a success message e.g. Certificate stored in file
<assert.cer>
3. Convert the keystore to P12 format.
keytool -importkeystore -srckeystore <filename> -srcstorepass <password> -
srckeypass <password> -srcalias <your_alias> -destalias <your_alias> -
destkeystore <destFileName> -deststoretype PKCS12 -deststorepass
<password> -destkeypass <password>
##example
keytool -importkeystore -srckeystore sampleKeystore.jks -srcstorepass
samplePasswd -srckeypass samplePasswd -srcalias assert -destalias assert -
destkeystore assert.p12 -deststoretype PKCS12 -deststorepass samplePasswd -
destkeypass samplePasswd
## This should show a success message e.g. Importing keystore
sampleKeystore.jks to assert.p12...
Chapter 2
Authentication Support
2-16
4. Export the private key from the P12 keystore.
openssl pkcs12 -in <destFileName> -nodes -nocerts -out <pem_file>
##example
openssl pkcs12 -in assert.p12 -nodes -nocerts -out private_key.pem
## This should show a success message: MAC verified OK
Configure the client application
To trigger the integration with OAuth, a client application is required.
1. Click Add application.
2. Select Confidential Application, and click Launch workflow.
3. Enter a name. The remaining fields on this page are optional and can be ignored.
4. Click Next.
5. In the Client configuration box, select Configure this application as a client now.
6. For JWT user assertions, select JWT assertion and Refresh token in the Allowed grant
types section.
Chapter 2
Authentication Support
2-17

7. Complete the following steps for the grant type:
a. Leave the Redirect URL, Post-logout redirect URL, and Logout URL fields blank.
b. In the Client type section, select Trusted.
c. Upload the certificate created in section Generate the key. This action adds the
certificate as a trusted partner.
d. Bypass several fields and scroll down to the Token issuance policy section.
e. Select Specific in the Authorized resources section.
f. Click the Add Resources check box.
g. Click Add scope.
h. Find the Oracle Integration application for your instance, and click .
i. Select the two scopes appended with the following details:
• urn:opc:resource:consumer::all
Chapter 2
Authentication Support
2-18

• ic/api/
j. Click Add.
The scopes are displayed in the Resources section.
k. Ignore the Add app roles check box. This selection is not required.
l. Click Next, then click Finish.
The details page for the client application is displayed.
m. Click Activate, and then Activate application to activate the client application for use.
n. In the General Information section, note the client ID and client secret values. These
values are required for the third-party application that is communicating with the
identity domain.
8. In the navigation pane, click Oracle Cloud Services.
9. Select the specific application corresponding to the Oracle Integration instance.
10. In the navigation pane, click Application roles.
11. Expand ServiceInvoker, then click Manage next to either Assigned users or Assigned
groups. For example, if you click Assigned users:
Chapter 2
Authentication Support
2-19

12. Click Show available users.
13. Select the user and click Assign, then click Close.
Add a certificate as a trusted partner
In addition to importing the signing certificate into the client application, you are also required
to include the certificate as a trusted partner certificate.
1. In the navigation pane, click Settings.
Chapter 2
Authentication Support
2-20

2. Click Trusted partner certificates.
3. Click Import certificate to upload the certificate created in section Generate the key.
Generate the JWT user assertion
1. Generate the JWT user assertion using the generated private key and simple Java code.
Note:
You can use the https://github.com/jwtk/jjwt library to generate the user assertion.
There are many libraries listed at https://jwt.io/ for multiple technologies.
Sample:
header:
{
"alg": "RS256",
"typ": "JWT",
"kid": "assert"
}
payload:
{
"sub": "ssaInstanceAdmin",
"jti": "8c7df446-bfae-40be-be09-0ab55c655436",
Chapter 2
Authentication Support
2-21

"iat": 1589889699,
"exp": 1589909699,
"iss": "d702f5b31ee645ecbc49d05983aaee54",
"aud": "https://identity.oraclecloud.com/"
}
Where:
•
sub
specifies the user name for whom user assertion is generated.
•
jti
is a unique identifier
•
iat
is issued (epoch seconds).
•
exp
is the token expiry (epoch seconds).
•
iss
is the client ID.
•
aud
must include the identity domain audience
https://identity.oracle.com/
. The
signing algorithm must be RS256.
•
kid
specifies the key to use to verify the signature. Therefore, it must match with the
uploaded certificate alias.
Validate the client application
1. Once you generate the JWT user assertion, generate the access token as follows.
##Syntax
curl -i -H 'Authorization: Basic <base64Encoded clientid:secret>' -H
'Content-Type: application/x-www-form-urlencoded;charset=UTF-8' --request
POST https://<Identity_Domain_Service_Instance>.identity.oraclecloud.com/
oauth2/v1/token -d 'grant_type=urn%3Aietf%3Aparams%3Aoauth%3Agrant-
type%3Ajwt-bearer&assertion=<user assertion>&scope=<app_scope>'
###where
#### grant type - urn:ietf:params:oauth:grant-type:jwt-bearer
#### <base64-clientid-secret> - Base 64 encode clientId:ClientSecret
#### <user assertion> - User assertion generated
#### <app scope> - Scope added while creating application in client
configuration section (Ends with urn:opc:resource:consumer::all)
2. Capture the
access_token
from the response.
{
"access_token": "eyJ4NXQjG...dfsdfsFgets2ed",
"token_type": "Bearer",
"expires_in": 3600
}
3. Use an
access_token
in the authorization header to invoke the Oracle Integration trigger
endpoint.
curl --location --request GET 'https://OIC host/OIC endpoint' \
--header 'Authorization: Bearer eyJ4NXQjG...dfsdfsFgets2ed'
Prerequisites for Authorization Code
• Configure the client application
Chapter 2
Authentication Support
2-22

• Validate the Oracle Integration application and user roles
• Validate the client application
Configure the client application
To trigger the integration with OAuth, a client application is required.
1. Click Add application.
2. Select Confidential Application. then click Launch workflow.
3. Enter a name. The remaining fields on this page are optional and can be ignored.
4. Click Next.
5. In the Client configuration box, select Configure this application as a client now.
6. Select the grant type to use:
a. For authorization code, select Refresh token and Authorization code in the Allowed
grant types section.
Chapter 2
Authentication Support
2-23

b. In the Redirect URL field, enter the redirect URL of the client application. After user
login, this URL is redirected to with the authorization code. You can specify multiple
redirect URLs. This is useful for development environments in which you have multiple
instances, but only one client application due to licensing issues.
Note:
If you don't know the following information, check with your administrator:
• If your instance is new or upgraded from Oracle Integration Generation 2
Generation 2 to Oracle Integration Generation 2.
• The complete instance URL with the region included (required for new
instances).
For
Connections…
Include the Region
as Part of the
Redirect URL?
Example of Redirect URL to Specify…
Created on new
Oracle Integration
Generation 2
instances
Yes.
https://
OIC_instance_URL.region.ocp.oracleclou
d.com/icsapis/agent/oauth/callback
Created on
instances
upgraded from
Oracle Integration
Generation 2
Generation 2 to
Oracle Integration
Generation 2
No.
This applies to both:
• New connections
created after the
upgrade
• Existing
connections that
were part of the
upgrade
https://
OIC_instance_URL.ocp.oraclecloud.com/
icsapis/agent/oauth/callback
c. In the Client type section, click Confidential.
d. Select Specific in the Authorized resources section.
Chapter 2
Authentication Support
2-24

e. Click the Add Resources check box.
f. Click Add scope.
g. Find the Oracle Integration application for your instance, and click .
h. Select the two scopes appended with the following details:
• urn:opc:resource:consumer::all
• ic/api/
i. Click Add.
The scopes are displayed in the Resources section.
j. Ignore the Add app roles check box. This selection is not required.
k. Click Next, then click Finish.
The details page for the client application is displayed.
l. Click Activate, and then Activate application to activate the client application for use.
m. In the General Information section, note the client ID and client secret values. These
values are required for the third-party application that is communicating with the
identity domain.
Validate the Oracle Integration application and user roles
1. In the navigation pane, click Oracle Cloud Services.
Chapter 2
Authentication Support
2-25

2. Select the specific application corresponding to the Oracle Integration instance.
3. In the navigation pane, click Application roles.
4. Expand ServiceInvoker, then click Manage next to either Assigned users or Assigned
groups. For example, if you click Assigned users:
5. Click Show available users.
6. Select the user and click Assign, then click Close.
Validate the client application
1. To fetch the authorization code, make the following request from the browser.
##Syntax
GET https://<Identity_Domain_Service_Instance>.identity.oraclecloud.com/
oauth2/v1/authorize?client_id=<client-
id>&response_type=code&redirect_uri=<client-redirect-
Chapter 2
Authentication Support
2-26

uri>&scope=<app_scope>%20offline_access&nonce=<nonce-
value>&state=<unique_value>
###where
#### <client-id> - ID of Client application generated.
#### <client-redirect-uri> - Redirect URI, in client application.
#### <app_scope> - scope added while creating application in client
configuration. (Ends with urn:opc:resource:consumer::all)
#### nonce - Optional, unique value to mitigate replay attacks
#### state - Recommended, Opaque to IDCS. Value used to maintain state
between the request and the callback
##Example
GET https://<identity_domain_host>/oauth2/v1/authorize?
client_id=<clientID>&response_type=code&redirect_uri=https://
app.getpostman.com/oauth2/callback&scope=https://
<Resource_APP_Audience>urn:opc:resource:consumer::all%20offline_access&nonc
e=121&state=12345544
2. If the user is not already logged in, you are challenged to authenticate your user
credentials. (For authentication, the user assigned the ServiceInvoker role must be used.)
After authentication is successful, the client URL is redirected to with the authorization
code and state added to the URL.
##Response URL
https://<redirect_URL>?code=<code_value>=&state=<state_value>
###Client should validate state received is same as one sent in request.
3. Capture the code value from the above response and make the following request to get the
access token.
##Syntax
curl -i -H 'Authorization: Basic <base64-clientid-secret>' -H 'Content-
Type: application/x-www-form-urlencoded;charset=UTF-8' --request POST
https://<Identity_Domain_Service_Instance>.identity.oraclecloud.com/
oauth2/v1/token -d 'grant_type=authorization_code&code=<authz-
code>&redirect_uri=<client-redirect-uri>
###where
#### <base64-clientid-secret> - BAse 64 encode clientId:ClientSecret
#### <authz-code> - code value received as response on redirect.
#### <client-redirect-uri> - Redirect URI, in client application.
##Example
curl -i -H 'Authorization: Basic MDMx..NGY1' -H 'Content-Type:
application/x-www-form-urlencoded;charset=UTF-8' --request POST https://
<identity_domain_host>/oauth2/v1/token -d
'grant_type=authorization_code&code=AQAg...3jKM4Gc=&redirect_uri=https://
app.getpostman.com/oauth2/callback
4. Capture the
access_token
and
refresh_token
from the response.
{
"access_token": "eyJ4NXQjG...dfsdfsFgets2ed",
"token_type": "Bearer",
Chapter 2
Authentication Support
2-27

"expires_in": 3600,
"refresh_token": "AQAgY2MzNjVlOTVhOTRh...vM5S0MkrFSpzc="
}
5. Use the
access_token
in the authorization header to invoke the Oracle Integration trigger
endpoint.
curl --location --request GET 'https://OIC host/OIC endpoint' \
--header 'Authorization: Bearer eyJ4NXQjG...dfsdfsFgets2ed'
6. To update the access token, use the refresh token and make the request.
7. Capture the
access_token
and
refresh_token
from a response for further use.
curl -i -H 'Authorization: Basic <base64-clientid-secret>' -H 'Content-
Type: application/x-www-form-urlencoded;charset=UTF-8' --request POST
https://<Identity_Domain_Service_Instance>.identity.oraclecloud.com/
oauth2/v1/token -d
'grant_type=refresh_token&refresh_token=<refresh_token>'
##Example
curl -i -H 'Authorization: Basic OGQyM...ZDA0Mjcz' -H 'Content-Type:
application/x-www-form-urlencoded;charset=UTF-8' --request POST https://
<Identity_Domain_Service_Instance>.identity.oraclecloud.com/oauth2/v1/
token -d
'grant_type=refresh_token&refresh_token=AQAgY2MzNjVlOTVhOTRh...vM5S0MkrFSpz
c='
Use OAuth 2.0 Grants in Oracle Identity Cloud Service Environments
To use an OAuth 2.0 grant type with this adapter in Oracle Integration, you must perform the
following prerequisites.
Note:
The following instructions apply only to cloud tenancies that still use Oracle Identity
Cloud Service. Most cloud tenancies have been migrated to identity domains, which
require different configuration instructions. See Use OAuth 2.0 Grants in Identity
Domain Environments. If you are unsure of your environment, check with your
administrator.
• Prerequisites for All Grants
• Prerequisites for JWT User Assertion
• Prerequisites for Authorization Code
• Prerequisites for Resource Owner Password Credentials
Chapter 2
Authentication Support
2-28

Note:
Understand the following restrictions before performing OAuth 2.0 grants.
• Do not let external client applications use the system-created Oracle Identity
Cloud Service application to authenticate against Oracle Integration endpoints.
• The scope of the client application is for accessing all deployed integrations in
that service instance. There is no support for limiting access to a subset of
integrations.
Prerequisites for All Grants
Perform the following tasks for each grant type you use.
• Obtain the Oracle Identity Cloud Service URL.
1. Go to the URL for your Oracle Integration instance.
For example, if your Oracle Integration instance is
https://myhost.example.com/ic/
home
, when you go to that URL, you are redirected to a URL such as:
https://idcs-c2881.identity.myhost.example.com/ui/v1/signin
2. Replace
/signin
with
/adminconsole
to access Oracle Identity Cloud Service.
For example:
https://idcs-c2881.identity.myhost.example.com/ui/v1/adminconsole
You'll be prompted to sign in again to the Oracle Identity Cloud Service Console.
3. Log in to the Oracle Identity Cloud Service Console with your identity domain
administrator credentials.
• Check the Oracle Integration application in Oracle Identity Cloud Service.
When an Oracle Integration instance is provisioned, an Oracle Identity Cloud Service
application is created for that Oracle Integration instance. The application name is
OICINST_service_instance_name
.
1. Log in to the Oracle instance to get the service instance name.
https://myhost.example.com/ic/home
2. Log in to Oracle Identity Cloud Service to get the application.
3. Go to Applications and find the application with the above name to access the
application.
Alternatively, you can find the application through the Oracle Cloud Dashboard. When you
click the IDCS Application link on the details page of the Oracle Integration instance (for
this example, named OIC), it opens the Oracle Identity Cloud Service application for
Oracle Integration that is already created.
Chapter 2
Authentication Support
2-29

Prerequisites for JWT User Assertion
Perform the following tasks.
• Validate the Oracle Integration application and user roles.
1. Verify that the Is Refresh Token Allowed option is enabled for the Oracle Identity
Cloud Service application.
2. Check under the Configuration > Resources section of the application. Note also that
there is a special scope predefined (urn:opc:resource:consumer::all), which can
trigger integrations using OAuth.
3. Add the appropriate user(s) to the various Oracle Integration roles. For standard/
production configurations, use the ServiceUser role. (See Oracle Integration Roles in
Provisioning and Administering Oracle Integration Generation 2.)
4. To assign the user, go to the Application Roles section of the application.
Chapter 2
Authentication Support
2-30

• Generate the key:
1. Generate the self-signed key pair.
keytool -genkey -keyalg RSA -alias <your_alias> -keystore
<keystore_file> -storepass <password> -validity 365 -keysize 2048
##example
keytool -genkey -keyalg RSA -alias assert -keystore sampleKeystore.jks -
storepass samplePasswd -validity 365 -keysize 2048
2. Export the public key for signing the JWT assertion.
keytool -exportcert -alias <your_alias> -file <filename> -keystore
<keystore_file> -storepass <password>
##example
keytool -exportcert -alias assert -file assert.cer -keystore
sampleKeystore.jks -storepass samplePasswd
## This should show a success message e.g. Certificate stored in file
<assert.cer>
3. Convert the keystore to P12 format.
keytool -importkeystore -srckeystore <filename> -srcstorepass
<password> -srckeypass <password> -srcalias <your_alias> -destalias
<your_alias> -destkeystore <destFileName> -deststoretype PKCS12 -
deststorepass <password> -destkeypass <password>
##example
keytool -importkeystore -srckeystore sampleKeystore.jks -srcstorepass
samplePasswd -srckeypass samplePasswd -srcalias assert -destalias
assert -destkeystore assert.p12 -deststoretype PKCS12 -deststorepass
samplePasswd -destkeypass samplePasswd
Chapter 2
Authentication Support
2-31

## This should show a success message e.g. Importing keystore
sampleKeystore.jks to assert.p12...
4. Export the private key from the P12 keystore.
openssl pkcs12 -in <destFileName> -nodes -nocerts -out <pem_file>
##example
openssl pkcs12 -in assert.p12 -nodes -nocerts -out private_key.pem
## This should show a success message: MAC verified OK
• Configure the client application:
To trigger the integration with OAuth, a client application is required.
1. In the Oracle Identity Cloud Service Console, go to the Application section to create a
new application that allows you to trigger an integration with OAuth.
The application is added as a confidential application.
2. Complete the Details section, and go to the Client section.
Chapter 2
Authentication Support
2-32

3. In the Client section, select Configure this application as a client now and add the
following.
a. Select Client Credentials and JWT Assertion for the Allowed Grant Types.
b. In the Security section, select Trusted Client and upload the certificate created in
the previous section (Generate the key - Step 2).
c. Select Specific in the Authorized Resources section.
d. Click Add Scope under the Resources section.
e. Find the Oracle Integration application, and click >.
Chapter 2
Authentication Support
2-33

f. Add the scope containing urn:opc:resource:consumer::all, and click >.
The scope containing urn:opc:resource:consumer::all is added.
g. Save your changes.
4. Skip the rest of the wizard steps and save the application.
5. Activate the application for use.
• Add a certificate as a trusted partner:
Even though you imported the signing certificate in the application, Oracle Identity Cloud
Service requires you to also have the certificate as a trusted partner certificate. Upload the
certificate created in the previous section. (See Generate the key - Step 2.)
• Generate the JWT user assertion:
1. Generate the JWT user assertion using the generated private key and simple Java
code.
Note:
You can use the https://github.com/jwtk/jjwt library to generate the user
assertion. There are many libraries listed at https://jwt.io/ for multiple
technologies.
Sample:
header:
{
"alg": "RS256",
"typ": "JWT",
"kid": "assert"
}
payload:
{
"sub": "ssaInstanceAdmin",
"jti": "8c7df446-bfae-40be-be09-0ab55c655436",
"iat": 1589889699,
"exp": 1589909699,
"iss": "d702f5b31ee645ecbc49d05983aaee54",
Chapter 2
Authentication Support
2-34

"aud": "https://identity.oraclecloud.com/"
}
Where:
–
sub
specifies the user name for whom user assertion is generated.
–
jti
is a unique identifier
–
iat
is issued (epoch seconds).
–
exp
is the token expiry (epoch seconds).
–
iss
is the client ID.
–
aud
must include the Oracle Identity Cloud Service audience
https://
identity.oracle.com/
. The signing algorithm must be RS256.
–
kid
specifies the key to use to verify the signature. Therefore, it must match with the
uploaded certificate alias in Oracle Identity Cloud Service.
• Validate the client application:
1. Once you generate the JWT user assertion, generate the Oracle Identity Cloud
Service access token as follows.
##Syntax
curl -i -H 'Authorization: Basic <base64Encoded clientid:secret>' -H
'Content-Type: application/x-www-form-urlencoded;charset=UTF-8' --
request POST https://<IDCS-Service-Instance>.identity.oraclecloud.com/
oauth2/v1/token -d 'grant_type=urn%3Aietf%3Aparams%3Aoauth%3Agrant-
type%3Ajwt-bearer&assertion=<user assertion>&scope=<app_scope>'
###where
#### grant type - urn:ietf:params:oauth:grant-type:jwt-bearer
#### <base64-clientid-secret> - Base 64 encode clientId:ClientSecret
#### <user assertion> - User assertion generated
#### <app scope> - Scope added while creating application in client
configuration section (Ends with urn:opc:resource:consumer::all)
2. Capture the
access_token
from the response.
{
"access_token": "eyJ4NXQjG...dfsdfsFgets2ed",
"token_type": "Bearer",
"expires_in": 3600
}
3. Use an
access_token
in the authorization header to invoke the Oracle Integration
trigger endpoint.
curl --location --request GET 'https://OIC host/OIC endpoint' \
--header 'Authorization: Bearer eyJ4NXQjG...dfsdfsFgets2ed'
Prerequisites for Authorization Code
Perform the following tasks.
• Validate the Oracle Integration application and user roles:
Chapter 2
Authentication Support
2-35

1. Verify that the Is Refresh Token Allowed option is enabled for the Oracle Identity
Cloud Service application.
2. Check the Configuration > Resources section of the application. Note also that there
is a special predefined scope (urn:opc:resource:consumer::all) that permits
triggering of the Oracle Integration integrations using OAuth.
3. Add the appropriate user(s) to the various Oracle Integration roles. For standard/
production configurations, use the ServiceUser role. (See Oracle Integration Roles in
Provisioning and Administering Oracle Integration Generation 2.)
4. To assign the user, go to the Application Roles section of the application.
Chapter 2
Authentication Support
2-36

• Configure the client application:
To allow you to trigger the Oracle Integration integration with OAuth, the client application
is required.
1. In the Oracle Identity Cloud Service Console, go to the Application section to create a
new application that allows you to trigger the Oracle Integration integration with OAuth.
The application is added as a confidential application.
2. Complete the Details section, and go to the Client section.
Chapter 2
Authentication Support
2-37

3. In the Client selection, select Configure this application as a client now and add
the following.
a. Select Refresh Token and Authorization Code for Allowed Grant Types.
b. Set the redirect URL to the URL of the client application (for example,
https://
sample_client_app/oauth2/callback
). After user login, Oracle Identity Cloud
Service redirects to this URL with the authorization code.
c. Select Specific in the Authorized Resources section.
d. Click Add Scope under the Resources section.
e. Find the Oracle Integration application, and click >.
Chapter 2
Authentication Support
2-38

f. Add the scope containing urn:opc:resource:consumer::all, and click >.
The scope containing urn:opc:resource:consumer::all is added.
g. Save your changes.
4. Skip the rest of the wizard steps and save the application.
5. Activate the application for use.
• Validate the client application:
1. To fetch the authorization code, make the following request from the browser.
##Syntax
GET https://<IDCS-Service-Instance>.identity.oraclecloud.com/oauth2/v1/
authorize?client_id=<client-id>&response_type=code&redirect_uri=<client-
redirect-uri>&scope=<app_scope>%20offline_access&nonce=<nonce-
value>&state=<unique_value>
###where
#### <client-id> - ID of Client application generated.
#### <client-redirect-uri> - Redirect URI, in client application.
#### <app_scope> - scope added while creating application in client
configuration. (Ends with urn:opc:resource:consumer::all)
#### nonce - Optional, unique value to mitigate replay attacks
#### state - Recommended, Opaque to IDCS. Value used to maintain state
between the request and the callback
##Example
GET https://<idcs-host>/oauth2/v1/authorize?
client_id=<clientID>&response_type=code&redirect_uri=https://
app.getpostman.com/oauth2/callback&scope=https://
<Resource_APP_Audience>urn:opc:resource:consumer::all%20offline_access&n
once=121&state=12345544
2. If the user is not already logged in, Oracle Identity Cloud Service challenges the user
to authenticate. Oracle Identity Cloud Service checks the user's credentials. (For
authentication, the user assigned the ServiceUser Role must be used.)
Chapter 2
Authentication Support
2-39

Post successful authentication, Oracle Identity Cloud Service redirects back to the
client redirect URL with the authorization code and state added to the URL.
##Response URL
https://<redirect_URL>?code=<code_value>=&state=<state_value>
###Client should validate state received is same as one sent in request.
3. Capture the code value from the above response and make the following request to
Oracle Identity Cloud Service to get the access token.
##Syntax
curl -i -H 'Authorization: Basic <base64-clientid-secret>' -H 'Content-
Type: application/x-www-form-urlencoded;charset=UTF-8' --request POST
https://<IDCS-Service-Instance>.identity.oraclecloud.com/oauth2/v1/
token -d 'grant_type=authorization_code&code=<authz-
code>&redirect_uri=<client-redirect-uri>
###where
#### <base64-clientid-secret> - BAse 64 encode clientId:ClientSecret
#### <authz-code> - code value received as response on redirect.
#### <client-redirect-uri> - Redirect URI, in client application.
##Example
curl -i -H 'Authorization: Basic MDMx..NGY1' -H 'Content-Type:
application/x-www-form-urlencoded;charset=UTF-8' --request POST https://
<idcs_host>/oauth2/v1/token -d
'grant_type=authorization_code&code=AQAg...3jKM4Gc=&redirect_uri=https:/
/app.getpostman.com/oauth2/callback
4. Capture the
access_token
and
refresh_token
from the response.
{
"access_token": "eyJ4NXQjG...dfsdfsFgets2ed",
"token_type": "Bearer",
"expires_in": 3600,
"refresh_token": "AQAgY2MzNjVlOTVhOTRh...vM5S0MkrFSpzc="
}
5. Use the
access_token
in the authorization header to invoke the Oracle Integration
trigger endpoint.
curl --location --request GET 'https://OIC host/OIC endpoint' \
--header 'Authorization: Bearer eyJ4NXQjG...dfsdfsFgets2ed'
6. To update the access token, use the refresh token and make the request to Oracle
Identity Cloud Service.
7. Capture the
access_token
and
refresh_token
from a response for further use.
curl -i -H 'Authorization: Basic <base64-clientid-secret>' -H 'Content-
Type: application/x-www-form-urlencoded;charset=UTF-8' --request POST
https://<IDCS-Service-Instance>.identity.oraclecloud.com/oauth2/v1/
token -d 'grant_type=refresh_token&refresh_token=<refresh_token>'
Chapter 2
Authentication Support
2-40

##Example
curl -i -H 'Authorization: Basic OGQyM...ZDA0Mjcz' -H 'Content-Type:
application/x-www-form-urlencoded;charset=UTF-8' --request POST https://
IDCS-Service-Instance.identity.oraclecloud.com/oauth2/v1/token -d
'grant_type=refresh_token&refresh_token=AQAgY2MzNjVlOTVhOTRh...vM5S0MkrF
Spzc='
Prerequisites for Resource Owner Password Credentials
Perform the following tasks.
• Validate the Oracle Integration application and user roles:
1. Verify that the Is Refresh Token Allowed option is enabled for the Oracle Integration
Oracle Identity Cloud Service application.
2. Check under the Configuration > Resources section of Application. Note also that
there is a special predefined scope (urn:opc:resource:consumer::all) that allows the
triggering of integrations with OAuth.
3. Add the appropriate user(s) to the various Oracle Integration roles. For standard/
production configurations, use the ServiceUser role. (See Oracle Integration Roles in
Provisioning and Administering Oracle Integration Generation 2.)
4. To assign the user, go to the Application Roles section of the application.
Chapter 2
Authentication Support
2-41

• Configure the client application:
1. In the Oracle Identity Cloud Service console, Go to the Application section to create a
new application that allows you to trigger an integration with OAuth. The application is
added as a confidential application.
2. Complete the Details section, and go to the Client section.
Chapter 2
Authentication Support
2-42

3. In the Client selection, select Configure this application as a client now and add
the following.
a. Select Resource Owner and Refresh Token for Allowed Grant Types.
b. Select Specific in the Authorized Resources section.
c. Click Add Scope under the Resources section.
Chapter 2
Authentication Support
2-43

d. Find the Oracle Integration application.
e. Add the scope containing urn:opc:resource:consumer::all, and click >.
The scope containing urn:opc:resource:consumer::all is added.
f. Save your changes.
4. Skip the rest of the wizard steps and save the application.
5. Activate the application for use.
• Validate the client application:
1. To fetch the access client, make a request to Oracle Identity Cloud Service with the
user name and password in the payload.
##Syntax
curl -i -H 'Authorization: Basic <base64Encoded_clientid:secret>' -H
Chapter 2
Authentication Support
2-44

'Content-Type: application/x-www-form-urlencoded;charset=UTF-8' --
request POST https://<IDCS-Service-Instance>.identity.oraclecloud.com/
oauth2/v1/token -d 'grant_type=password&username=<user-
name>&password=<password>&scope=<App_Scope>%20offline_access'
###where
#### <base64-clientid-secret> - Base 64 encode clientId:ClientSecret
#### <username> - user for token needs to be issued (must be in
serviceuser role).
#### <password> - password for above user
#### <app_scope> - Scope added while creating application in client
configuration section (Ends with urn:opc:resource:consumer::all)
##Example
curl -i -H 'Authorization: Basic OGQyM...ZDA0Mjcz' -H 'Content-Type:
application/x-www-form-urlencoded;charset=UTF-8' --request POST https://
<idcs_host>/oauth2/v1/token -d
'grant_type=password&username=sampleUser&password=SamplePassword&scope=h
ttps://
<Resource_APP_Audience>urn:opc:resource:consumer::all%20offline_access'
2. Capture the
access_token
and
refresh_token
from the response.
{
"access_token": "eyJ4NXQjG...dfsdfsFgets2ed",
"token_type": "Bearer",
"expires_in": 3600,
"refresh_token": "AQAgY2MzNjVlOTVhOTRh...vM5S0MkrFSpzc="
}
3. Use the
access_token
in the authorization header to invoke the Oracle Integration
trigger endpoint.
curl --location --request GET 'https://OIC host/OIC endpoint' \
--header 'Authorization: Bearer eyJ4NXQjG...dfsdfsFgets2ed'
4. To update the access token, use the refresh token and make a request to Oracle
Identity Cloud Service.
5. Capture the
access_token
and
refresh_token
from the response for further use.
curl -i -H 'Authorization: Basic <base64-clientid-secret>' -H 'Content-
Type: application/x-www-form-urlencoded;charset=UTF-8' --request POST
https://<IDCS-Service-Instance>.identity.oraclecloud.com/oauth2/v1/
token -d 'grant_type=refresh_token&refresh_token=<refresh_token>'
##Example
curl -i -H 'Authorization: Basic OGQyM...ZDA0Mjcz' -H 'Content-Type:
application/x-www-form-urlencoded;charset=UTF-8' --request POST https://
<IDCS-Service-Instance>.identity.oraclecloud.com/oauth2/v1/token -d
'grant_type=refresh_token&refresh_token=AQAgY2MzNjVlOTVhOTRh...vM5S0MkrF
Spzc='
Chapter 2
Authentication Support
2-45

Authentication Types
The REST Adapter supports the following types of authentication:
• For scenarios when the REST Adapter invokes an external REST endpoint:
– Basic Authentication
– OAuth Client Credentials (two-legged flow)
– OAuth Resource Owner Password Credentials (two-legged flow)
– OAuth Authorization Code Credentials (three-legged flow)
– OAuth Custom Three Legged Flow
– OAuth Custom Two Legged Flow
– API Key Based Authentication
– OAuth 1.0 One Legged Authentication
– Amazon Web Services (AWS) Signature Version 4
– Oracle Cloud Infrastructure (OCI) Signature Version 1
• For scenarios when the REST Adapter is used to create a REST endpoint to trigger an
integration:
– Basic Authentication
– OAuth 2.0
– OAuth 2.0 or Basic Authentication
See Configure Connection Security for more information about these security policies.
Role-Based Connections
The REST Adapter is bidirectional. You can configure the REST Adapter depending on the
context in which you want to use the connection.
• Trigger: The REST Adapter is used to create a REST endpoint to trigger an integration.
You select Trigger from the Role list on the Create New Connection dialog. When
configured as a trigger, a base URI is not required. The security policy defined in the
inbound direction accepts credentials configured in the identity domain. Therefore, you are
not required to provide the applicable credentials. When configuring security on the
Connections page, you only provide the security policy that must be attached to the
inbound endpoint. The following security policies are available:
– Basic authentication
– OAuth 2.0
– Basic authentication and OAuth 2.0
Agent configuration is not applicable on a connection with the trigger role.
• Invoke: The REST Adapter is used to invoke external REST endpoints. A base URI and
security configuration for accessing external protected resources are required. You are
prompted for these additional details on the Connections page. You cannot use an invoke
connection on the trigger side.
Chapter 2
Authentication Support
2-46

• Trigger and invoke: The REST Adapter is used in both the trigger and invoke directions of
an integration. This connection requires invoke and trigger values. Basic Authentication
can be used in both trigger and invoke connections.
See Create a Connection.
Extensibility Support for Multiple OAuth Providers
You can use the extensibility framework of the REST Adapter to access the OAuth-protected
resource of endpoints. This framework enables you to access endpoints that have
implemented their own variations of OAuth.
The OAuth standard provides flexibility for endpoints to define specific aspects of their OAuth
flows. For example:
• Create their own properties.
• Decide when to use these properties in an OAuth flow. For example, some custom
properties may be required with the authorization request, while others may be required for
the access token request or for the refresh of the access token after its expiration.
• Decide how to pass these properties in an OAuth flow. For example, whether a property is
passed as a header, query parameter, or payload.
To address these challenges, Oracle Integration provides two custom security policies that
enable you to specify each step in the OAuth flow when you create the REST Adapter
connection:
• OAuth custom two-legged flow: The client application directly interacts with the
authorization server on behalf of a resource owner.
• OAuth custom three-legged flow: The client application redirects the owner to a separate
resource URL where the resource owner authenticates and provides consent for the flow
to continue.
This enables you to adapt to most OAuth framework scenarios and integrate with many third-
party applications without writing additional code.
• During design-time, the access token is obtained, validated, and stored in the CSF. The
security token is also stored in the CSF.
• During runtime, the access token is retrieved, applied, and managed. A valid access token
is applied to the request before invoking the REST endpoint.
Specify the OAuth custom two-legged flow and three-legged flow security policies. See
Configure Connection Security and REST Adapter Use Cases.
Note:
This extensibility feature is an advanced feature, and not for business users. Users of
this feature should use a tool such as postman to configure the necessary properties.
Chapter 2
Authentication Support
2-47

REST API Support
The following sections describe REST Adapter REST API capabilities in more detail.
Topics:
• Oracle Cloud Infrastructure REST API Support with the OCI Signature Version 1 Security
Policy
• On-Premises REST API Support with the Agent
• Swagger and RAML Document Support for Describing External REST APIs
Oracle Cloud Infrastructure REST API Support with the OCI Signature
Version 1 Security Policy
You can call the Oracle Cloud Infrastructure (OCI) REST API by configuring the REST Adapter
connection to use the OCI Signature Version 1 security policy.
OCI signature support in the REST Adapter enables a user to use Oracle Cloud Infrastructure
services. For example, you can create an integration that calls Oracle Cloud Infrastructure to
create a storage bucket.
See Configure Connection Security.
On-Premises REST API Support with the Agent
The REST Adapter-specific connection can be configured to use the connectivity agent to
consume REST APIs that are hosted either on a customer's on-premises network or on a
private cloud, are truly private APIs, and are not exposed as public APIs that can be consumed
over the internet.
Oracle Integration provides the agent framework to enable you to create integrations and
exchange messages between on-premises applications and Oracle Integration. You can
integrate on-premises REST APIs with Oracle Integration with the on-premises connectivity
agent. Once you create an agent group and install the on-premises agent, you can create and
configure a REST Adapter connection on the Connections page as follows:
• Select REST API Base URL or Swagger Definition URL from the Connection Type list
and enter the appropriate URL in the Connection URL field. No other connection types
are supported.
• Select Basic Authentication, OAuth Client Credentials, OAuth Resource Owner
Password Credentials, OAuth Custom Two Legged Flow, or No Security Policy from
the Security Policy list. No other security policies are supported.
• Select the previously-created agent group in the Select an Agent Group dialog.
• Note that the token server cannot be on-premises. If the provider is accessible through the
cloud, you must get the bearer token in the cloud and perform the agent-based request
invocation by setting the authorization header.
For conceptual information about the on-premises agent, see About Agents and Integrations
Between On-Premises Applications and Oracle Integration. For information about creating an
agent group and installing the on-premises agent, see Manage the Agent Group and the On-
Premises Connectivity Agent.
Chapter 2
REST API Support
2-48

Swagger and RAML Document Support for Describing External REST APIs
The REST Adapter provides support for consuming REST APIs that are described in either a
Swagger or RAML document.
• RESTful API Modeling Language (RAML): A language for describing RESTful APIs. RAML
provides the information necessary to describe RESTful or practically-RESTful APIs (APIs
that do not obey all REST constraints). See REST Adapter Trigger Resource Configuration
Page.
• Swagger: A specification for describing, producing, consuming, and visualizing RESTful
web services. See Configure the REST Adapter to Consume an External REST API
Described Using a Swagger Document.
The following example shows a Swagger 2.0 file. This file contains two main resources:
•
/Book
. This resource contains
get
and
post
methods and
/Book/{id}
,
/Book/hello
, and
/
Book/search
subresources.
•
/Author
. This resource contains a
get
method and an
/Author/{id}
subresource.
When configuring an invoke (outbound) REST Adapter in the Adapter Endpoint Configuration
Wizard, the resources and subresources are displayed for selection as business objects and
the methods are displayed for selection as operations to perform on the business objects.
When creating the REST Adapter connection, you select Swagger Definition URL in the
Connection Type field and specify the URL in the Connection URL field of the Connection
Properties dialog. See Configure Connection Properties for Invoke Connections.
{
"swagger" : "2.0",
"info" : {
"version" : "1.0",
"title" : "RestServiceForBooks"
},
"host" : "host_name:8080",
"basePath" : "/Test/rest",
"schemes" : ["http"],
"paths" : {
"/Book" : {
"get" : {
"operationId" : "getBooks",
"description" : "Returns all the available books in the store",
"produces" : [ "application/xml", "application/json" ],
"responses" : {
"default" : {
"schema" : {
"$ref" : "#/definitions/Books"
}
}
}
},
"post" : {
"operationId" : "postBook",
Chapter 2
REST API Support
2-49

"description" : "Creates a new book item",
"produces" : [ "application/xml", "application/json" ],
"consumes" : [ "application/xml", "application/json" ],
"parameters" : [
{
"name" : "Book",
"in" : "body",
"required" : true,
"schema" : { "$ref" : "#/definitions/Book" }
}
],
"responses" : {
"default" : {
"schema" : { "$ref" : "#/definitions/Book" }
}
}
}
},
"/Book/{id}" : {
"get" : {
"operationId" : "getSingleBook",
"description" : "Returns a book with specific id",
"produces" : [ "application/xml", "application/json" ],
"parameters" : [
{
"name": "id",
"in": "path",
"required" : true,
"type" : "string"
}
],
"responses" : {
"default" : {
"schema" : { "$ref" : "#/definitions/Book" }
}
}
}
},
"/Book/hello" : {
"get" : {
"operationId" : "sayHelloToBook",
"description" : "says hello to a book",
"produces" : [ "application/xml", "application/json" ],
"responses" : {
"default" : {
"schema" : { "type" : "string" }
}
}
}
},
"/Book/search" : {
"get" : {
"operationId" : "searchBook",
"description" : "Returns a list of books that match query param",
"produces" : [ "application/xml", "application/json" ],
"parameters" : [
Chapter 2
REST API Support
2-50

{
"name": "name",
"in": "query",
"required" : false,
"type" : "string"
}
],
"responses" : {
"default" : {
"schema" : {
"$ref" : "#/definitions/Books"
}
}
}
}
},
"/Author" : {
"get" : {
"operationId" : "getAuthors",
"description": "Returns a list of authors",
"produces": [
"application/xml",
"application/json"
],
"responses": {
"default": {
"schema": {
"$ref" : "#/definitions/Authors"
}
}
}
}
},
"/Author/{id}" : {
"get" : {
"operationId" : "getSingleAuthor",
"description" : "Returns a Author with specific id",
"produces" : [ "application/xml", "application/json" ],
"parameters" : [
{
"name": "id",
"in": "path",
"required" : true,
"type" : "string"
}
],
"responses" : {
"default" : {
"schema" : { "$ref" : "#/definitions/Author" }
}
}
}
}
},
"definitions" : {
"Author" : {
Chapter 2
REST API Support
2-51

"type" : "object",
"properties" : {
"id" : { "type" : "string" },
"firstName" : { "type" : "string"},
"lastName" : { "type" : "string" }
},
"required" : [ "id", "firstName", "lastName"]
},
"Authors" : {
"type" : "object",
"properties" : {
"items" : {
"type" : "array",
"items" : {
"$ref" : "#/definitions/Author"
}
}
}
},
"Publisher" : {
"type" : "object",
"properties" : {
"id" : { "type" : "string" },
"name" : { "type" : "string"},
"location" : { "type" : "string" }
},
"required" : [ "id", "name", "location"]
},
"Publishers" : {
"type" : "object",
"properties" : {
"items" : {
"type" : "array",
"items" : {
"$ref" : "#/definitions/Publisher"
}
}
}
},
"Book" : {
"type" : "object",
"properties" : {
"id" : { "type" : "string" },
"name" : { "type" : "string" },
"ISBN" : { "type" : "string" },
"price" : { "type" : "integer" },
"author" : { "type" : "array", "items" :{ "$ref" : "#/definitions/
Author" } },
"publisher" : { "$ref" : "#/definitions/Publisher" }
},
"required" : ["id", "name", "ISBN", "price", "author", "publisher" ]
},
"Books" : {
"type" : "object",
"properties" : {
"items" : {
Chapter 2
REST API Support
2-52

"type" : "array",
"items" : {
"$ref" : "#/definitions/Book"
}
}
}
}
}
}
The following example shows a RAML file. The file contains the schemas that use the service.
This file contains two main resources:
•
/Author
. This resource contains a
get
method and an
/Author/{id}
subresource.
•
/Book
. This resource contains
get
and
post
methods and
/Book/{id}
and
/Book/search
subresources.
When configuring an invoke (outbound) REST Adapter in the Adapter Endpoint Configuration
Wizard, the resources and subresources are displayed for selection as business objects and
the methods are displayed for selection as operations to perform on the business objects.
When creating your REST Adapter connection, you select RAML Definition URL in the
Connection Type field and specify the URL in the Connection URL field of the Connection
Properties dialog.
#%RAML 0.8
title: API for Books
version: v1
baseUri: "http://host_name:8080/Test/rest"
protocols: [ HTTP ]
schemas:
- authors-jsonschema: |
{
"$schema" : "http://json-schema.org/draft-03/schema",
"type":"object",
"properties":{
"items":{
"type":"array",
"items":{
"type":"object",
"properties":{
"id":{
"type":"string"
},
"firstName":{
"type":"string"
},
"lastName":{
"type":"string"
}
},
"required":[
"id",
"firstName",
"lastName"
]
Chapter 2
REST API Support
2-53

}
}
}
}
- author-jsonschema: |
{
"$schema":"http://json-schema.org/draft-03/schema",
"type":"object",
"properties":{
"id":{
"type":"string"
},
"firstName":{
"type":"string"
},
"lastName":{
"type":"string"
}
},
"required":[
"id",
"firstName",
"lastName"
]
}
- books-jsonschema: |
{
"$schema":"http://json-schema.org/draft-03/schema",
"type":"object",
"properties":{
"items":{
"type":"array",
"items":{
"type":"object",
"properties":{
"id":{
"type":"string"
},
"name":{
"type":"string"
},
"ISBN":{
"type":"string"
},
"price":{
"type":"integer"
},
"author":{
"type":"array",
"items":{
"type":"object",
"properties":{
"id":{
Chapter 2
REST API Support
2-54

"type":"string"
},
"firstName":{
"type":"string"
},
"lastName":{
"type":"string"
}
},
"required":[
"id",
"firstName",
"lastName"
]
}
},
"publisher":{
"type":"object",
"properties":{
"id":{
"type":"string"
},
"name":{
"type":"string"
},
"location":{
"type":"string"
}
},
"required":[
"id",
"name",
"location"
]
}
},
"required":[
"id",
"name",
"ISBN",
"price",
"author",
"publisher"
]
}
}
}
}
- book-jsonschema: |
{
"$schema":"http://json-schema.org/draft-03/schema",
"type":"object",
"properties":{
"id":{
"type":"string"
Chapter 2
REST API Support
2-55

},
"name":{
"type":"string"
},
"ISBN":{
"type":"string"
},
"price":{
"type":"integer"
},
"author":{
"type":"array",
"items":{
"type":"object",
"properties":{
"id":{
"type":"string"
},
"firstName":{
"type":"string"
},
"lastName":{
"type":"string"
}
},
"required":[
"id",
"firstName",
"lastName"
]
}
},
"publisher":{
"type":"object",
"properties":{
"id":{
"type":"string"
},
"name":{
"type":"string"
},
"location":{
"type":"string"
}
},
"required":[
"id",
"name",
"location"
]
}
},
"required":[
"id",
"name",
"ISBN",
Chapter 2
REST API Support
2-56

"price",
"author",
"publisher"
]
}
/Author:
get:
responses:
200:
body:
application/xml:
schema: authors-jsonschema
example: |
<?xml version="1.0" encoding="UTF-8"?>
<authors></authors>
application/json:
schema: authors-jsonschema
example: |
{
"authors" : ""
}
/{id}:
get:
responses:
200:
body:
application/xml:
schema: author-jsonschema
example: |
<?xml version="1.0" encoding="UTF-8"?>
<author></author>
application/json:
schema: author-jsonschema
example: |
{
"author" : ""
}
/Book:
post:
body:
application/xml:
schema: book-jsonschema
application/json:
schema: book-jsonschema
responses:
200:
body:
application/xml:
schema: book-jsonschema
example: |
<?xml version="1.0" encoding="UTF-8"?>
<book>
<price></price>
</book>
application/json:
schema: book-jsonschema
Chapter 2
REST API Support
2-57

example: |
{
"book" : {
"price" : ""
}
}
get:
responses:
200:
body:
application/xml:
schema: books-jsonschema
example: |
<?xml version="1.0" encoding="UTF-8"?>
<book>
<price></price>
</book>
application/json:
schema: books-jsonschema
example: |
{
"book" : {
"price" : ""
}
}
/search:
get:
queryParameters:
name:
responses:
200:
body:
application/xml:
schema: books-jsonschema
example: |
<?xml version="1.0" encoding="UTF-8"?>
<book>
<price></price>
</book>
application/json:
schema: books-jsonschema
example: |
{
"book" : {
"price" : ""
}
}
/{id}:
get:
responses:
200:
body:
application/xml:
schema: book-jsonschema
example: |
<?xml version="1.0" encoding="UTF-8"?>
Chapter 2
REST API Support
2-58

<book>
<price></price>
</book>
application/json:
schema: book-jsonschema
example: |
{
"book" : {
"price" : ""
}
}
OpenAPI Support
The following sections describe REST Adapter OpenAPI capabilities in more detail.
Topics:
• Support for Publishing Interfaces for Oracle Integration Flows as OpenAPI Documents
• Consumption of OpenAPI Multipart for JSON and Form Data
Support for Publishing Interfaces for Oracle Integration Flows as OpenAPI
Documents
Oracle Integration supports open standards for publishing integration flows and simplifying
consumption of Oracle Integration flows from external systems.
In the same endeavor, the REST Adapter in Oracle Integration has started automatically
publishing OpenAPI documents for all of the Oracle Integration flows that have the REST
Adapter as a trigger connection. OpenAPI has become a de facto standard for describing a
REST API. You can download the OpenAPI documents and use the documents to build the
client applications for consuming the Oracle Integration flow exposed as a REST API.
Consumption of OpenAPI Multipart for JSON and Form Data
Request and response schemas for multipart (with a media type of multipart/form-data or
multipart/mixed) are compliant with the OpenAPI 3.x standard. This enables you to consume
the OpenAPI standard using the REST Adapter as a trigger connection in an integration.
For example, use cases such as the following are supported:
• Consuming an OpenAPI document with endpoints that consume or produce HTML form
data
• Consuming an OpenAPI document with endpoints with a multipart/mixed content type
• Consuming an OpenAPI document with endpoints with multipart/form-data
See Consume and Publish OpenAPI Documents with Multipart/Mixed and Multipart/Form-Data.
Chapter 2
OpenAPI Support
2-59

Attachment Support
The following sections describe REST Adapter attachment capabilities in more detail.
Topics:
• Multipart Attachment Support for Trigger and Invoke Connections
• Support for application/octet-stream MIME Attachment (Binary) Payloads
Multipart Attachment Support for Trigger and Invoke Connections
The REST Adapter supports multipart attachments for trigger (inbound) and invoke (outbound)
requests.
For example, you can send a review document attachment with the trigger (inbound) REST
Adapter to an invoke (outbound) Adobe eSign or DocuSign for delivery to the downstream
endpoint for signing.
If you want to send attachments from inbound to outbound (in request messages) or to
download attachments from outbound to inbound (in response messages), then for each
attachment you must map the attachmentReference from source to target in the mapper.
If you do not map attachmentReference in the mapper for a request, the outbound REST
Adapter does not receive attachments from the inbound direction (multipart request). Similarly,
if you do not map attachmentReference in the mapper for a response, the inbound REST
Adapter does not receive attachments from the outbound REST Adapter (multipart response).
Understand the data structures of different types of configurations made using the REST
Adapter or any application adapter exposing the REST API (used as a trigger) or consuming
the REST API (used as an invoke).
There are two configuration categories of multipart request and response:
• A - Multipart/mixed or multipart/form-data configured with JSON or XML samples
This configuration uses the attachments schema and payload schema. The payload
schema is derived based on a sample JSON/XML schema provided during configuration in
the Adapter Endpoint Configuration Wizard.
• B - Multipart/form-data with HTML form payload
This configuration uses the attachments schema and a generic schema with a
ParameterList element. The ParameterList element consists of an unbounded
parameter element. Each parameter has a name attribute. The value of the parameter is
set directly to the parameter element. If there are multiple parameters, the parameter
element can be repeated in the mapper. The datatype of the parameter and name is
string.
Chapter 2
Attachment Support
2-60

Note:
This category is used when you select Request is HTML Form in the Request
page of the Adapter Endpoint Configuration Wizard. This is similar for a response
if you select Response is HTML Form in the Response page of the Adapter
Endpoint Configuration Wizard.
Note the following details about both configuration categories:
• Attachments schema
The attachments element has an unbounded attachment element. This configuration
supports receiving (on the source) or sending (on the target) multiple attachments. Each
attachment element has attachmentReference and attachmentProperties.
• The AttachmentReference element contains the location where the attachment has been
staged for access.
The AttachmentProperties element provides metadata about a single attachment:
– The contentId property sets the Content-ID header of the body part. The Content-ID
header sets a unique ID for the body part.
– The contentType property sets the Content-Type header of the body part. For
example, if a PDF file is sent, the contentType property should be application/pdf. If
the source is providing a multipart attachment, this is determined automatically. The
mapper can set/override these values.
– The transferEncoding property sets the Content-Transfer-Encoding header of the
body part. This header's value is a single token specifying the type of encoding:
Content-Transfer-Encoding := "BASE64" / "QUOTED-PRINTABLE" /
"8BIT" / "7BIT" /
"BINARY" / x-token
These values are not case sensitive. That is, Base64, BASE64, and bAsE64 are all
equivalent. An encoding type of 7BIT requires that the body is already in a seven-bit,
mail-ready representation. This is the default value (that is, Content-Transfer-
Encoding: 7BIT is assumed if the Content-Transfer-Encoding header field is not
present). See https://www.w3.org/Protocols/rfc1341/5_Content-Transfer-
Encoding.html.
– The partName property sets the fileName of the body part. The attached file/body part
is saved by the target system with this name.
– The contentDisposition property sets the Content-Disposition header of the body
part.
In a multipart/form-data body, the HTTP Content-Disposition is a header to use on
the subpart (that is, the attachment) of a multipart body to provide information about
the field to which it applies. The Content-Disposition header value is generally set to
form-data. The optional directive name and filename can also be used. For example:
Content-Disposition: form-data
Content-Disposition: form-data; name="fieldName"
Content-Disposition: form-data; name="fieldName";
filename="filename.jpg"
Chapter 2
Attachment Support
2-61

– The contentDescription property sets some descriptive information with a given body
part. For example, you can mark an image body as
a picture of the Space
Shuttle Endeavor
. You can place such text in the Content-Description header field.
– The fileInputHtmlFieldName property sets the name of the part from which the server
must read the file.
Mapper configuration scenarios:
• Both source and target have multipart requests with JSON/XML payload (category A)
The following sample map focuses only on the mapping of attachmentReference to the
target. In this scenario, there is an assumption that only one attachment from the source is
being mapped to the target. The mapping of the payload (request-wrapper node) between
the source and target is not shown. You must perform that task.
• The source is multipart/mixed or multipart/form-data with JSON/XML payload (Category A).
The target is multipart/form-data with form fields (Category B)
The following map focuses on mapping of the attributes on the HTML form. There must be
as many parameters in the parameterList as there are fields in the HTML form.
• Creating a reference from base64–encoded content. The source has a base64–encoded
string and the target can be any of the three: multipart/mixed, multipart/form-data with
JSON/XML payload, or multipart/form-data with HTML form payload.
In the inbound payload, the content element is a base64–encoded string. This can be sent
as an attachment in the outbound request.
Chapter 2
Attachment Support
2-62

Since the inbound request is not multipart, but the outbound must be multipart, you must
set multipart-specific properties in the mapper for the outbound direction. The
contentType is set here to image/png, partName is set to picture.png, and
fileInputHtmlFieldName is set to image. The assumption is that the target system is
configured to read from a body part having name="image" in its content disposition. This
is done with the element fileInputHtmlFieldName.
The base64 string can be converted into a reference using XSL function
decodeBase64ToReference and the reference can be assigned to the
attachmentReference element.
• The inbound is an FTP file read operation (nonmultipart) and the outbound is multipart/
mixed with a JSON or XML payload.
Chapter 2
Attachment Support
2-63

Note:
• If the source is not multipart, but the target must be multipart, contentType and
partName must be provided for the target through the mapper.
• The response mapper description is similar to the request mapper.
Several implementation patterns are provided. See Implement Common Patterns Using the
REST Adapter.
Support for application/octet-stream MIME Attachment (Binary) Payloads
A MIME attachment with the content type
application/octet-stream
is a binary file. Typically,
it is an application or a document that is opened in an application such as a spreadsheet or
word processor. If the attachment has a filename extension associated with it, you may be able
to determine what type of file it is.
For example, an .exe extension indicates a Windows or DOS program (executable), while a
file ending in .doc is probably meant to be opened in Microsoft Word.
The
application/octet-stream
MIME type is used for unknown binary files. It preserves the
file contents, but requires the receiver to determine file type, for example, from the filename
extension. The Internet media type for an arbitrary byte stream is
application/octet-stream
.
To use this feature, select the Binary option from the invoke Request/Response page when
configuring the adapter as an invoke. When you select this option, you do not need to provide
a schema because the payload has no structure.
This feature works with the
application/octet-stream
MIME type and any other type that can
be sent as binary bytes. For example, the REST Adapter can send outbound requests or
process outbound responses using the
application/pdf
,
application/zip
,
image/jpeg
,
image/png
, and other formats. Commonly used types shown in the dropdown are:
•
application/octet-stream
•
application/pdf
Chapter 2
Attachment Support
2-64

•
application/msword
•
application/zip
•
image/jpeg
•
image/png
•
image/bmp
•
image/gif
There is also a text box to provide a type not listed in the dropdown list (for example,
video/mp4
or
text/csv
).
The following screenshots show how binary payloads can be mapped.
Chapter 2
Attachment Support
2-65

Header, Token, Query Parameter, and Array Support
The following sections describe REST Adapter header, token, query parameter, and array
capabilities in more detail.
Topics:
• Standard and Custom Header Support
• Nonstandard JWT Token Support
• RFC 3986 Support for Encoding Query Parameters
• Homogenous Multidimensional Array Support in JSON Documents
Standard and Custom Header Support
The REST Adapter supports standard and custom HTTP request and response headers in the
invoke and trigger directions.
• Outbound (Invoke) direction
HTTP headers enable you to use an outbound invocation to specify header properties.
Many REST APIs expect certain properties to be specified in the HTTP headers (similar to
SOAP APIs where you can specify header properties such as the WS address). Use the
standard HTTP headers to specify these properties. You can also use the custom HTTP
headers to specify properties. The REST APIs can expect the client application to pass
properties in the custom headers, which can influence the behavior of the APIs. The
standard and custom HTTP header properties configured in the Adapter Endpoint
Configuration Wizard automatically start appearing in the mapper. You can map the header
properties in the mapper.
• Inbound (trigger) direction
You can expose integration flows as REST endpoints and enable client applications to
populate the properties in the standard and custom headers. You can use these properties
to create routing expressions in your integrations. The standard and custom HTTP header
properties configured in the Adapter Endpoint Configuration Wizard automatically start
appearing in the mapper. You can map the header properties in the mapper. See Create
Routing Paths for Two Different Invoke Endpoints in Integrations and Create an
Orchestrated Integration.
Note:
• If you want to send multiple values of a header, use comma separated values
(CSVs). This is considered as one header and one value that consists of:
val1 comma val2 comma val3 ...
The same value is propagated across the mapper and then to the outbound
service. The outbound service must then interpret the CSVs of the header to be
used as multiple values.
• You cannot store multiple headers with the same name. The WSDL can only
store one element with one unique name.
Chapter 2
Header, Token, Query Parameter, and Array Support
2-66

Nonstandard JWT Token Support
The use of nonstandard JWT tokens is supported. The JSON content type is a standard JWT
token, while all other (for example, text or XML) are nonstandard JWT tokens. To fetch
nonstandard JWT tokens from a REST service, use the following
regex
string.
• Use
regex
“.*”
if the entire content is a JWT token. For this example, the entire content of
the sample HTTP response is JWT token.
HTTP/1.1 200 OK
Date: Wed Jul 4 15:38:53 2012
Connection: Keep-Alive:
Content-Type: text/plain;charset=UTF-8
Content-Length: 148
MTgwNzE5NTY1NToxQkhzQlpaSXM0a21BV3NhbVBIclJOTFM4OGFxU09jNlRTdmFKSmczLVBqVHl
WRF
JwbWYxOFhmcnN6S0N6c3Fzb1JKbEh6U2IwSTdvflVuZWFXVjVmemhJNTJ1YVN6bFdDbTBG
• Use
regex
“(?:.*?"my_token":")(.*?)(?:".*?)”
, if the JWT token is embedded inside a
nonstandard response. For example,
my_token
is shown in the following sample HTTP
response in which the JWT token is embedded inside a nonstandard response. This
regex
consists of a capturing group and noncapturing group. See https://www.regular-
expressions.info/refcapture.html.
HTTP/1.1 200 OK
Date: Wed Jul 4 15:38:53 2012
Connection: Keep-Alive:
Content-Type: text/plain;charset=UTF-8
Content-Length: 286
"name":"raw-jwt"
"my_token":"MTgwNzE5NTY1NToxQkhzQlpaSXM0a21BV3NhbVBIclJOTFM4OGFxU09jNlRTdmF
KSm
czLVBqVHlWRFJwbWYxOFhmcnN6S0N6c3Fzb1JKbEh6U2IwSTdvflVuZWFXVjVmemhJNTJ1YVN6b
FdD
bTBG"
"id":"8353"
RFC 3986 Support for Encoding Query Parameters
The REST Adapter supports encoding query parameters.
The REST Adapter supports encoding query parameters in accordance with RFC 3986
standards. The default behavior is to encode the query parameters following the
application/x-www-form-urlencoded
scheme. For most older services that expect query
parameters to be encoded following the
application/x-www-form-urlencoded
scheme, the
default scheme should work. If you find the target endpoint not behaving correctly with the
default encoding scheme, the REST Adapter can also be configured to strictly follow RFC
3986. A very common scenario in which the default behavior may not be desirable is when the
target service expects space characters encoded as
%20
in the query parameters. In this case,
the default behavior is to encode space characters as
+
. Some new services may also respond
with
HTTP 400
(bad data) if query parameters are encoded in the
application/x-www-form-
urlencoded
scheme. In these cases, you can switch to the RFC 3986 standard and check if
the service responds correctly. To use RFC 3986 (and override the default behavior), perform
Chapter 2
Header, Token, Query Parameter, and Array Support
2-67

the following steps to configure the REST Adapter as an invoke connection (and not as a
trigger connection) in the Adapter Endpoint Configuration Wizard and in the mapper.
1. On the Basic Info page, select the Custom check box for Configure Request Headers.
2. On the Request Headers page, add the
x-ics-use-x-www-form-urlencoded
custom
header and optionally provide a description.
3. Complete the Adapter Endpoint Configuration Wizard.
4. In the mapper, set the x-ics-use-x-www-form-urlencoded custom header to
false
.
The REST Adapter automatically encodes all query parameters in accordance with RFC 3986
in the outgoing request for this invoke connection.
Homogenous Multidimensional Array Support in JSON Documents
You can select a JSON sample with homogenous multidimensional arrays when configuring
the REST Adapter in the Adapter Endpoint Configuration Wizard.
All JSON messages must be converted to XML before they can be processed by Oracle
Integration at runtime. Semantically, there is no equivalent of multidimensional arrays in XML.
To support multidimensional arrays, intermediate XML elements are generated that denote the
beginning and ending of a nested array. When receiving a JSON message containing
multidimensional arrays, these reserved elements are injected into the generated XML to
denote the beginning and ending of a nested array. While converting XML elements back into
JSON, the injected elements are converted into JSON with nested arrays.
The following JSON document consists of a multidimensional array (
@ref "rercordsData”
).
{
"studentData": {
"fieldNames": [ "id","mobile_number" ],
"recordsData": [ ["21","23"], ["+91123456789", "+91987654321" ] ],
"name": "jack"
},
"schoolData": {
"Name": "ABCInternations",
"StudentNumbers": 1300,
"Address": "YYY streets Sector-44 India"
}
}
The sample generated schema XML for the JSON document looks as follows:
<?xml version = '1.0' encoding = 'UTF-8'?>
<ns0:executeResponse xmlns:ns1="http://xmlns.oracle.com/cloud//REST/test/
types"
xmlns:ns0="http://xmlns.oracle.com/cloud//REST/test_REQUEST/types">
<ns1:response-wrapper>
<ns1:studentData>
<ns1:fieldNames>id</ns1:fieldNames>
<ns1:fieldNames>mobile_number</ns1:fieldNames>
<ns1:recordsData>
<ns1:nestedArray>
<ns1:nestedArrayItem>21</ns1:nestedArrayItem>
Chapter 2
Header, Token, Query Parameter, and Array Support
2-68

<ns1:nestedArrayItem>23</ns1:nestedArrayItem>
</ns1:nestedArray>
<ns1:nestedArray>
<ns1:nestedArrayItem>+91123456789</
ns1:nestedArrayItem>
<ns1:nestedArrayItem>+91987654321</
ns1:nestedArrayItem>
</ns1:nestedArray>
</ns1:recordsData>
<ns1:name>jack</ns1:name>
</ns1:studentData>
<ns1:schoolData>
<ns1:Name>ABCInternations</ns1:Name>
<ns1:StudentNumbers>1300</ns1:StudentNumbers>
<ns1:Address>YYY streets Sector-44 India</ns1:Address>
</ns1:schoolData>
</ns1:response-wrapper>
</ns0:executeResponse>
Elements in the nested array appear as
nestedArray
in the mapper and items in the elements
appear as
nestedArrayItem
. You must map
nestedArray
as a
for-each
statement and
nestedArrayItem
as a
for-each
statement.
Swagger Support
The following sections describe REST Adapter Swagger capabilities in more detail.
Topics:
• View the Metadata for the Inbound REST Endpoint in Swagger Format
• REST Endpoint Metadata and a Swagger Link to a REST Metadata Description
• Security is Not Required for Swagger Definition and Metadata Catalog URL Connections
Chapter 2
Swagger Support
2-69

REST Endpoint Metadata and a Swagger Link to a REST Metadata
Description
When you activate an integration with a REST Adapter trigger connection, an endpoint
metadata URL link is provided at the top of the Integrations page.
For example:
integration Hello World (1.1.0) was activated successfully.
You can access it via http://host:port/ic/api/integration/v1/flows/rest/
HELLO_WORLD/1.0/metadata.
This link enables you to inspect the shape of the API. The metadata includes additional
information about the endpoint description, the endpoint URI, and the Swagger URI.
Note the following details:
• If you import an IAR file with an endpoint description defined in the inbound (trigger)
direction, update the connection, activate the integration, and access the metadata in a
browser (for example, through a URL similar in structure to the following), the endpoint
description is not shown even though the inbound direction has a description defined.
http://host:port/ic/api/integration/v1/flows/rest/OLD_INTG_DESC/1.0/
metadata
This is expected behavior. The description is stored in a JCA file from which it is read and
displayed. Existing integrations do not have this file. Even after upgrades, the existing
integration does not show the endpoint description. To get the correct description, you
must re-edit the REST Adapter to generate the artifacts again and re-activate the
integration.
• If you attempt to re-edit an imported integration or existing integration in the Adapter
Endpoint Configuration Wizard with a resource URI of
/metadata
or
/metadata/swagger
,
you cannot navigate the wizard and receive an error. This is because the
/metadata
or
/
metadata/swagger
keywords are reserved.
• If the relative URI has template parameters, then at runtime the value of the relative URI if
resolved to
/metadata
or
/metadata/swagger
is treated as reserved for retrieving the
integration metadata. Note the following behavior:
–
/{param}
: Allowed - The integration cannot be invoked with the value of
param
as
metadata and returns the metadata page.
–
/{param}/swagger
: Allowed - The integration cannot be invoked with the value of
param
as metadata and returns the Swagger page.
–
/metadata/{param}
: Allowed - The integration cannot be invoked with the value of
param
as Swagger and returns the Swagger page.
• Metadata and Swagger are only served depending on predefined reserve URIs for an
integration. Resources with arbitrary URIs ending with values
metadata
or
swagger
are not
confused with the endpoint documentation artifacts.
Chapter 2
Swagger Support
2-70

View the Metadata for the Inbound REST Endpoint in Swagger Format
You can view the metadata of an activated REST integration and then append
/swagger
to the
metadata URL to view the Swagger format for the integration. The inbound REST integration
can then be exposed as a Swagger connection.
1. On the Integrations page, find the integration whose endpoint URL you want to use.
2. Click the Details icon at the far right.
3. Click the Endpoint URL value (for example,
http://myPODname:7002/integration/
flowapi/rest/GET_ONE_BOOK/v01/metadata
).
4. Append
/swagger
to the end of the URL, and press Enter.
Appending
/swagger
to the URL generates a Swagger document for the inbound
integration. This URL can also be used to create a new Swagger connection in the
Connection Properties dialog. You enter the Swagger URL in the Connection URL field
and select Swagger Definition URL from the Connection Type field.
Security is Not Required for Swagger Definition and Metadata Catalog URL
Connections
Upon activation of an integration with a REST Adapter used as a trigger, a metadata link is
produced with documentation that describes the Oracle Integration REST endpoint. A Swagger
description is also produced so other APIs can also consume the Oracle Integration REST
endpoint.
The Swagger and metadata artifacts that correspond to the Oracle Integration REST endpoint
are unprotected.
The Oracle Integration REST endpoints are still protected. It's just that the Swagger and
metadata artifacts have been made unprotected to enable better discovery from third party
APIs.
Mapper Connectivity Properties Support
The following section describes REST Adapter mapper connectivity property capabilities in
more detail.
Topic:
• Set REST Adapter Connectivity Properties in the Mapper
Chapter 2
Mapper Connectivity Properties Support
2-71

Set REST Adapter Connectivity Properties in the Mapper
You can set REST Adapter connectivity properties in the mapper to propagate additional
information to and from the target endpoint.
• Restrictions
• Connectivity Properties (Trigger Request)
• Connectivity Properties (Trigger Response)
• Connectivity Properties (Invoke Request)
• Connectivity Properties (Invoke Response)
Restrictions
• You can customize the response status. However, this is not shown as part of the Swagger
contract because runtime overrides are not known as part of the interface.
• The HTTP response status cannot be customized for the following conditions:
– If the request is asynchronous one way, the response status is always
201
.
– Errors occurring during trigger request/response handling are reported using
predefined error codes.
– Basic routing integrations don't allow fault handling. Error response in these scenarios
cannot be customized.
Connectivity Properties (Trigger Request)
You can set the following properties for trigger requests in the mapper.
Property Description
Http Request Method
This field contains the method name with which the
REST Adapter trigger endpoint was invoked.
Http Request Uri
The absolute endpoint URI of the Oracle
Integration REST Adapter trigger that was invoked
by the client.
Http Request Relative Uri
The HTTP request relative URI. This is the relative
URI of the Oracle Integration REST Adapter trigger
REST endpoint.
Http Request Path
The HTTP request path. This is the path of the
Oracle Integration REST trigger REST endpoint.
An asterisk in the mapper identifies headers and query and path parameters already sent
along with the incoming request.
Chapter 2
Mapper Connectivity Properties Support
2-72

Connectivity Properties (Trigger Response)
You can set the following properties for trigger responses in the mapper.
Property Description
Http Response Status
The value assigned to this property is sent back as
the HTTP response status code by the Oracle
Integration REST integration.
An asterisk in the mapper identifies headers/content that can be set with the outgoing
response.
Connectivity Properties (Invoke Request)
You can set the following properties for invoke requests in the mapper.
Property
Description
Absolute Endpoint URI
When mapped to a valid URI, the request is routed
to this URI.
Base URI
The base URI to which this request is routed. This
is the equivalent of the base connection URL
provided during connection configuration.
Relative URI
The relative URI of the resource. This must start
with a
/
.
Chapter 2
Mapper Connectivity Properties Support
2-73

Property Description
URI (Complex)
Use one of the following elements to substitute URI
components.
• scheme
• host
• port
• path
• query
Post Query String When the runtime value is true and the HTTP verb
is POST, the query string parameters are sent in
the POST as form parameters. The default value is
false.
Use Form URL Encoding When the runtime value is false, the REST Adapter
uses RFC–3986 compliant encoding to encode the
query parameters. The default value is true (the
equivalent of setting custom header x-ics-use-x-
www-form-urlencoded to false). See RFC 3986
Support for Encoding Query Parameters.
Enforce Empty JSON Object Payload When set to true, sets the body payload to an
empty JSON object. The default value is false. See
Send an Empty JSON Object.
Enforce Absolute Endpoint URI
Applies when you map an absolute endpoint URI to
override the value configured in the REST Adapter.
The enforcement of the absolute endpoint URI
means that it does not encode or modify the URI
when submitting it to the target.
Skip Control Characters
Use to skip control characters.
An asterisk in the mapper identifies headers and query and path parameters already sent
along with the outgoing request.
Chapter 2
Mapper Connectivity Properties Support
2-74

Connectivity Properties (Invoke Response)
You can set the following properties for invoke responses in the mapper.
Property Description
Http Response Status
The HTTP response status returned by the target
endpoint.
Http Response Reason
The reason corresponding to the HTTP response
status returned by the target endpoint.
Http Target Endpoint Uri
The target endpoint that was invoked to receive this
response.
An asterisk in the mapper identifies headers/content already sent as part of the incoming
response received.
Chapter 2
Mapper Connectivity Properties Support
2-75

REST Endpoint Support
The following sections describe REST endpoint capabilities in more detail.
Topics:
• Support for Dynamic REST Endpoints
• Configuration Parameters
Support for Dynamic REST Endpoints
The REST Adapter enables you to dynamically change the (invoke) outbound endpoint
configuration. This feature is useful in the following scenarios:
• A REST endpoint is required to be invoked dynamically or an endpoint is not known at
design time.
• Multiple REST services must be invoked, all of which accept the same input payload and
return the same response payload as configured for the outbound endpoint. For such
cases, this feature eliminates the need to create multiple connections for invoking each of
these REST endpoints.
To change the endpoint configuration at runtime, you must provide a mapping for one or more
of the various properties under ConnectivityProperties.
For example, the following steps describe how to configure an integration to invoke a REST
endpoint determined at runtime:
1. Create and configure a REST Adapter as an invoke connection.
2. In the target pane of the mapper, expand RestApi under ConnectivityProperties. These
elements are made available automatically through a static schema that is added to the
user-provided schema.
3. Using the source schema in the source pane, create a mapping to AbsoluteEndpointUri
in the target pane. Alternatively, you can also provide a static mapping. The REST Adapter
uses the runtime value provided by this mapping to determine the REST endpoint to which
to route this request.
Chapter 2
REST Endpoint Support
2-76

4. You can similarly provide a source mapping to other target nodes under
ConnectivityProperties. The REST Adapter uses the runtime values provided by these
mappings to dynamically configure the request.
5. Activate and invoke the integration. The REST Adapter now invokes the endpoint URI
determined at runtime.
6. Hover the mouse pointer over these properties in the mapper for a brief description. These
descriptions are also provided below:
• AbsoluteEndpointUri: Represents the absolute endpoint URL that the REST Adapter
invokes. Empty values are ignored. To route the request to an endpoint URL
determined at runtime, provide a mapping for this element. AbsoluteEndpointUri
takes first precedence among other URL-related properties under
ConnectivityProperties.
• BaseUri: The equivalent of the base URL provided during connection configuration. To
substitute only the base URI and keep the rest of the URL the same, provide a
mapping for this element. The mapping is ignored if AbsoluteEndpointUri has a
runtime value.
• RelativeUri: Forms the part of the endpoint URI between BaseUri and ?. This
mapping has no impact if BaseUri has an empty runtime value or
AbsoluteEndpointUri has a runtime value. The runtime value must start with a /.
• Uri: Use the various elements under this node to substitute the specific parts with
runtime values of an endpoint URL.
– Scheme: Provide a mapping if you want to change only the scheme of the
endpoint URL. The only supported values are HTTP and HTTPS.
– Host: Provide a mapping if you want to change only the host of the endpoint URL.
– Port: Provide a mapping if you want to change only the port of the endpoint URL.
– Query: Provide a mapping if you want to change only the query portion of the
endpoint URL. The query portion follows the ?.
– Path: Provide a mapping if you want to change only the path portion of the
endpoint URL. A path is the part of a URI between the hostname and ?.
• Plugin: The various properties under this node impact the way the REST Adapter
invokes the endpoint URL.
– PostQueryString: When the runtime value is true and the HTTP verb is POST,
the query string parameters are sent in the POST as form parameters. The default
value is false.
– UseFormUrlEncoding: When the runtime value is false, the REST Adapter uses
RFC–3986 compliant encoding to encode the query parameters. The default value
is true (the equivalent of setting custom header x-ics-use-x-www-form-
urlencoded to false). See section “RFC 3986 Support for Encoding Query
Parameters” for more information on x-ics-use-x-www-form-urlencoded. The x-
ics-use-x-www-form-urlencoded custom header takes precedence when both
properties are set.
– EnforceEmptyJSONObjectPayload: When set to true, sets the body payload to
an empty JSON object. The default value is false.
Note the following restrictions:
• The request and response schema must be the same as provided during configuration in
the Adapter Endpoint Configuration Wizard.
• Template parameters are not supported while mapping these properties.
Chapter 2
REST Endpoint Support
2-77

• An HTTP verb cannot be changed for the endpoint URL. For example, if the endpoint is
configured to use POST, the outgoing request is a POST even if the endpoint URI changes
at runtime.
• Since the endpoint URL is determined at runtime, there is no facility to test whether the
security credentials provided during connection configuration also work with the new
endpoint URL. If the endpoint URL determined at runtime requires a different authorization
header then the original URL, you may also have to provide a mapping for the
authorization standard header.
Configuration Parameters
You configure the following parameters using the Adapter Endpoint Configuration Wizard to
expose and consume a REST service:
• Relative resource path URI
• HTTP method (actions) to perform
• Template and query parameters
• Request/response message structure
Cross-Origin Resource Sharing (CORS) Support
The following section describes cross-origin resource sharing (CORS) capabilities in more
detail.
Topics:
• Cross-Origin Resource Sharing (CORS)
Cross-Origin Resource Sharing (CORS)
CORS defines a way in which a browser and server can interact to determine safely whether or
not to allow the cross-origin request. CORS provides for more flexibility than same-origin
requests, but is more secure than simply permitting all cross-origin requests.
Oracle Integration supports CORS in the REST Adapter trigger (inbound) direction. You
configure CORS support in the Adapter Endpoint Configuration Wizard. See REST Adapter
Trigger Resource Configuration Page and REST Adapter Trigger CORS Configuration Page.
CORS is supported by browsers based on the following layout engines:
• Blink- and Chromium-based browsers (Chrome 28, Opera 15, Amazon Silk, Android's 4.4+
WebView, and Qt's WebEngine).
• Gecko 1.9.1 (Firefox 3.5, SeaMonkey 2.0, and Camino 2.1) and above.
• MSHTML/Trident 6.0 (Internet Explorer 10) has native support. MSHTML/Trident 4.0 & 5.0
(Internet Explorer 8 & 9) provide partial support through the XDomainRequest object.
• Presto-based browsers (Opera) implement CORS as of Opera 12.00 and Opera Mobile 12,
but not Opera Mini.
• WebKit (Safari 4 and above, Google Chrome 3 and above, possibly earlier).
The following browsers do not support CORS:
• Camino does not implement CORS in the 2.0.x release series because these versions are
based on Gecko 1.9.0.
Chapter 2
Cross-Origin Resource Sharing (CORS) Support
2-78

• As of version 0.10.2, Arora exposes WebKit's CORS-related APIs, but attempted cross-
origin requests fail.[16].
For CORS to work, you must send an OPTIONS request. Using the
XMLHttpRequest
object in
Javascript for (Ajax calls) automatically sends the OPTIONS request. If
XMLHttpRequest
is not
used, then the OPTIONS request must be sent explicitly.
In the following example, an HTML client invokes an Oracle Integration CORS-based endpoint
using
XMLHttpRequest
.
<html>
<script language="javascript">
var invocation = new XMLHttpRequest();
var url =
"<ics endpoint url>";
// Use postman to generate authCode. Sample is provided below
var authCode = 'Basic <base64encoded authorization string>';
function callOtherDomain(){ if(invocation) {
invocation.open('GET', url, true);
invocation.setRequestHeader('Accept', 'application/json');
invocation.setRequestHeader('X-Cache','aaa');
invocation.setRequestHeader('X-Forwarded-For','fwd1');
invocation.setRequestHeader('Authorization',authCode);
invocation.onreadystatechange = stateChangeEventHandler;
invocation.send();
}
}
function stateChangeEventHandler()
{
// check whether the data is loaded
if (invocation.readyState==4)
{ // check whether the status is ok
if (invocation.status==200) {
//alert(invocation.responseText)
document.getElementById("myTextarea").value = invocation.responseText
document.write("hello");
document.write(invocation.responseText);
}
else
{
alert ("Error Occurred")
}
}
}
</script>
<body onload="callOtherDomain()">
<br><br>
<textarea id="myTextarea" name="mytextarea1"></textarea><br><br>
</body>
</html>
Chapter 2
Cross-Origin Resource Sharing (CORS) Support
2-79

Some browsers may also have security restrictions such as the same origin policy or a similar
name that prevents using CORS. For example, to access a CORS-enabled endpoint using a
Chrome browser, you may have to start it with web security disabled as follows.
chrome.exe --user-data-dir="C:/Chrome dev session" --disable-web-security
Complex Schema Support
The following section describes REST Adapter complex schema capabilities in more detail.
Topics:
• Complex Schema Support
Complex Schema Support
Support is provided for XSDs that can import and include other XSDs. The included XSDs in
the ZIP file can import the XSD from an HTTP location. All XSD files must be added to a ZIP
file and uploaded when configuring the REST Adapter in the Adapter Endpoint Configuration
Wizard.
In the following example, the hierarchy of the ZIP file to upload is as follows:
zipxsd.zip
first.xsd
second (folder)
second.xsd
first.xsd
imports
second.xsd
.
<xs:schema xmlns:xs="http://www.w3.org/2001/XMLSchema"
xmlns:tns="http://xmlns.oracle.com/first"
targetNamespace="http://xmlns.oracle.com/first"
xmlns:tns1="http://xmlns.oracle.com/second">
<xs:import schemaLocation="./second/second.xsd"
targetNamespace="http://xmlns.oracle.com/second"/>
<xs:import schemaLocation="https://example.com/fscmService/ItemServiceV2?
XSD=/xml/datagraph.xsd" targetNamespace="commonj.sdo"/>
<xs:element name="book">
<xs:complexType>
<xs:sequence>
<xs:element name="isbn" type="xs:string"/>
<xs:element name="title" type="xs:string"/>
<xs:element name="author" type="tns1:author"/>
</xs:sequence>
</xs:complexType>
</xs:element>
</xs:schema>
The contents of
second.xsd
are as follows.
<xs:schema xmlns:xs="http://www.w3.org/2001/XMLSchema"
xmlns:tns="http://xmlns.oracle.com/second"
Chapter 2
Complex Schema Support
2-80

targetNamespace="http://xmlns.oracle.com/second">
<xs:import schemaLocation="https://example.com/fscmService/ItemServiceV2?
XSD=/mycompany/apps/scm/productModel/items/itemServiceV2/ItemAttachment.xsd"
targetNamespace="http://xmlns.oracle.com/apps/scm/productModel/items/
itemServiceV2/"/>
<xs:complexType name="author">
<xs:sequence>
<xs:element name="name" type="xs:string"/>
<xs:element name="address" type="xs:string"/>
</xs:sequence>
</xs:complexType>
<xs:element name="Admin">
<xs:complexType>
<xs:sequence>
<xs:element name="AdminName" type="xs:string"/>
<xs:element name="AdminAdd" type="xs:string"/>
</xs:sequence>
</xs:complexType>
</xs:element>
</xs:schema>
Note:
If you are importing from HTTPS locations, ensure that you import the SSL
certificates into Oracle Integration.
Chapter 2
Complex Schema Support
2-81

3
Create a REST Adapter Connection
A connection is based on an adapter. You define connections to the specific cloud applications
that you want to integrate.
Topics:
• Prerequisites for Creating a Connection
• Create a Connection
• Upload an SSL Certificate
Prerequisites for Creating a Connection
You must satisfy the following prerequisites to create a connection with the REST Adapter.
• OAuth Security Policies
• SSL Endpoints
• Amazon Web Services (AWS) REST API Consumption
• OCI Signature Version 1 Security Policy Use
OAuth Security Policies
If you are using one of the OAuth security policies, you must already have registered your
client application to complete the necessary fields on the Connections page. The Basic
Authentication and No Security Policy security policies are exempted.
Before a client application can request access to resources on a resource server, the client
application must first register with the authorization server associated with the resource server.
The registration is typically a one-time task. Once registered, the registration remains valid,
unless the client application registration is revoked.
At registration time, the client application is assigned a client ID and a client secret (password)
by the authorization server. The client ID and secret are unique to the client application on that
authorization server. If a client application registers with multiple authorization servers (for
example, Facebook, Twitter, and Google), each authorization server issues its own unique
client ID to the client application.
@ref: http://tutorials.jenkov.com/oauth2/authorization.html
For OAuth configuration, read the provider documentation carefully and provide the relevant
values.
SSL Endpoints
For SSL endpoints, obtain and upload a server certificate. For more information, see Upload
an SSL Certificate.
3-1

Amazon Web Services (AWS) REST API Consumption
Before you can create a connection that consumes an Amazon Web Services (AWS) REST
API, you must obtain the necessary access and secret keys. See Understanding and Getting
Your Security Credentials.
OCI Signature Version 1 Security Policy Use
To configure the REST Adapter to use the OCI Signature Version 1 security policy on the
Connections page, you must perform several tasks:
• Create an API signing key. You then specify the signing key in Oracle Cloud Infrastructure.
1. Create the signing key in Oracle Cloud Infrastructure using
openssl
. The key must be
in RSA (PKCS1) format. During creation, you also create a pass phase to protect the
key. Both the key and pass phrase are required when configuring the OCI Signature
Version 1 security policy on the Connections page. See Creating a Key Pair.
If the key downloaded from the Oracle Cloud Infrastructure Console is in PKCS8
format, it must be converted to RSA (PKCS1) format. See Convert a Private Key from
PKCS8 to RSA (PKCS1) Format for the OCI Signature Version 1 Security Policy.
Existing connections already using the OCI Signature Version 1 security policy do not
need to be upgraded because they continue to work.
2. Sign in to the Oracle Cloud Infrastructure Console to upload the public key.
3. In the upper left corner, select
.
4. Click Home.
5. Select Identity & Security, then select Users.
6. On the Users page, click the link of the user name to use.
7. In the Resources section, click API Keys.
8. Click Add API Key.
9. In the Add API Key dialog, add the public key you created, and click Add.
10. Copy the finger print value generated by Oracle Cloud Infrastructure. You need this
value when configuring the OCI Signature Version 1 security policy on the Connections
page.
• Obtain the tenancy OCID and user OCID details in the Oracle Cloud Infrastructure
Console. When you sign up for Oracle Cloud Infrastructure, Oracle creates a tenancy for
your company, which is a secure and isolated partition within Oracle Cloud Infrastructure
where you can create, organize, and administer your cloud resources.
1. Sign in to the Oracle Cloud Infrastructure Console.
Chapter 3
Prerequisites for Creating a Connection
3-2
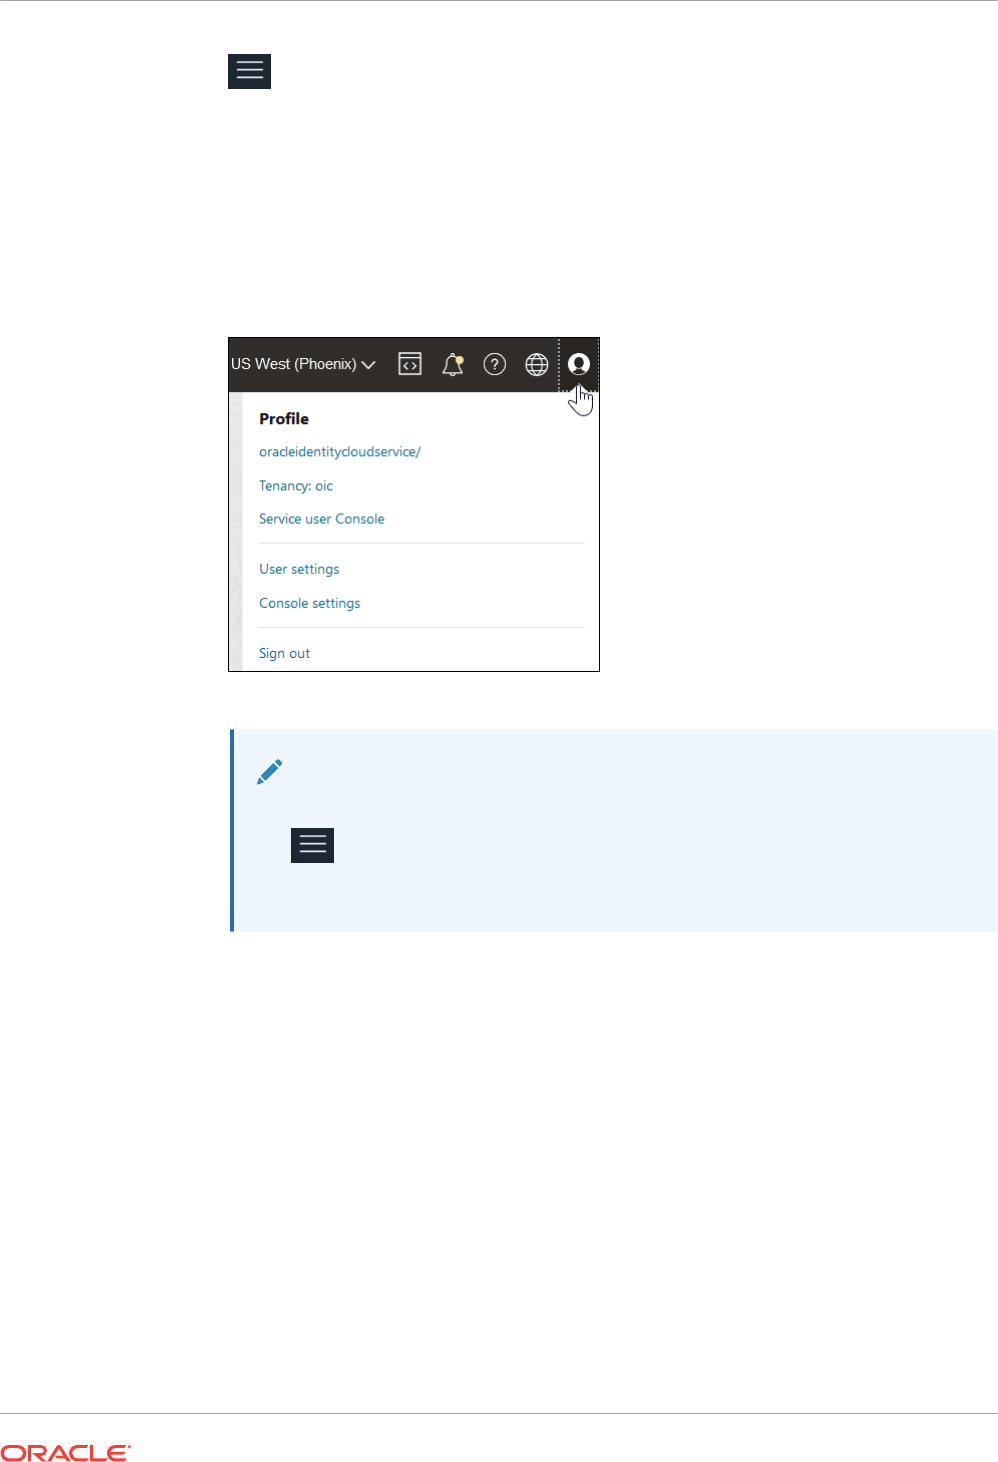
2. In the upper left corner, select
, and search for Tenancies.
3. Click Tenancies.
4. For your tenancy, go to the Tenancy Information section and click Show to display
the OCID tenancy value.
5. Copy the value. You need this value when configuring the OCI Signature Version 1
security policy on the Connections page.
6. In the upper right corner, click the Profile icon and select User settings.
Note:
You can also select
in the upper left corner, then select Identity & Security, and then select
User settings to access the user profile.
7. Click Show to display the OCID user value.
8. Copy the value. You need this value when configuring the OCI Signature Version 1
security policy on the Connections page.
Create a Connection
Before you can build an integration, you have to create the connections to the applications with
which you want to share data.
To create a connection in Oracle Integration:
1. In the left navigation pane, click Home > Integrations > Connections.
2. Click Create.
Chapter 3
Create a Connection
3-3

Note:
You can also create a connection in the integration canvas of:
• An orchestrated integration (See Define Inbound Triggers and Outbound
Invokes.)
• A basic routing integration (See Add a Trigger (Source) Connection.)
3. In the Create Connection — Select Adapter dialog, select the adapter to use for this
connection. To find the adapter, scroll through the list, or enter a partial or full name in the
Search field and click
Search.
4. In the Create Connection dialog, enter the information that describes this connection.
a. Enter a meaningful name to help others find your connection when they begin to
create their own integrations. The name you enter is automatically added in capital
letters to the Identifier field. If you modify the identifier name, don't include blank
spaces (for example,
SALES OPPORTUNITY
).
b. Enter optional keywords (tags). You can search on the connection keywords on the
Connections page.
c. Select the role (direction) in which to use this connection (trigger, invoke, or both). Only
the roles supported by the adapter are displayed for selection. When you select a role,
only the connection properties and security policies appropriate to that role are
displayed on the Connections page. If you select an adapter that supports both invoke
and trigger, but select only one of those roles, you'll get an error when you try to drag
the adapter into the section you didn't select. For example, let's say you configure a
connection for the Oracle Service Cloud (RightNow) Adapter as only an invoke.
Dragging the adapter to a trigger section in the integration produces an error.
d. Enter an optional description of the connection.
5. Click Create.
Your connection is created. You're now ready to configure the connection details, such as
connection properties, security policies, connection login credentials, and (for certain
connections) agent group.
Configure Connection Properties for Invoke Connections
Configure connection security to invoke a protected target service with the REST Adapter.
1. Go to the Connection Properties section.
The Connection Properties dialog is displayed.
2. From the Connection Type list, select the type to use:
The swagger, RAML, and metadata catalogs are commonly used, language agnostic
standards to define the capabilities of a service. The REST Adapter can parse these
resource definitions, discover resources, and understand how to interact with these
resources with a minimal amount of user intervention. If the target API does not define a
resource model in one of these formats, select the REST API Base URL as the connection
type, specify the base URL of the service, and model the request and the expected
response using the Adapter Endpoint Configuration Wizard.
Chapter 3
Create a Connection
3-4

• Open API (1.0/2.0/3.0) URL
• REST API Base URL
• Metadata Catalog URL
• Swagger Definition URL
• RAML Definition URL
Note:
The Metadata Catalog URL, Swagger Definition URL, and RAML Definition
URL connection types have been deprecated. Oracle recommends that you use
a different connection type.
3. From the TLS Version (Optional) list, it is recommended that you not select a value for
the Transport Layer Security (TLS) version of the target server. Oracle Integration
automatically uses the latest TLS version for SSL communication. TLSv1 is no longer
supported. If you previously configured a connection to use TLSv1.1, either update the
connection by not selecting a value for this field or select TLSv1.2.
The TLS protocol provides privacy and data integrity between two communicating
computer applications.
• TLSv1.1
• TLSv1.2
4. In the Connection URL field, specify the endpoint URL to use based on your selection in
Step 2. The connection URL can be both HTTP and HTTPS.
Type Endpoint Example
Open API (1.0/2.0/3.0) URL
https://
hostname:port/ic/api/
integration/v1/flows/rest/
INTEGRATION_NAME/v1/
metadata/openapi
REST API Base URL
https://
hostname:port/ic/api/
integration/v1/flows/rest/
INTEGRATION_NAME/v01/
Metadata Catalog URL
https://hostname:port/Test/
mdcatalogmain.json
Swagger Definition URL
https://hostname:port/Test/
application.json
Chapter 3
Create a Connection
3-5

Type Endpoint Example
RAML Definition URL
https://hostname:port//
Test/fullapi2.raml
5. If you are configuring the REST Adapter for use with a two-way SSL-enabled server, enter
information in the following fields.
a. In the Enable two way SSL for outbound connections field, select Yes.
b. In the Identity keystore alias name field, enter the key alias name from the keystore
file that you specified when importing the identity certificate.
The alias name to provide must match the name provided for the private key entry in
the JKS file.
Configure Connection Security
Configure security for your REST Adapter connection by selecting the security policy and
specifying the required details.
1. Go to the Security section.
2. Select the security policy to use. If you selected the Invoke role or the Trigger and Invoke
role during REST Adapter connection creation, the page is refreshed to display various
login credential fields. You must already have created your client application to complete
the necessary fields.
The following security policy restrictions apply when configuring a REST Adapter
connection with the trigger and invoke role on the Connections page:
• If you select Basic Authentication, it can be used as a trigger and an invoke.
• If you select any other security policy, it can only be used as an invoke. Dragging the
connection to the trigger area causes an exception error to be displayed.
• For existing integrations, the above restrictions do not apply when editing the REST
Adapter in the Adapter Endpoint Configuration Wizard.
Note:
The following standard OAuth security policies are implemented to work with
providers that are implemented as illustrated in RFC 6749.
• OAuth Resource Owner Password Credentials
• OAuth Client Credentials
In case the standard policy doesn't work, it is recommended that you use the
OAuth Custom Two Legged or OAuth Custom Three Legged security policy.
• Configure Security Policies for Trigger Connections
• Configure Security Policies for Invoke Connections
Chapter 3
Create a Connection
3-6

Configure Security Policies for Trigger Connections
Selected Security Policy Description Fields
OAuth2.0 • Supports HTTP bearer
authentication.
• The client should send the
OAuth 2.0 bearer token in
the HTTP headers.
See Authenticate Requests for
Invoking Oracle Integration
Flows.
No fields are displayed.
Basic Authentication • Supports HTTP basic
authentication.
• The client should send the
username/password in the
HTTP headers.
No fields are displayed.
OAuth 2.0 or Basic Authentication The client can use any of the
OAuth 2.0 bearer tokens or the
HTTP Basic Authentication
header.
No fields are displayed.
Configure Security Policies for Invoke Connections
Note:
OAuth Authorization Code Credentials, OAuth Custom Three Legged Flow, and
OAuth Custom Two Legged Flow security types, the connection is only successful
after you click the Provide Consent button. Configuring all the details alone is not
sufficient.
Note:
Testing a REST Adapter connection configured with the HTTP basic authentication
security policy and a role connection of Trigger and Invoke or Invoke does not
validate the credentials and simply opens a connection to the provided URL. To
validate the endpoint and credentials, the REST Adapter must invoke an API that is
idempotent.
Selected Security Policy Fields
AWS Signature Version 4 •
Access Key — Enter the key obtained when you created your
Amazon security credentials.
•
Secret Key — Enter the key obtained when you created your
Amazon security credentials.
•
Confirm Secret Key — Enter the key a second time.
•
AWS Region — Select the region in which the AWS server is
hosted.
•
Service Name — Select the AWS service to which to connect.
Chapter 3
Create a Connection
3-7

Selected Security Policy Fields
Basic Authentication •
Username — The name of a user who has access to the
destination web service.
•
Password — Enter the password.
•
Confirm Password — Reenter the password.
OAuth Client Credentials •
Access Token URI — The URL from which to obtain the
access token.
•
Client Id — The client identifier issued to the client during the
registration process.
•
Client Secret — The client secret.
•
Confirm Client Secret — Reenter the client secret.
•
Scope — The scope of the access request. Scopes enable you
to specify which type of access you need. Scopes limit access
for the OAuth token. They do not grant any additional
permission beyond that which the user already possesses.
•
Auth Request Media Type — The format of the data you want
to receive. This is an optional parameter that can be kept blank.
For example, if you are invoking Twitter APIs, you do not need to
select any type.
•
Client Authentication — You can optionally configure OAuth
flows with client authentication. This is similar to the Postman
user interface feature for configuring client authentication.
–
Send client credentials as basic auth header: Pass the
client ID and client secret in the header as basic
authentication.
–
Send client credentials in body: Pass the client ID and
client secret in the body as form fields.
OAuth Resource Owner
Password Credentials
•
Access Token URI — The URL from which to obtain the
access token.
•
Client Id — The client identifier issued to the client during the
registration process.
•
Client Secret — The client secret.
•
Confirm Client Secret — Reenter the client secret.
•
Scope — The scope of the access request. Scopes enable you
to specify which type of access you need. Scopes limit access
for the OAuth token. They do not grant any additional
permission beyond that which the user already possesses.
•
Auth Request Media Type — The format of the data you want
to receive.
•
Username — The resource owner’s user name.
•
Password — The resource owner’s password.
•
Confirm Password — Reenter the password.
•
Client Authentication — You can optionally configure OAuth
flows with client authentication. This is similar to the Postman
user interface feature for configuring client authentication.
–
Send client credentials as basic auth header: Pass the
client ID and client secret in the header as basic
authentication.
– Send client credentials in body: Pass the client ID and
client secret in the body as form fields.
Chapter 3
Create a Connection
3-8

Selected Security Policy Fields
OAuth Authorization Code
Credentials
•
Client Id — The client identifier issued to the client during the
registration process.
•
Client Secret — The client secret.
•
Confirm Client Secret — Reenter the client secret.
•
Authorization Code URI — The URI from which to request the
authorization code.
•
Access Token URI — URI to use for the access token.
•
Scope — The scope of the access request. Scopes enable you
to specify which type of access you need. Scopes limit access
for the OAuth token. They do not grant any additional
permission beyond that which the user already possesses.
•
Client Authentication — You can optionally configure OAuth
flows with client authentication. This is similar to the Postman
user interface feature for configuring client authentication.
–
Send client credentials as basic auth header: Pass the
client ID and client secret in the header as basic
authentication.
–
Send client credentials in body: Pass the client ID and
client secret in the body as form fields.
Chapter 3
Create a Connection
3-9

Selected Security Policy Fields
OAuth Custom Three Legged
Flow
See Configure the REST Adapter
to Consume a REST API
Protected with OAuth Custom
Three Legged Flow Token-Based
Authentication to learn more
about this security policy.
•
Authorization Request — The client application URL to which
you are redirected when you provide consent. The authorization
server sends a callback to Oracle Integration to obtain an
access token for storage. When you create your client
application, you must register a redirect URI where the client
application is listening.
•
Access Token Request — The access token request to use to
fetch the access token. Specify the request using CURL syntax.
For example:
-X POST method -H headers -d string_data
access_token_uri?query_parameters
•
Refresh Token Request — The refresh token request to use to
fetch the access token. This request refreshes the access token
if it expires. Specify the request using CURL syntax. For
example
-X POST method -H headers -d string_data
refresh_token_uri?query_parameters
•
Sauth_code — Use regex to identify the authorization code.
code
•
Saccess_token — Use a regular expression (regex) to retrieve
the access token.
access.[tT]oken
•
Srefresh_token — Use regex to retrieve the refresh token.
refresh.[tT]oken
•
Sexpiry — Use regex to identify when the access token expires.
expires_in
•
Stoken_type — Use regex to identify the access token type.
token.?[tT]ype
•
access_token_usage — Specify how to pass the token as
multiple headers or multiple query parameters to access a
protected resource. You cannot pass a mix of headers and
query parameters.
For headers:
-H Authorization: ${token_type} $
{access_token} -H validity: 30000 -H
signature: ok
Chapter 3
Create a Connection
3-10

Selected Security Policy Fields
You can optionally specify quotes for headers:
-H 'Authorization: ${token_type} $
{access_token}' -H 'validity: 30000' -H
'signature: ok'
For query parameters:
?token=$
{access_token}&validity=3000&signature=ok
Chapter 3
Create a Connection
3-11

Selected Security Policy Fields
OAuth Custom Two Legged Flow
See Configure the REST Adapter
to Consume a REST API
Protected with OAuth Custom
Two Legged Token-Based
Authentication to learn more
about this security policy.
•
Access Token Request — The access token request to use to
fetch the access token. Specify the request using CURL syntax.
For example:
-X POST method -H headers -d string_data
access_token_uri?query_parameters
•
Refresh Token Request — The refresh token request to use to
fetch the access token. This request refreshes the access token
if it expires. Specify the request using CURL syntax. For
example
-X POST method -H headers -d string_data
refresh_token_uri?query_parameters
•
Saccess_token — Use regex to identify the access token.
access.[tT]oken
•
Srefresh_token — Use regex to identify the refresh token.
refresh.[tT]oken
•
Sexpiry — Use regex to identify when the access token expires.
expires_in
•
Stoken_type — Use regex to identify the access token type.
token.?[tT]ype
•
access_token_usage — Specify how to pass the token as
multiple headers or multiple query parameters to access a
protected resource. You cannot pass a mix of headers and
query parameters.
For headers:
-H Authorization: ${token_type} $
{access_token} -H validity: 30000 -H
signature: ok
You can optionally specify quotes for headers:
-H 'Authorization: ${token_type} $
{access_token}' -H 'validity: 30000' -H
'signature: ok'
For query parameters:
?token=$
{access_token}&validity=3000&signature=ok
Chapter 3
Create a Connection
3-12

Selected Security Policy Fields
API Key Based Authentication
See Configure the REST Adapter
to Consume a REST API
Protected with the API Key to
learn more about this security
policy.
•
API Key — Specify the generated API key used to identify the
client making the request.
•
Confirm API Key — Reenter the API key.
•
API Key Usage — Specify the URI syntax for how to pass the
API key to access a protected resource.
To pass the API key as a query parameter at runtime to access
the protected resource:
?key=${api-key}
To pass the API key as a header at runtime to access the
protected resource.
-H Authorization: Bearer ${api_key}
For example:
-H Authorization: Bearer AASDFADADX
OAuth 1.0 One Legged
Authentication
•
Consumer Key — Specify the key that identifies the client
making the request.
•
Consumer Secret — Specify the consumer secret that
authorizes the client making the request.
•
Confirm Consumer Secret — Specify the secret a second
time.
•
Token — Specify the token that accesses protected resource.
•
Token Secret — Specify the token secret that generates the
signature for the request.
•
Confirm Token Secret — Specify the secret a second time.
•
Realm — Specify the realm that identifies the account.
•
Signature Method — Specify the signature encryption
algorithm.
–
HMAC-SHA1: The default value used for most signature
encryptions.
–
HMAC-SHA256: The signature encryption algorithm
required for Netsuite SHA-256 signing with the REST
Adapter starting with the May 2021 release of Oracle
Integration.
All connections in releases prior to the May 2021 release
automatically used the default value of HMAC-SHA1.
HMAC-SHA1 is no longer supported for integrating with
Oracle NetSuite. Create all new connections for integrating
with Oracle NetSuite by selecting HMAC-SHA256. Update
existing connections to use HMAC-SHA256, then test and
save your connection. After making the update, integration
reactivation is not required.
Chapter 3
Create a Connection
3-13

Selected Security Policy Fields
OCI Signature Version 1 Specify the values you created when satisfying the prerequisites for
using this security policy. See Prerequisites for Creating a
Connection.
•
Tenancy OCID — Specify the value you copied from the Oracle
Cloud Infrastructure Console.
•
User OCID — Specify the value you copied from the Oracle
Cloud Infrastructure Console.
•
Private Key — Click Upload to select the key you created.
Ensure that the key is in RSA (PKCS1) format. If you need to
convert to this format, see Convert a Private Key from PKCS8 to
RSA (PKCS1) Format for the OCI Signature Version 1 Security
Policy.
•
Finger Print — Enter the finger print that was generated when
you created the key in the Oracle Cloud Infrastructure Console.
•
Pass Phrase — Enter the pass phrase you created when
creating the key.
•
Confirm Pass Phrase — Enter the pass phrase a second time.
No Security Policy If you select this security policy, no additional fields are displayed.
Configure an Agent Group
Configure an agent group for accessing the service hosted on your premises behind the fire
wall.
1. Click Configure Agents.
The Select an Agent Group page appears.
2. Click the name of the agent group.
3. Click Use.
To configure an agent group, you must download and install the on-premises connectivity
agent. See Download and Run the Connectivity Agent Installer and About Connectivity Agents
and Integrations Between On-Premises Applications and Oracle Integration in Using
Integrations in Oracle Integration Generation 2.
Test the Connection
Test your connection to ensure that it's configured successfully.
1. In the page title bar, click Test. What happens next depends on whether your connection
uses a Web Services Description Language (WSDL) file.
If Your Connection...
Then...
Doesn't use a WSDL The test starts automatically and validates the inputs you provided for the
connection.
Chapter 3
Create a Connection
3-14

If Your Connection... Then...
Uses a WSDL A dialog prompts you to select the type of connection testing to perform:
• Validate and Test: Performs a full validation of the WSDL, including
processing of the imported schemas and WSDLs. Complete
validation can take several minutes depending on the number of
imported schemas and WSDLs. No requests are sent to the
operations exposed in the WSDL.
• Test: Connects to the WSDL URL and performs a syntax check on
the WSDL. No requests are sent to the operations exposed in the
WSDL.
2. Wait for a message about the results of the connection test.
• If the test was successful, then the connection is configured properly.
• If the test failed, then edit the configuration details you entered. Check for typos, verify
URLs and credentials, and download the diagnostic logs for additional details.
Continue to test until the connection is successful.
3. When complete, click Save.
Upload an SSL Certificate
Certificates are used to validate outbound SSL connections. If you make an SSL connection in
which the root certificate does not exist in Oracle Integration, an exception is thrown. In that
case, you must upload the appropriate certificate. A certificate enables Oracle Integration to
connect with external services. If the external endpoint requires a specific certificate, request
the certificate and then upload it into Oracle Integration.
For the REST Adapter, note the following certificate details for one-way and two-way SSL:
• One-way SSL: Oracle Integration only needs the public certificates of the HTTPS URL.
The certificate must be in
.pem
or
.crt
format and uploaded as a trust certificate.
• Two-way SSL: You must add the public certificate of the HTTPS URL. After that, you must
create a JKS certificate with a private key file. You must upload the JKS certificate as an
identity certificate.
Once you upload the identity certificate, you must use an alias on the Connections page.
To upload an SSL certificate:
1. In the left navigation pane, click Home > Settings > Certificates.
All certificates currently uploaded to the trust store are displayed in the Certificates dialog.
The
link enables you to filter by name, certificate expiration date, status, type, category, and
installation method (user-installed or system-installed). Certificates installed by the system
cannot be deleted.
Chapter 3
Upload an SSL Certificate
3-15

2. Click Upload at the top of the page.
The Upload Certificate dialog box is displayed.
3. Enter an alias name and optional description.
4. In the Type field, select the certificate type. Each certificate type enables Oracle
Integration to connect with external services.
• X.509 (SSL transport)
• SAML (Authentication & Authorization)
• PGP (Encryption & Decryption)
X.509 (SSL transport)
1. Select a certificate category.
a. Trust: Use this option to upload a trust certificate.
i. Click Browse, then select the trust file (for example,
.cer
or
.crt
) to upload.
b. Identity: Use this option to upload a certificate for two-way SSL communication.
i. Click Browse, then select the keystore file (
.jks
) to upload.
ii. Enter the comma-separated list of passwords corresponding to key aliases.
Note:
When an identity certificate file (JKS) contains more than one private key,
all the private keys must have the same password. If the private keys are
protected with different passwords, the private keys cannot be extracted
from the keystore.
iii. Enter the password of the keystore being imported.
c. Click Upload.
SAML (Authentication & Authorization)
1. Note that Message Protection is automatically selected as the only available certificate
category and cannot be deselected. Use this option to upload a keystore certificate with
SAML token support. Create, read, update, and delete (CRUD) operations are supported
with this type of certificate.
Chapter 3
Upload an SSL Certificate
3-16

2. Click Browse, then select the certificate file (
.cer
or
.crt
) to upload.
3. Click Upload.
PGP (Encryption & Decryption)
1. Select a certificate category. Pretty Good Privacy (PGP) provides cryptographic privacy
and authentication for communication. PGP is used for signing, encrypting, and decrypting
files. You can select the private key to use for encryption or decryption when configuring
the stage file action.
a. Private: Uses a private key of the target location to decrypt the file.
i. Click Browse, then select the PGP file to upload.
ii. Enter the PGP private key password.
b. Public: Uses a public key of the target location to encrypt the file.
i. Click Browse, then select the PGP file to upload.
ii. In the ASCII-Armor Encryption Format field, select Yes or No. Yes shows the
format of the encrypted message in ASCII armor. ASCII armor is a binary-to-
textual encoding converter. ASCII armor formats encrypted messaging in ASCII.
This enables messages to be sent in a standard messaging format. This selection
impacts the visibility of message content. No causes the message to be sent in
binary format.
iii. From the Cipher Algorithm list, select the algorithm to use. Symmetric-key
algorithms for cryptography use the same cryptographic keys for both encryption
of plain text and decryption of cipher text.
c. Click Upload.
Chapter 3
Upload an SSL Certificate
3-17

4
Add the REST Adapter Connection to an
Integration
When you drag the REST Adapter into the trigger or invoke area of an integration, the Adapter
Endpoint Configuration Wizard appears. This wizard guides you through the configuration of
the REST Adapter endpoint properties.
These topics describe the wizard pages that guide you through configuration of the REST
Adapter as a trigger or invoke in an integration.
Note:
• XML documents passed to a REST endpoint that support the application/XML
content type must comply with the XML schema specified during trigger
(inbound) REST Adapter configuration. When the REST Adapter invokes a target
endpoint, the application/XML response must comply with the XML schema
specified during invoke (outbound) REST Adapter response configuration.
• If the following integrations are imported from one environment to another
(having different host names), then editing the local (child) integration or editing
the REST Adapter in the Adapter Endpoint Configuration Wizard leads to major
changes in the mapper that may require remapping.
– Integrations in which a co-located (child) integration is invoked from a parent
integration. See Invoke a Co-located Integration from a Parent Integration.
– Integrations with a REST adapter using a Swagger-based connection.
Topics:
• Add the REST Adapter as a Trigger Connection
• Add the REST Adapter as an Invoke Connection
Add the REST Adapter as a Trigger Connection
When you drag the REST Adapter into the integration canvas as a trigger connection, the
Adapter Endpoint Configuration Wizard is invoked. Based on your selections in the wizard, the
following pages can be displayed.
Topics
• REST Adapter Trigger Basic Information Page
• REST Adapter Trigger Resource Configuration Page
• REST Adapter Trigger Request Parameters Page
• REST Adapter Trigger Request Page
• REST Adapter Trigger Request Header Page
4-1

• REST Adapter Trigger CORS Configuration Page
• REST Adapter Trigger Response Page
• REST Adapter Trigger Response Header Page
• REST Adapter Trigger Operations Page
• REST Adapter Trigger Operation Selection Page
• Summary Page
REST Adapter Trigger Resource Configuration Page
Enter the REST Adapter operation name, relative resource URI, and endpoint action. You can
also select to add query and template parameters or configure a request and/or response for
the endpoint.
Element Description
Provide an operation name
Enter an operation name.
What does this operation do?
Enter an optional description of the operation's
responsibilities.
What is the endpoint’s relative resource
URI?
Specify the relative path associated with the resource.
The path can contain template parameters specified
with curly braces (for example,
{order-id}
). A
resource is any source of specific information that can
be addressed. The resource path follows a fixed,
prefixed URL appended with the specified relative
path. By default, the URL is prefixed with the following
path:
https://instance_URL/ic/api/
integration/v1/flows/rest/
INTEGRATION_NAME/VERSION
For example, if the integration name is
ExposeFlowAsRESTResource
, the URL becomes:
https://instance_URL/ic/api/
integration/v1/flows/rest/
EXPOSEFLOWASRESTRESOURCE
You can override the URL, except for the fixed part at
the beginning:
instance_URL/ic
Chapter 4
Add the REST Adapter as a Trigger Connection
4-2

Element Description
What action do you want to perform on the
endpoint?
Select a single HTTP action (method) for the endpoint
to perform:
•
GET: Retrieves (reads) information (for example,
makes queries). If you select this option, you
cannot configure a request payload for this
endpoint.
•
PUT: Updates information.
•
POST: Creates information.
•
DELETE: Deletes information. If you select this
option, you cannot configure a request payload for
this endpoint.
PATCH: Partially updates existing resources ( for
example, when you only need to update one
attribute of the resource).
Note: The PATCH verb does not work with a non-
SSL REST service.
Select any options that you want to
configure
Select the options that you want to configure:
•
Add and review parameters for this endpoint:
Click to specify the query parameters and view
the template request parameters created as part
of the resource URI for this endpoint. If you select
this option and click Next, the Request
Parameters page is displayed.
•
Configure a request payload for this endpoint:
Click to configure the request payload for this
endpoint, including specifying the schema
location and payload type with which you want the
endpoint to reply. You can also select this option if
you want to include an attachment with the
inbound request. If you select this option and click
Next, the Request page is displayed.
•
Configure this endpoint to receive the
response: Click to configure the response
payload for this endpoint, including specifying the
schema location and payload type that you want
the endpoint to receive. If you select this option
and click Next, the Response page is displayed.
Configure Request Headers?
Select the type of request header to configure:
•
Standard: Select to configure standard HTTP
headers for the request message.
•
Custom: Select to configure custom HTTP
headers for the request message.
Configure Response Headers?
Select the type of response header to configure:
•
Standard: Select to configure standard HTTP
headers for the response message.
•
Custom: Select to configure custom HTTP
headers for the response message.
Configure CORS (Cross Origin Resource
Sharing)
(available only in the trigger (inbound) direction)
Select to configure CORS parameters for a trigger.
CORS enables restricted resources (for example,.
custom HTTP headers that introduce cross-site Java
scripting security issues) on a web page to be
requested from another domain outside of the domain
from which the resource originated.
Chapter 4
Add the REST Adapter as a Trigger Connection
4-3

REST Adapter Trigger Operations Page
Review or edit existing operations or add a new operation. Each operation represents a
different pick action branch in a single integration. The maximum number of operations
(branches) you can create in one integration is six. Each entry point can be configured with a
different resource URI and HTTP action/verb, as necessary. This feature eliminates the need to
create multiple integrations (each with a separate resource URI and verb) to perform different
operations. You can expose multiple entry points to a single orchestrated integration with a pick
action that uses the REST Adapter as the trigger connection.
See Receive Requests for Multiple Resources in a Single REST Adapter Trigger Connection of
Using Integrations in Oracle Integration Generation 2.
Element Description
Operation
Displays the operation name entered on the
Resource Configuration page.
Resource
Displays the endpoint relative resource URL
selected on the Resource Configuration page.
HTTP Method
Displays the action selected on the Resource
Configuration page.
Edit/Delete
Select to edit or delete an operation and its
endpoint relative resource URL and action.
Add another operation
Select to return to the Resource Configuration
page to add another operation name, endpoint
relative resource URL, and action.
REST Adapter Trigger Basic Information Page
Enter the REST Adapter user name and description. You can also select to configure multiple
resources or verbs.
Element Description
What do you want to call your endpoint?
Provide a meaningful name so that others can
understand the connection. For example, if you are
creating a source Oracle REST connection, you may
want to name it
ExposeFlowAsRESTResource
. You
can include English alphabetic characters, numbers,
underscores, and dashes in the name. You cannot
include the following:
• Blank spaces (for example,
My REST
Connection
)
• Special characters (for example,
#;83& or
res(t)4)
• Multibyte characters
What does this endpoint do?
Enter an optional description of the endpoint's
responsibilities (for example,
This inbound
endpoint exposes this integration flow as
a REST resource
).
Chapter 4
Add the REST Adapter as a Trigger Connection
4-4

Element Description
Select to configure multiple resources or
verbs (maximum 11)
Select to configure multiple operation entry points with
different resource URIs and HTTP actions/verbs, as
necessary. Each operation represents a different pick
action branch in a single orchestrated integration. The
maximum number of operations (branches) you can
create in one integration is eleven. This feature
eliminates the need to create multiple integrations
(each with a separate resource URI and verb) to
perform different operations.
REST Adapter Trigger Request Parameters Page
Enter the REST Adapter request parameters for this endpoint.
Element Description
Resource URI
Displays the endpoint relative resource URI entered
on the Basic Info page.
Specify Query Parameters
Specify query parameters for the REST endpoint.
Click the Add icon to display a row for entering the
parameter name and selecting its data type. For
example, specify
state
and select a data type of
string.
Click the Delete icon to delete a selected row.
Template Parameters
Displays the template parameters in the relative
resource URI. Template parameters are based on
details you specified on the Basic Info page and
cannot be edited.
Template parameters must be defined as part of a
path with curly braces around them. For example, the
URL
default/customers/{cust-id}/{ship-id
has
cust-id
and
ship-id
template parameters. You
can change the data type for the parameters.
Note:
• Any query and template parameters added or
configured are available for mapping in the
mapper and in the actions in orchestrated
integrations.
• Query and template parameter values added in
the URL specified on the Connection page do not
appear in the mapper. Instead, the template and
query parameters must be configured in the
Adapter Endpoint Configuration Wizard for those
parameters to appear in the mapper.
REST Adapter Trigger Request Page
Enter the REST Adapter request payload details for the endpoint.
Chapter 4
Add the REST Adapter as a Trigger Connection
4-5

Element Description
Select the multipart attachment
processing options
Configure the following options based on whether the request is
inbound or outbound.
For inbound (trigger) requests, select the multipart attachment
type to include. This option is only available if you selected the
POST action on the Basic Info page.
•
Request is multipart with payload: Select to send
multipart attachments as part of the request along with
JSON or XML content as the payload request.
•
Multipart request is of type multipart/form-data with
HTML form payload: Select for the REST endpoint to
accept to configure an HTML form. You must first select the
Request is multipart with payload option before you can
select this option. This selection assumes that the media
type is multipart/form-data.
Select the request payload format
Note:
• Ensure that the sample JSON or the uploaded XML
schema is representative of the actual runtime messages
exchanged with the endpoint. A mismatch in the structure
or type of runtime messages can result in errors.
• If you upload a schema file without a target namespace, a
surrogate namespace is added to the schema file that all
messages then use:
http://xmlns.oracle.com/cloud/adapter/nxsd/
surrogate
Select the request payload format to use. The request payload
body must be defined by the XSD element that defines the
structure of this representation.
•
XML Schema
•
JSON Sample: Select this option to use Swagger and
RAML files. JSON sample files of up to 100 KB in size are
supported.
Empty arrays in JSON sample files are not supported. For
information, see Empty Arrays Are Not Supported in
Sample JSON Files. You may need to process large JSON
sample files with special characters before using the
Adapter Endpoint Configuration Wizard. See Large Sample
JSON File Processing with Special Characters.
•
XML Sample (Single or No Namespace): Select this
option to use an XML document to generate the schema.
•
Binary: Use with payloads that are unstructured and inline
— for example,
application/octet-stream
. It
preserves the file contents, but requires the receiver to
determine file type, for example, from the filename
extension. The Internet media type for an arbitrary byte
stream is
application/octet-stream
.
Schema Location
Specify the schema file in either of the following ways:
•
Click Browse to select the request schema file to use.
•
Click <<inline>> to copy and paste the JSON payload or
URL into a text field. Click OK when complete.
Chapter 4
Add the REST Adapter as a Trigger Connection
4-6

Element Description
Element
Select the element that defines the payload structure. This field
is not displayed until you import the request payload file. Once
you browse for and select the schema or JSON sample file, the
schema is displayed automatically. It also displays a
combination box that selects the root element by default.
What is the media-type of the
Request Body? (Content-Type
Header)
•
XML: Displays the payload in XML format.
•
XML (text): Displays the payload in XML text format.
•
JSON: Displays the payload in JavaScript Object Notation
(JSON) format.
•
URL-encoded: Displays the payload in URL-encoded
format.
•
Other Media Type: Select to display the payload in another
format (for example,
application/oracle.cloud+json
).
You can only specify the media types that end with
+json
or
+xml
. The following media types are supported implicitly
and cannot be configured. At runtime, the request media
type is in the form of an
http Content-Type
header. The
expected response media type is specified through an
Accept
header. Any service can be accessed through
either of these media types.
– Application/XML
– Application/JSON
Select the multipart attachment type for the endpoint to receive.
This field is displayed if you selected the Request is multipart
with payload option in the Select the multipart attachment
processing options field.
•
multipart/mixed: Send an XML or JSON payload type with
an attachment. For example, send a PDF document for
review as a link in an email.
•
multipart/form-data: Send an XML or JSON payload type
with an attachment. For example, you create an HTML form
to upload and send an image. In the HTML form, the
method
is defined as
post
and the
enctype
(encoding
type) is defined as
multipart/form-data
. You can also
send the attachment alone without a payload when using
this attachment type.
REST Adapter Trigger Request Header Page
Enter the REST Adapter request header properties for this endpoint.
Note:
If you specify a custom header name that is the same as a standard header name,
an error occurs. Ensure that you specify unique names for your custom headers.
Specify the standard HTTP request headers to use.
Chapter 4
Add the REST Adapter as a Trigger Connection
4-7

Element Description
Add Standard Request Headers
Select the standard HTTP request header to use from the
default dropdown list.
•
Click the Add icon to add an additional row, then select the
standard HTTP request header to use from the dropdown
list. Standard headers available for selection include, but
are not limited to, the following:
– Accept: When sent by a client, the Accept header is
published to an integration. This header describes the
preferred format in which the client wants to accept the
request. This allows for the propagation of the header
sent by the client application to Oracle Integration.
– Connection: If a request is sent with the connection
header set, this value is propagated to the integration.
–
Content Length: The length of the content is
propagated to Oracle Integration, regardless of content
length. Post translation, this value may not match the
actual content.
–
Content-Type: This allows for the propagation of the
header sent by the client application to Oracle
Integration.
–
Origin: This header sent as part of the request to a
REST Adapter trigger is propagated to the integration.
•
Click the Delete icon to delete the row of a selected
standard HTTP request header.
Note:
HTTP Header Name
Perform the following tasks:
• From the list, select the header to use.
Specify the custom HTTP request headers to use.
Element Description
Add Custom Request Headers
Perform the following custom request header tasks:
•
Click the Add icon to add custom HTTP request headers
and optional descriptions.
•
Click the Delete icon to delete the selected custom HTTP
request headers.
Custom Header Name
Enter the custom header name.
Custom Header Description
Enter an optional description.
REST Adapter Trigger CORS Configuration Page
Enter the REST Adapter CORS configuration properties for this endpoint.
Chapter 4
Add the REST Adapter as a Trigger Connection
4-8

Element Description
Allowed Origins
Specify the allowable domains from which to make CORS
requests. Requests coming from these domains are accepted.
Enter an asterisk (
*
) for all domains to make the requests. Enter
comma-separated values for specific domains to make the
requests (for example,
http://localhost:8080
,
https://
myhost.example.com:7002
).
Allowed Methods
The allowed method displayed is based on your selection in the
What action does the endpoint perform? list on the Basic Info
page.
Requests are only accepted from the allowable domains that
perform the allowable actions (methods). You cannot configure
the method name listed in the CORS configuration.
REST Adapter Trigger Response Page
Enter the REST Adapter response payload details for the endpoint.
Element Description
Select the multipart attachment
processing options
Configure the following options based on whether the
request is inbound or outbound.
For inbound (trigger) responses, select the multipart
attachment type to include.
•
Response is multipart with payload: Select to receive
the response from the payload.
•
Multipart response is of type multipart/form-data
with HTML form payload: Select for the REST
endpoint to accept to configure an HTML form. You must
first select the Response is multipart with payload
option before you can select this option. This selection
assumes that the media type is multipart/form-data.
Chapter 4
Add the REST Adapter as a Trigger Connection
4-9

Element Description
Select the response payload format Note:
• Ensure that the sample JSON or the uploaded XML
schema is representative of the actual runtime
messages exchanged with the endpoint. A mismatch in
the structure or type of runtime messages can result in
errors.
• If you upload a schema file without a target namespace,
a surrogate namespace is added to the schema file that
all messages then use:
http://xmlns.oracle.com/cloud/adapter/
nxsd/surrogate
Select the response payload format to use. The response
payload body must be defined by the XSD element that
defines the structure of this representation.
•
XML Schema
•
JSON Sample: Select this option to use Swagger and
RAML files. JSON sample files of up to 100 KB in size
are supported.
Empty arrays in JSON sample files are not supported.
For information, see Empty Arrays Are Not Supported in
Sample JSON Files. You may need to process large
JSON sample files with special characters before using
the Adapter Endpoint Configuration Wizard. See Large
Sample JSON File Processing with Special Characters.
•
XML Sample (Single or No Namespace): Select this
option to use an XML document to generate the
schema.
•
Binary: Use with payloads that are unstructured and
inline — for example,
application/octet-stream
. It
preserves the file contents, but requires the receiver to
determine the file type, for example, from the filename
extension. The Internet media type for an arbitrary byte
stream is
application/octet-stream
.
Schema Location
Specify the schema file in either of the following ways:
•
Click Browse to select the response schema file to use.
•
Click <<inline>> to copy and paste the JSON payload
or URL into a text field. Click OK when complete.
Element
Select the element that defines the payload structure. This
field is not displayed until you import the response payload
file. Once you browse for and select the schema file, it
displays a combination box that selects the root element by
default.
Chapter 4
Add the REST Adapter as a Trigger Connection
4-10

Element Description
What is the media-type of Response
Body (Accept Header)
Select the payload type with which you want the endpoint to
reply.
•
XML: Displays the payload in XML format.
•
XML (text): Displays the payload in XML text.
•
JSON: Displays the payload in JavaScript Object
Notation (JSON) format.
•
Other Media Type: Select to display the payload in
another format (for example,
application/
oracle.cloud+json
). You can only specify media
types that end with
+json
or
+xml
. The following media
types are supported implicitly and cannot be configured.
At runtime, the request media type is in the form of an
http Content-Type
header. The expected response
media type is specified through an
Accept
header. Any
service can be accessed through either of these media
types.
– Application/XML
– Application/JSON
Select the multipart attachment type for the endpoint to
receive. This field is displayed if you selected the Response
is multipart with payload option in the Select the multipart
attachment processing options field.
•
multipart/mixed: Send an XML or JSON payload type
with an attachment. For example, send a PDF document
for review as a link in an email.
•
multipart/form-data: Send an XML or JSON payload
type with an attachment. For example, you create an
HTML form to upload and send an image. In the HTML
form, the
method
is defined as
post
and the
enctype
(encoding type) is defined as
multipart/form-data
.
REST Adapter Trigger Response Header Page
Enter the REST Adapter response header properties for this endpoint.
Note:
If you specify a custom header name that is the same as a standard header name,
an error occurs. Ensure that you specify unique names for your custom headers.
Specify the standard HTTP response headers to use.
Chapter 4
Add the REST Adapter as a Trigger Connection
4-11

Element Description
Add Standard Response Headers
Select the standard HTTP response header to use from the
default dropdown list.
•
Click the Add icon to add an additional row, then select the
standard HTTP response header to use from the dropdown
list. Standard headers available for selection include, but
are not limited to, the following:
– Content-Type: Enables you to assign the media type
of choice to the response content. The response
content type is not used for processing and is sent as
part of the response during postprocessing.
– Retry After: You can send this header as part of the
response back to the caller.
•
Click the Delete icon to delete the row of a selected
standard HTTP response header.
HTTP Header Name
Perform the following tasks:
• From the list, select the header to use.
Specify the custom HTTP response headers to use.
Element Description
Add Custom Response Headers
Perform the following custom response header tasks:
•
Click the Add icon to add custom HTTP response headers
and optional descriptions.
•
Click the Delete icon to delete the selected custom HTTP
response headers.
Custom Header Name
Enter the custom header name.
Custom Header Description
Enter an optional description.
REST Adapter Trigger Operation Selection Page
Enter the REST Adapter invoke operation selection parameters for this endpoint.
Element Description
Business Object
Select the business object (resource) to use in this
connection.
Operations
Select the operation (method) to perform on the
business object in this connection.
Chapter 4
Add the REST Adapter as a Trigger Connection
4-12

Summary Page
You can review the specified adapter configuration values on the Summary page.
Element Description
Summary
Displays a summary of the configuration values you defined on previous
pages of the wizard.
The information that is displayed can vary by adapter. For some
adapters, the selected business objects and operation name are
displayed. For adapters for which a generated XSD file is provided, click
the XSD link to view a read-only version of the file.
To return to a previous page to update any values, click the appropriate
tab in the left panel or click Back.
To cancel your configuration details, click Cancel.
Click generate a sample cURL to generate sample
cURL
syntax for the
configuration options that you have selected during REST Adapter
connection configuration, such as security policy, headers, parameters,
and so on.
Add the REST Adapter as an Invoke Connection
When you drag the REST Adapter into the integration canvas as an invoke connection, the
Adapter Endpoint Configuration Wizard is invoked. Based on your selections in the wizard, the
following pages can be displayed.
Topics:
• REST Adapter Invoke Basic Information Page
• REST Adapter Invoke Request Parameters Page
• REST Adapter Invoke Request Page
• REST Adapter Invoke Request Headers Page
• REST Adapter Invoke Response Page
• REST Adapter Invoke Response Header Page
• REST Adapter Invoke Operation Selection Page
• Summary Page
REST Adapter Invoke Basic Information Page
Enter the REST Adapter user name, description, relative resource URI, and endpoint action.
You can also select to add query and template parameters or configure a request and/or
response for the endpoint.
Chapter 4
Add the REST Adapter as an Invoke Connection
4-13

Element Description
What do you want to call your endpoint?
Provide a meaningful name so that others can
understand the connection. For example, if you are
creating a source Oracle REST connection, you may
want to name it
ExposeFlowAsRESTResource
. You
can include English alphabetic characters, numbers,
underscores, and dashes in the name. You cannot
include the following:
• Blank spaces (for example,
My REST
Connection
)
• Special characters (for example,
#;83& or
res(t)4)
• Multibyte characters
What does this endpoint do?
Enter an optional description of the connection’s
responsibilities (for example,
This inbound REST
connection exposes this integration flow
as a REST resource
).
What is the endpoint’s relative resource
URI?
Specify the relative path associated with the resource.
The path can contain template parameters specified
with curly braces (for example,
{order-id}
). A
resource is any source of specific information that can
be addressed. The resource path follows a fixed,
prefixed URL appended with the specified relative
path. By default, the URL is prefixed with the following
path:
http://host:port/integration/flowapi/
rest/INTEGRATION_NAME
For example, if the integration name is
ExposeFlowAsRESTResource
, the URL becomes:
http://host:port/integration/flowapi/
rest/EXPOSEFLOWASRESTRESOURCE
You can override the URL, except for the fixed part at
the beginning:
host:port/integrations
Chapter 4
Add the REST Adapter as an Invoke Connection
4-14

Element Description
What action do you want to perform on the
endpoint?
Select a single HTTP action (method) for the endpoint
to perform:
•
GET: Retrieves (reads) information (for example,
makes queries). If you select this option, you
cannot configure a request payload for this
endpoint.
•
PUT: Updates information.
•
POST: Creates information.
•
DELETE: Deletes information. If you select this
option, you cannot configure a request payload for
this endpoint.
PATCH: Partially updates existing resources ( for
example, when you only need to update one
attribute of the resource).
Note: The PATCH verb does not work with a non-
SSL REST service.
Select any options that you want to
configure
Select the options that you want to configure:
•
Add and review parameters for this endpoint:
Click to specify the query parameters and view
the template request parameters created as part
of the resource URI for this endpoint. If you select
this option and click Next, the Request
Parameters page is displayed.
•
Configure a request payload for this endpoint:
Click to configure the request payload for this
endpoint, including specifying the schema
location and payload type with which you want the
endpoint to reply. You can also select this option if
you want to include an attachment with the
inbound request. If you select this option and click
Next, the Request page is displayed.
•
Configure this endpoint to receive the
response: Click to configure the response
payload for this endpoint, including specifying the
schema location and payload type that you want
the endpoint to receive. If you select this option
and click Next, the Response page is displayed.
Configure Request Headers?
Select the type of request header to configure:
•
Standard: Select to configure standard HTTP
headers for the request message.
•
Custom: Select to configure custom HTTP
headers for the request message.
Configure Response Headers?
Select the type of response header to configure:
•
Standard: Select to configure standard HTTP
headers for the response message.
•
Custom: Select to configure custom HTTP
headers for the response message.
REST Adapter Invoke Request Parameters Page
Enter the REST Adapter request parameters for this endpoint.
Chapter 4
Add the REST Adapter as an Invoke Connection
4-15

Element Description
Resource URI
Displays the endpoint relative resource URI entered
on the Basic Info page.
HTTP Method
Displays the action to perform on the endpoint that
you selected on the Basic Info page.
Specify Query Parameters
Specify query parameters for the REST endpoint.
Click the Add icon to display a row for entering the
parameter name and selecting its data type. For
example, specify
state
and select a data type of
string.
Click the Delete icon to delete a selected row.
Template Parameters
Displays the template parameters in the relative
resource URI. Template parameters are based on
details you specified on the Basic Info page and
cannot be edited.
Template parameters must be defined as part of a
path with curly braces around them. For example, the
URL
default/customers/{cust-id}/{ship-id
has
cust-id
and
ship-id
template parameters. You
can change the data type for the parameters.
Note:
• Any query and template parameters added or
configured are available for mapping in the
mapper and in the actions in orchestrated
integrations.
• Query and template parameter values added in
the URL specified on the Connection page do not
appear in the mapper. Instead, the template and
query parameters must be configured in the
Adapter Endpoint Configuration Wizard for those
parameters to appear in the mapper.
REST Adapter Invoke Request Page
Enter the REST Adapter request payload details for the endpoint.
Element Description
Select the multipart attachment
processing options
•
Request is multipart with payload: Select to send
multipart attachments as part of the request along with
JSON or XML content as the payload request.
•
Multipart request is of type multipart/form-data with
HTML form payload: Select to send multipart attachments
as part of the request along with HTML form as the payload
request. You must first select the Response is multipart
with payload option before you can select this option. This
selection assumes that the media type is multipart/form-
data.
Chapter 4
Add the REST Adapter as an Invoke Connection
4-16

Element Description
Select the request payload format Note:
• Ensure that the sample JSON or the uploaded XML
schema is representative of the actual runtime messages
exchanged with the endpoint. A mismatch in the structure
or type of runtime messages can result in errors.
• If you upload a schema file without a target namespace, a
surrogate namespace is added to the schema file that all
messages then use:
http://xmlns.oracle.com/cloud/adapter/nxsd/
surrogate
Select the request payload format to use. The request payload
body must be defined by the XSD element that defines the
structure of this representation.
•
XML Schema
•
JSON Sample: Select this option to use Swagger and
RAML files. JSON sample files of up to 100 KB in size are
supported.
Empty arrays in JSON sample files are not supported. For
information, see Empty Arrays Are Not Supported in
Sample JSON Files. You may need to process large JSON
sample files with special characters before using the
Adapter Endpoint Configuration Wizard. See Large Sample
JSON File Processing with Special Characters.
•
XML Sample (Single or No Namespace): Select this
option to use an XML document to generate the schema.
•
Binary: Use with payloads that are unstructured and inline
— for example,
application/octet-stream
. It
preserves the file contents, but requires the receiver to
determine file type, for example, from the filename
extension. The Internet media type for an arbitrary byte
stream is
application/octet-stream
. A list of
commonly used types is shown in a dropdown list. You can
select a type from this list or provide a type not listed by
selecting Other Media Type and entering the type in the
text box.
Note: Binary payload support is only available when the
adapter is used as an invoke, not a trigger.
Schema Location
Specify the schema file in either of the following ways:
•
Click Browse to select the request schema file to use.
•
Click <<inline>> to copy and paste the JSON payload or
URL into a text field. Click OK when complete.
Element
Select the element that defines the payload structure. This field
is not displayed until you import the request payload file. Once
you browse for and select the schema or JSON sample file, the
schema is displayed automatically. It also displays a
combination box that selects the root element by default.
Chapter 4
Add the REST Adapter as an Invoke Connection
4-17

Element Description
What is the media-type of the
Request Body? (Content-Type
Header)
•
XML: Displays the payload in XML format.
•
XML (text): Displays the payload in XML text format.
•
JSON: Displays the payload in JavaScript Object Notation
(JSON) format.
•
URL-encoded: Displays the payload in URL-encoded
format.
•
Other Media Type: Select to display the payload in another
format (for example,
application/oracle.cloud+json
).
You can only specify the media types that end with
+json
or
+xml
. The following media types are supported implicitly
and cannot be configured. At runtime, the request media
type is in the form of an
http Content-Type
header. The
expected response media type is specified through an
Accept
header. Any service can be accessed through
either of these media types.
– Application/XML
– Application/JSON
Select the multipart attachment type for the endpoint to receive.
This field is displayed if you selected the Request is multipart
with payload option.
•
multipart/mixed: Send an XML or JSON payload type with
an attachment. For example, send a PDF document for
review as a link in an email.
•
multipart/form-data: Send an XML or JSON payload type
with an attachment. For example, you create an HTML form
to upload and send an image. In the HTML form, the
method
is defined as
post
and the
enctype
(encoding
type) is defined as
multipart/form-data
. You can also
send the attachment alone without a payload when using
this attachment type.
Send Query Parameter as form-data
in message body
Select if you want to pass URL-encoded form data in the
payload. The values are derived from the query parameters you
defined on the Request Parameters page. However, instead of
submitting the query parameters, they are sent as form data in
the message body with this option selected. This field is only
displayed if you made the following selections in the Adapter
Endpoint Configuration Wizard:
•
The POST verb was selected on the Basic Info page.
•
The Configure a request payload for this endpoint and
Add and review parameters for this endpoint options
were selected on the Basic Info page.
• Query parameters were specified on the Request
Parameters page.
REST Adapter Invoke Request Headers Page
Enter the REST Adapter request header properties for this endpoint.
Note:
If you specify a custom header name that is the same as a standard header name,
an error occurs. Ensure that you specify unique names for your custom headers.
Chapter 4
Add the REST Adapter as an Invoke Connection
4-18

Specify the standard HTTP request headers to use.
Element Description
Add Standard Request Headers
Select the standard HTTP request header to use from the
default dropdown list.
•
Click the Add icon to add an additional row, then select the
standard HTTP request header to use from the dropdown
list. Standard headers available for selection include, but
are not limited to, the following:
– Accept: Response processing occurs according to the
static contract defined at design time. The dynamic
value overrides the value sent to the endpoint. The
response returned must match the Accept header
configured at design time. The overridden header must
be a variation of the content length specified at design
time.
–
Authorization: The dynamic header value overrides
any authorization performed as part of the security
policy. Track any authorization failures to the given
header property.
–
Content Length: The REST Adapter always infers the
content length from the actual content length passed to
the target endpoint. If there is no content, but the target
endpoint expects the content-length header with a
value of
0
, then as with all request headers, you can
include the standard HTTP request header from the
Adapter Endpoint Configuration Wizard and assign it a
value of
0
in the mapper.
– Content-Type: The dynamic header is not passed to
the translation framework and translation continues
according to the static configuration at design time. At
runtime (post-message processing), the dynamic
header value is sent to the endpoint.
– Origin: You can set the origin request header as part
of the outgoing HTTP request.
•
Click the Delete icon to delete the row of a selected
standard HTTP request header.
HTTP Header Name
Perform the following tasks:
• From the list, select the header to use.
Specify the custom HTTP request headers to use.
Element Description
Add Custom Request Headers
Perform the following custom request header tasks:
•
Click the Add icon to add custom HTTP request headers
and optional descriptions.
•
Click the Delete icon to delete the selected custom HTTP
request headers.
Custom Header Name
Enter the custom header name.
Custom Header Description
Enter an optional description.
REST Adapter Invoke Response Page
Enter the REST Adapter response payload details for the endpoint.
Chapter 4
Add the REST Adapter as an Invoke Connection
4-19

Element Description
Resource URI
Displays the endpoint relative resource URI entered on the
Basic Info page.
HTTP Method
Displays the action to perform on the endpoint that you
selected on the Basic Info page.
Select the multipart attachment
processing options
Configure the following options based on whether the
request is inbound or outbound.
For inbound (trigger) responses, select the multipart
attachment type to include.
•
Response is multipart with payload: Select to receive
the response from the payload.
•
Multipart response is of type multipart/form-data
with HTML form payload: Select for the REST
endpoint to accept to configure an HTML form. You must
first select the Response is multipart with payload
option before you can select this option. This selection
assumes that the media type is multipart/form-data.
Select the response payload format Note:
• Ensure that the sample JSON or the uploaded XML
schema is representative of the actual runtime
messages exchanged with the endpoint. A mismatch in
the structure or type of runtime messages can result in
errors.
• If you upload a schema file without a target namespace,
a surrogate namespace is added to the schema file that
all messages then use:
http://xmlns.oracle.com/cloud/adapter/
nxsd/surrogate
Select the response payload format to use. The response
payload body must be defined by the XSD element that
defines the structure of this representation.
•
XML Schema
•
JSON Sample: Select this option to use Swagger and
RAML files. JSON sample files of up to 100 KB in size
are supported.
Empty arrays in JSON sample files are not supported.
For information, see Empty Arrays Are Not Supported in
Sample JSON Files. You may need to process large
JSON sample files with special characters before using
the Adapter Endpoint Configuration Wizard. See Large
Sample JSON File Processing with Special Characters.
•
XML Sample (Single or No Namespace): Select this
option to use an XML document to generate the
schema.
•
Binary: Use with payloads that are unstructured and
inline — for example,
application/octet-stream
. It
preserves the file contents, but requires the receiver to
determine the file type, for example, from the filename
extension. The Internet media type for an arbitrary byte
stream is
application/octet-stream
.
Schema Location
Specify the schema file in either of the following ways:
•
Click Browse to select the response schema file to use.
•
Click <<inline>> to copy and paste the JSON payload
or URL into a text field. Click OK when complete.
Chapter 4
Add the REST Adapter as an Invoke Connection
4-20

Element Description
Element
Select the element that defines the payload structure. This
field is not displayed until you import the response payload
file. Once you browse for and select the schema file, it
displays a combination box that selects the root element by
default.
What is the media-type of the
Response Body? (Accept Header)
Select the payload type with which you want the endpoint to
reply.
•
XML: Displays the payload in XML format.
•
XML (text): Displays the payload in XML text.
•
JSON: Displays the payload in JavaScript Object
Notation (JSON) format.
•
Other Media Type: Select to display the payload in
another format (for example,
application/
oracle.cloud+json
). You can only specify media
types that end with
+json
or
+xml
. The following media
types are supported implicitly and cannot be configured.
At runtime, the request media type is in the form of an
http Content-Type
header. The expected response
media type is specified through an
Accept
header. Any
service can be accessed through either of these media
types.
– Application/XML
– Application/JSON
Select the multipart attachment type for the endpoint to
receive. This field is displayed if you selected the Response
is multipart with payload option.
•
multipart/mixed: Send an XML or JSON payload type
with an attachment. For example, send a PDF document
for review as a link in an email.
•
multipart/form-data: Send an XML or JSON payload
type with an attachment. For example, you create an
HTML form to upload and send an image. In the HTML
form, the
method
is defined as
post
and the
enctype
(encoding type) is defined as
multipart/form-data
.
REST Adapter Invoke Response Header Page
Enter the REST Adapter response header properties for this endpoint.
Note:
If you specify a custom header name that is the same as a standard header name,
an error occurs. Ensure that you specify unique names for your custom headers.
Specify the standard HTTP response headers to use.
Chapter 4
Add the REST Adapter as an Invoke Connection
4-21

Element Description
Add Standard Response Headers
Select the standard HTTP response header to use from the
default dropdown list.
•
Click the Add icon to add an additional row, then select the
standard HTTP response header to use from the dropdown
list. Standard headers available for selection include, but
are not limited to, the following:
– Content Length: The content length of the response is
propagated to Oracle Integration (regardless of the
length). The response may have been translated and
the actual values may no longer match. This is the
response header corresponding to the original
message.
–
Content-Type: The response header is propagated
along with the response to the integration.
–
Retry-After: The response header sent by a target
endpoint is returned to the integration.
•
Click the Delete icon to delete the row of a selected
standard HTTP response header.
HTTP Header Name
Perform the following tasks:
• From the list, select the header to use.
Specify the custom HTTP response headers to use.
Element Description
Add Custom Response Headers
Perform the following custom response header tasks:
•
Click the Add icon to add custom HTTP response headers
and optional descriptions.
•
Click the Delete icon to delete the selected custom HTTP
response headers.
Custom Header Name
Enter the custom header name.
Custom Header Description
Enter an optional description.
REST Adapter Invoke Operation Selection Page
Enter the REST Adapter invoke operation selection parameters for this endpoint.
Element Description
Business Object
Select the business object (resource) to use in this
connection.
Operations
Select the operation (method) to perform on the
business object in this connection.
Chapter 4
Add the REST Adapter as an Invoke Connection
4-22

Summary Page
You can review the specified adapter configuration values on the Summary page.
Element Description
Summary
Displays a summary of the configuration values you defined on previous
pages of the wizard.
The information that is displayed can vary by adapter. For some
adapters, the selected business objects and operation name are
displayed. For adapters for which a generated XSD file is provided, click
the XSD link to view a read-only version of the file.
To return to a previous page to update any values, click the appropriate
tab in the left panel or click Back.
To cancel your configuration details, click Cancel.
Click generate a sample cURL to generate sample
cURL
syntax for the
configuration options that you have selected during REST Adapter
connection configuration, such as security policy, headers, parameters,
and so on.
Chapter 4
Add the REST Adapter as an Invoke Connection
4-23

5
Implement Common Patterns Using the REST
Adapter
You can use the REST Adapter to implement the following common patterns.
Topics:
• OAuth-Protected Patterns
• REST API Consumption Patterns
• JSON Content Patterns
• OpenAPI Document Patterns
• Best Practices for Invoking REST Endpoints
• Override the Endpoint URI/Host Name for an External REST API at Runtime
• Map to Construct the Payload for an External REST API that Accepts multipart/form-data
as the Content Type
• Implement an Integration to Send an Incoming Message with a Base64-Encoded String to
an External REST API that Accepts a Multipart Attachment
• Pass the Payload as URL-Encoded Form Data
• Implement an Integration to Send a PDF/CSV Document Downloaded from an SFTP
Server to an External REST API that Accepts Only application/octet-stream as the Content
Type
• Configure the REST Adapter to Expose an Integration as a REST API
• Enter q as a Standard HTTP Query Parameter with the Query as a Value
• Configure Oracle Integration to Call Oracle Cloud Infrastructure Functions with the REST
Adapter
• Configure a REST Adapter Trigger Connection to Work Asynchronously
• Create a Keystore File for a Two-Way, SSL-Based Integration
Note:
Oracle Integration offers a number of prebuilt integrations, known as recipes, that
provide you with a head start in building your integrations. You can start with a recipe,
and then customize it to fit your needs and requirements. Depending upon the
solution provided, a variety of adapters are configured in the prebuilt integrations.
See the Recipes and Accelerators page on the Oracle Help Center.
5-1

OAuth-Protected Patterns
You can use the REST Adapter to implement the following common patterns using OAuth
protection.
• Configure the REST Adapter to Consume a REST API Protected with OAuth Custom Two
Legged Token-Based Authentication
• Configure the REST Adapter to Consume a REST API Protected with OAuth Custom
Three Legged Flow Token-Based Authentication
• Configure the REST Adapter to Consume a REST API Protected with OAuth 1.0 One-
Legged Authentication
• Allow Client Applications to Consume an Integration Exposed as an OAuth-Protected
REST API
Configure the REST Adapter to Consume a REST API Protected with
OAuth Custom Two Legged Token-Based Authentication
This section provides an overview of the OAuth Custom Two Legged Flow security policy. This
policy is useful when the Basic Authentication security policy is not sufficient.
Most HTTP services typically use the OAuth authorization framework to protect their
resources. In accordance with the OAuth 2.0 specification, the OAuth 2.0 authorization
framework enables a third-party application to obtain limited access to an HTTP service, either
on behalf of a resource owner by orchestrating an approval interaction between the resource
owner and the HTTP service or by enabling the third-party application to obtain access on its
own behalf.
The REST Adapter enables you to integrate with any REST-enabled service including OAuth
services. To interact with an OAuth endpoint, you must create a one-time reusable connection
on the Connections page of Oracle Integration. Configure the connection with the base URI
and security configuration.
The following security policy options are available on the Connections page for the REST
Adapter.
Chapter 5
OAuth-Protected Patterns
5-2

Each option is applicable in a different context and is used to negotiate and obtain a valid
access token. Read your REST service provider documentation to identify the applicable
policy.
The following section describes a flexible OAuth security policy that can be used in OAuth
custom two legged flows called as an OAuth Custom Two Legged Flow.
OAuth 2.0 specification defines the following OAuth flows:
• OAuth Client Credentials
• OAuth Resource Owner Password Credentials
• OAuth Authorization Code Credentials
• OAuth Implicit Grant Authorization
The OAuth Client Credentials and OAuth Resource Owner Password Credentials options
are categorized as OAuth custom two legged flows because the client application directly
obtains access on its own without the resource owner’s intervention.
An HTTP request is typically sent to the authorization server passing the client application
credentials (note that these are different from the resource owner credentials and can be
obtained by registering the client application with the authorization server), the grant type and
scope, and other required properties. The authorization server responds to this request by
sending an access token, optionally with a token type, an expiry, and sometimes a refresh
token.
The following example describes a sample access token request with Twitter (a popular
microblogging site that supports OAuth2). For more information about Twitter developer
documentation, visit https://dev.twitter.com/oauth/application-only.
POST /oauth2/token HTTP/1.1
Host: api.twitter.com
Content-Type: application/x-www-form-urlencoded
Authorization: Basic a3NmM1yRnFweAx==
grant_type=client_credentials
According to the Twitter developer documentation, this request is required to obtain an access
token from Twitter. An HTTP basic authentication header is created by using the client ID and
client secret.
If the request is formatted correctly, the server responds with a JSON-encoded payload. This is
fairly straight forward.
{"token_type":"bearer","access_token":"AAAAAAAAAA"}
The following steps describe the OAuth Custom Two Legged Flow security policy and each
field in the context of this scenario.
Step 1: Configure the Access Token Request
Chapter 5
OAuth-Protected Patterns
5-3

The Access Token Request field is formed using the URI syntax of the HTTP request used to
fetch the access token. The URI syntax resembles
cURL
but is more basic and only supports
the following options.
Option Value Description Required
-X GET | PUT | POST
The HTTP verb in the
access token request.
Yes
-H -H “key: value”
Add each header key
value pair as described.
There can be multiple
headers.
No
-d -d ‘data-as-string’
String data enclosed
within single quotes.
Escape any quotes
within the data string.
No
URI Uri
(within quotes) - - Yes
Multiple
-d
options in the OAuth custom two legged flow security policy can be compressed
into a single
-d
as follows:
-d "grant_type=client_credentials&client_id=123"
Chapter 5
OAuth-Protected Patterns
5-4

Note:
• Other
curl
options are not supported.
• The easiest way to build this request is to use a free tool such as postman to
build and validate the HTTP request to obtain an access token and then use the
Generate Code Snippet/Code option to get
curl
syntax. Remove the
curl
from
the beginning to get the URI syntax. The following example shows URI syntax:
-X POST -H "Content-Type: application/x-www-form-urlencoded" -H
"Authorization:
Basic a3NmM0J6czJG==" -d 'grant_type=client_credentials'
https://api.twitter.com/oauth2/token
The URI syntax allows you to control the access token request. The following is a typical
access token response.
{
"access_token": "1-253912-240049694-f85c1d679211c",
"expires_in": 21599,
"token_type": "Bearer",
"refresh_token": "5707efdf04912f53b61cb5ec5dc7f166"
}
Step 2: Parse and Extract Tokens from Access Token Response
Note:
Skip this step if the access token response has properties as highlighted previously.
If the request is good, the authorization server returns an HTTP response with a success
status. The response contains the access token and may also contain several operational
details about the token such as the type of the token, its expiry, and refresh token as described
previously.
Chapter 5
OAuth-Protected Patterns
5-5

By default, the
$variables
are mapped to property names containing relevant tokens as
follows:
Property Name Default Mapping to a Property
with Name
Example Property Name
$access_token
access.[tT]oken access_token
$refresh_token
refresh.[tT]oken refresh_token
$expiry
expires_in expires_in
$token_type
token.?[tT]ype token_type
The default values match the sample response. Therefore, this step is not required and can be
skipped.
However, if the access token response is not standard, then you must define rules to fetch
tokens from the access token response.
For example, assume the access token response is as follows:
{ "access_token": "1-253912-240049694-f85c1d679211c", "expiry": 21599,
"token_type": "Bearer", "extended_token":
"5707efdf04912f53b61cb5ec5dc7f166" }
In this case, the authorization server returns a response, but chooses to specify the expiry and
the refresh token differently. This step is required to map these properties to the variables.
Chapter 5
OAuth-Protected Patterns
5-6

Variable Name Default Mapping to a Property
with Name
Example Property Name
$refresh_token
extended_token extended_token
$expiry
Expiry Expiry
Variables can be used in the configuration using the
${variable}
syntax once a value has
been assigned. For example,
$access_token
is assigned a value after an access token
request is made. The value of this variable may be useful while specifying the
access_token
usage or the
refresh_token_request
later.
Step 3: Access Token Usage (Important)
Access token usage describes how to pass the access token to access a resource. Enter this
information carefully because this usage governs how Oracle Integration passes the
negotiated access token to the endpoint.
The default value for this field is:
-H Authorization: ${token_type} ${access_token}
At runtime, the values of
${token_type}
and
${access_token}
are retrieved based on the
fetch rule and passed as an authorization header along with the endpoint request.
Chapter 5
OAuth-Protected Patterns
5-7

The literal value can also be used as follows:
-H API-Token: Bearer ${access_token}
Access Token Usage Description Example
-H Authorization: $
{token_type} $
{access_token}
The access token is passed as a
header at runtime for accessing
the protected resource.
-H Authorization: Bearer
AASDFADADX
?api_key=${access_token}
The access token is passed as a
query parameter at runtime for
accessing the protected resource.
http://someapi.com/
employee?api_key=ASDFADAX
Step 4: Refresh Token Request (Optional)
Some providers provide a mechanism to refresh a given access token. This sort of method is
generally part of a resource owner password credentials (ROPC) flow. However, there have
been instances where you also use this with client credentials even when the specification
says otherwise.
The refresh token request typically takes the refresh token and returns a new access token as
a response along with operational attributes such as the type of token, its expiry, and another
refresh token.
The refresh token request must also be specified in a syntax similar to the access token
request and prescribes to the same rules.
A sample refresh token request is as follows:
-X POST 'https://sample.com/oauth2/token?refresh_token=${refresh_token}
&client_id=[YOUR_CLEINT_ID]&client_secret=[YOUR_CLIENT_SECRET]&grant_type=refr
esh_token'
This request contains a variable that is replaced with the actual value of the current refresh
token at runtime.
See Configure Connection Security.
Configure the REST Adapter to Consume a REST API Protected with
OAuth Custom Three Legged Flow Token-Based Authentication
This section provides an overview of the OAuth Custom Three Legged Flow security policy.
The following steps are performed as part of a typical OAuth authorization code credentials
flow.
Chapter 5
OAuth-Protected Patterns
5-8

Ste
p
Description
1 The user specifies the authorization request URI. The user is redirected by the user agent
(browser) to the authorization URI.
2 The resource owner logs in to authenticate and provide consent to the client application to access
its resources.
3 The authorization server sends a callback request to the client application and sends the
authorization code.
4 The client application extracts the authorization code from the request and uses it to send another
request to the authorization server to get an access token.
5 The authorization server responds to the access token request by sending an access token to the
client application.
6 The client application uses the access token to make requests for protected resources.
This flow is defined in the OAuth specification. However, how to perform each step in the flow
is determined by the authorization server implementing the OAuth flow. There are several
variations to this flow.
• The OAuth provider expects that some query parameters are passed when the user is
redirected to the authorization URI.
• The provider calls the authorization code something else.
• The call for the access token should include the authorization code. However, some
providers may expect it as a header or a query parameter or maybe as part of the data.
Chapter 5
OAuth-Protected Patterns
5-9

• The access token response may also wary. Some providers may return a refresh token (for
example, call it extended_token or something else). Providers are known to return an
expiry, whereas some providers return a JWT token, where the expiry is embedded as a
claim within the token.
• Providers may also declare a custom token type.
• The call to refresh the access token may also vary from provider to provider.
• The call to access resources using the access token may also vary. Providers may expect
it to be a header or a query parameter. Some providers ask the token to be passed as an
authorization header. Few providers expect a custom header, and so on.
The REST Adapter provides a security policy called the OAuth Authorization Code
Credentials Flow. This policy provides a specific implementation of the OAuth as illustrated in
the OAuth specification. For all other cases, OAuth Custom Three Legged Flow can be used
to address these customizations.
Step 1: Configure the Authorization Request
Specify the authorization URI where the resource owner authenticates and provides consent in
the Authorization Request field. The client ID and scope are typically passed as query
parameters with the redirect URI from where the authorization server must send a callback and
the authentication code.
Chapter 5
OAuth-Protected Patterns
5-10

Oracle Integration has a fixed endpoint to receive this callback so you can specify the URI
directly or pass a reference
${refresh_token}
that is automatically resolved by the platform.
For example:
https://AUTH_URI?response_type=code&client_id=YOUR_CLIENT_ID &redirect_uri=$
{redirect_uri}&scope=app_scope
Step 2: Configure the Access Token Request
When the resource owner provides consent, the authorization server sends a callback to the
client application along with the authorization code. The next step is for the client application to
send a request for the access token using this authorization code.
If the authorization server returns the authorization code in a property named as anything but
code, you must map the property name with
$auth_code
.
The access token request is used to make a call for the access token. It is supposed to send
the authorization code that is not resolved until the flow is executed. Therefore, the
authorization code is passed by reference as
${auth_code}
in the request.
The rules for creating the access token request remain unchanged from the OAuth Custom
Two legged Flow option.
The Access Token Request value is formed using a URI syntax of the HTTP request used to
fetch the access token. The URI syntax resembles
cURL
, but it is more basic and only supports
the following options.
Option Value Description Required
-X GET | PUT | POST
The HTTP verb in the
access token request.
Yes
-H -H “key: value”
Add each header key
value pair as described.
There can be multiple
headers.
No
-d -d ‘data-as-string’
String data enclosed
within single quotes.
Escape any quotes
within the data string.
No
URI Uri
(within quotes) - - Yes
Multiple
-d
options in the OAuth Custom Three Legged Flow security policy can be
compressed into a single
-d
as follows:
-d "grant_type=client_credentials&client_id=123"
Chapter 5
OAuth-Protected Patterns
5-11

Note:
• Other
curl
options are not supported.
• The easiest way to build this request is to use a free tool such as POSTMAN to
build and validate the HTTP request to obtain an access token and then use the
Generate Code Snippet/Code option to get a
cURL
syntax. Remove the
curl
from
the beginning to get the URI syntax. The following example shows the URI
syntax:
-X POST -H "Content-Type: application/x-www-form-urlencoded" -d
'false' 'https://access_token_URI?code=$
{auth_code}&client_id=YOUR_CLIENT_ID&client_secret=YOUR_CLIENT_SECR
ET&redirect_uri=${redirect_uri}&grant_type=authorization_code'
Step 3: Optionally Configure the Refresh Token Request
Similar to an access token request, specify the refresh token request in URI syntax, if the
authorization server supports a refresh.
Step 4: Define the Fetch Rules for Intermediate Tokens
By default, the
$variables
are mapped to property names containing relevant tokens as
follows:
Property Name Default Mapping to a Property
with Name
Example Property Name
$auth_code
code code
$access_token
access.[tT]oken access_token
$refresh_token
refresh.[tT]oken refresh_token
$token_type
token.?[tT]ype token_type
$expiry
expires_in expires_in
This step is not required and can be skipped.
However, if the access token response is not standard, then you must define rules to fetch
tokens from the access token response.
Step 5: Define the Access Token Usage (Important)
Access token usage describes how to pass the access token to access a resource. Enter this
information carefully because this usage governs how Oracle Integration passes the
negotiated access token to the endpoint.
See Configure Connection Security.
Configure the REST Adapter to Consume a REST API Protected with
OAuth 1.0 One-Legged Authentication
This section provides an overview of the OAuth 1.0 One-Legged Authentication security policy
in the Connections page. This protocol enables web sites or applications (consumers) to
Chapter 5
OAuth-Protected Patterns
5-12

access protected resources from a web service (a service provider) through an API without
requiring you to disclose your service provider credentials to consumers.
Note:
No customization is required in this policy. This is a standard OAuth policy unlike
custom 2-legged and custom 3-legged OAuth policies.
You can use this security policy with service providers such as the following:
• Oracle NetSuite can expose restlets as REST APIs that are protected by OAuth 1.0 One-
Legged Authentication. For example:
https://rest.netsuite.com/app/site/hosting/restlet.nl?script=474&deploy=1
You must be a member of Oracle NetSuite to access this restlet.
This restlet returns a greeting in HTML.
• Twitter accounts can be protected by OAuth 1.0 One-Legged Authentication.
Configure the following fields on the Credentials dialog of the Connections page. These
credentials are provided by the service provider (Oracle NetSuite or Twitter).
Chapter 5
OAuth-Protected Patterns
5-13

• Consumer Key — Specify the key that identifies the client making the request.
• Consumer Secret — Specify the consumer secret that authorizes the client making the
request.
• Token — Specify the token that accesses the protected resource.
• Token Secret — Specify the token secret that generates the signature for the request.
• Realm — Specify the realm that identifies the account.
See Configure Connection Security.
Allow Client Applications to Consume an Integration Exposed as an OAuth-
Protected REST API
Integrations in Oracle Integration configured using the REST Adapter as a trigger are
automatically exposed as OAuth-protected REST resources. These integrations/resources can
be consumed using OAuth access tokens. To access an Oracle Integration endpoint using an
OAuth token, you must first acquire the token.
See Authenticate Requests for Invoking Oracle Integration Flows.
REST API Consumption Patterns
You can use the REST Adapter to implement the following common patterns to consume
REST APIs.
Topics:
• Configure the REST Adapter to Consume a REST API Protected with the API Key
• Configure the REST Adapter to Consume an External REST API Described Using a
Swagger Document
• Configure the REST Adapter to Consume an External REST API Described Using a RAML
Document
Chapter 5
REST API Consumption Patterns
5-14

• Configure the REST Adapter to Consume an External REST API with No Metadata
Described in a Document
• Configure a REST Adapter to Consume a REST API that Expects Custom HTTP Header
Properties
• Configure the REST Adapter to Consume an Amazon Web Services (AWS) REST API
Configure the REST Adapter to Consume a REST API Protected with the
API Key
This section provides an overview of the API Key-Based Authentication security policy. This
policy enables you to provide secure access to APIs. The resource owner generates an API
key for a given client application with the required authorization and then shares the generated
API key. The client application is then required to pass the API key with the request for
accessing protected resources.
The following steps are performed as part of the API key-based authentication flow.
Step Description
1 The resource owner authenticates and generates
an API key for the given client application.
2 The resource owner shares the generated API key
with the client application.
3 The client application makes a request for a
resource using the API key.
On the Connections page of the REST Adapter, you select API Key Based Authentication.
Chapter 5
REST API Consumption Patterns
5-15

In the API Key Usage field, you specify how the API key is passed with the request for
accessing a resource. Enter this information carefully since this usage governs how the
provided API key is passed to the endpoint. See Configure Connection Security for details.
At runtime, the API key is automatically passed to the endpoint while sending the request.
See Configure Connection Security.
Configure the REST Adapter to Consume an External REST API Described
Using a Swagger Document
Oracle Integration can seamlessly integrate with REST APIs described using Swagger. The
following example shows how to consume a Swagger-based REST API.
1. Create a REST Adapter connection by selecting Swagger Definition URL in the
Connection Type field and specifying the URL pointing to the Swagger definition in the
Connection URL field.
2. If the Swagger resource is protected, provide the necessary security configuration and test
and save the connection.
3. Design an integration using the REST Adapter as an invoke connection. When the
connection is used as an invoke, the REST Adapter automatically lists the operations and
resources from the Swagger definition.
4. Select the business object and the operation to invoke the object in the Adapter Endpoint
Configuration Wizard.
5. Complete the wizard and the mappings.
6. Activate and invoke the flow.
See Configure Connection Properties for Invoke Connections.
Configure the REST Adapter to Consume an External REST API Described
Using a RAML Document
Oracle Integration can seamlessly integrate with REST APIs described using RAML. The
following example shows how to consume a RAML-based REST API.
1. Create a REST Adapter connection by selecting RAML Definition URL in the Connection
Type field and specify the URL pointing to the RAML definition in Connection URL field.
2. If the resource is protected, provide the necessary security configuration and test and save
the connection.
3. Design an integration using the REST Adapter as an invoke connection. When the
connection is used as an invoke, the REST Adapter automatically lists the operations and
resources from the definition.
4. Select the business object and the operation to invoke the object in the Adapter Endpoint
Configuration Wizard.
5. Complete the wizard and the mappings.
6. Activate and invoke the flow.
See Configure Connection Properties for Invoke Connections.
Chapter 5
REST API Consumption Patterns
5-16

Configure the REST Adapter to Consume an External REST API with No
Metadata Described in a Document
Oracle Integration can integrate with REST APIs that do not publish any service description.
The following example shows how to integrate with these REST APIs. This example uses a
publicly available API that provides carbon intensity data for the United Kingdom.
Note:
The REST Adapter provides support for consuming REST APIs that are described
using the metadata catalog. However, because the metadata catalog as a standard is
not being actively maintained, you are advised to not use the metadata catalog
definition. Many applications have already moved their resource models to the
OpenAPI Specification, which is the preferred metadata description for describing
RESTful APIs. If the metadata catalog happens to be the only metadata definition,
you have the option of directly consuming the target REST API using the request
builder provided out of the box as part of the Adapter Endpoint Configuration Wizard.
The API is described at
https://carbon-intensity.github.io/api-definitions/
#intensity
. In this example, an integration is modeled to fetch carbon intensity data. Because
the API is not protected, no security configuration is required.
The endpoint URL to invoke can also be invoked using the following
CURL
command:
curl -X GET https://api.carbonintensity.org.uk/intensity/date -H 'Accept:
application/json'
The response is of the form:
{"data":[ {"from": "2018-01-20T12:00Z",
"to": "2018-01-20T12:30Z",
"intensity": {
"forecast": 266,
"actual": 263,
"index": "moderate"
}
}]
}
1. Configure a connection by selecting REST API Base URL in the Connection Type field
and providing the base URL of the service in the Connection URL field. See Configure
Connection Properties for Invoke Connections.
Test and save the connection. Generally speaking, the REST API base URL should be the
resource root of a REST API. In this example, the Connection URL field is configured as
https://api.carbonintensity.org.uk
.
The following steps describe how to configure the relative REST resource in the Adapter
Endpoint Configuration Wizard.
Chapter 5
REST API Consumption Patterns
5-17

2. Configure the REST Adapter as an invoke connection. Oracle Integration determines the
target endpoint URL by appending the relative resource URI to the base URL configured
during connection configuration.
3. Provide a relative resource URI of
/intensity/date
and select the HTTP verb to use
(GET for this example).
In this example, a request payload is not required. Therefore, the corresponding option is
not selected. The same applies for query and template parameters. However, since a
response is expected, the option corresponding to a response is selected. The Adapter
Endpoint Configuration Wizard determines the next page to show based on the options
selected on this page.
Because the options corresponding to request payload, request parameters (query and
template parameters), and request headers were not selected, the corresponding pages
are skipped.
4. Select the required payload format and provide a sample JSON, XML, or schema that
represents the payload.
Chapter 5
REST API Consumption Patterns
5-18

A JSON sample can also be provided using the <<<inline>>> option.
5. Complete the rest of the Adapter Endpoint Configuration Wizard.
6. Complete the mappings.
Chapter 5
REST API Consumption Patterns
5-19

Configure a REST Adapter to Consume a REST API that Expects Custom
HTTP Header Properties
The REST Adapter provides an easy and configurable way to consume an external HTTP
service. You can configure the HTTP verb, resource URI, query and template parameters,
HTTP headers, form parameters, body, and attachments that must be sent as part of the
request.
HTTP headers allow the client and the service to exchange additional information along with
the request or the response. The Internet Assigned Numbers Authority (IANA) maintains a
registry of standard or permanent HTTP request headers that are commonly used for
predefined reasons. Along with the standard headers, services can also define custom
proprietary headers for exchanging additional information.
Follow the steps mentioned below to invoke a REST service that expects a custom HTTP
request header.
Chapter 5
REST API Consumption Patterns
5-20

1. Create a connection with a REST Adapter invoke connection for the target service to
consume.
2. Drag the connection onto the integration canvas.
3. On the Basic Info page, provide the HTTP verb and the relative request URI.
4. Select Custom in the Configure Request Headers section.
The REST Adapter shows a page for you to configure the custom request headers.
5. Define the proprietary header name and provide a brief description of the header.
Upon completion, the REST Adapter exposes the custom header specified above as part
of the adapter request payload.
6. Assign this header a value using an assign action or the mapper. The assigned value is
sent as a custom HTTP header to the target service at runtime.
Configure the REST Adapter to Consume an Amazon Web Services (AWS)
REST API
You can configure the REST Adapter to consume an Amazon Web Services (AWS) REST API
by selecting the AWS Signature Version 4 security policy on the Connections page. AWS
provides a set of global compute, storage, database, analytics, application, and deployment
services for consumption.
1. On the Connections page for the REST Adapter, go to the Connection Properties
section. At a minimum, specify the following details.
2. From the Connection Type list, select REST API Base URL.
3. In the Connection URL field, specify the endpoint URL according to the service you want
to use. The REST Adapter exposes dynamic endpoint support. For example:
https://amazonaws.com
4. Go to the Security section.
5. From the Security Policy list, select AWS Signature Version 4.
6. Specify the following details.
Element Description
Access Key Enter the access key obtained when you created
your Amazon security credentials.
Secret Key Enter the secret key obtained when you created
your Amazon security credentials.
AWS Region Select the region in which the AWS server is
hosted.
Service Name Select the AWS service to which to connect.
Chapter 5
REST API Consumption Patterns
5-21

JSON Content Patterns
You can use the REST Adapter to implement the following common patterns with JSON
content.
Topics:
• Map JSON when the REST Adapter Request is Configured with multipart/form-data
• JSON to XML Special Character Conversion
• Send an Empty JSON Object
• Copy Element Names as Values in JSON
• Use JSON Objects With Single Elements Within an Array
Map JSON when the REST Adapter Request is Configured with multipart/
form-data
JSON can be mapped when the REST Adapter request is configured with multipart/form-data
(that is, when the Request is multipart with payload and Multipart request is of type
multipart/form-data with HTML form payload check boxes are selected on the Request
page).
You can send a JSON string as a parameter. The name of the parameter is
jsonInputParameters. The value of the parameter is the JSON string shown below. The value
should be mapped to the parameter node. In general, ParameterList contains a list of
parameters. Each parameter's name goes into parameter > name and its value goes into
parameter.
Chapter 5
JSON Content Patterns
5-22

JSON to XML Special Character Conversion
If the JSON payload has special characters that are not valid in XML, those characters are
replaced by a string when converted from JSON to XML.
For example, assume you have the following JSON payload:
{
"_id": {
"$oid": "52cdef7f4bab8bd67529c6f7"
}
}
You then select the JSON Sample payload format and <<inline>> to copy and paste the
payload into the text field in the Adapter Endpoint Configuration Wizard.
In the mapper, the field
$oid
is represented with a string value of
_0x646c72_oid
.
The list of special characters and their corresponding XML conversion strings are as follows:
Special Character Converted Value Represented in the Mapper
" " _0x737063_
"/" _0x736c68_
Chapter 5
JSON Content Patterns
5-23

Special Character Converted Value Represented in the Mapper
"\\" _0x626c68_
":" _0x636c6e_
";" _0x73636e_
"(" _0x6c7072_
")" _0x727072_
"&" _0x616d70_
"," _0x636d61_
"#" _0x706e64_
"?" _0x717374_
"<" _0x6c7374_
">" _0x677274_
"start" _0x737472_
"@" _0x617472_
"$" _0x646c72_
Chapter 5
JSON Content Patterns
5-24

Special Character Converted Value Represented in the Mapper
"{" _0x6c6362_
"}" _0x726362_
"%" _0x706572_
Send an Empty JSON Object
The REST Adapter can enforce the sending of an empty JSON object (
{}
) when needed with
the Enforce Empty JSON Object Payload property. Some providers have this requirement in
special cases, such as Concur. When enabled, this property inserts an empty JSON object.
This property is driven by Concur and Oracle Logistics and is disabled by default.
When set to true, the REST call inserts
{}
into the body regardless of the verb chosen. For
some third party APIs, this is a requirement for certain calls. By default, this property is not
enabled.
The following steps provide a high level overview of how to configure an empty JSON object.
1. Add a REST Adapter as an invoke connection in the integration canvas.
The Adapter Endpoint Configuration Wizard is displayed.
2. On the Basic Info page, select Configure a request payload for this endpoint.
3. On the Request page, select JSON Sample from the Select the request payload format
list, then specify
{}
as the empty JSON object in the <<<inline>>> link.
4. Open the mapper in front of the REST Adapter.
5. Set the Enforce Empty JSON Object Payload target element to true in the mapper. Use
the JavaScript function true(). You can enter this in the mapper without having to put
quotes around around it. This creates a boolean value of true.
Chapter 5
JSON Content Patterns
5-25

Chapter 5
JSON Content Patterns
5-26

Copy Element Names as Values in JSON
You can copy element names as values in JSON.
JSON Sample XSLT Mapping Explanation
• Input
{
"OutputCollection":
{
"Collection": [{
"ID": 1,
"NAME": "Name"
},{
"ID": 11,
"NAME":
"Name0"
}]
}
}
• Output
{
"items" : [ {
"name" : "ID",
"value" :
[ "1" ]
}, {
"name" : "NAME",
"value" :
[ "Name" ]
}, {
"name" : "ID",
"value" :
[ "11" ]
}, {
"name" : "NAME",
"value" :
[ "Name0" ]
} ]
}
<xsl:for-each select="/
nstrgmpr:execute/nstrgdfl:request-
wrapper/nstrgdfl:OutputCollection/
nstrgdfl:Collection/*">
<nstrgdfl:items>
<nstrgdfl:name>
<xsl:value-of select="name
()"/>
</nstrgdfl:name>
<nstrgdfl:value>
<xsl:value-of select="current
()"/>
</nstrgdfl:value>
</nstrgdfl:items>
</xsl:for-each>
Iterate over child
elements of a
required element.
Capture the
name and value
as required.
Chapter 5
JSON Content Patterns
5-27

Use JSON Objects With Single Elements Within an Array
You can use JSON objects with single elements within an array.
JSON Sample XSLT Mapping Explanation
{
"parameters": [
{
"closeAction":
"closeAction"
},
{
"closeReason":
"closeReason"
}
]
}
<execute>
<parameters>
<closeAction>closeAction</
closeAction>
</parameters>
<parameters>
<closeReason>closeReason</
closeReason>
</parameters>
</execute>
An array in JSON
is a repeating
element in XML.
An XML element
is an item in a
JSON object.
OpenAPI Document Patterns
You can use the REST Adapter to implement the following common patterns using OpenAPI
documents.
Topics:
• Publish REST-Based Integrations as OpenAPI Documents
• Consume and Publish OpenAPI Documents with Multipart/Mixed and Multipart/Form-Data
Publish REST-Based Integrations as OpenAPI Documents
You can publish an OpenAPI document describing an Oracle Integration REST endpoint and
consume the OpenAPI document using the REST Adapter. This section provides an overview
of the configuration steps.
1. Create a REST Adapter connection. The connection can use any security policy.
2. On the Integrations page, create an app driven orchestration integration.
3. Add the REST Adapter created in Step 1 as the trigger connection.
4. Design the integration.
5. On the Integrations page, activate the integration.
6. Hover your cursor over the row of the activated integration to display additional options.
7. Click
to show a message with details about running, testing, and tracking the integration.
8. Click the Metadata URL value.
Chapter 5
OpenAPI Document Patterns
5-28

This shows a message with a link to the Endpoint URL, Swagger, and OpenAPI
descriptions of the REST endpoint.
9. Click Open API to display the description for this endpoint, including the server to invoke,
the exposed resources, and security details.
10. To invoke the integration, import the document into a client such as postman.
11. Select an resource to invoke, and click Send. For this example, getEmployee is selected.
This matches the selection made on the Operation Selection page of the Adapter Endpoint
Configuration Wizard.
Consume and Publish OpenAPI Documents with Multipart/Mixed and
Multipart/Form-Data
You can consume and publish OpenAPI documents with multipart/mixed and multipart/form-
data in REST Adapter trigger connections. This section describes how to configure this type of
scenario in Oracle Integration.
• Consume an OpenAPI Document with Endpoints that Consume or Produce HTML Form
Data
• Consume an OpenAPI Document with Endpoints with a Multipart/mixed Content Type
• Consume an OpenAPI Document with Endpoints with multipart/form-data
Consume an OpenAPI Document with Endpoints that Consume or Produce HTML Form
Data
1. Create a REST Adapter connection and select the Trigger and Invoke role.
2. In the Connection Properties section, select OpenAPI 1.0/2.0/3.0 URL and specify the
connection URL.
3. Create an orchestration integration.
4. Add a REST Adapter trigger connection.
5. On the Resource Configuration page, select a POST action with Configure a request
payload for this endpoint and Configure this endpoint to receive the response.
6. On the Request page, select Request is multipart with payload and Multipart request
is of type multipart/form-data with HTML form payload.
7. On the Response page, select Request is multipart with payload and Multipart request
is of type multipart/form-data with HTML form payload.
8. Add a second REST Adapter as an invoke connection to call the OpenAPI endpoint.
9. On the Operation Selection page, select /formdata_html from the Resource list to call the
endpoint.
Chapter 5
OpenAPI Document Patterns
5-29

10. In the request mapper between the two REST Adapter connections, map the data sent to
the trigger connection to the outbound request in the invoke connection. The Parameter
List > Parameter > Name element for both the source and target includes the HTML form
data.
11. In the response mapper after the second REST Adapter connection, perform the same
mappings for the response from the outbound call.
12. Configure the business identifier to track the integration during runtime.
13. Save and activate the integration.
14. Invoke the integration and view the results.
Consume an OpenAPI Document with Endpoints with a Multipart/mixed Content Type
1. Create a REST Adapter connection and select the Trigger and Invoke role.
2. In the Connection Properties section, select OpenAPI 1.0/2.0/3.0 URL and specify the
connection URL.
3. Create an orchestration integration.
4. Add a REST Adapter trigger connection.
5. On the Resource Configuration page, select a POST action with Configure a request
payload for this endpoint and Configure this endpoint to receive the response.
6. On the Request page, select the following:
a. Select Request is multipart with payload.
b. Select JSON Sample in the dropdown and supply a valid JSON sample object.
c. Select multipart/mixed.
Chapter 5
OpenAPI Document Patterns
5-30
7. On the Response page, select the following:
a. Select Request is multipart with payload.
b. Select JSON Sample in the dropdown and supply a valid JSON sample object.
c. Select multipart/mixed.
8. Add a second REST Adapter as an invoke connection to call the OpenAPI endpoint.
9. On the Operation selection page, select /mixed_json from the Resource list to call the
endpoint.
10. In the request mapper between the two REST Adapter connections, map the data sent to
the trigger connection to the outbound request in the invoke connection. Contact
Disposition is set to a concrete value of "form-data". It must be form data for multipart
mixed to work. The Mixed Json Post Request and Multipart Mixed Data target node
represents the payload.
11. In the response mapper after the second REST Adapter connection, perform the same
mappings for the response from the outbound call.
12. Configure the business identifier to track the integration during runtime.
13. Save and activate the integration.
Chapter 5
OpenAPI Document Patterns
5-31

14. Invoke the integration and view the results.
Consume an OpenAPI Document with Endpoints with multipart/form-data
1. Create a REST Adapter connection and select the Trigger and Invoke role.
2. In the Connection Properties section, select OpenAPI 1.0/2.0/3.0 URL and specify the
connection URL.
3. Create an orchestration integration.
4. Add a REST Adapter trigger connection.
5. On the Resource Configuration page, select a POST action with Configure a request
payload for this endpoint and Configure this endpoint to receive the response.
6. On the Request page, select the following:
a. Select Request is multipart with payload.
b. Select JSON Sample in the dropdown and supply a valid JSON sample object.
c. Select multipart/form-data.
7. On the Response page, select the following:
a. Select Request is multipart with payload.
b. Select JSON Sample in the dropdown and supply a valid JSON sample object.
c. Select multipart/form-data.
8. Add a second REST Adapter as an invoke connection to call the OpenAPI endpoint.
9. On the Operation selection page, select /formdata_json from the Resource list to call the
endpoint.
10. In the request mapper between the two REST Adapter connections, map the data sent to
the trigger connection to the outbound request in the invoke connection. The Formdata
Json Post Request Multipart Form Data Data target node represents the payload.
11. In the response mapper after the second REST Adapter connection, perform the same
mappings for the response from the outbound call.
Chapter 5
OpenAPI Document Patterns
5-32

12. Configure the business identifier to track the integration during runtime.
13. Save and activate the integration.
14. Invoke the integration and view the results.
Best Practices for Invoking REST Endpoints
Follow these best practices for invoking REST endpoints with the REST Adapter.
• If you receive errors (for example,
401
,
429
, or
50x
errors) while invoking REST endpoints
with the REST Adapter, ensure that you employ instance retries.
• Client applications should cache the token while invoking OAuth-protected REST
endpoints.
Override the Endpoint URI/Host Name for an External REST API
at Runtime
You can design integrations in Oracle Integration in which you specify an endpoint URI at
runtime to invoke an external REST API. This feature is useful in situations in which the
endpoint of the external REST API is either not known at design time or a decision must be
made by the integration at run time to determine which one of the multiple REST services must
be invoked.
Perform the following steps to configure an integration to invoke a REST endpoint dynamically
using Oracle Integration.
The integration is typically designed with the REST Adapter as an invoke connection. The
connection has either the base URI or the absolute endpoint URI specified in a Swagger
document. In either case, the endpoint URI for the external API is derived at design time, and
is static.
In scenarios in which the endpoints are overridden at run time, it is assumed that the APIs
hosted on these endpoints comply with the interface defined for the API at design time.
1. Create and configure a REST Adapter as an invoke connection.
Chapter 5
Best Practices for Invoking REST Endpoints
5-33

During design time configuration, the interface for the external API is being specified
declaratively: the shape of the request and the response message (if any), the HTTP
method used, and the message exchange pattern (request, response, or one way).
2. In the Target section of the mapper, expand RestApi under ConnectivityProperties.
3. From the Source schema, provide a mapping for AbsoluteEndpointUri.
AbsoluteEndpointUri must be assigned the endpoint URI that has concrete values for the
path/template parameters and any query parameters with values. The REST Adapter
sends the request to the address stored in this property. Alternatively, you can also provide
a static mapping.
4. Activate and invoke the integration. The REST Adapter uses the runtime value provided by
this mapping to determine the REST endpoint to which to route this request.
5. Alternatively, in Step 4, you can map other siblings of AbsoluteEndpointUri. For a finer
control, you can also provide mappings for individual components of the URI by expanding
the URI.
• Scheme: Provide a mapping if you want to change only the scheme of the endpoint
URL. Supported values are HTTP and HTTPS only.
• Host: Provide a mapping if you want to change only the host portion of the endpoint
URL.
• Port: Provide a mapping if you want to change only the port of the endpoint URL.
• Query: Provide a mapping if you want to change only the query portion of the endpoint
URL. A query portion is the one that follows the ? character.
• Path: Provide a mapping if you want to change only the path portion of the endpoint
URL. A path is the part of a URI between the hostname and the ? character.
Map to Construct the Payload for an External REST API that
Accepts multipart/form-data as the Content Type
This section describes the data structures for different types of configurations made using the
REST Adapter or any application adapter exposing the REST API (used as a trigger
connection) or consuming the REST API (used as an invoke connection).
Chapter 5
Map to Construct the Payload for an External REST API that Accepts multipart/form-data as the Content Type
5-34

Categories
There are two categories of multipart request (and response):
• multipart/mixed or multipart/form-data configured with a JSON or XML sample
This category shows the attachments schema and payload schema. The payload schema
is derived based on the sample JSON/XML schema provided during Adapter Endpoint
Configuration Wizard configuration.
• multipart/form-data with HTML form payload
This is used when you select Multipart request is of type multipart/form-data with
HTML form payload on the Request page of the Adapter Endpoint Configuration Wizard
or when you select Multipart request is of type multipart/form-data with HTML form
payload on the Response page for a response. This configuration shows the attachments
schema and a generic schema with a ParameterList element. The ParameterList
element consists of an unbounded element parameter. Each parameter has a name
attribute. The value of the parameter is set directly to the parameter element. If there are
multiple parameters, the parameter element can be repeated in the mapper.
Attachments Schema
The attachments element has an unbounded attachment element. This provides support for
receiving (on the source) or sending (on the target) multiple attachments. Each attachment
element has attachmentReference and attachmentProperties.
The AttachmentReference element contains the location where the attachment has been
staged for access.
The AttachmentProperties element provides metadata about a single attachment. The
attachmentProperties element is used follows:
• The contentId property is used to set the Content-ID header of the body part. The
Content-ID header is used to set a unique ID for the body part.
• The contentType property is used to set the Content-Type header of the body part. For
example, if a PDF file is being sent, the contentType property should be application/pdf.
If the source is providing a multipart attachment, this is determined automatically. The
mapper can set/override these values.
• The transferEncoding property is used to set the Content-Transfer-Encoding header of
the body part. This header's value is a single token specifying the type of encoding, as
enumerated below. Formally:
Content-Transfer-Encoding := "BASE64" / "QUOTED-PRINTABLE" /
"8BIT" / "7BIT" /
"BINARY" / x-token
These values are not case sensitive. That is, Base64, BASE64, and bAsE64 are all
equivalent. An encoding type of 7BIT requires that the body is already in a seven-bit, mail-
ready representation. This is the default value; that is, Content-Transfer-Encoding: 7BIT
is assumed if the Content-Transfer-Encoding header field is not present. See https://
www.w3.org/Protocols/rfc1341/5_Content-Transfer-Encoding.html.
• The partName property is used to set the fileName of the body part. The attached file/
bodypart should be saved by a target system with this name.
• The contentDisposition property is used to set the Content-Disposition of the body part.
Chapter 5
Map to Construct the Payload for an External REST API that Accepts multipart/form-data as the Content Type
5-35

In a multipart/form-data body, the HTTP Content-Disposition is a header used on the
subpart (that is, attachment) of a multipart body to provide information about the field to
which it applies. The Content-Disposition header value is typically set to form-data. The
optional directive name and filename can be used. For example:
Content-Disposition: form-data
Content-Disposition: form-data; name="fieldName"
Content-Disposition: form-data; name="fieldName"; filename="filename.jpg"
and so on.
• The contentDescription property is used to set some descriptive information with a given
body part. For example, it may be useful to mark an image body as a picture of the
Space Shuttle Endeavor. Such text may be placed in the Content-Description header
field.
• The fileInputHtmlFieldName property lets you set the name of the part from which the
server needs to read the file. This is generally used when there is an HTML form to upload
the file. The file upload input field name is used as a body part name.
Scenario 1 - source and target both have multipart requests with JSON/XML payload
(Category A)
The following sample map focuses only on the mapping of attachmentReference to the
target. There is an assumption that only one attachment from the source is being mapped to
the target. The mapping of the payload (request-wrapper node) between the source and target
is not shown. You must do that.
Scenario 2 - source is multipart/mixed or multipart/form-data with JSON/XML payload
(Category A). Outbound request multipart/form-data with form fields (Category B)
The following map focuses on mapping the attributes in the HTML form. There should be as
many parameters in the parameterList as there are fields in the HTML form.
Note:
If the source is not multipart and the target must be multipart/form-data with form
fields, you must specify the value for the contentType and partName elements on
the target side.
Chapter 5
Map to Construct the Payload for an External REST API that Accepts multipart/form-data as the Content Type
5-36

The fileInputHtmlFieldName element is important to consider if the target endpoint expects
attachments under a specific body part name. The body part name should be specified here.
For example, in the following image, the target endpoint is expecting a PDF document under a
body part named file in the multipart/form-data request payload.
Scenario 3 - creating a reference from base64–encoded content
In this scenario, the source has a base64-encoded string and the target can be either one of
the three: multipart/mixed or multipart/form-data with JSON/XML payload, or multipart/form-
data with HTML form payload.
In the inbound payload, the content element is a base64-encoded string. This can be sent as
an attachment in the outbound request. The base64 string can be converted into a reference
using XSL function decodeBase64ToReference and the reference can be assigned to the
attachmentReference element as shown below. Since the inbound request is not multipart,
but the outbound must be multipart, you must set some multipart-specific properties in the
mapper for outbound. The contentType is set to image/png, partName is set to picture.png,
and fileInputHtmlFieldName is set to image. The assumption is that the target system is
configured to read from a body part having name="image" in its content disposition. This is
done with the fileInputHtmlFieldName element.
Note:
If the target is multipart/mixed or multipart/form-data using a JSON/XML payload, the
schema of the target also has the schema from JSON/XML, as shown in Scenario 1.
The approach for constructing the outbound request payload is the same.
Chapter 5
Map to Construct the Payload for an External REST API that Accepts multipart/form-data as the Content Type
5-37

Scenario 4 - source is an FTP file read operation (nonmultipart) and outbound is
multipart/mixed with a JSON or XML payload
Chapter 5
Map to Construct the Payload for an External REST API that Accepts multipart/form-data as the Content Type
5-38

Note:
• If both the source and target are multipart, then assigning only the
attachmentReference element from source to target is sufficient.
– This keeps the multipart properties for the target the same as the source.
– If you must make changes to the multipart properties for the target endpoint,
this can be done through the mapper for the target.
• If the source is not multipart, but the target must be multipart, contentType and
partName must be provided for the target through the mapper.
• The response mapper description is similar to the request mapper.
Implement an Integration to Send an Incoming Message with a
Base64-Encoded String to an External REST API that Accepts a
Multipart Attachment
In the inbound payload, the content element is a Base64–encoded string. This can be sent as
an attachment in an outbound request.
The Base64 string can be converted into a reference using XSL function
decodeBase64ToReference. The reference can be assigned to an attachmentReference
element as described in this section.
Since the inbound request is not multipart, but the outbound must be multipart, you must set
some multipart-specific properties in the mapper for the outbound direction.
In the mapper, the contentType element is set to image/png, partName is set to picture.png,
and fileInputHtmlFieldName is set to image.
In this scenario, the assumption is that the target system is configured to read from a body part
having name="image" in its content disposition. This is done through the
fileInputHtmlFieldName element.
Note:
If the target is multipart/mixed or multipart/form-data using a JSON/XML payload, the
schema of the target also has the schema from JSON/XML. The approach for
constructing the outbound request payload is the same.
Chapter 5
Implement an Integration to Send an Incoming Message with a Base64-Encoded String to an External REST API that Accepts a Multipart
Attachment
5-39

Pass the Payload as URL-Encoded Form Data
You can pass the payload as URL-encoded form data with the REST Adapter.
1. Add a REST Adapter as an invoke connection in an integration.
The Adapter Endpoint Configuration Wizard is displayed.
2. On the Basic Info page, make the following selections:
a. Select the POST verb.
b. Select the Add and review parameters for this endpoint and Configure a request
payload for this endpoint options.
Chapter 5
Pass the Payload as URL-Encoded Form Data
5-40

3. On the Request Parameters page, specify the query parameters and values to use.
4. On the Request page, scroll to the bottom and select the Send Query Parameter as form
data in message body checkbox. This enables the query parameters you defined on the
Request Parameters page to be sent as URL-encoded form data in the payload.
Implement an Integration to Send a PDF/CSV Document
Downloaded from an SFTP Server to an External REST API that
Accepts Only application/octet-stream as the Content Type
In an orchestrated integration, the FTP adapter is only supported as an invoke connection.
Implement this use case by selecting either an App Driven Orchestration or Scheduled
Orchestration integration on the Integration Style dialog.
The following example provides a high level overview on how to implement this use case as a
scheduled orchestration.
Chapter 5
Implement an Integration to Send a PDF/CSV Document Downloaded from an SFTP Server to an External REST API that Accepts Only
application/octet-stream as the Content Type
5-41

1. Configure an FTP Adapter with the List Files operation to list files from an SFTP server.
Chapter 5
Implement an Integration to Send a PDF/CSV Document Downloaded from an SFTP Server to an External REST API that Accepts Only
application/octet-stream as the Content Type
5-42

2. Configure a for-each action to iterate through the List Files operation response.
3. Configure a second FTP Adapter with the Read Files operation to read individual files
inside the loop.
4. Configure the FTP Adapter to not specify a structure of the file.
Chapter 5
Implement an Integration to Send a PDF/CSV Document Downloaded from an SFTP Server to an External REST API that Accepts Only
application/octet-stream as the Content Type
5-43

5. Configure a REST Adapter. The reference of the Read Files operation is handed over to
the outbound REST Adapter.
6. Configure the REST Adapter payload as application/octet-stream.
Chapter 5
Implement an Integration to Send a PDF/CSV Document Downloaded from an SFTP Server to an External REST API that Accepts Only
application/octet-stream as the Content Type
5-44

7. Configure the mapper to read individual files in the for-each loop.
8. Configure the mapper to send the read file to the outbound REST Adapter.
Configure the REST Adapter to Expose an Integration as a
REST API
Oracle Integration provides an easy way to expose an integration as a RESTFul service by
using the REST Adapter as a trigger.
1. Create and test a REST Adapter connection with a trigger as the role.
2. Create an integration.
3. Drag the REST Adapter connection as a trigger within the integration canvas.
Chapter 5
Configure the REST Adapter to Expose an Integration as a REST API
5-45

4. Follow the Adapter Endpoint Configuration Wizard to describe the shape of the RESTful
service.
The REST Adapter can be set up to accept a request on a specific URL path. This path
can have template and query parameters. You can also decide on the HTTP method, the
structure of the request payload, the request headers, and the CORS configuration.
Likewise, you can also specify the response payload and the response headers that must
be sent back to the client.
5. Upon activation, a RESTful service protected using OAuth and HTTP Basic Auth is
created.
A Swagger 2.0–compliant document is automatically produced for REST APIs exposed
using the REST Adapter. This document describes the metadata for the generated REST
APIs. Human-readable HTTP metadata is also produced for the REST endpoint.
Enter q as a Standard HTTP Query Parameter with the Query as
a Value
Many APIs have special handling for the
q
query parameter according to different schemes,
such as mongoDB query/SCIM/open search, and so on.
The REST Adapter treats
q
as a standard HTTP query parameter and treats the query
expression as a string value. For example:
•
https://host.example.com:7004/resource?q=AssetNumber=AP10001
•
GET /ccadmin/v1/products?q=orderLimit lt &maxLimit and startTime gt &startTime
•
https://mysite.example.com/services/rest/connect/v1.3/queryResults?
query=SELECT Contact from contract where contact.organization.name=&OrgName;
According to standard HTTP, the query parameter in this case is
q
and the value is
AssetNumber=AP1000
.
Therefore, you are required to pass the query expression as a value to the query parameter
with the name
q
.
Configure Oracle Integration to Call Oracle Cloud Infrastructure
Functions with the REST Adapter
The REST Adapter can integrate with Oracle Cloud Infrastructure services such as functions
and object storage. As an example, assume you need to convert an existing image in object
storage to a thumbnail format. You can design an integration in which a REST Adapter
connection takes an application/octet-stream for an image, saves it to Oracle Cloud
Infrastructure object storage, and sends the image to an Oracle Cloud Infrastructure function
that creates a thumbnail and saves it back to object storage.
The following steps provide a high-level overview of creating this type of integration.
1. Go to Developer Services > Functions in the Oracle Cloud Infrastructure Console, then
click an available Oracle Integration instance to view available functions.
2. In the Invoke endpoint column, view the function endpoint URL to invoke. For this
example, the function is named node-thumbnail. The node-thumbnail function generates
a thumbnail out of an image.
Chapter 5
Enter q as a Standard HTTP Query Parameter with the Query as a Value
5-46

3. Copy the URL. You use this URL to call the function from an integration.
4. Create an orchestrated integration that accepts an image and generates a thumbnail from
that image. When the integration is invoked, both the original image and the generated
thumbnail are uploaded to the object storage bucket in Oracle Cloud Infrastructure.
5. Configure the REST Adapter as an invoke connection in the integration.
a. On the Basic Info page, configure the REST Adapter invoke connection to handle
request and response payloads.
• Configure a request payload for this endpoint
• Configure this endpoint to receive the response
b. On the Request page, select application/octet-stream as the media type that you
want the endpoint to send (this is a binary input stream).
c. On the Response page, select application/octet-stream as the media type to which
you want the endpoint to reply (this is also a binary input stream).
6. Configure the mapper as follows:
a. Map the source attachmentReference element to the target streamReference for
thumbnail generation.
b. Configure the target AbsoluteEndpointURI element to call the node-thumbnail
function invoke endpoint URL copied in Step 3.
7. Design the remaining portions of the integration.
8. Activate and invoke the integration to call the function.
a. On the Integrations page, click
at the far right to show the endpoint URL.
b. Copy the endpoint URL to an application to invoke the integration, such as
Postman
.
9. Go to Storage > Buckets in the Oracle Cloud Infrastructure Console.
10. Click the object storage bucket instance.
11. Refresh the page and note that the original image (for this example, named
test_image_1.png) and the generated thumbnail (for this example, named thumbnail-
test_image_1.png) are now both displayed in the Objects table.
Chapter 5
Configure Oracle Integration to Call Oracle Cloud Infrastructure Functions with the REST Adapter
5-47

Configure a REST Adapter Trigger Connection to Work
Asynchronously
You can configure a trigger REST Adapter connection to work asynchronously in an
integration.
For example, assume you have the following use case:
• A parent scheduled integration that runs every three hours.
• A child integration that is executed many times (for example, 300) in a for-each action of
the parent integration.
To ensure that this use case runs efficiently, configure the child integration to run
asynchronously as follows:
1. Create an app driven orchestrated integration for the child integration.
2. Add a REST Adapter as a trigger connection in the integration.
The Adapter Endpoint Configuration Wizard appears.
3. On the Basic Info page of the wizard, ensure that you configure the page as follows. This
ensures that the integration runs asynchronously.
• From the What action do you want to perform on the endpoint list, select POST.
• From the Select any options that you want to configure list, do NOT select
Configure this endpoint to receive the response.
4. Complete configuration of the REST Adapter.
5. Design the remaining parts of the integration.
This design ensures that the child integration runs asynchronously.
Chapter 5
Configure a REST Adapter Trigger Connection to Work Asynchronously
5-48

Create a Keystore File for a Two-Way, SSL-Based Integration
If you need to create an integration that communicates with a two-way, SSL-enabled server,
you must create the keystore file required for establishing an Oracle Integration identity to
facilitate a two-way, SSL-based integration.
To create an integration that consumes external REST APIs hosted on the two-way, SSL-
enabled server, ensure that the server on which the external REST APIs are hosted is enabled
for two-way SSL support. Use Java version 1.8 or higher.
You can obtain the client certificate in a variety of ways. Select the method that is best for your
environment. For example, you can obtain the certificate directly from many certificate
authorities. The steps in this section describe how to generate a certificate signing request
(CSR) and have it signed by a well known certificate authority.
Note:
• This section describes how to configure Oracle Integration for use in outbound,
two-way SSL integrations. To use Oracle Integration in inbound, two-way SSL
integrations, you can use the Oracle Cloud Infrastructure API Gateway. The
Oracle Cloud Infrastructure API Gateway is integrated with the Oracle Cloud
Infrastructure certificates service. This approach enables you to deliver APIs
implemented with Oracle Integration that enforce client mTLS.
• Two-way SSL is not supported for calls to external services through the
connectivity agent. Two-way SSL requires direct connectivity from Oracle
Integration without the connectivity agent.
• The alias name to provide must match the name provided for the private key
entry in the JKS file.
See this blog and Adding mTLS support to API Deployments.
• Commonly Used Terms and Tools
• Commands to Create a Client Certificate with the keytool Utility
• Example: Create a Client Certificate with the keytool Utility
• Manage Certificates with openSSL
• Certificate Management - Two-Way SSL or mTLS
Commonly Used Terms and Tools
Term
Description
Secure socket layer (SSL) and Transport Layer
Security (TLS)
SSL and TLS, its successor, are protocols for
establishing authenticated and encrypted links
between networked computers.
Chapter 5
Create a Keystore File for a Two-Way, SSL-Based Integration
5-49

Term Description
Digital certificate A data file that holds the cryptographic key
provided to an organization or entity by a trusted
authority. A simple analogy is a driver’s license.
The license uniquely identifies the person to whom
it is issued. The license is issued by the DMV, a
trusted authority.
Certificate A public key and private key form a pair used to
encrypt and decrypt data. Public keys can be freely
given to anyone who needs to securely exchange
data. Private keys must never be shared and must
be stored securely. If private keys are listed or
compromised, the issuing certificate authority must
be notified so they can be added to the certificate
revocation list.
Certificate authority (or certification authority) An entity that issues digital certificates. A digital
certificate certifies the ownership of a public key by
the named subject of the certificate.
Certificate encoding/formats • Privacy Enhanced Mail (PEM): The full
specification of PEM is in RFC 7468. PEM is
the most commonly-used X509 certificate
format. It's a base64-encoded string enclosed
between:
-----BEGIN CERTIFICATE-----
and
-----END CERTIFICATE-----
• Distinguished Encoding Rules (DER): Binary
Format. Cannot be viewed in an editor.
• Public Key Cryptography Standards (PKCS):
These are a group of public key cryptography
standards devised and published by RSA
Security LLC. See https://
datatracker.ietf.org/wg/pkix/documents/.
TrustStore A password-protected repository for trust or public
certificates. The default location in Java
is
$JAVA_HOME/jre/lib/security/cacerts
. All
well known certificate authority root and
intermediate certificates are available in the JDK
truststore.
Keystore A password-protected repository to hold client or
private certificates. Since this store holds private
keys, it is imperative that the store resides in a
secure location.
Certificate chain A certificate chain is an ordered list of certificates
ending with the root certificate. For trust to be
established, the entire certificate chain is traversed.
Each certificate is validated by finding the public
key of the next issuing certificate authority or
intermediate certificate authority, until the root
certificate is reached. Certificate chains are usually
cached to validate the certificate locally.
The two most commonly used tools for SSL are the following:
Chapter 5
Create a Keystore File for a Two-Way, SSL-Based Integration
5-50

Tool Description
keytool
A JDK utility used to perform CRUD operations on
a truststore and keystore and to administer
certificates. All the commands require the
password that was used to create the store.
Consult your Java truststore documentation for the
default password.
openssl
This is a robust, commercial-grade, full-featured
toolkit for the TLS and SSL protocols. It is also a
general-purpose cryptography library.
Commands to Create a Client Certificate with the keytool Utility
Commonly used
keytool
commands are as follows.
Caution:
Replace the italicized variables in the commands below with values appropriate to
your environment.
Description Command
List the entire contents of the store
keytool -list -keystore
path_to_the_keystore
List the contents in the store for a specific alias
keytool -list -keystore
path_to_the_keystore -alias alias_name
View the contents of a certificate
keytool -printcert -v -file
name_of_the_file
Export a certificate from the store
keytool -export -alias alias_name -file
certificate_name -keystore
path_to_the_store
Import a new certificate into the store
keytool -import -trustcacerts -file
path_to_the_certificate -alias
alias_name -keystore path_to_the_store
To create a client certificate:
Caution:
Italicized variables indicate placeholder variables for which you must supply particular
values. If you copy the commands below, ensure that you replace the variables
shown in italics with values appropriate to your environment.
1. Go to the Java
bin
directory.
%JAVA_HOME%/jre/bin
Chapter 5
Create a Keystore File for a Two-Way, SSL-Based Integration
5-51

2. Enter the following command to create a JKS keystore to hold the certificates.
keytool -genkey -keyalg RSA -alias alias_name -keystore
identityKeystore.jks -storepass password_for_the_keystore -validity 360 -
keysize 2048
3. When prompted, change the values provided based on your company's security policy.
What is your first and last name?
[Unknown]: <FQDN>
What is the name of your organizational unit?
[Unknown]: Your_functional_org
What is the name of your organization?
[Unknown]: Company
What is the name of your City or Locality?
[Unknown]: City_name
What is the name of your State or Province?
[Unknown]: State_name
What is the two-letter country code for this unit?
[Unknown]: US
Is CN=<>, OU=<>, O=<>, L=Redwood Shores, ST=California, C=US correct?
[no]: yes
Enter key password for <oicclient>
(RETURN if same as keystore password):
4. Verify the existence of the JKS keystore file.
ls
5. Create a certificate that is ready to be signed.
keytool -certreq -alias alias_name -keystore name_of_keystore -storepass
password -storetype JKS -file name_of_csr_certificate.csr
6. List the JKS keystore and certificate files in the directory.
ls
7. Validate your CSR file at the following site.
https://ssltools.digicert.com/checker/views/csrCheck.jsp
8. Provide the
.csr
certificate file to a signing authority. A signed certificate and any root and
intermediate certificates are signed and returned by the authority. A self-signed certificate
can be used for testing, but is not allowed in a production environment.
9. If you have root and intermediate certificates, perform the following substeps. Otherwise,
go to Step 10.
Chapter 5
Create a Keystore File for a Two-Way, SSL-Based Integration
5-52

a. If you have a root certificate, enter the following command to import the signed root
certificate.
keytool -import -keystore keystore_name -file path_to_root_certificate -
alias root_alias_name
The following example is what you see when importing the DigiCert root certificate.
Enter keystore password:
Owner: CN=DigiCert Global Root CA, OU=www.digicert.com, O=DigiCert Inc,
C=US
Issuer: CN=DigiCert Global Root CA, OU=www.digicert.com, O=DigiCert
Inc, C=US
Serial number: 83be056904246b1a1756ac95991c74a
Valid from: Thu Nov 09 16:00:00 PST 2006 until: Sun Nov 09 16:00:00 PST
2031
Certificate fingerprints:
MD5: 79:E4:A9:84:0D:7D:3A:96:D7:C0:4F:E2:43:4C:89:2E
SHA1: A8:98:5D:3A:65:E5:E5:C4:B2:D7:D6:6D:40:C6:DD:2F:B1:9C:54:36
SHA256:
43:48:A0:E9:44:4C:78:CB:26:5E:05:8D:5E:89:44:B4:D8:4F:96:62:BD:26:DB:25:
7F:89:34:A4:43:C7:01:61
Signature algorithm name: SHA1withRSA
Version: 3Extensions:#1: ObjectId: 2.5.29.35 Criticality=false
AuthorityKeyIdentifier [
KeyIdentifier [
0000: 03 DE 50 35 56 D1 4C BB 66 F0 A3 E2 1B 1B C3
97 ..P5V.L.f.......
0010: B2 3D D1 55 .=.U
]
]#2: ObjectId: 2.5.29.19 Criticality=true
BasicConstraints:[
CA:true
PathLen:2147483647
]#3: ObjectId: 2.5.29.15 Criticality=true
KeyUsage [
DigitalSignature
Key_CertSign
Crl_Sign
]#4: ObjectId: 2.5.29.14 Criticality=false
SubjectKeyIdentifier [
KeyIdentifier [
0000: 03 DE 50 35 56 D1 4C BB 66 F0 A3 E2 1B 1B C3
97 ..P5V.L.f.......
0010: B2 3D D1 55 .=.U
]
]Trust this certificate? [no]: yes
Certificate was added to keystore
Chapter 5
Create a Keystore File for a Two-Way, SSL-Based Integration
5-53

b. If you have an intermediate certificate, enter the following command to import the
signed intermediate certificate.
keytool -import -keystore keystore_name -file
path_to_intermediate_certificate -alias intermediate_certificate_alias
Enter keystore password: replace_with_strong_password
Certificate was added to keystore
10. If you have only a single certificate, enter the following command to import the signed
certificate.
keytool -import -keystore keystore_name -file path_to_signed_certificate -
alias the_same_alias_used_to_create_the_keystore
Enter keystore password: replace_with_strong_password
Certificate was added to keystore
11. Check if all the certificates are in the store.
keytool -list -keystore
12. Export the public certifcate.
keytool -export -alias certificate_alias -keystore identity_keystore -file
your_public_certificate_filename
Enter keystore password: replace_with_strong_password
13. Export the public certificate to provide to the server.
keytool -export -alias certificate_alias -keystore identityKeystore.jks -
file your_public_certificate_filename
Enter keystore password:
Certificate stored in file your_public_certificate_filename
14. Import the new keystore into Oracle Integration as an X509 identity certificate.
15. List the entire contents of the store.
keytool -list -keystore path_to_the_keystore
Example: Create a Client Certificate with the keytool Utility
This section provides an example of how to create a client certificate. It uses actual file names.
Replace those names with values appropriate to your environment.
Chapter 5
Create a Keystore File for a Two-Way, SSL-Based Integration
5-54

1. Enter the following command to create a JKS keystore to hold the certificates.
keytool -genkey -keyalg RSA -alias oicclient -keystore
identityKeystore.jks -storepass replace_with_strong_password -validity 360
-keysize 2048
Where the following values are entered for this example:
•
-alias
is the
oicclient
keystore alias.
•
-keystore
is the
identityKeystore.jks
keystore file.
2. When prompted, change the values provided based on your company's security policy.
What is your first and last name?
[Unknown]: Joe Smith
What is the name of your organizational unit?
[Unknown]: Development
What is the name of your organization?
[Unknown]: GlobalChips
What is the name of your City or Locality?
[Unknown]: Redwood Shores
What is the name of your State or Province?
[Unknown]: California
What is the two-letter country code for this unit?
[Unknown]: US
Is CN=<>, OU=<>, O=<>, L=Redwood Shores, ST=California, C=US correct?
[no]: yes
Enter key password for oicclient
(RETURN if same as keystore password):
3. Verify the existence of the JKS keystore file.
ls
4. Create a certificate that is ready to be signed.
keytool -certreq -alias oicclient -keystore identityKeystore.jks -
storepass replace_with_strong_password -storetype JKS -file oicclient.csr
Where the following values are entered for this example:
•
-alias
is the
oicclient
keystore alias.
•
-keystore
is the
identityKeystore.jks
keystore file.
•
-file
is the
oicclient.csr
certificate file.
5. List the JKS keystore and certificate files in the directory.
ls
oicclient.csr identityKeystore.jks
Chapter 5
Create a Keystore File for a Two-Way, SSL-Based Integration
5-55

6. Validate your
.csr
certificate file at the following site.
https://ssltools.digicert.com/checker/views/csrCheck.jsp
7. Provide the
.csr
certificate file to a signing authority. The certificate and any root and
intermediate certificates are signed and returned by the authority. A self-signed certificate
can be used for testing, but is not allowed in a production environment.
8. If you have root and intermediate certificates, perform the following substeps. Otherwise,
go to Step 9.
a. If you have a root certificate, enter the following command to import the signed root
certificate.
keytool -import -keystore identityKeystore.jks -file
DigiCertGlobalRootCA.crt -alias DigiCertCARoot
Where the following values are entered for this example:
•
-keystore
is the
identityKeystore.jks
keystore file.
•
-file
is the
DigiCertGlobalRootCA.crt
signed root certificate file.
•
-alias
is the
DigiCertCARoot
alias.
Enter keystore password: replace_with_strong_password
Owner: CN=DigiCert Global Root CA, OU=www.digicert.com, O=DigiCert Inc,
C=US
Issuer: CN=DigiCert Global Root CA, OU=www.digicert.com, O=DigiCert
Inc, C=US
Serial number: 83be056904246b1a1756ac95991c74a
Valid from: Thu Nov 09 16:00:00 PST 2006 until: Sun Nov 09 16:00:00 PST
2031
Certificate fingerprints:
MD5: 79:E4:A9:84:0D:7D:3A:96:D7:C0:4F:E2:43:4C:89:2E
SHA1: A8:98:5D:3A:65:E5:E5:C4:B2:D7:D6:6D:40:C6:DD:2F:B1:9C:54:36
SHA256:
43:48:A0:E9:44:4C:78:CB:26:5E:05:8D:5E:89:44:B4:D8:4F:96:62:BD:26:DB:25:
7F:89:34:A4:43:C7:01:61
Signature algorithm name: SHA1withRSA
Version: 3Extensions:#1: ObjectId: 2.5.29.35 Criticality=false
AuthorityKeyIdentifier [
KeyIdentifier [
0000: 03 DE 50 35 56 D1 4C BB 66 F0 A3 E2 1B 1B C3
97 ..P5V.L.f.......
0010: B2 3D D1 55 .=.U
]
]#2: ObjectId: 2.5.29.19 Criticality=true
BasicConstraints:[
CA:true
PathLen:2147483647
]#3: ObjectId: 2.5.29.15 Criticality=true
KeyUsage [
DigitalSignature
Key_CertSign
Crl_Sign
Chapter 5
Create a Keystore File for a Two-Way, SSL-Based Integration
5-56

]#4: ObjectId: 2.5.29.14 Criticality=false
SubjectKeyIdentifier [
KeyIdentifier [
0000: 03 DE 50 35 56 D1 4C BB 66 F0 A3 E2 1B 1B C3
97 ..P5V.L.f.......
0010: B2 3D D1 55 .=.U
]
]Trust this certificate? [no]: yes
Certificate was added to keystore
b. If you have an intermediate certificate, enter the following command to import the
signed intermediate certificate.
keytool -import -keystore identityKeystore.jks -file
DigiCertGlobalInterCA.crt -alias DigiCertCAInter
Where the following values are entered for this example:
•
-keystore
is the
identityKeystore.jks
keystore file.
•
-file
is the
DigiCertGlobalInterCA.crt
signed intermediate certificate.
•
-alias
is the
DigiCertCAInter
alias.
Enter keystore password: replace_with_strong_password
Certificate was added to keystore
9. If you have only a single certificate, enter the following command to import the signed
certificate.
keytool -import -keystore identityKeystore.jks -file
my_company_signedcert.pem -alias oiclient
Where the following values are entered for this example:
•
-keystore
is the
identityKeystore.jks
keystore file.
•
-file
is the
my_company_signedcert.pem
signed certificate.
•
-alias
is the
oiclient
alias.
Enter keystore password: replace_with_strong_password
Certificate was added to keystore
10. Check if all the certificates are in the store.
keytool -list -keystore identityKeystore.jks
11. Export the public certificate corresponding to the private identity certificate.
keytool -export -alias oicclient -keystore identityKeystore.jks -file
my_company_signedcert.pem
Where the following values are entered for this example:
Chapter 5
Create a Keystore File for a Two-Way, SSL-Based Integration
5-57

•
-alias
is the
oicclient
keystore alias.
•
-keystore
is the
identityKeystore.jks
keystore file.
•
-file
is the
my_company_signedcert.pem
public certificate file.
Enter keystore password: replace_with_strong_password
Certificate stored in file my_company_signedcert.pem
12. Import the new keystore (
.jks
file) into Oracle Integration as an X509 identity certificate.
13. List the entire contents of the store.
keytool -list -keystore identityKeystore.jks
Manage Certificates with openSSL
Commonly used
openssl
commands are as follows:
Description Command
Check a certificate
openssl x509 -in certificate_name -text
-noout
Get all certificates from a server
openssl s_client -connect host:ssl_port
-showcerts
Convert a DER format certificate to PEM format
openssl x509 -inform der -in
path_to_DER_certificate -out
path_to_PEM_certificate
Convert a
.pfx
file to a JKS store
keytool -importkeystore -srckeystore
path_to_.pfx_file -srcstoretype pkcs12
-destkeystore path_to_the_jks_file -
deststoretype JKS -srcstorepass
pfx_passwd -deststorepass pfx_passwd
Convert a
.jks
file to PKCS12 format
keytool -importkeystore -srckeystore
path_to_.jks_file -destkeystore
full_path_to_.p12_file-srcstoretype JKS
- deststoretype PKCS12 -deststorepass
pkcs12_store_password
Extract a private key from a
.pfx
file
openssl pkcs12 -info -in
path_to_.pfx_file -nodes -nocerts -out
private_key_file_name
Extract a public certificate from a
.pfx
file
openssl pkcs12 -in path_to_.pfx_file -
out path_to_certificate_file -nokeys
Certificate Management - Two-Way SSL or mTLS
See Debugging SSL/TLS Connections.
To upload an identity certificate:
1. In the navigation pane, select Home > Settings > Certificates.
2. Click Upload.
3. Set the alias name to the alias listed in the keystore for the identity certificate. (Use
keytool -list
to see the contents of the keystore.)
4. Make sure the certificate category is set to Identity.
Chapter 5
Create a Keystore File for a Two-Way, SSL-Based Integration
5-58

5. Upload the client certificate file in JKS format.
6. Enter the keystore and key passwords used to create the JKS store. If there is a mismatch
in the passwords, Oracle Integration cannot access the identity certificates.
7. Create a new adapter connection (SOAP Adapter or REST Adapter connection) in Oracle
Integration.
8. On the Connections page, select the two-way SSL checkbox and associate the alias
required by the connection to use to complete the SSL connection. This alias must match
the value that was entered in the Upload Certificate dialog.
To test Mutual TLS authentication (mTLS):
1. Test access to the endpoint from the browser first. Import the client certificate in
.p12
format into the browser of choice.
2. Enter the endpoint in the browser bar and press Enter. A message is displayed asking you
to use the client certificate that was imported.
3. Follow the prompts in the message. If the certificate is valid, content is loaded in the
browser.
4. If the browser test was successful, test the REST/SOAP adapter connection in Oracle
Integration.
Chapter 5
Create a Keystore File for a Two-Way, SSL-Based Integration
5-59

6
Troubleshoot the REST Adapter
Review the following topics to learn about troubleshooting issues with the REST Adapter.
Topics:
• XML with an Empty Field for an Array Element Causes Malformed Badgerfish JSON
Output
• Access Token is Not Available Error Occurs When Using the OAuth Client Credentials
Security Policy
• Multipart Form-Data Endpoint Invocation Fails When Media Type is null
• Convert a Private Key from PKCS8 to RSA (PKCS1) Format for the OCI Signature Version
1 Security Policy
• HTTP Error Response for Pre-20.4.2 Connections is Not Compliant with the OpenAPI
Specification
• REST Services that Return Multiple Successful Responses
• Error Handling with the REST Adapter
• REST Service Invoked by the REST Adapter Returns a 401 Unauthorized Status
Response
• Configuration Limitation of Ten Pages in the Adapter Endpoint Configuration Wizard
• Keys with Null Values During JSON Transformation are Removed
• Large Sample JSON File Processing with Special Characters
• SSL Certification Troubleshooting Issues
• Fault and Response Pipeline Definitions in Basic Routing Integrations
• Empty Arrays Are Not Supported in Sample JSON Files
• Invoke Endpoint URI Must Match the Base URI + Resource URI in REST Adapter
• JD Edwards Form Service Invocation with the REST Adapter Causes APIInvocation Error
• REST Adapter Data is Only Saved When You Click Next
• Convert XML to a JSON Document
• Supported Special Characters in JSON Samples
• content-type is Missing for an Asynchronous Flow
• REST URLs Exceeding 8251 Characters Fail
• Send a "null" Value Instead of "" for Any Specific Key in JSON Through the REST Adapter
Additional integration troubleshooting information is provided. See Troubleshoot Oracle
Integration in Using Integrations in Oracle Integration Generation 2 and the Oracle Integration
Troubleshooting page on the Oracle Help Center.
6-1

XML with an Empty Field for an Array Element Causes
Malformed Badgerfish JSON Output
When configuring the request or response payload with XML schema in the Adapter Endpoint
Configuration Wizard and including an empty field for an array element, the Badgerfish JSON
output is malformed.
Actual Output:
{
"GetCustomerPartyMaster" : {
"DataArea" : {
"CustomerPartyMaster" : {
"TaxId" : [ {
"@schemeID" : "SID",
"@schemeVersionID" : 1,
"@schemeAgencyID" : "SAID",
"@typeCode" : "TC",
"$" <----SEE THIS IS SET INCORRECTLY
} ]
}
}
}
}
Expected Output:
{
"GetCustomerPartyMaster" : {
"DataArea" : {
"CustomerPartyMaster" : {
"TaxId" : [ {
"@schemeID" : "SID",
"@schemeVersionID" : 1,
"@schemeAgencyID" : "SAID",
"@typeCode" : "TC",
"$": null
} ]
}
}
}
}
Resolution: To receive the expected output, add the following annotation in the XSD file:
<xs:schema xmlns:nxsd="http://xmlns.oracle.com/pcbpel/nxsd"
nxsd:version="JSON" nxsd:enforceNullWhenEmpty="true">
Extract the schema from the WSDL and re-edit the Adapter Endpoint Configuration Wizard to
upload an XML schema in the Request or Response page of the Adapter Endpoint
Configuration Wizard to define the payload.
Chapter 6
XML with an Empty Field for an Array Element Causes Malformed Badgerfish JSON Output
6-2

Access Token is Not Available Error Occurs When Using the
OAuth Client Credentials Security Policy
Depending on the external REST service being invoked, you may receive an error similar to
Access token is not available
when using the OAuth Client Credentials security policy:
Access token is not available, Unexpected character, Expected space
separating root-level values ...
If this occurs, reconfigure the OAuth Client Credentials security policy as follows:
1. Go to the Connections page.
2. For the Client Authentication option of the OAuth Client Credentials security policy,
select Send client credentials in body instead of Send client credentials as basic auth
header.
Multipart Form-Data Endpoint Invocation Fails When Media Type
is null
Ensure that the attachment properties - attachment content type is mapped with an appropriate
value. The sample documentation for request mapping provides information.
See Map to Construct the Payload for an External REST API that Accepts multipart/form-data
as the Content Type.
Convert a Private Key from PKCS8 to RSA (PKCS1) Format for
the OCI Signature Version 1 Security Policy
Private keys downloaded from the Oracle Cloud Infrastructure Console are in PKCS8 format.
The OCI Signature Version 1 security policy available with the REST Adapter only supports
reading of the private key in RSA format (PKCS1 format).
If you receive the following error, you must convert the private key from PKCS8 to RSA
(PKCS1) format.
CASDK-0005: A connector specific exception was raised by the application.
java.lang.ClassCastException: org.bouncycastle.asn1.pkcs.PrivateKeyInfo
cannot be cast to org.bouncycastle.openssl.PEMKeyPair;
org.bouncycastle.asn1.pkcs.PrivateKeyInfo cannot be cast to
org.bouncycastle.openssl.PEMKeyPair
1. Convert the private key with the following command:
openssl rsa -in private_key_in_pkcs8_format.pem -out new_converted_file.pem
Chapter 6
Access Token is Not Available Error Occurs When Using the OAuth Client Credentials Security Policy
6-3

For example:
openssl rsa -in private_key_pkcs8.pem -out private_key_rsa.pem
An example of a PKCS8-formatted private key file:
-----BEGIN PRIVATE KEY-----
contents
-----END PRIVATE KEY-----
An example of an RSA (PKCS1)-formatted file after the conversion:
-----BEGIN RSA PRIVATE KEY-----
contents
-----END RSA PRIVATE KEY-----
HTTP Error Response for Pre-20.4.2 Connections is Not
Compliant with the OpenAPI Specification
The HTTP error response returned by integrations created prior to release 20.4.2 (November
2020 quarterly release) that include a REST Adapter-based trigger connection does not strictly
conform to the OpenAPI specification.
The error response returned has an
o:
prefixed to certain keys. For example:
{
"type" :
"http://www.w3.org/Protocols/rfc2616/rfc2616-sec10.html#sec10.5.1",
"title" : "Internal Server Error",
"detail" : "An internal error occurred while processing the request. Please
see the fault details for the nested error details.",
"o:errorCode" : "400",
"o:errorDetails" : [ {
"type" :
"http://www.w3.org/Protocols/rfc2616/rfc2616-sec10.html#sec10.4.5",
"instance" : "<![CDATA[{}.The HTTP 404, 404 Not Found, and 404 error
message
is a Hypertext Transfer Protocol (HTTP) standard response code, in computer
network communications, to indicate that the client was able to communicate
with a given server, but the server could not find the resource that was
requested.
Carefully re-examine the target endpoint that is being called. ]]>",
"title" : "Not Found",
"o:errorPath" : "<![CDATA[GET http://api.zippopotam.us/us/9021011
returned a response status of 404 Not Found]]>",
"o:errorCode" : "404"
} ]
}
Chapter 6
HTTP Error Response for Pre-20.4.2 Connections is Not Compliant with the OpenAPI Specification
6-4

With the November 2020 release (20.4.2), the HTTP error response format has been modified
for newly created integrations to be compliant with the OpenAPI specification. The
o:
previously prefixed to certain keys has been removed, as shown in the following message.
However, note that all existing, pre-20.4.2 integrations continue to have the same error
response shown above, even when those integrations are modified.
{
"type" :
"http://www.w3.org/Protocols/rfc2616/rfc2616-sec10.html#sec10.5.1",
"title" : "Internal Server Error",
"detail" : "An internal error occurred while processing the request. Please
see the fault details for the nested error details.",
"errorCode" : "404",
"errorDetails" : [ {
"type" :
"http://www.w3.org/Protocols/rfc2616/rfc2616-sec10.html#sec10.4.5",
"instance" : "<![CDATA[{}.The HTTP 404, 404 Not Found, and 404 error
message
is a Hypertext Transfer Protocol (HTTP) standard response code, in computer
network communications, to indicate that the client was able to communicate
with a given server, but the server could not find the resource that was
requested.
Carefully re-examine the target endpoint that is being called. ]]>",
"title" : "Not Found",
"errorPath" : "<![CDATA[GET http://api.zippopotam.us/us/9021011 returned a
response status of 404 Not Found]]>",
"errorCode" : "404"
} ]
}
REST Services that Return Multiple Successful Responses
The REST Adapter can be configured for only a single type of response. A service that returns
multiple responses, even with different HTTP success status codes, is not supported. All
except for the configured response type result in an
APIInvocationError
. You can catch the
resulting error using a scope action and a fault handler if the fault is not required in the
integration.
Error Handling with the REST Adapter
The REST Adapter uses the following strategy to handle errors in the invoke (outbound) and
trigger (inbound) directions.
Error Handling in the Invoke (Outbound) Direction
The REST Adapter in the invoke (outbound) direction returns a standard
APIInvocationError
for any HTTP response that it receives with an error code. In addition, it also produces an
APIInvocationError
if a processing error occurs within the REST Adapter while preparing the
request, calling the endpoint, or handling the response.
The format of the
APIInvocationError
in the mapper is as follows.
Chapter 6
REST Services that Return Multiple Successful Responses
6-5

The
errorDetails
section contains the actual cause.
You can handle the
APIInvocationError
with a fault handler in the orchestrated integration.
Error Handling in the Trigger (Inbound) Direction
The REST Adapter in the trigger (inbound) direction exposes an HTTP endpoint that HTTP
clients can request for using an HTTP request, and returns an HTTP response.
If successful, the REST Adapter returns a success response. The REST Adapter returns an
error response with an HTTP status belonging to the error family of codes depending on the
situation. The following table describes the possible cause and the REST Adapter response.
Chapter 6
Error Handling with the REST Adapter
6-6

Condition HTTP Status Details
Invalid client request
4xx
There are several conditions that
can cause client side failures,
including:
• An invalid resource URL
• Incorrect query parameters
• An unsupported method type
• An unsupported media type
• Bad data
Downstream processing errors
5xx
All other errors that can occur
within the integration, including:
• An invalid target
• An HTTP error response
• General processing errors
In addition, the REST Adapter also returns an error response with additional details about the
error and possible steps for troubleshooting. The standard error response format is returned
according to the configured response media type. The following is a sample JSON response
structure:
{
"type" : "http://www.w3.org/Protocols/rfc2616/rfc2616-sec10.html#sec10.5.1",
"title" : "Internal Server Error",
"detail" : "An internal error occurred while processing the request. Please
see the fault details for the nested error details.",
"o:errorCode" : "500",
"o:errorDetails" : [ {
"type" : "http://www.w3.org/Protocols/rfc2616/rfc2616-
sec10.html#sec10.4.1",
"instance" : "{\n \"error_message\" : \"Invalid request. Missing the
'origin' parameter.\",\n \"routes\" : [],\n
\"status\" : \"INVALID_REQUEST\"\n}\n",
"title" : "Bad Request",
"o:errorPath" : "GET http://maps.googleapis.com/maps/api/directions/json?
destination=Montreal returned a response status of
400 Bad Request",
"o:errorCode" : "APIInvocationError"
} ]
}
The
o:errorDetails
section is reserved for the actual cause. The prefix
o:
included is based
on Oracle standards.
The top portion is used to add any integration-specific details to the fault. This is typically not
necessary, but if you want to control the HTTP status, title, and details, set these values
appropriately. If not entered, sufficient default values are provided by the REST Adapter.
Note:
The REST Adapter returns the downstream errors with a
500 Internal server
error
code. You can override these errors and provide a custom error code by assigning an
appropriate value to APIInvocationError/errorCode in the target mapper.
Chapter 6
Error Handling with the REST Adapter
6-7
The suggested mappings to map faults raised by an outbound system to the trigger (inbound)
REST Adapter are as follows:
The top section is left out in this mapping and these are appropriately assigned by the REST
Adapter in the previously described sample.
Unmapped faults are propagated as system faults by Oracle Integration to the inbound REST
Adapter. They may not communicate the appropriate details. Therefore, it is recommended
that you define the fault pipelines.
REST Service Invoked by the REST Adapter Returns a 401
Unauthorized Status Response
If a REST service invoked using the REST Adapter consistently returns a response status of
401 Unauthorized
, it may be because the application credentials configured on the
Connections page are no longer valid.
The Connections page does not validate the credentials. Even if the test connection is
successful, it may not be sufficient because the test connection only validates the parameters
defined on the Connections page.
Because the parameters defined on the Connections page are used to call the target endpoint
REST API, which is configured as part of endpoint configuration, it is strongly recommended
that you test the endpoint configuration that uses this connection.
Configuration Limitation of Ten Pages in the Adapter Endpoint
Configuration Wizard
Note the following issue with the REST Adapter multiple resources per endpoint use case in
the Adapter Endpoint Configuration Wizard.
Chapter 6
REST Service Invoked by the REST Adapter Returns a 401 Unauthorized Status Response
6-8

Symptom Workaround Reason
A refresh issue may occur when
configuring multiple verbs and
resources for the REST Adapter
as a trigger connection in the
Adapter Endpoint Configuration
Wizard.
If the wizard does not refresh
while configuring multiple
operations, click Back to return to
a previous page and then press
Next to refresh to the current
page.
The REST Adapter multiple
sources per endpoint use case
requires multiple iterations over
the same sets of pages. This is
currently a technical restriction.
Keys with Null Values During JSON Transformation are
Removed
The REST Adapter removes keys with null values during JSON transformation.
For example, if the following JSON payload is sent to the REST Adapter:
{
"input" : "input",
"val" : null,
"response": "response"
}
Oracle Integration sends the outbound request with the following JSON output.
{
"input" : "input",
"response": "response"
}
If you need the key available at the outbound service, use the following payload:
{
"input" : "input",
"val" : "",
"response": "response"
}
Large Sample JSON File Processing with Special Characters
The sample JSON file is typically large when it has repeating structures. You can purge such
repetitions because the sample only needs to represent the structure and not the instance
document. However, if the JSON file is unusually large and cannot be trimmed, perform the
following the steps:
1. Replace all occurrences of special characters (for example,
$
) with their corresponding
codes in the sample JSON file. See JSON to XML Special Character Conversion.
2. Use the modified JSON file to complete the configuration.
3. Select the generated schema in the Adapter Endpoint Configuration Wizard.
Chapter 6
Keys with Null Values During JSON Transformation are Removed
6-9

At runtime, incoming instances of JSON documents with keys having special characters are
normalized to suitable XML element names and XML documents having these elements when
serialized are converted to JSON documents with special characters restored in the key
names.
SSL Certification Troubleshooting Issues
For SSL certificate errors, perform the following tasks.
Topics
• Go to the Settings > Certificates tab and upload the server certificate.
• For exception errors that occur when configuring a connection with OAuth Client
Credentials or OAuth Resource Owner Password Credentials:
Carefully review the OAuth documentation and use the Custom Two-Legged security
policy.
• For exception errors that occur when configuring a connection with OAuth Authorization:
Carefully review the OAuth documentation and use the Custom Three-Legged Security
Policy.
Fault and Response Pipeline Definitions in Basic Routing
Integrations
You can define REST Adapter fault and response pipelines in Basic Routing integrations.
The REST Adapter on the trigger (inbound) side exposes an HTTP endpoint that HTTP clients
can request for using an HTTP request, and returns an HTTP response.
If successful, the REST Adapter returns a success response. The REST Adapter returns an
error response with an HTTP status belonging to the error family of codes depending on the
situation. This table describes the possible cause and the REST Adapter response.
Condition HTTP Status Details
Invalid client request
4xx
There are several conditions that
can cause client side failures,
including:
• Invalid resource URL
• Incorrect query parameters
• Unsupported method type
• Unsupported media type
• Bad data
Downstream processing errors
5xx
All other errors that can occur
within the integration, including:
• Invalid target
• HTTP error response
• General processing errors.
In addition, the REST Adapter also returns an error response with additional details about the
error and possible steps for troubleshooting. The standard error response format is returned
Chapter 6
SSL Certification Troubleshooting Issues
6-10

according to the configured response media type. The following is a sample JSON response
structure:
{
"type" : "http://www.w3.org/Protocols/rfc2616/rfc2616-sec10.html#sec10.5.1",
"title" : "Internal Server Error",
"detail" : "An internal error occurred while processing the request. Please
see the fault details for the nested error details.",
"o:errorCode" : "500",
"o:errorDetails" : [ {
"type" : "http://www.w3.org/Protocols/rfc2616/rfc2616-
sec10.html#sec10.4.1",
"instance" : "{\n \"error_message\" : \"Invalid request. Missing the
'origin' parameter.\",\n \"routes\" : [],\n
\"status\" : \"INVALID_REQUEST\"\n}\n",
"title" : "Bad Request",
"o:errorPath" : "GET http://maps.googleapis.com/maps/api/directions/json?
destination=Montreal returned a response status of
400 Bad Request",
"o:errorCode" : "APIInvocationError"
} ]
}
The
errorDetails
section is reserved for the actual cause. You must configure the fault
pipelines to map the target faults into this element. The top portion is used to add any
integration-specific details to the fault. This is typically not necessary, but if you want to control
the HTTP status, title, and details, then set these values appropriately. If not entered, sufficient
default values are provided by the adapter.
The suggested mappings to map faults raised by an outbound system to the trigger (inbound)
REST Adapter are as follows:
The top section is left out in this mapping and so these are appropriately assigned by the
adapter in the previously described sample.
Unmapped faults are propagated as system faults by Oracle Integration to the inbound
adapter. They may not communicate the appropriate details. Therefore, it is recommended that
you define the fault pipelines.
Chapter 6
Fault and Response Pipeline Definitions in Basic Routing Integrations
6-11

Note:
Fault pipelines are only available with Basic Map Data integrations.
Empty Arrays Are Not Supported in Sample JSON Files
When configuring the REST Adapter, if a JSON property in the included JSON sample file has
an empty array, you receive the following error message. Note the last part of the message.
Modify the JSON sample file to include a value for the JSON property.
Invoke Endpoint URI Must Match the Base URI + Resource URI
in REST Adapter
While designing the REST Adapter in the Adapter Endpoint Configuration Wizard, carefully
review the contents on the Summary page. The endpoint URI must match the invoke service
URI. If you do not see the necessary values, review your invoke connection and the outbound
service. The base URI in the connection and resource URI in the invoke service must add up
to the endpoint URI.
JD Edwards Form Service Invocation with the REST Adapter
Causes APIInvocation Error
You can receive the following error in the
icsServer-diagnostic.log
file when invoking JD
Edwards Form Service from an integration in which a REST Adapter is configured as the
invoke connection.
[2016-06-07T02:13:54.346-07:00] [icsServer] [ERROR] []
[oracle.osb.transports.jca] [tid: [ACTIVE].ExecuteThread: '14'
for queue: 'weblogic.kernel.Default (self-tuning)'] [userId: <anonymous>]
Chapter 6
Empty Arrays Are Not Supported in Sample JSON Files
6-12

[ecid: f23c428c-9247-459c-bb9f-22cbadbeda35-0003651d,0] [APP: Service Bus JCA
Transport Provider] [oracle.soa.tracking.FlowId: 59] [FlowId:
0000LKe8vtD7MAW5Hzw0yf1NGeIK00001c] Error sending bytes to socket:
<genericRestFault><errorCode>500</errorCode><errorPath><![CDATA[POST
http://den60208jems.my_domain.com:9516/jderest/formservice returned a
response status of 500 Internal Server Error]]></errorPath><instance><!
[CDATA[{[[
"message" : "Can not deserialize instance of java.util.ArrayList out of
START_OBJECT token\n at [Source: java.io.StringReader@68f2c85d; line: 1,
column:
218] (through reference chain:
com.oracle.e1.jdemf.FormRequest[\"formInputs\"])", "exception" :
"com.fasterxml.jackson.databind.JsonMappingException",
"timeStamp" : "2016-06-07:03.13.54" }]]></instance></genericRestFault>
]]
This error occurs because the REST Adapter has only one array element. JSON documents
containing arrays in the REST Adapter require at least two array elements for the adapter to
generate a valid XML schema. For example:
"formInputs": [ "input1" ]
cannot be handled as an array unless another cell is added in the sample JSON:
"formInputs": [ "input1", "input2" ]
REST Adapter Data is Only Saved When You Click Next
When configuring the REST Adapter in the Adapter Endpoint Configuration Wizard, you must
click Next to save your changes and move to the next page of the wizard. For example, if you
configure details on the Request page, click the tab of the Basic Info page in the left pane, then
click Next to return to the Request page, none of your previous configurations were saved, and
the page is empty.
Convert XML to a JSON Document
You can convert XML to a JSON document. Oracle Integration resolves an XML element with a
number value to XML schema with a type of number, which converts the XML to a JSON
document with a type of number.
For example:
• XML:
<Phone>23249480</Phone>
• Generated XSD:
<element name="phone" type="integer"/>
Chapter 6
REST Adapter Data is Only Saved When You Click Next
6-13

• JSON:
"Phone": 23249480
The workaround is to use a string value for the phone number in the sample XML. The XML
schema generated has a type of string. At runtime, the XML to JSON conversion produces the
desired JSON. For example:
• XML:
<Phone>a23249480</Phone> <!-- modified -->
• Generated XSD:
<element name="phone" type="string"/>
At runtime:
• XML
<Phone>23249480</Phone>
• JSON
"Phone": "23249480"
Supported Special Characters in JSON Samples
The following special characters are supported in JSON samples.
• " " (blank space)
• /
• \\
• ;
• (
• )
• &
• ,
• #
• ?
• <
• >
content-type is Missing for an Asynchronous Flow
The
content-type
is missing for an asynchronous flow.
Assume you create the following integration:
Chapter 6
Supported Special Characters in JSON Samples
6-14

1. Configure a REST Adapter connection with another Oracle Integration REST endpoint.
2. Configure a trigger REST Adapter and an invoke REST Adapter with an asynchronous
flow.
3. Activate and invoke the integration.
The
content-type
is missing.
The
content-type
is ideally not required when the
content-length
is
0
, but
content-type
text/plain
is added as the default
content-type
by some layers. Both are correct and
permissible.
REST URLs Exceeding 8251 Characters Fail
The upper limit of characters that work in REST URLs in integrations with the REST Adapter is
8251. If you exceed this limit, a
414 Request-URI Too Large
error occurs.
Send a "null" Value Instead of "" for Any Specific Key in JSON
Through the REST Adapter
If you want to send a
"null"
value instead of
""
for any specific key in JSON through the
REST Adapter, you must map
"xsi:nil=true"
through the mapper for that specific key.
Chapter 6
REST URLs Exceeding 8251 Characters Fail
6-15

7
REST Adapter Samples
You can use the REST Adapter in end-to-end scenarios such as the following:
Topics:
• Build an Integration that Exposes the REST API Using the REST Adapter
Build an Integration that Exposes the REST API Using the REST
Adapter
The REST Adapter can be used in scenarios such as integrating with Twitter. Twitter provides
several REST endpoints for accessing resources. This use case describes how to access a
protected resource from Twitter using the Basic Authentication security policy.
Obtain the Twitter Credentials
1. Obtain the necessary Twitter connection details from the Twitter developer page at https://
dev.twitter.com. These keys are required for configuring the Twitter Adapter on the
Connections page. See Using the Twitter Adapter with Oracle Integration Generation 2 for
specific details.
• Consumer key
• Consumer secret
• Access token
• Access token secret
Configure the Twitter Adapter
1. In the Credentials dialog on the Connections page of Oracle Integration, complete the
following fields with the information obtained from Twitter. Note that the Custom Security
Policy security policy is displayed by default, and cannot be deselected.
• In the Consumer Key field, enter the consumer key.
• In the Consumer Secret field, enter the consumer secret.
• In the Access Token field, enter the access token.
• In the Access Secret field, enter the access token secret.
Configure the REST Adapter
1. In the Connections page of Oracle Integration, complete the following fields.
• In the Connection Properties dialog, select REST API Base URL and specify the
connection URL.
• In the Credentials dialog, select Basic Authentication as the security policy and
specify the applicable user name and password.
7-1

Create an Integration
1. Drag a REST Adapter to the trigger side, and configure it as follows:
• Specify the following parameters on the Basic Info page:
– Select the POST action.
– Select Configure a request payload for this endpoint.
– Select Configure this endpoint to receive the response.
• Specify the request schema on the Request page.
• Specify the response schema on the Response page.
2. Drag a Twitter Adapter to the invoke side, and configure it as follows:
• Select the Tweet operation.
3. In the request mapper, configure the appropriate source to target mapping.
4. In the response mapper, configure the appropriate source to target mapping.
When complete, the integration looks as follows.
Invoke the Integration
1. Invoke the integration from a browser:
https://host:port/integration/flowapi/rest/TWEET/v01/tweet?status=Hi
Twitter from ICS
This posts the request status to Twitter.
2. Log in to the Twitter account.
3. Note the request message and the response message.
Chapter 7
Build an Integration that Exposes the REST API Using the REST Adapter
7-2
