
E-mailing a large amount of recipients
DO NOT use the “TO” or “CC” field!
If you have a large list of recipients you need to send an email you, you should never try sending
one large email with all of the recipients listed in the “TO” and/or “CC” field. First of all, the
message will likely not be delivered to everyone. Even if the message makes it past our local
header size limit, every mail server you are attempting to send it to has it’s own header size limit
and can reject your message for exceeding this limit. There are other reasons you would not
want to send it that way as well. For instance, by including everyone you are sending the
message to, you are displaying that publicly to everyone on the list. Anyone who received the
message can easy perform a reply-all and send an unwanted message to everyone. This usually
begins when someone replies-all and says “Remove me from your list”. It won’t be long before
you get someone emailing the entire list saying “You didn’t have to email that request to all of
us”, etc... Basically, it could create a large amont of unwanted email for everyone involved. So
what are your options?
DO use the “BCC” field!
The first option is to include your list of recipients in the BCC field. This prevents the header size
from getting too large and also prevents people from purposely or accidentally replying-to-all.
The problem with this method is the recipient does not see their email address in the TO
header. This could make them feel like your message is total spam and also basically notifies
them that you are emailing a lot of people the same exact email. This could seem
unprofessional. So if you want an individual email sent to each recipient and for the recipient’s
email address to appear on the TO line, or if you want each email to include personalized data
such as the person’s first name, last name, or any other data you include in your data source,
then a mail merge is for you. It can be tricky to execute the first time you try, but it’s really not
that difficult at all and hopefully the guide below will help make the process very easy for you.
DO use the Microsoft Word E-Mail Merge feature!
1. Before you begin in Microsoft Word, be sure you have a good data source [typically a Microsoft
Excel file] with all of the recipient info you will need. This includes the email addresses and any
other personalized info you will want to reference within the email. You should be sure to
include a column description header in the first row, as pictured below, this is the row that says
LastName, FirstName, and Email. Note that the order of the columns does not matter. The
column description header should be a good description of what is in that column. For common
fields, Microsoft Word will be able to auto-match these fields for you. Be sure to save this
Microsoft Excel file and remember its save location. Other important info before you go further:
It is recommended that you open Microsoft Outlook at this point if you don’t already have it
open. Also, if you have access to an additional mailbox and wish to send the message from the
additional mailbox instead of from your own, you will need to log off your computer and log in
as the account you wish to send the message from. Even if you have the additional mailbox
open inside Microsoft Outlook underneath your own mailbox folders, the message will come
from your account unless you log off, log in as the additional account, and open the additional

account’s mailbox in Microsoft Outlook directly.
2. Open Microsoft Word. Click on the “Mailings” tab. Click on “Start Mail Merge”. Click on “E-mail
Messages”.

3. Click on “Select Recipients”. Click on “Use Existing List”.
4. Browse to the location where you saved your Data Source Excel File and click it and then click
“Open”.
5. If it was an Excel file with multiple sheets, it will ask you which sheet includes the data you wish
to use. If you are not sure and it shows 3 sheets named Sheet1, Sheet2, and Sheet3, know that
by default a new Microsoft Excel file starts with 3 sheets and Sheet1 is in the default view, so if
you are not sure, choose Sheet 1. To be 100% sure, open the file in Microsoft Excel and then
look at the bottom left corner of your Workbook to see which Worksheet is highlighted and in
the current view. This will show you the name of the Sheet you need to choose. In the mail
merge dialog, click on the Worksheet you wish to choose. As step 1 above mentioned, you
should include column header descriptions and if you did, make sure “First row of data contains

column headers” is checked and then click OK.
6. Next, you should compose the email message you wish to send (of course you can copy and
paste into this Microsoft Word window). This is the message that will be sent to all of the
recipients. You can include personalized fields from your data source by clicking on “Insert
Merge Fields” at the top. This will appear like “«LastName»” and when the message is sent will
actually substitute the personalized value from that column for each individual person’s email.
Note that advanced users that are including other data sources should click on “Match Fields” to
make sure all of the columns matched up correctly with pre-defined fields. When you are done
typing the message and are ready to send, you should click “Finish & Merge” and “Send E-mail
Messages”.
7. Be sure that in the To box it shows the column header for the email addresses you wish to send
to. As long as you included a word like Email in the column header description, Microsoft Word
should have auto-matched this correctly. If it doesn’t look right, click Cancel and then click on
“Match Fields” to check how the columns were matched and to fix it. Do not forget to include a
Subject in the “Subject line” field. Mail format should remain as HTML, especially if you included
any formating or pictures in the message. As long as you want to send to all addresses in your
Email column, leave “Send records” set to “All”. Double check everything looks good, and then
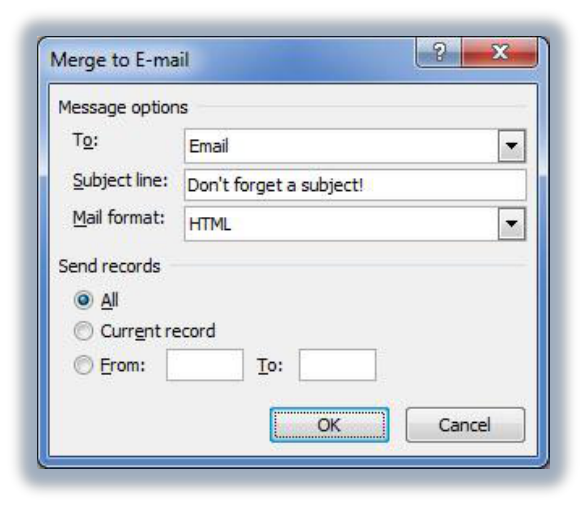
click OK. The emails will begin sending.
8. This process requires that you remain logged into your computer and requires Microsoft
Outlook remains open. It is actually generating individual messages and sending them out
through Outlook. If you close Outlook or log off, the messages will not go out. You can see
which messages have gone out by looking in your Sent Items folder. If you have a large amount
of recipients, this process can take an extended period of time to complete. Be careful not to
close Microsoft Outlook too soon. If there is anything still in your Outbox, it’s definitely too
early to close Microsoft Outlook. I would even recommend giving it a few minutes after it looks
like the last of them are in your Sent Items before closing Outlook. Please note that all of these
emails you’ve generated in your Sent Items folder do count toward your mailbox quota so if the
message was especially large or you had a very large amount of recipients, it is a good idea to
monitor your mailbox quota usage to make sure you don’t run out of mailbox quota. Part way
through the e-mail merge, you could always Shift-Delete any Sent Items you wish to purge from
your mailbox immediately so they don’t count toward your quota. Note you do have the option
of saving this mail merge in Microsoft Word which could then be opened in the future. This will
save the data source info (as long as the data source Microsoft Excel file does not get moved or
deleted) as well as the text of the email. In many ways, if the list of addresses and body of the
email will be changing for future email sends, and all of the fields auto-matched, I’d almost
recommend not even saving the file, but that’s completely up to you.
