
PY Job Aid
PY381_Using the Single-Use Payroll Online Tool (SPOT)
Rev 1/9/2024 Page 1 of 90
Table of Contents
Entering an Earnings Transaction in SPOT .............................................................................................. 3
Entering a Deduction Transaction in SPOT ............................................................................................ 18
SPOT Template Upload Process ........................................................................................................... 30
Deleting SPOT Batches ......................................................................................................................... 45
Approving SPOT Transactions Overview ............................................................................................... 47
Closing a SPOT Batch .............................................................................................................................................. 53
Sending Back a SPOT Batch ..................................................................................................................................... 55
Reviewing Send Back Batches .............................................................................................................. 57
Monitoring SPOT Transactions .............................................................................................................. 62
SPOT Scenarios .................................................................................................................................... 63
Entering Pay Docking (LNP) .................................................................................................................................... 63
Review Paycheck Page – Pay Docking (LNP) ........................................................................................................... 64
Entering Adjustments to Regular Pay – Hire or Terminated Mid Pay Period ......................................................... 65
Review Paycheck Page – Entering Adjustments to Reg Pay (Hired/Termed Mid Pay Period) ............................... 66
Entering Adjustments to Regular Pay – Change in Compensation from Prior Period ............................................ 67
Review Paycheck Page – Change in Compensation for Prior Pay Period ............................................................... 68
Entering a Separate Check – Bonus Payment with One-Time Deferrals ................................................................ 69
Review Paycheck Page - Bonus Payment with One-Time Deferrals ....................................................................... 71
Deceased Pay .......................................................................................................................................................... 73
Overview of the Using the Single-Use Payroll Online Tool (SPOT)
The Single-Use Payroll Online Tool (SPOT) tool is used by Payroll Administrators to enter one-time
transactions affecting pay or deductions in Cardinal. Transactions can be entered online in SPOT or
through a spreadsheet upload.
This Job Aid provides information on entering earnings and deduction transactions (online or
spreadsheet upload), deleting SPOT batches, SPOT transaction approvals, and reviewing batches
after approval.
This Job Aid also contains a SPOT scenario section which provides various examples to assist with
SPOT entry.

PY Job Aid
PY381_Using the Single-Use Payroll Online Tool (SPOT)
Rev 1/9/2024 Page 2 of 90
Review Paycheck Page with Due Agency Deduction - Deceased Pay ..................................................................... 75
Review Paycheck Page with Due Agency Deduction - Deceased Pay (continued) ................................................. 76
Review Paycheck Page with Due Agency Deduction – Deceased Pay (continued) ................................................ 77
Review Paycheck Page with Additional Before-Tax Medical Deduction ................................................................ 78
Review Paycheck Page with Additional Before-Tax Medical Deduction (continued) ............................................ 79
Review Paycheck Page with Additional Before-Tax Medical Deduction (continued) ............................................ 80
Adjusting VRS Retirement Benefit Deductions ....................................................................................................... 81
Employee Enrolled in the Retirement Plan............................................................................................................. 81
Review Paycheck Page – Employee Enrolled in in the Retirement Plan ................................................................ 84
Employee Not Enrolled in the Retirement Plan ...................................................................................................... 87
SPOT Entry for an Additional Pay ............................................................................................................................ 89

PY Job Aid
PY381_Using the Single-Use Payroll Online Tool (SPOT)
Rev 1/9/2024 Page 3 of 90
Entering an Earnings Transaction in SPOT
1. Navigate to the Enter SPOT Transactions page using the following path:
Menu > Payroll for North America > Payroll Processing USA > Create and Load Paysheets >
Enter SPOT Transactions
The Enter SPOT Transactions Search page displays.
2. Click the Add a New Value tab.

PY Job Aid
PY381_Using the Single-Use Payroll Online Tool (SPOT)
Rev 1/9/2024 Page 4 of 90
The Add a New Value tab displays.
The following table provides a brief description of each field within the Add a New Value tab:
Field
Description
Batch Identity
Defaults to NEXT. This number will automatically generate when the
batch is saved.
Company
Select your company. If you have access to enter transactions for
multiple companies, select the appropriate company.
Pay Group
Select the appropriate employee(s) pay group(s). Employees entered in
the SPOT batch must be in the Pay Group entered for the Pay Period
selected. When you validate the batch, an error message displays
indicating the employee is not in the Pay Group.
Pay Period End
Date
Select the appropriate pay period end date for the transactions being
entered (the pop-up window will only show pay periods that have not
been confirmed).
When processing an Off-cycle transaction, use the pay period end date
communicated by SPO.
Transaction Type
Select the appropriate type of transaction.
• Earnings – earnings in addition to time and labor or additional
pay (typically one time or amounts that vary from pay period to
pay period).
• Deductions – deduction overrides, extra deductions or deduction
refunds.

PY Job Aid
PY381_Using the Single-Use Payroll Online Tool (SPOT)
Rev 1/9/2024 Page 5 of 90
3. Enter/select the appropriate values in the Company, Pay Group, Pay Period End Date, and
Transaction Type fields.
4. Click the Add button.
The Enter SPOT Transactions page refreshes with the Enter Payroll SPOT Trans tab displayed.
Note: The Header section populates with the information previously entered on the Add a New
Value tab.
The following table provides a brief description of additional fields included in the Header section of the
Enter Payroll SPOT Trans tab:
Field
Description
Batch Status
Updates based on actions taken to the batch. Batch statuses include:
• New – when a new batch is initiated
• Created – when the batch is saved
• Validated – when the batch is validated
• Modified after Validation – when the batch is changed after
validation
• Submitted – when the batch is submitted for approval
• In Review – when the approver is reviewing the batch for
approval
• Closed – after the approver has submitted the batch to payroll
Batch ID
Defaults to “NEXT”; automatically updates when the batch is submitted
Created By
Displays the name of the Payroll Administrator who created the batch
Submitted By
Displays the name of the Payroll Administrator who submitted the batch
Approved By
Displays the name of the SPOT approver who approved the batch
Note: For further information on the Attach Files and Upload Files buttons, see the SPOT
Template Upload Process section of this Job Aid.

PY Job Aid
PY381_Using the Single-Use Payroll Online Tool (SPOT)
Rev 1/9/2024 Page 6 of 90
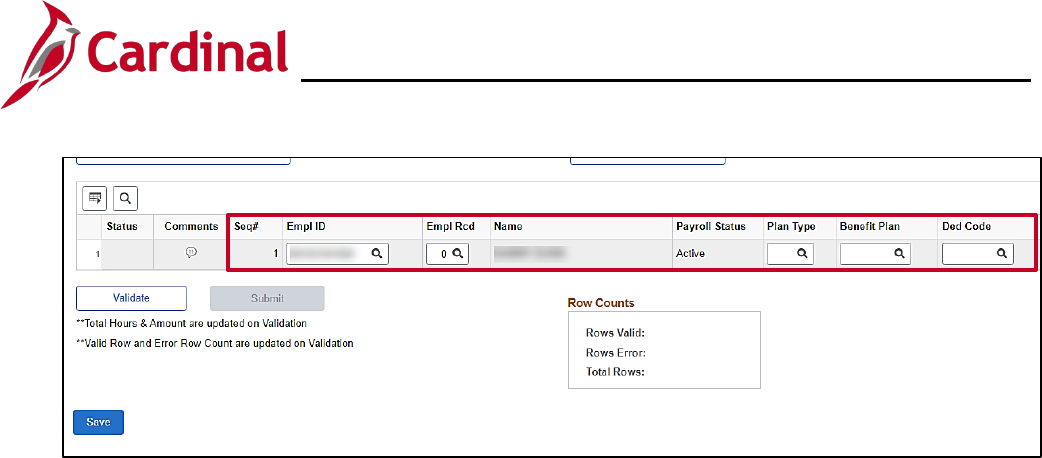
Note: Use the scrollbar at the bottom of the page to move left/right as required.
5. The Status column is initially blank. It displays the status of specific transaction after the batch has
been validated.
6. Click the Comments icon.
The SPOT Comments page displays in a pop-up window.
7. Enter any applicable comments in the Comment field.
8. Click the OK button.

PY Job Aid
PY381_Using the Single-Use Payroll Online Tool (SPOT)
Rev 1/9/2024 Page 7 of 90
The Enter Payroll SPOT Trans tab returns.
9. The Seq# field auto-populates and is read-only.
10. Select the applicable employee’s Employee ID using the Empl ID Look Up icon.
Note: An Empl ID not valid for the Company/Pay group combination of the batch will create an error
when the Validate button is clicked.
11. Select the applicable Employee Record as required using the Empl Rcd Look Up icon.
12. The Name field auto-populates based on the Employee ID selected. Verify accuracy.
13. Verify the Payroll Status in the Payroll Status field.
Note: A Paysheet is created for pending SPOT transactions during the SPOT load if the Payroll
Status is “Terminated”.
14. Select the appropriate Earnings Code using the Earn Code Look Up icon.
Note: An Earnings Code not valid for the Employee Type (Hourly vs Salaried) will create an error
when the Validate button is clicked. For a listing of Earnings Codes, see the Job Aid titled
PY381_Earnings Codes located on the Cardinal Website in Job Aids under Learning. The
following earnings codes cannot be entered as a separate check using the begin and end date
within the current period or it will cause an error. They are as follows:
• LSH – Leave Share
• STD – Short Term Disability
• WCL – VSDP Work Comp Pay
• WCP – Workers Comp
• WCS – Work Comp Supplement

PY Job Aid
PY381_Using the Single-Use Payroll Online Tool (SPOT)
Rev 1/9/2024 Page 8 of 90
15. The Description field auto-populates based on the Earnings Code selected. Verify accuracy.
16. Select the appropriate Earnings beginning and end dates using the Earns Begin Dt and Earns
End Dt Calendar icons.
Note: These are required fields for all Pay Periods. If left blank, an error will occur when the
Validate button is clicked.
17. The Tax Periods field defaults to “1” and refers to the number of Pay Periods covered by the
earnings payment.
Note: The Tax Periods field is used in conjunction with the “Annualized” tax method.
18. Select the appropriate tax method using the Tax Method dropdown button. There are two options
which are:
• Annualized – this tax method multiples the earnings by the pay periods and is taxed based
upon the annualized amount (the Tax Period field impacts how the earnings are annualized).
• Supplemental – this tax method is most often used for bonus payments and leave payouts
and should not be used for earnings related to hours worked. See the Job Aid titled
PY381_Earnings Codes for a list of Earning Codes that use the “Supplemental” tax method.
This Job Aid is located on the Cardinal Website in Job Aids under Learning.
19. Enter the applicable number of hours in the Oth Hrs field to one decimal place (e.g., 8.0).
20. Enter the applicable hourly rate in the Hourly Rate field to two decimal places (e.g., 22.55).
21. Enter the applicable amount in the Amount field to two decimal places (e.g., 200.00). The amount
can be a positive or negative number based upon the value selected in the Earn Code field.
Note: The Oth Hrs, Hourly Rate, and Amount fields are available only if applicable based upon
the value selected in the Earn Code field.
22. Click the horizontal scrollbar to scroll to the right as needed.

PY Job Aid
PY381_Using the Single-Use Payroll Online Tool (SPOT)
Rev 1/9/2024 Page 9 of 90
The remaining fields on the Enter Payroll SPOT Trans tab display.
23. The Benefit Ded Taken, Benefit Subset, Genl Ded Taken, and Genl Ded Subset fields are not
enabled. Entry of these fields is triggered based on the value in the Sepchk# field. See Steps 25
– 28 for details on these fields.
24. The Sepchk# field defaults to “0” indicating that the earnings will be added to the employee’s
regular check for the Pay Period being processed. Incrementally update this field by one if the
employee requires on or more separate checks.
Note: When deductions need to be modified on the separate check, you will need to enter a SPOT
deduction batch using the corresponding separate check value and make the adjustments. See
page 23 of this job aid for more details.

PY Job Aid
PY381_Using the Single-Use Payroll Online Tool (SPOT)
Rev 1/9/2024 Page 10 of 90
Note: When the Sepchk# field value is changed from the default of “0”, the Benefit Ded Taken,
Benefit Subset ID, Genl Ded Taken, and Genl Ded Subset fields become enabled and are
required to be completed. Follow the steps below to make the appropriate updates to each of
these fields.
25. Click the Benefit Ded Taken dropdown button and select the applicable value based on the
following:
a. Deduction – all benefit deductions are taken from the earnings
b. None – no benefit deductions are taken from the earnings
c. Subset – a subset of benefit deductions is taken from the earnings
Note: A Benefit Subset ID value must be selected in the Benefit Subset ID field if the “Subset”
value is selected in the Benefit Ded Taken field. If “Subset” was not selected, do not select a
value in the Benefit Subset ID field and skip to Step 27.
26. Select the appropriate value using the Benefit Subset ID Look Up icon based on the following:
a. BNS (Bonus) – Annuity and Deferred Compensation deductions will be taken from the
earnings
b. GRN (Garnishment Only) – Garnishment and Garnishment fee deductions will be taken
c. SPT (SPOT Allow) – Not used by Cardinal
d. LVS (Leave Share) – All deductions will be taken from the earnings
27. Select the appropriate value using the Genl Ded Taken dropdown button based on the following:
a. Deduction – all benefit deductions are taken from the earnings
b. None – no benefit deductions are taken from the earnings
c. Subset – a subset of benefit deductions is taken from the earnings
Note: A General Deduction Subset value must be selected in the Genl Ded Subset field if the
“Subset” value is selected in the Genl Ded Taken field. If “Subset” was not selected, do not select
a value in the Genl Ded Subset field and skip to Step 28.
28. Select the appropriate value using the Genl Ded Subset Look Up icon based on the following:
a. BNS (Bonus) – Annuity and Deferred Compensation deductions will be taken from the
earnings
b. GRN (Garnishment Only) – Garnishment and Garnishment fee deductions will be taken
c. SPT (SPOT Allow) – Not used by Cardinal
d. LVS (Leave Share) – All deductions will be taken from the earnings

PY Job Aid
PY381_Using the Single-Use Payroll Online Tool (SPOT)
Rev 1/9/2024 Page 11 of 90
29. The Addl Seq Nbr field is used to tie the SPOT entry to the respective Additional Pay record as
each additional pay record is created with a sequence number. The Addl Seq Nbr field is only
required if the Additional Pay record has a Goal Balance. Cardinal needs the Addl Seq Nbr to
recognize which record to update.
Note: If the adjustment being made is not for an Additional Pay, leave this field blank. If you enter
a sequence number for earnings that is not Additional Pay, you will receive a validation error.
30. Click the Add a Row icon (+) to add an additional item as needed and then repeat Steps 5 – 29
until all the SPOT earnings transactions have been entered into the batch.
31. Click the Delete a Row icon (-) to delete a line as needed.
32. Click the horizontal scrollbar to scroll to the left as needed.
33. Click the Save button to save the batch.

PY Job Aid
PY381_Using the Single-Use Payroll Online Tool (SPOT)
Rev 1/9/2024 Page 12 of 90
The Enter SPOT Transactions page refreshes.
34. Verify that the Batch ID field populates with a number (“1847” in the example above).
35. Verify that the Batch Status field updates to “Created”.
Note: After a batch is saved, additional items can still be added as necessary.
36. Click the Validate button to validate all the individual fields as well as combinations of fields.

PY Job Aid
PY381_Using the Single-Use Payroll Online Tool (SPOT)
Rev 1/9/2024 Page 13 of 90
The Enter SPOT Transactions page refreshes.
37. The Batch Status updates to “Validated”.
38. The Totals (only for Valid rows) section provides a summary of:
a. Total Amt – sum of the values entered in the Amount field for the batch
b. Total Hrs – sum of the values entered in the Oth Hrs field for the batch
39. The Row Counts section provides a summary of:
a. Rows Valid – the number of valid rows in the batch
b. Rows Error – the number or rows in the batch containing errors
c. Total Rows – total number of rows in the batch (sum of Rows Valid and Rows Error fields)
40. If the Rows Error field is blank, indicating that all rows are valid, skip to Step 49.

PY Job Aid
PY381_Using the Single-Use Payroll Online Tool (SPOT)
Rev 1/9/2024 Page 14 of 90
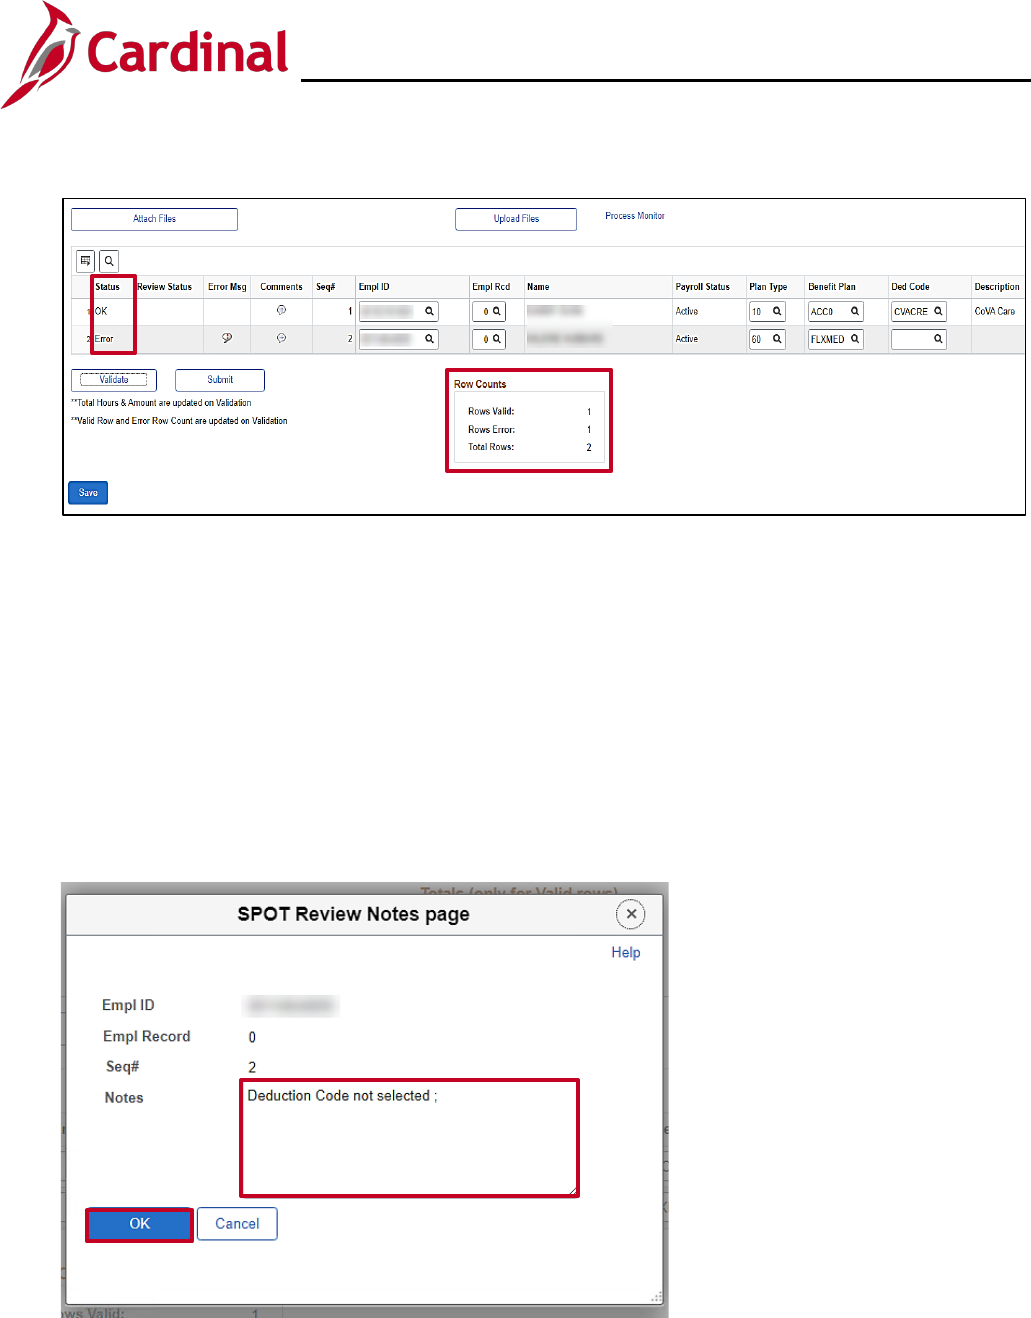
The screenshot below provides an example of a batch that contains an error.
41. If the Rows Error field populates with a number, indicating that at least one row is not valid.
42. The Status field updates with one of the following values:
• OK – no errors
• Error – issue with the line
Note: If there is an error during validation, the Row Counts section displays the number of lines
with an error in the Rows Error field, the Status field populates with “Error” for all lines containing
an error, and a bubble populates in the Error Msg field for all lines containing an error.
43. Click the Bubble icon in the Error Msg field to view the error message.
The SPOT Review Notes page displays in a pop-up window.
44. Review the Notes field.
45. Click the OK button.

PY Job Aid
PY381_Using the Single-Use Payroll Online Tool (SPOT)
Rev 1/9/2024 Page 15 of 90
The Enter Payroll SPOT Trans tab returns.
46. Update the applicable fields to correct the identified errors.
47. Click the Save button.
The Enter SPOT Transactions page refreshes.
Note: All line items in a batch must pass validation before the batch can be submitted for approval. The
Submit button is not enabled until all lines are validated successfully.
48. Verify that the Batch Status field updates to “Modified After Validation”.
49. Click the Validate button.

PY Job Aid
PY381_Using the Single-Use Payroll Online Tool (SPOT)
Rev 1/9/2024 Page 16 of 90
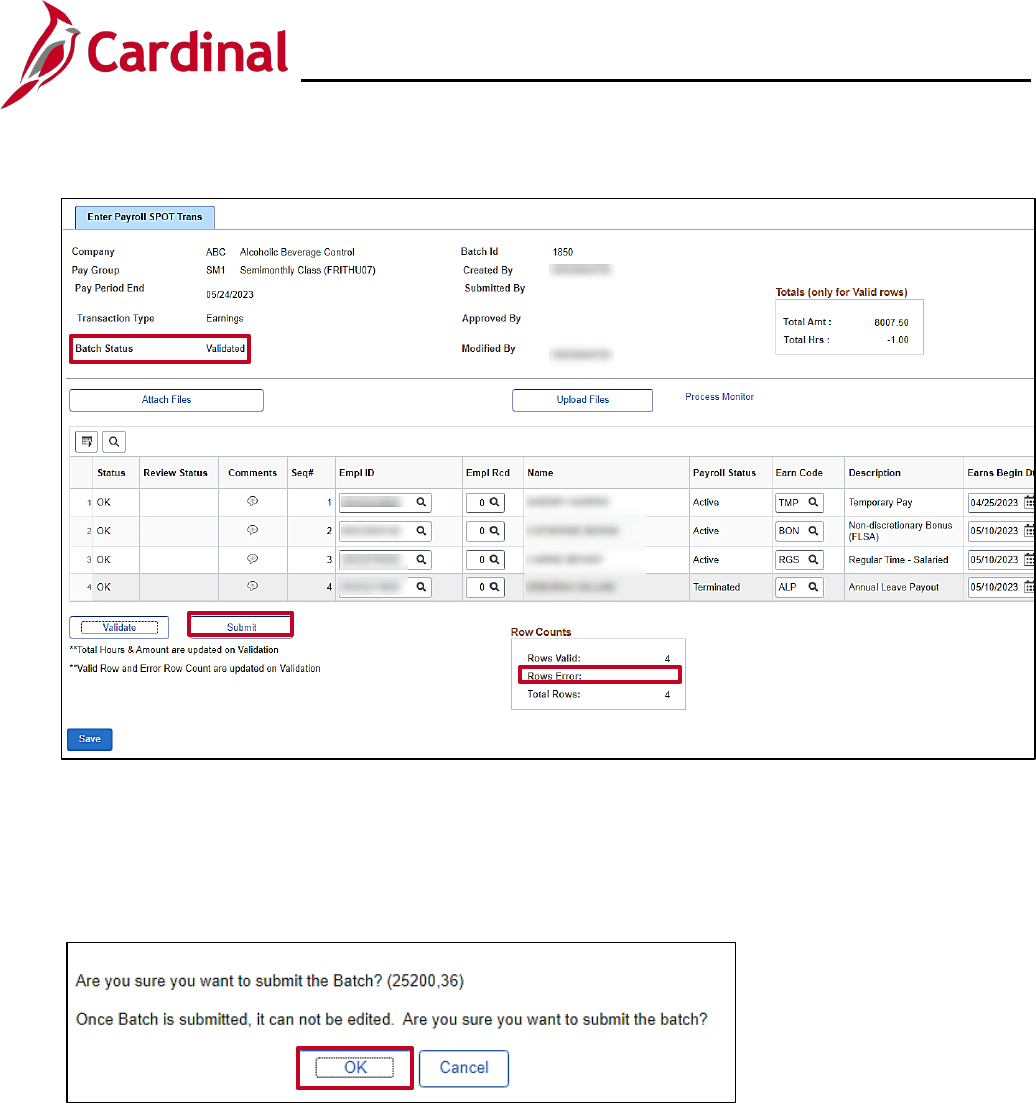
The Enter SPOT Transactions page refreshes.
51. Verify the Batch Status field updates to “Validated”.
52. Verify that the Rows Error field is blank indicating that all errors have been corrected.
53. Click the Submit button to submit the batch for review.
A Confirmation Message displays in a pop-up window.
54. Click the OK button to submit the batch for review.
Note: A batch cannot be edited after it has been submitted.

PY Job Aid
PY381_Using the Single-Use Payroll Online Tool (SPOT)
Rev 1/9/2024 Page 17 of 90
The Enter SPOT Transactions page returns.
55. Verify that the Batch Status field updates to “Submitted”.
56. Verify that the Submitted By field updates with your information.

PY Job Aid
PY381_Using the Single-Use Payroll Online Tool (SPOT)
Rev 1/9/2024 Page 18 of 90
Entering a Deduction Transaction in SPOT
1. Navigate to the Enter SPOT Transactions page using the following path:
Menu > Payroll for North America > Payroll Process USA > Create and Load Paysheets >
Enter SPOT Transactions
The Enter SPOT Transactions Search page displays.
2. Click the Add a New Value tab.

PY Job Aid
PY381_Using the Single-Use Payroll Online Tool (SPOT)
Rev 1/9/2024 Page 19 of 90
The Add a New Value tab displays.
The following table provides a brief description of each field within the Add a New Value tab:
Field
Description
Batch Identity
Defaults to NEXT. This number will automatically generate when the
batch is saved.
Company
Select your company. If you have access to enter transactions for
multiple companies, select the appropriate company.
Pay Group
Select the appropriate employee(s) pay group(s). Employees entered in
the SPOT batch must be in the Pay Group entered for the Pay Period
selected. When you validate the batch, an error message displays
indicating the employee is not in the Pay Group.
Pay Period End
Date
Select the appropriate pay period end date for the transactions being
entered (the pop-up window will only show pay periods that have not
been confirmed).
When processing an Off-cycle transaction, use the pay period end date
communicated by SPO.
Transaction Type
Select the appropriate type of transaction.
• Earnings – earnings in addition to time and labor or additional
pay (typically one time or amounts that vary from pay period to
pay period).
• Deductions – deduction overrides, extra deductions or deduction
refunds.

PY Job Aid
PY381_Using the Single-Use Payroll Online Tool (SPOT)
Rev 1/9/2024 Page 20 of 90
3. Enter/select the appropriate values in the Company, Pay Group, and Pay Period End Date fields.
4. Enter/select “Deductions” in the Transaction Type field.
5. Click the Add button.
The Enter SPOT Transactions page displays with the Enter Payroll SPOT Trans tab displayed.
Note: The Header section populates with the information previously entered on the Add a New
Value tab.
The following table provides a brief description of the additional fields included in the Header section of
the Enter Payroll SPOT Trans tab:
Field
Description
Batch Status
Updates based on actions taken to the batch. Batch statuses include:
• New – when a new batch is initiated
• Created – when the batch is saved
• Validated – when the batch is validated
• Modified after Validation – when the batch is changed after
validation
• Submitted – when the batch is submitted for approval
• In Review – when the approver is reviewing the batch for
approval
• Closed – after the approver has submitted the batch to payroll
Batch ID
Defaults to “NEXT”; automatically updates when the batch is submitted
Created By
Displays the name of the Payroll Administrator who created the batch
Submitted By
Displays the name of the Payroll Administrator who submitted the batch
Approved By
Displays the name of the SPOT approver who approved the batch
Note: For further information on the Attach Files and Upload Files buttons, see the SPOT
Template Upload Process section of this Job Aid.

PY Job Aid
PY381_Using the Single-Use Payroll Online Tool (SPOT)
Rev 1/9/2024 Page 21 of 90
Note: Use the scroll bar at the bottom of the page to move left/right as required.
6. The Status column is initially blank. It displays the status of each specific transaction after the
batch has been validated.
7. Click the Comments icon.
The SPOT Comments page displays in a pop-up window.
8. Enter any applicable comments in the Comment field.
9. Click the OK button.
PY Job Aid
PY381_Using the Single-Use Payroll Online Tool (SPOT)
Rev 1/9/2024 Page 22 of 90
10. The Seq# field auto-populates and is read-only.
11. Select the applicable employee’s Employee ID using the Empl ID Look Up icon.
Note: An Empl ID not valid for the Company/Pay group combination of the batch will create an
error when the Validate button is clicked.
12. Select the applicable Employee Record as required using the Empl Rcd Look Up icon.
13. The Name field auto-populates based on the Employee ID selected. Verify accuracy.
14. Verify the Payroll Status in the Payroll Status field.
Note: A Paysheet is created for pending SPOT transactions during the SPOT load if the Payroll
Status is “Terminated”.
15. Select the appropriate Plan Type using the Plan Type Look Up icon.
Note: For detailed information about the Plan Type, Benefit Plan, Ded Code, and Ded Class
fields, see the Job Aid titled PY381_General and Benefit Deduction Codes. This Job Aid is
located on the Cardinal Website in Job Aids under Training.
16. Select the appropriate Benefit Plan using the Benefit Plan Look Up icon.
17. Select the appropriate Deduction Code using the Ded Code Look Up icon.
Note: When the Validate button is clicked, the Deduction Code selected are verified as a valid
code for the Benefit Plan selected. An error will occur if this is an invalid combination.

PY Job Aid
PY381_Using the Single-Use Payroll Online Tool (SPOT)
Rev 1/9/2024 Page 23 of 90
18. The Description field auto-populates based on the Deduction Code selected. Verify accuracy.
19. Select the appropriate Deduction Classification using the Ded Class Look Up icon. The following
values are available, but only valid values for the Deduction Code display:
a. Before-Tax
b. After-Tax
c. Non-Taxable
d. Tax Ben
e. Taxable
20. Select the appropriate deduction calculation option using the Ded Calc dropdown button.
Note: The option of “Amount” is typically selected. The option “Percentage” can be selected when
the Ded Code is DUEAGY and a percentage of net pay needs to be entered. Confirm with SPO
prior to selecting any other deduction calculation options.
21. The Rate/Percent field enabled when the Ded Code is DUEAGY and the Ded Calc is
Percentage. This allows a percentage of net pay needs to be collected.
22. Enter the appropriate deduction amount to two decimal places (e.g., 200.00) in the Amount field.
The deduction amount can be either a positive or negative number.
23. Select the appropriate One Time Code using the One Time Cd dropdown button. The following
options are available:
a. Addition – Add to the current deduction(s)
b. Arrs Paybk – Not used by Cardinal
c. Override – Alter amount that would have been deducted
d. Refund – Amount due back to the employee; DO NOT enter a negative value in the Amount
field if this option is selected
24. The Sepchk# field defaults to “0” indicating that the deductions will be taken from the employee’s
regular check for the Pay Period being processed.
Note: For a separate check, the Sepchk# value will be greater than “0” and should correspond with
the separate check number entered on the SPOT earnings batch. This will ensure that the
deductions are taken from the correct check. An error will occur when the batch is validated if a
SPOT deduction transaction for a Separate check is entered prior to entering the corresponding
SPOT earnings transaction.
25. Click the Add a Row icon (+) to add an additional item and click the Delete a Row icon (-) to delete
a line. Repeat steps 5 – 23 until all SPOT deduction transactions are added.

PY Job Aid
PY381_Using the Single-Use Payroll Online Tool (SPOT)
Rev 1/9/2024 Page 24 of 90
26. Click the horizontal scrollbar to scroll to the left as needed.
27. Click the Save button.
Note: After a batch is saved, additional items can still be added as necessary.
The Enter SPOT Transactions page refreshes.
28. Verify that the Batch ID field populates with a number (“1848” in the example above).
29. Verify that the Batch Status field updates to “Created”.
30. Click the Validate button to validate all the individual fields as well as combinations of fields.

PY Job Aid
PY381_Using the Single-Use Payroll Online Tool (SPOT)
Rev 1/9/2024 Page 25 of 90
The Enter SPOT Transactions page refreshes.
31. Verify that the Batch Status updated to “Validated”.
32. The Totals (only for Valid rows) section provides a summary of the sum of the values entered in
the Amount field for the batch.
33. The Row Counts section provides a summary of:
a. Rows Valid – the number of valid rows in the batch
b. Rows Error – the number or rows in the batch containing errors
c. Total Rows – total number of rows in the batch (sum of Rows Valid and Rows Error fields)
34. If the Rows Error field is blank, indicating all rows are valid, skip to Step 43.
PY Job Aid
PY381_Using the Single-Use Payroll Online Tool (SPOT)
Rev 1/9/2024 Page 26 of 90
The screenshot below provides an example of a batch that contains an error.
35. If the Rows Error field populates with a number, indicating at least one row is not valid.
36. The Status field updates with one of the following values:
• OK – no errors
• Error – issue with the line
Note: If there is an error during validation, the Row Counts section displays the number of lines
with an error in the Rows Error field, the Status field populates with “Error” for all lines containing
an error, and a bubble populates in the Error Msg field for all lines containing an error.
37. Click the Bubble icon in the Error Msg field to view the error message.
The SPOT Review Notes Page pop-up window displays.
38. Review the Notes field.
39. Click the OK button.

PY Job Aid
PY381_Using the Single-Use Payroll Online Tool (SPOT)
Rev 1/9/2024 Page 27 of 90
The Enter Payroll SPOT Trans tab returns.
40. Update the applicable fields to correct the identified errors.
41. Click the Save button.
The Enter SPOT Transactions page refreshes.
Note: All line items in a batch must pass validation before the batch can be submitted for approval.
The Submit button is not enabled until all lines are validated.
42. Verify that the Batch Status field updates to “Modified After Validation”.
43. Click the Validate button.

PY Job Aid
PY381_Using the Single-Use Payroll Online Tool (SPOT)
Rev 1/9/2024 Page 28 of 90
The Enter SPOT Transactions page refreshes.
44. Verify that the Batch Status field updates to “Validated”.
45. Verify that the Rows Error field is blank indicating that all errors have been fixed.
46. Click the Submit button to submit the batch for review.
A Confirmation Message displays in a pop-up window.
47. Click the OK button to submit the batch for review.
Note: A batch cannot be edited after it is submitted.

PY Job Aid
PY381_Using the Single-Use Payroll Online Tool (SPOT)
Rev 1/9/2024 Page 29 of 90
The Enter Spot Transactions page returns.
48. Verify that the Batch Status field updates to “Submitted”.
49. Verify that the Submitted By field updates with your information.

PY Job Aid
PY381_Using the Single-Use Payroll Online Tool (SPOT)
Rev 1/9/2024 Page 30 of 90
SPOT Template Upload Process
The SPOT Template Upload process can be used to enter a large volume of transactions into SPOT.
There are two Template Uploads:
• Earnings
• Deductions
The templates are located on the Cardinal website in HCM Update Templates under Resources.
Note: Batches should not exceed more than 1000 lines. If you have more than 1000 lines to upload, you
will need to upload it as a separate batch.
1. Download and open the appropriate SPOT Upload Template. (The SPOT Earnings Template file
is used in this example).
The SPOT Earnings [or Deductions] Template opens with the Earnings [or Deductions] Template
workbook displayed by default.
2. Click the Earnings [or Deductions] Template workbook if it is not displayed by default.

PY Job Aid
PY381_Using the Single-Use Payroll Online Tool (SPOT)
Rev 1/9/2024 Page 31 of 90
3. Enter the transactions starting in Row 2 on the template following the instructions listed in the
Header Row (Row 1) and reference the Instructions tab as needed.
4. Use the mouse or track pad and right click in the cell labeled “1” to select the entire Header row.
5. Click the Delete menu list item from the dropdown menu to delete the entire Header row.

PY Job Aid
PY381_Using the Single-Use Payroll Online Tool (SPOT)
Rev 1/9/2024 Page 32 of 90
5. Click the File button from the Ribbon.
6. Click the Save a Copy or Save As button.
Note: The button name depends upon the version of Microsoft Excel and personalized settings
loaded on your computer, but the functionality is the same.

PY Job Aid
PY381_Using the Single-Use Payroll Online Tool (SPOT)
Rev 1/9/2024 Page 33 of 90
The Save As page displays in a pop-up window.
7. Select a destination using the Save Destination dropdown menu.
8. Enter a unique name for the file in the File name field.
9. Select CSV (Comma Delimited) from the Save as type drop-down menu.
10. Click the Save button.
A Microsoft Excel Warning Message displays.
11. Click the OK button.
A second Microsoft Excel Warning Message displays.
12. Click the No button.
Note: The file is now saved and ready to be uploaded.

PY Job Aid
PY381_Using the Single-Use Payroll Online Tool (SPOT)
Rev 1/9/2024 Page 34 of 90
13. Navigate to the Enter SPOT Transactions page using the following path:
Menu > Payroll for North America > Payroll Process USA > Create and Load Paysheets >
Enter SPOT Transactions
The Enter SPOT Transactions Search page displays.
14. Click the Add a New Value tab.

PY Job Aid
PY381_Using the Single-Use Payroll Online Tool (SPOT)
Rev 1/9/2024 Page 35 of 90
The following table provides a brief description of each field within the Add a New Value tab:
Field
Description
Batch Identity
Defaults to NEXT. This number will automatically generate when the batch
is saved.
Company
Select your company. If you have access to enter transactions for multiple
companies, select the appropriate company.
Pay Group
Select the appropriate employee(s) pay group(s). Employees entered in
the SPOT batch must be in the Pay Group entered for the Pay Period
selected. When you validate the batch, an error message displays
indicating the employee is not in the Pay Group.
Pay Period End
Date
Select the appropriate pay period end date for the transactions being
entered (the pop-up window will only show pay periods that have not been
confirmed).
Transaction Type
Select the appropriate type of transaction.
• Earnings – earnings in addition to time and labor or additional pay
(typically one time or amounts that vary from pay period to pay
period).
• Deductions – deduction overrides, extra deductions or deduction
refunds.
15. Enter/select the appropriate values in the Company, Pay Group, Pay Period End Date, and
Transaction Type fields.
Note: This Job Aid shows an Earnings transaction, but there is no difference between an Earnings
and Deductions transaction when using the mass upload process.
16. Click the Add button.

PY Job Aid
PY381_Using the Single-Use Payroll Online Tool (SPOT)
Rev 1/9/2024 Page 36 of 90
The Enter SPOT Transactions page refreshes with the Enter Payroll SPOT Trans tab displayed.
Note: The Header section populates with the information previously entered on the Add a New
Value tab.
17. Click the Attach Files button.
The SPOT Attachments page displays in a pop-up window.
18. Click the Add button.
The File Attachment page displays in a pop-up window.
19. Click the Choose File button.
Note: Depending on the browser used, a Browse button may appear in place of the Choose File
button.

PY Job Aid
PY381_Using the Single-Use Payroll Online Tool (SPOT)
Rev 1/9/2024 Page 37 of 90
The Open Files page displays in a pop-up window.
20. Navigate to and select the applicable file.
21. Click the Open button.
The File Attachment page returns.
22. Click the Upload button.

PY Job Aid
PY381_Using the Single-Use Payroll Online Tool (SPOT)
Rev 1/9/2024 Page 38 of 90
The SPOT Attachments page returns.
Note: The file is now connected to the batch, but the individual transactions are not uploaded.
23. Enter a description in the Description field as needed.
24. Select the Process checkbox option.
25. Click the OK button.
The Enter Payroll SPOT Trans tab returns.
26. Click the Upload Files button to upload the individual transactions.

PY Job Aid
PY381_Using the Single-Use Payroll Online Tool (SPOT)
Rev 1/9/2024 Page 39 of 90
A Successful Upload message displays in a pop-up window.
27. Click the OK button.
28. If the file does not successfully load, verify the following:
a. All mandatory fields were properly filled out in the template.
b. The fields were entered using the correct format.
c. The file was saved in the .csv format.
The Enter Payroll SPOT Trans tab returns.
29. Verify that a Batch ID is assigned (“1850” in this example).
30. Verify that the Batch Status field updates to “Created”.
31. Verify that the required fields were populated correctly and update if required.
32. Click the Validate button.
Note: Edits that occur when keying the batch online are applied when the Validate button is clicked
for the uploaded template.

PY Job Aid
PY381_Using the Single-Use Payroll Online Tool (SPOT)
Rev 1/9/2024 Page 40 of 90
The Enter Payroll SPOT Trans tab refreshes.
33. The Batch Status field updates to “Validated”.
34. The Totals (only for Valid rows) section provides a summary of:
a. Total Amt – sum of the values entered in the Amount field for the batch
b. Total Hrs – sum of the values entered in the Oth Hrs field for the batch
35. The Row Counts section provides a summary of:
a. Rows Valid – the number of valid rows in the batch
b. Rows Error – the number or rows in the batch containing errors
c. Total Rows – total number of rows in the batch (sum of Rows Valid and Rows Error fields)
36. If the Rows Error field is blank, indicating that all rows are valid, skip to Step 44.

PY Job Aid
PY381_Using the Single-Use Payroll Online Tool (SPOT)
Rev 1/9/2024 Page 41 of 90
The screenshot below provides an example of a batch that contains an error.
37. The Status field displays one of two statuses:
• OK – no errors
• Error – issue with the line
Note: If there is an error during validation, the Row Counts section displays the number of lines
with an error in the Rows Error field, the Status field populates with “Error” for all lines containing
an error, and a bubble populates in the Error Msg field for all lines containing an error.
38. Click the Bubble icon in the Error Msg field to view the error message.

PY Job Aid
PY381_Using the Single-Use Payroll Online Tool (SPOT)
Rev 1/9/2024 Page 42 of 90
The SPOT Review Notes Page displays in a pop-up window.
39. Review the Notes field.
40. Click the OK button.
41. Update the applicable fields to correct the identified errors.
42. Click the Save button.

PY Job Aid
PY381_Using the Single-Use Payroll Online Tool (SPOT)
Rev 1/9/2024 Page 43 of 90
The Enter SPOT Transactions page refreshes.
Note: All line items in a batch must pass validation before the batch can be submitted for approval.
The Submit button is not enabled until all lines are validated.
43. Verify that the Batch Status field updates to “Modified After Validation”.
44. Click the Validate button.
PY Job Aid
PY381_Using the Single-Use Payroll Online Tool (SPOT)
Rev 1/9/2024 Page 44 of 90
The Enter SPOT Transactions page refreshes.
45. Verify that the Batch Status field updates to “Validated”.
46. Verify that the Rows Error field is blank indicating that all errors have been fixed.
47. Click the Submit button to submit the batch for review.
A Confirmation Message displays in a pop-up window.
48. Click the OK button to submit the batch for review.
Note: A batch cannot be edited after it is submitted.

PY Job Aid
PY381_Using the Single-Use Payroll Online Tool (SPOT)
Rev 1/9/2024 Page 45 of 90
Deleting SPOT Batches
Payroll Administrators can delete batches if the batch has not been closed. All transactions within a
batch are deleted and will not process when a batch is deleted. This process cannot be undone, so use
only as appropriate. Utilize the Delete a Row button (-) to only delete specific transactions within a
batch.
1. Navigate to the Delete SPOT Transactions page using the following path:
Menu > Payroll for North America > Payroll Processing USA > Create and Load Paysheets >
Delete Spot Transactions
The Delete SPOT Transactions Search page displays.
2. Enter the search criteria in the corresponding fields for the applicable batch, preferably the specific
batch number.
3. Click the Search button.

PY Job Aid
PY381_Using the Single-Use Payroll Online Tool (SPOT)
Rev 1/9/2024 Page 46 of 90
The Delete SPOT Transactions page display with the applicable batch.
4. Click the Delete Batch button to delete the batch.
A Confirmation Message displays.
5. Click the OK button to delete the batch. Once a batch is deleted, it cannot be opened or edited.
The Delete SPOT Transactions Search page displays after the batch has been deleted.

PY Job Aid
PY381_Using the Single-Use Payroll Online Tool (SPOT)
Rev 1/9/2024 Page 47 of 90
Approving SPOT Transactions Overview
Each Agency designates at least one person as the SPOT Approver to review and approve, deny or
send back SPOT transactions. SPOT Approvers are not able to approve their own batches.
SPOT Approvers can take the following actions on the SPOT transactions within the batch:
• Approve: Approved SPOT transactions are loaded to employee paysheets for processing once
the batch is Closed.
• Deny: Denied transactions will not load to employee’s paysheets. When a transaction is marked
as denied, it cannot be updated. If the transaction needs to be processed, it must be entered in a
new batch. SPOT Approvers should include comments for transactions that are denied for
tracking and audit purposes.
• Send Back: Transactions that require updates will be sent back to the Payroll Administrator for
review and correction. These transactions are not marked as Approved or Denied. The SPOT
Approver should enter comments indicating the required revision. When a batch contains these
types of transactions, the batch cannot be Closed. The batch will be sent back to the Payroll
Administrator so that those transactions can be modified and resubmitted for approval. When
batches are sent back the only transactions that can be updated are those not marked as
Approved or Denied. SPOT transactions that are sent back do not generate an email, therefore
Payroll Administrators should use the SPOT Online Query to identify batches that require
updates.
This section of the job aid will walk through the approval process and the options noted above.

PY Job Aid
PY381_Using the Single-Use Payroll Online Tool (SPOT)
Rev 1/9/2024 Page 48 of 90
1. Navigate to the Review SPOT Transactions page using the following path:
Menu > Payroll for North America > Payroll Processing USA > Create and Load Paysheets >
Review SPOT Transactions
The Review SPOT Transactions Search page displays.
2. Enter the applicable/known search criteria to find the appropriate batch. The search options
include the following:
Fields
Descriptions
Batch Identity
Number assigned to the Batch
Company
The three-character company code
Pay Group
Pay group options for the Company
Pay Period End Date
Select the Pay Period end date for the batch you want to approve
Transaction Types
Select the appropriate option:
• Earnings
• Deductions
Batch Status
Options include:
• Closed
• Created
• Deleted
• In Review
• Modified After Validation
• New

PY Job Aid
PY381_Using the Single-Use Payroll Online Tool (SPOT)
Rev 1/9/2024 Page 49 of 90
Fields
Descriptions
• Submitted
• Validated
3. Click the Search button.
The Review SPOT Transactions page refreshes with the matching search results at the bottom of the
page (if more than one batch matches the search criteria entered).
4. If more than one batch matched the search criteria entered, click any of the links within the
appropriate batch’s row to open the Review Payroll Spot Trans tab for the applicable batch.
For this scenario, Batch 1850 is selected.

PY Job Aid
PY381_Using the Single-Use Payroll Online Tool (SPOT)
Rev 1/9/2024 Page 50 of 90
The Review Payroll SPOT Trans tab displays for the applicable batch.
5. Review the entries on the batch.
6. You have the following options:
a. Approve: Click the Approve checkbox next to individual transactions to approve them.
b. Deny: Click the Deny checkbox next to individual transaction to deny them. When you deny
an individual transaction, enter a Comment to note why for tracking and audit purposes.
c. Send Back: To Send Back an individual transaction, leave the Approve and Deny
checkboxes unchecked.
Note: SPOT Approvers cannot edit SPOT transactions.

PY Job Aid
PY381_Using the Single-Use Payroll Online Tool (SPOT)
Rev 1/9/2024 Page 51 of 90
Note: In this example, two transactions were approved, and one transaction, denied and one is left
unchecked so it can be sent back for updates.
7. Click the corresponding Comments icon for any denied transactions.

PY Job Aid
PY381_Using the Single-Use Payroll Online Tool (SPOT)
Rev 1/9/2024 Page 52 of 90
The SPOT Comments page displays in a pop-up window.
8. Enter a comment explaining why the transaction was denied in the Comment field.
Note: Cardinal does not require a comment, but comments are strongly recommended for audit
purposes.
9. Click the OK button.
The Review Payroll Spot Trans tab returns.
10. Choose the appropriate action:
a. Close the Batch. Go the section of this job aid titled Closing a SPOT Batch.
b. Send Back the batch. Go to the section of this job aid titled Sending Back a Batch.

PY Job Aid
PY381_Using the Single-Use Payroll Online Tool (SPOT)
Rev 1/9/2024 Page 53 of 90
Closing a SPOT Batch
Once all transactions in a batch have been reviewed and either approved or denied, the approver must
close the batch for it to be picked up by the SPOT load process. This section will walk you through the
process to close the SPOT batch.
1. Verify all transactions in the batch have been approved or denied.
2. Click the Close Batch button.
3. If all the transactions have been approved or denied, a Confirmation message displays in a pop-up
window.
Note: If you try to close a batch and all the transactions have not been approved or denied, a
message displays indicating “Some transactions are neither accepted or denied. All transactions
must be reviewed and can be accepted or denied”. You will have to click the OK button on this
message then go back and approve or deny any transaction that may have been missed.
4. Click the OK button.
Note: A batch cannot be edited after it has been closed.

PY Job Aid
PY381_Using the Single-Use Payroll Online Tool (SPOT)
Rev 1/9/2024 Page 54 of 90
The Enter Payroll SPOT Trans page returns.
5. Verify that the Batch Status is “Closed”.
6. Verify that the Approved By field updates with your information.
Note: The transactions will be loaded to payroll during the next SPOT Load to Payroll process.

PY Job Aid
PY381_Using the Single-Use Payroll Online Tool (SPOT)
Rev 1/9/2024 Page 55 of 90
Sending Back a SPOT Batch
This section of the job aid will walk through process to Send Back a batch to the Payroll Administrator to
make updates.
1. Click the Comments icon for any transaction in the batch that requires update.
Important: Do not click the Approve or Deny option for any transaction that you want to send
back to be updated by the Payroll Administrator. Clicking Approve or Deny will lock the
transaction and the Payroll Administrator, will not be able to make updates.
The SPOT Comments page displays in a pop-up window.
2. Enter comments regarding what needs to be updated in the Comment section.
3. Click the OK button.

PY Job Aid
PY381_Using the Single-Use Payroll Online Tool (SPOT)
Rev 1/9/2024 Page 56 of 90
A Confirmation Message displays in a pop-up window.
4. Click the OK button to send the batch back to the submitter for updates.
5. Verify that the Batch Status field updates to “Sent Back to Submitter”.
6. Verify that the Approved By field is blank.
Note: The Batch is sent back to the Payroll Administrator for updates.

PY Job Aid
PY381_Using the Single-Use Payroll Online Tool (SPOT)
Rev 1/9/2024 Page 57 of 90
Reviewing Send Back Batches
After a SPOT Approver has taken action on a Batch, the Payroll Administrator can review the Batch.
• If a SPOT transaction was denied and needs to be processed, it will need to be entered in a new
batch.
• If a SPOT transaction was sent back for revisions, the entire batch is sent back. The Payroll
Administrator will need to review the comments, make the necessary updates, and resubmit the
batch for approval.
1. To review a batch for approval, navigate to the Enter SPOT Transactions page using the following
path:
Menu > Payroll for North America > Payroll Processing USA > Create and Load Paysheets >
Enter SPOT Transactions
The Enter SPOT Transactions Search page displays.
2. Enter the appropriate data in the corresponding Search Criteria fields.
Note: Using the Batch Status field option is helpful when looking for batches that have been
Closed or Sent Back to Submitter.
For this scenario, Sent Back to Submitter is selected.
3. Click the Search button.

PY Job Aid
PY381_Using the Single-Use Payroll Online Tool (SPOT)
Rev 1/9/2024 Page 58 of 90
The Enter Payroll SPOT Trans tab displays for the applicable batch.
4. An Error Message bubble icon displays on the line for transactions that require revision.
Note: Transactions that have been marked as approved or denied by the approver cannot be
edited.
5. Click the Comments icon for the transaction that requires an update.
6. Review the comments in the Comment field.
7. Click the OK button.

PY Job Aid
PY381_Using the Single-Use Payroll Online Tool (SPOT)
Rev 1/9/2024 Page 59 of 90
8. Make the appropriate update per the comment from the Approver.
9. To add a comment regarding the update, click the Comments icon.
Note: Do not overwrite existing comments in this field as it is open and does not lock down
comments.
10. Enter your comment below any existing comments.
11. Click the OK button.

PY Job Aid
PY381_Using the Single-Use Payroll Online Tool (SPOT)
Rev 1/9/2024 Page 60 of 90
The Enter Payroll SPOT Trans page returns.
12. Click the Validate button.
13. Verify the Batch Status is “Validated”.
14. Verify the Row Counts does not display any row errors.
15. Click the Submit button.

PY Job Aid
PY381_Using the Single-Use Payroll Online Tool (SPOT)
Rev 1/9/2024 Page 61 of 90
The Submit Confirmation Message displays.
16. Click the OK button.
The Enter Payroll SPOT Trans page returns.
17. Verify that the Batch Status is “Submitted”.
18. Verify that the Modified By displays your ID.
Note: For additional information on entering SPOT transactions, refer to the Entering an Earnings
Transaction in SPOT or Entering a Deduction Transaction in SPOT sections of this Job Aid.

PY Job Aid
PY381_Using the Single-Use Payroll Online Tool (SPOT)
Rev 1/9/2024 Page 62 of 90
Monitoring SPOT Transactions
There are two key SPOT tools to help monitor transactions:
• Single-Use Payroll Online Transaction (SPOT) Online Query – This query provides the status
information for all SPOT batches for a specific pay period. It can be run by Payroll Run ID or a
specific date range.
• SPOT Transactions Not Loaded to Pay lines Report - Batches are loaded to the Paysheet
Transaction Table after they are closed. The Delivered Paysheet Transaction Process runs
according to the operation calendars. This report reflects transactions that are both “Accepted” and
“Closed” but do not appear in the employee’s paycheck.
Note: For further information about Reviewing Employee Paychecks, refer to the Job Aid titled
PY381_Review the View Paycheck Page. This Job Aid can be found on the Cardinal website in
Job Aids under Learning.
For further information on the SPOT Online Query and SPOT Transaction Not Loaded to Pay lines
Report, see the Cardinal HCM Payroll Reports Catalog located on the Cardinal website under
Resources.

PY Job Aid
PY381_Using the Single-Use Payroll Online Tool (SPOT)
Rev 1/9/2024 Page 63 of 90
SPOT Scenarios
In this section, we will review various scenarios regarding how to enter specific transactions into SPOT.
Each scenario will show how to enter the transaction into SPOT and how it displays on the Review
Paycheck page.
Entering Pay Docking (LNP)
In this scenario, we will enter 8 hours of pay docking for an employee in the current payroll (pay period
ending 04/09/2021).
1. Enter/select the following:
a. Empl ID
b. Empl Rcd: Defaults to 0. Update if necessary
c. Earn Code: LNP
d. Earns Begin Dt: enter the begin date of the period the employee is being docked
e. Earns End Dt: enter the end date of the period the employee is being docked
Note: If the pay docking is for a prior period, the employee must have regular pay in that
period for the LNP to process. If the employee does not have regular pay, process the LNP in
the current period
f. Oth Hrs: enter the hours to be docked (in this scenario 8)
g. Hourly Rate: Enter the hourly rate for the period
2. Validate and submit the batch for approval.

PY Job Aid
PY381_Using the Single-Use Payroll Online Tool (SPOT)
Rev 1/9/2024 Page 64 of 90
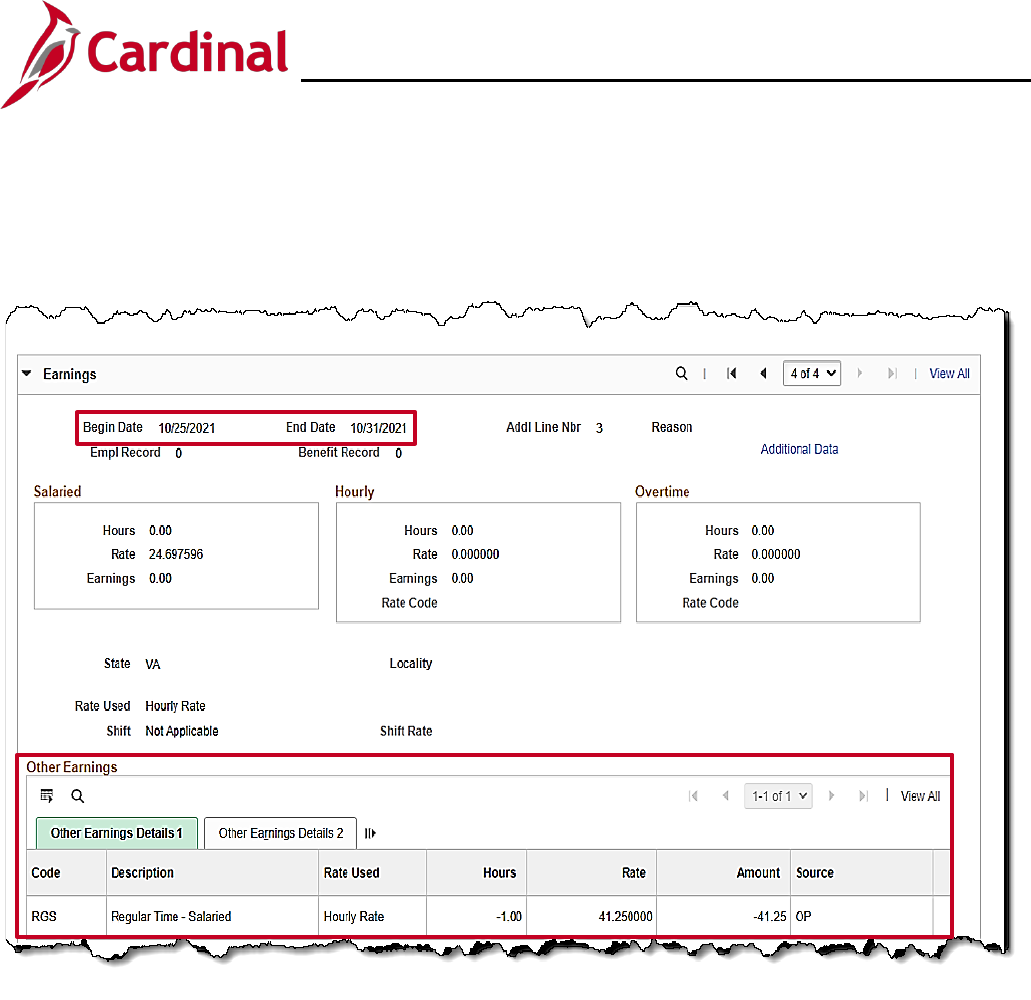
Review Paycheck Page – Pay Docking (LNP)
In the Other Earnings section of the Review Paycheck page, you are able to view the SPOT
transaction that processed for the employee.
The LNP displays in the Other Earnings section for the specific period that it was entered in SPOT.
A second line for Regular Time – Salaried (RGS) is automatically created by Cardinal during the SPOT
Load Process for LNP.

PY Job Aid
PY381_Using the Single-Use Payroll Online Tool (SPOT)
Rev 1/9/2024 Page 65 of 90
Entering Adjustments to Regular Pay – Hire or Terminated Mid Pay Period
If an employee is hired/terminated in the middle of the pay period, a reduction of regular pay may be
necessary. When an employee is hired or terminated within the pay period, the system calculates partial
pay based on an annualized hourly rate and not the pay period hourly rate.
Payroll Administrators will need to calculate what the employee is due using the pay period hourly rate
and enter the adjustment in SPOT.
In this scenario, an employee terminates in the middle of the pay period (11/1).
• The system will calculate the partial pay from 10/25 – 10/31 that is due to the employee at an
annualized hourly rate.
• You will need to calculate the amount due using the pay period hourly rate then enter the adjustment
in SPOT.
• For this scenario, the employee needs to have a pay reduction of $41.25.
1. Enter the following:
a. Empl ID
b. Empl Rcd: Defaults to 0. Update if necessary
c. Earn Code: RGS
d. Earns Begin Dt: enter the begin date of the period the employee terminated
e. Earns End Dt: enter the employee’s last day worked
f. Oth Hrs: enter -1
g. Hourly Rate: Enter the amount of pay to be reduced (for this scenario 41.25)
2. Validate and submit the batch for approval.
PY Job Aid
PY381_Using the Single-Use Payroll Online Tool (SPOT)
Rev 1/9/2024 Page 66 of 90
Review Paycheck Page – Entering Adjustments to Reg Pay (Hired/Termed Mid Pay Period)
In the Other Earnings section of the Review Paycheck page, you are able to view the SPOT
transaction that processed for the employee.

PY Job Aid
PY381_Using the Single-Use Payroll Online Tool (SPOT)
Rev 1/9/2024 Page 67 of 90
Entering Adjustments to Regular Pay – Change in Compensation from Prior Period
If an employee has a change in compensation, an addition to regular pay may be necessary.
When an employee receives an increase to their regular pay rate in the prior period, the Payroll
Administrator will calculate the amount of the increase and enter it into SPOT.
In this scenario, the current pay period is 3/25 – 4/9/2021. The increase is $1 an hour based on 88
hours in the prior pay period, 3/10 - 3/24/2021. The prior dates will need to be entered in the Earns
Begin Dt and Earns End Dt fields.
1. Enter the following:
a. Empl ID
b. Empl Rcd: Defaults to 0. Update if necessary
c. Earn Code: RGS
d. Earns Begin Dt: Enter the begin date of the prior pay period
e. Earns End Dt: Enter the end date of the prior pay period
f. Oth Hrs: enter 1
g. Hourly Rate: Enter the amount of pay to be added for the employee, based on your
calculation
2. Validate and submit the batch for approval.

PY Job Aid
PY381_Using the Single-Use Payroll Online Tool (SPOT)
Rev 1/9/2024 Page 68 of 90
Review Paycheck Page – Change in Compensation for Prior Pay Period
In the Other Earnings section of the Review Paycheck page, you are able to view the SPOT
transaction that processed for the employee.

PY Job Aid
PY381_Using the Single-Use Payroll Online Tool (SPOT)
Rev 1/9/2024 Page 69 of 90
Entering a Separate Check – Bonus Payment with One-Time Deferrals
When an employee receives earnings, to be paid on a separate check, the Payroll Administrator will
need to enter the SPOT Earnings transaction and update the Sepchk# field default value from 0 to 1. If
there are deductions that will need to be taken from the separate check, then a SPOT Deduction
transaction will need to be entered (after the SPOT Earnings) and the Sepchk# field will need to be
updated from 0 to 1 to ensure the deductions are taken from corresponding separate check.
Note: If there is more than one separate check with a deduction transaction, enter the next value (2,3,
etc.) and make sure the deduction separate check corresponds (2,3, etc.).
In this scenario, the employee is receiving a bonus of $5,000 for the pay period and deductions will be
overridden to take out additional VRS Retirement of $2,500.
SPOT Earnings Batch
1. First, enter the SPOT Earnings batch for the Bonus ($5,000) and change the Sepchk# field value
from 0 to 1. This will open the Benefit Ded Taken and Genl Ded Taken fields.
2. Make the appropriate adjustments to the Benefit Ded Taken and Genl Ded Taken fields. For this
scenario the following are selected:
3. Benefit Ded Taken: Subset
4. Benefit Subset ID: BNS
5. Genl Ded Taken: None (no general deductions will come out of this check)
6. Genl Ded Subset: Leave blank

PY Job Aid
PY381_Using the Single-Use Payroll Online Tool (SPOT)
Rev 1/9/2024 Page 70 of 90
SPOT Deduction Batch
Next, enter the SPOT Deduction batch to take the additional $2500 from the Bonus.
Note: This would work the same way for other deductions such as deferred compensation.
7. Enter the same employee that was entered on the earnings batch.
8. Select the appropriate, Plan Type, Benefit Plan, Ded Code, Ded Class, Ded Calc, and Amount
for the override (for this scenario $2500) and select One Time Cd of Override.
9. In the One Time Cd field, select the Override option.
10. In the Sepchk# field, update the 0 to a 1 to ensure the deduction override is coming out of the
correct check.

PY Job Aid
PY381_Using the Single-Use Payroll Online Tool (SPOT)
Rev 1/9/2024 Page 71 of 90
Review Paycheck Page - Bonus Payment with One-Time Deferrals
In the Other Earnings section of the Review Paycheck page, you are able to view the SPOT Bonus
transaction on the Paycheck Earnings tab that processed for the employee on a Separate Check.

PY Job Aid
PY381_Using the Single-Use Payroll Online Tool (SPOT)
Rev 1/9/2024 Page 72 of 90
On the Paycheck Deductions tab, you can view the deferred compensation amount ($2500) coming out
on the separate check under the Deductions section.

PY Job Aid
PY381_Using the Single-Use Payroll Online Tool (SPOT)
Rev 1/9/2024 Page 73 of 90
Deceased Pay
All deceased pay is paid through the AP Expense Module. Payroll Administrators will need to calculate
the gross to net pay to include the FICA tax deduction. Be sure to account for rounding differences and
any funds due to the agency from the employee (i.e., medical, VSELP). The Net Pay amount requested
from AP, should be paid to the Employee's Estate.
• When the payment is not processed in the same year that the employee deceased, there is no
further action in Cardinal Payroll.
• When the payment is processed in the same year that the employee deceased, SPOT transactions
must be processed for W2 reporting through Cardinal.
SPOT Earnings Batch:
1. Enter the employee deceased employee’s ID.
2. Enter the earnings code DPC (Deceased Pay/Current Year).
Note: This earnings code is subject to FICA taxes only.
3. The Amount should be a sum of all earnings types owed to the deceased employee. For this
scenario 1000.00.
4. Enter the current pay period in the Earns Begin Dt and Earns End Dt fields.

PY Job Aid
PY381_Using the Single-Use Payroll Online Tool (SPOT)
Rev 1/9/2024 Page 74 of 90
SPOT Deduction Batch:
When entering the SPOT Deduction batch, determine if the employee has any additional deductions
outside of the Due Agency that need to be deducted.
Example A:
The screenshot below is an example of the SPOT Deduction page with the Due Agency deduction only.
• Enter the amount paid out to the employee’s estate minus any taxes.
Note: The result is a ZERO NET PAY check.
Example B:
The screenshot below is an example of the SPOT Deduction page with an additional before tax medical
deduction.
• Enter any deductions due to the agency by the employee, using the appropriate deduction code. In
this scenario a medical deduction of 10.00.
• The net pay amount processed in AP should be entered using the DUEAGY deduction code. This
prevents the employee’s estate from being overpaid.
Note: The result is a ZERO NET PAY check.

PY Job Aid
PY381_Using the Single-Use Payroll Online Tool (SPOT)
Rev 1/9/2024 Page 75 of 90
Review Paycheck Page with Due Agency Deduction - Deceased Pay
On the Paycheck Earnings tab in the Other Earnings section of the page, you are able to view the
SPOT Earnings Transaction for the deceased pay ($1,000 for this scenario).

PY Job Aid
PY381_Using the Single-Use Payroll Online Tool (SPOT)
Rev 1/9/2024 Page 76 of 90
Review Paycheck Page with Due Agency Deduction - Deceased Pay (continued)
On the Paycheck Taxes tab, you are able to view the taxes that were deducted from the deceased pay.
When there are no deductions, the Taxable Gross equals the deceased pay amount ($1,000 for this
scenario).

PY Job Aid
PY381_Using the Single-Use Payroll Online Tool (SPOT)
Rev 1/9/2024 Page 77 of 90
Review Paycheck Page with Due Agency Deduction – Deceased Pay (continued)
On the Paycheck Deductions tab, in the Deductions section of the page, you are able to view the Due
Agency amount that was entered in the SPOT Deduction batch.

PY Job Aid
PY381_Using the Single-Use Payroll Online Tool (SPOT)
Rev 1/9/2024 Page 78 of 90
Review Paycheck Page with Additional Before-Tax Medical Deduction
On the Paycheck Earnings tab in the Other Earnings section of the page, you are able to view the
SPOT Earnings Transaction for deceased pay ($1,000 for this scenario).

PY Job Aid
PY381_Using the Single-Use Payroll Online Tool (SPOT)
Rev 1/9/2024 Page 79 of 90
Review Paycheck Page with Additional Before-Tax Medical Deduction (continued)
On the Paycheck Taxes tab, you can view the taxes that were deducted from the deceased pay.
Note: The Taxable Gross for FICA taxes were reduced due to the before tax medical. If there were no
before tax medical deductions, the Taxable Gross would equal the deceased pay amount.

PY Job Aid
PY381_Using the Single-Use Payroll Online Tool (SPOT)
Rev 1/9/2024 Page 80 of 90
Review Paycheck Page with Additional Before-Tax Medical Deduction (continued)
On the Paycheck Deductions tab, in the Deductions section of the page, you are able to view the
deductions that were entered in SPOT Deduction batch.

PY Job Aid
PY381_Using the Single-Use Payroll Online Tool (SPOT)
Rev 1/9/2024 Page 81 of 90
Adjusting VRS Retirement Benefit Deductions
Adjustments to the VRS Retirement Benefit Deductions may be needed for scenarios such as when an
employee terminates in the middle of the month, or a retro pay rate change has been made. The
adjustment can be made with a one-time override on the ‘VRS’ Earnings Code or the impacted
Retirement Benefit Deductions. How you key the adjustment will depend on whether the employee is
enrolled in the Retirement Plan.
Employee Enrolled in the Retirement Plan
• When the employee is enrolled in the Retirement Plan, the VRS Earnings Code (VRS Contribution
Base) can be entered as a SPOT Earnings batch.
• Enter the appropriate Amount as a positive to add to the amount already established as an Additional
Pay or a negative to reduce the amount. The impacted retirement benefit deductions will adjust
based on the transaction that is keyed.
For this scenario, the pay period is 5/25 – 6/09 and the employee is terminating on 6/09 in the (employee
worked through 6/9 and term date is 6/10). The VRS contribution base will need to be increased.
Additional Pay Page
You can navigate to this page using the following path:
Menu > Payroll for North America > Employee Pay Data USA > Create Additional Pay
This page shows the VRS Contribution Base for the employee.
PY Job Aid
PY381_Using the Single-Use Payroll Online Tool (SPOT)
Rev 1/9/2024 Page 82 of 90
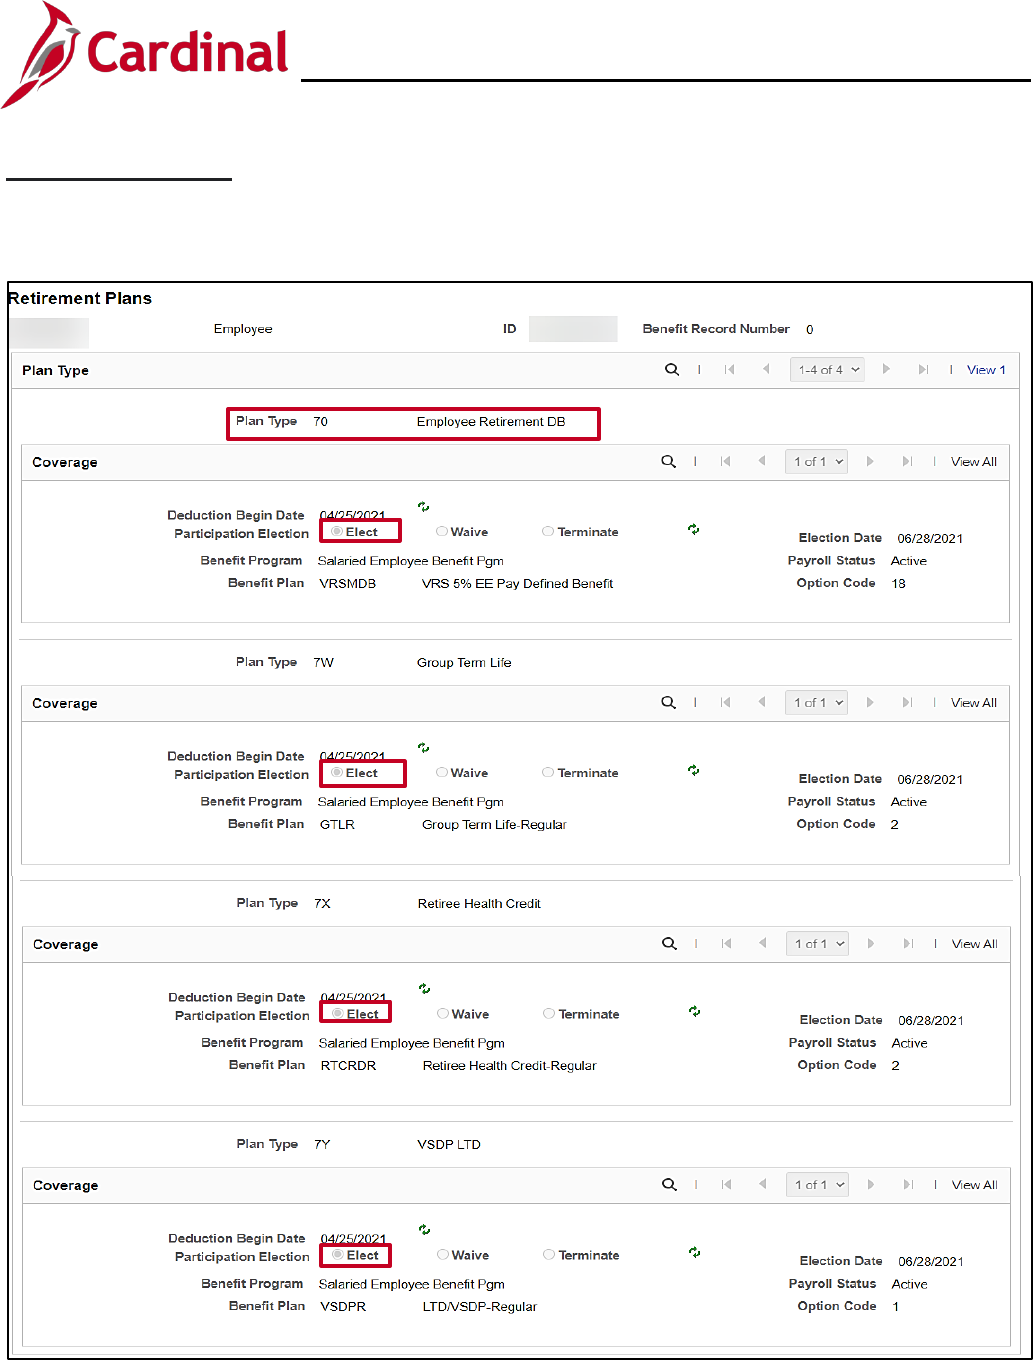
Retirement Plan Page
The Retirement Plans page displays the plan type and indicates whether it is still Active or not.
Menu > Benefits > Enroll in Benefits > Retirement Plans

PY Job Aid
PY381_Using the Single-Use Payroll Online Tool (SPOT)
Rev 1/9/2024 Page 83 of 90
SPOT Earnings Batch
Once you have determined the contribution base, verified the plan and that it is still active, enter the
SPOT batch.
1. Enter the Empl ID and Empl Rcd.
2. Enter the earning code VRS (VRS Contribution Base).
3. Enter the current pay period in the Earns Begin Dt and Earns End Dt, for the days worked during
the pay period (in this scenario 5/25 – 6/9).
4. Enter the Amount for the VRS Contribution Base pay period amount (from the Additional Pay
page). This will double the contribution for the month.
5. Validate and submit the batch.

PY Job Aid
PY381_Using the Single-Use Payroll Online Tool (SPOT)
Rev 1/9/2024 Page 84 of 90
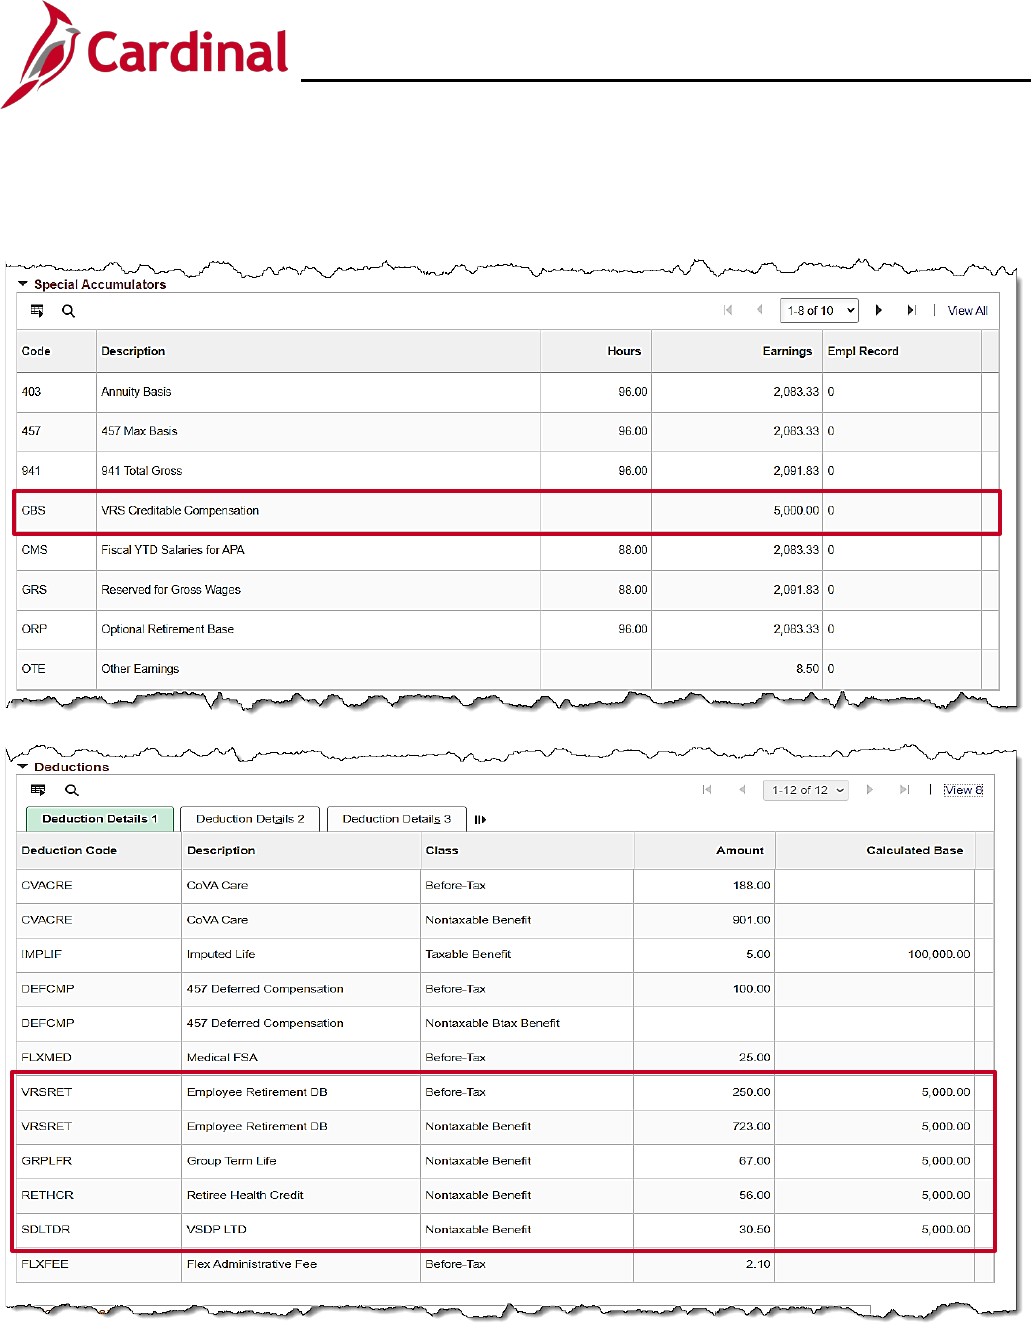
Review Paycheck Page – Employee Enrolled in in the Retirement Plan
Prior to VRS Adjustments
The screenshots below show the Paycheck Earnings tab, Special Accumulators section and
Paycheck Deductions tab, Deductions section, where you are able to view the VRS deductions.
These screenshot shows how it displays prior to VRS Adjustments.
For more information, see the Job Aid titled PY381_General and Benefit Deductions located on the
Cardinal Website in Job Aids under Learning.

PY Job Aid
PY381_Using the Single-Use Payroll Online Tool (SPOT)
Rev 1/9/2024 Page 85 of 90
Paycheck Deductions after SPOT Adjustments
On the Paycheck Earnings tab, in the Other Earnings section of the page, you are able to view the
VRS contribution base amount that was entered in SPOT.
PY Job Aid
PY381_Using the Single-Use Payroll Online Tool (SPOT)
Rev 1/9/2024 Page 86 of 90
The screenshots below show the Paycheck Earnings tab, Special Accumulators section and
Paycheck Deductions tab, Deductions section, where you are able to view the VRS deductions.
These screenshot shows how it displays after VRS Adjustments.

PY Job Aid
PY381_Using the Single-Use Payroll Online Tool (SPOT)
Rev 1/9/2024 Page 87 of 90
Employee Not Enrolled in the Retirement Plan
When an employee has been terminated and no longer enrolled in the retirement plan, you will need to
enter a SPOT Deduction batch to override the impacted retirement benefit deductions. You can navigate
to the Retirement Plans or Saving Plans pages to see this information using the following path:
Menu > Benefits > Enroll in Benefits > Retirement Plans
Menu > Benefits > Enroll in Benefits > Savings Plans
The screenshot below is an example of a prior paycheck showing the VRS retirement deductions and the
amount that will be used for SPOT entries.

PY Job Aid
PY381_Using the Single-Use Payroll Online Tool (SPOT)
Rev 1/9/2024 Page 88 of 90
SPOT Deduction Page
Once you have gathered the amounts, enter the VRS retirement deductions in SPOT.
1. Enter the Empl ID and Empl Rcd.
2. Enter the appropriate retirement benefit deductions.
3. The Amount entered in this example, is the prior pay period amount.
4. The One Time Cd select Addition.
Note: You can use the Override Code as well. In that case, you would enter the total amount that
would need to be deducted from the pay.
5. Repeat steps 1-4 until all VRS retirement deductions have been entered.
6. Validate and submit the Batch.

PY Job Aid
PY381_Using the Single-Use Payroll Online Tool (SPOT)
Rev 1/9/2024 Page 89 of 90
SPOT Entry for an Additional Pay
When entering a SPOT transaction for an additional pay, you must select the appropriate sequence
number.
In this scenario, we need to make an adjustment for Temporary pay. The employee is owed $100
because the effective date was entered incorrectly.
Additional Pay Page
You can navigate to this page using the following path:
Menu > Payroll for North America > Employee Pay Data USA > Create Additional Pay
This page shows the Temp pay which should have had an effective date of 03/10/2023.

PY Job Aid
PY381_Using the Single-Use Payroll Online Tool (SPOT)
Rev 1/9/2024 Page 90 of 90
SPOT Earnings Batch
In order for the Goal Amount to update on the Additional Pay record there must be matching additional
sequence number in SPOT.
1. Enter/select the following:
a. Enter the Empl ID
b. Empl Rcd: Defaults to 0. Update is necessary
c. Earn Code: select the appropriate code. For this scenario TMP
d. Earns Begin Date: enter the begin date of the period when the temporary pay should have
started
e. Earns End Dt: enter the end date of the period
f. Amount: Enter the amount for the temporary pay owed to the employee
g. Add’l Seq Nbr: Enter the additional sequence number associated with the temporary pay
2. Validate and submit the batch for approval.
