
Rescue
Administrators
Guide

Contents
Setting up Administration Center Fundamentals......................................................................6
Setting up Your Organization....................................................................................................................................6
About the Organization Tree................................................................................................................................. 6
How to Add a Master Administrator.....................................................................................................................7
How to Add an Administrator............................................................................................................................... 7
How to Create an Administrator Group................................................................................................................ 8
How to Create a Technician Group and Assign Permissions............................................................................... 9
How to Add Technicians..................................................................................................................................... 13
How to Set Global Password Policies................................................................................................................. 19
How to Enforce Two-Step Verification...............................................................................................................20
How to Set Hierarchy Visibility in Technician Console.....................................................................................23
How to Show Technician Groups only to Assigned Administrators.................................................................. 24
How to Restrict Access Based on IP Address.................................................................................................... 24
Allowlisting and ..................................................................................................................................................26
Allowlisting and - Data Center Range in the European Union..........................................................................31
Setting up Channels..................................................................................................................................................34
About Channels.................................................................................................................................................... 34
How to Assign a Channel to a Technician Group.............................................................................................. 34
How to Make a Channel Available for Use........................................................................................................35
How to Remove an Individual Technician from a Channel................................................................................35
How to Test a Channel........................................................................................................................................ 36
Setting up the Applet............................................................................................................................................... 36
How to Set the Default Applet (Standard or Instant Chat).................................................................................36
How to Set Windows System Service Behavior................................................................................................. 37
How to Set Mouse and Keyboard Data Entry Priority for Remote Control........................................................37
How to Show Estimated Length of Waiting to Customers.................................................................................38
How to Customize Applet Appearance............................................................................................................... 38
How to Set up Custom Terms and Conditions....................................................................................................39
How to Disable the Pause/Break Key................................................................................................................. 40
How to Prompt the Customer for Permissions at Session Start..........................................................................40
Setting up Lens....................................................................................................................................................... 41
Allowing Technicians to Use Lens.................................................................................................................... 41
Enabling Lens Audio.......................................................................................................................................... 42
Controlling How Sessions are Started and Managed..............................................................43
How to Set Connection Methods Available to Technicians....................................................................................44
How to Set Private Sessions to Start Automatically...............................................................................................46
How to Set Channel Sessions to Transfer Automatically....................................................................................... 47
How to Set Channel Sessions to Start Automatically............................................................................................. 47
How to Defer Auto-start for Channel Sessions.......................................................................................................48
How to Prevent Technicians from Transferring Sessions to Unmanned Channels................................................48
How to Exempt a Technician from Channel Session Auto-start.............................................................................48
How to Schedule Working Hours and "No Technician Available" Behavior for a Channel.................................. 49
How to Set No Technician Available Behavior for Private Sessions..................................................................... 49
How to Set Time-outs and Warnings...................................................................................................................... 50
Managing Sessions: Start, Transfer, Close, Hold....................................................................51
How to View Session Information.......................................................................................................................... 51
How to Start a Session from the Administration Center.........................................................................................51
How to Transfer Sessions from the Administration Center.................................................................................... 51
Monitoring a Technician's Desktop.......................................................................................... 53
ii Rescue Administrators Guide

How to View a Technician's Desktop..................................................................................................................... 53
How to Set up Technician Monitoring Options...................................................................................................... 54
Monitoring Performance Data: The Command Center..........................................................55
How to Monitor Performance Data for a Channel..................................................................................................55
How to Monitor Performance Data for a Technician Group.................................................................................. 56
How to Monitor Performance Data for a Technician..............................................................................................58
How to Monitor Performance Data Based on Custom Attributes (Labels).............................................................58
What is a Label?.................................................................................................................................................. 58
How to Add Labels..............................................................................................................................................59
How to Assign Labels..........................................................................................................................................60
How to Monitor Performance Data According to a Label..................................................................................60
How to Monitor Technician Chatlog.......................................................................................................................61
How to Set Command Center Alert Thresholds......................................................................................................62
How to Restrict Administrators to Command Center Monitoring Function........................................................... 62
Customizing the Command Center..........................................................................................................................63
How to Set Monitoring Data Collection Time Period.........................................................................................63
How to Set Value of Custom Column on Sessions Tab..................................................................................... 63
Command Center Terms and Definitions................................................................................................................63
Command Center Error Messages........................................................................................................................... 65
Managing Unattended Computers............................................................................................ 66
About Unattended Access........................................................................................................................................66
Setting up Unattended Access on Multiple Computers (Access Wizard)...............................................................66
Creating the Installer............................................................................................................................................66
Deploying the Installer.........................................................................................................................................67
Managing Unattended Access in the Admin Center........................................................................................... 68
How to Assign or Delete Unattended Computers................................................................................................... 68
How to Set the Authentication Method for Unattended Access............................................................................. 69
Controlling Technician Status................................................................................................... 70
How to Set Technician Status Controls (Maximum sessions, Busy, Away, Auto-logout)......................................70
Customizing the Technician Console........................................................................................ 71
External Content Portal............................................................................................................................................71
Integrated Content Portal......................................................................................................................................... 71
How to Manage Predefined Replies and URLs...................................................................................................... 72
Create New Predefines Replies and URLs..........................................................................................................72
Export a Set of Predefined Replies and URLs....................................................................................................73
Share a Set of Predefined Replies and URLs......................................................................................................73
How to Set Up Script Files for Storing Recordings in a Cloud..............................................................................73
Setting up Custom Fields........................................................................................................... 75
How to Name Custom Fields.................................................................................................................................. 75
How to Enable Custom Fields for Private Sessions................................................................................................76
Setting up Remote Control Defaults.........................................................................................77
How to Set up Screen Recording............................................................................................................................ 77
How to Set Clipboard Synchronization Behavior................................................................................................... 78
How to Disable Wallpaper for all Remote Sessions...............................................................................................79
Setting up Surveys.......................................................................................................................80
How to Set up the Technician Survey.....................................................................................................................80
How to Set Up the Customer Survey......................................................................................................................81
Setting up Instant Chat.............................................................................................................. 83
Setting up Calling Card..............................................................................................................84
MAC calling card JAMF deployment..................................................................................................................... 84
Configuring the Rescue Calling Card PKG.........................................................................................................84
Creating a Policy to Install the Rescue Calling Card for Mac............................................................................86
iii

Configuring a Privacy Preference Policy for Rescue..........................................................................................87
About the Calling Card Connection Method...........................................................................................................88
Calling Card Setup, Task One: Generate a Calling Card....................................................................................89
Calling Card Setup, Task Two: Give a Technician Group Permission to Deploy the Calling Card................... 89
Calling Card Setup, Task Three: Apply a Calling Card Installer to a Technician Group................................... 90
Calling Card Setup, Task Four: Customize the Calling Card Applet................................................................. 90
Calling Card Setup, Task Four: Customize the Calling Card Applet on a Mac..................................................91
Calling Card Setup, Task Five: Deploy the Calling Card to a Customer's Computer.........................................93
Setting Up External Technician Collaboration........................................................................94
Controlling How Your Technicians Collaborate With External Technicians......................................................... 94
Setting Permissions for External Technicians......................................................................................................... 94
Security and Reporting for External Technician Collaboration.............................................................................. 95
Setting up Scripting.................................................................................................................... 96
Embedded Scripting for Applet and Calling Card.................................................................................................. 96
Centralized Scripting................................................................................................................................................ 96
How to Create a New Script Collection..............................................................................................................97
How to Share a Script Collection with a Technician Group...............................................................................97
How to Modify a Script Collection.....................................................................................................................97
How to Modify a Script in the Collection...........................................................................................................98
Generating Reports..................................................................................................................... 99
How to Generate a Report.......................................................................................................................................99
Customer Survey Report (List All)........................................................................................................................100
Customer Survey Report (Summary).....................................................................................................................101
Customer Survey Issuance Report (List All).........................................................................................................101
Customer Survey Issuance Report (Summary)......................................................................................................102
Performance Report (List All)............................................................................................................................... 102
Performance Report (Summary)............................................................................................................................ 103
Login Report (List All)..........................................................................................................................................104
Login Report (Summary)....................................................................................................................................... 105
Session Report (List All)....................................................................................................................................... 106
Session Report (Summary).....................................................................................................................................108
Chatlog Report........................................................................................................................................................109
How to Delete Chatlogs.....................................................................................................................................110
Collaboration Chat Log Report..............................................................................................................................111
Custom Fields Report.............................................................................................................................................112
Missed Sessions Report (List All).........................................................................................................................113
Missed Sessions Report (Summary)...................................................................................................................... 114
Transferred Sessions Report...................................................................................................................................114
Transferred Sessions - Extended Report................................................................................................................115
Technician Survey Report (List All)..................................................................................................................... 116
Failed Sessions Report (List All)...........................................................................................................................117
Failed Sessions Report (Summary)........................................................................................................................117
Failed Sessions - Extended.................................................................................................................................... 118
External Technician Chatlog Report......................................................................................................................119
Audit Report (List All).......................................................................................................................................... 120
Rebooting/Reconnecting Report.............................................................................................................................122
Technician Status Report....................................................................................................................................... 123
Administrator Status Report...................................................................................................................................124
Integration and API..................................................................................................................125
Setting up Single Sign-On Authentication.............................................................................................................125
Web SSO via SAML 2.0 User Guide (PDF)................................................................................................... 127
Generate API Token...............................................................................................................................................127
Sending Session Data to a URL (Post-to-URL)....................................................................................................128
About Post-to-URL.............................................................................................................................................128
iv Rescue Administrators Guide

How to Post Session Data to a URL.................................................................................................................130
How to Hide Post Session URLs.......................................................................................................................131
API Guide (Web)..................................................................................................................................................131
Legal Notice................................................................................................................................132
Index............................................................................................................................................133
v

Setting up Administration Center Fundamentals
The Administration Center Organization Tree is where Administrators configure Rescue to match their support
organization. Once the organization is set up, the Organization Tree offers a clear representation of the structure, and
makes it easy to select existing organization members and channels, and make changes.
The configuration of the Organization Tree is a clear pre-requisite to using Rescue in an efficient and organized
way. It is typically performed by (Master) Administrators before any real support activity can take place. This
initial configuration consists of a logical sequence of setup tasks, which is best performed by following end-to-end
instructions detailed here regarding the following topics:
Setting up Your Organization
About the Organization Tree
The Organization Tree is where you configure to match your support organization. It is displayed in the left panel
of the Administration Center interface.
Once you have set up your organization, the Organization Tree offers a clear representation of your structure and
makes it easy to select existing organization members and channels, and to make changes with a simple drag-and-
drop motion.
Tip: To achieve optimal performance, close all items on the Organization Tree that you are not currently
using. This is particularly important for very large accounts.
Expand/Collapse
branches
Branches can be expanded/collapsed by clicking +/-
Search
Enter text in the search field to search for a group, technician, or any other unit in your
organization.
Drag-and-Drop
Certain items of the Organization Tree can be dragged and dropped items within the tree. For
example, Administrators can be assigned to a Technician Group by dragging them into the
group. Technicians and Technician Groups can also be easily moved and assigned using the
drag-and-drop facility.
Right-click menu
Right-click any item in the tree brings to open a shortcut menu. The available selections in the
menu change depending on your user role and the item you are clicking.
Dynamic
relationship with
the Workspace
Selecting an item on the organization tree opens the relevant form in the Workspace (the right
pane).
Select Technician Group 1 in the Organization Tree and select the Settings tab. The Settings for Technician Group 1
are displayed on the Local Setting tab.
Next, select Technician 2. The Settings for Technician 2 are displayed on the Settings tab.
Next, if you select the Sessions tab, the session information for Technician 2 is displayed in the Sessions tab.
6 Rescue Administrators Guide

How to Add a Master Administrator
Master Administrators have complete control over all areas of the Administration Center. They are the only users
with access to the Global Settings tab.
This option is only available to Master Administrators.
1.
Right-click Master Administrators on the Organization Tree.
2.
Click Create Master Administrator.
A new Master Administrator is added to the Organization Tree.
3.
Make sure the user you want to work with is selected on the Organization Tree and click the Organization tab.
The Configuration page is displayed.
4.
Edit the following options:
Option Description
Name
The user's name as it will be displayed on the Organization Tree and in the Technician
Console, if licensed.
Email
The email address the user will use to log in to LogMeIn Rescue.
Single Sign-On ID
The identification number the user will use to log on if Single Sign-on is active.
Description
This is for your own reference.
New password
The password the user will use to log in to LogMeIn Rescue.
Note: To require the user to change this password when they first log in,
make sure the Admin password changes force user to change password
at next logon option is selected under the Password policies section of the
Global Settings tab.
Minimum password
strength
The minimum required password strength as set on the Global Settings tab under
Password Policies.
5.
Under Status, select Enabled to activate the user.
6.
Click Save changes.
How to Add an Administrator
Administrators manage technicians and Technician Groups, generate reports, and more.
This option is only available to Master Administrators.
Administrator Characteristics:
• Maintains all assigned technicians and Technician Groups
• Disables any technicians and Technician Groups if necessary
• Generates reports
• Configures support channels for assigned Technician Groups
• Can be assigned to multiple Technician Groups
Copyright
©
2023 GoTo, Inc. 7

• Can perform all functions of a technician (if licensed)
1.
Right-click the location in the organization where you want to add the new Administrator and click Create
administrator.
• To add the new administrator at the Administrators root-level, right-click Administrators on the Organization
Tree
• To add the new administrator as a member of an existing Administrator Group, right- click the chosen group
on the Organization Tree
A new administrator is added to the Organization Tree at the chosen location.
2.
Make sure the user you want to work with is selected on the Organization Tree and click the Organization tab.
The Configuration page is displayed.
3.
Edit the following options:
Option Description
Name
The user's name as it will be displayed on the Organization Tree and in the Technician
Console, if licensed.
Email
The email address the user will use to log in to LogMeIn Rescue.
Single Sign-On ID
The identification number the user will use to log on if Single Sign-on is active.
Description
This is for your own reference.
New password
The password the user will use to log in to LogMeIn Rescue.
Note: To require the user to change this password when they first log in,
make sure the Admin password changes force user to change password
at next logon option is selected under the Password policies section of the
Global Settings tab.
Minimum password
strength
The minimum required password strength as set on the Global Settings tab under
Password Policies.
4.
Under Status, select Enabled to activate the user.
5.
Click Save changes.
Tip: To assign the user to a group (or groups), drag the user's icon to a target group.
How to Create an Administrator Group
An Administrator can belong to one Administrator Group at any time. You can include Administrator Groups within
Administrator Groups.
This option is only available to Master Administrators.
1.
Right-click the location in the organization where you want to add the new Administrator Group and click
Create group.
• To add the new Administrator Group at the Administrators root-level, right-click Administrators on the
Organization Tree
• To add the new Administrator Group as a sub-group of an existing Administrator Group, right-click the chosen
group on the Organization Tree
A new Administrator Group is added to the Organization Tree at the chosen location.
8 Rescue Administrators Guide

Note: Pay special attention to the Show Technician Groups only to assigned Administrators global
setting which must be used in order to prevent the admin seeing the rest of the groups they are not
assigned to.
2.
Enter a Group name and Description.
3.
Under Status, select Enabled to activate the group.
4.
Set group permissions.
Option Description
Standard
administrator rights
When Standard administrator rights is selected, group members can administer
technicians and access both the Administration Center and the Command Center.
Restricted
administrator rights
When Restricted administrator rights is selected, at least one sub-option must be
selected:
• Select Grant access to Command Center to allow group members to access the
Command Center.
• Select Grant access to Administration Center > Reports to allow group members
to access the Reports tab in the Administration Center.
• Select Grant access to Administration Center > CallingCard to allow group
members to access the CallingCard tab in the Administration Center.
• Select Grant access to Administration Center > Channels to allow group
members to access the Channels tab in the Administration Center.
• Select Grant access to Administration Center > Global Settings to allow group
members to access the Global Settings tab in the Administration Center.
• Select Grant access to Administration Center > Resources to allow group
members to access the Resources tab in the Administration Center.
• Select Grant access to Administration Center > Account to allow group
members to access the Account tab in the Administration Center.
Note: No other tabs are visible in the Administration Center if only one sub-
option is selected.
5.
Click Save changes.
When the administrator logs in they will now see a restricted view of the Administration Center with functions
limited to the tabs they can access.
How to Create a Technician Group and Assign Permissions
Master Administrators can create Technician Groups anywhere in the organization, while administrators can only
create groups under Technician Groups to which they are assigned. Master Administrators can lock permissions so
they cannot be changed by an Administrator.
1.
Right-click the location in the organization where you want to add the new Technician Group and click Create
group.
• To add the new Technician Group at the Technician Group root-level, right-click Technicians on the
Organization Tree
• To add the new Technician Group as a sub-group of an existing Technician Group, right-click the chosen
group on the Organization Tree
Copyright
©
2023 GoTo, Inc. 9

A new Technician Group is added to the Organization Tree at the chosen location.
2.
Enter a Group name and Description.
3.
Under Status, select Enabled to activate the group.
4.
Set group permissions.
Permission Description
Chat
Enables chat at session start. See About Chat Permissions on page 12.
Allow chat
enable/disable by
Technician
Allows group members to enable or disable chat. See About Chat Permissions on
page 12.
Launch remote
control
Allow group members to initiate a remote control session during any active session.
Launch desktop
viewing
Allow group members to initiate a Desktop Viewing Session during any active
session.
Send files
Allow group members to send files to a customer during any active session.
Receive files
Allow group members to receive files from a customer during any active session.
Access File Manager
tab
Allow group members to access the File Manager tab in the Rescue Technician
Console during any active session.
Note: The actual capability to send/receive files depends on the Send files
and Receive files permissions; therefore, when the Access File Manager tab
permission is denied, group members may still be able to send/receive files.
When the Manage files permission is selected, group members will be allowed to
manage a customer's files during any active session.
Send URLs
Allow group members to send a URL that will open on the customer’s device during
any active session.
View system
information
Allow group members to view the customer's system information during an active
desktop or mobile session. Not applicable to Click2Fix.
Reboot
Allow group members to reboot the customer’s device during an active session.
Record sessions
Allow group members to make a screen recording of any session.
When only with customer consent is selected, group members will only be allowed
to record a customer's screen with the customer's consent. Customers will always be
prompted to grant the technician permission, even when Use single prompt for all
permissions is enabled.
Start private sessions
Allow group members to start a session using a private method (PIN Code, Link,
SMS with Rescue+Mobile, Calling Card).
Use single prompt for
all permissions
Customers will be asked only once to grant the technician permission to perform
remote actions. Otherwise, the customer will be prompted each time the technician
attempts an action.
Transfer sessions
Allow group members to transfer a session to a valid member of the organization.
You have the following options:
• to any technician allows technicians to transfer sessions to any other technician in
the organization.
10 Rescue Administrators Guide

Permission Description
• to specific technician groups or channels allows technicians to transfer sessions to
selected Technician Groups and channels.
Hold sessions
Allow group members to place sessions on hold.
Request Windows
credentials
Allow group members to request a customer’s Windows credentials during an active
session.
Allow clipboard
synchronization
Allow group members to synchronize the customer’s clipboard to their own. Anything
copied on one machine is automatically available to be pasted on the other.
Deploy the Calling
Card
Allow group members to deploy the Calling Card Applet to the customer’s desktop.
Allow screen sharing
with customers
Allow group members to be able to share their desktop with customers.
Send collaboration
invitations
Allow group members to be able to invite other technicians to an active session. You
have the following options:
• to any technician allows technicians to invite any other technician in the
organization.
• to specific technician groups allows technicians to invite members of the selected
Technician Groups.
Invite external
technicians
Allow group members to collaborate on a session with individuals who are external
to your Rescue organization. External technicians do not need to have a Rescue
subscription of their own. That is, they are not configured as users in your Rescue
account. You have the following options:
• anyone can be invited allows technicians to send an invitation to any email
address.
• only approved allows technicians to invite only approved individuals who have
been added to External Technician Groups.
Inline editing of
Queue
Allow group members to edit Custom Fields during a session.
Script deployment
Allow group members to deploy scripts to the customer’s system.
Run embedded
scripts
Allow group members to manually run embedded scripts by clicking the Run Script
button on the Technician Console Reboot tab.
Unattended access
Unattended access allows a technician to connect to a remote computer when no
user is present. Allow group members to request permission to be able to access
the customer's computer when the customer is not present and to start unattended
sessions.
Connect On LAN
Allow group members to connect to unattended computers on the local area network.
No customer interaction required.
Configure mobile
device settings
Allow group members to manage mobile device settings using the Device
Configuration tab in the Technician Console. Not applicable to Click2Fix.
Click2Fix for mobile
When selected, all sessions with a mobile device will default to the Click2Fix tab.
Classic display for
mobile
For mobile sessions, activate the legacy Customer Display tab.
Copyright
©
2023 GoTo, Inc. 11

Permission Description
Rescue Lens
Allow group members to start Rescue Lens sessions. With Rescue Lens, customers
can use their mobile device to stream live video to a technician.
Screen capture
Allow group members to capture images of the customer's screen during a session.
5.
Click Save changes.
Hiding Disabled Features
To ensure that technicians can focus on the right tools for the job, the Technician Console hides certain tabs and
buttons when a technician does not have permission to use the associated feature.
To hide this... Deny this permission on the Organization tab…
Launch Remote Control Session button on Customer
Desktop tab
Launch remote control
Launch Desktop Viewing button on Customer Desktop
tab
Launch desktop viewing
File Manager tab
Access File Manager tab
or
Send files, Receive files, and Manage files
System Info tab View system information
Reboot tab Reboot
Calling Card tab Deploy the Calling Card
Scripts tab Script deployment and Run embedded scripts
Unattended Access tab Unattended Access
Device Configuration tab Configure mobile device settings
Customer Display tab for mobile sessions Classic display for mobile
Click2Fix tab for mobile sessions Click2Fix for mobile
About Chat Permissions
An administrator sets a Technician Group's permission to use the Enable/Disable Chat feature on the Organization
tab.
Select only Chat to enable Chat at session start.
12 Rescue Administrators Guide

Select Chat plus Allow chat enable/disable by
technician to enable Chat at session start and allow
technicians to toggle Chat during the session.
Select only Allow chat enable/disable by technician
to disable Chat at session start, but allow technicians to
toggle Chat during the session.
When neither option is selected, Chat is disabled at
session start, and technicians are not allowed to toggle
Chat during the session.
Note: The above settings apply to sessions started by running the Applet. Chat is always enabled for
Instant Chat sessions.
How to Add Technicians
Master Administrators can add technicians to any Technician Group in the organization, while Administrators can
only add technicians to groups to which they are assigned.
How to Add a Technician
Technician permissions are inherited from the Technician Group.
1.
Right-click the Technician Group to which you want to add the technician and click Create technician.
2.
Make sure the user you want to work with is selected on the Organization Tree and click the Organization tab.
The Configuration page is displayed.
3.
Edit the following options:
Option Description
Name
The user's name as it will be displayed on the Organization Tree and in the Technician
Console, if licensed.
Nickname
The user's name as it will be displayed to the customer during a session. Example:
[10:46 AM] Chat session established with Nickname.
Email
The email address the user will use to log in to LogMeIn Rescue.
Single Sign-On ID
The identification number the user will use to log on if Single Sign-on is active.
Copyright
©
2023 GoTo, Inc. 13

Option Description
Description
This is for your own reference.
New password
The password the user will use to log in to LogMeIn Rescue.
Note: To require the user to change this password when they first log in,
make sure the Admin password changes force user to change password
at next logon option is selected under the Password policies section of the
Global Settings tab.
Minimum password
strength
The minimum required password strength as set on the Global Settings tab under
Password Policies.
4.
Under Status, select Enabled to activate the user.
5.
Click Save changes.
Tip: To move a technician to another group, select a technician on the Organization Tree and drag it to the
desired Technician Group or use the Move to Technician Group drop-down list on the Configuration page.
How to Import Technicians from a File
Master Administrators can import technicians "in bulk" by uploading a CSV or JSON file.
Note: During the below procedure, you will be required define a password for each technician that you
import. As a best practice, before you perform the import, we recommend that you enable a setting that will
require the technician to change this initial password when they first log in. To do so, make sure the Admin
password changes force user to change password at next logon option is selected under the Password
policies section of the Global Settings tab in the Administration Center.
1.
Log in to your Rescue account. On the My Account page, click Import technicians.
Note: For detailed information about requirements related to the CSV or JSON files, you can download
example files from the Import technicians page.
To change the delimiter used in the example file, follow the below instructions.
•
Windows
•
Mac
2.
Select the Technician Group to which you want to import technicians by starting to type the name of the group in
the Search technician group... field.
Fastpath: If the uploaded file contains valid Technician Group IDs for each line, you may leave this
field empty.
3.
Click Upload file to choose the CSV or JSON file from your source.
4.
Click Start import.
Import starts. When the process ends, the Import Summary is displayed listing all the successful or failed
import items.
Note: The CSV or JSON file must meet the following requirements.
• All column headers are required and MUST remain in their original order in the file.
• The following fields are required and each row must contain data as part of the import:
• Name
• Email address
• Password
• (technician is) Enabled
• (has) Standard License
• (has) Mobile License
14 Rescue Administrators Guide

• If you set all users to be imported into the same Technician Group (by selecting a global group), you can
leave the Tech Group ID column blank.
Remember: The column header must remain in the original order.
• If you select a global Tech Group, Tech Group IDs in the file will be ignored during the import.
• Each import file is limited to a maximum of 500 users.
How to Synchronize a Rescue Technician Group with Azure Active Directory User Groups
Master Account Holders can import Azure Active Directory users as technicians into their organization. Key user
data in will be automatically updated when those change in the Azure Active Directory.
1.
Generate a service token and default password for new users in the Admin Center.
a) Select the Global Settings tab.
b) To generate a service token, click Generate and Copy under Active Directory Synchronization.
A service token is generated and copied to your clipboard.
c) Define the default password you want your new technicians to use for their first login.
Note: Users are required to change this password upon their first login.
d) At the bottom of the page click Save.
2.
Download and extract the server application.
a) In the Rescue Administration Center, under Active Directory Synchronization, click Download to
download the service installer.
The service installer is downloaded to your computer in a zip file.
b) Extract the zip file to a folder.
3.
Run the server application, and configure synchronization behavior.
Important: You need privileges to run the application as a system service. The computer running the
application must be connected to Active Directory with sufficient permissions to access and query all
Active Directory groups and users.
a) Select the Microsoft Azure AD service to be used.
b) Submit the following credentials:
• Master Account Holder Rescue credentials
• Email
• Password
• The service token you previously generated on the Global Settings tab of the Admin Center.
Note: By checking Dry Run mode, you can preview the changes the service will make in your
Rescue hierarchy tree.
c) Click Next.
Note: The application runs in Admin mode.
d) Enter your Azure App credentials, and click Next.
Note: How to create Client ID, Tenant and Client Secret in Azure.
4.
Select the Technician Groups you want to synchronize.
a) Click the Technician Groups radio button under Technician Groups/Admin Groups
• The first column contains the Azure AD Groups, select one Active Directory group you want to
synchronize with a Rescue Technician Group.
• The second column contains the Rescue Technician Groups, select one group that will be synchronized
with the AD group.
Copyright
©
2023 GoTo, Inc. 15

b) Click the arrow button pointing to the third column to finalize the selection.
Note: If you want to select multiple groups, repeat step a. To cancel synchronization between two
groups, select them in the third column, and click the arrow pointing towards the second column.
c) Click Next.
d) Enter a search criteria (for example 'support').
e) Enter a search term (for example 'aid').
AdSync searches for this term between the configured AD groups.
f) Select Yes in the confirmation pop-up window to continue with the synchronization.
Note: If you connected at least one Active Directory Group to a Rescue Technician Group check an
option under Global settings to define the behaviour of the synchronized group.
g) Select the Group settings for Technician Groups:
• Mobile license: a mobile license is assigned to the members of the group, if available.
• Mapping UPN to SSOID: the User Principal Name (UPN) from Azure will be mapped to the SSOIDs of
the group members. This feature is only available in Microsoft Azure Active Directory.
5.
Select the Admin and Master Admin Groups you want to synchronize with your Azure groups.
a) Click the Admin Groups/Master Admin radio button under Technician Groups/Admin Groups
• The first column contains the Azure AD Groups, select one Active Directory group you want to
synchronize with a Rescue Admin Group.
• The second column contains the Rescue Admin Groups, select one group that will be synchronized with
the AD group.
b) Click the arrow button pointing to the third column to finalize the selection.
Note: If you want to select multiple groups, repeat step a. To cancel synchronization between two
groups, select them in the third column, and click the arrow pointing towards the second column.
c) Click Next.
d) Enter a search criteria (for example 'support').
e) Enter a search term (for example 'aid').
AdSync searches for this term between the configured AD groups.
f) Select Yes in the confirmation pop-up window to continue with the synchronization.
Note: If you connected at least one Active Directory Group to a Rescue Admin Group check an
option under Global settings to define the behaviour of the synchronized group.
g) Select the Group settings for Admin Groups:
• Mobile license: a mobile license is assigned to the members of the group, if available.
• Mapping UPN to SSOID: the User Principal Name (UPN) from Azure will be mapped to the SSOIDs of
the group members. This feature is only available in Microsoft Azure Active Directory.
6.
Click Next.
7.
In the resulting pop-up window click Yes to continue with the synchronization.
8.
Select how AdSync will run:
• Start Active Directory Snychronizer as a service.
• Start Active Directory Snychronizer as a Windows terminal application.
Important: If you run synchronization as a Windows terminal application, do not close the appearing
terminal window.
9.
If the installation was successful, click Finish, and close the installer.
The service application is installed as a Windows service provisioning users belonging to the selected Azure
Active Directory group(s) to the selected Rescue Technician Group(s).
Restriction: It is not possible to delete a technician from the Admin Center by using the Active
Directory synchronization service. When a user is deleted or moved in Active Directory, the
corresponding technician is disabled.
16 Rescue Administrators Guide

Note: If a technician is moved to another Technician Group, subsequent synchronization will only
update the user's status, but will not move the user back to its initial synchronization group.
Note: If a user is disabled, deleted, or moved in Active Directory, the technician's mobile license is
freed up, and becomes available for other members of the organization.
Tip: If the synchronization service fails, you can get an error log by clicking Active Directory Logger
at the bottom of the Active Directory Synchronization section on the Global Settings tab of the Admin
Center.
How to Create a Client ID, Tenant and Client Secret in Azure
1.
Sign in to Microsoft Azure.
2.
Select Azure Active Directory.
3.
Click Add on the ribbon and select App registration.
4.
Enter the name of your application and click Add.
5.
Select Accounts in this organizational directory only (Default Directory only - Single tenant) option under
Supported account types.
6.
Note your Application Client ID and Directory tenant ID, as you will need them later on for AdSync.
7.
Select Certificates & Secrets from the sidebar on the left, and click the New client secret option.
8.
Enter the description and expiry of the Client secret in the Add a client secret dialog on the top of the screen.
9.
Save the value of the Client secret.
10.
Select API permission from the sidebar on the left, and click the Add a permission option.
11.
Select Microsoft Graph, and click the Application permissions tab.
12.
Scroll down to User and check in the User.Read.All option.
13.
Scroll to Group, and check in the Group.Read.All option.
14.
Scroll to Directory and check in the Directory.Read.All option.
15.
Click Add permissions at the bottom of the page.
16.
Click Grant admin consent for Default Directory, and click Yes, when prompted.
17.
Close the Microsoft Azure portal.
The Client ID, Tenant and Client Secret is populated in AdSync.
How to Stop the AD Sync Service
Click Terminate Service after having relaunched the application to stop running the service.
A confirmation window pops up, asking if you want to stop the service. Click Yes. Now the service is stopped, and
you will see the starting window of Rescue AD Sync.
How to Synchronize a Rescue Technician Group with Active Directory User Groups
Master Account Holders can import Active Directory users as Rescue technicians into their organization. Key user
data in Rescue will be automatically updated when those change in Active Directory.
1.
Generate a service token and default password for new users in the Admin Center.
a) Select the Global Settings tab.
b) To generate a service token, click Generate and Copy under Active Directory Synchronization.
A service token is generated and copied to your clipboard.
c) Define the default password you want your new technicians to use for their first login.
Note: Users are required to change this password upon their first login.
d) At the bottom of the page click Save.
2.
Download and extract the server application.
Copyright
©
2023 GoTo, Inc. 17

a) In the Rescue Administration Center, under Active Directory Synchronization, click Download to
download the service installer.
The service installer is downloaded to your computer in a zip file.
b) Extract the zip file to a folder.
3.
Run the server application, and configure synchronization behavior.
Important: You need privileges to run the application as a system service. The computer running the
application must be connected to Active Directory with sufficient permissions to access and query all
Active Directory groups and users.
a) Select the Microsoft AD service to be used.
b) Submit the following credentials:
• Master Account Holder Rescue credentials
• Email
• Password
• The service token you previously generated on the Global Settings tab of the Admin Center.
Note: By checking Dry Run mode, you can preview the changes the service will make in your
Rescue hierarchy tree.
c) Click Next.
Note: The application runs in Admin mode.
d) Enter the Active Directory domain from which you want to import users, and click Next.
4.
Select the Technician Groups you want to synchronize.
a) Click the Technician Groups radio button under Technician Groups/Admin Groups
• The first column contains the AD Groups, select one Active Directory group you want to synchronize with
a Rescue Technician Group.
• The second column contains the Rescue Technician Groups, select one group that will be synchronized
with the AD group.
b) Click the arrow button pointing to the third column to finalize the selection.
Note: If you want to select multiple groups, repeat step a. To cancel synchronization between two
groups, select them in the third column, and click the arrow pointing towards the second column.
c) Click Next.
d) Enter a search criteria (for example 'support').
e) Enter a search term (for example 'aid').
AdSync searches for this term between the configured AD groups.
f) Select Yes in the confirmation pop-up window to continue with the synchronization.
Note: If you connected at least one Active Directory Group to a Rescue Technician Group check an
option under Global settings to define the behaviour of the synchronized group.
g) Select the Group settings for Technician Groups:
• Mobile license: a mobile license is assigned to the members of the group, if available.
5.
Select the Admin and Master Admin Groups you want to synchronize with your Azure groups.
a) Click the Admin Groups/Master Admin radio button under Technician Groups/Admin Groups
• The first column contains the AD Groups, select one Active Directory group you want to synchronize with
a Rescue Admin Group.
• The second column contains the Rescue Admin Groups, select one group that will be synchronized with
the AD group.
18 Rescue Administrators Guide

b) Click the arrow button pointing to the third column to finalize the selection.
Note: If you want to select multiple groups, repeat step a. To cancel synchronization between two
groups, select them in the third column, and click the arrow pointing towards the second column.
c) Click Next.
d) Enter a search criteria (for example 'support').
e) Enter a search term (for example 'aid').
AdSync searches for this term between the configured AD groups.
f) Select Yes in the confirmation pop-up window to continue with the synchronization.
Note: If you connected at least one Active Directory Group to a Rescue Admin Group check an
option under Global settings to define the behaviour of the synchronized group.
g) Select the Group settings for Admin Groups:
• Mobile license: a mobile license is assigned to the members of the group, if available.
6.
Click Next.
7.
In the resulting pop-up window click Yes to continue with the synchronization.
8.
Select how AdSync will run:
• Start Active Directory Snychronizer as a service.
• Start Active Directory Snychronizer as a Windows terminal application.
Important: If you run synchronization as a Windows terminal application, do not close the appearing
terminal window.
9.
If the installation was successful, click Finish, and close the installer.
The service application is installed as a Windows service provisioning users belonging to the selected Active
Directory group(s) to the selected Rescue Technician Group(s).
Restriction: It is not possible to delete a technician from the Admin Center by using the Active
Directory synchronization service. When a user is deleted or moved in Active Directory, the
corresponding technician is disabled.
Note: If a technician is moved to another Technician Group, subsequent synchronization will only
update the user's status, but will not move the user back to its initial synchronization group.
Note: If a user is disabled, deleted, or moved in Active Directory, the technician's mobile license is
freed up, and becomes available for other members of the organization.
Tip: If the synchronization service fails, you can get an error log by clicking Active Directory Logger
at the bottom of the Active Directory Synchronization section on the Global Settings tab of the Admin
Center.
How to Stop the AD Sync Service
Click Terminate Service after having relaunched the application to stop running the service.
A confirmation window pops up, asking if you want to stop the service. Click Yes. Now the service is stopped, and
you will see the starting window of Rescue AD Sync.
How to Set Global Password Policies
Master Administrators can set password policies that apply to all users in the organization.
1.
Select the Global Settings tab.
2.
Under Password Policies, select from the following options:
Copyright
©
2023 GoTo, Inc. 19

Option Description
Minimum password
strength
Specify the minimum password strength that must be met by all members of the
organization.
No password may be less than 8 characters in length. Passwords comprise four
character types: lowercase ("abc"); uppercase ("ABC"); numeric ("123"); and special
("%#&").
Three password strengths can be assigned:
• Good: 3 character types, but some repeat characters, i.e. "Sampla12"
• Strong: 3 character types, no repeat characters, i.e. "Sample12"; or 4 character
types, but some repeat characters, i.e. "Sampla1%
• Excellent: 4 character types, no repeat characters, i.e. "Sample1%"
Maximum password
age
Specify the maximum number of days that a password remains valid (0 = no limit).
Notification before
password expires
Notify users that their password is due to expire in this many days (0 = no
notification).
Admin password
changes force user to
change password at
next logon
Force a user to change his password when next logging in to his account if his Rescue
password has been changed. After logging in with the new password created by the
administrator, the user will be prompted to create his own new password.
3.
Click Save Changes.
The settings are applied to all users in your Rescue organization.
How to Enforce Two-Step Verification
Master Administrators can add a second layer of protection to their account by forcing members of their
organization to use two-step verification for logging in to .
1.
Select the Global Settings tab.
2.
Under Two-step verification, select the members of your organization who you want to use two-step
verification when logging in to the Rescue website and Desktop Technician Console and when changing their
password in either component.
Important: Administrators with both an administrator and a technician license will be required to use
two-step verification if settings apply to them either as an Administrator, or as an affected technician.
20 Rescue Administrators Guide

If Members of selected Technician Group(s) is selected under Technicians, make sure to select the Enforce
two-step verification checkbox on the Settings tab for the desired Technician Group(s).
3.
Click Save Changes.
The settings are applied to the selected users in your Rescue organization.
Reset Two-Step Verification
Resetting two-step verification is necessary when a member of the organization required to use two-step
verification needs to reinstall the LastPass Authenticator app.
Examples when reinstalling the Authenticator app is necessary:
• The user loses their mobile device on which the Authenticator app is installed.
• The user starts using a new mobile device and has to install another instance of the Authenticator app.
• The Authenticator app fails, and there is no other way of fixing the issue.
Important: Master Administrators can reset two-step verification for any organization member for
whom the feature is enabled, while Administrators can only reset two-step verification for members of the
Technician Groups they are assigned to.
1.
Select the Organization tab.
2.
On the Organization Tree, select the member(s) for whom you want to reset two-step verification.
Copyright
©
2023 GoTo, Inc. 21

3.
Select Force two-step verification reset then Yes to confirm.
4.
Select Save.
22 Rescue Administrators Guide

The next time the selected member(s) log in, they are prompted to set up two-step verification.
How to Set Hierarchy Visibility in Technician Console
The Hierarchy Visibility feature allows Master Administrators to simplify the organizational hierarchy displayed to
users when transferring sessions, inviting other technicians, or choosing a technician to monitor.
1.
Select the Global Settings tab.
2.
Under Hierarchy Visibility in Technician Console, select from the following options:
Option Description
Compact View
Technicians see only those organization entities that are relevant targets for their
given action (transferring a session, inviting a technician, or monitoring a technician).
Compact View displays an aggregated view of channels (only one instance of each
channel displayed).
Note: The Monitoring Technician feature is available for Administrators
with a technician seat.
Extended View
Transfer session, Invite technician, and Monitor technician windows display the
full Organization Tree. Channels are displayed for each organization entity they are
assigned to.
3.
Click Save Changes.
The settings are applied to all users in your Rescue organization.
Copyright
©
2023 GoTo, Inc. 23

How to Show Technician Groups only to Assigned Administrators
Master Administrators can control if Administrators can see the whole Organization Tree or only those Technician
Groups to which they are assigned.
1.
Select the Global Settings tab.
2.
Under Show Technician Groups only to Assigned Administrators, enable the Show Technician Groups only
to Assigned Administrators setting.
3.
Click Save.
On the Organization Tree, Technician Groups will now be hidden from Administrators to whom they are not
assigned.
Remember: Master Administrators will still be able to see the whole organization structure.
How to Restrict Access Based on IP Address
Use the IP Restriction feature to grant or deny access to according to specified IP address ranges.
Grant/Deny Access to All Components
By default, users can access all components from any IP address. You can grant or deny access to all components,
including the Administration Center and Technician Console, according to specified IP address ranges.
1.
Select the Global Settings tab.
2.
Under IP restrictions (Global), complete the Add new exception fields to allow access to all Rescue
components from all IP addresses except those specified.
3.
To deny access to all Rescue Components from all IP addresses except those specified, select Denied access
and enter the appropriate Network ID.
24 Rescue Administrators Guide

Users of the Rescue account will be able to access Rescue components only from the address set as an exception.
Grant/Deny Access to Technician Console
By default, technicians can access the Technician Console from any IP address. You can grant or deny access to the
Technician Console according to specified IP address ranges.
These settings have no impact on external collaborating technicians.
1.
On the Organization Tree, select the Technician Group you want to work with.
2.
Select the Settings tab.
3.
Under IP restrictions (Technician Console), complete the Add new exception fields to allow access to the
Technician Console from all IP addresses except those specified.
Remember: If a technician cannot access the Technician Console, make sure they have also been
granted access to all components under Global Settings > IP restrictions (Global)
4.
To deny access to the Technician Console from all IP addresses except those specified, select Denied access
and enter the appropriate Network ID.
Copyright
©
2023 GoTo, Inc. 25

Users in the Technician Group will be able to access the Technician Console only from the address set as an
exception.
Remember: If a technician cannot access the Technician Console, make sure they have been granted
access to all components under Global Settings > IP restrictions (Global)
5.
Save your changes.
• Click Save to apply settings to the current Technician Group
• Click Apply to subgroups to apply the settings to the current Technician Group and all of its subgroups
• Click Apply to all groups to apply the same settings to all Technician Groups in your organization
Allowlisting and
We suggest you allow the GoTo URLs listed below to ensure that services are able to connect.
Important: For information about SaaS products offered by GetGo, Inc., a subsidiary of , Inc., visit this
page.
• *.logmein.com, *.logmein.eu - 's main site
Note: The *.logmein.eu site is not eligible for secure testing.
• *.logmeinrescue.com, *.logmeinrescue.eu - Powers the service
• *.logmeinrescue-enterprise.eu, *.logmeinrescue-enterprise.com - Powers account-specific features (should
only be allowlisted by enterprise accounts)
• *.logmein-gateway.com- Part of the service
• *.internap.net - Powers updates to multiple products
• *.internapcdn.net - Powers updates to multiple products
• *.logmein123.com, *.logmein123.eu - Site used to connect to a technician
• *.123rescue.com - Site used to connect to a technician
• *.support.me - Site used to connect to a technician
• *.rescuemobile.eu - Site used to connect to a technician
• *.rescuemobile.com - Site used to connect to a technician
• *.oty.com - Site used to connect to a technician
26 Rescue Administrators Guide

• * .logmeininc.com -'s corporate website
• *.remoteview.logmein.com - Powers Nextgen media-specific features for Rescue Lens and Rescue 7.50 and
above.
• *.turn.console.gotoassist.com - Powers Nextgen media-specific features for Rescue Lens and Rescue 7.50 and
above.
• *.lastpass.com -'s leading password management solution for personal and enterprise use and for two factor
authentication service
Note: This list includes sub-domains for these domains, so it is advisable to use wildcard rules wherever
possible when you allowlist or block any service on your network. The client-to-host connection uses peer-
to-peer connections, encrypted within a 256-bit AES tunnel. The services themselves communicate using
port 443 (HTTPS/SSL) and port 80, so no additional ports need to be opened within a firewall.
IP Ranges
It is recommended to use wildcard rules whenever possible while allowlisting or blocking any services on your
network as sub-domains of the domains listed above are included. Also, the client-to-host connection uses peer-to-
peer connections, encrypted within a 256-bit AES tunnel.
Use of IP ranges instead of domain names for the firewall configuration is discouraged unless absolutely
necessary because our IP ranges and those of our provider networks need to be periodically audited and modified,
creating additional maintenance for your network. These changes are necessary to continue to provide the maximum
performance for our products. Maintenance and failover events within our infrastructure may cause you to connect
to servers within any of the ranges.
If your firewall includes a content or application data scanning filter, this may cause a block or latency, which would
be indicated in the log files for the filter. To address this problem, verify that the domains or IP ranges will not be
scanned or filtered by specifying exception domains or IP ranges. If your security policy requires you to specify
explicit domain or IP ranges, then configure your firewall exceptions for outbound TCP ports 8200, 443, and 80
as well as UDP ports 8200 and 1853 for the domains or IP ranges, including those of our third-party provider
networks.
We do not recommend explicit IP allowlisting of ranges. If URL allowlisting is not feasible, refer to the list of IP
addresses.
IP Ranges
CIDR Notation Numeric IP Range Netmask Notation
111.221.57.0/24 111.221.57.0 - 111.221.57.255 111.221.57.0 255.255.255.0
176.34.175.41/32 176.34.175.41 - 176.34.175.41 176.34.175.41 255.255.255.255
176.34.201.99/32 176.34.201.99 - 176.34.201.99 176.34.201.99 255.255.255.255
18.202.5.124/32 18.202.5.124 - 18.202.5.124 18.202.5.124 255.255.255.255
212.118.234.0/24 212.118.234.0 - 212.118.234.254 212.118.234.0 255.255.254.0
34.254.76.175/32 34.254.76.175 - 34.254.76.175 34.254.76.175 255.255.255.255
34.255.156.182/32 34.255.156.182 - 34.255.156.182 34.255.156.182 255.255.255.255
46.137.118.35/32 46.137.118.35 - 46.137.118.35 46.137.118.35 255.255.255.255
52.19.6.219/32 52.19.6.219 - 52.19.6.219 52.19.6.219 255.255.255.255
52.209.158.52/32 52.209.158.52 - 52.209.158.52 52.209.158.52 255.255.255.255
52.210.249.247/32 52.210.249.247 - 52.210.249.247 52.210.249.247 255.255.255.255
52.49.175.18/32 52.49.175.18 - 52.49.175.18 52.49.175.18 255.255.255.255
Copyright
©
2023 GoTo, Inc. 27

CIDR Notation Numeric IP Range Netmask Notation
54.154.227.245/32 54.154.227.245 - 54.154.227.245 54.154.227.245 255.255.255.255
54.170.31.64/32 54.170.31.64 - 54.170.31.64 54.170.31.64 255.255.255.255
54.217.134.155/32 54.217.134.155 - 54.217.134.155 54.217.134.155 255.255.255.255
54.220.196.131/32 54.220.196.131 - 54.220.196.131 54.220.196.131 255.255.255.255
54.246.98.107/32 54.246.98.107 - 54.246.98.107 54.246.98.107 255.255.255.255
54.73.215.233/32 54.73.215.233 - 54.73.215.233 54.73.215.233 255.255.255.255
54.75.205.153/32 54.75.205.153 - 54.75.205.153 54.75.205.153 255.255.255.255
63.251.34.0/24 63.251.34.0 - 63.251.34.255 63.251.34.0 255.255.255.0
63.251.46.0/23 63.251.46.0 - 63.251.47.255 63.251.46.0 255.255.254.0
63.33.145.40/32 63.33.145.40 - 63.33.145.40 63.33.145.40 255.255.255.255
64.74.103.0/24 64.74.103.0 - 64.74.103.255 64.74.103.0 255.255.255.0
64.74.17.0/24 64.74.17.0 - 64.74.17.255 64.74.17.0 255.255.255.0
64.74.18.0/23 64.74.18.0 - 64.74.19.255 64.74.18.0 255.255.254.0
64.94.18.0/24 64.94.18.0 - 64.94.18.255 64.94.18.0 255.255.255.0
64.94.46.0/23 64.94.46.0 - 64.94.47.255 64.94.46.0 255.255.254.0
64.95.128.0/23 64.95.128.0 - 64.95.129.255 64.95.128.0 255.255.254.0
66.150.108.0/24 66.150.108.0 - 66.150.108.255 66.150.108.0 255.255.255.0
67.217.80.0/23 67.217.80.0 - 67.217.81.255 67.217.80.0 255.255.254.0
69.25.20.0/23 69.25.20.0 - 69.25.21.255 69.25.20.0 255.255.254.0
69.25.247.0/24 69.25.247.0 - 69.25.247.255 69.25.247.0 255.255.255.0
79.125.88.65/32 79.125.88.65 - 79.125.88.65 79.125.88.65 255.255.255.255
95.172.70.0/24 95.172.70.0 - 95.172.70.255 95.172.70.0 255.255.255.0
Rescue Lens and Rescue Nextgen media
CIDR Notation Numeric IP Range Netmask Notation
175.41.141.140/32 175.41.141.140 - 175.41.141.140 175.41.141.140 255.255.255.255
18.140.137.139/32 18.140.137.139 - 18.140.137.139 18.140.137.139 255.255.255.255
18.158.121.211/32 18.158.121.211 - 18.158.121.211 18.158.121.211 255.255.255.255
18.158.218.2/32 18.158.218.2 - 18.158.218.2 18.158.218.2 255.255.255.255
3.122.32.27/32 3.122.32.27 - 3.122.32.27 3.122.32.27 255.255.255.255
3.230.232.226/32 3.230.232.226 - 3.230.232.226 3.230.232.226 255.255.255.255
44.229.217.227/32 44.229.217.227 - 44.229.217.227 44.229.217.227 255.255.255.255
44.232.77.24/32 44.232.77.24 - 44.232.77.24 44.232.77.24 255.255.255.255
50.17.158.207/32 50.17.158.207 - 50.17.158.207 50.17.158.207 255.255.255.255
28 Rescue Administrators Guide

CIDR Notation Numeric IP Range Netmask Notation
52.13.255.230/32 52.13.255.230 - 52.13.255.230 52.13.255.230 255.255.255.255
52.28.148.85/32 52.28.148.85 - 52.28.148.85 52.28.148.85 255.255.255.255
52.35.84.247/32 52.35.84.247 - 52.35.84.247 52.35.84.247 255.255.255.255
52.54.244.43/32 52.54.244.43 - 52.54.244.43 52.54.244.43 255.255.255.255
54.146.34.187/32 54.146.34.187 - 54.146.34.187 54.146.34.187 255.255.255.255
54.185.112.207/32 54.185.112.207 - 54.185.112.207 54.185.112.207 255.255.255.255
54.189.249.52/32 54.189.249.52 - 54.189.249.52 54.189.249.52 255.255.255.255
54.204.126.154/32 54.204.126.154 - 54.204.126.154 54.204.126.154 255.255.255.255
54.227.77.39/32 54.227.77.39 - 54.227.77.39 54.227.77.39 255.255.255.255
54.255.100.96/32 54.255.100.96 - 54.255.100.96 54.255.100.96 255.255.255.255
54.255.48.58/32 54.255.48.58 - 54.255.48.58 54.255.48.58 255.255.255.255
Nextgen media
• *.remoteview.logmein.com
• turn.console.gotoassist.com
• For networks explicitly filtering outbound destination ports and protocols, the following ports are used on Rescue
Lens side and Rescue Nextgen media: 15000 (UDP traffic) or 443 (TCP traffic) for Rescue media sessions.
Tip: It is recommended that you allow UDP traffic through port 15000. Restricting the traffic to TCP may
decrease the quality of the Rescue media support experience.
Important: The use of IP ranges instead of domain names for the firewall configuration is discouraged
unless absolutely necessary because our IP ranges and those of our provider networks need to be
periodically audited and modified, thus creating additional maintenance for your network. If URL
allowlisting is not feasible, refer to the list of IP address in this document.
Third-party IP Ranges
You must also allowlist ranges for these third-party services:
•
Microsoft Azure
Chat monitor
Needed only if you are using the Chat monitoring feature.
CIDR Notation Numeric IP Range Netmask Notation
18.193.134.63/32 18.193.134.63 - 18.193.134.63 18.193.134.63 255.255.255.255
3.74.125.23/32 3.74.125.23 - 3.74.125.23 3.74.125.23 255.255.255.255
Email domains
For email invitations and correspondences from us and the software, we recommend allowing the following email
domains through your email's spam and allowlist filters.
• @m.logmein.com
• @t.logmein.com
Copyright
©
2023 GoTo, Inc. 29

• @logmeinrescue.com
• @logmein.com
• @m.lastpass.com
• @t.lastpass.com
server / Data Center IP addresses for use in firewall configurations
Equivalent specifications in 3 common formats
Assigned Range by Block Numeric IP Address
Range
Netmask Notation CIDR Notation
Block 1 216.115.208.0 –
216.115.223.255
216.115.208.0
255.255.240.0
216.115.208.0/20
Block 2 216.219.112.0 –
216.219.127.255
216.219.112.0
255.255.240.0
216.219.112.0/20
Block 3 67.217.64.0 –
67.217.95.255
67.217.64.0 255.255.224.0 67.217.64.0/19
Block 4 173.199.0.0 –
173.199.63.255
173.199.0.0 255.255.192.0 173.199.0.0/18
Block 5 206.183.100.0 –
206.183.103.255
206.183.100.0
255.255.252.0
206.183.100.0/22
Block 6 68.64.0.0 – 68.64.31.255 68.64.0.0 255.255.224.0 68.64.0.0/19
Block 7 23.239.224.0 –
23.239.255.255
23.239.224.0
255.255.224.0
23.239.224.0/19
Block 8 158.120.16.0 -
158.120.31.255
158.120.16.0
255.255.240.0
158.120.16.0/20
Block 9 202.173.24.0 –
202.173.31.255
202.173.24.0
255.255.248.0
202.173.24.0/21
Block 10 78.108.112.0 –
78.108.127.255
78.108.112.0
255.255.240.0
78.108.112.0/20
Block 11 185.36.20.0 –
185.36.23.255
185.36.20.0 255.255.252.0 185.36.20.0/22
Block 12 188.66.40.0 –
188.66.47.255
188.66.40.0 255.255.248.0 188.66.40.0/21
Block 13 45.12.196.0 –
45.12.199.255
45.12.196.0 255.255.252.0 45.12.196.0/22
Block 14 162.250.60.0 –
162.250.63.255
162.250.60.0
255.255.252.0
162.250.60.0/22
Block 15 199.36.248.0 –
199.36.251.255
199.36.248.0
255.255.252.0
199.36.248.0/22
Block 16 199.87.120.0 –
199.87.123.255
199.87.120.0
255.255.252.0
199.87.120.0/22
Block 17 103.15.16.0 –
103.15.19.255
103.15.16.0 255.255.252.0 103.15.16.0/22
30 Rescue Administrators Guide

Assigned Range by Block Numeric IP Address
Range
Netmask Notation CIDR Notation
Block 18 64.74.17.0 – 64.74.17.255 64.74.17.0 255.255.255.0 64.74.17.0/24
Block 19 64.74.18.0 – 64.74.19.255 64.74.18.0 255.255.254.0 64.74.18.0/23
Block 20 64.74.103.0 –
64.74.103.255
64.74.103.0 255.255.255.0 64.74.103.0/24
Block 21 64.94.18.0 – 64.94.18.255 64.94.18.0 255.255.255.0 64.94.18.0/24
Block 22 64.94.46.0 – 64.94.47.255 64.94.46.0 255.255.254.0 64.94.46.0/23
Block 23 64.95.128.0 –
64.95.129.255
64.95.128.0 255.255.254.0 64.95.128.0/23
Block 24 66.150.108.0 –
66.150.108.255
66.150.108.0
255.255.255.0
66.150.108.0/24
Block 25 69.25.20.0 – 69.25.21.255 69.25.20.0 255.255.254.0 69.25.20.0/23
Block 26 69.25.247.0 –
69.25.247.255
69.25.247.0 255.255.255.0 69.25.247.0/24
Block 27 95.172.70.0 –
95.172.70.255
95.172.70.0 255.255.255.0 95.172.70.0/24
Block 28 111.221.57.0 –
111.221.57.255
111.221.57.0
255.255.255.0
111.221.57.0/24
Allowlisting and - Data Center Range in the European Union
We suggest you allow the URLs listed below to ensure that services are able to connect.
Important: For information about SaaS products offered by GetGo, Inc., a subsidiary of , Inc., visit this
page.
• *.logmein.eu - 's main site
• *.logmeinrescue.eu *.logmeinrescue.com- Powers the service
• *.logmeinrescue-enterprise.eu,- Powers account-specific features (should only be allowlisted by enterprise
accounts)
• *.logmein-gateway.com - Part of the service
• *.internap.net - Powers updates to and invite external technician feature
• *.internapcdn.net - Powers updates to and invite external technician feature
• *.update.logmein.com- Powers updates to
• *.logmein123.eu - Site used to connect to a technician
• *.rescuemobile.eu - Site used to connect to a technician
• *.remoteview.logmein.eu - Powers Nextgen media specific features for Rescue Lens and Rescue 7.50 and above.
• *.turn.console.logmeinrescue.eu - Powers Nextgen media specific features for Rescue Lens and Rescue 7.50 and
above.
• *.lastpass.com -'s leading password management solution for personal and enterprise use and for two factor
authentication service
Note: This list includes sub-domains for these domains, so it is advisable to use wildcard rules wherever
possible when you allowlist or block any service on your network. The client-to-host connection uses peer-
Copyright
©
2023 GoTo, Inc. 31

to-peer connections, encrypted within a 256-bit AES tunnel. The services themselves communicate using
port 443 (HTTPS/SSL) and port 80, so no additional ports need to be opened within a firewall.
IP Ranges
It is recommended to use wildcard rules whenever possible while allowlisting or blocking any services on your
network as sub-domains of the domains listed above are included. Also, the client-to-host connection uses peer-to-
peer connections, encrypted within a 256-bit AES tunnel.
Use of IP ranges instead of domain names for the firewall configuration is discouraged unless absolutely
necessary because our IP ranges and those of our provider networks need to be periodically audited and modified,
creating additional maintenance for your network. These changes are necessary to continue to provide the maximum
performance for our products. Maintenance and failover events within our infrastructure may cause you to connect
to servers within any of the ranges.
If your firewall includes a content or application data scanning filter, this may cause a block or latency, which would
be indicated in the log files for the filter. To address this problem, verify that the domains or IP ranges will not be
scanned or filtered by specifying exception domains or IP ranges. If your security policy requires you to specify
explicit domain or IP ranges, then configure your firewall exceptions for outbound TCP ports 8200, 443, and 80
as well as UDP ports 8200 and 1853 for the domains or IP ranges, including those of our third-party provider
networks.
We do not recommend explicit IP allowlisting of ranges. If URL allowlisting is not feasible, refer to the list of IP
addresses.
EU IP addresses for use in firewall configurations
We do not recommend explicit IP allowlisting of ranges. If URL allowlisting is not feasible, refer to the list of IP
addresses.
Equivalent specifications in 3 common formats
CIDR Notation Numeric IP Range Netmask Notation
158.120.16.0/20 158.120.16.0 - 158.120.31.255 158.120.16.0 255.255.240.0
176.34.175.41/32 176.34.175.41 - 176.34.175.41 176.34.175.41 255.255.255.255
176.34.201.99/32 176.34.201.99 - 176.34.201.99 176.34.201.99 255.255.255.255
18.202.5.124/32 18.202.5.124 - 18.202.5.124 18.202.5.124 255.255.255.255
34.254.76.175/32 34.254.76.175 - 34.254.76.175 34.254.76.175 255.255.255.255
34.255.156.182/32 34.255.156.182 - 34.255.156.182 34.255.156.182 255.255.255.255
46.137.118.35/32 46.137.118.35 - 46.137.118.35 46.137.118.35 255.255.255.255
52.19.6.219/32 52.19.6.219 - 52.19.6.219 52.19.6.219 255.255.255.255
52.209.158.52/32 52.209.158.52 - 52.209.158.52 52.209.158.52 255.255.255.255
52.210.249.247/32 52.210.249.247 - 52.210.249.247 52.210.249.247 255.255.255.255
52.49.175.18/32 52.49.175.18 - 52.49.175.18 52.49.175.18 255.255.255.255
54.154.227.245/32 54.154.227.245 - 54.154.227.245 54.154.227.245 255.255.255.255
54.170.31.64/32 54.170.31.64 - 54.170.31.64 54.170.31.64 255.255.255.255
54.217.134.155/32 54.217.134.155 - 54.217.134.155 54.217.134.155 255.255.255.255
54.220.196.131/32 54.220.196.131 - 54.220.196.131 54.220.196.131 255.255.255.255
32 Rescue Administrators Guide

CIDR Notation Numeric IP Range Netmask Notation
54.246.98.107/32 54.246.98.107 - 54.246.98.107 54.246.98.107 255.255.255.255
54.73.215.233/32 54.73.215.233 - 54.73.215.233 54.73.215.233 255.255.255.255
54.75.205.153/32 54.75.205.153 - 54.75.205.153 54.75.205.153 255.255.255.255
63.33.145.40/32 63.33.145.40 - 63.33.145.40 63.33.145.40 255.255.255.255
64.95.128.0/23 64.95.128.0 - 64.95.129.255 64.95.128.0 255.255.254.0
79.125.88.65/32 79.125.88.65 - 79.125.88.65 79.125.88.65 255.255.255.255
95.172.70.0/24 95.172.70.0 - 95.172.70.255 95.172.70.0 255.255.255.0
Rescue Lens and Rescue Nextgen media
Lens Server / Data Center IP addresses:
CIDR Notation Numeric IP Range Netmask Notation
18.192.225.252/32 18.192.225.252 - 18.192.225.252 18.192.225.252 255.255.255.255
18.198.147.201/32 18.198.147.201 - 18.198.147.201 18.198.147.201 255.255.255.255
18.198.174.137/32 18.198.174.137 - 18.198.174.137 18.198.174.137 255.255.255.255
18.198.176.236/32 18.198.176.236 - 18.198.176.236 18.198.176.236 255.255.255.255
Nextgen media
• *.remoteview.logmein.eu
• turn.console.logmeinrescue.eu
• For networks explicitly filtering outbound destination ports and protocols, the following ports are used on Rescue
Lens side and Rescue Nextgen media: 15000 (UDP traffic) or 443 (TCP traffic) for Rescue media sessions.
Tip: It is recommended that you allow UDP traffic through port 15000. Restricting the traffic to TCP may
decrease the quality of the Rescue media support experience.
Important: The use of IP ranges instead of domain names for the firewall configuration is discouraged
unless absolutely necessary because our IP ranges and those of our provider networks need to be
periodically audited and modified, thus creating additional maintenance for your network. If URL
allowlisting is not feasible, refer to the list of IP address in this document.
Third-party IP Ranges
You must also allowlist ranges for these third-party services:
•
Microsoft Azure
Chat monitor
Needed only if you are using the Chat monitoring feature.
CIDR Notation Numeric IP Range Netmask Notation
18.193.134.63/32 18.193.134.63 - 18.193.134.63 18.193.134.63 255.255.255.255
3.74.125.23/32 3.74.125.23 - 3.74.125.23 3.74.125.23 255.255.255.255
Copyright
©
2023 GoTo, Inc. 33

Limitations in case of using IP Ranges
The following features won't be able to use in case of using IP based allowlist since these are using dynamic IPs:
• External technician invite: invited external technicians won't be able to reach one-time technician console to
download. This applies to networks where the external technicians are located.
• Auto-upgrade of Calling Card and Unattended endpoints won't be able to auto-upgrade. Manual upgrade and
redeployment will be required.
Email domains
For email invitations and correspondences from us and the software, we recommend allowing the following email
domains through your email's spam and allowlist filters.
• @m.logmein.com
• @t.logmein.com
• @logmeinrescue.com
• @logmein.com
• @m.lastpass.com
• @t.lastpass.com
Setting up Channels
About Channels
Customers use channels to initiate support sessions by clicking a URL embedded in your website or via the Calling
Card.
Incoming sessions are added to the queue for all members of any Technician Group which is assigned to a channel.
Any incoming channel session will be displayed to all technicians in a group until it is picked up or times out.
provides ten channels for flexible session routing.
How to Assign a Channel to a Technician Group
Channels can be assigned to a Technician Group by a Master Administrator or by an Administrator responsible for
that Technician Group.
By default, the channels are named "Channel 1", "Channel 2", and so on. You cannot create new channels; only
rename.
1.
On the Organization Tree, select the Technician Group to which you want to assign a channel.
2.
Select the Channels tab.
3.
On the Channels tab, click the checkbox next to the channel(s) you want to assign to the selected Technician
Group.
The assignment is applied immediately in the Administration Center. Any technician who is logged in to the
Technician Console must log off and log in again before the change is applied.
34 Rescue Administrators Guide

How to Make a Channel Available for Use
Master Administrators can configure channel details and integrate a channel link or form code into your support site.
1.
On the Organization Tree, select the channel you want to work with.
2.
Select the Channels tab. The Channel Configuration page is displayed.
3.
Enter a Channel name.
This will be seen in both the Administration Center and Technician Console.
4.
Enter a Description (optional). This is for your own reference.
5.
Copy the appropriate channel link or code for your preferred channel type.
Option Description
Channel link
This method allows you to build a simple link into your website/intranet. Customers
click the link to establish a support session.
Custom Live Support
Form
This method allows you to host both a link on your website/intranet as well as a
questionnaire which your customers have to complete.
Custom Live Support
Form with self-
hosted Instant Chat
For detailed information regarding Instant Chat and Instant Chat customization and
integration, please refer to the LogMeIn Rescue Customization and Integration
Guide.
6.
Integrate the channel link or form code into your support site.
Important: Channel integration is best performed by an experienced web developer.
How to Remove an Individual Technician from a Channel
Technicians and channels are assigned to Technician Groups. By default, each technician can work with sessions
in any channel assigned to his Technician Group. To deny an individual technician access to a channel, follow this
procedure.
1.
On the Organization Tree, select the technician that you want to remove from a channel.
2.
Select the Channels tab.
The Channels tab shows a list of channels assigned to the selected technician.
3.
On the Channels tab, clear the checkmark next to the Assigned to… box for each restricted Channel.
The assignment is applied immediately in the Administration Center. Any technician who is logged in to the
Technician Console must log off and log in again before the change is applied.
Deny an individual technician access to a channel
This feature is useful if you use product- or platform-based channels and have technicians who may not be ready to
support certain products or platforms.
Assume that you have assigned the Windows channel and Mac channel to Technician Group 1. All technicians in
Technician Group 1 except for the technician named “Sample Technician” have the skills to handle Mac issues. In
this case, you can remove “Sample Technician's” access to the Mac channel. "Sample Technician" will see sessions
arriving to the Windows channel, but not the Mac channel. Once “Sample Technician” has the skills to handle Mac
sessions, you can re-assign him to the Mac channel.
Copyright
©
2023 GoTo, Inc. 35

How to Test a Channel
Test a channel to make sure it is working properly.
1.
On the Organization Tree, select the channel you want to test.
2.
Select the Channels tab.
3.
Click Test channel (Standard) or Test channel (Instant Chat) as appropriate.
Download and run the Applet when prompted.
4.
Select the Sessions tab.
If the channel is working properly, the test session will appear in the appropriate queue.
Setting up the Applet
How to Set the Default Applet (Standard or Instant Chat)
Choose to run either the Applet or Instant Chat at the start of any session with a PC or Mac.
Note: Instant Chat runs by default for all sessions with PalmPre devices. No settings are required.
1.
On the Organization Tree, select the channel or Technician Group you want to work with.
2.
Select the Settings tab.
3.
Go to the Customer Applet section.
4.
Choose a Running Mode:
• Choose Use Instant Chat to activate all sessions for the selected channel or group as Instant Chat sessions in
Chat-only mode.
• Choose Standard to activate all sessions for the selected channel or group as standard Rescue Applet sessions.
5.
For the standard Rescue Applet, you can select the following options:
• Select Display Customer Applet download page to show customers a standard web page that explains how
to download the Applet.
• Select Use ActiveX Customer Applet if you want to install an ActiveX component on the customer device
that will download and automatically run the Applet. Use this feature to overcome restrictions related to direct
downloading of .exe files and to reduce the number of steps required to establish a connection.
Restriction: This method does not work for customers using Internet Explorer 11 and above, as these
browsers do not allow .exe files to be run from an ActiveX control.
6.
Save your changes.
• Click Save to apply the settings to the current channel or Technician Group
• Click Apply to all channels/groups to apply the same settings to all channels or Technician Groups in your
organization
• Click Apply to subgroups to apply the settings to the current Technician Group and all of its subgroups
36 Rescue Administrators Guide

How to Set Windows System Service Behavior
By default, the Applet is started as a normal application. You can set to launch the Applet as a Windows System
Service whenever the customer has Windows administrative rights.
1.
On the Organization Tree, select the channel or Technician Group you want to work with.
2.
Select the Settings tab.
3.
Under Customer Applet, go to Automatically start as Windows System Service and select the appropriate
options:
• Select if customer has administrative rights to launch the Applet as a Windows System Service whenever
the customer has Windows administrative rights.
• Select and UAC is enabled to launch the Applet as a Windows System Service when the customer has
administrative rights but is running an operating system with UAC enabled.
4.
Save your changes.
• Click Save to apply the settings to the current channel or Technician Group
• Click Apply to all channels/groups to apply the same settings to all channels or Technician Groups in your
organization
• Click Apply to subgroups to apply the settings to the current Technician Group and all of its subgroups
Tip: If the customer does not have administrative rights, or is running a Mac, then the technician can
manually restart the Applet as described in the “How to Restart the Applet as Windows System Service or
Mac Daemon” section of Technician Console User Guide.
How to Set Mouse and Keyboard Data Entry Priority for Remote Control
During a Remote Control session, the technician and customer may simultaneously use their mouse or keyboard.
Select the user whose actions should be processed first.
1.
On the Organization Tree, select the Technician Group you want to work with.
2.
Select the Settings tab.
3.
Under Customer Applet, go to Priority over mouse and keyboard actions during remote control and select
the user whose actions should be processed first: Technician or Customer.
4.
Save your changes.
• Click Save to apply settings to the current Technician Group
• Click Apply to subgroups to apply the settings to the current Technician Group and all of its subgroups
• Click Apply to all groups to apply the same settings to all Technician Groups in your organization
Copyright
©
2023 GoTo, Inc. 37

How to Show Estimated Length of Waiting to Customers
Show your customers the amount of time they can expect to wait before a technician will be able to activate their
session.
For a Technician Group
For private sessions, you can show the estimated waiting time. calculates the estimated waiting time based on the
average pick-up time for the last ten sessions of a specific technician. The time is displayed in the Applet, Calling
Card, or Instant Chat.
1.
On the Organization Tree, select the Technician Group you want to work with.
2.
Select the Settings tab.
3.
Under Customer Applet, select Display estimated waiting time.
4.
Save your changes.
• Click Save to apply the settings to the current channel or Technician Group
• Click Apply to all channels/groups to apply the same settings to all channels or Technician Groups in your
organization
• Click Apply to subgroups to apply the settings to the current Technician Group and all of its subgroups
For a Channel
For channel sessions, you can choose to show customers either the estimated waiting time or their position in the
queue of waiting customers. For estimated waiting time, calculates the average pick-up time of the last ten sessions
of a channel. The time or position in queue is displayed in the Applet, Calling Card, or Instant Chat.
1.
On the Organization Tree, select the channel you want to work with.
2.
Select the Settings tab.
3.
Choose what you want Rescue to show to waiting customers.
• For Rescue to show the estimated waiting time, under Customer Applet > Message to waiting customers:,
select Estimated waiting time.
• For Rescue to show the customer's position in the queue, under Customer Applet > Message to waiting
customers:, select Queue position.
4.
Save your changes.
• Click Save to apply the settings to the current channel or Technician Group
• Click Apply to all channels/groups to apply the same settings to all channels or Technician Groups in your
organization
• Click Apply to subgroups to apply the settings to the current Technician Group and all of its subgroups
How to Customize Applet Appearance
An Administrator can customize the appearance of the Applet by inserting a custom logo and icon.
1.
On the Organization Tree, select the channel or Technician Group you want to work with.
2.
Select the Settings tab.
3.
Under Customer Applet, go to Branding.
38 Rescue Administrators Guide

Option Description
Application name
Enter text to be displayed at the top of the Customer Applet, Mobile Applet, and
Instant Chat.
Logo
Upload the logo for the selected channel or Technician Group to use. The logo will be
shown in the top-right corner of the standard Applet, Mobile Applet, and Instant Chat.
Download the template to see a sample that conforms to all format requirements.
Icon
Upload the icon you want to use. The icon will be shown in the top-left corner of
the Customer Applet and Instant Chat. Download the template to see a sample that
conforms to all format requirements.
Note: The name of your organization will appear on the Applet as entered in the Organization field of the
My Account > Modify Contact Information.
How to Set up Custom Terms and Conditions
Show customers a customized Terms and Conditions after they have downloaded the Applet, but before the
technician can begin to provide service (while the session is in Connecting status).
1.
On the Organization Tree, select the channel or Technician Group you want to work with.
2.
Select the Settings tab.
3.
Under Customer Applet, go to Terms and Conditions and select from the following options:
Option Description
Use Terms and
Conditions
Select Use Terms and Conditions to show customers a customized Terms and
Conditions after they have downloaded the Applet or Mobile Applet, but before the
technician can begin to provide service (while the session is in Connecting status).
Tip: To give customers enough time to read the Terms and Conditions,
increase the time allowed before connecting sessions will time out (on the
Settings tab under Time-outs).
Terms and
Conditions
Type or insert your Terms and Conditions text in the Terms and Conditions box that
customers using computers or mobile devices will see. Plain text only. No formatting.
No character limit.
Force scrolling to
bottom
Select Force scrolling to bottom to force customers to scroll through the entire
Terms and Conditions before the Accept button on the Applet or Mobile Applet is
activated.
4.
Save your changes.
• Click Save to apply the settings to the current channel or Technician Group
• Click Apply to all channels/groups to apply the same settings to all channels or Technician Groups in your
organization
• Click Apply to subgroups to apply the settings to the current Technician Group and all of its subgroups
Note: When enabled, Channel Custom terms and conditions will display for Channel Link, Custom
Live Support forms, and Custom Live Support form with self-hosted Instant Chat sessions, however,
they will not display during Calling Card Channel sessions.
How does it work? A session remains in Connecting status while the customer is reading the Terms and
Conditions. Once the customer accepts the Terms and Conditions, the Applet chat window will appear and the
Copyright
©
2023 GoTo, Inc. 39

connection to the technician will be made. The session appears as Waiting in the technician's queue. If the customer
declines the Terms and Conditions, the Applet closes and is deleted immediately.
How to Disable the Pause/Break Key
Disable the Pause/Break key as a hotkey that customers press to revoke all permissions and end the current action,
even when the Applet is not in focus.
1.
On the Organization Tree, select the channel or Technician Group you want to work with.
2.
Select the Settings tab.
3.
Under Customer Applet, select Disable Pause/Break hotkey for revoking permissions.
4.
Save your changes.
• Click Save to apply the settings to the current channel or Technician Group
• Click Apply to all channels/groups to apply the same settings to all channels or Technician Groups in your
organization
• Click Apply to subgroups to apply the settings to the current Technician Group and all of its subgroups
The Pause/Break key is disabled as a Rescue hotkey. Customers will be forced to click the red X on the Applet
toolbar to revoke permissions and end the current action.
Sample use of Pause/Break key
The technician starts to control the customer's desktop. The customer realizes that confidential information is
exposed on his desktop. The customer presses the Pause/Break key to immediately end remote control even
though the Rescue Applet is not in focus on his desktop. Remote control ends; the session continues.
How to Prompt the Customer for Permissions at Session Start
Force the Applet to display a permission dialog before any other session activity occurs. Otherwise, customers are
prompted when the technician first attempts a remote action, such as when launching remote control or requesting
system information.
1.
On the Organization Tree, select the channel or Technician Group you want to work with.
2.
Select the Settings tab.
3.
Under Customer Applet, select Prompt customer for permissions > One time when session starts.
4.
Save your changes.
• Click Save to apply the settings to the current channel or Technician Group
• Click Apply to all channels/groups to apply the same settings to all channels or Technician Groups in your
organization
• Click Apply to subgroups to apply the settings to the current Technician Group and all of its subgroups
Once downloaded, the Applet will immediately display a dialog prompting the customer to grant overall permission
that remains valid for the life of the session.
Important: If the customer denies permission upon startup, he will be prompted again for permission when
the technician next attempts a remote action. If the customer accepts the first request, no further requests are
made.
40 Rescue Administrators Guide

Setting up Lens
Allowing Technicians to Use Lens
Allow group members to start Lens sessions. With Lens, customers can use their mobile device to stream live
video to a technician.
1.
Log in to the LogMeIn Rescue Administration Center.
2.
On the Organization Tree, select the Technician Group you want to work with.
3.
Select the Organization tab.
4.
Under Permissions, select Rescue Lens.
5.
Click Save Changes.
Copyright
©
2023 GoTo, Inc. 41

Enabling Lens Audio
You can set Lens sessions to launch with an active VoIP connection between technician and customer that remains
open throughout the session but can be muted by either party.
1.
Log in to the LogMeIn Administration Center.
2.
On the Organization Tree, select the Technician Group you want to work with.
3.
Select the Settings tab.
4.
Under Rescue Lens, select Enable audio:
For the selected Technician Group, all Lens sessions are launched with an active VoIP connection between
technician and customer.
5.
Save your changes.
• Click Save to apply settings to the current Technician Group
• Click Apply to all subgroups to apply the settings to the current Technician Group and all of its subgroups
• Click Apply to all groups to apply the same settings to all Technician Groups in your organization
42 Rescue Administrators Guide

Controlling How Sessions are Started and Managed
Copyright
©
2023 GoTo, Inc. 43

How to Set Connection Methods Available to Technicians
Choose which connection methods to make available to technicians on the Technician Console Create New Session
dialog box.
1.
On the Organization Tree, select the Technician Group you want to work with.
2.
Select the Settings tab.
3.
Under Connection Method, select the connection methods you want to allow.
44 Rescue Administrators Guide
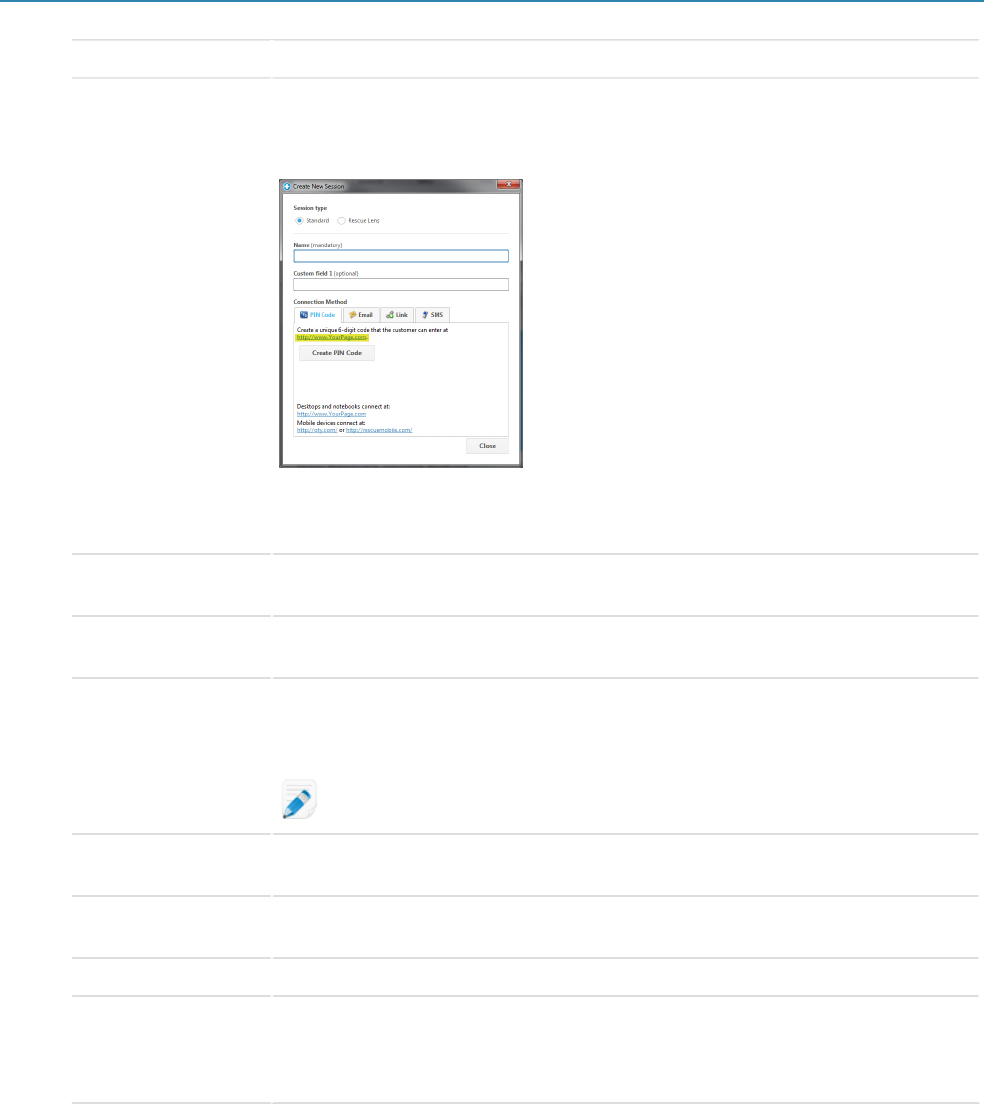
Option Description
PIN Code
Allow technicians to use the PIN Code connection method. Enter the URL of the site
that customers use to enter the session PIN. The value will be shown to technicians on
the PIN Code tab of the Create New Session dialog box.
Figure 1: Technician Console, Create New Session dialog box showing the
URL to display when creating code session
Allow email via
default client
Allow technicians to use the email connection method and to send the email via their
default email client.
Allow email via
Rescue servers
Allow technicians to use the email connection method and to send the email via
LogMeIn Rescue servers.
Reply-to address
(optional):
Specify the email address to which replies to a session connection email are sent. To
use the email address of the technician who sent the session connection email, leave
this field blank.
Restriction: Applies only to emails sent via servers!
Connection email
subject
The default subject line of all session connection emails. A technician can change the
subject line in his email client.
Connection email
text
The default introductory text of all session connection emails. A technician can
change the text in his email client.
Link
Allow technicians to use the Link connection method.
SMS
Allows technicians to use the SMS connection method to start private sessions:
• For Rescue Lens sessions, available to all technicians with Rescue Lens permission
• For Rescue+Mobile sessions, available to technicians with a Rescue+Mobile license
4.
Save your changes.
• Click Save to apply settings to the current Technician Group
• Click Apply to subgroups to apply the settings to the current Technician Group and all of its subgroups
• Click Apply to all groups to apply the same settings to all Technician Groups in your organization
Copyright
©
2023 GoTo, Inc. 45

How to Set Private Sessions to Start Automatically
Administrators can set all PIN Code, Link, and SMS sessions to go directly from Connecting status to Active.
Technicians will be unable to change the Auto-start Incoming Private Sessions option in the Technician Console.
1.
On the Organization Tree, select the Technician Group you want to work with.
2.
Select the Settings tab.
3.
Under Technician Console, select Auto-start incoming private sessions.
4.
Save your changes.
• Click Save to apply settings to the current Technician Group
• Click Apply to subgroups to apply the settings to the current Technician Group and all of its subgroups
• Click Apply to all groups to apply the same settings to all Technician Groups in your organization
46 Rescue Administrators Guide

How to Set Channel Sessions to Transfer Automatically
Reduce customer waiting time for channel-based sessions by automatically transferring waiting sessions to another
channel. Set the amount of time to wait before initiating a transfer to the selected receiving channel. The actual
transfer may take up to an additional 90 seconds to complete.
1.
On the Organization Tree, select the channel you want to work with.
2.
Select the Settings tab.
3.
Under Session management, go to Auto-transfer waiting sessions.
4.
Set the amount of time (in minutes) to wait before initiating a transfer to the selected receiving channel.
5.
Click Save changes.
Note: You cannot save this setting to all channels.
From the technician perspective, the status of any automatically transferred session will be shown as Outgoing in
the original channel queue and Incoming in the receiving queue.
How to Set Channel Sessions to Start Automatically
Reduce customer waiting time for channel-based sessions by automatically activating sessions at the least busy
technician (defined as the technician with the fewest active sessions or the longest idle time upon session arrival).
1.
On the Organization Tree, select the channel you want to work with.
2.
Select the Settings tab.
3.
Under Session management, select the Auto-start waiting sessions box.
Sessions will only be started automatically when the technician is handling a number of sessions under the
threshold defined in the ...less than X active sessions drop-down list.
Tip: Select a value of 10 to start sessions automatically regardless of the number of active sessions a
technician is handling.
4.
Click Save changes.
Note: You cannot save this setting to all channels.
Copyright
©
2023 GoTo, Inc. 47

How to Defer Auto-start for Channel Sessions
Exempt group members from being auto-assigned waiting sessions for a configurable period of time after logging in
to the Technician Console.
Remember: This setting only applies when Auto-start waiting sessions is enabled.
1.
On the Organization Tree, select the Technician Group you want to work with.
2.
Select the Settings tab.
3.
Under Technician Console > Defer auto-start after login by set the length of time for which you want the
selected group members to be exempted from being assigned waiting channel sessions.
Note: A value of 0 means no deferment.
4.
Save your changes.
How to Prevent Technicians from Transferring Sessions to Unmanned
Channels
An Administrator can ensure technicians can only transfer sessions to a channel with available technicians.
This feature helps you avoid long customer waiting times due to transfer to an unmanned channel.
1.
On the Organization Tree, select the channel you want to work with.
2.
Select the Settings tab.
3.
Under Session management, select the Incoming transfer restriction box.
4.
Save your changes.
• Click Save Changes to apply the setting to the current channel.
• Click Save settings to all channels to apply the setting to all channels in your organization.
How to Exempt a Technician from Channel Session Auto-start
An Administrator can override the auto-start waiting session option for individual technicians.
The use of this feature is recommended for supervisors who should be exempt from "round-robin" session routing.
For example, let's say you have an Administrator who logs in as a technician in order to monitor technicians by
using the Technician Console monitoring feature. You do not want the Administrator to be interrupted by new
sessions, so you select the Never auto-start waiting channel sessions option.
1.
On the Organization Tree, select the technician who should be exempt from channel session routing.
2.
Select the Organization tab.
3.
Select Never auto-start waiting channel sessions.
4.
Click Save changes.
48 Rescue Administrators Guide

How to Schedule Working Hours and "No Technician Available" Behavior
for a Channel
Apply working hours to a channel and set the default behavior in response to requests that arrive when no technician
is available.
1.
On the Organization Tree, select the channel you want to work with.
2.
Select the Settings tab.
3.
Under No technician available and Scheduling, choose the Start Time and End Time for your working day.
4.
Choose the Time Zone to be associated with the selected working hours.
5.
Clear the box next to each day that should not be a working day.
6.
Set up the default behavior in response to sessions that arrive during working hours when no technician is
available and during non-working hours.
Option Description
Keep sessions alive
Choose Keep sessions alive if you want all sessions to remain in a queue even if no
technicians are online and available.
Notify technicians of
pending sessions via
email
Select Notify technicians of pending sessions via email if you want to send an email
to the relevant technicians when an incoming support request is received, but no
technician is logged in. An email message from [email protected] will be
sent to all the technicians who could handle this support request.
Abort sessions and
show this webpage to
the customer
Choose Abort sessions and show this webpage to the customer if you want to
display a specific web page to the customer when no technician is available. Enter the
URL of the web page to be displayed in the corresponding box.
7.
Save your changes.
• Click Save Changes to activate the form for the current Channel.
• Click Save settings to all channels to apply the same settings to all Channels in your organization.
How to Set No Technician Available Behavior for Private Sessions
Set the default behavior in response to requests that arrive when no technician is available.
1.
On the Organization Tree, select the Technician Group you want to work with.
2.
Select the Settings tab.
3.
Under No technician available, select from the following options:
Option Description
Keep sessions alive
Choose Keep sessions alive if you want all sessions to remain in a queue even if no
technicians are online and available.
Notify technicians of
pending sessions via
email
Select Notify technicians of pending sessions via email if you want to send an email
to the relevant technicians when an incoming support request is received, but no
technician is logged in. An email message from [email protected] will be
sent to all the technicians who could handle this support request.
Copyright
©
2023 GoTo, Inc. 49

Option Description
Abort sessions and
show this webpage to
the customer
Choose Abort sessions and show this webpage to the customer if you want to
display a specific web page to the customer when no technician is available. Enter the
URL of the web page to be displayed in the corresponding box.
4.
Save your changes.
• Click Save to apply settings to the current Technician Group
• Click Apply to subgroups to apply the settings to the current Technician Group and all of its subgroups
• Click Apply to all groups to apply the same settings to all Technician Groups in your organization
How to Set Time-outs and Warnings
Administrators can define the length of time after which a PIN Code, a waiting, connecting, or active but idle
sessions times out. They can also configure alarms for timed out and waiting sessions.
1.
On the Organization Tree, select the channel or Technician Group you want to work with.
2.
Select the Settings tab.
3.
Under Time-outs, select from the following options:
Option Description
Private code validity
period
The length of time a PIN Code or Link remains valid. If a customer attempts to start a
session after this period has expired, he receives a message saying that the PIN Code
or Link has expired.
Connecting sessions
will time out
The length of time a connecting session remains valid. The session will be removed
from the Technician Console queue after the specified time is exceeded.
Waiting sessions will
time out
The number of minutes after which a waiting session (a session in a queue that has not
yet been picked up) is dropped from a technician's queue. The session is displayed in
red before being removed. The period can be between 1 and 999 minutes. A value of
0 means sessions will never time out.
Active session idle
time-out
The number of minutes after which an Active session will be ended if no action
is taken by the technician or customer. Certain processes will prevent time out,
including the following: an open remote control, screen sharing, or file manager
session; a pending file transfer; an open save dialog; or a pending Calling Card
deployment. The period can be any length between 1 and 999 minutes. A value of 0
means an active session will never time out. On Hold sessions will never time out.
Time-out alarms
Use predefined colors to highlight Time-out and Waiting session alarms. The
connection and/or wait times can be specified in seconds, including multiple alarms to
escalate waiting sessions in the Technician Console.
4.
Save your changes.
• Click Save to apply the settings to the current channel or Technician Group
• Click Apply to all channels/groups to apply the same settings to all channels or Technician Groups in your
organization
• Click Apply to subgroups to apply the settings to the current Technician Group and all of its subgroups
50 Rescue Administrators Guide

Managing Sessions: Start, Transfer, Close, Hold
Administrators use the Sessions tab to manage LogMeIn support sessions. A session can be started, transferred,
closed, or put on hold directly from the Sessions tab.
How to View Session Information
Administrators use the Sessions tab to manage LogMeIn support sessions. A session can be started, transferred,
closed, or put on hold directly from the Sessions tab.
1.
On the Organization Tree, select the Technician Group, channel, or technician for which you want to view
session information.
2.
Select the Session tab.
Sessions are displayed for the selected Technician Group, channel or technician. You can see a simple snapshot
of active and waiting sessions, including the name of the technician(s) handling sessions, session start times, and
whether the sessions are Channel or Private.
Tip: To view session information for another Technician Group, Channel, or Technician simply select a
new item on the Organization Tree and the Session tab will be updated.
How to Start a Session from the Administration Center
Sessions can be manually started directly from the Administration Center Sessions tab.
1.
In the Administration Center, select the appropriate session from the list on the Session tab and click Start.
The Session Start dialog box is displayed.
2.
Select the technician for which you want to start the session.
You are prompted to confirm your selection.
3.
Click OK to start the session.
The session appears in the session list of the technician for whom it was started.
Tip: You may need to click Refresh to see the change.
How to Transfer Sessions from the Administration Center
Sessions can be manually transferred directly from the Administration Center Sessions tab.
Remember: You can only transfer mobile sessions to a technician with a valid + Mobile subscription.
1.
Select the appropriate session from the session list on the Session tab and click Transfer.
Copyright
©
2023 GoTo, Inc. 51

The Transfer dialog box is displayed.
2.
Type a description in the Comment box (for example, a reason for the transfer or a brief summary of the case).
3.
Select the technician, Technician Group or channel to which you want to transfer the session.
You are prompted to confirm your selection.
4.
Click OK to execute the transfer.
The session appears in the session list of the Technician, Technician Group, or Channel to which it was
transferred.
Tip: You may need to click Refresh to see the change.
The original technician will see the session as Transferred in their Technician Console queue. Any comment that the
administrator added during the transfer will also be visible in the Transferred by box.
52 Rescue Administrators Guide
Monitoring a Technician's Desktop
How to View a Technician's Desktop
Administrators can view the desktop of technicians in their organization from within the Technician Console.
Requirements:
• A Master Administrator or Administrator with both an administrator and a technician license can use this feature
• Both the administrator and the monitored technician must be running a Technician Monitoring enabled version of
the Technician Console
• A Master Administrator can monitor any technician in an organization
• An Administrator can monitor any technician in a Technician Group to which he has administrative rights
Restriction: Monitoring the desktop of a technician running the Technician Console for Mac is not
supported.
Remember: Technician Monitoring is initiated in the Technician Console, not the Administration Center.
1.
On the Technician Console Session toolbar, click the Monitoring button.
The Monitor Technician dialog box is displayed.
2.
In the Monitor Technician dialog box, select the technician you want to monitor.
Note: The list of technicians visible in the Monitor Technician dialog box depends on a permission
granted by a Administrator.
Optional: In a large organization, use the Filter field to locate technicians.
3.
Click OK.
A connection is made to the technician's computer and a new Session tab appears in the Technician Console
workspace showing the technicians name.
4.
You must authenticate yourself to the technician's computer. On the Session tab showing the technician's name,
select an authentication method.
• Select Use current credentials to send the Windows credentials you used to log on to your current Windows
session. You must be a Windows administrator or otherwise have user rights on the target machine.
• Select Add username and password to use a different combination with valid user rights on the target
machine.
Tip: If the domain name is needed in the Username field, the acceptable formats are
username@domain and domain\username.
• Select Request Authorization to ask the technician for permission to monitor his desktop.
5.
Click Launch Monitoring.
The technician's desktop is displayed on the Session tab in your Technician Console workspace.
Copyright
©
2023 GoTo, Inc. 53

How to Set up Technician Monitoring Options
Set up authentication requirements for administrators attempting to monitor a technician's desktop. Control how
technicians will be notified when they are being monitored.
1.
Select the Global Settings tab.
2.
Under Technician monitoring, select from the following options:
Option Description
Credentials required
for authentication
Select this option to allow monitoring only by users with an administrative account
on the monitored technician's computer. Select any user to allow monitoring by users
with any user account type on the monitored technician's computer.
Disable technician
monitoring
Select this option to turn off technician monitoring. When disabled, no technician
desktop can be monitored by the organization.
Notify technician
about desktop
monitoring
• Select upon login to the Technician Console if you want technicians to be shown
only a single message upon logging in to the Technician Console listing users who
have permission to monitor the technician's desktop without providing notification.
• Select every time monitoring starts to notify technicians each time they are being
monitored.
Note: When the Disable technician monitoring setting is enabled, the
setting every time monitoring starts is automatically selected. This cannot
be changed. Technicians will not receive any notification about desktop
monitoring.
3.
Click Save Changes.
The settings are applied to all administrators in your Rescue organization.
54 Rescue Administrators Guide

Monitoring Performance Data: The Command Center
The Command Center is a LogMeIn component that gives you a powerful tool for monitoring key performance
indicators in your support organization. Use it to generate and analyze performance data to determine usage patterns,
optimize resource allocation and identify problem areas in your organization.
Requirements:
• A LogMeIn Rescue account
• A Rescue organization already built in the Administration Center
• A supported browser
• Internet Explorer 8 or higher
• The latest version Firefox, Chrome, Safari
To have a quick look at how the Command Center works, see Command Center – At a Glance.
How to Monitor Performance Data for a Channel
1.
In the Command Center, open the drop-down menu and select the unit you want to monitor.
Remember: Master Account Holders and Master Administrators can access data from their whole
Organization Tree. Administrators can only access data concerning the Technician Group they are
assigned to.
Data for the selected Channel is displayed in two sections: Overview and Table.
Tip: Don't see the data you expected? You can set the starting time of the data collection period. See
How to Set Monitoring Data Collection Time Period on page 63.
CAUTION: The browser Back button quits the Command Center. To navigate to previous levels in the
hierarchy, use the breadcrumb.
2.
Review data in the Overview section.
This is aggregated data about the selected Channel as a collective entity including all of its Technician Groups.
• Status (Technicians)
• Capacity (Total, Available, Used). Both private and channel sessions are considered.
• Missed session count
• Closed session count
• Running session count
• Waiting session count
• Incoming session count
• Outgoing session count
• Wait time average
• Wait time max
• Handling time average
• Handling time max
Tip: For definitions, see Command Center Terms and Definitions on page 63.
3.
Review data in the Table section.
Copyright
©
2023 GoTo, Inc. 55

• Under the Technicians tab, data pertain to technicians belonging to the selected Channel.
• Status
• Name
• Technician Group
• Wait time average
• Wait time maximum
• Handling time average
• Handling time maximum
• Available capacity
• Total capacity
• Closed session count
• Active session count from the selected Channel
• Active session count from other Channel(s)
• Private session count
• Under the Sessions tab, you can view data for individual channel sessions handled by technicians belonging to
the selected channel.
• Technician
• Wait time
• First chat time
• Handling time
• Wrap time
• Session status
• Custom column (as defined under Settings)
• Channel
• Session ID
• Chat monitor
Tip: For definitions, see Command Center Terms and Definitions on page 63.
How to Monitor Performance Data for a Technician Group
1.
In the Command Center, open the drop-down menu and select the unit you want to monitor.
Remember: Master Account Holders and Master Administrators can access data from their whole
Organization Tree. Administrators can only access data concerning the Technician Group they are
assigned to.
Data for the selected Technician Group is displayed in two sections: Overview and Table.
Tip: Don't see the data you expected? You can set the starting time of the data collection period. See
How to Set Monitoring Data Collection Time Period on page 63.
CAUTION: The browser Back button quits the Command Center. To navigate to previous levels in the
hierarchy, use the breadcrumb.
2.
Review data in the Overview section.
This is aggregated data about the selected Technician Group as a collective entity of all the technicians that
belong to it.
56 Rescue Administrators Guide

Important: Sub-groups of the selected Technician Group are excluded from calculation.
• Status (Technicians)
• Capacity (Total, Available, Used)
• Missed session count
• Closed session count
• Running session count
• Waiting session count
• Incoming session count
• Outgoing session count
• Wait time average
• Wait time max
• Handling time average
• Handling time max
Tip: For definitions, see Command Center Terms and Definitions on page 63.
3.
Review data in the Table section.
• Under the Technicians tab, data pertain to technicians belonging to the selected Technician Group.
• Status
• Name
• Wait time average
• Wait time maximum
• Handling time average
• Handling time maximum
• Available capacity
• Total capacity
• Closed session count
• Channel session count
• Private session count
• Under the Sessions tab, you can view data for individual channel sessions handled by technicians belonging to
the selected channel.
• Technician
• Wait time
• First chat time
• Handling time
• Wrap time
• Session status
• Custom column (as defined under Settings)
• Channel
• Session ID
• Chat monitor
Tip: For definitions, see Command Center Terms and Definitions on page 63.
Copyright
©
2023 GoTo, Inc. 57

How to Monitor Performance Data for a Technician
Technicians cannot be accessed directly, but rather through a Technician Group or Channel to which they belong.
1.
In the Command Center, use the drop-down menu to choose the unit that includes the technician who you want
to monitor.
2.
In the Table section under the Technicians tab, find the technician's row and click it.
Monitoring data for the selected technician is displayed in two sections: Overview and Table.
Tip: Don't see the data you expected? You can set the starting time of the data collection period. See
How to Set Monitoring Data Collection Time Period on page 63.
3.
Review data in the Overview section.
Data pertain to the selected technician.
Tip: For definitions, see Command Center Terms and Definitions on page 63.
4.
Review data in the Table section.
Under the Sessions tab, you can view detailed data about each channel and private session handled by the
selected technician.
• Technician
• Wait time
• First chat time
• Handling time
• Wrap time
• Session status
• Custom column (as defined under Settings)
• Channel
• Transferring from/to
• Session ID
• Chat monitor
Tip: For definitions, see Command Center Terms and Definitions on page 63.
How to Monitor Performance Data Based on Custom Attributes (Labels)
What is a Label?
A label collects all Technician Groups and/or Channels that have been tagged with it, so that organization units can
be monitored as an arbitrary group. This helps administrators to monitor their organization along any lines relevant
to their operation. By applying labels, Command Center monitoring is no longer restricted to a single organizational
unit.
58 Rescue Administrators Guide

Figure 2: Labels in the Command Center
Organization units can be assigned more than one label. For example, if a support organization has five Technician
Groups (TG1, TG2, TG3, TG4 and TG5), and these work in two geographical areas, an Administrator can create
labels such as "Central Europe" (TG1, TG2 and TG3 belong here in this example) and "USA East Coast" (TG4 and
TG5 belong here in this example). Also, in this example, this organization supports two departments; therefore,
the Administrator will also create two corresponding labels "Finance" (for TG1, TG3 and TG4 in this example)
and "Legal" (for TG2 and TG5 in this example). This means that, for example, Technician Group 2 has both label
"Central Europe" and label "Legal".
Technician Group Labels
TG1 Central Europe, Finance
TG2 Central Europe, Legal
TG3 Central Europe, Finance
TG4 USA East Coast, Finance
TG5 USA East Coast, Legal
How to Add Labels
This option is available to Master Administrators and Master Account Holders.
1.
In the Administration Center, go to the Global Settings tab.
2.
Under Labels, click Manage Labels.
The Add/Remove Labels page is displayed.
3.
Click the gear icon.
The Add new labels option is displayed.
4.
Under Add new labels, name the new label and click Add.
The new label is displayed.
Tip: Repeat this step for each label you want to add.
5.
Click Done.
Remember: Don't forget to assign labels to Channels or Technician Groups. See How to Assign Labels
on page 60.
Copyright
©
2023 GoTo, Inc. 59

How to Assign Labels
Master Administrators and Master Account Holders can assign labels to any Technician Group or Channel in their
organization tree. Administrators can assign labels to the Technician Group that they are assigned to.
1.
In the LogMeIn Rescue Administration Center on the Organization Tree, select the Technician Group or
Channel to which you want to assign the label.
2.
Select the Organization tab.
3.
Under Assigned labels, select a label.
4.
Click Add.
The selected label is displayed next to Labels
5.
Click Save Changes.
How to Monitor Performance Data According to a Label
Monitoring according to labels is only available if labels have been added and assigned.
1.
In the Command Center, select a label from the Label List or from the drop-down menu.
Data related to the selected label is displayed in two sections: Overview and Table.
Remember: Master Account Holders and Master Administrators can access data from their whole
Organization Tree. Administrators can only access data concerning the Technician Group they are
assigned to.
Tip: Don't see the data you expected? You can set the starting time of the data collection period. See
How to Set Monitoring Data Collection Time Period on page 63.
CAUTION: The browser Back button quits the Command Center. To navigate to previous levels in the
hierarchy, use the breadcrumb.
2.
Review data in the Overview section:
This is aggregated data about the selected Label as a collective entity of all the elements assigned to it.
• Status (Technicians)
• Capacity (Total, Available, Used)
• Missed session count
• Closed session count
• Running session count
• Waiting session count
• Incoming session count
60 Rescue Administrators Guide

• Outgoing session count
• Wait time average
• Wait time max
• Handling time average
• Handling time max
Tip: For definitions, see Command Center Terms and Definitions on page 63.
3.
Review data under Table:
Data is for all Technician Groups and all Channels assigned to the selected Label.
• Under the Channels tab, data pertain to Channel(s) assigned to the selected Label.
• Under the Technician Groups tab, data pertain to the Technician Group(s) assigned to the selected Label.
• Under theSessions tab, you can view data for individual sessions handled by technicians belonging to
Technician Groups and Channels assigned to the selected Label.
• Technician
• Wait time
• First chat time
• Handling time
• Wrap time
• Session status
• Custom column (as defined under Settings)
• Channel
• Session ID
• Chat monitor
Tip: For definitions, see Command Center Terms and Definitions on page 63.
How to Monitor Technician Chatlog
Administrators can monitor chat sessions in the Command Center.
1.
Under the Sessions tab in the Table section of the Command Center, select the session you want to monitor.
2.
Click the CHAT MONITOR icon to see the full chatlog of the selected session.
The chat conversation is displayed in a new window. All information normally included in a chatlog is
displayed, such as status changes and connection messages.
Tip: In case of active sessions, the Chat Monitor window displays the live chatlog in real time.
Copyright
©
2023 GoTo, Inc. 61

How to Set Command Center Alert Thresholds
Command Center alerts give you visual notification if the performance of the selected unit is out of the specified
range. Configure the values that trigger alerts.
There are two kinds of alerts: Warning (yellow) and Alert (red). When triggered, these alerts make the background
of the corresponding Table panel cell yellow (for Warnings) or red (for Alerts).
Important:
Configuring alerts is optional. However, when you configure both an Alert value and a Warning value for a
cell, the following applies:
• For Wait Time Max, Handling Time Max, and Handling Time Avg, the Alert value must be higher than
the Warning value. This is because lower Wait and Handling time values are more desirable, and an Alert
is stronger than a Warning.
1.
In the Command Center, click the gear icon in the upper right corner.
The Settings page is displayed.
2.
Set alert levels for any of the following fields:
• Wait Time Max
• Handling Time Max
• Handling Time Avg
How to Restrict Administrators to Command Center Monitoring Function
A Master Administrator or a Master Account Holder can restrict an Administrator Group's role to Command Center
monitoring only.
If this feature is activated for an Administrator Group, members will not be able to access the Administration
Center.
Tip: This feature is recommended for Administrators whose role is exclusively to monitor Technician
Groups to which they are assigned.
1.
In the Administration Center on the Organization Tree, select the Administrator Group that should be restricted
to Command Center monitoring only.
2.
Select the Organization tab.
3.
Select Access Command Center only.
4.
Click Save Changes.
62 Rescue Administrators Guide

Customizing the Command Center
How to Set Monitoring Data Collection Time Period
Set the starting time from which Command Center should collect data.
1.
In the Command Center, click the gear icon in the upper right corner.
The Settings page is displayed.
2.
Use the slider to set the time from which you want to start collecting data.
3.
Click Apply to save your changes.
In this example, a monitoring agent's shift starts at 4pm, so he is only interested in data reported starting from 4pm
and wants to ignore data before that time.
How to Set Value of Custom Column on Sessions Tab
When viewing detailed information about sessions, you can choose which Custom Field is reported as a column on
the Session tab.
1.
In the Command Center, click the gear icon in the upper right corner.
The Settings page is displayed.
2.
Under Custom column on Session tab, select a field.
These are the Custom Fields set in the Administration Center under Global Settings > Custom fields.
3.
Click Apply to save your changes.
The chosen field is shown as a column on the Sessions tab in the Table section of the Command Center.
Command Center Terms and Definitions
For information on general terms and definitions, see "Appendix - Session statuses in the Technician Console" in
Technician Console User Guide.
Available
capacity
Total capacity minus active sessions of technicians belonging to the unit being monitored.
Capacity
The number of sessions a technician can handle. Configurable in Administration Center
(value: 1-10).
Copyright
©
2023 GoTo, Inc. 63

Total capacity
Total capacity is the sum of the capacity of all the technicians who belong to the organizational
unit that is being monitored. For example, for a Technician Group the sum of all the online
technicians in the group is calculated. For a label, the calculation considers all Technician
Groups assigned to the given label, plus all Technician Groups belonging to the Channels
assigned to the label, excluding any technicians whose assignment to a given channel has been
revoked.
Used
Total capacity minus Available capacity.
Running
The number of sessions of the given type (private or channel) that have been picked up and are
in a status that allows a technician to work with them in the Technician Console.
Waiting
The number of sessions of the given type (private or channel) in waiting status in the
Technician Console.
Incoming
The number of sessions of the given type (private or channel) being transferred to the unit
being viewed.
Outgoing
The number of sessions of the given type (private or channel) being transferred from the unit
being viewed.
Missed
Sessions that reached Waiting status, but did not become Active. This includes:
• Sessions closed by customer before Pickup
• Sessions that timed out after Waiting time
Remember: Waiting session timeout is configurable in the Administration Center.
For information, see "How to Set Time-outs and Warnings" in Administration
Center User Guide.
Closed
Sessions that were picked up, and then closed.
Note: Only those sessions are calculated that were closed after the starting time
configured in Settings > Reset time. (For details, see section How to Set Monitoring
Data Collection Time Period on page 63).
Wait time
The length of time the session is in Waiting status. (Pickup time minus Start time)
Wait time
average
Average of waiting time calculating sessions in Waiting state.
Wait time max
The longest waiting time calculating sessions in Waiting state.
Handling time
1.
If the session has been picked up and closed: Close time minus Pickup time
2.
If the session has been picked up but has not been closed: Current time minus Pickup time
3.
If the session has neither been picked up nor closed: 0
Handling time
average
Average of handling time for all the sessions.
Handling time
max
The length of the session with the longest handling time.
64 Rescue Administrators Guide

Command Center Error Messages
The selected
view is not
available. Select
an option below.
This error message is displayed in either of the following cases:
• An Administrator tries to monitor an organizational entity for which he has no authorization.
• An Administrator tries to monitor an organizational entity that no longer exists.
Note: The Command Center remembers the view last used by the Administrator.
If his authorization for the given organizational entity has been revoked, or the
organizational entity has been deleted since his last using/refreshing the Command
Center, this error message is displayed.
Authorization
has been denied
for this request.
This error message is displayed in either of the following cases:
• An Administrator tries to refresh the Command Center, but he has already been logged out
of his account.
Note: For example, an Administrator is working in the Command Center, and he
is also logged in to the Administration Center at the same time. If he logs out from
the Administration Center, or his account login expires, he will receive this error
message in the Command Center.
• An Administrator tries to refresh the Command Center, but his right to access the Command
Center has been revoked.
Copyright
©
2023 GoTo, Inc. 65

Managing Unattended Computers
About Unattended Access
Unattended access allows a technician to connect to a remote computer when no user is present.
Technicians are often unable to resolve an issue during a single session; the job may be too big, or the customer
may need his computer. The technician and customer could theoretically arrange a time for a second session, but
it is more practical for the technician to continue work later – at a time more convenient for all – even when the
customer is not present.
Administrators use the Administration Center to assign unattended computers to groups or technicians, or to disable
unattended access.
See the Technician Console User Guide for step-by-step instructions on how to enable unattended access.
Requirements:
• The agent's Technician Group must have permission to use unattended access
• Unattended access requests cannot be sent during the following session types: Instant Chat in Chat-only mode,
Mobile Applet
Setting up Unattended Access on Multiple Computers (Access Wizard)
By using the Access Wizard, customers can conveniently mass-deploy the Unattended Access service to multiple
devices. Once the installer is deployed, Administrators can manage the machines associated with each MSI they
created.
Topics in this article:
•
Creating the Installer
•
Deploying the Installer
•
Managing Unattended Access in the Admin Center
Creating the Installer
Master Account Holders and Master Administrators can create MSI installers with the Access Wizard.
Note: The installer is only compatible with a direct connection to secure.logmeinrescue.com; it is unable
to connect to a proxy using a PAC file.
1.
Log in to your Rescue account, and go to My Account.
2.
Click Launch Access Wizard.
The Access Wizard page is displayed.
66 Rescue Administrators Guide

Note: At any time during the process, you can return to the My Account page by clicking Discard &
close in the bottom right corner. This, however, will discard all the parameters you have configured.
3.
Configure the parameters for the installer.
Name
The name you provide here will identify the installer and the computers associated with it
in the following places.
• In the Admin Center: On the Computers tab, under section Unattended MSI-s (for
detailed information, see Managing Unattended Access in the Admin Center on page
68).
• In the Technician Console: In the Description field of the Unattended Accessible tab in
the Computers window.
Note: To see the list of Unattended Accessible Computers, click the
Computers icon on the Session Toolbar.
Description
You must add a description. This will appear in the Admin Center as the description of the
computers on which the installer has been deployed.
Daily time range
Select a time range if you want the unattended machines to be available only during set
hours (for example, business hours, or off hours only). If no range is defined, the default
(12 AM - 12 AM) value means the unattended machines will be available 24 hours a day.
Unattended
access expires in
You can set an expiration date (defined in days or weeks) for Unattended Access, or check
Never expires for permanent access.
4.
Click Next Step.
Step 2/3 of the Wizard is displayed.
5.
Select the technician(s) and/or Technician Group(s) you want to enable to access any machine on which this
particular installer is deployed.
• To select individual users, use the Technicians tab.
• To select one or more entire Technician Group, use the Technician Group tab.
Note: When you select a Technician Group, members of that group show as checked when reviewing
the Technicians tab.
6.
Click Next step.
The final screen of the Wizard displays a summary of the package that is being created.
Note: If you need to make any changes, you can return to a previous step by clicking Previous step.
7.
To generate and download the MSI installer, click Download installer.
Once the installer is generated, you are prompted to save the file on your computer.
8.
To exit the Wizard, click Finish & close.
Deploying the Installer
The MSI file can be shared and deployed in a number of ways thus offering Rescue users flexibility in how their
Unattended Access devices are initially set up. Below you can find some examples for sharing and deploying the
installer file:
• Sending the MSI via email to a vendor in a remote location
• A field service agent storing the MSI on a pendrive to install on machines in the field
• Placing a download link to the MSI on a portal page for self-service customer installs
Copyright
©
2023 GoTo, Inc. 67

• Deploying the MSI via group policy to machines on an internal network
Note: This option assumes you are familiar with and use built-in Windows software distribution methods
such as Microsoft Group Policy Management.
Managing Unattended Access in the Admin Center
This section describes the management of the MSI installers created by the Access Wizard. For information about
general management of unattended computers, see How to Assign or Delete Unattended Computers on page
68.
1.
In the Administration Center, select the Technicians root or a Technician Group on the Organization Tree.
2.
Select the Computers tab.
Under section Unattended MSI-s the list of installers generated for the selected organizational entity is
displayed.
3.
You can manage the MSI installer in the following ways.
Download the
installer again
Under Regenerate installer, click x86 or x64 depending on your OS.
Make the
installer expire
Under Regenerate installer, click the Make package expire icon.
Note: The installer cannot be downloaded anymore.
How to Assign or Delete Unattended Computers
Use the Computers tab to manage the unattended computers that are accessible to an organizational unit.
A computer is added to your Rescue organization each time a customer grants unattended access rights to a
technician.
Each computer is named according to the value entered in the Name field for the session during which unattended
access was enabled.
1.
Select the Technicians root or a Technician Group on the Organization Tree.
2.
Select the Computers tab.
A list of all unattended access computers assigned to the selected unit is displayed.
3.
Select computers and choose an action:
• Use Copy... to assign the selected computers to an additional Technician Group or Computer Group while
maintaining any current assignments.
• Use Move... to assign the selected computers to a different Technician Group or Computer Group.
• Click Delete to remove the selected assignment(s). Any other assignments remain valid.
• To revoke unattended access for a given computer, select all assignments and click Delete.
4.
Confirm your action.
The new assignment is reflected on the Organization Tree and Computers tab.
Tip:
To change the name of a computer, under Actions click the Rename Computer (pencil) icon, and submit
the new name.
68 Rescue Administrators Guide

Right-click an item to delete an individual assignment.
To create a Computer Group, right-click on a Technician Group and select Create Computer Group.
How to Set the Authentication Method for Unattended Access
You must decide how technicians will authenticate when they access an unattended computer.
1.
On the Organization Tree, select the Technician Group you want to work with.
2.
Select the Settings tab.
3.
Under Unattended Access, set the Technician enters administrator credentials at start of every session
option:
• Clear this option to allow technicians to authenticate to an unattended computer using a customer's credentials.
This is the default setting.
Important: The duration of unattended access is limited to two weeks when technicians authenticate
using customer credentials.
• Select this option to force the technician to enter valid administrative credentials at the start of every
unattended session.
4.
Under Unattended Access, set the Block pop-up notification after session option:
• Clear Block pop-up notification after session to send a pop-up notification to the customer at the end of the
unattended session that their computer was accessed by a technician.
• Select Block pop-up notification after session to block the pop-up notification on the customer’s computer at
the end of the unattended session.
5.
Save your changes.
• Click Save to apply settings to the current Technician Group
• Click Apply to subgroups to apply the settings to the current Technician Group and all of its subgroups
• Click Apply to all groups to apply the same settings to all Technician Groups in your organization
Copyright
©
2023 GoTo, Inc. 69

Controlling Technician Status
How to Set Technician Status Controls (Maximum sessions, Busy, Away,
Auto-logout)
offers a group of settings that help you control technician status.
1.
On the Organization Tree, select the Technician Group you want to work with.
2.
Select the Settings tab.
3.
Under Technician Console, select from the following options:
Option Description
Technician can
handle maximum X
active sessions
Set the maximum number of simultaneous sessions that you want to allow technicians
to handle. When the maximum number is reached, a technician will be unable to
activate new sessions.
Restriction: A technician can handle only one active Lens session at a time.
Technician
automatically goes
into Busy state when
handling more than
X active sessions
Sessions cannot be transferred to a Busy technician, but a Busy technician can see all
sessions in his queue and pick up new sessions.
Technician
automatically goes
into Away state after
X min(s) of inactivity
Sessions cannot be transferred to an Away technician, but an Away technician can see
all sessions in his queue and pick up new sessions.
Technician
automatically logs
out after X min(s) of
inactivity
Inactivity is measured as the time when no actions are taken in the Technician
Console. Certain processes running in the Technician Console will prevent automatic
log out, including the following: an open remote control, screen sharing, or file
manager session; a pending file transfer; or an open save dialog.
4.
Save your changes.
• Click Save to apply settings to the current Technician Group
• Click Apply to subgroups to apply the settings to the current Technician Group and all of its subgroups
• Click Apply to all groups to apply the same settings to all Technician Groups in your organization
70 Rescue Administrators Guide

Customizing the Technician Console
See also:
•
Hiding Disabled Features on page 12
•
How to Set Connection Methods Available to Technicians on page 44
•
Setting up Custom Fields on page 75
External Content Portal
Add a link to any source of information that may help technicians do their job, such as a Knowledge Base,
documentation, or other valuable support material. Technicians will see a link added to the menu in the upper-left
corner of the Technician Console interface.
Figure 3: Sample Custom Informational Link
1.
On the Organization Tree, select the Technician Group you want to work with.
2.
Select the Settings tab.
3.
Under Content Portals, go to External Content Portal.
4.
Select Show link in Tech Console menu to activate the feature.
5.
Enter the Link name as you want it to be shown in the Technician Console.
6.
In the Link opens new window at box, enter the URL of the site that will be opened when the link is clicked in
the Technician Console.
7.
Save your changes.
• Click Save to apply settings to the current Technician Group
• Click Apply to subgroups to apply the settings to the current Technician Group and all of its subgroups
• Click Apply to all groups to apply the same settings to all Technician Groups in your organization
Integrated Content Portal
Administrators can set a URL that technicians can open within the Technician Console.
This feature integrates a modified Internet Explorer browser window into the Technician Console. The window can
be set to display any URL.
Copyright
©
2023 GoTo, Inc. 71

How to set the Integrated Content Portal URL
The Integrated Content Portal URL is set per Technician Group in the Administration Center.
Fastpath: Settings tab > Content Portals > Integrated Content Portal
Opens with
session
The given link opens when a session enters Active status.
Opens on launch
The given link opens when the Technician Console is launched, and stays open until there is a
session.
Additionally, you can post session data to the URL by appending the following parameters:
• $cfield0$ Customer's name
• $cfield1$ Custom Field 1
• $cfield2$ Custom Field 2
• $cfield3$ Custom Field 3
• $cfield4$ Custom Field 4
• $cfield5$ Custom Field 5
• $platform$ Platform
• $sessionid$ Session ID
• $techid$ Technician ID
• $techdescr$ Technician description
• $techemail$ Technician email
• $techname$ Technician name
• $techssoid$ Technician Single Sign-on ID
• Example: http://myurl.com/$techid$
How to Manage Predefined Replies and URLs
An Administrator with a technician license can create a set of standard replies and URLs and then export them to an
XML file. Technicians in the Administrators' organization will then be able to import the replies and URLs into their
own Technician Console.
Create New Predefines Replies and URLs
1.
Log in to the Rescue Technician Console.
Restriction: Only Administrators with a technician license can access the Technician Console.
2.
From the Tools menu, select Manage Predefined Replies.
The Manage Predefined Replies tab is displayed in the Technician Console workspace.
3.
On the Predefined Replies or Predefined URLs tab, click Add New.
The Add New Predefined Reply form is displayed.
4.
Give the reply or URL a short Name.
5.
Type the text of the reply or the URL in the Content box.
All content is text only. Formatting is not available.
72 Rescue Administrators Guide

Note: You can also enter an FTP address.
6.
Click Save.
Export a Set of Predefined Replies and URLs
1.
Log in to the Rescue Technician Console.
Restriction: Only Administrators with a technician license can access the Technician Console.
2.
From the Tools menu, select Manage Predefined Replies.
The Manage Predefined Replies tab is displayed in the Technician Console workspace.
3.
On the Manage Predefined Replies tab, click the Import/Export tab.
4.
Click Export.
The Save As dialog box is displayed with replies.xml in the File name field.
5.
Choose a location where you would like to save replies.xml.
You should choose a location accessible to other members of your organization.
Remember: Files saved/exported during a session are available at Users/[username]/Library/
Application Support/-/Bottles//drive_c/users/crossover/My Documents
6.
Click Save
Your replies and URLs are saved as an XML file.
Share a Set of Predefined Replies and URLs
Share the xml file with your technicians so they can start using your set of predefined replies and URLs by
following the below procedure.
Tip: You can send the xml file attached to an email, or you can share the URL of the location where the
xml file has been stored. Make sure the location is accessible to your technicians.
1.
Log in to the Rescue Technician Console.
2.
From the Tools menu, select Manage Predefined Replies.
The Manage Predefined Replies tab is displayed in the Technician Console workspace.
3.
On the Manage Predefined Replies tab, click the Import/Export tab.
4.
Click Import.
The Open dialog box is displayed.
5.
Locate the xml file and click Open.
The replies are added to your list of predefined replies.
How to Set Up Script Files for Storing Recordings in a Cloud
Administrators can set up script files to store session recordings in the cloud.
Requirements:
Copyright
©
2023 GoTo, Inc. 73

• Check in the Do not allow the technician to set the location box.
• Enter script reference into the Screen recording location box:
"custom:MyUploadScript.cmd"
"custom:c:\MyScripts\MyUploadScript.cmd"
Note: We recommend customizing the ready-to-use Rescue script titled CustomSRUploader.cmd,
however, customers are allowed to set up their own scripts as well.
Important: For security reasons, if the edit box contains only the name of the script, the TC is looking for
the script only around the TC's executable in the installation folder, to protect the integrity of the script. If
the administrator provides the absolute path of the script on the technician machine, the TC will accept it.
Why does Rescue provide the "CustomSRUploader.cmd" script
Rescue provides a ready-to-use script template suitable for the majority of use cases. For security reason we
recommend saving the custom script into a dedicated folder where restricted users cannot modify it, granting editing
permissions to administrators only. Consequently, malicious intruders, or hackers cannot change the intended upload
flow.
The CustomSRUploader.cmd is placed near the TC binary file in the installation folder for this reason.
The script can be used as a safe starting point for calling customer's own scripts. While it seems to be easy to find
the install folder of the Technician Console, it is quite the contrary with the browser TC. Windows may change
folders of plugin files depending on the preliminary install history. Using "CustomSRUploader.cmd" will make
integration with the TC easier. As safety is paramount, we recommend using absolute paths, and using quotation
marks for any path containing space characters in the scripts.
What command line tool is recommended for uploading the script
We recommend using the “rclone” command line, available at https://rclone.org, to execute upload tasks.
"Rclone" is a command line program to manage files on cloud storage, first released in 2014. It is a feature rich
alternative to cloud vendors' web storage interfaces. Over 40 cloud storage products support rclone including S3
object stores, business & consumer file storage services, as well as standard transfer protocols. "rclone" hides the
differences of the various targets by a simple configuration process.
TC expects a so called "remote" element preconfigured by the customer, to be able to upload the screen recordings
to the remote location. Authentication is done during the configuration process.
Rclone executes checks on:
• duplicated uploads
• size and content of the target file
• resend in case of broken uploads
Rclone and its configuration parameters may be either deployed by IT, or through the customer's upload script.
Rclone is able to manage proxy based on preconfigured environment parameters:
HTTP_PROXY=http://mm:[email protected]:3128
HTTPS_PROXY=http://mm:[email protected]:3128
74 Rescue Administrators Guide

Setting up Custom Fields
How to Name Custom Fields
Custom Fields allow you to collect information about your customers or sessions. Set the name of fields as they will
appear in reports and in the Technician Console.
1.
Select the Global Settings tab.
2.
Under Custom Fields, set the names of the various fields.
Option Description
Name for name field
This field is used as a primary session identifier. Some organizations may want to use
an employee number or ID code instead of a given name.
Name for custom
fields
These are further session identifiers. Technicians can add these fields as columns on
their Session List. Technicians with permission to use Inline Editing of Queue will be
able to edit the values entered in these fields during a session.
3.
Click Save changes.
Field values are entered by the customer for Channel sessions; by the technician for Private.
Figure 4: Custom Fields as seen in the Technician Console
Note: To change the name of the custom fields used in a Channel Form, edit the code for Custom Live
Support Forms when you integrate it into your website. See How to Make a Channel Available for Use
on page 35.
Copyright
©
2023 GoTo, Inc. 75

Remember: The default language used by the Administration Center Organization Tree, channel names,
and Custom Fields on the Global Settings tab is set according to the language used at the time when you
register for a Rescue account. This feature protects your Custom Fields and Organization Tree entity names
from unwanted changes.
How to Enable Custom Fields for Private Sessions
Custom Fields appear in the Technician Console on the Create New Session dialog box. They are seen by a
technician while creating a new session.
1.
On the Organization Tree, select the Technician Group you want to work with.
2.
Select the Settings tab.
3.
Under Custom Fields (Private Sessions), choose from the following options:
• Select Enabled to activate a Custom Field. It will be displayed on the Create New Session dialog box
• Select Mandatory for each field that must be completed by the technician before a new session can be
generated
• Select Open text if you want technicians to be able to enter any text in the field’s text box (up to 64
characters)
• Select Drop-down to add a drop-down list and choices to a field
4.
Save your changes.
• Click Save to apply settings to the current Technician Group
• Click Apply to subgroups to apply the settings to the current Technician Group and all of its subgroups
• Click Apply to all groups to apply the same settings to all Technician Groups in your organization
76 Rescue Administrators Guide

Setting up Remote Control Defaults
How to Set up Screen Recording
Define how and when Remote Control and Desktop Viewing sessions are recorded.
1.
On the Organization Tree, select the Technician Group you want to work with.
2.
Select the Settings tab.
3.
Under Screen Recording, select from the following options:
Option Description
Forced screen
recording
Choose this option to record all Remote Control and Desktop Viewing sessions
conducted by members of the selected Technician Group.
Allow Remote
Control when screen
recording cannot be
saved
Choose this option if you want technicians to be able to run Remote Control sessions
even if a recording of the session cannot be saved. If you disable this option,
technicians can only launch remote control when a recording can be saved on the
technician's computer. Furthermore, remote control will end if an error occurs during
screen recording.
Screen recording
location
Specify a central location to which recorded sessions will be saved. You can save
locally, to a network location, to an FTP, HTTP, or HTTPS server, or to a cloud
location.
Examples:
• Network: \\computer\directorypath. For example, \\support
\recordings
• Local: C:\recordings
• External server:
<scheme>://<user>:<pass>@<domain>:
<port><path><extra>
where <scheme> is ftp, http, and https. For example, ftp://
user:[email protected]:21/recordings
Restriction: For technicians working on Technician Console for Mac,
uploading screen recordings to an HTTP or HTTPS server is not available.
Tip: User name and password in the URL are only required when the host or
proxy requires authentication. When credentials are omitted from URL, the
Technician Console will prompt for credentials. Credentials in the URL are
allowed, but not recommended.
Deferred Upload of
Screen Recordings
By default, screen recordings are uploaded to the screen recording location in real
time, as the session occurs. This works well in a high bandwidth environment, but
may cause performance issues if a technician is using a low bandwidth connection.
Select Deferred Upload of Screen Recordings to temporarily save all screen
recordings to the technician’s local drive and then upload them to the screen recording
location as bandwidth becomes available. If the Technician Console is closed while
Copyright
©
2023 GoTo, Inc. 77

Option Description
uploading a file, it starts the upload process upon restarting the Technician Console. If
you select FTP, HTTP, or HTTPS as a Screen recording location, deferred upload is
automatically enabled regardless of your settings.
File Format
Recorded sessions can be saved as AVI files or in RCREC format. RCREC is a
LogMeIn proprietary format that must be converted to AVI using the Rescue AVI
Converter on a Windows PC. Each AVI option offers similar file size, with some
variations in color and smoothness. Experiment to find the best choice to meet your
needs. The LogMeIn encoder (RASC) is designed to offer the highest overall quality,
but requires the LogMeIn codec for playback (available for Windows only). Anyone
viewing your recordings must have the appropriate codec for the chosen AVI type.
Note: Rescue 7.50 and later offers MKV/VP8 screen recording method for
sessions initiated from the applet. No preinstalled Rescue or Windows codec
is needed, no more headaches if codecs are missing on x64 platforms. The
recording can be played back with most open source media players without
the hassle of converting the recordings.
4.
Save your changes.
• Click Save to apply settings to the current Technician Group
• Click Apply to subgroups to apply the settings to the current Technician Group and all of its subgroups
• Click Apply to all groups to apply the same settings to all Technician Groups in your organization
How to Set Clipboard Synchronization Behavior
Define how you want clipboard synchronization to behave during Remote Control.
1.
On the Organization Tree, select the Technician Group you want to work with.
2.
Select the Settings tab.
3.
Under Technician Console, go to Clipboard Synchronization and select from the following options:
• Choose Use universal clipboard across all sessions to allow a technician's clipboard to store copied items
from multiple sessions.
• Choose Use one unique clipboard for each session to ensure that material copied during any given session
can be pasted to the technician's computer, but never to another customer.
4.
Save your changes.
• Click Save to apply settings to the current Technician Group
• Click Apply to subgroups to apply the settings to the current Technician Group and all of its subgroups
• Click Apply to all groups to apply the same settings to all Technician Groups in your organization
78 Rescue Administrators Guide

How to Disable Wallpaper for all Remote Sessions
Force the customer's desktop wallpaper and all user interface effects to be disabled during remote control. User
interface effects include transition effects (fade, scroll), shadows under menus, and trailing effects while dragging
windows.
1.
On the Organization Tree, select the Technician Group you want to work with.
2.
Select the Settings tab.
3.
Under Technician Console, select Disable wallpaper and visual effects.
4.
Save your changes.
• Click Save to apply settings to the current Technician Group
• Click Apply to subgroups to apply the settings to the current Technician Group and all of its subgroups
• Click Apply to all groups to apply the same settings to all Technician Groups in your organization
The Disable wallpaper and visual effects box in the Technician Console will be deactivated. Wallpaper and effects
will be disabled for all remote control sessions.
Copyright
©
2023 GoTo, Inc. 79

Setting up Surveys
How to Set up the Technician Survey
Administrators can customize and activate a survey to be completed by technicians at the end of a session.
1.
On the Organization Tree, select the Technician Group you want to work with.
2.
Select the Settings tab.
3.
Under Technician Survey, select the appropriate options:
Option Description
No technician survey
Choose No technician survey if you do not want your technicians to complete a
survey at session end.
Use Rescue
technician survey
Choose Use Rescue technician survey to collect responses using a standard Rescue
survey interface. The form can contain up to ten questions, each with five possible
predefined answers, or with free-form (open-ended) answers. Technicians will be
shown the survey at session end. Survey results are reported in the Technician Survey
report, generated on the Reports tab.
Use self-hosted
technician survey
Choose Use self-hosted technician survey to redirect technicians to a self-hosted
survey or third-party survey tool. Enter the URL of your survey in the URL field.
Technicians will be taken to the specified site at session end. In this case, survey data
is not reported in the Technician Survey report, but rather using the mechanism native
to the self-hosted or third-party survey site.
Add additional
Rescue session details
to this URL
If you are using a self-hosted or third-party survey, select Add additional Rescue
session details to this URL to send the value of the Session ID and Custom Fields to
the survey. The survey URL will be appended with the following data:
RescueSessionID=xxxxxxxxx&CField0=xxxxx&CField1=xxxxx&
CField2=xxxxx&CField3=xxxxx&CField4=xxxxx&CField5=xxxxx
These parameters can be used, for example, to map a Rescue report to an external
report. Your survey should be coded to accept these parameters in a GET request.
Note: CField0, CField1, etc. refer to the Name for name field and
other Custom Fields set on the Global Settings tab. The actual values passed
to the survey are entered when the session is generated.
4.
Click the Edit button next to a question.
The Type your question here box is activated.
5.
Type your question.
6.
Choose the question type:
• open answer
• drop-down
7.
Select mandatory to force technicians to complete the question.
8.
Select enable to activate the question.
80 Rescue Administrators Guide

The question will be included in the survey.
9.
Click Apply when you are satisfied with the question.
10.
Add more questions as required.
11.
Save your changes.
• Click Save to apply settings to the current Technician Group
• Click Apply to subgroups to apply the settings to the current Technician Group and all of its subgroups
• Click Apply to all groups to apply the same settings to all Technician Groups in your organization
Tip: To view survey results, go to the Reports tab and generate a Technician Survey report.
How to Set Up the Customer Survey
Administrators can customize and activate a survey to be completed by the customer at the end of a session.
1.
On the Organization Tree, select the channel or Technician Group you want to work with.
2.
Select the Settings tab.
3.
Under Customer Survey, select the appropriate options:
Option Description
No customer survey
Choose No customer survey if you do not want your customers to complete a survey
at session end.
Use Rescue customer
survey
Choose Use Rescue customer survey to collect responses using a standard Rescue
survey interface. The form can contain up to ten questions, each with five possible
predefined answers, or with free-form (open-ended) answers. Customers will be
shown the survey at session end. Survey results are reported in the Customer Survey
report, generated on the Reports tab.
Use self-hosted
customer survey
Choose Use self-hosted customer survey to redirect customers to a self-hosted
survey or third-party survey tool. Enter the URL of your survey in the URL field.
Customers will be taken to the specified site at session end. In this case, survey data is
not reported in the Customer Survey report, but rather using the mechanism native to
the self-hosted or third-party survey site.
Add additional
Rescue session details
to this URL
If you are using a self-hosted or third-party survey, select Add additional Rescue
session details to this URL to send the value of the Session ID and Custom Fields to
the survey. The survey URL will be appended with the following data:
RescueSessionID=xxxxxxxxx&CField0=xxxxx&CField1=xxxxx&
CField2=xxxxx&CField3=xxxxx&CField4=xxxxx&CField5=xxxxx
These parameters can be used, for example, to map a Rescue report to an external
report. Your survey should be coded to accept these parameters in a GET request.
Note: CField0, CField1, etc. refer to the Name for name field and
other Custom Fields set on the Global Settings tab. The actual values passed
to the survey are entered when the session is generated.
4.
Click enable and then edit to activate and edit questions.
5.
Save your changes.
• Click Save to apply settings to the current Technician Group
Copyright
©
2023 GoTo, Inc. 81

• Click Apply to subgroups to apply the settings to the current Technician Group and all of its subgroups
• Click Apply to all groups to apply the same settings to all Technician Groups in your organization
Tip: To view survey results, go to the Reports tab and generate a Customer Survey report.
82 Rescue Administrators Guide

Setting up Instant Chat
You can set Instant Chat as the default running mode for all PC and Mac sessions. See How to Set the Default
Applet (Standard or Instant Chat) on page 36.
Tip: Refer to the Customization and Integration Guide for detailed information about Instant Chat,
including implementation tips and a “How to” guide to Instant Chat customization.
Copyright
©
2023 GoTo, Inc. 83

Setting up Calling Card
MAC calling card JAMF deployment
You can learn more about setting up a Mac Calling Card through JAMF deployment.
• Open Jamf pro with appropriate permissions
The purpose of this guide is to provide a workflow for Mac administrators to deploy Rescue Calling Cards for
Mac with customized settings to multiple Mac computers. This guide uses Jamf Pro as an example mobile device
management (MDM) solution and uses a feature called Custom Schema which was introduced in Jamf Pro version
10.19.
Configuring the Rescue Calling Card PKG
1.
Sign in to Jamf Pro with appropriate permissions
2.
Navigate to Settings using the gear icon in the top right of the main page.
3.
Click Computer Management, then Packages
84 Rescue Administrators Guide

4.
Select + New to create a new package.
5.
Add a new package by clicking Choose file under Filename.
6.
Upload the Rescue Calling Card package you generated.
Important: Do not modify the name of the package!
7.
Once the file uploads, click Save.
Copyright
©
2023 GoTo, Inc. 85

Creating a Policy to Install the Rescue Calling Card for Mac
1.
On the JamfPro dashboard, navigate to Policies under Content Management in the computers tab and click
New to start creating a new policy.
2.
Configure the required settings:
a)
Display Name: A name of your choosing. This guide uses Install Zoom.
b)
Enabled: Checkbox selected
c)
Category: optional field
d)
Trigger: Select the checkbox for the Custom option.
e)
Trigger: Custom Event: Enter a name of your choice.
f)
Execution Frequency: Choose a frequency, for example Once per computer.
3.
Under Packages find your calling card and click Add.
4.
Choose a Distribution point if needed.
5.
Click Scope.
6.
Set the Target Computers you wish to apply the policy to.
7.
Click Save.
8.
Open the Terminal on your Mac.
9.
Run the following command to run the policy that installs the Rescue Calling Card for Mac on your computer by
using the customer event name you specified earlier:sudo jamf policy -event InstallRescue
10.
Enter your administrator credentials when prompted.
11.
The installation process will start.
12.
Confirm that the Rescue Calling Card for Mac was installed in the Applications folder. Do not open the
application now.
86 Rescue Administrators Guide

Configuring a Privacy Preference Policy for Rescue
On an unattended Mac, the first time you open Rescue, you'll see a dialog asking to allow Rescue access to the
Downloads folder. However, for a Mac that you manage with Jamf Pro, you can use a configuration profile to allow
apps to access certain files used for system administration, and to access application data. For example, if an app
requests access to your Downloads folder, the configuration profile can allow or deny the request without user
intervention. As an MDM administrator, you can apply a configuration profile with the Privacy Preferences Policy
Control payload to stop these messages from being presented to the user. Not all messages can be managed using the
Privacy Preferences Policy Control payload. For example, access to the camera, microphone, and screen recording
must be approved by the user and cannot be managed by an MDM server.
1.
Download the PPPC Utility app to configure PPPC settings for Rescue.
2.
Open the Applications folder.
3.
Click the + sign and locate LogMeIn-Rescue.
4.
Add LogMeIn-Rescue to the Applications section in the PPPC Utility app.
5.
In the Applications column select LogMeIn-Rescue.
6.
In the Properties column, next to Accessibility, click the menu and select Allow.
7.
In the Properties column, next to the Downloads folder, click the menu and select Allow.
8.
Click Upload.
9.
Configure the following settings:
a)
Jamf Pro Server: Enter the URL of your Jamf Pro server.
Note: If you use an Identity Provider (IdP) to log in to Jamf Pro, when you enter your Jamf
Pro URL use the following pattern: https://hcs.jamfcloud.com/?failover where you replace
“hcs.jamfcloud.com” with your organization's URL.
b)
Username: Enter a Jamf Pro administrative account name.
c)
Password: Enter a Jamf Pro administrative password.
d) Click Check Connection. If the connection was successful, the PPPC Utility automatically enters the
appropriate information in the Organization field. Otherwise, double-check the Jamf Pro Server, Username,
and Password fields and click Check Connection again.
e)
Payload Name: Enter a name you find easy to remember.
f)
Payload Description: Enter a description if you wish (optional).
10.
Click Upload - This will create the PPPC configuration profile on your Jamf Pro server.
11.
Quit the PPPC Utility application and log in to Jamf Pro.
12.
Click Computers and select Configuration profiles.
13.
Confirm that the configuration profile you uploaded is displayed in the No category assigned section.
14.
Click your configuration profile.
15.
Click Edit in the lower right corner.
16.
Scroll down and select he Privacy Preferences Policy Control payload (optional).
17.
Confirm that the settings were automatically applied by the PPPC Utility app.
18.
Click Scope.
19.
Set the Target Computers you wish to apply the policy to.
20.
Click Save.
21.
Open System Preferences on your Mac.
22.
Click Profiles.
23.
Confirm that your profile is installed.
Copyright
©
2023 GoTo, Inc. 87

About the Calling Card Connection Method
The LogMeIn Calling Card allows for both Channel and Private connections.
When your customers need support, they simply click the Calling Card icon to open your branded Calling Card
Applet.
Unlike other connection methods, the Calling Card needs to be installed on the customer's PC before it can be used.
It exists as a desktop shortcut or Quick Launch icon, which the customer clicks to launch the pre-installed Calling
Card Applet.
The Calling Card can be downloaded as an MSI installer, or on Mac as a .zip file, from your website, or it can be
silently deployed by technicians during the first session with the customer, using the Technician Console.
The Calling Card can be customized in appearance; including text, logos, images, and color schemes. For advanced
Calling Card customization options, see the Customization and Integration Guide.
Note: The 123 app available through the Microsoft Store offers a limited set of the Calling Card
functionalities for Windows 10S. For detailed information, see the related Release Notes.
Process Overview: Calling Card
• A Administrator generates Calling Card Installers for channels in the Administration Center
• A Administrator allows Calling Card deployment for Technician Groups
• A Administrator associates Calling Card Installers with Technician Groups
• Optional: Administrators may customize the Calling Card's appearance
• Customers download the Calling Card application or it is deployed by technicians via the Technician Console
• A customer opens the Calling Card and connects to your organization using a PIN provided by a specific
technician or via the channel associated with the Calling Card
• The support session is assigned to the individual technician who provided the PIN, or to the Channel Queue of the
Technician Group(s) associated with the channel
• The individual technician or any online technician in an assigned Technician Group can activate the support
session
Benefits of Calling Card Connection
• Once the Calling Card is installed, it offers an easy, one-click, no-download connection
• Branding allows you to extend your corporate appearance right to the customer’s desktop
• The layout can be dynamically changed, for example to announce special offers and marketing messages
• Each Calling Card is linked to a channel
Points to consider:
• Customers may try to connect 24 hours a day, so Administrators must use 'No Technician Available' settings to
deal with connections made outside of business hours
• When customers are initiating session requests, Administrators must use dynamic channel and team re-routing to
control traffic during peak hours
• Web developer and/or graphic design resources may be required for customization and integration
88 Rescue Administrators Guide

Calling Card Setup, Task One: Generate a Calling Card
The first task in the process of setting up a Calling Card is to generate a Calling Card installer for a channel.
1.
On the Organization Tree, select the channel for which you want to generate a Calling Card.
2.
Select the Channels tab and scroll to the Generate Calling Card for this Channel section.
3.
Give the Calling Card a meaningful name in the Installer Name box.
Tip: In large organizations with many Calling Card installers, always use a meaningful installer name to
help identify different installers.
4.
Select the operating system you want to generate the Calling Card for.
Note: Check Windows Service Mode if you want to use the Calling Card as a Windows service. The
feature is available from Calling Card v.7.51.1043.
5.
Click Generate.
6.
On Windows operating systems run the .msi file to install it on the local machine or save the .msi file to a folder
on the local machine or on a network for later manual distribution. On Mac operating systems unzip and save the
file to a local or network location for later manual distribution.
You will see the Calling Card details on the Channels tab in the Generate Calling Card for this Channel section.
Each Calling Card installer that you generate has a unique Referral ID. This Referral ID is tracked when a new
Rescue session is started using the Calling Card application and it will appear in any session reports.
Using Multiple Installers
Every installer is linked to a particular channel; however, administrators can track sessions based on different
installers by generating multiple installers for the same channel.
This may be useful, for example, if you have two Technician Groups and you want to measure how many sessions
are launched from each group's installer. The two Technician Groups will have two different Referral IDs for their
Calling Card. Both of the groups then start to deploy Calling Cards and you are then able to see how many sessions
originate from each deployment.
Similarly, you may want to use two website landing pages for your installers. By using separate Referral IDs, you
can track which one is used more often, based on the number of sessions started.
Calling Card Setup, Task Two: Give a Technician Group Permission to
Deploy the Calling Card
The second task in the process of activating a Calling Card is to give a Technician Group permission to be able to
deploy the Calling Card.
1.
On the Organization Tree, select the Technician Group you want to work with.
2.
Select the Organization tab.
3.
Under Permissions, select Deploy Calling Card.
Note: Check Allow Service Mode, if you want to use the Calling Card as a Windows service. The
feature is available from Calling Card v.7.51.1043.
4.
Click Save Changes.
Copyright
©
2023 GoTo, Inc. 89

Calling Card Setup, Task Three: Apply a Calling Card Installer to a
Technician Group
The third task in the process of activating a Calling Card is to apply a Calling Card to a Technician Group.
1.
On the Channels tab in the Generate Calling Card for this Channel section, copy the Referral ID of the
Calling Card you want to apply.
2.
On the Organization Tree, select the Technician Group you want to work with.
3.
Select the Organization tab.
4.
Scroll to the Apply Calling Card section, and enter the referral ID into the Installer Referral ID field.
5.
Click Save Changes.
Any technician in the Technician Group will be able to deploy the Calling Card via the Technician Console.
Calling Card Setup, Task Four: Customize the Calling Card Applet
A Master Administrator can customize Calling Card appearance and content on the Calling Card tab.
1.
Select the Calling Card tab.
2.
Edit the following options, as required.
Option Description
Application name
How the Applet will be named on the user’s device. Choose a name that is easy for
your customers to identify with your organization.
Menu Bar color, text
color
These settings determine the color of the menu bar and the text that appears in the
bar. It is important to ensure that these two colors contrast highly to ensure the text is
clearly visible.
Border
Set the color of the border and its width in pixels.
Footer
Set the color and height of the footer in pixels.
Icon file
The icon that a customer will click to open the Calling Card. Maximum file size is 50
kilobytes. File format must be .ico.
Logo
The logo shown in the top-right corner of the Calling Card once the connection to the
technician has been established. Download the template to see a sample that conforms
to all format requirements.
Header image
The header image shown at the top of the Calling Card. Maximum file size is 100
kilobytes. File format must be .bmp, .png, or .jpg.
Background
The image shown in the background of the Calling Card. Maximum file size is 100
kilobytes. File format must be .bmp, .png, or .jpg.
Help URL
You may want to provide instructions to your customers regarding the Calling Card.
The Help URL should point to these instructions.
Disable Help URL
Select this option if you do not want to display the Help menu item on the Calling
Card.
90 Rescue Administrators Guide

Option Description
Footer text and links
There is space in the Calling Card footer to include up to five hyperlinks to other
websites. You should keep the text as brief as possible since line space may become
an issue if you use all five links or long link names.
Text before form
Use these fields to specify up to three lines of text that will be seen at the top of
the Calling Card. Example: “Please fill in all fields and click Connect to contact a
technician”
Text after form
Use this field to specify one line of text that will be seen at the bottom of the Calling
Card Connect to Remote Support dialog box. Example: “Thank You!”
Custom fields
Choose which input fields to include in the Calling Card interface. Custom Fields are
named on the Global Settings tab.
Note: Select Retain text to preserve values entered by the customer. That is,
the next time the customer starts the Calling Card, previously entered values
will be retained.
Code lines
On the PIN code connection page, you can specify up to three lines of text to explain
to the user what he must do to complete the form correctly. Example: “Please enter
the 6-digit PIN code provided by your technician”
Supported
connection methods
Calling Card can be used to initiate channel sessions, PIN code (Private) sessions, or
both.
Default connection
method
Set the connection method to be displayed by default when the Calling Card is
opened. If both connection methods are active, the customer will be able to switch
between methods using the Connect menu on the Calling Card.
Company ID
validation
Select this option to ensure that the Calling Card only accepts PIN codes created by
the same support organization that installed the Calling Card.
The Company ID validation option is selected by default.
3.
Click Save Changes.
Note: The name of your organization will appear on the Calling Card as entered in the Organization field
of the My Account > Modify Contact Information page. The "Powered by " logo cannot be customized.
Tip: After making changes, click the Regenerate button on the Channel tab to regenerate the installer.
The same referral ID is used. You will not need to inform your customers of the update, because the Calling
Card application will automatically be updated when started. The exception to this is if you place the
installer somewhere on your website for your customers to download. This installer will not be updated.
However, once it is downloaded and run by your customers, it will be automatically updated. If the original
installer is deleted, use Regenerate to reinstall an identical copy of the installer onto your local hard drive.
Calling Card Setup, Task Four: Customize the Calling Card Applet on a Mac
A Master Administrator can customize Calling Card appearance and content on the Calling Card tab.
1.
Select the Calling Card tab.
2.
Edit the following options, as required.
Option Description
Border
Set the color of the border and its width in pixels.
Copyright
©
2023 GoTo, Inc. 91

Option Description
Footer
Set the color and height of the footer in pixels.
Logo
The logo shown in the top-right corner of the Calling Card once the connection to the
technician has been established. Download the template to see a sample that conforms
to all format requirements.
Help URL
You may want to provide instructions to your customers regarding the Calling Card.
The Help URL should point to these instructions.
Disable Help URL
Select this option if you do not want to display the Help menu item on the Calling
Card.
Footer text and links
There is space in the Calling Card footer to include up to five hyperlinks to other
websites. You should keep the text as brief as possible since line space may become
an issue if you use all five links or long link names.
Terms and
Conditions
Use the Terms and Conditions fields to set up a custom link to your organization's
Terms and Conditions or other legal text.
Text before form
Use these fields to specify up to three lines of text that will be seen at the top of
the Calling Card. Example: “Please fill in all fields and click Connect to contact a
technician”
Text after form
Use this field to specify one line of text that will be seen at the bottom of the Calling
Card Connect to Remote Support dialog box. Example: “Thank You!”
Custom fields
Choose which input fields to include in the Calling Card interface. Custom Fields are
named on the Global Settings tab.
Note: Select Retain text to preserve values entered by the customer. That is,
the next time the customer starts the Calling Card, previously entered values
will be retained.
Code lines
On the PIN code connection page, you can specify up to three lines of text to explain
to the user what he must do to complete the form correctly. Example: “Please enter
the 6-digit PIN code provided by your technician”
Supported
connection methods
Calling Card can be used to initiate channel sessions, PIN code (Private) sessions, or
both.
Default connection
method
Set the connection method to be displayed by default when the Calling Card is
opened. If both connection methods are active, the customer will be able to switch
between methods using the Connect menu on the Calling Card.
Company ID
validation
Select this option to ensure that the Calling Card only accepts PIN codes created by
the same support organization that installed the Calling Card.
The Company ID validation option is selected by default.
3.
Click Save Changes.
Note: The name of your organization will appear on the Calling Card as entered in the Organization field
of the My Account > Modify Contact Information page. The "Powered by " logo cannot be customized.
Tip: After making changes, click the Regenerate button on the Channel tab to regenerate the installer.
The same referral ID is used. You will not need to inform your customers of the update, because the Calling
Card application will automatically be updated when started. The exception to this is if you place the
installer somewhere on your website for your customers to download. This installer will not be updated.
However, once it is downloaded and run by your customers, it will be automatically updated. If the original
installer is deleted, use Regenerate to reinstall an identical copy of the installer onto your local hard drive.
92 Rescue Administrators Guide

Calling Card Setup, Task Five: Deploy the Calling Card to a Customer's
Computer
Follow this procedure to install the Calling Card on a customer's computer during an active session. A technician
installs the Calling Card to the customer's PC from the Technician Console.
Requirements:
• The agent's Technician Group must have permission to deploy the Calling Card
• A Rescue Administrator must have already applied a Calling Card to the agent's Technician Group
• The session must be Active
1.
Click the Calling Card tab.
Remember: This task is performed in the Technician Console.
2.
Select one of the following options:
• Select Launch Calling Card immediately after installation if you want the Calling Card application to run
once it has been successfully installed on the customer's computer
• Select Launch Calling Card every time the remote device is started to set the Calling Card application to
open each time the target device is started
Tip: Customers can clear this setting on the Settings > General tab of the Calling Card.
3.
Click Install Calling Card.
The Calling Card installer is deployed and executed. The customer may be prompted to give you permission to
deploy the installer. If so, ask the customer to accept the deployment.
Once the installation is complete, the customer will be able to initiate sessions via the Calling Card.
Copyright
©
2023 GoTo, Inc. 93

Setting Up External Technician Collaboration
Controlling How Your Technicians Collaborate With External Technicians
Define whether the members of a Technician Group will be able to invite external technicians, and more.
Goal Setting or Location in Administration Center
Define whether the members of a Technician Group will
be able to invite external technicians
Technician Group > Organization tab > Permissions
> Invite external technicians
Define whether members of a Technician Group can
invite anyone or only approved external technicians
Technician Group > Organization tab > Permissions
> Invite external technicians > anyone can be
invited / only approved
Tip: To make an external technician or group
available to a specific technician or group, drag
their name tag to the appropriate technician or
group on the Organization Tree.
Note: IP controls set in the Administration
Center do not apply to external technicians.
Control how technicians are able to invite external
technicians to a session
Technician Group > Settings tab > Connection
method for external technician invitations.
For maximum flexibility, select all options. For
maximum control, only allow technicians to invite
external technicians via email sent through servers.
Invitation settings impact the tabs available on the
Invitation to External Technician dialog box under
Connection Method.
Setting Permissions for External Technicians
Define what approved external technicians can do during a session, and more.
What can approved external technicians do during a session?
For each group of approved external technicians, Administrators define the permissions that can be assigned by the
lead technician to the approved external technician. The lead technician can toggle permissions on and off at the
time of invite and during the session.
Fastpath: External Technician Group > Organization tab > Permissions
94 Rescue Administrators Guide

What can unapproved external technicians do during a session?
For each technician group with permission to invite any external technician, Administrators define the permissions
that can be assigned by the lead technician to the external technician. The lead technician can toggle permissions on
and off at the time of invite and during the session.
Fastpath: Technician Group > Organization tab > External Permissions
Can unique session permissions be set for a single external technician?
The lead technician can toggle permissions on and off at the time of invite and during the session. The permissions
that are available to lead technician are set in the Administration Center.
Security and Reporting for External Technician Collaboration
Follow these guidelines for maximum control and accountability when using external technician collaboration.
Goal Setting or Location in Administration Center
Only allow technicians to invite from an
approved list
Select a Technician Group and go to Organization tab > Permissions
> Invite external technicians > only approved.
Prevent external technicians from using
specific features
Select an External Technician Group and go to Organization tab
> Permissions > clear permissions. Any permission that is cleared
will not be available to the lead technician to grant to the external
technician.
Only allow technicians to send invitations
via email sent through servers
Select a Technician Group and go to Settings tab > Connection
method for external technician invitations > Email > Allow email
via servers. Clear all other options.
Check reports for any External
Technician Group or individual external
technician
Select an External technician group or External technician and go to
Reports > Chatlog or Session.
Check reports for any Technician Group
or individual technician
Select a Technician Group or technician and go to Reports >
External Technician Chatlog.
Copyright
©
2023 GoTo, Inc. 95

Setting up Scripting
Embedded Scripting for Applet and Calling Card
You can set up LogMeIn to run embedded scripts via the Customer Applet and Calling Card.
Fastpath: To configure embedded scripts, go to the Administration Center Resources tab.
Requirements
• The customer must be using a Windows-based computer
• The session must use the Customer Applet or Calling Card (not Mobile Applet or Instant Chat in chat-only mode)
How it works
• You can specify one script up to 64 KB, with an associated resource file up to 2 MB. A resource file is any file
used by the script. For example, if the script sends a ZIP file to the customer, the ZIP file is the resource file.
• This is an organization-level setting. That is, the script will be transferred during each session that uses the
Customer Applet or Calling Card, for every Technician Group and channel in your organization.
• The script is transferred when the Customer Applet is downloaded or Calling Card is started.
• The script is executed according to your preference:
Remember: You can set your preference in the Configure Embedded Script section on the Resources
tab.
• Select Run after reboot to execute the script after restarting the customer's computer.
• Select Run after X minutes of disconnection to execute the script every X minutes for as long as the session
remains disconnected (for example, due to a network connection problem).
• Select Run event triggered script to execute the script after specified session events. To obtain a sample script
with condition syntax for all valid parameters in its body, click Download an example script.
• Additionally, technicians in a group with the Run embedded script permission set in the Administration Center
can run an embedded script via the Technician Console Script tab. The Run embedded script permission is off
by default.
Tip: Sample scripts are available in the Community Script Repository.
Centralized Scripting
96 Rescue Administrators Guide

How to Create a New Script Collection
Master Administrators can upload and organize scripts to a common repository and share them with technicians.
1.
In the Administration Center, go to the Global Settings tab.
2.
Under Centralized Scripts, click Manage Centralized Scripts.
The Centralized Scripts window is displayed.
3.
Click New collection.
4.
Name the collection and click Create.
The collection is created.
5.
Add scripts. You have two options.
• Option one: Add a new script by clicking Add script.. Fill in the fields and select the necessary files. Fields
with an asterisk are mandatory.
• Option two: Import scripts from the Technician Console or from another collection by clicking Import XML.
6.
Save your changes.
How to Share a Script Collection with a Technician Group
Master Administrators and Administrators can provide script collections to any Technician Group in their
organization tree.
1.
In to the Administration Center on the Organization Tree, select the Technician Group to which you want to
provide the script collection.
2.
Select the Settings tab.
3.
Under Centralized Scripts, select the desired script collection from the All collections box, and click << Add.
The name of the script collection is listed in the Collections available to this group box.
Tip: Want to add more script collections? Repeat this step for each collection that you want to provide
to this Technician Group.
4.
Click Save Changes.
The agent's Technician Group must have permission to deploy scripts. Make sure the Script deployment permission
is enabled in the Administration Center at the group level on the Organization tab.
How to Modify a Script Collection
Master Administrators can modify their script collections.
1.
In the Administration Center, go to the Global Settings tab.
2.
Under Centralized Scripts, click Manage Centralized Scripts.
The Centralized Scripts window is displayed.
3.
Hover over the script collection you want to modify. You can perform the following modifications:
Copyright
©
2023 GoTo, Inc. 97

• To delete a collection, click the Delete button.
• To rename a collection, click the Rename button.
• To delete a script from the collection:
a.
In the Script Library, click the selected collection. The list of scripts belonging to the collection is
displayed.
b.
Select the script you want to delete and click the Delete button.
How to Modify a Script in the Collection
Master Administrators can modify scripts in their script collections.
1.
In the Administration Center, go to the Global Settings tab.
2.
Under Centralized Scripts, click Manage Centralized Scripts.
The Centralized Scripts window is displayed.
3.
Select the script collection you want to modify.
Scripts belonging to the selected script collection are listed.
4.
Select the script you want to modify. You can perform the following modifications:
• To modify data related to a script, select the script and click the Edit button.
• To make a script run automatically upon session start, in the Autostart drop-down list select a numerical
value. The actual value corresponds to the execution priority of the script upon session start relative to other
autostart scripts in the collection. For example, when a support session is started, the script with value 1 will
run first; the script with value 2 will run second, and so on.
98 Rescue Administrators Guide

Generating Reports
How to Generate a Report
Follow this procedure to generate a report in the LogMeIn Administration Center.
1.
On the Organization Tree, select the organizational unit for which you want to generate a report.
2.
Select the Reports tab.
3.
Select the type of report you want to generate using the Report Area drop-down box.
4.
For most report areas, you must select a List Type.
• Choose List All to view information about specific sessions or logins
• Choose Summary to view cumulative information
5.
Specify the reporting period (Date Range) in one of two ways:
• Choose a pre-defined report period (today, yesterday, etc.)
• Choose a specific Start Date and End Date
6.
Select the Time Zone to be applied:
• Choose Local to report all times using your current time zone (where you are when you generate the report)
• Choose UTC to report all times in Coordinated Universal Time, which is effectively the same as Greenwich
Mean Time (GMT)
7.
Choose a Daily Time Range.
Generate reports covering any period of the day. This is useful for evaluating shift performance.
8.
Select the type of file to generate from the drop-down list next to Get report.
Tip: To view the report on the Administration Center Reports tab without downloading a file, choose
HTML.
9.
Generate the report by clicking Get report.
Time Zone Example
Local time. Assume you are in New York and you generate a report for a Technician Group with technicians in San
Francisco and Paris. Event times will be reported in local (New York) time. An event that occurred at 2:00:00 PM
in San Francisco will be reported as 5:00:00 PM. An event that occurred at 2:00:00 PM in Paris will be reported as
8:00:00 AM.
UTC. Assume you generate a report for a Technician Group with technicians in San Francisco and Paris. Regardless
of your location, event times will be reported in UTC. An event that occurred at 2:00:00 PM San Francisco time
(UTC-8) will be reported as 10:00:00 PM. An event that occurred at 2:00:00 PM in Paris (UTC+1) will be reported
as 1:00:00 PM.
Copyright
©
2023 GoTo, Inc. 99

Customer Survey Report (List All)
This report returns the results of individual customer surveys submitted in response to sessions conducted by
members of the selected unit during the selected period.
Important: This report type does NOT contain data for Live Control sessions.
Each row represents one submitted survey.
Source
The name of each channel or Technician Group for which a Customer Survey has been
activated on the Settings tab > Customer Survey section. The value Technicians is
returned when a global survey is assigned to all technicians in an organization. Data type:
String. Data length: 128 characters.
Session ID
An automatically generated, unique identification number. Data type: Integer. Data length:
unspecified.
Date
The date and time when the technician ended the session. Data type: DateTime. Data length:
unspecified.
[Name]
The name of this column is derived from the following setting: Global Settings > Custom
Fields > Name for name field. The actual reported value is entered by a customer or
technician during session generation. By default this is the name of the customer. Data type:
String. Data length: 128 characters.
[Survey
Columns]
These variable columns will show responses to the survey questions defined on the Settings tab
in the Customer Survey section.
Open answers
If open answers is selected under Settings > Customer Survey > Edit,
the column displays the verbatim answer submitted by the customer.
Drop-down
If drop-down is selected under Settings > Customer Survey > Edit,
the column displays the numeric value corresponding to the configured
predefined reply. (For example, 1 corresponds to the first predefined
answer from the drop-down list, while 2 corresponds to the second one,
and so on.)
Data type: String. Data length: 128 characters.
Technician
Name
The technician's name as recorded in the Name field on the Organization tab. Data type:
String. Data length: 128 characters.
Technician ID
An automatically generated, unique identification number. Data type: Integer. Data length:
unspecified.
Technician
Email
The email address of the technician. For approved technicians, the email is recorded in the
Email field on the Organization tab. For unlisted technicians, the email is recorded during the
invitation process. Data type: String. Data length: 128 characters.
100 Rescue Administrators Guide

Customer Survey Report (Summary)
This report returns the cumulative results of customer surveys submitted in response to sessions conducted by
members of the selected unit during the selected period.
Important: This report type does NOT contain data for Live Control sessions.
Each row represents an organizational unit.
Source
The name of each channel or Technician Group for which a Customer Survey has been
activated on the Settings tab > Customer Survey section. The value Technicians is
returned when a global survey is assigned to all technicians in an organization. Data type:
String. Data length: 128 characters.
Number of
Surveys
The total number of surveys received. Data type: Integer. Data length: unspecified.
[Survey
Columns]
These variable columns will show the total number of responses to the survey questions
defined on the Settings tab in the Customer Survey section. Data type: String. Data length: 128
characters.
Customer Survey Issuance Report (List All)
This report returns the results of individual customer surveys submitted in response to sessions conducted
by members of the selected unit during the selected period. It also displays whether the closing or the starting
technician issued the customer survey.
Important: This report type does NOT contain data for Live Control sessions.
Important: This report is only available if in the Administration Center you choose Global Settings >
Customer Survey Issuance > Survey issued by > Closing technician.
Each row represents one submitted survey.
Source
The name of each channel or Technician Group for which a Customer Survey has been
activated on the Settings tab > Customer Survey section. The value Technicians is
returned when a global survey is assigned to all technicians in an organization. Data type:
String. Data length: 128 characters.
Session ID
An automatically generated, unique identification number. Data type: Integer. Data length:
unspecified.
Date
The date and time when the technician ended the session. Data type: DateTime. Data length:
unspecified.
[Name]
The name of this column is derived from the following setting: Global Settings > Custom
Fields > Name for name field. The actual reported value is entered by a customer or
technician during session generation. By default this is the name of the customer. Data type:
String. Data length: 128 characters.
Technician
Name
The technician's name as recorded in the Name field on the Organization tab. Data type:
String. Data length: 128 characters.
Copyright
©
2023 GoTo, Inc. 101

Technician ID
An automatically generated, unique identification number. Data type: Integer. Data length:
unspecified.
Technician
Email
The email address of the technician. For approved technicians, the email is recorded in the
Email field on the Organization tab. For unlisted technicians, the email is recorded during the
invitation process. Data type: String. Data length: 128 characters.
Survey issued
by closing
technician
Displays which technician issued the customer survey:
• Yes – the closing technician issued the survey
• No – the starting technician issued the survey
Customer Survey Issuance Report (Summary)
This report returns the cumulative results of customer surveys submitted in response to sessions conducted
by members of the selected unit during the selected period. It also displays whether the closing or the starting
technician issued the customer survey.
Important: This report type does NOT contain data for Live Control sessions.
Important: This report is only available if in the Administration Center you choose Global Settings >
Customer Survey Issuance > Survey issued by > Closing technician.
Each row represents an organizational unit.
Source
The name of each channel or Technician Group for which a Customer Survey has been
activated on the Settings tab > Customer Survey section. The value Technicians is
returned when a global survey is assigned to all technicians in an organization. Data type:
String. Data length: 128 characters.
Number of
Surveys
The total number of surveys received. Data type: Integer. Data length: unspecified.
[Survey
Columns]
These variable columns will show the total number of responses to the survey questions
defined on the Settings tab in the Customer Survey section. Data type: String. Data length: 128
characters.
Survey issued
by closing
technician
Displays which technician issued the customer survey:
• Yes – the closing technician issued the survey
• No – the starting technician issued the survey
Performance Report (List All)
This report returns individual performance data for each member of the selected unit for the selected period.
Important: This report type does NOT contain data for Live Control sessions.
Each row represents a technician.
Technician
Name
The technician's name as recorded in the Name field on the Organization tab. Data type:
String. Data length: 128 characters.
102 Rescue Administrators Guide

Technician ID
An automatically generated, unique identification number. Data type: Integer. Data length:
unspecified.
Technician
Email
The technician's email address as recorded in the Email field on the Organization tab. Data
type: String. Data length: 128 characters.
Total Login
Time
Per technician, the total time spent logged in to the Technician Console. Data type: DateTime.
Data length: unspecified.
Number of
Sessions
Per technician, the number of sessions handled. Data type: Integer. Data length: unspecified.
Number of
Sessions per
Hour
Per technician, the number of sessions divided by total login time. Use this value to assess
how many sessions a technician can manage in an hour. Data type: String. Data length: 128
characters.
Average Pick-up
Speed
Per technician, the average elapsed time between the beginning of Waiting status and session
start by the technician. From the customer's perspective, this is the amount of time the
customer sees the message Waiting for a technician. Data type: DateTime. Data
length: unspecified.
Average
Duration
Per technician, the average session duration. Data type: DateTime. Data length: unspecified.
Average Work
Time
Work Time is actual Technician Console utilization time during a session. It is the time spent
actually using Technician Console functionality: (1) the session must be selected, (2) with
an active connection to the Applet, (3) with the Technician Console in focus, and (4) the
technician's status must not be Away. Data type: DateTime. Data length: unspecified.
Longest Session
Per technician, the length of the longest single session. Data type: DateTime. Data length:
unspecified.
Total Active
Time
Per technician, the cumulative time spent in Active status for all sessions. Active time is
measured from pickup (Active status) to close (Closed status), excluding Hold Time, Time
in Transfer, Rebooting Time, and Reconnecting Time. Data type: DateTime. Data length:
unspecified.
Total Work
Time
Work Time is actual Technician Console utilization time during a session. It is the time spent
actually using Technician Console functionality: (1) the session must be selected, (2) with
an active connection to the Applet, (3) with the Technician Console in focus, and (4) the
technician's status must not be Away. Data type: DateTime. Data length: unspecified.
Performance Report (Summary)
This report returns collective performance data for all members of the selected unit for the selected period.
Important: This report type does NOT contain data for Live Control sessions.
Number of
Sessions
The total number of sessions handled. Data type: Integer. Data length: unspecified.
Total Login
Time
The total time spent logged in to the Technician Console. Data type: DateTime. Data length:
unspecified.
Average Number
of Sessions per
Hour
The average number of sessions handled per hour. Data type: String. Data length: 128
characters.
Copyright
©
2023 GoTo, Inc. 103

Average Pick-up
Speed
The average elapsed time between the beginning of Waiting status until entering Active status
(when the session is picked up by the technician). From the customer's perspective, this is the
amount of time the customer sees the message Waiting for a technician. Data type:
DateTime. Data length: unspecified.
Average Session
Duration
The average length of sessions handled by technicians in the selected unit. Data type:
DateTime. Data length: unspecified.
Average Work
Time
Work Time is actual Technician Console utilization time during a session. It is the time spent
actually using Technician Console functionality: (1) the session must be selected, (2) with
an active connection to the Applet, (3) with the Technician Console in focus, and (4) the
technician's status must not be Away. Data type: DateTime. Data length: unspecified.
Total Session
Time
The total length of sessions handled by technicians in the selected unit. Data type: DateTime.
Data length: unspecified.
Longest Session
The length of the longest session conducted during the selected period by any member of the
selected unit. Data type: DateTime. Data length: unspecified.
Total Active
Time
The cumulative time spent in Active status for all sessions. Active time is measured from
pickup (Active status) to close (Closed status), excluding Hold Time, Time in Transfer,
Rebooting Time, and Reconnecting Time. Data type: DateTime. Data length: unspecified.
Total Work
Time
Work Time is actual Technician Console utilization time during a session. It is the time spent
actually using Technician Console functionality: (1) the session must be selected, (2) with
an active connection to the Applet, (3) with the Technician Console in focus, and (4) the
technician's status must not be Away. Data type: DateTime. Data length: unspecified.
Login Report (List All)
This report returns data for each unique login performed by a member of the selected unit during the selected period
This report can be generated for any organizational unit.
Each row represents a unique login event.
Login Date
The date when the login occurred, based on the selected time zone. Data type: DateTime. Data
length: unspecified.
Name
The user's name as recorded in the Name field on the Organization tab. Data type: String. Data
length: 128 characters.
User ID
An automatically generated, unique identification number. Data type: Integer. Data length:
unspecified.
Email
The user's email address as recorded in the Email field on the Organization tab. Data type:
String. Data length: 128 characters.
Start Time
The exact login time. Data type: DateTime. Data length: unspecified.
End Time
The exact logout time. Data type: DateTime. Data length: unspecified.
Total Login
Time
Length of time logged in to . Data type: DateTime. Data length: unspecified.
IP Address
The IP address from which login occurred. Data type: String. Data length: 15 characters.
Busy Time
Length of time in Busy status. Reported for technicians only. Data type: DateTime. Data
length: unspecified.
104 Rescue Administrators Guide

Away Time
Length of time in Away status. Reported for technicians only. Data type: DateTime. Data
length: unspecified.
Idle Time
Idle Time is when a technician is logged in to the Technician Console but has no sessions.
Idle Time ends as soon as any session enters any status in the Technician Console. Data type:
DateTime. Data length: unspecified.
Login Report (Summary)
This report returns cumulative login data for members of the selected unit for the selected period.
This report can be generated for any organizational unit.
Each row represents one member of the organization.
Name
The user's name as recorded in the Name field on the Organization tab. Data type: String.
Data length: 128 characters.
User ID
An automatically generated, unique identification number. Data type: Integer. Data length:
unspecified.
Email
The user's email address as recorded in the Email field on the Organization tab. Data type:
String. Data length: 128 characters.
Nickname
The user's nickname as recorded in the Nickname field on the Organization tab. Data type:
String. Data length: 128 characters.
Group
The name of the Administrator Group or Technician Group to which the user belonged at the
time of login. Data type: String. Data length: 128 characters.
User Created On
The date when the user was added to the organization with a valid name and email on the
Organization tab. Data type: DateTime. Data length: unspecified.
Number of
Logins
The number of unique login events recorded during the selected period. Data type: Integer.
Data length: unspecified.
Average Login
Time
The average length of time logged in to . Data type: DateTime. Data length: unspecified.
Total Login
Time
The total time spent logged in to . Data type: DateTime. Data length: unspecified.
Total Busy Time
The total time in Busy status. Reported for technicians only. Data type: DateTime. Data length:
unspecified.
Total Away
Time
The total time in Away status. Reported for technicians only. Data type: DateTime. Data
length: unspecified.
Total Idle Time
Idle Time is when a technician is logged in to the Technician Console but has no sessions.
Idle Time ends as soon as any session enters any status in the Technician Console. Data type:
DateTime. Data length: unspecified.
Copyright
©
2023 GoTo, Inc. 105

Session Report (List All)
This report returns data for each unique session conducted by members of the selected unit during the selected
period.
Each row represents a unique session.
Start Time
The exact time when the session entered Active status. Data type: DateTime. Data length:
unspecified.
End Time
The exact time when the session entered Closed or Timed Out status. Data type: DateTime.
Data length: unspecified.
Last Action
Time
The exact time of the action that ended the technician's state of being "in action". A technician
is in action if he is in a session, and for that session the Technician Console and the Applet
have a working connection (that is, the sockets between the Technician Console and Applet are
connected). Any of the following ends the technician's "in action" state:
• The technician's status Changes to "Away".
• The technician loses connection with customer.
• The session tab gets unselected, or the TC goes to background while there is no active tear-
away window of the session.
• The tear-away window of the session gets inactive while either the session tab is unselected
or the TC is in the background.
• The technician or Administrator ends, holds, or transfers the session.
Data type: DateTime. Data length: unspecified.
Technician
Name
The technician's name as recorded in the Name field on the Organization tab. Data type:
String. Data length: 128 characters.
Technician ID
An automatically generated, unique identification number. Data type: Integer. Data length:
unspecified.
Technician
Email
The technician's email address as recorded in the Email field on the Organization tab. Data
type: String. Data length: 128 characters.
Session ID
An automatically generated, unique identification number. Data type: Integer. Data length:
unspecified.
Session Type
The customer-side technology applied. Data type: String. Data length: 100 characters. Possible
values are as follows:
• Mobile Applet
• Calling Card
• Instant Chat
• Unattended
• Applet On LAN
• Applet
Status
The final status at the time of the last action performed by the given technician. Data type:
String. Data length: 64 characters. Possible values are as follows:
• Connecting
• Waiting
• Active
• Closed by customer
106 Rescue Administrators Guide

• Closed by technician
• Transferring
• Transferred
• Closed by waiting customer
• Timed out
• Aborted: technician was deleted or disabled
• Rebooting
• Reconnecting
• On Hold
• Timed out: closed by technician
• Offline
• Disconnected
• Rebooted
• Declined by customer
[Name]
The name of this column is derived from the following setting: Global Settings > Custom
Fields > Name for name field. The actual reported value is entered by a customer or
technician during session generation. By default this is the name of the customer. Data type:
String. Data length: 128 characters.
[Custom Fields]
The names of these columns are derived from the following settings: Global Settings >
Custom Fields > Name for custom field. Data type: String. Data length: 64 characters.
Tracking ID
A custom field used for mapping Rescue sessions to a CRM system or for other custom
administrative purposes. Data type: String. Data length: 256 characters.
Customer IP
The customer's IP address. If no value is reported, your organization probably chose not to
store customer IP address information (Global Settings > Do not store customer IP address).
Data type: String. Data length: 15 characters.
Device ID
The customer's device ID. Data type: String. Data length: 128 characters.
Incident Tool
Used
This column lists Technician Console tools used by the technician during the session. See the
legend at the bottom of the report for a key to abbreviations. Data type: String. Data length:
128 characters.
Resolved/
Unresolved
This column is no longer actively used though may show results when reporting on sessions
held prior to May 2009 (Resolved/Unresolved, as submitted by the technician). Data type:
String.
Channel ID
The Channel ID of the channel used during the session. Data type: Integer. Data length:
unspecified.
Channel Name
The name of the channel used during the session. Data type: String. Data length: 64 characters.
Calling Card
The Installer Name of the Calling Card used during the session. Data type: String. Data length:
64 characters.
Connecting Time
From the beginning of Applet download until the session appears as Waiting in a queue. Data
type: DateTime. Data length: unspecified.
Waiting Time
From the beginning of Waiting status until session start (Active status). Data type: DateTime.
Data length: unspecified.
Total Time
The sum of Active Time, Hold Time, Time in Transfer, Rebooting Time, and Reconnecting
Time; excluding Connecting and Waiting time. This is not the same as Total Time as shown in
the Technician Console Session List. Data type: DateTime. Data length: unspecified.
Copyright
©
2023 GoTo, Inc. 107

Active Time
The total time the session was in Active status. Active time is measured from pickup (Active
status) to close (Closed status), excluding Hold Time, Time in Transfer, Rebooting Time, and
Reconnecting Time. Data type: DateTime. Data length: unspecified.
Work Time
Work Time is actual Technician Console utilization time during a session. It is the time spent
actually using Technician Console functionality: (1) the session must be selected, (2) with
an active connection to the Applet, (3) with the Technician Console in focus, and (4) the
technician's status must not be Away. Data type: DateTime. Data length: unspecified.
Hold Time
The length of time in Hold status. Data type: DateTime. Data length: unspecified.
Time in Transfer
The length of time in Transfer status. Data type: DateTime. Data length: unspecified.
Rebooting Time
The length of time in Rebooting status. Data type: DateTime. Data length: unspecified.
Reconnecting
Time
The length of time in Reconnecting status due to a problem on the customer side. Data type:
DateTime. Data length: unspecified.
Platform
The customer's operating system. Data type: String. Data length: 20 characters.
Browser Type
The type of browser in which the customer started the Instant Chat session. Data type:
String.Data length: unspecified.
Session Report (Summary)
This report returns cumulative data for all sessions conducted by members of the selected unit during the selected
period.
Number of
Sessions
The total number of sessions handled. Data type: Integer. Data length: unspecified.
Average Session
Time
The average length of sessions. Total Session Time divided by Number of Sessions. Data type:
DateTime. Data length: unspecified.
Total Session
Time
The cumulative length of all sessions. Data type: DateTime. Data length: unspecified.
Average Pick-up
Time
The average elapsed time between the beginning of Waiting status and session start by the
technician. From the customer's perspective, this is the amount of time the customer sees the
message Waiting for a technician. Data type: DateTime. Data length: unspecified.
Total Pick-up
Time
For all sessions, the total elapsed time between the beginning of Waiting status and session
start by the technician. Data type: DateTime. Data length: unspecified.
Average Active
Time
The average time in Active status. Active time is measured from pickup (Active status)
to close (Closed status), excluding Hold Time, Time in Transfer, Rebooting Time, and
Reconnecting Time. Data type: DateTime. Data length: unspecified.
Total Active
Time
For all sessions, the total time in Active status. Active time is measured from pickup (Active
status) to close (Closed status), excluding Hold Time, Time in Transfer, Rebooting Time, and
Reconnecting Time. Data type: DateTime. Data length: unspecified.
Average Work
Time
Work Time is actual Technician Console utilization time during a session. It is the time spent
actually using Technician Console functionality: (1) the session must be selected, (2) with
an active connection to the Applet, (3) with the Technician Console in focus, and (4) the
technician's status must not be Away. Data type: DateTime. Data length: unspecified.
Total Work
Time
Total Technician Console utilization time during all sessions. Data type: DateTime. Data
length: unspecified.
108 Rescue Administrators Guide

Average Hold
Time
The average time in Hold status. Data type: DateTime. Data length: unspecified.
Total Hold Time
The total time in Hold status. Data type: DateTime. Data length: unspecified.
Average
Transfer Time
The average time in Transfer status. Data type: DateTime. Data length: unspecified.
Total Transfer
Time
The total time in Transfer status. Data type: DateTime. Data length: unspecified.
Average
Rebooting Time
The average time in Rebooting status. Data type: DateTime. Data length: unspecified.
Total Rebooting
Time
The total time in Rebooting status. Data type: DateTime. Data length: unspecified.
Average
Reconnecting
Time
The average time in Reconnecting status. Data type: DateTime. Data length: unspecified.
Total
Reconnecting
Time
The total time in Reconnecting status. Data type: DateTime. Data length: unspecified.
Longest Session
Time
The length of the longest single session. Data type: DateTime. Data length: unspecified.
Number of
Missed Sessions
The number of sessions that were never picked up (that is, sessions that never entered Active
status). Data type: Integer. Data length: unspecified.
Chatlog Report
This report retrieves the chatlog and session notes for each unique session conducted by a member of the selected
unit during the selected period.
Important: This report type does NOT contain data for Live Control sessions.
Each row represents a unique session.
Start Time
The exact time when the session entered Active status. Data type: DateTime. Data length:
unspecified.
End Time
The exact time when the session entered Closed or Timed Out status. Data type: DateTime.
Data length: unspecified.
Total Time
The sum of Active Time, Hold Time, Time in Transfer, Rebooting Time, and Reconnecting
Time; excluding Connecting and Waiting time. This is not the same as Total Time as shown in
the Technician Console Session List. Data type: DateTime. Data length: unspecified.
Session ID
An automatically generated, unique identification number. Data type: Integer. Data length:
unspecified.
[Name]
The name of each channel or Technician Group for which a Customer Survey has been
activated on the Settings tab > Customer Survey section. The value Technicians is
returned when a global survey is assigned to all technicians in an organization. Data type:
String. Data length: 128 characters.
Copyright
©
2023 GoTo, Inc. 109

Technician
Name
The technician's name as recorded in the Name field on the Organization tab. Data type:
String. Data length: 128 characters.
Technician ID
An automatically generated, unique identification number. Data type: Integer. Data length:
unspecified.
Technician
Email
The email address of the technician. For approved technicians, the email is recorded in the
Email field on the Organization tab. For unlisted technicians, the email is recorded during the
invitation process. Data type: String. Data length: 128 characters.
Chat Log
An icon is displayed if a Chat Log is available. Click the icon to view the log. Data type:
String. Data length: 2048 characters.
Notes
An icon is displayed if notes are available. Click the icon to view the notes. Data type: String.
Data length: 1024 characters.
Note: For collaboration sessions, the log contains full details of the session, including system messages,
chat between technicians, and chat between technicians and customer.
Sample Chat Log
This sample shows the Chat Log for the same session as shown in the sample for the Collaboration Chat Log report.
Notice that the perspective is that of the Lead Technician.
9:19 AM Connecting to: [...]
9:19 AM Connected to Applet (RSA 2048 bits, AES256-SHA 256 bits)
9:19 AM Switched to P2P
9:19 AM Technician 2 invited to the session...
9:19 AM Technician 2 joined the session
9:19 AM «Technician 1»: This is between technicians
9:20 AM «Technician 2»: This is between technicians
9:20 AM Technician 1: This is between technician and customer
9:20 AM Technician 2: This is between technician and customer
9:20 AM Customer: This is from the customer to the technicians
9:20 AM The technician ended the session.
How to Delete Chatlogs
If sensitive information is communicated during a session, Master Administrators can choose to delete a session's
chatlog, thereby excluding sensitive data from the Chatlog report.
Important: This report type does NOT contain data for Live Control sessions.
1.
When logged in as a Master Administrator, go to Organization Tree and select an organizational unit.
2.
Select the Reports tab.
3.
Under Report Area, select Chatlog.
4.
Find the sessions with chatlogs you want to delete:
• Option 1. If you need to delete the chatlog for multiple sessions or do not know the exact Session ID,
you should first generate the Chatlog report in HTML format. For step-by-step instructions, see How to
Generate a Report on page 99.
• Option 2. If you already know the Session ID of a single session, enter it in the Session ID field and click
Find.
5.
In the Delete column, click the trash can icon for each appropriate session.
The chatlog for each selected session is queued for deletion. Chatlogs are not deleted immediately.
110 Rescue Administrators Guide

Tip: If you change your mind, you can revoke any deletion within 24 hours by clicking this icon
in the Delete column.
Chatlogs are deleted 24 hours from the moment they are queued for deletion. Pending deletions are reported in the
Chatlog report; deleted chatlogs are not.
Collaboration Chat Log Report
This report returns the chat log from each unique session in which a member of the selected unit participated as a
collaborating technician.
Important: This report type does NOT contain data for Live Control sessions.
Start Time
For the collaborating technician. The exact time when the session entered Active status. Data
type: DateTime. Data length: unspecified.
End Time
For the collaborating technician. The exact time when the session entered Active status. Data
type: DateTime. Data length: unspecified.
Total Time
The amount of time that the collaborating technician spent in the session. Data type: DateTime.
Data length: unspecified.
Session ID
An automatically generated, unique identification number. Data type: Integer. Data length:
unspecified.
[Name]
The name of this column is derived from the following setting: Global Settings > Custom
Fields > Name for name field. The actual reported value is entered by a customer or
technician during session generation. By default this is the name of the customer. Data type:
String. Data length: 128 characters.
Technician
Name
The technician's name as recorded in the Name field on the Organization tab. Data type:
String. Data length: 128 characters.
Technician ID
An automatically generated, unique identification number. Data type: Integer. Data length:
unspecified.
Technician
Email
The email address of the technician. For approved technicians, the email is recorded in the
Email field on the Organization tab. For unlisted technicians, the email is recorded during the
invitation process. Data type: String. Data length: 128 characters.
Chat Log
The Collaboration Chat Log contains full details of the collaboration session, including system
messages, chat between technicians, and chat between technicians and customer. Click the icon
to view the log. Data type: String. Data length: 2048 characters.
Sample Collaboration Chat Log
This sample shows the Collaboration Chat Log for the same session as shown in the sample for the Chat Log report.
Notice that the perspective is that of the Collaborating Technician.
9:19 AM Incoming collaboration session from: Technician 1
9:19 AM Connecting to: [...]
9:19 AM Connected to Applet (RSA 2048 bits, AES256-SHA 256 bits)
9:19 AM Switched to P2P
9:19 AM «Technician 1»: This is between technicians
Copyright
©
2023 GoTo, Inc. 111

9:20 AM «Technician 2»: This is between technicians
9:20 AM Technician 1: This is between technician and customer
9:20 AM Technician 2: This is between technician and customer
9:20 AM Customer: This is from the customer to the technicians
9:20 AM The Lead Technician ended the session
9:20 AM Disconnected (Applet)
9:21 AM The technician ended the session.
Custom Fields Report
This report returns data entered into Custom Fields for individual sessions conducted by members of the selected
unit during the selected period.
Important: This report type does NOT contain data for Live Control sessions.
Each row represents a set of data submitted during a unique session.
Start Time
The exact time when the session entered Active status. Data type: DateTime. Data length:
unspecified.
End Time
The exact time when the session entered Closed or Timed Out status. Data type: DateTime.
Data length: unspecified.
Total Time
The sum of Active Time, Hold Time, Time in Transfer, Rebooting Time, and Reconnecting
Time; excluding Connecting and Waiting time. This is not the same as Total Time as shown in
the Technician Console Session List. Data type: DateTime. Data length: unspecified.
Session ID
An automatically generated, unique identification number. Data type: Integer. Data length:
unspecified.
[Name]
The name of this column is derived from the following setting: Global Settings > Custom
Fields > Name for name field. The actual reported value is entered by a customer or
technician during session generation. By default this is the name of the customer. Data type:
String. Data length: 128 characters.
[Custom Fields]
The names of these columns are derived from the following settings: Global Settings >
Custom Fields > Name for custom field. Data type: String. Data length: 64 characters.
Tracking ID
A custom field used for mapping Rescue sessions to a CRM system or for other custom
administrative purposes. Data type: String. Data length: 256 characters.
Technician
Name
The technician's name as recorded in the Name field on the Organization tab. Data type:
String. Data length: 128 characters.
Technician ID
An automatically generated, unique identification number. Data type: Integer. Data length:
unspecified.
Technician
Email
The email address of the technician. For approved technicians, the email is recorded in the
Email field on the Organization tab. For unlisted technicians, the email is recorded during the
invitation process. Data type: String. Data length: 128 characters.
112 Rescue Administrators Guide

Missed Sessions Report (List All)
This report returns data for each individual session missed by members of the selected unit during the selected
period.
Important: This report type does NOT contain data for Live Control sessions.
A missed session is any session that enters the queue and never enters Active status.
Each row represents a missed session.
Start Time
The exact time when the session entered Waiting status. Data type: DateTime. Data length:
unspecified.
End Time
The exact time when the customer ended the session (Closed status), or when the session timed
out (Timed Out status). Data type: DateTime. Data length: unspecified.
Waiting Time
The length of time from Start Time to End Time. Data type: DateTime. Data length:
unspecified.
Session ID
An automatically generated, unique identification number. Data type: Integer. Data length:
unspecified.
Session Type
The customer-side technology applied. Data type: String. Data length: 100 characters. Possible
values are as follows:
• Mobile Applet
• Calling Card
• Instant Chat
• Unattended
• Applet On LAN
• Applet
Status
The final status at the time of session end. Data type: String. Data length: 64 characters.
[Name]
The name of this column is derived from the following setting: Global Settings > Custom
Fields > Name for name field. The actual reported value is entered by a customer or
technician during session generation. By default this is the name of the customer. Data type:
String. Data length: 128 characters.
[Custom Fields]
The names of these columns are derived from the following settings: Global Settings >
Custom Fields > Name for custom field. Data type: String. Data length: 64 characters.
Tracking ID
A custom field used for mapping Rescue sessions to a CRM system or for other custom
administrative purposes. Data type: String. Data length: 256 characters.
Customer IP
The customer's IP address. Data type: String. Data length: 15 characters.
Private Session
For Private Sessions, this column lists the name of the initiating technician. Data type: String.
Data length: 128 characters.
Channel
For Channel Sessions, the name of the incoming channel. Data type: String. Data length: 64
characters.
Copyright
©
2023 GoTo, Inc. 113

Missed Sessions Report (Summary)
This report returns cumulative data for all sessions missed by members of the selected unit during the selected
period.
Important: This report type does NOT contain data for Live Control sessions.
A missed session is any session that enters the queue and never enters Active status.
Number of
Missed Sessions
The total number of sessions that were never activated by a technician. Data type: Integer. Data
length: unspecified.
Average Waiting
Time
Average time customers waited before abandoning the session or timing out. Data type:
DateTime. Data length: unspecified.
Total Waiting
Time
Total time customers waited before abandoning the session or timing out. Data type:
DateTime. Data length: unspecified.
Longest Session
The longest time any one customer waited before abandoning the session or timing out. Data
type: DateTime. Data length: unspecified.
Transferred Sessions Report
This report returns data for each transfer executed by a member of the selected unit during the selected period.
Important: This report type does NOT contain data for Live Control sessions.
Each row represents one transfer event.
Session ID
An automatically generated, unique identification number. Data type: Integer. Data length:
unspecified.
Time of Transfer
The exact time of the transfer event. Data type: DateTime. Data length: unspecified.
Waiting Time
The length of time before the customer either abandons the session or is transferred again. Data
type: DateTime. Data length: unspecified.
[Name]
The name of this column is derived from the following setting: Global Settings > Custom
Fields > Name for name field. The actual reported value is entered by a customer or
technician during session generation. By default this is the name of the customer. Data type:
String. Data length: 128 characters.
Transferred by
The entity that initiated the transfer. The value System is returned for channel sessions that
are automatically transferred according to rules set at Settings > Session Management >
Auto-transfer waiting sessions. Data type: String. Data length: 128 characters.
Transferred
from
The technician or channel from which the session was transferred. Data type: String. Data
length: 128 characters.
Transferred to
The technician or channel to which the session was transferred. Data type: String. Data length:
128 characters.
Transfer
Comment
The value of the Comment field in the Transfer Session dialog box. Data type: String. Data
length: 128 characters.
114 Rescue Administrators Guide

Time in Transfer
The length of time in Transfer. Data type: DateTime. Data length: unspecified.
Transferred Sessions - Extended Report
This report returns data for each transfer executed by a member of the selected unit during the selected period.
Important: This report type does NOT contain data for Live Control sessions.
Each row represents one transfer event.
Session ID
An automatically generated, unique identification number. Data type: Integer. Data length:
unspecified.
Time of Transfer
The exact time of the transfer event. Data type: DateTime. Data length: unspecified.
Waiting Time
The length of time before the customer either abandons the session or is transferred again. Data
type: DateTime. Data length: unspecified.
[Name]
The name of this column is derived from the following setting: Global Settings > Custom
Fields > Name for name field. The actual reported value is entered by a customer or
technician during session generation. By default this is the name of the customer. Data type:
String. Data length: 128 characters.
Transferred by -
Technician ID
An automatically generated, unique identification number of the technician that initiated the
transfer. Data type: Integer. Data length: unspecified.
Transferred by
The entity that initiated the transfer. The value System is returned for channel sessions that
are automatically transferred according to rules set at Settings > Session Management >
Auto-transfer waiting sessions. Data type: String. Data length: 128 characters.
Transferred
from -
Technician/
Channel ID
An automatically generated, unique identification number of the technician or channel from
which the session was transferred. Data type: Integer. Data length: unspecified.
Transferred
from
The technician or channel from which the session was transferred. Data type: String. Data
length: 128 characters.
Transferred to
- Technician/
Channel ID
An automatically generated, unique identification number of the technician or channel to
which the session was transferred. Data type: Integer. Data length: unspecified.
Transferred to
The technician or channel to which the session was transferred. Data type: String. Data length:
128 characters.
Transfer
Comment
The value of the Comment field in the Transfer Session dialog box. Data type: String. Data
length: 128 characters.
Time in Transfer
The length of time in Transfer. Data type: DateTime. Data length: unspecified.
Transferred
from -
Technician
Group ID
An automatically generated, unique identification number of the technician group from which
the session was transferred. Data type: Integer. Data length: unspecified.
Transferred
from -
The Technician Group from which the session was transferred. Data type: String. Data length:
128 characters.
Copyright
©
2023 GoTo, Inc. 115

Technician
Group
Transferred to
- Technician
Group ID
An automatically generated, unique identification number of the technician group to which the
session was transferred. Data type: Integer. Data length: unspecified.
Transferred to
- Technician
Group
The Technician Group to which the session was transferred. Data type: String. Data length:
128 characters.
Chatlog
An icon is displayed if a Chatlog is available. Click the icon to view the log. Data type: String.
Data length: unspecified.
Technician Survey Report (List All)
This report returns the results of individual technician surveys (technician session evaluations) submitted by
members of the selected unit during the selected period.
Important: This report type does NOT contain data for Live Control sessions.
Each row represents one submitted survey.
Source
The name of the Technician Group the technician belonged to at the time of submitting the
survey. Data type: String. Data length: 128 characters.
Note: For Technician Survey Reports concerning periods before 12 August 2014, the
value Technicians is returned when a global survey is assigned to all technicians
in an organization.
Session ID
An automatically generated, unique identification number. Data type: Integer. Data length:
unspecified.
Date
The date and time when the technician submitted the survey. Data type: DateTime. Data
length: unspecified.
[Name]
The name of this column is derived from the following setting: Global Settings > Custom
Fields > Name for name field. The actual reported value is entered by a customer or
technician during session generation. By default this is the name of the customer. Data type:
String. Data length: 128 characters.
[Survey
Columns]
These variable columns will show responses to the survey questions defined on the Settings tab
under Session evaluation by technician. Data type: String. Data length: 128 characters.
Technician
Name
The technician's name as recorded in the Name field on the Organization tab. Data type:
String. Data length: 128 characters.
Technician ID
An automatically generated, unique identification number. Data type: Integer. Data length:
unspecified.
Technician
Email
The technician's email address as recorded in the Email field on the Organization tab. Data
type: String. Data length: 128 characters.
116 Rescue Administrators Guide

Failed Sessions Report (List All)
This report returns data for each individual session that fails during Connecting status for members of the selected
unit during the selected period.
Important: This report type does NOT contain data for Live Control sessions.
A Failed session is any session successfully submitted by the customer, but which never proceeds from Connecting
to Waiting status.
Note: A session enters Connecting status when the customer begins downloading the Applet.
Start Time
The exact time when the session entered Connecting status. Data type: DateTime. Data length:
unspecified.
Session ID
An automatically generated, unique identification number. Data type: Integer. Data length:
unspecified.
Session Type
The customer-side technology applied. Data type: String. Data length: 100 characters.
Status
The final status at the time of session end. Data type: String. Data length: 64 characters.
[Name]
The name of this column is derived from the following setting: Global Settings > Custom
Fields > Name for name field. The actual reported value is entered by a customer or
technician during session generation. By default this is the name of the customer. Data type:
String. Data length: 128 characters.
[Custom Fields]
The names of these columns are derived from the following settings: Global Settings >
Custom Fields > Name for custom field. Data type: String. Data length: 64 characters.
Customer IP
The customer's IP address. Data type: String. Data length: 15 characters.
Private Session
For Private Sessions, the name of the technician who initiated the failed session. Data type:
String. Data length: 128 characters.
Channel
For Channel Sessions, the name of the incoming channel. Data type: String. Data length: 64
characters.
Failed Sessions Report (Summary)
This report returns cumulative data for all sessions that fail during Connecting status for members of the selected
unit during the selected period.
Important: This report type does NOT contain data for Live Control sessions.
A Failed session is any session successfully submitted by the customer, but which never proceeds from Connecting
to Waiting status.
Note: A session enters Connecting status when the customer begins downloading the Applet.
Number of
Failed Sessions
The total number of failed sessions for members of the selected unit during the selected period.
Data type: Integer. Data length: unspecified.
Copyright
©
2023 GoTo, Inc. 117

Average
Connecting Time
The average time spent in Connecting status before failure. Data type: DateTime. Data length:
unspecified.
Total
Connecting Time
The total time spent in Connecting status before failure. Data type: DateTime. Data length:
unspecified.
Failed Sessions - Extended
This report returns data for each individual session that fails during Connecting status for members of the selected
unit during the selected period.
Important: This report type does NOT contain data for Live Control sessions.
A Failed session is any session successfully submitted by the customer, but which never proceeds from Connecting
to Waiting status.
Note: A session enters Connecting status when the customer begins downloading the Applet.
Start Time
The exact time when the session entered Connecting status. Data type: DateTime. Data length:
unspecified.
Session ID
An automatically generated, unique identification number. Data type: Integer. Data length:
unspecified.
Session Type
The customer-side technology applied. Data type: String. Data length: 100 characters.
Status
The final status at the time of session end. Data type: String. Data length: 64 characters.
[Name]
The name of this column is derived from the following setting: Global Settings > Custom
Fields > Name for name field. The actual reported value is entered by a customer or
technician during session generation. By default this is the name of the customer. Data type:
String. Data length: 128 characters.
[Custom Fields]
The names of these columns are derived from the following settings: Global Settings >
Custom Fields > Name for custom field. Data type: String. Data length: 64 characters.
Customer IP
The customer's IP address. Data type: String. Data length: 15 characters.
Private Session
Technician
Name
For Private Sessions, the name of the technician who initiated the failed session. Data type:
String. Data length: 128 characters.
Channel
For Channel Sessions, the name of the incoming channel. Data type: String. Data length: 64
characters.
Technician
Email
The technician's email address as recorded in the Email field on the Organization tab. Data
type: String. Data length: 128 characters.
Technician
Group ID
An automatically generated, unique identification number of the Technician Group to which
the technician belonged at the time of generating the report. Data type: Integer. Data length:
unspecified.
Technician
Group
The name of the Technician Group to which the technician belonged at the time of generating
the report. Data type: String.Data length: 128 characters.
118 Rescue Administrators Guide

External Technician Chatlog Report
This report retrieves the chat log and session notes for the selected period for each unique session conducted with an
external technician.
Important: This report type does NOT contain data for Live Control sessions.
You can run external technician chat log reports on your technicians and on invited external technicians. When you
run a report on external technicians, only those sessions will be listed where the invited technician was approved.
When you run a report on your technicians, sessions with unlisted external technicians will also be listed.
Start Time
The exact time when the session entered Collaborating status for the external technician. Data
type: DateTime. Data length: unspecified.
End Time
The exact time when the session entered Closed or Timed Out status for the external
technician. Data type: DateTime. Data length: unspecified.
Total Time
The sum of Active Time, Hold Time, Rebooting Time, and Reconnecting Time; excluding
Waiting time. This is not the same as Total Time as shown in the Technician Console Session
List. Data type: DateTime. Data length: unspecified.
Session ID
An automatically generated, unique identification number. Data type: Integer. Data length:
unspecified.
[Name]
The name of this column is derived from the following setting: Global Settings > Custom
Fields > Name for name field. The actual reported value is entered by a customer or
technician during session generation. By default this is the name of the customer. Data type:
String. Data length: 128 characters.
External
Technician
Name
The name of the external technician. For approved external technicians, the name is recorded
in the Name field on the Organization tab. For unlisted technicians, the name is recorded
during the invitation process. Data type: String. Data length: 128 characters.
External
Technician
Email
The email address of the external technician. For approved external technicians, the email is
recorded in the Email field on the Organization tab. For unlisted technicians, the email is
recorded during the invitation process. Data type: String. Data length: 128 characters.
Inviter's Name
The technician's name who invited the external technician. Data type: String. Data length: 128
characters.
Inviter's ID
The Rescue identifier of the technician who invited the external technician. Data type: String.
Data length: 128 characters.
Inviter's Email
The technician's email address who invited the external technician. Data type: String.Data
length: 128 characters.
Chat Log
An icon is displayed if a Chat Log is available. Click the icon to view the log. Data type:
String. Data length: 2048 characters.
Copyright
©
2023 GoTo, Inc. 119

Audit Report (List All)
This report returns data for each action taken by Administrators on the selected item of the Organization Tree during
the selected period.
Note: Company-level actions only appear in the report when the report is generated either for the
Administrator who performed the action, or for the root-level Master Administrators organizational unit.
Requested by
The Administrator that performed the given action. The displayed value is the Administrator's
name as recorded in the Name field on the Organization tab. Data type: String. Data length:
128 characters.
Entity type
The type of organizational entity affected by the action taken by an Administrator. Data type:
String.Data length: 128 characters. Possible values are as follows:
• Channel
• Technician Group
• Technician
• Unattended Computer Group
• Unattended Computer
• Administrator Group
• Master Administrator
• Administrator
• Administrator Group link
• Administrator link
• External Technician Group
• External Technician
• External link
Entity ID
An automatically generated, unique ID of the organizational entity affected by the action taken
by an Administrator. Data type: Integer. Data length: Unspecified.
Entity name
The name of the organizational entity affected by the action taken by an Administrator. The
displayed value is the organizational entity's name as recorded in the Name field on the
Organization tab. Data type: String. Data length: 256 characters.
Change type
The type of change action taken by the Administrator. Data type: String. Data length: 128
characters. Possible values are as follows:
• Add
• Delete
• Move
• Copy
• Assign
• Unassign
• Change
• View
Last changed
The exact time when the change action took place. Data type: DateTime. Data length:
unspecified.
Section
The header in the Administration Center under which the change was made. Data type:
String.Data Length: unspecified.
120 Rescue Administrators Guide

Field
The field under the Section header in the Administration Center that was affected by the
change. Data type: String.Data Length: unspecified.
Old Value
The value of Field before the change action took place. Data type: String.Data Length:
unspecified.
Old Action
The status of Field before the change action took place. Data type: String.Data Length:
unspecified. Possible values are as follows:
• Enabled
• Disabled
• Selected
• Unselected
• Set
• Not set
• Assigned
• Unassigned
• Locked
• Unlocked
• Added
• Removed
• Order
• Unknown
New Value
The value of Field after the change action took place. Data type: String.Data Length:
unspecified.
New Action
The status of Field after the change action took place. Data type: String.Data Length:
unspecified. Possible values are as follows:
• Enabled
• Disabled
• Selected
• Unselected
• Set
• Not set
• Assigned
• Unassigned
• Locked
• Unlocked
• Added
• Removed
• Order
• Unknown
Copyright
©
2023 GoTo, Inc. 121

Rebooting/Reconnecting Report
This report returns data for each unique reconnecting or rebooting event that occurred during a session conducted
by members of the selected unit during the selected period.
Important: This report type does NOT contain data for Live Control sessions.
Each row represents a unique reconnecting/rebooting event.
Session ID
An automatically generated, unique identification number. Data type: Integer. Data length:
unspecified.
[Custom Fields]
The names of these columns are derived from the following settings: Global Settings >
Custom Fields > Name for custom field. Data type: String. Data length: 64 characters.
Technician
Name
The technician's name as recorded in the Name field on the Organization tab. Data type:
String. Data length: 128 characters.
Technician ID
An automatically generated, unique identification number. Data type: Integer. Data length:
unspecified.
Technician
Email
The email address of the technician. For approved technicians, the email is recorded in the
Email field on the Organization tab. For unlisted technicians, the email is recorded during the
invitation process. Data type: String. Data length: 128 characters.
Channel ID
The Channel ID of the channel used during the session. Data type: Integer. Data length:
unspecified.
Channel Name
The name of the channel used during the session. Data type: String. Data length: 64 characters.
Technician
Group
The name of the Technician Group to which the technician belonged at the time of the session.
Data type: String.Data length: 128 characters.
Start Time
The exact time when the session entered Active status. Data type: DateTime. Data length:
unspecified.
End Time
The exact time when the session entered Closed or Timed Out status. Data type: DateTime.
Data length: unspecified.
Last Action
Time
The exact time of the action that ended the technician's state of being "in action". A technician
is in action if he is in a session, and for that session the Technician Console and the Applet
have a working connection (that is, the sockets between the Technician Console and Applet are
connected). Any of the following ends the technician's "in action" state:
• The technician's status Changes to "Away".
• The technician loses connection with customer.
• The session tab gets unselected, or the TC goes to background while there is no active tear-
away window of the session.
• The tear-away window of the session gets inactive while either the session tab is unselected
or the TC is in the background.
• The technician or Administrator ends, holds, or transfers the session.
Data type: DateTime. Data length: unspecified.
Event type
The type of event that triggered the report entry. Data type: String. Data length: unspecified.
Possible values are as follows:
• Rebooting
122 Rescue Administrators Guide

• Reconnecting
Rebooting/
Reconnecting
Start Time
The exact time when the session entered Rebooting/Reconnecting status. Data type: DateTime.
Data length: unspecified.
Rebooting/
Reconnecting
End Time
The exact time when the session moved to the next status from Rebooting/Reconnecting status.
Data type: DateTime. Data length: unspecified.
Technician Status Report
This report delivers cumulative status data for members of the selected unit for the selected period.
Important: This report type does NOT contain data for Live Control sessions.
Each row represents one technician.
Technician ID
An automatically generated, unique identification number. Data type: Integer. Data length:
unspecified.
Tip: This node ID is displayed when you hover over the technician on the
Organization Tree.
Technician
Name
The technician's name as recorded in the Name field on the Organization tab. Data type:
String. Data length: 128 characters.
Technician
Email
The email address of the technician as recorded in the Email field on the Organization tab.
Data type: String. Data length: 128 characters.
Parent Group
The name of the Technician Group to which the technician belonged at the time of generating
the report. Data type: String. Data length: 128 characters.
Status
The status of the technician at the time of generating the report. Possible values are as follows:
• Active
• Inactive
Data type: String. Data length: 8 characters.
Type
The type of user for whom data is retrieved. Possible values are as follows:
• Technician
• Administrator
• Master Administrator
Data type: String. Data length: 22 characters.
Last Login Time
The time when the technician last logged in to the Technician Console. Data type: DateTime.
Data length: unspecified.
Last Used
Technician
Console Version
The version of the Technician Console to which the technician last logged in. Data type:
String. Data length: 50 characters.
Copyright
©
2023 GoTo, Inc. 123

Administrator Status Report
This report delivers cumulative status data for members of the selected unit for the selected period.
Each row represents one Administrator.
Administrator
ID
An automatically generated, unique identification number. Data type: Integer. Data length:
unspecified.
Tip: This node ID is displayed when you hover over the Administrator on the
Organization Tree.
Administrator
Name
The Administrator's name as recorded on the Name field of the Organization tab.
Administrator
Email
The email address of the Administrator as recorded in the Email field on the Organization
tab. Data type: String. Data length: 128 characters.
Status
The status of the Administrator at the time of generating the report. Possible values are as
follows:
• Active
• Inactive
Data type: String. Data length: 8 characters.
Type
The type of user for whom data is retrieved. Possible values are as follows:
• Technician
• Administrator
• Master Administrator
Data type: String. Data length: 22 characters.
Linked to
The name of the Technician Group to which the Administrator is assigned. Data type: String.
Last Login Time
The exact time of the Administrator's last login to . Data type: DateTime. Data length:
unspecified.
124 Rescue Administrators Guide

Integration and API
See also the Customization and Integration Guide (English and Japanese only).
For API documentation see the API Guide (English only).
Setting up Single Sign-On Authentication
Using Single Sign-on, support technicians can securely log in to from other applications.
In the world of enterprise IT, many companies end up with multiple, disparate systems that all require their own
separate authentication. This proves to be a challenge for both administrators and end users. 's Single Sign-on (SSO)
capability helps you manage this issue.
Options
Setup takes place in the Administration Center on the Global Settings tab under Single Sign-On.
You have control over how technicians and administrators can log in to .
Here is a summary of options available under Global Settings > Single Sign-On > Allowed login method:
• Option One: Standard or SSO
• Users will be able to login with either their standard email/password or their SSO ID. Both methods are valid.
• Remember: When allowing SSO you must set a Master SSO password (on the Global Settings tab) and assign
an SSO ID per user (on the Organization tab). Users without an SSO ID are unable to use SSO.
• Option Two: SSO only
• Users will be able to login using their SSO ID only. With this option, users without an SSO ID will be unable to
login.
• Remember: When allowing SSO you must set a Master SSO password (on the Global Settings tab) and assign
an SSO ID per user (on the Organization tab).
• Option Three: SSO only plus Allow users without an SSO ID to use standard login
• Users with an SSO ID will be able to login using their SSO ID only.
• Users without an SSO ID will be able to use standard login.
How it Works
SSO functionality makes use of API technology.
• The company-hosted script makes an HTTP request to the SSO login services
• SSO login service confirms the successful login and retrieves the login URL, or an error message upon failure
• The company-hosted script then evaluates the returned value
• If successful, the company-hosted script redirects the user to the URL provided, or if unsuccessful, error handling
is triggered
The HTTP request is a simple formatted URL string, which contains the SSO URL, SSOID, CompanyID, and SSO
Password.
Copyright
©
2023 GoTo, Inc. 125

Single Sign-on
URL (SSO URL)
For logging in to the web-based Technician Console:
https://secure.logmeinrescue.com/SSO/GetLoginTicket.aspx
For logging in to the Desktop Technician Console:
https://secure.logmeinrescue.com/SSO/GetDTCLoginTicket.aspx
Single Sign-on
ID (SSOID)
The ID you define in the Single Sign-On ID box on the Organization tab of the
Administration Center when adding or editing organization members.
CompanyID
See the sample code on the Global Settings tab of the Administration Center.
Master SSO
Password
The SSO password defined on the Global Settings tab.
An example of this formatted URL would be:
In case of logging in to the web-based Technician Console:
https://secure.logmeinrescue.com/SSO/GetLoginTicket.aspx?
ssoid=123456&Password=secretPassword&CompanyID=654321
In case of logging in to the Desktop Technician Console:
• x86 DTC:
https://secure.logmeinrescue.com/SSO/GetDTCLoginTicket.aspx?
ssoid=123456&Password=secretPassword&CompanyID=654321
• x64 DTC:
https://secure.logmeinrescue.com/SSO/GetDTCLoginTicket.aspx?
ssoid=123456&Password=secretPassword&CompanyID=654321&arch=64
When making this request, the SSOID, Password, and CompanyID are sent to the SSO service, which returns a
string value. A successful authentication would return a string similar to:
In case of the web-based Technician Console:
OK: https://secure.logmeinrescue.com/SSO/Login.aspx?
Ticket=6ab9a0f6-d3ce-4f498-8ea7-b9a76a67a0c8
In case of the Desktop Technician Console:
• x86 DTC:
https://secure.logmeinrescue.com/TechConsole/DesktopApp/DownloadSSO.aspx?
companyid=654321&ticket=4c6f1815-1e0c-43ab-8117-d79b8f523824
• x64 DTC:
https://secure.logmeinrescue.com/TechConsole/DesktopApp/DownloadSSO.aspx?
companyid=654321&ticket=4c6f1815-1e0c-43ab-8117-d79b8f523824&arch=64
An unsuccessful authentication would return a string similar to:
ERROR: INVALIDPASSWORD
126 Rescue Administrators Guide

You can then process this string, process for errors, and handle them accordingly. In a typical scenario, you would
use an IF condition to process the returned string, and check for the presence of OK: in the first three characters. If
they are present, you would then take the URL (the last part of the string you processed) and either present it to the
user or redirect them automatically.
Single Sign-On: Considerations
Since Single Sign-on requires a user ID to be authenticated, the logical step is to use Windows credentials. Most
programming languages allow you to do this with server-side variables. The key driver is that the server connection
needs to be an authenticated connection (not anonymous). This is an integration process through Internet Explorer,
which would pass Domain credentials to the Intranet server automatically, provided you do not allow anonymous
access. The best approach is to pass the authenticated user ID from your Intranet web server to the SSO service as
the SSOID.
Single Sign-On and SAML 2.0
is compatible with Security Assertion Markup Language (SAML) 2.0. For detailed information about configuring
to use SAML 2.0 with your Identity Provider, see the Web SSO via SAML 2.0 User Guide.
Note: The final step in the SSO configuration process needs to be performed by the Support team. Please
contact your Customer Success Manager or Support for assistance. Remember to send out the Certificate
before contacting Support to finish te SSO setup.
Web SSO via SAML 2.0 User Guide (PDF)
Having trouble viewing? Click here
This document describes how to configure to use Security Assertion Markup Language (SAML) 2.0 with your
Identity Provider (IDP) (for example, ADFS 2.0).
Generate API Token
Master Account Holders (MAH) and Master Administrators (MA) can generate a secret token that is used to
authenticate the user and to prevent them from logging out if there is a timeout. This feature serves the same
purpose as the requestAuthCode API call, but this code is shown to the MAH or MA only upon creation and will not
be visible once they leave the page, thus increasing security.
1.
To generate an API token, select the Global Settinggs tab in the Administration Center.
2.
Under Generate API token, click Generate and Copy
A new API token is generated, displayed, and automatically copied to your clipboard.
3.
Optionally, select either or both from the following restrictions.
• Select Deny access to the requestAuthcode endpoint to force your users to use the token obtained from
Generate API token in API calls that require an AuthCode.
Important: Users will not be able to use the requestAuthCode API endpoint.
• Select Deny access to the login endpoint to stop users from being able to log in via the login API call.
Remember: Users will still be able to use the website login.
Copyright
©
2023 GoTo, Inc. 127

For more information about the related API calls, see:
•
https://secure.logmeinrescue.com/welcome/webhelp/en/RescueAPI/API/
API_Rescue_requestLensPINCode_v3.html
•
https://secure.logmeinrescue.com/welcome/webhelp/en/RescueAPI/API/
API_Rescue_requestLensPINCode_v4.html
Sending Session Data to a URL (Post-to-URL)
About Post-to-URL
The Post to URL function is used in conjunction with CRM Integration APIs (particularly requestPINCode) to
provide a complete set of integration tools for CRMs or other applications.
Post to URL allows you to host your own server script to handle the session data and to process them as you see fit.
Some potential use examples include database importing and email notifications.
How it Works
• The technician starts a support session
• At the beginning and/or end of a session, the session data are transferred via HTTP Post or XML to the specified
URL
• Your script processes the data as specified in your code
Post-to-URL Variables
These are the variables that are submitted via the Post to URL function.
[...] is replaced with the actual data value. This method does an XML request to your URL. You would handle
this via an XML parser.
Session Data Description
<sessionid>[...]</sessionid> Session ID
<techid>[...]</techid> Technician ID
<techssoid>[...]</techssoid> Technician Single Sign-on ID (as defined on the
Organization tab in the Administration Center)
<techname>[...]</techname> Technician name (as defined on the Organization tab)
<techemail>[...]</techemail> Technician email (as defined on the Organization tab)
<techdescr>[...]</techdescr> Technician description (as defined on the Organization
tab)
<cfield0>[...]</cfield0> Value returned for the Name field (as defined on the
Global Settings tab in the Administration Center)
<cfield1>[...]</cfield1> Value returned for Custom field 1 (as defined on the
Global Settings tab)
128 Rescue Administrators Guide

Session Data Description
<cfield2>[...]</cfield2> Value returned for Custom field 2 (as defined on the
Global Settings tab)
<cfield3>[...]</cfield3> Value returned for Custom field 3 (as defined on the
Global Settings tab)
<cfield4>[...]</cfield4> Value returned for Custom field 4 (as defined on the
Global Settings tab)
<cfield5>[...]</cfield5> Value returned for Custom field 5 (as defined on the
Global Settings tab)
<tracking0>[...]</tracking0> Value returned for the Tracking field; typically used for
mapping sessions to a CRM
<chatlog>[...]</chatlog> Transcript of all chat held since the previous post
<notes>[...]</notes> Notes saved by the technician
<waitingtime>[...]</waitingtime> From the beginning of Waiting status until session start
(Active status) in seconds
<pickuptime>[...]</pickuptime> The exact time when the session entered Active status
(UTC)
<closingtime>[...]</closingtime> The exact time when the session entered Closed or
Timed Out status (UTC)
<worktime>[...]</worktime> Actual Technician Console utilization time during the
session (until the post) in seconds
<lastactiontime>[...]</
lastactiontime>
The exact time of the last action taken by the technician
in the Technician Console (UTC)
<transmitted>[...]</transmitted> Amount of data transmitted during the session (until the
post) in bytes
<platform>[...]</platform> The platform of the customer device
<tsurvey0>[...]</tsurvey0> Value returned for Technician Survey Question 1 (as
defined on the Settings tab)
<tsurvey1>[...]</tsurvey1> Value returned for Technician Survey Question 2
<tsurvey2>[...]</tsurvey2> Value returned for Technician Survey Question 3
<tsurvey3>[...]</tsurvey3> Value returned for Technician Survey Question 4
<tsurvey4>[...]</tsurvey4> Value returned for Technician Survey Question 5
<tsurvey5>[...]</tsurvey5> Value returned for Technician Survey Question 6
<tsurvey6>[...]</tsurvey6> Value returned for Technician Survey Question 7
<tsurvey7>[...]</tsurvey7> Value returned for Technician Survey Question 8
<tsurvey8>[...]</tsurvey8> Value returned for Technician Survey Question 9
<tsurvey9>[...]</tsurvey9> Value returned for Technician Survey Question 10
Copyright
©
2023 GoTo, Inc. 129
HTTP Post based
This method submits the URL with the POST variables on the end. This is the same as submitting an HTML form.
The variables use the same naming convention as the XML format.
https://example.com/script.aspx]?
SessionID=[...]&TechID=[...]&TechSSOID=[...]
&TechDescr=[...]&CField0=[...]&CField1=[...]&CField2=[...]&CField3=[...]&CField4=[...]
&CField5=[...]&Tracking0=[...]&ChatLog=[...]&Notes=[...]&WaitingTime=[...]
&PickupTime=[...]&ClosingTime=[...]&WorkTime=[...]&LastActionTime=[...]&Transmitted=[...]
&TSurvey0=[...]&TSurvey1=[...]&TSurvey2=[...]&TSurvey3=[...]&TSurvey4=[...]&TSurvey5=[...]
&TSurvey6=[...]&TSurvey7=[...]&TSurvey8=[...]&TSurvey9=[...]
Note: The HTTP POST option is actual POST data. Using the GET method will not work properly.
How to Post Session Data to a URL
This feature allows you to take the session data from your technicians and have them posted to a script you create
on your own server.
To implement this feature, knowledge of web forms or XML handling is recommended. This feature requires you to
code and host the target page/URL to which Rescue is sending data.
Note: does not support code troubleshooting.
1.
On the Organization Tree, select the Technician Group you want to work with.
2.
Select the Settings tab.
3.
Under Exporting session data, type the URL to which you want to post session details.
Note: When the Hide post session URLs setting is enabled on the Global Settings tab, users are
required to click Show URLs to see or modify the values set for the given Technician Group. Clicking
this button is recorded in the Audit Report log. For more information, see How to Hide Post Session
URLs on page 131.
You can post data in the following cases:
• Each time a session is started (each time it enters Active status)
• Only when a session is started for the first time (the first time it enters Active status)
• When a session is ended (enters Closed status)
• When a session is suspended by putting it on hold or transferring it to a technician
• When the Technician Console is refreshed or closed
• Enter a URL your technicians can access. For example: https://webserver/path
• For authentication, use this format: https://[username]:[password]@webserver/path
Prerequisite: Sending sensitive session data and credentials via cleartext http protocol is NOT
recommended.
4.
As appropriate, choose to post session details in one of the following formats:
• HTML Form parameters
• XML data
130 Rescue Administrators Guide

• JSON
Restriction: This format is only available with Technician Console version 7.12.3341 and above.
5.
By default, the complete chat log is posted. To control how chat data is posted, select from the following
options:
• Select Omit chat text from post to URL to post only system messages. All chat between the technician and
customer is excluded.
• Select Omit chat from Rescue Data Center storage to ensure that only system messages are passed to the
Rescue Data Center when a session is transferred or placed on hold, or when the browser that is running the
Technician Console is refreshed or closed during a session. Only system messages will be posted at session
end.
6.
Save your changes.
• Click Save to apply settings to the current Technician Group
• Click Apply to subgroups to apply the settings to the current Technician Group and all of its subgroups
• Click Apply to all groups to apply the same settings to all Technician Groups in your organization
How to Hide Post Session URLs
Master Administrators can force Administrators to click a dedicated button to see or modify session data URLs in
the Exporting session data section of the Settings tab. Viewing or modifying the URLs will be recorded in the
Audit Report log. This feature protects sensitive information (such as, username, password, API key) provided in the
URLs, and allows companies to track which user viewed or modified these values.
1.
Select the Global Settings tab.
2.
Under Hide post session URLs, enable the Hide post session URLs setting.
3.
Click Save.
Post session URLs are now hidden in the Exporting session data section of the Settings tab. Users need to click
Show URLs to see or modify the values set for the given Technician Group.
API Guide (Web)
Having trouble viewing? Click here
The API provides an interface to third parties for communicating with an application. Use this API to customize
how integrates with your other support applications.
Copyright
©
2023 GoTo, Inc. 131

Legal Notice
PUBLISHED BY
, Inc.
320 Summer Street Suite 100
Boston, MA 02210
All rights reserved. No part of the contents of this document may be reproduced or transmitted in any form or by any
means without the written permission of the publisher.
®
Central
™
, Hamachi
®
, join.me
®
, Pro
®
,
®
or
®
+Mobile
™
, along with their related software, including the
Network Console
™
, and the other denoted terms in this publication are the trademarks and service marks of , Inc.,
and may be registered in the U.S. Patent and Trademark Office and in other countries. All other trademarks and
registered trademarks are property of their respective owners.
This publication may contain the trademarks and service marks of third parties and such trademarks and service
marks are the property of their respective owners. These marks may be registered and/or used in the U.S. and other
countries around the world. These third party marks include, but are not limited to, Blackberry, Windows, Apple,
iPhone, iPod Touch, iTunes App Store and related trademarks, names and logos. These third party marks are the
property of Research In Motion Limited, Microsoft Corporation, and Apple, Inc., respectively, and are registered
and/or used in the U.S. and other countries around the world.
THE SPECIFICATIONS AND INFORMATION REGARDING THE PRODUCTS AND SERVICES IN THIS
MANUAL ARE SUBJECT TO CHANGE WITHOUT NOTICE. ALL STATEMENTS, INFORMATION,
AND RECOMMENDATIONS IN THIS MANUAL ARE BELIEVED TO BE ACCURATE BUT ARE
PRESENTED WITHOUT WARRANTY OF ANY KIND, EXPRESS OR IMPLIED. USERS MUST TAKE FULL
RESPONSIBILITY FOR THEIR APPLICATION OF ANY PRODUCTS AND SERVICES. THE LICENSE AND
LIMITED WARRANTY FOR THE ACCOMPANYING PRODUCT AND SERVICES ARE SET FORTH IN THE
TERMS AND CONDITIONS AND ARE INCORPORATED HEREIN BY THIS REFERENCE.
132 Rescue Administrators Guide

Index
Index
A
Administration Center 41
administrator 7
administrator group 8
API reference 131
API token 127
applet
applying a custom logo and icon 38
choosing the default applet 36
start as Windows System Service 37
audio 42
authcode 127
authentication
API Token 127
for technician monitoring 54
setting a global password policy 19
single-sign-on (SSO) 125
auto-start private sessions 46
auto-start waiting sessions 47
automatic logout 70
automatic transfer 47
away state 70
B
busy state 70
C
calling card
apply installer 90
generate 89
Calling Card 84
deploying to the customer 93
centralized script 98
channels
about 34, 96
activating 35
assigning to a group 34
denying access (individual technician) 35
editing custom fields 75
integrating 35
setting up auto-start logic 47
Defer auto-start 48
setting up automatic transfer logic 47
setting working hours 49
testing 36
chat
permissions 12
clipboard synchronization behavior 78
Comman Center 55
compact view 23
connecting
via Calling Card 88
connection methods 44
CRM integration 128
custom fields 75, 76
customer survey 81
customize
applet appearance 38
Calling Card appearance 90, 91
channel code 35
custom fields 75, 76
customer survey 81
informational link 71
Instant Chat 83
technician survey 80
D
default
clipboard synchronization behavior 78
screen recording settings 77
Defer auto-start for Channel sessions 48
disable keys 40
disable wallpaper and visual effects 79
E
Email 44
Exempt from session auto-assignment 48
extended 115
extended view 23
H
hierarchy visibility 23
I
Instant Chat
allowed URLs for Instant Chat customization 83
set as default 36
set up and customization 83
integration 128
J
JSON 130
Copyright
©
2023 GoTo, Inc. 133

Index
L
lens 42
Lens 41
Link 44
LogMeIn123 88
logout
technician 70
M
Mac daemon 37
managing unattended access computers 68
master administrator 7
maximum sessions 70
modify script 98
monitor chat 61
monitoring 55
monitoring technicians
step-by-step 53
mouse and keyboard priority during remote control 37
N
no technician available 49, 49
notification during desktop monitoring 54
O
organization tree 6
P
password
setting a global policy 19
Permission 41
permissions
prompt at start 40
technician group 9
Technician Group 89
PIN Code 44
predefined replies and URLs
create 72
export 72
import 72
manage 72
share 72
R
report
audit list all 120
chatlog 109, 110
collaboration chat log 111
custom fields 112
customer survey issuance list all 101
customer survey issuance summary 102
customer survey list all 100
customer survey summary 101
external technician chatlog 119
failed sessions list all 117
failed sessions summary 117
generate 99
login list all 104
login summary 105
missed sessions extended list all 118
missed sessions list all 113, 118
missed sessions summary 114
performance list all 102
performance summary 103
rebooting 122
reconnecting 122
session list all 106
session summary 108
status
Administrator 124
technician 123
technician survey 116
transferred sessions 114, 115
reports
post-to-URL 130
standard 99
S
screen recording settings 77
script collection 97, 97, 97
session limits per technician 70
session management 47
sessions
close 51
managing 43
place on hold 51
start 51
start automatically 46, 47
defer auto-start 48
time-outs 50
transfer 51, 51
transfer automatically 47
set authentication method 69
single sign-on (SSO) 125
SMS 44
T
technicians
adding 13
editing 13
import 13
monitoring a technician's desktop 53
setting permissions (technician group) 9
survey completed by 80
terms and conditions 39
134 Rescue Administrators Guide

Index
time-outs
alarms 50
connecting session 50
idle session 50
private code 50
technician 70
waiting session 50
transfer visibility 23
Two-factor authentication 20, 21
Two-step verification
Administration Center 20
Enforce 20
Reset 21
U
unattended access 66, 68, 69
about 66
V
VoIP 42
W
wallpaper
disable 79
Windows System Service 37
working hours 49
Copyright
©
2023 GoTo, Inc. 135
