Terminal User Guide
Move/5000

Page 1
Move/5000
User Guide
Copyright© 2019 Ingenico
Table of contents
Introduction ....................................................................................................................................... 3
Contents of box ................................................................................................................................ 3
Overview of Move/5000 .................................................................................................................... 4
Battery .............................................................................................................................................. 8
Paper roll ........................................................................................................................................ 11
Terminal Base Overview ................................................................................................................. 14
Using the terminal keyboard & display ............................................................................................ 15
Supervisor Code ............................................................................................................................. 15
Display/Icons .................................................................................................................................. 16
GPRS Terminal .............................................................................................................................. 17
Bluetooth Terminal (IP/PSTN) ......................................................................................................... 18
Wi-Fi Terminal ................................................................................................................................ 18
Transactions ................................................................................................................................... 19
Sale – contactless .................................................................................................................... 22
Sale – inserted card (via menu) ................................................................................................ 23
Sale – swiped card ................................................................................................................... 24
Purchase with cashback (PWCB) ............................................................................................. 25
Sales with Gratuity (Tip Mode) .................................................................................................. 26
Split Bills ................................................................................................................................... 27
Surcharging .............................................................................................................................. 28
Refund ..................................................................................................................................... 29
Mailorder Transactions (Customer Not Present) ....................................................................... 30
Mailorder Transaction ............................................................................................................... 32
Hotel Mode ............................................................................................................................... 33
Pre-Auth ................................................................................................................................... 34
Completion ............................................................................................................................... 35
Reversals ................................................................................................................................. 36
Duplicate Receipts.................................................................................................................... 36
Cash advance .......................................................................................................................... 37
Account Verification .................................................................................................................. 38
Authorisation only transaction ................................................................................................... 39

Page 2
Move/5000
User Guide
Copyright© 2019 Ingenico
Declined Transactions .............................................................................................................. 40
Referrals ................................................................................................................................... 41
Force transaction ...................................................................................................................... 42
Transaction Receipts ...................................................................................................................... 43
Merchant Copy - Contactless Transactions ..................................................................................... 47
Customer Copy ............................................................................................................................... 48
Declined and Void Receipts ............................................................................................................ 52
Transaction Referencing ................................................................................................................. 53
Reports ........................................................................................................................................... 54
End of Day Report .......................................................................................................................... 55
Banking Report ............................................................................................................................... 56
X Balance Report ............................................................................................................................ 61
Z Balance Report ............................................................................................................................ 62
Stored Transaction Report .............................................................................................................. 65
TMS Report .................................................................................................................................... 65
Supervisor Functions ...................................................................................................................... 67
Menu Structure ............................................................................................................................... 84
Recommendations .......................................................................................................................... 85
Security of the terminal ................................................................................................................... 87

Page 3
Move/5000
User Guide
Copyright© 2019 Ingenico
Introduction
Thank you for choosing an Ingenico payment terminal.
We recommend that you carefully read this user guide: It gives you the
necessary information about safety precautions, unpacking, installation, and
maintenance of your terminal.
This symbol indicates an important warning
This symbol indicates a piece of advice
Contents of box
The power supply unit provided with this equipment is specially
designed for Ingenico terminals. Do not use any other power
supply.
Move/5000 terminal
with a paper roll
Battery
User Guide
Power Supply
Terminal Base
Stylus

Page 4
Move/5000
User Guide
Copyright© 2019 Ingenico
Overview of Move/5000
Weight
(
w
\
o
paper roll or battery)
310g
01/01/19
Dimensions (L x w x h) 169x78x57 mm
Electrical mains network 100-240VAC / 50-60 Hz - Class II equipment
Terminal Connections Micro USB AB serial link Power connector Contacts for Cradle
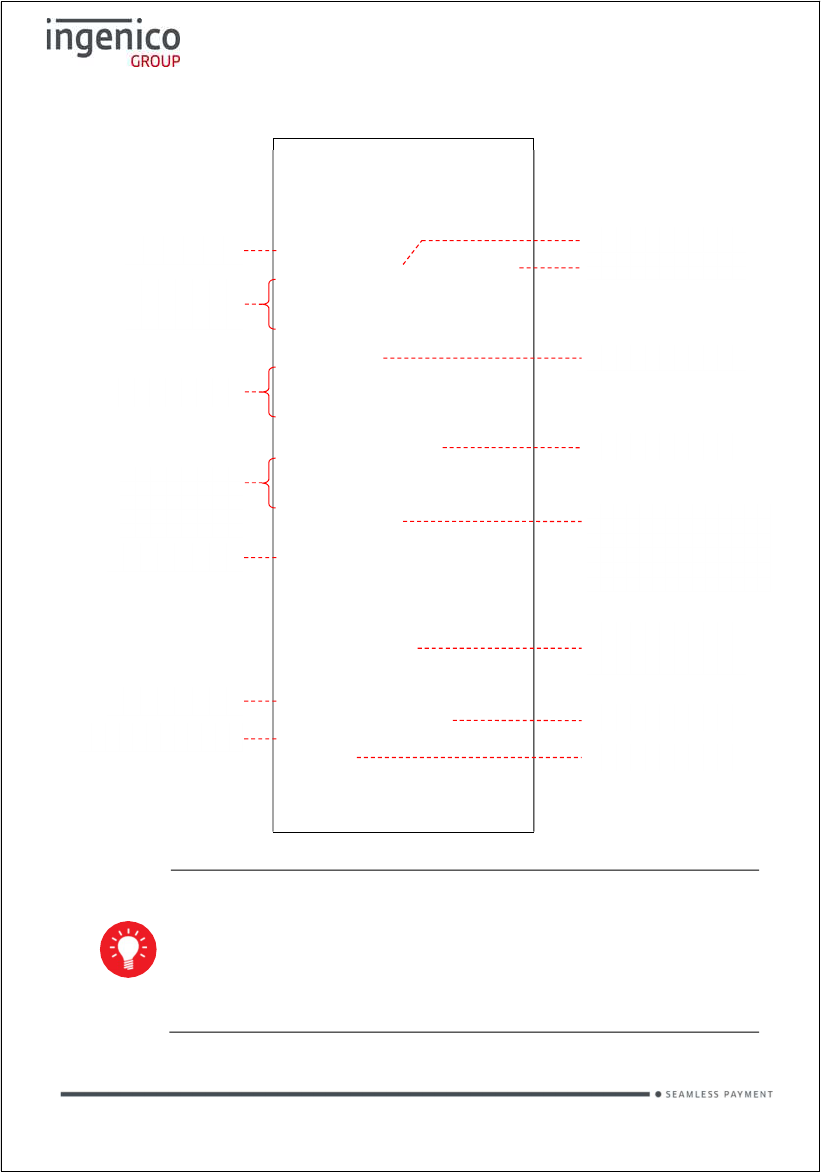
Keyboard details and functionality
Some keys can have other functions depending on the
applications on the terminal.
3”5 LCD touch display
Contactless card reader
Magnetic card reader
Easy loading printer
Backlit keyboard
Chip card reader
Red key cancels the procedure in progress
Yellow key cancels the last character
Green key validates input selections and information
It also switches the terminal on.
Paper feed (long press)

Page 5
Move/5000
User Guide
Copyright© 2019 Ingenico
Switching ON / OFF terminal
• To switch ON the terminal press on the keyboard.
• To switch OFF the terminal press and for one second.
Before using the terminal, always check the paper roll is present.
Installation
Location of the Move/5000
Place the base on flat surface near an electric socket and if required near to
the telephone or an Ethernet socket.
The terminal should be placed far from any very hot zones, protected from
vibrations, dust, damp and electromagnetic radiation (computer screen, anti-
theft barrier etc.).
Operating Condition
Ambient temperature
0°C to +50°C
01/01/19
Max relative humidity 85% at +40°C
Max altitude 2000m
Battery charging conditions
Ambient temperature
0°C to +45°C
Storage conditions
Ambient temperature
0°C to +50°C
01/01/19
Max relative humidity 85% at +40°C

Page 6
Move/5000
User Guide
Copyright© 2019 Ingenico
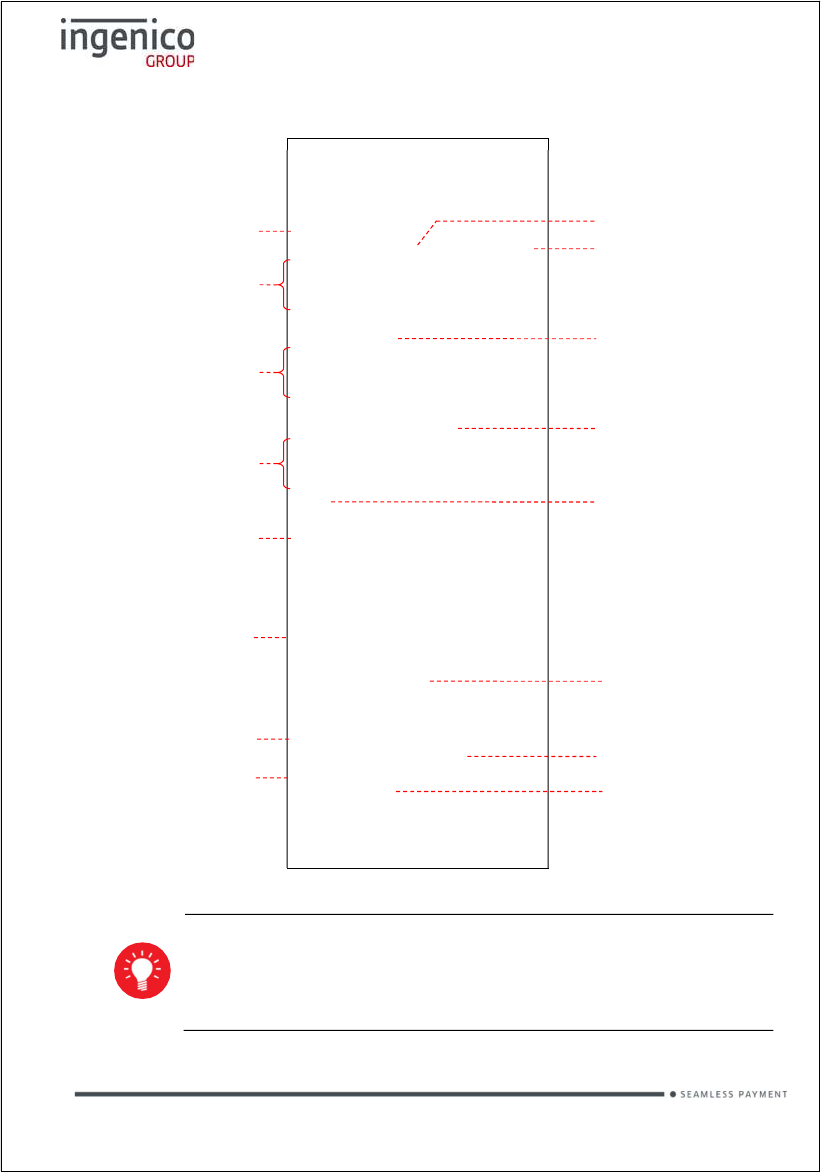
Terminal connections
µUSB
• There is a Micro-USB connector on the left side of the Move/5000
wireless terminal. (see picture). This connector manages Host and
Slave connections.
• The terminal supports USB
keys with FAT16 or FAT32 file
systems
• The USB key has to be used
with an USB adapter (refer to
accessories section)
µSD Memory Card
• Insert the MicroSD memory
card into the connector slot
as shown on the picture
• MicroSD connector is located
on terminal side.
• The terminal supports
MicroSD up to 32GB
Switch off the terminal prior to installing a Micro SD
Stylus
Stylus pen is provided with the terminal to help operating
touch screen. The stylus holder is located on the back cover
of the terminal - shown on the picture.
USB micro AB
Connector used for USB key etc.
MicroSD Slot

Page 7
Move/5000
User Guide
Copyright© 2019 Ingenico
Opening the back cover
Switch off the terminal before opening the back cover
Turn the terminal over and unclip the
back cover by pushing on the clip as
shown with the arrows in the picture
SAMs & SIMs
• The connector modules security SAM / SIM are located inside the
terminal in a closed compartment
• SAMs / SIMs are identified by the engraved marks on the lower housing
• When introducing a SAM / SIM in its slot, be sure to put the cut corner as
indicated on the engraved markings.
SIM 2 connector or SAM 3 connector
SIM 1 connector
SAM 1 connector
SAM 1 connector

Page 8
Move/5000
User Guide
Copyright© 2019 Ingenico
Battery
Main characteristics
Operating Condition
Characteristics Li-ion 2900 mAh
01/01/19
Charge
(power supply - 1.5A)
50% capacity in 1,5 h; full capacity in 4 hours
Battery Life
450 transactions in GPRS with fully charged battery,
printing and backlight activated
150 hours powered ON
with connected GPRS link and terminal
in sleeping state starting with fully charged battery and without
energy consumption relat
ed to backlit or radio link
The battery capacity depends on the model of terminal and its use
Installing the battery
Check that the terminal is not connected to the mains electricity
network
• Turn the terminal over and unclip the back cover by pushing on the clip
• Take the battery pack included in the box
• Locate the battery pack connector
beside the battery compartment
• Plug the battery pack into the
battery pack connector
• Verify that it locks
• Place the battery pack in its
compartment.
• Close the back cover
Battery connector
Battery compartment

Page 9
Move/5000
User Guide
Copyright© 2019 Ingenico
Charging the battery
When does the battery need to be charged?
• On initial startup, charge the battery for 16 hours under the environmental
conditions stated earlier in this guide
• When used daily, the terminal recharges its batteries each time it is
placed on its base. Charging is automatic
• When used with a terminal power supply: connect the power supply to
Move/5000 power connector
• The environment in which the charge takes place influences battery
lifetime and autonomy (number of transactions)
• The optimal conditions are as follows:
- Charge away from any external heat source (radiator, sun, enclosed
area etc.)
- The optimal temperature is between +15°C and +25°C
How can the battery be charged?
Using the base
• Place the terminal on its base
• Check the battery symbol is flashing or moving to indicate charging
Using the terminal power supply
• Connect the terminal power supply unit to the terminal charging port on
the left of the terminal
• Check the battery symbol is flashing or moving to indicate charging

Page 10
Move/5000
User Guide
Copyright© 2019 Ingenico
Replacing the battery
It is imperative to use a battery authorized by Ingenico. There is
danger of explosion if battery used is not approved by Ingenico
• Remove the terminal from its base
• Turn it off by pressing simultaneously the and keys for about
one second
• Remove the back cover
• Carefully disconnect battery, following the instructions below
a) Unlock the connector by pressing the locking
mechanism as indicated by F1 arrow while
pulling this connector (F2 arrow) Release
traction on it as soon as the connector comes
unclipped
b) Finish extracting connector by tilting it slightly
(F3 arrow) to bring it away from the terminal
housing
• Power on the terminal by placing it on its base, or connect the terminal to
the power supply to reset the battery indicator
• Remove terminal from base or disconnect terminal power supply
• Connect and install the new battery by following the instructions in section
“Installing the battery”
• Close the back cover and charge the new battery. As advised in the
charging battery section
• In order to preserve the environment, dispose used battery at appropriate
site in compliance with recycling legislation

Page 11
Move/5000
User Guide
Copyright© 2019 Ingenico
Paper roll
Main characteristics of Ingenico paper roll
R40 Paper Roll
Colour White
01/01/19
Width 58 mm
Diameter 40 mm
Length About 18 meters
The battery capacity depends on the model of terminal and its use
The quality of the thermal paper can be reduced by poor storage conditions,
so it is recommended the following are avoided:
• Storage in hot wet places (near air-conditioner, humidity above 85%)
• Exposure to direct sunlight or ultraviolet for long periods of time
• Contact with organic solvents (solvent type adhesive)
• Direct contact with materials containing plasticizers (PVC transparent
folders or envelopes)
• Direct contact with “diazo” papers
• Direct contact with water
• Rubbing or pressing the paper too strongly
For best performance use only heat sensitised paper roll
approved by Ingenico. The use of non-approved paper is likely
to damage the terminals printer

Page 12
Move/5000
User Guide
Copyright© 2019 Ingenico
Installing a paper roll
• Open the paper compartment by lifting the catch located at the rear of
the terminal and pull the cover to the rear of the terminal
• Insert the paper roll in the compartment following the directions shown in
the picture
• Pull the paper up to the top of the terminal
• Hold the paper and close the lid
• Press simultaneously on both upper corners of the paper flap, until it clips
into position
When a new paper roll is inserted, tear off the first length (one
complete turn) to avoid printing on the adhesive tape footprint

Page 13
Move/5000
User Guide
Copyright© 2019 Ingenico
Card reading
Magnetic Stripe Card
The card can be read either from bottom
to top or from top to bottom, with the
stripe facing the terminal.
Use a regular movement in order to
ensure a reliable card reading.
Chip Card
Insert the card horizontally into the terminal with
the chip facing upwards.
Leave the card in position throughout
the transaction.
Contactless Card
Bring the card firmly up to the active zone
above the contactless logo located on the
paper trapdoor.
Keep the card close to the contactless
logo during the transaction.
The 4 virtual LEDs will light sequentially
during the transaction.

Page 14
Move/5000
User Guide
Copyright© 2019 Ingenico
Terminal Base Overview
1
You should set up your base unit in a convenient location close to a power source
and, for Bluetooth terminals, either a telephone socket and/or an Ethernet socket,
as required.
To open the base unit cover, located on the bottom of the base unit, you must
unclip an access clip and lift the cover from the base unit. To replace the cover,
reverse these instructions being sure to engage all the retaining pins before the
access clips.
1
Please note some terminal types might have charging base option supplied
which does not have any connection ports and it is solely used for charging the
terminal.
Terminal
guides
Terminal
charging points
Ethernet
port
USB
ports
Serial connection
ports
Telephone
socket
Power
socket

Page 15
Move/5000
User Guide
Copyright© 2019 Ingenico
Using the terminal keyboard & display
To enter numbers press the relevant keys. If you make a mistake you can correct
this using the correction keys. Press the yellow button once to delete one
character at a time. Press the red button once to delete the entire line; pressing
the red button again will cancel the transaction or exit the menu.
When typing in an authorisation code, for example, you may need to enter letters
as well as number. Where you see the 123 graphic (see below) on screen you
can toggle the input mode by pressing menu button. To enter uppercase letters
use the ABC input mode, and to enter lowercase letters use the abc input mode.
When entering letters, you should press the number key repeatedly until the
desired letter appears. For example, if you want to type B then you must press 2,
2. To move on to next character either press another key or wait for the flashing
cursor to appear.
Terminal is in the lowercase letter mode, mode is changed by
pressing menu button
Terminal is in the uppercase letter mode, mode is changed by
pressing menu button
Terminal is in the numeric mode, mode is changed by
pressing menu button
Supervisor Code
The default Supervisor Code is 01483. Please note: The terminal will require
you to change this to a new code of your choosing before you can process any
transactions.

Page 16
Move/5000
User Guide
Copyright© 2019 Ingenico
Display/Icons
Please note the terminal is using following colouring scheme:
No icon means the function is not present in the terminal or its switched off.
Grey icon represents an active feature but not connected.
Orange icon represents connection in progress
Green icon is used during connection when the terminal is ready to exchange
data.
Following power icons will be displayed, depending on the battery charge.
Battery charge greater than 80%
Battery charge greater than 60% and less than 80%
Battery charge greater than 40% and less than 60%
Battery charge greater than 20% and less than 40%
Battery charge less than 20%
Terminal powered by external power supply, battery full charge
Icons displayed on your terminal display depend on your terminal
type
Time displayed in 24-hour format with long date format
Time displayed in 12-hour format with long date format
Date and time formats can be changed to suit your preference.
Please call helpdesk for further information

Page 17
Move/5000
User Guide
Copyright© 2019 Ingenico
GPRS Terminal
Your terminal might be 2G, 3G or combined 2G/3G capable
Before connection, the mobile network status is represented by:
No icon No mobile network module or module not activated;
Mobile network module is activated but not attached to a
network.
The terminal is connected to a mobile network but the GPRS
session has not yet been established
The terminal is connected to a mobile network and the GPRS
session has been established
Maximum reception level (100%)
High reception level (75%)
Medium reception level (50%)
Low reception level (25%)
Very low reception level (<5%)
Network provider name is displayed underneath the signal
indicator

Page 18
Move/5000
User Guide
Copyright© 2019 Ingenico
Bluetooth Terminal (IP/PSTN)
No icons Network card not yet activated / Bluetooth not yet activated
Ethernet cable not connected
Ethernet cable connected. No IP address set/received from
the network
Ethernet connected and IP address set/received from the
network
Bluetooth present but not activated.
Bluetooth connection is in progress.
Terminal connected to at least one base.
Wi-Fi Terminal
No icons Network card not yet activated / Wi-Fi not yet activated
Not connected to the Wi-Fi network
Wi-Fi connection is in progress.
. No IP address set/received
from the network
Wi-Fi connected and IP address set/received from the
network
Please note: Some terminals might have multiple comms
capability; therefore you might see a combination of various
comms icons on the display.

Page 19
Move/5000
User Guide
Copyright© 2019 Ingenico
Transactions
To perform a transaction in a quick and efficient manner you may type in the
transaction amount from the idle screen, insert the card to the card reader or press
menu key and select sale option. This method may be used to start any sale
transaction, regardless of card type is (i.e. contactless cards or cards with, or
without, a chip).
Enter the transaction amount while the idle screen is being displayed by typing in
the amount in pence (i.e. 1234 for £12.34) followed by the green key. If you make
a mistake when entering the amount you can correct this by using the correction
keys. Press the yellow key once to delete one character at a time. Press the red
key to cancel the amount entry and return to the idle screen.
Contactless card transactions are performed by this method and when the
transaction value is under the contactless card limit (e.g. £30.00). Your terminal
will only prompt for a card to be presented when a
contactless transaction is allowed. When a contactless
transaction is allowed your terminal will show a contactless
icon on the screen. The terminal will prompt for contactless
card or contactless device to be presented depending on
the amount.
Contactless transactions that are above a pre-set value (Floor Limit) may go
online/dial for authorisation.
If you consistently sell an item at the same price you can ‘recall’ the last
transaction amount by pressing the dot key while the idle screen is being
displayed. Your terminal will allow you to confirm if this is the correct amount, and
you can continue with the transaction by pressing the green key.
Alternatively the traditional method of starting the transaction by swiping or
inserting the card first may be utilised if required.

Page 20
Move/5000
User Guide
Copyright© 2019 Ingenico
Contactless High Value Payment (HVP) – Wallet Payments
High Value Payments are contactless payments that are
above the limit for contactless cards (e.g. £30.00) but are
protected by the cardholder verifying themselves to the
mobile phone either using a scanned thumb/fingerprint in
the case of Apple Pay, or by the entry of a pass code for
other mobile phone manufacturers. This process is known
as a Cardholder Device Cardholder Verification Method or
CDCVM for short.
This means that once HVP is enabled, the contactless logo will be displayed on
your terminal for all transactions rather than just those under the contactless card
limit (e.g. £30.00).
Acceptance of normal contactless cards for transactions below the £30 limit will
continue as normal and, if a cardholder taps a contactless card for a transaction
above the £30 limit, the terminal will instruct them to complete the transaction
using chip and PIN.
In some cases, a cardholder may need to tap their mobile phone against the
contactless reader twice. This is because they have not pre entered their CDCVM
on their device prior to starting the transaction and their device has prompted
them to complete their CDCVM and tap the phone again. The cardholder should
follow the instructions on their device to complete the transaction.

Page 21
Move/5000
User Guide
Copyright© 2019 Ingenico
Dealing with Contactless Card Read Failures
A contactless card read may fail, and the customer will be prompted to re-present
their card.
If the card is removed too soon, before all four contactless status lights are lit;
before the confirmation tone is heard; or before prompted to remove the card, the
card read will fail.
If the card is removed too soon the card read will fail. An alert
tone will sound and the customer will be prompted to re-present
the card.
If more than one contactless card is presented to the contactless
card read zone together then the card read will fail. This may
occur if the card is presented in a wallet with other contactless
payment cards, or other contactless cards such as public
transport smart cards. An alert tone will sound and the customer
will be prompted to re-present the card.
In both cases the terminal will continue as per a normal
contactless sale to complete the transaction.
Printing the Customer Copy (Duplicate)
Only the merchant copy is printed during a contactless transaction. Because the
transaction value is low and fast transaction times are desired, the customer copy
is not printed by default.
If the customer requires a receipt then a customer copy may be printed any time
until another transaction is performed by pressing the F1 key whilst the idle screen
is displayed. This prints a duplicate of the last transaction taken and is not
restricted to contactless transactions.
For security reasons the full card number is not shown on the
customer copy.

Page 22
Move/5000
User Guide
Copyright© 2019 Ingenico
Sale – contactless
From the idle screen,
enter the amount and
press enter.
Transaction is
approved.
Insert / Swipe /
Present screen is
shown.
Present the
contactless card.
Terminal w
ill print the
merchant receipt.
Contactless read is
successful when all
four status lights are lit
and confirmation tone
is heard.
Tear off
the merchant
receipt, the terminal
will return to ready
screen
Terminal connects to
the acquirer.
If the cardholder
requires a receipt,
press F1 to print a
duplicate.

Page 23
Move/5000
User Guide
Copyright© 2019 Ingenico
Sale – inserted card (via menu)
Select SALE from the
transaction menu.
Terminal connects to
the acquirer using
mobile network.
Insert / Swipe screen is
shown.
Insert the card.
Auth code is returned
by the acquirer.
The card is read and
will then proceed to the
sale screen.
Enter the sale amount
and press the green
key.
Terminal will print the
merchant receipt
Cardholder to enter
their PIN code and
press the green key.
Tear off the receipt and
remove the card, this
will then initiate the
printing of the
customers receipt
Cardholder is then
prompted to return the
terminal if the PIN is
accepted
Tear off the customer
receipt, the terminal will
to ready screen

Page 24
Move/5000
User Guide
Copyright© 2019 Ingenico
Sale – swiped card
Select SALE from the
transaction menu.
The merchant copy of
the receipt is printed for
the cardholder to sign.
Insert/Swipe screen is
shown.
If the signature on the
card matches the one
provided on the receipt,
press the green key.
Once the card has been
read by the Terminal,
the sale screen is
shown. Enter the sale
amount and press the
green key.
Terminal will print the
merchant receipt. Tear
this off and ask the
cardholder to sign it,
Terminal connects to
the acquirer.
The customer copy of
the receipt is printed
and the Terminal
returns to the Ready
screen
Auth code is returned
by the acquirer.

Page 25
Move/5000
User Guide
Copyright© 2019 Ingenico
Purchase with cashback (PWCB)
Your terminal is not pre-configured to allow for Sales with Cashback. If you would
like Cashback mode enabled on your terminal please contact the terminal
Helpdesk. Please note only debit cards can offer this functionality and the
cashback limit is set by your acquirer.
You must ensure that this option is enabled on your
acquirers Merchant Account. Contact your acquirer to
ensure that this option is available to you; this option may
not be available for all account types.
From the idle screen start the
transaction by keying in the
amount, inserting or swiping the
customer’s card or alternatively
press menu key and select sale
from the available options.
Enter the sale amount in pence
(e.g. 2134 for £21.34) and press
the green key.
If cashback is allowed for the
customer’s card the terminal will
display a cashback prompt.
Enter
the cashback amount in pence
and press the green key.
If cashback is not required press
the green key
without entering an
amount.

Page 26
Move/5000
User Guide
Copyright© 2019 Ingenico
The terminal will continue as per a
normal sale, refer to the
instructions for the appropriate
sale transaction type to complete
the transaction.
Sales with Gratuity (Tip Mode)
Your terminal is not pre-configured to allow for Gratuities (i.e. tips). If you would
like the Gratuity mode enabled on your terminal please contact the terminal
helpdesk.
You must ensure that this option is enabled on your acquirers
Merchant Account.
Gratuity mode would commonly be used within the leisure industry to allow the
customer to add a tip to the final amount before completing the transaction.
For sales with inserted cards, when Gratuity mode is enabled, your terminal will
prompt for the customer to enter a gratuity on the screen.
Alternatively, your terminal can be configured to print an additional ticket for the
customer to fill in with any gratuity and the final transaction amount. If you wish
your terminal to be configured in this way, please contact the terminal helpdesk.
For sales with swiped cards when gratuity mode is enabled in this manner, the
merchant copy will allow the customer to fill in with any gratuity and the final
transaction amount. This is unaffected by the method of entering the gratuity for
inserted cards.
If you wish, your terminal can be configured to allow the entry via the choosing of
set monetary values, set percentages or a combination of the two; contact the
helpdesk if you wish to enable tips in this manner
When gratuity mode is enabled, your terminal will only contact the acquirer for
authorisation after the final transaction amount (including any gratuities) is known.

Page 27
Move/5000
User Guide
Copyright© 2019 Ingenico
For swiped cards this means that this is after the terminal has printed the
merchant copy for signature.
Due to the authorisation code being gained after the merchant copy is printed, the
authorisation code will not be shown. The authorisation codes are printed on the
transaction breakdown on the X and Z Balance reports.
If you wish, your terminal can be configured to print an additional receipt at the
end of the transaction which shows the authorisation code and the gratuity
entered. If you wish your terminal to be configured in this way please contact the
terminal helpdesk.
Split Bills
Your terminal is not pre-configured to allow for Split Bills. If you would like the Split
Bill functionality enabled on your terminal please contact the terminal Helpdesk.
The Split Bill functionality would commonly be used within the leisure industry in
order to break down a bill associated with a table into amounts that can be paid
by each person using differing payment methods.
The options available for Split Bills are:
PER PERSON
Allows the bill to be split equally between multiple
customers.
PER COUPLE
Allows the bill to be split equally between multiple
customers, but allows for one person to pay per
couple.
VARIABLE SPLIT
Allows the bill to be split unequally between
multiple customers.

Page 28
Move/5000
User Guide
Copyright© 2019 Ingenico
Surcharging
Your terminal is not pre-configured to allow for Surcharging. If you would like the
Surcharge functionality enabled on your terminal please contact the terminal
Helpdesk.
The Surcharge functionality would commonly be used within the leisure & service
industries to add a surcharge of a set amount or set percentage rate to the total
of the bill automatically. For example you could automatically apply a surcharge
of 10% to all transactions over £10.00, and a £1.00 surcharge to all transactions
of £10.00 and less.
You can discuss your specific requirements by contacting the terminal Helpdesk.

Page 29
Move/5000
User Guide
Copyright© 2019 Ingenico
Refund
Select REFUND from
the transaction menu.
Terminal will connect to
the host via the mobile
network.
Enter the supervisor
password
and press the
green key.
Refund is accepted by
the acquirer.
The REFUND menu
screen will be displayed
Enter the sale amount
and press the green
key.
Terminal will print the
merchant receipt
Insert / Swipe / Present
card screen is
displayed.
Depending on the
acquirer configuration
the terminal might
request to check the
customer signature and
press the green key.
Terminal will check the
card.
Terminal will print the
merchant cardholder
receipt and return to
the Ready screen

Page 30
Move/5000
User Guide
Copyright© 2019 Ingenico
Mailorder Transactions (Customer Not Present)
You must ensure that this option is enabled on your acquirers
Merchant Account.
Your terminal is pre-configured for Mailorder (Customer Not Present)
transactions.
Mailorder transactions are performed without the customer or the card being
present. All card details must be manually entered so please take note of what
information will be asked for by your terminal. If supported by your acquirer and
by the card type taken, you will have the option of entering the CSC (Card Security
Code) and using the AVS (Address Verification Service).
The CSC is the last three digits of the number printed on the signature strip on
the back of the card. To use AVS checking, you will be prompted to input only the
digits from the customer’s postcode and address.
For American Express cards there is a four-digit Card Security
Code printed on the front of the card, any numbers on the
signature strip should be ignored.
The response from the acquirer will then give you the result of the security checks
to help you decide if you wish to continue with the transaction.

Page 31
Move/5000
User Guide
Copyright© 2019 Ingenico
Mailorder - CSC/AVS Results
Please be aware that the CSC/AVS result is intended only to guide you in a
decision to void or confirm an already authorised transaction. Contact your
acquirer for more information and details of liability.
DATA MATCHED
Both the CSC and AVS data matches.
AVS MATCH ONLY
Only the AVS data matches.
CSC MATCH ONLY
Only the CSC data matches.
DATA NON MATCH
Neither the CSC nor AVS data matches.
NOT CHECKED
The data was not checked.
The data may not be checked if the service is not supported or if there is a
temporary system failure.

Page 32
Move/5000
User Guide
Copyright© 2019 Ingenico
Mailorder Transaction
From the idle screen
press the green key
once and select
Mailorder.
If you see this prompt,
enter the numbers from
the card’s billing
address postcode (e.g.
119 for KY11 9JU) and
press the green key.
Select Sale
If you see this prompt,
enter the numbers from
the card’s billing
address (e.g. 221 for
221b Baker Street) and
press the green key.
Key in the customer’s
card number and press
the green key.
Enter the sale amount
in pence (e.g. 2134 for
£21.34) and press the
green key.
The terminal will
connect to the acquirer
for authorisation.
Key in the expiry date
in MMYY format (1217
for December 2017).
If the transaction has
been authorised then
an auth code will be
displayed, together with
the CSC/AVS check
result.
You must decide
whether to continue
with the transaction.
E
nter three digit code at
the back of the card
Please note for AMEX
four digits are required.
Tear off the merchant
copy and press the
green key.

Page 33
Move/5000
User Guide
Copyright© 2019 Ingenico
Hotel Mode
When a large value transaction is expected (typically in Hotel or Rental
environments), a Pre-Authorisation can be made for the expected value, to check
the customer’s card is valid and the customer has enough credit available for the
transaction.
If the expected value increases, then further Pre-Authorisations can be made.
The final amount is fully authorised and captured by using the Completion
function.
To perform a Hotel Mode transaction press the menu key three times, then
choose HOTEL
Choose the required transaction type.
Then follow prompts on the screen.
A Pre-Authorisation (PREAUTH) transaction proceeds as for a Sale transaction.
If the customer’s card number is keyed in, then you will be asked to confirm if the
customer is present. These transactions do not include gratuities.
The transaction details are not captured by the acquirer, so the customer’s bank
account IS NOT debited, although the available credit on the customer’s bank
account will be reduced by the amount authorised.
Authorisation codes typically expire after 7 days (or 3-4 days for
Maestro cards). If the transaction is not submitted within that time
the customer’s available balance will be restored by the
authorised amount.
A Completion (COMPLTE) transaction requires the most recent authorisation
code and the total amount of all pre-auths, in addition to the final amount to be
debited from the customer’s card. This transaction will require a signature check
and the acquirer will capture the transaction details, so the customer’s bank
account is debited.

Page 34
Move/5000
User Guide
Copyright© 2019 Ingenico
Pre-Auth
Select Hotel from the
menu, then pre-auth.
Terminal will connect to
the host via the mobile
network.
Insert or Swipe card
screen is displayed.
Pre-Auth is accepted
by the acquirer.
Enter the amount and
press the green key.
Terminal will print the
merchant receipt
Terminal will check the
card.
Remove card.
Cardholder enter the
PIN code and press the
green key.
Terminal will print
customer receipt, then
return to the ready
screen.

Page 35
Move/5000
User Guide
Copyright© 2019 Ingenico
Completion
Select “Complte” from
the transaction menu.
Customer will be prompt
for PIN entry.
Insert / Swipe card
screen is displayed,
start keying in the card
number if you are
looking to perform
customer not present
transaction.
The terminal displays
approved/declined
message.
Enter the final amount.
Terminal will print the
merchant receipt
Key in sum of all pre-
auths taken to date for
this card.
Remove card.
Terminal will request
the first pre-auth code
to be entered.
Terminal will print the
customer receipt.

Page 36
Move/5000
User Guide
Copyright© 2019 Ingenico
Reversals
If a mistake in a transaction is identified immediately after the transaction has
been completed, then the transaction can be completely reversed by selecting
the Reversal function within 30 seconds of the end of the transaction.
This function is particularly useful when the wrong transaction amount has been
entered, and the mistake is only noticed on the customer copy.
To perform a Reversal press the menu key twice, then choose REVERSAL.
If the 30 second timer has not expired then your terminal will perform the
Reversal, contacting the acquirer if necessary.
When a Reversal has been successfully performed the original transaction and
the Reversal will not appear on the customer’s bank statement.
The original transaction and the Reversal will appear on your Banking and X/Z
Balance reports. Reversals are recorded as the opposite of the original
transaction: if you reverse a Sale then the Reversal will be shown as a Refund;
or if you reverse a Refund then the Reversal will be shown as a Sale.
You have 30 seconds of the end of transaction to perform
reversal. Once that elapsed the transaction cannot be reversed.
Duplicate Receipts
Your terminal can produce a duplicate copy of the customer receipt for the last
completed transaction.
To print a duplicate ticket press the menu key three times, then choose
DUPLICATE. All duplicate copies will have the word DUPLICATE printed at the
top of the receipt.
You can print a duplicate customer copy receipt quickly by
pressing the F1 key when your terminal is displaying the idle
screen.

Page 37
Move/5000
User Guide
Copyright© 2019 Ingenico
Cash advance
You must ensure that this option is enabled on your acquirers
Merchant Account. Contact your acquirer to ensure that this
option is available to you; this option may not be available for all
account types.
Your terminal is not pre-configured to allow for Cash Advance. If you would like
Cash Advance mode enabled on your terminal please contact the terminal
Helpdesk.
The idle screen will be displayed, press the
menu key once.
Select the CASH menu and Insert or swipe
the customer’s card when prompted.
Enter the transaction amount in pence (e.g.
2134 for £21.34) and press the green key.
The terminal will continue as per a normal sale, refer to the instructions for the
appropriate sale transaction type to complete the transaction.

Page 38
Move/5000
User Guide
Copyright© 2019 Ingenico
Account Verification
You must ensure that this option is enabled on your acquirers
Merchant Account. Contact your acquirer to ensure that this
option is available to you
In order to check that a customer’s card is valid an Account Verification can be
performed. Typically this would be used before opening a bar tab, or any situation
where a low value Pre-Authorisation would otherwise be performed. An Account
Verification has no value and therefore does not affect the available balance on
the customer’s bank account.
To perform an Account Verification press the menu key three times, then choose
ACC VERIFY.
Insert, swipe or key the customer’s card.
The terminal will continue as per a normal sale with the exception that an amount
is not prompted for, refer to the instructions for the appropriate sale transaction
type to complete the transaction.
When an Account Verification is successful then ACCOUNT VERIFIED will be
displayed on the terminal and printed on the transaction receipts.
Account Verification receipts carry the extra text of ACCOUNT VERIFICATION to
indicate that the transaction details are not captured by the acquirer.
If the ACC VERIFY option is not shown in the menu on your
terminal then the Account Verification functionality is not
available to you.
Account Verification many not be available for all card types.

Page 39
Move/5000
User Guide
Copyright© 2019 Ingenico
Authorisation only transaction
You must ensure that this option is enabled on your acquirers
Merchant Account. Contact your acquirer to ensure that this
option is available to you
An Authorisation Only transaction gives an authorisation code for a specific
amount against a customer’s card without the capture of the transaction details
by the acquirer.
This facility is intended for merchants who wish to bank transactions using a
different system, or to check that the customer has enough credit for a transaction.
The transaction does NOT debit the customers bank account or credit your
merchant account. The transaction value is NOT added to the terminal totals.
When an Authorisation Only transaction is done the available credit on the
customers bank account will be reduced by the amount authorised.
Authorisation Only transactions may be submitted to the acquirer through the
Forced Transaction function. These transactions do not include gratuities.
To perform an Authorisation Only transaction press the menu key twice, then
choose AUTH
Select the desired Authorisation
Only transaction type and perform
the transaction as normal.
Authorisation Only receipts carry the extra text of AUTHORISATION ONLY to
indicate that the transaction details are not captured by the acquirer.
Authorisation codes typically expire after 7 days (or 3-4 days for
Maestro cards). If the transaction is not submitted within that time
the customer’s available balance will be restored by the
authorised amount.

Page 40
Move/5000
User Guide
Copyright© 2019 Ingenico
Declined Transactions
The customer’s card, card issuer or the acquirer can decline to authorise any
transaction.
A declined response from the acquirer’s host system will display a message on
your terminal in place of the usual AUTH CODE: xxxxx message. This can be, for
example, DECLINED, NOT AUTHORISED, or RETAIN CARD. This message will
be displayed on the screen for up to 60 seconds, or until the enter key is pressed.
A declined receipt will be printed which clearly indicates that the transaction has
not been authorised. It will also show the message from the acquirer if such
message is present.
Transactions with an inserted chip card may be declined by the card without the
terminal contacting the acquirer’s host system. You should advise the customer
to contact their card issuer and request another means of payment.
If your terminal is unable to contact the acquirer for a transaction with an inserted
Chip card, the transaction maybe declined by the card with the message COMMS
FAILURE DECLINED.
If the COMMS FAILURE DECLINED message is displayed there
may be a problem with your telephone or LAN connection. This
will be indicated by the diagnostic (DIAG) codes printed on the
receipt. Refer to the section entitled Diagnostic Codes for more
details.
If you are prompted to retain the customer card you should follow
the standard procedures as laid down by your acquirer.

Page 41
Move/5000
User Guide
Copyright© 2019 Ingenico
Referrals
A transaction may be referred for voice authorisation if an extra security check is
required by the acquirer. The terminal will display or print instructions to call the
acquirer. If a telephone number is not shown please use the standard voice
authorisation number as supplied by that acquirer.
Once you have dialled or made a note of the telephone number press the green
key to continue.
Please be ready to quote your merchant number, the full card number and any
referral message that was displayed (such as REFERRAL B or CODE 10
REFER). The authorisation centre may need to speak to the customer.
If requested to do so by the authorisation centre operator, you
may remove the card from your terminal after a referral request
to do further visual checks on the card; at all other times, you
should only remove the card when prompted to do so by your
terminal.
If the transaction is authorised by the authorisation centre, your terminal will
prompt you to enter both your supervisor password and the authorisation code.
You should take care entering the authorisation code to avoid unnecessary
chargebacks from your acquirer.
Your terminal will also refer transactions if it is unable to contact the acquirer. This
can happen during exceptionally busy periods when the acquirer’s host system
cannot answer the authorisation request.
If you experience a high volume of referrals there may be a
problem with your connection. This will be indicated by the
diagnostic (DIAG) codes printed on the receipt. Refer to the
section entitled Diagnostic Codes for more details
FRAUD ALERT: Your acquirer will never contact you via
telephone call asking you to use a temporary authorisation centre
telephone number.

Page 42
Move/5000
User Guide
Copyright© 2019 Ingenico
Force transaction
You must ensure that this option is enabled on your acquirers
Merchant Account. Contact your acquirer to ensure that this
option is available to you; this option may not be available for all
account types.
The Forced Transaction function allows for the completion of a transaction
following a referral or voice authorisation. It also provides the opportunity to
capture the details of transactions authorised by means other than your terminal.
For example, card transactions authorised using paper vouchers and calls to the
authorisation centre during a power cut, or transactions previously authorised
using the Authorisation Only function.
You must have a valid authorisation code before performing a
forced transaction.
To perform a forced transaction press the menu key three times, then choose
FORCE TRANS. You will be asked to type your supervisor password, and then
press enter.
Select the desired transaction type, enter
your supervisor password
and then select
the desired transaction type.
Insert, swipe or key the customer’s card,
then follow instructions on the screen.

Page 43
Move/5000
User Guide
Copyright© 2019 Ingenico
Transaction Receipts
Merchant Copy - Signature Transactions
Inserted or Swiped Cards with Signature (Merchant Copy)
Merchant Name
Merchant Address 1
Merchant Address 2
M:12345678
TID:22160000 S2
WAITER:02
TABLE:00000001
HANDSET:01
VISA DEBIT
AID: A0000000031010
VISA DEBIT
4444 3333 2222 1111
EXP 12/20
STT 12/17
ISS 1
ICC
SALE
AMOUNT £21.34
TOTAL £21.34
SIGN BELOW
------------------------
PLEASE DEBIT MY ACCOUNT
01/01/19 12:00
AUTH CODE: 123ABC
TXN 0002
DIAG 8282
MERCHANT COPY
PLEASE RETAIN RECEIPT
Merchant ID
Sequence Number
Terminal ID
Transaction
Referencing
Card Issuer
Card AID & Label
Inserted Cards Only
Card Number
Entry Method
ICC for Inserted Cards
SWIPED for Swiped Cards
KEYED for Keyed Cards
CONTACTLESS for Contactless Cards
Transaction Type
Card Details
EXP for Expiry Date
STT for Start Date
ISS for Issue Number
Date & Time
Transaction Number
Auth Code
Diagnostic Code
Signature Section

Page 44
Move/5000
User Guide
Copyright© 2019 Ingenico
Inserted or Swiped Cards with Signature and Gratuity (Merchant Copy)
Merchant Name
Merchant Address 1
Merchant Address 2
M:12345678
TID:22160000 S4
WAITER:03
TABLE:00000004
HANDSET:01
VISA DEBIT
AID: A0000000031010
VISA DEBIT
4444 3333 2222 1111
EXP 12/20
STT 12/17
ISS 1
ICC
SALE
AMOUNT £21.34
GRATUITY ........
TOTAL ........
SIGN BELOW
------------------------
PLEASE DEBIT MY ACCOUNT
01/01/19 12:04
AUTH CODE: 123ABC
TXN 0003
DIAG 4141
MERCHANT COPY
PLEASE RETAIN RECEIPT
Merchant ID
Sequence Number
Terminal ID
Transaction
Referencing
Card Issuer
Card AID & Label
Inserted Cards Only
Card Number
Entry Method
ICC for Inserted Cards
SWIPED for Swiped Cards
KEYED for Keyed Cards
CONTACTLESS for Contactless Cards
Transaction Type
Card Details
EXP for Expiry Date
STT for Start Date
ISS for Issue Number
Date & Time
Transaction Number
Auth Code
Diagnostic Code
Signature Section

Page 45
Move/5000
User Guide
Copyright© 2019 Ingenico
Merchant Copy - PIN Transactions
Inserted Cards with PIN Entry (Merchant Copy)
Merchant Name
Merchant Address 1
Merchant Address 2
M:12345678
TID:22160000 S5
WAITER:01
TABLE:00000003
HANDSET:01
VISA DEBIT
AID: A0000000031010
VISA DEBIT
4444 3333 2222 1111
EXP 12/20
STT 12/17
ISS 1
ICC
SALE
AMOUNT £21.34
TOTAL £21.34
PIN VERIFIED
PLEASE DEBIT MY ACCOUNT
01/01/19 12:11
AUTH CODE: 123ABC
TXN 0004
DIAG 8241
MERCHANT COPY
PLEASE RETAIN RECEIPT
Merchant ID
Sequence Number
Terminal ID
Transaction
Referencing
Card Issuer
Card AID & Label
Card Number
Entry Method
ICC for Inserted Cards
SWIPED for Swiped Cards
KEYED for Keyed Cards
CONTACTLESS for Contactless Cards
Transaction Type
Card Details
EXP for Expiry Date
STT for Start Date
ISS for Issue Number
Date & Time
Transaction Number
Auth
Code
Diagnostic Code
Successful PIN Entry

Page 46
Move/5000
User Guide
Copyright© 2019 Ingenico
Inserted Cards with PIN Entry and Gratuity (Merchant Copy)
Merchant Name
Merchant Address 1
Merchant Address 2
M:12345678
TID:22160000 S7
WAITER:03
TABLE:00000004
HANDSET:01
VISA DEBIT
4444 3333 2222 1111
EXP 12/20
ICC
SALE
AMOUNT £21.34
GRATUITY £2.00
TOTAL £23.34
PIN VERIFIED
PLEASE DEBIT MY ACCOUNT
01/01/19 12:13
AUTH CODE: 123ABC
TXN 0005
DIAG 8282
MERCHANT COPY
PLEASE RETAIN RECEIPT
Merchant ID
Sequence Number
Terminal ID
Transaction
Referencing
Card Issuer
Card Number
Entry Method
ICC for Inserted Cards
SWIPED for Swiped Cards
KEYED for Keyed Cards
CONTACTLESS for Contactless Cards
Card Details
EXP for Expiry Date
STT for Start Date
ISS for Issue Number
Date & Time
Transaction Number
Auth Code
Diagnostic Code
Successful PIN Entry

Page 47
Move/5000
User Guide
Copyright© 2019 Ingenico
Merchant Copy - Contactless Transactions
Contactless Cards (Merchant Copy)
Merchant Name
Merchant Address 1
Merchant Address 2
M:12345678
TID:22160000 S9
WAITER:01
TABLE:00000003
HANDSET:01
VISA DEBIT
AID: A0000000031010
VISA DEBIT
4444 3333 2222 1111
EXP 12/20
STT 12/17
ISS 1
CONTACTLESS
SALE
AMOUNT £1.23
TOTAL £1.23
NO CARDHOLDER
VERIFICATION
01/01/19 12:30
AUTH CODE: 123ABC
TXN 0006
DIAG 52
MERCHANT COPY
PLEASE RETAIN RECEIPT
Merchant ID
Sequence Number
Terminal ID
Transaction
Referencing
Card Issuer
Card AID & Label
Card Number
Entry Method
ICC for Inserted Cards
SWIPED for Swiped Cards
KEYED for Keyed Cards
CONTACTLESS for Contactless Cards
Transaction Type
Card Details
EXP for Expiry Date
STT for Start Date
ISS for Issue Number
Date & Time
Transaction Number
Auth Code
Diagnostic Code
Successful
Contactless Read

Page 48
Move/5000
User Guide
Copyright© 2019 Ingenico
Customer Copy
Keyed Cards with Signature (Customer Copy)
Merchant Name
Merchant Address 1
Merchant Address 2
M:****5678
TID:****0000 S10
WAITER:01
TABLE:00000003
HANDSET:01
VISA DEBIT
************1111
EXP 12/20
STT 12/17
ISS 1
KEYED
SALE
AMOUNT £21.34
TOTAL £21.34
SIGNATURE VERIFIED
THANKYOU FOR YOUR CUSTOM
01/01/19 12:32
AUTH CODE: 123ABC
TXN 0007
DIAG 8241
CUSTOMER COPY
PLEASE RETAIN RECEIPT
For security reasons the full card number is not shown on the
customer copy.
Merchant ID
Sequence Number
Terminal ID
Transaction
Referencing
Card Issuer
Card Number
Entry Method
ICC for Inserted Cards
SWIPED for Swiped Cards
KEYED for Keyed Cards
CONTACTLESS for Contactless Cards
Transaction Type
Card Details
EXP for Expiry Date
STT for Start Date
ISS for Issue Number
Date & Time
Transaction Number
Auth Code
Diagnostic Code
Confirmed
Signature Prompt

Page 49
Move/5000
User Guide
Copyright© 2019 Ingenico
Inserted Cards with PIN Entry (Customer Copy)
Merchant Name
Merchant Address 1
Merchant Address 2
M:****5678
TID:****0000 S5
WAITER:03
TABLE:00000004
HANDSET:01
VISA DEBIT
AID: A0000000031010
VISA DEBIT
************1111
EXP 12/20
STT 12/17
ISS 1
ICC
SALE
AMOUNT £21.34
TOTAL £21.34
PIN VERIFIED
THANKYOU FOR YOUR CUSTOM
01/01/19 12:11
AUTH CODE: 123ABC
TXN 0004
DIAG 8241
MERCHANT COPY
PLEASE RETAIN RECEIPT
For security reasons the full card number is not shown on the
customer copy.
Merchant ID
Sequence Number
Terminal ID
Transaction
Referencing
Card Issuer
Card AID & Label
Card Number
Entry Method
ICC for Inserted Cards
SWIPED for Swiped Cards
KEYED for Keyed Cards
CONTACTLESS for Contactless Cards
Transaction Type
Card Details
EXP for Expiry Date
STT for Start Date
ISS for Issue Number
Date & Time
Transaction Number
Auth Code
Diagnostic Code
Successful PIN Entry
Page 50
Move/5000
User Guide
Copyright© 2019 Ingenico
Contactless Cards (Customer Copy)
DUPLICATE
Merchant Name
Merchant Address 1
Merchant Address 2
M:****45678
TID:****60000 S9
WAITER:01
TABLE:00000003
HANDSET:01
VISA DEBIT
AID: A0000000031010
VISA DEBIT
************1111
EXP 12/20
STT 12/17
ISS 1
CONTACTLESS
SALE
AMOUNT £1.23
TOTAL £1.23
NO CARDHOLDER
VERIFICATION
01/01/19 12:30
AUTH CODE: 123ABC
TXN 0006
DIAG 52
CUSTOMER COPY
PLEASE RETAIN RECEIPT
For security reasons the full card number is not shown on the
customer copy.
Please Note: Only the merchant copy is printed during a
contactless transaction. If the customer requires a receipt then
the customer copy can be printed by pressing the F1 key whilst
the idle screen is displayed.
Merchant ID
Sequence Number
Terminal ID
Transaction
Referencing
Card Issuer
Card AID & Label
Card Number
Entry Method
ICC for Inserted Cards
SWIPED for Swiped Cards
KEYED for Keyed Cards
CONTACTLESS for Contactless Cards
Transaction Type
Card Details
EXP for Expiry Date
STT for Start Date
ISS for Issue Number
Date & Time
Transaction Number
Auth Code
Diagnostic Code
Successful
Contactless Read
Page 51
Move/5000
User Guide
Copyright© 2019 Ingenico
Pre-Paid Cards (Customer Copy)
Merchant Name
Merchant Address 1
Merchant Address 2
M:****5678
TID:****0000 S5
WAITER:03
TABLE:00000004
HANDSET:01
VISA DEBIT
AID: A0000000031010
VISA DEBIT
************1111
EXP 12/20
STT 12/17
ISS 1
ICC
SALE
AMOUNT £21.34
TOTAL £21.34
AVAILABLE:
£1000.00
PIN VERIFIED
THANKYOU FOR YOUR CUSTOM
01/01/19 12:11
AUTH CODE: 123ABC
TXN 0004
DIAG 8241
MERCHANT COPY
PLEASE RETAIN RECEIPT
For security reasons the full card number is not shown on the
customer copy.
Please Note: The Pre-Paid Card available balance is shown only
on the customer copy.
Merchant ID
Sequence Number
Terminal ID
Transaction
Referencing
Card Issuer
Card AID & Label
Card Number
Entry Method
ICC for Inserted Cards
SWIPED for Swiped Cards
KEYED for Keyed Cards
CONTACTLESS for Contactless Cards
Transaction Type
Card Details
EXP for Expiry Date
STT for Start Date
ISS for Issue Number
Date & Time
Transaction Number
Auth Code
Diagnostic Code
Successful PIN Entry
Pre-Paid Card
Available Balance

Page 52
Move/5000
User Guide
Copyright© 2019 Ingenico
Declined and Void Receipts
If the transaction is declined by the acquirer or by an inserted Chip card, the
terminal will print a declined receipt, as shown below. The text printed below the
Date and Time is the response from message from the acquirer.
Example Declined Receipt (Customer Copy)
Merchant Name
Merchant Address 1
Merchant Address 2
M:****5678
TID:***0000 S11
WAITER:02
TABLE:00000010
HANDSET:01
VISA DEBIT
************1111
EXP 12/20
STT 12/17
ISS 1
SWIPED
SALE
AMOUNT £21.34
TOTAL £21.34
D E C L I N E D
THANKYOU FOR YOUR CUSTOM
01/01/19 12:40
NOT AUTHED
TXN 0008
DIAG 41
CUSTOMER COPY
PLEASE RETAIN RECEIPT
For security reasons the full card number is not shown on the
customer copy. If you have had any voided transactions you must
perform an End of Day report to ensure that the acquirer receives
confirmation that the transaction(s) have been voided.
Merchant ID
Sequence Number
Terminal ID
Transaction
Referencing
Card Issuer
Card Number
Entry Method
ICC for Inserted Cards
SWIPED for Swiped Cards
KEYED for Keyed Cards
CONTACTLESS for Contactless Cards
Transaction Type
Card Details
EXP for Expiry Date
STT for Start Date
ISS for Issue Number
Date & Time
Transaction Number
Acquirer Message
Diagnostic Code
Result Indication

Page 53
Move/5000
User Guide
Copyright© 2019 Ingenico
VOID
If the Result Indication shows VOID then the transaction has
been cancelled by the operator.
CANCELLED
If the transaction was cancelled by pressing the cancel key,
the message below the date/time will read CANCELLED.
SIGNATURE
INVALID
If the transaction was cancelled by the operator selecting
NO to the signature check, then the text below the Date and
Time will read SIGNATURE INVALID.
Transaction Referencing
Your terminal is not pre-configured to allow for Transaction Referencing. If you
would like Transaction Referencing to be enabled on your terminal please
contact the terminal Helpdesk.
Transaction Referencing can be used to reference each transaction’s ticket to a
specific terminal operator, or location. The most common use of Transaction
Referencing is in the leisure industry for use by Waiters (operator) and Tables
(location).
The labels for these references are completely customisable for your needs, so
you could have Room Number (in a Hotel), or Invoice ID (in an office based
business), or maybe Customer ID. Please contact the terminal Helpdesk if you
wish to customise these labels.
OPERATOR
Operator ID (Waiter ID) is printed on both the merchant and
customer copy of the transaction receipts. You will also have a
sub-report on your X/Z Balance reports which breakdown the
transactions including gratuities (if enabled) by each operator.
Operator ID has a range from 1 to 99.
LOCATION
Location ID (Table ID) is printed on both the merchant and
customer copy of the transaction receipts. Location ID can be
up to twenty-five characters in length and formed of both letters
and numbers if required.
HANDSET
Handset ID is enabled by default, and allows you to simply
reference which terminal was used to take the transaction,
when you have more than one terminal in use in your business.
The default value of 01 can be changed within the supervisor
menu

Page 54
Move/5000
User Guide
Copyright© 2019 Ingenico
Reports
The terminal can produce several reports to aid banking:
End of Day Banking Reconciliation report with the acquirers
X Balance Transaction total print without a reset
Z Balance(!) Transaction total print with a reset
Waiters Totals Gratuity summary per waiter
At the end of each trading day you should perform an End of Day
report (or a Banking and Z Balance report). This will give you a
full record of all business done that day and will allow for the
fastest possible processing of funds into your merchant account.
If you do not complete an End of Day report there will be a delay
in you receiving funds. If you have had any voided transactions
you must perform an End of Day report to ensure that the
acquirer receives confirmation that the transaction(s) have been
voided.
• There are several common features across all the totals and sub-totals
on all of the reports that are available.
• DR indicates that the value of transactions shown is in your favour - the
value shown will be debited from customers.
• CR indicates that the value of transactions shown is not in your favour -
the value shown will be credited to customers.
• The number of transactions that add up to the total shown will always be
shown on the left of the value.
• Any gratuity and cashback amounts are included in the TOTAL and SUB-
TOTAL, as well as in the breakdown by transaction type (i.e. Sales or
Refunds).
Always check that your paper roll is not about to run out, before
doing any reports.

Page 55
Move/5000
User Guide
Copyright© 2019 Ingenico
End of Day Report
Your terminal is provided with an End of Day report that allows you to print both
the Z Balance and the Banking reports from the one place. This simplifies your
end of day procedure and ensures that you do the correct reports each day.
The End of Day report prints first the Z Balance, followed by Banking for all
acquirers. After the report has printed you should ensure that the Banking report
shows TOTALS CONFIRMED for each acquirer, and that the totals are consistent
with the Z Balance report.
To perform an End of Day report press the menu key twice, then choose
REPORTS. You will be asked to type your supervisor password, then press enter,
choose END OF DAY.
Reports performed by the End of Day function will look exactly the same as if they
were done separately, however above each report title will be the legend of END
OF DAY.
Example End of Day report
END OF DAY
Z BALANCES
Totals Reset
Merchant Name
Merchant Address 1
Merchant Address 2
END OF DAY
BANKING
Merchant Name
Merchant Address 1
Merchant Address 2
Please refer to the following sections entitled Banking Report and Z Balance
report for more details on the contents of each report.
Your terminal can be configured to automatically perform the End of Day report
at a set time each day (or a specific range of days) to make this process even
more streamlined. If you would like the Auto End of Day functionality enabled on
your terminal please contact the terminal Helpdesk.

Page 56
Move/5000
User Guide
Copyright© 2019 Ingenico
Banking Report
Performing a Banking report reconciles the transaction totals held in the terminal
with the totals held by each acquirer. The terminal may need to contact some or
all of the acquirers to complete this report.
Transactions are listed by acquirer, and are also shown by card type (issuer)
under that acquirer. Reconciliations are done by sessions; these sessions are
tracked by both the terminal and the acquirer.
The totals listed under CURRENT SESSION were carried out during the current
reconciliation session and will be processed by the acquirer at the end of the
session.
The totals listed under PREVIOUS SESSION were carried out during the
previous reconciliation session and have already been processed by the
acquirer.
To understand the concept of sessions, the PREVIOUS SESSION on today’s
reports will be the same as the CURRENT SESSION on yesterday’s report, and
so on. If these totals do not match then you may be doing your report outside of
the acquirer’s specified banking window.
You should contact your acquirer(s) to find out when your
specified banking window is, if you do your Banking report
outside of this time then your reports may not reconcile correctly.
The result for each acquirer’s reconciliation is shown below the acquirer’s name.
TOTALS CONFIRMED
Shown if the totals held by the acquirer and the
terminal agree.
TOTALS NOT AGREED
Shown if the totals held by the acquirer and the
terminal do not agree. The report will show the
totals held by the terminal and the acquirer
separately to show the difference. You should
contact the acquirer to ensure that all expected
funds have been transferred.
CANNOT CONFIRM
TOTALS
Shown when the terminal cannot contact the
acquirer to check the totals. The diagnostic code
printed will indicate the reason for the
communications failure.

Page 57
Move/5000
User Guide
Copyright© 2019 Ingenico
To perform banking report please follow the instructions below.
To perform a Banking report for ALL
acquirers press the green key
twice, then
choose REPORTS.
You will be asked to type your
supervisor
password, then choose BANKING.
To perform a Banking report for ALL
acquirers,
choose ALL. If you are looking
to select acquirer to be banked select
SINGLE
If you selected SINGLE you will be asked
to choose an acquirer from the list.
The terminal will contact the acquirer and
display confirmation screen followed by
the banking printout.
The Banking report is a constitutional part of the End of Day
Report. If you do an End of Day report then you do not need to
perform a separate Banking report.
If you do not complete an End of Day report (or the Banking and
Z Balance separately), money may not be collected from the
customer and will lead to a delay in you receiving funds

Page 58
Move/5000
User Guide
Copyright© 2019 Ingenico
Example Banking report (Acquirer 1)
BANKING
Merchant Name
Merchant Address 1
Merchant Address 2
TID:22160001
01/01/19 23:54
HANDSET:01
--==++oooo++==--
ACQUIRER 1
TOTALS CONFIRMED
01/01/19 23:54
M:12345678
TID:22160001
CURRENT SESSION: 3
TXN NOs 0041-0089
Sales 47 £844.06
Refunds 1 £5.00
TOTAL DR £839.06
VISA CREDIT
Sales 18 £319.83
SUB-TOTAL DR £319.83
ELECTRON
Sales 29 £524.23
Refunds 1 £5.00
SUB-TOTAL DR £519.23
PREVIOUS SESSION:
TXN NOs 0025-0040
Sales 13 £100.41
Refunds 2 £20.00
TOTAL DR £80.41
VISA CREDIT
Sales 8 £85.08
Refunds 2 £20.00
SUB-TOTAL DR £65.08
MAESTRO
Sales 5 £25.33
SUB-TOTAL DR £25.33
SESSION NOW CHANGED TO 4
TXN 0090
DIAG 76
--==++oooo++==--
Terminal ID
Print Date & Time
Acquirer Name
Acquirer Result
TOTALS CONFIRMED
The totals were agreed for
this acquirer
Transaction Range
Current Session - relates to
the Transaction breakdown
on the Z Balance Report
Issuer Breakdown
Current Session totals for each
Issuer linked to this acquirer.
This section will not appear this
acquirer has only one Issuer
Transaction Number
Session Message
Diagnostic Code
DIAG 76 indicates that a successful
online banking was performed
Current Session
The breakdown of totals for the current
banking session. Combining the
Current Session totals for all acquirers
should match the Grand Total on the Z
Balance Report
Merchant ID
Current Session Number
Issuer Breakdown
Previous Session totals for each
Issuer linked to this acquirer.
This section will not appear this
acquirer has only one Issuer
Previous Session
The breakdown of totals for the
previous banking session
Transaction Range
Previous Session

Page 59
Move/5000
User Guide
Copyright© 2019 Ingenico
Example Banking report continued (Acquirer 2)
--==++oooo++==--
ACQUIRER 2
TOTALS UNCONFIRMED
01/01/19 23:55
M:87654321
TID:22160001
CURRENT SESSION: 2
TXN NOs 0039-0042
Sales 1 £10.00
Refunds 1 £20.00
TOTAL CR £10.00
PREVIOUS SESSION:
TXN NOs 0025-0038
Sales 8 £827.19
Refunds 1 £40.00
TOTAL DR £787.19
TXN 0046
DIAG 828282
--==++oooo++==--
TOTALS UNCONFIRMED means that the totals were in balance
after the last online transaction so are probably correct, but they
have not been checked during the reconciliation because, in this
case, a communications error (see the section entitled
Diagnostic Codes for more details). If the reconciliation is
attempted again and the terminal again fails to contact the
acquirer, the report will indicate CANNOT CONFIRM TOTALS.
This acquirer has only one issuer, so no breakdown by issuer is
shown.
Previous Session
The breakdown of totals for the
previous banking session
Acquirer Name
Acquirer Result
TOTALS UNCONFIRMED
The totals were not checked
for this acquirer
Transaction Range
Current Session - relates to
the Transaction breakdown
on the Z Balance Report
Current Session
The breakdown of totals for the current
banking session. Combining the
Current Session totals for all acquirers
should match the Grand Total on the Z
Balance Report
Merchant ID
Current Session Number
Transaction Range
Previous Session
Transaction Number
Diagnostic Code
DIAG 828282 indicates that the acquirer was
unable to be reached due to three
communications errors (82)

Page 60
Move/5000
User Guide
Copyright© 2019 Ingenico
Example Banking report continued (Acquirer 3)
The acquirer totals will match the current session totals if the
Banking report is completed daily during the banking window, if
it is not completed in this way then this total may differ.
This acquirer has had no business, so no breakdown by issuer is
shown.
--==++oooo++==--
ACQUIRER 3
TOTALS NOT AGREED
CALL ACQUIRER
01/01/19 23:56
M:11223344
TID:22160001
--==**==--
HOST AND TERMINAL TOTALS
DO NOT AGREE:
HOST: ACQUIRER 3
Sales 8 £787.19
TOTAL CR £787.19
TERMINAL:
Sales 3 £500.00
TOTAL CR £500.00
--==**==--
CURRENT SESSION: 3
TXN NOs 0016-0019
Sales 3 £500.00
TOTAL DR £500.00
PREVIOUS SESSION:
No Business
TXN 0020
DIAG 7376
--==++oooo++==--
CAUTION
Acquirers attempted 3
Agreed 1
Not Agreed 1
Unconfirmed 1
REPORT COMPLETE
Merchant ID
Acquirer Name
Acquirer Result
TOTALS NOT AGREED
The terminal totals did not
match the host’s totals for this
acquirer
Disputed Totals
Only shown when totals are not agreed.
The totals returned by the acquirer are
printed together with the terminal totals
for comparison
Current Session
The Current Session indicates that there
have been 3 transactions for this
acquirer recorded by the terminal.
Date & Time
Current Session
Previous Session
The breakdown of totals for the
previous banking session
Transaction Number
Diagnostic Code
DIAG 7376 indicates that the totals
are out of balance (73) and a
successful online
banking was performed (76)
Report Summary
If some or all of the acquirers do
not give TOTALS CONFIRMED
responses then a summary of the
issues is shown
Acquirer Totals
Number of transactions and amounts
recorded by the host.
Terminal Totals
Number of transactions and amounts
recorded by the terminal.

Page 61
Move/5000
User Guide
Copyright© 2019 Ingenico
X Balance Report
The X Balance report is sometimes referred to as an End of Shift Balance
report. This is because it allows you to print a total of all transactions performed
since the last Z Balance report. The X Balance may be printed at any time
throughout the day.
Transactions are listed by card type, and by Operator ID (Waiter ID for example,
if enabled) showing transactions together with any gratuities or cashback (if
enabled) by each operator.
A list of all transactions done since the last Z Balance was completed is also
shown.
The totals within the terminal will not be reset after printing an X
Balance.
To perform an X Balance report press the menu key twice, then choose
REPORTS. You will be asked to type your supervisor password, then press
green key, choose X BALANCE and press green key.
The X Balance report is exactly the same as the Z Balance excepting the totals
are not reset.
Example X Balance report
X BALANCES
Totals Not Reset
Merchant Name
Merchant Address 1
Merchant Address 2
Please refer to the following section entitled Z balance report for more details on
the contents of the X Balances report.

Page 62
Move/5000
User Guide
Copyright© 2019 Ingenico
Z Balance Report
The Z Balance report is sometimes referred to as an End of Day Balance report.
This is because it allows you to print a total of all transactions performed since
the last Z Balance report. The Z Balance should be printed at end of each
trading day.
Transactions are listed by card type, and by Operator ID (Waiter ID for example,
if enabled) showing transactions together with any gratuities or cashback (if
enabled) by each operator.
A list of all transactions done since the last Z Balance was completed is also
shown.
The totals within the terminal will be reset after printing a Z
Balance.
To perform a Z Balance report press the menu key twice, then choose
REPORTS. You will be asked to type your supervisor password, then press
enter, then choose Z BALANCE(!)
The Z Balance report is exactly the same as the X Balance excepting the totals
are reset in the terminal once the report is complete. The terminal will display
PLEASE WAIT and a short progress indication while the totals are being reset.
The Z Balance report is a constitutional part of the End of Day
Report. If you do an End of Day report then you do not need to
perform a separate Z Balance report.
If you do not complete an End of Day report (or the Banking and
Z Balance separately), money may not be collected from the
customer and will lead to a delay in you receiving funds.

Page 63
Move/5000
User Guide
Copyright© 2019 Ingenico
Example Z Balance Report (Totals and Breakdown by Issuer)
Z BALANCES
Totals Reset
Merchant Name
Merchant Address 1
Merchant Address 2
TID:22160001
01/01/19 23:47
HANDSET:01
GRAND TOTALS
Since 01/01/19 23:50
Sales 48 £854.06
Refunds 4 £40.00
TOTAL DR £814.06
Includes
Tips 30 £61.24
Cashback 5 £50.00
--==++oooo++==--
BREAKDOWN BY
ISSUER
Since 01/01/19 23:50
AMERICAN EXPRESS
Sales 1 £10.00
Refunds 1 £35.00
SUB-TOTAL CR £25.00
VISA CREDIT
Sales 18 £319.83
SUB-TOTAL DR £319.83
ELECTRON
Sales 29 £524.23
Refunds 1 £5.00
SUB-TOTAL DR £519.23
--==++oooo++==--
Date & Time
Grand Totals
Summarises all transactions
performed since the last
Z Balance Report was printed
Terminal ID
Issuer Breakdown
The breakdown of all transactions
performed since the last Z Balance Report
was printed, for each Issuer (i.e. card
type). For clarity Tips and Cashback are
not shown in this section. All SUB-TOTAL
values add up to the TOTAL shown on the
report; note that values shown as CR must
be subtracted to give the final total
Last Z Balance
The date & time when the last
Z Balance Report was performed
Total
Includes
Shows the total value of Tips and
Cashback for example (if enabled)
included within the Grand Totals
Last Z Balance
The date & time when the last
Z Balance Report was printed
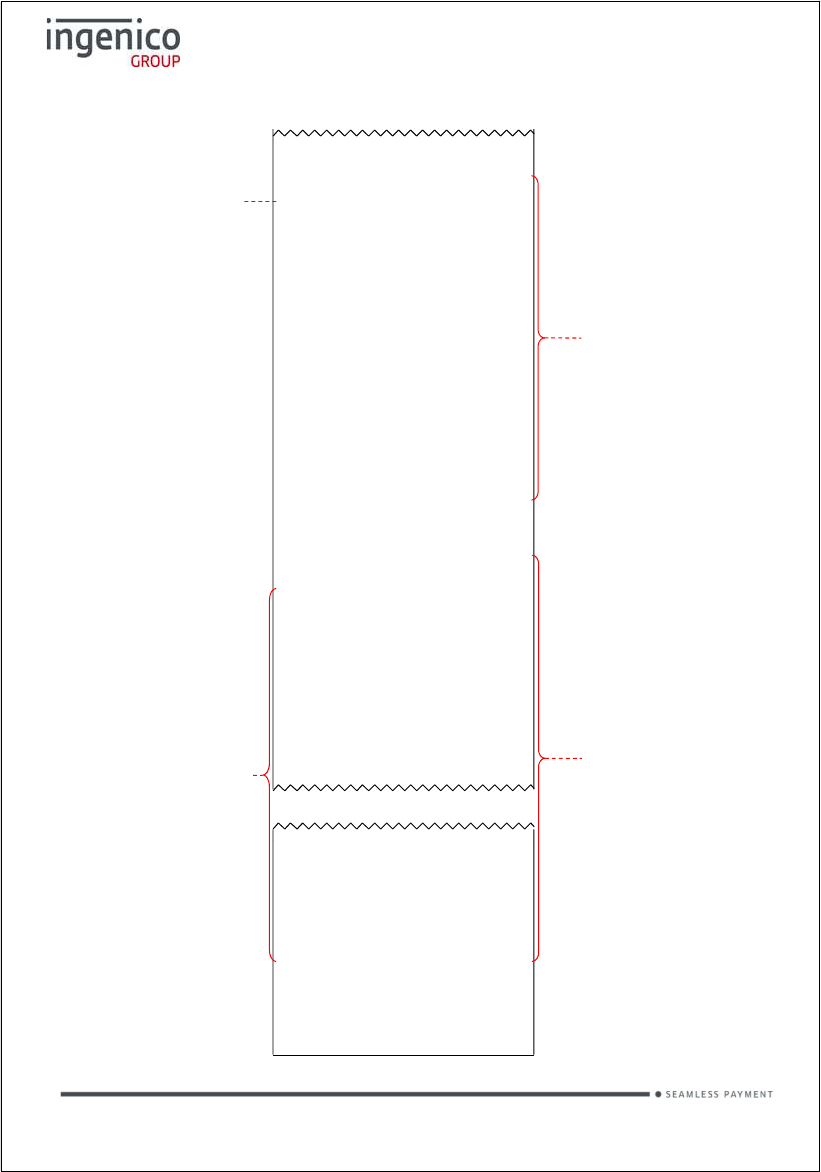
Page 64
Move/5000
User Guide
Copyright© 2019 Ingenico
Example Z Balance Report continued (Breakdown by Waiter and Transaction
Log)
--==++oooo++==--
BREAKDOWN BY WAITER
Since 01/01/19 23:50
WAITER ID: 01
Sales 25 £562.68
Refunds 2 £35.00
SUB-TOTAL DR £527.68
Includes
Tips 17 £38.50
Cashback 3 £30.00
WAITER ID: 02
Sales 23 £291.38
Refunds 1 £5.00
SUB-TOTAL DR £286.38
Includes
Tips 13 £22.74
Cashback 2 £20.00
--==++oooo++==--
TRANSACTIONS
Seq Txn RESULT
S35 AUTH CODE:27
T0041 £36.00
S36 AUTH CODE:00321
T0042 £15.00
S37 DECLINED
T0043 £9006.00
S38 CANCELLED
S39 AUTH CODE:16
T0044 £48.16
S93 AUTH CODE:19
T0086 A £22.00
S94 VOID
£50.00
S95 AUTH CODE:0227
T0087 £5.00
S96 AUTH CODE:28642
T0088 £17.86
S97 AUTH CODE:0227
T0089 £14.51
--==++oooo++==--
REPORT COMPLETE
Waiter Breakdown
The breakdown of all transactions
performed since the last Z Balance
Report was printed, for each Operator
(i.e. Waiter). For convenience Tips and
Cashback for example (if enabled) are
shown with each Operator.
This section is only printed if
Transaction Referencing is enabled
Last Z Balance
The date & time when the last
Z Balance Report was printed
Transaction Log
Detail of all transactions performed
since the last Z Balance Report was
printed.
For each transaction the Sequence
Number of the transaction (S) together
with the result. Each receipt has a
different S number even if the
transaction was cancelled before the
amount was entered.
If a transaction went online second line
showing the Transaction Number (T).
The full transaction amount is also
shown (inclusive of any Tips and
Cashback for example). Transaction
numbers are per acquirer meaning that
the same T number could be shown for
two different transactions, but the S
number will not be the same
Example Transactions
S35 represents an authorised transaction
S36 represents an authorised transaction
S37 represents a transaction declined
by the acquirer
S38 represents a transaction cancelled before
connection to the acquirer
S39 represents an authorised transaction
S40 to S92 are not shown
S93 represents an Authorisation Only
transaction shown by the (A) label -it is NOT
added to the Grand Totals
S94 represents a transaction that was voided
at the signature check
S95 represents an authorised transaction
S96 represents an authorised transaction
S97 represents an authorised transaction
Page 65
Move/5000
User Guide
Copyright© 2019 Ingenico
Stored Transaction Report
A Stored Transaction report may be printed to show how many transactions are
stored in the terminal, awaiting transmission to the host.
Up to five transactions may be stored in the terminal per acquirer. A transaction
may be stored after contactless transaction, voice referral, or by using the
Forced Transaction or Hotel Mode Completion functions.
Do not print this report unless instructed to do so by the terminal
Helpdesk.
To perform a Stored report for ALL acquirers press the menu key twice, then
choose REPORTS and press enter. You will be asked to type your supervisor
password, then press enter, press the menu key once more, choose STORED
followed by selecting ALL.
To perform a Stored report for a SINGLE acquirer press the menu key twice,
then choose REPORTS. You will be asked to type your supervisor password,
then press enter, press the menu key once more, choose STORED then choose
SINGLE. Select from the list the required acquirer
TMS Report
Approximately once a month your terminal will call the Terminal Management
System (TMS) to receive any updates to the software, details of new card
schemes, and any changes to your configuration. This call will take place
automatically, normally outside of standard trading hours.
After the TMS call has taken place your terminal will print a TMS report,
indicating if the communication was successful or has failed.
If the TMS call is interrupted part way through downloading a new or updated
configuration file, for example due to a communications problem, the terminal
will be set into a NOT READY state and will not be usable until the file has been
downloaded.

Page 66
Move/5000
User Guide
Copyright© 2019 Ingenico
If your terminal displays the NOT READY status message then your terminal is
not initialised. Press menu once and choose the SETUP menu option. You
should contact the terminal Helpdesk if the problem persists after a successful
TMS call.
Example successful TMS report
TMS CALL
Merchant Name
Merchant Address 1
Merchant Address 2
TID:22160001
S/N:01234WL12345678
01/01/19 02:36
CONNECTED: OK
CONIG DATA: OK
REPORT COMPLETE
The status of CONNECTED may be; OK (if successfully connected to the TMS),
or FAIL (if unable to connect to the TMS).
The status of CONFIG DATA may be; OK (if download was successful), FAIL (if
download was not successful), or NOT REQUIRED (if no update was required).
Terminal ID
Serial Number
Result
Print Date & Time

Page 67
Move/5000
User Guide
Copyright© 2019 Ingenico
Supervisor Functions
Supervisor password
Default supervisor password is 01483
The Supervisor password is designed to limit access to the Supervisor functions
(such as the Supervisor Menus, or Refund transactions) on the terminal to those
who have access to the code.
Your terminal is shipped with an initial default code of 01483 but is configured
so that a change of this code is required before you process any transactions. If
you forget your code, please contact the terminal Helpdesk who will be able to
reset the code back to the default.
The following codes are not valid choices for your Supervisor
password: 01483, 1234, 0000, or 9999.
Any other numerical code of four or more digits will be a valid
Supervisor password.
The Supervisor password allows entry into the Refund option on
the terminal.
To change your Supervisor password press the menu key twice, then choose
SUPERVISOR from the list. You will be asked to type your current supervisor
password (i.e. 01483), then press green key, choose PASSWORD then
CHANGE PWD.
You will need to enter your new numerical code (4 digits or more) twice,
pressing the green key after each input, before the Supervisor password is
updated to this new value.
If your terminal is lost or stolen you should contact the terminal
Helpdesk immediately.

Page 68
Move/5000
User Guide
Copyright© 2019 Ingenico
You are strongly advised to ensure that privileged access to your terminal
(including access to the Supervisor password) is only granted to staff that have
been independently verified as being trustworthy.
Supervisor password change – initial transaction
If you have not changed the Supervisor password before you process your first
transaction the terminal will prompt you to change the code from the default
during the transaction.
During the transaction, you will be
prompted that the code needs to be
changed, press any key to continue.
Enter a new code and press the green key.
Re-enter the new code and press the green
key.
A confirmation will be shown if the two
entries match and the code has been
changed.
The terminal will continue as normal, refer to the instructions for transaction type
that you chose to complete the transaction.

Page 69
Move/5000
User Guide
Copyright© 2019 Ingenico
Refund Password
Your terminal is configured to use the Supervisor password to protect both the
Refund and the Supervisor functions. If you would like a separate code enabled
in order to protect the Refund function please contact the terminal Helpdesk.
This feature could be used to allow one member of staff the added ability to
perform a Refund; while allowing another member(s) of staff the ability to perform
the Supervisor functions.
Supervisor Menus
The Supervisor menus allow access to various management functions in your
terminal. To be able to access the Supervisor menu, you must use the Supervisor
password.
To access the Supervisor menus press the menu key twice, then choose
SUPERVISOR and press the green key. You will be asked to type your current
supervisor password and confirm this by pressing the green key.
Once you have access to the Supervisor menus, press the menu key to cycle
through the various menu screens.
The following pages show a summary of the Supervisor functions and how to
access them, and what they do.
Some Supervisor functions MUST only be used when instructed
to do so by the terminal Helpdesk.

Page 70
Move/5000
User Guide
Copyright© 2019 Ingenico
First Supervisor Menu Screen
PRINT CONF
Allows the
terminal to print the configuration of
any additional apps installed i.e. TruRating
PASSWORD
Allows the various code
s in the terminal to be
reset or changed. Enters the PASSWORD
menu
- see next section.
CONFIG
Allows the access to various extended
configuration options. Enters the CONFIG
menu
- see next section.
LOGON
Allows the terminal to
perform a test with
some, or all, of the acquirers loaded on the
terminal. Do not use this feature unless
instructed to do so by the terminal Helpdesk.
Second Supervisor Menu Screen (press menu once)
SHORT CUT
Allows access to advanced configuration
options. Enters the SHORT CUT menu -
see next
section.
TIPS
Allows the Gratuity/Tip mode to be switched on
and off. Setting TIPS to ON, sets OP MODE
to
LATE.
OP MODE
Allows the setting of when the terminal will
contact the acquirer for authorisation during the
transaction. Gratuity/Tip mode is only available
in LATE mode. Setting OP MODE to EARLY
, sets
TIPS to OFF.
CALL TMS
Immediately sets off a configuration data c
all to
the Terminal Management System (TMS). Do
not use this feature unless instructed to do so
by the terminal Helpdesk.

Page 71
Move/5000
User Guide
Copyright© 2019 Ingenico
Third Supervisor Menu Screen (press menu twice)
INTL
Allows the international dialling code to be set.
Do not use this feature
unless instructed to do
so by the terminal Helpdesk.
SALETYPE
Allows the default transaction type to be set,
so the transaction type will begin as soon as a
card is swiped or inserted from the idle screen.
If REFUND is set then the
Supervisor password
check will
not
be done.
TERM PARAM
Allows the setting of internal terminal options.
Do not use this feature unless instructed to do
so by the terminal Helpdesk.
UPGRADE
Immediately sets off a software upgrade call to
the Terminal Management System (TMS).
Do
not use this feature unless instructed to do so
by the terminal Helpdesk.
Fourth Supervisor Menu Screen (press menu three times)
DATE TIME
Allows the date and time to be set. The date
and time is
automatically updated when a
successful TMS call is made.
BACKLIGHT
Allows the setting of the time taken after a key
is pressed before the backlight turns off.
AUTO-OFF
Allows the setting of the time taken after a key
is pressed before the terminal enters power
save mode.
RELEASE
Prints a summary report of software versions
loaded on the terminal. Do not use this feature
unless instructed to do so by the terminal
Helpdesk.

Page 72
Move/5000
User Guide
Copyright© 2019 Ingenico
Supervisor Sub-Menus
There are three Supervisor sub-menus. They are the Password menu, the Config
menu and the Shortcut menu. They allow access to extended options within the
Supervisor menus.
To access the Password menu press the menu key twice, then choose
SUPERVISOR and press green key. You will be asked to type your current
supervisor password, and confirm this by pressing the green key, and choose
PASSWORD.
Below is a summary of the functions within the Password menu and how to access
them, and what they do.
Some Supervisor functions MUST only be used when instructed
to do so by the terminal Helpdesk.
Password Menu Screen
DELETE ACQ
Deletes all datasets for one or all acquirers from
the terminals
memory. Do not use this feature
unless instructed to do so by the terminal
Helpdesk.
MAC RESET
Allows the Message Authentication Code (MAC)
key to be reset to the initial value for one or all
acquirers. Do not use this feature unless
instructed to do so by the terminal Helpdesk.
TMS RESET
Allows the secure code
used for communications
to the TMS to be reset to the initial value. Do not
use this feature unless instructed to do so by the
terminal Helpdesk.
CHANGE PWD
Allows the Supervisor password
(and/or Refund
code) to be changed. The new code
must be
used for all future code requests.

Page 73
Move/5000
User Guide
Copyright© 2019 Ingenico
To access the Config menu press the menu key twice, then choose
SUPERVISOR and press green key. You will be asked to type your current
supervisor password, and confirm this by pressing the green key, and choose
CONFIG.
Below is a summary of the functions within the Config menu and how to access
them, and what they do.
Some Supervisor functions MUST only be used when instructed
to do so by the terminal Helpdesk.
First Config Menu Screen
PRINT EMV
Prints EMV data loaded on the terminal. Do not
use this feature unless instructed to do so by the
terminal Helpdesk.
PRINT CERTS
Prints Certificates loaded on the terminal. Do not
use this feature unless
instructed to do so by the
terminal Helpdesk.
PSTN PREFIX
Allows the telephone network (P
STN) prefix
number to be set.
GSM N/W
TEST
Prints a rolling data sheet of the mobile network.
Do not use this feature unless instructed to do so
by the terminal Helpdesk.
SEL GSM N/W
Allow the selection of a different mobile network.
Do not use this feature unless instructed to do so
by the terminal Helpdesk.

Page 74
Move/5000
User Guide
Copyright© 2019 Ingenico
To access the Shortcut menu press the menu key twice, then choose
SUPERVISOR and press the green key. You will be asked to type your current
supervisor password and confirm this by pressing the green key. Press the menu
key and choose SHORT CUT.
Below is a summary of the functions within the Shortcut menu, how to access
them and what they do.
Some Supervisor functions MUST only be used when instructed
to do so by the terminal Helpdesk.
Shortcut Menu Screen
CONTACTLESS
Configures the internal/external Contactless
Reader support. Do not use this feature unless
instructed to do so by the terminal Helpdesk.
PINPAD
Configures the external PINPad support. Do not
use this feature unless instructed to do so by the
terminal Helpdesk.
EPOS INTERF
Configures the EPoS
(till) Interface functionality.
Do not use this feature unless instructed to do
so by the terminal Helpdesk.
BLUETOOTH
Allows the terminal to be associated to a
Bluetooth base. Do not use this feature unless
instructed to do so by the terminal Helpdesk.
WIFI SETUP
Configures the Wi-
Fi network. Do not use this
feature unless instructed to do so by the terminal
Helpdesk.

Page 75
Move/5000
User Guide
Copyright© 2019 Ingenico
Troubleshooting
Frequently Asked Questions
Q My terminal displays NOT READY on the idle screen, what do I do?
• Your terminal is not initialised or has failed an automatic TMS call.
Press menu once and choose the SETUP menu option. You should
contact the terminal Helpdesk if the problem persists after a
successful TMS Call.
Q What can I do if the terminal does not print anything on the paper, does the ink
need replacing?
• Your terminal uses a thermal printer and so does not require any ink.
You should ensure that the paper is inserted in the correct orientation,
as thermal paper only prints on one side. Refer to the section entitled
Loading a Paper Roll for more information. Printing can be tested
by using the DUPLICATE function to produce a duplicate receipt. Only
use approved paper rolls from your terminal supplier. If the printer
housing or printer roller is damaged you should contact the terminal
Helpdesk.
Q What should I do if I have forgotten my Supervisor password?
• You should first try the default code of 01483, if this is not the code
then please contact the terminal Helpdesk who will reset the code
back to the default value.
Q What does it mean if my mobile terminal displays the message ENTER SIM
CODE?
• Only use the SIM Card supplied to you by your terminal supplier. If
you have been supplied with a replacement SIM Card (for example a
faulty or lost SIM Card) your terminal will request a new activation
code. Check the documentation which came with the SIM Card. If
you cannot locate the SIM Code then please contact the terminal
Helpdesk who will provide you with the appropriate SIM Code.
Q What does it mean when the terminal displays PIN TRIES EXCEEDED?
• The card has been locked after too many failed PIN entry attempts.
It may be possible to perform a PIN Bypass. The customer should

Page 76
Move/5000
User Guide
Copyright© 2019 Ingenico
contact their card issuer to change their PIN, or if they do know it they
can unlock it at any ATM.
Q What should I do if my mobile terminal fails to display a mobile network name
on the screen, even though the provided SIM is inserted correctly?
• Your terminal requires a good mobile network signal to operate, if you
are in an area that mobile phones do not operate then the terminal
will, also, not operate. You should move to an area of good mobile
network signal.
• If you are in an area of good mobile network signal you should try to
turn the terminal off, leave for about 30 seconds and turn the terminal
back on. If the problem persists you should contact the terminal
Helpdesk.
Q What should I do if my Bluetooth terminal shows a flashing number, or no
number, on the Bluetooth status section of the screen?
• If the number is flashing ensure that the base unit with the Serial
Number displayed is powered on and in range. If this is the case then
power off the terminal and the base unit. Power back on the base unit
and then place the terminal on that base unit and wait for the
Bluetooth status to update. If the problem persists you should contact
the terminal Helpdesk.
• If there is no number displayed then power off the terminal and the
base unit. Power back on the base unit and then place the terminal
on that base unit and wait for the Bluetooth status to update. You
should refer to the section entitled Bluetooth Base Setup for further
details. If the problem persists you should contact the terminal
Helpdesk.
Q What do I do if the customer has forgotten their PIN code?
• If your acquirer allows it, you can perform a PIN Bypass to bypass
the entry of the PIN code, by pressing the cancel key followed
promptly by the menu key twice. If the card allows the PIN Bypass
you may find that the acquirer declines the transaction. Transactions
taken by PIN Bypass are subject to chargebacks so you should make
other careful checks on the card and cardholder as laid out by your
acquirer. For more information on the use of PIN Bypass please
contact your acquirer.

Page 77
Move/5000
User Guide
Copyright© 2019 Ingenico
Q I would like to refer a transaction before I attempt a transaction on the terminal
as I am suspicious?
• You should contact the authorisation centre and ask for a ‘Code 10
Referral’, this alerts the operator why you are asking for the referral,
without arousing suspicion with the customer.
Q Every transaction that I take is producing a referral, am I doing something
incorrectly?
• Mobile terminals require a good mobile network signal in order to
operate, if you are in an area that mobile phones do not operate then
the terminal will, also, not operate. You should move to an area of
good mobile network signal. If no mobile network is shown on the
screen then you should check that the SIM is installed correctly. You
should refer to the section entitled SIM Card Installation for further
details. If the problem persists you should contact the terminal
Helpdesk.
• Bluetooth terminals require either a telephone line or LAN in order to
operate. You should check that the base unit is connected correctly
and that the telephone line or LAN are working correctly. You should
refer to the sections entitled Terminal Base Overview and PSTN
Connectivity for further details. If the problem persists you should
contact the terminal Helpdesk. If there is a problem with the
telephone line or internet connection you should contact your
telecommunications supplier.
Q My totals on the Z Balance and Banking reports do not match, what do I do?
• The Z Balance report totals give you a total of all transactions done
across all acquirers. The Banking report totals give you the total for
each acquirer. You should try to add up all the individual totals across
all acquirers on the Banking to try to reconcile with the Z Balance
total. The current session totals on the Banking shows all
transactions for that session - if you perform the Z Balance and
Banking at the same time every trading day this should match the
totals on the Z Balance. If you still cannot match the totals you should
contact the terminal Helpdesk. Please ensure that you have all
relevant reports with you when you call. It is possible that you will be
asked for the proceeding day’s reports as well.

Page 78
Move/5000
User Guide
Copyright© 2019 Ingenico
Q A number of contactless transactions prompt that the card should be inserted
or swiped, is this normal?
• It is routine that a contactless card will require a further security check
occasionally. If the card is used for a lot of contactless transactions
then this should be expected.
Q I am unable to take contactless transactions, am I doing something incorrectly?
• The contactless option will only become active when the transaction
amount is under the contactless limit (e.g. £30.00).
• Not all cards are enabled for contactless transactions, please ensure
that the card presented to terminal is a contactless card, the customer
should contact their card issuer if they are unsure.
• Ensure that the contactless card is presented to the contactless card
read zone until prompted to remove the card. You can check the card
read by observing the lighting of the contactless status lights - the
card is read when the confirmation tone is heard and all four lights
are lit steadily.

Page 79
Move/5000
User Guide
Copyright© 2019 Ingenico
Screen Messages
During normal operation you may come across a number of screen messages.
Some indicate an error, whereas others offer information. Below is a list of some
of the messages that you may see on your terminal.
BAD MAC
The security password is mismatched between the
terminal and the acquirer, please contact the
terminal Helpdesk.
CALL AUTH CENTRE
The transaction has been referred, call the
authorisation centre on the number provided on the
screen or printed on the receipt.
CANCELLED
The terminal is displaying confirmation that you
have cancelled the transaction.
DECLINED
The card, card issuer or acquirer has declined to
authorise the transaction, you should ask for
another means of payment.
BAD READ
The inserted card could not be read, check
orientation of the card and try again.
BAD SWIPE
The swiped card could not be read, check
orientation of the card and try again.
NOT ACCEPTED
The card presented is not configured for the
selected transaction type, you should ask for
another means of payment.
PROCESSING ERROR
The selected operation is not allowed for the card
presented, or the card is faulty. You should ask for
another means of payment.
OPERATION NOT
ALLOWED
The selected operation has been disabled, is not
allowed for the card presented, or the card is faulty.
You should ask for another means of payment.
INVALID
TRANSACTION
The selected transaction type (e.g. Cashback) may
not be active on your merchant account; you should
contact your acquirer.

Page 80
Move/5000
User Guide
Copyright© 2019 Ingenico
INVALID CARD
The card presented is of a type that is not
supported, or is damaged and could not be read,
you should ask for another means of payment.
EXPIRED CARD
The card presented is expired, you should ask for
another means of payment. If the card is in date
check the date and time on the terminal.
PREVALID CARD
The card presented is not yet valid, you should ask
for another means of payment. If the card is in date
check the date and time on the terminal.
SORRY FOR DELAY…
RETRYING
The terminal is unable to contact the acquirer due
to a communications error. The terminal will make
three dial attempts; if all three attempts should fail
the transaction will be referred. For mobile
terminals you should check the mobile network, for
Bluetooth terminals you should check the
telephone line or LAN; contacting the terminal
Helpdesk if the problem persists.
PRESS ENTER
TO RETRY
PRESS ENTER
TO RETRY
(continued)
The first two dial attempts have failed, resolve the
issue (e.g. ensure that the telephone line is not in
use) and press enter to continue for the third and
final dial attempt. For mobile terminals you should
check the mobile network, for Bluetooth terminals
you should check the telephone line or LAN;
contacting the terminal Helpdesk if the problem
persists.
CANNOT CALL HOST
CHECK PHONE LINE
The terminal is unable to contact the acquirer due
to a communications error after three dial attempts.
For mobile terminals you should check the mobile
network, for Bluetooth terminals you should check
the telephone line or LAN; contacting the terminal
Helpdesk if the problem persists.
MEMORY xx% FULL
DO Z BALANCE
The terminal’s memory is becoming full and needs
to be cleared. Do a Z Balance to clear the
transaction log. Warning will only show when 90%
full or more. You should perform the Z Balance at
the end of every trading day. If the problem persists
after a successful Z Balance, please contact the
terminal Helpdesk.

Page 81
Move/5000
User Guide
Copyright© 2019 Ingenico
Below is a list of the messages that you may see on the display of your terminal
that specifically relate to contactless transactions.
APPROVED
The contactless transaction has been approved.
UNSUPPORTED CARD
The contactless card type is not enabled by the
acquirer.
NOT AUTHORISED
The card, card issuer or acquirer has declined to
authorise the transaction, you should ask for
another means of payment.
TRY AGAIN
The card was removed too soon and the card read
has failed. The cardholder should re-present the
card. They should not remove the card until
prompted to do so.
PLEASE PRESENT
ONLY ONE CARD
The card was presented with another contactless
card and the card read has failed. The cardholder
should re-present the card ensuring that it is the
only card presented.
INSERT OR SWIPE
CARD
The card requires a further security check. The
transaction must be completed with cardholder
verification (PIN entry or Signature as appropriate).
LOADING TPASS
PARAMETERS…
The integrated contactless reader is being updated.
This message is displayed during start up, and after
your terminal has performed a maintenance call.
Please wait a few seconds for the idle screen to be
displayed before starting a transaction.

Page 82
Move/5000
User Guide
Copyright© 2019 Ingenico
Diagnostic Codes
You may see diagnostic (DIAG) codes at the bottom of transaction receipts and
reports. Some indicate an error while others offer information. More than one
diagnostic code may be printed. For example DIAG 828282 would indicate three
communication failure attempts during a transaction.
10 or 17
GPRS or IP connection error.
Retry transaction. If the problem persists check the mobile
network (mobile terminals) or LAN (Bluetooth terminals),
and contact the terminal Helpdesk quoting the diagnostic
code.
15
Unexpected response after dialling.
Check the telephone line; if a prefix is required to obtain an
outside line refer to the section entitled “Supervisor
functions” to programme this into the terminal. If the
problem persists contact the terminal Helpdesk quoting the
diagnostic code.
22
No dial tone.
Check the telephone line and retry the transaction. If the
problem persists contact the terminal Helpdesk quoting the
diagnostic code.
31
Line busy.
Check the telephone line is not in use and retry the
transaction. If the problem persists contact the terminal
Helpdesk quoting the diagnostic code.
41 or 44
Call connected but received an End of Transmission
response.
The acquirer maybe busy or there was a communication
error. Retry transaction. If the problem persists contact the
terminal Helpdesk quoting the diagnostic code.
49
Invalid message contents.
The selected transaction type (e.g. Cashback) may not be
active on your merchant account; you should contact your
acquirer. If the problem persists contact the terminal
Helpdesk quoting the diagnostic code.
52
Offline or Forced Transaction.
This is not an error and is for information only.

Page 83
Move/5000
User Guide
Copyright© 2019 Ingenico
53
Offline store is full.
You should attempt an online transaction. If the problem
persists check the mobile network (mobile terminals),
telephone line or LAN (Bluetooth terminals), and contact the
terminal Helpdesk quoting the full diagnostic code.
61
PIN Bypass attempted.
This is not an error and is for information only.
62
PIN tries exceeded.
This is not an error and is for information only.
70xx
Error in transaction security.
Normally indicates that the MAC code is invalid, contact the
terminal Helpdesk quoting the full diagnostic code.
72
Merchant has indicated an invalid signature.
This is not an error and is for information only.
73
Terminal and host totals do not agree.
Do a Banking report and contact the acquirer if advised to
do so. If the problem persists, contact the terminal Helpdesk
quoting the diagnostic code.
76
Terminal completed online reconciliation.
This is not an error and is for information only.
82
Modem or communications error.
Retry transaction. If the problem persists check the mobile
network (mobile terminals), telephone line or LAN
(Bluetooth terminals), and contact the terminal Helpdesk
quoting the diagnostic code.
93
Transaction cancelled by the operator.
This is not an error and is for information only.
98
Bad on TMS call. Contact the terminal Helpdesk

Page 84
Move/5000
User Guide
Copyright© 2019 Ingenico
Menu Structure
MAILORDER
REFUND
REFUND
SALE
CASH
END OF DAY
BANKING
SALE
X BALANCE
Z BALANCE (!)
REPORTS
STORED
REFUND
AUTH
SALE
DELETE ACQ
MAC RESET
SUPERVISOR
TMS RESET
PRINT CONF
CHANGE PWD
REVERSAL
PASSWORD
PREAUTH
CONFIG
PRINT EMV
HOTEL
COMPLTE
LOGON
PRINT CERTS
SHORT CUT
CONTACTLESS
PSTN PREFIX
FORCE TRANS
TIPS
PINPAD
GSM N/W TEST
MAILORDER
OP MODE
EPOS INTERF
SEL GSM N/W
ACC VERIFY†
REFUND
CALL TMS
BLUETOOTH
CASH
INTL
WI-FI SETUP
DUPLICATE
SALE
SALETYPE
TERM
PARAM
TAXFREE
UPGRADE
TRURATING
CONTACT HOST
DATE TIME
PRINT CONF
BACKLIGHT
AUTO-OFF
RELEASE
† if the ACC VERIFY option is not shown in the menu on your terminal then the
Account Verification functionality is not available to you.

Page 85
Move/5000
User Guide
Copyright© 2019 Ingenico
Recommendations
Safety
Powering down the Move/5000
• Disconnect the Move/5000 power supply block adapter from the electrical
mains network
Lithium cell
• The Move/5000 is fitted with an internal lithium cell which can only be
accessed by a qualified technician
Electrical power outlet
• The electrical power outlet must meet the following criteria:
• Must be installed near the equipment and easily accessible
• Must meet the standards and regulation in the country where used
• For type G plug the fuse rating must be 5A
Explosion areas
• Certain regulations restrict the use of radio equipment in chemical plants,
fuel depots and any site where blasting is carried out. You are urged to
comply with these regulations. The terminal shall be protected by a
specially fitted and certified cover enabling use in proximity to a fuel
pump.
Electronic health appliances
• The handset is a radio transmitter which may interfere with health
appliances, such as hearing aids, pacemaker, hospital equipment, etc.
• Your doctor or the equipment manufacturer will be able to provide you
with appropriate advice.
External connection
• All external circuits connected to the Move3500 must be SELV (Safety
Extra Low Voltage) and LPS (limited power source) within the meaning of
section 2.2 and 2.5 of the standard IEC60950- 1:2005+/A1:2010 and
EN60950-1:2006+/A11:2009+/A1:2010+/ A12:2011
. Cleaning
• To clean the terminal, use a soft cloth slightly moistened with water. Do
not clean the electrical connections; do not use solvents, detergents or
abrasive products.

Page 86
Move/5000
User Guide
Copyright© 2019 Ingenico
The power supply contains the following symbols:
.
Double insulation symbol
Marking for Class II product. Such product does not require a safety connection to
electrical earth
DC current output
This marking indicates that your terminal is suitable for direct current (DC) only. It is
completed by afferent values (voltage,
and max current)
AC current input
This marking indicates that the product operates with an alternating current (AC)
source (mains). It is completed by afferent values (voltage, frequency, max current)
DC power jack polarity
Output plug is Positive
(+) and the barrel (ring) of the output plug is Negative (
-
)
Indoor use only
Energy star level 6
International efficiency marking protocol
Environment (WEEE, batteries and packaging)
This product is labelled in accordance with European Directives 2001/01/19
concerning Waste Electrical and Electronic Equipment (WEEE) and 2001/01/19
concerning Batteries and Accumulators. Those provisions are requiring producers
and manufacturers to become liable for take-back, treatment and recycling upon
end of life of equipment and batteries.
The associated symbol means that WEEE and waste batteries must
not be thrown away but collected separately and recycled.
Ingenico ensures that efficient collection and recycling schemes are set-up for
WEEE and batteries according to the local regulation of your country. Please
contact your retailers for more detailed information about the compliance solution
in place for disposing of your old product and used batteries.
Packaging waste must also be collected separately to assure a proper disposal
and recycling.
Please note that proper recycling of the electrical and electronic equipment and
waste batteries will ensure safety of human health and environment.

Page 87
Move/5000
User Guide
Copyright© 2019 Ingenico
Security of the terminal
This device fulfils current applicable PCI PTS security requirements. Upon receipt
of the terminal you should check for signs of tampering of the equipment. It is
strongly advised that these checks are performed regularly after receipt. Check,
for example: that the keypad is firmly in place; that there is no evidence of unusual
wires that have been connected to any ports on the terminal or associated
equipment, the chip card reader or any other part of the terminal. Such checks
would provide warning of any unauthorised modifications to the terminal, and
other suspicious behaviour of individuals that have access to your terminal. The
terminal detects any “tampered state”. In this state the terminal will repeatedly
flash the message ”Irruption!” and further use of the terminal will not be possible.
If the “Irruption!” message is observed, contact the terminal helpdesk
immediately.
It is strongly advised that privileged access to the terminal is only granted to staff
that have been independently verified as being trustworthy.
The terminal must never be put in or left at a location where it could be stolen or
replaced by another device.

Page 88
Move/5000
User Guide
Copyright© 2019 Ingenico
Fixed installation
If the device is to be used in a situation where it is not possible for the cardholder
to pick up and shield their PIN entry themselves, the device may be used without
PIN shield, but it must be installed in the following manner:
The device must be angled at 45 or more, so that oversight of the PIN entry from
the rear of the device is not possible.
The device must either be fitted in a swivel stand, so that the customer can
position the device in the best angle to prevent oversight or the device must be
fixed in the best possible position to prevent oversight if such a generic position
exists in the specific environment to which the device is installed.
The device environment must be accompanied with conspicuous notices and
educational material which informs the customer to shield their PIN during PIN
entry.
The device must be deployed so that oversight from other customers, either in
different payment lanes, or in other areas of the shopping environment, is
prevented. This may be achieved through the placement of the lanes and device,
so that the customer is automatically positioned between the device keypad and
other customers. Alternatively, it may be achieved by the environment in which
the device is installed, so that the checkout itself shields the PIN entry process.
The terminal is exclusively made for indoor use.If the above conditions are not
fulfilled, a PIN shield must be used.
Positioning of the terminal on check stand must be in such a way to make
cardholder PIN (Personal Identification Number) spying infeasible.
Installing device on an adjustable stand must be in such a way that consumers
can swivel the terminal sideways and / or tilt it forwards / backwards to a position
that makes visual observation of the PIN-entry process difficult.
Positioning of in-store security cameras must be such a way that the PIN-entry
keypad is not visible.

Page 89
Move/5000
User Guide
Copyright© 2019 Ingenico
Standards
CE Mark
The CE marking indicates Move/5000 complies with the requirements of
European Directive 1999/5/EC of 9 March 1999 on Radio and
Telecommunications Terminal Equipment for:
• The protection of the health and the safety of the user and any other
person.
• The protection requirements with respect to electromagnetic
compatibility.
EU Directives
According to harmonised EU standards
Product Product Type Standards Issue date
1999/5/EC
(R&TTE Directive)
Move 5000
All product type EN 60950-1
2006
2009 (A11)
2010 (A1)
2011
(A12)
Contactless
EN 302 291-1/2
EN301 489-1
EN 301 489-3
EN 50357
EN 50364
2005
2008
2002
2001
2001
GSM/GPRS/ UMTS
EN 301 489-1
EN 301 489-7
EN 301 489-24
EN 301 511
EN 301 908-1
EN 62 311
2008
2005
2007
2003
2010
2008
2001/01/19
(RoHS Directive)
All product type EN 50581 2012

Page 90
Move/5000
User Guide
Copyright© 2019 Ingenico
DIV
434810
B
Copyright © 2019 Ingenico (UK) Ltd.
This User Guide (x053) relates to terminal software APACS40 97.12.01
Whilst every effort has been made to ensure that the content of this document is accurate, Ingenico will not
accept responsibility for any loss, damage or injury that may be incurred as a result of any such errors or
inaccuracies. The product is varied to suit acquirer’s requirements and as such some features may vary or
be disabled, this document should be accepted as a guide only to the use of the product.
In an effort for continued improvements in design and quality; products, features and information regarding
the setting up, installation and use of all Ingenico products is subject to change without prior notice.
