
USER GUIDE
MADCAP FLARE 2024
Getting Started
Copyright © 2024 MadCap Software.All rights reserved.
Information in this document is subject to change without notice. The software described in this document is furnished
under a license agreement or nondisclosure agreement. The software may be used or copied only in accordance with the
terms of those agreements. No part of this publication may be reproduced, stored in a retrieval system, or transmitted in
any form or any means electronic or mechanical, including photocopying and recording for any purpose other than the
purchaser's personal use without the written permission of MadCap Software.
MadCap Software
9171 Towne Center Drive, Suite 335
San Diego, California 92122
858-320-0387
www.madcapsoftware.com
THIS PDF WAS CREATED USING MADCAP FLARE.

CONTENTS
CHAPTER 1
Introduction 6
Process 7
Getting Started Video and Tutorial 8
Planning Your Project 9
Key Concepts and Features 10
Architecture 12
Getting Additional Help 13
CHAPTER 2
Creating a Project 14
How to Create a Project 14
CHAPTER 3
Adding Content and Features 18
Topics 20
Glossaries 20
Images 20
Indexes 20
Links 21
Template Pages 21
Micro Content 22
CONTENTS
iii

Multimedia 22
Page Layouts 22
Responsive Content 23
Snippets 23
Tables 24
Tables of Contents 24
Variables 25
Other Features 25
CHAPTER 4
Design 26
Styles and Local Formatting 27
Common Design Features 28
CHAPTER 5
Developing Targets 33
Targets 34
Online vs. Print-Based Output 34
HTML5—Recommended Online Output Type 35
PDF and Word—Recommended Print-Based Output Types 37
Other Output Types 37
HTML Help (Legacy Output) 38
Output Type Comparison Tables 38
Conditions 39
CHAPTER 6
Building and Publishing Output 41
Ways to Build and Publish Targets 42
Interface or Command Line 43
Where Output Files are Stored 44
CONTENTS
iv


CHAPTER 1
Introduction
Welcome to MadCap Flare—the first native XML content authoring application, which offers single-
source authoring in an environment that does not require you to know any coding. From a single
Flare project you can produce output in many different formats, including documentation for the
web, desktop, print, and mobile.
This chapter discusses the following:
Process 7
Getting Started Video and Tutorial 8
Planning Your Project 9
Key Concepts and Features 10
Architecture 12
Getting Additional Help 13
CHAPTER 1
6

Process
When you break down the authoring process in Flare, you will discover that it can be quite simple.
Following are the basic steps that you need to follow for creating and developing a project in Flare.
Although Flare users sometimes need to produce completely different kinds of output from one
another (e.g., a technical writer might need a quite large online Help system, whereas an eLearning
professional could just need some short training courses), the same basic five steps are necessary
for everyone.
1. Start Projects Create a project from scratch, or start a project by importing existing content
from a variety of sources. See "Creating a Project" on page 14.
2. Add Content and Features Add content and features, such as topics, text, a table of contents,
cross-references, navigation, page layouts, and all of the other elements necessary to help
your end users. See "Adding Content and Features" on page 18.
3. Design Through the use of features such as stylesheets, skins, page layouts, template pages,
and more, you can design a look and feel for your output. See "Design" on page 26.
4. Develop Targets Decide the type(s) of output formats that you want to generate and develop
targets accordingly to meet your needs. See "Developing Targets" on page 33.
5. Build and Distribute Output Generate output from a target, then make the files accessible to
your end users. See "Building and Publishing Output" on page 41.
CHAPTER 1
7

Getting Started Video and Tutorial
In addition to this PDF guide, we also recommend the Getting Started Video and Getting Started
Tutorial for new Flare users. Although there is certainly common information in all three of these
resources, each one is also unique.
The Getting Started Video provides a visual demonstration of how to create a new project,
introduces basic information about Flare, and points you to additional videos and resources to
further develop the project.
The Getting Started Tutorial is a PDF file that you can use alongside Flare to create, develop, and
generate output from an actual project.
You can access the video and tutorial from the Get Started topic in the online Help.
CHAPTER 1
8

Planning Your Project
Before you create a project in Flare, you should first take some time to decide exactly what you
want to accomplish with your output. Here are some of the questions you might consider:
n
What kinds of output do you want to create?
n
Do you need online output, print output, or both?
n
How many different versions of online and print output do you need?
n
Does the output need to be up on a server or placed locally on the end users' computers?
n
How will you name your files to keep things consistent and organized?
n
What kinds of reusable content will you need?
n
How do you want your output to look? Will someone provide you with a design, or will you use
one of Flare's project templates, swapping out your company logo and colors?
n
Will one author be working on the project or will multiple people be involved?
n
Do you need to use a source control system? Which one?
n
Do you need to merge multiple project outputs together?
n
Would it be useful to keep a few shared files (such as a stylesheet and some images) in a
parent project and then synchronize them with child projects (Global Project Linking)?
You might not think of all of the questions you need to ask beforehand. There might be some issues
that come to mind after you're already well into your project. And you certainly won't know how to
accomplish everything you want to right away. As is the case with any powerful and flexible
software application, you will become more familiar and comfortable with it over time and the more
you use it. So don't expect to be an expert immediately. But the more planning and preparation you
do ahead of time, the smoother your journey in Flare will be.
Also, it's a good idea to create some test projects and play with Flare's different features. Once you
feel more comfortable with the basic steps and features in Flare, as well as the workspace, go
ahead and get started with your own project.
CHAPTER 1
9

Key Concepts and Features
There are seemingly an endless number of things you can do in Flare. But you don't have to do all of
them, or even most of them. Instead, you should begin by learning about the most important
concepts and features. These ideas all tend to revolve around the idea of content reuse (or single-
sourcing), which means that you can take the same content, reuse it, and produce multiple outputs
from it.
Here are some of the most important concepts and features in Flare:
n
Building Blocks—Content Reuse In other authoring tools, you’re probably used to everything
being a part of a single file—the content, the table of contents, the glossary, the styles, and so
on. It’s not like that in Flare. Instead, most of the pieces are separate, sort of like building
blocks. This is one of the things that helps to make Flare so powerful and give you so much
flexibility in how to create your output.
n
Topic-Based Authoring Topics are where you type your text and add other content. If you
come from the world of print publishing, you’ll probably be tempted at first to create really
long topics—such as one topic for each chapter or even one topic for an entire PDF manual.
And while Flare lets you create very long topics and there may be cases where you need to do
that, for the most part, you want your topics to be smaller, digestible chunks of content that
you can reuse for different outputs. Topic-based authoring sets you up for creating eLearning
content. That is, creating goal-oriented content for an eLearning course and its learning
objectives.
n
Conditions A condition is a single-sourcing feature that you can apply to files or different
areas of your content. Conditions can determine whether certain information displays in
some outputs but not in others. You can also control whether content displays on a certain
device or screen size. For example, maybe you need to produce both online and print-based
output. Much of the content you create is going to be the same for both outputs, but some of
it is going to be written only for online output, and some only for print-based output. So you
can create condition tags for each and use those tags to separate the content when you build
your output.
n
Styles You can take advantage of cascading stylesheets (CSS files) and the rules around
them to control the look of your output in one place. This helps to keep the content separate
from its presentation, which is very important when it comes to single-sourcing. CSS isn’t a
Flare idea. It’s an international standard for formatting web content, and it was developed by
a group called the World Wide Web Consortium (or W3C). You can learn all about the W3C at
w3.org.
CHAPTER 1
10
Once again, these are just a few of the more important concepts and features in Flare. For more
information about each of these concepts features, as well as others, open the online Help and
check out the "Key Features" topic. You can also download the Key Features Guide.
CHAPTER 1
11

Architecture
You should think about what’s important for your goals, consider the features that will best support
your efforts, and come up with a structural design.
Flare is extremely flexible, which means your project universe (i.e., all of your projects, tools,
features, elements, and content; and how it is all put together) might end up being somewhat
unique. Therefore, you will want to take some time to plan your project architecture, both externally
and internally.
For detailed information about project architecture, see the online Help or download the
Architecture Guide.
CHAPTER 1
12

Getting Additional Help
You can use any of the following resources for additional help not provided in this manual.
Knowledge Base
You can browse the online Knowledge Base for articles covering common support issues.
http://kb.madcapsoftware.com/
Peer-to-Peer Online Forums
You can visit the online forums to learn from other users or share your own expertise.
http://forums.madcapsoftware.com/
Contact Flare Support
You can contact the Flare support team and get answers to your specific support issues.
http://madcapsoftware.com/support/
CHAPTER 1
13

CHAPTER 2
Creating a Project
Following are the steps for creating a new Flare project using the Start New Project Wizard.
For more information, see the Project Creation Guide. For links to this manual and others, see the
online Help.
How to Create a Project
1. On the Start Page click New Project. Alternatively, you can select File > New Project.
2. Complete the fields on the first page of the wizard and click Next.
n
Project name Enter a name for the project.
n
Project folder Keep the default location for the project, or click to select another.
n
Language Select the primary language for the project.
n
(Optional) Bind to Source Control Select this if you want to integrate the new Flare
project with a source control application.
3. (Optional) If you selected the "Bind to Source Control" option, click Bind Project. In the Bind
Project dialog, complete the fields, depending on the source control application being used.
When you are finished, click Next.
4. Select a template using one of the three options—(1) new from template, (2) new from
existing, (3) new from import—and click Next.
CHAPTER 2
14

NEW FROM TEMPLATE
Choose either a factory template file or one of your own custom template files as a starting
point. The new file will take on all of the settings contained in the template. If you want to use
the factory template provided by Flare, expand the Factory Templates folder and click on a
template file. If you want to use your own custom template file, expand the appropriate folder
and click on a file. For more information about templates, see the online Help.
Flare's factory templates are organized into the following folders:
n
Online These templates were designed for online output only (although you can always
add print-based outputs later).
n
Online & Print These templates were designed to generate both online and print-based
outputs from the same content.
n
Print These templates were designed for print-based output only (although you can
always add online outputs later).
n
Tutorials This folder contains templates intended to be used with various Flare
Tutorials.
CHAPTER 2
15

NEW FROM EXISTING
You can use this option if you already have a Flare project that you want to use as the basis
for your new project. Click , use the Open File dialog to find a Flare project file (FLPRJ), and
double-click it.
NEW FROM IMPORT
You can choose legacy files (e.g., Word, Excel, FrameMaker, HTML, DITA, HTML Help,
RoboHelp) to import. If you select this option and click Next, a list of import options is
displayed. You can select the file type, click Next again, and complete the options in the new
wizard that opens, instead of completing the rest of the Start New Project Wizard.
5. (Optional) Depending on the template selected, choose branding colors, a font family, logo,
and hero image to apply to your project. This will give your project a custom look and feel
from the start. These options can be changed later in the Branding Editor. Click Next.
CHAPTER 2
16

NOTE If you use a factory template or a custom preview project template, the
branding page displays. If you select files from a New from existing or a New from
import source, the branding screen will be bypassed.
NOTE The field selection for the branding screen in the wizard might change slightly
depending on the factory template chosen.
6. Select the primary target for your project and click Finish. The targets listed in the drop-down
are limited to the those found in the template you selected.
CHAPTER 2
17

CHAPTER 3
Adding Content and Features
As soon as you start a project, you can do any number of things with it. Technically, you could build
the final output immediately. However, if it is a new project, building the output right away would
not do your end users much good, since the output does not yet have any real substance. The
project needs topics, content, cross-references, navigation, and all of the other elements necessary
to help your end users.
Some of these features can be used in online output as well as print-based output, some are for
online output only, and some are for print output only. Topics are essential for any project, but
otherwise you can pick and choose which of the following to include and which to leave out. Also, it
is not necessary that you add these items and features in any particular order, although topics
usually are created first.
For more detailed information about each of these features—including examples—see the online
Help or the appropriate PDF guide.
This chapter discusses the following:
Topics 20
Glossaries 20
Images 20
Indexes 20
Links 21
Template Pages 21
Micro Content 22
Multimedia 22
Page Layouts 22
CHAPTER 3
18


Topics
A topic is a file containing information about a particular subject. Topics might be the most
important part of a Flare project. Everything else is contained within topics (e.g., cross-references,
text, images) or points toward topics (e.g., tables of contents, indexes, browse sequences). The
very reason end users open a Help system or manual is to find information, a little direction. They
find that help within individual topics.
To create a topic, open the Content Explorer on the left side of Flare. Then click in the local
toolbar. After the topic is created and opened, you can edit it in the XML Editor to the right.
Glossaries
A glossary is a feature that you can add to your output to help users understand the meaning of
individual terms. You can include a glossary in both online and print-based output. To create a
generated glossary in print output, you can let Flare auto-generate one for you (faster method), or
you can create a unique topic and insert a Glossary proxy into it (more powerful and flexible
method).
To add a glossary file, open the Project Organizer on the left side of Flare. Right-click the Glossaries
folder and select Add Glossary. After the glossary is created and opened, you can edit it in the
Glossary Editor to the right.
Images
You can insert images into content files (e.g., topics, snippets). Flare supports the following types
of raster and vector image files: BMP, EMF, EPS, EXPS, GIF, HDP, JPG, JPEG, PDF, PNG, PS, SVG,
SWF, TIF, TIFF, WDP, WMF, XAML, XPS.
To insert an image into a content file, open the Insert ribbon and select Image.
Indexes
You can include an index in your output through the use of index keywords. An Index proxy is also
necessary for print-based outputs. Unlike some features in Flare, there is no independent index file
CHAPTER 3
20

in your project that becomes the index in your output. Instead, the index is automatically generated
when you build output, based on index keywords that you insert into content files in your project.
To insert an index keyword into a content file, open the View ribbon and select Index Window. Then
use the Index window pane on the right to create index keywords, which will be inserted at your
cursor location in the open content file.
Links
You can create many kinds of links, such as cross-references, text hyperlinks, text popups, topic
popups, image hyperlinks, togglers, and bookmarks. Cross-references are especially useful in Flare.
A cross-reference is an automated link that is based on a format with commands. This method of
linking saves time because you don't have to type the link text each time, or manage it over time if
the destination content changes. Cross-references are recommended when you are linking from
one place in your project to another (as opposed to linking to external files or websites). The format
can be controlled in your stylesheet. This lets you keep links consistent and change them in just one
place by using the MadCap|xref style (or a class of it that you have created). Cross-references are
also useful for converting online links to page number references when you are producing printed
output (by having a separate format for the cross-reference style in the print medium of the
stylesheet).
To insert a link into a content file, open the Insert ribbon and use the appropriate button to create a
link in the topic, snippet, or template page that is open.
Template Pages
A template page lets you automatically apply certain content—such as breadcrumbs, menus,
toolbars, search bars, mini-TOCs, or footer text—to multiple topics in the output. A template page is
primarily used in online outputs, but it can be used in Word output as well. For Word output, a
template page lets you determine page specifications (such as size or orientation) and to apply
certain content (e.g., header text or page numbers) to many topics in a manual. For print-based
outputs other than Word, page layouts are used instead of template pages.
To add a template page file, open the Content Explorer on the left side of Flare. Expand the
Resources folder. Right-click the TemplatePages folder (you can create this subfolder from the
local toolbar if it doesn't already exist) and select New > Template Page. After the template page is
created and opened, you can edit it in the XML Editor to the right.
CHAPTER 3
21

Micro Content
Micro content is short, concise information that stands alone and is easily consumable. In Flare, it
begins with the creation of a collection of brief phrases and corresponding responses, such as
questions and answers. After generating HTML5 output, these phrase/response combinations can
be used in different ways as users interact with your output. For example, it can greatly improve the
user experience when people search in your HTML5 output. It can also be used to create field-level
context-sensitive Help.
To add a micro content file, open the Content Explorer on the left side of Flare. Expand the
Resources folder. Right-click the MicroContent folder (you can create this subfolder from the local
toolbar if it doesn't already exist) and select New > Micro Content. After the micro content file is
created and opened, you can add phrases and responses to it in the editor to the right.
Multimedia
Flare lets you include various kinds of multimedia elements in your output, including video, audio,
and 3D models.
To insert multimedia into a content file, open the Insert ribbon and from the Multimedia drop-down,
choose the kind of element you'd like to add.
Page Layouts
A page layout is used for page specifications (e.g., size, margins) and to apply certain content (e.g.,
headers, footers, page numbers) to many (or all) topics in print-based output. It allows for easy
configuration through the use of content frames, bleeds, crop marks, registration marks, margins,
padding, alignment features, and more. You might create multiple page layouts for different
purposes (e.g., title page, TOC, chapters, appendix).Page layouts are similar to template pages, but
are more flexible and easier to use. The general rule is that page layouts are recommended for
print-based output, and template pages continue to be the best method for automatically adding
headers, footers, breadcrumbs, and more in multiple topics for online output. Another difference
between page layouts and template pages is that page layouts can be used for either Adobe PDF or
Microsoft Word), whereas template pages can be used only for Microsoft Word when creating print-
based output.
CHAPTER 3
22

To add a page layout file, open the Content Explorer on the left side of Flare. Expand the Resources
folder. Right-click the PageLayouts folder (you can create this subfolder from the local toolbar if it
doesn't already exist) and select New > Page Layout. After the page layout is created and opened,
you can edit it in the XML Editor to the right.
Responsive Content
For HTML5 output, you can use the Responsive Layout window pane to help you design responsive
content. This window pane lets you create a one-row grid to hold content. The benefit of putting
your content into such a grid is that it allows it to shift and be responsive to screens of different
sizes. The Get Started topic in Flare's Help system is one example where such a responsive layout
is used.
To create a responsive layout, open the Home ribbon and select Responsive Layout. Then use the
Responsive Layout window pane on the right to create a style, insert a row, and create a responsive
layout in the open content file.
Snippets
A snippet is a chunk of formatted content that is heavily used in single-sourcing. Snippets can
include text, tables, images, and whatever else can be included in a normal topic. You can insert
snippets into one or more topics throughout your project, thus allowing you to reuse content that is
maintained in one place. You can even insert them into other snippets, creating nested snippets.
Snippets are not usually intended for single words or very short phrases that change frequently. In
those cases, you probably want to use variables instead.
To add a snippet file, open the Content Explorer on the left side of Flare. Expand the Resources
folder. Right-click the Snippets folder (you can create this subfolder from the local toolbar if it
doesn't already exist) and select New > Snippet. After the snippet is created and opened, you can
edit it in the XML Editor to the right.
To insert a snippet into a content file, open the Insert ribbon and select Snippet.
CHAPTER 3
23

Tables
A table in Flare is much like it is in any word processing program, such as Microsoft Word, or in a
printed textbook. It is a group of intersecting columns and rows that you can add to a topic for
various purposes, such as comparing different elements.
To insert a table into a content file, open the Table ribbon and select Insert Table.
Tables of Contents
A table of contents (TOC) in Flare works much like a TOC in a printed book. It provides an outline of
contents in your Help system so that end users can easily and quickly navigate to the information
they need. You create a TOC, adding books, topic links, and links to external files in a structure that
you think would be useful for the user. End users then browse through a TOC to find information.
For print-based and EPUB output, you need to use the TOC Editor to create a TOC just as you would
create one for online output. However, there is a fundamental difference. Performing this task for
online output creates an actual TOC in the output, which people use to navigate from topic to topic.
This is not the case for print-based output. Performing this task for print-based output lets you
indicate which topics will be included in the output and in what order. In that sense, this TOC
functions more as an outline for print-based output. Therefore, for print-based output, you can think
of it as an "outline TOC." If you want to include a generated TOC in print-based output, you need to
use a TOC proxy in a topic instead.
To add a TOC file, open the Project Organizer on the left side of Flare. Right-click the TOCs folder
and select Add Table of Contents. After the TOC is created and opened, you can edit it in the TOC
Editor to the right.
CHAPTER 3
24

Variables
A variable is a small piece of plain text or auto-generated content that can be edited in one place
but used in many places throughout your project. Variables are especially useful for text that might
change frequently, such as version numbers and dates. Variables are stored in variable sets, which
can hold multiple variables. Depending on the template you select when creating a project, Flare
may provide you with an initial variable set, but you can add as many additional variable sets and
variables as you like. There are different kinds of variables: (1) basic ones that you create,
(2)custom date/time variables that you create, (3) system variables (e.g., date and time; titles; page
count; Chapter, Section, and Volume numbers), (4) Heading variables, and (5) Running Head
variables. Some of these are especially useful for page headers and footers in print-based output.
To add a variable set file, open the Project Organizer on the left side of Flare. Right-click the
Variables folder and select Add Variable Set. After the variable set is created and opened, you can
edit it in the Variable Set Editor to the right, adding as many variables as you need into it.
To insert a variable into a content file, open the Insert ribbon and select Variable.
Other Features
In addition to the elements and features just descirbed, there are many others that can be added to
a Flare project. Following is a partial list. For more information about each of these, please see the
online Help.
n
Accessibility
n
Browse sequences
n
Context-sensitive Help
n
Equations
n
Footnotes and endnotes
n
IFrame
n
Plug-In API
n
Proxies
n
QR codes
n
Slideshows
n
Text boxes
CHAPTER 3
25

CHAPTER 4
Design
There are numerous features for "dressing up" your output. For more detailed information about the
features in this chapter, including examples, see the online Help or the appropriate PDF guide.
This chapter discusses the following:
Styles and Local Formatting 27
Common Design Features 28
CHAPTER 4
26

Styles and Local Formatting
The two basic methods for accomplishing most formatting tasks are the use of styles and local
formatting.
Styles and Stylesheets
Styles are used to control the look and feel of your documentation, and keep the content separate
from its presentation. The styling is based on cascading stylesheets (CSS), which is an international
standard for formatting web content, developed by the World Wide Web Consortium (or W3C).
For all kinds of information about styles—including steps and examples—see the online Help or the
Styles Guide.
Local Formatting
Sometimes called “inline formatting,” local formatting is a way to change the look and feel of
content directly so that the changes are applied only to that specific content (as opposed to
applying the changes throughout your project via the use of styles).
Styles are recommended over local formatting.
CHAPTER 4
27

Common Design Features
Following are some of the primary ways that you can design your project.
Autonumbers
Autonumbering is a feature where content is numbered automatically. It is often used to place
numbers on headings, chapter titles, table captions, image captions, and so on.
To create autonumbers, you should add an autonumber format to a style in your stylesheet. For
details about how to do this, see the online Help, the Autonumbers Guide, or the Styles Guide.
Following are some of the most popular ways to use autonumbering:
n
Chapter, Section, and Volume Numbers If you are producing output that is organized into
multiple chapters, sections, and/or volumes, you can apply autonumbers to those different
elements. Not only does this let you produce numbers automatically for chapter, section, and
volume headings, but you can also incorporate this numbering into other content (e.g., page
numbers, figure captions, table headings).
n
Paragraphs You can apply autonumbering to different levels of paragraphs in your project.
EXAMPLE
You might specify that the first-level paragraphs contain number formats such as
1.0, 2.0, 3.0, and so on. Maybe your second level paragraphs would be formatted as
1.1, 1.2, 1.3, 2.1, 2.2, and so on. And finally, the third level paragraphs might be
formatted as 1.1.1, 1.1.2, 1.2.1, 1.2.2, 1.2.3, and so on.
n
Figure Captions Perhaps you have inserted multiple images into your project, with a caption
under each image. If you want the captions for each chapter to be numbered (e.g., "Figure 1-
1," "Figure 1-2," "Figure 1-3," "Figure 2-1," "Figure 2-2"), you can apply autonumber formats to
that content. If you insert a new figure caption with that format between existing captions,
Flare will renumber them automatically.
n
Table Headings Another way to make use of autonumbering is to apply them to headings for
tables in your project (e.g., Table 1, Table 2, Table 3).
CHAPTER 4
28

Lists
Flare lets you work with numbered and bulleted lists in a variety of ways. This includes creating
simple, multi-level, and custom format lists.
The easiest way to create a numbered, bulleted, or definition list is to use Flare's quick drop-down
menu button in the Home ribbon. Click the down arrow next to the list button and select a
format from the menu. However, when creating numbered or bulleted lists, it is a best practice to
limit your selections to the Bullet List and Numbered List options, then rely on list style
settings to provide the type of list item automatically depending on its level.
Inserts a bullet list (recommended).
Inserts a circle bullet list.
Inserts a square bullet list.
Inserts a numbered list (recommended).
Inserts a lower alpha numbered list.
Inserts an upper alpha numbered list.
Inserts a lower Roman numbered list.
Inserts an upper Roman numbered list.
Inserts a definition list.
CHAPTER 4
29
Template Pages
These are used to apply certain content to multiple pages automatically in the output. See
"Template Pages" on page 21.
Page Layouts
These are used for page specfiications in print-based output. See "Page Layouts" on page 22.
Paragraph Formatting
You can affect the look and behavior of paragraphs in various ways. These settings can be applied
locally or to the style used for the paragraph. Modifying the style is typically preferable to changing
the settings locally for a single paragraph.
Some of the most common formatting changes to paragraphs include alignment, background,
breaks, indentation, line spacing, and spacing above/below. But there are many more ways to
format your paragraphs than just these.
For details on how you can format your paragraphs—including steps and examples—see the online
Help or the Flare Styles Guide.
Object Positioning
You can adjust the positioning of content in a couple of ways:
n
Absolute Positioning You can use absolute positioning, which frees content from the main
text so you can click and drag it anywhere in the topic to reposition it.
CHAPTER 4
30

n
Float Positioning Another way to position an object is to "float" it to the left or right on a page.
When you float an object to the left, wraparound text can flow on the right side of the object.
When you float an object to the right, wraparound text can flow on the left side of the object.
You can also float objects outside of the frames where the normal text flow occurs.
For details on positioning—including steps and examples—see the online Help, the Flare Styles
Guide, or the Print-Based Output Guide.
CHAPTER 4
31
Skins
A skin is a file that contains information about the appearance of an online output window.
Depending on the type of output, a skin can help to determine the following:
n
Main menu position
n
Slide-out position
n
Slide-out menu style
n
Top menu depth levels
n
User interface text
n
Size and position of output
n
Which navigation elements to include
n
Other settings…
To add a skin file, open the Project Organizer on the left side of Flare. Right-click the Skins folder
and select Add Skin. After the skin is created and opened, you can edit it in the Skin Editor to the
right.
For more information on creating and using skins, see the online Help or the Skins Guide.
CHAPTER 4
32

CHAPTER 5
Developing Targets
The first task in developing a target for your project is to determine which type of output is most
appropriate for your needs. You might even need to produce multiple outputs and require more
than one output type. After you decide on the kinds of outputs, you can add targets based on those
formats and editing the settings for each.
For more detailed information about developing targets—including examples—see the online Help,
the Targets Guide, or the Print-Based Output Guide.
This chapter discusses the following:
Targets 34
Online vs. Print-Based Output 34
HTML5—Recommended Online Output Type 35
PDF and Word—Recommended Print-Based Output Types 37
Other Output Types 37
HTML Help (Legacy Output) 38
Output Type Comparison Tables 38
Conditions 39
CHAPTER 5
33

Targets
There are several types of online output and print-based output that you can produce in Flare.
HTML5 is the recommended online output type, and for print-based output, PDF and Word are
preferred. Each output type has its own set of advantages.
It is easy to confuse output types with targets, but they are two different (although related)
concepts. A target is one instance of an output type. It is the engine that takes all of your files and
settings, and brings them together to produce the end result. When you build your final output, you
are essentially building one or more of the targets in your project.
To add a target file, open the Project Organizer on the left side of Flare. Right-click the Targets
folder and select Add Target. After the target is created and opened, you can edit it in the Target
Editor to the right. The editor is different for each output type.
For more information about targets—including steps and examples—see the online Help or the
Targets Guide.
Online vs. Print-Based Output
There is a fine line between what is called "online output" and what is called "print-based output."
The truth is that topics in virtually any of Flare's online output types can be sent to a printer, and
therefore considered print-based. Similarly, any of the print-based output types can be viewed
electronically, and therefore considered online.
The real distinction between online and print-based outputs has to do with their primary purpose.
Online outputs are usually intended to be viewed on a screen, rather than on a printed page. The
idea is to show only small pieces of content at a time and allow users to jump around to other
topics or elements of the output.
On the other hand, print-based output follows a more traditional format that you would find in an
actual book or manual—with the pieces of the output following one after the other on pages until
the end of the book (e.g., title page, table of contents, preface, chapters, index, appendixes—with
page numbers, as well as header or footer content, shown along the way).
Then there is EPUB output, which is intended to be viewed on a screen, but follows a structure
closer to print-based outputs.
CHAPTER 5
34

HTML5—Recommended Online Output
Type
There are several online output options available in Flare, but HTML5 is the recommended format.
n
HTML5 This output format supports the HTML5 specification developed by the Web
Hypertext Application Technology Working Group (WHATWG) and the World Wide Web
Consortium (W3C). Therefore, the HTML5 format results in better markup and offers unique
characteristics and features not found in other outputs (e.g., frameless, responsive, micro
content, private output). HTML5 also lets you create traditional Tripane output or the newer
Side or Top Navigation outputs, which give your output the appearance of a modern website
with integrated responsive skins and content.
For more information, see the HTML5 Guide. For links to this PDF manual and others, see the
online Help.
CHAPTER 5
35

It is possible to generate HTML5 output with eLearning components for learning and development
(L&D) courses. You can use Flare to leverage single-sourced content from a project for creating
interactive knowledge checks and gradable quizzes. It provides the capability to design courses
with linear workflows, form questions, and build online output with learning management system
(LMS) standards for sharing. Use the Target Editor to set output options for eLearning material.
CHAPTER 5
36

PDF and Word—Recommended Print-
Based Output Types
Flare provides multiple print-based output options, but PDF and Word are recommended.
n
Adobe PDF Short for "Portable Document Format," PDF is an open standard format for
electronic documentation exchange invented by Adobe. PDF files are used to represent a
two-dimensional document in an device- and resolution-independent fixed-layout format.
n
Microsoft WordThe output can be exported to Microsoft Word in DOCX, DOC, PDF, or XPS
format.
For more information, see the Print-Based Output Guide. For links to this PDF manual and
others, see the online Help.
Other Output Types
Following are a few other unique output options in Flare:
n
Clean XHTML Clean XHTML produces basic HTML files that are free of MadCap-specific tags
and not dependent upon other MadCap-generated files. The output does not include any
skins, search, navigation, or other extra features; it is simply your single-sourced content. This
lets you re-purpose your output in many flexible ways (e.g., you can embed the output files
into other applications, such as project management tools, wikis, or eLearning systems). A
common use for this output format is for publishing to Salesforce
®
, ServiceNow
®
, and
Zendesk. You might also perform other types of post-processing tasks with the output.
n
Eclipse Help This is a Java-based Help system that requires the latest Java Runtime
Environment (JRE) and Java version. Use Eclipse Help to create an Eclipse plug-in for the
Eclipse Help Viewer.
For more information, see the Eclipse Help Guide. For links to this PDF manual and others,
see the online Help.
n
EPUB This is a format for creating reflowable digital books (ebooks). It is developed and
maintained by the International Digital Publishing Forum (IDPF). EPUB is sort of a hybrid
format. The output is designed to be viewed electronically; in that way, it is like an online
format. On the other hand, its structure is like a book or manual; in that way, it is like a print-
based format. In fact, you can follow many of the same steps for creating EPUB output that
you would follow for producing a PDF. For additional information about this group and the
EPUBformat, see http://idpf.org/.
CHAPTER 5
37

HTML Help (Legacy Output)
In addition to the output options mentioned, you can create HTML Help, which is an older legacy
online output not often used by most authors. See the online Help for information about this output
format.
Output Type Comparison Tables
To compare the various outputs side-by-side, you can open the online Help to the topic "Output
Type Comparison Tables."
CHAPTER 5
38
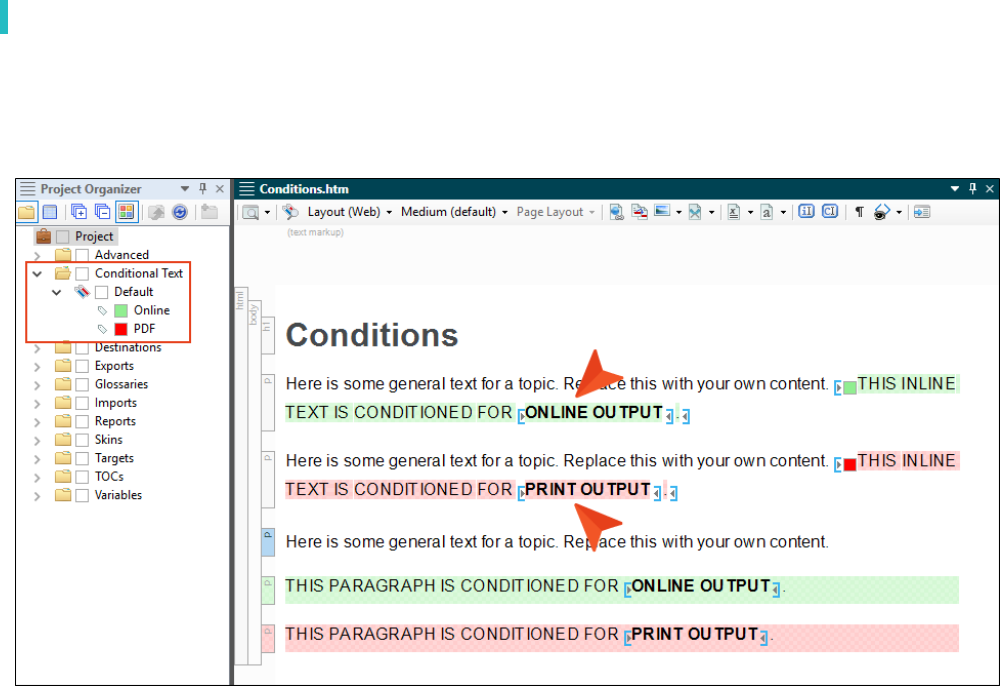
Conditions
A condition is a single-sourcing feature that you can apply to files or different areas of your content.
Conditions can determine whether certain information displays in some outputs but not in others.
You can also control whether content displays on a certain device or screen size.
One way to single-source content is to take advantage of multiple output formats and condition
tags. How does it work? Each target in your project is a potential output (using a specific output
format, such as HTML5 or PDF). You can create and apply condition tags to content. Then you
associate the condition tags to your different targets as necessary, so that some content appears
in some targets but not in other targets. This way, you do not need to create a separate project for
each output that you want to produce. If most of the content for your outputs is similar, there is no
need to rewrite it in another project. Simply specify which sections to include or exclude in which
targets through the use of condition tags. This is one reason that topic-based authoring is so
appealing. By placing condition tags on individual topic files themselves, you can pick and choose
which topics to include in some outputs and which to include in other outputs.
CHAPTER 5
39

EXAMPLE You need to create two PDFs from your project—one for beginning users and
another for advanced users. Rather than creating two separate projects, you can put all of
the content into a single project.
Then you can create one condition tag called "Beginner Manual" and another condition tag
called "Advanced Manual."
After that, you can apply the "Beginner Manual" condition tag to the content that belongs
only in the manual for beginners, and you can apply the "Advanced Manual" condition tag to
the content that belongs only in the manual for advanced users.
Finally, you open one PDF target and tell Flare to include the "Beginner Manual" condition
tag and exclude the "Advanced Manual" condition tag. In the other PDF target, you do the
opposite; exclude the "Beginner Manual" condition tag and include the "Advanced Manual"
condition tag.
To add a condition tag set file, open the Project Organizer on the left side of Flare. Right-click the
Conditional Text folder and select Add Condition Tag Set. After the condition tag set is created and
opened, you can edit it in the Condition Tag Set Editor to the right, adding as many conditions as
you need.
There are many ways to apply conditions to files and content. One way to apply a condition to a
piece of content is to select the content, then open the Home ribbon and choose Conditions.
For more information about conditions—including steps and examples—see the online Help or the
Condition Tags Guide.
CHAPTER 5
40

CHAPTER 6
Building and Publishing Output
After you have created a project, added and formatted content, and developed a target, you are
ready to build and publish the final output. Your output might be online (similar to a website) or
print-based (such as a PDF). Of course, you can build the output at any point during the
development process, but if you make additional changes to content, targets, or the look and feel,
you will need to build the output again to make sure the changes are included in the files that you
deliver to your end users.
For more detailed information about the features in this chapter, including examples, see the online
Help or the Targets Guide.
This chapter discusses the following:
Ways to Build and Publish Targets 42
Interface or Command Line 43
Where Output Files are Stored 44
Publishing Features 45
CHAPTER 6
41

Ways to Build and Publish Targets
Building the final output involves generating one or more targets in your project, usually with just
the click of a button or two. You can build output in the following ways:
n
Primary Target Do this if you are only concerned about building and publishing the primary
target for your project.
n
Single Target Do this if you want to build and publish a target that may or may not be
designated as your primary target.
n
Multiple Targets Do this if you want to quickly build and publish multiple targets using an
option in the Builds window pane. The targets do not need to be within the project that you
currently have open. This is an alternative to using batch targets.
n
Batch Target Do this if you want to build and publish one or multiple targets in a batch file,
perhaps scheduled to run at a specific time.
n
MadCap Central MadCap Central is a cloud-based platform that lets you plan, track, and
manage the processes, content, and teams that are at the heart of your
organization.MadCap Central's integration with MadCap Flare lets you store copies of your
projects in Central, continue to work on them locally in Flare, and keep both sets of copies in
sync. You can use Central to quickly build and publish output (and roll back when necessary)
without the need to involve an IT department. Custom vanity URLs let you produce
meaningful paths for your outputs. You can also send topics and snippets for review on
Central, as well as use custom checklists to track your progress in Flare projects. For more
information about Central and how you can build and publish your Flare output on it, see the
MadCap Central Integration Guide or the online Help.
CHAPTER 6
42

Interface or Command Line
You can build and publish output (primary, single, multiple, or batch targets) using either the Flare
interface or your system's command line. There are benefits to using each method.
User Interface
This method lets you build output using options in Flare's workspace. When you generate a target
using this method, the Builds window pane opens at the bottom of the workspace. You can
continue working in your project while targets are generated behind the scenes.
There are many ways to initiate the building of a target. For example, you can double-click the
target in the Project Organizer. Then in the Target Editor, click Build in the local toolbar.
Command Line
This option is intended for more advanced users. It lets you build targets from your operating
system's command line. Using this method, you do not have to open Flare at all. In addition, this
method lets you build a single target or all targets in your Flare project in one batch. The best way
to use this feature is to create a batch file with the necessary commands in it. Then you can use a
scheduling tool (such as the "Scheduled Tasks" utility in Windows) to run the batch file
automatically whenever you want. This is similar to the "batch target" feature. However, the
command line feature works outside of the Flare interface, is a bit more manual, and does not
support as many processes. For steps see the online Help.
CHAPTER 6
43

Where Output Files are Stored
When you build a target, Flare creates output files and places them in a folder named after the
target, which is stored in a subfolder of your project called "Output." For example, let's say your
project is stored here: C:\MyProject. In that case, after you generate output, the files would be
stored here:
C:\MyProject\Output\MyName\TargetName
Depending on the output type associated with the target, the generated output might consist of
many files.
CHAPTER 6
44

Publishing Features
To distribute output, you can simply open your Output folder to retrieve the files manually, or you
can use Flare's publishing destination feature to automatically send a copy of the output files to
another location (e.g., to a network folder or a website).
NOTE If you choose to use Flare’s integration with MadCap Central, your published output
can be hosted on MadCap servers.
Retrieving Files Manually
Select Project > Open Output Folder.
You can also select this button in the Builds window pane.
Navigate to the folder showing the name of your target. Then you can copy those files to any
location you want, whether it is on a network, in a version control directory, or up on a web server.
You might need to work with your network or web administrator to learn the proper way to move
files in your company, including login credentials.
CHAPTER 6
45

Using the Publishing Destination Feature
To use this automated feature, you must first create a publishing destination for your output. In the
Project Organizer, right-click the Destinations folder and select Add Destination.
Next, open your target and on the Publishing tab, associate the publishing destination with the
target.
Then when you build your output (or after you build it) you simply use the Publish button or check
box, depending on the method you use for generating the output (e.g., build primary target, single
target, batch target).
CHAPTER 6
46

TIP You do not need to build the target to see how a particular topic will look in the final
output. You can always preview topics as you develop your project by clicking in the
local toolbar of the XML Editor. If you click the face of the button, the preview is shown
based on the format specified in the primary target. If you click the down arrow, you can
select any of the targets in your project from a menu. The preview is then displayed using
the output format specified in that target. As you make changes in a topic, snippet, or
template page, the preview window pane updates automatically.
CHAPTER 6
47

APPENDIX
PDFs
The following PDFs are available for download from the online Help.
Tutorials
Getting Started Tutorial
Autonumbers Tutorial
Back-to-Top Button Tutorial
Context-Sensitive Help Tutorial
Custom Toolbar Tutorial
eLearning Tutorial—Basic
eLearning Tutorial—Advanced
Image Tooltips Tutorial
Lists Tutorial
Meta Tags Tutorial
Micro Content Tutorial—Basic
Micro Content Tutorial—Advanced
Responsive Output Tutorial
Single-Sourcing Tutorial
Snippet Conditions Tutorial
Styles Tutorials
Tables Tutorial
Word Import Tutorial
APPENDIX
48

Cheat Sheets
Context-Sensitive Help Cheat Sheet
Folders and Files Cheat Sheet
Learning & Development Cheat Sheet
Lists Cheat Sheet
Micro Content Cheat Sheet
Print-Based Output Cheat Sheet
Search Cheat Sheet
Shortcuts Cheat Sheet
Structure Bars Cheat Sheet
Styles Cheat Sheet
APPENDIX
49

User Guides
Accessibility Guide
Analysis and Reports Guide
Architecture Guide
Autonumbers Guide
Branding Guide
Condition Tags Guide
Context-Sensitive Help Guide
Eclipse Help Guide
eLearning Guide
Getting Started Guide
Global Project Linking Guide
HTML5 Guide
Images Guide
Import Guide
Indexing Guide
Key Features Guide
Lists Guide
MadCap Central Integration
Guide
Meta Tags Guide
Micro Content Guide
Navigation Links Guide
Plug-In API Guide
Print-Based Output Guide
Project Creation Guide
QR Codes Guide
Reviews & Contributions With
Contributor Guide
Scripting Guide
Search Guide
SharePoint Guide
Skins Guide
Snippets Guide
Source Control Guide: Git
Source Control Guide:
Perforce Helix Core
Source Control Guide:
Subversion
Source Control Guide: Team
Foundation Server
Styles Guide
Tables Guide
Tables of Contents Guide
Targets Guide
Template Pages Guide
Templates Guide
Topics Guide
Touring the Workspace Guide
Transition From FrameMaker
Guide
Translation and Localization
Guide
Variables Guide
Videos Guide
What's New Guide
APPENDIX
50
