
FactoryTalk AssetCentre Getting
Results Guide
Version 13.00.00
Getting Results
Original Instructions

Important User Information
Read this document and the documents listed in the additional resources section about installation, configuration, and operation of this equipment before you install,
configure, operate, or maintain this product. Users are required to familiarize themselves with installation and wiring instructions in addition to requirements of all
applicable codes, laws, and standards.
Activities including installation, adjustments, putting into service, use, assembly, disassembly, and maintenance are required to be carried out by suitably trained
personnel in accordance with applicable code of practice.
If this equipment is used in a manner not specified by the manufacturer, the protection provided by the equipment may be impaired.
In no event will Rockwell Automation, Inc. be responsible or liable for indirect or consequential damages resulting from the use or application of this equipment.
The examples and diagrams in this manual are included solely for illustrative purposes. Because of the many variables and requirements associated with any particular
installation, Rockwell Automation, Inc. cannot assume responsibility or liability for actual use based on the examples and diagrams.
No patent liability is assumed by Rockwell Automation, Inc. with respect to use of information, circuits, equipment, or software described in this manual.
Reproduction of the contents of this manual, in whole or in part, without written permission of Rockwell Automation, Inc., is prohibited.
Throughout this manual, when necessary, we use notes to make you aware of safety considerations.
WARNING:
Identifies information about practices or circumstances that can cause an explosion in a hazardous environment, which may lead to personal
injury or death, property damage, or economic loss.
ATTENTION:
Identifies information about practices or circumstances that can lead to personal injury or death, property damage, or economic loss.
Attentions help you identify a hazard, avoid a hazard, and recognize the consequence.
IMPORTANT:
Identifies information that is critical for successful application and understanding of the product.
Labels may also be on or inside the equipment to provide specific precautions.
SHOCK HAZARD:
Labels may be on or inside the equipment, for example, a drive or motor, to alert people that dangerous voltage may be present.
BURN HAZARD:
Labels may be on or inside the equipment, for example, a drive or motor, to alert people that surfaces may reach dangerous
temperatures.
ARC FLASH HAZARD:
Labels may be on or inside the equipment, for example, a motor control center, to alert people to potential Arc Flash. Arc Flash
will cause severe injury or death. Wear proper Personal Protective Equipment (PPE). Follow ALL Regulatory requirements for safe work practices and for
Personal Protective Equipment (PPE).
The following icon may appear in the text of this document.
Tip:
Identifies information that is useful and can help to make a process easier to do or easier to understand.
2 FTAC-GR002I-EN-E - January 2024 Rockwell Automation, Inc.
Rockwell Automation recognizes that some of the terms that are currently used in our industry and in this publication are not in alignment with the movement toward
inclusive language in technology. We are proactively collaborating with industry peers to find alternatives to such terms and making changes to our products and content.
Please excuse the use of such terms in our content while we implement these changes.
Rockwell Automation, Inc. FTAC-GR002I-EN-E - January 2024 3
Table of Contents
Introduction to FactoryTalk AssetCentre................................................................................................................................................................................................8
Activation..................................................................................................................................................................................................................................................................................8
About the documentation set...............................................................................................................................................................................................................................................8
FactoryTalk AssetCentre Help.....................................................................................................................................................................................................................................9
About this book....................................................................................................................................................................................................................................................................... 9
Contact Technical Support....................................................................................................................................................................................................................................................9
Navigate the FactoryTalk AssetCentre client........................................................................................................................................................................................10
Run the FactoryTalk AssetCentre client............................................................................................................................................................................................................................10
Elements of the FactoryTalk AssetCentre client window...............................................................................................................................................................................................10
Asset view......................................................................................................................................................................................................................................................................11
Asset.....................................................................................................................................................................................................................................................................11
Design mode.......................................................................................................................................................................................................................................................11
Asset catalog................................................................................................................................................................................................................................................................12
About asset types............................................................................................................................................................................................................................................. 13
Workspace pane...........................................................................................................................................................................................................................................................17
Toolbar...........................................................................................................................................................................................................................................................................18
Menu bar....................................................................................................................................................................................................................................................................... 19
Right-click menus....................................................................................................................................................................................................................................................... 19
Status bar.................................................................................................................................................................................................................................................................... 20
FactoryTalk AssetCentre system architecture......................................................................................................................................................................................21
About FactoryTalk AssetCentre Web Client.......................................................................................................................................................................................... 22
Access FactoryTalk AssetCentre Web Client.................................................................................................................................................................................................................... 22
Quick Start 1: Configure the system..................................................................................................................................................................................................... 23
Quick Start steps for configuring the system.................................................................................................................................................................................................................23
Step 1: Add users to the FactoryTalk Directory....................................................................................................................................................................................................23
Step 2: Add client computers...................................................................................................................................................................................................................................24
Step 3: Configure security for FactoryTalk AssetCentre.....................................................................................................................................................................................25
Policy settings and their meanings..............................................................................................................................................................................................................26
Step 4: Add contacts to the Address Book............................................................................................................................................................................................................28
Step 5: Set up FactoryTalk AssetCentre database limitations...........................................................................................................................................................................30
Step 6: Configure the TLS protocol......................................................................................................................................................................................................................... 31
Create a self-signed TLS certificate............................................................................................................................................................................................................32
Export the created TLS certificate for FactoryTalk AssetCentre client and agent computers..........................................................................................................33
4 FTAC-GR002I-EN-E - January 2024 Rockwell Automation, Inc.
Configure a site binding.................................................................................................................................................................................................................................35
Configure SSL settings for Management of Change, FactoryTalk AssetCentre Desktop Client and Agent, and FactoryTalk AssetCentre Web Client................ 37
Turn on secure communication between the server, client(s), and agent(s).......................................................................................................................................39
Import the self-signed TLS certificate to client and agent computers................................................................................................................................................ 40
Configure a firewall rule if the default port is modified..........................................................................................................................................................................44
Step 7: Configure Windows Authentication............................................................................................................................................................................................................47
Turn on Windows Authentication mode in Internet Information Services (IIS)....................................................................................................................................48
Quick Start 2: Design the asset tree.....................................................................................................................................................................................................51
Quick Start steps for designing the asset tree............................................................................................................................................................................................................... 51
Step 1: Plan the organization of your asset tree.................................................................................................................................................................................................. 51
Step 2: Add assets to the asset tree......................................................................................................................................................................................................................53
Use Asset Inventory to add assets to the asset tree................................................................................................................................................................................54
Step 3: Change security settings for an asset.....................................................................................................................................................................................................56
Quick Start 3: Set up Disaster Recovery schedules.............................................................................................................................................................................59
Quick Start steps for setting up schedules.....................................................................................................................................................................................................................60
Step 1: Set up Agent Groups and agent computers in them..............................................................................................................................................................................60
Create an agent group....................................................................................................................................................................................................................................60
Create an agent computer..............................................................................................................................................................................................................................61
Step 2: Create a schedule for the desired Disaster Recovery operation......................................................................................................................................................... 61
Step 3: Set up recipient lists for schedule results..............................................................................................................................................................................................63
Send an End of Schedule report...................................................................................................................................................................................................................63
Send an operation-specific report............................................................................................................................................................................................................... 63
Step 4: Run schedules...............................................................................................................................................................................................................................................64
Run schedules by making them active....................................................................................................................................................................................................... 64
Run schedules manually.................................................................................................................................................................................................................................64
Quick Start 4: View and search logs.................................................................................................................................................................................................... 66
Quick Start steps for viewing and searching logs..........................................................................................................................................................................................................67
Step 1: View logs.........................................................................................................................................................................................................................................................67
Step 2: Create a search............................................................................................................................................................................................................................................ 68
Step 3: Set search security...................................................................................................................................................................................................................................... 72
Step 4: Run searches.................................................................................................................................................................................................................................................73
Make a search active...................................................................................................................................................................................................................................... 73
Run searches manually...................................................................................................................................................................................................................................73
Step 5: View and print search results....................................................................................................................................................................................................................73
Quick Start 5: Open and edit files in Archive....................................................................................................................................................................................... 75
Rockwell Automation, Inc. FTAC-GR002I-EN-E - January 2024 5
Quick Start steps for managing files in Archive.............................................................................................................................................................................................................75
Step 1: Set a working folder..................................................................................................................................................................................................................................... 76
Step 2: Check out a file for editing........................................................................................................................................................................................................................ 77
Step 3: Check in a file...............................................................................................................................................................................................................................................78
Step 4: Get a read-only version of a file...............................................................................................................................................................................................................80
Step 5: Open a file for viewing................................................................................................................................................................................................................................82
Step 6: Initiate a Management of Change workflow to check out a file for editing......................................................................................................................................83
Quick Start 6: Manage Rockwell Automation hardware lifecycle........................................................................................................................................................ 86
Quick Start steps for managing Rockwell Automation hardware life cycle...............................................................................................................................................................86
Step 1: Synchronize lifecycle status....................................................................................................................................................................................................................... 86
Step 2: Refresh lifecycle status...............................................................................................................................................................................................................................87
Step 3: View detailed lifecycle status.................................................................................................................................................................................................................... 87
Troubleshoot.......................................................................................................................................................................................................................................... 89
Troubleshoot the FactoryTalk AssetCentre client........................................................................................................................................................................................................... 89
If the client fails to start..........................................................................................................................................................................................................................................89
If the client cannot communicate with the server..............................................................................................................................................................................................90
If you cannot enter Design Mode............................................................................................................................................................................................................................90
If you cannot connect to Allen-Bradley PanelView Plus devices....................................................................................................................................................................... 91
If you cannot connect to Allen-Bradley MobileView devices...............................................................................................................................................................................91
Troubleshoot Schedules........................................................................................................................................................................................................................................................91
If a schedule did not run...........................................................................................................................................................................................................................................91
If a schedule no longer appears on the Schedules tab.......................................................................................................................................................................................91
If an asset is missing from a schedule................................................................................................................................................................................................................. 92
My schedule contains extra devices that I don't want in the schedule...........................................................................................................................................................92
If you are prompted to install agents when creating a Disaster Recovery schedule....................................................................................................................................93
If you see the message "Failed to create RSLogix 5 [or 500] data [or program ladder] file list"...............................................................................................................93
If the scheduled Disaster Recovery operation never completes.......................................................................................................................................................................93
Troubleshoot e-mail notifications......................................................................................................................................................................................................................................94
If e-mail notifications do not reach their recipients.......................................................................................................................................................................................... 94
Troubleshoot Logs.................................................................................................................................................................................................................................................................94
If you cannot view a log...........................................................................................................................................................................................................................................94
If no data appears in a log...................................................................................................................................................................................................................................... 95
If you cannot refresh a log...................................................................................................................................................................................................................................... 95
If you cannot show a previously viewed log.........................................................................................................................................................................................................95
Troubleshoot Archive............................................................................................................................................................................................................................................................95
6 FTAC-GR002I-EN-E - January 2024 Rockwell Automation, Inc.
If you cannot check in a file................................................................................................................................................................................................................................... 95
If you cannot open a file..........................................................................................................................................................................................................................................95
If the wrong program opens a file......................................................................................................................................................................................................................... 96
If a button is not available.......................................................................................................................................................................................................................................96
If you performed a recursive check out and the subfolders didn't copy........................................................................................................................................................96
Legal Notices......................................................................................................................................................................................................................................... 97
Rockwell Automation, Inc. FTAC-GR002I-EN-E - January 2024 7

Chapter 1
Introduction to FactoryTalk AssetCentre
FactoryTalk® AssetCentre monitors your factory automation system, provides centralized tools to minimize downtime
due to unauthorized actions or failing devices, and manages the life cycle of Rockwell Automation hardware devices
in the system. It does this by:
• securing access to actions within the FactoryTalk AssetCentre system. For information about security, see
Quick Start 1: Configure the system on page 23.
•
managing device configuration files. For more information about configuration files, see Quick Start 2: Design
the asset tree on page 51.
• providing a disaster recovery system that verifies your devices' program and configuration files against
protected master files, ensuring quick and accurate recovery if a problem should occur. For information
about Disaster Recovery, see Quick Start 3: Set up Disaster Recovery schedules on page 59.
•
monitoring FactoryTalk-enabled software products and logging system events and user actions (recorded in
the Event log and Audit log respectively). For information about logs, see Quick Start 4: View and search logs
on page 66.
•
providing version control and archiving of program files and documents. For information about Archive, see
Quick Start 5: Open and edit files in Archive on page 75.
•
synchronizing lifecycle information in the FactoryTalk AssetCentre server and client with the data on the
Rockwell Automation life cycle website. For information about lifecycle management, see Quick Start 6:
Manage Rockwell Automation hardware lifecycle on page 86.
Activation
FactoryTalk AssetCentre software is activated on two criteria:
•
capacity (number of devices)
• capability (purchased functionality)
In addition, the FactoryTalk AssetCentre server must be activated. For more information on activation, refer to the
Activation in FactoryTalk AssetCentre topic of Help.
About the documentation set
The documentation set includes:
•
FactoryTalk AssetCentre Installation Guide (Document ID FTAC-IN005). Use this manual to install the
FactoryTalk AssetCentre system. This manual is also available in the FactoryTalk AssetCentre installation
package in 13.00.00-FTAssetCentre\Docs. The file name is FactoryTalk AssetCentre Installation Guide.pdf. You
can find it in Rockwell Automation Literature Library.
•
Help. Use the comprehensive Help for assistance while using the FactoryTalk AssetCentre system.
•
FactoryTalk AssetCentre Getting Results Guide (Document ID FTAC-GR002). Use this manual to get started
with the FactoryTalk AssetCentre system. You can find it in Rockwell Automation Literature Library.
•
FactoryTalk AssetCentre Utilities User Manual (Document ID FTAC-UM001). Use this manual for assistance
while using an array of utilities whose capabilities are not present in the FactoryTalk AssetCentre system. You
can find it in Rockwell Automation Literature Library.
This manual is intended to give a general overview of the software. For more detailed information, please refer to
FactoryTalk AssetCentre Help.
8 FTAC-GR002I-EN-E - January 2024 Rockwell Automation, Inc.

Chapter 1Introduction to FactoryTalk AssetCentre
FactoryTalk AssetCentre Help
FactoryTalk AssetCentre Help is available from the Help menu, by pressing F1 or clicking the Show Help button, or by
clicking the Help button in any dialog box in the FactoryTalk AssetCentre software.
About this book
This manual provides you with information on how to get started using your FactoryTalk AssetCentre system. It is not
intended to be a comprehensive users guide. For complete information on all features, tasks, and interface elements,
refer to Help.
This book is written for FactoryTalk AssetCentre users. We assume you are familiar with:
•
Microsoft® Windows® operating systems including basic Windows networking and administration tasks
•
RSLinx® Classic and FactoryTalk® Linx communication software
•
Rockwell Automation programing tools for programmable logic controllers
•
control networks such as DeviceNet and programmable logic controllers such as ControlLogix® processors
Contact Technical Support
If you cannot find answers to your questions in this manual, Help, or on the Technical Support Web site, call Technical
Support.
• Phone—440-646-3434 in the USA
• Technical Support hours of operation—8:00 AM - 5:00 PM
If you are not located in the USA and want to contact Rockwell Automation Support by telephone, go to https://
www.rockwellautomation.com/global/support/overview.page, choose language as needed, click Local and Contact
Support, click Call us, and then select your region and country for information about contacting your local support
organization.
When you call you should be at your computer and be prepared to give the following information:
•
the product version number
•
the type of hardware you are using
•
the exact wording of any messages that appeared on your screen
•
a description of what happened and what you were doing when the problem occurred
•
a description of how you tried to solve the problem
Tip:
Select Help > About from the Menu bar to show the product serial number and product
version number.
For information about all of the products available from Rockwell Automation or for technical support, go to one of
the following sites:
•
https://www.rockwellautomation.com/en-us/products.html#software
•
https://www.rockwellautomation.com/global/support/overview.page
•
https://rockwellautomation.custhelp.com
Rockwell Automation, Inc. FTAC-GR002I-EN-E - January 2024 9

Chapter 2
Navigate the FactoryTalk AssetCentre client
All actions in FactoryTalk AssetCentre take place in the FactoryTalk AssetCentre Client. Changes you make in the
client window are stored on the FactoryTalk AssetCentre Server.
Run the FactoryTalk AssetCentre client
To start the FactoryTalk AssetCentre Client
•
Using Windows Search, find FactoryTalk AssetCentre Client, and then double-click the name.
If the client fails to start properly, see If the client fails to start on page 89.
Elements of the FactoryTalk AssetCentre client window
The screen includes the following items:
1.
Menu bar
2.
Toolbar
3.
Asset view
It shows an assets tree that you create to represent your plant.
4.
Workspace pane
It shows the information and controls of the tools:
◦ Address Book
◦ Agent Groups
◦
Archive
◦
Assets Lifecycle
◦
Logs
◦ Schedules
◦
Searches
10 FTAC-GR002I-EN-E - January 2024 Rockwell Automation, Inc.

Chapter 2Navigate the FactoryTalk AssetCentre client
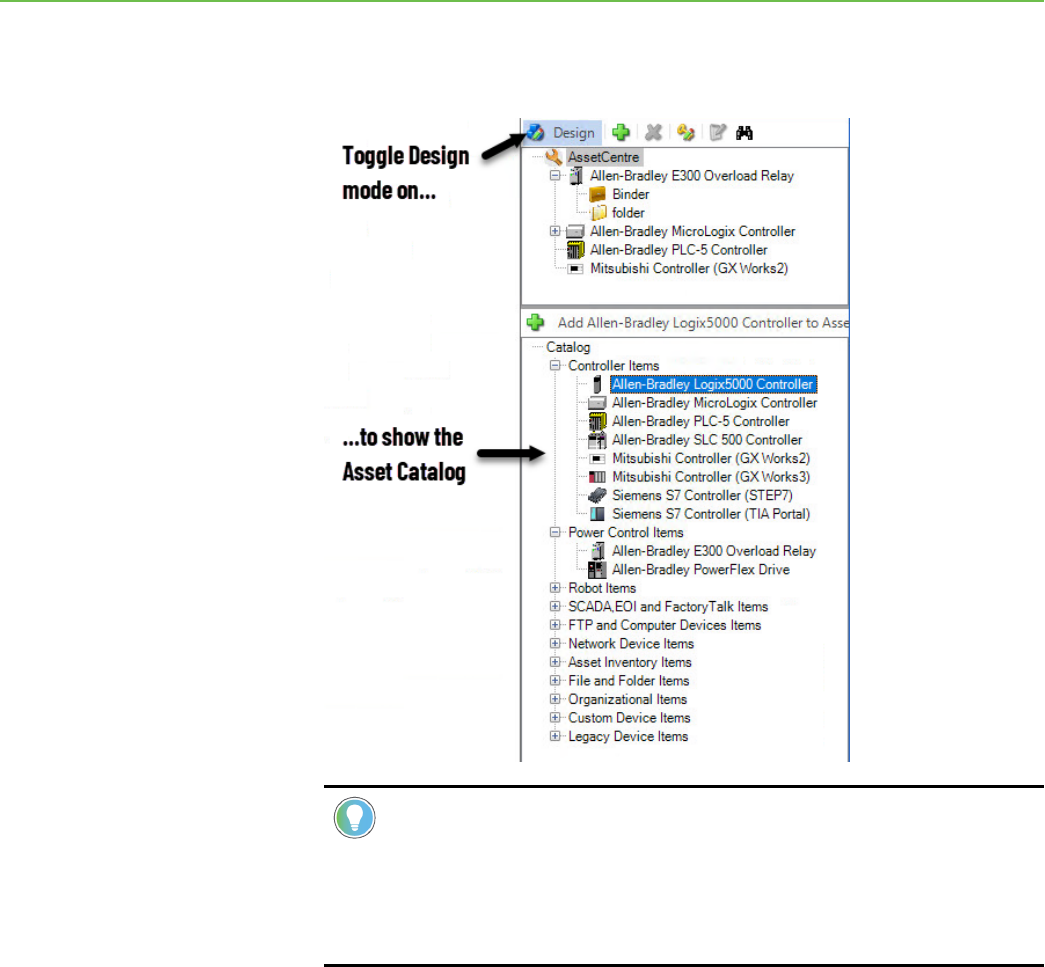
5. Asset catalog
Available in the design mode, it lists all the types of assets that you can add to the assets tree in the asset
view.
6. Status bar
It shows the following information:
◦ The currently logged on user
◦ The status of the connection to the server
◦
The number of connected agent computers in the system
Asset view
Everything that you do in FactoryTalk AssetCentre begins with an asset. The Asset View shows the asset tree, a
representation of your plant. In the asset tree, you can include all of the assets (anything from a device to a program
to a procedure document) that you want to control, back up, or monitor.
Asset
An asset in FactoryTalk AssetCentre represents items of value in your automation system — things you want to control
and to which you want to monitor access. Assets can be automation device items and legacy device items (including
controllers, drives, robots, Allen-Bradley® E300 Overload Relay, Asset Inventory, FactoryTalk Directory, FactoryTalk
View Site Edition, and more), files (program files or even drawings or word processing files), folders, or containers of
other assets. While FactoryTalk AssetCentre is intended to handle files for automation projects, any kind of file can
become an asset in FactoryTalk AssetCentre.
Design mode
In this mode, you can:
•
Set up or modify the asset tree in the Asset View so that it represents your system.
• Add devices to the asset tree from the Asset Catalog or edit devices already in the asset tree. The Asset
Catalog is only shown in Design mode.
•
Set up or modify the agent group tree in the Agent Groups plug-in.
Rockwell Automation, Inc. FTAC-GR002I-EN-E - January 2024 11
Chapter 2Navigate the FactoryTalk AssetCentre client
To enter Design mode, click the Design button in the Asset View. The Design button toggles Design mode on and off.
You can also, on the Menu bar, select Edit > Design Mode or press F3. Only one user in your system can be in Design
mode at a time.
Tip:
You must have Switch to Design mode permission to enter Design mode. See Step 3: Set Feature
Security for FactoryTalk AssetCentre on page 25.
If you have Switch to Design mode permission and still cannot enter Design mode to view the Asset
Catalog, see If you can’t enter Design Mode on page 90.
Asset catalog
The Asset Catalog lists all the types of assets that can be added to the asset tree. The Asset Catalog is only available
when the Asset View is in Design mode. In Design mode, you will use the Asset Catalog to select and add assets by
dragging them from the Asset Catalog to the asset tree. For information about adding assets to the asset tree, see
Step 2: Add assets to the asset tree on page 53.
12 FTAC-GR002I-EN-E - January 2024 Rockwell Automation, Inc.

Chapter 2Navigate the FactoryTalk AssetCentre client
The Asset Catalog can be positioned either below the Asset View or beside the Asset View.
•
To position the Asset Catalog below the Asset View, select View > Layout > Split Horizontally.
•
To position the Asset Catalog beside and to the right of the Asset View, select View > Layout > Split
Vertically.
About asset types
Assets fall into these categories:
•
Controller Items
• Power Control Items
•
Robot Items
•
SCADA, EOI and FactoryTalk Items
•
FTP and Computer Device Items
•
Network Device Items
•
Asset Inventory Items
•
Files and Folder Items
•
Organizational Items
•
Custom Device Items
•
Legacy Device Items
Rockwell Automation, Inc. FTAC-GR002I-EN-E - January 2024 13

Chapter 2Navigate the FactoryTalk AssetCentre client
Assets can be placed in the asset tree in the root or in a container. Device assets, except for Generic Device, count
toward capacity activation. Most device assets are used with the Disaster Recovery capability. An asset represents a
physical automation device in the control system.
Controller Items
A controllerasset can be placed in the root or in a container in the asset tree.
•
Allen-Bradley Logix 5000 Controller
Use this asset type to run a schedule to store a backup copy of files that are associated with the Allen-
Bradley Logix 5000 Controller, retrieve a copy of those files and compare them to a master version, execute
a source code validation for vulnerability detection, and run a change detect schedule to get a list of changes
from the controller log.
•
Allen-Bradley MicroLogix Controller
Use this asset type to run a schedule to store a backup copy of files that are associated with the Allen-
Bradley MicroLogix™ Controller or retrieve a copy of those files and compare them to an archive file.
•
Allen-Bradley PLC-5 Controller
Use this asset type to run a schedule to store a backup copy of files that are associated with the Allen-
Bradley PLC-5® Controller or retrieve a copy of those files and compare them to an archive file.
•
Allen-Bradley SLC 500 Controller
Use this asset type to run a schedule to store a backup copy of files that are associated with the Allen-
Bradley SLC™ 500 Controller or retrieve a copy of those files and compare them to an archive file.
•
Mitsubishi Controller (GX Works2)
Use this asset type to run a schedule to store a backup copy of files that are associated with the
Mitsubishi®Controller (GX Works2™) or retrieve a copy of those files and compare them to an archive file.
•
Mitsubishi Controller (GX Works3)
Use this asset type to run a schedule to store a backup copy of files that are associated with the
MitsubishiController (GX Works3™) or retrieve a copy of those files and compare them to an archive file.
•
Siemens S7 Controller (STEP7)
Use this asset type to run a schedule to store a backup copy of files that are associated with the Siemens® S7
Controller (STEP7) or retrieve a copy of those files and compare them to an archive file.
•
Siemens S7 Controller (TIA Portal)
Use this asset type to run a schedule to store a backup copy of files that are associated with the Siemens S7
Controller (TIA Portal) or retrieve a copy of those files and compare them to an archive file.
Power Control Items
A power control asset can be placed in the root or in a container in the asset tree.
•
Allen-Bradley E300 Overload Relay
Use this asset type to run a schedule to store a backup copy of files that are associated with the Allen-
Bradley E300 Overload Relay or retrieve a copy of those files and compare them to an archive file.
•
Allen-Bradley PowerFlex Drive
Use this asset type to run a schedule to store a backup copy of files that are associated with the Allen-
Bradley PowerFlex® Drive or retrieve a copy of those files and compare them to an archive file.
14 FTAC-GR002I-EN-E - January 2024 Rockwell Automation, Inc.

Chapter 2Navigate the FactoryTalk AssetCentre client
Robot Items
A robot asset can be placed in the root or in a container in the asset tree.
• Motoman Robot
Use this asset type to run a schedule to store a backup copy of files that are associated with the Motoman
Robot or retrieve a copy of those files and compare them to an archive file.
SCADA, EOI and FactoryTalk Items
SCADA, EOI and FactoryTalk Itemscan be placed in the root or in a container in the asset tree.
•
Allen-Bradley MobileView
Use this asset type to run a schedule to store a backup copy of files that are associated with the Allen-
Bradley MobileView™ or retrieve a copy of those files and compare them to an archive file.
•
Allen-Bradley PanelView
Use this asset type to run a schedule to store a backup copy of files that are associated with the Allen-
Bradley PanelView™ or retrieve a copy of those files and compare them to an archive file.
•
Allen-Bradley PanelView Plus
Use this asset type to run a schedule to store a backup copy of files that are associated with the Allen-
Bradley PanelView Plus or retrieve a copy of those files and compare them to an archive file.
•
FactoryTalk Directory
Use this asset type to run a schedule that backs up the FactoryTalk® Directory of your system on a regular
basis.
•
FactoryTalk View Site Edition
Use this asset type to run a schedule that backs up FactoryTalk® View Site Edition (SE) network applications,
including HMI server, FactoryTalk Directory, FactoryTalk Linx, and FactoryTalk Alarms and Events data.
FTP and Computer Device Items
FTP and Computer Device Itemscan be placed in the root or in a container in the asset tree.
•
Generic FTP Device
Use this asset type for devices that use FTP, like robots and drives that host a FTP Server, such as FANUC
or ABB robots. The Generic FTP device replaced the vendor-specific robot asset type, Fanuc Robot and ABB
Robot, in version 7.00 and later.
•
Remote Computer
Use this asset type with the Disaster Recovery capability to back up and verify the contents of a specified
shared folder on a computer in the system. A binder asset is used to specify which files within the shared
folder should be operated on.
Network Device Items
Network Device Itemscan be placed in the root or in a container in the asset tree.
•
Allen-Bradley Stratix Switch
Use this asset type to run a schedule to store a backup copy of files that are associated with the Allen-
Bradley Stratix™ Switch or retrieve a copy of those files and compare them to an archive file.
Rockwell Automation, Inc. FTAC-GR002I-EN-E - January 2024 15

Chapter 2Navigate the FactoryTalk AssetCentre client
Asset Inventory Items
Asset Inventory Items can be placed in the root or in a container in the asset tree.
• Asset Inventory
Use this asset type to scan physical automation devices on the network. When you run a backup or backup
and compare schedule on an Asset Inventory asset, the Asset Inventory agent service scans the connected
devices and computers on the network and stores unique identification information about hardware,
firmware, and software in the backup data. You can open the backup data in grid view to see the detailed
scanning result of devices and associated software. You can also add the scanned assets to the asset tree or
update assets in the asset tree with different properties.
Files and Folder Items
These types of assets can be placed under any device or container in the asset tree.These asset types do not count
toward asset capacity activation.
•
A Binder is a collection of files and folders that is treated as a unit. For example, when you check out a
binder all the contents of the binder are checked out and placed in your working folder.
•
A File in the asset tree can be any type of data file, from a device's configuration file, to a text file, to a CAD
drawing.
•
A Folder is simply a container in which to place files. You may want to organize files within a folder if you
have many files associated with a component or area of your plant, such as a procedure document, an
inventory spreadsheet, CAD drawings, and so on. Folders can only contain Files, Binders, and Links, not
Devices.
•
A Link to a binder or file is similar to a shortcut in Microsoft Windows. It is not a second copy of the file or
binder, but rather a link to an existing file or binder in the asset tree. Including the same file or binder in
several locations in the asset tree would compromise version control for that file or binder. Instead, place a
link to the file or binder in the additional locations.
Organizational Items
An organizational asset can be placed in the root or in another container in the asset tree.These asset types do not
count toward asset capacity activation.
•
A Generic Container provides a means of representing a functional area of your plant that is comprised of
multiple devices. For example, a wash rack might be comprised of a processor, a robot, valves, flow meters,
and so on. (Valves and flow meters are not included in FactoryTalk AssetCentre. Additional device types will
be added in future releases. For the time being, they could be represented by a Generic Device.)
Tip: While containers and folders both contain assets, they are not interchangeable. Containers
can hold ANY type of asset (including folders). Use a generic container to hold devices and other
associated assets. Folders and asset inventories can ONLY contain files, links, binders, and other
folders.
•
A Generic Device enables you to add unsupported devices to the asset tree.
16 FTAC-GR002I-EN-E - January 2024 Rockwell Automation, Inc.

Chapter 2Navigate the FactoryTalk AssetCentre client
Custom Device Items
Custom DeviceItems can be placed in the root or in a container in the asset tree.
• Custom Device
Use this asset type to perform Disaster Recovery capability for a physical automation device which has no
corresponding asset type inFactoryTalk AssetCentre. When configuring your backup tool and compare tool in
Tools > Options, you can perform Disaster Recovery capability for your device automatically.
Legacy Device Items
Legacy Devices Items can be placed in the root or in a container in the asset tree.
•
ABB Robot
Use this asset type to run a schedule to store a backup copy of files that are associated with the ABB Robot
or retrieve a copy of those files and compare them to an archive file.
•
FANUC Robot
Use this asset type to run a schedule to store a backup copy of files that are associated with the FANUC
Robot or retrieve a copy of those files and compare them to an archive file.
•
RA Drive
Use this asset type to run a schedule to store a backup copy of files that are associated with the RA Drive or
retrieve a copy of those files and compare them to an archive file.
Workspace pane
The Workspace Pane shows the information and controls for the FactoryTalk AssetCentre tools: Archive, Schedules,
Logs, Searches, Agent Groups, and Address Book. After a tool is selected, it appears on a tab in the Workspace Pane:
1.
Click a button to show a tool in the Workspace Pane.
Alternatively, you can choose a tool on the View menu.
2.
Tabs appear on the Workspace Pane for each tool that is open.
3.
Users can get the severity of the logs and take the corresponding actions.
Rockwell Automation, Inc. FTAC-GR002I-EN-E - January 2024 17

Chapter 2Navigate the FactoryTalk AssetCentre client
Use the Workspace Pane to:
•
Set up and run schedules. See Quick Start 3: Set up Disaster Recovery schedules on page 59.
• View and search logs. See Quick Start 4: View and search logs on page 66.
• Manage file versions in Archive. See Quick Start 5: Open and edit files in Archive on page 75.
Toolbar
The following table lists the FactoryTalk AssetCentre client toolbar buttons and provides a brief description of each
button’s functions:
Button Description
New
Adds a new item such as an asset, schedule, search, or Address
Book contact or group, depending on what is selected and has
focus in the rest of the window. This button is unavailable if
nothing can be added (for example, if the Asset View has focus,
but is not in Design mode).
Save
Available only when information (such as a schedule or search)
has been edited, but not yet saved.
Print
Available only when viewing a log. Prints either the selected
records or all records listed.
Cut
Combined with the Paste button, the Cut button moves an asset
from one location in the tree to another. Select the asset, then
click the Cut button. Click on the container in which you want
to place the asset, then click the Paste button. The asset that
was cut does not disappear from its original location until it is
pasted in the new location.
Copy
Combined with the Paste button, the Copy button duplicates
an asset in the tree. First select the asset and click the Copy
button. Next select the container in which you want to place the
asset, then click the Paste button.
Paste
Combined with the Cut (or Copy) button, the Paste button
moves (or copies) an asset from one location in the tree to
another. Select the asset, then click the Cut (or Copy) button.
Click on the container in which you want to place the asset,
then click the Paste button.
Delete
Deletes the selected asset (if in Design mode), search, schedule,
or Address Book contact or group. This has the same function
as the Delete button on the Asset Viewtoolbar, Searchtoolbar,
and Schedulestoolbar.
Opens or shifts focus to the Asset View. This view contains the
asset tree that you create to represent your system. For more
information about the asset tree, see Quick Start 2: Design the
asset tree on page 51.
18 FTAC-GR002I-EN-E - January 2024 Rockwell Automation, Inc.

Chapter 2Navigate the FactoryTalk AssetCentre client
Button Description
Opens the Agent Groups tab on which you can manage the
agents into groups. If the tab is open, it brings the Agent
Groups tab to the front.
Opens or shifts focus to the Archive tab. Archive
isFactoryTalkAssetCentre’s source control tool that you will use
to manage file versions. For more information, see Quick Start
5: Open and edit files in Archive on page 75.
Opens the AssetsLifecycle tab on which you can synchronize
lifecycle information in theFactoryTalk AssetCentreserver
and client with the data on the Rockwell Automation
lifecycle website, or refresh lifecycle information in
theAssetCentreclient with theAssetCentreserver.
Opens or shifts focus to the Logs tab. This tab allows you to
view any of the logs the Audit Log, the Event Log, and the
Diagnostics and Health Log. For more information, see Quick
Start 4: View and search logs on page 66.
Opens or shifts focus to the Schedules tab where you can
set up scheduled operations such as Backup and Backup and
Compare. For more information, see Quick Start 3: Set up
Disaster Recovery schedules on page 59.
Opens or shifts focus to the Searches tab where you can
search the logs or the Archive history. For more information,
see Quick Start 4: View and search logs on page 66.
Properties
Shows the properties of the selected item: an asset in the Asset
View or a contact in the Address Book, for example. For an
asset, you can only edit the properties if the Asset View is in
Design mode.
Show Help
Shows theonlinehelp related to the part of the software you are
currently using.
Menu bar
Any menu can be clicked or opened by holding down the Alt key and pressing the underlined letter in the menu name.
For example, to show the Tools menu, press Alt-t. For information on any menu command, refer to the About the Menu
Bar topic of the FactoryTalk AssetCentre Help.
Right-click menus
Right-click menus provide access to most functions in the FactoryTalk AssetCentre client and are available
throughout the software. For example, right-click in the Asset View, on an asset in the Asset View, or in the Workspace
Pane to see a list of functions particular to that item.
For information on a particular command on a right-click menu, refer to Help and search for the command.
Rockwell Automation, Inc. FTAC-GR002I-EN-E - January 2024 19

Chapter 2Navigate the FactoryTalk AssetCentre client
Status bar
The Status Bar at the bottom of the FactoryTalk AssetCentre window shows the currently logged on FactoryTalk user
and the status of the connection to the server. It also shows the number of FactoryTalk AssetCentre agents running in
the system.
If the server status is Disconnected, see If the client cannot communicate with the server on page 90.
20 FTAC-GR002I-EN-E - January 2024 Rockwell Automation, Inc.

Chapter 3
FactoryTalk AssetCentre system architecture
The following graphic shows the FactoryTalk AssetCentre system architecture and relationship of user permission,
networking, license management, and version control within the architecture.
Rockwell Automation, Inc. FTAC-GR002I-EN-E - January 2024 21

Chapter 4
About FactoryTalk AssetCentre Web Client
FactoryTalk AssetCentre Web Client is a web application that provides access to the FactoryTalk AssetCentre system
from a web browser. As opposed to the FactoryTalk AssetCentre Desktop Client with full read-and-write functions, the
web client allows you to do the following to monitor your factory automation system:
• View the asset tree and archive workspace.
•
Check in and check out files or binders, undo a check-out, unblock a workflow, pin, unpin, label, and promote
files and binders, view and remove labels, and copy a version from backup data to configuration data.
• View, update, refresh, report lifecycle information, view, filter, and sort report.
• View, filter, and sort logs.
•
Create, edit, delete, activate or deactivate, run, stop, filter, and sort schedules.
•
Run, filter, and sort searches.
•
View database information, set database limitations, analyze index fragmentation, and rebuild fragmented
indexes.
•
Createa log cleanup schedule.
We recommend that you use the TLS protocol with FactoryTalk AssetCentre Web Client. See Step 6: Configure the TLS
protocol on page 31.
Access FactoryTalk AssetCentre Web Client
You must sign in every time you try to open the web client with a browser.
To sign in to FactoryTalk AssetCentre Web Client
1. From the Start menu, select FactoryTalk AssetCentre Web Client, or open the browser, and then enter the
URL address http://<FQDN>/RockwellSoftware/AssetCentreWebClient.
Tip:
FQDN is the fully qualified domain name of the FactoryTalk AssetCentre Server computer.
If you are changed the default port in site binding, you need to include the self-defined port
number in the computer name part in the form as MYSERVER:PortNumber.
2.
On the AssetCentre Web Client page, enter the user name and the password.
IMPORTANT:
You can sign in to FactoryTalk AssetCentre Web Client using a FactoryTalk user
or Windows-linked user.
3.
Select Sign in.
22 FTAC-GR002I-EN-E - January 2024 Rockwell Automation, Inc.

Chapter 5
Quick Start 1: Configure the system
After installing the FactoryTalk AssetCentre software, there are several steps you must perform to start using the
software. The next several chapters of this guide take you through the steps required to quickly get results using
FactoryTalk AssetCentre.
The main tasks necessary to begin using FactoryTalk AssetCentre are:
•
Quick Start 1: Configure the system on page 23
•
Quick Start 2: Design the asset tree on page 51
•
Quick Start 3: Set up Disaster Recovery schedules on page 59
•
Quick Start 4: View and search logs on page 66
•
Quick Start 5: Open and edit files in Archive on page 75
•
Quick Start 6: Manage Rockwell Automation hardware lifecycle on page 86
This current chapter will concentrate only on the steps necessary to configure your FactoryTalk AssetCentre system.
Quick Start steps for configuring the system
To configure your FactoryTalk AssetCentre system, you must perform the following steps:
•
Step 1: Add users to the FactoryTalk Directory on page 23
• Step 2: Add client computers on page 24
• Step 3: Set feature security for FactoryTalk AssetCentre on page 25
•
Step 4: Add contacts to the FactoryTalk AssetCentre Address Book on page 28
•
Step 5: Set up FactoryTalk AssetCentre database limitations on page 30
•
Step 6: Configure the SSL protocol on page 31
• Step 7: Configure Windows Authentication on page 47
Step 1: Add users to the FactoryTalk Directory
A user must be able to authenticate with the FactoryTalk Directory in order to be authorized to use FactoryTalk
AssetCentre.
Tip:
This section contains only basic instructions for using the FactoryTalk Directory and FactoryTalk
Security. For background information and information regarding more advanced procedures, see the Help
section in FactoryTalk Administration Console.
By default, all members of the Administrators group on the computers on which you installed the FactoryTalk
Services Platform were added to the Administrators group in the FactoryTalk Directory. Also, any rights that you
assign to a Windows User Group are assigned to all members of that group.
We recommend that you use a native FactoryTalk Group with Windows AD linked Group. This practice simplifies the
process of confirming the security configuration as testing is performed on the native FactoryTalk Group, and policy
is written about which Windows user and groups are added to the native FactoryTalk group.
Rockwell Automation, Inc. FTAC-GR002I-EN-E - January 2024 23

Chapter 5Quick Start 1: Configure the system
To add a user to the FactoryTalk Directory
1.
Start the FactoryTalk Administration Console:
a.
Click Start, and then use search to search for FactoryTalk Administration Console.
b. Click FactoryTalk Administration Console.
FactoryTalk Administration Console appears.
2.
Log on to the Network directory using a FactoryTalk Administrator account.
3.
Open the Users and Groups folder.
4. Under the Users and Groups folder, right-click the Users folder, and then select New.
5.
Determine how you want to add user accounts to the system. You can add users indirectly by adding
Windows-linked Groups or Azure AD Groups. Or, directly add users using Windows-linked User or native
FactoryTalk User accounts. For more information, see "Accounts and groups" in FactoryTalk Services Platform
Help. Consider the following:
◦
Adding user accounts indirectly, using groups, is a best practice. Adding user accounts indirectly
moves group management, that is, who is a member of which group, from the FactoryTalk system
administrator to IT.
This technique also simplifies commissioning as a group's permissions are validated in the system, but
group membership is determined by policy or standard operating procedures. Further abstracting the
security design by adding Windows-linked or Azure AD groups to a native FactoryTalk Groups that are
used within the system’s access-control lists results in a security system that is more maintainable and
sustainable.
◦
Windows-linked groups and Windows-linked users can be part of either a Microsoft Active Directory
domain or local to a specific computer.
The Microsoft Windows operating system is used to authenticate user credentials and determine
Windows group membership. When disconnected from the network, the system can use valid cached
Windows user credentials to perform authentication.
◦
Azure AD groups requires the FactoryTalk Directory server has access to the Microsoft Azure. The
system utilizes Microsoft Azure to authenticate user credentials and determine Azure AD group
membership. When disconnected from the network, a user that is a member of an Azure AD group
cannot be authenticated.
◦
Native FactoryTalk User accounts are managed solely by the FactoryTalk system. Their access is
independent of the Windows operating system. The FactoryTalk system authenticates the user and
determines group member ship. When disconnected from the network, a user is authenticated using
local valid FactoryTalk Directory cache. If the local FactoryTalk Directory cache has expired, the user
cannot be authenticated.
6.
Enter the information for the user.
For more detailed instructions on adding users and grouping users, refer to the FactoryTalk Services Platform Help.
Step 2: Add client computers
Before adding a client computer to the FactoryTalk AssetCentre system, install the FactoryTalk AssetCentre Desktop
Client or the FactoryTalk AssetCentre Diagnostics Connector on a computer that meets the system requirements and
is connected to the same network as the FactoryTalk AssetCentre server.
24 FTAC-GR002I-EN-E - January 2024 Rockwell Automation, Inc.

Chapter 5Quick Start 1: Configure the system
To add a client computer
1.
If necessary, close all open Windows programs.
2. From the installation package, double-click Setup.exe.
3.
Select AssetCentre Desktop Client or AssetCentre Diagnostics Connector (Optional).
4.
Follow the on-screen instructions to complete the installation.
NOTE:
For more information about how to install FactoryTalk AssetCentre Desktop Client
software and FactoryTalk AssetCentre Diagnostics Connector, see FactoryTalk AssetCentre
Installation Guide.
During the installation, the FactoryTalk Services Platform will be installed and the computer will be added to the
FactoryTalk Network Directory. If for some reason the client computer is not in the FactoryTalk Network Directory,
use the FactoryTalk Administration Console to add it. See the Help section in FactoryTalk Administration Console for
instructions on adding a computer.
Tip:
If you have a significant number of computers for which you need to permit or restrict access,
consider grouping them in the FactoryTalk Administration Console to make assigning security privileges
easier. For example, you can group all of the computers used in oces away from the plant floor and
restrict access to features that should be used only from computers stationed where the user can see the
automation system directly.
Step 3: Configure security for FactoryTalk AssetCentre
By default, all users and the Administrators group in FactoryTalk Directory can perform any task in the FactoryTalk
AssetCentre software. To deny specific users the right to perform tasks in FactoryTalk AssetCentre, you must edit the
Feature Security settings in the FactoryTalk Administration Console.
IMPORTANT:
Never explicitly deny rights to the All Users or Administrators group in FactoryTalk.
Rather, set up specific user groups of your own and deny rights to those groups. Denying rights
to All Users or Administrators could lock everyone out of the system and would deny rights in all
FactoryTalk-enabled products using any FactoryTalk CPR9 version.
To configure security settings
1.
Start the FactoryTalk Administration Console:
a.
Click Start, and then use search to search for FactoryTalk Administration Console.
b. Click FactoryTalk Administration Console.
FactoryTalk Administration Console appears.
2.
Log on to the Network directory using a FactoryTalk Administrator account.
3.
In the Explorer pane of the FactoryTalk Administration Console, navigate to System > Policies > Product
Policies > FactoryTalk AssetCentre.
4.
Double-click Feature Security.
Rockwell Automation, Inc. FTAC-GR002I-EN-E - January 2024 25

Chapter 5Quick Start 1: Configure the system
IMPORTANT:
There is also a Server Settings object in the FactoryTalk AssetCentre folder.
Do NOT attempt to change any of the settings in this object. Doing so may render your
FactoryTalk AssetCentre system inoperative. If you need to change server settings (to use a
different mail server, for example), from Windows Start menu, select Rockwell Software >
FactoryTalk AssetCentre Server Settings.
5.
In the Feature Security Properties window, click the policy you want to change, and then click the browse
button for the policy.
See Policy settings and their meanings on page 26.
6.
In the Configure Securable Action dialog box, select the user or group for whom you want to assign
permissions. If the user or group does not appear in the list, click Add, click Show all, select the user or
group, and then click OK.
7.
Click the appropriate box to allow or deny the user permission to the selected feature.
8.
Click OK.
Tip:
As a default, FactoryTalk AssetCentre uses Microsoft Windows file associations. To specify
which software program will open a specific type of file, set file associations. See the Set le
associations topic of Help.
Policy settings and their meanings
The following table shows the policy settings and their functions.
This policy setting Controls whether users can
View Address Book View the Address Book (which contains addresses for the
purpose of sending automatic e-mail notifications).
Edit Address Book Edit or add contacts and groups in the Address Book (which
contains addresses for the purpose of sending automatic
e-mail notifications).
Override Archive Check In Check in a file regardless of who checked it out or from where it
was checked out.
Configure Archive Options Settings Turn on or off the function that allowsLogixDesigner to
perform archive activities, such as file check-in, without direct
interaction with theFactoryTalk AssetCentre Desktop Client
and Web Client. FactoryTalk AssetCentre Diagnostics Connector
installation is mandatory if only FactoryTalk AssetCentre Web
Client is used.
Override Archive Undo Check Out Undo a check out even if a different user checked the file out.
Override Removal of Local Copies Choose to keep local copies of checked-in files on their
computer. If this right is allowed, the user can keep local
copies. If this right is denied, the user is not given this option.
26 FTAC-GR002I-EN-E - January 2024 Rockwell Automation, Inc.

Chapter 5Quick Start 1: Configure the system
This policy setting Controls whether users can
Configure Personal Archive File Associations Configure which software product launches when opening a
particular type of file. If a personal file association is set, it will
take precedence over the system file association.
Configure System Archive File Associations Configure which software product launches when opening a
particular type of file. This setting applies unless the user has
specified a personal file association.
Configure Personal Archive Working Folders Set a personal working folder for checking out files.
Configure System Archive Working Folders Set the system working folder to which all users check out files
unless they have a personal working folder.
Allow Empty Comment at Check In Leave the comment field empty as they check in an asset.
Allow Empty Comment at Check Out Leave the comment field empty as they check out an asset.
Clear the Get Writable Copy check box by default Enable or clear the Get Writable Copy check box during get.
Denying this permission enables the Get Writable Copy check
box; a Get retrieves a writable copy of an Archive object.
Allowing this permission (by default) clears the Get Writable
Copy check box; a Get retrieves a read-only copy of an Archive
object.
Store Latest Version Only Choose to store only the latest version in the Archive.
Set Maximum Versions Configure the total maximum number of versions stored in the
Archive.
Configure Asset Inventory Settings Configure the settings in the Asset Inventory window.
Configure AssetsLifecycleSync Synchronize lifecycle information in theFactoryTalk
AssetCentre Server, Desktop Client, and Web Client with the
Rockwell Automation lifecycle website.
Display Calibration Management Data* View Calibration Management data inFactoryTalk AssetCentre.
Perform Calibration Management* Access Calibration Management functionality inProCalV5
software.
Administer Calibration Users* Administer users, groups, and permissions inProCalV5
software. Note that this policy only determines if the user is
automatically added to the Administrator group in theProCalV5
software. Once the user is added toProCalV5, changing
this policy for anAssetCentreuser does not change the
user'sProCalV5 security permissions.
Configure Database Limitations Configure the total maximum size of theAssetCentredatabase,
the size warning levels, the maximum number of versions
per archive asset, the maximum size of Event, Audit, and
Diagnostics logs, and the database capacity status refresh rate.
Configure Database Maintenance Configure automatic database maintenance, manually analyze,
or rebuild index fragmentation.
Run Archive Database Cleanup Wizard Run the Archive Database Cleanup Wizard to delete unused
versions of files.
Rockwell Automation, Inc. FTAC-GR002I-EN-E - January 2024 27

Chapter 5Quick Start 1: Configure the system
This policy setting Controls whether users can
Run Log Database Cleanup Wizard Run the Log Database Cleanup Wizard to remove old records
from the logs. Data can be exported and saved in a separate
file.
Switch to Design mode Enter Design mode, in which the user can edit the asset tree.
Use Web Client Authorized users can use FactoryTalk AssetCentre Web Client.
Change Server Settings Authorized users can run the Server Settings Utility and change
system settings.
Configure Options Authorized users can configure the system and client options.
View Event Log Show the Event Log and run a search on the Event Log.
View Audit Log Show the Audit Log and run a search on the Audit Log.
View Diagnostics and Health Log Show the Diagnostics and Health Log and run a search on the
Diagnostics and Health Log.
Change Diagnostics and Health Log Message Change the status of or add a comment to a Diagnostics and
Health Log record.
View Diagnostics and Health Log Status View a status history for a Diagnostics and Health Log record.
Enable or DisableDTMs* Enable and disableDTMsin theDTMCatalog.
EditDTMNetwork* Show theDTMNetworks dialog box to edit theDTMnetwork.
RunPDCField Edition* Use the Process Device Configuration Field Edition software.
Create a new schedule Create a schedule.
Edit a schedule Change existing schedules.
Delete a schedule Delete schedules.
View a schedule Show the Schedules tab.
Command a schedule Issue commands to a schedule, such as making the schedule
active or running the schedule immediately.
Create a Search Set up a new search to find entries matching specified criteria
in one of the logs, in the Archive History, or in Archive Check Out
Status information.
* Starting from FactoryTalk AssetCentre version 10.00, process device capabilities are not supported. The policies
marked with asterisk are only kept for viewing purposes if you have upgraded FactoryTalk AssetCentre from version
9.00 or earlier.
Step 4: Add contacts to the Address Book
Use the FactoryTalk AssetCentre Address Book tab to create contact information that the system uses to notify users
about the progress and outcome of FactoryTalk AssetCentre schedules and other system-related events. You can then
add contacts to groups (for example, [email protected]) if your existing mail system supports groups. This
allows you to inform recipients about system events simultaneously.
28 FTAC-GR002I-EN-E - January 2024 Rockwell Automation, Inc.

Chapter 5Quick Start 1: Configure the system
Tip:
You cannot import groups from another e-mail program. More than one user can create groups at
the same time.
To create contacts and groups, you must be granted View Address Book and Edit Address Book
permissions. See Step 3: Set Feature Security for FactoryTalk AssetCentre on page 25.
To add contacts to the Address Book
1.
Start the FactoryTalk AssetCentre Client.
2.
Select View > Address Book.
3.
Select Tasks > Add New Address Book Contact or click the New button (Keyboard users: Press Ctrl-N).
4.
In the New Contact name dialog box, complete the Contact tab. You must enter a unique name for the
contact that is not the same as any other contact or group name.
5.
Click the Internet tab and complete it. You must enter an e-mail address for the contact to receive
notifications.
Tip:
If in your existing e-mail system you have a group that already has an e-mail address (for
example, a group of electricians with the e-mail address AllElectricians@MyCompany.com), you
can use that group’s existing e-mail address. Simply create a contact and give it a name (for
example, Electricians) and enter the group’s e-mail address (AllElectricians@MyCompany.com)
as the contact’s default e-mail address. The individual e-mail addresses of the electricians in the
group will not be added to the Address Book as contacts.
6.
Click OK.
Once you have created Address Book contacts, you can add those contacts to Address Book groups. Groups
cannot be imported from another e-mail program.
7.
Click Tasks > Add New Address Book Group.
Tip:
To add members to an existing rather than new group, see Help. Select Help > Contents.
Open the Address Book and click the Modify contacts and groups topic.
8.
On the Group tab in the Group Name field, enter a name for the group.
9.
Click Select Members.
10.
In the Contacts/Groups list on the left of the New Group dialog box, select the contact or group to add to
the group, and click Select.
11.
Click OK.
Tip:
To perform additional Address Book tasks (for example, to delete or modify groups or
contacts), see Help. Select Help > Contents, and open the Addresses Book topic.
Rockwell Automation, Inc. FTAC-GR002I-EN-E - January 2024 29

Chapter 5Quick Start 1: Configure the system
Step 5: Set up FactoryTalk AssetCentre database limitations
Use the Options: Database Limitations dialog box to specify the settings of database limitations, including:
•
Total maximum size of the AssetCentre database
• Size warning levels
• Maximum number of versions per archive asset
•
Maximum size of database table capturing logs
•
Database capacity status refresh rate
•
Email notification
Tip:
Database limitation configuration is recommended but optional. You can use FactoryTalk
AssetCentre without setting up database limitations.
To set up database limitations
1.
Start the FactoryTalk AssetCentre client.
2.
Select Tools > Options.
3.
Under Category on the left side of the dialog box, select Database Limitations.
4.
Select the Database Limitations Enabled check box, and specify the settings as desired.
Tip:
By default, the Database Limitations Enabled check box is not selected, and all the
settings of database limitations are unavailable. To select the Database Limitations Enabled
check box to configure all the settings, you must have Configure Database Limitations
permission. See Step 3: Set Feature Security for FactoryTalk AssetCentre on page 25.
The following table shows how to configure each setting for Database Limitations.
Settings How to configure
Total maximum size of theAssetCentredatabase Enter a value for the total maximum size of
theAssetCentredatabase. No minimum value is required.
Size warning levels Specify the percentage of database capacity as the Warning
level or Critical level. The status of database usage appears in
the status bar of theFactoryTalk AssetCentreclient.
Maximum number of versions per archive asset Enter a value for the maximum version number of an asset in
archive.
You can also configure the maximum number of versions per
asset in Archive.
Maximum size of database table capturing logs Enter a value for the maximum file size of Event Log, Audit Log,
and Diagnostics Log.
If the file size of any log exceeds its maximum size,FactoryTalk
AssetCentrewrites the log, and adds a new warning log about
the current event log size exceeding its maximum size.
When the Event, Audit, or Diagnostic and Health logs reach
the maximum size, a warning message appears when you
30 FTAC-GR002I-EN-E - January 2024 Rockwell Automation, Inc.

Chapter 5Quick Start 1: Configure the system
Settings How to configure
run theFactoryTalk AssetCentreclient, indicating the log size
status.
Database capacity status refresh rate Enter a value to specify the frequency to refresh the database
capacity status. The default value is 2. The minimum accepted
value is 1, and 0 is not accepted.
When the database capacity reaches the warning or critical
level, or the Event, Audit, or Diagnostic and Health logs
reach the maximum size, a warning message appears when
theFactoryTalk AssetCentreclient refreshes the database
capacity status.
Email notification Specify the email addresses to receive notifications when
database size, asset version max, or log size reaches alarm
level.
Click the browse button to select email address from
Contacts and Groups address book dialog.
If you set any value as 0 or higher than the maximum size, or
leave any value blank, it is translated as unlimited.
SCANto Proceed Validate whether the current total database size, event log size,
audit log size, diagnostics log size, and asset versions meet
each own specified threshold.
This operation is required when making any changes to the
Database Limitations.
Not all situations during database limitation configuration are covered in this manual. For detailed information, refer
to the FactoryTalk AssetCentre Help.
Step 6: Configure the TLS protocol
Beginning with FactoryTalk AssetCentre version 13.00.00,it is required to turn on TLS 1.2 for secure communications
within the FactoryTalk AssetCentre system.We recommend that you disable TLS 1.0 and TLS 1.1 in the system and we
strongly recommend that you use a TLS certificate signed by a certificate authority (CA).
For more information about TLS protocol version support, see Protocols in TLS/SSL. For more information about the
compatible operating system, see Software requirements in FactoryTalk AssetCentre Installation Guide.
IMPORTANT:
•
When the installation environment is targeted to use TLS 1.3, note that FactoryTalk
AssetCentre requires both TLS 1.2 and TLS 1.3 to be enabled. FactoryTalk AssetCentre will not
work if only TLS 1.3 is enabled.
•
Using the TLS protocol is an essential part for the communication security over your
network.
•
If you want to configure the protocols as needed, you should use the same protocol for all
computers deployed in your network.
Rockwell Automation, Inc. FTAC-GR002I-EN-E - January 2024 31

Chapter 5Quick Start 1: Configure the system
For more information about the TLS configuration, see Congure the TLS protocol for FactoryTalk AssetCentre in
FactoryTalk AssetCentre Installation Guide.
Create a self-signed TLS certificate
Follow these steps to create a self-signed TLS certificate on the FactoryTalk AssetCentre Server computer.
To create an TLS certificate
1. Open Internet Information Services (IIS) Manager on the FactoryTalk AssetCentre server computer.
On Windows Server 2019, Windows Server 2016, and Windows Server 2012 R2:
a. On the taskbar, click .
b. In the search box, type inetmgr, and then press Enter.
c.
Click the best match result.
2.
Under Connections, click the FactoryTalk AssetCentre server.
3.
In Features View, double-click Server Certificates.
32 FTAC-GR002I-EN-E - January 2024 Rockwell Automation, Inc.

Chapter 5Quick Start 1: Configure the system
4. Under Actions, click Create Self-Signed Certificate.
5.
In the Create Self-Signed Certificate dialog box:
◦
Specify a name for the certificate.
◦ Select Web Hosting as the certificate store.
6.
Click OK.
The created TLS certificate is listed.
Export the created TLS certificate for FactoryTalk AssetCentre client and agent computers
After creating an TLS certificate on the FactoryTalk AssetCentre server computer, export the certificate which will
need to be imported on the FactoryTalk AssetCentre client and agent computers.
Rockwell Automation, Inc. FTAC-GR002I-EN-E - January 2024 33

Chapter 5Quick Start 1: Configure the system
To export the created TLS certificate
1.
Open Internet Information Services (IIS) Manager on the FactoryTalk AssetCentre server computer.
On Windows Server 2019, Windows Server 2016, and Windows Server 2012 R2:
a. On the taskbar, click .
b. In the search box, type inetmgr, and then press Enter.
c.
Click the best match result.
2.
Under Connections, click the FactoryTalk AssetCentre server.
3.
In Features View, double-click Server Certificates.
4.
Select the TLS certificate that you have created.
5.
Under Actions, click Export.
34 FTAC-GR002I-EN-E - January 2024 Rockwell Automation, Inc.

Chapter 5Quick Start 1: Configure the system
6. In the Export Certificate dialog box:
◦
Under Export to, click , and then specify the location and name to save the certificate.
◦ Specify the password for the certificate.
7. Click OK.
Configure a site binding
Before you begin
•
Create a self-signed TLS certificate on page 32.
To configure a site binding
1.
Open Internet Information Services (IIS) Manager on the FactoryTalk AssetCentre server computer.
On Windows Server 2019, Windows Server 2016, and Windows Server 2012 R2:
a. On the taskbar, click .
b. In the search box, type inetmgr, and then press Enter.
c.
Click the best match result.
2.
Navigate to localhost > Sites > Default Web Site.
Rockwell Automation, Inc. FTAC-GR002I-EN-E - January 2024 35

Chapter 5Quick Start 1: Configure the system
3. Under Actions, click Bindings.
4.
In the Site Bindings dialog box, click Add.
5.
In the Add Site Binding dialog box, configure the following settings.
For this option... Do this...
Type Select https.
IP address Select All Unassigned.
Port Keep the default port number 443 or if you needed, you
may change it to a self-defined port.
If you use a self-defined port, you need to configure a
firewall rule and web services URL on page 44.
Host name Type the fully qualified domain name (FQDN) of the
FactoryTalk AssetCentre server.
SSL certificate Select your TLS certificate.
See Create a self-signed TLS certificate on page 32.
6.
Click OK.
36 FTAC-GR002I-EN-E - January 2024 Rockwell Automation, Inc.

Chapter 5Quick Start 1: Configure the system
7. In the Site Bindings dialog box, the created site binding is listed. Click Close.
Tip:
You can remove the default HTTP site binding and only keep the created HTTPS site binding.
Configure SSL settings for Management of Change, FactoryTalk AssetCentre Desktop Client and Agent,
and FactoryTalk AssetCentre Web Client
Before you begin
•
Create a self-signed TLS certificate on page 32.
• Configure a site binding on page 35.
To configure SSL settings for Management of Change, FactoryTalk AssetCentre
Desktop Client and Agent, and FactoryTalk AssetCentre Web Client
1.
Open Internet Information Services (IIS) Manager on the FactoryTalk AssetCentre server computer.
On Windows Server 2019, Windows Server 2016, and Windows Server 2012 R2:
a. On the taskbar, click .
b. In the search box, type inetmgr, and then press Enter.
c. Click the best match result.
2.
Navigate to localhost > Sites > Default Web Site.
To configure the SSL settings for Management of Change, select LLumin.
Rockwell Automation, Inc. FTAC-GR002I-EN-E - January 2024 37

Chapter 5Quick Start 1: Configure the system
To configure the SSL settings for FactoryTalk AssetCentre Desktop Client and Agent, and FactoryTalk
AssetCentre Web Client, select AssetCentre and AssetCentreWebClient under RockwellSoftware.
3.
In Features View, double-click SSL Settings.
4.
Make sure the following options are selected:
◦
Require SSL
(FactoryTalk AssetCentre Web Client only) Selecting this option will result in deactivating the HTTP
protocol (with the default port 80). When you type http:// in the web browser, it will be automatically
redirected to https://.
38 FTAC-GR002I-EN-E - January 2024 Rockwell Automation, Inc.

Chapter 5Quick Start 1: Configure the system
◦ Ignore
This option applies to the client certificates.
5.
Under Actions, click Apply.
6.
Restart the computer.
Turn on secure communication between the server, client(s), and agent(s)
Once you configured the TLS protocol, turn on secure communication between the server, client(s), and agent(s) in
the Configure Server Settings Utility window.
To enable secure communication
1.
Open the Configure Server Settings Utility window.
On Windows Server 2019, Windows Server 2016, and Windows Server 2012 R2:
a. On the taskbar, click .
b. In the search box, type Server Settings.
c. Click FactoryTalk AssetCentre Server Settings.
2.
Enter the user name and password to log on to FactoryTalk, and then click OK.
In the Configure Server Settings Utility window, under Server Location, the domain name (FQDN) of the
FactoryTalk AssetCentre server computer will be detected automatically.
3. Select the Use the secure communication channel option.
4.
Click OK.
Rockwell Automation, Inc. FTAC-GR002I-EN-E - January 2024 39

Chapter 5Quick Start 1: Configure the system
Import the self-signed TLS certificate to client and agent computers
On the client and agent computers, add the self-signed TLS certificate to the Trusted Root Certification Authorities
certificate store.
Before you begin
•
Create a self-signed TLS certificate on page 32.
•
Export the created TLS certificate on page 33.
To import the self-signed TLS certificate on operating systems
1.
Copy the created TLS certificate on the computer.
2.
Double-click the TLS certificate.
3.
Select Local Machine, and then click Next.
4.
When prompted to confirm the operation, click Yes.
5. Follow the on-screen instructions until you get to the Certificate Store screen.
40 FTAC-GR002I-EN-E - January 2024 Rockwell Automation, Inc.
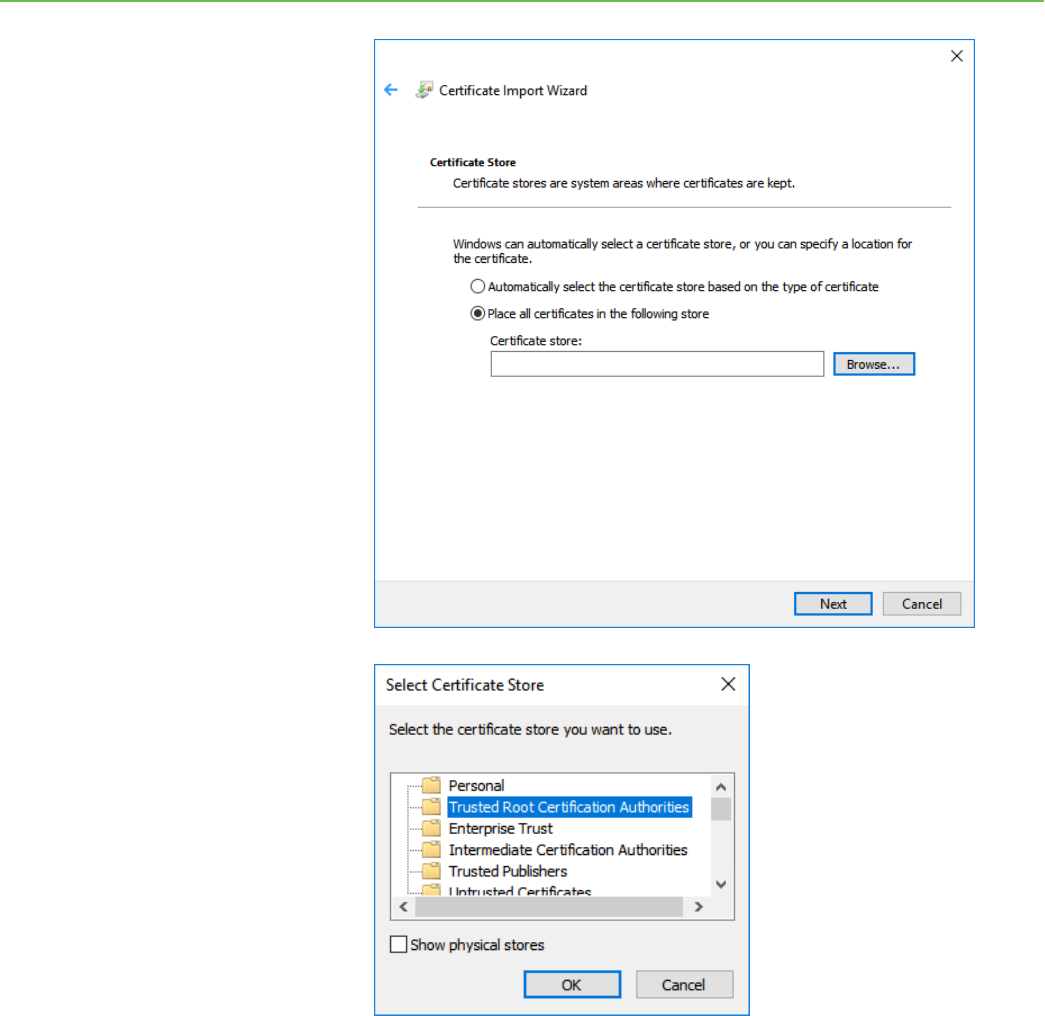
Chapter 5Quick Start 1: Configure the system
6. On the Certificate Store screen, select Place all certificates in the following store.
7.
Click Browse, select Trusted Root Certification Authorities, and then click OK.
Rockwell Automation, Inc. FTAC-GR002I-EN-E - January 2024 41

Chapter 5Quick Start 1: Configure the system
8. Click Next.
9.
Follow the on-screen instructions to complete the import.
To verify the import operation
1.
Click Start, type mmc, and then press Enter.
The Microsoft Management Console opens.
2. Click File > Add/Remove Snap-in.
3.
In the Add or Remove Snap-ins dialog box, select Certificates, and then click Add.
42 FTAC-GR002I-EN-E - January 2024 Rockwell Automation, Inc.

Chapter 5Quick Start 1: Configure the system
4. In the Certificates snap-in dialog box, select Computer account, and then click Next.
5.
Click Finish.
Rockwell Automation, Inc. FTAC-GR002I-EN-E - January 2024 43

Chapter 5Quick Start 1: Configure the system
6. In the Add or Remove Snap-ins dialog box, click OK.
7.
In the Microsoft Management Console, navigate to Console Root > Certificates (Local Computer) > Trusted
Root Certification Authorities > Certificates, and verify that the TLS certificate is listed.
8.
If the TLS certificate is not listed, make sure to select Certificates under Trusted Root Certification
Authorities > Certificates, and then click Action > All Tasks > Import.
9. Follow the on-screen instructions to complete the import.
Configure a firewall rule if the default port is modified
If the default port 443 is modified during the site binding configuration, you need to configure a Windows firewall rule
for the self-defined port.
44 FTAC-GR002I-EN-E - January 2024 Rockwell Automation, Inc.

Chapter 5Quick Start 1: Configure the system
To configure a Windows firewall rule
1.
On the FactoryTalk AssetCentre server computer, click Start, type rewall, and then click Windows Defender
Firewall with Advanced Security.
2.
Click Inbound Rules.
3.
Click Action > New Rule.
4. In the New Inbound Rule Wizard, select Port, and then click Next.
Rockwell Automation, Inc. FTAC-GR002I-EN-E - January 2024 45

Chapter 5Quick Start 1: Configure the system
5. In the Specific local ports box, enter the self-defined port as set during the site binding configuration, for
example 9000, and then click Next.
6.
Follow the on-screen instructions until you get to the Name page.
46 FTAC-GR002I-EN-E - January 2024 Rockwell Automation, Inc.

Chapter 5Quick Start 1: Configure the system
7. In the Name box, enter the name for the new inbound rule, and then click Finish.
The new rule is shown in the list.
Step 7: Configure Windows Authentication
Windows Authentication is a secure way of authentication that uses the username and the password of the user
logged on to the operating system. In the communication secured with Windows Authentication mode, the username
and the password are sent between the client and the server in a strongly hashed form.
Windows Authentication may be enabled in corporate networks that use Microsoft Active Directory services as well as
other ways to identify users.
By turning on Windows Authentication mode you increase the security of the communication between the FactoryTalk
AssetCentre server, client(s) and agent(s) and prevent unauthorized users from accessing the FactoryTalk AssetCentre
server.
Rockwell Automation, Inc. FTAC-GR002I-EN-E - January 2024 47
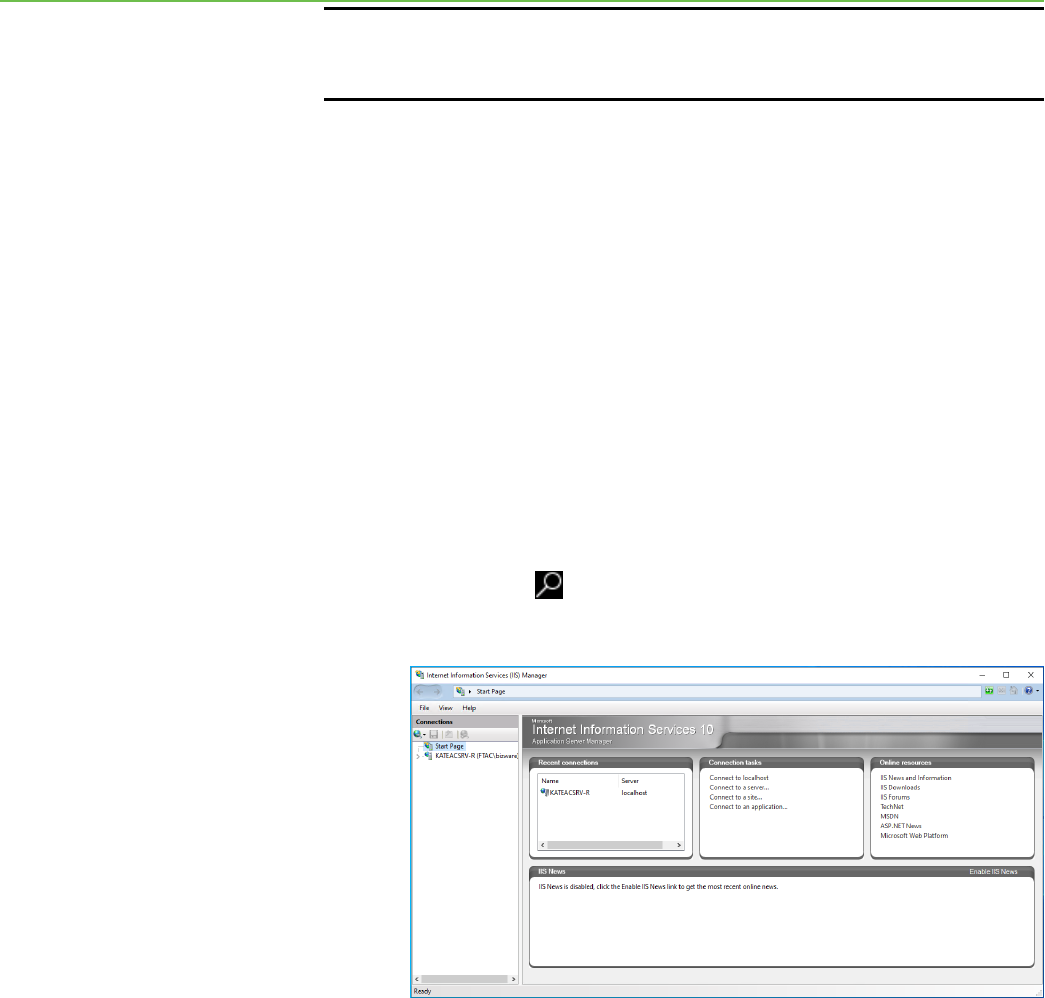
Chapter 5Quick Start 1: Configure the system
IMPORTANT:
For the purposes of FactoryTalk AssetCentre, Windows Authentication mode should be
enabled only in corporate networks that use Microsoft Active Directory services.
After you turn on Windows Authentication mode, the access to the page:
http(s)://assetcentre_server_full_name/rockwellsoftware/assetcentre
...will be secured from being accessed by anonymous users.
In order to access the page, the users will need to log on using their Windows username and password.
This section describes:
•
Turn on Windows Authentication mode in Internet Information Services (IIS) on page 48
Turn on Windows Authentication mode in Internet Information Services (IIS)
To turn on Windows Authentication mode in Internet Information Services (IIS)
1.
Open Internet Information Services (IIS) Manager on the FactoryTalk AssetCentre server computer.
On Windows Server 2019, Windows Server 2016, and Windows Server 2012 R2:
a. On the taskbar click .
b. In the search box, type inetmgr, and then press Enter.
c.
Click the best match result.
48 FTAC-GR002I-EN-E - January 2024 Rockwell Automation, Inc.

Chapter 5Quick Start 1: Configure the system
2. Under Connections, expand the tree, and then click AssetCentre.
3.
In Features View, double-click Authentication.
4.
Under Authentication, click Windows Authentication.
5.
Under Actions, click Providers.
The Providers dialog box appears.
6. Make sure that you have the following providers selected in the order presented in the figure below.
If these providers are not listed, select each of them in the list under Available Providers, and then click
Add.
Rockwell Automation, Inc. FTAC-GR002I-EN-E - January 2024 49

Chapter 5Quick Start 1: Configure the system
7. Make sure that all other authentication modes listed in the pane under Authentication are disabled.
IMPORTANT:
When running FactoryTalk AssetCentre in a workgroup environment, Internet
Information Services (IIS) Anonymous Authentication is enabled by default. Anonymous
Authentication is required for proper operation of the system. To mitigate any security-
related concerns, you must run FactoryTalk AssetCentre in a domain environment.
50 FTAC-GR002I-EN-E - January 2024 Rockwell Automation, Inc.

Chapter 6
Quick Start 2: Design the asset tree
Everything that you do in FactoryTalk AssetCentre begins with an asset. The asset tree in the Asset View represents
your plant including all the assets (anything from a device to a program to a procedure document) that you want to
control, back up, or monitor. The asset tree provides you a method of organizing your plant assets in a logical fashion
that makes sense to you (for example, by physical location, flow of materials, or machine type).
Quick Start steps for designing the asset tree
To design the asset tree, you must perform the following steps:
•
Step 1: Plan the organization of your asset tree on page 51
• Step 2: Add assets to the asset tree on page 53
• Step 3: Change security settings for an asset on page 56
Step 1: Plan the organization of your asset tree
It is important to plan the organization of your asset tree in advance. The organization of the tree can impact your
eciency in applying security settings to assets and setting up Disaster Recovery schedules.
Tip:
For background information to better understand the types of assets available in FactoryTalk
AssetCentre and the use of the asset tree, see About the Asset Catalog and About the Asset View sections in
the Help.
You must be in Design mode to edit the tree. Only one user in the system at a time can be in Design mode.
Assets are listed in alphabetical order in the tree.
Security considerations
When initially added, an asset inherits the security settings of the container in which it is placed (and a container
inherits the security settings of the container in which it is placed). First, set security on the root. Then add
containers under the root and set security for those containers. Then add the next level of assets and containers, and
so on.
Schedule considerations
Schedules are set up by selecting the asset to be scheduled from the Asset View. You can only select one asset when
creating a schedule. If you want the schedule to operate on multiple assets, place all those assets in a container
in the asset tree. This container will be the starting point of the schedule. For example, if you want to backup the
configuration files for a group of devices, place all those devices in a container in the Asset View.
Organization
When you initially set up the asset tree, you will have to decide what will be the most useful organization for you. The
examples below show three possible organizations:
Rockwell Automation, Inc. FTAC-GR002I-EN-E - January 2024 51

Chapter 6Quick Start 2: Design the asset tree
• Physical location
In this arrangement, assets are organized by their physical location in your plant.
•
Flow of materials
In this arrangement assets are organized by the flow of materials in the production process. This may be
particularly useful for continuous and batch processes.
Tip:
Items in the tree are automatically organized alphabetically. If you want to force a certain
order, use numbers in your asset names.
•
Machine type
In this arrangement, assets are organized by the type of machine. You might further organize machines of
the same type by location.
52 FTAC-GR002I-EN-E - January 2024 Rockwell Automation, Inc.

Chapter 6Quick Start 2: Design the asset tree
Step 2: Add assets to the asset tree
Assets are the heart of FactoryTalk AssetCentre. Anything you want the FactoryTalk AssetCentre system to manage
must be included in the asset tree. On first use, all assets to be managed must be added to the asset tree.
There are rules that govern the location of the different types of assets that you can add to the asset tree:
•
The root may contain any type of asset.
Best practice is to place only generic containers or folders directly under the root and use these to organize
the tree in some useful way, perhaps by physical location or by function.
•
A generic container may contain any type of asset.
•
A device may contain files, binders, links, and folders.
•
A folder or an asset inventory may contain files, binders, links, and folders.
•
A file cannot contain any other assets.
•
A link cannot contain any other assets.
•
A binder cannot have any other assets placed under it.
Files are initially placed in the binder by specifying the files to include in the Add Binder dialog box and
checking the binder in, not by placing files under the binder in the asset tree.
Tip:
When initially added, an asset inherits the security settings of the container in which it is
placed (and a container inherits the security settings of the container in which it is placed). Take
advantage of this inheritance by setting security for a container before placing assets inside that
container. See Step 3: Change security settings for an asset on page 56.
To add an asset to the tree, you must have:
•
Switch to Design Mode permission. See Step 3: Set Feature Security for FactoryTalk AssetCentre on page 25.
•
Create Children, Read, and Write permissions for the container into which you want to add an asset. See
Step 3: Change security settings for an asset on page 56.
Work online and oine
You can add devices to the asset tree whether your FactoryTalk AssetCentre client computer is connected to the
devices via a network or not. When connected to the devices, however, you can automatically acquire device
information by browsing for the device. This is the preferred method in this manual. The client computer must be
connected to the FactoryTalk AssetCentre Server to add devices to the asset tree.
Enter device information manually when:
•
the asset cannot be identified by Rockwell Automation or third party network browsers. For example, a device
not supported by FactoryTalk AssetCentre or the network browser would not be found when browsing the
network.
•
the asset has not been placed on the control network yet.
•
the client workstation is working oine so it does not have access to the control network.
To enter device information manually when you are disconnected from the device network, see Help. Select Help >
Contents. Open the Assets topic and click the Associate a device in the Asset View with a networked device topic.
Rockwell Automation, Inc. FTAC-GR002I-EN-E - January 2024 53

Chapter 6Quick Start 2: Design the asset tree
To add assets
1.
To enter Design mode, on the Asset View toolbar, click the Design button (Keyboard users: Press F3 to toggle
Design mode on and off). If you cannot enter Design mode, see If you can’t enter Design Mode on page 90.
2.
Click an asset in the Asset Catalog and drag it to the desired location in the asset tree.
Tip:
Select the container into which you want to place the new asset and press Ctrl-N.
3.
Enter the properties for the asset. For additional information about completing the fields for a particular
asset type, click Help.
4.
When the (Device Type) Properties dialog box is complete, click OK.
Tip:
To learn about additional asset tasks (for example copying, deleting, moving, or renaming
assets), refer to Help. Select Help > Contents. Open the Assets topic and click the desired topic.
Use Asset Inventory to add assets to the asset tree
FactoryTalk AssetCentre supports a new asset type, Asset Inventory. The Asset Inventory asset can be used to scan
physical automation devices on the network. When you run a backup or backup and compare schedule on an Asset
Inventory asset, the Asset Inventory agent service scans the connected devices and computers on the network and
stores unique identification information about hardware, firmware, and software in the backup data. Once you have
the Asset Inventory scanning result, you can add new assets from the scanning result to the asset tree. This is very
helpful especially the first time you build the asset tree. For information about schedules, see Step 4: Run schedules
on page 64.
You need to open the Asset Inventory window first before adding assets to the asset tree. After running backup or
backup and compare schedule on Asset Inventory, you can open the Asset Inventory window.
IMPORTANT:
You must enter design mode to add new assets to the asset tree.
To open the Asset Inventory window
1.
Select View > Archive, or click the Archive button.
2.
In the asset tree, right-click the Asset Inventory backup file and select Open, or select the file in the asset
tree and then at the top of the Archive tab, click the file link. The File Retrieval Options dialog box opens.
3.
In the File Retrieval Options dialog box, keep the Show in Asset Inventory Grid View check box selected.
◦
If you want to open the Asset Inventory window in read-only mode, click the Get button. In read-only
mode, you cannot edit the additional information or commission date for device assets. A read-only
copy of the file is retrieved to the current working folder on your computer.
Tip:
To open the Asset Inventory window in read-only mode, you can also right-click a
version of Asset Inventory asset's backup data on the History tab of Archive and select
Asset Inventory View.
54 FTAC-GR002I-EN-E - January 2024 Rockwell Automation, Inc.

Chapter 6Quick Start 2: Design the asset tree
◦ If you want to open the Asset Inventory window in editable mode, click the Check Out button. In
editable mode, you can edit the additional information and commission date for device assets. A copy
of the file is retrieved to the current working folder on your computer so that you can edit it.
Tip:
Clear the Show in Asset Inventory Grid View check box to get or check out a file as a
normal backup file, without opening it in the Asset Inventory window.
4.
The Asset Inventory window opens.
Once the Asset Inventory window opens, you can add new assets to the asset tree.
To add new assets to the asset tree
1.
On the Devices tab in the Asset Inventory window, select the Add option.
2.
Click the SYNC button.
Tip:
Clicking the SYNC button doesn't add any new assets to the asset tree. It identifies assets in
the scanning result that are new compared to assets on the asset tree.
Make sure you are in design mode to proceed.
After clicking the SYNC button, assets on the Devices tab that:
◦
exist in the asset tree with the same properties appear dimmed. The check boxes before them are
automatically selected.
◦
exist in the asset tree with different properties appear dimmed. The check boxes before them are
automatically selected. You can update these assets with different properties using the Update option.
◦
don't exist in the asset tree can be added to the asset tree. The check boxes before the new assets are
available.
3.
Select the check boxes before the assets you want to add to the asset tree. Click the button on
the toolbar. The Asset Inventory Add Asset Wizard dialog box opens.
4.
In the Asset Inventory Add Asset Wizard - Step 1 of 4 dialog box, enter the required information before
proceeding.
◦ (Required) Asset Type
Click in the Asset Type field and click the browse button . In the Select Asset Type dialog box,
select the asset type. Click Select.
Tip:
Device assets that can be mapped to the corresponding asset type have the Asset
Type field automatically filled. Otherwise, the Asset Type field is empty.
◦
(Optional) Asset Name
Click in the Asset Name field and type the asset name. The name must be unique within the parent
container. That is, you can have two devices with the same name in the asset tree, they just can't be in
the same container.
Rockwell Automation, Inc. FTAC-GR002I-EN-E - January 2024 55

Chapter 6Quick Start 2: Design the asset tree
Tip:
You can leave the Asset Name field blank. FactoryTalk AssetCentre automatically
creates the asset name according to the asset type appended with a number (like _2).
◦ (Required) Asset Location
Click in the Asset Location field and click the browse button . In the Select Asset Location dialog
box, select the node on the asset tree or click the Add New Container button to create a new generic
container. Click Select.
Tip:
The level an asset is added to the asset tree depends on which node you select in the
asset tree structure. By default, the asset is added in the root. If you select a container, the
asset is added to the container. If you select a non-container asset, the asset is added to
the structure at the same level as other assets.
After Asset Type and Asset Location are specified, click Next.
Tip:
You cannot proceed to the next step without specifying Asset Type and Asset Location.
5.
In the Asset Inventory Add Asset Wizard - Step 2 of 4 dialog box, review the details of the new assets that
will be updated to the asset tree. Click Start.
Tip:
To return to Asset Inventory Add Asset Wizard - Step 1 of 4 to modify the asset type,
name, or location, click Back.
6. In the Asset Inventory Add Asset Wizard - Step 3 of 4 dialog box, a progress bar is shown while the adding
operation is in process. If you want to cancel the operation, click Cancel. Usually, this step takes a very short
amount of time unless you are adding a large amount of assets.
7.
When the adding process is complete, you can see result of the adding operation in the Asset Inventory Add
Asset Wizard - Step 4 of 4 dialog box. Click Finish.
To export the result, click Export to save the result as a .csv or .txt file.
Assets added to the asset tree appear dimmed on the Devices tab with check boxes selected before them.
For more information about Asset Inventory, refer to the FactoryTalk AssetCentre Help. Select Help > Contents, and
open the About the Asset Inventory window topic.
Step 3: Change security settings for an asset
Each asset in the asset tree has security settings controlling which users can perform what actions with that asset.
When initially added, an asset inherits the security settings of the container in which it is placed (and a container
inherits the security settings of the container in which it is placed). That is, children inherit security permissions
from their parents. You can assign explicit permissions to an asset, overriding the inherited permissions. You can also
break the chain of inheritance for an asset so that it will not inherit permissions. For more information on inheritance
see the FactoryTalk Security Help which is accessible from the Security Settings dialog box (referenced in the steps
below).
56 FTAC-GR002I-EN-E - January 2024 Rockwell Automation, Inc.

Chapter 6Quick Start 2: Design the asset tree
If you move an asset, it retains its security settings. If you copy an asset, the copy does not retain the security
settings of the original. Rather, the copy inherits the settings from its new parent container.
Tip:
To change security settings for an asset, you must have Switch to Design mode permission. See
Step 3: Set feature security for FactoryTalk AssetCentre on page 25. Keyboard users: Press F3 to toggle
Design mode on and off.
To change security settings for an asset
1.
While in Design mode, right-click the asset in the asset tree and select Security.
2.
On the Permissions tab of the Security Settings dialog box, select whether you want to set permissions by
User or by Action.
3.
In the top pane, select either the user or the action for which you want to set security for the selected asset.
4.
In the bottom pane, select either the action (see the table below) or the user for which you want to set
security and select or clear the Allow and Deny boxes accordingly. For more detailed information on using
the dialog box and FactoryTalk Security, click Help.
This action... Allows you to...
AssetCentre
CheckIndoes not requireMoC workflow Turn off Management of Changeworkflowwhen checking
in selected files and binders associated with the selected
asset.
Select Deny box to require Management of
Changeworkflowon check-in operation.
CheckOut-CheckIn Check out or check in files associated with the selected
asset.
CheckOutdoes not requireMoC workflow Turn off Management of Changeworkflowwhen checking
out files and binders associated with the selected asset.
Select Deny box to require Management of
Changeworkflowon check-out operation.
Get Get a copy of the file or files associated with the selected
asset from Archive.
Label Apply a descriptive Label to a version of a file associated
with the selected asset in Archive.
Pin Pin a version of a file associated with the selected asset.
Promote Store an old version of the file as the most recent version.
Set Store Latest Version Specify that only the most recent version of the file
associated with the selected file asset should be retained.
Set Working Folder Set the working folder for files associated with the selected
asset.
UnblockMoC workflow Reset the Management of Changeworkflowstatus of files
and binders associated with the selected asset.
Rockwell Automation, Inc. FTAC-GR002I-EN-E - January 2024 57

Chapter 6Quick Start 2: Design the asset tree
This action... Allows you to...
UndoCheckOut Undo a check-out operation for files associated with the
selected asset. See Help. Select Help > Contents. Open the
Archive topic and click the Undo a check-out topic.
Common
Configure Security Change security settings for the selected asset.
Create Children Add assets underneath the selected asset (only if the
selected asset is a container or device-type asset).
Delete Delete the selected asset from the asset tree.
Execute This setting is not applicable in this release of
theFactoryTalk AssetCentresoftware.
List Children Show children of the selected asset. If a user does not have
this right, they will not be able to expand the selected asset
to see assets that it contains. If you set this right to Allow,
also set the Read right for this asset to Allow.
Read Show the selected asset in the asset tree.
Show the selected asset's properties.
Write Change the selected asset's properties.
Tip:
For more information on any of the Archive tasks listed in the first section of this table, see Quick
Start 5: Open and edit files in Archive on page 75.
To learn about additional asset tasks (for example copying, deleting, moving, or renaming assets), refer to
Help. Select Help > Contents. Open the Assets topic and click the desired topic.
58 FTAC-GR002I-EN-E - January 2024 Rockwell Automation, Inc.

Chapter 7
Quick Start 3: Set up Disaster Recovery schedules
FactoryTalk AssetCentre allows you to create certain types of scheduled operations, the results of which (whether
or not the operation completed successfully) can be e-mailed to the desired recipients. Currently, FactoryTalk
AssetCentre offers two types of scheduled operations beyond scheduling searches — Device Monitor and Disaster
Recovery. The Disaster Recovery capability ensures quick and accurate file recovery by verifying your devices'
program and configuration files against protected master files.
A master file is a designated version of an asset's configuration data file. A master file may initially be uploaded
from the physical device such as a controller, processor, or robot, or it may be saved directly from the programming
software (such as Studio 5000 Logix Designer). A master file is added to FactoryTalk AssetCentre for backup in
Archive and is required for some FactoryTalk AssetCentre functions such as Disaster Recovery Backup and Compare
schedules (where the file in the physical asset is backed up and compared to the master file stored in Archive so the
differences can be reported).
Disaster Recovery provides two types of operations:
•
Backup. Stores a backup copy of files associated with a number of devices, including Rockwell Automation
devices, Siemens S7 Controllers (STEP7), FTP devices including Robots, and more.
•
Backup and Compare. Retrieves a copy of the files associated with a device asset. If differences are found
and you choose to store the uploaded device files, the retrieved copy of files associated with the device asset
are promoted as the new master file stored in Archive.
•
Change Detect. FactoryTalk AssetCentre can monitor a v20 or higher ControlLogix asset for any changes in
real-time.
Scheduled events for Rockwell Automation Logix 5000 processors will fail if FactoryTalk Security is enabled for that
devices' programming software (RSLogix 5000 versions 16 and earlier). The problem is fixed in RSLogix 5000 versions
later than 16. For RSLogix 5000 versions 16 and earlier, running scheduled events requires single sign-on for these
versions. This issue does not affect other device's schedules (such as robots or Allen-Bradley PanelView devices). If
a schedule contains both Logix 5000 processors and other devices, the scheduled event will only fail for those Logix
5000 processors for which FactoryTalk Security is enabled in the programming software; the event will complete for
the other devices.
To configure the system so that scheduled operations will succeed even with security enabled in the RSLogix
software, see Help. Select Help > Contents. Open the Welcome to FactoryTalk AssetCentre topic and click the About
the configuration for security-enabled RSLogix products topic.
Also, activation is required for Disaster Recovery. For information regarding the activation required, see Help. Select
Help > Contents. Open the Schedules topic and click the Activation in FactoryTalk AssetCentre topic.
Tip:
•
To create scheduled searches instead of scheduled Disaster Recovery operations, see Step 2:
Create a search on page 68.
Asset Inventory asset requires a separate activation to work with disaster recovery
Rockwell Automation, Inc. FTAC-GR002I-EN-E - January 2024 59

Chapter 7Quick Start 3: Set up Disaster Recovery schedules
Quick Start steps for setting up schedules
To set up schedules, you must perform the following steps:
•
Step 1: Set up Agent Groups and agent computers in them on page 60
• Step 2: Create a schedule for the desired Disaster Recovery operation on page 61
• Step 3: Set up recipient lists for schedule results on page 63
•
Step 4: Run schedules on page 64
Step 1: Set up Agent Groups and agent computers in them
FactoryTalk AssetCentre uses agents to perform Disaster Recovery operations. Agents are programs that
communicate with the FactoryTalk AssetCentre server and perform tasks on behalf of the server. Agents allow work
to be distributed and shared among multiple computers to spread processing load and speed up operations. When a
server needs an agent to perform a task, it locates the computer running the operation and assigns the task to that
agent. The agent then reports the task's completion to the server.
FactoryTalk AssetCentre Agent Groups is a plug-in that helps you manage the agents into groups. With this plug-in,
the agent computers that are connected to the same FactoryTalk AssetCentre server do not need to have the same
configuration. This plug-in allows you to:
•
Create agent groups, assign agent computers to the agent groups, and identify an agent group for an asset
•
Assign backup and compare schedule tasks on an asset to the agent computers that belong to the asset’s
agent group
•
Monitor the status of agent computers in the Agent Status pane, the Agent Group Creation and Agent
Assignment pane, and the Assets per Agent Group pane.
This manual covers operations configuring Agent Groups and agent computers within those groups. To add a physical
agent computer into FactoryTalk AssetCentre system instead of managing agent computers in agent groups, see
Help. Select Help > Contents. Open the Administration topic and click the Add an agent computer topic.
To learn about more Agent Groups configurations (for example, delete and rename an agent group, edit agent group
properties, delete an agent computer, edit agent computer properties, move an agent computer, and move an asset
from one agent group in to another) not covered in this manual, refer to Help. Select Help > Contents. Open the Agent
Groups topic and click the desired topic.
Create an agent group
Agent Groups plug-in manages the usage of agents. By default, there is one System Default agent group, which
cannot be renamed or deleted. The System Default agent group is used for scheduled searches, and by default for any
Disaster Recovery tasks. If you need to create a new agent group, follow the steps below.
To create an agent group
1.
If you are not in it, enter Design mode.
2.
On the Menu bar, click View > Agent Groups (or click the Agent Groups button).
3.
Click the Add Agent Group button on the Agent group Creation and Agent Assignment toolbar. The
Add an Agent Group dialog box opens.
60 FTAC-GR002I-EN-E - January 2024 Rockwell Automation, Inc.

Chapter 7Quick Start 3: Set up Disaster Recovery schedules
Tip:
You can also right-click anywhere in Agent Group Creation and Agent Assignment pane
and select Add Agent Group.
4. In the Add an Agent Group dialog box, enter the name and the description for the agent group. Click OK.
Tip:
The maximum number of agent groups which you can create depends on your licensed
agent group capacity. By default, you can create one agent group in addition to the existing
System Default agent group.
Create an agent computer
You can create an agent computer in Agent Groups to monitor the physical agent computers.
To create an agent computer
1. If you are not in it, enter Design mode.
2.
On the Menu bar, click View > Agent Groups (or click the Agent Groups button).
3.
Select an agent group, or an agent computer under the group where you want to add the agent computer to.
Otherwise, the agent computer will be created under System Default agent group.
4.
Click the Add Agent Computer button on the Agent Group Creation and Agent Assignment toolbar.
The Add an Agent Computer dialog box opens.
Tip:
You can also right-click the agent group and select Add Agent Computer.
5.
In the Add an Agent Computer dialog box, enter the name, location and the description for the agent
computer.
You can click the Connect button to check whether the FactoryTalk AssetCentre Server service can connect
to the agent computer.
6.
Click OK.
Step 2: Create a schedule for the desired Disaster Recovery operation
You can set up either a Backup or Backup and Compare Disaster Recovery operation when you create a schedule.
Tip:
To create schedules, you must have Create a new schedule, Edit a schedule, and Command a
schedule permissions. See Step 3: Set Feature Security for FactoryTalk AssetCentre on page 25.
Rockwell Automation, Inc. FTAC-GR002I-EN-E - January 2024 61

Chapter 7Quick Start 3: Set up Disaster Recovery schedules
To create a schedule
1.
In the asset tree, select the container or device for which you want to schedule an operation.
Tip:
Multiple assets can be included in the same scheduled operation by creating a scheduled
operation for a container. For example, a single container may contain multiple controllers.
Scheduling a Backup operation for the container backs up all of the devices in that container in
one operation.
For all of a device's schedule properties to be available for modification, make sure each device
to be added to a schedule has its Configuration Data defined in the device's properties. The
Configuration Data will be used to specify the master file for a Disaster Recovery schedule. See
Step 2: Add assets to the asset tree on page 51.
2.
Select View > Schedules (or click the Schedules button).
3.
Click the New button (Keyboard users: Press Ctrl-N).
4.
Complete the New Schedule Wizard: Step 1 Schedule Properties dialog box and then click Next.
You must enter a unique name for the schedule.
If you have more than one e-mail address you want to include, separate the addresses in the Completion
Email List field with semicolons (;), or, if you have View Address Book permission, select the contacts or
groups from the FactoryTalk Address Book. The report sent from this field is the End of Schedule Report. For
more information about the End of Schedule report, see Step 2: Set up recipient lists for schedule results on
page 63. For more information on a particular field, click Help.
5.
Complete the New Schedule Wizard: Step 2 Recurrence Pattern dialog box and click Next.
To create a start time that does not begin on the hour or half hour, type the time (and AM or PM) in the field.
Be aware that it is possible to create a schedule that will not run on a specific date. For example, if you
choose to have a schedule run on the 31st day of every month, it will not execute in months that do not have
31 days. For more information on a particular field, click Help.
6.
Complete the New Schedule Wizard: Step 3 Operation Properties dialog box. In the tree on the left side of
the dialog box, check boxes appear selected next to each asset in the schedule. Clear a box to not include
that asset in the schedule.
Properties for the selected device appear on the right side of the dialog box. For help completing the shown
properties for the selected device, click Help.
The schedule you created will be active unless you clear the Activate the Schedule box. For more
information on a particular field, click Help.
7.
Click Finished.
62 FTAC-GR002I-EN-E - January 2024 Rockwell Automation, Inc.

Chapter 7Quick Start 3: Set up Disaster Recovery schedules
Step 3: Set up recipient lists for schedule results
There are two different types of schedule reports you can send to specified recipients when a schedule completes:
•
End of Schedule report. This general report summarizes information such as a Backup and Compare
schedule's start and stop times and whether there were any differences between the contents of the physical
device and the asset's master file stored in Archive. This report is set up through the Schedules tab.
•
Backup report or Backup and Compare report. These more detailed, operation-specific reports include
information such as asset and hardware details, the agent computer that ran the schedule, and the name and
location of the master file used in a Compare. For Backup and Compare operations, the Backup and Compare
report indicates whether or not differences were found. To include the detail of what these differences were,
attach the Compare Report file to the e-mail notifications. Both the Backup report and Backup and Compare
report are set up through an asset's scheduled operation properties.
Tip:
To send schedule results, you must have Command a schedule and Edit a schedule
permissions. See Step 3: Set Feature Security for FactoryTalk AssetCentre on page 25.
Send an End of Schedule report
To send an End of Schedule report at the end of a schedule
1.
On the Schedules tab, click in the desired schedule's Completion Email List field and then click the Browse
button. The schedule must be inactive to change the e-mail address, that is, the Active check box must be
cleared.
2.
Complete the Contacts dialog box.
3.
To avoid scrolling the entire list, begin typing the last name of the contact or the name of the group. You
can double-click the contact or group to add it to the list of recipients at the bottom of the dialog box. For
information on adding a new contact, see Step 4: Add contacts to the Address Book on page 28.
4.
Click OK.
Send an operation-specific report
To send a Backup report or Backup and Compare report at the end of a schedule
1.
On the Schedules tab, select the schedule containing the asset for which you want to send a report.
2. To select the asset associated with the schedule and complete its e-mail (and other) operation properties,
see Help. Select Help > Content. Open the Schedules topic and click the Modify scheduled operation
properties topic.
Tip:
After a Backup and Compare operation completes, if no differences are found, the Compare
Report file is attached to e-mail notifications if, in the device properties under Attach Report to
email, you set the Event Completed field to True. If differences are found, the Compare Report
file is attached to e-mail notifications if you set the Event Compare Differences Detected
field to True. See Help. Select Help > Content. Open the Schedules topic and click the Modify
scheduled operation properties topic.
Rockwell Automation, Inc. FTAC-GR002I-EN-E - January 2024 63

Chapter 7Quick Start 3: Set up Disaster Recovery schedules
Step 4: Run schedules
You can activate a schedule so that it runs at its next scheduled time. You did this automatically if you selected the
Activate the Schedule box in the wizard when you created the schedule. You can also activate schedules from the
Schedules tab.
To run a schedule immediately, you can run schedules manually. Choosing to run a schedule manually immediately
runs the schedule and sends e-mail notifications to your recipient list instead of waiting for the operation's next run
time. Running a schedule manually does not affect that schedule's next run time.
Tip:
To run schedules, you must have Command a schedule permission. To activate schedules, you must
have Edit a schedule permission. See Step 3: Set Feature Security for FactoryTalk AssetCentre on page
25.
Run schedules by making them active
To activate an existing schedule that you did not activate when you created the
schedule
• On the Schedules tab next to the schedule you want to activate, select the Active check box. If the selected
schedule is to run daily at 4:00 P.M., the schedule will run next at 4:00 P.M. today (or 4:00 P.M. tomorrow if it is
already later than 4:00 P.M. today).
Run schedules manually
To run a schedule immediately without waiting for its next scheduled run time
1.
You cannot manually run a schedule that has Running status, so on the Schedules tab, select a schedule with
Waiting to Run status.
2.
Click the Run Now button.
3.
Once the schedule is run manually, it returns to Waiting to Run status. If running the schedule manually
causes the schedule to run through its start time, FactoryTalk AssetCentre does not attempt to run the
previously scheduled operation. Instead, the message The schedule has tripped but didn't run because it is
64 FTAC-GR002I-EN-E - January 2024 Rockwell Automation, Inc.

Chapter 7Quick Start 3: Set up Disaster Recovery schedules
already running is logged to the AssetCentre Event Log and the schedule waits to run again at its next start
time.
Tip:
When you move, copy, or delete assets in the asset tree, the schedules for those assets are
also moved, copied, or deleted. To learn about the impacts moving, copying, and deleting assets
have on schedules, refer to Help. Select Help > Contents. Open the Schedules topic and click the
Schedule changes when assets are moved, copied, deleted or renamed topic.
To learn about additional schedule tasks (for example, stopping schedules, changing schedule
run times, setting asset defaults for schedules, or renaming, filtering, and deleting schedules) not
covered in this manual, refer to Help. Select Help > Contents. Open the Schedules topic and click
the desired topic.
Rockwell Automation, Inc. FTAC-GR002I-EN-E - January 2024 65

Chapter 8
Quick Start 4: View and search logs
FactoryTalk AssetCentre offers three different logs:
•
Event Log. This log shows database information regarding events that occur in the system. Events are
generally system-initiated, for example an upload occurred, or a scheduled task completed. Event records
are generated by FactoryTalk-enabled products.
•
Audit Log. This log shows database information regarding actions users perform in the system, such as
making edits to an Studio 5000 Logix Designer project or opening or closing such a software product. Audit
records are generated by FactoryTalk-enabled products.
• Diagnostics & Health Log. The Diagnostics and Health Log provides information about the condition of
automation devices. For example, a monitoring software product, such as Automatic Device Descriptive
Analytics (ADDA) function and RSNetWorx MD, detects a problem with a device on the automation network. It
reports the problem and logs the information in the Diagnostics and Health Log.
FactoryTalk AssetCentre uses the same FactoryTalk Directory server with FactoryTalk Alarms and Events.
When installing AssetCentre Diagnostics Connector, FactoryTalk AssetCentre will log Automatic Device
Descriptive Analytics (ADDA) events from FactoryTalk Alarms and Events and displays them as Diagnostics
and Health logs in version 10.00.00 and later. FactoryTalk View Studio Enterprise version 12.00.00 and
Studio 5000 Logix Designer v33.00.00 are required to be installed for this function. The Automatic Device
Descriptive Analytics (ADDA) logs are not editable.
Tip:
Initially, only previously existing data appears in the Diagnostics and Health Log if that data
was imported from the RSMACC Network Health Solution. This data is not updated by FactoryTalk
AssetCentre. New data is logged in the Diagnostics and Health Log only if RSNetWorx MD is
installed on your system or ADDA functionality is available.
You can search for and show specified records from one log at a time. For example, you could search for log entries
where a specific user performed a task on a specific computer.
You can perform searches in two different manners:
•
Scheduled searches are used to execute a search on a recurring basis and works well for detecting specific
conditions and user behaviors in log data. For instance, you can create a scheduled search to detect unsafe
programming practices among your maintenance staff by searching the Audit Log for edits made to program
files at the end of each shift. You can run scheduled searches manually to show search results immediately.
Scheduled search results can be delivered via e-mail. Search results can be printed and saved in .PDF or CSV
format.
•
Unscheduled searches are used for one-time purposes or when there is an immediate need, such as
searching the Audit Log to determine if anyone has made a change in a control system that was working fine
a few hours ago, but now is down and preventing production.
Tip:
In addition to searching logs, you can search the Archive History Log, the Archive Check Out
Status, and the Asset Extended Property.
To perform a quick search without complex conditions instead of the full searches described in
this manual, see Help. Select Help > Contents. Open the Logs topic and click the Perform a Quick
Search on a log topic.
66 FTAC-GR002I-EN-E - January 2024 Rockwell Automation, Inc.

Chapter 8Quick Start 4: View and search logs
Quick Start steps for viewing and searching logs
To set up searches, you can view logs and then perform the steps to set up and run searches:
•
Step 1: View logs on page 67
• Step 2: Create a search on page 68
• Step 3: Set search security on page 72
•
Step 4: Run searches on page 73
•
Step 5: View and print search results on page 73
Step 1: View logs
Viewing a particular log shows the latest entries for that log only. If no data appears in the log, see If no data appears
in a log on page 95.
Tip:
To view the desired log, you must be granted View Audit Log, View Event Log, or View Diagnostics
and Health Log permission. If you do not have rights to view the desired log, the message You do not
have permission to view the selected log will appear. See Step 3: Set Feature Security for FactoryTalk
AssetCentre on page 25.
1.
When you click a log button, the newest log entries for the selected log appear.
2.
Use the filter fields to limit the items shown in the log. To filter fields, see Help.
Click Help > Contents. Open the Logs topic and click the Filter log records topic.
3.
To perform a quick search on a log, see Help.
Click Help > Contents. Open the Logs topic and click Perform a quick search on a log topic.
4.
Use the column headings to sort and arrange the log data. See Help.
Rockwell Automation, Inc. FTAC-GR002I-EN-E - January 2024 67

Chapter 8Quick Start 4: View and search logs
Click Help > Contents. Open the Logs topic and click the Sort and arrange log records topic.
5.
When you click a log entry, its contents is shown here in the Details pane.
To view logs
1.
Select View > Logs.
2.
To view the desired log:
◦
Select View > Audit Log (or click the Audit Log button).
◦ Select View > Event Log (or click the Event Log button).
◦ Select View > Diagnostics & Health Log (or click the Diagnostics & Health Log button).
To learn about the data fields shown in each log, click Help while the desired log is shown.
3.
To show the contents of a log entry in the Log Item Details pane, click the log entry.
4.
To update the shown log with any additional records, click the Refresh button . This updates the
records in the log with events that occurred in your system since the log display was last refreshed. The
log display is automatically refreshed at the rate determined in the client software settings. To change the
number of seconds between automatic refreshes, see Help. Select Help > Contents. Open the Logs topic and
click the Change the refresh rate and number of shown records topic.
Tip:
To learn about additional log tasks (for example, sorting, filtering, printing, showing
attachments, or changing the status of a Diagnostics & Health Log record) see Help. Select Help >
Contents. Open the Logs topic and click the desired topic.
Step 2: Create a search
Use FactoryTalk AssetCentre Searches to show specified records of the Event Log, Audit Log, Diagnostics and Health
Log, the Archive History Log, the Archive Check Out Status, or the Asset Extended Property. Search results can be
based on any column of data in a record and are generated based on complex conditions that you set.
Tip:
To create unscheduled searches, you must have Create a Search permission. To create scheduled
searches, you must also be granted Create a Schedule, Edit a Schedule, View a Schedule, and
Command a schedule permissions. See Step 3: Set Feature Security for FactoryTalk AssetCentre on page
25.
To create a search
1.
Select View > Searches (or click the Searches button).
2.
Click the New button (Keyboard users: Press Ctrl-N).
3.
Complete the Search Properties page of the New Search Wizard dialog box. Be sure to enter a unique name
for the search and select its data source (the record you want to search). For information to complete any of
the fields, click Help.
4.
To create an unscheduled search for the selected record, click Finished and go to Step 6.
5.
To create a scheduled search to run at a later time, click Schedule, complete the New Schedule Wizard:
Step 2 Timing Properties dialog box.
To create a start time that does not begin on the hour or half hour, type the time (and AM or PM) in the field.
Be aware that it is possible to create a search that will not run on a specific date. For example, if you choose
68 FTAC-GR002I-EN-E - January 2024 Rockwell Automation, Inc.

Chapter 8Quick Start 4: View and search logs
to have a search run on the 31st day of every month, it will not execute in months that do not have 31 days.
For more information on a particular field, click Help. When the dialog box is complete, click Finished.
6. To configure how the search results will appear, complete the Source and Display tab. If you do not
complete this tab, the default format will be used for the search results. The following table lists this tab’s
buttons and options:
Button or graphic Description
Move the selected column one column to the left. Columns
appear in the search results report in the order in which
they are shown here. The columns of data available
vary depending on the record you are searching. Sort
precedence is determined by column display order. For
example, if you want to sort the results by user name and
then logged time, place User Name as the first column and
Logged Time as the second column.
Move Column Right.
Move the selected column one column to the right. Columns
are sorted in the order in which they are shown. The
columns shown vary depending on the record you are
searching. For example, if you want to sort the results by
user name and then logged time, place User Name as the
first column and Logged Time as the second column.
Show all of the selected record's columns in the search
results. This is helpful if you havede-selected some of the
columns and want to re-select all of the columns without
doing so manually.
Show none of the selected record's columns in the search
results. This is helpful if you want to show very few
columns because you candeselectall of the columns and
then select only those that you want.
Show (row heading) Show the record's selected data fields in the search results.
In the Show row beneath the column heading, select
thecheckboxfor each field of data to show in the search
results.
Sort (row heading) Select the shown data fields (above) to sort the search
results. In the Sort row beneath the column heading,
click the cell to select the desired sort order (Ascending,
Descending, or No Sorting). Columns are sorted in the order
in which they are shown. To change column order, use the
Move Column buttons described above.
Width(%) Specify the column width of data fields in percentage
in the search results. In the Width(%) row, click the
cell to enter an integer as the percentage of width for a
column. The total of each column's width percentage can
be equal to or less than 100 percent, but cannot exceed
Rockwell Automation, Inc. FTAC-GR002I-EN-E - January 2024 69

Chapter 8Quick Start 4: View and search logs
Button or graphic Description
100 percent. When the total of width percentage is less
than 100 percent, all the columns except for the last one
will keep their width percentage. The last column will
expand its width by the percentage that is missing from
100 percent against the total of the rest column widths. For
example, there are a total of four columns, each of whose
column width is 10 percent. In the search results, the first
three columns take the space of 10 percent of the entire
row, while the last column will take the space of 70 percent
of the entire row, even though it's specified as 10 percent.
Display all rows In the search results, show all records of the source log
that meet the search criteria.
Display only the first (number) rows In the search results, limit the matching records shown up
to the number indicated.
Tabular style Tabular style arranges each record with column-style
headings.
Card style Card style arranges each record with row-style headings.
Portrait The search report is shown in portrait orientation.
Landscape The search report is shown in landscape orientation.
7.
To create or modify the search criteria for the selected search definition, complete the Conditions tab. The
conditions you create determine the records that will appear in the search results. For example, you can
create a condition to include only those search results logged before or after a specific date and time. If you
do not complete this tab, there will be no conditions placed on the records returned in the search results.
That is, the search will return all records.
How FactoryTalk AssetCentre Evaluates Search Conditions
Evaluating ungrouped conditions is straightforward. FactoryTalk AssetCentre evaluates conditions from top
to bottom. Place conditions in the order you want them evaluated by using the Move Up and Move Down
buttons.
More complicated expressions can have a different meaning depending on how the elements are grouped.
With no grouping, FactoryTalk AssetCentre evaluates first the AND operators and then the OR operators.
Conditions grouped with parenthesis override this, so anything in parenthesis is evaluated first.
Example 1:
Occurred Time Equals '7/22/2007'
And Username Equal To Sally
Or Username Equal To Harry
And Resource Equal To Line1Computer
In this case, FactoryTalk AssetCentre evaluates first the ANDs and then the OR, so it is as if the expression
were written:
(7/22/2007 AND Sally) Or (Harry AND Line1Computer)
Meaning: Include anything Sally did on July 22. Include anything Harry did on the Line1Computer.
Example 2:
Occurred Time Equals '7/22/2007'
70 FTAC-GR002I-EN-E - January 2024 Rockwell Automation, Inc.

Chapter 8Quick Start 4: View and search logs
And (Username Equal to Sally
Or Username Equal to Harry)
And Resource Equal To Line1Computer
The following table lists the Conditions tab’s buttons for creating conditions:
Button or graphic Description
Create a new condition on which to search. The New
Condition dialog box fields and options that appear vary
depending on the log data for which you are creating the
condition.
Properties
Change the properties of the selected condition. The
Condition Properties dialog box fields and options that
appear vary depending on log data for which you are
creating the condition.
Delete the selected condition.
Place a left parenthesis at the beginning of the selected
condition. Use parenthesis to group conditions to control
the way the entire expression is evaluated.
Place a right parenthesis at the end of the selected
condition. Use parenthesis to control the way the entire
expression is evaluated.
Place an And in front of the selected condition. By default,
each condition has an And in front of it. Use And when you
want results to appear in the search results only if both
conditions are met.
Place an Or in front of the selected condition. Use Or when
you want an item to appear in the search results if either
one or the other condition is met.
Place a Not in front of the selected condition. Use Not
when you want to exclude log records that meet the
condition.
Move a condition higher in the list of shown conditions.
WhileFactoryTalk AssetCentredoes evaluate conditions
in a specific order (parenthetical conditions before And
conditions, and Or conditions last), it does also evaluate
those conditions from top to bottom.
Move Down
Move a condition lower in the list of shown
conditions.FactoryTalk AssetCentreevaluates the
conditions in the order they appear.
8.
When the conditions are created, click Save (Search Name).
9.
To quickly see the search results, view the Preview tab.
Rockwell Automation, Inc. FTAC-GR002I-EN-E - January 2024 71

Chapter 8Quick Start 4: View and search logs
10. To format and modify the recipient list for scheduled search results as well as set the time zone for the
computer running the search, complete the Scheduled Search Operation tab. For information on completing
this tab, click Help.
Tip:
The Scheduled Search Operation tab only appears when you select a scheduled search
definition on the Searches tab. To add a schedule to an existing search definition, see Help.
Select Help > Content. Open the Searches topic and click the Create or modify a search
schedule topic.
Step 3: Set search security
You can set security for a search definition to determine which users can set security for, save, execute, and delete
the search.
Tip:
To modify security settings for a search, you must be granted Configure Security permission. In
addition, you must be granted the Read and Write permissions. See the steps below.
Do not deny yourself Read permission or you will no longer be able to show the Security Settings for
(Search name) dialog box to change security for the selected search definition. Generally, all FactoryTalk
AssetCentre users are initially granted each permission related to search security. To prevent other users
from changing your search definition, deny them Configure Security permission.
To set search security
1.
Select View > Searches, or click the Searches button.
2.
On the Searches tab, select the search for which you want to change security.
3.
Select Edit > Security (or click the Security button at the bottom of the Searches tab).
4.
Complete the Security Settings for (Search name) dialog box. To do this, select the user and then set
that user's permissions for the selected search definition, and then click OK. To add a user for whom to set
security for the selected search definition, at the top of the dialog box, click Add.
The Common permissions that apply to searches are:
This permission: Allows the selected user to:
Configure Security modify the Read, Write, Execute, and Delete settings for
this search
Read show these security settings for the this search
Write save this search
Execute run this search
Delete delete this search
5.
Click OK.
72 FTAC-GR002I-EN-E - January 2024 Rockwell Automation, Inc.

Chapter 8Quick Start 4: View and search logs
Step 4: Run searches
To run searches, you can either activate scheduled searches or manually run a scheduled or unscheduled search.
You may want to run a scheduled search manually if you do not want to have to wait for the search's next run time.
Running a scheduled search manually does not affect that search's next scheduled run time.
Time Zones
A scheduled search may actually run on a different computer than your client computer. If some computers in your
FactoryTalk AssetCentre system are in different time zones, this could confuse the time-related information in your
search results. To set the time zone for a computer that is to run a selected scheduled search, see Help. Select Help
> Contents. Open the Searches topic and click the About modifying and saving searches topic. To set the default
time zone for a computer that is to run scheduled searches, click the Set scheduled search options topic.
Tip:
To run a search, you must be granted Execute permission. See Step 3: Set search security on
page 72. To activate and deactivate scheduled searches, you must be granted Command a Schedule
permission. To run a search immediately, you must be granted the appropriate permission for the type
of search you are going to run — View Audit Log, View Event Log, or View Diagnostics & Health Log
permission. See Step 3: Set Feature Security for FactoryTalk AssetCentre on page 25.
Make a search active
To activate scheduled searches so that they run at their next scheduled run time
1.
Select View > Searches, or click the Searches button.
2. Next to the searches you want to activate, select the Active check box. If the selected search is scheduled
to run daily at 4:00 P.M., the search will run next at 4:00 P.M. today (or 4:00 P.M. tomorrow if it is already later
than 4:00 P.M. today).
Run searches manually
To run a scheduled or unscheduled search immediately
1.
Select View > Searches, or click the Searches button.
2. On the Searches tab, select the search row.
3.
Click the Run Now button.
Tip:
To perform a quick search without complex conditions instead of the full searches
described in this manual, see Help. Select Help > Contents. Open the Logs topic and click the
Perform a Quick Search on a log topic.
Step 5: View and print search results
Once you run a search, the results appear on a separate tab. Use the Report (Search Name) tab to view and navigate
the results of a search you have run, as well as export and print the search's results.
Rockwell Automation, Inc. FTAC-GR002I-EN-E - January 2024 73

Chapter 8Quick Start 4: View and search logs
Tip:
To preview a search instead of showing the report, click the Preview tab.
To view and print search results
1. After you run the search, click the Report (Search Name) tab.
2.
Use the Report tab's toolbar to navigate, export, and print the results. The following table lists the Report
tab's toolbar buttons and provides a brief description of each button’s functions.
Button Description
Export Report
Export the search results to the desired location on your
hard drive. Results are saved inPDFformat.
Print Report
Print the search results. Complete the Print dialog box and
click Print.
Go To First Page
Show the first page of the search results.
Go To Previous Page
Show the previous page of the search results.
Go To Next Page
Show the next page of the search results. If the cover page
of the report is shown, click this button to see the first
page of the report containing the actual search results
returned.
Go To Last Page
Show the last page of the search results.
Go To Page
Show a specific page of the search results by entering the
page number.
Zoom
Show the search results as larger or smaller using different
percentages.
3.
To close the Report tab, click the Close button on the right side of the tab.
Tip:
To learn about additional search tasks (for example, filtering, modifying, renaming, sorting,
or deleting searches), refer to Help. Select Help > Contents. Open the Searches topic and then
click the desired topic.
74 FTAC-GR002I-EN-E - January 2024 Rockwell Automation, Inc.

Chapter 9
Quick Start 5: Open and edit files in Archive
The FactoryTalk AssetCentre Archive is a version control tool that helps manage asset files. Use Archive to keep
secure copies of asset configuration files, pin file versions as masters, track versions, and control file use so that
only one person at a time can modify a file.
Tip:
When archiving FactoryTalk AssetCentre's File asset file size is limited by Microsoft SQL Server to
2GB. It is not possible to archive files larger than 2GB. FactoryTalk AssetCentre's Binder asset can store
collections that exceed 2GB. Extreme care should be exercised when archiving Binders with sizes that
exceed 2GB as this can negatively impact database performance.
Using Archive, you can:
•
Keep automation files securely archived. FactoryTalk AssetCentre's Archive uses Microsoft SQL Server to
safely store archived files in a relational database. When you store assets in Archive, you reduce your need
to back up work and prevent accidental deletion of asset data.
•
Ensure that files are modified by one user at a time. Designate a file you want to work on and ensure no
other users can work on the same archived file until your changes are saved in the Archive database.
•
Version files. Archive is similar to a library. To use an archived file, check it out and when you are done,
check it in again. As with a library book, only one person can check out a file at a time. The difference is
that you can make changes to the checked-out file, so the library keeps a copy of each version of the file.
This way, if someone needs to see a version of a file before it was changed, the earlier version can still be
obtained. See Step 2: Check out a file for editing on page 77 and Step 3: Check in a file on page 78.
•
Keep an existing version available for use while development continues. Pin the version of a file that you
want other users to use. Development can continue on that file and each revision is saved in Archive, but if
another user gets the file, they get the pinned version. Also, scheduled operations use the pinned version of
the master file. For information about pinning files, refer to Help. Select Help > Contents. Open the Archive
topic and click the Pin or unpin files or binders topic.
Tip:
To add files to Archive, all you need to do is add assets and their associated files to the
asset tree. See Step 2: Add assets to the asset tree on page 53.
Quick Start steps for managing files in Archive
To work with files in Archive:
•
Step 1: Set a working folder on page 76
• Step 2: Check out a file for editing on page 77
• Step 3: Check in a file on page 78
•
Step 4: Get a read-only version of a file on page 80
•
Step 5: Open a file for viewing on page 82
•
Step 6: Initiate a Management of Change workflow to check out a file for editing on page 83
Rockwell Automation, Inc. FTAC-GR002I-EN-E - January 2024 75

Chapter 9Quick Start 5: Open and edit files in Archive
Step 1: Set a working folder
To edit a file or binder stored in the Archive database, you must place a copy of the file or binder on your local hard
drive. The location on your hard drive is called a working folder. Without a working folder, you cannot retrieve files or
binders from the Archive database. When you set a working folder for an asset, you set the working folder for all files
and binders within the asset.
Types of Working Folders
FactoryTalk AssetCentre has two types of working folders:
•
System working folder. The location where images of files and binders will be stored when you check out
the files for editing or get a read-only version of a file. When the system working folder is set, this working
folder applies to all files and binders in an asset, and all FactoryTalk AssetCentre users. For example, if you
set a system working folder located at C:\BOTTLING PLANT for an asset called East Conveyor, when a
user gets or checks out the East Conveyor asset, the path C:\BOTTLING PLANT is created on that user's
local computer and will contain all of the East Conveyor asset's files. Each asset can only have one system
working folder. Any user with Configure System Archive Working folders permission can set a system working
folder for an asset.
•
Personal working folder. The working folder that overrides the system working folder. When you set a
personal working folder in Archive, that folder is created on your computer and remains your personal
working folder for an asset's files and binders. Other users use the system working folder until they set their
own personal working folders. If users set personal working folders for assets on one computer and then
launch FactoryTalk AssetCentre on another computer and want to use the same personal working folders,
they must set the working folders again.
Tip:
When you check out, check in, or get a file or binders, you have the option of overriding the
current working folder with a temporary location. See Step 2: Check out a file for editing on page
77, Step 3: Check in a file on page 78, or Step 4: Get a read-only version of a file on page
80.
To set a system working folder, you must have Configure System Archive Working Folders permission. To set a
personal working folder (or to override a working folder when checking in, checking out, or getting a file or binder),
you must have Configure Personal Archive Working Folders permission (see Step 3: Set Feature Security for
FactoryTalk AssetCentre on page 25) and Set Working Folder permission for the asset (see Step 3: Change security
settings for an asset on page 56).
To set a working folder
1.
Select View > Archive (or click the Archive button).
2.
In the asset tree, select the asset containing the files and binders for which you want to set the working
folder.
3.
On the Archive tab, after the Working folder field, click Set.
4.
Complete the Set Working Folders dialog box. The current working folder for the selected asset appears at
the bottom of this dialog. If you set a personal working folder for yourself, it will override the system working
folder. However, all other users will use the system working folder for the asset’s files.
76 FTAC-GR002I-EN-E - January 2024 Rockwell Automation, Inc.

Chapter 9Quick Start 5: Open and edit files in Archive
5. Click OK.
6.
To show the contents of a working folder in Windows Explorer, right-click the asset in the asset tree and
select Open Working Folder. To show the contents of a working folder from within Archive, with the asset
selected in the asset tree, and click the link at the top of the Archive tab:
Step 2: Check out a file for editing
Before modifying any file stored in Archive, you must retrieve a copy of the file to the current working folder on your
computer. Retrieving a file and making it available for editing is called checking out a file. Only one user at a time can
check out a file. If a file is checked out by another user, you must wait until that user checks in the file again before
you can check out and edit the file. However, you can get a file that is checked out by another user so that you can
view it in your project. For information about getting a read-only version of a file, see Step 4: Get a read-only version
of a file on page 80.
When you check out an asset, you automatically check out all of the files within the asset. You have the option of
checking out any files located in subfolders of the asset.
FactoryTalk AssetCentre makes it easy to locate a file you check out by duplicating the asset tree structure in folders
and subfolders on your hard drive. A check out duplicates the asset tree structure from the container or folder where
you set the working folder to the container or folder where the file you checked out is located.
Tip:
To check out files, you must have CheckOut - CheckIn permission for the asset. See Step 3: Change
security settings for an asset on page 56.
To check out a file or folder of files
1.
In the asset tree, select the asset containing the file(s) to check out. Once you select an asset in the asset
tree, you can also select the file to check out on the Archive tab.
2.
On the Archive tab, click the Check Out button.
Tip:
You can also right-click an asset in the asset tree (or a file on the Archive tab after you
select an asset in the asset tree) and select Check Out.
3.
Complete the Check out dialog box by selecting any of the following options:
This option Performs the following:
Get local copy Select this option to check out the version of a file from
the Archive database and place it in your working folder;
any version of the file in your current working folder will be
Rockwell Automation, Inc. FTAC-GR002I-EN-E - January 2024 77

Chapter 9Quick Start 5: Open and edit files in Archive
This option Performs the following:
overwritten by the version checked out from the Archive
database. Clear this option to preserve the file version in
your current working folder. This is useful when you've
performed a Get to retrieve a writable version of the file
to your current working folder and now want to back up
changes you make to that file in Archive. Clearing this
option allows you to continue editing the version in your
current working folder and back up those changes in
Archive the next time you check in the file. For information
about getting a version of a file, see Step 4: Get a read-only
version of a file on page 80.
Recursively check out files fromsubfolders Normally when you check out an asset, you check out all of
the files within the asset. Select this option to also check
out all of the files located insubfoldersof the asset. This
option is only available if you select an asset that contains
files in the asset tree.
Override working folders Select this option to override your current working folder
and check out files to a temporary working folder used
for this one check out operation only. Type the path of the
temporary working folder (you can type the path of a new
temporary working folder and the working folder will be
created automatically), or click Browse to select the path
of the working folder you want to use temporarily.
To override the working folder, you must have Configure
Personal Archive Working Folders permission (see Step
3: Set Feature Security forFactoryTalk AssetCentre on
page 25) and Set Working Folders permission (see Step 3:
Change security settings for an asset on page 56).
4.
Enter an optional comment to summarize the work. This is helpful when tracking work done in a file. The
maximum length for a comment is 2500 characters.
5.
Click OK. A checkmark appears next to the file link and the check out location of the file appears on the
Archive tab.
Tip:
You can undo a check-out. This reverts a file or an asset's files to the previous version and
marks the file as no longer checked out. For information about undoing a check-out, refer to
Help. See Help > Contents. Open the Archive topic and click the Undo a check out topic.
Step 3: Check in a file
Once edits are completed to a checked-out file, return it to the Archive database. Checking in a file saves a new
version so that changes are backed up and protected in the Archive database. When you are working on a file over a
long period of time, it is good practice to check in the file daily.
78 FTAC-GR002I-EN-E - January 2024 Rockwell Automation, Inc.

Chapter 9Quick Start 5: Open and edit files in Archive
If you check in an asset, you automatically check in all files within the asset. You have the option of checking in any
files located in subfolders of the asset as well.
You can only check in a file that someone else has checked out if you have permission.
Tip:
To check in files, you must have CheckOut - CheckIn permission (see Step 3: Change security
settings for an asset on page 56). To check in a file someone else has checked out, you must have
Override Archive CheckIn permission (see Step 3: Set Feature Security for FactoryTalk AssetCentre on
page 25).
To check in a file or folder of files
1.
In the asset tree, select the file or the asset containing the files to check in.
2.
On the Archive tab, click the Check In button.
Tip:
You can also right-click the asset or file in the asset tree (or a file on the Archive tab if you
select an asset in the asset tree) and select Check In.
3.
Complete the Check in dialog box. The following options are available:
This option: Performs the following:
Check in and delete the local copy Check in the file so the changes are backed up in the
Archive database, and delete the copy of the modified file
from your current working folder.
Check in but keep a local copy Check in the file so the changes are backed up in the
Archive database, and keep a read-only copy of the file
in your current working folder. When you check out this
file again, you will have to decide whether or not you want
to overwrite the file in your working folder. This option
is only available when you have Override Removal of
Local Copies permission. See Step 3: Set Feature Security
forFactoryTalk AssetCentre on page 25.
Keep checked out Check in the file so the changes are backed up in the
Archive database, but immediately check out the file to
yourself again so that you can keep editing it.
Recursively check in files fromsubfolders Normally when you check in a device or container, you
check in all of the files within that asset. Select this option
to also check in any files located insubfoldersof the
device or container. This option is only available if you
select a device or container in the asset tree.
Override check-out location with path Select this option to check in files from a temporary
working folder instead of your current working folder.
This is useful if you made a copy of a file and placed it
in a location other than the working folder to which you
originally checked out the file. To save any changes to the
Rockwell Automation, Inc. FTAC-GR002I-EN-E - January 2024 79

Chapter 9Quick Start 5: Open and edit files in Archive
This option: Performs the following:
file you copied, click Browse and select the location from
which you want to check in the file.
To override the working folder, you must have Configure
Personal Archive Working Folders permission (see Step
3: Set Feature Security forFactoryTalk AssetCentre on
page 25) and Set Working Folders permission (see Step 3:
Change security settings for an asset on page 56).
4.
Enter a comment to summarize the work. This is helpful when tracking work done in a file. The maximum
length for a comment is 2500 characters.
Tip:
Depending on the value assigned to the Allow Empty Comment at Check In security setting
for a particular user or group, typing a comment may or may not be obligatory upon the check-in.
5.
Click OK. The checkmark is removed from the asset or file on the Archive tab. The check-in action, as well as
the date and time the file is checked in, appears on the History tab. To learn about the History tab, see Help.
Select Help > Contents. Open the Archive topic and click the View file history topic.
Step 4: Get a read-only version of a file
Use Get to retrieve a read-only copy of a file or the files in an asset to your current working folder. Get allows people
who need to use the file (but don't need to edit it) to get the necessary file version. For example, if you want to copy
rungs from another ladder program, you can get that program (even if another user has the file checked out), copy
the rungs, and then paste them into your file. Getting a file eliminates accidental changes to the master file.
You can get the current version of a file or the files in an asset, or you can select an earlier version. You can also get a
file that is marked as checked out, even if you have the file checked out.
FactoryTalk AssetCentre makes it easy to locate a file that you get by duplicating the asset tree structure in folders
and subfolders on your hard drive. Getting a file duplicates the asset tree structure from the container or folder
where you set the working folder to the container or folder where the file you get is located.
The date and time a file is retrieved appears in the file history. To learn about how Archive sets dates and times for
files, see Help. Select Help > Contents. Open the Archive topic and click the Date and time settings topic.
Tip:
To get read-only versions of files, you must have Get permission. See Step 3: Change security
settings for an asset on page 56.
To get the current version of a file
1.
In the asset tree, select the file or asset containing the files to retrieve and click the Get button.
2.
Complete the Get dialog box. The following options are available:
80 FTAC-GR002I-EN-E - January 2024 Rockwell Automation, Inc.

Chapter 9Quick Start 5: Open and edit files in Archive
This option: Performs the following:
Get writable copy Retrieve an editable instead of read-only copy of the file.
This retrieves the most recent or pinned file version into
the current working folder.
Recursively get files fromsubfolders Place a copy of all files located insubfoldersof the
selected device, container, or folder into the current
working folder. This option is only available when you
select a device, container, or folder in the asset tree. It is
not available if you select a file.
Overwrite checked-out files Overwrite any versions of the file in the current working
folder with the version you are retrieving from the Archive
database.
Override local name Select this option to provide another name for the file to be
placed in the working folder. Select the check box and type
a name for the file. When you click OK, the file is placed in
the working folder with the specified name.
Override working folders Select this option to retrieve the file into a temporary
working folder, instead of the current working folder,
for this Get operation only. Type the exact path of the
temporary working folder or click Browse to select the
working folder location where you would like to store the
retrieved files.
To override the working folder, you must have Configure
Personal Archive Working Folders permission (see Step
3: Set Feature Security forFactoryTalk AssetCentre on
page 25) and Set Working Folders permission (see Step 3:
Change security settings for an asset on page 56).
3.
Enter an optional comment to summarize the work. This is helpful when tracking work done in a file. The
maximum length for a comment is 2500 characters.
4.
Click OK. The file appears in your current working folder. The Get action is shown in the file history unless
you select to show version-related activities.
Tip:
To get a specific (labeled) version of a file, see Help. Select Help > Contents. Open the
Archive topic and click the Label a file or binder version and Get a read-only version of a file
or binder topics.
You can also get a pinned version of a file, if there is one. For more information, see Help. Select
Help > Contents. Open the Archive topic and click the Pin or unpin files or binders topic.
To learn about additional Archive tasks (for example, promoting, or deleting files from the
FactoryTalk AssetCentre Archive), also refer to Help. Open the Archive topic and click the desired
topic.
Rockwell Automation, Inc. FTAC-GR002I-EN-E - January 2024 81

Chapter 9Quick Start 5: Open and edit files in Archive
Step 5: Open a file for viewing
If you have set a working folder for a file, you can choose to open that file to view its contents. This is helpful when
you want to make sure you have selected the correct file. Opening a file also allows you to copy its content.
When you open a file and have already placed a local copy of that file in the working folder by either checking out or
getting the file, the software program associated with the file opens the file. To set a file association for a file, see
Help. Select Help > Contents. Open the Archive topic and click the Set file associations topic.
If you do not have a local copy of the file in your working folder when you choose to open the file, FactoryTalk
AssetCentre prompts you to either check out the file for editing (see Step 2: Check out a file for editing on page 77)
or Get a read-only version of the file (see Step 4: Get a read-only version of a file on page 80). This allows you to
place a local copy of the file in your working folder and have the associated software program open the file at the
same time.
To open a file
1.
In the asset tree, right-click the file and select Open Working Folder. You can also double-click the file or
select it in the asset tree and then at the top of the Archive tab, click the file link:
If there is a copy of the file in your working folder, the file's associated software program launches and opens
the file.
Tip:
If you do not have a working folder set for the file's asset, the message dialog box Unable to
Launch File appears instead of the File Retrieval Options dialog box. See Step 1: Set a working
folder on page 76.
If there is not a copy of the file in your working folder, complete the File Retrieval Options dialog
box to place the file in your working folder and then either checking out or getting the file. For
more information about checking out a file, see Step 2: Check out a file for editing on page 77.
For more information about getting a file, see Step 4: Get a read-only version of a file on page
80.
If the message No program is associated with the specied le for this operation, see If you cannot
open a file on page 95.
2.
Close the file when you are done viewing it. Any changes you make to an open file will not be saved unless
you check out the file from Archive. See Step 2: Check out a file for editing on page 77.
If the automatic check-in feature is enabled, after done editing the file that checked out from Archive, you
will be asked if you need to save a new version. For more information on automatic check-in, see Help. Select
Help > Contents, and navigate to the Archive topic and then to the Check in files or binders automatically
topic.
82 FTAC-GR002I-EN-E - January 2024 Rockwell Automation, Inc.

Chapter 9Quick Start 5: Open and edit files in Archive
Step 6: Initiate a Management of Change workflow to check out a file for editing
You can use Management of Change to supervise the check-out and check-in operations.
Prerequisites
• You must have CheckOut - CheckIn permission for the asset.
•
CheckOut does not require MoC workflow permission is denied.
•
Administrator has configured electronic workflow rules for the application.
To initiate a Management of Change workflow for check-out operation
1.
In the asset tree, select the asset containing the file(s).
Once you select an asset in the asset tree, you can also select the file to check out on the Archive tab.
2.
On the Archive tab, select Check Out.
Tip:
You can also right-click an asset in the asset tree (or a file on the Archive tab after you
select an asset in the asset tree) and select Check Out.
3.
In the Check Out Request dialog box, enter the reason for check-out.
4.
Select Submit.
5.
(optional) To reset the file's and binder's status, select Unblock Workflow.
Rockwell Automation, Inc. FTAC-GR002I-EN-E - January 2024 83

Chapter 9Quick Start 5: Open and edit files in Archive
You must have the Unblock MoC workflow permission.
Tip:
◦
Other users cannot perform check-out until the submitted request is approved or rejected,
or Unblock Workflow is used.
◦ After the request is approved by Management of Change administrators, you can do the
following steps.
6.
On the Archive tab, select Check Out.
7. Complete the Check out dialog box.
84 FTAC-GR002I-EN-E - January 2024 Rockwell Automation, Inc.

Chapter 9Quick Start 5: Open and edit files in Archive
8. Click OK.
A checkmark next to the file or binder in the Archive tab indicates the item is checked out. The location and
the action statuses of the checked out item is also shown on the Archive tab.
Rockwell Automation, Inc. FTAC-GR002I-EN-E - January 2024 85

Chapter 10
Quick Start 6: Manage Rockwell Automation hardware lifecycle
Assets Lifecycle provides the lifecycle information for Rockwell Automation hardware devices in the system. It shows
the lifecycle status in the form of a list that allows you to easily manage the hardware lifecycle and make decisions
about which device needs upgrade or replacement. In order to take advantage of this feature, the Asset Inventory for
disaster recovery license is required.
Quick Start steps for managing Rockwell Automation hardware life cycle
To manage the life cycle of Rockwell Automation hardware devices:
•
Step 1: Synchronize lifecycle status on page 86
• Step 2: Refresh lifecycle status on page 87
• Step 3: View detailed lifecycle status on page 87
For more information, refer to Help. Select Help > Contents. Open the Assets Lifecycle topic and click the desired
topic.
Step 1: Synchronize lifecycle status
Synchronize lifecycle information in the FactoryTalk AssetCentre server and client with the data on the Rockwell
Automation lifecycle website. For more information about securely accessing the Rockwell Automation lifecycle
website from your OT zone-based FactoryTalk AssetCentre Server, please refer to this document Cloud Connectivity
to a Converged Plantwide Ethernet Architecture in Rockwell Automation Literature Library. You can synchronize the
lifecycle information of either assets or asset inventory in the AssetCentre server. The lifecycle synchronization is
recommended to run during server null time (time when no scheduled tasks or user interaction is taking place) if
possible. With the synchronization process being based on product ID or catalog number quantity, it can take some
time to complete based on the total collected, and will require server resources during runtime.
Synchronizing the Assets and Asset Library requires an Internet connection.
To synchronize lifecycle status of assets
1.
Select View > Assets Lifecycle, or click the Assets Lifecycle button.
2. Click the Asset tab.
3.
Click Sync. A progress bar shows.
4.
After the progress, the lifecycle information is updated to the FactoryTalk AssetCentre database and the
lifecycle status is updated on the asset list.
To synchronize lifecycle status of asset inventory
1.
Select View > Assets Lifecycle, or click the Assets Lifecycle button.
2. Click the Asset Inventory tab.
3.
If you have used an asset inventory file before and don't want to use another version, skip to Step 7.
If this is the first time to use an asset inventory file, the Asset Inventory tab is empty. You need to specify an
RAAI file. On the right of the Asset Inventory File box, click .
4. On the left of the Select File dialog box, select an RAAI file in the asset tree view.
86 FTAC-GR002I-EN-E - January 2024 Rockwell Automation, Inc.

Chapter 10Quick Start 6: Manage Rockwell Automation hardware lifecycle
5. On the right of the Select File dialog box, select an RAAI file version.
◦
Filter by label
Select this option to filter the RAAI files by label.
◦ Filter by version
Select this option to filter the RAAI files by version.
◦
Latest version
Select this option to use the latest version of the RAAI file.
6. Click OK.
7.
Click Sync. A progress bar shows.
8.
After the progress, the lifecycle information is updated to the FactoryTalk AssetCentre database and the
lifecycle status is updated on the asset list.
Step 2: Refresh lifecycle status
Refreshing lifecycle information only updates the data on the AssetCentre client with the AssetCentre server. You can
refresh the lifecycle information of either assets or asset inventory on the AssetCentre client.
This operation doesn't need an Internet connection.
To refresh lifecycle status of assets or asset inventory
1.
Select View > Assets Lifecycle, or click the Assets Lifecycle button.
2.
To refresh assets, click the Asset tab.
To refresh asset inventory, click the Asset Inventory tab.
3.
Click Refresh. A progress bar shows.
4.
After the progress, the lifecycle information is updated from the FactoryTalk AssetCentre database to the
client and the lifecycle status is updated on the asset list.
Step 3: View detailed lifecycle status
In the asset list on the Asset or Asset Inventory tab, you can view the detailed lifecycle status of devices, including:
•
Device: product ID of a device.
• Description: product description of a device.
• In Device: the existing firmware revision in the device.
•
Most Current Minor Release: the most current minor firmware revision available for the device, including its
Release Notes, Product Notices, or Product Service Advisories.
•
Most Current Release: the most current major firmware revision available for the device, including its Release
Notes, Product Notices, or Product Service Advisories.
•
Lifecycle Status: lifecycle status of a device.
•
Last Update Date: the last time when the lifecycle status was updated.
•
Discontinued Date: the announced discontinued date.
•
Replacement Category: the nature of the replacement.
•
Replacement Product: the recommended product to replace the current one.
To view detailed lifecycle status
1.
Select View > Assets Lifecycle, or click the Assets Lifecycle button.
2.
Click the Asset tab or the Asset Inventory tab.
Rockwell Automation, Inc. FTAC-GR002I-EN-E - January 2024 87

Chapter 10Quick Start 6: Manage Rockwell Automation hardware lifecycle
3. Click a device in the list. A window of lifecycle information opens.
Tip:
For devices in the Active Mature, End of Life or Discontinued status, you can expand the
Replacement Information to view the recommended replacement product and replacement
category.
4.
To close the window, click anywhere outside the window.
Tip:
If you want to reopen the lifecycle window of an asset you just closed, click another asset
then click the one whose lifecycle window you want to open again.
Lifecycle statuses
In the asset list of Assets Lifecycle, there are seven statuses appended to each asset, showing their current lifecycle
stage.
Status Description
None The Rockwell Automation device was found in the PCDC, but the
product lifecycle status is set to None.
Active The most current fully supported Rockwell Automation device
offering within a product category.
Active Mature Rockwell Automation device is fully supported and available
for sale. The product is stable; future efforts will be focused
on sustainment and maintenance. A newer device or product
family within the product category may be available; customers
will often gain value by migrating to the newer offering.
End of Life Rockwell Automation has announced a discontinuation date for
the device. Customers need to actively execute their migrations
and last time buys. The Rockwell Automation device is generally
available for sale or download until the discontinued date,
although outages on specific devices within a product family
may occur prior to that date.
Discontinued Product is no longer being sold, manufactured, or procured.
Repair or exchange services may still be available.
Multiple Status There are several product lifecycle statuses found in the PCDC
for the Rockwell Automation device.
Not Available The Rockwell Automation device was found in the PCDC, but
there is no configured product lifecycle state.
Non Rockwell Only available for FactoryTalk AssetCentre Web Client
The device is not a Rockwell Automaton product. There is
no product lifecycle information available for non-Rockwell
Automation devices.
88 FTAC-GR002I-EN-E - January 2024 Rockwell Automation, Inc.

Chapter 11
Troubleshoot
Troubleshoot the FactoryTalk AssetCentre client
For additional troubleshooting information see Help.
This section includes the following topics:
• If the client fails to start on page 89
•
If the client cannot communicate with the server on page 90
•
If you cannot enter Design Mode on page 90
•
If you cannot connect to Allen-Bradley PanelView Plus devices on page 91
•
If you cannot connect to Allen-Bradley MobileView devices on page 91
If the client fails to start
• Make sure the client computer is connected to the network and the network is operational.
•
Make sure your FactoryTalk AssetCentre server computer is running.
• Make sure the FactoryTalk AssetCentre Server service, IIS and SQL server are all running on the server
computer (and the database computer if separate).
•
Make sure the correct FactoryTalk Directory is specified. On the machine running the client, select Start >
Rockwell Software > Specify FactoryTalk Directory Location.
•
If your computer is not authenticated by a domain controller (for example, if it is part of a workgroup
instead), turn off the FactoryTalk single sign-in feature. For information about single sign-in, see the
FactoryTalk help file. Select Start > Rockwell Software > FactoryTalk Help.
•
Make sure the server location setting is correct. On the server computer go to Start > Rockwell Software
> FactoryTalk AssetCentre Server Settings. The server location must be set in this utility, NOT in the
FactoryTalk Administration Console.
•
Make sure the SQL Connection is set properly. On the server computer go to Start > Rockwell Software
>FactoryTalk AssetCentreData Source Configuration.
•
If the message The client and server versions are incompatible appears when you attempt to start the
FactoryTalk AssetCentre client, and the FactoryTalk AssetCentre software installed on the server has been
updated, then the software on the client needs to be updated. See the FactoryTalk AssetCentre Installation
Guide for information on updating the client and agent software.
•
If the message Error initializing FactoryTalk AssetCentre appears when you attempt to start the FactoryTalk
AssetCentre client, your FactoryTalk AssetCentre server may have failed (or you may have lost your network
connection to the server) or the client computer may not be part of the FactoryTalk Directory. If you have
checked the server (as directed earlier in this list), try adding the client computer to the FactoryTalk Network
Directory. From another computer that has access to the FactoryTalk Directory (the FactoryTalk AssetCentre
server, for example), use the FactoryTalk Administration Console to add the computer to the FactoryTalk
Directory.
•
If you are using a firewall, make sure your firewall is configured properly to permit access to the FactoryTalk
AssetCentre Server. See the FactoryTalk AssetCentre Installation Guide for information on firewall settings.
Tip:
For information on port requirements, see the topic Network requirements in the
FactoryTalk AssetCentre Installation Guide. Select Help > Installation Guide to open the guide.
Rockwell Automation, Inc. FTAC-GR002I-EN-E - January 2024 89

Chapter 11Troubleshoot
If the client cannot communicate with the server
If a client cannot connect to the server (if the server status in the Status Bar is Disconnected) or the client cannot
connect to capabilities located on the network (for example, if logs won't show or schedule information does not
appear) check the following:
• client computer is connected to the network and the network is operational.
•
FactoryTalk AssetCentre Server service, IIS, and SQL Server are all on-line. See below for more information on
IIS.
•
server location setting is correct. On the server computer select Start > Rockwell Software > FactoryTalk
AssetCentre Server Settings. The server location must be set in this utility, not in the FactoryTalk
Administration Console.
•
SQL Connection is set properly. On the server computer select Start > Rockwell Software >FactoryTalk
AssetCentre Data Source Configuration.
To make sure IIS is running on the server computer
1.
Click Start.
2.
On the taskbar, click .
3.
In the search box, type inetmgr, and then press Enter.
4.
Click the best match result.
5.
In the right pane, under Connections, expand the server node.
6.
Expand Sites, and then click Default Web Site.
7.
In the right pane, under Actions, check if the site is running.
If it is not, start it:
◦ In the right pane, under Manage Web Site, click Start.
If you cannot enter Design Mode
• You might not have the appropriate permissions to enter Design mode. See Step 3: Set Feature Security for
FactoryTalk AssetCentre on page 25.
• Only one user in your system can be in Design mode at a time. If another user is in Design mode, you will not
be able to enter Design mode until that user exits Design mode.
90 FTAC-GR002I-EN-E - January 2024 Rockwell Automation, Inc.

Chapter 11Troubleshoot
• The server might not be activated. To see if the server is activated, select Help > About. Under Components,
select FactoryTalk AssetCentre Server Features, and then below that select FactoryTalk AssetCentre
Server. Activation information for the server appears on the right.
If the server needs to be activated, in the About dialog box, click Refresh. If the server is still not activated,
see the FactoryTalk Activation Manager Help for more information.
•
The server, database, or FactoryTalk Directory may be oine or unavailable.
If you cannot connect to Allen-Bradley PanelView Plus devices
FactoryTalk Linx, formerly known as RSLinx Enterprise, must be installed on the client computer to communicate with
Allen-Bradley PanelView Plus operator interfaces. See the FactoryTalk AssetCentre Installation Guide for information on
installing FactoryTalk Linx.
FactoryTalk View ME must be installed on the agent computer to communicate with Allen-Bradley PanelView Plus
operator interfaces. This is a separate installation that is not included as part of the FactoryTalk AssetCentre
installation.
If you cannot connect to Allen-Bradley MobileView devices
FactoryTalk Linx, formerly known as RSLinx Enterprise, must be installed on the client computer to communicate with
Allen-Bradley MobileView operator interfaces. FactoryTalk Linx must be version 5.71 or higher. See the FactoryTalk
AssetCentre Installation Guide for information on installing FactoryTalk Linx.
FactoryTalk View ME must be installed on the agent computer to communicate with Allen-Bradley MobileView operator
interfaces. This is a separate installation that is not included as part of the FactoryTalk AssetCentre installation.
Troubleshoot Schedules
This section includes the following topics:
•
If a schedule did not run on page 91
• If a schedule no longer appears on the Schedules tab on page 91
• If an asset is missing from a schedule on page 92
•
My schedule contains extra devices that I don't want in the schedule on page 92
•
If you are prompted to install agents when creating a Disaster Recovery schedule on page 93
•
If you see the message "Failed to create RSLogix 5 [or 500] data [or program ladder] file list" on page 93
• If the scheduled Disaster Recovery operation never completes on page 93
If a schedule did not run
You must make a schedule active for its status to be Waiting to Run or Running. See Step 3: Run schedules on page
64.
If a schedule no longer appears on the Schedules tab
Any user with Delete a schedule permission can delete any schedule from FactoryTalk AssetCentre. You do not have
to create a schedule to be able to delete that schedule. If you or another FactoryTalk AssetCentre user has permission
and deletes an asset from the asset tree, the schedule will be deleted. This occurs if an asset is the starting point (the
top level asset) of a schedule. The schedule cannot be retrieved. You must add the device to the asset tree again and
Rockwell Automation, Inc. FTAC-GR002I-EN-E - January 2024 91

Chapter 11Troubleshoot
then recreate the asset's schedule. For more information about deleting assets, see Help. Select Help > Contents.
Open the Assets topic and click the Delete an asset topic.
If an asset is missing from a schedule
If you or another FactoryTalk AssetCentre user deletes an asset from the asset tree, that asset will be removed from
any schedules in which it was included. To restore that asset to the schedule, you would have to add the asset back
into the container in the asset tree that is the starting point of the schedule. When you add the asset back to the
container, it will appear in the schedule again, but it will have the default operation properties set under Tools >
Options. If these are not the desired properties, you can change the properties for that asset in that schedule. See
Help. Select Help > Contents. Open the Schedules topic and click the Modify scheduled operation properties topic.
My schedule contains extra devices that I don't want in the schedule
Devices meeting the necessary criteria will automatically be added to a scheduled container as soon the device is
added to the container in the asset tree. To exclude assets from a schedule, disable the assets you do not want to
include in the schedule. See Help. Select Help > Contents. Open the Schedules topic and click the Enable or disable
scheduled assets topic.
If a scheduled operation fails
•
Certain operations, such as Backup and Compare, may fail if the operation requires that a device has a
master file and it does not. To select which version of the file in Archive will serve as the master file to the
device, see Help. Select Help > Contents. Open the Assets topic and click the Add an asset topic.
•
The FactoryTalk Linx or RSLinx Classic path on the client computer where the device's addressing information
was set may not match the FactoryTalk Linx or RSLinx Classic path on the agent computer running the
schedule. All computers in the FactoryTalk AssetCentre system must have the same FactoryTalk Linx or
RSLinx Classic drivers and paths.
•
Scheduled events for Rockwell Automation Logix 5000 processors will fail if FactoryTalk Security is enabled
for that devices' programming software (RSLogix 5000 versions 16 and earlier). The problem is fixed in
RSLogix 5000 versions later than 16. For RSLogix 5000 versions 16 and earlier, running scheduled events
requires single sign-on for these versions. This issue does not affect other device's schedules (such as robots
or Allen-Bradley PanelView devices). If a schedule contains both Logix 5000 processors and other devices,
the scheduled event will only fail for those Logix 5000 processors for which FactoryTalk Security is enabled
in the programming software; the event will complete for the other devices.
To configure the system so that scheduled operations will succeed even with security enabled in the RSLogix
software, see Help. Select Help > Contents. Open the Schedules topic and click the About the configuration
for security-enabled RSLogix products topic.
You will be unable to create a schedule for an asset that is to be the starting point of a schedule if the asset isn't
supported by the scheduled operation. Also, a schedule will not include an asset that is not supported by the selected
operation. For example, if you have Disaster Recovery for Rockwell devices, but did not purchase Disaster Recovery
for Motoman Robots, you won't be able to create a schedule for a Motoman robot, nor will a Motoman robot appear in
a schedule for its parent container.
92 FTAC-GR002I-EN-E - January 2024 Rockwell Automation, Inc.

Chapter 11Troubleshoot
If you are prompted to install agents when creating a Disaster Recovery schedule
An agent is a program capability (such as Disaster Recovery) that can be located and run on a computer to help
another computer complete a task. Agents or operations allow work to be distributed and shared among multiple
computers to spread processing load and speed up operations. When a server needs an agent to perform a task, it
locates the computer running the operation and assigns the task to that agent. The agent then reports the task's
completion to the server.
If you receive a message to install agents or that no agents are installed, the software cannot contact any agents
(for example, Unable to create a new schedule ... No licensed agents are available). The computers running the agents
are not currently available on the network, the agent software needs to be updated, or there are no computers with
agents installed on the network.
•
When you create a Disaster Recovery schedule, make sure you have not selected an invalid asset, such as a
binder or a file. You cannot create any schedules on a binder or file.
•
Make sure you have selected a device asset for which you have the Disaster Recovery capability. The Disaster
Recovery capability operates only on device assets for which you have purchased the Disaster Recovery
capability. You can get Disaster Recovery activation for Rockwell Automation devices and for Motoman
robots. See the FactoryTalk AssetCentre Installation Guide.
•
Creating a Disaster Recovery schedule requires that at least one computer on your network has the Disaster
Recovery agent installed on it. If there are no computers with the agent software installed, install the agent
software. See the topic "Install FactoryTalk AssetCentre agents" in the FactoryTalk AssetCentre Installation
Guide.
•
If the agent is installed, make sure the computers on which the agent is installed are running and available
on your network and that the Disaster Recovery capability is activated. See the FactoryTalk AssetCentre
Installation Guide.
•
The agent software must be the same version as the server. To update the agent software, see the topic
"Install FactoryTalk AssetCentre agents" in the FactoryTalk AssetCentre Installation Guide.
If you see the message "Failed to create RSLogix 5 [or 500] data [or program ladder] file list"
This message appears if you do not have the RSLogix 5 or RSLogix 500 programming software installed on the
client computer on which you are specifying which files and data will be compared during a Backup and Compare
operation. Install the appropriate RSLogix programming software on the client computer or use a client computer
that already has the programming software.
If the scheduled Disaster Recovery operation never completes
The agent that actually performs the operation may be busy, unavailable, or uninstalled. If Waiting for Interface
appears next to the scheduled assets in the lower left pane of the Schedules tab and it never changes, then either
all agents are busy or no agents are online. You can check all schedules on the Schedules tab to see whether any
are running (and thus using the available agent or agents). You can also check the status bar to see how many agent
computers are connected to the system.
If all agents are online, you may need to install the Disaster Recovery agent on more computers or change the
execution times so schedules are not running at the same time. To do this, see the topic "Install FactoryTalk
AssetCentre agents" in the FactoryTalk AssetCentre Installation Guide.
Rockwell Automation, Inc. FTAC-GR002I-EN-E - January 2024 93

Chapter 11Troubleshoot
Another reason can be that the FactoryTalk AssetCentre server has been updated, but the software on the agent
computer has not been updated. If the agent software version is not compatible with the server software, the agent
will not run. A message is logged in the System Event log and the AssetCentre Event log. You can also see the number
of active agents appears in the status bar of the FactoryTalk AssetCentre client. To update the agent software, see
"Install FactoryTalk AssetCentre agents" in the FactoryTalk AssetCentre Installation Guide.
Troubleshoot e-mail notifications
This section includes the following topic:
•
If e-mail notifications do not reach their recipients on page 94
If e-mail notifications do not reach their recipients
• Make sure you are using valid e-mail addresses. E-mail addresses must be in standard SMTP format (for
example, myaddres[email protected]). Other types of e-mail addresses are not handled by FactoryTalk
AssetCentre.
• Check the Event log to make sure the scheduled operation is completing. See Step 1: View logs on page 67.
•
Check your schedule definitions on the Schedules tab to make sure there are e-mail addresses assigned to
receive notifications. See Step 2: Set up recipient lists for schedule results on page 63.
•
Make sure the FactoryTalk AssetCentre server is set up to send e-mail.To do this, log onto the FactoryTalk
AssetCentre server computer, and then select Start > Rockwell Software > FactoryTalk AssetCentre
Server Settings. Consult with your e-mail administrator for the correct settings.
•
If you are using a firewall (such as the Windows Firewall), make sure the ports used to send e-mail trac are
open. Also make sure that SMTP services are permitted to send trac through your firewall.
Troubleshoot Logs
This section includes the following topics:
•
If you cannot view a log on page 94
• If no data appears in a log on page 95
• If you cannot refresh a log on page 95
•
If you cannot show a previously viewed log on page 95
If you cannot view a log
• You might not have the appropriate permissions to view the specific log. See Step 3: Set Feature Security for
FactoryTalk AssetCentre on page 25.
• Your server may not be activated. To see if the server is activated, select Help > About. Under Components,
select FactoryTalk AssetCentre Server Features and then in the left pane, select FactoryTalk AssetCentre
Server. Activation information on the server appears on the right.
If the server needs to be activated, in the About dialog box, click Refresh. If the server is still not activated,
refer to the FactoryTalk Activation Manager Help and contact your system administrator.
94 FTAC-GR002I-EN-E - January 2024 Rockwell Automation, Inc.

Chapter 11Troubleshoot
If no data appears in a log
• All logs. If no data appears in a log, you may not have permission to view the log. See Step 3: Set Feature
Security for FactoryTalk AssetCentre on page 25. There might also be an error regarding your connection to
the server. See If the client cannot communicate with the server on page 90.
• Diagnostics and Health Log. Initially, only previously existing data appears in the Diagnostics and Health Log
if that data was imported from the RSMACC Network Health Solution. This data is not updated by FactoryTalk
AssetCentre.
New data is logged in the Diagnostics and Health Log only if Automatic Device Descriptive Analytics (ADDA) is
supported or RSNetWorx MD is installed on your system. Contact your system administrator.
If you cannot refresh a log
If you try and refresh the data in the currently shown log and the message You do not have permission to view the
selected log appears, your permission to view the log was removed after you shown the log. See Step 3: Set Feature
Security for FactoryTalk AssetCentre on page 25.
If you cannot show a previously viewed log
If you try and show a log which you could view previously and the message You do not have permission to view the
selected log appears, your permission to view the log was removed since you last viewed the log. See Step 3: Set
Feature Security for FactoryTalk AssetCentre on page 25.
Troubleshoot Archive
This section includes the following topics:
•
If you cannot check in a file on page 95
• If you cannot open a file on page 95
• If the wrong program opens a file on page 96
•
If a button is not available on page 96
•
If you performed a recursive check out and the subfolders didn't copy on page 96
If you cannot check in a file
You may have changed an asset's working folder since checking out the file. Make sure that the working folder points
to the correct location of the checked-out file. See Step 1: Set a working folder on page 76.
If you cannot open a file
Before opening a file, you must retrieve an image of the file to the current working folder or you will be prompted
to either get a read-only copy of the file or check out the file for editing. See Step 5: Open a file for viewing on page
82. If the message No program associated with the specied le for this operation appears, you need to specify the
software program that should open the file. See Help. Select Help > Contents. Open the Archive topic and click the
Set file associations topic.
Rockwell Automation, Inc. FTAC-GR002I-EN-E - January 2024 95

Chapter 11Troubleshoot
If the wrong program opens a file
FactoryTalk AssetCentre allows you to set file associations to determine the software product that opens a file. The
wrong file association may be set for a file type. See Help. Select Help > Contents. Open the Archive topic and click
the Set file associations topic.
If a button is not available
If a button or field on the Archive tab is disabled, it generally means the operation cannot be performed because the
user doesn't have the required permission. See Step 3: Set Feature Security for FactoryTalk AssetCentre on page 25.
Also, the asset state may not permit the operation. For example, you cannot check in a file that has not been checked
out.
If you performed a recursive check out and the subfolders didn't copy
If an asset's subfolder has its own working folder specified, files will be copied to that working folder rather than the
working folder of the asset. See Step 1: Set a working folder on page 76.
96 FTAC-GR002I-EN-E - January 2024 Rockwell Automation, Inc.

Legal Notices
Legal Notices
Rockwell Automation publishes legal notices, such as privacy policies, license agreements, trademark disclosures,
and other terms and conditions on the Legal Notices page of the Rockwell Automation website.
Software and Cloud Services Agreement
Review and accept the Rockwell Automation Software and Cloud Services Agreement here.
Open Source Software Licenses
The software included in this product contains copyrighted software that is licensed under one or more open source
licenses.
You can view a full list of all open source software used in this product and their corresponding licenses by opening
the oss_license.txt file located in your product's OPENSOURCE folder on your hard drive. This file is divided into these
sections:
• Components
Includes the name of the open source component, its version number, and the type of license.
• Copyright Text
Includes the name of the open source component, its version number, and the copyright declaration.
• Licenses
Includes the name of the license, the list of open source components citing the license, and the terms of the
license.
The default location of this file is:
C:\Program Files (x86)\Common Files\Rockwell\AssetCentre\ReleaseNotes\OPENSOURCE\oss_license.txt
You may obtain Corresponding Source code for open source packages included in this product from their respective
project web site(s). Alternatively, you may obtain complete Corresponding Source code by contacting Rockwell
Automation via the Contact form on the Rockwell Automation website: http://www.rockwellautomation.com/global/
about-us/contact/contact.page. Please include "Open Source" as part of the request text.
Rockwell Automation, Inc. FTAC-GR002I-EN-E - January 2024 97

Rockwell Automation support
Use these resources to access support information.
Technical Support Center Find help with how-to videos, FAQs, chat, user forums, and
product notification updates.
rok.auto/support
Knowledgebase Access Knowledgebase articles. rok.auto/knowledgebase
Local Technical Support Phone Numbers Locate the telephone number for your country. rok.auto/phonesupport
Literature Library Find installation instructions, manuals, brochures, and
technical data publications.
rok.auto/literature
Product Compatibility and Download Center (PCDC) Get help determining how products interact, check features
and capabilities, and find associated firmware.
rok.auto/pcdc
Documentation feedback
Your comments help us serve your documentation needs better. If you have any suggestions on how to improve our content, complete the form at rok.auto/docfeedback.
Waste Electrical and Electronic Equipment (WEEE)
At the end of life, this equipment should be collected separately from any unsorted municipal waste.
Rockwell Automation maintains current product environmental information on its website at rok.auto/pec.
Rockwell Otomasyon Ticaret A.Ş. Kar Plaza İş Merkezi E Blok Kat:6 34752 İçerenköy, İstanbul, Tel: +90 (216) 5698400 EEE Yönetmeliğine Uygundur
FTAC-GR002I-EN-E - January 2024
Supersedes Publication FTAC-GR002H-EN-E - December 2022
Copyright © 2024, Rockwell Automation Technologies, Inc. All rights reserved. Printed in the U.S.A.
