
Grandstream Networks, Inc.
GWN Management Platforms
GWN.Cloud: Cloud based Access Points Controller
GWN Manager: On-premise Access Points Controller
User Guide

P a g e | 2
GWN Management Platforms - User Manual
GWN.Cloud & GWN Manager - Version 1.0.19.7 & 1.0.19.8
COPYRIGHT
©2021 Grandstream Networks, Inc. http://www.grandstream.com
All rights reserved. Information in this document is subject to change without notice. Reproduction or
transmittal of the entire or any part, in any form or by any means, electronic or print, for any purpose without
the express written permission of Grandstream Networks, Inc. is not permitted.
The latest electronic version of this guide is available for download here:
http://www.grandstream.com/support
Grandstream is a registered trademark and Grandstream logo is trademark of Grandstream Networks, Inc.
in the United States, Europe and other countries.

P a g e | 3
GWN Management Platforms - User Manual
GWN.Cloud & GWN Manager - Version 1.0.19.7 & 1.0.19.8
Table of Contents
DOCUMENT PURPOSE ............................................................................................... 16
CHANGE LOG .............................................................................................................. 17
GWN.Cloud .......................................................................................................................................... 17
Version 1.0.19.7 ............................................................................................................................ 17
Version 1.0.19.2 ............................................................................................................................ 17
Version 1.0.10.7 ............................................................................................................................ 17
Version 1.0.9.8 .............................................................................................................................. 18
Version 1.0.8.17 ............................................................................................................................ 18
Version 1.0.8.7 .............................................................................................................................. 19
Version 1.0.7.18 ............................................................................................................................ 19
Version 1.0.0.37 ............................................................................................................................ 19
GWN Manager ..................................................................................................................................... 19
Version 1.0.19.7 ............................................................................................................................ 19
Version 1.0.19.2 ............................................................................................................................ 20
Version 1.0.0.33 ............................................................................................................................ 20
REQUIREMENTS ......................................................................................................... 21
WELCOME ................................................................................................................... 22
PRODUCT OVERVIEW ................................................................................................ 23
Features Highlights .............................................................................................................................. 23
Specifications ....................................................................................................................................... 24
GETTING TO KNOW GWN MANAGEMENT PLATFORM ........................................... 26
GWN.Cloud .......................................................................................................................................... 26
Sign up to GWN.Cloud ................................................................................................................. 26
GWN Manager ..................................................................................................................................... 29
Installation Steps .......................................................................................................................... 29

P a g e | 4
GWN Management Platforms - User Manual
GWN.Cloud & GWN Manager - Version 1.0.19.7 & 1.0.19.8
Configuring GWN Manager .......................................................................................................... 31
Upgrading GWN Manager ............................................................................................................ 31
Uninstalling GWN Manager .......................................................................................................... 31
First Use ....................................................................................................................................... 32
Sign up to GWN Manager ............................................................................................................ 33
GETTING STARTED WITH GWN MANAGEMENT PLATFORM ................................. 35
GWN76xx LED Patterns ...................................................................................................................... 35
Adding GWN76XX to GWN.Cloud ....................................................................................................... 36
Method 1: Adding New AP Manually ............................................................................................ 36
Method 2: Adding New AP using GWN.Cloud Application ........................................................... 38
Method 3: Transfer APs from Local Master .................................................................................. 39
Adopt GWN76XX to GWN Manager .................................................................................................... 42
Discover GWN76XX ..................................................................................................................... 43
Method 1: Auto Discovery ............................................................................................................. 43
Method 2: Manual discovery ......................................................................................................... 43
DASHBOARD ............................................................................................................... 45
Overview .............................................................................................................................................. 45
Network List ......................................................................................................................................... 46
AP List .................................................................................................................................................. 48
NETWORK .................................................................................................................... 50
Create a New Network ......................................................................................................................... 50
Overview Page ..................................................................................................................................... 51
ACCESS POINTS ......................................................................................................... 53
Summary .............................................................................................................................................. 53
Status ................................................................................................................................................... 53
Configuration ........................................................................................................................................ 57
Add New Access Points ................................................................................................................ 57

P a g e | 5
GWN Management Platforms - User Manual
GWN.Cloud & GWN Manager - Version 1.0.19.7 & 1.0.19.8
Move Access Points ..................................................................................................................... 58
Delete Access Points .................................................................................................................... 58
Reboot Access Points ................................................................................................................... 58
Configure Access Points ............................................................................................................... 59
Reset Access Points ..................................................................................................................... 60
SSID .............................................................................................................................. 62
Summary .............................................................................................................................................. 62
Configuration ........................................................................................................................................ 62
Wi-Fi Settings ............................................................................................................................... 63
Device Membership ...................................................................................................................... 70
CLIENTS ....................................................................................................................... 71
Summary .............................................................................................................................................. 71
Clients Count ................................................................................................................................ 72
Bandwidth Usage .......................................................................................................................... 72
Clients Statistics for Last Day ....................................................................................................... 72
Client Manufacturer ...................................................................................................................... 72
Client OS ...................................................................................................................................... 72
Status ................................................................................................................................................... 72
CAPTIVE PORTAL ....................................................................................................... 75
Summary .............................................................................................................................................. 75
Guest New Session ...................................................................................................................... 76
Guest Session by Authentication .................................................................................................. 76
Guest Session by SSID ................................................................................................................ 77
Guest ............................................................................................................................................ 77
Guest.................................................................................................................................................... 78
Policy List ............................................................................................................................................. 79
Internal Splash Page .................................................................................................................... 80

P a g e | 6
GWN Management Platforms - User Manual
GWN.Cloud & GWN Manager - Version 1.0.19.7 & 1.0.19.8
External Splash Page ................................................................................................................... 81
Splash Page ......................................................................................................................................... 82
Page ............................................................................................................................................. 82
Advertisement ............................................................................................................................... 88
Voucher ................................................................................................................................................ 91
RADIO ........................................................................................................................... 94
ACCESS CONTROL ..................................................................................................... 98
Access List ........................................................................................................................................... 98
Time Policy ........................................................................................................................................... 99
Bandwidth rules ................................................................................................................................. 100
INSIGHT ...................................................................................................................... 102
Site Survey ......................................................................................................................................... 102
Known Clients .................................................................................................................................... 102
SECURITY .................................................................................................................. 104
Rogue AP ........................................................................................................................................... 104
Firewall ............................................................................................................................................... 106
Outbound Rules .......................................................................................................................... 106
Inbound Rules ............................................................................................................................. 107
SERVICE .................................................................................................................... 108
Hotspot 2.0 ......................................................................................................................................... 108
SNMP ..................................................................................................................................................111
SYSTEM ..................................................................................................................... 113
Settings .............................................................................................................................................. 113
URL Access Log ......................................................................................................................... 114
Guest Information ....................................................................................................................... 116
NAT Pool ..................................................................................................................................... 117
Schedule ............................................................................................................................................ 117

P a g e | 7
GWN Management Platforms - User Manual
GWN.Cloud & GWN Manager - Version 1.0.19.7 & 1.0.19.8
Mesh .................................................................................................................................................. 119
Maintenance ...................................................................................................................................... 122
Alert .................................................................................................................................................... 122
USER MANAGEMENT ............................................................................................... 126
Add New Users .................................................................................................................................. 126
User Privilege levels .......................................................................................................................... 127
Super Administrator .................................................................................................................... 127
Platform Administrator ................................................................................................................ 129
Network Administrator ................................................................................................................ 129
Guest Editor ................................................................................................................................ 129
Edit User Settings .............................................................................................................................. 129
Changing Password ................................................................................................................... 129
Changing Super Administrator Email ......................................................................................... 130
Delete Users ...................................................................................................................................... 130
Change Log ....................................................................................................................................... 131
Report ................................................................................................................................................ 132
Feedback ........................................................................................................................................... 136
GLOBAL ..................................................................................................................... 137
Upgrade ............................................................................................................................................. 137
Manager Settings (GWN Manager Only) ........................................................................................... 139
Manager Log ............................................................................................................................... 139
SMTP Server .............................................................................................................................. 139
Backup & Restore ....................................................................................................................... 140
Report ................................................................................................................................................ 142
Change Log ....................................................................................................................................... 142
API Developer .................................................................................................................................... 142


P a g e | 9
GWN Management Platforms - User Manual
GWN.Cloud & GWN Manager - Version 1.0.19.7 & 1.0.19.8
Table of Tables
Table 1: Requirements ................................................................................................................................ 21
Table 2: GWN Management Platform Specifications .................................................................................. 24
Table 3: GWN.Cloud Sign up Settings ........................................................................................................ 28
Table 4: GWN Manager Setup Wizard ........................................................................................................ 32
Table 5: LED Patterns ................................................................................................................................. 35
Table 6: Dashboard Description .................................................................................................................. 46
Table 7: Create a New Network Settings .................................................................................................... 48
Table 8: Create a New Network Settings .................................................................................................... 51
Table 9: Access Points Status Parameters ................................................................................................. 54
Table 10: Access Point Configuration Settings ........................................................................................... 59
Table 11: SSID Wi-Fi Settings ..................................................................................................................... 64
Table 12: Add new Policy List – Splash Page as “Internal” ......................................................................... 80
Table 13: Add new Policy List – Splash Page as “External” ....................................................................... 81
Table 14: Advertisement Settings Configuration ......................................................................................... 89
Table 15: Voucher Configuration Parameters ............................................................................................. 92
Table 16: Radio Settings ............................................................................................................................. 94
Table 17: Time Policy Configuration Parameters ........................................................................................ 99
Table 18: Bandwidth Rules ........................................................................................................................ 100
Table 19: Rogue AP parameters description ............................................................................................. 105
Table 20: Firewall Outbound Rules parameters ........................................................................................ 107
Table 21: Firewall Inbound Rules parameters........................................................................................... 107
Table 22: Hotspot 2.0 parameters description .......................................................................................... 108
Table 23: SNMP parameters description .................................................................................................. 112
Table 24: Settings ...................................................................................................................................... 113
Table 25: Maintenance .............................................................................................................................. 122

P a g e | 10
GWN Management Platforms - User Manual
GWN.Cloud & GWN Manager - Version 1.0.19.7 & 1.0.19.8
Table 26: Alert ........................................................................................................................................... 122
Table 27: Alert configuration parameters .................................................................................................. 123
Table 28: Super Administrator Account ..................................................................................................... 128
Table 29: Report Settings .......................................................................................................................... 133
Table 30: SMTP server Configuration Details ........................................................................................... 140
Table 31: Backup Configuration Details .................................................................................................... 141
Table of Figures
Figure 1: GWN.Cloud Architecture .............................................................................................................. 26
Figure 2: GWN.Cloud Login Page .............................................................................................................. 27
Figure 3: GWN.Cloud Sign up page ........................................................................................................... 27
Figure 4: GWN.Cloud Dashboard ............................................................................................................... 28
Figure 5: GWN Manager Architecture ......................................................................................................... 29
Figure 6: GWN Manager Start page ........................................................................................................... 30
Figure 7: GWN Manager Wizard ................................................................................................................. 33
Figure 8: GWN Manager Login Page .......................................................................................................... 34
Figure 9: GWN Manager Dashboard .......................................................................................................... 34
Figure 10: GWN Access Point MAC and Wi-Fi Password .......................................................................... 36
Figure 11: Adding New Access Point to GWN.Cloud .................................................................................. 37
Figure 12: Adding Access Points Manually ................................................................................................. 37
Figure 13: Import CSV file for APs .............................................................................................................. 38
Figure 14: Upload CSV file .......................................................................................................................... 38
Figure 15: Adding Access Point to GWN.Cloud using GWN App ............................................................... 39
Figure 16: Access Points Status ................................................................................................................. 39
Figure 17: Master AP - Access Points ......................................................................................................... 40
Figure 18: Transfer AP to Cloud .................................................................................................................. 40
Figure 19: Select Network ........................................................................................................................... 41

P a g e | 11
GWN Management Platforms - User Manual
GWN.Cloud & GWN Manager - Version 1.0.19.7 & 1.0.19.8
Figure 20: Transfer AP to Cloud - Success ................................................................................................. 41
Figure 21: Adding New Access Point to GWN Manager ............................................................................. 42
Figure 22: Auto detect Access Points ......................................................................................................... 42
Figure 23: Select Access Points ................................................................................................................. 42
Figure 24: Confirm APs Adoption ................................................................................................................ 43
Figure 25: Adopted Access Points .............................................................................................................. 43
Figure 26: Manager Settings – SSH ........................................................................................................... 44
Figure 27: Manager Settings – Slave WebGUI ........................................................................................... 44
Figure 28: GWN.Cloud Dashboard - Overview ........................................................................................... 45
Figure 29: GWN.Cloud Dashboard - Network List ...................................................................................... 47
Figure 30: Create a New Network ............................................................................................................... 47
Figure 31: GWN.Cloud Dashboard – AP List .............................................................................................. 48
Figure 32: Customize AP List Table Fields ................................................................................................. 49
Figure 33: Network List and Network Creation Button ................................................................................ 50
Figure 34: Create Network .......................................................................................................................... 51
Figure 35: Overview Page Displays Information related to Specific Network ............................................. 52
Figure 36: Access Points – Summary ......................................................................................................... 53
Figure 37: Access Points - Status ............................................................................................................... 54
Figure 38: Usage of a Specific AP .............................................................................................................. 55
Figure 39: Current Clients - Stats per AP .................................................................................................... 55
Figure 40: Event Log per AP ....................................................................................................................... 55
Figure 41: AP Info ....................................................................................................................................... 56
Figure 42: Debug Tool Tab .......................................................................................................................... 57
Figure 43: Access Points Configuration Page ............................................................................................. 57
Figure 44: Moving Access Points between Networks ................................................................................. 58
Figure 45: Delete Access Point ................................................................................................................... 58
Figure 46: Reboot Access Point .................................................................................................................. 58

P a g e | 12
GWN Management Platforms - User Manual
GWN.Cloud & GWN Manager - Version 1.0.19.7 & 1.0.19.8
Figure 47: Access Point Configuration Page .............................................................................................. 59
Figure 48: Reset Access Point .................................................................................................................... 61
Figure 49: SSIDs - Summary ...................................................................................................................... 62
Figure 50: SSIDs - Configuration ................................................................................................................ 63
Figure 51: SSIDs – Configuration – Wi-Fi Settings ..................................................................................... 63
Figure 52: Device Membership - Available Devices .................................................................................... 70
Figure 53: Device Membership - Members Devices ................................................................................... 70
Figure 54: Clients - Summary ..................................................................................................................... 71
Figure 55: Clients Status ............................................................................................................................. 72
Figure 56: Client Data Usage Info ............................................................................................................... 73
Figure 57: Client Info ................................................................................................................................... 73
Figure 58: Client Roaming .......................................................................................................................... 74
Figure 59: Clients - Select Items ................................................................................................................. 74
Figure 60: Captive Portal Summary ............................................................................................................ 75
Figure 61: Guest New Session ................................................................................................................... 76
Figure 62: Guest Session by Authentication ............................................................................................... 76
Figure 63: Guest Session by SSID ............................................................................................................. 77
Figure 64: Guest Section ............................................................................................................................ 77
Figure 65: Guest List ................................................................................................................................... 78
Figure 66: Export Guest Information Period ............................................................................................... 78
Figure 67: Add/Edit Captive Portal Policy ................................................................................................... 79
Figure 68: Create New Splash Page .......................................................................................................... 83
Figure 69: Setup Logging Methods - Splash Page ..................................................................................... 84
Figure 70: Upload a logo - Splash Page ..................................................................................................... 84
Figure 71: Name - Splash Page .................................................................................................................. 85
Figure 72: Setup Social Logging Parameters ............................................................................................. 86
Figure 73: Splash Page Preview ................................................................................................................. 87

P a g e | 13
GWN Management Platforms - User Manual
GWN.Cloud & GWN Manager - Version 1.0.19.7 & 1.0.19.8
Figure 74: Splash Pages List ...................................................................................................................... 87
Figure 75: Enable Captive Portal ................................................................................................................ 88
Figure 76: Portal Splash Page .................................................................................................................... 88
Figure 77: Advertisement Page ................................................................................................................... 89
Figure 78: Add Video - Advertisement ........................................................................................................ 90
Figure 79: Adding Vouchers ........................................................................................................................ 91
Figure 80: Voucher Details .......................................................................................................................... 93
Figure 81: Voucher Settings ........................................................................................................................ 93
Figure 82: Radio-General ............................................................................................................................ 94
Figure 83: Access List ................................................................................................................................. 98
Figure 84: Adding New Clients to Access List ............................................................................................. 98
Figure 85: Add Time Policy List ................................................................................................................... 99
Figure 86: MAC Address Bandwidth Rule ................................................................................................. 101
Figure 87: Site Survey - Insight ................................................................................................................. 102
Figure 88: Known Clients - Insight ............................................................................................................ 103
Figure 89: Rogue AP configuration page .................................................................................................. 104
Figure 90: Detected Trusted and Untrusted APs ...................................................................................... 105
Figure 91: Firewall Outbound Rules ......................................................................................................... 106
Figure 92: Hotspot 2.0 ............................................................................................................................... 108
Figure 93: SNMP configuration page ........................................................................................................ 112
Figure 94 :System Settings ....................................................................................................................... 113
Figure 95: URL Access Log Settings ........................................................................................................ 115
Figure 96: Export Immediately .................................................................................................................. 115
Figure 97: Export Succeed ........................................................................................................................ 115
Figure 98: URL Access Log- CSV file example ........................................................................................ 116
Figure 99: Guest Information .................................................................................................................... 116
Figure 100: NAT Pool configuration .......................................................................................................... 117

P a g e | 14
GWN Management Platforms - User Manual
GWN.Cloud & GWN Manager - Version 1.0.19.7 & 1.0.19.8
Figure 101: Create New Schedule- Weekly .............................................................................................. 118
Figure 102: Create New Schedule- Absolute ............................................................................................ 118
Figure 103: Schedules List........................................................................................................................ 119
Figure 104: Mesh Settings ........................................................................................................................ 120
Figure 105: Mesh Topology ....................................................................................................................... 120
Figure 106: Neighbor ................................................................................................................................ 121
Figure 107: Maintenance/Syslog Settings ................................................................................................ 122
Figure 108: Alert Email .............................................................................................................................. 123
Figure 109: Alert Events List ..................................................................................................................... 123
Figure 110: Alert Details ............................................................................................................................ 125
Figure 111 : Users List............................................................................................................................... 126
Figure 112 : Add New “Platform Administrator” User ................................................................................ 127
Figure 113 : Add “New Network Administrator” User ................................................................................ 127
Figure 114 : Edit Super Administrator Account ......................................................................................... 128
Figure 115 : Edit Super Administrator Password ...................................................................................... 130
Figure 116 : Edit Super Administrator Email ............................................................................................. 130
Figure 117 : Delete Users ......................................................................................................................... 131
Figure 118: Change Log Records ............................................................................................................. 131
Figure 119: Change Log Action ................................................................................................................. 132
Figure 120: Generate Report .................................................................................................................... 132
Figure 121: Create Report ........................................................................................................................ 133
Figure 122: Created Report ...................................................................................................................... 135
Figure 123: Generated Report .................................................................................................................. 135
Figure 124: Feedback ............................................................................................................................... 136
Figure 125: Upgrade ................................................................................................................................. 137
Figure 126: Firmware - Recommended Version ....................................................................................... 137
Figure 127: Firmware - Customized Version ............................................................................................. 138

P a g e | 15
GWN Management Platforms - User Manual
GWN.Cloud & GWN Manager - Version 1.0.19.7 & 1.0.19.8
Figure 128: Upgrade AP from GWN Manager .......................................................................................... 138
Figure 129: Upgrade Schedule for GWN AP from GWN Manager ........................................................... 139
Figure 130: Upgrade - Schedule ............................................................................................................... 139
Figure 131: SMTP server .......................................................................................................................... 140
Figure 132: Backup Settings ..................................................................................................................... 140
Figure 133: Restore .................................................................................................................................. 141
Figure 134: Confirm Backup ..................................................................................................................... 141
Figure 135: Enable API Developer Mode .................................................................................................. 142

P a g e | 16
GWN Management Platforms - User Manual
GWN.Cloud & GWN Manager - Version 1.0.19.7 & 1.0.19.8
DOCUMENT PURPOSE
This document describes the basic concepts and operations necessary to use GWN Management
Platforms to manage multiple GWN Access points including GWN7610, GWN7600, GWN7630 and
GWN7600LR. The intended audiences of this document are network administrators.
This guide will cover the below topics:
• Product Overview
• Getting To Know GWN Management Platform
• Getting Started With GWN Management Platform
• Dashboard
• Network
• Access Points
• SSID
• Clients
• Captive Portal
• Access Control
• Insight
• System
• User Management
• Global

P a g e | 17
GWN Management Platforms - User Manual
GWN.Cloud & GWN Manager - Version 1.0.19.7 & 1.0.19.8
CHANGE LOG
This section documents significant changes from previous versions of the GWN Management Platform User
Manuals. Only major new features or major document updates are listed here. Minor updates for corrections
or editing are not documented here.
GWN.Cloud
Version 1.0.19.7
▪ Support client name in csv file when import access list. [Access List]
▪ Added secondary RADIUS server for WLAN 802.1x authentication. [Wi-Fi Settings]
▪ Added WPA3 options for SSID setting. [Security Mode]
▪ Moved upgrade feature from Network to Global. [Upgrade]
Version 1.0.19.2
▪ Added new statistical graphs for top website and guest count. [Overview] [Overview Page]
▪ Added API feature. [API Developer]
▪ Added SNMP feature. [SNMP]
▪ Added Rogue AP feature. [Rogue AP]
▪ Added Firewall feature. [Firewall]
▪ Added Hotspot 2.0 feature (Beta). [Hotspot 2.0]
▪ Added NAT as a new client IP assignment method. [NAT Pool]
▪ Added support for 802.11w Management Frame Protection. [802.11w]
▪ Added support to import access list by csv file. [Access List]
Version 1.0.10.7
▪ Added Site Survey feature. [Site Survey]
▪ Added feature of Minimum Rate Control. [Enable Minimum Rate] [Minimum Rate (Mbps)]
▪ Added feature of SSH Remote Access. [SSH Remote Access]
▪ Added feature of External Portal support Socifi Platform. [External Splash Page]

P a g e | 18
GWN Management Platforms - User Manual
GWN.Cloud & GWN Manager - Version 1.0.19.7 & 1.0.19.8
▪ Added feature of Client inactivity timeout. [Client Inactivity Timeout]
▪ Added feature of Upgrade Regularly. [Upgrade]
▪ Added feature of Client Steering. [RADIO]
▪ Enhanced feature of Voucher: display of remaining bytes. [Figure 80: Voucher Details]
▪ Enhanced feature of Dynamic VLAN. [Enable Dynamic VLAN]
▪ Changed LED patterns. [GWN76xx LED Patterns]
Version 1.0.9.8
▪ Added support for collecting user feedback from GWN Cloud page. [
▪ Feedback]
▪ Added support for Voucher Style Customization. [Voucher Settings]
▪ Added support for video URL. [Advertisement]
▪ Added support to export Guest Information via Email. [Email Guest Information]
▪ Added support for client RX/TX Rate display. [Status]
▪ Expanded Max Devices to use the same Voucher. [Voucher]
▪ Added support to enable/disable client connection/disconnection events.
Version 1.0.8.17
▪ Added support for Advertisement for Captive Portal [Advertisement]
▪ Added support for Custom Field for Captive Portal Splash Page [Splash Page][Guest]
▪ Added feature of ARP Proxy. [ARP Proxy]
▪ Added support of Clear client data. [Status]
▪ Enhanced Event log by Wi-Fi authentication event. [Event Log per AP]
▪ Added EU Server support. [Zone]
▪ Enhanced Bandwidth Rules by adding option to limit bandwidth Per-Client. [Range Constraint]
▪ Added Total Bandwidth Usage Display [Summary][Overview][Status]
▪ Added Export Immediately feature for URL Access Logs. [URL Access Log]

P a g e | 19
GWN Management Platforms - User Manual
GWN.Cloud & GWN Manager - Version 1.0.19.7 & 1.0.19.8
Version 1.0.8.7
▪ Added support for URL logging (Except for GWN7610). [URL Access Log]
Version 1.0.7.18
▪ Enhanced Client Information. [Summary] [Client Manufacturer] [Client OS]
▪ Enhanced Access Point status. [Status]
▪ Added Reset access point button. [Reset Access Points]
▪ Added External Captive Portal Support. [External Splash Page]
▪ Added AP Scheduling Reboot. [Reboot Schedule]
▪ Added Change Log section. [Change Log]
▪ Added Account idle timeout. [Account Idle timeout]
▪ Added feature of Wi-Fi Statistic Report. [Report]
▪ Added feature of Captive Portal Guest Summary. [Summary]
▪ Changed SSID limit. [SSID Limit]
▪ Enhanced Wi-Fi Service by adding configurable options. [Beacon Interval] [DTIM Period]
[Convert IP multicast to unicast].
▪ Enhanced Captive Portal features. [Failsafe Mode] [Daily Limit] [Byte Quota] [Force To Follow]
Version 1.0.0.37
▪ This is the initial version for GWN.Cloud.
GWN Manager
Version 1.0.19.8
▪ No major changes.
Version 1.0.19.7
▪ Support client name in csv file when import access list. [Access List]
▪ Added secondary RADIUS server for WLAN 802.1x authentication. [Wi-Fi Settings]
▪ Added WPA3 options for SSID setting. [Security Mode]

P a g e | 20
GWN Management Platforms - User Manual
GWN.Cloud & GWN Manager - Version 1.0.19.7 & 1.0.19.8
▪ Moved upgrade feature from Network to Global. [Upgrade]
Version 1.0.19.2
▪ Added new statistical graphs for top website and guest count. [Overview] [Overview Page]
▪ Added API feature. [API Developer]
▪ Added SNMP feature. [SNMP]
▪ Added Rogue AP feature. [Rogue AP]
▪ Added Firewall feature. [Firewall]
▪ Added Hotspot 2.0 feature (Beta). [Hotspot 2.0]
▪ Added NAT as a new client IP assignment method. [NAT Pool]
▪ Added support for 802.11w Management Frame Protection. [802.11w]
▪ Added support to import access list by csv file. [Access List]
Version 1.0.0.33
▪ This is the initial version for GWN Manager.

P a g e | 21
GWN Management Platforms - User Manual
GWN.Cloud & GWN Manager - Version 1.0.19.7 & 1.0.19.8
REQUIREMENTS
Following table shows the requirements of Grandstream networking products GWN76xx and version of
APP per GWN Management Platform:
Table 1: Requirements
Model
GWN.Cloud
1.0.19.7
GWN Manager
1.0.19.7
Minimum
Recommended
Minimum
Recommended
Version of AP
GWN7610
1.0.6.37
1.0.19.15
1.0.15.20
1.0.19.15
GWN7600
1.0.8.17
GWN7600LR
1.0.8.17
GWN7630
1.0.9.2
GWN7630LR
1.0.11.8
GWN7602
1.0.1.6
Version of
APP
iOS
TM
1.0.5
1.0.6
1.0.6
1.0.6
Android
TM
1.0.0.14
1.0.0.20
1.0.0.19
1.0.0.20
System
(GWN
Manager only)
OS: Linux Redhat7, CentOS 7
Hardware:
- For up to 200 APs and 2000 Clients:
• CPU: Intel® Core™ i3-3240 or above
• RAM: 4GB or above
• Storage: 250GB (SSD preferred, depend on retained data size)
- For up to 3000 APs and 30000 Clients:
• CPU: Intel® Xeon® Silver 4210
• RAM: 16GB or above
• Storage: 250GB (SSD preferred, depend on retained data size)

P a g e | 22
GWN Management Platforms - User Manual
GWN.Cloud & GWN Manager - Version 1.0.19.7 & 1.0.19.8
WELCOME
Thank you for using Grandstream GWN Management Platform.
GWN Management Platforms are enterprise-grade Wi-Fi network management platforms that offer a
centralized, streamlined network management and monitoring. This includes GWN.Cloud, the cloud-based
platform and the GWN Manager which is a Linux based platform. Both solutions allow business to deploy
a secure Wi-Fi network in seconds and manage those networks across multiple locations through a web
user interface. Users can keep an eye on the network’s performance with real-time monitoring, alerts,
statistics and reports that can be viewed using a web browser or the mobile application.

P a g e | 23
GWN Management Platforms - User Manual
GWN.Cloud & GWN Manager - Version 1.0.19.7 & 1.0.19.8
PRODUCT OVERVIEW
Features Highlights
GWN.Cloud
• Software-as-a-Service (SaaS) Solution to manage all your Grandstream Access
point, without any additional on-premise infrastructure.
• High level security, since all the traffic between GWN AP and cloud is secured, in
addition to powerful authentication method required to add new AP.
• Easy way to add new access point, either by scanning a barcode from GWN.Cloud
App (iOS & Android) or by entering AP MAC and random password.
• No limits on number of sites or APs
GWN Manager
• Linux solution to secure manage all your Grandstream Access point
• Automatically discover and Adopt Access point in your network
• Adopt APs manually using SSH or through Web GUI by setting the Manager
address and port.
• Up to 3000 APs, with high performance hardware
Shared
• Highly available with no single point of failure across the whole system.
• Easy and intuitive dashboard for monitoring.
• Network Group creation.
• AP and clients Centralized monitoring and management.
• Captive portal configuration.
• Bandwidth control per SSID, IP, or MAC address.

P a g e | 24
GWN Management Platforms - User Manual
GWN.Cloud & GWN Manager - Version 1.0.19.7 & 1.0.19.8
Specifications
Table 2: GWN Management Platform Specifications
Function
• Network-based AP management
• Network/AP/client monitoring
Security and
Authentication
• Supports access policies configuration (blacklist, whitelist, time policy)
• Multiple security modes including WPA, WPA2, WPA3, WEP, open,
etc.
• Bandwidth rules for client access
• User and privilege management
Enterprise Features
• No limits on number of sites or APs for GWN.Cloud; Up to 3000 APs
for GWN Manager with high performance hardware
• Hosted by AWS with 99.99% uptime (GWN.Cloud only)
• Bank-grade TLS encryption from end-to-end
• X.509 certificate-based authentication
• Supports Wi-Fi Alliance Voice-Enterprise
• Mobile app for iOS
TM
and Android
TM
• Real-time Wi-Fi Scan for deployment
• URL access log collection
• Multiple Wi-Fi performance optimization methods including band
steering, Minimum RSSI, ARP Proxy, IP multicast to unicast, etc
Supported Wi-Fi Access
Points
GWN7610, GWN7600, GWN7600LR, GWN7630, GWN7630LR,
GWN7602, GWN7605, GWN7605LR, GWN7615.
Captive Portals
• Splash page with built-in WYSIWYG editor
• Facebook, Twitter integration
• Multiple captive portal authentications including simple password,
radius, voucher, custom field etc.
• External captive portal integration

P a g e | 25
GWN Management Platforms - User Manual
GWN.Cloud & GWN Manager - Version 1.0.19.7 & 1.0.19.8
• Real-time guest statistics and monitoring
• Advertisement integration with flexible strategies
• Export guest info into file and automatically send to email
Centralized Management
• Local data forwarding, no user traffic sent to the controller
• Network-based AP management
• Network/AP/client monitoring
• Layer2 and Layer3 based AP discovery
Reporting and
Monitoring
• Real-time Wi-Fi AP and client monitoring
• Detailed reports by network, AP, client etc.
• Retrieval of historical data for statistical observations
• Real-time alerts and event logs
Maintenance
• Ping/traceroute/capture
• Both configuration and data backup
• Scheduled AP firmware update and LED control
• Change log for audit trail
Languages
English, Chinese, French, German, Portuguese and Spanish

P a g e | 26
GWN Management Platforms - User Manual
GWN.Cloud & GWN Manager - Version 1.0.19.7 & 1.0.19.8
GETTING TO KNOW GWN MANAGEMENT PLATFORM
GWN.Cloud
Figure 1: GWN.Cloud Architecture
GWN.Cloud is a cloud-based platform used to manage and monitor GWN Access points wherever they are
in Internet. The platform can be accessed using the following link: https://www.gwn.cloud/login
It provides an easy and intuitive web-based configuration interface as well as an Android App.
Sign up to GWN.Cloud
When accessing GWN.Cloud for the first time, users are required to sign up. The following screen will be
displayed:

P a g e | 27
GWN Management Platforms - User Manual
GWN.Cloud & GWN Manager - Version 1.0.19.7 & 1.0.19.8
Figure 2: GWN.Cloud Login Page
1. Click on Sign up to go to the sign-up screen, then enter the required information.
Figure 3: GWN.Cloud Sign up page

P a g e | 28
GWN Management Platforms - User Manual
GWN.Cloud & GWN Manager - Version 1.0.19.7 & 1.0.19.8
Table 3: GWN.Cloud Sign up Settings
Zone
Users will need to choose US server or EU server to store their data at. This is
mainly for GDPR regulation compliance.
Email
This email will be used to receive account activation link and also can be used as
a username when login to GWN.Cloud.
Login name
Enter the login name that will be used to login to your GWN.Cloud space.
Password
Enter the password for Login authentication
Confirm
password
Confirm the previously entered password
Country/Region
Enter the country/region on which applies to your account.
Time zone
Set your time zone.
Confirmation
code
Copy the confirmation from the Captcha.
2. Once you create an account, you can access to your GWN.Cloud page for the first time and the
following page will be displayed:
Figure 4: GWN.Cloud Dashboard

P a g e | 29
GWN Management Platforms - User Manual
GWN.Cloud & GWN Manager - Version 1.0.19.7 & 1.0.19.8
GWN Manager
Figure 5: GWN Manager Architecture
GWN Manager is an On-premise Access Points Controller used to manage and monitor GWN Access points
on your network. The GWN Manager platform can be installed and accessed by following the steps below:
Installation Steps
1. Install dependencies:
- Type in the following commands under CentOS Terminal
yum install epel-release
yum install jemalloc libaio glibc-devel fontconfig xorg-x11-font-utils freetype
2. Installing GWN Manager
- Download link: https://www.grandstream.com/support/tools?hsLang=en
- After a successful download, browse to the file directory and uncompress it:
tar -zxvf GWN_Manager-1.0.0.21-201912121121.tar.gz
- Then, Install all packages:
rpm -ivh gwn*1.0.0.21*.rpm
Warning: Please use the rpm packages we provided to install mariadb, redis, nginx, or GWN Manager may
work abnormally.
3. Add firewall exceptions:

P a g e | 30
GWN Management Platforms - User Manual
GWN.Cloud & GWN Manager - Version 1.0.19.7 & 1.0.19.8
firewall-cmd --zone=public --add-port=8443/tcp –permanent
firewall-cmd --zone=public --add-port=10014/tcp –permanent
firewall-cmd --reload
Note: By default, GWN Manager use port 8443 for web service (nginx) and port 10014 for gateway
communication separately.
4. Run the script to start the services:
/gwn/gwn start
Note: After all services starting up, please go to the Web Portal for further configuration. By default, the
Web Portal address is https://server_ipaddress:8443
Figure 6: GWN Manager Start page
Note: GWN Manager installation is supported on virtual machines (Tested on VMware & VirtualBox).

P a g e | 31
GWN Management Platforms - User Manual
GWN.Cloud & GWN Manager - Version 1.0.19.7 & 1.0.19.8
Configuring GWN Manager
Users can change the nginx binding protocol, port as well as access address for communication:
/gwn/gwn config
Warnings:
• If you change the nginx binding port, do not forget to add a new firewall exception, and if you change
the IP address of your machine, don't forget to update the config of access address synchronously.
Moreover, for security consideration, GWN Manager runs as a non-root user, so please use a
number larger than 1024 as the nginx binding port number, or you may fail to start the service due
to denied permission.
• HTTPs is used by default due to its security, and GWN Manager will automatically generate
certificate along with private key after installation. You can also apply for a certificate that signed
by trusted authority to replace it. Path to replace the ssl certificate and private key:
- certificate: /gwn/conf/nginx/ssl.pem
- private key: /gwn/conf/nginx/ssl.key
• After replacing the two files, restart gwn service to validate it:
/gwn/gwn restart
• If the login password is forgotten, users can change it using the command below:
/gwn/gwn modify-password
Upgrading GWN Manager
GWN Manager will check for the new firmware version automatically when you log into web GUI, if a new
version is found, a notification will pop-up and you may click to complete upgrade. You can also upgrade
manually using the below commands:
rpm -Uvh gwn*1.0.0.13*.rpm
/gwn/gwn restart
Uninstalling GWN Manager
Run these commands to uninstall GWN packages from your Linux system:
rpm -e gwn gwn-redis gwn-mariadb gwn-nginx
rm -rf /gwn

P a g e | 32
GWN Management Platforms - User Manual
GWN.Cloud & GWN Manager - Version 1.0.19.7 & 1.0.19.8
Important Notes
• GWN Manager only support one access address at present, so if your machine has more than one
network interface, you should set the access address to the one (IP address) that you expect to
communicate with Access point.
• Please consider setting the right time zone of your machine before running GWN Manager,
modifying the time zone may cause data corruption.
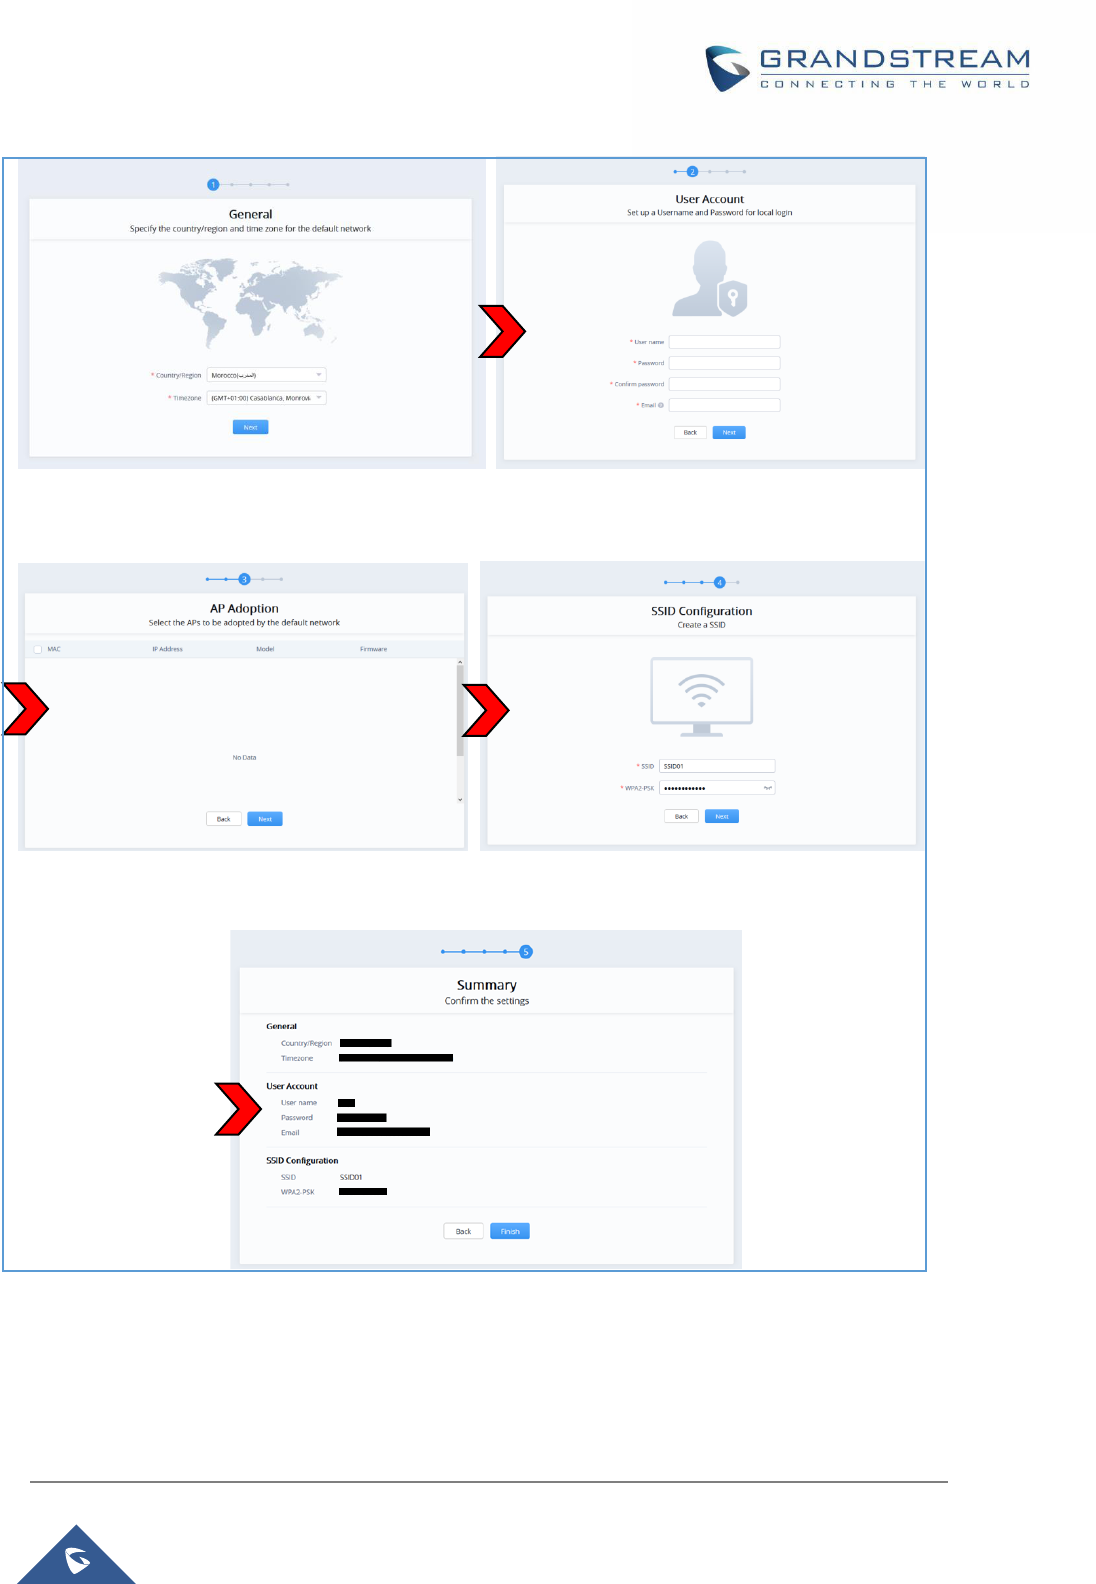
First Use
The GWN Manager provides an easy and intuitive Web UI to manage and monitor GWN76xx Access Points,
it provides users access to all GWN Access Points settings, without any additional on-premise infrastructure.
On first use, users need to fill in additional information following the GWN Manager Wizard:
Table 4: GWN Manager Setup Wizard
General
Specify the country/region and time zone for the default network:
Country/Region
Time zone
Note: These parameters can be automatically detected by the system
User Account
Set up a Username and Password for local login
Username
Password
Confirm password
Email
AP Adoption
Select the APs to be adopted by the default network.
Note: APs Available on the same LAN will be detected automatically
SSID Configuration
Create a SSID
Summary
Review all the previous settings
P a g e | 33
GWN Management Platforms - User Manual
GWN.Cloud & GWN Manager - Version 1.0.19.7 & 1.0.19.8
Figure 7: GWN Manager Wizard
Sign up to GWN Manager
Enter the previously configured user credentials to access the GWN Manager GUI:

P a g e | 34
GWN Management Platforms - User Manual
GWN.Cloud & GWN Manager - Version 1.0.19.7 & 1.0.19.8
Figure 8: GWN Manager Login Page
The following page will be displayed:
Figure 9: GWN Manager Dashboard

P a g e | 35
GWN Management Platforms - User Manual
GWN.Cloud & GWN Manager - Version 1.0.19.7 & 1.0.19.8
GETTING STARTED WITH GWN MANAGEMENT PLATFORM
The GWN Management Platforms provide an easy and intuitive Web UI or mobile app (both Android & iOS
versions) to manage and monitor GWN76xx Access Points, it provides users access to all GWN Access
Points settings, without any additional on-premise infrastructure.
GWN76xx LED Patterns
The panel of the GWN76XX has different LED patterns for different activities, to help users read the status
of the GWN76XX AP whether it’s powered up correctly, provisioned, in upgrading process and more, for
more details please refer to the below table.
Table 5: LED Patterns
LED Status
Indication
OFF
Unit is powered off or abnormal power supply.
Solid green
Unit is powered on.
Blinking green
Firmware update in progress.
Solid green
Firmware update successful.
Solid red
Firmware update failed.
Blinking red
Factory reset initiated
Solid purple
Unit not provisioned.
Blinking blue
Unit provisioning in progress.
Solid blue
Unit is provisioned successfully and running normally.
Blinking White
Used for Access Point location feature.
Note: To add GWN76XX AP to a GWN Management platform, either GWN.Cloud or GWN Manager, the
status of the LED should be Solid Purple (AP not provisioned/uncontrolled).

P a g e | 36
GWN Management Platforms - User Manual
GWN.Cloud & GWN Manager - Version 1.0.19.7 & 1.0.19.8
Adding GWN76XX to GWN.Cloud
To add an Access point to GWN.Cloud, the administrator needs two information:
• MAC address of the Access Point.
• Wi-Fi Password in the back of the unit.
Note: Refer to [REQUIREMENTS] section of this document to make sure your GWN76xx is using the
proper firmware version. If not, please upgrade the units before adding them to GWN.Cloud.
There are 3 methods to add GWN76xx to the cloud:
• Method 1: Adding New AP Manually
• Method 2: Adding New AP using GWN Application
• Method 3: Transfer APs control from Local Master
Method 1: Adding New AP Manually
1. Locate the MAC address on the MAC tag of the unit, which is on the underside of the device, or on
the package.
2. Locate the Wi-Fi Password.
Figure 10: GWN Access Point MAC and Wi-Fi Password
3. Navigate to Access Points → Configuration → Click on Add button.

P a g e | 37
GWN Management Platforms - User Manual
GWN.Cloud & GWN Manager - Version 1.0.19.7 & 1.0.19.8
Figure 11: Adding New Access Point to GWN.Cloud
4. Enter the MAC address the Wi-Fi Password of the access point to be added.
Figure 12: Adding Access Points Manually
5. Click on Add and reset your Access Point. After reset, it will be added automatically to your Cloud
account and you will be able to monitor/manage it.
Bulk-add AP using CSV file import
Another option for bulk-add access points is to use CSV file upload, to do that follow below steps:
1- After clicking on Add under the menu Access Points → Configuration, click on Import Tab.

P a g e | 38
GWN Management Platforms - User Manual
GWN.Cloud & GWN Manager - Version 1.0.19.7 & 1.0.19.8
Figure 13: Import CSV file for APs
2- After this select “Click to upload CSV file” in order to import pre-configured CSV file with list of
access points (MAC address and Wi-Fi password).
Figure 14: Upload CSV file
Method 2: Adding New AP using GWN.Cloud Application
An easy way to add new Access points to your GWN.Cloud is to use GWN.Cloud Application.
Note: GWN.Cloud Application is available on Google Play for Android
TM
and App Store for iOS
TM
.
The operation is done by scanning the barcode from GWN Access Point’s sticker.

P a g e | 39
GWN Management Platforms - User Manual
GWN.Cloud & GWN Manager - Version 1.0.19.7 & 1.0.19.8
Figure 15: Adding Access Point to GWN.Cloud using GWN App
Once added, the list of APs will be displayed on GWN.Cloud interface.
Figure 16: Access Points Status
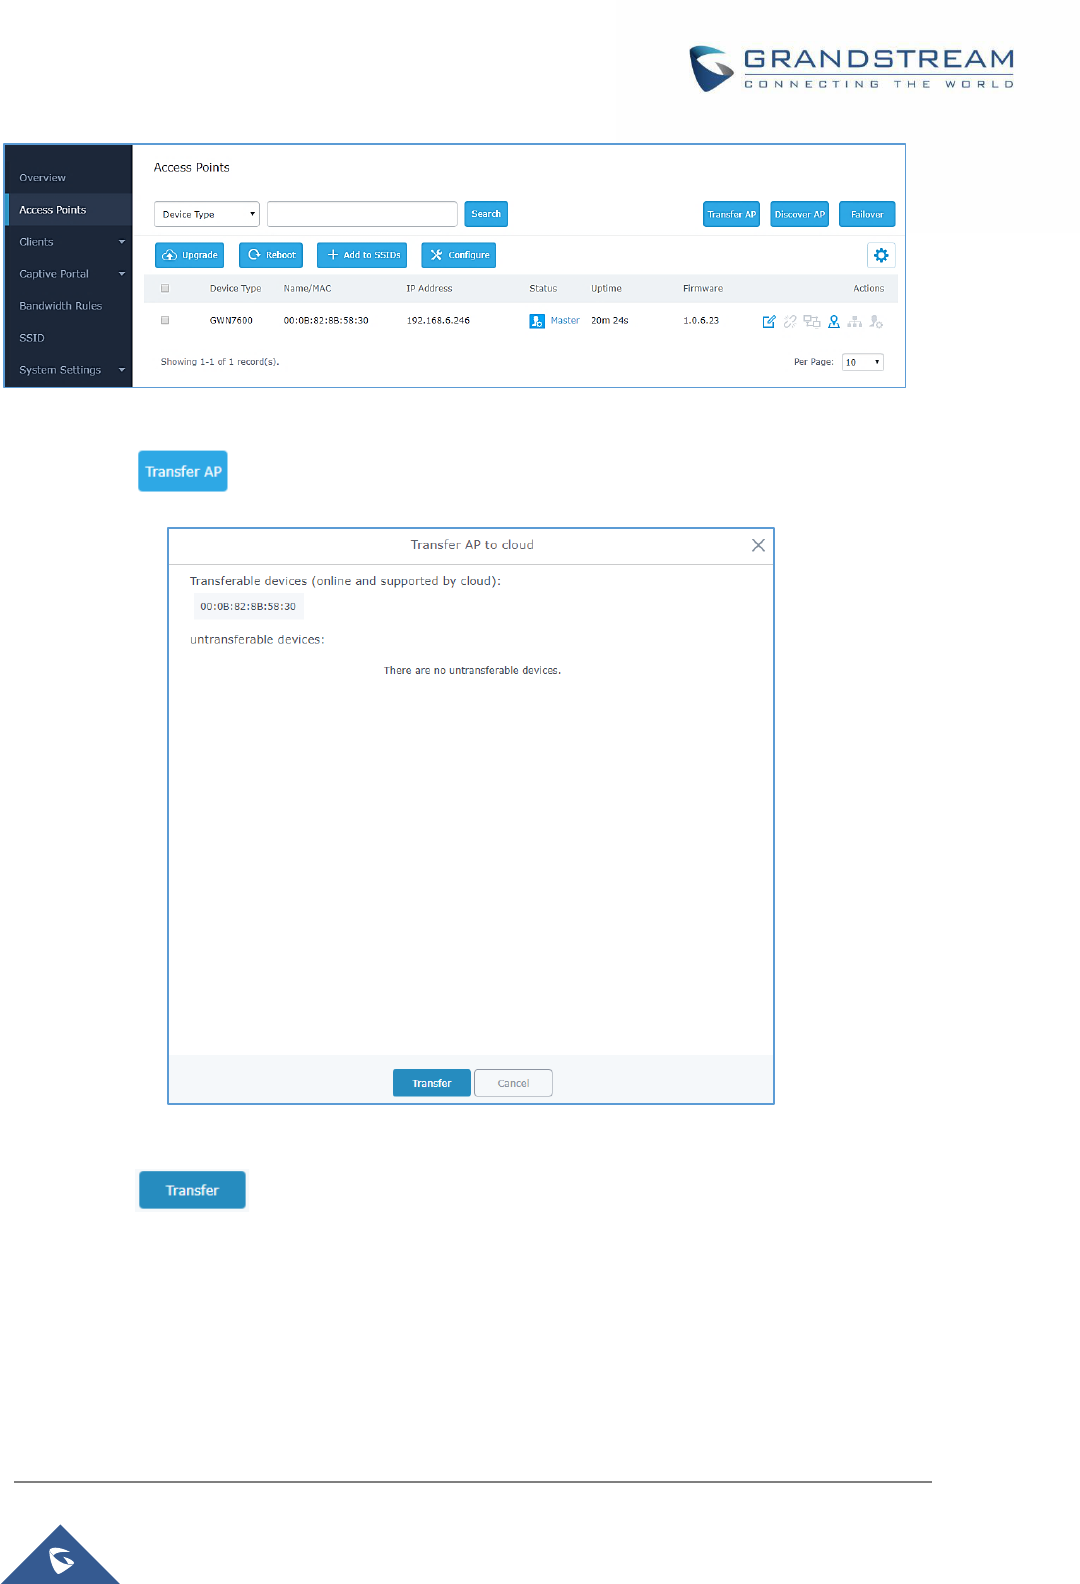
Method 3: Transfer APs from Local Master
Another method to add GWN APs to the cloud is by transferring them to the cloud from the local Master
AP. Follow these steps to achieve this:
1. Access the web UI of the Master AP and go to Access Points.
P a g e | 40
GWN Management Platforms - User Manual
GWN.Cloud & GWN Manager - Version 1.0.19.7 & 1.0.19.8
Figure 17: Master AP - Access Points
2. Press button. A new window will display “Transferable devices” list as shown below.
Figure 18: Transfer AP to Cloud
3. Press button. The web browser will redirect to GWN.Cloud login page.
4. Once logged in to the cloud, the configuration page “Select Network” will be displayed:

P a g e | 41
GWN Management Platforms - User Manual
GWN.Cloud & GWN Manager - Version 1.0.19.7 & 1.0.19.8
Figure 19: Select Network
• Access Point: Shows the MAC address of the passed check device.
• Failed: Shows the MAC address of the authentication failed or added.
5. Select Network from the drop-down list to which the AP will be assigned.
6. Press Save button to confirm.
7. Once added to the cloud, Master AP web UI will display following successful notice.
Figure 20: Transfer AP to Cloud - Success

P a g e | 42
GWN Management Platforms - User Manual
GWN.Cloud & GWN Manager - Version 1.0.19.7 & 1.0.19.8
Adopt GWN76XX to GWN Manager
Note: Refer to [REQUIREMENTS] section of this document to make sure your GWN76xx is using the
proper firmware version. If not, please upgrade the units before adding them to GWN Manager.
1. Navigate to Access Points → Configuration
2. Click on Adopt button.
Figure 21: Adding New Access Point to GWN Manager
3. The GWN Manager will scan and detect the available APs on your Network
Figure 22: Auto detect Access Points
4. Select an AP by checking the box on its left. Or select all by checking the top box.
Figure 23: Select Access Points

P a g e | 43
GWN Management Platforms - User Manual
GWN.Cloud & GWN Manager - Version 1.0.19.7 & 1.0.19.8
5. A new window will pop up to confirm the success of the operation:
Notice the MAC addresses of the new added units. Then, click OK to confirm.
Figure 24: Confirm APs Adoption
6. The newly added APs should now be available under Access Points → Configuration
Figure 25: Adopted Access Points
Discover GWN76XX
Method 1: Auto Discovery
• If GWN Manager connects to the same local subnet as GWN APs, it can discover the APs
automatically via layer 2 broadcast.
• GWN APs accept DHCP option 224 encapsulated in option 43 to direct the controller. An example
of DHCP option 43 configuration would be:
224(type)18(length)172.16.1.124:10014(value) translated into Hex as
e0123137322e31362e312e3132343a3130303134
Method 2: Manual discovery
• You can SSH to slave AP and use GWN menu to set the Manager address and port (10014).

P a g e | 44
GWN Management Platforms - User Manual
GWN.Cloud & GWN Manager - Version 1.0.19.7 & 1.0.19.8
Figure 26: Manager Settings – SSH
• You can log into WebUI of slave AP or an unpaired AP to set the Manager address and port.
Figure 27: Manager Settings – Slave WebGUI

P a g e | 45
GWN Management Platforms - User Manual
GWN.Cloud & GWN Manager - Version 1.0.19.7 & 1.0.19.8
DASHBOARD
Overview
The Overview page provides general information that can be used to monitor both access points and clients
connected to them, it’s separated into seven sections:
• Access Points
• Clients
• Alerts
• Clients Count
• Bandwidth usage
• Top APs
• Top Clients
• Top SSIDs
• Tope Websites
Figure 28: GWN.Cloud Dashboard - Overview
The following table describes each section:

P a g e | 46
GWN Management Platforms - User Manual
GWN.Cloud & GWN Manager - Version 1.0.19.7 & 1.0.19.8
Table 6: Dashboard Description
Section
Description
Access Points
Displays the number of Access points monitored as well as their status
(Offline/Online)
Clients
Displays the total number of clients connected to the monitored APs, in addition
to the band they are connected to 2.4G or 5G.
Alerts
This section shows alerts the administrator about any wrong behavior, based on
the configured Alerts. (Refer to Alert section under Settings for more details)
Clients Count
It shows the number of clients connected at a specific period of time; the
administrator can toggle between four different periods of time:
• 2 hours: Displays the connected clients graph for the two last hours.
• 1 day: Displays the connected clients graph for the last day.
• 1 week: Displays the connected clients graph for the last week.
• 1 month: Displays the connected clients graph for the last month.
Bandwidth usage
This section shows the bandwidth usage (Upload/Download) by all the clients,
it provides the BW statistics for both Download and upload.
Top APs
Displays the top APs that consumed the max of the bandwidth/data
Top Clients
Lists the clients that downloaded/uploaded the max of data
Top SSIDs
Displays the SSIDs that are mostly used by clients.
Network List
The Network List page displays different Network Groups created on your account:

P a g e | 47
GWN Management Platforms - User Manual
GWN.Cloud & GWN Manager - Version 1.0.19.7 & 1.0.19.8
Figure 29: GWN.Cloud Dashboard - Network List
• From Network list pages the administrator can monitor the number of Access points connected to each
AP as well as the total APs, in addition to the number of clients on each network group.
• From this page New Network Groups can be also added by clicking on button. A
new page will popup, fill in the fields as show in previous figure to create a new network.
Figure 30: Create a New Network

P a g e | 48
GWN Management Platforms - User Manual
GWN.Cloud & GWN Manager - Version 1.0.19.7 & 1.0.19.8
Table 7: Create a New Network Settings
Setting
Description
Network Name
Enter the network Name to identify different networks in your environment.
Country/Region
Select the country/Region, this is required to set the Wi-Fi specifications of your
country on GWN AP.
Time Zone
Select your time zone.
Network
Administrator
This field displays the list of administrators that can manage this network.
Clone Network
When you have an existing Network, you can choose to clone the new one with the
already existing network.
• Administrator can search for specific Network by name using .
AP List
The AP List page displays the list of APs connected to your Account.
Figure 31: GWN.Cloud Dashboard – AP List
The AP List page provides also the following information regarding the Access point:
• Access Point Model.
• MAC address of the AP.

P a g e | 49
GWN Management Platforms - User Manual
GWN.Cloud & GWN Manager - Version 1.0.19.7 & 1.0.19.8
• Name of the AP.
• The IP address of the AP.
• The network Group to which the AP is assigned.
• The number of clients connected to the AP.
• Total Data consumed by the AP.
• Firmware.
Notes:
➢ The administrator can search access points from this list by Model, by name or also by MAC
address.
➢ The list of information to display can be customized, by selecting which fields to display, as shown
in the following figure:
Figure 32: Customize AP List Table Fields

P a g e | 50
GWN Management Platforms - User Manual
GWN.Cloud & GWN Manager - Version 1.0.19.7 & 1.0.19.8
NETWORK
The network page provides an information regarding all the network groups created under your account,
once the administrator selects one network all the other configuration pages will change to reflect the
information related to the selected network.
Create a New Network
1. Click on Network and a list of the networks will be displayed.
2. Click on to add new network to your Platform Account.
Figure 33: Network List and Network Creation Button
3. Fill the information as shown in the figure below.

P a g e | 51
GWN Management Platforms - User Manual
GWN.Cloud & GWN Manager - Version 1.0.19.7 & 1.0.19.8
Figure 34: Create Network
Table 8: Create a New Network Settings
Setting
Description
Network Name
Enter the network Name to identify different networks in your environment.
Country/Region
Select the country/Region, this is required to set the Wi-Fi specifications of your
country on GWN AP.
Time Zone
Select your time zone.
Network
Administrator
This field displays the list of administrators that can manage this network.
Clone network
When you have an existing Network, you can choose to clone the new one with the
already existing network.
Overview Page
The overview page provides an overall view of the network selected. The administrator must select a
network first and click on Overview in order to displays the network overview including:

P a g e | 52
GWN Management Platforms - User Manual
GWN.Cloud & GWN Manager - Version 1.0.19.7 & 1.0.19.8
• Access Points added to this network
• Clients connected to the network
• Different Alerts
• Clients Count
• Bandwidth usage
• Top APs
• Top Clients
• Top SSIDs
• Top Websites
Figure 35: Overview Page Displays Information related to Specific Network
Note: The overview page is related to specific network, while Dashboard is general overview page that
shows information related to all the network monitored by the administrator.

P a g e | 53
GWN Management Platforms - User Manual
GWN.Cloud & GWN Manager - Version 1.0.19.7 & 1.0.19.8
ACCESS POINTS
From the access points page, the administrator can monitor different information regarding the access
points of the selected network, this section is separated into 3 sub-sections:
1. Summary
2. Status
3. Configuration
Summary
The summary page displays information about the monitored access points, including Channel usage as
well as the total access points and their status Online/Offline.
Figure 36: Access Points – Summary
Status
The Status page lists all the access points assigned to the selected network, along with the possibility to
perform some basic operations such locating the device (LEDs start blinking in White) or clear the usage
data, also users can check more detailed information about each access point and benefit from useful
debugging tools which can help diagnose issue when they appear.

P a g e | 54
GWN Management Platforms - User Manual
GWN.Cloud & GWN Manager - Version 1.0.19.7 & 1.0.19.8
Figure 37: Access Points - Status
Table 9: Access Points Status Parameters
Model
GWN Access Point Model
MAC
MAC Address of the Access Point
Name
Access Point’s name
IP Address
IP Address of the Access point
Firmware
Firmware of the Access point
Uptime
Uptime of the Access point
Channel
Channels used by this Access points for both 2G and 5G.
Client
Number of clients connected to the Access Point
Actions
Locate Access point using button.
Press to clear access point usage.
To get more detailed information about the status of a specific access point, users can click on the desired
AP then a page similar to the following will show up:

P a g e | 55
GWN Management Platforms - User Manual
GWN.Cloud & GWN Manager - Version 1.0.19.7 & 1.0.19.8
Figure 38: Usage of a Specific AP
The first tab will display the data usage for the specified access point and allows the user to filter the traffic
graph for the last 2hours, 1day, 1week or 1 month. Also, the user has the ability to visualize the data usage
(Upload/Download) for all SSIDs broadcasted by the AP or select a specific SSID from the drop-down list.
Click on Current clients to see the currently connected clients to the select AP as shown on the figure below.
Figure 39: Current Clients - Stats per AP
Click on Event log tab to see the log of all events that have occurred on the select access point, some
events can help diagnosing Wi-Fi problems as shown on the figure below, the client has been disconnected
due to four-way handshake failure, which is most likely because of wrong Wi-Fi password secret entered
on client device.
Figure 40: Event Log per AP

P a g e | 56
GWN Management Platforms - User Manual
GWN.Cloud & GWN Manager - Version 1.0.19.7 & 1.0.19.8
The next tab “Info” shows detailed information about the select AP, such as the model, name, firmware
version, memory used and which SSID is being broadcasted by this AP and more.
Figure 41: AP Info
The last Tab is used by administrator for debugging purposes and provides the following tools:
• Ping/Traceroute tools, such as the ping utility, traceroute utility and nslookup tool.
• Capture, to capture traffic for different network groups and filter by IP, TCP of UDP traffic. Mostly
this will be used by engineering team for debugging purposes.
• Core Files, when a crash event happens on the unit, it will automatically generate a coredump file
that can used by engineering team for debugging purposes.
• SSH Remote Access: This feature enables SSH access from GWN.cloud to your AP device, and
this is mainly for extra troubleshooting method. Remote SSH will be automatically deactivated after
48 hours.

P a g e | 57
GWN Management Platforms - User Manual
GWN.Cloud & GWN Manager - Version 1.0.19.7 & 1.0.19.8
Figure 42: Debug Tool Tab
Configuration
The configuration page allows the administrator to add, move, delete, reboot, configure or reset access
points.
Figure 43: Access Points Configuration Page
Add New Access Points
• There are two methods to add new access points, either manually or using GWN Cloud App. Please
refer to [Adding GWN76XX to GWN.Cloud] section in this manual.
• Please refer to [Adopt GWN76XX to GWN Manager] section in this manual.

P a g e | 58
GWN Management Platforms - User Manual
GWN.Cloud & GWN Manager - Version 1.0.19.7 & 1.0.19.8
Move Access Points
The administrator can move GWN Access points from one network to another. Click on Move button and
the following window will popup, select the network where to move the access point and click on move.
Figure 44: Moving Access Points between Networks
Delete Access Points
To delete an access point, select it, then click on reboot button, the following confirmation message will be
displayed:
Figure 45: Delete Access Point
Reboot Access Points
To reboot an Access point, select it then click on Reboot button, the below confirmation message will be
displayed:
Figure 46: Reboot Access Point

P a g e | 59
GWN Management Platforms - User Manual
GWN.Cloud & GWN Manager - Version 1.0.19.7 & 1.0.19.8
Configure Access Points
To configure an access point, select and click on button. A new config page will popup:
Figure 47: Access Point Configuration Page
The following settings can be configured from this page:
Table 10: Access Point Configuration Settings
Device Name
Set GWN76xx’s name to identify it along with its MAC address.
Fixed IP
Check this option to configure the device with a static IP configuration; it must be in
the same subnet with the default Network Group; Once enabled, these fields will
show up: IPv4 Address/IPv4 Subnet Mask/IPv4 Gateway/Preferred IPv4
DNS/Alternate IPv4 DNS.
Band Steering
Band Steering will help redirecting clients to a radio band 2.4G or 5G, depend on
what’s supported by the device, for efficient use and to benefit from the maximum
throughput. Four options are allowed by GWN.Cloud:
• Disable Band steering: This will disable the band steering feature and the
access point will accept the band chosen by the client.

P a g e | 60
GWN Management Platforms - User Manual
GWN.Cloud & GWN Manager - Version 1.0.19.7 & 1.0.19.8
• 2G in Priority: 2G Band will be prioritized over 5G Band
• 5G in Priority: 5G Band will be prioritized over 2G Band
• Balance: GWN will balance between the clients connected to 2G and those
connected to 5G.
Net Port Type
You can configure Trunk port or Access port. When it’s set to Access, you also need
to specify the VLAN ID.
For example, if you have multiple SSIDs on different VLANs, then the port need to
be set to Trunk in order to negotiate trunk with the switch port where the AP is
plugged. Otherwise if there is only one SSID/VLAN the port type is set to Access.
This feature is not supported in GWN7600/7600LR/GWN7610.
Radio Power
Set the Radio Power depending on desired cell size to be broadcasted, four options
are available: “Low”, “Medium”, “High” and “custom” Default is “High”.
Custom
2.4GHz/5GHz Tx
Power (dBm)
Allows users to set a custom wireless power for both 5GHz/2.4GHz band, the value
of this field must be between 1 and 31.
Enable Minimum
RSSI
Configures whether to enable/disable Minimum RSSI function. This option can be
either Disabled, or Enabled and set manually or set to Use Radio Settings.
Minimum
Access Rate
Limit
Specify whether to limit the minimum access rate for clients. This function may
guarantee the connection quality between clients and AP. This option can be either
Disabled, or Enabled and set manually or set to Use Radio Settings.
Notes:
• The administrator can filter access points by Model or search by name/MAC of the device.
• Click on Button to save the changes and apply them to the AP.
Reset Access Points
To reset an access point, select and click on button, a confirmation message will be displayed,
click on to confirm the operation.

P a g e | 61
GWN Management Platforms - User Manual
GWN.Cloud & GWN Manager - Version 1.0.19.7 & 1.0.19.8
Figure 48: Reset Access Point

P a g e | 62
GWN Management Platforms - User Manual
GWN.Cloud & GWN Manager - Version 1.0.19.7 & 1.0.19.8
SSID
SSIDs page is used to monitor and manage network SSIDs, it’s divided into two different sections:
• Summary
• Configuration
Summary
The summary page displays statistics about different SSIDs, including the number of clients connected to
them as well as the bandwidth usage per period of time.
Figure 49: SSIDs - Summary
Configuration
From the Configuration page, users can create new SSIDs or configure an existing SSID.

P a g e | 63
GWN Management Platforms - User Manual
GWN.Cloud & GWN Manager - Version 1.0.19.7 & 1.0.19.8
Figure 50: SSIDs - Configuration
Wi-Fi Settings
To add new SSID, navigate to SSIDs → Configuration → Add. A new page will popup, enter different
settings to add new SSID.
Figure 51: SSIDs – Configuration – Wi-Fi Settings

P a g e | 64
GWN Management Platforms - User Manual
GWN.Cloud & GWN Manager - Version 1.0.19.7 & 1.0.19.8
Table 11: SSID Wi-Fi Settings
Field
Description
SSID
Set or modify the SSID name.
Enabled
Check to enable Wi-Fi for the SSID
VLAN
Check to Enable VLAN and enter VLAN ID, otherwise, this SSID will be
using the default network group.
SSID Band
Select the Wi-Fi band the GWN will use, three options are available:
Dual-Band, 2.4GHz or 5GHz
Security Mode
Set the security mode for encryption, 8 options are available:
• WEP 64-bit: Using a static WEP key. The characters can only be
0-9 or A-F with a length of 10, or printable ASCII characters with a
length of 5.
• WEP 128-bit: Using a static WEP key. The characters can only be
0-9 or A-F with a length of 26, or printable ASCII characters with a
length of 13.
• WPA/WPA2: Using “PSK” or “802.1x” as WPA Key Mode, with
“AES” or “AES/TKIP” Encryption Type.
• WPA2: Using “PSK” or “802.1x” as WPA Key Mode, with “AES” or
“AES/TKIP” Encryption Type. Recommended configuration for
authentication.
• WPA2/WPA3: Using “802.1x” as WPA Key Mode, with “GCMP-
256” or “GCMP-128” Encryption Type.
• WPA3-192: Using “SAE-PSK” or “802.1x” as WPA Key Mode, with
“GCMP-256” or “CCMP-256” Encryption Type.
• Open: No password is required. Users will be connected without
authentication. Not recommended for security reasons.
Note: GWN products support for 802.1x (PEAP-MSCHAPv2 and EAP-
TLS) requires external AAA server to permit authentication and centralized
access management.

P a g e | 65
GWN Management Platforms - User Manual
GWN.Cloud & GWN Manager - Version 1.0.19.7 & 1.0.19.8
WEP Key
Enter the password key for WEP protection mode.
This option is available when selecting WEP64-bit/WEP128-bit as
Security Mode
WPA Key Mode
Select key mode (Pre-Shared Key or 802.1X Authentication).
WPA Encryption Type
Select Encryption type (AES or AES/TKIP).
WPA Pre-Shared Key
Configures the WPA pre-shared key. The input range: 8-63 ASCII
characters or 8-64 hex characters.
This option is available when selecting PSK as WPA Key Mode.
RADIUS Sever Address
Configures RADIUS authentication server address.
This option is available when selecting 802.1x as WPA Key Mode.
RADIUS Server Port
Configures RADIUS Server Listening port (defaults to 1812).
This option is available when selecting 802.1x as WPA Key Mode.
RADIUS Server Secret
Enter the secret password for client authentication with RADIUS server.
This option is available when selecting 802.1x as WPA Key Mode.
Secondary RADIUS Server
Enable the configuration of secondary RADIUS authentication server
address
RADIUS Accounting Server
Address
Configures the address for the RADIUS accounting server.
This option is available when selecting 802.1x as WPA Key Mode.
RADIUS Accounting Server
Port
Configures RADIUS accounting server listening port (Default is 1813).
This option is available when selecting 802.1x as WPA Key Mode.
RADIUS Accounting Server
Secret
Enter the secret password for client authentication with RADIUS
accounting server. This option is available when selecting 802.1x as WPA
Key Mode.
RADIUS NAS ID
Configures the Radius NAS ID used to notify the source of RADIUS access
request so that, the RADIUS server can choose policy for that request.
This option is available when selecting 802.1x as WPA Key Mode.
Enable Captive Portal
Click on the checkbox to enable the captive portal feature.

P a g e | 66
GWN Management Platforms - User Manual
GWN.Cloud & GWN Manager - Version 1.0.19.7 & 1.0.19.8
Captive Portal Policy
Select the captive portal policy already created on the “CAPTIVE
PORTAL” web page to be used in the created SSID.
MAC Filter
Choose Blacklist/Whitelist to specify MAC addresses to be
excluded/included from connecting to Wi-Fi. Default is Disabled.
Enable Dynamic VLAN
When enabled, clients will be assigned IP address form corresponding
VLAN configured on the Radius user profile.
This option is available when selecting 802.1x as WPA Key Mode.
Note: When using 802.1X authentication on your SSID with dynamic
VLAN assignment. Admin does not need to create all VLAN SSIDs to
match destination VLAN. On 1.0.11.1, AP will trunk its Ethernet with the
VLAN assigned to Wi-Fi client through 802.1X
Client Isolation
Client isolation feature blocks any TCP/IP connection between connected
clients to GWN76xx’s Wi-Fi access point. Client isolation can be helpful to
increase security for Guest networks/Public Wi-Fi. Available modes are:
• Radio Mode: Wireless clients can access to the internet services,
GWN7xxx router and the access points GWN76xx but they cannot
communicate with each other.
• Internet Mode: Wireless clients will be allowed to access only the
internet services and they cannot access any of the management
services, either on the router nor the access points GWN76xx.
• Gateway MAC Mode: Wireless clients can only communicate
with the gateway, the communication between clients is blocked
and they cannot access any of the management services on the
GWN76xx access points.
Gateway MAC Address
This field is required when using Client Isolation, so users will not lose
access to the Network (usually Internet).
Type in the default LAN Gateway’s MAC address (router’s MAC address
for instance) in hexadecimal separated by “:”.
Example: 00:0B:82:8B:4D:D8
P a g e | 67
GWN Management Platforms - User Manual
GWN.Cloud & GWN Manager - Version 1.0.19.7 & 1.0.19.8
802.11w
Management Frame Protection 802.11w applies to a set of management
frames, these include Disassociation, Deauthentication, and Robust
Action frames. 3 modes are available:
• Disabled:Disable 802.11w;
• Optional: Either 802.11w supported or unsupported clients can
access the network;
• Required: Only the clients that support 802.11w can access the
network.
SSID Hidden
Select to hide SSID. SSID will not be visible when scanning for Wi-Fi, to
connect a device to hidden SSID, users need to specify SSID name and
authentication password manually.
Beacon Interval
Configures interval between beacon transmissions/broadcasts.
The Beacon signals help to keep the network synchronized and provide
main information about the network such as SSID, Timestamp…
• Using High Beacon Interval: AP will be sending beacon
broadcast less frequently. This will help to get better throughput,
thus better speed/performance. It also helps to save WiFi clients
energy consumption.
• Using Low Beacon Interval: AP will be sending beacon
broadcast more frequently. This can help in environments with
weak signal areas; sending more frequently beacons will increase
chances to be received by WiFi clients with weak signal.
Notes:
1. When AP enables several SSIDs with different interval values, the
max value will take effect.
2. When AP enables less than 3 SSIDs, the interval value which will
be effective are the values from 40 to 500.
3. When AP enables more than 2 but less than 9 SSIDs, the interval
value which will be effective are the values from 100 to 500.
4. When AP enables more than 8 SSIDs, the interval value which will
be effective are the values from 200 to 500.

P a g e | 68
GWN Management Platforms - User Manual
GWN.Cloud & GWN Manager - Version 1.0.19.7 & 1.0.19.8
5. Mesh feature will take up a share when it is enabled.
Default value is 100ms. Valid range: 40 – 500 ms.
DTIM Period
Configures the frequency of DTIM (Delivery Traffic Indication Message)
transmission per each beacon broadcast. Clients will check the AP for
buffered data at every configured DTIM Period. You may set a high value
for power saving consideration.
Default value is 1, meaning that AP will have DTIM broadcast every
beacon. If set to 10, AP will have DTIM broadcast every 10 beacons.
Valid range: 1 – 10.
Wireless Client Limit
Configure the limit for wireless client. If there’s an SSID per-radio on a
network group, each SSID will have the same limit. So, setting a limit of 50
will limit each SSID to 50 users independently. 0 means limit is disabled.
Client Inactivity Timeout
AP will remove the client's entry if the client generates no traffic at all for
the specified time period. The client inactivity timeout is set to 300 seconds
by default.
Client Bridge
Configures the client bridge support to allows the access point to be
configured as a client for bridging wired only clients wirelessly to the
network. When an access point is configured in this way, it will share the
Wi-Fi connection to the LAN ports transparently. Once a Network Group
has a Client Bridge Support enabled, the AP adopted in this Network
Group can be turned into Bridge Client mode by click the Bridge button.
Client Time Policy
Configures the client time policy. Default is None.
Convert IP multicast to
unicast
Once selected, AP will convert multicast streams into unicast streams over
the wireless link. Which helps to enhance the quality and reliability of
video/audio stream and preserve the bandwidth available to the non-
video/audio clients.
Schedule
Select a schedule that will be applied to this SSID, schedules can be
managed from the menu “System → Schedule”.
Enable Minimum RSSI
Check to enable RSSI function, this will lead the AP to disconnect users
below the configured threshold in Minimum RSSI (dBm).
Minimum RSSI (dBm)
Enter the minimum RSSI value in dBm. If the signal value is lower than the
configured minimum value, the client will be disconnected.

P a g e | 69
GWN Management Platforms - User Manual
GWN.Cloud & GWN Manager - Version 1.0.19.7 & 1.0.19.8
The input range is from “-94” or “-1”.
Enable Minimum Rate
Specify whether to limit the minimum access rate for clients. This function
may guarantee the connection quality between clients and AP.
Minimum Rate (Mbps)
Specify the minimum access rate. Once the client access rate is less than
the specified value, AP will kick it off. Available values are: 1Mbps, 2Mbps,
5Mbps, 6Mbps, 9Mbps, 11Mbps or 12Mbps.
Enable Voice Enterprise
Enable this feature to help clients connected to the GWN76xx to perform
better roaming decision.
• The 802.11k standard helps clients to speed up the search for
nearby APs that are available as roaming targets by creating an
optimized list of channels. When the signal strength of the current
AP weakens, your device will scan for target APs from this list.
• When your client device roams from one AP to another on the
same network, 802.11r uses a feature called Fast Basic Service
Set Transition (FT) to authenticate more quickly. FT works with
both pre-shared key (PSK) and 802.1X authentication methods.
• 802.11v allows client devices to exchange information about the
network topology, including information about the RF
environment, making each client network aware, facilitating
overall improvement of the wireless network.
Notes:
1. 11R is required for enterprise audio feature, 11V and 11K are
optional.
2. Enable Voice Enterprise is only available under “WPA/WPA2”
and “WPA2” Security Mode.
Enable 11R
Check to enable 802.11r
Enable 11K
Check to enable 802.11k
Enable 11V
Check to enable 802.11v
ARP Proxy
Once enabled, AP will avoid transferring the ARP messages to Stations,
while initiatively answer the ARP requests in the LAN.

P a g e | 70
GWN Management Platforms - User Manual
GWN.Cloud & GWN Manager - Version 1.0.19.7 & 1.0.19.8
Device Membership
After adding new SSID the administrator needs to select the GWN76XX access points to be assigned to it.
To add a GWN76xx to a SSID, follow below steps:
1. Check the access points to add from “Available Devices” list.
Figure 52: Device Membership - Available Devices
2. Press to move GWN76xx Access Points to “Member Devices”.
3. Once done, press Save button.
Figure 53: Device Membership - Members Devices
SSID Limit
Users have not limit on number of SSID which can be created per Network; however, when any AP has
reached a limit of 16 SSID, it will be shown in grey in the new SSID’s available devices and cannot be
added to new SSID anymore.

P a g e | 71
GWN Management Platforms - User Manual
GWN.Cloud & GWN Manager - Version 1.0.19.7 & 1.0.19.8
CLIENTS
From The client’s page, the administrator can monitor and manage all the clients connected to his
networks/access points, this configuration page is divided to 2 sections:
• Summary
• Status
Summary
The summary page provides real time information about the number of clients connected to different SSIDs,
the bandwidth usage as well as the client Manufacturer and Client OS.
Figure 54: Clients - Summary
The summary page is divided into 5 different sections: Clients count, Bandwidth usage, Clients statistics
for last day, Client Manufacturer as well as Client OS.

P a g e | 72
GWN Management Platforms - User Manual
GWN.Cloud & GWN Manager - Version 1.0.19.7 & 1.0.19.8
Clients Count
Provides in real time the number of clients connected to the Access points, the administrator can filter select
the period for monitoring, which can be 2 hours, 1 day, 1 week or 1 month, and specify the SSID to monitor.
Bandwidth Usage
This section shows the download and upload level per time, based on this information the administrator
can decide to reduce the bandwidth for specific user and increase it for others.
Clients Statistics for Last Day
From this section, the administrator can monitor the number of new clients for the last day as well as the
return clients and the average time spent in the network.
Client Manufacturer
This section shows the statistics of the different client’s manufacturer connected to the Access points based
on their vendor name.
Client OS
This section shows the statistics of the client’s Operating System connected to the APs; for example:
Android, iOS...
Status
The status page allows the administrator to monitor all the wireless clients connected to his network:
Figure 55: Clients Status
By clicking on the icon, user can display other information’s such as TX and RX Rate, SSID etc.
• Click on under Actions to edit the client’s hostname.
• Click on under Actions to set the bandwidth rules to each client.

P a g e | 73
GWN Management Platforms - User Manual
GWN.Cloud & GWN Manager - Version 1.0.19.7 & 1.0.19.8
• Click on to block a client’s MAC address from connecting to the SSID, Once the client is
blocked it will be added to Global blacklist under Clients → Access List.
• Click on to clear collected data from Wi-Fi clients. This is mainly for certain data security
regulation compliance.
Users can click on a specific client to see detailed information about that client as follow:
First tab is for data usage (Upload/Download) for the selected client as shown on the figure below:
Figure 56: Client Data Usage Info
The second tab has some information about the client device itself, such as the MAC address, IP address,
UP time…etc.
Figure 57: Client Info

P a g e | 74
GWN Management Platforms - User Manual
GWN.Cloud & GWN Manager - Version 1.0.19.7 & 1.0.19.8
The last tab is to check roaming status of the client between the different APs as shown on the sample
figure below, which do include the Time of roaming.
Figure 58: Client Roaming
Users can press button to customize items to display on the page. Following items are supported:
Figure 59: Clients - Select Items

P a g e | 75
GWN Management Platforms - User Manual
GWN.Cloud & GWN Manager - Version 1.0.19.7 & 1.0.19.8
CAPTIVE PORTAL
Captive Portal feature helps to define a Landing Page (Web page) that will be displayed on Wi-Fi clients’
browsers when attempting to access Internet. Once connected to a GWN AP, Wi-Fi clients will be forced to
view and interact with that landing page before Internet access is granted.
The Captive Portal feature can be configured from the platform Web page under “Captive Portal”.
The page contains five tabs: Summary, Guest, Policy List, Splash page and Vouchers.
Summary
The summary page provides real time information about the clients connected via Captive portal to different
SSIDs, including statistics showing the authentication type, the guest session by SSID as well as the max
concurrent new session and login failure, the administrator can filter select the period for monitoring, which
can be 2 hours, 1 day, 1 week or 1 month, He can also specify the SSID to monitor.
Figure 60: Captive Portal Summary
The summary page is divided into 4 different sections: Guest New Session, Guest Session By
Authentication, Guest Session By SSID, Guest section.

P a g e | 76
GWN Management Platforms - User Manual
GWN.Cloud & GWN Manager - Version 1.0.19.7 & 1.0.19.8
Guest New Session
Provides in real time the number of clients connected via Captive Portal, the administrator can filter select
the period for monitoring, which can be 2 hours, 1 day, 1 week or 1 month, He can also specify the SSID to
monitor.
Figure 61: Guest New Session
Guest Session by Authentication
Displays a statistical graphic showing the authentication type used by clients to gain access to internet, it
can include all the authentication methods deployed by the captive portal (Free login, Simple password,
Facebook Authentication, Twitter Authentication…).
Figure 62: Guest Session by Authentication

P a g e | 77
GWN Management Platforms - User Manual
GWN.Cloud & GWN Manager - Version 1.0.19.7 & 1.0.19.8
Guest Session by SSID
This section displays count of authenticated guests on captive portals per SSID.
Figure 63: Guest Session by SSID
Guest
This section provides the number of authenticated clients connected on captive portal according to the
period selected: 2hours, 1day, 1 week or 1 month, as well as the maximum concurrent new session and
login failure.
Figure 64: Guest Section

P a g e | 78
GWN Management Platforms - User Manual
GWN.Cloud & GWN Manager - Version 1.0.19.7 & 1.0.19.8
Guest
The guest page displays information about the clients connected via Captive portal including the MAC
address, Hostname, Authentication Type, the Access point they are connected to, Certification state, SSID
as well as the RSSI and Data usage. The following figure shows an example of the connected client via
captive portal.
Figure 65: Guest List
Administrator can also export a .csv file containing all the guest information (Client MAC address;
Authentication Form when choosing Custom Field, Last Visit...etc.) by clicking on button, and
selecting the export time period for all users which connected to the captive portal during that period
Figure 66: Export Guest Information Period

P a g e | 79
GWN Management Platforms - User Manual
GWN.Cloud & GWN Manager - Version 1.0.19.7 & 1.0.19.8
Note: When authenticating using either “Voucher” or “Custom Field” method, an icon will prompt under
“Authentication Type” column, when scrolling mouse over it, it will display the actual voucher
number/Authentication form filled by users before gaining access to internet.
Policy List
The policy configuration page allows adding multiple captive portal policies which will be applied to SSIDs
and contains options for different authentication types a splash page that can be easily configured as shown
on the next section.
Each SSID can be assigned a different captive portal policy, for example company ABC could have a
specified Wi-Fi for staff people who can access via a portal policy requiring user name and password for
authentication, and another SSID for guest people who can sign in via their Facebook account; also, they
could assign either an internal or external Splash page.
Figure 67: Add/Edit Captive Portal Policy

P a g e | 80
GWN Management Platforms - User Manual
GWN.Cloud & GWN Manager - Version 1.0.19.7 & 1.0.19.8
Internal Splash Page
The following table describes all the settings when creating new internal captive portal policies:
Table 12: Add new Policy List – Splash Page as “Internal”
Field
Description
Name
Enter a name to identify the created portal policy.
Splash Page
Select Splash Page type, Internal or External.
Client Expiration
Configures the period of validity, after the valid period, the client will
be re-authenticated again.
Failsafe Mode
When enabled; guest can surf on the internet when the
authentication server or external portal cannot communicate.
Daily Limit
Once enabled, guest can authenticate once every day, and he
cannot re-authenticate after the first authentication expired. The
authentication will reset every 0 o'clock.
Splash Page Customization
Configure portal display page.
Landing page
Select the landing page where the users will be sent after successful
authentication, two options are available:
• Redirect External Page URL Address: for promotional
purposes, admin can this to redirect all authenticated users
to the company website.
• Redirect to the Original URL Address: Sent the user to
the original requested URL.
Enable HTTPS
Check to Enable/disable HTTPS service over captive portal.
Note: If enabled, both HTTP and HTTPS requests sent from stations
will be redirected to the splash page by using HTTPS protocol, and
in some cases, guests may not be authenticated successfully for the
system or browser does not trust our self-signed certificate.

P a g e | 81
GWN Management Platforms - User Manual
GWN.Cloud & GWN Manager - Version 1.0.19.7 & 1.0.19.8
Pre-Authentication Rule(s)
Set the Pre-Authentication Rules for temporarily release the IP or
ports of the devices (e.g.: subnet:192.168.10.1/12, TCP: TCP src 80
dst 80, UDP: UDP src 80 dst 80, SSH, TELNET)
Post Authentication Rule(s)
Set the Post Authentication Rules (e.g.: subnet:192.168.10.1/12,
TCP: TCP src 80 dst 80, UDP: UDP src 80 dst 80, SSH, TELNET,
HTTP, HTTPS)
External Splash Page
Table 13: Add new Policy List – Splash Page as “External”
Field
Description
Name
Enter a name to identify the created portal policy.
Splash Page
Select Splash Page type, Internal or External Splash Page
Platform
Select which external captive portal platform to use:
• Linkyfi Platform (https://www.avsystem.com/products/linkyfi)
• Purple Platform (https://purple.ai/)
• Universal Platform (Socifi Platform for instance)
External Splash Page Address
Enter the External Splash Page URL, and make sure to enter the pre-
authentication rules request by the external portal platform in the pre-
authentication configuration option.
RADIUS Server Address
Enter the RADIUS Server Address provided by external portal platform.
RADIUS Server Port
Enter the RADIUS Server Port provided by external portal platform, the
default value is 1812.
RADIUS Server Secret
Enter the RADIUS Server Secret provided by external portal platform.
RADIUS Accounting Server
Address
Enter the Radius Accounting Server Address provided by external portal
platform.
RADIUS Accounting Server
Port
Enter the Radius Accounting Server Port provided by external portal
platform.

P a g e | 82
GWN Management Platforms - User Manual
GWN.Cloud & GWN Manager - Version 1.0.19.7 & 1.0.19.8
RADIUS Accounting Server
Secret
Enter the Radius Accounting Server Port provided by external portal
platform.
Accounting Update Interval
Enter the Accounting Update Interval, an integer from 30 to 604800. Once
the external splash page has configured the parameter, this value will be
invalid.
RADIUS NAS ID
Specify the AP tag, limit to 32 characters.
This field appears only when Platform is set to “Linkyfi Platform”.
Redirect URL
Please enter the Redirect URL provided by external portal platform.
Pre-Authentication Rule(s)
Set the Pre-Authentication Rules for temporarily release the IP or ports of
the devices (e.g.: subnet:192.168.10.1/12, TCP: TCP src 80 dst 80, UDP:
UDP src 80 dst 80, SSH, TELNET)
Post Authentication Rule(s)
Set the Post Authentication Rules (e.g.: subnet:192.168.10.1/12, TCP: TCP
src 80 dst 80, UDP: UDP src 80 dst 80, SSH, TELNET, HTTP, HTTPS)
Note:
Users could create multiple captive portal instances and assign the desired one for each SSID.
As an example, users can create one captive portal for Intranet usage and a second one for public Guest
users, after customizing each captive portal separately, you can assign each one to the corresponding SSID.
Splash Page
Page
Splash page allows users with an easy to configure menu to generate a customized splash page that will
be displayed to the users when trying to connect to the Wi-Fi.
On this menu, users can create multiple splash pages and assign each one of them on a separate captive
portal policy to enforce the select authentication type.
The generation tool provides an intuitive “WYSIWYG” method to customize a captive portal with very rich
manipulation tool.
Users can set the following:
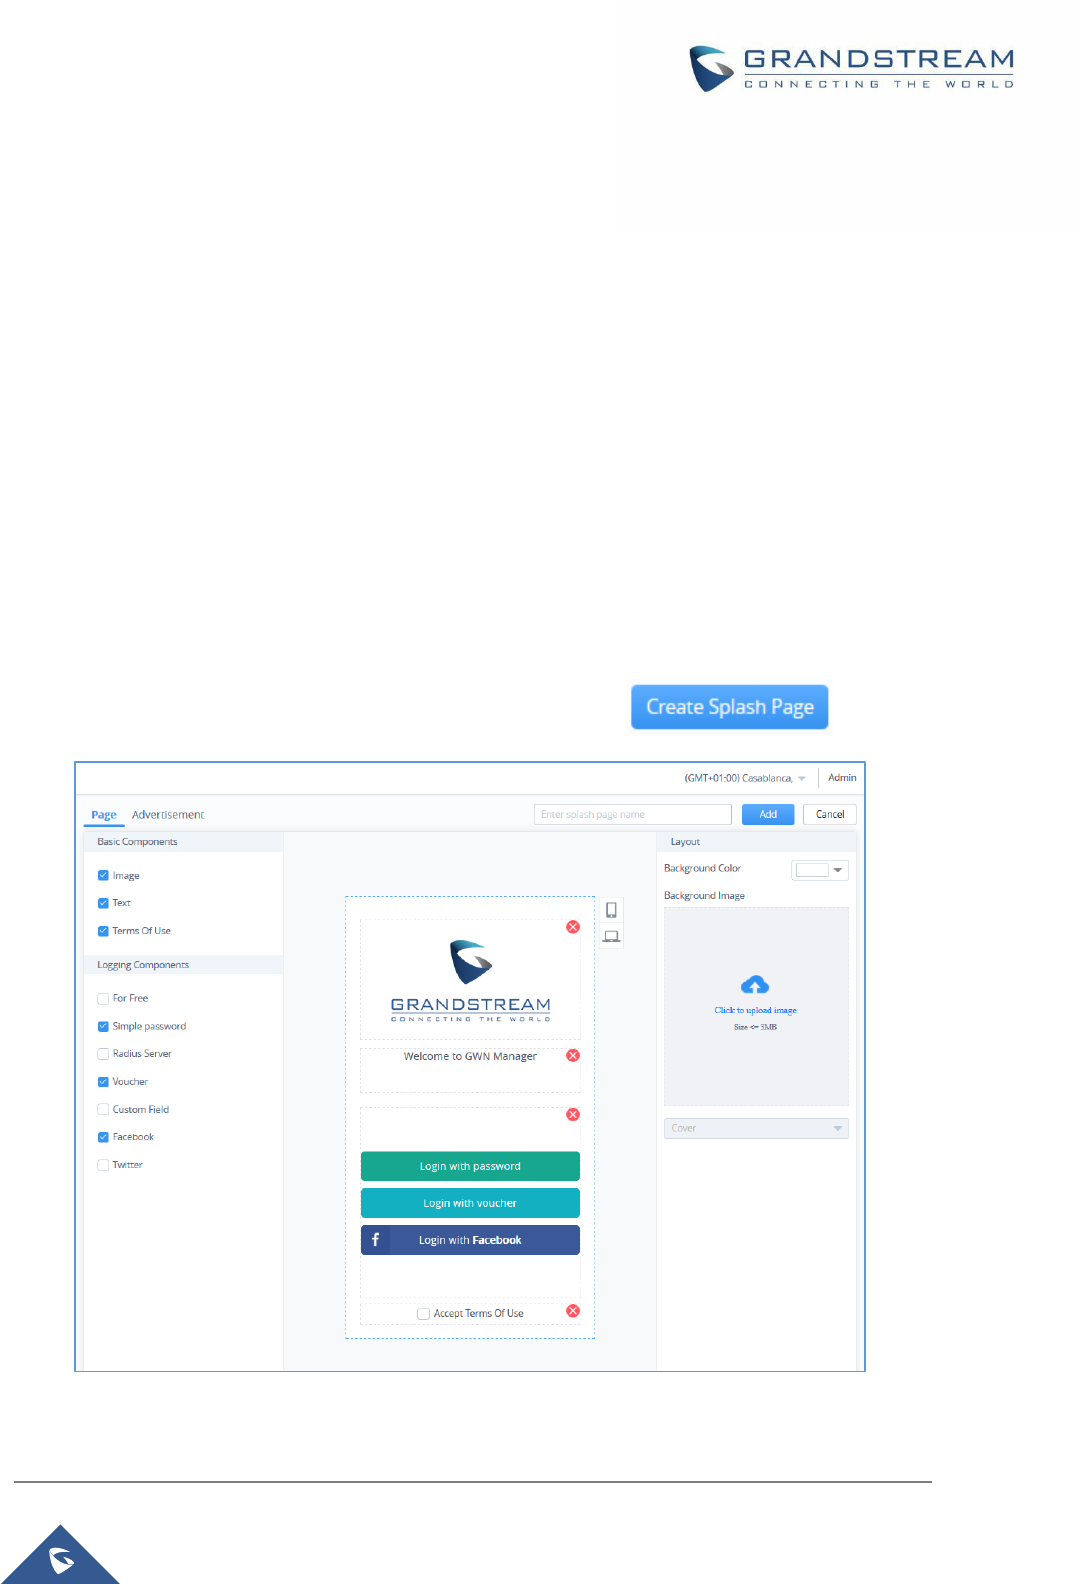
P a g e | 83
GWN Management Platforms - User Manual
GWN.Cloud & GWN Manager - Version 1.0.19.7 & 1.0.19.8
• Authentication type: Add one or more ways from the supported authentication methods (Simple
Password, Facebook, Twitter, Voucher, Radius, No Authentication, WeChat.
• Setup a picture (company Logo) to be displayed on the splash page.
• Customize the layout of the page and background colors.
• Customize the Terms of use text.
• Visualize a preview for both mobile devices and laptops.
Note: On each splash page, the maximum number of authentication methods is 5 methods.
Let’s create a simple splash page as demonstration, the steps below can be followed to reproduce the
same image.
1. First go under “Captive Portal → Splash Page” then click on .
Figure 68: Create New Splash Page

P a g e | 84
GWN Management Platforms - User Manual
GWN.Cloud & GWN Manager - Version 1.0.19.7 & 1.0.19.8
2. Next, under “Logging Components” tab we check the methods that will be displayed to the users
as a choice to logging. (Users can choose logging either via Facebook, Twitter, Vouchers, Radius
Server, For Free or Custom Field)
Figure 69: Setup Logging Methods - Splash Page
3. Under “Layout”, users can upload a logo picture using “Click to Upload Image” which will be used
on the splash page. and select a background color if desired (we will skip this step as we demo).
Figure 70: Upload a logo - Splash Page
4. Give the page a name at the top of the screen and click on Add.

P a g e | 85
GWN Management Platforms - User Manual
GWN.Cloud & GWN Manager - Version 1.0.19.7 & 1.0.19.8
Figure 71: Name - Splash Page
5. Once you click on Add, you will be prompted to enter some necessary information that are required
when using social logging (Facebook API codes, Twitter...Etc.) for more details about these
concepts, please refer to the following How-to Guides:
✓ Captive Portal - RADIUS Authentication
✓ Captive Portal - Facebook Authentication
✓ Captive Portal - Twitter Authentication
✓ Captive Portal - Voucher Authentication

P a g e | 86
GWN Management Platforms - User Manual
GWN.Cloud & GWN Manager - Version 1.0.19.7 & 1.0.19.8
Figure 72: Setup Social Logging Parameters
Note: When choosing “Twitter Authentication” method; a “Force To Follow” button will be added; by
enabling it, admin can request guest Wi-Fi clients to follow his Twitter account when getting authenticated.
6. Once done, users can have a preview of the look of the page on either mobile phones or laptops.
o To see the preview of the page on mobile phones click on button.

P a g e | 87
GWN Management Platforms - User Manual
GWN.Cloud & GWN Manager - Version 1.0.19.7 & 1.0.19.8
o Or click on button to see the preview of the page on computer screens.
Figure 73: Splash Page Preview
7. If you are satisfied with the final design. Click on Add and after the page has been added to it will
be displayed along other existing pages with the possibility to either “Edit” or “Delete” it.
Figure 74: Splash Pages List
All these pages can be used on different captive portal policies depending on the user’s needs.
8. Go back to SSIDs ➔ Configuration ➔ Actions: “Edit” ➔ Wi-Fi Settings ➔ Access Security, to
“Enable” Captive Portal and “Select” the preferred Captive Portal Policy:

P a g e | 88
GWN Management Platforms - User Manual
GWN.Cloud & GWN Manager - Version 1.0.19.7 & 1.0.19.8
Figure 75: Enable Captive Portal
9. Clients will get the below display when trying to connect to the Wi-Fi:
Figure 76: Portal Splash Page
Advertisement
Advertisement page is a Marketing feature which will allow to play advertisement upon Captive Portal login
for Wi-Fi users.
As an example, most companies or stores have free Wi-Fi which they offer to their customers.

P a g e | 89
GWN Management Platforms - User Manual
GWN.Cloud & GWN Manager - Version 1.0.19.7 & 1.0.19.8
This is a good place to meet their customers where they are at by using the Advertisement Splash Page
to connect advertisers to target customers either by displaying a promoting video or images.
To configure or enable advertisement, following steps must be configured:
1. Go under “Captive Portal → Splash Page → Advertisement”
- Click on Enable Advertisement.
Figure 77: Advertisement Page
2. Enter the Advertisement Settings, below table gives more details about each option:
Table 14: Advertisement Settings Configuration
Force to watch
duration
Specify the duration that guests must watch advertisement for.
Please enter an integer from 1 to 300.
Rotation
Specify the rotation mode of the ads.
• Random: the ads will be prompted randomly.

P a g e | 90
GWN Management Platforms - User Manual
GWN.Cloud & GWN Manager - Version 1.0.19.7 & 1.0.19.8
• Regular Interval: the created ads should be specified with advertising periods,
and the ads will be prompted in turns.
• Regular Time: the created ads should be specified with start time and end time,
and the ads will be prompted at regular time every day.
Preset Time
Preset the start time of the advertising policy.
Media Content
Click button to add Image/Video content.
Notes:
• The video file content should not exceed 5 MB
• Video format only supports MP4 in H.264 codec
• Supports input of YouTube URL.
• When playing ads with multiple images, it will automatically switch every 3 seconds.
Figure 78: Add Video - Advertisement
3. Once done, users can have a preview of the advertisement on either mobile phones or laptops.
• To see the preview of the ads on mobile phones click on button.
• Or click on button to see the preview of the ads on computer screens.

P a g e | 91
GWN Management Platforms - User Manual
GWN.Cloud & GWN Manager - Version 1.0.19.7 & 1.0.19.8
Voucher
Voucher feature will allow clients to have internet access for a limited duration using a code that is randomly
generated from platform controller.
As an example, a coffee shop could offer internet access to customers via Wi-Fi using voucher codes that
can be delivered on each command. Once the voucher expires the client can no longer connect to the
internet.
Note that multiple users can use a single voucher for connection with expiration duration of the voucher
that starts counting after first successful connection from one of the users that are allowed.
Another interesting feature is that the admin can set data bandwidth limitation on each created voucher
depending on the current load on the network, users’ profile (VIP customers get more speed than regular
ones etc.…) and the internet connection available (fiber, DSL or cable etc.…) to avoid connection
congestion and slowness of the service.
Each created voucher can be printed and served to the customers for usage, and the limit is 1000 vouchers.
To configure or add vouchers, following steps must be followed:
4. Go under “Captive Portal → Voucher” then click on Add.
Figure 79: Adding Vouchers

P a g e | 92
GWN Management Platforms - User Manual
GWN.Cloud & GWN Manager - Version 1.0.19.7 & 1.0.19.8
5. Enter the parameters to create a voucher, below table give more details about each option.
Table 15: Voucher Configuration Parameters
Name
Enter a name to identify the voucher
Quantity
Specify how many voucher codes to create which do follow same settings
(bandwidth rates, duration, validity...Etc.). Range from 1~1000.
Max Devices
Specify how many users can connect using the same voucher code. Range
is from 1~10000 while 0 means unlimited.
Duration
Configure the voucher duration from 1 minutes to 7 days.
Upload Limit (kbps)
Configured upstream data rate limit for the voucher. 0 means unlimited.
Download Limit (kbps)
Configured downstream data rate limit for the voucher. 0 means unlimited.
Byte Quota (MB)
Configure the total usage of the voucher.
Validity Time
Duration of validity of the voucher. It starts with first authentication.
Notes
Notes entered during configuration. Used by admin for documentation
purpose.
6. Click on Save to generate the Vouchers.
7. Once done, the voucher status will be displayed with related information and users can click on the
voucher to see more details about the generated codes.

P a g e | 93
GWN Management Platforms - User Manual
GWN.Cloud & GWN Manager - Version 1.0.19.7 & 1.0.19.8
Figure 80: Voucher Details
This page displays the vouchers status as used/unused, remaining Bytes, the validity time and how many
devices used the voucher if multi-user is enabled (quota) when setting the voucher parameters.
With Voucher Settings, users can customize the voucher layout by clicking on and can add logo
(Size <=1MB, pixel: 368*30) and slogan (maximum character length is 120).
Figure 81: Voucher Settings

P a g e | 94
GWN Management Platforms - User Manual
GWN.Cloud & GWN Manager - Version 1.0.19.7 & 1.0.19.8
RADIO
When using GWN76XX as Master Access Point, users can edit the frequency band used by the AP and
channel used along with the Transmission power for each band.
Log in as Master to the GWN76XX Web GUI and go to Radio.
Figure 82: Radio-General
Table 16: Radio Settings
General
Field
Description
Band Steering
When Frequency is set to Dual-Band, users can check this option to
enable Band Steering on the Access Point, this will help redirecting clients
to a radio band accordingly for efficient use and to benefit from the
maximum throughput supported by the client.
Client Steering
This feature will help Wi-Fi client to roam to other APs within same
Network. Parameters of RSSI Threshold and Client Access Threshold
parameters will show up only when Client Steering is enabled.

P a g e | 95
GWN Management Platforms - User Manual
GWN.Cloud & GWN Manager - Version 1.0.19.7 & 1.0.19.8
Supported only by GWN7600/7600LR/ GWN7630/7630LR /GWN7605/
7605LR.
Airtime Fairness
Allow faster clients to have more airtime than slower clients. This feature
is not supported on GWN7600/GWN7600LR/GWN7610.
Beacon Interval
Configures interval between beacon transmissions/broadcasts.
The Beacon signals help to keep the network synchronized and provide
main information about the network such as SSID, Timestamp…
• Using High Beacon Interval: AP will be sending beacon
broadcast less frequently. This will help to get better throughput,
thus better speed/performance. It also helps to save Wi-Fi clients
energy consumption.
• Using Low Beacon Interval: AP will be sending beacon
broadcast more frequently. This can help in environments with
weak signal areas; sending more frequently beacons will increase
chances to be received by Wi-Fi clients with weak signal.
Notes:
1. When AP enables several SSIDs with different interval values,
the max value will take effect.
2. When AP enables less than 3 SSIDs, the interval value which
will be effective are the values from 40 to 500.
3. When AP enables more than 2 but less than 9 SSIDs, the
interval value which will be effective are the values from 100 to
500.
4. When AP enables more than 8 SSIDs, the interval value which
will be effective are the values from 200 to 500.
5. Mesh feature will take up a share when enabled.
Scene
Depending deployment type (Indoor or Outdoor) then additional 5Ghz
channels (DFS Channels) will be available to be used. Please refer to table
DFS Channels supported by Model.
2.4G & 5G Configuration
• Channel Width: Choose the Channel Width, note that wide channel
will give better speed/throughput, and narrow channel will have less
interference. 20Mhz is suggested in very high-density environment.

P a g e | 96
GWN Management Platforms - User Manual
GWN.Cloud & GWN Manager - Version 1.0.19.7 & 1.0.19.8
• 40MHz Channel Location: Configure the 40MHz channel location
when using 20MHz/40MHz in Channel Width, users can set it to be
Secondary below Primary, Primary below Secondary or Auto.
• Channel: Select Auto, or a specified channel, default is Auto. Note
that the proposed channels depend on Country Settings under
System Settings→Maintenance.
• Radio Power: Set the Radio Power, it can be Low, Medium or High,
or Dynamically assigned by RRM (AP will actively change TX power
depending on RRM settings).
• Enable Short Guard Interval: Check to activate this option to
increase throughput.
• Custom Wireless Power(dBm): allows users to set a custom
wireless power for both 5GHz/2.4GHz band, the value of this field
must be between 1 and 31.
• Allow Legacy Devices(802.11b): Check to support 802.11b devices
to connect the AP in 802.11n/g mode. (2.4GHz setting)
• Dynamic Channel Assignment: Once enabled, AP will try to allocate
and move the best channel during operation, unlike Auto Channel
Selection (ACS) which scan and assign channel when Wi-Fi interface
goes up for one time.
This feature is not supported on GWN7602.
• Transmit Power Control: TPC algorithm runs every 10 minutes. AP
acquires the RSSI information of the neighbor by wireless scanning
and establishes the neighbor table. The algorithm requires that there
must be at least 3 neighbor APs with RSSI larger than -70dbm.
Otherwise, power will not be adjusted.
This feature is not supported on GWN7602.
Coverage Hole Detection: CHD enables AP to decide whether to
increase the AP power by the current SNR and SNR threshold of the
connected clients.
This feature is not supported on GWN7602.
• Enable Minimum RSSI: Check to enable RSSI function, this will lead
the AP to disconnect users below the configured threshold in
Minimum RSSI (dBm).
• Minimum RSSI: Enter the minimum RSSI value in dBm. If the signal
value is lower than the configured minimum value, the client will be
disconnected. The input range is from “-94” or “-1”.

P a g e | 97
GWN Management Platforms - User Manual
GWN.Cloud & GWN Manager - Version 1.0.19.7 & 1.0.19.8
• Minimum Access Rate Limit: Specify whether to limit the minimum
access rate for clients. When enabled, it will help to eliminate the
legacy connection which slow the total performance of the Wi-Fi
network. Range from 1 to 54 Mbps.

P a g e | 98
GWN Management Platforms - User Manual
GWN.Cloud & GWN Manager - Version 1.0.19.7 & 1.0.19.8
ACCESS CONTROL
Access control menu is used in order to set different access control policy such as blocking specific clients
from accessing the wireless network using access list of MAC addresses, or setting up time policies which
specified how much time are clients allowed to connect to a specific network/SSID and finally administrator
can even setup bandwidth rules to control the data rate usage for a specific MAC, IP address or even the
whole SSID/Network Group.
Access List
Access List configuration page is used to block specific clients by their address MAC, the administrator can
create several access Lists and apply them to specific SSIDs.
Figure 83: Access List
To add a client to access list go under Clients → Access List → Add, a new page will popup, enter the
MAC addresses of the clients to block and click on save:
Figure 84: Adding New Clients to Access List
Note: It is also possible to import an access list in CSV format by clicking on .
Template is available for download from the same page

P a g e | 99
GWN Management Platforms - User Manual
GWN.Cloud & GWN Manager - Version 1.0.19.7 & 1.0.19.8
Time Policy
The administrator can configure a Time policy which will dictate for how much a client connect to the Wi-Fi
if this policy is applied for the SSID.
Figure 85: Add Time Policy List
Table 17: Time Policy Configuration Parameters
Name
Enter a name to identify the Policy. Supports 1 to 32 characters, including numbers,
letters and special characters.
Enable Time
Policy
Check/Uncheck to Enable/Disable Policy
Connection
Time
Configure the policy duration from 1 minutes to 365 days.
Reset Cycle
Set up a Reset mode: Daily, Weekly or Periodically
Reset Time
When Reset Cycle is Daily: configure the time of the day
When Reset Cycle is Weekly: configure the time and the day of the week
When Reset Cycle is Periodically: configure the period (d//h/m)
Time Zone
Detected Automatically.
This parameter can be changed under System ➔ Settings

P a g e | 100
GWN Management Platforms - User Manual
GWN.Cloud & GWN Manager - Version 1.0.19.7 & 1.0.19.8
Bandwidth rules
The bandwidth rule is a platform feature that allows users to limit bandwidth utilization per SSID, per Client
or client (MAC address or IP address).
Click to add a new rule, the following table provides an explanation about different options for
bandwidth rules.
Table 18: Bandwidth Rules
Field
Description
Enable Bandwidth Rules
Enable/Disable Bandwidth Rules
SSID
Select the SSID to which the limitation will be applied.
Range Constraint
• Per-SSID: means the rule will be shared/applied to all clients
connected to the SSID.
• Single MAC: This means the rule will be applied only to one client.
• Single IP: This means the rule will be applied to the specified IP or
shared among subnet, for example if we set a Downstream Rate of
20 Mbps on 192.168.10.0/24; all members of that subnet will share
the 20Mbps Downstream Rate.
• Per-Client: This means the rule will be applied to each client
connected to the specific SSID, for example if we set a rule of 5Mbps
Downstream Rate, each client will have a maximum downstream
rate of 5Mbps.
MAC
Enter the MAC address of the device to which the limitation will be
applied, this option appears only when MAC type is selected.
IP address
Enter the IP address of the device to which the limitation will be applied,
this option appears only when IP Address type is selected.
Schedule
Select a specific schedule where this bandwidth rule will be active, the
schedule can be created under the menu “System → Schedule”
Upstream Rate
Specify the limit for the upload bandwidth using Kbps or Mbps.

P a g e | 101
GWN Management Platforms - User Manual
GWN.Cloud & GWN Manager - Version 1.0.19.7 & 1.0.19.8
Downstream Rate
Specify the limit for the download bandwidth using Kbps or Mbps.
The following figure shows an example of MAC address rule limitation.
Figure 86: MAC Address Bandwidth Rule

P a g e | 102
GWN Management Platforms - User Manual
GWN.Cloud & GWN Manager - Version 1.0.19.7 & 1.0.19.8
INSIGHT
Site Survey
An integrated Wi-Fi Scanner is supported on GWN Management Platforms helps the administrator to scan
the wireless networks in the area and to display extensive information including: SSID’s name, AP’s MAC
address, Channel used, Wi-Fi Standard, Bandwidth, security standard used, Manufacturer, RSSI, … and
more.
Figure 87: Site Survey - Insight
Users can press to run the Wi-Fi Scanner or Press to refresh the results page.
Known Clients
This option is only available on GWN Manager.
It displays extensive information about all the previously connected clients including: MAC address,
Hostname, Identity (Network), Upload/Download stream, OS … and more.

P a g e | 103
GWN Management Platforms - User Manual
GWN.Cloud & GWN Manager - Version 1.0.19.7 & 1.0.19.8
Figure 88: Known Clients - Insight

P a g e | 104
GWN Management Platforms - User Manual
GWN.Cloud & GWN Manager - Version 1.0.19.7 & 1.0.19.8
SECURITY
Rogue AP
GWN Cloud and GWN Manager offer the ability to prevent malicious intrusion to the network and increases
the wireless security access of clients when introducing Rogue AP detection feature to the adopted / paired
GWN76xx Wi-Fi access points. The detected APs will be listed with all the details under “Detected” section
for further intervention.
Note: This feature is not supported in GWN7610/GWN7602.
Navigate to Security ➔ Rogue AP , The below figure shows the configuration page in order to enable
Rogue AP detection.
Figure 89: Rogue AP configuration page

P a g e | 105
GWN Management Platforms - User Manual
GWN.Cloud & GWN Manager - Version 1.0.19.7 & 1.0.19.8
The “Detected” page shows all the SSIDs within the Wi-Fi coverage of the adopted / paired, GWN76xx,
including the APs that have been set as Trusted or Untrusted.
Figure 90: Detected Trusted and Untrusted APs
Table 19: Rogue AP parameters description
Field
Description
Enable Rogue AP Detection
Select to either to enable or disable Rogue AP scan.
Detect range
Specify the rogue AP detect range.
• Same channel: AP will execute simple detection on the APs around,
this mode almost has no effects on the wireless network
communication.
• All channels: AP will execute a deep detection every 5 minutes. And
the clients connecting to the AP will have few seconds of
communication interrupt.
Default is Same Channel.
Countermeasure level
Countermeasures level specifies the type of attacks which will be
suspected by the AP. Select different levels:
• High: Untrusted BSSID, Illegal access without authentication,
Illegal access, Spoofing SSID.
• Medium: Untrusted BSSID, Illegal access without authentication,
Illegal access.
• Low: Untrusted BSSID, Illegal access without authentication.
Default is Disabled.

P a g e | 106
GWN Management Platforms - User Manual
GWN.Cloud & GWN Manager - Version 1.0.19.7 & 1.0.19.8
Containment Range
Specify the containment range:
• Same channel: detect AP will countermeasure the APs in the
same channel.
• All channels: detect AP will countermeasure the APs in all
channels at the cost of consuming of much AP performance.
Default is Same Channel.
Sub-string for Spoofing SSID
The AP broadcasting SSID with the specified string will be classified as a
Spoofing SSID.
Trusted AP
You can specify MAC address of the trusted AP, which should be
formatted as XX:XX:XX:XX:XX:XX. If an AP is defined as trusted AP, no
countermeasures will be executed on it.
Untrusted AP
You can specify MAC address of the untrusted AP, which should be
formatted as XX:XX:XX:XX:XX:XX. If an AP is defined as untrusted AP,
countermeasures will be executed on it when countermeasure is enabled.
Firewall
This section is located under to Security ➔ Firewall , it does allow users to control the outgoing and
incoming traffic from clients connected to the adopted / paired GWN76xx Wi-Fi access points by manually
setting up policies to either deny or permit the traffic based on protocol type and by specifying SSIDs and
destinations.
Outbound Rules
Below figure shows the Outbound Rules configuration page, Click on to add outbound rules
based on the parameters as described in the table.
Figure 91: Firewall Outbound Rules

P a g e | 107
GWN Management Platforms - User Manual
GWN.Cloud & GWN Manager - Version 1.0.19.7 & 1.0.19.8
Table 20: Firewall Outbound Rules parameters
Field
Description
Service Protocol
Select type of traffic to be affected by the outbound rule like ICMP, HTTP,
HTTPS… or you may add another type of traffic when selecting Custom.
When set to Custom, user could enter the following:
Protocol: TCP or UDP
Port: define the port used by this protocol.
Policy
Either select to Permit or Deny Outbound traffic.
Destination
Select either:
• Particular Domain: enter FQDN of a destination.
• Particular IP: IP address of destination.
• Particular Network: Network IP address.
• All: the rule will apply on all destinations.
SSID
Select one or multiple SSIDs to apply the rule on.
Inbound Rules
Click on to add inbound rules based on the parameters as described in the table.
Table 21: Firewall Inbound Rules parameters
Field
Description
Service Protocol
Select type of traffic to be affected by the inbound rule like ICMP, HTTP,
HTTPS… or you may add another type of traffic when selecting Custom.
When set to Custom, user could enter the following:
Protocol: TCP or UDP
Port: define the port used by this protocol.
Policy
Either select to Permit or Deny inbound traffic.
Source
Select either:
• Particular IP: IP address of source.
• Particular Network: Network IP address.
• All: the rule will apply on all destinations.

P a g e | 108
GWN Management Platforms - User Manual
GWN.Cloud & GWN Manager - Version 1.0.19.7 & 1.0.19.8
SERVICE
Hotspot 2.0
This section lists the configuration page for Hotspot 2.0. This technology allows mobile devices to
automatically connect to available Passpoint-certified WiFi hotspots. This gives the device liberty to hop
from one hotspot on a network to another without the need log in to each hotspot. This feature is currently
a Beta.
Note: This is not supported in GWN7610/GWN7602.
Figure 92: Hotspot 2.0
Table 22: Hotspot 2.0 parameters description
General
Field
Description
P a g e | 109
GWN Management Platforms - User Manual
GWN.Cloud & GWN Manager - Version 1.0.19.7 & 1.0.19.8
Name
Set name of the hotspot.
Domain ID
Set the Domain ID.
HESSID
Configure the Homogenous Extended Service Set Identifier information for
Hotspot2.0.
This value must be consistent with the BSSID of an AP to identify the AP
set that provides the same network access service. The format is
H:H:H:H:H:H, where H is a 2-digit hexadecimal number.
Network Access
Enabled or disable internet access.
Network Type
Select network type:
• Private network
• Private network with guest access
• Chargeable public network
• Free public network
• Personal device network
• Emergency services only network
• Test or experimental
• Wildcard
IPv4 Type
Select IPv4 Type:
• Address type not available
• Public IPv4 address available
• Port-restricted IPv4 address available
• Single NATed private IPv4 address available
• Double NATed private IPv4 address available
• Port-restricted IPv4 address and single NATed IPv4 address
available
• Port-restricted IPv4 address and double NATed IPv4 address
available
• Availability of the address type not known
IPv6 Type
Select IPv4 Type:
• Address type not available
• Address type available
• Availability of the address type not known
Network Auth Type
Configure the Network authentication type to help users find and select
the right network. Select either:
• Acceptance of terms and conditions

P a g e | 110
GWN Management Platforms - User Manual
GWN.Cloud & GWN Manager - Version 1.0.19.7 & 1.0.19.8
• On-line enrollment supported
• http/https redirection
• DNS redirection
• Not configured
Venue
Venue Group
Select the Venue Group type:
• Unspecified
• Assembly
• Business
• Educational
• Factory
• Institutional
• Mercantile
• Residential
• Storage
• Utility
• Vehicular
• Outdoor
Venue Type
Select the Venue type, which will depend on the Venue Group.
Language Code
Select the language.
Venue Name
Set the Venue name.
Operator Name
Language Code
Select the language.
Operator Name
Set the Operator name.
Roaming Consortium
Roaming Consortium Name
Configure the Roaming Consortium Name to identify network operators.
The format is H-H-H or H-H-H-H-H, where H is a 2-digit hexadecimal
number.
Domain
Domain
Enter the domain name.
Realm

P a g e | 111
GWN Management Platforms - User Manual
GWN.Cloud & GWN Manager - Version 1.0.19.7 & 1.0.19.8
Realm
Select the EAP Method: EAP-TLS, EAP-SIM, EAP-TTLS, EAP-AKA and
EAP-AKA’.
Cellular Network Information
Cellular Network Information
Enter the Name, Country Code and Network Code.
Port Configuration
IP Protocol
Configure the protocol type: ICMP, TCP, UDP or ESP.
Port Number
Set the protocol port.
Port Status
Set the port status to either: Open, Close or Unknown.
Advanced
WAN Link Status
Set the WAN Link Status to either: Not configured, Link-up, Link-down or
Link-test.
WAN Downlink Speed
Set Download speed.
WAN Uplink Speed
Set Upload speed.
GAS Fragmentation Limit
Set GAS fragmentation limit. Default is 1400.
GAS Comeback Delay
Set GAS comeback delay. Default is 0.
Disable Downstream Group-
Addressed Forwarding
When this option is disabled, it means the DGAF is enabled, the AP will
forward all downlink broadcast ARP messages and wireless group
broadcasts.
When this option is anabled, the DGAF function is disabled, the AP will
discard all downlink broadcast ARP messages and wireless group
broadcasts.
Disable DGAF function to prevent attackers from using the vulnerability of
all clients in the same BSS using the same Group Temporal Key (GTK) to
forge Group address frames and then attack the clients.
SNMP
This section lists the SNMPv1, SNMPv2c, and SNMPv3 options available to integrate the adopted / paired
GWN76xx Wi-Fi access points with enterprise monitoring systems.

P a g e | 112
GWN Management Platforms - User Manual
GWN.Cloud & GWN Manager - Version 1.0.19.7 & 1.0.19.8
Users can enable SNMP feature under Service ➔ SNMP
Figure 93: SNMP configuration page
Table 23: SNMP parameters description
Field
Description
Enable
Enable SNMPv1/SNMPv2c.
Community String
Enter the SNMP Community string.
Enable
Enable SNMPv3.
Username
Enter the SNMPv3 username.
Authentication Mode
Set the Authentication mode to: either MD5 or SHA.
Authentication password
Enter the SNMPv3 authentication password.
Privacy Mode
Set the Privacy mode to: either AES128 or DES.
Privacy password
Enter the privacy password.

P a g e | 113
GWN Management Platforms - User Manual
GWN.Cloud & GWN Manager - Version 1.0.19.7 & 1.0.19.8
SYSTEM
Settings
Settings page allows Country and Time configuration, reboot schedule and enabling URL log activity.
Figure 94 :System Settings
Table 24: Settings
Field
Description
Country/Region
Select the country or region from the drop-down list. This can affect the
number of channels depending on the country standards.
Time Zone
Configure time zone for GWN APs. Please reboot the device to take effect.
SSH Password
Set SSH Password for GWN APs.
LED
Select whether to always turn ON or OFF the LEDs on the APs or apply a
schedule for this function.
LED Schedule
Select a schedule that will be applying to LEDs, dictating when they will be
ON and OFF.

P a g e | 114
GWN Management Platforms - User Manual
GWN.Cloud & GWN Manager - Version 1.0.19.7 & 1.0.19.8
Reboot Schedule
Once scheduled, the current network will not work for a while during the
scheduled period.
Enable client connection
event
When enabled, then Client connects/disconnects events are listed under
Access Points→Status→AP details page.
URL Access Log
Once enabled, the GWN Cloud will record the URL access log from the
clients.
Note: GWN7610 does not support this feature.
Export URL Access Log
Once enabled, the Cloud Server will periodically send out the log download
link to the configured URL Log Received email.
Users can click on “Export Immediately” and then specify the time range
of the URL Access Log to be exported; range is 1 to 30 last days.
Email Frequency
Specify the Email frequency to be generated either on daily basis, weekly
or monthly.
URL Log Receiver
Configure the Email address of the URL Log Receiver.
Email Guest Information
Once enabled, cloud server will periodically send out the guest information
download link as configured.
Email Frequency
Specify the Email frequency to be generated either on daily basis, weekly
or monthly.
URL Log Receiver
Configure the Email address of the URL Log Receiver.
URL Access Log
Administrators can easily configure the platform to record, monitor and maintain a log of all the websites
visited by the clients connected to the paired GWN76xx access points.
The platform System will send these logs via Email to the configured Log Receiver in a form of
downloadable link providing a CSV file format containing all the websites logs visited for each client during
the defined period (daily, weekly or monthly basis).
In order to enable this feature, follow below steps:
1. Go under “System → Settings” and enable URL Access Log field, this will configure the GWN
Manager System to start recording the websites logs visited by the clients.
2. Enable Export URL Access Log.

P a g e | 115
GWN Management Platforms - User Manual
GWN.Cloud & GWN Manager - Version 1.0.19.7 & 1.0.19.8
3. Administrators can choose to set the Email Frequency to be generated either on a daily, weekly or
monthly basis.
4. Configure the URL Log Receiver Email.
Figure 95: URL Access Log Settings
In this example, the administrator will start receiving, on a daily basis, an Email containing a downloadable
link providing a CSV file containing the websites visited by the clients during the last day.
Users can click on , and then specify the time range of the URL Access Log during the
last (1 – 30) days to be exported immediately.
Figure 96: Export Immediately
5. Click and notice the success confirmation message:
Figure 97: Export Succeed
6. Click the highlighted link to Download the log file and save it locally.

P a g e | 116
GWN Management Platforms - User Manual
GWN.Cloud & GWN Manager - Version 1.0.19.7 & 1.0.19.8
Once downloaded, administrators will have a CSV file tracking the Internet activity for all the clients
connected to the paired GWN76xx access points.
The CSV file will contain columns displaying the AP MAC address, client’s hostname as well the device
MAC address, the Source and Destination IP, the URL logs, the HTTP Method (GET/POST) and the time
of request.
Figure 98: URL Access Log- CSV file example
Notes:
• Currently, GWN7610 doesn’t support this feature.
• The Platform Database will keep storage of reports for 30 days, after that, they will be automatically
erased from the system.
Guest Information
In order to enable this feature, follow below steps:
1. Go under “System → Settings” and enable Guest Information field.
2. Choose to set the Email Frequency to be generated either on a daily, weekly or monthly basis.
3. Configure the Email Receiver.
Figure 99: Guest Information

P a g e | 117
GWN Management Platforms - User Manual
GWN.Cloud & GWN Manager - Version 1.0.19.7 & 1.0.19.8
NAT Pool
Users can use this feature in order to set an address Pool from which the clients that are connected to the
adopted / paired GWN76xx will acquire their IP address in that way the access point will act as a light weight
router.
Notes:
• This option cannot be enabled when Client Assignment IP is set to Bridge mode.
• This option is not supported in GWN7610.
Navigate to System → Settings → NAT Pool, in order to configure the Gateway, DHCP Server Subnet
Mask, DHCP Lease Time and DHCP Preferred/Alternate DNS
Figure 100: NAT Pool configuration
Schedule
In order to configure a new schedule, follow below steps:
1. Go under “System → Schedule” and click on

P a g e | 118
GWN Management Platforms - User Manual
GWN.Cloud & GWN Manager - Version 1.0.19.7 & 1.0.19.8
Figure 101: Create New Schedule- Weekly
2. Select the periods on each day that will be included on the schedule and enter a name for the
schedule (ex: S01).
3. Users can choose to set weekly schedule or absolute schedule (for specific days for example), and
if both weekly schedule and absolute schedules are configured on the same day then the absolute
schedule will take effect and the weekly program will be cancelled for that specific date.
Figure 102: Create New Schedule- Absolute
4. Once the schedule periods are selected, click on Save to save the schedule.
The list of created schedules will be displayed as shown on the figure below. With the possibility to edit or
delete each schedule:

P a g e | 119
GWN Management Platforms - User Manual
GWN.Cloud & GWN Manager - Version 1.0.19.7 & 1.0.19.8
Figure 103: Schedules List
Mesh
Wireless Mesh Network is a wireless extension of the traditional wired network using multiple access points
connected through wireless links to areas where wired access is not an option while also expanding the
coverage of the WLAN network.
In the traditional WLAN network, the uplink of the AP is a wired network (usually an Ethernet Link):
• The advantages of a wired network are security, anti-interference and stable bandwidth.
• The disadvantages are high construction cost, long period of planning and deployment, and difficulty
of change in case a modification is needed.
However, these are precisely the advantages of wireless networks. As a result, Wireless Mesh Network is
an effective complement of wired network.
In addition, Mesh networking provides a mechanism for network redundancy. When an abnormality occurs
in a wired network, an AP suffering the uplink failure can keep the data service continuity through its Mesh
network.
For more details about the GWN Mesh Network feature, please Check the document from below link:
http://www.grandstream.com/sites/default/files/Resources/GWN76XX_Mesh_Network.pdf

P a g e | 120
GWN Management Platforms - User Manual
GWN.Cloud & GWN Manager - Version 1.0.19.7 & 1.0.19.8
Users can setup some Mesh Network parameters under the menu “System → Mesh”, as shown on the
figure below:
Figure 104: Mesh Settings
Also, it’s possible to visualize the Mesh topology by going under the Topology Tab.
Figure 105: Mesh Topology
• Click To check the AP Neighbors:
• By checking option “Disable Automatic Uplink”, the uplink of this AP will need to be assigned
manually.
• Select 2.4G or 5G to display the AP Neighbors information by frequency band. Available information:
MAC, RSSI, Wireless Cascades and Connect Status.
• Click to update information

P a g e | 121
GWN Management Platforms - User Manual
GWN.Cloud & GWN Manager - Version 1.0.19.7 & 1.0.19.8
Figure 106: Neighbor

P a g e | 122
GWN Management Platforms - User Manual
GWN.Cloud & GWN Manager - Version 1.0.19.7 & 1.0.19.8
Maintenance
The Maintenance Web page allows to configure Syslog settings in order to have APs sending log messages
to your debugging syslog server.
Figure 107: Maintenance/Syslog Settings
Table 25: Maintenance
Field
Description
Syslog Server
Enter the IP address or URL of Syslog server.
Syslog Level
Select the level of Syslog, 5 levels are available: None, Emergency, Alert,
Critical, Error, Warning and Notice.
Protocol
Select which protocol will be used for transport (UDP or TCP).
Alert
The Alert Web page provides configuration for Alert settings. The first tab is to setup the email address of
admin(s) which will be receiving alert events notifications.
Table 26: Alert
Field
Description
Email
Enable this feature to receive alerts via email
Alert configure
Specify the modules to monitor, there are seven modules: Memory Usage,
CPU Usage, Network Throughput, AP Throughput, SSID Throughput,
Firmware Upgrade, AP Offline

P a g e | 123
GWN Management Platforms - User Manual
GWN.Cloud & GWN Manager - Version 1.0.19.7 & 1.0.19.8
Alert details
Displays the alerts in the web UI of GWN Manager.
Figure 108: Alert Email
Next Tab is to enabled/disable specific alert events as shown on the figure below:
Figure 109: Alert Events List
The next Table details the Alert configuration parameters:
Table 27: Alert configuration parameters
Manager Memory Usage
Threshold(%)
(GWN Manager only) Once enabled, system will generate an Alert when
Manager Memory Usage reaches the configured threshold [1-100].

P a g e | 124
GWN Management Platforms - User Manual
GWN.Cloud & GWN Manager - Version 1.0.19.7 & 1.0.19.8
Manager Disk Usage
Threshold(%)
(GWN Manager only) Once enabled, system will generate an Alert when
Manager Disk Usage reaches the configured threshold [1-100].
AP Memory Usage
Threshold(%)
Once enabled, system will generate an Alert when AP memory usage
reaches the configured threshold [1-100].
Network Throughput
Threshold
Once enabled, system will generate an Alert when network throughput
reaches the configured threshold [1-999].
AP Throughput
Threshold
Once enabled, system will generate an Alert when AP throughput reaches
the configured threshold [1-999].
SSID Throughput
Threshold
Once enabled, system will generate an Alert when SSID throughput
reaches the configured threshold [1-999].
Firmware Upgrade
Once enabled, system will generate an Alert when AP starts or finishes
upgrade.
AP Offline
Once enabled, system will generate an Alert when the AP goes online or
offline.
Offline Time
Specify the tolerance time of AP offline alert, manager will generate an alert
if the AP keeps offline for the specified time period.
The last tab is to display the alert events that have occurred on the managed system as shown below:

P a g e | 125
GWN Management Platforms - User Manual
GWN.Cloud & GWN Manager - Version 1.0.19.7 & 1.0.19.8
Figure 110: Alert Details

P a g e | 126
GWN Management Platforms - User Manual
GWN.Cloud & GWN Manager - Version 1.0.19.7 & 1.0.19.8
USER MANAGEMENT
User Management allows the administrator to create multiple accounts for different administrators or users
to login to the platform. There are four different access levels to monitor and manage GWN Management
Platforms:
• Super administrator
• Platform administrator
• Network administrator
• Guest editor
Add New Users
To list all the users managing an account, Click on username from the top right corner → Users
Figure 111 : Users List
To add a new user, click on button then enter the email address and select the privilege to assign to
the new user.

P a g e | 127
GWN Management Platforms - User Manual
GWN.Cloud & GWN Manager - Version 1.0.19.7 & 1.0.19.8
Figure 112 : Add New “Platform Administrator” User
Figure 113 : Add “New Network Administrator” User
Note: When selecting privilege “Network Administrator” or “Guest Editor”, the networks that will be
monitored by this user should be selected, the new user will have access to those networks only.
User Privilege levels
Super Administrator
The Super administrator is an admin with top authority, using this privilege users can create/delete accounts
with any privilege level. Each account has a unique Super Administrator which is created automatically
when signing in.

P a g e | 128
GWN Management Platforms - User Manual
GWN.Cloud & GWN Manager - Version 1.0.19.7 & 1.0.19.8
To edit Super Administrator account, click on its name from the top right corner → Click on Personal
Settings a new page displaying the administrator details will be displayed.
Figure 114 : Edit Super Administrator Account
Table 28: Super Administrator Account
Field
Description
Email
The email address of the Super Administrator. Click on change to change
this email address
Login name
Username used for login authentication
Username
This is the name that will be displayed on the top right corner of the web
page when login as super administrator
Password
Password used for login authentication
Account Idle timeout
Once enabled, the administrators will be logged out automatically after
being idle for the specified time. This parameter will not take effect until
the account login at the next time.
Idle timeout (min)
Specify the idle timeout, please enter an integer from 5 to 1440.
Company
Enter the company name

P a g e | 129
GWN Management Platforms - User Manual
GWN.Cloud & GWN Manager - Version 1.0.19.7 & 1.0.19.8
Country/Region
Select the country/region from the list
Phone
Enter the phone number
Address
Enter the address
Multi-Factor Safety
Authentication
(GWN Manager only) Enable/Disable Multi-Factor Safety Authentication.
Privilege
Displays the type of privileges that the user has
Platform Administrator
Platform administrator is the second highest level, users with this privilege can create, delete all users with
the same privilege or lower, in other words a platform administrator can create, delete, or edit other platform
administrators, network administrators and guest editors.
Network Administrator
A network administrator is the third user privilege level, he can edit the networks assigned to him, and create
or delete Guest editor belonging to the network he owns.
Guest Editor
This is the lowest privilege level, a guest editor can only view and edit/monitor captive portal, and voucher
page within his network.
Edit User Settings
Changing Password
To Edit the user password, access the user account settings by clicking on his username from the top right
corner of the page, then click on Change next to the password field, a new web page will be displayed,
enter the old password, then the new one, confirm it, and finally submit the changes.

P a g e | 130
GWN Management Platforms - User Manual
GWN.Cloud & GWN Manager - Version 1.0.19.7 & 1.0.19.8
Figure 115 : Edit Super Administrator Password
Note: User passwords registered for authentication through the web portal are stored in an encrypted form
Changing Super Administrator Email
To edit super admin’s email address, click on Change and a new web page will be displayed, enter the
password of the super admin account as well as the new email address then click on Submit.
Figure 116 : Edit Super Administrator Email
Delete Users
To delete users, select one or multiple users, click on button, then accept the confirmation
message.

P a g e | 131
GWN Management Platforms - User Manual
GWN.Cloud & GWN Manager - Version 1.0.19.7 & 1.0.19.8
Figure 117 : Delete Users
Change Log
To list all the event logs recorded on the platform, Click on username from the top right corner ➔ Change
Log
Figure 118: Change Log Records
• For some records including a value update, users can click on under Actions section
to list the actual change by showing both: The Old and New value.

P a g e | 132
GWN Management Platforms - User Manual
GWN.Cloud & GWN Manager - Version 1.0.19.7 & 1.0.19.8
Figure 119: Change Log Action
Note: This option can be found under Global section for GWN Manager and GWN Manager
Report
Administrators can generate and configure the platform to send reports periodically to the configured email
addresses. Each report can be related to one or more different Network groups, providing Wi-Fi statistics
(clients count, bandwidth usage, client and guest statistics…etc.)
To generate the report, click on username from the top right corner → Report, then click on
button, a new page displaying the report details will be displayed.
Figure 120: Generate Report

P a g e | 133
GWN Management Platforms - User Manual
GWN.Cloud & GWN Manager - Version 1.0.19.7 & 1.0.19.8
Figure 121: Create Report
The following table provides an explanation about different options for report settings:
Table 29: Report Settings
Field
Description
Title
Specify the report title. The maximum length is 32 alphabet characters.
Network
Specify the Network Group to be included in the generated report.

P a g e | 134
GWN Management Platforms - User Manual
GWN.Cloud & GWN Manager - Version 1.0.19.7 & 1.0.19.8
Report Contents
Specify the report contents for the selected network group(s), the
contents can include:
• Clients Count: reports the number of clients for all the SSIDs
under selected network group.
• Bandwidth Usage: The download and upload level statistics for
all the SSIDs for the selected network group
• Clients Statistics: reports the statistics for the different client
manufacturer, client OS, the number for new clients as well as
the return clients and the average duration.
• Guest Statistics: reports statistics about the clients connected
via Captive portal including the Guest New session, the Max
concurrent New session, the login failure.
• Top APs: reports the top 5/20/50 APs that consumed the max of
the bandwidth/data.
• Top Clients: Lists the top 5/20/50 clients that
downloaded/uploaded the max of data
• Top SSIDs: reports the top 5/20/50 SSIDs that are mostly used
by clients.
Report Frequency
Specify the report frequency to be generated either on daily basis,
weekly, monthly or custom range.
Date
Specify the Start and Date for the report to be generated when selecting
“Custom Range” as Report Frequency.
Report Generate Time
Select either to generate the report now, or at later time
Time
Specify when you want the report to be generated.
This field appear when selecting “Later” in “Report Generate Time”.
Email Address
Enter the mail address(es) to which the report will be sent.

P a g e | 135
GWN Management Platforms - User Manual
GWN.Cloud & GWN Manager - Version 1.0.19.7 & 1.0.19.8
Once you press , a report schedule will be generated under Schedule section which you can
preview by clicking on Action button, or delete it using .
Figure 122: Created Report
Note:
• Once you create a report, it cannot be edited afterwards, you will need to delete it and create a new
one.
• Once the report is generated, it will appear under Generated Report section, the administrator can
view it by clicking on Action button, download it in PDF format by clicking on , or delete it
using .
Figure 123: Generated Report
• This option can be found under Global section for GWN Manager and GWN Cloud

P a g e | 136
GWN Management Platforms - User Manual
GWN.Cloud & GWN Manager - Version 1.0.19.7 & 1.0.19.8
Feedback
Users can now send their feedback by clicking on the icon on the bottom of the page
(maximum allowed character input is 2000) and they can file in different format (tar, jpg, pdf…etc) along
with screenshot of the GWN Cloud page if needed.
Figure 124: Feedback
Users can add multiple emails by click on before feedbacks
Change the display language by clicking on then selecting an input from the dropdown list

P a g e | 137
GWN Management Platforms - User Manual
GWN.Cloud & GWN Manager - Version 1.0.19.7 & 1.0.19.8
GLOBAL
Upgrade
This feature allows upgrading access points. Under “Upgrade” menu allows administrator to manage GWN
APs firmware, trigger immediate upgrade or schedule an upgrade for GWN76xx.
• Managing Firmware Files
1. Go to Upgrade → Devices.
Figure 125: Upgrade
2. Click on button. A new window will be displayed:
a. Recommended Version: The recommended version tab lists the latest official firmware.
Figure 126: Firmware - Recommended Version
b. Customized Version: From the customized version tab, users can upload a custom firmware to
GWN Manager server to use it for access point upgrade.

P a g e | 138
GWN Management Platforms - User Manual
GWN.Cloud & GWN Manager - Version 1.0.19.7 & 1.0.19.8
Figure 127: Firmware - Customized Version
• Upgrading Firmware
To upgrade access points, select one or more from the list, then click on upgrade button, a new web page
will popup:
Figure 128: Upgrade AP from GWN Manager
1. Select the firmware version from the list. Both recommended and customized versions will be
displayed.
2. In the Upgrade Time list, select:
a. Upgrade Now: Trigger immediate upgrade for the GWN76XX access points.
b. Upgrade Later: Schedule upgrade at specific date and time. Administrator must specify time
interval.

P a g e | 139
GWN Management Platforms - User Manual
GWN.Cloud & GWN Manager - Version 1.0.19.7 & 1.0.19.8
Figure 129: Upgrade Schedule for GWN AP from GWN Manager
The schedule tab lists upcoming and executed upgrade actions:
Figure 130: Upgrade - Schedule
Manager Settings (GWN Manager Only)
Manager Log
Click on to download all the manager Log to your local directory (Including Redis, Nginx, MySQL
and GWN logs).
SMTP Server
Set up SMTP server configuration:

P a g e | 140
GWN Management Platforms - User Manual
GWN.Cloud & GWN Manager - Version 1.0.19.7 & 1.0.19.8
Figure 131: SMTP server
Table 30: SMTP server Configuration Details
From Email Address
Specify the email address of the notification sender. If the address is not
specified, AP will use the SMTP username as a sender.
From Name
Specify the Name of the notification sender.
SMTP Username
Enter the username to login the mail server.
SMTP Password
Enter the password to login the mail server.
SMTP Host
Specify the mail server URL.
SMTP Port
Specify the mail server port.
Users may test the configuration using option .
Backup & Restore
Users can Backup GWN Manager configuration as shown below:
Figure 132: Backup Settings

P a g e | 141
GWN Management Platforms - User Manual
GWN.Cloud & GWN Manager - Version 1.0.19.7 & 1.0.19.8
Table 31: Backup Configuration Details
File Storage Path
Specify the path the backup files will be stored.
Retained Data Backup
Specify the contents of retained data backup. Settings only will not backup
any data. The other options will back up the settings and the data recorded
in the specified period.
Backup Time
Enter the backup time period (Daily, Weekly or Monthly)
File storage limit
Specify the maximum file number manager will store. Once the backup
files reached limit, the old ones will be replaced with the new ones.
Restore tab holds the two option “Backup and Upload:
Figure 133: Restore
Users can either click to import backup from the local directory. Or, click to backup
immediately. A pop window will show to confirm the operation:
Figure 134: Confirm Backup
A list of available Backup files with their specific Time, File Size and Version is displayed on the bottom
where the user may Restore , Download or Delete a File.

P a g e | 142
GWN Management Platforms - User Manual
GWN.Cloud & GWN Manager - Version 1.0.19.7 & 1.0.19.8
Report
Refer to [Report] section.
Change Log
Refer to [Change Log] section.
API Developer
Enterprises can enable API Developer Mode to invoke various GWN features via API in third-party
applications.
Figure 135: Enable API Developer Mode
For further details, please refer to the GWN API Developer Guide

P a g e | 143
GWN Management Platforms - User Manual
GWN.Cloud & GWN Manager - Version 1.0.19.7 & 1.0.19.8
EXPERIENCING GWN MANAGEMENT PLATFORMS
Please visit our Website: http://www.grandstream.com to receive the most up- to-date updates on
firmware releases, additional features, FAQs, documentation and news on new products.
We encourage you to browse our product related documentation, FAQs and User and Developer Forum
for answers to your general questions. If you have purchased our products through a Grandstream
Certified Partner or Reseller, please contact them directly for immediate support.
Our technical support staff is trained and ready to answer all your questions. Contact a technical support
member or submit a trouble ticket online to receive in-depth support.
Thank you again for using Grandstream GWN Management Platforms, it will be sure to bring convenience
to both your business and personal life.
