
User's Guide
QTouch® Modular Library Peripheral Touch Controller
User's Guide
Description
The Microchip QTouch
®
Peripheral Touch Controller (PTC) offers built-in hardware for capacitive touch
measurement on sensors that function as buttons, sliders, and wheels. The PTC supports both mutual
and self-capacitance measurement without the need for any external component. It offers superb
sensitivity and noise tolerance, as well as self-calibration, and minimizes the sensitivity tuning effort by
the user.
The PTC is intended for autonomously performing capacitive touch sensor measurements. The external
capacitive touch sensor is typically formed on a PCB, and the sensor electrodes are connected to the
analog charge integrator of the PTC using the device I/O pins. The PTC supports mutual capacitance
sensors organized as capacitive touch matrices in different X-Y configurations, including Indium Tin Oxide
(ITO) sensor grids. In Mutual Capacitance mode, the PTC requires one pin per X-line (drive line) and one
pin per Y-line (sense line). In Self-Capacitance mode, the PTC requires only one pin with a Y-line driver
for each self-capacitance sensor.
Features
• Implements Low-Power, High-Sensitivity, Environmentally Robust Capacitive Touch Buttons
• Supports Mutual Capacitance and Self-Capacitance Sensing
• Up to 32 Buttons in Self-Capacitance mode
• Up to 256 Buttons in Mutual Capacitance mode
• Supports Lumped Mode Configuration
• One Pin Per Electrode - No External Components
• Load Compensating Charge Sensing
• Parasitic Capacitance Compensation for Mutual Capacitance mode
• Adjustable Gain for Superior Sensitivity
• Zero Drift Over the Temperature and V
DD
Range
• No Need for Temperature or V
DD
Compensation
• Hardware Noise Filtering and Noise Signal De-Synchronization for High Conducted Immunity
• Atmel Start QTouch Configurator Support – Wizard Guided Touch Project Creation
Product Support
For assistance related to QTouch capacitive touch sensing software libraries and related issues, contact
your local microchip sales representative or visit https://www.microchip.com/support/.
© 2017 Microchip Technology Inc.
User Guide
DS40001986A-page 1

Table of Contents
Description.......................................................................................................................1
Features.......................................................................................................................... 1
Product Support...............................................................................................................1
1. Introduction................................................................................................................5
2. Capacitive Touch Measurement................................................................................ 6
2.1. Self-Capacitance.......................................................................................................................... 6
2.2. Mutual Capacitance......................................................................................................................7
3. Touch Sensors.........................................................................................................10
3.1. Buttons....................................................................................................................................... 10
3.2. Proximity Sensor........................................................................................................................ 10
3.3. Lumped Sensor..........................................................................................................................10
3.4. Linear Sensors........................................................................................................................... 11
3.5. 2D Position Sensors................................................................................................................... 11
3.6. Mix and Match............................................................................................................................ 11
4. PTC......................................................................................................................... 12
4.1. Overview.................................................................................................................................... 12
4.2. Self-Capacitance........................................................................................................................ 12
4.3. Mutual Capacitance....................................................................................................................12
5. QTouch Modular Library.......................................................................................... 14
5.1. Introduction.................................................................................................................................14
5.2. QTouch Library Modules............................................................................................................ 14
5.3. Module Naming Conventions..................................................................................................... 14
5.4. QTouch Library Application Interface......................................................................................... 16
5.5. Application Flow......................................................................................................................... 17
5.6. MISRA Compliance.................................................................................................................... 17
6. Acquisition Module.................................................................................................. 19
6.1. Overview.................................................................................................................................... 19
6.2. Interface..................................................................................................................................... 19
6.3. Functional Description................................................................................................................19
6.4. Data Structures.......................................................................................................................... 20
7. Frequency Hop Module........................................................................................... 26
7.1. Overview.................................................................................................................................... 26
7.2. Interface..................................................................................................................................... 26
7.3. Functional Description................................................................................................................27
7.4. Data Structures.......................................................................................................................... 27
User's Guide
© 2017 Microchip Technology Inc.
User Guide
DS40001986A-page 2

8. Frequency Hop Auto-tune Module...........................................................................30
8.1. Overview.................................................................................................................................... 30
8.2. Interface..................................................................................................................................... 30
8.3. Functional Description................................................................................................................31
8.4. Data Structures.......................................................................................................................... 33
9. Touch Key Module................................................................................................... 34
9.1. Overview.................................................................................................................................... 34
9.2. Interface..................................................................................................................................... 34
9.3. Functional Description................................................................................................................35
9.4. Data Structures.......................................................................................................................... 36
10. Scroller Module........................................................................................................39
10.1. Overview.................................................................................................................................... 39
10.2. Interface..................................................................................................................................... 39
10.3. Functional Description................................................................................................................40
10.4. Data Structures.......................................................................................................................... 41
11. Binding Layer Module..............................................................................................44
11.1. Overview.................................................................................................................................... 44
11.2. Interface..................................................................................................................................... 44
11.3. Functional Description................................................................................................................45
11.4. Data Structures.......................................................................................................................... 47
12. Building Applications Using Atmel START...............................................................49
12.1. Working With KIT Example Projects.......................................................................................... 49
12.2. Creating User-Board Projects.................................................................................................... 50
12.3. Import Project Using Atmel Studio............................................................................................. 62
12.4. Import Project Using IAR
™
Workbench......................................................................................65
13. Using Data Visualizer with QTouch
®
Applications................................................... 72
13.1. Overview.................................................................................................................................... 72
13.2. Datastreamer Module.................................................................................................................72
13.3. Debugging Using Data Visualizer...............................................................................................73
14. Tuning Procedure.................................................................................................... 78
14.1. Tuning for Noise Performance....................................................................................................78
14.2. Tuning the Slider/Wheel Sensor.................................................................................................83
15. Known Issues.......................................................................................................... 86
16. Appendix A - Revision History.................................................................................87
17. Appendix B - Acquisition Module API Reference.................................................... 88
18. Appendix C - Frequency Hop Module API Reference.............................................90
19. Appendix D - Frequency Hop Auto-tune Module API Reference............................ 91
User's Guide
© 2017 Microchip Technology Inc.
User Guide
DS40001986A-page 3

20. Appendix E - Touch Key Module API Reference.....................................................92
21. Appendix F - Scroller Module API Reference..........................................................93
22. Appendix G - Binding Layer Module API Reference............................................... 94
23. Appendix H - Device Support.................................................................................. 95
The Microchip Web Site................................................................................................ 96
Customer Change Notification Service..........................................................................96
Customer Support......................................................................................................... 96
Microchip Devices Code Protection Feature................................................................. 96
Legal Notice...................................................................................................................97
Trademarks................................................................................................................... 97
Quality Management System Certified by DNV.............................................................98
Worldwide Sales and Service........................................................................................99
User's Guide
© 2017 Microchip Technology Inc.
User Guide
DS40001986A-page 4

1. Introduction
The QTouch
®
Modular Library (QTML) provides the touch sensing functionality of a QTouch Library under
a modular architecture. By dividing the library into functional units, it is possible for an application
developer to include only those modules which provide functionality relevant to the target application,
thereby saving both device memory and processing time.
User's Guide
Introduction
© 2017 Microchip Technology Inc.
User Guide
DS40001986A-page 5

2. Capacitive Touch Measurement
The QTouch Modular Library supports PTC measurement of self-capacitance and mutual capacitance
touch sensors on a selection of AVR
®
and SAM
®
microcontrollers.
In all current capacitive touch measurement methods, one of two basic functional approaches is
implemented: self-capacitance or mutual capacitance.
2.1 Self-Capacitance
Self-capacitance refers to a capacitive measurement using a single sensor electrode to measure the
apparent capacitance between the electrode and the DC ground of the touch sensor MCU circuit.
At power-on or Reset, a baseline measurement of the capacitance is recorded and assumed to be the
‘Out Of Touch’ capacitance. Reference capacitance is the combination of Cp in parallel to the series pair
Cg and Cx.
When a touch contact is applied, the capacitance is increased by the introduction of a parallel path to
Earth, via the series combination of Ct and Ch. The increase is compared to the touch threshold, and if
exceeded, the sensor is indicated to be ‘In Touch’.
Note: Cx, the human body capacitance, varies by person and surroundings and is typically in the order
of 100 pF to 200 pF. The touch contact Ct, however, is more consistent and much smaller at typically 1 pF
User's Guide
Capacitive Touch Measurement
© 2017 Microchip Technology Inc.
User Guide
DS40001986A-page 6

to 5 pF, depending primarily on the design and construction of the touch sensor and secondly on the size
of the finger used to activate the sensor.
As the dominant component in a pair of series capacitors is the smaller one, in this case Ct, a well-
designed and tuned sensor shows very consistent sensitivity to touch contact with little dependence on
the user.
2.2 Mutual Capacitance
Mutual capacitance refers to a capacitive measurement using a pair of sensor electrodes to measure the
apparent capacitance between them. Typically, one electrode acts as the Driver (X), while the other is the
receiver (Y). Each physical location where an X electrode transfers charge to a Y electrode is a sensor
node, and this is the location of touch sensitivity.
User's Guide
Capacitive Touch Measurement
© 2017 Microchip Technology Inc.
User Guide
DS40001986A-page 7

As with self-capacitance, a baseline measurement of the capacitance is recorded and assumed to be the
‘Out Of Touch’ capacitance. Reference capacitance is the apparent capacitance between the X electrode
and the Y electrode. Unlike self-capacitance, the reference capacitance does not depend on an earth
return.
Interaction between a mutual capacitance sensor and the human body is more complex. It may be
modeled by considering two separate touch contacts to the X and Y electrodes, where each is
capacitively coupled to the body, resistively connected to each other inside the body and capacitively
coupled to earth via the human body capacitance.
A touch contact has two competing effects:
• The introduction of a conductive plate (finger) to both X and Y electrodes increases the capacitance
between X and Y. This occurs if any conductive part is placed over the sensor
User's Guide
Capacitive Touch Measurement
© 2017 Microchip Technology Inc.
User Guide
DS40001986A-page 8

• The addition of another capacitance (Ch + Cg) at the XY node provides an alternative path for the
energy emitted by X electrode, reducing the amount of charge accumulated on the sensor. This
effect is manifested as an apparent reduction in the XY capacitance. This occurs only if the body of
material connected to the conductive part has a significant self-capacitance.
When a real touch contact is placed, the second (reducing) effect is much greater than the first
(increasing) effect, and so a touch contact on a mutual capacitance sensor is indicated by an apparent
reduction in sensor capacitance.
This apparent change in capacitance (delta) is compared to the configured touch threshold, and if it
exceeds the threshold then the sensor is deemed to be in detect.
User's Guide
Capacitive Touch Measurement
© 2017 Microchip Technology Inc.
User Guide
DS40001986A-page 9

3. Touch Sensors
Capacitive sensors may be implemented to simply detect contact as a button replacement, or functionally
extended to provide a relative measurement of distance (proximity), 1D position (slider or wheel), 2D
position (QTouch Surface), or 3D position (QTouch Surface with proximity).
In each case, the modular library detects a touch contact by a change in capacitance exceeding a pre-
configured threshold. Once a contact has been confirmed, the various post-processing modules use the
calculated touch delta to interpolate amongst neighboring sensors and calculate the location of the touch
position or relative proximity.
3.1 Buttons
The simplest implementation of a capacitive sensor is a button, where the sensor consists of a single
node (one electrode for self-capacitance, one pair of electrodes for mutual capacitance) and is interpreted
as a binary state; In Detect or Out of Detect.
3.2 Proximity Sensor
An extension of the button is a proximity sensor. A single sensor node is monitored for a change in
capacitance exceeding a pre-configured threshold. In the same way as the button, the sensor is
considered to be ‘In Detect’ when that threshold is exceeded. Once in detect, a relative measurement of
the contact distance is made by scaling the touch delta between two thresholds, the initial ‘Detect’
threshold and a second ‘Full Contact’ threshold.
Note: As the proximity sensor relies on the capacitive load of a distant object, the ‘apparent distance’ to
the contact will depend on the shape and size of the contact.
i.e., an open hand in proximity at 10 cm will ‘appear’ closer than an extended finger at 10cm, as it has a
larger influence on capacitance due to a larger surface area at the same distance.
Capacitance (C) is proportional to Area (A) and inversely proportional to distance (d).
3.3 Lumped Sensor
A Lumped sensor is implemented as a combination of multiple sense lines (self-capacitance
measurement) or multiple drive and sense lines (mutual capacitance measurement) to act as one single
sensor. This provides the application developer with greater flexibility in the touch sensor implementation.
• Improve the touch sensor responsiveness by reducing the number of measurements and therefore,
the time required for initial touch detection
• Fast position resolution by binary search
• Improved moisture rejection through ‘All but one’ key lumping in a touch button application
• Provide wake-on-touch functionality on any key (up to maximum capacitance limits) with
significantly lower power consumption as only one sensor measurement is required for all keys
• Dual purpose sensor electrodes – e.g., individual keys may be lumped together to form a proximity
sensor
Touch detection on a lumped sensor is implemented in the same way as a single node touch button.
User's Guide
Touch Sensors
© 2017 Microchip Technology Inc.
User Guide
DS40001986A-page 10

3.4 Linear Sensors
A linear sensor utilizes the touch delta of two or more adjacent sensor nodes arranged in a row to
calculate the position of a touch contact along that row. The sensor layout is designed and the threshold
configured in such a way that a contact anywhere along the sensor will cause:
1. A touch delta exceeding the threshold on at least one sensor node. The node with the
strongest touch delta is determined to be the center node of the touch contact and identified the
approximate location of the touch contact.
2. Some touch delta on neighbouring nodes, used for position interpolation between nodes.
The relative delta on the nodes to the left and right of the center node are used to adjust the
calculated touch position towards the side with the strongest delta.
A linear sensor may be formed into any physical shape, with or without a wrap-around from the last
sensor to the first. A sensor with wrap-around is configured as a ‘Wheel’, while one without is configured
as a ‘Slider’. In the case of the wheel, a touch contact centered on the 1
st
key uses the last key for ‘left’
interpolation and vice-versa while the slider option implements a dead band at the ends.
3.5 2D Position Sensors
Where a linear sensor is physically implemented as a line of keys, the same approach may be extended
to 2D position detection through a grid of keys. The keys are designed such that interpolation may be
made in either the vertical or horizontal direction, and multiple separate touch contacts may be
individually resolved in their interpolated positions.
3.6 Mix and Match
The QTouch Modular Library allows an unprecedented degree of combinations implementing different
sensor types and measurement technology, in many cases utilizing the same sensor electrodes in
multiple ways and within the same firmware application.
For example, a 2D position sensor using mutual capacitance key sensors may be lumped or partially
lumped in Mutual Capacitance mode to provide proximity measurements and the Y lines individually
measured in Self-Capacitance mode to improve moisture immunity.
User's Guide
Touch Sensors
© 2017 Microchip Technology Inc.
User Guide
DS40001986A-page 11

4. PTC
4.1 Overview
The Microchip QTouch
®
Peripheral Touch Controller (PTC) offers built-in hardware for capacitive touch
measurement on sensors that function as buttons, sliders, and wheels. The PTC supports both mutual
and self-capacitance measurement without the need for any external components. It offers superb
sensitivity and noise tolerance, as well as self-calibration, and minimizes the sensitivity tuning effort by
the user.
The PTC is intended for autonomously performing capacitive touch sensor measurements. The external
capacitive touch sensor is typically formed on a PCB, and the sensor electrodes are connected to the
analog charge integrator of the PTC using the device I/O pins. The PTC supports mutual capacitance
sensors organized as capacitive touch matrices in different X-Y configurations, including Indium Tin Oxide
(ITO) sensor grids.
4.2 Self-Capacitance
In Self-Capacitance mode, the PTC requires only one pin with a Y-line driver for each self-capacitance
sensor.
Figure 4-1. Self-Capacitance PTC Measurement
4.3 Mutual Capacitance
In Mutual Capacitance mode, the PTC requires one pin per X-line (drive line) and one pin per Y-line
(sense line).
User's Guide
PTC
© 2017 Microchip Technology Inc.
User Guide
DS40001986A-page 12

Figure 4-2. Mutual Capacitance PTC Measurement
User's Guide
PTC
© 2017 Microchip Technology Inc.
User Guide
DS40001986A-page 13

5. QTouch Modular Library
5.1 Introduction
The QTouch Modular Library provides the touch sensing functionality of a QTouch Library under the
redesigned modular architecture. By dividing the library into functional units, it is possible for an
application developer to include only those modules which provide functionality relevant to the target
application, thereby saving both device memory and processing time.
5.2 QTouch Library Modules
QTouch Library modules can be classified into three types based on the functionality as shown below.
5.3 Module Naming Conventions
The naming conventions followed on the QTouch Library modules are given below.
qtm _ <module_name_identifier> _ <device_architecture> _ <module_ID> .
<file extension>
qtm / libqtm
Acronym indicates QTouch module. All QTouch modules begin with
“qtm_” for easy identification.
User's Guide
QTouch Modular Library
© 2017 Microchip Technology Inc.
User Guide
DS40001986A-page 14

For GCC modules, “lib” is prepended to the module name, thus it
would be “libqtm”.
module_name_identifier
acq – acquisition module with auto-tune
acq_runtime – acquisition module without auto-tune code
freq_hop – Frequency hop module
freq_hop_auto_tune – frequency hop with auto-tune module
device_architecture
cm0p – for all cortex M0+ post processing modules
cm4 – for all cortex M4F post processing modules
samd1x – samd10/d11 acquisition modules only
t81x – all modules of AVR tiny817 device families
t161x - all modules of AVR tiny1617 device families
t321x - all modules of AVR tiny3217 device families
m328pb - all modules of AVR mega328pb device
m324pb - all modules of AVR mega324pb device
saml21 - saml21 acquisition module only
saml22 - saml22 acquisition module only
samc21 - samc21 acquisition module only
samc20 - samc20 acquisition module only
samd21 - samd21 acquisition module only
samda1 - samda1 acquisition module only
samha1 - samha1 acquisition module only
samd20 - samd20 acquisition module only
module_id
Unique 16-bit identifier for each module
file_extension
.a – GCC modules of AVR and ARM
®
devices, IAR modules of ARM
devices
.r90 – IAR modules of all AVR modules
Table 5-1. Acquisition module of AVR mega328pb device
GCC module:
libqtm_acq_m328pb_0x0001.a
IAR module :
qtm_acq_m328pb_0x0001.r90
Touch keys processing module of SAMd10/d11 device
GCC module:
libqtm_touch_keys_cm0p_0x0002.a
IAR module :
qtm_touch_keys_cm0p_0x0002.a
User's Guide
QTouch Modular Library
© 2017 Microchip Technology Inc.
User Guide
DS40001986A-page 15

5.4 QTouch Library Application Interface
In addition to library modules, the various components that are required to build the complete touch
application are given below.
1. Module API files
2. Touch.c and Touch.h files
3. Common_components_api.h
4. Touch_api_ptc.h
5. Module reburst flag
6. Binding layer module
5.4.1 Module API files
The API for each module is defined in its associated header file. Dependencies between modules are
minimized and implemented at the application level. This allows for easy porting of application code from
one device to another – only the hardware dependent module configurations must be adjusted. The
acquisition auto-tune and acquisition manual tune modules have the same API file. All the other modules
have their own API file that needs to be linked to the user application.
5.4.2 Touch.c and Touch.h files
User options for each module are configured in application code, typically touch.h and touch.c, and
shared with the library module by pointer reference. Similarly, arrays are created in application code for
modules’ run-time data and provided to the module via a pointer.
Configurations may be modified on-the-fly by application code in between measurement sweeps of the
touch sensors. All runtime data is available to application code.
5.4.3 Common_components_api.h
The application requires structures and definitions common to all modules. The common definitions,
macros and the data structures are placed in the file “qtm_common_components_api.h”.
5.4.4 Touch_api_ptc.h
This file contains all the module API files included in the content and thus this single file is sufficient to be
included on the application source files wherever necessary.
5.4.5 Module Reburst Flag
Module configuration and functionality is unique to each module, but any module may require a repeated
measurement of specific sensors. In order to achieve this, a signal conditioning module may temporarily
change the acquisition configuration, e.g. to disable those sensors not requiring reburst.
This is indicated to the application by the implementation of a common ‘Status’ byte at the first location of
the signal conditioning group data structure. A ‘1’ in bit 7 indicates that the application should re-start
measurement on the sensor group without waiting for the measurement cycle timeout.
Figure 5-1. uint8_t qtm_xxx_status
Bit 7
Bit 6
Bit 5
Bit 4
Bit 3
Bit 2
Bit 1
Bit 0
Re-burst
Module specific status flags
User's Guide
QTouch Modular Library
© 2017 Microchip Technology Inc.
User Guide
DS40001986A-page 16

5.4.6 Binding Layer Module
The binding layer module provides easy interface of QTouch modules to the user application. The binding
layer binds all the configured modules in the appropriate sequence using minimal API functions. It takes
care of initialization of modules, synchronizes the calling procedures and handles the error statuses.
5.5 Application Flow
5.6 MISRA Compliance
QTouch Library modules source code is compliant with the ‘Required’ rule set of MISRA 2004, with the
following exceptions:
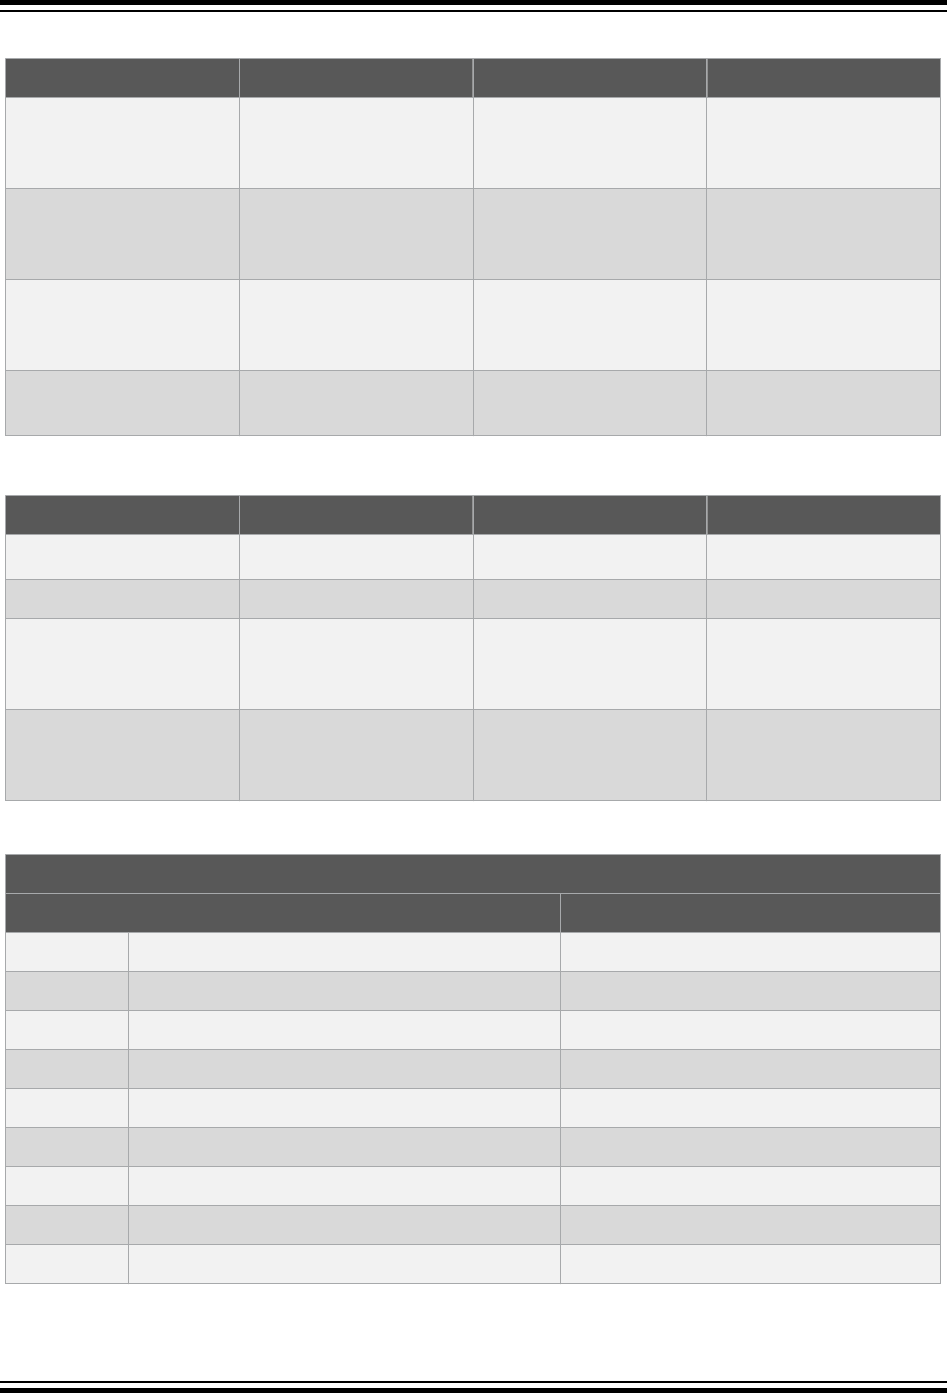
Table 5-2. AVR MCU Acquisition Modules and Exceptions:
Acquisition modules of Mega32xpb, Tiny81x, Tiny161x, Tiny321x devices
MISRA Rule Definition Remarks
1.1
All code shall conform to ISO 9899:1990
Programming languages – C, amended and
Compiler is configured to allow
extensions
User's Guide
QTouch Modular Library
© 2017 Microchip Technology Inc.
User Guide
DS40001986A-page 17

Acquisition modules of Mega32xpb, Tiny81x, Tiny161x, Tiny321x devices
MISRA Rule Definition Remarks
corrected by ISO/IEC 9899/COR1:1995, ISO/IEC
9899/AMD1:1995, and ISO/IEC 9899/COR2:1996
8.5
There shall be no definitions of objects or
functions in a header file
Inline functions are used in the header
files
17.4
Array indexing shall be the only allowed form of
pointer arithmetic
Pointer of module data structures are
passed as parameter and individual
object data are fetched by iterating the
data structure as array index.
Table 5-3. AVR Postprocessing Modules & Exceptions:
Touch_key, binding layer, frequency hop auto tune, frequency hop, scroller
MISRA Rule Definition Remarks
17.4
Array indexing shall be the only
allowed form of pointer arithmetic
Pointer of module data structures are passed as
parameter and individual object data are fetched
by iterating the data structure as array index.
Table 5-4. ARM Acquisition Modules & Postprocessing Modules :
Modules
MISRA Rule Definition Remarks
1.1
All code shall conform to ISO 9899:1990
Programming languages – C, amended and
corrected by ISO/IEC 9899/COR1:1995, ISO/IEC
9899/AMD1:1995, and ISO/IEC 9899/COR2:1996
Compiler is configured to allow
extensions
17.4
Array indexing shall be the only allowed form of
pointer arithmetic
Pointer of module data structures are
passed as parameter and individual
object data are fetched by iterating the
data structure as array index.
User's Guide
QTouch Modular Library
© 2017 Microchip Technology Inc.
User Guide
DS40001986A-page 18

6. Acquisition Module
6.1 Overview
The minimum requirement for a touch sensor application is an acquisition module, which implements all
hardware dependent operations for configuration and measurement of capacitive touch or proximity
sensors.
6.2 Interface
The data structure definitions and the API declarations are included in the API file
“qtm_acq_<device_id>_<module_id>_api.h”. The data structure covers all the configurations and
output data variables. This file should be included on the common api ‘touch_ptc_api.h’ file.
User
Application
Touch.h
Macros and
constants
Qtm_acq_<device_i
d>_<Module_id>_a
pi.h
Touch_api_ptc
.h
Acquisition
Module
common_
components_api.h
Touch.c
Global variables declaration
and initialization, Helper API
functions
6.3 Functional Description
Acquisition modules are target specific, each having a hardware configuration structure depending on the
touch sensing technology and method applied.
User's Guide
Acquisition Module
© 2017 Microchip Technology Inc.
User Guide
DS40001986A-page 19

Features Implemented in this Acquisition Module
• Hardware calibration for sensor nodes
– Calibration of Prescaler/Resistor/Charge share delay to compensate for time constant of
sensor electrodes
– Calibration of internal compensation circuit to match sensor load
• Selfcap and mutual cap sensor touch measurement with normal sequencing
• Low-Power mode of automated scanning using Event System (currently not supported on Atmel
Start Configurator)
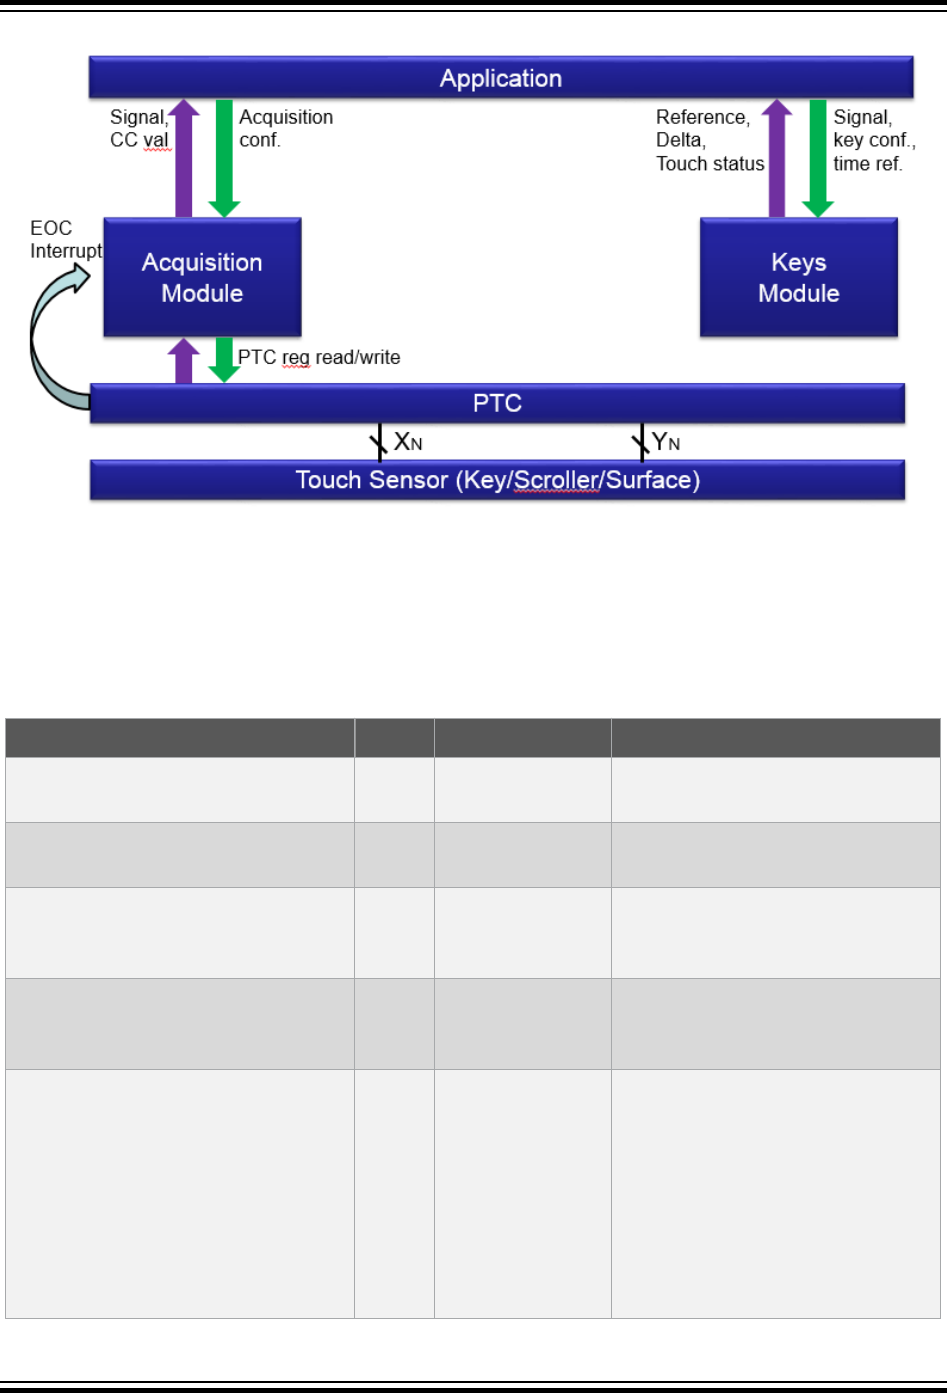
6.4 Data Structures
6.4.1 Configurations
The acquisition module implements all functionality required for making relative measurements of sensor
capacitance. This is the only module uniquely built for an individual device, as it must access and control
the pins used for touch sensor implementation.
As devices have different hardware features available, different configuration options are available on
each device. For most efficient use of system resources – ROM and RAM – different sensor configuration
structures are required.
However, where the same variable name is used within the structure, the functionality controlled by that
variable is identical. Any dependent function should utilize a reference to the variable, and NOT rely on a
reference to the structure and pointer arithmetic.
User's Guide
Acquisition Module
© 2017 Microchip Technology Inc.
User Guide
DS40001986A-page 20

Acquisition Group Configuration
A reference by pointer to ‘&ptc_qtlib_acq_gen1.freq_option_select’ will always point to the
correct memory location, regardless of the device. However, any implementation based on pointer
arithmetic will require re-factoring if code is to be re-used from one device for another.
Parameter Size Range/Options Usage
num_sensor_nodes
16-bit 0 to 65535
The number of sensor nodes
configured in the group.
acq_sensor_type
8-bit
NODE_SELFCAP
NODE_MUTUAL
Defines the measurement method
applied to this group of nodes.
calib_option_select
1 byte
Bits 7:4
Calibration type:
CAL_AUTO_TUNE_NONE
CAL_AUTO_TUNE_RSEL
CAL_AUTO_TUNE_PRSC
CAL_AUTO_TUNE_CSD*
Calibration Type selects which
parameter should be automatically
tuned for optimal charge transfer.
Bits 3:0
Calibration type:
CAL_CHRG_2TAU
CAL_CHRG_3TAU
CAL_CHRG_4TAU
CAL_CHRG_5TAU
Calibration target applies a limit to the
charge transfer loss allowed, where a
higher setting of target ensures a
greater proportion of full charge is
transferred.
freq_option_select
1 byte
FREQ_SEL_0 to FREQ_SEL_15
Or FREQ_SEL_SPREAD
FREQ_SEL_0 to FREQ_SEL_15 inserts
a delay cycle between measurements
during oversampling, where 0 is the
shortest delay, 15 the longest.
FREQ_SEL_SPREAD varies this delay
from 0 to 15 in a sawtooth manner
during the oversampling set
PTC_interrupt_priority**
1 byte 1 to 3 Interrupt priority level for the PTC.
Note: * - Not available on all devices
** - Applicable for ARM cortex devices only
Node Configuration
Similarly, node configuration structures vary depending on which device is used.
• Number of X lines
• Number of Y lines
• Feature availability
User's Guide
Acquisition Module
© 2017 Microchip Technology Inc.
User Guide
DS40001986A-page 21

Parameter Size Range/Options Usage
node_xmask
1/2/4
Bytes
(Bitfield)
Set the bit(s) at location(s) corresponding to X line
number(s).
Example:
X0 only = 0b00000001 = 0x01
X0 and X2 = 0b00000101 = 0x05
1 byte is used for devices with up to 8 “X” lines
2 bytes and 4 bytes are used for devices up to 16
and 32 “X” lines respectively
node_ymask
1/2/4
Bytes
(Bitfield)
Set the bit(s) at location(s) corresponding to Y line
number(s).
Example:
Y5 only = 0b00100000 = 0x20
Y1, Y2 and Y7 = 0b10000110 = 0x86
1 byte is used for devices with up to 8 “Y” lines
2 byte and 4 bytes are used for devices up to 16
and 32 “Y” lines respectively
node_csd*
1 byte 0 to 255
Number of delay cycles to ensure charging of
sensor node capacitances.
(Applicable for AVR
®
Tiny, Mega ARM
®
SAM E54,
SAMCx, SAML22 family only)
node_rsel_prsc
1 byte
Bits 7:4 = RSEL
RSEL_VAL_0
RSEL_VAL_3*
RSEL_VAL_6*
RSEL_VAL_20
RSEL_VAL_50
RSEL_VAL_75*
RSEL_VAL_100
RSEL_VAL_200*
Internal Y line series resistor selection
(75k and 200k are available on ARM SAM E54
family and SAML22)
Bits 3:0 = PRSC
PRSC_DIV_SEL_1
PRSC_DIV_SEL_2
PRSC_DIV_SEL_4
PRSC_DIV_SEL_8
Clock Prescaler
Acquisition clock is derived and scaled from CPU
Clock for AVR devices
(Prescalar values 16, 32, 64, 128 are available on
AVR Tiny, SAM E5x family, SAM D51)
User's Guide
Acquisition Module
© 2017 Microchip Technology Inc.
User Guide
DS40001986A-page 22

Parameter Size Range/Options Usage
PRSC_DIV_SEL_16*
PRSC_DIV_SEL_32*
PRSC_DIV_SEL_64*
PRSC_DIV_SEL_128*
node_gain
1 byte
Bits 7:4 = Analog Gain
GAIN_1
GAIN_2
GAIN_4
GAIN_8
GAIN_16
Analog gain setting
Integration capacitor adjusted to control integrator
gain.
Bits 3:0 = Digital Gain
GAIN_1
GAIN_2
GAIN_4
GAIN_8
GAIN_16
Digital gain setting
Accumulated sum is scaled to Digital Gain.
node_oversampling
1 byte
FILTER_LEVEL_1
FILTER_LEVEL_2
FILTER_LEVEL_4
FILTER_LEVEL_8
FILTER_LEVEL_16
FILTER_LEVEL_32
FILTER_LEVEL_64
FILTER_LEVEL_128*
FILTER_LEVEL_256*
FILTER_LEVEL_512*
FILTER_LEVEL_1024*
Number of samples to accumulate for each
measurement.
Note: Oversampling must be configured to be
greater than or equal to digital gain for correct
operation.
(Higher filter level values > 64 are available only on
ARM SAM E54 family only)
Note: * - Not available on all devices
6.4.2 Status and Output Data
While different target hardware requires that the configuration structure for sensor nodes varies from one
device to another, all acquisition modules conform to a standard sensor node data structure. Processed
module output data are stored in this data structure during run-time.
The outputs/status information may be used by other post processing modules or by the application.
User's Guide
Acquisition Module
© 2017 Microchip Technology Inc.
User Guide
DS40001986A-page 23

Parameter Size Range/Options Usage
node_acq_status
1 byte
Bit 7
Indicates node calibration error
NODE_CAL_ERROR
Bit 6 Rise Time calibration complete
Bit 5 -
Bit <4:2> (three bits)
Node calibration state
NODE_MEASURE
NODE_CC_CAL
NODE_PRSC_CAL
NODE_RSEL_CAL
NODE_CSD_CAL
Indicates whether a calibration is ongoing and its
current stage.
Calibration Request
Write to 1 to trigger calibration sequence on this
node.
(Reset to ‘0’ by module once actioned)
Enabled
Write to ‘1’ to enable this node for measurement
node_acq_signals
2 bytes
Most recent measurement for
this sensor node.
16-bit unsigned value
Accumulated and scaled as per
node_oversampling and
node_gain_digital settings.
node_comp_caps
2 bytes Hardware calibration data
Indicates the tuning of the compensation circuit
for this node.
Table 6-1. node_acq_status
Bit 7 6 5 4 3 2 1 0
Node
Calibration
Error
Rise time
calibration
complete
- Node State
Calibrate
request
Enabled
NODE_MEASURE
0
NODE_CC_CAL
1
NODE_PRSC_CAL
2
NODE_RSEL_CAL
3
NODE_CSD_CAL* 4
Note: * - CSD Calibration is not available on SAMD10/D11, SAMD2x, SAML21 devices.
User's Guide
Acquisition Module
© 2017 Microchip Technology Inc.
User Guide
DS40001986A-page 24

Acquisition Library State
Table 6-2. touch_lib_state_t
TOUCH_STATE_NULL
0
TOUCH_STATE_INIT
1
TOUCH_STATE_READY
2
TOUCH_STATE_CALIBRATE
3
TOUCH_STATE_BUSY
4
Return Parameter
Table 6-3. touch_ret_t common return type, used by all QTML modules
TOUCH_SUCCESS
0
TOUCH_ACQ_INCOMPLETE
1
TOUCH_INVALID_INPUT_PARAM
2
TOUCH_INVALID_LIB_STATE
3
TOUCH_INVALID_POINTER
11
TOUCH_LIB_NODE_CAL_ERROR
14
Note: Other values are reserved for future use.
User's Guide
Acquisition Module
© 2017 Microchip Technology Inc.
User Guide
DS40001986A-page 25

7. Frequency Hop Module
7.1 Overview
Frequency Hop module provides a way of filtering the noise during the sensor measurement by varying
the frequency of bursting the sensors. Module ID for frequency hop module is 0x0006 and the module
name is in the format given below.
GCC compiler:
libqtm_freq_hop_xxxxx_0x0006.a
IAR compiler (AVR MCU):
qtm_freq_hop_xxxxx_0x0006.r90
IAR compiler (ARM MCU):
qtm_freq_hop_xxxxx_0x0006.a
Note: “xxxxx” – string based on the device architecture that the module is built.
7.2 Interface
The data structure definitions and the API declarations are included in the API file
‘qtm_freq_hop_0x0006_api.h’. The data structure covers all the configurations and output data
variables. This file should be included on the common api ‘touch_ptc_api.h’ file.
User
Application
Touch.h
Macros and
constants
Qtm_freq_hop_
0x0006_api.h
Touch_api_
ptc.h
Frequency
Hop Module
common_
components_api.h
Touch.c
Global variables declaration
and initialization, Helper
API functions
The default values of configurations should be defined on the touch.c and touch.h files. Global
variables of the data structures have to be initialized in touch.c file and the reference of the structure has
to be used on the application files.
User's Guide
Frequency Hop Module
© 2017 Microchip Technology Inc.
User Guide
DS40001986A-page 26

7.3 Functional Description
Frequency Hop module is interfaced between acquisition module and rest of post processing modules as
shown below.
Frequency Hop
Auto-Tune
Module
The Frequency Hop module applies a configurable cyclic frequency hopping algorithm, such that on each
measurement cycle a different sampling frequency is used. The module is initialized with predefined
frequencies which are set by cyclic order during the consecutive measurement cycles.
The measured raw signal values from the Acquisition module are then passed through “Median filter”.
Finally, the filtered value is stored back on the memory for further processing by the post processing
modules.
More number of frequencies provide effective filtering by processing more samples. However, this also
increases the buffer size used by the median filter and takes more number of measurement cycles to
report filtered value. So, the number of frequencies should be configured based on the RAM memory
available.
7.4 Data Structures
User's Guide
Frequency Hop Module
© 2017 Microchip Technology Inc.
User Guide
DS40001986A-page 27
7.4.1 Configurations
Parameter Size Range/Options Usage
num_sensors
1 Byte 0-255
Number of sensors to
buffer data for median
filter
num_freqs
1 Byte 3-to-7
Number of frequencies
to cycle/depth of median
filter
*freq_option_selec
t
2/4 Bytes N/A
Pointer to acquisition
library frequency
selection parameter
*median_filter_fre
q
2/4 Bytes N/A
Pointer to array of
selected frequencies
7.4.2 Status and Output Data
Parameter Size Range/Options Usage
module_status
1 Byte N/A
Module Status – N/A
current_freq
1 Byte 0-to-15 Current frequency step
*filter_buffer
2/4 Bytes N/A
Pointer to the filter buffer
array for measured
signals
*qtm_acq_node_data
2/4 Bytes N/A
Pointer to the node data
structure of the
acquisition group
Table 7-1. List of Supported Frequencies
PTC Clock = 4 MHz
PTC frequency Delay Cycles Frequency (kHz)
0
FREQ_SEL_0
66.67
1
FREQ_SEL_1
62.5
2
FREQ_SEL_2
58.82
3
FREQ_SEL_3
55.56
4
FREQ_SEL_4
52.63
5
FREQ_SEL_5
50
6
FREQ_SEL_6
47.62
7
FREQ_SEL_7
45.45
8
FREQ_SEL_8
43.48
User's Guide
Frequency Hop Module
© 2017 Microchip Technology Inc.
User Guide
DS40001986A-page 28

PTC Clock = 4 MHz
PTC frequency Delay Cycles Frequency (kHz)
9
FREQ_SEL_9
41.67
10
FREQ_SEL_10
40
11
FREQ_SEL_11
38.46
12
FREQ_SEL_12
37.04
13
FREQ_SEL_13
35.71
14
FREQ_SEL_14
34.48
15
FREQ_SEL_15
33.33
16
FREQ_SEL_SPREAD
Variable frequencies
User's Guide
Frequency Hop Module
© 2017 Microchip Technology Inc.
User Guide
DS40001986A-page 29

8. Frequency Hop Auto-tune Module
8.1 Overview
The Frequency Hop auto-tune module is the super set of frequency hop module with additionally
providing noise monitoring and tuning the frequency according to the measured noise factor.
The Module ID for the Frequency Hop auto-tune module is ‘0x0004’ and the module name is in the format
given below.
GCC compiler :
libqtm_freq_hop_auto_xxxxx_0x0004.a
IAR compiler (AVR MCU) :
qtm_freq_hop_auto_xxxxx_0x0004.r90
IAR compiler (ARM MCU) :
qtm_freq_hop_auto_xxxxx_0x0004.a
Note: “xxxxx” – string based on the device architecture that the module is built.
8.2 Interface
The data structure definitions and the API declarations are included in the API file
‘qtm_freq_hop_auto_0x0004_api.h’. The data structure covers all the configurations and output
data variables. This file should be included on the common api touch_ptc_api.h file.
User's Guide
Frequency Hop Auto-tune Module
© 2017 Microchip Technology Inc.
User Guide
DS40001986A-page 30

User
Application
Touch.h
Macros and
constants
Qtm_freq_ho
p_auto_0x00
04_api.h
Touch_api_
ptc.h
Frequency
Hop Auto
-tune Module
common_
components_api.h
Touch.c
Global variables declaration
and initialization, Helper API
functions
The default values of configurations should be defined on the touch.c and touch.h files. Global
variables of the data structures have to be initialized in touch.c file and the reference of the structure has
to be used on the application files.
8.3 Functional Description
The Frequency Hop auto-tune module is interfaced between the acquisition module and the rest of post
processing modules as shown below.
User's Guide
Frequency Hop Auto-tune Module
© 2017 Microchip Technology Inc.
User Guide
DS40001986A-page 31

Frequency Hop
Auto-Tune
Module
The Frequency Hop auto-tune module applies a configurable cyclic frequency-hopping algorithm, such
that on each measurement cycle a different sampling frequency is used. A number of preconfigured
frequencies are implemented in turn during consecutive measurement cycles.
Where ‘n’ frequencies are included in the cycle, an ‘n’-point median filter is applied to the output data.
To perform auto-tuning, the signals measured on each sensor node are recorded for each selected
frequency. When one frequency shows greater variance than others, that frequency is removed from the
measurement sequence and replaced with another.
User's Guide
Frequency Hop Auto-tune Module
© 2017 Microchip Technology Inc.
User Guide
DS40001986A-page 32

8.4 Data Structures
8.4.1 Configurations
Parameter Size
Range/
Options
Usage
num_sensors
1 Byte 0 – 255
Number of sensors to buffer data for median
filter
num_freqs
1 Byte 3-to-7
Number of frequencies to cycle/depth of
median filter
*freq_option_select
Pointer 2/4
Bytes
Pointer
Pointer to acquisition library frequency
selection parameter
*median_filter_freq
Pointer 2/4
Bytes
Pointer Pointer to array of selected frequencies
enable_freq_autotune
1 Byte 0 or 1
Disable (0) or Enable (1) automatic retuning
of hop frequencies
max_variance_limit
1 Byte 1-to-255
Signal variance required to trigger returning
of hop frequency
Autotune_count_in
1 Byte 1-to-255
Number of occurrences of
max_variance_limit to trigger retuning
of hop frequency
8.4.2 Status and Output Data
Parameter Size Range/Options Usage
module_status
1 Byte N/A Module Status – N/A
current_freq
1 Byte 0-to-15 Current frequency step
*filter_buffer
Pointer 2/4 Bytes Pointer
Pointer to the filter buffer array for
measured signals
*qtm_acq_node_data
Pointer 2/4 Bytes Pointer
Pointer to the node data structure of
the acquisition group
*freq_tune_count_ins
Pointer 2/4 Bytes Pointer
Pointing to the counter array to trigger
frequency change
User's Guide
Frequency Hop Auto-tune Module
© 2017 Microchip Technology Inc.
User Guide
DS40001986A-page 33

9. Touch Key Module
9.1 Overview
Touch Key module implements functionality that can handle the key sensors also called as one
dimensional touch sensors. The module receives the raw output from the acquisition module, process
them and provide touch status of key sensors. The processing includes signal post-processing,
environmental drift, touch detection, touch state machine and timing management for the implementation
of application touch sensors. Reference touch sensor designs are provided to assist the users to evaluate
and design their custom sensor boards. The touch sensor board view and the sensor design of QT3
XPlained Pro sensor board are shown below.
QT3 Sensor Board Overlay
QT3 Sensor Board Design
Table 9-1. Module Format
GCC compiler :
libqtm_touch_key_xxxxx_0x0002.a
IAR compiler (AVR MCU) :
qtm_touch_key_xxxxx_0x0002.r90
IAR compiler (ARM MCU) :
qtm_touch_key_xxxxx_0x0002.a
9.2 Interface
The data structure definitions and the API declarations are included in the API file
‘qtm_touch_key_0x0002_api.h’. The data structure covers all the configurations and output data
variables. This file should be included on the common api touch_ptc_api.h file.
User's Guide
Touch Key Module
© 2017 Microchip Technology Inc.
User Guide
DS40001986A-page 34

User
Application
Touch.h
Macros and
constants
Qtm_touch_key
_0x0002_api.h
Touch_api_
ptc.h
Touch Key
Module
common_
components_api.h
Touch.c
Global variables declaration
and initialization, Helper API
functions
9.3 Functional Description
The Touch Key module is responsible for the detection of a touch contact, where higher-level module(s)
carry out position interpolation, gesture recognition, contact tracking etc.
Features implemented in the touch key module:
• Timing management for detecting towards touch, away from touch
• Software calibration
– Reference Signal
– Reference Drift
• Touch Detection State Machine
User's Guide
Touch Key Module
© 2017 Microchip Technology Inc.
User Guide
DS40001986A-page 35
9.4 Data Structures
9.4.1 Configurations
Table 9-2. Group Configuration
Parameter Size Range/Options Usage
num_key_sensors
2 Bytes 1-to-65535
Number of sensor keys in the
group
sensor_touch_di
1 Byte 0-to-255
Number of repeat measurements to
confirm touch detection
sensor_max_on_time
1 Byte
0 (Disabled), 1-
to-255
Number of timer periods with
sensor In Detect before automatic
‘recal’
sensor_anti_touch_di
1 Byte
0 (Disabled), 1-
to-255
Number of repeat measurements to
confirm anti-touch recalibration
required
sensor_anti_touch_recal_thr
1 Byte 0-to-5
Scale-down of touch threshold to
set anti-touch threshold.
0 = 100% Touch Threshold
1 = 50%
2 = 25%
3 = 12.5%
4 = 6.25%
User's Guide
Touch Key Module
© 2017 Microchip Technology Inc.
User Guide
DS40001986A-page 36

Parameter Size Range/Options Usage
5 = Maximum Recalibration
sensor_touch_drift_rate
1 Byte
0 (Disabled), 1-
to-255
Number of timer periods to
countdown between towards touch
drifts
sensor_anti_touch_drift_rate
1 Byte
0 (Disabled), 1-
to-255
Number of timer periods to
countdown between away from
touch drifts
sensor_drift_hold_time
1 Byte
0 (Disabled), 1-
to-255
Number of timer periods to stop
drifting after touch event
sensor_reburst_mode
1 Byte
0 = None
1 = Unresolved
(Quick reburst)
2 = All
None – Reburst is never set,
measurements according to
application schedule.
Unresolved – Reburst is set, all
sensors suspended but those in
same AKS as the target sensor.
All – Reburst is set, no sensors are
suspended.
Table 9-3. Individual Sensor Configuration
Parameter Size Range/Options Usage
channel_threshold
1 Byte 0-to-255 Minimum signal delta indicating touch contact
channel_hysteresis
1 Byte 0 (50%)-to-4 (3.125%)
Reduction of touch threshold to de-bounce
when filtering out removed touch contact
channel_aks_group
1 Byte 0-to-255
Grouping of key sensors controlling
simultaneous touch detect.
9.4.2 Status and Output Data
Table 9-4. Group Data
Parameter Size Range/Options Usage
qtm_keys_status
1 Byte
Bit 7: Reburst required
Bit 6-1: Reserved
Bit 0: Touch Detection
Indicates the
current state of
the Touch Key
Group
acq_group_timestamp
2 Bytes 0-to-65535
Timestamp of last
drift period
processed
dht_count_in
1 Byte
0-to-‘sensor_drift_hold_time’
Countdown to drift
hold release after
touch event
User's Guide
Touch Key Module
© 2017 Microchip Technology Inc.
User Guide
DS40001986A-page 37

Parameter Size Range/Options Usage
tch_drift_count_in
1 Byte
0-to-‘sensor_touch_drift_rate’
Countdown to
next towards
touch drift period
antitch_drift_count_in
1 Byte
0-to-‘sensor_anti_touch_drift_rate’
Countdown to
next away from
touch drift period
Individual Key Sensor Data
The individual key sensor data is required by other post processing modules like Scroller. So, this data
structure definition is placed on the common_compoenents_api.h file.
Parameter Size Range/Options Usage
sensor_state
1 Byte Bitfield Touch key sensor state
sensor_state_counter
1 Byte 0-to-255
Number of repeat measurements to confirm
touch detection
*node_data_struct_ptr
2/4 Bytes Pointer Pointer to node data structure array
Channel_reference
2 Bytes 0-to-65535
Reference measurement, baseline for touch
detection
Table 9-5.
sensor_state
QTM_KEY_STATE_DISABLE
0x00
QTM_KEY_STATE_INIT
0x01
QTM_KEY_STATE_CAL
0x02
QTM_KEY_STATE_NO_DET
0x03
QTM_KEY_STATE_FILT_IN
0x04
QTM_KEY_STATE_DETECT
0x85
QTM_KEY_STATE_FILT_OUT
0x86
QTM_KEY_STATE_ANTI_TCH
0x07
QTM_KEY_STATE_SUSPEND
0x08
QTM_KEY_STATE_CAL_ERR
0x09
Note: Bit 7 (0x80u) is set in each state where the touch key sensor is ‘In Detect’
User's Guide
Touch Key Module
© 2017 Microchip Technology Inc.
User Guide
DS40001986A-page 38

10. Scroller Module
10.1 Overview
The Scroller module processes the group of touch sensors constructed either as linear slider or circular
wheel as shown in the figure below. The slider/wheel sensors, also known as one-dimensional surface
sensors, track the touch movement scrolled over them and report the state and the position to the user
application. The size of the slider/wheel is the underlying number of the touch key sensors that form the
linear/circular surface.
Slider Sensor
Wheel Sensor
The slider/wheel can be formed by using both self cap and mutual cap sensors. The above figure shows
the 4-channel slider and 3-channel wheel sensors based on self-cap technology. To get good linearity on
the reported touch positions when the touch is scrolled over the sensor surface, the touch keys should be
inter-digitized as shown in the above figure.
GCC compiler :
libqtm_scroller_xxxxx_0x000B.a
IAR compiler (AVR MCU) :
qtm_scroller_xxxxx_0x000B.r90
IAR compiler (ARM MCU) :
qtm_scroller_xxxxx_0x000B.a
10.2 Interface
The data structure definitions and the API declarations are included in the API file
‘qtm_scroller_0x000b_api.h’. The data structure covers all the configurations and output data
variables. This file should be included on the common api touch_ptc_api.h file.
User's Guide
Scroller Module
© 2017 Microchip Technology Inc.
User Guide
DS40001986A-page 39

User
Application
Touch.h
Macros and
constants
Qtm_scroller
_0x000b_api.
h
Touch_api_
ptc.h
Scroller
Module
common_
components_api.h
Touch.c
Global variables declaration
and initialization, Helper API
functions
10.3 Functional Description
The Scroller module processing is dependent on the Touch Key module output. After the keys are
processed and statuses are updated in the data structures, they are checked by the slider module. Based
on the key status, the slider/wheel position is calculated from the current signal values available on the
acquisition module variables.
The possible use cases and the sequence of operation under each use case are given below.
Use Case 1: Touch contact made on slider/wheel sensor
1. The module checks the status of all keys in the scroller for a touch contact detection.
2. If any key is in detect state, the touch position is calculated using the signal values of three
adjacent keys.
3. Both raw position and filtered position are calculated.
4. The scroller state comes to “TOUCH_ACTIVE” and the scroller reburst flag is set.
5. The “POSITION_CHANGE” flag is set now. The flag is cleared on the next measurement cycle if the
touch is stationary and no change in touch position.
Use Case 2: Touch contact scrolling over the slider/wheel surface
1. Module checks all keys for touch contact
2. If no key is in detect, the module searches for a pair of neighboring keys whose touch delta
exceeds the minimum contact threshold
3. If such a contact is found then the new position is calculated OR
4. If no such contact is found the scroller returns to ‘No Detect’ condition
User's Guide
Scroller Module
© 2017 Microchip Technology Inc.
User Guide
DS40001986A-page 40

Use Case 3: Touch contact removed from slider/wheel sensor
1. The module checks the status of all keys in the scroller for a touch contact detection.
2. If no key is in detect, the module searches for a pair of neighboring keys whose touch delta
exceeds the minimum contact threshold.
3. If such a contact is found then the new position is calculated OR
4. If no such contact is found the scroller returns to ‘No Detect’ condition. That is the flag
“TOUCH_ACTIVE” is cleared.
10.4 Data Structures
10.4.1 Configurations
Table 10-1. Group Configuration
Parameter Size Range/Options Usage
*qtm_touch_key_data
Pointer 2/4
Bytes
qtm_touch_key_data_t
Pointer to touch key data for the
underlying set of touch keys
num_scrollers
1 Byte 1-to-255*
Number of scrollers
implemented in this group
Table 10-2. Individual Sensor Configuration
Parameter Size Range/Options Usage
type
1 Byte
0 = Linear Slider
Type of scroller
User's Guide
Scroller Module
© 2017 Microchip Technology Inc.
User Guide
DS40001986A-page 41

Parameter Size Range/Options Usage
1 = Wheel
start_key
2 Bytes 0-to-65535*
Key number which forms the first
component key of the scroller
number_of_keys
1 Byte 2-to-255
Number of component keys to form the
scroller. The minimum number of keys
required to make a slider is two and the
minimum number of keys to make a wheel
is three.
resol_deadband
1 Byte
Bits 7:4 = Resolution
2 to 12 bits
Full scale position resolution reported for
the scroller
Bits 3:0 = Deadband
0% to 15% (each
side)
Size of the edge correction deadbands as
a percentage of the full scale range
position_hysteresis
1 Byte 0-to-255
The minimum travel distance to be
reported after contact or direction change
contact_min_threshold
2 Bytes 0-to-65535
The minimum contact size measurement
for persistent contact tracking. Contact
size is the sum of two neighboring keys’
touch deltas forming the touch contact
10.4.2 Status and Output Data
Table 10-3. Group Data
Parameter Size Range/Options Usage
scroller_group_status
1 Byte
Bitfield
Bit 7: Reburst required
Bit 0: Touch detection
Reburst Required = 1
Indicates that some scroller in the group
requires reburst of sensors.
Touch Detection = 1
Indicates that some scroller in the group
is in ‘Touch Detect’
Individual Key Sensor Data
Parameter Size Range/Options Usage
scroller_status
1 Byte
Bitfield
Bit 7: Reburst
required
Bit 1: Contact moved
Bit 0: Touch
detection
Reburst Required = 1
Indicates that some scroller in the group requires
reburst of sensors.
Touch contact reported position has changed
Touch Detection = 1
User's Guide
Scroller Module
© 2017 Microchip Technology Inc.
User Guide
DS40001986A-page 42

Parameter Size Range/Options Usage
Indicates that some scroller in the group is in
‘Touch Detect’
right_hyst
1 Byte Hysteresis limit
Indicates when a contact is moving ‘Right’, ie.,
The direction of increasing touch position
left_hyst
1 Byte Hysteresis limit
Indicates when a contact is moving ‘Left’, ie., The
direction of reducing touch position
raw_position
2 Bytes 0-to-4095
The calculated location of the touch contact prior
to motion filtering
position
2 Bytes 0-to-4095 The calculated location of the touch contact after
motion filtering
contact_size
2 Bytes 0-to-65535 The sum of two neighbouring keys’ touch deltas
comprising the touch contact
User's Guide
Scroller Module
© 2017 Microchip Technology Inc.
User Guide
DS40001986A-page 43
11. Binding Layer Module
11.1 Overview
The binding layer is the generic framework that binds the QTouch Library modules and automates the
initialization and processing of modules. The binding layer is configured with data pointers and function
pointers of the QTouch modules which are used to execute the module API functions in the appropriate
sequence. The binding module also provides callback on completion of every stage to the user
application.
The binding includes the acquisition module, signal conditioning modules and post processing modules.
Controlling all the modules with unified application interface reduces the complexity of handling multiple
modules, their states and errors and callback functions. The user application code can also be built as
library module and automated using the binding layer provided the user module conforms to the QTouch
modular library architecture.
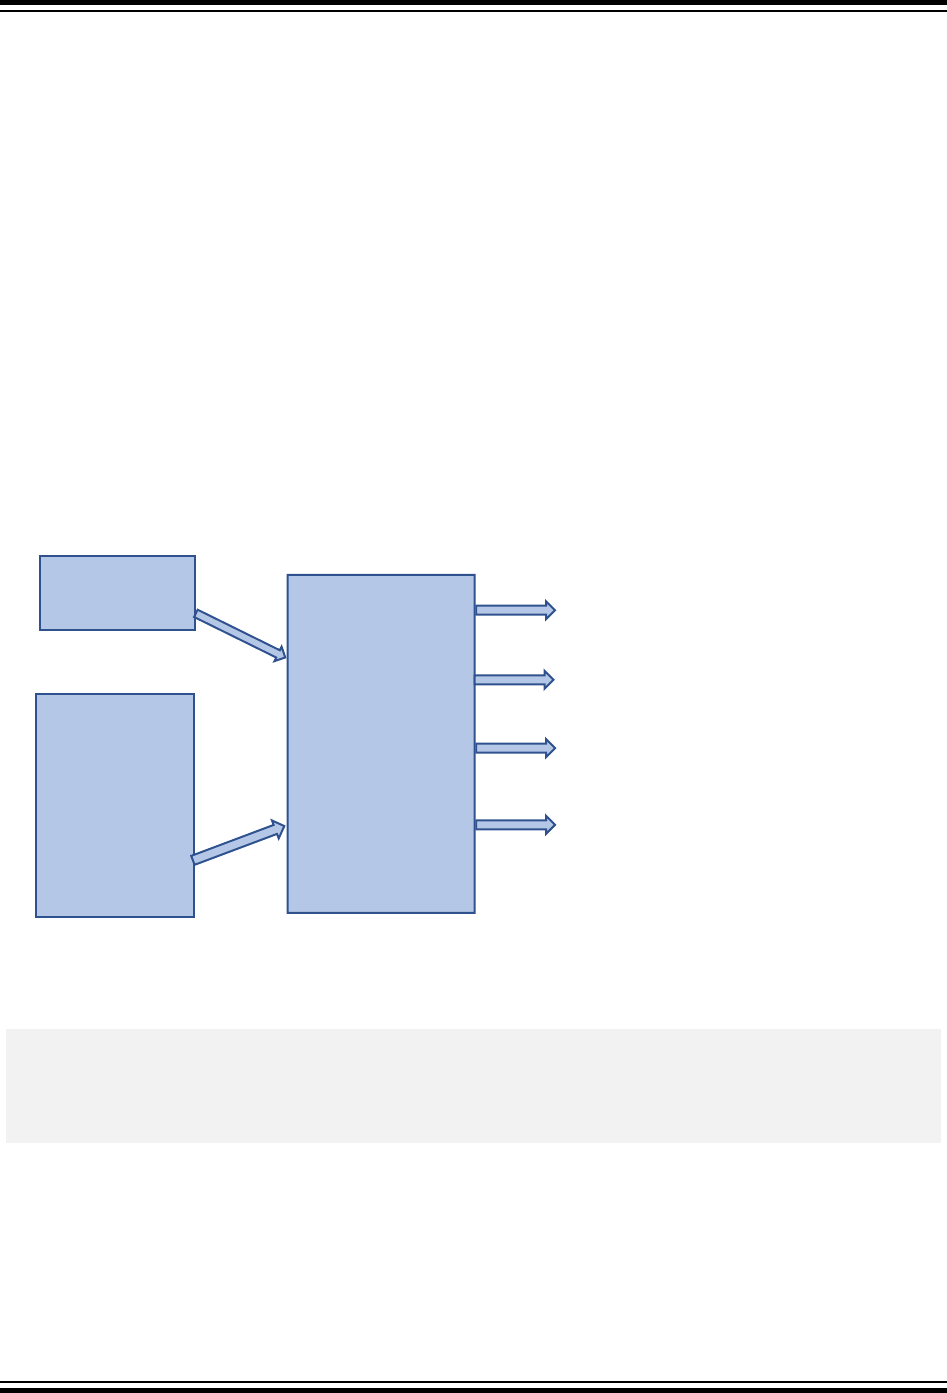
Figure 11-1. Binding Layer Framework Block Diagram
BINDING LAYER
MODULE
CONFIGURATION
(Data pointers,
Function pointers)
Acquisition
Module
Post
processing
Modules
(keys,
frequency
hop, scroller)
Initialization Complete callback
Measurement Complete callback
Post Process Complete callback
Error callback
Table 11-1. Module Format
GCC compiler :
libqtm_binding_layer_xxxxx_0x0005.a
IAR compiler (AVR MCU) :
qtm_binding_layer_xxxxx_0x0005.r90
IAR compiler (ARM MCU) :
qtm_binding_layer_xxxxx_0x0002.a
11.2 Interface
The data structure definitions and the API declarations are included in the API file
‘qtm_binding_layer_0x0005_api.h’. The data structure covers all the configurations and output
data variables. This file should be included on the common api touch_ptc_api.h file.
User's Guide
Binding Layer Module
© 2017 Microchip Technology Inc.
User Guide
DS40001986A-page 44

User
Application
Touch.h
Macros and
constants
Qtm_binding
_layer_0x000
5_api.h
Touch_api
_ptc.h
Binding
Layer
Module
common_
components_api.h
Touch.c
Global variables declaration
and initialization, Helper API
functions
11.3 Functional Description
Binding layer automates the following processes of each module.
1. Module initialization
2. Capture success/error and report through callback
3. Module post processing
4. Capture success/error and report through callback
5. Capture “module reburst” flag and retriggers the acquisition based on the ‘Reburst’ status
User's Guide
Binding Layer Module
© 2017 Microchip Technology Inc.
User Guide
DS40001986A-page 45

Figure 11-2. Binding Layer-based QTouch
®
Application
Error handling support by binding layer module:
The individual module errors are validated inside the binding layer and they are encoded and passed to
the application as single error code.
The error code is decoded in the touch.c file and displayed on the data visualizer software. The error
code format is given below.
Acquisition Module Error codes: 0x8<error code>
0x81 - Qtm init
0x82 - start acq
0x83 - cal sensors
0x84 - cal hardware
Post processing Modules error codes: 0x4<process_id>
0x40, 0x41, 0x42, ...
process_id is the sequence of process IDs listed in #define LIB_MODULES_PROC_LIST macro.
Process IDs start from zero and maximum is 15
Examples:
0x40 -> error in post processing module 1
0x42 -> error in post processing module 3
Decoded Module_error_codes:
Acquisition module error = 1
post processing module1 error = 2
post processing module2 error = 3
... and so on
User's Guide
Binding Layer Module
© 2017 Microchip Technology Inc.
User Guide
DS40001986A-page 46
11.4 Data Structures
11.4.1 Configurations
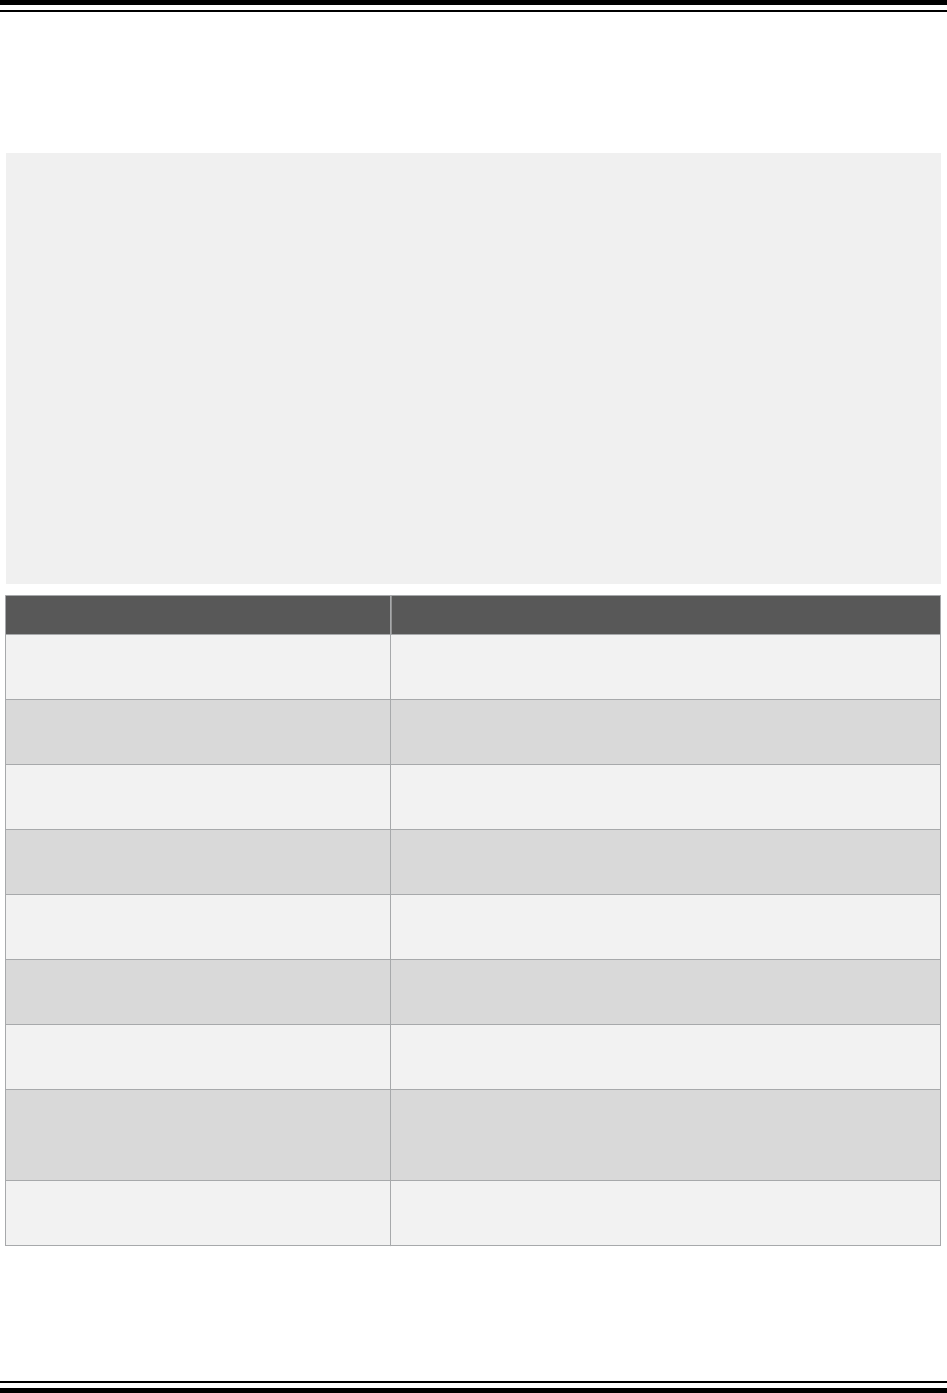
The container structure that holds the entire configuration of binding layer is given below.
typedef struct qtm_control_tag
{
uint8_t binding_layer_flags;
module_init_t *library_modules_init;
module_proc_t *library_modules_proc;
module_acq_t *library_modules_acq;
module_arg_t *library_module_init_data_model;
module_arg_t *library_module_proc_data_model;
module_arg_t *library_modules_acq_dm;
qtm_acq_pp_t *qtm_acq_pp;
/*******************************/
/* Callbacks for Binding layer */
/*******************************/
qtm_library_init_complete_t qtm_init_complete_callback;
qtm_error_callback_t qtm_error_callback;
qtm_measure_complete_t qtm_measure_complete_callback;
qtm_pre_process_callback_t qtm_pre_process_callback;
qtm_post_process_callback_t qtm_post_process_callback;
} qtm_control_t;
Parameter Description
*library_modules_init
Pointer to the array that contains the list of module
initialization function pointers.
*library_modules_proc
Pointer to the array that contains the list of module post
processing function pointers.
*library_modules_acq
Pointer to the array that contains the list of acquisition
module function pointers.
*library_module_init_data_model
Pointer to the array which contains the Data Pointers of the
acquisition modules.
*library_module_proc_data_model
Pointer to the array which contains the Data Pointers of the
post processing modules.
*library_modules_acq_dm
Pointer to the array which contains the pointers of
acquisition groups.
qtm_init_complete_callback
Callback provided by binding layer module after executing
all the module initializations.
qtm_error_callback
Callback function triggered only if there is any error
encountered by the binding layer during the module
processes.
qtm_measure_complete_callback
Callback triggered by binding layer module after the
completion of measurement and before post processing.
User's Guide
Binding Layer Module
© 2017 Microchip Technology Inc.
User Guide
DS40001986A-page 47

Parameter Description
qtm_pre_process_callback
Callback triggered after the acquisition process and before
post processing. This is provided to enable user to
implement custom filtering modules.
qtm_post_process_callback
Callback triggered by binding layer module after the
completion of all the post processing of modules.
11.4.2 Status and Output Data
Parameter Description
binding_layer_flags
Three status flags are set inside the binding layer callback functions to
perform further processing the Application.
Three binding layer flags are supported in the current version as below.
time_to_measure_touch:
This flag is set on the timer ISR handler and when any module reburst is
requested. This flag is used to trigger the measurement on either one of the
above conditions met.
node_pp_request:
This flag is set in the measurement complete callback to indicate post
processing is required. This flag is handled in the touch_process function.
reburst_request:
This flag is set in the post process complete callback and this is set based
on the individual module reburst flags. This flag is handled on the
touch_process function.
User's Guide
Binding Layer Module
© 2017 Microchip Technology Inc.
User Guide
DS40001986A-page 48

12. Building Applications Using Atmel START
Atmel START helps the user to select and configure software components for Microchip MCUs. The
QTouch project can be created using Atmel START. The user can add sensors and configure QTouch
parameters represented in graphical ways. The created project supports GCC and IAR compilers.
12.1 Working With KIT Example Projects
Atmel START provides example projects for standard Xplained Pro and Xplained Mini kits. The kit
examples are a good way to get up and running with touch applications. The projects can be downloaded
and built with the following steps.
Step 1:
Open Atmel START main page and click ‘Browse Examples’
Step 2:
Select one of the listed KIT example projects by clicking on the description. Click the ‘Download selected
example’ button and save the atzip file.
User's Guide
Building Applications Using Atmel START
© 2017 Microchip Technology Inc.
User Guide
DS40001986A-page 49

Step 3:
Import the atzip file into Atmel studio or IAR IDE and build the example. Flash the built binary on the
target MCU.
Step 4:
Open the data visualizer software and configure the path to the directory
“<example_project_directory>\qtouch\datastreamer\”.
Step 5:
Connect the data visualizer to the target hardware using a serial port channel and verify the ON button
touch status. The on-board LED will turn on when touch is made and vice-versa.
For more details, refer to the guides present on the Microchip developer page link http://
microchipdeveloper.com/touch:generate-atmel-board-touch-project
12.2 Creating User-Board Projects
The following steps describe the procedure to create touch projects for the custom/user specific hardware
boards.
Step 1:
Open Atmel START main page and click ‘Browse Examples’.
Step 2:
Select ‘Create New Project’ option.
User's Guide
Building Applications Using Atmel START
© 2017 Microchip Technology Inc.
User Guide
DS40001986A-page 50

Step 3
Type ‘mega328’ in the ‘Filter on text…’ field. Select ATmega328PB-AN from the list and click CREATE
NEW PROJECT.
User's Guide
Building Applications Using Atmel START
© 2017 Microchip Technology Inc.
User Guide
DS40001986A-page 51

Step 4:
The project will be created with default initialization and the project dashboard is displayed as below.
User's Guide
Building Applications Using Atmel START
© 2017 Microchip Technology Inc.
User Guide
DS40001986A-page 52

Step 5:
Click Add Software Component to add QTouch Library.
Step 6:
In “ADD SOFTWARE COMPONENT” window, add QTouch Library by clicking + icon and then ‘Add
Component ‘ button.
User's Guide
Building Applications Using Atmel START
© 2017 Microchip Technology Inc.
User Guide
DS40001986A-page 53

Step 7:
‘QTouch Library Middleware’ will be added to the project.
User's Guide
Building Applications Using Atmel START
© 2017 Microchip Technology Inc.
User Guide
DS40001986A-page 54

Step 8:
Select QTouch tab.
Step 9:
QTouch Configuration options appears as follows. Select Add Button option.
Step 10:
Select the following in ‘Add Sensor’ window and click Add Sensor.
• Sensor Count: 1
• Technology: SelfCap
User's Guide
Building Applications Using Atmel START
© 2017 Microchip Technology Inc.
User Guide
DS40001986A-page 55

Step 11:
Simply click the ‘Button’ icon to add more buttons. To delete sensor, select the sensor by single clicking
on the sensor icon and click the ‘Delete Sensor’. Three Buttons are added as shown in following figure.
Step 12:
Select the Button and click on cogwheel icon.
User's Guide
Building Applications Using Atmel START
© 2017 Microchip Technology Inc.
User Guide
DS40001986A-page 56

Step 13:
Sensor Properties are displayed as shown in the following figure. Sensor Threshold, Hysteresis and
AKS can be configured in this option.
Step 14:
Select Pin Selection tab and select the correct Y lines for each button.
User's Guide
Building Applications Using Atmel START
© 2017 Microchip Technology Inc.
User Guide
DS40001986A-page 57

Step 15:
In ‘Pin Selection’ tab, the Debug Interface can be enabled as follows. Select the correct interface.
Step 16
Select ‘Parameter Selection’ tab. These touch channel properties like Prescaler, Gain, Filter Level, CSD
can be changed in this tab.
User's Guide
Building Applications Using Atmel START
© 2017 Microchip Technology Inc.
User Guide
DS40001986A-page 58

Note: The maximum allowed clock frequency for PTC is 4 MHz. In megaAVR and tinyAVR, the PTC
uses the same CPU clock. The prescaler option in the Parameter Selection tab needs to be changed to
all buttons such that the PTC clock frequency is less than 4 MHz.
The CPU clock frequency can be configured in the Clock tab as shown below. Click on the Settings
icon to configure the clock frequency.
User's Guide
Building Applications Using Atmel START
© 2017 Microchip Technology Inc.
User Guide
DS40001986A-page 59

Step 17:
In ‘Parameter Selection’ tab, Key group configuration parameters like DI, MOD and acquisition
configuration parameters like Acquisition Frequency, Measurement Period can be configured as follows.
User's Guide
Building Applications Using Atmel START
© 2017 Microchip Technology Inc.
User Guide
DS40001986A-page 60

Step 18:
In the ‘Advanced Selection’ tab, the frequency hop option can be enabled by selecting the Enable
Frequency Hop tick-box. When Frequency Hop is enabled, configuration parameters related frequency
hopping can be changed.
Section 19:
After completing all the configuration, click Export Project option.
In the ‘Export Project’ window,
User's Guide
Building Applications Using Atmel START
© 2017 Microchip Technology Inc.
User Guide
DS40001986A-page 61

• Select Atmel Studio and IAR Embedded Workbench (Both configurations will be available in
single pack).
• enter the file name as “selfcap_3ch”
• Click Download Pack
12.3 Import Project Using Atmel Studio
Step 1:
Open Atmel Studio 7. Select File->Import->Atmel Start Project.
User's Guide
Building Applications Using Atmel START
© 2017 Microchip Technology Inc.
User Guide
DS40001986A-page 62

Step 2:
In Atmel Start Importer option,
1. Browse and select the downloaded ‘.atzip’ file
2. Browse and select the desired project location
3. Provide the project name
4. Click OK to generate project
User's Guide
Building Applications Using Atmel START
© 2017 Microchip Technology Inc.
User Guide
DS40001986A-page 63

Step 3:
Verify the project created as shown below.
User's Guide
Building Applications Using Atmel START
© 2017 Microchip Technology Inc.
User Guide
DS40001986A-page 64
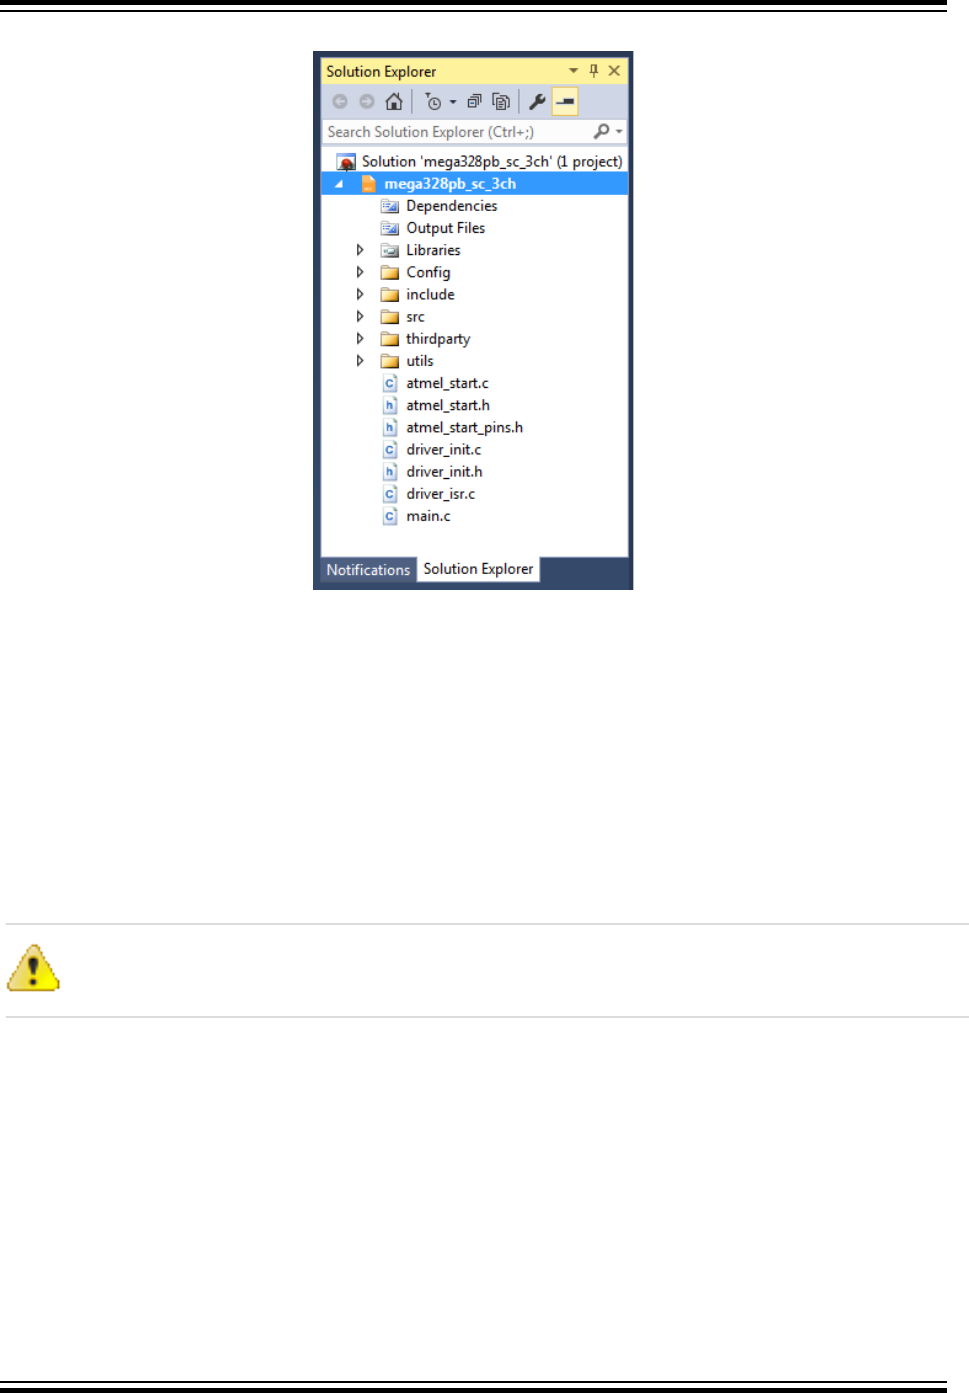
12.4 Import Project Using IAR
™
Workbench
Step 1:
Create a folder ‘selfcap_3ch’ in a desired location.
Step 2:
Rename the ‘selfcap_3ch.atzip’ file to ‘selfcap_3ch.zip’. Extract the content to ‘selfcap_3ch’
folder.
Attention: Do not extract to a sub folder.
Step 3:
Open IAR Embedded Workbench. Select Project->New Project.
User's Guide
Building Applications Using Atmel START
© 2017 Microchip Technology Inc.
User Guide
DS40001986A-page 65

Step 4:
Select Empty Project option and AVR as toolchain.
Step 5:
Browse the ‘selfcap_3ch’ folder created above and give it a project name. The project will be created
and will be displayed in workspace.
User's Guide
Building Applications Using Atmel START
© 2017 Microchip Technology Inc.
User Guide
DS40001986A-page 66

Step 6:
Select Project->Add Project Connections option and select IAR Project Connection option in the
subsequent window.
Step 7:
Browse the ‘iar-project-connection.ipcf’ file from ‘selfcap_3ch’ folder and click OK. Ignore
any warning that appears. The source files generated from Atmel START will be added to the IAR project
file. If additional files have to be included into the project, then the ‘iar-project-connection.ipcf’
file should be removed from the project.
User's Guide
Building Applications Using Atmel START
© 2017 Microchip Technology Inc.
User Guide
DS40001986A-page 67

Step 8:
Select Project->Options.
User's Guide
Building Applications Using Atmel START
© 2017 Microchip Technology Inc.
User Guide
DS40001986A-page 68

Step 9:
In General Options, select Normal DLIB option in Library Configuration tab.
Step 10:
The stack set by default is not sufficient. Select System tab and update the stack size as shown below.
Step 11:
Change the output format as follows:
1. Select Linker->Output
User's Guide
Building Applications Using Atmel START
© 2017 Microchip Technology Inc.
User Guide
DS40001986A-page 69

2. Select Override Default tick box and rename the output file to ‘.hex’
3. Select the Format to “Others” and select “Intel-extended” from drop-down menu
4. Click OK.
Step 12:
This step is required only if the project is generated for the ATtiny817 device.
1. Open ‘iotiny817.h' file.
2. Go to RTC_t typedef definition.
3. Change clock control register definition as follows:
Default: register8_t CLKCTRL; Change to register8_t CLKSEL;
Step 13:
By default, the ‘main()’ contains hardware initialization code and the empty ‘while’ loop. The ‘touch
initialization’ is done in the atmel_start_init() function. Touch example functions have to be
included as shown below. Include the touch_example.h file in the main.c file for the touch API
User's Guide
Building Applications Using Atmel START
© 2017 Microchip Technology Inc.
User Guide
DS40001986A-page 70

declarations. cpu_irq_enable(); is done to enable the global interrupt for Tiny/Mega devices and is
part of the touch_example() function. The touch_example() function part of the
touch_example.c file also contains LED code which can be modified as per application requirements.
#include "touch_example.h"
int main(void)
{
/* Initializes MCU, drivers and middleware */
atmel_start_init();
/* Replace with your application code */
while(1) {
touch_example();
}
}
Step 14:
The project is now ready to be built and tested. Press F7 to build the project.
User's Guide
Building Applications Using Atmel START
© 2017 Microchip Technology Inc.
User Guide
DS40001986A-page 71

13. Using Data Visualizer with QTouch
®
Applications
13.1 Overview
Data Visualizer (DV) is a program used for processing and visualization of run-time data from the target
hardware. Data Visualizer can receive data from various sources such as the Embedded Debugger Data
Gateway Interface (DGI) and serial port (COM port).
Typical connection models of the data visualizer with target hardware is shown below.
SPI
UART
GPIO
SPI
UART
GPIO
MCU
Embedded
Debugger
USB
Xplained Pro Series Board
Datastreamer
protocol
13.2 Datastreamer Module
Datastreamer module embeds with simple mono-directional data transfer protocol and the data frame that
is transmitted to the data visualizer software. The current version of datastreamer provides support only
for UART port communication.
Figure 13-1. Datastreamer Module Block Diagram
DATA
FRAME
UART
transmission
Header
Fixed Data
Dynamic Data
UART Transmission:
The UART transmission function is device-dependent and the Atmel START automatically picks up the
right driver and includes it on the user board/kit example project. Simple Asynchronous mode (non-
interrupt driven) of driver is used in all the devices.
Data frame:
Data frame contains header, fixed module data and dynamic module data bytes.
User's Guide
Using Data Visualizer with QTouch
®
Applications
© 2017 Microchip Technology Inc.
User Guide
DS40001986A-page 72

Header details:
The header contains 19 bytes, and needs to be transmitted as part of the packet. The header need not be
transmitted on every packet, rather transmitted once every 15 packet transmissions. The header packet
details are listed below.
// uint8_t data[] =
// {
// 0x5F,
// 0xB4, 0x00, 0x86, 0x4A,
// 0x51, 0x54, 0x38, 0x31, 0x37, 0x54, 0x4F, 0x55, 0x43, 0x48, 0x55, 0xAA,
// 0xF9,
// 0xA0
// };
Bytes Description
Byte 0 Start token. Contains fixed value ‘0x5F’
Bytes 1 to 14 Checksum type. Corresponds to LRC8 (XOR sum of packet, excluding start and end
token)
Bytes 5 to 16 GUID, an identifier for the target hardware
Byte 17 Checksum of the header packet
Byte 18 End token. Contains fixed value ‘0xA0’
Fixed module data:
1. Basic button sensor data of all the configured button sensors
2. Error status data.
Dynamic module data:
1. Acquisition auto-tune parameters are included when auto-tune is enabled in Atmel START QTouch
configurator.
2. Frequency hop auto-tune data is included as per the configurations done on the Atmel START.
3. Scroller module parameters are transmitted when the Slider/Wheel sensors are configured on
Atmel START.
13.3 Debugging Using Data Visualizer
Data visualizer supports many widgets to visualize the data like terminal, label, graph, etc. The
continuous data and their types are parsed and displayed on the appropriate elements using three scripts
files having extensions of *.db, *.ds, *.sc. These script files are automatically generated by the Atmel
START platform based on the project configuration and just the path of the scripts needs to be configured
on the data visualizer software. Data visualizer software is available both as stand-alone installable
version as well as an extension on Atmel Studio IDE and can be downloaded from the following link:
https://gallery.atmel.com/Products/Details/0b2891f4-167a-49fc-b3f0-b882c7a11f98.
The sequence of steps used for debugging are given below.
1. Create a configuration folder “dv_config” for data visualizer in a desired location.
2. Copy the dashboard configuration (.db, .ds, .sc) files from “..\thirdparty\qtouch\datastreamer”
project folder to “dv_config” folder.
User's Guide
Using Data Visualizer with QTouch
®
Applications
© 2017 Microchip Technology Inc.
User Guide
DS40001986A-page 73

Note: These files are not source files. They will not be automatically extracted to the project folder.
To extract these files, rename the selfcap_3ch.atzip file to selfcap_3ch.zip. Then extract
the content.
3. Open Data Visualizer.
Note: If QTouch Debug data is sent using SPI or I
2
C interface, go to Step 6. If QTouch Debug data
is sent using COM port, continue.
4. Double-click the serial port control panel and click “Connect” button to make connection to target.
Close the DGI control panel tab.
5. Another way to make the connection is through the Configuration option on the left side. Expand
Configuration option and under External Connection option, double-click on Serial Port option
and click the “Connect” button on the serial port control panel. Restore the configuration option to
minimized state
6. Select the desired kit, select Autodetect protocol check-box and click Connect.
User's Guide
Using Data Visualizer with QTouch
®
Applications
© 2017 Microchip Technology Inc.
User Guide
DS40001986A-page 74

7. For the very first time, Data Visualizer will prompt the user to select the folder containing
configuration information as follows. Browse and selet the ‘dv_config’ folder and click OK.
Alternatively, the path of the configuration folder ‘dv_config’ can be specified in the
config_path tab as shown below. Click the check box option “show config search path” to
enable the config path tab.
Note: The selected folder will be saved by the Data Visualizer. Data Visualizer will not prompt the
user to select a folder for subsequent connections. If the sensor configuration is changed, the new
dashboard configuration files from the Atmel START project need to be copied to this folder. Since
the configuration file names are the same, the old files should be replaced with the new ones. The
file names should not be modified.
8. The dashboard view contains three sections of data displayed. The first section converts the status
information of all the configured buttons along with delta and threshold values.
User's Guide
Using Data Visualizer with QTouch
®
Applications
© 2017 Microchip Technology Inc.
User Guide
DS40001986A-page 75

9. Section 2 shows the graph view plotted with the signal, reference and delta values of the configured
channels as shown below. The plots can be enbled/disabled by clicking on the legends at the
bottom of the graph.
10. The third section displays the table of data from Noise Immunity modules, detailed sensor
information including Compensation Capacitance value, Error Status data.
User's Guide
Using Data Visualizer with QTouch
®
Applications
© 2017 Microchip Technology Inc.
User Guide
DS40001986A-page 76

11. To disconnect the hardware, open the Serial Port Control Panel by double-clicking on the tab and
click ‘Disconnect’ button as shown below:
User's Guide
Using Data Visualizer with QTouch
®
Applications
© 2017 Microchip Technology Inc.
User Guide
DS40001986A-page 77

14. Tuning Procedure
14.1 Tuning for Noise Performance
In any touch sensing application, the system designer must consider how electrical interference in the
target environment may affect the performance of the sensors.
Touch sensors with insufficient tuning can show failures in tests of either radiated or conducted noise,
which can occur in the environment or power domain of the appliance or may be generated by the
appliance itself during normal operation.
In many applications there are quality standards which must be met where EMC performance criteria are
clearly defined. However meeting the standards cannot be considered as proof that the system will never
show EMC problems, as the standards include only the most commonly occurring types and sources of
noise.
Noise immunity comes at a cost of increased touch response time and power consumption. The system
designer must carry out proper tuning of the touch sensors in order to ensure least power consumption.
The QTouch modular library has a number of user configurable features which can be tuned to give the
best balance between touch response time, noise immunity and power consumption.
Noise Sources
Noise sources that affect touch sensor performance can occur in a wide variety of applications
• Motors
• Piezo buzzers
• PWM controls Radiated
• Fluorescent lamp
• Radio transmission
• Inductive cook top
• Power supply/charger
• Mains supply
Applicable EMC standards
• Conducted Immunity EN61000-4-6
Noise Counter Measures
The effects of noise are highly dependent on the amplitude of the noise signal induced or injected onto
the sensors, and the frequency profile of that noise signal.
Generally, this noise can be classified as:
• Broadband noise
Or
• Narrow band noise
Broadband Noise Counter Measures
Broadband noise refers to interfering signals whose frequency components are not harmonically related
to the capacitance measurement frequency. Provided that the maximum and minimum voltage levels of
User's Guide
Tuning Procedure
© 2017 Microchip Technology Inc.
User Guide
DS40001986A-page 78

the acquisition signal combined with noise signals are within the input range of the measurement system
and a sufficiently large number of samples are taken, broadband noise interference can be averaged out
by setting a high value of oversampling.
If the noise amplitude is excessive, then sensor circuit components experience saturation of
measurement. In this case the acquisition signals combined with the noise signals are outside the input
range of the measurement circuit, which results in clipping of the measurements.
Often the clipping is not observable in the resolved measurement, as it occurs only on a portion of the
measurement samples, but the presence of clipped samples prevents effective averaging of the sample
points.
In this case, averaging of samples will not result in a noise-free measurement even with large rates of
oversampling. The resolved signal will show a shift from its correct level due to asymmetry of signal
clipping.
14.1.1 Step 1: Prevent Clipping
This requires the implementation of a hardware low-pass filter in order to reduce the scale of the noise
combined with acquisition signal. The sensor capacitance is combined with a series resistor on the Y
(Sense) line, which may be internal or external to the microcontroller.
Note: Internal series resistor is only available in Mutual Capacitance mode with PTC.
The external series resistor should be mounted between the Y line of the device to the sensor, closest to
the device pin.
14.1.2 Step 2: Charge Transfer Test
As an effect of adding a series resistor to form a low pass filter, the time constant for charging the sensors
is increased. It is essential to ensure that the sensor capacitance is fully charged and discharged during
each measurement sampling.
Insufficient charging can be observed as a reduced touch delta or compensation circuit calibration.
However, this problem may not be apparent in the touch sensor operation; the application may behave
well even in the presence of low-level noise, but show much worse performance during noise tests with
the addition of the resistor compared to a configuration which excludes the resistor.
Charge Transfer Calibration
The QTouch
®
Modular Library provides functionality to automatically adjust timing parameters in order to
ensure full charge transfer.
Calibration may be configured to tune one of three parameters, depending on the target device and
measurement technology.
CAL_AUTO_TUNE_RSEL
Clock prescaler and CSD are maintained at the configured setting, while the
internal series resistor is adjusted to the maximum value which allows
adequate charging for each sensor node.
• Only available with PTC Mutual capacitance acquisition.
CAL_AUTO_TUNE_PRSC
Series resistor and CSD are maintained at the configured setting, while the
prescaler is adjusted to the minimum value which allows adequate charging
for each sensor node.
• Incrementing doubles the acquisition time, decrementing halves the
acquisition time
User's Guide
Tuning Procedure
© 2017 Microchip Technology Inc.
User Guide
DS40001986A-page 79

CAL_AUTO_TUNE_CSD
Both Prescaler and Resistor are maintained at the configured setting, Charge
Share Delay is adjusted to the minimum value which allows adequate
charging for each sensor node.
• Incrementing CSD adds one cycle to the charge transfer phase of
acquisition sequence
14.1.3 Step 3: Adjusting Oversampling
Once clipping is prevented by hardware filtering and full charge transfer is ensured, the next step is to
find the optimal settings for oversampling.
This is a trade-off between noise tolerance against response time and power consumption. More samples
give better quality data, but take longer to acquire.
Narrow Band Noise Counter Measures
If the noise includes a frequency component which is related to the capacitance measurement frequency,
then no amount of oversampling will average out the noise effects. Any batch of measurement samples
taken with the same sampling frequency will result in a measurement offset. The actual offset resulting
from each measurement depends on the relative phase of the noise component and the sampling
frequency.
This effect is illustrated in the following diagram, where the noise is represented by a sine wave.
14.1.4 Step 4: Select Frequency Mode
In the case where the noise is at (or close to) a frequency which is harmonically related to the sampling
frequency then the noise issue becomes severe, as illustrated above. In this case the oversampling
frequency must be adjusted in order to avoid the noise.
This is particularly important in applications where a frequency sweep test is required, such as
EN61000-4-6.
User's Guide
Tuning Procedure
© 2017 Microchip Technology Inc.
User Guide
DS40001986A-page 80

Acquisition Module (PTC)
Available frequencies (4 MHz PTC Clk)
Frequency Selection Frequency (kHz)
FREQ_SEL_0
66.67
FREQ_SEL_1
62.5
FREQ_SEL_2
58.82
FREQ_SEL_3
55.56
FREQ_SEL_4
52.63
FREQ_SEL_5
50
FREQ_SEL_6
47.62
FREQ_SEL_7
45.45
FREQ_SEL_8
43.48
FREQ_SEL_9
41.67
FREQ_SEL_10
40
FREQ_SEL_11
38.46
FREQ_SEL_12
37.04
FREQ_SEL_13
35.71
FREQ_SEL_14
34.48
FREQ_SEL_15
33.33
FREQ_SEL_SPREAD
Variable frequencies
The acquisition module provides two strategies for frequency selection:
1. A single acquisition frequency is selected and oversampling takes place at this frequency only.
FREQ_SEL_0 provides the fastest measurements, FREQ_SEL_15 the slowest. If no high
performance EMC standards are required, but the application equipment generates noise which
interferes with a particular acquisition frequency, the designer may simply change the frequency.
2. A variable frequency is used during oversampling. FREQ_SEL_SPREAD varies the frequency
during the acquisition oversampling. The delay is varied from 0 to 15 in a sawtooth manner on
successive samples during oversampling to apply a wider spectrum of sampling frequency.
Compared to single frequency acquisition, the frequency spread option reduces the sensitivity to
noise at a particular ‘worst-case’ frequency, but increases the range of noise frequencies around
that worst-case frequency which will show harmonic interference – albiet with reduced severity of
the noise effects. In many applications, FREQ_SEL_SPREAD is sufficient to achieve the required
noise tolerance.
Frequency Hopping Module
Module ID: 0x0006
User's Guide
Tuning Procedure
© 2017 Microchip Technology Inc.
User Guide
DS40001986A-page 81

The Frequency Hopping module utilizes three or more base frequencies and a median filter to avoid
using measurements taken with harmonic interference. The frequencies should be selected to minimize
the set of crossover harmonics within the problem frequency band.
Each of the selected frequencies is used for acquisition oversampling during successive measurement
cycles.
Frequency Hopping with 3 Frequencies:
• Cycle 1: All sensors measured with Frequency 0
• Cycle 2: All sensors measured with Frequency 1
• Cycle 3: All sensors measured with Frequency 2
• Cycle 4: All sensors measured with Frequency 0
• Cycle 5: All sensors measured with Frequency 1
If Frequency 0 is related to the noise frequency, then the measurements taken with F0 will show high
variation. By using a median filter, the outlying measurements will be rejected.
Figure 14-1. Measurements Taken at Frequency 1 are Affected by Noise
User's Guide
Tuning Procedure
© 2017 Microchip Technology Inc.
User Guide
DS40001986A-page 82
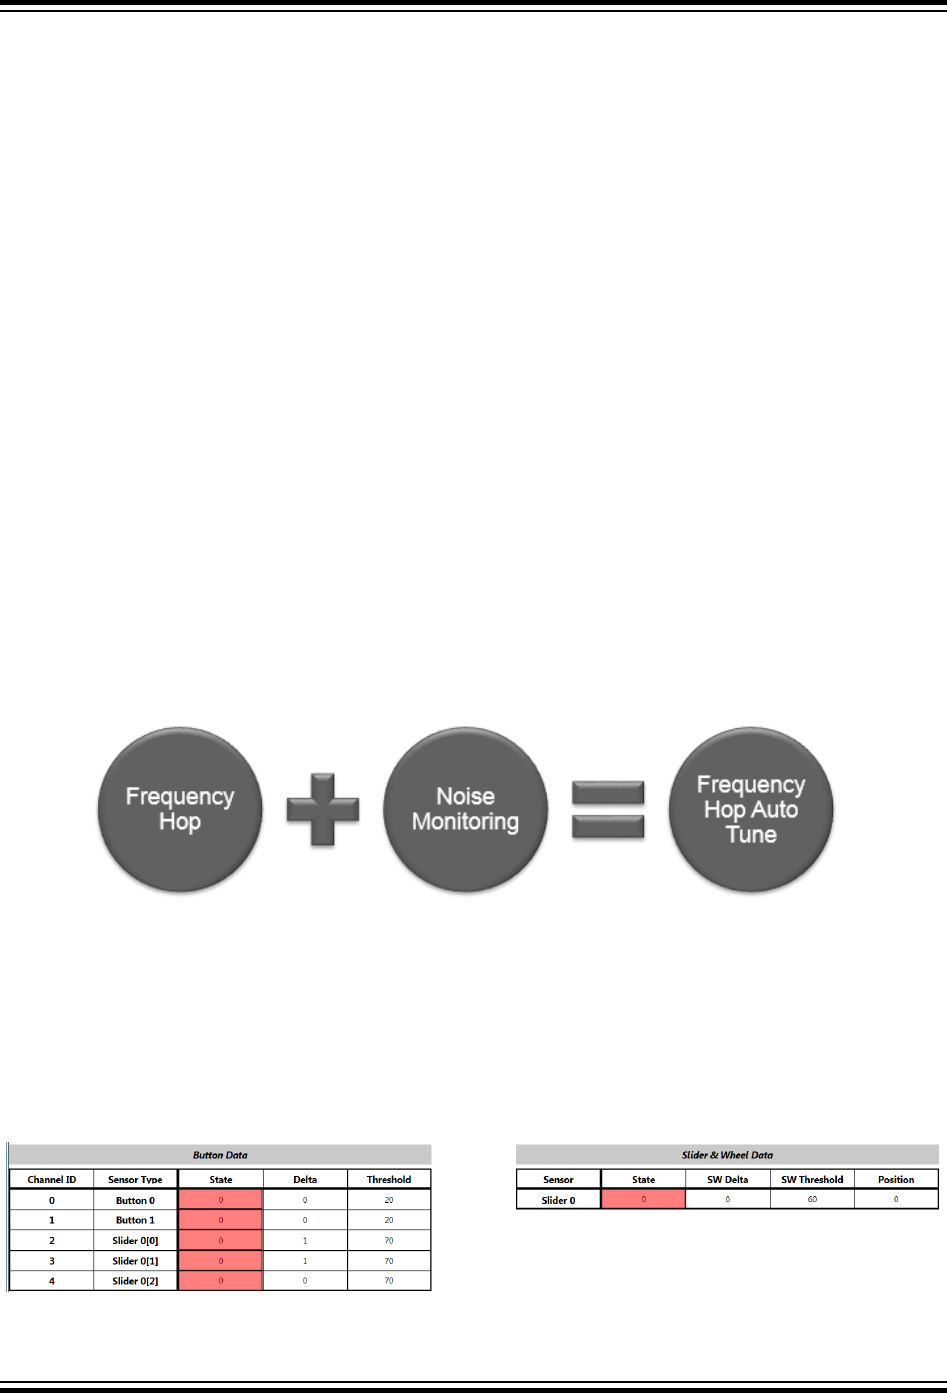
Common Harmonics
No matter which frequencies are chosen, there exists the possibility of noise at higher frequencies which
are harmonics of more than one of the selected frequencies.
Further up the spectrum there are frequencies which are harmonics of ALL of all available frequencies
but those superset harmonics are at higher frequencies and so are blocked by the low pass filter.
In some applications, the potential for exposure to noise frequencies may be an unknown and variable
quantity.
For example, a device utilizing a USB charger may not always be plugged into the charger that it was
supplied with. Inexpensive replacement chargers are often found to generate high levels of common-
mode noise, and at variable frequencies – often in the same band as the acquisition frequencies.
A similar situation occurs with applications tested to EN61000-4-6 for conducted immunity. The test
equipment sweeps through injected noise from 150kHz to 80MHz, in steps of 1%. This gives an excellent
chance of hitting an interference frequency which is a common harmonic of the HOP frequencies.
In both cases, no static selection of frequencies can ensure harmonic avoidance by median filter.
Frequency Hopping with Auto-tune
Module ID: 0x0004
Frequency Hopping with auto-tune provides the cyclic frequency hopping with median filter functionality,
extended to quantify the variance of signals as measured by each individual frequency.
The module is configured with a stability limit, and when signals measured at a particular oversampling
frequency show a repeated variance exceeding this limit then the module switches this frequency to
another, searching for a better performing option.
14.2 Tuning the Slider/Wheel Sensor
For instance, two buttons and a three-channel self-cap slider are configured. Let the buttons B0, B1 and
the Key sensors that form the slider sensor be Slider0[0], Slider0[1] and Slider0[2].
The Buttons, Slider/Wheel data are displayed in the data visualizer control panel view as shown below.
User's Guide
Tuning Procedure
© 2017 Microchip Technology Inc.
User Guide
DS40001986A-page 83
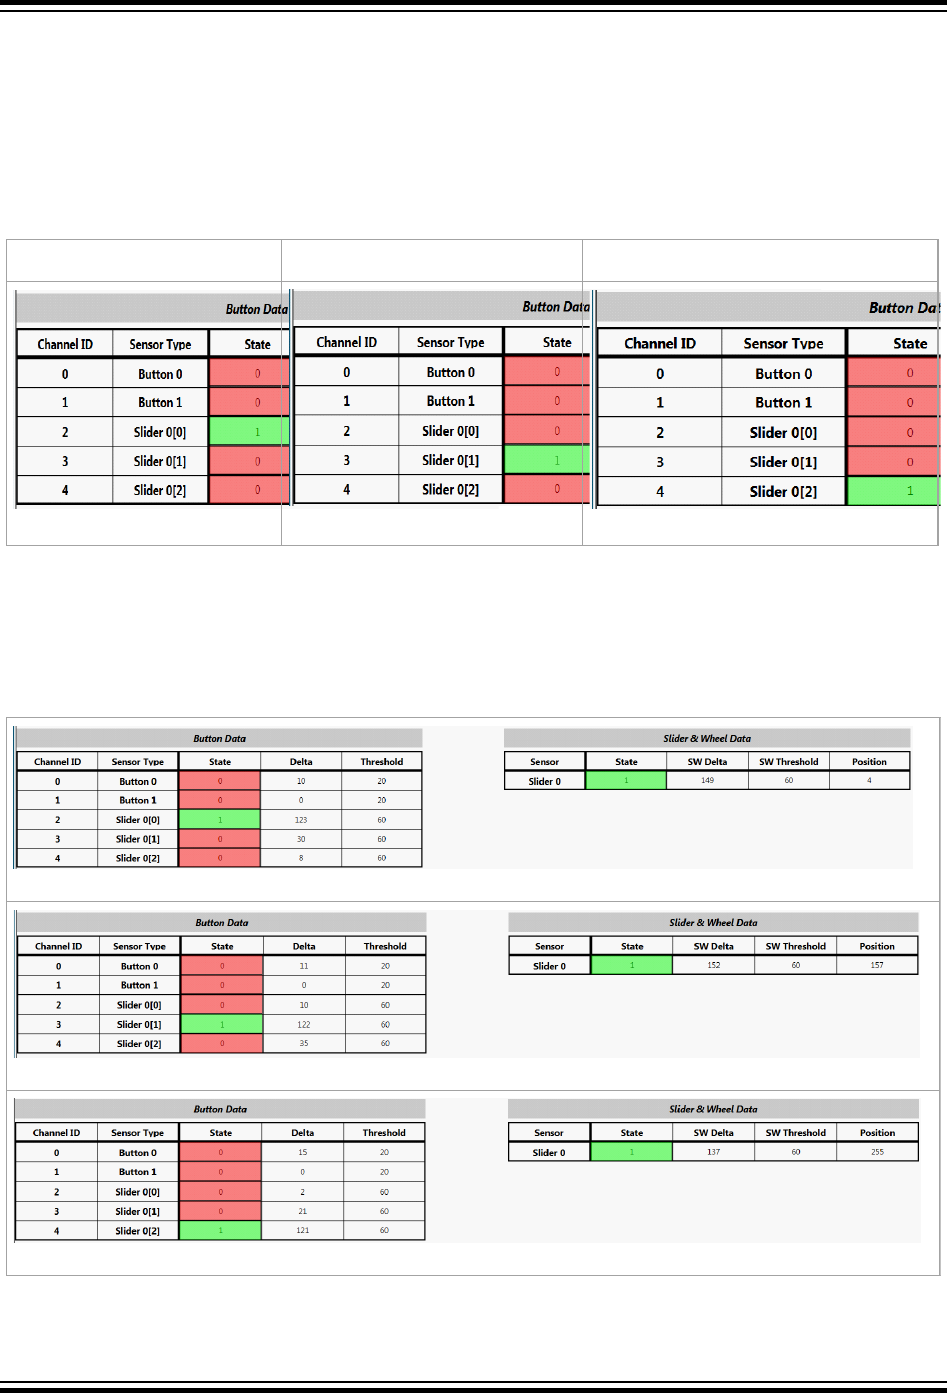
The following steps describe the procedure for tuning the slider/wheel sensors.
Step 1:
Make a touch on each key sensor Slider0[0], Slider0[1] and Slider0[2] and note the delta values. For
example, the delta observed on slider0[0] is shown below.
Set the individual key sensor threshold to half the value of the delta value observed. In this case, the key
threshold should be set to 60.
Slider0[0]
Slider0[1]
Slider0[2]
Step 2:
Set the calculated key threshold on Step 1 as the SW Threshold and verify the slider sensor goes to
detect when the touch made on the individual sensors is as shown below.
User's Guide
Tuning Procedure
© 2017 Microchip Technology Inc.
User Guide
DS40001986A-page 84

Step 3:
Scroll over the slider sensor back and forth between start and end corners and record the SW delta on a
CSV file using the File logger utility.
To use file logger, follow the instructions below:
1. Switch to Edit mode by checking the edit box at the bottom of the debug control panel
2. Open the File Logger element Configurations -> Utilities -> File Logger
3. Minimize the QTouch Data Visualizer view window by double-clicking on the title bar
4. In the File Logger view, click the file browser and select the file name to log data.
5. Click the SWDelta0 connector, drag it and plug it to the file logger socket as shown in the figure
below.
6. Now click the Start/Stop button to log the data.
7. After logging complete, remove the SWDelta0 connection, uncheck the edit mode check box and
close the File Logger.
Step 4:
Open the file log and identify the lowest SWDelta0 value from the samples. A few samples of the
SWDelta0 collected from the Slider_delta.csv file are listed below.
103,102,101,106,98,92,86,82,78,76,78,86,0,118,113,109,105,102,100,106,102,93,86,80,76,73,72,73,79,
88,90,90,89,89,89,90,94,87,81,76,72,71,69,72,81,89,94,98,100,102
Set the SW Threshold less than identified minimal value "69". In this case, the SW Threshold is set about
15 counts less than the observed value which is 54. Repeat step3 and step4 for couple of iterations and
tune the SW threshold based on the logs.
The Buttons, Slider/Wheel data after the tuning are given below.
User's Guide
Tuning Procedure
© 2017 Microchip Technology Inc.
User Guide
DS40001986A-page 85

15. Known Issues
Sl. No. Issue Description Category Work-around Solution
1
When PTC is used in Self-Capacitance
mode, the internal series resistor is not
effective in reducing noise.
PTC
Recommended to use external series
resistor
2
Y0 and Y2 pins have higher parasitic
capacitance in SAMD2x/SAMDA1/
SAMHA1 devices. Y0, Y26, Y27 pins in
SAMC21/C20/CA1.
PTC
1. Avoid these pins if alternate Y lines
are available.
2. If it is required to use this pin for
touch, then higher charge-time
needs to be provided which might
impact response time.
User's Guide
Known Issues
© 2017 Microchip Technology Inc.
User Guide
DS40001986A-page 86

16. Appendix A - Revision History
Doc Rev. Date Comments
A 11/2016 Initial document release.
B 02/2017 Added SAMD10/D11 Library information
C 06/2017
Revised sections:
Touch Library introduction, Data Visualizer, Atmel START configurator
Additions:
Acquisition module, Touch key module, Frequency hop module, Frequency Hop
Auto-tune module, Slider/Wheel module, Binding Layer module, MISRA report, API
Reference for each module, Kit example projects, Module naming conventions, API
files interface
A 12/2017
Microchip DS40001986 Revision A replaces Atmel 42805A.
Revised sections:
Updated the screenshots in the KIT example/user board project creation section
with the latest QTouch configurator GUI
Included Picture for the Touch Key sensors, Included graphs on introduction section
Additions:
New section “Known Issues” is added
User's Guide
Appendix A - Revision History
© 2017 Microchip Technology Inc.
User Guide
DS40001986A-page 87

17. Appendix B - Acquisition Module API Reference
------------------------------------------------------------------------------
touch_ret_t qtm_acquisition_process(void)
------------------------------------------------------------------------------
Purpose: Signal capture and processing
Input : (Measured signals, config)
Output : touch_ret_t
Notes : Called by application after 'touch_measure_complete_callback'
------------------------------------------------------------------------------
touch_ret_t qtm_ptc_init_acquisition_module(qtm_acquisition_control_t* qtm_acq_control_ptr);
------------------------------------------------------------------------------
Purpose: Initialize the PTC & Assign pins
Input : pointer to acquisition set
Output : touch_ret_t: TOUCH_SUCCESS or INVALID_PARAM
Notes : ptc_init_acquisition module must be called ONLY once with a pointer to each config
set
------------------------------------------------------------------------------
touch_ret_t qtm_ptc_qtlib_assign_signal_memory(uint16_t* qtm_signal_raw_data_ptr);
------------------------------------------------------------------------------
Purpose: Assign raw signals pointer to array defined in application code
Input : pointer to raw data array
Output : touch_ret_t: TOUCH_SUCCESS
Notes : none
------------------------------------------------------------------------------
touch_ret_t qtm_enable_sensor_node(qtm_acquisition_control_t* qtm_acq_control_ptr, uint16_t
qtm_which_node_number);
------------------------------------------------------------------------------
Purpose: Enables a sensor node for measurement
Input : Node configurations pointer, node (channel) number
Output : touch_ret_t:
Notes : none
------------------------------------------------------------------------------
touch_ret_t qtm_calibrate_sensor_node(ptc_seq_acq_settings* qtm_acq_control_l_ptr, uint16_t
which_node_number)
------------------------------------------------------------------------------
Purpose: Marks a sensor node for calibration
Input : Node configurations pointer, node (channel) number
Output : touch_ret_t:
Notes : none
------------------------------------------------------------------------------
touch_ret_t qtm_ptc_start_measurement_seq(qtm_acquisition_control_t* qtm_acq_control_pointer,
void (*measure_complete_callback) (void));
------------------------------------------------------------------------------
Purpose: Loads touch configurations for first channel and start,
Input : Node configurations pointer, measure complete callback pointer
Output : touch_ret_t:
Notes : none
------------------------------------------------------------------------------
touch_ret_t qtm_autoscan_sensor_node(qtm_auto_scan_config_t* qtm_auto_scan_config_ptr, void
(*auto_scan_callback)(void));
------------------------------------------------------------------------------
Purpose: Configures the PTC for sleep mode measurement of a single node, with window
comparator wake
Input : Acquisition set, channel number, threshold, scan trigger
Output : touch_ret_t
Notes : none
------------------------------------------------------------------------------
touch_ret_t qtm_autoscan_node_cancel(void)
------------------------------------------------------------------------------
Purpose: Cancel auto-scan config
Input : None
Output : touch_ret_t
Notes : none
------------------------------------------------------------------------------
User's Guide
Appendix B - Acquisition Module API Refere...
© 2017 Microchip Technology Inc.
User Guide
DS40001986A-page 88

void qtm_ptc_de_init(void)
------------------------------------------------------------------------------
Purpose: Clear PTC Pin registers, set TOUCH_STATE_NULL
Input : none
Output : none
Notes : This API function is used to RESET the PTC during runtime without power cycle the
hardware. The application may include this function as part of other soft reset functions to
restart the application at runtime.
------------------------------------------------------------------------------
uint16_t qtm_<device_family>_acq_module_get_id(void)
Applicable <device_family> =
m328pb,m324pb,t81x,t161x,samd1x,samd20,samd21,samda1,same51,same53,same54,samd51,tiny321x,samc
20,samc21,saml21,saml22,samha1
------------------------------------------------------------------------------
Purpose: Returns the module ID
Input : none
Output : Module ID
Notes : none
------------------------------------------------------------------------------
uint8_t qtm_<device_family>_acq_module_get_version(void);
Applicable <device_family> =
m328pb,m324pb,t81x,t161x,samd1x,samd20,samd21,samda1,same51,same53,same54,samd51,tiny321x,samc
20,samc21,saml21,saml22,samha1
------------------------------------------------------------------------------
Purpose: Returns the module Firmware version
Input : none
Output : Module ID - Upper nibble major / Lower nibble minor
Notes : none
------------------------------------------------------------------------------
void qtm_ptc_clear_interrupt(void) -> ARM Cortex SAMD10,SAMD11,SAME51/E53/E54/D51
------------------------------------------------------------------------------
Purpose : Clears the eoc/wcomp interrupt bits
Input : none
Output : none
Notes : none
------------------------------------------------------------------------------
void qtm_<device_family>_ptc_handler_eoc(void)
Applicable <device_family> =
m328pb,m324pb,t81x,t161x,samd1x,samd20,samd21,samda1,same51,same53,same54,samd51,tiny321x,samc
20,samc21,saml21,saml22,samha1
------------------------------------------------------------------------------
Purpose : Captures the measurement, starts the next or End Of Sequence handler
Input : none
Output : none
Notes : none
------------------------------------------------------------------------------
void qtm_<device_family>_ptc_handler_wcomp(void)
Applicable <device_family> =
m328pb,m324pb,t81x,t161x,samd1x,samd20,samd21,samda1,same51,same53,same54,samd51,tiny321x,samc
20,samc21,saml21,saml22,samha1
------------------------------------------------------------------------------
Purpose : Captures the measurement, calls the callback
Input : none
Output : none
Notes : none
User's Guide
Appendix B - Acquisition Module API Refere...
© 2017 Microchip Technology Inc.
User Guide
DS40001986A-page 89

18. Appendix C - Frequency Hop Module API Reference
------------------------------------------------------------------------------
touch_ret_t qtm_freq_hop(qtm_freq_hop_control_t *qtm_freq_hop_control);
------------------------------------------------------------------------------
Purpose: Runs freq hop process
Input : Pointer to container structure
Output : touch_ret_t
Notes : none
------------------------------------------------------------------------------
uint16_t qtm_get_freq_hop_module_id(void)
------------------------------------------------------------------------------
Purpose: Returns the module ID
Input : none
Output : Module ID
Notes : none
------------------------------------------------------------------------------
uint8_t qtm_get_freq_hop_module_ver(void)
------------------------------------------------------------------------------
Purpose: Returns the module Firmware version
Input : none
Output : Module ID - Upper nibble major / Lower nibble minor
Notes : none
------------------------------------------------------------------------------
User's Guide
Appendix C - Frequency Hop Module API Refe...
© 2017 Microchip Technology Inc.
User Guide
DS40001986A-page 90

19. Appendix D - Frequency Hop Auto-tune Module API Reference
------------------------------------------------------------------------------
touch_ret_t qtm_freq_hop_autotune(qtm_freq_hop_autotune_control_t
*qtm_freq_hop_autotune_control);
------------------------------------------------------------------------------
Purpose: Runs freq hop auto tune process
Input : Pointer to container structure
Output : touch_ret_t
Notes : none
------------------------------------------------------------------------------
uint16_t qtm_get_freq_auto_module_id(void);
------------------------------------------------------------------------------
Purpose: Returns the module ID
Input : none
Output : Module ID
Notes : none
------------------------------------------------------------------------------
uint8_t qtm_get_freq_auto_module_ver(void);
------------------------------------------------------------------------------
Purpose: Returns the module Firmware version
Input : none
Output : Module ID - Upper nibble major / Lower nibble minor
Notes : none
------------------------------------------------------------------------------
User's Guide
Appendix D - Frequency Hop Auto-tune Module ...
© 2017 Microchip Technology Inc.
User Guide
DS40001986A-page 91

20. Appendix E - Touch Key Module API Reference
------------------------------------------------------------------------------
touch_ret_t qtm_init_sensor_key(qtm_touch_key_control_t* qtm_lib_key_group_ptr, uint8_t
which_sensor_key, qtm_acq_node_data_t* acq_lib_node_ptr)
------------------------------------------------------------------------------
Purpose: Initialize a touch key sensor
Input : Pointer to key group control data, key number, pointers to sensor node status and
signal
Output : TOUCH_SUCCESS
Notes : none
------------------------------------------------------------------------------
touch_ret_t qtm_key_sensors_process(qtm_touch_key_control_t* qtm_lib_key_group_ptr)
------------------------------------------------------------------------------
Purpose: Sensor key post-processing (touch detect state machine)
Input : Pointer to key group control data
Output : TOUCH_SUCCESS
Notes : none
------------------------------------------------------------------------------
touch_ret_t qtm_key_suspend(uint16_t which_sensor_key, qtm_touch_key_control_t*
qtm_lib_key_group_ptr)
------------------------------------------------------------------------------
Purpose: Suspends acquisition measurements for the key
Input : Key number, Pointer to key group control data
Output : TOUCH_SUCCESS
Notes : Used to suspend the key temporarily, like to save the power by avoiding the
continuous scan on all the sensors. A single key can be defined to act as wake up sensor and
other key sensors can be suspended using this API. This API function works in association
with resume API function
------------------------------------------------------------------------------
touch_ret_t qtm_key_resume(uint16_t which_sensor_key, qtm_touch_key_control_t*
qtm_lib_key_group_ptr)
------------------------------------------------------------------------------
Purpose: Resumes acquisition measurements for the key
Input : Key number, Pointer to key group control data
Output : TOUCH_SUCCESS
Notes : Can be used along with suspend API function to avoid scanning of sensors
temporarily. For instance, some of the keys may be suspended from scanning during the idle
time and resumes based on touch on a defined key
------------------------------------------------------------------------------
void update_qtlib_timer(uint16_t time_elapsed_since_update)
------------------------------------------------------------------------------
Purpose: Updates local variable with time period
Input : Number of ms since last update
Output : none
Notes : none
------------------------------------------------------------------------------
uint16_t qtm_get_touch_keys_module_id(void)
------------------------------------------------------------------------------
Purpose: Returns the module ID
Input : none
Output : Module ID
Notes : none
------------------------------------------------------------------------------
uint8_t qtm_get_touch_keys_module_ver(void)
------------------------------------------------------------------------------
Purpose: Returns the module Firmware version
Input : none
Output : Module ID - Upper nibble major / Lower nibble minor
Notes : none
------------------------------------------------------------------------------
User's Guide
Appendix E - Touch Key Module API Reference
© 2017 Microchip Technology Inc.
User Guide
DS40001986A-page 92

21. Appendix F - Scroller Module API Reference
------------------------------------------------------------------------------
touch_ret_t qtm_init_scroller_module(qtm_scroller_control_t *qtm_scroller_control)
------------------------------------------------------------------------------
Purpose: Initialize a scroller
Input : Pointer to scroller group control data
Output : Touch return status value
Notes : none
------------------------------------------------------------------------------
touch_ret_t qtm_scroller_process(qtm_scroller_control_t *qtm_scroller_control)
------------------------------------------------------------------------------
Purpose: Scroller position calculation and filtering
Input : Pointer to scroller group control data
Output : Touch return status value
Notes : none
------------------------------------------------------------------------------
uint16_t qtm_get_scroller_module_id(void)
------------------------------------------------------------------------------
Purpose: Returns the module ID
Input : none
Output : Module ID
Notes : none
------------------------------------------------------------------------------
uint8_t qtm_get_scroller_module_ver(void)
------------------------------------------------------------------------------
Purpose: Returns the module Firmware version
Input : none
Output : Module ID - Upper nibble major / Lower nibble minor
Notes : none
------------------------------------------------------------------------------
User's Guide
Appendix F - Scroller Module API Reference
© 2017 Microchip Technology Inc.
User Guide
DS40001986A-page 93

22. Appendix G - Binding Layer Module API Reference
------------------------------------------------------------------------------
void qtm_binding_layer_init(qtm_control_t *qtm_control);
------------------------------------------------------------------------------
Purpose: This function internally executes the individual module initialization functions
using the pointers. Based on the initialization output, init_complete_callback or the
error_callback function is triggered.
Input : Pointer to binding layer container structure
Output : none
Notes : none
------------------------------------------------------------------------------
void qtm_lib_start_acquisition(qtm_control_t *qtm_control);
------------------------------------------------------------------------------
Purpose: This function internally executes the “qtm_ptc_start_measurement_seq” function to
start the measurement of sensors. The functions of multiple acquisition groups are executed
sequentially.
Input : Pointer to binding layer container structure
Output : none
Notes : none
------------------------------------------------------------------------------
touch_ret_t qtm_lib_acq_process(void)
------------------------------------------------------------------------------
Purpose: Executes the acquisition post process functions. The acquisition post process of
multiple groups is executed sequentially according to the configuration.
Input : none
Output : Touch return status value
Notes : none
------------------------------------------------------------------------------
touch_ret_t qtm_lib_post_process(void)
------------------------------------------------------------------------------
Purpose: Executes the individual module post processes. The sequence of post processes
executed is based on the configuration of qtm_config_t
Input : none
Output : Touch return status value
Notes : none
------------------------------------------------------------------------------
qtm_control_t* qmt_get_binding_layer_ptr(void)
------------------------------------------------------------------------------
Purpose: Returns the pointer to the binding layer container structure
Input : none
Output : pointer to the binding layer container
Notes : none
------------------------------------------------------------------------------
uint16_t qtm_get_lib_state(void)
------------------------------------------------------------------------------
Purpose: Returns the binding layer state
Input : none
Output : Module state
Notes : none
------------------------------------------------------------------------------
uint16_t qtm_get_binding_layer_module_id(void)
------------------------------------------------------------------------------
Purpose: Returns the module ID
Input : none
Output : Module ID
Notes : none
------------------------------------------------------------------------------
uint8_t qtm_get_binding_layer_module_ver(void)
------------------------------------------------------------------------------
Purpose: Returns the module Firmware version
Input : none
Output : Module ID - Upper nibble major / Lower nibble minor
Notes : none
User's Guide
Appendix G - Binding Layer Module API Reference
© 2017 Microchip Technology Inc.
User Guide
DS40001986A-page 94


The Microchip Web Site
Microchip provides online support via our web site at http://www.microchip.com/. This web site is used as
a means to make files and information easily available to customers. Accessible by using your favorite
Internet browser, the web site contains the following information:
• Product Support – Data sheets and errata, application notes and sample programs, design
resources, user’s guides and hardware support documents, latest software releases and archived
software
• General Technical Support – Frequently Asked Questions (FAQ), technical support requests,
online discussion groups, Microchip consultant program member listing
• Business of Microchip – Product selector and ordering guides, latest Microchip press releases,
listing of seminars and events, listings of Microchip sales offices, distributors and factory
representatives
Customer Change Notification Service
Microchip’s customer notification service helps keep customers current on Microchip products.
Subscribers will receive e-mail notification whenever there are changes, updates, revisions or errata
related to a specified product family or development tool of interest.
To register, access the Microchip web site at http://www.microchip.com/. Under “Support”, click on
“Customer Change Notification” and follow the registration instructions.
Customer Support
Users of Microchip products can receive assistance through several channels:
• Distributor or Representative
• Local Sales Office
• Field Application Engineer (FAE)
• Technical Support
Customers should contact their distributor, representative or Field Application Engineer (FAE) for support.
Local sales offices are also available to help customers. A listing of sales offices and locations is included
in the back of this document.
Technical support is available through the web site at: http://www.microchip.com/support
Microchip Devices Code Protection Feature
Note the following details of the code protection feature on Microchip devices:
• Microchip products meet the specification contained in their particular Microchip Data Sheet.
• Microchip believes that its family of products is one of the most secure families of its kind on the
market today, when used in the intended manner and under normal conditions.
• There are dishonest and possibly illegal methods used to breach the code protection feature. All of
these methods, to our knowledge, require using the Microchip products in a manner outside the
operating specifications contained in Microchip’s Data Sheets. Most likely, the person doing so is
engaged in theft of intellectual property.
• Microchip is willing to work with the customer who is concerned about the integrity of their code.
User's Guide
© 2017 Microchip Technology Inc.
User Guide
DS40001986A-page 96

• Neither Microchip nor any other semiconductor manufacturer can guarantee the security of their
code. Code protection does not mean that we are guaranteeing the product as “unbreakable.”
Code protection is constantly evolving. We at Microchip are committed to continuously improving the
code protection features of our products. Attempts to break Microchip’s code protection feature may be a
violation of the Digital Millennium Copyright Act. If such acts allow unauthorized access to your software
or other copyrighted work, you may have a right to sue for relief under that Act.
Legal Notice
Information contained in this publication regarding device applications and the like is provided only for
your convenience and may be superseded by updates. It is your responsibility to ensure that your
application meets with your specifications. MICROCHIP MAKES NO REPRESENTATIONS OR
WARRANTIES OF ANY KIND WHETHER EXPRESS OR IMPLIED, WRITTEN OR ORAL, STATUTORY
OR OTHERWISE, RELATED TO THE INFORMATION, INCLUDING BUT NOT LIMITED TO ITS
CONDITION, QUALITY, PERFORMANCE, MERCHANTABILITY OR FITNESS FOR PURPOSE.
Microchip disclaims all liability arising from this information and its use. Use of Microchip devices in life
support and/or safety applications is entirely at the buyer’s risk, and the buyer agrees to defend,
indemnify and hold harmless Microchip from any and all damages, claims, suits, or expenses resulting
from such use. No licenses are conveyed, implicitly or otherwise, under any Microchip intellectual
property rights unless otherwise stated.
Trademarks
The Microchip name and logo, the Microchip logo, AnyRate, AVR, AVR logo, AVR Freaks, BeaconThings,
BitCloud, CryptoMemory, CryptoRF, dsPIC, FlashFlex, flexPWR, Heldo, JukeBlox, KeeLoq, KeeLoq logo,
Kleer, LANCheck, LINK MD, maXStylus, maXTouch, MediaLB, megaAVR, MOST, MOST logo, MPLAB,
OptoLyzer, PIC, picoPower, PICSTART, PIC32 logo, Prochip Designer, QTouch, RightTouch, SAM-BA,
SpyNIC, SST, SST Logo, SuperFlash, tinyAVR, UNI/O, and XMEGA are registered trademarks of
Microchip Technology Incorporated in the U.S.A. and other countries.
ClockWorks, The Embedded Control Solutions Company, EtherSynch, Hyper Speed Control, HyperLight
Load, IntelliMOS, mTouch, Precision Edge, and Quiet-Wire are registered trademarks of Microchip
Technology Incorporated in the U.S.A.
Adjacent Key Suppression, AKS, Analog-for-the-Digital Age, Any Capacitor, AnyIn, AnyOut, BodyCom,
chipKIT, chipKIT logo, CodeGuard, CryptoAuthentication, CryptoCompanion, CryptoController,
dsPICDEM, dsPICDEM.net, Dynamic Average Matching, DAM, ECAN, EtherGREEN, In-Circuit Serial
Programming, ICSP, Inter-Chip Connectivity, JitterBlocker, KleerNet, KleerNet logo, Mindi, MiWi,
motorBench, MPASM, MPF, MPLAB Certified logo, MPLIB, MPLINK, MultiTRAK, NetDetach, Omniscient
Code Generation, PICDEM, PICDEM.net, PICkit, PICtail, PureSilicon, QMatrix, RightTouch logo, REAL
ICE, Ripple Blocker, SAM-ICE, Serial Quad I/O, SMART-I.S., SQI, SuperSwitcher, SuperSwitcher II, Total
Endurance, TSHARC, USBCheck, VariSense, ViewSpan, WiperLock, Wireless DNA, and ZENA are
trademarks of Microchip Technology Incorporated in the U.S.A. and other countries.
SQTP is a service mark of Microchip Technology Incorporated in the U.S.A.
Silicon Storage Technology is a registered trademark of Microchip Technology Inc. in other countries.
GestIC is a registered trademark of Microchip Technology Germany II GmbH & Co. KG, a subsidiary of
Microchip Technology Inc., in other countries.
All other trademarks mentioned herein are property of their respective companies.
User's Guide
© 2017 Microchip Technology Inc.
User Guide
DS40001986A-page 97

©
2017, Microchip Technology Incorporated, Printed in the U.S.A., All Rights Reserved.
ISBN: 978-1-5224-2495-6
AMBA, Arm, Arm7, Arm7TDMI, Arm9, Arm11, Artisan, big.LITTLE, Cordio, CoreLink, CoreSight, Cortex,
DesignStart, DynamIQ, Jazelle, Keil, Mali, Mbed, Mbed Enabled, NEON, POP, RealView, SecurCore,
Socrates, Thumb, TrustZone, ULINK, ULINK2, ULINK-ME, ULINK-PLUS, ULINKpro, µVision, Versatile
are trademarks or registered trademarks of Arm Limited (or its subsidiaries) in the US and/or elsewhere.
Quality Management System Certified by DNV
ISO/TS 16949
Microchip received ISO/TS-16949:2009 certification for its worldwide headquarters, design and wafer
fabrication facilities in Chandler and Tempe, Arizona; Gresham, Oregon and design centers in California
and India. The Company’s quality system processes and procedures are for its PIC
®
MCUs and dsPIC
®
DSCs, KEELOQ
®
code hopping devices, Serial EEPROMs, microperipherals, nonvolatile memory and
analog products. In addition, Microchip’s quality system for the design and manufacture of development
systems is ISO 9001:2000 certified.
User's Guide
© 2017 Microchip Technology Inc.
User Guide
DS40001986A-page 98

AMERICAS ASIA/PACIFIC ASIA/PACIFIC EUROPE
Corporate Office
2355 West Chandler Blvd.
Chandler, AZ 85224-6199
Tel: 480-792-7200
Fax: 480-792-7277
Technical Support:
http://www.microchip.com/
support
Web Address:
www.microchip.com
Atlanta
Duluth, GA
Tel: 678-957-9614
Fax: 678-957-1455
Austin, TX
Tel: 512-257-3370
Boston
Westborough, MA
Tel: 774-760-0087
Fax: 774-760-0088
Chicago
Itasca, IL
Tel: 630-285-0071
Fax: 630-285-0075
Dallas
Addison, TX
Tel: 972-818-7423
Fax: 972-818-2924
Detroit
Novi, MI
Tel: 248-848-4000
Houston, TX
Tel: 281-894-5983
Indianapolis
Noblesville, IN
Tel: 317-773-8323
Fax: 317-773-5453
Tel: 317-536-2380
Los Angeles
Mission Viejo, CA
Tel: 949-462-9523
Fax: 949-462-9608
Tel: 951-273-7800
Raleigh, NC
Tel: 919-844-7510
New York, NY
Tel: 631-435-6000
San Jose, CA
Tel: 408-735-9110
Tel: 408-436-4270
Canada - Toronto
Tel: 905-695-1980
Fax: 905-695-2078
Australia - Sydney
Tel: 61-2-9868-6733
China - Beijing
Tel: 86-10-8569-7000
China - Chengdu
Tel: 86-28-8665-5511
China - Chongqing
Tel: 86-23-8980-9588
China - Dongguan
Tel: 86-769-8702-9880
China - Guangzhou
Tel: 86-20-8755-8029
China - Hangzhou
Tel: 86-571-8792-8115
China - Hong Kong SAR
Tel: 852-2943-5100
China - Nanjing
Tel: 86-25-8473-2460
China - Qingdao
Tel: 86-532-8502-7355
China - Shanghai
Tel: 86-21-3326-8000
China - Shenyang
Tel: 86-24-2334-2829
China - Shenzhen
Tel: 86-755-8864-2200
China - Suzhou
Tel: 86-186-6233-1526
China - Wuhan
Tel: 86-27-5980-5300
China - Xian
Tel: 86-29-8833-7252
China - Xiamen
Tel: 86-592-2388138
China - Zhuhai
Tel: 86-756-3210040
India - Bangalore
Tel: 91-80-3090-4444
India - New Delhi
Tel: 91-11-4160-8631
India - Pune
Tel: 91-20-4121-0141
Japan - Osaka
Tel: 81-6-6152-7160
Japan - Tokyo
Tel: 81-3-6880- 3770
Korea - Daegu
Tel: 82-53-744-4301
Korea - Seoul
Tel: 82-2-554-7200
Malaysia - Kuala Lumpur
Tel: 60-3-7651-7906
Malaysia - Penang
Tel: 60-4-227-8870
Philippines - Manila
Tel: 63-2-634-9065
Singapore
Tel: 65-6334-8870
Taiwan - Hsin Chu
Tel: 886-3-577-8366
Taiwan - Kaohsiung
Tel: 886-7-213-7830
Taiwan - Taipei
Tel: 886-2-2508-8600
Thailand - Bangkok
Tel: 66-2-694-1351
Vietnam - Ho Chi Minh
Tel: 84-28-5448-2100
Austria - Wels
Tel: 43-7242-2244-39
Fax: 43-7242-2244-393
Denmark - Copenhagen
Tel: 45-4450-2828
Fax: 45-4485-2829
Finland - Espoo
Tel: 358-9-4520-820
France - Paris
Tel: 33-1-69-53-63-20
Fax: 33-1-69-30-90-79
Germany - Garching
Tel: 49-8931-9700
Germany - Haan
Tel: 49-2129-3766400
Germany - Heilbronn
Tel: 49-7131-67-3636
Germany - Karlsruhe
Tel: 49-721-625370
Germany - Munich
Tel: 49-89-627-144-0
Fax: 49-89-627-144-44
Germany - Rosenheim
Tel: 49-8031-354-560
Israel - Ra’anana
Tel: 972-9-744-7705
Italy - Milan
Tel: 39-0331-742611
Fax: 39-0331-466781
Italy - Padova
Tel: 39-049-7625286
Netherlands - Drunen
Tel: 31-416-690399
Fax: 31-416-690340
Norway - Trondheim
Tel: 47-7289-7561
Poland - Warsaw
Tel: 48-22-3325737
Romania - Bucharest
Tel: 40-21-407-87-50
Spain - Madrid
Tel: 34-91-708-08-90
Fax: 34-91-708-08-91
Sweden - Gothenberg
Tel: 46-31-704-60-40
Sweden - Stockholm
Tel: 46-8-5090-4654
UK - Wokingham
Tel: 44-118-921-5800
Fax: 44-118-921-5820
Worldwide Sales and Service
© 2017 Microchip Technology Inc.
User Guide
DS40001986A-page 99
